Structured Product Education & Evaluation Development - eLearning
jpm-speed.com
Made to Measure Window Furnishings
Innovative Solutions to Add Value for your Customer
Sales Product Training Module 10.1 – Roller Blinds Revision K
Dated 2nd July 2012
jpm-speed.com

Structured Product Education & Evaluation Development - eLearning
jpm-speed.com
Please turn off your mobile phones
during this training workshop

Structured Product Education & Evaluation Development - eLearning
jpm-speed.com
Sales Product Training Contents for Module 10.1 - Roller Blinds
1. Overview
– Operation & Advantages
– Roller Blind Specifications
2. Fabrics
– Fabric Compatibility Chart
– Important Information
3. Product Information
– Control System Options
– Chain Options
– Bottom Bar Options
– Motorisation
4. Measuring Guidelines
5. Child Safety
6. Common Problems, Causes & Solutions
7. Summary
8. Knowledge & Learning Assessment Test

Structured Product Education & Evaluation Development - eLearning
jpm-speed.com
Sales Product Training Contents for Module 10.1 - Roller Blinds
1. Overview
– Operation & Advantages
– Roller Blind Specifications
2. Fabrics
– Fabric Range
– Important Information
3. Product Information
– Control System Options
– Chain Options
– Bottom Bar Options
– Motorisation
4. Measuring Guidelines
5. Child Safety
6. Common Problems, Causes & Solutions
7. Summary
8. Knowledge & Learning Assessment Test

Structured Product Education & Evaluation Development - eLearning
jpm-speed.com
Roller Blinds Overview Operation & Advantages
• Decorative & functional shading solution
– Offers a cost effective solution where important
– Suitable for heat, light, glare and/or privacy control
– Smooth and easy operation
– May be raised and lowered to any level
– Compact installation that does not obstruct views
• Motorised roller binds
– Offer a cord-free solution where child safety is paramount
• Available in a wide range of fabric alternatives
– Sunscreen - daytime view
– Translucent - daytime light with some night time privacy
– Room Darkening - daytime & night time privacy
Structured Product Education & Evaluation Development - eLearning
jpm-speed.com
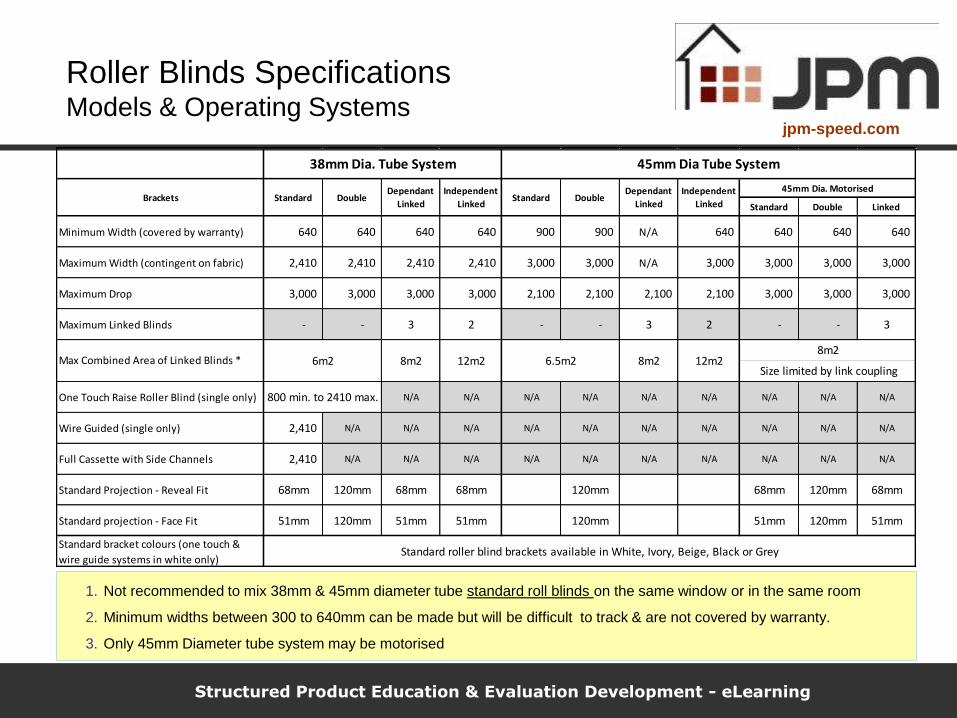
Roller Blinds Specifications Models & Operating Systems
1. Not recommended to mix 38mm & 45mm diameter tube standard roll blinds on the same window or in the same room
2. Minimum widths between 300 to 640mm can be made but will be difficult to track & are not covered by warranty.
3. Only 45mm Diameter tube system may be motorised
Standard Double Linked
Minimum Width (covered by warranty) 640 640 640 640 900 900 N/A 640 640 640 640
Maximum Width (contingent on fabric) 2,410 2,410 2,410 2,410 3,000 3,000 N/A 3,000 3,000 3,000 3,000
Maximum Drop 3,000 3,000 3,000 3,000 2,100 2,100 2,100 2,100 3,000 3,000 3,000
Maximum Linked Blinds - - 3 2 - - 3 2 - - 3
One Touch Raise Roller Blind (single only) N/A N/A N/A N/A N/A N/A N/A N/A N/A
Wire Guided (single only) 2,410 N/A N/A N/A N/A N/A N/A N/A N/A N/A N/A
Full Cassette with Side Channels 2,410 N/A N/A N/A N/A N/A N/A N/A N/A N/A N/A
Standard Projection - Reveal Fit 68mm 120mm 68mm 68mm 120mm 68mm 120mm 68mm
Standard projection - Face Fit 51mm 120mm 51mm 51mm 120mm 51mm 120mm 51mm
Standard bracket colours (one touch &
wire guide systems in white only)
BracketsIndependent
LinkedStandard Double
Dependant
LinkedDoubleStandard
38mm Dia. Tube System 45mm Dia Tube System
Dependant
Linked
Independent
Linked
45mm Dia. Motorised
Max Combined Area of Linked Blinds * Size limited by link coupling
Standard roller blind brackets available in White, Ivory, Beige, Black or Grey
8m26m2 12m2 6.5m2 8m2 12m28m2
800 min. to 2410 max.

Structured Product Education & Evaluation Development - eLearning
jpm-speed.com
Sales Product Training Contents for Module 10.1 - Roller Blinds
1. Overview
– Operation & Advantages
– Roller Blind Specifications
2. Fabrics
– Fabric Range
– Important Information
3. Product Information
– Control System Options
– Chain Options
– Bottom Bar Options
– Motorisation
4. Measuring Guidelines
5. Child Safety
6. Common Problems, Causes & Solutions
7. Summary
8. Knowledge & Learning Assessment Test
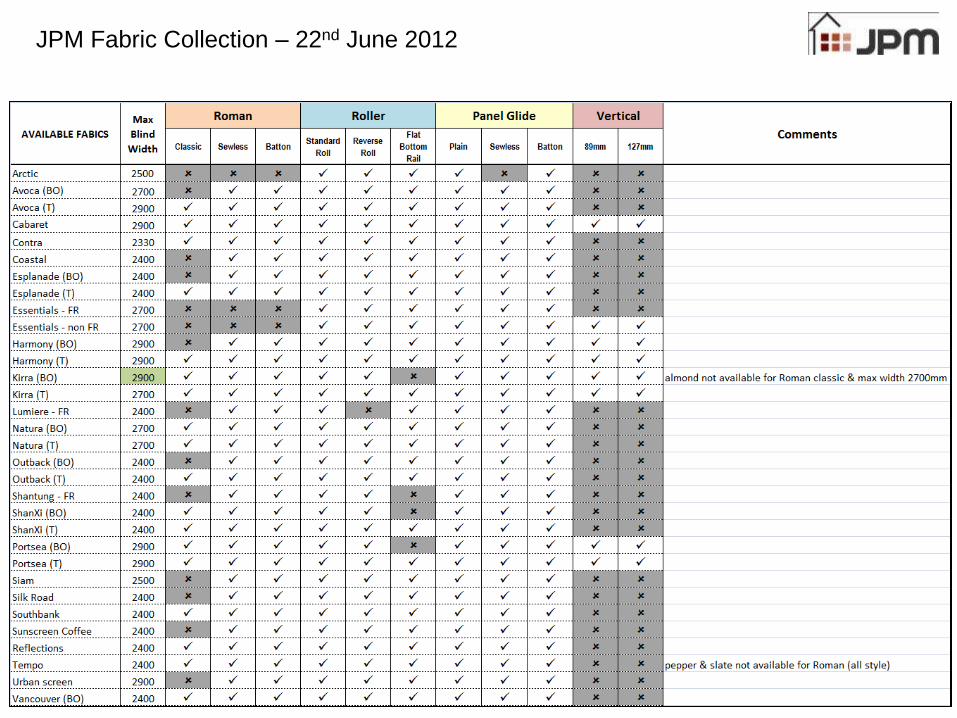
JPM Fabric Collection – 22nd June 2012

Structured Product Education & Evaluation Development - eLearning
jpm-speed.com
Fabrics Important Information
Fabric Wavering
Large roller blinds will show fabric wavering, this is because it is impossible to make a large
piece of fabric hang perfectly flat. This generally appears on roller with widths greater than
2000mm and/or drops greater than 3000mm.Consider splitting the blind into two smaller
widths and linking them together.
Cupping
Roller blinds with block out fabrics will usually show some cupping on each of the
vertical edges. Cupping of up to a few centimetres will be considered within acceptable
allowance.
Light Bleed
All roller blinds allow light to pass around the sides of the fabric (even with block out fabric).
Consider using face fit as an option rather than reveal fit.
Fabric Patterns
For a roller blind with a patterned fabric, the pattern grain won’t usually line up perfectly
with the horizontal or vertical edges of the blind. Expect to see variation of up to a few
centimetres along the pattern direction from one side of the blind to the other.

Structured Product Education & Evaluation Development - eLearning
jpm-speed.com
Fabric Care & Maintenance Regular cleaning maintenance to preserve their integrity
General Maintenance
Most roller blinds simply require regular vacuuming (with an upholstery attachment) in order to keep them in top condition
Stain Removal
To remove wet embedded stains, sponge blind clean with a damp cloth. Use diluted washing liquid in warm water &
avoid rubbing the stain. Do not immerse blinds in water.
Spot Cleaning
Small dry marks may be rubbed off quite effectively with a gum-based eraser (available in most art supply stores). If this
fails, use the method described in the paragraph above.
PVC Coated Fabrics
Fabrics are particularly resistant to soiling and can be wiped, or vigorously rubbed with a soft cloth. These fabrics are
also more tolerant to detergents than most, and can be treated with more caustic cleaners if absolutely necessary.
Ultrasonic or Dry Cleaning
Ultrasonic cleaning may lead to fabric shrinkage and/or distortion as it involves complete immersion in water. Read the
fabric care label instructions carefully. Do not hand wash if dry cleaning is recommended?
Mould Prevention
Many of our fabrics are impregnated with mould repelling agents, however, under certain conditions even these
preventative agents can be rendered ineffective. High levels of humidity inside your house can lead to mould growth on
any surface, including your blinds. Mould is most commonly found in areas such as bathrooms, but any room could have
a humidity problem When the warm air inside your home comes into contact with the cold glass of your windows,
condensation can occur. This can trap a layer of moisture between your windows and your blinds and over time, may
lead to the growth of mould. Proper ventilation is the simplest way to reduce humidity levels. However where this is not
possible, installing a de-humidifier is a sure way to solve the problem.

Structured Product Education & Evaluation Development - eLearning
jpm-speed.com
Sales Product Training Contents for Module 10.1 - Roller Blinds
1. Overview
– Operation & Advantages
– Roller Blind Specifications
2. Fabrics
– Fabric Range
– Important Information
3. Product Information
– Control System Options
– Chain Options
– Bottom Bar Options
– Motorisation
4. Measuring Guidelines
5. Child Safety
6. Common Problems, Causes & Solutions
7. Summary
8. Knowledge & Learning Assessment Test

Structured Product Education & Evaluation Development - eLearning
jpm-speed.com
Product Information Standard Roller Blinds - Rolling Directions
Standard Roll
Fabric rolls off BACK of tube – towards glass
Better light block - fabric hangs closer to window/glass, architrave or wall
Best light block when face fitted using block out fabric
NOTE; Roll will be visible which may not be acceptable if fabric back is a
different colour e.g. white backed block out fabrics
Reverse Roll
Fabric rolls off FRONT of tube – towards room
Allows more light penetration around the sides of the blind, particularly in
outside mount applications – fabric sits further away from the window/glass
Suited for window reveal installation
Roll will not be visible so may be preferred option when fabric back is a
different colour e.g. white backed fabrics

Structured Product Education & Evaluation Development - eLearning
jpm-speed.com
Product Information Standard Roller Blinds – Pin Mechanism
Compressible pin allows for easy installation …..

Structured Product Education & Evaluation Development - eLearning
jpm-speed.com
Product Information Standard Roller Blinds – Brackets
38mm & 45mm Pin End Brackets
38mm & 45mm Chain End Brackets
Brackets & End Covers are available in 5 colours
Black, white, ivory, grey & beige
10 x 45 x 25 Clear Plastic Packer (NOTE: not an exact size match)

Structured Product Education & Evaluation Development - eLearning
jpm-speed.com
Control System Options Dependant Linked Brackets
• Single chain control for up to 3 blinds & blind area < 8m2
• Good solution to eliminate loose chains over sliding doors.
• Helps comply with cord safety legislation.
• Reduced 19mm light gap with common centre bracket
• Brackets & end covers available in 5 colours.
- black, white, ivory, grey & beige
38mm
45mm

Structured Product Education & Evaluation Development - eLearning
jpm-speed.com
Control System Options Independent Linked Brackets
• Separate chain controls for 2 independent linked blinds
• Reduced 19mm light gap with common centre bracket
• Maximum total blind area < 12m2
• Brackets & end covers available in 5 colours.
- black, white, ivory, grey & beige
Independent Link Bracket Components Separate Chain Controls for Each Blind
38mm 45mm
19mm

Structured Product Education & Evaluation Development - eLearning
jpm-speed.com
Control System Options Angle Linking Brackets - for Bay Windows
135 deg & 90 deg Coupling Link
38mm dia. Tube system only - MANUAL OPERATION ONLY
2 Blinds may be Linked in a Bay Window
Reduces the number of difficult to access chains
Recommend check measure blind sizes with brackets installed
Installer must adjust bracket alignment for smooth operation
Always discuss larger corner light gaps with client
Standard or reverse roll?
Standard roll – LARGER light gaps & backing visible
Reverse roll – SMALLER light gaps & fabric visible
Note: Butt fitting brackets have smaller light gaps than angle
link brackets
Angle link brackets are available in White Only
WIN
DO
W

Structured Product Education & Evaluation Development - eLearning
jpm-speed.com
Control System Options Double Brackets
2 Blinds are installed on one set of brackets
• Control system where 2 Blinds are installed on one set
of 38mm tube brackets
1. Viewscreen blind for the daytime
2. Block out blind for night time privacy – Reverse
roll & fit on room side for nicer finish
• Chains for both roller blinds on same side is standard.
• Left / Right chain controls available if required
• Suited for installation in deeper reveals
• Provide fast & simple installation.
• For shallow reveals consider single brackets.
– Reveal fit block out blind
– Face fit sunscreen blind
• 45mm tube adaptors available to fit 38mm “B” Profile brackets.

Structured Product Education & Evaluation Development - eLearning
jpm-speed.com
Control System Options Face Fit Double Brackets (Old Type) “B” Profile Brackets
38mm Double RH Control
(End Covers are Supplied Standard)
38mm Double LH Control 38mm Double L / R Control
Fits 38mm & 45mm dia. Tube
Window side blind standard roll. Room side blind reverse rolled
Chains for both roller blinds on same side is standard.
Left / Right chain controls available if required.
Available in 5 colours - black, white, ivory, grey & beige
104
10
6

Structured Product Education & Evaluation Development - eLearning
jpm-speed.com
Control System Options Face Fit Double Linked & Tube Adaptor Brackets “B” Profile Brackets
Double Linked Brackets
4 Blinds may be installed on two sets of brackets
Available in 5 colours - black, white, ivory, grey & beige
45mm Tube Adaptors for Double Linked Brackets
45mm dia. tube adaptors to fit 38mm double brackets
Recommended to check tube + fabric roll up diameter

Structured Product Education & Evaluation Development - eLearning
jpm-speed.com
Control System Options Head & Face Fit Model Double Brackets (New Type)
“L” Profile Brackets
38mm Double Face & Head Fix (No End Covers Available)
This model double bracket can be used
for head & face fix mounting
Both fabrics may be standard or reverse
rolled without fabrics rubbing
Chains for both roller blinds on same
side is standard.
Left / Right chain controls are also
available
Not available as a link bracket
Available in 5 colours - white,black,
ivory, grey & beige
No end covers are available
120mm
150mm
45mm Double Face & Head Fix (No End Covers Available)
Structured Product Education & Evaluation Development - eLearning
jpm-speed.com
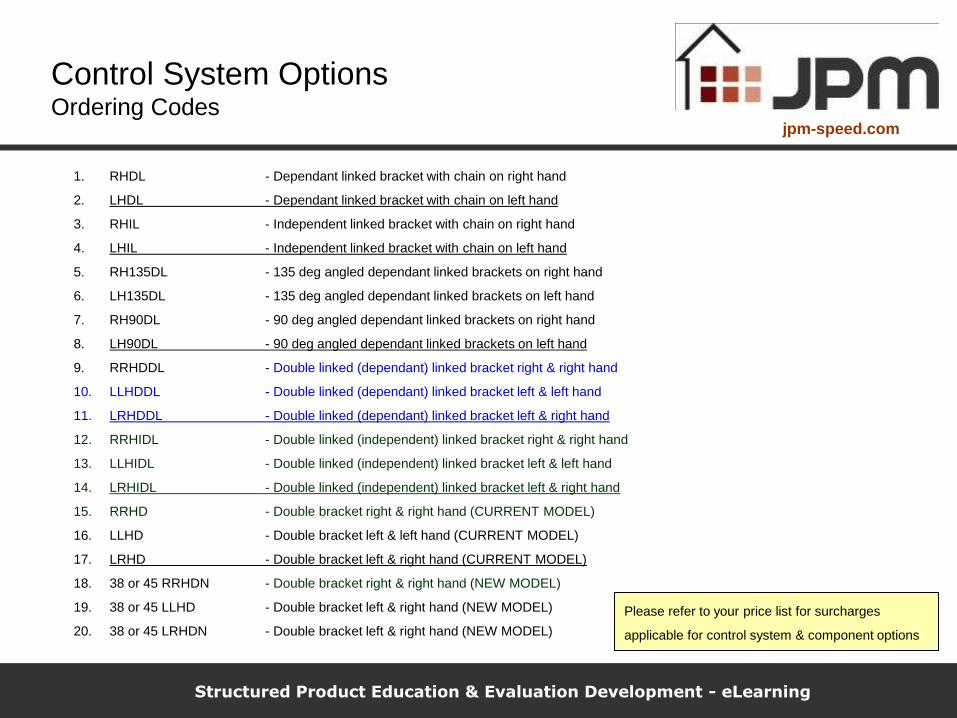
1. RHDL - Dependant linked bracket with chain on right hand
2. LHDL - Dependant linked bracket with chain on left hand
3. RHIL - Independent linked bracket with chain on right hand
4. LHIL - Independent linked bracket with chain on left hand
5. RH135DL - 135 deg angled dependant linked brackets on right hand
6. LH135DL - 135 deg angled dependant linked brackets on left hand
7. RH90DL - 90 deg angled dependant linked brackets on right hand
8. LH90DL - 90 deg angled dependant linked brackets on left hand
9. RRHDDL - Double linked (dependant) linked bracket right & right hand
10. LLHDDL - Double linked (dependant) linked bracket left & left hand
11. LRHDDL - Double linked (dependant) linked bracket left & right hand
12. RRHIDL - Double linked (independent) linked bracket right & right hand
13. LLHIDL - Double linked (independent) linked bracket left & left hand
14. LRHIDL - Double linked (independent) linked bracket left & right hand
15. RRHD - Double bracket right & right hand (CURRENT MODEL)
16. LLHD - Double bracket left & left hand (CURRENT MODEL)
17. LRHD - Double bracket left & right hand (CURRENT MODEL)
18. 38 or 45 RRHDN - Double bracket right & right hand (NEW MODEL)
19. 38 or 45 LLHD - Double bracket left & right hand (NEW MODEL)
20. 38 or 45 LRHDN - Double bracket left & right hand (NEW MODEL)
Control System Options Ordering Codes
Please refer to your price list for surcharges
applicable for control system & component options
Structured Product Education & Evaluation Development - eLearning
jpm-speed.com
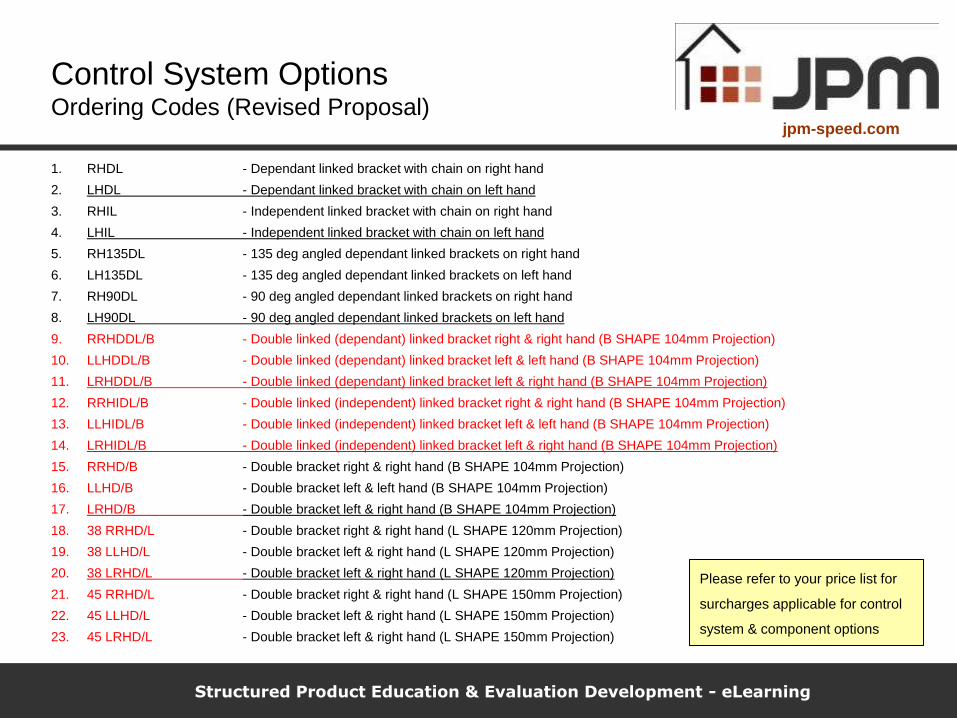
1. RHDL - Dependant linked bracket with chain on right hand
2. LHDL - Dependant linked bracket with chain on left hand
3. RHIL - Independent linked bracket with chain on right hand
4. LHIL - Independent linked bracket with chain on left hand
5. RH135DL - 135 deg angled dependant linked brackets on right hand
6. LH135DL - 135 deg angled dependant linked brackets on left hand
7. RH90DL - 90 deg angled dependant linked brackets on right hand
8. LH90DL - 90 deg angled dependant linked brackets on left hand
9. RRHDDL/B - Double linked (dependant) linked bracket right & right hand (B SHAPE 104mm Projection)
10. LLHDDL/B - Double linked (dependant) linked bracket left & left hand (B SHAPE 104mm Projection)
11. LRHDDL/B - Double linked (dependant) linked bracket left & right hand (B SHAPE 104mm Projection)
12. RRHIDL/B - Double linked (independent) linked bracket right & right hand (B SHAPE 104mm Projection)
13. LLHIDL/B - Double linked (independent) linked bracket left & left hand (B SHAPE 104mm Projection)
14. LRHIDL/B - Double linked (independent) linked bracket left & right hand (B SHAPE 104mm Projection)
15. RRHD/B - Double bracket right & right hand (B SHAPE 104mm Projection)
16. LLHD/B - Double bracket left & left hand (B SHAPE 104mm Projection)
17. LRHD/B - Double bracket left & right hand (B SHAPE 104mm Projection)
18. 38 RRHD/L - Double bracket right & right hand (L SHAPE 120mm Projection)
19. 38 LLHD/L - Double bracket left & right hand (L SHAPE 120mm Projection)
20. 38 LRHD/L - Double bracket left & right hand (L SHAPE 120mm Projection)
21. 45 RRHD/L - Double bracket right & right hand (L SHAPE 150mm Projection)
22. 45 LLHD/L - Double bracket left & right hand (L SHAPE 150mm Projection)
23. 45 LRHD/L - Double bracket left & right hand (L SHAPE 150mm Projection)
Control System Options Ordering Codes (Revised Proposal)
Please refer to your price list for
surcharges applicable for control
system & component options
Structured Product Education & Evaluation Development - eLearning
jpm-speed.com
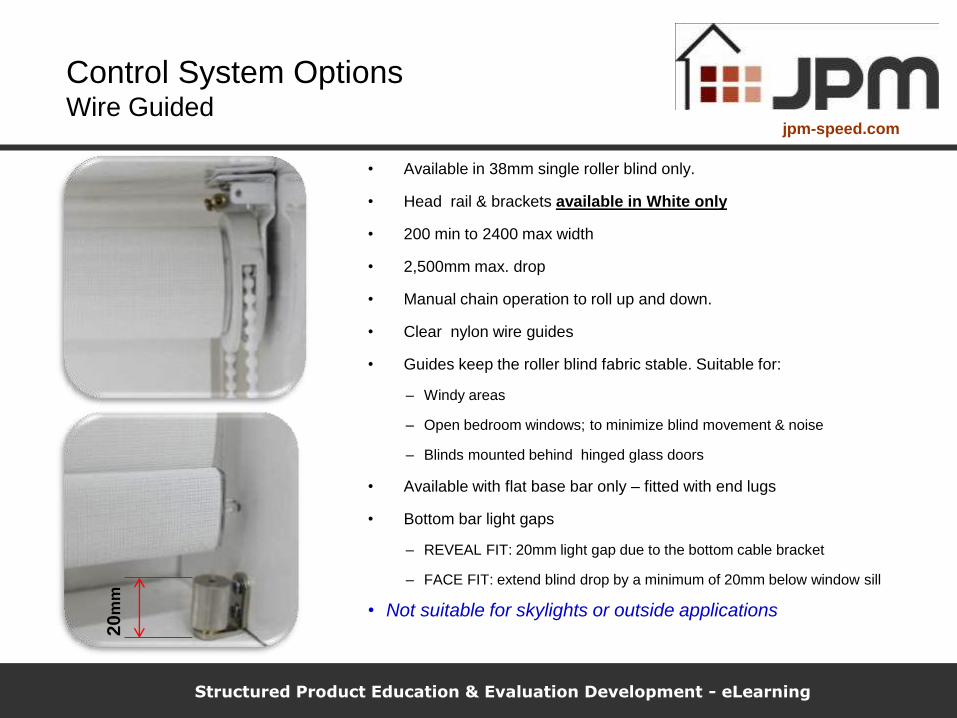
Control System Options Wire Guided
• Available in 38mm single roller blind only.
• Head rail & brackets available in White only
• 200 min to 2400 max width
• 2,500mm max. drop
• Manual chain operation to roll up and down.
• Clear nylon wire guides
• Guides keep the roller blind fabric stable. Suitable for:
– Windy areas
– Open bedroom windows; to minimize blind movement & noise
– Blinds mounted behind hinged glass doors
• Available with flat base bar only – fitted with end lugs
• Bottom bar light gaps
– REVEAL FIT: 20mm light gap due to the bottom cable bracket
– FACE FIT: extend blind drop by a minimum of 20mm below window sill
• Not suitable for skylights or outside applications
20
mm

Structured Product Education & Evaluation Development - eLearning
jpm-speed.com
Control System Options One Touch Raise Roller Blind
• Head rail & brackets available in White only
• 800 min to 2410 max width x 2,500mm max. drop
• One touch mechanism is fitted inside top tube
• “One Touch” of chain to ROLL UP AUTOMATICALLY.
• Normal chain operation to ROLL DOWN MANUALLY.
• Available in single roller blind only.
– Not available in linked, or dual or motorised
• Bottom bar top stop position is set at the factory
approximately 50mm +/-
• Not recommended for multiple blinds in one window as
difficult to align top position of all bottom bars precisely,
as you are more able to do using motorised blinds
• Mounting brackets slide & clip to suit along headrail
– Head or face fix

Structured Product Education & Evaluation Development - eLearning
jpm-speed.com
Control System Options One Touch Roller Blind Adjustments Bottom Bar Upper Stop Position may be Adjusted on Installation
Bottom Bar Height is factory set at 50mm
Bottom Bar Height adjustment is set on opposite (non chain) end
• Clockwise to raise bottom bar
• Anti-clockwise to lower bottom bar
Should adjustment be required remove bracket to access screw
speed adjustment using a large screw driver (clockwise to tension)
Not recommended for multiple blinds in one window as difficult to
align top position of all bottom bars precisely, as you are more able
to do using motorised blinds
FACTORY SET at 50mm

Structured Product Education & Evaluation Development - eLearning
jpm-speed.com
Available in 38mm single roller blind only.
Headrail, brackets & guides available in White only
200 min to 2400 max width
2,200mm max. drop
Manual chain operation to roll up and down.
90mm x 90mm cassette head box in white only
20mm x 8mm flat base bar
2 piece 40mm x 20mm channel side guides
Front piece of cover clips over the side.
Channel guides eliminate light gaps & keep the
roller blind fabric stable. Suitable for windows;
Home theatre rooms
Windy areas.
Bedrooms to minimize blind movement & noise
Not available in linked, or double or motorised
Not suitable for skylights or outside applications
Channel Guide with Front Cover Removed
Control System Options Cassette Head Box with Channel Guides FACE FIT SCREW FIXING ONLY
Curved Cassette Head Box

Structured Product Education & Evaluation Development - eLearning
jpm-speed.com
Structured Product Education & Evaluation Development - eLearning
jpm-speed.com
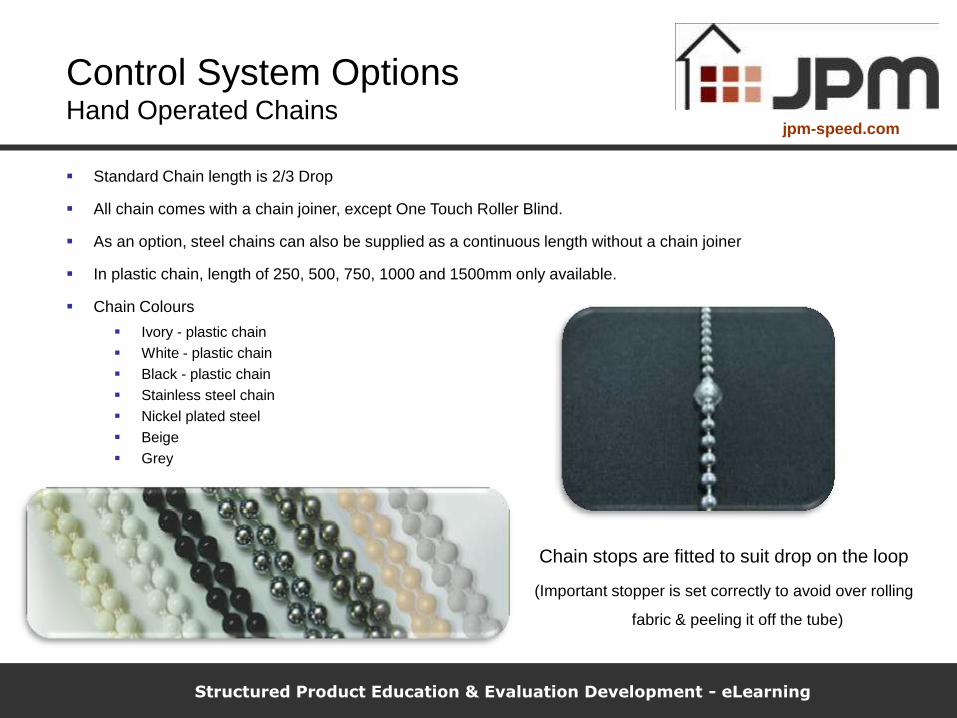
Control System Options Hand Operated Chains
Standard Chain length is 2/3 Drop
All chain comes with a chain joiner, except One Touch Roller Blind.
As an option, steel chains can also be supplied as a continuous length without a chain joiner
In plastic chain, length of 250, 500, 750, 1000 and 1500mm only available.
Chain Colours
Ivory - plastic chain
White - plastic chain
Black - plastic chain
Stainless steel chain
Nickel plated steel
Beige
Grey
Chain stops are fitted to suit drop on the loop
(Important stopper is set correctly to avoid over rolling
fabric & peeling it off the tube)

Structured Product Education & Evaluation Development - eLearning
jpm-speed.com
Control System Options Bottom Bar Styles – Round & Oval
20mm Dia. Round Bar Bottom Rail
Black, Cream, White, Beige, Silver Anodized
Popular classic finish
15mm Dia. Round Bottom Rail
Silver Anodized
Oval Base Bar
White, Cream, Black, Beige, Silver Anodized,
Popular contemporary finish

Structured Product Education & Evaluation Development - eLearning
jpm-speed.com
Control System Options Bottom Bar Styles - Flat
30mm x 13mm Flat Base Bar (Half Fabric Wrapped)
• Standard flat base bar has fabric wrapped around FRONT ONLY side of rail = ROOM SIDE
• Fabric wrapped around BACK ONLY side of rail is also available if requested.
• 5 Colours Available - Black, Cream, Beige, White & Silver Anodized
• Shantung, Shanxi / Portsea(BO) and Kirra (BO) - NOT available with flat base bar
– These thicker fabrics that are prone to pucker at seam
• Flat base bar with guide lugs is used for Wire Guide system
.
Standard Flat Base Bar
NO Fabric Wrapped on BACK Face
WINDOW SIDE
Standard Flat Base Bar
Fabric on FRONT Face of Bar
ROOM SIDE

Structured Product Education & Evaluation Development - eLearning
jpm-speed.com
Control System Options Bottom Bar Styles – Plain Trim (Concealed)
.
Plain Trim (Concealed)
• PVC rail enclosed in a sewn bottom pocket.
• Good to dampen sound of bottom bar hitting
window frame in windy conditions
Structured Product Education & Evaluation Development - eLearning
jpm-speed.com
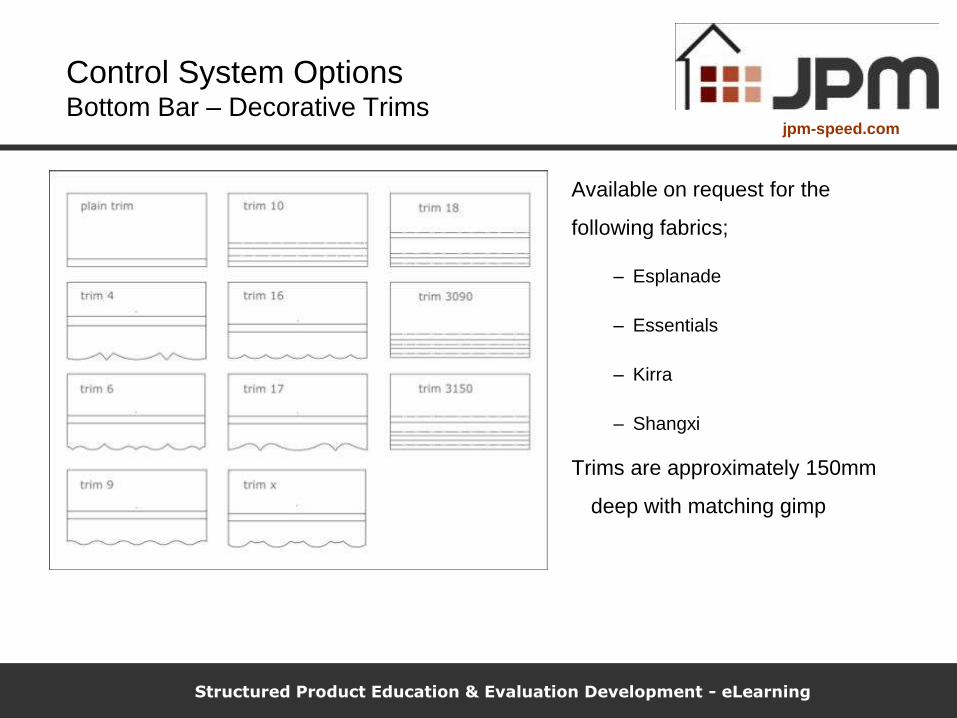
Control System Options Bottom Bar – Decorative Trims
Available on request for the
following fabrics;
– Esplanade
– Essentials
– Kirra
– Shangxi
Trims are approximately 150mm
deep with matching gimp

Structured Product Education & Evaluation Development - eLearning
jpm-speed.com
Motorised Roller Blinds Features & Benefits
• Cord-free solution where child safety is paramount
• Increases lifting mechanism life as it is not exposed to daily incorrect use
• Increases fabric life as it is not exposed to daily incorrect handling
• 2 Models of motors are available
- THIS MOTOR CANNOT BE WIRED DIRECTLY ACROSS A 240 VOLT WALL SWITCH

Structured Product Education & Evaluation Development - eLearning
jpm-speed.com
Motorised R.T.S. Roller Blind Electrical Installation – Molex Plug
• “Molex” plug is fitted to motor cable as standard
• A loose Construction Cable”, fitted with a “Molex” plug,
is supplied before the blinds & MUST ONLY BE
CONNECTED to the HOUSE ELECTRICAL SYSTEM
by a LICENSED ELECTRICIAN
• “Molex” plugs are suitable for internal use only
• Installed motor cables must be kept separate of other cables &
clear of other motors to avoid interference.
• DO NOT INSTALL 2 motors close to each other (head to head)
as electronic interference may affect operation
“Construction Cable” Fitted with Molex Plug
Motor Supplied fitted with Cable & Molex Connector
Structured Product Education & Evaluation Development - eLearning
jpm-speed.com
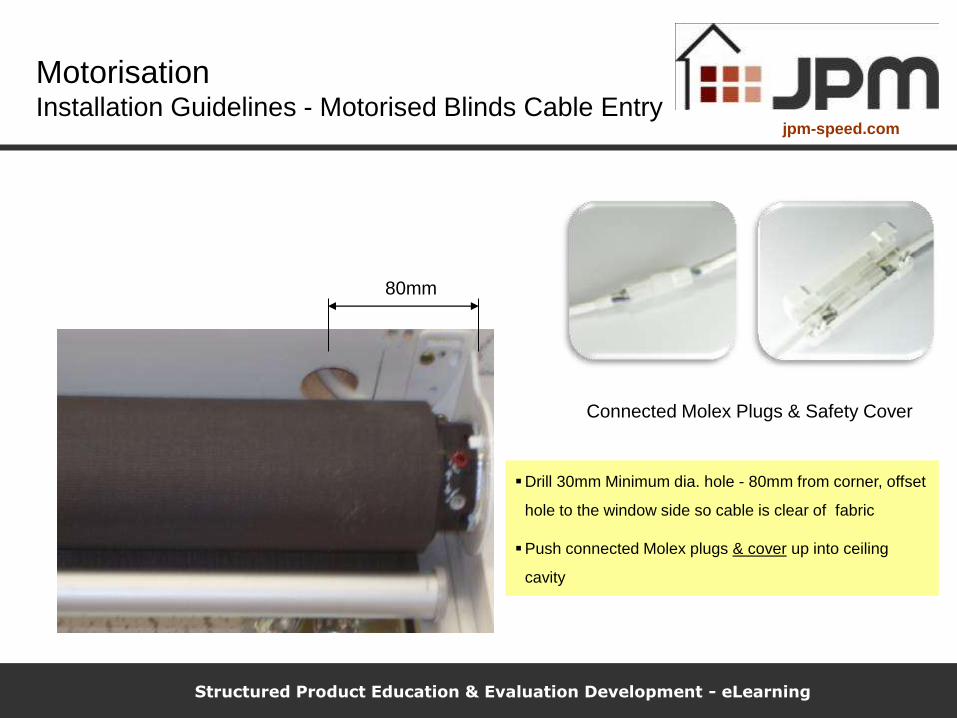
Motorisation
Installation Guidelines - Motorised Blinds Cable Entry
80mm
Drill 30mm Minimum dia. hole - 80mm from corner, offset
hole to the window side so cable is clear of fabric
Push connected Molex plugs & cover up into ceiling
cavity
Connected Molex Plugs & Safety Cover

Structured Product Education & Evaluation Development - eLearning
jpm-speed.com
Control System Options
RTS Transmitters
Single Channel Transmitter Multi (11) Channel Transmitter

Structured Product Education & Evaluation Development - eLearning
jpm-speed.com
Single Remote Programming Example
1. If you use a Single Remote all 4 blinds will
operate at the same time.
Multi Remote Programming Example
1. If you use a Multi Remote you are able to set UP TO
11 motorised blinds to operate individually, using
separate channels.
2. Using a separate (unused) channel to Group all 4
blinds to operate at the same time.
Blind A Blind B
Blin
d D
Blin
d C
(Ch 5)
Group Control
(Ch 4) (Ch 3)
(Ch 2) (Ch 1) Blind A Blind B
Blin
d D
Blin
d C
One Channel
Receiver
Group Control
Motorisation Programming Options

Structured Product Education & Evaluation Development - eLearning
jpm-speed.com
Programming Options Multi Channel Remote to Individually Control 3 Windows
INDIVIDUAL CONTROL
Channel 1 – left hand window
Channel 2 – centre window
Channel 3 – right hand window
GROUP CONTROL
Channel 4 – All 3 widows together

Structured Product Education & Evaluation Development - eLearning
jpm-speed.com
Motorisation
For more Detailed Information on Motorisation
Refer Training Module 10.8 – Motorisation

Structured Product Education & Evaluation Development - eLearning
jpm-speed.com
Product Information Linea Valance Options Option to Fit in Front of Double Brackets
– Standard PVC extrusion sizes -100mm & 140mm deep
– Colours options - Cotta & Mist
– Widths
• Maximum is 2,900mm
• Minimum width is 600mm
• Specify if joiners or extra joint brackets required for longer lengths
• Specify if extra brackets required for overhangs
• Specify if LH & RH mitred corners are required & return length
– Fabric Insert
• Fabric insert to co-ordinate with the selected blind fabric
• Fabric butt & corner joins will be visible
– Measuring Valance
• Manufactured based on measurements supplied
– Inside mount : specify if required 10mm wider than the blind
– Outside mount : specify if returns required & depth of returns

Structured Product Education & Evaluation Development - eLearning
jpm-speed.com
Product Information Linea Valance Butt Join Detail
Structured Product Education & Evaluation Development - eLearning
jpm-speed.com
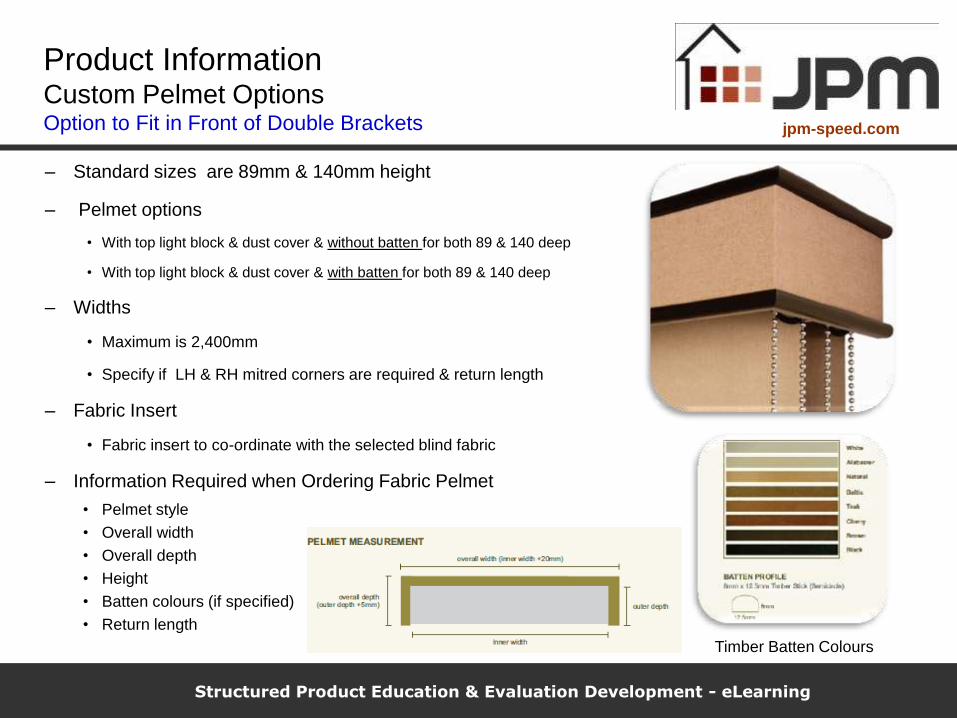
Product Information Custom Pelmet Options Option to Fit in Front of Double Brackets
– Standard sizes are 89mm & 140mm height
– Pelmet options
• With top light block & dust cover & without batten for both 89 & 140 deep
• With top light block & dust cover & with batten for both 89 & 140 deep
– Widths
• Maximum is 2,400mm
• Specify if LH & RH mitred corners are required & return length
– Fabric Insert
• Fabric insert to co-ordinate with the selected blind fabric
– Information Required when Ordering Fabric Pelmet
• Pelmet style
• Overall width
• Overall depth
• Height
• Batten colours (if specified)
• Return length
Timber Batten Colours

Structured Product Education & Evaluation Development - eLearning
jpm-speed.com
Sales Product Training Contents for Module 10.1 - Roller Blinds
Overview
– Operation & Advantages
– Roller Blind Specifications
Fabrics
– Fabric Range
– Important Information
Product Information
– Control System Options
– Chain Options
– Bottom Bar Options
– Motorisation
Measuring Guidelines
Child Safety
Common Problems, Causes & Solutions
Summary
Knowledge & Learning Assessment Test

Structured Product Education & Evaluation Development - eLearning
jpm-speed.com
Measuring Guidelines The Importance of Accurate Information
• 67% of errors at the quotation stage
– Mis-measured
• 27% of errors at the order entry stage
• Know how your product fits
• Measure, write down & check measure
• Write clearly 0, 6 or 9?, 1, 4 or 7
• Write any additional instructions
Structured Product Education & Evaluation Development - eLearning
jpm-speed.com
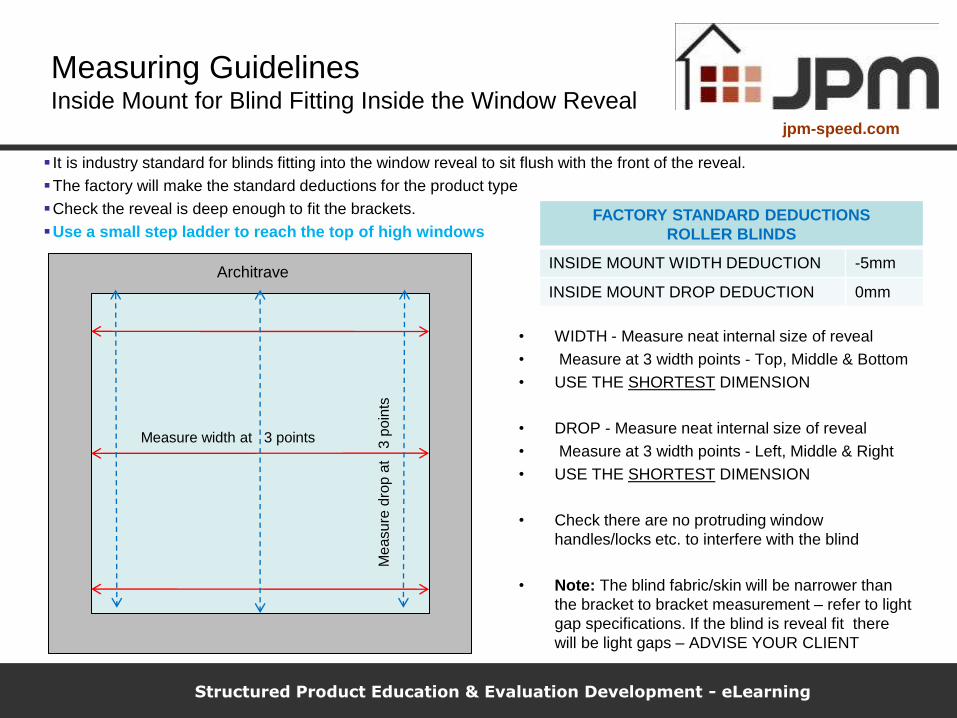
• WIDTH - Measure neat internal size of reveal
• Measure at 3 width points - Top, Middle & Bottom
• USE THE SHORTEST DIMENSION
• DROP - Measure neat internal size of reveal
• Measure at 3 width points - Left, Middle & Right
• USE THE SHORTEST DIMENSION
• Check there are no protruding window
handles/locks etc. to interfere with the blind
• Note: The blind fabric/skin will be narrower than
the bracket to bracket measurement – refer to light
gap specifications. If the blind is reveal fit there
will be light gaps – ADVISE YOUR CLIENT
Measure width at 3 points
It is industry standard for blinds fitting into the window reveal to sit flush with the front of the reveal.
The factory will make the standard deductions for the product type
Check the reveal is deep enough to fit the brackets.
Use a small step ladder to reach the top of high windows
Measuring Guidelines Inside Mount for Blind Fitting Inside the Window Reveal
FACTORY STANDARD DEDUCTIONS
ROLLER BLINDS
INSIDE MOUNT WIDTH DEDUCTION -5mm
INSIDE MOUNT DROP DEDUCTION 0mm
Architrave
Me
asu
re d
rop
at 3
poin
ts

Structured Product Education & Evaluation Development - eLearning
jpm-speed.com
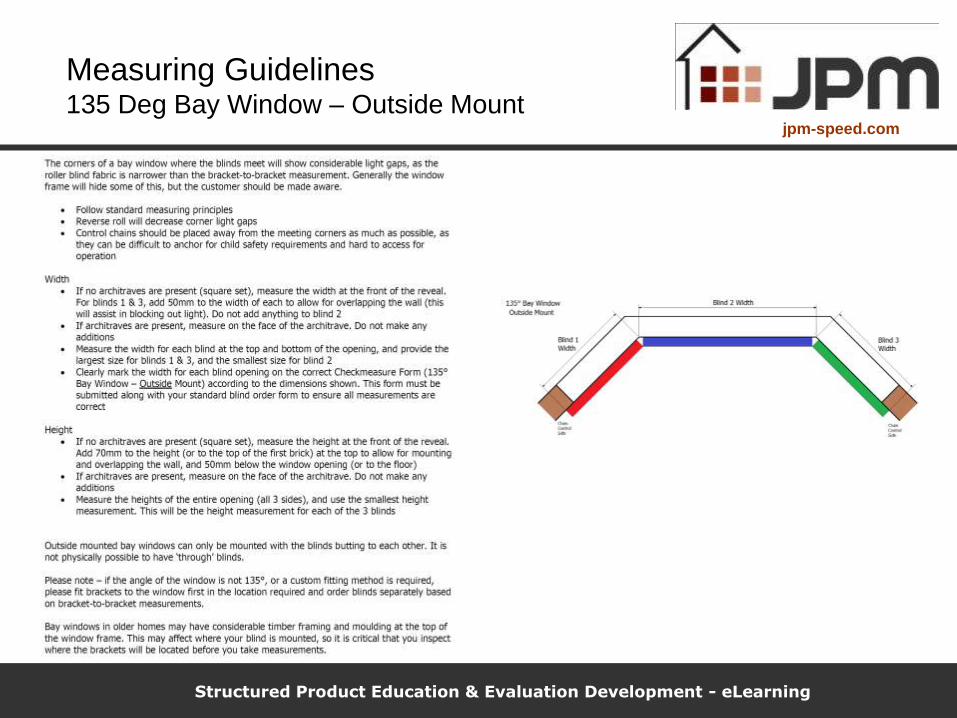
• WIDTH - Measure outside edge of architrave to
outside edge of opposite architrave
• Measure at 3 width points - Top, Middle & Bottom
• USE THE WIDEST DIMENSION
• DROP - Measure top of architrave to base of lower
architrave or floor
• Measure at 3 drop points - Left, Middle & Right
• USE THE SHORTEST DIMENSION
• Note: The blind fabric/skin will be narrower than the
bracket to bracket measurement – refer to light gap
specifications. Some architrave will be visible on
each side of the blind – ADVISE YOUR CLIENT
Measure width at 3 points
Use a small step ladder to reach the top of high windows
Measuring Guidelines Outside Mount for Blind Fitting onto Architrave
FACTORY STANDARD DEDUCTIONS
ROLLER BLINDS
OUTSIDE MOUNT WIDTH DEDUCTION 0mm
OUTSIDE MOUNT DROP DEDUCTION 0mm Architrave
Me
asu
re d
rop
at 3
poin
ts

Structured Product Education & Evaluation Development - eLearning
jpm-speed.com
Measure 50mm past each
side of opening width
Measuring Guidelines Outside Mount for Blind Fitting onto Wall
This situation will occur where there is no architrave or
when you wish to reduce the amount of window area
that will be covered by the stack of the blind
WIDTH
Measure minimum of 50mm past each side of window
opening
DROP
If fitting blind into plaster or concrete – measure
minimum of 70mm above window opening to a
minimum of 50mm below window opening or the floor
If fitting a blind into brick – measure from top of first
brick to a minimum of 50mm below window opening or
to the floor
Measure 70mm above opening
drop or to top of first brick
Measure 50mm below
opening drop or to floor

Structured Product Education & Evaluation Development - eLearning
jpm-speed.com
Measuring Guidelines Multiple Blinds on One Window
• Use standard measuring principles for INSIDE & OUTSIDE mount
• Factory will make appropriate deductions for link bracket (refer reference diagrams for information)
• Align gap with mullion for a better appearance & assist in light blocking.
• Check windows/doors are closed before measuring to mullion
• Measure & record the blinds from left to right
LINK BLINDS (in front of the window mullion or framing)
1. Measure each blind individually right up to each other
2. Write dimensions on paperwork & indicate if blinds are linked
3. Do not measure total width to be covered & divide by No. of blinds
– Blind widths will not always be the same
BUTTING BLINDS (Blinds fitting side by side not using link brackets)
1. Apply the same measuring principles as for the Linked Roller Blind &
state on the paperwork that the blinds are Butting together.
1. There will be a gap between the blinds - refer the “Side/Light Gap” notes in the specification
LINK BRACKET

Structured Product Education & Evaluation Development - eLearning
jpm-speed.com
Measuring Guidelines Inside Mount Multiple Blinds on One Window Factory Standard Deductions for Linked Brackets

Structured Product Education & Evaluation Development - eLearning
jpm-speed.com
Measuring Guidelines 90 Deg Corner Window – Inside Mount

Structured Product Education & Evaluation Development - eLearning
jpm-speed.com
Measuring Guidelines 90 Deg Corner Window – Outside Mount

Structured Product Education & Evaluation Development - eLearning
jpm-speed.com
Measuring Guidelines 135 Deg Bay Window – Inside Mount
Structured Product Education & Evaluation Development - eLearning
jpm-speed.com
Measuring Guidelines 135 Deg Bay Window – Outside Mount

Structured Product Education & Evaluation Development - eLearning
jpm-speed.com
Measuring Guidelines 90 Deg Box Bay Window – Inside Mount

Structured Product Education & Evaluation Development - eLearning
jpm-speed.com
Measuring Guidelines 90 Deg Box Bay Window – Outside Mount

Structured Product Education & Evaluation Development - eLearning
jpm-speed.com
Measuring Guidelines 90 Deg Corner Window Sample Check Measure Forms for Inside & Outside Mount

Structured Product Education & Evaluation Development - eLearning
jpm-speed.com
Measuring Guidelines 135 Deg Bay Window Sample Check Measure Forms for Inside & Outside Mount

Structured Product Education & Evaluation Development - eLearning
jpm-speed.com
Measuring Guidelines 90 Deg Box Bay Windows Sample Check Measure Forms for Inside & Outside Mount

Structured Product Education & Evaluation Development - eLearning
jpm-speed.com
Measuring Guidelines Roller Blind Light Gaps – Reference Information
The fabric width of roller blinds is less then the window opening width due to roller blind mechanism
Window Reveal or Bracket to Bracket Width
Standard Splined Bottom Bar Width is 25mm Less than Window or Bracket to Bracket Width
IMPORTANT - Actual Fabric Width is approximately 30mm Less than Window or Bracket to Bracket Width
10mm Min. Light Gap
20mm Min. Light Gap

Structured Product Education & Evaluation Development - eLearning
jpm-speed.com
Measuring Guidelines 135 deg & 90 deg Link Brackets Top Fix Reveal Fit Key Dimensions – Brackets Do Not Butt
Ceiling fit

Structured Product Education & Evaluation Development - eLearning
jpm-speed.com
Measuring Guidelines 135 deg & 90 deg Link Brackets Internal Corner Reveal Fit Key Dimensions – Brackets Do Not Butt

Structured Product Education & Evaluation Development - eLearning
jpm-speed.com
Measuring Guidelines 135 deg & 90 deg Link Brackets External Corner Face Fit Key Dimensions – Brackets Do Not Butt

Structured Product Education & Evaluation Development - eLearning
jpm-speed.com
Sales Product Training Contents for Module 10.1 - Roller Blinds
1. Overview
– Operation & Advantages
– Roller Blind Specifications
2. Fabrics
– Fabric Range
– Important Information
3. Product Information
– Control System Options
– Chain Options
– Bottom Bar Options
– Motorisation
4. Measuring Guidelines
5. Child Safety
6. Common Problems, Causes & Solutions
7. Summary
8. Knowledge & Learning Assessment Test

Structured Product Education & Evaluation Development - eLearning
jpm-speed.com
Child Safety - Corded Internal Window Coverings
Trade Practices Regulations 2010
Children Can Die from Cord
Strangulation
It is Australian Federal law
that we must supply & FIT
safety clips & warning
labels in accordance with
ACCC standards

Structured Product Education & Evaluation Development - eLearning
jpm-speed.com
Chain Safety for Roman Blinds Important for Safe Installation & Operation
Important for Safe Installation & Operation
In the sales process inform each customer of December
2010 ACCC National Safety Standards & our requirement to fit safety
labels and for our installer to fit safety cleats.
– We PROVIDE a warning label on the chain or cord to highlight the
risk of strangulation to children.
– We INSTALL chain safety cleats to prevent the possibility of a cord
forming a loop 220mm or longer at a height of less than 1,600mm
above floor level.
– We MUST USE 2 SCREWS to fix chain safety clip or cleats to the
wall or architrave
– Screws & cleats must remain securely attached when subjected to a
force of 70N (7kgf) applied in any direction for 10 seconds.
– Sales consultant should recommend to keep cots and furniture away
from window coverings, cords/chains, to install & use safety devices
that remove the cord loop or reduce access to cords
LABELS MUST NOT BE REMOVED FROM
CHAINS or CORDS BY INSTALLER
CLEAT or CORD
GUIDE MUST BE
FIXED TO TIMBER
OR MASONRY WALL
USING 2 SCREWS

Structured Product Education & Evaluation Development - eLearning
jpm-speed.com
Child Safety - Corded Internal Window Coverings
Safety Warning Labels Continued
Label Fitted on Bottom Bar (at the Back)
Warning Label Fitted on Every Internal Custom Blind Product Box)

Structured Product Education & Evaluation Development - eLearning
jpm-speed.com
Child Safety Guidelines Leaflet Corded Internal Window Coverings
Leaflets printed with your company logo can be ordered for you to use to inform your customers.

Structured Product Education & Evaluation Development - eLearning
jpm-speed.com
Child Safety - Corded Internal Window Coverings
Trade Practices Regulations 2010

Structured Product Education & Evaluation Development - eLearning
jpm-speed.com
WE MUST COMPLY WITH THE LAW
1. Warning label on package
2. Warning label attached to cord or
chain – must NOT be removed by
installer
3. Installation instructions for cord safety
requirements MUST be left with the
customer.
4. Cord guide designed to meet
standards – Must be fixed with two
(2) screws into timber or
masonry walls.

Structured Product Education & Evaluation Development - eLearning
jpm-speed.com
Sample Safety Induction Document - Duty of Care
This “Duty of Care” document is used by
other purchasers of internal corded window
coverings, at the completion of safety
induction training, for sales consultants &
installers.
All staff involved in the process to supply
corded internal window coverings need to
inform & educate all customers of our
companies & their own responsibilities to
work together to minimise the risks to small
children.

Structured Product Education & Evaluation Development - eLearning
jpm-speed.com
Sales Product Training Contents for Module 1 - Roller Blinds
1. Overview
– Operation & Advantages
– Roller Blind Specifications
2. Fabrics
– Fabric Range
– Important Information
3. Product Information
– Control System Options
– Chain Options
– Bottom Bar Options
– Motorisation
4. Measuring Guidelines
5. Child Safety
6. Common Problems, Causes & Solutions
7. Summary
8. Knowledge & Learning Assessment Test

Structured Product Education & Evaluation Development - eLearning
jpm-speed.com
Common Problems, Causes & Solutions
Problem Possible Cause Possible Solution
Blinds too wide & installer can’t fit in
reveal
Common problem in units with rendered
walls
Measure top of window reveal to check
if narrower
Blind 6mm too short Handwriting not clear Print dimensions clearly on quote pad
Bottom bar too wide Catching skirting board or wall tiles at
bottom of the wall
Centre light gaps does not line up with
window frame/mullions
Average of total width divided by 2 Measure width of each blind individually
To much light gap down sides of a face
fit blind
Installed reverse roll Specify standard roll if block out
backing is the same colour
Blinds hit window & door handles Blinds specified standard roll Reverse roll blinds to clear door handles
Bedroom window light gaps Customer sensitive to light gaps Recommend flush fitting Roman blinds
or curtains

Structured Product Education & Evaluation Development - eLearning
jpm-speed.com
Sales Product Training Contents for Module 10.1 - Roller Blinds
1. Overview
– Operation & Advantages
– Roller Blind Specifications
2. Fabrics
– Fabric Range
– Important Information
3. Product Information
– Control System Options
– Chain Options
– Bottom Bar Options
– Motorisation
4. Measuring Guidelines
5. Chain Safety
6. Common Problems, Causes & Solutions
7. Summary
8. Knowledge & Learning Assessment Test

Structured Product Education & Evaluation Development - eLearning
jpm-speed.com
Roller Blinds Review of This Modules Key Issues
Innovative Solutions to Add Value for your Customer
• Always assess customers budget/decorator goals
• Custom blind not ready made blind allows for a wide range of solutions
• Types of fabrics & wide range fabrics available in different widths
• Wide range of operating systems
– Manual chain drive
– Linked systems – independent, dependant, 90 deg & 135 deg
– Double brackets
– Wire guided
– One touch raise
– Cassette
– Motorized – 2 types available: MotorMAX & MotorMATE
• Motorized programming options
• Measuring guidelines for different types of windows
• Child Safety & ACCC legislation - very important where there are small children in homes
• Common problems

Structured Product Education & Evaluation Development - eLearning
jpm-speed.com
Sales Product Training Contents for Module 1 - Roller Blinds
1. Overview
– Operation & Advantages
– Roller Blind Specifications
2. Fabrics
– Fabric Range
– Important Information
3. Product Information
– Control System Options
– Chain Options
– Bottom Bar Options
– Motorisation
4. Measuring Guidelines
5. Child Safety
6. Common Problems, Causes & Solutions
7. Summary
8. Knowledge & Learning Assessment Test

Structured Product Education & Evaluation Development - eLearning
jpm-speed.com
Knowledge & Learning Assessment Test Certificate of Achievement
Please answer the 20 questions on your test paper
10 mins. allowed
When you complete answering the questions we will
review the answers together as follows;
1. Exchange completed test papers with a colleague &
mark each others.
2. Add up the number of questions answered correctly &
divide by 20 to work out the score on the test paper.
3. Return marked papers to me after we finish checking
the results.
Recommended