HI-HH-2600
HF+ Barcode Handheld Reader Industrial Level
HYIN TECHNOLOGY CO.,LTD
www.hyintech.com
Content
Chapter 1. Items include in standard package ▓Product package content ………………………………………...1-2
Chapter 2 HI-2600 Series Introduction ▓HI-2600 introduction …………………………………………2-2
Chapter 3 Get Started ▓ First time operation(Turn on/off, Setup, Adjustment )………….3-2 ▓ General Maintenance …………………………………………….3-3 ▓ On/Off Power ………………………………...……………………3-3 ▓ Touch Screen Adjustment ………………………………………..3-4 ▓ Time and Date setting …………………………………………….3-4 ▓ Touch Setting and input setting…………………………………..3-7 ▓ Input Information ………………………………………………….3-9 ▓ Virtual screen keyboard …………………………………………..3-9 ▓ Use of input keys ………………………………………………….3-9 ▓ Connection to personal Computer ………………………………3-9 ▓ Reconfiguration ………………………………………………….3-10 ▓ Battery operation notice…………………………………………3-10 ▓ Battery level indication …………………………………………..3-11 ▓ Checking of remaining battery…………………………………..3-11
Chapter 4 Accessories Operations ▓ GPRS network connection setting ……………………………..4-15 ▓ WLAN network connection setting …………………………….4-19 ▓ Bar Code Scanning………………………………………………4-23 Appendix HI-2600 Series Specification
HYIN TECHNOLOGY CO.,LTD
www.hyintech.com
Chapter 1. Items include in standard package
▓ Standard Package content
HYIN TECHNOLOGY CO.,LTD
www.hyintech.com
▓ Standard Package Include
Please verify the package content with the following items:
• This User Manual • Hardware include
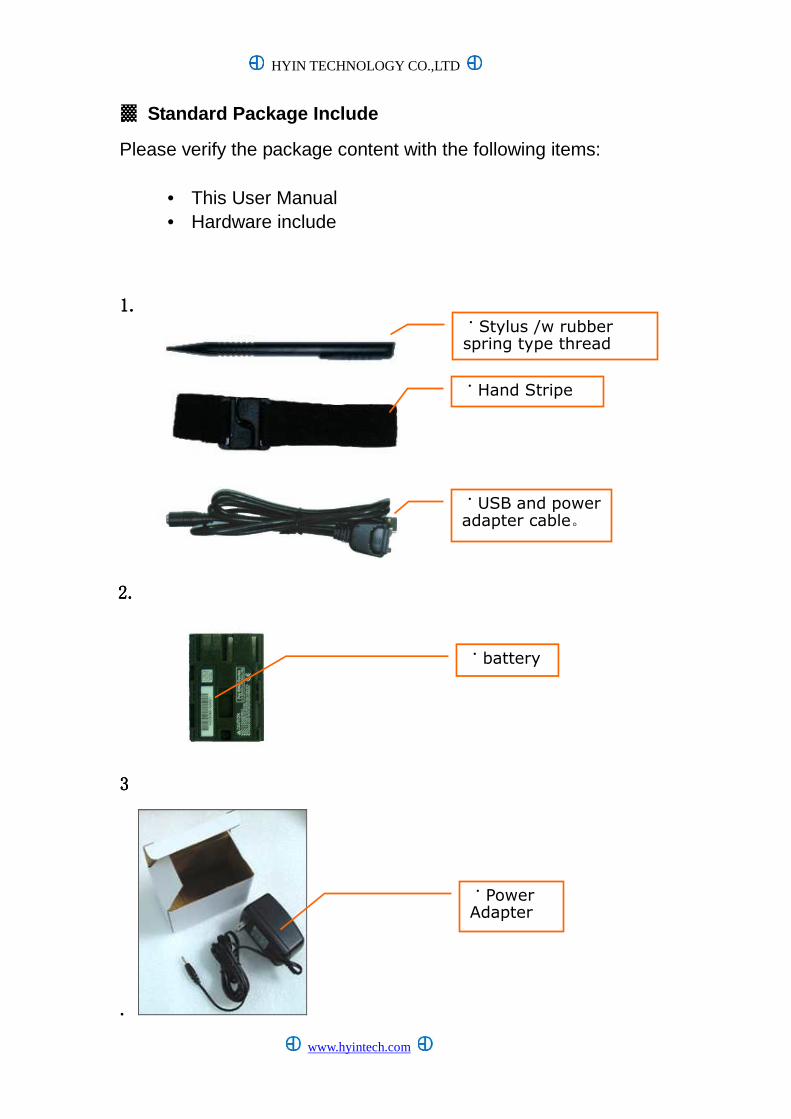
1.1.1.1.
2.2.2.2.
3333
....
˙battery
˙Hand Stripe
˙Stylus /w rubber spring type thread
˙USB and power adapter cable。
˙Power Adapter
HYIN TECHNOLOGY CO.,LTD
www.hyintech.com
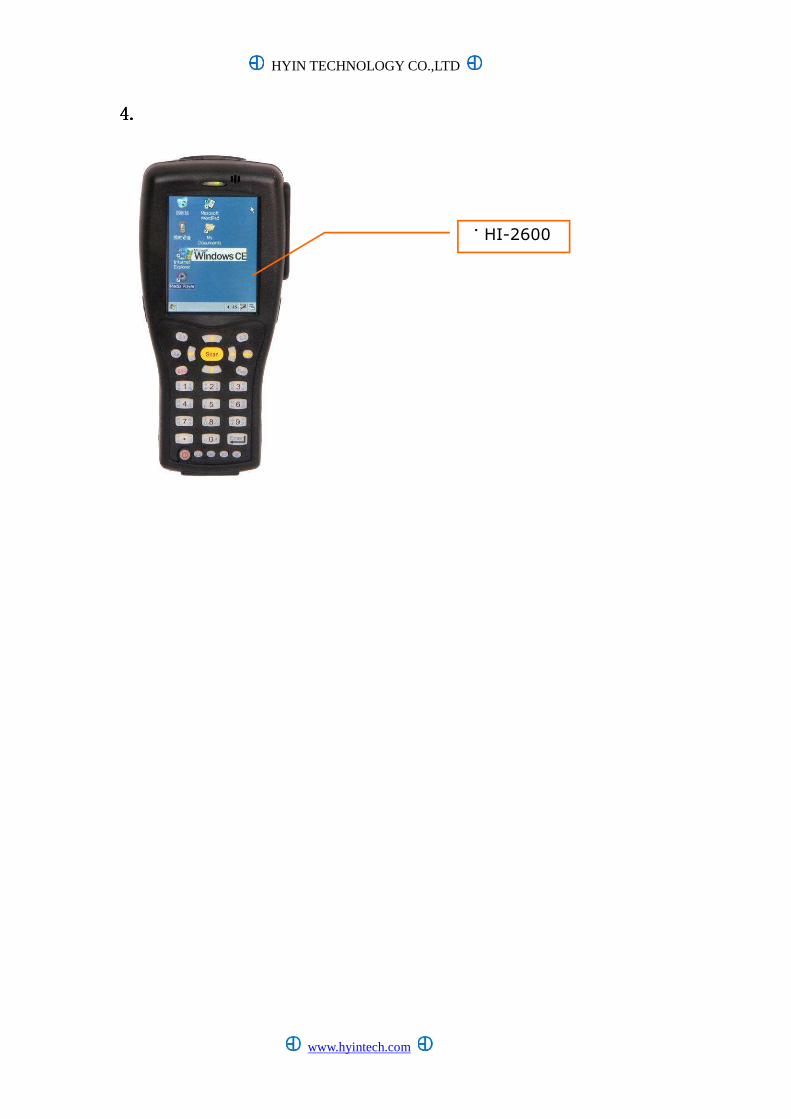
4.4.4.4.
˙HI-2600
HYIN TECHNOLOGY CO.,LTD
www.hyintech.com
Chapter 2 HI-2600 Introduction
▓ HI-2600 Hardware Introduction
Front (Function Introduction)
Front (Buttons Introduction)
Function Shortcut Keys
Rear (Function Introduction)
HYIN TECHNOLOGY CO.,LTD
www.hyintech.com
▓ HI-2600 Hardware Introduction
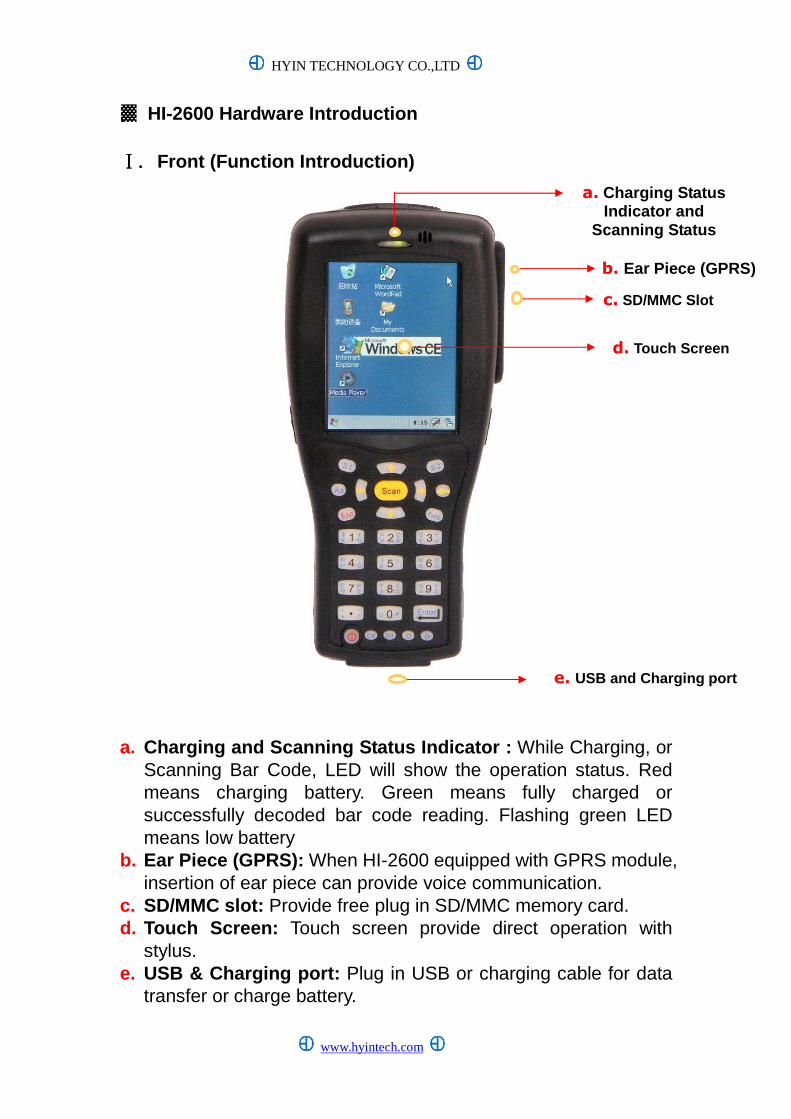
ⅠⅠⅠⅠ. . . . Front (Function Introduction)
a. Charging and Scanning Status Indicator : While Charging, or Scanning Bar Code, LED will show the operation status. Red means charging battery. Green means fully charged or successfully decoded bar code reading. Flashing green LED means low battery
b. Ear Piece (GPRS): When HI-2600 equipped with GPRS module, insertion of ear piece can provide voice communication.
c. SD/MMC slot: Provide free plug in SD/MMC memory card. d. Touch Screen: Touch screen provide direct operation with
stylus. e. USB & Charging port: Plug in USB or charging cable for data
transfer or charge battery.
a. Charging Status Indicator and
Scanning Status
d. Touch Screen
c. SD/MMC Slot
b. Ear Piece (GPRS)
e. USB and Charging port
HYIN TECHNOLOGY CO.,LTD
www.hyintech.com
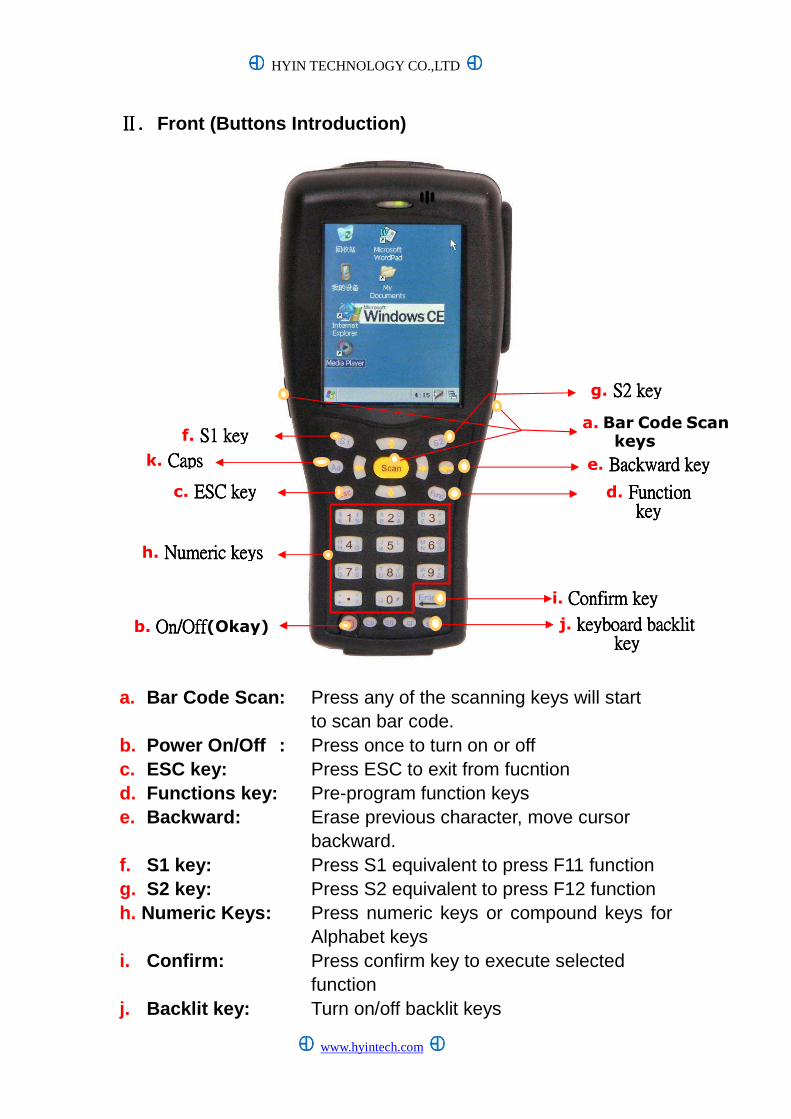
ⅡⅡⅡⅡ. . . . Front (Buttons Introduction)
a. Bar Code Scan: Press any of the scanning keys will start to scan bar code.
b. Power On/Off : Press once to turn on or off c. ESC key: Press ESC to exit from fucntion d. Functions key: Pre-program function keys e. Backward: Erase previous character, move cursor
backward. f. S1 key: Press S1 equivalent to press F11 function g. S2 key: Press S2 equivalent to press F12 function h. Numeric Keys: Press numeric keys or compound keys for
Alphabet keys i. Confirm: Press confirm key to execute selected
function j. Backlit key: Turn on/off backlit keys
a. Bar Code Scan keys
c. ESCESCESCESC keykeykeykey
i. Confirm keyConfirm keyConfirm keyConfirm key
b. On/OffOn/OffOn/OffOn/Off(Okay)
g. S2S2S2S2 keykeykeykey
d. Function Function Function Function keykeykeykey
f. S1S1S1S1 keykeykeykey
e. Backward keyBackward keyBackward keyBackward key
h. Numeric keysNumeric keysNumeric keysNumeric keys
j. keyboard backlit keyboard backlit keyboard backlit keyboard backlit keykeykeykey
k. CapsCapsCapsCaps
HYIN TECHNOLOGY CO.,LTD
www.hyintech.com
k. Cap key: Alternatively turn on/off capital letter input
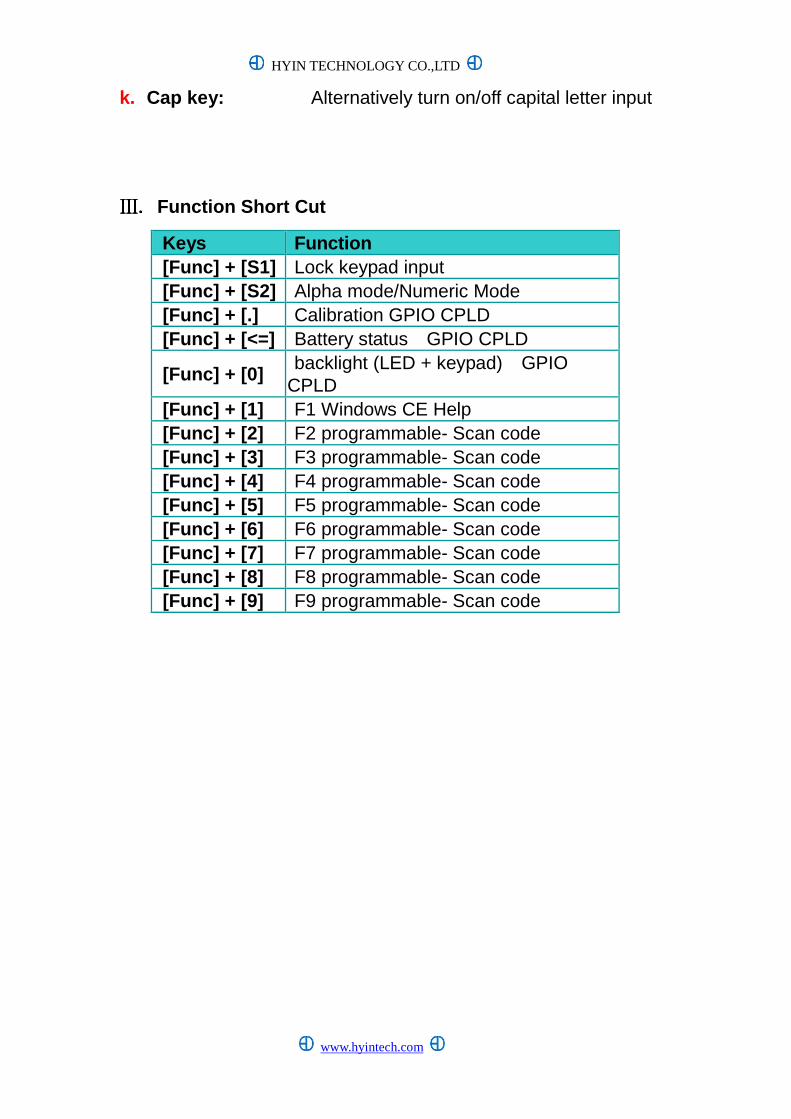
ⅢⅢⅢⅢ. . . . Function Short Cut
Keys Function [Func] + [S1] Lock keypad input [Func] + [S2] Alpha mode/Numeric Mode [Func] + [.] Calibration GPIO CPLD [Func] + [<=] Battery status GPIO CPLD
[Func] + [0] backlight (LED + keypad) GPIO
CPLD [Func] + [1] F1 Windows CE Help [Func] + [2] F2 programmable- Scan code [Func] + [3] F3 programmable- Scan code [Func] + [4] F4 programmable- Scan code [Func] + [5] F5 programmable- Scan code [Func] + [6] F6 programmable- Scan code [Func] + [7] F7 programmable- Scan code [Func] + [8] F8 programmable- Scan code [Func] + [9] F9 programmable- Scan code
www.hyintech.com
Chapter 3 Getting Started
▓ First time operation(Turn on/off, Setup, Adjustment ) ▓ General Maintenance ▓ On/ Off Power ▓ Touch Screen Adjustment ▓ Time and Date setting ▓ Touch Setting and input setting ▓ Input Information ▓ Virtual screen keyboard ▓ Use of input keys ▓ Connection to personal Computer ▓ Reconfiguration ▓ Battery operation notice ▓ Battery level indication ▓ Checking of remaining battery
HYIN TECHNOLOGY CO.,LTD
www.hyintech.com
▓▓▓▓ First Time Operate
Connect Power Adapter to AC Power Source Connect AC Power Adapter to the main unit through power cable and charge the main battery for at least 18 hours before first time operate. Turn On Press On/Off key to turn on main unit. Touch Screen Adjustment Use Stylus point to center of cross appear on screen and release, Adjust until advance to next screen. Confirm Setup Press OK to confirm, save cursor positioning setup. Adjust date and time 1. First of all, adjust the time zone first, select the correct time
zone that you are located, when complete press the “apply” at the bottom right of the screen.
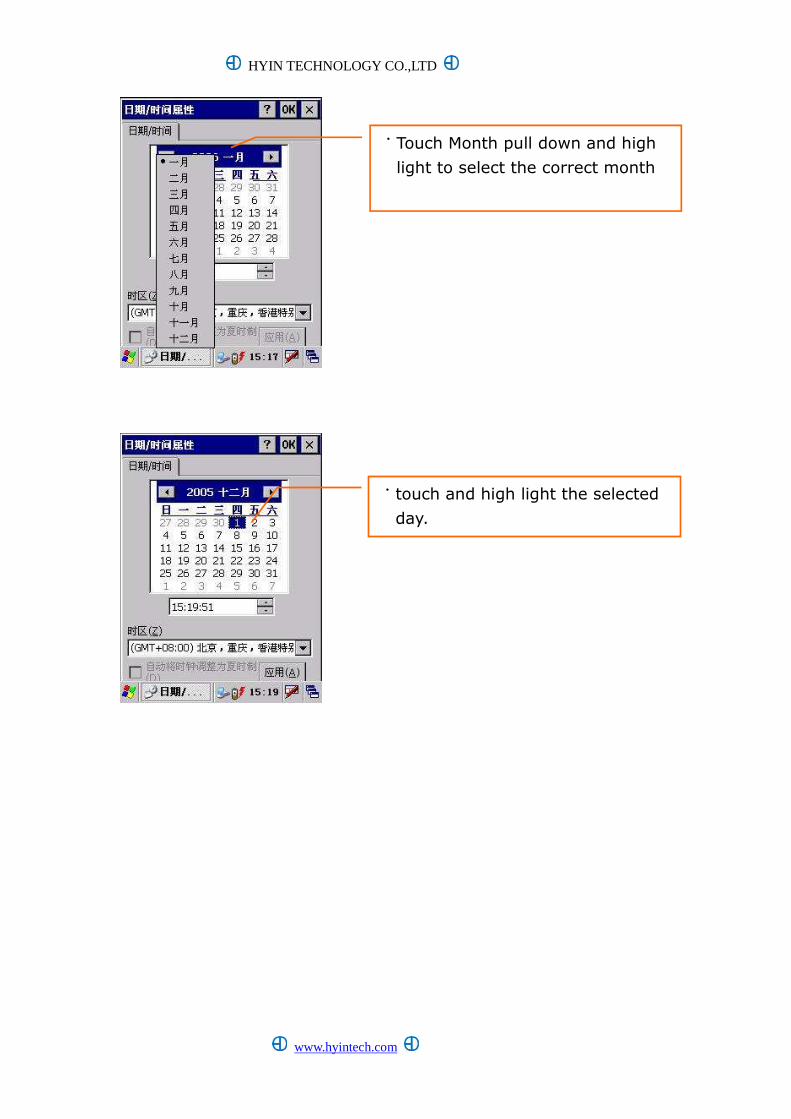
2. Setup Date (year), press once at the year field, then you can select which year. 3. Setup Date (Month), press once at the month field, then you
can select month in the pull-down list; or press left / right for other months.
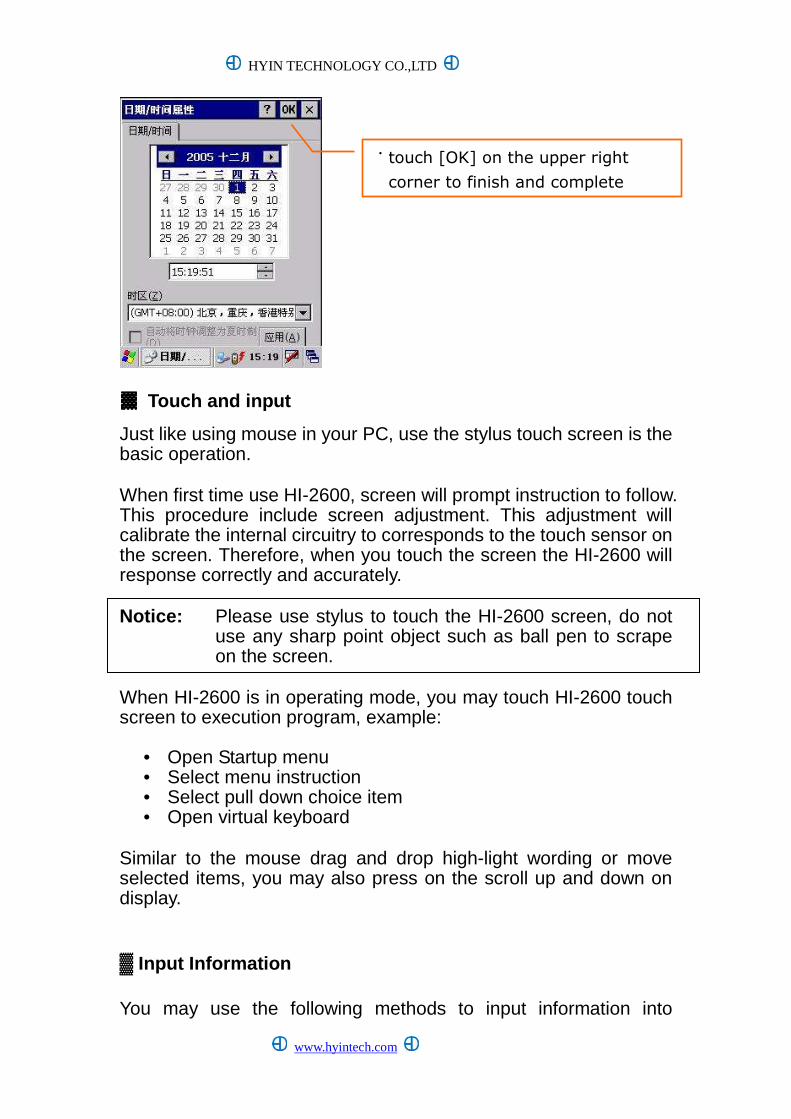
4. Setup Date (Day), press once at the selected day field, and the setup of date is completed. 5. When Complete, please press upper right corner “OK” to confirm setup.
HYIN TECHNOLOGY CO.,LTD
www.hyintech.com
▓ General Maintenance
Screen Cleaning Use finger touch screen will left fingerprint or dirt on screen and create smudge display. To clean up screen, use the soft cloth apply small amount of glass cleaning solvent and gently rub the screen surface. Please do not directly apply the glass cleaning solvent onto the screen. You may use screen protector to protect the screen.
▓▓▓▓ On/Off Power
Turn On Power While in Power Off mode, press once at On/Off Key will turn on HI-2600. Turn Off Power While in Power On mode, press once at On/Off key will turn off HI-2600.
▓▓▓▓ Touch Screen Adjustment
After a period of time, you may find out the touch screen is not so sensitive, thereafter, you may recalibrate the touch screen. Steps: 1.Choose Control Panel, select “pen point”, then select
“adjustment”, select “readjustment”, the adjustment screen will appear.
** The above words “pen point”, “adjustment”, “read justment” may appear differently
in your machine due to the following reason
• This is a direct translation from foreign language, therefore the actual message
prompt at the screen with your local language may a ppear different, but the
meaning should be equivalent.
• This may also caused by different version of operat ing system
HYIN TECHNOLOGY CO.,LTD
www.hyintech.com
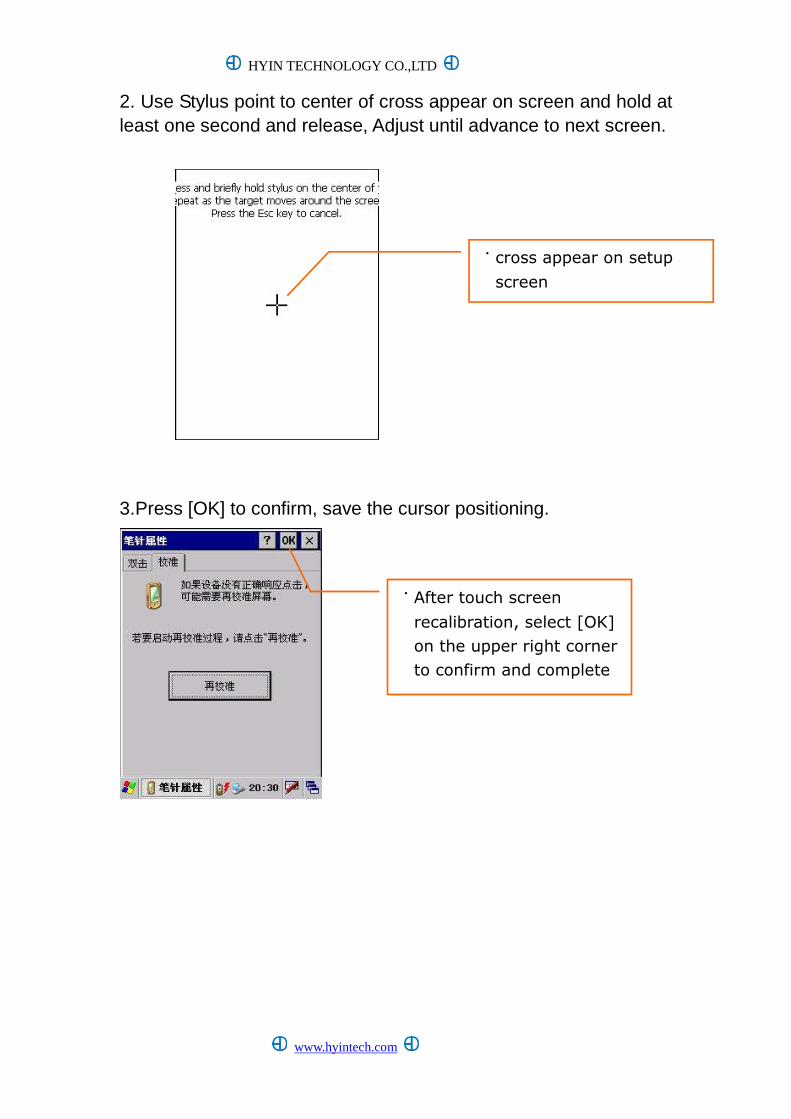
2. Use Stylus point to center of cross appear on screen and hold at least one second and release, Adjust until advance to next screen.
3.Press [OK] to confirm, save the cursor positioning.
˙cross appear on setup
screen
˙After touch screen
recalibration, select [OK]
on the upper right corner
to confirm and complete
HYIN TECHNOLOGY CO.,LTD
www.hyintech.com
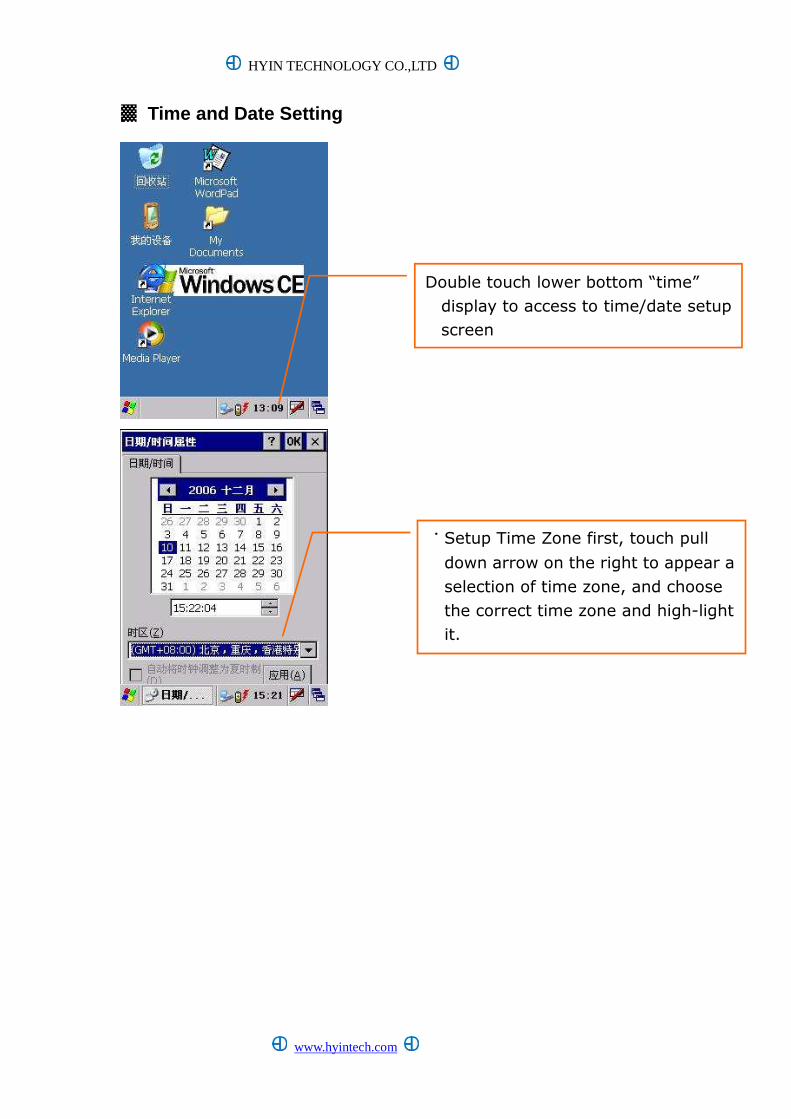
▓ Time and Date Setting
Double touch lower bottom “time”
display to access to time/date setup
screen
˙Setup Time Zone first, touch pull
down arrow on the right to appear a
selection of time zone, and choose
the correct time zone and high-light
it.
HYIN TECHNOLOGY CO.,LTD
www.hyintech.com
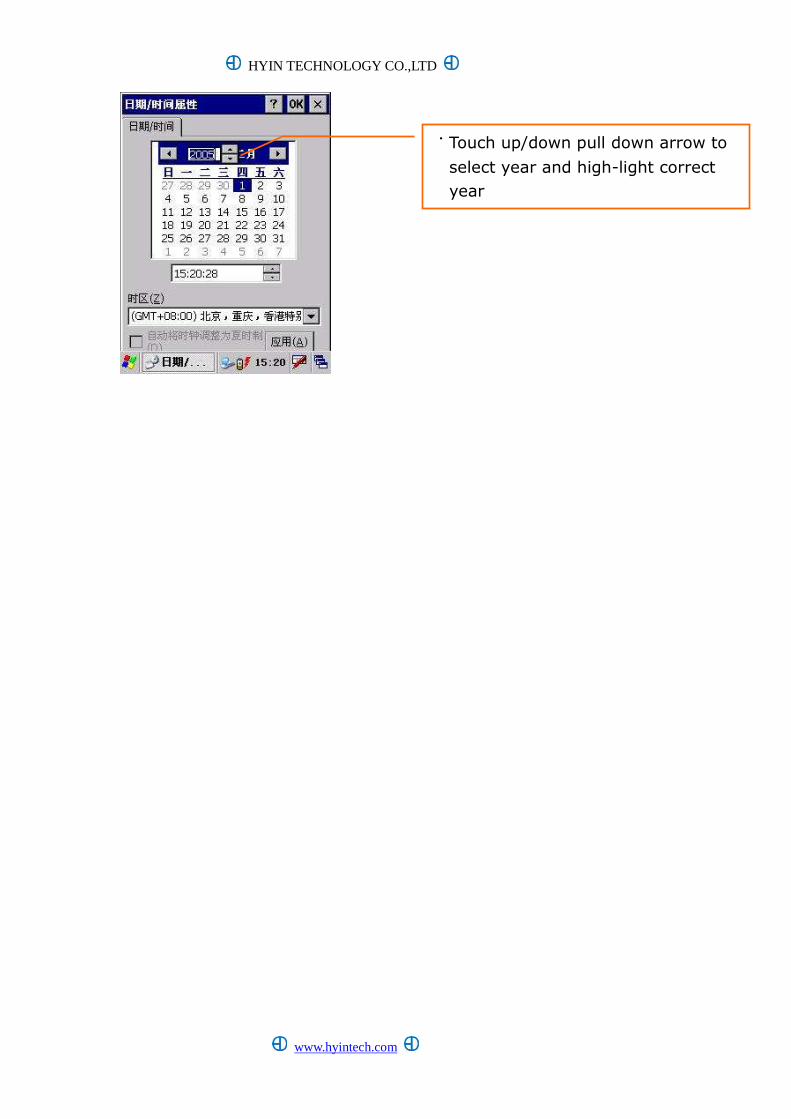
˙Touch up/down pull down arrow to
select year and high-light correct
year
HYIN TECHNOLOGY CO.,LTD
www.hyintech.com
˙Touch Month pull down and high
light to select the correct month
˙touch and high light the selected
day.
HYIN TECHNOLOGY CO.,LTD
www.hyintech.com
▓▓▓▓ Touch and input
Just like using mouse in your PC, use the stylus touch screen is the basic operation. When first time use HI-2600, screen will prompt instruction to follow. This procedure include screen adjustment. This adjustment will calibrate the internal circuitry to corresponds to the touch sensor on the screen. Therefore, when you touch the screen the HI-2600 will response correctly and accurately. Notice: Please use stylus to touch the HI-2600 screen, do not
use any sharp point object such as ball pen to scrape on the screen.
When HI-2600 is in operating mode, you may touch HI-2600 touch screen to execution program, example:
• Open Startup menu • Select menu instruction • Select pull down choice item • Open virtual keyboard
Similar to the mouse drag and drop high-light wording or move selected items, you may also press on the scroll up and down on display. ▓ Input Information You may use the following methods to input information into
˙touch [OK] on the upper right
corner to finish and complete
HYIN TECHNOLOGY CO.,LTD
www.hyintech.com
HI-2600:
• Input from virtual keyboard • Input directly from numeric keys or compound keys on
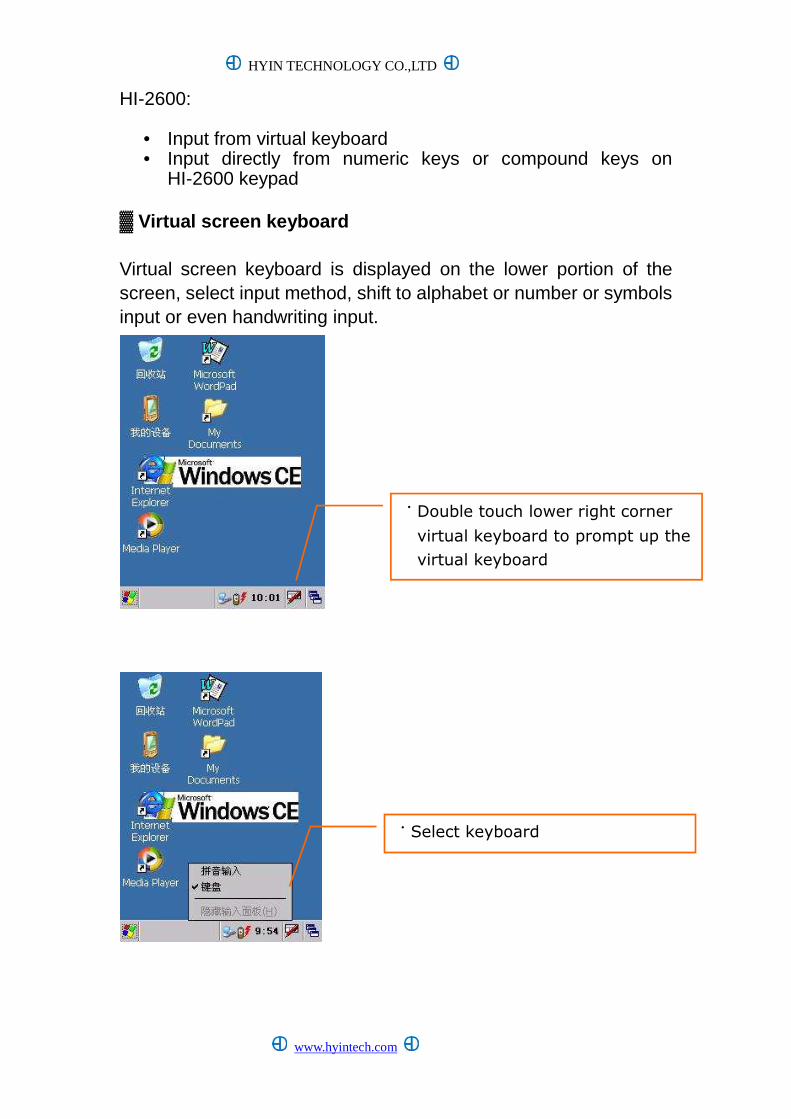
HI-2600 keypad ▓ Virtual screen keyboard Virtual screen keyboard is displayed on the lower portion of the screen, select input method, shift to alphabet or number or symbols input or even handwriting input.
˙Double touch lower right corner
virtual keyboard to prompt up the
virtual keyboard
˙Select keyboard
HYIN TECHNOLOGY CO.,LTD
www.hyintech.com
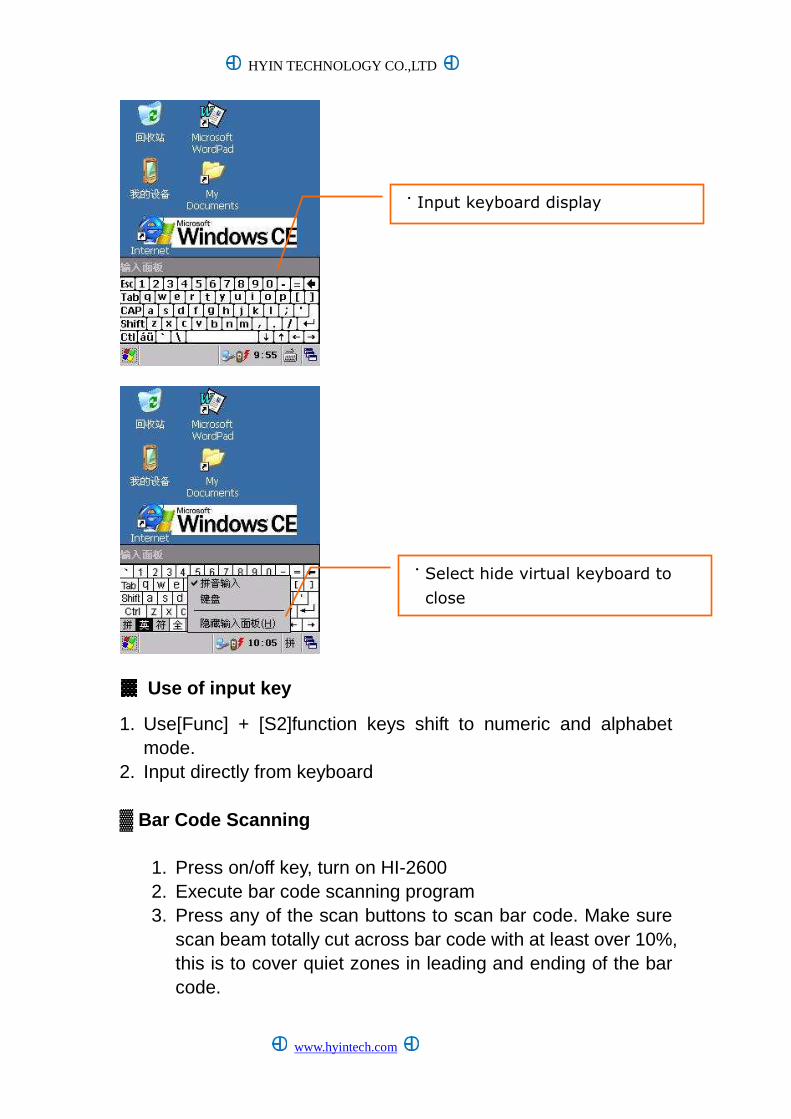
▓▓▓▓ Use of input key
1. Use[Func] + [S2]function keys shift to numeric and alphabet mode.
2. Input directly from keyboard ▓ Bar Code Scanning
1. Press on/off key, turn on HI-2600 2. Execute bar code scanning program 3. Press any of the scan buttons to scan bar code. Make sure
scan beam totally cut across bar code with at least over 10%, this is to cover quiet zones in leading and ending of the bar code.
˙Select hide virtual keyboard to
close
˙Input keyboard display
HYIN TECHNOLOGY CO.,LTD
www.hyintech.com
▓ Connects to PC
1. Install Microsoft ActiveSync first in PC(Can download from Microsoft website).
2. Setup in HI-2600: Select Start/Setup/ Control Panel/ PC Connect/ Change connection, select USB Socket Default.
HYIN TECHNOLOGY CO.,LTD
www.hyintech.com
▓ Reset
In normal condition, you do not need to press “Reset” button, However, when you encounter situation of no response from touch screen, then you should press “Reset” and resume the HI-2600 to normal operation. ▓ Soft Reset Soft Reset(Software reset) make HI-2600 stop execute current process, and restart HI-2600. All data and program in working memory will be lost. Execute method: Use stylus tip press into “Reset” button. ▓ Hard Reset Hard Reset(hardware reset) will make HI-2600 force shutdown and clean up the current process and data stored in the working memory. Execute method: press and hold on/off key, at the same time use Stylus tip press “Reset” key. ▓ Note about Battery Usage Because the files and information are stored in RAM (Random Access Internal Memory), therefore retain the battery at functional level is very important. If you operate until the battery is depleted, your data information will be lost. Although the O.S. and internal programs will not be erased, however, add on program and special setup will be lost. In normal situation, HI-2600 can operate 8 hours after complete charge. When power drop below minimum power threshold, it be appear lack of power (insufficient main battery) signal, you should immediately response to this warning by backup data to the host computer in order to avoid data lost. If you turn off HI-2600, data can retain for 3 days.
HYIN TECHNOLOGY CO.,LTD
www.hyintech.com
When connect HI-2600 to power adapter, HI-2600 will automatically charge up main battery. Therefore, when encounter low battery, the scanning led will appear flash green light, in such situation you should connect power adapter immediately. When you connect HI-2600 power adapter, scanning led will show the charging status:
• Red light indicate currently charging • Green light indicate fully charged
HYIN TECHNOLOGY CO.,LTD
www.hyintech.com
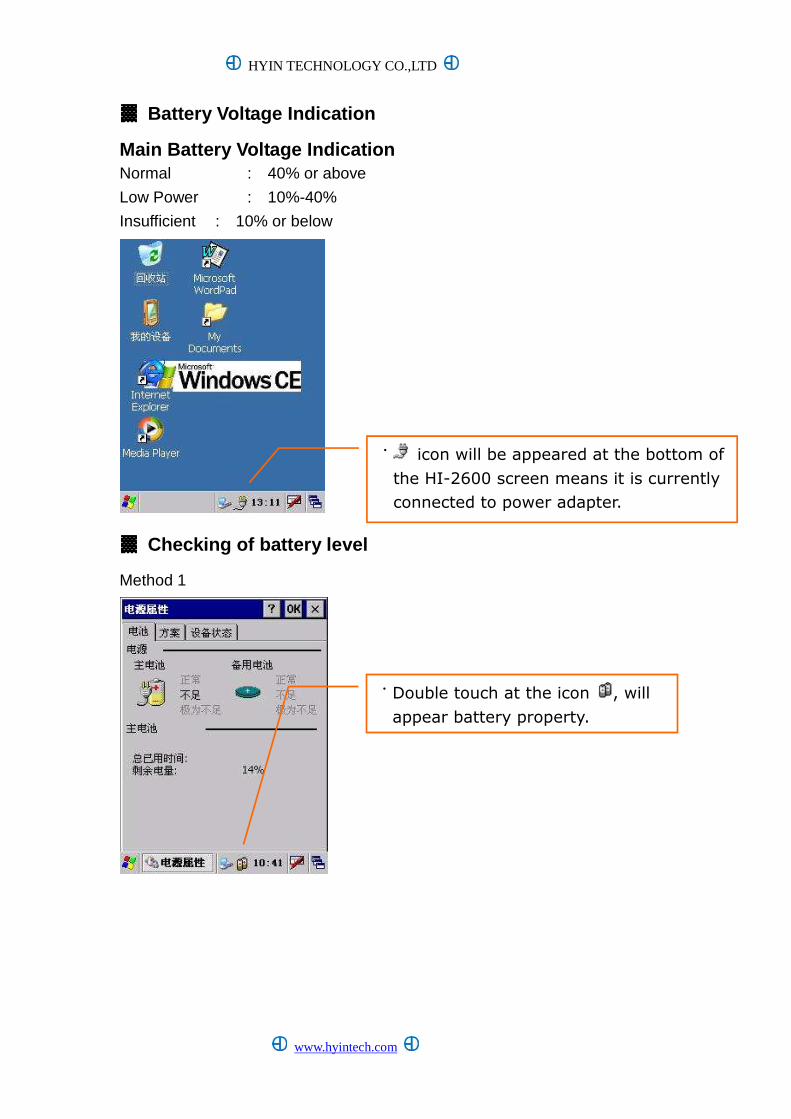
▓▓▓▓ Battery Voltage Indication
Main Battery Voltage Indication Normal : 40% or above
Low Power : 10%-40%
Insufficient : 10% or below
▓▓▓▓ Checking of battery level
Method 1
˙ icon will be appeared at the bottom of
the HI-2600 screen means it is currently
connected to power adapter.
˙Double touch at the icon , will
appear battery property.
HYIN TECHNOLOGY CO.,LTD
www.hyintech.com
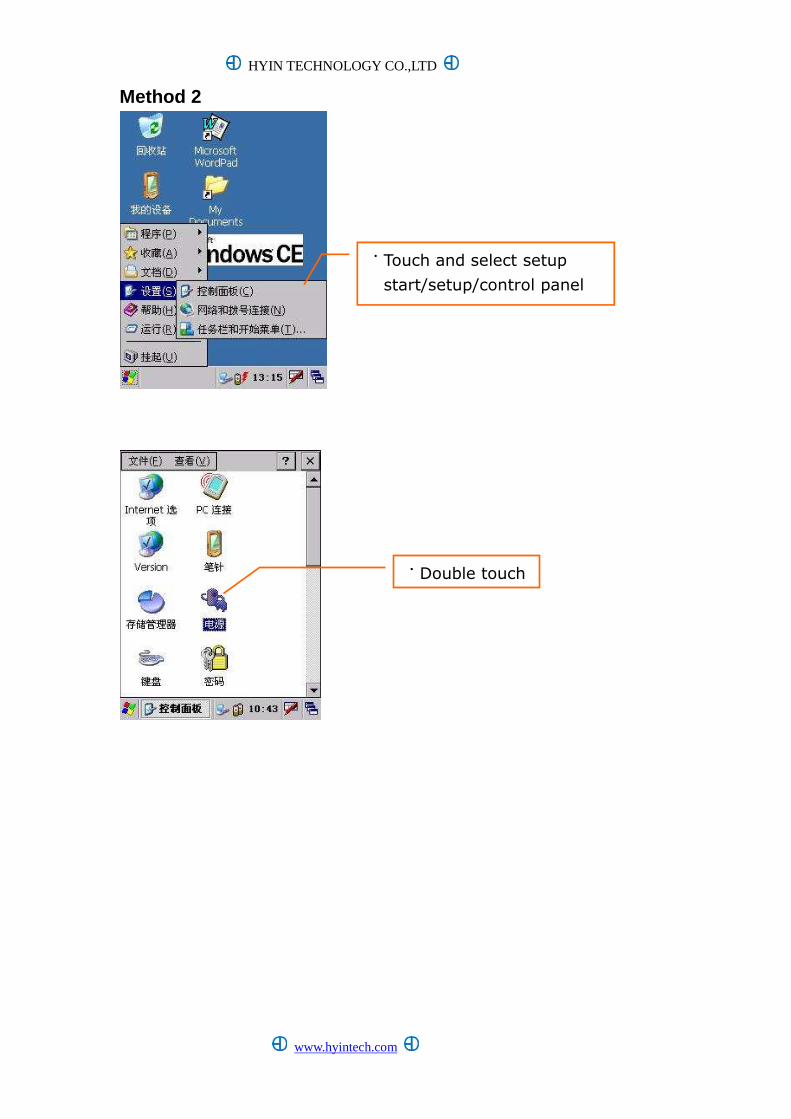
Method 2
˙Touch and select setup
start/setup/control panel
˙Double touch
HYIN TECHNOLOGY CO.,LTD
www.hyintech.com
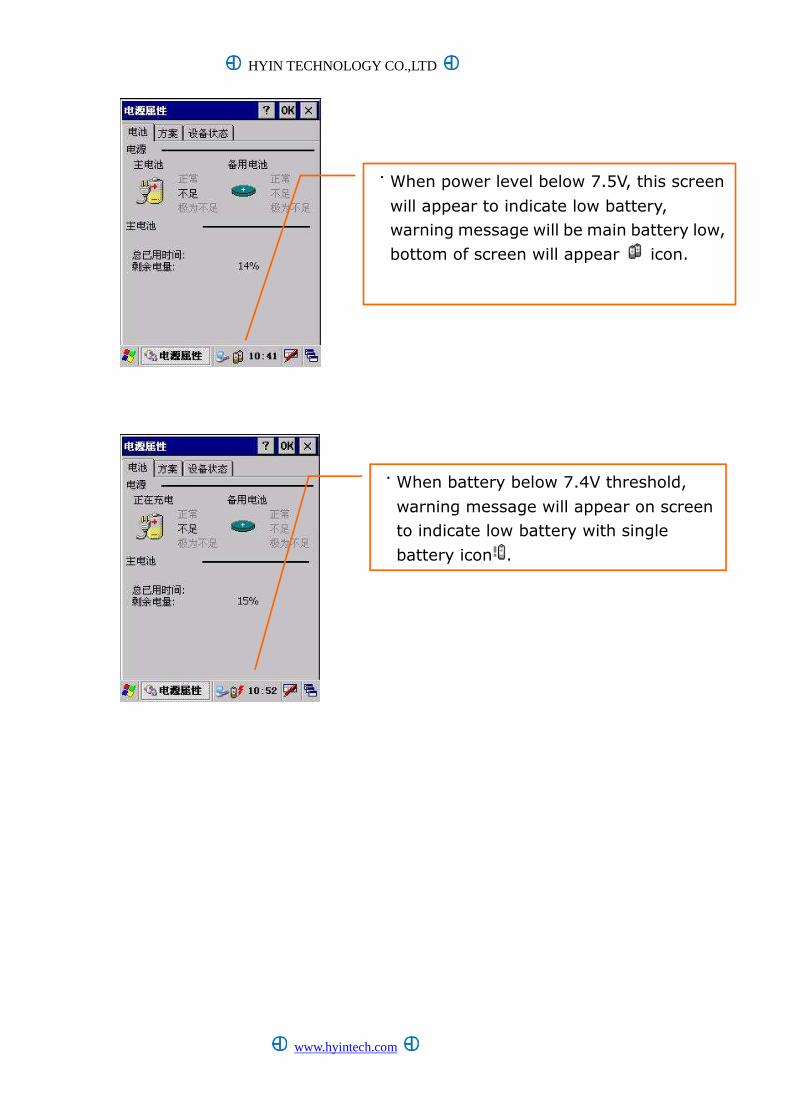
˙When battery below 7.4V threshold,
warning message will appear on screen
to indicate low battery with single
battery icon .
˙When power level below 7.5V, this screen
will appear to indicate low battery,
warning message will be main battery low,
bottom of screen will appear icon.
HYIN TECHNOLOGY CO.,LTD
Chapter 4 Accessories Operations
▓ GPRS network connection setting ▓ WLAN network connection setting ▓ Bar Code Scanning
HYIN TECHNOLOGY CO.,LTD
www.hyintech.com
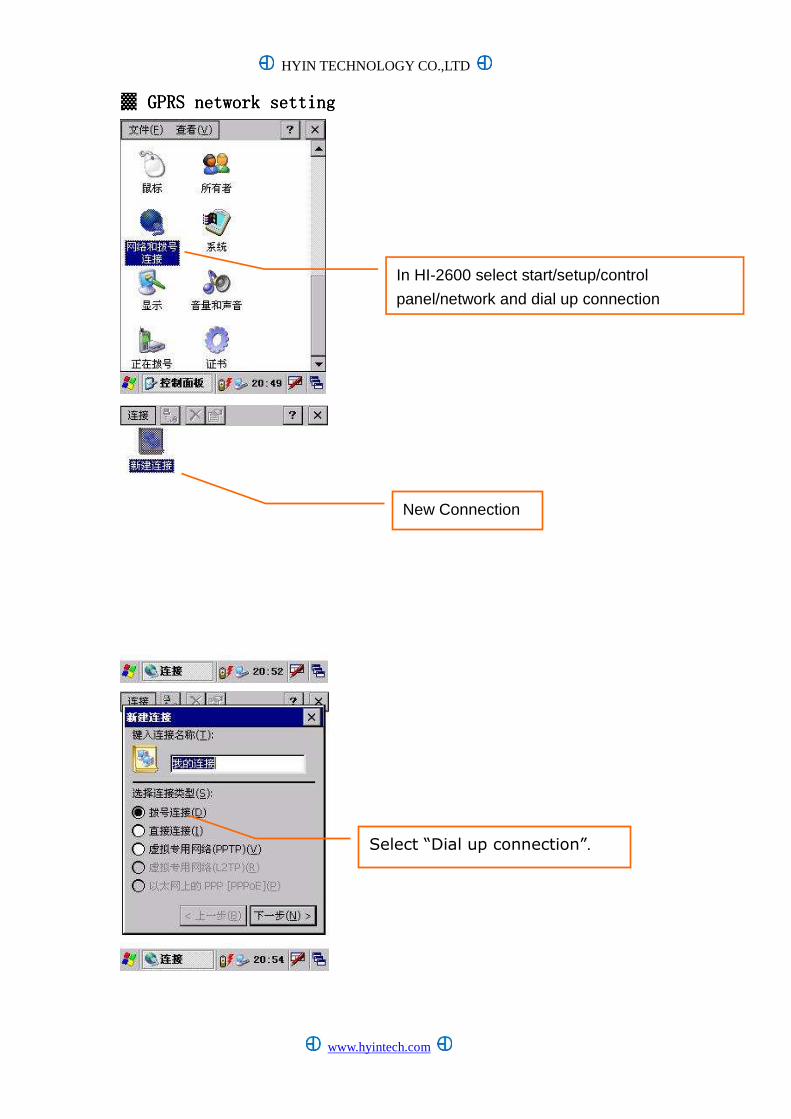
▓ GPRSGPRSGPRSGPRS network settingnetwork settingnetwork settingnetwork setting
In HI-2600 select start/setup/control
panel/network and dial up connection
New Connection
Select “Dial up connection”.

HYIN TECHNOLOGY CO.,LTD
www.hyintech.com
input name for connection
(i.e.:GPRS)
Select Modem: VCA1 ** Please select
virtual communication port 1
Select port setup for baud rate
to :115200 “8” date bit, parity
“none” and flow control “ none”
HYIN TECHNOLOGY CO.,LTD
www.hyintech.com
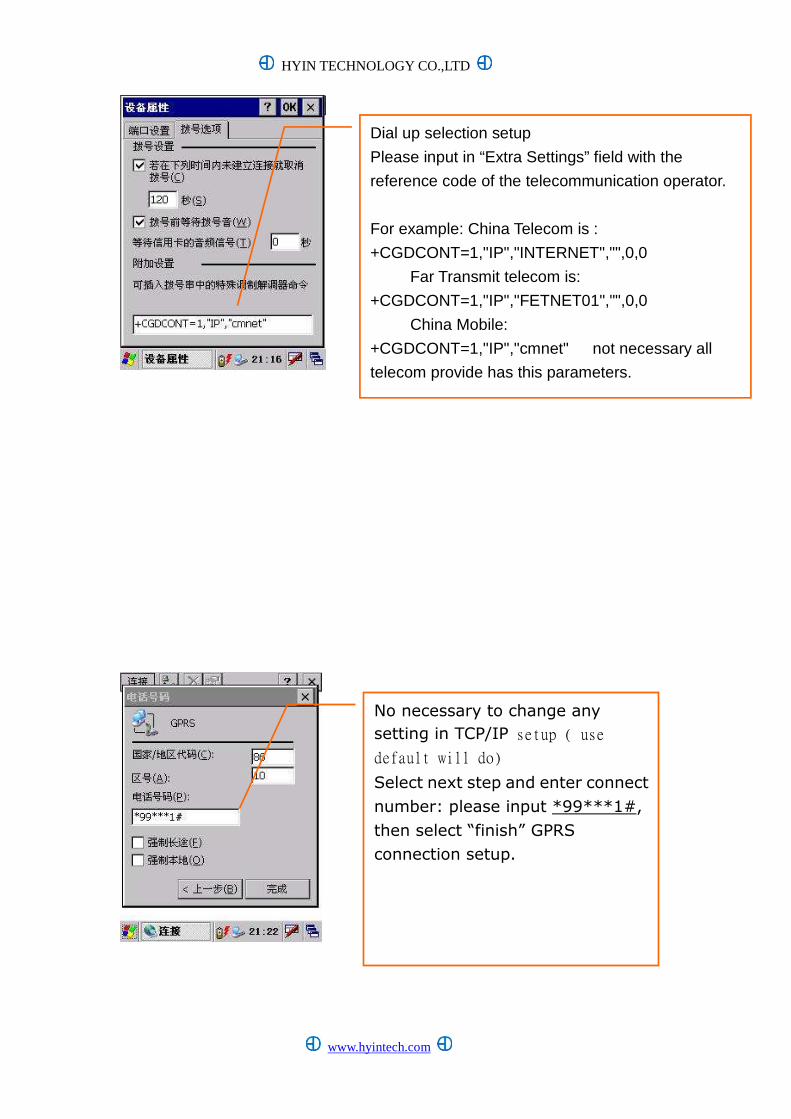
Dial up selection setup
Please input in “Extra Settings” field with the
reference code of the telecommunication operator.
For example: China Telecom is :
+CGDCONT=1,"IP","INTERNET","",0,0
Far Transmit telecom is:
+CGDCONT=1,"IP","FETNET01","",0,0
China Mobile:
+CGDCONT=1,"IP","cmnet" not necessary all
telecom provide has this parameters.
No necessary to change any
setting in TCP/IP setup ( use
default will do)
Select next step and enter connect
number: please input *99***1#,
then select “finish” GPRS
connection setup.
HYIN TECHNOLOGY CO.,LTD
www.hyintech.com
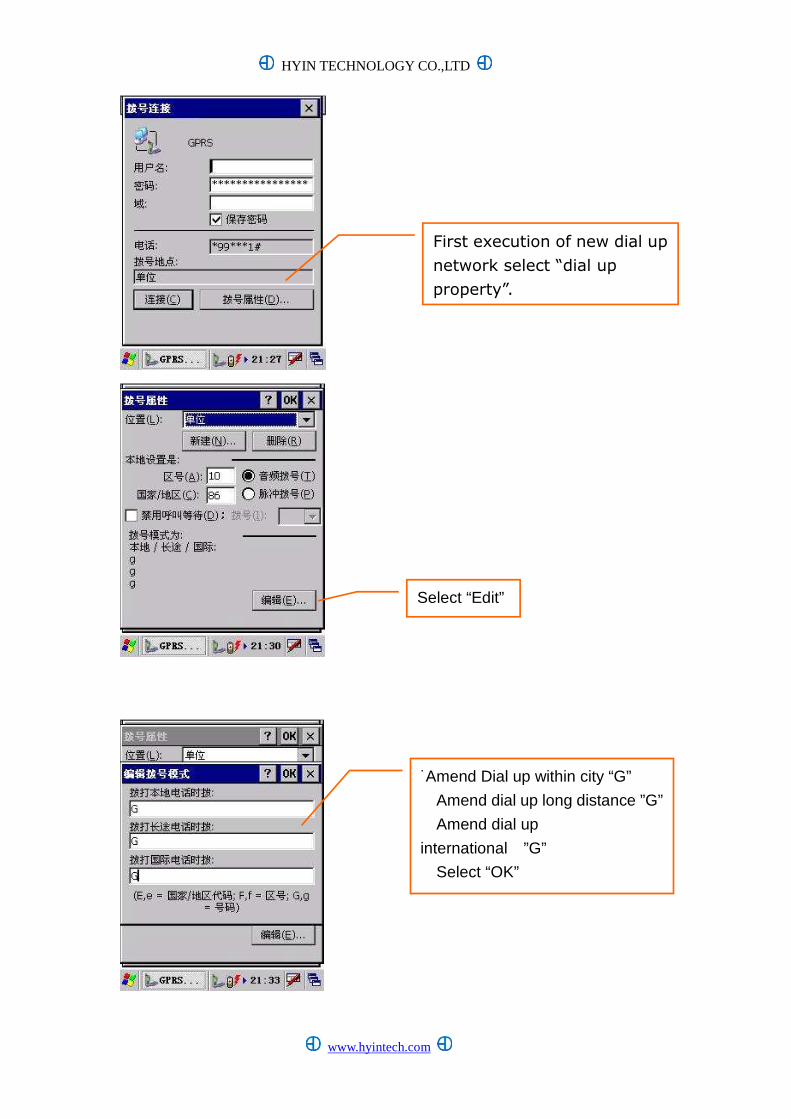
First execution of new dial up
network select “dial up
property”.
Select “Edit”
˙Amend Dial up within city “G”
Amend dial up long distance ”G”
Amend dial up
international ”G”
Select “OK”
HYIN TECHNOLOGY CO.,LTD
www.hyintech.com
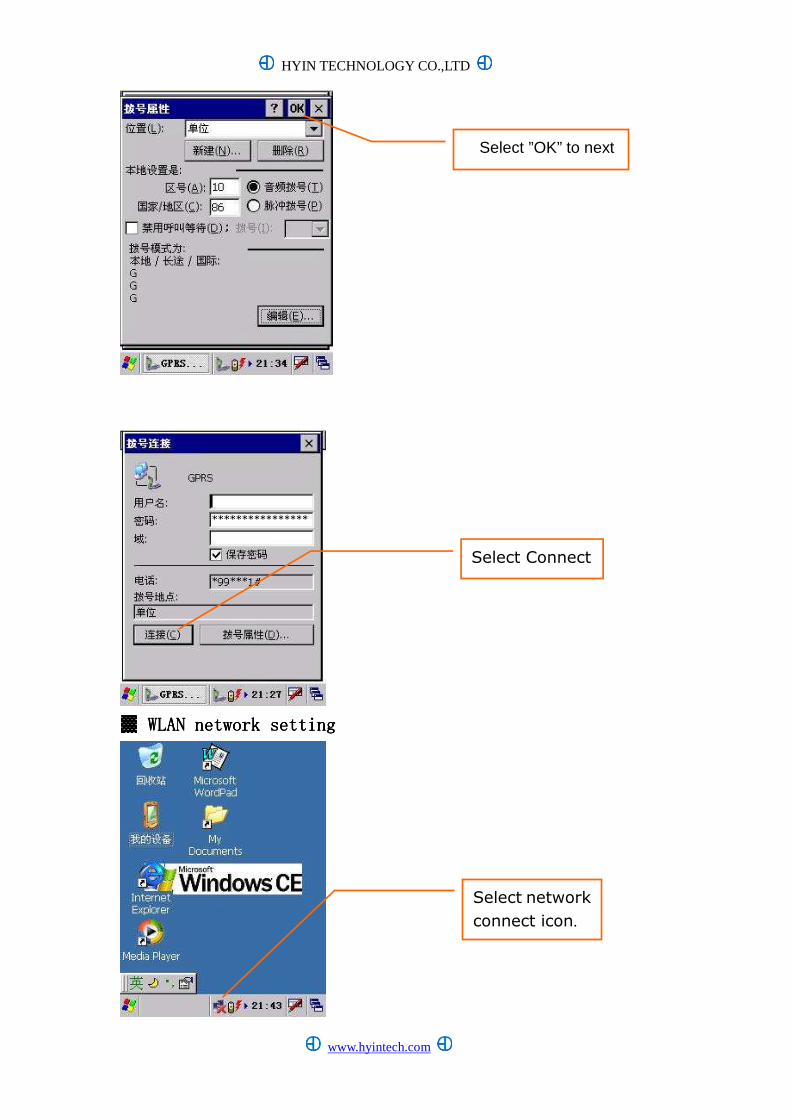
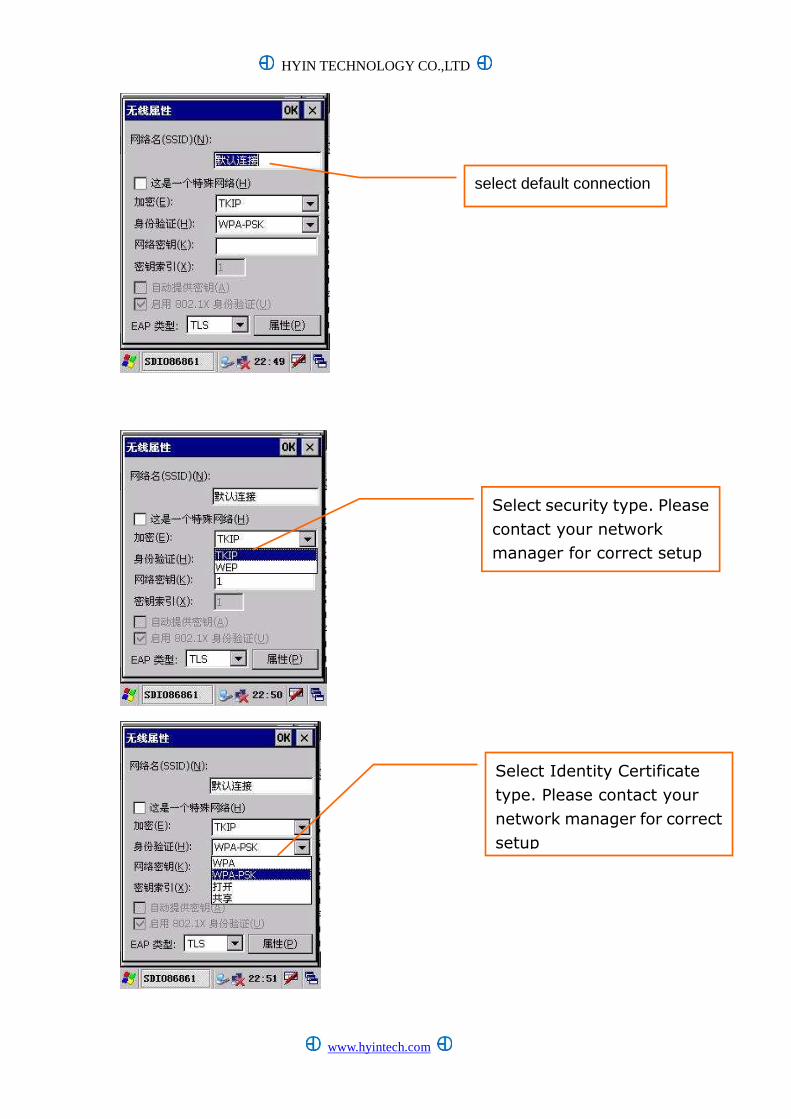
▓▓▓▓ WLANWLANWLANWLAN network settingnetwork settingnetwork settingnetwork setting
Select Connect
Select network
connect icon.
Select ”OK” to next
HYIN TECHNOLOGY CO.,LTD
www.hyintech.com
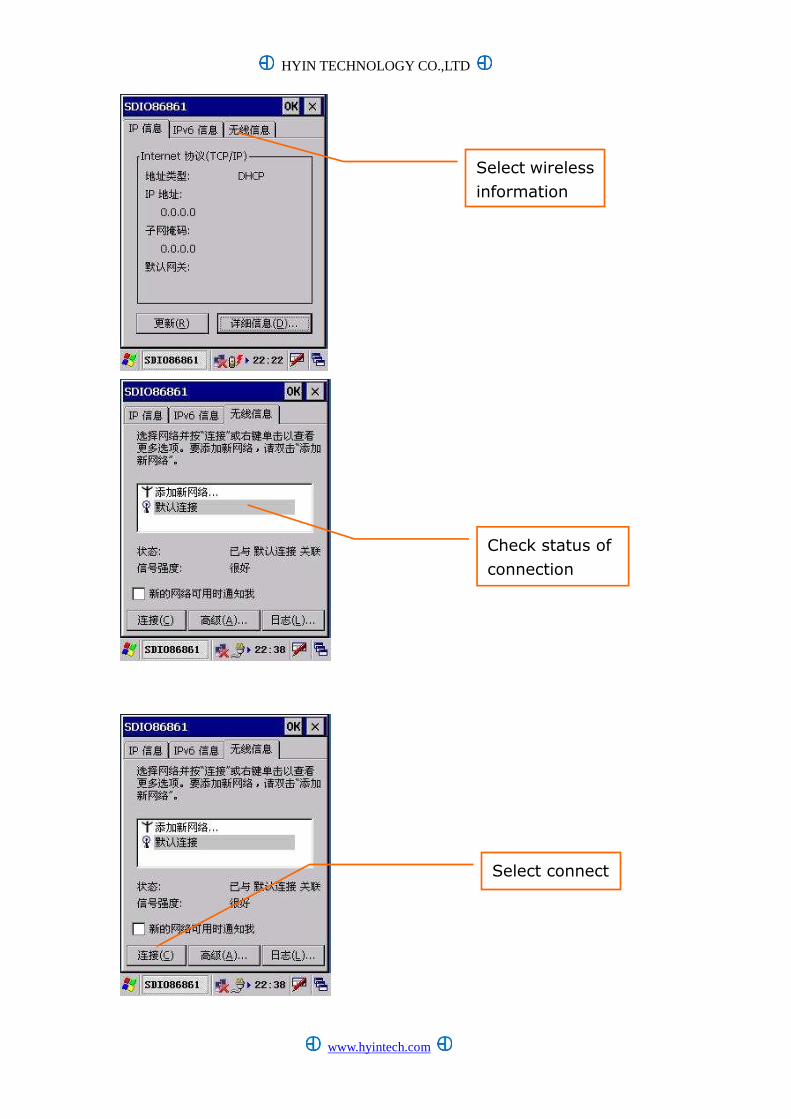
Check status of
connection
Select connect
Select wireless
information
HYIN TECHNOLOGY CO.,LTD
www.hyintech.com
Select security type. Please
contact your network
manager for correct setup
Select Identity Certificate
type. Please contact your
network manager for correct
setup
select default connection
HYIN TECHNOLOGY CO.,LTD
www.hyintech.com
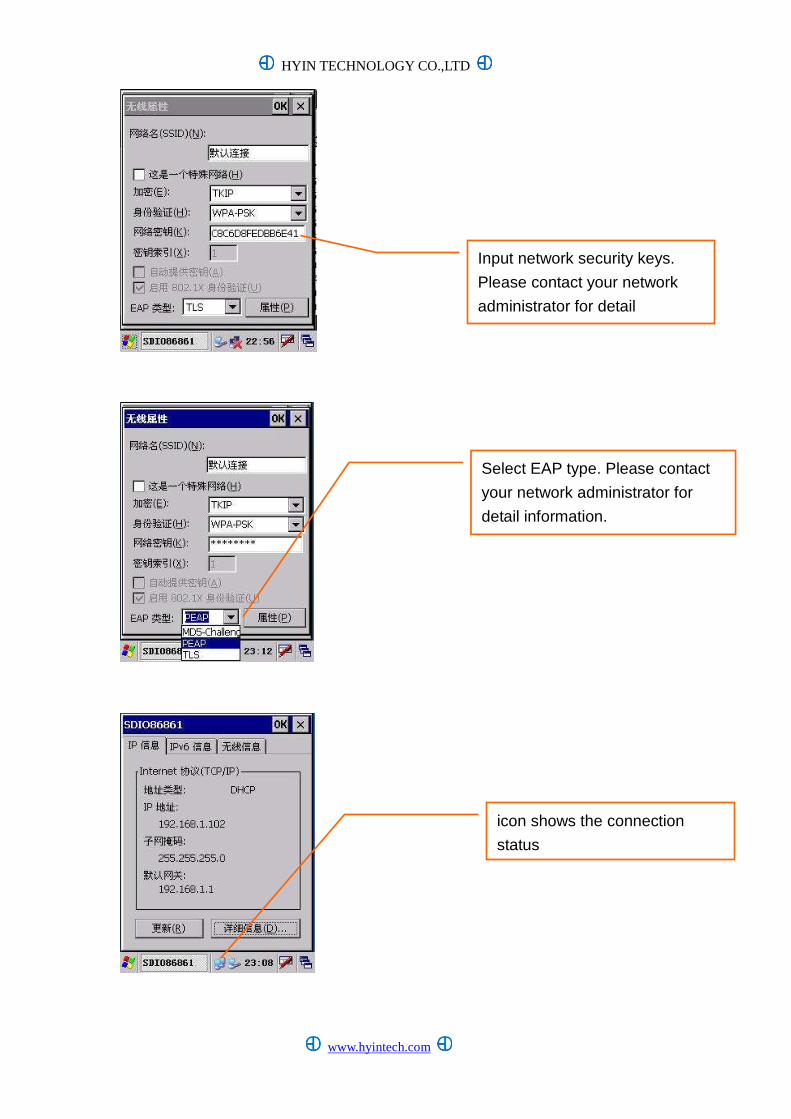
Select EAP type. Please contact
your network administrator for
detail information.
Input network security keys.
Please contact your network
administrator for detail
icon shows the connection
status
HYIN TECHNOLOGY CO.,LTD
www.hyintech.com
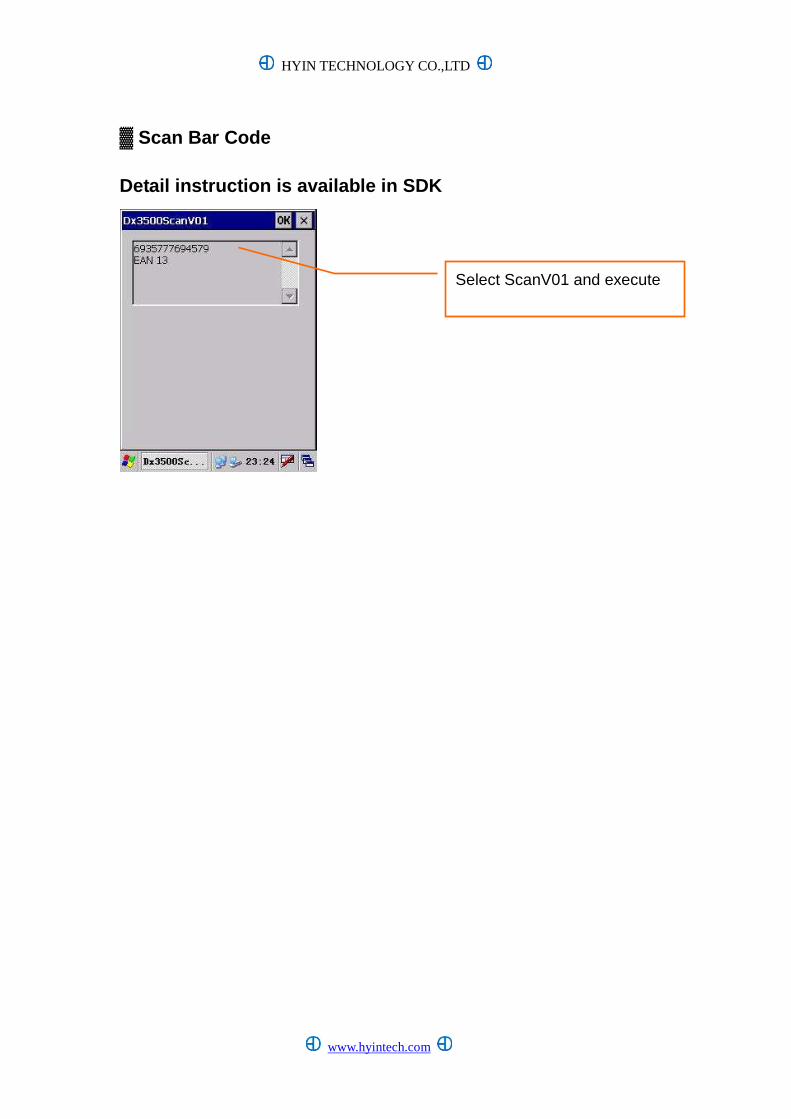
▓ Scan Bar Code Detail instruction is available in SDK
Select ScanV01 and execute
Appendix
▓ HI-2600 Series standards

Product Intrduction ::::
� Industial Level HF handheld reader;
� High capability barcode scanner.
� Combined PDA and RFID technology, with data collecting and storing features;
� WiFi,Bluetooth, and GPRS for Real-time connection
� Support Wavelink Avalanche For remote mobile devices management
� Support OAC Client for 802.1 Security
� Support T9 multilingual intellignent input method
� Industrial grade hardware design , durable and able to sustain in harsh enviroment
� Support signature capture function
� Special design be applied in industry market and hazardous environments. e.g. logistic
management, asset tracking, anti-fake etc ;
Specification:
HF Reader
Supported protocal:
ISO/IEC 14443A/B ISO/IEC 15693; Mifare One S50,S70, UltraLight,PRO;
AT88RF020 66CL160S ;
Frequency:13.56MHz
Bound Rate:9600-115200 bit/s
Operation Distance:0--8cm
Support:
SR176;SRIX4K(TYPE-B);I-Code2;TI RFID Tag-it HF-I,EM4135,EM4034 etc.
Working temperature:-10 degree ~ +40 degree
Storage Temperature:-20 degree~ +70 degree
Barcode Scanner Optical Definition:0.004 inch(smallest width)
Frequency: 100 time per second(bi- direction)
scanning distance :10~78cn
Sunlight: 8,000 ft. candles (86,112Lux)
artifical light:450 ft. candles (4,844Lux)
anti-shake:2,000 +/- 5% G
supported barcode style:
UPC-A,UPC-E, EAN-13,/JAN-13, EAN-8/JAN-8, CODE 39, CODE 128,
CODABAR/NW7,Interleave 2/5, Industrial 2/5, Matrix 2/5, CODE 93, CODE 11,
China Postage, MSI/PLESSEY.
Physical Characteristics
Size:190x90x25mm
Wight:400g 〔with standard battery〕
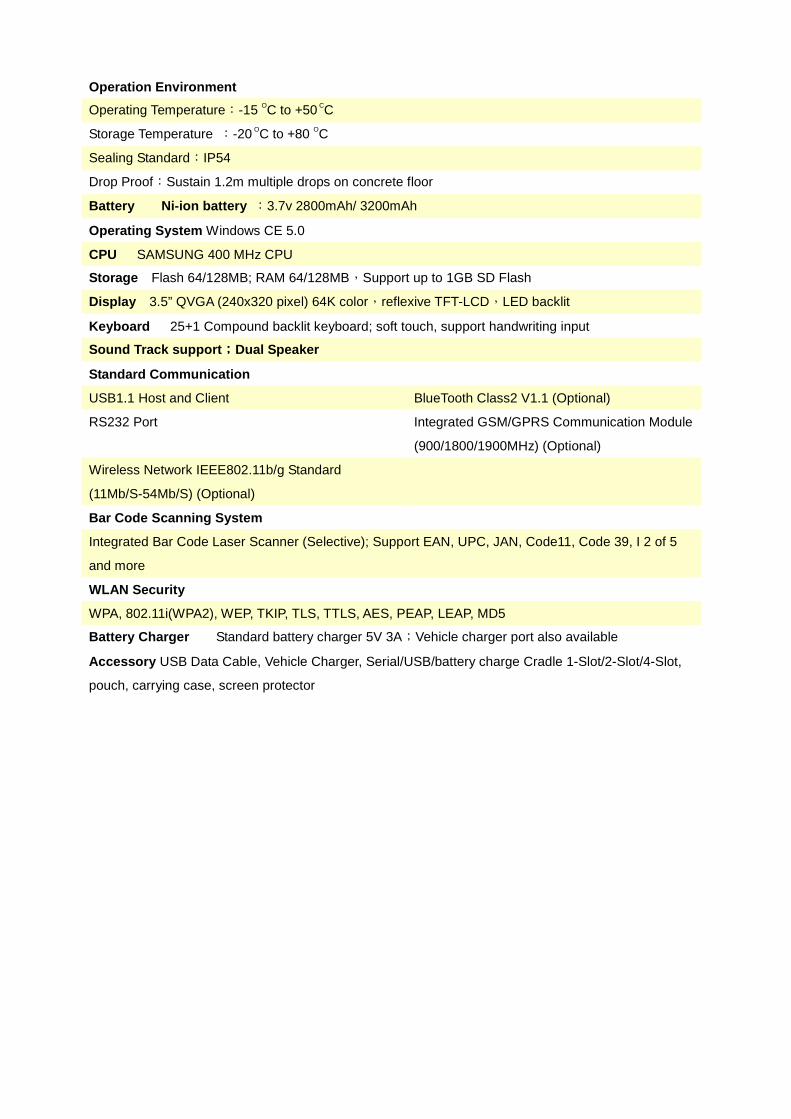
Operation Environment
Operating Temperature:-15 OC to +50 CC
Storage Temperature :-20 OC to +80 OC
Sealing Standard:IP54
Drop Proof:Sustain 1.2m multiple drops on concrete floor
Battery Ni-ion battery :3.7v 2800mAh/ 3200mAh
Operating System Windows CE 5.0
CPU SAMSUNG 400 MHz CPU
Storage Flash 64/128MB; RAM 64/128MB,Support up to 1GB SD Flash
Display 3.5” QVGA (240x320 pixel) 64K color,reflexive TFT-LCD,LED backlit
Keyboard 25+1 Compound backlit keyboard; soft touch, support handwriting input
Sound Track support ;;;;Dual Speaker
Standard Communication
USB1.1 Host and Client BlueTooth Class2 V1.1 (Optional)
RS232 Port Integrated GSM/GPRS Communication Module
(900/1800/1900MHz) (Optional)
Wireless Network IEEE802.11b/g Standard
(11Mb/S-54Mb/S) (Optional)
Bar Code Scanning System
Integrated Bar Code Laser Scanner (Selective); Support EAN, UPC, JAN, Code11, Code 39, I 2 of 5
and more
WLAN Security
WPA, 802.11i(WPA2), WEP, TKIP, TLS, TTLS, AES, PEAP, LEAP, MD5
Battery Charger Standard battery charger 5V 3A;Vehicle charger port also available
Accessory USB Data Cable, Vehicle Charger, Serial/USB/battery charge Cradle 1-Slot/2-Slot/4-Slot,
pouch, carrying case, screen protector
Recommended