INSTALLATION INSTRUCTIONS
© 2019 SuperATV.com. All Rights Reserved. Rev IN-DOOR-Y-ViK-001 6/22/2020
Thank You For Choosing
2753 Michigan Road • Madison, Indiana 47250 • 855-743-3427Full Doors: for Yamaha Viking
Need help with your installation?
www.superatv.com
8:00am - 8:00pm EST M-Th8:00am - 7:00pm EST Friday9:00am - 2:00pm EST Saturday
1-855-743-3427
Read instructions and view illustrations before beginning.
Liability StatementSuperATV’s® products are designed to best fit user’s ATV/UTV under stock conditions. Adding, modifying, or fabricating any factory or aftermarket parts will void any warranty provided by SuperATV® and is not recommended. SuperATV’s® products could interfere with other aftermarket accessories. If user has aftermarket products on machine, contact SuperATV® to verify that they will work together.Although SuperATV® has thousands of satisfied customers, user should be aware that installing lift kits, long travel, or suspension kits, tires, etc. will change the ride of machine and may increase maintenance and part wear. Operating any off-road machine while, or after, consuming alcohol and/or drugs increases risk of bodily harm or death. No warranty or representation is made as to this product’s ability to protect user from severe injury or death. SuperATV® urges operators and occupants to wear a helmet and appropriate riding gear at all times.By purchasing and installing SuperATV® products, user agrees that should damages occur, SuperATV® will not be held responsible for loss of time, use, labor fees, replacement parts, or freight charges. SuperATV®, nor any 3rd party, will not be held responsible for any direct, indirect, incidental, special, or consequential damages that result from any product purchased from SuperATV®. The total liability of seller to user for all damages, losses, and causes of action, if any, shall not exceed the total purchase price paid for the product that gave rise to the claim.SuperATV® will warranty only parts provided by SuperATV®. Any damage or problems with OEM housings, bearings, seals, or other manufacturers’ products will not be covered by SuperATV®. SuperATV® parts and products are not warrantied if item was not installed properly, misused, or modified.Installing, adding, modifying, or fabricating any factory or aftermarket product to your ATV/UTV may violate certain local, state, and federal laws. Be advised that laws vary depending on town, city, county, state, etc. Use of certain products on public streets, roads, or highways may be in violation law. The Buyer is solely and exclusively legally and personally responsible for any violation of the law by the installation or use of the product. You must abide by all local, state, and federal laws, including but not limited to vehicle safety, traffic laws, and ordinances. It is your responsibility to know the laws and how they apply to you. The Buyer is responsible to fully understand the capability and limitations of his/her vehicle according to manufacturer specifications, warnings and instructions and agrees to hold SuperATV® harmless from any damage resulting from failure to adhere to such specifications, warnings and/ or instructions. The Buyer is also responsible to obey all applicable federal, state, and local laws and ordinances when operating his/her vehicle while using this product, and the Buyer agrees to hold SuperATV® harmless from any violation thereof.
- Do not tighten any hardware completely unless noted.- Passenger side installation shown.
make sure door handles are unlocked before installing
Door Cleaning:- Do not use Rain-X®, Plexus® or any other protector, wax, or polish.- Donotusewindowcleaningfluids(Windex,409,etc)oranysolvents(gasoline,denaturedalcohol,acetone,etc).- Never use abrasive cleaners, abrasive pads, or gritty cloths.- Never use razor blades, scrapers, squeegees, brushes, etc.1. ThoroughlyrinseDoorstofloatoffdirtandmud.2. Usingasoftcloth,ormicrofibercloth,cleanDoorswithwarmwaterandagentledetergent.Babyshampoo,rubbing
alcohol, or hand washing soap can also be used.3. To prevent water spots, use a chamois to blot Doors dry.

IN-D
OO
R-Y
-ViK
-001
2
A
B
J
K
Item
Des
crip
tion
FRightBracket
GRightStriker
HLeftStriker
JClampx4
KG
as S
trut x
2M
Left
Supp
ort
PLe
ft H
inge
Ass
embl
yR
Rig
ht L
ower
Doo
rT
Rig
ht H
inge
Mou
nt
Item
Des
crip
tion
ALe
ft U
pper
Doo
rB
Rig
ht U
pper
Doo
rC
Left
Mal
e H
inge
DR
ight
Mal
e H
inge
ELeftBracket
LR
ight
Sup
port
NR
ight
Hin
ge A
ssem
bly
QLe
ft Lo
wer
Doo
rS
Left
Hin
ge M
ount
UTu
be C
lam
p x
2
RQ
U
E
F
CD
GH
L
M
PN
ST
Foam
Mirr
ors

IN-DOOR-Y-ViK-001 3
-RemovestockDoors.
(passenger side)
(remove stock hardware)
M6 x 20mm
M6 Washer
2 each
M10 Nut
2 each
M10 x 60mm- InstallRightBracket(F)andRightStriker(G)withhardwareshown.
F
G

IN-DOOR-Y-ViK-001 4
- InstallTubeClamp(U)aroundCageinlocationshown;donottightenhardware.-PlaceRightSupport(L)inlocationshown.
U L
if plastic is present, pull away from Frame when installing Tube Clamp (U)
IN-DOOR-Y-ViK-001 5
Foam
Foam
Foam
J
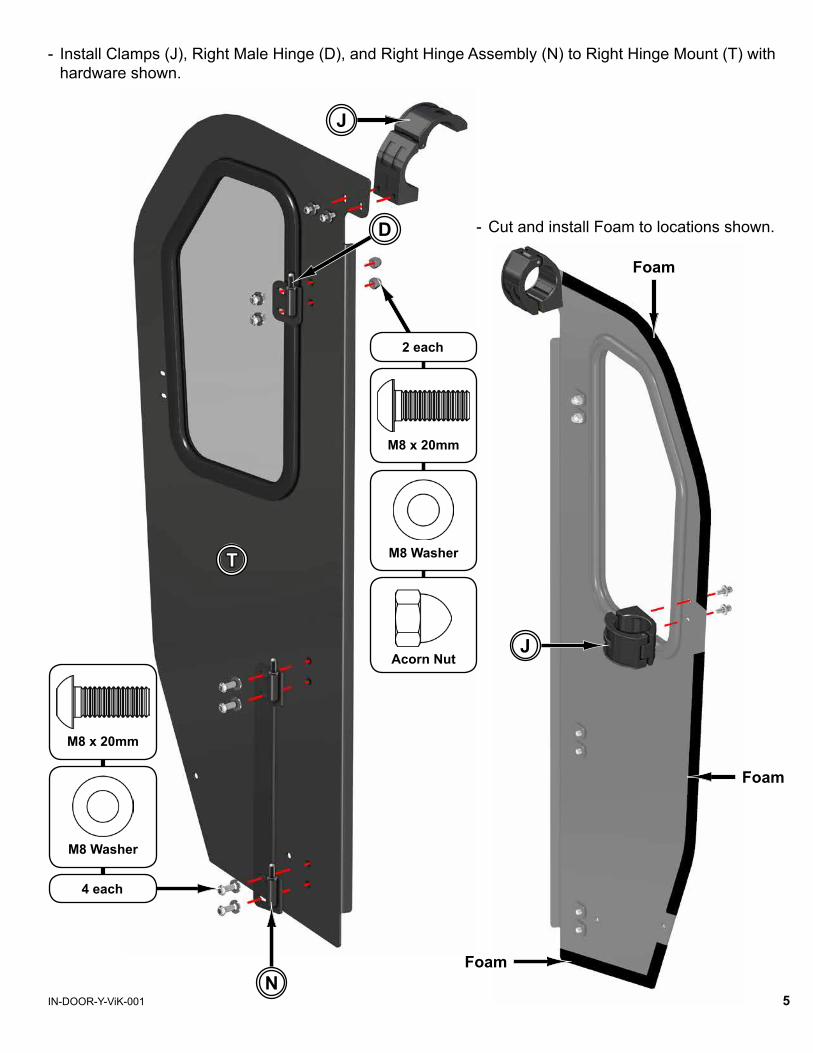
- InstallClamps(J),RightMaleHinge(D),andRightHingeAssembly(N)toRightHingeMount(T)withhardware shown.
J
D
N
4 each
2 each
Acorn Nut
M8 x 20mm
M8 x 20mm
M8 WasherT
M8 Washer
- Cut and install Foam to locations shown.

IN-DOOR-Y-ViK-001 6
Foam
-SecureRightHingeMount(T)topreviouslyinstalledTubeClamp(U)andRightSupport(L)with hardware shown.
-SecureClamps(J)aroundCage;usepreviouslyremovedClamps(J)hardware.- Install Foam to location shown.
UL
J
M8 Washer
M8 x 14mm
M8 x 25mm
M8 Washer
J

IN-DOOR-Y-ViK-001 7
M6 Nut
M6 x 50mm
3 each
B
R
- JoinRightUpperDoor(B)andRightLowerDoor(R)withhardwareshown.Tightenhardwarecompletely.

IN-DOOR-Y-ViK-001 8
-HangDooronRightHingeAssembly(N)andRightMaleHinge(D).
- Close Door and engage Latch.- Align to machine and tighten all hardware completely;seefollowingpage.
Latch

IN-DOOR-Y-ViK-001 9
(Passenger Side)
startwithrearmostlocationsandworktowards front when adjusting Door
(whenadjusting,usehighlightedbolts)

IN-DOOR-Y-ViK-001 10
Mount
hardware
hardware
Mirror
- Remove installed Mounts on Mirrors. Discard Mount and hardware.- Install Mirrors to Doors with hardware shown.
M5 Nut
2 each
M5 x 20mm
M8 Jam NutM8 Nut
K
- Repeat steps for opposite side.
- InstallGasStrut(K)toDoorandClamp(J)withhardwareshown.

IN-DOOR-Y-ViK-001 11
do not loosen
- Mirror is spring loaded and can also be adjusted here.- Ball will allow adjustment in various directions.
Ball
slots shown control front-to-back Mirror rotation

IN-DOOR-Y-ViK-001 12
Foam Foam
(driver side)
(driver side)
Roof
- Remove Roof hardware shown.- Reinstall after Foam has been installed.
- Install Foam to Cage in locations shown.
remove hardware
Recommended