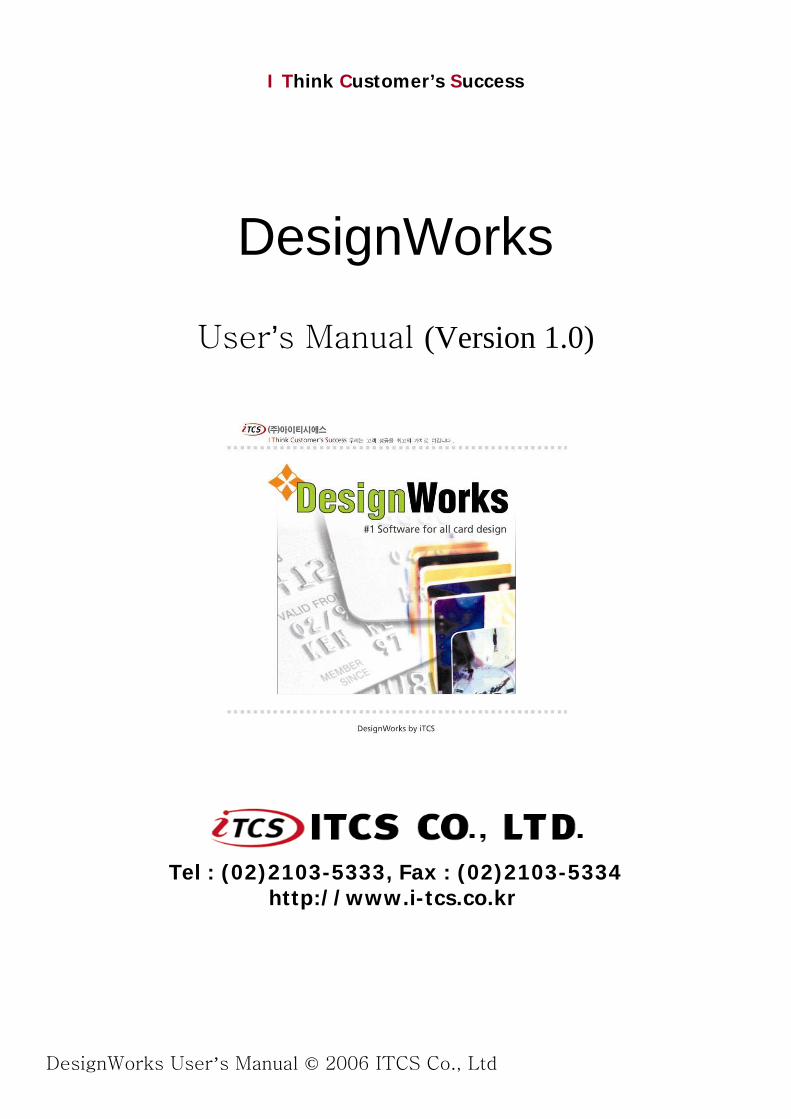
DesignWorks
User’s Manual (Version 1.0)
Tel : (02)2103-5333, Fax : (02)2103-5334http://www.i-tcs.co.kr
I Think Customer’s Success
DesignWorks User’s Manual © 2006 ITCS Co., Ltd

1
This manual should not be duplicated without agreement by ITCS.
The contents of this manual could be changed without any information and ITCS’s not responsible for the damage from that.
2
CONTENTS
Before the beginning
1. DesignWorks Environment ----------------------------------------------------------------------- 3
2. Installation ----------------------------------------------------------------------- 4
3. DesignWorks synopsis ----------------------------------------------------------------------- 7
제 1장 DesignWorks Use
1. Start ----------------------------------------------------------------------- 9
2. File menu ----------------------------------------------------------------------- 10
3. Edit menu ----------------------------------------------------------------------- 16
4. View menu ----------------------------------------------------------------------- 17
5. Object menu ----------------------------------------------------------------------- 19
6. Effect menu ----------------------------------------------------------------------- 22
7. Option menu ----------------------------------------------------------------------- 24
제 2장 DesignWorks With DataBase (DBWorks)
1. Field connection ----------------------------------------------------------------------- 29
2. DBWorks start ----------------------------------------------------------------------- 30
3. DB making ----------------------------------------------------------------------- 32
4. File menu ----------------------------------------------------------------------- 33
5. Edit menu ----------------------------------------------------------------------- 34
6. View menu ----------------------------------------------------------------------- 35
7. Image menu ----------------------------------------------------------------------- 36
Digital Watermarking ------------------------------------------------------- 26
3
Before the beginning
All fonts Installed on OSAll fonts Installed on OSText
Windows 85/98/2000/NTWindows 85/98/2000/NTOS
Parallel portParallel portPrinter Port
103/106 Key103/106 KeyKey Board
IBM PS/2IBM PS/2Mouse
Video Memory 32MB overVideo Memory 16MB overVGA
128 MB over64 MB overRAM
8 GB over4 GB overHard Disk
PENTIUM III overPENTIUM II overCPU
Recommend specificationBasic specification구분
Tel : (02)584-0115 Fax : (02)584-0145http://www.i-tcs.co.kr
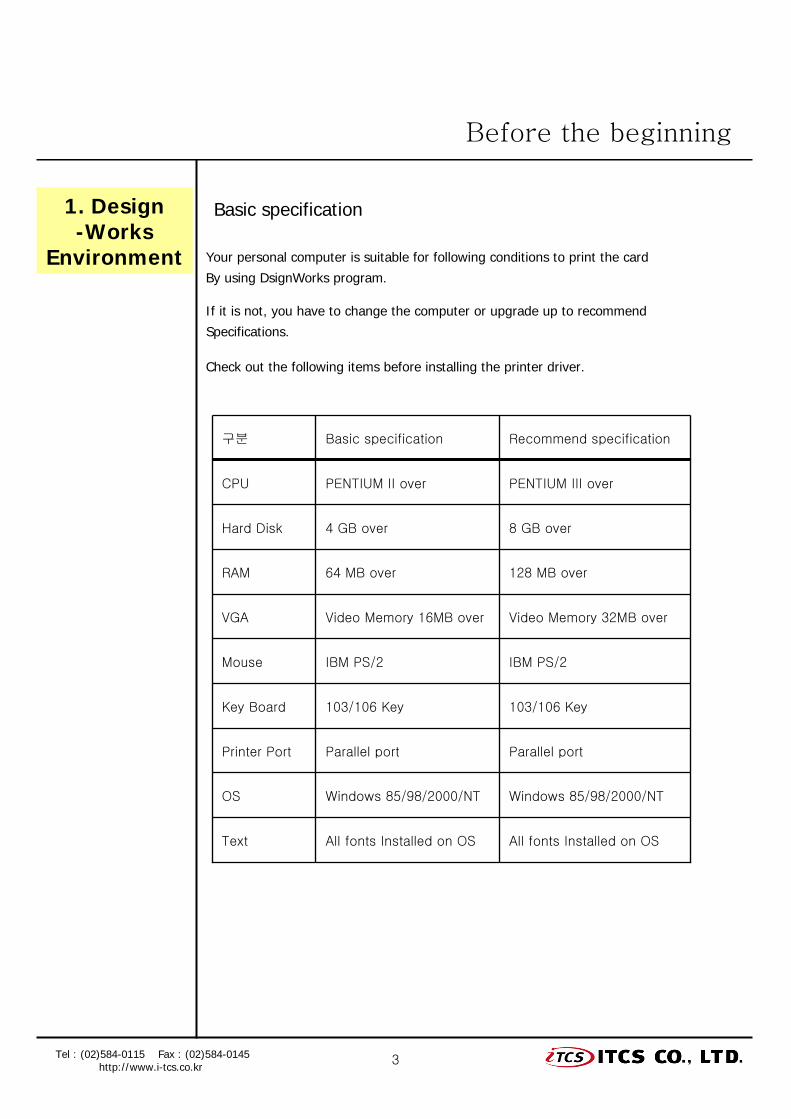
1. Design-Works
Environment
Basic specification
Your personal computer is suitable for following conditions to print the card
By using DsignWorks program.
If it is not, you have to change the computer or upgrade up to recommend
Specifications.
Check out the following items before installing the printer driver.

4
Before the beginning
2. Installation To install the DesignWorks.Double-click "setup.exe" from the supplied CD or downloaded file.
Input user's information.1. Name2. Company3. Number : There is Serial Number in CD case
Tel : (02)584-0115 Fax : (02)584-0145http://www.i-tcs.co.kr
In the popup window, click “N” button.
5
Before the beginning
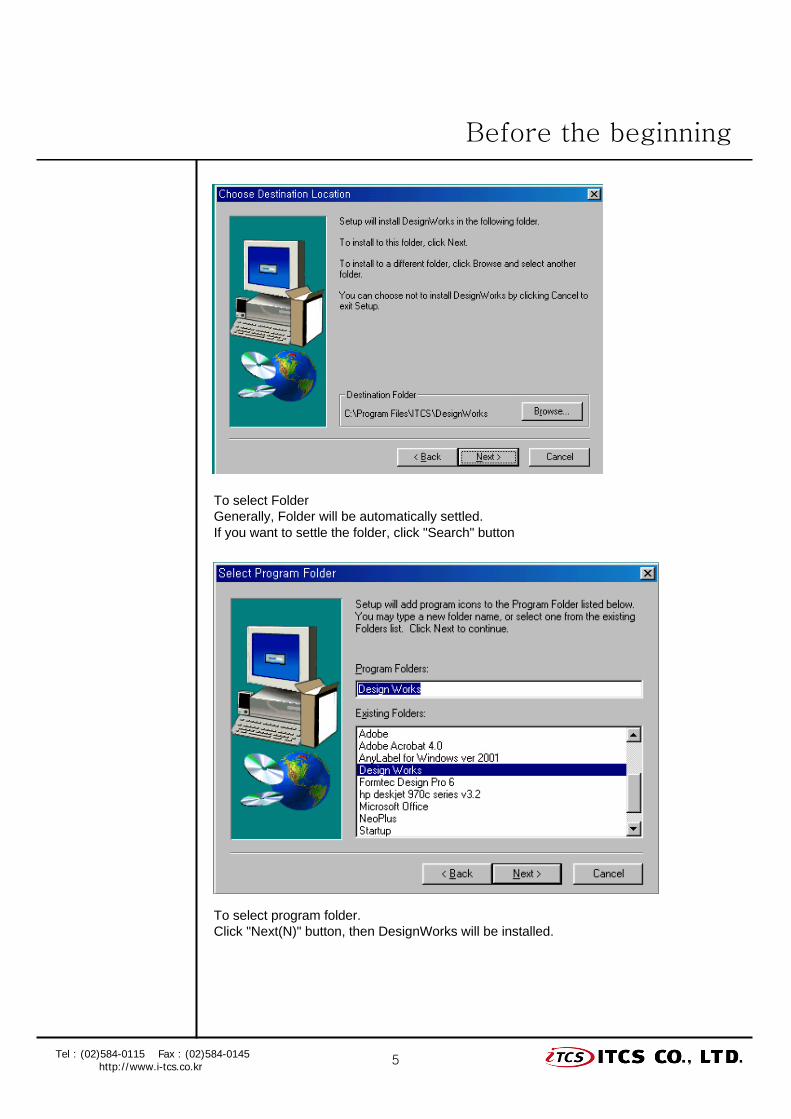
To select FolderGenerally, Folder will be automatically settled.If you want to settle the folder, click "Search" button
To select program folder. Click "Next(N)" button, then DesignWorks will be installed.
Tel : (02)584-0115 Fax : (02)584-0145http://www.i-tcs.co.kr
6
Before the beginning
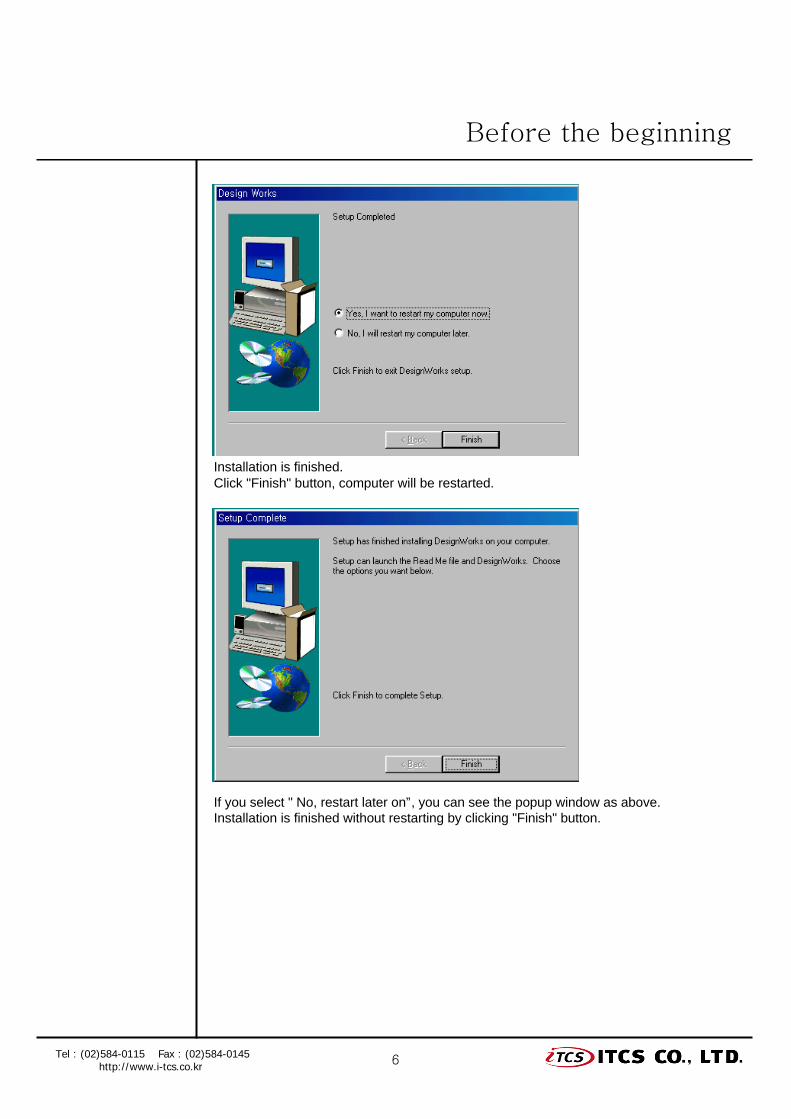
Installation is finished.Click "Finish" button, computer will be restarted.
If you select " No, restart later on”, you can see the popup window as above. Installation is finished without restarting by clicking "Finish" button.
Tel : (02)584-0115 Fax : (02)584-0145http://www.i-tcs.co.kr
7
3. Synopsis ofDesignWorks
Before the beginning
DesignWorks is developed to print with any kind of Card
Printer easily and rapidly.
If you has basic knowledge for a computer, you can use it
with perfect freedom because of using GUI of Windows.
Also, DegignWorks is simple program to print on the card
but it has a various function to design the cardform with
good command.
DesignWorks helps to print the photo, image, text, and
Barcode as well as encode the Magnetic Stripe at the
same time with any user’s card printer.
DesignWorks has database in itself and supports the
function of external database connection as like Oracle,
MS SQL.
Tel : (02)584-0115 Fax : (02)584-0145http://www.i-tcs.co.kr

8
1. DesignWorks
Tel : (02)584-0115 Fax : (02)584-0145http://www.i-tcs.co.kr
9
1. DesignWorks
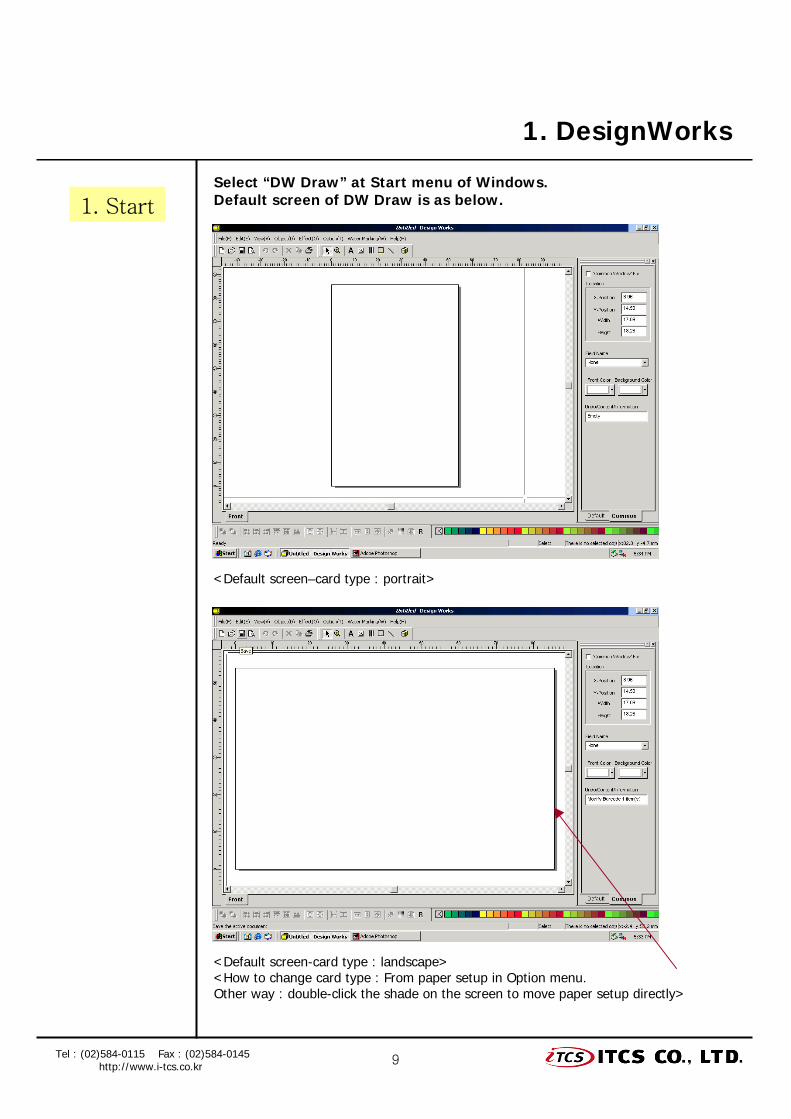
1. StartSelect “DW Draw” at Start menu of Windows.Default screen of DW Draw is as below.
<Default screen–card type : portrait>
<Default screen-card type : landscape><How to change card type : From paper setup in Option menu.Other way : double-click the shade on the screen to move paper setup directly>
Tel : (02)584-0115 Fax : (02)584-0145http://www.i-tcs.co.kr
10
1. DesignWorks
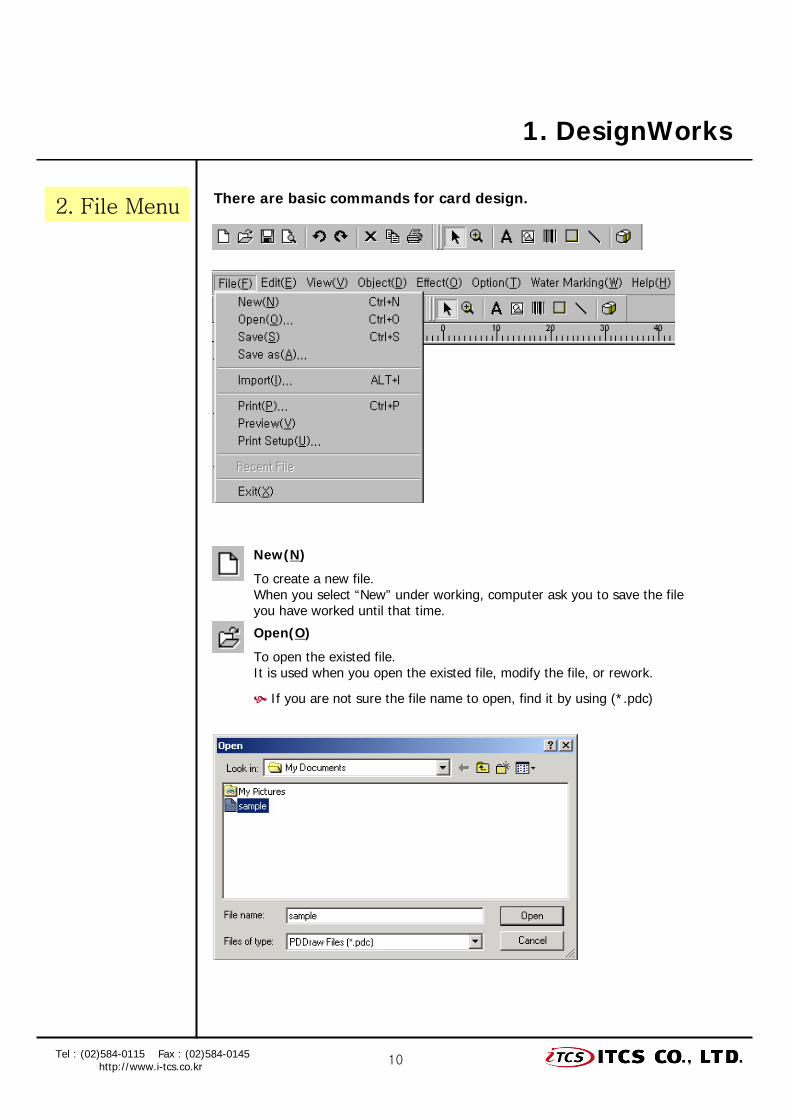
2. File Menu There are basic commands for card design.
New(N)
Open(O)
To create a new file.When you select “New” under working, computer ask you to save the fileyou have worked until that time.
To open the existed file. It is used when you open the existed file, modify the file, or rework.
If you are not sure the file name to open, find it by using (*.pdc)
Tel : (02)584-0115 Fax : (02)584-0145http://www.i-tcs.co.kr
11
1. DesignWorks
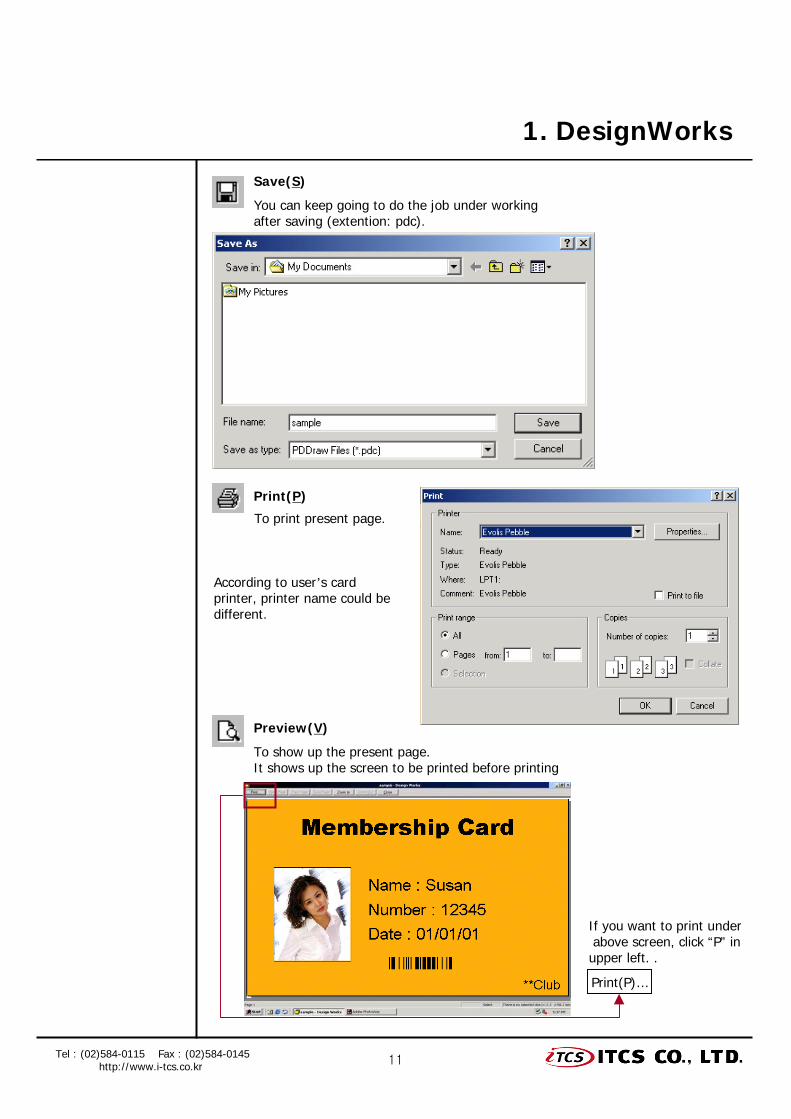
Save(S)
Preview(V)
Print(P)
You can keep going to do the job under working after saving (extention: pdc).
To show up the present page.It shows up the screen to be printed before printing
To print present page.
If you want to print underabove screen, click “P” in upper left. .
According to user’s cardprinter, printer name could be different.
Tel : (02)584-0115 Fax : (02)584-0145http://www.i-tcs.co.kr
Print(P)…
12
1. DesignWorks
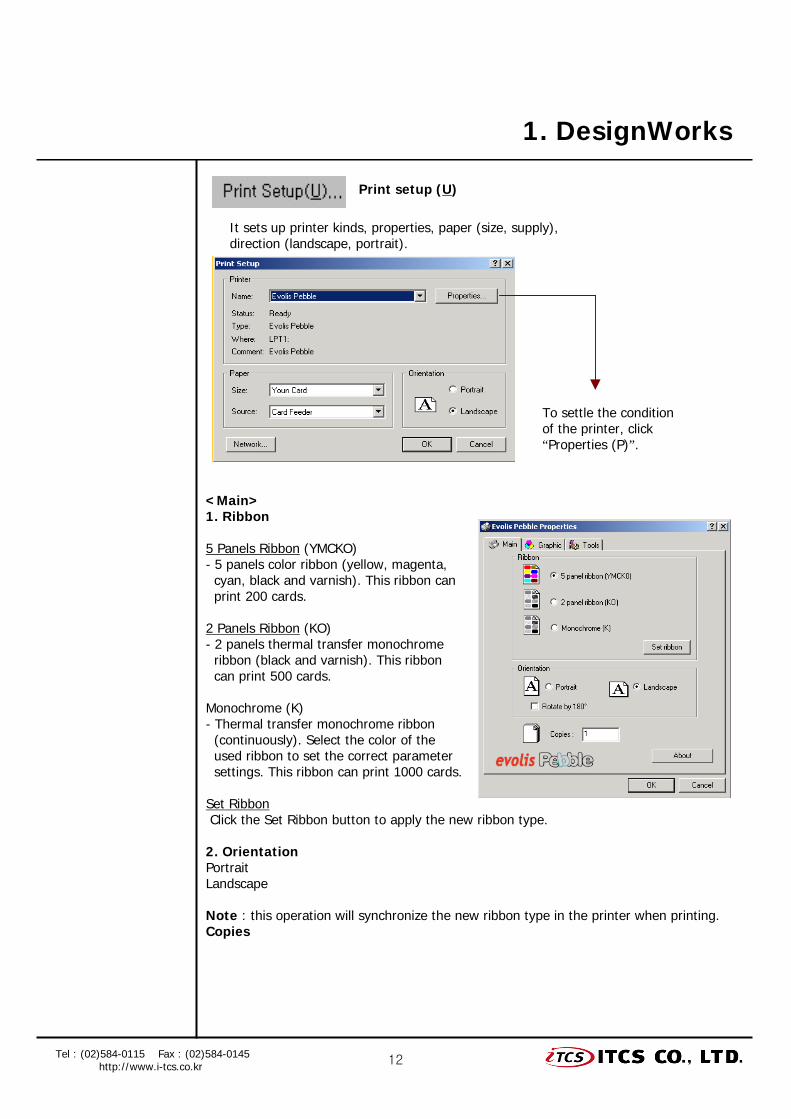
Print setup (U)
It sets up printer kinds, properties, paper (size, supply), direction (landscape, portrait).
To settle the condition of the printer, click “Properties (P)”.
<Main>1. Ribbon
5 Panels Ribbon (YMCKO)- 5 panels color ribbon (yellow, magenta, cyan, black and varnish). This ribbon can print 200 cards.
2 Panels Ribbon (KO)- 2 panels thermal transfer monochrome ribbon (black and varnish). This ribbon can print 500 cards.
Monochrome (K)- Thermal transfer monochrome ribbon (continuously). Select the color of the used ribbon to set the correct parametersettings. This ribbon can print 1000 cards.
Set RibbonClick the Set Ribbon button to apply the new ribbon type.
2. OrientationPortrait Landscape
Note : this operation will synchronize the new ribbon type in the printer when printing.Copies
Tel : (02)584-0115 Fax : (02)584-0145http://www.i-tcs.co.kr
13
1. DesignWorks
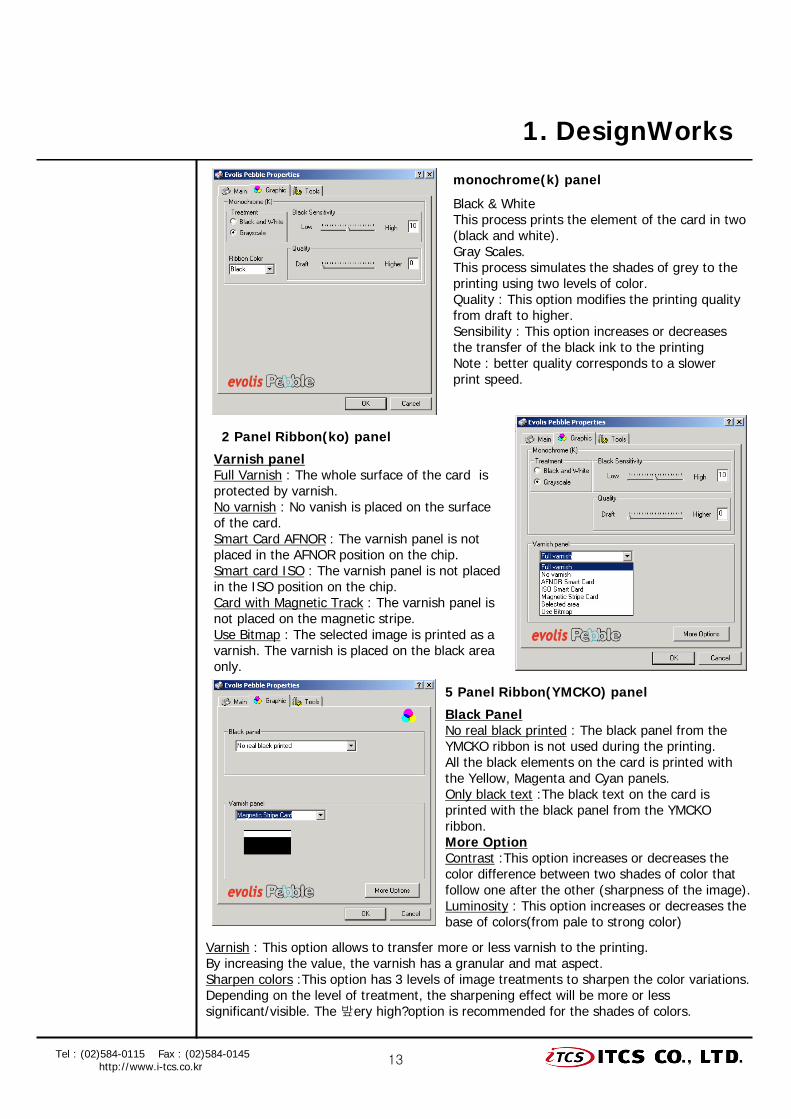
Black PanelNo real black printed : The black panel from the YMCKO ribbon is not used during the printing.All the black elements on the card is printed withthe Yellow, Magenta and Cyan panels.Only black text :The black text on the card isprinted with the black panel from the YMCKOribbon.More OptionContrast :This option increases or decreases thecolor difference between two shades of color thatfollow one after the other (sharpness of the image).Luminosity : This option increases or decreases thebase of colors(from pale to strong color)
monochrome(k) panel
Black & WhiteThis process prints the element of the card in two(black and white).Gray Scales.This process simulates the shades of grey to theprinting using two levels of color. Quality : This option modifies the printing qualityfrom draft to higher.Sensibility : This option increases or decreasesthe transfer of the black ink to the printingNote : better quality corresponds to a slowerprint speed.
2 Panel Ribbon(ko) panel
Varnish panelFull Varnish : The whole surface of the card isprotected by varnish.No varnish : No vanish is placed on the surfaceof the card.Smart Card AFNOR : The varnish panel is notplaced in the AFNOR position on the chip.Smart card ISO : The varnish panel is not placedin the ISO position on the chip.Card with Magnetic Track : The varnish panel isnot placed on the magnetic stripe.Use Bitmap : The selected image is printed as avarnish. The varnish is placed on the black areaonly.
5 Panel Ribbon(YMCKO) panel
Varnish : This option allows to transfer more or less varnish to the printing. By increasing the value, the varnish has a granular and mat aspect. Sharpen colors :This option has 3 levels of image treatments to sharpen the color variations.Depending on the level of treatment, the sharpening effect will be more or less significant/visible. The 밮ery high?option is recommended for the shades of colors.
Tel : (02)584-0115 Fax : (02)584-0145http://www.i-tcs.co.kr
14
1. DesignWorks
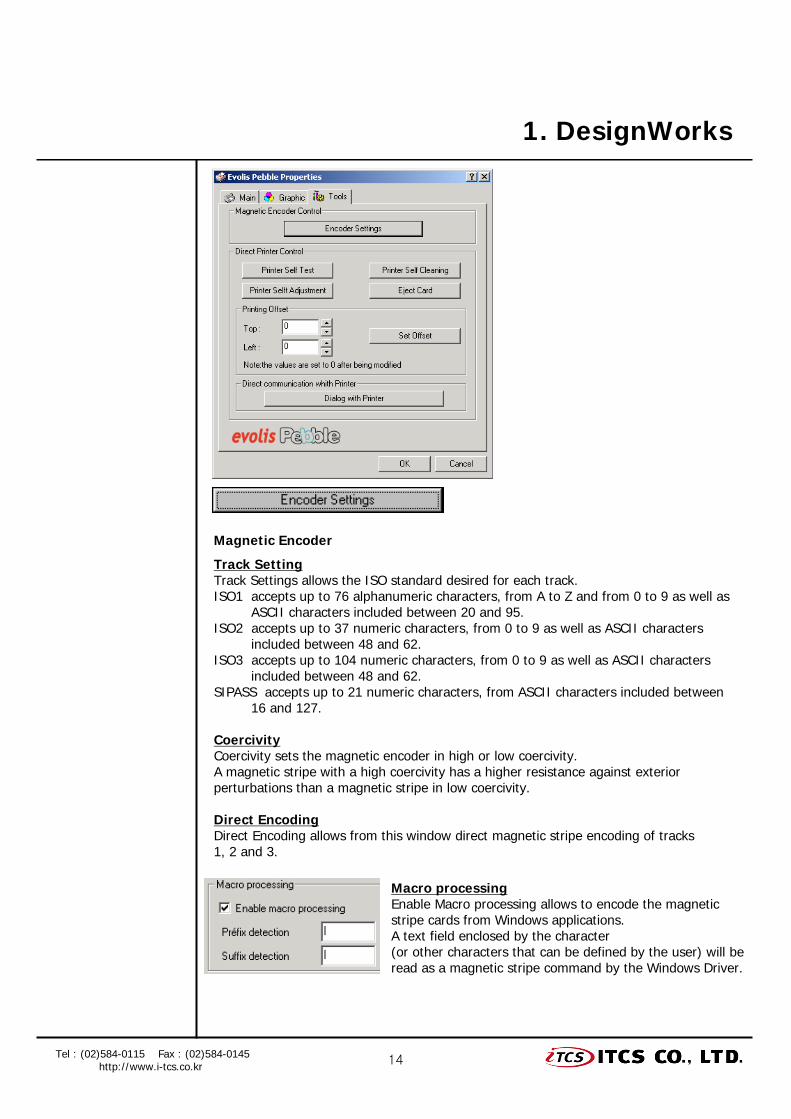
Track Setting Track Settings allows the ISO standard desired for each track.ISO1 accepts up to 76 alphanumeric characters, from A to Z and from 0 to 9 as well as
ASCII characters included between 20 and 95.ISO2 accepts up to 37 numeric characters, from 0 to 9 as well as ASCII characters
included between 48 and 62. ISO3 accepts up to 104 numeric characters, from 0 to 9 as well as ASCII characters
included between 48 and 62. SIPASS accepts up to 21 numeric characters, from ASCII characters included between
16 and 127.
CoercivityCoercivity sets the magnetic encoder in high or low coercivity. A magnetic stripe with a high coercivity has a higher resistance against exterior perturbations than a magnetic stripe in low coercivity.
Direct EncodingDirect Encoding allows from this window direct magnetic stripe encoding of tracks1, 2 and 3.
Magnetic Encoder
Macro processingEnable Macro processing allows to encode the magneticstripe cards from Windows applications. A text field enclosed by the character (or other characters that can be defined by the user) will be read as a magnetic stripe command by the Windows Driver.
Tel : (02)584-0115 Fax : (02)584-0145http://www.i-tcs.co.kr
15
1. DesignWorks
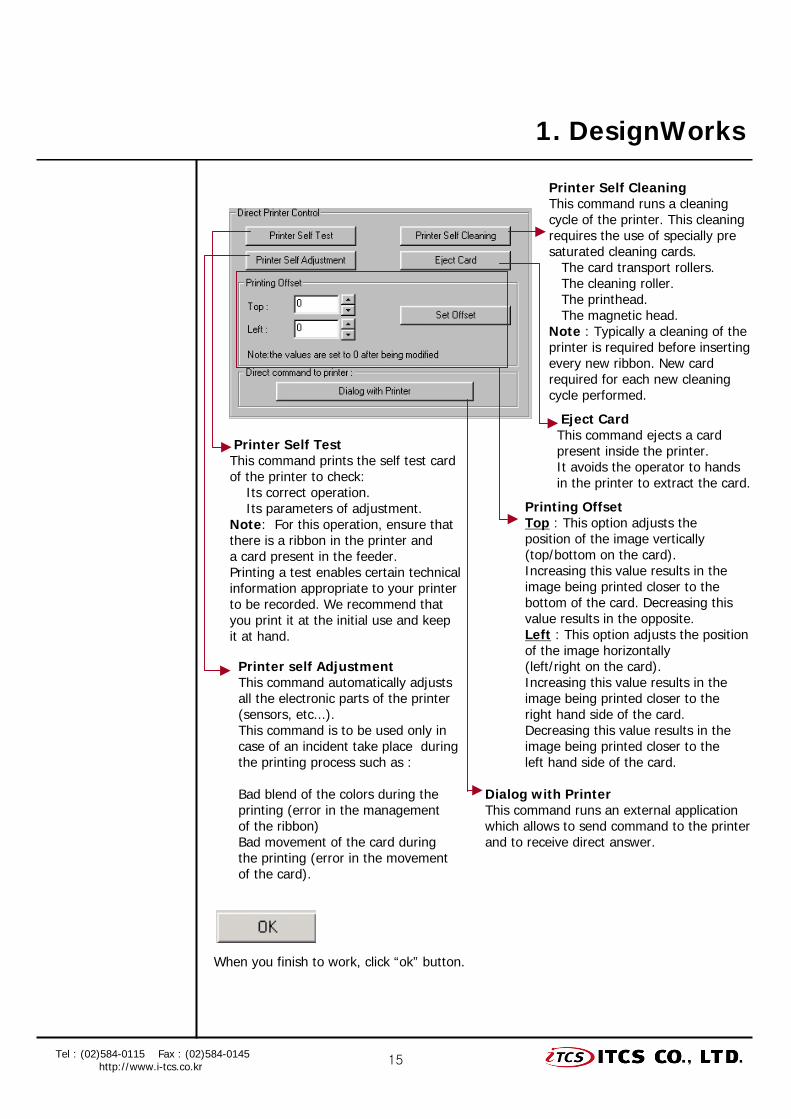
Printer Self TestThis command prints the self test card of the printer to check:
Its correct operation.Its parameters of adjustment.
Note: For this operation, ensure that there is a ribbon in the printer and a card present in the feeder. Printing a test enables certain technical information appropriate to your printer to be recorded. We recommend that you print it at the initial use and keep it at hand.
Printer Self CleaningThis command runs a cleaning cycle of the printer. This cleaning requires the use of specially pre saturated cleaning cards.
The card transport rollers.The cleaning roller.The printhead.The magnetic head.
Note : Typically a cleaning of theprinter is required before inserting every new ribbon. New card required for each new cleaning cycle performed.
Printer self AdjustmentThis command automatically adjusts all the electronic parts of the printer (sensors, etc...). This command is to be used only in case of an incident take place during the printing process such as :
Bad blend of the colors during the printing (error in the management of the ribbon)Bad movement of the card during the printing (error in the movement of the card).
Eject CardThis command ejects a card present inside the printer. It avoids the operator to hands in the printer to extract the card.
Printing OffsetTop : This option adjusts the position of the image vertically (top/bottom on the card). Increasing this value results in the image being printed closer to the bottom of the card. Decreasing this value results in the opposite.Left : This option adjusts the positionof the image horizontally (left/right on the card). Increasing this value results in the image being printed closer to the right hand side of the card. Decreasing this value results in the image being printed closer to the left hand side of the card.
Dialog with PrinterThis command runs an external applicationwhich allows to send command to the printer and to receive direct answer.
When you finish to work, click “ok” button.
Tel : (02)584-0115 Fax : (02)584-0145http://www.i-tcs.co.kr
16
1. DesignWorks
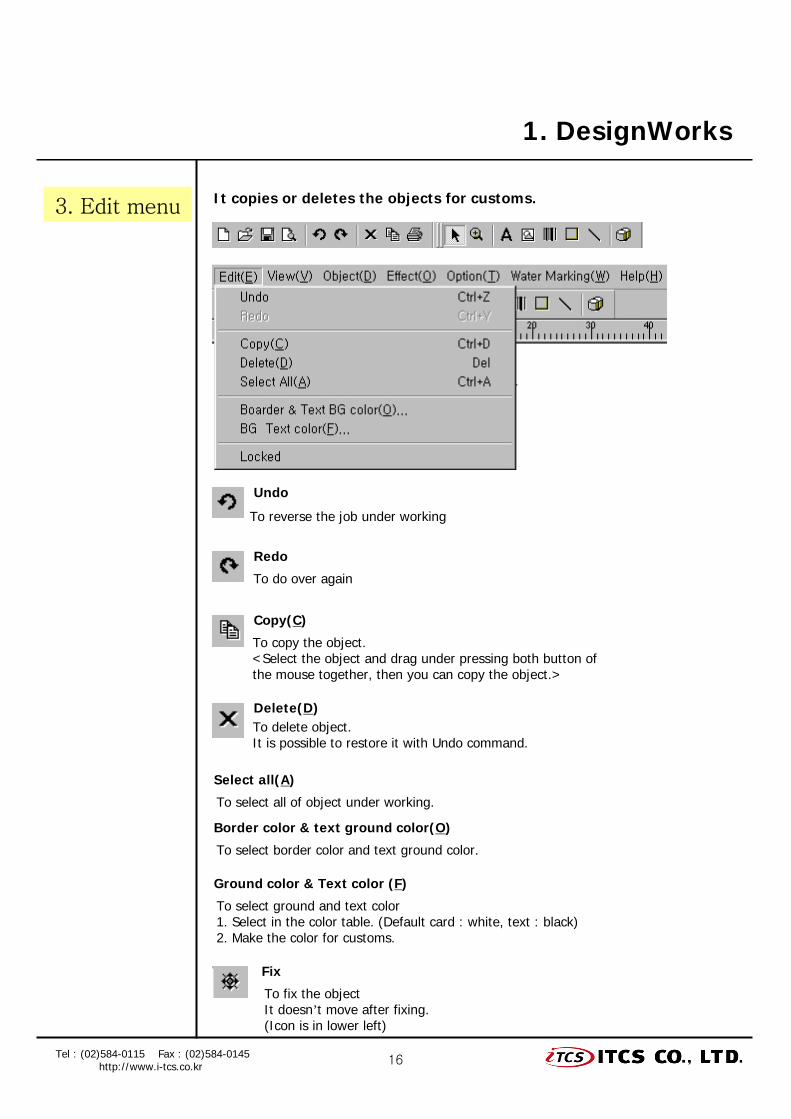
3. Edit menu It copies or deletes the objects for customs.
Undo
Redo
Delete(D)
Copy(C)
To reverse the job under working
To do over again
To copy the object.<Select the object and drag under pressing both button of the mouse together, then you can copy the object.>
To delete object.It is possible to restore it with Undo command.
Select all(A)
To select all of object under working.
Border color & text ground color(O)
To select border color and text ground color.
Ground color & Text color (F)
To select ground and text color1. Select in the color table. (Default card : white, text : black) 2. Make the color for customs.
Fix
To fix the objectIt doesn’t move after fixing.(Icon is in lower left)
Tel : (02)584-0115 Fax : (02)584-0145http://www.i-tcs.co.kr
17
1. DesignWorks
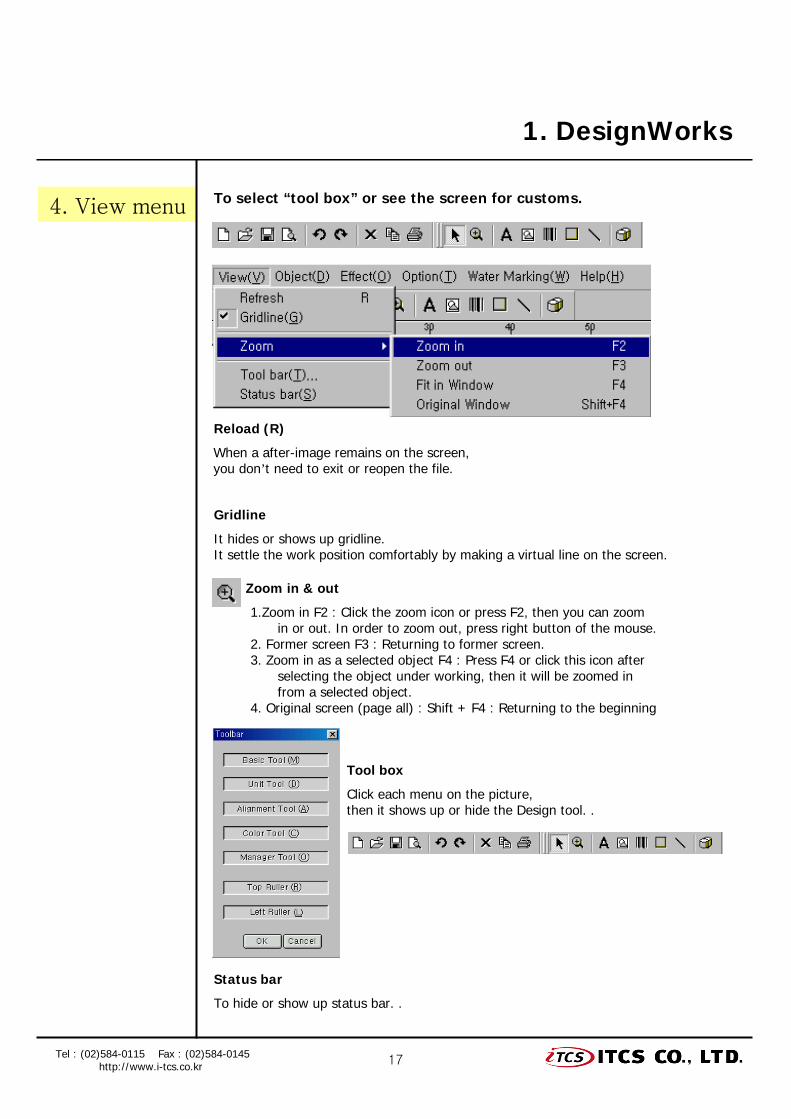
4. View menu To select “tool box” or see the screen for customs.
Reload (R)
When a after-image remains on the screen,you don’t need to exit or reopen the file.
Gridline
It hides or shows up gridline.It settle the work position comfortably by making a virtual line on the screen.
Zoom in & out
1.Zoom in F2 : Click the zoom icon or press F2, then you can zoom in or out. In order to zoom out, press right button of the mouse.
2. Former screen F3 : Returning to former screen. 3. Zoom in as a selected object F4 : Press F4 or click this icon after
selecting the object under working, then it will be zoomed in from a selected object.
4. Original screen (page all) : Shift + F4 : Returning to the beginning
Tool box
Click each menu on the picture, then it shows up or hide the Design tool. .
Status bar
To hide or show up status bar. .
Tel : (02)584-0115 Fax : (02)584-0145http://www.i-tcs.co.kr
18
1. DesignWorks
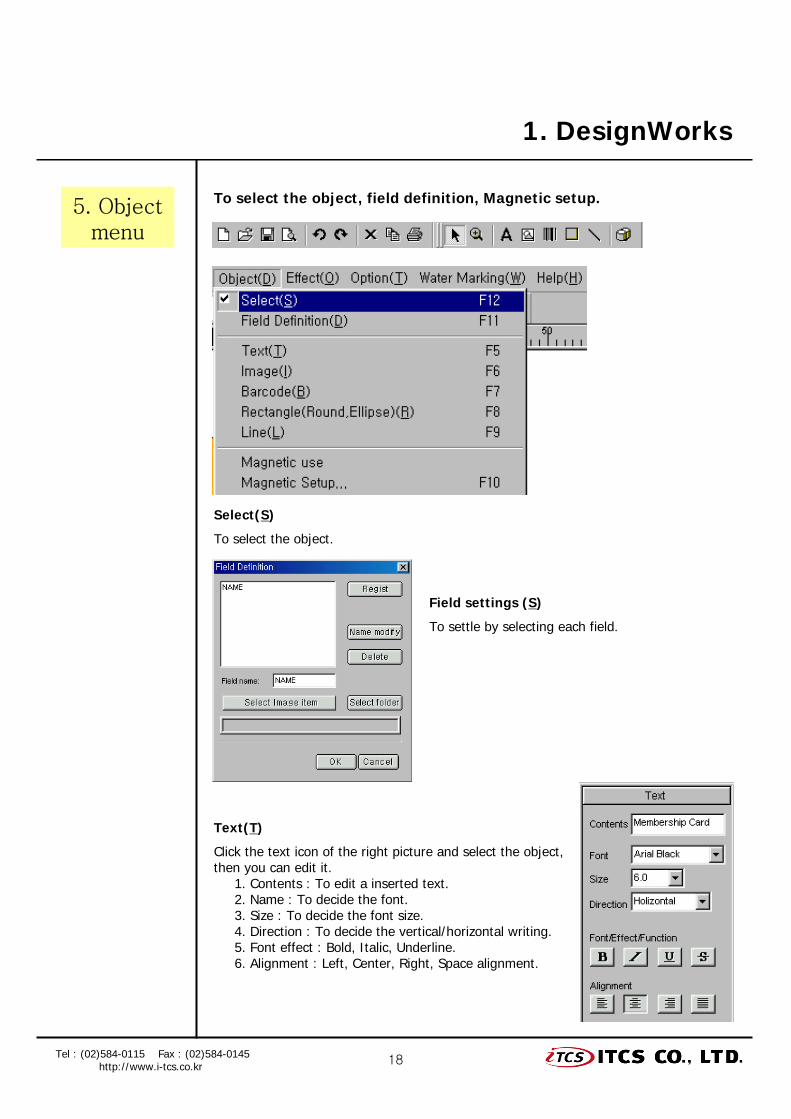
5. Objectmenu
To select the object, field definition, Magnetic setup.
Select(S)
To select the object.
Field settings (S)
To settle by selecting each field.
Text(T)
Click the text icon of the right picture and select the object, then you can edit it.
1. Contents : To edit a inserted text.2. Name : To decide the font.3. Size : To decide the font size.4. Direction : To decide the vertical/horizontal writing. 5. Font effect : Bold, Italic, Underline.6. Alignment : Left, Center, Right, Space alignment.
Tel : (02)584-0115 Fax : (02)584-0145http://www.i-tcs.co.kr
19
1. DesignWorks
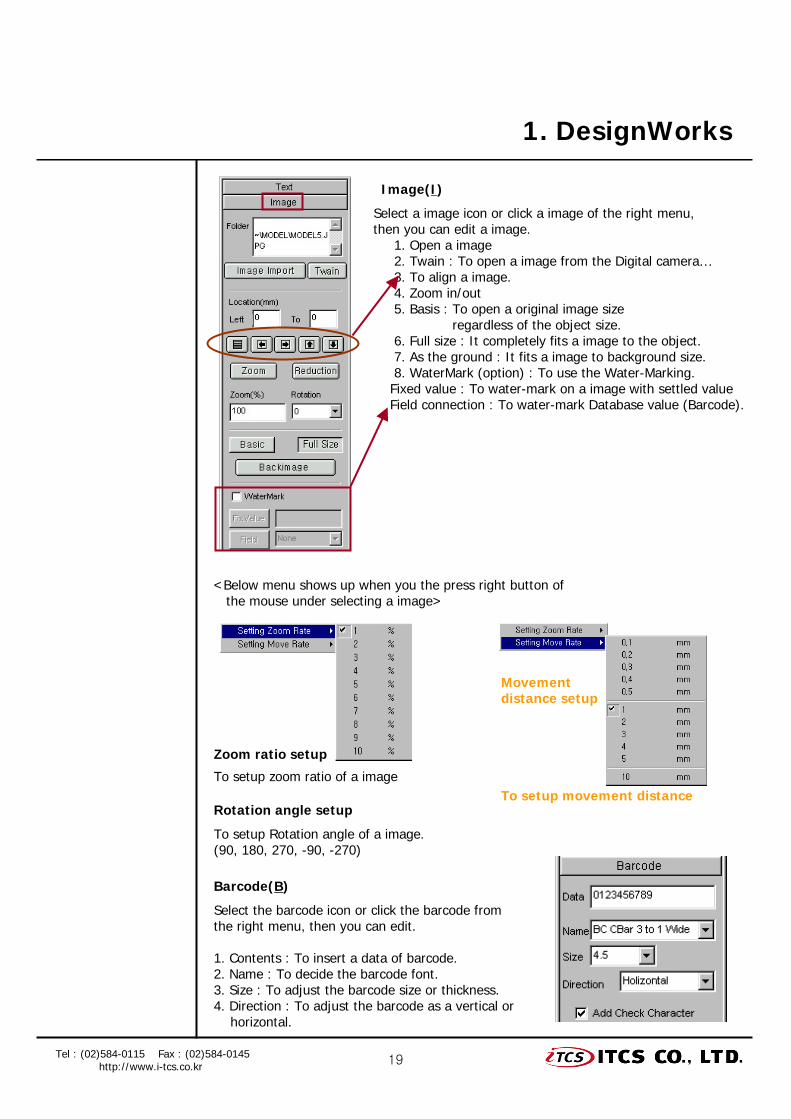
Image(I)
Select a image icon or click a image of the right menu, then you can edit a image.
1. Open a image 2. Twain : To open a image from the Digital camera…3. To align a image.4. Zoom in/out 5. Basis : To open a original image size
regardless of the object size.6. Full size : It completely fits a image to the object.7. As the ground : It fits a image to background size.8. WaterMark (option) : To use the Water-Marking.Fixed value : To water-mark on a image with settled valueField connection : To water-mark Database value (Barcode).
Barcode(B)
<Below menu shows up when you the press right button ofthe mouse under selecting a image>
To setup zoom ratio of a image
To setup Rotation angle of a image.(90, 180, 270, -90, -270)
Rotation angle setup
Select the barcode icon or click the barcode from the right menu, then you can edit.
1. Contents : To insert a data of barcode.2. Name : To decide the barcode font.3. Size : To adjust the barcode size or thickness.4. Direction : To adjust the barcode as a vertical or
horizontal.
Tel : (02)584-0115 Fax : (02)584-0145http://www.i-tcs.co.kr
Zoom ratio setup
To setup movement distance
Movement distance setup
20
1. DesignWorks
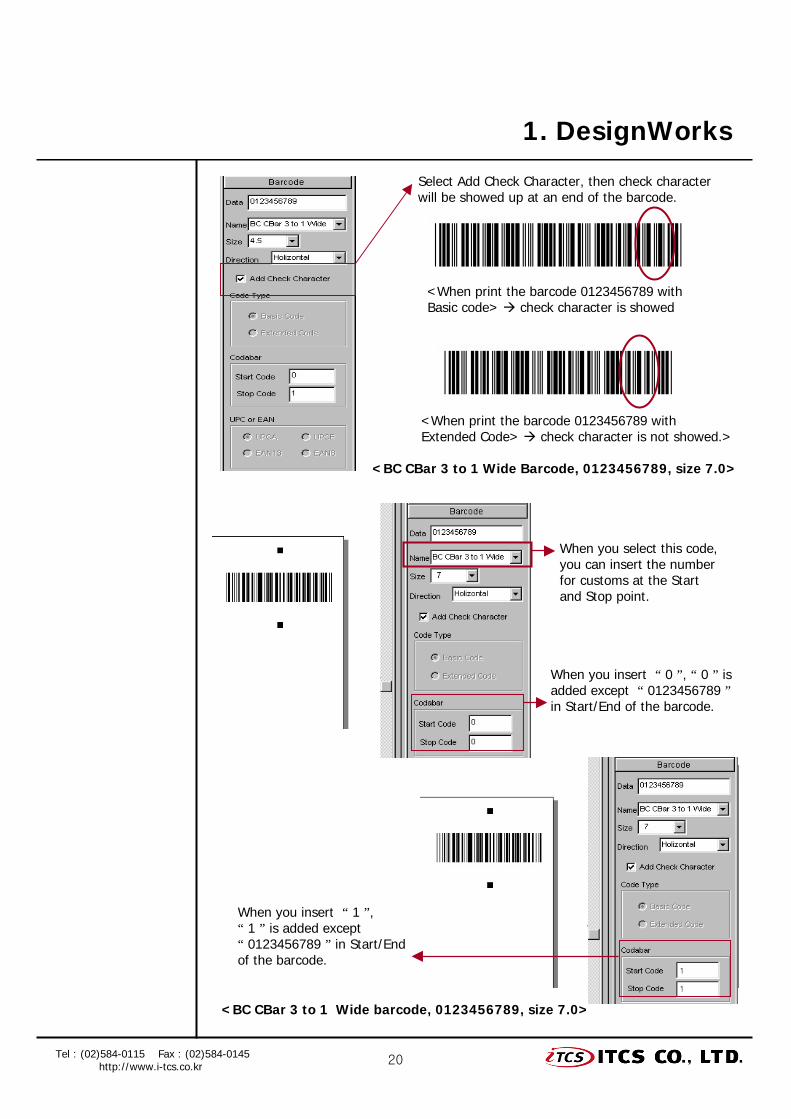
<BC CBar 3 to 1 Wide Barcode, 0123456789, size 7.0>
Select Add Check Character, then check character will be showed up at an end of the barcode.
<When print the barcode 0123456789 with Basic code> check character is showed
<When print the barcode 0123456789 with Extended Code> check character is not showed.>
<BC CBar 3 to 1 Wide barcode, 0123456789, size 7.0>
When you select this code, you can insert the number for customs at the Start and Stop point.
When you insert “ 0 ”, “ 0 ” is added except “ 0123456789 ”in Start/End of the barcode.
When you insert “ 1 ”, “ 1 ” is added except “ 0123456789 ” in Start/End of the barcode.
Tel : (02)584-0115 Fax : (02)584-0145http://www.i-tcs.co.kr
21
1. DesignWorks
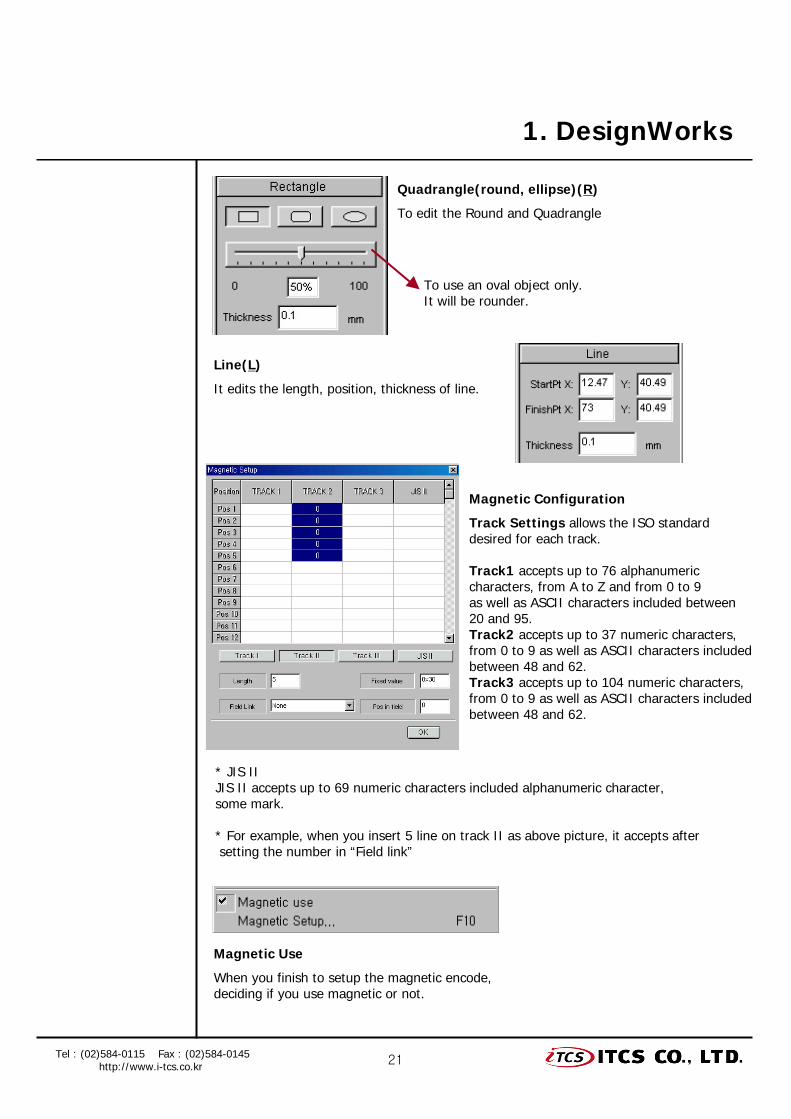
Magnetic Configuration
Track Settings allows the ISO standard desired for each track.
Track1 accepts up to 76 alphanumeric characters, from A to Z and from 0 to 9 as well as ASCII characters included between 20 and 95.Track2 accepts up to 37 numeric characters, from 0 to 9 as well as ASCII characters included between 48 and 62. Track3 accepts up to 104 numeric characters, from 0 to 9 as well as ASCII characters included between 48 and 62.
Magnetic Use
When you finish to setup the magnetic encode,deciding if you use magnetic or not.
Quadrangle(round, ellipse)(R)
To edit the Round and Quadrangle
To use an oval object only.It will be rounder.
Line(L)
It edits the length, position, thickness of line.
Tel : (02)584-0115 Fax : (02)584-0145http://www.i-tcs.co.kr
* JIS IIJIS II accepts up to 69 numeric characters included alphanumeric character, some mark.
* For example, when you insert 5 line on track II as above picture, it accepts after setting the number in “Field link”
22
1. DesignWorks
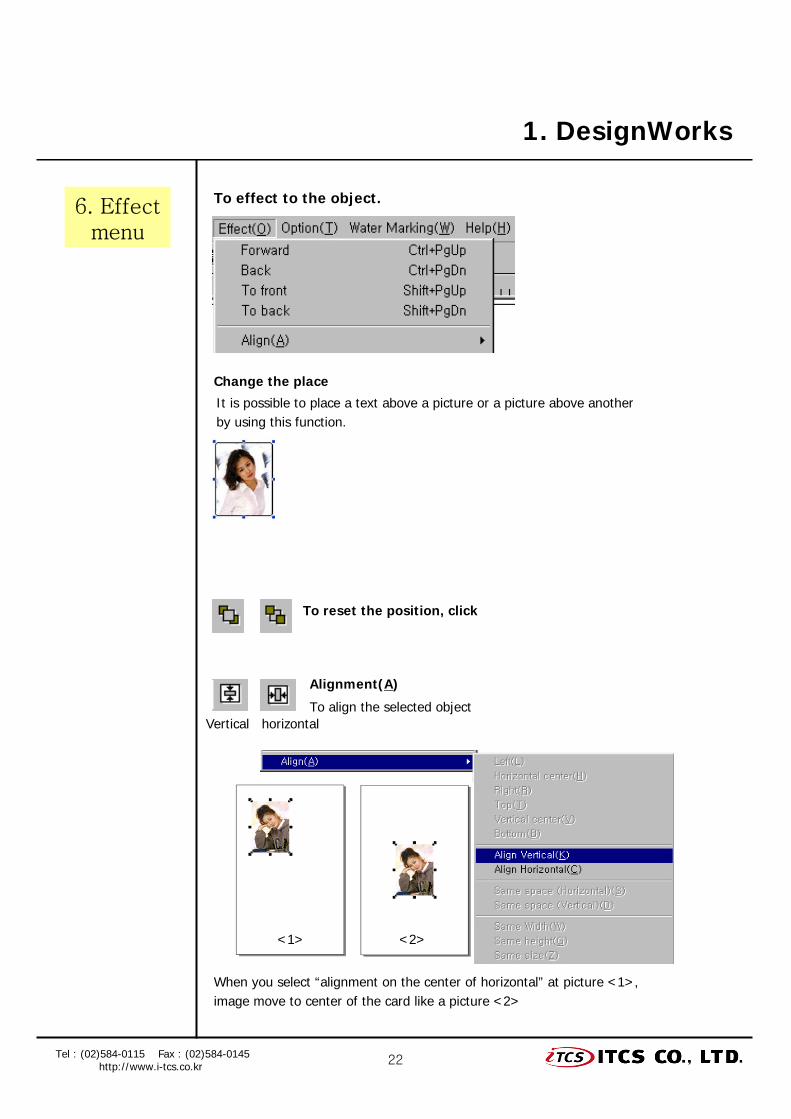
6. Effectmenu
To effect to the object.
Tel : (02)584-0115 Fax : (02)584-0145http://www.i-tcs.co.kr
Change the place
It is possible to place a text above a picture or a picture above anotherby using this function.
Alignment(A)
To align the selected objectVertical horizontal
To reset the position, click
When you select “alignment on the center of horizontal” at picture <1>, image move to center of the card like a picture <2>
<1> <2>
23
1. DesignWorks
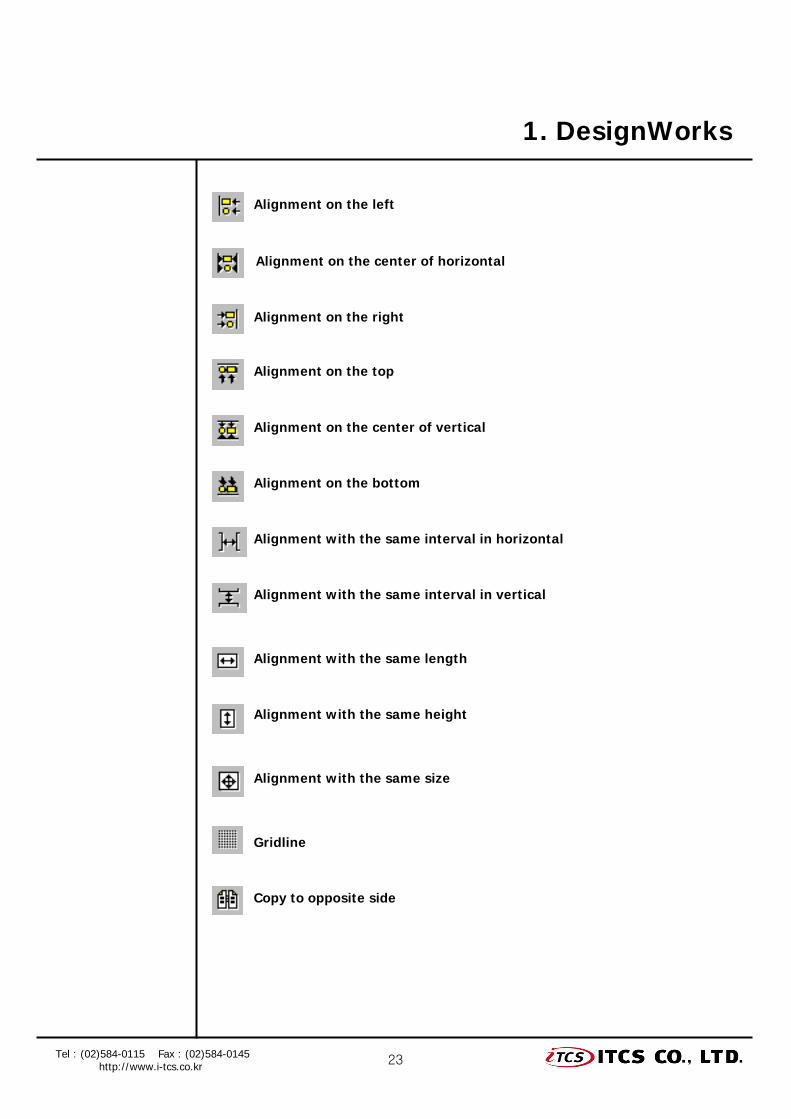
Alignment on the left
Alignment on the center of horizontal
Alignment on the right
Alignment on the top
Alignment on the center of vertical
Alignment on the bottom
Alignment with the same interval in horizontal
Alignment with the same interval in vertical
Alignment with the same length
Alignment with the same height
Alignment with the same size
Copy to opposite side
Gridline
Tel : (02)584-0115 Fax : (02)584-0145http://www.i-tcs.co.kr
24
1. DesignWorks
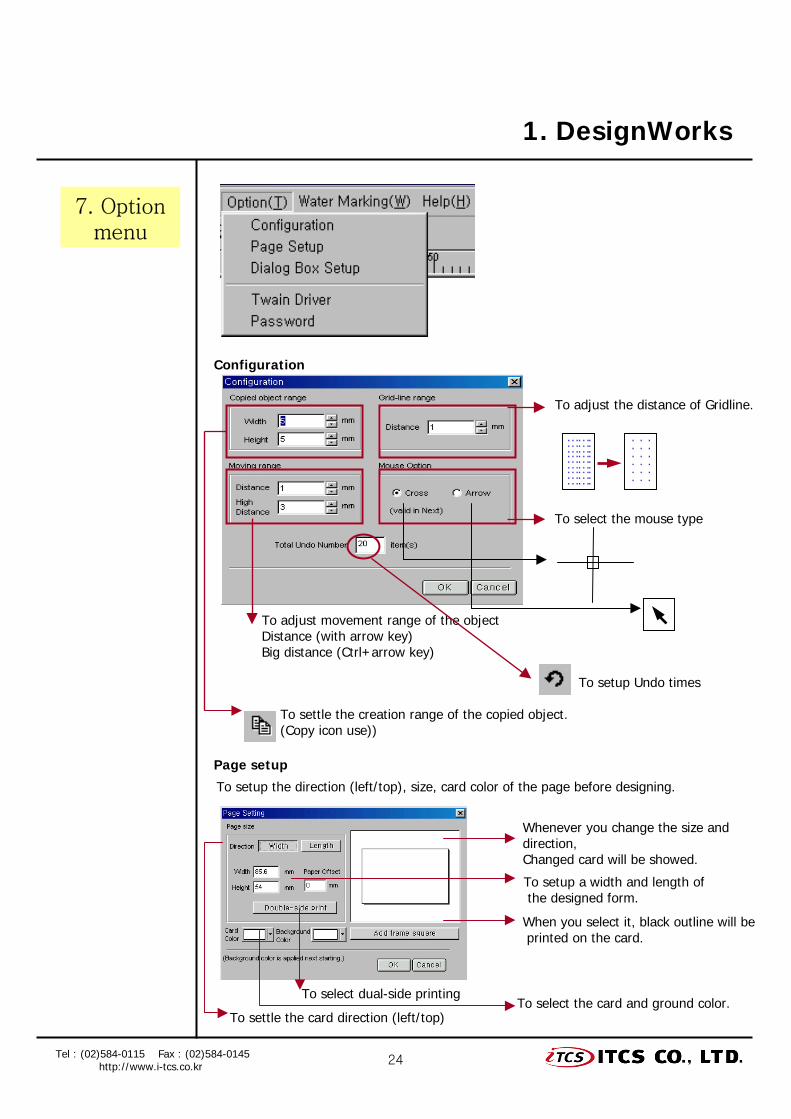
7. Optionmenu
…….…….…….…….…….…….
…….…….…….
. . .
. . .
. . .
. . .
. . .
. . .
To adjust the distance of Gridline.
To select the mouse type
To settle the creation range of the copied object.(Copy icon use))
To setup Undo times
Page setup
To setup the direction (left/top), size, card color of the page before designing.
Whenever you change the size and direction, Changed card will be showed.
When you select it, black outline will beprinted on the card.
To setup a width and length of the designed form.
To settle the card direction (left/top)To select the card and ground color.
Tel : (02)584-0115 Fax : (02)584-0145http://www.i-tcs.co.kr
Configuration
To adjust movement range of the objectDistance (with arrow key)Big distance (Ctrl+arrow key)
To select dual-side printing
25
1. DesignWorks
Twain drive
It is applied for a image only.You can open the worked image file, database file directly from image processor or digital camera
Password setup
To setup a password.
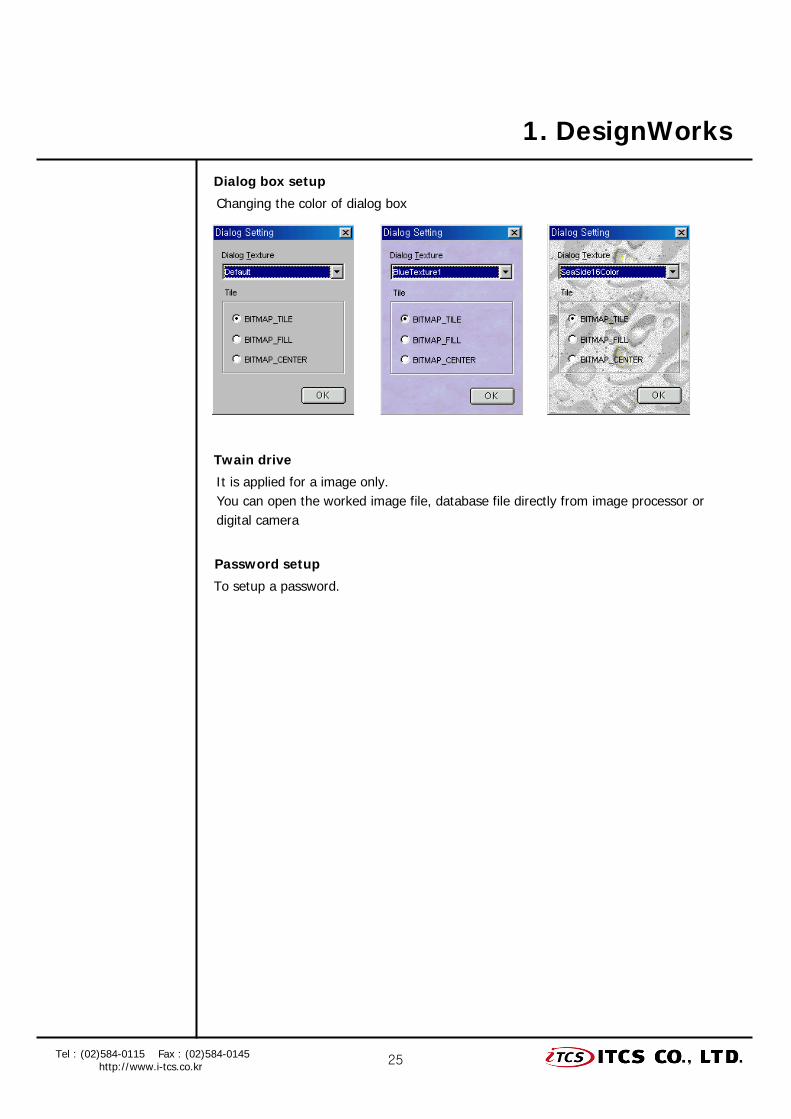
Dialog box setup
Changing the color of dialog box
Tel : (02)584-0115 Fax : (02)584-0145http://www.i-tcs.co.kr
26
Digital Watermarking
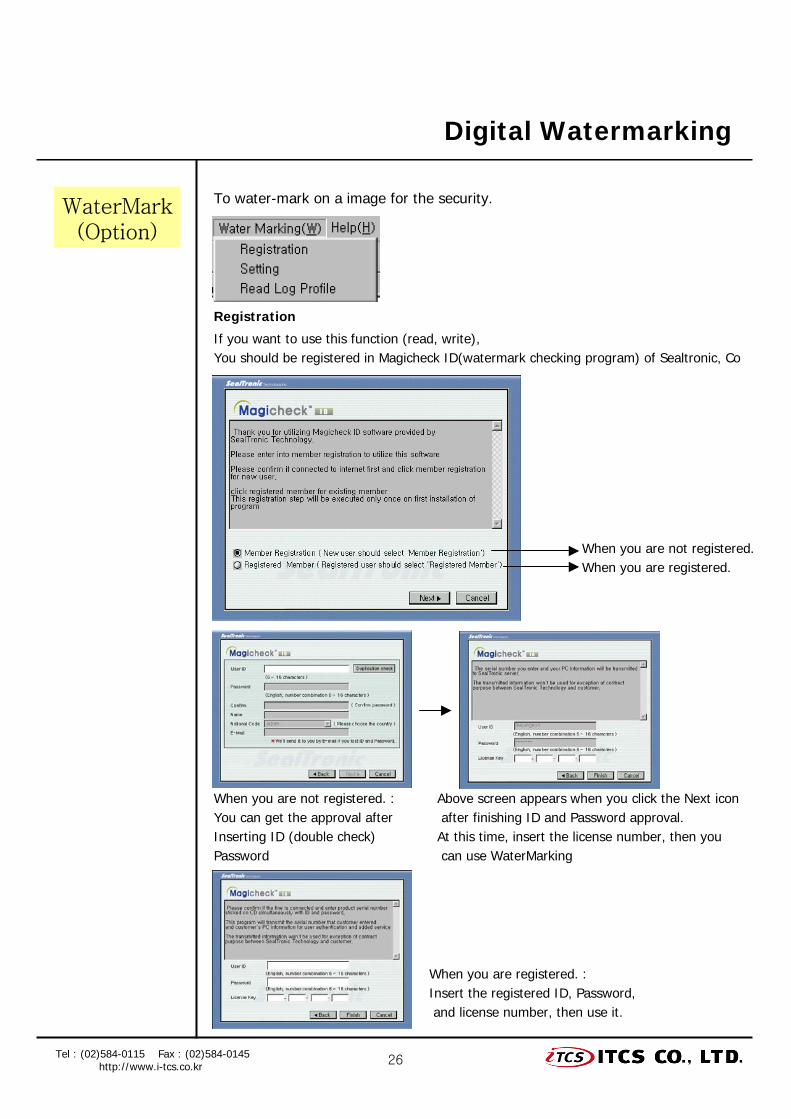
WaterMark(Option)
Registration
If you want to use this function (read, write), You should be registered in Magicheck ID(watermark checking program) of Sealtronic, Co
To water-mark on a image for the security.
When you are not registered. :You can get the approval afterInserting ID (double check)Password
When you are registered. :Insert the registered ID, Password,and license number, then use it.
When you are not registered.When you are registered.
Above screen appears when you click the Next iconafter finishing ID and Password approval. At this time, insert the license number, then you can use WaterMarking
Tel : (02)584-0115 Fax : (02)584-0145http://www.i-tcs.co.kr
27
Setting
You should decide the card type to be applied before using Water-Marking.
Usage of Water-Marking
1. Drag the range to make a image by clicking the image button.( Pink frame will appear in)
2. Open a image by clicking the image field in the object manager tool of the right menu.3. When the image has been opened, select Water-mark icon.
( Pink frame will change to Red)4. Select “fixed value” or “field connection” with Water-Marking value,
then insert a data or select in the field.
Print by using Water-MarkingWater-Marked image will be printed with the black frame .
Digital Watermarking
Tel : (02)584-0115 Fax : (02)584-0145http://www.i-tcs.co.kr
28
2. DesignWorks with DataBase
Tel : (02)584-0115 Fax : (02)584-0145http://www.i-tcs.co.kr
29
2. DesignWorks With DB
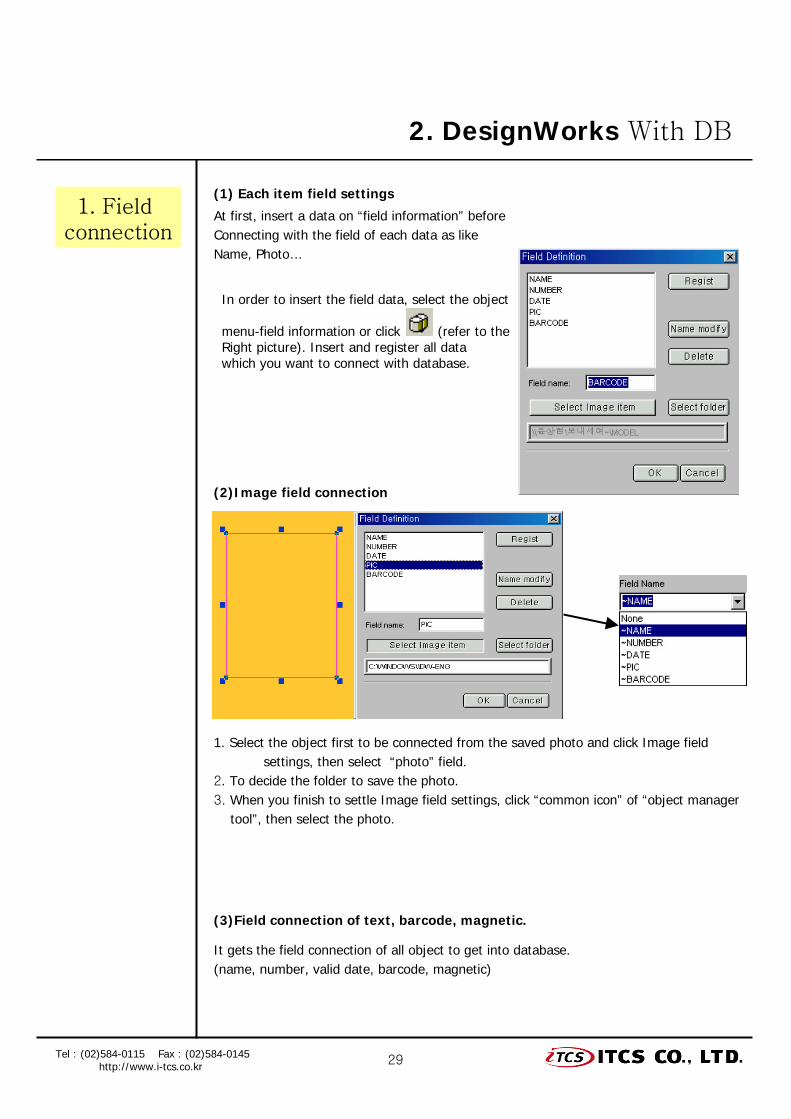
(1) Each item field settings
At first, insert a data on “field information” beforeConnecting with the field of each data as like Name, Photo…
(2)Image field connection
1. Select the object first to be connected from the saved photo and click Image fieldsettings, then select “photo” field.
2. To decide the folder to save the photo. 3. When you finish to settle Image field settings, click “common icon” of “object manager
tool”, then select the photo.
(3)Field connection of text, barcode, magnetic.
It gets the field connection of all object to get into database.(name, number, valid date, barcode, magnetic)
1. Field connection
Tel : (02)584-0115 Fax : (02)584-0145http://www.i-tcs.co.kr
In order to insert the field data, select the object
menu-field information or click (refer to theRight picture). Insert and register all data which you want to connect with database.
30
2. DesignWorks With DB
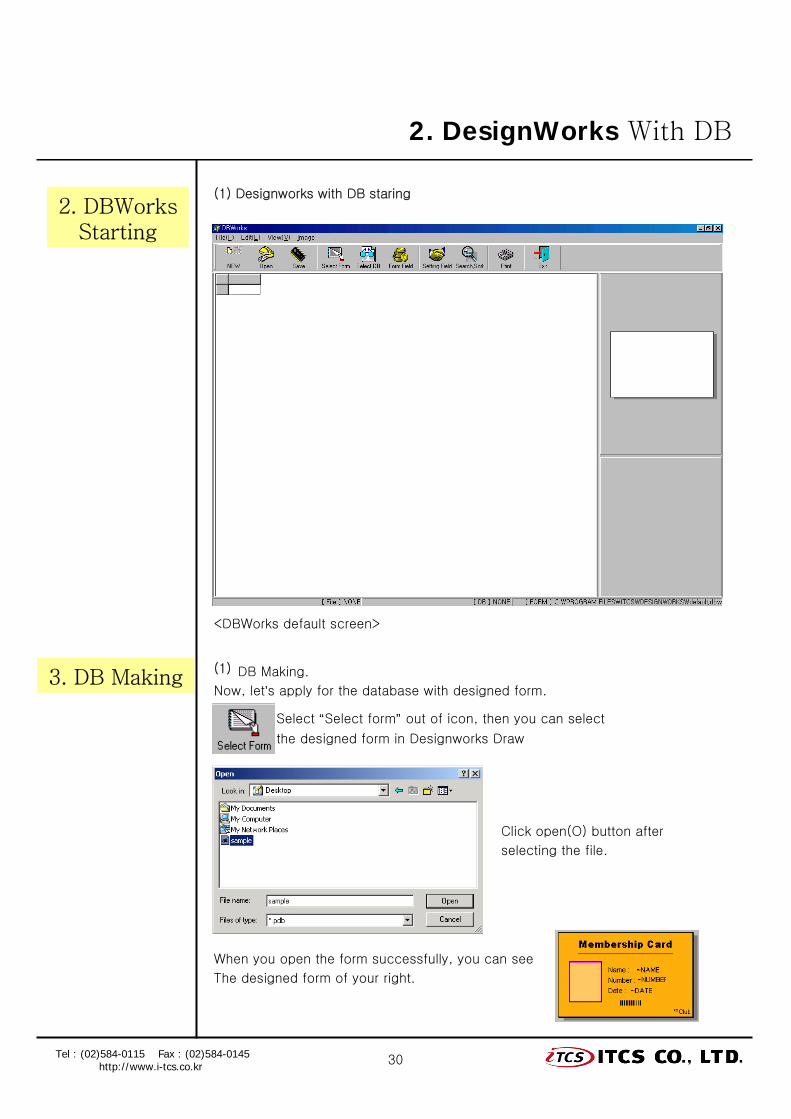
(1) Designworks with DB staring
<DBWorks default screen>
(1)
Now, let’s apply for the database with designed form.
Select “Select form” out of icon, then you can select
the designed form in Designworks Draw
Click open(O) button after
selecting the file.
When you open the form successfully, you can see
The designed form of your right.
2. DBWorksStarting
3. DB Making
Tel : (02)584-0115 Fax : (02)584-0145http://www.i-tcs.co.kr
DB Making.
31
2. DesignWorks With DB
(2) Form field creation
Select “Form field creation”, pop up window will appear as below.
At this time, click “ok”, you are ready to make the database by opening
the worked field (name, number, photo…)
Does field name pop up?
then, insert a data.
When you insert a data as above, each data appears
in designed form on your right.
(3) Save
Save when you finish the database job.
(When you save it, .pdb and .db file will be automatically created.
Save after selecting the folder
and inserting the file name.
extension will be automatically
Saved with .pdb
Tel : (02)584-0115 Fax : (02)584-0145http://www.i-tcs.co.kr
If there is all of photo in model folder,
You can open a image by inserting
the file name only without extension
as like model1, model2, model3.
(Image extension should be JPG
32
2. DesignWorks With DB
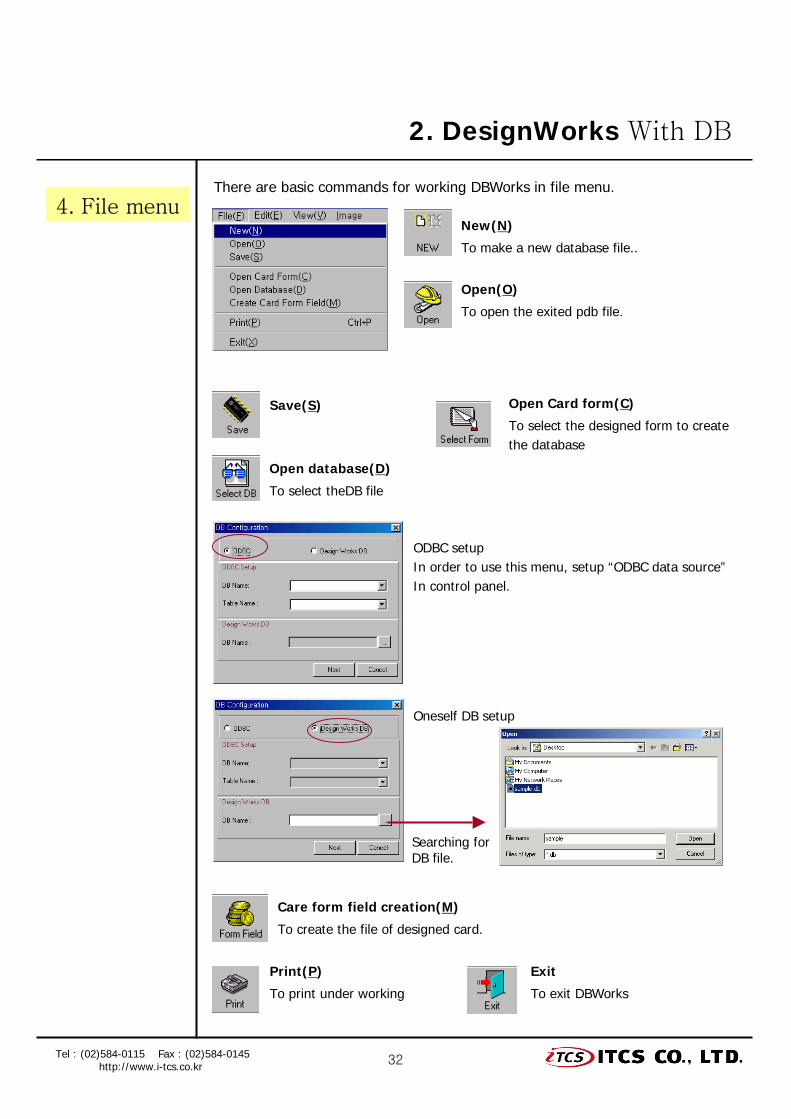
New(N)
To make a new database file..
4. File menu
Open(O)
To open the exited pdb file.
Save(S) Open Card form(C)
To select the designed form to create the database
There are basic commands for working DBWorks in file menu.
Open database(D)
To select theDB file
ODBC setupIn order to use this menu, setup “ODBC data source”In control panel.
Oneself DB setup
Searching forDB file.
Care form field creation(M)
To create the file of designed card.
Print(P)
To print under working
Exit
To exit DBWorks
Tel : (02)584-0115 Fax : (02)584-0145http://www.i-tcs.co.kr
33
2. DesignWorks With DB
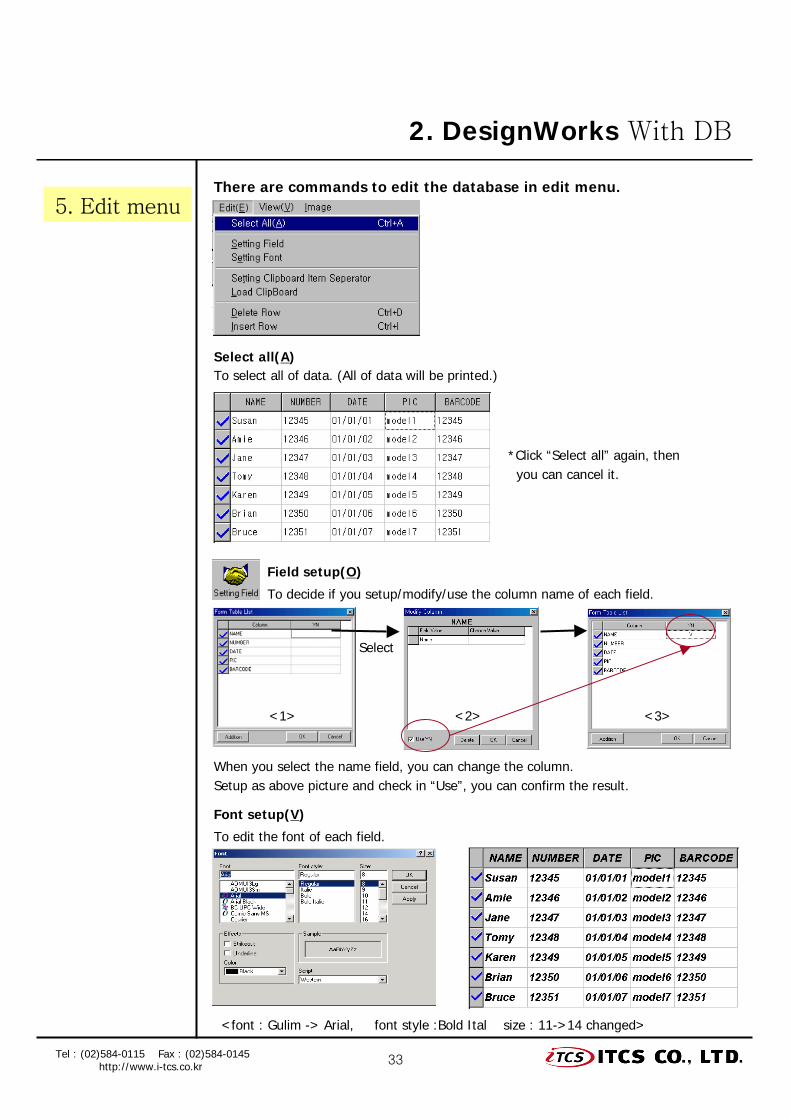
Select all(A)To select all of data. (All of data will be printed.)
5. Edit menuThere are commands to edit the database in edit menu.
*Click “Select all” again, then you can cancel it.
Field setup(O)
To decide if you setup/modify/use the column name of each field.
When you select the name field, you can change the column.Setup as above picture and check in “Use”, you can confirm the result.
Font setup(V)
To edit the font of each field.
<font : Gulim -> Arial, font style :Bold Ital size : 11->14 changed>
Tel : (02)584-0115 Fax : (02)584-0145http://www.i-tcs.co.kr
Select
<1> <2> <3>
34
2. DesignWorks With DB
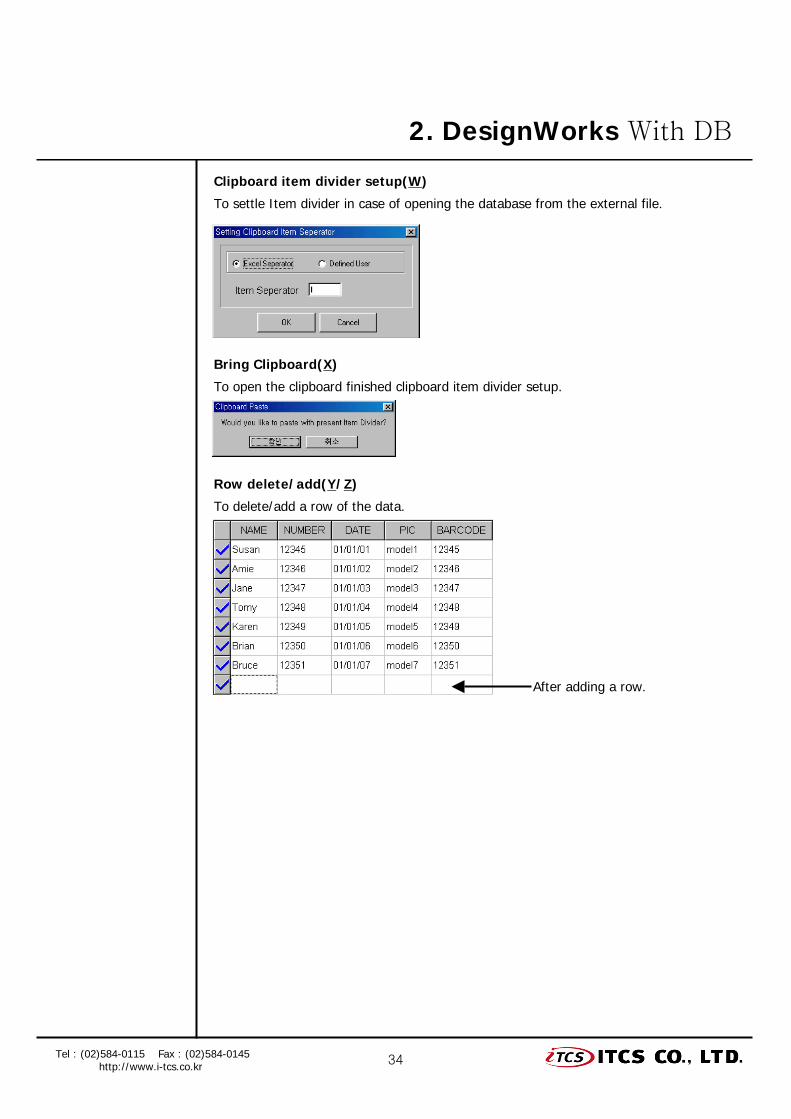
Clipboard item divider setup(W)
To settle Item divider in case of opening the database from the external file.
Bring Clipboard(X)
To open the clipboard finished clipboard item divider setup.
Row delete/add(Y/Z)
To delete/add a row of the data.
Tel : (02)584-0115 Fax : (02)584-0145http://www.i-tcs.co.kr
After adding a row.
35
2. DesignWorks With DB
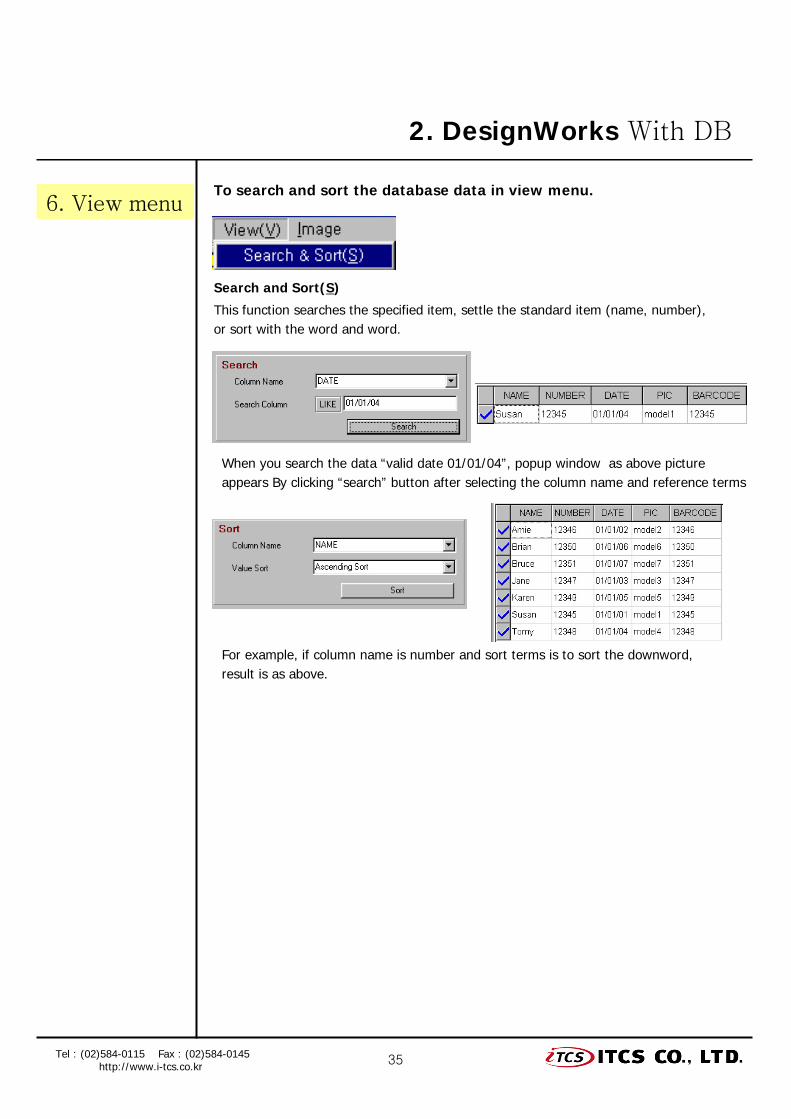
6. View menu
Search and Sort(S)
This function searches the specified item, settle the standard item (name, number), or sort with the word and word.
To search and sort the database data in view menu.
When you search the data “valid date 01/01/04”, popup window as above picture appears By clicking “search” button after selecting the column name and reference terms
For example, if column name is number and sort terms is to sort the downword,result is as above.
Tel : (02)584-0115 Fax : (02)584-0145http://www.i-tcs.co.kr
36
2. DesignWorks With DB
7. ImageMenu
Tel : (02)2103-5333 Fax : (02)2103-5334http://www.i-tcs.co.kr
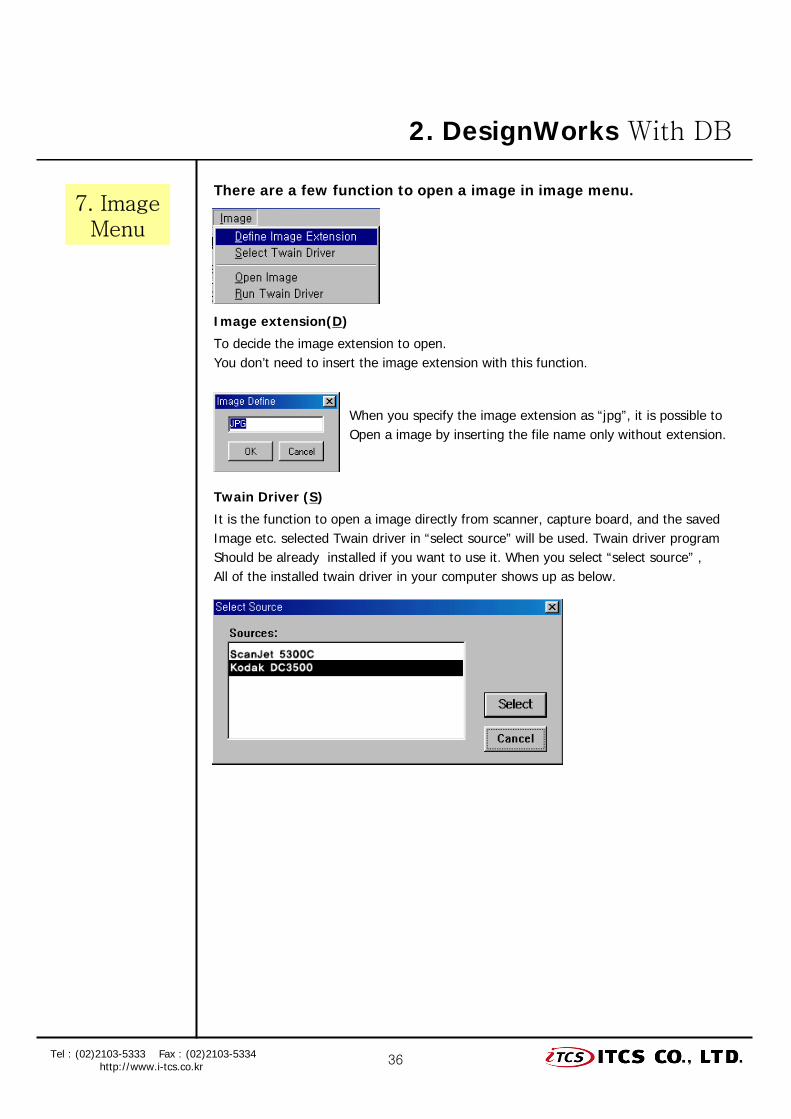
Image extension(D)
To decide the image extension to open.You don’t need to insert the image extension with this function.
There are a few function to open a image in image menu.
When you specify the image extension as “jpg”, it is possible to Open a image by inserting the file name only without extension.
Twain Driver (S)
It is the function to open a image directly from scanner, capture board, and the saved Image etc. selected Twain driver in “select source” will be used. Twain driver programShould be already installed if you want to use it. When you select “select source” ,All of the installed twain driver in your computer shows up as below.
Recommended