1
CQ5 Training Content Management System (CMS)
released: 01/10
This system allows users without technical knowledge to update, manage and maintain sites. Though there are other content management systems currently being used on campus, Communiqué 5 (CQ5) by Day Software is an enterprise-
level CMS that offers:
* Scalability * Workflow * Integrated with LDAP
* Centrally located hardware * Web-based * Campus Media Library
2
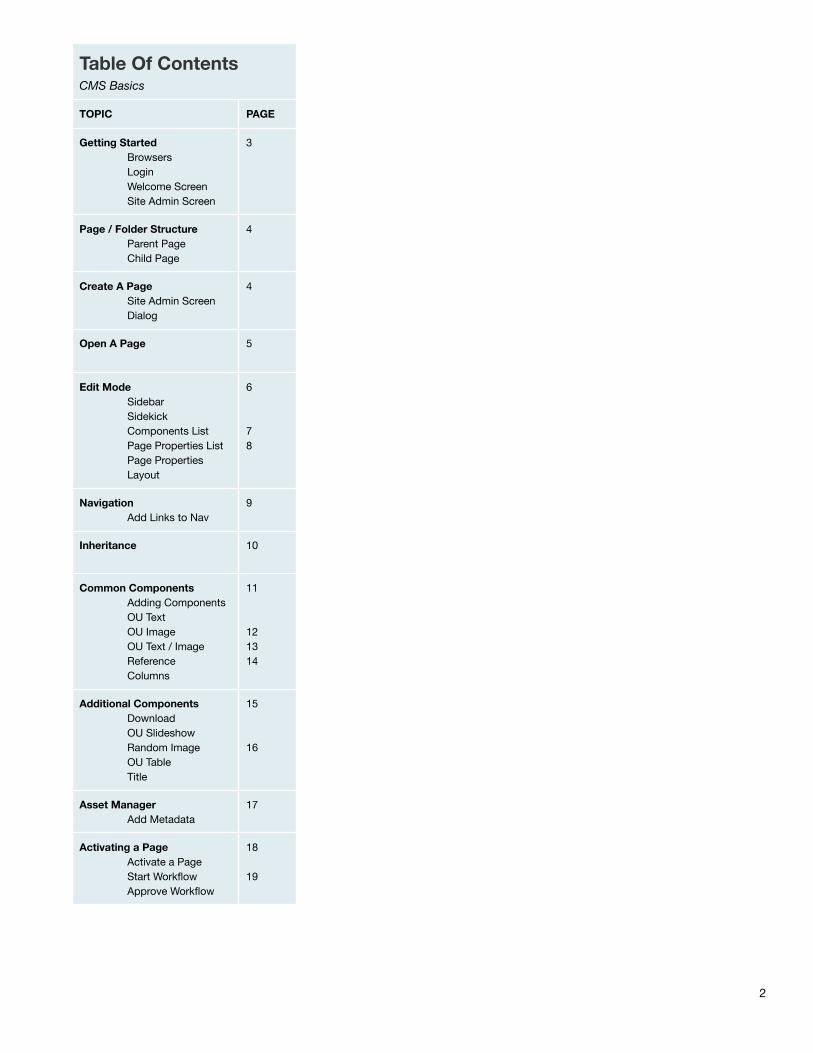
Table Of ContentsCMS Basics
Table Of ContentsCMS Basics
TOPIC PAGE
Getting StartedBrowsersLoginWelcome ScreenSite Admin Screen
3
Page / Folder StructureParent PageChild Page
4
Create A PageSite Admin ScreenDialog
4
Open A Page 5
Edit ModeSidebarSidekickComponents ListPage Properties ListPage PropertiesLayout
6
78
NavigationAdd Links to Nav
9
Inheritance 10
Common ComponentsAdding ComponentsOU TextOU ImageOU Text / ImageReferenceColumns
11
121314
Additional ComponentsDownloadOU SlideshowRandom ImageOU TableTitle
15
16
Asset ManagerAdd Metadata
17
Activating a PageActivate a PageStart WorkflowApprove Workflow
18
19
3
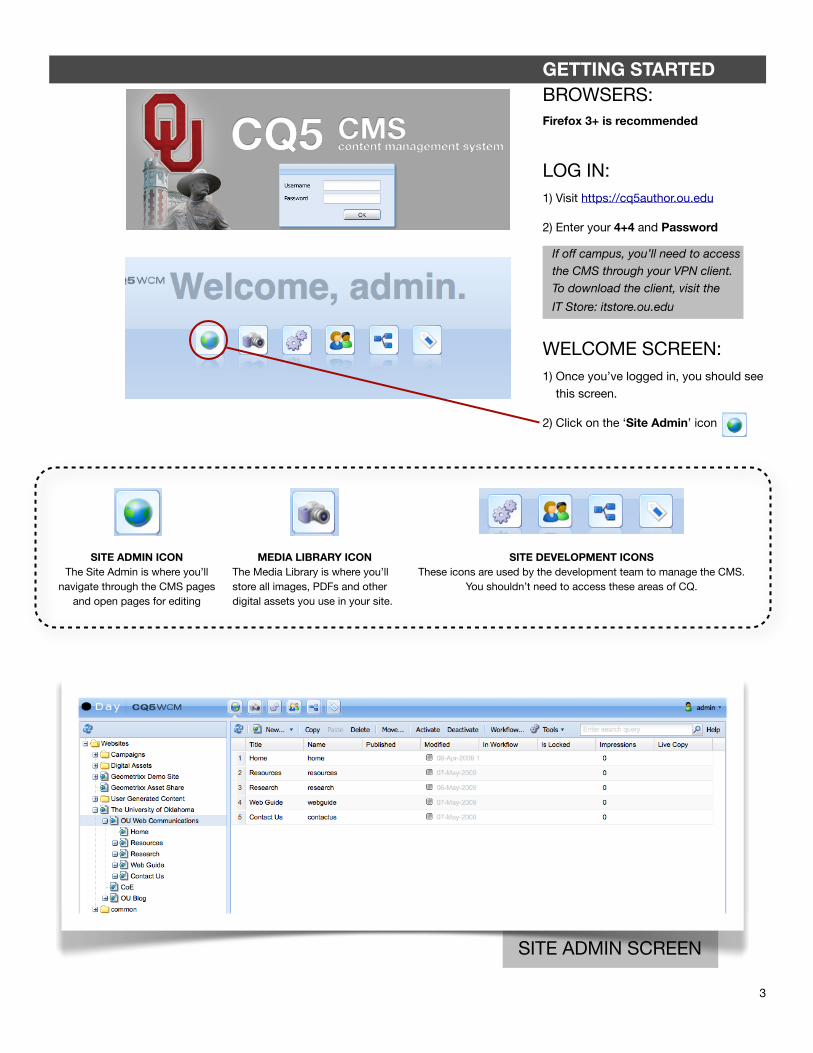
GETTING STARTEDBROWSERS:Firefox 3+ is recommended
LOG IN:1) Visit https://cq5author.ou.edu
2) Enter your 4+4 and Password
WELCOME SCREEN:1) Once you’ve logged in, you should see
this screen.
2) Click on the ‘Site Admin’ icon
SITE ADMIN ICONThe Site Admin is where you’ll
navigate through the CMS pages and open pages for editing
MEDIA LIBRARY ICONThe Media Library is where you’ll store all images, PDFs and other digital assets you use in your site.
SITE DEVELOPMENT ICONSThese icons are used by the development team to manage the CMS.
You shouldn’t need to access these areas of CQ.
SITE ADMIN SCREEN
If off campus, you’ll need to access the CMS through your VPN client. To download the client, visit the
IT Store: itstore.ou.edu
4
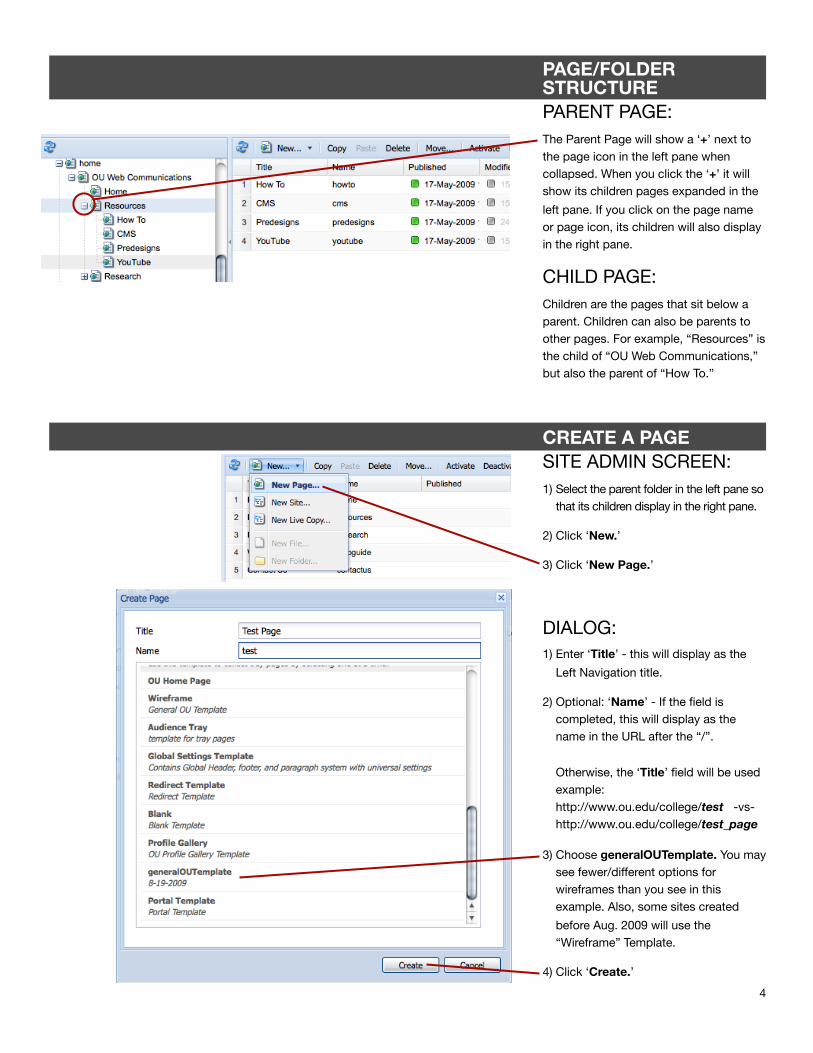
PAGE/FOLDER STRUCTUREPARENT PAGE:The Parent Page will show a ‘+’ next to the page icon in the left pane when collapsed. When you click the ‘+’ it will show its children pages expanded in the
left pane. If you click on the page name or page icon, its children will also display in the right pane.
CHILD PAGE:Children are the pages that sit below a parent. Children can also be parents to other pages. For example, “Resources” is the child of “OU Web Communications,” but also the parent of “How To.”
CREATE A PAGESITE ADMIN SCREEN:1) Select the parent folder in the left pane so
that its children display in the right pane.
2) Click ‘New.’
3) Click ‘New Page.’
DIALOG:1) Enter ‘Title’ - this will display as the
Left Navigation title.
2) Optional: ‘Name’ - If the field is completed, this will display as the name in the URL after the “/”.
Otherwise, the ‘Title’ field will be usedexample:http://www.ou.edu/college/test -vs- http://www.ou.edu/college/test_page
3) Choose generalOUTemplate. You may see fewer/different options for wireframes than you see in this example. Also, some sites created
before Aug. 2009 will use the “Wireframe” Template.
4) Click ‘Create.’
5
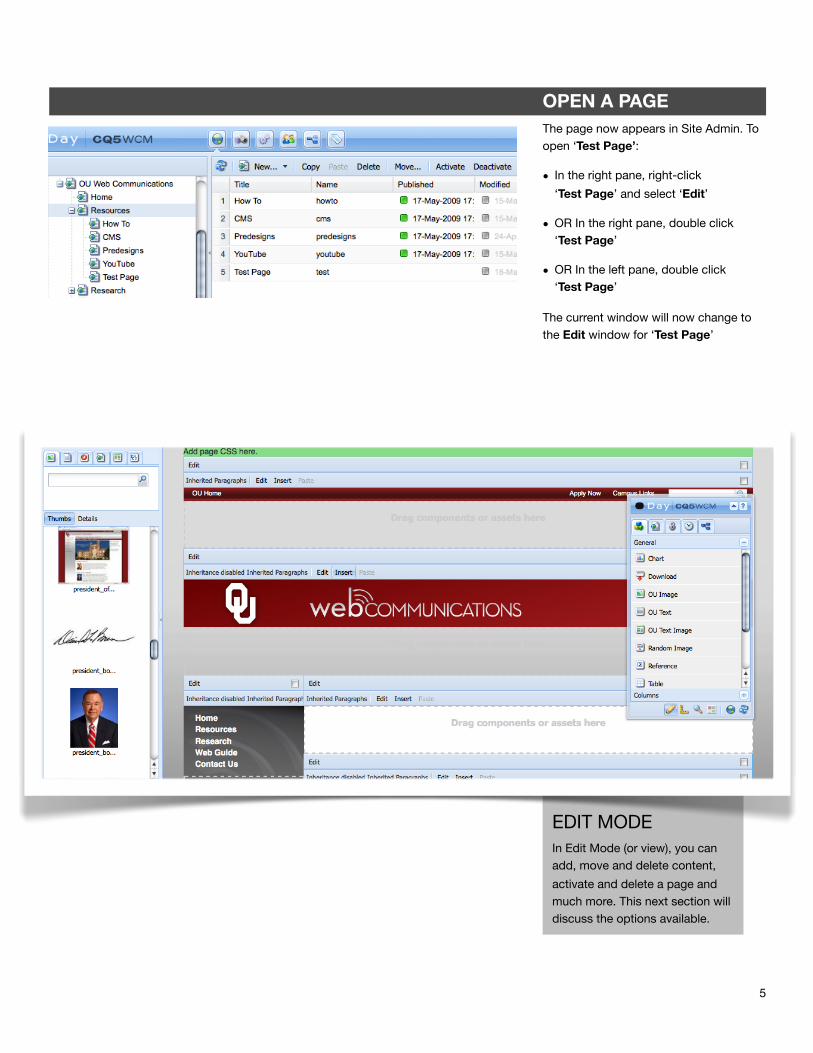
EDIT MODEIn Edit Mode (or view), you can add, move and delete content,
activate and delete a page and much more. This next section will discuss the options available.
OPEN A PAGEThe page now appears in Site Admin. To open ‘Test Page’:
• In the right pane, right-click
‘Test Page’ and select ‘Edit’
• OR In the right pane, double click ‘Test Page’
• OR In the left pane, double click ‘Test Page’
The current window will now change to the Edit window for ‘Test Page’
6
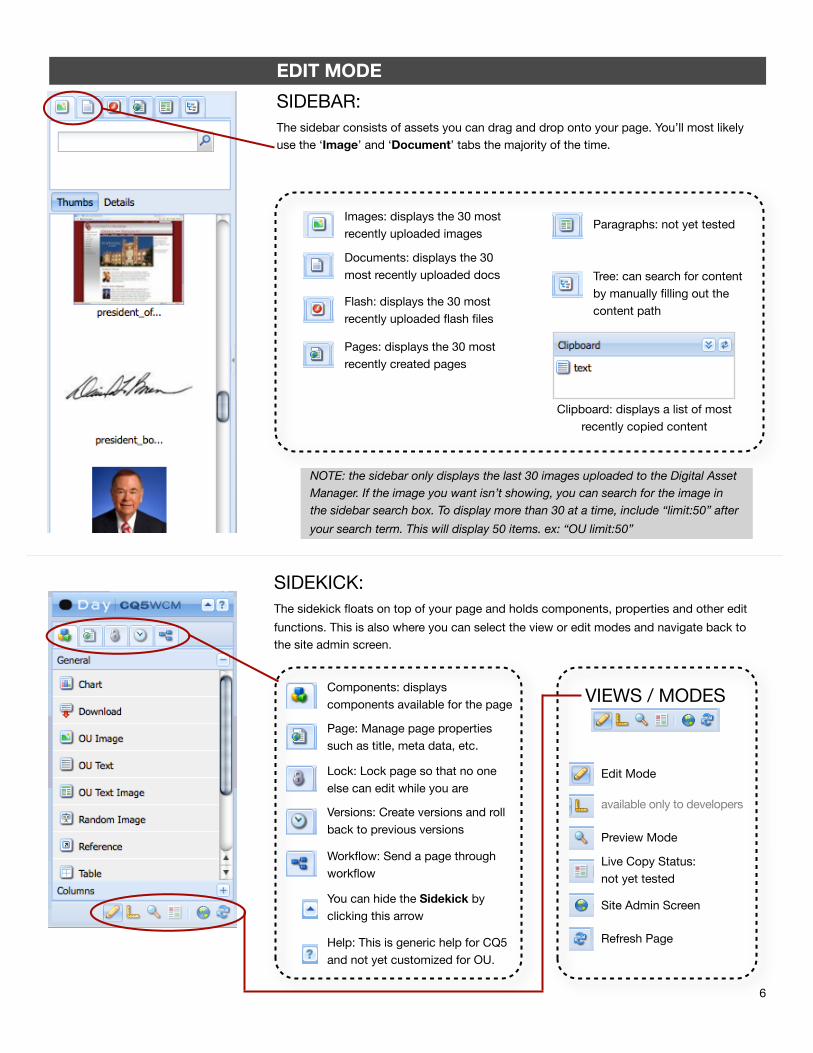
Images: displays the 30 most recently uploaded images
Documents: displays the 30 most recently uploaded docs
Flash: displays the 30 most recently uploaded flash files
Pages: displays the 30 most recently created pages
Paragraphs: not yet tested
Tree: can search for content by manually filling out the content path
Clipboard: displays a list of most recently copied content
SIDEKICK:The sidekick floats on top of your page and holds components, properties and other edit
functions. This is also where you can select the view or edit modes and navigate back to the site admin screen.
Components: displays components available for the page
Page: Manage page properties such as title, meta data, etc.
Lock: Lock page so that no one else can edit while you are
Versions: Create versions and roll back to previous versions
Workflow: Send a page through workflow
EDIT MODE
SIDEBAR:The sidebar consists of assets you can drag and drop onto your page. You’ll most likely use the ‘Image’ and ‘Document’ tabs the majority of the time.
You can hide the Sidekick by clicking this arrow
Help: This is generic help for CQ5 and not yet customized for OU.
VIEWS / MODES
Edit Mode
available only to developers
Preview Mode
Live Copy Status: not yet tested
Site Admin Screen
Refresh Page
NOTE: the sidebar only displays the last 30 images uploaded to the Digital Asset Manager. If the image you want isn’t showing, you can search for the image in the sidebar search box. To display more than 30 at a time, include “limit:50” after
your search term. This will display 50 items. ex: “OU limit:50”
7
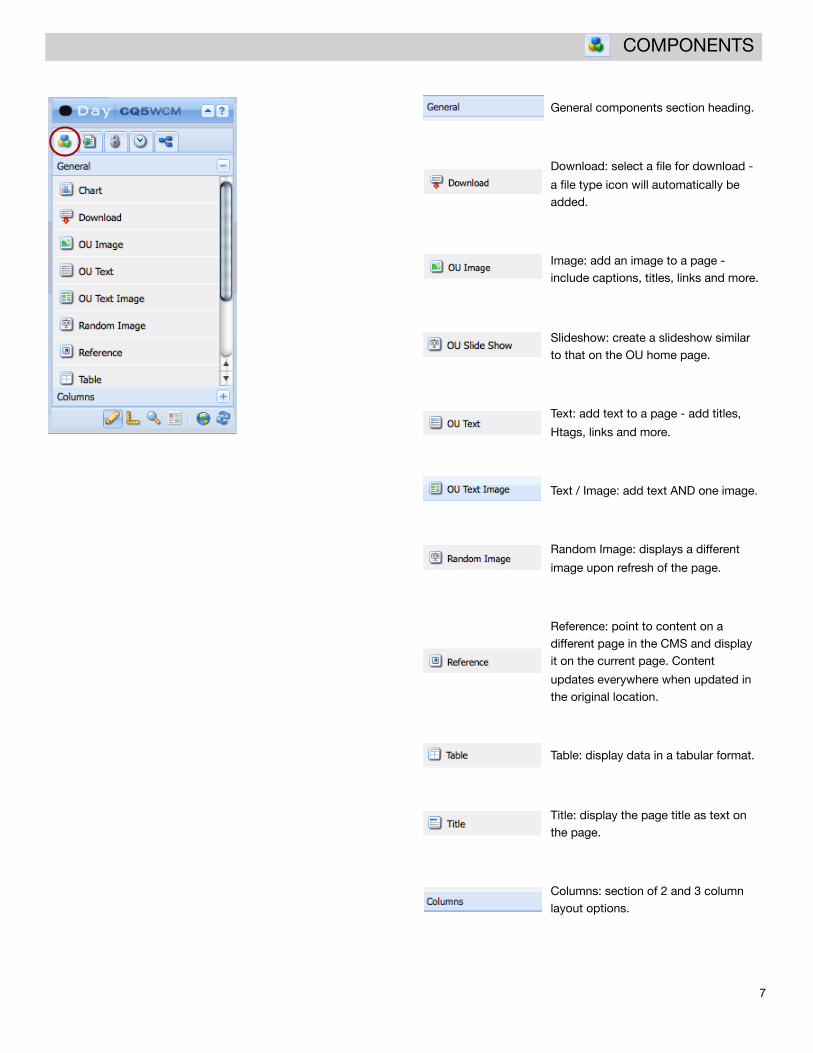
General components section heading.
Download: select a file for download -
a file type icon will automatically be added.
Image: add an image to a page - include captions, titles, links and more.
Slideshow: create a slideshow similar to that on the OU home page.
Text: add text to a page - add titles,
Htags, links and more.
Text / Image: add text AND one image.
Random Image: displays a different
image upon refresh of the page.
Reference: point to content on a different page in the CMS and display it on the current page. Content
updates everywhere when updated in the original location.
Table: display data in a tabular format.
Title: display the page title as text on the page.
Columns: section of 2 and 3 column layout options.
COMPONENTS
8
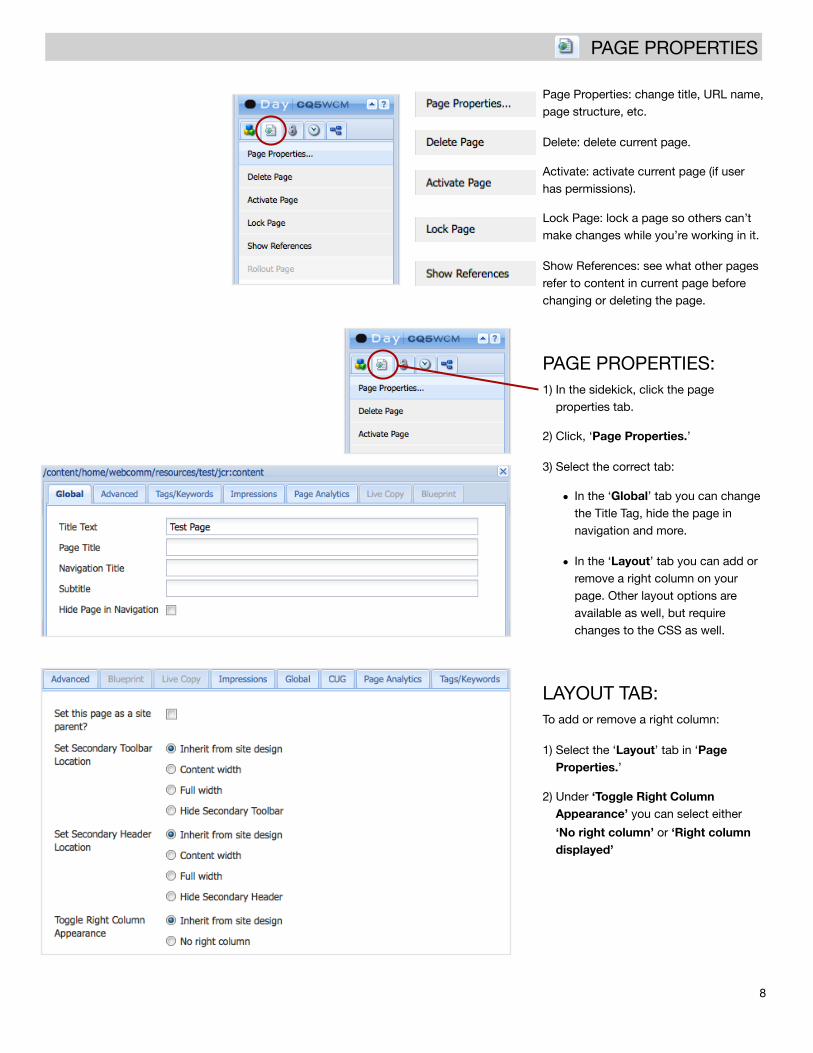
PAGE PROPERTIES
Page Properties: change title, URL name, page structure, etc.
Delete: delete current page.
Activate: activate current page (if user has permissions).
Lock Page: lock a page so others can’t make changes while you’re working in it.
Show References: see what other pages refer to content in current page before changing or deleting the page.
PAGE PROPERTIES:1) In the sidekick, click the page
properties tab.
2) Click, ‘Page Properties.’
3) Select the correct tab:
• In the ‘Global’ tab you can change the Title Tag, hide the page in navigation and more.
• In the ‘Layout’ tab you can add or remove a right column on your page. Other layout options are available as well, but require changes to the CSS as well.
LAYOUT TAB:To add or remove a right column:
1) Select the ‘Layout’ tab in ‘Page Properties.’
2) Under ‘Toggle Right Column Appearance’ you can select either
‘No right column’ or ‘Right column displayed’
9
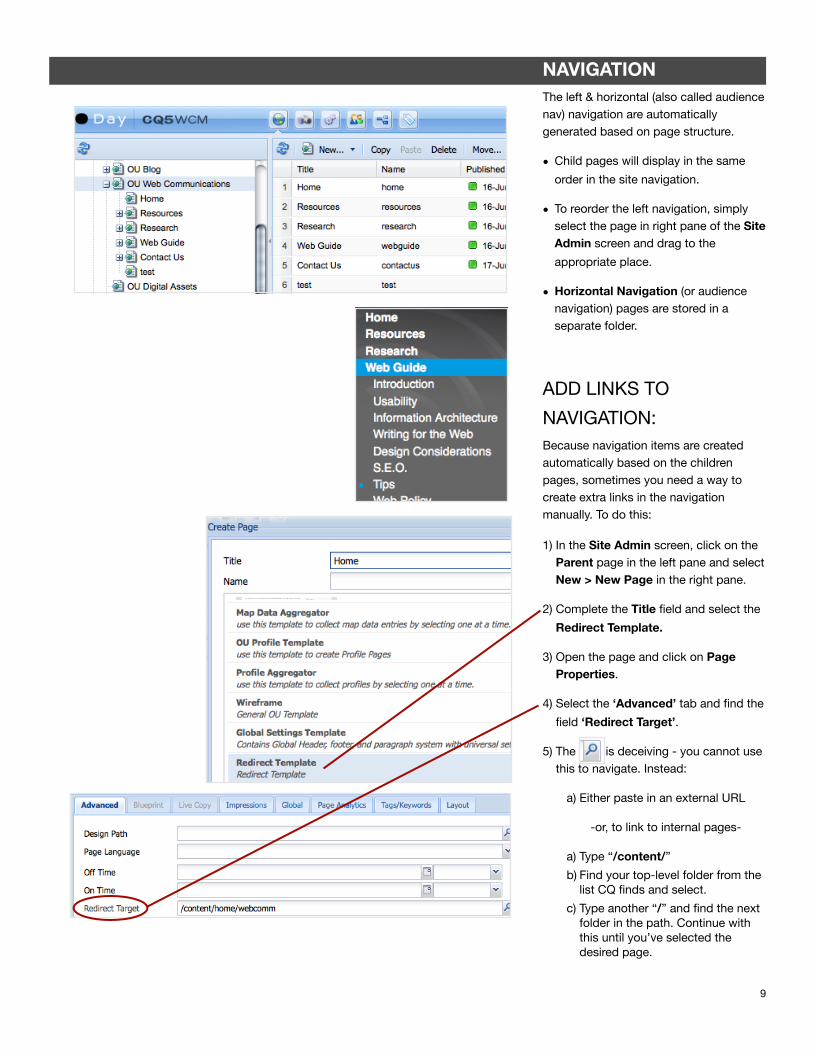
NAVIGATIONThe left & horizontal (also called audience nav) navigation are automatically generated based on page structure.
• Child pages will display in the same
order in the site navigation.
• To reorder the left navigation, simply select the page in right pane of the Site Admin screen and drag to the
appropriate place.
• Horizontal Navigation (or audience navigation) pages are stored in a separate folder.
ADD LINKS TO
NAVIGATION:Because navigation items are created automatically based on the children pages, sometimes you need a way to create extra links in the navigation manually. To do this:
1) In the Site Admin screen, click on the Parent page in the left pane and select New > New Page in the right pane.
2) Complete the Title field and select the
Redirect Template.
3) Open the page and click on Page Properties.
4) Select the ‘Advanced’ tab and find the
field ‘Redirect Target’.
5) The is deceiving - you cannot use this to navigate. Instead:
a) Either paste in an external URL
-or, to link to internal pages-
a) Type “/content/”
b) Find your top-level folder from the list CQ finds and select.
c) Type another “/” and find the next folder in the path. Continue with this until you’ve selected the desired page.
10
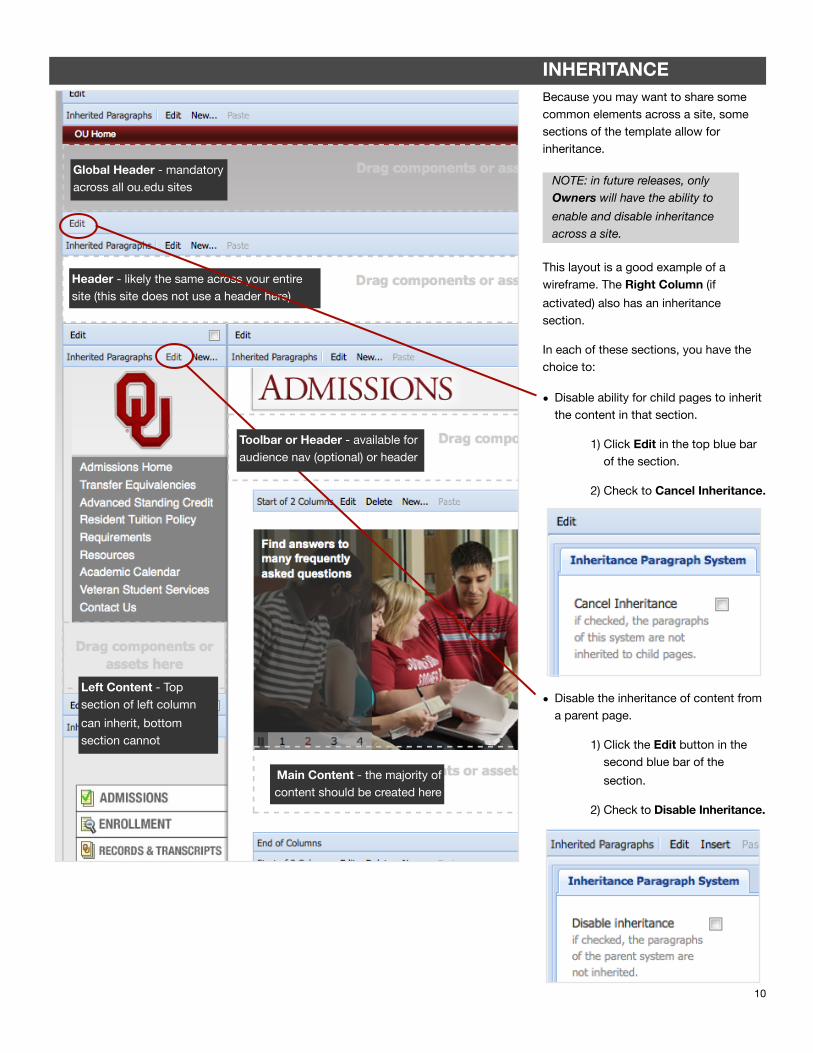
INHERITANCEBecause you may want to share some common elements across a site, some sections of the template allow for inheritance.
This layout is a good example of a wireframe. The Right Column (if
activated) also has an inheritance section.
In each of these sections, you have the choice to:
• Disable ability for child pages to inherit the content in that section.
1) Click Edit in the top blue bar of the section.
2) Check to Cancel Inheritance.
• Disable the inheritance of content from a parent page.
1) Click the Edit button in the second blue bar of the
section.
2) Check to Disable Inheritance.
NOTE: in future releases, only Owners will have the ability to
enable and disable inheritance across a site.
Global Header - mandatory across all ou.edu sites
Header - likely the same across your entire site (this site does not use a header here)
Left Content - Top section of left column
can inherit, bottom section cannot
Main Content - the majority of content should be created here
Toolbar or Header - available for audience nav (optional) or header
11
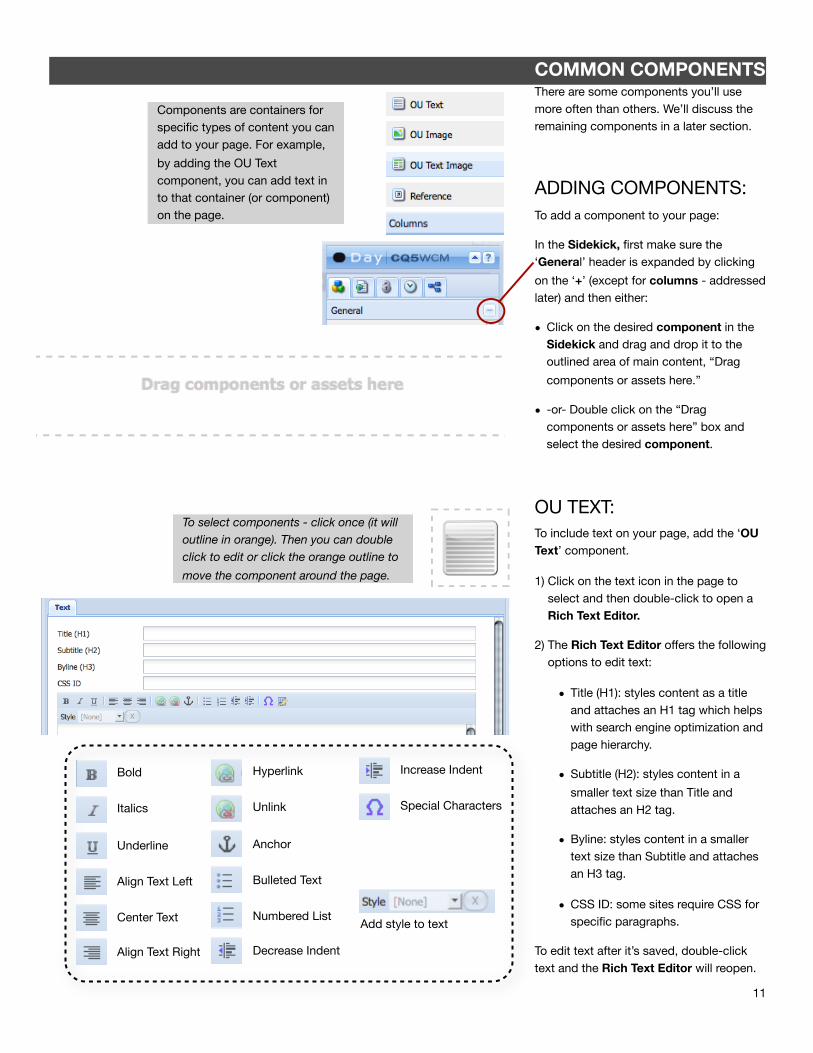
COMMON COMPONENTSThere are some components you’ll use more often than others. We’ll discuss the remaining components in a later section.
ADDING COMPONENTS:To add a component to your page:
In the Sidekick, first make sure the ‘General’ header is expanded by clicking
on the ‘+’ (except for columns - addressed later) and then either:
• Click on the desired component in the Sidekick and drag and drop it to the outlined area of main content, “Drag
components or assets here.”
• -or- Double click on the “Drag components or assets here” box and select the desired component.
OU TEXT:To include text on your page, add the ‘OU Text’ component.
1) Click on the text icon in the page to select and then double-click to open a Rich Text Editor.
2) The Rich Text Editor offers the following options to edit text:
• Title (H1): styles content as a title and attaches an H1 tag which helps with search engine optimization and page hierarchy.
• Subtitle (H2): styles content in a
smaller text size than Title and attaches an H2 tag.
• Byline: styles content in a smaller text size than Subtitle and attaches an H3 tag.
• CSS ID: some sites require CSS for specific paragraphs.
To edit text after it’s saved, double-click text and the Rich Text Editor will reopen.
Components are containers for specific types of content you can add to your page. For example,
by adding the OU Text component, you can add text in to that container (or component) on the page.
Bold
Italics
Underline
Align Text Left
Center Text
Align Text Right
Hyperlink
Unlink
Anchor
Bulleted Text
Numbered List
Decrease Indent
Increase Indent
Special Characters
Add style to text
To select components - click once (it will outline in orange). Then you can double click to edit or click the orange outline to
move the component around the page.
12
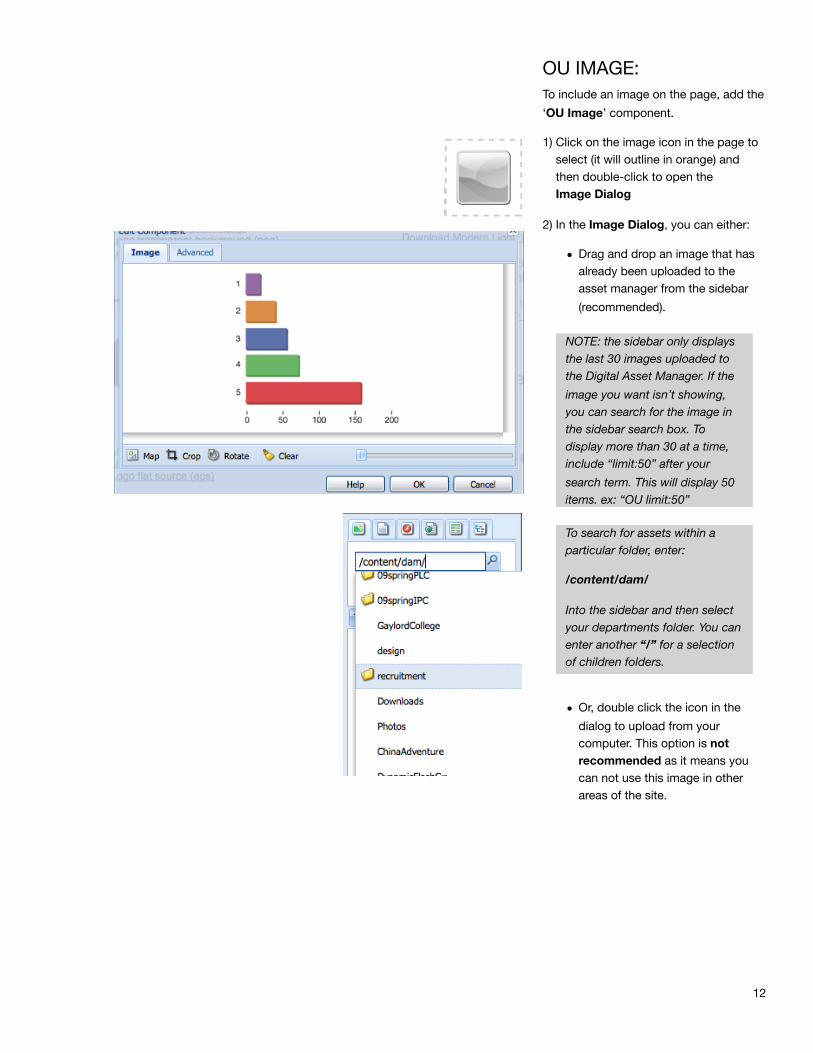
OU IMAGE:To include an image on the page, add the
‘OU Image’ component.
1) Click on the image icon in the page to select (it will outline in orange) and then double-click to open the Image Dialog
2) In the Image Dialog, you can either:
• Drag and drop an image that has already been uploaded to the asset manager from the sidebar
(recommended).
• Or, double click the icon in the
dialog to upload from your computer. This option is not recommended as it means you can not use this image in other areas of the site.
NOTE: the sidebar only displays the last 30 images uploaded to the Digital Asset Manager. If the
image you want isn’t showing, you can search for the image in the sidebar search box. To display more than 30 at a time, include “limit:50” after your
search term. This will display 50 items. ex: “OU limit:50”
To search for assets within a particular folder, enter:
/content/dam/
Into the sidebar and then select your departments folder. You can enter another “/” for a selection of children folders.
13
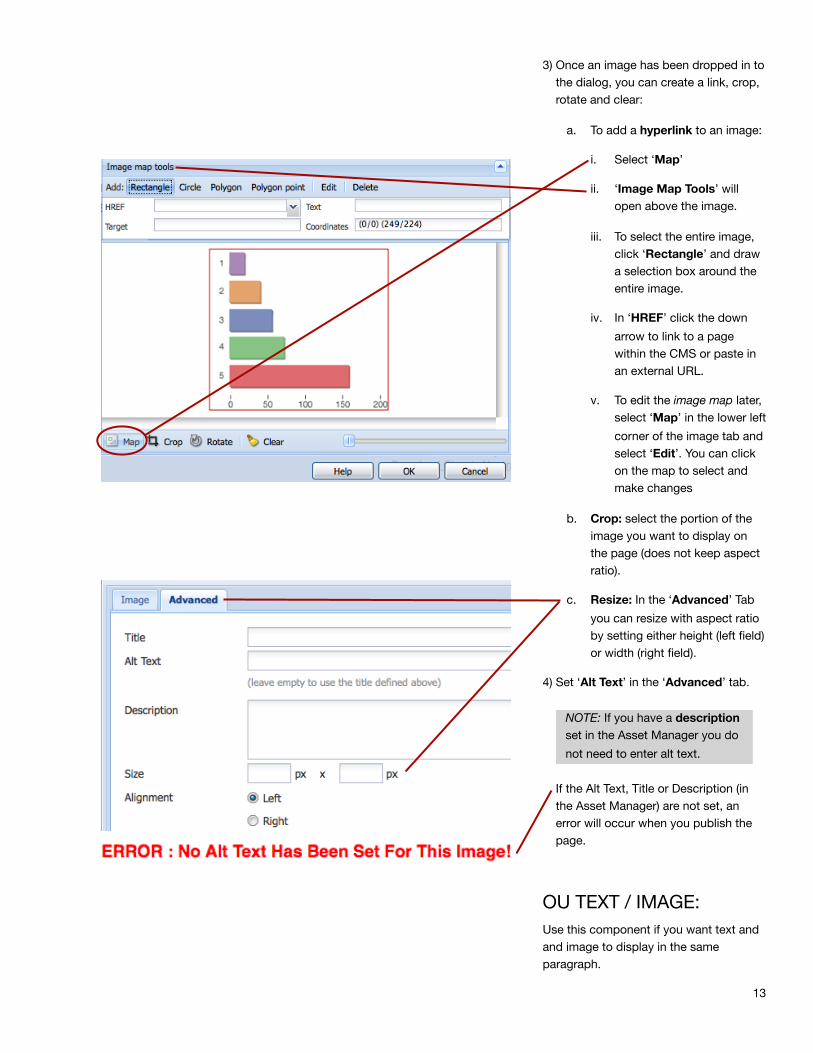
3) Once an image has been dropped in to the dialog, you can create a link, crop, rotate and clear:
a. To add a hyperlink to an image:
i. Select ‘Map’
ii. ‘Image Map Tools’ will open above the image.
iii. To select the entire image, click ‘Rectangle’ and draw a selection box around the entire image.
iv. In ‘HREF’ click the down
arrow to link to a page within the CMS or paste in an external URL.
v. To edit the image map later, select ‘Map’ in the lower left
corner of the image tab and select ‘Edit’. You can click on the map to select and make changes
b. Crop: select the portion of the image you want to display on the page (does not keep aspect ratio).
c. Resize: In the ‘Advanced’ Tab
you can resize with aspect ratio by setting either height (left field) or width (right field).
4) Set ‘Alt Text’ in the ‘Advanced’ tab.
If the Alt Text, Title or Description (in the Asset Manager) are not set, an error will occur when you publish the page.
OU TEXT / IMAGE:Use this component if you want text and and image to display in the same paragraph.
NOTE: If you have a description set in the Asset Manager you do
not need to enter alt text.
14
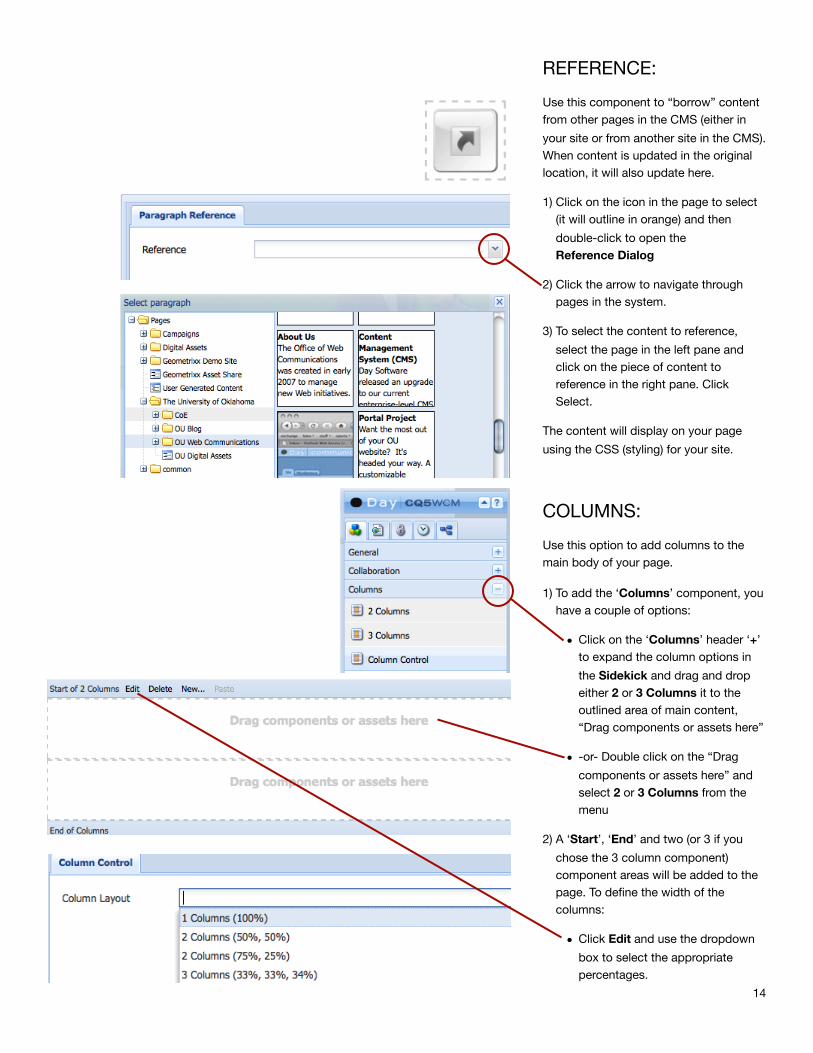
REFERENCE:
Use this component to “borrow” content from other pages in the CMS (either in
your site or from another site in the CMS). When content is updated in the original location, it will also update here.
1) Click on the icon in the page to select (it will outline in orange) and then
double-click to open the Reference Dialog
2) Click the arrow to navigate through pages in the system.
3) To select the content to reference,
select the page in the left pane and click on the piece of content to reference in the right pane. Click Select.
The content will display on your page
using the CSS (styling) for your site.
COLUMNS:
Use this option to add columns to the main body of your page.
1) To add the ‘Columns’ component, you have a couple of options:
• Click on the ‘Columns’ header ‘+’ to expand the column options in
the Sidekick and drag and drop either 2 or 3 Columns it to the outlined area of main content, “Drag components or assets here”
• -or- Double click on the “Drag
components or assets here” and select 2 or 3 Columns from the menu
2) A ‘Start’, ‘End’ and two (or 3 if you
chose the 3 column component) component areas will be added to the page. To define the width of the columns:
• Click Edit and use the dropdown
box to select the appropriate percentages.
15
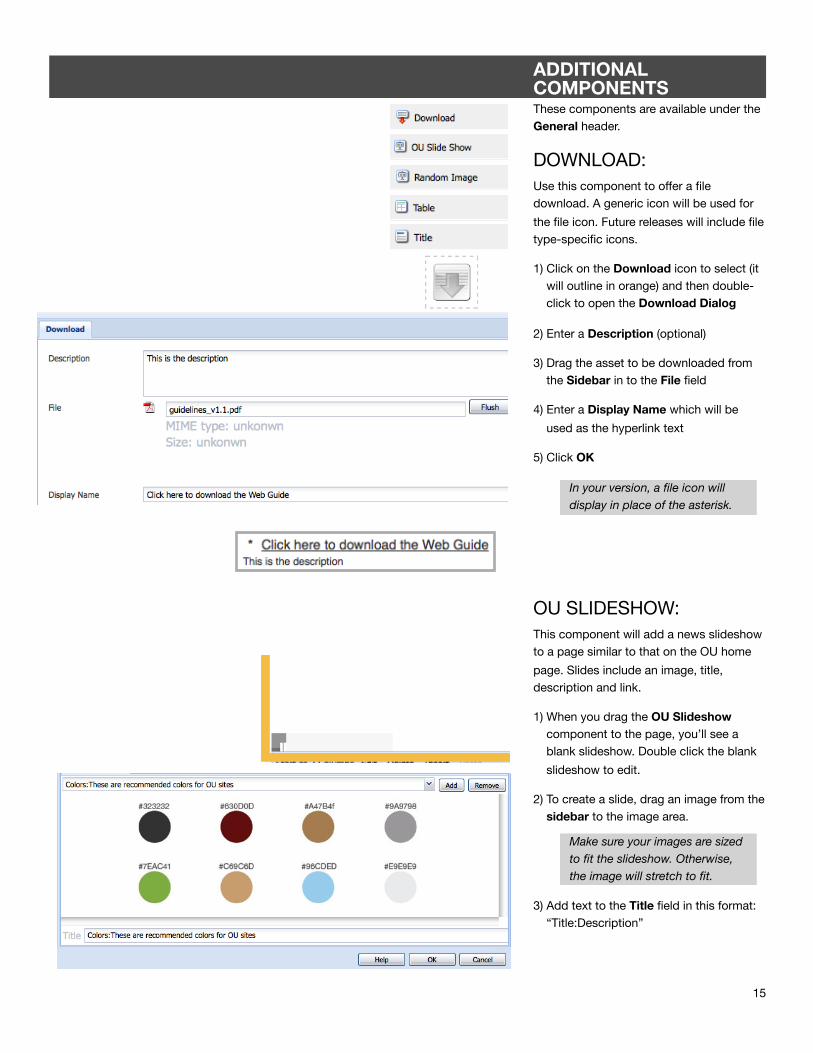
In your version, a file icon will display in place of the asterisk.
Make sure your images are sized to fit the slideshow. Otherwise, the image will stretch to fit.
ADDITIONAL COMPONENTSThese components are available under the General header.
DOWNLOAD:Use this component to offer a file download. A generic icon will be used for
the file icon. Future releases will include file type-specific icons.
1) Click on the Download icon to select (it will outline in orange) and then double-click to open the Download Dialog
2) Enter a Description (optional)
3) Drag the asset to be downloaded from the Sidebar in to the File field
4) Enter a Display Name which will be
used as the hyperlink text
5) Click OK
OU SLIDESHOW:This component will add a news slideshow to a page similar to that on the OU home
page. Slides include an image, title, description and link.
1) When you drag the OU Slideshow component to the page, you’ll see a blank slideshow. Double click the blank
slideshow to edit.
2) To create a slide, drag an image from the sidebar to the image area.
3) Add text to the Title field in this format:“Title:Description”
16
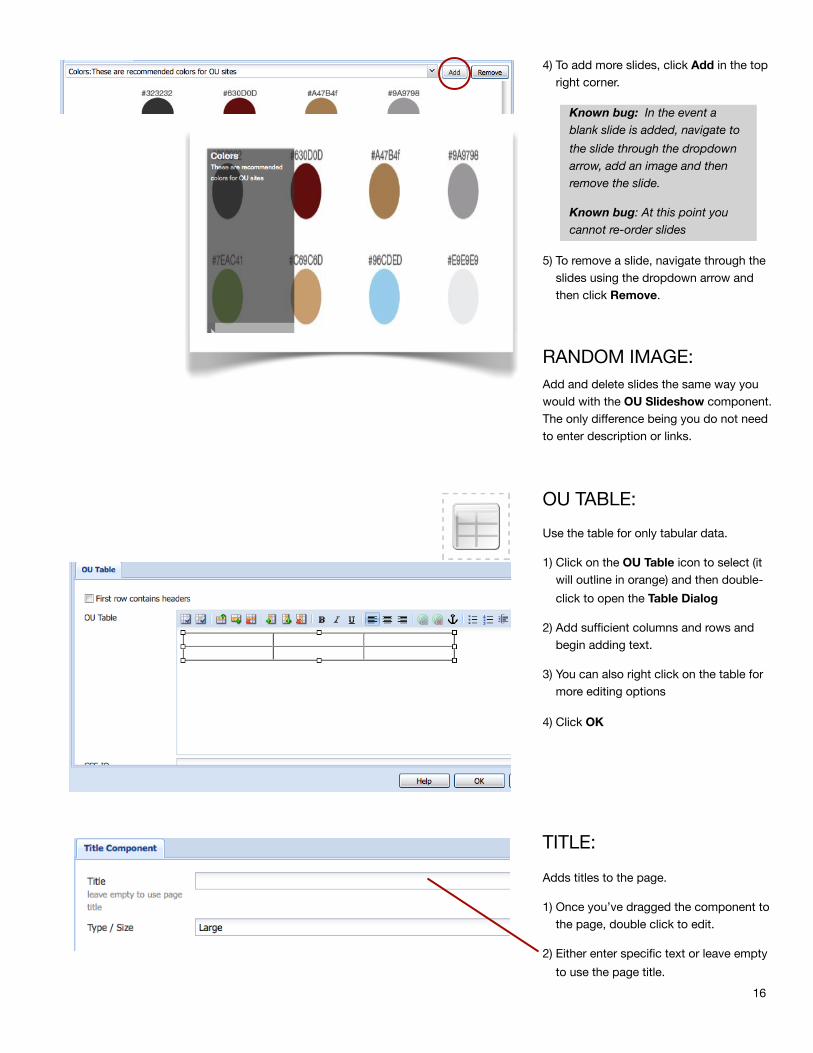
4) To add more slides, click Add in the top right corner.
5) To remove a slide, navigate through the slides using the dropdown arrow and then click Remove.
RANDOM IMAGE:Add and delete slides the same way you would with the OU Slideshow component. The only difference being you do not need to enter description or links.
OU TABLE:
Use the table for only tabular data.
1) Click on the OU Table icon to select (it will outline in orange) and then double-
click to open the Table Dialog
2) Add sufficient columns and rows and begin adding text.
3) You can also right click on the table for more editing options
4) Click OK
TITLE:
Adds titles to the page.
1) Once you’ve dragged the component to the page, double click to edit.
2) Either enter specific text or leave empty
to use the page title.
Known bug: In the event a blank slide is added, navigate to
the slide through the dropdown arrow, add an image and then remove the slide.
Known bug: At this point you cannot re-order slides
17
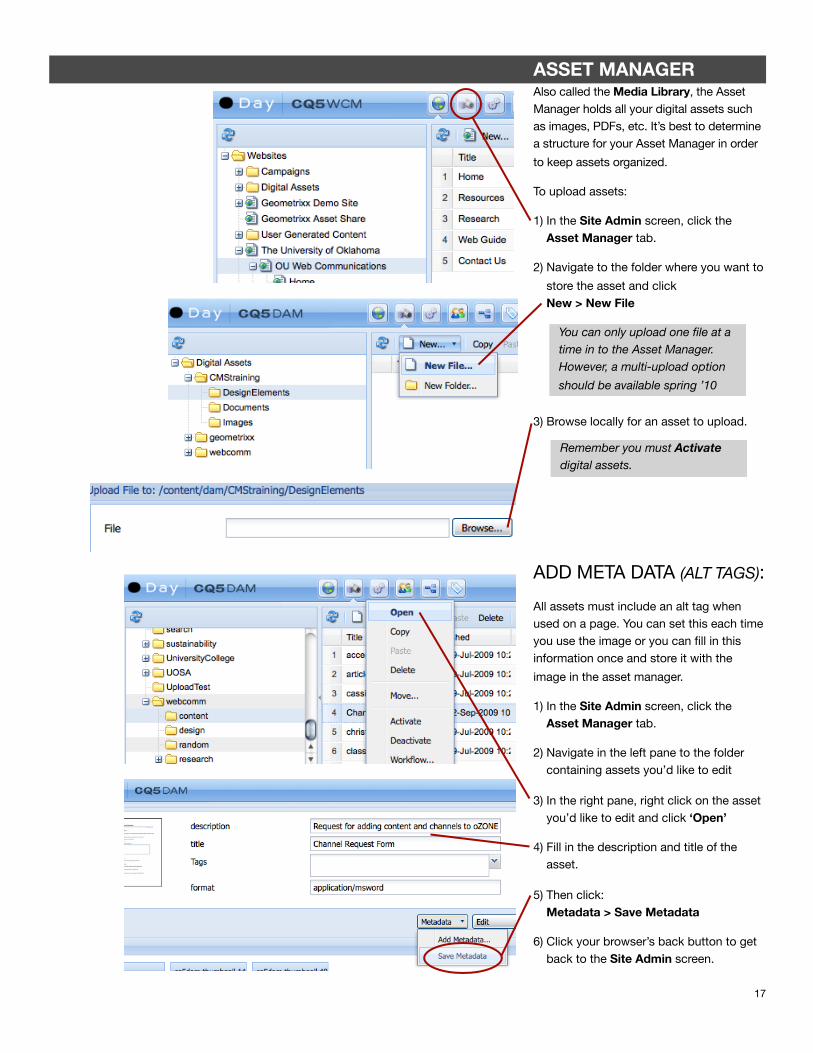
ASSET MANAGERAlso called the Media Library, the Asset Manager holds all your digital assets such as images, PDFs, etc. It’s best to determine a structure for your Asset Manager in order
to keep assets organized.
To upload assets:
1) In the Site Admin screen, click the Asset Manager tab.
2) Navigate to the folder where you want to
store the asset and click New > New File
3) Browse locally for an asset to upload.
ADD META DATA (ALT TAGS):
All assets must include an alt tag when used on a page. You can set this each time you use the image or you can fill in this information once and store it with the
image in the asset manager.
1) In the Site Admin screen, click the Asset Manager tab.
2) Navigate in the left pane to the folder containing assets you’d like to edit
3) In the right pane, right click on the asset you’d like to edit and click ‘Open’
4) Fill in the description and title of the asset.
5) Then click:Metadata > Save Metadata
6) Click your browser’s back button to get back to the Site Admin screen.
You can only upload one file at a time in to the Asset Manager. However, a multi-upload option
should be available spring ’10
Remember you must Activate digital assets.
18
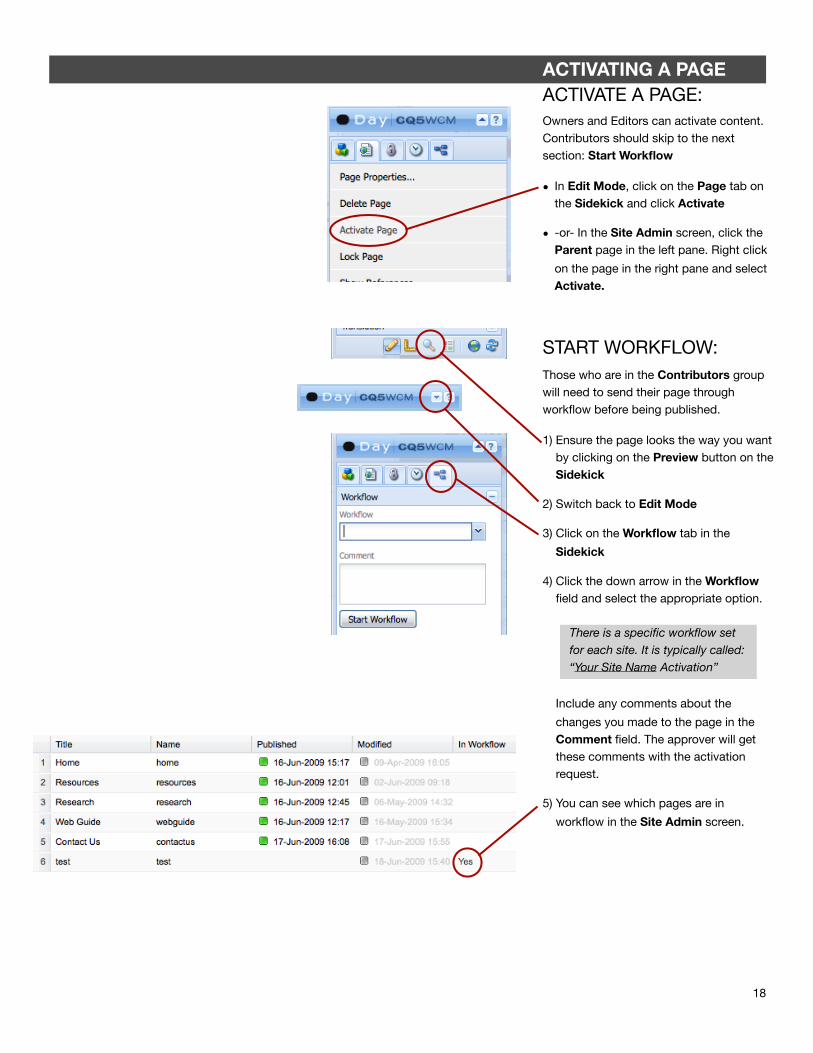
ACTIVATING A PAGEACTIVATE A PAGE:Owners and Editors can activate content. Contributors should skip to the next section: Start Workflow
• In Edit Mode, click on the Page tab on the Sidekick and click Activate
• -or- In the Site Admin screen, click the Parent page in the left pane. Right click
on the page in the right pane and select Activate.
START WORKFLOW:Those who are in the Contributors group will need to send their page through workflow before being published.
1) Ensure the page looks the way you want by clicking on the Preview button on the Sidekick
2) Switch back to Edit Mode
3) Click on the Workflow tab in the
Sidekick
4) Click the down arrow in the Workflow field and select the appropriate option.
Include any comments about the
changes you made to the page in the Comment field. The approver will get these comments with the activation request.
5) You can see which pages are in
workflow in the Site Admin screen.
There is a specific workflow set for each site. It is typically called: “Your Site Name Activation”
19
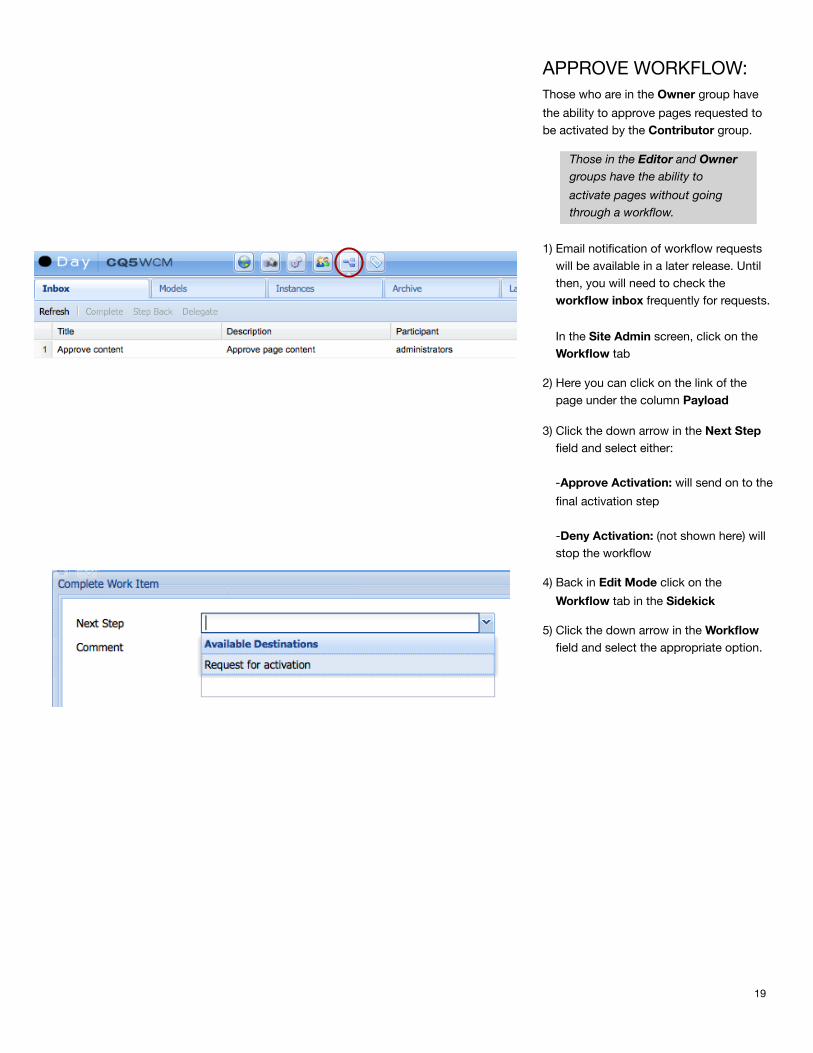
APPROVE WORKFLOW:Those who are in the Owner group have
the ability to approve pages requested to be activated by the Contributor group.
1) Email notification of workflow requests will be available in a later release. Until then, you will need to check the workflow inbox frequently for requests.
In the Site Admin screen, click on the Workflow tab
2) Here you can click on the link of the page under the column Payload
3) Click the down arrow in the Next Step field and select either:
-Approve Activation: will send on to the
final activation step
-Deny Activation: (not shown here) will stop the workflow
4) Back in Edit Mode click on the
Workflow tab in the Sidekick
5) Click the down arrow in the Workflow field and select the appropriate option.
Those in the Editor and Owner groups have the ability to
activate pages without going through a workflow.
Recommended