www.papasboxes.com
www.papasboxes.com 1
Cigar Box Ukulele Kit Assembly Instructions
Hi,
Thanks for purchasing a Cigar Box Ukulele kit from Papa’s Boxes.
You will find that this kit is very easy to assemble. It’s also a lot of fun to build and even
more fun to play. That’s the main thing “Have Fun”!!!
This is not something new. Cigar box instruments have a long history that spans many
genres, including Blues, Country, and Hawaiian.
Many famous musicians got there start on cigar box instruments.
Carl Perkins, Jimi Hendrix, Roy Clark, and even Mickey Mouse to name a few! You
may be next!!
There are no rules. Cigar box instruments are humble by nature. You can’t do it wrong.
We have provided this kit as a starting point. Use your imagination. If you come up with
something that works well, let me know. Heck I might add it to the kit.
I hope you love your new Cigar Box Ukulele, and have many hours of enjoyment
building and playing it.
Papa Out
www.papasboxes.com
www.papasboxes.com 2
Tools required
Drill (any hand or power drill)
Screw Driver (Philips head)
Scraping tool
(Putty knife, chisel, or razor blade)
¾” Masking tape
12” Straight edged ruler
Pencil
Good quality wood glue
Titebond II is recommended

www.papasboxes.com
www.papasboxes.com 3
Parts included in kit
(A) 1 each Tail block
(B) 1 each Neck block
(C) 1 each Neck alignment template
(D) 1 each Tail alignment template
(E) 1 each 3/32” drill bit
(F) 3 each #6 x ¾” wood screw
(G) 1 each 3/16” drill bit
(H) 4 each Zither pins
(I) 1 each String Guard (for tenor and baritone kits only)
(J) 1 each Angle bracket
(K) 1 each #8 x 1” wood screw
(L) 1 each #8 x ¾” wood screw
(M) 1 each 1/8” drill bit
(N) 1 each Box brace
Items NOT labled with a letter
Neck and finger board assembly
Set of strings
Bridge
Nail for template punctures
Brass tuning key (for zither pin kits)
Geared tuner assembly (for geared tuner kits)
www.papasboxes.com
www.papasboxes.com 4
1. Finding a box
For this kit it is recommended that you use a wooden cigar box with a bottom
that is about 1/8” thick. The bottom of the box will be used as the front of
the Uke.
Soprano use box between 7” and 9” long
Concert use box between 8” and 10” long
Tenor use box between 8” and 10” long
Baritone use box between 9” and 11” long
Wider is better. 6” is the minimum width that should be used
Box must be at least 2 ½” deep
2. Preparing the box
Remove all paper from the inside of the box. Use a scraping tool and warm
water if necessary. (Use water conservatively) Be sure that paper is
completely removed from the ends as you will be gluing blocking there.

www.papasboxes.com
www.papasboxes.com 5
3. Installation of blocking
Spread glue evenly on one long edge and face of blocks marked (A) & (B)
Now firmly place each block at opposite ends of the box so that the thinner
edge surface (with glue) is against bottom of the box, and the 2” surface (with
glue) is against the end. Blocks should be in the center of each end.
Block (B) should be on the end of the box that you wish to attach the neck to.
Allow drying time as per glue manufacturer’s instructions.

www.papasboxes.com
www.papasboxes.com 6
4. Neck installation
Cut out Neck alignment template (C) and carefully fold on dotted line.
With bottom of box up, identify the end that you wish the neck to be attached
to. Using ruler, find and mark the center of the box. Attach Neck alignment
template (C) with masking tape as shown below
Note: Avoid contact with tape and any paper portions of the box as the tape
could damage the paper when removed.
www.papasboxes.com
www.papasboxes.com 7
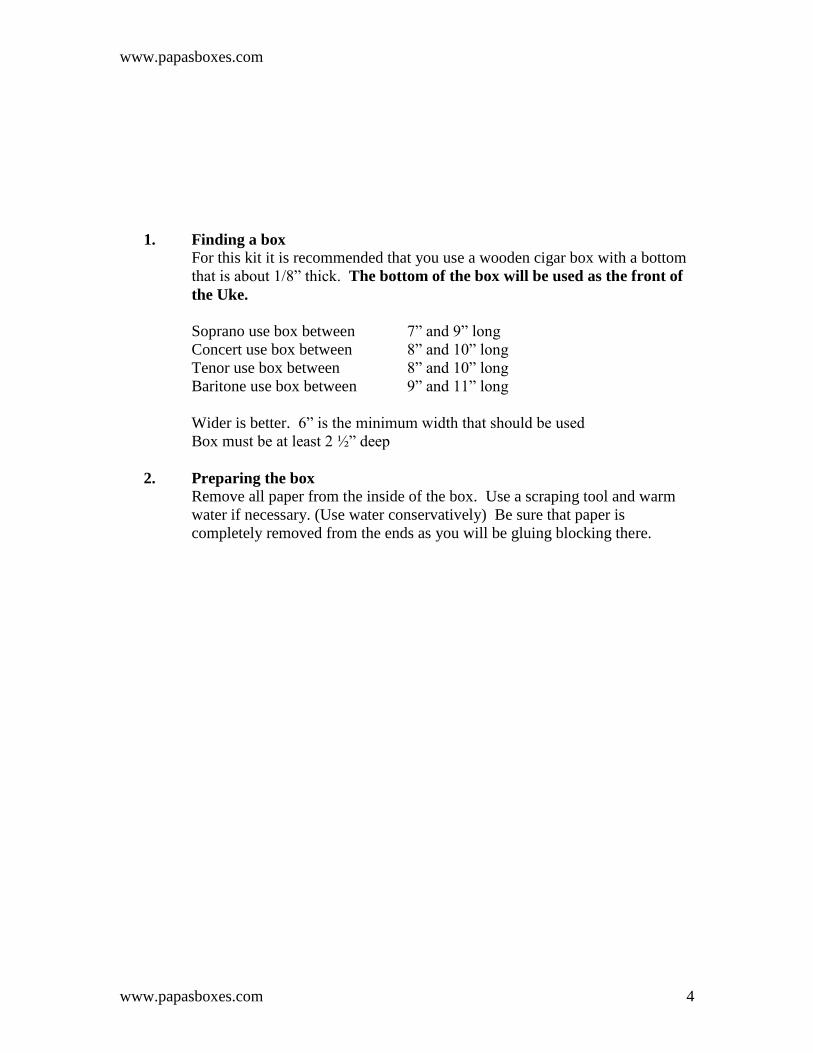
Using provided nail, firmly mark box through all 4 cross hairs.
(See Below)
www.papasboxes.com
www.papasboxes.com 8
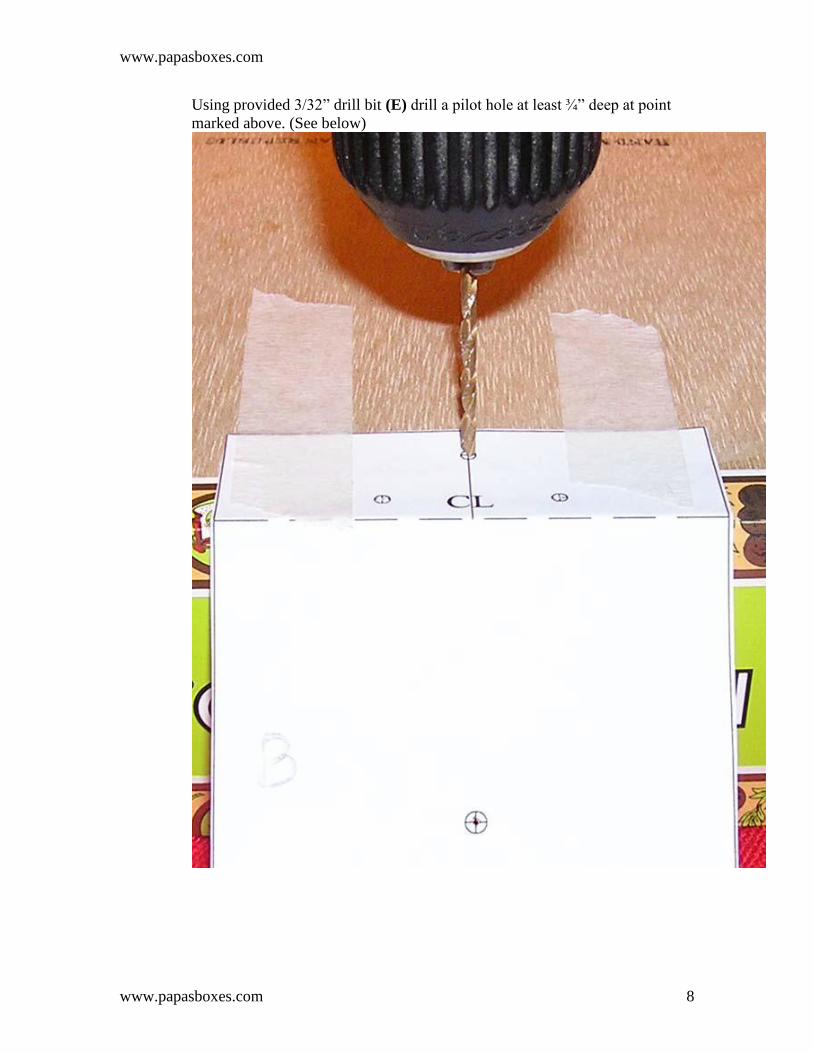
Using provided 3/32” drill bit (E) drill a pilot hole at least ¾” deep at point
marked above. (See below)
www.papasboxes.com
www.papasboxes.com 9
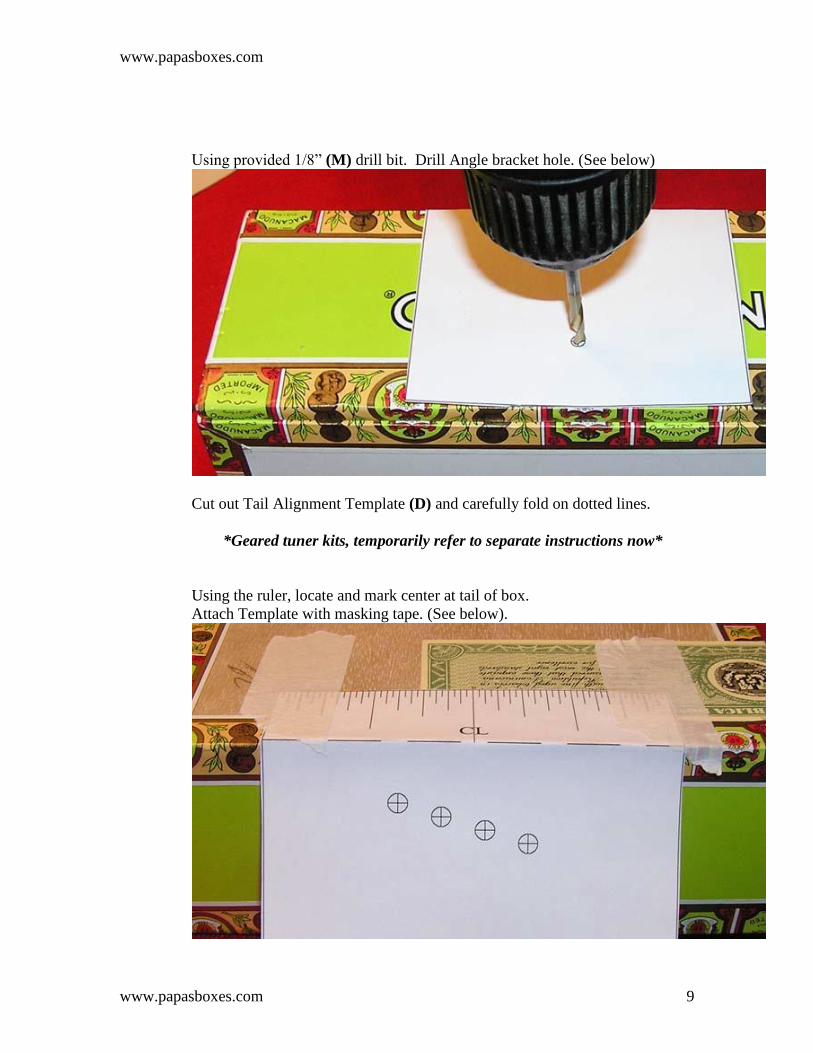
Using provided 1/8” (M) drill bit. Drill Angle bracket hole. (See below)
Cut out Tail Alignment Template (D) and carefully fold on dotted lines.
*Geared tuner kits, temporarily refer to separate instructions now*
Using the ruler, locate and mark center at tail of box.
Attach Template with masking tape. (See below).
www.papasboxes.com
www.papasboxes.com 10
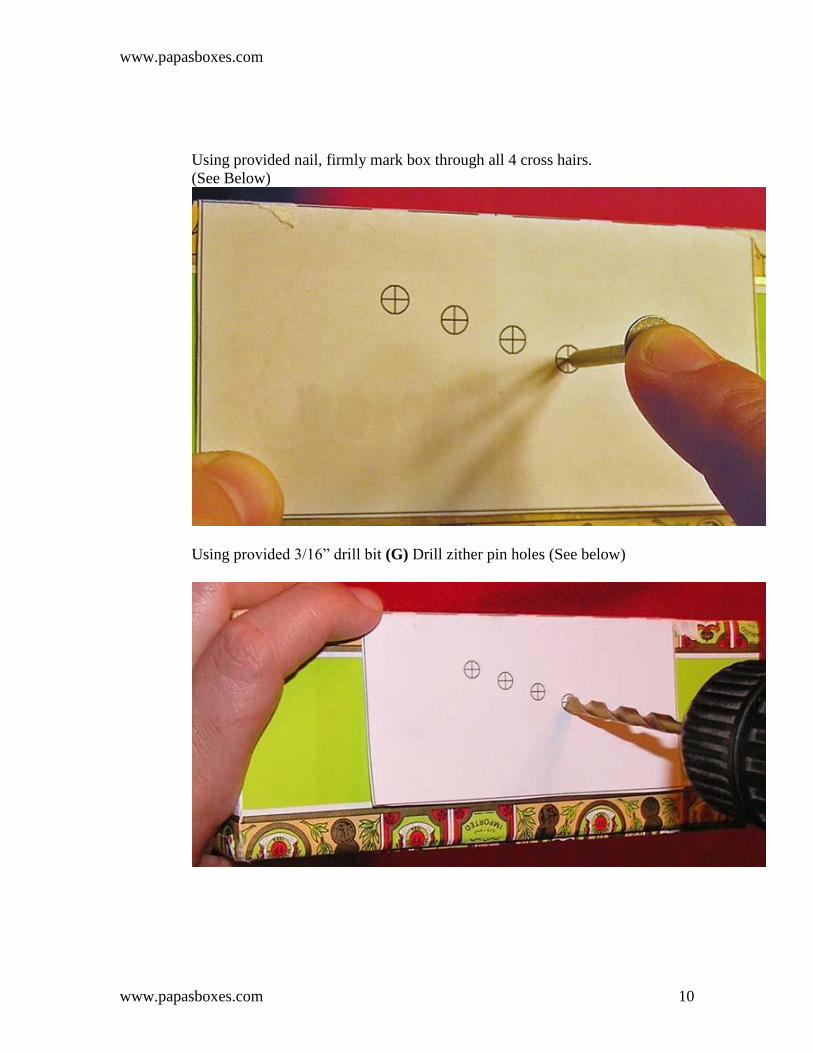
Using provided nail, firmly mark box through all 4 cross hairs.
(See Below)
Using provided 3/16” drill bit (G) Drill zither pin holes (See below)
www.papasboxes.com
www.papasboxes.com 11
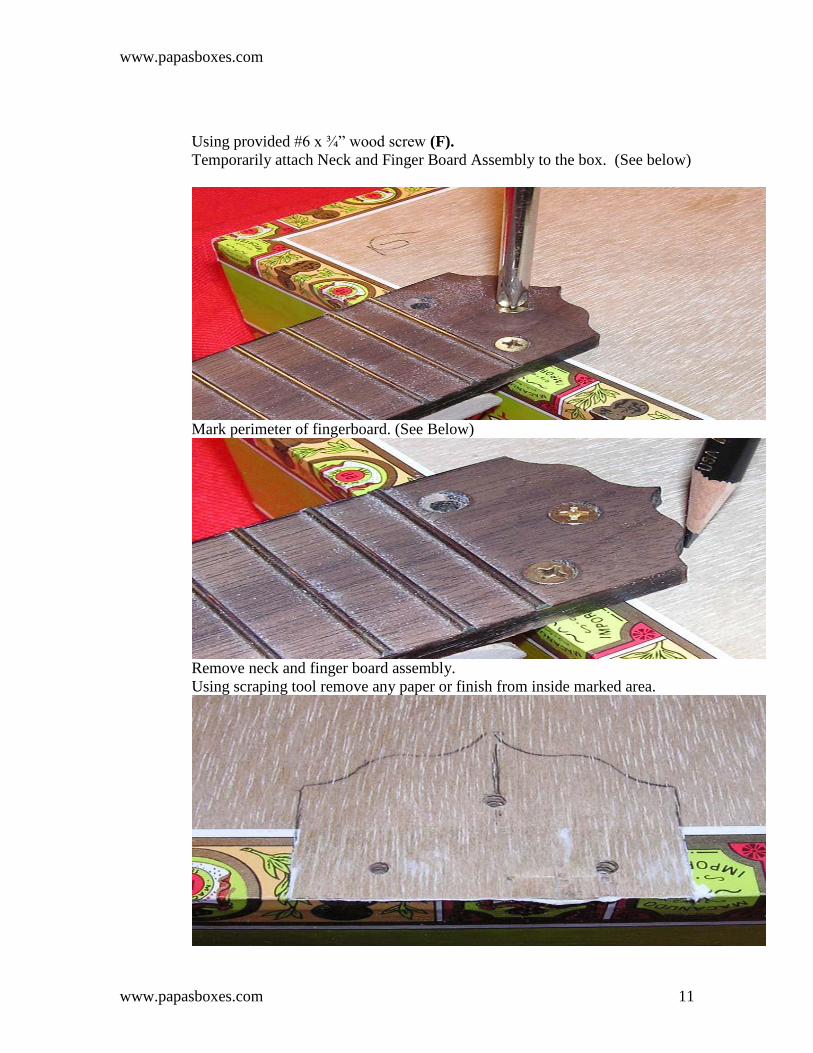
Using provided #6 x ¾” wood screw (F).
Temporarily attach Neck and Finger Board Assembly to the box. (See below)
Mark perimeter of fingerboard. (See Below)
Remove neck and finger board assembly.
Using scraping tool remove any paper or finish from inside marked area.
www.papasboxes.com
www.papasboxes.com 12
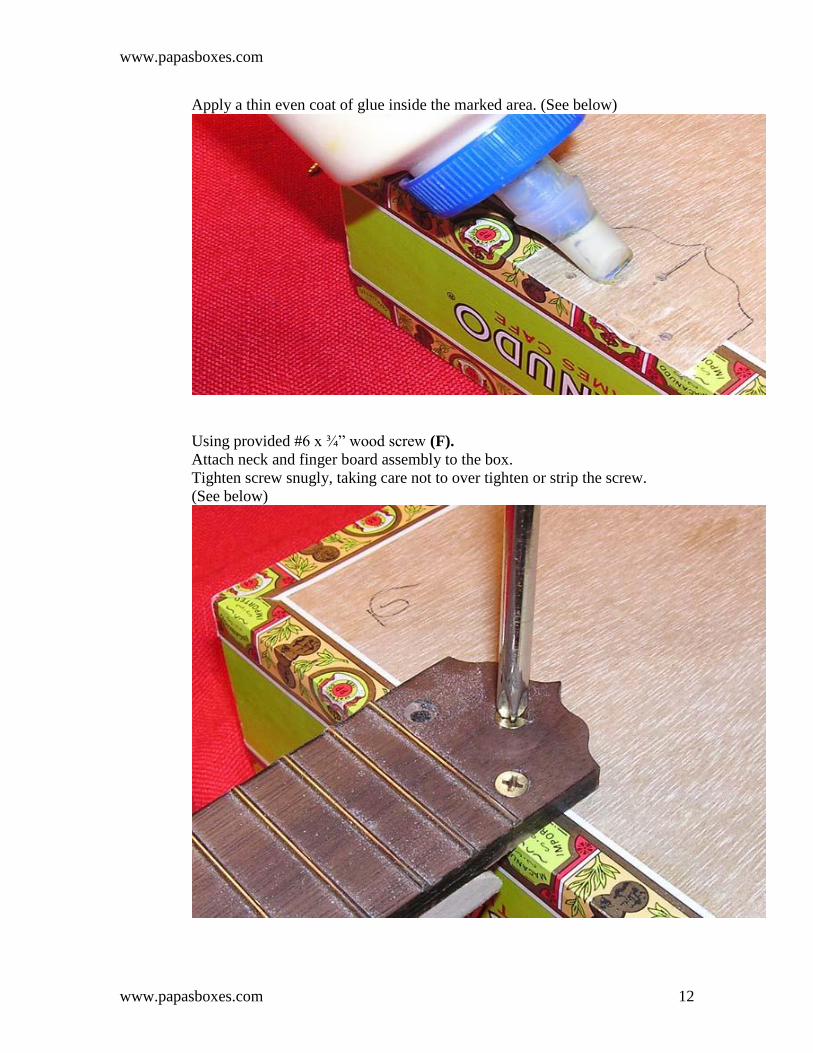
Apply a thin even coat of glue inside the marked area. (See below)
Using provided #6 x ¾” wood screw (F).
Attach neck and finger board assembly to the box.
Tighten screw snugly, taking care not to over tighten or strip the screw.
(See below)
www.papasboxes.com
www.papasboxes.com 13
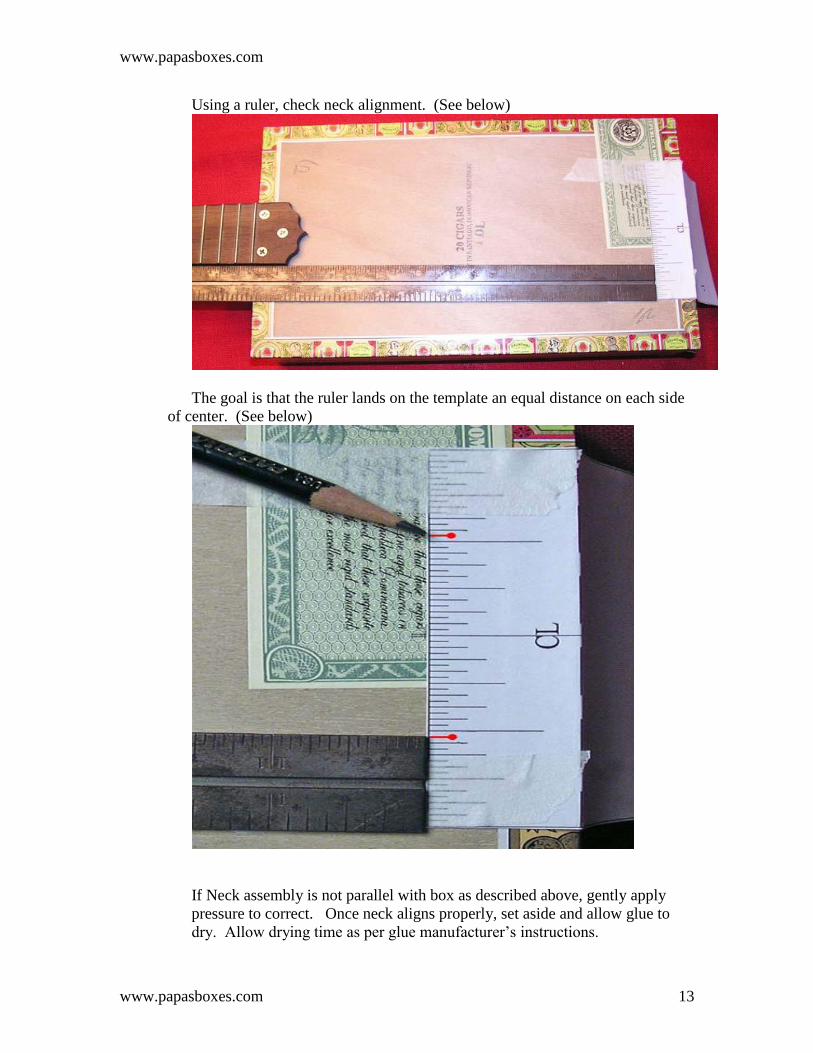
Using a ruler, check neck alignment. (See below)
The goal is that the ruler lands on the template an equal distance on each side
of center. (See below)
If Neck assembly is not parallel with box as described above, gently apply
pressure to correct. Once neck aligns properly, set aside and allow glue to
dry. Allow drying time as per glue manufacturer’s instructions.
www.papasboxes.com
www.papasboxes.com 14
5. Optional Finishing Steps
After all glue has been given ample time to dry, any sanding and finishing
steps may be completed as desired. We have had good luck using aerosol cans
of gloss lacquer. It is not necessary to apply finish to the fingerboard. Use
masking tape to keep fingerboard free of finish. After all finishing steps are
complete standard fingerboard oil can be used.
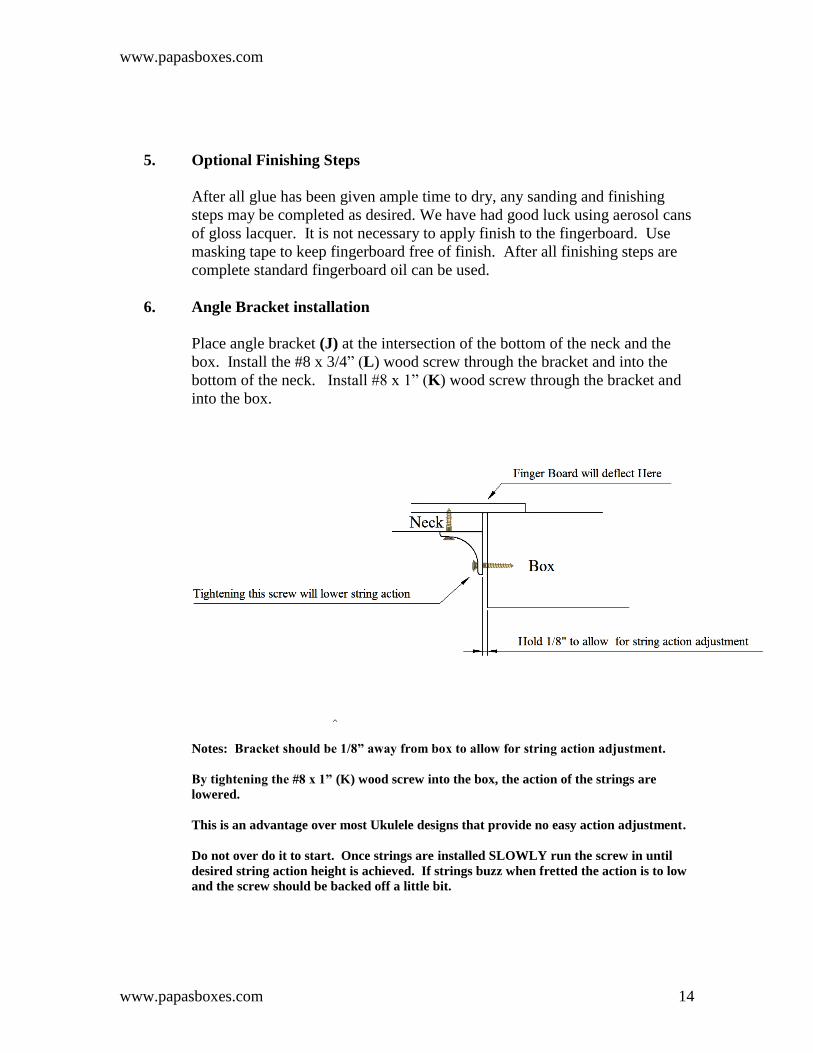
6. Angle Bracket installation
Place angle bracket (J) at the intersection of the bottom of the neck and the
box. Install the #8 x 3/4” (L) wood screw through the bracket and into the
bottom of the neck. Install #8 x 1” (K) wood screw through the bracket and
into the box.
Notes: Bracket should be 1/8” away from box to allow for string action adjustment.
By tightening the #8 x 1” (K) wood screw into the box, the action of the strings are
lowered.
This is an advantage over most Ukulele designs that provide no easy action adjustment.
Do not over do it to start. Once strings are installed SLOWLY run the screw in until
desired string action height is achieved. If strings buzz when fretted the action is to low
and the screw should be backed off a little bit.
www.papasboxes.com
www.papasboxes.com 15
7. Set up
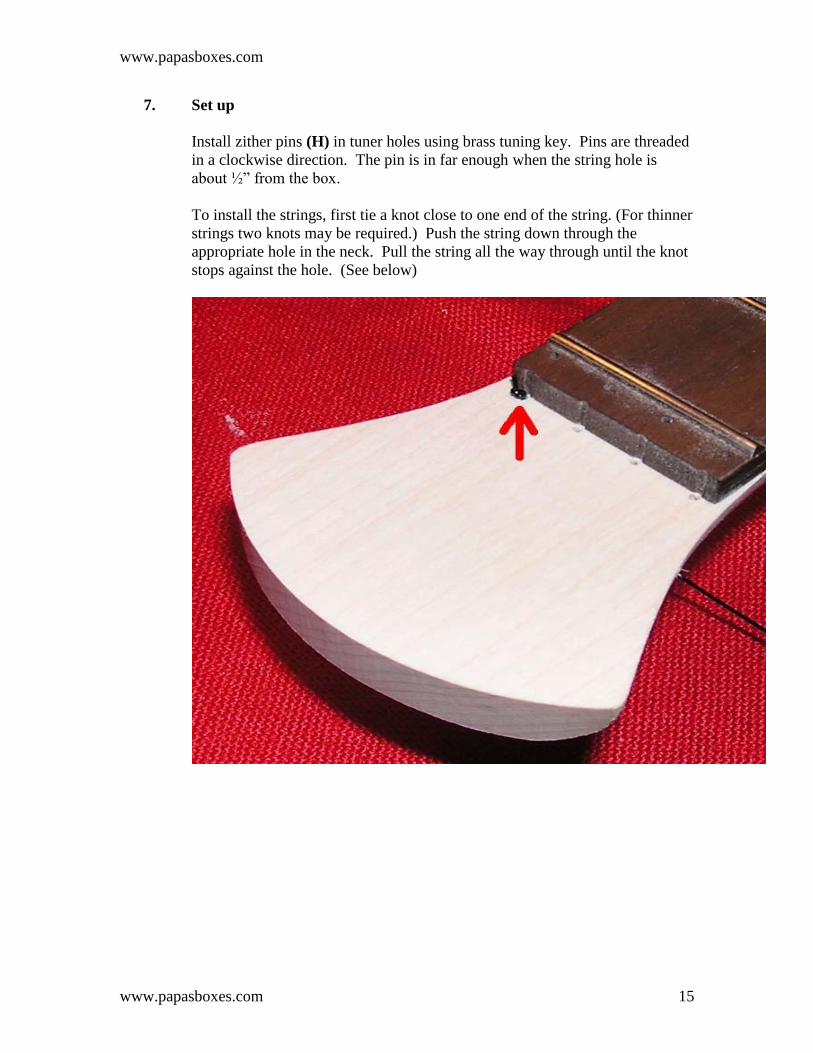
Install zither pins (H) in tuner holes using brass tuning key. Pins are threaded
in a clockwise direction. The pin is in far enough when the string hole is
about ½” from the box.
To install the strings, first tie a knot close to one end of the string. (For thinner
strings two knots may be required.) Push the string down through the
appropriate hole in the neck. Pull the string all the way through until the knot
stops against the hole. (See below)
www.papasboxes.com
www.papasboxes.com 16
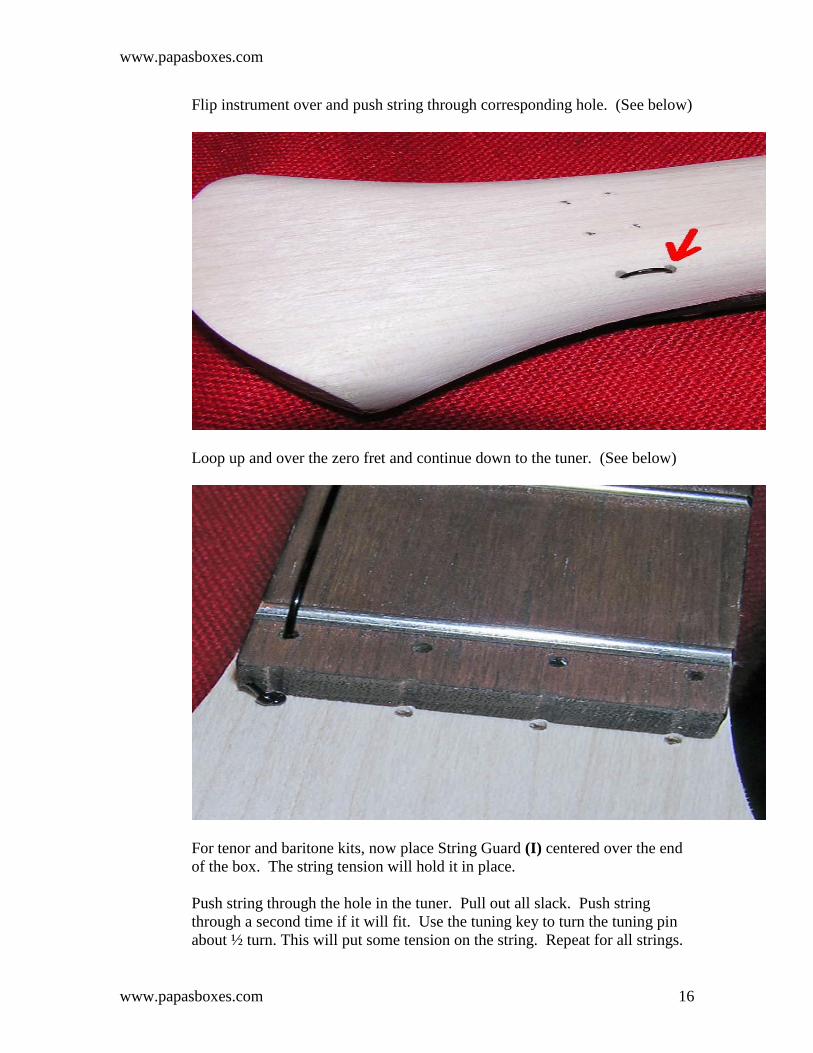
Flip instrument over and push string through corresponding hole. (See below)
Loop up and over the zero fret and continue down to the tuner. (See below)
For tenor and baritone kits, now place String Guard (I) centered over the end
of the box. The string tension will hold it in place.
Push string through the hole in the tuner. Pull out all slack. Push string
through a second time if it will fit. Use the tuning key to turn the tuning pin
about ½ turn. This will put some tension on the string. Repeat for all strings.
www.papasboxes.com
www.papasboxes.com 17
Slide Bridge under strings at approximately the scale length of instrument.
(Scale length = 0 fret to bridge)
Soprano 14”
Concert 15 ½”
Tenor 17”
Baritone 19”
Make sure that the strings are in the appropriate slots. Tune instrument.
Soprano, Concert, and Tenor ukes are usually tuned A-E-C-G, with the
G-string traditionally tuned an octave up (re-entrant), so it is pitched
between the E- and A-strings.
Baritone ukes are tuned the same as the 1st 4 strings of a guitar E-B-G-D
To check intonation play the first string open and then at the 12th
. If at the
12th
the note is sharp move that end of the bridge towards the tuners. If flat,
move toward the nut. Retune and check again.
Repeat same process for the 4th
string. This process will ensure proper bridge
placement.
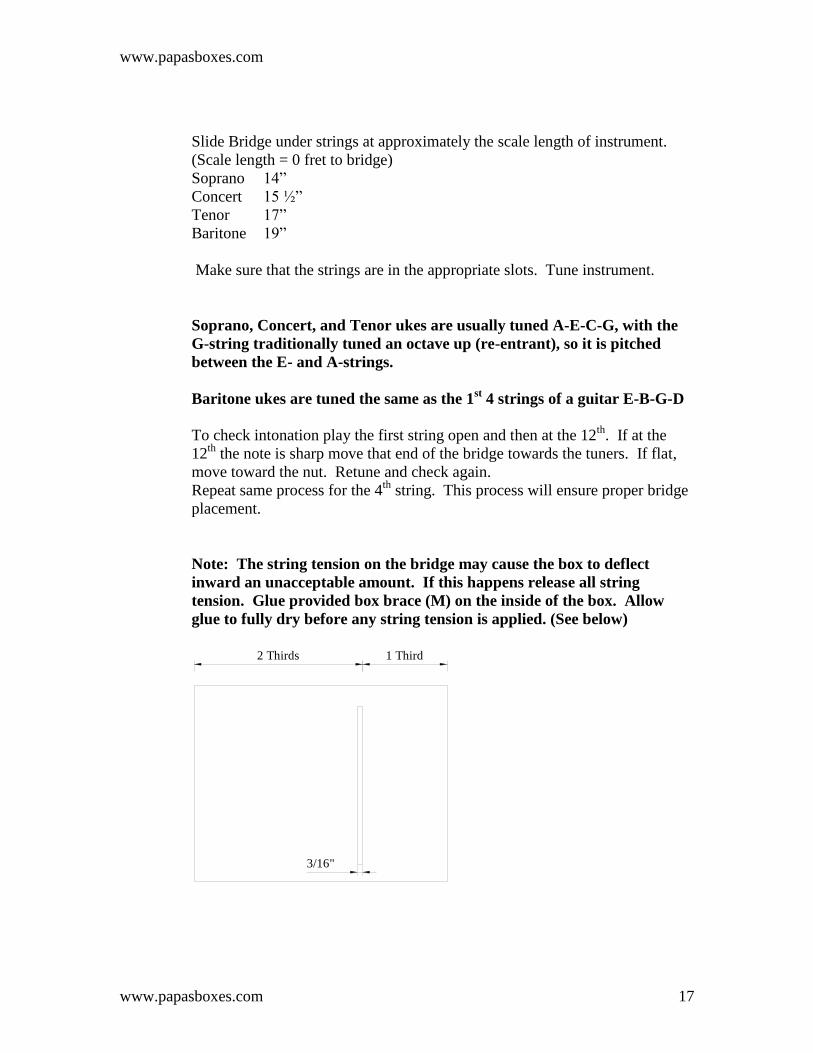
Note: The string tension on the bridge may cause the box to deflect
inward an unacceptable amount. If this happens release all string
tension. Glue provided box brace (M) on the inside of the box. Allow
glue to fully dry before any string tension is applied. (See below)
2 Thirds 1 Third
3/16"
www.papasboxes.com
www.papasboxes.com 18
8. Optional Pickup installation.
Using 3/8” drill bit, drill a hole in desired location for jack. Slide jack through
from the inside and tighten nut and washer on the outside.
Apply provided adhesive to the face of the pickup opposite the face that the
wires are attached to. Gently but firmly press the adhesive face onto the
inside of the box under or near the bridge.
Recommended