Mattson Macdonald Young - 1 - Copyright © 2009
Basement Wall Cracking
Many times each year we are asked by concerned owners to visit their home and give them an assessment of cracking
they have observed in their basement walls. Sometimes we are able to inform them that the cracking we observe is not
a threat to the structural capacity and stability of the foundation. Other times, we must inform them that a potential for
further cracking and damage exists and repair measures must be taken to stabilize the wall. If you are worried about
cracking in your foundation wall, here are some things to consider:
What kind of loads are really on the wall?
The foundation wall serves two important functions for the building:
1. It carries the floor and roof loads to the footings below and helps to
spread that load evenly on the soil under the footings.
2. It holds back the earth that is pushing on the basement wall from
the outside.
The vertical load on a basement wall from a typical roof and floor above might
be 1,500 pounds per linear foot of wall length. The lateral load (the loads
pushing inward on the wall) from the soil at the outside might be 1,000 pounds
per linear foot. These loads will vary, of course, depending on the number of
floors, span direction, span length, and the quality and height of soil being
retained above the basement level.
While these loads may seem high, a well designed and constructed foundation wall will be capable of easily supporting
and resisting these forces. To see the important elements that go into the construction of a good residential foundation
wall, take a look at the drawing at the end of this document.
So What Causes the Cracking in My Wall?
Cracks in your basement walls are evidence of movement. The masonry and concrete that are used in the construction
of foundation walls are strong in compression but not very strong in tension. Therefore, any movement that creates
tension stresses in the wall will most likely cause cracking.
� One common type of cracking is sometimes referred to as "Stair Step" cracking. This is a diagonal zig-zag
pattern that quite often follows the mortar joints. This type of cracking is usually the result of uneven
settlement on either side of the crack.
� Another common crack is a vertical crack. This crack may not be perfectly vertical and may do some "stair
stepping" of its own, but the crack usually passes through masonry units instead of following only the mortar
joints and proceeds in a mostly vertical direction. This type of cracking is quite often the result of shrinkage and
thermal movements of the wall.
� The other type of cracking, and the one that we structural engineers become quite concerned about, is a
horizontal crack. This crack usually occurs near the midheight of the wall. Along with the cracking, the wall
usually exhibits measurable inward bowing. This type of crack is the result of lateral soil loads pushing against
the wall that exceed the strength of the block or concrete.
The following is a closer look at each of these crack types, with general recommendations and options for a homeowner
to consider.
Typical loads on a foundation

Mattson Macdonald Young - 2 - Copyright © 2015
How Concerned Do I Need To Be About This Cracking?
Stair Step Cracking
As mentioned above, this cracking is most likely the result of differential or
uneven settlements of the footing and subgrade below the wall. This might
be due to a change in loading on the wall or a soft spot in the soil below the
footing. The first question to try to resolve is whether the wall is still moving
or not. This can be done by monitoring the condition. This takes some time
but since this type of crack is usually not a serious threat, time is available to
record some data.
Mark several locations with a permanent marker and measure the width
of the crack. Record this information including the date. Take photos of
the condition if possible. Repeat this every month or so to see if the
measurement changes over time.
Another method of monitoring the crack is to place a piece of tape across the crack and use a razor blade to split the
tape at the crack location. Check back each month to see if the razor thin slit widens. Photos are also a good idea.
Crack monitors are available from several companies, one is Avongard (www.avongard.com ). These are attached
across the crack and have a grid and crosshair that allow
you to measure movements to within 1 mm. Record this
information at the initial installation and each following
month using the data sheet provided with the crack
monitor. It never hurts to keep taking photos.
Movements that lead to "stairstep" type of cracking are usually short lived and reach a steady state within a short period
of time, say 2 to 4 months. When there does not appear to be any more movement taking place, the crack can usually
be patched.
If the movement does not appear to be stopping, or if you notice lateral movement of the wall (you run your finger
across the crack and find that one side of the wall has moved inward more than the other side) it would be wise to
contact an engineer or contractor to look at the condition. It is possible that there is still nothing to be highly concerned
about, but it may be good to have a professional look things over.
Once you are convinced that very little, if any movements are taking place, the repairs are relatively easy. The loose
mortar should be removed at the crack and the gap can be patched with a premixed mortar that you buy from the
hardware store. For narrow cracks you may need to do a little chipping or sawcutting to make them wide enough to
accept the mortar.
This type of crack probably extends through the wall and is mirrored on the exterior face. This means that the
movement may have ruptured the waterproofing or dampproofing on the outside face of the wall. Not much can be
done about this unless you decide to dig down alongside the wall to expose the exterior face. But you can do some
good preventive landscaping work at the surface to make sure that the rain and snowmelt from the roof will drain away
from the building wall and will be less likely to soak the earth next to this crack and leak inside. Take a look at the
quality and condition of the gutters and downspouts as well so that they carry water away from the foundation wall.
Example from the Avongard website
Typical "Stair Step" Cracking

Mattson Macdonald Young - 3 - Copyright © 2015
Vertical Cracking
This type of cracking is often due to shrinkage of the masonry or concrete as it dries out or
movements due to changes in the temperature of the wall. Block and concrete are constructed
in a very wet condition. Water is present in the concrete, the mortar and the grout. The free
water, the water that is not required to create the chemical bond in the Portland cement,
eventually has to evaporate out of the wall. This evaporation occurs during the curing process
and the loss of water will cause a slight loss of volume. The wall wants to shrink to compensate
for this loss. Every other part of the building is trying to hold the wall in a rigid position and
prevent it from actually shrinking. So rather than shrink from the ends, the wall will develop
cracks along its length. A well designed wall will actually develop hundreds of microscopic
cracks along its entire length that will compensate for the shrinkage. Sometimes, however the wall will find a weak
plane and decide to make up all of the shrinkage at one location. It seems inevitable that the wall will choose the most
noticeable and objectionable spot to produce the new crack.
It is also possible that temperature changes can cause a similar volume change in the walls. A wall that is subjected to a
cold environment for an extended period and then warmed to room temperature, or vice versa, will undergo some
volume change. Other phenomenon, such as chemical changes in the block and concrete, can cause volume changes
over a longer period of time as well and create cracking.
In most cases, this condition is not of great concern and usually does not seriously threaten the stability or strength of
the wall. The procedure for monitoring and repairing the crack is the same as for the "stair step" crack described above.
This type of crack may also affect the waterproofing or damproofing. Consider some of the same steps mentioned
above for the stair step cracking to avoid excess water around the base of the wall.
Horizontal Cracking
A fairly long horizontal crack observed in a masonry or concrete foundation
wall, particularly one that is retaining soil, is a condition that gets us
structural engineers immediately concerned. This crack and the
measurable inward bowing that usually accompanies it is a sign that the
wall has theoretically failed. This failure does not necessarily mean that
the wall is minutes away from collapsing and spilling dirt into your
basement, but the laws of physics and statics tell us that the factor of
safety against collapse has been reduced considerably.
It is possible that the small size of the crack and the lack of inward bowing
of the wall mean that the wall is still stable and capable of adequately
supporting the vertical and lateral loads. But we have found in the past
that this is not likely or that the factor of safety has been reduced to a level
that is unacceptable.
What causes this type of cracking?
The crack is evidence of horizontal movement and inward bowing of the wall. The soil on the outside is pushing the wall
and the wall does not have enough strength to resist this movement. It is possible that the wall was not designed
properly, but it is also possible that the forces are greater than a reasonable design might anticipate. If drainage is poor
and the soil adjacent to the wall becomes saturated or if the winter is particularly severe, and frost penetration becomes
severe, the force pushing against the wall may become extremely high. It is also possible that the movement took place
during construction if the wall was not adequately braced during the backfilling procedure.
Typical vertical cracking
Example of a horizontal crack
Mattson Macdonald Young - 4 - Copyright © 2015
If the cracking that you are experiencing looks like this type of movement, we would suggest that you contact an
engineer or contractor right away to have them assess the problem and make recommendations. In severe cases it
might be wise to install temporary supports for the floor joists that bear on this wall. But remember, the foundation is
also supporting the exterior wall and roof immediately above and temporary shoring in the basement will not
necessarily carry these loads unless the temporary shoring extends all the way up to the underside of the roof members.
Very seldom are we comfortable instructing an owner to monitor this condition and wait to see if anything changes. We
usually make immediate plans to investigate the problem and design a repair. What are the repair options? Here are a
few ideas:
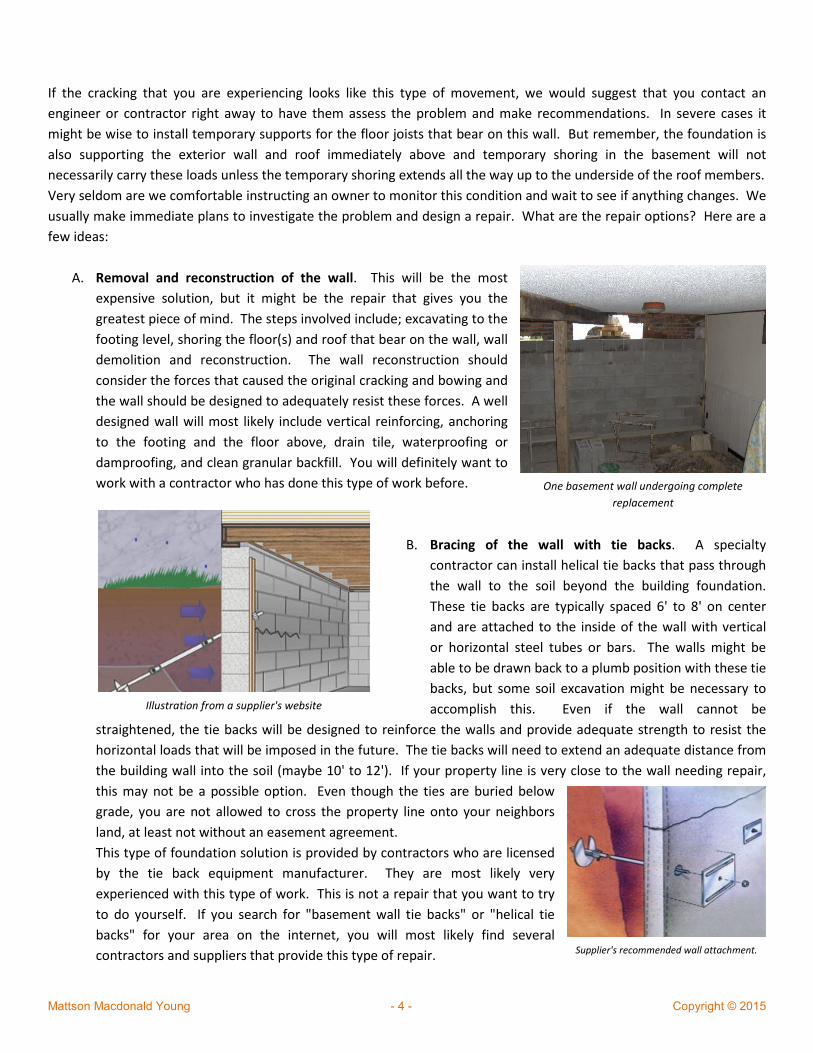
A. Removal and reconstruction of the wall. This will be the most
expensive solution, but it might be the repair that gives you the
greatest piece of mind. The steps involved include; excavating to the
footing level, shoring the floor(s) and roof that bear on the wall, wall
demolition and reconstruction. The wall reconstruction should
consider the forces that caused the original cracking and bowing and
the wall should be designed to adequately resist these forces. A well
designed wall will most likely include vertical reinforcing, anchoring
to the footing and the floor above, drain tile, waterproofing or
damproofing, and clean granular backfill. You will definitely want to
work with a contractor who has done this type of work before.
B. Bracing of the wall with tie backs. A specialty
contractor can install helical tie backs that pass through
the wall to the soil beyond the building foundation.
These tie backs are typically spaced 6' to 8' on center
and are attached to the inside of the wall with vertical
or horizontal steel tubes or bars. The walls might be
able to be drawn back to a plumb position with these tie
backs, but some soil excavation might be necessary to
accomplish this. Even if the wall cannot be
straightened, the tie backs will be designed to reinforce the walls and provide adequate strength to resist the
horizontal loads that will be imposed in the future. The tie backs will need to extend an adequate distance from
the building wall into the soil (maybe 10' to 12'). If your property line is very close to the wall needing repair,
this may not be a possible option. Even though the ties are buried below
grade, you are not allowed to cross the property line onto your neighbors
land, at least not without an easement agreement.
This type of foundation solution is provided by contractors who are licensed
by the tie back equipment manufacturer. They are most likely very
experienced with this type of work. This is not a repair that you want to try
to do yourself. If you search for "basement wall tie backs" or "helical tie
backs" for your area on the internet, you will most likely find several
contractors and suppliers that provide this type of repair.
One basement wall undergoing complete
replacement
Illustration from a supplier's website
Supplier's recommended wall attachment.

Mattson Macdonald Young - 5 - Copyright © 2015
C. Bracing the wall with internal studs or posts. An engineer can design steel or treated wood posts, placed on
the inside face of the wall to brace the wall and transfer the lateral force to the basement floor and the first
floor diaphragm. This might be the least costly solution but it will reduce the interior space and may not be able
to restore the wall to the upright plumb position. The internal studs act as a type of "second wall" inside the
original masonry wall and pushes back against the masonry wall when it wants to bow further inward. The
design for this type of repair is specific to each condition and depends on the load on the wall, the height of the
wall and how capable the floor above is of resisting the lateral loads. For a wood framed bracing method, it is
not uncommon to have double 2x8's spaced every 16" on center to properly assure that the wall will remain
stable. The connection to the basement slab is a normal treated plate with expansion anchors into the slab, or if
the slab is in poor condition, a new concrete footing is poured in a trench next to the wall. The connection at
the top of the wall, to the first floor framing, might be simply nailing of the new studs to the floor joists. The
loads and height of the wall may dictate the need for lags or bolts for connection of the members. If steel
members are used for the bracing members, the spacing might be larger, but the connections to the floor above
and slab below become more difficult.
An example of one bracing method where the
floor joists are perpendicular to the wall.
An example of one bracing method where the
floor joists are parallel to the wall.
Some examples of bracing using steel members
Plan view
Mattson Macdonald Young - 6 - Copyright © 2015
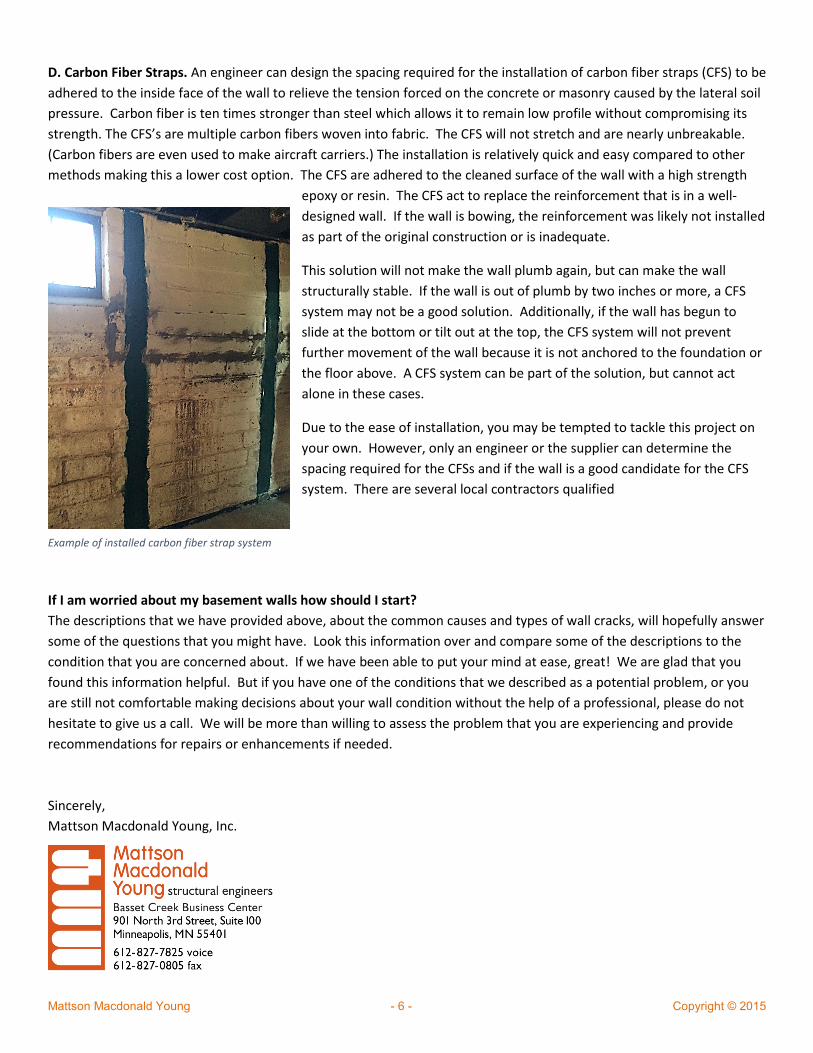
D. Carbon Fiber Straps. An engineer can design the spacing required for the installation of carbon fiber straps (CFS) to be
adhered to the inside face of the wall to relieve the tension forced on the concrete or masonry caused by the lateral soil
pressure. Carbon fiber is ten times stronger than steel which allows it to remain low profile without compromising its
strength. The CFS’s are multiple carbon fibers woven into fabric. The CFS will not stretch and are nearly unbreakable.
(Carbon fibers are even used to make aircraft carriers.) The installation is relatively quick and easy compared to other
methods making this a lower cost option. The CFS are adhered to the cleaned surface of the wall with a high strength
epoxy or resin. The CFS act to replace the reinforcement that is in a well-
designed wall. If the wall is bowing, the reinforcement was likely not installed
as part of the original construction or is inadequate.
This solution will not make the wall plumb again, but can make the wall
structurally stable. If the wall is out of plumb by two inches or more, a CFS
system may not be a good solution. Additionally, if the wall has begun to
slide at the bottom or tilt out at the top, the CFS system will not prevent
further movement of the wall because it is not anchored to the foundation or
the floor above. A CFS system can be part of the solution, but cannot act
alone in these cases.
Due to the ease of installation, you may be tempted to tackle this project on
your own. However, only an engineer or the supplier can determine the
spacing required for the CFSs and if the wall is a good candidate for the CFS
system. There are several local contractors qualified
If I am worried about my basement walls how should I start?
The descriptions that we have provided above, about the common causes and types of wall cracks, will hopefully answer
some of the questions that you might have. Look this information over and compare some of the descriptions to the
condition that you are concerned about. If we have been able to put your mind at ease, great! We are glad that you
found this information helpful. But if you have one of the conditions that we described as a potential problem, or you
are still not comfortable making decisions about your wall condition without the help of a professional, please do not
hesitate to give us a call. We will be more than willing to assess the problem that you are experiencing and provide
recommendations for repairs or enhancements if needed.
Sincerely,
Mattson Macdonald Young, Inc.
Example of installed carbon fiber strap system
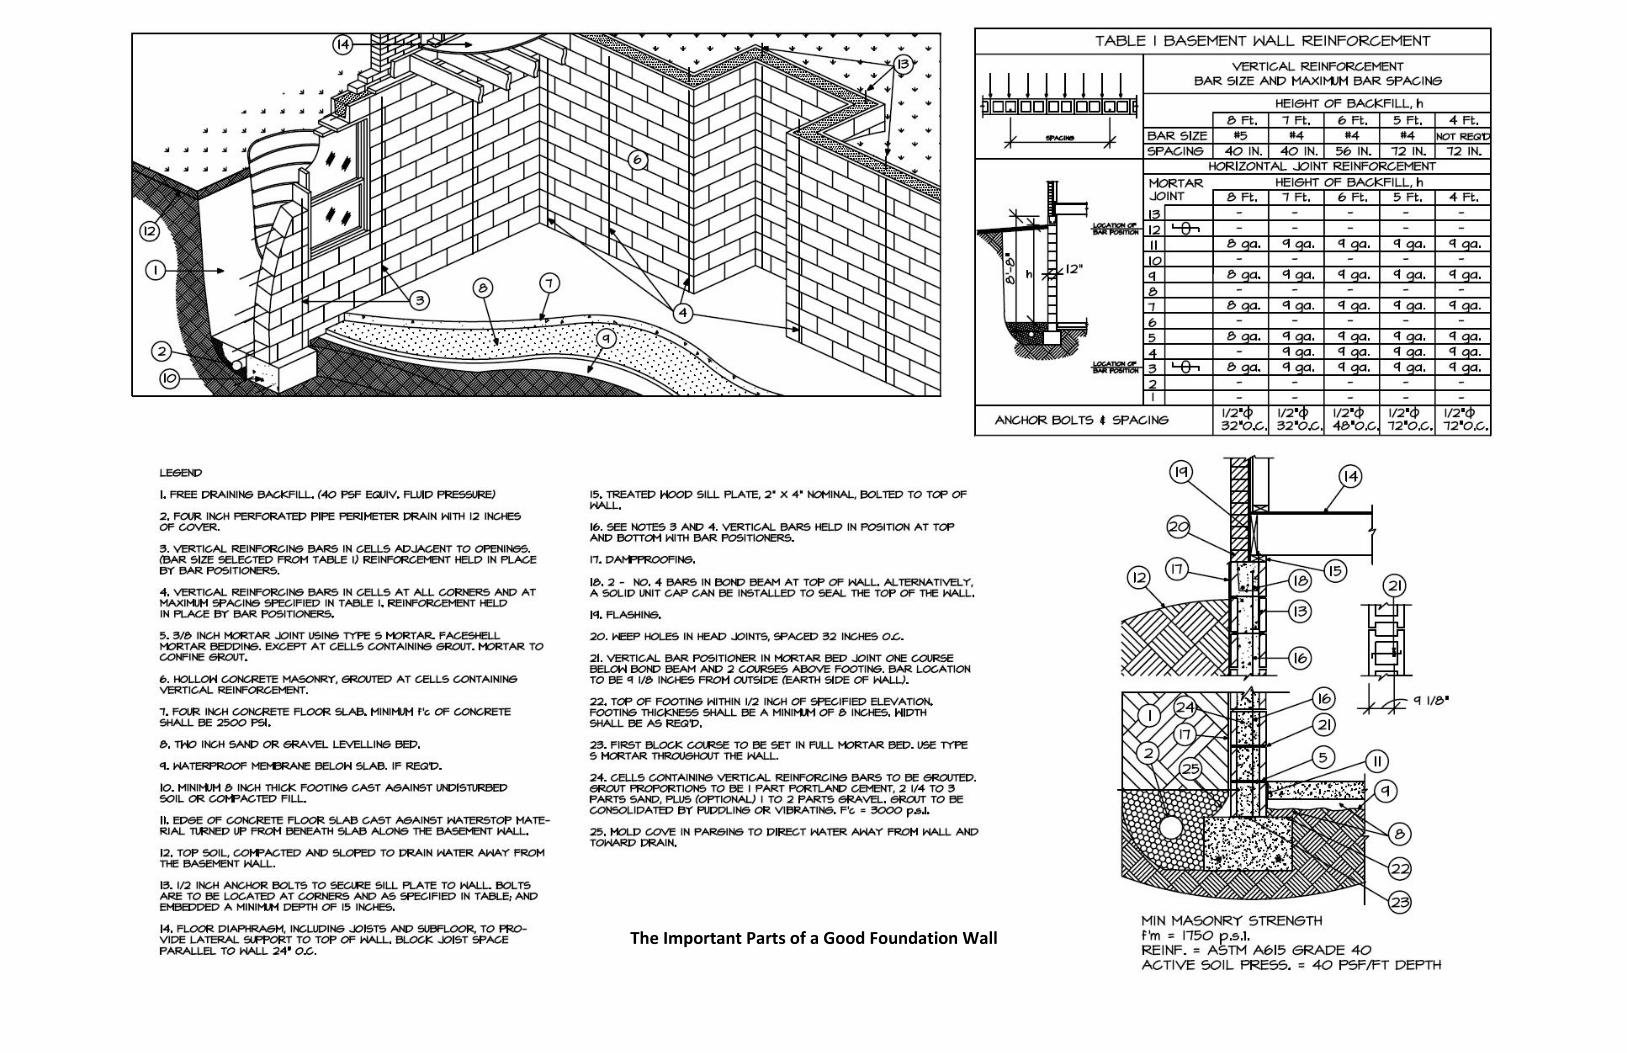
The Important Parts of a Good Foundation Wall
Recommended