Advanced Reporting Tool PRO for vTiger
1
Advanced Reporting Tool PRO for vTiger
USER MANUAL
Contents Contents ......................................................................................................................................................................... 1
ADVANCED REPORTING TOOL FEATURE OVERVIEW ...................................................................................................... 2
PRE-DEFINED REPORT LIST AND FOLDERS ...................................................................................................................... 3
REPORT AND CHART SETTINGS OVERVIEW .................................................................................................................... 5
Mass Update for Collapsed / Expanded Report Sections ........................................................................................... 9
Print Report, Export to Excel/ PDF ............................................................................................................................ 10
FILTERING REPORT DATA - „REPORT FILTERS” TAB ...................................................................................................... 11
Additional pre-defined date and datetime filters for report viewing and for regular e-mail scheduling: ............... 12
Selection of converted / not converted Leads for Leads Reports ............................................................................ 13
SELECTING COLUMNS FOR YOUR REPORT – „FIELDS” TAB .......................................................................................... 13
CALCULATE YOUR OWN FUNCTIONS – „CALCULATED FIELDS” TAB ............................................................................ 14
SET COLUMNS TO SUM, AVG OR COUNT – „AGGREGATES” TAB ................................................................................. 18
„GROUPING & SORTING” TAB ...................................................................................................................................... 19
Grouping and sorting for multi-select pick-lists ....................................................................................................... 24
REPORT HEADER AND LABEL RENAMING - RENAME LABELS TAB ............................................................................... 25
REPORT PERMISSIONS - „SHARING & SCHEDULING” TAB ............................................................................................ 26
REPORT E-MAIL SCHEDULING - „SHARING & SCHEDULING” TAB ................................................................................ 27
MASS EDIT FOR PERMISSIONS AND SCHEDULING ....................................................................................................... 28
CHART TYPES AND SETTINGS ........................................................................................................................................ 30
Pie Chart ................................................................................................................................................................... 32
Column Chart ............................................................................................................................................................ 33
Line Chart .................................................................................................................................................................. 34
Combined (Multi-Axis) Chart .................................................................................................................................... 35
Funnel Chart ............................................................................................................................................................. 36
Gauge (Dial) Chart .................................................................................................................................................... 38
GEOGRAPHIC (MAP) CHART ..................................................................................................................................... 38
Yearly Comparison by Quarter/Month/Week for Charts ......................................................................................... 40
Adding a Chart to the Homepage Dashlets .............................................................................................................. 40
DRILL DOWN FROM CHART AREA TO DETAILED DATA ................................................................................................ 43
CREATING NEW REPORT TEMPLATES VIA REPORT BUILDER ........................................................................................ 45
ADDING AN ADDITIONAL MODULE TO EXISTING REPORTS ......................................................................................... 50
Advanced Reporting Tool PRO for vTiger
2
ADVANCED REPORTING TOOL FEATURE OVERVIEW Various pre-defined reports are available for most of VTIGERCRM modules containing different summary
types and chart types
You can modify any of the existing reports or you can copy an existing report in order to create new one
You can
o add/remove fields or columns to be displayed in a report
o Select what should be summarized, counted or calculated as min, max, average value
o Filter your report data to see a specific date range, statuses or any other option
o Calculate your own functions
o Create detailed, summary and pivot(matrix) reports
o Choose report grouping and summary options, incl. the grouping order
o Identify what should be displayed as a row and what should be a column in your report
o Identify the order for unlimited grouping and summary levels
o Chart types: Pie, Line, Bar, Combined (Multi-axis), Funnel, Gauge and Geographic
o Change chart types and set options what should be displayed on which axis
o In the same report and chart you can summarize and compare data from various modules
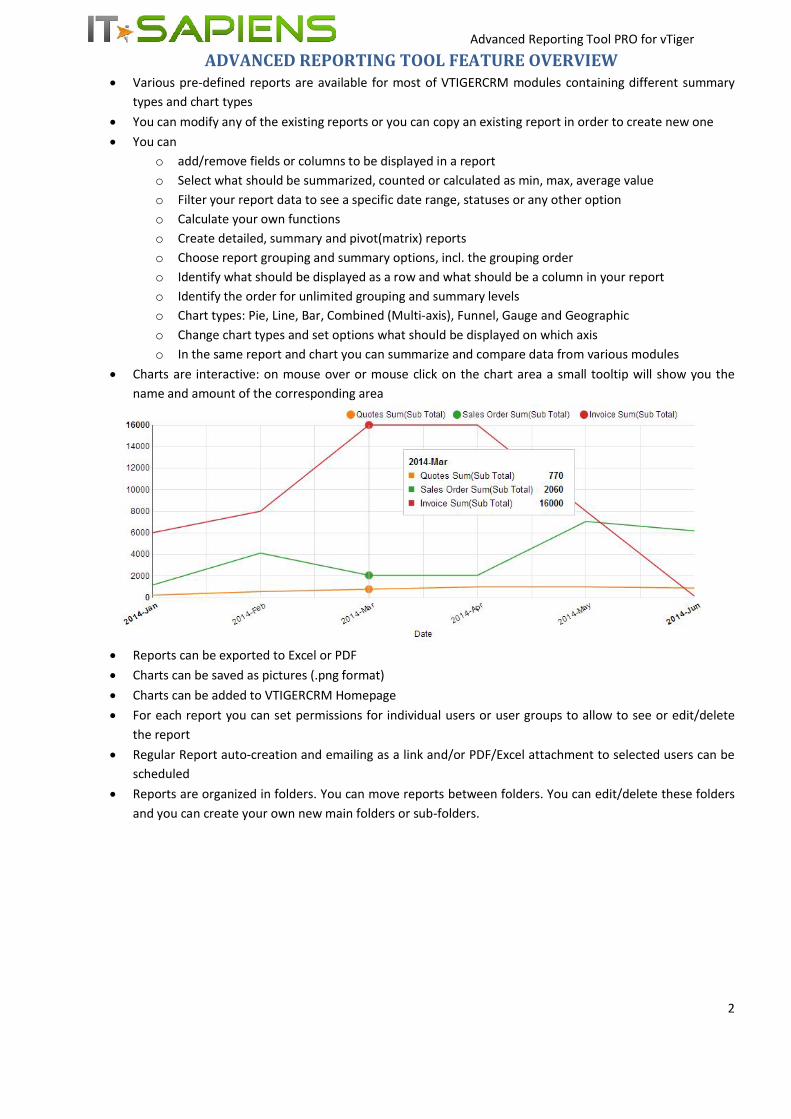
Charts are interactive: on mouse over or mouse click on the chart area a small tooltip will show you the
name and amount of the corresponding area
Reports can be exported to Excel or PDF
Charts can be saved as pictures (.png format)
Charts can be added to VTIGERCRM Homepage
For each report you can set permissions for individual users or user groups to allow to see or edit/delete
the report
Regular Report auto-creation and emailing as a link and/or PDF/Excel attachment to selected users can be
scheduled
Reports are organized in folders. You can move reports between folders. You can edit/delete these folders
and you can create your own new main folders or sub-folders.

Advanced Reporting Tool PRO for vTiger
3
PRE-DEFINED REPORT LIST AND FOLDERS List of the folders with pre-defined reports will be the first thing you see after opening „Advanced Reporting” from
the main menu. Reports are mainly organized according to VTIGERCRM modules, for example, in the „Invoices”
folder, you will see summary and detailed reports related to Invoices, Quote related reports are found in the
„Quotes” folder. The „Combined Reports” folder contains combined summary reports which apply to multiple
VTIGERCRM areas, for example, a report containing summary of Quotes, Sales Orders, Invoices and Purchase
Orders.
Open a folder by simply clicking its name or icon to see the reports inside. Close the folder by clicking it again.
In the folder list you can drag&drop reports to another folder but only if you have edit permissions to this Report.
Click „Edit” on the right side of the folder if you want to change the Folder name and/or its Description. Clicking
„Add folder” on the right side of the folder lets you add a sub-folder. To add a regular folder click “Add folder” in
the top-left section:
Clicking „Delete” on the right side of the Report deletes the Report. This option is only available if you have the
permissions to Delete the report. You can delete folders in the same way. However, only empty folders can be
deleted. If there are any reports in the Folder, you will not be able to delete it.
Note: A folder might appear to be empty but in fact there might be reports which you don’t have permissions to see.
In this case you will not be able to remove the folder.
New folders and reports are sorted in the order of their creation date&time (latest will appear at the end of the
list). After they are saved you can easily rearrange their order by dragging & dropping them as you wish.
Open a report by clicking its name from the list.
To create a new report you should start from opening an existing report, which contains data of those modules
that you need to see in your new report. Then click „Save as” and in the pop-up window enter the name,
description and folder of your new report and after clicking „Save” the report will be created.

Advanced Reporting Tool PRO for vTiger
4

Advanced Reporting Tool PRO for vTiger
5
REPORT AND CHART SETTINGS OVERVIEW When you have your report open, in the upper part of your screen you will see the Report editor and Report data.
In the lower part of the screen you will see the Chart editor and the Chart related to this report.
For any changes to take effect you need to click the „Save” button. The save button applies to both: Report and
Chart settings.

Advanced Reporting Tool PRO for vTiger
6
The „Delete” button also applies to both: current report and chart. Confirming a deletion of a report removes it
permanently.
Note: „Save”, „Save as” and „Preview” buttons are only visible if you have permissions to Edit this report. The
„Delete” button is only visible if you have permissions to delete this report.
„Back to reports” will return to the Folder and Report list, without saving any changes made to the report (unless
you have saved those changes already).
On the next line is the Report Name. Clicking the pencil icon (to the right of the report name) you can change the
name and description of this report.
Bellow the Report Name you can see the four main parts of your report:
1. Report Editor – here you can edit the Report settings
2. Report - shows report data according to its settings
3. Chart Editor – for Chart Settings
4. Chart – shows your chart according to report and chart settings
Each of these sections can be closed or opened with the small arrow next to the section name:
This way you can hide some parts. For example, you can keep the report settings always closed and open them only
when you need to make changes. The small triangle next to the section title identifies its state, whether it is open
or closed. In the example below only the “Chart” section is open, all others i.e. Report Editor, Report, Chart Editor
are closed:

Advanced Reporting Tool PRO for vTiger
7
After clicking “Save” the report will remember the section states for when it is opened the next time.
When changing settings in the Report Editor, click „Preview” to see the report data according to the new settings. It
is important to remember to Save (or „Save as”), if the Preview gives satisfactory results and you would like to keep
the new settings ;).
After changing the report settings, you need to change the chart settings properly, and then click on the Chart
„Preview” button. Modified Chart settings should be saved as well.
Blue colored text inside of your report means that you can open it. For example (picture bellow), clicking on the
Organization Name „EDFG Group Limited” will open that Organization's Detail View to see all its data. Clicking the
Contact Name „Margaret” will open Margaret's Contact Information detailed view. Clicking „t3M Invest A/S – 1000
units” will open the corresponding Opportunity.
If you have grouped items selected under the “Grouping & Sorting” tab for a detailed report or you have some
additional grouping levels, then you can select to expand or collapse each group in the report table by clicking “+”
or “-“ next to it. Selected expanded or closed state will be remembered if this is common for all items within a
group. In the example below we have expanded all of the customer names and collapsed all of the Statuses, these
settings will be saved by clicking the “Save” button at the top of this report.
Advanced Reporting Tool PRO for vTiger
8
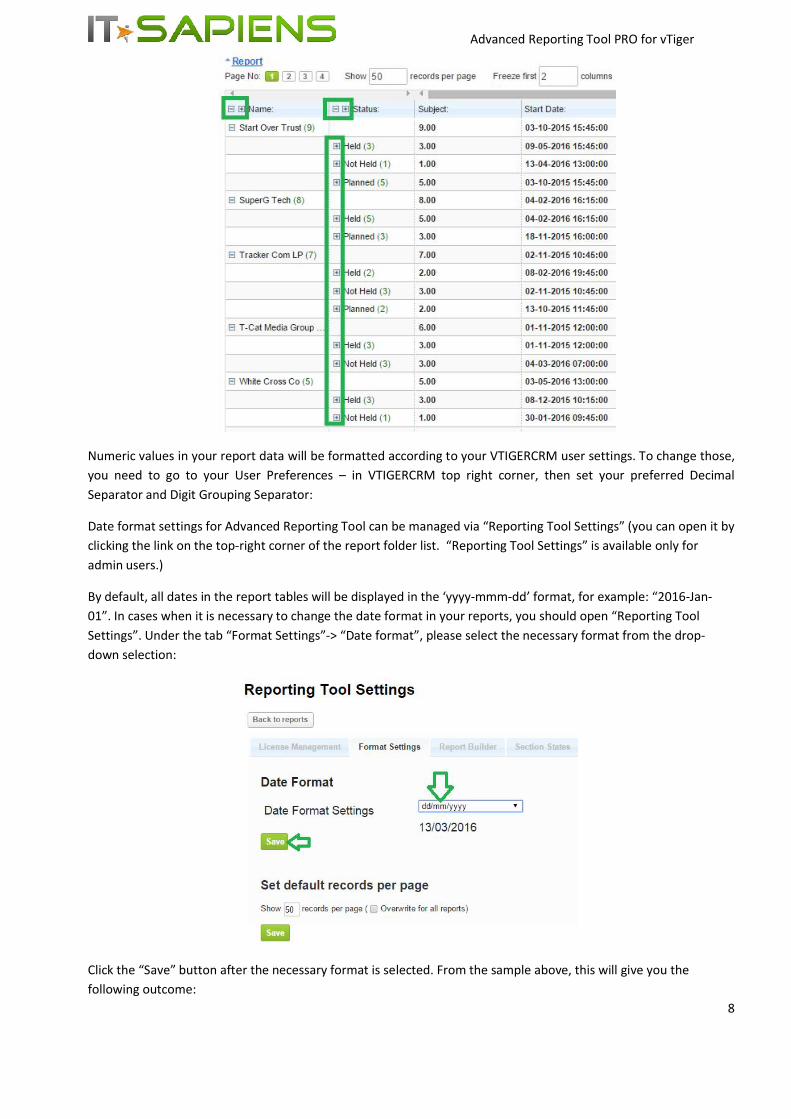
Numeric values in your report data will be formatted according to your VTIGERCRM user settings. To change those,
you need to go to your User Preferences – in VTIGERCRM top right corner, then set your preferred Decimal
Separator and Digit Grouping Separator:
Date format settings for Advanced Reporting Tool can be managed via “Reporting Tool Settings” (you can open it by
clicking the link on the top-right corner of the report folder list. “Reporting Tool Settings” is available only for
admin users.)
By default, all dates in the report tables will be displayed in the ‘yyyy-mmm-dd’ format, for example: “2016-Jan-
01”. In cases when it is necessary to change the date format in your reports, you should open “Reporting Tool
Settings”. Under the tab “Format Settings”-> “Date format”, please select the necessary format from the drop-
down selection:
Click the “Save” button after the necessary format is selected. From the sample above, this will give you the
following outcome:

Advanced Reporting Tool PRO for vTiger
9
You can change the width of columns by dragging the edges of its header. After saving the report the column sizes
will be remembered.
Mass Update for Collapsed / Expanded Report Sections As described before, collapsed/expanded report sections are saved for each report separately. In case you need to
update the same settings for all the reports, it would take a lot of time to do so one by one. In order to make it
quick, you can do the following; Under “Reporting Tool Settings” which is located in the folder list, is a tab “Section
States”. Here you can select, whether each section should be collapsed or expanded. After clicking “Save”, the
section states will be updated for all reports independently on what they were before.
After making these changes, each report section state can again be edited and saved separately.
Please note that “Reporting Tool Settings” in the report folder list is only visible and available for admin users.

Advanced Reporting Tool PRO for vTiger
10
Print Report, Export to Excel/ PDF To print the Report, click the link „Print Report” (or „Print Report with Chart” if you would like to print the Chart as
well) at the bottom of your report. This will open Print Preview and Printing options.
To export the Report Data to Excel, click the link, „Export as .xlsx” at the bottom of your report:
Note: Older Excel versions than .xlsx might have problems with export. To solve them, upgrade the Ms Office plug-in
or upgrade the Ms Office version.
„Export as PDF” will export your report in PDF format.
To save your chart as a Picture (.png format), click on the „Save Chart as Picture” link at the bottom of the Chart:
Note: Please check your Browser - older Web browsers (Chrome, Firefox or Internet Explorer) might have issues with
Saving charts as pictures.

Advanced Reporting Tool PRO for vTiger
11
FILTERING REPORT DATA - „REPORT FILTERS” TAB You can limit the data in your report by adding filter options. This can be done under the „Filters” tab. Selected
filters will apply to both: the Report data and Chart. Filters can also be used for Search purposes.
In the pre-defined reports you can see what filters have already been applied. You can add/remove or edit the
existing filters.
1. First you need to select the column (field) on which the filter will be applied. Start typing the field name
and the drop-down menu will quickly narrow down the available fields.
2. Select the operator for the criteria, for example, „Is” if you need to get a match with your specified criteria,
„Isn’t” if you want to set criteria to be dismissed from the report. In our example we want to filter only
those Quotes, which have Valid dates between June 1st, 2014 and June 30th, 2014. We choose the
„Between” operator.
3. We then set the criteria. In our example since we chose the „Between” operator, we can now set the start
date and end date:
4. If we want to add one more criteria and, for example, we want to filter out rejected quotes. First we add a
second filter by clicking the green „+”. Choose „Quote Stage” as the column to be filtered. Select „Isn’t” as
the operator. We are now given a drop-down selection of all the “Quote Stage” values:

Advanced Reporting Tool PRO for vTiger
12
If both filter conditions must strictly match our criteria at the same time for each Quote, we set „And” between
both filter rows. This is the case in our example. If either one or the other filter can be be a match select “or”.
You can have groups of Filter conditions as well (this is needed, if there are complex combinations of “and”/”or”
filter connectors). In such cases you should click the „Add group” button and then set another group of filter
conditions.
Remove filters with the red „x”.
Please remember to save the Filter changes. If you are not sure, that you want to Save your changed filters, you can
„Preview” the report and then close the report without saving if you do not wish to save the changes. You can also
„Save as” to keep the current report without changes and play with the new report at the same time.
Additional pre-defined date and datetime filters for report viewing and for regular e-
mail scheduling: - # of Next days (for example, next 25 days or next 60 days from report viewing/auto-sending date);
- # of Passed days (for example, last 25 days or last 60 days till report viewing/auto-sending date);
- # of Greater than days (for example, 5 days will filter data where the date is 5 days or more in the future from
the viewing/auto-sending date)
- # of Less than days (for example, 5 days will filter data where the date is 5 days or more in the past from the
viewing/auto-sending date)
- You can also use date filters for: this week, last week, this month, last month, this year, last year.

Advanced Reporting Tool PRO for vTiger
13
All filters are runtime for e-mail scheduling, except the ‘Current user’ filter will not be taken in account when the
report is sent via e-mail in PDF and Excel format. Only the link to the report will work with the ‘Current User’ filter.
With the “Current user” filter you can limit the User access to the data. If such filter is set, each user will see only
their assigned entries.
Selection of converted / not converted Leads for Leads Reports If you are using the Leads module, it might be interesting for you to compare unconverted leads versus converted
leads. In order to do that, you can select the field „Converted” and then Group by this field.
If you only want to see Leads that are unconverted, set up a filter for „Converted” to „Is empty” – this means that
lead is not converted.
Vice versa if you set the „Converted” field filter to „Isn’t empty” you will only see those leads that are converted.
SELECTING COLUMNS FOR YOUR REPORT – „FIELDS” TAB Under the „Fields” tab you can select fields to be shown, grouped or summarized in your Report and Chart:
1. Simply click on the field in the left-side selection box to highlight it (you can scroll down to find the field or
you can type any part of the field title and also the module name to search)
2. Click on the green arrow to move the highlighted field from left to right side box
3. All fields, which appear in the right-side box, are selected for your report

Advanced Reporting Tool PRO for vTiger
14
4. If you have selected „Include details” check-box, then you will see all field data in your report. The column
order in a detailed report will be organized same way as the fields in the right-side box. Highlight a field and
then use the up/down arrows to change the field order.
You can remove a field from your report by highlighting it and then clicking the red „x” to remove it.
5. If you only need to see the summary data in your report keep „Include details” unchecked. Only those
fields which are selected under the „Aggregates” and „Grouping and Sorting” tabs will be shown. The
column order will depend on the selected grouping and sorting order as set in the „Grouping and Sorting”
tab.
In both of the selection boxes you can highlight multiple fields by holding down the „Ctrl” key while clicking the
fields.
Remember to save the selected Field changes. If you are not sure, that you want to Save the modified Field
selection, you can „Preview” the changes and then close the report without saving if you do not wish to save the
changes. You can also use „Save as” to keep the current report without changes and play with the new report at
the same time.
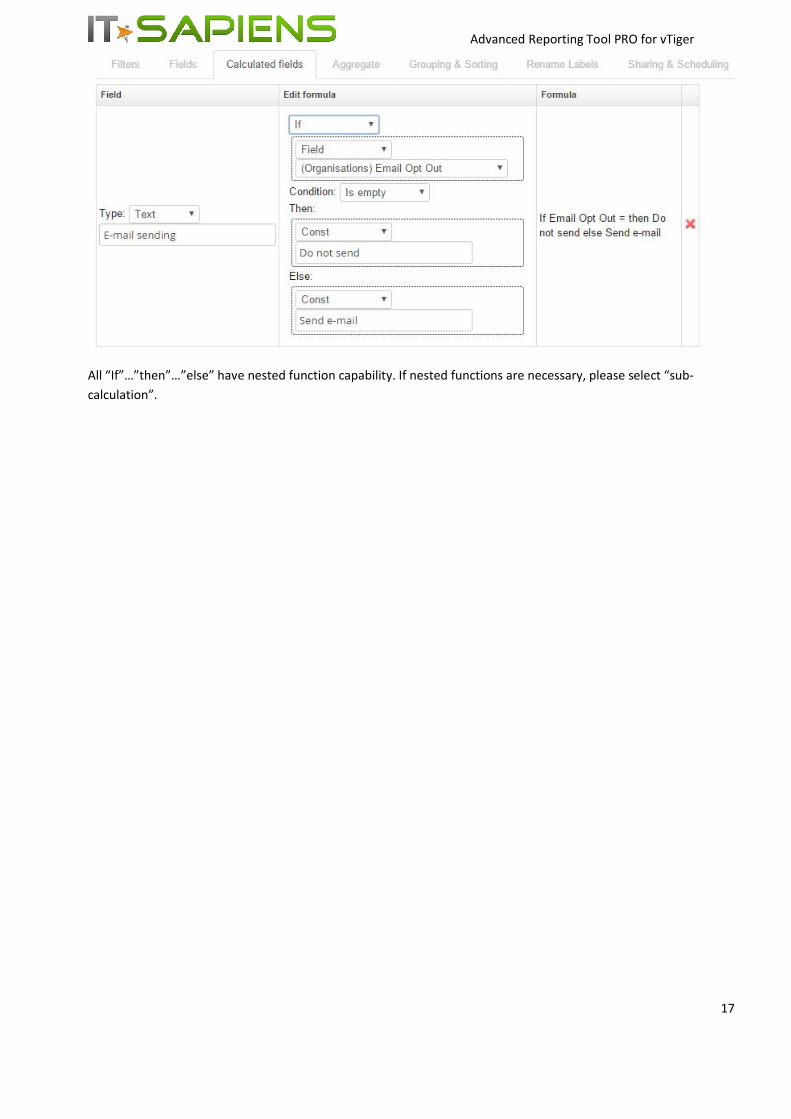
CALCULATE YOUR OWN FUNCTIONS – „CALCULATED FIELDS” TAB With Advanced Reporting you can now calculate your own functions using field values and/or constants.
Please follow these steps for function creation:
1. Open the report where you would like to add the function
2. Open the „Calculated fields” tab
3. Click the green „+” to add a formula. You can add an unlimited number of calculated functions.

Advanced Reporting Tool PRO for vTiger
15
4. Replace the „Untitled field 0” with the name of the new field. In the „Edit formula” column first choose the
operator: Add/Subtract/Multiply/Divide/Add Date/Subtract Date/If.
5. After you have selected the necessary operation type, please select fields or constants on which to operate;
For example, to have the Budget cost reduced by 100 USD for every Campaign choose „Subtract”, then choose
„Field” and select „Budget cost”. Select „Constant” in the next line and input „100”. The formula will be displayed in
the last column. The example will look like:
To continue the example, to subtract the Actual cost from the Budget cost, change „Constant” to „Field” and then
select „Actual cost”:
6. To add additional calculations to the formula, select „Sub-calculation” in this way it is possible to make as
many sub calculations as necessary.
For example, to calculate Campaign Actual Response Percentage (%) from Expected, the formula would need
„*100” and two field division, so it would look like this:
You can remove any formula with the red „x” on the right side.

Advanced Reporting Tool PRO for vTiger
16
7. In the Detailed Report it is possible to „Preview” the changes, however, in summary or pivot reports it is
better to save the report. It is also possible to average or sum the calculated value under the „Aggregates”
tab:
8. Finally identify under „Grouping and Sorting” if summaries / grand totals of the newly calculated value are
needed:
9. Remember to save the new settings!
Under ‘Calculated fields’, you can also use “Add Date”, “Subtract Date” and “If”, which will work a bit differently
than “Add”, “Subtract”, “Multiply”, “Divide”, as they have different calculation rules.
The example below is for “If” condition.
Advanced Reporting Tool PRO for vTiger
17
All “If”…”then”…”else” have nested function capability. If nested functions are necessary, please select “sub-
calculation”.

Advanced Reporting Tool PRO for vTiger
18
SET COLUMNS TO SUM, AVG OR COUNT – „AGGREGATES” TAB Under the „Aggregates” tab you can select which fields you would like to Count, Summarize, or find Minimal,
Maximal or Average value. Simply select the field from the drop-down menu and then mark the check-box next to
the selected field. Click the green „+” to add additional fields for aggregating. Remove fields with the red „X”.
For each selected field at least one of the summary options must be selected: Sum, Average, Min, Max or Count. All
of the options can be selected but it is recommended to use only Sum or Average for amount and currency fields,
while ID or Number should be used for count (or any unique field is highly recommended for correct count).
Min / max values you can calculate for amounts and for date/date-time field types. As always, it is necessary to
select at least one “Group by” item under “Grouping & Sorting”. For example, if you need to see the first meeting
date and time for each of your Customers, please select “Min” value for meeting Start Date under “Aggregates”
and “Account Name” to be grouped by under “Grouping & sorting” tab.

Advanced Reporting Tool PRO for vTiger
19
Include details check-box is there to select detailed or summary report type. For more information about „Include
details” please see the previous section „SELECTING COLUMNS FOR YOUR REPORT – „FIELDS” TAB” tab description,
point 4 and 5.
Remember to save the selected Summary option changes. If you are not sure, whether you want to Save the
changed Summary settings, you can click „Preview” and then close the report without saving. You can also use the
„Save as” option, - to keep the current report without changes and play with the new report at the same time.
„GROUPING & SORTING” TAB After you have selected the necessary Columns(fields) and summaries in your Report, you can identify how data
should be grouped and sorted – under the „Grouping and Sorting” tab.
In the Grouping & sorting upper table in „Group by” select the field from the drop-down menu by which the data
should be grouped and summarized in our Report. The drop-down menu contains only those fields which are
selected under „Fields” tab. You can have several grouping levels in your report. The order of selected fields is
replicated in your report. The first selected group (in the first row) is the upper level of the grouping and
summarizing in your report, the „Level” number is „1”. The next summary you add (Level „2”) will be summarized
already inside the 1st group. For example, if we want to see in our report Invoice amounts by Date and then by

Advanced Reporting Tool PRO for vTiger
20
Product, we select date first and Product name second (please see the picture below). If you need to have this field
grouped for summary, it is important to choose „Group” or „Group and sort” in the „Action” pick-list.
„Group and sort” and „Sort” options will allow you to identify the sort order in the „Sort” column: „Ascending” or
„Descending”. If your report has selected Aggregates for summaries (under „Aggregates” tab), for the „Group and
sort” option you can also choose to sort by this summary aggregate, for example, if you would like to sort not by
Product name, but by product sold amounts.
For detailed reports (if „Include details” is checked) you can also select only to „sort” by this column. For more
information about „Include details” please see the previous „Aggregates” tab section, point 4 and 5.
For date and date-time fields we can identify one of the following grouping levels: Day, Week, Month, Quarter,
Year. In our example below we have selected to group and sort by Month of the Invoice date. In „Sort” selection
you can identify the sort order (Ascending/ Descending) and also – do you want to sort by the group (in Alphabetic
order) or by Sums in this group. For example, if you want to see the the month with the largest income from
invoices first, you need to select Sum(Net Price)+Descending in sort options. In our example we want this to be
sorted in calendar order, not by amounts, so we select the Invoice Date Ascending.
The green „+” adds one more grouping level and the red „x” removes it.
After the Grouping and Sorting options is the „Select summaries to show in this report:” table to select where we
want our summaries to be shown/hided. In our case we have selected to show selected summaries for all our
groups and to display the Grand total as well:

Advanced Reporting Tool PRO for vTiger
21
When our grouping options are set, we can click „Preview” button to see the result:
If you want to see the group items each as a new column (instead of row), you should select the check-box for
„Pivot (Matrix)”. As soon as „Pivot (Matrix)” check-box is selected, we see additional options in our Grouping and
sorting table: „Position”. Here we need to select at least one group item that should be organized as a „Column”. In
our case it is Invoice Date, while Product name will be as „Row”.
In our example, we want to see each month in a new column. We select the „Pivot (Matrix)” check-box, set
„Column” next to Invoice Date and click „Preview”. Now our report looks different:
However, since we have two aggregates: Sum of Net Price and Sum of Quantity, each column for each month is
shown twice (additional column per aggregate within each month) and our report looks unnecessarily large. To
solve this, we can select „Aggregates as column” and we get:

Advanced Reporting Tool PRO for vTiger
22
Each month now has only one column, but Sum of Net Price and Sum of Quantity are organized as rows in our
report.
Sometimes it is necessary to see detailed data together with summary pivot view in the same report. For example,
if you need to see Account details, Name, created date, Industry in each row and then summary by Opportunity
Stage as a matrix, then just select “Pivot (Matrix)” checkbox again, and for detailed entries identify as “sort” and
“row” – please see the sample below:

Advanced Reporting Tool PRO for vTiger
23
For Pivot types of reports, empty summary values are displayed empty by default like this:
In some cases it is preferred to show empty values as ‘0’ instead, for example, for exporting to Excel.
This can be achieved by selecting the “Empty values as 0” checkbox under “Grouping & Sorting” tab.
Please note that „Pivot (Matrix)” is not available if you have selected „Include details”.
Remember to save the selected Grouping and Sorting changes. If you are not sure, if you want to Save the changed
Grouping and sorting settings, you can preview and close the report without saving. You can also use the „Save as”
option to keep the current report without changes and play with the new report at the same time.
Note: If you are using the Leads module, it might be interesting for you to compare unconverted leads versus
converted leads. In order to do that, you can select field „Converted” and then Group by this field.

Advanced Reporting Tool PRO for vTiger
24
Grouping and sorting for multi-select pick-lists If you have a multi-select pick-list and have selected several pick-list values for each e.g. Organization and you still
want to see how many Organizations have selected each value, you can choose the option „Separate each value”
(on demo versions you will see a Report „Organization-Product Multi Select test” in the „Test” folder):

Advanced Reporting Tool PRO for vTiger
25
If you would like to see how many organizations have selected a combination of certain pick-list values, you simply
need to deselect the check-box „Separate each value”.
REPORT HEADER AND LABEL RENAMING - RENAME LABELS TAB If you want to change your report column / row titles or labels as well as chart labels click the „Rename Labels” tab.
Here in the left column you can see the original report labels and on the right side you can edit and enter new
labels which you would like to show in your report. Please see the example below.
Please note that you can edit the Report Title not under „Rename Labels” tab but with the pencil icon next to the
Report Title. You can edit the Chart Title simply by clicking the Chart Title inside the Chart Title box.
Remember to save the Report Label changes. If you are not sure, whether you want to Save the changed Report
Labels, you can preview and exit the report without saving. You can also use the „Save as” option to keep the
current report without changes and play with the new report at the same time.

Advanced Reporting Tool PRO for vTiger
26
REPORT PERMISSIONS - „SHARING & SCHEDULING” TAB After you have installed the Advanced Reporting module, for security reasons all available pre-defined reports are
available for admin users only (users with „Admin” checked). If the user profile has permissions to see the
Advanced Reporting module, then all users without admin permissions can only see empty folders and can not see
any reports, until their report viewing permissions are changed.
1. For each report under the „Sharing & Scheduling” tab the report owner (by default admin after the module
installation) can set permissions to see, edit and delete for Individual users or for Roles (to apply
permissions for all Users within a Role).
„View” permissions means that a user can open and preview report data with current settings. The
user will not be able to change or save any of the report or chart settings and will also not be able
to use the „Save as” button.
„Edit” permissions allows to change any of the report and chart settings and also to use the „Save
as” option for copying an existing report. Edit permissions also automatically grant View
permissions.
2. The user identified as „Owner” can always see, edit and delete the report with chart.
3. You can then set the report mode to „Public” or „Private”. „Public” reports will be visible to all VTIGERCRM
users, who have Advanced Reporting module enabled for their profiles. For Public Report you can set
permissions for all users- should they be able to only see this report and chart, or can they also edit or even
delete it.
4. If you set the Report mode to „Private”, then only the Owner can see, edit and delete this report. In addition to the
owner you can identify either specific user(s) or user group(s) to be able to View, edit or delete the current report.
Click on the User or Group in the left box, then use the green arrow to move it to the right-side box. Now you can
identify permissions to View, Edit or Delete the report for each user or group by selecting the proper drop-down
value next to the User/Group name.
With the gray „x” in the right-side box you can remove User or Group permissions, this User or Group will no longer
see the Report after the changes are saved.
All user permission setting changes under „Sharing & Scheduling” apply only after saving the Report (click the
„Save” button above the report).
If you need to limit users to see only their data, you should use the filter “Current user”. With “Current user” filter
you can limit the User access to the data. If such filter is set, each user will see only their assigned entries.

Advanced Reporting Tool PRO for vTiger
27
‘Current user’ filter will not be taken in account when report scheduled via e-mail in PDF and Excel format. Only
link to the report will work with ‘Current User’ filter.
REPORT E-MAIL SCHEDULING - „SHARING & SCHEDULING” TAB You can schedule regular Report sending by e-mail. To enable and schedule automated regular Reports first select
the check-box „Schedule Report” under the „Sharing & Scheduling” tab. As soon as the check-box is selected,
options for scheduling will appear.
First, you need to select the frequency from the drop-down menu. For example, if you select „Daily”, then the
report will be e-mailed once per day. „Weekly”, „Monthly” and „Yearly” options are also available.
If you have selected „Daily”, then select what time this e-mail will be sent each day.
Weekly – which weekday (e.g. Monday, Tuesday, etc.) and time.
Monthly – which date and time;
For „Yearly” you can select which month of the year, date and time.
Scheduled e-mail time setting applies to report owner time zone which is identified in their user settings, taking into
account VTIGERCRM server time zone settings.
Under „Send report as format”, you can select one or several of the following options:
„XLSX” to send the report attached to the e-mail in Excel format
„PDF” to send the report as attached to the e-mail in PDF format
„Send link to report” will send the e-mail with a link to this report
The e-mail subject will contain the report name and date sent.
To identify report recipients select from the available users/groups/roles from the left box and then move them to
the right by clicking the green arrow.
E-mails are sent to the user e-mail address which is defined in the VTIGERCRM user settings.
You can remove an e-mail recipient from the selected list with the gray „x”.
All users, or users within a group or role appearing on the right side box will be receiving an e-mail with the report
attached according to the scheduled settings.

Advanced Reporting Tool PRO for vTiger
28
Under “Sharing and Scheduling”, it is also possible to enter an e-mail address manually – even if there is no user
with such an e-mail address registered. In order to do that, please enter the necessary e-mail address in the
“Custom email” field and then click the green arrow next to it – in order to move the entered address to the
recipient box on the right side.
For security purposes custom e-mail addresses can be entered only by admin users or by the report owner. Other
users will not have this option available.
It is important to always remember to Save the report for the e-mail scheduling changes to take effect.
MASS EDIT FOR PERMISSIONS AND SCHEDULING It is possible to set the same permissions and/or report e-mail scheduling options for several reports at once. This
can be done from the Report and Folder list.
1. Mark the necessary reports for scheduling (if you mark a folder, then all reports within that folder will be
selected). You can select only those reports, where you have editing permissions.
2. Click „Mass schedule and permissions” to open the Sharing and Scheduling options.

Advanced Reporting Tool PRO for vTiger
29
3. Inside the pop-up window select what you would like to update:
a. „Update permissions” should be selected in case you need to update permissions for the selected
reports (leave „Schedule Report” blank, in case you don’t want to change the previous Scheduling
Options for those reports.)
b. „Schedule Report” should be selected in case certain options of report scheduling via e-mail should
be applied to all selected reports. Leave „Update Permissions” check-box unselected in case you
don’t need to change previous permissions for the selected reports.
c. You can select both „Update Permissions” and „Schedule Report”, in case both – permissions and
also the scheduling options should be changed for all selected reports.

Advanced Reporting Tool PRO for vTiger
30
4. Please identify the necessary sharing and/or scheduling options (you can find more information about
setting changes in the previous sections).
Please note that if you want to remove e-mail scheduling for all selected reports, you can simply select the
„Schedule Report” check-box and then leave the right side box empty.
5. Changes will be applied to all selected reports after clicking the „Save” button. Or you can click „Cancel” in
case you do not wish to apply the changes to the selected reports.
CHART TYPES AND SETTINGS Below the Report data you can find the Chart and Chart editor. Chart information is strictly related to Report data
above and Report settings, such as Filters, Aggregates and Groups. This means that every time you change the
Report settings in the Report Editor, you need to Save those settings in order to be able to see them changed
accordingly in the Chart Editor before adjusting the Chart Settings.
In the Chart Editor you can identify the chart type and other chart settings. After changing the chart settings, click
on „Preview” button inside Chart editor to see the new look of the chart. Changed chart settings are saved only
after you save the Report.
In the „Title” area you can enter the Chart title. Hovering or clicking on the colored chart area will display the data
represented by this area:
Clicking on the chart legend will hide/show the data.

Advanced Reporting Tool PRO for vTiger
31
Click the „Save Chart as Picture” link below the chart to save the Chart as a PNG format picture.
You can enlarge the entire chart by selecting pre-defined sizes from the drop-down menu in the top-right corner of
the chart. If you need to increase/decrease the chart height only, you can click on Chart height increase/decrease
below the chart. Chart height increase will also help you in case you have a large number of labels and they do not
fit in the original chart size.
Advanced Reporting Tool PRO for vTiger
32
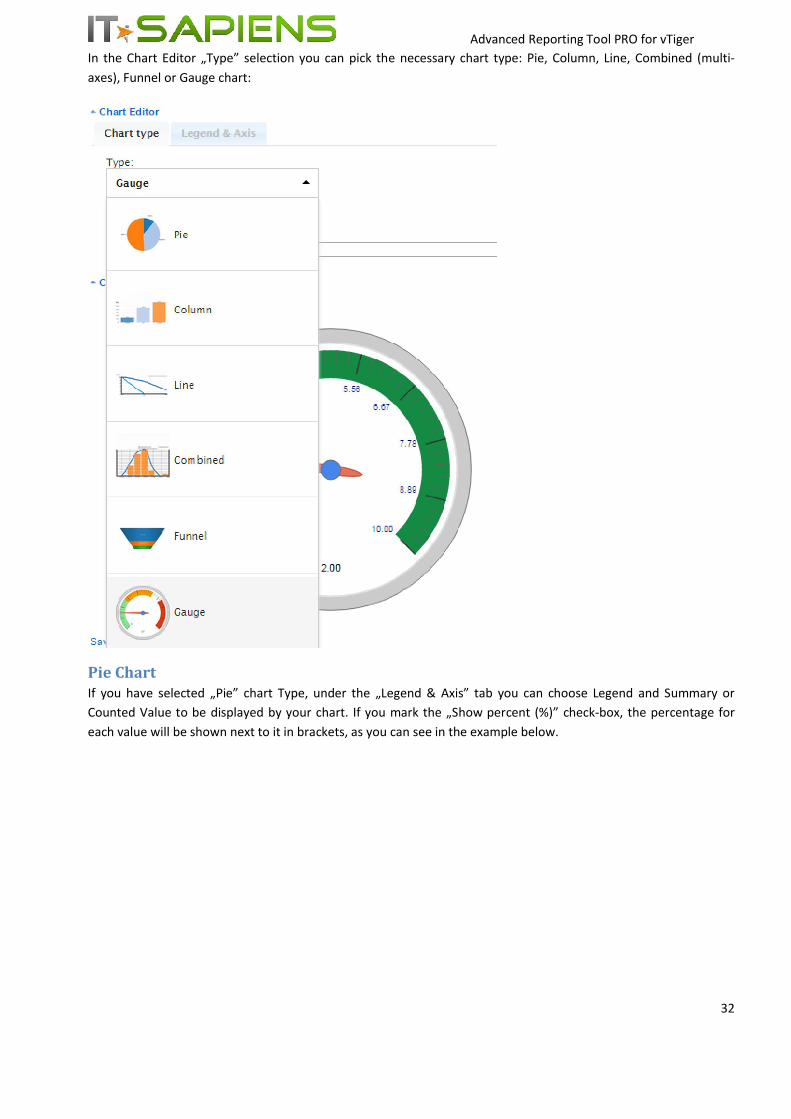
In the Chart Editor „Type” selection you can pick the necessary chart type: Pie, Column, Line, Combined (multi-
axes), Funnel or Gauge chart:
Pie Chart If you have selected „Pie” chart Type, under the „Legend & Axis” tab you can choose Legend and Summary or
Counted Value to be displayed by your chart. If you mark the „Show percent (%)” check-box, the percentage for
each value will be shown next to it in brackets, as you can see in the example below.

Advanced Reporting Tool PRO for vTiger
33
Hovering or clicking on any chart area will display the data represented by this area. Clicking the circles next to the
Chart Legend will hide/show the corresponding data in the chart.
It is important to Save the report if you want your new chart settings to be saved.
Column Chart If you have selected the „Column” chart type, under „Legend and Axis” you can identify the group from your Report
which should be represented by the Primary Horizontal Axis. The summary, count or average should be selected for
the Secondary Vertical Axis. You can select more than one of the Summary Aggregates under Secondary Vertical
Axis, in this case the „Legend” should be same as selected under Vertical Axis. Otherwise it can be any of the
Groups from your report.

Advanced Reporting Tool PRO for vTiger
34
For Column chart you can select „Grouped” or „Stacked” data representation.
Hovering or clicking on any chart area will display the data represented by this area. Clicking the circles next to the
Chart Legend will hide/show the corresponding data in the chart.
It is important to Save the report if you want your new chart settings to be saved.
Line Chart If you have selected the „Line” chart type, under „Legend and Axis” you can identify the group from your Report
which should be represented by the Primary Horizontal Axis. The summary, count or average should be selected for
the Secondary Vertical Axis. You can select more than one of the Summary Aggregates under Secondary Vertical
Axis, in this case the „Legend” should be same as selected under Vertical Axis. Otherwise it can be any of the
Groups from your report.

Advanced Reporting Tool PRO for vTiger
35
Hovering or clicking on any chart segment will display the data represented by this segment. Clicking the circles
next to the Chart Legend will hide/show the corresponding data in the chart.
It is important to Save the report if you want your new chart settings to be saved.
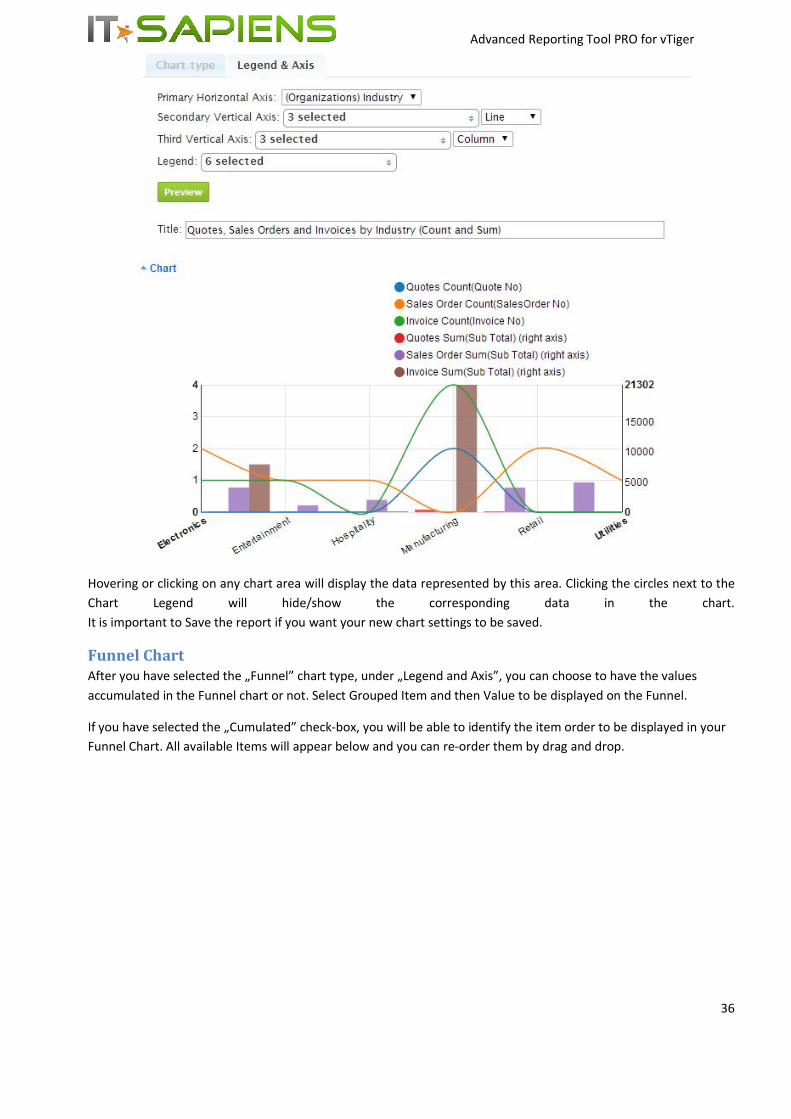
Combined (Multi-Axis) Chart The Combined chart has two Vertical Axes, which is important if you want to see differently scaled amounts in the
same chart, for example, if you need to see Sales Order Sums and Count in the same chart, like in the picture
below. In this chart all selected data can be represented as Line or as Column. The legend should then contain all
those values, which are selected under both Vertical Axes. The group (which is date, status, name etc.) is
recommended to be selected for the Horizontal axis.
In our example below we have Lines representing Count on the Secondary vertical axis (Quote, Sales Order and
Invoice Count), and Columns representing Sums on the Third Vertical Axis (Sum of Quote, Sales Order and Invoice
Sub total).
Advanced Reporting Tool PRO for vTiger
36
Hovering or clicking on any chart area will display the data represented by this area. Clicking the circles next to the
Chart Legend will hide/show the corresponding data in the chart.
It is important to Save the report if you want your new chart settings to be saved.
Funnel Chart After you have selected the „Funnel” chart type, under „Legend and Axis”, you can choose to have the values
accumulated in the Funnel chart or not. Select Grouped Item and then Value to be displayed on the Funnel.
If you have selected the „Cumulated” check-box, you will be able to identify the item order to be displayed in your
Funnel Chart. All available Items will appear below and you can re-order them by drag and drop.

Advanced Reporting Tool PRO for vTiger
37
If you don’t want to cumulate values in the chart, you need to deselect the „Cumulated” check-box. In this case you
will not be able to identify the Item order in the Funnel manually, as it will be sorted automatically in Descending
order (from the largest amount to the smallest).
Note the difference in the example below:
If you mark the check-box near „Show percent (%)”, the calculated % for each value will be shown next to the value
in brackets.

Advanced Reporting Tool PRO for vTiger
38
Gauge (Dial) Chart After you have selected „Gauge” chart type, under „Legend and Axis”, you can select one of the Groups and then
the Segment (Item) of this Group, then summarized, averaged or counted Value to be displayed in your Gauge
chart. If you select „All” under Grouped Segment, then Gauge will show the grand total value. For example, if you
only want to see, how many Leads with the Qualified status there are, you need to select „Lead Status” for the
Group and „Qualified” – for Group Segment, then „Lead No Count” for the value. In the example below you can see
how it would look.
Before that, you need to identify the ranges and their colors for your Gauge. In our example Qualified lead numbers
between 0 and 1 will be in a red colored area; between 1 and 4 – yellow and the best values between 4 and 10 will
be green. The arrow in the Dial will point to the value, which you can see at the bottom as well – it is „2” in our
case.
GEOGRAPHIC (MAP) CHART Under “Chart Editor” the selection of Map chart type is now available.

Advanced Reporting Tool PRO for vTiger
39
Currently the Map Chart is available for data representing either Countries or States. Under “Legend & Axis” ->
“Map for:” please select whether you need to see the chart representing Countries or just States.
Under “Identify Country” – please select the report column, which contains country or state names. Under “Value”
please identify the summary column with values that should be represented in the chart.
In addition, you can add one more dimension to be displayed in
your Geographic chart. For example, it can be customer industry
by country. If this is necessary, please select “Map with pie chart”
checkbox and then identify the dimension field name as you can
see in the sample below.

Advanced Reporting Tool PRO for vTiger
40
If the chart doesn’t fit, you can use “Chart size” and “Chart height” to increase / decrease its size. As always, please
remember to Save the added or modified Chart settings.
Yearly Comparison by Quarter/Month/Week for Charts Advanced Reporting Tool allows you to have more than one date dimension for the same date field in the same
report. It is available for both: the report table and the chart. For example, if you need to compare the monthly
pipeline of 2015 versus 2014, under “Grouping & Sorting” you need to select the same date field twice. In “Group
by” you should select date + “Year” for one and then date “Month” for the other, like in the example below:
After saving these options you can now identify the Year for the Label and Month for the Horizontal Axis. Our
example might look something like this:
Adding a Chart to the Homepage Dashlets When the report is open, you can add the chart to your Home Dashlets. Click the „Add to Homepage” link to add
this chart to your VTIGERCRM Homepage Dashlets.

Advanced Reporting Tool PRO for vTiger
41
If you are an admin user or report owner, you can also add the chart to other user's home dashlets. You can either
add it to all users within a selected role, or a specific user. After clicking “Add to Homepage”, the current chart will
be added to the dashlet according to your options.
After a pop-up confirmation the Chart and its Title will appear in your VTIGERCRM Homepage Dashlet:

Advanced Reporting Tool PRO for vTiger
42
On the Homepage charts are still interactive (i.e. displays the information on mouse-over represented by the area,
can hide/show by clicking on the legend, etc.).
Clicking the Chart Title link inside the Homepage Chart Dashlet will open the corresponding Report and Chart.
Changed and saved Report or Chart settings will apply to charts in the Homepage Dashlet as well.

Advanced Reporting Tool PRO for vTiger
43
DRILL DOWN FROM CHART AREA TO DETAILED DATA You can drill-down to the detailed data with a click to the chart area:
A report with detailed data represented by this chart area will open in a new browser tab.
As you can see from the ScreenShot above, you can save the new detailed data as a report, export it, or use the
report settings for additional filters or report layout changes, as well as to add the chart, if necessary.
Whenever you create or edit any summary report, you can identify, what columns and in what order should be
displayed upon drill-down. This can be done in the Report Editor “Fields” tab.

Advanced Reporting Tool PRO for vTiger
44
Drill down is available for both: Charts in the Home Dashlets and for Charts under the Report.
Drill down is not available for users who have no permission to drill-down the data. It is also not available for
customized combined reports, Geographic Chart and Gauge Chart.

Advanced Reporting Tool PRO for vTiger
45
CREATING NEW REPORT TEMPLATES VIA REPORT BUILDER It is recommended to start from an already pre-defined report template, and then use “Save as” in order to add a
new Report (you can use Search to find a report by related modules). However, if there is no report with your
necessary module or required relationships, or if you have a custom module, you can create a new report template
using the Report Builder.
1. The Report Builder is located under “Reporting Tool Settings” in the top-right corner of the Advanced
Reporting Tool folder list. “Reporting Tool Settings” link is visible and available only for admin users.
2. Click to open the tab “Report Builder”:
First of all, here you set permissions to report builder by selecting “Allow public access” and saving. If you keep this
checkbox un-selected, after “Save” only admin users will be able to create new reports via Report Builder.
Click “Open” next to “Report Builder” in order to Open it.
3.1. Under “Report Folder” please choose the Report folder, where the new report will be stored
3.2. Enter the Report Name and Description
3.3. The recommended Report Type is “Standard”; “Combined” reports will be covered later in this section.
3.4. Select the main module for your new report. If you don't need any further modules click “Save”;

Advanced Reporting Tool PRO for vTiger
46
After saving, the status “Saved” will appear along with the link “Open Report”. You can open the new report by
following this link. Please remember to add the necessary columns and data for your report under “Fields” tab,
as well as to add other needed settings and then “Save” again.
If non-admin users have granted permissions, they can open the report builder by clicking the link in Advanced
Reporting Tool report and folder list:
Adding a second module to the new report:
If you need to add a second related module, stay in the Report Builder (without Save) and click the green “+”
next to the selected main module. In our example below, “Accounts” is the main module. Clicking the “+” in
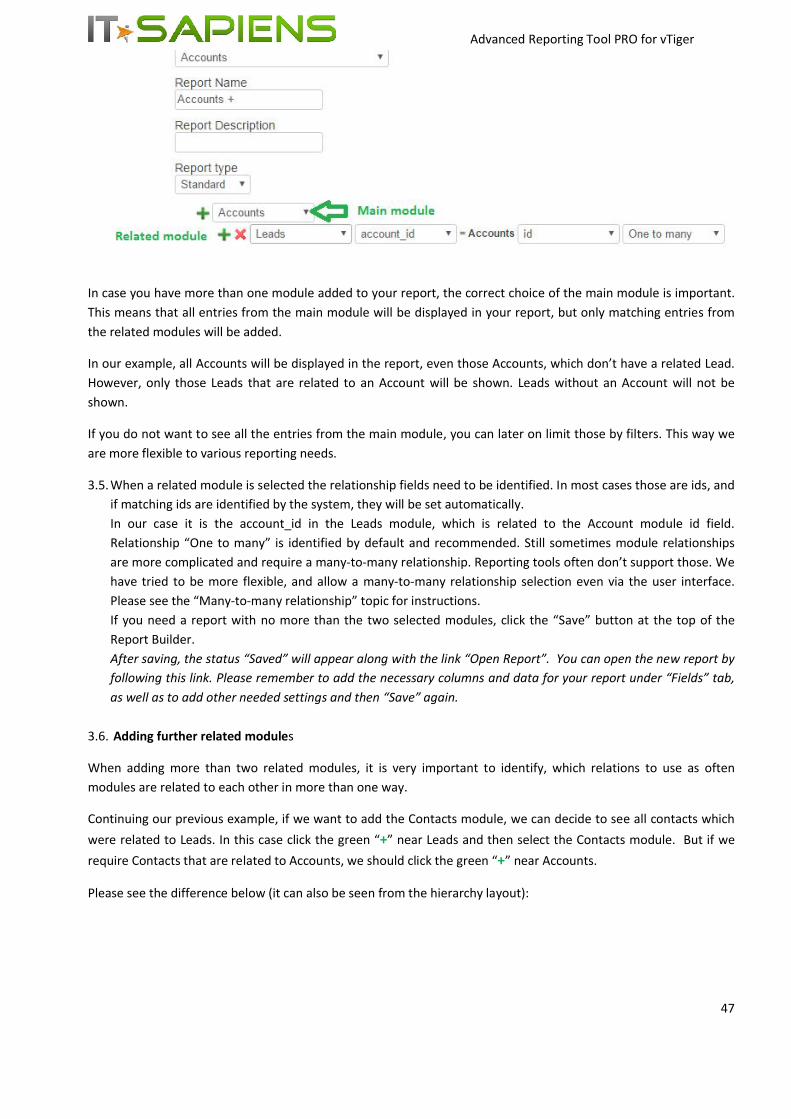
front of “Accounts” we added a second row – and selected Leads as our related module.
Advanced Reporting Tool PRO for vTiger
47
In case you have more than one module added to your report, the correct choice of the main module is important.
This means that all entries from the main module will be displayed in your report, but only matching entries from
the related modules will be added.
In our example, all Accounts will be displayed in the report, even those Accounts, which don’t have a related Lead.
However, only those Leads that are related to an Account will be shown. Leads without an Account will not be
shown.
If you do not want to see all the entries from the main module, you can later on limit those by filters. This way we
are more flexible to various reporting needs.
3.5. When a related module is selected the relationship fields need to be identified. In most cases those are ids, and
if matching ids are identified by the system, they will be set automatically.
In our case it is the account_id in the Leads module, which is related to the Account module id field.
Relationship “One to many” is identified by default and recommended. Still sometimes module relationships
are more complicated and require a many-to-many relationship. Reporting tools often don’t support those. We
have tried to be more flexible, and allow a many-to-many relationship selection even via the user interface.
Please see the “Many-to-many relationship” topic for instructions.
If you need a report with no more than the two selected modules, click the “Save” button at the top of the
Report Builder.
After saving, the status “Saved” will appear along with the link “Open Report”. You can open the new report by
following this link. Please remember to add the necessary columns and data for your report under “Fields” tab,
as well as to add other needed settings and then “Save” again.
3.6. Adding further related modules
When adding more than two related modules, it is very important to identify, which relations to use as often
modules are related to each other in more than one way.
Continuing our previous example, if we want to add the Contacts module, we can decide to see all contacts which
were related to Leads. In this case click the green “+” near Leads and then select the Contacts module. But if we
require Contacts that are related to Accounts, we should click the green “+” near Accounts.
Please see the difference below (it can also be seen from the hierarchy layout):

Advanced Reporting Tool PRO for vTiger
48
3.7. Many-to-many relationship
A many-to-many relationship is necessary in cases when both entities can be related to several other module
entities. For example, we can add several Accounts to the same Contact; and we can add several Contacts to the
same Account.
In this case the Report Type is still “Standard”. Same as previously we first select the main module. In our example
we want to see all Service Contracts, whether or not they have a Trouble Ticket related to them, so Service
Contracts is the main module.
Next we add a new row and select “Helpdesk” as the related module and identify the relationship type “Many to
many” instead of “One to many”.
An additional row is automatically added:
This is due to the fact, that Many-to-many relationships are defined through an additional table. Our Tool
automatically detected the correct values. You can follow this example if you have similar cases.
3.8. Combined Report Template Creation

Advanced Reporting Tool PRO for vTiger
49
Combined Report Types are the most complex. The reports have different logic and Report Settings UI. These are
quite different from standard reports and don’t have detailed data view – only the summary. Yet, they are
sometimes needed and creating them can be a little tricky.
Combined reports are needed, for example, if you would like to see the summary of all Activities related to a User
(Calendar events, Contacts, Accounts, Opportunities, Tickets, Quotes, etc.). Calendar events, Contacts, Accounts,
Opportunities, Tickets and Quotes do not need to be all connected. The only relation they have is the relation to
the User.
In our example, we would like to create a Summary Report by Account to see all Contracts and Leads related to the
Account only, but not necessarily related among themselves.
In this case we select Report Type: “Combined”. We then select the main module “Accounts” and with the green
“+” near “Accounts” we select all the necessary related modules.
After saving this we will be able to see the count of Contracts & Leads by each Account name. From this example
only the Account name will be available from the Accounts module.
However, if we need to filter or group by some additional Account information, for example, if we want to see the
summary of activities and Sales by Account Industry, we need to make some additional relations.
In this case we need to Add accounts to each of the related modules: to Contracts and to Leads. And then ensure
that the relations are correct. Please see the sample below:
When all is ready, please remember to click “Save” in order to create your new report, after that click “Open
report”, and add the necessary fields and other settings to get your report ready for use.

Advanced Reporting Tool PRO for vTiger
50
ADDING AN ADDITIONAL MODULE TO EXISTING REPORTS If you already have a report or a report template with all the settings identified and you need to add an additional
module, which is not yet available under the “Fields” tab, it is possible to do so under “Fields” tab.
For data security purposes, only admin users can add modules to already created reports and this feature is not
visible for other users.
In our example we have a report which is only related to the “Leads” module. If we need to add the “Bugs” module,
we click “Add module to current report”. This will open the “Report builder” screen. The identified report folder
and report name is already identified there, no need to change. With the green “+” near the “Leads” module name,
we add a second row where we select the “Bugs” module.
When the necessary additional module and the relationship are identified, we can click the “Update current
report” button. A “Saved” text will verify the success of the update and a “Open Report” link will appear:

Advanced Reporting Tool PRO for vTiger
51
Please click the “Open Report” link to go back to your original report with the new module added. Now, you can
open the “Fields” tab again and you will see the new module with its fields added – they are now available for your
report.
You are welcome to contact our IT Sapiens team via: [email protected] for further questions!
Recommended