861 Reference Digital Surround Controller User Guide
ii
Preface Important safety instructions
Read the instructions.Keep these instructions.Follow all instructions.Do not use this apparatus near water.Clean only with a dry cloth.Install only in accordance with the manufacturer’s instructions.Refer all servicing to approved service personnel.
WARNING: TO REDUCE THE RISK OF FIRE OR ELECTRIC SHOCK, DO NOT EXPOSE THIS APPARATUS TO RAIN OR MOISTURE.
This apparatus has been designed with Class 1 construction and must be connected to a mains socket outlet with a protective earthing connection (the third grounding pin).
This apparatus uses a single-pole power switch. As a result it is not isolated from AC mains power when switched off at the rear panel. The apparatus may be isolated from mains power either by unplugging the power connector from the rear of the unit, or by unplugging the connector at the opposing end of the power cord or cable from its supply outlet. As a result, either or both of these connectors should remain accessible
Safety warningsDo not expose the unit to dripping or splashing.Do not place any object filled with liquid, such as a vase, on the unit.Do not place naked flame sources, such as lighted candles, on the unit.
••••••
•
••
•
To avoid overheatingLeave at least 10cm around the equipment to ensure sufficient ventilation.
Do not position the unit:
In direct sunlight.Near heat sources, such as a radiator.Directly on top of heat producing equipment, such as a power amplifier.
To avoid interferenceDo not position the unit:
Near strong electrical or magnetic radiation, such as near a power amplifier.
Radio interferenceFCC Warning: This equipment generates and can radiate radio frequency energy and if not installed and used correctly in accordance with our instructions may cause interference to radio communications or radio and television reception. It has been type-tested and complies with the limits set out in Subpart J, Part 15 of FCC rules for a Class B computing device. These limits are intended to provide reasonable protection against such interference in home installations.
EEC: This product has been designed and type-tested to comply with the limits set out in EN55013 and EN55020.
•
•••
•
iii
Contents
Contents
Introduction 1
The 861 Reference Digital Surround Controller 2
DSP presets and layouts 4
Specifications 6
Using the 861 Reference Digital Surround Controller 7
Front panel keys 8
MSR+ keys 9
Switching on and off 10
Selecting a source 11
Adjusting the volume 12
Changing the DSP preset 13
Changing the display 14
Customising the 861 Reference Digital Surround Controller 15
Locking and unlocking the menus 16
Changing the DSP parameters 17
Changing treble, bass, or phase 19
Changing the listening position 20
Changing the integration of the centre 21
Changing the spaciousness of the sound 22
SpeakerLink controls 23
Changing the LipSync 24
Changing the DSP preset for a source 25
Defining your own presets 26
DSP presets 27
DSP presets for two-channel material 28
DSP presets for multichannel material 32
Installing the 861 Reference Digital Surround Controller 35
Unpacking 36
Applications 39
Configuring the 861 Reference Digital Surround Controller 47
Choosing a standard setting 48
Calibrating the system 50
Calibration tests 51
Setting up sources 53
Setting up SpeakerLink 55
Sinewave sweep test 56
Installing the Meridian Configuration Application 57
Index 59
iv
Preface Copyright and acknowledgements
Sales and service in the UKMeridian Audio Ltd Latham Road Huntingdon Cambridgeshire PE29 6YE England
Tel (01480) 445678 Fax (01480) 445686
Sales and service in the USAMeridian America Inc. 110 Greene Street, Suite #407 New York NY 10012 USA
Tel (646) 66 0140 Fax (646) 66 0152
Designed and manufactured in the UKMeridian Audio Ltd Latham Road Huntingdon Cambridgeshire PE29 6YE England
Visit us on the Webhttp://www.meridian-audio.com
Copyright © 1999-2012 Meridian Audio Ltd.
Part no: 861U/8 (P88413)
Manufactured under license from Dolby Laboratories Licensing Corporation (Canadian patent 1,037,877), Lucasfilm Ltd. (US patents 5,043,970; 5,189,703; 5,222,059. European patent 0323830), Trifield Productions Ltd, and Nimbus Records Ltd.
MHR: this product incorporates copyright protection technology covered by certain patent applications and intellectual property of Meridian Audio Ltd. This technology is provided for the express purpose of securely containing copyright audio within the Meridian System only. Reverse engineering or circumvention of this protection is strictly prohibited.
Dolby, Dolby Digital, Pro Logic, AC-3, PLII, and the double-D symbol are trademarks of Dolby Laboratories Licensing Corporation. Lucasfilm, THX, and THX Cinema are registered trademarks of Lucasfilm Ltd. Surround EX is a jointly developed technology of THX and Dolby Laboratories, Inc. and is a trademark of Dolby Laboratories, Inc. All rights reserved. Used under authorisation. DTS is a registered trademark of Digital Theatre Systems Inc. MPEG is a registered trademark of the MPEG organisation. Ambisonic is a registered trademark of Nimbus Records Ltd. Trifield is a trademark of Trifield Productions Ltd. LaserDisc is a trademark of Pioneer Electric Corp.
Boothroyd|Stuart Meridian, Meridian, Meridian Digital Theatre, MHR, MLP, LipSync, and Sooloos are registered trademarks of Meridian Audio Ltd.
This guide was produced by: Human-Computer Interface Ltd, http://www.interface.co.uk
1
Introduction
Introduction
Welcome to the Meridian 861 Reference Digital Surround Controller.
This User Guide provides full information about using the surround controller in conjunction with your other equipment, to achieve the superb results you can expect from it.
2
Introduction The 861 Reference Digital Surround Controller
Digital signal processing, or DSP, is a technique pioneered by Meridian in hi-fi products for achieving extremely accurate reproduction of audio signals. Unlike conventional analogue systems – which process signals using electronic circuits based on resistors, capacitors, and inductors – DSP works by performing exact mathematical calculations on digital versions of the signals.
The advantage of DSP over analogue circuitry is that the signals are held as precise numbers, rather than voltages in a circuit. This means that any number of stages of processing can be performed with high precision, and without any of the cumulative noise or degradation that inevitably occurs, even with high-quality analogue circuitry. In addition, several of the surround-sound decoding techniques and signal improvement techniques available in the 861 would be virtually impossible to implement in analogue circuitry.
At Meridian we have taken advantage of the availability of high speed DSP microprocessors to incorporate DSP in hi-fi products, and the 861 is the result of over a decade of our research and development in this field.
The 861 takes advantage of DSP for several different functions:
To de-jitter incoming digital signals and expand the precision of the signal.To perform filtering or adjustment of the frequency response; eg treble or bass.To decode digitally-encoded signals from Dolby Digital (AC-3), DTS, or MPEG Audio.To process the audio into a multichannel signal, and match the source channels to the configuration of main loudspeakers and subwoofers in the system.
The 861 converts analogue input signals to digital format, using high-quality analogue-to-digital converters (ADCs). Digital signals, from CD, DVD, or digital broadcasting, are already in digital format and do not need to be converted.
•
•
•
•
The signals are then retained in digital form throughout the 861 until they are converted back to analogue form at the analogue outputs, to drive power amplifiers. If you are using the 861 with Meridian DSP Loudspeakers, the signals remain in digital form until the last possible stage.
The architecture of the 861 allows for wide flexibility – future sources and formats can be handled by upgrading either software or cards.
Meridian MHR Smartlink and MMHRThe 861 Reference Digital Surround Controller incorporates the unique MHR SmartLink and MMHR multichannel links. The MHR SmartLink allows it to receive an upsampled 6-channel PCM stream from a compatible source such as the Meridian 800 Reference DVD/CD Player. The MMHR receives an 8-channel PCM stream from a compatible system such as the Meridian HD621 HDMI Audio Processor.
Meridian MHR Smartlink and Meridian MMHR obtain intelligent stream content information from the source, allowing the 861 Reference Digital Surround Controller to select an appropriate preset depending on whether the source is music or a movie soundtrack, and whether it is 2-channel or multichannel.
InputsThe 861 is a full-system controller preamp that provides seamless control of up to 12 sources.
By providing digital as well as analogue inputs the 861 can give radically higher sound quality for sources that are originally digital – like CD, Digital Radio and DVD.
As well as accepting 2-channel or multichannel digital audio, the 861 will handle SPDIF-encoded Dolby Digital, DTS, or MPEG from sources like DVD, Satellite, and BluRay.
3
Introduction
ProcessingThe Meridian 861 routes all signals – if necessary via a 24-bit A/D converter – into the digital domain for processing in the highly developed Meridian DSP cards.
The incoming signals are processed using a variety of proprietary algorithms, and up to eight output signals are generated. These output signals can be used to feed a number of speaker layouts, ranging from two to eight loudspeakers.
The on-board algorithms include Meridian’s own highly transparent Dolby Pro Logic, PLII, Dolby Digital, MPEG Surround, DTS, THX extensions, TV Logic, and a variety of award-winning music programs including Trifield and Ambisonic.
OutputsThe eight outputs can be provided as digital signals to feed Meridian DSP Loudspeakers, or as variable analogue outputs using a proprietary on-board 24-bit resolution conversion method.
Room CorrectionThe Meridian 861 can be used in conjunction with the Meridian Configuration Program to create a set of one or more room correction profiles matched to your room. A profile can then be selected to compensate for room artefacts, including resonances and reflections, or for imbalances between the speakers, to give a significant improvement in the sound.
4
Introduction
The 861 provides an extensive range of options for decoding and processing analogue and digital signals for multichannel reproduction.
Music on CD or radioThe following DSP presets add a surround dimension to stereo recordings, such as on audio CDs or radio.
Music extracts the mono and surround components of the original recording for the centre and surround speakers to give a spacious open sound field.
Trifield is similar to Music but generates a centre-front signal that is completely integrated with the front stereo image, for a more stable, accurate, and focused stereo image. The image width is also adjustable.
Super produces a very good surround effect with many live recordings.
PLIIx Music and Music Logic are recommended for use with studio produced music, and provide different options for adjusting the sound field.
Two-channel movie soundtracks on DVD, video, and TVMany movie soundtracks are Dolby Surround Encoded onto a two-channel stereo soundtrack.
The following DSP presets re-create the surround components from this type of material:
PLIIx Movie is Dolby’s recommended choice for Dolby Surround Encoded material, and PLIIx THX provides a variant of this better suited to home listening.
TV Logic uses the same processing techniques as PLIIx Movie but with adjustable steering to give better results with TV material.
Special presets for two-channel materialsDirect uses only the left and right speakers; compare this with the effect of surround processing using the other modes. Stereo will use a subwoofer if it is present.
Ambisonics is specially designed for two-channel materials that are UHJ Ambisonically encoded, such as certain audio CDs. The encoded surround information is recovered and played back using all the loudspeakers in your system. In addition it will give impressive results with other two-channel material.
Multichannel movie soundtracks on DVD The following presets are designed for use with multichannel movie soundtracks encoded using Dolby Digital or DTS. Typically these are labelled 5.1 because they provide five full-range channels (three front and two rear) and one LFE (bass effects) channel.
Cinema and THX decode the soundtrack to render the original six channels to your speaker layout. THX adds some additional signal processing to match the sound to typical home listening conditions.
PLIIx Mov6, PLIIx Mus6, THX Surround EX, THX Ultra2, and THX Music create an additional pair of surround channels from the 5.1 channel soundtrack and are available if you have four surround speakers in your system. Use PLIIx Mus6 or THX Music for music.
DSP presets and layouts
5
Introduction
Multichannel music recordingsThe following presets are recommended for music recordings containing more than two channels:
Discrete renders the source channels to your speaker layout with the ultimate precision and transparency.
Ambisonics is especially designed for multichannel recordings on DVD-Audio discs that use Ambisonic encoding.
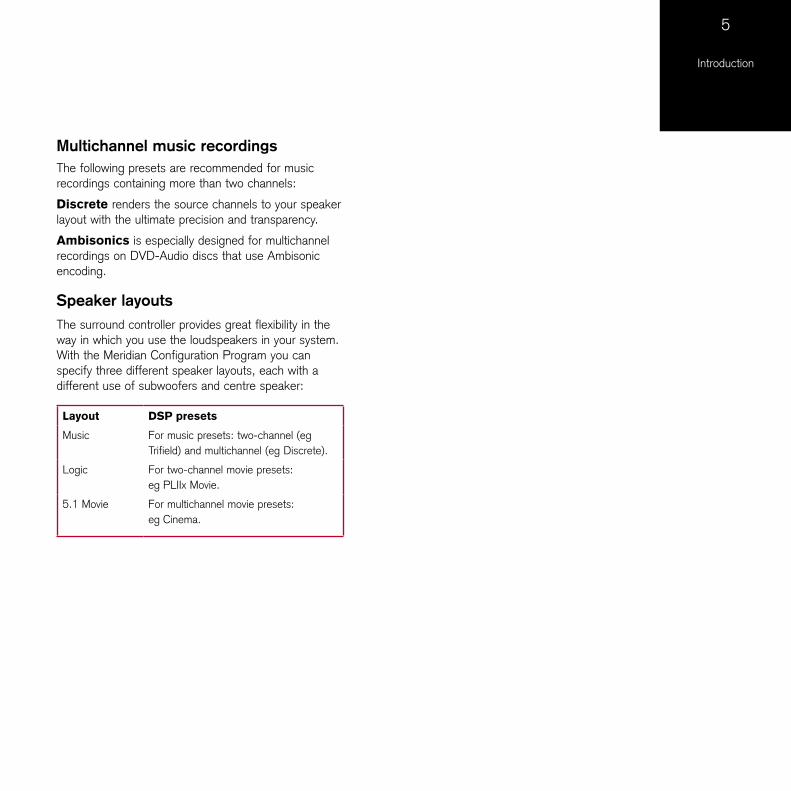
Speaker layoutsThe surround controller provides great flexibility in the way in which you use the loudspeakers in your system. With the Meridian Configuration Program you can specify three different speaker layouts, each with a different use of subwoofers and centre speaker:
Layout DSP presets
Music For music presets: two-channel (eg Trifield) and multichannel (eg Discrete).
Logic For two-channel movie presets: eg PLIIx Movie.
5.1 Movie For multichannel movie presets: eg Cinema.
6
Introduction Specifications
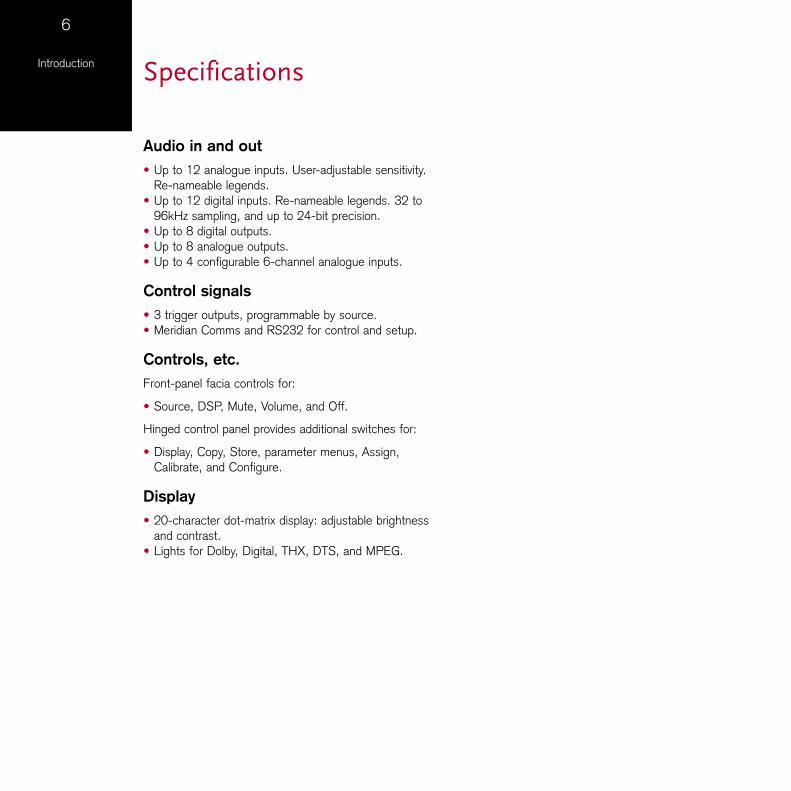
Audio in and out Up to 12 analogue inputs. User-adjustable sensitivity. Re-nameable legends. Up to 12 digital inputs. Re-nameable legends. 32 to 96kHz sampling, and up to 24-bit precision. Up to 8 digital outputs. Up to 8 analogue outputs.Up to 4 configurable 6-channel analogue inputs.
Control signals3 trigger outputs, programmable by source.Meridian Comms and RS232 for control and setup.
Controls, etc.Front-panel facia controls for:
Source, DSP, Mute, Volume, and Off.
Hinged control panel provides additional switches for:
Display, Copy, Store, parameter menus, Assign, Calibrate, and Configure.
Display 20-character dot-matrix display: adjustable brightness and contrast. Lights for Dolby, Digital, THX, DTS, and MPEG.
•
•
•••
••
•
•
•
•
7
Using the 861 Reference Digital
Surround Controller
Using the 861 Reference Digital Surround Controller
This chapter provides a summary of the functions of the 861 Reference Digital Surround Controller to identify the controls which you use to operate the unit.
It also provides step-by-step instructions for operating the digital surround controller, using either the front panel or the MSR+.
8
Using the 861 Reference Digital
Surround ControllerFront panel keys
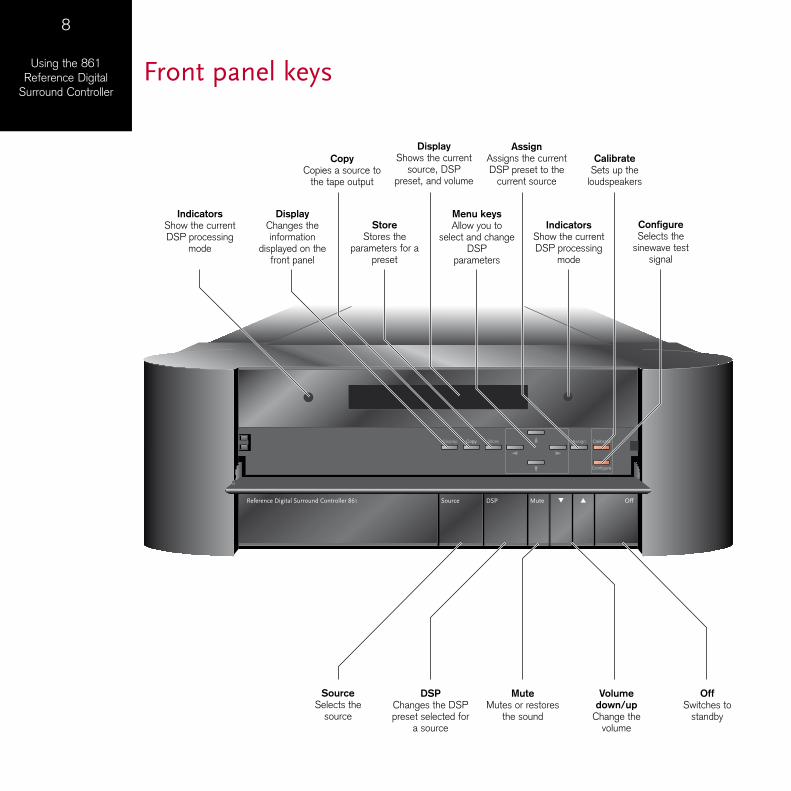
OffDSP MuteSourceReference Digital Surround Controller 861
Calibrate
Configure
AssignStoreCopyDisplay
DisplayShows the current
source, DSP preset, and volume
DSPChanges the DSP preset selected for
a source
MuteMutes or restores
the sound
Volume down/up
Change the volume
OffSwitches to
standby
SourceSelects the
source
ConfigureSelects the
sinewave test signal
DisplayChanges the information
displayed on the front panel
StoreStores the
parameters for a preset
Menu keysAllow you to
select and change DSP
parameters
IndicatorsShow the current DSP processing
mode
IndicatorsShow the current DSP processing
mode
CalibrateSets up the
loudspeakers
AssignAssigns the current DSP preset to the
current source
CopyCopies a source to
the tape output
9
Using the 861 Reference Digital
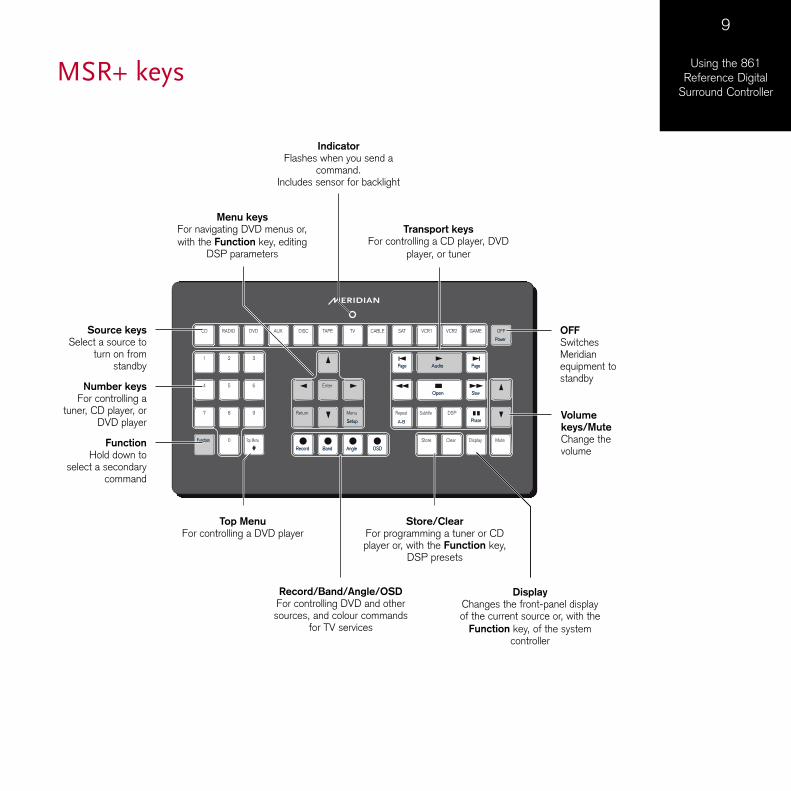
Surround ControllerMSR+ keys
1
OpenOpen
AudioAudio
CD
1
4
7
FunctionFunction
RADIO
2
5
8
0
DVD
3
6
9
AUX DISC
Return
RecordRecord
TAPE
Enter
TV
Menu
SetupSetup
CABLE SAT VCR1
Store
SubtitleRepeat
Clear
DSP
Display Mute
VCR2 GAME OFF
PowerPower
BandBand AngleAngle OSDOSD
Top Menu
##
PagePage
SlowSlow
PhasePhase
PagePage
A-BA-B
OFFSwitchesMeridianequipment to standby
Volume keys/MuteChange the volume
Menu keysFor navigating DVD menus or, with the Function key, editing
DSP parameters
IndicatorFlashes when you send a
command.Includes sensor for backlight
Transport keysFor controlling a CD player, DVD
player, or tuner
DisplayChanges the front-panel display of the current source or, with the
Function key, of the system controller
Number keysFor controlling a
tuner, CD player, or DVD player
Source keysSelect a source to
turn on from standby
FunctionHold down to
select a secondary command
Top MenuFor controlling a DVD player
Record/Band/Angle/OSDFor controlling DVD and other sources, and colour commands
for TV services
Store/ClearFor programming a tuner or CD player or, with the Function key,
DSP presets
10
Using the 861 Reference Digital
Surround ControllerSwitching on and off
When not playing, the digital surround controller should be left in the standby state. This ensures that the components of the digital surround controller operate at maximum efficiency from the moment you start.
If you are not going to use the digital surround controller for several days you should switch the unit off completely at the rear panel, and disconnect it from the AC power supply.
To switch on from standbyPress Source (front panel), or select a source by pressing the appropriate source key on the remote; eg CD.
If the digital surround controller is part of a Meridian system it will automatically switch on any other unit in the system, such as the 800 Reference DVD/CD Player and Meridian DSP Loudspeakers.
To switch to standbyPress Off (front panel or remote).
If you have other Meridian equipment or Meridian DSP Loudspeakers connected to the digital surround controller these units will also switch to standby.
•
•
11
Using the 861 Reference Digital
Surround ControllerSelecting a source
The digital surround controller provides the following 12 sources:
CD, Radio, DVD, Aux, Disc, Tape, TV, Cable, Sat, VCR1, VCR2, and Game.
The input and DSP preset associated with each source depends on how the digital surround controller has been set up; for more information see Setting up sources, page 53.
Your installer may have customised the labels displayed for each source to suit your other equipment.
To select a sourcePress Source (front panel) until the display shows the source you want, or press the appropriate source key on the remote; eg CD.
The display shows the source, DSP preset, and volume setting.
For example, if you select the CD source:
The display shows: CD Trifield 65
The 861 Reference Digital Surround Controller mutes the sound while you change source.
•
12
Using the 861 Reference Digital
Surround ControllerAdjusting the volume
The 861 Reference Digital Surround Controller adjusts the volume in precise steps of 1dB, where 9dB is equivalent to doubling the loudness. The current volume setting is displayed in dB on the front-panel display, and can be varied in the range 1 to 99dB. When you first connect power to the digital surround controller the volume is set to 65, which is similar to the mid-way position of the rotary volume control on a conventional preamplifier.
A setting of 87 corresponds to THX reference gain, the level at which film soundtracks are mixed.
For normal to high level listening you should expect to use volume levels in the range 60 to 90.
On a system with analogue outputs the volume on startup can be set using the Meridian Configuration Program. For details see the Meridian Configuration Program Guide, available separately.
To change the volumePress A or V (front panel), or the red A or V keys on the remote.
As you adjust the volume setting the display shows the current volume level.
For example: CD Trifield 70
To mute the soundPress Mute (front panel or remote).
The display will show: Mute
•
•
To restore the soundPress Mute again.
Alternatively, the sound will be restored if you adjust the volume.
•
13
Using the 861 Reference Digital
Surround ControllerChanging the DSP preset
Each source has a set of DSP presets associated with it, one for each of the alternative content types: Music 2 (2-channel music), Music 6 (multichannel music), Movie 2 (2-channel movie soundtrack), or Movie 6 (multichannel movie soundtrack).
When you choose a source, a DSP preset is selected depending on the incoming content type.
For example, if you have selected the CD source and are playing a conventional CD, the Trifield DSP preset will initially be selected.
You may then wish to choose a different DSP preset, such as Music or Ambisonics.
You can also change the default DSP preset assigned to the source; see To assign a DSP preset to a source, page 25.
The sequence of DSP presets for each content type is as follows:
Content type Presets available
Music 2, Movie 2 Music, Trifield, Ambisonics, Super Stereo, Music Logic, PLIIx Music, Stereo, Direct, PLIIx Movie, PLIIx THX, TV Logic, Mono.
Music 6 Discrete, PLIIx Mus6, THX Music, Ambisonics B format.
Movie 6 Cinema, PLIIx Mov6, THX, THX Surround EX, THX Ultra2 Cinema.
In each case these will be followed by any user-defined presets you have stored for the appropriate content type.
To change the DSP presetPress DSP (front panel or remote) to step between the different DSP presets.
You will be able to choose any of the predefined DSP presets, or any user-defined presets you have stored.
The 861 Reference Digital Surround Controller mutes the sound while you change DSP preset, to avoid clicks in the speakers.
•
14
Using the 861 Reference Digital
Surround Controller
The 861 Reference Digital Surround Controller displays information about the current settings on the 20-character front-panel display. In addition, it can display the same information superimposed on a video image.
You can adjust the contrast and brightness of the front-panel display for optimum viewing, and choose what information is displayed.
The digital surround controller automatically stores these settings, even with the power off.
To change the contrastHold down Function and press > or < on the remote, or press the corresponding menu keys under the front panel, until the display shows the current contrast setting.
For example: CD Contrast 8
Hold down Function and press A or V on the remote, or press the corresponding menu keys under the front panel, to change the display contrast.
You can change the contrast between 0 and 15.
To change the brightnessHold down Function and press > or < on the remote, or press the corresponding menu keys under the front panel, until the display shows the current brightness setting.
For example: CD Bright 11
Hold down Function and press A or V on the remote, or press the corresponding menu keys under the front panel, to change the display brightness.
You can change the brightness between 0 and 15.
•
•
•
•
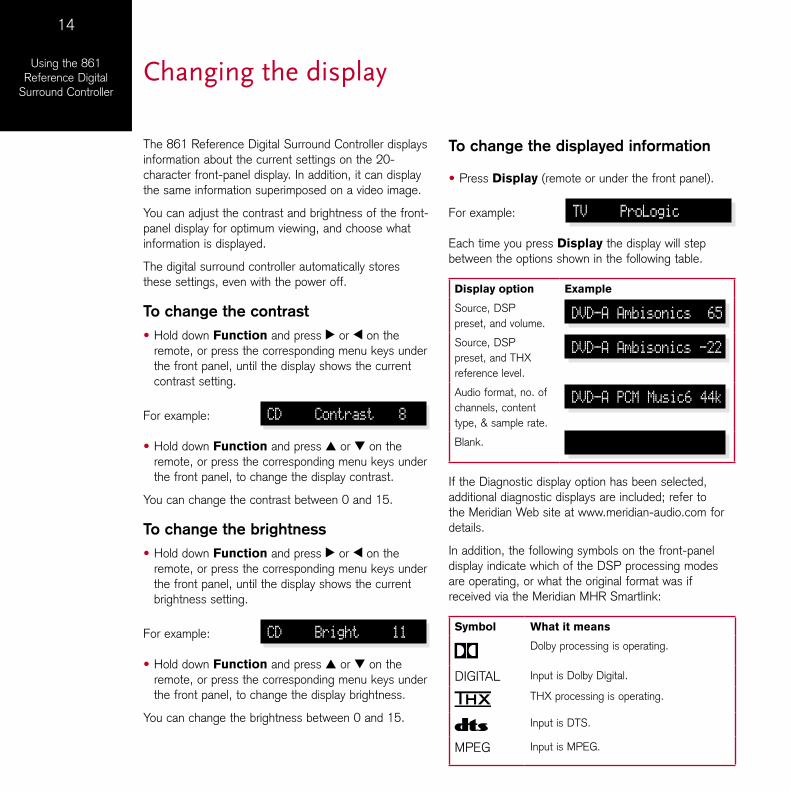
To change the displayed information
Press Display (remote or under the front panel).
For example: TV ProLogic
Each time you press Display the display will step between the options shown in the following table.
Display option Example
Source, DSP preset, and volume.
DVD-A Ambisonics 65
Source, DSP preset, and THX reference level.
DVD-A Ambisonics -22
Audio format, no. of channels, content type, & sample rate.
DVD-A PCM Music6 44k
Blank.
If the Diagnostic display option has been selected, additional diagnostic displays are included; refer to the Meridian Web site at www.meridian-audio.com for details.
In addition, the following symbols on the front-panel display indicate which of the DSP processing modes are operating, or what the original format was if received via the Meridian MHR Smartlink:
Symbol What it means
Dolby processing is operating.
DIGITAL Input is Dolby Digital.
THX processing is operating.
Input is DTS.
MPEG Input is MPEG.
•
Changing the display
15
Customising the 861 Reference Digital
Surround Controller
Customising the 861 Reference Digital Surround Controller
In addition to being able to change the source, volume, and DSP preset, the 861 Reference Digital Surround Controller provides a sophisticated range of more advanced adjustments for each DSP preset, to allow you to tailor the sound.
This chapter explains how to change these parameters, using the menu keys on the remote or under the front panel, and gives detailed instructions for adjusting common parameters.
For information about the parameters specific to individual presets see the chapter DSP presets, page 27.
16
Customising the 861 Reference Digital
Surround ControllerLocking and unlocking the menus
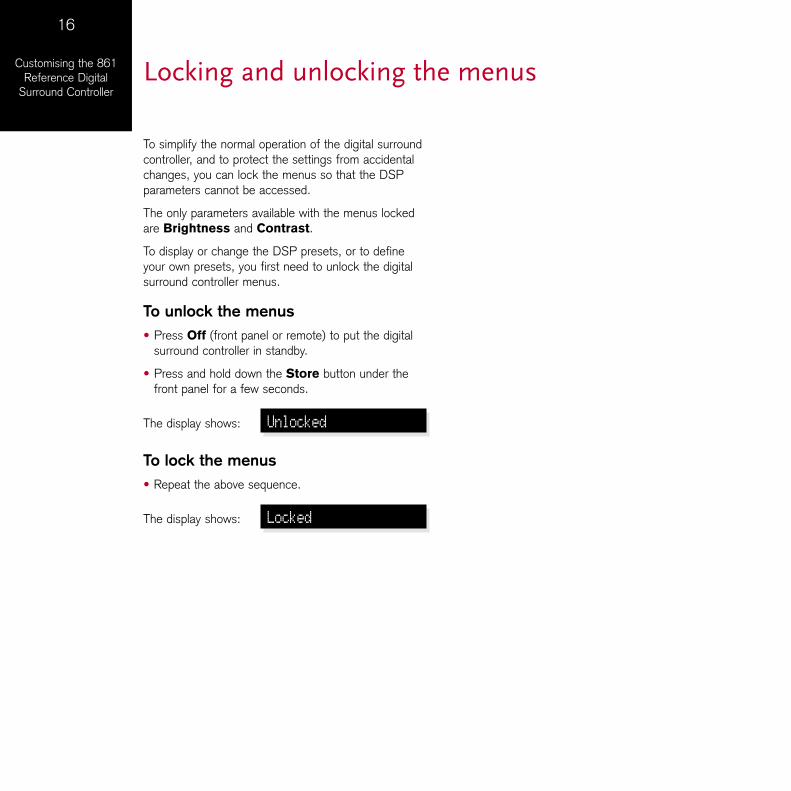
To simplify the normal operation of the digital surround controller, and to protect the settings from accidental changes, you can lock the menus so that the DSP parameters cannot be accessed.
The only parameters available with the menus locked are Brightness and Contrast.
To display or change the DSP presets, or to define your own presets, you first need to unlock the digital surround controller menus.
To unlock the menusPress Off (front panel or remote) to put the digital surround controller in standby.
Press and hold down the Store button under the front panel for a few seconds.
The display shows: Unlocked
To lock the menusRepeat the above sequence.
The display shows: Locked
•
•
•
17
Customising the 861 Reference Digital
Surround ControllerChanging the DSP parameters
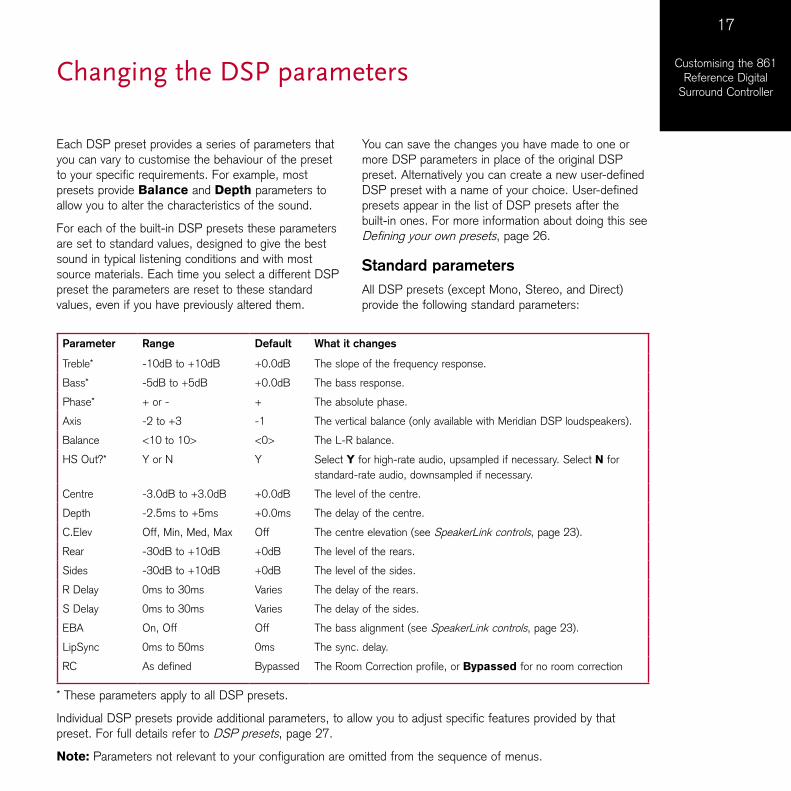
Each DSP preset provides a series of parameters that you can vary to customise the behaviour of the preset to your specific requirements. For example, most presets provide Balance and Depth parameters to allow you to alter the characteristics of the sound.
For each of the built-in DSP presets these parameters are set to standard values, designed to give the best sound in typical listening conditions and with most source materials. Each time you select a different DSP preset the parameters are reset to these standard values, even if you have previously altered them.
You can save the changes you have made to one or more DSP parameters in place of the original DSP preset. Alternatively you can create a new user-defined DSP preset with a name of your choice. User-defined presets appear in the list of DSP presets after the built-in ones. For more information about doing this see Defining your own presets, page 26.
Standard parametersAll DSP presets (except Mono, Stereo, and Direct) provide the following standard parameters:
Parameter Range Default What it changes
Treble* -10dB to +10dB +0.0dB The slope of the frequency response.
Bass* -5dB to +5dB +0.0dB The bass response.
Phase* + or - + The absolute phase.
Axis -2 to +3 -1 The vertical balance (only available with Meridian DSP loudspeakers).
Balance <10 to 10> <0> The L-R balance.
HS Out?* Y or N Y Select Y for high-rate audio, upsampled if necessary. Select N for standard-rate audio, downsampled if necessary.
Centre -3.0dB to +3.0dB +0.0dB The level of the centre.
Depth -2.5ms to +5ms +0.0ms The delay of the centre.
C.Elev Off, Min, Med, Max Off The centre elevation (see SpeakerLink controls, page 23).
Rear -30dB to +10dB +0dB The level of the rears.
Sides -30dB to +10dB +0dB The level of the sides.
R Delay 0ms to 30ms Varies The delay of the rears.
S Delay 0ms to 30ms Varies The delay of the sides.
EBA On, Off Off The bass alignment (see SpeakerLink controls, page 23).
LipSync 0ms to 50ms 0ms The sync. delay.
RC As defined Bypassed The Room Correction profile, or Bypassed for no room correction
* These parameters apply to all DSP presets.
Individual DSP presets provide additional parameters, to allow you to adjust specific features provided by that preset. For full details refer to DSP presets, page 27.
Note: Parameters not relevant to your configuration are omitted from the sequence of menus.
18
Customising the 861 Reference Digital
Surround Controller
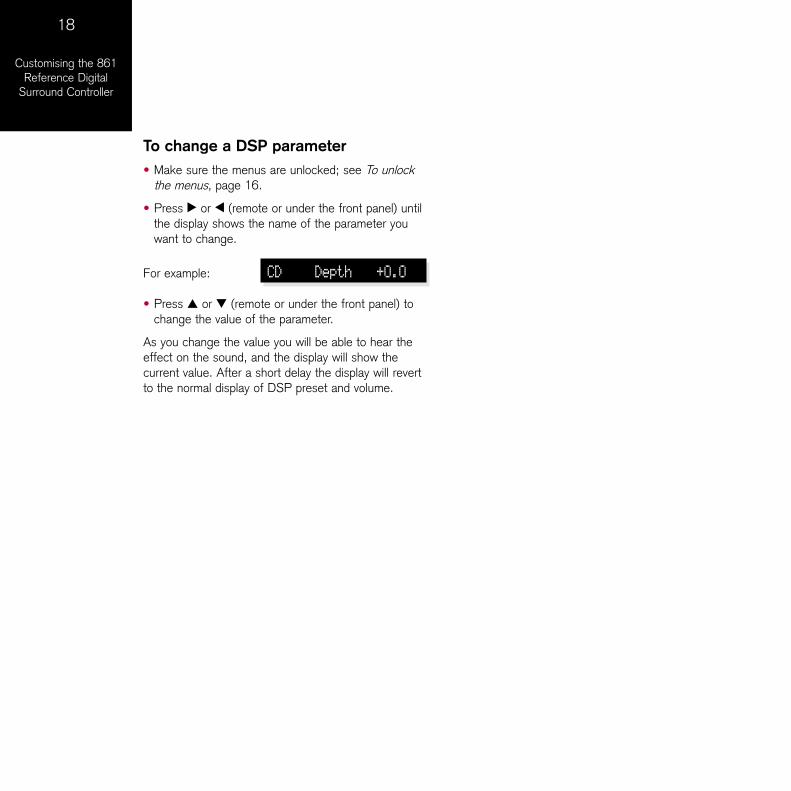
To change a DSP parameterMake sure the menus are unlocked; see To unlock the menus, page 16.
Press > or < (remote or under the front panel) until the display shows the name of the parameter you want to change.
For example: CD Depth +0.0
Press A or V (remote or under the front panel) to change the value of the parameter.
As you change the value you will be able to hear the effect on the sound, and the display will show the current value. After a short delay the display will revert to the normal display of DSP preset and volume.
•
•
•
19
Customising the 861 Reference Digital
Surround Controller
The digital surround controller provides sophisticated treble and bass controls, to allow you to adjust the broad balance of the system to correct for the acoustics of your listening room, or for a misbalanced recording.
The controls are more subtle than conventional tone controls, and take advantage of digital signal processing techniques to provide a more natural adjustment of the frequency response.
You can also change the absolute phase of the signal, to compensate for recordings which are out of phase.
In each case all the outputs of the digital surround controller are given the same frequency adjustment, to ensure a correct surround effect.
If you have a Meridian DSP Loudspeaker the Treble and Bass settings apply to all DSP presets.
To change the treblePress < or > until the display shows the current treble setting.
For example: CD Treble +0.0
Press A or V to change the treble.
The treble control tilts the frequency of the response over the entire frequency range to make the sound more or less bright. It can be adjusted between ±10dB in 0.5dB steps. Normally settings between +1.0 and -2.0 will give the most natural results.
•
•
To change the bassPress < or > until the display shows the current bass setting.
For example: CD Bass +0.0
Press A or V to change the bass.
The bass control allows you to adjust the bass response in the room by ±5dB in 0.5dB steps. Normally settings between +3.0 and -2.0 will give the most natural results.
To change the absolute phasePress > or < until the display shows the current phase.
For example: CD + Phase
Press A or V to change the phase.
•
•
•
•
Changing treble, bass, or phase
20
Customising the 861 Reference Digital
Surround ControllerChanging the listening position
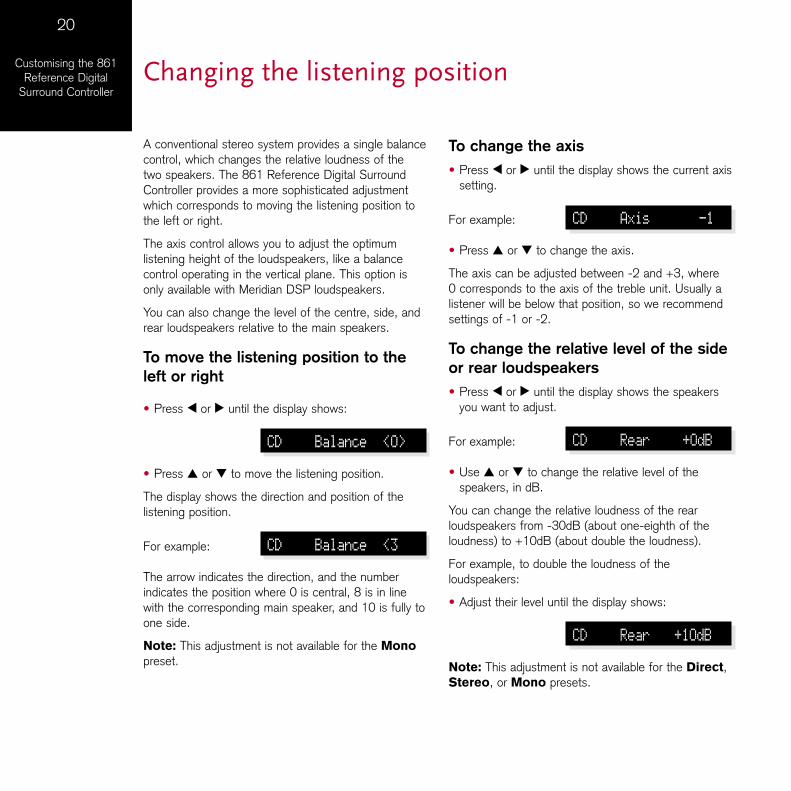
A conventional stereo system provides a single balance control, which changes the relative loudness of the two speakers. The 861 Reference Digital Surround Controller provides a more sophisticated adjustment which corresponds to moving the listening position to the left or right.
The axis control allows you to adjust the optimum listening height of the loudspeakers, like a balance control operating in the vertical plane. This option is only available with Meridian DSP loudspeakers.
You can also change the level of the centre, side, and rear loudspeakers relative to the main speakers.
To move the listening position to the left or right
Press < or > until the display shows:
CD Balance <0>
Press A or V to move the listening position.
The display shows the direction and position of the listening position.
For example: CD Balance <3
The arrow indicates the direction, and the number indicates the position where 0 is central, 8 is in line with the corresponding main speaker, and 10 is fully to one side.
Note: This adjustment is not available for the Mono preset.
•
•
To change the axisPress < or > until the display shows the current axis setting.
For example: CD Axis -1
Press A or V to change the axis.
The axis can be adjusted between -2 and +3, where 0 corresponds to the axis of the treble unit. Usually a listener will be below that position, so we recommend settings of -1 or -2.
To change the relative level of the side or rear loudspeakers
Press < or > until the display shows the speakers you want to adjust.
For example: CD Rear +0dB
Use A or V to change the relative level of the speakers, in dB.
You can change the relative loudness of the rear loudspeakers from -30dB (about one-eighth of the loudness) to +10dB (about double the loudness).
For example, to double the loudness of the loudspeakers:
Adjust their level until the display shows:
CD Rear +10dB
Note: This adjustment is not available for the Direct, Stereo, or Mono presets.
•
•
•
•
•
21
Customising the 861 Reference Digital
Surround ControllerChanging the integration of the centre
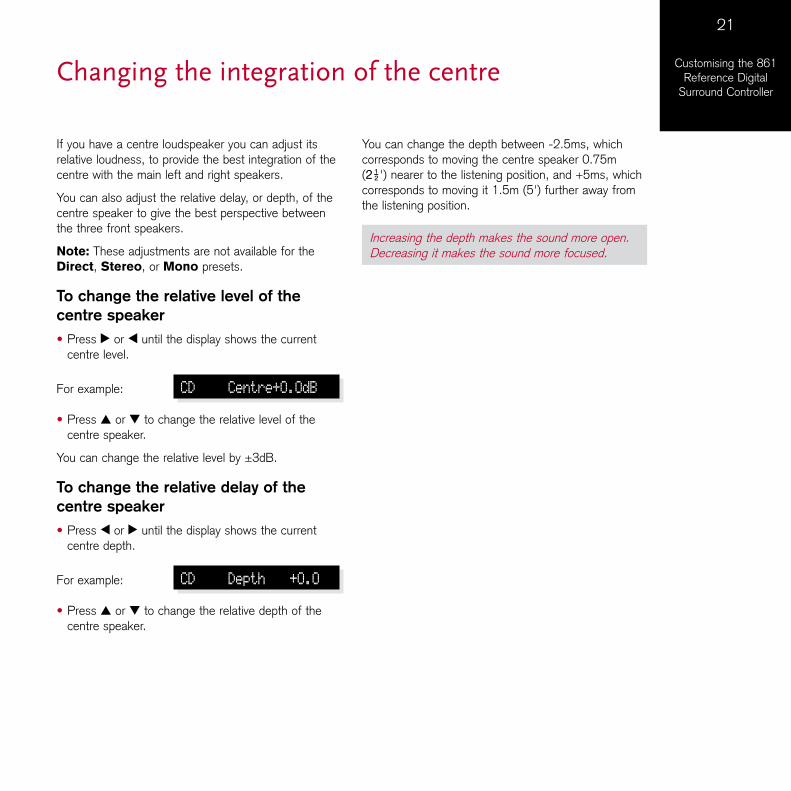
If you have a centre loudspeaker you can adjust its relative loudness, to provide the best integration of the centre with the main left and right speakers.
You can also adjust the relative delay, or depth, of the centre speaker to give the best perspective between the three front speakers.
Note: These adjustments are not available for the Direct, Stereo, or Mono presets.
To change the relative level of the centre speaker
Press > or < until the display shows the current centre level.
For example: CD Centre+0.0dB
Press A or V to change the relative level of the centre speaker.
You can change the relative level by ±3dB.
To change the relative delay of the centre speaker
Press < or > until the display shows the current centre depth.
For example: CD Depth +0.0
Press A or V to change the relative depth of the centre speaker.
•
•
•
•
You can change the depth between -2.5ms, which corresponds to moving the centre speaker 0.75m (2 ') nearer to the listening position, and +5ms, which corresponds to moving it 1.5m (5') further away from the listening position.
Increasing the depth makes the sound more open. Decreasing it makes the sound more focused.
22
Customising the 861 Reference Digital
Surround ControllerChanging the spaciousness of the sound
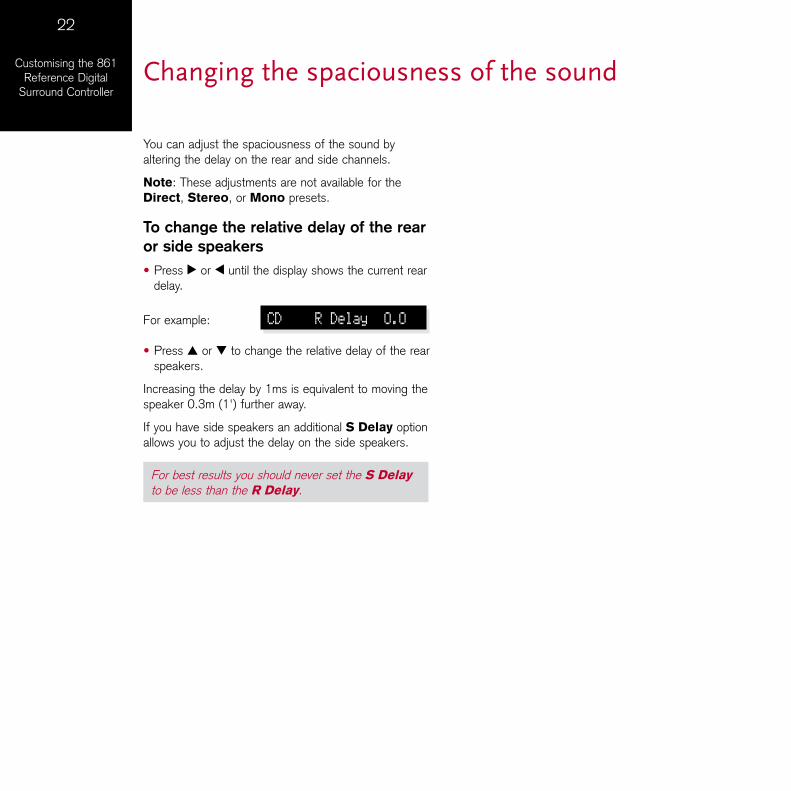
You can adjust the spaciousness of the sound by altering the delay on the rear and side channels.
Note: These adjustments are not available for the Direct, Stereo, or Mono presets.
To change the relative delay of the rear or side speakers
Press > or < until the display shows the current rear delay.
For example: CD R Delay 0.0
Press A or V to change the relative delay of the rear speakers.
Increasing the delay by 1ms is equivalent to moving the speaker 0.3m (1') further away.
If you have side speakers an additional S Delay option allows you to adjust the delay on the side speakers.
For best results you should never set the S Delay to be less than the R Delay.
•
•
23
Customising the 861 Reference Digital
Surround ControllerSpeakerLink controls
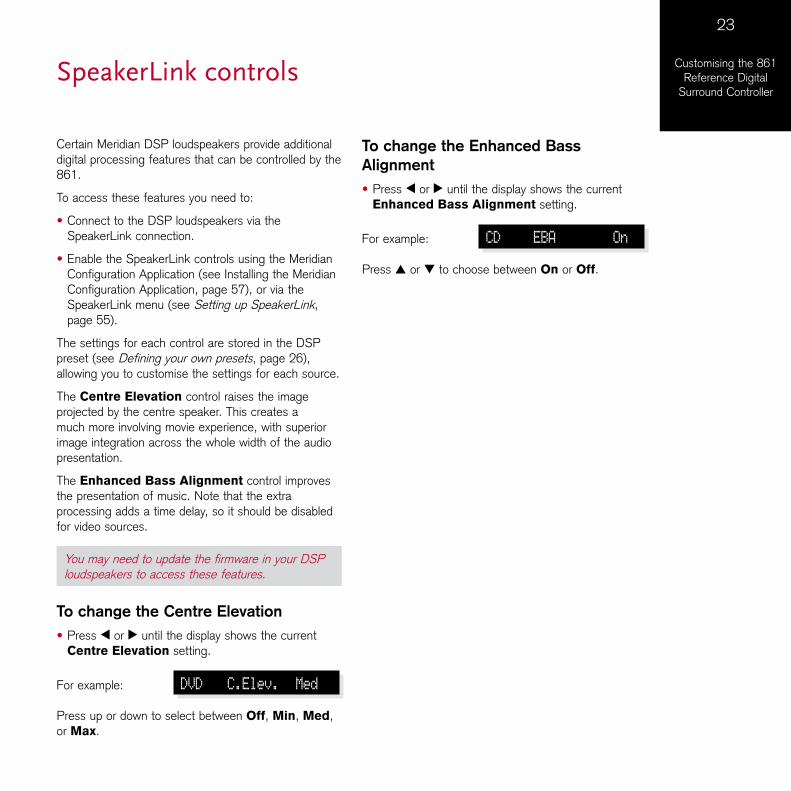
Certain Meridian DSP loudspeakers provide additional digital processing features that can be controlled by the 861.
To access these features you need to:
Connect to the DSP loudspeakers via the SpeakerLink connection.
Enable the SpeakerLink controls using the Meridian Configuration Application (see Installing the Meridian Configuration Application, page 57), or via the SpeakerLink menu (see Setting up SpeakerLink, page 55).
The settings for each control are stored in the DSP preset (see Defining your own presets, page 26), allowing you to customise the settings for each source.
The Centre Elevation control raises the image projected by the centre speaker. This creates a much more involving movie experience, with superior image integration across the whole width of the audio presentation.
The Enhanced Bass Alignment control improves the presentation of music. Note that the extra processing adds a time delay, so it should be disabled for video sources.
You may need to update the firmware in your DSP loudspeakers to access these features.
To change the Centre ElevationPress < or > until the display shows the current Centre Elevation setting.
For example: DVD C.Elev. Med
Press up or down to select between Off, Min, Med, or Max.
•
•
•
To change the Enhanced Bass Alignment
Press < or > until the display shows the current Enhanced Bass Alignment setting.
For example: CD EBA On
Press A or V to choose between On or Off.
•

24
Customising the 861 Reference Digital
Surround ControllerChanging the LipSync
To adjust the LipSyncThe LipSync parameter is a feature originated by Meridian that allows you to adjust the delay between the sound and the video image by up to 50ms, or up to 85ms if Meridian Room Correction is not being used.
Most movies are mixed for a viewing distance of 9m (30'), and when viewed from 3.6m (12') or less the sound arrives too early, giving a disconcerting effect. Using the LipSync parameter you can add an overall delay to the sound to accommodate your closer home viewing distance.
Many TV broadcasts delay the picture by half a frame, and can benefit from a LipSync setting of 12ms.
Note: The LipSync setting is associated with a source rather than a DSP preset. The value set here will be applied whenever that source is selected, whatever the DSP preset.
Press > or < until the display shows the current LipSync.
For example: CD LipSync 0.0
Press A or V to change the delay in milliseconds.
You can adjust the delay between 0 and 85ms, where 30ms corresponds to sitting 9m (30') further away from the screen.
•
•

25
Customising the 861 Reference Digital
Surround ControllerChanging the DSP preset for a source
Each source has an appropriate DSP preset associated with it for each music format. For example, for a standard stereo (PCM) signal the CD source uses Trifield and the TV source uses TV Logic.
This section explains how to change the DSP preset associated with any source.
To assign a DSP preset to a source Make sure the menus are unlocked; see To unlock the menus, page 16.
Select the source you want to change by pressing the Source key on the front panel or the appropriate source button on the remote, eg CD.
If necessary, select a signal in the appropriate format. For example, to change the DSP preset used for DTS compact discs, play a DTS CD.
The display will show the source and the DSP preset currently assigned to that source.
For example: CD Trifield 65
Press A or V until the display shows the new DSP preset you want to assign.
For example: CD MusicLogic 65
Press Assign (under the front panel) to save the new assignment.
•
•
•
•
•
26
Customising the 861 Reference Digital
Surround ControllerDefining your own presets
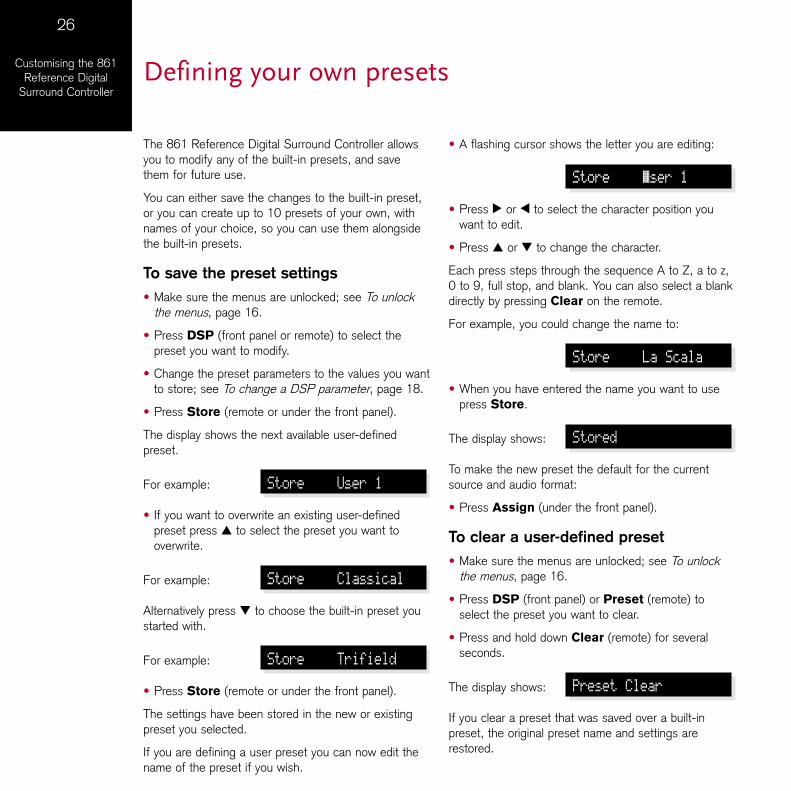
The 861 Reference Digital Surround Controller allows you to modify any of the built-in presets, and save them for future use.
You can either save the changes to the built-in preset, or you can create up to 10 presets of your own, with names of your choice, so you can use them alongside the built-in presets.
To save the preset settingsMake sure the menus are unlocked; see To unlock the menus, page 16.
Press DSP (front panel or remote) to select the preset you want to modify.
Change the preset parameters to the values you want to store; see To change a DSP parameter, page 18.
Press Store (remote or under the front panel).
The display shows the next available user-defined preset.
For example: Store User 1
If you want to overwrite an existing user-defined preset press A to select the preset you want to overwrite.
For example: Store Classical
Alternatively press V to choose the built-in preset you started with.
For example: Store Trifield
Press Store (remote or under the front panel).
The settings have been stored in the new or existing preset you selected.
If you are defining a user preset you can now edit the name of the preset if you wish.
•
•
•
•
•
•
A flashing cursor shows the letter you are editing:
Store •ser 1
Press > or < to select the character position you want to edit.
Press A or V to change the character.
Each press steps through the sequence A to Z, a to z, 0 to 9, full stop, and blank. You can also select a blank directly by pressing Clear on the remote.
For example, you could change the name to:
Store La Scala
When you have entered the name you want to use press Store.
The display shows: Stored
To make the new preset the default for the current source and audio format:
Press Assign (under the front panel).
To clear a user-defined presetMake sure the menus are unlocked; see To unlock the menus, page 16.
Press DSP (front panel) or Preset (remote) to select the preset you want to clear.
Press and hold down Clear (remote) for several seconds.
The display shows: Preset Clear
If you clear a preset that was saved over a built-in preset, the original preset name and settings are restored.
•
•
•
•
•
•
•
•
27
DSP Presets
DSP presets
This chapter gives technical information about each of the DSP presets built in to the 861 Reference Digital Surround Controller, including information about which preset you should select for different types of material. It also gives details of the special DSP parameters available for each preset.
28
DSP Presets DSP presets for two-channel material
The digital surround controller provides several signal processing options for two-channel material. The Music DSP presets are designed for use with music from sources such as CD or radio:
Music, Trifield, Ambisonics, Super Stereo, Music Logic, PLIIx Music, Stereo, and Direct.
The Logic DSP presets are designed for use with film soundtracks or TV programmes:
PLIIx Movie, PLIIx THX, TV Logic, and Mono.
The Music and Logic DSP presets use the Music and Logic speaker layout respectively; see Speaker layouts, page 5.
MusicThe Music DSP preset extracts the mono and surround components of the original recording. These components provide an alternative representation of the original sound, and this is sometimes used for recording systems or in broadcasts such as FM radio. The mono element is equalised using a proprietary Meridian technique to match the tone colour of the centre speaker, and to compensate for the fact that the frequency response of human hearing changes with direction.
The Music DSP preset is recommended for recordings made with spaced omnidirectional microphones, or using a mono-surround technique.
TrifieldAs for the Music DSP preset, the Trifield preset extracts the mono and surround components of the original recording. It then calculates the signals for the front, left, centre, and right speakers, using the phase and amplitude differences between the three front channels, to redistribute the sounds on a frequency-dependent basis.
This gives a significant improvement over traditional
•
•
stereo, which converts the differences between the microphone signals into amplitude differences in the speaker signals. This version of the Trifield algorithm is virtually impossible to implement without digital signal processing.
Trifield is recommended for well-made recordings and stereo television broadcasts that are not Dolby Surround encoded. An advantage over the Music DSP preset is that the front stereo image is more focused, and the width of the image can be adjusted.
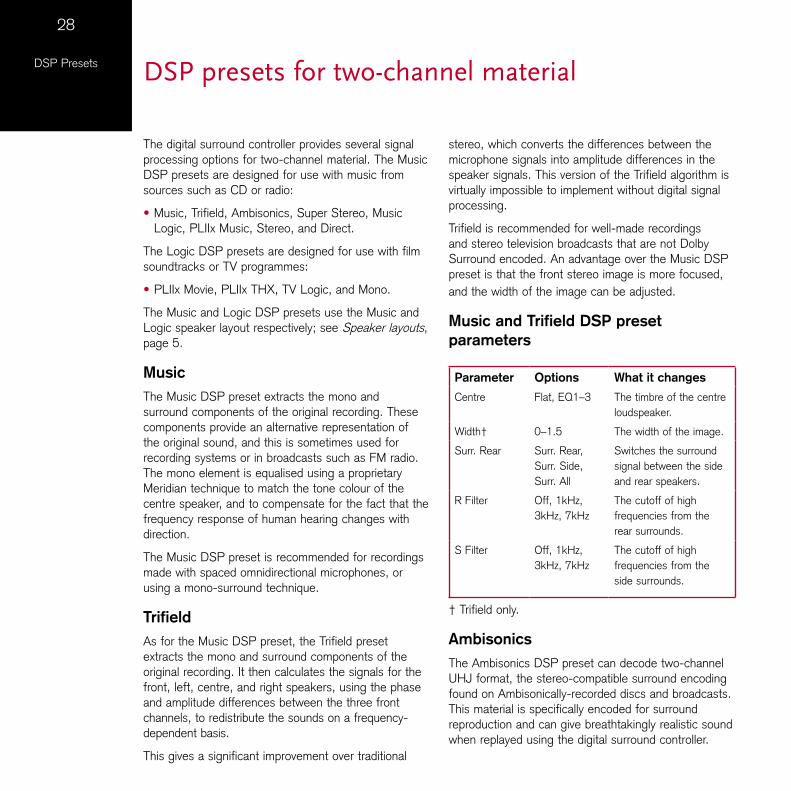
Music and Trifield DSP preset parameters
Parameter Options What it changes
Centre Flat, EQ1–3 The timbre of the centre loudspeaker.
Width† 0–1.5 The width of the image.
Surr. Rear Surr. Rear, Surr. Side, Surr. All
Switches the surround signal between the side and rear speakers.
R Filter Off, 1kHz, 3kHz, 7kHz
The cutoff of high frequencies from the rear surrounds.
S Filter Off, 1kHz, 3kHz, 7kHz
The cutoff of high frequencies from the side surrounds.
† Trifield only.
AmbisonicsThe Ambisonics DSP preset can decode two-channel UHJ format, the stereo-compatible surround encoding found on Ambisonically-recorded discs and broadcasts. This material is specifically encoded for surround reproduction and can give breathtakingly realistic sound when replayed using the digital surround controller.
29
DSP Presets
Ambisonic surround sound is quite unlike conventional stereo. A special microphone can be used to capture the sound of the original performance in all three dimensions, allowing a recording to be made in a special format (B-Format) that describes the soundfield exactly at the microphone position. Alternatively, special mixing techniques including Ambisonic spatial localisation controls (panpots) can be used to mix conventional multitrack into the same Ambisonic surround format. The channels of this recording can then be encoded using a phase-amplitude matrix (UHJ) to allow the surround information to be conveyed, typically via a two-channel medium such as disc or FM broadcast. On playback, the decoder reconstructs the soundfield captured by the original recording.
The digital surround controller uses accurately matched, frequency-dependent, phase-amplitude matrices to decode the signal and construct the signals for each speaker feed.
The fundamental difference between Ambisonics surround sound and conventional stereo is that the signals from all the speakers combine to produce a coherent soundfield at the listening position, giving the illusion that you are sitting inside the recording space whether you are at the exact central seat or well off to one side.
Of all the signal-processing options, Ambisonics is the one that requires the greatest attention to speaker choice and positioning.
SuperSuper synthesises a signal from a conventional stereo recording or broadcast so that it can be decoded using the Ambisonic decoder. The result is especially effective for two particular types of recordings:
Those using true coincident microphone techniques.Multi-tracked or multi-miked recordings.
••
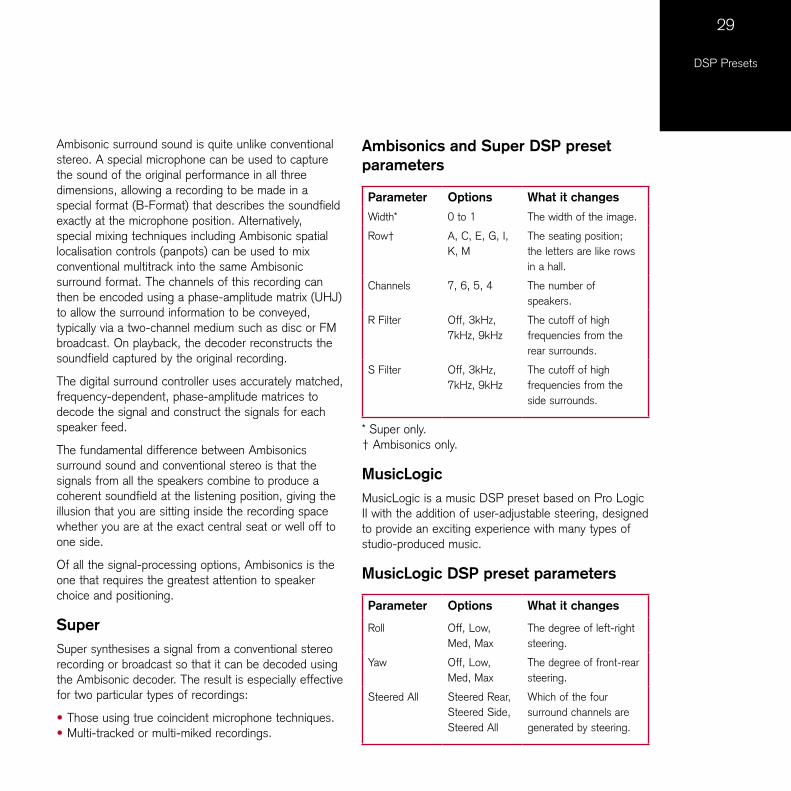
Ambisonics and Super DSP preset parameters
Parameter Options What it changes
Width* 0 to 1 The width of the image.
Row† A, C, E, G, I, K, M
The seating position; the letters are like rows in a hall.
Channels 7, 6, 5, 4 The number of speakers.
R Filter Off, 3kHz, 7kHz, 9kHz
The cutoff of high frequencies from the rear surrounds.
S Filter Off, 3kHz, 7kHz, 9kHz
The cutoff of high frequencies from the side surrounds.
* Super only. † Ambisonics only.
MusicLogicMusicLogic is a music DSP preset based on Pro Logic II with the addition of user-adjustable steering, designed to provide an exciting experience with many types of studio-produced music.
MusicLogic DSP preset parameters
Parameter Options What it changes
Roll Off, Low, Med, Max
The degree of left-right steering.
Yaw Off, Low, Med, Max
The degree of front-rear steering.
Steered All Steered Rear, Steered Side, Steered All
Which of the four surround channels are generated by steering.
30
DSP Presets
PLIIx MusicThe PLIIx Music preset is designed to use the Pro Logic IIx DSP processing mode to decode music sources. It provides additional Width, Dimension, and Panorama preset parameters to allow you to adjust the soundfield.
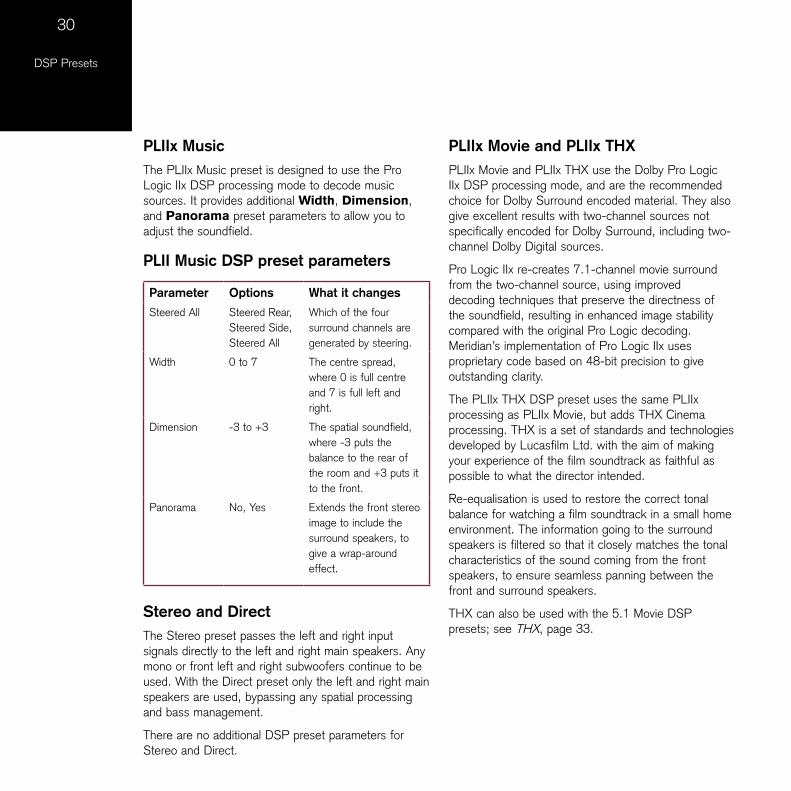
PLII Music DSP preset parameters
Parameter Options What it changes
Steered All Steered Rear, Steered Side, Steered All
Which of the four surround channels are generated by steering.
Width 0 to 7 The centre spread, where 0 is full centre and 7 is full left and right.
Dimension -3 to +3 The spatial soundfield, where -3 puts the balance to the rear of the room and +3 puts it to the front.
Panorama No, Yes Extends the front stereo image to include the surround speakers, to give a wrap-around effect.
Stereo and DirectThe Stereo preset passes the left and right input signals directly to the left and right main speakers. Any mono or front left and right subwoofers continue to be used. With the Direct preset only the left and right main speakers are used, bypassing any spatial processing and bass management.
There are no additional DSP preset parameters for Stereo and Direct.
PLIIx Movie and PLIIx THXPLIIx Movie and PLIIx THX use the Dolby Pro Logic IIx DSP processing mode, and are the recommended choice for Dolby Surround encoded material. They also give excellent results with two-channel sources not specifically encoded for Dolby Surround, including two-channel Dolby Digital sources.
Pro Logic IIx re-creates 7.1-channel movie surround from the two-channel source, using improved decoding techniques that preserve the directness of the soundfield, resulting in enhanced image stability compared with the original Pro Logic decoding. Meridian’s implementation of Pro Logic IIx uses proprietary code based on 48-bit precision to give outstanding clarity.
The PLIIx THX DSP preset uses the same PLIIx processing as PLIIx Movie, but adds THX Cinema processing. THX is a set of standards and technologies developed by Lucasfilm Ltd. with the aim of making your experience of the film soundtrack as faithful as possible to what the director intended.
Re-equalisation is used to restore the correct tonal balance for watching a film soundtrack in a small home environment. The information going to the surround speakers is filtered so that it closely matches the tonal characteristics of the sound coming from the front speakers, to ensure seamless panning between the front and surround speakers.
THX can also be used with the 5.1 Movie DSP presets; see THX, page 33.
31
DSP Presets
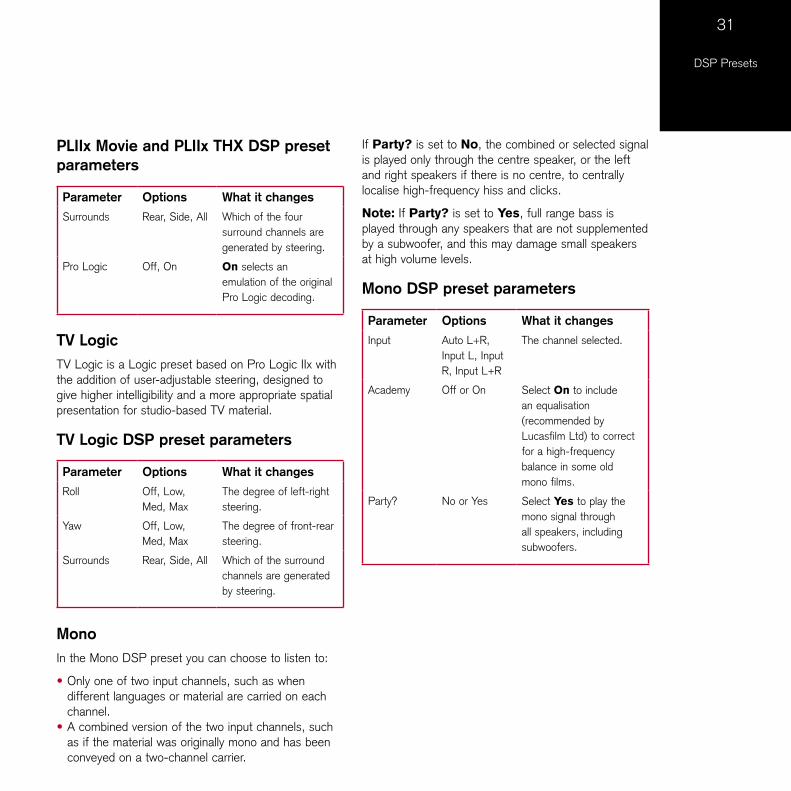
PLIIx Movie and PLIIx THX DSP preset parameters
Parameter Options What it changes
Surrounds Rear, Side, All Which of the four surround channels are generated by steering.
Pro Logic Off, On On selects an emulation of the original Pro Logic decoding.
TV LogicTV Logic is a Logic preset based on Pro Logic IIx with the addition of user-adjustable steering, designed to give higher intelligibility and a more appropriate spatial presentation for studio-based TV material.
TV Logic DSP preset parameters
Parameter Options What it changes
Roll Off, Low, Med, Max
The degree of left-right steering.
Yaw Off, Low, Med, Max
The degree of front-rear steering.
Surrounds Rear, Side, All Which of the surround channels are generated by steering.
MonoIn the Mono DSP preset you can choose to listen to:
Only one of two input channels, such as when different languages or material are carried on each channel.A combined version of the two input channels, such as if the material was originally mono and has been conveyed on a two-channel carrier.
•
•
If Party? is set to No, the combined or selected signal is played only through the centre speaker, or the left and right speakers if there is no centre, to centrally localise high-frequency hiss and clicks.
Note: If Party? is set to Yes, full range bass is played through any speakers that are not supplemented by a subwoofer, and this may damage small speakers at high volume levels.
Mono DSP preset parameters
Parameter Options What it changes
Input Auto L+R, Input L, Input R, Input L+R
The channel selected.
Academy Off or On Select On to include an equalisation (recommended by Lucasfilm Ltd) to correct for a high-frequency balance in some old mono films.
Party? No or Yes Select Yes to play the mono signal through all speakers, including subwoofers.
32
DSP Presets DSP presets for multichannel material
Multichannel audio signals can come from either encoded data streams (such as Dolby Digital) or as discrete channels from a DVD player. If you are using Meridian SmartLink then all formats will reach the 861 as discrete channels. With suitable loudspeakers the 861 can upsample these to provide a more enjoyable surround experience.
The 861 Reference Digital Surround Controller will automatically select the right decoder algorithm and present the same set of preset choices for all streams. Note: Some presets are only available if there are four surround speakers in the system.
There are four multichannel Music presets:
Discrete, PLIIx Mus6, THX Music, and Ambisonics B format (discrete inputs only).
There are five multichannel Movie presets:
Cinema, PLIIx Mov6, THX, THX Surround EX, and THX Ultra2 Cinema.
The multichannel Music presets all use the Music speaker layout and the multichannel Movie presets all use the 5.1 Movie speaker layout; see Speaker layouts, page 5.
CinemaThe Cinema preset is recommended for listening to multichannel movie soundtracks when no further processing is required.
DiscreteThe Discrete preset is similar to Cinema, except that it uses the Music speaker layout and sets the LFE level to -10dB.
•
•
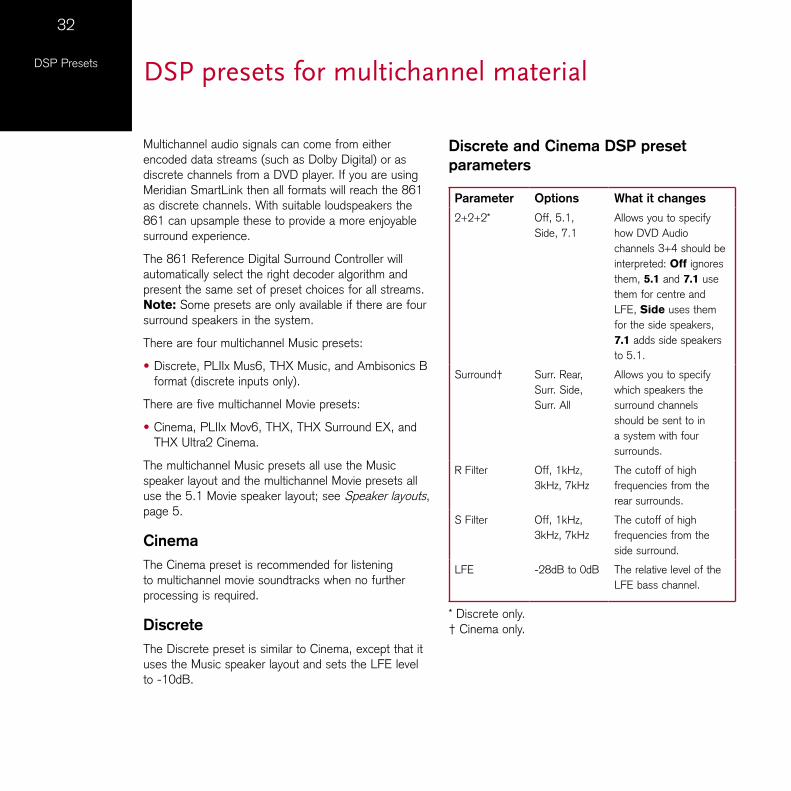
Discrete and Cinema DSP preset parameters
Parameter Options What it changes
2+2+2* Off, 5.1, Side, 7.1
Allows you to specify how DVD Audio channels 3+4 should be interpreted: Off ignores them, 5.1 and 7.1 use them for centre and LFE, Side uses them for the side speakers, 7.1 adds side speakers to 5.1.
Surround† Surr. Rear, Surr. Side, Surr. All
Allows you to specify which speakers the surround channels should be sent to in a system with four surrounds.
R Filter Off, 1kHz, 3kHz, 7kHz
The cutoff of high frequencies from the rear surrounds.
S Filter Off, 1kHz, 3kHz, 7kHz
The cutoff of high frequencies from the side surround.
LFE -28dB to 0dB The relative level of the LFE bass channel.
* Discrete only. † Cinema only.
33
DSP Presets
THXAs with the PLIIx THX DSP preset, THX re-equalises the signals to suit domestic listening conditions, and applies frequency-response correction and decorrelation to the surround channels to make the surround sound more realistic. It can be used whether or not your other equipment is THX approved.
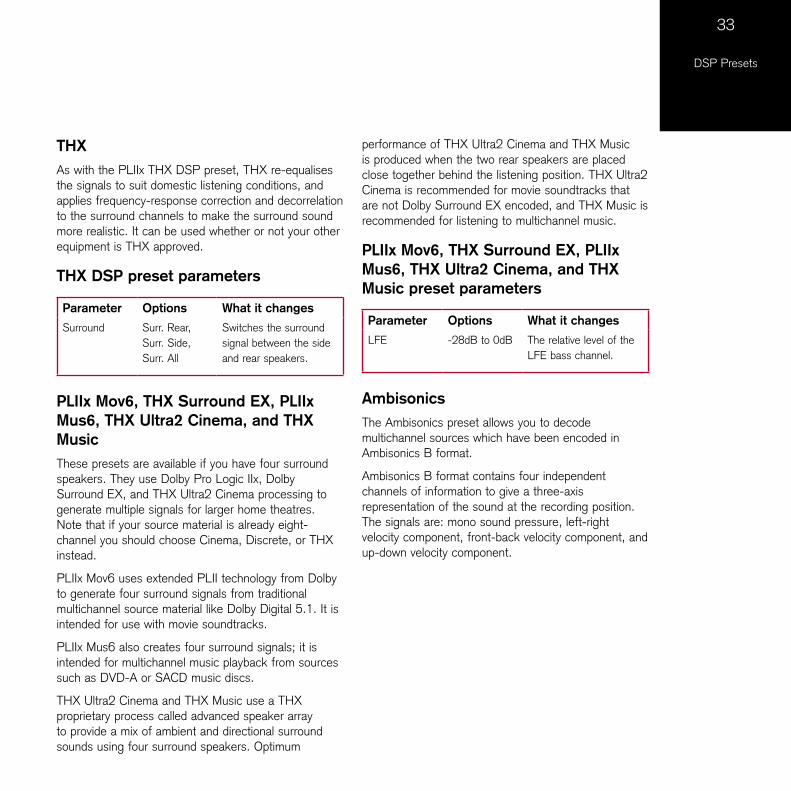
THX DSP preset parameters
Parameter Options What it changes
Surround Surr. Rear, Surr. Side, Surr. All
Switches the surround signal between the side and rear speakers.
PLIIx Mov6, THX Surround EX, PLIIx Mus6, THX Ultra2 Cinema, and THX MusicThese presets are available if you have four surround speakers. They use Dolby Pro Logic IIx, Dolby Surround EX, and THX Ultra2 Cinema processing to generate multiple signals for larger home theatres. Note that if your source material is already eight-channel you should choose Cinema, Discrete, or THX instead.
PLIIx Mov6 uses extended PLII technology from Dolby to generate four surround signals from traditional multichannel source material like Dolby Digital 5.1. It is intended for use with movie soundtracks.
PLIIx Mus6 also creates four surround signals; it is intended for multichannel music playback from sources such as DVD-A or SACD music discs.
THX Ultra2 Cinema and THX Music use a THX proprietary process called advanced speaker array to provide a mix of ambient and directional surround sounds using four surround speakers. Optimum
performance of THX Ultra2 Cinema and THX Music is produced when the two rear speakers are placed close together behind the listening position. THX Ultra2 Cinema is recommended for movie soundtracks that are not Dolby Surround EX encoded, and THX Music is recommended for listening to multichannel music.
PLIIx Mov6, THX Surround EX, PLIIx Mus6, THX Ultra2 Cinema, and THX Music preset parameters
Parameter Options What it changes
LFE -28dB to 0dB The relative level of the LFE bass channel.
AmbisonicsThe Ambisonics preset allows you to decode multichannel sources which have been encoded in Ambisonics B format.
Ambisonics B format contains four independent channels of information to give a three-axis representation of the sound at the recording position. The signals are: mono sound pressure, left-right velocity component, front-back velocity component, and up-down velocity component.
34
DSP Presets
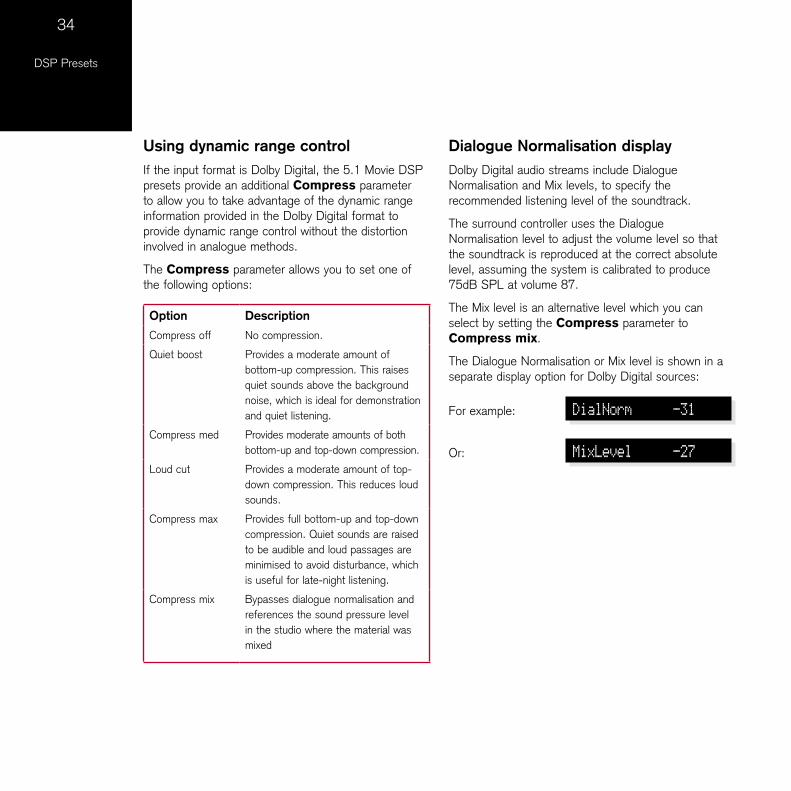
Using dynamic range controlIf the input format is Dolby Digital, the 5.1 Movie DSP presets provide an additional Compress parameter to allow you to take advantage of the dynamic range information provided in the Dolby Digital format to provide dynamic range control without the distortion involved in analogue methods.
The Compress parameter allows you to set one of the following options:
Option Description
Compress off No compression.
Quiet boost Provides a moderate amount of bottom-up compression. This raises quiet sounds above the background noise, which is ideal for demonstration and quiet listening.
Compress med Provides moderate amounts of both bottom-up and top-down compression.
Loud cut Provides a moderate amount of top-down compression. This reduces loud sounds.
Compress max Provides full bottom-up and top-down compression. Quiet sounds are raised to be audible and loud passages are minimised to avoid disturbance, which is useful for late-night listening.
Compress mix Bypasses dialogue normalisation and references the sound pressure level in the studio where the material was mixed
Dialogue Normalisation displayDolby Digital audio streams include Dialogue Normalisation and Mix levels, to specify the recommended listening level of the soundtrack.
The surround controller uses the Dialogue Normalisation level to adjust the volume level so that the soundtrack is reproduced at the correct absolute level, assuming the system is calibrated to produce 75dB SPL at volume 87.
The Mix level is an alternative level which you can select by setting the Compress parameter to Compress mix.
The Dialogue Normalisation or Mix level is shown in a separate display option for Dolby Digital sources:
For example: DialNorm -31
Or: MixLevel -27
35
Installing the 861 Reference Digital
Surround Controller
Installing the 861 Reference Digital Surround Controller
This chapter explains how to install the 861 Reference Digital Surround Controller. It describes what you should find when you unpack the product, and how you should connect it to the other equipment in the system.
You should not make any connections to the product or to any other component in the system while the AC power supply is connected and switched on.
36
Installing the 861 Reference Digital
Surround ControllerUnpacking
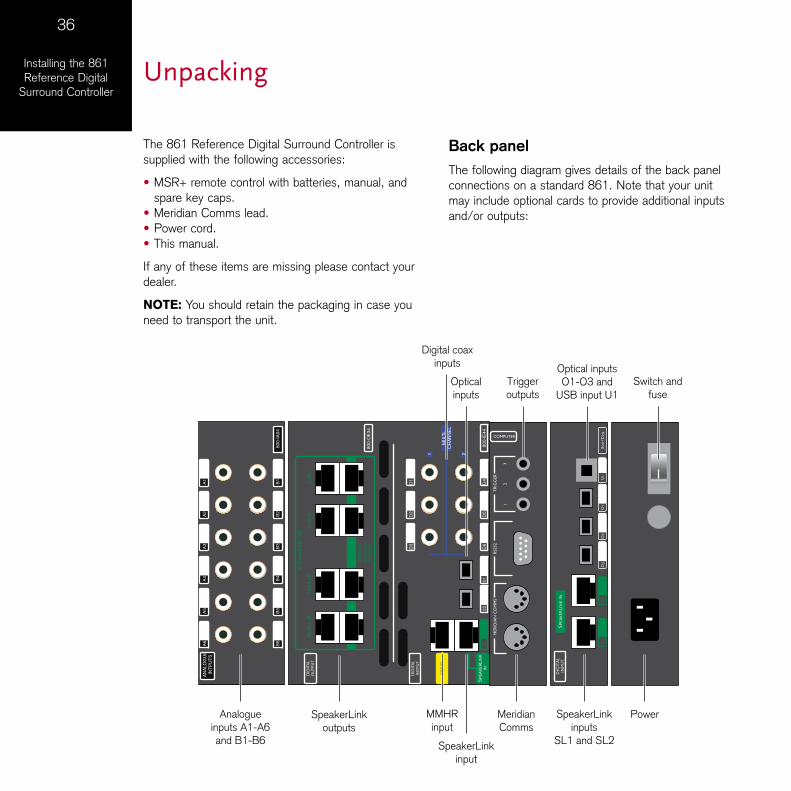
The 861 Reference Digital Surround Controller is supplied with the following accessories:
MSR+ remote control with batteries, manual, and spare key caps.Meridian Comms lead.Power cord.This manual.
If any of these items are missing please contact your dealer.
NOTE: You should retain the packaging in case you need to transport the unit.
•
•••
Back panelThe following diagram gives details of the back panel connections on a standard 861. Note that your unit may include optional cards to provide additional inputs and/or outputs:
D1
D4
D2
D5
D6
0102
21
D3
800-
IE44
RE
AR
L+
RS
IDE
L+
RC
+S
UB
L+R
MA
STE
R(O
NE
ON
LY,
THIS
RO
W)
800-
OE
34
SP
EA
KE
RLI
NK
OU
T
DIG
ITA
LO
UTP
UT
DIG
ITA
LIN
TPU
T
SP
EA
KE
RLI
NK
IN
MM
HR
MU
LTI-
CH
AN
NE
L
SL1
ANAL
OG
UEIN
TPU
TS
800-
IA04
B1A1
B2A2
B3A3
B4A4
B5A5
B6A6
COMPUTER
MER
IDIA
N C
OM
MS
3
TR
IGG
ER
21
RS2
32
SPEA
KER
LIN
KIN
DIG
ITA
LIN
PUT
800
-ID
29O
1O
3O
2SL
2SL
1U
1
Optical inputsO1-O3 and
USB input U1
SpeakerLinkinputs
SL1 and SL2
Analogueinputs A1-A6and B1-B6
SpeakerLinkoutputs
SpeakerLinkinput
MMHRinput
MeridianComms
Power
Digital coaxinputs
Opticalinputs
Triggeroutputs
Switch andfuse
37
Installing the 861 Reference Digital
Surround Controller
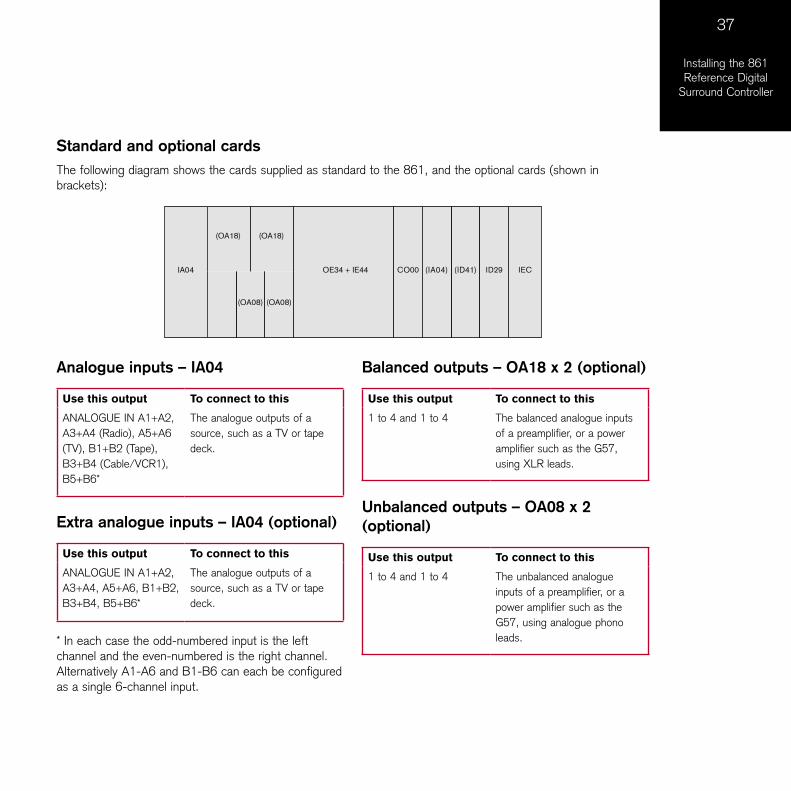
Analogue inputs – IA04
Use this output To connect to this
ANALOGUE IN A1+A2, A3+A4 (Radio), A5+A6 (TV), B1+B2 (Tape), B3+B4 (Cable/VCR1), B5+B6*
The analogue outputs of a source, such as a TV or tape deck.
Extra analogue inputs – IA04 (optional)
Use this output To connect to this
ANALOGUE IN A1+A2, A3+A4, A5+A6, B1+B2, B3+B4, B5+B6*
The analogue outputs of a source, such as a TV or tape deck.
* In each case the odd-numbered input is the left channel and the even-numbered is the right channel. Alternatively A1-A6 and B1-B6 can each be configured as a single 6-channel input.
Balanced outputs – OA18 x 2 (optional)
Use this output To connect to this
1 to 4 and 1 to 4 The balanced analogue inputs of a preamplifier, or a power amplifier such as the G57, using XLR leads.
Unbalanced outputs – OA08 x 2 (optional)
Use this output To connect to this
1 to 4 and 1 to 4 The unbalanced analogue inputs of a preamplifier, or a power amplifier such as the G57, using analogue phono leads.
Standard and optional cardsThe following diagram shows the cards supplied as standard to the 861, and the optional cards (shown in brackets):
OE34 + IE44 CO00 IECID29
(OA08) (OA08)
(ID41)(IA04)IA04
(OA18) (OA18)
38
Installing the 861 Reference Digital
Surround Controller
SpeakerLink outputs – OE34
Use this output To connect to this
L+R, C+SUB, SIDE L+R, REAR L+R
Digital loudspeakers, using Meridian SpeakerLink leads or standard CAT5 network cables. The Master speaker must be connected to the appropriate socket on the right-hand column.
Digital inputs – IE44
Use this input To connect to this
D1 (CD), D2, D3, D4 (Sat), D5, and D6*
The digital output of a source such as a DVD player.
MD1 (DVD) and MD2 (using D1-D3 and D4-D6)
The multichannel digital output of an MHR SmartLink source.
O1 (Game) and O2 The optical output of a source such as a satellite receiver or computer.
SL1 (Disc) The SpeakerLink output of a Meridian source with a SpeakerLink output.
MMHR A multichannel digital source with an MMHR output, such as the Meridian HD621 HDMI Audio Processor.
Extra digital inputs – ID29
Use this input To connect to this
O1 to O3 The optical output of a source such as a satellite receiver or computer.
USB INPUT U1 (VCR2) A personal computer USB socket.
SL1 and SL2 The SpeakerLink output of a Meridian source with a SpeakerLink output
Sooloos connections – ID41 (optional)
Use this connection To connect to this
NETWORK (SLS) An Ethernet network, for use in a Sooloos system.
USB For maintenance only.
Communications connections – CO00
Use this connection To connect to this
MERIDIAN COMMS Other Meridian equipment, or Meridian DSP loudspeakers.
RS232 A computer, for configuring the 861, or a serial control system.
TRIGGER 1, 2, and 3 Equipment that can be triggered by a 12V 100mA signal.
39
Installing the 861 Reference Digital
Surround ControllerApplications
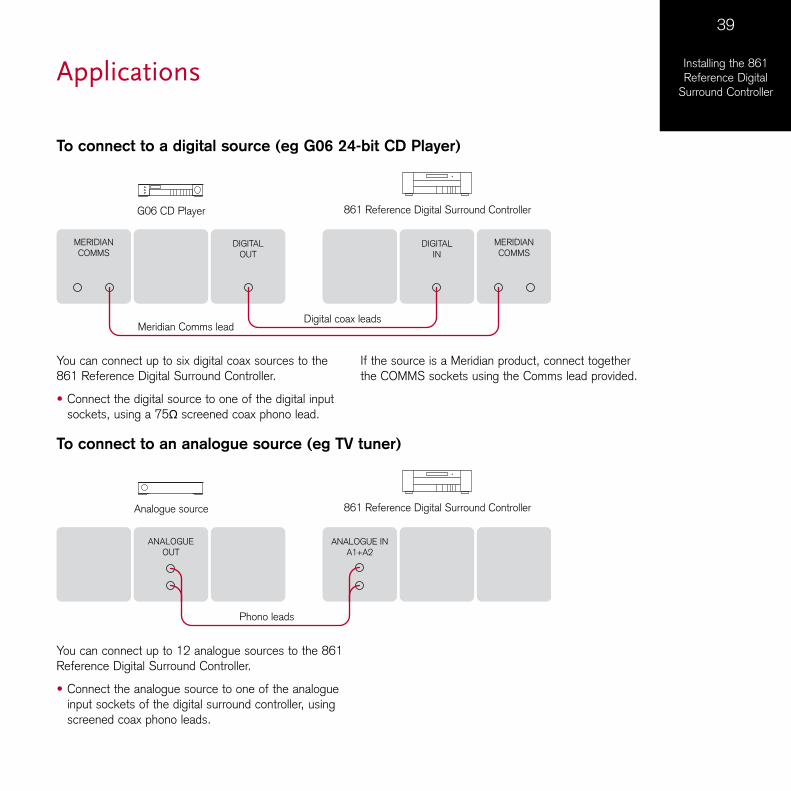
To connect to a digital source (eg G06 24-bit CD Player)
861 Reference Digital Surround ControllerG06 CD Player
DIGITALIN
DIGITALOUT
Digital coax leads
MERIDIANCOMMS
MERIDIANCOMMS
Meridian Comms lead
You can connect up to six digital coax sources to the 861 Reference Digital Surround Controller.
Connect the digital source to one of the digital input sockets, using a 75Ω screened coax phono lead.
•
If the source is a Meridian product, connect together the COMMS sockets using the Comms lead provided.
To connect to an analogue source (eg TV tuner)
861 Reference Digital Surround ControllerAnalogue source
ANALOGUE INA1+A2
ANALOGUEOUT
Phono leads
You can connect up to 12 analogue sources to the 861 Reference Digital Surround Controller.
Connect the analogue source to one of the analogue input sockets of the digital surround controller, using screened coax phono leads.
•
40
Installing the 861 Reference Digital
Surround Controller
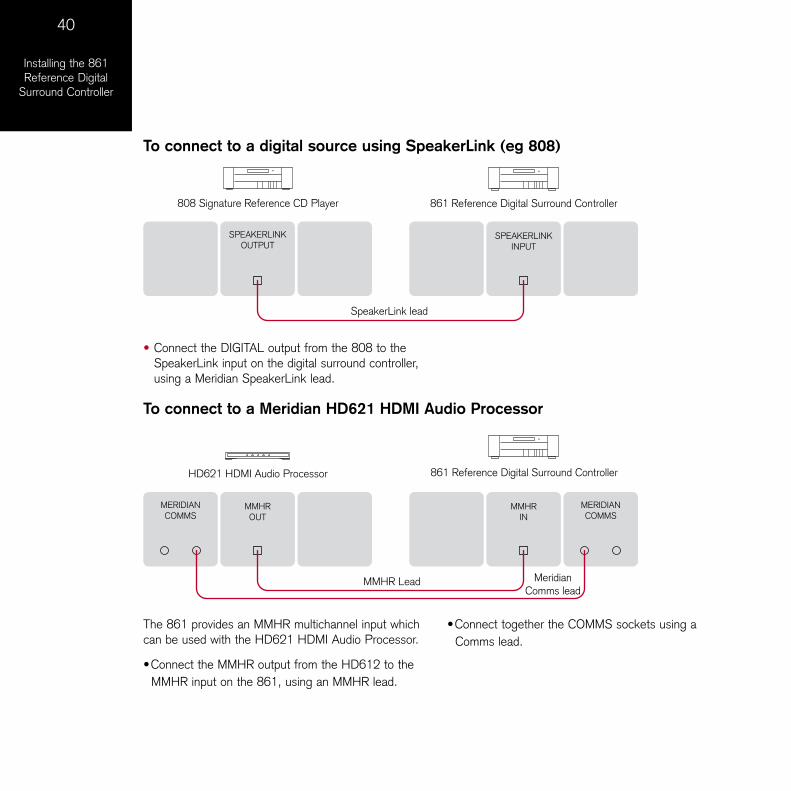
To connect to a digital source using SpeakerLink (eg 808)
SpeakerLink lead
SPEAKERLINKOUTPUT
SPEAKERLINKINPUT
861 Reference Digital Surround Controller808 Signature Reference CD Player
Connect the DIGITAL output from the 808 to the SpeakerLink input on the digital surround controller, using a Meridian SpeakerLink lead.
•
To connect to a Meridian HD621 HDMI Audio Processor
861 Reference Digital Surround ControllerHD621 HDMI Audio Processor
MMHRIN
MMHROUT
MMHR Lead
MERIDIANCOMMS
MERIDIANCOMMS
MeridianComms lead
The 861 provides an MMHR multichannel input which can be used with the HD621 HDMI Audio Processor.
• Connect the MMHR output from the HD612 to the MMHR input on the 861, using an MMHR lead.
• Connect together the COMMS sockets using a Comms lead.
41
Installing the 861 Reference Digital
Surround Controller
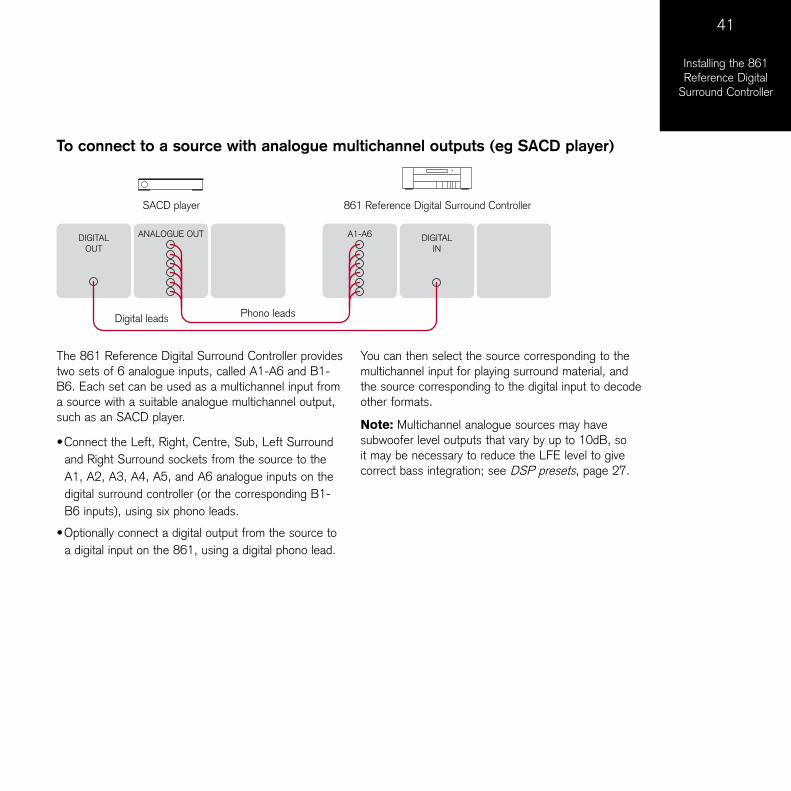
To connect to a source with analogue multichannel outputs (eg SACD player)
861 Reference Digital Surround ControllerSACD player
A1-A6ANALOGUE OUT
Phono leads
DIGITALIN
DIGITALOUT
Digital leads
The 861 Reference Digital Surround Controller provides two sets of 6 analogue inputs, called A1-A6 and B1-B6. Each set can be used as a multichannel input from a source with a suitable analogue multichannel output, such as an SACD player.
• Connect the Left, Right, Centre, Sub, Left Surround and Right Surround sockets from the source to the A1, A2, A3, A4, A5, and A6 analogue inputs on the digital surround controller (or the corresponding B1-B6 inputs), using six phono leads.
• Optionally connect a digital output from the source to a digital input on the 861, using a digital phono lead.
You can then select the source corresponding to the multichannel input for playing surround material, and the source corresponding to the digital input to decode other formats.
Note: Multichannel analogue sources may have subwoofer level outputs that vary by up to 10dB, so it may be necessary to reduce the LFE level to give correct bass integration; see DSP presets, page 27.
42
Installing the 861 Reference Digital
Surround Controller
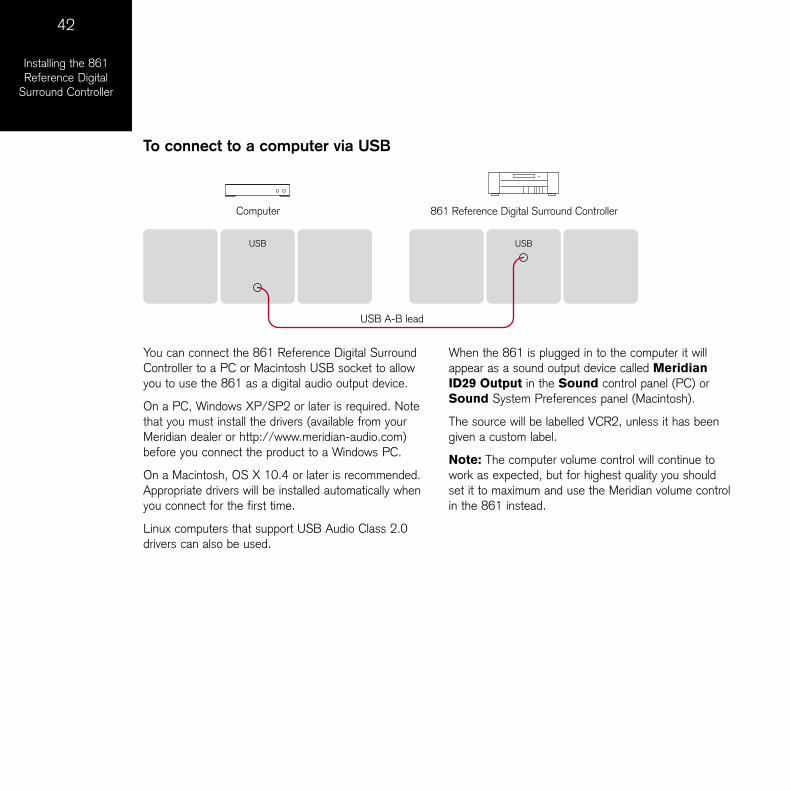
To connect to a computer via USB
Computer
USBUSB
USB A-B lead
861 Reference Digital Surround Controller
You can connect the 861 Reference Digital Surround Controller to a PC or Macintosh USB socket to allow you to use the 861 as a digital audio output device.
On a PC, Windows XP/SP2 or later is required. Note that you must install the drivers (available from your Meridian dealer or http://www.meridian-audio.com) before you connect the product to a Windows PC.
On a Macintosh, OS X 10.4 or later is recommended. Appropriate drivers will be installed automatically when you connect for the first time.
Linux computers that support USB Audio Class 2.0 drivers can also be used.
When the 861 is plugged in to the computer it will appear as a sound output device called Meridian ID29 Output in the Sound control panel (PC) or Sound System Preferences panel (Macintosh).
The source will be labelled VCR2, unless it has been given a custom label.
Note: The computer volume control will continue to work as expected, but for highest quality you should set it to maximum and use the Meridian volume control in the 861 instead.
43
Installing the 861 Reference Digital
Surround Controller
861 Reference Digital Surround Controller
SPEAKERLINK
Centre – Slave
MERIDIANSPEAKERLINK
INPUT OUTPUT
Front L – Master
Rear L – Slave
MERIDIANSPEAKERLINK
INPUT OUTPUT
MERIDIANSPEAKERLINK
INPUT OUTPUT
Rear R – Slave
Front R – Slave
MERIDIANSPEAKERLINK
INPUT OUTPUT
MERIDIANSPEAKERLINK
INPUT OUTPUT
SpeakerLink leadSpeakerLink lead
SpeakerLink leadSpeakerLink lead
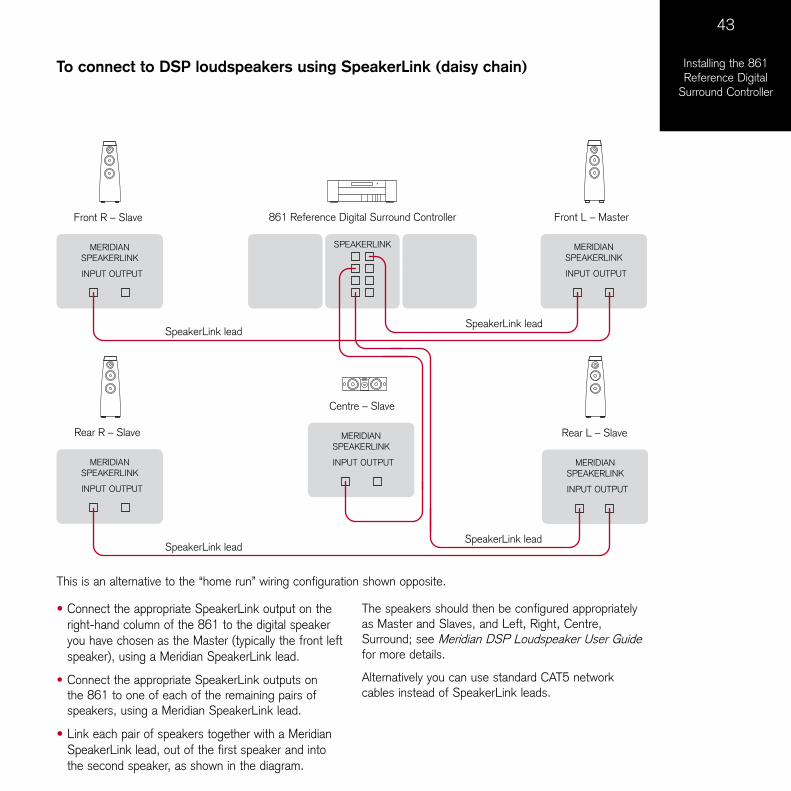
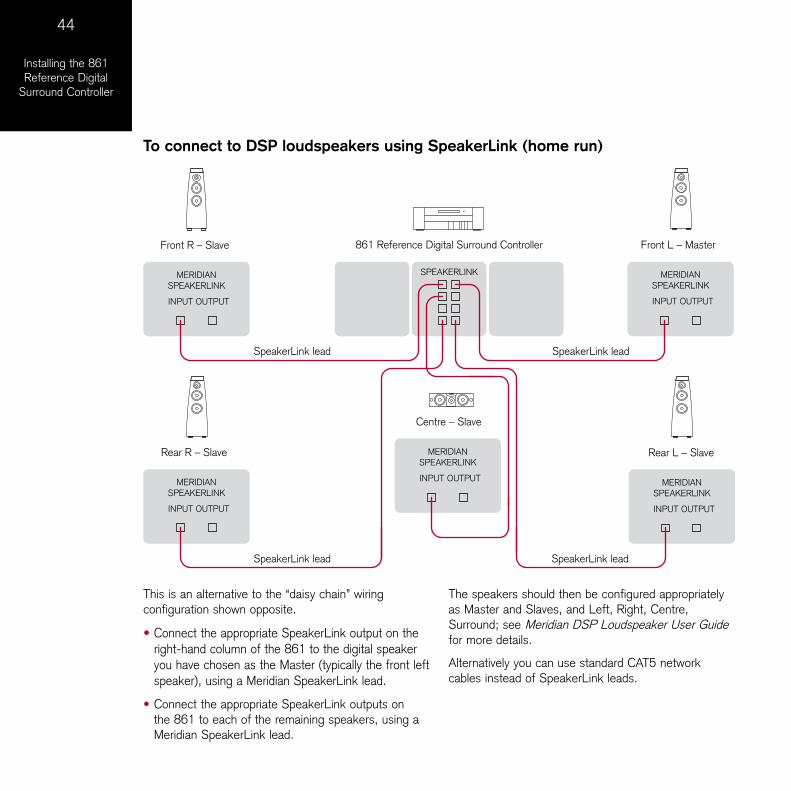
This is an alternative to the “home run” wiring configuration shown opposite.
To connect to DSP loudspeakers using SpeakerLink (daisy chain)
Connect the appropriate SpeakerLink output on the right-hand column of the 861 to the digital speaker you have chosen as the Master (typically the front left speaker), using a Meridian SpeakerLink lead.
Connect the appropriate SpeakerLink outputs on the 861 to one of each of the remaining pairs of speakers, using a Meridian SpeakerLink lead.
Link each pair of speakers together with a Meridian SpeakerLink lead, out of the first speaker and into the second speaker, as shown in the diagram.
•
•
•
The speakers should then be configured appropriately as Master and Slaves, and Left, Right, Centre, Surround; see Meridian DSP Loudspeaker User Guide for more details.
Alternatively you can use standard CAT5 network cables instead of SpeakerLink leads.
44
Installing the 861 Reference Digital
Surround Controller
To connect to DSP loudspeakers using SpeakerLink (home run)
861 Reference Digital Surround Controller
SPEAKERLINK
Centre – Slave
MERIDIANSPEAKERLINK
INPUT OUTPUT
Front L – Master
Rear L – Slave
MERIDIANSPEAKERLINK
INPUT OUTPUT
MERIDIANSPEAKERLINK
INPUT OUTPUT
Rear R – Slave
Front R – Slave
MERIDIANSPEAKERLINK
INPUT OUTPUT
MERIDIANSPEAKERLINK
INPUT OUTPUT
SpeakerLink lead
SpeakerLink lead SpeakerLink lead
SpeakerLink lead
This is an alternative to the “daisy chain” wiring configuration shown opposite.
Connect the appropriate SpeakerLink output on the right-hand column of the 861 to the digital speaker you have chosen as the Master (typically the front left speaker), using a Meridian SpeakerLink lead.
Connect the appropriate SpeakerLink outputs on the 861 to each of the remaining speakers, using a Meridian SpeakerLink lead.
•
•
The speakers should then be configured appropriately as Master and Slaves, and Left, Right, Centre, Surround; see Meridian DSP Loudspeaker User Guide for more details.
Alternatively you can use standard CAT5 network cables instead of SpeakerLink leads.
45
Installing the 861 Reference Digital
Surround Controller
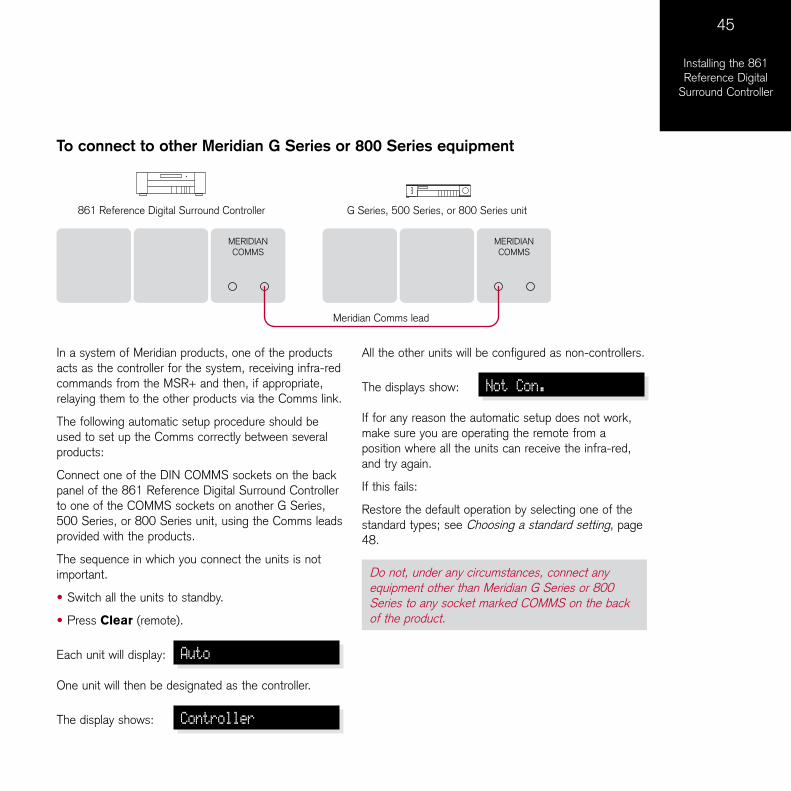
To connect to other Meridian G Series or 800 Series equipment
G Series, 500 Series, or 800 Series unit
MERIDIANCOMMS
Meridian Comms lead
MERIDIANCOMMS
861 Reference Digital Surround Controller
In a system of Meridian products, one of the products acts as the controller for the system, receiving infra-red commands from the MSR+ and then, if appropriate, relaying them to the other products via the Comms link.
The following automatic setup procedure should be used to set up the Comms correctly between several products:
Connect one of the DIN COMMS sockets on the back panel of the 861 Reference Digital Surround Controller to one of the COMMS sockets on another G Series, 500 Series, or 800 Series unit, using the Comms leads provided with the products.
The sequence in which you connect the units is not important.
Switch all the units to standby.
Press Clear (remote).
Each unit will display: Auto
One unit will then be designated as the controller.
The display shows: Controller
•
•
All the other units will be configured as non-controllers.
The displays show: Not Con.
If for any reason the automatic setup does not work, make sure you are operating the remote from a position where all the units can receive the infra-red, and try again.
If this fails:
Restore the default operation by selecting one of the standard types; see Choosing a standard setting, page 48.
Do not, under any circumstances, connect any equipment other than Meridian G Series or 800 Series to any socket marked COMMS on the back of the product.

46
Installing the 861 Reference Digital
Surround Controller
47
Configuring the 861 Reference Digital
Surround Controller
Configuring the 861 Reference Digital Surround Controller
This chapter explains how to set up the 861 Reference Digital Surround Controller for most standard configurations of loudspeakers and sources using just the front-panel controls and MSR+.
For complete control over all aspects of the digital surround controller’s configuration, or to take advantage of Room Correction, it is recommended that you set up the unit using the Meridian Configuration Program; for more information see Installing the Meridian Configuration Application, page 57.
48
Configuring the 861 Reference Digital
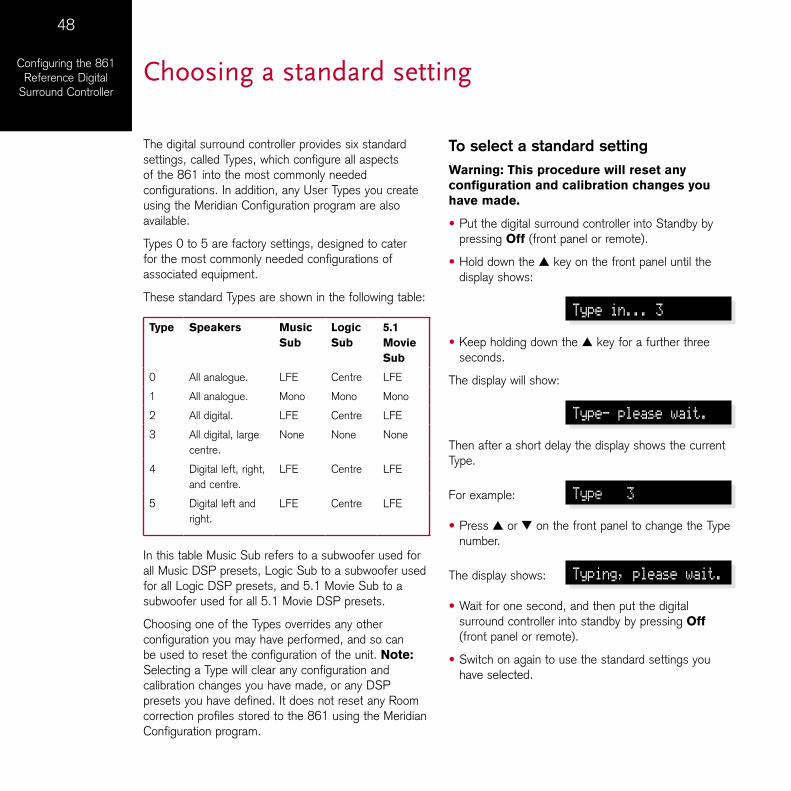
Surround ControllerChoosing a standard setting
The digital surround controller provides six standard settings, called Types, which configure all aspects of the 861 into the most commonly needed configurations. In addition, any User Types you create using the Meridian Configuration program are also available.
Types 0 to 5 are factory settings, designed to cater for the most commonly needed configurations of associated equipment.
These standard Types are shown in the following table:
Type Speakers Music Sub
Logic Sub
5.1 Movie Sub
0 All analogue. LFE Centre LFE
1 All analogue. Mono Mono Mono
2 All digital. LFE Centre LFE
3 All digital, large centre.
None None None
4 Digital left, right, and centre.
LFE Centre LFE
5 Digital left and right.
LFE Centre LFE
In this table Music Sub refers to a subwoofer used for all Music DSP presets, Logic Sub to a subwoofer used for all Logic DSP presets, and 5.1 Movie Sub to a subwoofer used for all 5.1 Movie DSP presets.
Choosing one of the Types overrides any other configuration you may have performed, and so can be used to reset the configuration of the unit. Note: Selecting a Type will clear any configuration and calibration changes you have made, or any DSP presets you have defined. It does not reset any Room correction profiles stored to the 861 using the Meridian Configuration program.
To select a standard settingWarning: This procedure will reset any configuration and calibration changes you have made.
Put the digital surround controller into Standby by pressing Off (front panel or remote).
Hold down the A key on the front panel until the display shows:
Type in... 3
Keep holding down the A key for a further three seconds.
The display will show:
Type- please wait.
Then after a short delay the display shows the current Type.
For example: Type 3
Press A or V on the front panel to change the Type number.
The display shows: Typing, please wait.
Wait for one second, and then put the digital surround controller into standby by pressing Off (front panel or remote).
Switch on again to use the standard settings you have selected.
•
•
•
•
•
•
49
Configuring the 861 Reference Digital
Surround Controller
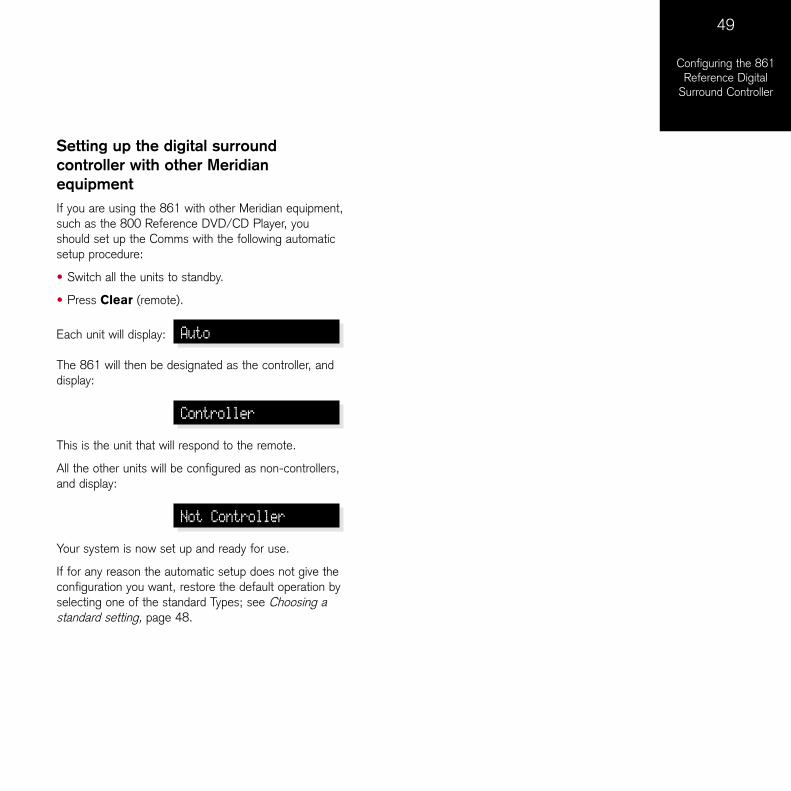
Setting up the digital surround controller with other Meridian equipmentIf you are using the 861 with other Meridian equipment, such as the 800 Reference DVD/CD Player, you should set up the Comms with the following automatic setup procedure:
Switch all the units to standby.
Press Clear (remote).
Each unit will display: Auto
The 861 will then be designated as the controller, and display:
Controller
This is the unit that will respond to the remote.
All the other units will be configured as non-controllers, and display:
Not Controller
Your system is now set up and ready for use.
If for any reason the automatic setup does not give the configuration you want, restore the default operation by selecting one of the standard Types; see Choosing a standard setting, page 48.
•
•
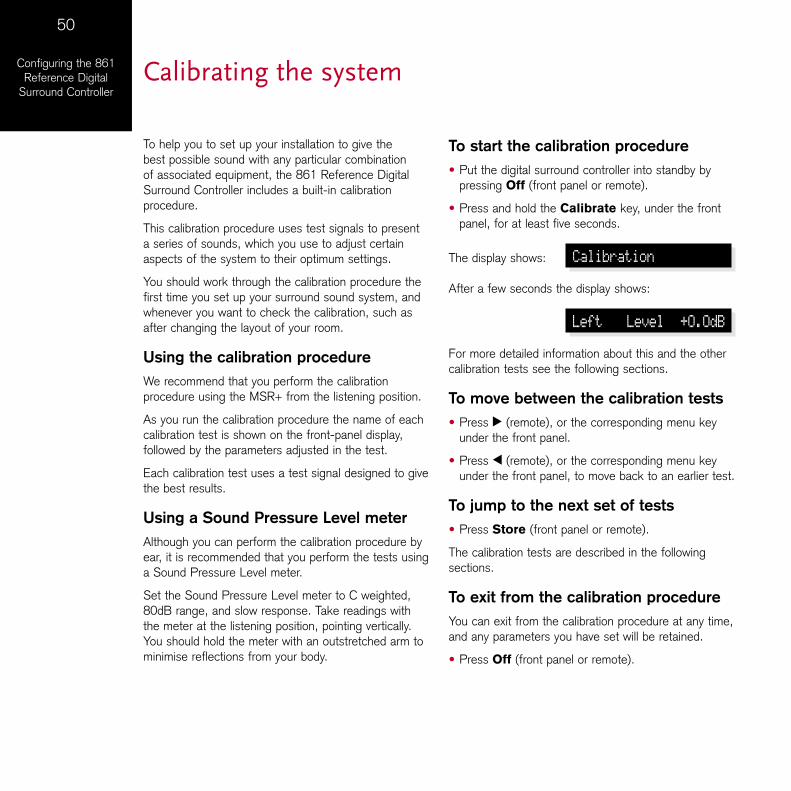
50
Configuring the 861 Reference Digital
Surround ControllerCalibrating the system
To help you to set up your installation to give the best possible sound with any particular combination of associated equipment, the 861 Reference Digital Surround Controller includes a built-in calibration procedure.
This calibration procedure uses test signals to present a series of sounds, which you use to adjust certain aspects of the system to their optimum settings.
You should work through the calibration procedure the first time you set up your surround sound system, and whenever you want to check the calibration, such as after changing the layout of your room.
Using the calibration procedureWe recommend that you perform the calibration procedure using the MSR+ from the listening position.
As you run the calibration procedure the name of each calibration test is shown on the front-panel display, followed by the parameters adjusted in the test.
Each calibration test uses a test signal designed to give the best results.
Using a Sound Pressure Level meterAlthough you can perform the calibration procedure by ear, it is recommended that you perform the tests using a Sound Pressure Level meter.
Set the Sound Pressure Level meter to C weighted, 80dB range, and slow response. Take readings with the meter at the listening position, pointing vertically. You should hold the meter with an outstretched arm to minimise reflections from your body.
To start the calibration procedurePut the digital surround controller into standby by pressing Off (front panel or remote).
Press and hold the Calibrate key, under the front panel, for at least five seconds.
The display shows: Calibration
After a few seconds the display shows:
Left Level +0.0dB
For more detailed information about this and the other calibration tests see the following sections.
To move between the calibration testsPress > (remote), or the corresponding menu key under the front panel.
Press < (remote), or the corresponding menu key under the front panel, to move back to an earlier test.
To jump to the next set of testsPress Store (front panel or remote).
The calibration tests are described in the following sections.
To exit from the calibration procedureYou can exit from the calibration procedure at any time, and any parameters you have set will be retained.
Press Off (front panel or remote).
•
•
•
•
•
•
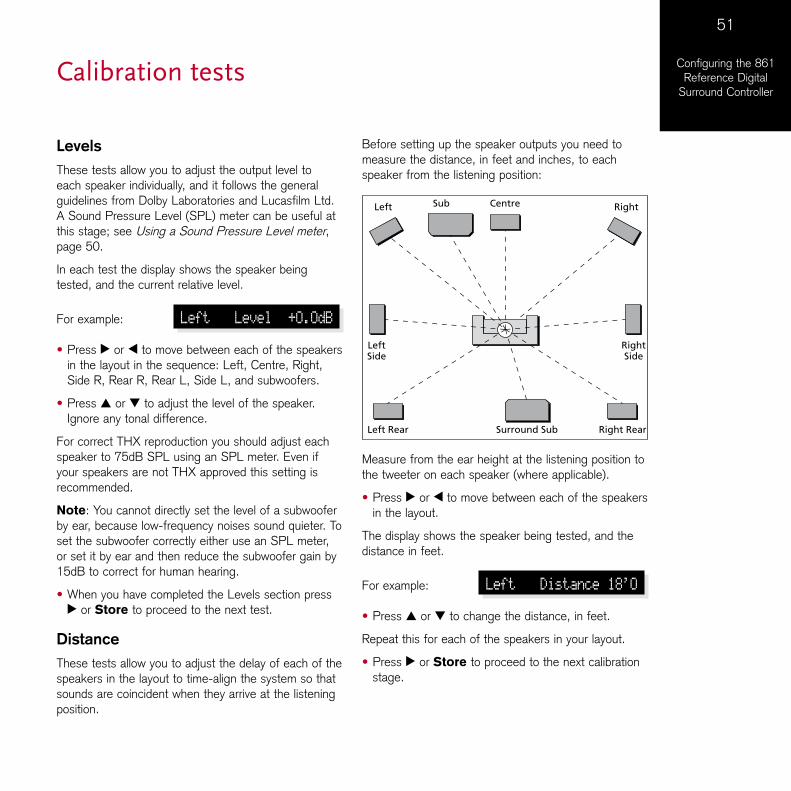
51
Configuring the 861 Reference Digital
Surround Controller
Levels These tests allow you to adjust the output level to each speaker individually, and it follows the general guidelines from Dolby Laboratories and Lucasfilm Ltd. A Sound Pressure Level (SPL) meter can be useful at this stage; see Using a Sound Pressure Level meter, page 50.
In each test the display shows the speaker being tested, and the current relative level.
For example: Left Level +0.0dB
Press > or < to move between each of the speakers in the layout in the sequence: Left, Centre, Right, Side R, Rear R, Rear L, Side L, and subwoofers.
Press A or V to adjust the level of the speaker. Ignore any tonal difference.
For correct THX reproduction you should adjust each speaker to 75dB SPL using an SPL meter. Even if your speakers are not THX approved this setting is recommended.
Note: You cannot directly set the level of a subwoofer by ear, because low-frequency noises sound quieter. To set the subwoofer correctly either use an SPL meter, or set it by ear and then reduce the subwoofer gain by 15dB to correct for human hearing.
When you have completed the Levels section press > or Store to proceed to the next test.
DistanceThese tests allow you to adjust the delay of each of the speakers in the layout to time-align the system so that sounds are coincident when they arrive at the listening position.
•
•
•
Before setting up the speaker outputs you need to measure the distance, in feet and inches, to each speaker from the listening position:
CentreSubLeft Right
LeftSide
RightSide
Left Rear Right RearSurround Sub
Measure from the ear height at the listening position to the tweeter on each speaker (where applicable).
Press > or < to move between each of the speakers in the layout.
The display shows the speaker being tested, and the distance in feet.
For example: Left Distance 18'0
Press A or V to change the distance, in feet.
Repeat this for each of the speakers in your layout.
Press > or Store to proceed to the next calibration stage.
•
•
•
Calibration tests

52
Configuring the 861 Reference Digital
Surround Controller
Fine tuningThese tests allow you to fine-tune the phase and delay of each speaker when used in conjunction with other speakers on the layout.
Press > or < to move between each of the speakers in the layout.
The first display allows you to adjust the phase.
For example: Left Phase
The next display shows the distance (or delay) for the same speaker.
For example: Left Distance 18'0
Choose the setting that gives an even sound between the speakers, that does not change radically as you move your head. If the setting is incorrect the sound will appear diffused, and change in timbre and apparent location as you move your head.
Pay particular attention to the centre channel, as this can have a dramatic effect on the overall sound.
As you increase the delay the speaker will appear to move away from you.
Press > or Store to proceed to the next calibration stage.
Speaker sizeThese tests allow you to determine the bass handling capability of large analogue speakers and subwoofers. Once set, the 861 will limit the bass level to protect the speakers from potential damage.
In each test the display shows the speaker being tested and the current size value chosen for the speaker. This value will default to zero, corresponding to maximum bass protection.
•
•
For example: Left Size 15
Press > or < to move between each of the speakers under test.
Press A and V to adjust the Size value for the speaker.
As you increase the Size value, the test signal will get louder, since the bass protection is treating the speaker as one capable of handling more bass.
Adjust the Size value until the speaker is just beginning to produce distortion, indicating that it is reaching its bass handling limit.
You have now completed the calibration of your system.
Press Off (front panel or remote) to exit from the calibration procedure.
•
•
•
•

53
Configuring the 861 Reference Digital
Surround ControllerSetting up sources
This section explains how to use Gain/Sub mode to set up the sources connected to the digital surround controller, and configure them to suit your other equipment.
You can also adjust the subwoofer crossover frequency to suit the subwoofers in your system.
To turn on Gain/Sub modePut the digital surround controller into standby by pressing Off (front panel or remote).
Press and hold the Configure key under the front panel for at least five seconds.
The display shows: Gain/Sub On
The digital surround controller will then return to standby with Gain/Sub mode turned on.
Gain/Sub mode adds two extra options to the DSP parameter menus: Sensitivity and Xover.
To turn off Gain/Sub modeRepeat the above procedure until the display shows:
Gain/Sub Off
To adjust the sensitivity of a sourceTo obtain the best signal-to-noise ratio for your analogue sources you can adjust the sensitivity of each input to give the highest level that does not produce clipping.
Turn on Gain/Sub mode, as described above.
Select the source you want to adjust, with loud source material playing.
Press < or > (remote or under the front panel) until the display shows the current sensitivity.
•
•
•
•
•
•
For example: Radio 2.0V In
Press A or V (remote or under the front panel) to change the sensitivity.
You can select between sensitivities of 0.5V (most sensitive), 1.0V, 2.0V, or 2.5V (least sensitive).
If the sensitivity is set too high the input will clip the loudest passages.
The display shows, for example:
Radio 0.5V In Clip
In this case reduce the sensitivity.
If you have selected a digital source you cannot adjust the sensitivity. The display shows, for example:
CD Not Analogue
To adjust the subwoofer crossover frequencyThe digital surround controller allows you to adjust the crossover frequency of any subwoofers between 30 and 150Hz. The crossover can be set independently for Music, Logic, and 5.1 Movie speaker layouts. The default is the THX standard of 80Hz. For details of which speaker layout is used by each DSP preset see Speaker layouts, page 5.
Turn on Gain/Sub mode, as described above.
Press < or > (remote or under the front panel) until the display shows the current crossover frequency.
For example: Radio Xover 80Hz
Press A or V (remote or under the front panel) to set the crossover frequency.
•
•
•
•
54
Configuring the 861 Reference Digital
Surround Controller
For THX loudspeaker systems you should leave the crossover setting at 80Hz.
80Hz is also the recommended setting for all movie listening. You may prefer, however, to lower the crossover frequency for music if your main speakers have good bass handling down to, say, 50Hz.
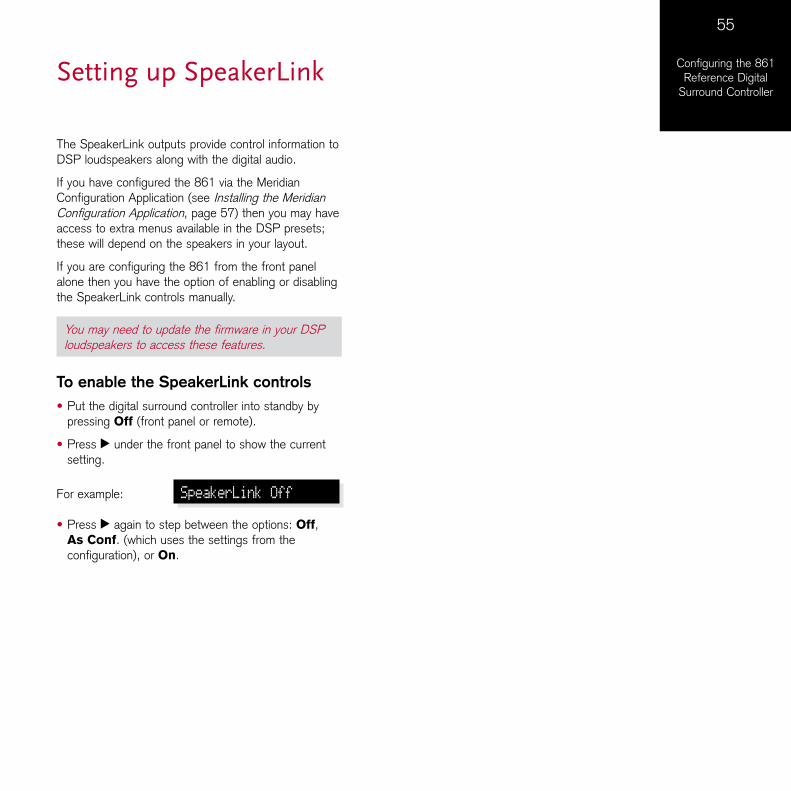
55
Configuring the 861 Reference Digital
Surround ControllerSetting up SpeakerLink
The SpeakerLink outputs provide control information to DSP loudspeakers along with the digital audio.
If you have configured the 861 via the Meridian Configuration Application (see Installing the Meridian Configuration Application, page 57) then you may have access to extra menus available in the DSP presets; these will depend on the speakers in your layout.
If you are configuring the 861 from the front panel alone then you have the option of enabling or disabling the SpeakerLink controls manually.
You may need to update the firmware in your DSP loudspeakers to access these features.
To enable the SpeakerLink controlsPut the digital surround controller into standby by pressing Off (front panel or remote).
Press > under the front panel to show the current setting.
For example: SpeakerLink Off
Press > again to step between the options: Off, As Conf. (which uses the settings from the configuration), or On.
•
•
•
56
Configuring the 861 Reference Digital
Surround ControllerSinewave sweep test
The 861 Reference Digital Surround Controller includes a sinewave signal test, to help you set the subwoofer crossover frequencies, or check for room resonances.
Select a PCM source; eg an analogue source or CD.
Press Configure (under the front panel).
The displays shows: CD Sine 80.0Hz
An 80Hz sinewave will be played through all channels.
You can change the test signal using the menu keys, as described in the following sections.
To change the sweep ratePress < or > (remote or under the front panel) until the display shows:
CD Pause 80.0Hz
Press A or V to change the sweep rate and direction, as follows:
Display Description
CD >> 88.5Hz Fast sweep up.
CD > 81.5Hz Slow sweep up.
CD Pause 80.0Hz Paused.
CD < 78.5Hz Slow sweep down.
CD << 70.5Hz Fast sweep down.
The sine sweep will stop when it reaches 0.5Hz or 200Hz.
•
•
•
•
To change the volumeUse the volume keys in the usual way.
Warning: Very loud low-frequency signals may damage speakers.
To select other test signalsPress < or > (remote or under the front panel) until the display shows the current signal.
For example: CD Sine
Press A or V to choose between the following test signals:
Display Description
CD Sine A sinewave.
CD Silent Silence.
CD Input The source signal in mono (left + right).
CD Noise Pink noise (band pass 500Hz to 2kHz for main channels).
To select the channelPress < or > (remote or under the front panel) until the display shows the current channels.
For example: CD All Channels
Press A or V to select a specific channel, or All Channels.
•
•
•
•
•
57
Configuring the 861 Reference Digital
Surround ControllerInstalling the Meridian Configuration Application
The Meridian Configuration Application is not included with this product.
The application should be installed from the Internet.
RequirementsTo use the Meridian Configuration Application you need:
A computer running Windows 95, 98, 2000, NT 4, ME, XP, Vista, or Windows 7.10Mbytes of free disk space.A 9-pin serial port or suitable serial adaptor (such as USB-Serial, PC Card, etc).A mouse or similar pointing device – the application cannot be operated solely from the keyboard.
The Meridian Configuration Application communicates with the products you are setting up via a serial cable.
You can connect the product to a 9-pin serial port on the computer.
Alternatively, a USB-to-serial converter, available from most computer retailers, can be used to connect between the product and a USB port on the computer.
InstallationTo install the application you will need a computer that is connected to the Internet.
Type the following URL into the address bar of a Web browser:
http://www.meridian-audio.com/download/setup.exe
If you are asked whether to Run or Save the application:
Click Run.
Otherwise:
Run the setup.exe application once it has downloaded.
•
••
•
•
•
•
The Setup application’s Welcome page will be displayed.
Follow the instructions.
On the Preferences page:
Leave Install for all users selected, unless you want to restrict use of the application to yourself on a multi-user machine.
User guideYou can download an electronic copy of the Meridian Configuration Program Guide in Acrobat format from the following URL:
http://www.meridian-audio.com/media/107004/meridian-config-guide.pdf
•
•
58
Configuring the 861 Reference Digital
Surround Controller
59
IndexIndex
AAcademy (DSP parameter) 31
accessories 36
Ambisonics (DSP preset) 28, 33
analogue inputs 37
analogue source, connecting 39
analogue sources, adjusting sensitivity
53
Axis (DSP parameter) 17
axis, changing 20
Bback panel connections 36
Balance (DSP parameter) 17, 20
balanced outputs 36, 37
Bass (DSP parameter) 17, 19
bass, changing 19
brightness, display 14
built-in presets, replacing 26
CC.Elev (DSP parameter) 17, 23
calibration procedure 50
exiting 50
starting 50
calibration tests 51
Distance 51
Fine tuning 52
Levels 51
Speaker size 52
Centre (DSP parameter) 17, 21, 28
Centre Elevation control 23
centre speaker
changing the relative delay 21
changing the relative level 21
Channels (DSP parameter) 29
Cinema (DSP preset) 32
clip indicator 53
Comms, connecting 45
communications connections 38
Compress (DSP parameter) 34
compression 34
computer, connecting to 42
configuration 47
resetting 48
connecting
to a computer 42
to DSP loudspeakers 43, 44
to Meridian G Series, 500 Series,
or 800 Series equipment 45
content types 13, 14
Movie 2 13
Movie 6 13
Music 2 13
Music 6 13
contrast, display 14
crossover frequency, adjusting 53
DDepth (DSP parameter) 17, 21
Dialog Normalisation 34
digital inputs 38
Digital signal processing 2
digital source, connecting 39
Dimension (DSP parameter) 30
Direct (DSP preset) 30
Discrete (DSP preset) 32
display
brightness 14
contrast 14
information 14
Distance (calibration test) 51, 52
DSP 2
DSP loudspeakers
connecting via SpeakerLink 43,
44
DSP parameters
changing 17, 18
standard 17
DSP presets 27
Ambisonics 28, 33
assigning to a source 25
changing 13
Cinema 32
clearing 26
Compress parameter 34
defining 26
Direct 30
Discrete 32
editing name 26
Mono 31
multichannel 32
Music 28
PLIIx Mov6 33
PLIIx Movie 30, 31
PLIIx Mus6 33
PLIIx Music 30
PLIIx THX 30, 31
selecting 13
Stereo 30
60
Index
DSP presets (continued)
Super 29
THX 32, 33
THX Music 33
THX Surround EX 33
THX Ultra2 Cinema 33
Trifield 28
two-channel 28
user-defining 26
dynamic range control 34
EEBA (DSP parameter) 17, 23
Enhanced Bass Alignment control 23
Ffront panel keys 8
GGain/Sub mode 53
HHD621 HDMI Audio Processor 40
HS Out? (DSP parameter) 17
IInput (DSP parameter) 31
inputs
analogue 37
digital 38
MMHR 38
multichannel digital 38
optical 38
inputs (continued)
SpeakerLink 38
USB 38
installing 35
Llayouts 5
5.1 Movie 32
Logic 28
Music 28
Levels (calibration test) 51
LFE (DSP parameter) 32, 33
LipSync 24
LipSync (DSP parameter) 17, 24
listening position, changing 20
locking the menus 16
Mmenus, locking 16
Meridian Configuration Application
57
Meridian DSP loudspeakers,
connecting to 43, 44
Meridian System Remote keys 9
Mix level 34
MMHR multichannel input 38, 40
Mono (DSP preset) 31
Movie 2 13
Movie 6 13
multichannel digital inputs 38
multichannel link 2
Music (DSP preset) 28
Music 2 13
Music 6 13
Music DSP presets 28
muting the sound 12
Ooptical inputs 38
outputs
balanced 37, 38
SpeakerLink 37
unbalanced 37
PPanorama (DSP parameter) 30
Party? (DSP parameter) 31
Phase (calibration test) 52
Phase (DSP parameter) 17, 19
phase, changing 19
PLIIx (DSP preset) 30
PLIIx Mov6 (DSP preset) 33
PLIIx Movie (DSP preset) 31
PLIIx Mus6 (DSP preset) 33
PLIIx Music (DSP preset) 30
PLIIx THX (DSP preset) 30
presets
defining 26
multichannel 32
two-channel 28
user-defined 26
Pro Logic (DSP parameter) 31
RRC (DSP parameter) 17
R Delay (DSP parameter) 17, 22
61
Index
Rear (DSP parameter) 17, 20
rear speakers
changing the relative delay 22
changing the relative level 20
resetting the configuration 48
R Filter (DSP parameter) 28, 29, 32
Roll (DSP parameter) 29, 31
Room Correction 3
Row (DSP parameter) 29
RS232 connection 38
SSACD player, connecting to 41
safety warnings ii
S Delay (DSP parameter) 17, 22
selecting a source 11
S Filter (DSP parameter) 28, 29, 32
Sides (DSP parameter) 17, 20
side speakers
changing the relative delay 22
changing the relative level 20
sinewave sweep test 56
Sooloos connections 38
Sound Pressure Level meter 50
sources 11
adjusting sensitivity 53
assigning DSP presets 25
default DSP preset 13
selecting 11
setting up 53
spaciousness of the sound, changing
22
speaker layouts 5
5.1 Movie 32
Logic 28
Music 28
SpeakerLink 38, 43, 44
connecting with 43, 44
SpeakerLink controls 23
Centre Elevation 23
enabling or disabling 55
Enhanced Bass Alignment 23
SpeakerLink input 38
SpeakerLink outputs 37
standard DSP parameters 17
standard settings, selecting 48
standby, switching to 10
Steered All (DSP parameter) 29, 30
Stereo (DSP preset) 30
subwoofers, crossover frequency 53
Super (DSP preset) 29
Surr. Rear (DSP parameter) 28, 32,
33
switching on and off 10
TTHX (DSP preset) 32, 33
THX level 51
THX Music (DSP preset) 33
THX Surround EX (DSP preset) 33
THX Ultra2 Cinema (DSP preset) 33
time-aligning the system 51
Treble (DSP parameter) 17, 19
treble, changing 19
Trifield (DSP preset) 28
trigger outputs 38
2+2+2 (DSP parameters) 32
Types 48
UUHJ format 28
unbalanced outputs 37
unlocking the menus 16
unpacking 36
USB, connecting 42
USB input 38
user-defined presets 26
clearing 26
editing name 26
Vvolume
adjusting 12
WWidth (DSP parameter) 28, 29, 30
YYaw (DSP parameter) 29, 31

62
Index
Recommended