Create a Contact Sheet of Your Images . . . . . . . . . . . . . . . . . . . 158
Design a Picture Package . . . . . . . . . . . . 160
Customize Your Picture Package Layout . . . . 162
Resample Your Image . . . . . . . . . . . . . . . . . . . . 164
Scale Your Images for Print and the Web. . . . . . . 166
Create an Online Photo Gallery . . . . . . . . . . . . . . 168
Optimize Images for Print or the Web . . . . . . . . 170
Put File Info into Your Images . . . . . . . . . . . . . 172
Work with the File Browser. . . . . . . . . . . . 174
Rank Files with the File Browser . . . . 176
#71
#72
#73
#74
#75
#76
#77
#78
#79
#80
54182X Ch08.qxd 12/12/03 11:21 PM Page 157
When you are finished with a file,
you may want to either print the file
or use it on the Web. Photoshop
includes many features that make
printing photographs or any image a
snap. It also provides tools for
creating attractive images that you
can upload straight to the Web.
Photoshop offers automated tools
that create contact sheets and
picture packages. Contact sheets are
composed of thumbnails of your
images that you can use to preview
and record your images. You print
these images at a slightly lower
resolution because they are only for
your reference. A picture package
contains one or several different
images in a variety of sizes that you
can print on one page. You should
always take advantage of the Print
Preview feature in Photoshop, to
spot errors or other problems before
the photo goes to print.
You can use the Save for Web dialog
box to create images in GIF, JPEG,
and PNG formats, the three standard
formats for displaying images on the
Web. Photoshop can also build an
online photo gallery. You can have
Photoshop automatically generate
the thumbnails and layouts for you,
and all you need to do is upload the
Web pages and images.
The File Browser is a great tool for
working with your print images or
your Web graphics. You can easily
browse, rank, and add information
to your images.
Preparing Imagesfor Print andthe Web
54182X Ch08.qxd 12/12/03 11:21 PM Page 156

Create a Contact Sheet of Your Images . . . . . . . . . . . . . . . . . . . 158
Design a Picture Package . . . . . . . . . . . . 160
Customize Your Picture Package Layout . . . . 162
Resample Your Image . . . . . . . . . . . . . . . . . . . . 164
Scale Your Images for Print and the Web. . . . . . . 166
Create an Online Photo Gallery . . . . . . . . . . . . . . 168
Optimize Images for Print or the Web . . . . . . . . 170
Put File Info into Your Images . . . . . . . . . . . . . 172
Work with the File Browser. . . . . . . . . . . . 174
Rank Files with the File Browser . . . . 176
#71
#72
#73
#74
#75
#76
#77
#78
#79
#80
54182X Ch08.qxd 12/12/03 11:21 PM Page 157

You can use Photoshop to automatically create a
digital version of a photographer’s contact sheet.
Contact sheets are made up of small versions, or
thumbnails, of your images. You can use a contact
sheet to preview and keep a record of your image
files. This can be useful if you have a large number
of digital photos to keep track of, and when you do
not want to print them out at full size.
The Contact Sheet II dialog box allows you to
specify the number of rows and columns of images
you want to display on the contact sheet. It also
allows you to add the filename as a caption for each
image, which can be useful for matching up each
thumbnail with an image file on your computer. You
may want to print the contact sheet with a slightly
lower resolution, because it is primarily for reference.
For more information on previewing how the contact
sheet prints on a page, see tasks #72 and #73.
CREATE ACONTACT SHEET of your images
158158
File
Automate
Screens
Contact Sheet II...
1 Place the images that
you want on the contact
sheet in a folder.
Note: To work with folders,
see your specific operating
system’s documentation.
2 Click File.
3 Click Automate.
4 Click Contact Sheet II.
• The Contact Sheet II
dialog box appears.
5 Click Browse.
• The Browse For Folder
dialog box appears.
6 Select a folder containing
images.
7 Click OK.
54182X Ch08.qxd 12/12/03 11:22 PM Page 158

Did You Know?
You can make the thumbnail
images of your contact sheet
larger or smaller by adjusting the
number of rows and columns. Photoshop
determines the final size of the thumbnails
on the contact sheet based on the number of
rows and columns, as well as the paper size.
You can edit your contact sheets after you
create them. In the Contact Sheet II dialog box,
click the Flatten All Layers check box ( changes
to ). When Photoshop creates the layout, each
image is on its own layer, and each filename, if used,
is still an editable text layer. You can now edit the
images or rename the caption.
DIFFICULTY LEVEL
159159
Did You Know?
8
8 Select the contact sheet
properties you want.
• You can set the contact
sheet size and resolution,
the order and number of
columns and rows, and the
caption font and font size.
• Photoshop displays a
preview of the layout.
9 Click OK.
• Photoshop creates and
displays your contact sheets.
• If there are more images
than Photoshop can fit on a
single page, then Photoshop
adds more contact sheets.
88Preparing
Images for Printand the Web
PreparingImages for Print
and the Web
54182X Ch08.qxd 12/12/03 11:22 PM Page 159

You can use the Picture Package command to
automatically create a one-page layout containing a
selected image displayed at various sizes. You may
find this useful when you want to print out copies of
your favorite photo taken with a digital camera or
imported by a scanner. Picture sizes range from wallet
size to 10 by 13 inches, and paper sizes range from 8
by 10 inches to 11 by 17 inches, giving you many
different photograph layouts from which to choose.
The Picture Package dialog box allows you to
preview the arrangement of the layout as well as
specify the page size, resolution, and color mode.
You can specify what color mode you want to print,
such as RGB, CMYK, or Grayscale.
The quality of the resulting printout depends on the
quality of the original image, as well as the picture
package settings. To help ensure your prints looks
as sharp as possible, start with a large image and
increase the resolution of the picture package
setting. You can directly change the resolution
of the imported images by entering a value in the
Resolution field of the Picture Package dialog box.
Design a
PICTURE PACKAGE
160160
File
Automate
Moni8Me9-25-03.tif
Picture Package...
1 Click File. 2 Click Automate.
3 Click Picture Package.
• The Picture Package
dialog box appears.
4 Click Browse.
• The Select an Image File
dialog box appears.
5 Click here and select the
folder that contains the
image file you want.
6 Click the image file.
7 Click Open.
54182X Ch08.qxd 12/12/03 11:22 PM Page 160

Did You Know?
You can have many different
images in each picture package.
Click the placeholder for the photo
in the Picture Package dialog box, and
Photoshop allows you to specify a single
image for that placement. You can assign as
many different images as there are spaces for
the layout. This is very useful for creating sample
packages, or printing a series of photos from a
particular photo shoot.
You can create multiple picture packages by
specifying a folder in the Use in the Source
area of the Picture Package dialog box. Photoshop
takes each image in the folder and creates a
separate picture package image for it.
DIFFICULTY LEVEL
161161
Did You Know?
(2)4x5 (4)2.5x3.5
8 Click here and select a
page size.
9 Click here and select a
layout.
• Photoshop displays the
layout.
0 Click OK.
• Photoshop opens a new
image window that displays
the picture package image.
88Preparing
Images for Printand the Web
PreparingImages for Print
and the Web
54182X Ch08.qxd 12/12/03 11:22 PM Page 161

You can place your images into one of Photoshop’s
prepared Picture Packages, but you may be limited
by the availability of specific sizes or the number of
available copies of a size. Photoshop now allows you
to edit a picture package and save it for future use.
The Picture Package layout is located under the
Automate menu, which is found under the File menu.
When you click the Edit Layout button, located at
the bottom right of the dialog box, a separate dialog
box appears, in which you can make changes to
your Picture Package layout.
In the Picture Package Edit Layout dialog box, you
can add and remove photo positions, and resize
them by entering values or dragging the bounding
boxes. Other options allow you to define the page-
size and save the layout. After saving the layout,
you can access it through the Picture Package dialog
box drop-down menus. When you select the same
paper size on which you created your custom layout,
it appears on that menu. You can find the file in
Adobe\Photoshop CS\Presets\Layouts. Simply copy
these files to share with other Photoshop users.
Customize your
PICTURE PACKAGELAYOUT
162162
File
Automate
1 Click File.
2 Click Automate.
3 Click Picture Package.
• The Picture Package
dialog box appears.
4 Click Edit Layout.
• The Picture Package Edit
Layout dialog box appears.
5 Type a name for your
layout.
6 Click to select an image
position.
7 Type values for the size
and image position.
• You can repeat steps 5 to
7 for any other image
positions you want to alter.
8 Click Save.
54182X Ch08.qxd 12/12/03 11:22 PM Page 162

Did You Know?
The Picture Package dialog
box allows you to add a custom
label to each image in the picture
package. This can be useful if you want
to prominently display a caption or copyright
information associated with the image. Click
in the Custom Text field to type your caption
or label.
You can also resize the images by clicking and
dragging any of the points of the bounding box
that surrounds an image position when you select
it. As you drag and resize, the actual size appears
in the Width and Height text.
DIFFICULTY LEVEL
163163
Customize It!
myTwoByFive8ct.txt
My Custom (8)2x5
• The Enter the new layout
file name dialog box
appears.
9 Type a name for your
layout.
0 Click here and save
your layout in the
Adobe\Photoshop CS\
Presets\Layouts folder.
! Click Save.
• The Picture Package
dialog box appears.
@ Click here to display the
Layout drop-down menu.
• Photoshop displays the
layout you created.
88Preparing
Images for Printand the Web
PreparingImages for Print
and the Web
54182X Ch08.qxd 12/12/03 11:22 PM Page 163

You can design an online photo gallery with
Photoshop. You can use your digital images to create
a Web site that contains everything necessary to
view it as a Web site on the Internet. Photoshop not
only optimizes your image files for the site, but it
also allows you to select the design for the Web
pages that display the images from a gallery of
different templates.
Photoshop also generates thumbnails, or miniature
versions of your images, for display as links in the
gallery. When a visitor clicks a link, a full-size image
appears in the browser window. Photoshop also adds
graphical arrows to use as navigational links.
When you design your gallery, Photoshop offers you
several options, including what information — titles,
file names, descriptions — is displayed, different
layout styles, and the treatment of specific elements
within the page.
After you have set the options, Photoshop generates
the thumbnails, optimizes the images, and creates
everything necessary for the gallery to appear as
a Web page. Photoshop saves the finished product in
a folder that you can upload to the area designated
for your Web page. Photoshop even opens your
computer’s Internet browser so you can view the
new Photo Gallery.
Create an
ONLINE PHOTOGALLERY
168168
File
Automate
Panorama
Web Photo Gallery...
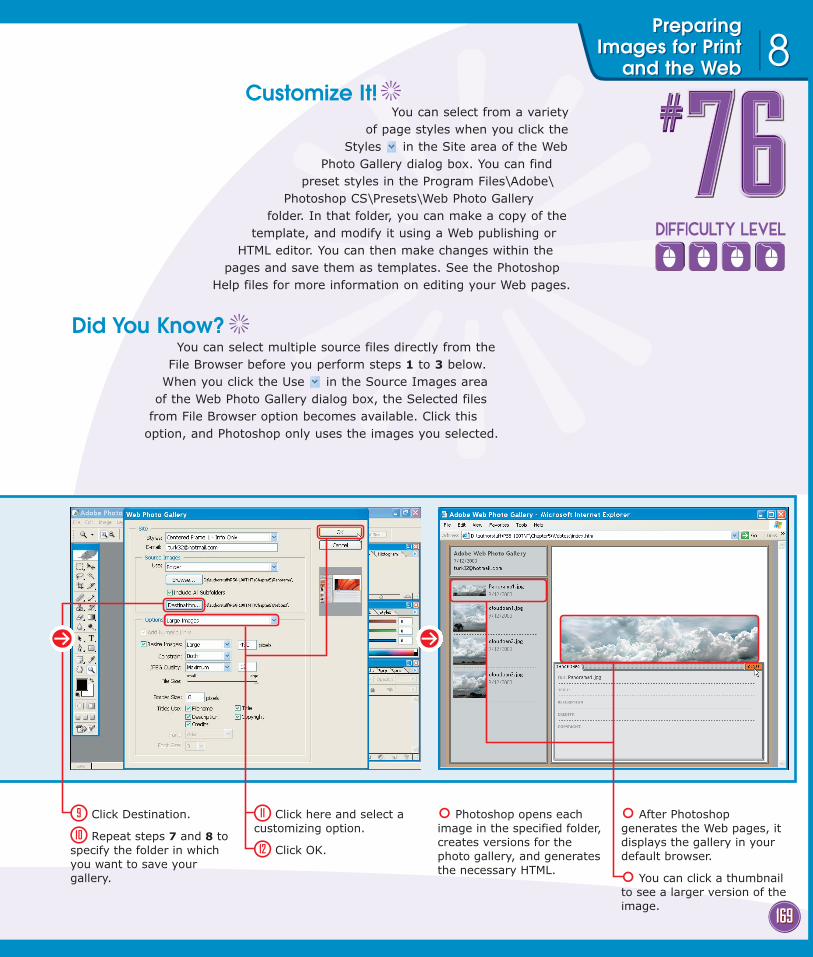
1 Click File. 2 Click Automate.
3 Click Web Photo Gallery.
• The Web Photo Gallery
dialog box appears.
4 Click here and select a
photo gallery style.
5 Type an e-mail address
as the contact for the
gallery.
6 Click Browse.
• The Browse For Folder
dialog box appears.
7 Select the folder
containing your images.
8 Click OK.
54182X Ch08.qxd 12/12/03 11:22 PM Page 168
Did You Know?
You can select from a variety
of page styles when you click the
Styles in the Site area of the Web
Photo Gallery dialog box. You can find
preset styles in the Program Files\Adobe\
Photoshop CS\Presets\Web Photo Gallery
folder. In that folder, you can make a copy of the
template, and modify it using a Web publishing or
HTML editor. You can then make changes within the
pages and save them as templates. See the Photoshop
Help files for more information on editing your Web pages.
You can select multiple source files directly from the
File Browser before you perform steps 1 to 3 below.
When you click the Use in the Source Images area
of the Web Photo Gallery dialog box, the Selected files
from File Browser option becomes available. Click this
option, and Photoshop only uses the images you selected.
DIFFICULTY LEVEL
169169
Customize It!
9 Click Destination.
0 Repeat steps 7 and 8 to
specify the folder in which
you want to save your
gallery.
! Click here and select a
customizing option.
@ Click OK.
• Photoshop opens each
image in the specified folder,
creates versions for the
photo gallery, and generates
the necessary HTML.
• After Photoshop
generates the Web pages, it
displays the gallery in your
default browser.
• You can click a thumbnail
to see a larger version of the
image.
88Preparing
Images for Printand the Web
PreparingImages for Print
and the Web
54182X Ch08.qxd 12/12/03 11:22 PM Page 169
Recommended