Embed Size (px)
Citation preview
Your Quick Reference Expert
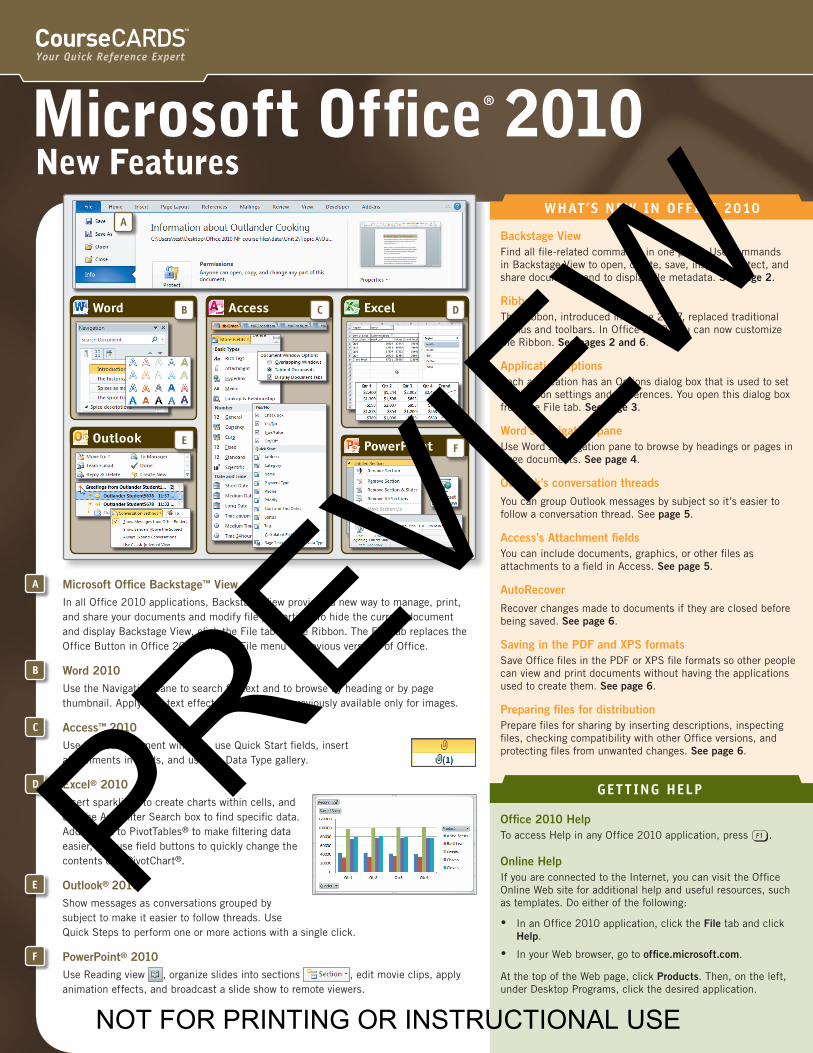
Microsoft Office® 2010New Features
Microsoft Office Backstage™ ViewIn all Office 2010 applications, Backstage View provides a new way to manage, print, and share your documents and modify file properties. To hide the current document and display Backstage View, click the File tab on the Ribbon. The File tab replaces the Office Button in Office 2007 and the File menu in previous versions of Office.
Word 2010Use the Navigation pane to search for text and to browse by heading or by page thumbnail. Apply new text effects that were previously available only for images.
Access™ 2010Use tabbed document windows, use Quick Start fields, insert attachments in fields, and use the Data Type gallery.
Excel® 2010Insert sparklines to create charts within cells, and use the AutoFilter Search box to find specific data. Add slicers to PivotTables® to make filtering data easier, and use field buttons to quickly change the contents of a PivotChart®.
Outlook® 2010Show messages as conversations grouped by subject to make it easier to follow threads. Use Quick Steps to perform one or more actions with a single click.
PowerPoint® 2010Use Reading view , organize slides into sections , edit movie clips, apply animation effects, and broadcast a slide show to remote viewers.
WHAT ’S NEW IN OFF ICE 2010
Backstage ViewFind all file-related commands in one place. Use commands in Backstage View to open, create, save, inspect, protect, and share documents and to display file metadata. See page 2.
RibbonThe Ribbon, introduced in Office 2007, replaced traditional menus and toolbars. In Office 2010, you can now customize the Ribbon. See pages 2 and 6.
Application OptionsEach application has an Options dialog box that is used to set application settings and preferences. You open this dialog box from the File tab. See page 3.
Word’s Navigation paneUse Word’s Navigation pane to browse by headings or pages in large documents. See page 4.
Outlook’s conversation threads
You can group Outlook messages by subject so it’s easier to follow a conversation thread. See page 5.
Access’s Attachment fields You can include documents, graphics, or other files as attachments to a field in Access. See page 5.
AutoRecover
Recover changes made to documents if they are closed before being saved. See page 6.
Saving in the PDF and XPS formatsSave Office files in the PDF or XPS file formats so other people can view and print documents without having the applications used to create them. See page 6.
Preparing files for distributionPrepare files for sharing by inserting descriptions, inspecting files, checking compatibility with other Office versions, and protecting files from unwanted changes. See page 6.
GET T ING HELP
A
B
C
D
E
F
Office 2010 HelpTo access Help in any Office 2010 application, press !.
Online HelpIf you are connected to the Internet, you can visit the Office Online Web site for additional help and useful resources, such as templates. Do either of the following:
y In an Office 2010 application, click the File tab and click Help.
y In your Web browser, go to office.microsoft.com.
At the top of the Web page, click Products. Then, on the left, under Desktop Programs, click the desired application.
A
Word B
Outlook E
Access C
PowerPoint F
Excel D
PREVIEW
NOT FOR PRINTING OR INSTRUCTIONAL USE
2Quick Reference
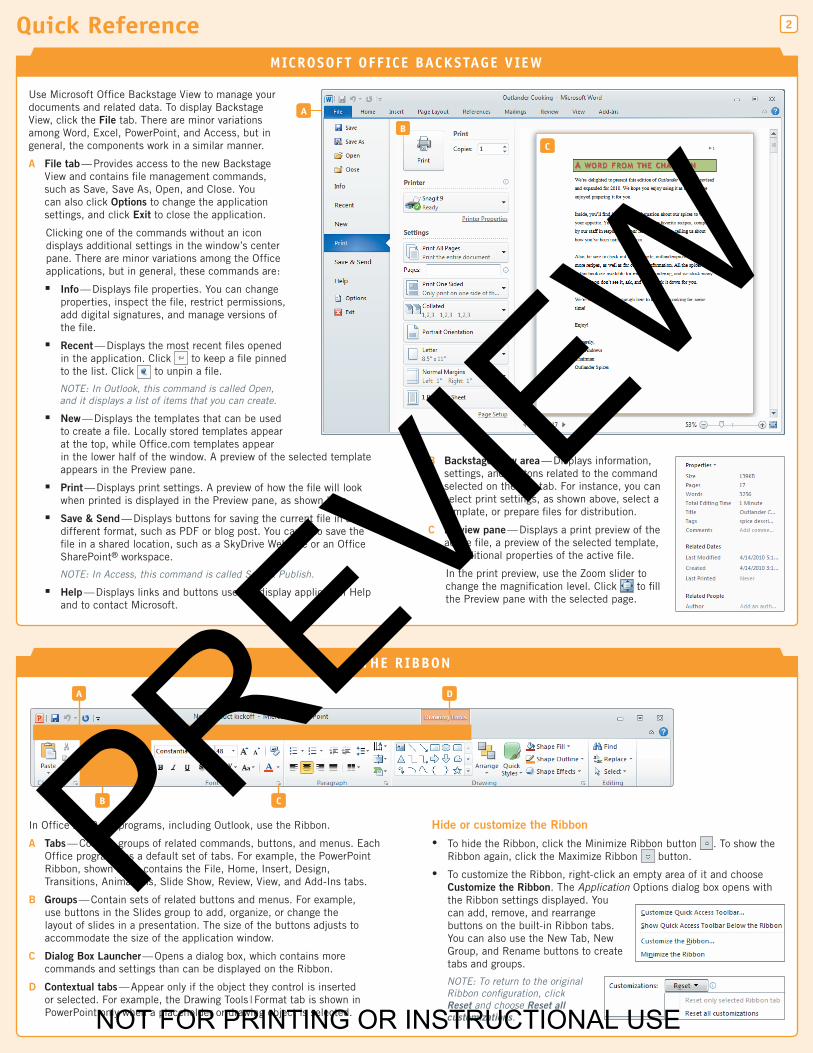
Use Microsoft Office Backstage View to manage your documents and related data. To display Backstage View, click the File tab. There are minor variations among Word, Excel, PowerPoint, and Access, but in general, the components work in a similar manner.
A File tab — Provides access to the new Backstage View and contains file management commands, such as Save, Save As, Open, and Close. You can also click Options to change the application settings, and click Exit to close the application.
Clicking one of the commands without an icon displays additional settings in the window’s center pane. There are minor variations among the Office applications, but in general, these commands are:
� Info — Displays file properties. You can change properties, inspect the file, restrict permissions, add digital signatures, and manage versions of the file.
� Recent — Displays the most recent files opened in the application. Click to keep a file pinned to the list. Click to unpin a file.
NOTE: In Outlook, this command is called Open, and it displays a list of items that you can create.
� New — Displays the templates that can be used to create a file. Locally stored templates appear at the top, while Office.com templates appear in the lower half of the window. A preview of the selected template appears in the Preview pane.
� Print — Displays print settings. A preview of how the file will look when printed is displayed in the Preview pane, as shown here.
� Save & Send — Displays buttons for saving the current file in a different format, such as PDF or blog post. You can also save the file in a shared location, such as a SkyDrive Web site or an Office SharePoint® workspace.
NOTE: In Access, this command is called Save & Publish.
� Help — Displays links and buttons used to display application Help and to contact Microsoft.
B Backstage View area — Displays information, settings, and buttons related to the command selected on the File tab. For instance, you can select print settings, as shown above, select a template, or prepare files for distribution.
C Preview pane — Displays a print preview of the active file, a preview of the selected template, or additional properties of the active file.
In the print preview, use the Zoom slider to change the magnification level. Click to fill the Preview pane with the selected page.
MICROSOF T OFF ICE BACKSTAGE VIEW
A
In Office 2010, all programs, including Outlook, use the Ribbon.
A Tabs — Contain groups of related commands, buttons, and menus. Each Office program has a default set of tabs. For example, the PowerPoint Ribbon, shown here, contains the File, Home, Insert, Design, Transitions, Animations, Slide Show, Review, View, and Add-Ins tabs.
B Groups — Contain sets of related buttons and menus. For example, use buttons in the Slides group to add, organize, or change the layout of slides in a presentation. The size of the buttons adjusts to accommodate the size of the application window.
C Dialog Box Launcher — Opens a dialog box, which contains more commands and settings than can be displayed on the Ribbon.
D Contextual tabs — Appear only if the object they control is inserted or selected. For example, the Drawing Tools | Format tab is shown in PowerPoint only when a placeholder or drawing object is selected.
Hide or customize the Ribbon
y To hide the Ribbon, click the Minimize Ribbon button . To show the Ribbon again, click the Maximize Ribbon button.
y To customize the Ribbon, right-click an empty area of it and choose Customize the Ribbon. The Application Options dialog box opens with the Ribbon settings displayed. You can add, remove, and rearrange buttons on the built-in Ribbon tabs. You can also use the New Tab, New Group, and Rename buttons to create tabs and groups.
NOTE: To return to the original Ribbon configuration, click Reset and choose Reset all customizations.
THE RIBBON
A
B C
D
B
C
PREVIEW
NOT FOR PRINTING OR INSTRUCTIONAL USE
3
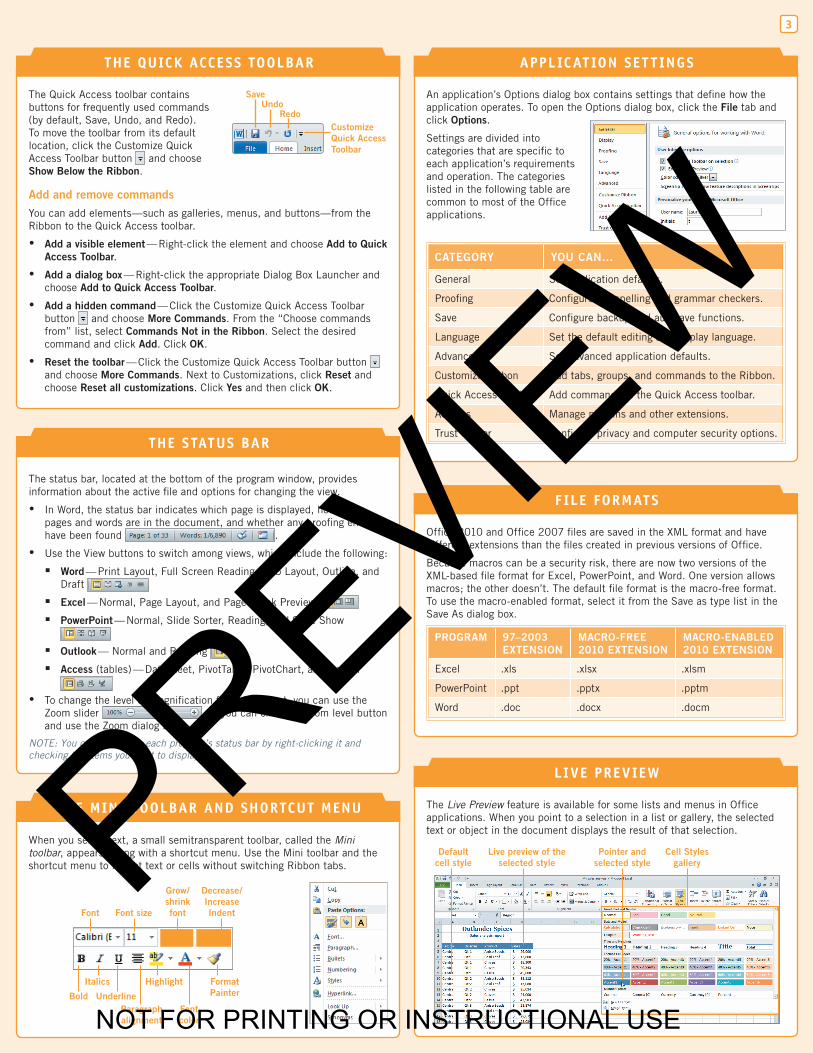
The status bar, located at the bottom of the program window, provides information about the active file and options for changing the view.
y In Word, the status bar indicates which page is displayed, how many pages and words are in the document, and whether any proofing errors have been found .
y Use the View buttons to switch among views, which include the following:
� Word — Print Layout, Full Screen Reading, Web Layout, Outline, and Draft
� Excel — Normal, Page Layout, and Page Break Preview
� PowerPoint — Normal, Slide Sorter, Reading, and Slide Show
� Outlook — Normal and Reading
� Access (tables) — Datasheet, PivotTable, PivotChart, and Design
y To change the level of magnification for a document, you can use the Zoom slider , or you can click the Zoom level button and use the Zoom dialog box.
NOTE: You can customize each program’s status bar by right-clicking it and checking the items you want to display.
THE STATUS BAR
The Quick Access toolbar contains buttons for frequently used commands (by default, Save, Undo, and Redo). To move the toolbar from its default location, click the Customize Quick Access Toolbar button and choose Show Below the Ribbon.
Add and remove commands
You can add elements—such as galleries, menus, and buttons—from the Ribbon to the Quick Access toolbar.
y Add a visible element — Right-click the element and choose Add to Quick Access Toolbar.
y Add a dialog box — Right-click the appropriate Dialog Box Launcher and choose Add to Quick Access Toolbar.
y Add a hidden command — Click the Customize Quick Access Toolbar button and choose More Commands. From the “Choose commands from” list, select Commands Not in the Ribbon. Select the desired command and click Add. Click OK.
y Reset the toolbar — Click the Customize Quick Access Toolbar button and choose More Commands. Next to Customizations, click Reset and choose Reset all customizations. Click Yes and then click OK.
THE QUICK ACCESS TOOLBAR
When you select text, a small semitransparent toolbar, called the Mini toolbar, appears, along with a shortcut menu. Use the Mini toolbar and the shortcut menu to format text or cells without switching Ribbon tabs.
THE MINI TOOLBAR AND SHORTCUT MENU
Save
Customize Quick Access Toolbar
RedoUndo
Bold
Font Font size
Italics
Grow/shrink font
Decrease/Increase Indent
Paragraph alignment
Underline
Highlight
Font color
Format Painter
An application’s Options dialog box contains settings that define how the application operates. To open the Options dialog box, click the File tab and click Options.
Settings are divided into categories that are specific to each application’s requirements and operation. The categories listed in the following table are common to most of the Office applications.
CATEGORY YOU CAN…
General Set application defaults.
Proofing Configure the spelling and grammar checkers.
Save Configure backup and autosave functions.
Language Set the default editing and display language.
Advanced Set advanced application defaults.
Customize Ribbon Add tabs, groups, and commands to the Ribbon.
Quick Access Toolbar Add commands to the Quick Access toolbar.
Add-Ins Manage plug-ins and other extensions.
Trust Center Configure privacy and computer security options.
APPLICAT ION SET T INGS
Office 2010 and Office 2007 files are saved in the XML format and have different extensions than the files created in previous versions of Office.
Because macros can be a security risk, there are now two versions of the XML-based file format for Excel, PowerPoint, and Word. One version allows macros; the other doesn’t. The default file format is the macro-free format. To use the macro-enabled format, select it from the Save as type list in the Save As dialog box.
PROGRAM 97–2003 EXTENSION
MACRO-FREE 2010 EXTENSION
MACRO-ENABLED 2010 EXTENSION
Excel .xls .xlsx .xlsm
PowerPoint .ppt .pptx .pptm
Word .doc .docx .docm
F ILE FORMATS
The Live Preview feature is available for some lists and menus in Office applications. When you point to a selection in a list or gallery, the selected text or object in the document displays the result of that selection.
LIVE PREVIEW
Default cell style
Live preview of the selected style
Cell Styles gallery
Pointer and selected stylePREVIEW
NOT FOR PRINTING OR INSTRUCTIONAL USE

4Word, PowerPoint, and Excel
Display the Navigation pane
Use the Navigation pane to search for text, to navigate by heading or by page, and to view and arrange a document outline. To display the Navigation pane, click the View tab and then check Navigation Pane in the Show group.
Navigate in a document
y The “Browse headings” tab displays text that is formatted with a heading style. Click a heading in the Navigation pane to go directly to that text in the document. (This tab replaces the Document Map feature in previous versions of Word.)
y The “Browse pages” tab displays document pages as thumbnails. Click the thumbnail of the page you want to view.
y In the Search Document box, enter the word or phrase you want to find, and press e. The search results are displayed on the “Browse search results” tab.
Apply text effects
You can apply text effects—such as Shadow, Reflection, Glow, and Soft Edges—that were previously available only for formatting images.
1. Select the text you want to format.
2. On the Home tab, in the Font group, click the Dialog Box Launcher to open the Font dialog box.
3. Click Text Effects to open the Format Text Effects dialog box.
4. Apply the desired effects and click Close. Click OK.
NOTE: You can also use the Text Effects button in the Font group. Click the button and then select the desired text effect in the gallery.
WORD
Broadcast a slide show
With your Windows Live ID and an Internet connection, you can broadcast a presentation to remote viewers.
1. Click the Slide Show tab and click Broadcast Slide Show.
2. Select a broadcast service and click Start Broadcast.
3. Enter your Windows Live ID and password. Click OK.
4. Click Send in Email to open your default e-mail application and create a message containing a link to your slide show. Enter e-mail addresses for your audience members, and send the message.
5. Remote viewers navigate to the link in their Web browsers. When you click Start Slide Show, they see the first slide.
6. When you’re finished, click End Broadcast. Remote viewers receive a message that the broadcast is over.
Create sections in a presentation
Use sections to organize and manage slides in groups. To create a section:
1. Select the first slide you want in the new section.
2. On the Home tab, in the Slides group, click and choose Add Section.
3. To rename and manage the new section, right-click its heading and choose the desired command.
POWERPOINT
Use the AutoFilter Search box
Excel tables can be formatted, sorted, and filtered independently of other worksheet data. You can use the Search box to find specific items in large tables.
1. Click the AutoFilter arrow at the top of the column you want to search.
2. In the Search box, enter the text or numbers you want to look for. The items in the list change to reflect your search criteria.
3. Check the items you want to use as filters.
Insert slicers
Slicers are interactive objects that can be used to quickly filter PivotTable data. They reflect data changes in the underlying PivotTable, and they can be formatted, moved, and resized like other worksheet objects.
1. Select any cell in the PivotTable.
2. On the PivotTable Tools | Options tab, click Insert Slicer.
3. Select the slicers you want to add.
4. Click OK. The slicers appear, layered on top of the PivotTable.
NOTE: The selected items on each slicer indicate which filters are being applied. To change a slicer filter, click the item you want to use as a filter. Use Ctrl+click to select multiple filters.
Use PivotCharts
You can now filter PivotTable data by using the interactive buttons in a PivotChart. When you use a field button to apply a filter to the PivotChart, both the chart and the PivotTable data reflect your change.
To hide some or all of the fields in the PivotChart, click Field Buttons on the PivotChart Tools | Analyze tab.
NOTE: Use the PivotChart Tools tabs to change the chart’s design, layout, and formatting.
Insert sparklines
A sparkline is a tiny chart object that can be inserted into a single cell. Like other objects, sparklines can be arranged, modified, and formatted.
To insert a sparkline:
1. Select the data you want to chart, and click the Insert tab.
2. In the Sparklines group, click the type of sparkline you want to insert. In the Create Sparklines dialog box, specify the location of the new sparkline.
3. Click OK.
NOTE: Use the Sparkline Tools tabs to change the sparkline settings, design, and formatting.
EXCEL
Drag a slicer heading to move the slicer
Highlighted items indicate filters; click an item to remove it as a filter
Click the icon to remove all filters
Browse search resultsBrowse pages
Browse headings Click the AutoFilter drop-down arrows
PREVIEW
NOT FOR PRINTING OR INSTRUCTIONAL USE

5Outlook and Access
Use Quick Steps
You can use Quick Steps to perform one or more actions with a single click. With the exception of Reply & Delete, you need to configure the Quick Steps the first time you use them.
QUICK STEP DESCRIPTION
Move to: ? Moves the item to a folder and marks it as read.
Team E-mail Creates a new message to your team.
Reply & Delete Creates a reply to the sender and deletes the original message from your Inbox.
To Manager Forwards a message to your manager.
Done Marks the selected message as complete, moves it to a folder, and marks it as read.
Create New Creates a new Quick Step.
Create a custom Quick Step
1. In the Quick Step gallery, click to open the Edit Quick Step dialog box.
2. In the Name box, enter a name for your Quick Step.
3. From the Choose an Action list, select the first action you want performed. Enter any information needed to configure it.
4. Repeat step 3 if you want to add more actions.
5. Optional: Select a shortcut key combination and enter the tooltip text.
6. Click Finish. Your new Quick Step appears in the Quick Step gallery.
Manage Quick Steps
In the Quick Steps group, click to open the Manage Quick Steps dialog box. You can edit, duplicate, delete, and rearrange Quick Steps.
Show messages as conversations
Conversations, sometimes called threads, are based on the subject of the messages.
1. On the View tab, in the Conversations group, check the Show as Conversations box.
2. Click This Folder.
3. The conversation appears in the Folder List.
� Click the orange triangle to the left of the first message to display the conversation.
� Click the orange triangle again to see all items in the conversation. Orange connector lines indicate messages sent as replies.
Manage conversations
y On the View tab, click Conversation Settings and choose a command to change how conversations are displayed.
y On the Home tab, click Clean Up and choose Clean Up Conversation to remove duplicated information and save space in your mailbox.
y On the Home tab, click Ignore to move current and future messages in the conversation to the Deleted Items folder.
OUTLOOK
Display multiple windows as tabs
If you open a database that was created in a previous version of Access, you might want to change the Window Options setting to display opened items in tabs. To do so:
1. Click the File tab and click Options.
2. In the left pane, click Current Database.
3. Under Document Window Options, select Tabbed Documents and check Display Document Tabs. Click OK.
4. Close and reopen the database to see tabbed documents.
Use the Data Type gallery
There are two ways to open the Data Type gallery:
y In the datasheet, in a new field, click the drop-down arrow to the right of “Click to Add.”
y On the Table Tools | Fields tab, in the Add & Delete group, click More Fields.
Use the Attachment data type
You can include documents, graphics, or other files as attachments to a field. To change a field to the Attachment data type and add a file attachment:
1. Open the table in Design view.
2. Add a field to house the attachment for a record.
3. Under Data Type, select Attachment.
4. Save the table.
5. Switch to Datasheet view. Right-click the Attachment field for the first record and choose Manage Attachments.
6. Click Add to open the Choose File dialog box. Navigate to and select the desired file, and click Open.
7. Click OK. The number of attachments is indicated in the field.
Quick Start fields
Quick Start fields are sets of fields for common data types, such as Address. The Address field set consists of Address, City, State Province, Zip Postal, and Country Region fields.
To add a Quick Start field:
1. On the Table Tools | Fields tab, in the Add & Delete group, click More Fields.
2. Scroll down to the Quick Start fields group, and select the field you want to add.
All of the fields in the Quick Start field are inserted in your table. You can modify each field individually.
ACCESS
Click to display more commands
Expanded conversation shown in Classic Indented view
IgnoreClean
Up
Click to specify the data type for
a new field
PREVIEW
NOT FOR PRINTING OR INSTRUCTIONAL USE
6
© 2010 Axzo Press. All rights reserved. No part of this work may be reproduced, transcribed, or used in any form or by any means graphic, electronic, or mechanical, including photocopying, recording, taping, Web distribution, or information storage and retrieval systems without the prior written permission of the publisher. For more information visit us on the Web at: www.axzopress.com. Some of the product names and company names have been used for identification purposes only and may be trademarks or registered trademarks of their respective manufacturers and sellers.
6Top Productivity Tips and Solutions
9 781426 006593
ISBN-10 1-4260-0659-4ISBN-13 978-1-4260-0659-3
90000
Open Office 2010 files in earlier versions of the programs
To be able to open Office 2010 files in previous versions of the Office applications (97–2003), you must install the Compatibility Pack.
NOTE: You must download and install all high-priority updates before installing the Compatibility Pack.
1. Go to www.office.microsoft.com/downloads.
2. Download and install the Microsoft Office Compatibility Pack for Word, Excel, and PowerPoint File Formats.
Save a file so it’s compatible with an Office 97–2003 application
To save an Office 2010 file so it is compatible with older versions of the application, click the File tab and click Save As. From the Save as type list, select Application 97-2003 format.
Use improved AutoRecover to save drafts
The AutoRecover feature can automatically save drafts of any open document at specified intervals. Now, even if you close a document without saving it, you can recover your changes. To enable this feature:
1. On the File tab, click Options. In the Options dialog box, click Save.
2. Under Save Documents, check the Keep the last autosaved version if I close without saving box. Then click OK.
Save a file as a static document
You can save Word, Excel, and PowerPoint files as static documents. Doing so has a couple of advantages:
y Your audience does not need to have the software used to create the original document. Instead, people can use viewers—such as Adobe Reader®—that can be downloaded free of charge.
y A static document is a snapshot of the original document and can’t be altered.
Static-document formats include:
y PDF — Files saved in Adobe’s PDF format can be viewed in Adobe Reader or another PDF reader.
y XPS — Files saved in Microsoft’s XML-based XPS format can be viewed in XPS Viewer.
Create a PDF or XPS document
1. With the file open in the Office 2010 program, click the File tab and click Save & Send.
2. Under File Types, click Create PDF/XPS Document and then click Create PDF/XPS to open the Publish as PDF or XPS dialog box.
3. In the File name box, enter a name for the file.
4. In the Save as type list, verify that PDF or XPS Document is selected.
5. Optional: Check Open file after publishing.
6. Select an optimization setting. To specify which pages to save and how to handle markups and nonprinting information, click Options, select the settings you want, and click OK.
7. Click Publish.
NOTE: You can also save a file in PDF or XPS format by using the Save as type list in the Save As dialog box.
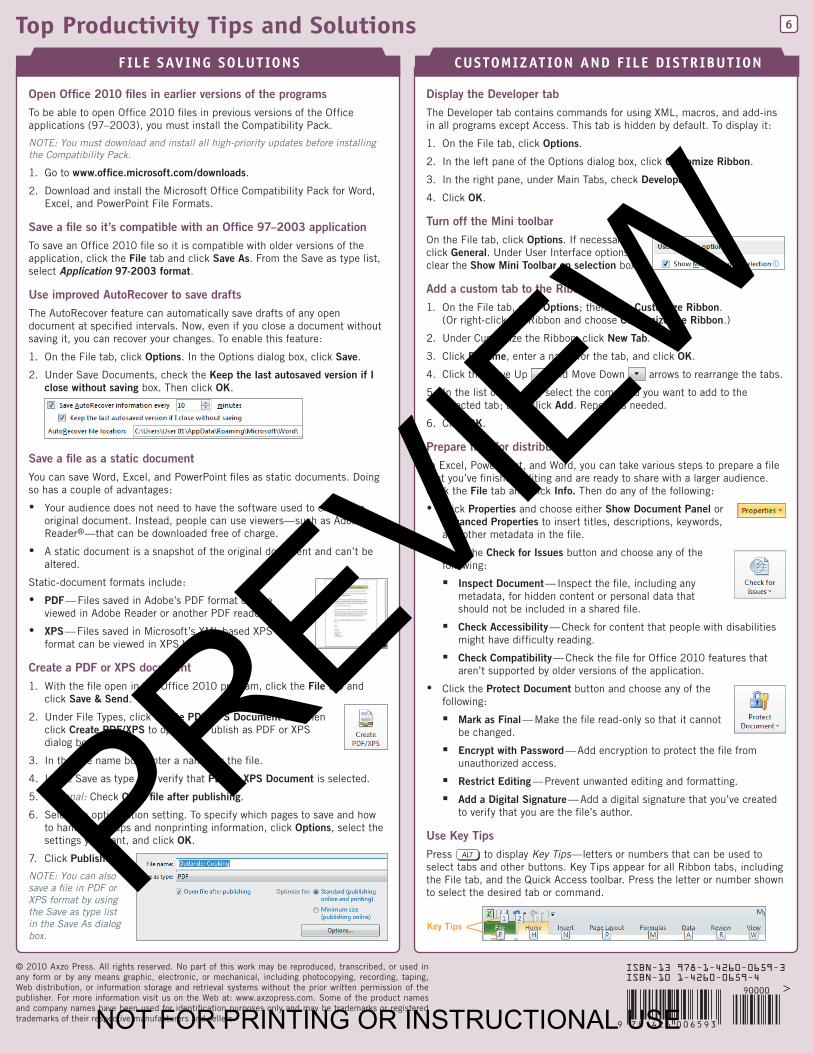
Display the Developer tab
The Developer tab contains commands for using XML, macros, and add-ins in all programs except Access. This tab is hidden by default. To display it:
1. On the File tab, click Options.
2. In the left pane of the Options dialog box, click Customize Ribbon.
3. In the right pane, under Main Tabs, check Developer.
4. Click OK.
Turn off the Mini toolbar
On the File tab, click Options. If necessary, click General. Under User Interface options, clear the Show Mini Toolbar on selection box.
Add a custom tab to the Ribbon
1. On the File tab, click Options; then click Customize Ribbon. (Or right-click the Ribbon and choose Customize the Ribbon.)
2. Under Customize the Ribbon, click New Tab.
3. Click Rename, enter a name for the tab, and click OK.
4. Click the Move Up and Move Down arrows to rearrange the tabs.
5. In the list on the left, select the command you want to add to the selected tab; then click Add. Repeat as needed.
6. Click OK.
Prepare files for distribution
In Excel, PowerPoint, and Word, you can take various steps to prepare a file that you’ve finished editing and are ready to share with a larger audience. Click the File tab and click Info. Then do any of the following:
y Click Properties and choose either Show Document Panel or Advanced Properties to insert titles, descriptions, keywords, and other metadata in the file.
y Click the Check for Issues button and choose any of the following:
� Inspect Document — Inspect the file, including any metadata, for hidden content or personal data that should not be included in a shared file.
� Check Accessibility — Check for content that people with disabilities might have difficulty reading.
� Check Compatibility — Check the file for Office 2010 features that aren’t supported by older versions of the application.
y Click the Protect Document button and choose any of the following:
� Mark as Final — Make the file read-only so that it cannot be changed.
� Encrypt with Password — Add encryption to protect the file from unauthorized access.
� Restrict Editing — Prevent unwanted editing and formatting.
� Add a Digital Signature — Add a digital signature that you’ve created to verify that you are the file’s author.
Use Key Tips
Press a to display Key Tips—letters or numbers that can be used to select tabs and other buttons. Key Tips appear for all Ribbon tabs, including the File tab, and the Quick Access toolbar. Press the letter or number shown to select the desired tab or command.
F ILE SAVING SOLUT IONS CUSTOMIZAT ION AND F ILE DISTRIBUT ION
Key Tips
PREVIEW
NOT FOR PRINTING OR INSTRUCTIONAL USE