Embed Size (px)
Citation preview
YOGA
Karthikeyan S NLITN Holistic Wellness Center
30-1-2013
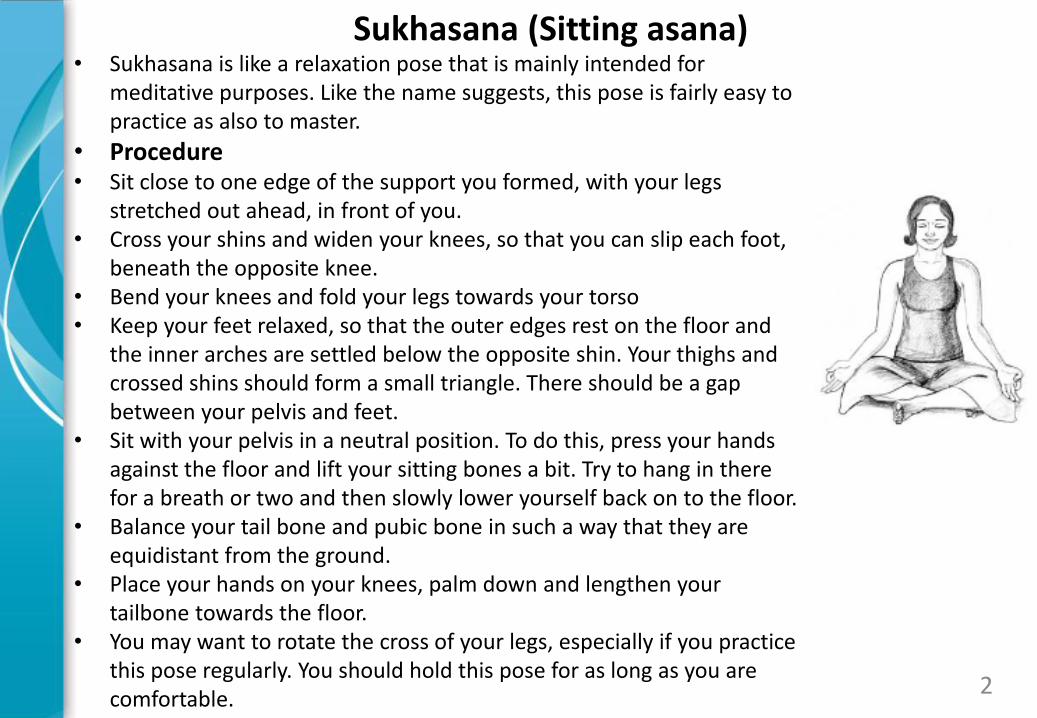
• Sukhasana is like a relaxation pose that is mainly intended for meditative purposes. Like the name suggests, this pose is fairly easy to practice as also to master.
• Procedure • Sit close to one edge of the support you formed, with your legs
stretched out ahead, in front of you. • Cross your shins and widen your knees, so that you can slip each foot,
beneath the opposite knee. • Bend your knees and fold your legs towards your torso • Keep your feet relaxed, so that the outer edges rest on the floor and
the inner arches are settled below the opposite shin. Your thighs and crossed shins should form a small triangle. There should be a gap between your pelvis and feet.
• Sit with your pelvis in a neutral position. To do this, press your hands against the floor and lift your sitting bones a bit. Try to hang in there for a breath or two and then slowly lower yourself back on to the floor.
• Balance your tail bone and pubic bone in such a way that they are equidistant from the ground.
• Place your hands on your knees, palm down and lengthen your tailbone towards the floor.
• You may want to rotate the cross of your legs, especially if you practice this pose regularly. You should hold this pose for as long as you are comfortable.
2
Sukhasana (Sitting asana)
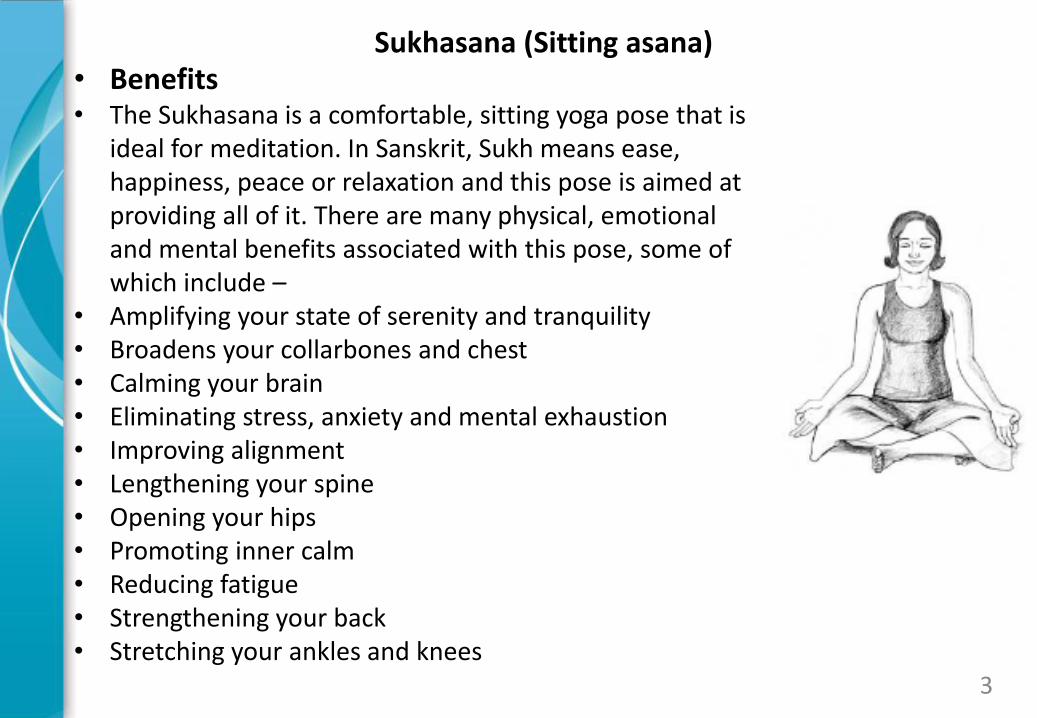
• Benefits • The Sukhasana is a comfortable, sitting yoga pose that is
ideal for meditation. In Sanskrit, Sukh means ease, happiness, peace or relaxation and this pose is aimed at providing all of it. There are many physical, emotional and mental benefits associated with this pose, some of which include –
• Amplifying your state of serenity and tranquility • Broadens your collarbones and chest • Calming your brain • Eliminating stress, anxiety and mental exhaustion • Improving alignment • Lengthening your spine • Opening your hips • Promoting inner calm • Reducing fatigue • Strengthening your back • Stretching your ankles and knees
3
Sukhasana (Sitting asana)
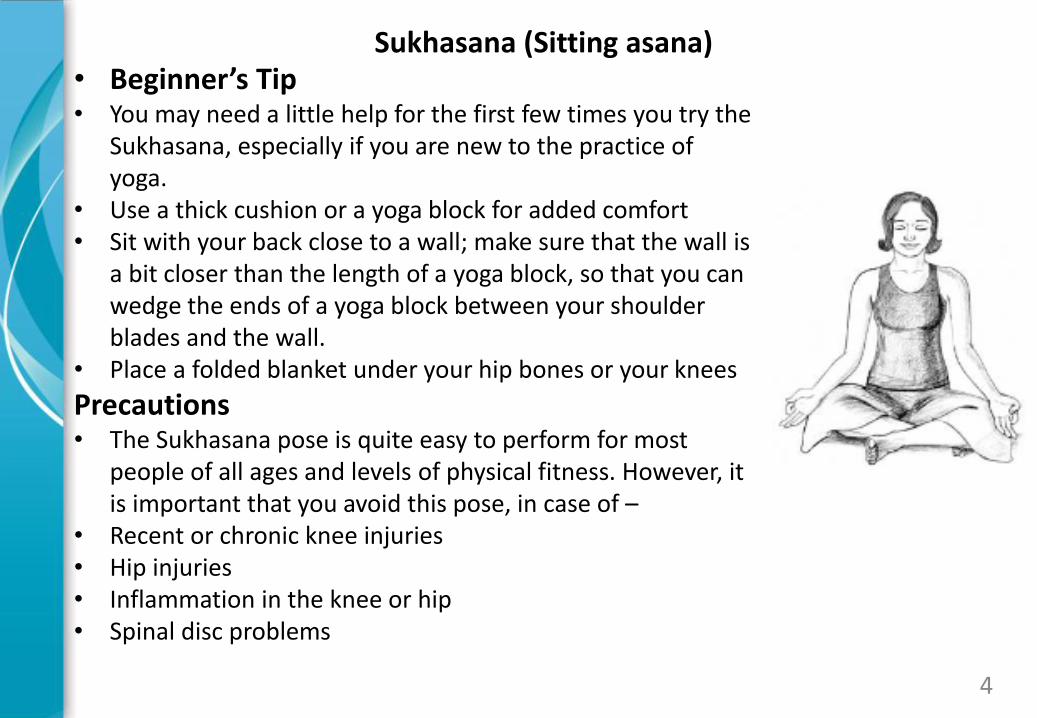
• Beginner’s Tip • You may need a little help for the first few times you try the
Sukhasana, especially if you are new to the practice of yoga.
• Use a thick cushion or a yoga block for added comfort • Sit with your back close to a wall; make sure that the wall is
a bit closer than the length of a yoga block, so that you can wedge the ends of a yoga block between your shoulder blades and the wall.
• Place a folded blanket under your hip bones or your knees
Precautions • The Sukhasana pose is quite easy to perform for most
people of all ages and levels of physical fitness. However, it is important that you avoid this pose, in case of –
• Recent or chronic knee injuries • Hip injuries • Inflammation in the knee or hip • Spinal disc problems
4
Sukhasana (Sitting asana)
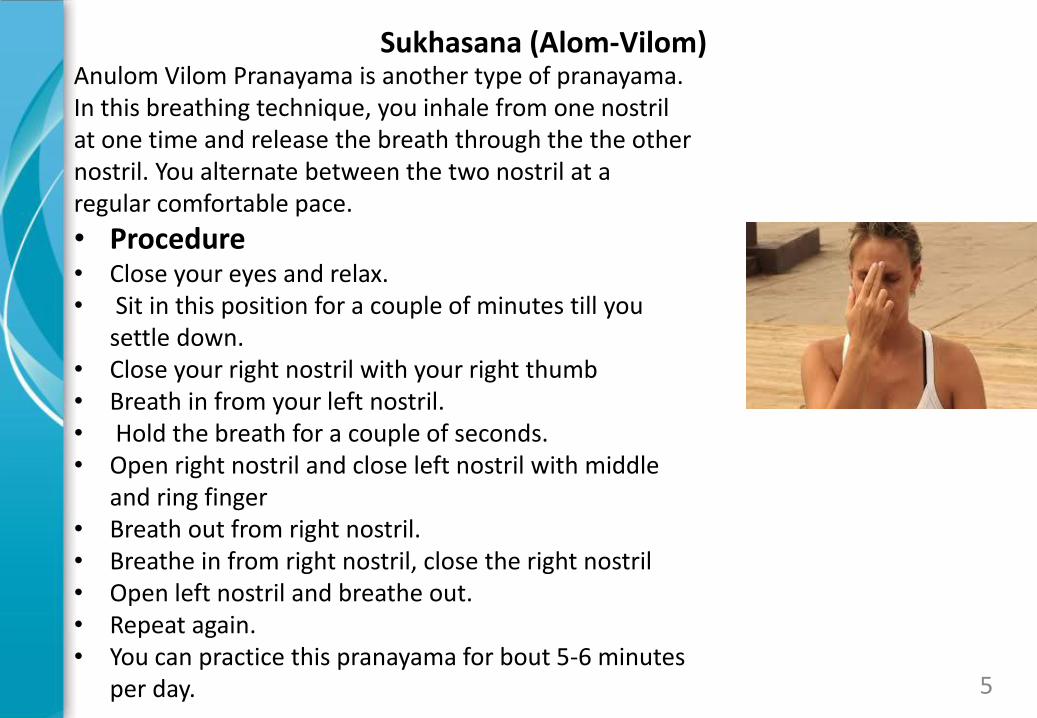
Anulom Vilom Pranayama is another type of pranayama. In this breathing technique, you inhale from one nostril at one time and release the breath through the the other nostril. You alternate between the two nostril at a regular comfortable pace.
• Procedure • Close your eyes and relax. • Sit in this position for a couple of minutes till you
settle down. • Close your right nostril with your right thumb • Breath in from your left nostril. • Hold the breath for a couple of seconds. • Open right nostril and close left nostril with middle
and ring finger • Breath out from right nostril. • Breathe in from right nostril, close the right nostril • Open left nostril and breathe out. • Repeat again. • You can practice this pranayama for bout 5-6 minutes
per day. 5
Sukhasana (Alom-Vilom)
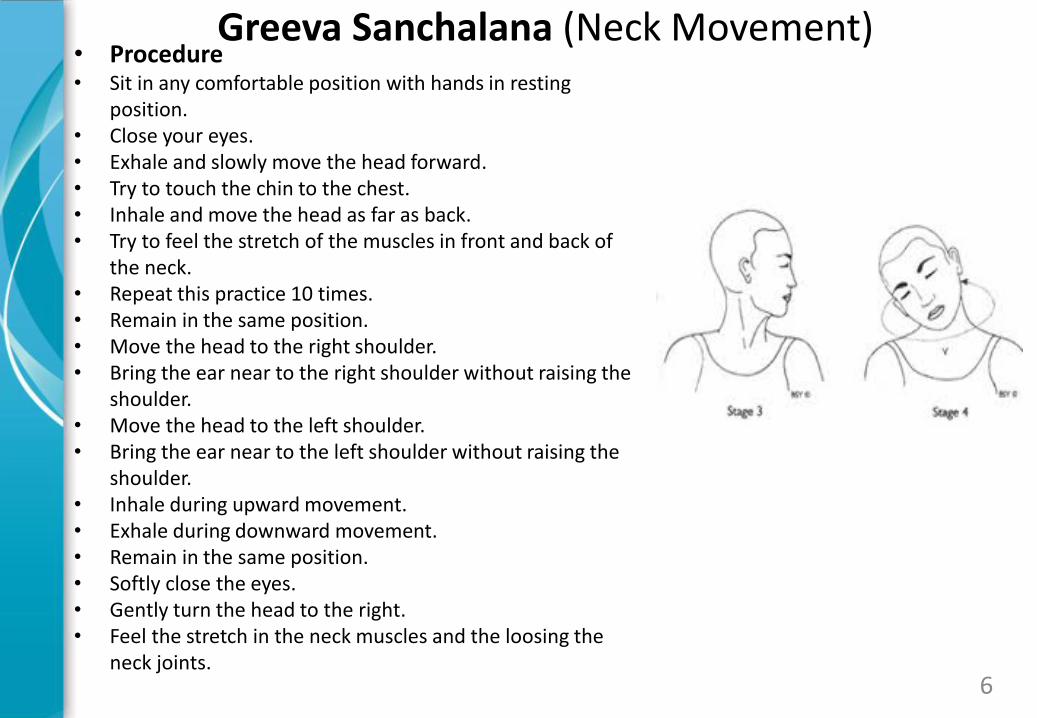
Greeva Sanchalana (Neck Movement) • Procedure • Sit in any comfortable position with hands in resting
position. • Close your eyes. • Exhale and slowly move the head forward. • Try to touch the chin to the chest. • Inhale and move the head as far as back. • Try to feel the stretch of the muscles in front and back of
the neck. • Repeat this practice 10 times. • Remain in the same position. • Move the head to the right shoulder. • Bring the ear near to the right shoulder without raising the
shoulder. • Move the head to the left shoulder. • Bring the ear near to the left shoulder without raising the
shoulder. • Inhale during upward movement. • Exhale during downward movement. • Remain in the same position. • Softly close the eyes. • Gently turn the head to the right. • Feel the stretch in the neck muscles and the loosing the
neck joints. 6
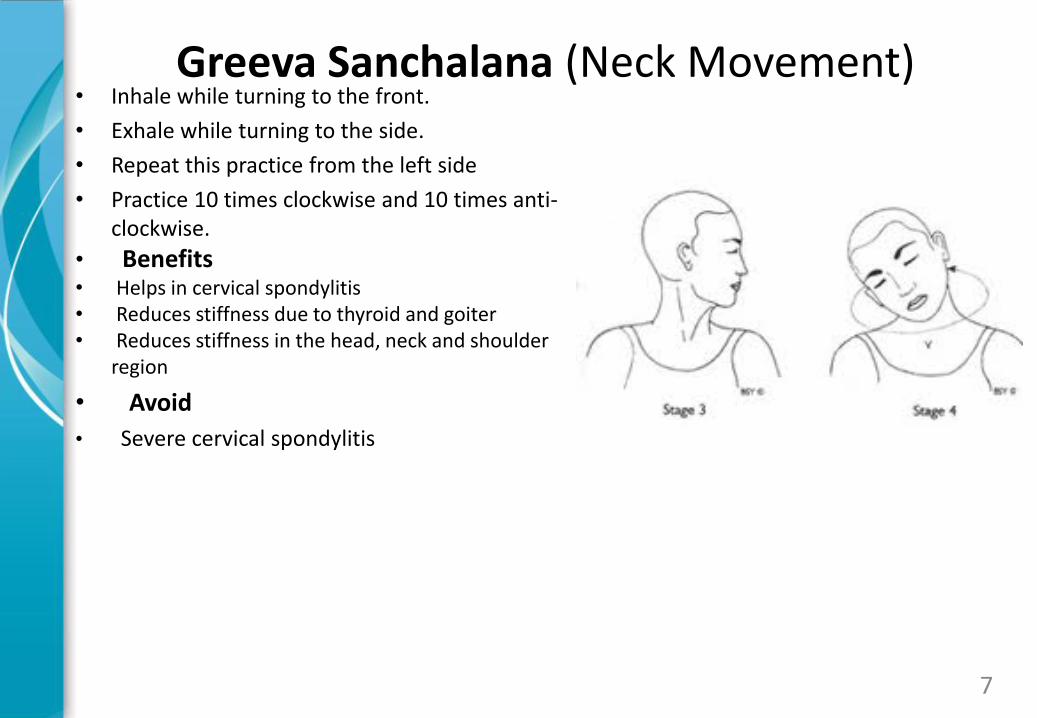
Greeva Sanchalana (Neck Movement) • Inhale while turning to the front.
• Exhale while turning to the side.
• Repeat this practice from the left side
• Practice 10 times clockwise and 10 times anti-clockwise.
• Benefits • Helps in cervical spondylitis • Reduces stiffness due to thyroid and goiter • Reduces stiffness in the head, neck and shoulder
region
• Avoid
• Severe cervical spondylitis
7
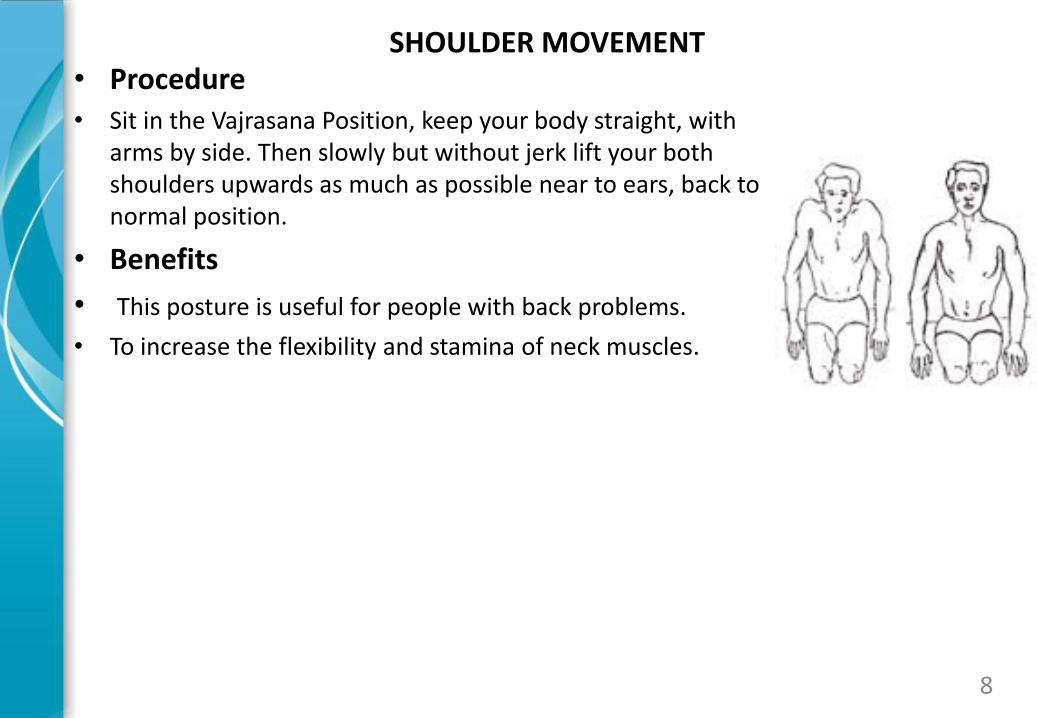
• Procedure • Sit in the Vajrasana Position, keep your body straight, with
arms by side. Then slowly but without jerk lift your both shoulders upwards as much as possible near to ears, back to normal position.
• Benefits
• This posture is useful for people with back problems.
• To increase the flexibility and stamina of neck muscles.
8
SHOULDER MOVEMENT
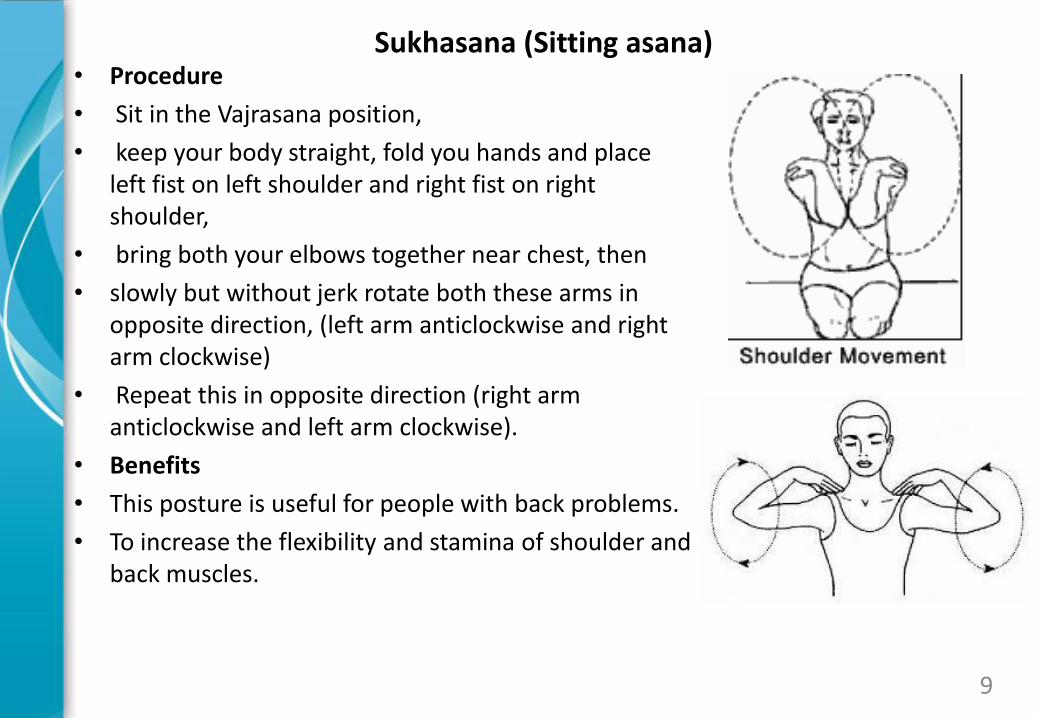
• Procedure
• Sit in the Vajrasana position,
• keep your body straight, fold you hands and place left fist on left shoulder and right fist on right shoulder,
• bring both your elbows together near chest, then
• slowly but without jerk rotate both these arms in opposite direction, (left arm anticlockwise and right arm clockwise)
• Repeat this in opposite direction (right arm anticlockwise and left arm clockwise).
• Benefits
• This posture is useful for people with back problems.
• To increase the flexibility and stamina of shoulder and back muscles.
9
Sukhasana (Sitting asana)
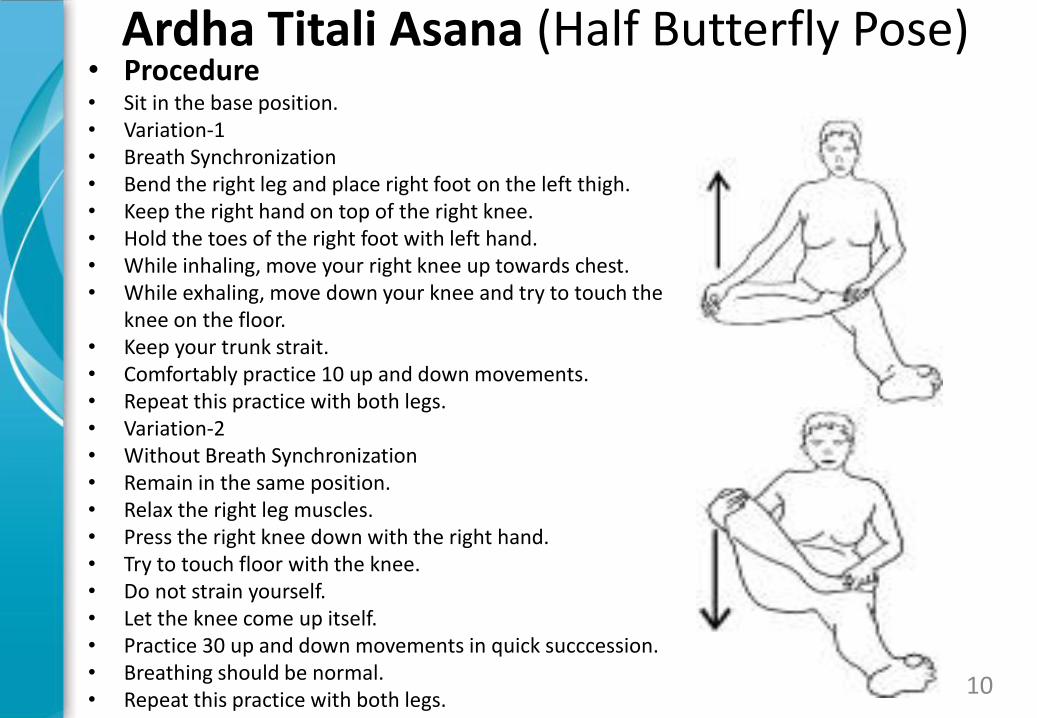
Ardha Titali Asana (Half Butterfly Pose) • Procedure • Sit in the base position. • Variation-1 • Breath Synchronization • Bend the right leg and place right foot on the left thigh. • Keep the right hand on top of the right knee. • Hold the toes of the right foot with left hand. • While inhaling, move your right knee up towards chest. • While exhaling, move down your knee and try to touch the
knee on the floor. • Keep your trunk strait. • Comfortably practice 10 up and down movements. • Repeat this practice with both legs. • Variation-2 • Without Breath Synchronization • Remain in the same position. • Relax the right leg muscles. • Press the right knee down with the right hand. • Try to touch floor with the knee. • Do not strain yourself. • Let the knee come up itself. • Practice 30 up and down movements in quick succcession. • Breathing should be normal. • Repeat this practice with both legs.
10
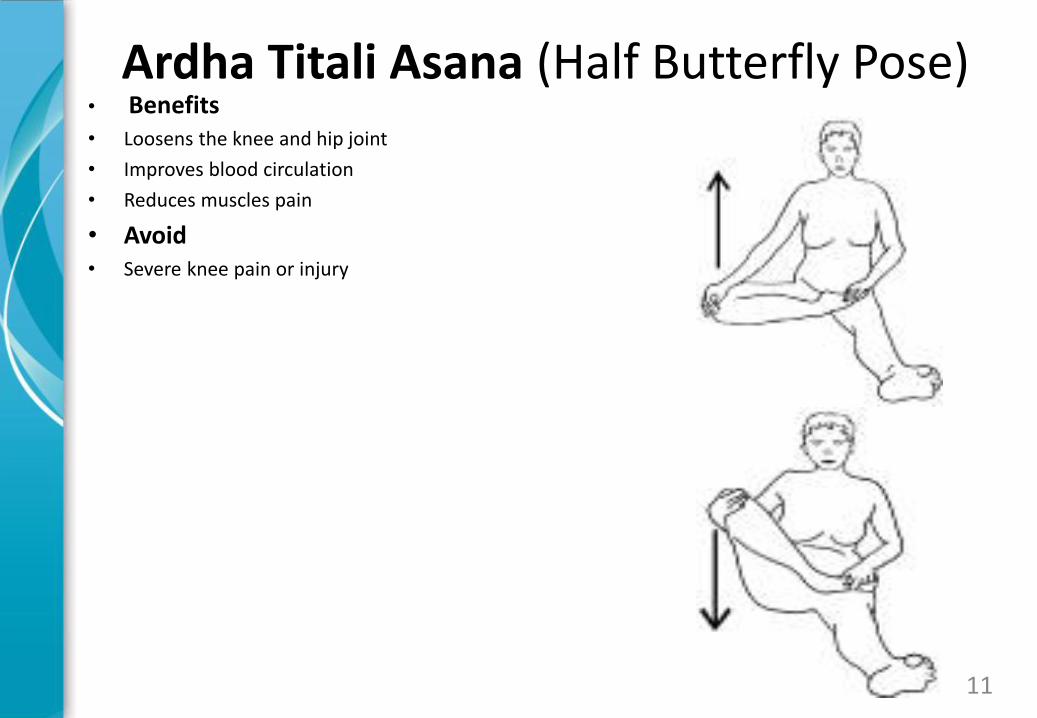
Ardha Titali Asana (Half Butterfly Pose) • Benefits • Loosens the knee and hip joint
• Improves blood circulation
• Reduces muscles pain
• Avoid • Severe knee pain or injury
11
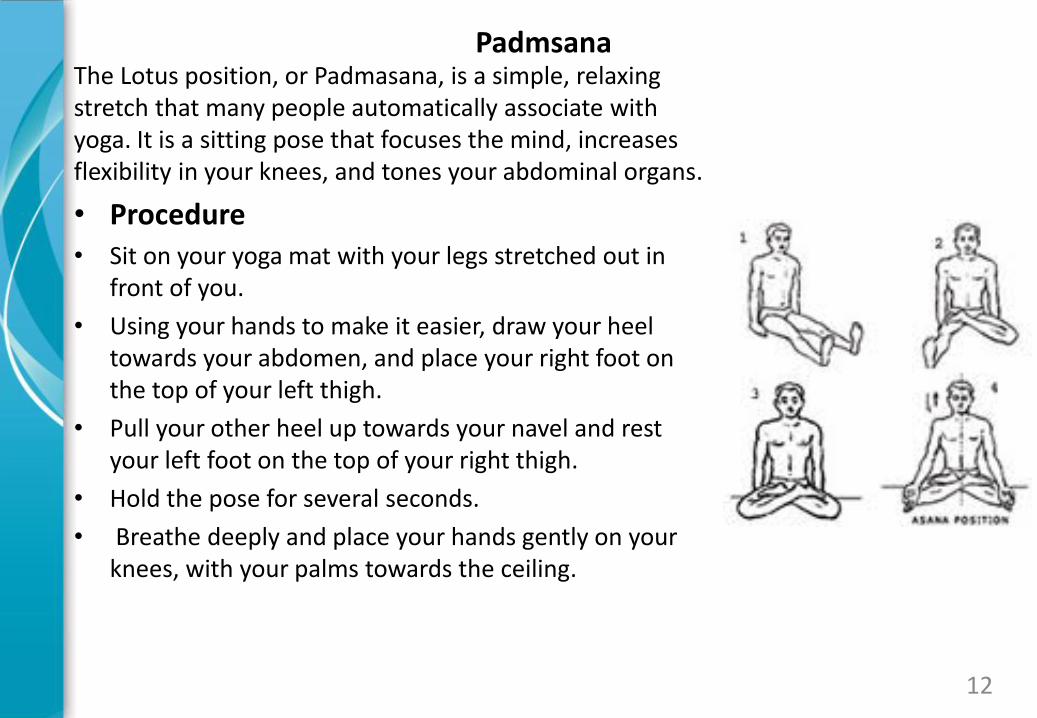
The Lotus position, or Padmasana, is a simple, relaxing stretch that many people automatically associate with yoga. It is a sitting pose that focuses the mind, increases flexibility in your knees, and tones your abdominal organs.
• Procedure • Sit on your yoga mat with your legs stretched out in
front of you.
• Using your hands to make it easier, draw your heel towards your abdomen, and place your right foot on the top of your left thigh.
• Pull your other heel up towards your navel and rest your left foot on the top of your right thigh.
• Hold the pose for several seconds.
• Breathe deeply and place your hands gently on your knees, with your palms towards the ceiling.
12
Padmsana
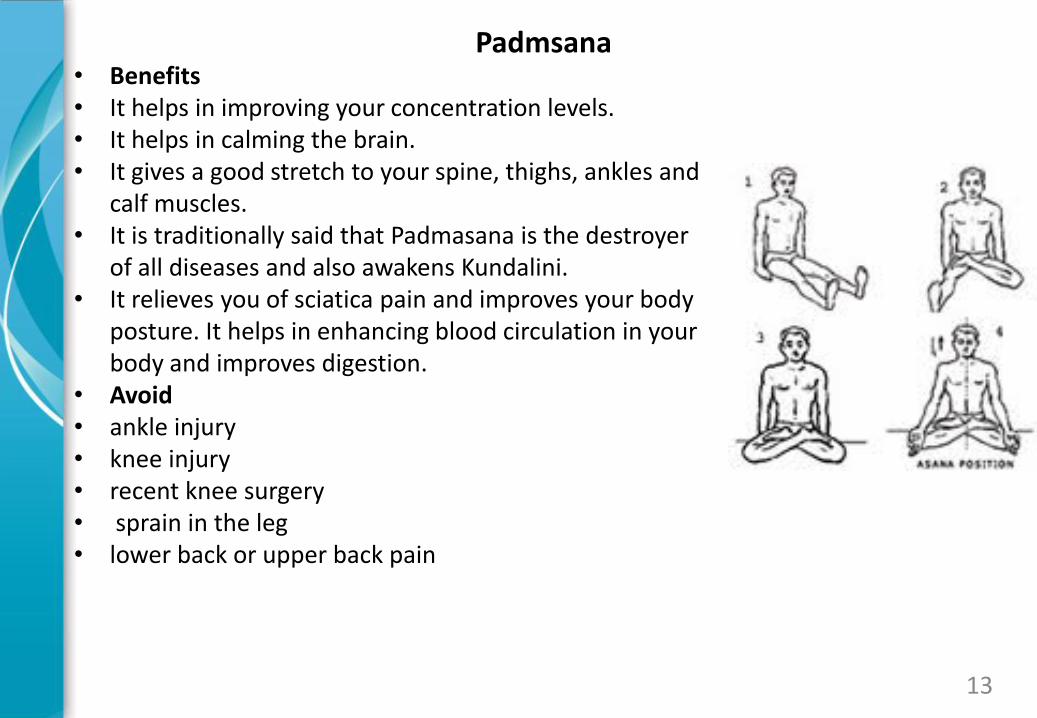
• Benefits • It helps in improving your concentration levels. • It helps in calming the brain. • It gives a good stretch to your spine, thighs, ankles and
calf muscles. • It is traditionally said that Padmasana is the destroyer
of all diseases and also awakens Kundalini. • It relieves you of sciatica pain and improves your body
posture. It helps in enhancing blood circulation in your body and improves digestion.
• Avoid • ankle injury • knee injury • recent knee surgery • sprain in the leg • lower back or upper back pain
13
Padmsana
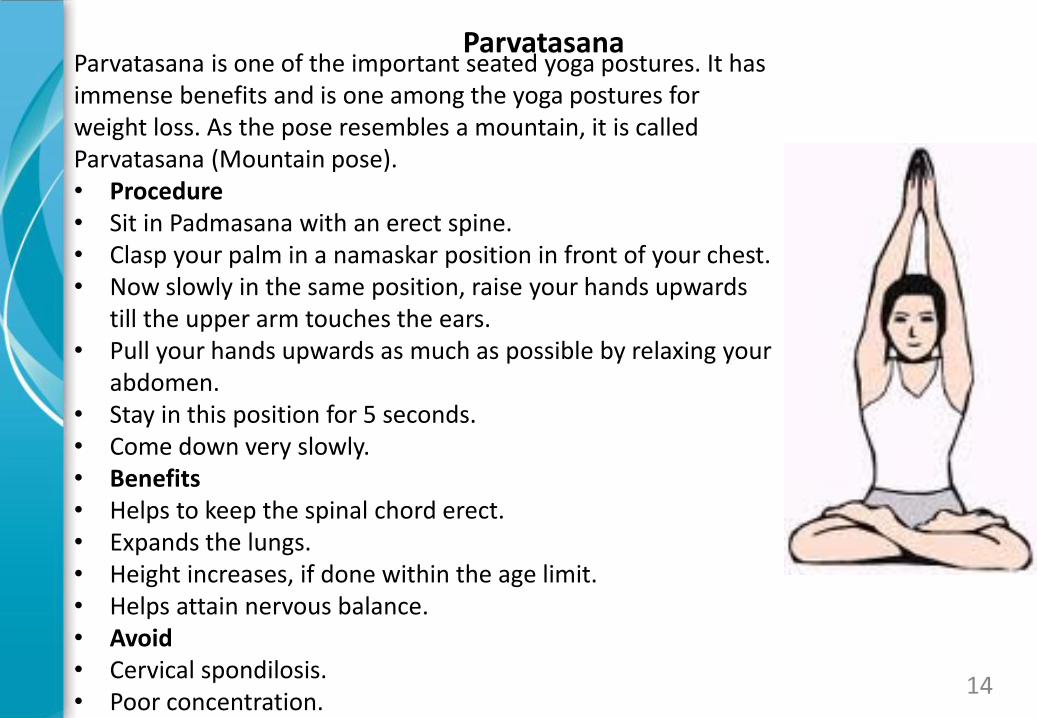
Parvatasana is one of the important seated yoga postures. It has immense benefits and is one among the yoga postures for weight loss. As the pose resembles a mountain, it is called Parvatasana (Mountain pose). • Procedure • Sit in Padmasana with an erect spine. • Clasp your palm in a namaskar position in front of your chest. • Now slowly in the same position, raise your hands upwards
till the upper arm touches the ears. • Pull your hands upwards as much as possible by relaxing your
abdomen. • Stay in this position for 5 seconds. • Come down very slowly. • Benefits • Helps to keep the spinal chord erect. • Expands the lungs. • Height increases, if done within the age limit. • Helps attain nervous balance. • Avoid • Cervical spondilosis. • Poor concentration.
14
Parvatasana
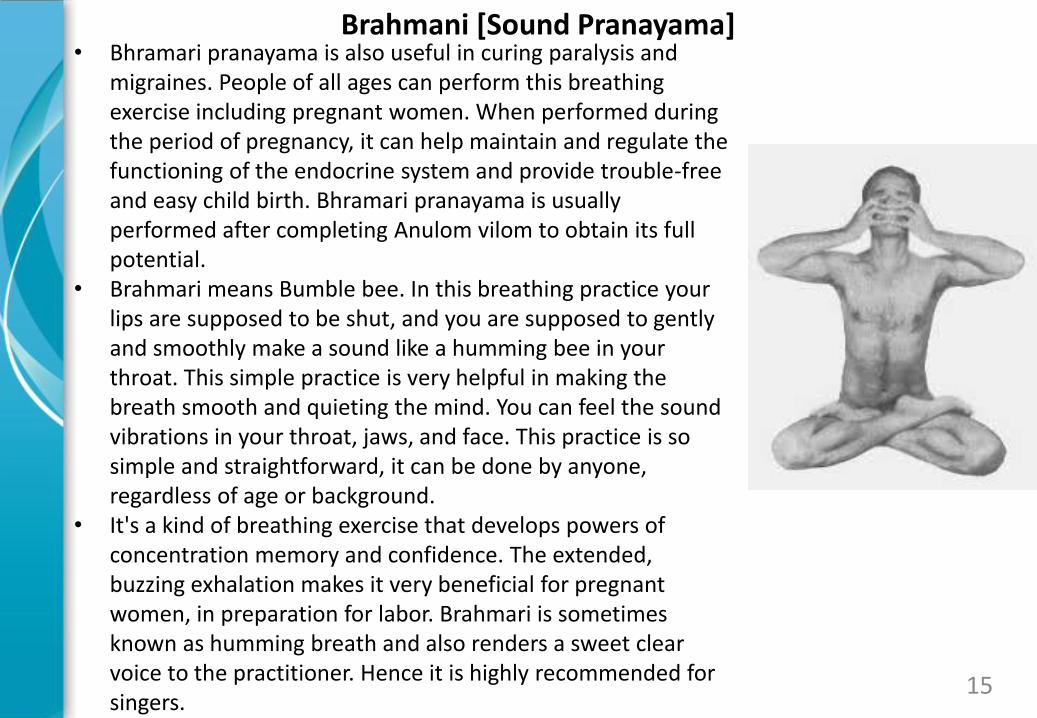
• Bhramari pranayama is also useful in curing paralysis and migraines. People of all ages can perform this breathing exercise including pregnant women. When performed during the period of pregnancy, it can help maintain and regulate the functioning of the endocrine system and provide trouble-free and easy child birth. Bhramari pranayama is usually performed after completing Anulom vilom to obtain its full potential.
• Brahmari means Bumble bee. In this breathing practice your lips are supposed to be shut, and you are supposed to gently and smoothly make a sound like a humming bee in your throat. This simple practice is very helpful in making the breath smooth and quieting the mind. You can feel the sound vibrations in your throat, jaws, and face. This practice is so simple and straightforward, it can be done by anyone, regardless of age or background.
• It's a kind of breathing exercise that develops powers of concentration memory and confidence. The extended, buzzing exhalation makes it very beneficial for pregnant women, in preparation for labor. Brahmari is sometimes known as humming breath and also renders a sweet clear voice to the practitioner. Hence it is highly recommended for singers.
15
Brahmani [Sound Pranayama]
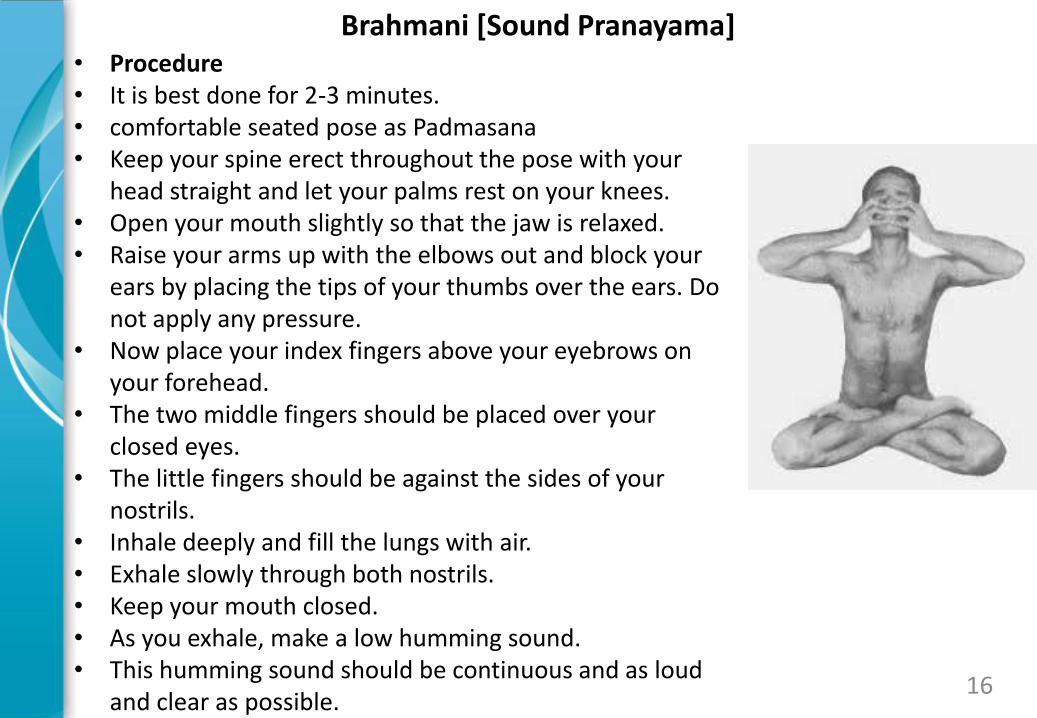
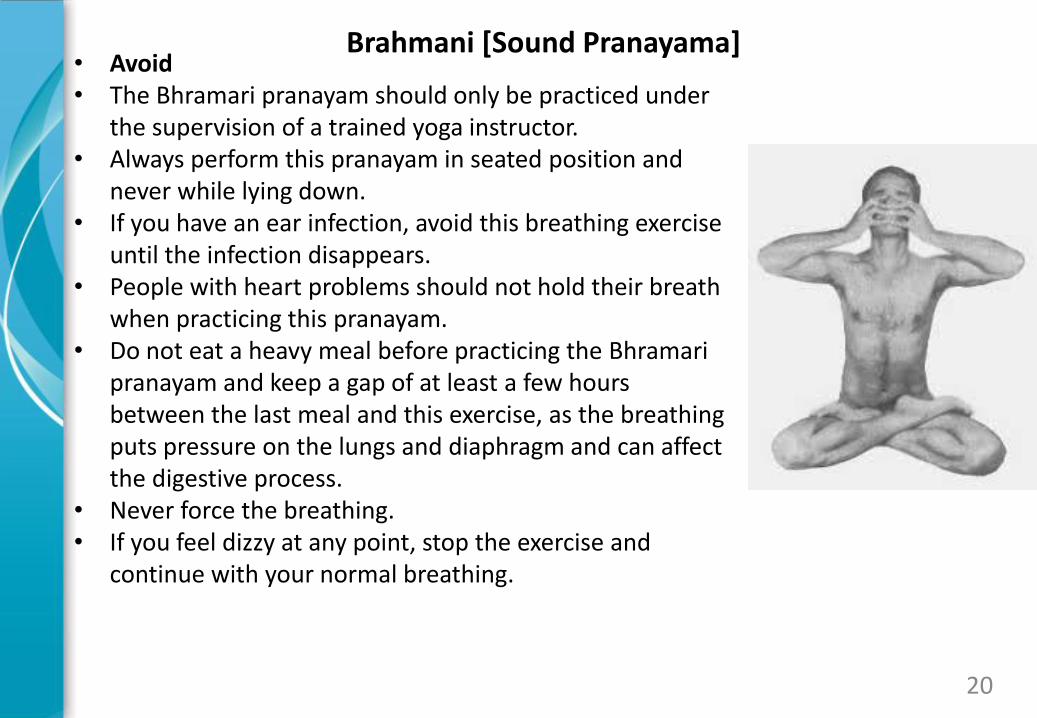
• Procedure • It is best done for 2-3 minutes. • comfortable seated pose as Padmasana • Keep your spine erect throughout the pose with your
head straight and let your palms rest on your knees. • Open your mouth slightly so that the jaw is relaxed. • Raise your arms up with the elbows out and block your
ears by placing the tips of your thumbs over the ears. Do not apply any pressure.
• Now place your index fingers above your eyebrows on your forehead.
• The two middle fingers should be placed over your closed eyes.
• The little fingers should be against the sides of your nostrils.
• Inhale deeply and fill the lungs with air. • Exhale slowly through both nostrils. • Keep your mouth closed. • As you exhale, make a low humming sound. • This humming sound should be continuous and as loud
and clear as possible. 16
Brahmani [Sound Pranayama]
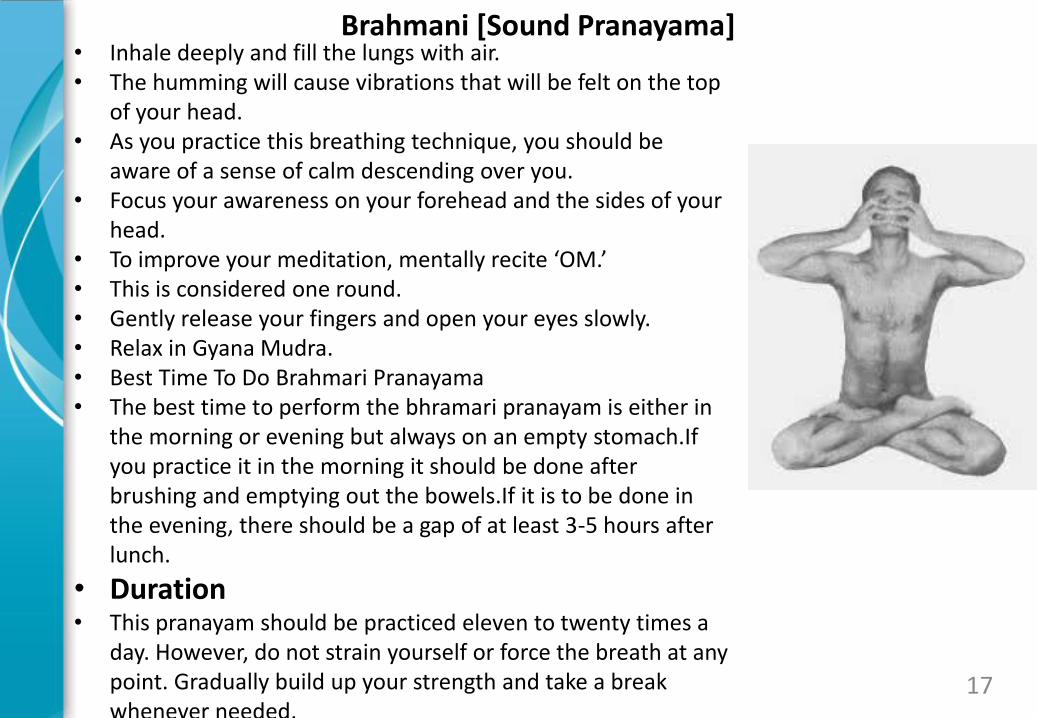
• Inhale deeply and fill the lungs with air. • The humming will cause vibrations that will be felt on the top
of your head. • As you practice this breathing technique, you should be
aware of a sense of calm descending over you. • Focus your awareness on your forehead and the sides of your
head. • To improve your meditation, mentally recite ‘OM.’ • This is considered one round. • Gently release your fingers and open your eyes slowly. • Relax in Gyana Mudra. • Best Time To Do Brahmari Pranayama • The best time to perform the bhramari pranayam is either in
the morning or evening but always on an empty stomach.If you practice it in the morning it should be done after brushing and emptying out the bowels.If it is to be done in the evening, there should be a gap of at least 3-5 hours after lunch.
• Duration • This pranayam should be practiced eleven to twenty times a
day. However, do not strain yourself or force the breath at any point. Gradually build up your strength and take a break whenever needed.
17
Brahmani [Sound Pranayama]
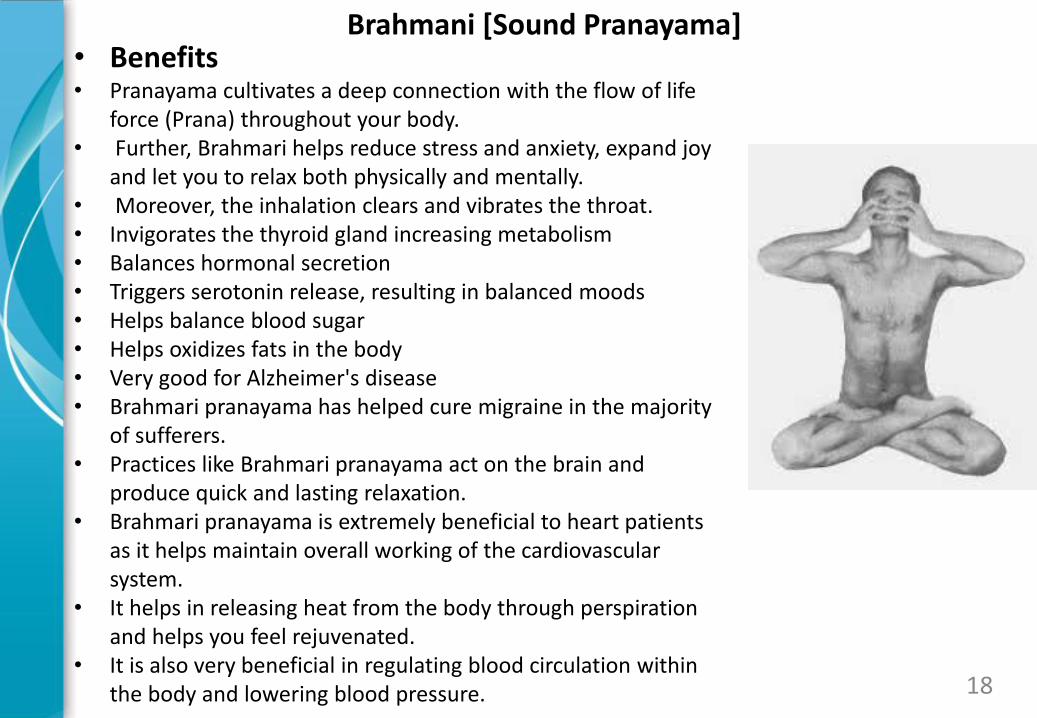
• Benefits
• Pranayama cultivates a deep connection with the flow of life force (Prana) throughout your body.
• Further, Brahmari helps reduce stress and anxiety, expand joy and let you to relax both physically and mentally.
• Moreover, the inhalation clears and vibrates the throat. • Invigorates the thyroid gland increasing metabolism • Balances hormonal secretion • Triggers serotonin release, resulting in balanced moods • Helps balance blood sugar • Helps oxidizes fats in the body • Very good for Alzheimer's disease • Brahmari pranayama has helped cure migraine in the majority
of sufferers. • Practices like Brahmari pranayama act on the brain and
produce quick and lasting relaxation. • Brahmari pranayama is extremely beneficial to heart patients
as it helps maintain overall working of the cardiovascular system.
• It helps in releasing heat from the body through perspiration and helps you feel rejuvenated.
• It is also very beneficial in regulating blood circulation within the body and lowering blood pressure.
18
Brahmani [Sound Pranayama]
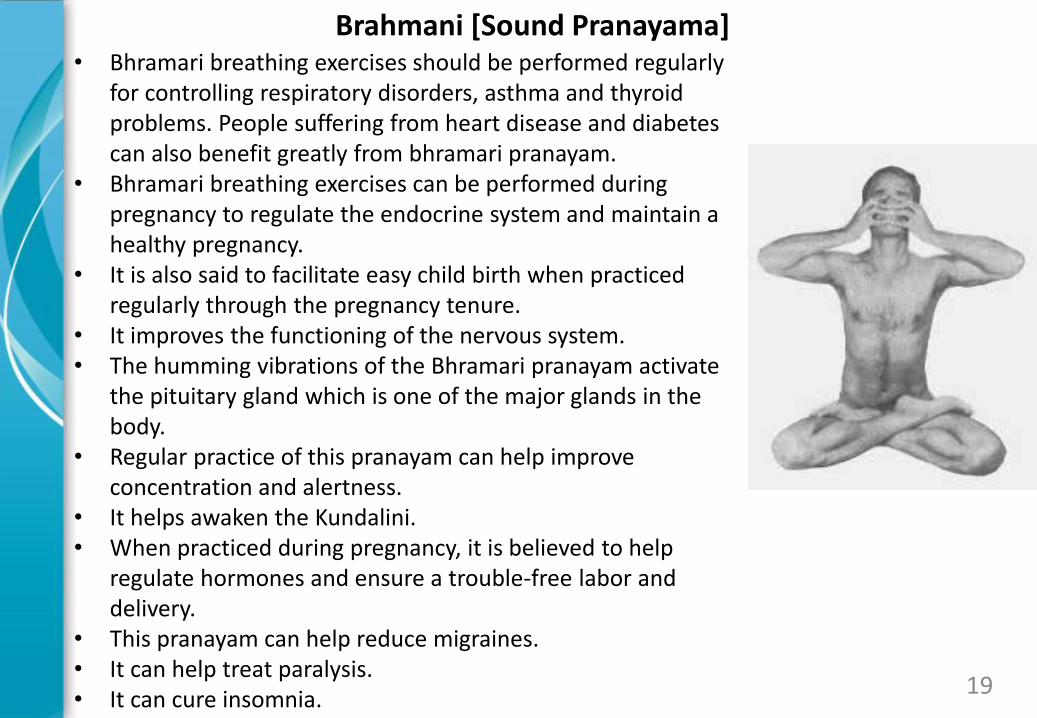
• Bhramari breathing exercises should be performed regularly for controlling respiratory disorders, asthma and thyroid problems. People suffering from heart disease and diabetes can also benefit greatly from bhramari pranayam.
• Bhramari breathing exercises can be performed during pregnancy to regulate the endocrine system and maintain a healthy pregnancy.
• It is also said to facilitate easy child birth when practiced regularly through the pregnancy tenure.
• It improves the functioning of the nervous system. • The humming vibrations of the Bhramari pranayam activate
the pituitary gland which is one of the major glands in the body.
• Regular practice of this pranayam can help improve concentration and alertness.
• It helps awaken the Kundalini. • When practiced during pregnancy, it is believed to help
regulate hormones and ensure a trouble-free labor and delivery.
• This pranayam can help reduce migraines. • It can help treat paralysis. • It can cure insomnia.
19
Brahmani [Sound Pranayama]
• Avoid • The Bhramari pranayam should only be practiced under
the supervision of a trained yoga instructor. • Always perform this pranayam in seated position and
never while lying down. • If you have an ear infection, avoid this breathing exercise
until the infection disappears. • People with heart problems should not hold their breath
when practicing this pranayam. • Do not eat a heavy meal before practicing the Bhramari
pranayam and keep a gap of at least a few hours between the last meal and this exercise, as the breathing puts pressure on the lungs and diaphragm and can affect the digestive process.
• Never force the breathing. • If you feel dizzy at any point, stop the exercise and
continue with your normal breathing.
20
Brahmani [Sound Pranayama]
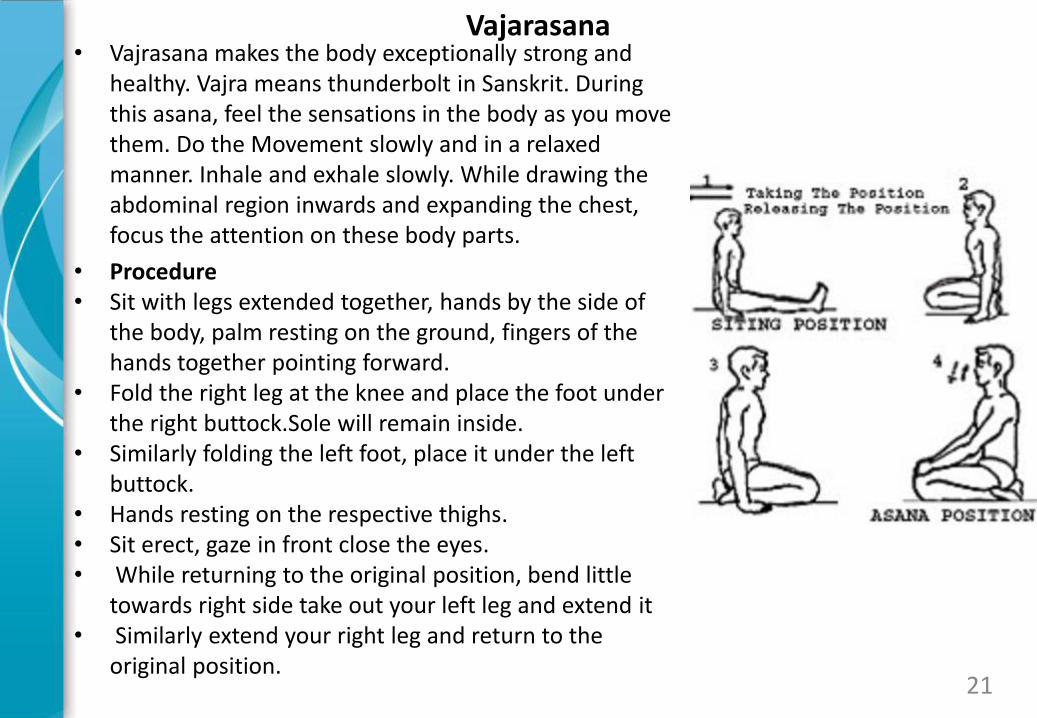
• Vajrasana makes the body exceptionally strong and healthy. Vajra means thunderbolt in Sanskrit. During this asana, feel the sensations in the body as you move them. Do the Movement slowly and in a relaxed manner. Inhale and exhale slowly. While drawing the abdominal region inwards and expanding the chest, focus the attention on these body parts.
• Procedure • Sit with legs extended together, hands by the side of
the body, palm resting on the ground, fingers of the hands together pointing forward.
• Fold the right leg at the knee and place the foot under the right buttock.Sole will remain inside.
• Similarly folding the left foot, place it under the left buttock.
• Hands resting on the respective thighs. • Sit erect, gaze in front close the eyes. • While returning to the original position, bend little
towards right side take out your left leg and extend it • Similarly extend your right leg and return to the
original position.
21
Vajarasana
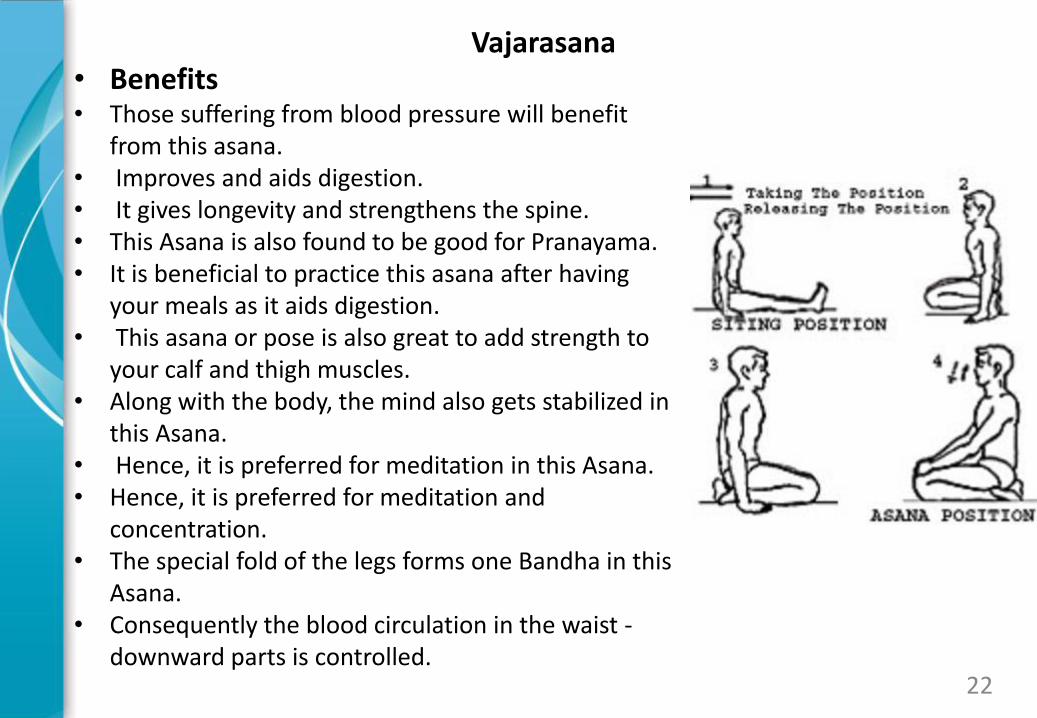
• Benefits • Those suffering from blood pressure will benefit
from this asana. • Improves and aids digestion. • It gives longevity and strengthens the spine. • This Asana is also found to be good for Pranayama. • It is beneficial to practice this asana after having
your meals as it aids digestion. • This asana or pose is also great to add strength to
your calf and thigh muscles. • Along with the body, the mind also gets stabilized in
this Asana. • Hence, it is preferred for meditation in this Asana. • Hence, it is preferred for meditation and
concentration. • The special fold of the legs forms one Bandha in this
Asana. • Consequently the blood circulation in the waist -
downward parts is controlled. 22
Vajarasana
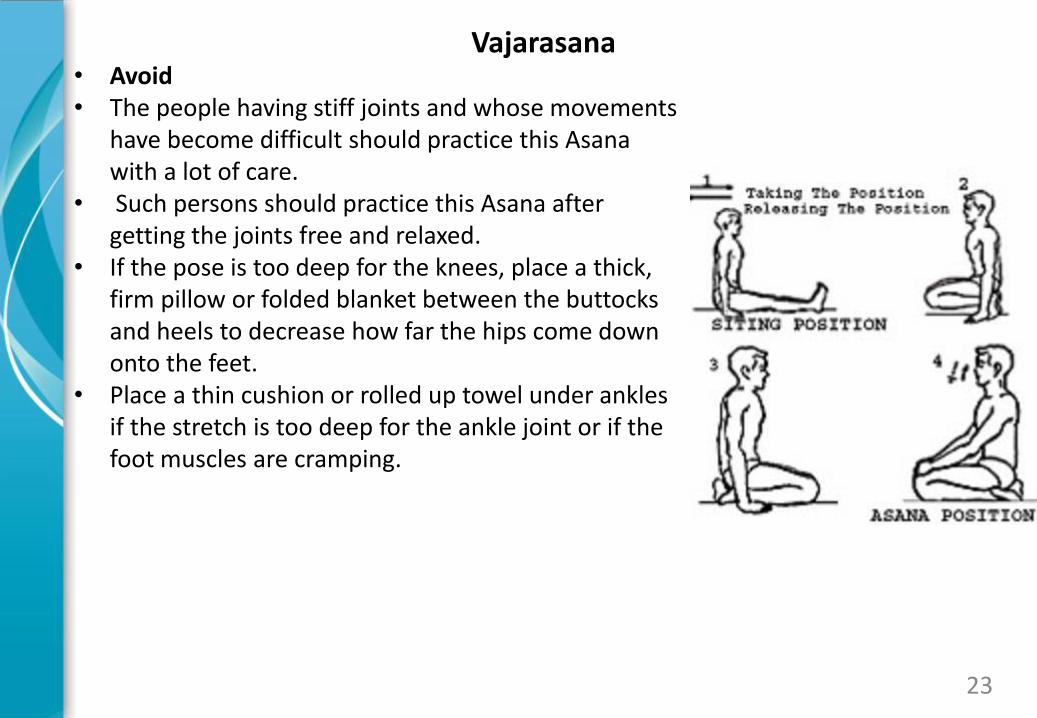
• Avoid • The people having stiff joints and whose movements
have become difficult should practice this Asana with a lot of care.
• Such persons should practice this Asana after getting the joints free and relaxed.
• If the pose is too deep for the knees, place a thick, firm pillow or folded blanket between the buttocks and heels to decrease how far the hips come down onto the feet.
• Place a thin cushion or rolled up towel under ankles if the stretch is too deep for the ankle joint or if the foot muscles are cramping.
23
Vajarasana

• The meaning of the word 'Janu' means the knee and 'Hasta' means Hand. In the Januhastasana pose, the hand is placed just beside the knee hence the name. In this asana, the body is stretched like a string of a bow when pulled at the time or archery.
• Procedure • First sit down on the ground with legs bent at the knees and
folded backwards and soles upturned and toes touching the floor. • Now as in Vajrasana pose, place both the palms on the ground
ahead of the knees touching each other. • Push the neck backwards, chest outwards and waist downwards. • Now relax your entire body with normal breathing. • Continue normal breathing • Benefits • Januhastasana is very useful for treating joint pains • Hypertension and Gout can be cured by practicing Januhastasana • The Januhastasana improves blood circulation to the waist and
lower portion of your body • The januhastasana is very much useful for meditation and for
improving concentration • Avoid
• The people with stiff joints should avoid 24
Januhastasana
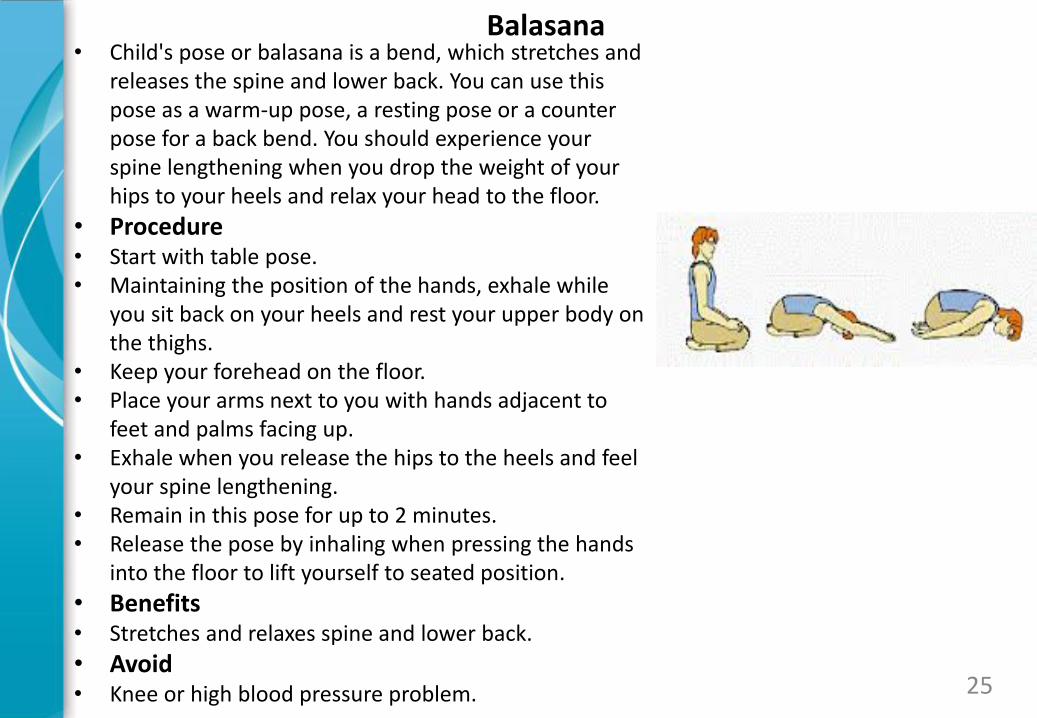
• Child's pose or balasana is a bend, which stretches and releases the spine and lower back. You can use this pose as a warm-up pose, a resting pose or a counter pose for a back bend. You should experience your spine lengthening when you drop the weight of your hips to your heels and relax your head to the floor.
• Procedure • Start with table pose. • Maintaining the position of the hands, exhale while
you sit back on your heels and rest your upper body on the thighs.
• Keep your forehead on the floor. • Place your arms next to you with hands adjacent to
feet and palms facing up. • Exhale when you release the hips to the heels and feel
your spine lengthening. • Remain in this pose for up to 2 minutes. • Release the pose by inhaling when pressing the hands
into the floor to lift yourself to seated position.
• Benefits • Stretches and relaxes spine and lower back.
• Avoid • Knee or high blood pressure problem. 25
Balasana
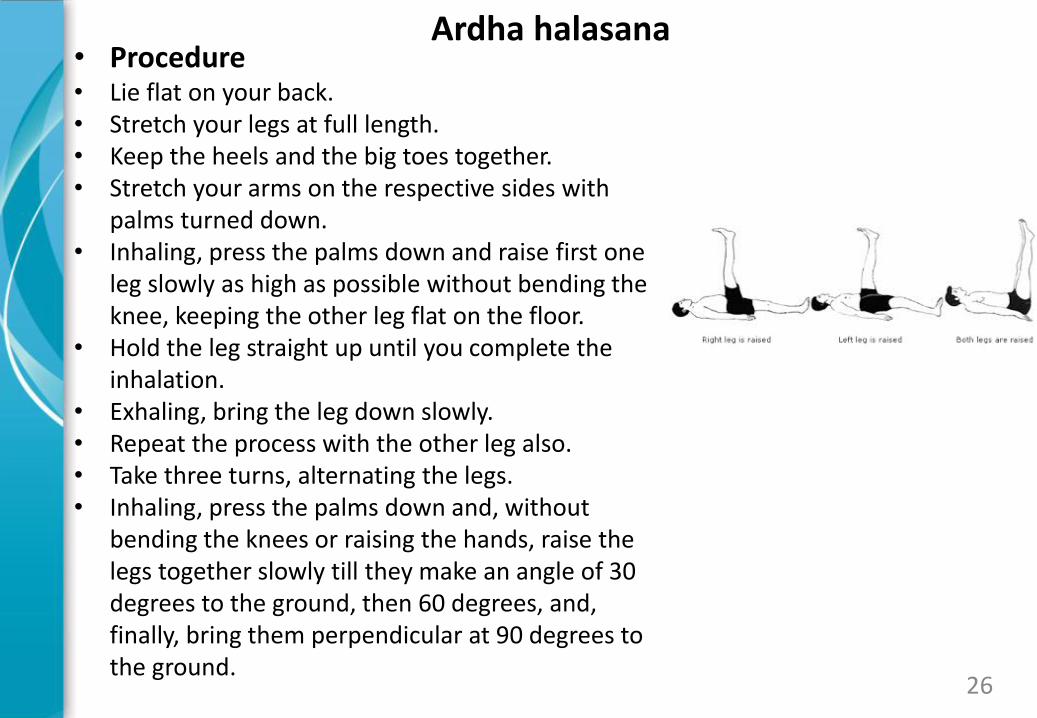
• Procedure • Lie flat on your back. • Stretch your legs at full length. • Keep the heels and the big toes together. • Stretch your arms on the respective sides with
palms turned down. • Inhaling, press the palms down and raise first one
leg slowly as high as possible without bending the knee, keeping the other leg flat on the floor.
• Hold the leg straight up until you complete the inhalation.
• Exhaling, bring the leg down slowly. • Repeat the process with the other leg also. • Take three turns, alternating the legs. • Inhaling, press the palms down and, without
bending the knees or raising the hands, raise the legs together slowly till they make an angle of 30 degrees to the ground, then 60 degrees, and, finally, bring them perpendicular at 90 degrees to the ground.
26
Ardha halasana
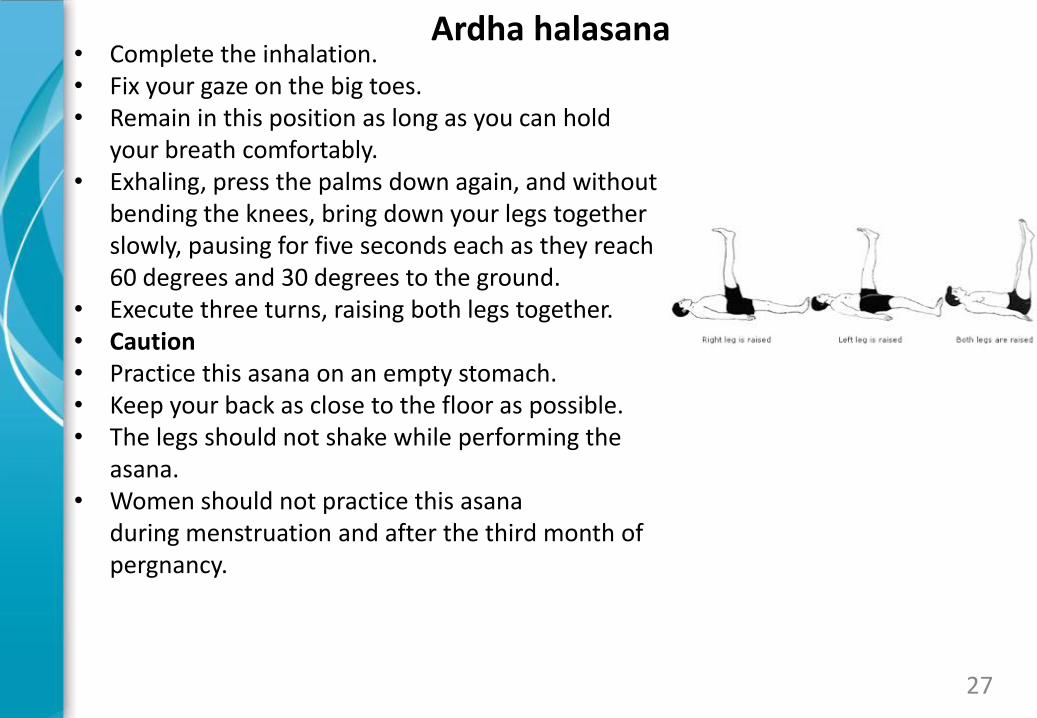
• Complete the inhalation. • Fix your gaze on the big toes. • Remain in this position as long as you can hold
your breath comfortably. • Exhaling, press the palms down again, and without
bending the knees, bring down your legs together slowly, pausing for five seconds each as they reach 60 degrees and 30 degrees to the ground.
• Execute three turns, raising both legs together. • Caution • Practice this asana on an empty stomach. • Keep your back as close to the floor as possible. • The legs should not shake while performing the
asana. • Women should not practice this asana
during menstruation and after the third month of pergnancy.
27
Ardha halasana

• Benefits • Ardha Halasana builds up the elasticity of the
muscle in the abdominal area. • It prevents the prolapse of the abdominal organs,
such as the uterus in women and the rectum in men.
• It has a curative effect on menstrual disorders • It helps to rid the stomach and intestines of gas
and eliminate Constipation. • It prevents Hernia. • Persons who have varicose veins can practice this
posture several times a day to get relief. • You may perform this asana in bed also before
rising in the morning if you are plagued by constipation.
28
Ardha halasana
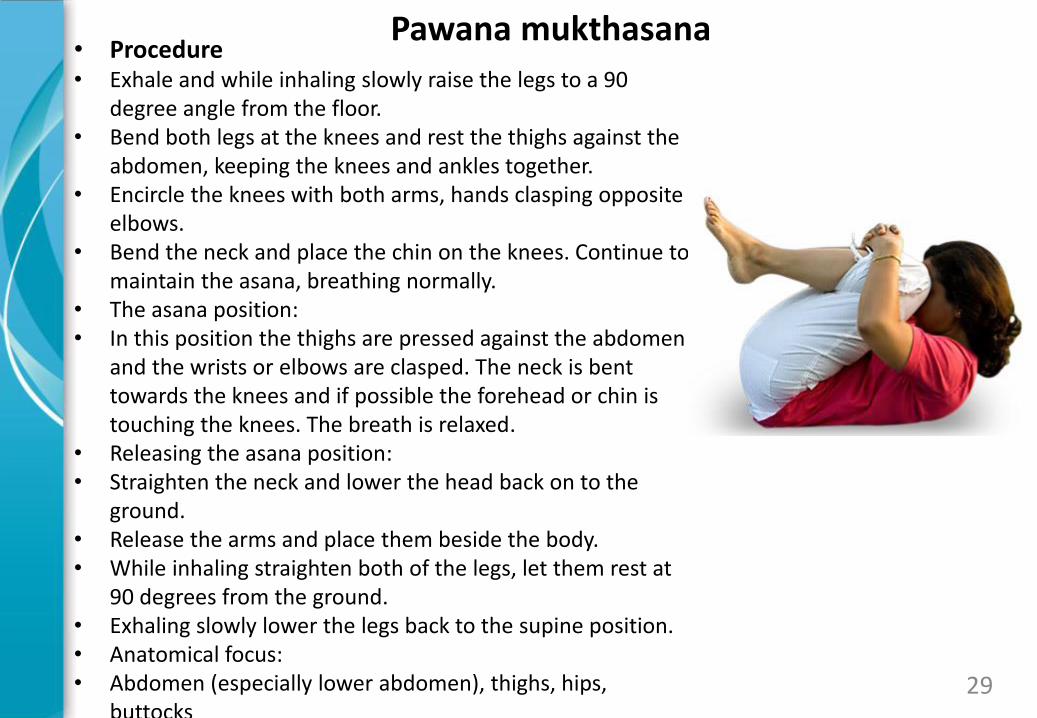
• Procedure • Exhale and while inhaling slowly raise the legs to a 90
degree angle from the floor. • Bend both legs at the knees and rest the thighs against the
abdomen, keeping the knees and ankles together. • Encircle the knees with both arms, hands clasping opposite
elbows. • Bend the neck and place the chin on the knees. Continue to
maintain the asana, breathing normally. • The asana position: • In this position the thighs are pressed against the abdomen
and the wrists or elbows are clasped. The neck is bent towards the knees and if possible the forehead or chin is touching the knees. The breath is relaxed.
• Releasing the asana position: • Straighten the neck and lower the head back on to the
ground. • Release the arms and place them beside the body. • While inhaling straighten both of the legs, let them rest at
90 degrees from the ground. • Exhaling slowly lower the legs back to the supine position. • Anatomical focus: • Abdomen (especially lower abdomen), thighs, hips,
buttocks
29
Pawana mukthasana
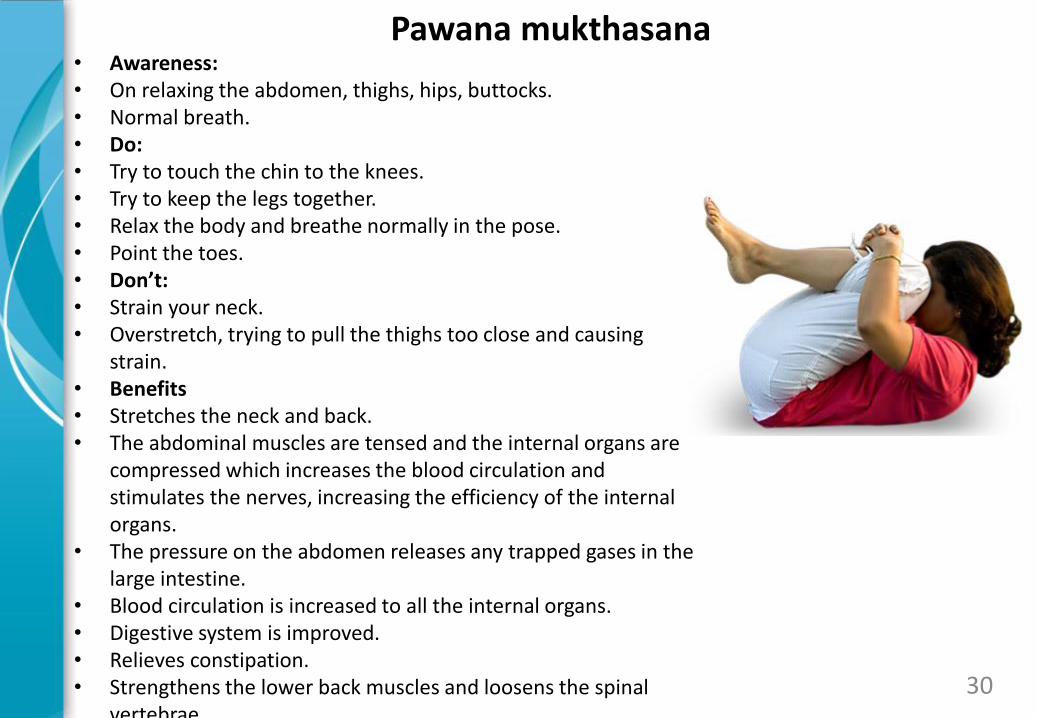
• Awareness: • On relaxing the abdomen, thighs, hips, buttocks. • Normal breath. • Do: • Try to touch the chin to the knees. • Try to keep the legs together. • Relax the body and breathe normally in the pose. • Point the toes. • Don’t: • Strain your neck. • Overstretch, trying to pull the thighs too close and causing
strain. • Benefits • Stretches the neck and back. • The abdominal muscles are tensed and the internal organs are
compressed which increases the blood circulation and stimulates the nerves, increasing the efficiency of the internal organs.
• The pressure on the abdomen releases any trapped gases in the large intestine.
• Blood circulation is increased to all the internal organs. • Digestive system is improved. • Relieves constipation. • Strengthens the lower back muscles and loosens the spinal
vertebrae. 30
Pawana mukthasana
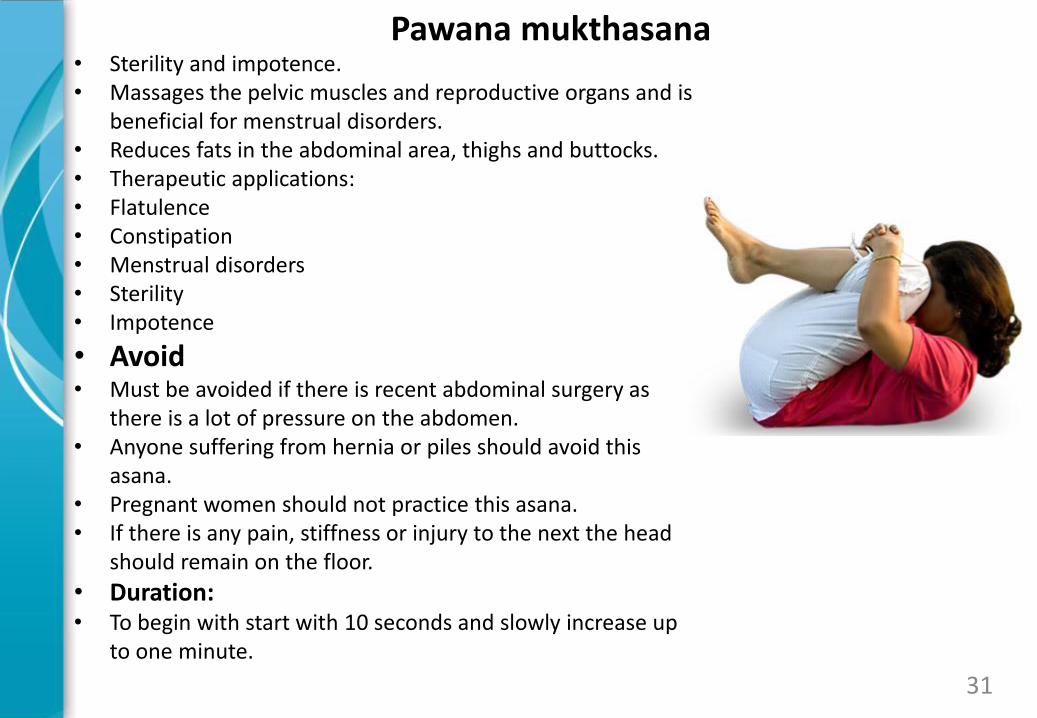
• Sterility and impotence. • Massages the pelvic muscles and reproductive organs and is
beneficial for menstrual disorders. • Reduces fats in the abdominal area, thighs and buttocks. • Therapeutic applications: • Flatulence • Constipation • Menstrual disorders • Sterility • Impotence
• Avoid • Must be avoided if there is recent abdominal surgery as
there is a lot of pressure on the abdomen. • Anyone suffering from hernia or piles should avoid this
asana. • Pregnant women should not practice this asana. • If there is any pain, stiffness or injury to the next the head
should remain on the floor.
• Duration: • To begin with start with 10 seconds and slowly increase up
to one minute.
31
Pawana mukthasana
• Procedure • Lie down with your back against the floor and
bend your knees at 90 degrees. • Keep your feet against the ground and legs
apart. • Put your hands on both sides of your head,
and breathe naturally for a while. • Slightly raise your head and shoulders from
the ground. • This is your starting position. • With your hands behind your head, raise your
head towards your knees, while concentrating on your abdominal region.
• Contract your abs without stressing the rest of your body.
• Now, slowly lower your body to come back to your starting position.
• Repeat the same for 8-10 times to complete the exercise.
32
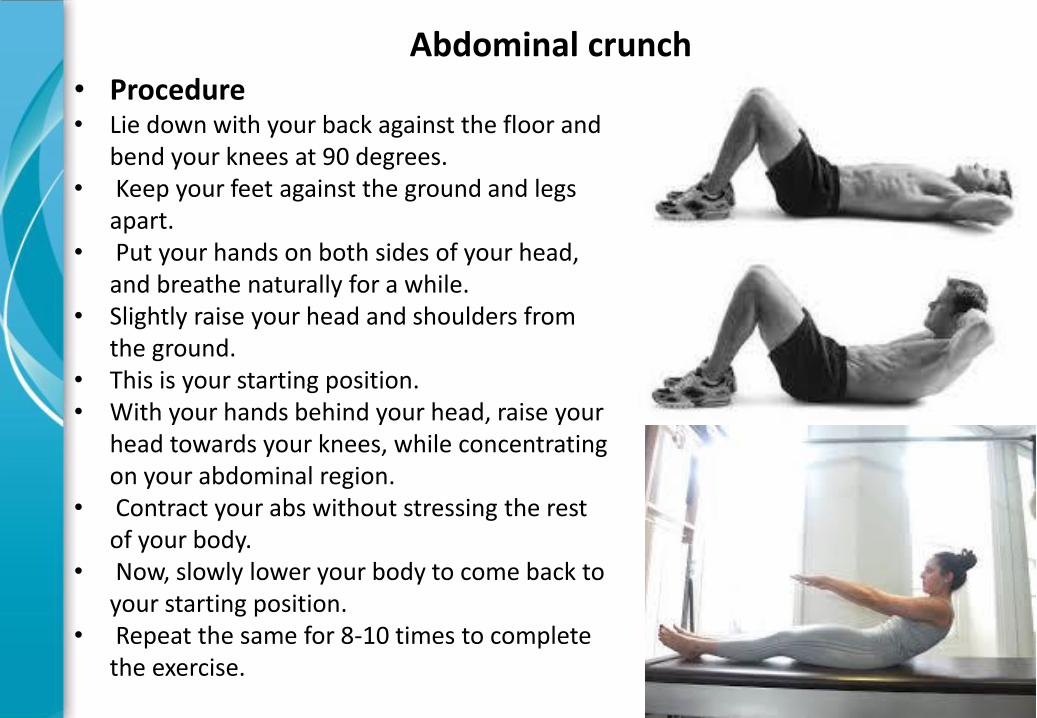
Abdominal crunch
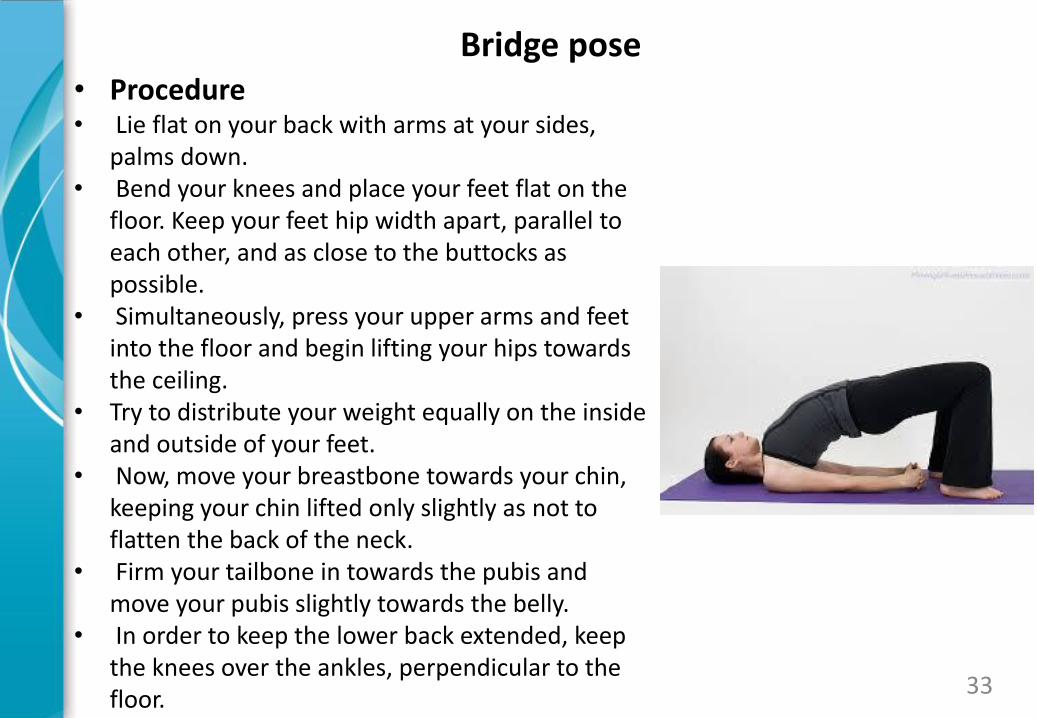
• Procedure • Lie flat on your back with arms at your sides,
palms down. • Bend your knees and place your feet flat on the
floor. Keep your feet hip width apart, parallel to each other, and as close to the buttocks as possible.
• Simultaneously, press your upper arms and feet into the floor and begin lifting your hips towards the ceiling.
• Try to distribute your weight equally on the inside and outside of your feet.
• Now, move your breastbone towards your chin, keeping your chin lifted only slightly as not to flatten the back of the neck.
• Firm your tailbone in towards the pubis and move your pubis slightly towards the belly.
• In order to keep the lower back extended, keep the knees over the ankles, perpendicular to the floor.
33
Bridge pose
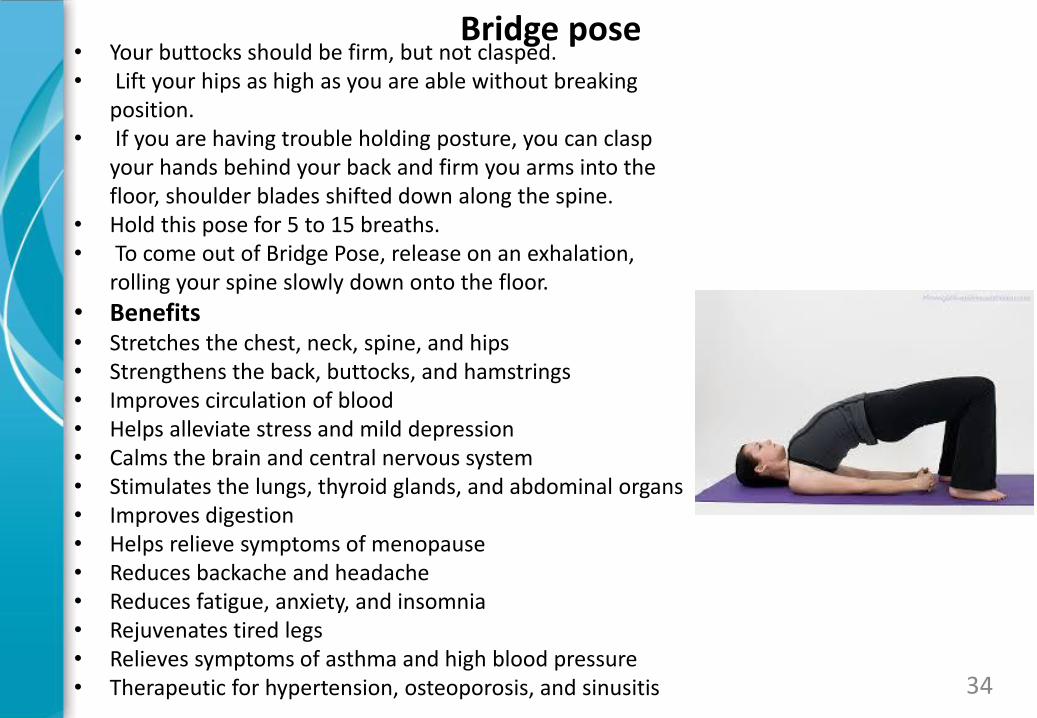
• Your buttocks should be firm, but not clasped. • Lift your hips as high as you are able without breaking
position. • If you are having trouble holding posture, you can clasp
your hands behind your back and firm you arms into the floor, shoulder blades shifted down along the spine.
• Hold this pose for 5 to 15 breaths. • To come out of Bridge Pose, release on an exhalation,
rolling your spine slowly down onto the floor.
• Benefits • Stretches the chest, neck, spine, and hips • Strengthens the back, buttocks, and hamstrings • Improves circulation of blood • Helps alleviate stress and mild depression • Calms the brain and central nervous system • Stimulates the lungs, thyroid glands, and abdominal organs • Improves digestion • Helps relieve symptoms of menopause • Reduces backache and headache • Reduces fatigue, anxiety, and insomnia • Rejuvenates tired legs • Relieves symptoms of asthma and high blood pressure • Therapeutic for hypertension, osteoporosis, and sinusitis 34
Bridge pose
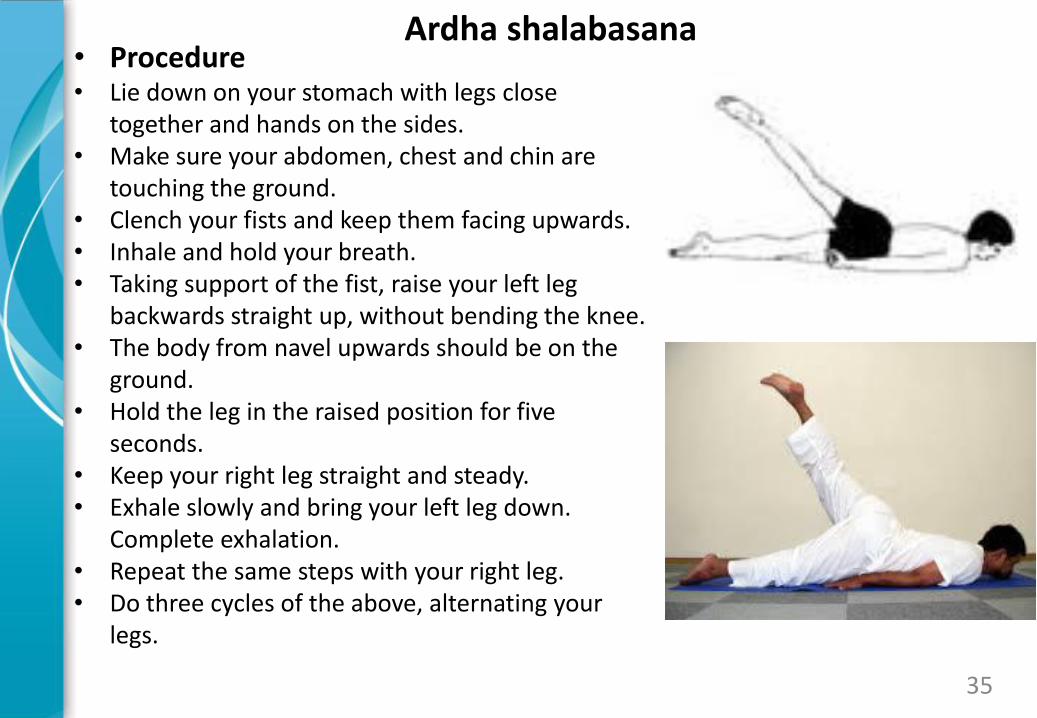
• Procedure • Lie down on your stomach with legs close
together and hands on the sides. • Make sure your abdomen, chest and chin are
touching the ground. • Clench your fists and keep them facing upwards. • Inhale and hold your breath. • Taking support of the fist, raise your left leg
backwards straight up, without bending the knee. • The body from navel upwards should be on the
ground. • Hold the leg in the raised position for five
seconds. • Keep your right leg straight and steady. • Exhale slowly and bring your left leg down.
Complete exhalation. • Repeat the same steps with your right leg. • Do three cycles of the above, alternating your
legs.
35
Ardha shalabasana
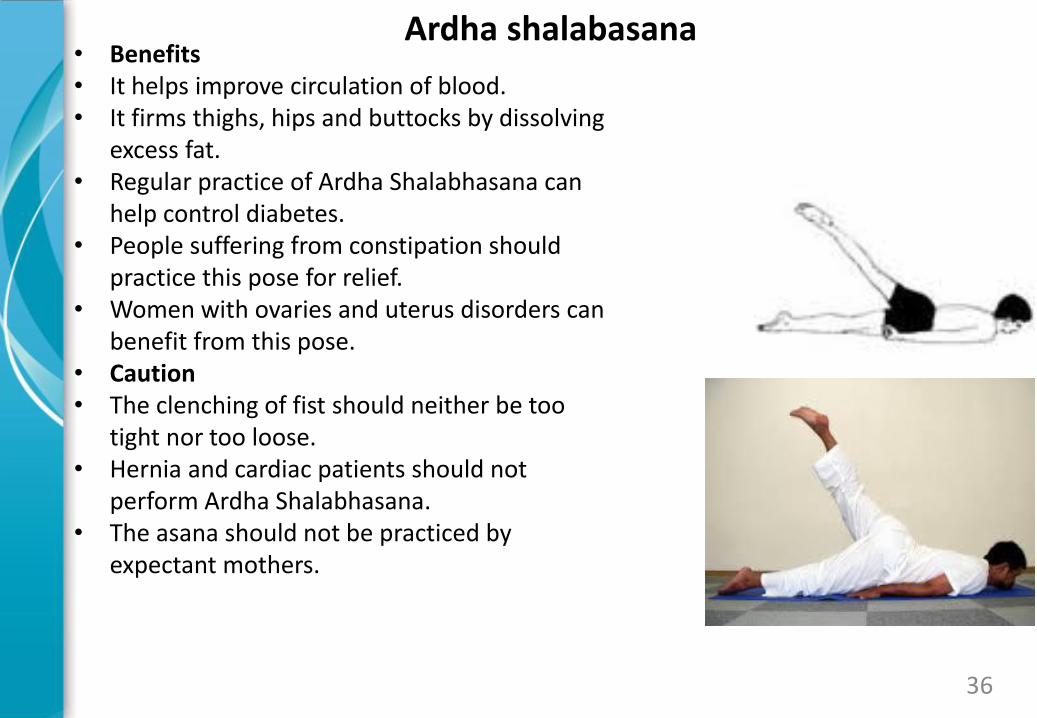
• Benefits • It helps improve circulation of blood. • It firms thighs, hips and buttocks by dissolving
excess fat. • Regular practice of Ardha Shalabhasana can
help control diabetes. • People suffering from constipation should
practice this pose for relief. • Women with ovaries and uterus disorders can
benefit from this pose. • Caution • The clenching of fist should neither be too
tight nor too loose. • Hernia and cardiac patients should not
perform Ardha Shalabhasana. • The asana should not be practiced by
expectant mothers.
36
Ardha shalabasana
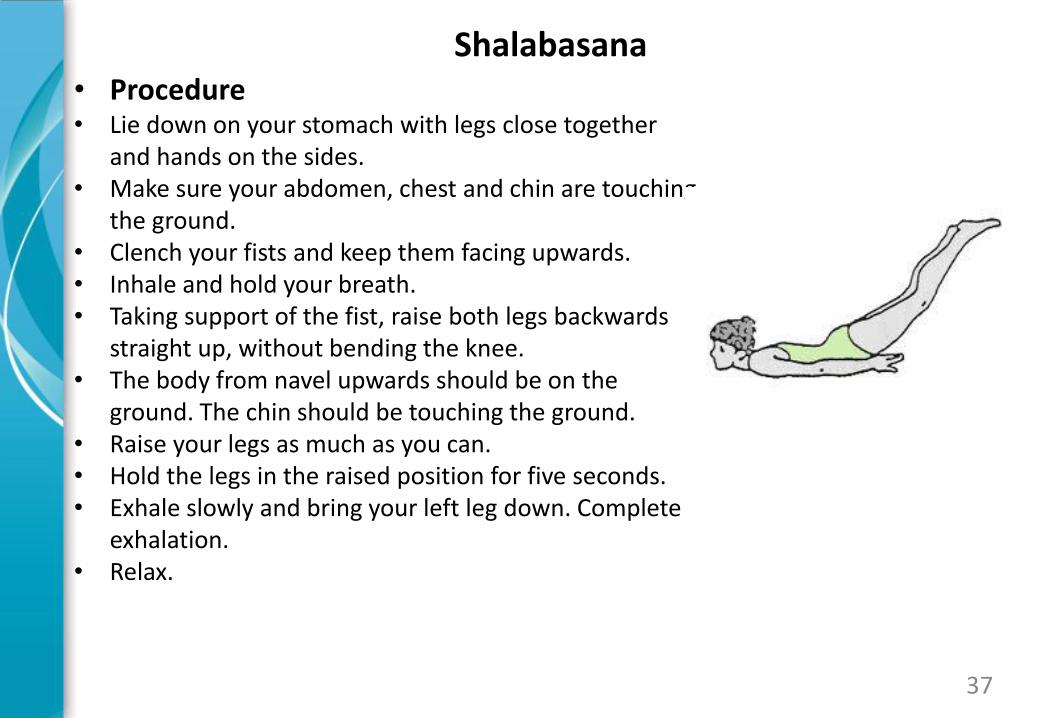
• Procedure • Lie down on your stomach with legs close together
and hands on the sides. • Make sure your abdomen, chest and chin are touching
the ground. • Clench your fists and keep them facing upwards. • Inhale and hold your breath. • Taking support of the fist, raise both legs backwards
straight up, without bending the knee. • The body from navel upwards should be on the
ground. The chin should be touching the ground. • Raise your legs as much as you can. • Hold the legs in the raised position for five seconds. • Exhale slowly and bring your left leg down. Complete
exhalation. • Relax.
37
Shalabasana
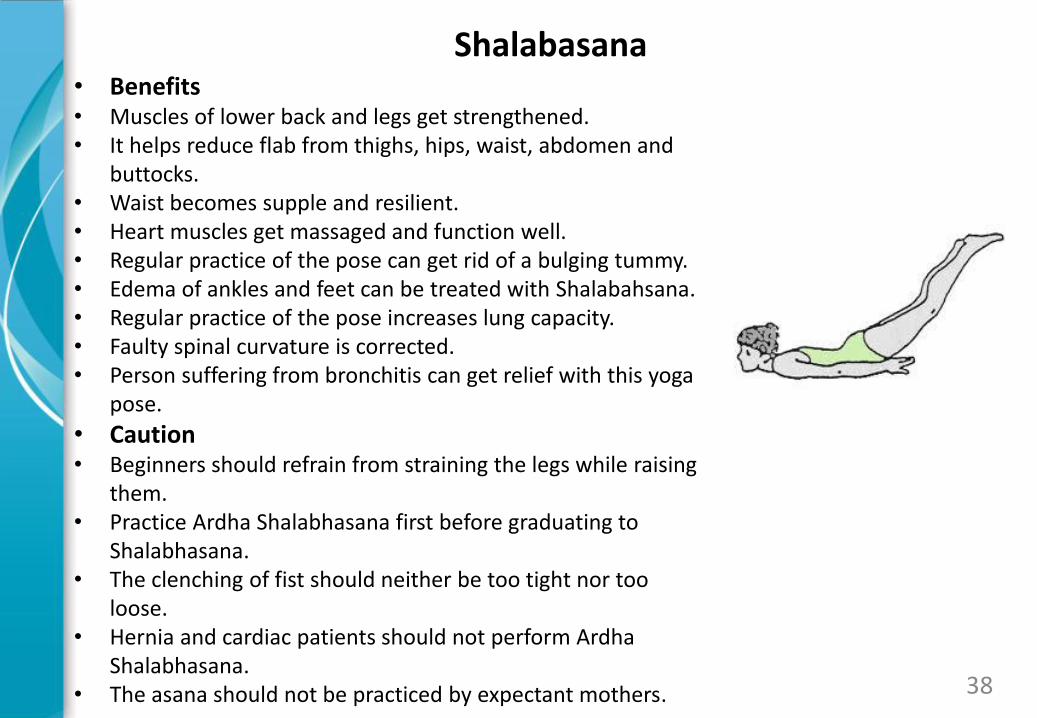
• Benefits • Muscles of lower back and legs get strengthened. • It helps reduce flab from thighs, hips, waist, abdomen and
buttocks. • Waist becomes supple and resilient. • Heart muscles get massaged and function well. • Regular practice of the pose can get rid of a bulging tummy. • Edema of ankles and feet can be treated with Shalabahsana. • Regular practice of the pose increases lung capacity. • Faulty spinal curvature is corrected. • Person suffering from bronchitis can get relief with this yoga
pose.
• Caution • Beginners should refrain from straining the legs while raising
them. • Practice Ardha Shalabhasana first before graduating to
Shalabhasana. • The clenching of fist should neither be too tight nor too
loose. • Hernia and cardiac patients should not perform Ardha
Shalabhasana. • The asana should not be practiced by expectant mothers. 38
Shalabasana
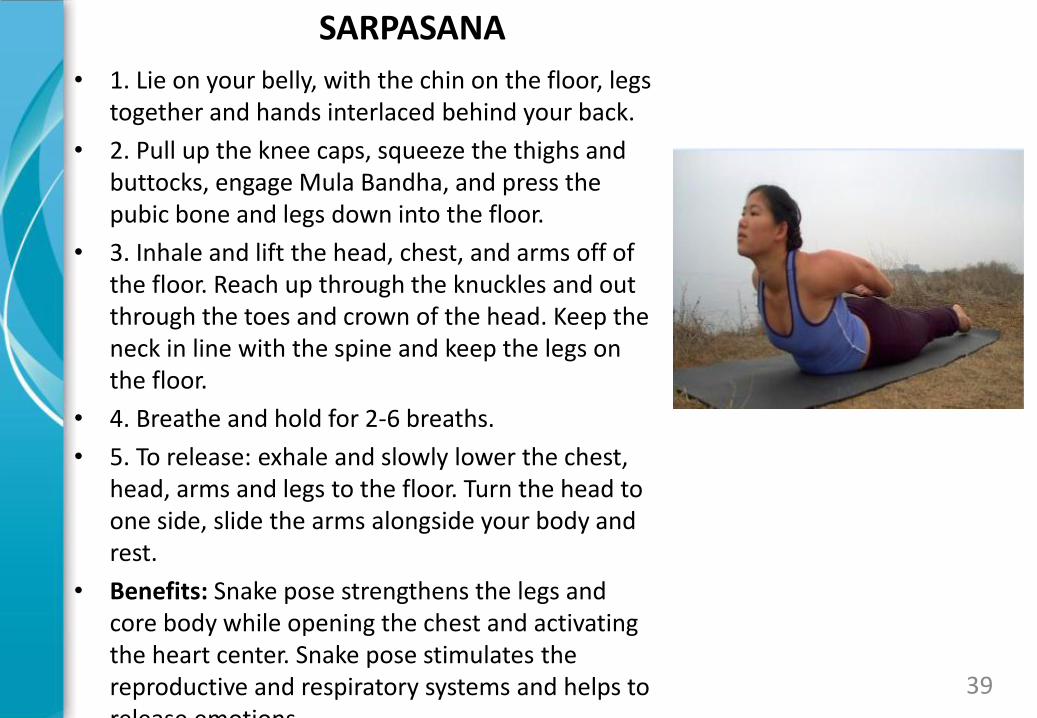
• 1. Lie on your belly, with the chin on the floor, legs together and hands interlaced behind your back.
• 2. Pull up the knee caps, squeeze the thighs and buttocks, engage Mula Bandha, and press the pubic bone and legs down into the floor.
• 3. Inhale and lift the head, chest, and arms off of the floor. Reach up through the knuckles and out through the toes and crown of the head. Keep the neck in line with the spine and keep the legs on the floor.
• 4. Breathe and hold for 2-6 breaths.
• 5. To release: exhale and slowly lower the chest, head, arms and legs to the floor. Turn the head to one side, slide the arms alongside your body and rest.
• Benefits: Snake pose strengthens the legs and core body while opening the chest and activating the heart center. Snake pose stimulates the reproductive and respiratory systems and helps to release emotions.
39
SARPASANA
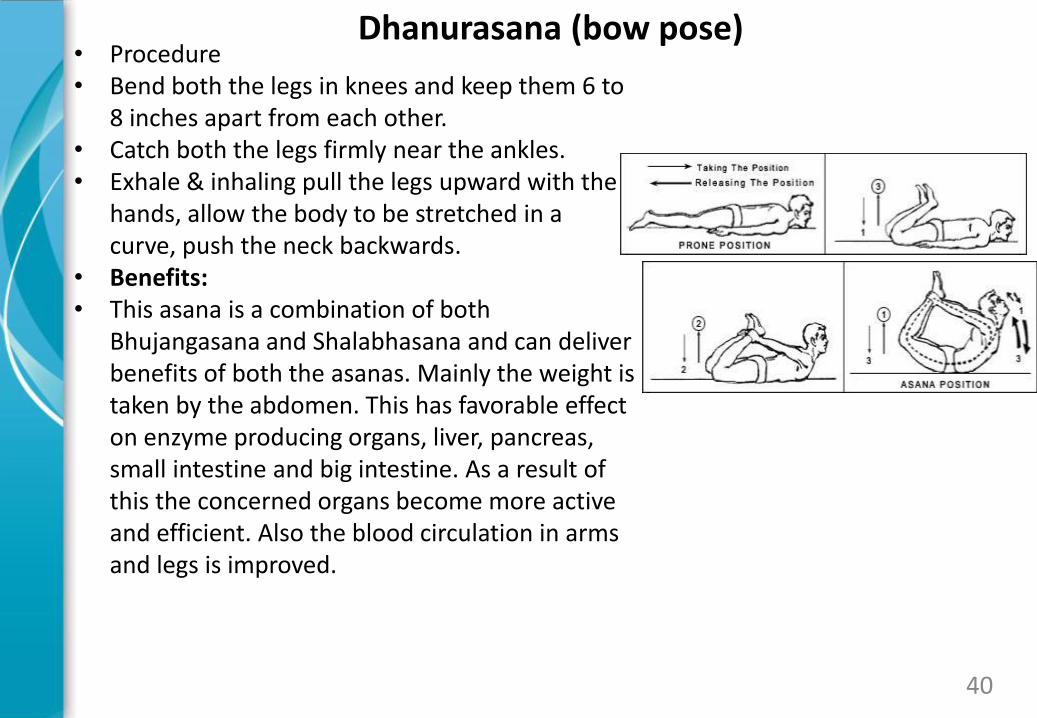
• Procedure • Bend both the legs in knees and keep them 6 to
8 inches apart from each other. • Catch both the legs firmly near the ankles. • Exhale & inhaling pull the legs upward with the
hands, allow the body to be stretched in a curve, push the neck backwards.
• Benefits: • This asana is a combination of both
Bhujangasana and Shalabhasana and can deliver benefits of both the asanas. Mainly the weight is taken by the abdomen. This has favorable effect on enzyme producing organs, liver, pancreas, small intestine and big intestine. As a result of this the concerned organs become more active and efficient. Also the blood circulation in arms and legs is improved.
40
Dhanurasana (bow pose)
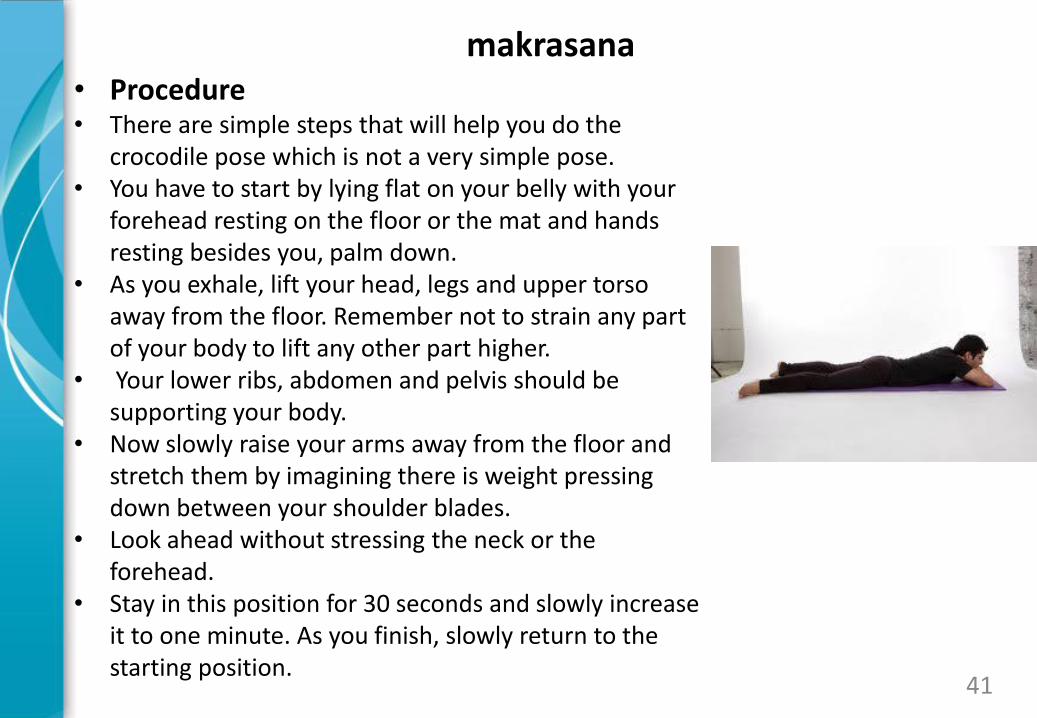
• Procedure • There are simple steps that will help you do the
crocodile pose which is not a very simple pose. • You have to start by lying flat on your belly with your
forehead resting on the floor or the mat and hands resting besides you, palm down.
• As you exhale, lift your head, legs and upper torso away from the floor. Remember not to strain any part of your body to lift any other part higher.
• Your lower ribs, abdomen and pelvis should be supporting your body.
• Now slowly raise your arms away from the floor and stretch them by imagining there is weight pressing down between your shoulder blades.
• Look ahead without stressing the neck or the forehead.
• Stay in this position for 30 seconds and slowly increase it to one minute. As you finish, slowly return to the starting position.
41
makrasana
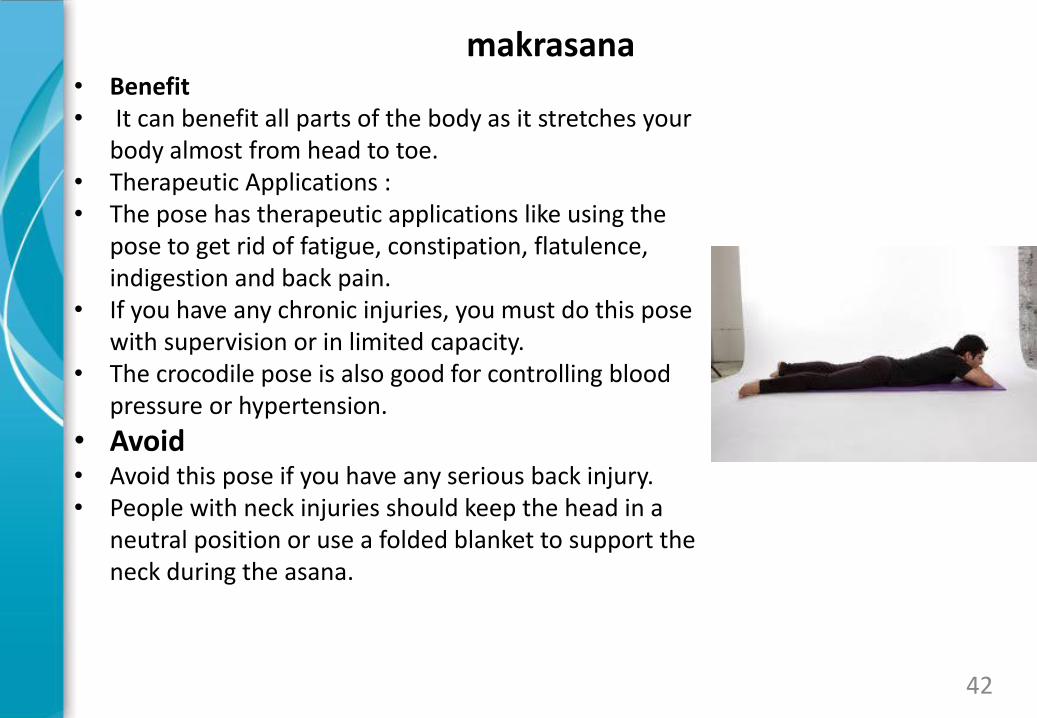
• Benefit • It can benefit all parts of the body as it stretches your
body almost from head to toe. • Therapeutic Applications : • The pose has therapeutic applications like using the
pose to get rid of fatigue, constipation, flatulence, indigestion and back pain.
• If you have any chronic injuries, you must do this pose with supervision or in limited capacity.
• The crocodile pose is also good for controlling blood pressure or hypertension.
• Avoid • Avoid this pose if you have any serious back injury. • People with neck injuries should keep the head in a
neutral position or use a folded blanket to support the neck during the asana.
42
makrasana
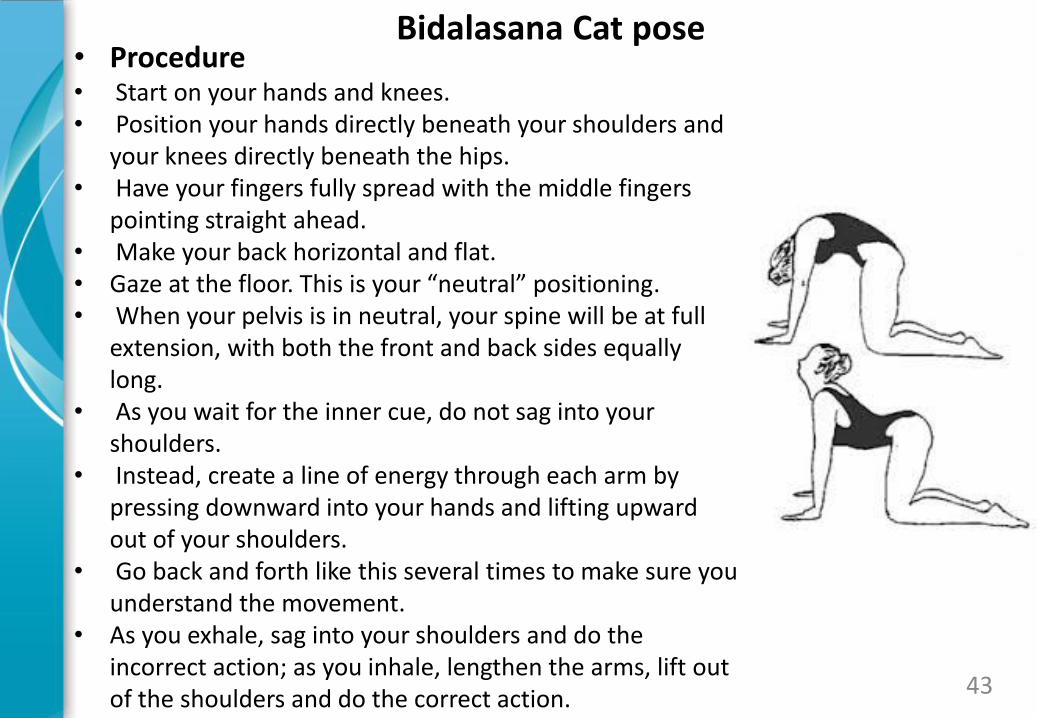
• Procedure • Start on your hands and knees. • Position your hands directly beneath your shoulders and
your knees directly beneath the hips. • Have your fingers fully spread with the middle fingers
pointing straight ahead. • Make your back horizontal and flat. • Gaze at the floor. This is your “neutral” positioning. • When your pelvis is in neutral, your spine will be at full
extension, with both the front and back sides equally long.
• As you wait for the inner cue, do not sag into your shoulders.
• Instead, create a line of energy through each arm by pressing downward into your hands and lifting upward out of your shoulders.
• Go back and forth like this several times to make sure you understand the movement.
• As you exhale, sag into your shoulders and do the incorrect action; as you inhale, lengthen the arms, lift out of the shoulders and do the correct action.
43
Bidalasana Cat pose
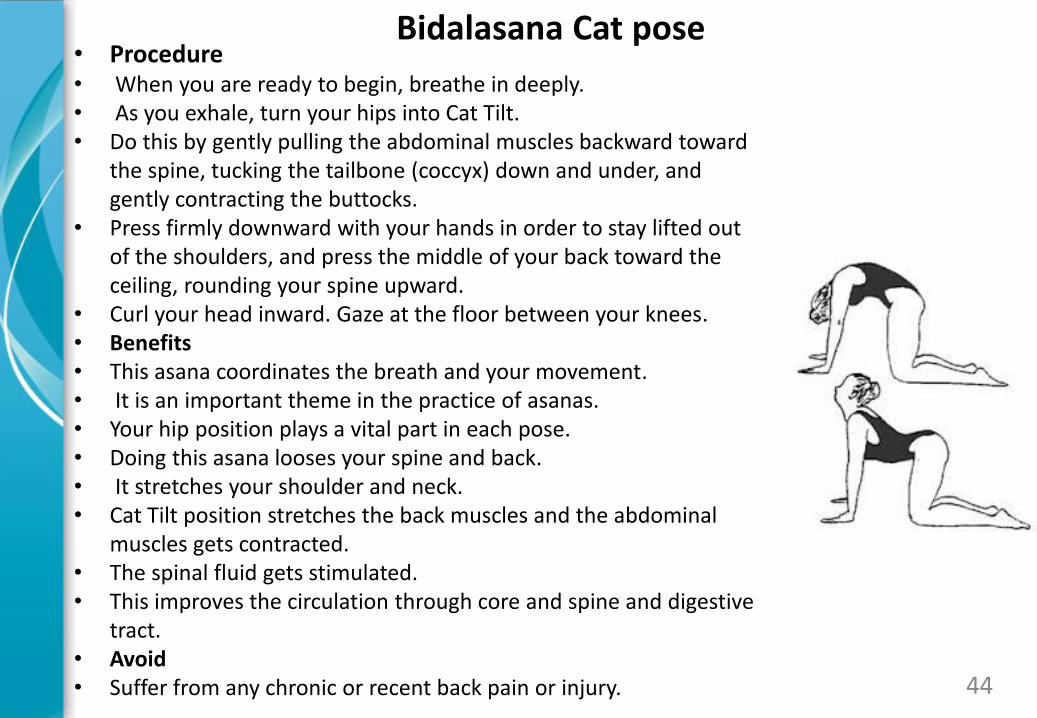
• Procedure • When you are ready to begin, breathe in deeply. • As you exhale, turn your hips into Cat Tilt. • Do this by gently pulling the abdominal muscles backward toward
the spine, tucking the tailbone (coccyx) down and under, and gently contracting the buttocks.
• Press firmly downward with your hands in order to stay lifted out of the shoulders, and press the middle of your back toward the ceiling, rounding your spine upward.
• Curl your head inward. Gaze at the floor between your knees. • Benefits • This asana coordinates the breath and your movement. • It is an important theme in the practice of asanas. • Your hip position plays a vital part in each pose. • Doing this asana looses your spine and back. • It stretches your shoulder and neck. • Cat Tilt position stretches the back muscles and the abdominal
muscles gets contracted. • The spinal fluid gets stimulated. • This improves the circulation through core and spine and digestive
tract. • Avoid • Suffer from any chronic or recent back pain or injury.
44
Bidalasana Cat pose
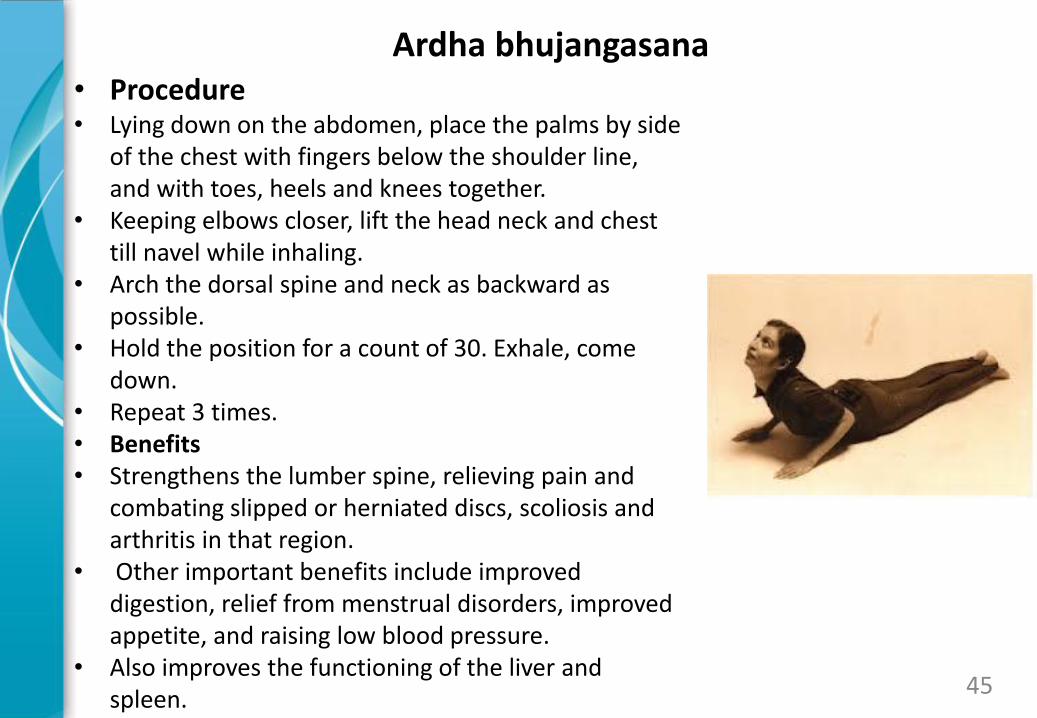
• Procedure • Lying down on the abdomen, place the palms by side
of the chest with fingers below the shoulder line, and with toes, heels and knees together.
• Keeping elbows closer, lift the head neck and chest till navel while inhaling.
• Arch the dorsal spine and neck as backward as possible.
• Hold the position for a count of 30. Exhale, come down.
• Repeat 3 times. • Benefits • Strengthens the lumber spine, relieving pain and
combating slipped or herniated discs, scoliosis and arthritis in that region.
• Other important benefits include improved digestion, relief from menstrual disorders, improved appetite, and raising low blood pressure.
• Also improves the functioning of the liver and spleen.
45
Ardha bhujangasana
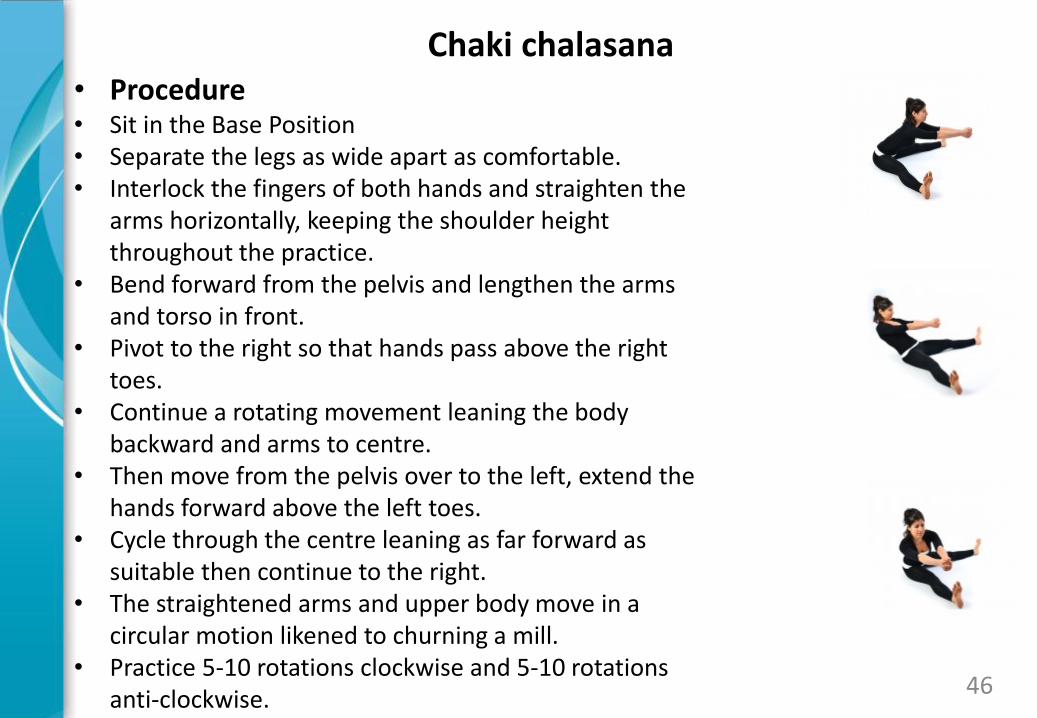
• Procedure • Sit in the Base Position • Separate the legs as wide apart as comfortable. • Interlock the fingers of both hands and straighten the
arms horizontally, keeping the shoulder height throughout the practice.
• Bend forward from the pelvis and lengthen the arms and torso in front.
• Pivot to the right so that hands pass above the right toes.
• Continue a rotating movement leaning the body backward and arms to centre.
• Then move from the pelvis over to the left, extend the hands forward above the left toes.
• Cycle through the centre leaning as far forward as suitable then continue to the right.
• The straightened arms and upper body move in a circular motion likened to churning a mill.
• Practice 5-10 rotations clockwise and 5-10 rotations anti-clockwise.
46
Chaki chalasana
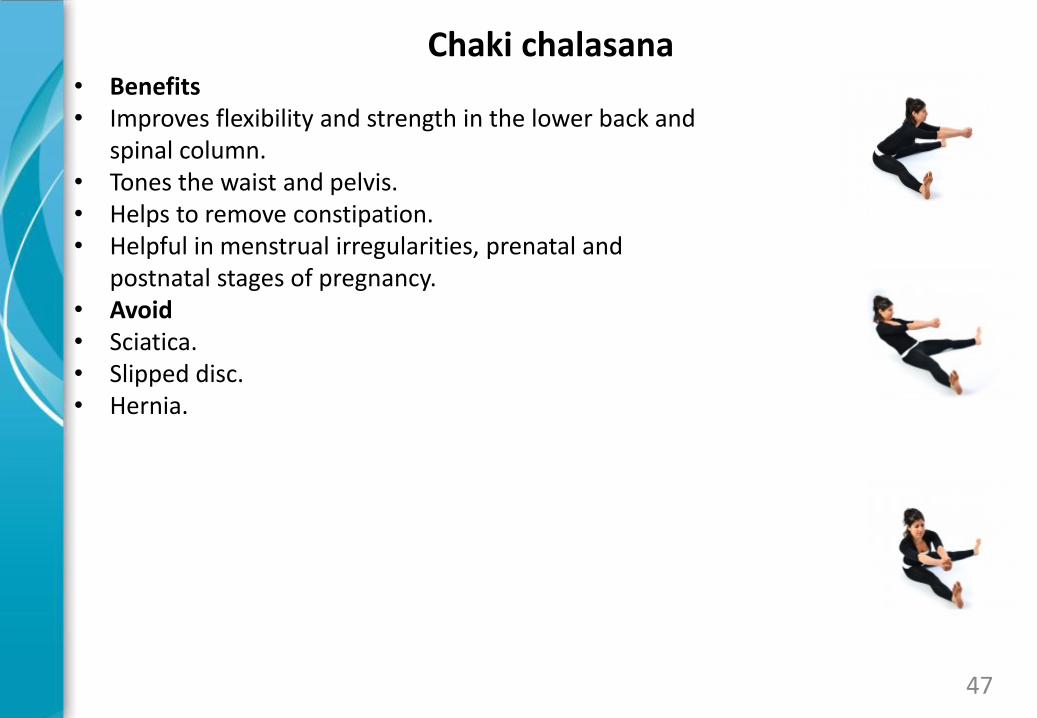
• Benefits • Improves flexibility and strength in the lower back and
spinal column. • Tones the waist and pelvis. • Helps to remove constipation. • Helpful in menstrual irregularities, prenatal and
postnatal stages of pregnancy. • Avoid • Sciatica. • Slipped disc. • Hernia.
47
Chaki chalasana
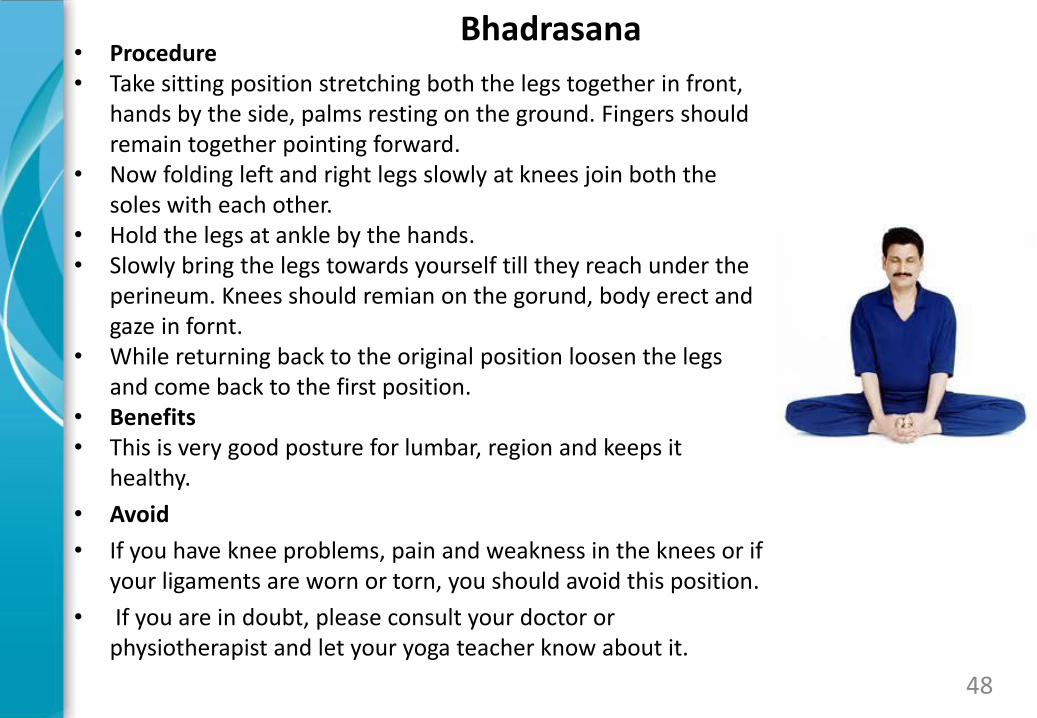
• Procedure • Take sitting position stretching both the legs together in front,
hands by the side, palms resting on the ground. Fingers should remain together pointing forward.
• Now folding left and right legs slowly at knees join both the soles with each other.
• Hold the legs at ankle by the hands. • Slowly bring the legs towards yourself till they reach under the
perineum. Knees should remian on the gorund, body erect and gaze in fornt.
• While returning back to the original position loosen the legs and come back to the first position.
• Benefits • This is very good posture for lumbar, region and keeps it
healthy.
• Avoid
• If you have knee problems, pain and weakness in the knees or if your ligaments are worn or torn, you should avoid this position.
• If you are in doubt, please consult your doctor or physiotherapist and let your yoga teacher know about it.
48
Bhadrasana
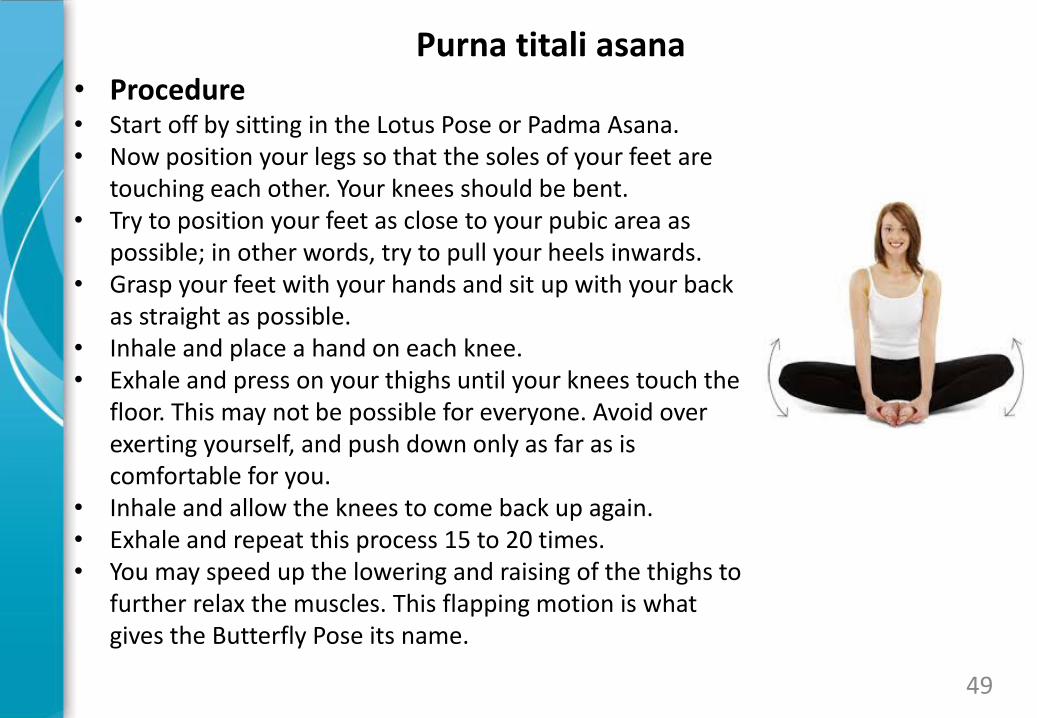
• Procedure • Start off by sitting in the Lotus Pose or Padma Asana. • Now position your legs so that the soles of your feet are
touching each other. Your knees should be bent. • Try to position your feet as close to your pubic area as
possible; in other words, try to pull your heels inwards. • Grasp your feet with your hands and sit up with your back
as straight as possible. • Inhale and place a hand on each knee. • Exhale and press on your thighs until your knees touch the
floor. This may not be possible for everyone. Avoid over exerting yourself, and push down only as far as is comfortable for you.
• Inhale and allow the knees to come back up again. • Exhale and repeat this process 15 to 20 times. • You may speed up the lowering and raising of the thighs to
further relax the muscles. This flapping motion is what gives the Butterfly Pose its name.
49
Purna titali asana
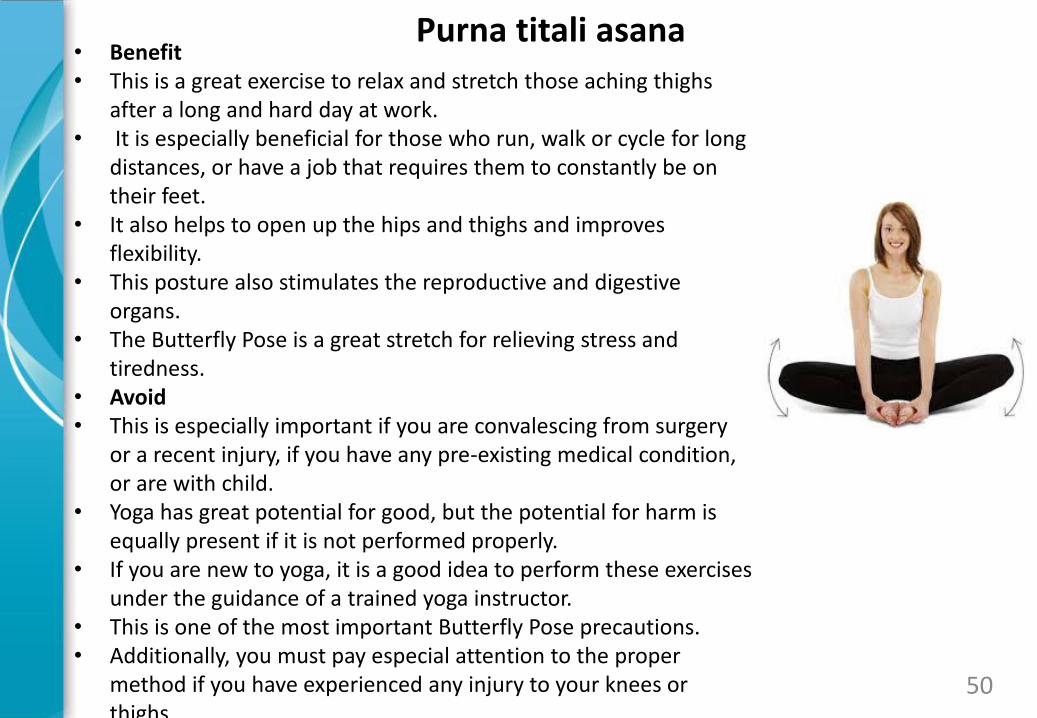
• Benefit • This is a great exercise to relax and stretch those aching thighs
after a long and hard day at work. • It is especially beneficial for those who run, walk or cycle for long
distances, or have a job that requires them to constantly be on their feet.
• It also helps to open up the hips and thighs and improves flexibility.
• This posture also stimulates the reproductive and digestive organs.
• The Butterfly Pose is a great stretch for relieving stress and tiredness.
• Avoid • This is especially important if you are convalescing from surgery
or a recent injury, if you have any pre-existing medical condition, or are with child.
• Yoga has great potential for good, but the potential for harm is equally present if it is not performed properly.
• If you are new to yoga, it is a good idea to perform these exercises under the guidance of a trained yoga instructor.
• This is one of the most important Butterfly Pose precautions. • Additionally, you must pay especial attention to the proper
method if you have experienced any injury to your knees or thighs.
50
Purna titali asana
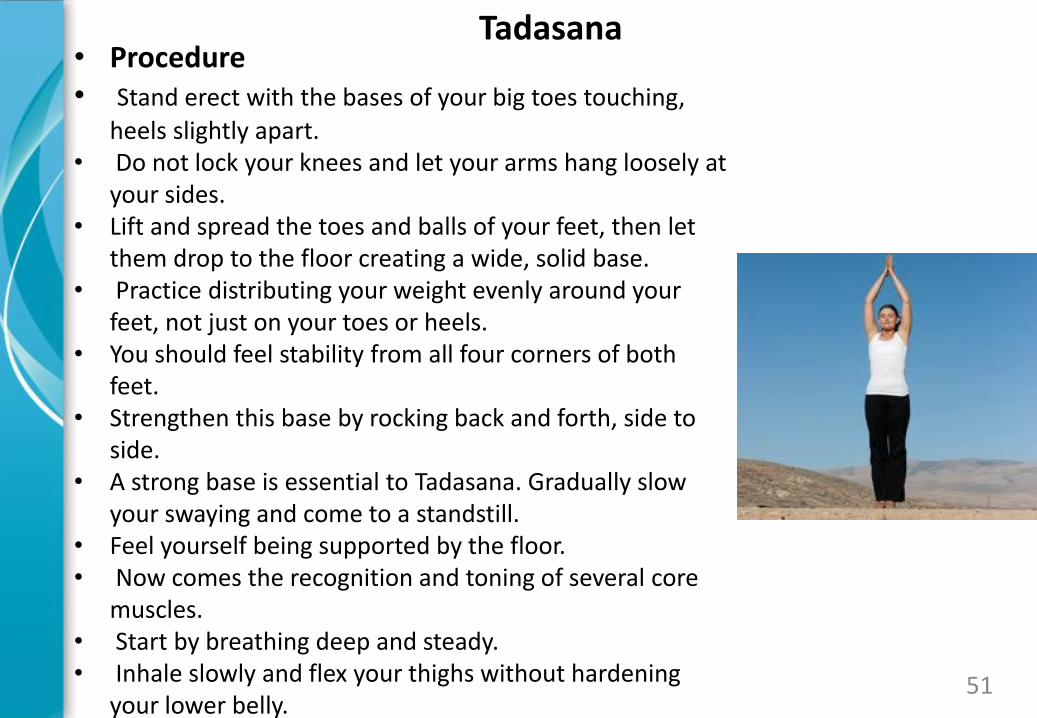
• Procedure • Stand erect with the bases of your big toes touching,
heels slightly apart. • Do not lock your knees and let your arms hang loosely at
your sides. • Lift and spread the toes and balls of your feet, then let
them drop to the floor creating a wide, solid base. • Practice distributing your weight evenly around your
feet, not just on your toes or heels. • You should feel stability from all four corners of both
feet. • Strengthen this base by rocking back and forth, side to
side. • A strong base is essential to Tadasana. Gradually slow
your swaying and come to a standstill. • Feel yourself being supported by the floor. • Now comes the recognition and toning of several core
muscles. • Start by breathing deep and steady. • Inhale slowly and flex your thighs without hardening
your lower belly. 51
Tadasana
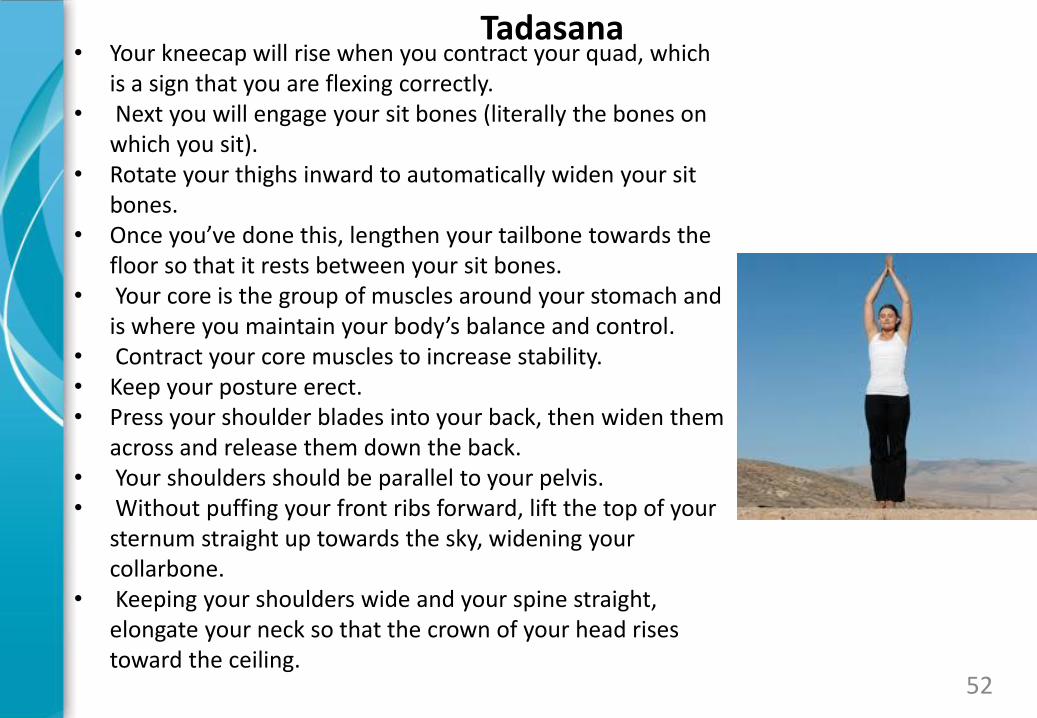
• Your kneecap will rise when you contract your quad, which is a sign that you are flexing correctly.
• Next you will engage your sit bones (literally the bones on which you sit).
• Rotate your thighs inward to automatically widen your sit bones.
• Once you’ve done this, lengthen your tailbone towards the floor so that it rests between your sit bones.
• Your core is the group of muscles around your stomach and is where you maintain your body’s balance and control.
• Contract your core muscles to increase stability. • Keep your posture erect. • Press your shoulder blades into your back, then widen them
across and release them down the back. • Your shoulders should be parallel to your pelvis. • Without puffing your front ribs forward, lift the top of your
sternum straight up towards the sky, widening your collarbone.
• Keeping your shoulders wide and your spine straight, elongate your neck so that the crown of your head rises toward the ceiling.
52
Tadasana
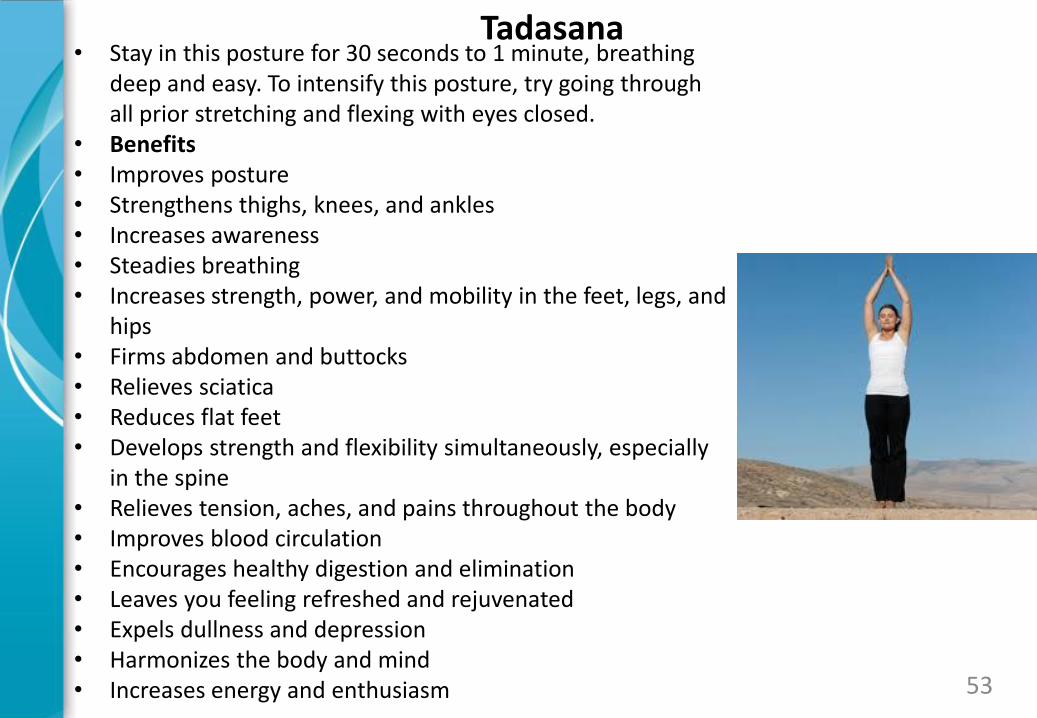
• Stay in this posture for 30 seconds to 1 minute, breathing deep and easy. To intensify this posture, try going through all prior stretching and flexing with eyes closed.
• Benefits • Improves posture • Strengthens thighs, knees, and ankles • Increases awareness • Steadies breathing • Increases strength, power, and mobility in the feet, legs, and
hips • Firms abdomen and buttocks • Relieves sciatica • Reduces flat feet • Develops strength and flexibility simultaneously, especially
in the spine • Relieves tension, aches, and pains throughout the body • Improves blood circulation • Encourages healthy digestion and elimination • Leaves you feeling refreshed and rejuvenated • Expels dullness and depression • Harmonizes the body and mind • Increases energy and enthusiasm 53
Tadasana
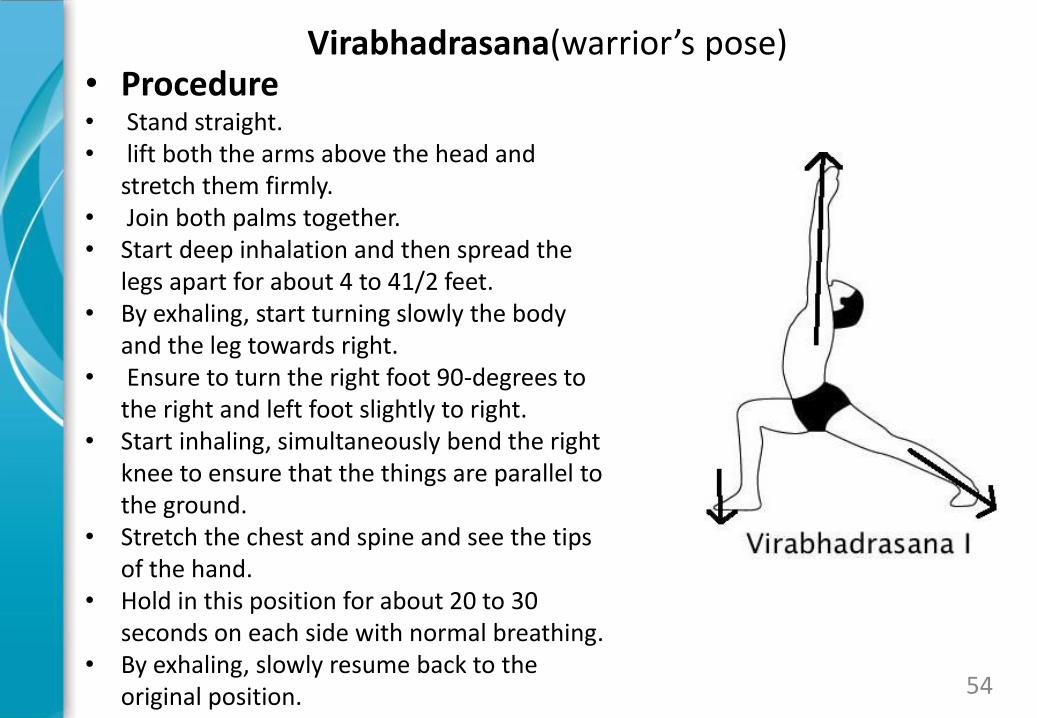
Virabhadrasana(warrior’s pose) • Procedure • Stand straight. • lift both the arms above the head and
stretch them firmly. • Join both palms together. • Start deep inhalation and then spread the
legs apart for about 4 to 41/2 feet. • By exhaling, start turning slowly the body
and the leg towards right. • Ensure to turn the right foot 90-degrees to
the right and left foot slightly to right. • Start inhaling, simultaneously bend the right
knee to ensure that the things are parallel to the ground.
• Stretch the chest and spine and see the tips of the hand.
• Hold in this position for about 20 to 30 seconds on each side with normal breathing.
• By exhaling, slowly resume back to the original position.
54
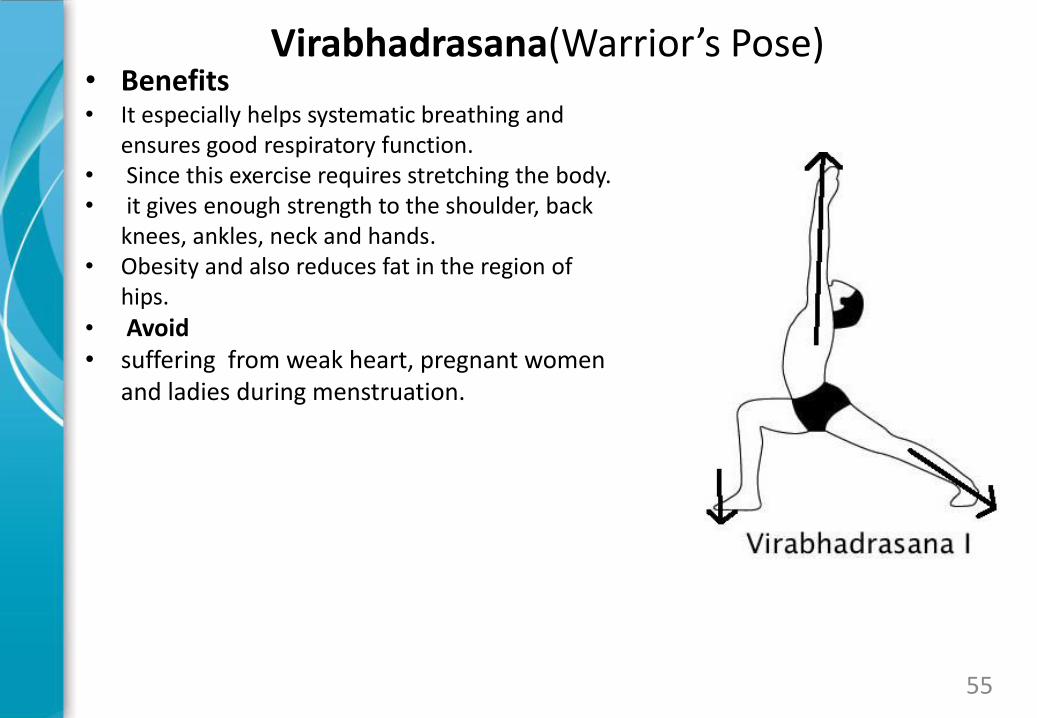
Virabhadrasana(Warrior’s Pose) • Benefits • It especially helps systematic breathing and
ensures good respiratory function. • Since this exercise requires stretching the body. • it gives enough strength to the shoulder, back
knees, ankles, neck and hands. • Obesity and also reduces fat in the region of
hips.
• Avoid • suffering from weak heart, pregnant women
and ladies during menstruation.
55
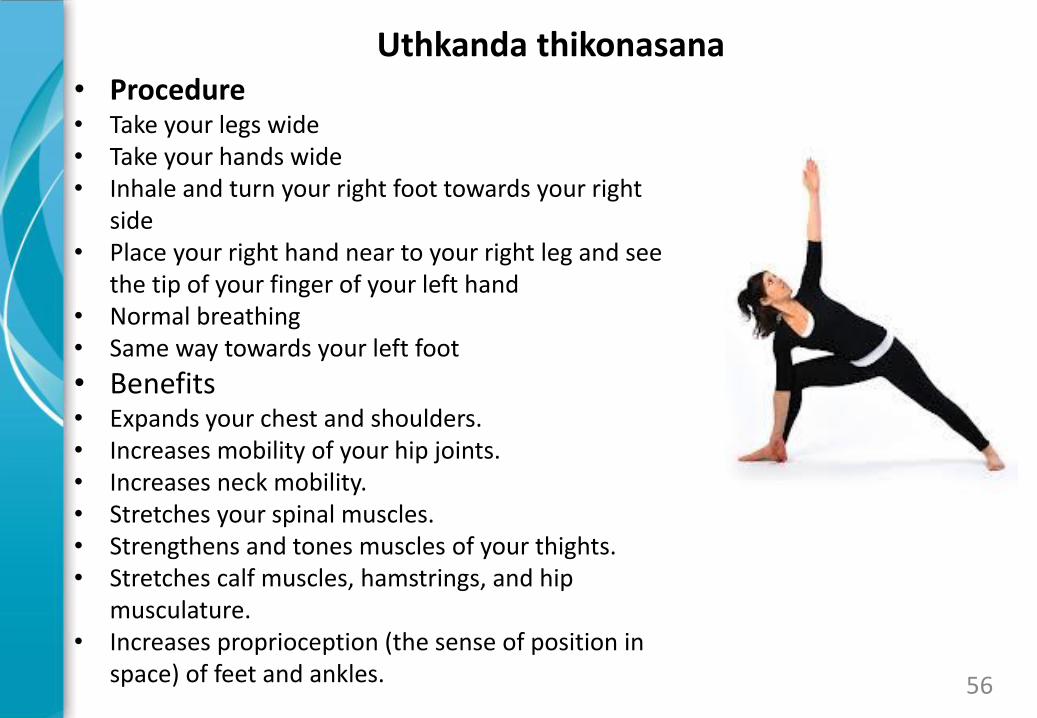
• Procedure • Take your legs wide • Take your hands wide • Inhale and turn your right foot towards your right
side • Place your right hand near to your right leg and see
the tip of your finger of your left hand • Normal breathing • Same way towards your left foot
• Benefits • Expands your chest and shoulders. • Increases mobility of your hip joints. • Increases neck mobility. • Stretches your spinal muscles. • Strengthens and tones muscles of your thights. • Stretches calf muscles, hamstrings, and hip
musculature. • Increases proprioception (the sense of position in
space) of feet and ankles. 56
Uthkanda thikonasana
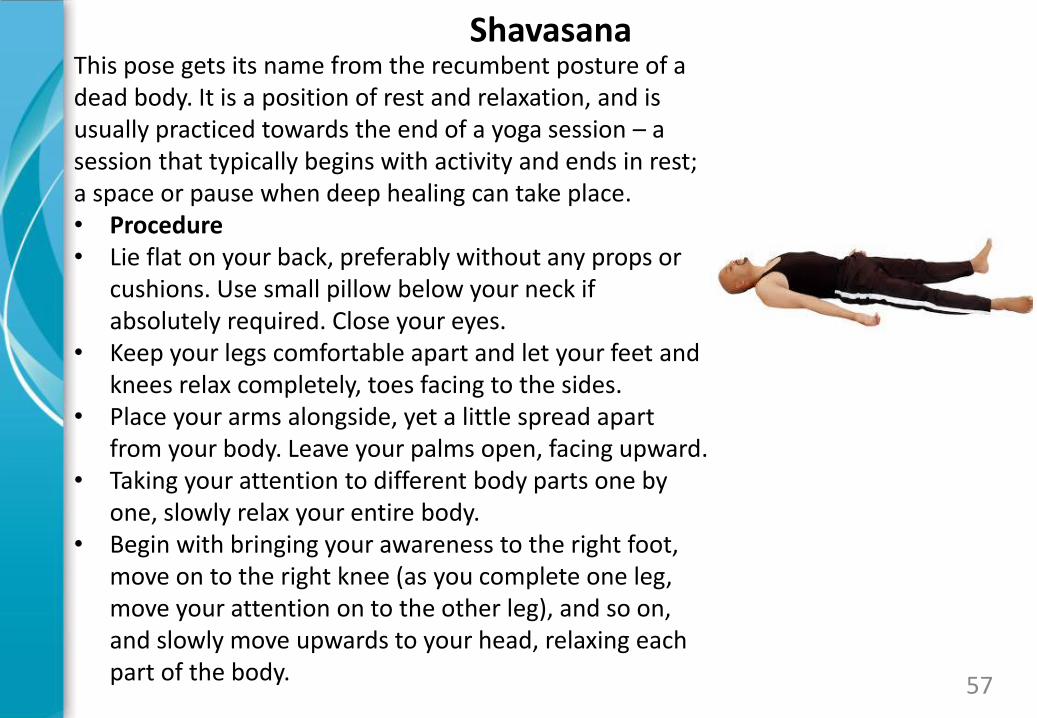
This pose gets its name from the recumbent posture of a dead body. It is a position of rest and relaxation, and is usually practiced towards the end of a yoga session – a session that typically begins with activity and ends in rest; a space or pause when deep healing can take place. • Procedure • Lie flat on your back, preferably without any props or
cushions. Use small pillow below your neck if absolutely required. Close your eyes.
• Keep your legs comfortable apart and let your feet and knees relax completely, toes facing to the sides.
• Place your arms alongside, yet a little spread apart from your body. Leave your palms open, facing upward.
• Taking your attention to different body parts one by one, slowly relax your entire body.
• Begin with bringing your awareness to the right foot, move on to the right knee (as you complete one leg, move your attention on to the other leg), and so on, and slowly move upwards to your head, relaxing each part of the body.
57
Shavasana
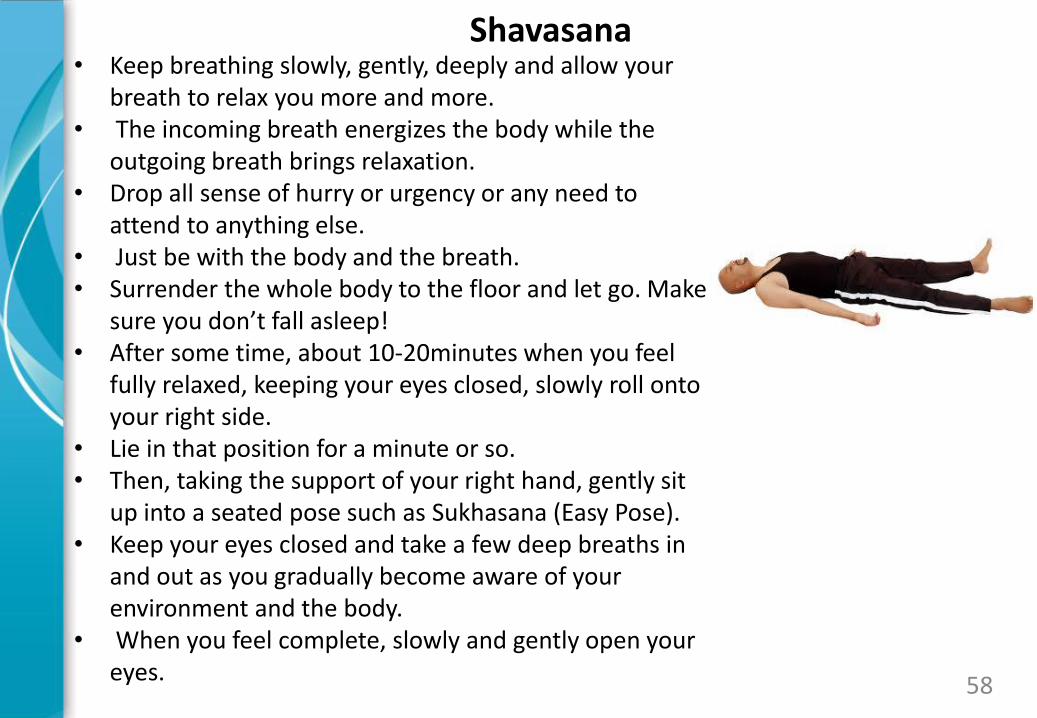
• Keep breathing slowly, gently, deeply and allow your breath to relax you more and more.
• The incoming breath energizes the body while the outgoing breath brings relaxation.
• Drop all sense of hurry or urgency or any need to attend to anything else.
• Just be with the body and the breath. • Surrender the whole body to the floor and let go. Make
sure you don’t fall asleep! • After some time, about 10-20minutes when you feel
fully relaxed, keeping your eyes closed, slowly roll onto your right side.
• Lie in that position for a minute or so. • Then, taking the support of your right hand, gently sit
up into a seated pose such as Sukhasana (Easy Pose). • Keep your eyes closed and take a few deep breaths in
and out as you gradually become aware of your environment and the body.
• When you feel complete, slowly and gently open your eyes.
58
Shavasana
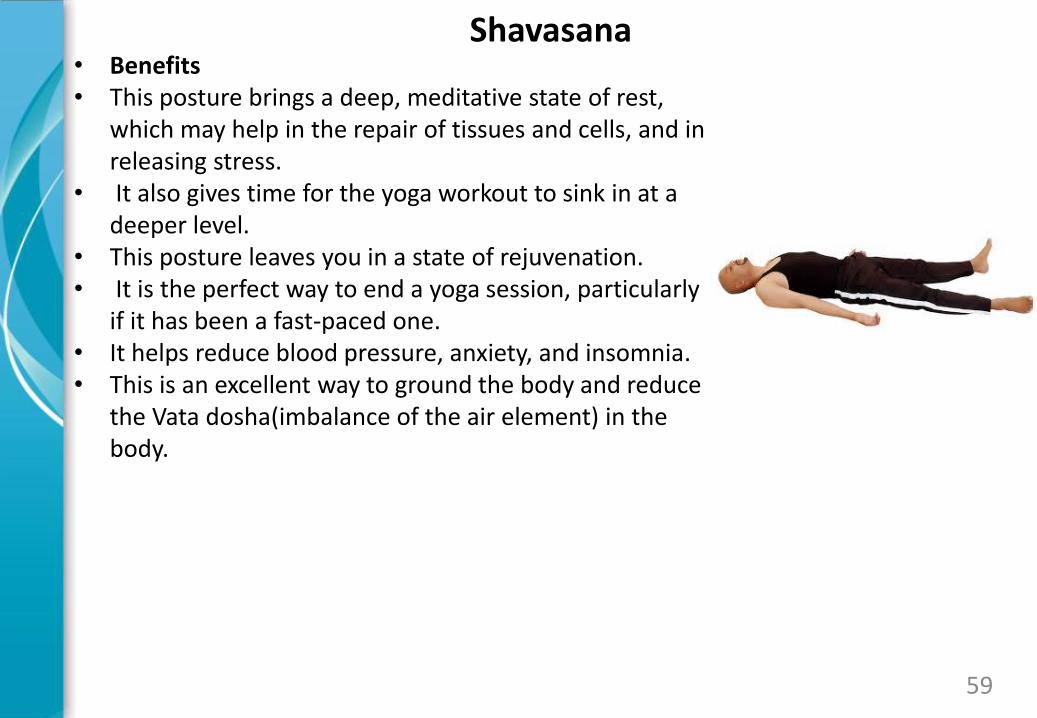
• Benefits • This posture brings a deep, meditative state of rest,
which may help in the repair of tissues and cells, and in releasing stress.
• It also gives time for the yoga workout to sink in at a deeper level.
• This posture leaves you in a state of rejuvenation. • It is the perfect way to end a yoga session, particularly
if it has been a fast-paced one. • It helps reduce blood pressure, anxiety, and insomnia. • This is an excellent way to ground the body and reduce
the Vata dosha(imbalance of the air element) in the body.
59
Shavasana
Surya namaskara (sun salutation)
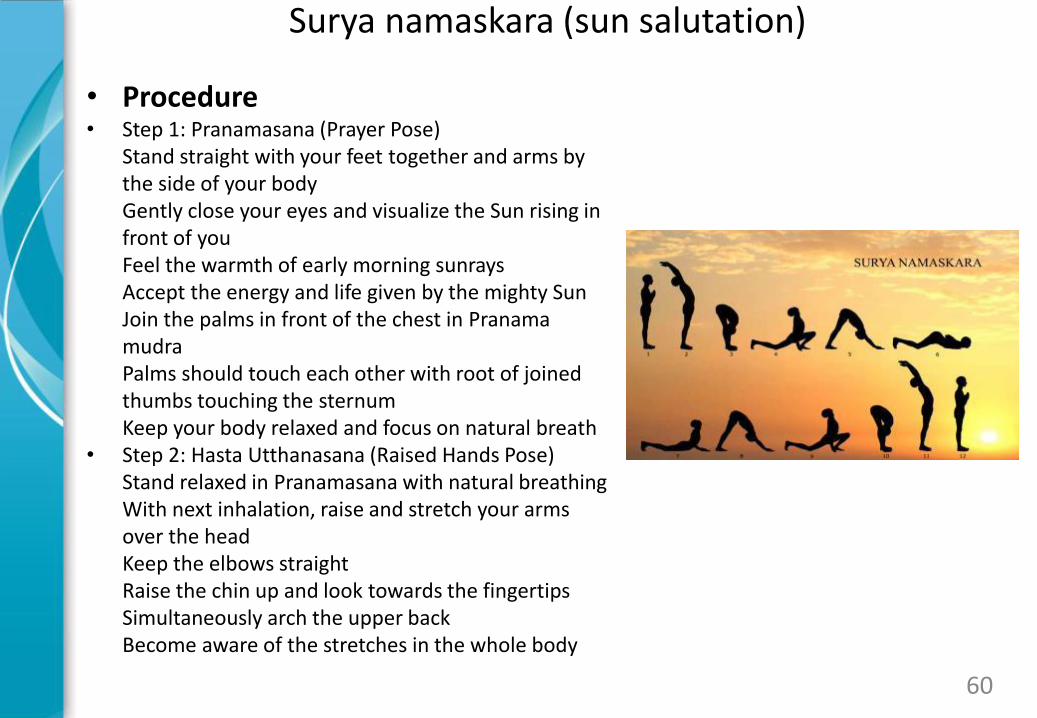
• Procedure • Step 1: Pranamasana (Prayer Pose)
Stand straight with your feet together and arms by the side of your body Gently close your eyes and visualize the Sun rising in front of you Feel the warmth of early morning sunrays Accept the energy and life given by the mighty Sun Join the palms in front of the chest in Pranama mudra Palms should touch each other with root of joined thumbs touching the sternum Keep your body relaxed and focus on natural breath
• Step 2: Hasta Utthanasana (Raised Hands Pose) Stand relaxed in Pranamasana with natural breathing With next inhalation, raise and stretch your arms over the head Keep the elbows straight Raise the chin up and look towards the fingertips Simultaneously arch the upper back Become aware of the stretches in the whole body
60
Surya namaskara (sun salutation)
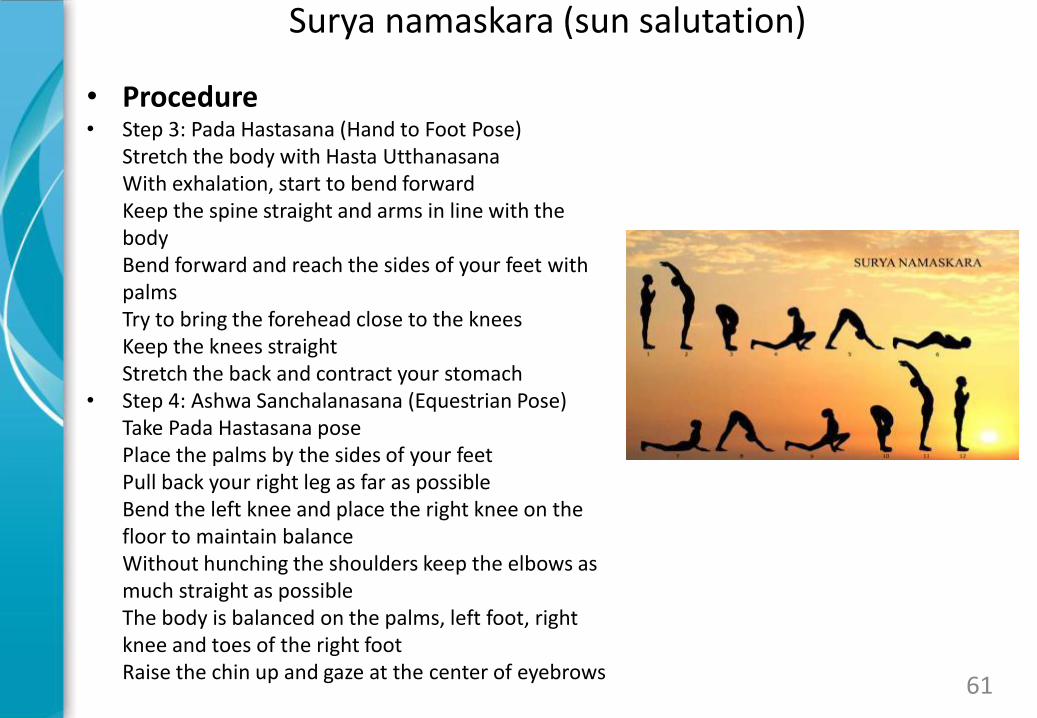
• Procedure • Step 3: Pada Hastasana (Hand to Foot Pose)
Stretch the body with Hasta Utthanasana With exhalation, start to bend forward Keep the spine straight and arms in line with the body Bend forward and reach the sides of your feet with palms Try to bring the forehead close to the knees Keep the knees straight Stretch the back and contract your stomach
• Step 4: Ashwa Sanchalanasana (Equestrian Pose) Take Pada Hastasana pose Place the palms by the sides of your feet Pull back your right leg as far as possible Bend the left knee and place the right knee on the floor to maintain balance Without hunching the shoulders keep the elbows as much straight as possible The body is balanced on the palms, left foot, right knee and toes of the right foot Raise the chin up and gaze at the center of eyebrows
61
Surya namaskara (sun salutation)
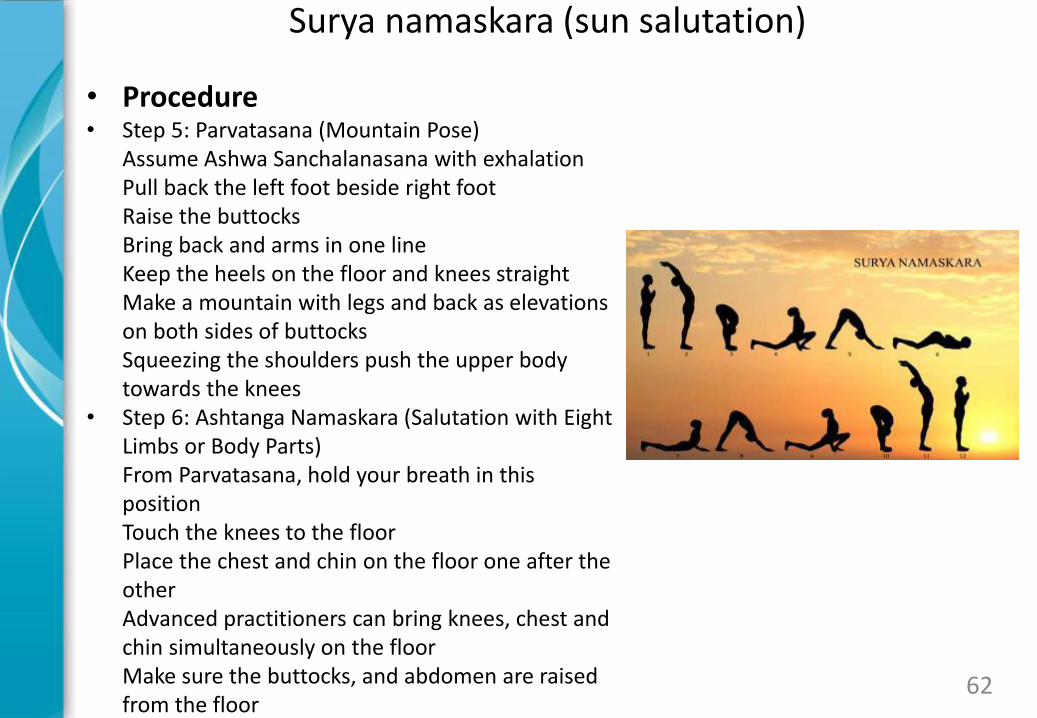
• Procedure • Step 5: Parvatasana (Mountain Pose)
Assume Ashwa Sanchalanasana with exhalation Pull back the left foot beside right foot Raise the buttocks Bring back and arms in one line Keep the heels on the floor and knees straight Make a mountain with legs and back as elevations on both sides of buttocks Squeezing the shoulders push the upper body towards the knees
• Step 6: Ashtanga Namaskara (Salutation with Eight Limbs or Body Parts) From Parvatasana, hold your breath in this position Touch the knees to the floor Place the chest and chin on the floor one after the other Advanced practitioners can bring knees, chest and chin simultaneously on the floor Make sure the buttocks, and abdomen are raised from the floor
62
Surya namaskara (sun salutation)
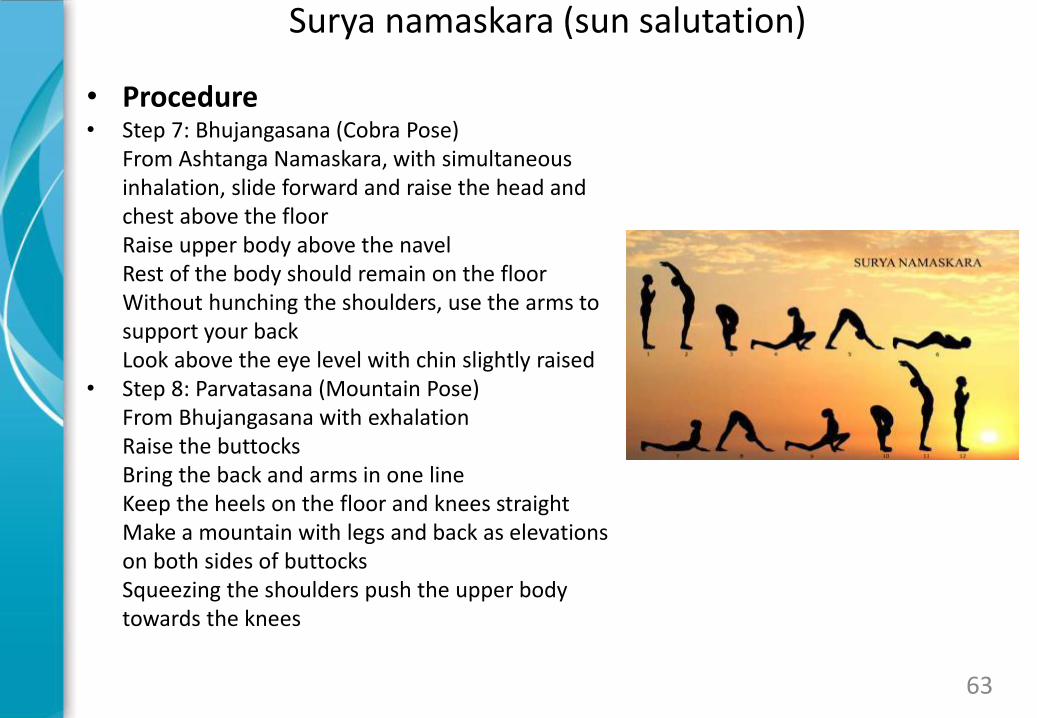
• Procedure • Step 7: Bhujangasana (Cobra Pose)
From Ashtanga Namaskara, with simultaneous inhalation, slide forward and raise the head and chest above the floor Raise upper body above the navel Rest of the body should remain on the floor Without hunching the shoulders, use the arms to support your back Look above the eye level with chin slightly raised
• Step 8: Parvatasana (Mountain Pose) From Bhujangasana with exhalation Raise the buttocks Bring the back and arms in one line Keep the heels on the floor and knees straight Make a mountain with legs and back as elevations on both sides of buttocks Squeezing the shoulders push the upper body towards the knees
63
Surya namaskara (sun salutation)
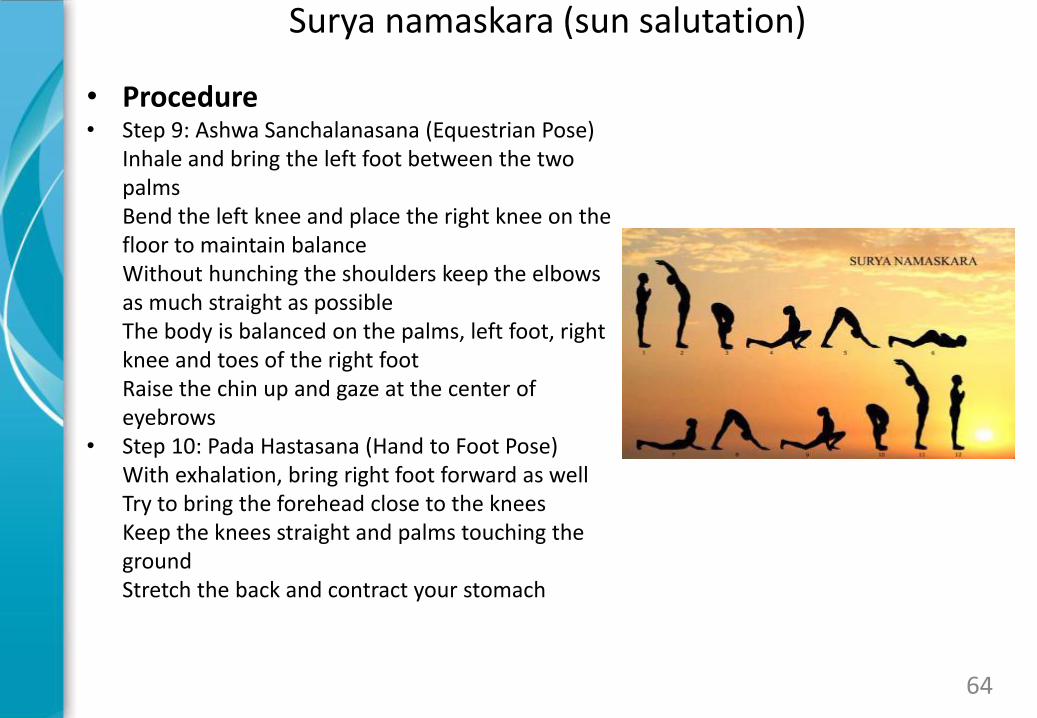
• Procedure • Step 9: Ashwa Sanchalanasana (Equestrian Pose)
Inhale and bring the left foot between the two palms Bend the left knee and place the right knee on the floor to maintain balance Without hunching the shoulders keep the elbows as much straight as possible The body is balanced on the palms, left foot, right knee and toes of the right foot Raise the chin up and gaze at the center of eyebrows
• Step 10: Pada Hastasana (Hand to Foot Pose) With exhalation, bring right foot forward as well Try to bring the forehead close to the knees Keep the knees straight and palms touching the ground Stretch the back and contract your stomach
64
Surya namaskara (sun salutation)
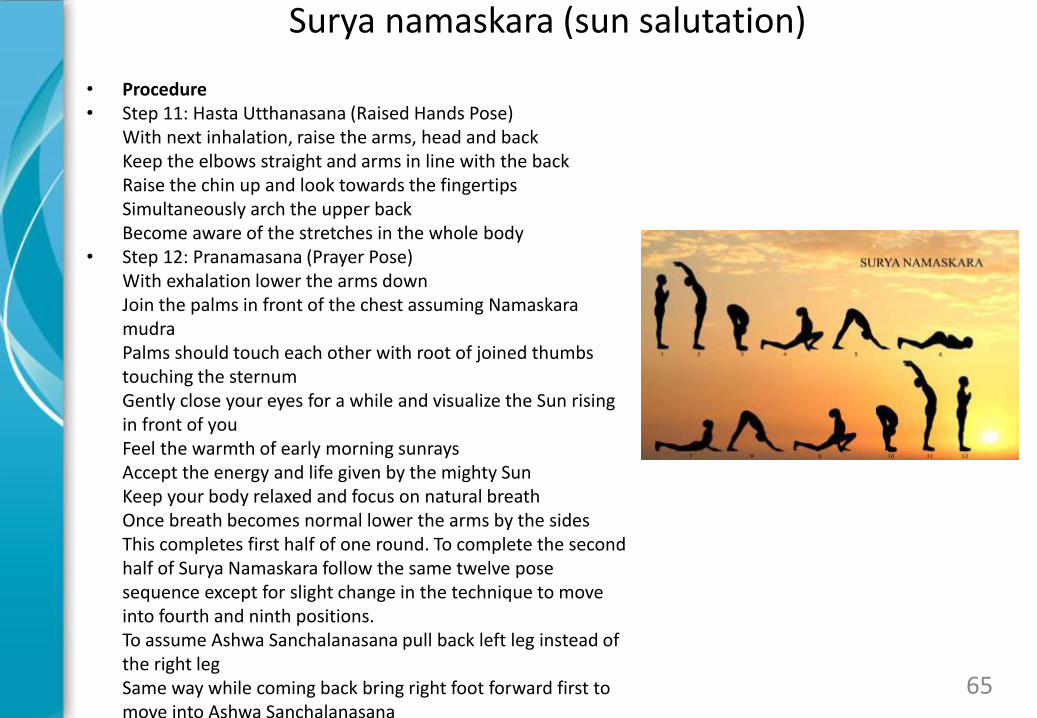
• Procedure • Step 11: Hasta Utthanasana (Raised Hands Pose)
With next inhalation, raise the arms, head and back Keep the elbows straight and arms in line with the back Raise the chin up and look towards the fingertips Simultaneously arch the upper back Become aware of the stretches in the whole body
• Step 12: Pranamasana (Prayer Pose) With exhalation lower the arms down Join the palms in front of the chest assuming Namaskara mudra Palms should touch each other with root of joined thumbs touching the sternum Gently close your eyes for a while and visualize the Sun rising in front of you Feel the warmth of early morning sunrays Accept the energy and life given by the mighty Sun Keep your body relaxed and focus on natural breath Once breath becomes normal lower the arms by the sides This completes first half of one round. To complete the second half of Surya Namaskara follow the same twelve pose sequence except for slight change in the technique to move into fourth and ninth positions. To assume Ashwa Sanchalanasana pull back left leg instead of the right leg Same way while coming back bring right foot forward first to move into Ashwa Sanchalanasana
65
Surya namaskara (sun salutation)
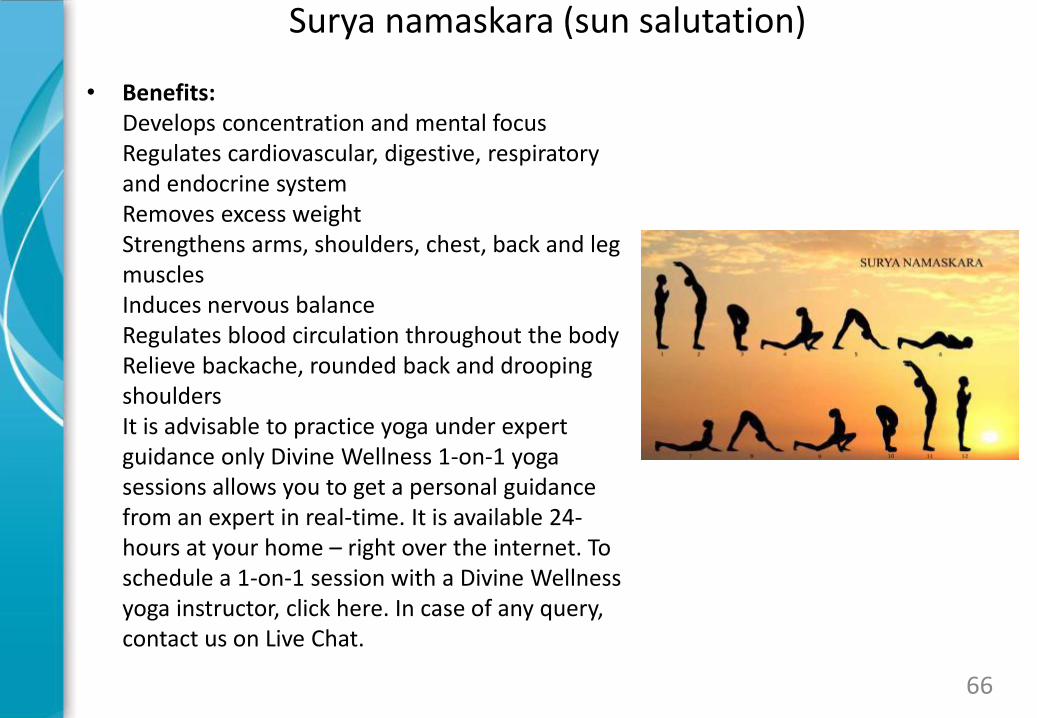
• Benefits: Develops concentration and mental focus Regulates cardiovascular, digestive, respiratory and endocrine system Removes excess weight Strengthens arms, shoulders, chest, back and leg muscles Induces nervous balance Regulates blood circulation throughout the body Relieve backache, rounded back and drooping shoulders It is advisable to practice yoga under expert guidance only Divine Wellness 1-on-1 yoga sessions allows you to get a personal guidance from an expert in real-time. It is available 24-hours at your home – right over the internet. To schedule a 1-on-1 session with a Divine Wellness yoga instructor, click here. In case of any query, contact us on Live Chat.
66
References • http://www.divinewellness.com/yoga-asanas/sun-salutation.html
67
Thanks for taking step
towards your health
Now Practice
69


![Sukh Evaluation Question[1]](https://img.pdfslide.us/doc/110x75/5556bab2d8b42ad94d8b4591/sukh-evaluation-question1.jpg)