Embed Size (px)
Citation preview

HOME BICYCLEREPAIR1C
HA
PT
ER
ball-tipped hex key set
flat-tippedscrewdriver
needlenose pliers
diagonal cutter
crankarm puller
headset wrench
tire levers
pedal wrench
third hand tool
hook spanner
cassette lockringtool (Campagnolo)
cassette lockringtool (Shimano)
adjustable pin spanner
adjustablewrench
chainwhip
cone wrenches
phillips screwdriver
spoke wrench
xviii-1-095_BikeMaint_01 prep 12/21/04 10:43 AM Page xviii

hether you ride a bicycle for fun,fitness, transportation, or an adrenalin fix—ormaybe all of these—you need this book. Even if youthink you never want to perform your own repairs,knowing your bike intimately, as you can afterreading this text, is an invaluable tool for any cyclist.Just in taking this book from the shelf, you’ve shownyourself to be a cycling enthusiast: someone who hasmore than a passing interest in bicycles and cycling.You ride your bike (maybe several) far, frequently, orboth. Perhaps you ride only in fair weather, or per-haps you’re out even when the Postal Service wantsto stay in. In either case, all that time spent in thesaddle of any bike results in wear and tear, no matterwhat the quality of the bike.
Luckily for us, bicycles are nearly as fun andeasy to service as they are to ride. The bicycle is oneof the few things left in our lives that just aboutanyone—with a small amount of coaching—can un-derstand and maintain at home. Your car, as a com-parison, is intentionally shrouded in mystery, withanything not integral to its daily use hidden behindplastic and glossy paint. Lights on the dashboardhint that something is amiss, but only your dealercan coax the car to reveal its ailment with special di-agnostic equipment that reads the millions of bits ofinformation that the car’s computer tracks. The bi-cycle, though, is open and obvious. A lightweightframework of tubes proudly presents all the bicycle’smechanisms for inspection and adjustment. Shapes,materials, and dimensional standards have changedslightly as technology has progressed over the bi-cycle’s nearly 150-year history, but form still followsfunction on the bicycle, and the same simple me-chanical principles make it go and stop.
If you’re a numbers person, you’ll be pleased tofind that geometry and dimensional tolerances candictate how and when your bike works and doesn’twork. And if you’re not a numbers person, you’reequally in luck. How’s this possible? Despite the fact
that bicycle components are designed with very spe-cific dimensions that allow them to work seamlesslytogether, it’s important to remember that human in-terface is what makes a bicycle work. Without aperson, a bicycle cannot stand on its own twowheels; it can’t steer; it can’t shift. It needs a rider tobe a bicycle. And like your favorite pair of jeans,when something “feels” right, it’s usually right.
“So what does it really take?” you ask. “And haveI got it?” Every cyclist needs a pump, a patch kit, afolding tool or mini tool kit, and just a little bit ofknow-how to keep a favorite bike—or any bike, forthat matter—rolling along smoothly. That’s it. Really.
Hand tools are easy. There are many high-qualityoptions available from several manufacturers, and thegood folks at your local bike shop can help you decidewhich suits you and your bike best. The Bicycling Guideto Complete Bicycle Maintenance & Repair can take careof the rest; giving you the knowledge and the confi-dence to start you on your way to knowing your bikebetter than you ever have before—because knowingyour bike will make every ride more enjoyable. Andisn’t that what it’s really all about?
YOU ARE IN THE SADDLEMaintaining your own bicycle can be relaxing, re-warding, and financially liberating. As parts wear,they need to be replaced—and you’ll pay the sameamount for these whether the bike shop installs themor you do it yourself. A good mechanic costs money,though, and a cheap mechanic may end up costingyou more in the long run. So it stands to reason thatthe cost (in time) of performing your own labor maybe repaid both in dollars—and in pride.
There are other good reasons to become yourown bike mechanic, too. The more you work onyour bike, the more you learn about it, and thebetter it runs. You soon discover that a tweak hereand a tweak there is often all it takes to keep things
1
W
xviii-1-095_BikeMaint_01 prep 12/21/04 10:43 AM Page 1
running right. You learn that some problems areeasy to correct and that some are difficult, and thenyou learn a few tricks to prevent the difficult ones.You see the value of preventive maintenance in min-imizing the need for expensive repairs.
Think how much more enjoyable, too, yourrides with friends will be if you can quickly diagnoseand correct a roadside or trailside problem on ariding partner’s bike. You can be a hero and preserveprecious ride time that might otherwise be spenthobbling home.
Of course, unless you’ve made the greatest com-mitment of all—to open your own full-service bicyclerepair shop—there will be repairs that are simply outof your grasp for lack of specialized tools. Things likeframe-alignment tables and facing tools are just tooexpensive and infrequently needed to justify for anyhome workshop. When these kinds of situations arise,knowing the root cause can help a qualified profes-sional help you much more quickly and efficiently—the way a physician is more able to treat your physicalailments when you’ve stated your symptoms clearly.These procedures will be discussed in this book soyou can understand and identify them.
CREATING A SPECIAL WORK SPACEYour home workshop should be in a comfortable,open space with sufficient ventilation. Garages andbasements are the most popular locations for a homework space, but be certain that the lighting is goodand the surrounding area is kept relatively clean. Afloor clean enough to eat off isn’t necessary, but youdon’t know frustration until you’ve chased a 1⁄8-inchball bearing across a cluttered basement!
In a space of about 7 by 7 feet, you can create apretty comfortable bicycle repair station. This allowsfor a workbench about 4 to 6 feet long by 2 feet deepfor resting tools, small parts, and a supply of lubri-cants and cleaners. Opposite the workbench, youwill want a workstand to hold your bike. An ideallyplaced workstand will hold your bike about 36 to 40inches from the workbench, giving you enoughroom to move while still keeping both bike andbench within easy reach. On the back of your work-bench, a pegboard with hooks to hold your most fre-quently used tools will keep things organized andefficient. Paint the pegboard a light color to make
2
HO
ME
BIC
YCLE
REP
AIR
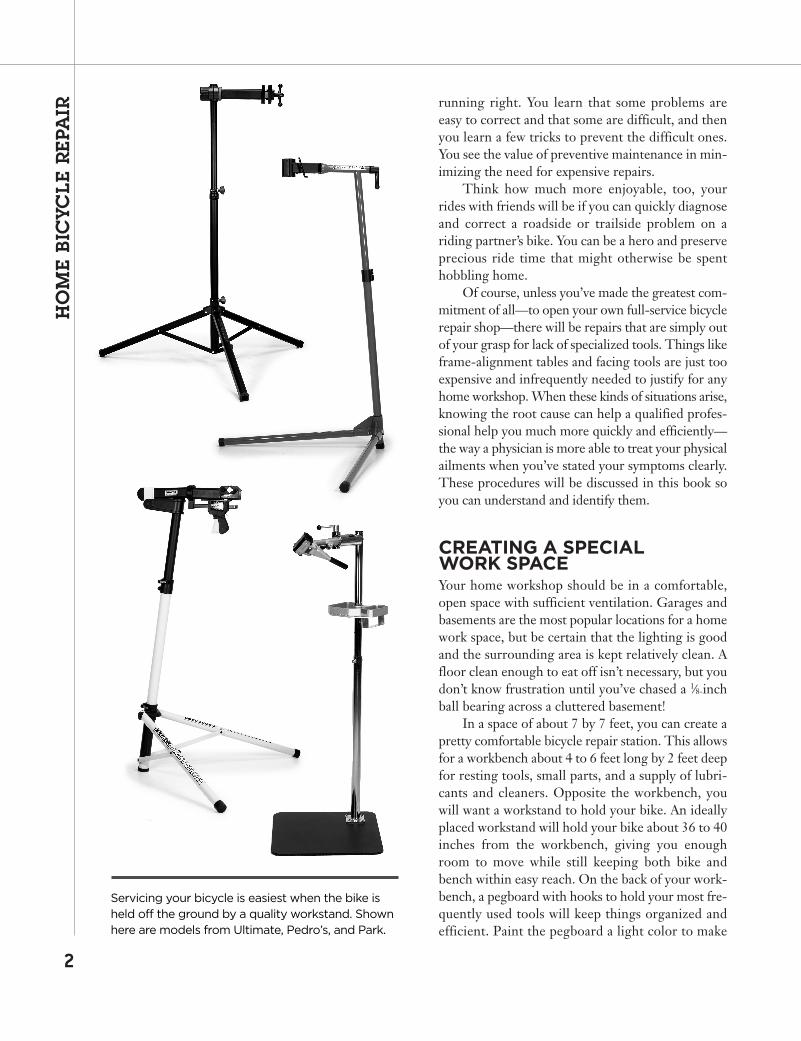
Servicing your bicycle is easiest when the bike isheld off the ground by a quality workstand. Shownhere are models from Ultimate, Pedro’s, and Park.
xviii-1-095_BikeMaint_01 prep 12/21/04 10:43 AM Page 2
Hardware stores sell kits for building work-benches just like the one described, but the stur-diest are easily constructed with just a few 2�4sand a sheet of 3⁄4-inch plywood (Spend a little extraon exterior-grade plywood. It’s more resistant toliquids that can cause your workbench top to warpand peel.) Build your workbench about 34 to 36inches tall (or a little higher or lower if you’re over6 feet or under 5 feet tall). If you have a larger areato play with, go ahead and build your workbench 8
your tools more visible, then outline the tools witha black marker on the board to help remind youwhere things go and what isn’t put away. A shortpiece of 2�4 with holes drilled through makes agreat storage solution for screwdrivers, loose hexkeys, pens, picks, and other small tools. Lastly, ashelf under your workbench is handy for housing asmall toolbox with less frequently used tools, a smalltrash bucket, a rag bin, and some small bins forhardware and spare parts.
3
Crea
ting a
Specia
l Work Sp
ace
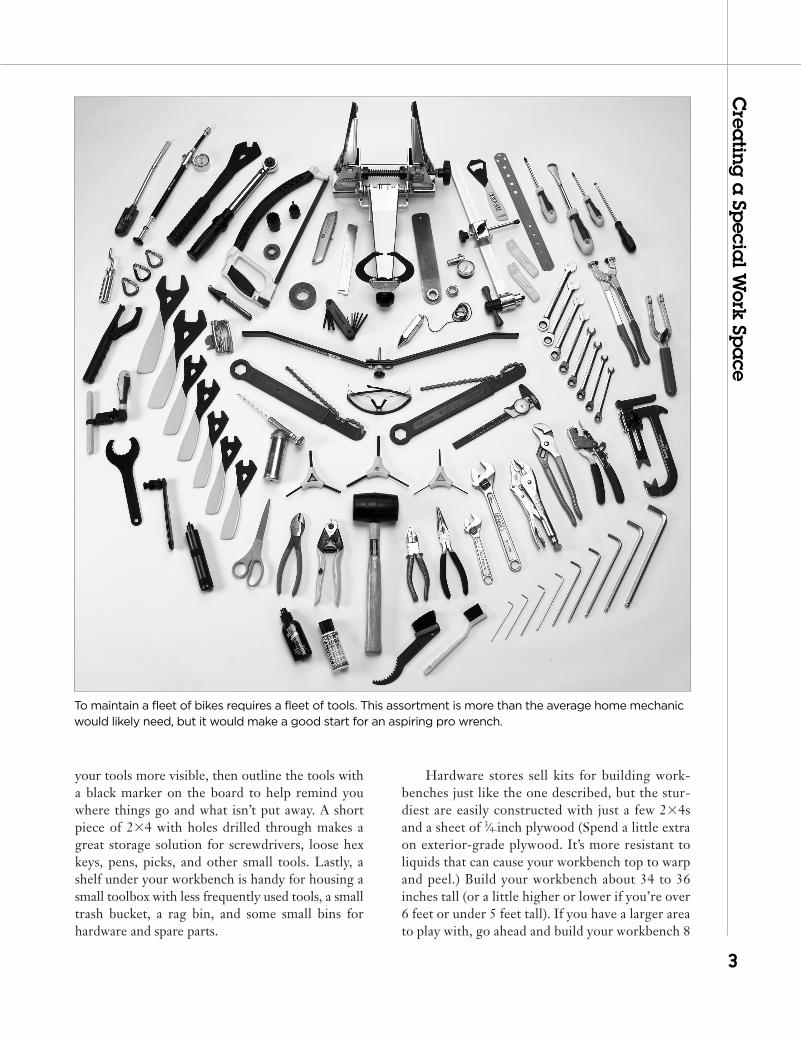
To maintain a fleet of bikes requires a fleet of tools. This assortment is more than the average home mechanicwould likely need, but it would make a good start for an aspiring pro wrench.
xviii-1-095_BikeMaint_01 prep 12/21/04 10:43 AM Page 3

feet long, and revel in all that extra elbowroom.It’s easiest to work on your bike when it’s sus-
pended a couple of feet off the floor. This can beachieved in a number of ways. A system as simple astwo cords hanging from a rafter with hooks to holdyour bike at the correct level or a rack made fromscrap 2�4s to hold your bike up by the frame (thesame way a rack on the back of a car works) servesjust fine for the purposes of most simple mainte-nance tasks. Just be sure that there is clearance forthe crank and wheels to spin freely. For frequent
use or for more complex jobs, though, nothingbeats a proper bicycle repair stand. Ready-madestands come in versions to suit anyone from themost casual home tinkerer to the seasoned pro.They work by clamping onto the seatpost or aframe tube (be careful and read the manual—someof these clamps are powerful enough to crush aframe if not applied properly) and allow you to ro-tate the bike up or down to bring the area you areworking on closer to you.
All this talk of garages, basements, and extra
4
HO
ME
BIC
YCLE
REP
AIR
GENERAL TOOLS
■ Phillips screwdrivers (#1 and #2)
■ flat screwdrivers (7⁄32”, 1⁄4”, and 5⁄16”)
■ standard pliers
■ water pump pliers (Channel Lock, etc.)
■ needle-nose pliers
■ locking pliers (small, medium - Vise Grip, etc.)
■ diagonal cutter
■ hex keys (2, 2.5, 3, 4, 5, 6, 8, and 10mm)
■ Torx keys (T-7, T-25, and T-40 for disc brakemaintenance and some chainring bolts)
■ metric combination wrench set (6 through17mm)
■ adjustable wrenches (8 and 12 inch)
■ 8-ounce ballpeen hammer
■ plastic, rubber, or leather mallet
■ scissors
■ tape measure (in centimeters and inches)
■ hacksaw frame and blades (18 and 32 tpi)
■ utility knife
■ awl
■ cold chisels (for cutting or carving metal)
■ punches (for driving out or aligning things)
■ outside calipers
■ small magnet (useful for extracting ball bearings from components)
■ rubber gloves
■ safety glasses or goggles
BICYCLE TOOLS
■ floor pump with gauge
■ repair stand
■ tire levers
■ pedal wrench (long-handled wrench withstrong jaws for removing and installing pedals)
■ cone wrenches (13 through 19mm for adjustingwheel axle bearings)
■ Schrader valve core remover (to fix slow leaksin car-type valves)
■ cable cutter (cuts brake and shift cableswithout fraying)
■ third hand tool (for brake cable adjustments)
■ chain rivet extractor (for removing, installing,and repairing chains)
■ cassette lockring remover or freewheel removerthat fits the cogset(s) on your wheel(s)
■ chain whips (for holding cassettes steadyduring lockring removal or to disassemble freewheels)
■ spoke wrench(es) that fit your spoke nipples
■ crank bolt wrench or 14mm socket and ratchethandle
■ crankarm remover(s)
■ chainring bolt spanner
■ bottom bracket tool(s) to fit your bottombracket(s)
■ headset wrenches (if you have a threadedheadset)
■ suspension pump (if you have air-sprungshocks)
Good Tool Assortment
xviii-1-095_BikeMaint_01 prep 12/21/04 10:43 AM Page 4

space may be making the apartment dwellers amongus feel left out in the cold, but there’s no need to de-spair. Folding workbenches and repair stands candisappear into a closet quickly and easily, along witha small tool tote. Pick up a small linoleum remnantfrom a flooring store and you can even save yourcarpet (and security deposit!). Lay it down whenworking on your bike; when you’re finished, wipe itdown and roll it up to hide away with your portablebike shop.
It is likely that you already have many of thebasic hand tools you will need to get startedworking on your own bike. If not, things like ad-justable wrenches, pliers, screwdrivers, and combi-nation wrenches can be most economicallypurchased from your local hardware store. Of
course, if you like to “keep it in the neighborhood,”bicycle-specific tool manufacturers like Pedro’s andPark make shop-quality versions of these, as well asall the specialty tools you may eventually want orneed. We have provided lists of what makes a“good” assortment of tools for the casual home me-chanic and what could be an “ultimate” assortmentfor those who want to be entirely self-sufficient.You’ll also need cutting oil (if you plan to tap orchase threads), electrical tape, grease, solvents, spraylube, thread adhesive, and wax. If you’re not surewhere you fall, start small and add tools to your col-lection as the need arises.
Now that your workspace is organized, you maywant to create a list of periodic maintenance tasks tohang next to your favorite cycling calendar.
5
Crea
ting a
Specia
l Work Sp
ace
■ Sutherland’s Handbook for Bicycle Mechanics(the definitive source for component measure-ments)
■ stainless steel ruler (6 inch/15cm)
■ sturdy bench vise
■ solvent tank (a safe place to clean parts andstore solvent)
■ truing stand
■ Vernier caliper (a precise tool for checkingcomponent dimensions)
■ dishing gauge (for centering the rim over theaxle when building or truing wheels)
■ taps (for repairing threads; 5mm x 0.8, 6mm x1.0, 7mm x 1.0, 8mm x 1.0, and 10mm x 1.0)
■ spoke tensiometer (for measuring spoke tension)
■ tap handle
■ dropout alignment tools (for repairing bentdropouts)
■ thread pitch gauge (for measuring threads)
■ headset installation tools (for installing headset cups and crown races)
■ spoke ruler
■ derailleur hanger alignment tool (for repairingbent hangers)
■ tapered reamer (for enlarging holes by hand)
■ rear triangle alignment indicator bar (for checking frame alignment)
■ medium and coarse, round and flat files (for machining metal parts by hand)
■ electric drill and drill bits
■ Bondhus hex keys (hex keys with a ball-shapedend ideal for working in tight spaces; 2 through6mm, and 8 and 10mm)
■ inside caliper
■ torque wrench
■ grinder with wire wheel
■ hex key bits (to fit torque wrench; 4, 5, 6, and8mm)
■ air compressor with blower attachment (simplifies tire inflation and grip installation)
■ snap ring pliers
■ lockwire pliers and lockwire (for securing discbrake hardware and for wiring mountain bikegrips in place)
■ tubing cutter
■ hydraulic disc brake bleed kit(s)
Ultimate Tool AssortmentIncludes all of the tools from the Good Tool Assortment list, plus:
xviii-1-095_BikeMaint_01 prep 12/21/04 10:43 AM Page 5
AVOID PROBLEMS THROUGHPREVENTIVE MAINTENANCEEverybody has heard the saying “An ounce of pre-vention is worth a pound of cure.” Well, when itcomes to bikes, an ounce of preventive maintenanceis worth a pound of expensive repair.
The first part of preventive maintenance is alsothe simplest—keeping your tires properly inflated.You’ll find the recommended pressure written onthe tire’s sidewall. At least every other ride for roadbikes or once a week for mountain bikes, check thepressure with a floor pump that has a gauge. Main-taining the proper tire pressure makes the bike rollmost efficiently. More important, it ensures thatwhen you hit a rut or pothole or rock, your wheelswill have the best chance of escaping damage (youcan help, too, by getting off the saddle and ab-sorbing the shock in your knees and elbows).
Next priority should be keeping your bike cleanand lubricated. Freeing your bike of grime and gritby wiping it down regularly will help your machineperform better and prevent corrosion. It’s alsoeasier to inspect your frame for signs of corrosionand cracks at the tube junctions when the frame isclean. Discovering these issues early gives you thebest chance of mitigating the problem and savingthe frame (or your front teeth).
At least once a month (or after every muddyride), wipe down your frame with a damp cloth.While you’re at it, polish it with a car wax or an all-in-one bike cleaner (even Lemon Pledge furniturepolish for a quick spray and spruce-up). Polish orwax will give your paint job a slick surface that dirtand grit will less easily adhere to and makes eachsubsequent cleaning easier.
Clean the rims of your wheels frequently be-cause the grime that builds up on them is passedalong to your brake pads and can reduce the brakes’effectiveness. At least once a month (more fre-quently if you do a lot of riding on dirty road sur-faces), clean your rims and brake pads with alcohol.
Inspect the brake pad surfaces that strike therims, and use an awl or pick to dig out any smallstones, metal, and debris embedded in the pads.These will quickly cut into the rims, damaging themover time. Then, scuff off the glaze that may developon your brake pads with a piece of emery cloth,sandpaper, or a fine file.
The grit and grime that makes its way into your
6
HO
ME
BIC
YCLE
REP
AIR
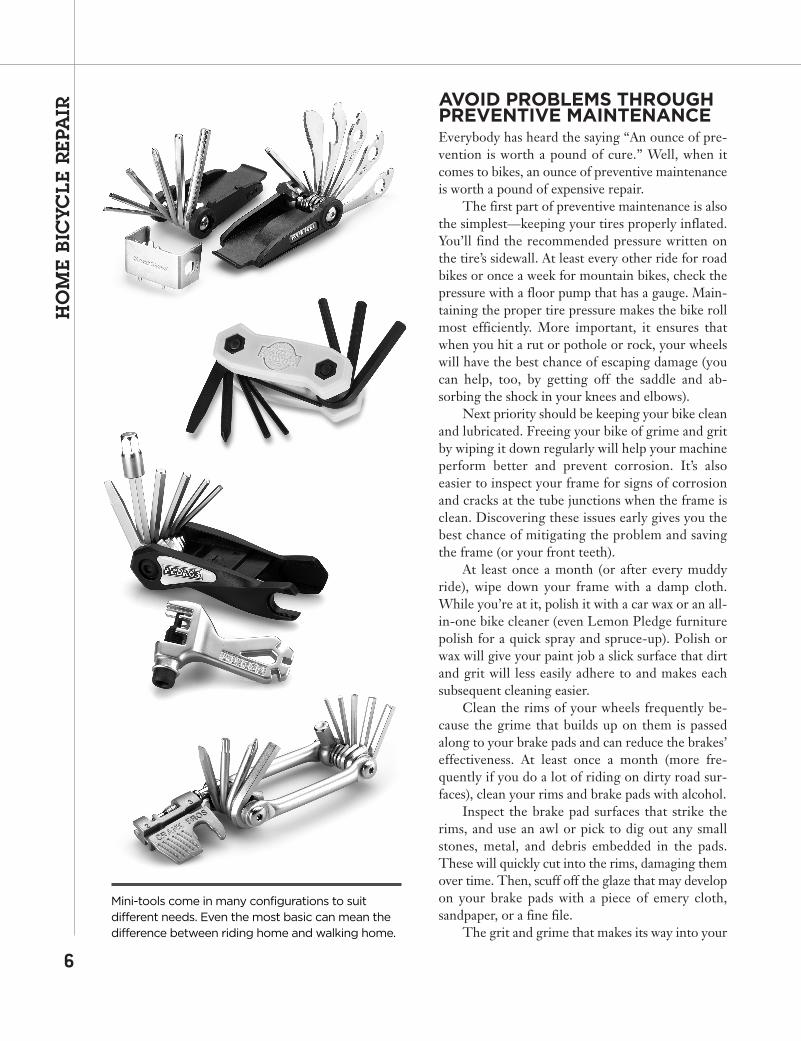
Mini-tools come in many configurations to suit different needs. Even the most basic can mean thedifference between riding home and walking home.
xviii-1-095_BikeMaint_01 prep 12/21/04 10:43 AM Page 6

hubs, headset, and bottom bracket is a little moredifficult to remove. In this case, you must disas-semble the parts, clean them, and repack them infresh grease. There are also preventive measures thatyou can take. Wrapping pipe cleaners around theopenings into your hubs or pulling sections of oldtire tubes over the upper and lower stacks on yourheadset are cheap, effective ways of making a me-chanical seal. These techniques are described furtherin the chapters devoted to these bike parts.
Besides inflating tires and cleaning and lubri-cating, the other primary maintenance tasks on abike are to make sure that parts are properly fas-tened and adjusted.
Some loose or improperly adjusted parts aredangerous. Others simply lead to unnecessary wearand deterioration of components. Both types ofproblems can be avoided by frequent checking tomake sure all parts of your bike are properly tight-ened and adjusted.
CHOOSING CLEANING MATERIALSWhat do you use to clean a bike? Water, forstarters. Some cyclists hose down their bikes after adirty ride. This technique is fine when using thetrickle from a garden hose or squirts from a spraybottle. When you do this, just bounce the bike onits tires a couple times to shake off some of thewater, then let it air-dry in a warm place. Treat it thesame way after riding in a drenching rain. In bothcases, if you have a leather saddle, you don’t want toget it too wet, so wrap it in a plastic bag to protectit. Avoid using pressurized water streams, like thoseat a car wash for example, though. Too much forcecan push water past the seals in your hubs, headset,and bottom bracket and force the grease out, in-creasing the frequency with which you will need toservice these bearings.
Along with the water, use a sponge and a mildsoap such as dish soap. Some parts get too greasy andgrimy to be cleaned with soap and water. Parts suchas chainrings, chains, the insides of hubs, headsets,and bottom brackets need to be cleaned with a de-greaser or solvent. Which one you use depends onhow difficult the part is to clean. In general, the mostaggressive solvents are the most volatile, which meansin part that their vapors will quickly permeate the airaround you and may pose a hazard to your health.
Gasoline and lacquer thinner are examples ofreadily available solvents of this type. Both are veryeffective cleaners but also are highly volatile andhighly flammable. Don’t use them.
WD-40 is a well-known product that containsseveral different solvents mixed with a light oil. Themost aggressive solvent in the mixture quickly evap-orates into the air if you leave it sitting in an opencontainer. For cyclists, WD-40 may be most usefulin its spray form for loosening gummed-up parts inderailleurs and chains. Bicycle-specific degreasersare available in varying strengths from Pedro’s,Finish Line, and Simple Green. The advantage tousing a bicycle-specific cleaner or degreaser is thatmost are formulated to not harm plastic or com-posite components that make up many of today’shigh-performance parts. As a general rule, keepcitrus-based cleaners on chains, cogs, and chainringsand away from shifters, and minimize their contactwith your bike’s paint. “Green” cleaners like Pedro’sBio Cleaner (formerly Bio Degreaser) and SimpleGreen Bike Cleaner are milder and will not harm
7
Avoid
Problem
s through Preventive M
aintena
nce
Here are tools to carry when you ride. Carrythem in a bag under your seat or in a backpack.
■ spare tube (even if you use tubeless tires)
■ tube patch kit (contains patches, glue, andsandpaper; check the glue frequently since it tends to dry out once opened)
■ tire boots (special patches to repair cuts inthe tire; a dollar bill works in a pinch)
■ tire levers
■ all-in-one mini-tool such as the CrankBrothers Multi 17 (a small tool that includes 2, 2.5, 3, 4, 5, 6, and 8mm hex keys; chaintool; flat screwdriver; Phillips screwdriver; T-25 Torx key; spoke wrenches; and 8 and10mm open wrenches)
■ frame pump or mini pump (set to fit yourtype of valve)
■ small length of wire (handy for making temporary, ‘get-home’ repairs on the road- or trail-side)
■ emergency money
■ identification (written inside your helmet,too)
Bicycle Tool Kit
xviii-1-095_BikeMaint_01 prep 12/21/04 10:43 AM Page 7
plastics or paint in any concentration. Use these toclean greasy residue anywhere on your bike.
Best of all, these cleaners are environmentallyfriendly and, in most cases, biodegradable. Despitethe relatively benign nature of these biodegradablecleaning products, wear rubber gloves idea wheneverusing cleaning agents. In fact, wearing gloves likePark’s Nitrile rubber gloves is a good way to protectyour hands and keep clean while you’re performingany bicycle repair.
Alcohol is less harsh to your skin than most sol-vents and works for lighter jobs, such as cleaning brakepads and the braking surfaces of your wheel rims.
Besides soap, water, and degreaser, all you needto get your bike parts clean are a bucket, plenty of
rags, a few sponges, pads, and brushes. Scouringpads made of synthetic materials that are kind toshiny metal surfaces are useful aids in cleaning rimsand removing road tar from bike frames. Old tooth-brushes can be put to good use cleaning freewheelcogs, chainring teeth, and chains. Larger brusheswork well for getting between spokes, aroundbrakes, and into the tight spots on the frame. Ex-periment to find what works best for you, put to-gether a kit, and store it in a bucket.
Disc brakes are extremely sensitive to oil, sospecial care must be taken when cleaning the brakedisc, or rotor. Even the small amount of oil on thesurface of your skin is enough to hinder disc brakes’performance or even ruin the brake pads perma-
8
HO
ME
BIC
YCLE
REP
AIR
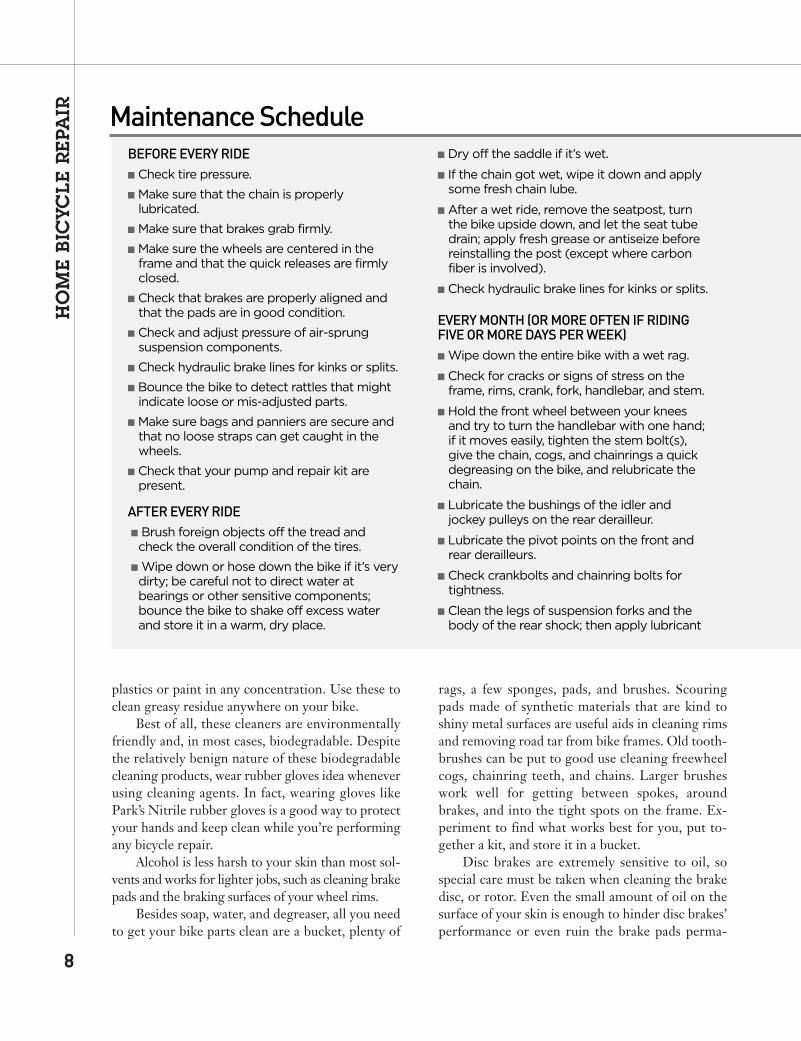
BEFORE EVERY RIDE■ Check tire pressure.
■ Make sure that the chain is properlylubricated.
■ Make sure that brakes grab firmly.
■ Make sure the wheels are centered in theframe and that the quick releases are firmlyclosed.
■ Check that brakes are properly aligned andthat the pads are in good condition.
■ Check and adjust pressure of air-sprungsuspension components.
■ Check hydraulic brake lines for kinks or splits.
■ Bounce the bike to detect rattles that mightindicate loose or mis-adjusted parts.
■ Make sure bags and panniers are secure andthat no loose straps can get caught in thewheels.
■ Check that your pump and repair kit arepresent.
AFTER EVERY RIDE■ Brush foreign objects off the tread andcheck the overall condition of the tires.
■ Wipe down or hose down the bike if it’s verydirty; be careful not to direct water atbearings or other sensitive components;bounce the bike to shake off excess waterand store it in a warm, dry place.
■ Dry off the saddle if it’s wet.
■ If the chain got wet, wipe it down and applysome fresh chain lube.
■ After a wet ride, remove the seatpost, turnthe bike upside down, and let the seat tubedrain; apply fresh grease or antiseize beforereinstalling the post (except where carbonfiber is involved).
■ Check hydraulic brake lines for kinks or splits.
EVERY MONTH (OR MORE OFTEN IF RIDINGFIVE OR MORE DAYS PER WEEK)■ Wipe down the entire bike with a wet rag.
■ Check for cracks or signs of stress on theframe, rims, crank, fork, handlebar, and stem.
■ Hold the front wheel between your kneesand try to turn the handlebar with one hand;if it moves easily, tighten the stem bolt(s),give the chain, cogs, and chainrings a quickdegreasing on the bike, and relubricate thechain.
■ Lubricate the bushings of the idler andjockey pulleys on the rear derailleur.
■ Lubricate the pivot points on the front andrear derailleurs.
■ Check crankbolts and chainring bolts fortightness.
■ Clean the legs of suspension forks and thebody of the rear shock; then apply lubricant
Maintenance Schedule
xviii-1-095_BikeMaint_01 prep 12/21/04 10:43 AM Page 8

nently. Use a cleaner specifically intended for discbrakes, such as White Lightning Clean Streak orDisc Doctor, and a perfectly clean rag to spray andwipe off the rotors. In the absence of these products,rubbing alcohol is an acceptable substitute forcleaning rotors. Disc brake pads generally shouldnot be cleaned, but in a case of oil contamination, itis sometimes possible to revive the pads by soakingthem in rubbing alcohol and then gently scuffingthem on a piece of sandpaper or emery cloth laid flaton your workbench.
LUBRICANTSAlong with thorough cleaning, properly lubricatingthe moving parts of your bike is extremely impor-
tant. There are many lubricants on the market, andhere are some general guidelines.
Grease. This book frequently calls for the use ofmedium-weight grease. This is the lubricant recom-mended for all bearing installations on a bike as wellas for threaded parts on freewheels, bottom brackets,headsets, pedals, and wheel axles. The same greasecan be used to lubricate as well as rust-protect brakeand gear cables.
The bike greases marketed by Finish Line,Park, Pedro’s, and Phil Wood, among other bike-product companies, are the type we have in mind.These greases are generally sold in tubes. If you ex-pect to use a lot of grease, you may want to purchasea tub of white lithium grease at an auto parts store.
9
Avoid
Problem
s through Preventive M
aintena
nce
to the dust wipers to keep them from dryingout.
■ Lubricate springs and pivot points on cliplesspedals.
■ Check that all brake hardware is secure.
■ Check the spoke tension and truness ofwheels and adjust as needed.
■ Check cables for kinks and fraying.
■ Measure the chain and check the cogs andchainrings for excessive wear; replace ifnecessary.
■ Check the condition of the brake pads;replace if excessively or unevenly worn; forrubber rim-brake pads, pick out debris withan awl and remove glazing by scuffing with ahalf-round file.
■ Clean rims with isopropyl rubbing alcohol.
■ Check accessory hardware (racks, bottlecages, etc.) for tightness.
■ Check the condition of glue on tubular (sew-up) tires.
■ Add two to four drops of oil to three-speedhubs.
■ Clean and treat leather saddles with saddlesoap or leather dressing.
■ Check headset for proper adjustment.
■ Check rear suspension pivot bolts for propertorque.
EVERY SIX MONTHS■ Check the bearing adjustment on front andrear hubs.
■ Check the adjustment on pedal bearings.
■ Check the bottom bracket for properadjustment.
■ Check the seat tube for rust on steel frames.
■ Clean cables and flush cable housings with a light aerosol solvent.
■ Check all hardware on the bike.
■ Overhaul suspension forks, rear shocks, andrear suspension pivots
EVERY YEAR■ Overhaul hubs.
■ Overhaul headset.
■ Replace cables and housings.
■ Replace worn parts such as tires and brake pads.
■ Replace grips or handlebar wrap.
xviii-1-095_BikeMaint_01 prep 12/21/04 10:43 AM Page 9
This is similar to bike grease and works just as well.Just make sure you buy white lithium grease and notautomotive bearing grease, which contains molyb-denum disulfide to help it handle high temperatures.This grease is too thick and sticky for use on a bike.
When servicing suspension forks, be sure toread the manual provided with the fork. Somemodels must be lubed with a certain grease type.Using a lithium-based grease, for instance, maydamage the bushings inside the fork.
Oil. Oils are used to lubricate the pivot points ofbrakes and derailleurs, the cassette bearings (insidethe cluster of gears on the rear wheel), and the chainlinks. The internally geared hubs on three-speedbikes also need a periodic healthy dose of oil, as dosuspension forks. In fact, most suspension forks useoil as a way to control travel.
Many companies offer quality oils. Pedro’s,Finish Line, ProGold (the only lubricant to ever winBicycling Magazine’s Editor’s Choice Award), DTSwiss, and a host of others offer a wide variety of oilsfor different applications. Avoid the familiar three-in-one oil because it is vegetable-based and will gumup your bike’s moving parts. For suspension forks,get the oil recommended by the manual.
As with grease, so with oil. The automotive in-dustry provides an alternative to the oil sold in bikeshops. Ordinary 30-weight motor oil is a workablesubstitute. Pour it into a squirt can and apply a fewdrops where needed. Fight the temptation, however,to be frugal and put used motor oil to use on yourbicycle. Used motor oil contains microscopic metalfilings and develops an acidic quality from the intro-duction of carbon and heat in the combustionchamber. Both of these will compromise metal sur-faces and increase wear.
There is much debate over the question of thebest lubricant for chains, the bike component that isparticularly subject to the ravages of dirt and water.This is partly because riding conditions vary somuch. What works in southern California isn’tgoing to be much good in Maine, for instance. Herewe offer general recommendations. Try varioustypes to determine what is best for you.
As a general rule, wet lubricants (oils) workyear-round but are messier and require more fre-quent cleaning of your drivetrain than dry lubri-cants, which are best suited to warm, dry conditionsbut don’t tend to hold dirt and grime as much.
What you use on your chain is somewhat lessimportant than how you use it. Contrary to whatsome may believe, it is not necessary to have a heavycoating of lubricant on the outside of the chain or onthe teeth of your chainrings and cogs. Rather, it’s theinner surfaces of the chain where wear takes place—the interfaces of the pins, plates, and rollers.
The correct way to lubricate your chain beginswith a clean chain. Removing the chain and soakingit in a solvent or degreaser is a great way to do this,but not necessary. Chain cleaning devices that soakand scrub the chain while it is still in place on yourbike do a great job, save you a step, and keep thewhole process neat and tidy. In the absence of achain-cleaning box, you can simply soak a rag in de-greaser and grip it loosely on the chain while ped-aling your drivetrain backward. You’ll need to repeatthis several times to achieve the results of soaking orof a mechanical chain-cleaning box. If there arethick clumps of dry, dirty lubricant between thechain links, scrub these out with an old toothbrush.If time allows, it’s best to let the chain dry for severalhours.
Once your chain is clean, drip lubricant over thechain while pedaling the drivetrain backward. Afterlightly coating the entire chain, continue the ped-aling motion for 20 to 30 seconds to allow the lubri-cant to work its way into the deepest parts of thechain. Use a clean rag to wipe the excess lubricantfrom the outside of the chain. This last step leaves athin film of lubricant on the outside of the chain toinhibit corrosion but minimizes the amount of gritthat will stick to the chain. Your chainring and cogteeth will receive enough lubricant just from contactwith the chain to fight corrosion.
Use these same steps before installing a newchain, as well. New chains are coated with a protec-tive, oil-based wax to prevent rust while in shippingand storage, but it is not an ideal lubricant. This pro-tectant is very sticky and will attract dirt and debris.
Keeping cables freely flowing through theirhousings follows two schools of thought. The firstsays that grease on the cables will prevent water andgrit from entering the housing. However, some dirtwill always be dragged into the housing by the mo-tion of the cable, so greased cables should be re-moved, cleaned, and regreased regularly. The othersays that a perfectly clean cable and housing allowsthe cable to move quickly and smoothly, especially
10
HO
ME
BIC
YCLE
REP
AIR
xviii-1-095_BikeMaint_01 prep 12/21/04 10:43 AM Page 10

DON’T BE A STATISTICThere’s nothing like a trip to the emergency roomto put a dent in the Sunday that you were devotingto tuning up your road rocket. Worse, it’s a terribleirony when you can’t ride because you hurt yourself
in modern, Teflon-lined cable housings. Care, too,should be taken to ensure that the cables and hous-ings remain clean by removing the cables periodi-cally and spraying a solvent or very light oil likeWhite Lightning Clean Streak or WD-40 throughthe housings to flush them.
11
Don’t Be a
Statistic
Brake cable Flush housing with aerosol solvent; if desired,lubricate using a lightweight oil
Brake pivot Medium weight bike grease or Teflon-based oil
Chain
Derailleur pivots
Internal gear hubs
Seatposts (steel or aluminum frame and/orseatpost)
Seatposts (titanium frame with steel, aluminum,or titanium seatpost; titanium seatpost withsteel, aluminum, or titanium frame)
Seatposts (carbon fiber frame with any materialseatpost; carbon fiber seatpost with anymaterial frame)
Stem (quill-type)
Stem (threadless type)
Suspension fork dust wipers
Threads
Pick a chain lubricant; there are lots out there fordifferent conditions
Teflon-based oil
Lightweight machine oil with no particulateadditives
Medium weight bike grease
Antiseize compound
Nothing (any type of lubricant could causeslipping and possibly compromise the carbonfiber)
Medium weight bike grease; substitute antiseizecompound if any titanium component isinvolved
Nothing
Teflon-based oil
White lithium grease, medium weight bike grease,antiseize compound, or thread-lockingcompound, depending on the application
Brake spring Medium weight bike grease
Bottom bracket spindle Medium weight bike grease (do not lubricatesquare-taper spindles unless directed to by thecrankarm manufacturer
Recommended LubricantsPART LUBRICANT
Medium weight bike greaseBall bearings
xviii-1-095_BikeMaint_01 prep 12/21/04 10:43 AM Page 11

cranking on your sled. Fortunately for you, we’vemade every dumb mistake a mechanic can make andare here to tell you about them. Keep these in mindas you wrench and you’ll escape the embarrassmentand downtime of an injury. Also, take your time, usecommon sense, and be careful.
Bad jab. When you’re pushing down with ascrewdriver, knife, awl, electric drill—anythingsharp—make sure your free hand and any otherbody part aren’t directly behind the object you’reoperating on. If you slip, you’ll likely cut, poke, ordrill yourself.
Face job. Likewise, whenever you’re pulling onthings, keep your face out of the way. The classicgoof is pulling up hard to remove something, say afrozen seatpost or seat. When it releases, you bash
yourself in the face. Ouch.Slice of life. Watch out for sharp parts. When
removing pedals, for instance, you’re workingaround the chainrings with all those nasty teeth(not just sharp, but greasy, too). A good way toprotect yourself is to always shift the chain ontothe large chainring before trying to remove or in-stall a pedal. That way, the teeth are covered. Andwatch out for frayed cables, which can stick youlike splinters.
Can clumsiness. When using spray lubes orcleaners, be sure the nozzle is pointing away fromyour face. And don’t drop the cans because that canknock the nozzles off, leading to broken cans thatwon’t stop spraying. Also, read the labels before useso you know what to do if you get the stuff in your
12
HO
ME
BIC
YCLE
REP
AIR
A bike repair school, like this class being held at United Bicycle Institute in Ashland, Oregon, is the idealstarting point for a career in bicycle mechanics.
xviii-1-095_BikeMaint_01 prep 12/21/04 10:43 AM Page 12

eyes. Be sure to work with spray lubes in ventilatedareas only.
Splish-splash guard. When working with sol-vents, wear rubber gloves to protect your skin andgoggles to protect your eyes from splashback.
Test-ride. After finishing a repair, test-ride thebike—but take it easy. Even the best mechanicsforget things. It’s better to pedal gently and testthings at slow speeds than to vault into the saddleand sprint down the road.
TAKING IT TO THE NEXT LEVELIf you get hooked on fixing bikes, you may want topursue it as a career or learn as much as you can.While it’s a tough field in which to earn a living, ifyou love bikes, wrenching from 9:00 to 5:00 (okay,more like 10:00 to 8:00, but love knows no time) cansure be satisfying. So how do you get the experienceneeded to land a job or to do advanced work? Oneapproach is to attend a bike-repair school such asthose offered by Barnett’s Bicycle Institute in Col-orado Springs, Colorado, and the United Bicycle In-stitute in Ashland, Oregon.
These extensive courses plunge you headfirstinto the world of bicycle mechanics, similar to whatit would be like working in a shop. You’ll graduatehaving worked on many different bikes and prob-lems, confident in your ability to troubleshoot what-ever bicycle failure comes your way. The courseseven provide manuals that you keep for use in thereal world.
If you’re not ready to attend a repair school oryou don’t want to spend the tuition for one, ParkTool has put together a program called Park ToolSchool that is run through local bike shops acrossthe country. Here you can learn bicycle repair onyour own bike in small classes with lots of one-on-one time with the instructor. You might also checkcommunity colleges or universities that may have abike co-op. These often offer much more affordablebike-repair classes where you can get hands-on ex-perience. If you can’t find one, consider rounding upsome friends who’d like to learn repair, and then ap-proach local shops to see if they’d be willing to puttogether a course. They may not have thought of itbefore and might be happy to test the profit poten-tial of such an idea.
BASIC PRINCIPLES OFBICYCLE MAINTENANCE AND REPAIRHere are the guidelines that we live by when itcomes to bicycle maintenance and repair.
Think safety first. Wear rubber gloves to pro-tect your hands from solvents and grease. Don gog-gles to protect your eyes when using hammers orpower tools. Wear a face mask and ventilate yourshop when working with chemicals.
Don’t wait until severe problems arise beforedoing anything. Preventive maintenance is the bestway to take care of your bike.
When lubricating your bike, use plenty of oil
or grease, then wipe away any excess that will attractgrit. Don’t wipe off dirty grease that appears on theoutside of bearings until overhaul time; doing so willonly shove grit inside the bearings.
Most parts are turned to the right to tighten
and to the left to loosen. One way to remember thisis to repeat, “Righty, tighty; lefty, loosey.” Thecommon exceptions to this rule are the left pedaland the right side of the bottom bracket.
Before installing any threaded part, check the
threads to see that they match. Don’t mismatchthreaded parts. And never force things: Alwaysgrease threads first, then start threading them to-gether carefully and gently.
Take it easy when tightening things. Bicyclecomponents are often small and made of lightweightmaterials. Tighten, then check the tightness, thentighten some more if needed. That’s better thanstripping threads and breaking parts.
Some repair jobs are better left to experts.
Learn to recognize your skills and limitations. Learnto make wise choices as to what you can handle andwhat’s better left to a trained shop mechanic.
BOXING A BIKEThough it’s not really a repair topic, knowing howto properly box a bike for shipping can come inhandy. Most airlines require that a bike be placed ina box before you can take it on a flight. Anothergood way to get your machine somewhere is to shipit via United Parcel Service (UPS) or Federal Ex-press. Both require that the bike be boxed in aproper bike container.
More important, a careful packing job will pro-
13
Boxing a
Bike
xviii-1-095_BikeMaint_01 prep 12/21/04 10:43 AM Page 13

tect the bike and improve the chances that baggagehandlers won’t trash your prize possession. The firststep is getting a good box, and the place to do that isa bike shop. Tell them the type of bike it is and theframe size so they can select the correct box. It’s agood idea to call first because shops may have spareboxes only when they’re building new bikes, whichisn’t necessarily every day.
Some shops sell bike boxes for a nominal fee;others give them away. Besides the box, pick upsome 2-inch-wide packing tape. Get good tape that’sdifficult to tear and that will stick fast, like the kindUPS sells. Other things you’ll need include a per-manent black marker (to address the box and crossout old addresses), pipe insulation (or newspaper orbubble wrap), string, elastics, a fork spacer (ask at theshop or make a 1-inch by 1-inch wood block that’s100 mm long), and a shoebox-size box for small-parts storage.
The fork-spacer block is an important piece be-cause it will prevent the fork from being damagedshould some gorilla-like handler abuse your box. Ifyou get a plastic fork spacer from a shop, it willpress into the dropouts and stay in place. If youmake your own spacer out of wood, however, you’llneed to fasten it in place. Pressing it between theblades usually isn’t sufficient, and it will do no goodif it falls out the first time that someone bumps ordrops the box. One way to attach the spacer is todrill holes in each end and drive in sheetrock
screws. Also, insert washers between the screws andthe dropouts.
It’s also a good idea to reinforce the box. Somecareful packers get an oversize box and put the cor-rect size box inside the first to create a double-wallbox. This adds weight but pretty much guaranteesthat the box will protect your prize possession fromdamage.
If you don’t want to double the box, you cansimply put in pieces of cardboard on the sides of thebox to reinforce it. Or, if you have some 1⁄4-inch ply-wood or old paneling, use pieces of that to reinforcethe cardboard.
Keep in mind that airlines charge an additionalfee for bringing your bike on the plane—usuallyabout $75 to $100 one way. It’s often cheaper to shipthe bike using UPS or FedEx. This is also easierthan dragging the bike through the airport. Intoday’s time of heightened security awareness, it’sbest not to try to fool the airlines by disguising boxesor lying about their contents. It could mean the dif-ference between making your flight and spending 3hours in a security shakedown.
The step-by-step instructions on boxing a bikethat begin on page 15 refer to mechanical skills de-scribed later in the book. If you don’t understand astep, jump to the chapter pertaining to the compo-nent being described to learn how to work on thepart. Most of the skills required to box a bike are notadvanced.
14
HO
ME
BIC
YCLE
REP
AIR
xviii-1-095_BikeMaint_01 prep 12/21/04 10:43 AM Page 14

1 To prevent cuts, remove any protruding staplesfrom the box lids. Start bike preparation by re-
moving the pedals with a pedal wrench. Turn the leftpedal clockwise to loosen; turn the right pedal coun-terclockwise. Place the pedals in the small-parts box.Shift onto the largest rear cog and smallest chainring.To prevent damage, cover all the tubes and the leftcrankarm with pipe insulation (see photo), bubblewrap, or many sheets of newspaper wrapped andtaped. Loosen and remove the seat and seatpost asa unit. If necessary, remove the handlebar and com-puter, carefully unwinding the cable from the brakewire. Wrap the seat and seatpost, aero bar, and com-puter. Place the computer in the small-parts box.
2 If you are taking your bike on a plane or shippingby air, the lower atmospheric pressure in the
cargo compartment should be taken into considera-tion. Deflate tires to about 25 psi so they won’t burst.Air-sprung shocks and suspension forks should alsobe aired down to prevent blown seals and oil weeping.
3 Open both sidepull brake quick-releases, unhookcantilever link wires, or release the noodle from
direct-pull cantilevers. If you have slotted cable stops,lift the brake housings out of the stops. For the shiftcables, click the right lever several times as if you’reshifting to smaller cogs, then pull on the front derailleur to create slack and release the derailleurhousing sections. Some bikes have stems that openso that the handlebars can be removed intact (that is,with the levers and grips attached). If you have thistype, open the stem, remove the bar, and reattach the stem parts (see photo).
15
HO
ME B
ICYC
LE REPAIR
Boxing a Bike
xviii-1-095_BikeMaint_01 prep 12/21/04 10:43 AM Page 15
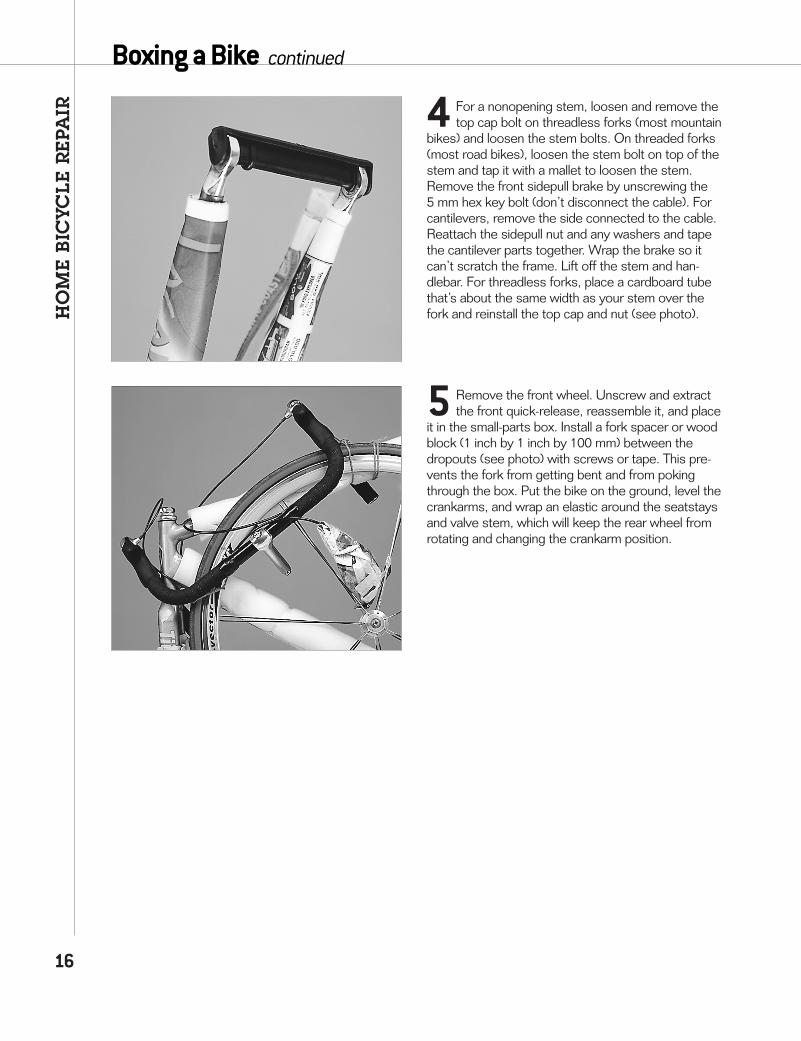
4 For a nonopening stem, loosen and remove thetop cap bolt on threadless forks (most mountain
bikes) and loosen the stem bolts. On threaded forks(most road bikes), loosen the stem bolt on top of thestem and tap it with a mallet to loosen the stem. Remove the front sidepull brake by unscrewing the 5 mm hex key bolt (don’t disconnect the cable). Forcantilevers, remove the side connected to the cable.Reattach the sidepull nut and any washers and tapethe cantilever parts together. Wrap the brake so itcan’t scratch the frame. Lift off the stem and han-dlebar. For threadless forks, place a cardboard tubethat’s about the same width as your stem over thefork and reinstall the top cap and nut (see photo).
5 Remove the front wheel. Unscrew and extractthe front quick-release, reassemble it, and place
it in the small-parts box. Install a fork spacer or woodblock (1 inch by 1 inch by 100 mm) between thedropouts (see photo) with screws or tape. This pre-vents the fork from getting bent and from pokingthrough the box. Put the bike on the ground, level thecrankarms, and wrap an elastic around the seatstaysand valve stem, which will keep the rear wheel fromrotating and changing the crankarm position.
16
HO
ME
BIC
YCLE
REP
AIR
Boxing a Bike continued
xviii-1-095_BikeMaint_01 prep 12/21/04 10:43 AM Page 16
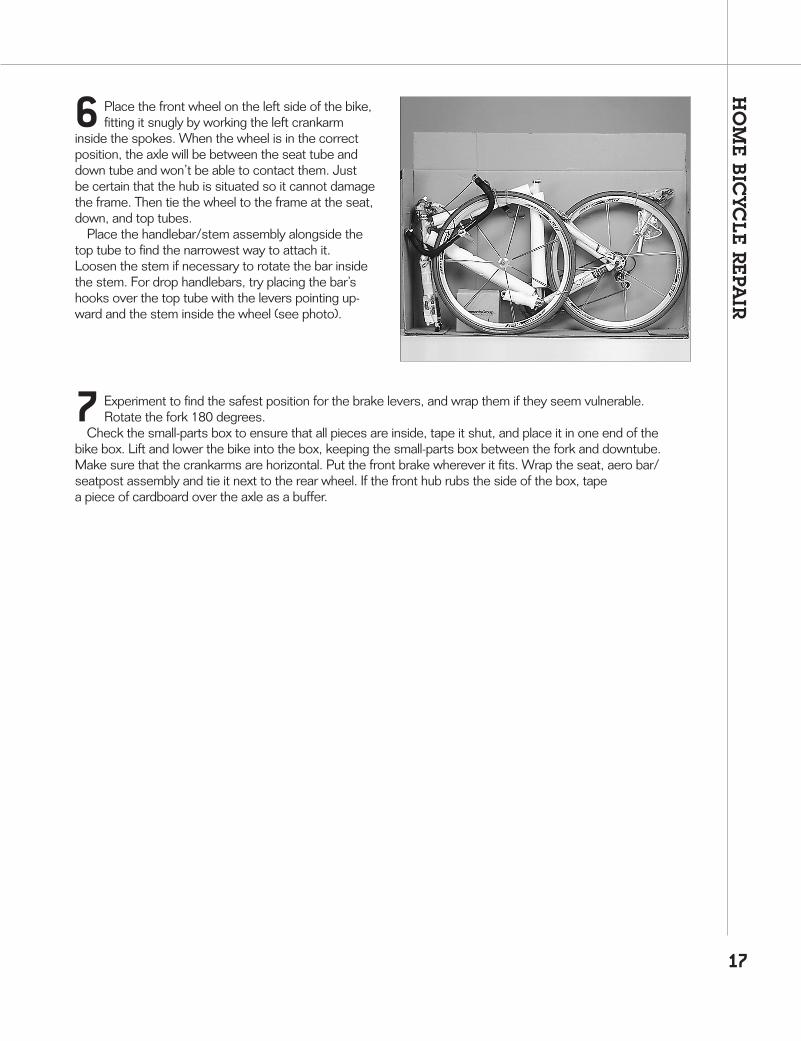
6 Place the front wheel on the left side of the bike,fitting it snugly by working the left crankarm
inside the spokes. When the wheel is in the correctposition, the axle will be between the seat tube anddown tube and won’t be able to contact them. Just be certain that the hub is situated so it cannot damagethe frame. Then tie the wheel to the frame at the seat,down, and top tubes.
Place the handlebar/stem assembly alongside thetop tube to find the narrowest way to attach it.Loosen the stem if necessary to rotate the bar insidethe stem. For drop handlebars, try placing the bar’shooks over the top tube with the levers pointing up-ward and the stem inside the wheel (see photo).
7 Experiment to find the safest position for the brake levers, and wrap them if they seem vulnerable. Rotate the fork 180 degrees.
Check the small-parts box to ensure that all pieces are inside, tape it shut, and place it in one end of the bike box. Lift and lower the bike into the box, keeping the small-parts box between the fork and downtube.Make sure that the crankarms are horizontal. Put the front brake wherever it fits. Wrap the seat, aero bar/seatpost assembly and tie it next to the rear wheel. If the front hub rubs the side of the box, tape a piece of cardboard over the axle as a buffer.
17
HO
ME B
ICYC
LE REPAIR
xviii-1-095_BikeMaint_01 prep 12/21/04 10:43 AM Page 17