Embed Size (px)
Citation preview
February 1, 2012
XSEDE System Administration
Genesis II Components
Agenda
•Audience & Goals •XSEDE Context •Client/Container Installation
•Client Interface Basics •Mapping Resources into the Grid
–Data
–Compute
•Users and Groups •Implementation Details
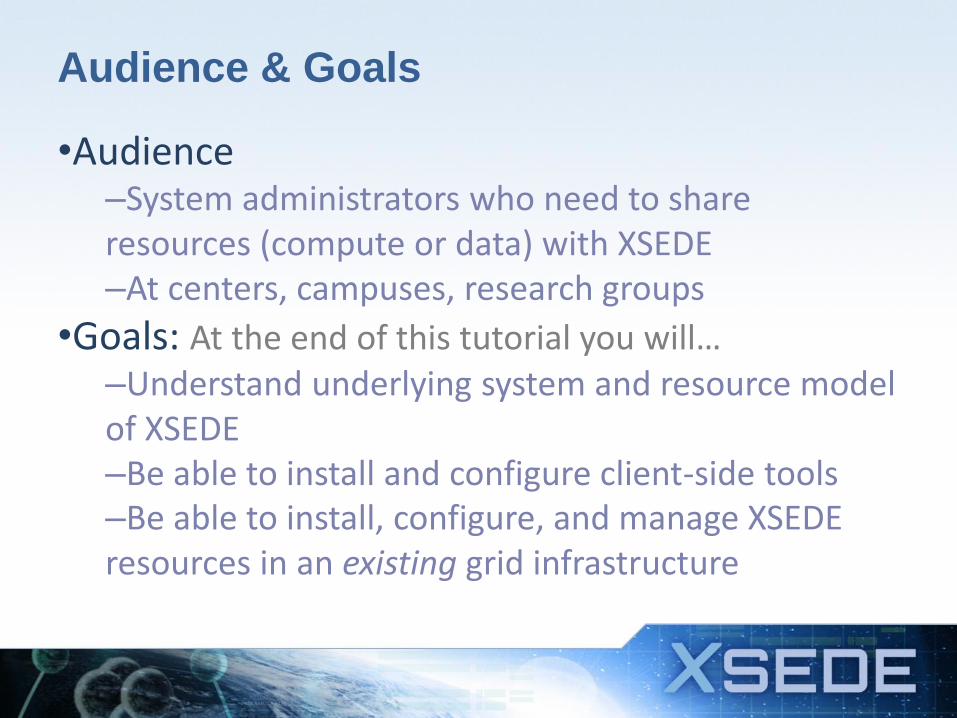
Audience & Goals
•Audience –System administrators who need to share resources (compute or data) with XSEDE
–At centers, campuses, research groups
•Goals: At the end of this tutorial you will…
–Understand underlying system and resource model of XSEDE
–Be able to install and configure client-side tools –Be able to install, configure, and manage XSEDE resources in an existing grid infrastructure
February 1, 2012
XSEDE Architecture Overview & Context
Andrew Grimshaw and Karolina Sarnowska-Upton
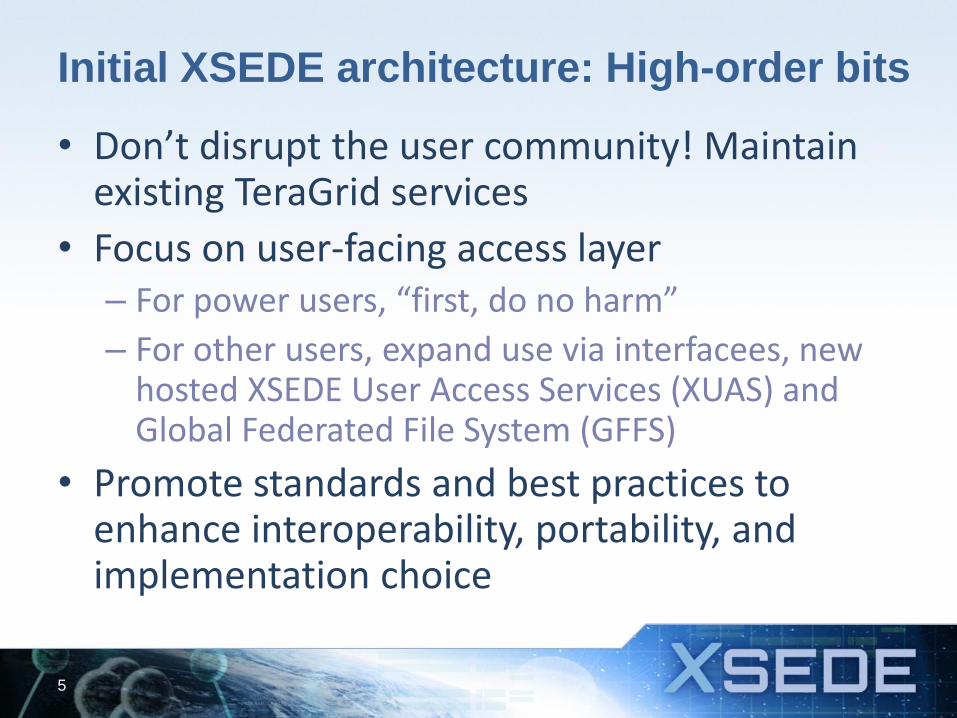
Initial XSEDE architecture: High-order bits
• Don’t disrupt the user community! Maintain existing TeraGrid services
• Focus on user-facing access layer – For power users, “first, do no harm”
– For other users, expand use via interfacees, new hosted XSEDE User Access Services (XUAS) and Global Federated File System (GFFS)
• Promote standards and best practices to enhance interoperability, portability, and implementation choice
5
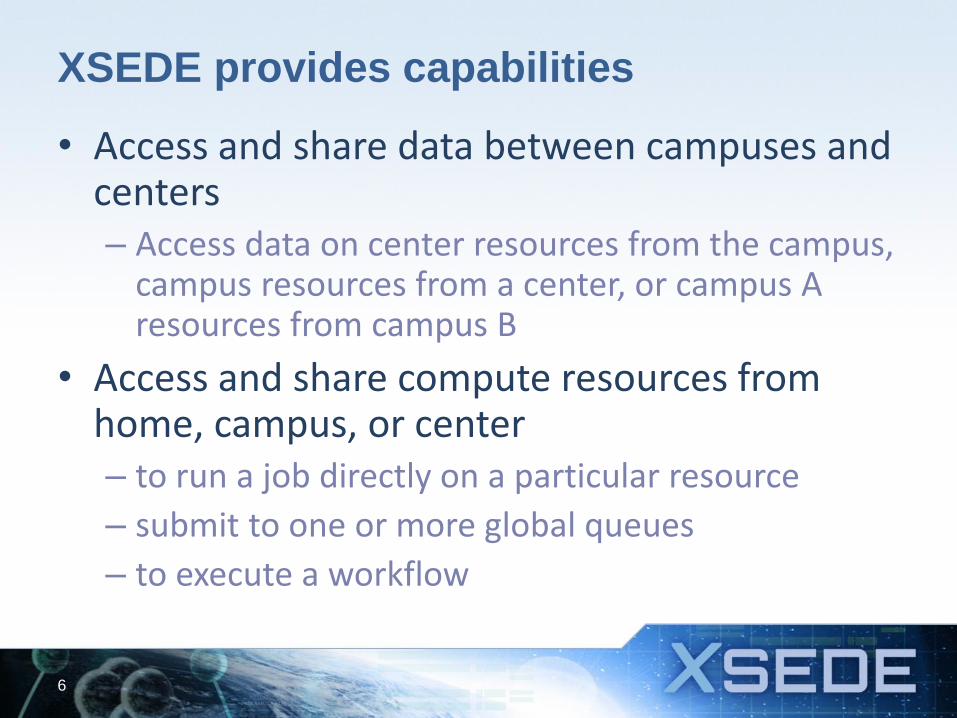
XSEDE provides capabilities
• Access and share data between campuses and centers – Access data on center resources from the campus,
campus resources from a center, or campus A resources from campus B
• Access and share compute resources from home, campus, or center – to run a job directly on a particular resource
– submit to one or more global queues
– to execute a workflow
6
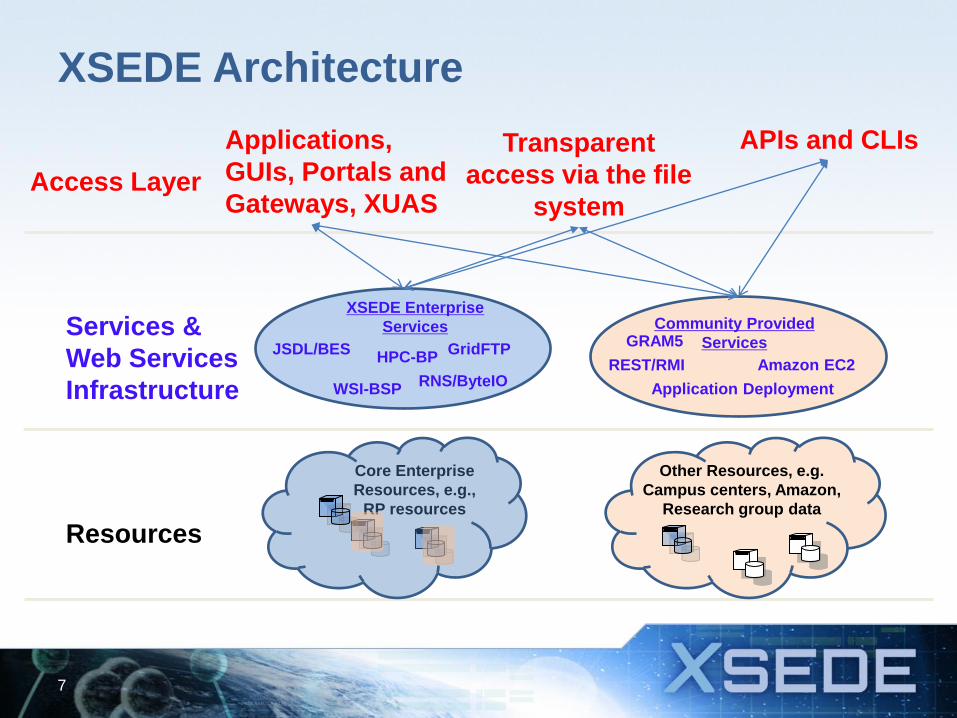
XSEDE Architecture
7
Applications,
GUIs, Portals and
Gateways, XUAS
APIs and CLIs Transparent
access via the file
system
Services &
Web Services
Infrastructure
Resources
Access Layer
XSEDE Enterprise
Services
JSDL/BES
RNS/ByteIO
GridFTP
WSI-BSP
HPC-BP
Community Provided
Services GRAM5
REST/RMI Amazon EC2
Application Deployment
Core Enterprise
Resources, e.g.,
RP resources
Other Resources, e.g.
Campus centers, Amazon,
Research group data
Implementations and Architecture
• The architecture defines the interfaces, communication, and interactions between software components
• The architecture defines how quality attributes are realized – Security, reliability, availability, performance, ..
• Architecture components (that implement interfaces) may have more than one implementation – Thus, we distinguish between the architecture and the
implementation
8
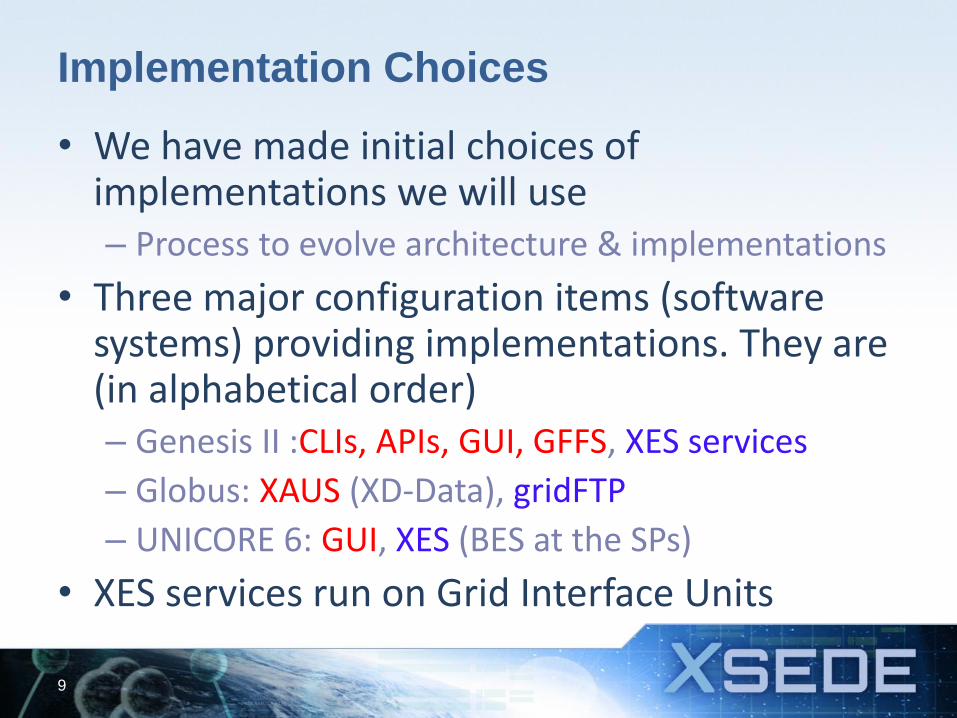
Implementation Choices
• We have made initial choices of implementations we will use – Process to evolve architecture & implementations
• Three major configuration items (software systems) providing implementations. They are (in alphabetical order) – Genesis II :CLIs, APIs, GUI, GFFS, XES services
– Globus: XAUS (XD-Data), gridFTP
– UNICORE 6: GUI, XES (BES at the SPs)
• XES services run on Grid Interface Units
9
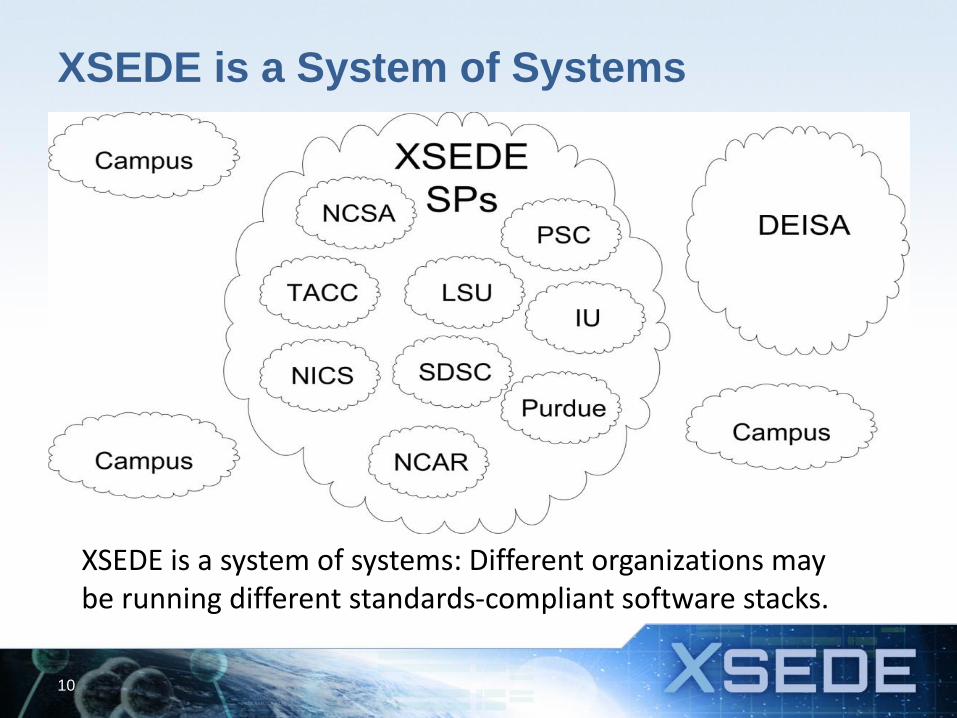
XSEDE is a System of Systems
10
XSEDE is a system of systems: Different organizations may be running different standards-compliant software stacks.
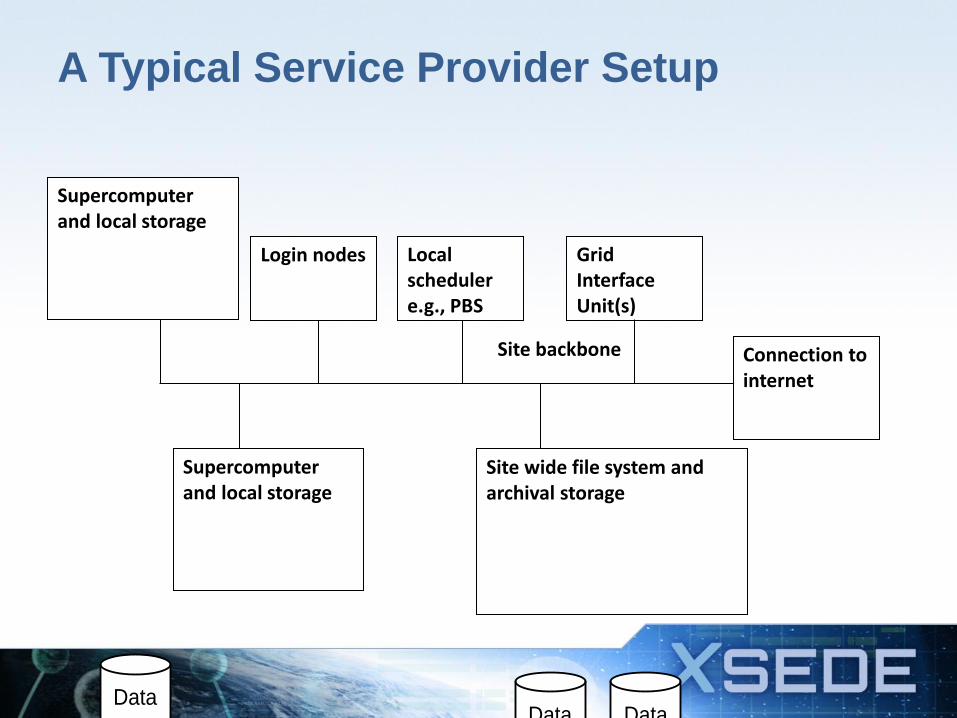
A Typical Service Provider Setup
Connection to internet
Site backbone
Login nodes
Supercomputer and local storage
Grid Interface Unit(s)
Site wide file system and archival storage
Data DataData
Local scheduler e.g., PBS
Supercomputer and local storage
Data
A Typical Campus Setup
Connection to
internet Campus backbone
Campus
cluster
Researcher
cluster
Researcher
data set
Department
file system
Grid Interface
Unit(s)
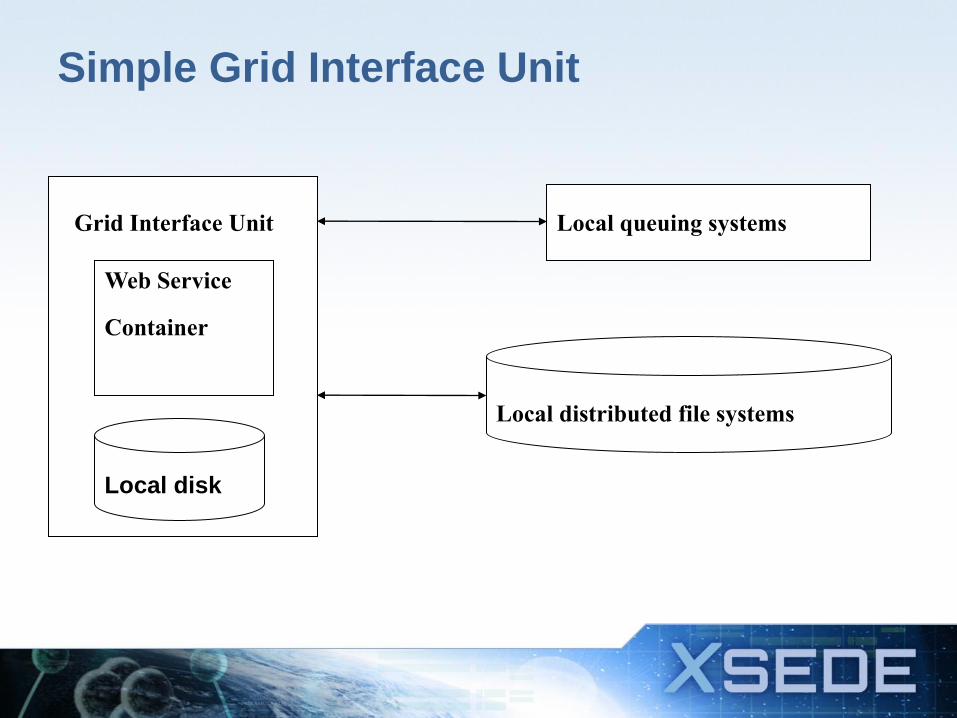
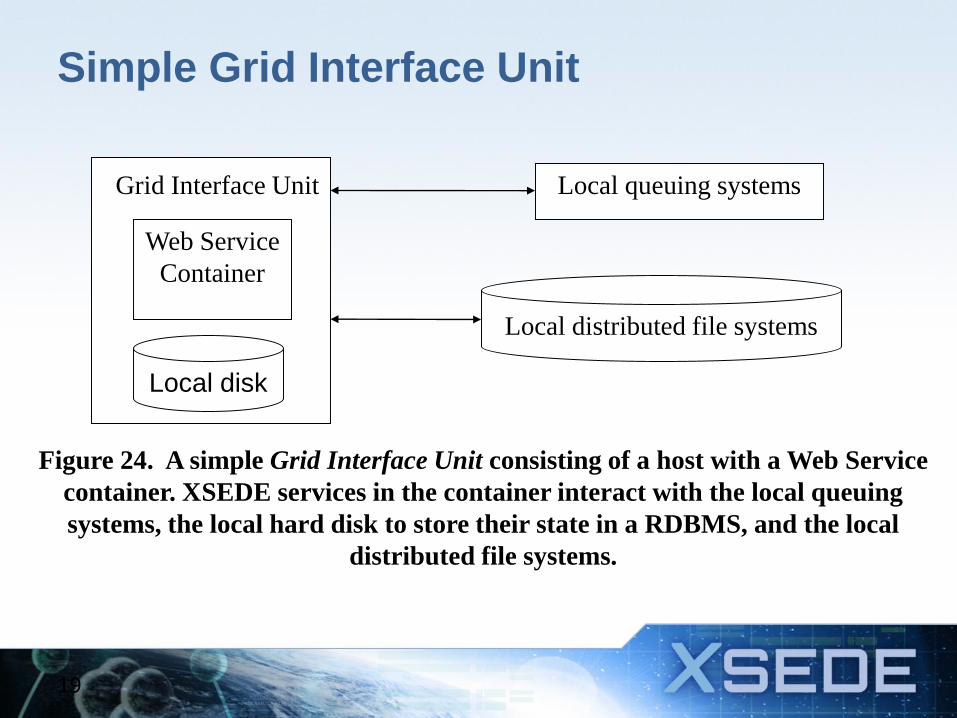
Simple Grid Interface Unit
Local distributed file systems
Local disk
Web Service
Container
Local queuing systems Grid Interface Unit
February 1, 2012
XSEDE Genesis II Client/Container
Installation
Andrew Grimshaw and Karolina Sarnowska-
Upton
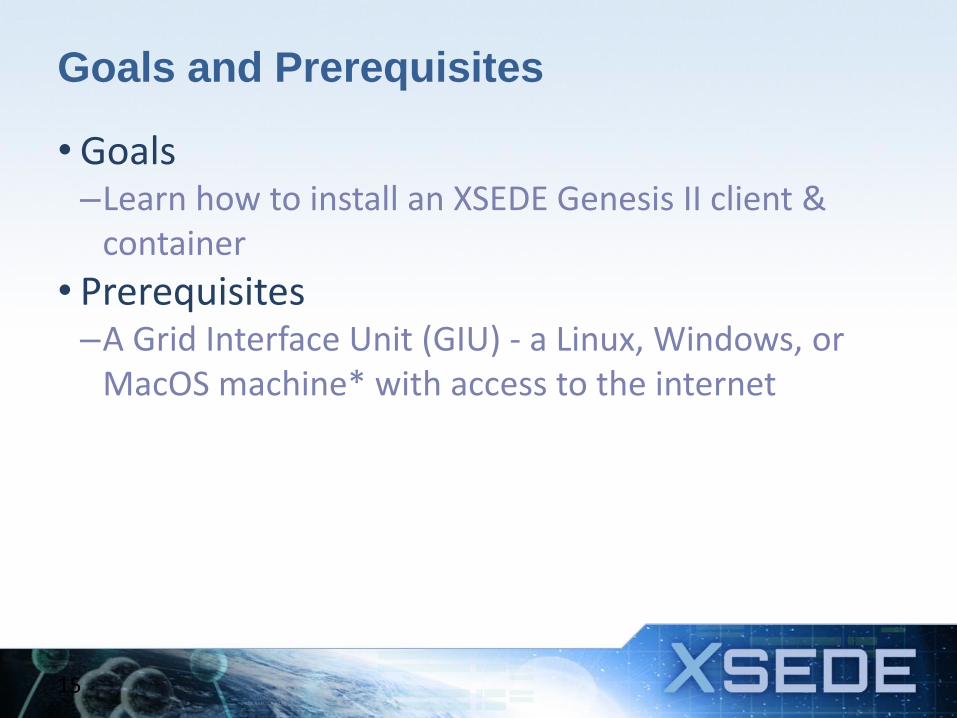
Goals and Prerequisites
• Goals –Learn how to install an XSEDE Genesis II client &
container
• Prerequisites –A Grid Interface Unit (GIU) - a Linux, Windows, or
MacOS machine* with access to the internet
15
Agenda
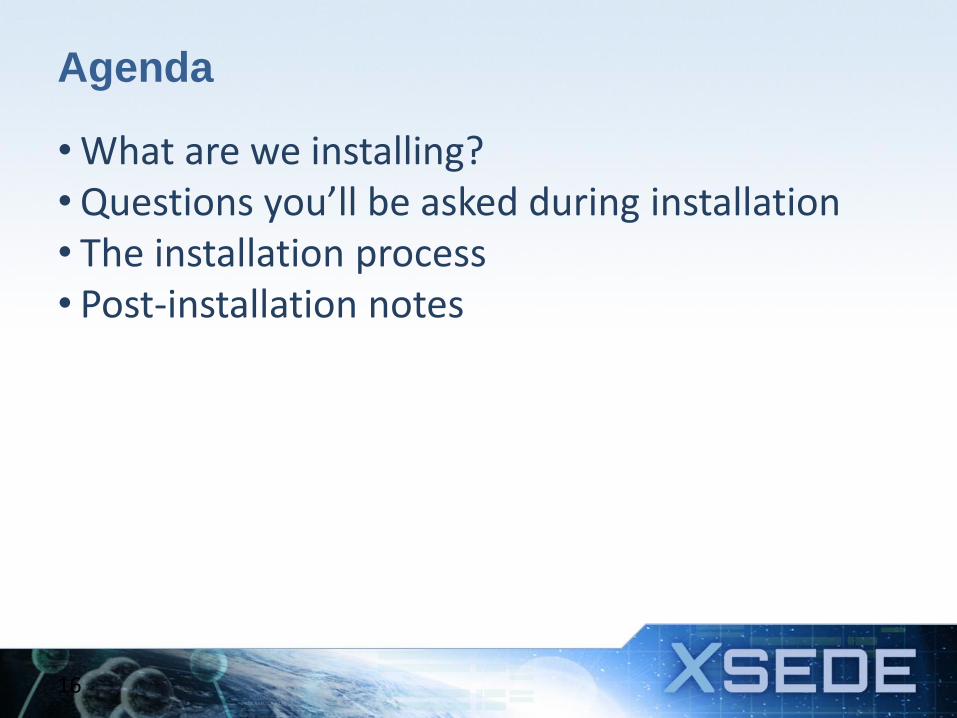
• What are we installing? • Questions you’ll be asked during installation • The installation process • Post-installation notes
16
What are we installing?
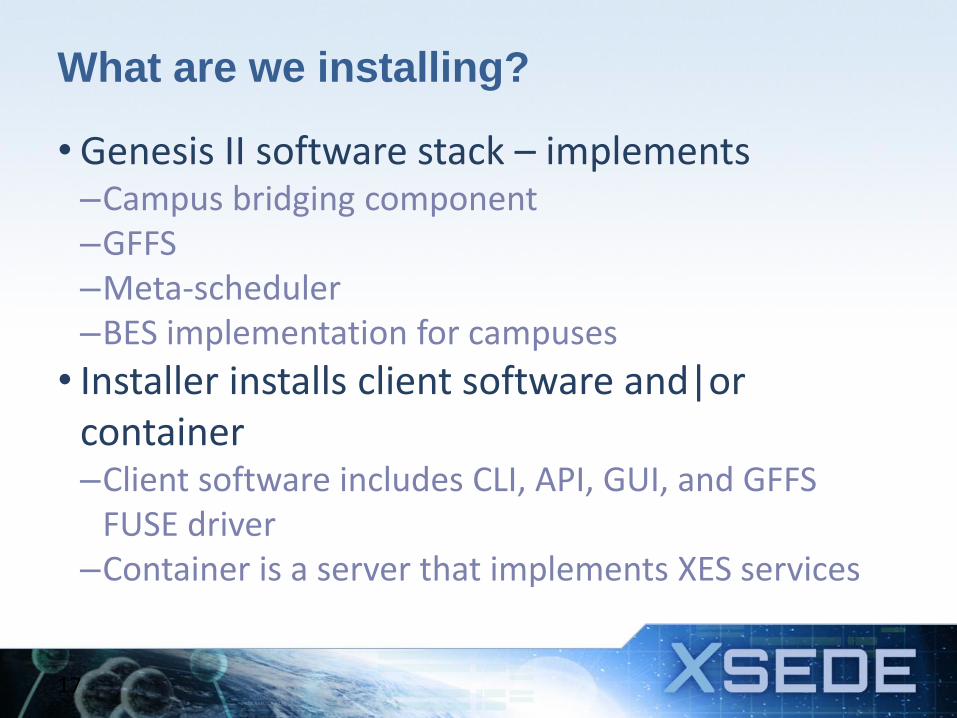
• Genesis II software stack – implements –Campus bridging component –GFFS –Meta-scheduler –BES implementation for campuses
• Installer installs client software and|or container –Client software includes CLI, API, GUI, and GFFS
FUSE driver –Container is a server that implements XES services
17
Why Install A Container?
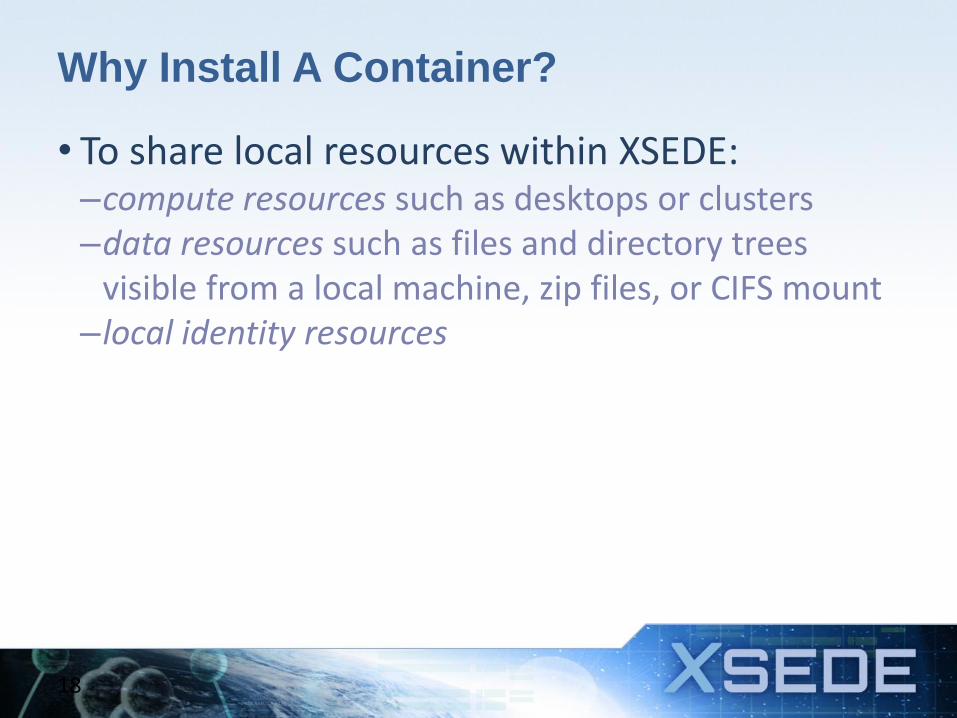
• To share local resources within XSEDE: –compute resources such as desktops or clusters –data resources such as files and directory trees
visible from a local machine, zip files, or CIFS mount –local identity resources
18
Simple Grid Interface Unit
Local distributed file systems
Local disk
Web Service
Container
Local queuing systems Grid Interface Unit
Figure 24. A simple Grid Interface Unit consisting of a host with a Web Service
container. XSEDE services in the container interact with the local queuing
systems, the local hard disk to store their state in a RDBMS, and the local
distributed file systems.
19
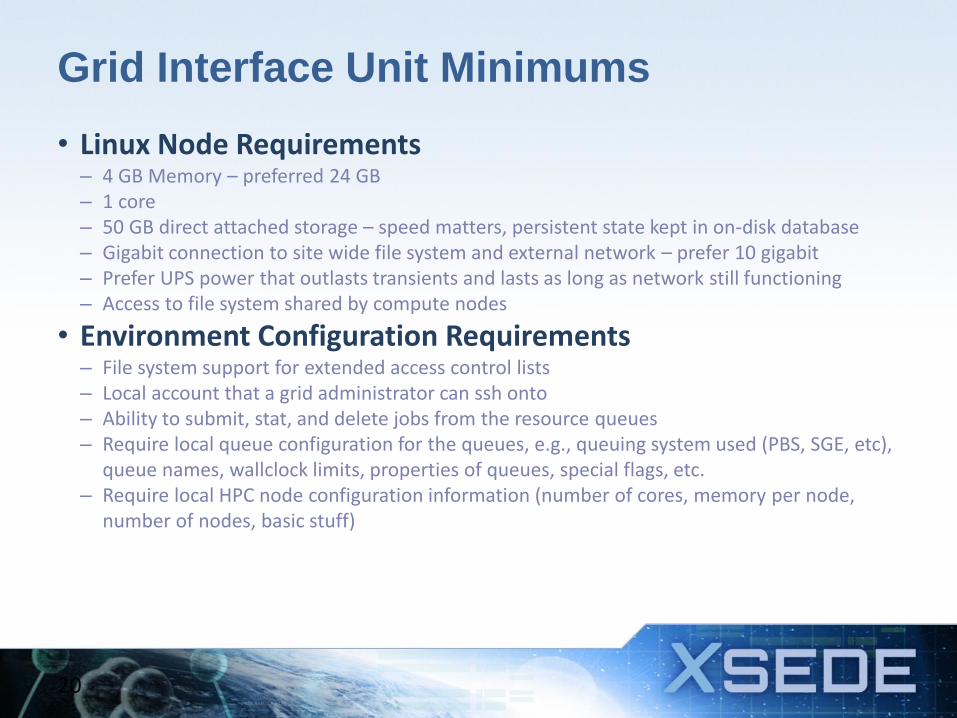
Grid Interface Unit Minimums
• Linux Node Requirements – 4 GB Memory – preferred 24 GB – 1 core – 50 GB direct attached storage – speed matters, persistent state kept in on-disk database – Gigabit connection to site wide file system and external network – prefer 10 gigabit – Prefer UPS power that outlasts transients and lasts as long as network still functioning – Access to file system shared by compute nodes
• Environment Configuration Requirements – File system support for extended access control lists – Local account that a grid administrator can ssh onto – Ability to submit, stat, and delete jobs from the resource queues – Require local queue configuration for the queues, e.g., queuing system used (PBS, SGE, etc),
queue names, wallclock limits, properties of queues, special flags, etc. – Require local HPC node configuration information (number of cores, memory per node,
number of nodes, basic stuff)
20
A Note on the UNICORE 6 Container
• XSEDE is installing the UNICORE 6 container to implement BES services at the centers –They are interface compatible with the Genesis II
BES containers – mixed systems are fine
• This tutorial does not cover installing a UNICORE 6 tutorial –There will be a workshop for SP system
administrators on installing the UNICORE 6 container in late September or early October
21
Things You’ll Need Before Starting a
Container on Your Home Resource • Select a Grid Interface Unit (GIU), a Widows, Linux, or MacOS host, which can access resources
you want to share • Ensure that GIU has a public IP address
– Use of GIUs behind a NAT is possible, but setup is more complex and will not be discussed here
• Choose open port number (default is 18443) – Update firewall rules as necessary to allow incoming TCP traffic
• Ensure there is sufficient storage on a locally attached disk – Container uses an on-disk transactional database – A slow remote disk will significantly reduce performance – For a container managing a moderate number of resources 5GB is adequate
• If you are going to share cluster or supercomputer resources, the GIU must share a file system with the compute nodes and it must have sufficient space for input and output files as well as temporary files used by jobs
• Chose a local account that will run the grid container – Account does not require root privilege unless running on Windows host
• If you are going to share local user directories, it is best if extended access control lists are turned on in your local environment
• A grid account for the user/group that will “own” container
22
Download Container Installation Bundle
• Installers are specific to target architecture/operating system and grid deployment – Reduces configuration burden to deploy new containers – Helps avoid deployment mistakes and mismatches between
different containers within grid system The XSEDE container installer is available for Linux. It is available in the Increment 1 TRR resources.
23
Container Installation
• Turns on HTTPS/SSL communication • Deploys and configures certificates and trust
stores to allow grid containers within one grid system to authenticate and/or trust each other
• Downloads information about global namespace root (i.e. “/”) for target grid system and store sit in local state directory –This allows clients and container to communicate
with proper grid system without manual user intervention
• Executes code to generate new unique grid container certificate.
• Registers new grid container with target grid system’s global namespace (usually in a directory named /uninitialized-containers) –This makes it easy to reference and communicate
with the new grid container
24
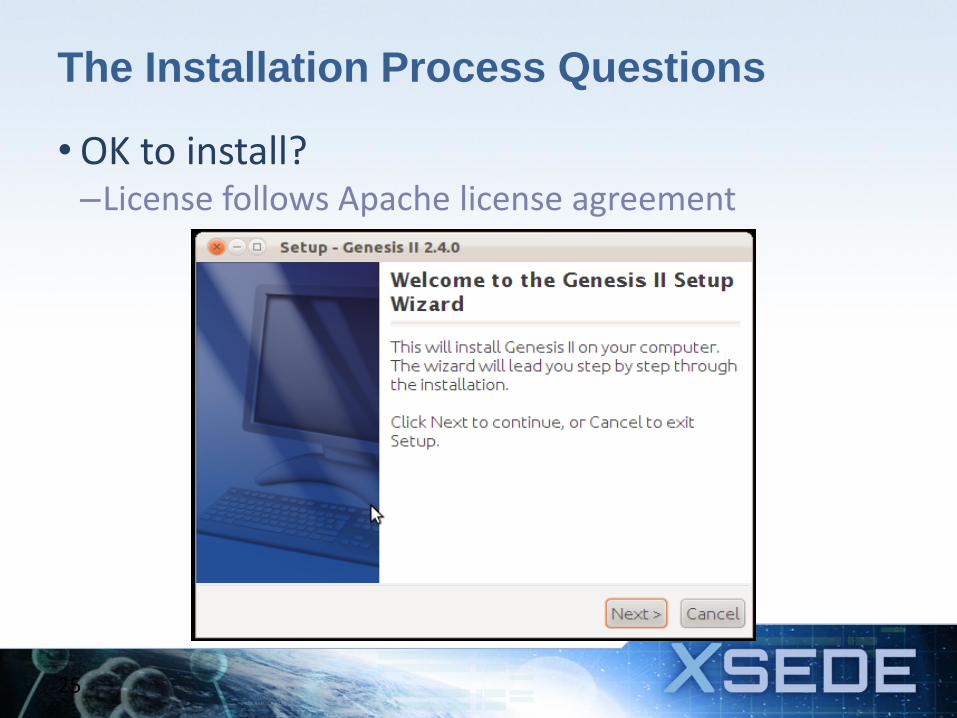
The Installation Process Questions
• OK to install? –License follows Apache license agreement
25
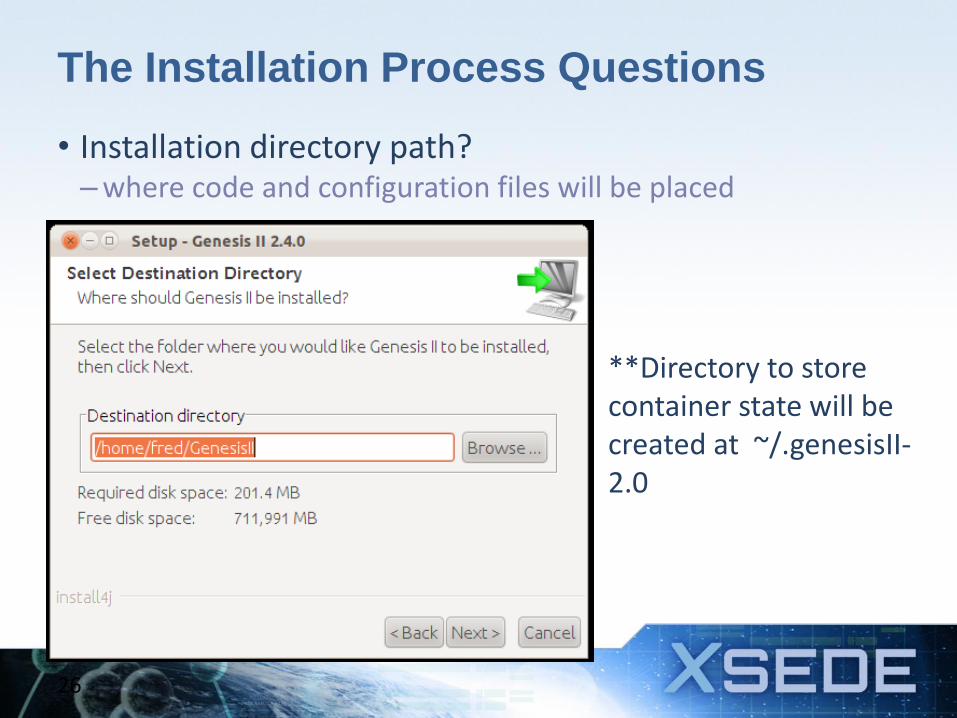
The Installation Process Questions
• Installation directory path? – where code and configuration files will be placed
26
**Directory to store container state will be created at ~/.genesisII-2.0
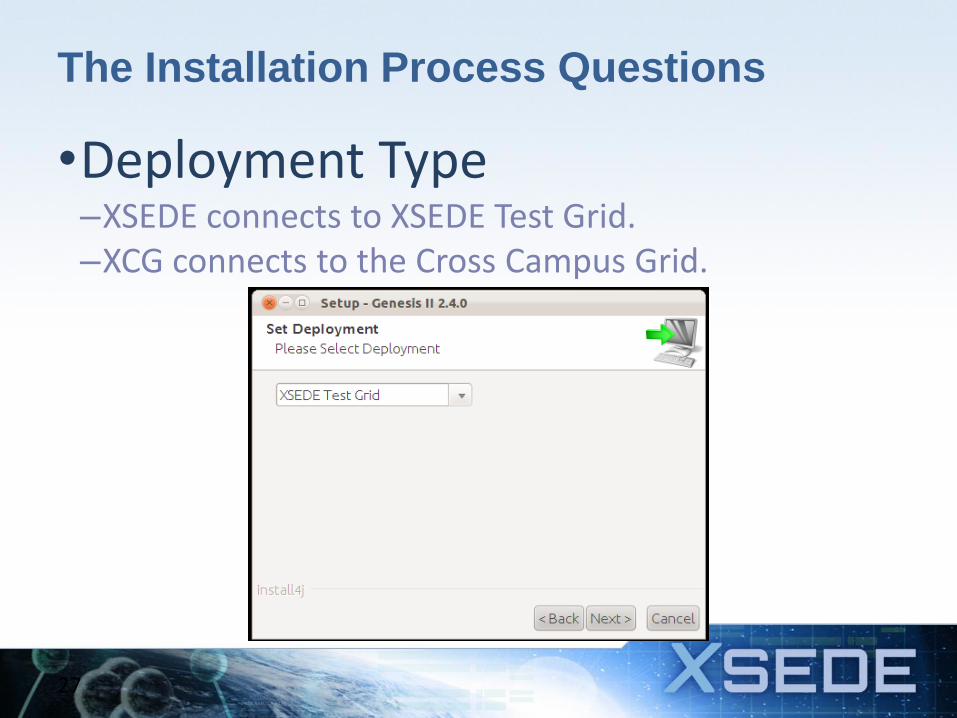
The Installation Process Questions
•Deployment Type –XSEDE connects to XSEDE Test Grid. –XCG connects to the Cross Campus Grid.
27
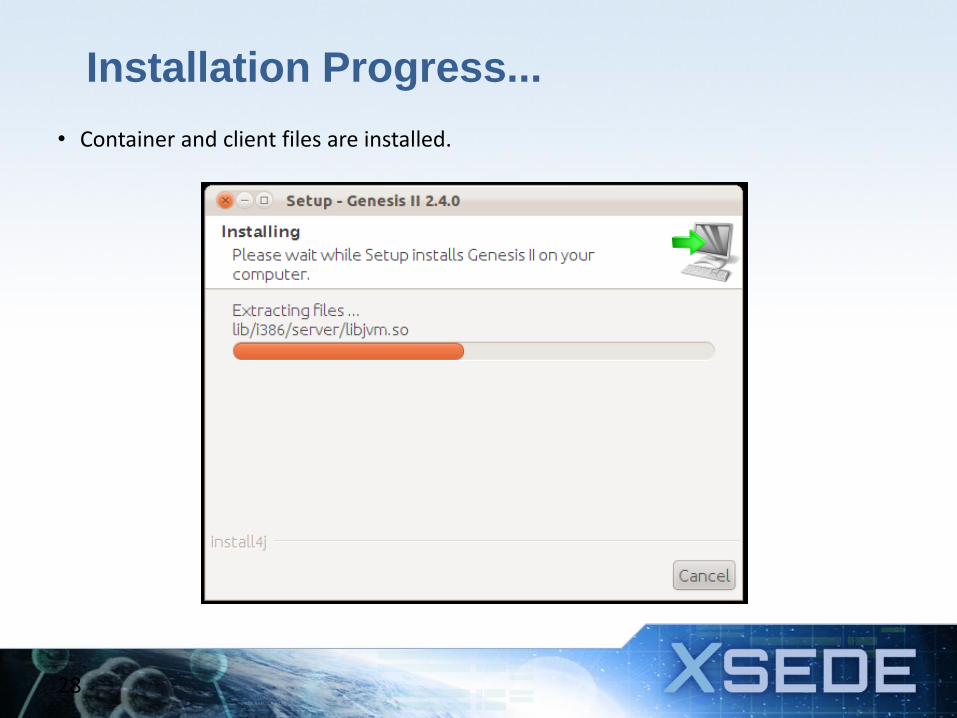
Installation Progress...
• Container and client files are installed.
28
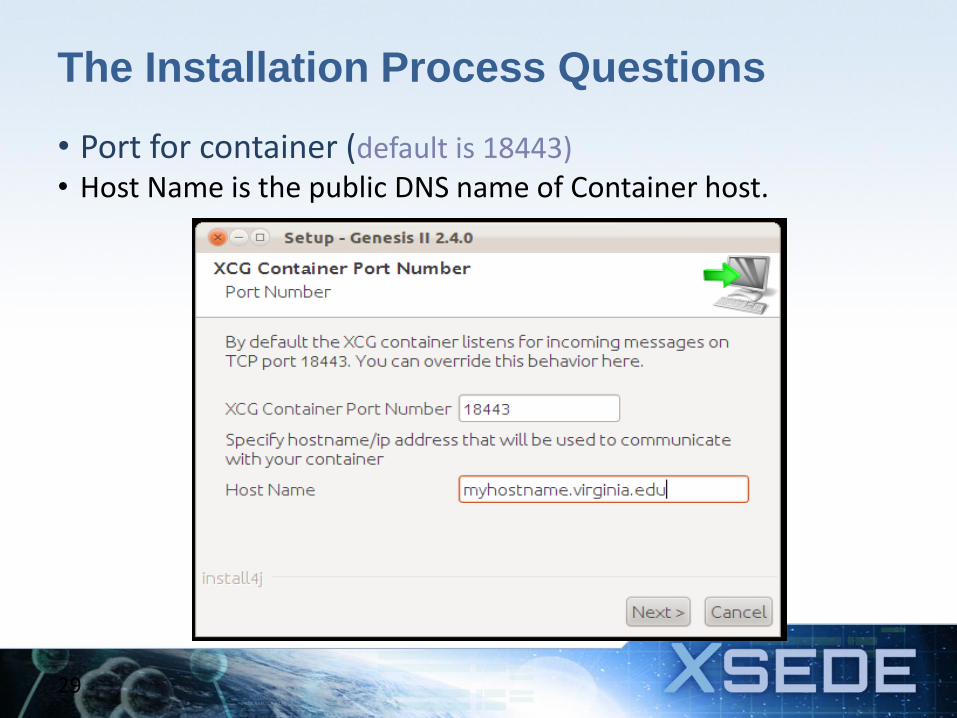
The Installation Process Questions
• Port for container (default is 18443) • Host Name is the public DNS name of Container host.
29
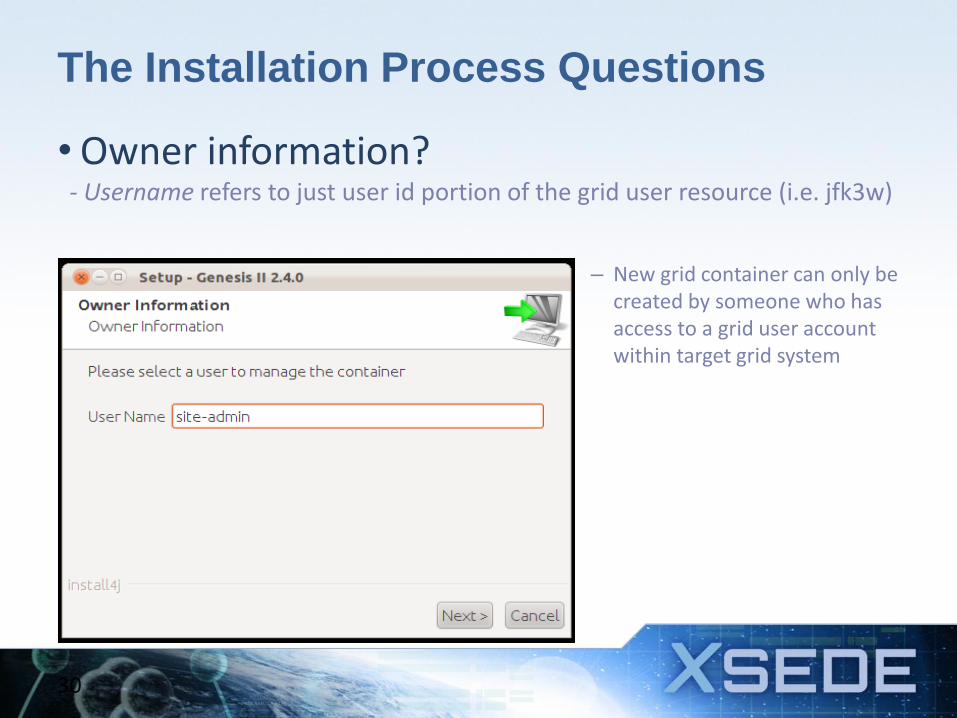
The Installation Process Questions
• Owner information? - Username refers to just user id portion of the grid user resource (i.e. jfk3w)
30
– New grid container can only be created by someone who has access to a grid user account within target grid system
The Installation Process Questions
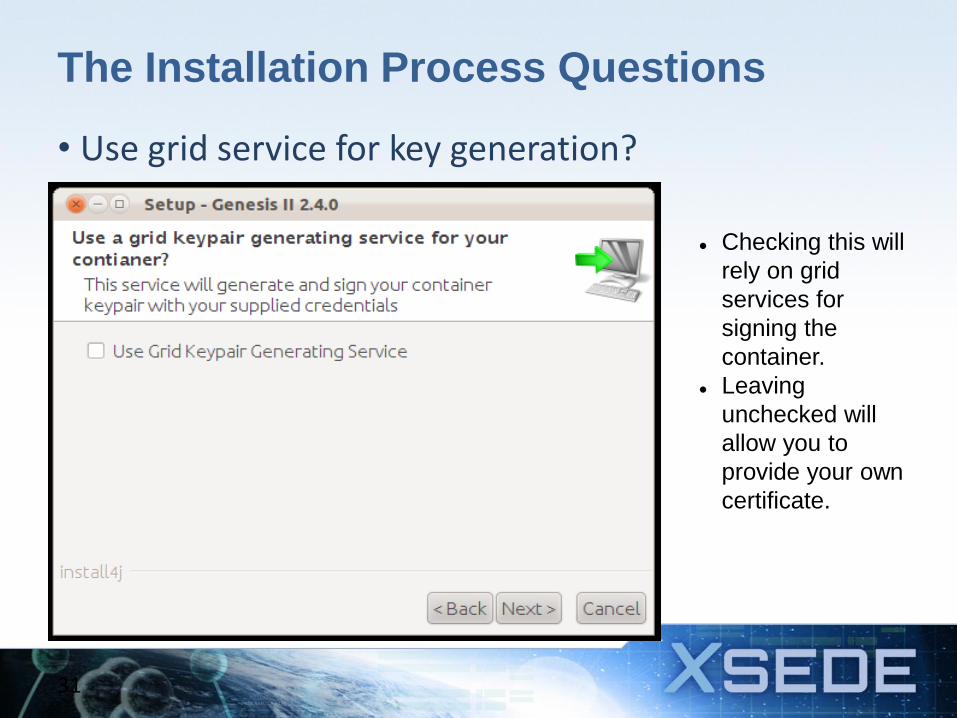
• Use grid service for key generation?
31
Checking this will
rely on grid
services for
signing the
container.
Leaving
unchecked will
allow you to
provide your own
certificate.
The Installation Process Questions
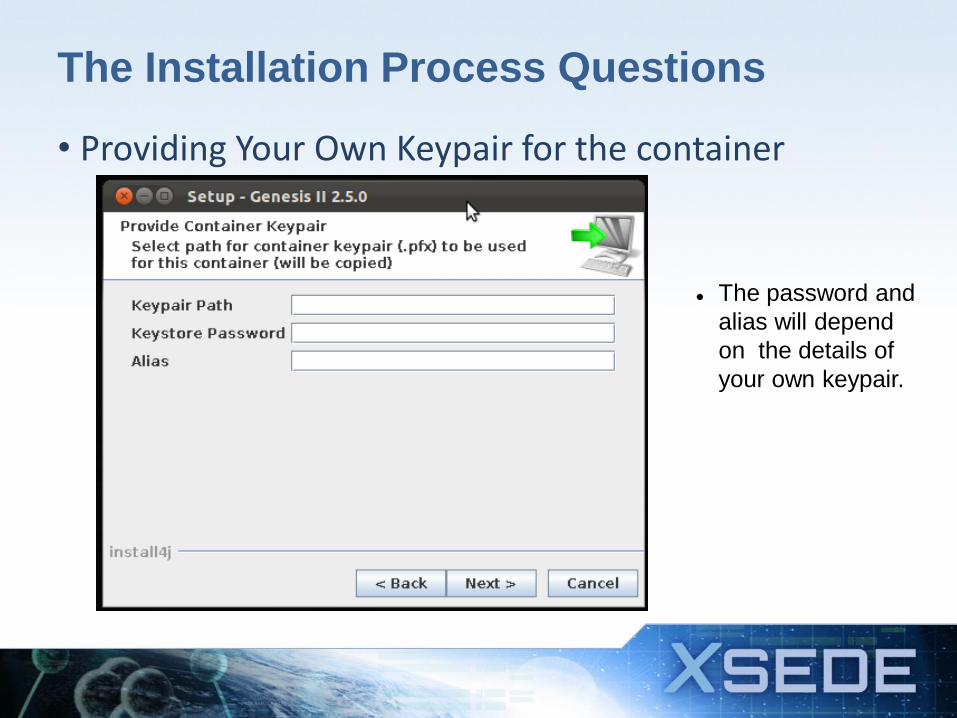
• Providing Your Own Keypair for the container
The password and
alias will depend
on the details of
your own keypair.
The Installation Process Questions
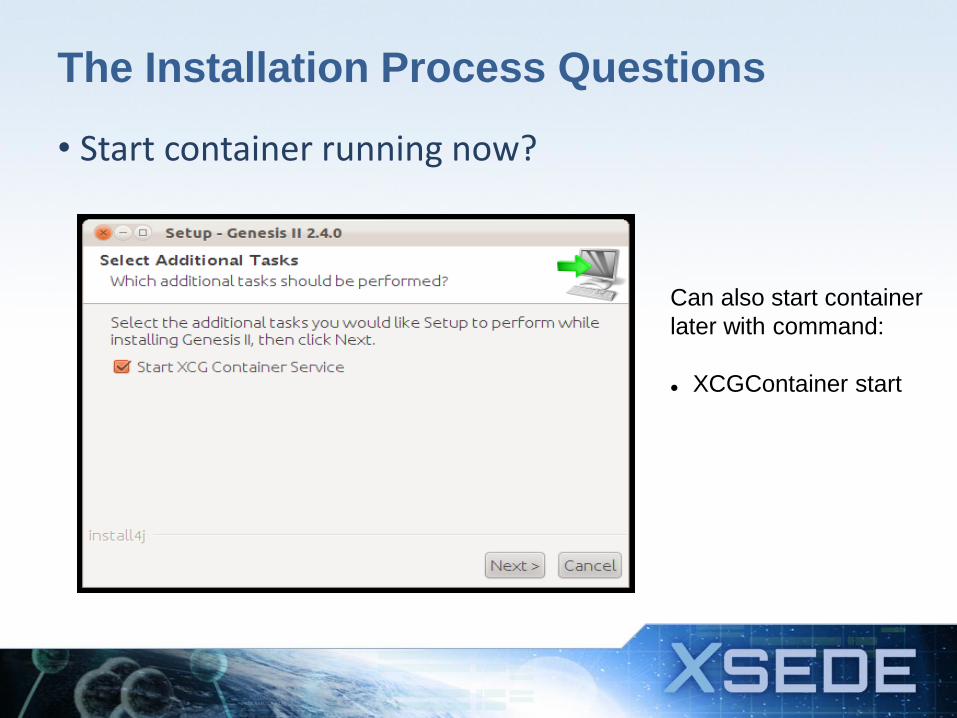
• Start container running now?
Can also start container
later with command:
XCGContainer start

The Installation Process Questions
•Finished!
34
Post-Install: Adding Container to the Grid
35
• Your container has now been installed, but is not yet linked in to a namespace.
• grid ln --service-url={service path} {Destination RNS Path}
• For service path, a file called service-url.txt is generated in the install directory during installation.
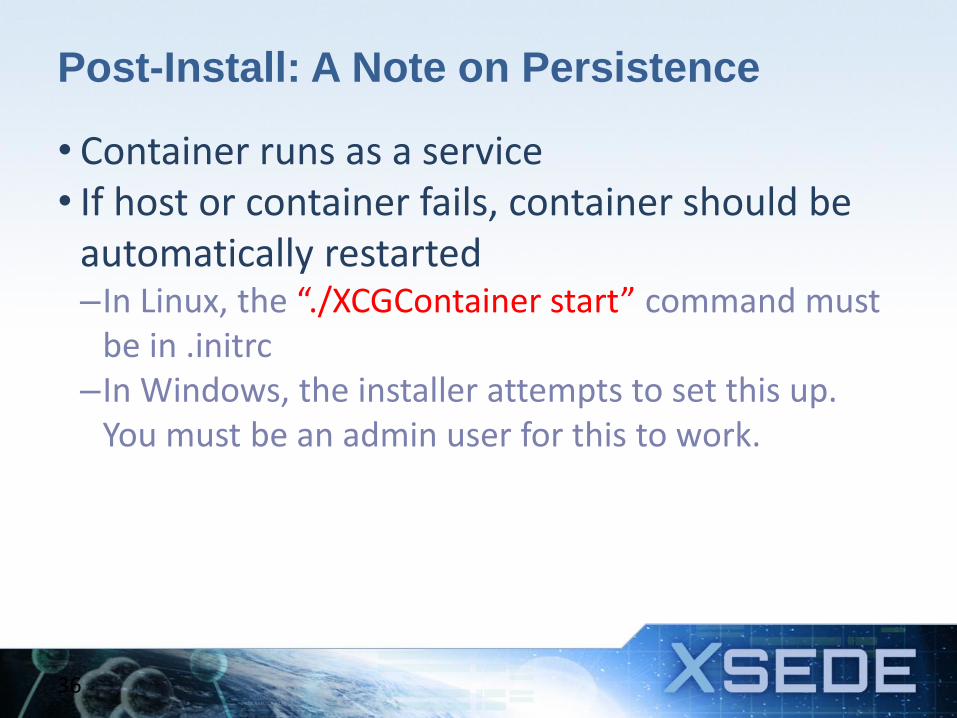
Post-Install: A Note on Persistence
• Container runs as a service • If host or container fails, container should be
automatically restarted –In Linux, the “./XCGContainer start” command must
be in .initrc –In Windows, the installer attempts to set this up.
You must be an admin user for this to work.
36
Note on access control
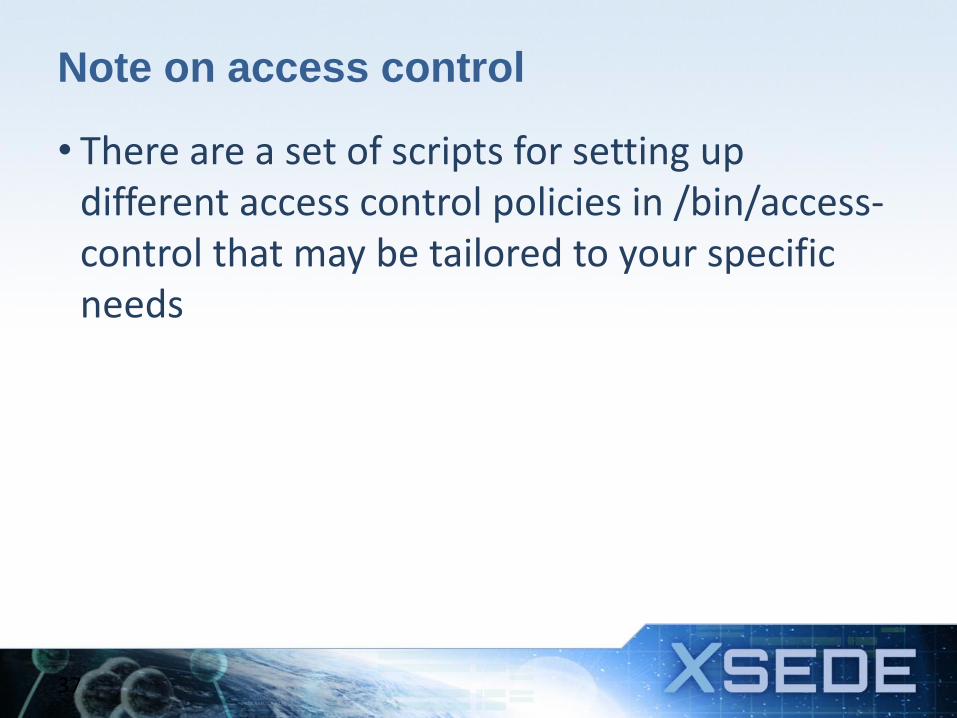
• There are a set of scripts for setting up different access control policies in /bin/access-control that may be tailored to your specific needs
37

Post-Install Container Testing
• Check that container is linked into target grid system name space –Located at /uninitialized-containers under IP or
hostname
• We have a script you can use to test - /bin/testing
• Make sure container services are working –List services directory
• Located at /uninitialized-containers/<container>/Services
–Create directory and file on new container • mkdir –rns-service=<path-to-
container>/Services/EnhancedRNSPortType <new-dir> • cp local:<path-to-local-file> <new-dir> • Check EPR address of directory and file to confirm
• Test access control –By default, only installer has permission to do
anything on new container –Try tests when logged in and when logged out –Use client-ui or scripts to change container’s access
control
38
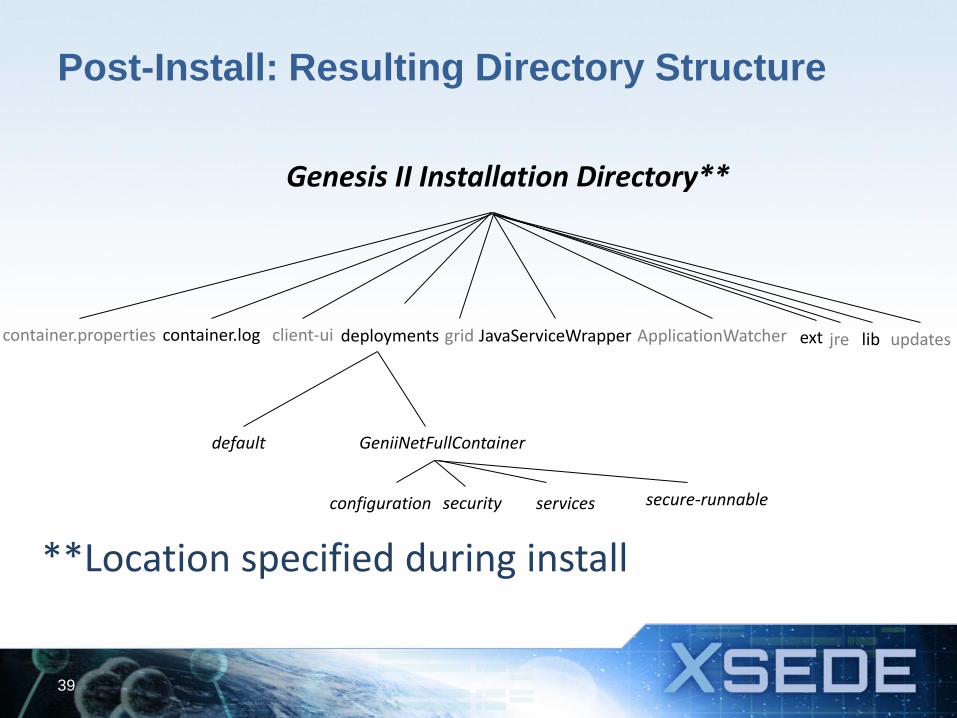
Post-Install: Resulting Directory Structure
39
container.properties deployments JavaServiceWrapper updates
default
Genesis II Installation Directory**
container.log client-ui
GeniiNetFullContainer
configuration security
services
grid lib jre ApplicationWatcher ext
secure-runnable
**Location specified during install
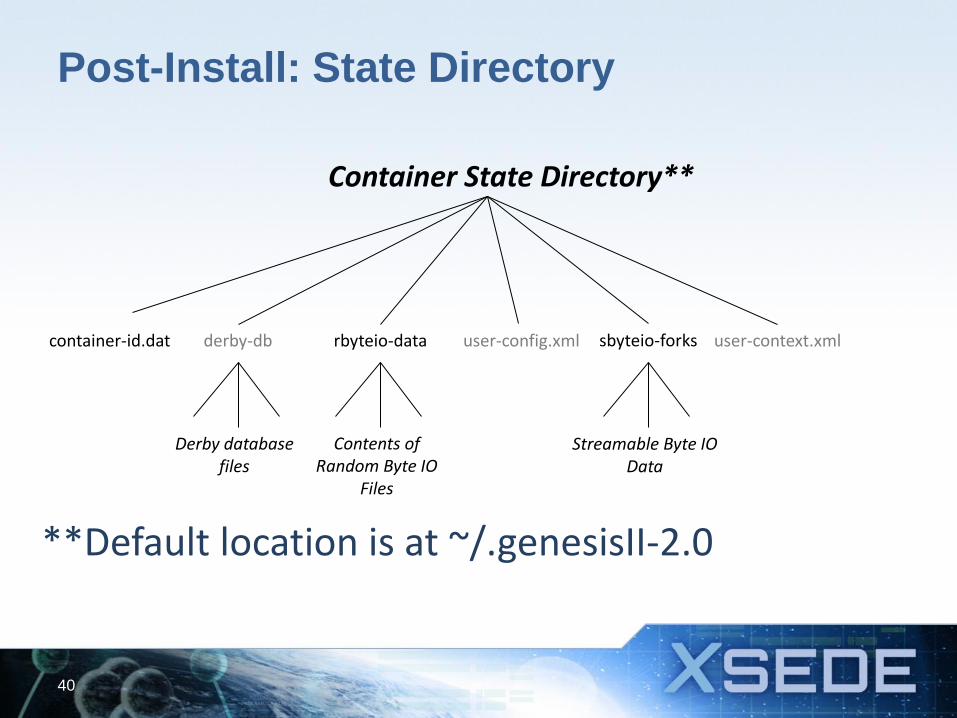
Post-Install: State Directory
40
container-id.dat sbyteio-forks user-config.xml user-context.xml derby-db
Derby database files
rbyteio-data
Contents of Random Byte IO
Files
Streamable Byte IO Data
Container State Directory**
**Default location is at ~/.genesisII-2.0

February 1, 2012
XSEDE Genesis II Client Usage
Andrew Grimshaw and Karolina Sarnowska-Upton
Agenda
• Prerequisites
– Client installed
• Access grid via:
– Cmd-line grid shell
– GUI client
– FUSE file system mount
• Learn access control basics
42
Using the Grid Client
• Multiple access methods – Cmd-line grid shell
– GUI client-ui
– FUSE file system mount
• You will learn to: – Login
– Navigate namespace
– Use GUI
– Manage access control
– Setup FUSE mount
43
Login via the CLI
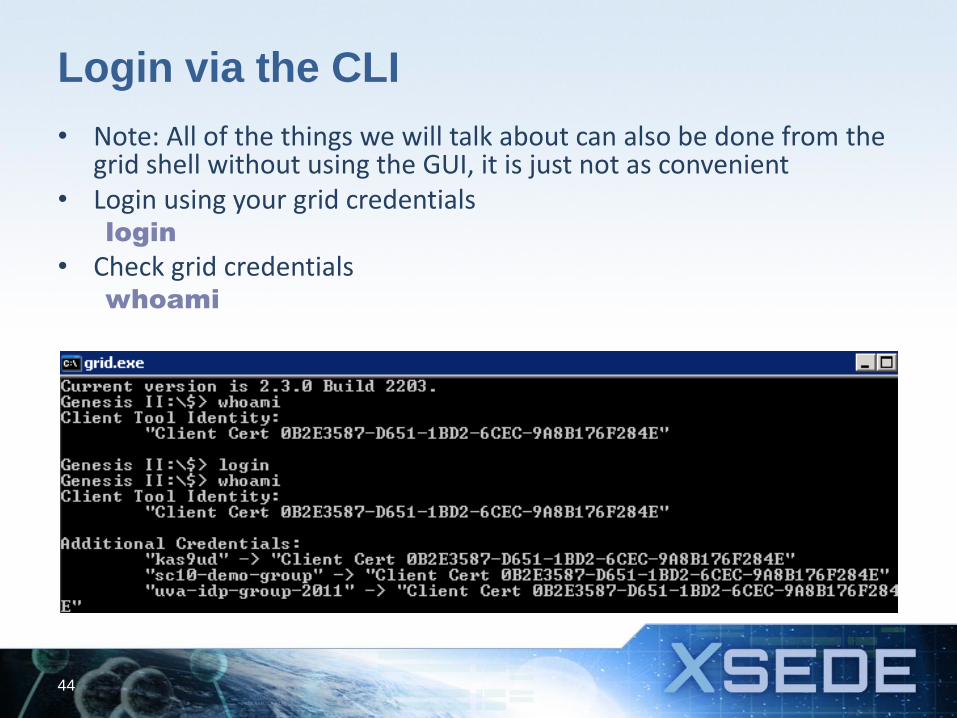
• Note: All of the things we will talk about can also be done from the grid shell without using the GUI, it is just not as convenient
• Login using your grid credentials login
• Check grid credentials whoami
44
Fire up the GUI
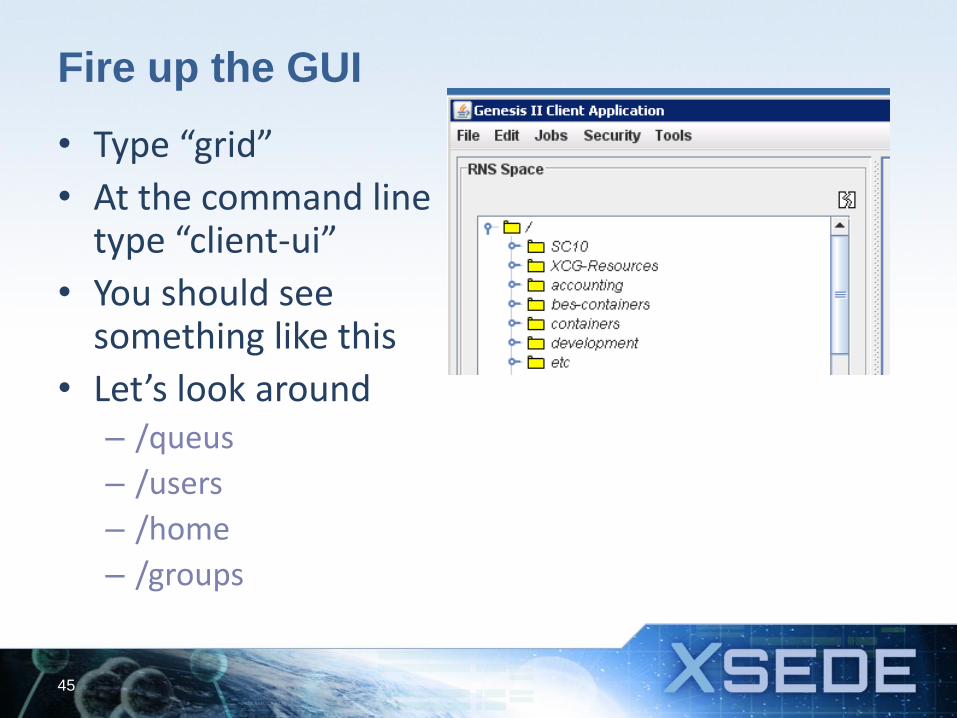
• Type “grid”
• At the command line type “client-ui”
• You should see something like this
• Let’s look around – /queus
– /users
– /home
– /groups
45
/users versus /home
• /users is a directory of end user identities
– Used to log in and to add people to access control lists, e.g., chmod myfile +r /users/karolina
• /home shows home directories in GFFS of users … you can put files and directories there
– E.g., /home/grimshaw/data.txt
46
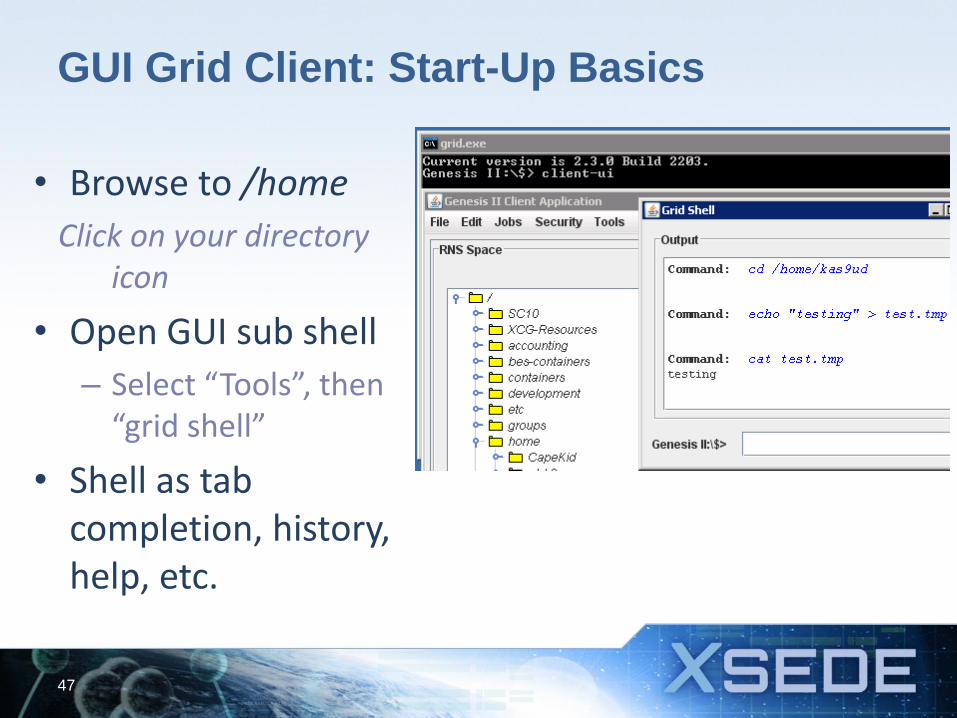
GUI Grid Client: Start-Up Basics
• Browse to /home
Click on your directory icon
• Open GUI sub shell
– Select “Tools”, then “grid shell”
• Shell as tab completion, history, help, etc.
47
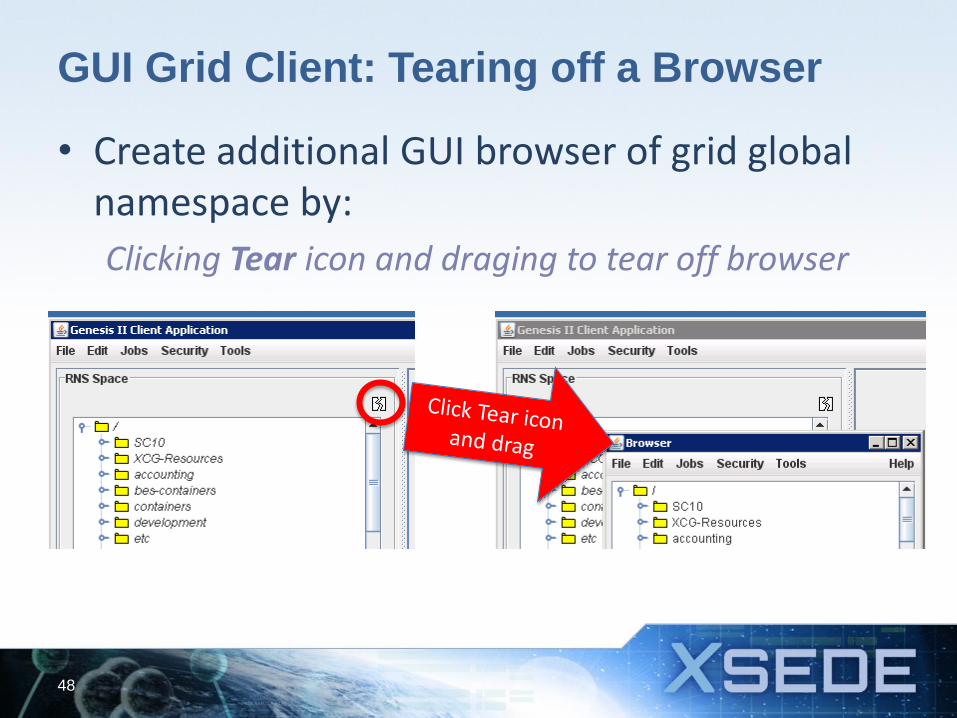
GUI Grid Client: Tearing off a Browser
• Create additional GUI browser of grid global namespace by:
Clicking Tear icon and draging to tear off browser
48
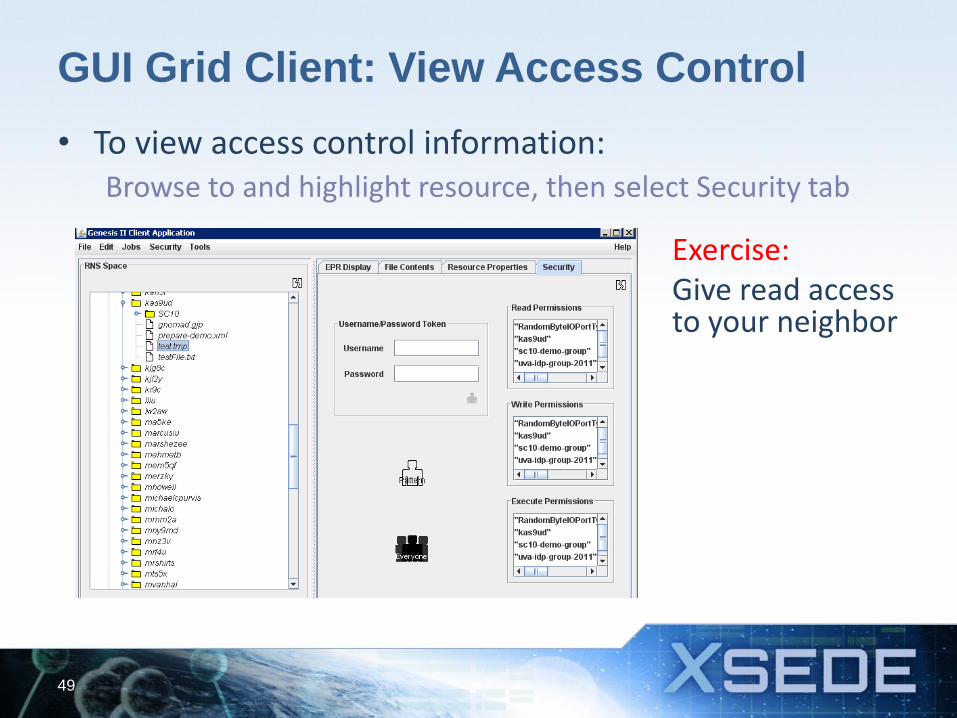
GUI Grid Client: View Access Control
• To view access control information: Browse to and highlight resource, then select Security tab
49
Exercise: Give read access to your neighbor
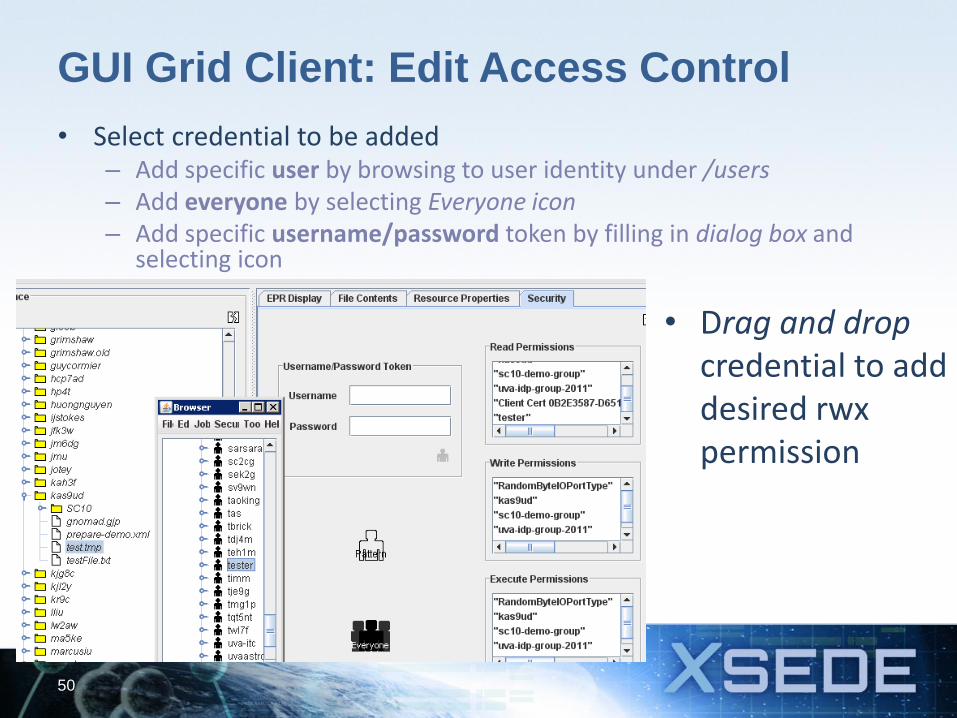
GUI Grid Client: Edit Access Control
• Select credential to be added – Add specific user by browsing to user identity under /users – Add everyone by selecting Everyone icon – Add specific username/password token by filling in dialog box and
selecting icon
50
• Drag and drop credential to add desired rwx permission

That’s it for the GUI for now
Let’s look at mapping the
directory structure into the local
file system using FUSE
51
FUSE Mounting the Grid: Overview
• Filesystem in Userspace (FUSE) is a loadable kernel module for Unix-like computer operating systems that lets non-privileged users create their own file systems without editing kernel code
• We use FUSE to provide accesses to gird resources directly from your Linux file system via a directory mount point
52
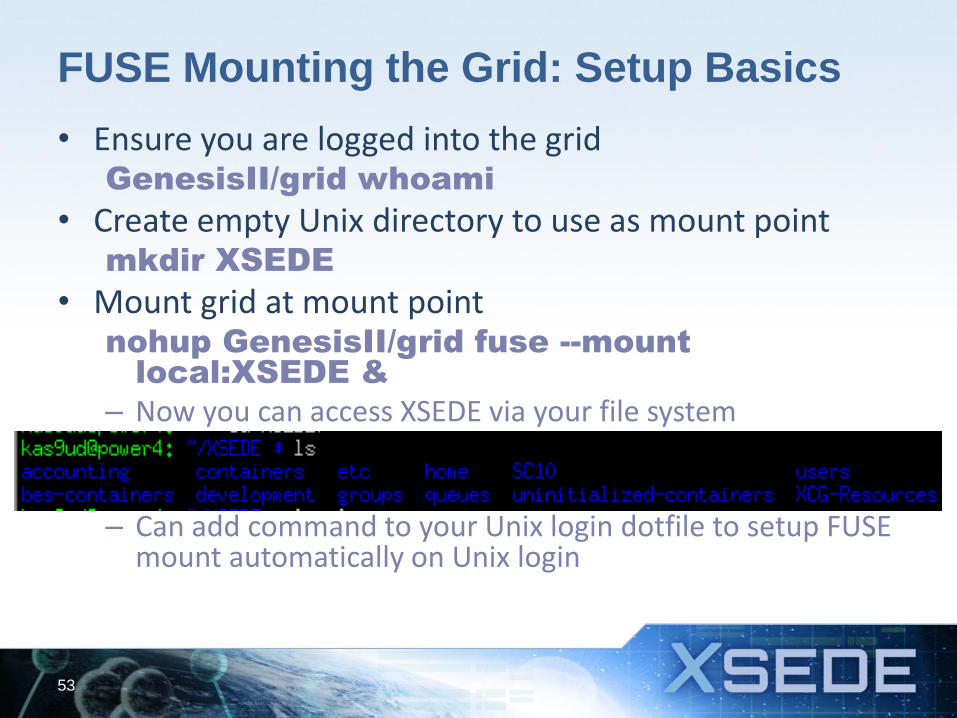
FUSE Mounting the Grid: Setup Basics
• Ensure you are logged into the grid GenesisII/grid whoami
• Create empty Unix directory to use as mount point mkdir XSEDE
• Mount grid at mount point nohup GenesisII/grid fuse --mount
local:XSEDE &
– Now you can access XSEDE via your file system
– Can add command to your Unix login dotfile to setup FUSE
mount automatically on Unix login
53
Result
• XSEDE resources regardless of location can be accessed via the file system – Files and directories can be accessed by programs and
shell scripts as if they were local files
– Jobs can be started by copying job descriptions into directories
– One can see the jobs running or queued by doing an “ls”.
– One can “cd” into a running job and access the working directory where the job is running directly
54
GUI Grid Client: Editing Files
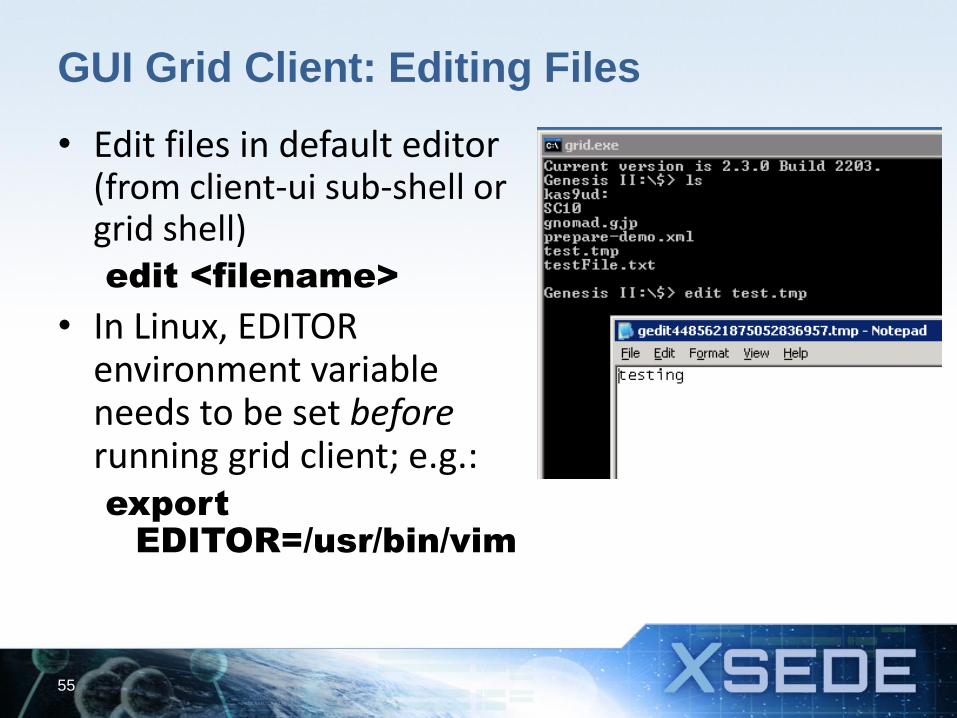
• Edit files in default editor (from client-ui sub-shell or grid shell) edit <filename>
• In Linux, EDITOR environment variable needs to be set before running grid client; e.g.: export
EDITOR=/usr/bin/vim
55
GUI Grid Client: Configuring Preferences
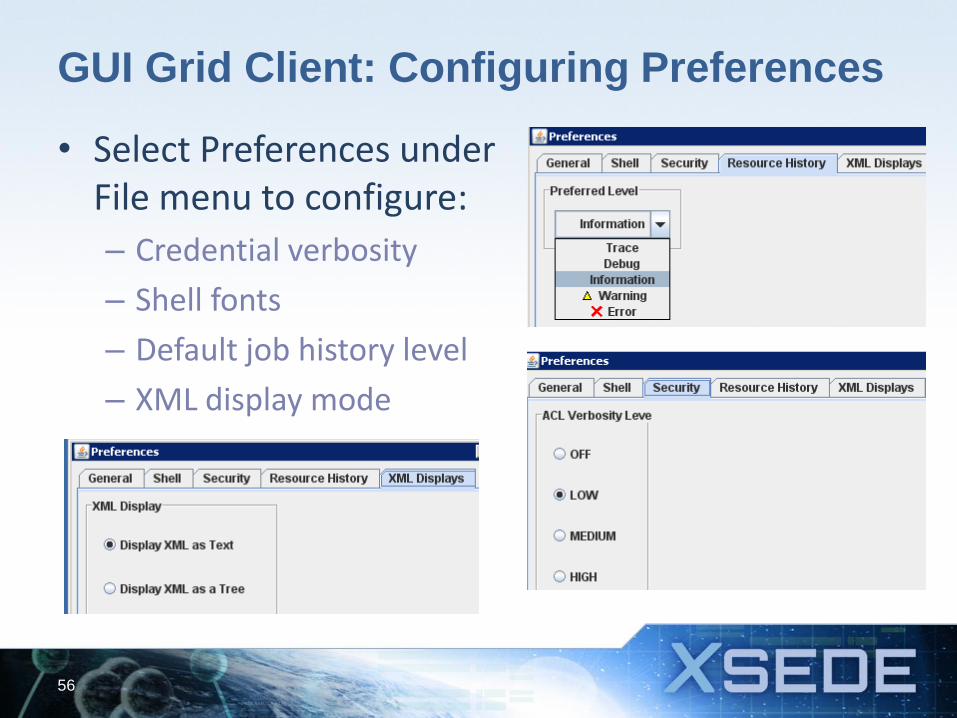
• Select Preferences under File menu to configure:
– Credential verbosity
– Shell fonts
– Default job history level
– XML display mode
56
February 1, 2012
XSEDE Users and Groups
Genesis II Components
Audience & Goals
• Audience
– System administrators who need manage users and groups
– At centers, campuses, research groups
• Goals: At the end of this tutorial you will…
– Create users
– Create groups
– Add users to groups

Agenda
• Background
• Creating user identity
• Create user home directory
• Create groups
• Add/remove user from groups
59
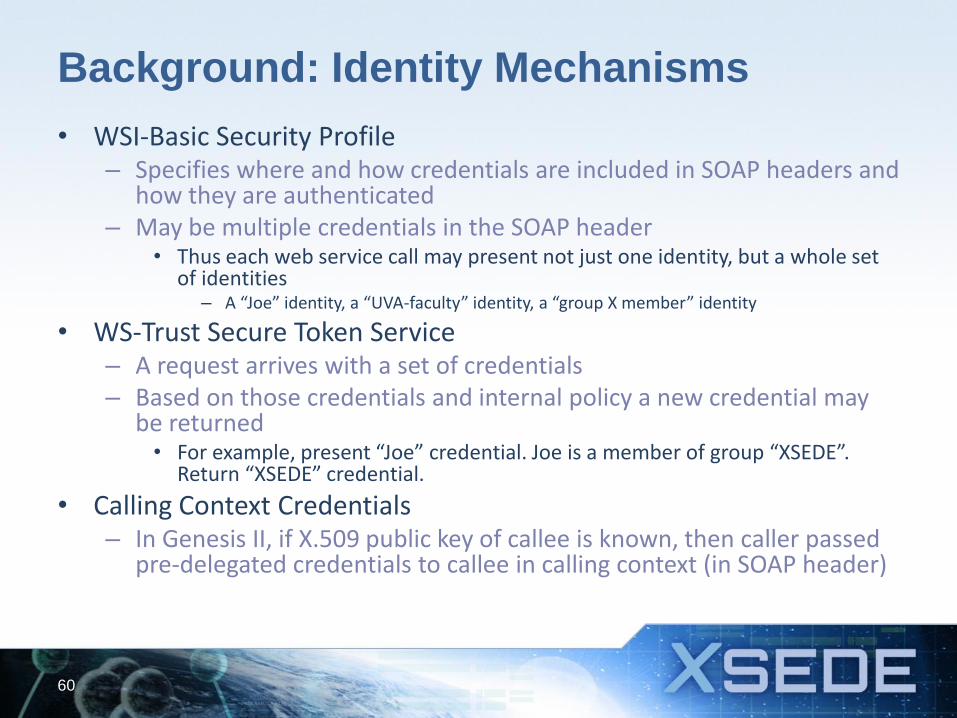
Background: Identity Mechanisms
• WSI-Basic Security Profile – Specifies where and how credentials are included in SOAP headers and
how they are authenticated – May be multiple credentials in the SOAP header
• Thus each web service call may present not just one identity, but a whole set of identities
– A “Joe” identity, a “UVA-faculty” identity, a “group X member” identity
• WS-Trust Secure Token Service – A request arrives with a set of credentials – Based on those credentials and internal policy a new credential may
be returned • For example, present “Joe” credential. Joe is a member of group “XSEDE”.
Return “XSEDE” credential.
• Calling Context Credentials – In Genesis II, if X.509 public key of callee is known, then caller passed
pre-delegated credentials to callee in calling context (in SOAP header)
60
Background: Logging In
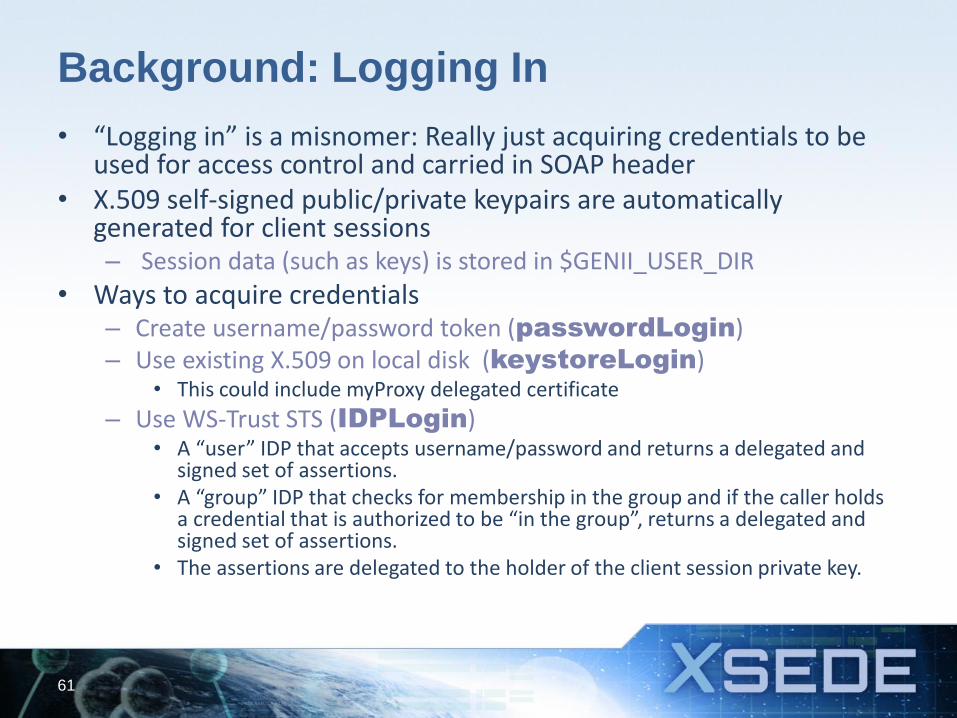
• “Logging in” is a misnomer: Really just acquiring credentials to be used for access control and carried in SOAP header
• X.509 self-signed public/private keypairs are automatically generated for client sessions – Session data (such as keys) is stored in $GENII_USER_DIR
• Ways to acquire credentials – Create username/password token (passwordLogin) – Use existing X.509 on local disk (keystoreLogin)
• This could include myProxy delegated certificate
– Use WS-Trust STS (IDPLogin) • A “user” IDP that accepts username/password and returns a delegated and
signed set of assertions. • A “group” IDP that checks for membership in the group and if the caller holds
a credential that is authorized to be “in the group”, returns a delegated and signed set of assertions.
• The assertions are delegated to the holder of the client session private key.
61
Background: Creating Users
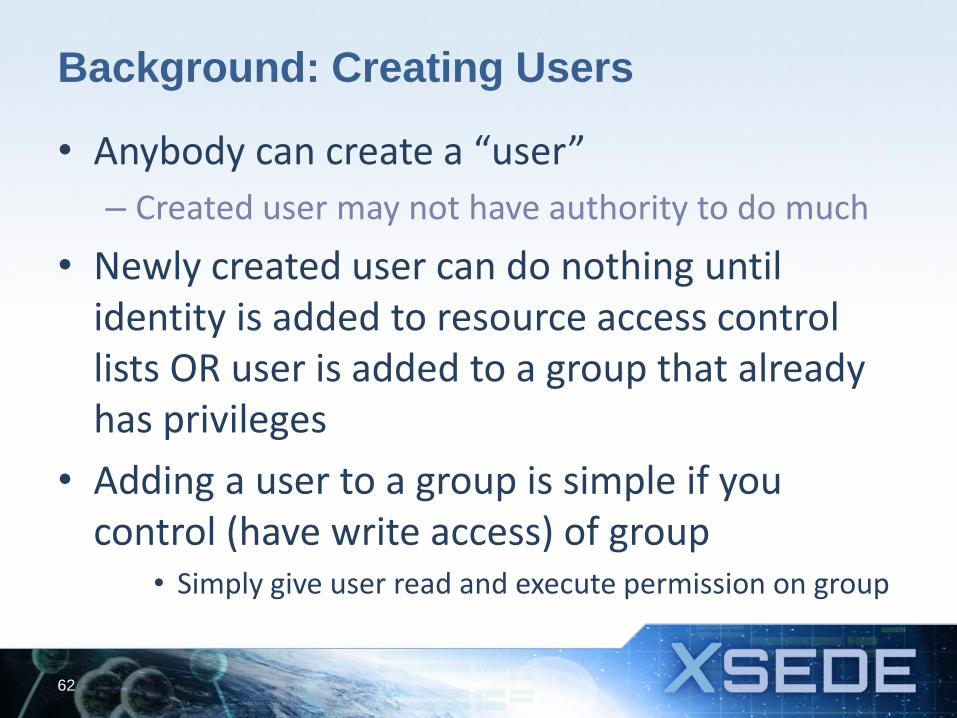
• Anybody can create a “user”
– Created user may not have authority to do much
• Newly created user can do nothing until identity is added to resource access control lists OR user is added to a group that already has privileges
• Adding a user to a group is simple if you control (have write access) of group
• Simply give user read and execute permission on group
62
The User Creation Process
1. Create a user identity
2. Create home directory for user
3. Add user to desired groups
63
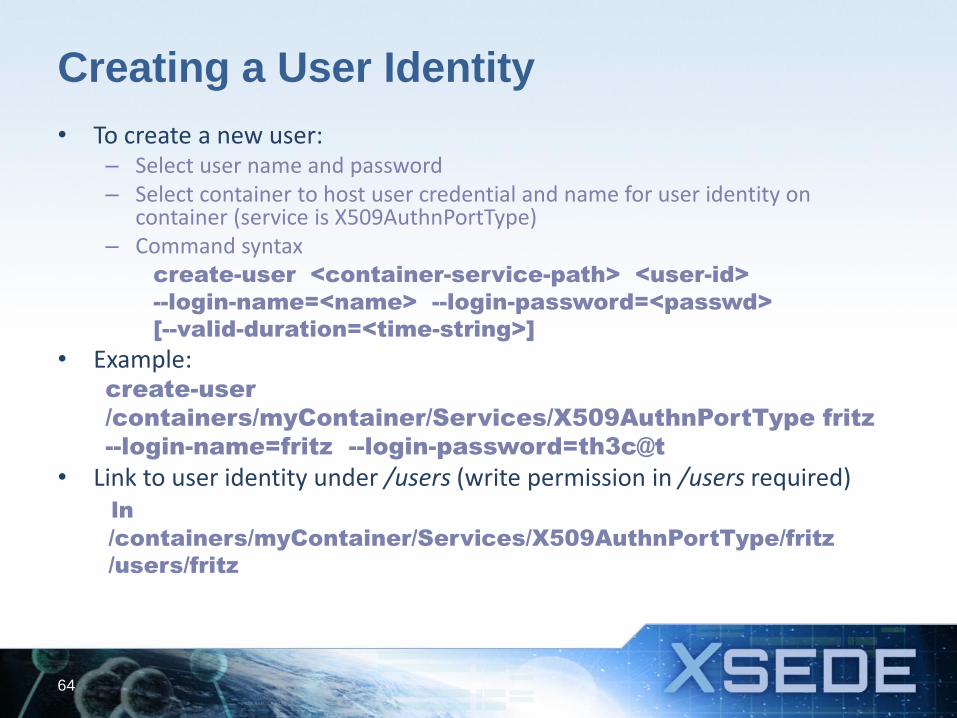
Creating a User Identity
• To create a new user: – Select user name and password – Select container to host user credential and name for user identity on
container (service is X509AuthnPortType) – Command syntax create-user <container-service-path> <user-id>
--login-name=<name> --login-password=<passwd>
[--valid-duration=<time-string>]
• Example: create-user
/containers/myContainer/Services/X509AuthnPortType fritz
--login-name=fritz --login-password=th3c@t
• Link to user identity under /users (write permission in /users required) ln
/containers/myContainer/Services/X509AuthnPortType/fritz
/users/fritz
64
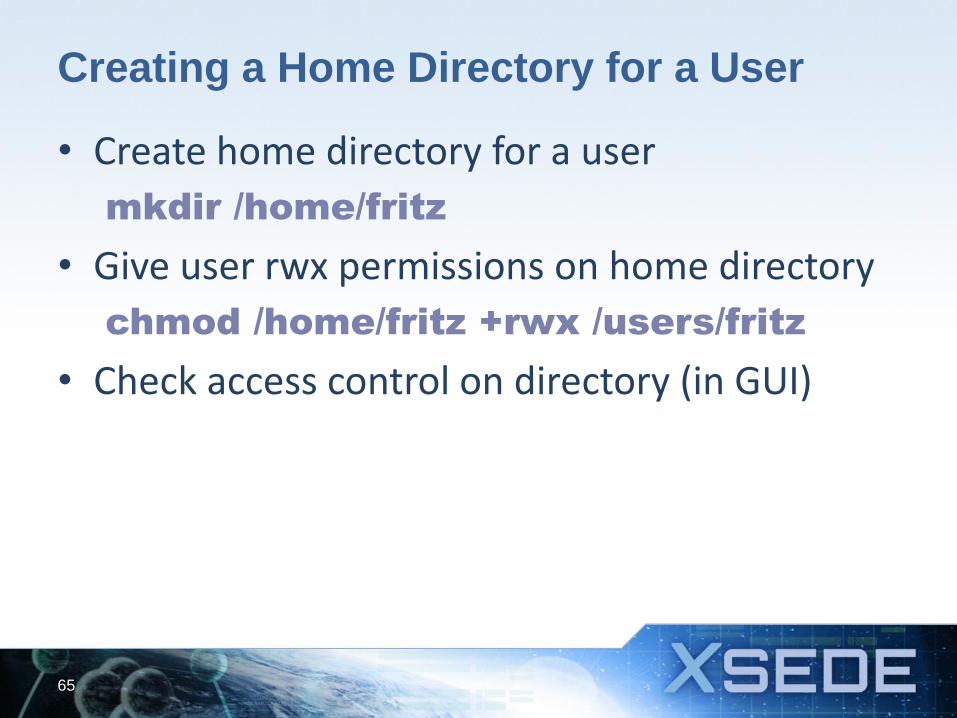
Creating a Home Directory for a User
• Create home directory for a user
mkdir /home/fritz
• Give user rwx permissions on home directory
chmod /home/fritz +rwx /users/fritz
• Check access control on directory (in GUI)
65
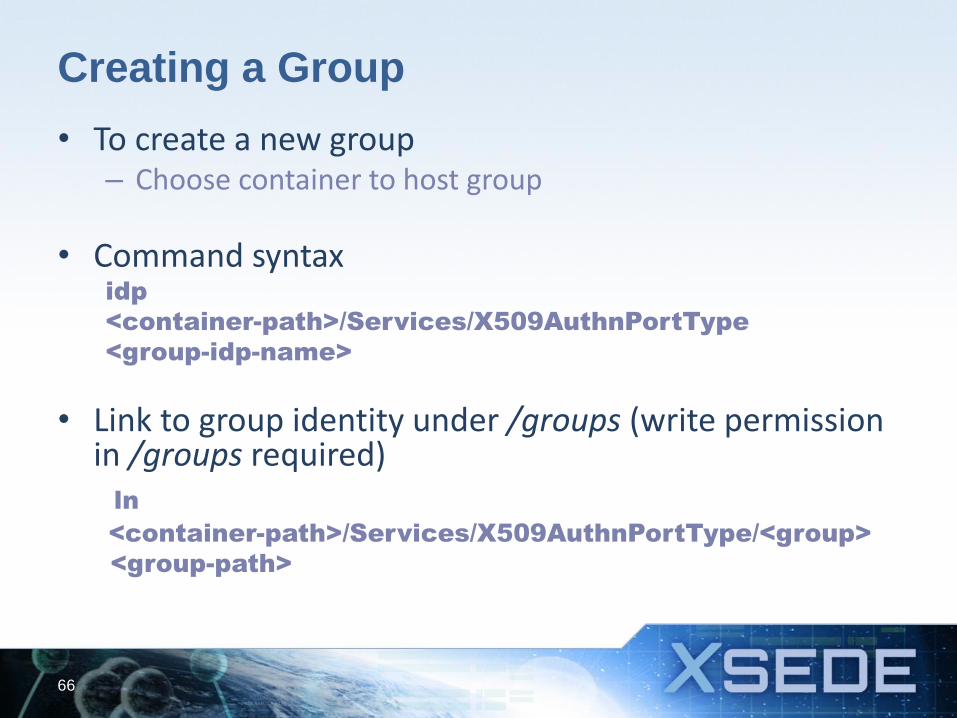
Creating a Group
• To create a new group – Choose container to host group
• Command syntax idp
<container-path>/Services/X509AuthnPortType
<group-idp-name>
• Link to group identity under /groups (write permission in /groups required)
ln
<container-path>/Services/X509AuthnPortType/<group>
<group-path>
66
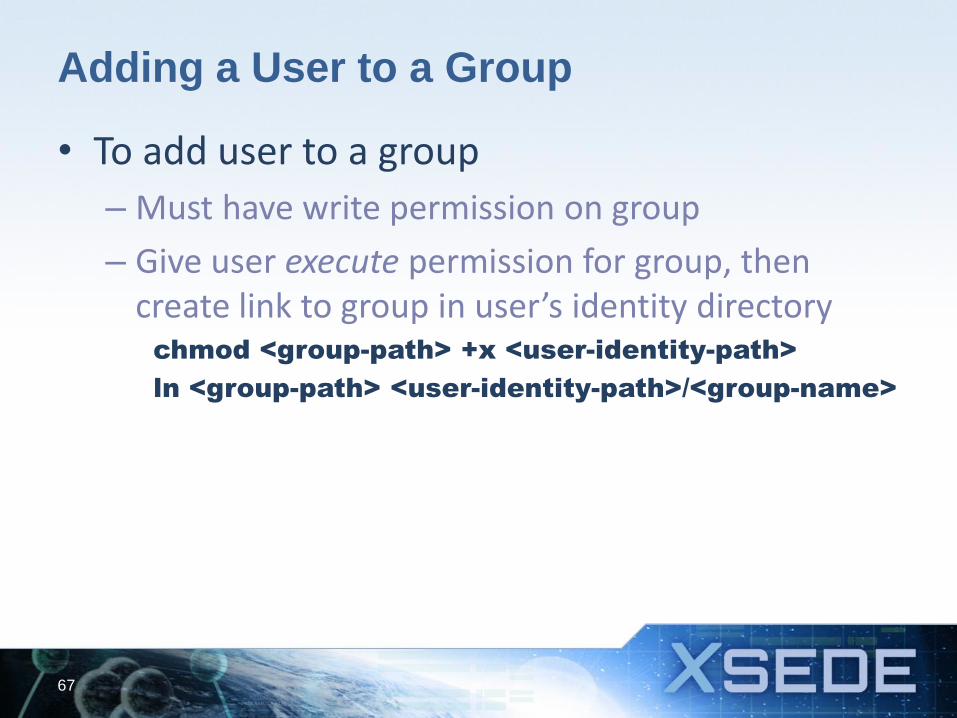
Adding a User to a Group
• To add user to a group
– Must have write permission on group
– Give user execute permission for group, then create link to group in user’s identity directory
chmod <group-path> +x <user-identity-path>
ln <group-path> <user-identity-path>/<group-name>
67
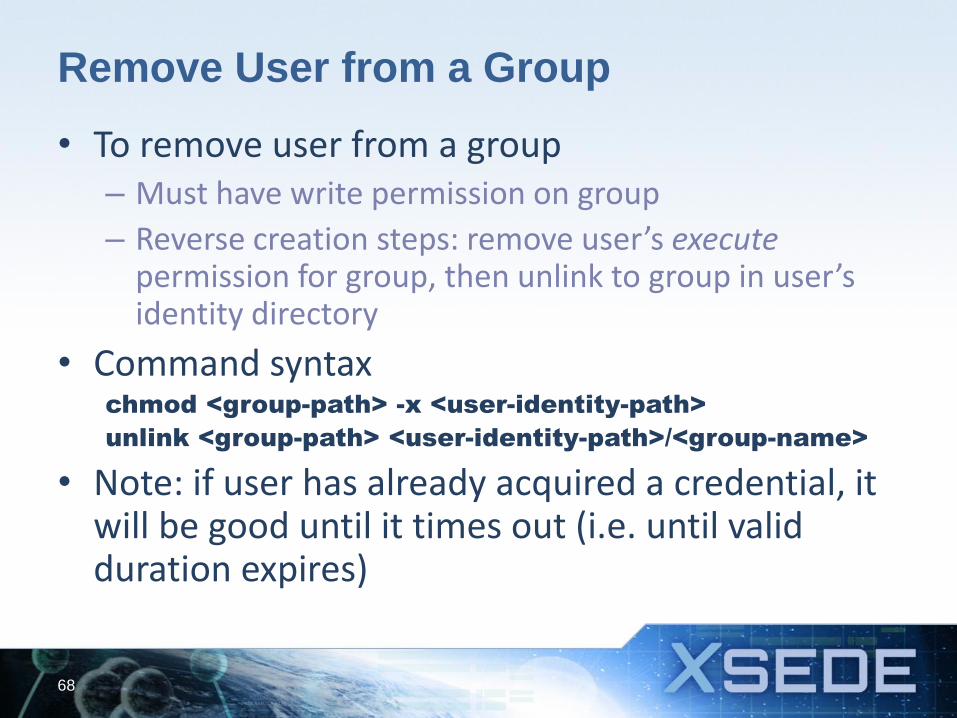
Remove User from a Group
• To remove user from a group – Must have write permission on group
– Reverse creation steps: remove user’s execute permission for group, then unlink to group in user’s identity directory
• Command syntax chmod <group-path> -x <user-identity-path>
unlink <group-path> <user-identity-path>/<group-name>
• Note: if user has already acquired a credential, it will be good until it times out (i.e. until valid duration expires)
68

February 1, 2012
Adding DATA Resources into the Grid
Andrew Grimshaw
Ways to Add Data into the Grid
• Create files and directories
• Export file system directory
70
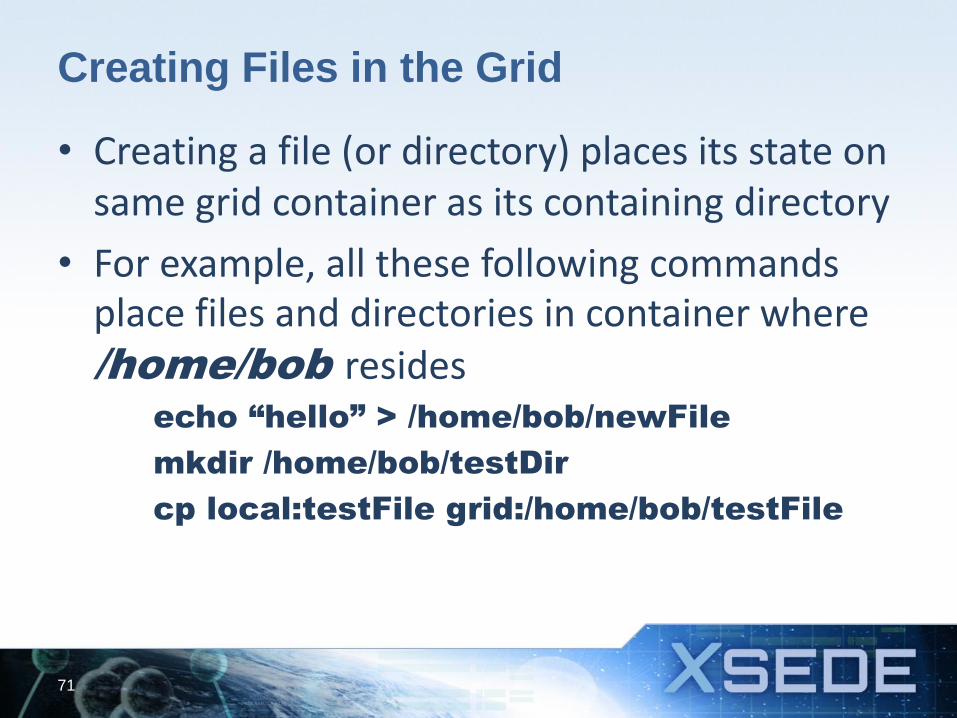
Creating Files in the Grid
• Creating a file (or directory) places its state on same grid container as its containing directory
• For example, all these following commands place files and directories in container where /home/bob resides
echo “hello” > /home/bob/newFile
mkdir /home/bob/testDir
cp local:testFile grid:/home/bob/testFile
71

Creating Directories on Specific Containers
• Files can be created on other containers by specifying creating a containing directory on target container
• Directory placement location can be changed by explicitly specifying grid container to be used – Path to service on target container is given to
directory creation command (service is EnhancedRNSServicePortType)
mkdir --rns-service=<rns-service-path> <new-dir-path>
72
Exports: Mapping Data into the Grid
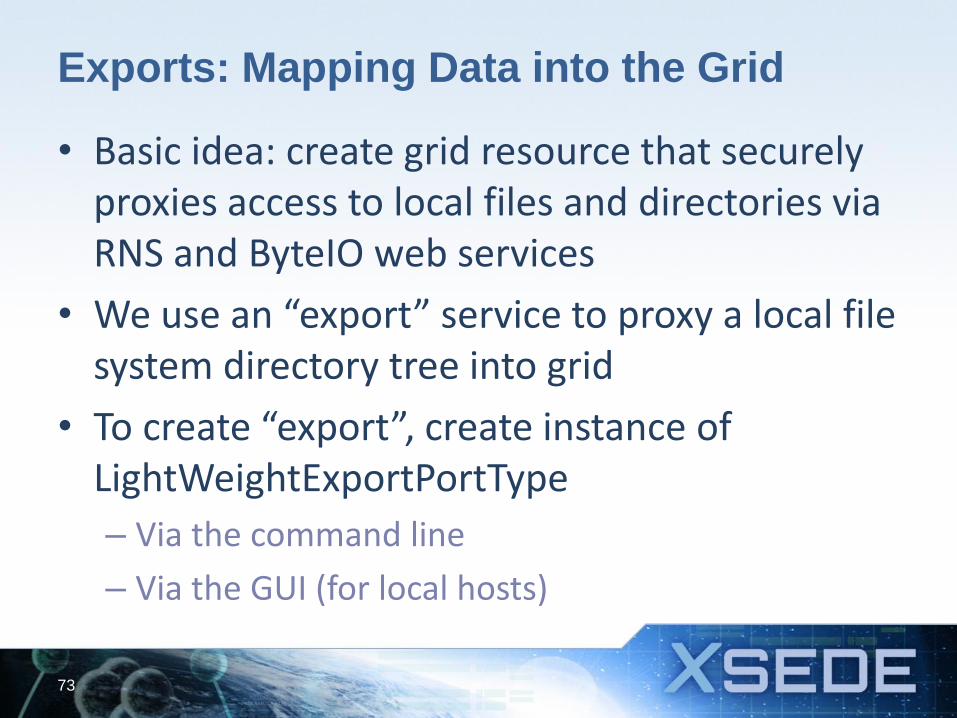
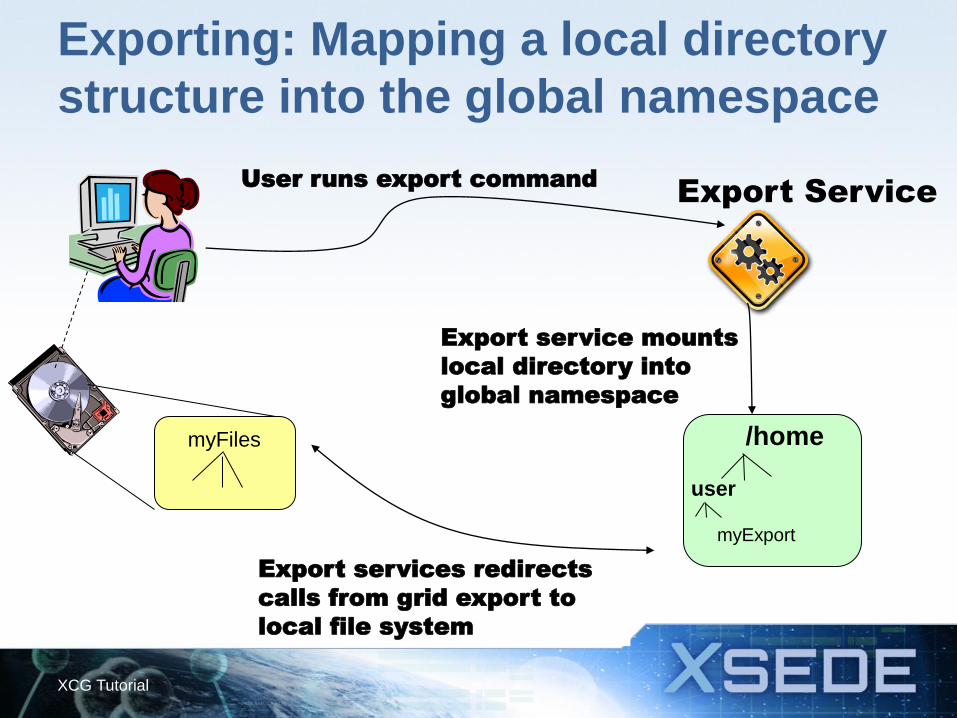
• Basic idea: create grid resource that securely proxies access to local files and directories via RNS and ByteIO web services
• We use an “export” service to proxy a local file system directory tree into grid
• To create “export”, create instance of LightWeightExportPortType
– Via the command line
– Via the GUI (for local hosts)
73
XCG Tutorial
Exporting: Mapping a local directory
structure into the global namespace
Export Service
user
/home myFiles
Export services redirects
calls from grid export to
local file system
Export service mounts
local directory into
global namespace
User runs export command
myExport
Export Creation Example: Cmdline
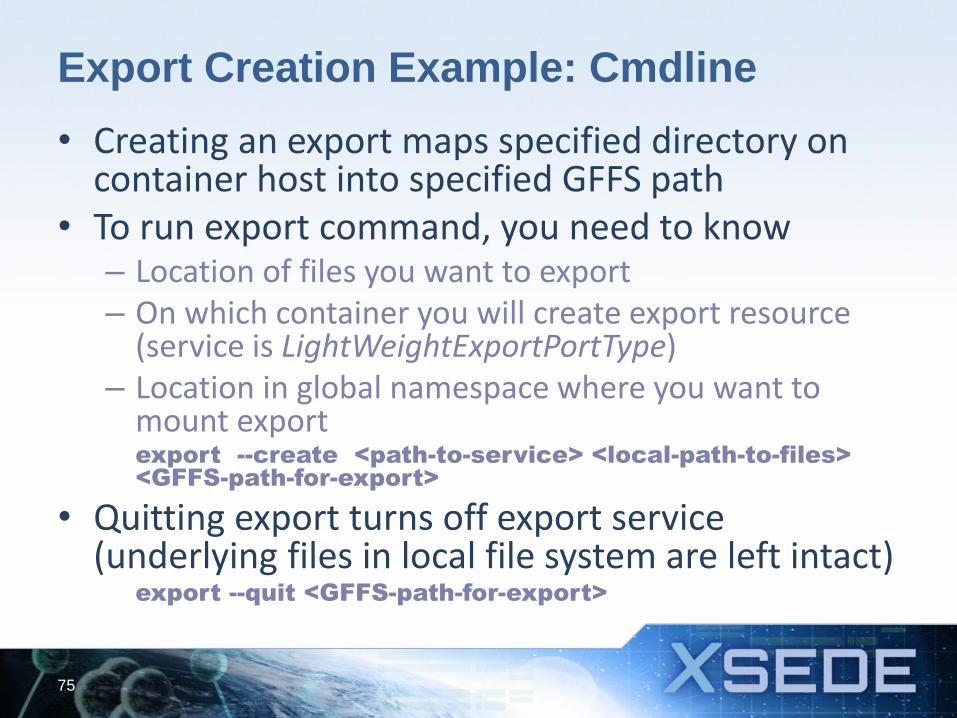
• Creating an export maps specified directory on container host into specified GFFS path
• To run export command, you need to know – Location of files you want to export – On which container you will create export resource
(service is LightWeightExportPortType) – Location in global namespace where you want to
mount export export --create <path-to-service> <local-path-to-files>
<GFFS-path-for-export>
• Quitting export turns off export service (underlying files in local file system are left intact) export --quit <GFFS-path-for-export>
75
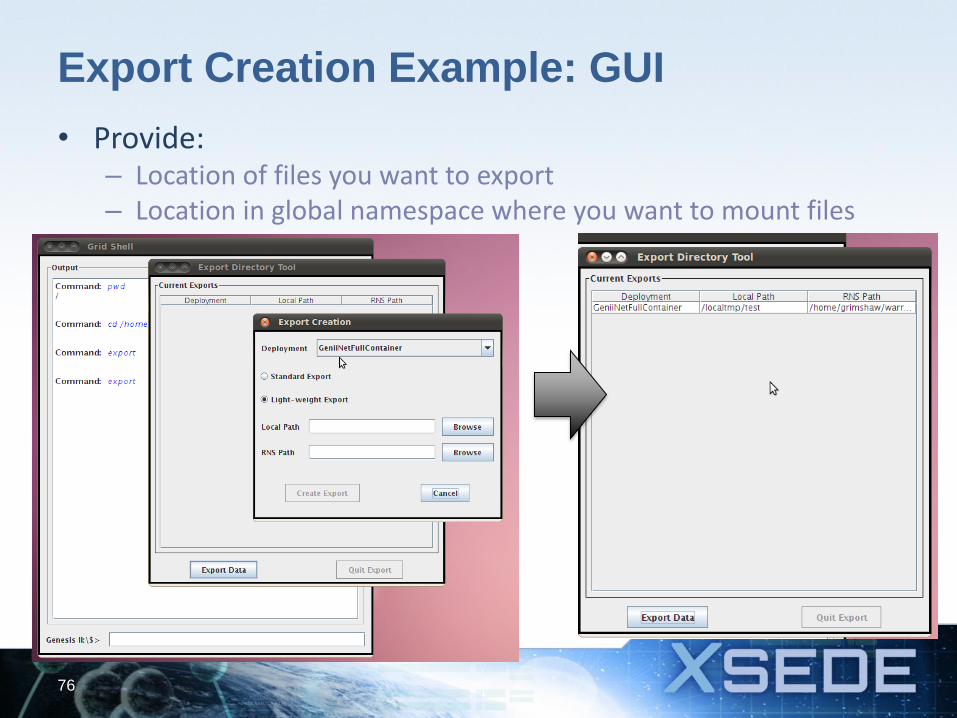
Export Creation Example: GUI
• Provide: – Location of files you want to export – Location in global namespace where you want to mount files
76
Export Security Settings Recommendation
• Give users extended access control to enable export creation
• Allow only admin users to create exports
77

February 1, 2012
XSEDE Compute Resources
Genesis II Components

Audience & Goals
• Audience
– System administrators who need to share compute resources within XSEDE or create and manage Grid queues
– At centers, campuses, research groups
• Goals: At the end of this tutorial you will…
– Create and manage Basic Execution Services (BES)
– Create and manage Grid queues
Background
• Compute resources modeled as Basic Execution Services (OGSA-BES)
80
Basic Execution Services
• Open Grid Forum standard – OGSA-BES • Several profiles/specializations
– HPC Basic Profile (HPC-BP) – HPC File Staging
• Jobs defined by JSDL (Job Submission Description Language) documents (see “Running a Job with XSEDE” module)
• Several existing implementations – Genesis II – UNICORE 6 – GridSam – CREAM – Poznan – BES++
81
BESes are Resources
• A Genesis II container may have many BES resources of different types
• BES resources are created using same mechanism as other resources
(service is GeniiBESPortType) – Cmdline command “create-resource
[--construction-properties=<properties-file>]
<grid-container-service-path>
[<global-namespace-path-for-new-resource>]”
– Also by GUI tool “bes-manager”
82
BES Types
• Genesis II has multiple BES implementations for different back-end compute resource types (all support the same interface and profiles)
– Unix fork/exec
– Windows spawn
– Native queue submission
• SGE, PBS/Torque, others as necessary
– Amazon EC2 cloud (Amazon, FutureGrid)
• UNICORE also has multiple BES types
83
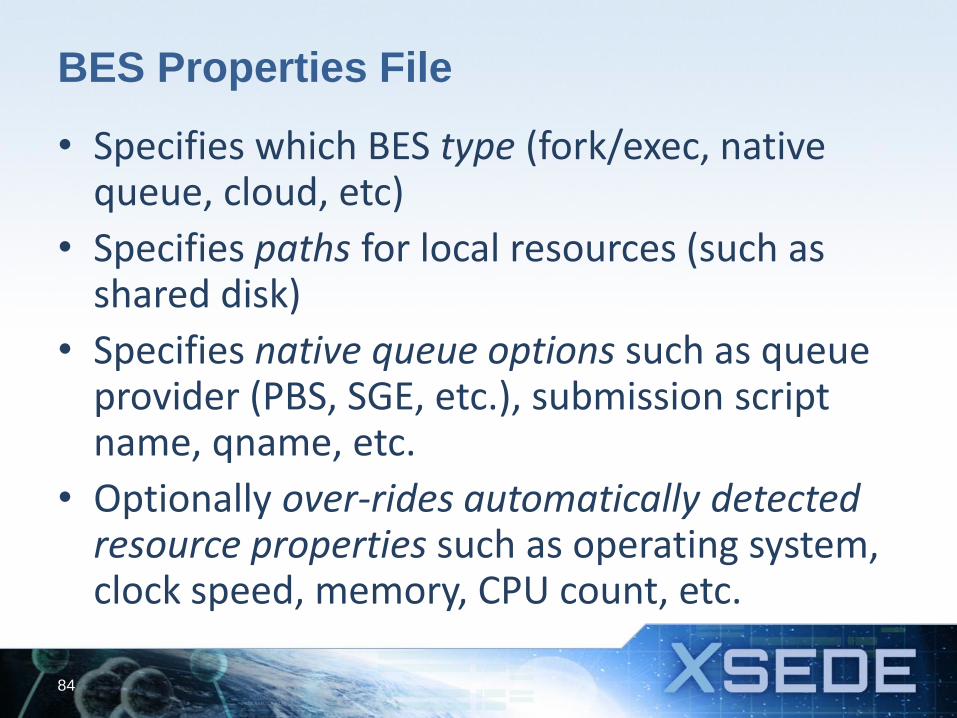
BES Properties File
• Specifies which BES type (fork/exec, native queue, cloud, etc)
• Specifies paths for local resources (such as shared disk)
• Specifies native queue options such as queue provider (PBS, SGE, etc.), submission script name, qname, etc.
• Optionally over-rides automatically detected resource properties such as operating system, clock speed, memory, CPU count, etc.
84
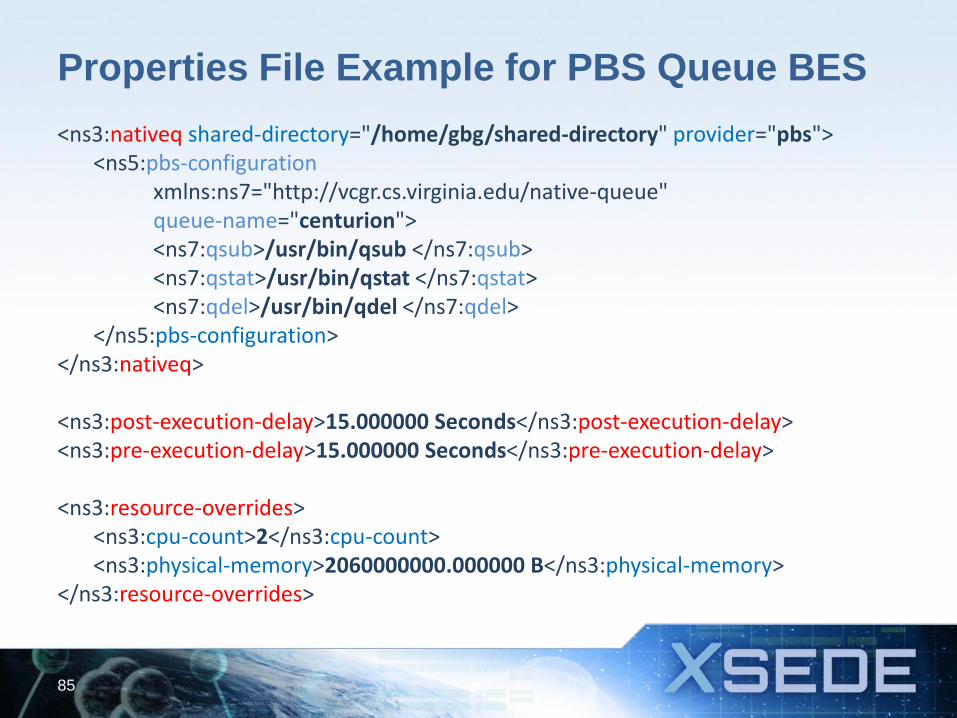
Properties File Example for PBS Queue BES
<ns3:nativeq shared-directory="/home/gbg/shared-directory" provider="pbs"> <ns5:pbs-configuration xmlns:ns7="http://vcgr.cs.virginia.edu/native-queue" queue-name="centurion"> <ns7:qsub>/usr/bin/qsub </ns7:qsub> <ns7:qstat>/usr/bin/qstat </ns7:qstat> <ns7:qdel>/usr/bin/qdel </ns7:qdel> </ns5:pbs-configuration> </ns3:nativeq> <ns3:post-execution-delay>15.000000 Seconds</ns3:post-execution-delay> <ns3:pre-execution-delay>15.000000 Seconds</ns3:pre-execution-delay> <ns3:resource-overrides> <ns3:cpu-count>2</ns3:cpu-count> <ns3:physical-memory>2060000000.000000 B</ns3:physical-memory> </ns3:resource-overrides>
85
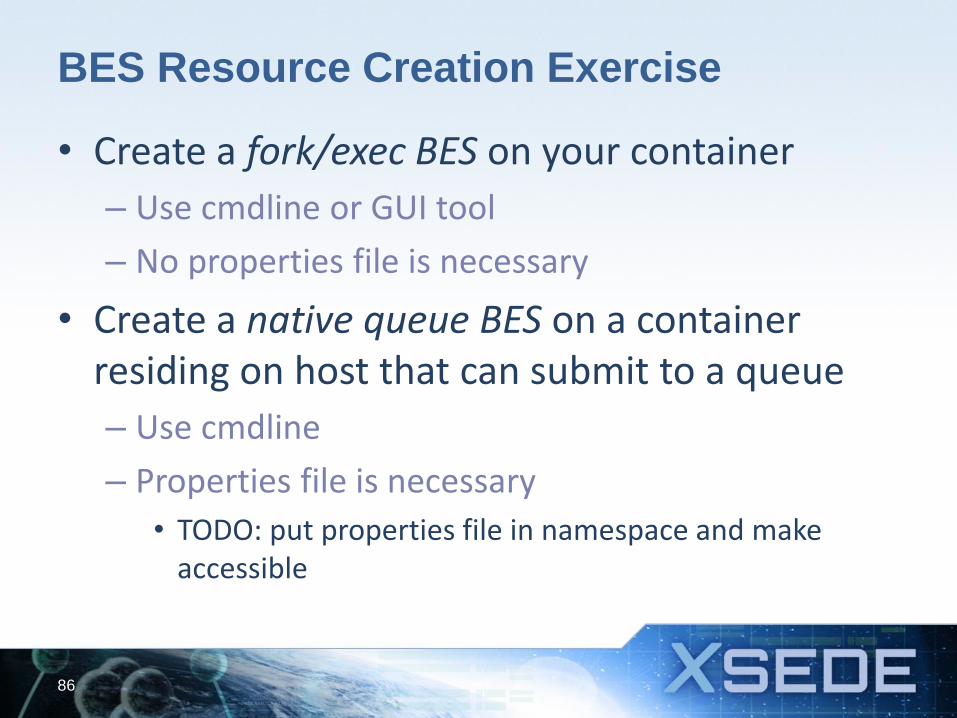
BES Resource Creation Exercise
• Create a fork/exec BES on your container
– Use cmdline or GUI tool
– No properties file is necessary
• Create a native queue BES on a container residing on host that can submit to a queue
– Use cmdline
– Properties file is necessary
• TODO: put properties file in namespace and make accessible
86
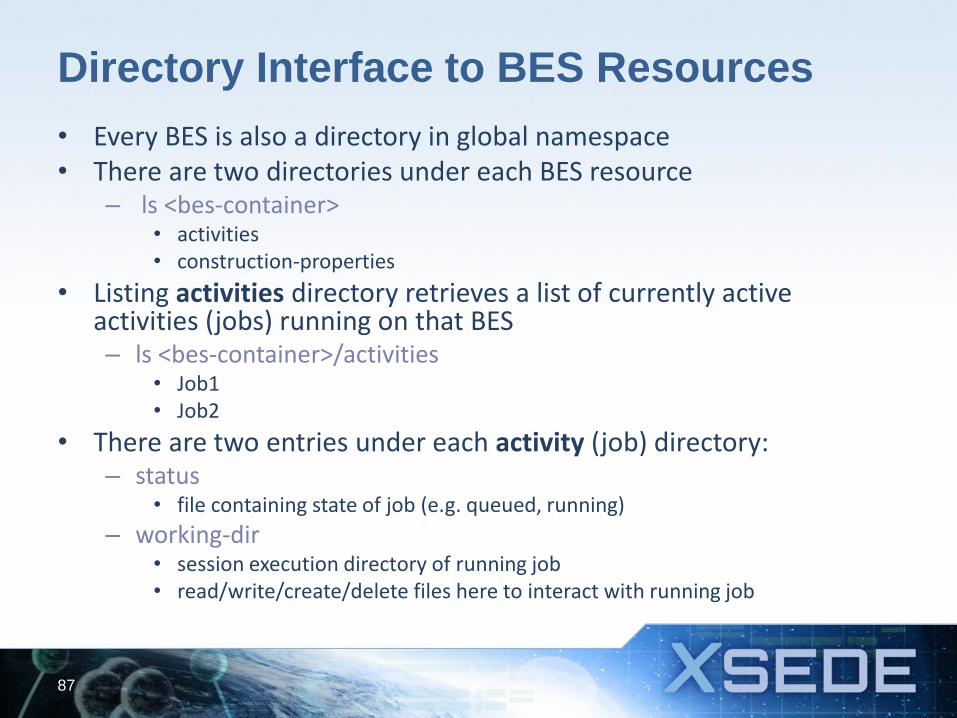
Directory Interface to BES Resources
• Every BES is also a directory in global namespace • There are two directories under each BES resource
– ls <bes-container> • activities • construction-properties
• Listing activities directory retrieves a list of currently active activities (jobs) running on that BES – ls <bes-container>/activities
• Job1 • Job2
• There are two entries under each activity (job) directory: – status
• file containing state of job (e.g. queued, running)
– working-dir • session execution directory of running job • read/write/create/delete files here to interact with running job
87
XCG Tutorial
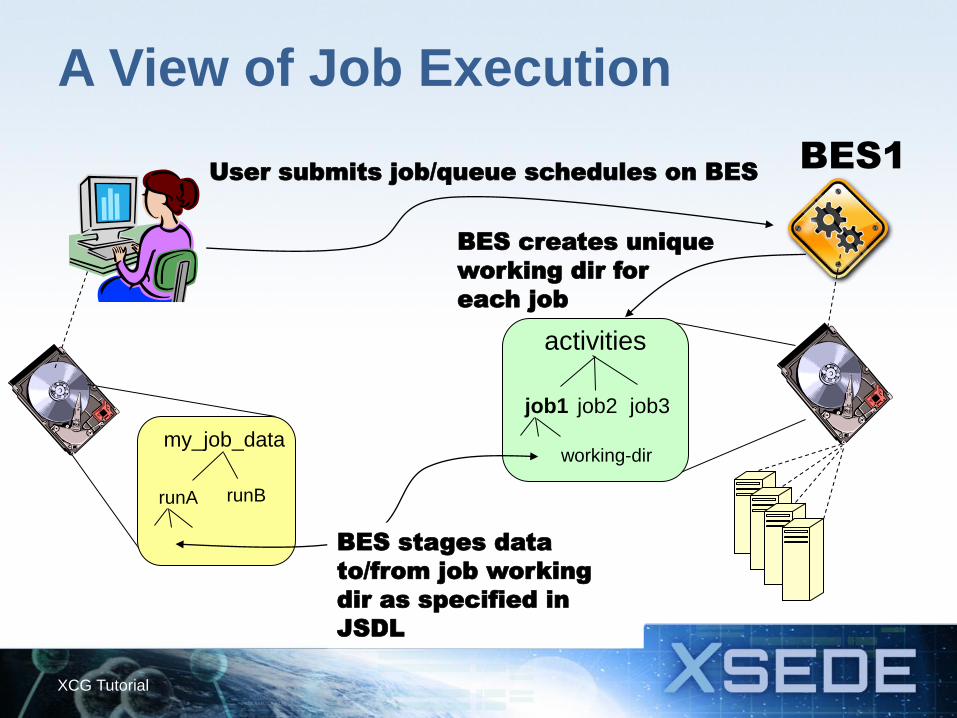
A View of Job Execution
BES1
job1 job3 job2
activities
runA runB
my_job_data
BES stages data
to/from job working
dir as specified in
JSDL
BES creates unique
working dir for
each job
User submits job/queue schedules on BES
working-dir

BES Permissions: The BES Activity Interface
• Read – getActivityStatuses: retrieve status information for a list of
activities – getActivityDocuments: retrieve submission details for list
of activities
• Write – addMatchingParameters: add matching parameter
definition to BES resource – stopAcceptingNewActivities: management function to
instruct BES resource to stop accepting jobs until further notice.
• Execute – createActivity: submit job/activity – terminateActivities: stop/delete list of jobs/activities
89
Creating & Configuring a Grid-Queue
• What is a grid-queue?
• How are queues created?
• How are queues configured?
90
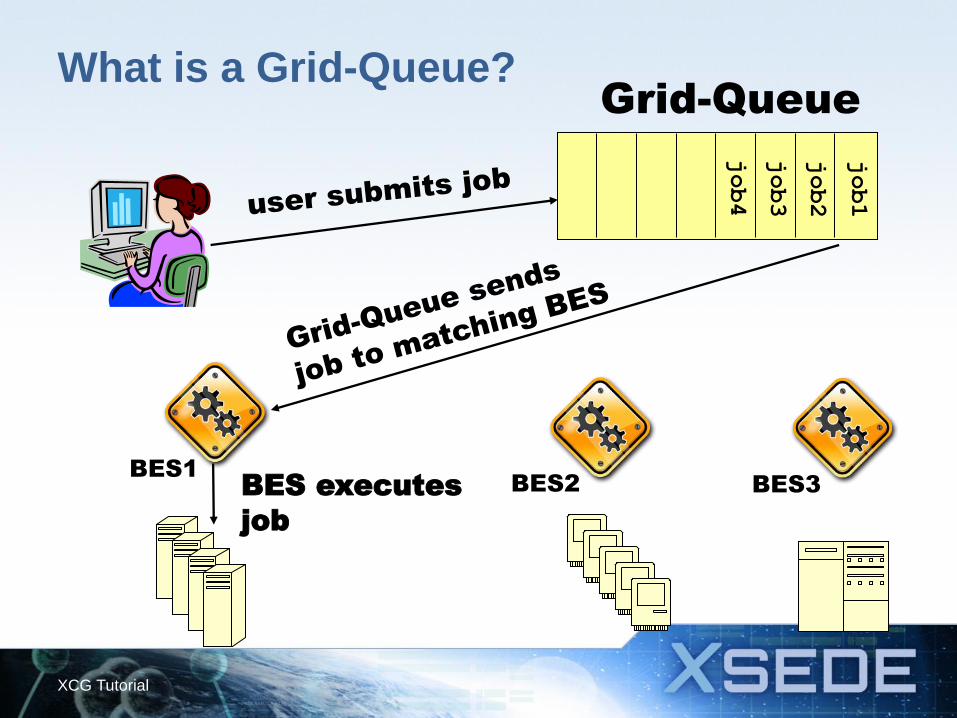
XCG Tutorial
What is a Grid-Queue? job1
job4
job3
job2
Grid-Queue
BES1
BES3 BES2 BES executes
job
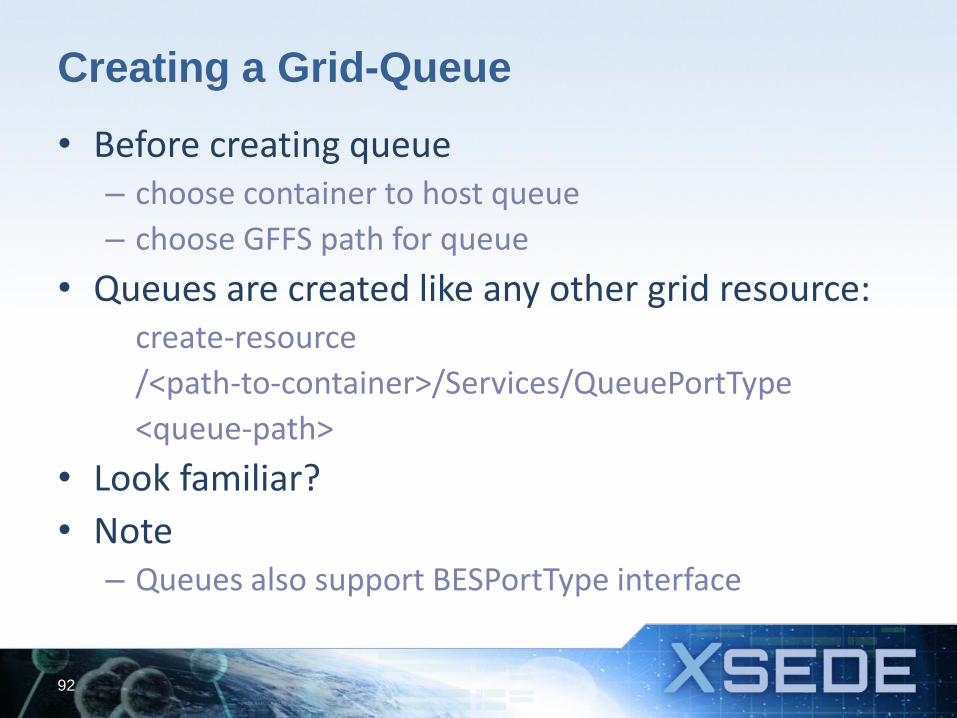
Creating a Grid-Queue
• Before creating queue – choose container to host queue
– choose GFFS path for queue
• Queues are created like any other grid resource: create-resource
/<path-to-container>/Services/QueuePortType
<queue-path>
• Look familiar?
• Note – Queues also support BESPortType interface
92
Grid-Queue Creation Exercise
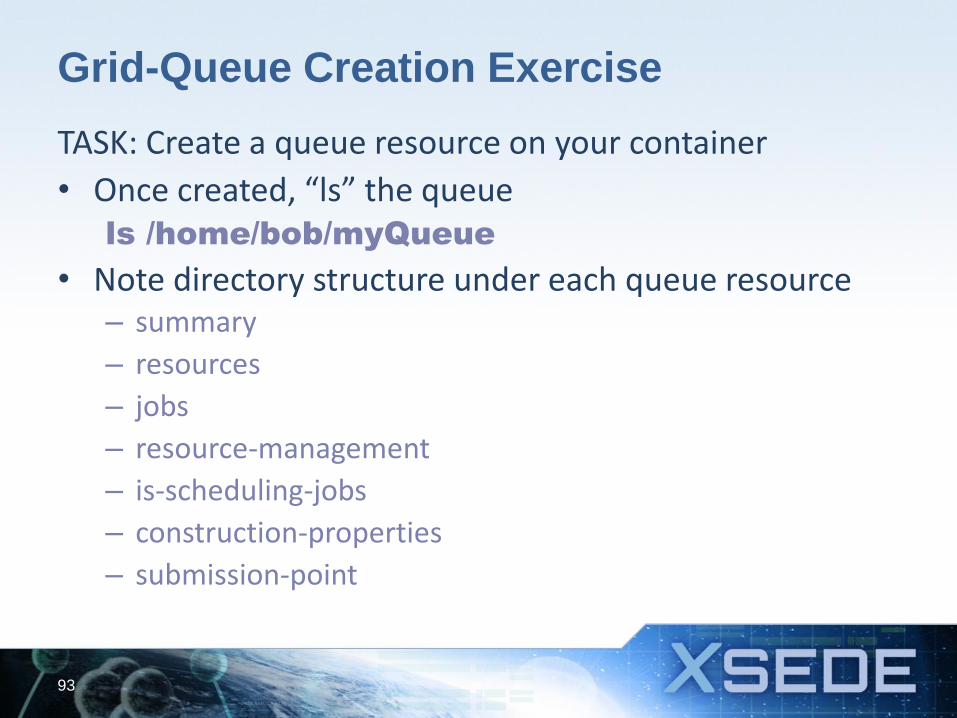
TASK: Create a queue resource on your container
• Once created, “ls” the queue ls /home/bob/myQueue
• Note directory structure under each queue resource – summary
– resources
– jobs
– resource-management
– is-scheduling-jobs
– construction-properties
– submission-point
93
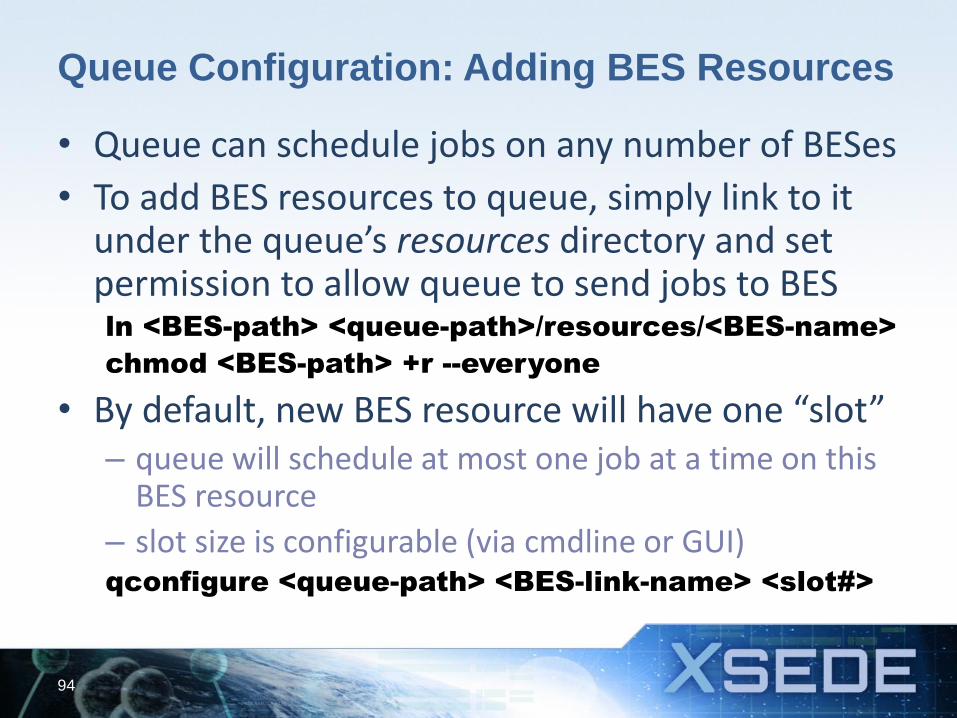
Queue Configuration: Adding BES Resources
• Queue can schedule jobs on any number of BESes
• To add BES resources to queue, simply link to it under the queue’s resources directory and set permission to allow queue to send jobs to BES ln <BES-path> <queue-path>/resources/<BES-name>
chmod <BES-path> +r --everyone
• By default, new BES resource will have one “slot” – queue will schedule at most one job at a time on this
BES resource
– slot size is configurable (via cmdline or GUI) qconfigure <queue-path> <BES-link-name> <slot#>
94
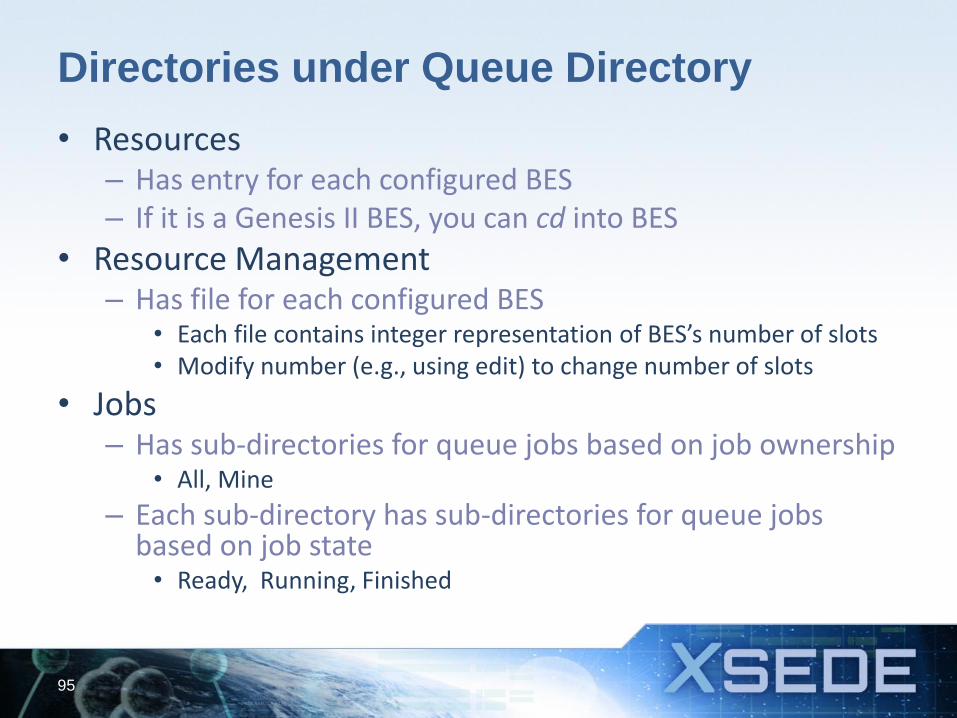
Directories under Queue Directory
• Resources – Has entry for each configured BES – If it is a Genesis II BES, you can cd into BES
• Resource Management – Has file for each configured BES
• Each file contains integer representation of BES’s number of slots • Modify number (e.g., using edit) to change number of slots
• Jobs – Has sub-directories for queue jobs based on job ownership
• All, Mine
– Each sub-directory has sub-directories for queue jobs based on job state
• Ready, Running, Finished
95
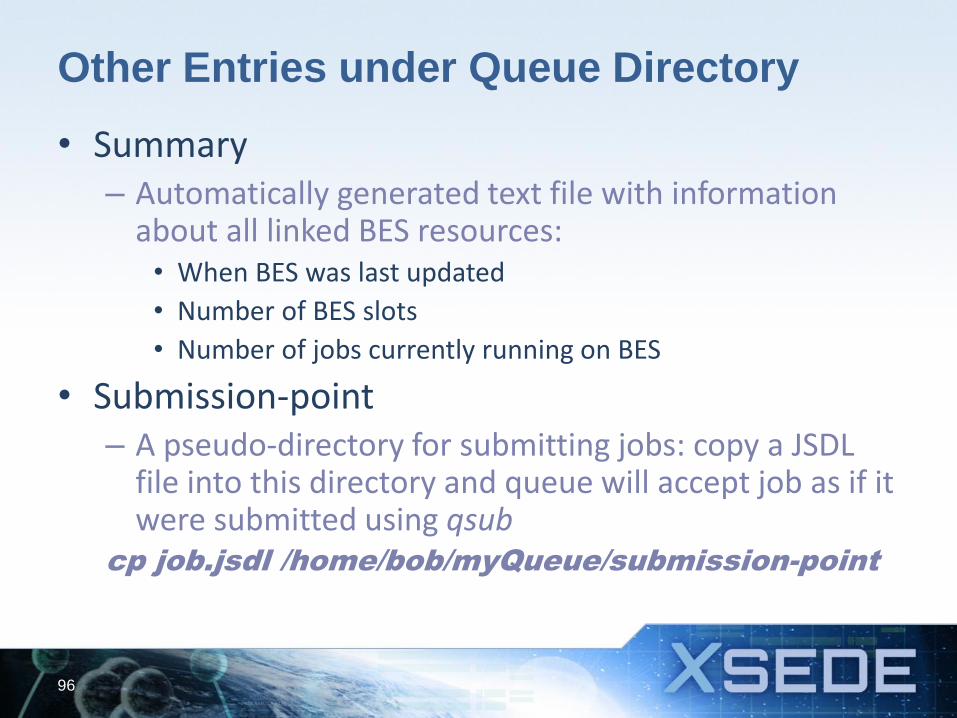
Other Entries under Queue Directory
• Summary – Automatically generated text file with information
about all linked BES resources: • When BES was last updated
• Number of BES slots
• Number of jobs currently running on BES
• Submission-point – A pseudo-directory for submitting jobs: copy a JSDL
file into this directory and queue will accept job as if it were submitted using qsub
cp job.jsdl /home/bob/myQueue/submission-point
96
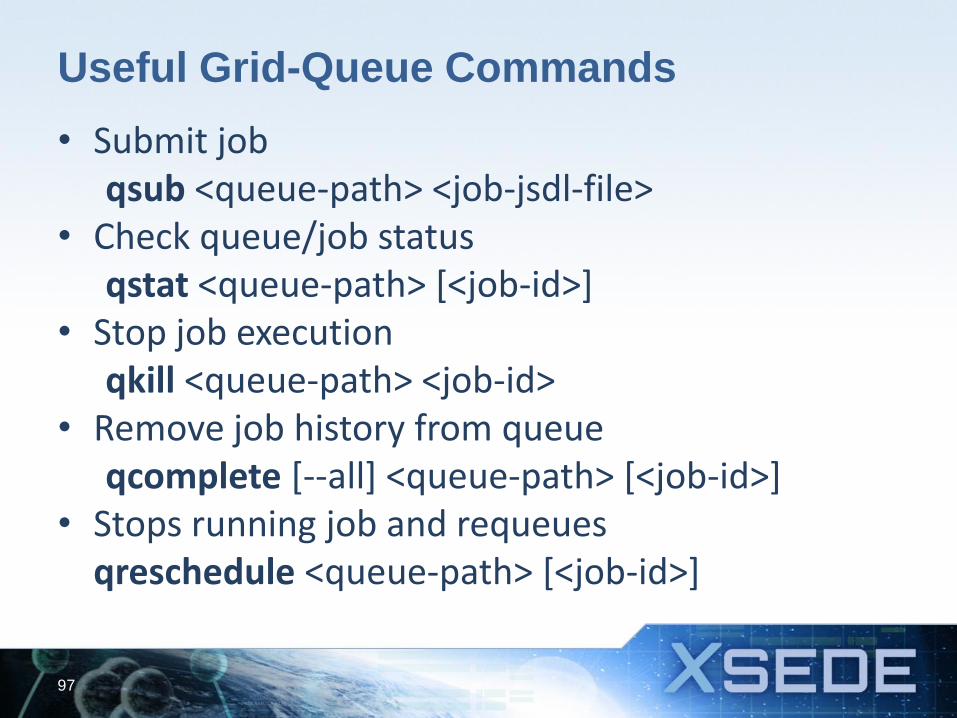
Useful Grid-Queue Commands
• Submit job qsub <queue-path> <job-jsdl-file> • Check queue/job status qstat <queue-path> [<job-id>] • Stop job execution qkill <queue-path> <job-id> • Remove job history from queue qcomplete [--all] <queue-path> [<job-id>] • Stops running job and requeues qreschedule <queue-path> [<job-id>]
97
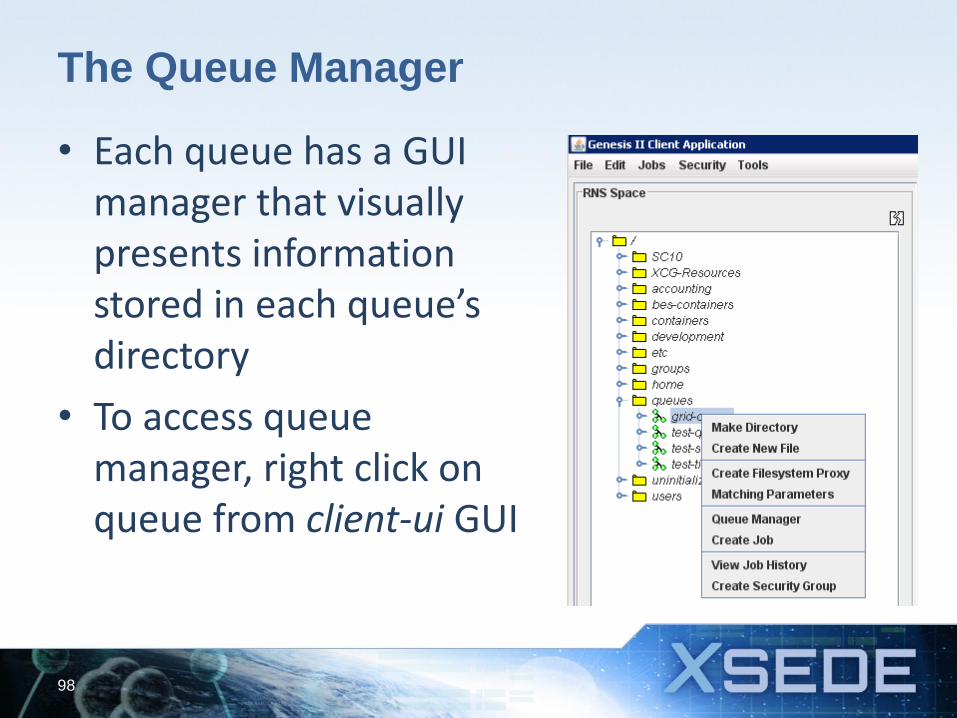
The Queue Manager
• Each queue has a GUI manager that visually presents information stored in each queue’s directory
• To access queue manager, right click on queue from client-ui GUI
98

The Queue Manager: Job Manager Tab
99
Click in the Max Slots column in the row for the desired resource, type in a
number, and save.
• Job Manager tab presents information about jobs currently managed by queue
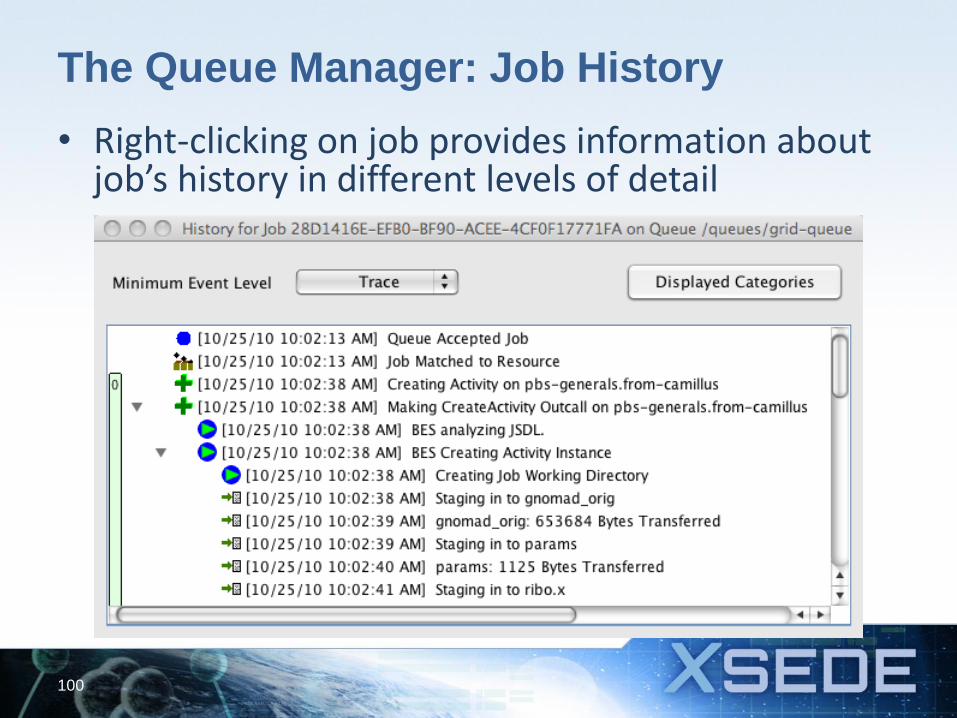
The Queue Manager: Job History
100
• Right-clicking on job provides information about job’s history in different levels of detail
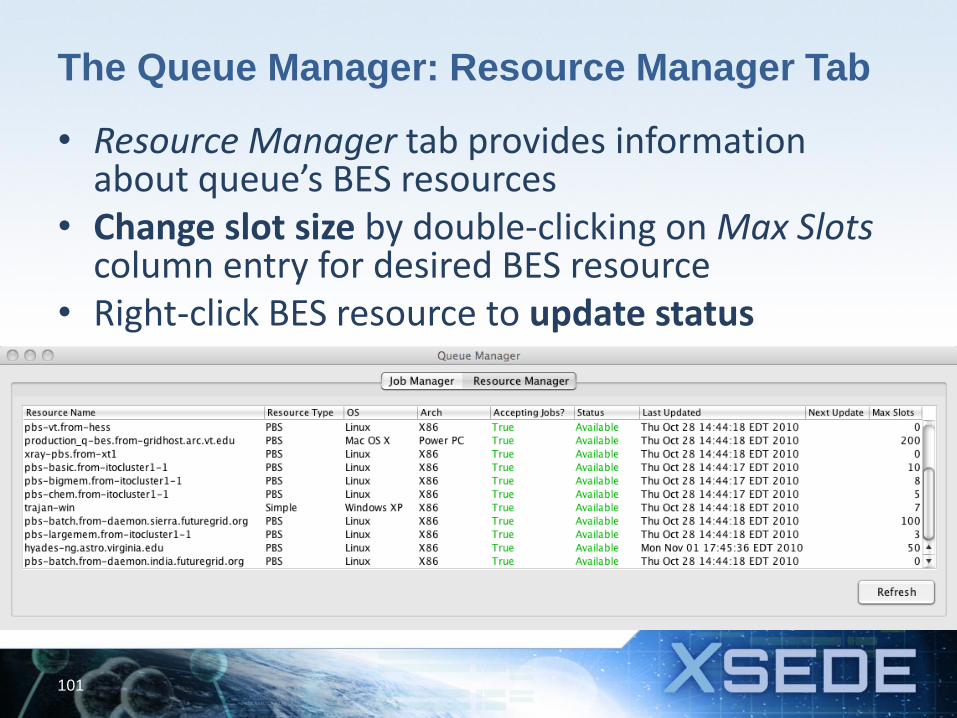
The Queue Manager: Resource Manager Tab
101
• Resource Manager tab provides information about queue’s BES resources
• Change slot size by double-clicking on Max Slots column entry for desired BES resource
• Right-click BES resource to update status
Interested in Learning More?
• See “Running Grid Jobs for XSEDE” module for more information on managing and interacting with jobs through a queue resource
102
System Model & Overview
• System of systems
• Resource model & resource “types”
• Global name space and the GFFS
• Security model
Distributed Systems Basics
• Goal is to facilitate secure resource sharing between geographically distributed resources in a multi-organizational context
– Compute, data, policy, applications, etc.
• Remote Procedure Call (RPC) has been the dominate form of interaction since late 1970s – Marshal arguments (packing) – Send arguments from client to service – Unpack arguments – Compute result – Marshall results – Send results back to client – Unpack results – Return results up the call stack
• One usually defines the interface to a remote procedure call using an interface description language (IDL) of some kind
• There have been many RPC environments over the years, with many different IDLs, message transport mechanisms, and run time environments
– Sun RPC, CORBA, Java RMI are some of the best known.
• Besides actual parameters, there is usually a mechanism to convey non-parametric data such as the calling context, security context, etc.
• Web services are an RPC environment, WSDL (Web Services Description Language) is the IDL. Typically http(s) is the transport layer.
104
Web Services Basics
• Interfaces are defined using WSDL – based on XML • Implementation is language independent • Wire format is XML/SOAP usually over http(s) • SOAP header is where non-parametric data is carried
– In particular the security context is carried as specified in WSI-BSP (Basic Security Profile) as a set of typed security tokens
• Typically web services are implemented in a web services container – a piece of software that handles all of the packing/unpacking (XML processing), communication, and function dispatch.
• Web services are addressed using either URIs, or more properly, EndPoint References – EPRs – An EPR is an XML document
105
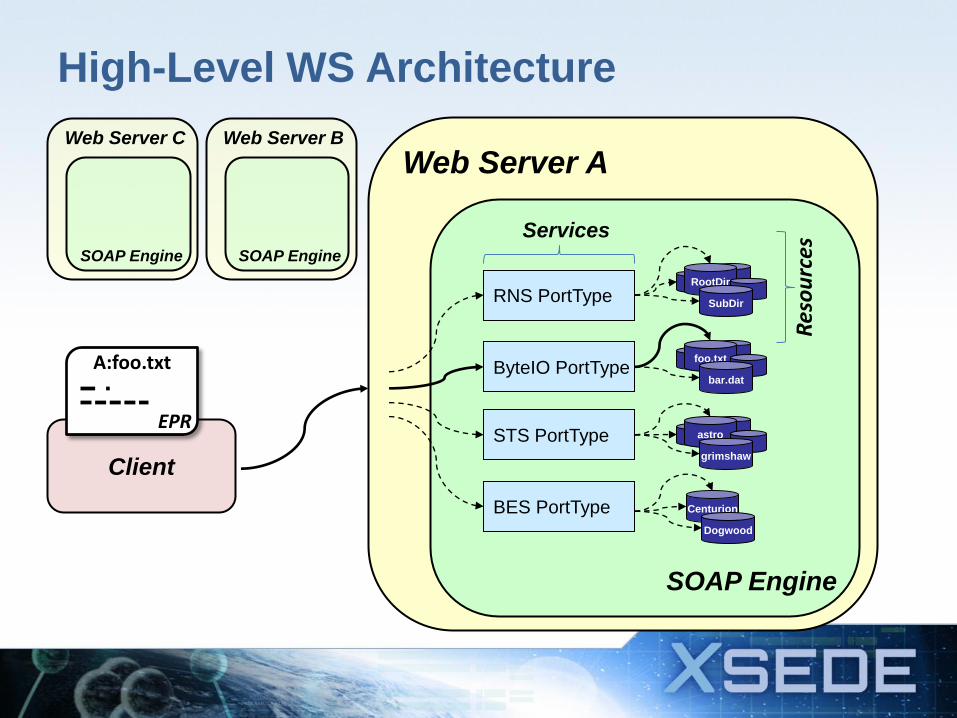
High-Level WS Architecture
Client
Web Server A
SOAP Engine
BES PortType
RNS PortType
ByteIO PortType
STS PortType
foo.txt
bar.dat
RootDir
SubDir
astro
grimshaw
Res
ou
rces
Services
Web Server C
SOAP Engine
Centurion
Dogwood
A:foo.txt
EPR
Web Server B
SOAP Engine
Resource Model
• Architecturally visible resources have:
– interface (port type) defined by WSDL
– address represented by a WS-Addressing EPR
• stands for EndPoint Reference
• XML document that “points” to resource
– unique identifier called EPI (EndPoint Identifier)
– implementation specific state
– arbitrary XML resource properties
107
Resource Model
• Resources communicate synchronously using remote procedure calls (SOAP/http(s)) and asynchronously using notifications (events)
• Resources are typically created using a factory pattern or as a side-effect of an operation on another resource
• Authentication is as per Web Services Interoperability Basic Security Profile (WSI-BSP) – Identity tokens are carried in SOAP header
• Authorization policy and mechanism is up to resource – Ideally advertised in EPR
– Access control lists are implemented
108
Resource “Types” (Interfaces)
• RandomByteIOPortType – think POSIX files • EnhancedRNSPortType – implements RNS 1.1 (resource namespace
service); directories map strings to EPRs; contains a ByteIO factory operation (as per spec)
• BESPortType – Basic Execution Service - executes activities (jobs) • BESActivityPortType – a “job” interface that allows clients to interact with
job as it runs • QueuePortType – a job manager that interacts with sets of BESs and
manages lifetime of jobs, matching jobs to BESs that can execute them, and executing them in FIFO order
• VCGRContainerPortType – a web services container in which resources execute. A container contains many grid resources. A grid resource is typically located in one container (unless replicated).
• LightWeightExportPortType – a service that maps local file system into grid (implements RNS and RandomByteIO interface)
• IdentifyProviderPortType – a service that issues security tokens (implements WS-Trust STS)
109
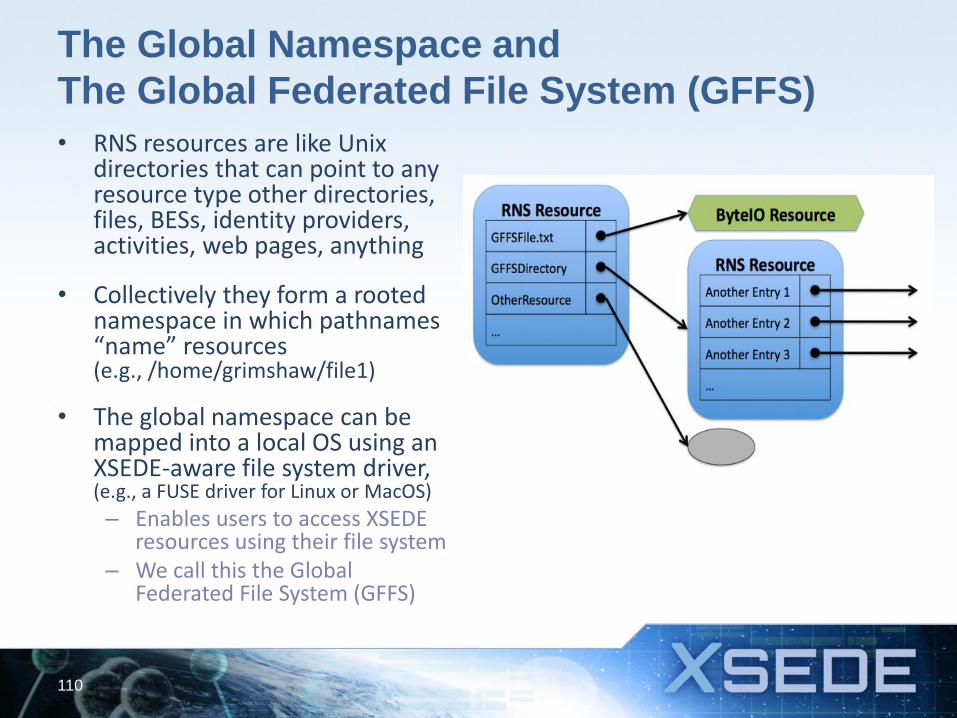
The Global Namespace and
The Global Federated File System (GFFS)
• RNS resources are like Unix directories that can point to any resource type other directories, files, BESs, identity providers, activities, web pages, anything
• Collectively they form a rooted namespace in which pathnames “name” resources (e.g., /home/grimshaw/file1)
• The global namespace can be mapped into a local OS using an XSEDE-aware file system driver, (e.g., a FUSE driver for Linux or MacOS)
– Enables users to access XSEDE resources using their file system
– We call this the Global Federated File System (GFFS)
110
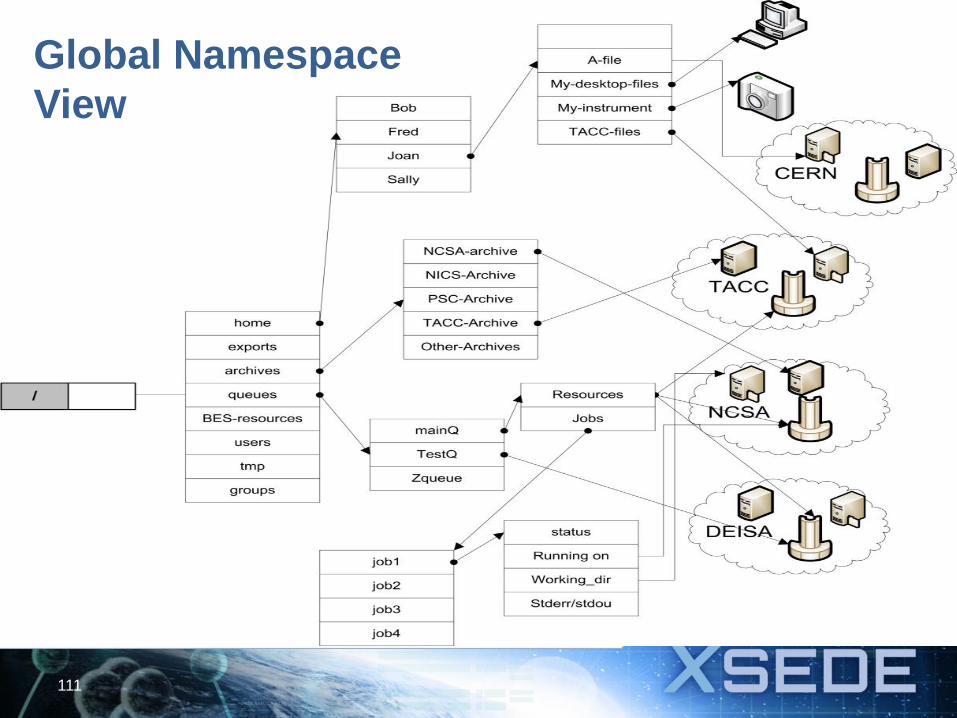
Single global namespace
111
Global Namespace
View
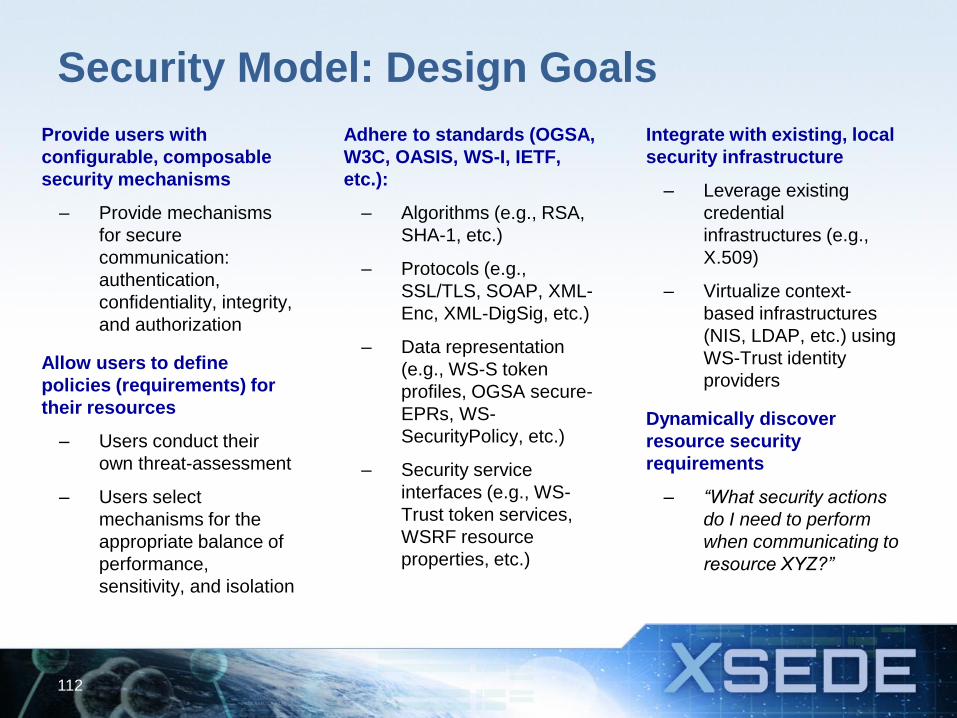
Security Model: Design Goals
112
Provide users with
configurable, composable
security mechanisms
– Provide mechanisms
for secure
communication:
authentication,
confidentiality, integrity,
and authorization
Allow users to define
policies (requirements) for
their resources
– Users conduct their
own threat-assessment
– Users select
mechanisms for the
appropriate balance of
performance,
sensitivity, and isolation
Adhere to standards (OGSA,
W3C, OASIS, WS-I, IETF,
etc.):
– Algorithms (e.g., RSA,
SHA-1, etc.)
– Protocols (e.g.,
SSL/TLS, SOAP, XML-
Enc, XML-DigSig, etc.)
– Data representation
(e.g., WS-S token
profiles, OGSA secure-
EPRs, WS-
SecurityPolicy, etc.)
– Security service
interfaces (e.g., WS-
Trust token services,
WSRF resource
properties, etc.)
Integrate with existing, local
security infrastructure
– Leverage existing
credential
infrastructures (e.g.,
X.509)
– Virtualize context-
based infrastructures
(NIS, LDAP, etc.) using
WS-Trust identity
providers
Dynamically discover
resource security
requirements
– “What security actions
do I need to perform
when communicating to
resource XYZ?”
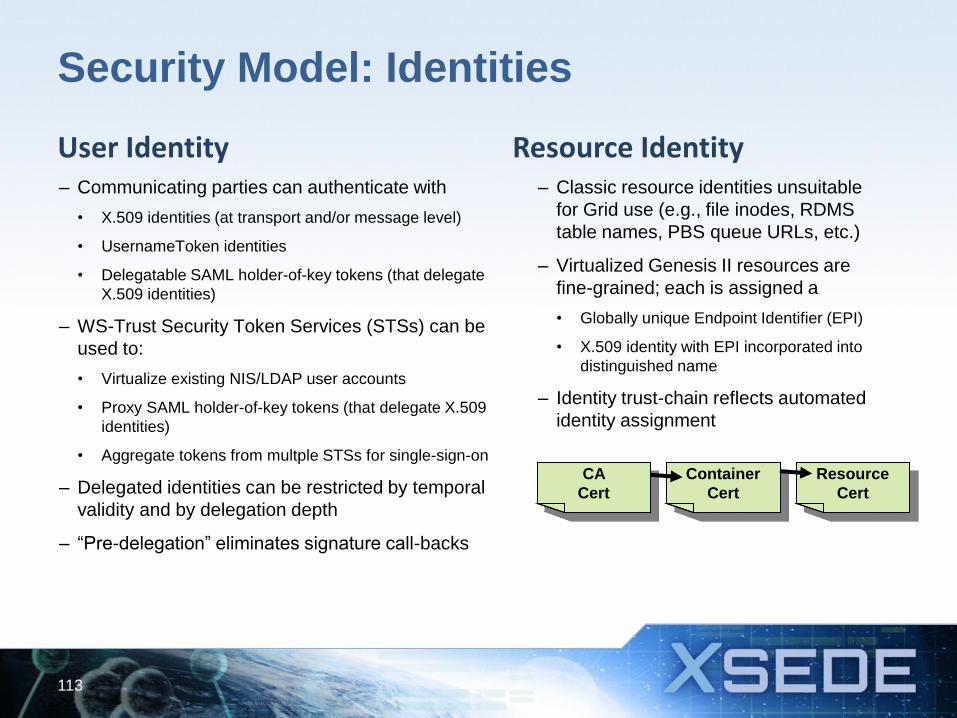
Security Model: Identities
User Identity – Communicating parties can authenticate with
• X.509 identities (at transport and/or message level)
• UsernameToken identities
• Delegatable SAML holder-of-key tokens (that delegate
X.509 identities)
– WS-Trust Security Token Services (STSs) can be
used to:
• Virtualize existing NIS/LDAP user accounts
• Proxy SAML holder-of-key tokens (that delegate X.509
identities)
• Aggregate tokens from multple STSs for single-sign-on
– Delegated identities can be restricted by temporal
validity and by delegation depth
– “Pre-delegation” eliminates signature call-backs
Resource Identity – Classic resource identities unsuitable
for Grid use (e.g., file inodes, RDMS
table names, PBS queue URLs, etc.)
– Virtualized Genesis II resources are
fine-grained; each is assigned a
• Globally unique Endpoint Identifier (EPI)
• X.509 identity with EPI incorporated into
distinguished name
– Identity trust-chain reflects automated
identity assignment
113
CA
Cert
Container
Cert
Resource
Cert
WSI-BSP
• Multiple identity tokens can be carried in the SOAP header, e.g.,
– An “Andrew Grimshaw” token
– A “UVA professor” token
– A “Genesis II” group token
• These tokens may be used for authorization and are pre-delegated to the callee
114