Embed Size (px)
Citation preview
8/8/2019 WTJ, VAN-J, 0607
http://slidepdf.com/reader/full/wtj-van-j-0607 1/10
Revised 06-07 28-126
A company dedicated to solving ergonomic and
material handling problems since 1955 .
VESTIL MANUFACTURING CORPORATION2999 North Wayne St., Angola, IN 46703
Phone (260) 665-7586 Fax (260) 665-1339E-mail: [email protected] • www.vestil.com
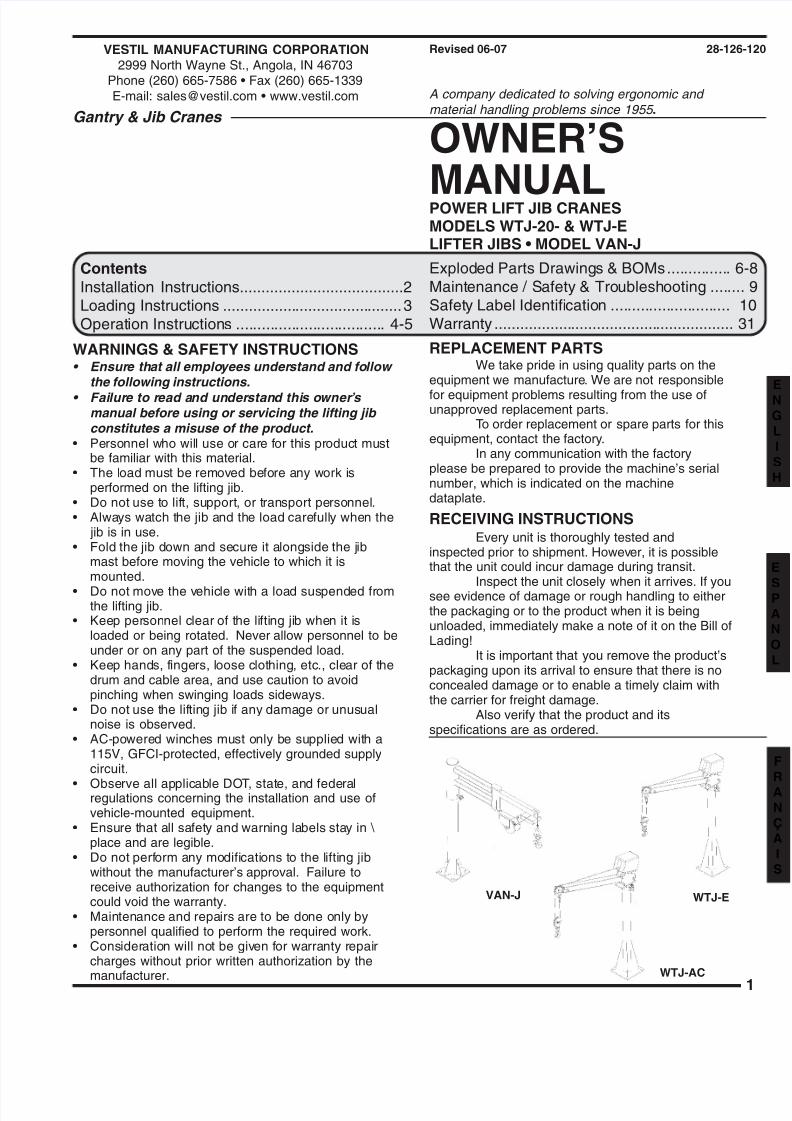
POWER LIFT JIB CRANESMODELS WTJ-20- & WTJ-ELIFTER JIBS MODEL VAN-J
OWNER’S
MANUAL
Gantry & Jib Cranes
Exploded Parts Drawings & BOMs............... 6Maintenance / Safety & Troubleshooting .......Safety Label Identification ............................ Warranty ........................................................
ContentsInstallation Instructions......................................2Loading Instructions ..........................................3Operation Instructions ................................... 4-5
WARNINGS & SAFETY INSTRUCTIONS• Ensure that all employees understand and follow
the following instructions.
• Failure to read and understand this owner’s manual before using or servicing the lifting jib constitutes a misuse of the product.
• Personnel who will use or care for this product mustbe familiar with this material.
• The load must be removed before any work isperformed on the lifting jib.
• Do not use to lift, support, or transport personnel.• Always watch the jib and the load carefully when the
jib is in use.• Fold the jib down and secure it alongside the jib
mast before moving the vehicle to which it ismounted.
• Do not move the vehicle with a load suspended fromthe lifting jib.
• Keep personnel clear of the lifting jib when it isloaded or being rotated. Never allow personnel to beunder or on any part of the suspended load.
• Keep hands, fingers, loose clothing, etc., clear of thedrum and cable area, and use caution to avoidpinching when swinging loads sideways.
• Do not use the lifting jib if any damage or unusualnoise is observed.
• AC-powered winches must only be supplied with a115V, GFCI-protected, effectively grounded supplycircuit.
• Observe all applicable DOT, state, and federalregulations concerning the installation and use ofvehicle-mounted equipment.
• Ensure that all safety and warning labels stay in \ place and are legible.
• Do not perform any modifications to the lifting jibwithout the manufacturer’s approval. Failure toreceive authorization for changes to the equipmentcould void the warranty.
• Maintenance and repairs are to be done only bypersonnel qualified to perform the required work.
• Consideration will not be given for warranty repaircharges without prior written authorization by themanufacturer.
WTJ-E
WTJ-AC
REPLACEMENT PARTSWe take pride in using quality parts on the
equipment we manufacture. We are not responsible
for equipment problems resulting from the use ofunapproved replacement parts.
To order replacement or spare parts for thisequipment, contact the factory.
In any communication with the factoryplease be prepared to provide the machine’s serialnumber, which is indicated on the machinedataplate.
RECEIVING INSTRUCTIONSEvery unit is thoroughly tested and
inspected prior to shipment. However, it is possiblethat the unit could incur damage during transit.
Inspect the unit closely when it arrives. If yousee evidence of damage or rough handling to eitherthe packaging or to the product when it is beingunloaded, immediately make a note of it on the Bill ofLading!
It is important that you remove the product’spackaging upon its arrival to ensure that there is noconcealed damage or to enable a timely claim withthe carrier for freight damage.
Also verify that the product and itsspecifications are as ordered.
VAN-J

8/8/2019 WTJ, VAN-J, 0607
http://slidepdf.com/reader/full/wtj-van-j-0607 2/102
INSTALLATION INSTRUCTIONS - WTJ, VAN-JReview this entire page before installing the lifting jib.
Consult the factory in the event there are any questions or problems at the time of installation, or for information
egarding optional features not covered by the owner’s manual.
The lifting jib must be securely anchored to a solid mounting surface before use! Before mounting a lifting jib in a
vehicle, consult the vehicle manufacturer for a specific mounting location and mounting hardware recommendations.
The installation must be made so that it complies with all the regulations applicable to the machine and its location,including DOT, state, and federal regulations. The end-user must verify that the supplied equipment is installed so itwill be suited to the environment in which it will be used.
The end user must verify that the vehicle surface to which the lifting jib will be mounted has sufficient strength andstability, not only for lifting static loads but also for the dynamic forces that develop from being mounted on a movingvehicle when the lifting jib in the stowed position.
Modifications or additions to the lifting jib without prior manufacturer’s authorization may void the product’s warranty.The addition of ancillary equipment to the lifting jib may necessitate that its load capacity be reduced.
Installation must be performed by suitably trained personnel with access to the appropriate equipment. Theelectrical aspects of the installation should be performed by an electrician.
For a typical installation of a standard lifting jib (WTJ models or the VAN-J), you will need the following:
. A means to unload the lifting jib from the freight truck.
. A smooth, level, and adequately strong surface on which to mount the lifting jib.
Note : Backing or stiffener plates may be required to provide sufficient support for the lifting jib. Consult the vehicle’smanufacturer for assistance in determining the need for additional materials to ensure proper mounting.
. A power drill, drill bits, and hardware. Again, consult the vehicle’s manufacturer to determine the best size and typeof hardware with which to anchor the lifting jib to a vehicle bed.
. If the VAN-J is to be installed in a covered vehicle, verify that there is enough clearance inside the vehicle to mountthe unit and that the jib will be able to swing appropriately. The VAN-J has an overall height of 46", and the VAN-J-DC is 55".
. For units with an AC-powered winch, it is recommended that a ground-fault circuit interrupter device be used in thesupply circuit to protect personnel from electrical shock. The AC winch must only be used with effectively groundedsupply circuits.
To install a standard lifting jib (WTJ, WTJ-E and VAN-J):
. It is recommended that the lifting jib remain completely assembled for installation. If the base is removed during theinstallation of a WTJ model, be sure that the bearing disk is still inside the bottom tube before reinstalling the jibpole.
. Using two people, move the lifting jib into the desired position on the vehicle bed. Use care to avoid damaging thewinch or any hydraulic components (when supplied). Choose a location that will allow for an adequate swingingradius. Consult the vehicle manufacturer for recommendations regarding the mounting location.
. Use the lifting jib’s base as a template to mark the drill hole locations on the vehicle bed.
. Remove the lifting jib and drill holes through the vehicle bed, sized appropriately for the hardware selected formounting the lifting jib.
. Using two people, align the lifting jib’s base with the holes drilled into the vehicle bed. With one person holding thelifting jib steady, anchor its base to the vehicle’s bed using the hardware and any backing or stiffener platesrecommended by the vehicle manufacturer.
. Raise the end of the jib and secure it at the desired lifting angle.
. Verify that the jib swings freely and without obstruction throughout the desired range of use.
. Connect the power supply (if applicable) to the winch’s power supply cord. On DC-powered units, the includedpower supply cord and pendant control cable must be plugged into the winch.
. Run the winch down and up to ensure it operates properly and verify that the winch cable is spooling on and off thereel smoothly.
0. Test the lifting jib at 125% of the rated capacity prior to its initial use. After testing, visually inspect the lifting jib andthe vehicle for evidence of deformation, cracking, fatigue, or other damage. If any of these conditions are seen,make necessary corrections to the installation and retest the unit again before approving it for use.

8/8/2019 WTJ, VAN-J, 0607
http://slidepdf.com/reader/full/wtj-van-j-0607 3/10
LOADING INSTRUCTIONS - WTJ, WTJ-E, VAN-J• Observe all pertinent DOT regulations regarding the installation, transportation and use of the lifting jib .• Ensure that all employees involved in the operation of this lifting jib understand and follow these instructions
The standard model lifting jib is suitable for being mounted on many pickup trucks and trailers. It is intended to used to pick up static, non-hazardous loads from the ground and load them onto the vehicle to which the jib is mounor vice versa.
Caution: Do not allow the lifting jib to be used by children or unauthorized personnel. Always fold the jib arm dosecure it alongside the jib mast, and disconnect the winch from its power supply when not in use.
• LOADING:
The load rating, in pounds, is shown on the machine dataplate located on the side of the rotating head of the jibindicates the net capacity of the jib lifting a load that has a center of gravity directly below the jib pulley.
Note: The addition of any ancillary equipment to the lifting jib by third parties must be taken into account whendetermining the maximum working load to be placed on the load hook.
Warning: Do not exceed the lifting jib’s load ratings. Injury to personnel or permanent damage to the jib or winch coresult from exceeding the listed capacity.
Warning: Only lift loads that are directly below the hook. Do not use the lifting jib in any application that will create sloading of the winch cable or jib arm. Never use the jib to pull or drag loads.
Warning: The load hook’s safety latch must be closed before lifting a load.
Warning: Loads must be lifted using only the winch load hook. Do not use straps or rigging over the top of the jib arDo not attempt to lift any load using the cable end hook. The cable end hook is to be connected to the bracket unthe end of the jib arm at all times.
Warning: Loads must be connected to the lifting jib’s load hook with appropriate lifting rigging and devices.
Caution: Ensure that at least three turns of cable remain on the winch reel at all times.
JIB ARM
POSITION
20°
40°
60°
20°
40°
60°
15°
25°
40°
FULLY
RETRACTED
1,000 LBS.
1,250 LBS.
2,000 LBS.
1,500 LBS.
1,850 LBS.
1,850 LBS.
1,110 LBS.
1,250 LBS.
1,500 LBS.
FULLY
EXTENDED
600 LBS.
780 LBS.
1,200 LBS.
850 LBS.
1,050 LBS.
1,800 LBS.
550 LBS.
650 LBS.
800 LBS.
MIDDLE
POSITION
770 LBS.
950 LBS.
1,500 LBS.
1,200 LBS. / 1,000 LBS.
1,450 LBS. / 1,250 LBS.
2,000 LBS. / 1,900 LBS.
650 LBS.
850 LBS.
1,150 LBS.
FULLY
RETRACTED
FULLY
EXTENDED
SECOND POSITION /
THIRD POSITION
JIB ARM
POSITION
FULLY
RETRACTED
FULLY
EXTENDED
MIDDLE
POSITION
JIB ARM
POSITION
WTJ-20-3- . . . JIB CAPACITY CHART
WTJ-20-4- . . . JIB CAPACITY CHART
WTJ-E-15-3- . . . JIB CAPACITY CHART
8/8/2019 WTJ, VAN-J, 0607
http://slidepdf.com/reader/full/wtj-van-j-0607 4/104
OPERATION INSTRUCTIONS - WTJ, WTJ-E, VAN-JNote: The powered winch is not equipped with independent overload protection. Always pay close attention to the
sound of the winch and to the load that is being raised. If the cable tension increases suddenly, indicating a bind,stop the winch immediately.
Warning: The vehicle to which the lifting jib is mounted must be level and unable to move or tip. If the lifting jib ismounted on a trailer, chock the trailer’s wheels before operating the lifting jib.
Warning: Keep all personnel clear of the lifting jib whenever it is loaded or being rotated. Never allow personnel to beunder any part of the suspended load.
Caution: Ensure that at least three turns of cable remain on the winch reel at all times.Caution: Always carefully watch and constantly supervise any load suspended from the lifting jib.
Caution: Never use the lifting jib or winch if any damage or unusual noise is observed, if it is in need of repairs, or if itseems to be malfunctioning.
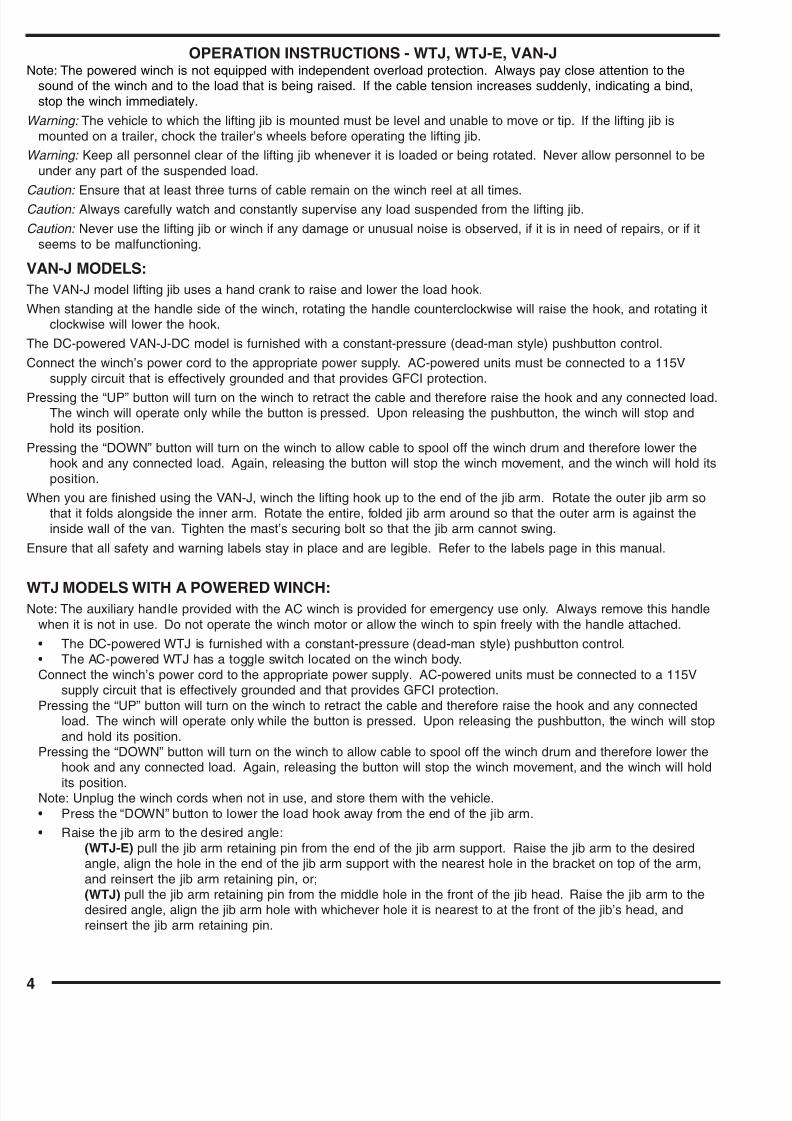
VAN-J MODELS:The VAN-J model lifting jib uses a hand crank to raise and lower the load hook.
When standing at the handle side of the winch, rotating the handle counterclockwise will raise the hook, and rotating itclockwise will lower the hook.
The DC-powered VAN-J-DC model is furnished with a constant-pressure (dead-man style) pushbutton control.
Connect the winch’s power cord to the appropriate power supply. AC-powered units must be connected to a 115Vsupply circuit that is effectively grounded and that provides GFCI protection.
Pressing the “UP” button will turn on the winch to retract the cable and therefore raise the hook and any connected load.The winch will operate only while the button is pressed. Upon releasing the pushbutton, the winch will stop andhold its position.
Pressing the “DOWN” button will turn on the winch to allow cable to spool off the winch drum and therefore lower thehook and any connected load. Again, releasing the button will stop the winch movement, and the winch will hold itsposition.
When you are finished using the VAN-J, winch the lifting hook up to the end of the jib arm. Rotate the outer jib arm sothat it folds alongside the inner arm. Rotate the entire, folded jib arm around so that the outer arm is against theinside wall of the van. Tighten the mast’s securing bolt so that the jib arm cannot swing.
Ensure that all safety and warning labels stay in place and are legible. Refer to the labels page in this manual.
WTJ MODELS WITH A POWERED WINCH:Note: The auxiliary handle provided with the AC winch is provided for emergency use only. Always remove this handle
when it is not in use. Do not operate the winch motor or allow the winch to spin freely with the handle attached.
• The DC-powered WTJ is furnished with a constant-pressure (dead-man style) pushbutton control.• The AC-powered WTJ has a toggle switch located on the winch body.Connect the winch’s power cord to the appropriate power supply. AC-powered units must be connected to a 115V
supply circuit that is effectively grounded and that provides GFCI protection.Pressing the “UP” button will turn on the winch to retract the cable and therefore raise the hook and any connected
load. The winch will operate only while the button is pressed. Upon releasing the pushbutton, the winch will stopand hold its position.
Pressing the “DOWN” button will turn on the winch to allow cable to spool off the winch drum and therefore lower thehook and any connected load. Again, releasing the button will stop the winch movement, and the winch will hold
its position.Note: Unplug the winch cords when not in use, and store them with the vehicle.• Press the “DOWN” button to lower the load hook away from the end of the jib arm.
• Raise the jib arm to the desired angle:(WTJ-E) pull the jib arm retaining pin from the end of the jib arm support. Raise the jib arm to the desiredangle, align the hole in the end of the jib arm support with the nearest hole in the bracket on top of the arm,and reinsert the jib arm retaining pin, or;(WTJ) pull the jib arm retaining pin from the middle hole in the front of the jib head. Raise the jib arm to thedesired angle, align the jib arm hole with whichever hole it is nearest to at the front of the jib’s head, andreinsert the jib arm retaining pin.
8/8/2019 WTJ, VAN-J, 0607
http://slidepdf.com/reader/full/wtj-van-j-0607 5/10
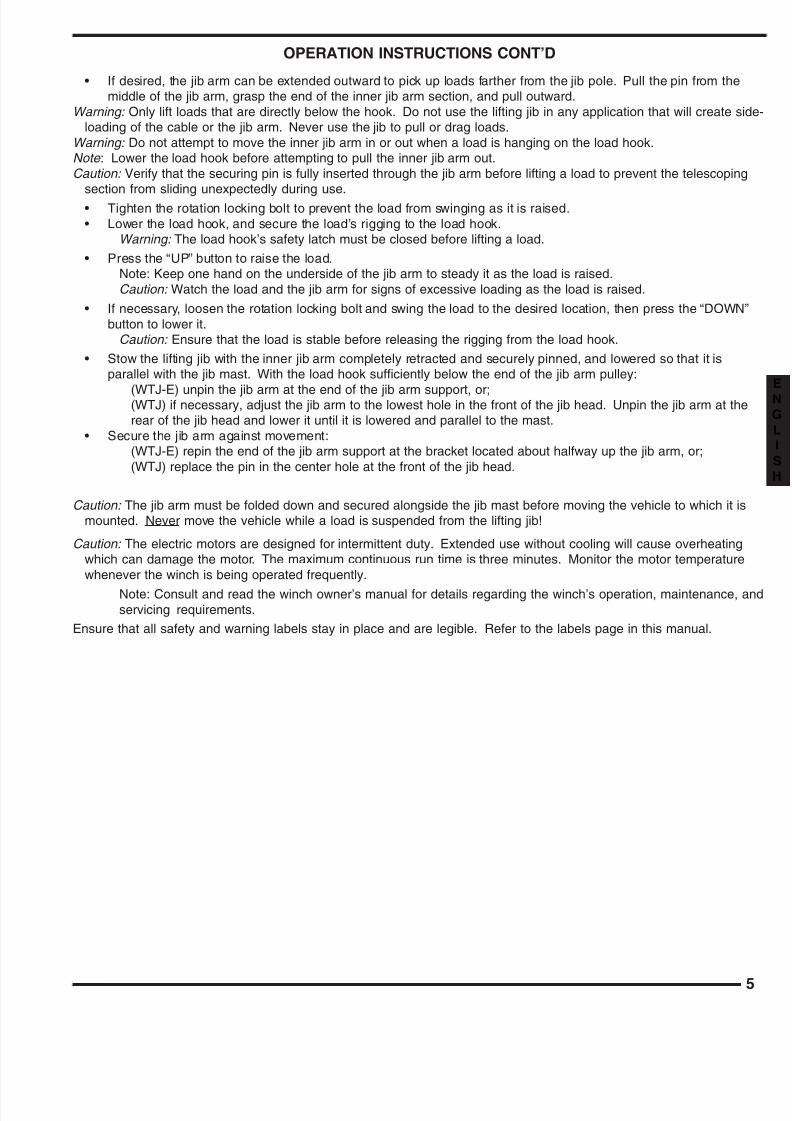
OPERATION INSTRUCTIONS CONT’D
• If desired, the jib arm can be extended outward to pick up loads farther from the jib pole. Pull the pin from themiddle of the jib arm, grasp the end of the inner jib arm section, and pull outward.
Warning: Only lift loads that are directly below the hook. Do not use the lifting jib in any application that will create sloading of the cable or the jib arm. Never use the jib to pull or drag loads.
Warning: Do not attempt to move the inner jib arm in or out when a load is hanging on the load hook.Note : Lower the load hook before attempting to pull the inner jib arm out.Caution: Verify that the securing pin is fully inserted through the jib arm before lifting a load to prevent the telescopin
section from sliding unexpectedly during use.
• Tighten the rotation locking bolt to prevent the load from swinging as it is raised.• Lower the load hook, and secure the load’s rigging to the load hook.
Warning: The load hook’s safety latch must be closed before lifting a load.
• Press the “UP” button to raise the load.Note: Keep one hand on the underside of the jib arm to steady it as the load is raised.Caution: Watch the load and the jib arm for signs of excessive loading as the load is raised.
• If necessary, loosen the rotation locking bolt and swing the load to the desired location, then press the “DOWNbutton to lower it.
Caution: Ensure that the load is stable before releasing the rigging from the load hook.
• Stow the lifting jib with the inner jib arm completely retracted and securely pinned, and lowered so that it isparallel with the jib mast. With the load hook sufficiently below the end of the jib arm pulley:
(WTJ-E) unpin the jib arm at the end of the jib arm support, or;(WTJ) if necessary, adjust the jib arm to the lowest hole in the front of the jib head. Unpin the jib arm at threar of the jib head and lower it until it is lowered and parallel to the mast.
• Secure the jib arm against movement:(WTJ-E) repin the end of the jib arm support at the bracket located about halfway up the jib arm, or;(WTJ) replace the pin in the center hole at the front of the jib head.
Caution: The jib arm must be folded down and secured alongside the jib mast before moving the vehicle to which it imounted. Never move the vehicle while a load is suspended from the lifting jib!
Caution: The electric motors are designed for intermittent duty. Extended use without cooling will cause overheatingwhich can damage the motor. The maximum continuous run time is three minutes. Monitor the motor temperaturwhenever the winch is being operated frequently.
Note: Consult and read the winch owner’s manual for details regarding the winch’s operation, maintenance, servicing requirements.
Ensure that all safety and warning labels stay in place and are legible. Refer to the labels page in this manual.
8/8/2019 WTJ, VAN-J, 0607
http://slidepdf.com/reader/full/wtj-van-j-0607 6/106
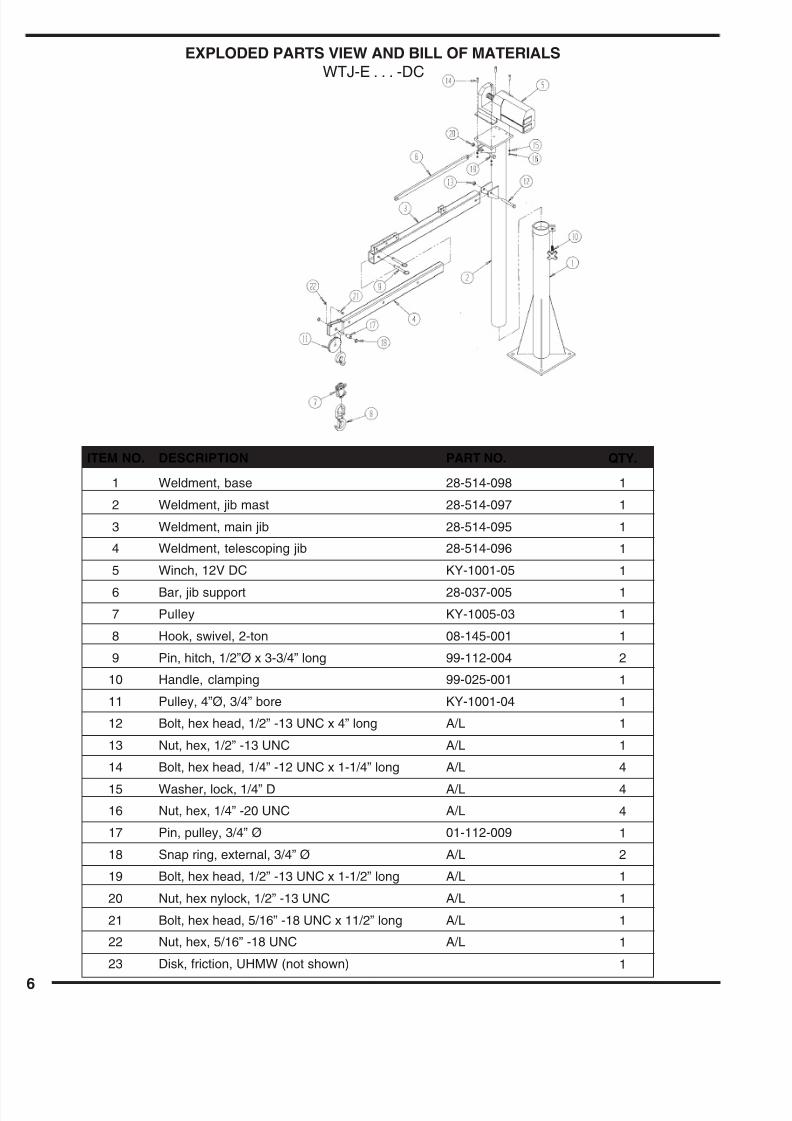
EXPLODED PARTS VIEW AND BILL OF MATERIALSWTJ-E . . . -DC
ITEM NO.
1
2
3
4
5
67
8
9
10
11
12
13
14
1516
17
18
19
20
21
22
23
DESCRIPTION
Weldment, base
Weldment, jib mast
Weldment, main jib
Weldment, telescoping jib
Winch, 12V DC
Bar, jib supportPulley
Hook, swivel, 2-ton
Pin, hitch, 1/2”Ø x 3-3/4” long
Handle, clamping
Pulley, 4”Ø, 3/4” bore
Bolt, hex head, 1/2” -13 UNC x 4” long
Nut, hex, 1/2” -13 UNC
Bolt, hex head, 1/4” -12 UNC x 1-1/4” long
Washer, lock, 1/4” DNut, hex, 1/4” -20 UNC
Pin, pulley, 3/4” Ø
Snap ring, external, 3/4” Ø
Bolt, hex head, 1/2” -13 UNC x 1-1/2” long
Nut, hex nylock, 1/2” -13 UNC
Bolt, hex head, 5/16” -18 UNC x 11/2” long
Nut, hex, 5/16” -18 UNC
Disk, friction, UHMW (not shown)
QTY.
1
1
1
1
1
11
1
2
1
1
1
1
4
44
1
2
1
1
1
1
1
PART NO.
28-514-098
28-514-097
28-514-095
28-514-096
KY-1001-05
28-037-005KY-1005-03
08-145-001
99-112-004
99-025-001
KY-1001-04
A/L
A/L
A/L
A/LA/L
01-112-009
A/L
A/L
A/L
A/L
A/L

8/8/2019 WTJ, VAN-J, 0607
http://slidepdf.com/reader/full/wtj-van-j-0607 7/10
EXPLODED PARTS VIEW AND BILL OF MATERIALSWTJ-E . . . -AC
ITEM NO.
1
2
3
4
5
6
7
8
9
10
11
12
13
14
15
16
17
DESCRIPTION
Weldment, base
Weldment
Weldment
Weldment
Winch, 120 VAC
Handle, clamping
Bolt, hex head, 3/8” -16 UNC x 3/4” long
Pin, quick-release, 3/4” Ø x 6” long
Pulley
Pulley, 4” Ø, 3/4” Ø bore
Pin, pulley
Snap ring, external, 3/4” Ø
Bolt, hex head, 5/16” -18 UNC x 1-1/2” long
Nut, hex, 5/16” -18 UNC x 11/2” long
Hook, swivel, 2-ton
Washer, flat, 3/8” ID
Disk, friction, UHMW (not shown)
QTY.
1
1
1
1
1
1
1
1
1
1
1
2
1
1
1
6
1
PART NO.
28-514-091
28-514-092
28-514-094
28-514-093
KY-1012-06
99-025-001
A/L
28-112-018
KY-1012-05
KY-1001-04
01-112-009
A/L
A/L
A/L
08-145-001
A/L

8/8/2019 WTJ, VAN-J, 0607
http://slidepdf.com/reader/full/wtj-van-j-0607 8/108
EXPLODED PARTS VIEW AND BILL OF MATERIALSVAN-J
ITEM NO.
1
2
3
4
5
6
7
8
9
10
11
DESCRIPTION
Weldment, base, 3-1/2”Ø x 44-1/2” long
Weldment, 4”Ø x 14-1/2” long
Winch, hand
Bolt, hex head, 3/8” -16 UNC x 3/4” long
Washer, flat, 3/8ӯ
Hook, swivel, 2-ton
Cable, 1/8”Ø x 10’ long
Pulley
Knob, 3/8” -16 UNC x 1-1/2” long
Pin, clevis, 1/2”Ø x 1-3/4” long
Pin, cotter, 1/8ӯ
QTY.
1
1
1
3
2
1
1
1
1
1
1
PART NO.
28-514-077
28-514-076
21-042-002
A/L
A/L
08-145-001
28-145-006
21-027-001
08-025-007
A/L
A/L
8/8/2019 WTJ, VAN-J, 0607
http://slidepdf.com/reader/full/wtj-van-j-0607 9/10
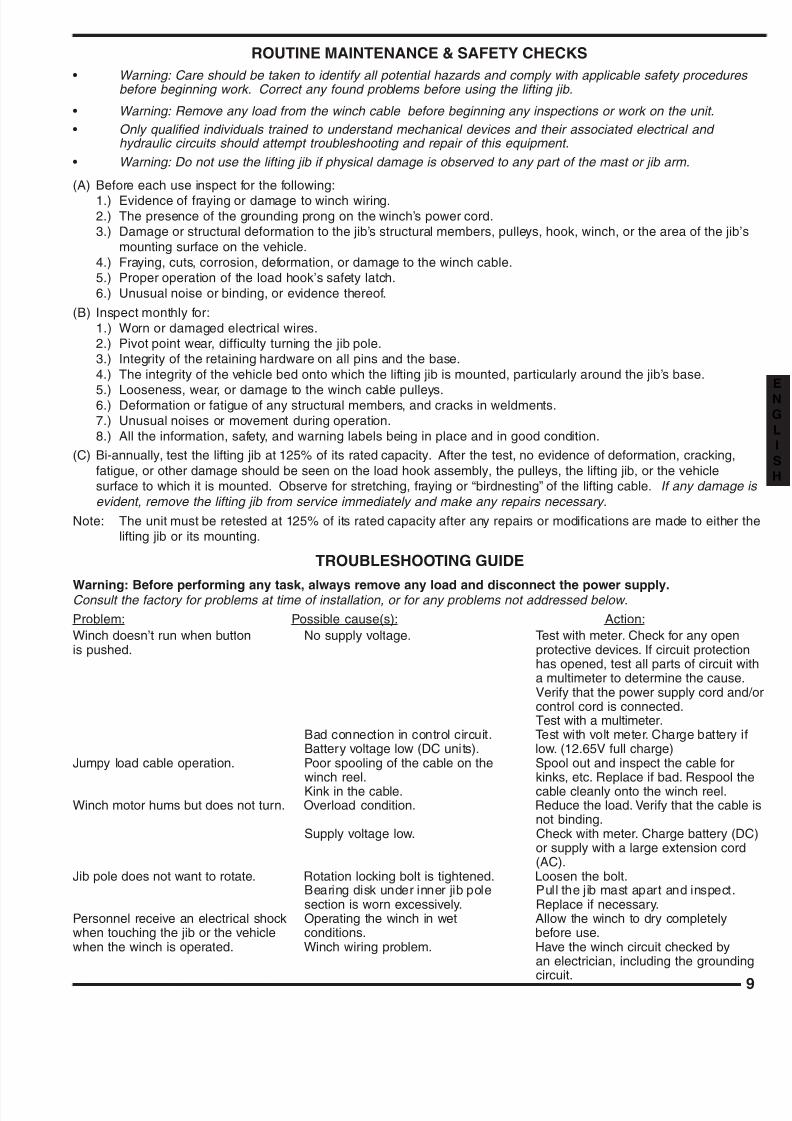
• Warning: Care should be taken to identify all potential hazards and comply with applicable safety procedurebefore beginning work. Correct any found problems before using the lifting jib.
• Warning: Remove any load from the winch cable before beginning any inspections or work on the unit.
• Only qualified individuals trained to understand mechanical devices and their associated electrical and hydraulic circuits should attempt troubleshooting and repair of this equipment.
• Warning: Do not use the lifting jib if physical damage is observed to any part of the mast or jib arm.
(A) Before each use inspect for the following:
1.) Evidence of fraying or damage to winch wiring.2.) The presence of the grounding prong on the winch’s power cord.3.) Damage or structural deformation to the jib’s structural members, pulleys, hook, winch, or the area of the jib
mounting surface on the vehicle.4.) Fraying, cuts, corrosion, deformation, or damage to the winch cable.5.) Proper operation of the load hook’s safety latch.6.) Unusual noise or binding, or evidence thereof.
(B) Inspect monthly for:1.) Worn or damaged electrical wires.2.) Pivot point wear, difficulty turning the jib pole.3.) Integrity of the retaining hardware on all pins and the base.4.) The integrity of the vehicle bed onto which the lifting jib is mounted, particularly around the jib’s base.
5.) Looseness, wear, or damage to the winch cable pulleys.6.) Deformation or fatigue of any structural members, and cracks in weldments.7.) Unusual noises or movement during operation.8.) All the information, safety, and warning labels being in place and in good condition.
(C) Bi-annually, test the lifting jib at 125% of its rated capacity. After the test, no evidence of deformation, cracking,fatigue, or other damage should be seen on the load hook assembly, the pulleys, the lifting jib, or the vehiclesurface to which it is mounted. Observe for stretching, fraying or “birdnesting” of the lifting cable. If any damage
evident, remove the lifting jib from service immediately and make any repairs necessary.
Note: The unit must be retested at 125% of its rated capacity after any repairs or modifications are made to eitherlifting jib or its mounting.
TROUBLESHOOTING GUIDE
Warning: Before performing any task, always remove any load and disconnect the power supply.Consult the factory for problems at time of installation, or for any problems not addressed below.
Problem: Possible cause(s): Action:
ROUTINE MAINTENANCE & SAFETY CHECKS
Winch doesn’t run when button No supply voltage. Test with meter. Check for any openis pushed. protective devices. If circuit protectio
has opened, test all parts of circuit wa multimeter to determine the causeVerify that the power supply cord ancontrol cord is connected.Test with a multimeter.
Bad connection in control circuit. Test with volt meter. Charge battery Battery voltage low (DC units). low. (12.65V full charge)
Jumpy load cable operation. Poor spooling of the cable on the Spool out and inspect the cable forwinch reel. kinks, etc. Replace if bad. Respool tKink in the cable. cable cleanly onto the winch reel.
Winch motor hums but does not turn. Overload condition. Reduce the load. Verify that the cabnot binding.
Supply voltage low. Check with meter. Charge battery (Dor supply with a large extension cord(AC).
Jib pole does not want to rotate. Rotation locking bolt is tightened. Loosen the bolt.Bearing disk under inner jib pole Pull the jib mast apart and inspect.section is worn excessively. Replace if necessary.
Personnel receive an electrical shock Operating the winch in wet Allow the winch to dry completelywhen touching the jib or the vehicle conditions. before use.when the winch is operated. Winch wiring problem. Have the winch circuit checked by
an electrician, including the groundicircuit.

8/8/2019 WTJ, VAN-J, 0607
http://slidepdf.com/reader/full/wtj-van-j-0607 10/100
SAFETY LABEL IDENTIFICATIONProduct safety signs or labels should be periodically inspected and cleaned by the product users as necessary tomaintain good legibility for safe viewing distance — ANSI 535.4 (10.21). Contact the manufacturer for replacementlabels.
VESTILMANUFACTURING
CORPORATIONPhone: (260) 665-7586 • Fax: (260) 665-1339
E-mail: [email protected] • www.vestil.com
BOOM CAPACITY CHART WTJ-20-4 (AC OR DC)
4 FT
2000 LBS
1850 LBS
1500 LBS
5 FT
2000 LBS
1450 LBS
1200 LBS
6 FT
1900 LBS
1250 LBS
1000 LBS
7 FT
1800 LBS
1050 LBS
850 LBS
BOOM EXTENSIONDEGREEOF LIFT
60°
40°
20°
BOTH SIDES
577
2
3
VESTIL MANUFACTURINGCORPORATION
Phone: (260) 665-7586 • Fax: (260) 665-1339 • E-mail: [email protected] • www.vestil.com585
586CLEAR BACKGROUND WITH YELLOW TEXT
VESTIL MANUFACTURING [email protected] • www.vestil.com
287REV 09/03
MODEL/MODÉLO/MODÈLE ____________CAPACITY _______________________ lbs.
CAPACIDAD/CAPACITÉ ____________ kgs.SERIAL/SERIE/SÉRIE_________________
SIDE WITH CRANK
287
VOLTAGE LABEL
HOLE IDENTIFICATION,
BOTH SIDES
Tighten know before moving vehicle.Apriete la perilla antes de vehiculo móvil.
Resserrer le bouton avant de déplacer véhicule.IN HOUSE LABEL
• DO NOT exceed rated capacity• LOWER LOAD before moving to avoid
load swing• NEVER STAND under, beside or in front
of load• USE on hard level surface• INSPECT connections before using• READ manual before use
WARNING ADVERTENCIA AVERTISSEMENT• No exceda la capacidad tasada• Descienda la carga antes de mover para
evitar que la carga se balancee• Nunca se situe debajo, al lado o delante
de la carga• Use en una superficie a nivel dura• Inspeccione las conexiones antes del uso• Lea el manual antes del uso
• NE PAS DÉPASSER la capacité nominale• DESCENDRE la charge avant de la
transporter pour éviter la giration• JAMAIS vous mettre sous, à côté de ou
devant une charge• UTILISER sur un sol plat et dur• INSPECTER les connexions avant utilisation
• LIRE le guide avant utilisation
VESTIL MANUFACTURING CORPORATION • Angola, IN USA • Ph. (260) 665-7586 • Fax (260) 665-1339 • www.vestil.com 586
!! !
586
BOTH SIDES
1
1
4
5
2
3 1
4
6
5
6
WTJ
VAN-J