Embed Size (px)
Citation preview
1
What is Dreamweaver? Dreamweaver is an HTML editing and webpage construction tool, with both HTML code
and Graphic User Interface (GUI) options for editing the content of a single webpage or an entire website. Dreamweaver can do many functions; this handout explains how to create a simple HTML document. HTML documents like thoseDreamweaver helps you make can be edited in a number of programs, so you can create a webpage in Dreamweaver and edit it in Nvu, TextWrangler, or another editor and vice versa.
In this handout, you’ll find information on how to:o Create a webpageo Save your worko Navigate the main screeno View your pageso Add an imageo Add a tableo Add an embedded videoo Create linkso Create anchorso Manage page properties
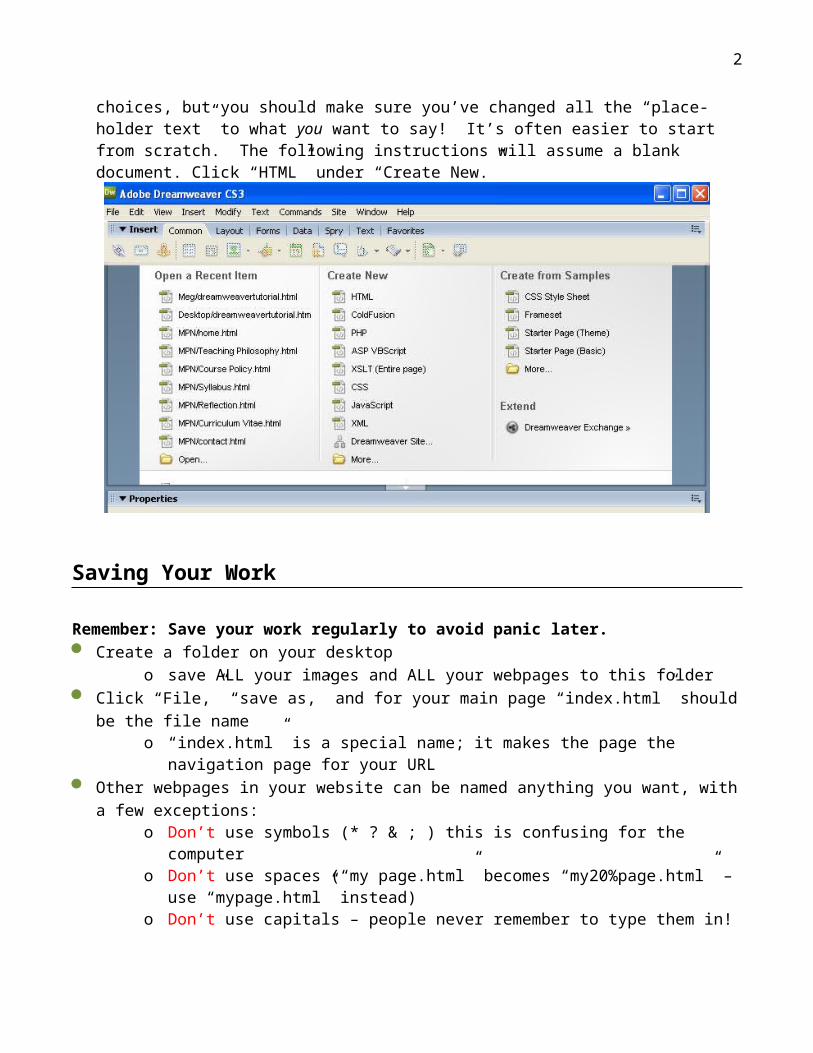
Creating Your Page(s) When you open DW, you can choose to either “Create New” (blank document) or “Create
from Samples” (templates). Using Samples can provide inspiration in layout, color schemes, and other design choices, but you should make sure you’ve changed all the “place-holder text” to what you want to say! It’s often easier to start from scratch. The following instructions will assume a blank document. Click “HTML” under “Create New.”
2
Saving Your Work
Remember: Save your work regularly to avoid panic later. Create a folder on your desktop
o save ALL your images and ALL your webpages to this folder Click “File,” “save as,” and for your main page “index.html” should be the file name
o “index.html” is a special name; it makes the page the navigation page for your URL
Other webpages in your website can be named anything you want, with a few exceptions:o Don’t use symbols (* ? & ; ) this is confusing for the computero Don’t use spaces (“my page.html” becomes “my20%page.html” – use
“mypage.html” instead)o Don’t use capitals – people never remember to type them in!
3
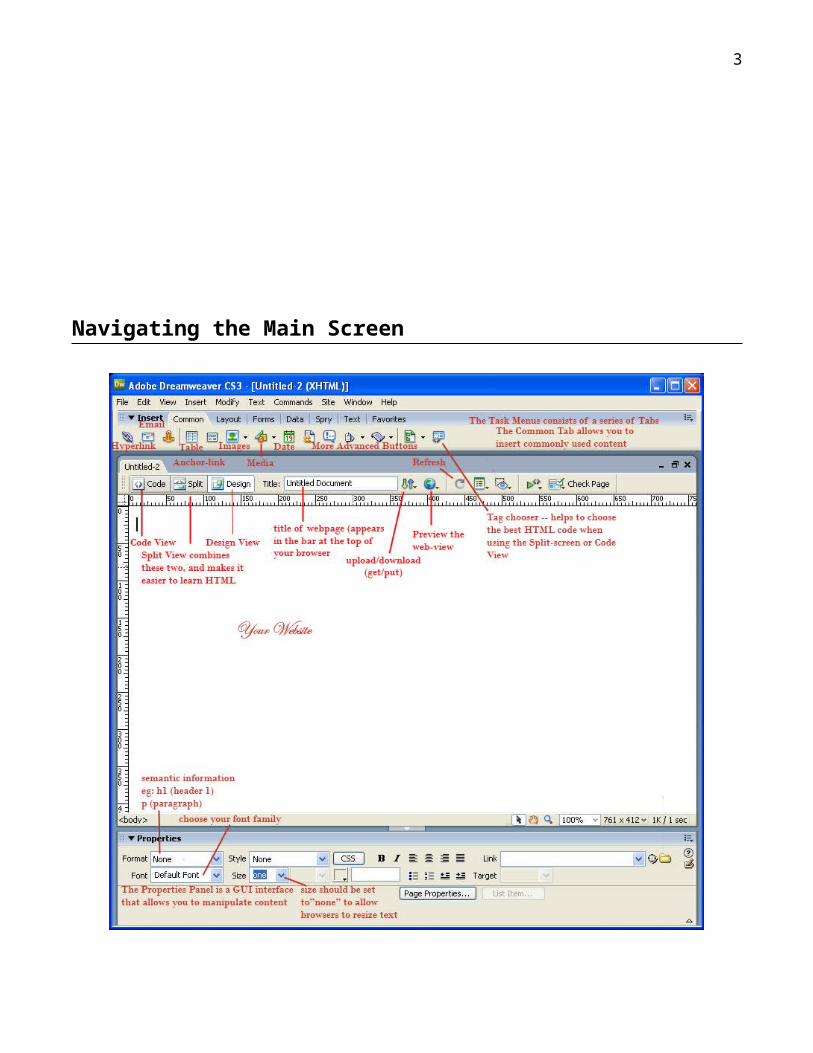
Navigating the Main Screen
Page Views Dreamweaver offers three viewing options for working on and creating your page:
1. Code: This view presents the user with only the HTML code. 2. Design: This view presents the user with a GUI interface, similar to a word
processing program, allowing for the creation of professional quality pages with little or no knowledge of code.
3. Code and Design: This view splits the screen, providing the user with both the code (on top) and GUI (on the bottom). Highlighting text in the bottom, GUI portion, will highlight the code on top. This offers the user a unique opportunity to learn code in a "subtitle" fashion.

4
Preview Your Work in a Browser While working on your webpage, you may want to see how it will look when it's posted or in
a browser. There are two ways to achieve this goal:
1. From the main toolbar select File --> Preview in Browser. You may then select a browser (e.g., Mozilla Firefox or Internet Explorer).
2. Another way to check is to open the folder with your file in it, right click the file, select “Open With,” and choose your web-browser there.
So you now have a Blank Document. Next: Adding Content
Adding an Image There are three ways to insert a picture:
1. You can select “insert” from the tool bar, and pick “image” from the drop-down menu.2. You can click “ctrl + alt + i” on the keyboard.3. You can click on the image button within the “common” tab.
o holding down the arrow next to the image button allows you to access the image menu, which provides additional options
Tips:
1. Remember: Dreamweaver is an HTML editor, not a photo editor. Make all adjustments to your photos in Photoshop, Gimp, Paint, etc., before inserting it into your webpage. This includes resizing!

5
2. Include Alternative Text. When inserting a picture, you’ll be prompted to type in “alternate text”: this is the text that shows up if your picture fails to load, when you mouse-over an image, as well as what is read by aids for the blind called “website reading devices.”
Note: Alt-Text is an Accessibility Attribute. To be ADA compliant, your website must include alt-text for all images.
Adding a Table Like inserting a picture, there are multiple ways to insert a table:
1. Select “insert” and then “table” from the pull-down menu2. Click “ctrl + alt + t”3. Click the image on the “common tab”
All options will generate a window that allows you to specify the dimensions and traits of your table, including # of rows, columns, cell spacing, width and border.
Adding an Embedded Video

6
Like how your favorite website has video from YouTube? You can insert video using the “embed” code supplied by YouTube (to the right of the video screen). Simply copy the code (making sure to get all of it!) and past it into the HTML code where you want the video to appear.
Tips: 1. You must be in either Code View or Split View to see the HTML code. 2. In Split-screen, once you’ve pasted the code into your HTML code, click in the GUI
window to see where your video appears.
Creating Links There are two types of links in this world: absolute and relative. You should already be
familiar with absolute links—these are links that are full URL addresses. Here's one example:
http://www.english3.fsu.edu/~yourprofsname/yourteamname/bunnies.html
Absolute links are used to direct a reader of your webpage to a place outside your webpage. For navigating within your own website, you should use relative links. The relative link for the html document above would be:
bunnies.html
Relative links are shorter. They point to a specific file within the folder that contains your entire website—the file's relation to the current directory. For example, if you have two webpage documents in your website folder, index.html and school.html, to link from one to the other you only need to insert the relative link when creating a link. In other words, you only need “school.html,” not “http://www.english3.fsu.edu/~myprofessor/myname/school.html”. For starters, don’t insert folders within your website structure: it is possible to do, but the linking becomes much more complicated.
As is the case with many of Dreamweaver's functions, there are many paths to the same end.
1. Select “Insert” and then “hyperlink” from the drop-down menu.2. Highlight the text you wish to make into a link and use the link function in the
Properties menu at the bottom of the composition window.3. In the “common” tab, click the link icon.

7
Tips:
1. The “Text” asked for are the words which will become the link. If you wish to make a picture a link, you simply highlight an image before clicking the link button. In that case, you leave “Text” blank. In this case, the link code <a href=“links.html”> </a> goes around your image: <a href=“links.html”><img src=“mypic.jpg” /></a>.
2. “Link” is where you put your relative or absolute link (i.e., “bunnies.html”). You can also click on the folder icon next to the drop-down menu to find the relative link.
3. The rest can be left blank.
Creating Anchors Anchors are like links within a single webpage. When writing papers or posting "information
rich" pages, you may want to link within the page to afford the user more freedom of movement and choice (e.g. "back to top"). These situations call for named Anchors.
1. Main toolbar, Insert > Named Anchor2. Using the anchor icon under the common tab
When you insert a Named Anchor, a tag is inserted into your document. To continue with the above example, insert one at the top of your document and call it "top.”
Lower on your page (at least one screen length), type "back to top" or simply "top."

8
Highlight the word or phrase, and then place your cursor in the link field of the Properties Window and type "#top". The # is telling the browser to look for the anchor named "top."
Page Properties The Page Properties Menu allows you to manipulate the text font, size, and color for your
webpage, as well as set the background color or background image for the entire website.
To get there (2 ways): 1. Select “Modify” then “Page properties” 2. Type “Ctrl + j”
Tips: 1. Leave “size” blank: this allows users to resize their webpages automatically to see
yours without issues.2. The six digit code next to the colors is called a “hex code”; more color codes can be
found at www.colorjack.com.3. You can use a background color or a background image.4. If your background image is smaller than your website, it will repeat itself across the
page. To prevent this, select “no-repeat.”
For additional How-Tos and help with HTML in general, check out http://w3schools.com.For uploading your webpage to your server space, see the SSH handout.