Embed Size (px)
Citation preview

Workshop4 Integrated Development Environment
INSTALLATION GUIDE
Document Revision: 2.1
Document Date: 5th April 2019

WORKSHOP4 IDE
WORKSHOP4 INSTALLATION GUIDE Page 2 of 12 www.4dlabs.com.au
Table of Contents
1. Description .............................................................................................................. 3
2. Requirements .......................................................................................................... 3
3. Download the Installer ............................................................................................. 3
4. Run the Installer ....................................................................................................... 4
5. Programming Tools Driver Installation ...................................................................... 8
5.1. CP210x VCP Driver ................................................................................................... 8
5.2. FTDI VCP Driver ........................................................................................................ 8
6. MicroSD Card Format ............................................................................................... 9
7. Revision History ..................................................................................................... 11
8. Legal Notice ........................................................................................................... 12
9. Contact Information ............................................................................................... 12

WORKSHOP4 IDE
WORKSHOP4 INSTALLATION GUIDE Page 3 of 12 www.4dlabs.com.au
1. Description This document describes how to install and configure Workshop4 IDE. The software installer can be downloaded from its product page on 4D Labs website. It is highly recommended to follow this document prior to the other ones.
2. Requirements The following are required for the installation of Workshop4:
• Windows PC (Windows XP to Windows 10)
o Windows 7+ is ideal
• Workshop4 IDE Installer
Note: Some older operating systems such as ME and Vista have not been tested for some time due to their availability, however should still work. It is also possible to run Workshop4 under a VM on Linux or Mac, however it is up to the user to set this up.
Listed are tools that are recommended during development:
• uUSB-PA5
• gen4-PA
• 4D-UPA
• 4D Programming Cable
All are available from 4D Systems. These hardware tools are used to update the PmmC of 4D Labs processors. Additionally, these are used to program the module using a selection of powerful environments offered by Workshop4 IDE. These environments are Designer, ViSi, ViSi-Genie and Serial. These are discussed in the manual titled:
Workshop4 IDE User Guide
3. Download the Installer The installer can be downloaded on its product page from 4D Labs website. Using the web browser of your choice and go to www.4dlabs.com.au.
Hover your mouse over Products. On the Development Tools group, you should be able to find Software. Click on it to proceed on its product page.
This will bring you to Workshop4’s product page. Alternatively, you can also simply go directly to its product page. The link to the installer can be found on the Downloads section of the page. Besides the software installer, useful documentations are also available.

WORKSHOP4 IDE
WORKSHOP4 INSTALLATION GUIDE Page 4 of 12 www.4dlabs.com.au
4. Run the Installer After acquiring a copy of the installer, you should be able to run it simply by double clicking the file. The installation starts by verifying the contents of the setup package.
Once done, the installer will open the Terms and Conditions window.
Please read the agreement carefully then tick the checkbox and click on Next to continue.
WORKSHOP4 IDE
WORKSHOP4 INSTALLATION GUIDE Page 5 of 12 www.4dlabs.com.au
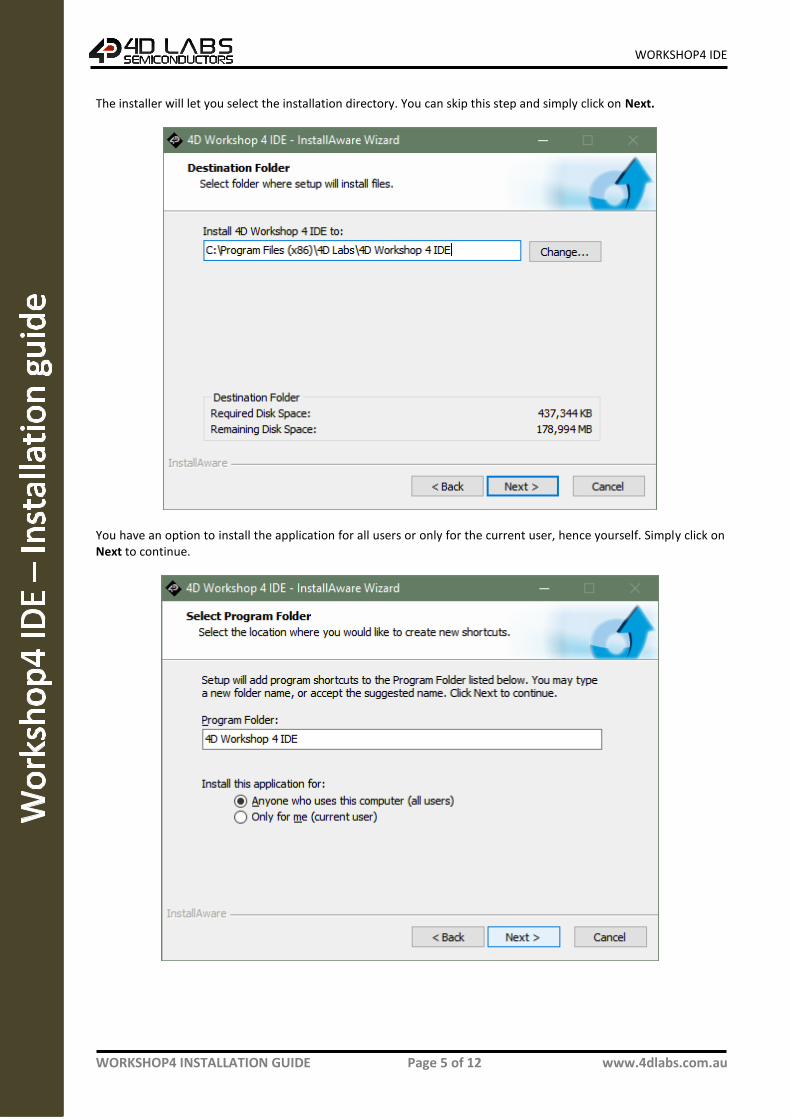
The installer will let you select the installation directory. You can skip this step and simply click on Next.
You have an option to install the application for all users or only for the current user, hence yourself. Simply click on Next to continue.

WORKSHOP4 IDE
WORKSHOP4 INSTALLATION GUIDE Page 6 of 12 www.4dlabs.com.au
If all is set and done to your liking simply continue from this screen by clicking on Next. Otherwise, click on Back to change what you’ve set.
Note: It is recommended to stick to the default configurations.
Simply wait for the installation to finish.

WORKSHOP4 IDE
WORKSHOP4 INSTALLATION GUIDE Page 7 of 12 www.4dlabs.com.au
After the installation, you are given an option to run Workshop4 IDE after closing the installation window. If you want to do so, leave a check mark on the checkbox. Click on Finish.
Besides the last window from the installer, a text editor session will open a README.TXT file. This file contains the change log and known issues.

WORKSHOP4 IDE
WORKSHOP4 INSTALLATION GUIDE Page 8 of 12 www.4dlabs.com.au
5. Programming Tools Driver Installation You can find the links of the drivers for each recommended USB to TTL programming solutions on their product pages.
5.1. CP210x VCP Driver This is used for 4D Programming Cable, uUSB-PA5-II gen4-PA and 4D-UPA. This driver can be downloaded here. After downloading successfully, save the zipped file into a folder on your system and unzip the file. Launch the appropriate installer based on your computer’s architecture.
Continue with the installation prompts by clicking on Next.
The installation should finish shortly.
5.2. FTDI VCP Driver
The installer for this driver can be found here. This driver is used solely for uUSB-PA5 which has been superseded by the uUSB-PA5-II. After downloading, save the zipped file into a folder on your system and unzip the file. Launch the installer afterwards.
Accept the agreement and continue with the installation prompts by clicking on Next.
The installation should finish quickly afterwards.

WORKSHOP4 IDE
WORKSHOP4 INSTALLATION GUIDE Page 9 of 12 www.4dlabs.com.au
6. MicroSD Card Format The microSD card shall be FAT16-formatted for processors other than Goldelox which uses RAW mode. It is recommended to use Workshop4’s built-in utility, RMPet when formatting and partitioning a microSD card. Particularly when using uSD cards with capacity greater than 4GB.
The software provides detailed information on the uSD card’s current status an easy way to partition the uSD card while considering the read disturb protection of uSD cards.
Note: Cards MUST be formatted FAT16 (except Goldelox) or RAW to work with 4D Systems models. FAT32, exFAT, NTFS etc will not work. For best results, format and partition your microSD cards using RMPet.
For a more detailed instruction on how to use this utility, please refer to 4D Systems’ application note titled:
General Partitioning a micro-SD into FAT and RAW Components

WORKSHOP4 IDE
WORKSHOP4 INSTALLATION GUIDE Page 10 of 12 www.4dlabs.com.au
When using RMPet to format and/or Partition your microSD card, it is best to use a microSD to USB adaptor, or a microSD to SD adaptor into a media slot of your Laptop/PC. The cards need to be formatted on your PC, not on the display module themselves. Many types/brands are available, choose one that best suits your hardware setup.
Note: microSD cards MUST be SPI compatible, and it is highly recommended to use Industrial Grade cards to prevent corruption over time due to a phenomenon called Read Disturb, which affects NAND Flash memory. 4D Systems offers such cards, available on our website.
Afterwards, check if the uSD card mounted successfully. Here, it is shown as drive E:.

WORKSHOP4 IDE
WORKSHOP4 INSTALLATION GUIDE Page 11 of 12 www.4dlabs.com.au
7. Revision History
Revision Revision Content Revision Date
2.0 Updated Formatting and Contents 01/05/2017
2.1 Cosmetic changes and added 4D-UPA 05/04/2019

WORKSHOP4 IDE
WORKSHOP4 INSTALLATION GUIDE Page 12 of 12 www.4dlabs.com.au
8. Legal Notice Proprietary Information The information contained in this document is the property of 4D Labs Semiconductors and may be the subject of patents pending or granted, and must not be copied or disclosed without prior written permission. 4D Labs Semiconductors endeavours to ensure that the information in this document is correct and fairly stated but does not accept liability for any error or omission. The development of 4D Labs Semiconductors products and services is continuous and published information may not be up to date. It is important to check the current position with 4D Labs Semiconductors. 4D Labs Semiconductors reserves the right to modify, update or makes changes to Specifications or written material without prior notice at any time. All trademarks belong to their respective owners and are recognised and acknowledged. Disclaimer of Warranties & Limitation of Liability 4D Labs Semiconductors makes no warranty, either expressed or implied with respect to any product, and specifically disclaims all other warranties, including, without limitation, warranties for merchantability, non-infringement and fitness for any particular purpose. Information contained in this publication regarding device applications and the like is provided only for your convenience and may be superseded by updates. It is your responsibility to ensure that your application meets with your specifications. Images and graphics used throughout this document are for illustrative purposes only. All images and graphics used are possible to be displayed on the 4D Labs Semiconductors range of products, however the quality may vary. In no event shall 4D Labs Semiconductors be liable to the buyer or to any third party for any indirect, incidental, special, consequential, punitive or exemplary damages (including without limitation lost profits, lost savings, or loss of business opportunity) arising out of or relating to any product or service provided or to be provided by 4D Labs Semiconductors, or the use or inability to use the same, even if 4D Labs Semiconductors has been advised of the possibility of such damages. 4D Labs Semiconductors products are not fault tolerant nor designed, manufactured or intended for use or resale as on line control equipment in hazardous environments requiring fail – safe performance, such as in the operation of nuclear facilities, aircraft navigation or communication systems, air traffic control, direct life support machines or weapons systems in which the failure of the product could lead directly to death, personal injury or severe physical or environmental damage (‘High Risk Activities’). 4D Labs Semiconductors and its suppliers specifically disclaim any expressed or implied warranty of fitness for High Risk Activities. Use of 4D Labs Semiconductors’ products and devices in 'High Risk Activities' and in any other application is entirely at the buyer’s risk, and the buyer agrees to defend, indemnify and hold harmless 4D Labs Semiconductors from any and all damages, claims, suits, or expenses resulting from such use. No licenses are conveyed, implicitly or otherwise, under any 4D Labs Semiconductors intellectual property rights.
9. Contact Information For Technical Support: www.4dlabs.com.au/support For Sales Support: [email protected] Website: www.4dlabs.com.au
Copyright 4D Labs Semiconductors 2000-2019.