Embed Size (px)
DESCRIPTION
System user manual - an electronic journal
Citation preview
WORKBOOK Information System
Chestere Eube I. Baring [email protected]
MAPLE
MURAMOTO AUDIO-VISUAL PHILIPPINES, INC.
Mactan Economic Zone, Lapu-Lapu City, Philippines

1 | P a g e
Workbook
Revision History
Version No. Date Modified By Modifications
00.00.00 2014.11.8 Chestere Eube I. Baring New Document
System Overview
Workbook is an integrated web – based system and is used exclusively for Information System staffs. The
main function of this system is to monitor the assigned tasks of each members of workbook. It is the baseline
of all projects for the requesting departments, it is where the Work plan of each members are being
accumulated and is also considered as an electronic work journal of all IS employees.
Definitions:
Baseline – data that is collected about specific indicators before an intervention starts that will serve
as the starting point against which to measure change.
Work plan – an integrated planned activities that will help in implementing the projects developed
and the resources required to accomplish on the targets they intended to reach.
Monitoring – an essential part of the system for periodic tracking whether it is daily, weekly, monthly,
quarterly or annually for each of the project’s progress by systematically gathering and analyzing the
data and information about what the members are doing, whom they are reaching and whether the
activities are implemented as planned.
Figure 1. Components of the system
Workbook – Information System
MAPLE
MURAMOTO AUDIO-VISUAL PHILIPPINES, INC.
Mactan Economic Zone, Lapu-Lapu City, Philippines
Baseline
1
Workplan
2
Monitoring
3

2 | P a g e
Workbook – Information System
Objective
To be able to keep track of all tasks /activities of IS employees.
Recommended Browser
Google Chrome
Basic Structure of the System
A. MENU – located at the top right side of the interface. It is the navigation to go through the other
pages.
MENU ITEMS:
1. HOME – redirects to the homepage.
2. VIEW – Where the users can view the team’s tasks, project schedules and system
documents.
3. ACTIONS – where the users can add new Issue, New help desk support, View Reports,
McDoc and Logout.
If a user is an administrator, he/she can manage projects, users and system
documents.
B. SIDEBAR – Located at the side of the interface. It is the navigation to go through the other pages.
a. Left Side
i. Profile
1. My Tasks
a. It is where the user can view all of his/her tasks.
2. Edit My Profile
a. It is where the user can edit his/her profile. Includes profile image,
Full name and page settings.
b. Current projects involved are also listed in this page.
c. List of Projects moderated, if the user’s privilege is a moderator.
ii. Users
1. A list of active workbook users.
2. The usernames are clickable and can visit their page. The other users can
view their assigned tasks and can also comment.

3 | P a g e
b. Right Side
i. List of Tasks
1. Weekly – Tasks for the week
2. Delayed – if tasks are on due date / beyond the target date.
3. Pending – tasks that are unresolved.
4. For Checking – tasks that are already done and ready for checking if
necessary.
Workbook - Graphical User Interface
Figure 2. Graphical User Interface
Workbook – Information System

4 | P a g e
GETTING STARTED
ACTION MENU:
How to make a new Issue / task in workbook
1. Fill out all required fields in Basic information
2. You can skip optional information since it is not necessary, but it’s also important that you fill out
optional information to indicate your work details and the project manager can know your work
flow or how you solve the problem.
3. If you already fill out the fields, the summary checker will update. “X” mark indicates that there
is an empty field, “” mark will indicate if fields are not empty.
4. And lastly, choose to add the issue in your tasks or if not.
(Refer to figure 3 for a detailed view)
MENU: Actions -> New Issue
Figure 3. New Issue User Interface
Workbook – Information System

5 | P a g e
How to make a help desk support issue/ task
1. Fill out all required fields in Basic information
2. The user should also fill out optional information for the administrator/project manager’s basis
in generating work report of the employees under help desk support.
3. If you already fill out the fields, the summary checker will update. “X” mark indicates that there
is an empty field, “” mark will indicate if fields are not empty.
4. And lastly, choose to add the issue in your tasks or if not.
(Refer to figure 4 for a detailed view)
MENU: Actions -> New Help Desk Support
Figure 4. New Help Desk Support User Interface
Workbook – Information System

6 | P a g e
Workbook – Information System
REPORTS
Overview
Generating a Report in a specific system is very essential to the company. It holds greater value to all
tasks/transactions made to every employees and it is also the basis in measuring the progress and
improvement of the interrelated business processes and it will also help in identifying the strengths and
weaknesses of a company through which we called as, “Reports”. In workbook, the current report
operations is given to provide an accurate results from the transactions made by the users.
Current Reports Generated:
1. Default Report – Displays issue/task information basing on the following parameters:
a. Username – required by the system to specify the user when generating report.
b. Start Date – the start date of the report to be generated.
c. End Date - the end date of the report to be generated.
2. Graphical Report – Displays a summary of all Help Desk Problems handled by IS Staffs.
3. HSUR Report – Displays a summary on the following:
a. Hardware/ Software Upgrade & Repair.
4. RPCH Report – Displays a summary on the following
a. Request to Purchase Computer Hardware.
5. Factory 2 Weekly Report – Displays a weekly job and Help Desk Support in Factory 2.
6. IS Job Requests Report – Displays all IS Job Requests both F1 and F2.
7. Help Desk Support Report – Displays all Help Desk Support Reports.
Figure 5. Reports Module User Interface

7 | P a g e
Generated Graphical Reports for a detailed explanation of the corresponding calculations and results:
Figure 6. Bar Graph Report
Figure 7. Pie Graph of IS Request Documents
Workbook – Information System

8 | P a g e
ADMINISTRATION
Overview
Administering a system like workbook or any other systems owned by MAPLE is handled by an
authorized person only. The System is capable in restricting the users in accessing pages in workbook,
Manage Users, or Manage Projects. Through this, we can definitely control the access of every users. It is
also concerned with specifying constraints on the behavior of the executing system when the users tried to
access pages that are allowed/not allowed basing on the restrictions assigned.
Manage Users & Projects – Main User Interface
General Use of Managing Users:
Add/ Update User information such as member status and privilege.
o Privileges to choose from:
Ordinary user – can only view pages that are not restricted and can
update changes to his/her own tasks.
Moderator – has the privilege to update tasks of all users, especially
to Information System Request Documents. The moderator is also
the assigner of the requests to the IS Staffs.
Administrator – has all the privileges from adding, updating,
deleting (if necessary) or any manipulation undertaken by his/her
role as the owner of the system.
Workbook – Information System

9 | P a g e
Adding new workbook User:
1. Input name of the user. Below 3 characters are not accepted by the system.
2. If valid, continue button will be changed to color blue
means that, the name is accepted.
3. You will be directed to a new page to fill out required fields to be able to create a user for
workbook.
4. You must input all the required fields to add user, you can cancel anytime if you wish not to
proceed.
5. If creating a new user is successful, use the following credentials in logging in to workbook
What is LDAP?
Authentication using LDAP (Lightweight Directory Access Protocol)
To access the LDAP service, the LDAP client first must authenticate itself to the service. That is, it
must tell the LDAP server who is going to be accessing the data so that the server can decide what the client
is allowed to see and do. If the client authenticates successfully to the LDAP server, then when the server
subsequently receives a request from the client, it will check whether the client is allowed to perform the
request. This process is called “Access Control”.
How it works?
(Refer to figure 8 below for a detailed view)
Workbook – Information System
Username: (Domain Login Name)
Password: (Domain Password – LDAP Password)

10 | P a g e
Workbook – Information System
Figure 8. Adding New user Interface
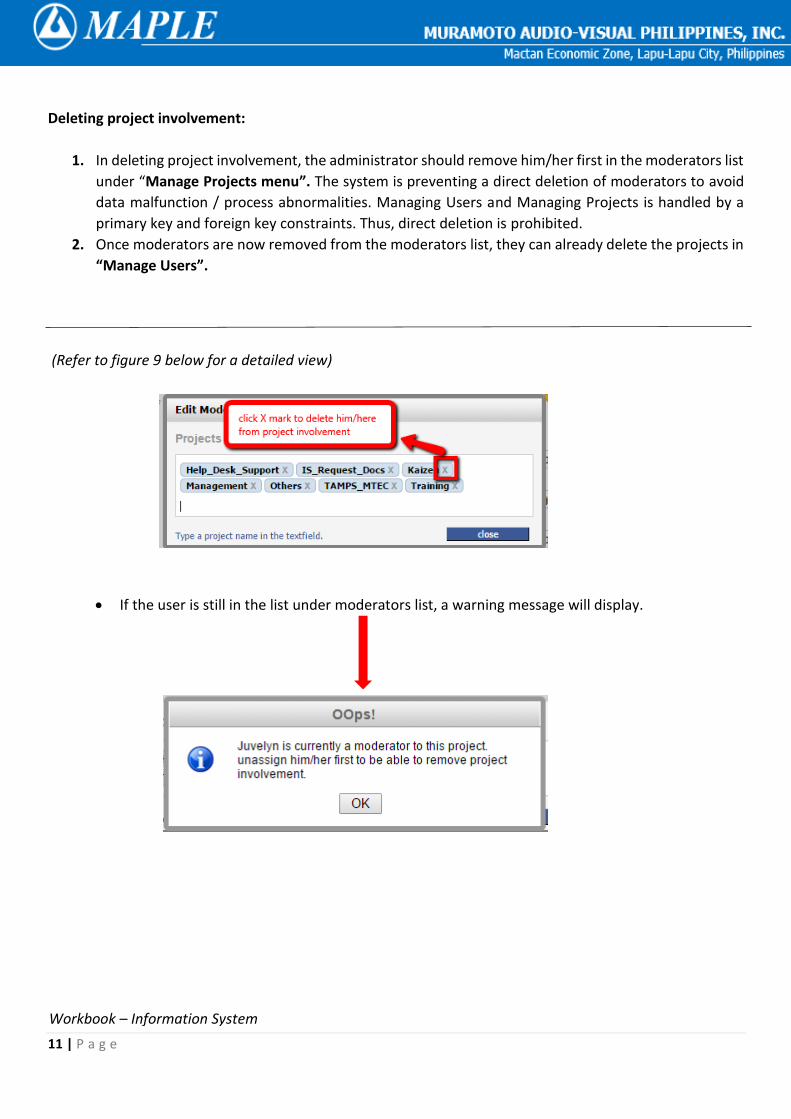
Adding project involvement:
1. To be able to add projects to users, select and click the name of the users in the users list. And
user details form will display on the right side part of the interface.
2. Below you can see a list of projects from user details. Click the link “edit” to add project
involvement to user. And a pop up window will display where you can search and add projects.
3. When you search, just simply type the name of the project and list of projects will automatically
listed/ filtered basing on the keywords inputted.
4. When you want to add the project, just click the name of the project or press enter key.
Note: For the project, IS Request Docs, users who are involved to this project will be automatically
added in moderator’s list only if the user’s privilege is a moderator.
11 | P a g e
Workbook – Information System
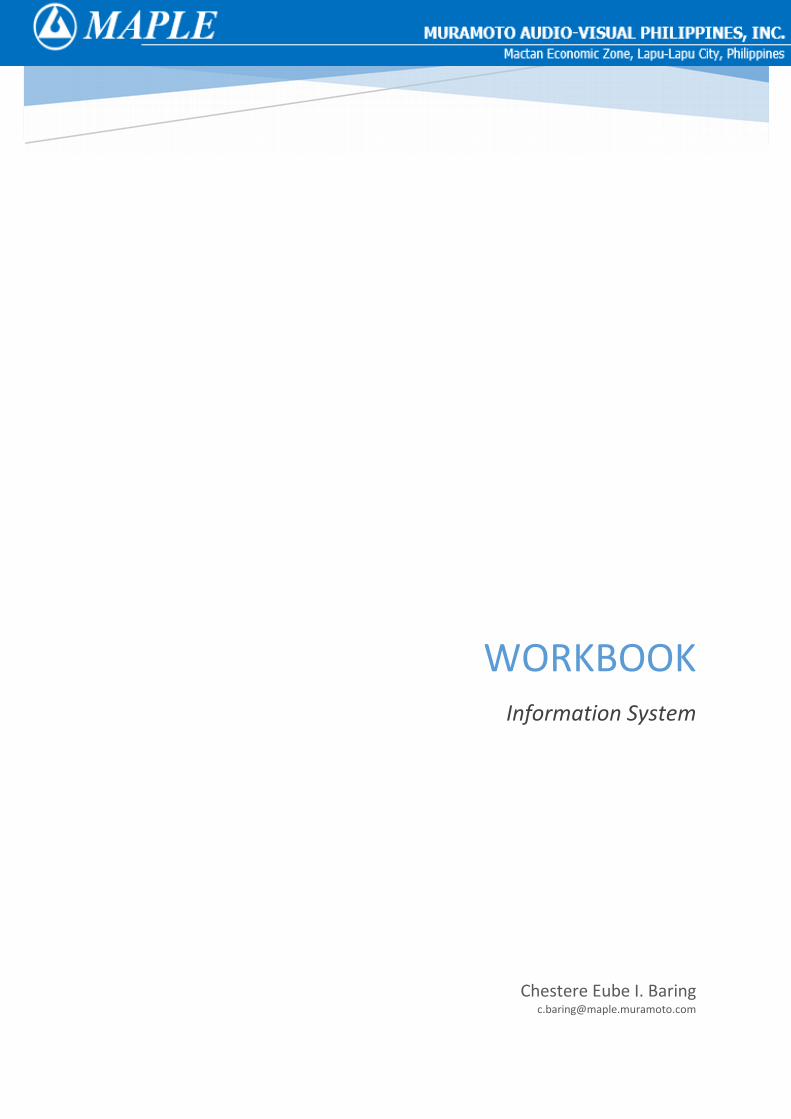
Deleting project involvement:
1. In deleting project involvement, the administrator should remove him/her first in the moderators list
under “Manage Projects menu”. The system is preventing a direct deletion of moderators to avoid
data malfunction / process abnormalities. Managing Users and Managing Projects is handled by a
primary key and foreign key constraints. Thus, direct deletion is prohibited.
2. Once moderators are now removed from the moderators list, they can already delete the projects in
“Manage Users”.
(Refer to figure 9 below for a detailed view)
If the user is still in the list under moderators list, a warning message will display.
12 | P a g e
Figure 9. Manage Users - User Interface
General use of Managing Projects:
Add / Update Project information and manage moderators.
(Refer to figure 11 below for a detailed view)
Adding new Project:
1. Input name of the project/system. Below 3 characters are not accepted.
2. If valid, continue button will be changed to color blue
means that, the name is accepted.
3. You will be directed to a new page to fill out required fields to be able to create a new project.
4. You must input all the required fields to add user, you can cancel anytime if you wish not to
proceed.
5. If creating a new project is successful, the project names will be listed upon searching/adding
projects under manage users for project involvement.
(Refer to figure 10 below for a detailed view)

13 | P a g e
Workbook – Information System
Figure 10. Manage Users - User Interface
Removing moderators from a project:
1. In removing a moderator from a project, just simply click “delete” and a pop up window will
display where a list of moderators are listed to be removed from being a moderator.
2. From the pop up window, you can select multiple moderators by ticking the checkbox.
3. Confirmation box will also prompt if you wish to proceed or not.
(Refer to figure 12 below for a detailed view)

14 | P a g e
Workbook – Information System
Figure 11. Manage Projects User Interface
Figure 12. Deleting/Removing Moderators

15 | P a g e
Workbook – Information System
Manage System Documents:
Documentation involves creating documents to record details / specification / events or storing and
preserving documents that are relevant. They are important for the purposes of recording details of
various activities, for retaining as evidence, for documenting policies & rules, for exercising control,
preserving for posterity or as instruction for work to be done. With the help of documentation, it is very
easy to track the flow the system’s progress.
Uses of the Documentation:
It facilitates effective communication regarding the system between the
technical and non-technical users.
It is very useful in training new users.
Helps the users to solve problems like trouble shooting
Plays a significant role in evaluation process.
Main Purpose of System Documentation:
The main purpose of the system documentation is to help learn from the design, development,
implementation and re – evaluation experience as to which it will be used in creating a record as well as to
help for future modifications. If ever the system doesn’t exist anymore, this will be a living proof/evidence
that the company/firm has.
Components of Manage System Documents Page:
Uploading of System Document.
1. Click “Choose File” button to select files you want to upload.
2. If you already selected a file, click “Upload File button”.
(Note: PDF Files are only accepted)
Email the uploaded System Document to the users.
1. Just click button to email the uploaded system document to users.
2. A confirmation dialog box will pop up if you want to proceed to this transaction. If you choose
“OK”, the document will be emailed to the respective users. Otherwise, not.
(Refer to figure 13 below for a detailed view)

16 | P a g e
Workbook – Information System
Figure 13. Managing System Documents

17 | P a g e
Workbook – Information System
VIEW MENU:
View Teams Tasks:
This will display all the tasks of all workbook users.
View My Tasks:
This will display the tasks of a specific user.

18 | P a g e
Workbook – Information System
View User Manual
A dialog box will appear containing the user manual of Workbook system for everyone’s
reference if they need clarifications, help and understanding in using the system.

19 | P a g e
Workbook – Information System
SYSTEM FEATURES
Workbook Task Monitoring Management:
This feature in Workbook System will help the users to monitor their assigned tasks. The users are
notified via Email. The system will automatically send an email regarding to the status of their assigned
tasks and they will be notified 1 day before the target date.
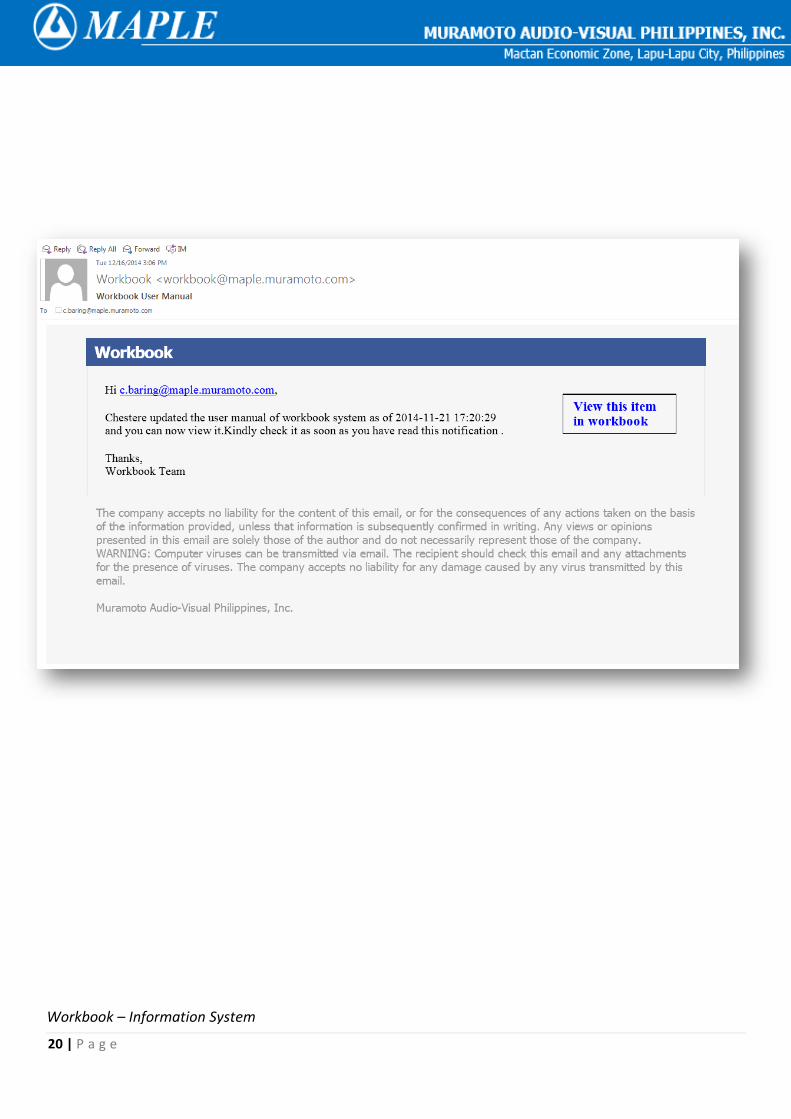
User Manual Update Notification:
This feature in Workbook System enables the users to be updated with the User Manual of
the system through Email Notification. Through this, they will be aware of every changes/updates in the
system.
Refer to the image below
20 | P a g e
Workbook – Information System