Embed Size (px)
Citation preview
Word Processing with
OpenOffice
Writer
W o r d P r o c e s s i n g w i t h O p e n O f f i c e W r i t e r – P a r t 1
1
Part I: Introduction to OpenOffice Writer
OpenOffice Writer is an open-source free software program with features commonly found in commercial word processing programs like Microsoft Word. It allows you to design and produce text documents that can include graphics, tables, or charts. Because OpenOffice Writer has so many components, Word Processing with OpenOffice Writer will be taught in three parts.
Part I will focus on the introduction and basics of the program, including the writing program and usual features found in word processors.
Part 2 will focus navigating, formatting text, and numbering and bullets.
Part 3 will focus on working with columns, tables, and images.
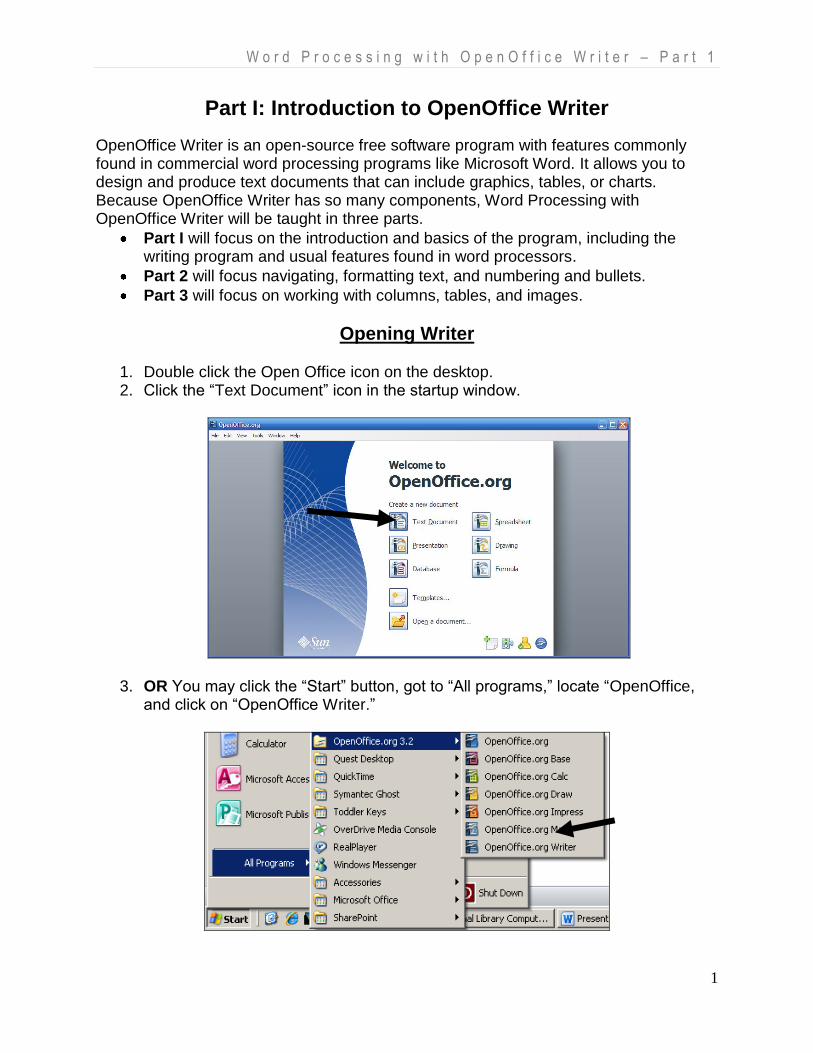
Opening Writer
1. Double click the Open Office icon on the desktop. 2. Click the “Text Document” icon in the startup window.
3. OR You may click the “Start” button, got to “All programs,” locate “OpenOffice, and click on “OpenOffice Writer.”
W o r d P r o c e s s i n g w i t h O p e n O f f i c e W r i t e r – P a r t 1
2
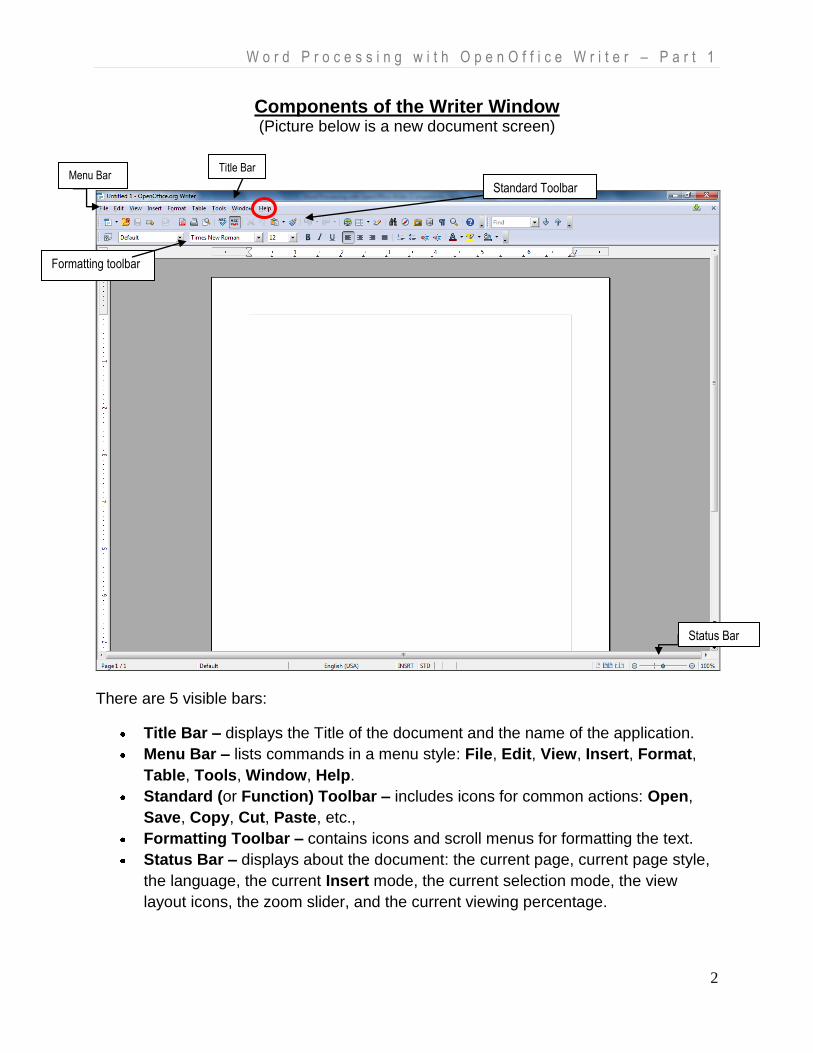
Components of the Writer Window (Picture below is a new document screen)
There are 5 visible bars:
Title Bar – displays the Title of the document and the name of the application.
Menu Bar – lists commands in a menu style: File, Edit, View, Insert, Format,
Table, Tools, Window, Help.
Standard (or Function) Toolbar – includes icons for common actions: Open,
Save, Copy, Cut, Paste, etc.,
Formatting Toolbar – contains icons and scroll menus for formatting the text.
Status Bar – displays about the document: the current page, current page style,
the language, the current Insert mode, the current selection mode, the view
layout icons, the zoom slider, and the current viewing percentage.
Menu Bar Title Bar
Status Bar
Standard Toolbar
Formatting toolbar
W o r d P r o c e s s i n g w i t h O p e n O f f i c e W r i t e r – P a r t 1
3
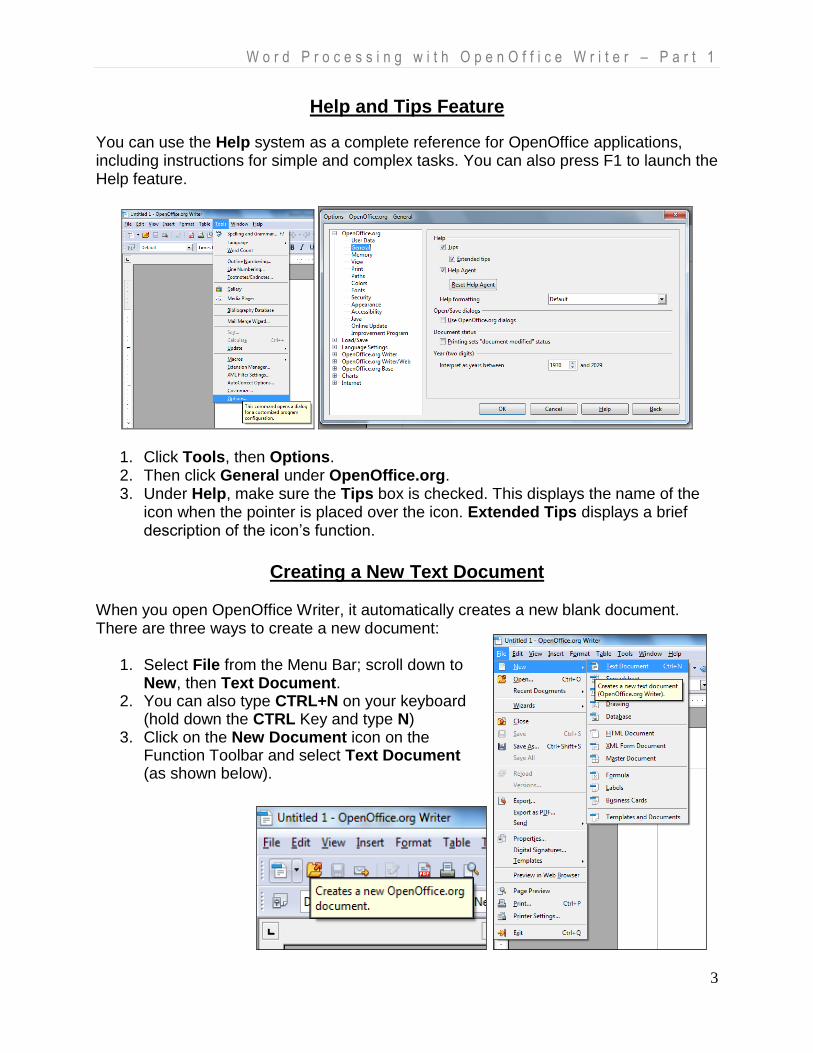
Help and Tips Feature
You can use the Help system as a complete reference for OpenOffice applications, including instructions for simple and complex tasks. You can also press F1 to launch the Help feature.
1. Click Tools, then Options. 2. Then click General under OpenOffice.org. 3. Under Help, make sure the Tips box is checked. This displays the name of the
icon when the pointer is placed over the icon. Extended Tips displays a brief description of the icon’s function.
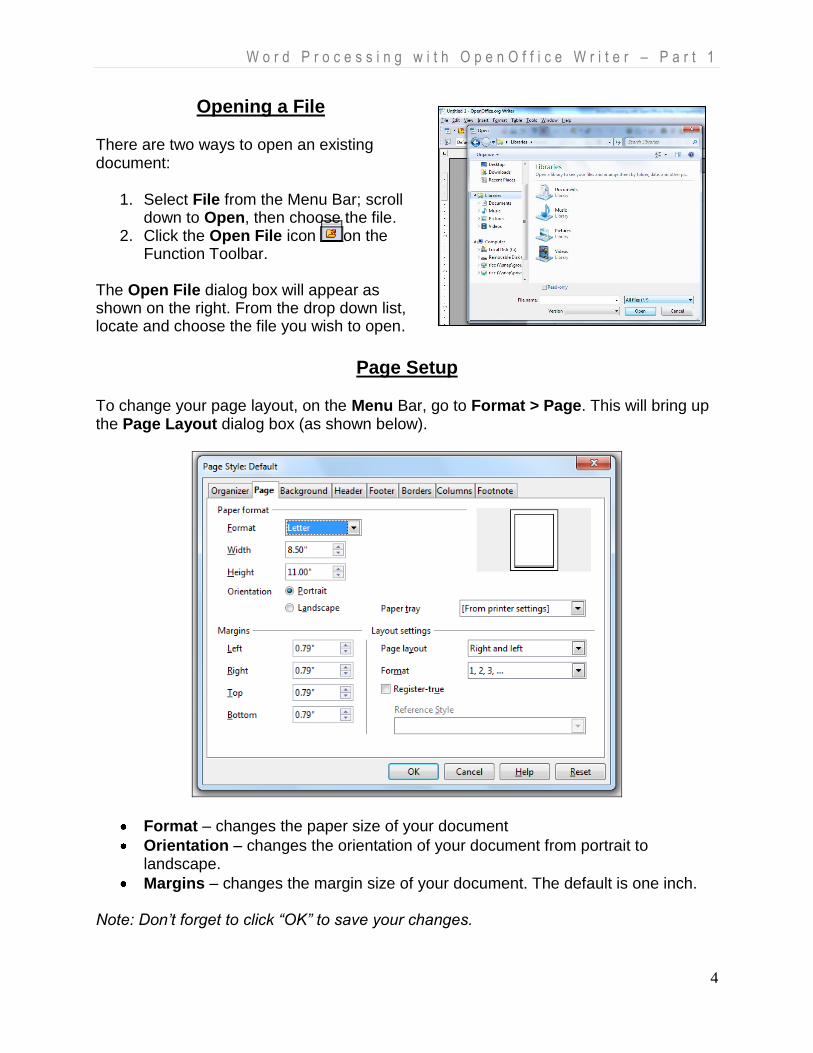
Creating a New Text Document
When you open OpenOffice Writer, it automatically creates a new blank document. There are three ways to create a new document:
1. Select File from the Menu Bar; scroll down to New, then Text Document.
2. You can also type CTRL+N on your keyboard (hold down the CTRL Key and type N)
3. Click on the New Document icon on the Function Toolbar and select Text Document (as shown below).
W o r d P r o c e s s i n g w i t h O p e n O f f i c e W r i t e r – P a r t 1
4
Opening a File There are two ways to open an existing document:
1. Select File from the Menu Bar; scroll down to Open, then choose the file.
2. Click the Open File icon on the Function Toolbar.
The Open File dialog box will appear as shown on the right. From the drop down list, locate and choose the file you wish to open.
Page Setup
To change your page layout, on the Menu Bar, go to Format > Page. This will bring up the Page Layout dialog box (as shown below).
Format – changes the paper size of your document
Orientation – changes the orientation of your document from portrait to landscape.
Margins – changes the margin size of your document. The default is one inch.
Note: Don’t forget to click “OK” to save your changes.
W o r d P r o c e s s i n g w i t h O p e n O f f i c e W r i t e r – P a r t 1
5
Entering Text
After you have opened a new document, you are now ready to start entering text. You will notice there is a blinking vertical cursor on your screen. This is called the insertion point. (In a new document, it is always in the upper left corner.) The insertion point indicates the point at which text will appear when you type. Keep in mind that in a word processing program like OpenOffice Writer, there is no need to press Enter for the next line. That will be done automatically. However, there is no automatic indent.
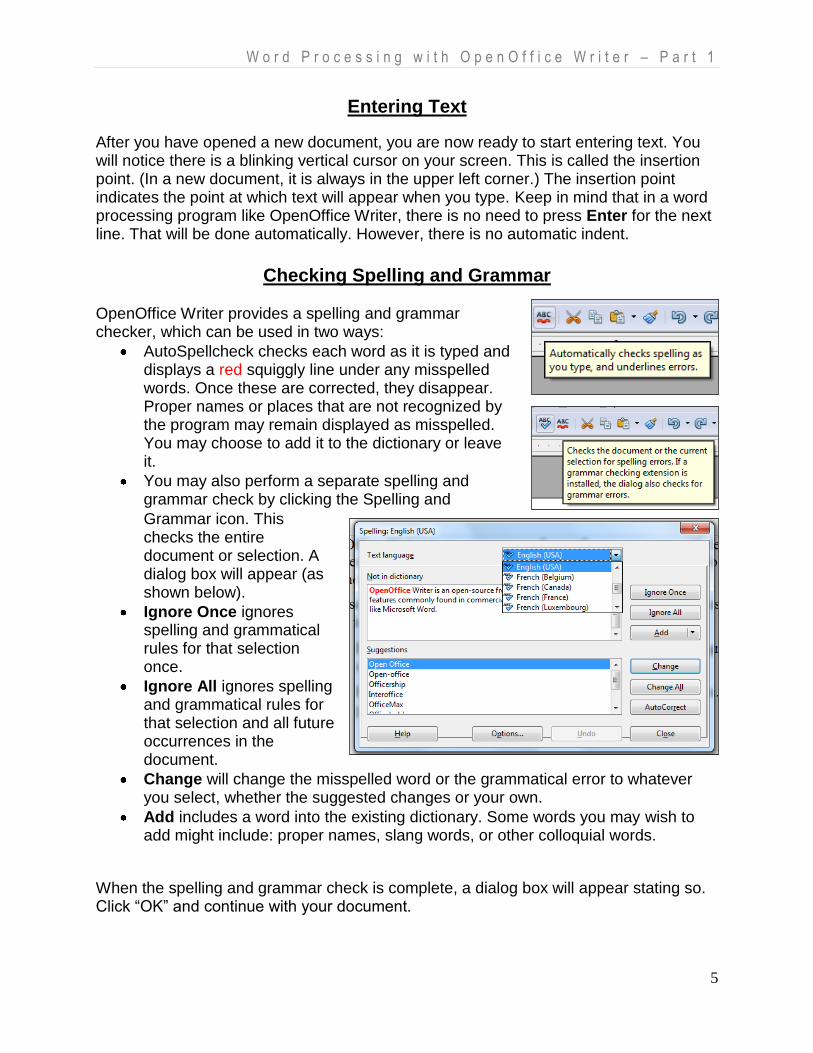
Checking Spelling and Grammar
OpenOffice Writer provides a spelling and grammar checker, which can be used in two ways:
AutoSpellcheck checks each word as it is typed and displays a red squiggly line under any misspelled words. Once these are corrected, they disappear. Proper names or places that are not recognized by the program may remain displayed as misspelled. You may choose to add it to the dictionary or leave it.
You may also perform a separate spelling and grammar check by clicking the Spelling and
Grammar icon. This checks the entire document or selection. A dialog box will appear (as shown below).
Ignore Once ignores spelling and grammatical rules for that selection once.
Ignore All ignores spelling and grammatical rules for that selection and all future occurrences in the document.
Change will change the misspelled word or the grammatical error to whatever you select, whether the suggested changes or your own.
Add includes a word into the existing dictionary. Some words you may wish to add might include: proper names, slang words, or other colloquial words.
When the spelling and grammar check is complete, a dialog box will appear stating so. Click “OK” and continue with your document.
W o r d P r o c e s s i n g w i t h O p e n O f f i c e W r i t e r – P a r t 1
6
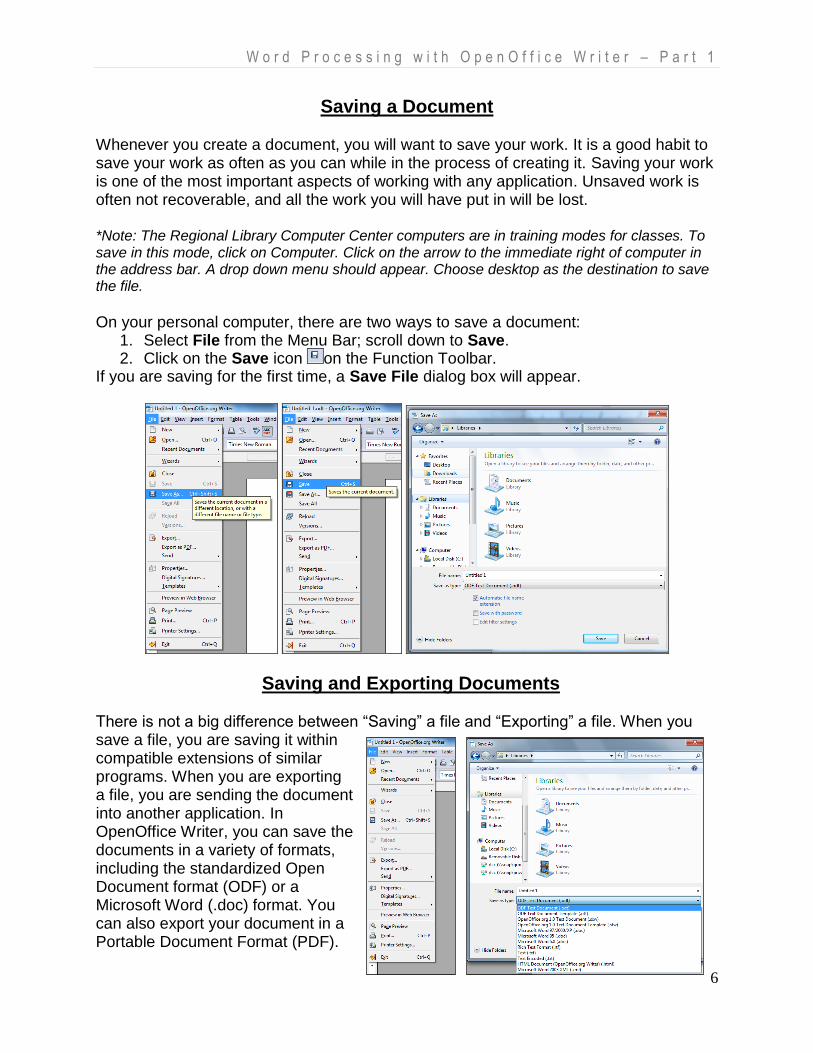
Saving a Document Whenever you create a document, you will want to save your work. It is a good habit to save your work as often as you can while in the process of creating it. Saving your work is one of the most important aspects of working with any application. Unsaved work is often not recoverable, and all the work you will have put in will be lost. *Note: The Regional Library Computer Center computers are in training modes for classes. To save in this mode, click on Computer. Click on the arrow to the immediate right of computer in the address bar. A drop down menu should appear. Choose desktop as the destination to save the file.
On your personal computer, there are two ways to save a document:
1. Select File from the Menu Bar; scroll down to Save. 2. Click on the Save icon on the Function Toolbar.
If you are saving for the first time, a Save File dialog box will appear.
Saving and Exporting Documents There is not a big difference between “Saving” a file and “Exporting” a file. When you save a file, you are saving it within compatible extensions of similar programs. When you are exporting a file, you are sending the document into another application. In OpenOffice Writer, you can save the documents in a variety of formats, including the standardized Open Document format (ODF) or a Microsoft Word (.doc) format. You can also export your document in a Portable Document Format (PDF).
W o r d P r o c e s s i n g w i t h O p e n O f f i c e W r i t e r – P a r t 1
7
Printing
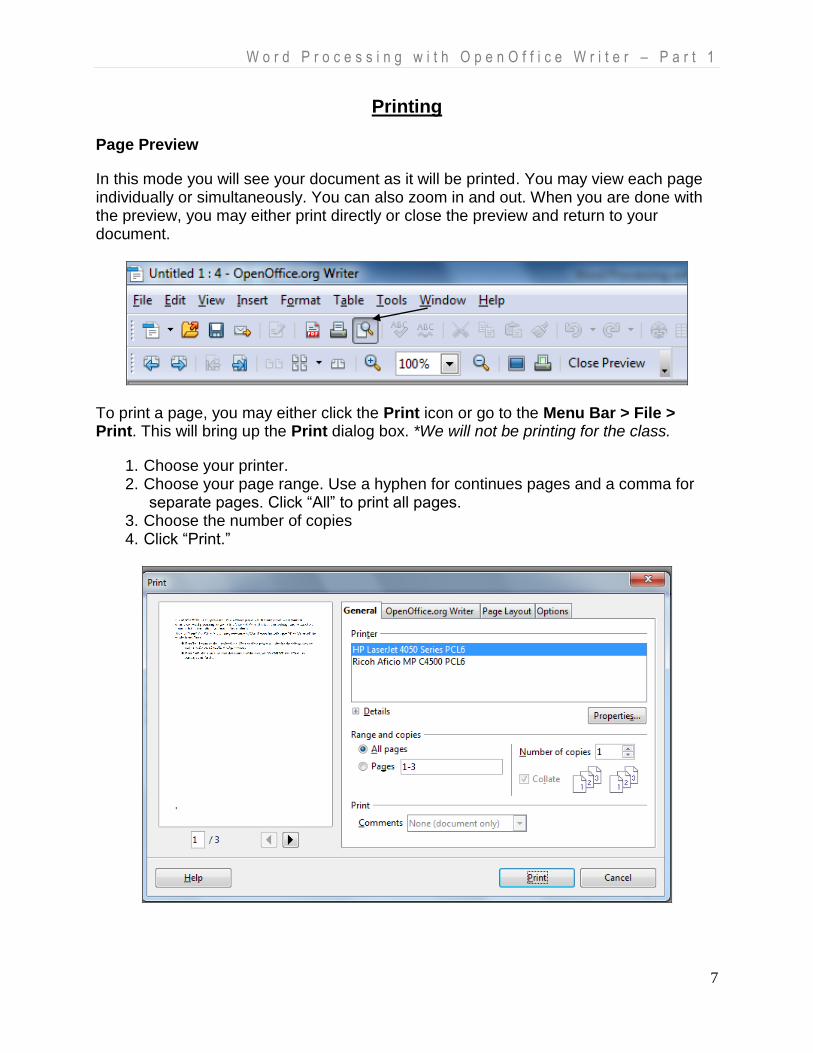
Page Preview
In this mode you will see your document as it will be printed. You may view each page individually or simultaneously. You can also zoom in and out. When you are done with the preview, you may either print directly or close the preview and return to your document.
To print a page, you may either click the Print icon or go to the Menu Bar > File > Print. This will bring up the Print dialog box. *We will not be printing for the class.
1. Choose your printer. 2. Choose your page range. Use a hyphen for continues pages and a comma for
separate pages. Click “All” to print all pages. 3. Choose the number of copies 4. Click “Print.”
W o r d P r o c e s s i n g w i t h O p e n O f f i c e W r i t e r – P a r t 1
8
Closing a Document
To close a document, click File > Close. A dialog box will appear.
• Save – The document is saved and then closed. • Discard – The document is closed, and all modifications since the last save are lost. • Cancel – Nothing happens, and you return to the document. Note: Not saving your document regularly will result in loss of recent changes made to your document or your entire file.
Exiting the Application
To close the application completely, click File > Exit. If all the documents have been saved, OpenOffice Writer will close immediately. If any documents have been modified but not saved, a warning message appears. Follow the procedure in “Saving a Document” or “Closing a Document” to save or discard your changes.
Exercise: Part 1
1. Open the OpenOffice Writer program.
2. When the program opens, create a new blank document. 3. Change the margins to 1.5 inches. 4. Type a three- to five-sentence description of yourself. 5. Make another paragraph. Type a three- to five-sentence description of your best friend. 6. Practice navigating and selecting text. 7. Save the document as Practice 1 on the desktop. 8. Close the document and then the application.
W o r d P r o c e s s i n g w i t h O p e n O f f i c e W r i t e r – P a r t 2
9
Part II: Text and Formatting
Navigating OpenOffice Writer
Use Your To Go
Space Bar One space to the right
Right Arrow One place to the right (without deleting)
Left Arrow One place to the left (without deleting)
Enter or Return Key Hard line break to next line
Down Arrow Key Down one space (without a break)
Up Arrow Up one space
Horizontal Scrollbar Scroll document left to right
Vertical Scrollbar Scroll document up and down
Ctrl + Home Beginning of document
Ctrl + End End of document
Home Beginning of a line
End End of a line
Ctrl + One word to the right
Ctrl + One word to the left
Ctrl + Previous Paragraph
Ctrl + Next Paragraph
Page Up Up one section in document
Page Down Down one section in document
Delete Key Deletes the character to the right of the blinking cursor or insertion point.
Backspace Key Deletes the character to the left of the blinking cursor or insertion point.
Red Squiggly lines indicate that a word is misspelled according to the OpenOffice dictionary.
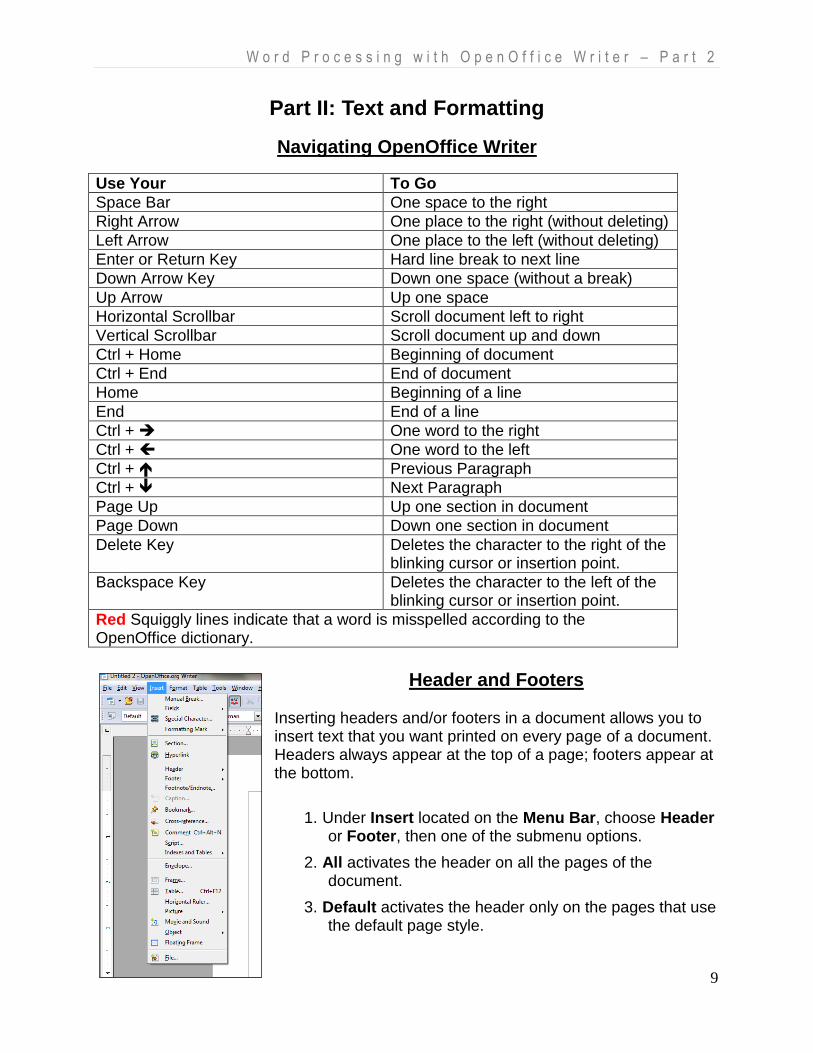
Header and Footers
Inserting headers and/or footers in a document allows you to insert text that you want printed on every page of a document. Headers always appear at the top of a page; footers appear at the bottom.
1. Under Insert located on the Menu Bar, choose Header or Footer, then one of the submenu options.
2. All activates the header on all the pages of the document.
3. Default activates the header only on the pages that use the default page style.

W o r d P r o c e s s i n g w i t h O p e n O f f i c e W r i t e r – P a r t 2
10
4. Type in your desired header or footer.
5. Follow the instruction to place a footer in your document. To place a page number, go back to the Menu Bar, choose Insert, then Fields, and then Page Number.
Selecting Text
Word – position the cursor in the middle of the word and double click.
Sentence – position the cursor within the sentence and triple click.
Entire paragraph – position the cursor within the paragraph and click four times.
Entire Document – (1) Hold down the control key on the keyboard and press A. (CTRL+A) OR (2) Choose Edit on the menu bar and choose Select All (as shown on the right).
Selecting items that are not consecutive
o To select nonconsecutive items:
1. Select the first piece of text.
2. Hold down the Control (Ctrl) key and use the mouse to click on the next selection.
3. Repeat as often as needed.
Formatting Text
Formatting a text changes its appearance in the document: font, size, bold, underline, italics, and its orientation on the page. You can do so by choosing the icons and drop menus on the Formatting Toolbar or by utilizing the Styles and Formatting window.
Changing Your Font Note: Some of the buttons on the formatting toolbar are toggle buttons. This means if you click on them once, you will format the selected text. If you click them again, you will remove that formatting from the selected text.
Font – Select your text. Choose the desired font from the Font drop down menu. The text will change upon your selection. (You may undo your selection at any time.)
Size – Sizes are measured in “points.” The default font and size is Times New Roman, 12 point. To change the size, make your text selection and choose the desired size from the Size drop menu.
W o r d P r o c e s s i n g w i t h O p e n O f f i c e W r i t e r – P a r t 2
11
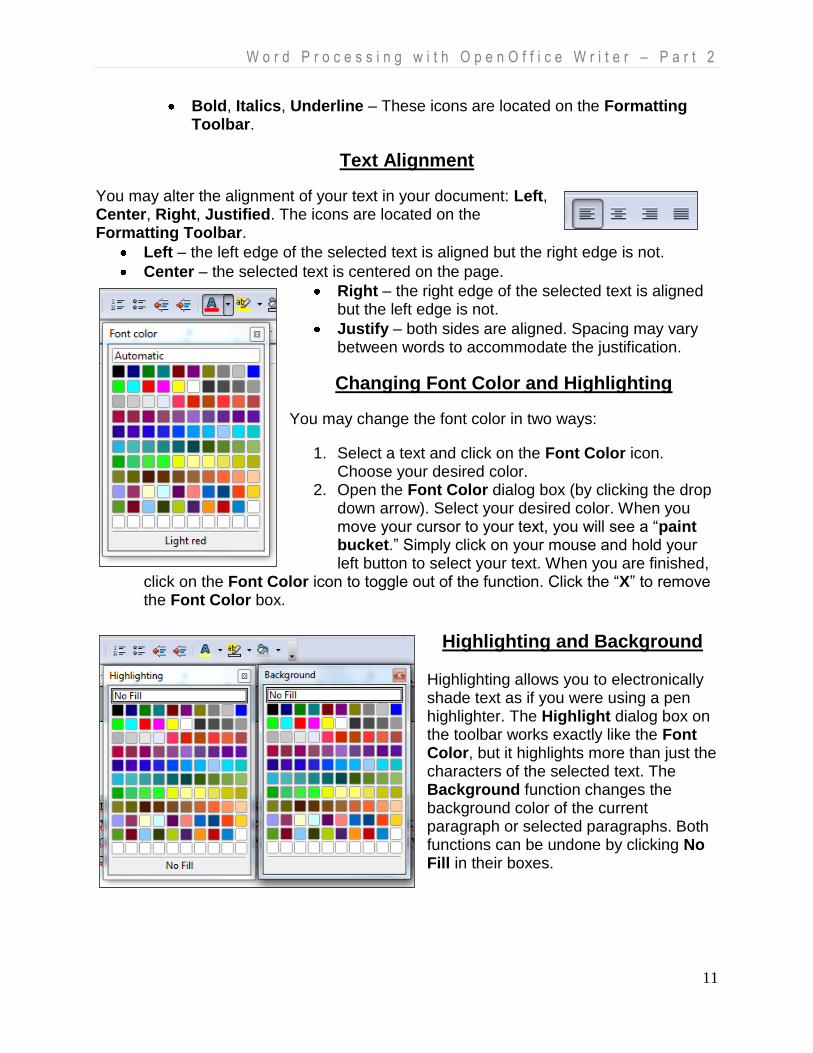
Bold, Italics, Underline – These icons are located on the Formatting Toolbar.
Text Alignment
You may alter the alignment of your text in your document: Left, Center, Right, Justified. The icons are located on the Formatting Toolbar.
Left – the left edge of the selected text is aligned but the right edge is not.
Center – the selected text is centered on the page.
Right – the right edge of the selected text is aligned but the left edge is not.
Justify – both sides are aligned. Spacing may vary between words to accommodate the justification.
Changing Font Color and Highlighting
You may change the font color in two ways:
1. Select a text and click on the Font Color icon. Choose your desired color.
2. Open the Font Color dialog box (by clicking the drop down arrow). Select your desired color. When you move your cursor to your text, you will see a “paint bucket.” Simply click on your mouse and hold your left button to select your text. When you are finished,
click on the Font Color icon to toggle out of the function. Click the “X” to remove the Font Color box.
Highlighting and Background
Highlighting allows you to electronically shade text as if you were using a pen highlighter. The Highlight dialog box on the toolbar works exactly like the Font Color, but it highlights more than just the characters of the selected text. The Background function changes the background color of the current paragraph or selected paragraphs. Both functions can be undone by clicking No Fill in their boxes.
W o r d P r o c e s s i n g w i t h O p e n O f f i c e W r i t e r – P a r t 2
12
Cut, Copy, and Paste
These actions will allow you to easily copy or move text, data, graphics, or art from one location to another in your document as well as from one application to another. These can be found on the Menu Toolbar or under the Edit drop down menu.
Cut – Removes the selection from its present position to be placed to another position.
Copy – Duplicates the selection.
Paste – Places the selection into another location in the document or into another application.
Drag and Drop
The Drag and Drop feature enables you to quickly move a text, a selection, a graphic or art from one location of the document to another by clicking on the desired context, holding down the left button of the mouse (which will display and around with a box under it), and “dragging” to the desired location.
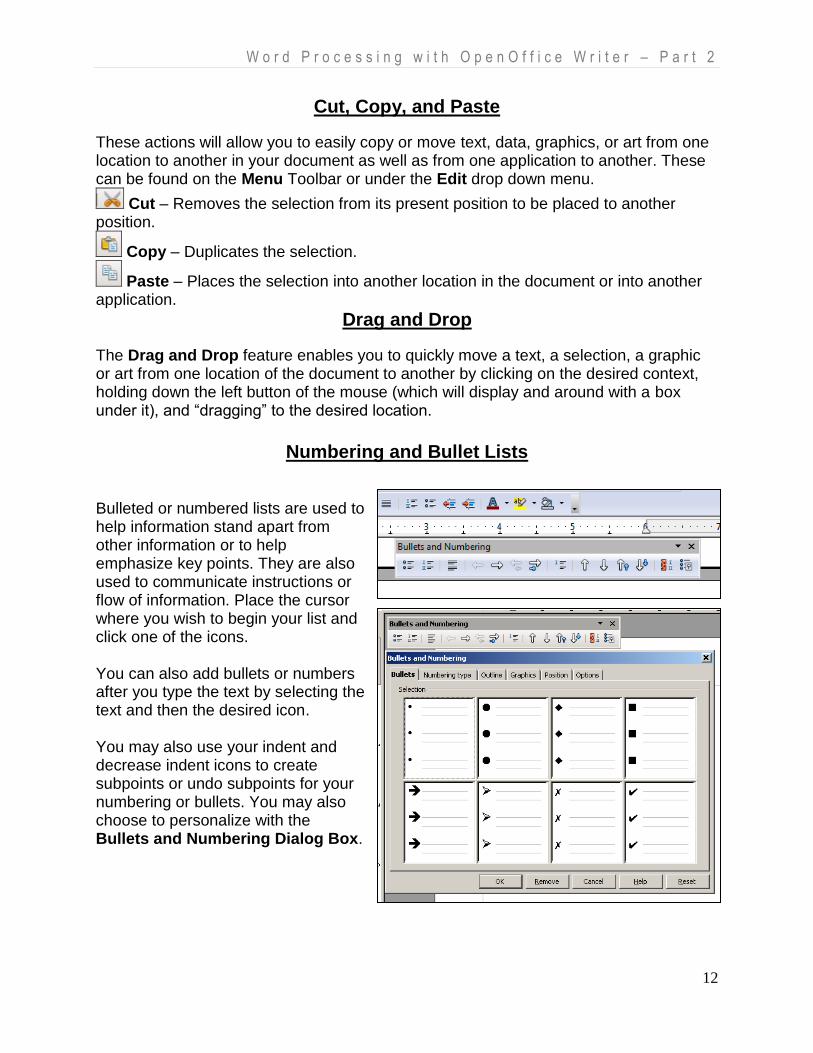
Numbering and Bullet Lists
Bulleted or numbered lists are used to help information stand apart from other information or to help emphasize key points. They are also used to communicate instructions or flow of information. Place the cursor where you wish to begin your list and click one of the icons. You can also add bullets or numbers after you type the text by selecting the text and then the desired icon. You may also use your indent and decrease indent icons to create subpoints or undo subpoints for your numbering or bullets. You may also choose to personalize with the Bullets and Numbering Dialog Box.
W o r d P r o c e s s i n g w i t h O p e n O f f i c e W r i t e r – P a r t 2
13
Indent Icons The Increase and Decrease Indent icons increase or decrease the left indent of the current paragraph or cell content. The increase sets it to the next tab position, while decrease sets it to the previous tab position.
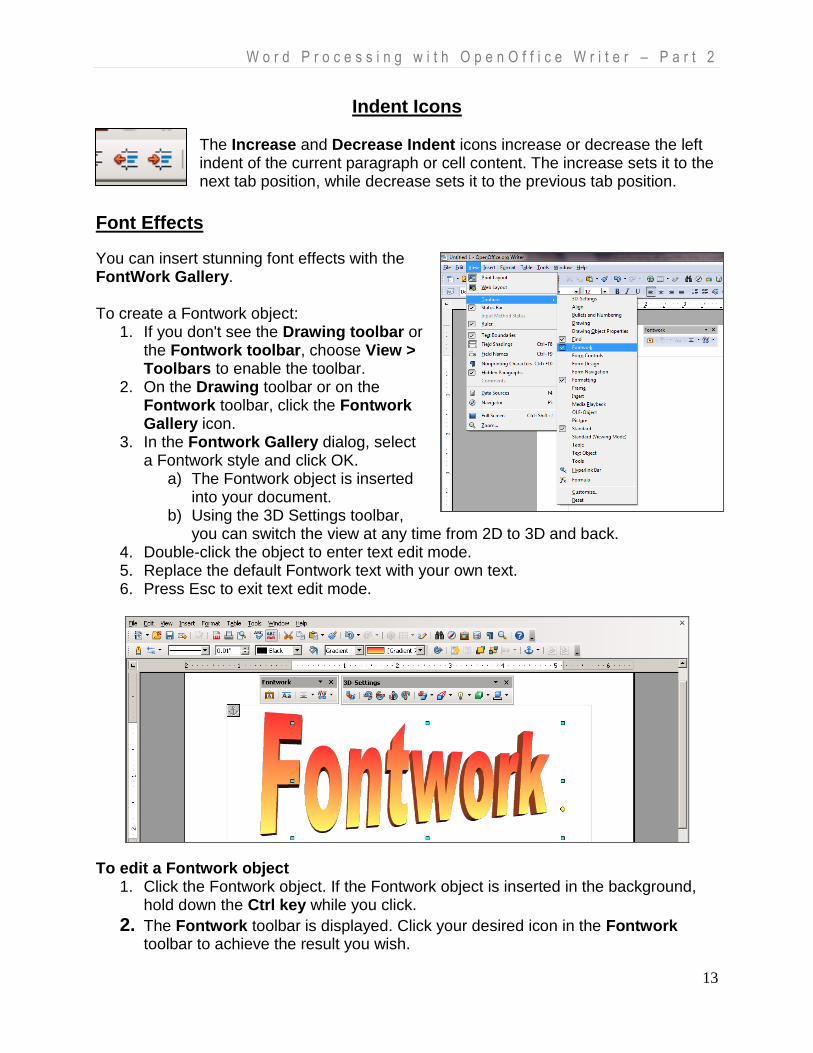
Font Effects
You can insert stunning font effects with the FontWork Gallery. To create a Fontwork object:
1. If you don't see the Drawing toolbar or the Fontwork toolbar, choose View > Toolbars to enable the toolbar.
2. On the Drawing toolbar or on the Fontwork toolbar, click the Fontwork Gallery icon.
3. In the Fontwork Gallery dialog, select a Fontwork style and click OK.
a) The Fontwork object is inserted into your document.
b) Using the 3D Settings toolbar, you can switch the view at any time from 2D to 3D and back.
4. Double-click the object to enter text edit mode. 5. Replace the default Fontwork text with your own text. 6. Press Esc to exit text edit mode.
To edit a Fontwork object 1. Click the Fontwork object. If the Fontwork object is inserted in the background,
hold down the Ctrl key while you click.
2. The Fontwork toolbar is displayed. Click your desired icon in the Fontwork toolbar to achieve the result you wish.
W o r d P r o c e s s i n g w i t h O p e n O f f i c e W r i t e r – P a r t 2
14
Exercise: Part 2
PART 2A
1. Open Libraries.
2. Add a header and type RLCC Practice Exercises.
3. Add a page number as a footer.
4. Select the second paragraph and move it so that it is now the third paragraph.
5. Select the whole document and change the Font to Arial.
6. Make sure the Font Size is 12 pt.
7. Select “Public Libraries” and make this sentence Bold.
8. Select “School Libraries” and make this sentence Italic.
9. Select “More reasons to love libraries” and Underline this sentence.
10. Make the paragraphs under “Public Libraries” bulleted.
11. Make the paragraphs under “School Libraries” bulleted. Customize the bullets.
12. Make the paragraphs under “More reasons to love libraries” numbered.
13. Select the paragraph that begins with “Libraries are Helpful for News Archives” and
delete the entire paragraph.
14. Select 3rd, 4th, and 5th sentences. Make these bulleted.
PART 2B
1. Create a new document.
2. Set a left tab stop on the 1 inch mark.
3. Set a center tab stop on the 3 inch mark.
4. Set a right tab stop on the 4 ½ inch mark.
5. Set a decimal tab stop on the 6 inch mark.
6. Type headers: (tab) Name (tab), Supply Order (tab), Amount (tab), Total Cost.
7. Type the following (using tabs):
a. John Smith, Pencils, 800, $180.00
b. Mike Dunham, Copy Paper, 1000, $550.00
c. Susan Jones, Manila Folders, 250, $160.00
d. Chester Brown, Erasers, 120, $80.00
W o r d P r o c e s s i n g w i t h O p e n O f f i c e W r i t e r – P a r t 3
15
Part III: Columns, Tables, and Images
Columns New documents can be formatted for columns. You can also select the text and apply the column settings. To create columns:
1. Place the insertion point where you want the columns to begin or select the text that you want to format as columns.
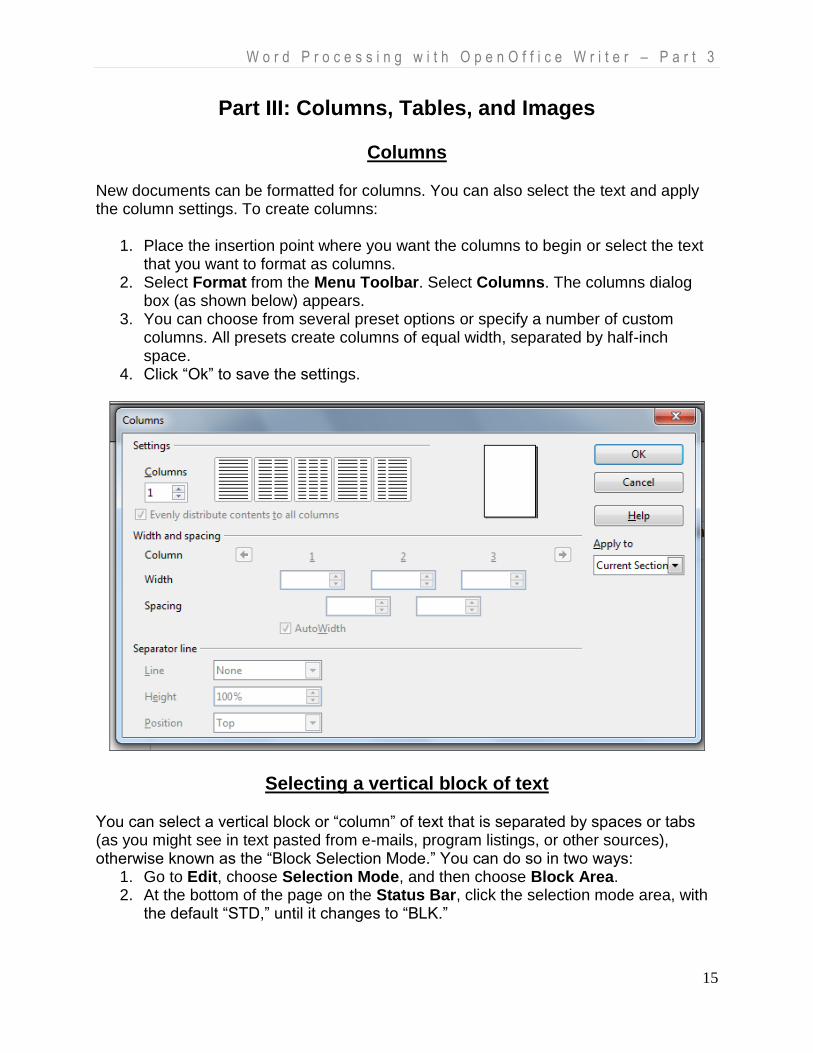
2. Select Format from the Menu Toolbar. Select Columns. The columns dialog box (as shown below) appears.
3. You can choose from several preset options or specify a number of custom columns. All presets create columns of equal width, separated by half-inch space.
4. Click “Ok” to save the settings.
Selecting a vertical block of text You can select a vertical block or “column” of text that is separated by spaces or tabs (as you might see in text pasted from e-mails, program listings, or other sources), otherwise known as the “Block Selection Mode.” You can do so in two ways:
1. Go to Edit, choose Selection Mode, and then choose Block Area. 2. At the bottom of the page on the Status Bar, click the selection mode area, with
the default “STD,” until it changes to “BLK.”
W o r d P r o c e s s i n g w i t h O p e n O f f i c e W r i t e r – P a r t 3
16
Now highlight the selection using mouse or your keyboard (using the shift key and the arrow buttons).
Tables
In your document, you may want to insert a table for a number of reasons: technical, financial or statistical reports; catalog of prices of products; bills or invoices; mailing or contact list.
Before inserting a table in a document, you should roughly define the number of rows and columns required. However, this is just a starting point because you can change the number of rows and columns as you edit the document.
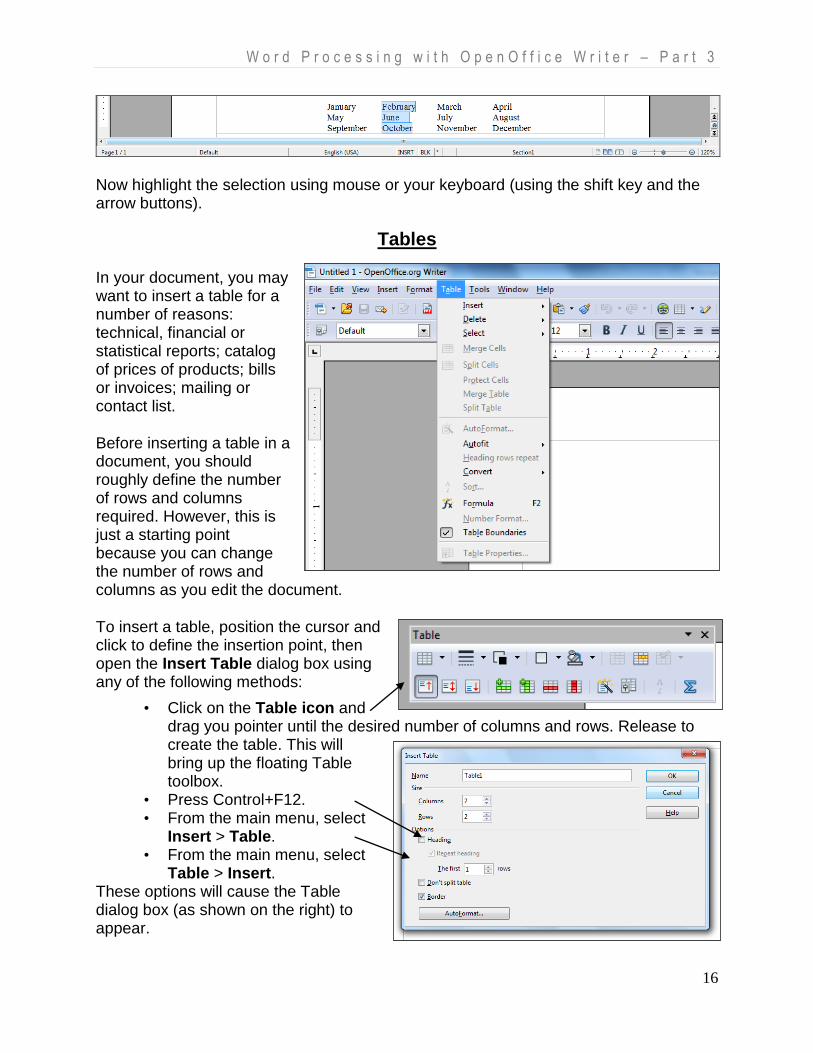
To insert a table, position the cursor and click to define the insertion point, then open the Insert Table dialog box using any of the following methods:
• Click on the Table icon and drag you pointer until the desired number of columns and rows. Release to create the table. This will bring up the floating Table toolbox.
• Press Control+F12. • From the main menu, select
Insert > Table. • From the main menu, select
Table > Insert. These options will cause the Table dialog box (as shown on the right) to appear.
W o r d P r o c e s s i n g w i t h O p e n O f f i c e W r i t e r – P a r t 3
17
1. In the Name box, you will see Table1, indicating that this is the first table inserted in this document. Following tables inserted in the document will be respectively named Table 2, Table 3, etc.
2. Under Size, Columns, change the number to your desired amount of columns. 3. Under Rows, change the number to number to your desired amount of rows. 4. Under Options > Heading will include a heading row in your table. Repeat
Heading will repeat the heading of the table at the top of subsequent pages if the table spans more than one page.
Sorting Data
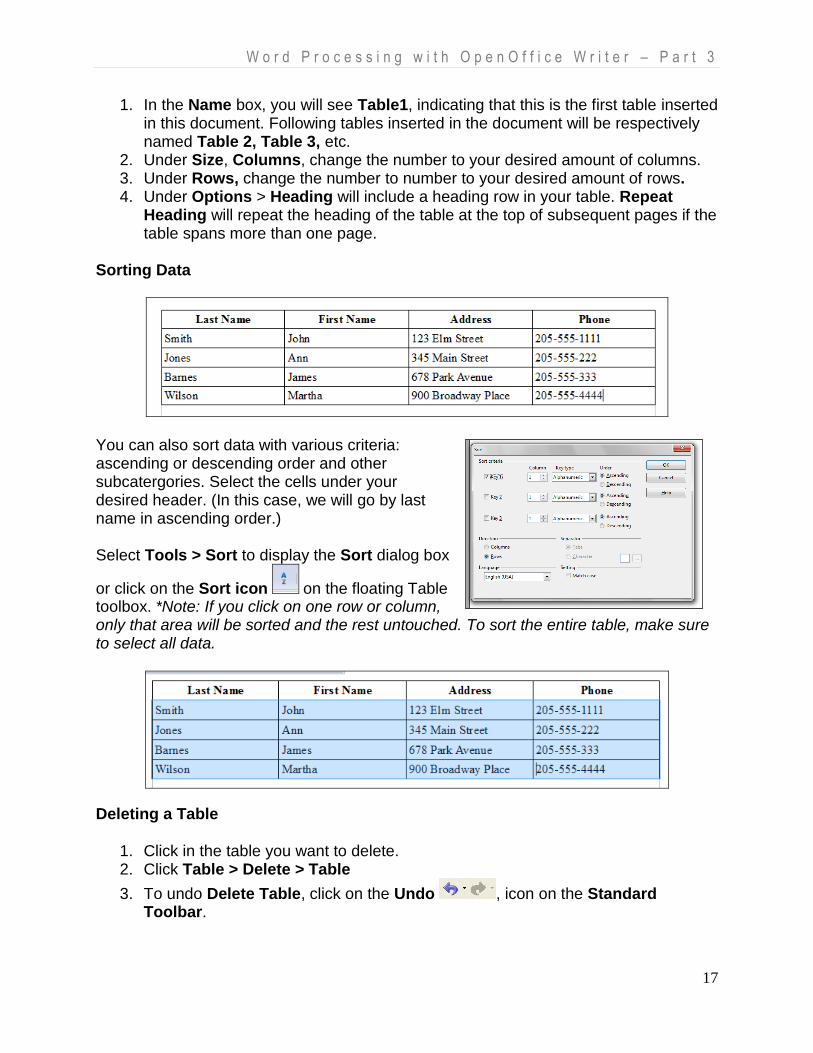
You can also sort data with various criteria: ascending or descending order and other subcatergories. Select the cells under your desired header. (In this case, we will go by last name in ascending order.) Select Tools > Sort to display the Sort dialog box
or click on the Sort icon on the floating Table toolbox. *Note: If you click on one row or column, only that area will be sorted and the rest untouched. To sort the entire table, make sure to select all data.
Deleting a Table
1. Click in the table you want to delete. 2. Click Table > Delete > Table
3. To undo Delete Table, click on the Undo , icon on the Standard Toolbar.
W o r d P r o c e s s i n g w i t h O p e n O f f i c e W r i t e r – P a r t 3
18
Graphics
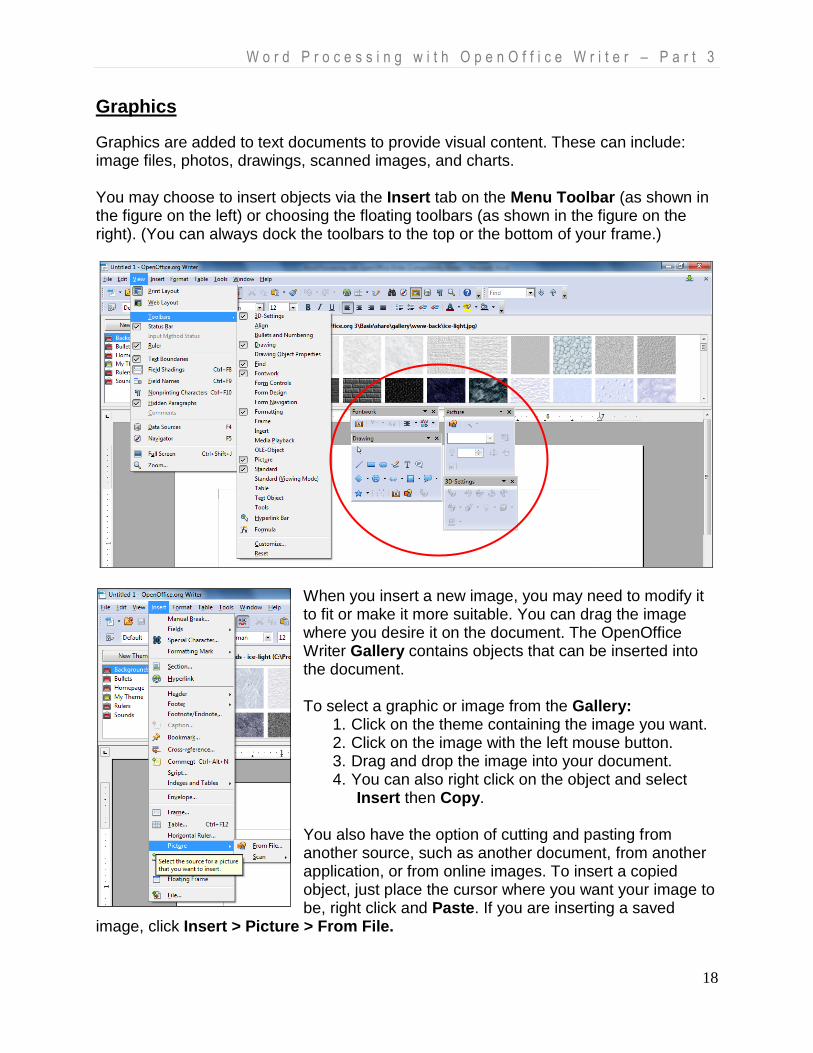
Graphics are added to text documents to provide visual content. These can include: image files, photos, drawings, scanned images, and charts. You may choose to insert objects via the Insert tab on the Menu Toolbar (as shown in the figure on the left) or choosing the floating toolbars (as shown in the figure on the right). (You can always dock the toolbars to the top or the bottom of your frame.)
When you insert a new image, you may need to modify it to fit or make it more suitable. You can drag the image where you desire it on the document. The OpenOffice Writer Gallery contains objects that can be inserted into the document. To select a graphic or image from the Gallery:
1. Click on the theme containing the image you want. 2. Click on the image with the left mouse button. 3. Drag and drop the image into your document. 4. You can also right click on the object and select
Insert then Copy. You also have the option of cutting and pasting from another source, such as another document, from another application, or from online images. To insert a copied object, just place the cursor where you want your image to be, right click and Paste. If you are inserting a saved
image, click Insert > Picture > From File.
W o r d P r o c e s s i n g w i t h O p e n O f f i c e W r i t e r – P a r t 3
19
Anchoring Objects
When you insert an object or graphic, an icon nachor appears where the item is anchored. You can position an anchored item by dragging the item to another location. To change anchoring options, right-click the item and choose an option from the Anchor submenu.
Anchoring Effect
As character Anchors the selected item as a character in the current text. If the height of the selected item is greater than the current font size, the height of the line containing the item is increased.
To center an image on an HTML page, insert the image, anchor it "as character", then center the paragraph.
To character Anchors the selected item to a character.
To paragraph Anchors the selected item to the current paragraph.
To page Anchors the selected item to the current page.
To frame Anchors the selected item to the surrounding frame.
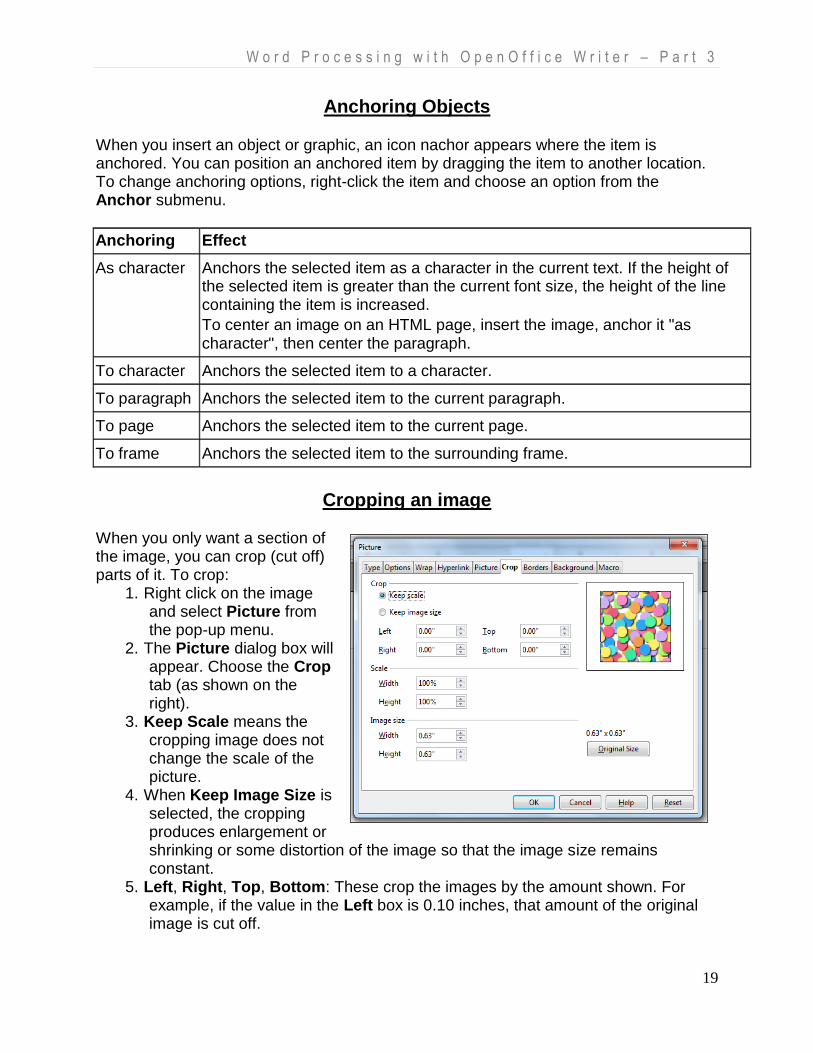
Cropping an image
When you only want a section of the image, you can crop (cut off) parts of it. To crop:
1. Right click on the image and select Picture from the pop-up menu.
2. The Picture dialog box will appear. Choose the Crop tab (as shown on the right).
3. Keep Scale means the cropping image does not change the scale of the picture.
4. When Keep Image Size is selected, the cropping produces enlargement or shrinking or some distortion of the image so that the image size remains constant.
5. Left, Right, Top, Bottom: These crop the images by the amount shown. For example, if the value in the Left box is 0.10 inches, that amount of the original image is cut off.
W o r d P r o c e s s i n g w i t h O p e n O f f i c e W r i t e r – P a r t 3
20
Wrapping
You may choose to wrap text around an object. You can do so by:
1. Select the object.
2. Choose Format > Wrap or right-clicking on the image, and then choose the wrapping style that you want to apply. The current wrapping style is indicated by a bullet.
You may also specify the wrapping properties.
1. Select the object.
2. Choose Format > Graphics, and then click the Wrap tab.
3. Set the options that you want.
4. Click OK.
Resizing an image
You can change the size of the image by: 1. Click the picture to show the green resizing handles. 2. Position the pointer over one of the green squares. The
pointer will change to a double-sided arrow. 3. Click and drag to resize the picture. 4. To retain the proportions of the image, hold the Shift key as
you drag. Release the mouse button before you release the mouse button.
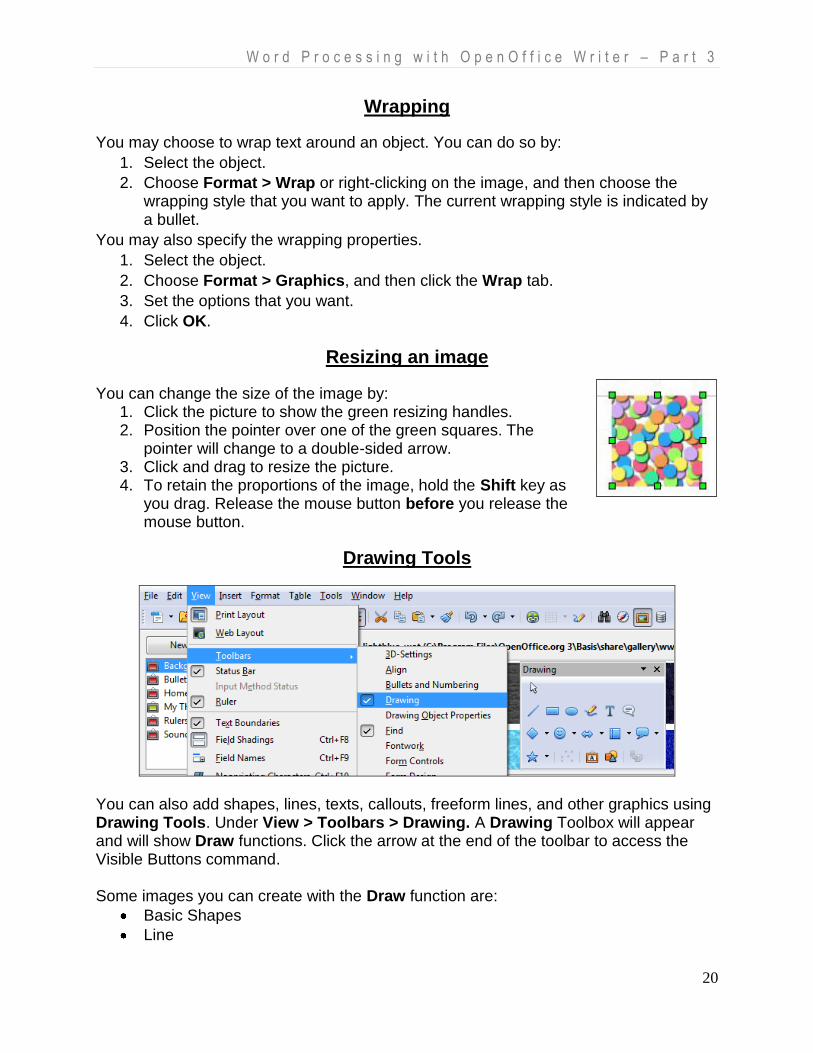
Drawing Tools
You can also add shapes, lines, texts, callouts, freeform lines, and other graphics using Drawing Tools. Under View > Toolbars > Drawing. A Drawing Toolbox will appear and will show Draw functions. Click the arrow at the end of the toolbar to access the Visible Buttons command. Some images you can create with the Draw function are:
Basic Shapes
Line
W o r d P r o c e s s i n g w i t h O p e n O f f i c e W r i t e r – P a r t 3
21
Ellipse (To draw a circle, hold down the SHIFT key while you drag.)
Curve
Freeform Line (To draw a closed shape, release the mouse button near the beginning point.)
Symbol shapes
Block Arrows
Text animation
Callouts (To add text, click the edge of the callout and type or paste your text.)
Deleting an image
You may delete an image at any time by clicking on the desired image and pressing the Delete button on your keyboard.
Exercise: Part 3
PART 3A
1. Open Table.
2. Create a table under Industry Contacts. Make it 4 columns and 6 rows.
3. In the header cells, type: Last Name, First Name, Address, Phone Number.
4. Type the following:
a. Starr, Ringo, 333 Yellow Submarine, (205) 555-1234
b. Duck, Donald, 234 Disney Lane, (205) 555-5678
c. Barnes, Penelope, 1000 Saks Avenue, (205) 555-5656
d. Wilson, Martha, 900 Broadway Avenue, (205) 555-8978
e. Wilson, Owen, 900 Broadway Avenue, (205) 555-8979
5. Sort the data according to the Last Name (ascending) then First Name
(Ascending).
6. Choose a style for your table.
PART 3B
1. Open Caramel Apple Pie.
2. Insert a Clip Art of an apple pie from one of the selections.
3. Resize the graphic either bigger or smaller, according to your preference.
4. Crop the graphic so that there is no negative space, only the pie.
5. Choose a square wrap option for the graphic and place wherever you want in
your document.
6. If time permits, make changes to the document from any of the instructions and
training you received during the course(s).


![Module 3 - Word Processing [ Word ]](https://img.pdfslide.us/doc/110x75/577daecc1a28ab223f915bf5/module-3-word-processing-word-.jpg)