Embed Size (px)
Citation preview
WirelessD.I.Y.AlarmKit
MAMI21 Hubert Mathew Road
Illiondale1610
Tel: +27 11 452 4737Email: [email protected]
User ManualDecember 2010
Wireless DIY alarm kit
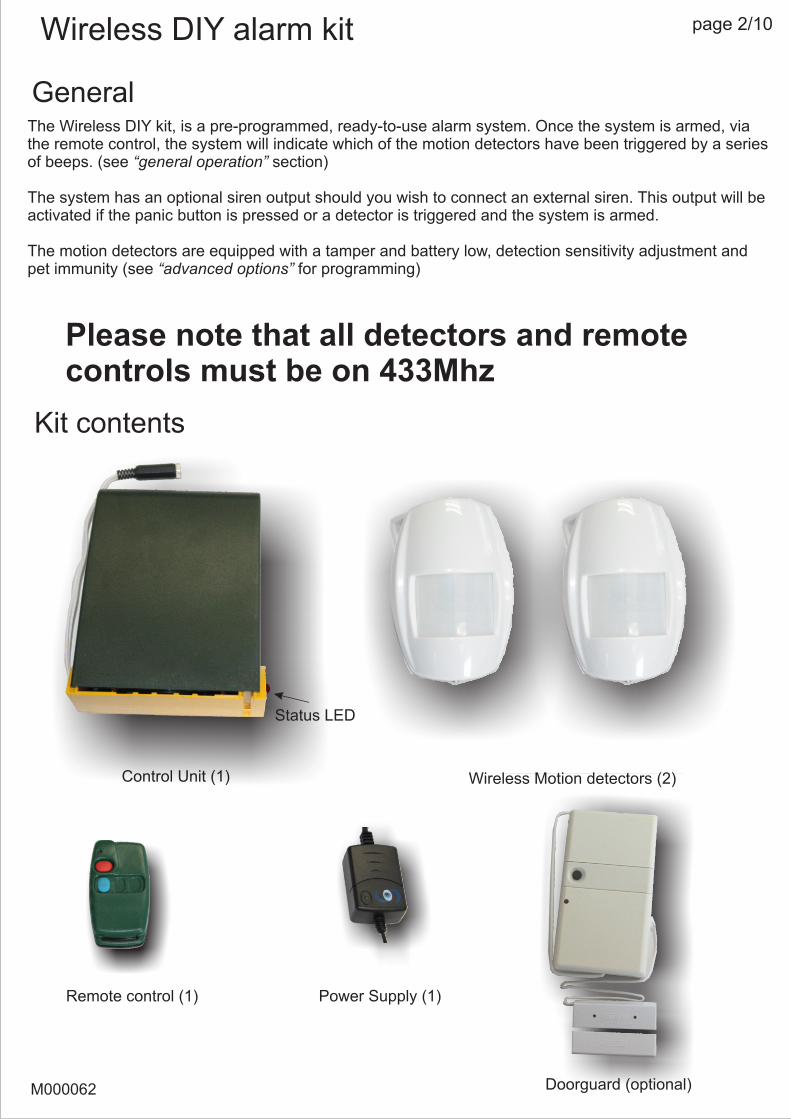
GeneralThe Wireless DIY kit, is a pre-programmed, ready-to-use alarm system. Once the system is armed, via the remote control, the system will indicate which of the motion detectors have been triggered by a series of beeps. (see “general operation” section)
The system has an optional siren output should you wish to connect an external siren. This output will be activated if the panic button is pressed or a detector is triggered and the system is armed.
The motion detectors are equipped with a tamper and battery low, detection sensitivity adjustment and pet immunity (see “advanced options” for programming)
Kit contents
main
Wireless Motion detectors (2)Control Unit (1)
Remote control (1) Power Supply (1)
Doorguard (optional)
Status LED
page 2/10
Please note that all detectors and remote controls must be on 433Mhz
M000062
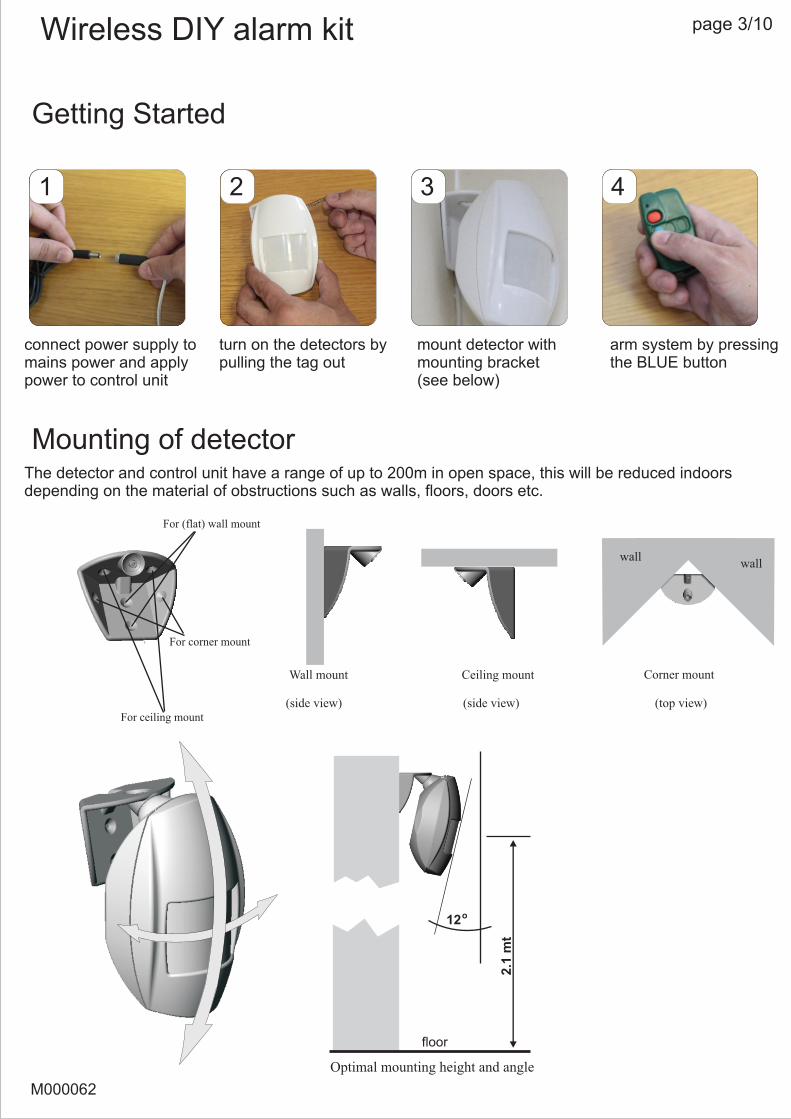
Getting Started
connect power supply to mains power and apply power to control unit
turn on the detectors bypulling the tag out
mount detector with mounting bracket(see below)
arm system by pressing the BLUE button
Mounting of detector
For ceiling mount
For corner mount
For (flat) wall mount
Corner mountWall mount Ceiling mount
1 2 3 4
(side view) (side view) (top view)
wallwall
12o
2.1
mt
floor
Optimal mounting height and angle
page 3/10Wireless DIY alarm kit
The detector and control unit have a range of up to 200m in open space, this will be reduced indoors depending on the material of obstructions such as walls, floors, doors etc.
M000062
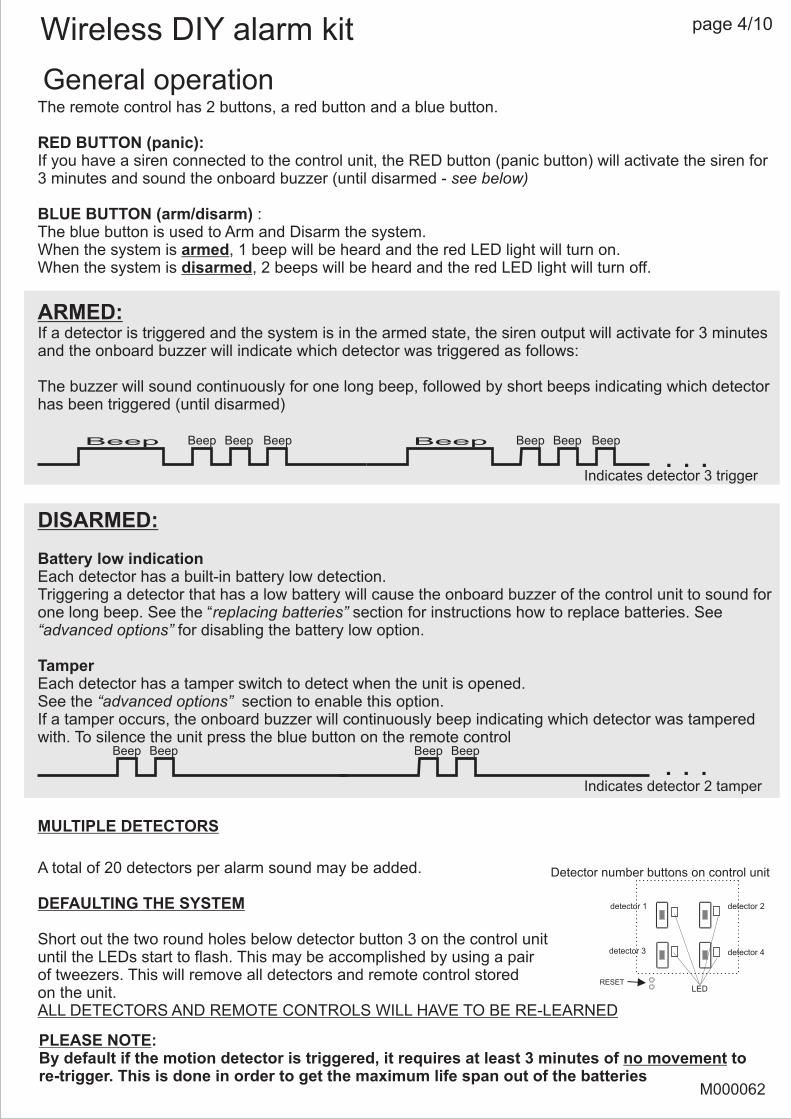
General operationThe remote control has 2 buttons, a red button and a blue button.
RED BUTTON (panic):If you have a siren connected to the control unit, the RED button (panic button) will activate the siren for 3 minutes and sound the onboard buzzer (until disarmed - see below)
BLUE BUTTON (arm/disarm) :The blue button is used to Arm and Disarm the system. When the system is armed, 1 beep will be heard and the red LED light will turn on.When the system is disarmed, 2 beeps will be heard and the red LED light will turn off.
ARMED:If a detector is triggered and the system is in the armed state, the siren output will activate for 3 minutes and the onboard buzzer will indicate which detector was triggered as follows:
The buzzer will sound continuously for one long beep, followed by short beeps indicating which detector has been triggered (until disarmed)
DISARMED:
Battery low indicationEach detector has a built-in battery low detection. Triggering a detector that has a low battery will cause the onboard buzzer of the control unit to sound for one long beep. See the “replacing batteries” section for instructions how to replace batteries. See “advanced options” for disabling the battery low option.
TamperEach detector has a tamper switch to detect when the unit is opened. See the “advanced options” section to enable this option.If a tamper occurs, the onboard buzzer will continuously beep indicating which detector was tampered with. To silence the unit press the blue button on the remote control
MULTIPLE DETECTORS
A total of 20 detectors per alarm sound may be added.
DEFAULTING THE SYSTEM
Short out the two round holes below detector button 3 on the control unit until the LEDs start to flash. This may be accomplished by using a pair of tweezers. This will remove all detectors and remote control storedon the unit. ALL DETECTORS AND REMOTE CONTROLS WILL HAVE TO BE RE-LEARNED
Beep Beep Beep Beep
Indicates detector 3 trigger
Beep Beep
Indicates detector 2 tamper
Beep Beep
Beep Beep Beep Beep
. . .
. . .
PLEASE NOTE:By default if the motion detector is triggered, it requires at least 3 minutes of no movement to re-trigger. This is done in order to get the maximum life span out of the batteries
RESET
detector 1 detector 2
detector 3 detector 4
Detector number buttons on control unit
LED
page 4/10Wireless DIY alarm kit
M000062
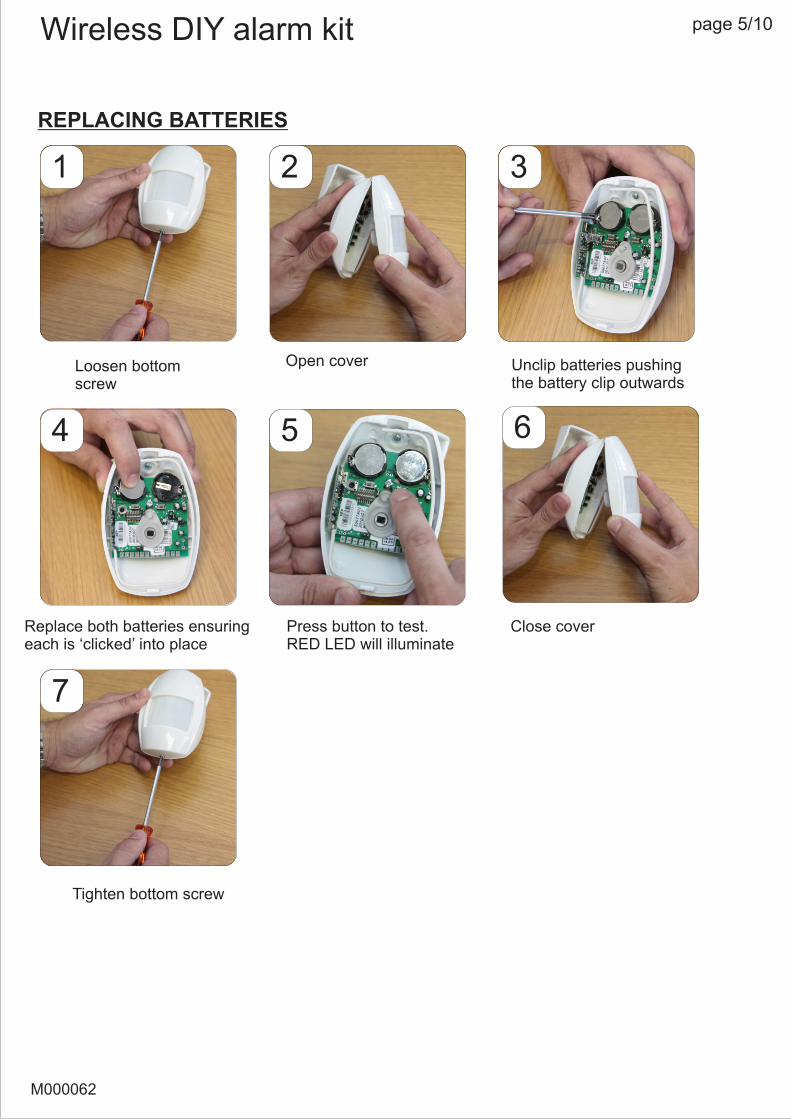
REPLACING BATTERIES
Loosen bottomscrew
Open cover Unclip batteries pushing the battery clip outwards
Replace both batteries ensuringeach is ‘clicked’ into place
Press button to test.RED LED will illuminate
Close cover
Tighten bottom screw
1 2 3
4 5 6
7
page 5/10Wireless DIY alarm kit
M000062
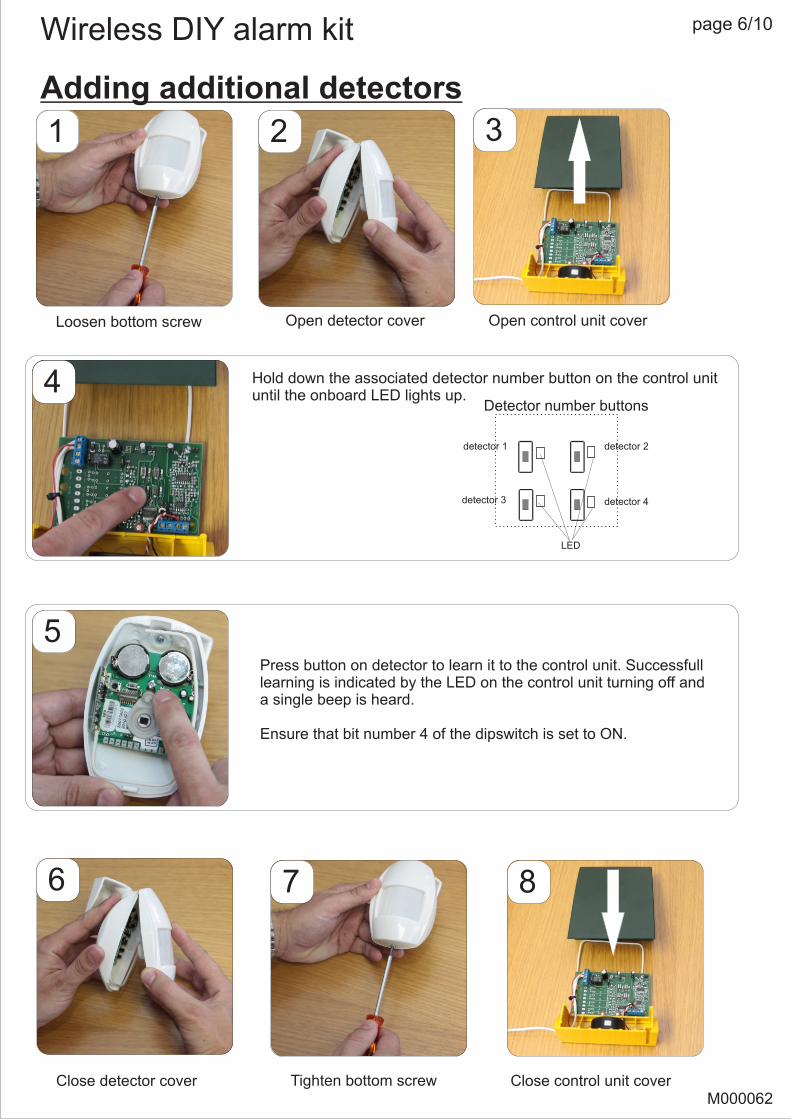
Loosen bottom screw Open detector cover Open control unit cover
Hold down the associated detector number button on the control unit until the onboard LED lights up.
Close detector cover Close control unit cover
4
Adding additional detectors
1 2 3
5
6 8
detector 1 detector 2
detector 3 detector 4
Detector number buttons
LED
Press button on detector to learn it to the control unit. Successfull learning is indicated by the LED on the control unit turning off anda single beep is heard.
Ensure that bit number 4 of the dipswitch is set to ON.
Tighten bottom screw
7
page 6/10Wireless DIY alarm kit
M000062
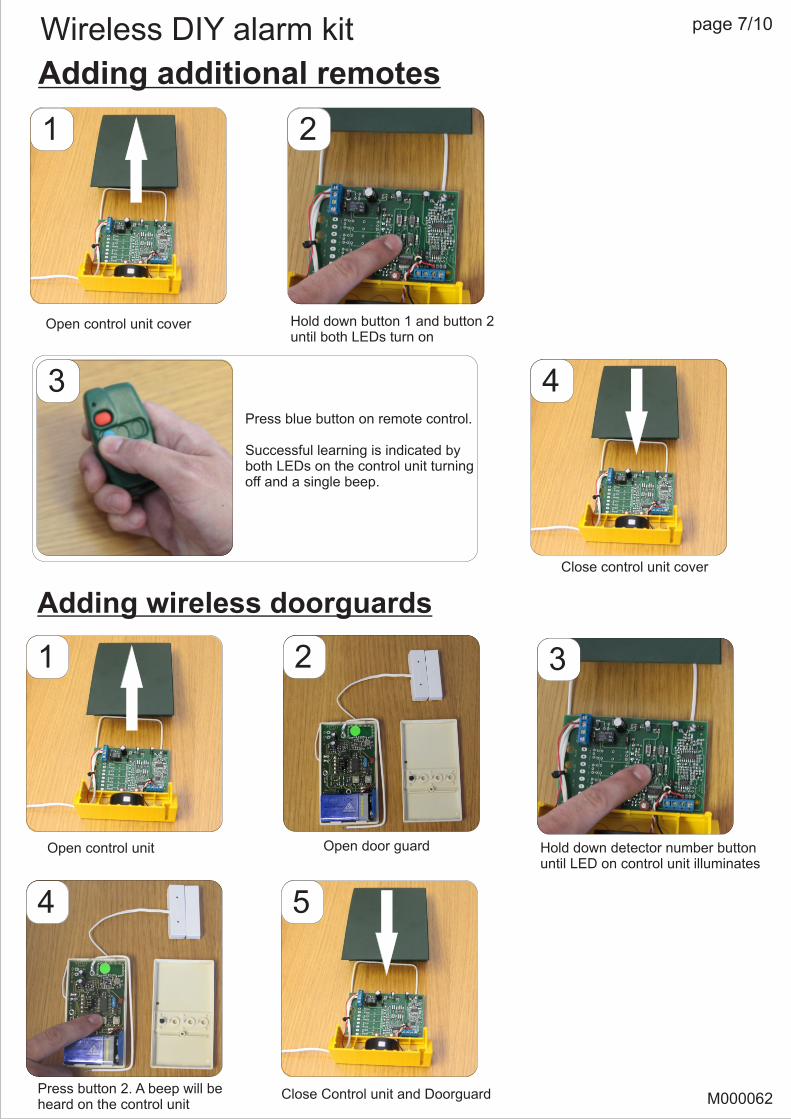
Open control unit cover
Press blue button on remote control.
Successful learning is indicated byboth LEDs on the control unit turning off and a single beep.
Close control unit cover
Adding additional remotes
Hold down button 1 and button 2until both LEDs turn on
Open control unit
Adding wireless doorguards
Open door guard
Press button 2. A beep will beheard on the control unit
Hold down detector number button until LED on control unit illuminates
Close Control unit and Doorguard
1 2
4
1 2
4 5
3
page 7/10Wireless DIY alarm kit
3
M000062
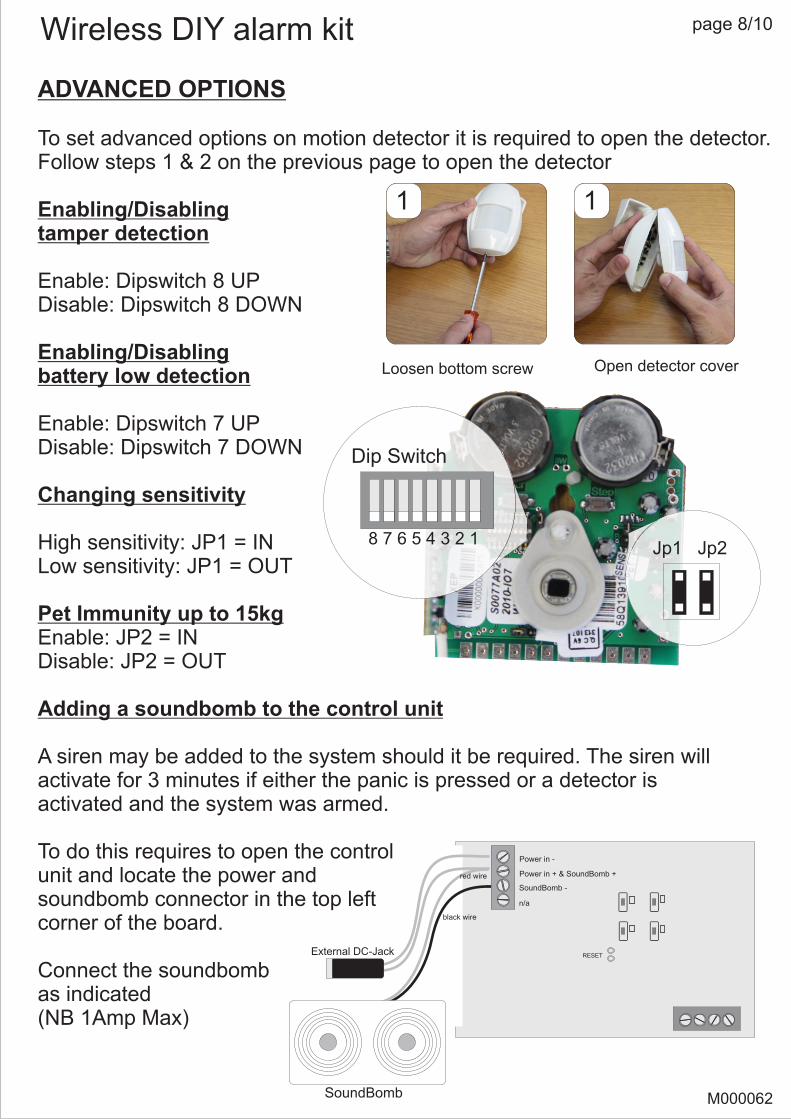
ADVANCED OPTIONS
To set advanced options on motion detector it is required to open the detector. Follow steps 1 & 2 on the previous page to open the detector
Enabling/Disabling tamper detection
Enable: Dipswitch 8 UPDisable: Dipswitch 8 DOWN
Enabling/Disabling battery low detection
Enable: Dipswitch 7 UPDisable: Dipswitch 7 DOWN
Changing sensitivity
High sensitivity: JP1 = INLow sensitivity: JP1 = OUT
Pet Immunity up to 15kgEnable: JP2 = INDisable: JP2 = OUT
Adding a soundbomb to the control unit
A siren may be added to the system should it be required. The siren will activate for 3 minutes if either the panic is pressed or a detector is activated and the system was armed.
To do this requires to open the controlunit and locate the power and soundbomb connector in the top leftcorner of the board.
Connect the soundbombas indicated (NB 1Amp Max)
8 7 6 5 4 3 2 1
Dip Switch
Jp2Jp1
black wire
red wire
SoundBomb
External DC-Jack
Power in + & SoundBomb +
Power in -
SoundBomb -
n/a
RESET
Loosen bottom screw Open detector cover
1 1
page 8/10Wireless DIY alarm kit
M000062
Technical specifications
Troubleshooting
page 9/10Wireless DIY alarm kit
Control Unit Motion detector Remote control
Standby current
Supply votlage 12V 6V or 9V 12V
6uA17mA
Transmitting current 20mA 20mA
12V / 1AOutput relay rating
n/a
n/a n/a
Problem: The system does not arm or disarm, no beeps are heard, external LED does not change.Solution: Make sure power is connected. To confirm this, the external LED will either solidly on or flash fast every 2seconds. Re-learn the remote control to the system (see page 7)
Problem: The system does not sound when a detector is triggeredSolution: Ensure that power is connected and the system is in the armed state (external LED is on) Ensure that the unit has been learned into the control unit (page 6) Ensure that the control unit and detector are less than 100m apart (This may be as low as 20m depending on the material of the obstacles between them)
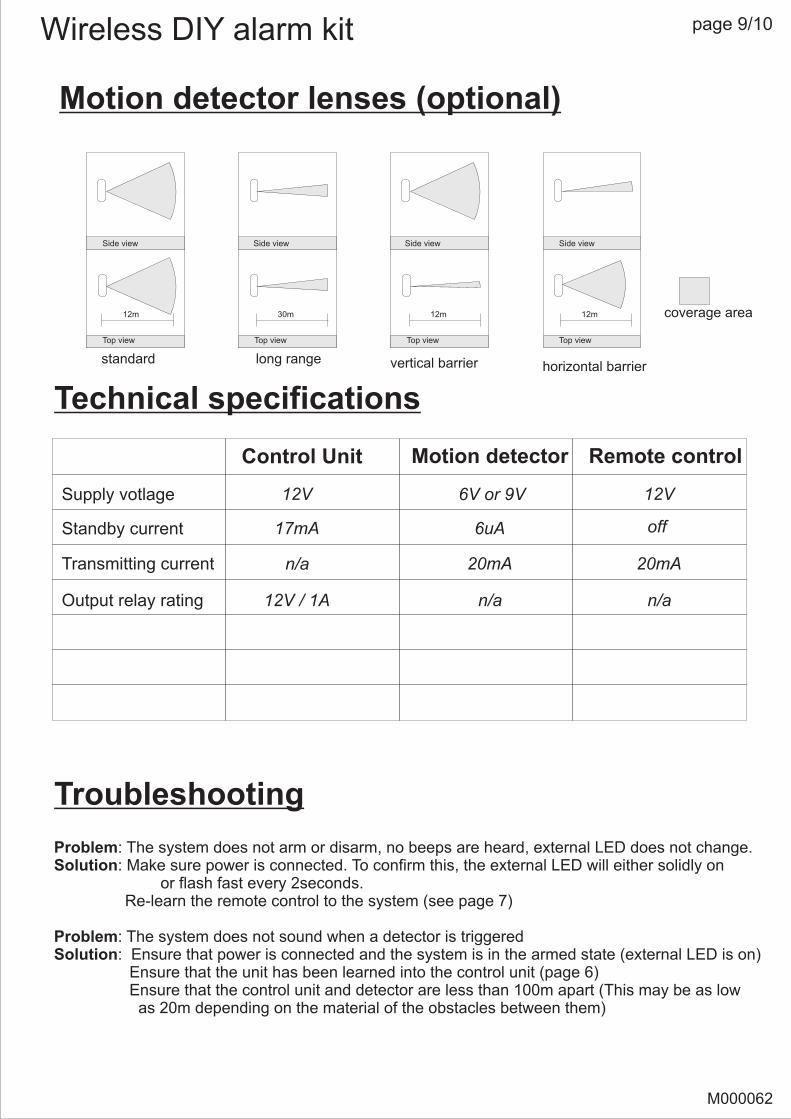
Motion detector lenses (optional)
off
Side view
Top view
long range
Side view
30m
Side view
Top view
standard
12m
Side view
Top view
vertical barrier
Side view
12m
Side view
Top view
horizontal barrier
12m coverage area
M000062
page 10/10Wireless DIY alarm kit
MAMI21 Hubert Mathew Road
Illiondale1610
Tel: +27 11 452 4737Email: [email protected]


![Untitled-2 [suntracbatteries.com]suntracbatteries.com/suntrac.pdf · capacity 12v 20ah 12v 40ah 12v 60ah 12v b40ah 12v b60ah 12v b80ah 12v biooah 12v 80ah 12v iooah 12v 130ah 12v](https://img.pdfslide.us/doc/110x75/603efb7aa12c32391f5484d1/untitled-2-capacity-12v-20ah-12v-40ah-12v-60ah-12v-b40ah-12v-b60ah-12v-b80ah.jpg)