Embed Size (px)
Citation preview

Manual Revision: 01/29/2021
User Manual
For the latest information and specifications visit www.startech.com/WIFI2HDMC
www.startech.com/WIFI2HDMCGE
Wireless Display Adapter for Mobile Devices
Actual product may vary from photos
SKU#: WIFI2HDMC/WIFI2HDMCGE

1
To view manuals, videos, drivers, downloads, technical drawings, and more visit www.startech.com/support
Compliance StatementsFCC Compliance StatementThis equipment has been tested and found to comply with the limits for a Class B digital device, pursuant to part 15 of the FCC Rules. These limits are designed to provide reasonable protection against harmful interference in a residential installation. This equipment generates, uses and can radiate radio frequency energy and, if not installed and used in accordance with the instructions, may cause harmful interference to radio communications. However, there is no guarantee that interference will not occur in a particular installation. If this equipment does cause harmful interference to radio or television reception, which can be determined by turning the equipment off and on, the user is encouraged to try to correct the interference by one or more of the following measures:• Reorient or relocate the receiving antenna• Increase the separation between the equipment and receiver• Connect the equipment into an outlet on a circuit different from that to
which the receiver is connected• Consult the dealer or an experienced radio/TV technician for help
Use of Trademarks, Registered Trademarks, and other Protected Names and SymbolsThis manual may make reference to trademarks, registered trademarks, and other protected names and/or symbols of third-party companies not related in any way to StarTech.com. Where they occur these references are for illustrative purposes only and do not represent an endorsement of a product or service by StarTech.com, or an endorsement of the product(s) to which this manual applies by the third-party company in question. Regardless of any direct acknowledgement elsewhere in the body of this document, StarTech.com hereby acknowledges that all trademarks, registered trademarks, service marks, and other protected names and/or symbols contained in this manual and related documents are the property of their respective holders.

2
To view manuals, videos, drivers, downloads, technical drawings, and more visit www.startech.com/support
Safety StatementsSafety Measures• Wiring terminations should not be made with the product and/or electric
lines under power.• Product installation and/or mounting should be completed by a certified
professional as per the local safety and building code guidelines.• Cables (including power and charging cables) should be placed and routed
to avoid creating electric, tripping or safety hazards.
Mesures de sécurité• Les terminaisons de câblâge ne doivent pas être effectuées lorsque le produit
et/ou les câbles électriques sont sous tension.• L’installation et/ou le montage du produit doit être réalisé par un
professionnel certifié et dans le respect des normes locales et du code de construction local.
• Les câbles (y compris les câbles d’alimentation et de chargement) doivent être placés et acheminés de façon à éviter tout risque électrique, de chute ou de sécurité
安全対策• 電源が入っている状態の製品または電線の終端処理を行わないでください。
• 製品の設置やマウントは、使用地域の安全ガイドラインおよび建築基準に従い、有資格の専門業者が行うようにしてください。
• ケーブル(電源ケーブルと充電ケーブルを含む)は、適切な配置と引き回しを行い、電気障害やつまづきの危険性など、安全上のリスクを回避するようにしてください。
Misure di sicurezza• I terminiali dei fili elettrici non devono essere realizzate con il prodotto e/o le
linee elettriche sotto tensione.• L’installazione e/o il montaggio dei prodotti devono essere eseguiti da un
tecnico professionale certificato che conosca le linee guida locali sulle norme edilizie e sulla sicurezza.
• I cavi (inclusi i cavi di alimentazione e di ricarica) devono essere posizionati e stesi in modo da evitare pericoli di inciampo, rischi di scosse elettriche o pericoli per la sicurezza.

3
To view manuals, videos, drivers, downloads, technical drawings, and more visit www.startech.com/support
Säkerhetsåtgärder• Montering av kabelavslutningar får inte göras när produkten och/eller
elledningarna är strömförda.• Installation och/eller montering får endast göras av behöriga yrkespersoner
och enligt gällande lokala förordningar för säkerhet och byggnormer.• Kablar (inklusive elkablar och laddningskablar) ska dras och placeras på så
sätt att risk för snubblingsolyckor och andra olyckor kan undvikas.
Warning Statements• Make sure to assemble this product according to the instructions. Failure to
do so might result in personal injury or property damage.• Never use this product if parts are missing or damaged.

4
To view manuals, videos, drivers, downloads, technical drawings, and more visit www.startech.com/support
Table of ContentsCompliance Statements ........................................................................1
Safety Statements ..................................................................................2
Warning Statements ..............................................................................3
Product Diagram ....................................................................................7Side View ...................................................................................................................................................... 7
Rear View ...................................................................................................................................................... 8
Product Information ..............................................................................9Packaging Contents ................................................................................................................................. 9
System Requirements .............................................................................................................................. 9
Installation ..............................................................................................10Installing the Display Adapter .............................................................................................................. 10
Upgrading Firmware ................................................................................................................................ 11
Connecting to a Smartphone or Tablet ............................................................................................. 13
Connecting to a Computer ................................................................................................................... 14
AllShareCast/Screen Mirror Device (Samsung) .............................................................................. 15
Android Nexus Device 4.2 or Higher .................................................................................................. 18
Configuration ..........................................................................................19Accessing the Remote Control Interface .......................................................................................... 19
Configuring a Wired Connection ........................................................................................................ 21
Changing the Device Name .................................................................................................................. 22
Configuring a WiFi Connection ............................................................................................................ 24
Configuring Virtual AP ............................................................................................................................ 25

5
To view manuals, videos, drivers, downloads, technical drawings, and more visit www.startech.com/support
Creating a Bridge to a Wireless Connection .................................................................................... 27
Creating a Bridge to a Wired Connection ......................................................................................... 28
Configuring Night Mode ........................................................................................................................ 30
Setting HDMI Output Method .............................................................................................................. 31
Configuring a Surround Sound Mode ............................................................................................... 32
Configuring Lip Sync Mode ................................................................................................................... 33
Configuring Aspect Ratio ...................................................................................................................... 35
Configuring a TV System ........................................................................................................................ 36
Scaling Video Output ............................................................................................................................... 37
Configuring Video Output ..................................................................................................................... 38
Setting the On-Screen Display Language ........................................................................................ 39
Resetting the Display Adapter to Factory Settings ....................................................................... 40
Resetting the Display Adapter’s IP Address ..................................................................................... 41
Checking the Current Firmware Version ........................................................................................... 42
ScreenShare Mode .................................................................................44Installation ................................................................................................................................................... 44
Logging into ScreenShare ...................................................................................................................... 45
Checking the MAC Address ................................................................................................................... 47
ScreenShare Panel Controls .................................................................................................................. 48
Configuring a Display Mode ................................................................................................................. 49
Configuring a Display Resolution ........................................................................................................ 50
Configuring the Display’s Aspect Ratio ............................................................................................. 52
Enabling Auto Resolution ...................................................................................................................... 53
Enabling Auto Save .................................................................................................................................. 54
Exiting the ScreenShare App ................................................................................................................ 55
Playing Media from a USB Stick ...........................................................56

6
To view manuals, videos, drivers, downloads, technical drawings, and more visit www.startech.com/support
AirFun Utility ...........................................................................................56Installation ................................................................................................................................................... 56
Operation ..................................................................................................................................................... 57

7
To view manuals, videos, drivers, downloads, technical drawings, and more visit www.startech.com/support
Product DiagramSide View
1 USB Media Input
2 Mode Selection Button
1 2

8
To view manuals, videos, drivers, downloads, technical drawings, and more visit www.startech.com/support
Rear View
3 Analog Audio/Video Out Port
4 HDMI Out Port
5 RJ45 Port
6 Power Button
7 Power Adapter Port
3 4 5 6 7

9
To view manuals, videos, drivers, downloads, technical drawings, and more visit www.startech.com/support
Product InformationPackaging Contents
• Wireless Display Adapter x 1• Universal Power Adapter (NA/UK/EU) x 3• USB Cable to Power Adapter Port (optional for USB Power
source) x 1• 4 position A/V cable x 1• User Manual x 1
System Requirements• HDMI-enabled display device w/ cabling (i.e. television,
projector)• Miracast, or 802.11n/g Wireless-enabled video source device
(i.e. Smartphone, tablet, Computer system)• USB Flash Drive (For updating the device’s firmware)

10
To view manuals, videos, drivers, downloads, technical drawings, and more visit www.startech.com/support
InstallationInstalling the Display Adapter1. Connect an HDMI Cable (sold separately) to the HDMI Out
Port on the Display Adapter and the other end of the HDMI Cable to the HDMI In port on a Display Device.
2. Connect the Universal Power Adapter to the Power Adapter Port on the Display Adapter and the other end to an AC Electrical Outlet.
- or -
3. Connect the USB Power Cable (included) to the Power Adapter Port on the Display Adapter and the other end to an available USB Power Source.
4. Press the Power Button on the Display Adapter.
5. The Launch screen will appear on the Display Device once the installation is complete.
Notes: The Launch screen may take several seconds to load.The appearance of the Launch screen may vary depending on the firmware version you are using.

11
To view manuals, videos, drivers, downloads, technical drawings, and more visit www.startech.com/support
Upgrading FirmwareFor optimal performance, make sure that the Display Adapter’s firmware is up to dated.
Warnings: Do not unplug the USB flash drive or power down the device until the new primary launch screen is displayed.Firmware upgrades are irreversible.
Identifying Firmware Version• The firmware version number will be in the bottom right-
hand corner of the Launch screen.Updating from Version 1.6.51. Download the firmware update files from StarTech.com and
unzip the compressed file.
2. Copy install.img and install_sp.img from the downloaded folder to the root directory (the parent/top directory) of the USB flash drive.
3. Ensure the Display Adapter is powered off.
4. Plug the USB flash drive into the USB Media Input on the Display Adapter.
5. Hold down the Mode Select Button and turn on the Display Adapter by pressing the Power Button. Continue to hold down the Mode Select Button while the device powers on.

12
To view manuals, videos, drivers, downloads, technical drawings, and more visit www.startech.com/support
6. Release the Mode Select Button after the Please wait for USB update appears on your Display Device.
7. The firmware on your Display Adapter will now update. Once the update has completed the Launch screen will appear.
Update from Version 2.0.01. Download the firmware update files from StarTech.com and
Unzip the compressed file.
2. Copy install_sp.img from the downloaded folder to the root directory (the parent/top directory) of the USB flash drive.
3. Once the file has been moved to your USB flash drive, rename install_sp.img file to install.img.
4. Ensure the Display Adapter is powered off.
5. Plug the USB flash drive into the USB Media Input on the Display Adapter.
6. Hold down the Mode Select Button and turn on the Display Adapter by pressing the Power Button. Continue to hold down the Mode Select Button while the device powers on.
7. Release the Mode Select Button after the Please wait for USB update appears on your Display Device.
8. The firmware on your Display Adapter will now update. Once the update has completed the Launch screen will appear.

13
To view manuals, videos, drivers, downloads, technical drawings, and more visit www.startech.com/support
Connecting to a Smartphone or TabletThe Display Adapter can connect (through a wireless connection) to a Miracast enabled device (smart phone or tablet).
1. Set the Display Adapter to Miracast mode. Press the Mode Select Button until the Miracast Launch screen is displayed.
Miracast Launch screen
2. The Miracast Launch screen will display the Adapter name and Adapter ID.
Note: The Display Adapter name cannot be edited/changed.
3. Connect to the Display Adapter using your Miracast-enabled smartphone or tablet.
Note: Exact steps regarding Miracast setup will vary de-pending on your device. Please review the documentation included with your smartphone or tablet.

14
To view manuals, videos, drivers, downloads, technical drawings, and more visit www.startech.com/support
Connecting to a Computer The Display Adapter can connect (through a wireless connection) to a Computer with an Operating System (OS)Window 8.1 or higher.
Note: Please ensure the drivers for your graphics adapter and wireless adapter are up to date.
1. Launch the Windows 8 Charms Bar and select Devices.
2. Select Project, then Add a wireless display.
3. Select the Display Adapter from the list of devices.
4. If you are prompted for a PIN code, enter the PIN code that pops up on the Display Adapter screen and click Next.
5. If you are prompted for a PIN code, enter the PIN code that pops up on the Display Adapter screen and click Next.

15
To view manuals, videos, drivers, downloads, technical drawings, and more visit www.startech.com/support
AllShareCast/Screen Mirror Device (Samsung)1. Open the Settings menu.
2. Select More Settings.
Settings screen

16
To view manuals, videos, drivers, downloads, technical drawings, and more visit www.startech.com/support
3. Scroll through the list and select AllShare Cast or Screen Mirror (depending on your version of Samsung device).
All Share Cast
4. Turn AllShare Cast ON and select the device name from the list. By default Display Adapter will be listed as the device name. Tap the device to connect.
17
To view manuals, videos, drivers, downloads, technical drawings, and more visit www.startech.com/support
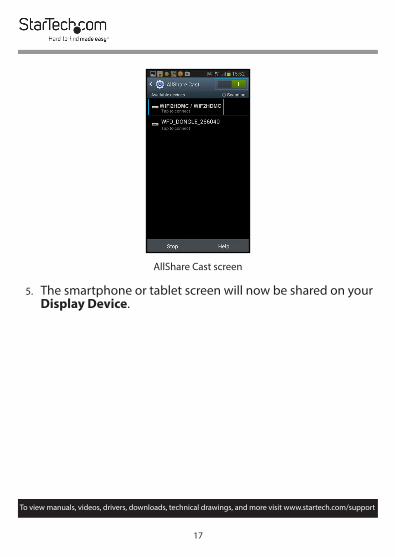
AllShare Cast screen
5. The smartphone or tablet screen will now be shared on your Display Device.

18
To view manuals, videos, drivers, downloads, technical drawings, and more visit www.startech.com/support
Android Nexus Device 4.2 or Higher1. Open the Settings menu.
Settings menu
2. Select Display.
3. Select Wireless display or Cast screen (depending on your version of Android).
4. Turn Wireless display ON and select the device name from the list. By default Display Adapter will be listed as the device name. Tap the device to connect.

19
To view manuals, videos, drivers, downloads, technical drawings, and more visit www.startech.com/support
Cast screen
5. The smartphone or tablet screen will now be shared on your Display Device.
ConfigurationAccessing the Remote Control Interface1. Once the Display Adapter is connected to your TV and
powered on, the Miracast Launch screen will show on the display.
2. Press the Mode Select button beside the USB port. A secondary Launch screen will load.
Note: You will want to be in the same room as the display connected to the Display Adapter.
3. Connect your Smartphone, Tablet, or Laptop to the SSID of the device. By default the SSID for the device is WIFI2HDMC xxx with no security key.

20
To view manuals, videos, drivers, downloads, technical drawings, and more visit www.startech.com/support
4. Once you have connected to the device, open a web browser and enter the IP address (http://192.168.59.254) in the address bar. The Airfun Launch screen will appear.
Note: The IP address is also listed on the display The default is http://192.168.59.254.
Airfun Launch screen

21
To view manuals, videos, drivers, downloads, technical drawings, and more visit www.startech.com/support
5. Select the Remote Control button to access the Remote Control screen.
Remote Control screen
Configuring a Wired Connection 1. From the Remote Control screen, click on the Setup Button,
the Setup screen will appear.
Setup screen
2. From the Setup screen, click on the Network tab.
3. Click on the Wired Connection link.

22
To view manuals, videos, drivers, downloads, technical drawings, and more visit www.startech.com/support
Wired Connection Link
4. A pop-up screen will appear with the following options:• Obtain an IP address automatically: An IP address from
DHCP server will be assigned automatically.• Set IP address manually: Allows you to set an IP address
manually • Subnet Mask: Enter the Subnet Mask e.g. 255.255.255.0• Gateway Address: Enter the Routers address • DNS Server: Enter the IP address of the DNS (Domain
Name Service) server.
Changing the Device NameThe Device Name will be used as the SSID name while board casting in ad hoc mode and as the device name within the ScreenShare software.
1. From the Remote Control screen, click on the Setup Button, the Setup screen will appear.

23
To view manuals, videos, drivers, downloads, technical drawings, and more visit www.startech.com/support
Setup screen
2. From the Setup screen, click on the Network tab.
3. Click on the Device Name link.
Device Name Link
4. Enter the Device Name of the presentation gateway.
Note: The Device Name default is WIFI2HDMC.

24
To view manuals, videos, drivers, downloads, technical drawings, and more visit www.startech.com/support
Configuring a WiFi Connection1. From the Remote Control screen, click on the Setup Button,
the Setup screen will appear.
Setup screen
2. From the Setup screen, click on the Network tab.
3. Click on the Wifi Connection link.
Wifi Connection link

25
To view manuals, videos, drivers, downloads, technical drawings, and more visit www.startech.com/support
4. A list of available wireless access points (AP) will be displayed.
5. Select the desired wireless AP.
Note: The selected wireless AP may require a password.
Configuring Virtual AP 1. From the Remote Control screen, click on the Setup Button,
the Setup screen will appear.
Setup screen
2. From the Setup screen, click on the Network tab.

26
To view manuals, videos, drivers, downloads, technical drawings, and more visit www.startech.com/support
3. Click on the Virtual AP Setup link.
Virtual AP Setup link
4. A pop-up screen will appear with the following options:• Radio Band: Set the Radio band to 2.4GHz or 5GHz.
Note: Please confirm that your PC/Notebook supports 5GHz operation before you set the radio band to 5GHz.
• Security: • Open: Disables wireless encryption.• WPA: Enable WPA encryption. Wireless clients must
support WPA encryption and know the encryption pass-phrase you set here.
• Region: Choose your region.5. Click the Save button to save the changes to the virtual AP
configuration.

27
To view manuals, videos, drivers, downloads, technical drawings, and more visit www.startech.com/support
Creating a Bridge to a Wireless Connection1. From the Remote Control screen, click on the Setup Button,
the Setup screen will appear.
Setup screen
2. From the Setup screen, click on the Network tab.
Network tab
3. Click on the Wifi Connection link.

28
To view manuals, videos, drivers, downloads, technical drawings, and more visit www.startech.com/support
4. A list of available wireless access points (AP) will be displayed.
5. Select the desired wireless AP.
Note: The selected wireless AP may require a password.
Creating a Bridge to a Wired Connection1. Connect a LAN Cable from the Display Adapter to the AP
Router.
2. From the Remote Control screen, click on the Setup Button, the Setup screen will appear.
Setup screen
3. From the Setup screen, click on the Network tab.

29
To view manuals, videos, drivers, downloads, technical drawings, and more visit www.startech.com/support
Network tab
4. Click on the Wired Connection link.
5. A pop-up screen will appear with the following options:• Obtain an IP address automatically: An IP address from
DHCP server will be assigned automatically.• Set IP address manually: Allows you to set an IP address
manually • Subnet Mask: Enter the Subnet Mask e.g. 255.255.255.0• Gateway Address: Enter the Routers address • DNS Server: Enter the IP address of the DNS (Domain
Name Service) server.

30
To view manuals, videos, drivers, downloads, technical drawings, and more visit www.startech.com/support
Configuring Night ModeNight Mode allows you to keep theater sounds at a lower volume. It increases the level of low level audio while decreasing the level of high level audio.
1. From the Remote Control screen, click on the Setup Button, the Setup screen will appear.
Setup screen
31
To view manuals, videos, drivers, downloads, technical drawings, and more visit www.startech.com/support
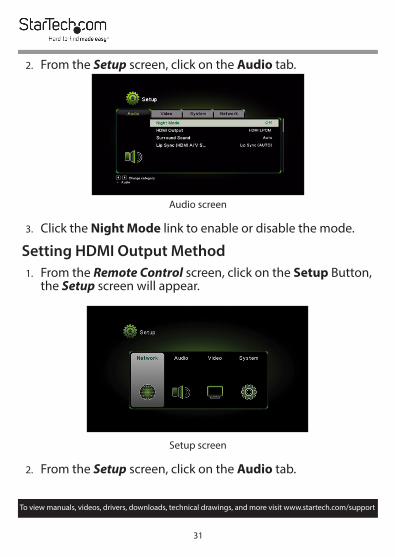
2. From the Setup screen, click on the Audio tab.
Audio screen
3. Click the Night Mode link to enable or disable the mode.
Setting HDMI Output Method1. From the Remote Control screen, click on the Setup Button,
the Setup screen will appear.
Setup screen
2. From the Setup screen, click on the Audio tab.
32
To view manuals, videos, drivers, downloads, technical drawings, and more visit www.startech.com/support
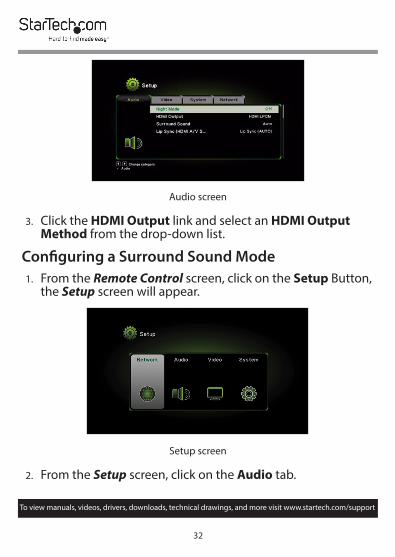
Audio screen
3. Click the HDMI Output link and select an HDMI Output Method from the drop-down list.
Configuring a Surround Sound Mode1. From the Remote Control screen, click on the Setup Button,
the Setup screen will appear.
Setup screen
2. From the Setup screen, click on the Audio tab.

33
To view manuals, videos, drivers, downloads, technical drawings, and more visit www.startech.com/support
Audio screen
3. Click the Surround Sound link and select a mode from the drop-down list.
Configuring Lip Sync ModeLip Sync mode synchronizes audio and video together so no audio delay is visible within the video.
1. From the Remote Control screen, click on the Setup Button, the Setup screen will appear.
Setup screen

34
To view manuals, videos, drivers, downloads, technical drawings, and more visit www.startech.com/support
2. From the Setup screen, click on the Audio tab.
Audio screen
3. Click the Lip Sync link and select a mode from the drop-down list.

35
To view manuals, videos, drivers, downloads, technical drawings, and more visit www.startech.com/support
Configuring Aspect Ratio Allows you to manually set a video aspect ratio.
1. From the Remote Control screen, click on the Setup Button, the Setup screen will appear.
Setup screen
2. From the Setup screen, click on the Video tab.
Video screen
36
To view manuals, videos, drivers, downloads, technical drawings, and more visit www.startech.com/support
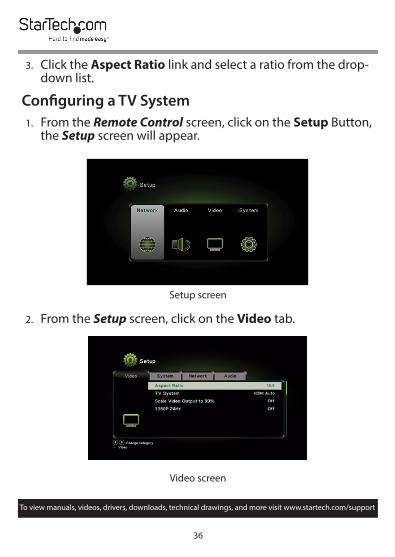
3. Click the Aspect Ratio link and select a ratio from the drop-down list.
Configuring a TV System1. From the Remote Control screen, click on the Setup Button,
the Setup screen will appear.
Setup screen
2. From the Setup screen, click on the Video tab.
Video screen

37
To view manuals, videos, drivers, downloads, technical drawings, and more visit www.startech.com/support
3. Click the TV System link and select an option from the drop-down list.
Scaling Video Output1. From the Remote Control screen, click on the Setup Button,
the Setup screen will appear.
Setup screen
2. From the Setup screen, click on the Video tab.
Video screen

38
To view manuals, videos, drivers, downloads, technical drawings, and more visit www.startech.com/support
3. Click the Scale Video Output to 90% link to enable or disable the feature.
Configuring Video Output1. From the Remote Control screen, click on the Setup Button,
the Setup screen will appear.
Setup screen
2. From the Setup screen, click on the Video tab.
Video screen

39
To view manuals, videos, drivers, downloads, technical drawings, and more visit www.startech.com/support
3. Click the 1080p 24Hz link to enable or disable the feature.
Setting the On-Screen Display Language1. From the Remote Control screen, click on the Setup Button,
the Setup screen will appear.
Setup screen
2. From the Setup screen, click on the System tab.
System screen

40
To view manuals, videos, drivers, downloads, technical drawings, and more visit www.startech.com/support
3. Click the Language link and select a language from the drop-down list.
Resetting the Display Adapter to Factory Settings1. From the Remote Control screen, click on the Setup Button,
the Setup screen will appear.
Setup screen
2. From the Setup screen, click on the System tab.
System screen

41
To view manuals, videos, drivers, downloads, technical drawings, and more visit www.startech.com/support
3. Click on the Factory Default link to reset the Display Adapter to the factory defaults.
4. Power cycle the Display Adapter for the changes to take place.
Resetting the Display Adapter’s IP AddressThe Reset button is located on the bottom of the Display Adapter.
1. Using a Pen gently press and hold the recessed Reset button for 10 seconds while the Display Adapter is still connected to the AC Power Adapter.
2. The IP Address and Name will return to the factory default setting.

42
To view manuals, videos, drivers, downloads, technical drawings, and more visit www.startech.com/support
Checking the Current Firmware VersionNote: the firmware version can also be found on the Screen-Share Home screen.
1. From the Remote Control screen, click on the Setup Button, the Setup screen will appear.
Setup screen

43
To view manuals, videos, drivers, downloads, technical drawings, and more visit www.startech.com/support
2. From the Setup screen, click on the System tab.
System screen
3. Click on the Version Info link to see the current firmware version.
Note: To update the firmware please refer to the Updating Firmware section of the manual.

44
To view manuals, videos, drivers, downloads, technical drawings, and more visit www.startech.com/support
ScreenShare ModeInstallation
Note: New versions of this product do not include a Driver CD. Please visit www.StarTech.com/WIFI2HDMC and navigate to the Drivers/Downloads tab to download the latest Drivers.
1. Ensure you have .NET Framework version 3.5 installed prior to installing ScreenShare
2. Insert the included software CD into the computer’s CD/DVD drive. You may also download the latest version from our website.
3. Run the Autorun.exe application from the Autoplay menu. If Autoplay is disabled on your system, browse to your CD/DVD drive and run the application.
4. Choose Typical Installation from the following screen and click Install.
Quick Installer screen

45
To view manuals, videos, drivers, downloads, technical drawings, and more visit www.startech.com/support
5. Follow the on screen instructions to complete the installation.
6. When finished, restart the computer.
Logging into ScreenShare1. Switch the Display Adapter device into ScreenShare
mode by pressing the Mode Select button on the Display Adapter (located next to the USB connector).
2. The Home screen will appear on the Display.
Note: The Login Code will be displayed at the bottom of the screen.
Login Code

46
To view manuals, videos, drivers, downloads, technical drawings, and more visit www.startech.com/support
3. On your Notebook / PC, search and connect to the Display Adapter’s SSID (wireless network) on the Wireless Network Connection screen.
Wireless Network Connection screen
4. Click the ScreenShare icon from your desktop or Start Menu.
ScreenShare Icon

47
To view manuals, videos, drivers, downloads, technical drawings, and more visit www.startech.com/support
5. ScreenShare will auto detect the Display Adapter. Enter the input Login Code that is located in the top right-hand corner of the Home screen as indicated in step 2, then click OK.
ScreenShare Login screen
Checking the MAC Address• The MAC address can be found on the Home screen, and is
located on the bottom right of the Home screen.
Checking the MAC Address

48
To view manuals, videos, drivers, downloads, technical drawings, and more visit www.startech.com/support
ScreenShare Panel Controls1. Once you have logged into the ScreenShare app the Panel
Control screen will appear.
Panel Control screen
2. From the Panel Control screen the following controls are available:• Play/Pause: Starts or pauses the presentation.• Stop: Stops the presentation and returns to the
Information screen.• Menu: Allows you access to advance menu options.• Login Code: Displays the current login code.• Mute: Mutes the volume of the presentation.• Volume Up/Down: Turns the volume of the presentation
up or down.• Information: Displays application information (adapter
name, IP address, radio band, version).• Minimize: Minimizes the Panel Control screen to the
Taskbar.• Close: Closes the Panel Control screen.

49
To view manuals, videos, drivers, downloads, technical drawings, and more visit www.startech.com/support
Configuring a Display Mode1. From the Panel Control screen, select the Menu icon.
2. The Menu screen will appear.
Menu screen
3. Select the Display Mode link, a pop-up screen will extend.
Display Mode screen
4. Select either: • Mirror Mode: Mirrors the content on the main display.• Extend Mode: Extends the main display’s viewing area
two multiple displays allow for a larger display area.

50
To view manuals, videos, drivers, downloads, technical drawings, and more visit www.startech.com/support
5. Select which display the mode will apply to.
Select a display
Configuring a Display Resolution1. From the Panel Control screen, select the Menu icon.
2. The Menu screen will appear.
Menu screen

51
To view manuals, videos, drivers, downloads, technical drawings, and more visit www.startech.com/support
3. Select the HDMI Resolution link, a pop-up screen will extend.
HDMI Resolution screen
4. Select a Resolution from the pop-up screen.
52
To view manuals, videos, drivers, downloads, technical drawings, and more visit www.startech.com/support
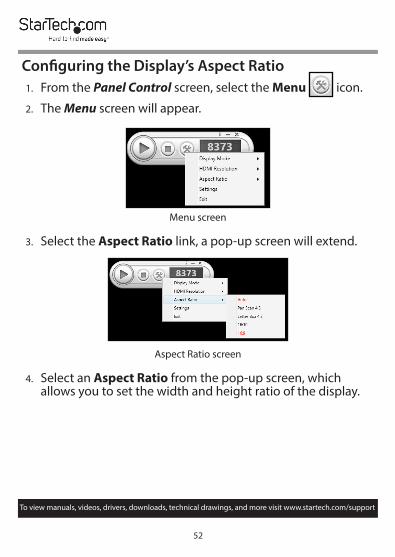
Configuring the Display’s Aspect Ratio1. From the Panel Control screen, select the Menu icon.
2. The Menu screen will appear.
Menu screen
3. Select the Aspect Ratio link, a pop-up screen will extend.
Aspect Ratio screen
4. Select an Aspect Ratio from the pop-up screen, which allows you to set the width and height ratio of the display.

53
To view manuals, videos, drivers, downloads, technical drawings, and more visit www.startech.com/support
Enabling Auto Resolution1. From the Panel Control screen, select the Menu icon.
2. The Menu screen will appear.
Menu screen
3. Select the Settings link, the Settings screen will appear.
Setting screen
4. Select Enable Auto Adjust Resolution to enable/disable automatic resolution adjustments.

54
To view manuals, videos, drivers, downloads, technical drawings, and more visit www.startech.com/support
5. Click the Apply button to save the changes made on the Settings screen.
Enabling Auto Save1. From the Panel Control screen, select the Menu icon.
2. The Menu screen will appear.
Menu screen
3. Select the Settings link, the Settings screen will appear.
Setting screen

55
To view manuals, videos, drivers, downloads, technical drawings, and more visit www.startech.com/support
4. Select Enable Auto Save to enable/disable the auto save function.
5. Click the Apply button to save the changes made on the Settings screen.
Exiting the ScreenShare App1. From the Panel Control screen, select the Menu icon.
2. The Menu screen will appear.
Menu screen
3. Select the Exit link.
4. A Confirmation screen will appear asking Do you really want to exit? click the Yes button to exit to the Login screen.
- or -Click the No button to return to the ScreenShare App.

56
To view manuals, videos, drivers, downloads, technical drawings, and more visit www.startech.com/support
Playing Media from a USB Stick1. Connect your Smartphone/Tablet or Notebook to the
WIFI2HDMC device and navigate to the Setup (remote) page using a web browser.
2. Plug your USB stick into the port located on the side of the WIFI2HDMC device.
3. Navigate the USB stick contents using the web remote to choose the video, music or picture file you would like to view.
AirFun UtilityInstallation
Note: New versions of this product do not include a Driver CD. Please visit www.StarTech.com/WIFI2HDMC and navigate to the Drivers/Downloads tab to download the latest Drivers.
The AirFun utility is available for PC (on the included software CD), iPhone or Android platforms. Android/iPhone
• Download and install the latest version of the AirFun utility from your mobile app store.
PC1. Insert the included software CD into the computer’s CD/
DVD drive, or download the latest drivers from http://www.starTech.com.

57
To view manuals, videos, drivers, downloads, technical drawings, and more visit www.startech.com/support
2. Run the Autorun.exe application from the Autoplay menu. If Autoplay is disabled on your system, browse to your CD/DVD drive and run the application.
3. Select Software Installation from the menu.
4. Choose Typical Installation from the following screen and click Install.
Note: This will install both the AirFun and the ScreenShare utilities (outlined later in this manual). Should you only desire to install only the AirFun utility, choose Custom Installation and de-select Screenshare.
5. Follow the on screen instructions to complete the installation(s).
OperationAndroid/iPhone1. Open the AirFun app, it will begin to automatically search for
the Display Adapter.
Searching for a Device

58
To view manuals, videos, drivers, downloads, technical drawings, and more visit www.startech.com/support
2. Once found, tap the buttons for either Photo/Music Playback or Video Playback and choose the file you wish to view/play.
Please choose a scenario screen
PC
1. Click the AirFun icon from your desktop or Start Menu.
AirFun Icon

59
To view manuals, videos, drivers, downloads, technical drawings, and more visit www.startech.com/support
2. The AIRFUN utility will begin to search for the WIFI2HDMC device. If the device is not found before the timeout period, it will display No device found.
Found Device screen
3. If successfully connected, you should be able to see your PC screen on the TV.
AirFun app
4. Drag the video/photo/music file to the Airfun main menu directly.
5. For video files, drag files to the Video Playback folder.
6. For photo/music files, drag files to the Photo/Music Playback folder.

60
Warranty InformationThis product is backed by a two-year warranty.
For further information on product warranty terms and conditions, please refer to www.startech.com/warranty.
Limitation of LiabilityIn no event shall it be the liability of StarTech.com Ltd. and StarTech.com USA LLP (or their officers, directors, employees or agents) for any damages (whether direct or indirect, special, punitive, incidental, consequential, or otherwise), loss of profits, loss of business, or any pecuniary loss, arising out of or related to the use of the product exceed the actual price paid for the product.
Some states do not allow the exclusion or limitation of incidental or consequential damages. If such laws apply, the limitations or exclusions contained in this statement may not apply to you.
To view manuals, videos, drivers, downloads, technical drawings, and more visit www.startech.com/support
60

Hard-to-find made easy. At StarTech.com, that isn’t a slogan. It’s a promise.StarTech.com is your one-stop source for every connectivity part you need. From the latest technology to legacy products — and all the parts that bridge the old and new — we can help you find the parts that connect your solutions.
We make it easy to locate the parts, and we quickly deliver them wherever they need to go. Just talk to one of our tech advisors or visit our website. You’ll be connected to the products you need in no time.
Visit www.startech.com for complete information on all StarTech.com products and to access exclusive resources and time-saving tools.
StarTech.com is an ISO 9001 Registered manufacturer of connectivity and technology parts. StarTech.com was founded in 1985 and has operations in the United States, Canada, the United Kingdom and Taiwan servicing a worldwide market.ReviewsShare your experiences using StarTech.com products, including product applications and setup, what you love about the products, and areas for improvement.
StarTech.com Ltd.45 Artisans Cres.
London, Ontario
N5V 5E9
Canada
StarTech.com LLP4490 South Hamilton
Road
Groveport, Ohio
43125
U.S.A.
StarTech.com Ltd.Unit B, Pinnacle
15 Gowerton Rd., Brackmills
Northampton
NN4 7BW
United Kingdom
FR: fr.startech.com
DE: de.startech.com
ES: es.startech.com
NL: nl.startech.com
IT: it.startech.com
JP: jp.startech.com
To view manuals, videos, drivers, downloads, technical drawings, and more visit www.startech.com/support