Embed Size (px)
Citation preview
Integrating Prepress with MIS CERM at NW label printers. An Esko White Paper. Last updated 23feb2013 by [email protected]
1
White Paper
Integration of Esko prepress
with MIS Cerm
at Narrow Web label printers
Integrating Prepress with MIS CERM at NW label printers. An Esko White Paper. Last updated 23feb2013 by [email protected]
2
Index 1. Intro & main requirements ......................................................................................................... 3
1.1. Requirements on Cerm side ............................................................................................. 3 1.2. Requirements on Esko side .............................................................................................. 3 1.3. Structure of this White Paper ............................................................................................ 3
2. Overview of Integrated Workflow ............................................................................................... 4 2.1 What is NOT included in this „standard‟ workflow? ............................................................ 4 2.2 What is NOT POSSIBLE, technically? .............................................................................. 4 2.3. What information is exchanged? (overview) ......................................................................... 5
2.3.1. Cerm sends 2 types of Job-orders to Prepress: ......................................................... 5 2.3.2 Esko prepress sends this information back to Cerm: ..................................................... 5
3. Workflow Step 1: a new Product is created in Cerm and announced in Esko ............................. 6 3.1. Note on required logic in the data structure .......................................................................... 10
4. Workflow Step 2: design data arrive for the new product ......................................................... 11 4.1. Design data arrive through Cerm-users........................................................................... 11 4.2. Design data enter through Prepress department (AE users) ............................................ 12 4.3. Design data enter through Cerm‟s Web4Labels .............................................................. 12 4.4. Design data enter through Esko WebCenter ................................................................... 12
5. Workflow Step 3: Esko preps the product file for approval ....................................................... 13 5.1 Automated Preflight in background on AE ....................................................................... 13 5.2. Check/Edit of one-up prepress file and make proofs ............................................................ 16 5.3. What Cerm has received as feedback/proof files: ................................................................. 18
6. Workflow step 4: Approval of the one-up file ............................................................................ 22 6.1. When a Cerm user asks approval ................................................................................... 22 6.2. When Cerm‟s Web4Labels invites the customer to approve (on a web-page) .................. 24 6.3. When Esko WebCenter invites the customer to approve (in the WebCenter Viewer) ....... 25 6.4. When both Web4Labels and WebCenter are used: ......................................................... 25 6.5 The Product is approved = End of the Prepress job ........................................................ 26
7. Workflow step 5: the „Production Job‟ ...................................................................................... 27 7.1. In Cerm: a sales order becomes a Production Job .......................................................... 27 7.2. The Production Job in AE (Step&Repeat and output) ...................................................... 34
8. Note on „End of Job‟ and „End of Product Life‟ ......................................................................... 38 9. Note on Product statuses ........................................................................................................ 39 10. Work list of the Esko Solution Architect in these 5 days ........................................................... 40
10.1. Tasks that the Esko SA will do in these 5 days:............................................................... 40 10.2. Tasks that the Esko SA will NOT do in these 5 days: ...................................................... 41
11. With or without Cerm‟s „Web4Labels‟ tool ................................................................................ 42 12. Confirmation of understanding (please sign)............................................................................ 43
Integrating Prepress with MIS CERM at NW label printers. An Esko White Paper. Last updated 23feb2013 by [email protected]
3
1. Intro & main requirements This White Paper describes the current standard integration between the MIS „Cerm‟ and Esko‟s prepress workflow server „Automation Engine‟ (AE). It is this integration that can be delivered when the standard Cerm-integration solution is purchased from Esko. This integration will be implemented by an Esko Solution Architect. A consultant from Cerm will handle the setup in Cerm. The used applications are
Cerm v7.08 or higher
Automation Engine 12.0 or higher
1.1. Requirements on Cerm side
The MIS Cerm needs to be in use and ready for real production. Cerm users need to be able to create Products based on reference calculations. They need to be able to create Sales orders and Production Jobs.
When there is a need to create „ganged‟ layouts (= multi-grid or multi-product Step & Repeat‟s), then this must be done with the „Autoplan‟ tool. That is the tool that helps create the high-level JDF that then enables fully automatic Step&Repeat on Esko.
1.2. Requirements on Esko side
This „5 days integration package‟ does not include time to train Automation Engine (modules) or other Esko products. These 5 days will really be needed to setup and train the integration.
What Automation Engine modules do I need? See a dedicated document describing the required modules (minimal, advised and optional).
If asked, the Esko Solution Architect will only have time to change existing SmartMarks sets or ReportMaker templates ; he will not have the time to create new ones.
When Esko WebCenter is used,
o the workflow with Cerm requires that a WebCenter project maps to 1 specific (Cerm) product.
o the link between WebCenter and Automation Engine already needs to be installed and known. The Esko specialist will not have time in these 5 days to train the basic configuration and use of WebCenter and its approval logic.
1.3. Structure of this White Paper Next in this White Paper, find these main blocks:
A description of the workflow, the processes (first an intro then more detailed). This will describe the „standard‟ logic workflow process steps. These steps might be different from your current workflow. These steps are not mandatory processes but help to clarify the currently possible integration processes. Cerm and Esko are convinced that these lead to the best „standard‟ automation.
A description of the actual work tasks that the Solution Architect will do when on site. o Including a list (or repeat) of what he will NOT spend time on
Some extra Notes
The page we require you to sign when you purchase this integration package
Integrating Prepress with MIS CERM at NW label printers. An Esko White Paper. Last updated 23feb2013 by [email protected]
4
2. Overview of Integrated Workflow A demo video of this „standard‟ workflow is available on www.esko.com/movies (section software - section „workflow integration‟). It will help you visualise this integration and its benefits. You will there also find a movie that shows the integrated workflow when started form Cerm‟s web store front „Web4Labels‟. At the end of this document, you can read a note about the extra automation that comes on top when you use this extra tool from Cerm. In any case, it is advised and required that the integration with Cerm is done, before it can be published to this extra add-on process of web-communication with the customer. After this overview, we will show in more detail which information is exchanged in this integration. But first these 2 important notes:
2.1 What is NOT included in this ‘standard’ workflow? The title of this White Paper already mentions it: this is about narrow-web roll-fed label production. Even within roll-fed, the following topics cannot be handled in the minimal pre-set implementation days that this „standard‟ package delivers:
Communication on Booklets
Communication on Multi-layer label products / In-prints
Communication on Front-Back printing
Communication on Staggered layouts (only manual in Esko tools)
Versioning of Products
Products that existed before the integration will need to be migrated manually into the new data structure.
Integration between Cerm‟s Web4Labels and Esko‟s WebCenter: see more info in separate documents.
The automation and communication on these above topics can of course be discussed during extra service days, possibly at a later stage.
2.2 What is NOT POSSIBLE, technically?
Today, the following items are really not possible to automate through this integration. Or because the concept is not known in Cerm and/or Esko or because there is no process that we can agree on to be „standard‟. Some of our customers do have these processes, but will need to continue using manual tools:
Non-180-degree-based rotations of stations
Communication on plate/cliché ID/numbers
Communication on Layouts combing labels with different sizes/shapes
Communication on Layout for sheet fed printing (only manual in Esko tools)
Ink info from MIS to AE: checked but process wise not seen as a viable solution.
Different status for Front/Back Labels: need to be approved as 1 PDF. We can only communicate 1 status per Product to Cerm.
Exchanging Milestones on Job level, other than the standard described in this White Paper.
Re-use of S&R: the Cerm integration process assumes the S&R is always made again.
Integrating Prepress with MIS CERM at NW label printers. An Esko White Paper. Last updated 23feb2013 by [email protected]
5
2.3. What information is exchanged? (overview) All communication between Cerm and Automation Engine is done in a „Job‟ context: this guarantees that all resulting data and (feedback) info can be stored in a right job-context. This then enables correct measuring/statistics. Unless mentioned otherwise, the technique used for the communication is JMF: Job Messaging Format (JDF-communication over HTTP-ports).
2.3.1. Cerm sends 2 types of Job-orders to Prepress:
„Prepress Jobs‟
„Prepress Jobs‟ ask the prepress department to create a new Product. The new Product is based on a technical project (estimate) and probably new artwork is delivered. Prepress makes it print-ready and makes proofs. 1 or more approval cycles later the Product‟s status is „Approved/Ready for print‟. This is then the end of the „Prepress Job‟. When a new Product item is created in Cerm, a „Prepress Job‟ is automatically created in Esko‟s workflow server Automation Engine. Both Cerm and Automation Engine look at the same prepress data, no data is copied. They are both configured to look at the same “Product Data Zone”
Based on the Product status in Cerm, Cerm will automatically start workflow actions on AE. Those workflows will send statuses back to Cerm.
„Production Jobs‟
„Production Jobs‟ are more classic Jobs: they ask prepress any activity related to the printing of existing Products. This is typically plate layout („Step&Repeat‟), RIP-ing and plate making or direct sending to the digital press. Maybe also some Quality Assurance (QA) steps in that process. Production Jobs could also be the re-use of existing RIP‟ed digital data or even simply collecting the existing plate(s) (cylinders) from a warehouse.
2.3.2 Esko prepress sends this information back to Cerm:
Products Statuses o Confirmation of chosen Product status o Example: „proof ready – proof sent – approved...‟
Product files o Product Display files (JPeG, PDF) o Product Report files (ReportMaker PDF ; if ReportMaker license if present)
Product metadata description o XML file containing all XMP-metadata of the Esko production file (PDF or AP): o Example: often used to report back the real list of ink names and their ink
coverage. Also the real final trim-size after prepress editing.
Job Milestones ( = Job level status) o Confirmation of the „Step&Repeat OK‟ Milestone of the Job-order.
Integrating Prepress with MIS CERM at NW label printers. An Esko White Paper. Last updated 23feb2013 by [email protected]
6
3. Workflow Step 1: a new Product is created in Cerm and announced in Esko
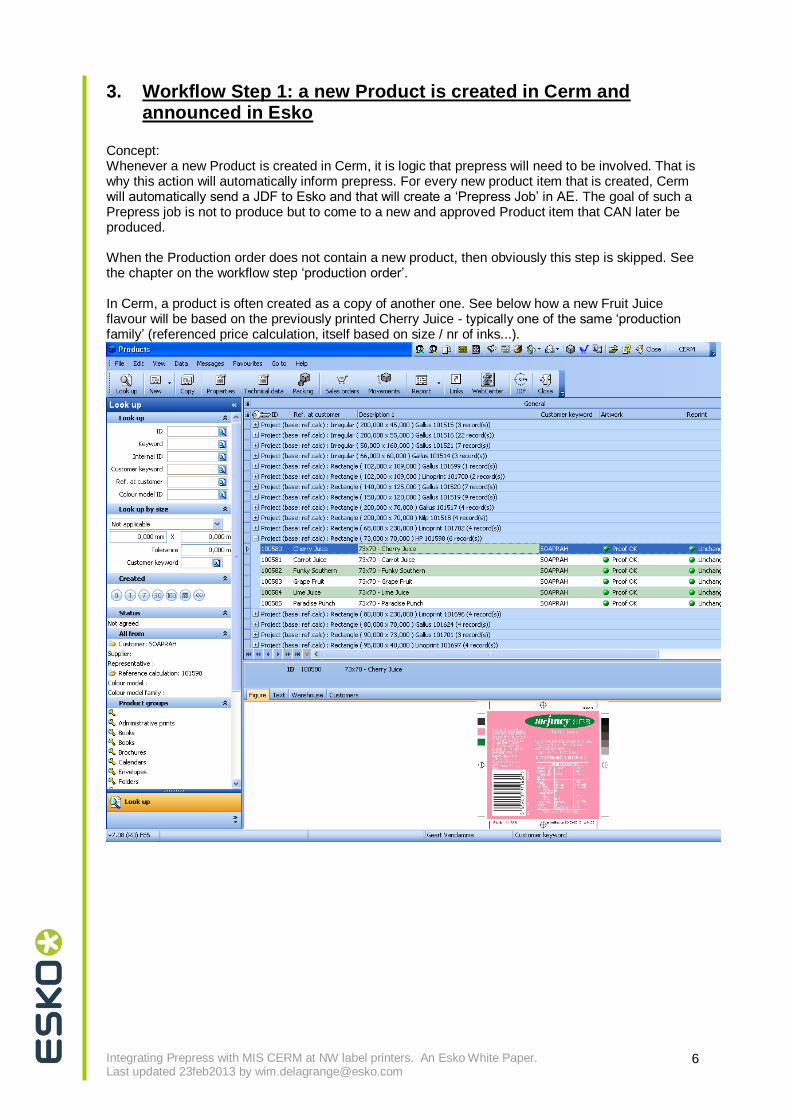
Concept: Whenever a new Product is created in Cerm, it is logic that prepress will need to be involved. That is why this action will automatically inform prepress. For every new product item that is created, Cerm will automatically send a JDF to Esko and that will create a „Prepress Job‟ in AE. The goal of such a Prepress job is not to produce but to come to a new and approved Product item that CAN later be produced. When the Production order does not contain a new product, then obviously this step is skipped. See the chapter on the workflow step „production order‟. In Cerm, a product is often created as a copy of another one. See below how a new Fruit Juice flavour will be based on the previously printed Cherry Juice - typically one of the same „production family‟ (referenced price calculation, itself based on size / nr of inks...).
Integrating Prepress with MIS CERM at NW label printers. An Esko White Paper. Last updated 23feb2013 by [email protected]
7
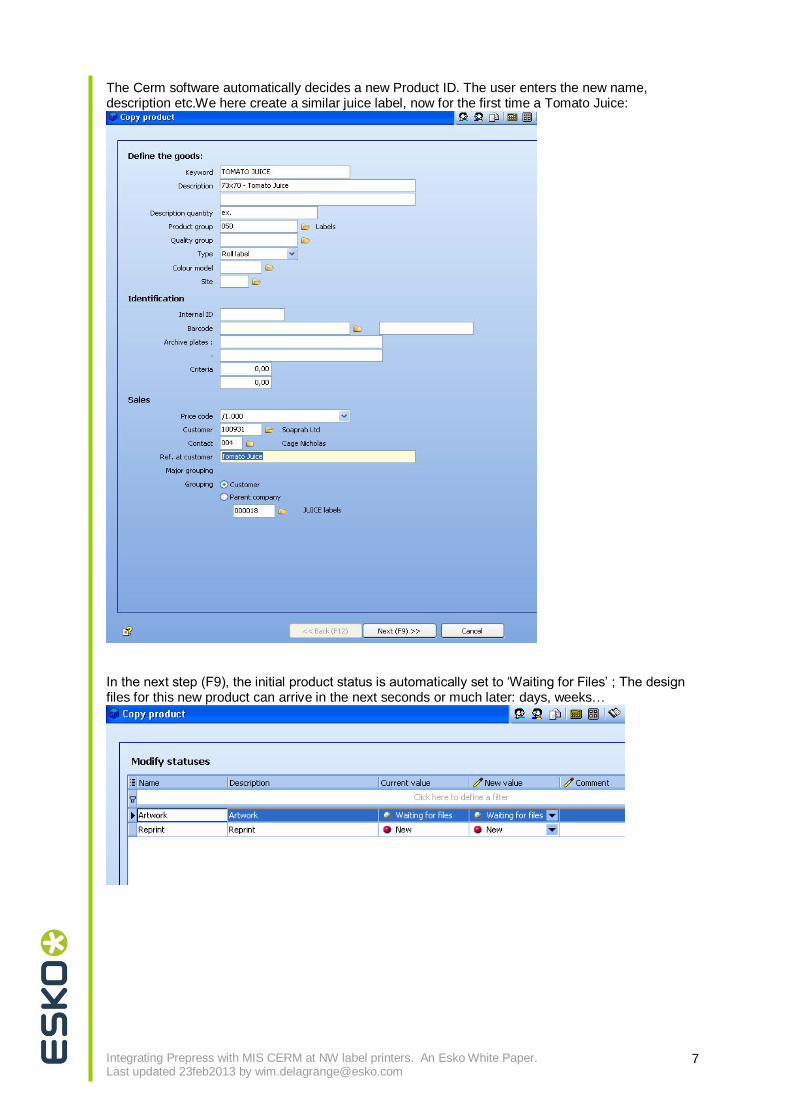
The Cerm software automatically decides a new Product ID. The user enters the new name, description etc.We here create a similar juice label, now for the first time a Tomato Juice:
In the next step (F9), the initial product status is automatically set to „Waiting for Files‟ ; The design files for this new product can arrive in the next seconds or much later: days, weeks…
Integrating Prepress with MIS CERM at NW label printers. An Esko White Paper. Last updated 23feb2013 by [email protected]
8
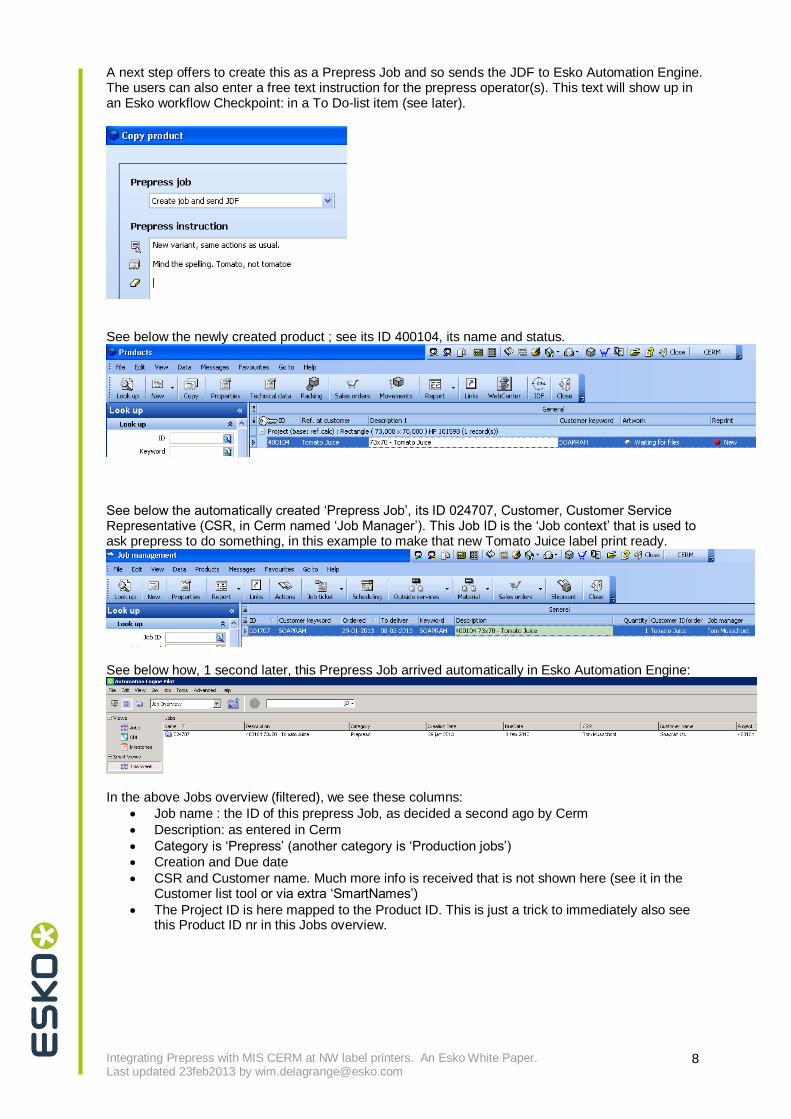
A next step offers to create this as a Prepress Job and so sends the JDF to Esko Automation Engine. The users can also enter a free text instruction for the prepress operator(s). This text will show up in an Esko workflow Checkpoint: in a To Do-list item (see later).
See below the newly created product ; see its ID 400104, its name and status.
See below the automatically created „Prepress Job‟, its ID 024707, Customer, Customer Service Representative (CSR, in Cerm named „Job Manager‟). This Job ID is the „Job context‟ that is used to ask prepress to do something, in this example to make that new Tomato Juice label print ready.
See below how, 1 second later, this Prepress Job arrived automatically in Esko Automation Engine:
In the above Jobs overview (filtered), we see these columns:
Job name : the ID of this prepress Job, as decided a second ago by Cerm
Description: as entered in Cerm
Category is „Prepress‟ (another category is „Production jobs‟)
Creation and Due date
CSR and Customer name. Much more info is received that is not shown here (see it in the Customer list tool or via extra „SmartNames‟)
The Project ID is here mapped to the Product ID. This is just a trick to immediately also see this Product ID nr in this Jobs overview.
Integrating Prepress with MIS CERM at NW label printers. An Esko White Paper. Last updated 23feb2013 by [email protected]
9
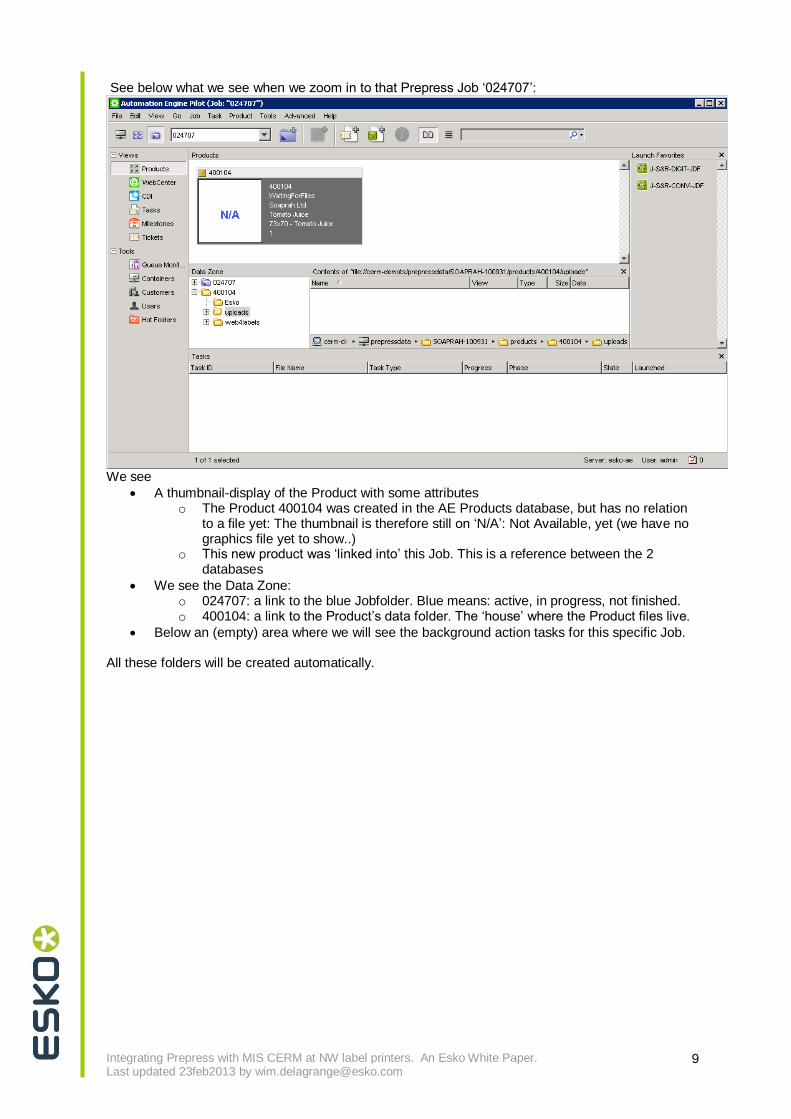
See below what we see when we zoom in to that Prepress Job „024707‟:
We see
A thumbnail-display of the Product with some attributes o The Product 400104 was created in the AE Products database, but has no relation
to a file yet: The thumbnail is therefore still on „N/A‟: Not Available, yet (we have no graphics file yet to show..)
o This new product was „linked into‟ this Job. This is a reference between the 2 databases
We see the Data Zone: o 024707: a link to the blue Jobfolder. Blue means: active, in progress, not finished. o 400104: a link to the Product‟s data folder. The „house‟ where the Product files live.
Below an (empty) area where we will see the background action tasks for this specific Job. All these folders will be created automatically.
Integrating Prepress with MIS CERM at NW label printers. An Esko White Paper. Last updated 23feb2013 by [email protected]
10
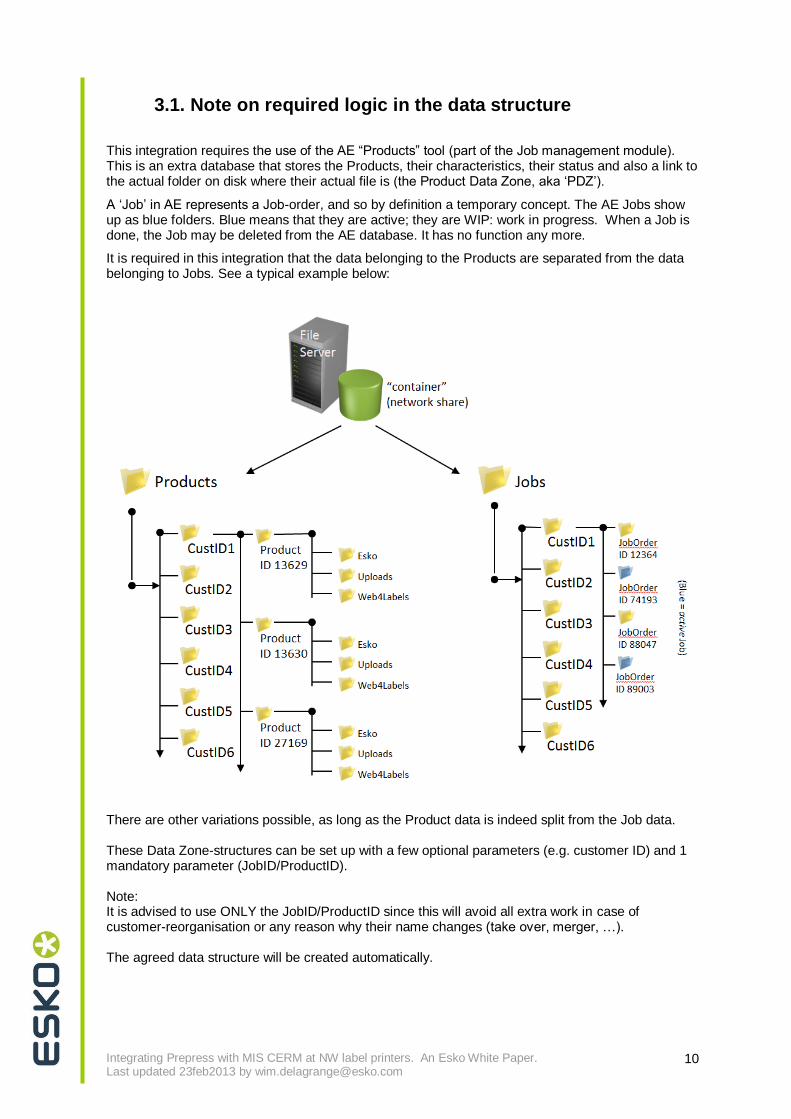
3.1. Note on required logic in the data structure
This integration requires the use of the AE “Products” tool (part of the Job management module). This is an extra database that stores the Products, their characteristics, their status and also a link to the actual folder on disk where their actual file is (the Product Data Zone, aka „PDZ‟).
A „Job‟ in AE represents a Job-order, and so by definition a temporary concept. The AE Jobs show up as blue folders. Blue means that they are active; they are WIP: work in progress. When a Job is done, the Job may be deleted from the AE database. It has no function any more.
It is required in this integration that the data belonging to the Products are separated from the data belonging to Jobs. See a typical example below:
There are other variations possible, as long as the Product data is indeed split from the Job data. These Data Zone-structures can be set up with a few optional parameters (e.g. customer ID) and 1 mandatory parameter (JobID/ProductID). Note: It is advised to use ONLY the JobID/ProductID since this will avoid all extra work in case of customer-reorganisation or any reason why their name changes (take over, merger, …). The agreed data structure will be created automatically.
Integrating Prepress with MIS CERM at NW label printers. An Esko White Paper. Last updated 23feb2013 by [email protected]
11
4. Workflow Step 2: design data arrive for the new product
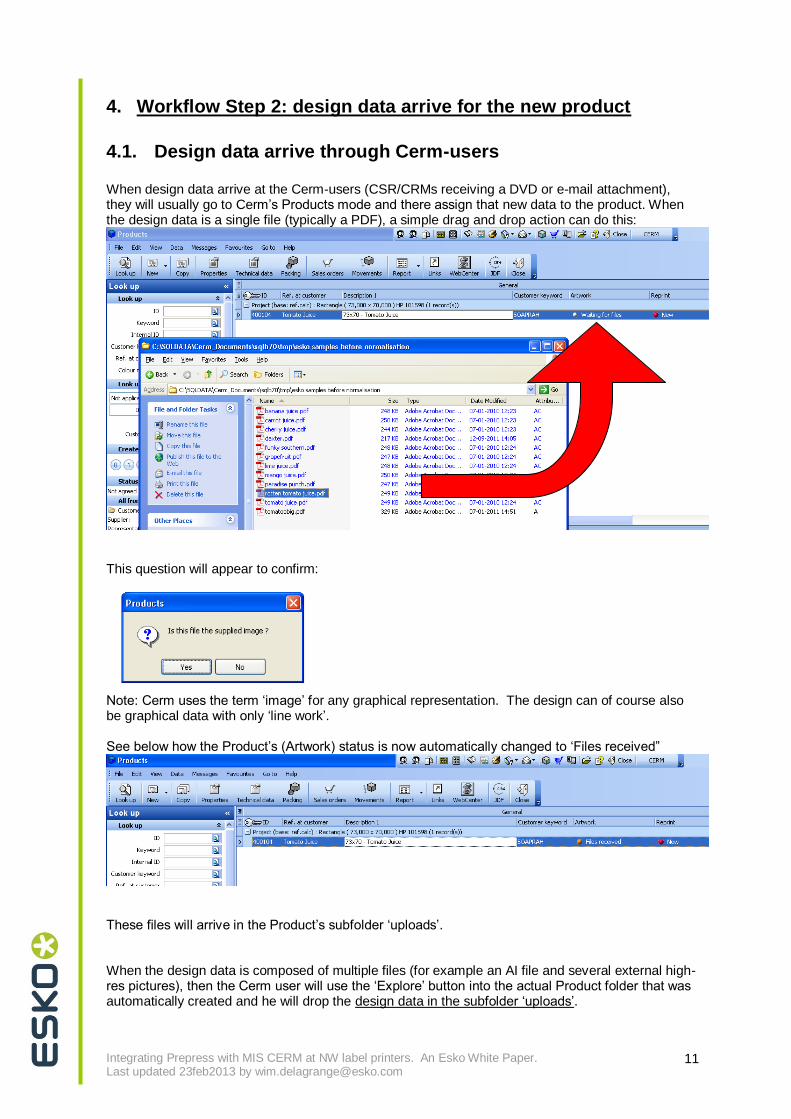
4.1. Design data arrive through Cerm-users When design data arrive at the Cerm-users (CSR/CRMs receiving a DVD or e-mail attachment), they will usually go to Cerm‟s Products mode and there assign that new data to the product. When the design data is a single file (typically a PDF), a simple drag and drop action can do this:
This question will appear to confirm:
Note: Cerm uses the term „image‟ for any graphical representation. The design can of course also be graphical data with only „line work‟. See below how the Product‟s (Artwork) status is now automatically changed to „Files received”
These files will arrive in the Product‟s subfolder „uploads‟. When the design data is composed of multiple files (for example an AI file and several external high-res pictures), then the Cerm user will use the „Explore‟ button into the actual Product folder that was automatically created and he will drop the design data in the subfolder „uploads‟.
Integrating Prepress with MIS CERM at NW label printers. An Esko White Paper. Last updated 23feb2013 by [email protected]
12
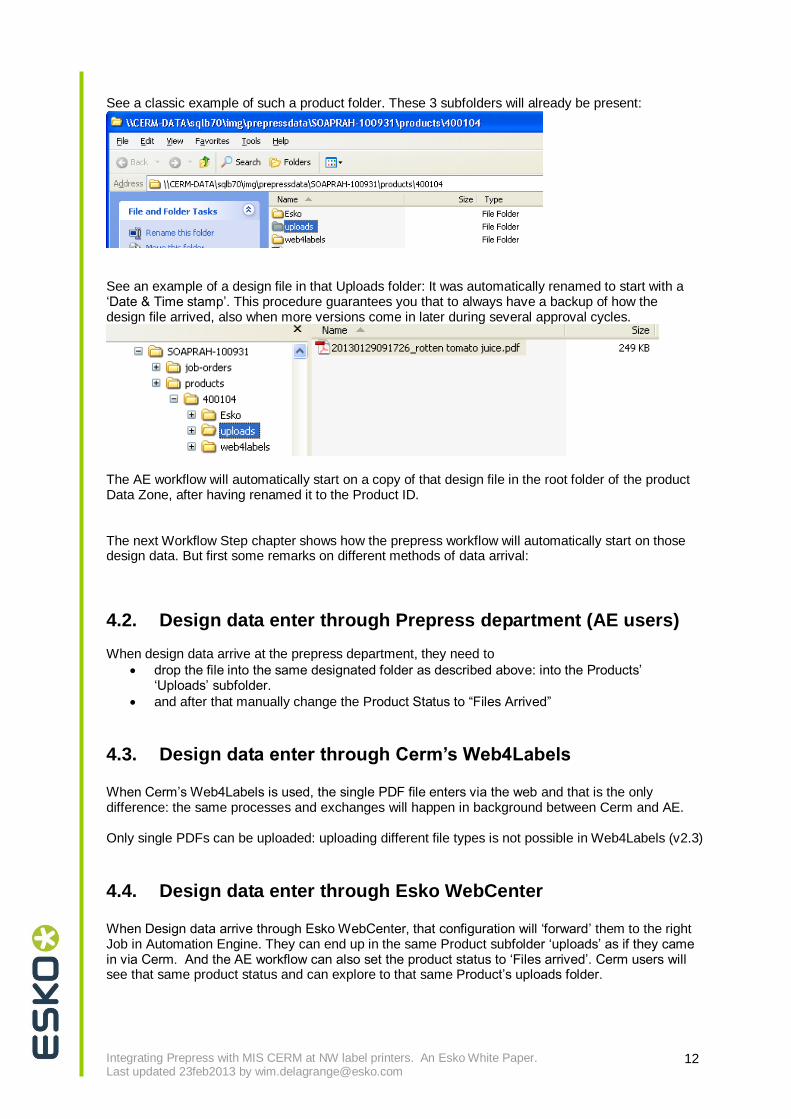
See a classic example of such a product folder. These 3 subfolders will already be present:
See an example of a design file in that Uploads folder: It was automatically renamed to start with a „Date & Time stamp‟. This procedure guarantees you that to always have a backup of how the design file arrived, also when more versions come in later during several approval cycles.
The AE workflow will automatically start on a copy of that design file in the root folder of the product Data Zone, after having renamed it to the Product ID. The next Workflow Step chapter shows how the prepress workflow will automatically start on those design data. But first some remarks on different methods of data arrival:
4.2. Design data enter through Prepress department (AE users) When design data arrive at the prepress department, they need to
drop the file into the same designated folder as described above: into the Products‟ „Uploads‟ subfolder.
and after that manually change the Product Status to “Files Arrived”
4.3. Design data enter through Cerm’s Web4Labels When Cerm‟s Web4Labels is used, the single PDF file enters via the web and that is the only difference: the same processes and exchanges will happen in background between Cerm and AE. Only single PDFs can be uploaded: uploading different file types is not possible in Web4Labels (v2.3)
4.4. Design data enter through Esko WebCenter When Design data arrive through Esko WebCenter, that configuration will „forward‟ them to the right Job in Automation Engine. They can end up in the same Product subfolder „uploads‟ as if they came in via Cerm. And the AE workflow can also set the product status to „Files arrived‟. Cerm users will see that same product status and can explore to that same Product‟s uploads folder.
Integrating Prepress with MIS CERM at NW label printers. An Esko White Paper. Last updated 23feb2013 by [email protected]
13
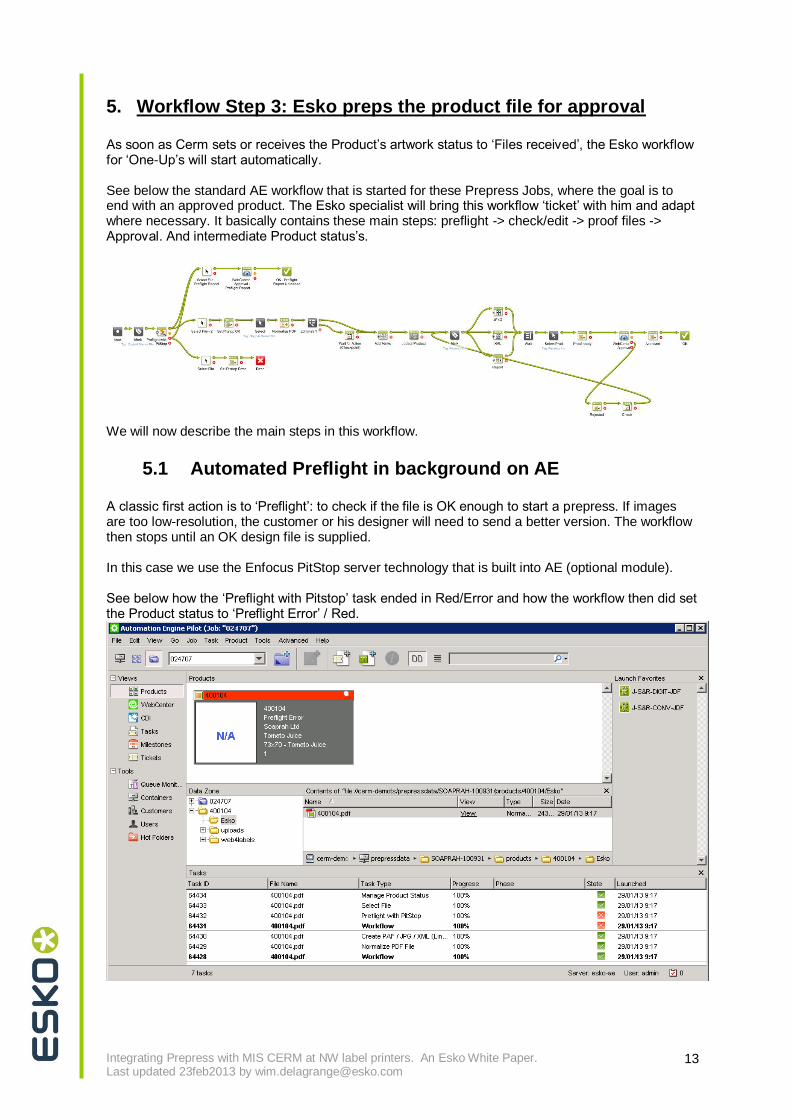
5. Workflow Step 3: Esko preps the product file for approval As soon as Cerm sets or receives the Product‟s artwork status to „Files received‟, the Esko workflow for „One-Up‟s will start automatically. See below the standard AE workflow that is started for these Prepress Jobs, where the goal is to end with an approved product. The Esko specialist will bring this workflow „ticket‟ with him and adapt where necessary. It basically contains these main steps: preflight -> check/edit -> proof files -> Approval. And intermediate Product status‟s.
We will now describe the main steps in this workflow.
5.1 Automated Preflight in background on AE A classic first action is to „Preflight‟: to check if the file is OK enough to start a prepress. If images are too low-resolution, the customer or his designer will need to send a better version. The workflow then stops until an OK design file is supplied. In this case we use the Enfocus PitStop server technology that is built into AE (optional module). See below how the „Preflight with Pitstop‟ task ended in Red/Error and how the workflow then did set the Product status to „Preflight Error‟ / Red.
Integrating Prepress with MIS CERM at NW label printers. An Esko White Paper. Last updated 23feb2013 by [email protected]
14
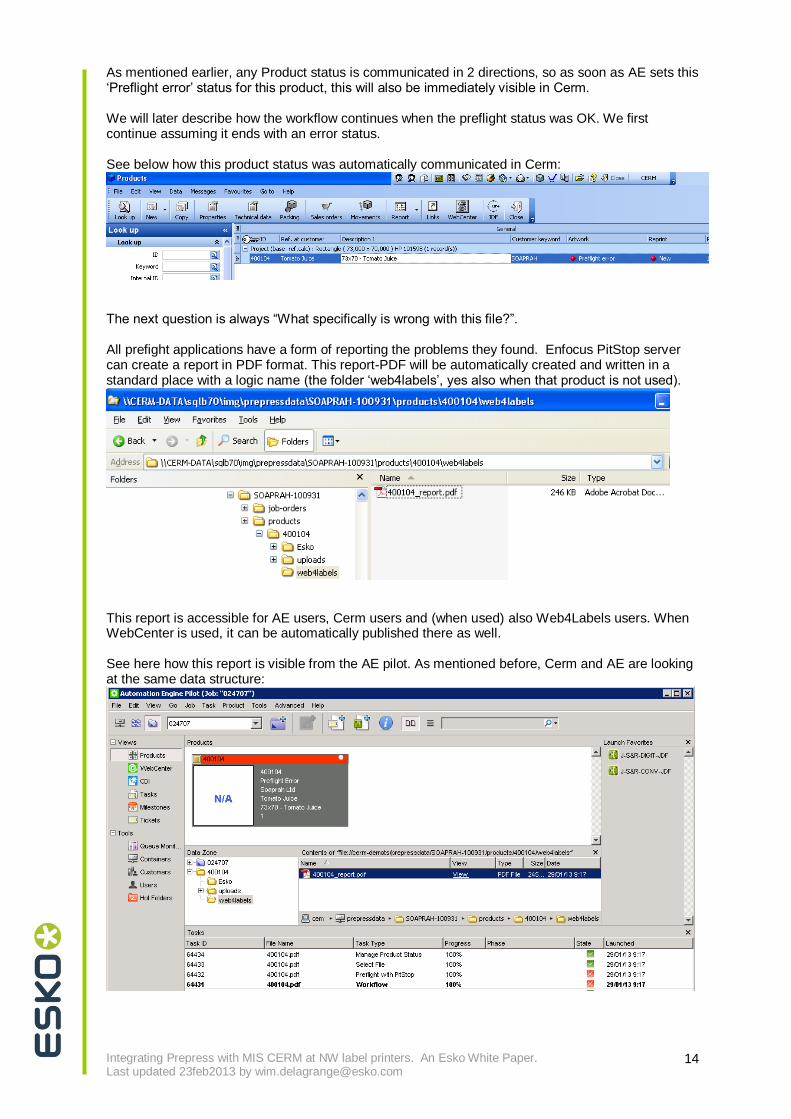
As mentioned earlier, any Product status is communicated in 2 directions, so as soon as AE sets this „Preflight error‟ status for this product, this will also be immediately visible in Cerm. We will later describe how the workflow continues when the preflight status was OK. We first continue assuming it ends with an error status. See below how this product status was automatically communicated in Cerm:
The next question is always “What specifically is wrong with this file?”. All prefight applications have a form of reporting the problems they found. Enfocus PitStop server can create a report in PDF format. This report-PDF will be automatically created and written in a standard place with a logic name (the folder „web4labels‟, yes also when that product is not used).
This report is accessible for AE users, Cerm users and (when used) also Web4Labels users. When WebCenter is used, it can be automatically published there as well. See here how this report is visible from the AE pilot. As mentioned before, Cerm and AE are looking at the same data structure:
Integrating Prepress with MIS CERM at NW label printers. An Esko White Paper. Last updated 23feb2013 by [email protected]
15
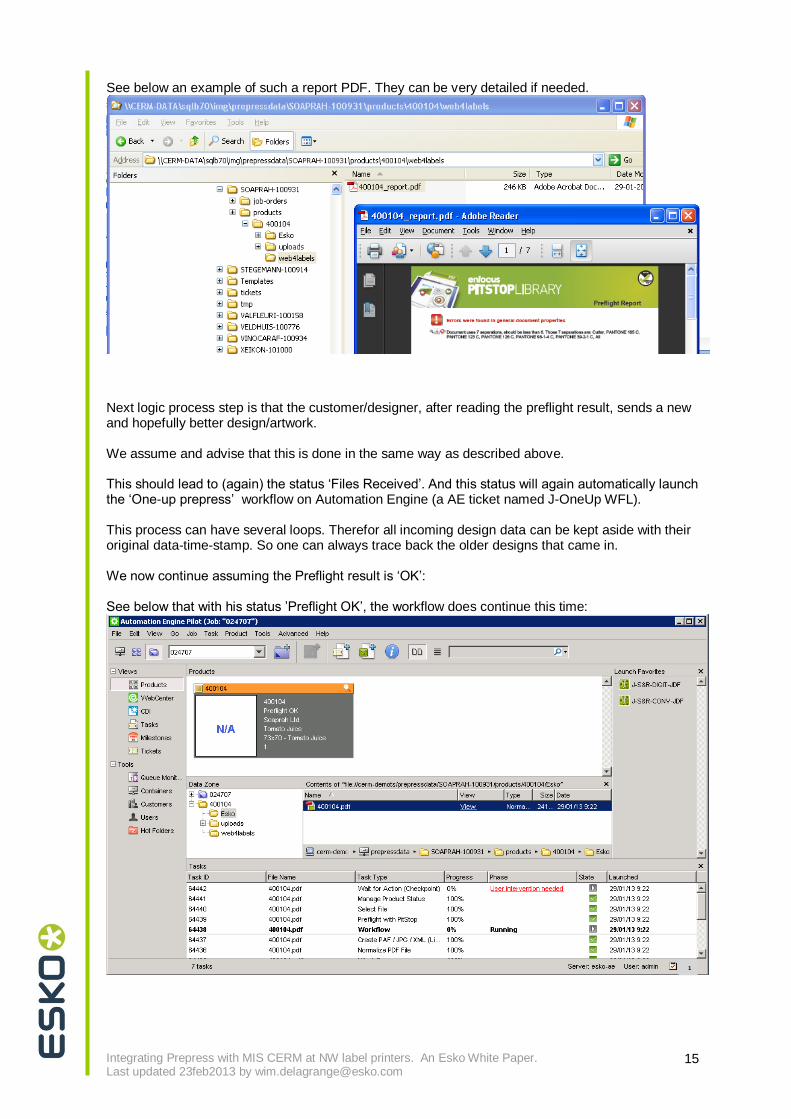
See below an example of such a report PDF. They can be very detailed if needed.
Next logic process step is that the customer/designer, after reading the preflight result, sends a new and hopefully better design/artwork. We assume and advise that this is done in the same way as described above. This should lead to (again) the status „Files Received‟. And this status will again automatically launch the „One-up prepress‟ workflow on Automation Engine (a AE ticket named J-OneUp WFL). This process can have several loops. Therefor all incoming design data can be kept aside with their original data-time-stamp. So one can always trace back the older designs that came in. We now continue assuming the Preflight result is „OK‟: See below that with his status ‟Preflight OK‟, the workflow does continue this time:
1
Integrating Prepress with MIS CERM at NW label printers. An Esko White Paper. Last updated 23feb2013 by [email protected]
16
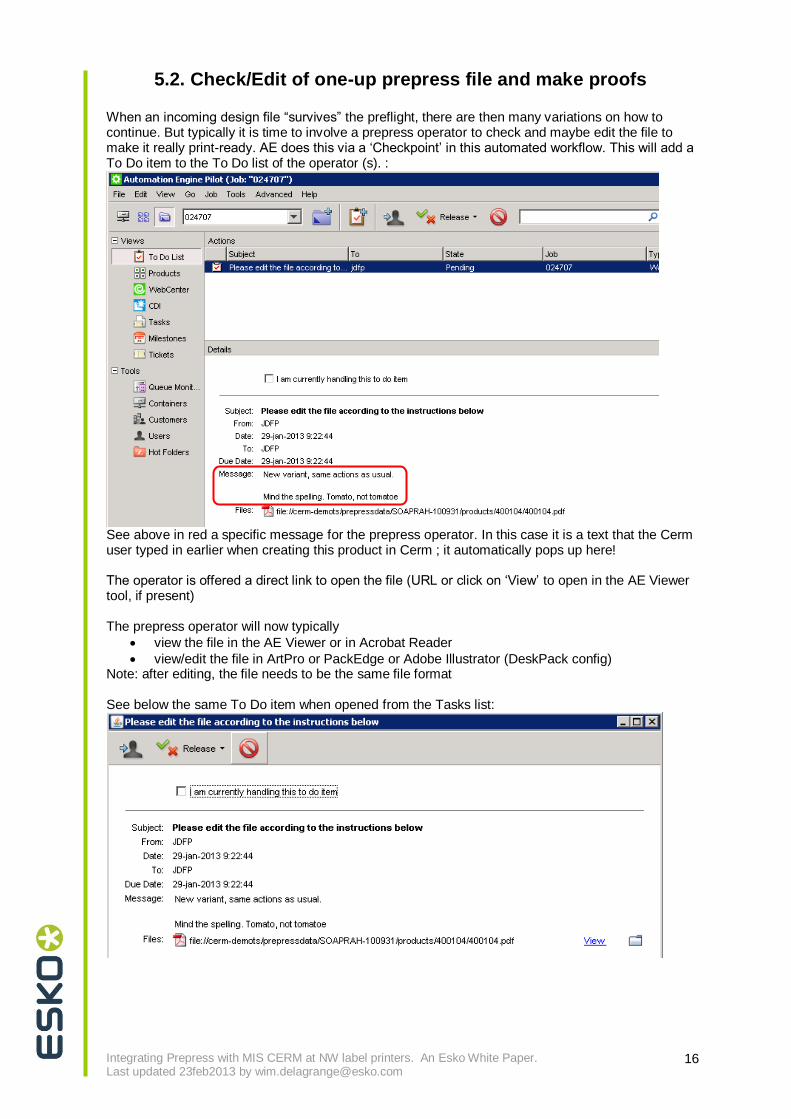
5.2. Check/Edit of one-up prepress file and make proofs When an incoming design file “survives” the preflight, there are then many variations on how to continue. But typically it is time to involve a prepress operator to check and maybe edit the file to make it really print-ready. AE does this via a „Checkpoint‟ in this automated workflow. This will add a To Do item to the To Do list of the operator (s). :
See above in red a specific message for the prepress operator. In this case it is a text that the Cerm user typed in earlier when creating this product in Cerm ; it automatically pops up here! The operator is offered a direct link to open the file (URL or click on „View‟ to open in the AE Viewer tool, if present) The prepress operator will now typically
view the file in the AE Viewer or in Acrobat Reader
view/edit the file in ArtPro or PackEdge or Adobe Illustrator (DeskPack config) Note: after editing, the file needs to be the same file format See below the same To Do item when opened from the Tasks list:
Integrating Prepress with MIS CERM at NW label printers. An Esko White Paper. Last updated 23feb2013 by [email protected]
17
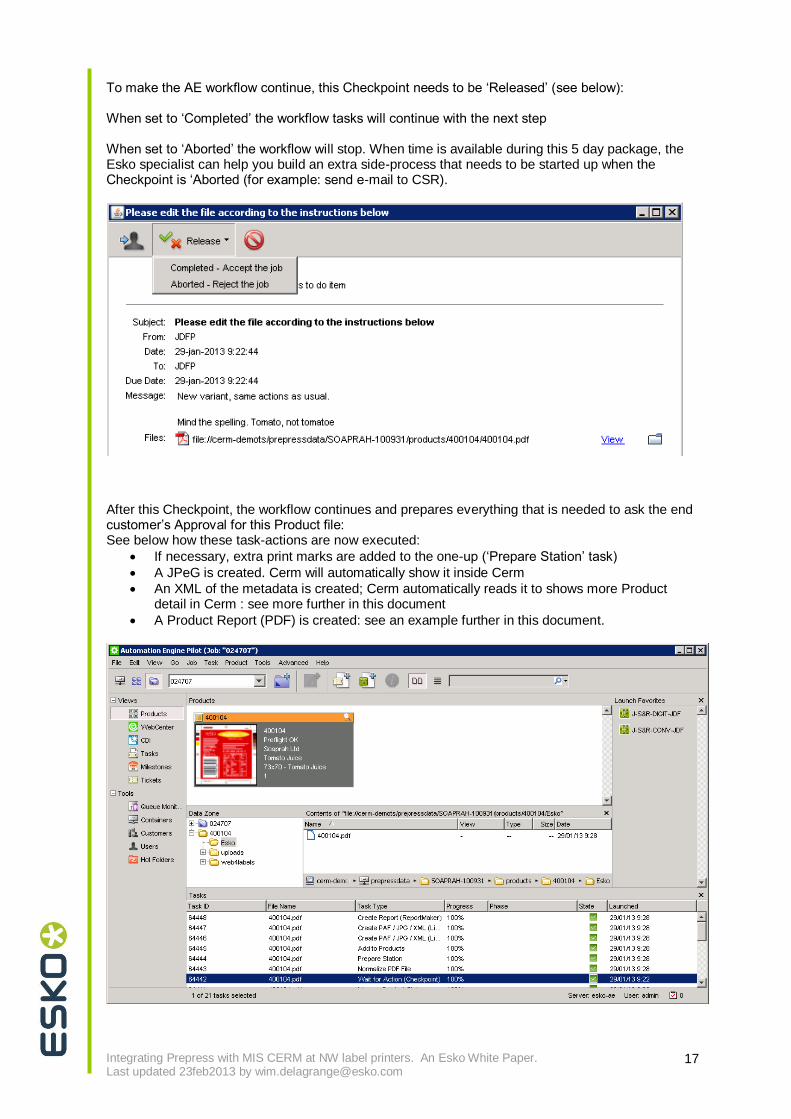
To make the AE workflow continue, this Checkpoint needs to be „Released‟ (see below): When set to „Completed‟ the workflow tasks will continue with the next step When set to „Aborted‟ the workflow will stop. When time is available during this 5 day package, the Esko specialist can help you build an extra side-process that needs to be started up when the Checkpoint is „Aborted (for example: send e-mail to CSR).
After this Checkpoint, the workflow continues and prepares everything that is needed to ask the end customer‟s Approval for this Product file: See below how these task-actions are now executed:
If necessary, extra print marks are added to the one-up („Prepare Station‟ task)
A JPeG is created. Cerm will automatically show it inside Cerm
An XML of the metadata is created; Cerm automatically reads it to shows more Product detail in Cerm : see more further in this document
A Product Report (PDF) is created: see an example further in this document.
Integrating Prepress with MIS CERM at NW label printers. An Esko White Paper. Last updated 23feb2013 by [email protected]
18
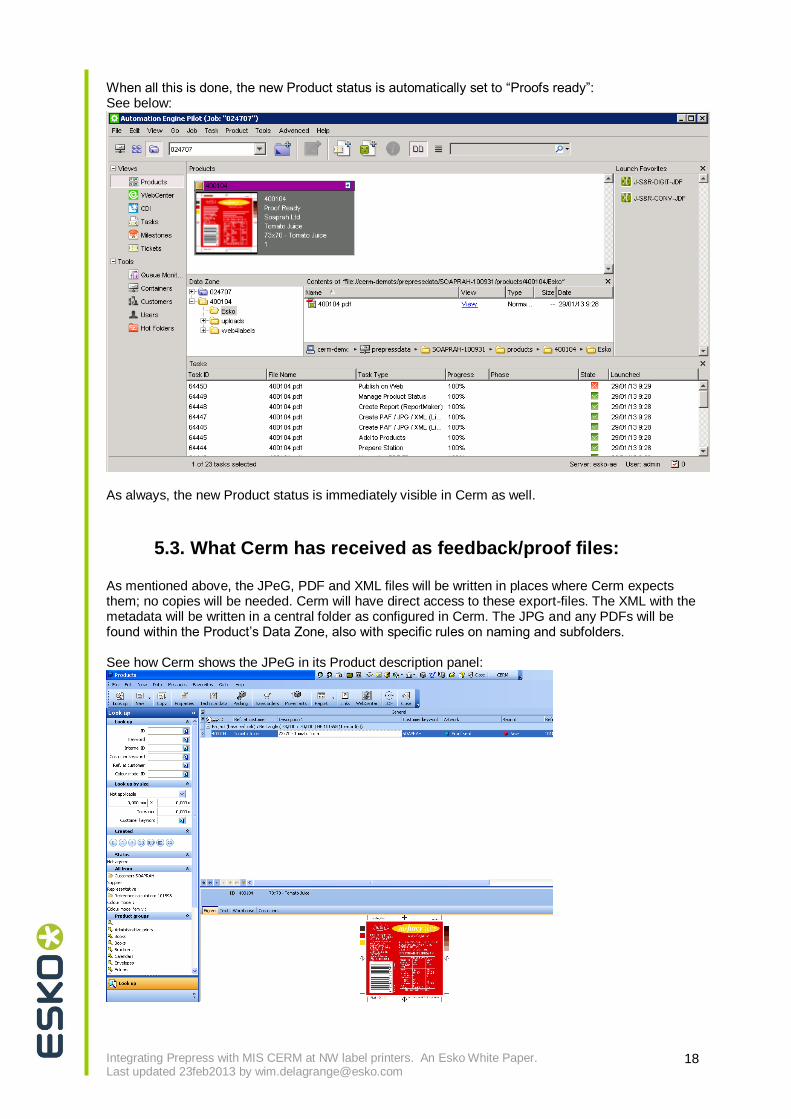
When all this is done, the new Product status is automatically set to “Proofs ready”: See below:
As always, the new Product status is immediately visible in Cerm as well.
5.3. What Cerm has received as feedback/proof files: As mentioned above, the JPeG, PDF and XML files will be written in places where Cerm expects them; no copies will be needed. Cerm will have direct access to these export-files. The XML with the metadata will be written in a central folder as configured in Cerm. The JPG and any PDFs will be found within the Product‟s Data Zone, also with specific rules on naming and subfolders. See how Cerm shows the JPeG in its Product description panel:
Integrating Prepress with MIS CERM at NW label printers. An Esko White Paper. Last updated 23feb2013 by [email protected]
19
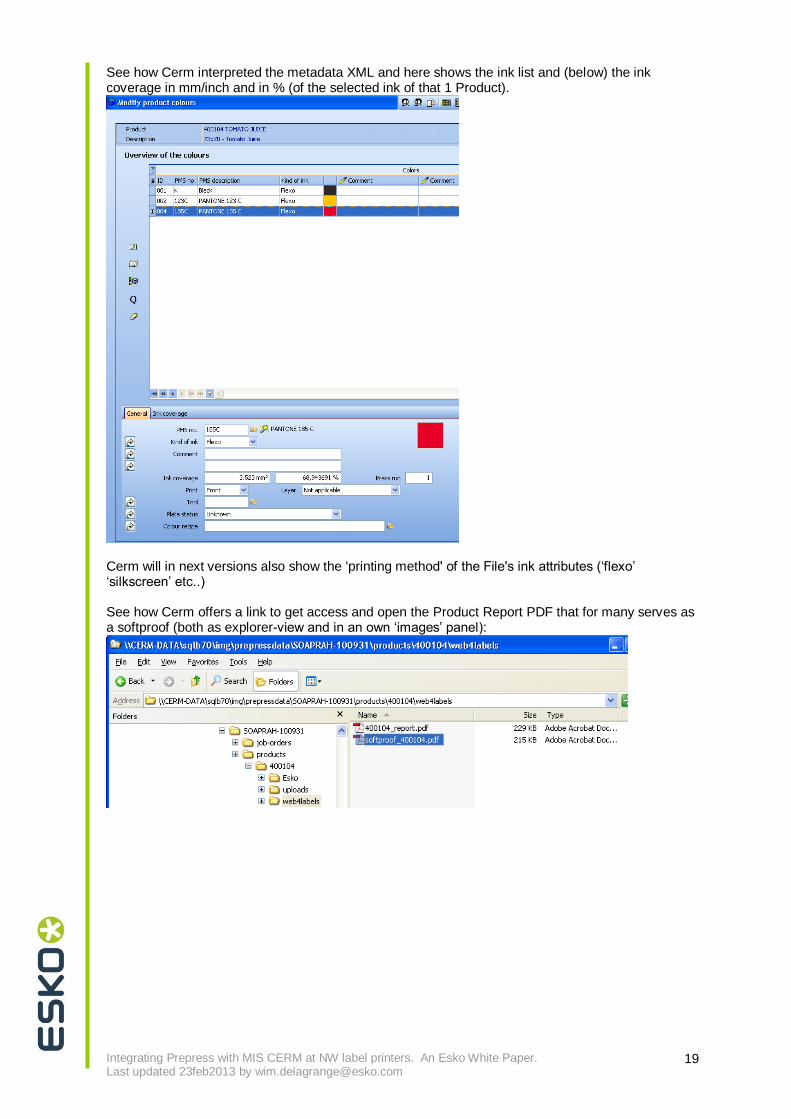
See how Cerm interpreted the metadata XML and here shows the ink list and (below) the ink coverage in mm/inch and in % (of the selected ink of that 1 Product).
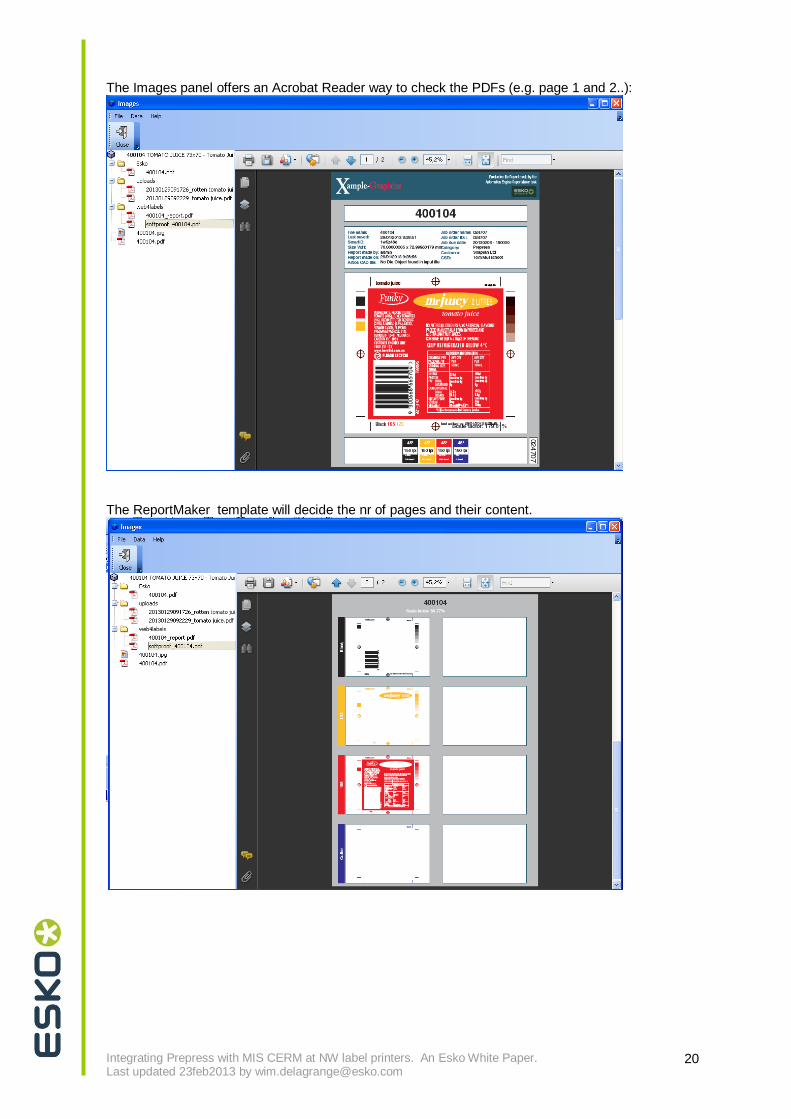
Cerm will in next versions also show the 'printing method' of the File's ink attributes („flexo‟ „silkscreen‟ etc..) See how Cerm offers a link to get access and open the Product Report PDF that for many serves as a softproof (both as explorer-view and in an own „images‟ panel):
Integrating Prepress with MIS CERM at NW label printers. An Esko White Paper. Last updated 23feb2013 by [email protected]
20
The Images panel offers an Acrobat Reader way to check the PDFs (e.g. page 1 and 2..):
The ReportMaker template will decide the nr of pages and their content.
Integrating Prepress with MIS CERM at NW label printers. An Esko White Paper. Last updated 23feb2013 by [email protected]
21
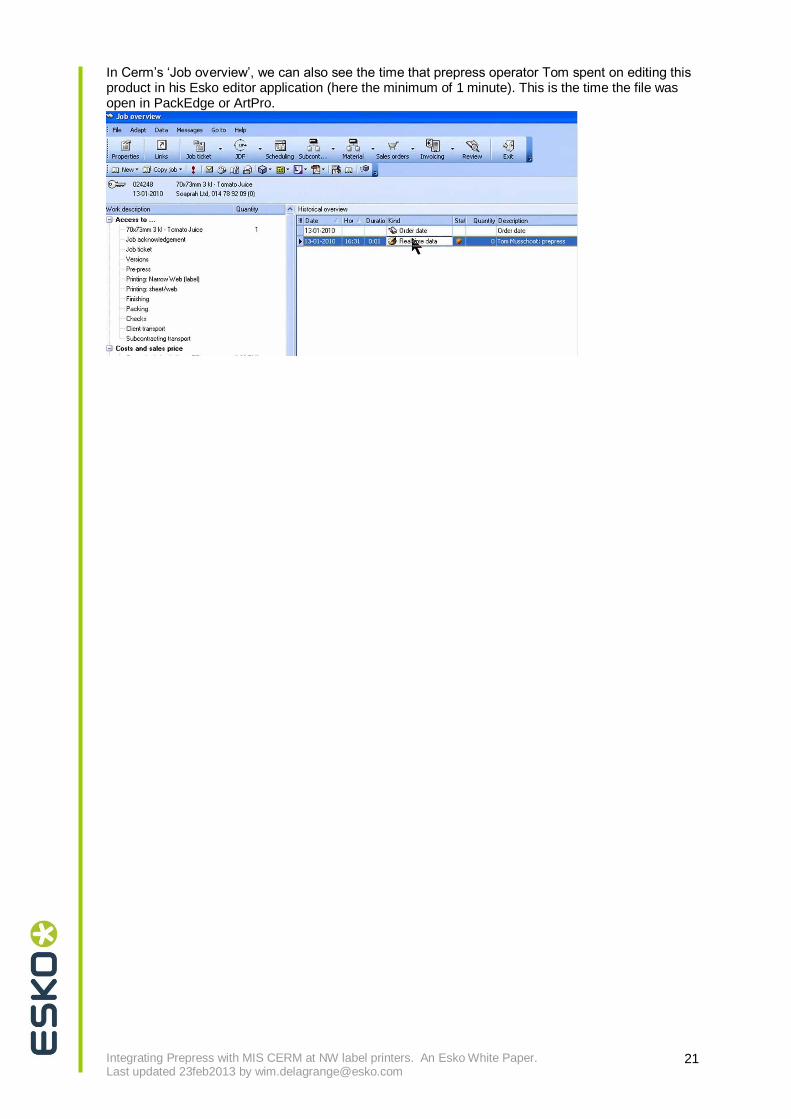
In Cerm‟s „Job overview‟, we can also see the time that prepress operator Tom spent on editing this product in his Esko editor application (here the minimum of 1 minute). This is the time the file was open in PackEdge or ArtPro.

Integrating Prepress with MIS CERM at NW label printers. An Esko White Paper. Last updated 23feb2013 by [email protected]
22
6. Workflow step 4: Approval of the one-up file The last status we mentioned was „Proof ready‟ ; this means that the Proof (files) are ready to be sent to the customer. How these files are sent can also be done in many different ways. We here list 4 most common proof scenarios:
6.1. When a Cerm user asks approval
The Cerm user (a Customer Service Representative) can select (all) Products with the status ‟Proof ready‟ and with 1 click have Cerm send e-mails to the customer(s) asking their approval. This procedure in Cerm will even automatically attach the ReportMaker product report PDF.
Cerm then also automatically changes the product status in Cerm to „proofs sent‟
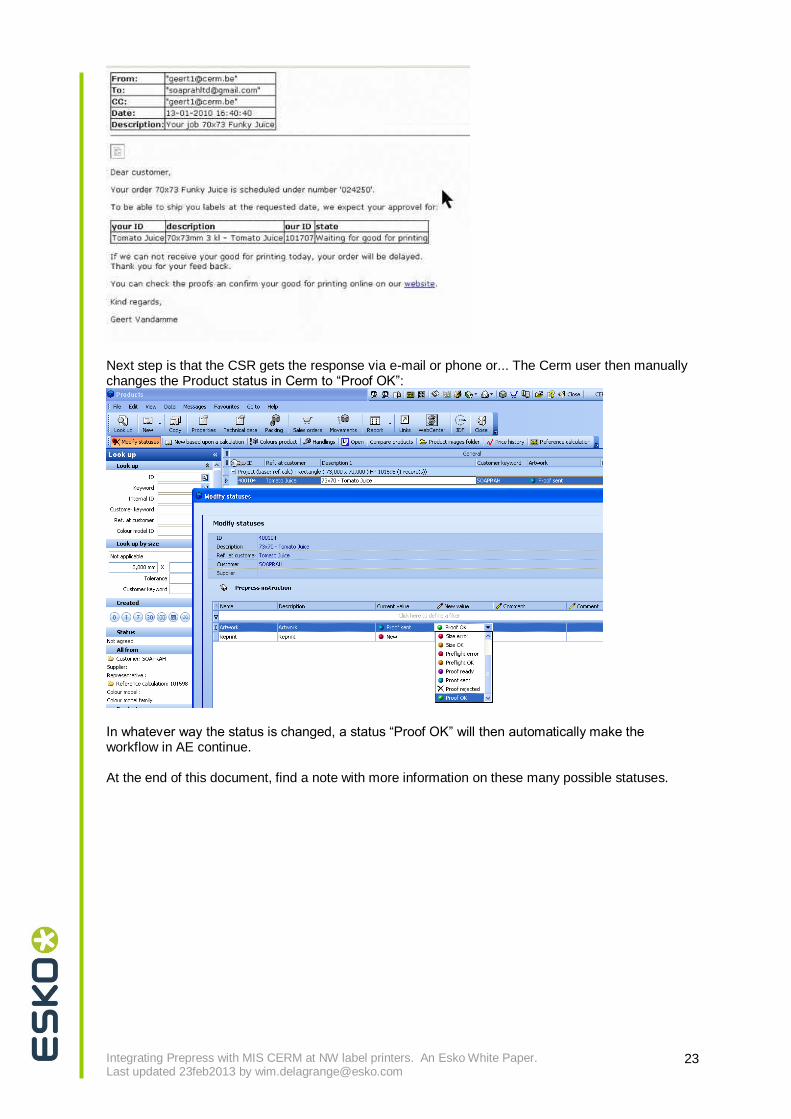
Note: To prevent scheduling problems, Cerm offers to remind customers via e-mail when a Product is not approved yet although it is scheduled for printing the next day: see below an example e-mail:
Integrating Prepress with MIS CERM at NW label printers. An Esko White Paper. Last updated 23feb2013 by [email protected]
23
Next step is that the CSR gets the response via e-mail or phone or... The Cerm user then manually changes the Product status in Cerm to “Proof OK”:
In whatever way the status is changed, a status “Proof OK” will then automatically make the workflow in AE continue. At the end of this document, find a note with more information on these many possible statuses.
Integrating Prepress with MIS CERM at NW label printers. An Esko White Paper. Last updated 23feb2013 by [email protected]
24
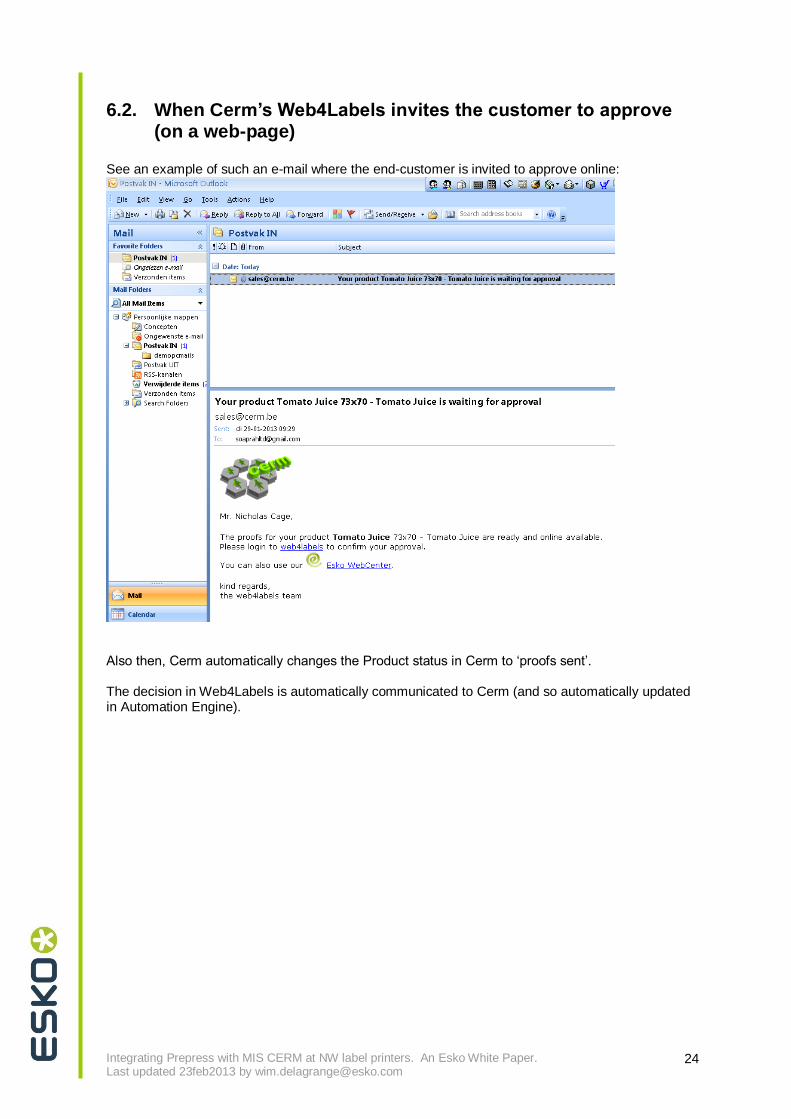
6.2. When Cerm’s Web4Labels invites the customer to approve (on a web-page)
See an example of such an e-mail where the end-customer is invited to approve online:
Also then, Cerm automatically changes the Product status in Cerm to „proofs sent‟. The decision in Web4Labels is automatically communicated to Cerm (and so automatically updated in Automation Engine).
Integrating Prepress with MIS CERM at NW label printers. An Esko White Paper. Last updated 23feb2013 by [email protected]
25
6.3. When Esko WebCenter invites the customer to approve (in the WebCenter Viewer)
When WebCenter is used for online approval, the Esko specialist will - in the AE workflow - insert the action task to publish the file to the correct WebCenter project (for that product). The „Publish to web‟ task is used for this purpose. Important requirement: As mentioned earlier, when WebCenter is used for online approval, it is mandatory that the WebCenter project matches to represent 1 Product ! Note: When the approval cycle was started in WebCenter, it is mandatory that this cycle then also ends in WebCenter (approve-reject). This cycle cannot be overruled by a decision coming from Cerm. Example: the customer should do the approval with WebCenter but instead calls/e-mails his CSR and gives to him/her. This process violation can be solved when the CSR then does the approval in WebCenter, with a note why (s)he is doing it i.s.o. the customer.
6.4. When both Web4Labels and WebCenter are used: If the customer has both these Web-products, it is usually the case that the WebCenter Viewer is integrated into the Web4Labels interface (this integration is described in separate documents). In this setup, the approval is actually made in the WebCenter Viewer, and so actually in the WebCenter software. The workflow is that WebCenter captures the approval and informs Automation Engine. In AE, the workflow will automatically inform Cerm of the Product status. And Cerm then automatically informs its „own‟ Web4Labels. All this happens in a second.
Integrating Prepress with MIS CERM at NW label printers. An Esko White Paper. Last updated 23feb2013 by [email protected]
26
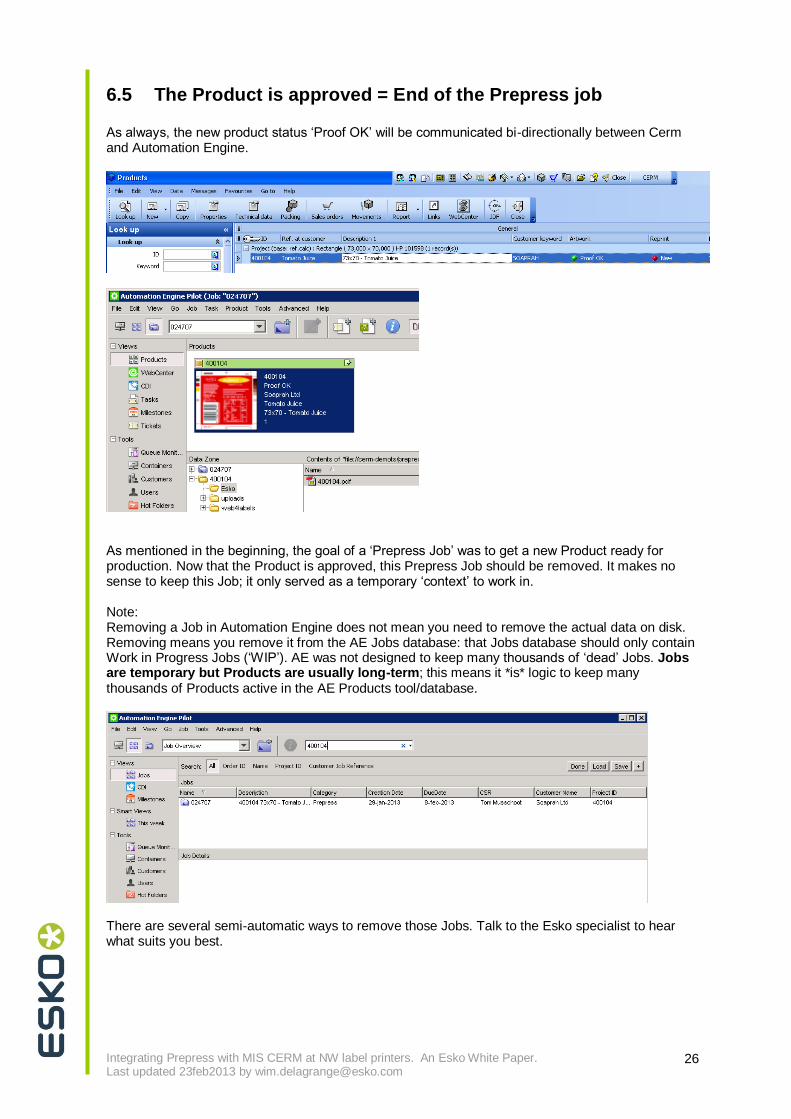
6.5 The Product is approved = End of the Prepress job As always, the new product status „Proof OK‟ will be communicated bi-directionally between Cerm and Automation Engine.
As mentioned in the beginning, the goal of a „Prepress Job‟ was to get a new Product ready for production. Now that the Product is approved, this Prepress Job should be removed. It makes no sense to keep this Job; it only served as a temporary „context‟ to work in. Note: Removing a Job in Automation Engine does not mean you need to remove the actual data on disk. Removing means you remove it from the AE Jobs database: that Jobs database should only contain Work in Progress Jobs („WIP‟). AE was not designed to keep many thousands of „dead‟ Jobs. Jobs are temporary but Products are usually long-term; this means it *is* logic to keep many thousands of Products active in the AE Products tool/database.
There are several semi-automatic ways to remove those Jobs. Talk to the Esko specialist to hear what suits you best.
Integrating Prepress with MIS CERM at NW label printers. An Esko White Paper. Last updated 23feb2013 by [email protected]
27
7. Workflow step 5: the ‘Production Job’ Cerm users will turn a sales order into a production order. Typical main actions here are
Choosing a production method (substrate, press, post-press, shipping details…)
Plan this activity: production scheduling Thanks to the high-level integration, all the required steps in Esko (Step&Repeat – output) can be automated.
7.1. In Cerm: a sales order becomes a Production Job A Production order can be created
Or: after the Prepress Job was done ; so after the Product has an approved status
Or: even parallel / during the Prepress job. Of course the Step&Repeat/layout PDF should only be made once all Products on that layout are approved by the customer.
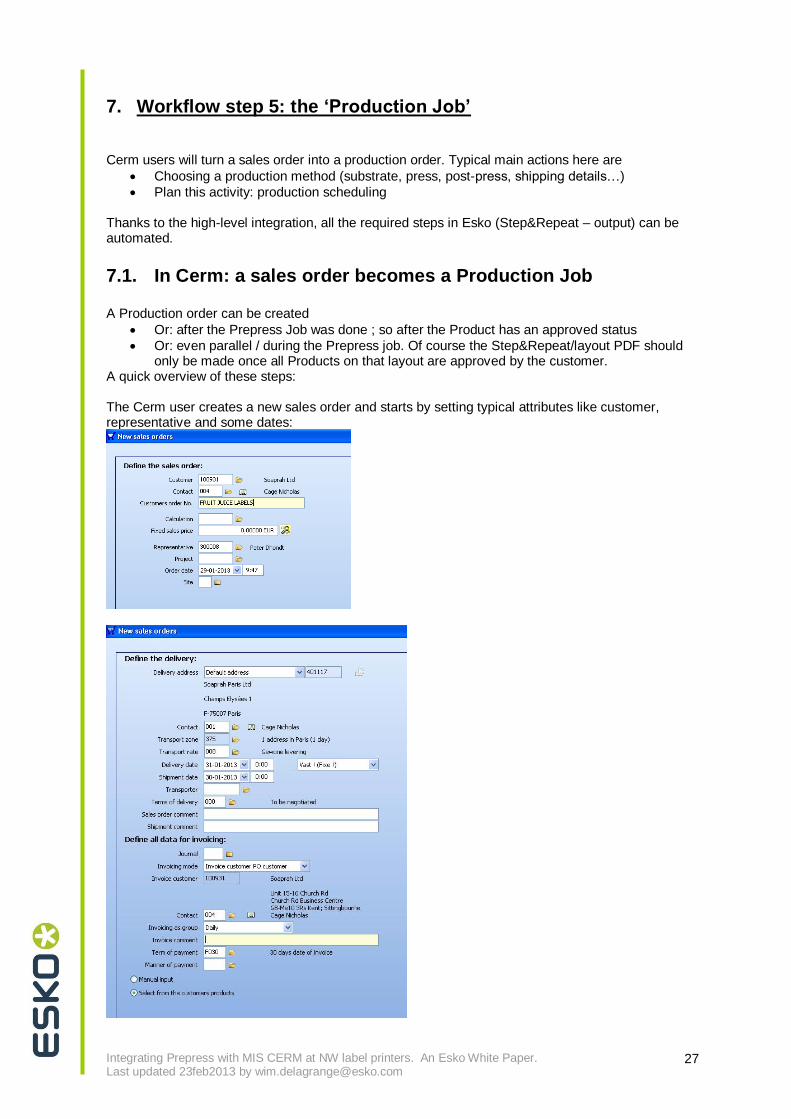
A quick overview of these steps: The Cerm user creates a new sales order and starts by setting typical attributes like customer, representative and some dates:
Integrating Prepress with MIS CERM at NW label printers. An Esko White Paper. Last updated 23feb2013 by [email protected]
28
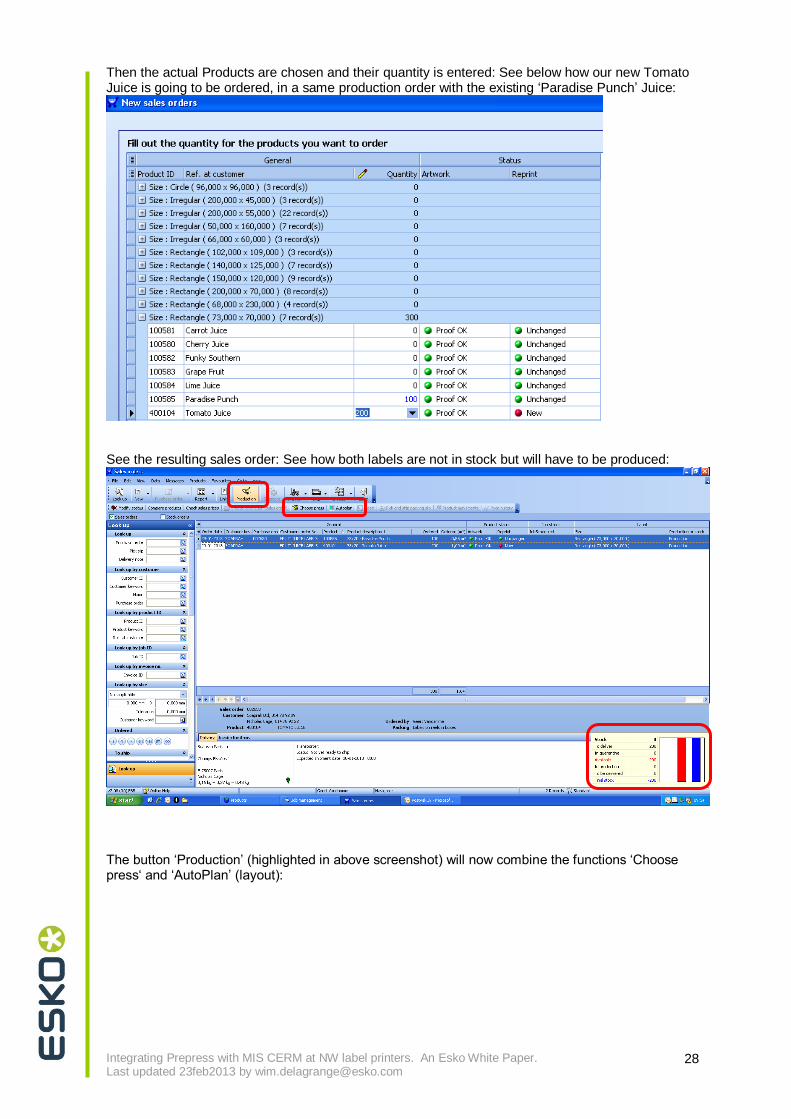
Then the actual Products are chosen and their quantity is entered: See below how our new Tomato Juice is going to be ordered, in a same production order with the existing „Paradise Punch‟ Juice:
See the resulting sales order: See how both labels are not in stock but will have to be produced:
The button „Production‟ (highlighted in above screenshot) will now combine the functions „Choose press„ and „AutoPlan‟ (layout):
Integrating Prepress with MIS CERM at NW label printers. An Esko White Paper. Last updated 23feb2013 by [email protected]
29
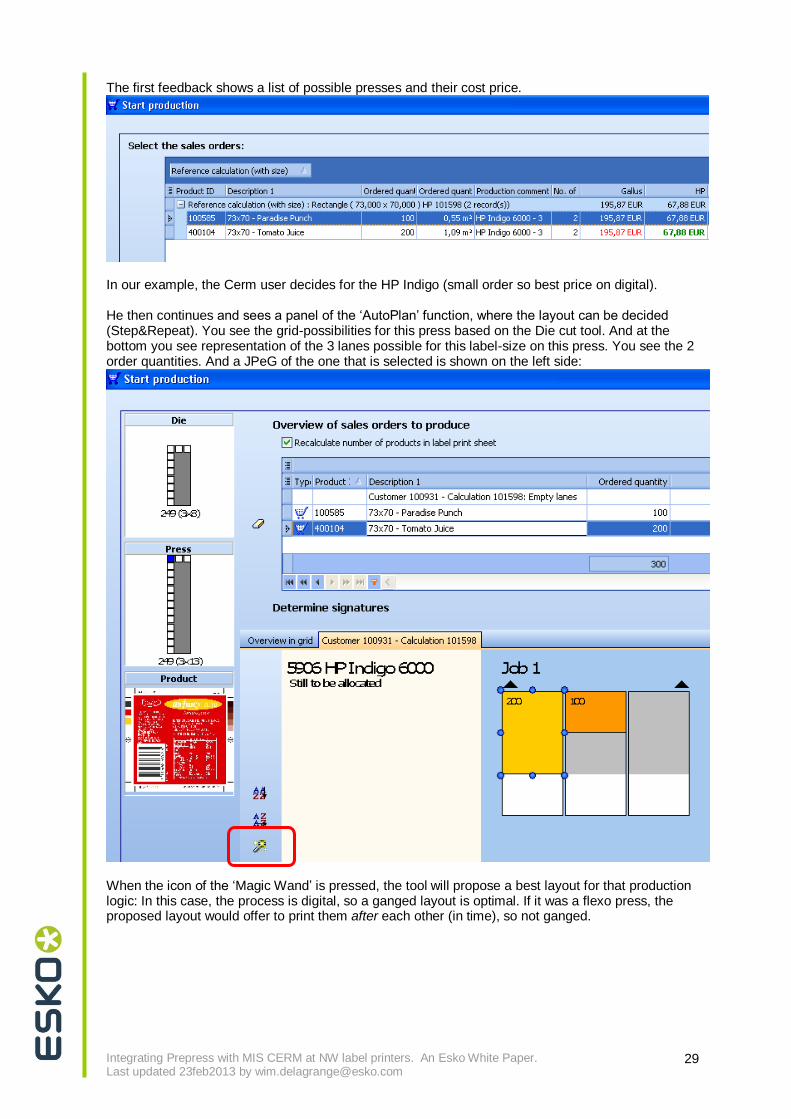
The first feedback shows a list of possible presses and their cost price.
In our example, the Cerm user decides for the HP Indigo (small order so best price on digital). He then continues and sees a panel of the „AutoPlan‟ function, where the layout can be decided (Step&Repeat). You see the grid-possibilities for this press based on the Die cut tool. And at the bottom you see representation of the 3 lanes possible for this label-size on this press. You see the 2 order quantities. And a JPeG of the one that is selected is shown on the left side:
When the icon of the „Magic Wand‟ is pressed, the tool will propose a best layout for that production logic: In this case, the process is digital, so a ganged layout is optimal. If it was a flexo press, the proposed layout would offer to print them after each other (in time), so not ganged.
Integrating Prepress with MIS CERM at NW label printers. An Esko White Paper. Last updated 23feb2013 by [email protected]
30
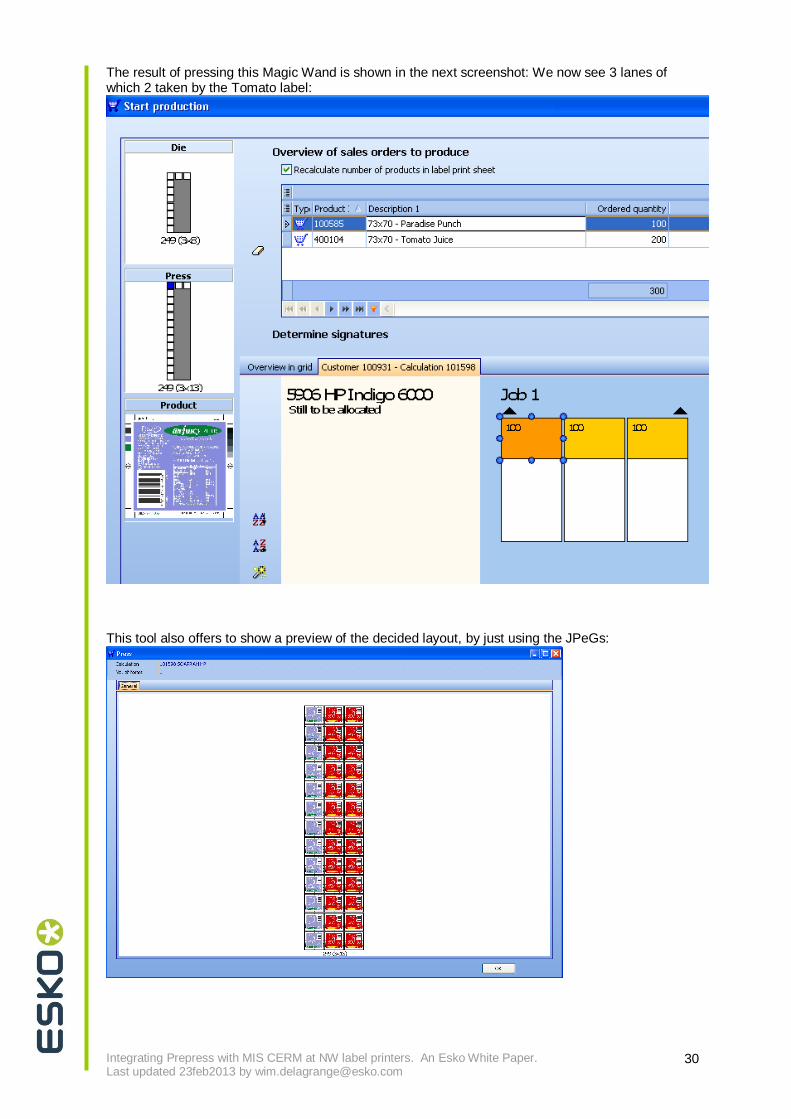
The result of pressing this Magic Wand is shown in the next screenshot: We now see 3 lanes of which 2 taken by the Tomato label:
This tool also offers to show a preview of the decided layout, by just using the JPeGs:
Integrating Prepress with MIS CERM at NW label printers. An Esko White Paper. Last updated 23feb2013 by [email protected]
31
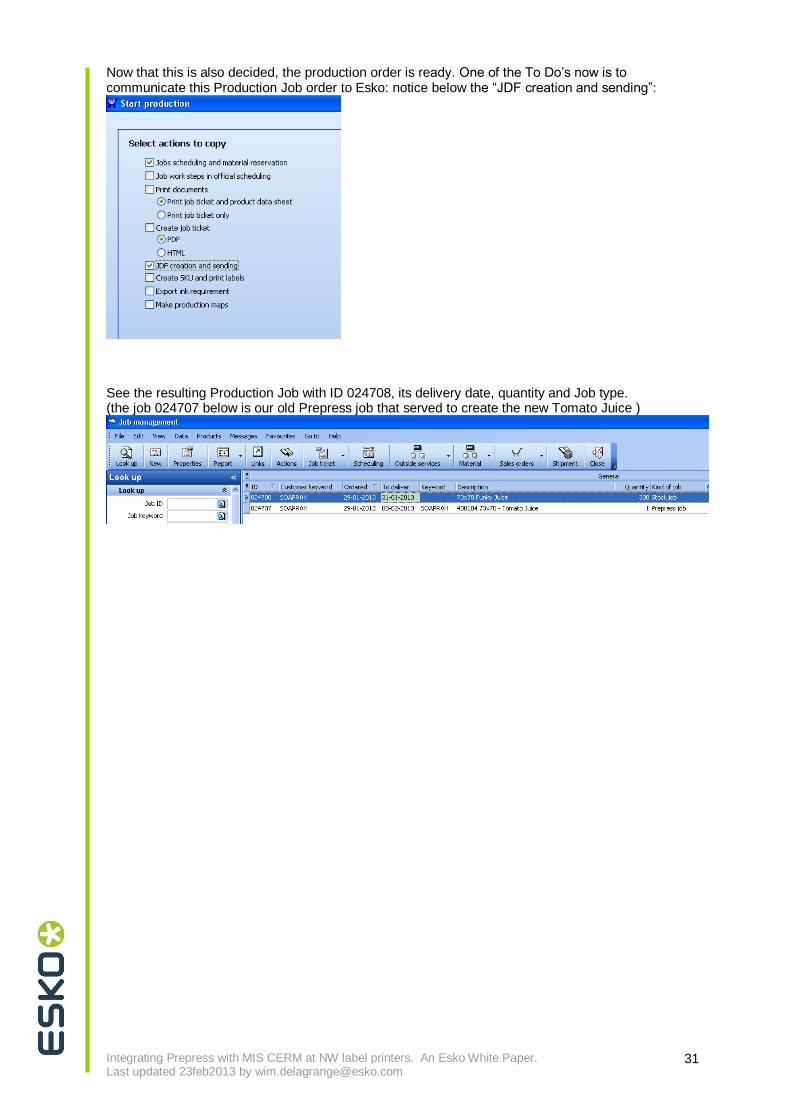
Now that this is also decided, the production order is ready. One of the To Do‟s now is to communicate this Production Job order to Esko: notice below the “JDF creation and sending”:
See the resulting Production Job with ID 024708, its delivery date, quantity and Job type. (the job 024707 below is our old Prepress job that served to create the new Tomato Juice )
Integrating Prepress with MIS CERM at NW label printers. An Esko White Paper. Last updated 23feb2013 by [email protected]
32
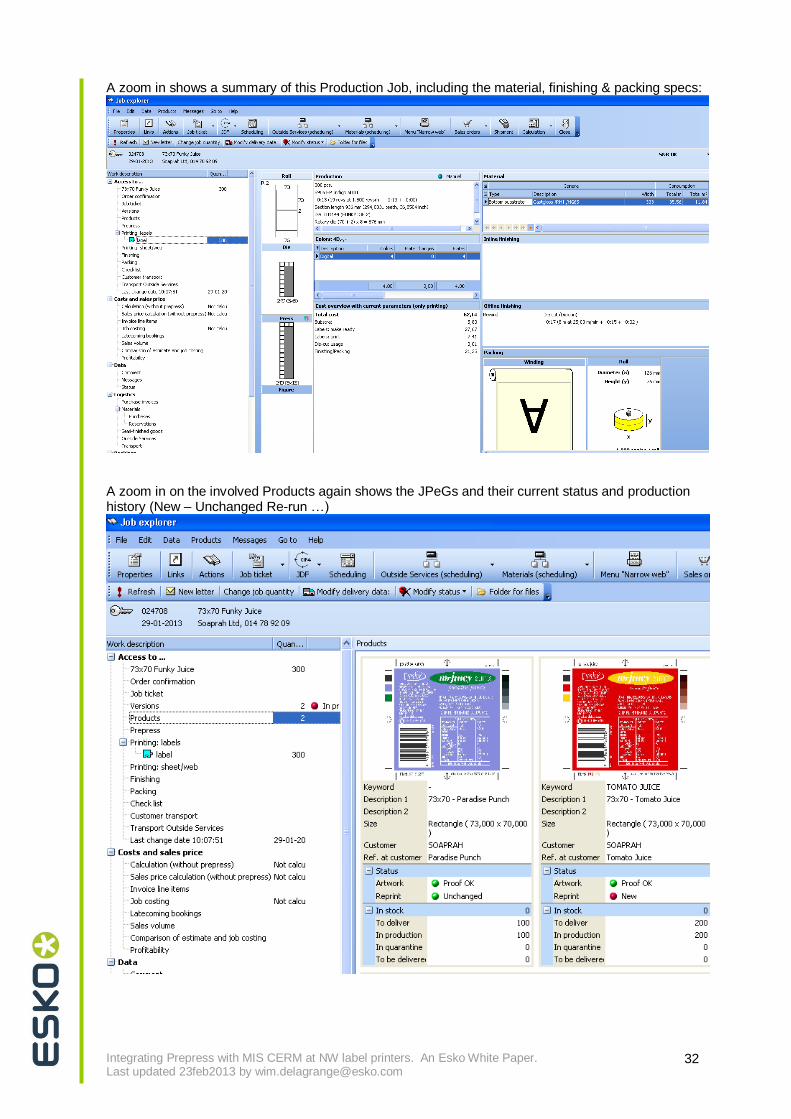
A zoom in shows a summary of this Production Job, including the material, finishing & packing specs:
A zoom in on the involved Products again shows the JPeGs and their current status and production history (New – Unchanged Re-run …)
Integrating Prepress with MIS CERM at NW label printers. An Esko White Paper. Last updated 23feb2013 by [email protected]
33
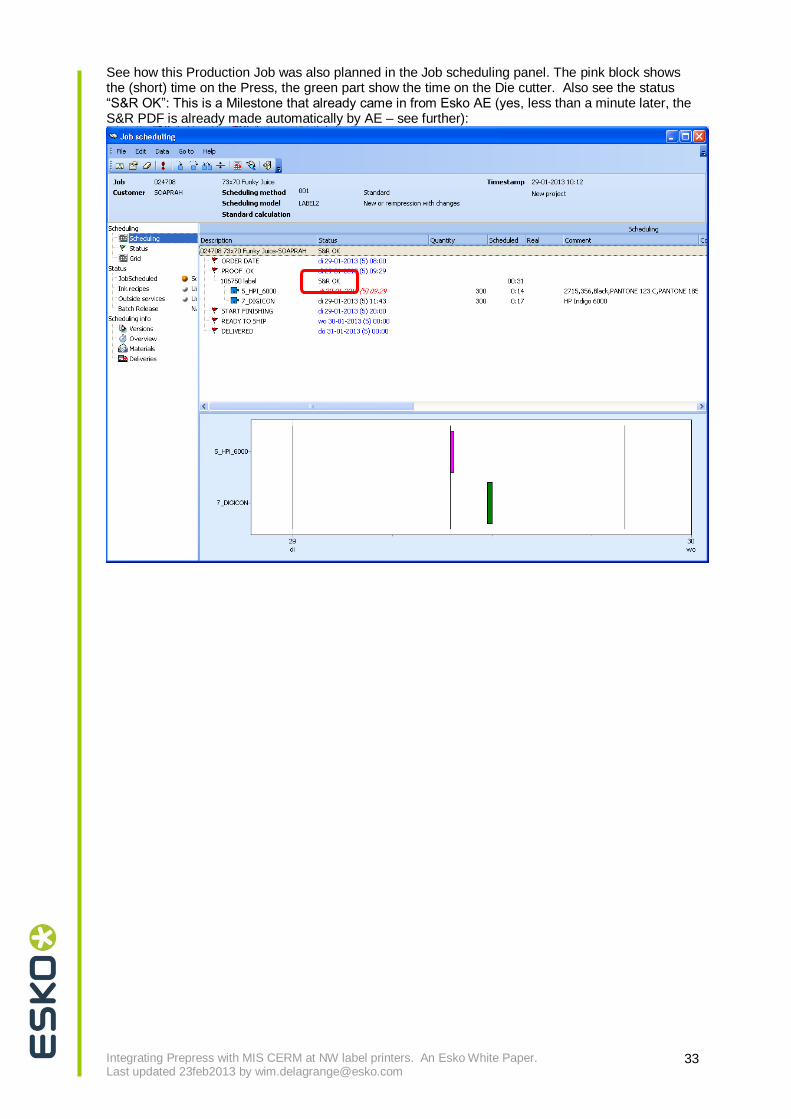
See how this Production Job was also planned in the Job scheduling panel. The pink block shows the (short) time on the Press, the green part show the time on the Die cutter. Also see the status “S&R OK”: This is a Milestone that already came in from Esko AE (yes, less than a minute later, the S&R PDF is already made automatically by AE – see further):
Integrating Prepress with MIS CERM at NW label printers. An Esko White Paper. Last updated 23feb2013 by [email protected]
34
7.2. The Production Job in AE (Step&Repeat and output)
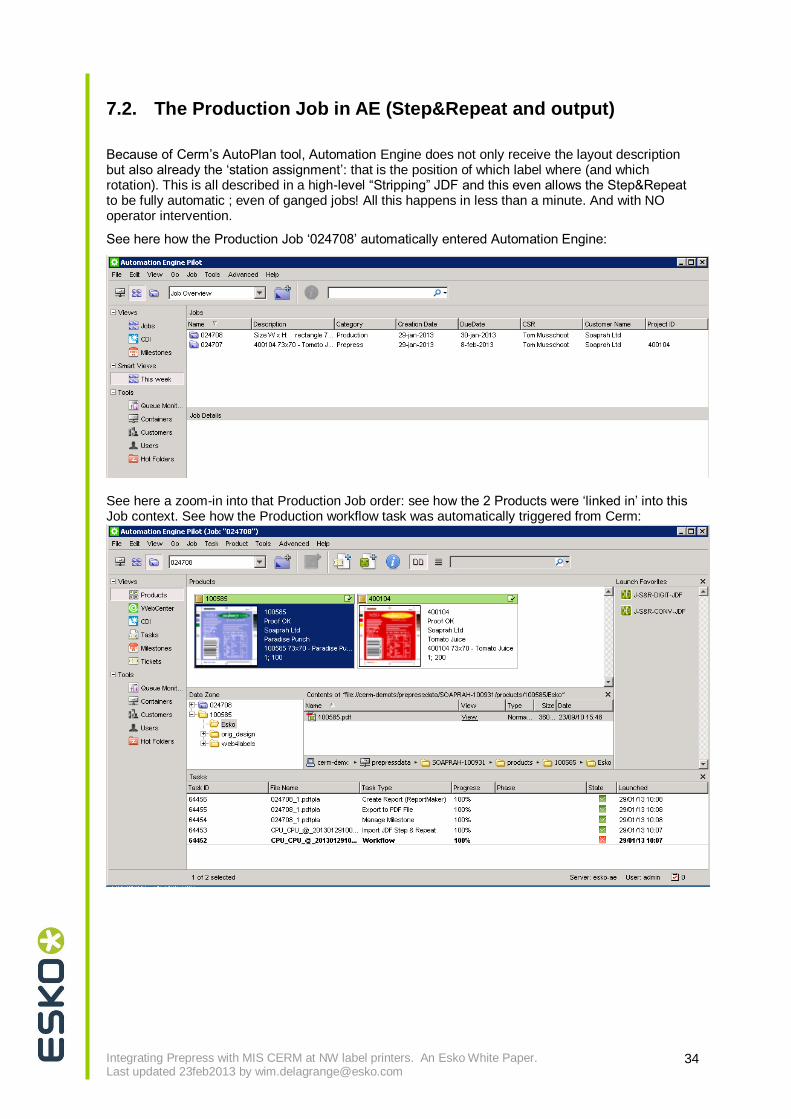
Because of Cerm‟s AutoPlan tool, Automation Engine does not only receive the layout description but also already the „station assignment‟: that is the position of which label where (and which rotation). This is all described in a high-level “Stripping” JDF and this even allows the Step&Repeat to be fully automatic ; even of ganged jobs! All this happens in less than a minute. And with NO operator intervention.
See here how the Production Job „024708‟ automatically entered Automation Engine:
See here a zoom-in into that Production Job order: see how the 2 Products were „linked in‟ into this Job context. See how the Production workflow task was automatically triggered from Cerm:
Integrating Prepress with MIS CERM at NW label printers. An Esko White Paper. Last updated 23feb2013 by [email protected]
35
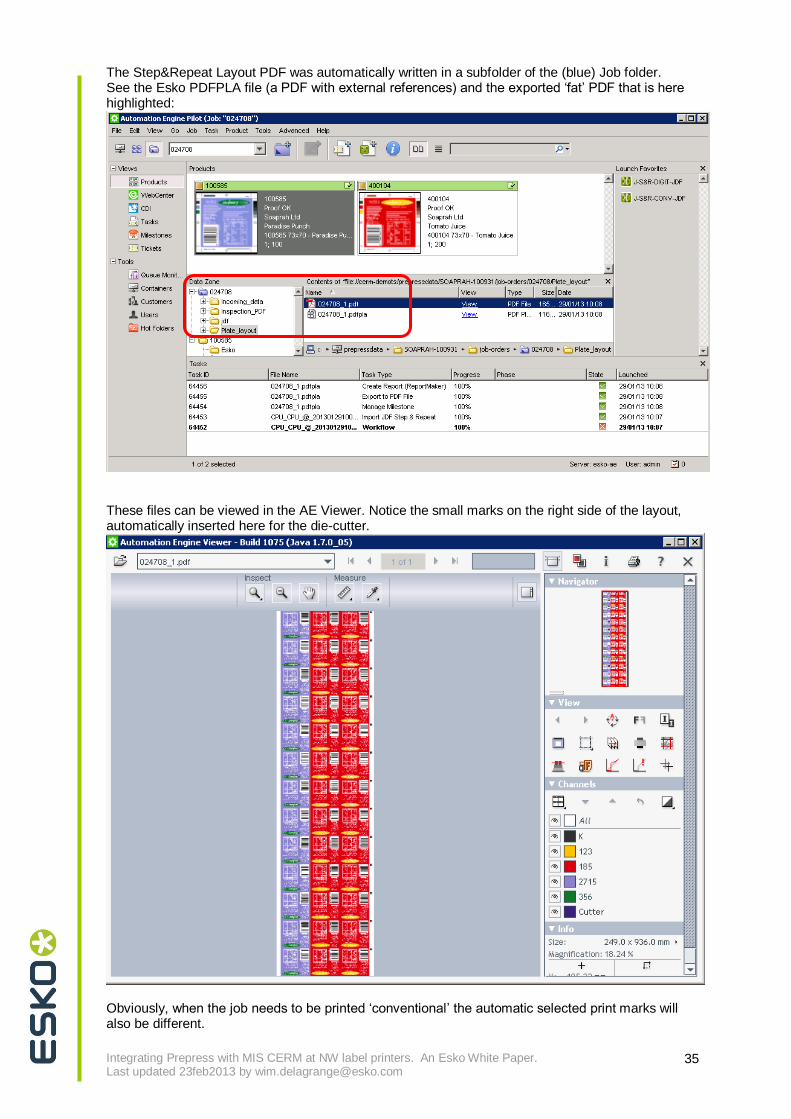
The Step&Repeat Layout PDF was automatically written in a subfolder of the (blue) Job folder. See the Esko PDFPLA file (a PDF with external references) and the exported „fat‟ PDF that is here highlighted:
These files can be viewed in the AE Viewer. Notice the small marks on the right side of the layout, automatically inserted here for the die-cutter.
Obviously, when the job needs to be printed „conventional‟ the automatic selected print marks will also be different.
Integrating Prepress with MIS CERM at NW label printers. An Esko White Paper. Last updated 23feb2013 by [email protected]
36
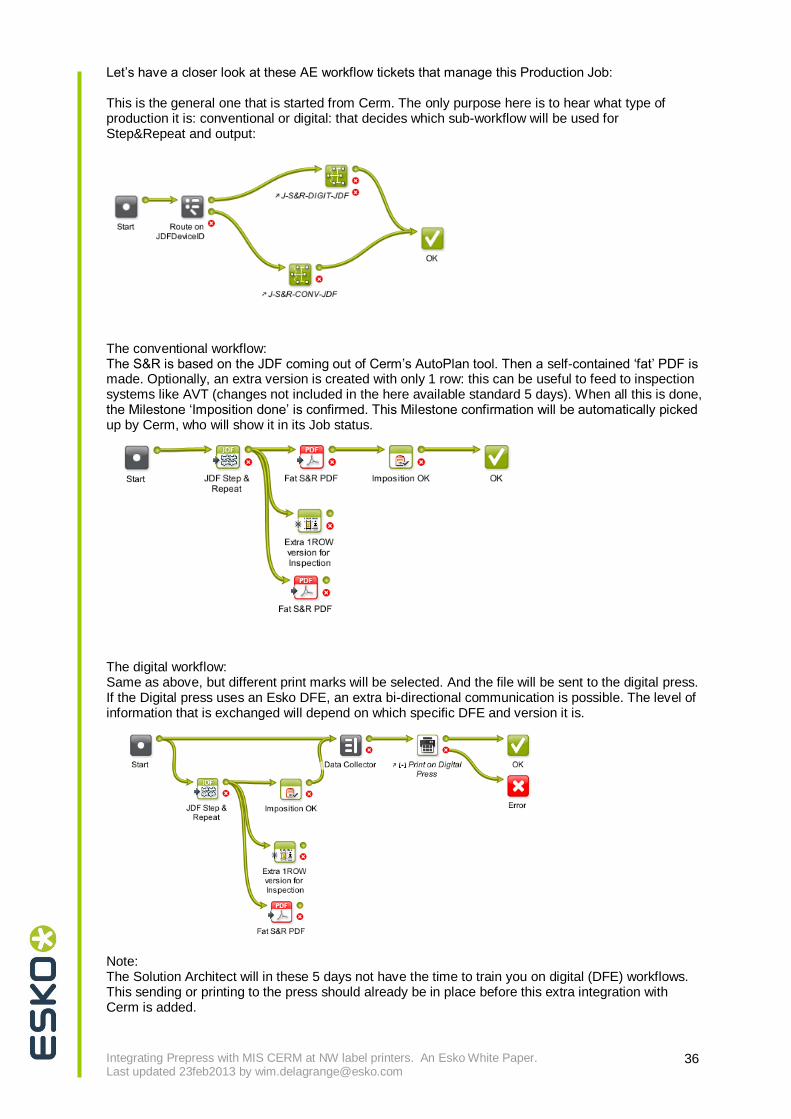
Let‟s have a closer look at these AE workflow tickets that manage this Production Job: This is the general one that is started from Cerm. The only purpose here is to hear what type of production it is: conventional or digital: that decides which sub-workflow will be used for Step&Repeat and output:
The conventional workflow: The S&R is based on the JDF coming out of Cerm‟s AutoPlan tool. Then a self-contained „fat‟ PDF is made. Optionally, an extra version is created with only 1 row: this can be useful to feed to inspection systems like AVT (changes not included in the here available standard 5 days). When all this is done, the Milestone „Imposition done‟ is confirmed. This Milestone confirmation will be automatically picked up by Cerm, who will show it in its Job status.
The digital workflow: Same as above, but different print marks will be selected. And the file will be sent to the digital press. If the Digital press uses an Esko DFE, an extra bi-directional communication is possible. The level of information that is exchanged will depend on which specific DFE and version it is.
Note: The Solution Architect will in these 5 days not have the time to train you on digital (DFE) workflows. This sending or printing to the press should already be in place before this extra integration with Cerm is added.
Integrating Prepress with MIS CERM at NW label printers. An Esko White Paper. Last updated 23feb2013 by [email protected]
37
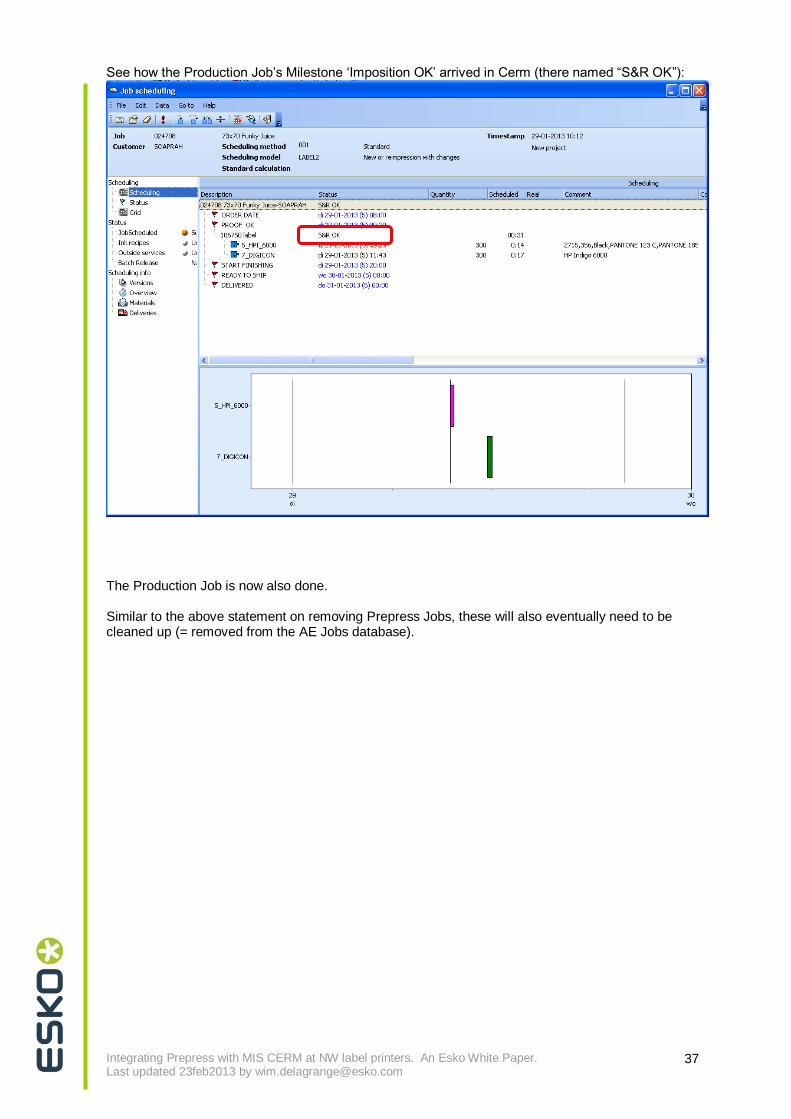
See how the Production Job‟s Milestone „Imposition OK‟ arrived in Cerm (there named “S&R OK”):
The Production Job is now also done. Similar to the above statement on removing Prepress Jobs, these will also eventually need to be cleaned up (= removed from the AE Jobs database).
Integrating Prepress with MIS CERM at NW label printers. An Esko White Paper. Last updated 23feb2013 by [email protected]
38
8. Note on ‘End of Job’ and ‘End of Product Life’
End of a Prepress or of a Production Job: Cerm administration contains a procedure for closing jobs after invoicing. This procedure can send a „RemoveJob‟ instruction to Esko‟s Automation Engine. This will delete the Job from the Jobs database, and preferably also the data in that Job-Folder (as explained, this is supposed to be temporary data anyway). On the Automation Engine side no extra action is required. The Products that were linked into those Jobs of course stay in their database, also when the Job(s) they are in are being deleted (that is why we have that requirement to split the data structure). Those Products will stay available for a later new production Job order.
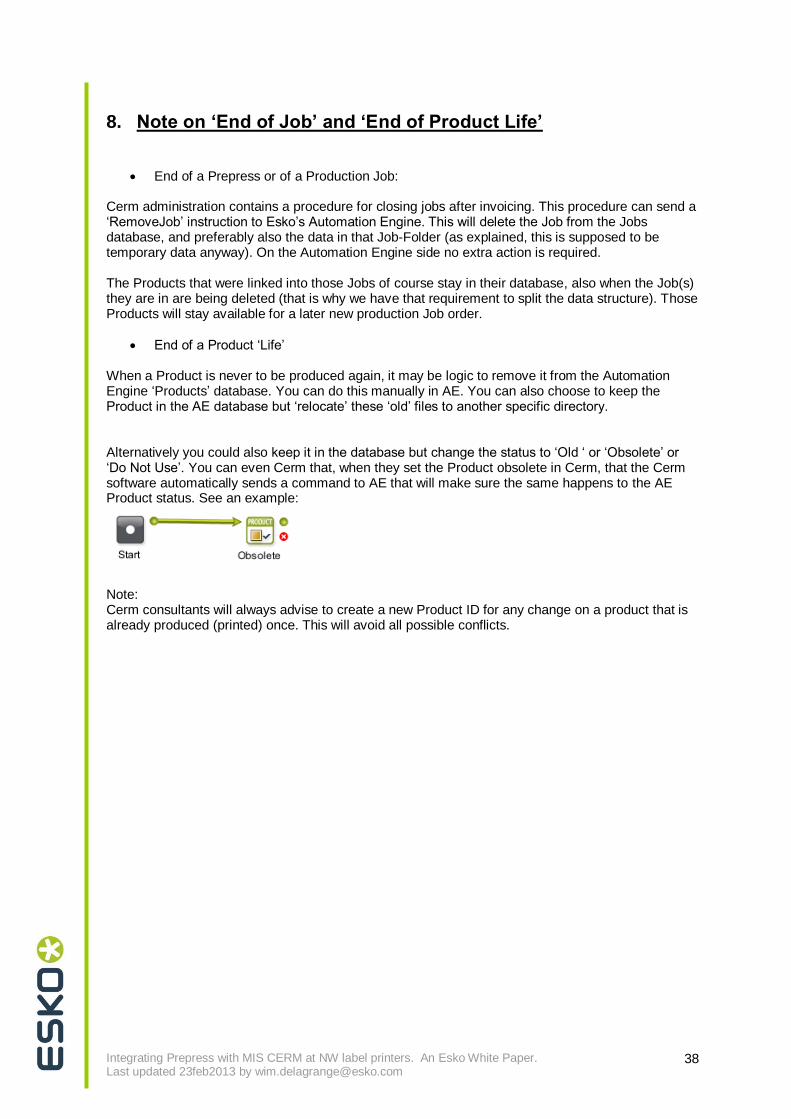
End of a Product „Life‟ When a Product is never to be produced again, it may be logic to remove it from the Automation Engine „Products‟ database. You can do this manually in AE. You can also choose to keep the Product in the AE database but „relocate‟ these „old‟ files to another specific directory. Alternatively you could also keep it in the database but change the status to „Old „ or „Obsolete‟ or „Do Not Use‟. You can even Cerm that, when they set the Product obsolete in Cerm, that the Cerm software automatically sends a command to AE that will make sure the same happens to the AE Product status. See an example:
Note: Cerm consultants will always advise to create a new Product ID for any change on a product that is already produced (printed) once. This will avoid all possible conflicts.
Integrating Prepress with MIS CERM at NW label printers. An Esko White Paper. Last updated 23feb2013 by [email protected]
39
9. Note on Product statuses You have seen that a lot of automation is based on the status of the Product. A change in Product status is indeed typically a signal for a next action to take place. Most of the standard ones used have indeed been described here. We still get these frequently asked questions related to statuses:
Can they be renamed? o yes, by Cerm and Esko specialists o typically to more personal phrasings or translations
Can you add extra ones? o yes, by Cerm and Esko specialists o What can NOT be done in the standard 5 days of this integration package is
extending the workflow so that extra AE-tasks are launched when such an extra status is set. However do not hesitate to contact Cerm or Esko to explain this request.
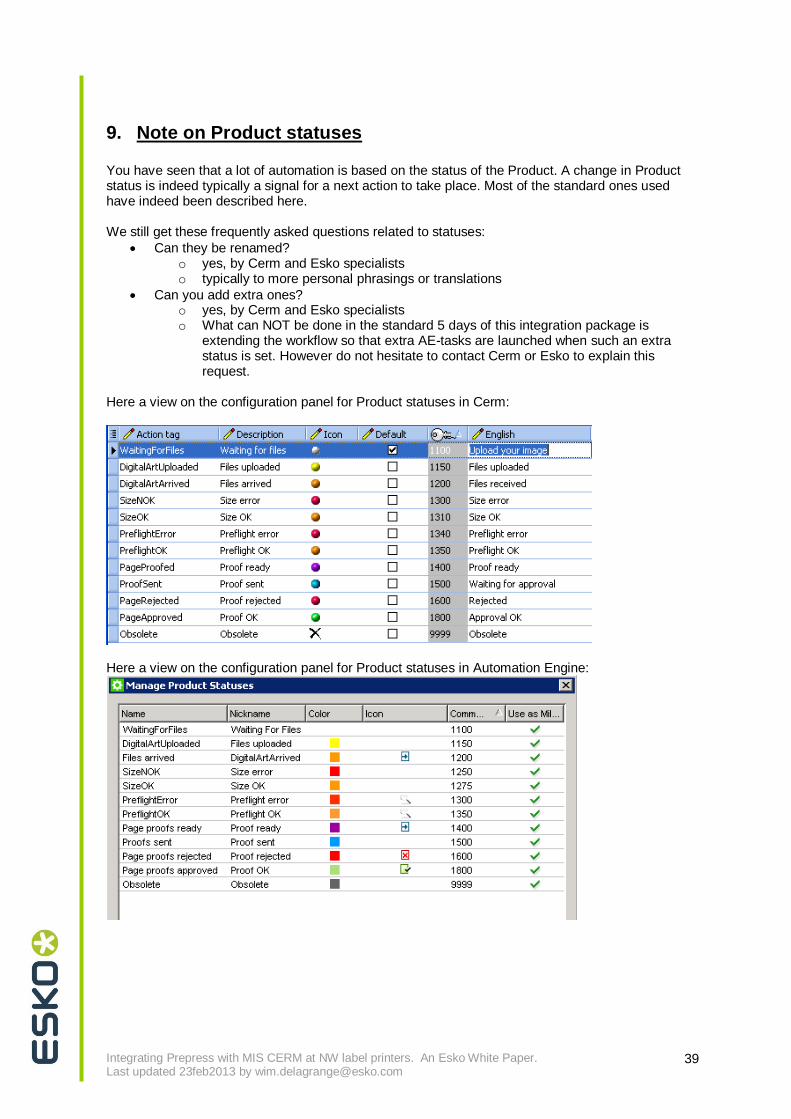
Here a view on the configuration panel for Product statuses in Cerm:
Here a view on the configuration panel for Product statuses in Automation Engine:
Integrating Prepress with MIS CERM at NW label printers. An Esko White Paper. Last updated 23feb2013 by [email protected]
40
10. Work list of the Esko Solution Architect in these 5 days
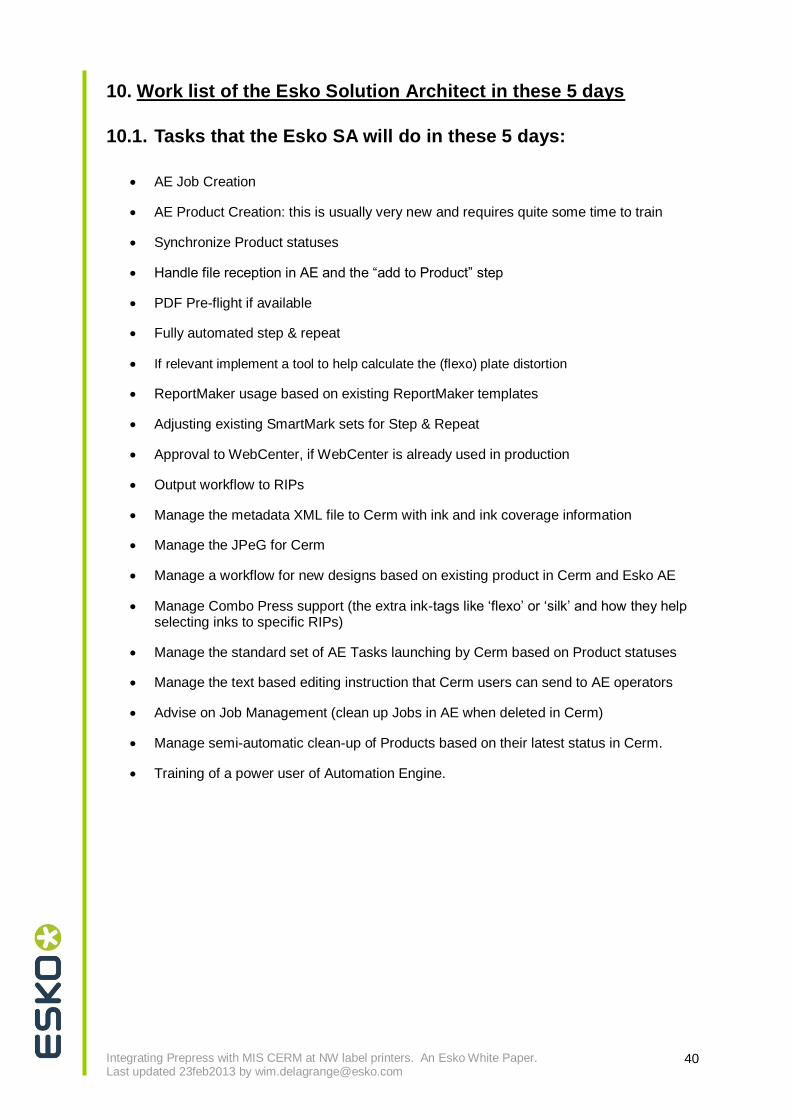
10.1. Tasks that the Esko SA will do in these 5 days:
AE Job Creation
AE Product Creation: this is usually very new and requires quite some time to train
Synchronize Product statuses
Handle file reception in AE and the “add to Product” step
PDF Pre-flight if available
Fully automated step & repeat
If relevant implement a tool to help calculate the (flexo) plate distortion
ReportMaker usage based on existing ReportMaker templates
Adjusting existing SmartMark sets for Step & Repeat
Approval to WebCenter, if WebCenter is already used in production
Output workflow to RIPs
Manage the metadata XML file to Cerm with ink and ink coverage information
Manage the JPeG for Cerm
Manage a workflow for new designs based on existing product in Cerm and Esko AE
Manage Combo Press support (the extra ink-tags like „flexo‟ or „silk‟ and how they help selecting inks to specific RIPs)
Manage the standard set of AE Tasks launching by Cerm based on Product statuses
Manage the text based editing instruction that Cerm users can send to AE operators
Advise on Job Management (clean up Jobs in AE when deleted in Cerm)
Manage semi-automatic clean-up of Products based on their latest status in Cerm.
Training of a power user of Automation Engine.
Integrating Prepress with MIS CERM at NW label printers. An Esko White Paper. Last updated 23feb2013 by [email protected]
41
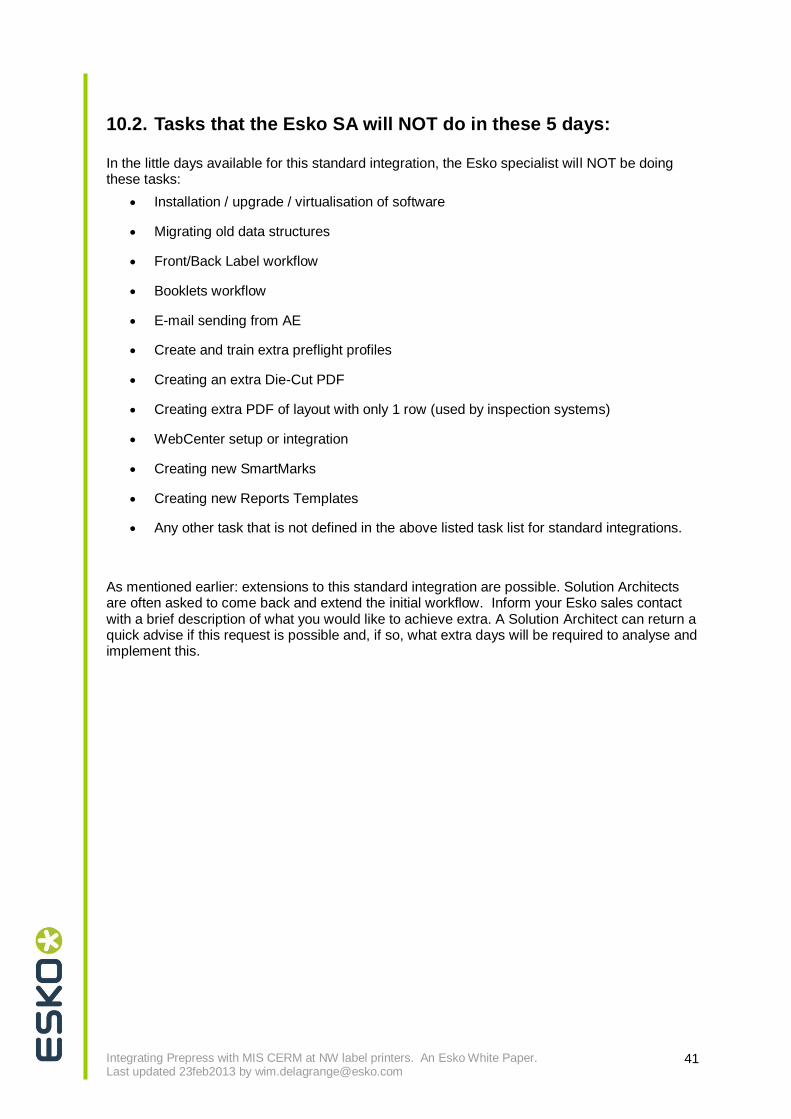
10.2. Tasks that the Esko SA will NOT do in these 5 days: In the little days available for this standard integration, the Esko specialist will NOT be doing these tasks:
Installation / upgrade / virtualisation of software
Migrating old data structures
Front/Back Label workflow
Booklets workflow
E-mail sending from AE
Create and train extra preflight profiles
Creating an extra Die-Cut PDF
Creating extra PDF of layout with only 1 row (used by inspection systems)
WebCenter setup or integration
Creating new SmartMarks
Creating new Reports Templates
Any other task that is not defined in the above listed task list for standard integrations.
As mentioned earlier: extensions to this standard integration are possible. Solution Architects are often asked to come back and extend the initial workflow. Inform your Esko sales contact with a brief description of what you would like to achieve extra. A Solution Architect can return a quick advise if this request is possible and, if so, what extra days will be required to analyse and implement this.

Integrating Prepress with MIS CERM at NW label printers. An Esko White Paper. Last updated 23feb2013 by [email protected]
42
11. With or without Cerm’s ‘Web4Labels’ tool „Web4Labels‟ (W4L) is the web store front of the MIS Cerm where end-customers can place production orders of existing products, including pricing quotes and get information on prior produced products. They can also create new products, upload the new artwork, and decide a „good for print‟ online. „Web4Labels‟ is an extension of Cerm, the MIS of the printer, and so also owned and managed by the printer.
There is also a demo movie that shows this workflow with this extra use of W4L: Find it in the list on www.esko.com/movies (section software - section „workflow integration‟). Main differences when you also Cerm‟s W4L:
Creation of new products in W4L is automatically entered in (and decided by) the underlying MIS Cerm.
Design arrival via W4L automatically enters Cerm. o Cerm forwards to Esko (in same way as if done manual in Cerm)
Product status in Cerm is automatically visible in W4L. So when changed in Esko, both Cerm and W4L.
o So no matter where a user decides an approval, these 3 applications will keep each other up to date. Also when even Esko WebCenter is used!
Product related files visible in Cerm (made by Esko) are also made visible in W4L: JPeG, Report Files, Preflight report files.
Sales orders requested on W4L enter Cerm, but do not automatically go to Esko. o They first need to become production orders: before going to Esko they need a
Cerm users to determine the production, to „AutoPlan‟ and check production planning.
Integrating Prepress with MIS CERM at NW label printers. An Esko White Paper. Last updated 23feb2013 by [email protected]
43
This concludes the overview of what information is exchanged between Cerm and Automation Engine during a standard integration project. **********************************************************************************************************
12. Confirmation of understanding (please sign) When purchasing the ‘Standard integration of Automation Engine with Cerm’ package from Esko, please do sign below and send this page to your sales contact or to [email protected]. Thank you very much! Full Name: Job function: Date:
“I have read and understood this White Paper” Signature: