Embed Size (px)
Citation preview

White & Gloss Ink Guide

Thank you very much for purchasing this product. To ensure correct and safe usage with a full understanding of this product's performance, please be sure to
read through this manual completely and store it in a safe location. Unauthorized copying or transferral, in whole or in part, of this manual is prohibited. The contents of this operation manual and the specifications of this product are subject to change without
notice. The operation manual and the product have been prepared and tested as much as possible. If you find any
misprint or error, please inform us. Roland DG Corp. assumes no responsibility for any direct or indirect loss or damage which may occur through
use of this product, regardless of any failure to perform on the part of this product. Roland DG Corp. assumes no responsibility for any direct or indirect loss or damage which may occur with
respect to any article made using this product.

1
Chapter 1 Getting Started .................................................................................................................3
1-1 What This Document Assumes and Related Manuals ..........................................................4What This Document Assumes ................................................................................................................................................ 4Related Manuals ........................................................................................................................................................................... 4
1-2 White Ink Features and Printing Methods ............................................................................5Features of White Ink ................................................................................................................................................................... 5Methods of Printing Using White Ink .................................................................................................................................... 5
1-3 Gloss Ink Features and Printing Methods ............................................................................6Features of Gloss Ink ..................................................................................................................................................................... 6Methods of Printing Using Gloss Ink ...................................................................................................................................... 6
1-4 Important Points to Know Before You Print ..........................................................................7Important Points to Know Before You Print ........................................................................................................................ 7
Chapter 2 Getting Ready ...................................................................................................................9
2-1 Preparing Roland VersaWorks ............................................................................................10Starting Roland VersaWorks ....................................................................................................................................................10Creating a Folder for Saving PS Files ...................................................................................................................................10
2-2 Creating Printing Data ......................................................................................................... 11Basic Approach for Creating Printing Data ........................................................................................................................11Creating Data for Printing (Adobe Illustrator CS3) .........................................................................................................12
2-3 Printer Preparations ............................................................................................................18Making the Printer Settings and Loading Media ............................................................................................................18
Chapter 3 Printing ............................................................................................................................19
3-1 Print Modes .........................................................................................................................20Print Mode .....................................................................................................................................................................................20
3-2 Printing Using White or CMYK Color Inks ...........................................................................21Printing Using White and CMYK Color Inks ........................................................................................................................21Printing Using Only White Ink .................................................................................................................................................25Printing Using Only CMYK Inks ...............................................................................................................................................26
3-3 Printing Using Gloss Ink ......................................................................................................27Gloss-finish Printing (White or CMYK Colors Gloss) ...................................................................................................27Matte-finish Printing (White or CMYK Colors Gloss) .................................................................................................29Embossed-finish Printing (White or CMYK Colors Gloss) .........................................................................................31Printing Using Only Gloss Ink ..................................................................................................................................................34
Chapter 4 Advanced ........................................................................................................................35
4-1 More Advanced Printing Settings ........................................................................................36Making Advanced Settings for Each Individual Job ......................................................................................................36White or CMYK Colors ⇨ Gloss: When You Want Keep Changes in Settings to a Minimum ............................37VersaWorks Online (More Advanced Printing Settings) ...............................................................................................41
4-2 Creating Decals (Cutting after Printing) .............................................................................42Overview of Decal Creation ....................................................................................................................................................42Creating Decals Through Printing Using CMYK Color Inks or White Ink ..................................................................42Creating Decals Through Printing Using Gloss Ink .........................................................................................................42
Contents

2
Copyright and property of this Software and this manual belong to Roland DG Corp. No part of this publication may be reproduced, stored in a retrieval system or transmitted, in any from or by any means, electronic, mechanical, photocopy, recording or otherwise, without the prior written permission of the publisher.VersaWorks is a registered trademark of Roland DG Corp.Windows is a registered trademarks or trademarks of Microsoft® Corporation in the United States and/or other countries.Pentium are registered trademarks of Intel Corporation in the United States.Macintosh is a registered trademark of Apple Inc.Adobe, the Adobe logo, PostScript, PostScript 3, and Illustrator are either registered trademarks or trademarks of Adobe Systems Incorporated in the United States and/or other countries. ©2007 Adobe Systems Incorporated. All rights reserved.Other company names and product names are trademarks or registered trademarks of their respective holders.
http://www.rolanddg.com/Copyright © 2008 Roland DG Corporation

3
Chapter 1 Getting Started

4 Chapter 1 Getting Started
1-1 What This Document Assumes and Related Manuals
What This Document Assumes
Before performing any operations described in this guide, make sure that all the following preparations are complete. Assembling and installing the LEC-300 unit Installing VersaWorks on your computer, and connecting the computer to the LEC-300 via a network
Related Manuals
Read the following documentation for information about setting up the LEC-300 unit and VersaWorks.
(1) LEC-300 Setup GuideThis manual covers details about how to use the LEC-300, including how to set up the printer and where to locate the printer, etc. Be sure to read this manual.
(2) LEC-300 User's ManualThis manual describes operation methods in detail. After you've read the LEC-300 Setup Guide, be sure to read this manu-al.
(3) VersaWorks Quick Start GuideThis manual explains basic operations of VersaWorks, including how to set up the program. Be sure to read Chapter 1 of this manual and make necessary setups on your computer. It is also recommended to read Chapter 2 of this manual and become familiar with how to use this program.

5Chapter 1 Getting Started
1-2 White Ink Features and Printing Methods
Features of White Ink
The ECO-UV white ink that this unit uses achieves high density and concealment, and is capable of providing attractive results when white and CMYK colors are overprinted. This ink is suited to printing on transparent media, and can be used it to create items for shop interiors and displays, PET bottles and other packages, decals, and more.
Methods of Printing Using White Ink
Printing using white and CMYK ink
When you're printing using white and CMYK color inks, this unit prints the areas that use the white ink and the CMYK color inks simultaneously, in a single pass, so stable, highly intricate printing having no misalignment due to feed is possible. When you're printing using transparent media, you can create results intended to be viewed from the back (the side opposite the printed surface) by reversing the image and changing the sequence in which white and CMYK colors are printed. P. 21, "Printing Using White and CMYK Color Inks"
Printing White Only or CMYK Colors Only
You can also perform printing using only white ink or only CMYK color inks.To display the side opposite the printed surface, you can take such action as printing a mirror image of the artwork. P. 25, "Printing Using Only White Ink," and p. 26, "Printing Using Only CMYK Color Inks"

6 Chapter 1 Getting Started
1-3 Gloss Ink Features and Printing Methods
Features of Gloss Ink
The ECO-UV Gloss ink that this unit uses is colorless and transparent, and can impart a glossy feel to the printed item, as well as enhancing weatherability and robustness.* Also, depending on the printing settings, you can even deliberately eliminate glossiness and produce a matte finish, or perform fill overprinting using gloss ink to raise the printed surface and create an embossed finish.* Glossiness, weatherability, and robustness may vary depending on the media used, the environment, and other printing
conditions.
Methods of Printing Using Gloss Ink
Gloss-finish Printing
This printing method imparts a glossy finish to the printed item. When you're overprinting an item already printed using white or CMYK color inks, you pull back the printed item and perform one pass of fill overprinting with gloss ink. Printing using only gloss ink is also possible. Forming a coating of gloss ink imparts a glossy finish and can also achieve high weath-erability and robustness. P. 27, "Gloss-finish Printing (White or CMYK Colors Gloss)," and p. 34, "Printing Using Only Gloss Ink"
Matte-finish Printing
This printing method eliminates glossiness and produces a restful matte finish. When you're overprinting an item already printed using white or CMYK color inks, you pull back the printed item and perform one pass of fill overprinting with gloss ink. Printing using only gloss ink is also possible. This perform fill overprinting of white and CMYK colors with gloss ink, which makes it possible to produce results where glossiness is suppressed while weatherability and robustness are enhanced. P. 29, "Matte-finish Printing (White or CMYK Colors Gloss)," and p. 34, "Printing Using Only Gloss Ink"
Embossed-finish Printing
This printing method can produce items that have a three-dimensional feel by performing fill overprinting of the item using gloss ink. You determine the height to which the printed surface is raised by setting the number of fill-overprint passes in VersaWorks. After performing fill-overprinting by this specified number of passes, the item is overprinted one last time using gloss ink to produce a gloss finish. When you're overprinting an item already printed using white or CMYK color inks, you pull back the printed item and perform fill overprinting with gloss ink. Printing using only gloss ink is also possible. P. 31, "Embossed-finish Printing (White or CMYK Colors Gloss)," and p. 34, "Printing Using Only Gloss Ink"

7Chapter 1 Getting Started
1-4 Important Points to Know Before You Print
Important Points to Know Before You Print
Printing using white ink or gloss ink differs in some ways from printing using CMYK color inks. Give attention to the follow-ing points when printing.
Creating Printing Data When you're printing using white ink or gloss ink, you use what's called a "spot color" when you create the printing data.
You can then use this spot color to specify and print the areas employing white ink or gloss ink. P. 12, "Creating Data for Printing (Adobe Illustrator CS3)" Set up the printer
When you're using transparent media, the settings on the printer must be made to match the media, such as by setting [EDGE DETECTION] to "DISABLE."
P. 18, "Making the Printer Settings and Loading Media" Settings for Roland VersaWorks
When you're using white ink or gloss ink, the settings must be made to match the printing sequence for filling using CMYK color inks and white ink and the method of gloss-ink finish (glossy, matte, or embossed).
P. 19, "Chapter 3 -- Printing"

8

9
Chapter 2 Getting Ready

10 Chapter 2 Getting Ready
2-1 Preparing Roland VersaWorks
Starting Roland VersaWorks
On the computer you're using, start Roland VersaWorks. For information on how to start the program, see the Roland Ver-saWorks Quick Start Guide. After starting the program, go to the upper left of the main screen and check to make sure that "Model (or Nickname) of Your Printer" is displayed, and that "Status" is set to "Ready to Print."
Creating a Folder for Saving PS Files
Before you actually print an image you draw using application software such as Adobe Illustrator, it is necessary to save the image as a PS file(s). And then, you can print the image by loading the PS file(s) on VersaWorks. Because of this, you should create a folder for saving PS files in advance. It is recommended to locate the folder in the root directory on your computer's local disk.
Procedure
Open [Computer] ( or [My Computer]), and then open [Local Disk (C:)].
On the [Organize] menu, click [New Folder]. (Or on the [File] menu, click [New], and then click [Folder].)
Enter the name for the folder, and then press the Enter key.Here you name "white-gloss_print", for example.

11Chapter 2 Getting Ready
2-2 Creating Printing Data
Basic Approach for Creating Printing Data
When you're printing using white ink and gloss ink, you create the printing data using spot colors. Briefly, you use the pro-gram with which you create the printing data to create spot colors named "RDG_WHITE" and "RDG_GLOSS," then apply the RDG_WHITE spot color to the areas you want to print using white ink, and the RDG_GLOSS spot color to the areas you want to print using gloss ink.The method you use to set the spot color differs depending on the program you're using. Refer to the documentation that comes with the program. This document describes how to create printing data, including how to make the settings for the spot color, using Adobe Illustrator CS3. These explanations this start on the following page.
When specifying the "RDG_WHITE" and "RDG_GLOSS" names, enter the names accurately, using single-byte upper-case charac-ters. Take care not to omit the "_" (underbar) character. The names are case-sensitive, and incorrect use of upper- and lower-case letters or omitting the "_" (underbar) when typing in either name will make detection as areas using white ink or gloss ink fail.
Specify "RDG_WHITE" for the areas where you want to use white ink.
Areas specified using RDG_WHITE are printed using white ink.Areas specified using RDG_GLOSS are printed using gloss ink.
Specify "RDG_GLOSS" for the areas where you want to use gloss ink.
2-2 Creating Printing Data
12 Chapter 2 Getting Ready
Creating Data for Printing (Adobe Illustrator CS3)
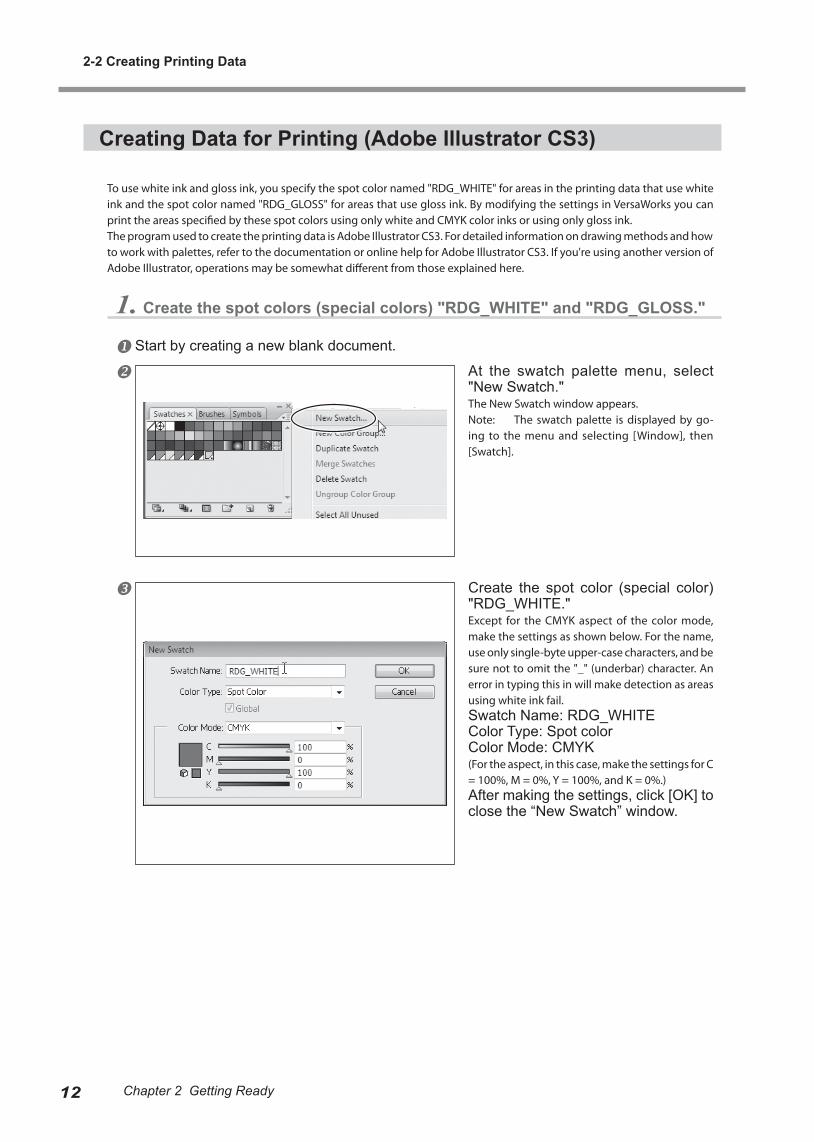
To use white ink and gloss ink, you specify the spot color named "RDG_WHITE" for areas in the printing data that use white ink and the spot color named "RDG_GLOSS" for areas that use gloss ink. By modifying the settings in VersaWorks you can print the areas specified by these spot colors using only white and CMYK color inks or using only gloss ink.The program used to create the printing data is Adobe Illustrator CS3. For detailed information on drawing methods and how to work with palettes, refer to the documentation or online help for Adobe Illustrator CS3. If you're using another version of Adobe Illustrator, operations may be somewhat different from those explained here.
1. Create the spot colors (special colors) "RDG_WHITE" and "RDG_GLOSS."
Start by creating a new blank document.
At the swatch palette menu, select "New Swatch."The New Swatch window appears.Note: The swatch palette is displayed by go-ing to the menu and selecting [Window], then [Swatch].
Create the spot color (special color) "RDG_WHITE."Except for the CMYK aspect of the color mode, make the settings as shown below. For the name, use only single-byte upper-case characters, and be sure not to omit the "_" (underbar) character. An error in typing this in will make detection as areas using white ink fail.Swatch Name: RDG_WHITEColor Type: Spot colorColor Mode: CMYK (For the aspect, in this case, make the settings for C = 100%, M = 0%, Y = 100%, and K = 0%.)After making the settings, click [OK] to close the “New Swatch” window.

2-2 Creating Printing Data
13Chapter 2 Getting Ready
Create the spot color (special color) "RDG_GLOSS."Repeat step to display the New Swatch window again, and make the following settings for the values other than the CMYK aspect of the color mode. For the name, use only single-byte upper-case characters, and be sure not to omit the "_" (underbar) character. An error in typing this in will make detection as areas using gloss ink fail.Name: RDG_GLOSSColor type: Spot colorColor mode: CMYK (For the aspect, in this case, make the settings for C = 0%, M = 60%, Y = 100%, and K = 0%.)After making the settings, click [OK] to close the “New Swatch” window.
2. Create the illustration and specify the areas using "RDG_WHITE" and "RDG_GLOSS."
Create the illustration using CMYK colors.Be sure to draw the illustration in the CMYK mode.

2-2 Creating Printing Data
14 Chapter 2 Getting Ready
Specify "RDG_WHITE" as the color of areas using white ink. Note: If you're not using white ink, you can skip this step.
Select the illustration that has areas using white ink, and for the fill color, select the "RDG_WHITE" spot color you cre-ated in step 1.-.
Specify "RDG_GLOSS" as the color of areas using gloss ink.Note: If you're not using gloss ink, you can skip this step.
Select the illustration that has areas using gloss ink, and for the fill color, select the "RDG_GLOSS" spot color you cre-ated in step 1.-.
Specify "RDG_WHITE" for the areas where you want to use white ink.
Specify "RDG_GLOSS" for the areas where you want to use gloss ink.

2-2 Creating Printing Data
15Chapter 2 Getting Ready
3. Create the PS (PostScript) file.
Select [Print] from the [File] menu.
Select [Roland VW].
Click [Setup].
Click [Continue].

2-2 Creating Printing Data
16 Chapter 2 Getting Ready
Turn on the [Print to file] option.
Click [Preferences].
Click [Advanced] in the [Layout] tab.For Windows 2000: In the "Print" dia-log box (the window at the very top of this page), go to the "Layout" tab and click [Advanced].
Click the down arrow to the right of the [Paper Size] box, and then click [PostScript Custom Page Size] from the list that appears.
For "Custom Page Size Dimen-sions," enter the values in the "Width" and "Height" fields. Enter values for the same size as the illustration you created in step 2..
2-2 Creating Printing Data
17Chapter 2 Getting Ready
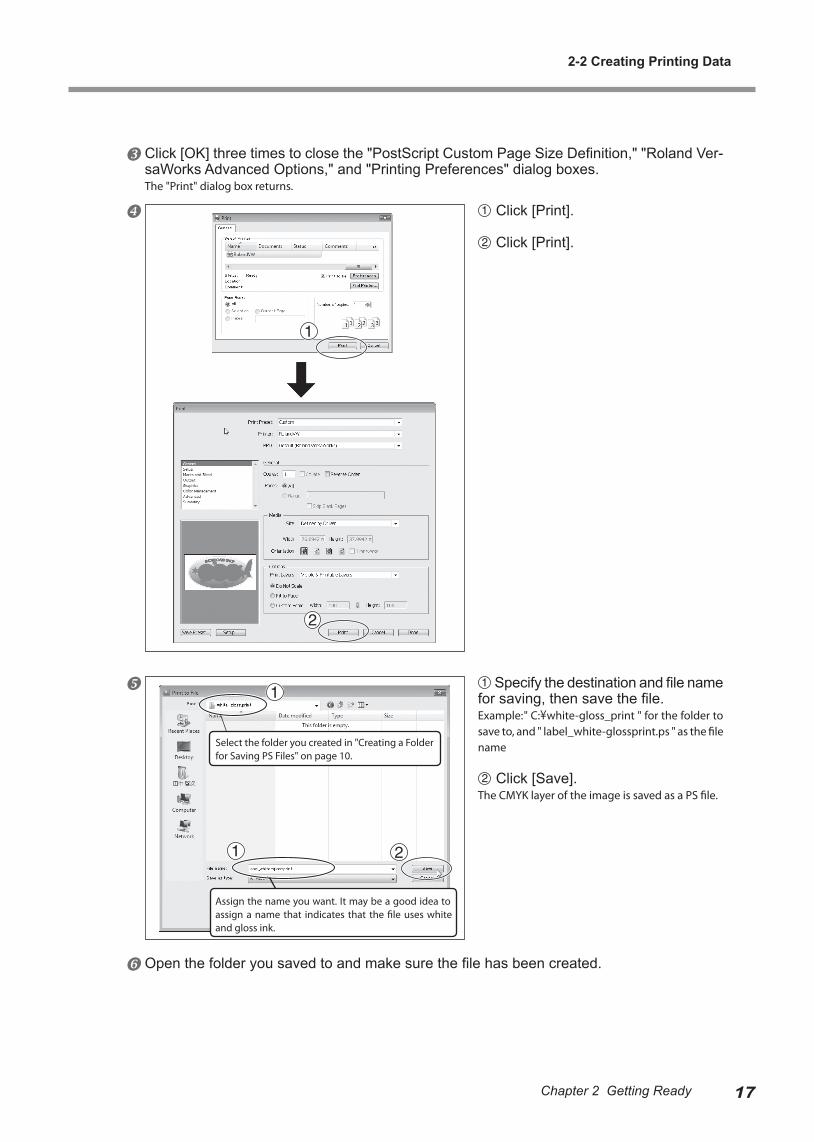
Click [OK] three times to close the "PostScript Custom Page Size Definition," "Roland Ver-saWorks Advanced Options," and "Printing Preferences" dialog boxes.The "Print" dialog box returns.
Click [Print].
Click [Print].
Specify the destination and file name for saving, then save the file. Example: " C:¥white-gloss_print " for the folder to save to, and " label_white-glossprint.ps " as the file name
Click [Save].The CMYK layer of the image is saved as a PS file.
Open the folder you saved to and make sure the file has been created.
Select the folder you created in "Creating a Folder for Saving PS Files" on page 10.
Assign the name you want. It may be a good idea to assign a name that indicates that the file uses white and gloss ink.

18 Chapter 2 Getting Ready
2-3 Printer Preparations
Making the Printer Settings and Loading Media
When Using Transparent Media
When you're using transparent media, make the necessary printing settings on the printer and load the media accord-ingly.
Procedure
Press and make the following settings.[EDGE DETECTION] to "DISABLE".
Load transparent media into the printer. When the media you are loading into the printer warps or partially floats from the platen, load it into the printer so
that its front end goes about 20 cm (8 in.) from the starting edge of the print area. Be sure to use the media clamps when you load media.
When Using Media Other Than Transparent Media
Load the media using the method described in the LEC-300 User's Manual.

19
Chapter 3 Printing

20 Chapter 3 Printing
3-1 Print Modes
Print Mode
When you're printing using white ink and gloss ink, you need to make the settings for the print mode to match the sequence of fill printing using CMYK color inks and white ink and the method of expression using gloss ink. This section gives a brief overview of each type of print mode.
White ink
Print mode Overview
CMYK (v) + PASS This mode is for printing CMYK color data only. White ink is not used.
White -> CMYK (v) + PASS This print mode is for single-pass printing using white and CMYK colors. Printing is performed in the sequence of first white ink, then overprinting by CMYK color inks.
CMYK -> White (v) + PASS This print mode is for single-pass printing using white and CMYK colors. Printing is performed in the sequence of first CMYK color inks, then overprinting by white ink.
White (v) + PASS This mode is for printing white data only. CMYK color inks are not used.
Gloss ink
Print mode Overview
GlossVarnish (v) + PASS This mode produces a glossy finish on the printed item. In the case of fill overprint-ing on CMYK colors or white, the media is pulled back and printed with gloss ink.
MatteVarnish (v) + PASS This mode produces a matte finish on the printed item. In the case of fill overprint-ing on CMYK colors or white, the media is pulled back and printed with gloss ink.
Embossing (v) + PASS
This mode produces a embossed finish that imparts a three-dimensional feel to the printed item. In the case of fill overprinting on CMYK colors or white, the media is pulled back and printed with gloss ink. You can vary the thickness by adjusting the setting for the number of fill-overprinting passes using gloss ink.

21Chapter 3 Printing
3-2 Printing Using White or CMYK Color Inks
Printing Using White and CMYK Color Inks
This section describes how to perform printing using both white ink and CMYK color inks. This method prints CMYK color data and white data in a single pass, but you vary the printing settings depending on how the finished results are you be viewed (the printed surface or the side opposite the printed surface) and on which type of ink is the undercoat.
Procedure
Make sure that you have finished making the preparations for VersaWorks, creating the printing data, and getting the printer ready ( page 9, "Chapter 2 Getting Ready").
Double-click ."Queue A Properties" window appears.
At the "Queue A Properties" window, make the basic settings for printing. Clicking an icon on the left side of the window switches what is displayed on the right side. Refer to the table following and make the settings for the respective items.

3-2 Printing Using White or CMYK Color Inks
22 Chapter 3 Printing
When You Want to Display the Printed Surface of the Finished Results (White Undercoat)
Icon Setting Item Setting
Mirror Off
Media Type Generic
Mode White -> CMYK (v) + PASS *
Operation Mode Print Only
Return to Origin After Print Off
* When you want to make the CMYK color inks the undercoat, even in cases where the printed surface of the finished results is to be the surface displayed, select the "CMYK -> White (v) + PASS" setting.
After making the settings, click [OK] to close the "Queue A Properties" window.
Transparent media
You will have the printed image from this side (the printed surface of the fin-ished results).
WhiteCMYK
Note: The white data and the CMYK color data are printed simultaneously, but are shown here as separate layers in order to indicate the printing sequence.

3-2 Printing Using White or CMYK Color Inks
23Chapter 3 Printing
When You Want to Display the Side Opposite the Printed Surface of the Finished Results (CMYK Un-dercoat)
Icon Setting Item Setting
Mirror Off
Media Type Generic
Mode CMYK (v) -> White + PASS *
Operation Mode Print Only
Return to Origin After Print Off
* When you want to make the white ink the undercoat, even in cases where the side opposite the printed surface of the finished results is to be the surface displayed, select the "White -> CMYK (v) + PASS " setting.
After making the settings, click [OK] to close the "Queue A Properties" window.
Transparent media
You will have the printed image from this side (the opposite side of the printed surface of the finished results).
White
CMYK
Note: The white data and the CMYK color data are printed simultaneously, but are shown here as separate layers in order to indicate the printing sequence.

3-2 Printing Using White or CMYK Color Inks
24 Chapter 3 Printing
Go to "Job List" and click the "Queue A" tab, and drag the print job you created in "Creating Data for Printing" on page 12 to the queue A job list.The contents of the file are displayed in the preview window, and the layout on the media is displayed in the layout window. Areas using "RDG_WHITE" are displayed in transparent magenta.
Carry out printing.Click the print job in the job list on the Queue A tab to select it, then click .

3-2 Printing Using White or CMYK Color Inks
25Chapter 3 Printing
Printing Using Only White Ink
Procedure
Make sure that you've finished making the preparations for VersaWorks and getting the printer ready ( page 9, "Chapter 2 Getting Ready").
Prepare the printing data.Using a program such as Adobe Illustrator, create the data for printing white only. When creating the data, remember to specify "RDG_WHITE" as the color.
P. 12, "Creating Data for Printing"
Make the settings in the "Queue A Properties" window.Double-click , and in the "Queue A Properties" window that appears, make the basic settings for printing as shown following.
Icon Setting item Setting
Mirror On *
Media Type Generic
Mode White (v) + PASS
Operation Mode Print Only
Return to Origin After Print Off
* Change the setting depending on whether you want to display the printed surface of the finished results or the side opposite the printed surface.
After making the settings, click [OK] to close the "Queue A Properties" window.
Go to the job list and click the "Queue A" tab, and drag the white-only print job to the queue A job list.
Carry out printing of white data only.Click the print job in the job list on the Queue A tab to select it, then click .

3-2 Printing Using White or CMYK Color Inks
26 Chapter 3 Printing
Printing Using Only CMYK Inks
Procedure
Make sure that you've finished making the preparations for VersaWorks and getting the printer ready ( page 9, "Chapter 2 Getting Ready").
Prepare the printing data.Using a program such as Adobe Illustrator, create the data for printing CMYK colors only.
Make the settings in the "Queue A Properties" window.Double-click , and in the "Queue A Properties" window that appears, make the basic settings for printing as shown following.
Icon Setting item Setting
Mirror On *
Media Type Generic
Mode CMYK (v) + PASS
Operation Mode Print Only
Return to Origin After Print Off
* Change the setting depending on whether you want to display the printed surface of the finished results or the side opposite the printed surface.
After making the settings, click [OK] to close the "Queue A Properties" window.
Go to the job list and click the "Queue A" tab, and drag the CMYK-only print job to the queue A job list.
Carry out printing of CMYK color data only.Click the print job in the job list on the Queue A tab to select it, then click .
27Chapter 3 Printing
3-3 Printing Using Gloss Ink
Gloss-finish Printing (White or CMYK Colors Gloss)
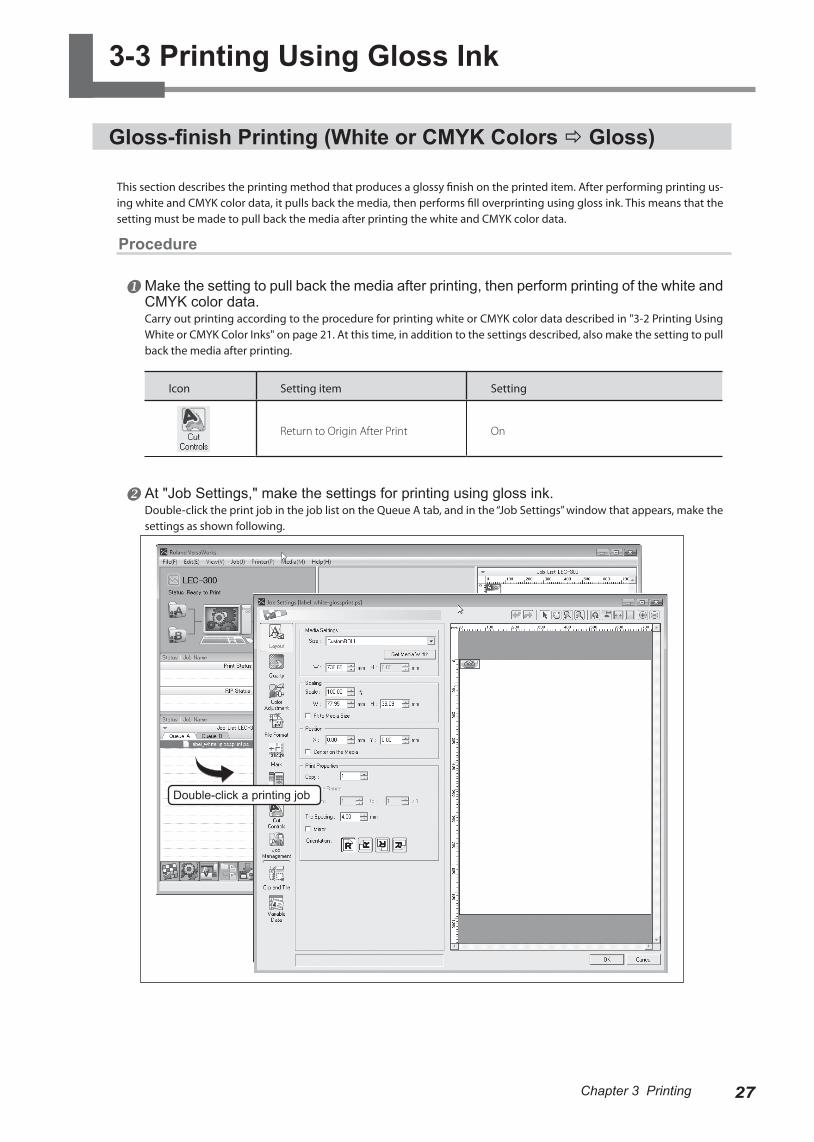
This section describes the printing method that produces a glossy finish on the printed item. After performing printing us-ing white and CMYK color data, it pulls back the media, then performs fill overprinting using gloss ink. This means that the setting must be made to pull back the media after printing the white and CMYK color data.
Procedure
Make the setting to pull back the media after printing, then perform printing of the white and CMYK color data.Carry out printing according to the procedure for printing white or CMYK color data described in "3-2 Printing Using White or CMYK Color Inks" on page 21. At this time, in addition to the settings described, also make the setting to pull back the media after printing.
Icon Setting item Setting
Return to Origin After Print On
At "Job Settings," make the settings for printing using gloss ink.Double-click the print job in the job list on the Queue A tab, and in the “Job Settings” window that appears, make the settings as shown following.
Double-click a printing job

3-3 Printing Using Gloss Ink
28 Chapter 3 Printing
Icon Setting item Setting
Media Type Special Effects
Mode GlossVarnish (v) + PASS
Operation Mode Print Only
Return to Origin After Print Off
After making the settings, click [OK] to close the "Job Settings" window.The contents of the file are displayed in the preview window, and the layout on the media is displayed in the layout window. Areas using "RDG_WHITE" are displayed with shading in transparent magenta, and areas using "RDG_GLOSS" are displayed with shading in transparent cyan.
Carry out gloss-finish printing using gloss ink.Click the print job in the job list on the Queue A tab to select it, then click .This prints only the gloss-ink areas of the print job.

3-3 Printing Using Gloss Ink
29Chapter 3 Printing
Matte-finish Printing (White or CMYK Colors Gloss)
This section describes the printing method that produces a matte finish on the printed item. After performing printing using white and CMYK color data, it pulls back the media, then performs paper overprinting using gloss ink. This means that the setting must be made to pull back the media after printing the white and CMYK color data.
Procedure
Make the setting to pull back the media after printing, then perform printing of the white and CMYK color data.Carry out printing according to the procedure for printing white or CMYK color data described in "3-2 Printing Using White or CMYK Color Inks" on page 21. At this time, in addition to the settings described, also make the setting to pull back the media after printing.
Icon Setting item Setting
Return to Origin After Print On
At "Job Settings," make the settings for printing using gloss ink.Double-click the print job in the job list on the Queue A tab, and in the “Job Settings” window that appears, make the settings as shown following.
Double-click a printing job

3-3 Printing Using Gloss Ink
30 Chapter 3 Printing
Icon Setting item Setting
Media Type Special Effects
Mode MatteVarnish (v) + PASS
Operation Mode Print Only
Return to Origin After Print Off
After making the settings, click [OK] to close the "Job Settings" window.The contents of the file are displayed in the preview window, and the layout on the media is displayed in the layout window. "RDG_WHITE" are displayed with shading in transparent magenta, and areas using "RDG_GLOSS" are displayed with shading in transparent cyan.
Carry out matte-finish printing using gloss ink.Click the print job in the job list on the Queue A tab to select it, then click .This prints only the gloss-ink areas of the print job.

3-3 Printing Using Gloss Ink
31Chapter 3 Printing
Embossed-finish Printing (White or CMYK Colors Gloss)
This section describes the printing method that produces an embossed finish by raising the printed surface through fill overprinting using gloss ink. After performing printing using white and CMYK color data, it pulls back the media, then per-forms fill overprinting using gloss ink. This means that the setting must be made to pull back the media after printing the white and CMYK color data. You use VersaWorks to set the number of fill-overprinting passes using gloss ink. The unit performs matte-finish fill overprint-ing for the specified number of passes, then performs overprinting one additional time to give the surface a glossy finish. This means that the number of fill-overprint passes using gloss ink is equal to the number set using VersaWorks plus one.
Procedure
Make the setting to pull back the media after printing, then perform printing of the white and CMYK color data.Carry out printing according to the procedure for printing white or CMYK color data described in "3-2 Printing Using White or CMYK Color Inks" on page 21. At this time, in addition to the settings described, also make the setting to pull back the media after printing.
Icon Setting item Setting
Return to Origin After Print On
At "Job Settings," make the settings for printing using gloss ink.Double-click the print job in the job list on the Queue A tab, and in the “Job Settings” window that appears, make the settings as shown following.
Double-click a printing job

3-3 Printing Using Gloss Ink
32 Chapter 3 Printing
Icon Setting item Setting
Media Type Special Effects
Mode Embossing (v) + PASS
Use Custom Settings On
Overprint 1 to 7 times*
Operation Mode Print Only
Return to Origin After Print Off
* The specified number of overprinting passesYou can select a value from 1 to 7 for the number of overprint passes for an embossed finish. The actual number of printing passes is the specified value plus one. The ink thickness of the number of overprinting passes varies according to such factors as the type of media used and the printing environment, but one example is as shown in the graph following.
Specified number of overprinting passes
Ink thickness(thickness of specified num
ber of passes +1)
(Set using .)
Media: uncoated PET filmAmbient temperature: 25 °C (77 °F)
(mm)
(Number)
For reference: specified number of overprinting passes and ink thickness

3-3 Printing Using Gloss Ink
33Chapter 3 Printing
After making the settings, click [OK] to close the "Job Settings" window.The contents of the file are displayed in the preview window, and the layout on the media is displayed in the layout window. Areas using "RDG_WHITE" are displayed with shading in transparent magenta, and areas using "RDG_GLOSS" are displayed with shading in transparent cyan.
Carry out embossed-finish printing using gloss ink.Click the print job in the job list on the Queue A tab to select it, then click .This prints only the gloss-ink areas of the print job.

3-3 Printing Using Gloss Ink
34 Chapter 3 Printing
Printing Using Only Gloss Ink
Gloss finish, matte finish, and embossed finish can also all be printed using only gloss ink.
Procedure
Make sure that you’ve finished making the preparations for VersaWorks and getting the printer ready ( page 9, “Chapter 2 Getting Ready”).
Prepare the printing data.Using a program such as Adobe Illustrator, create the data for printing gloss only. When creating the data, remember to specify "RDG_GLOSS" as the color.
P. 12, "Creating Data for Printing"
Make the settings in the “Queue A Properties” window.Double-click , the “Queue A Properties” window that appears, make the basic settings for printing as shown fol-lowing.
Icon Setting item Setting
Media Type Special Effects
Mode
<For gloss finish>GlossVarnish (v) + PASS
<For matte finish>MatteVarnish (v) + PASS
<For embossed finish>Embossing (v) + PASS
Embossed finish only
Use Custom Settings On
Overprint 1 to 7 times*
Operation Mode Print Only
Return to Origin After Print Off
* The specified number of overprinting passesYou can select a value from 1 to 7 for the number of overprint passes for an embossed finish. The actual number of printing passes is the specified value plus one. (For reference, see the chart on page 32.)
After making the settings, click [OK] to close the “Queue A Properties” window.
Go to the job list and click the “Queue A” tab, and then drag the gloss-only print job to the queue A job list.
Carry out printing of gloss data only.Click the print job in the Job list on the Queue A tab to select it, then click .

35
Chapter 4 Advanced

36 Chapter 4 Advanced
4-1 More Advanced Printing Settings
Making Advanced Settings for Each Individual Job
Procedure
Before executing printing, double-click the print job to display the "Job Setting" window. This window is where you make advanced settings for a specific job, including settings that control printer operation and color adjustment.
Description
For many jobs, making the printing settings separately for each individual job when you execute it can be troublesome. Ac-cordingly, the "Job Setting" window is where you make the settings for individual jobs before you execute printing. In other words, with this approach, you make shared basic settings at the "Queue Properties" window, and make the settings for the individual job at the "Job Setting" window. The settings in the "Job Setting" window are updates with the settings made at the "Queue Properties" window, so you can make job-specific settings such as color adjustment.
Double-click a printing job

4-1 More Advanced Printing Settings
37Chapter 4 Advanced
White or CMYK Colors ⇨ Gloss: When You Want Keep Changes in Settings to a Minimum
The program used to create the printing data is Adobe Illustrator CS3. For detailed information on drawing methods and how to work with palettes, refer to the documentation or online help for Adobe Illustrator CS3. If you're using a different version of Adobe Illustrator, some of the operations may differ from the explanations given below.
Procedure
1. Create separate layers for the CMYK-color or white printing data and the gloss printing data.
Create the spot colors (special colors) "RDG_WHITE" and "RDG_GLOSS." On page 12, "Creating Data for Printing," follow step 1. to create the spot colors (special colors) "RDG_WHITE" and "RDG_GLOSS."
Create the illustration for the areas using CMYK color and white data.When drawing the illustration, give attention to the following points. Draw in CMYK mode. If you used two or more layers when drawing, then before you proceed to the subsequent operations, move all
drawings to the same layer (named "Layer 1" here).
Name the layer. At the layer palette menu, select "Options for
'Layer 1'" to display the Layer Options window.Note: The layer palette is displayed by going to the menu and selecting [Window], then [Layer].
Assign "CMYK-white" (for example) as the name, then click [OK].

4-1 More Advanced Printing Settings
38 Chapter 4 Advanced
Create a new layer for the gloss data. At the layer palette menu, select "New Layer"
to display the Layer Options window.Note: The layer palette is displayed by going to the menu and selecting [Window], then [Layer].
Assign "Gloss" (for example) as the name, then click [OK].
Create the illustration for the areas using gloss data.Click the "Gloss" layer to make it the layer for drawing, then create the illustration for the areas using gloss.
Specify "RDG_WHITE" as the color of the areas using white. Select the illustration that has the areas using white, and for the fill color, select the "RDG_WHITE" spot color you cre-ated in step .
Specify "RDG_GLOSS" as the color of the areas using gloss.Select the illustration that has the areas using gloss, and for the fill color, select the "RDG_GLOSS" spot color you cre-ated in step .
2. Save the CMYK-color and white printing data and the gloss printing data separately.
At the layer palette, display "CMYK-white" only.
Carry out step 3. on pages 15 through 17 to save a PostScript file containing "CMYK" only. Example: "C:¥white-gloss_print" for the folder to save to, and "label_cmyk-white.ps" as the file name

4-1 More Advanced Printing Settings
39Chapter 4 Advanced
At the layer palette, display "Gloss" only.
Carry out step 3. on pages 15 through 17 to save a PostScript file containing "CMYK-white" only.Example: "C:¥white-gloss_print" for the folder to save to, and "label_cmyk-white.ps" as the file name
3. At the "Queue A Properties" and "Queue B Properties" windows, make the basic settings for printing.
At the "Queue A Properties" window, make the basic settings for printing the CMYK color data or white data.Double-click , and in the "Queue A Properties" window that appears, make the basic settings for printing as shown below.
Icon Setting item Setting
Media Type Generic
ModeRefer to page 21, "3-2 Printing Using White and CMYK Color Inks," and select the mode that matches the target results.
Operation Mode Print Only
Return to Origin After Print Off

4-1 More Advanced Printing Settings
40 Chapter 4 Advanced
At the "Queue B Properties" window, make the basic settings for printing white data only. Double-click , and in the "Queue B Properties" window that appears, make the basic settings for printing as shown below.
Icon Setting item Setting
Media Type Special Effects
ModeRefer to page 27, "3-3 Printing Using Gloss Ink," and select the mode that matches the target results.
Embossed finish only
Use Custom Settings On
Overorint 1 to 7 times*
Operation Mode Print Only
Return to Origin After Print On
* The specified number of overprinting passesYou can select a value from 1 to 7 for the number of overprint passes for an embossed finish. The actual number of printing passes is the specified value plus one. (For reference, see the chart on page 32.)
4. Execute printing of the CMYK color data or white data.
Go to "Job List" and click the "Queue A" tab.
Drag "label_cmyk-white.ps" to the queue A job list.
Click " label_cmyk-white.ps" to select it, then click .Printing of the CMYK color data or white data is executed. After output, the media is taken back up and printing of the gloss data is executed.
5. Execute printing of the Gloss data.
Go to "Job List" and click the "Queue B" tab.
Drag "label_gloss.ps" to the queue B job list.
Click "label_gloss.ps" to select it, then click .
Description
When you perform fill overprinting using gloss ink after printing using white or CMYK color inks, you can keep the changes to settings during printing to a minimum by modifying the settings for the method you use to create the printing data and the settings for the queue folder. With this method, you first break down and save separate printing data for white and CMYK colors on the one hand and for gloss on the other, and also selectively use queue folders A and B: one for white and CMYK color data, and one for gloss data. This method requires more preparations before you perform printing, but is effective when you don't want to have to modify the printing settings for each individual job.
4-1 More Advanced Printing Settings
41Chapter 4 Advanced
VersaWorks Online (More Advanced Printing Settings)
This document has described the basic methods for printing using white or gloss ink. Of course, methods of printing using white or gloss ink other than the ones in this document are also available. You can use Illustrator's transparency features, or perform other special printing operations not covered in this document. You can get information on these advanced printing methods and the latest information about Roland VersaWorks by viewing VersaWorks Online. If you want to learn more about the features of Roland VersaWorks, or if you want to use white or gloss ink more effectively, be sure to visit VersaWorks Online. VersaWorks Online: http://dg4.roland.co.jp/en/RVW2forWeb/index.html
42 Chapter 4 Advanced
4-2 Creating Decals (Cutting after Printing)
Overview of Decal Creation
You can carry out cutting after completing printing by drawing what are known as "cutting paths" in the image data used for printing, then using the printing settings to perform what's called "printing and cutting." This feature is useful, for example, when you want to make stickers using adhesive transparent film media. For information about how to draw contour lines, see "Roland VersaWorks Quick Start Guide".When you're cutting a printed surface, we recommend carrying out a cutting test before the actual operation. For informa-tion on how to perform a cutting test, refer to the LEC-300 User's Manual.
Creating Decals Through Printing Using CMYK Color Inks or White Ink
Carry out the operations in "Printing Using White and CMYK Color Inks" on page 21, "Printing Using Only White Ink" on page 25, or "Printing Using Only CMYK Color Inks" page 26, except for the following changes. Add cutting paths to the printing data. At the "Queue A Properties" window, make the settings shown below for "Cutting Control," then carry out printing.
Icon Setting item Setting
Operation Mode Print & Cut
This executes cutting automatically after printing and drying have finished.
Creating Decals Through Printing Using Gloss Ink
Carry out the operations in "Gloss-finish Printing (White or CMYK Colors Gloss)" on page 27, "Matte-finish Printing (White or CMYK Colors Gloss)" on page 29, "Matte-finish Printing (White or CMYK Colors Gloss)" on page 31, or "Printing Using Only Gloss Ink" on page 33, except for the following changes. Use the methods of step 1. in "White or CMYK Color Gloss: When You Want Keep Changes in Settings to a Minimum"
on page 37 to create the printing data for white and CMYK colors and the printing data for gloss. If you're using only gloss ink, create printing data that uses only "RDG_GLOSS."
In the printing data you created using the methods just noted, add cutting paths to the "gloss" layer (or, if you're using only gloss ink, add cutting paths to the printing data), then save the data using the method of step 2. in "White or CMYK Color Gloss: When You Want Keep Changes in Settings to a Minimum" on page 37.
At the "Queue A Properties" window (or "Job Setting" window) for when printing the gloss ink, make the settings shown below for "Cutting Control," then carry out printing.
Note: We recommend carrying out a cutting test before the actual operation. For information on how to perform a cutting test, refer to the LEC-300 User's Manual.
Icon Setting item Setting
Operation Mode Print & Cut
This executes cutting automatically after all printing and drying have finished.

43

44

45

46

47

48

49

50

51

52


R2-080917