Embed Size (px)
Citation preview
WHAT'S NEW IN MASTERCAM 2022
May 2021
WHAT'S NEW IN MASTERCAM 2022
May 2021© 2021 CNC Software, Inc. – All rights reserved.Software: Mastercam 2022
Terms of UseUse of this document is subject to the Mastercam End User License Agreement. The Mastercam End User License Agreement can be found at:
http://www.mastercam.com/companyinfo/legal/LicenseAgreement.aspx
Be sure you have the latest information!Information might have changed or been added since this document was published. The latest version of the document is installed with Mastercam or can be obtained from your local Reseller. A ReadMe file (ReadMe.PDF) – installed with each release – includes the latest information about Mastercam features and enhancements.
ii
TABLE OF CONTENTS
Introduction 11
Release Highlights 11
Mastercam Resources 11
Contact Us 12
Milling Enhancements 13
3D High Speed Dynamic OptiRough Available for Mill and Router Product Levels 13
Check Tool Reach Enhancements 14
Finding Unreachable Areas Due to Undercuts 14
Accessing Tools Loaded in the Part File 16
Checking the Roughing Tool Diameter and Corner Radius When Using Stock 17
Setting the Conventional Feed Rate and Stepover 19
2D Enhancements 20
Automatically Select Machining, Air, and Avoidance Regions 20
Expanded Air Region and Avoidance Region Support 21
Improvements to Chain Selection Order When Machining 23
Overriding Feed and Speed Options for Finish Passes 24
2D Contour Toolpath Enhancements 25
Reversing the Order of Spring Passes 25
Smooth Sharp Corner Machining for Control Compensation 26
Editing the Line Length and Arc Options for Contour Profile Ramp Moves 27
Using a Percentage or Radius in the 2D Face Roll In Option 28
Slot Mill Linking and Retract Motion Now Matches Contour 29
Hole Making Enhancements 30
Checking for Collisions in Hole Making Toolpaths 30
Displaying Collisions Directly From the Linking Parameters Page 33
Automatically Prevent Gouges During Linking Moves 34
Selecting Solid Holes from the Solids Manager 34
iii
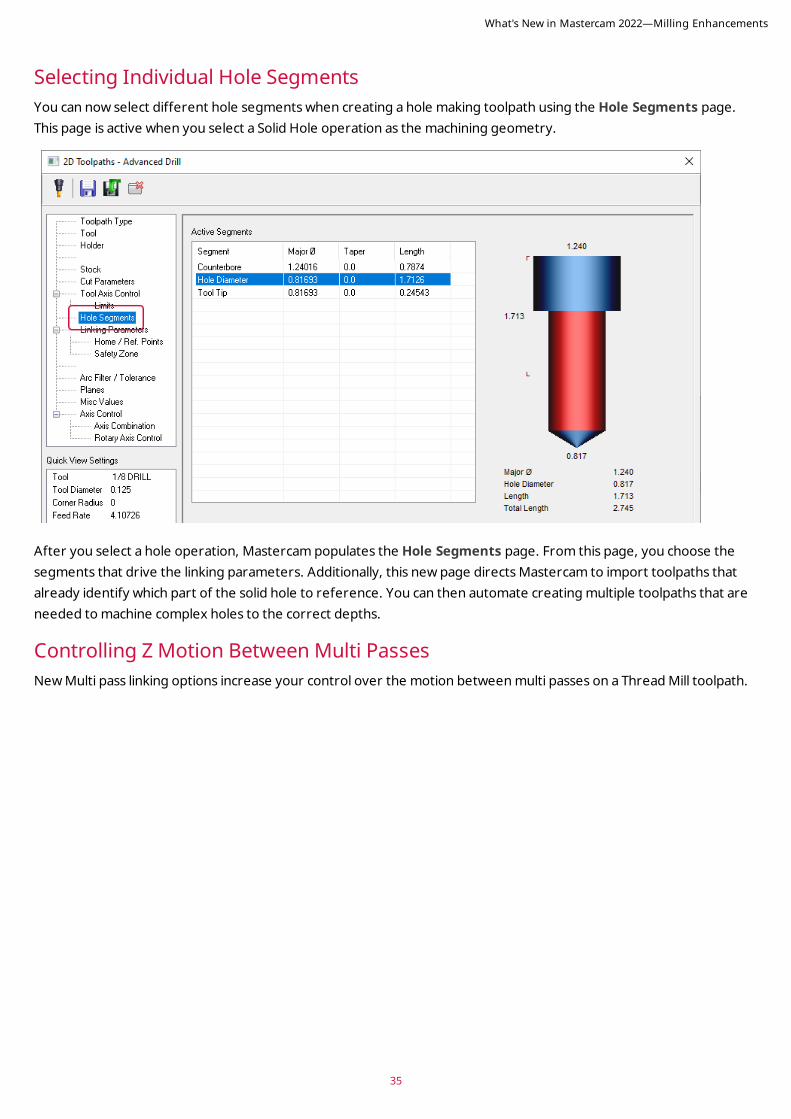
Selecting Individual Hole Segments 35
Controlling Z Motion Between Multi Passes 35
Changing Direction and Orientation During Selection 37
Using the Arc Filter/Tolerance Page for Hole Making Toolpaths 38
Linearizing the Circle Mill Toolpath 39
Changes to the Toolpath Type Page 40
Advanced Drill Enhancements 42
Populating Drill Segments From a Solid Hole 42
Using a Rapid Move to the Top of Stock Position 42
Rapiding Down to the Initial Toolpath Position 43
Cutting, Copying, and Pasting Drill Segments 43
Helix Bore Toolpath Enhancements 44
Adding Spring Passes to Helix Bore 44
Locking Values for Helix Bore Toolpaths 45
Maintaining CS/SFM in Chamfer Drill 46
3D Enhancements 47
More Powerful and Flexible 3D Linking 47
Adding Leads to Transition Moves 48
Avoiding Tall, Long, or Steep Transition Moves 49
Trimming Passes to Fit Transition Moves 50
Additional Changes to the Linking Parameters Page 51
Improved Approximate Start Point Selection 52
Dragging and Dropping Geometry Groups 53
3D High Speed Blend Toolpath Enhancements 54
Optimizing the Cut Order 54
Machining with Spiral Cutting 55
3D High Speed Waterline Toolpath Enhancements 55
Machining with a Spiral Pattern and New Contour Directions 55
Machining Flat Areas 57
Optimizing the Cut Order 61
iv
Filtering Out Small Toolpath Segments with Equal Scallop 61
Selecting Machining, Avoidance, and Remaining Entities from the Right-click Menu 62
Multiaxis Enhancements 64
New Multiaxis Unified Toolpath 64
Deburr Toolpath Enhancements 68
Performing Multiple Cuts 68
Limiting Tilt Motion 69
Controlling Climb and Conventional Cutting 69
Swarf Milling Toolpaths Enhancements 72
Dropping the Tool to the Floor 72
Sorting Spiral Multicuts 73
Maintaining a Single Tool Axis Orientation with Accelerated Finishing Tools 75
Rotating a Toolpath Around an Offset Point 76
Automatic Arcs and Automatic Tool Axis Orientation for Lead In/Out Moves 76
Previewing Multiaxis Toolpaths 77
Expanded Options for Excluding Undercuts for Triangular Mesh 78
Filtering the Convert to 5-Axis Toolpaths for Size and Noise 78
Rotary Advanced Toolpath Enhancements 80
Shifting a Tool Off-Center 80
Rounding Sharp Corners 81
Blending to Undercut Areas for Multiaxis Pocketing 82
Tooling Enhancements 85
Building Mill Tool Assemblies 85
Using the Mill Tool Manager in Design 86
Setting Your Active Display Tool 87
Exporting Tool Components 88
Turning Enhancements 89
Working with Mill-Turn Steady Rests 89
Creating Steady Rest Components 90
Selecting Steady Rests in Job Setup 92
v
Steady Rest Support in Part Handling Strategies 93
The New Steady Rest Operation 93
The New Steady Rest Point Operation 95
Adding Steady Rest Events to Part Handling Strategies 96
Using Multiple Adapters in 3D-Turning Tooling 97
Subprograms Supported in Mill-Turn 99
Automatically Retracting to Center 100
Generic .machine Files Installed with Mastercam 102
Setting the Stock Diameter as an Arc or Radial Face 104
Adding Incremental Spindle Moves 105
Design Enhancements 106
New Mesh Functions and Support for Mesh Bodies 106
Creating Mesh Bodies 106
Modifying Mesh Bodies 107
Refining Mesh Bodies 108
Simplifying Mesh Bodies 109
Trimming Mesh Bodies 110
Filling Holes and Smoothing Mesh Edges 111
Modifying Mesh Facets 111
Smoothing Mesh Areas 112
Exploding Meshes 114
Identifying Errors in a Mesh Model 115
Adding or Removing Colors on Mesh Facets 116
Performing Top-level Editing for Wireframe Entities 117
Editing with Point Controls 117
Editing with Line Controls 118
Editing with Spline Controls 118
Editing with Arc Controls 119
Model Prep Enhancements 120
Applying Push-Pull Modifications to Multiple Bodies 120
vi
Recognizing Interrupted and Intersecting Holes 121
Improved Selection for Hole Axis 122
Surface Enhancements 123
Creating and Controlling Flowlines with Overflow UV 123
Creating Surfaces in Notes 124
Creating Draft Surfaces in Multiple Planes 125
Flipping Surface Normals Using On-screen Controls 125
Wireframe Enhancements 125
Enhancements to Support Multiaxis Machining 125
Editing Tool Axis Control Lines 126
Expanded Line Normal Functions 127
Creating Cross-Sections Along a Curve 128
Creating a Midline Between Wireframe 129
New Name and Interface for Curve Slice 130
Transform Enhancements 131
Distributing Entities Along a Chain 131
Copying Entities in Two Directions 132
Rotating Geometry Around Plane Origins 133
Dimension Enhancements 136
Create Conjugate Angle Dimensions with On-Screen Trigger Points 136
Associativity to Solid Geometry 136
Dimensioning Your Part in Multiple Planes 137
Better Cursor Control When Dimensioning Multiple Z Depths in 3D Mode 137
Using the Interactive Plane Depth Arrow 138
New Solids Manager Icons 139
Simulation Enhancements 140
Analyzing Distances Using Smart Measuring 140
Improved Toolpath Processing Time for Mastercam Simulator 141
Viewing Collisions and Alerts Using the New Report Pane 141
Setting Proximity Alerts for Verifying and Simulating 142
vii
Simulating with a Specific External Post 143
Toolpath Utility Enhancements 144
Viewing Your Tool Assembly During Part Programming 144
Selecting Individual Solid Faces for Stock Model 148
Toolpaths Manager Enhancements 149
New Toolpaths Manager Icons 149
Exploring Toolpaths Manager Display Options 150
System Enhancements 151
Planes and Planes Manager Enhancements 151
Linking and Unlinking Planes 151
Directly Locking and Unlocking Planes 153
Toggling Display and Section for Locked Planes 154
Controlling Plane Associativity 154
Associating the Plane Origin to New Geometry 155
Simplifying the Mastercam Ribbon 156
Setting the View with the Dynamic Gnomon 156
Copying and Moving Selected Entities Between Levels 157
Providing Feedback During Your Mastercam Session 157
My Mastercam Login Enhancements 160
Automatically Change Geometry Color When Opening a File 161
Selection and Chaining Enhancements 162
Rapidly Select Solid Edges 162
Dynamically Adjust the Start and End Point of Chains 163
Setting the Color for Lathe Solid Chain Profile Preview 163
Re-selecting and Ending Chains for Lathe Operations 164
Chaining and Extruding Notes 164
File Management Enhancements 166
Working with Mastercam Content Files 166
File Translator Enhancements 167
Support for 3MF Files 167
viii
Importing and Exporting CAD Files with New File Translators 167
Multiple STL Files Merged as Separate Level Names 167
Merge Enhancements 167
Merge Multiple Files in One Operation 167
See Level Options Immediately Upon Merging Files 168
General Enhancements 169
Borrowing Mastercam Network Licenses 169
Expanding the Functionality of Mastercam Demo/Home Learning Edition 170
Interact with Mastercam with the Toolpath Dialog Box Open 172
Accepting and Generating a Toolpath with a Single Click 173
System Configuration Enhancements 174
Customizing Mesh Color Settings 174
Showing Mesh Edges with a Greater Degree of Control 174
Moving a Shared Folder Without Copying Files 175
Setting Chaining Mode Defaults 176
Creating and Editing .NET Scripts in Mastercam 176
Finding Arcs and Splines by Length 178
Retaining Wire Work Settings 179
Posts and Machine Environments 180
Lathe Machine Environments 180
Mill-Turn Machine Environments 182
Multiaxis Posts 184
Wire Posts 185
ix

x
11
INTRODUCTION
CAUTIONPlease be aware that any information described in this document is subject to change at any time. Features may be removed, added, or changed over the course of the Mastercam Technical Previews.
Welcome to Mastercam 2022! Mastercam 2022 features new functionality focused on delivering speed and efficiency to your machining jobs.
Release HighlightsOnly have a few minutes? Listed below are a few of the highlights from this release, including a new toolpath and enhanced functionality.
l "3D High Speed Dynamic OptiRough Available for Mill and Router Product Levels" on page 13
l "New Mesh Functions and Support for Mesh Bodies" on page 106
l "Performing Top-level Editing for Wireframe Entities" on page 117
l "New Multiaxis Unified Toolpath" on page 64
l "More Powerful and Flexible 3D Linking " on page 47
l "Planes and Planes Manager Enhancements " on page 151
l "Borrowing Mastercam Network Licenses" on page 169
l "Expanding the Functionality of Mastercam Demo/Home Learning Edition" on page 170
Mastercam ResourcesEnhance your Mastercam experience by using the following resources:
l Mastercam Documentation—Mastercam installs a number of helpful documents for your version of software in the Documentation folder of your Mastercam 2022 installation.
l Mastercam Help—Access Mastercam Help by selecting Help, Contents from Mastercam's File tab or by pressing [Alt+H] on your keyboard.
l Mastercam Reseller—Your local Mastercam Reseller can help with most questions about Mastercam.
l Technical Support—Our Technical Support department (+1 860-875-5006 or [email protected]) is open Monday through Friday from 8:00 a.m. to 5:30 p.m. USA Eastern Standard Time.
l Mastercam Tutorials—We offer a series of tutorials to help registered users become familiar with basic Mastercam features and functions. Visit our website, or select Help, Tutorials from Mastercam's File tab to see the latest publications.
l Mastercam University—Mastercam University, an affordable online learning platform, gives you 24/7 access to Mastercam training materials. Take advantage of over hundreds of videos to master skills at your own pace and
What's New in Mastercam 2022—Introduction
help prepare for Mastercam Certification. For more information on Mastercam University, please contact your authorized Mastercam Reseller, visit university.mastercam.com/, or email [email protected].
l Online Communities—You can find a wealth of information at www.mastercam.com.
l Follow us on Facebook (www.facebook.com/Mastercam), Twitter (twitter.com/Mastercam), and Instagram (www.instagram.com/mastercamcadcam/) for the latest tech tips and Mastercam news.
l See Mastercam in action on YouTube (www.youtube.com/user/MastercamCadCam).
l For more information on CNC Software, Inc., to find and apply to jobs, and connect with people using Mastercam, visit us on LinkedIn (www.linkedin.com/company/cnc-software/).
l Registered users can search for information or ask questions on the Mastercam Web forum, forum.mastercam.com, or use the Mastercam Knowledge Base at kb.mastercam.com.
Contact UsFor questions about this or other Mastercam documentation, contact the Technical Documentation department by email at [email protected].
What's New in Mastercam 2022—Introduction
12
13
MILLING ENHANCEMENTS
Listed below are major enhancements to the Mill product. These include improvements to 2D, 3D, and Multiaxis toolpaths.
NOTEUnless otherwise stated, the new features and functionality listed in this section apply to both Mill and Router licenses.
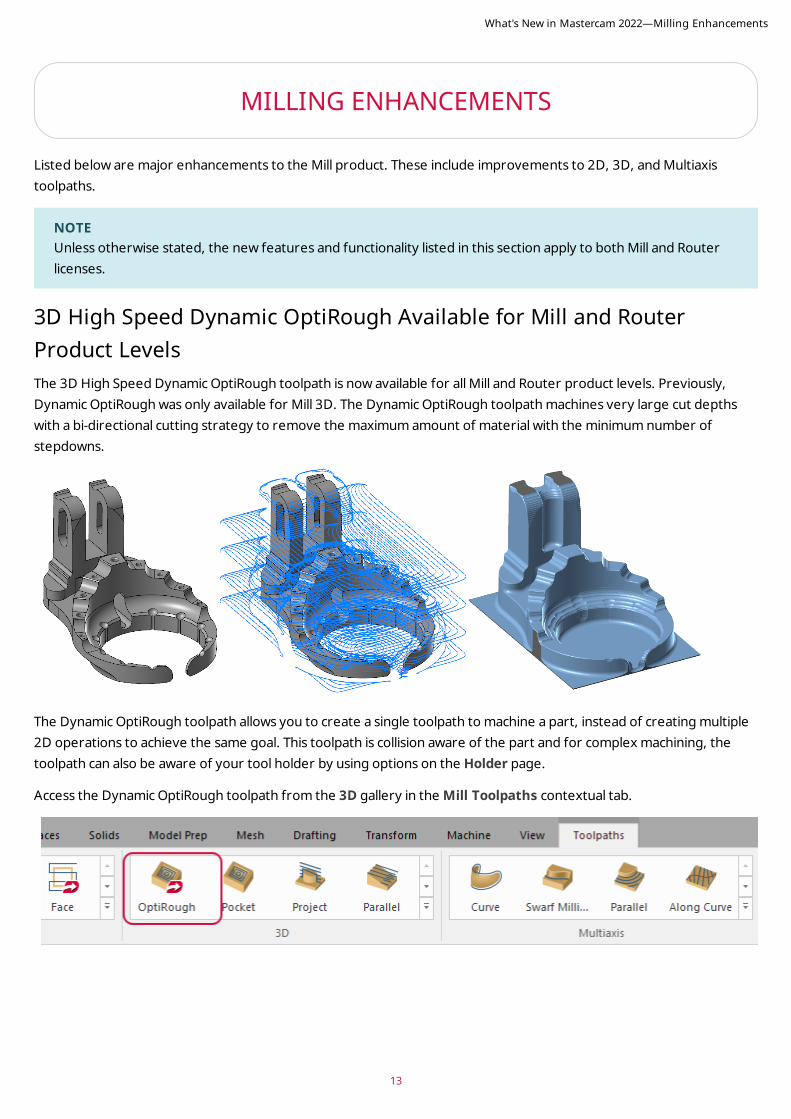
3D High Speed Dynamic OptiRough Available for Mill and Router Product LevelsThe 3D High Speed Dynamic OptiRough toolpath is now available for all Mill and Router product levels. Previously, Dynamic OptiRough was only available for Mill 3D. The Dynamic OptiRough toolpath machines very large cut depths with a bi-directional cutting strategy to remove the maximum amount of material with the minimum number of stepdowns.
The Dynamic OptiRough toolpath allows you to create a single toolpath to machine a part, instead of creating multiple 2D operations to achieve the same goal. This toolpath is collision aware of the part and for complex machining, the toolpath can also be aware of your tool holder by using options on the Holder page.
Access the Dynamic OptiRough toolpath from the 3D gallery in the Mill Toolpaths contextual tab.
What's New in Mastercam 2022—Milling Enhancements
Check Tool Reach EnhancementsListed below are enhancements to the Check Tool Reach function, located on the Mill Toolpaths contextual tab.
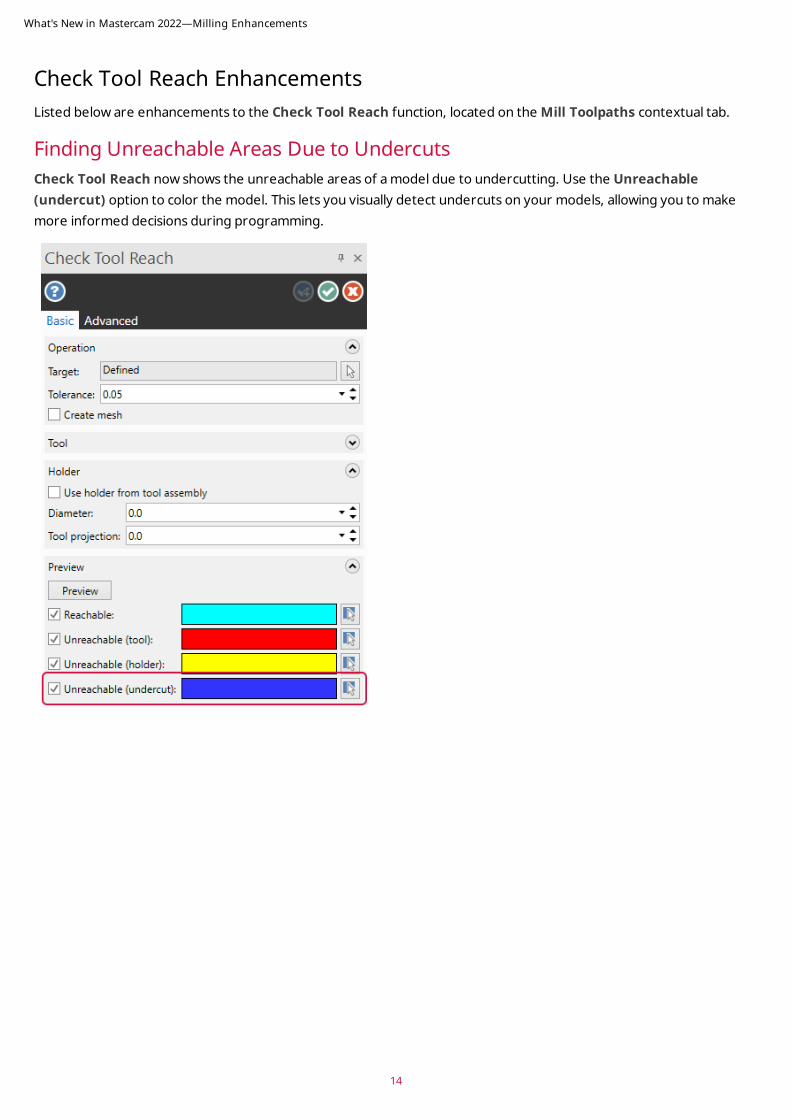
Finding Unreachable Areas Due to UndercutsCheck Tool Reach now shows the unreachable areas of a model due to undercutting. Use the Unreachable (undercut) option to color the model. This lets you visually detect undercuts on your models, allowing you to make more informed decisions during programming.
What's New in Mastercam 2022—Milling Enhancements
14
15
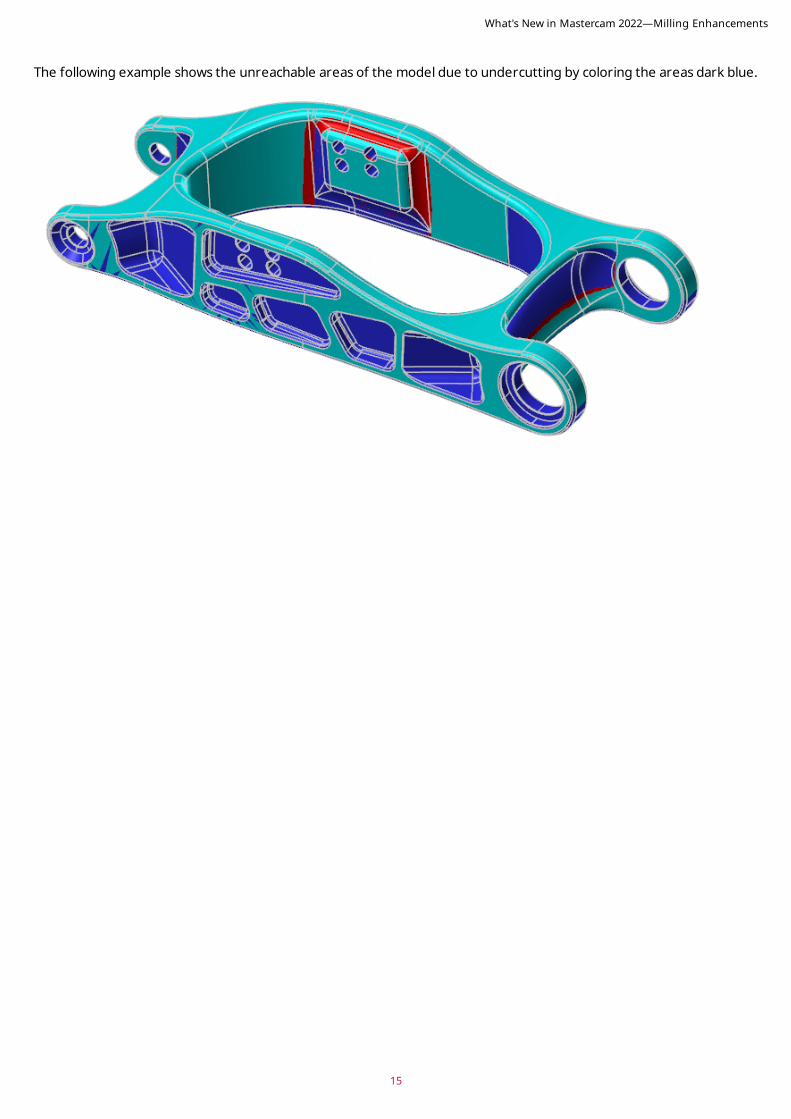
The following example shows the unreachable areas of the model due to undercutting by coloring the areas dark blue.
What's New in Mastercam 2022—Milling Enhancements
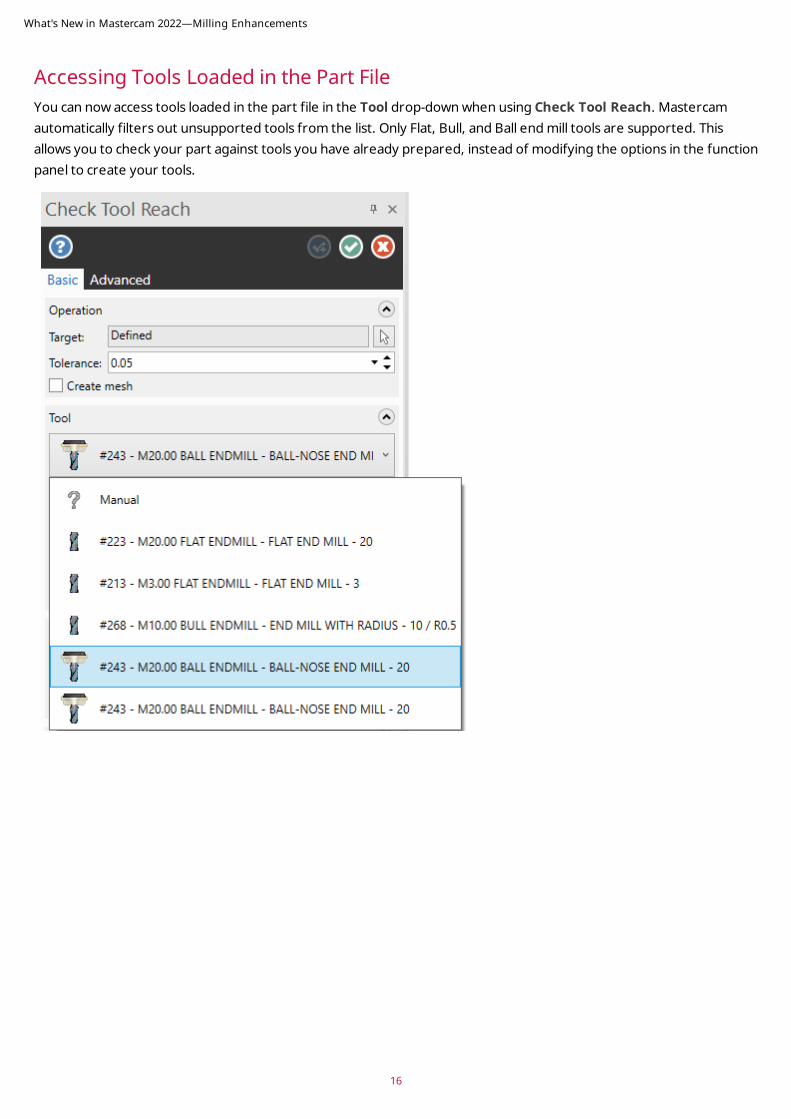
Accessing Tools Loaded in the Part File You can now access tools loaded in the part file in the Tool drop-down when using Check Tool Reach. Mastercam automatically filters out unsupported tools from the list. Only Flat, Bull, and Ball end mill tools are supported. This allows you to check your part against tools you have already prepared, instead of modifying the options in the function panel to create your tools.
What's New in Mastercam 2022—Milling Enhancements
16
17
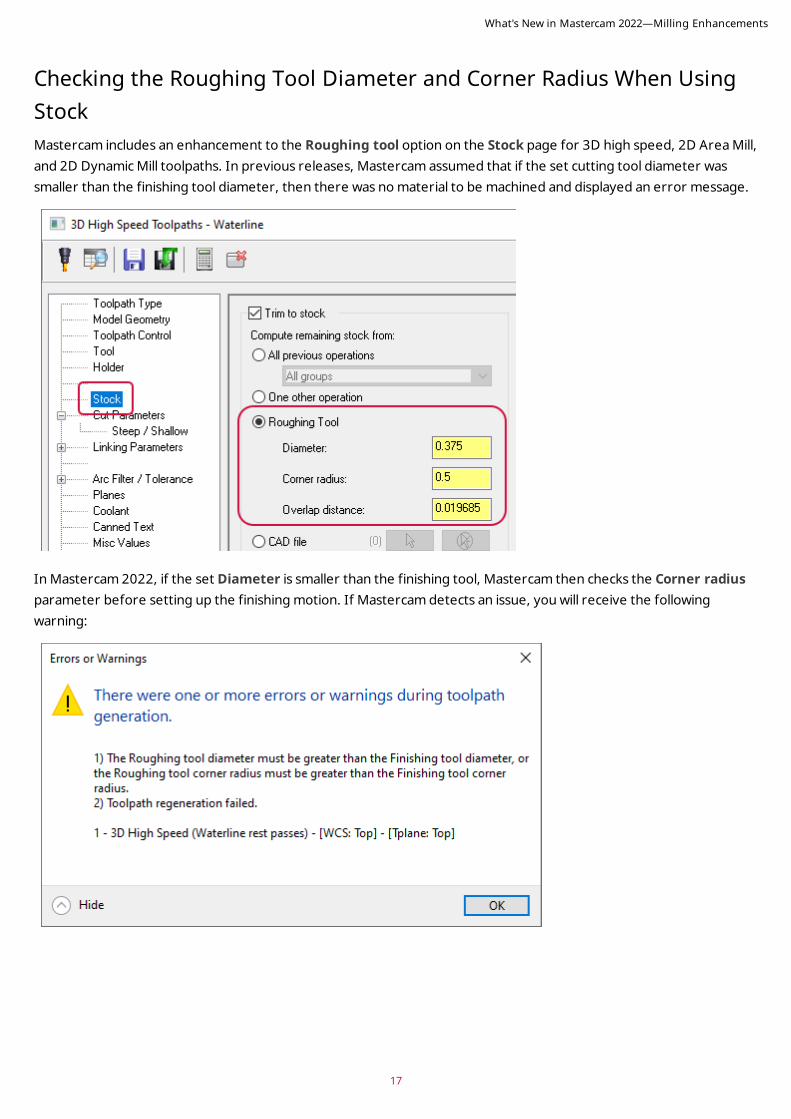
Checking the Roughing Tool Diameter and Corner Radius When Using StockMastercam includes an enhancement to the Roughing tool option on the Stock page for 3D high speed, 2D Area Mill, and 2D Dynamic Mill toolpaths. In previous releases, Mastercam assumed that if the set cutting tool diameter was smaller than the finishing tool diameter, then there was no material to be machined and displayed an error message.
In Mastercam 2022, if the set Diameter is smaller than the finishing tool, Mastercam then checks the Corner radius parameter before setting up the finishing motion. If Mastercam detects an issue, you will receive the following warning:
What's New in Mastercam 2022—Milling Enhancements

For example, the part shown below is first machined with a Waterline toolpath using a bull end mill with a Tool diameter of 16 and a Corner radius of 2.
The second toolpath is machined using a flat end mill with a Tool diameter of 20 and a Corner radius of 0.
In previous releases, you would receive an error and the toolpath would not generate. Now, Mastercam generates a toolpath based on the new criteria.
What's New in Mastercam 2022—Milling Enhancements
18
19
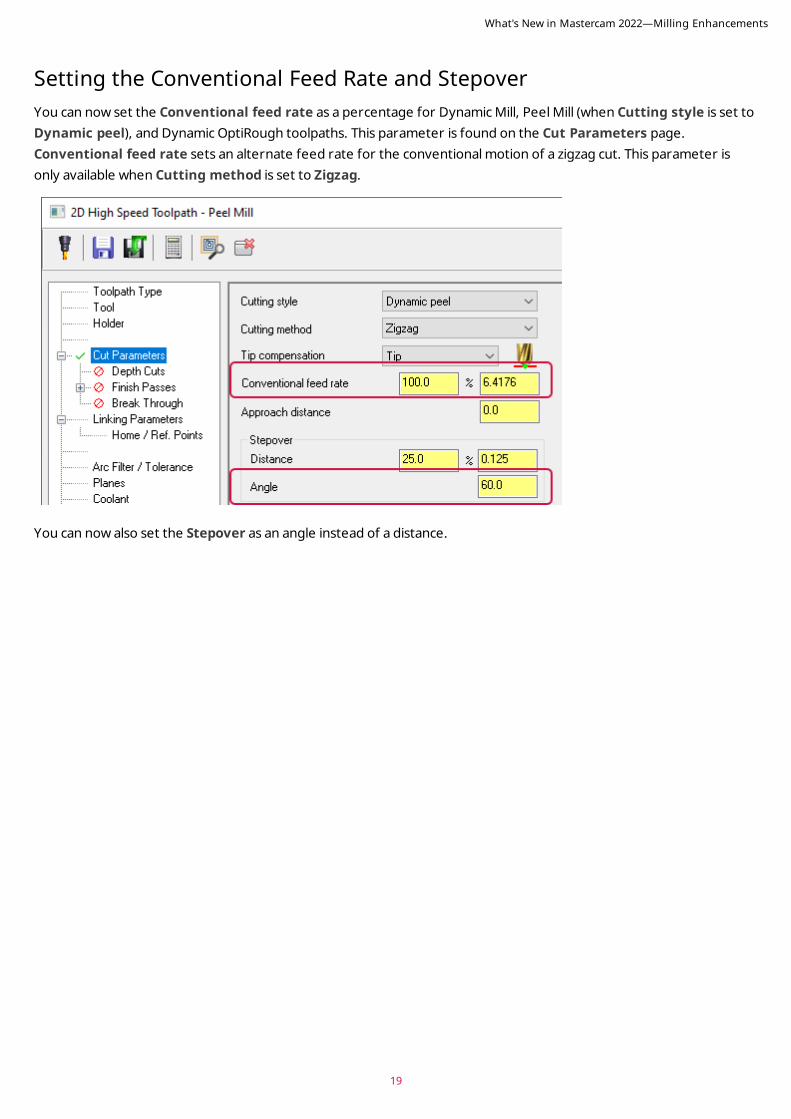
Setting the Conventional Feed Rate and Stepover You can now set the Conventional feed rate as a percentage for Dynamic Mill, Peel Mill (when Cutting style is set to Dynamic peel), and Dynamic OptiRough toolpaths. This parameter is found on the Cut Parameters page. Conventional feed rate sets an alternate feed rate for the conventional motion of a zigzag cut. This parameter is only available when Cutting method is set to Zigzag.
You can now also set the Stepover as an angle instead of a distance.
What's New in Mastercam 2022—Milling Enhancements
2D EnhancementsListed below are enhancements to the 2D milling toolpaths.
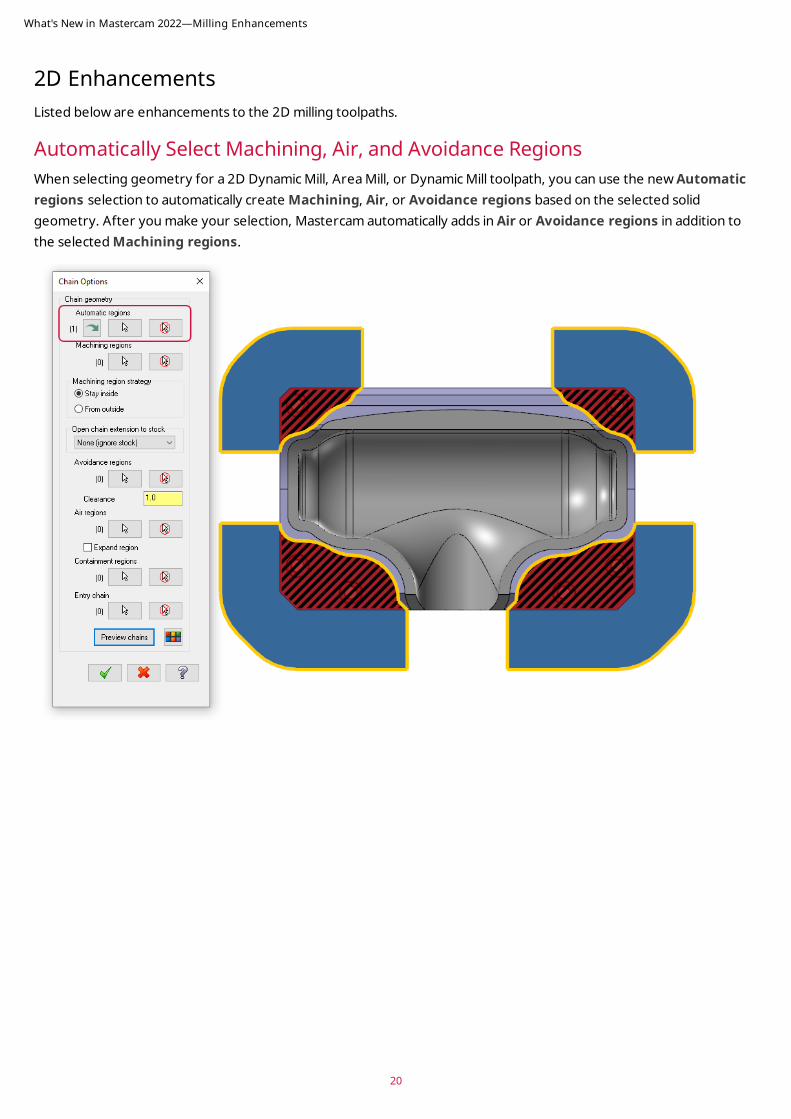
Automatically Select Machining, Air, and Avoidance Regions When selecting geometry for a 2D Dynamic Mill, Area Mill, or Dynamic Mill toolpath, you can use the new Automatic regions selection to automatically create Machining, Air, or Avoidance regions based on the selected solid geometry. After you make your selection, Mastercam automatically adds in Air or Avoidance regions in addition to the selected Machining regions.
What's New in Mastercam 2022—Milling Enhancements
20
21
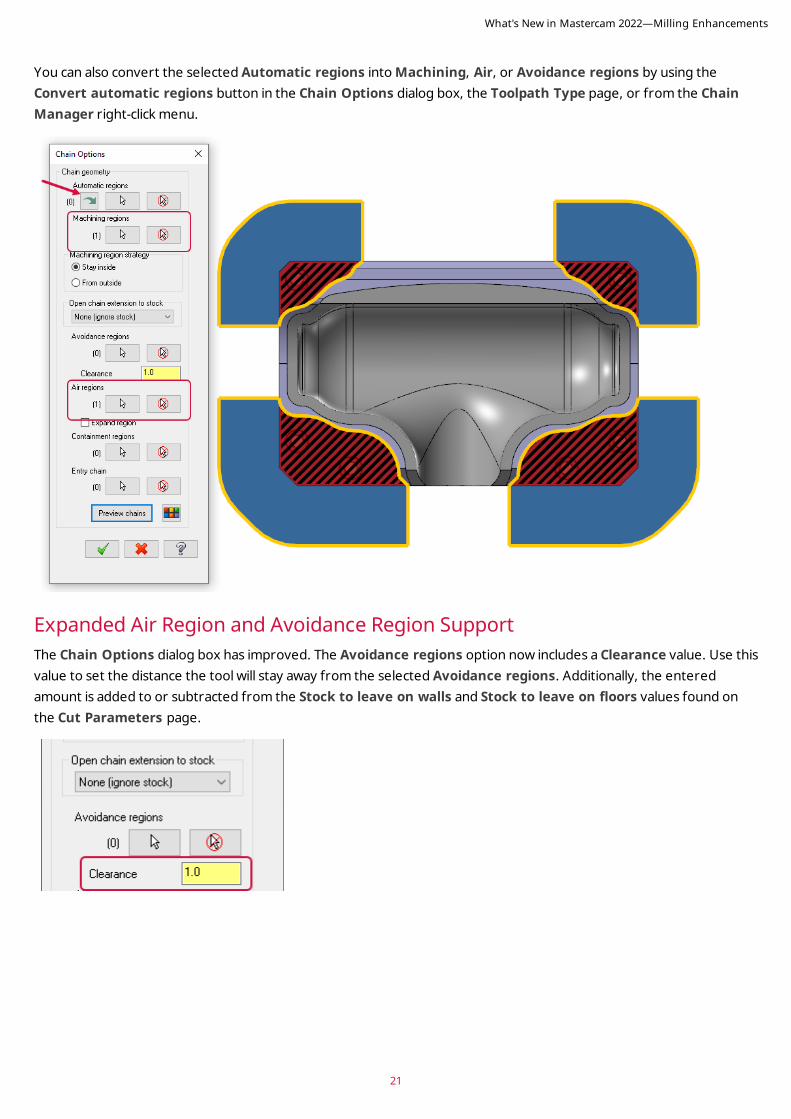
You can also convert the selected Automatic regions into Machining, Air, or Avoidance regions by using the Convert automatic regions button in the Chain Options dialog box, the Toolpath Type page, or from the Chain Manager right-click menu.
Expanded Air Region and Avoidance Region SupportThe Chain Options dialog box has improved. The Avoidance regions option now includes a Clearance value. Use this value to set the distance the tool will stay away from the selected Avoidance regions. Additionally, the entered amount is added to or subtracted from the Stock to leave on walls and Stock to leave on floors values found on the Cut Parameters page.
What's New in Mastercam 2022—Milling Enhancements
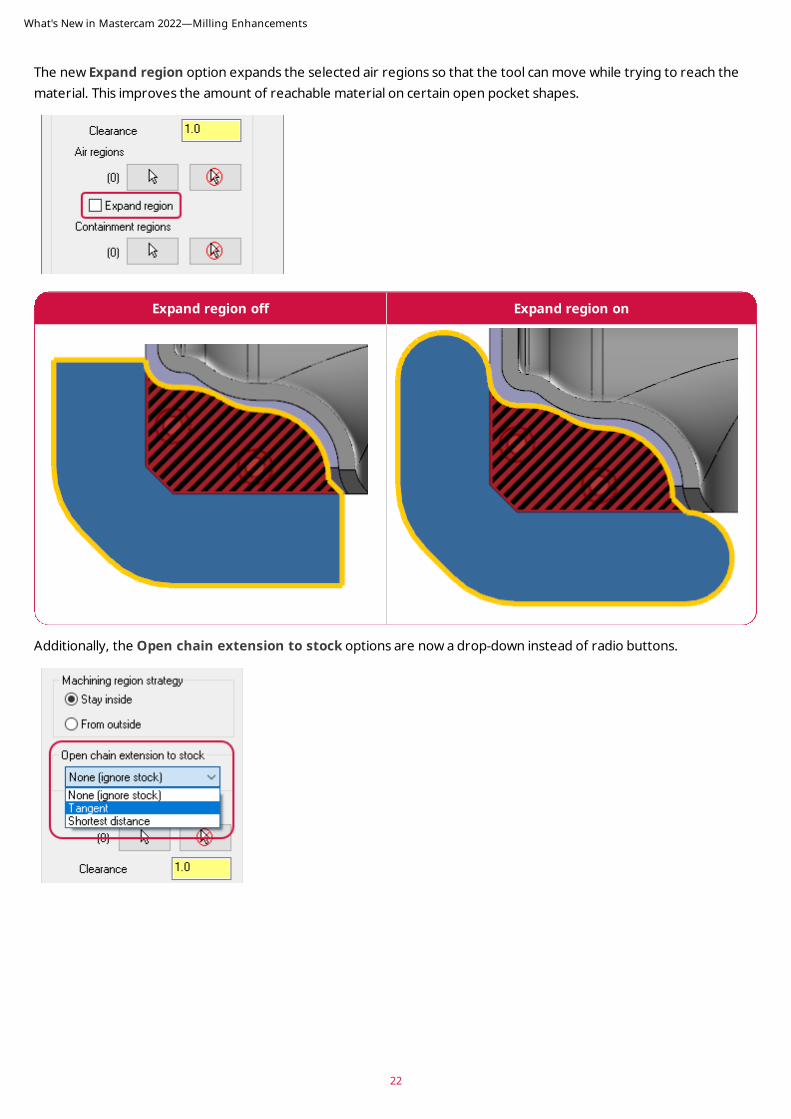
The new Expand region option expands the selected air regions so that the tool can move while trying to reach the material. This improves the amount of reachable material on certain open pocket shapes.
Expand region off Expand region on
Additionally, the Open chain extension to stock options are now a drop-down instead of radio buttons.
What's New in Mastercam 2022—Milling Enhancements
22
23
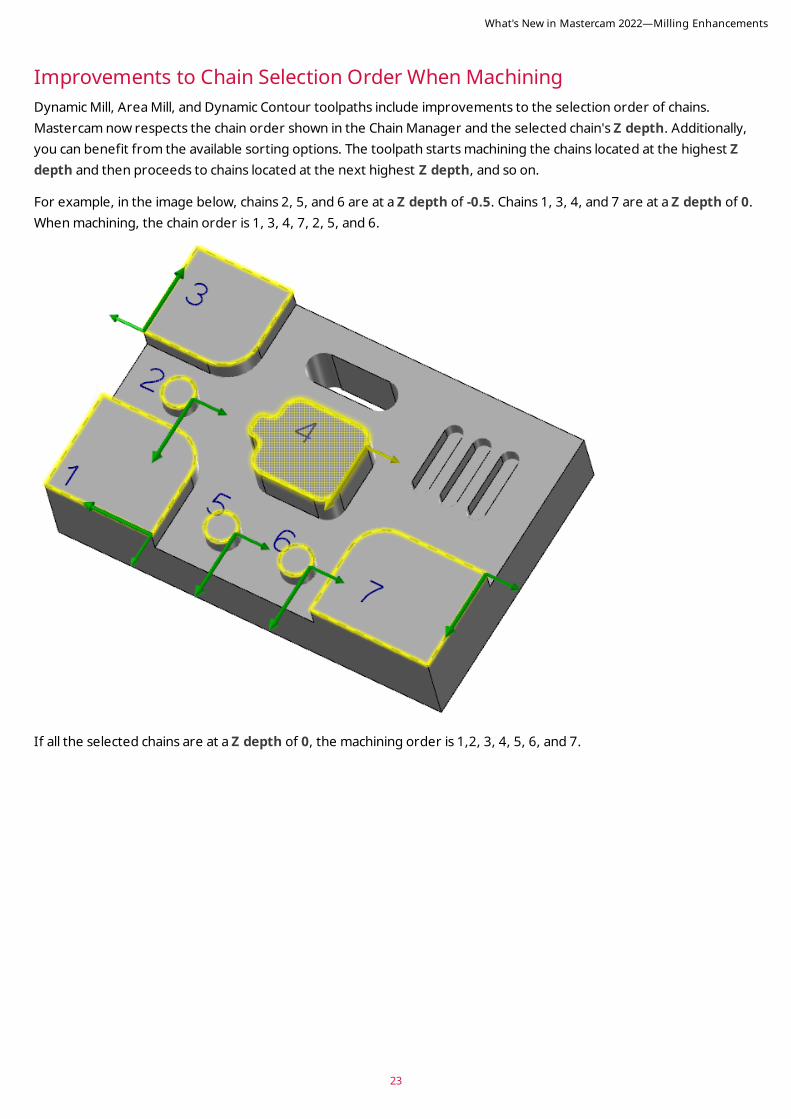
Improvements to Chain Selection Order When MachiningDynamic Mill, Area Mill, and Dynamic Contour toolpaths include improvements to the selection order of chains. Mastercam now respects the chain order shown in the Chain Manager and the selected chain's Z depth. Additionally, you can benefit from the available sorting options. The toolpath starts machining the chains located at the highest Z depth and then proceeds to chains located at the next highest Z depth, and so on.
For example, in the image below, chains 2, 5, and 6 are at a Z depth of -0.5. Chains 1, 3, 4, and 7 are at a Z depth of 0. When machining, the chain order is 1, 3, 4, 7, 2, 5, and 6.
If all the selected chains are at a Z depth of 0, the machining order is 1,2, 3, 4, 5, 6, and 7.
What's New in Mastercam 2022—Milling Enhancements
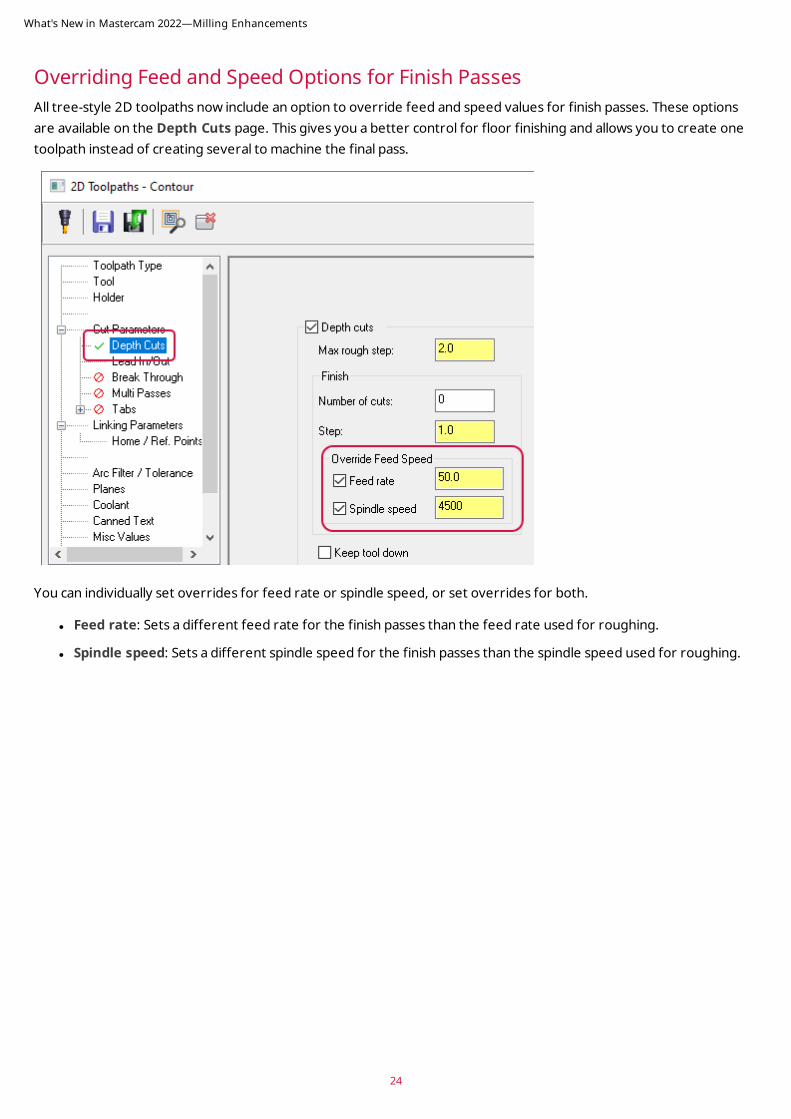
Overriding Feed and Speed Options for Finish PassesAll tree-style 2D toolpaths now include an option to override feed and speed values for finish passes. These options are available on the Depth Cuts page. This gives you a better control for floor finishing and allows you to create one toolpath instead of creating several to machine the final pass.
You can individually set overrides for feed rate or spindle speed, or set overrides for both.
l Feed rate: Sets a different feed rate for the finish passes than the feed rate used for roughing.
l Spindle speed: Sets a different spindle speed for the finish passes than the spindle speed used for roughing.
What's New in Mastercam 2022—Milling Enhancements
24
25
2D Contour Toolpath EnhancementsListed below are enhancements to the 2D Contour toolpath.
Reversing the Order of Spring Passes
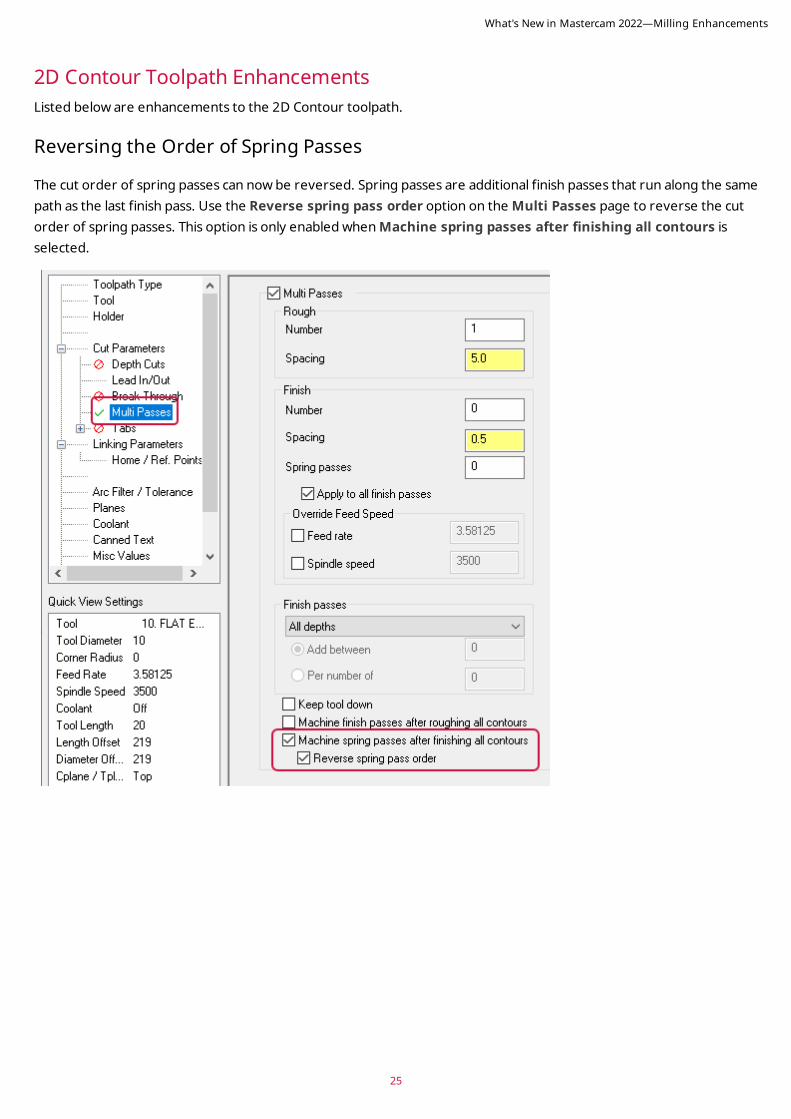
The cut order of spring passes can now be reversed. Spring passes are additional finish passes that run along the same path as the last finish pass. Use the Reverse spring pass order option on the Multi Passes page to reverse the cut order of spring passes. This option is only enabled when Machine spring passes after finishing all contours is selected.
What's New in Mastercam 2022—Milling Enhancements
Smooth Sharp Corner Machining for Control Compensation
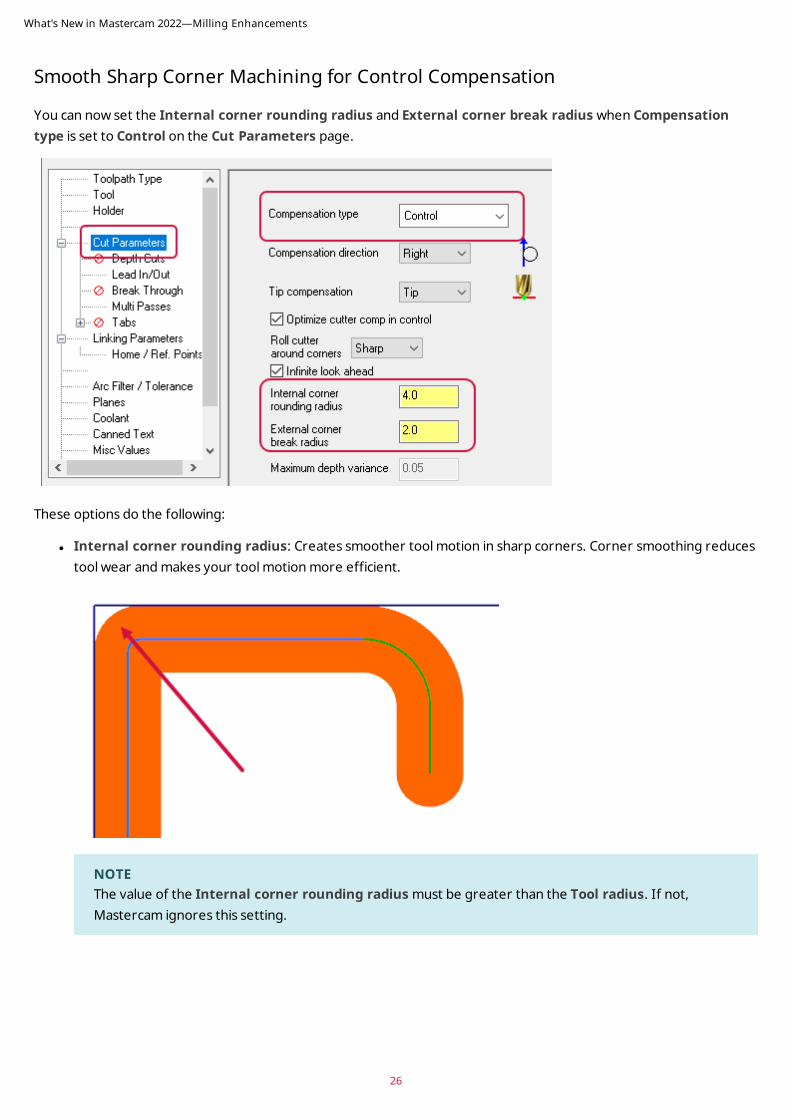
You can now set the Internal corner rounding radius and External corner break radius when Compensation type is set to Control on the Cut Parameters page.
These options do the following:
l Internal corner rounding radius: Creates smoother tool motion in sharp corners. Corner smoothing reduces tool wear and makes your tool motion more efficient.
NOTEThe value of the Internal corner rounding radius must be greater than the Tool radius. If not, Mastercam ignores this setting.
What's New in Mastercam 2022—Milling Enhancements
26
27
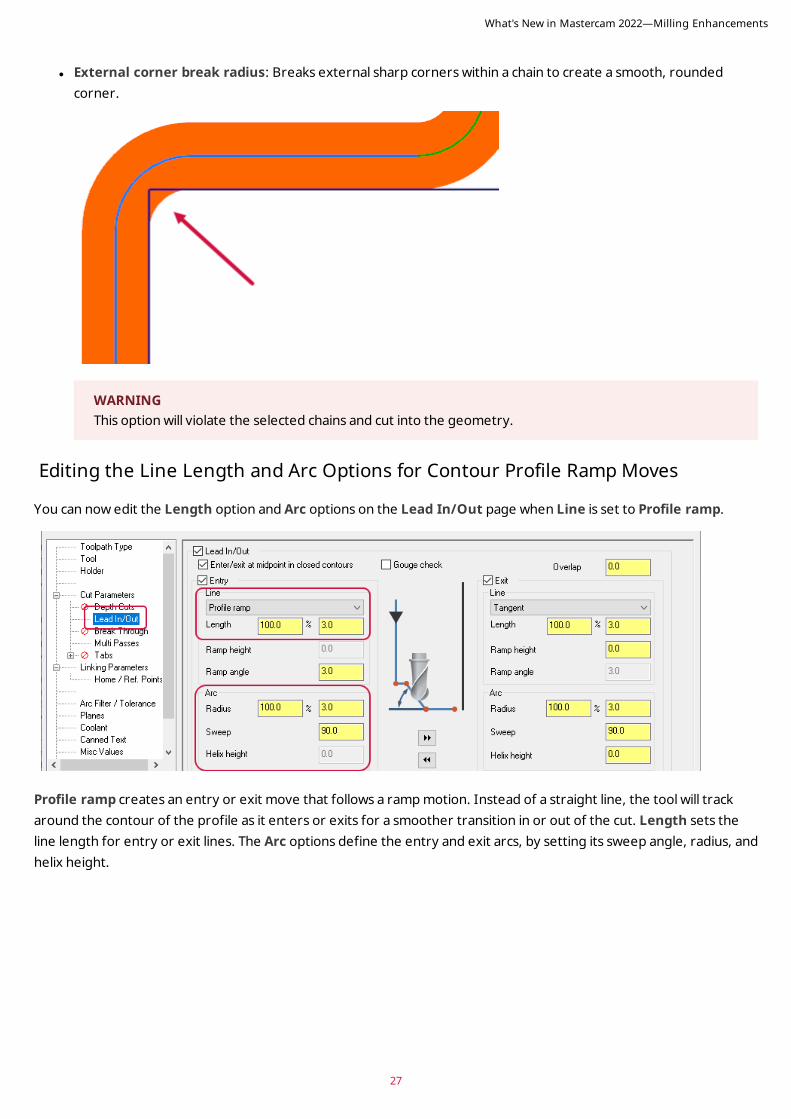
l External corner break radius: Breaks external sharp corners within a chain to create a smooth, rounded corner.
WARNINGThis option will violate the selected chains and cut into the geometry.
Editing the Line Length and Arc Options for Contour Profile Ramp Moves
You can now edit the Length option and Arc options on the Lead In/Out page when Line is set to Profile ramp.
Profile ramp creates an entry or exit move that follows a ramp motion. Instead of a straight line, the tool will track around the contour of the profile as it enters or exits for a smoother transition in or out of the cut. Length sets the line length for entry or exit lines. The Arc options define the entry and exit arcs, by setting its sweep angle, radius, and helix height.
What's New in Mastercam 2022—Milling Enhancements
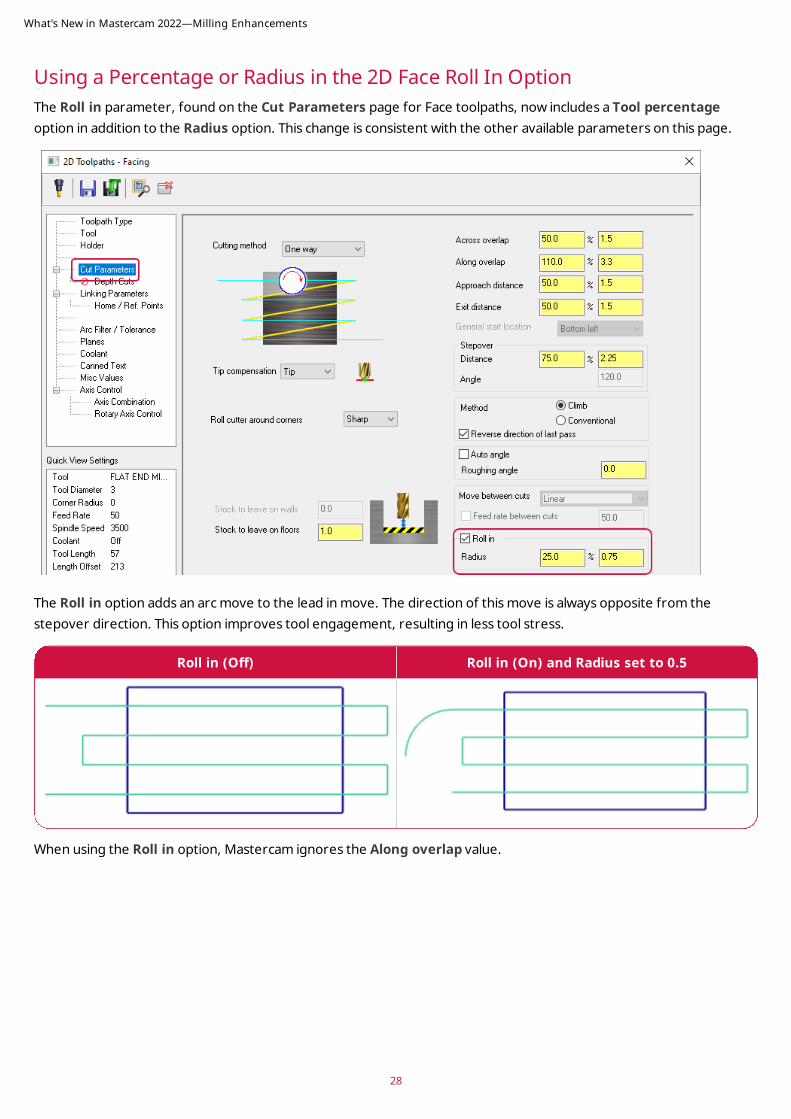
Using a Percentage or Radius in the 2D Face Roll In Option The Roll in parameter, found on the Cut Parameters page for Face toolpaths, now includes a Tool percentage option in addition to the Radius option. This change is consistent with the other available parameters on this page.
The Roll in option adds an arc move to the lead in move. The direction of this move is always opposite from the stepover direction. This option improves tool engagement, resulting in less tool stress.
Roll in (Off) Roll in (On) and Radius set to 0.5
When using the Roll in option, Mastercam ignores the Along overlap value.
What's New in Mastercam 2022—Milling Enhancements
28
29
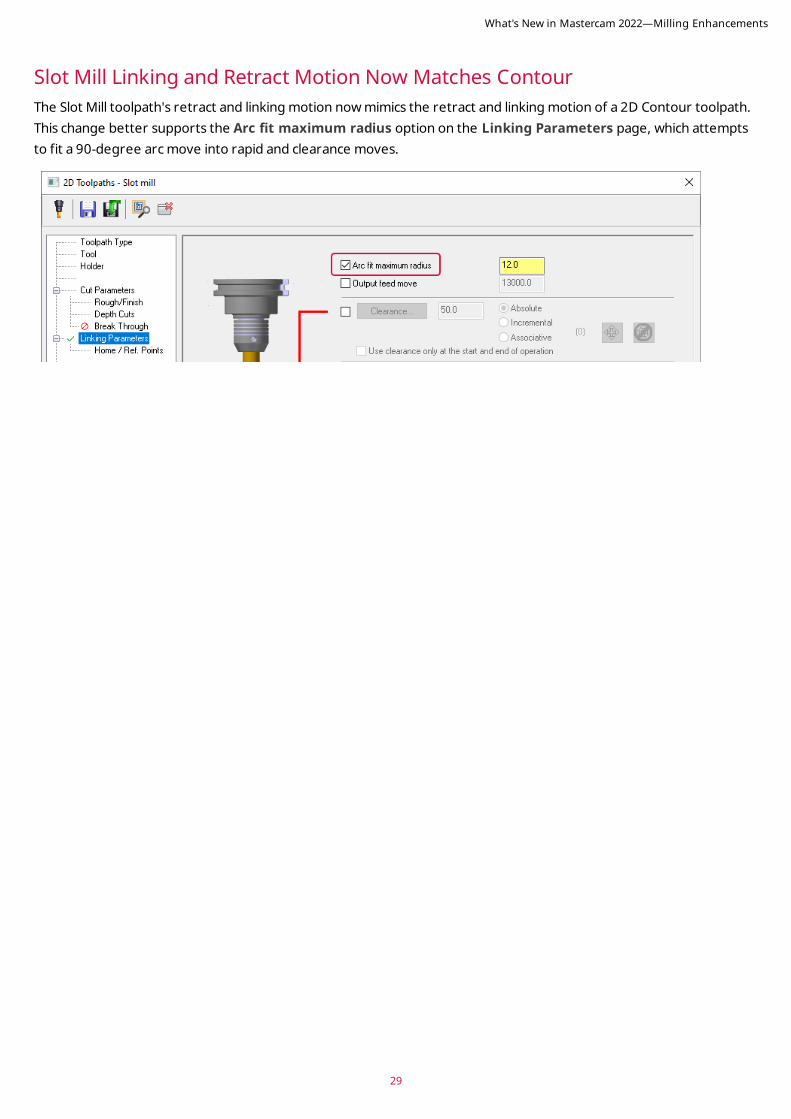
Slot Mill Linking and Retract Motion Now Matches ContourThe Slot Mill toolpath's retract and linking motion now mimics the retract and linking motion of a 2D Contour toolpath. This change better supports the Arc fit maximum radius option on the Linking Parameters page, which attempts to fit a 90-degree arc move into rapid and clearance moves.
What's New in Mastercam 2022—Milling Enhancements
Hole Making EnhancementsListed below are enhancements to the Hole Making toolpaths.
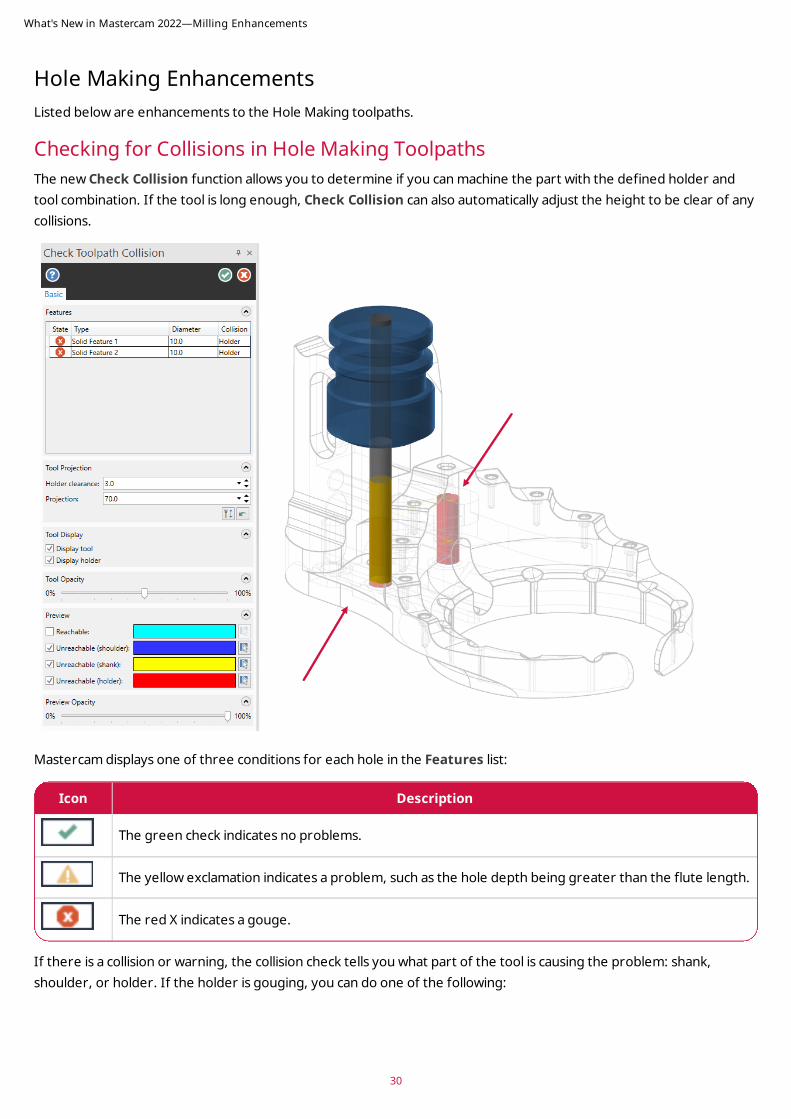
Checking for Collisions in Hole Making ToolpathsThe new Check Collision function allows you to determine if you can machine the part with the defined holder and tool combination. If the tool is long enough, Check Collision can also automatically adjust the height to be clear of any collisions.
Mastercam displays one of three conditions for each hole in the Features list:
Icon Description
The green check indicates no problems.
The yellow exclamation indicates a problem, such as the hole depth being greater than the flute length.
The red X indicates a gouge.
If there is a collision or warning, the collision check tells you what part of the tool is causing the problem: shank, shoulder, or holder. If the holder is gouging, you can do one of the following:
What's New in Mastercam 2022—Milling Enhancements
30
31
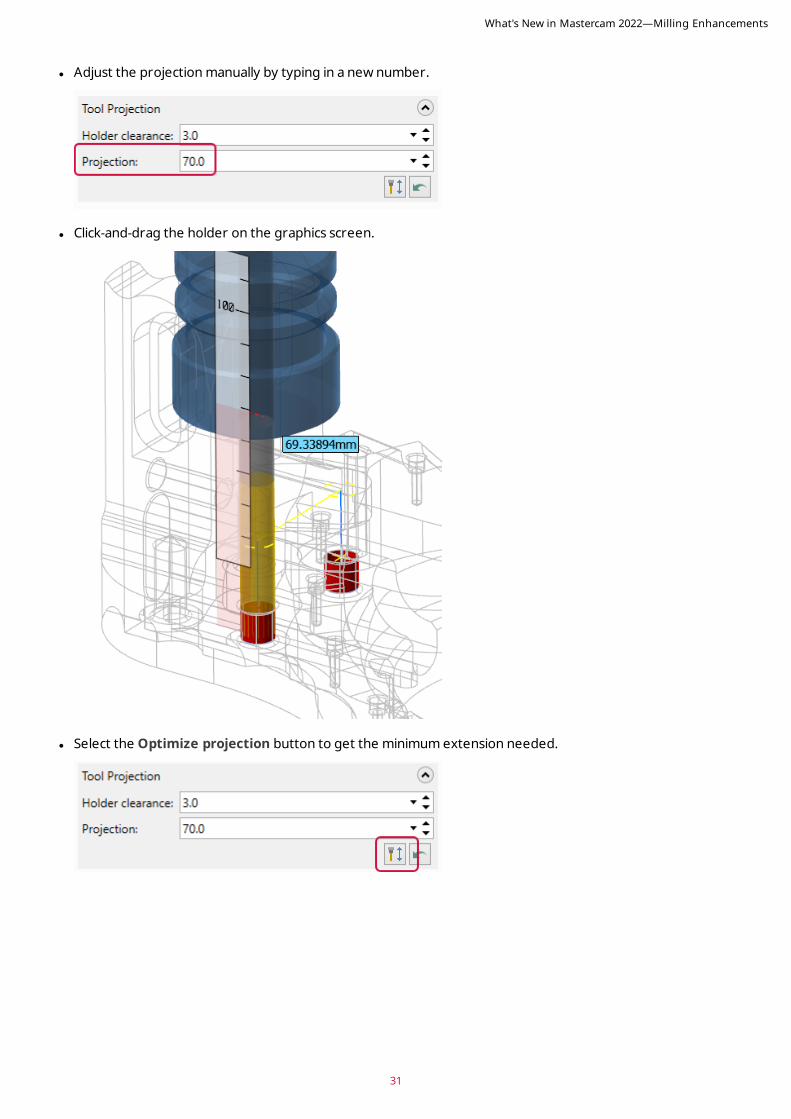
l Adjust the projection manually by typing in a new number.
l Click-and-drag the holder on the graphics screen.
l Select the Optimize projection button to get the minimum extension needed.
What's New in Mastercam 2022—Milling Enhancements
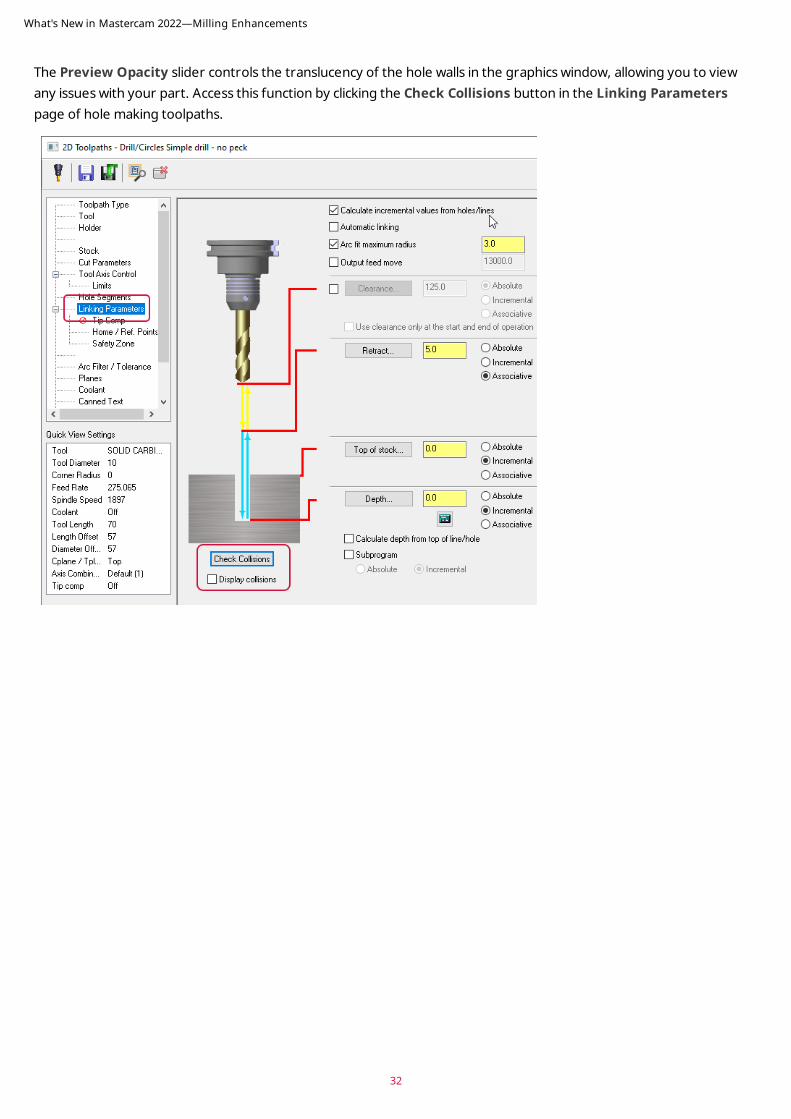
The Preview Opacity slider controls the translucency of the hole walls in the graphics window, allowing you to view any issues with your part. Access this function by clicking the Check Collisions button in the Linking Parameters page of hole making toolpaths.
What's New in Mastercam 2022—Milling Enhancements
32
33
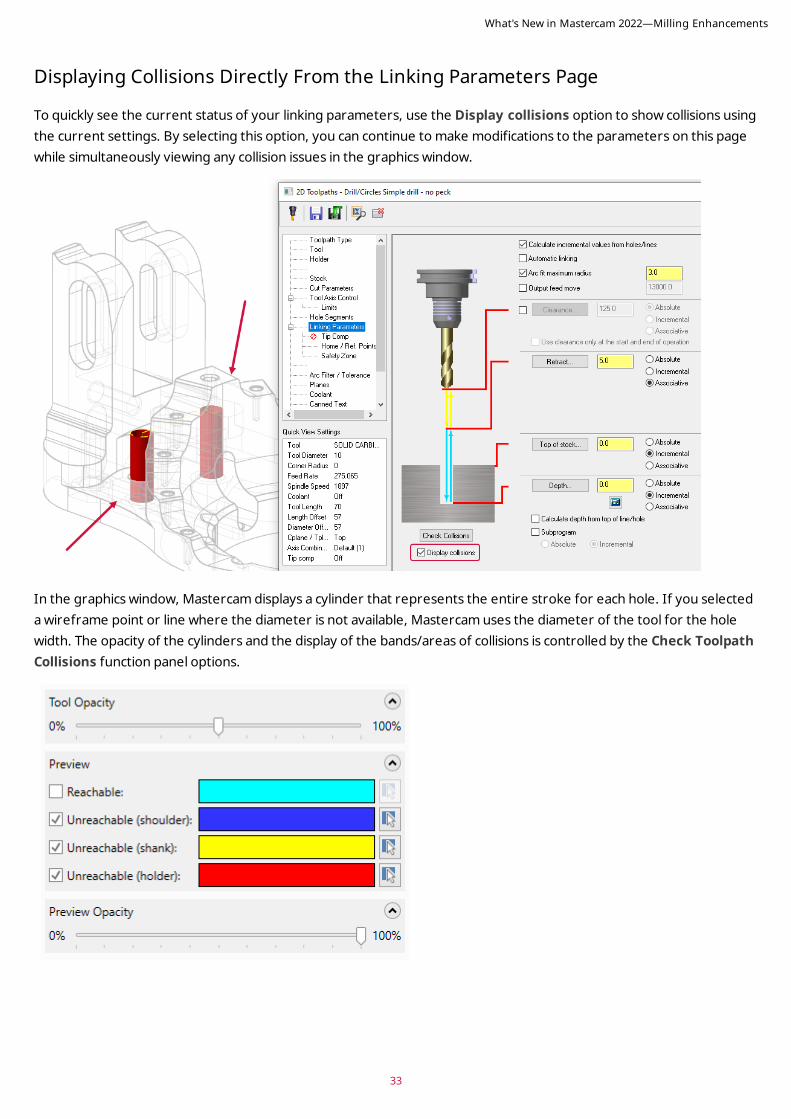
Displaying Collisions Directly From the Linking Parameters Page
To quickly see the current status of your linking parameters, use the Display collisions option to show collisions using the current settings. By selecting this option, you can continue to make modifications to the parameters on this page while simultaneously viewing any collision issues in the graphics window.
In the graphics window, Mastercam displays a cylinder that represents the entire stroke for each hole. If you selected a wireframe point or line where the diameter is not available, Mastercam uses the diameter of the tool for the hole width. The opacity of the cylinders and the display of the bands/areas of collisions is controlled by the Check Toolpath Collisions function panel options.
What's New in Mastercam 2022—Milling Enhancements
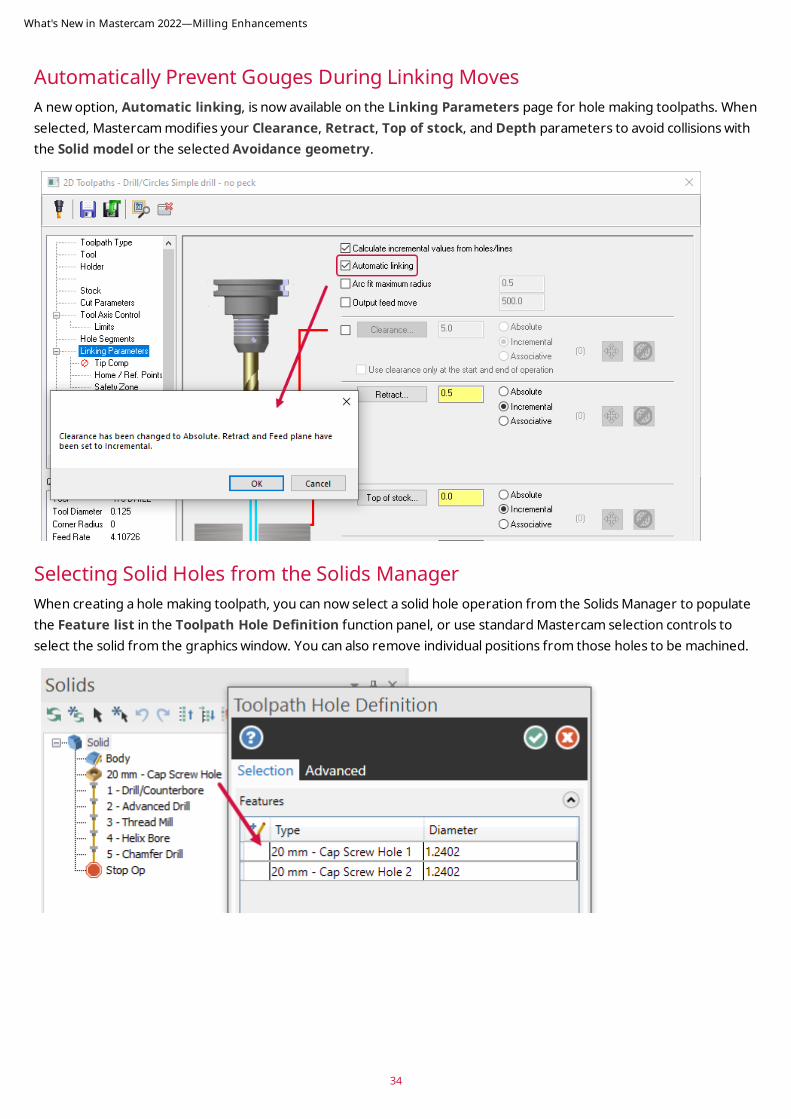
Automatically Prevent Gouges During Linking Moves A new option, Automatic linking, is now available on the Linking Parameters page for hole making toolpaths. When selected, Mastercam modifies your Clearance, Retract, Top of stock, and Depth parameters to avoid collisions with the Solid model or the selected Avoidance geometry.
Selecting Solid Holes from the Solids Manager When creating a hole making toolpath, you can now select a solid hole operation from the Solids Manager to populate the Feature list in the Toolpath Hole Definition function panel, or use standard Mastercam selection controls to select the solid from the graphics window. You can also remove individual positions from those holes to be machined.
What's New in Mastercam 2022—Milling Enhancements
34
35
Selecting Individual Hole Segments You can now select different hole segments when creating a hole making toolpath using the Hole Segments page. This page is active when you select a Solid Hole operation as the machining geometry.
After you select a hole operation, Mastercam populates the Hole Segments page. From this page, you choose the segments that drive the linking parameters. Additionally, this new page directs Mastercam to import toolpaths that already identify which part of the solid hole to reference. You can then automate creating multiple toolpaths that are needed to machine complex holes to the correct depths.
Controlling Z Motion Between Multi Passes New Multi pass linking options increase your control over the motion between multi passes on a Thread Mill toolpath.
What's New in Mastercam 2022—Milling Enhancements
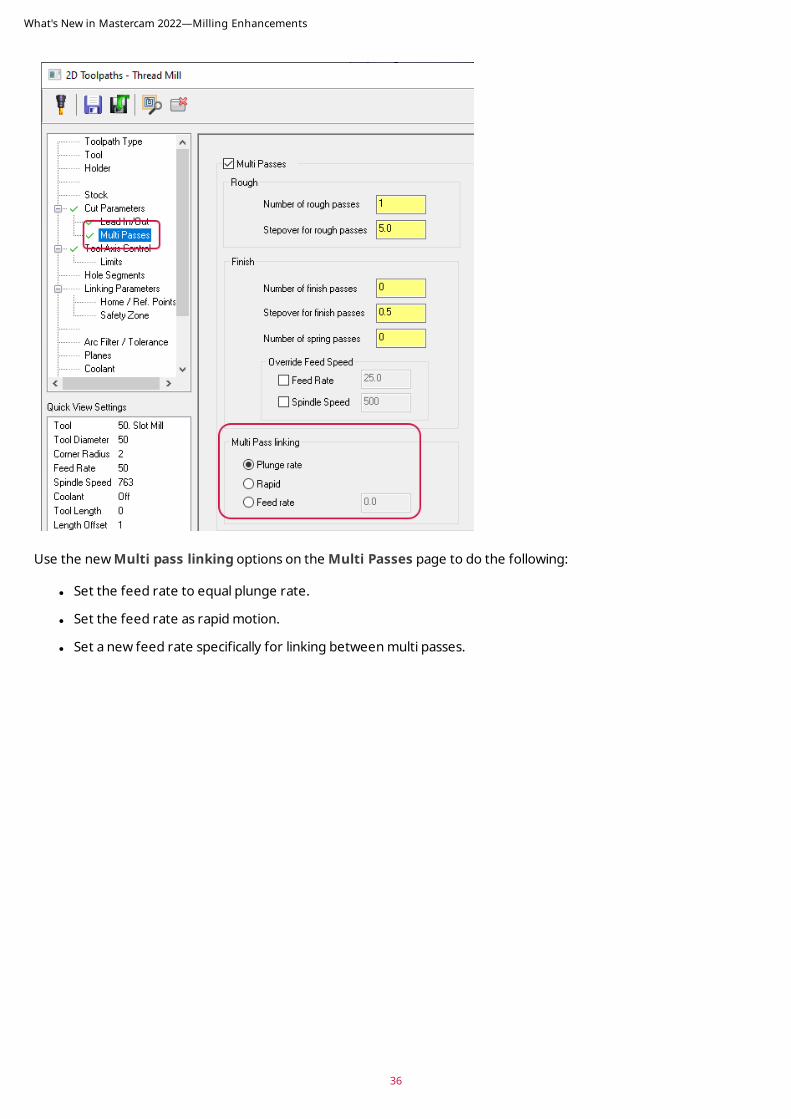
Use the new Multi pass linking options on the Multi Passes page to do the following:
l Set the feed rate to equal plunge rate.
l Set the feed rate as rapid motion.
l Set a new feed rate specifically for linking between multi passes.
What's New in Mastercam 2022—Milling Enhancements
36

37
Changing Direction and Orientation During SelectionThe new Orientation and Direction options on the Advanced tab of the Toolpath Hole Definition function panel allow you to change the hole direction and orientation, or to align the hole to an axis while making selections for a hole making toolpath.
This is particularly helpful when working on round parts, as it makes manual selection easier.
The first image below shows the axis alignment for First pick when all holes are selected.
What's New in Mastercam 2022—Milling Enhancements

The second picture shows the orientation when Axis is selected.
Using the Arc Filter/Tolerance Page for Hole Making ToolpathsThe Arc Filter/Tolerance page has been added to hole making toolpaths' tree-style dialog boxes. Use this page to control toolpath tolerance, which Mastercam uses to smooth and refine motion wherever possible.
This update also makes the following changes for the Arc Filter/Tolerance page:
What's New in Mastercam 2022—Milling Enhancements
38

39
l Output 3D arc entry motion has been moved from the Circle Mill Roughing page to the new Arc Filter/Tolerance page.
l Output arc moves for helixes has been moved from the Helix Bore Rough/Finish page to the new Arc Filter/Tolerance page.
l Linearize helixes has been moved from the Thread Mill Cut Parameters page to the new Arc Filter/Tolerance page.
l Tolerance has been moved from the three aforementioned pages to the new Arc Filter/Tolerance page.
Linearizing the Circle Mill Toolpath You can now linearize a Circle Mill toolpath with the new Linearize toolpath option located on the new Arc Filter/Tolerance page.
What's New in Mastercam 2022—Milling Enhancements
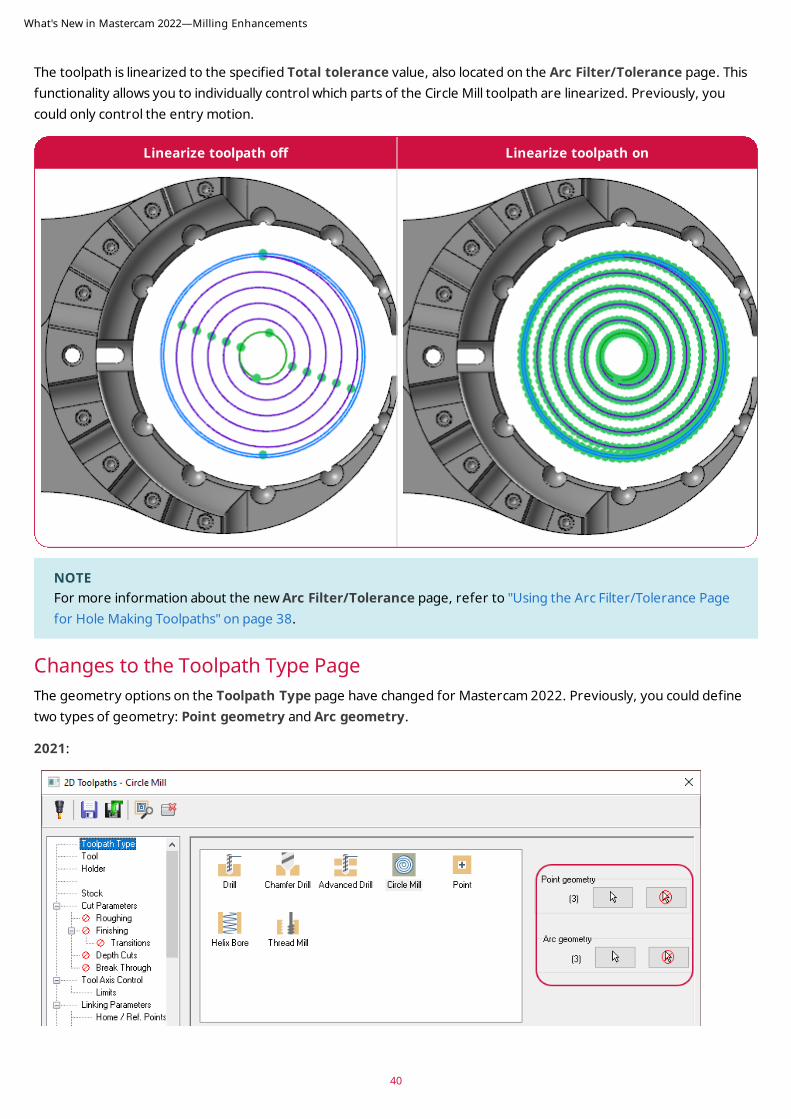
The toolpath is linearized to the specified Total tolerance value, also located on the Arc Filter/Tolerance page. This functionality allows you to individually control which parts of the Circle Mill toolpath are linearized. Previously, you could only control the entry motion.
Linearize toolpath off Linearize toolpath on
NOTEFor more information about the new Arc Filter/Tolerance page, refer to "Using the Arc Filter/Tolerance Page for Hole Making Toolpaths" on page 38.
Changes to the Toolpath Type Page The geometry options on the Toolpath Type page have changed for Mastercam 2022. Previously, you could define two types of geometry: Point geometry and Arc geometry.
2021:
What's New in Mastercam 2022—Milling Enhancements
40
41
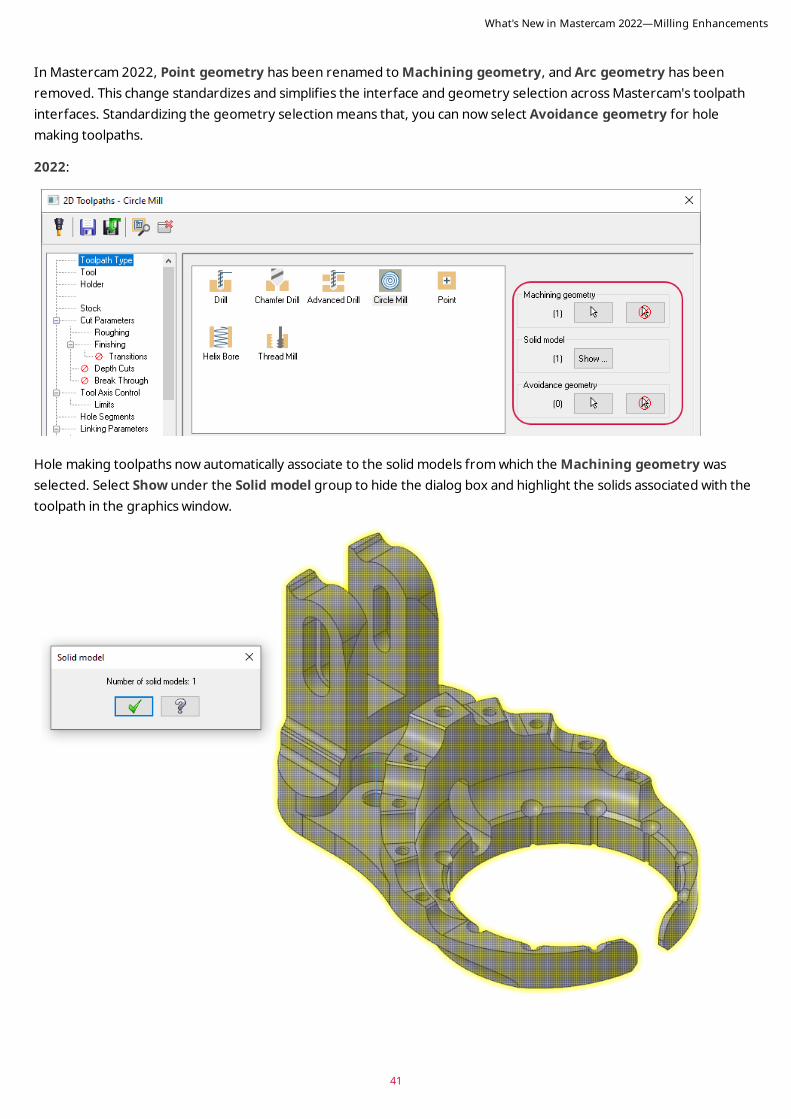
In Mastercam 2022, Point geometry has been renamed to Machining geometry, and Arc geometry has been removed. This change standardizes and simplifies the interface and geometry selection across Mastercam's toolpath interfaces. Standardizing the geometry selection means that, you can now select Avoidance geometry for hole making toolpaths.
2022:
Hole making toolpaths now automatically associate to the solid models from which the Machining geometry was selected. Select Show under the Solid model group to hide the dialog box and highlight the solids associated with the toolpath in the graphics window.
What's New in Mastercam 2022—Milling Enhancements
Advanced Drill Enhancements Listed below are enhancements to the Advanced Drill toolpath.
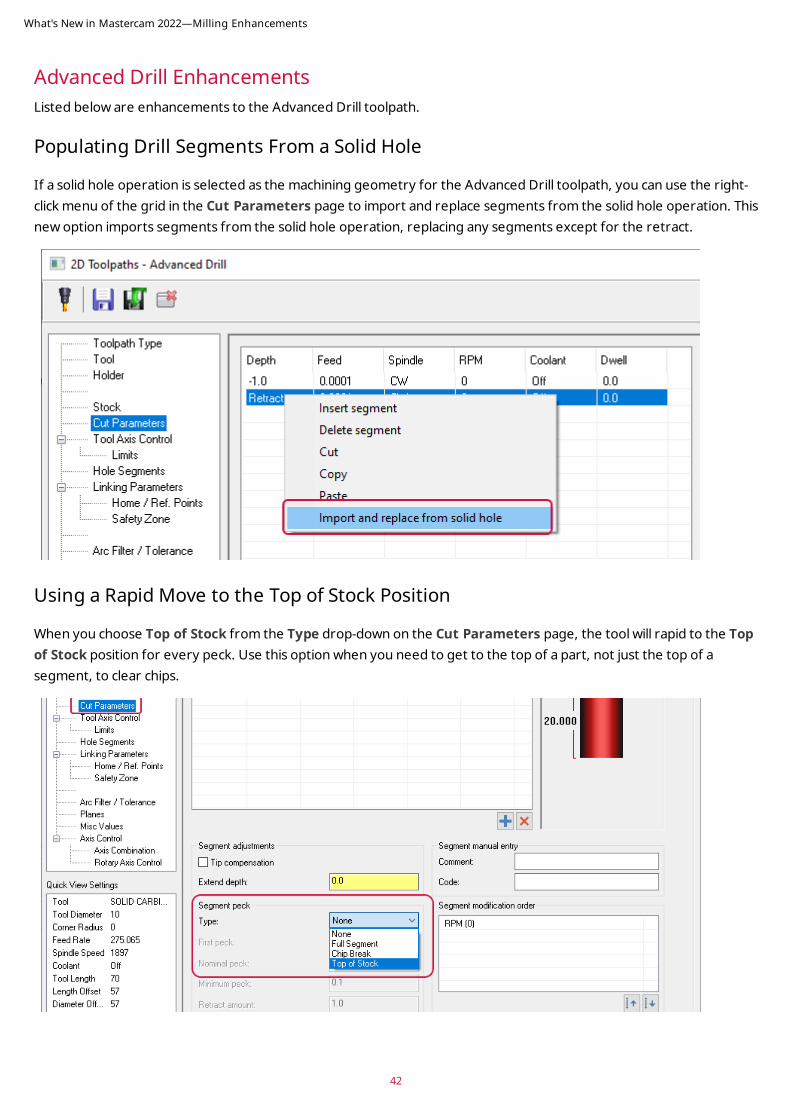
Populating Drill Segments From a Solid Hole
If a solid hole operation is selected as the machining geometry for the Advanced Drill toolpath, you can use the right-click menu of the grid in the Cut Parameters page to import and replace segments from the solid hole operation. This new option imports segments from the solid hole operation, replacing any segments except for the retract.
Using a Rapid Move to the Top of Stock Position
When you choose Top of Stock from the Type drop-down on the Cut Parameters page, the tool will rapid to the Top of Stock position for every peck. Use this option when you need to get to the top of a part, not just the top of a segment, to clear chips.
What's New in Mastercam 2022—Milling Enhancements
42
43
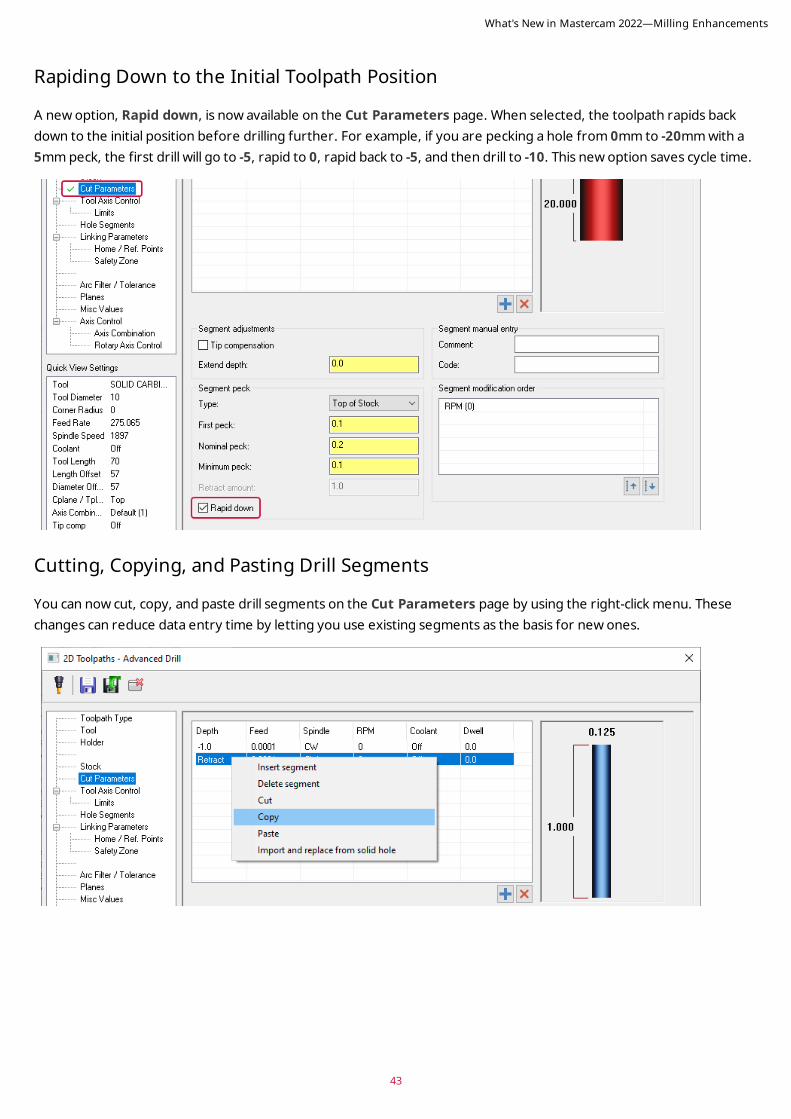
Rapiding Down to the Initial Toolpath Position
A new option, Rapid down, is now available on the Cut Parameters page. When selected, the toolpath rapids back down to the initial position before drilling further. For example, if you are pecking a hole from 0mm to -20mm with a 5mm peck, the first drill will go to -5, rapid to 0, rapid back to -5, and then drill to -10. This new option saves cycle time.
Cutting, Copying, and Pasting Drill Segments
You can now cut, copy, and paste drill segments on the Cut Parameters page by using the right-click menu. These changes can reduce data entry time by letting you use existing segments as the basis for new ones.
What's New in Mastercam 2022—Milling Enhancements
Helix Bore Toolpath Enhancements
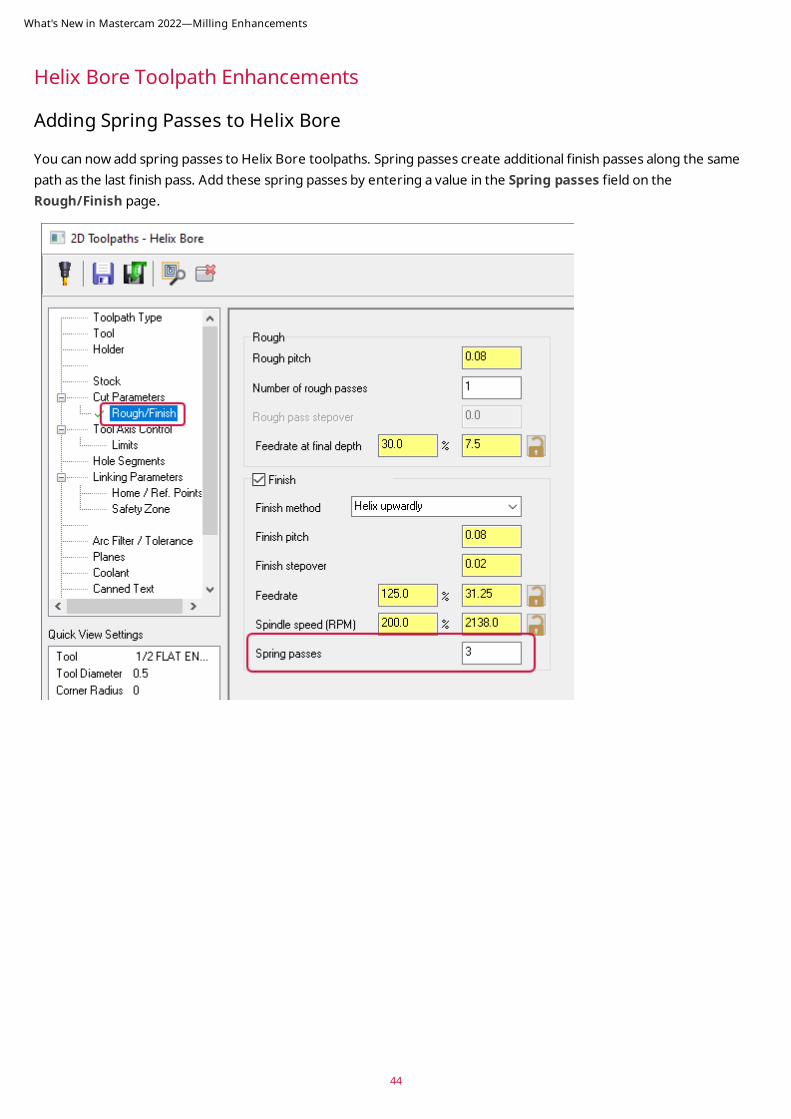
Adding Spring Passes to Helix Bore
You can now add spring passes to Helix Bore toolpaths. Spring passes create additional finish passes along the same path as the last finish pass. Add these spring passes by entering a value in the Spring passes field on the Rough/Finish page.
What's New in Mastercam 2022—Milling Enhancements
44
45
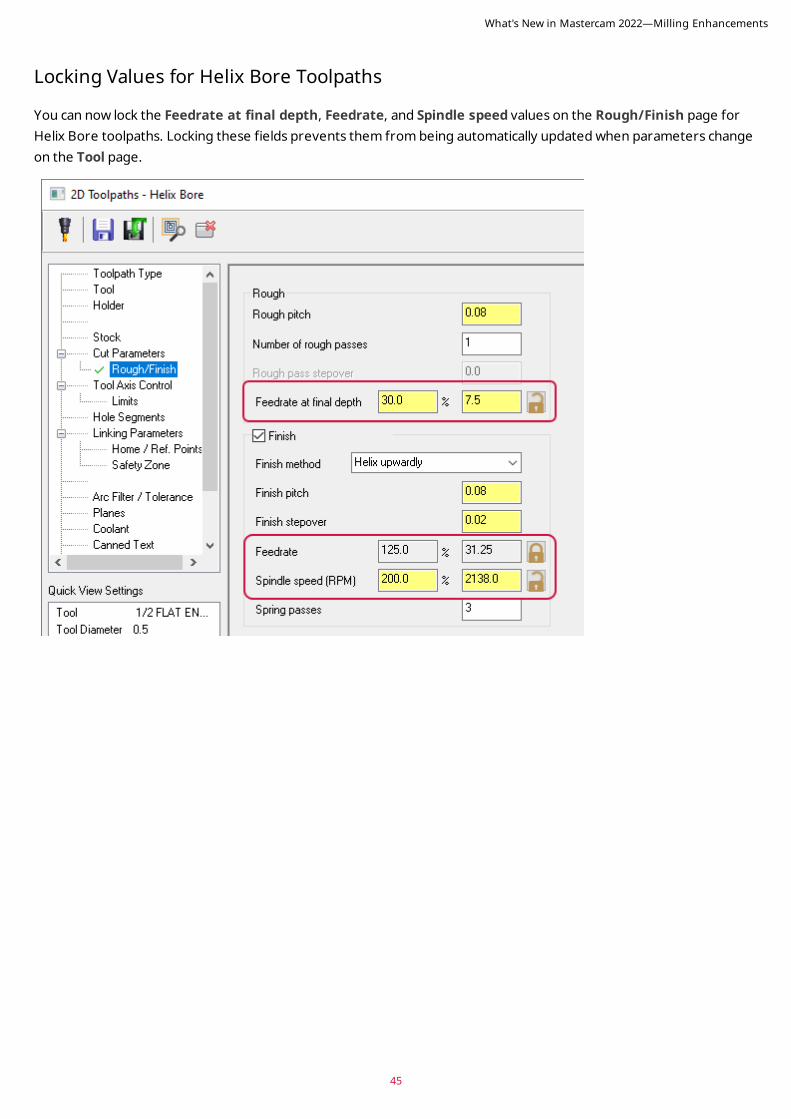
Locking Values for Helix Bore Toolpaths
You can now lock the Feedrate at final depth, Feedrate, and Spindle speed values on the Rough/Finish page for Helix Bore toolpaths. Locking these fields prevents them from being automatically updated when parameters change on the Tool page.
What's New in Mastercam 2022—Milling Enhancements

Maintaining CS/SFM in Chamfer Drill The new Maintain CS/SFM option on the Cut Parameters page of Chamfer Drill toolpaths varies the spindle speed for each hole to maintain the cutting speed (CS) in surface meters per minute or surface feet per minute (SFM). This new option helps when machining different sized holes, as the CS or SFM are generally calculated based on the diameter of the tool. This option increases the spindle speed for smaller holes to maintain the proper CS/SFM.
What's New in Mastercam 2022—Milling Enhancements
46
47
3D EnhancementsListed below are enhancements to the 3D toolpaths.
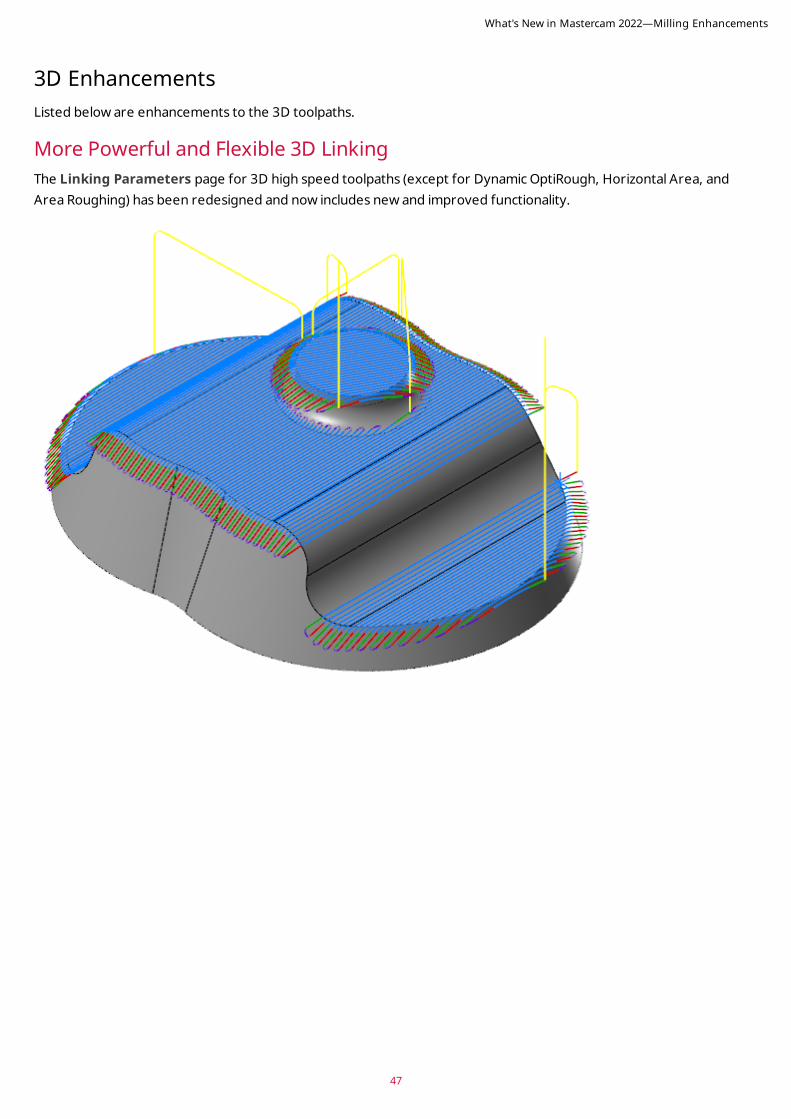
More Powerful and Flexible 3D Linking The Linking Parameters page for 3D high speed toolpaths (except for Dynamic OptiRough, Horizontal Area, and Area Roughing) has been redesigned and now includes new and improved functionality.
What's New in Mastercam 2022—Milling Enhancements
Adding Leads to Transition Moves
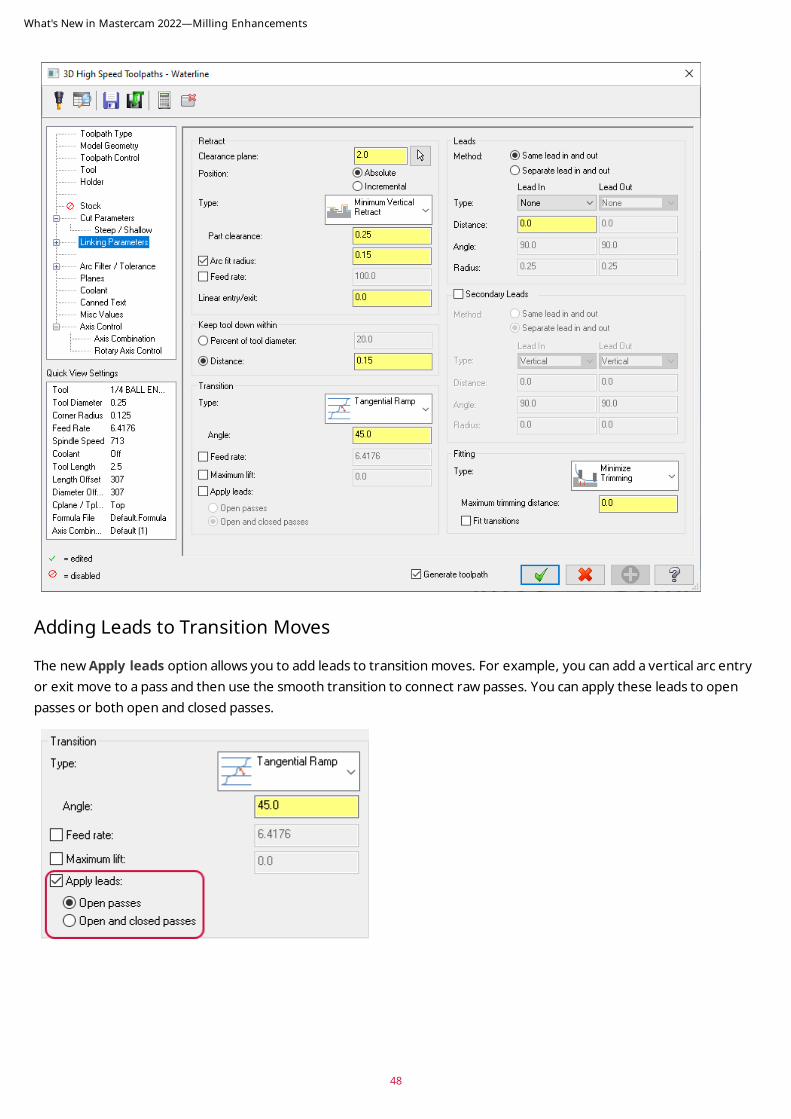
The new Apply leads option allows you to add leads to transition moves. For example, you can add a vertical arc entry or exit move to a pass and then use the smooth transition to connect raw passes. You can apply these leads to open passes or both open and closed passes.
What's New in Mastercam 2022—Milling Enhancements
48
49
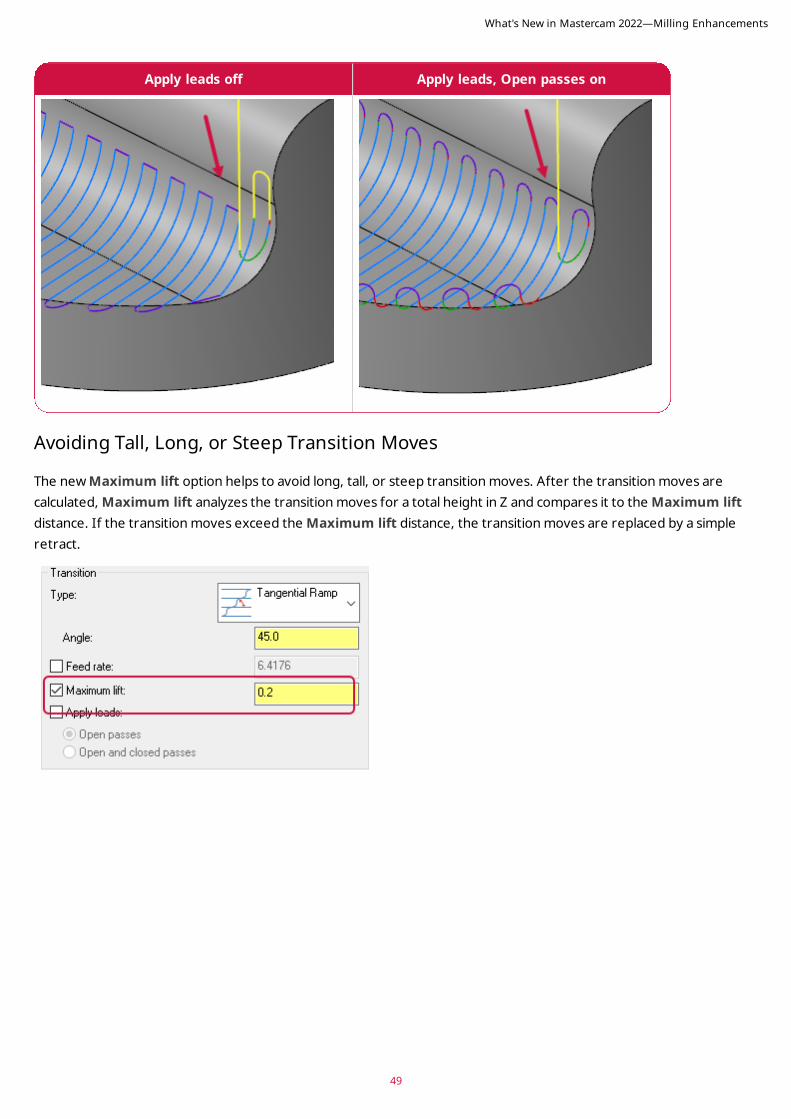
Apply leads off Apply leads, Open passes on
Avoiding Tall, Long, or Steep Transition Moves
The new Maximum lift option helps to avoid long, tall, or steep transition moves. After the transition moves are calculated, Maximum lift analyzes the transition moves for a total height in Z and compares it to the Maximum lift distance. If the transition moves exceed the Maximum lift distance, the transition moves are replaced by a simple retract.
What's New in Mastercam 2022—Milling Enhancements
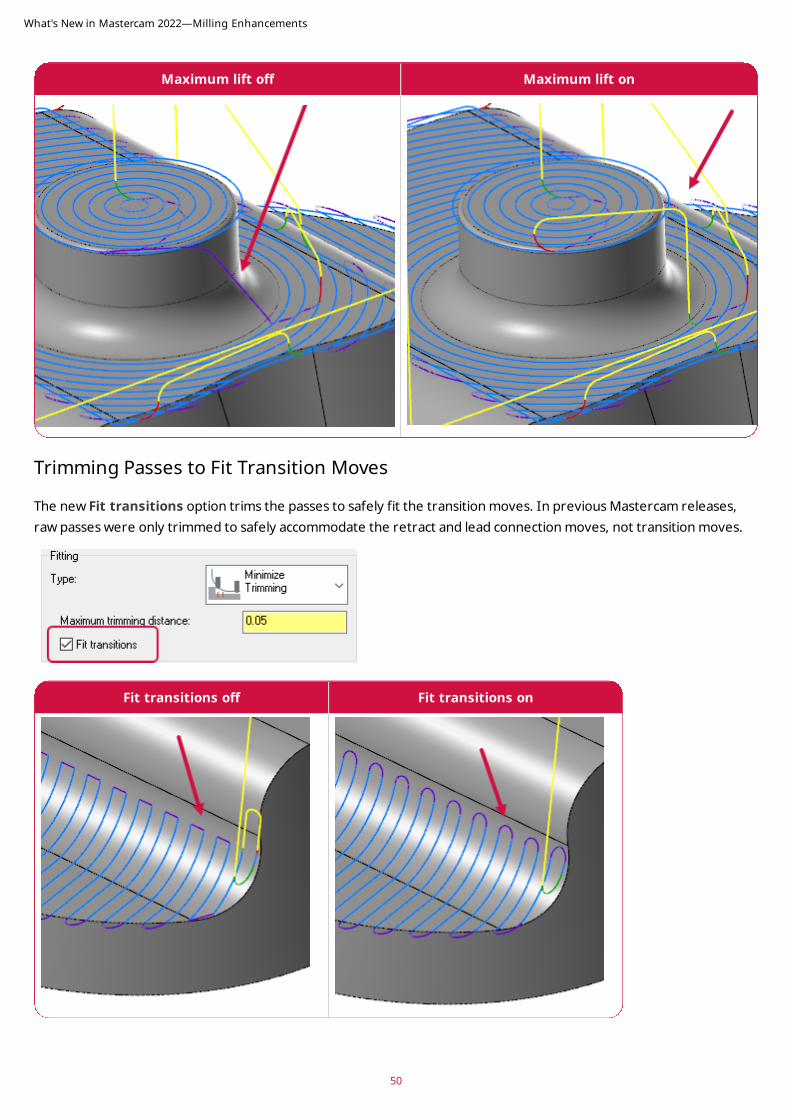
Maximum lift off Maximum lift on
Trimming Passes to Fit Transition Moves
The new Fit transitions option trims the passes to safely fit the transition moves. In previous Mastercam releases, raw passes were only trimmed to safely accommodate the retract and lead connection moves, not transition moves.
Fit transitions off Fit transitions on
What's New in Mastercam 2022—Milling Enhancements
50
51
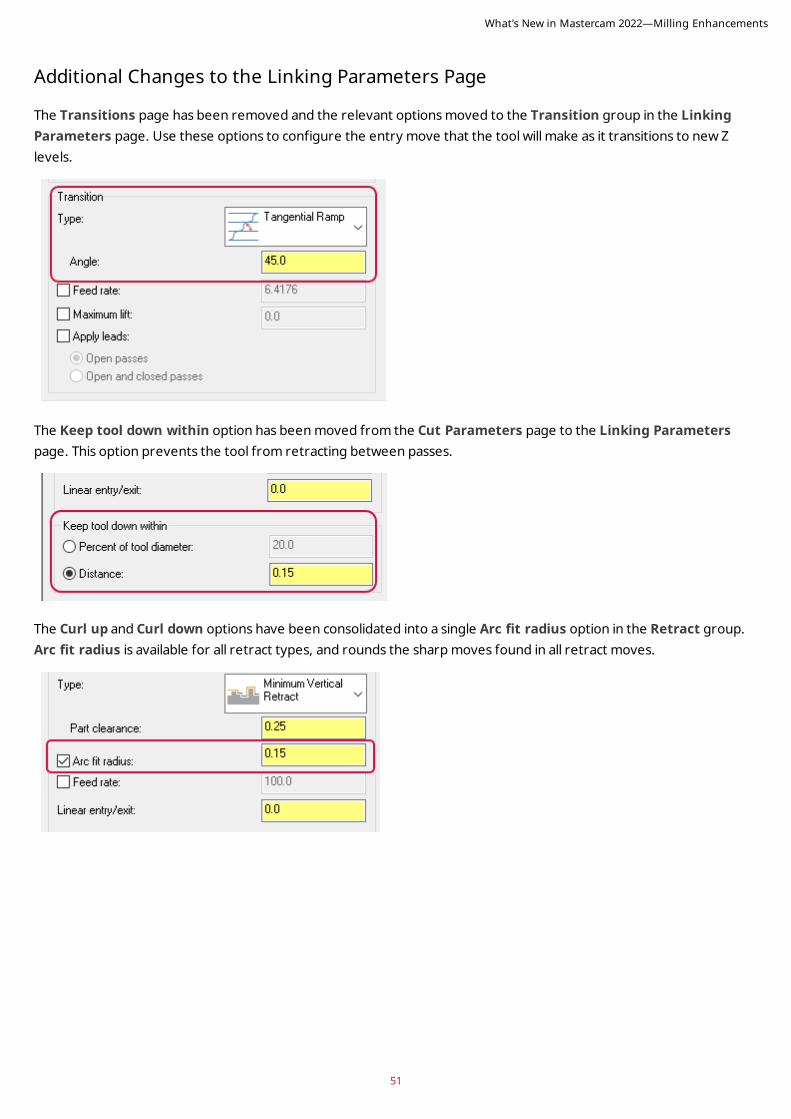
Additional Changes to the Linking Parameters Page
The Transitions page has been removed and the relevant options moved to the Transition group in the Linking Parameters page. Use these options to configure the entry move that the tool will make as it transitions to new Z levels.
The Keep tool down within option has been moved from the Cut Parameters page to the Linking Parameters page. This option prevents the tool from retracting between passes.
The Curl up and Curl down options have been consolidated into a single Arc fit radius option in the Retract group. Arc fit radius is available for all retract types, and rounds the sharp moves found in all retract moves.
What's New in Mastercam 2022—Milling Enhancements
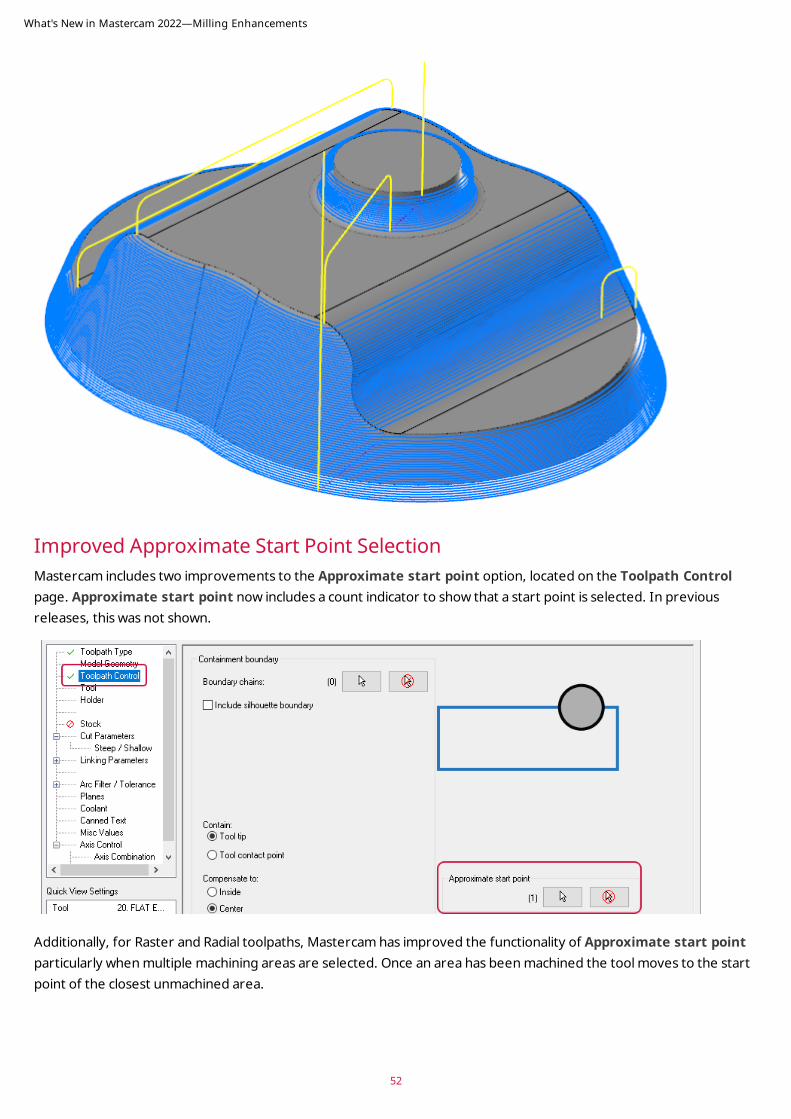
Improved Approximate Start Point Selection Mastercam includes two improvements to the Approximate start point option, located on the Toolpath Control page. Approximate start point now includes a count indicator to show that a start point is selected. In previous releases, this was not shown.
Additionally, for Raster and Radial toolpaths, Mastercam has improved the functionality of Approximate start point particularly when multiple machining areas are selected. Once an area has been machined the tool moves to the start point of the closest unmachined area.
What's New in Mastercam 2022—Milling Enhancements
52

53
Dragging and Dropping Geometry GroupsWhen dragging and dropping geometry from a 3D high speed toolpath to another 3D high speed toolpath, Mastercam checks both the source and destination toolpaths for a single group.
l If only one group is found, the geometry is added to or replaces that group.
l If you select Add geometry and stock to leave values, a new group is created in the Model Geometry page.
l If there is more than one geometry group in either the source toolpath or the destination toolpath, Mastercam creates a new group in the Model Geometry page as in previous releases.
What's New in Mastercam 2022—Milling Enhancements
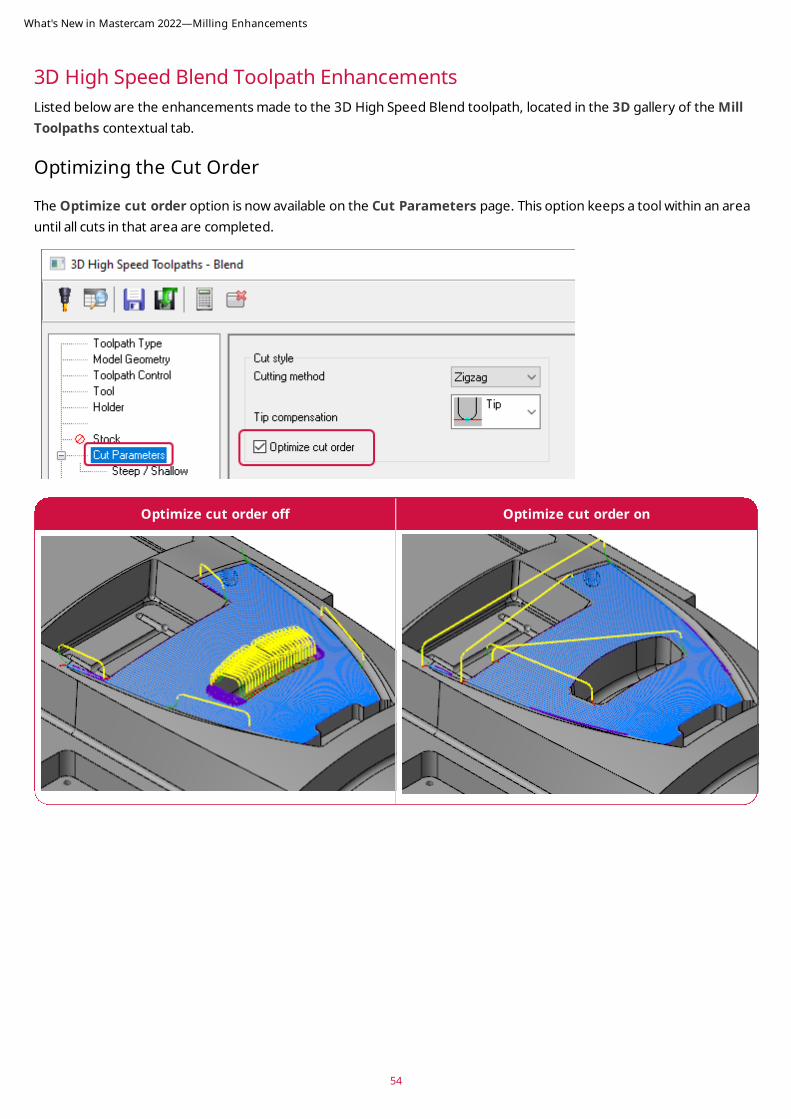
3D High Speed Blend Toolpath EnhancementsListed below are the enhancements made to the 3D High Speed Blend toolpath, located in the 3D gallery of the Mill Toolpaths contextual tab.
Optimizing the Cut Order
The Optimize cut order option is now available on the Cut Parameters page. This option keeps a tool within an area until all cuts in that area are completed.
Optimize cut order off Optimize cut order on
What's New in Mastercam 2022—Milling Enhancements
54
55
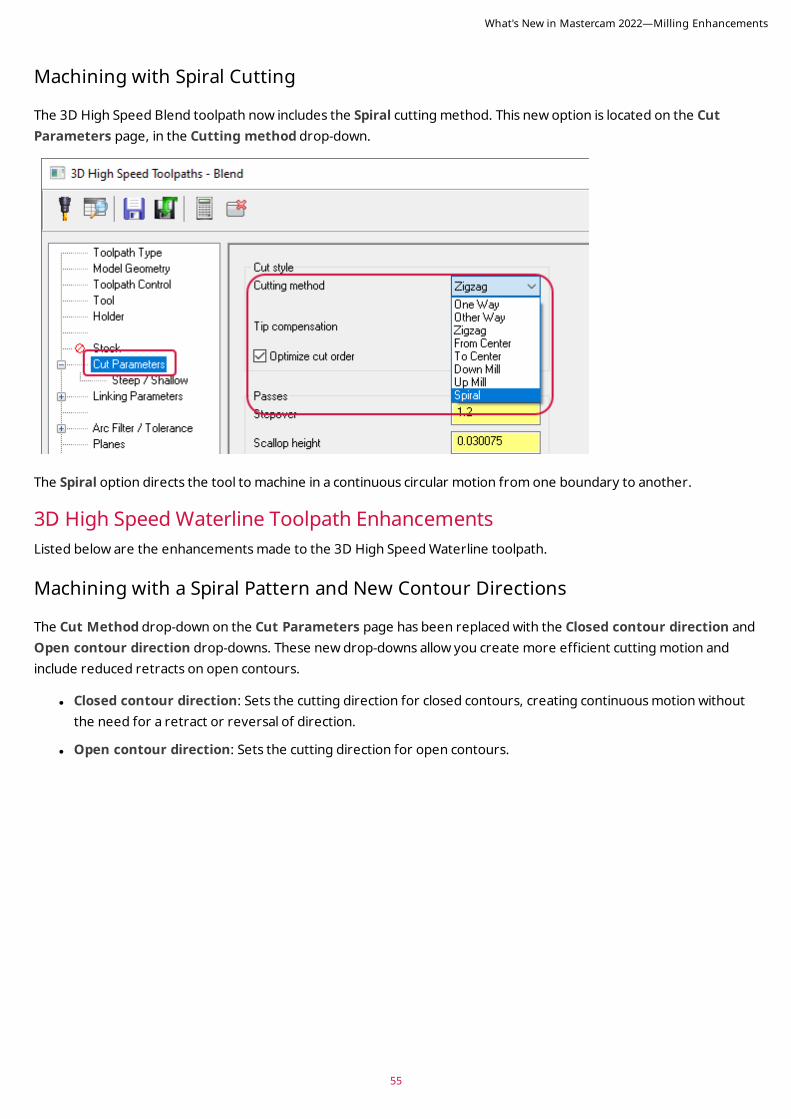
Machining with Spiral Cutting
The 3D High Speed Blend toolpath now includes the Spiral cutting method. This new option is located on the Cut Parameters page, in the Cutting method drop-down.
The Spiral option directs the tool to machine in a continuous circular motion from one boundary to another.
3D High Speed Waterline Toolpath Enhancements Listed below are the enhancements made to the 3D High Speed Waterline toolpath.
Machining with a Spiral Pattern and New Contour Directions
The Cut Method drop-down on the Cut Parameters page has been replaced with the Closed contour direction and Open contour direction drop-downs. These new drop-downs allow you create more efficient cutting motion and include reduced retracts on open contours.
l Closed contour direction: Sets the cutting direction for closed contours, creating continuous motion without the need for a retract or reversal of direction.
l Open contour direction: Sets the cutting direction for open contours.
What's New in Mastercam 2022—Milling Enhancements

The example below has Closed contour direction set to Climb and Open contour direction set to Zigzag.
Waterline also includes two new Closed contour direction options, Climb Spiral and Conventional Spiral.
These new cut styles provide cleaner finishes, less machining motion, and fewer retracts. Spiral also helps to avoid creating marks on your part due to stepdown motion.
l Climb spiral: Cuts in one direction in a spiral pattern, with tool rotating in the opposite direction of the tool motion.
l Conventional spiral: Cuts in one direction in a spiral pattern, with the tool rotating in the same direction as the tool motion.
What's New in Mastercam 2022—Milling Enhancements
56
57
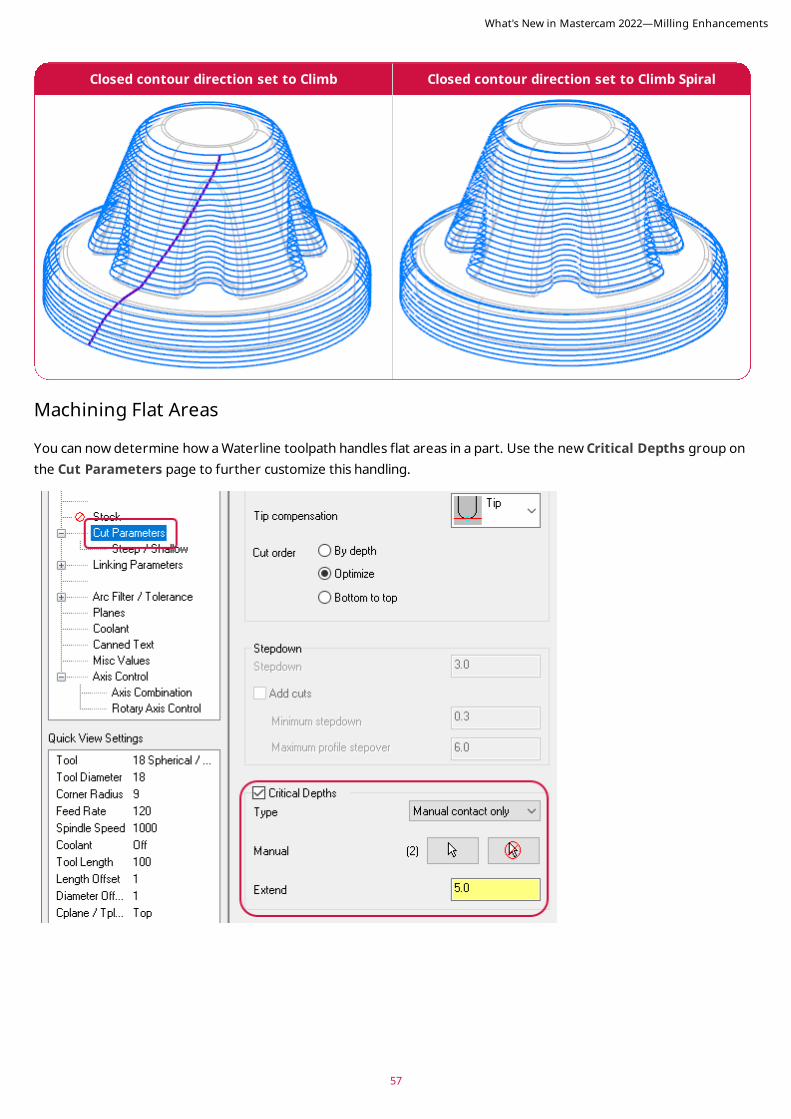
Closed contour direction set to Climb Closed contour direction set to Climb Spiral
Machining Flat Areas
You can now determine how a Waterline toolpath handles flat areas in a part. Use the new Critical Depths group on the Cut Parameters page to further customize this handling.
What's New in Mastercam 2022—Milling Enhancements
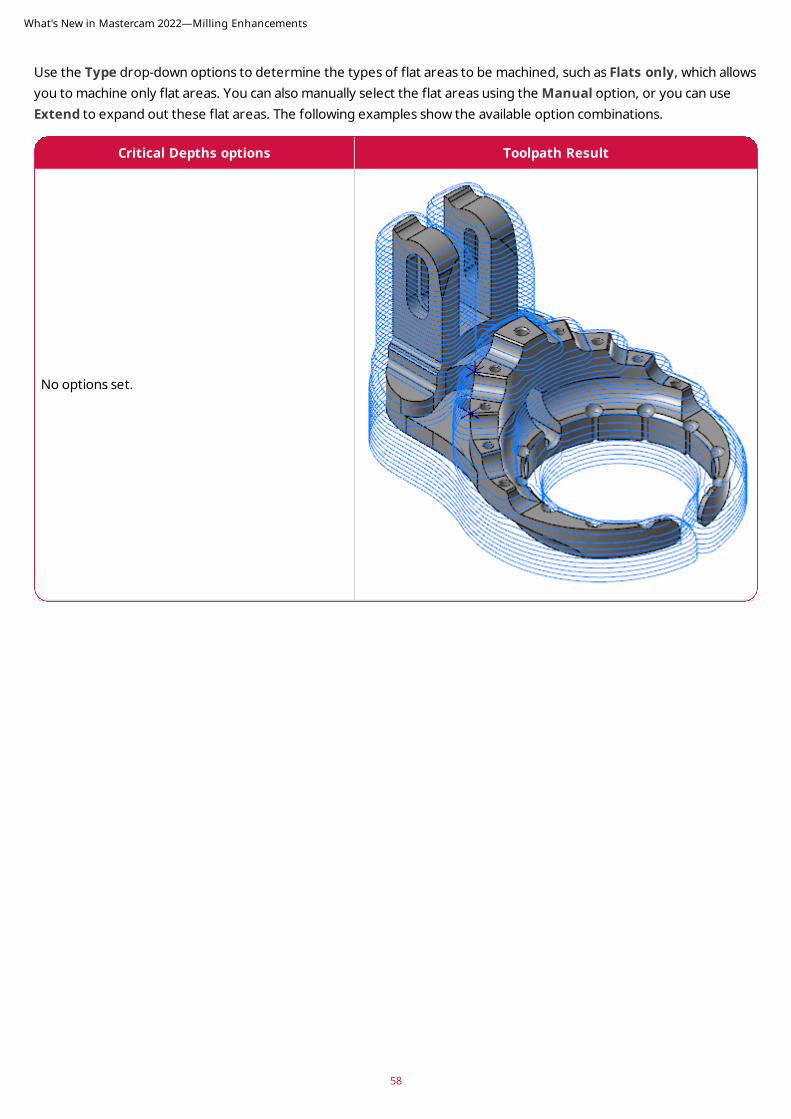
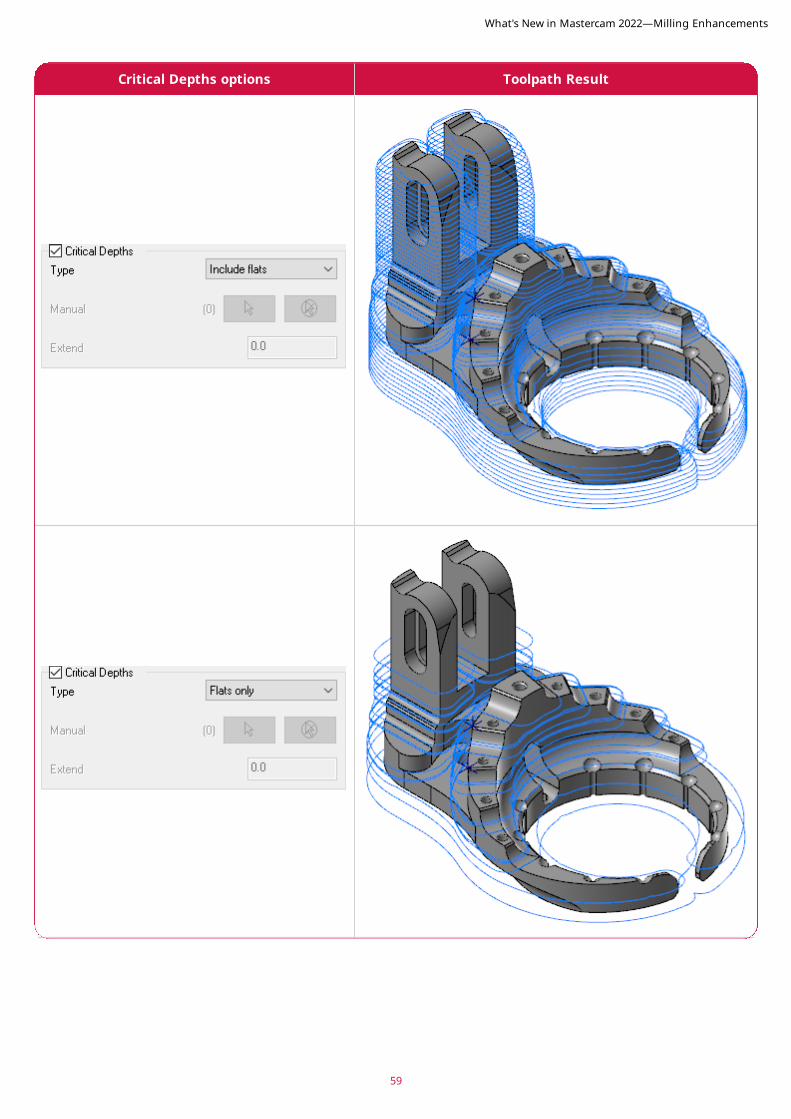
Use the Type drop-down options to determine the types of flat areas to be machined, such as Flats only, which allows you to machine only flat areas. You can also manually select the flat areas using the Manual option, or you can use Extend to expand out these flat areas. The following examples show the available option combinations.
Critical Depths options Toolpath Result
No options set.
What's New in Mastercam 2022—Milling Enhancements
58
59
Critical Depths options Toolpath Result
What's New in Mastercam 2022—Milling Enhancements

Critical Depths options Toolpath Result
What's New in Mastercam 2022—Milling Enhancements
60
61
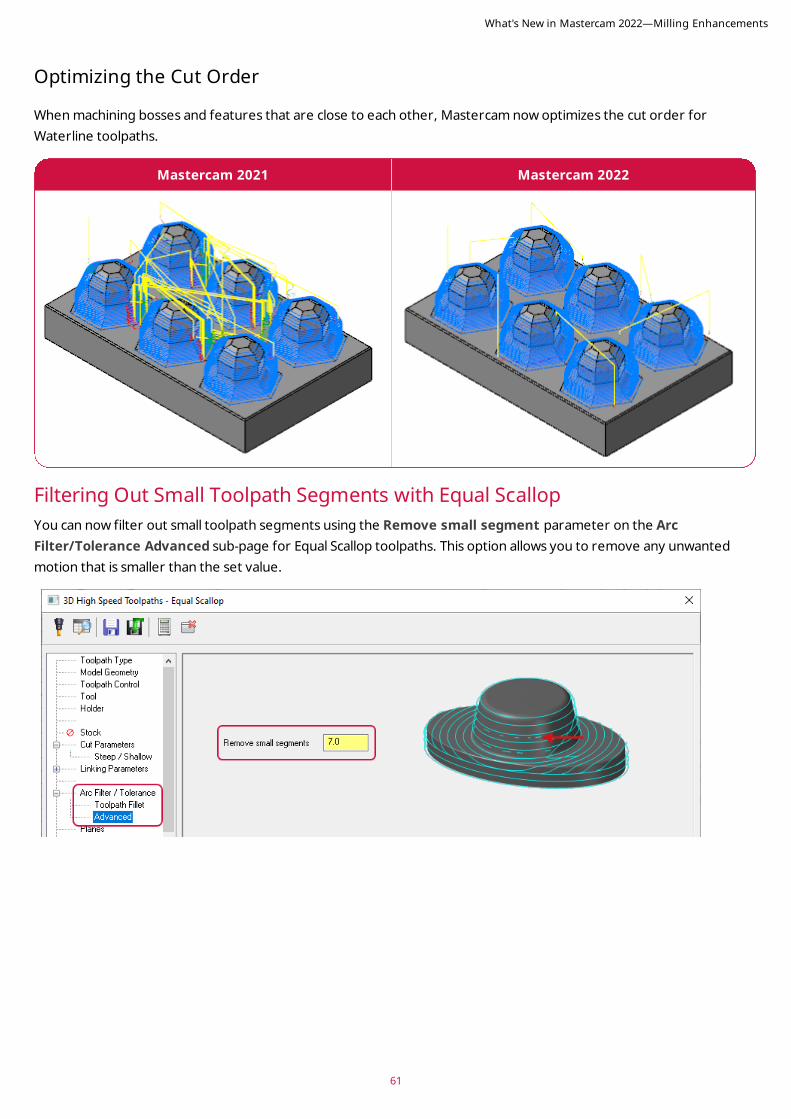
Optimizing the Cut Order
When machining bosses and features that are close to each other, Mastercam now optimizes the cut order for Waterline toolpaths.
Mastercam 2021 Mastercam 2022
Filtering Out Small Toolpath Segments with Equal Scallop You can now filter out small toolpath segments using the Remove small segment parameter on the Arc Filter/Tolerance Advanced sub-page for Equal Scallop toolpaths. This option allows you to remove any unwanted motion that is smaller than the set value.
What's New in Mastercam 2022—Milling Enhancements
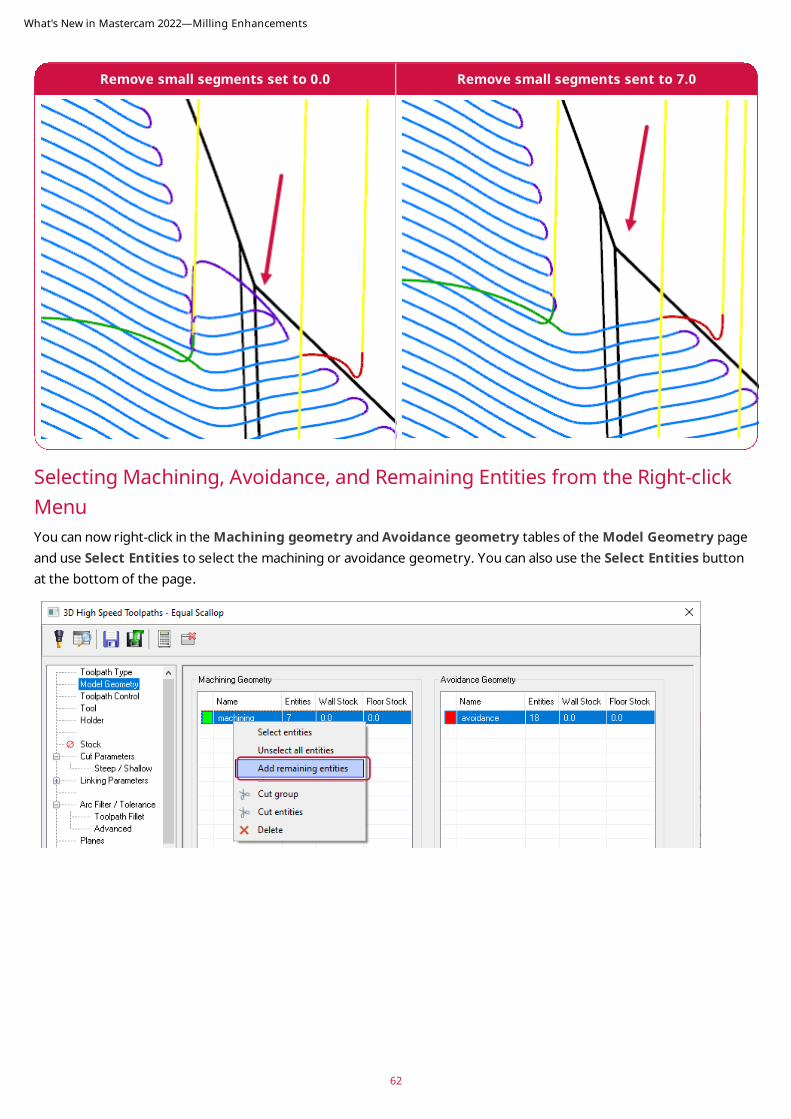
Remove small segments set to 0.0 Remove small segments sent to 7.0
Selecting Machining, Avoidance, and Remaining Entities from the Right-click Menu You can now right-click in the Machining geometry and Avoidance geometry tables of the Model Geometry page and use Select Entities to select the machining or avoidance geometry. You can also use the Select Entities button at the bottom of the page.
What's New in Mastercam 2022—Milling Enhancements
62
63
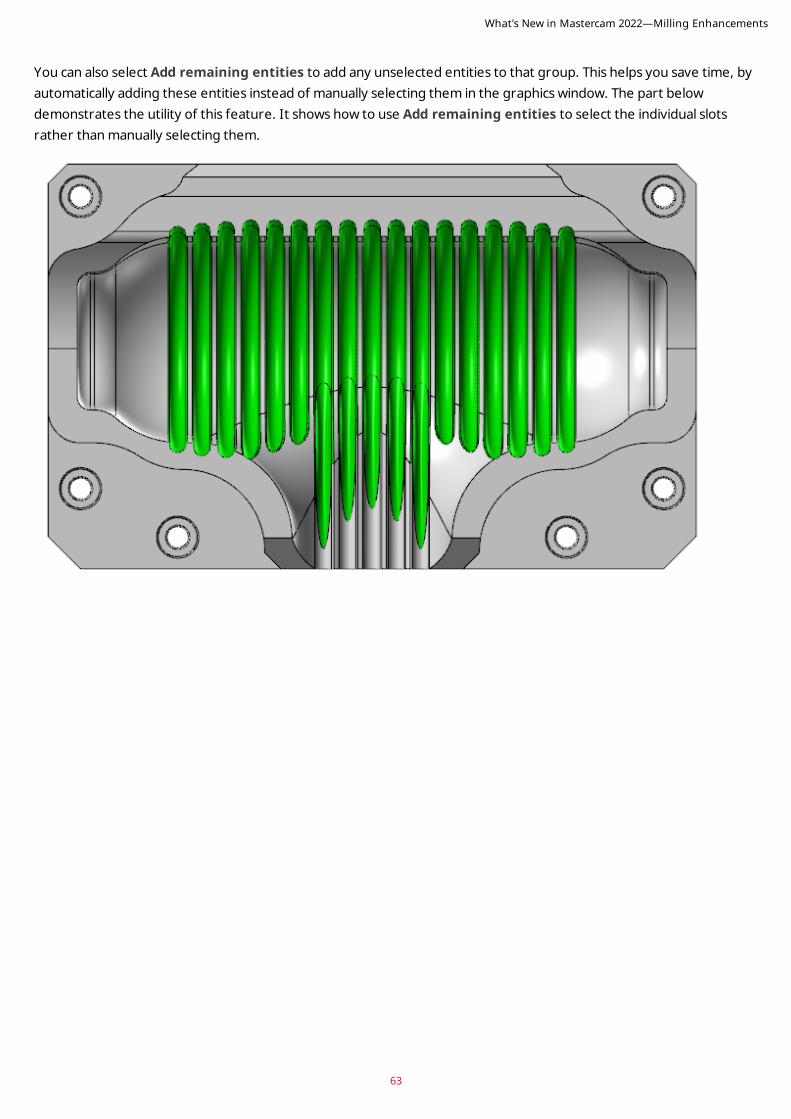
You can also select Add remaining entities to add any unselected entities to that group. This helps you save time, by automatically adding these entities instead of manually selecting them in the graphics window. The part below demonstrates the utility of this feature. It shows how to use Add remaining entities to select the individual slots rather than manually selecting them.
What's New in Mastercam 2022—Milling Enhancements
Multiaxis EnhancementsListed below are enhancements to Multiaxis toolpaths.
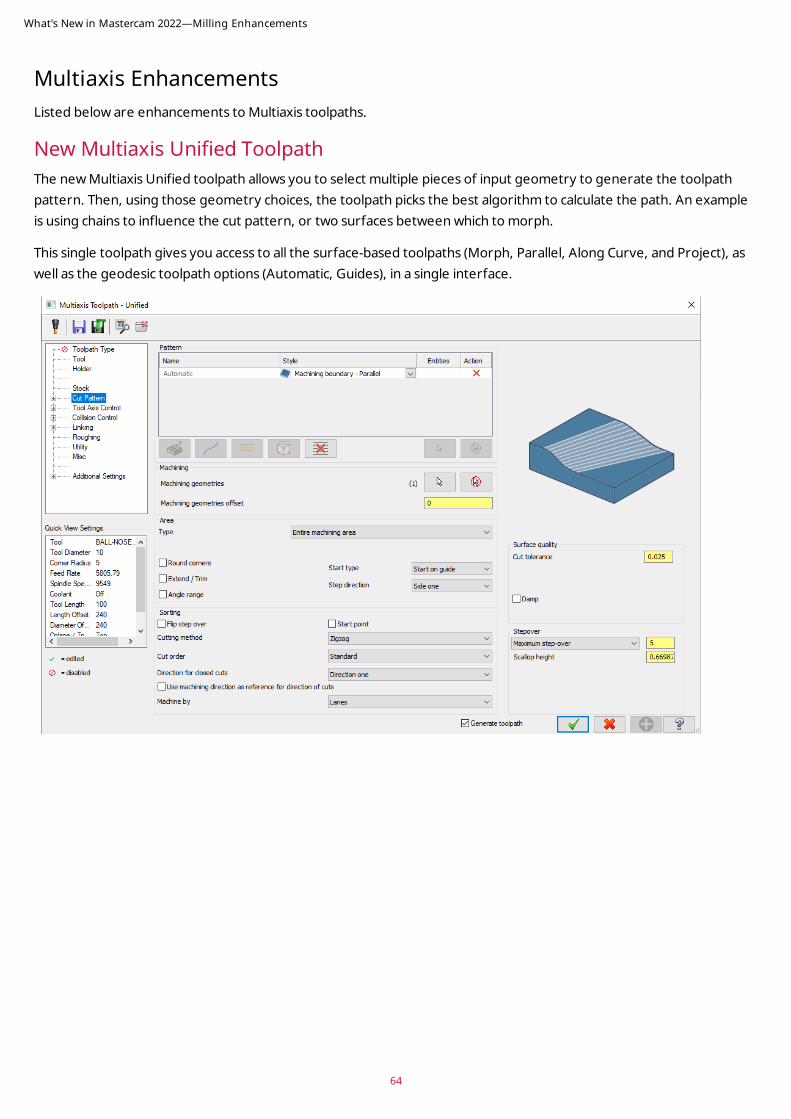
New Multiaxis Unified ToolpathThe new Multiaxis Unified toolpath allows you to select multiple pieces of input geometry to generate the toolpath pattern. Then, using those geometry choices, the toolpath picks the best algorithm to calculate the path. An example is using chains to influence the cut pattern, or two surfaces between which to morph.
This single toolpath gives you access to all the surface-based toolpaths (Morph, Parallel, Along Curve, and Project), as well as the geodesic toolpath options (Automatic, Guides), in a single interface.
What's New in Mastercam 2022—Milling Enhancements
64
65
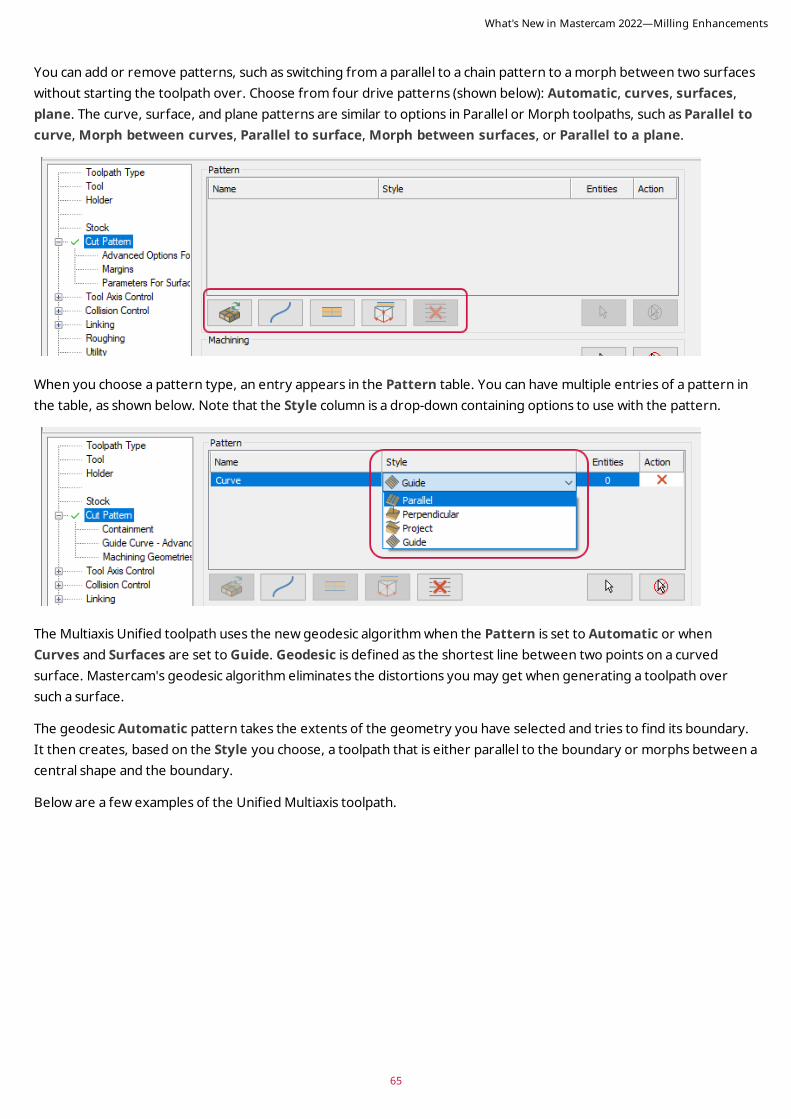
You can add or remove patterns, such as switching from a parallel to a chain pattern to a morph between two surfaces without starting the toolpath over. Choose from four drive patterns (shown below): Automatic, curves, surfaces, plane. The curve, surface, and plane patterns are similar to options in Parallel or Morph toolpaths, such as Parallel to curve, Morph between curves, Parallel to surface, Morph between surfaces, or Parallel to a plane.
When you choose a pattern type, an entry appears in the Pattern table. You can have multiple entries of a pattern in the table, as shown below. Note that the Style column is a drop-down containing options to use with the pattern.
The Multiaxis Unified toolpath uses the new geodesic algorithm when the Pattern is set to Automatic or when Curves and Surfaces are set to Guide. Geodesic is defined as the shortest line between two points on a curved surface. Mastercam's geodesic algorithm eliminates the distortions you may get when generating a toolpath over such a surface.
The geodesic Automatic pattern takes the extents of the geometry you have selected and tries to find its boundary. It then creates, based on the Style you choose, a toolpath that is either parallel to the boundary or morphs between a central shape and the boundary.
Below are a few examples of the Unified Multiaxis toolpath.
What's New in Mastercam 2022—Milling Enhancements

Parameters Toolpath Result
Pattern set to Automatic.
Style set to Machining boundary - Parallel.
Pattern set to Automatic.
Style set to Center - Parallel.
Pattern set to Automatic.
Style set to Center - Parallel.
Fill holes selected on the Machining Geometries - Advanced Parameters page.
What's New in Mastercam 2022—Milling Enhancements
66
67
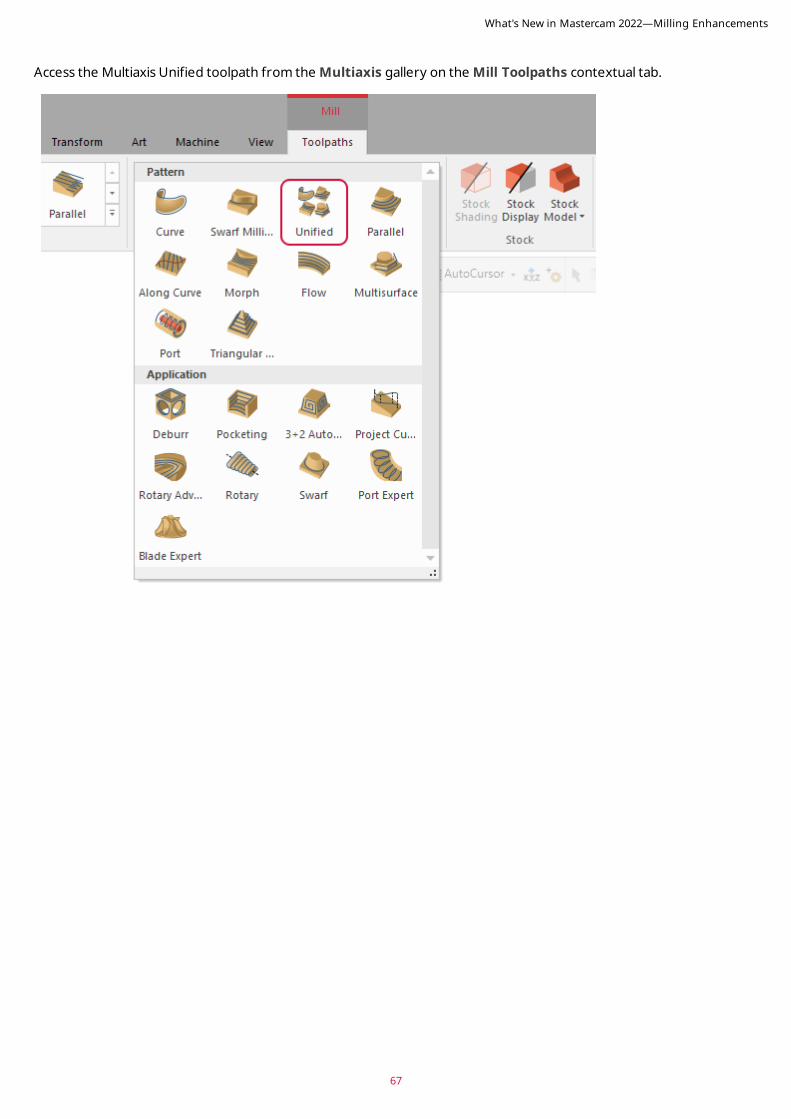
Access the Multiaxis Unified toolpath from the Multiaxis gallery on the Mill Toolpaths contextual tab.
What's New in Mastercam 2022—Milling Enhancements
Deburr Toolpath EnhancementsListed below are enhancements to the Deburr toolpath.
Performing Multiple Cuts
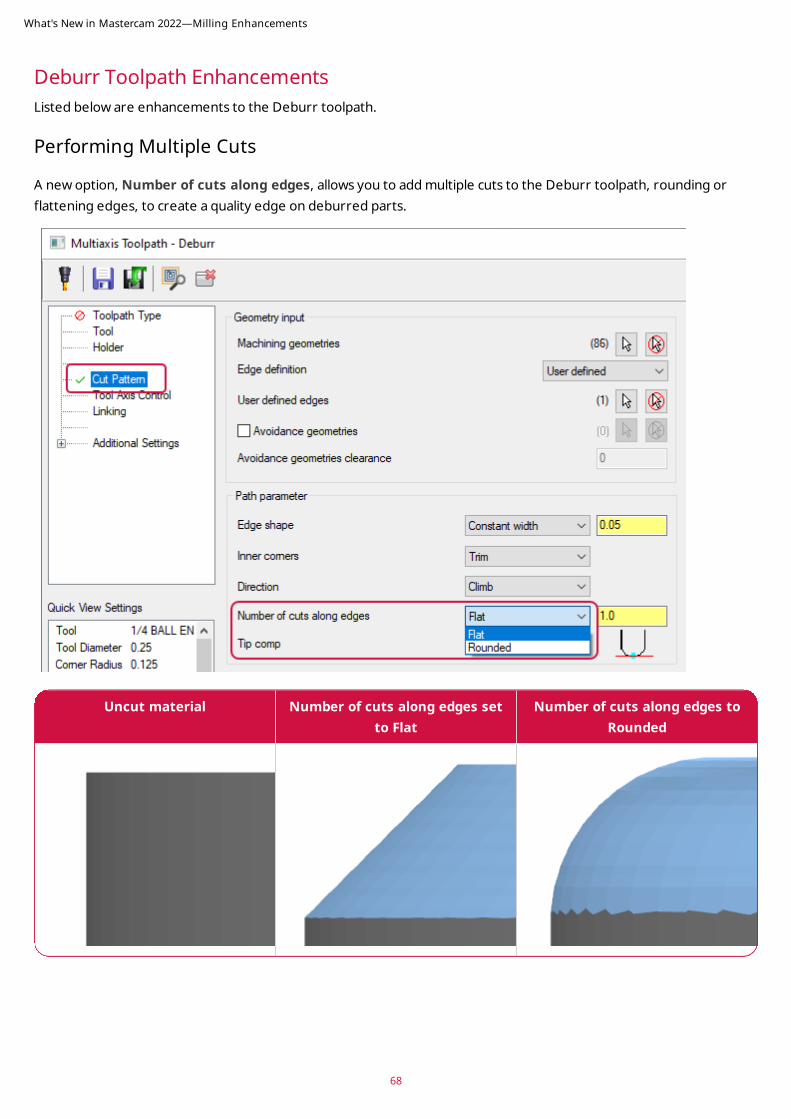
A new option, Number of cuts along edges, allows you to add multiple cuts to the Deburr toolpath, rounding or flattening edges, to create a quality edge on deburred parts.
Uncut material Number of cuts along edges set to Flat
Number of cuts along edges to Rounded
What's New in Mastercam 2022—Milling Enhancements
68
69
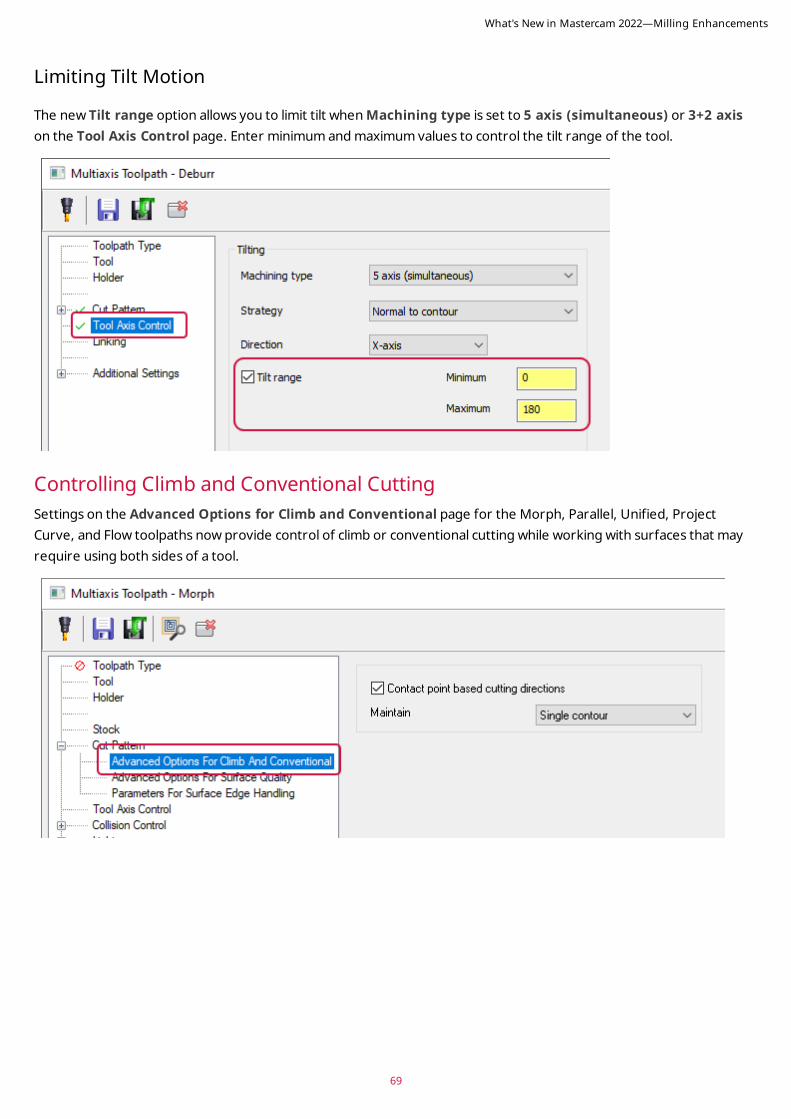
Limiting Tilt Motion
The new Tilt range option allows you to limit tilt when Machining type is set to 5 axis (simultaneous) or 3+2 axis on the Tool Axis Control page. Enter minimum and maximum values to control the tilt range of the tool.
Controlling Climb and Conventional Cutting Settings on the Advanced Options for Climb and Conventional page for the Morph, Parallel, Unified, Project Curve, and Flow toolpaths now provide control of climb or conventional cutting while working with surfaces that may require using both sides of a tool.
What's New in Mastercam 2022—Milling Enhancements
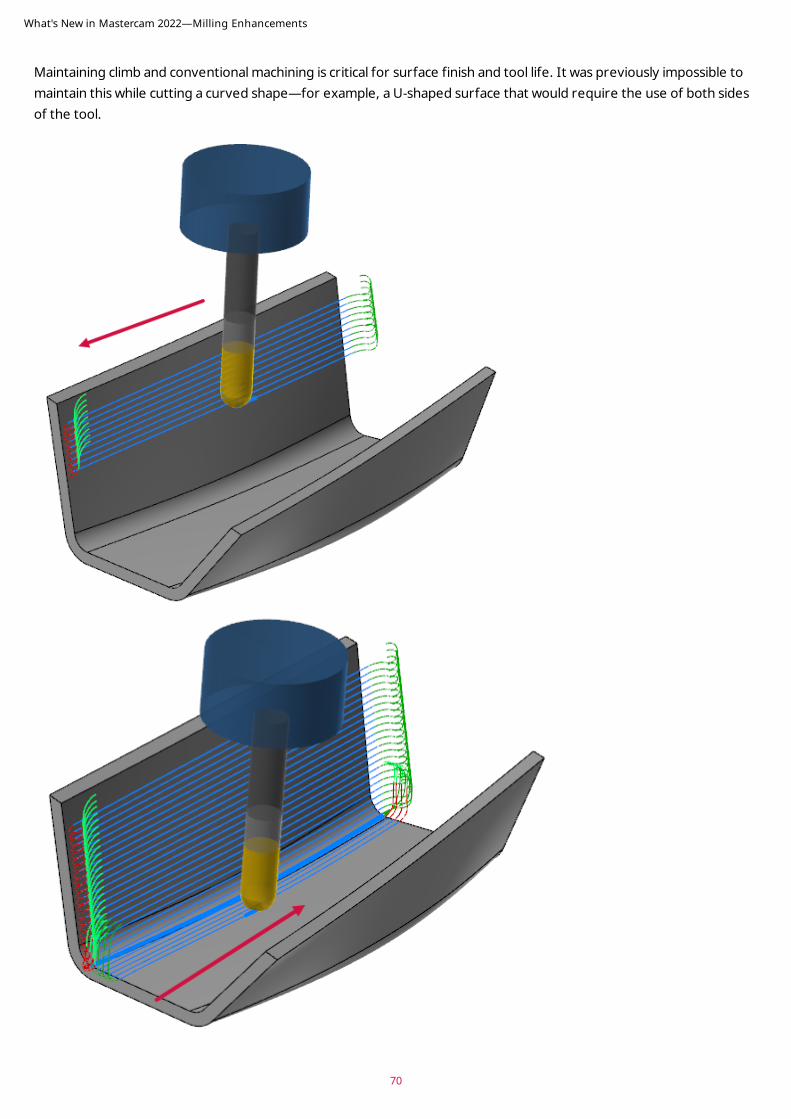
Maintaining climb and conventional machining is critical for surface finish and tool life. It was previously impossible to maintain this while cutting a curved shape—for example, a U-shaped surface that would require the use of both sides of the tool.
What's New in Mastercam 2022—Milling Enhancements
70
71
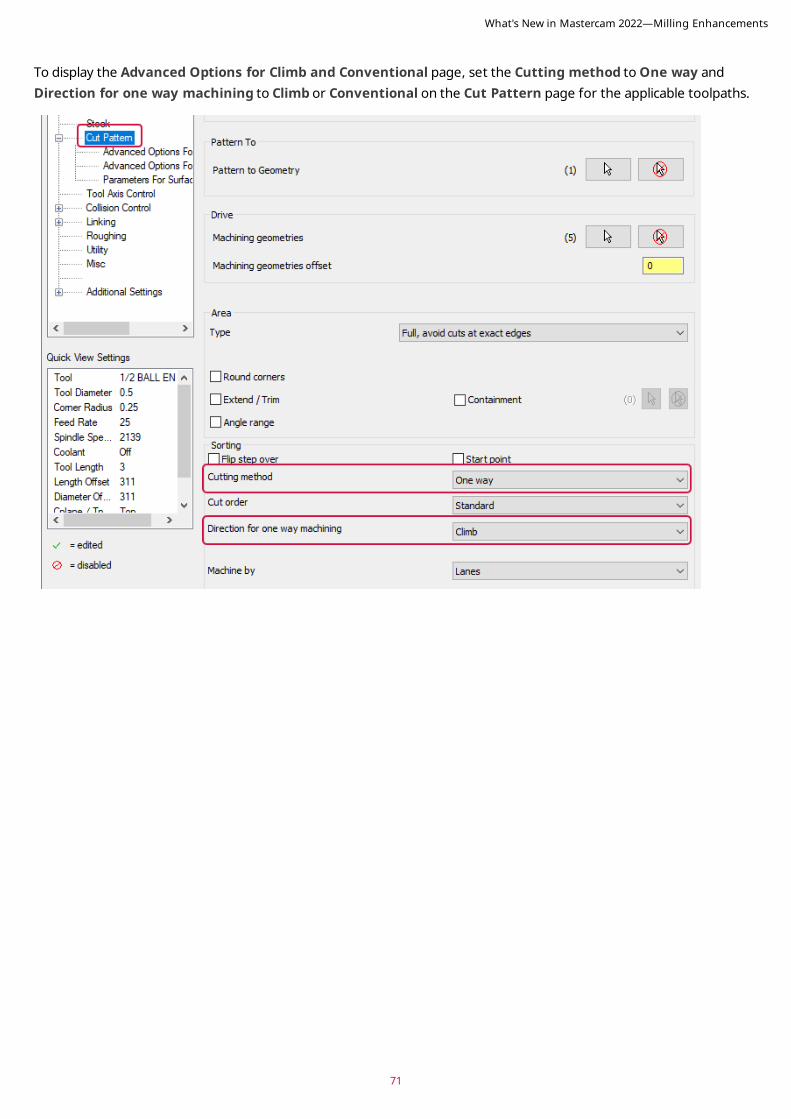
To display the Advanced Options for Climb and Conventional page, set the Cutting method to One way and Direction for one way machining to Climb or Conventional on the Cut Pattern page for the applicable toolpaths.
What's New in Mastercam 2022—Milling Enhancements
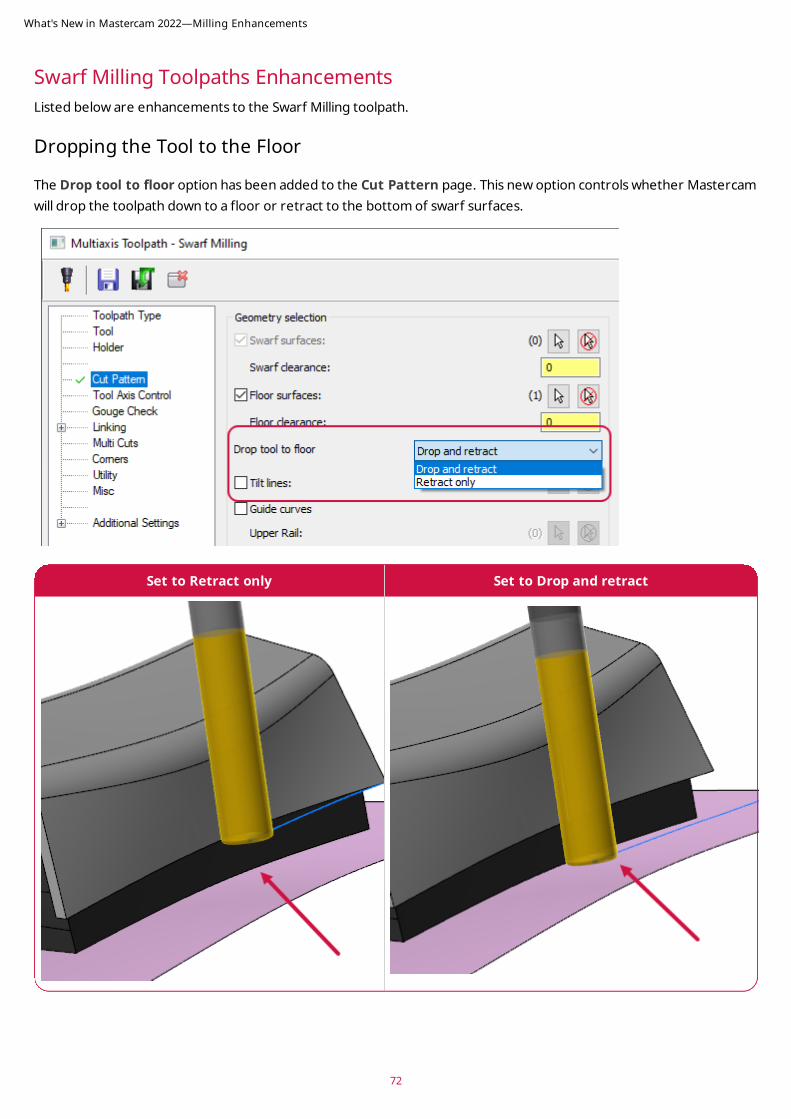
Swarf Milling Toolpaths EnhancementsListed below are enhancements to the Swarf Milling toolpath.
Dropping the Tool to the Floor
The Drop tool to floor option has been added to the Cut Pattern page. This new option controls whether Mastercam will drop the toolpath down to a floor or retract to the bottom of swarf surfaces.
Set to Retract only Set to Drop and retract
What's New in Mastercam 2022—Milling Enhancements
72
73
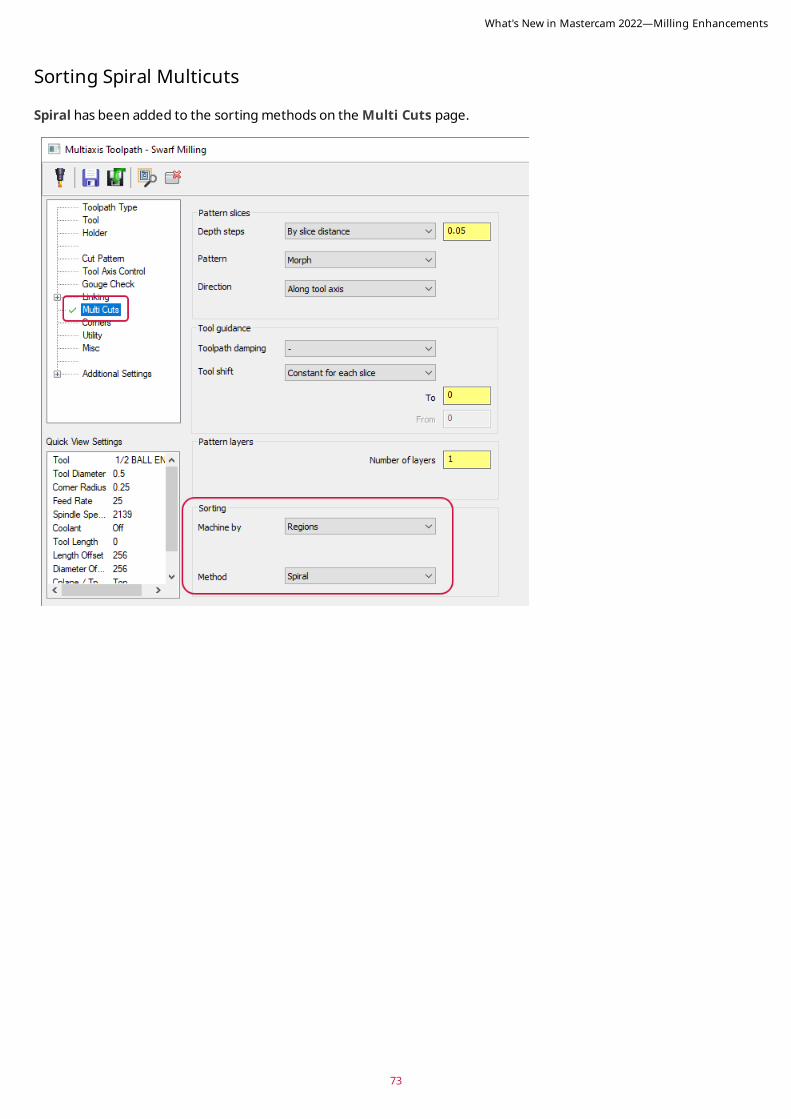
Sorting Spiral Multicuts
Spiral has been added to the sorting methods on the Multi Cuts page.
What's New in Mastercam 2022—Milling Enhancements
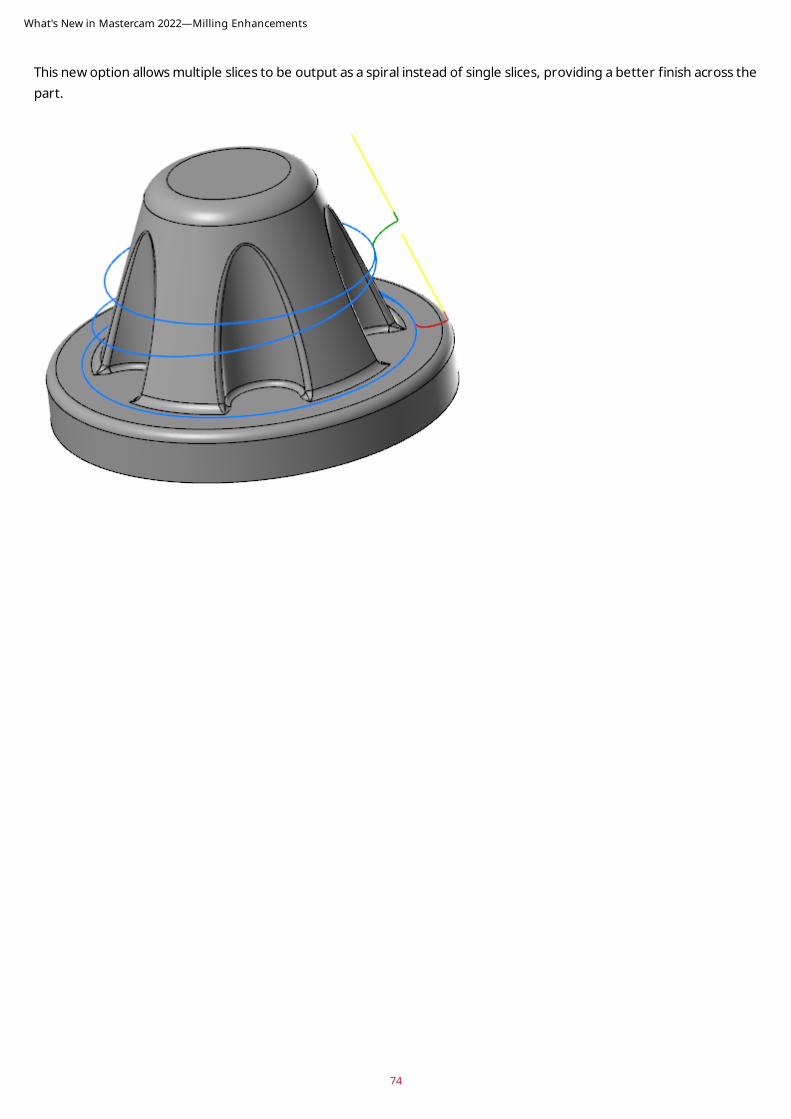
This new option allows multiple slices to be output as a spiral instead of single slices, providing a better finish across the part.
What's New in Mastercam 2022—Milling Enhancements
74
75
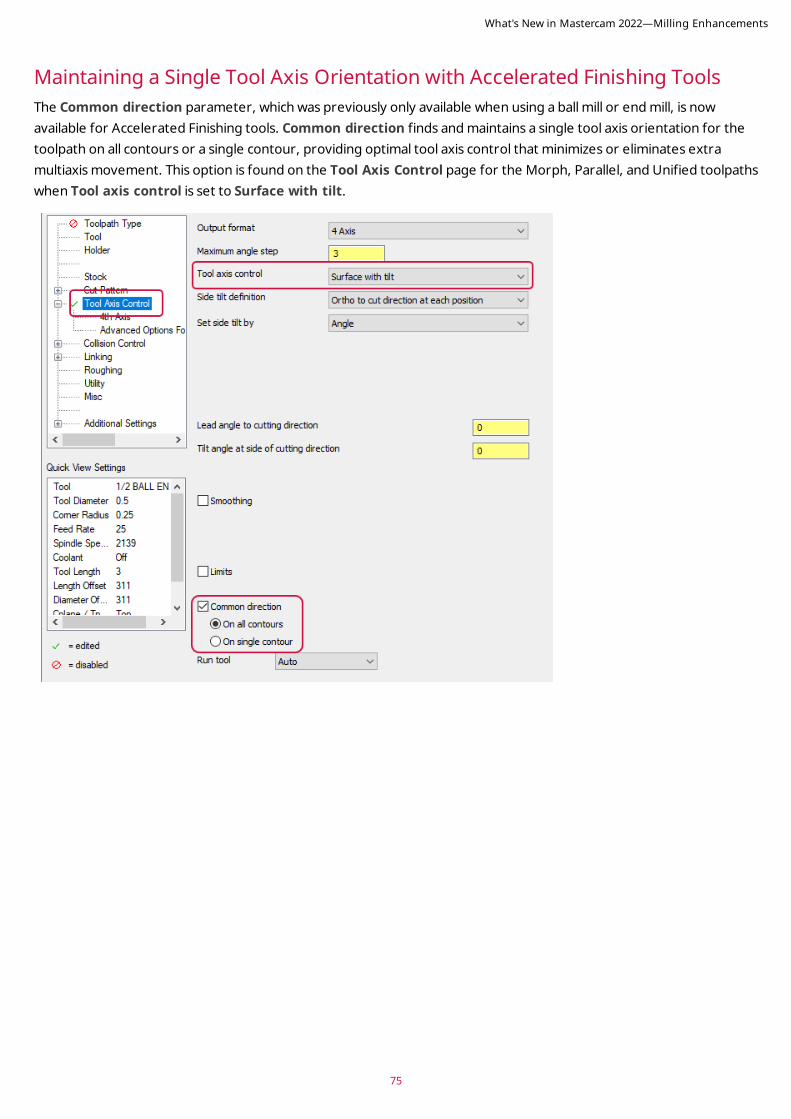
Maintaining a Single Tool Axis Orientation with Accelerated Finishing Tools The Common direction parameter, which was previously only available when using a ball mill or end mill, is now available for Accelerated Finishing tools. Common direction finds and maintains a single tool axis orientation for the toolpath on all contours or a single contour, providing optimal tool axis control that minimizes or eliminates extra multiaxis movement. This option is found on the Tool Axis Control page for the Morph, Parallel, and Unified toolpaths when Tool axis control is set to Surface with tilt.
What's New in Mastercam 2022—Milling Enhancements
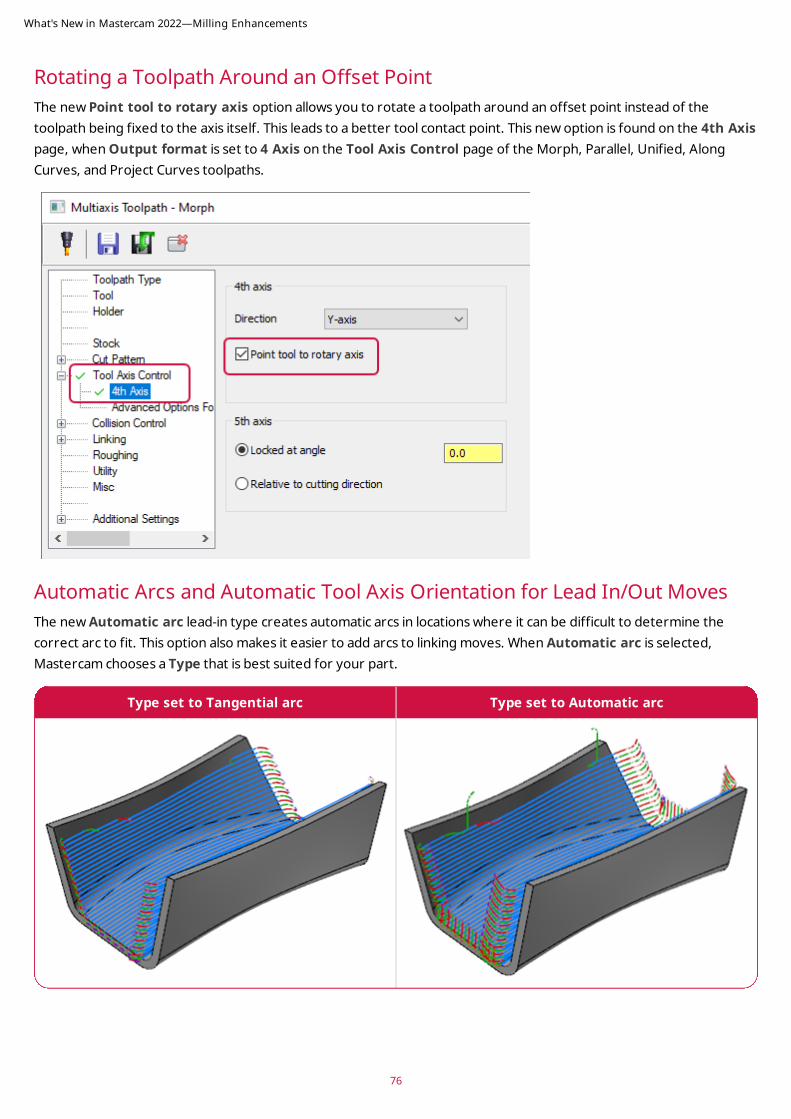
Rotating a Toolpath Around an Offset PointThe new Point tool to rotary axis option allows you to rotate a toolpath around an offset point instead of the toolpath being fixed to the axis itself. This leads to a better tool contact point. This new option is found on the 4th Axis page, when Output format is set to 4 Axis on the Tool Axis Control page of the Morph, Parallel, Unified, Along Curves, and Project Curves toolpaths.
Automatic Arcs and Automatic Tool Axis Orientation for Lead In/Out MovesThe new Automatic arc lead-in type creates automatic arcs in locations where it can be difficult to determine the correct arc to fit. This option also makes it easier to add arcs to linking moves. When Automatic arc is selected, Mastercam chooses a Type that is best suited for your part.
Type set to Tangential arc Type set to Automatic arc
What's New in Mastercam 2022—Milling Enhancements
76
77
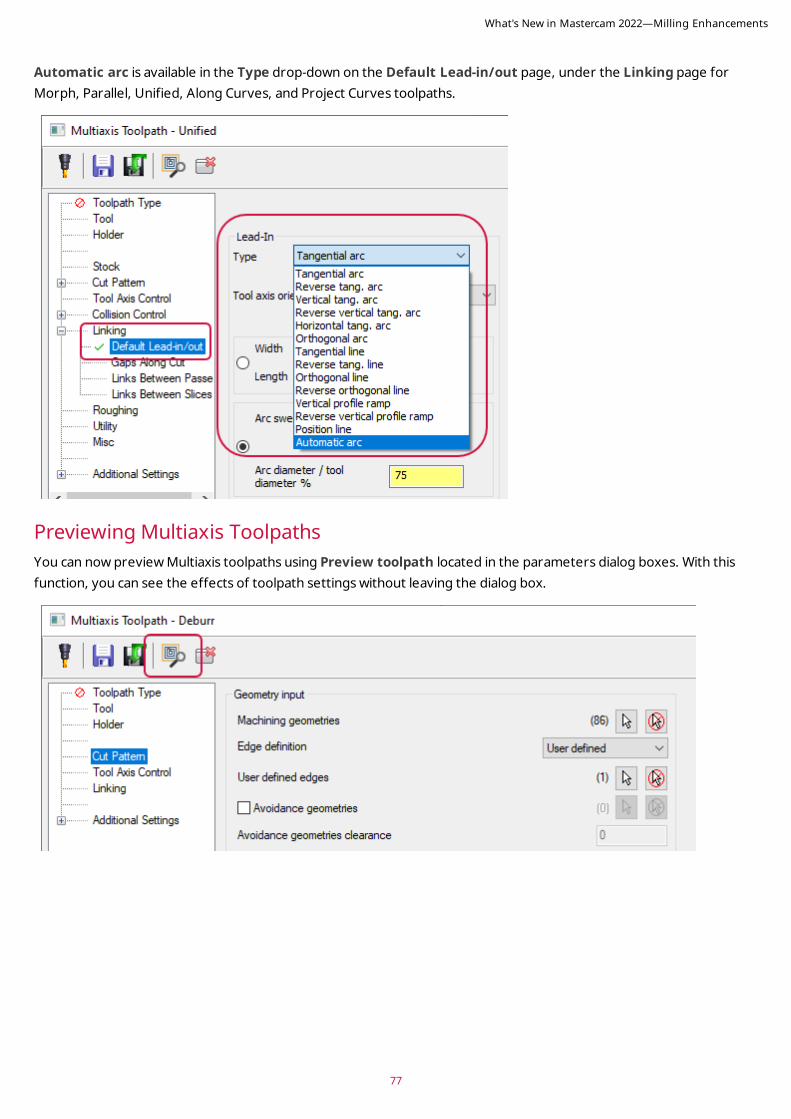
Automatic arc is available in the Type drop-down on the Default Lead-in/out page, under the Linking page for Morph, Parallel, Unified, Along Curves, and Project Curves toolpaths.
Previewing Multiaxis ToolpathsYou can now preview Multiaxis toolpaths using Preview toolpath located in the parameters dialog boxes. With this function, you can see the effects of toolpath settings without leaving the dialog box.
What's New in Mastercam 2022—Milling Enhancements
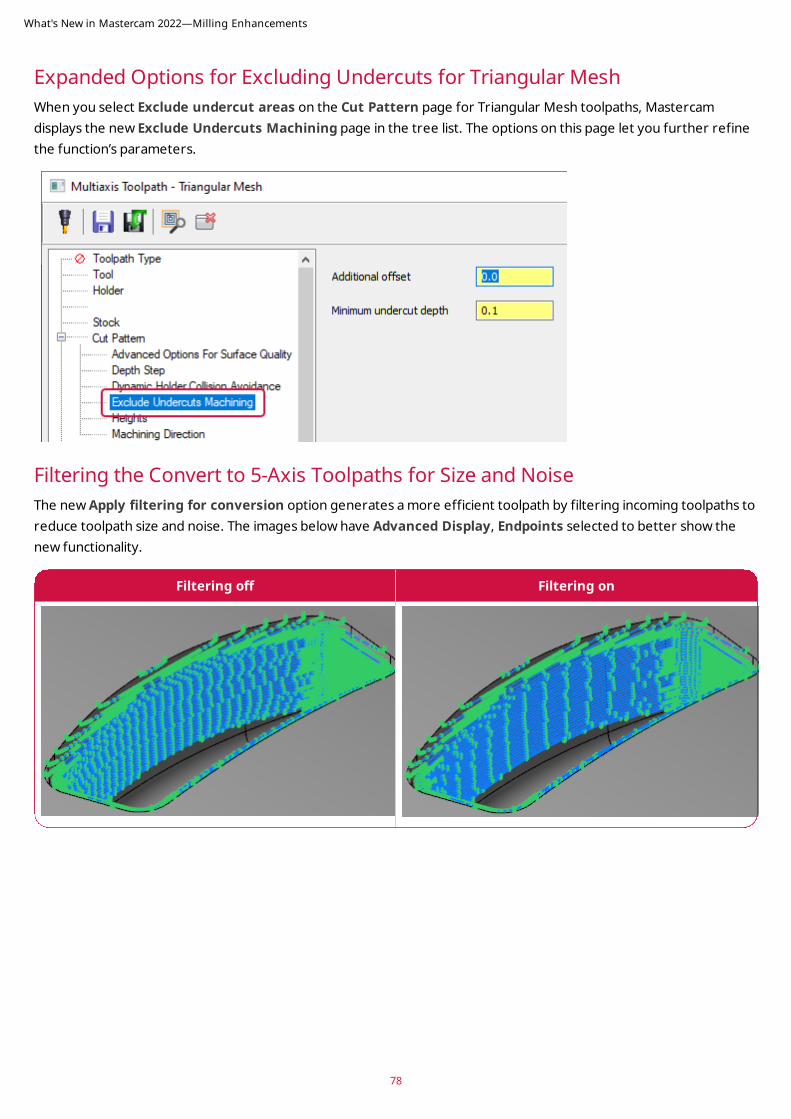
Expanded Options for Excluding Undercuts for Triangular MeshWhen you select Exclude undercut areas on the Cut Pattern page for Triangular Mesh toolpaths, Mastercam displays the new Exclude Undercuts Machining page in the tree list. The options on this page let you further refine the function’s parameters.
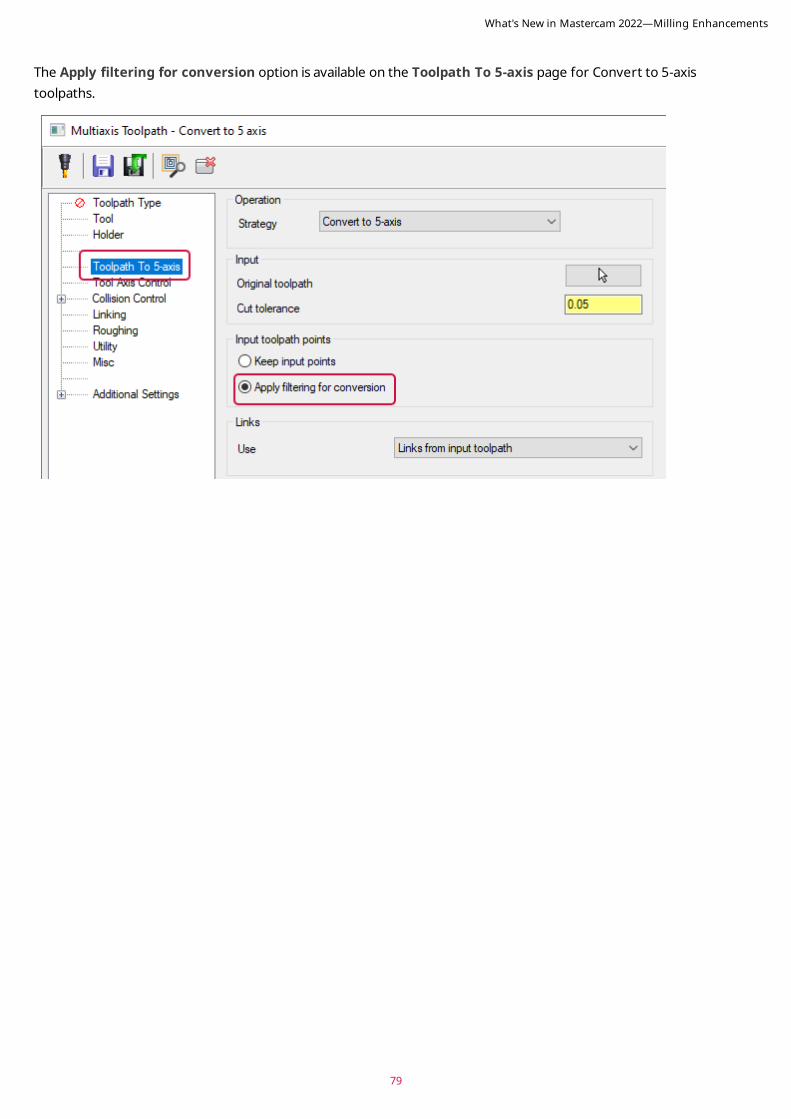
Filtering the Convert to 5-Axis Toolpaths for Size and NoiseThe new Apply filtering for conversion option generates a more efficient toolpath by filtering incoming toolpaths to reduce toolpath size and noise. The images below have Advanced Display, Endpoints selected to better show the new functionality.
Filtering off Filtering on
What's New in Mastercam 2022—Milling Enhancements
78
79
The Apply filtering for conversion option is available on the Toolpath To 5-axis page for Convert to 5-axis toolpaths.
What's New in Mastercam 2022—Milling Enhancements
Rotary Advanced Toolpath Enhancements Listed below are enhancements to the Rotary Advanced toolpath.
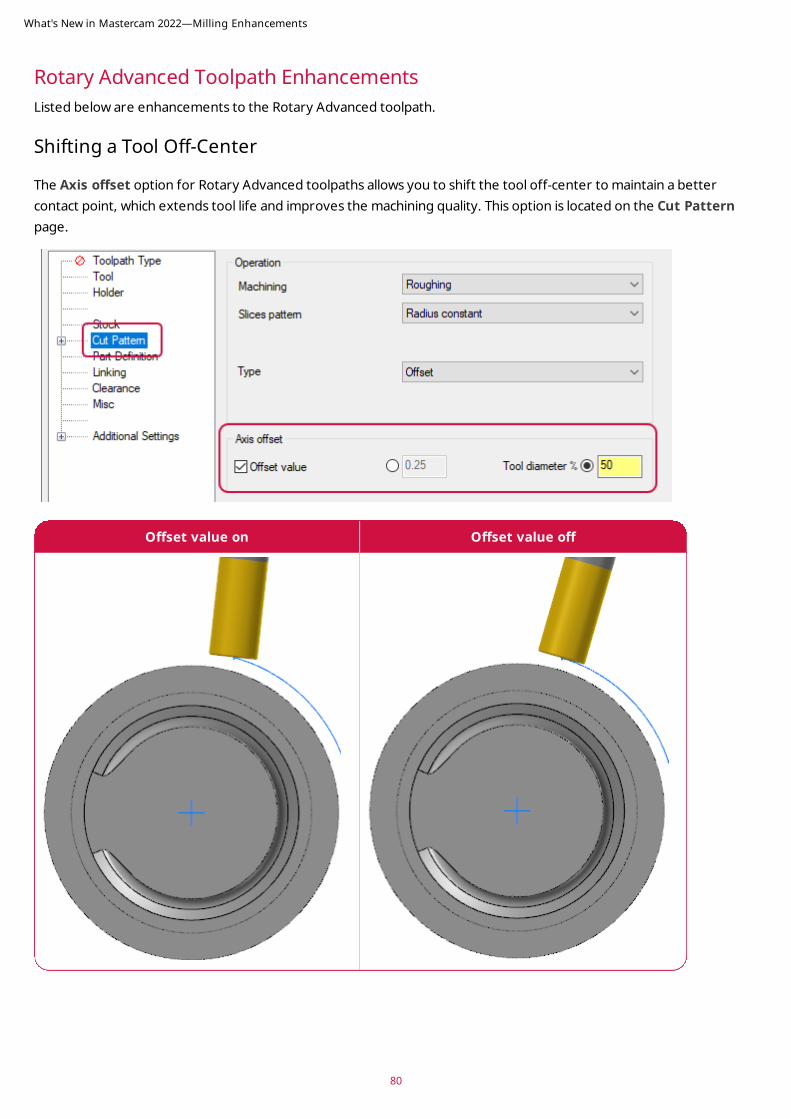
Shifting a Tool Off-Center
The Axis offset option for Rotary Advanced toolpaths allows you to shift the tool off-center to maintain a better contact point, which extends tool life and improves the machining quality. This option is located on the Cut Pattern page.
Offset value on Offset value off
What's New in Mastercam 2022—Milling Enhancements
80

81
Rounding Sharp Corners
The new Smoothing options on the Cut Pattern page of Rotary Advanced toolpaths rounds sharp corners using a percent of the stepover.
What's New in Mastercam 2022—Milling Enhancements
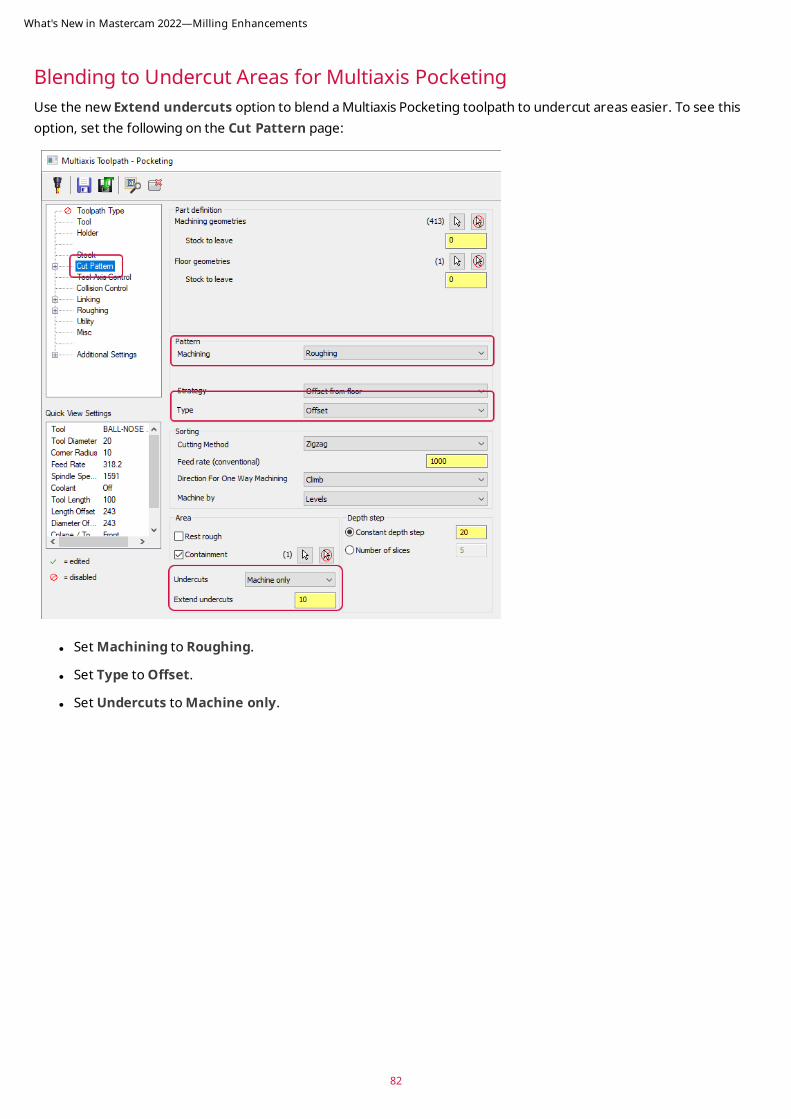
Blending to Undercut Areas for Multiaxis PocketingUse the new Extend undercuts option to blend a Multiaxis Pocketing toolpath to undercut areas easier. To see this option, set the following on the Cut Pattern page:
l Set Machining to Roughing.
l Set Type to Offset.
l Set Undercuts to Machine only.
What's New in Mastercam 2022—Milling Enhancements
82
83
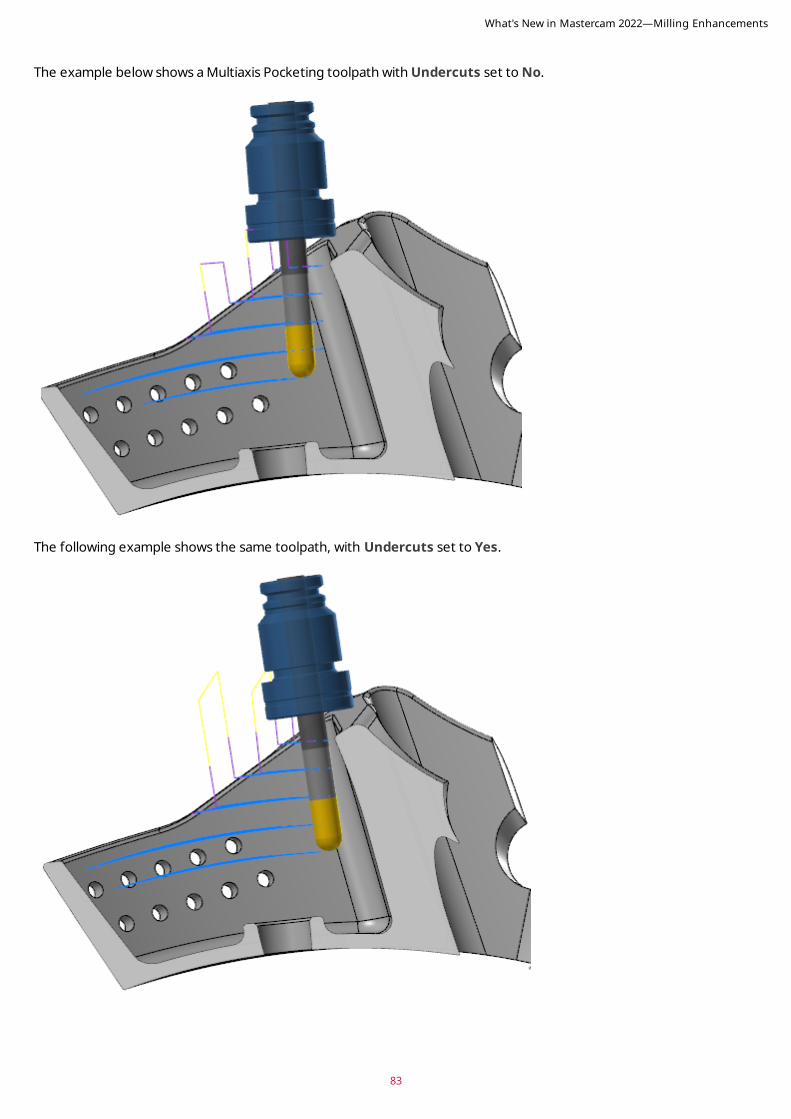
The example below shows a Multiaxis Pocketing toolpath with Undercuts set to No.
The following example shows the same toolpath, with Undercuts set to Yes.
What's New in Mastercam 2022—Milling Enhancements
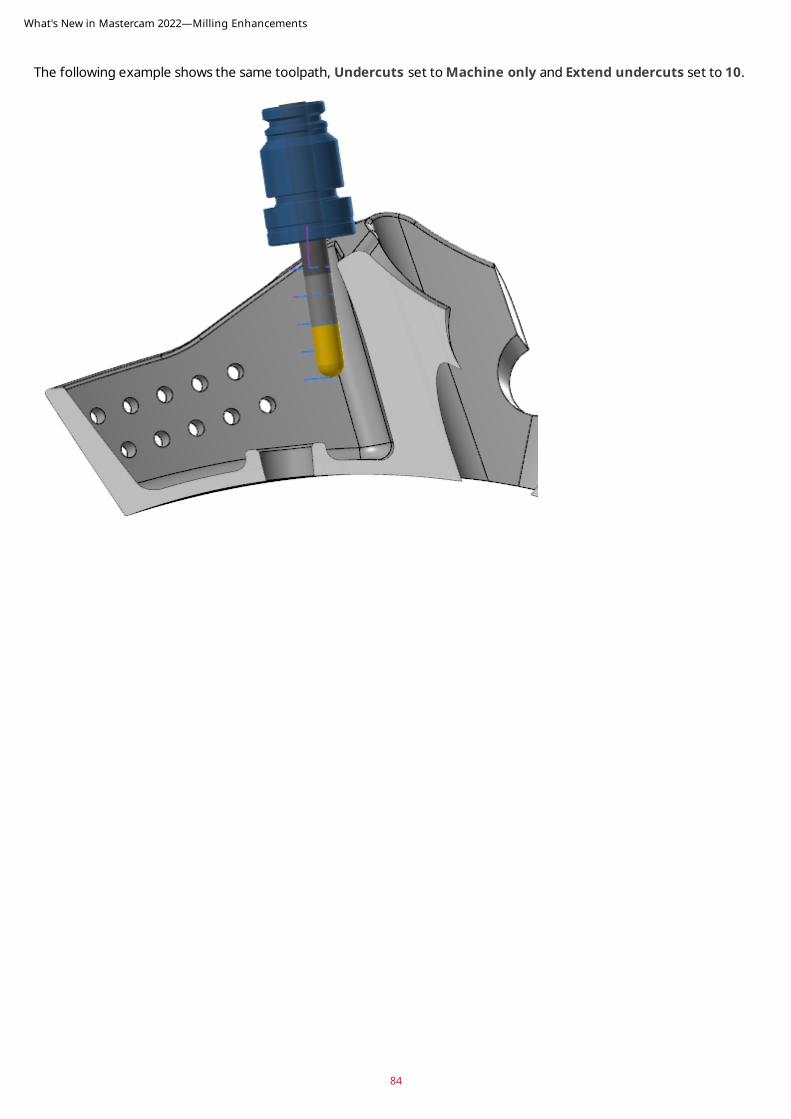
The following example shows the same toolpath, Undercuts set to Machine only and Extend undercuts set to 10.
What's New in Mastercam 2022—Milling Enhancements
84
85
Tooling EnhancementsListed below are enhancements made to mill tools.
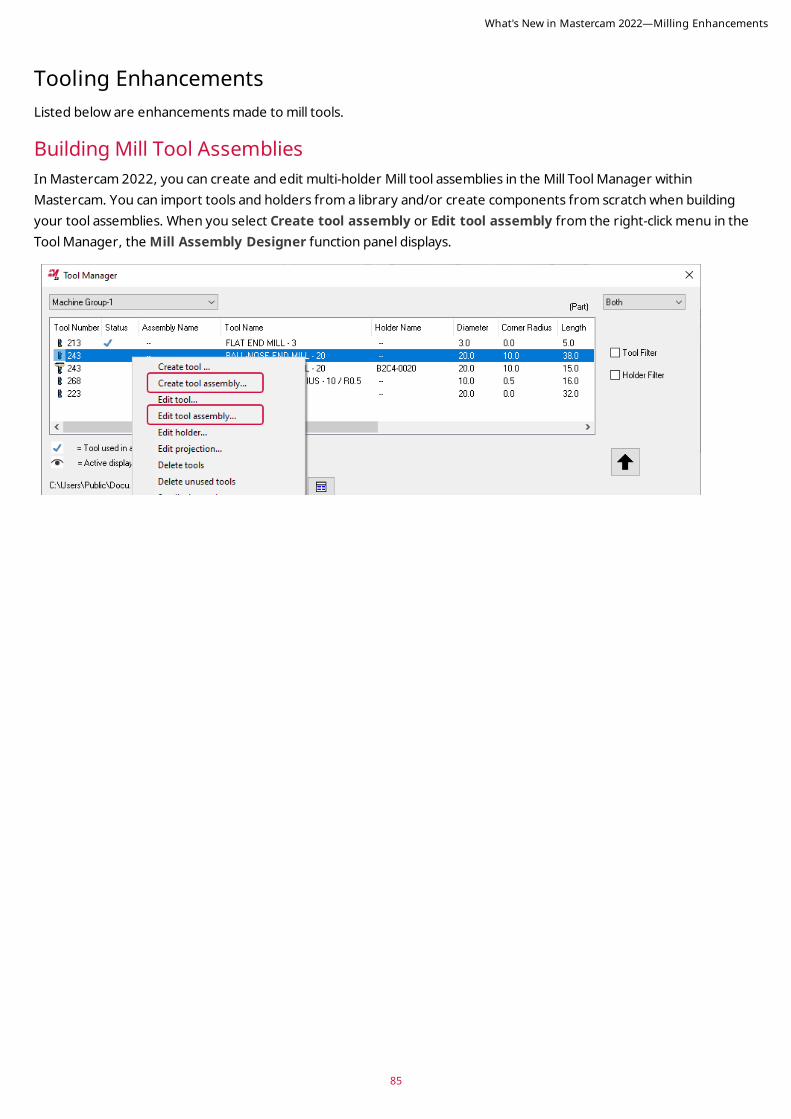
Building Mill Tool AssembliesIn Mastercam 2022, you can create and edit multi-holder Mill tool assemblies in the Mill Tool Manager within Mastercam. You can import tools and holders from a library and/or create components from scratch when building your tool assemblies. When you select Create tool assembly or Edit tool assembly from the right-click menu in the Tool Manager, the Mill Assembly Designer function panel displays.
What's New in Mastercam 2022—Milling Enhancements
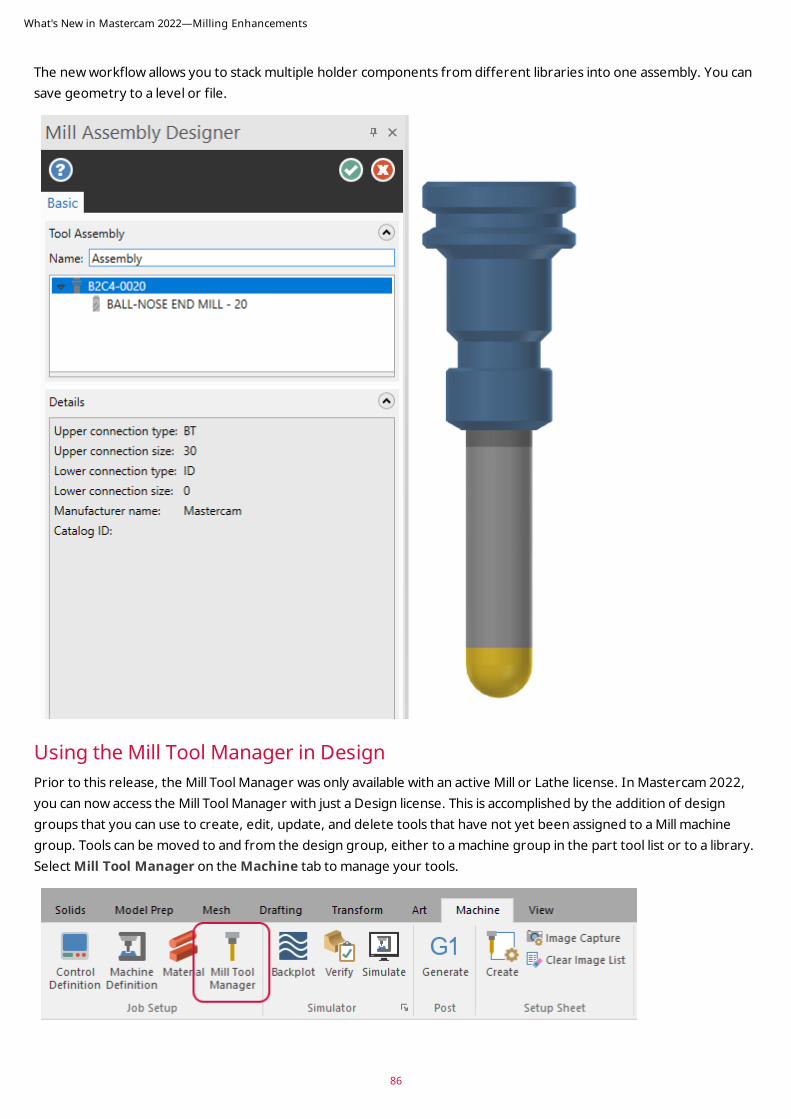
The new workflow allows you to stack multiple holder components from different libraries into one assembly. You can save geometry to a level or file.
Using the Mill Tool Manager in DesignPrior to this release, the Mill Tool Manager was only available with an active Mill or Lathe license. In Mastercam 2022, you can now access the Mill Tool Manager with just a Design license. This is accomplished by the addition of design groups that you can use to create, edit, update, and delete tools that have not yet been assigned to a Mill machine group. Tools can be moved to and from the design group, either to a machine group in the part tool list or to a library. Select Mill Tool Manager on the Machine tab to manage your tools.
What's New in Mastercam 2022—Milling Enhancements
86
87
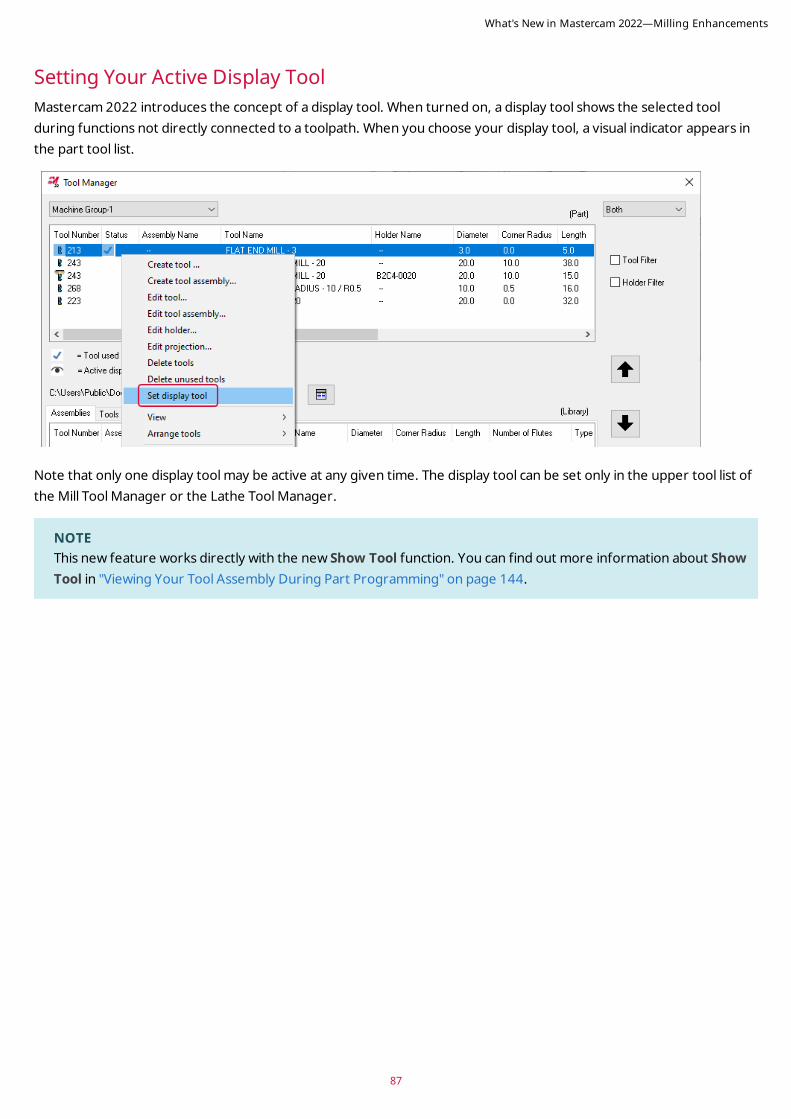
Setting Your Active Display ToolMastercam 2022 introduces the concept of a display tool. When turned on, a display tool shows the selected tool during functions not directly connected to a toolpath. When you choose your display tool, a visual indicator appears in the part tool list.
Note that only one display tool may be active at any given time. The display tool can be set only in the upper tool list of the Mill Tool Manager or the Lathe Tool Manager.
NOTEThis new feature works directly with the new Show Tool function. You can find out more information about Show Tool in "Viewing Your Tool Assembly During Part Programming" on page 144.
What's New in Mastercam 2022—Milling Enhancements
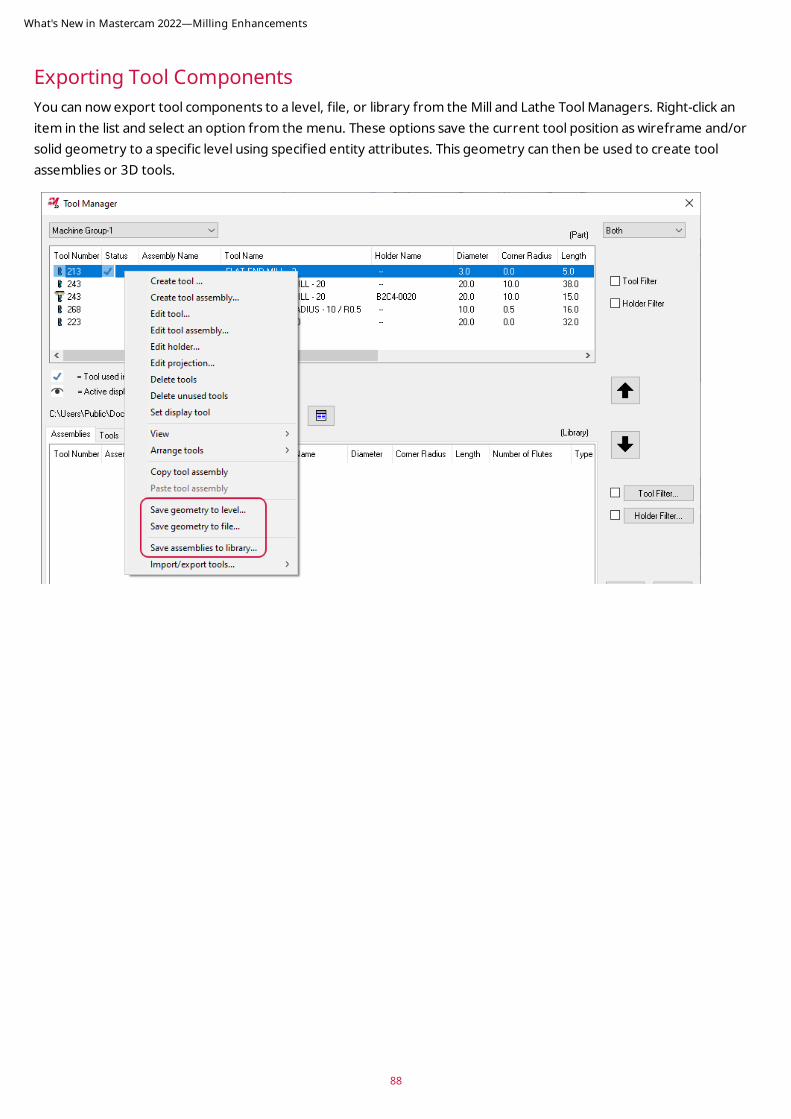
Exporting Tool ComponentsYou can now export tool components to a level, file, or library from the Mill and Lathe Tool Managers. Right-click an item in the list and select an option from the menu. These options save the current tool position as wireframe and/or solid geometry to a specific level using specified entity attributes. This geometry can then be used to create tool assemblies or 3D tools.
What's New in Mastercam 2022—Milling Enhancements
88

89
TURNING ENHANCEMENTS
Listed below are major enhancements to the Lathe and Mill-Turn products.
NOTEUnless otherwise stated, the new features and functionality listed in this section apply to both Lathe and Mill-Turn licenses.
Working with Mill-Turn Steady RestsMastercam 2022 introduces steady rest support for Mill-Turn. This lets you precisely position and simulate steady rests throughout their machining process, adding part support capability to turning, milling, and part-handling operations. This includes:
l New component types that you create for turret-mounted or standalone steady rests. Sub-component types for arms and pistons let you quickly create components with a modular approach.
l Enhanced component libraries that organize steady rests in the same libraries used for tool locators, chucks, jaws, and collets. This lets you easily select and load from a single library all of the components needed to configure your machine.
l Dedicated operations for each type of steady rest let you precisely program each individual movement. You can create syncs to specific steady rest events.
l Part handling strategies let you pre-program sequences of steady rest operations or add steady rest operations to existing part handling strategies.
l All steady rest operations and movements—including the movements of pistons and arms—are fully supported in simulation. You can also define and customize the boundary used for collision checking and turn it on or off individually for each steady rest operation.
What's New in Mastercam 2022—Turning Enhancements
Mill-Turn's steady rest support goes far beyond what has traditionally been available in Mastercam Lathe. However, even Lathe users without a Mill-Turn license can use single-stream .machine files to access Mill-Turn's steady rest capabilities.
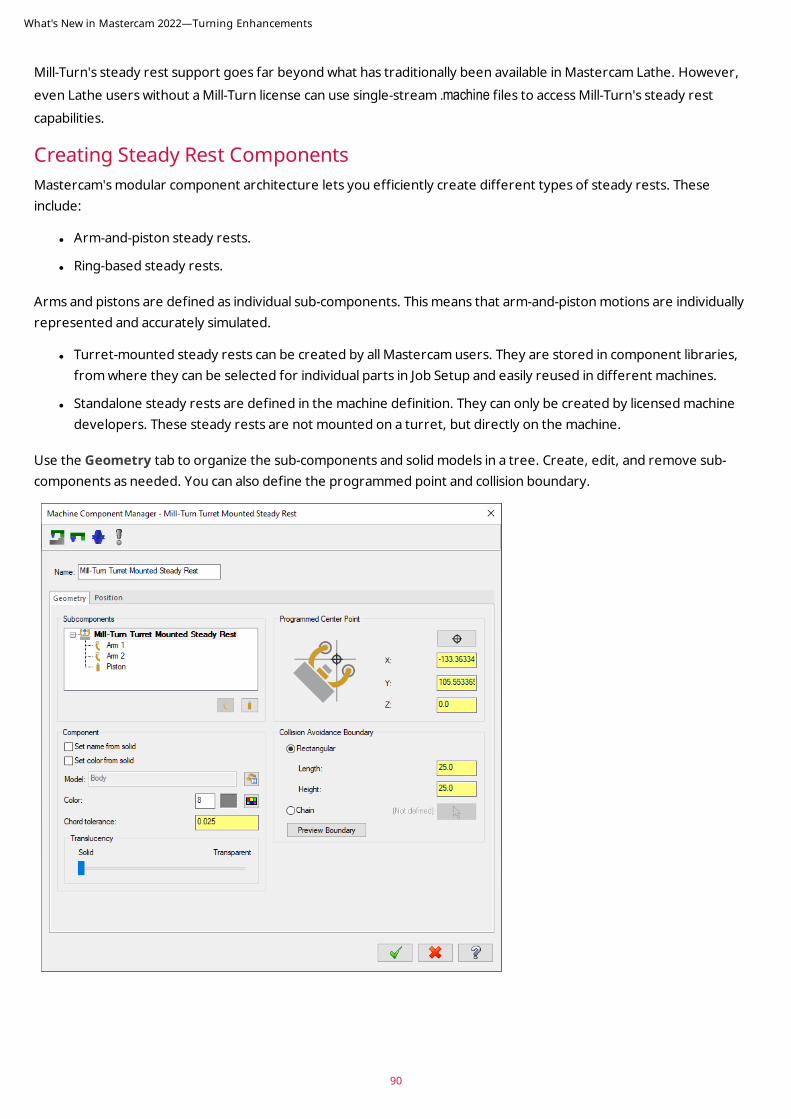
Creating Steady Rest ComponentsMastercam's modular component architecture lets you efficiently create different types of steady rests. These include:
l Arm-and-piston steady rests.
l Ring-based steady rests.
Arms and pistons are defined as individual sub-components. This means that arm-and-piston motions are individually represented and accurately simulated.
l Turret-mounted steady rests can be created by all Mastercam users. They are stored in component libraries, from where they can be selected for individual parts in Job Setup and easily reused in different machines.
l Standalone steady rests are defined in the machine definition. They can only be created by licensed machine developers. These steady rests are not mounted on a turret, but directly on the machine.
Use the Geometry tab to organize the sub-components and solid models in a tree. Create, edit, and remove sub-components as needed. You can also define the programmed point and collision boundary.
What's New in Mastercam 2022—Turning Enhancements
90
91
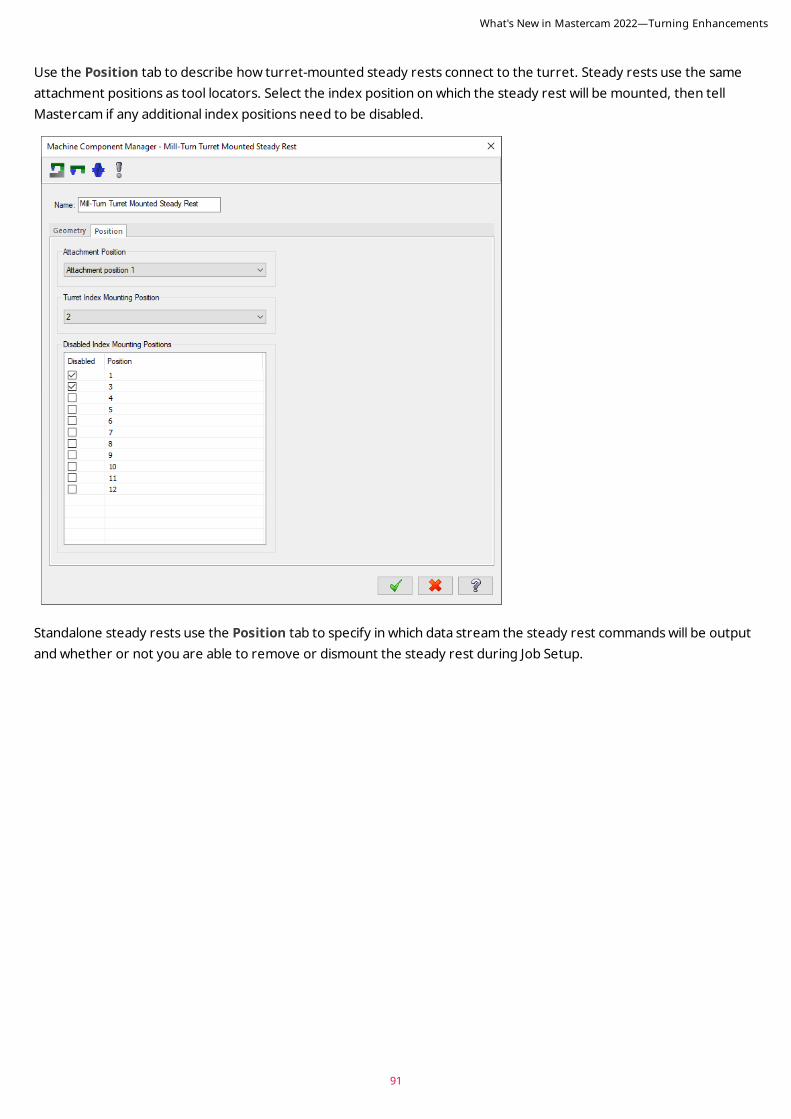
Use the Position tab to describe how turret-mounted steady rests connect to the turret. Steady rests use the same attachment positions as tool locators. Select the index position on which the steady rest will be mounted, then tell Mastercam if any additional index positions need to be disabled.
Standalone steady rests use the Position tab to specify in which data stream the steady rest commands will be output and whether or not you are able to remove or dismount the steady rest during Job Setup.
What's New in Mastercam 2022—Turning Enhancements
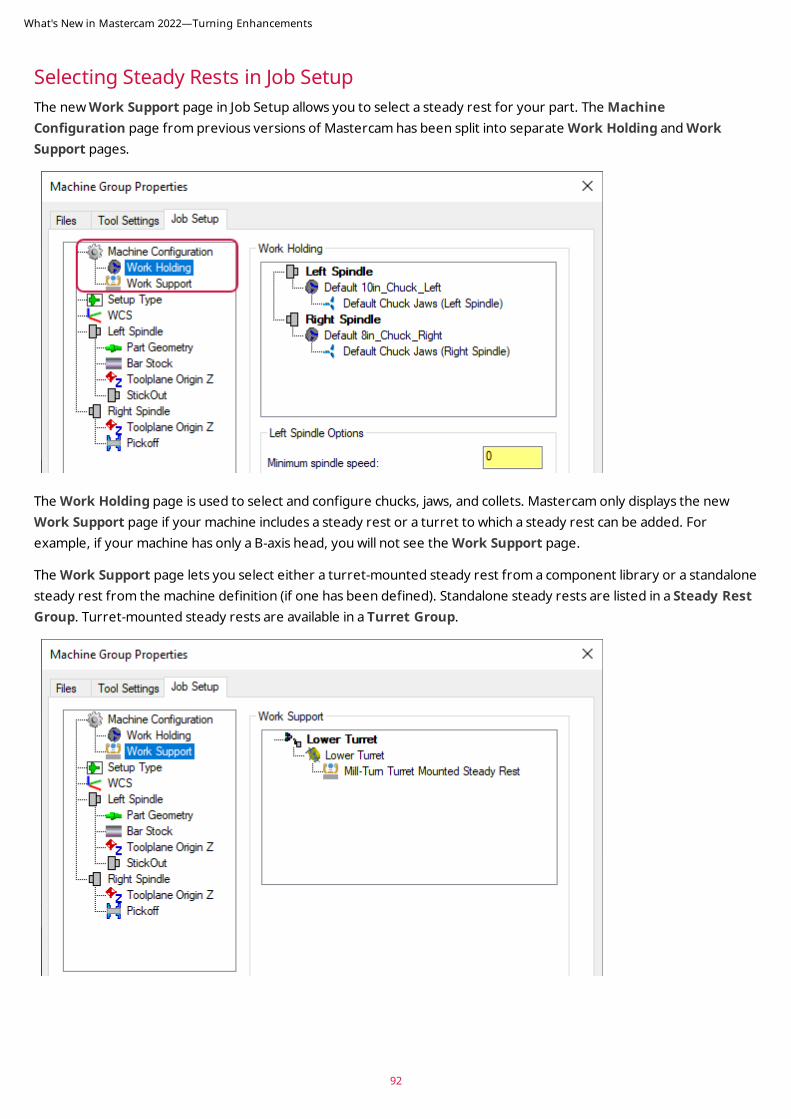
Selecting Steady Rests in Job SetupThe new Work Support page in Job Setup allows you to select a steady rest for your part. The Machine Configuration page from previous versions of Mastercam has been split into separate Work Holding and Work Support pages.
The Work Holding page is used to select and configure chucks, jaws, and collets. Mastercam only displays the new Work Support page if your machine includes a steady rest or a turret to which a steady rest can be added. For example, if your machine has only a B-axis head, you will not see the Work Support page.
The Work Support page lets you select either a turret-mounted steady rest from a component library or a standalone steady rest from the machine definition (if one has been defined). Standalone steady rests are listed in a Steady Rest Group. Turret-mounted steady rests are available in a Turret Group.
What's New in Mastercam 2022—Turning Enhancements
92
93
Right-click Steady Rest (Empty) and choose Select new steady rest to select a steady rest from the current component library. You can also open a different component library. Once a steady rest has been selected, you can right-click on it to edit its properties if desired.
Selecting a standalone steady rest activates additional Job Setup options:
l You can choose to use the collision detection boundary from the component definition.
l You can also choose to remove the standalone steady rest, if one has been defined as removable. Deselecting this option means that the steady rest will not be programmable, and will not appear in simulation or interfere with any other components.
Steady Rest Support in Part Handling StrategiesMastercam provides two types of operations for programming your steady rests:
l Steady rest operation
l Steady rest point operation
The New Steady Rest Operation
Steady rest operations are used to program standalone steady rests. Four actions are supported:
l Clamp
l Unclamp
l Linear move
l Retract
What's New in Mastercam 2022—Turning Enhancements
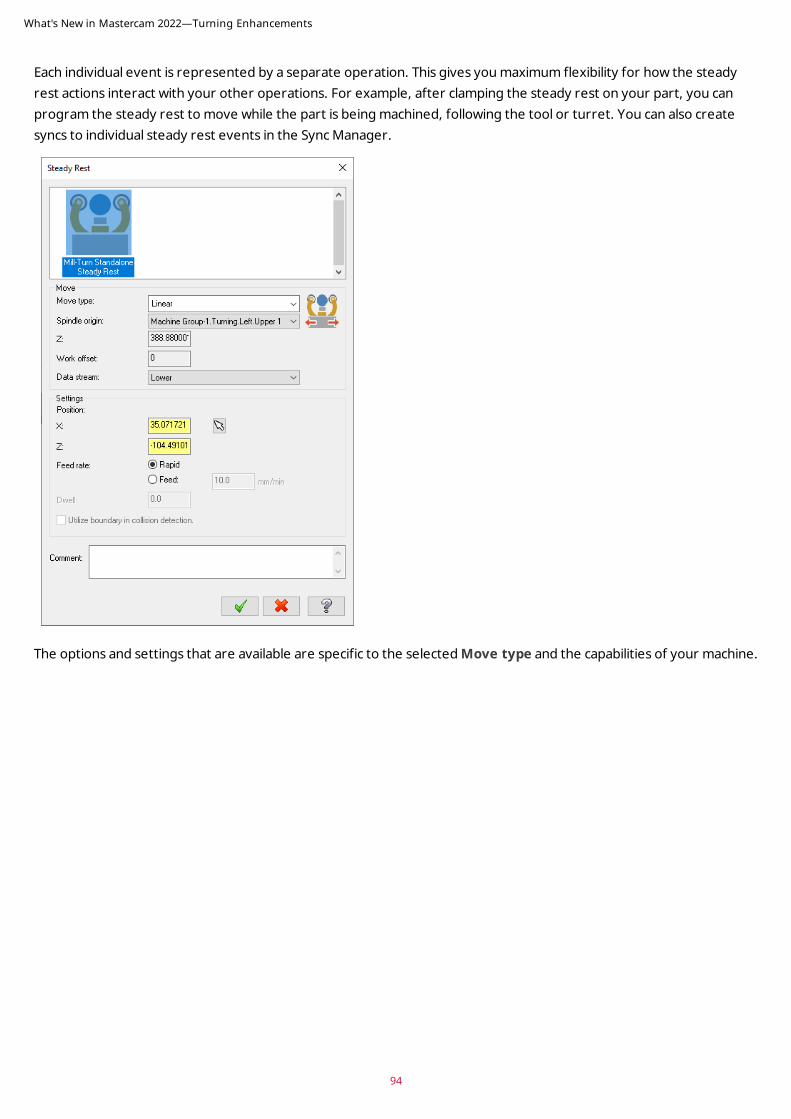
Each individual event is represented by a separate operation. This gives you maximum flexibility for how the steady rest actions interact with your other operations. For example, after clamping the steady rest on your part, you can program the steady rest to move while the part is being machined, following the tool or turret. You can also create syncs to individual steady rest events in the Sync Manager.
The options and settings that are available are specific to the selected Move type and the capabilities of your machine.
What's New in Mastercam 2022—Turning Enhancements
94

95
The New Steady Rest Point Operation
Steady rest point operations are used to program turret-mounted steady rests. These operations use a grid to organize the points and other steady rest actions, like a Center Point operation.
Right-click in the grid or use the buttons below it to add new points or clamp/unclamp events to the operation.
What's New in Mastercam 2022—Turning Enhancements
As you add points and events, Mastercam filters the available options to only those that make sense. For example, once you clamp the steady rest, the options to add new points are disabled.
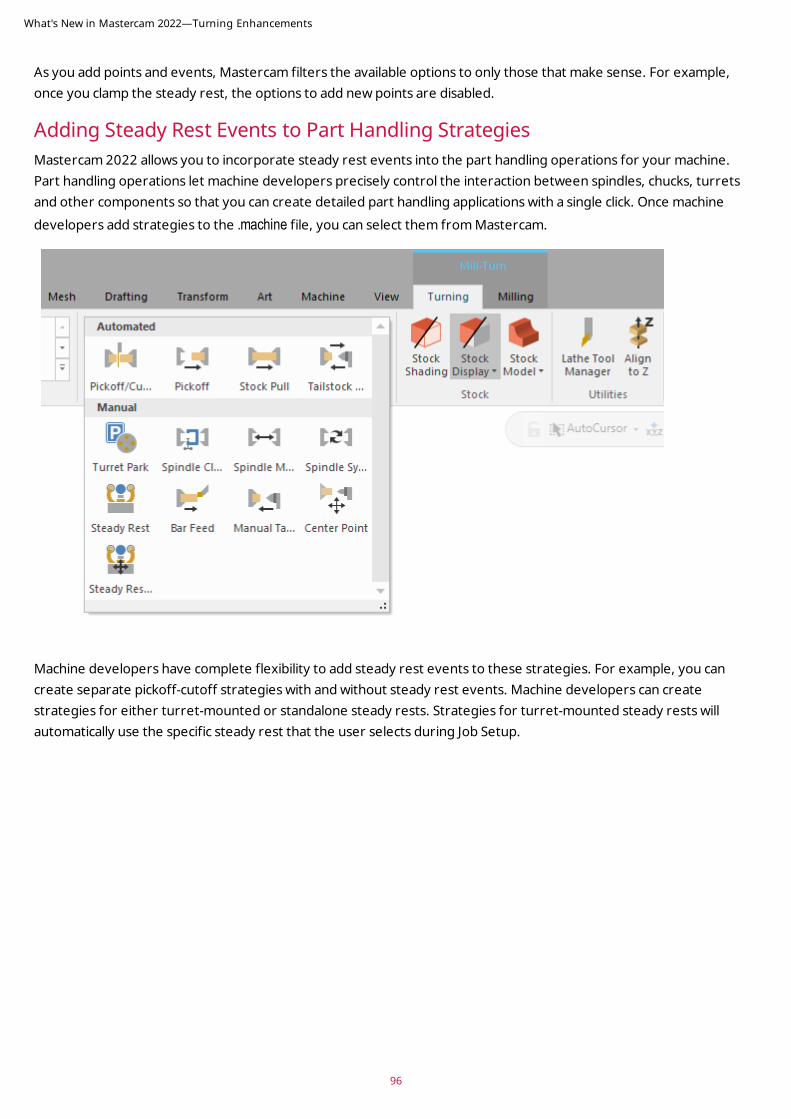
Adding Steady Rest Events to Part Handling Strategies Mastercam 2022 allows you to incorporate steady rest events into the part handling operations for your machine. Part handling operations let machine developers precisely control the interaction between spindles, chucks, turrets and other components so that you can create detailed part handling applications with a single click. Once machine developers add strategies to the .machine file, you can select them from Mastercam.
Machine developers have complete flexibility to add steady rest events to these strategies. For example, you can create separate pickoff-cutoff strategies with and without steady rest events. Machine developers can create strategies for either turret-mounted or standalone steady rests. Strategies for turret-mounted steady rests will automatically use the specific steady rest that the user selects during Job Setup.
What's New in Mastercam 2022—Turning Enhancements
96
97
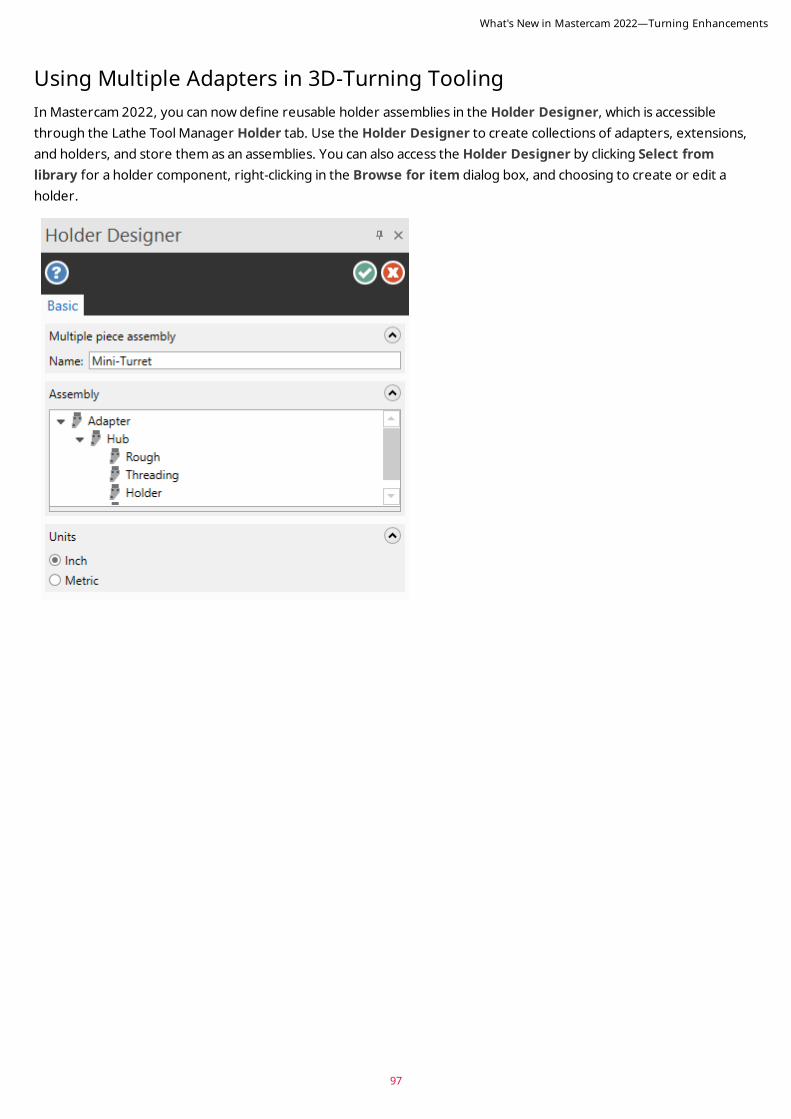
Using Multiple Adapters in 3D-Turning ToolingIn Mastercam 2022, you can now define reusable holder assemblies in the Holder Designer, which is accessible through the Lathe Tool Manager Holder tab. Use the Holder Designer to create collections of adapters, extensions, and holders, and store them as an assemblies. You can also access the Holder Designer by clicking Select from library for a holder component, right-clicking in the Browse for item dialog box, and choosing to create or edit a holder.
What's New in Mastercam 2022—Turning Enhancements
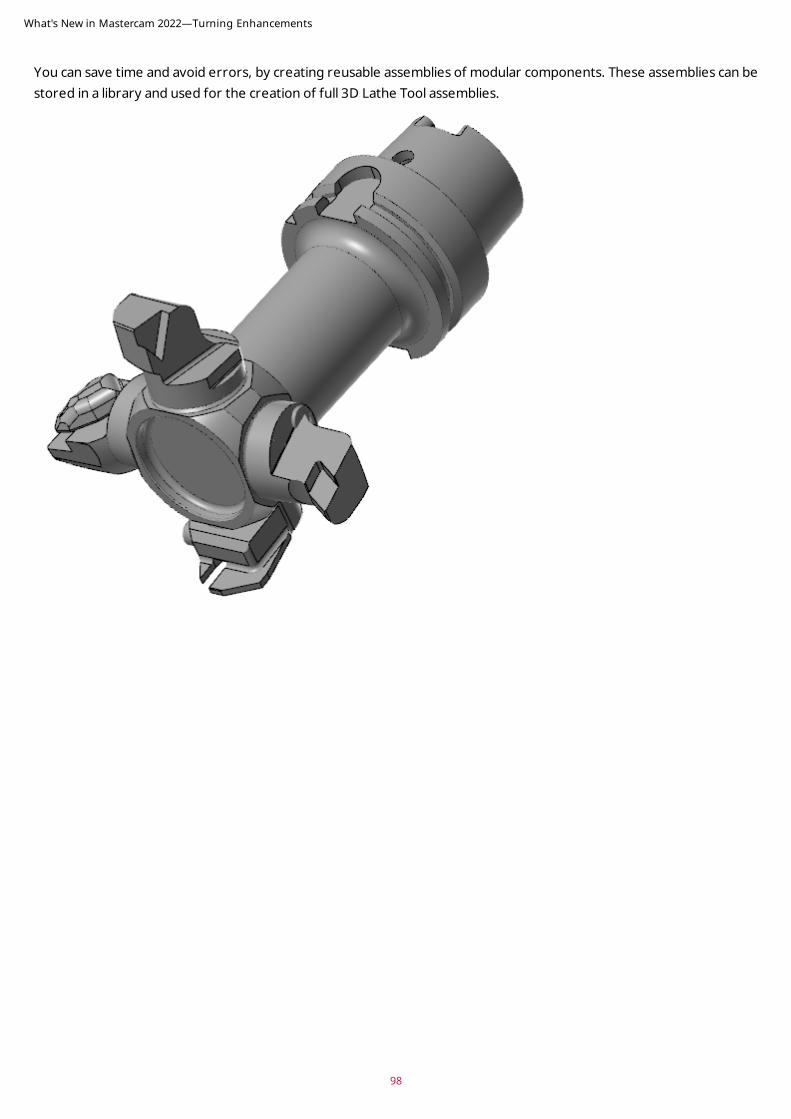
You can save time and avoid errors, by creating reusable assemblies of modular components. These assemblies can be stored in a library and used for the creation of full 3D Lathe Tool assemblies.
What's New in Mastercam 2022—Turning Enhancements
98

99
Subprograms Supported in Mill-TurnThe subprogram support found in other Mastercam products has been extended to Mill-Turn. You can create subprograms for depth cuts and hole-making operations such as drilling. These are the same options, in the same locations, that are available in Mill.
The subprogram options are only available when they are supported by the selected machine environment. Machine environment developers can enable or disable subprogram support as necessary for each individual machine environment. This is similar to other Mastercam products, where subprogram support is indicated in the control definition. Options available to machine developers let them completely customize subprogram numbering, how they are output, and which options to expose to end-users in their machine environments.
Note that transform and nested subprograms are not supported.
What's New in Mastercam 2022—Turning Enhancements
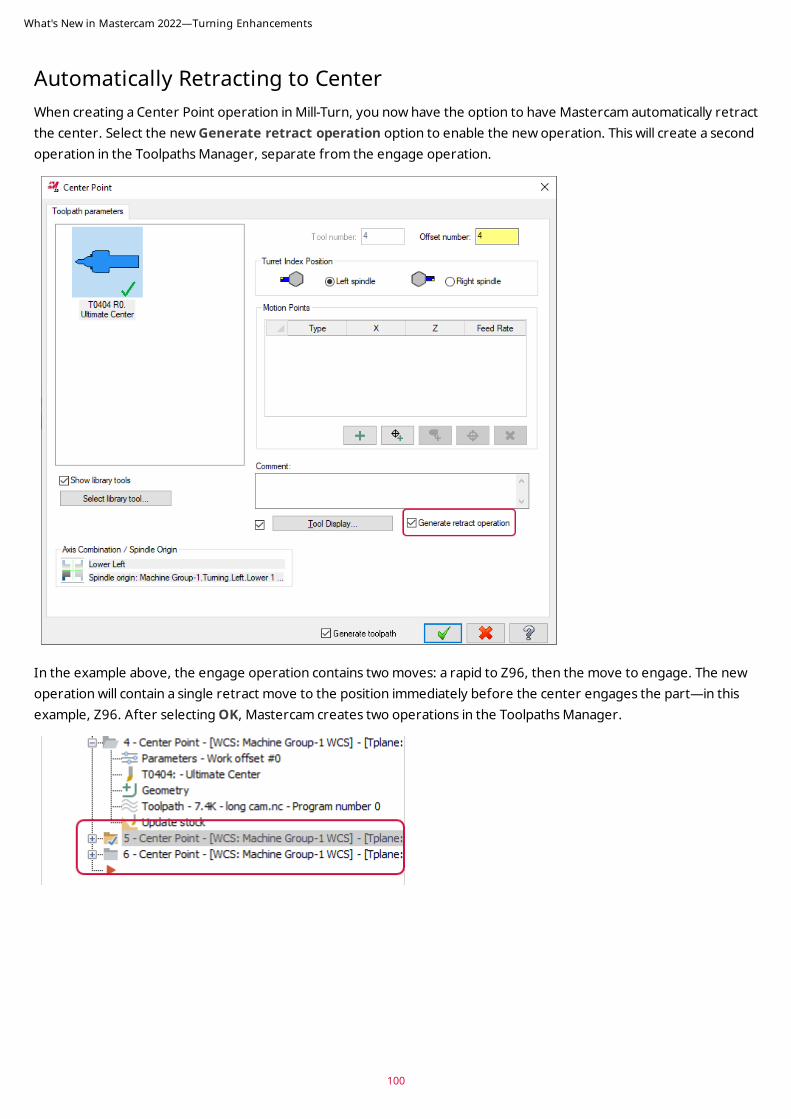
Automatically Retracting to Center When creating a Center Point operation in Mill-Turn, you now have the option to have Mastercam automatically retract the center. Select the new Generate retract operation option to enable the new operation. This will create a second operation in the Toolpaths Manager, separate from the engage operation.
In the example above, the engage operation contains two moves: a rapid to Z96, then the move to engage. The new operation will contain a single retract move to the position immediately before the center engages the part—in this example, Z96. After selecting OK, Mastercam creates two operations in the Toolpaths Manager.
What's New in Mastercam 2022—Turning Enhancements
100
101
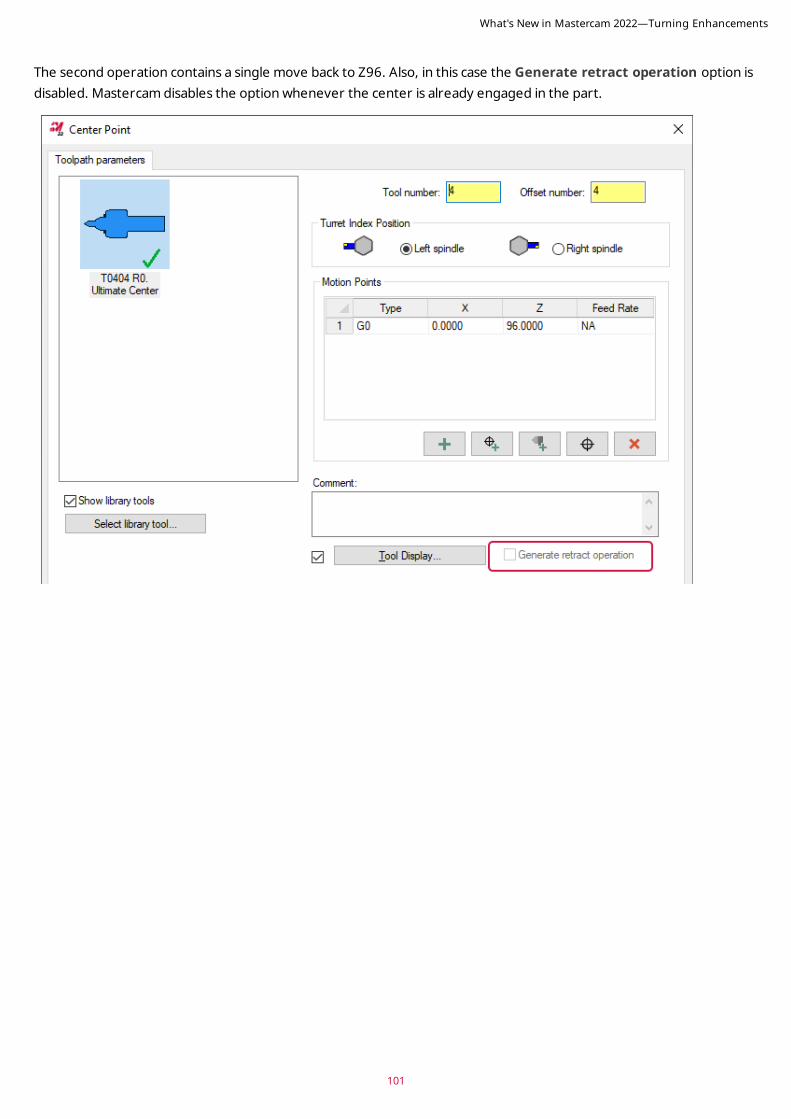
The second operation contains a single move back to Z96. Also, in this case the Generate retract operation option is disabled. Mastercam disables the option whenever the center is already engaged in the part.
What's New in Mastercam 2022—Turning Enhancements
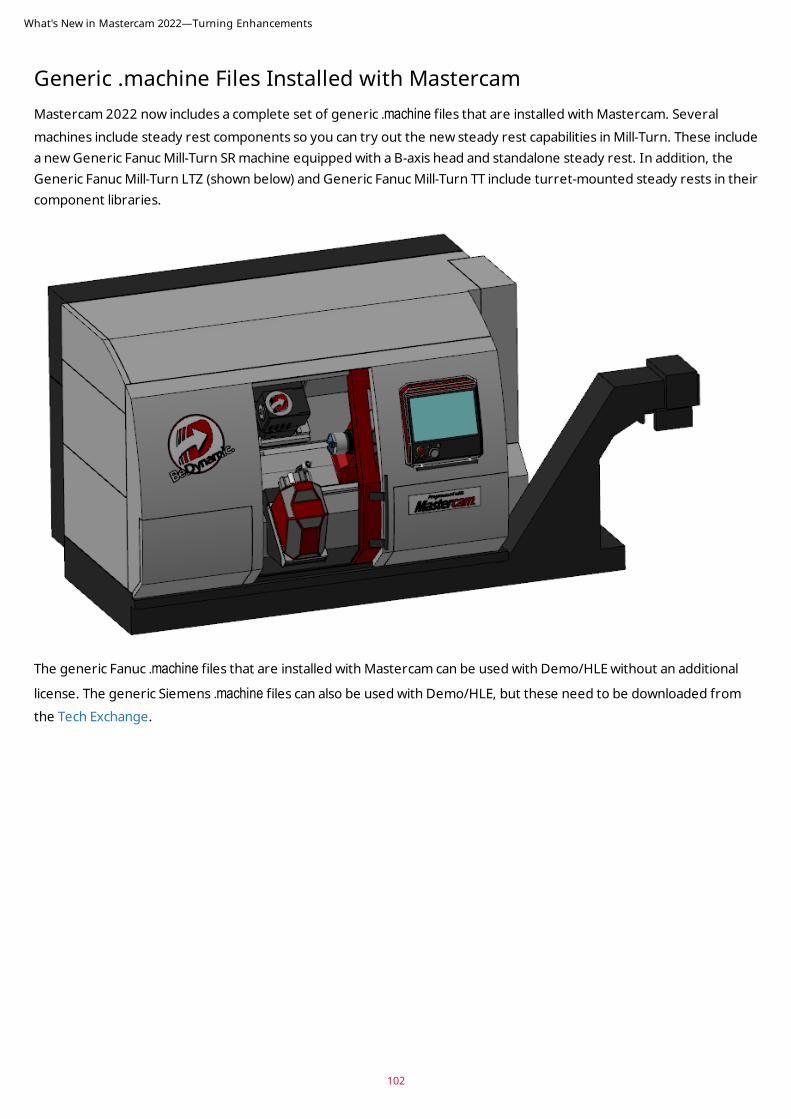
Generic .machine Files Installed with Mastercam Mastercam 2022 now includes a complete set of generic .machine files that are installed with Mastercam. Several machines include steady rest components so you can try out the new steady rest capabilities in Mill-Turn. These include a new Generic Fanuc Mill-Turn SR machine equipped with a B-axis head and standalone steady rest. In addition, the Generic Fanuc Mill-Turn LTZ (shown below) and Generic Fanuc Mill-Turn TT include turret-mounted steady rests in their component libraries.
The generic Fanuc .machine files that are installed with Mastercam can be used with Demo/HLE without an additional
license. The generic Siemens .machine files can also be used with Demo/HLE, but these need to be downloaded from the Tech Exchange.
What's New in Mastercam 2022—Turning Enhancements
102
103
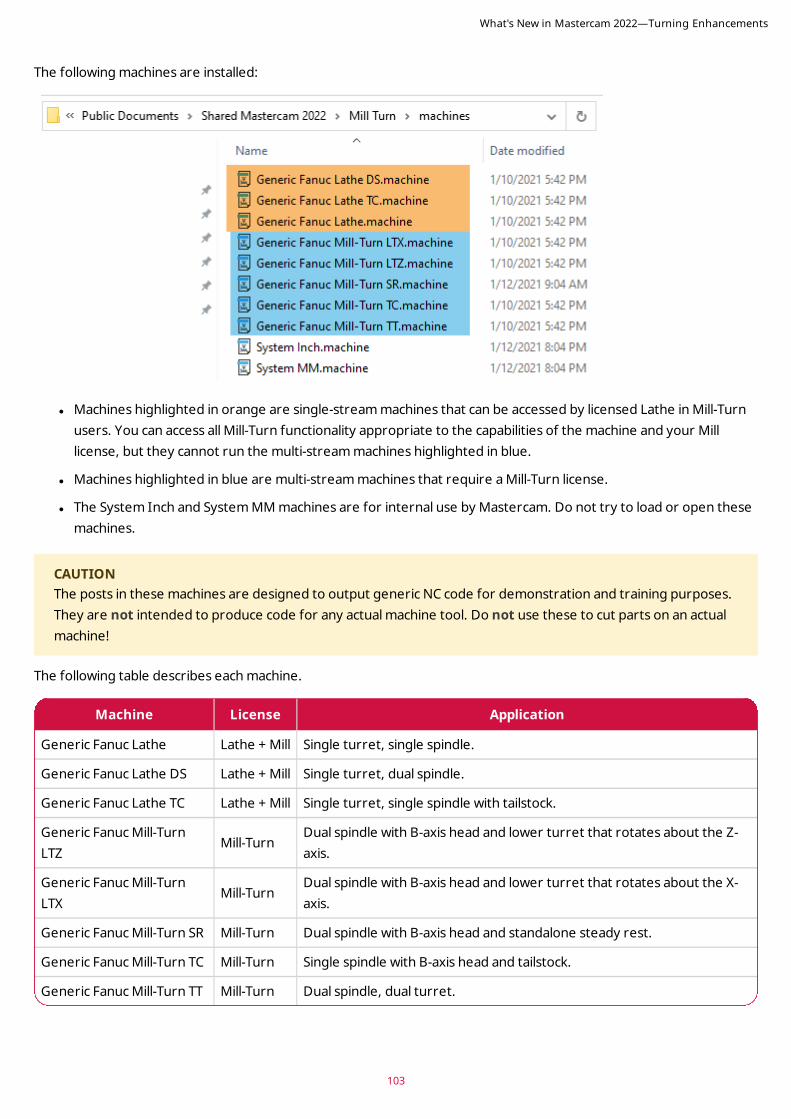
The following machines are installed:
l Machines highlighted in orange are single-stream machines that can be accessed by licensed Lathe in Mill-Turn users. You can access all Mill-Turn functionality appropriate to the capabilities of the machine and your Mill license, but they cannot run the multi-stream machines highlighted in blue.
l Machines highlighted in blue are multi-stream machines that require a Mill-Turn license.
l The System Inch and System MM machines are for internal use by Mastercam. Do not try to load or open these machines.
CAUTIONThe posts in these machines are designed to output generic NC code for demonstration and training purposes. They are not intended to produce code for any actual machine tool. Do not use these to cut parts on an actual machine!
The following table describes each machine.
Machine License Application
Generic Fanuc Lathe Lathe + Mill Single turret, single spindle.
Generic Fanuc Lathe DS Lathe + Mill Single turret, dual spindle.
Generic Fanuc Lathe TC Lathe + Mill Single turret, single spindle with tailstock.
Generic Fanuc Mill-Turn LTZ
Mill-TurnDual spindle with B-axis head and lower turret that rotates about the Z-axis.
Generic Fanuc Mill-Turn LTX
Mill-TurnDual spindle with B-axis head and lower turret that rotates about the X-axis.
Generic Fanuc Mill-Turn SR Mill-Turn Dual spindle with B-axis head and standalone steady rest.
Generic Fanuc Mill-Turn TC Mill-Turn Single spindle with B-axis head and tailstock.
Generic Fanuc Mill-Turn TT Mill-Turn Dual spindle, dual turret.
What's New in Mastercam 2022—Turning Enhancements
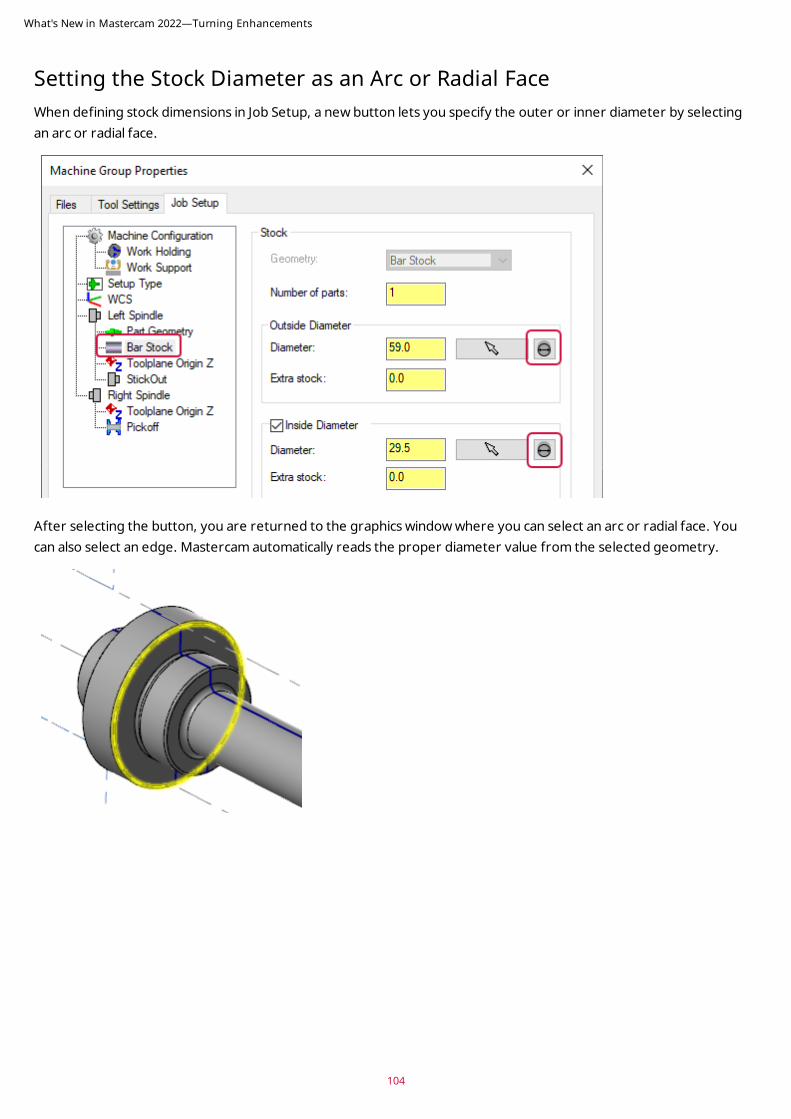
Setting the Stock Diameter as an Arc or Radial FaceWhen defining stock dimensions in Job Setup, a new button lets you specify the outer or inner diameter by selecting an arc or radial face.
After selecting the button, you are returned to the graphics window where you can select an arc or radial face. You can also select an edge. Mastercam automatically reads the proper diameter value from the selected geometry.
What's New in Mastercam 2022—Turning Enhancements
104
105
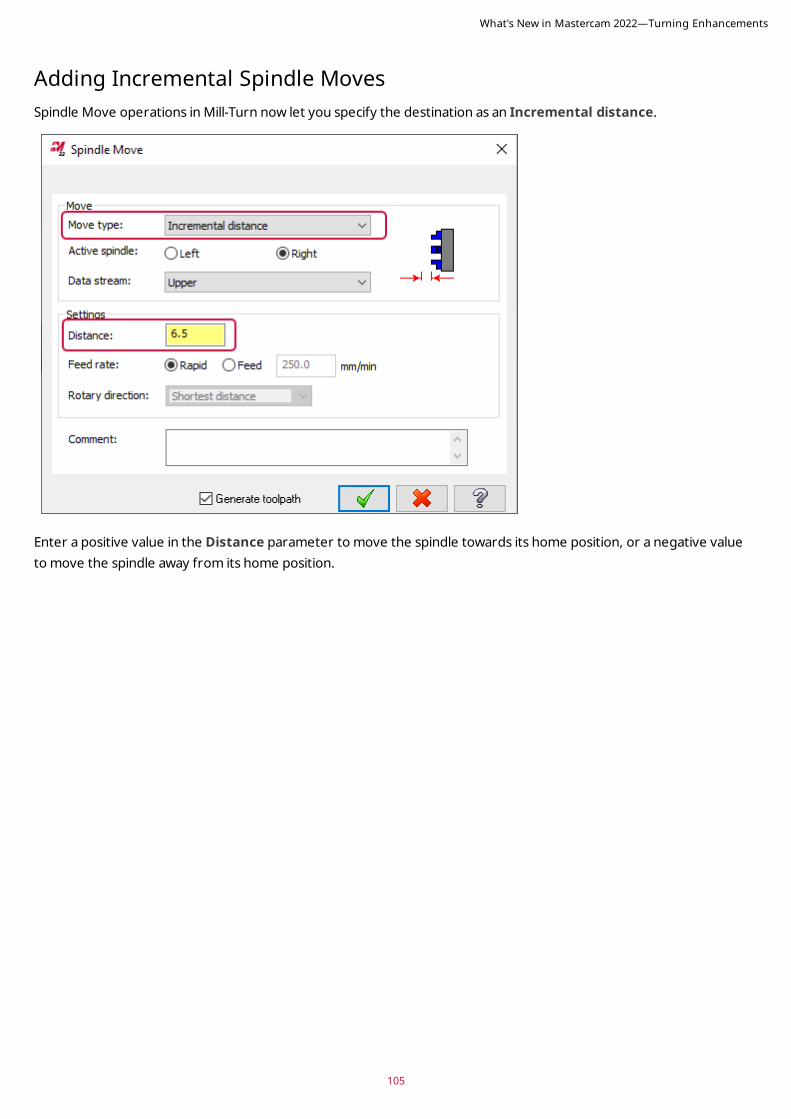
Adding Incremental Spindle MovesSpindle Move operations in Mill-Turn now let you specify the destination as an Incremental distance.
Enter a positive value in the Distance parameter to move the spindle towards its home position, or a negative value to move the spindle away from its home position.
What's New in Mastercam 2022—Turning Enhancements
DESIGN ENHANCEMENTS
Listed below are major enhancements to the Design product.
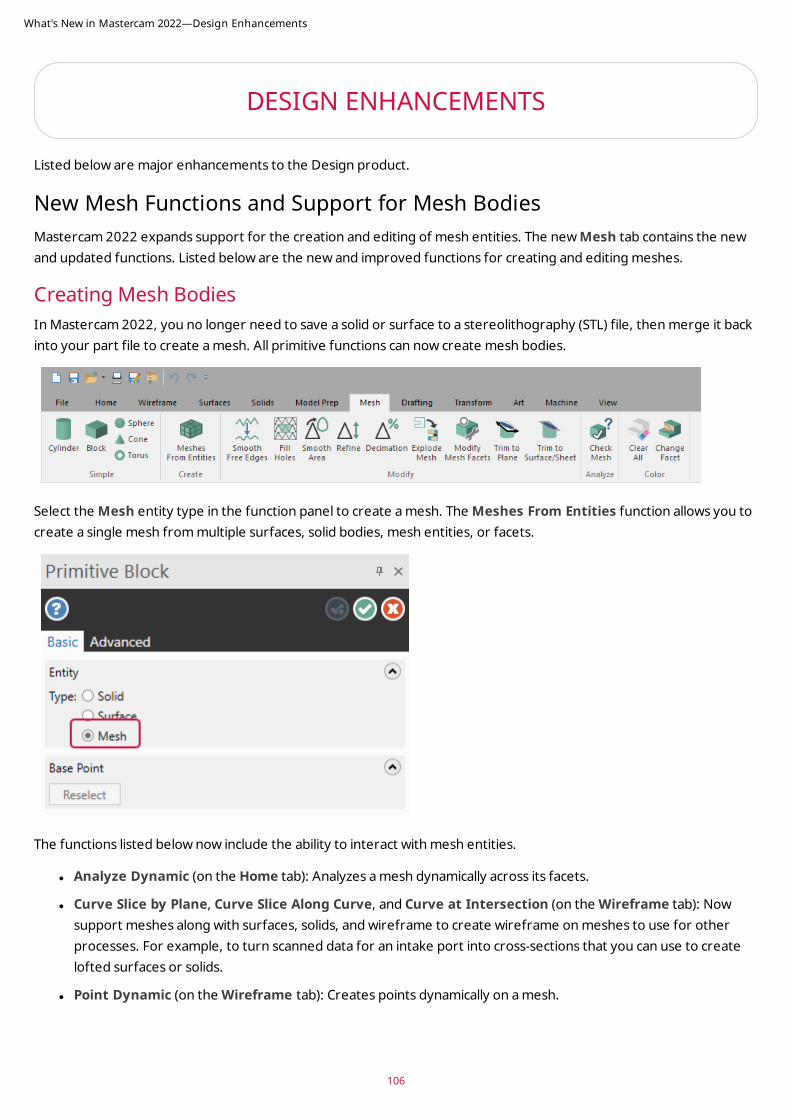
New Mesh Functions and Support for Mesh BodiesMastercam 2022 expands support for the creation and editing of mesh entities. The new Mesh tab contains the new and updated functions. Listed below are the new and improved functions for creating and editing meshes.
Creating Mesh BodiesIn Mastercam 2022, you no longer need to save a solid or surface to a stereolithography (STL) file, then merge it back into your part file to create a mesh. All primitive functions can now create mesh bodies.
Select the Mesh entity type in the function panel to create a mesh. The Meshes From Entities function allows you to create a single mesh from multiple surfaces, solid bodies, mesh entities, or facets.
The functions listed below now include the ability to interact with mesh entities.
l Analyze Dynamic (on the Home tab): Analyzes a mesh dynamically across its facets.
l Curve Slice by Plane, Curve Slice Along Curve, and Curve at Intersection (on the Wireframe tab): Now support meshes along with surfaces, solids, and wireframe to create wireframe on meshes to use for other processes. For example, to turn scanned data for an intake port into cross-sections that you can use to create lofted surfaces or solids.
l Point Dynamic (on the Wireframe tab): Creates points dynamically on a mesh.
What's New in Mastercam 2022—Design Enhancements
106
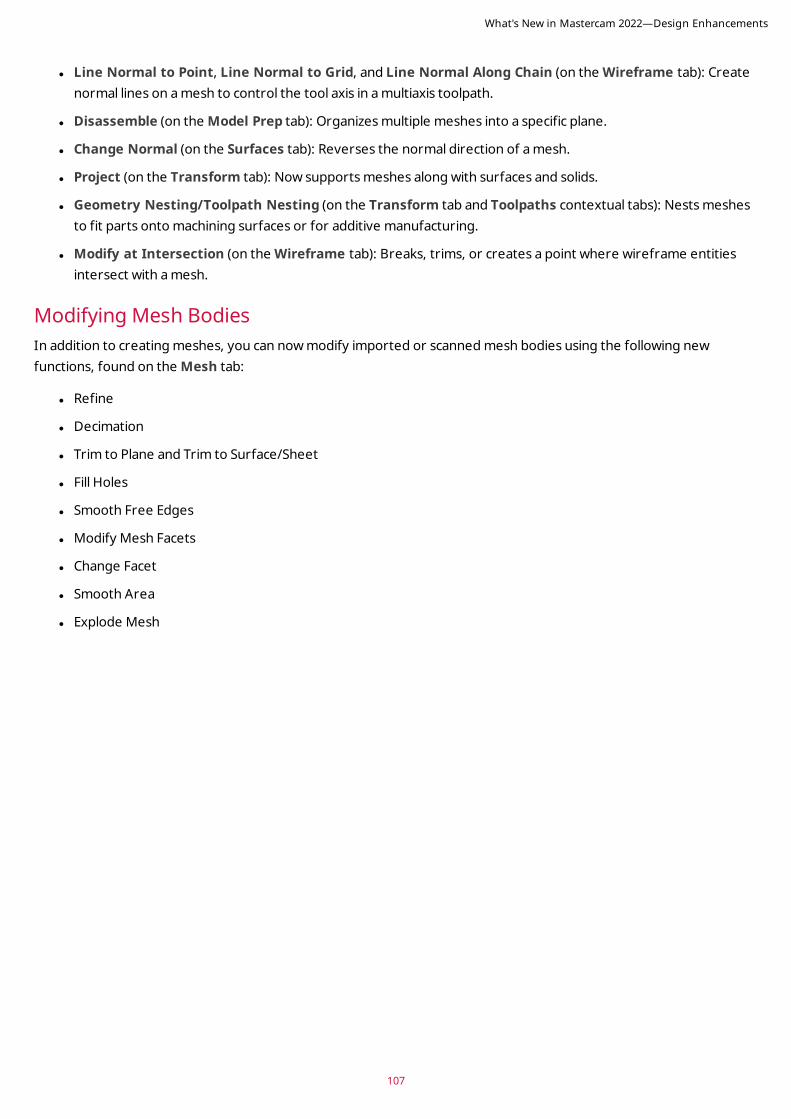
107
l Line Normal to Point, Line Normal to Grid, and Line Normal Along Chain (on the Wireframe tab): Create normal lines on a mesh to control the tool axis in a multiaxis toolpath.
l Disassemble (on the Model Prep tab): Organizes multiple meshes into a specific plane.
l Change Normal (on the Surfaces tab): Reverses the normal direction of a mesh.
l Project (on the Transform tab): Now supports meshes along with surfaces and solids.
l Geometry Nesting/Toolpath Nesting (on the Transform tab and Toolpaths contextual tabs): Nests meshes to fit parts onto machining surfaces or for additive manufacturing.
l Modify at Intersection (on the Wireframe tab): Breaks, trims, or creates a point where wireframe entities intersect with a mesh.
Modifying Mesh BodiesIn addition to creating meshes, you can now modify imported or scanned mesh bodies using the following new functions, found on the Mesh tab:
l Refine
l Decimation
l Trim to Plane and Trim to Surface/Sheet
l Fill Holes
l Smooth Free Edges
l Modify Mesh Facets
l Change Facet
l Smooth Area
l Explode Mesh
What's New in Mastercam 2022—Design Enhancements
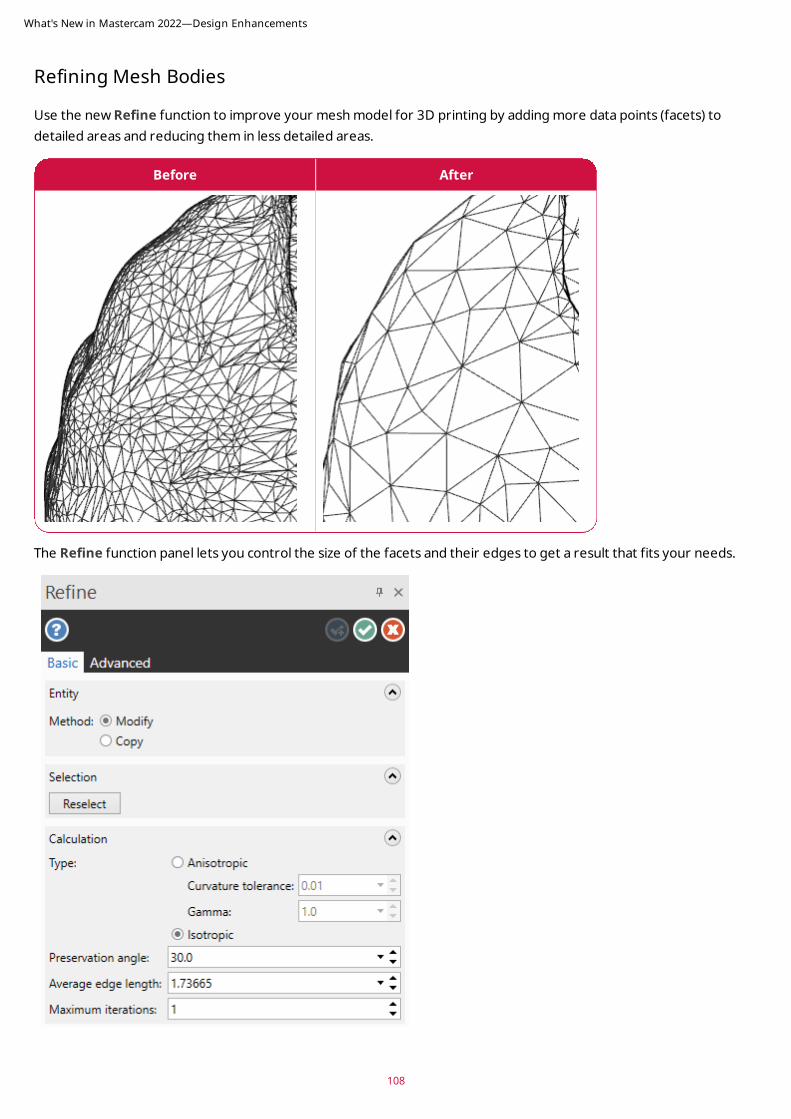
Refining Mesh Bodies
Use the new Refine function to improve your mesh model for 3D printing by adding more data points (facets) to detailed areas and reducing them in less detailed areas.
Before After
The Refine function panel lets you control the size of the facets and their edges to get a result that fits your needs.
What's New in Mastercam 2022—Design Enhancements
108
109
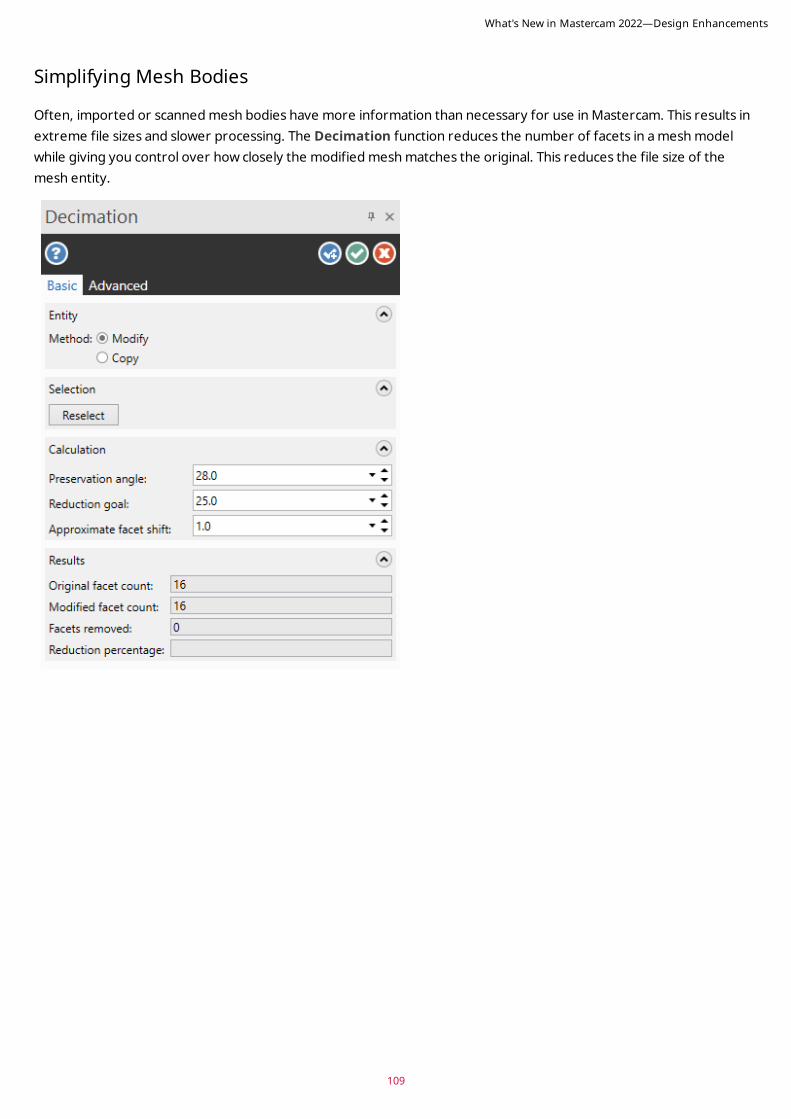
Simplifying Mesh Bodies
Often, imported or scanned mesh bodies have more information than necessary for use in Mastercam. This results in extreme file sizes and slower processing. The Decimation function reduces the number of facets in a mesh model while giving you control over how closely the modified mesh matches the original. This reduces the file size of the mesh entity.
What's New in Mastercam 2022—Design Enhancements
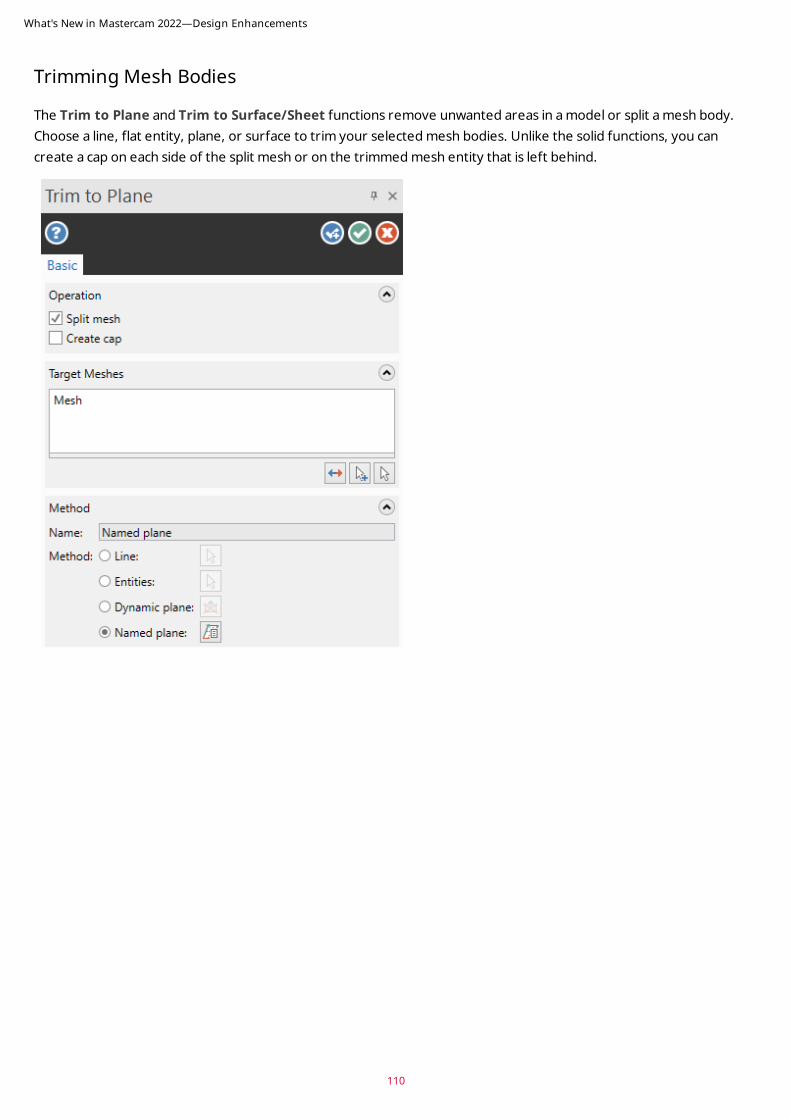
Trimming Mesh Bodies
The Trim to Plane and Trim to Surface/Sheet functions remove unwanted areas in a model or split a mesh body. Choose a line, flat entity, plane, or surface to trim your selected mesh bodies. Unlike the solid functions, you can create a cap on each side of the split mesh or on the trimmed mesh entity that is left behind.
What's New in Mastercam 2022—Design Enhancements
110
111
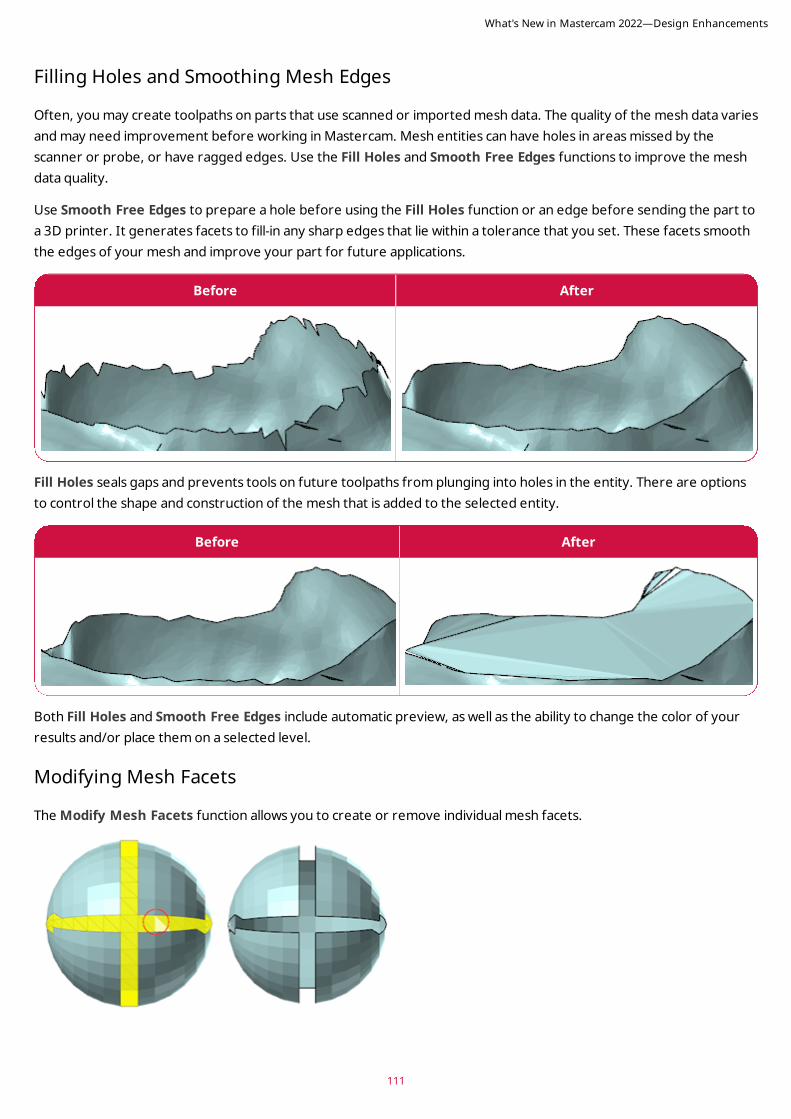
Filling Holes and Smoothing Mesh Edges
Often, you may create toolpaths on parts that use scanned or imported mesh data. The quality of the mesh data varies and may need improvement before working in Mastercam. Mesh entities can have holes in areas missed by the scanner or probe, or have ragged edges. Use the Fill Holes and Smooth Free Edges functions to improve the mesh data quality.
Use Smooth Free Edges to prepare a hole before using the Fill Holes function or an edge before sending the part to a 3D printer. It generates facets to fill-in any sharp edges that lie within a tolerance that you set. These facets smooth the edges of your mesh and improve your part for future applications.
Before After
Fill Holes seals gaps and prevents tools on future toolpaths from plunging into holes in the entity. There are options to control the shape and construction of the mesh that is added to the selected entity.
Before After
Both Fill Holes and Smooth Free Edges include automatic preview, as well as the ability to change the color of your results and/or place them on a selected level.
Modifying Mesh Facets
The Modify Mesh Facets function allows you to create or remove individual mesh facets.
What's New in Mastercam 2022—Design Enhancements
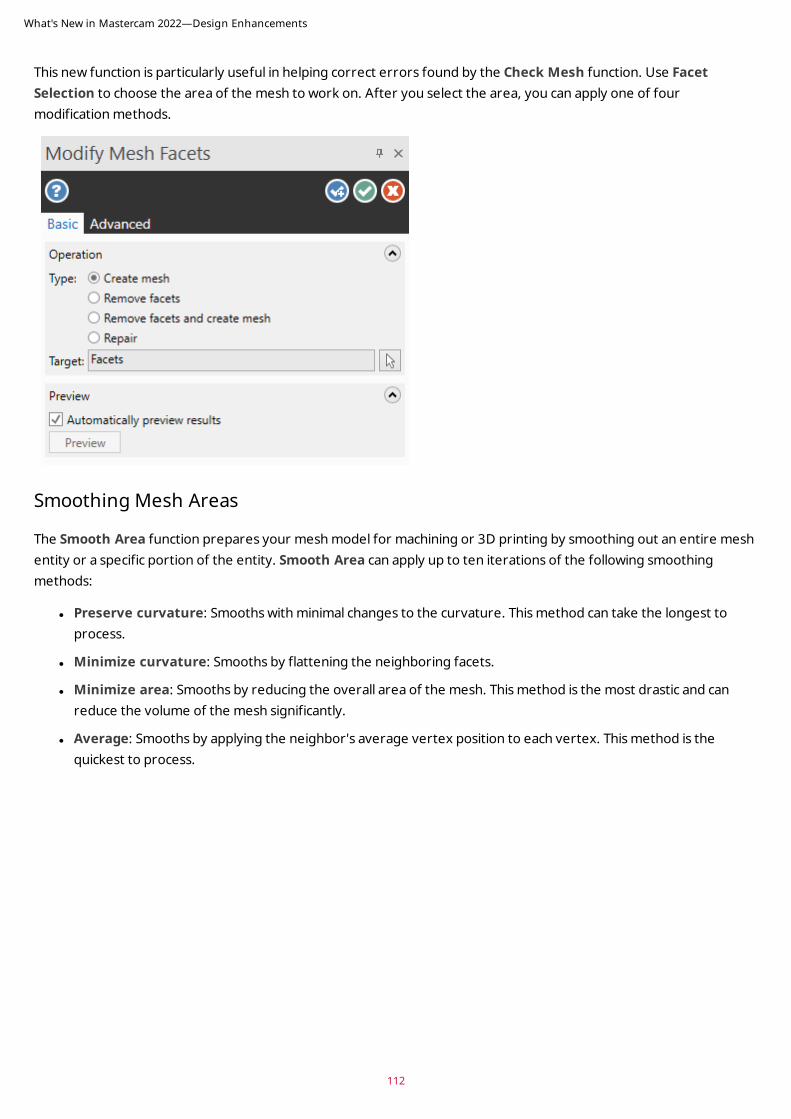
This new function is particularly useful in helping correct errors found by the Check Mesh function. Use Facet Selection to choose the area of the mesh to work on. After you select the area, you can apply one of four modification methods.
Smoothing Mesh Areas
The Smooth Area function prepares your mesh model for machining or 3D printing by smoothing out an entire mesh entity or a specific portion of the entity. Smooth Area can apply up to ten iterations of the following smoothing methods:
l Preserve curvature: Smooths with minimal changes to the curvature. This method can take the longest to process.
l Minimize curvature: Smooths by flattening the neighboring facets.
l Minimize area: Smooths by reducing the overall area of the mesh. This method is the most drastic and can reduce the volume of the mesh significantly.
l Average: Smooths by applying the neighbor's average vertex position to each vertex. This method is the quickest to process.
What's New in Mastercam 2022—Design Enhancements
112
113
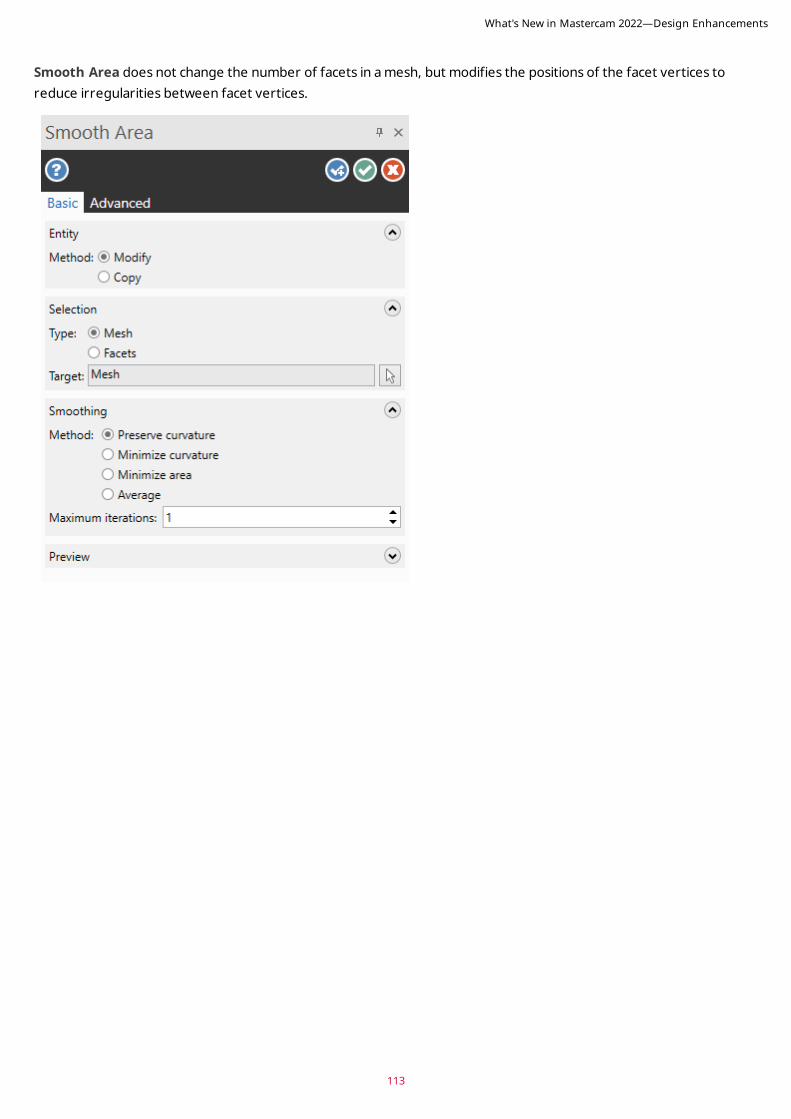
Smooth Area does not change the number of facets in a mesh, but modifies the positions of the facet vertices to reduce irregularities between facet vertices.
What's New in Mastercam 2022—Design Enhancements
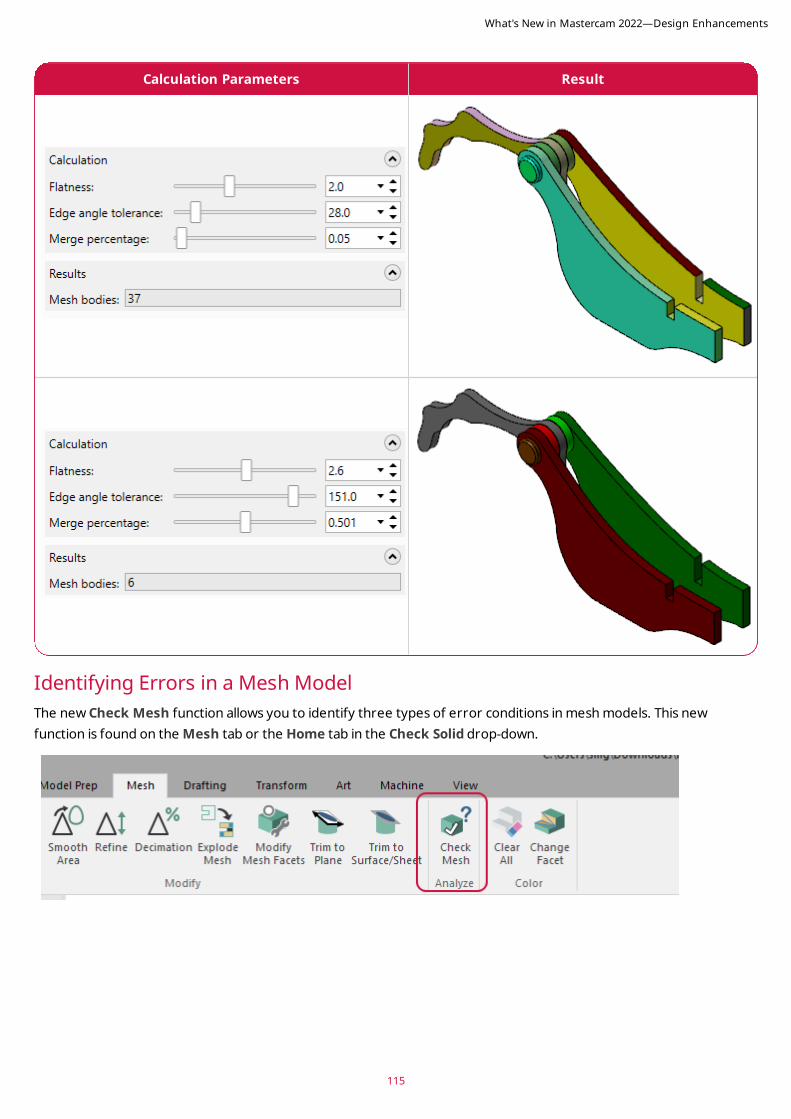
Exploding Meshes
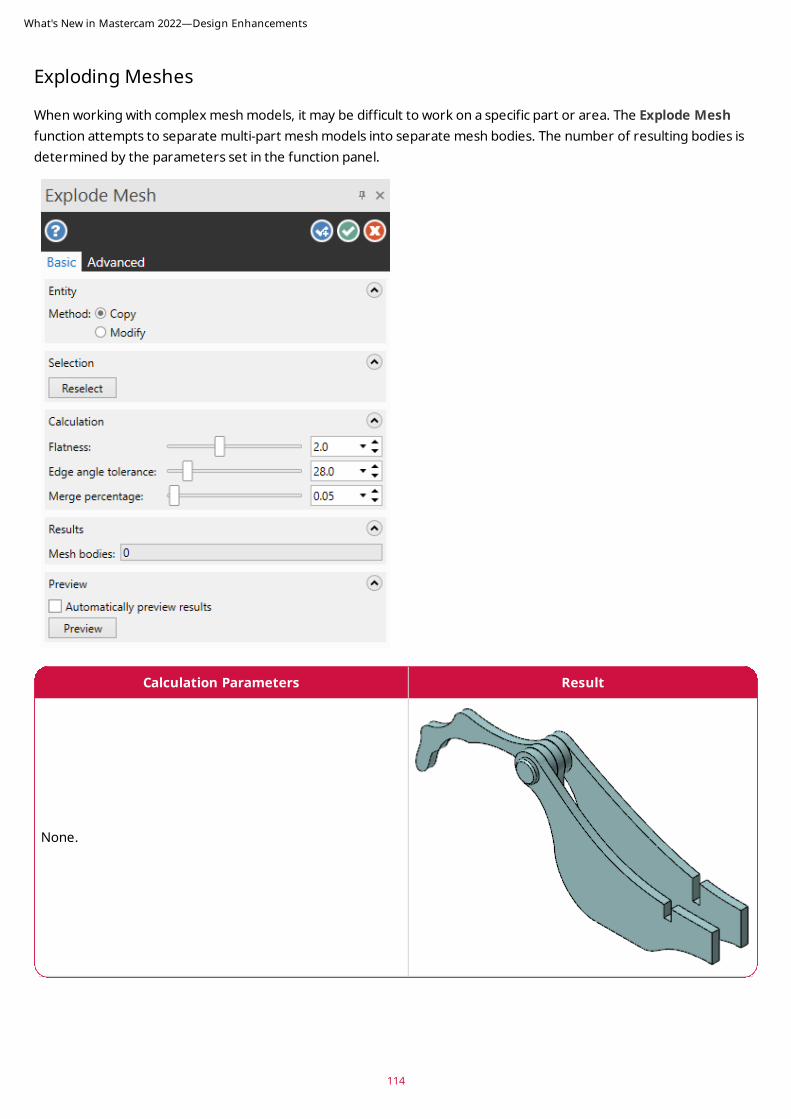
When working with complex mesh models, it may be difficult to work on a specific part or area. The Explode Mesh function attempts to separate multi-part mesh models into separate mesh bodies. The number of resulting bodies is determined by the parameters set in the function panel.
Calculation Parameters Result
None.
What's New in Mastercam 2022—Design Enhancements
114
115
Calculation Parameters Result
Identifying Errors in a Mesh Model The new Check Mesh function allows you to identify three types of error conditions in mesh models. This new function is found on the Mesh tab or the Home tab in the Check Solid drop-down.
What's New in Mastercam 2022—Design Enhancements
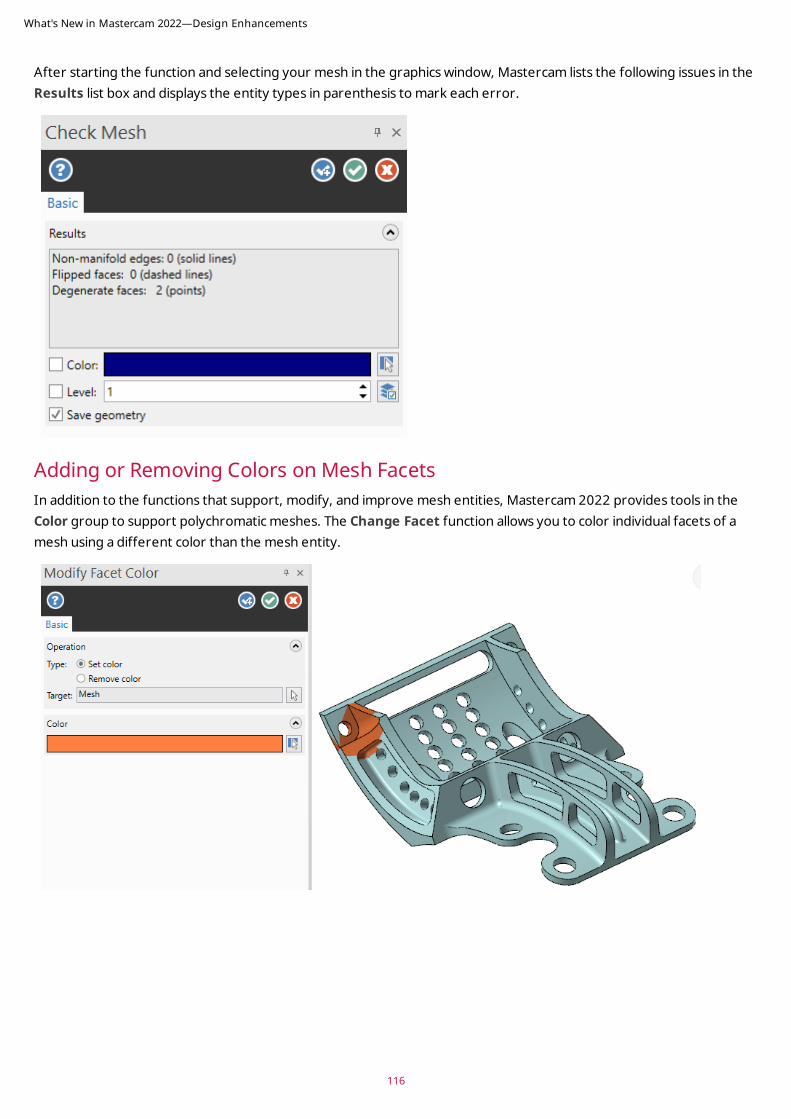
After starting the function and selecting your mesh in the graphics window, Mastercam lists the following issues in the Results list box and displays the entity types in parenthesis to mark each error.
Adding or Removing Colors on Mesh FacetsIn addition to the functions that support, modify, and improve mesh entities, Mastercam 2022 provides tools in the Color group to support polychromatic meshes. The Change Facet function allows you to color individual facets of a mesh using a different color than the mesh entity.
What's New in Mastercam 2022—Design Enhancements
116
117
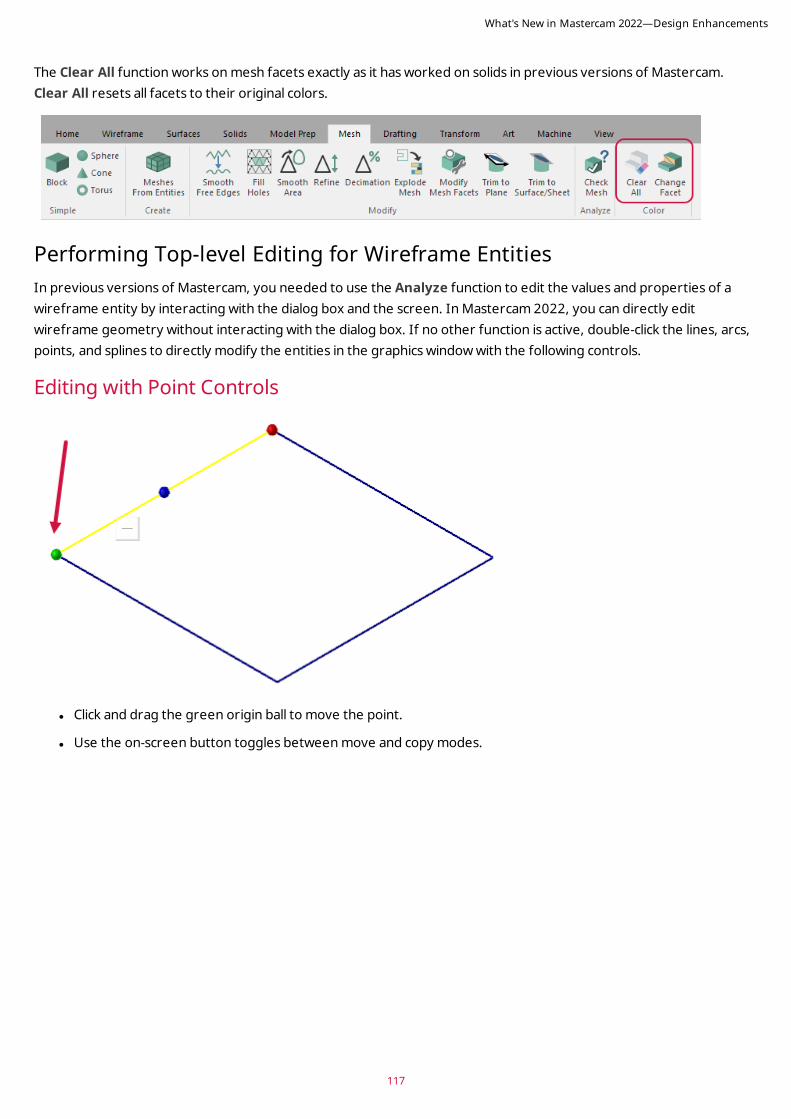
The Clear All function works on mesh facets exactly as it has worked on solids in previous versions of Mastercam. Clear All resets all facets to their original colors.
Performing Top-level Editing for Wireframe EntitiesIn previous versions of Mastercam, you needed to use the Analyze function to edit the values and properties of a wireframe entity by interacting with the dialog box and the screen. In Mastercam 2022, you can directly edit wireframe geometry without interacting with the dialog box. If no other function is active, double-click the lines, arcs, points, and splines to directly modify the entities in the graphics window with the following controls.
Editing with Point Controls
l Click and drag the green origin ball to move the point.
l Use the on-screen button toggles between move and copy modes.
What's New in Mastercam 2022—Design Enhancements
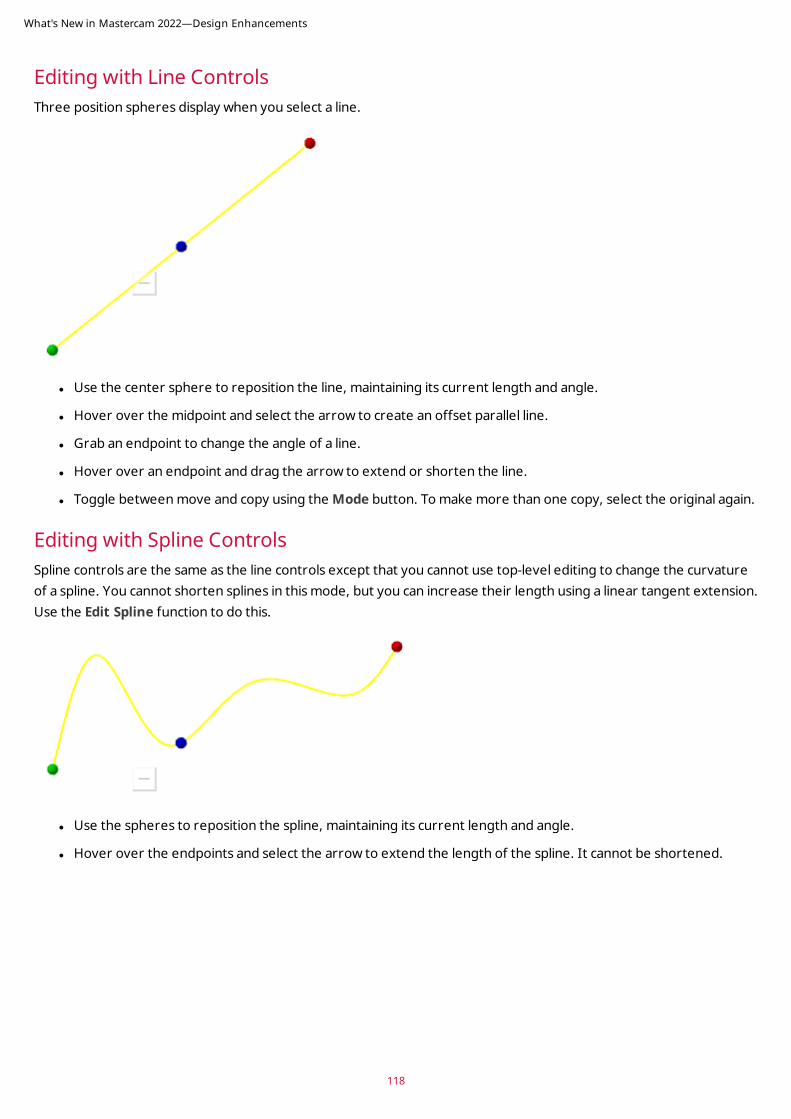
Editing with Line ControlsThree position spheres display when you select a line.
l Use the center sphere to reposition the line, maintaining its current length and angle.
l Hover over the midpoint and select the arrow to create an offset parallel line.
l Grab an endpoint to change the angle of a line.
l Hover over an endpoint and drag the arrow to extend or shorten the line.
l Toggle between move and copy using the Mode button. To make more than one copy, select the original again.
Editing with Spline Controls Spline controls are the same as the line controls except that you cannot use top-level editing to change the curvature of a spline. You cannot shorten splines in this mode, but you can increase their length using a linear tangent extension. Use the Edit Spline function to do this.
l Use the spheres to reposition the spline, maintaining its current length and angle.
l Hover over the endpoints and select the arrow to extend the length of the spline. It cannot be shortened.
What's New in Mastercam 2022—Design Enhancements
118
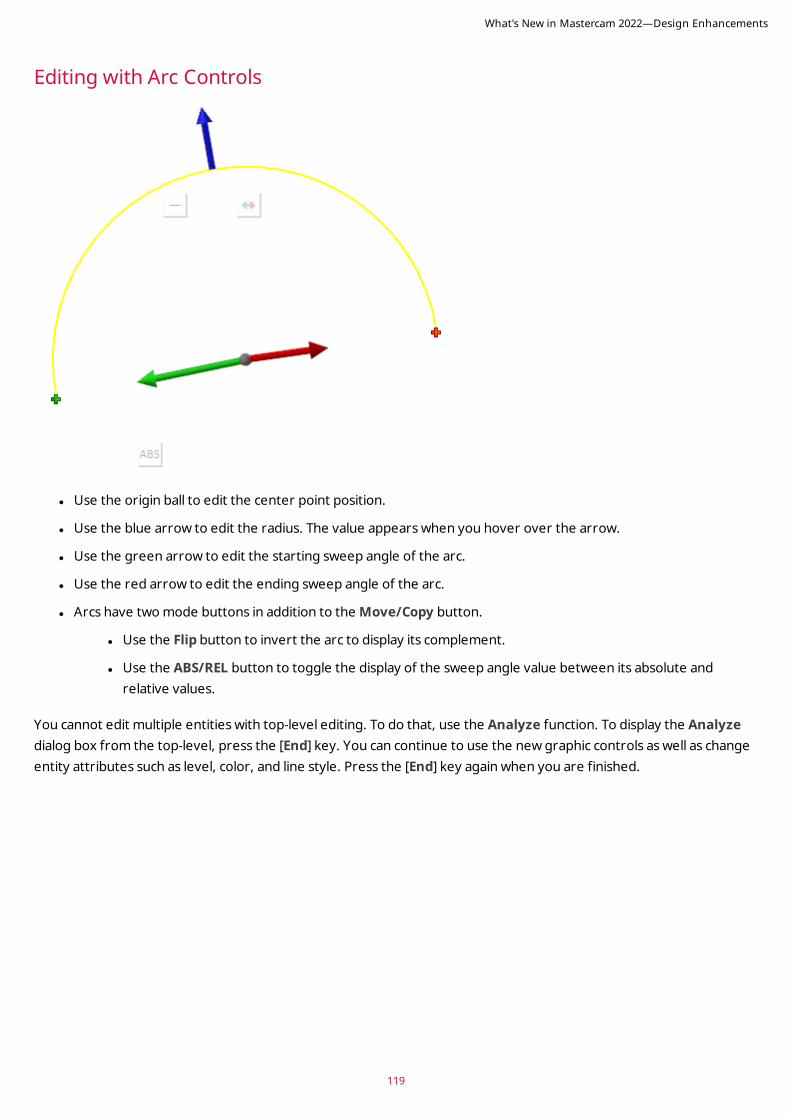
119
Editing with Arc Controls
l Use the origin ball to edit the center point position.
l Use the blue arrow to edit the radius. The value appears when you hover over the arrow.
l Use the green arrow to edit the starting sweep angle of the arc.
l Use the red arrow to edit the ending sweep angle of the arc.
l Arcs have two mode buttons in addition to the Move/Copy button.
l Use the Flip button to invert the arc to display its complement.
l Use the ABS/REL button to toggle the display of the sweep angle value between its absolute and relative values.
You cannot edit multiple entities with top-level editing. To do that, use the Analyze function. To display the Analyze dialog box from the top-level, press the [End] key. You can continue to use the new graphic controls as well as change entity attributes such as level, color, and line style. Press the [End] key again when you are finished.
What's New in Mastercam 2022—Design Enhancements
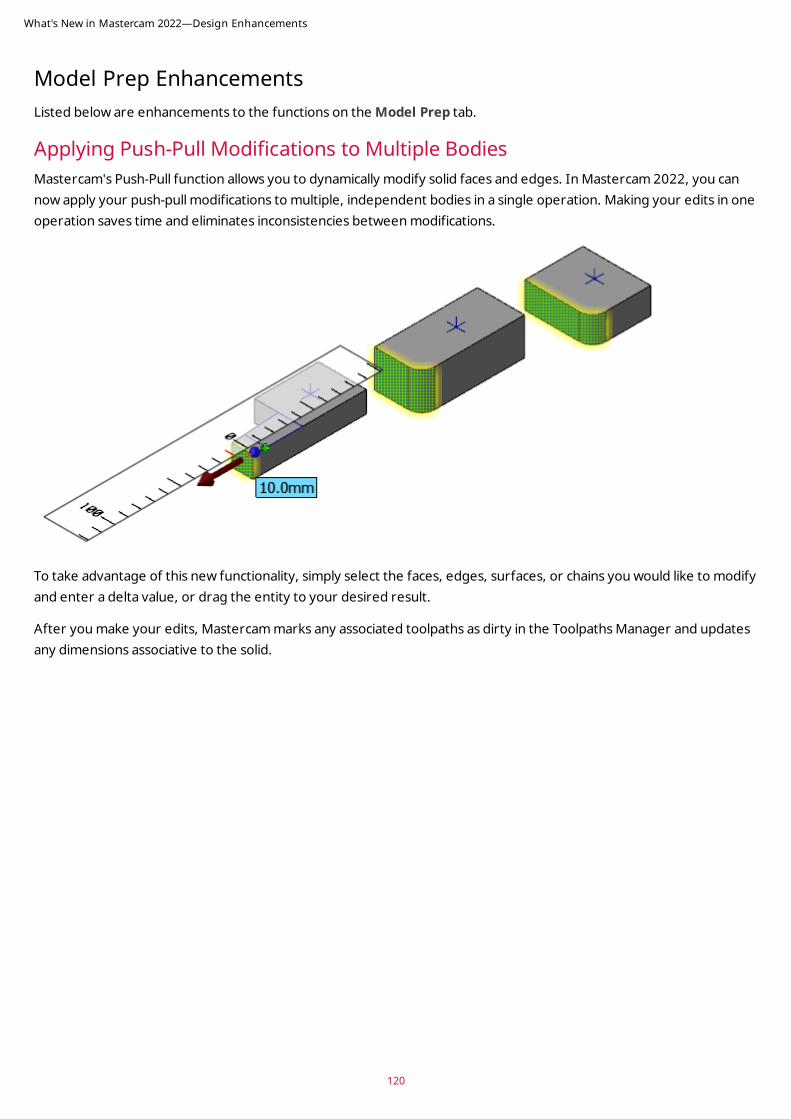
Model Prep EnhancementsListed below are enhancements to the functions on the Model Prep tab.
Applying Push-Pull Modifications to Multiple Bodies Mastercam's Push-Pull function allows you to dynamically modify solid faces and edges. In Mastercam 2022, you can now apply your push-pull modifications to multiple, independent bodies in a single operation. Making your edits in one operation saves time and eliminates inconsistencies between modifications.
To take advantage of this new functionality, simply select the faces, edges, surfaces, or chains you would like to modify and enter a delta value, or drag the entity to your desired result.
After you make your edits, Mastercam marks any associated toolpaths as dirty in the Toolpaths Manager and updates any dimensions associative to the solid.
What's New in Mastercam 2022—Design Enhancements
120
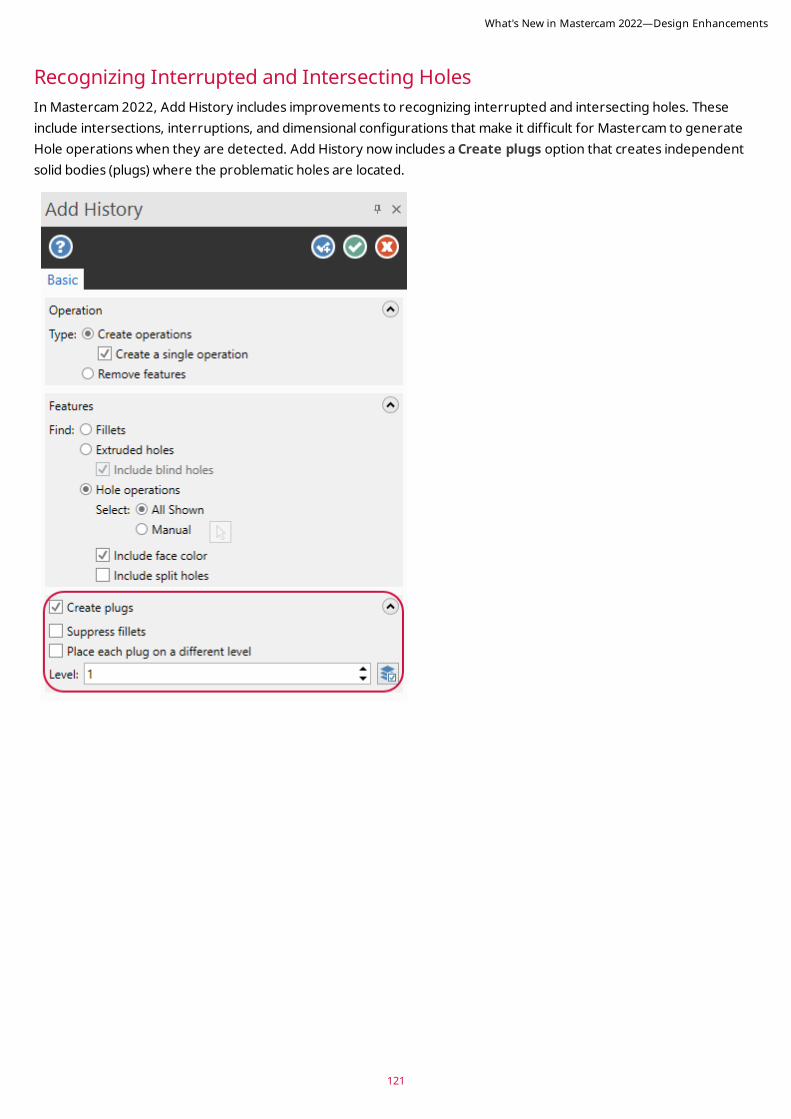
121
Recognizing Interrupted and Intersecting HolesIn Mastercam 2022, Add History includes improvements to recognizing interrupted and intersecting holes. These include intersections, interruptions, and dimensional configurations that make it difficult for Mastercam to generate Hole operations when they are detected. Add History now includes a Create plugs option that creates independent solid bodies (plugs) where the problematic holes are located.
What's New in Mastercam 2022—Design Enhancements
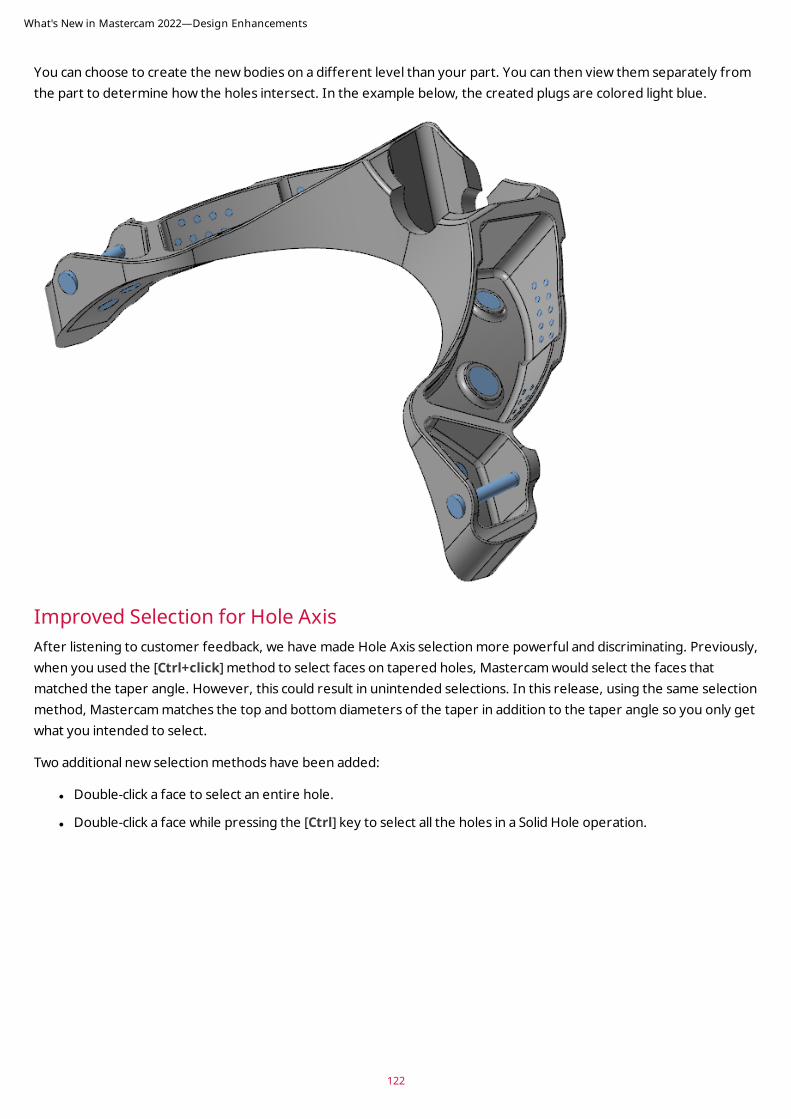
You can choose to create the new bodies on a different level than your part. You can then view them separately from the part to determine how the holes intersect. In the example below, the created plugs are colored light blue.
Improved Selection for Hole AxisAfter listening to customer feedback, we have made Hole Axis selection more powerful and discriminating. Previously, when you used the [Ctrl+click] method to select faces on tapered holes, Mastercam would select the faces that matched the taper angle. However, this could result in unintended selections. In this release, using the same selection method, Mastercam matches the top and bottom diameters of the taper in addition to the taper angle so you only get what you intended to select.
Two additional new selection methods have been added:
l Double-click a face to select an entire hole.
l Double-click a face while pressing the [Ctrl] key to select all the holes in a Solid Hole operation.
What's New in Mastercam 2022—Design Enhancements
122
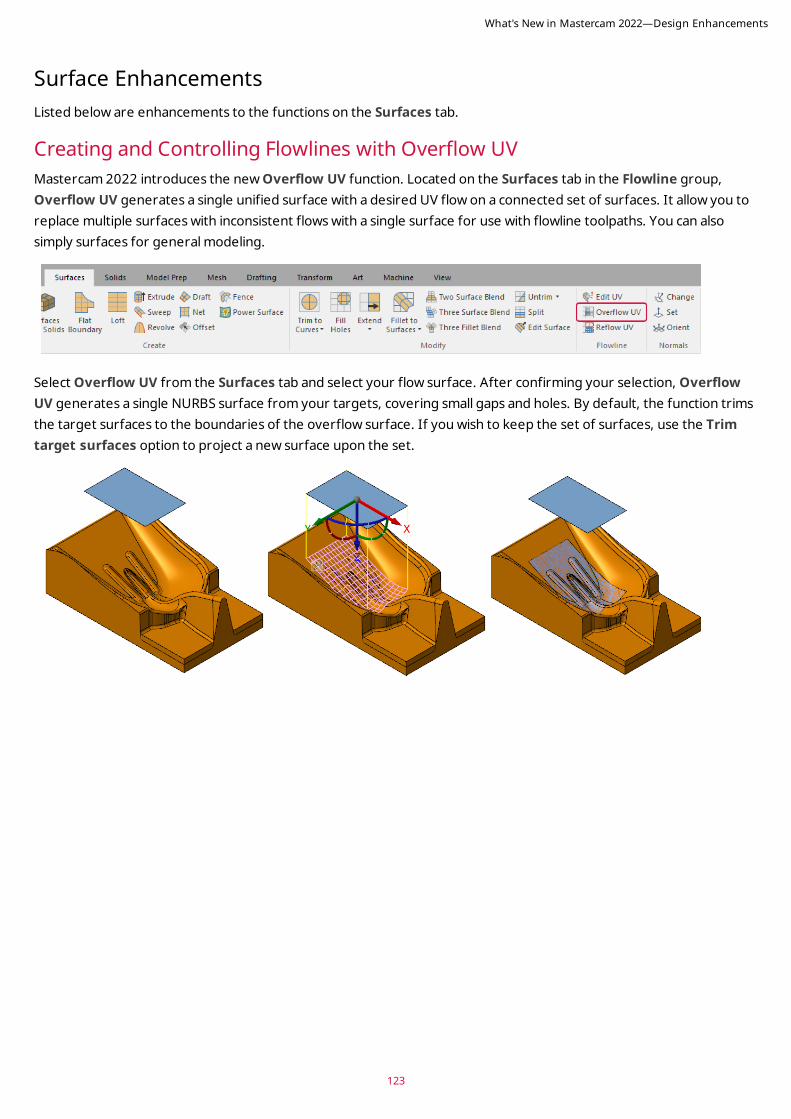
123
Surface EnhancementsListed below are enhancements to the functions on the Surfaces tab.
Creating and Controlling Flowlines with Overflow UV Mastercam 2022 introduces the new Overflow UV function. Located on the Surfaces tab in the Flowline group, Overflow UV generates a single unified surface with a desired UV flow on a connected set of surfaces. It allow you to replace multiple surfaces with inconsistent flows with a single surface for use with flowline toolpaths. You can also simply surfaces for general modeling.
Select Overflow UV from the Surfaces tab and select your flow surface. After confirming your selection, Overflow UV generates a single NURBS surface from your targets, covering small gaps and holes. By default, the function trims the target surfaces to the boundaries of the overflow surface. If you wish to keep the set of surfaces, use the Trim target surfaces option to project a new surface upon the set.
What's New in Mastercam 2022—Design Enhancements
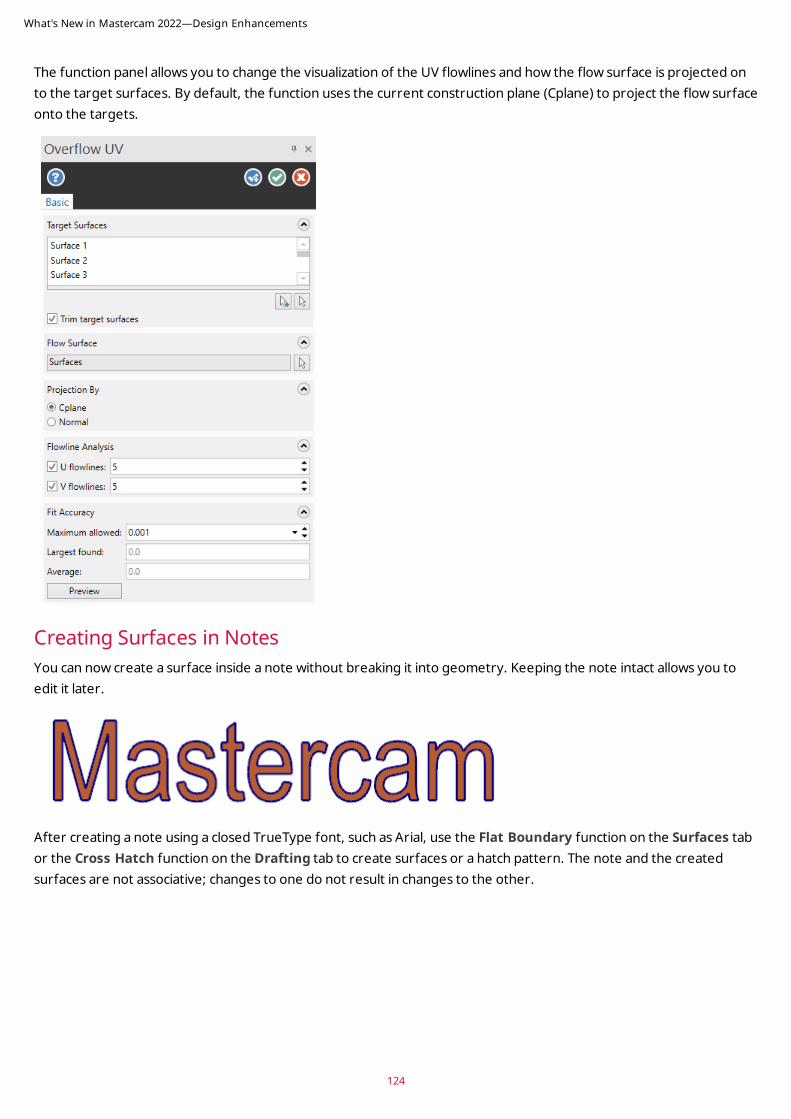
The function panel allows you to change the visualization of the UV flowlines and how the flow surface is projected on to the target surfaces. By default, the function uses the current construction plane (Cplane) to project the flow surface onto the targets.
Creating Surfaces in NotesYou can now create a surface inside a note without breaking it into geometry. Keeping the note intact allows you to edit it later.
After creating a note using a closed TrueType font, such as Arial, use the Flat Boundary function on the Surfaces tab or the Cross Hatch function on the Drafting tab to create surfaces or a hatch pattern. The note and the created surfaces are not associative; changes to one do not result in changes to the other.
What's New in Mastercam 2022—Design Enhancements
124
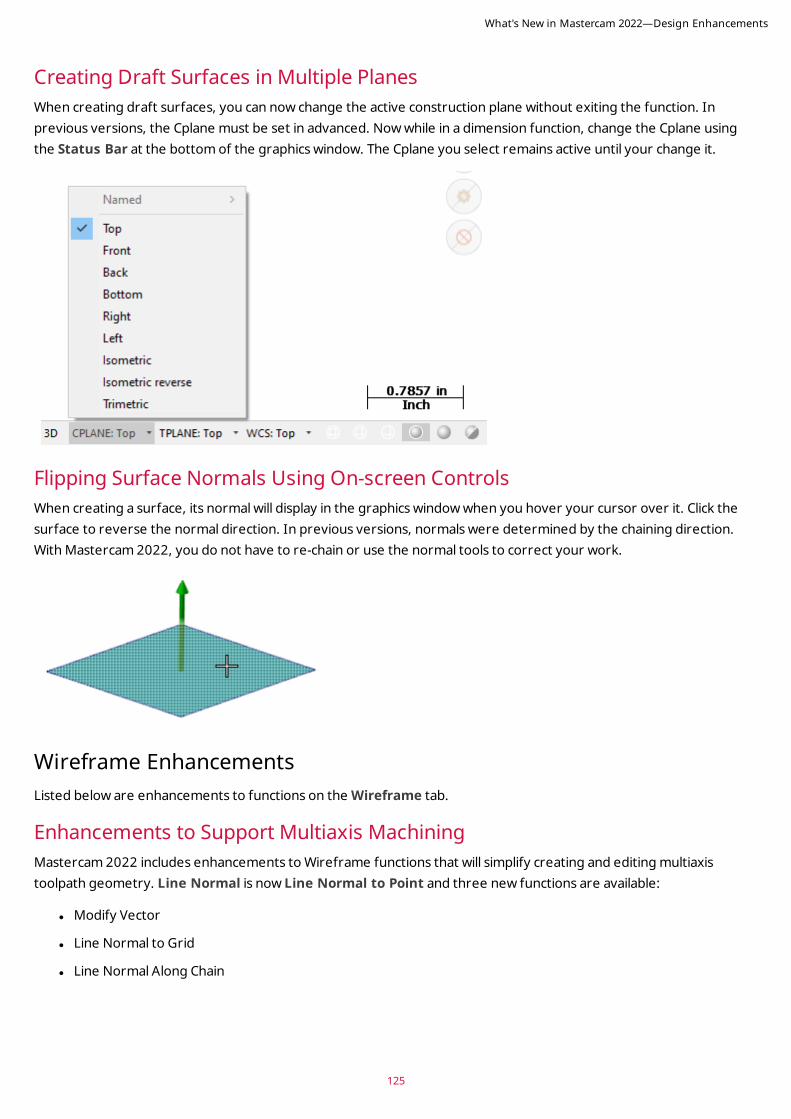
125
Creating Draft Surfaces in Multiple PlanesWhen creating draft surfaces, you can now change the active construction plane without exiting the function. In previous versions, the Cplane must be set in advanced. Now while in a dimension function, change the Cplane using the Status Bar at the bottom of the graphics window. The Cplane you select remains active until your change it.
Flipping Surface Normals Using On-screen Controls When creating a surface, its normal will display in the graphics window when you hover your cursor over it. Click the surface to reverse the normal direction. In previous versions, normals were determined by the chaining direction. With Mastercam 2022, you do not have to re-chain or use the normal tools to correct your work.
Wireframe Enhancements Listed below are enhancements to functions on the Wireframe tab.
Enhancements to Support Multiaxis MachiningMastercam 2022 includes enhancements to Wireframe functions that will simplify creating and editing multiaxis toolpath geometry. Line Normal is now Line Normal to Point and three new functions are available:
l Modify Vector
l Line Normal to Grid
l Line Normal Along Chain
What's New in Mastercam 2022—Design Enhancements
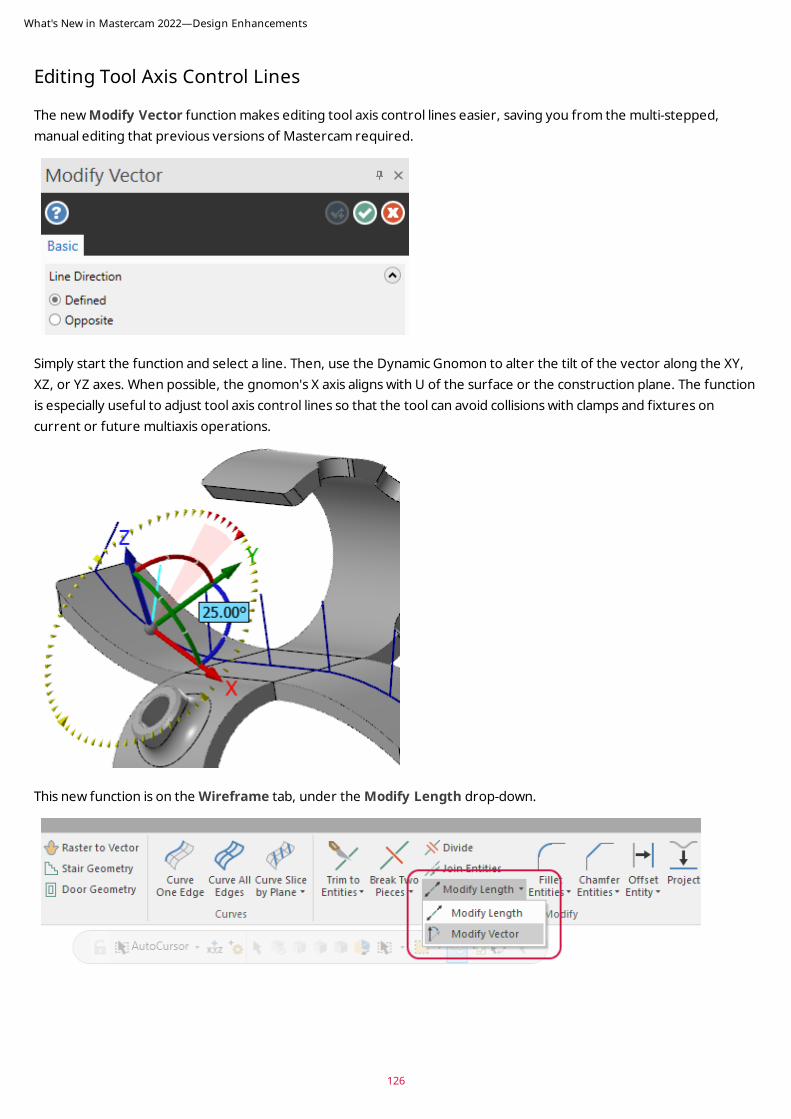
Editing Tool Axis Control Lines
The new Modify Vector function makes editing tool axis control lines easier, saving you from the multi-stepped, manual editing that previous versions of Mastercam required.
Simply start the function and select a line. Then, use the Dynamic Gnomon to alter the tilt of the vector along the XY, XZ, or YZ axes. When possible, the gnomon's X axis aligns with U of the surface or the construction plane. The function is especially useful to adjust tool axis control lines so that the tool can avoid collisions with clamps and fixtures on current or future multiaxis operations.
This new function is on the Wireframe tab, under the Modify Length drop-down.
What's New in Mastercam 2022—Design Enhancements
126

127
Expanded Line Normal Functions
The Line Normal function has been expanded to give you multiple ways to add normals to your geometry. These functions simplify the creation of tool axis control lines that are required for multiaxis machining. You can find the following functions under the Line Closest drop-down in the Lines group.
Line Normal to Grid creates a grid of lines that are normal to your selected surfaces, solid faces, meshes and open sheet bodies. Choose a start point (the grid origin) and use the parameters in the function panel to control length, point creation, and spacing of the lines generated from the grid. Line Normal to Grid replaces the need for the GridPock add-in.
What's New in Mastercam 2022—Design Enhancements
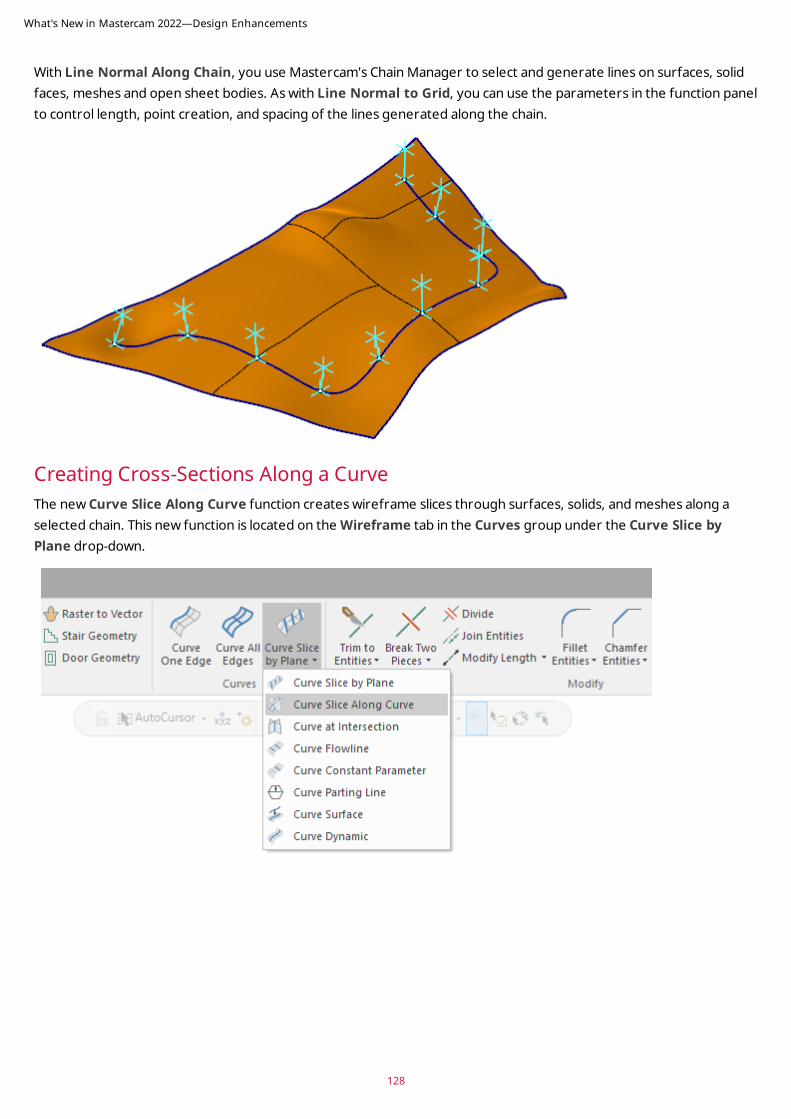
With Line Normal Along Chain, you use Mastercam's Chain Manager to select and generate lines on surfaces, solid faces, meshes and open sheet bodies. As with Line Normal to Grid, you can use the parameters in the function panel to control length, point creation, and spacing of the lines generated along the chain.
Creating Cross-Sections Along a CurveThe new Curve Slice Along Curve function creates wireframe slices through surfaces, solids, and meshes along a selected chain. This new function is located on the Wireframe tab in the Curves group under the Curve Slice by Plane drop-down.
What's New in Mastercam 2022—Design Enhancements
128
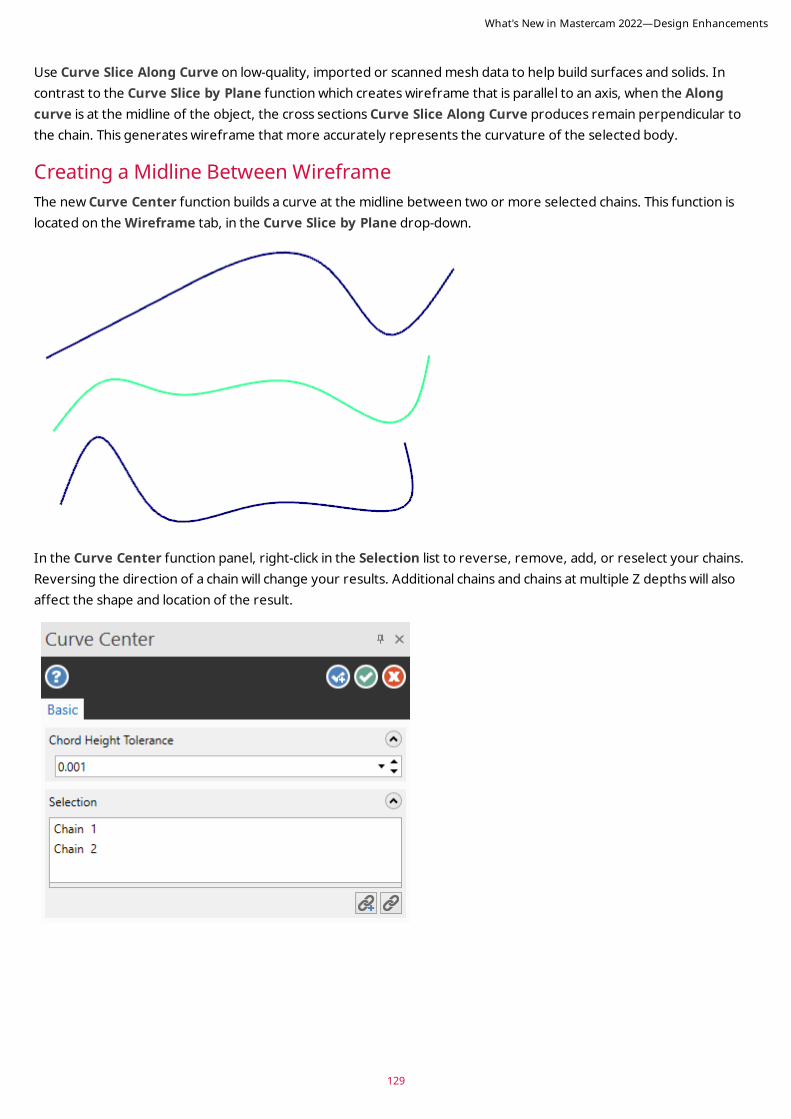
129
Use Curve Slice Along Curve on low-quality, imported or scanned mesh data to help build surfaces and solids. In contrast to the Curve Slice by Plane function which creates wireframe that is parallel to an axis, when the Along curve is at the midline of the object, the cross sections Curve Slice Along Curve produces remain perpendicular to the chain. This generates wireframe that more accurately represents the curvature of the selected body.
Creating a Midline Between WireframeThe new Curve Center function builds a curve at the midline between two or more selected chains. This function is located on the Wireframe tab, in the Curve Slice by Plane drop-down.
In the Curve Center function panel, right-click in the Selection list to reverse, remove, add, or reselect your chains. Reversing the direction of a chain will change your results. Additional chains and chains at multiple Z depths will also affect the shape and location of the result.
What's New in Mastercam 2022—Design Enhancements

New Name and Interface for Curve Slice To distinguish it from the new Curve Slice Along Curve function, the Curve Slice function has been renamed to Curve Slice by Plane. This function retains all of its past functionality, but in Mastercam 2022, it comes with a new, more intuitive interface.
The panel now includes a selection list box to make adding and removing your selections easier and integrated plane selection controls. Additionally, you can drag the on-screen arrow to change the position of the defined plane and a new mode button moves the plane to the current Z value as defined in the Status Bar.
What's New in Mastercam 2022—Design Enhancements
130
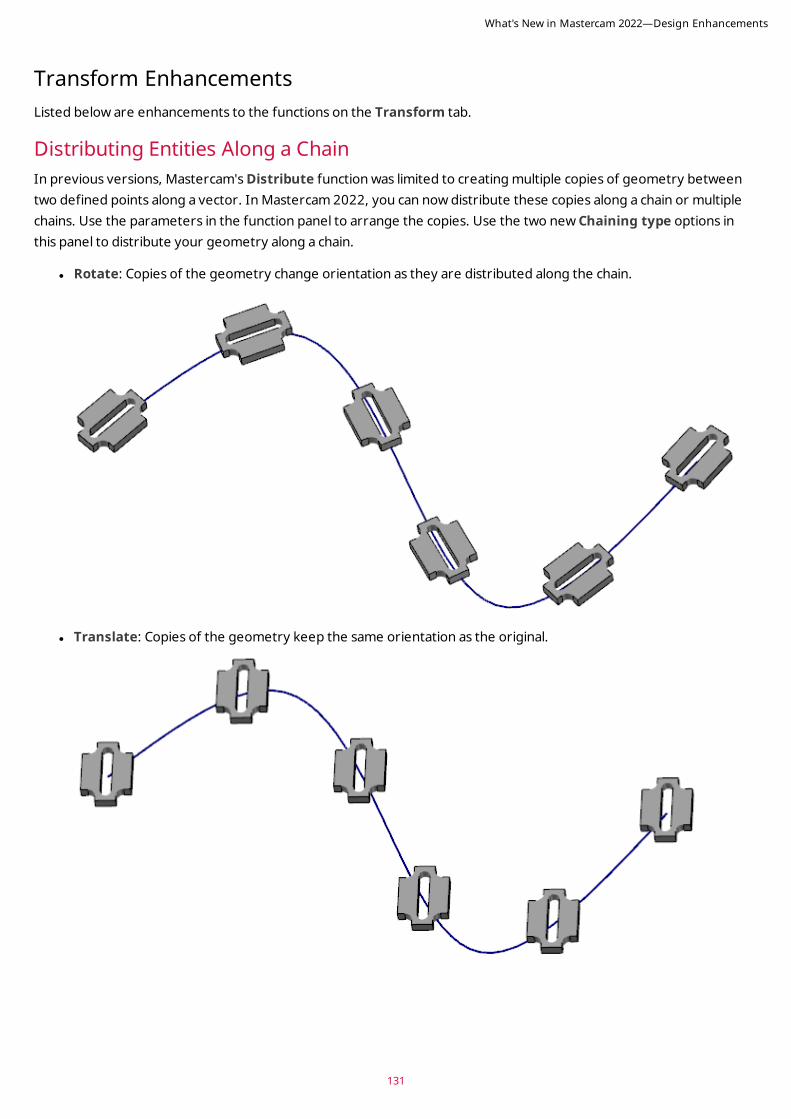
131
Transform EnhancementsListed below are enhancements to the functions on the Transform tab.
Distributing Entities Along a ChainIn previous versions, Mastercam's Distribute function was limited to creating multiple copies of geometry between two defined points along a vector. In Mastercam 2022, you can now distribute these copies along a chain or multiple chains. Use the parameters in the function panel to arrange the copies. Use the two new Chaining type options in this panel to distribute your geometry along a chain.
l Rotate: Copies of the geometry change orientation as they are distributed along the chain.
l Translate: Copies of the geometry keep the same orientation as the original.
What's New in Mastercam 2022—Design Enhancements
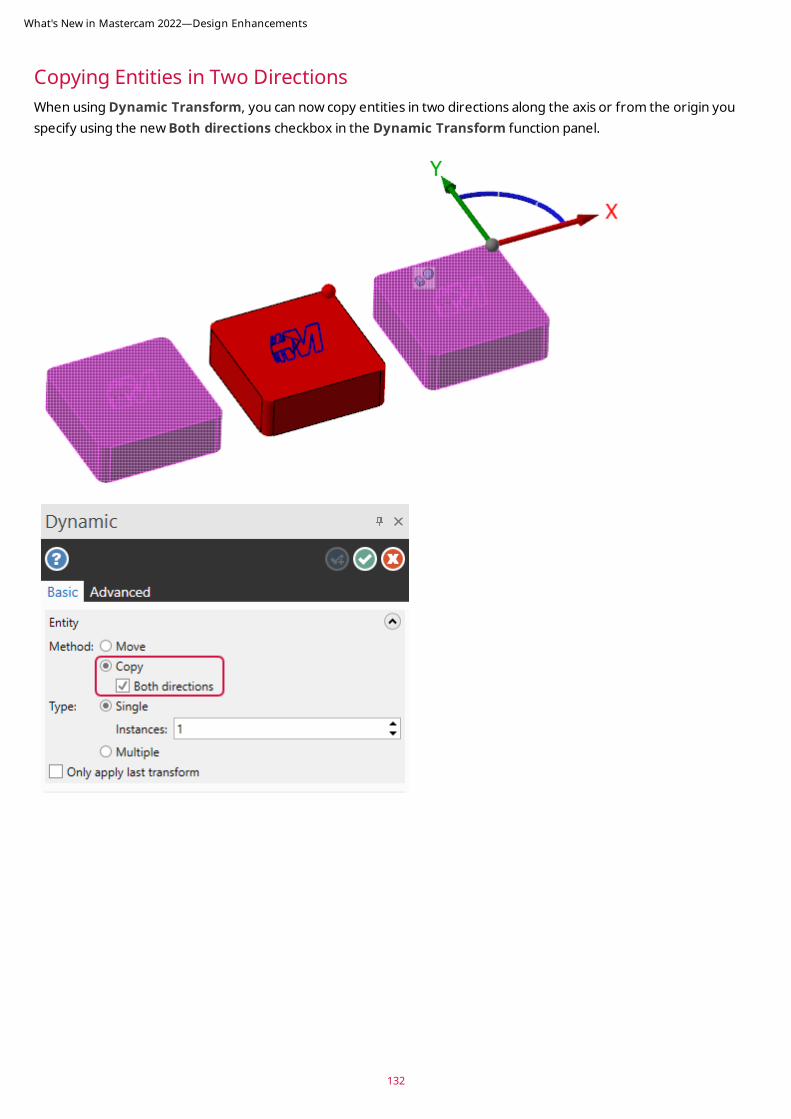
Copying Entities in Two DirectionsWhen using Dynamic Transform, you can now copy entities in two directions along the axis or from the origin you specify using the new Both directions checkbox in the Dynamic Transform function panel.
What's New in Mastercam 2022—Design Enhancements
132

133
Rotating Geometry Around Plane OriginsTranslate to Plane moves or creates copies of selected entities from one plane to another. In previous versions of Mastercam, unless you overrode it with the Source and Destination buttons on the function panel, the selected geometry would rotate around the World origin. In Mastercam 2022, Translate to Plane includes the new Use plane origins option that automatically rotates and places your geometry using the origins of the source and destination planes as reference points.
What's New in Mastercam 2022—Design Enhancements
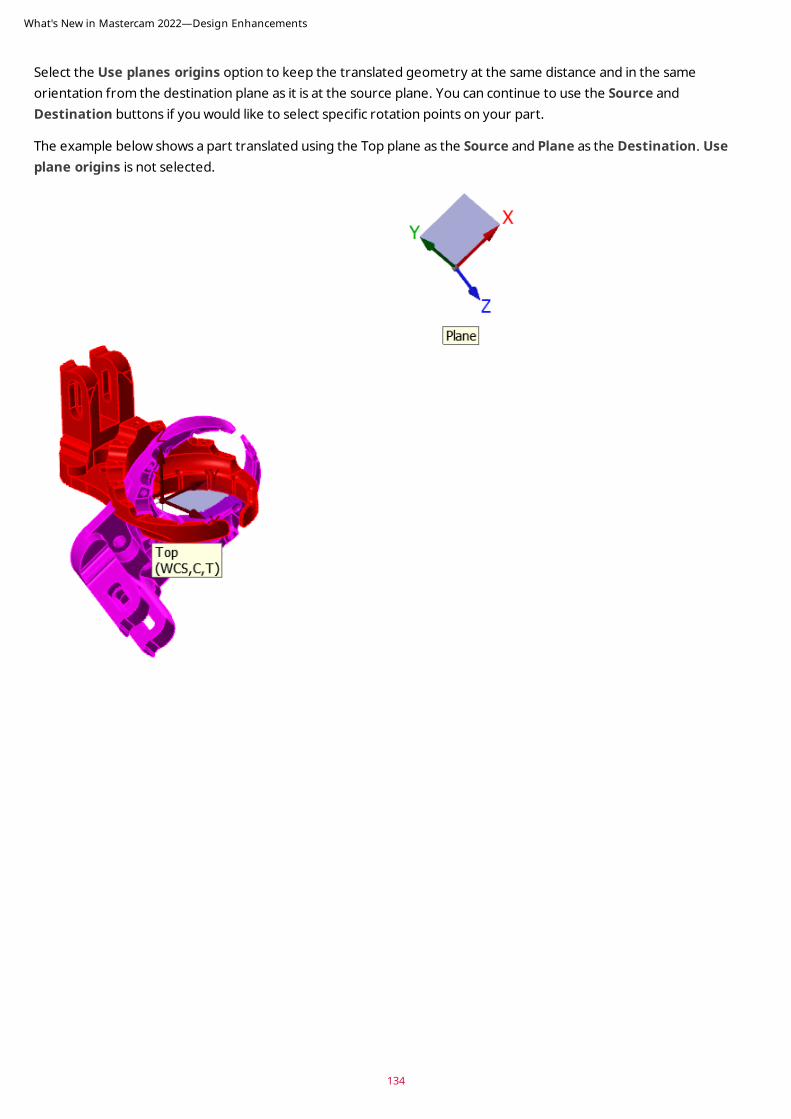
Select the Use planes origins option to keep the translated geometry at the same distance and in the same orientation from the destination plane as it is at the source plane. You can continue to use the Source and Destination buttons if you would like to select specific rotation points on your part.
The example below shows a part translated using the Top plane as the Source and Plane as the Destination. Use plane origins is not selected.
What's New in Mastercam 2022—Design Enhancements
134
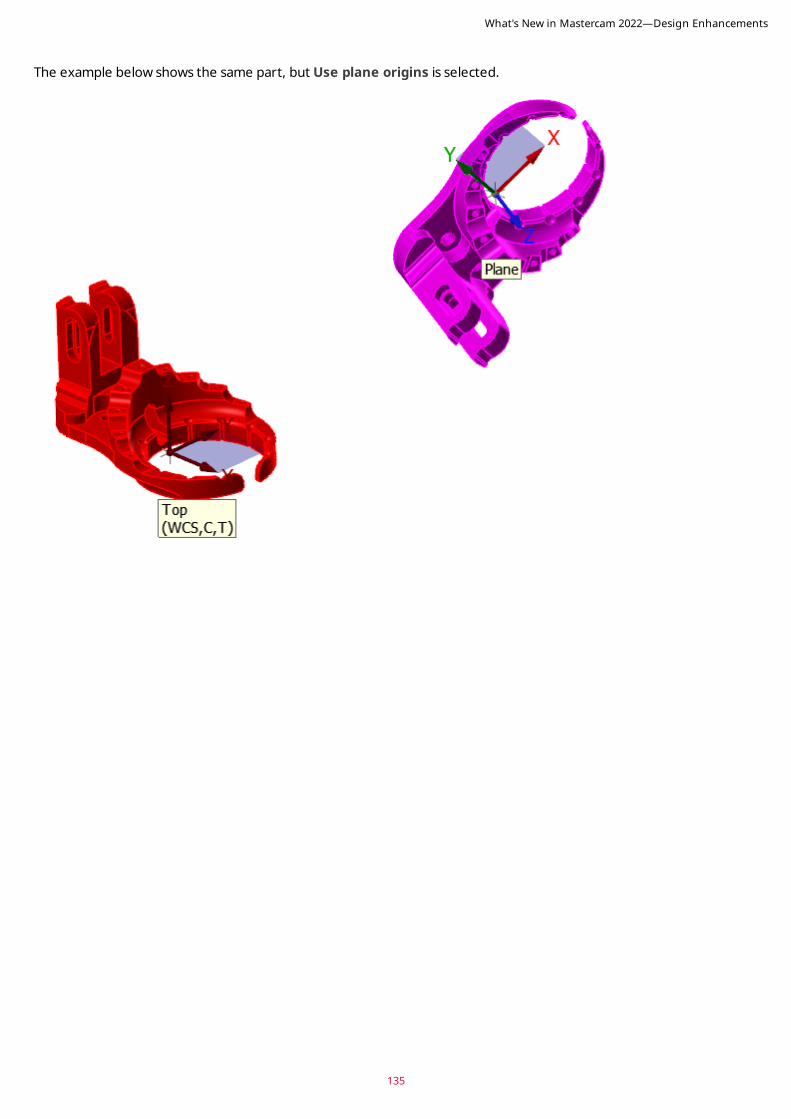
135
The example below shows the same part, but Use plane origins is selected.
What's New in Mastercam 2022—Design Enhancements
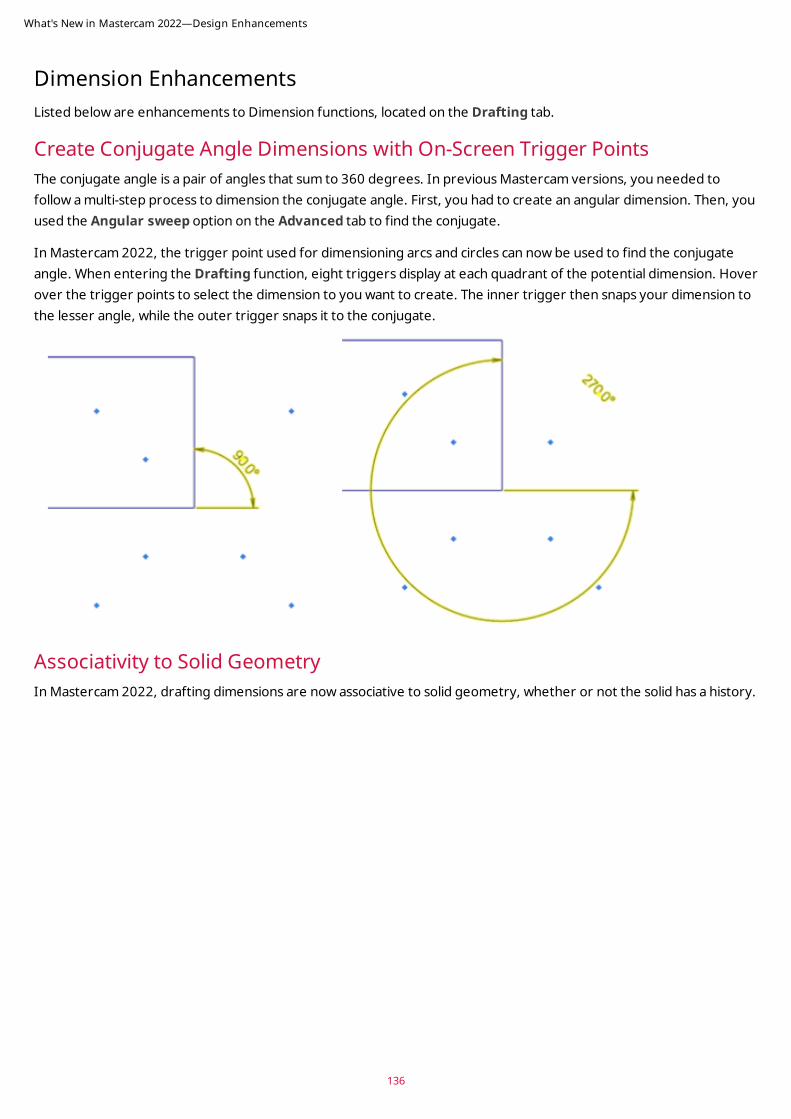
Dimension EnhancementsListed below are enhancements to Dimension functions, located on the Drafting tab.
Create Conjugate Angle Dimensions with On-Screen Trigger Points The conjugate angle is a pair of angles that sum to 360 degrees. In previous Mastercam versions, you needed to follow a multi-step process to dimension the conjugate angle. First, you had to create an angular dimension. Then, you used the Angular sweep option on the Advanced tab to find the conjugate.
In Mastercam 2022, the trigger point used for dimensioning arcs and circles can now be used to find the conjugate angle. When entering the Drafting function, eight triggers display at each quadrant of the potential dimension. Hover over the trigger points to select the dimension to you want to create. The inner trigger then snaps your dimension to the lesser angle, while the outer trigger snaps it to the conjugate.
Associativity to Solid Geometry In Mastercam 2022, drafting dimensions are now associative to solid geometry, whether or not the solid has a history.
What's New in Mastercam 2022—Design Enhancements
136
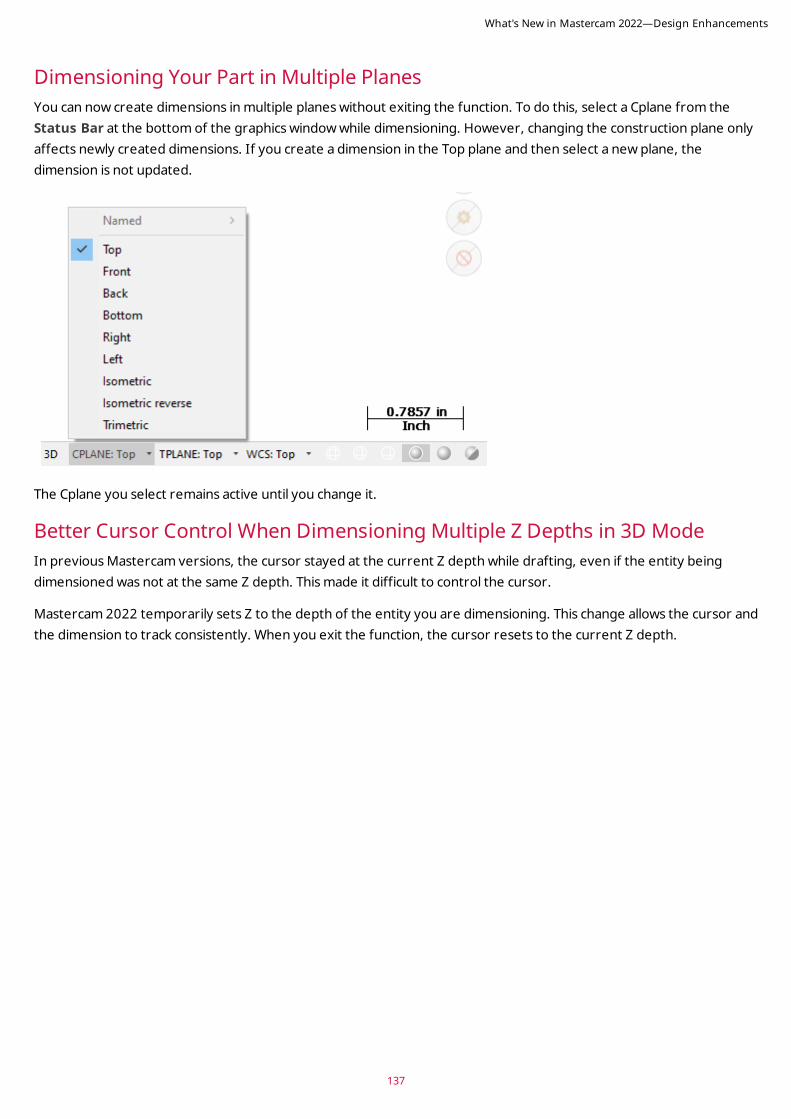
137
Dimensioning Your Part in Multiple PlanesYou can now create dimensions in multiple planes without exiting the function. To do this, select a Cplane from the Status Bar at the bottom of the graphics window while dimensioning. However, changing the construction plane only affects newly created dimensions. If you create a dimension in the Top plane and then select a new plane, the dimension is not updated.
The Cplane you select remains active until you change it.
Better Cursor Control When Dimensioning Multiple Z Depths in 3D ModeIn previous Mastercam versions, the cursor stayed at the current Z depth while drafting, even if the entity being dimensioned was not at the same Z depth. This made it difficult to control the cursor.
Mastercam 2022 temporarily sets Z to the depth of the entity you are dimensioning. This change allows the cursor and the dimension to track consistently. When you exit the function, the cursor resets to the current Z depth.
What's New in Mastercam 2022—Design Enhancements
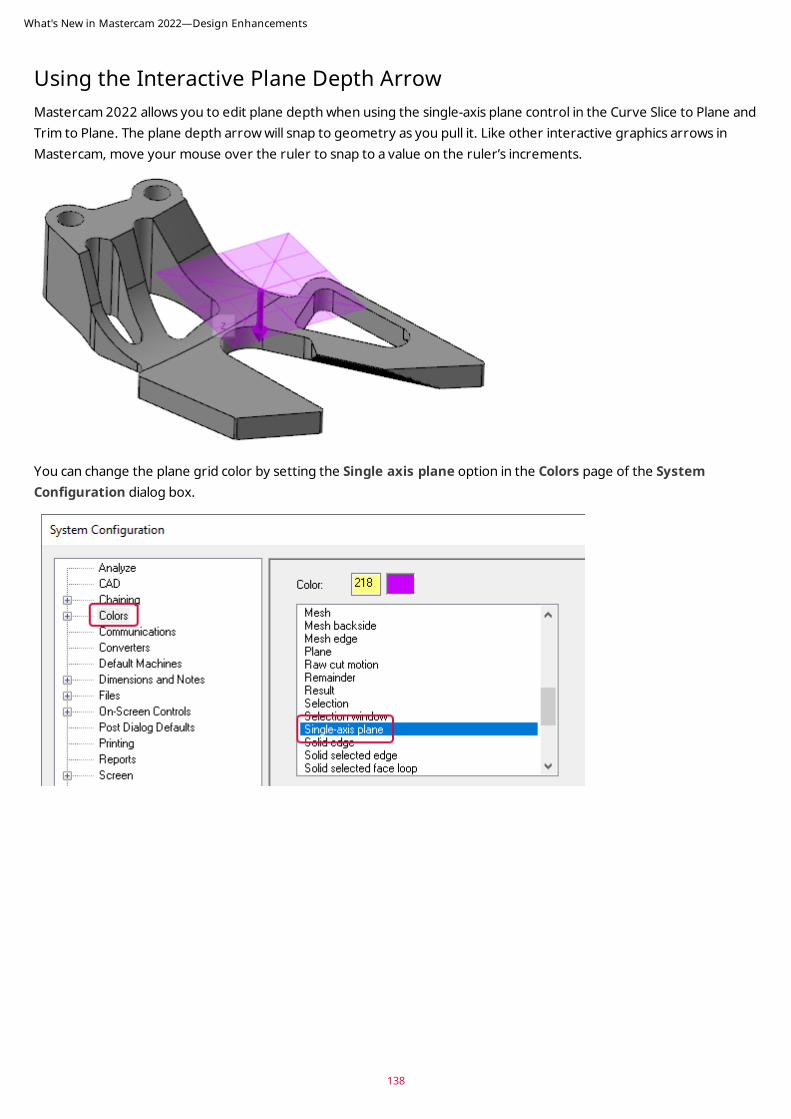
Using the Interactive Plane Depth ArrowMastercam 2022 allows you to edit plane depth when using the single-axis plane control in the Curve Slice to Plane and Trim to Plane. The plane depth arrow will snap to geometry as you pull it. Like other interactive graphics arrows in Mastercam, move your mouse over the ruler to snap to a value on the ruler’s increments.
You can change the plane grid color by setting the Single axis plane option in the Colors page of the System Configuration dialog box.
What's New in Mastercam 2022—Design Enhancements
138
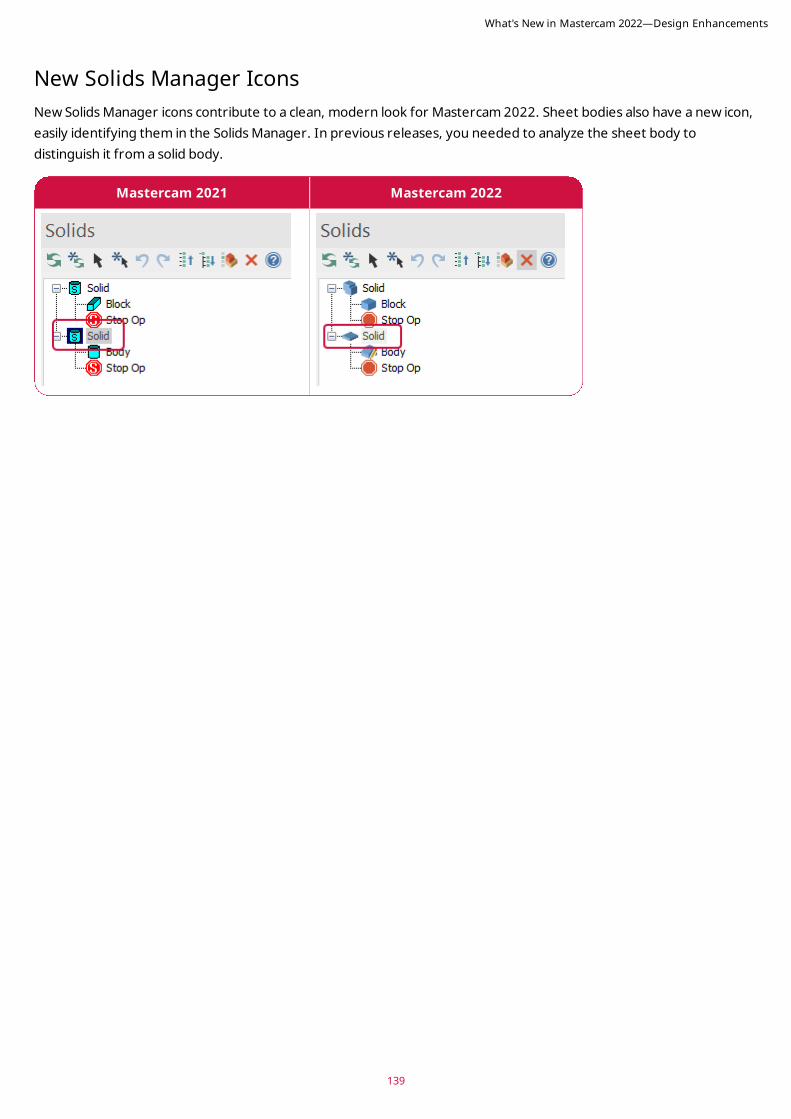
139
New Solids Manager IconsNew Solids Manager icons contribute to a clean, modern look for Mastercam 2022. Sheet bodies also have a new icon, easily identifying them in the Solids Manager. In previous releases, you needed to analyze the sheet body to distinguish it from a solid body.
Mastercam 2021 Mastercam 2022
What's New in Mastercam 2022—Design Enhancements
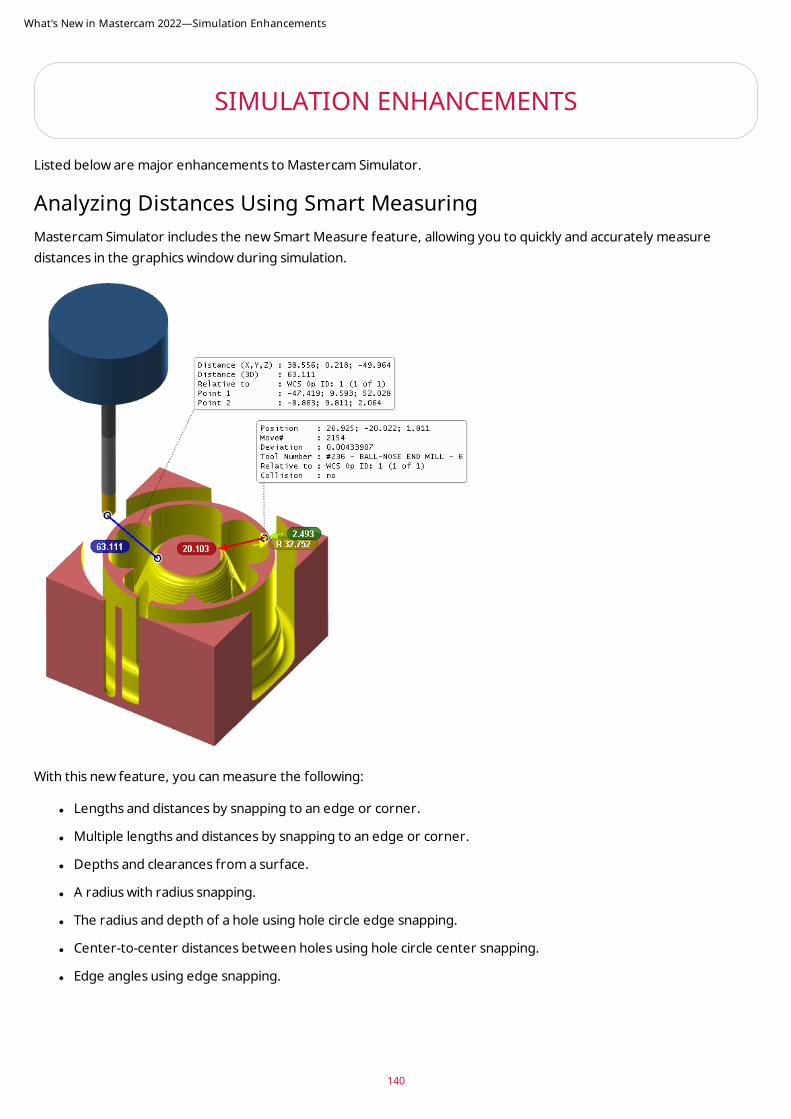
SIMULATION ENHANCEMENTS
Listed below are major enhancements to Mastercam Simulator.
Analyzing Distances Using Smart MeasuringMastercam Simulator includes the new Smart Measure feature, allowing you to quickly and accurately measure distances in the graphics window during simulation.
With this new feature, you can measure the following:
l Lengths and distances by snapping to an edge or corner.
l Multiple lengths and distances by snapping to an edge or corner.
l Depths and clearances from a surface.
l A radius with radius snapping.
l The radius and depth of a hole using hole circle edge snapping.
l Center-to-center distances between holes using hole circle center snapping.
l Edge angles using edge snapping.
What's New in Mastercam 2022—Simulation Enhancements
140
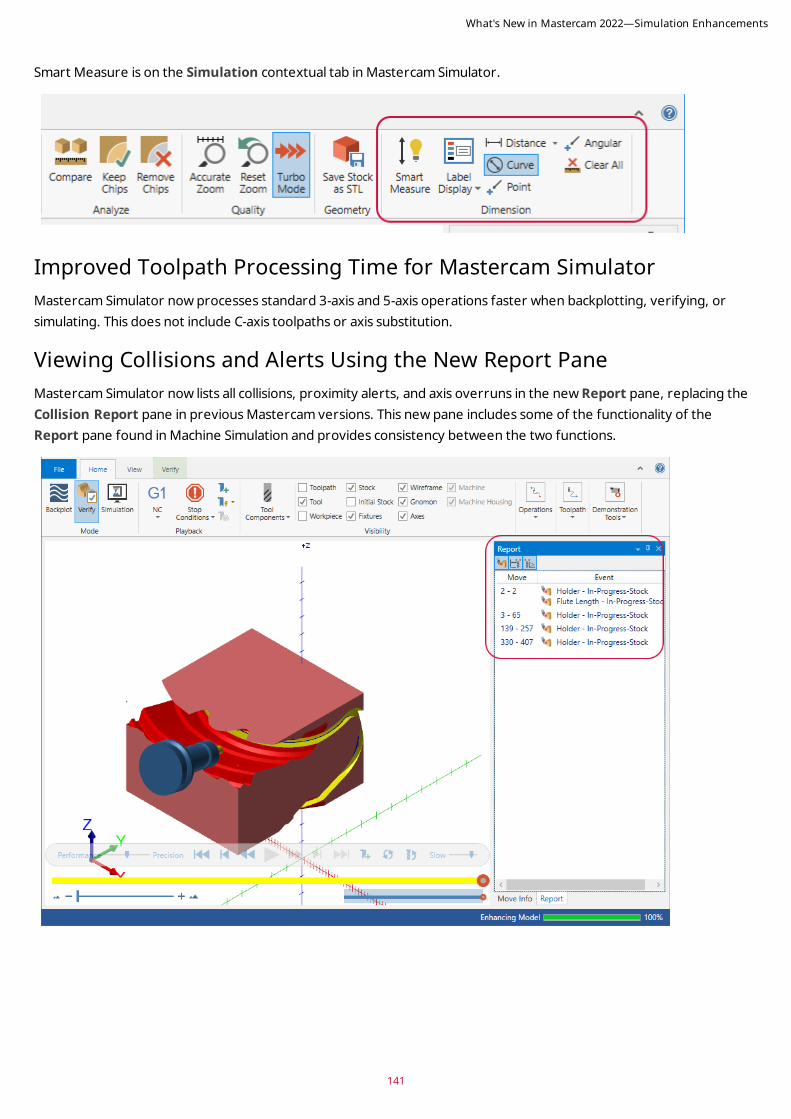
141
Smart Measure is on the Simulation contextual tab in Mastercam Simulator.
Improved Toolpath Processing Time for Mastercam SimulatorMastercam Simulator now processes standard 3-axis and 5-axis operations faster when backplotting, verifying, or simulating. This does not include C-axis toolpaths or axis substitution.
Viewing Collisions and Alerts Using the New Report PaneMastercam Simulator now lists all collisions, proximity alerts, and axis overruns in the new Report pane, replacing the Collision Report pane in previous Mastercam versions. This new pane includes some of the functionality of the Report pane found in Machine Simulation and provides consistency between the two functions.
What's New in Mastercam 2022—Simulation Enhancements
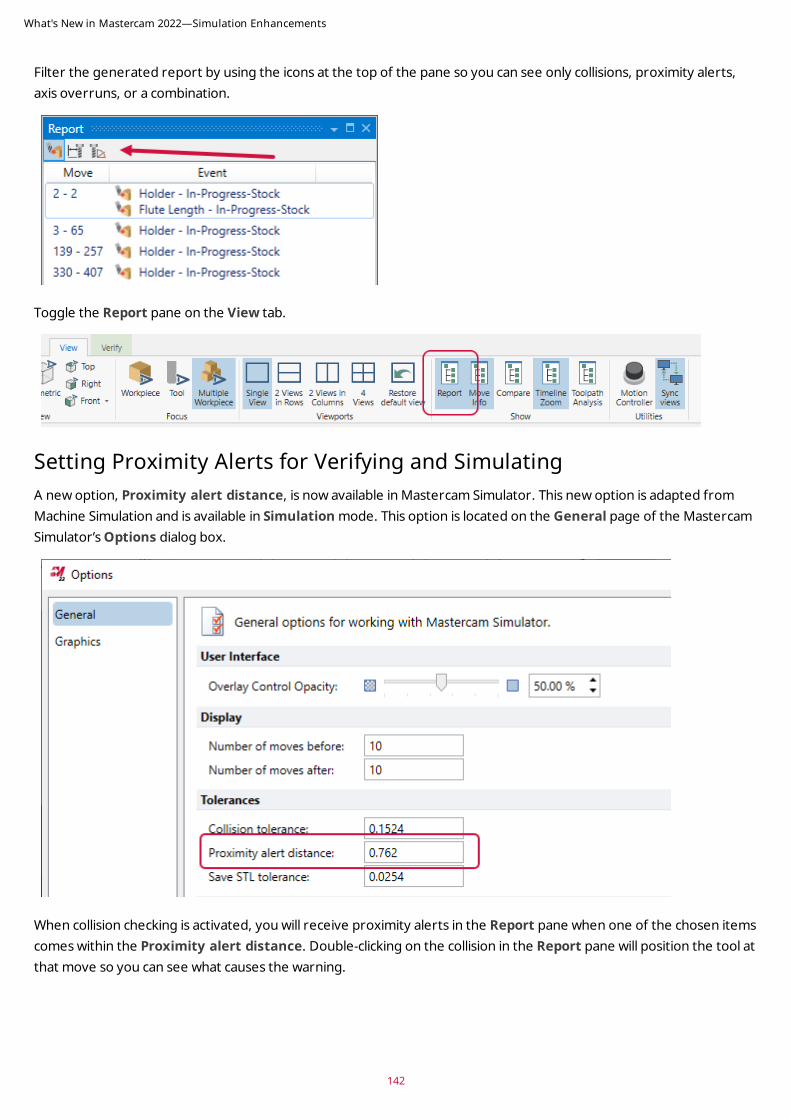
Filter the generated report by using the icons at the top of the pane so you can see only collisions, proximity alerts, axis overruns, or a combination.
Toggle the Report pane on the View tab.
Setting Proximity Alerts for Verifying and Simulating A new option, Proximity alert distance, is now available in Mastercam Simulator. This new option is adapted from Machine Simulation and is available in Simulation mode. This option is located on the General page of the Mastercam Simulator’s Options dialog box.
When collision checking is activated, you will receive proximity alerts in the Report pane when one of the chosen items comes within the Proximity alert distance. Double-clicking on the collision in the Report pane will position the tool at that move so you can see what causes the warning.
What's New in Mastercam 2022—Simulation Enhancements
142
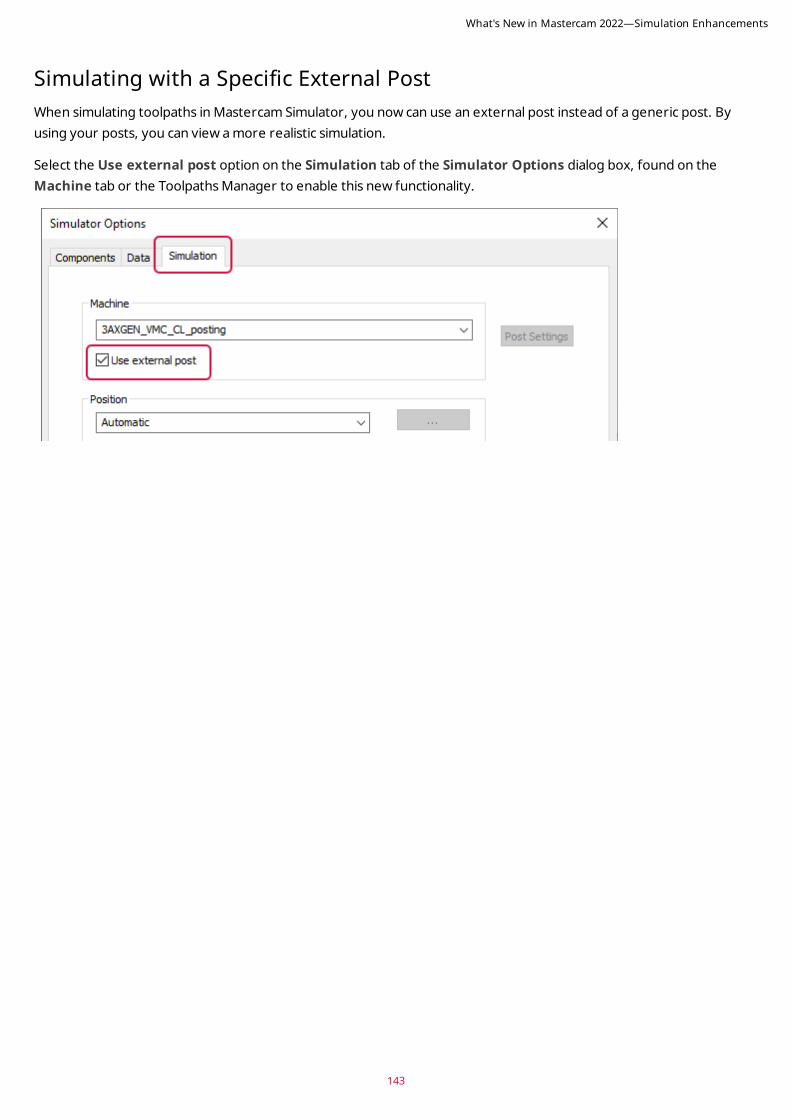
143
Simulating with a Specific External Post When simulating toolpaths in Mastercam Simulator, you now can use an external post instead of a generic post. By using your posts, you can view a more realistic simulation.
Select the Use external post option on the Simulation tab of the Simulator Options dialog box, found on the Machine tab or the Toolpaths Manager to enable this new functionality.
What's New in Mastercam 2022—Simulation Enhancements

TOOLPATH UTILITY ENHANCEMENTS
Listed below are major enhancements to toolpath utilities, including the Toolpaths Manager and stock model.
Viewing Your Tool Assembly During Part ProgrammingMastercam 2022 features the Show Tool function, which displays a mill, router, or lathe tool assembly with the tool tip attached to your mouse cursor. By moving your cursor around, you can quickly see if your tool or holder might cause a problem while simultaneously modeling or programming your part. You have control over displaying a tool, holder, or both, as well as controlling the shading and opacity.
Multiple functions have been enhanced to show the display tool, including Mastercam 2022's new Modify Vector (refer to "Enhancements to Support Multiaxis Machining" on page 125 for more information), allowing you to identify potential issues upfront while you edit. For functions that support a display gnomon or green arrow, such as Create/Edit Plane, the tool detaches from your cursor and aligns with the blue Z axis of the gnomon or the green normal arrow. Streamline your workflow by identifying potential holder collisions while creating a new plane for tilt machining.
What's New in Mastercam 2022—Toolpath Utility Enhancements
144
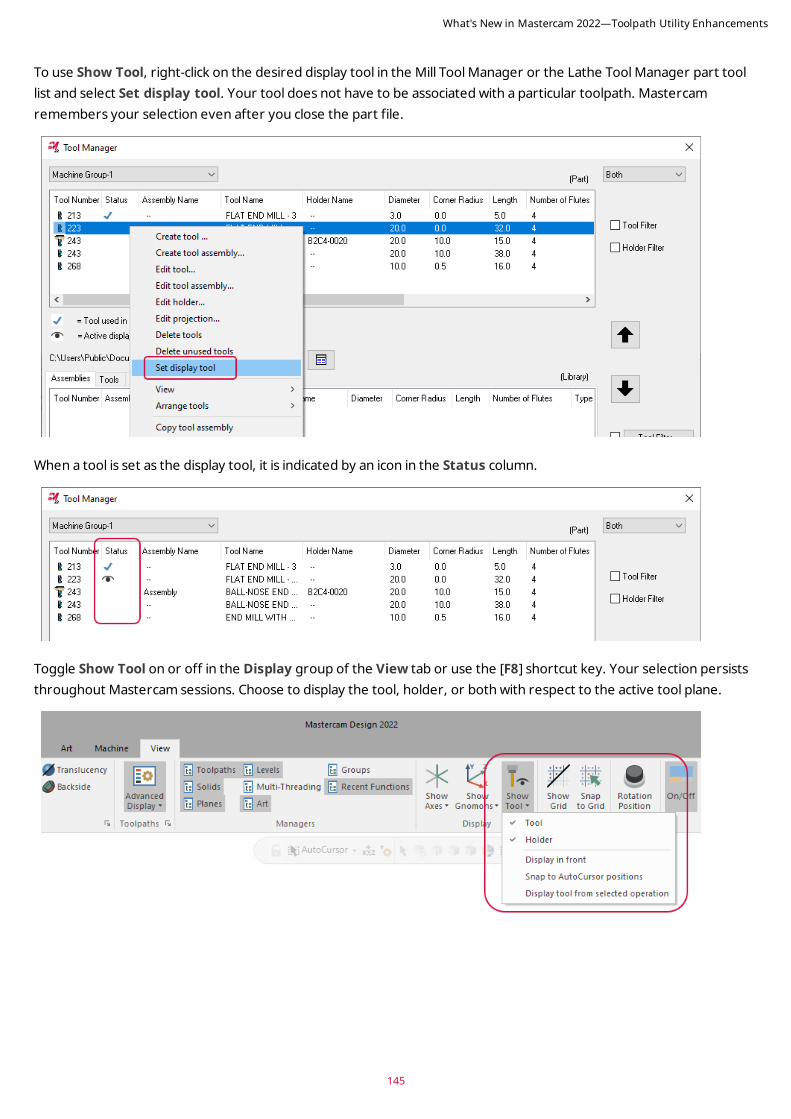
145
To use Show Tool, right-click on the desired display tool in the Mill Tool Manager or the Lathe Tool Manager part tool list and select Set display tool. Your tool does not have to be associated with a particular toolpath. Mastercam remembers your selection even after you close the part file.
When a tool is set as the display tool, it is indicated by an icon in the Status column.
Toggle Show Tool on or off in the Display group of the View tab or use the [F8] shortcut key. Your selection persists throughout Mastercam sessions. Choose to display the tool, holder, or both with respect to the active tool plane.
What's New in Mastercam 2022—Toolpath Utility Enhancements
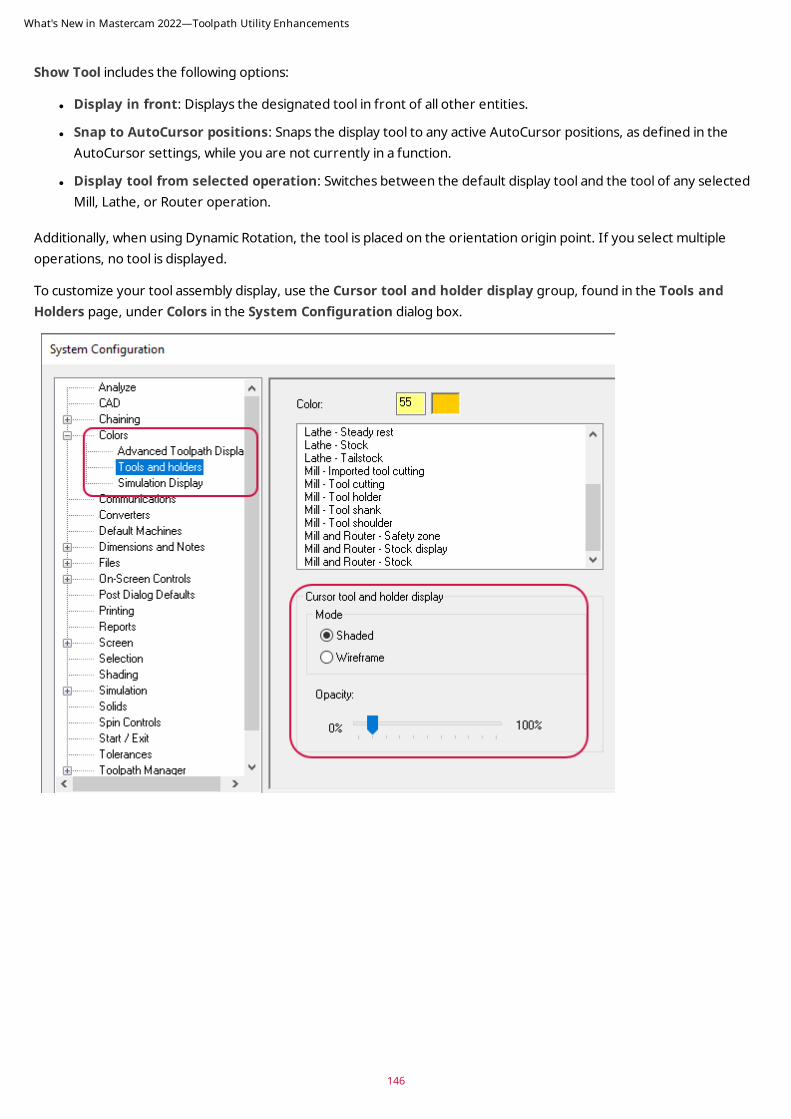
Show Tool includes the following options:
l Display in front: Displays the designated tool in front of all other entities.
l Snap to AutoCursor positions: Snaps the display tool to any active AutoCursor positions, as defined in the AutoCursor settings, while you are not currently in a function.
l Display tool from selected operation: Switches between the default display tool and the tool of any selected Mill, Lathe, or Router operation.
Additionally, when using Dynamic Rotation, the tool is placed on the orientation origin point. If you select multiple operations, no tool is displayed.
To customize your tool assembly display, use the Cursor tool and holder display group, found in the Tools and Holders page, under Colors in the System Configuration dialog box.
What's New in Mastercam 2022—Toolpath Utility Enhancements
146
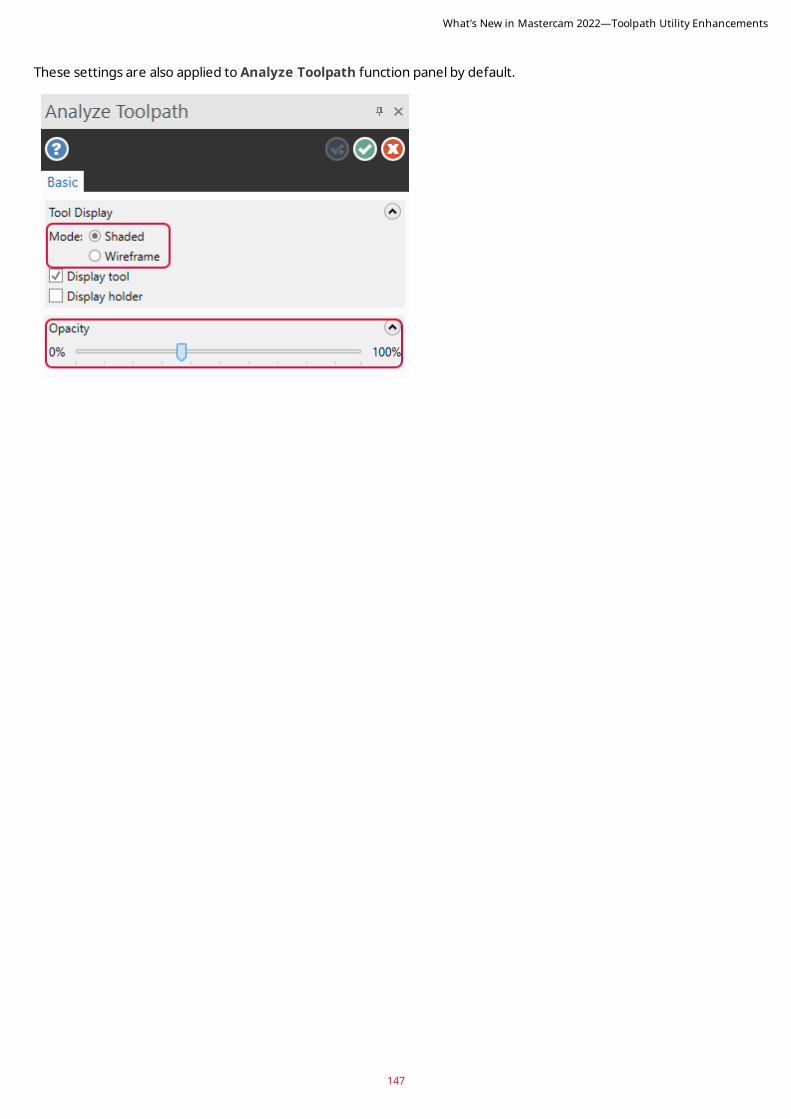
147
These settings are also applied to Analyze Toolpath function panel by default.
What's New in Mastercam 2022—Toolpath Utility Enhancements
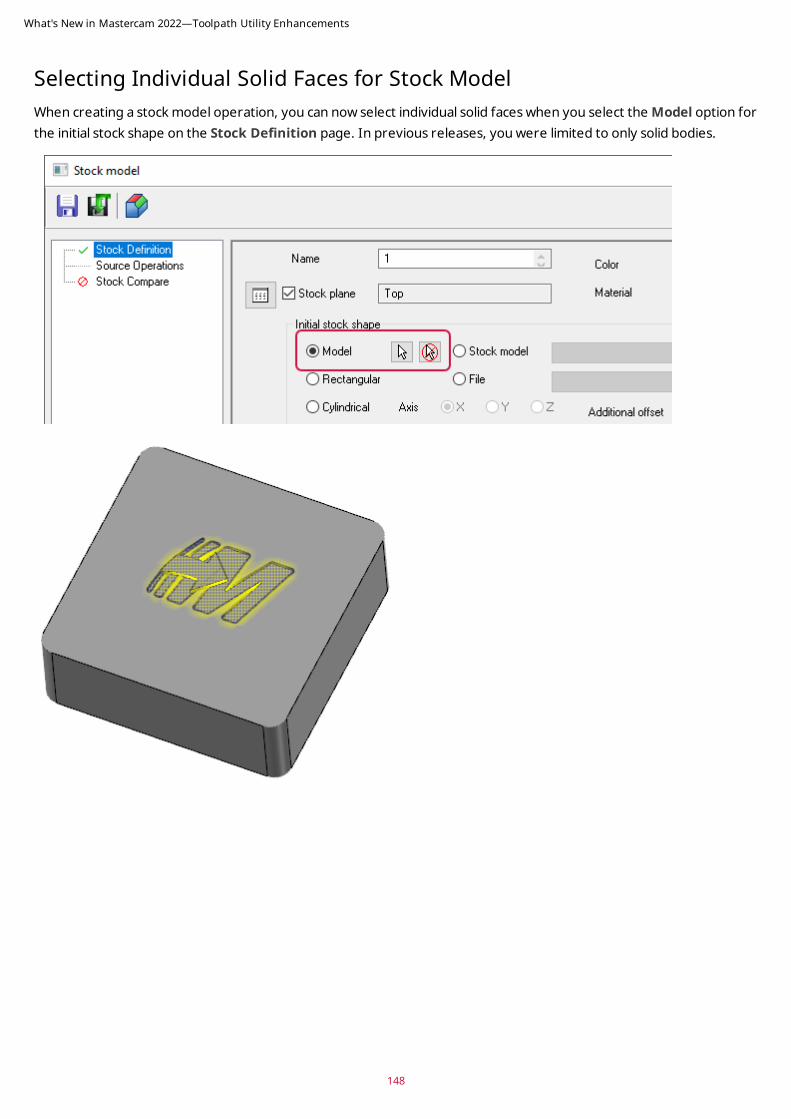
Selecting Individual Solid Faces for Stock ModelWhen creating a stock model operation, you can now select individual solid faces when you select the Model option for the initial stock shape on the Stock Definition page. In previous releases, you were limited to only solid bodies.
What's New in Mastercam 2022—Toolpath Utility Enhancements
148
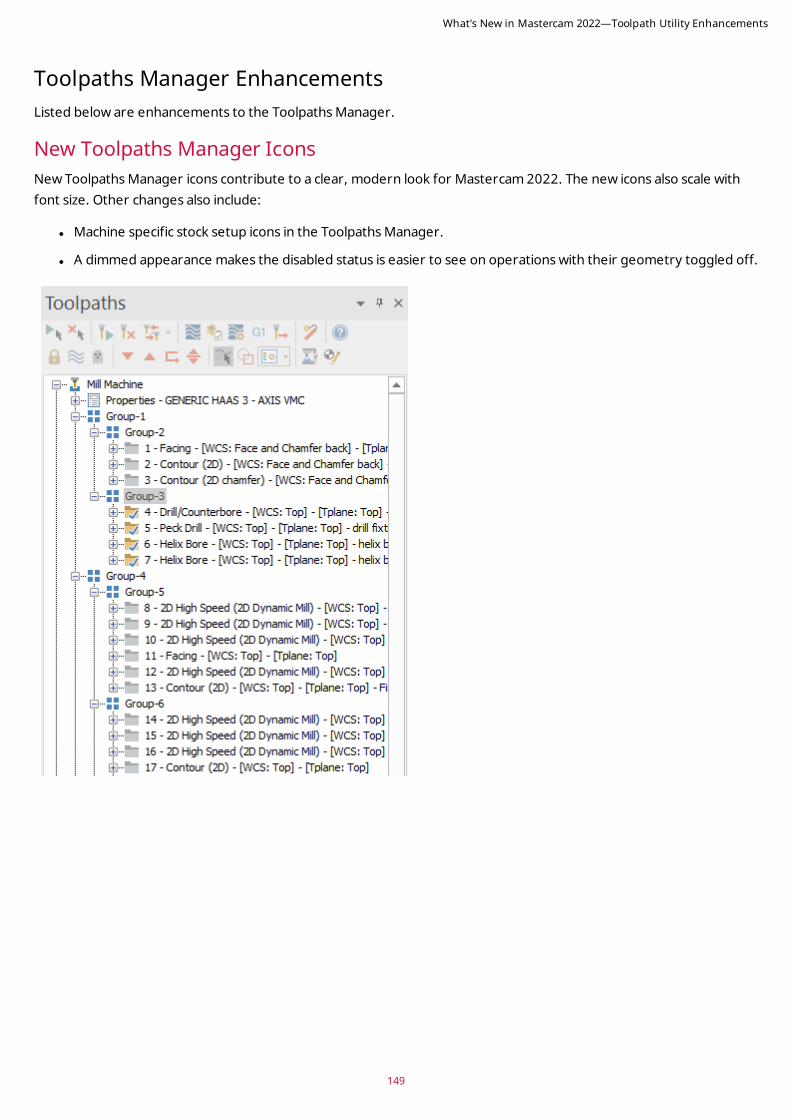
149
Toolpaths Manager EnhancementsListed below are enhancements to the Toolpaths Manager.
New Toolpaths Manager IconsNew Toolpaths Manager icons contribute to a clear, modern look for Mastercam 2022. The new icons also scale with font size. Other changes also include:
l Machine specific stock setup icons in the Toolpaths Manager.
l A dimmed appearance makes the disabled status is easier to see on operations with their geometry toggled off.
What's New in Mastercam 2022—Toolpath Utility Enhancements
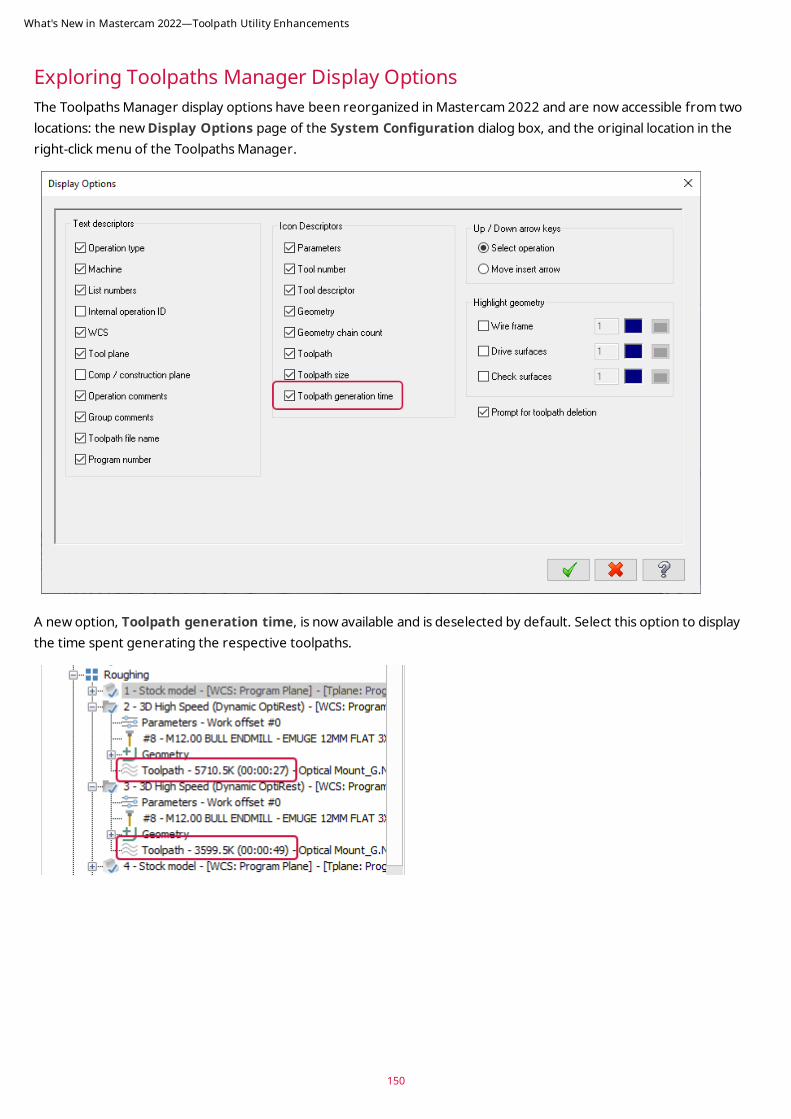
Exploring Toolpaths Manager Display OptionsThe Toolpaths Manager display options have been reorganized in Mastercam 2022 and are now accessible from two locations: the new Display Options page of the System Configuration dialog box, and the original location in the right-click menu of the Toolpaths Manager.
A new option, Toolpath generation time, is now available and is deselected by default. Select this option to display the time spent generating the respective toolpaths.
What's New in Mastercam 2022—Toolpath Utility Enhancements
150
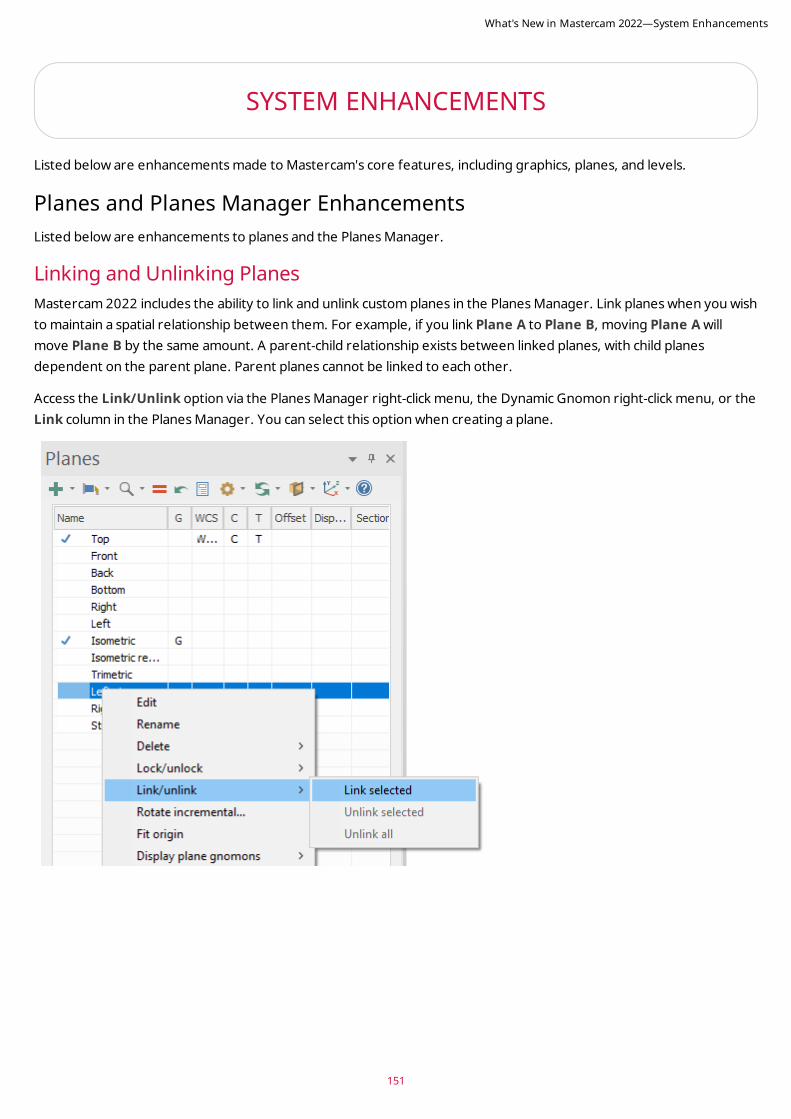
151
SYSTEM ENHANCEMENTS
Listed below are enhancements made to Mastercam's core features, including graphics, planes, and levels.
Planes and Planes Manager Enhancements Listed below are enhancements to planes and the Planes Manager.
Linking and Unlinking PlanesMastercam 2022 includes the ability to link and unlink custom planes in the Planes Manager. Link planes when you wish to maintain a spatial relationship between them. For example, if you link Plane A to Plane B, moving Plane A will move Plane B by the same amount. A parent-child relationship exists between linked planes, with child planes dependent on the parent plane. Parent planes cannot be linked to each other.
Access the Link/Unlink option via the Planes Manager right-click menu, the Dynamic Gnomon right-click menu, or the Link column in the Planes Manager. You can select this option when creating a plane.
What's New in Mastercam 2022—System Enhancements
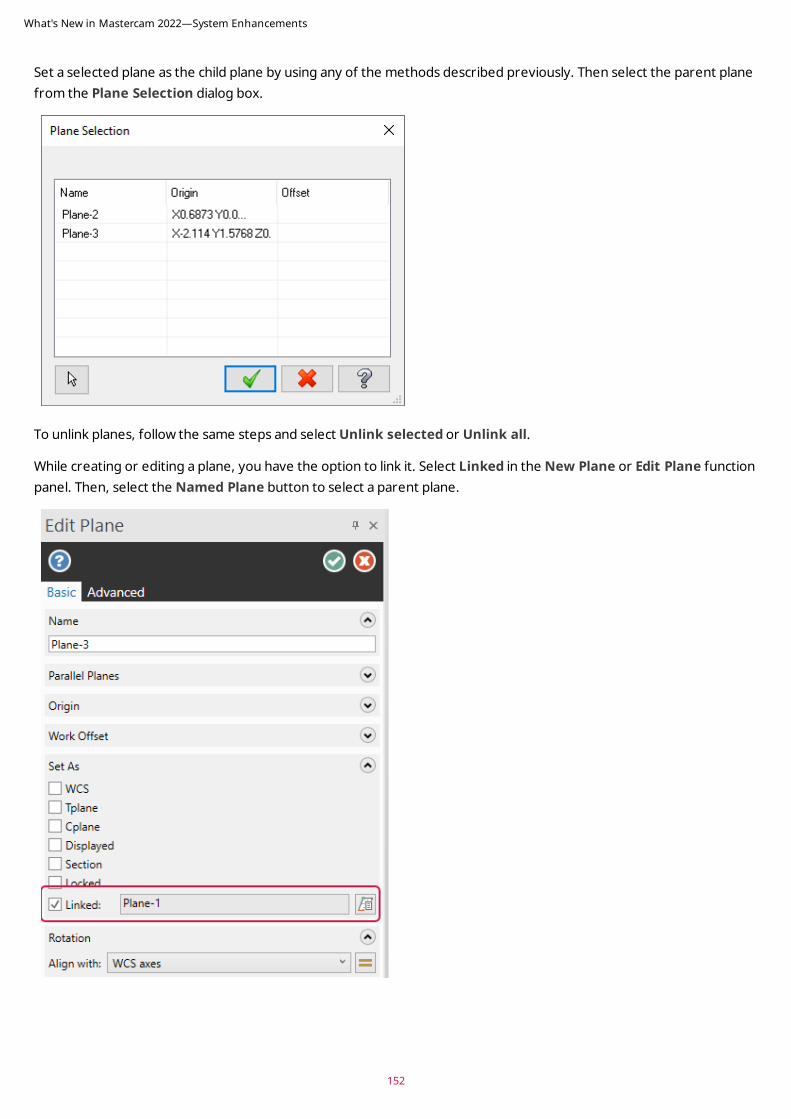
Set a selected plane as the child plane by using any of the methods described previously. Then select the parent plane from the Plane Selection dialog box.
To unlink planes, follow the same steps and select Unlink selected or Unlink all.
While creating or editing a plane, you have the option to link it. Select Linked in the New Plane or Edit Plane function panel. Then, select the Named Plane button to select a parent plane.
What's New in Mastercam 2022—System Enhancements
152
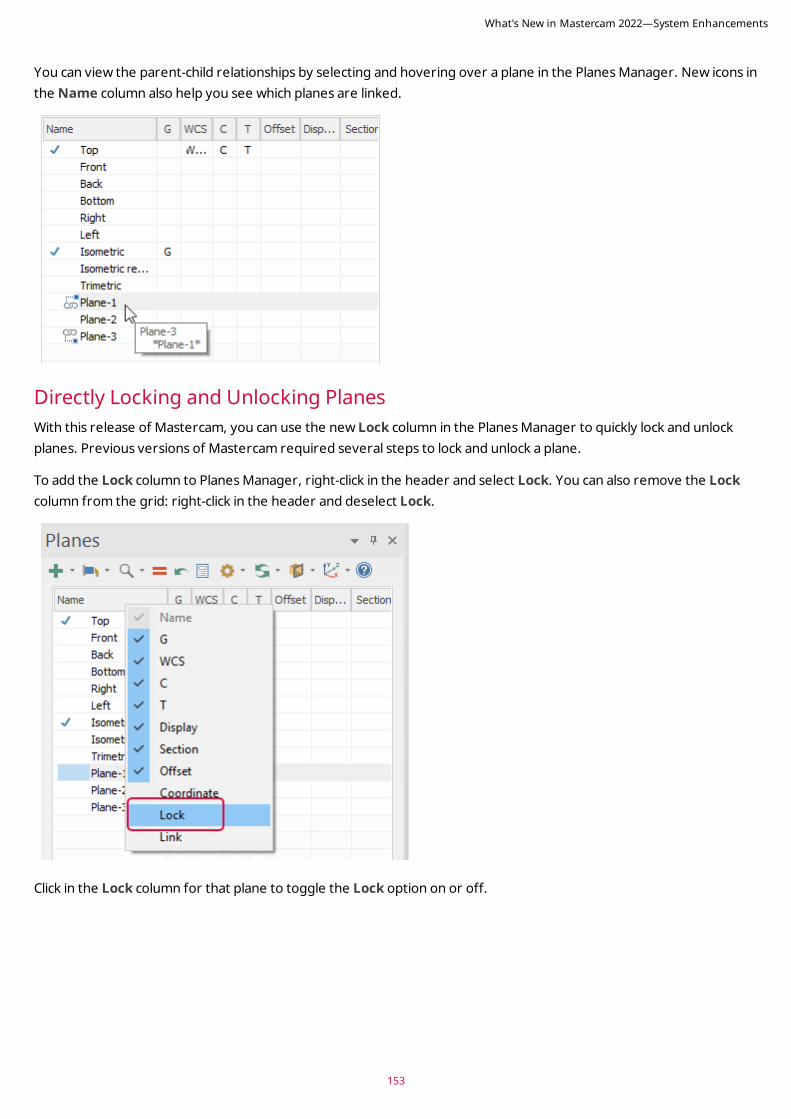
153
You can view the parent-child relationships by selecting and hovering over a plane in the Planes Manager. New icons in the Name column also help you see which planes are linked.
Directly Locking and Unlocking PlanesWith this release of Mastercam, you can use the new Lock column in the Planes Manager to quickly lock and unlock planes. Previous versions of Mastercam required several steps to lock and unlock a plane.
To add the Lock column to Planes Manager, right-click in the header and select Lock. You can also remove the Lock column from the grid: right-click in the header and deselect Lock.
Click in the Lock column for that plane to toggle the Lock option on or off.
What's New in Mastercam 2022—System Enhancements
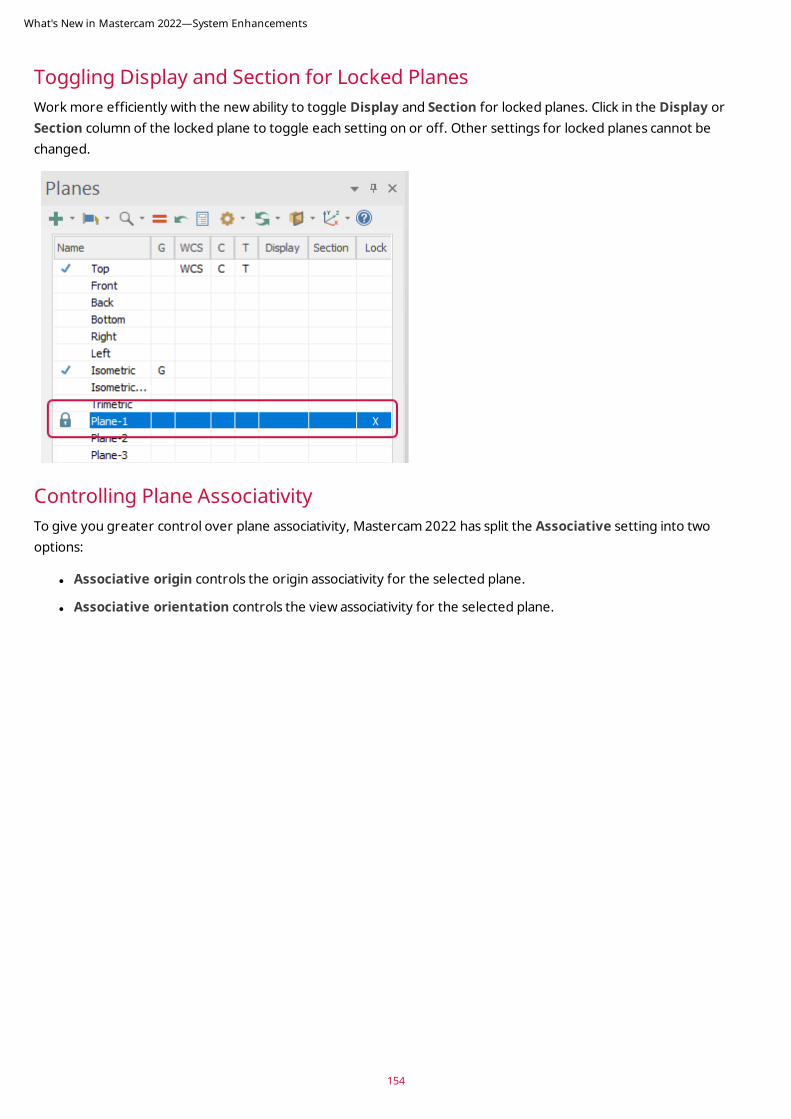
Toggling Display and Section for Locked PlanesWork more efficiently with the new ability to toggle Display and Section for locked planes. Click in the Display or Section column of the locked plane to toggle each setting on or off. Other settings for locked planes cannot be changed.
Controlling Plane Associativity To give you greater control over plane associativity, Mastercam 2022 has split the Associative setting into two options:
l Associative origin controls the origin associativity for the selected plane.
l Associative orientation controls the view associativity for the selected plane.
What's New in Mastercam 2022—System Enhancements
154
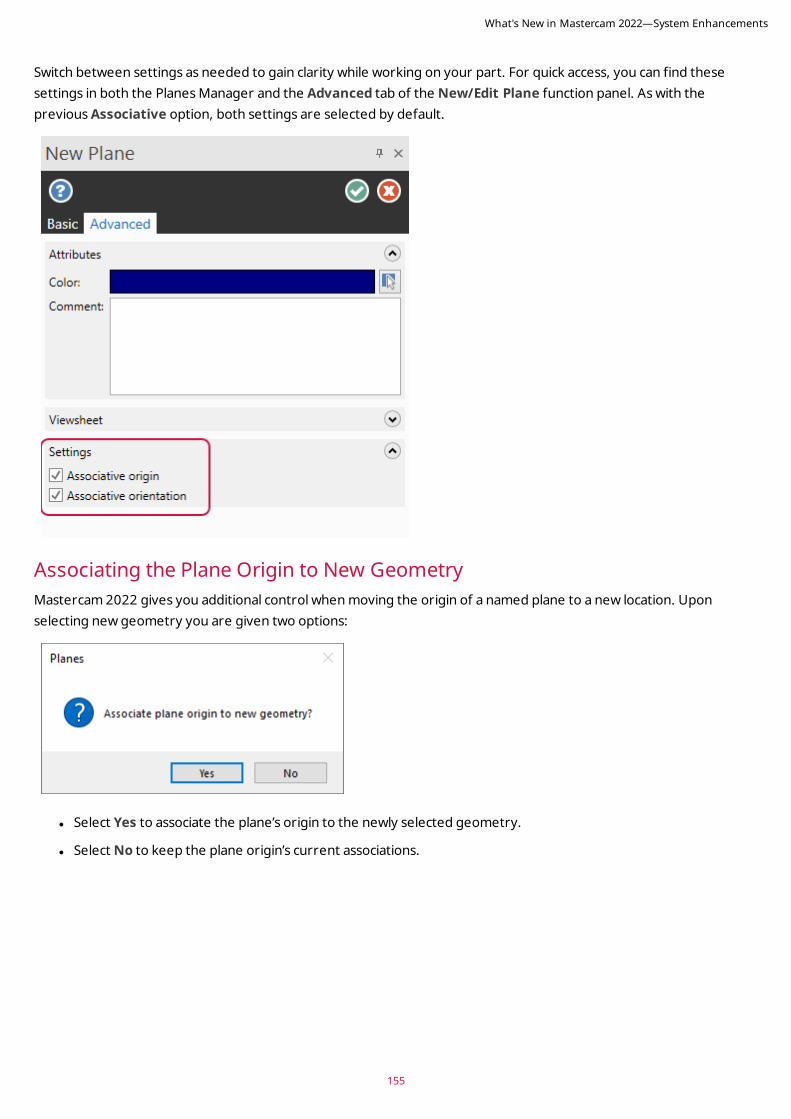
155
Switch between settings as needed to gain clarity while working on your part. For quick access, you can find these settings in both the Planes Manager and the Advanced tab of the New/Edit Plane function panel. As with the previous Associative option, both settings are selected by default.
Associating the Plane Origin to New GeometryMastercam 2022 gives you additional control when moving the origin of a named plane to a new location. Upon selecting new geometry you are given two options:
l Select Yes to associate the plane’s origin to the newly selected geometry.
l Select No to keep the plane origin’s current associations.
What's New in Mastercam 2022—System Enhancements
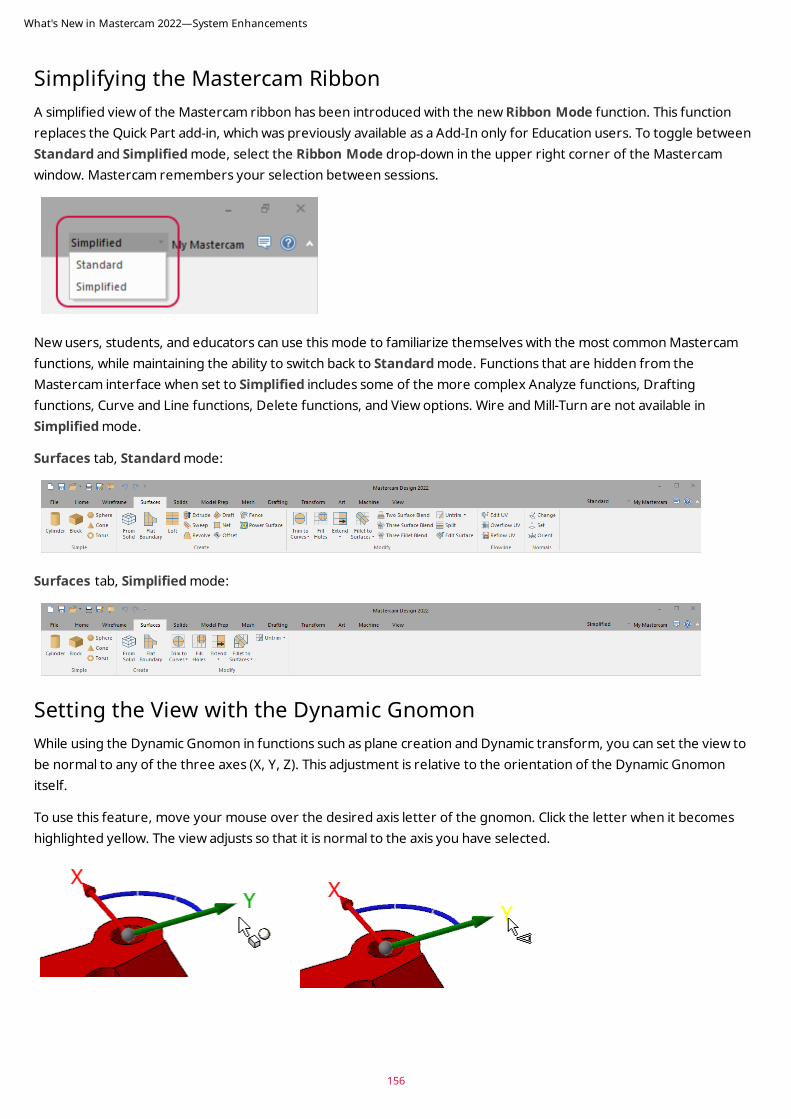
Simplifying the Mastercam RibbonA simplified view of the Mastercam ribbon has been introduced with the new Ribbon Mode function. This function replaces the Quick Part add-in, which was previously available as a Add-In only for Education users. To toggle between Standard and Simplified mode, select the Ribbon Mode drop-down in the upper right corner of the Mastercam window. Mastercam remembers your selection between sessions.
New users, students, and educators can use this mode to familiarize themselves with the most common Mastercam functions, while maintaining the ability to switch back to Standard mode. Functions that are hidden from the Mastercam interface when set to Simplified includes some of the more complex Analyze functions, Drafting functions, Curve and Line functions, Delete functions, and View options. Wire and Mill-Turn are not available in Simplified mode.
Surfaces tab, Standard mode:
Surfaces tab, Simplified mode:
Setting the View with the Dynamic GnomonWhile using the Dynamic Gnomon in functions such as plane creation and Dynamic transform, you can set the view to be normal to any of the three axes (X, Y, Z). This adjustment is relative to the orientation of the Dynamic Gnomon itself.
To use this feature, move your mouse over the desired axis letter of the gnomon. Click the letter when it becomes highlighted yellow. The view adjusts so that it is normal to the axis you have selected.
What's New in Mastercam 2022—System Enhancements
156
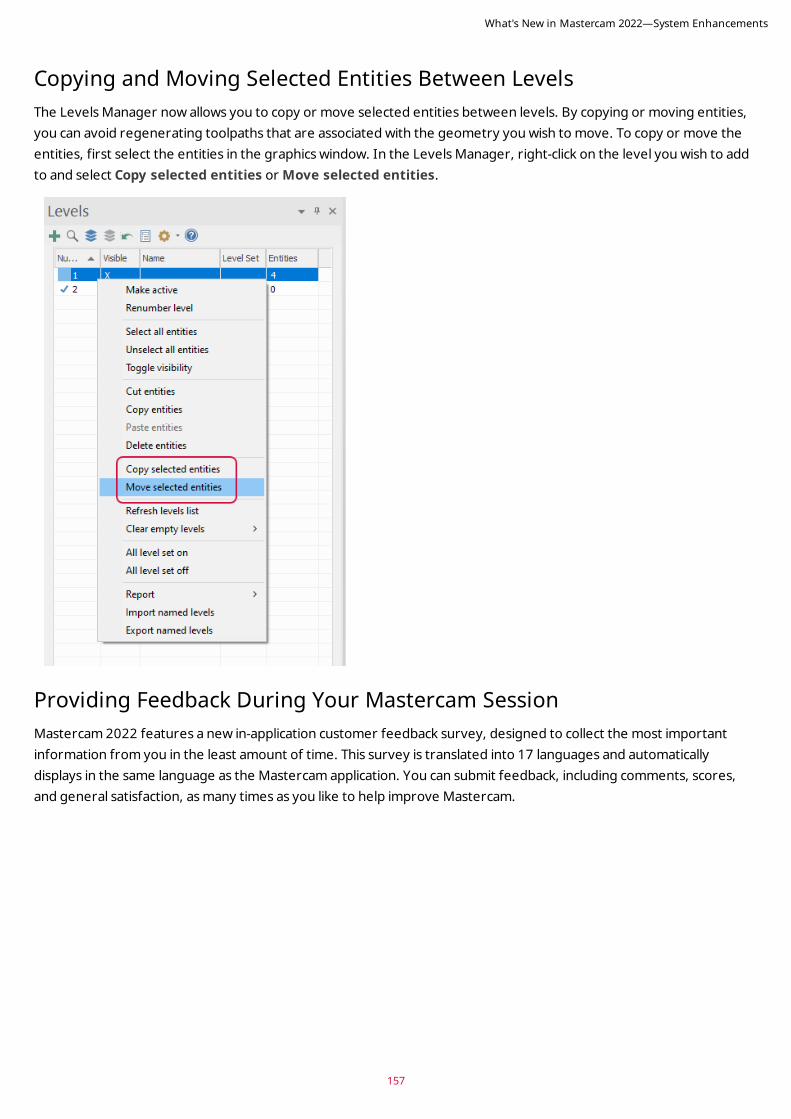
157
Copying and Moving Selected Entities Between LevelsThe Levels Manager now allows you to copy or move selected entities between levels. By copying or moving entities, you can avoid regenerating toolpaths that are associated with the geometry you wish to move. To copy or move the entities, first select the entities in the graphics window. In the Levels Manager, right-click on the level you wish to add to and select Copy selected entities or Move selected entities.
Providing Feedback During Your Mastercam SessionMastercam 2022 features a new in-application customer feedback survey, designed to collect the most important information from you in the least amount of time. This survey is translated into 17 languages and automatically displays in the same language as the Mastercam application. You can submit feedback, including comments, scores, and general satisfaction, as many times as you like to help improve Mastercam.
What's New in Mastercam 2022—System Enhancements
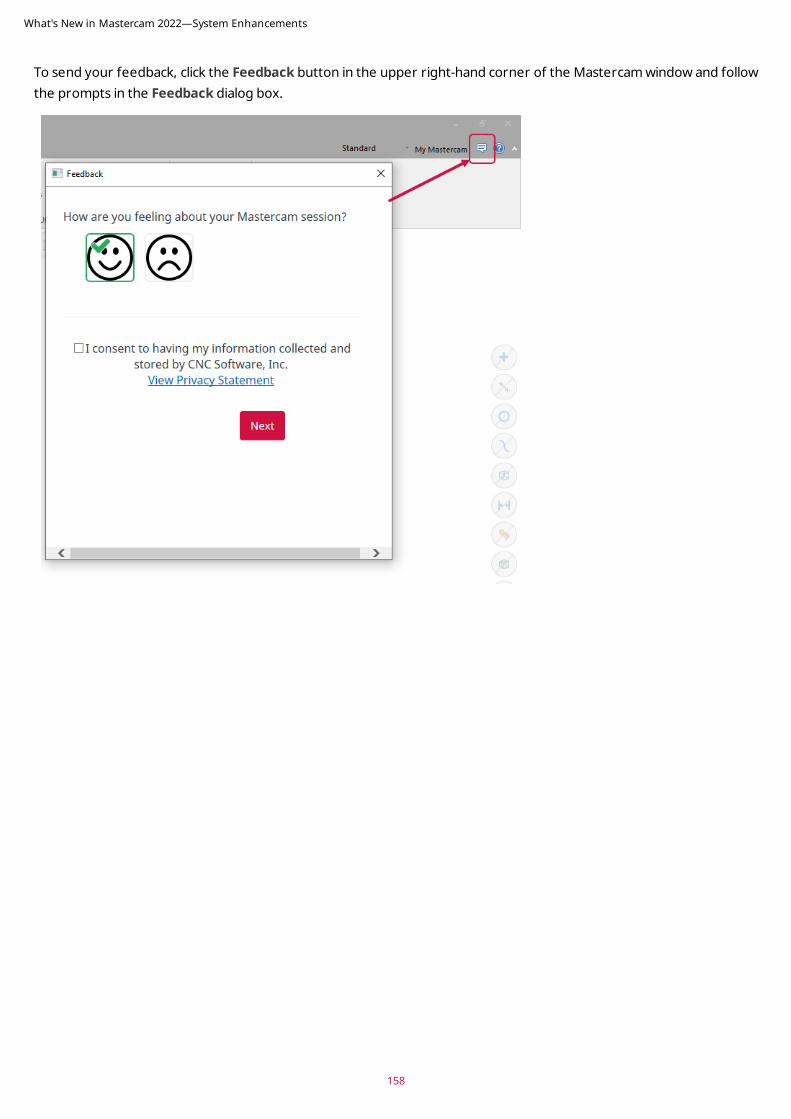
To send your feedback, click the Feedback button in the upper right-hand corner of the Mastercam window and follow the prompts in the Feedback dialog box.
What's New in Mastercam 2022—System Enhancements
158
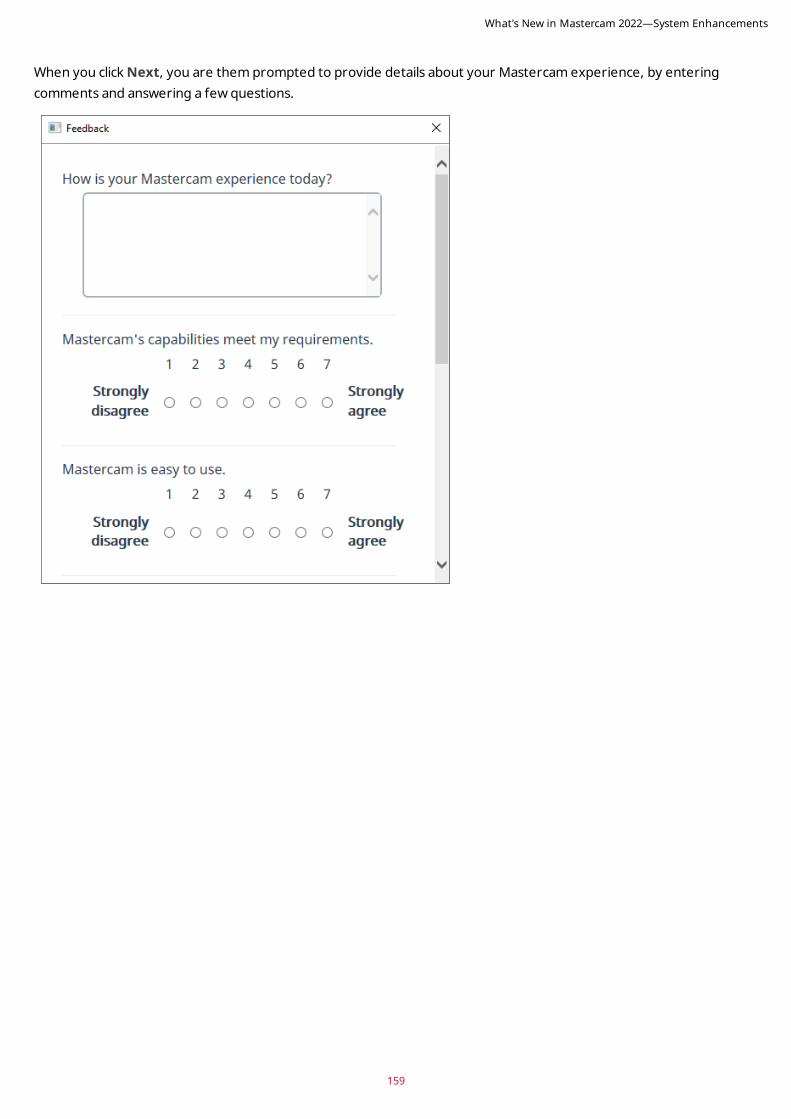
159
When you click Next, you are them prompted to provide details about your Mastercam experience, by entering comments and answering a few questions.
What's New in Mastercam 2022—System Enhancements
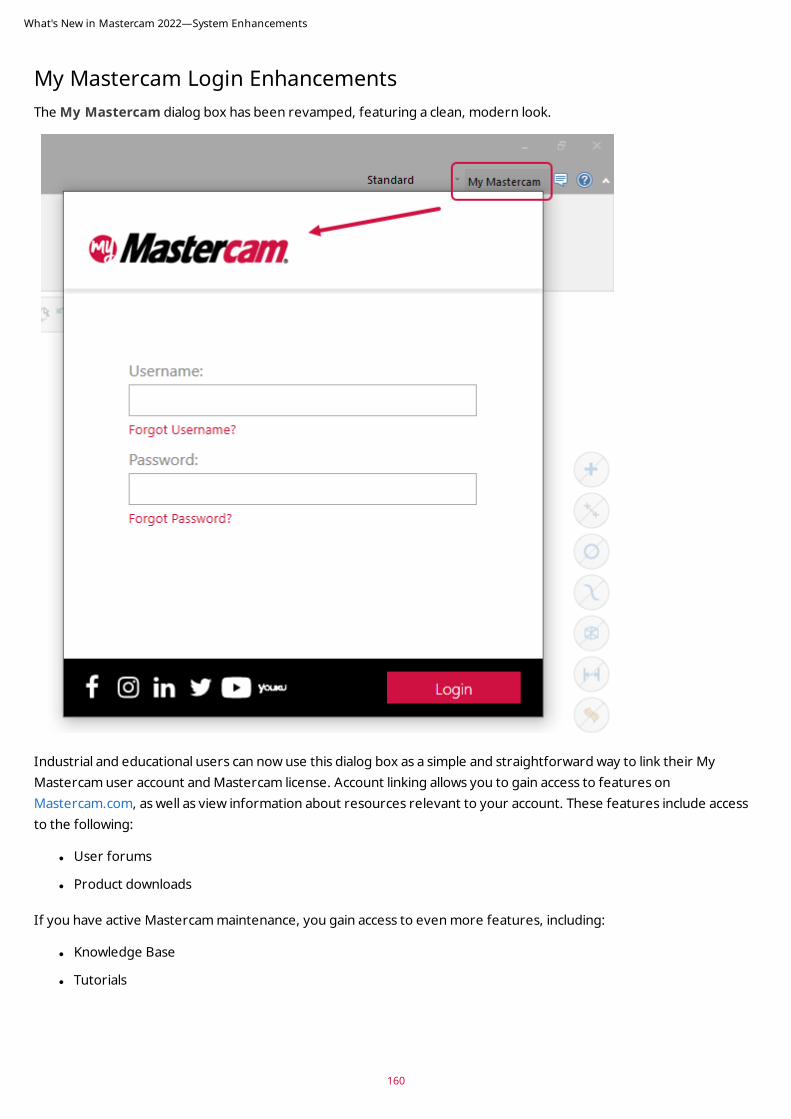
My Mastercam Login Enhancements The My Mastercam dialog box has been revamped, featuring a clean, modern look.
Industrial and educational users can now use this dialog box as a simple and straightforward way to link their My Mastercam user account and Mastercam license. Account linking allows you to gain access to features on Mastercam.com, as well as view information about resources relevant to your account. These features include access to the following:
l User forums
l Product downloads
If you have active Mastercam maintenance, you gain access to even more features, including:
l Knowledge Base
l Tutorials
What's New in Mastercam 2022—System Enhancements
160
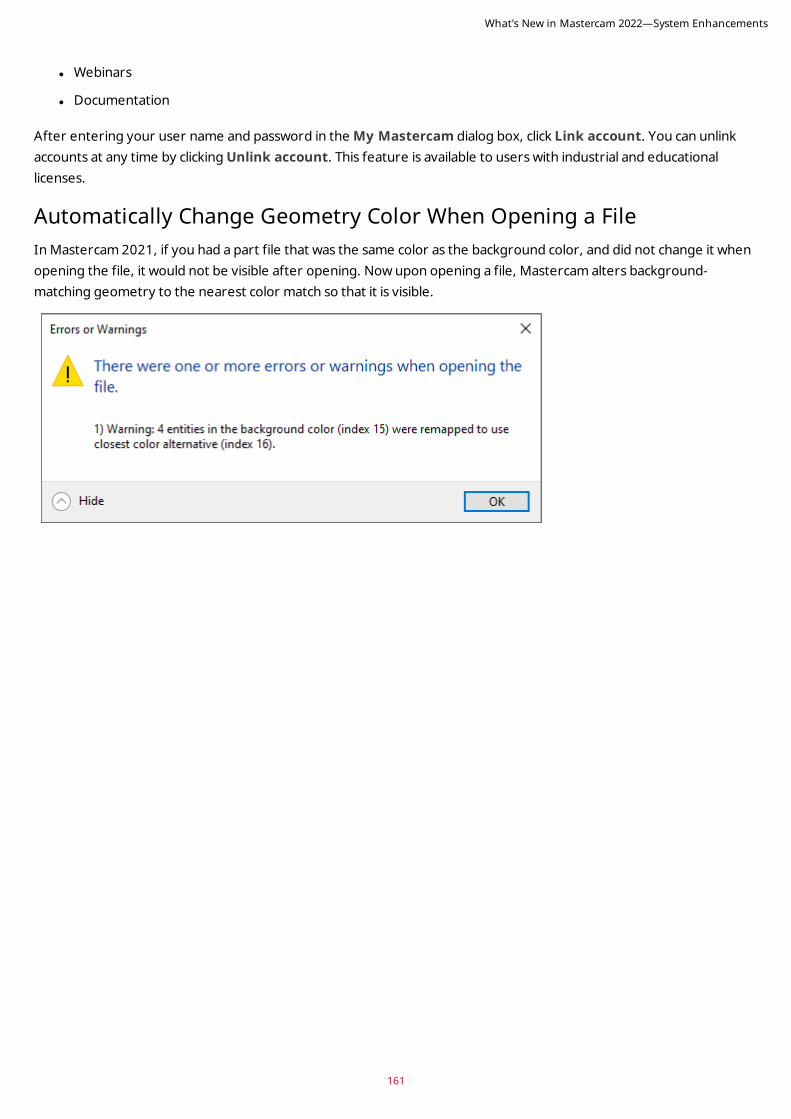
161
l Webinars
l Documentation
After entering your user name and password in the My Mastercam dialog box, click Link account. You can unlink accounts at any time by clicking Unlink account. This feature is available to users with industrial and educational licenses.
Automatically Change Geometry Color When Opening a FileIn Mastercam 2021, if you had a part file that was the same color as the background color, and did not change it when opening the file, it would not be visible after opening. Now upon opening a file, Mastercam alters background-matching geometry to the nearest color match so that it is visible.
What's New in Mastercam 2022—System Enhancements
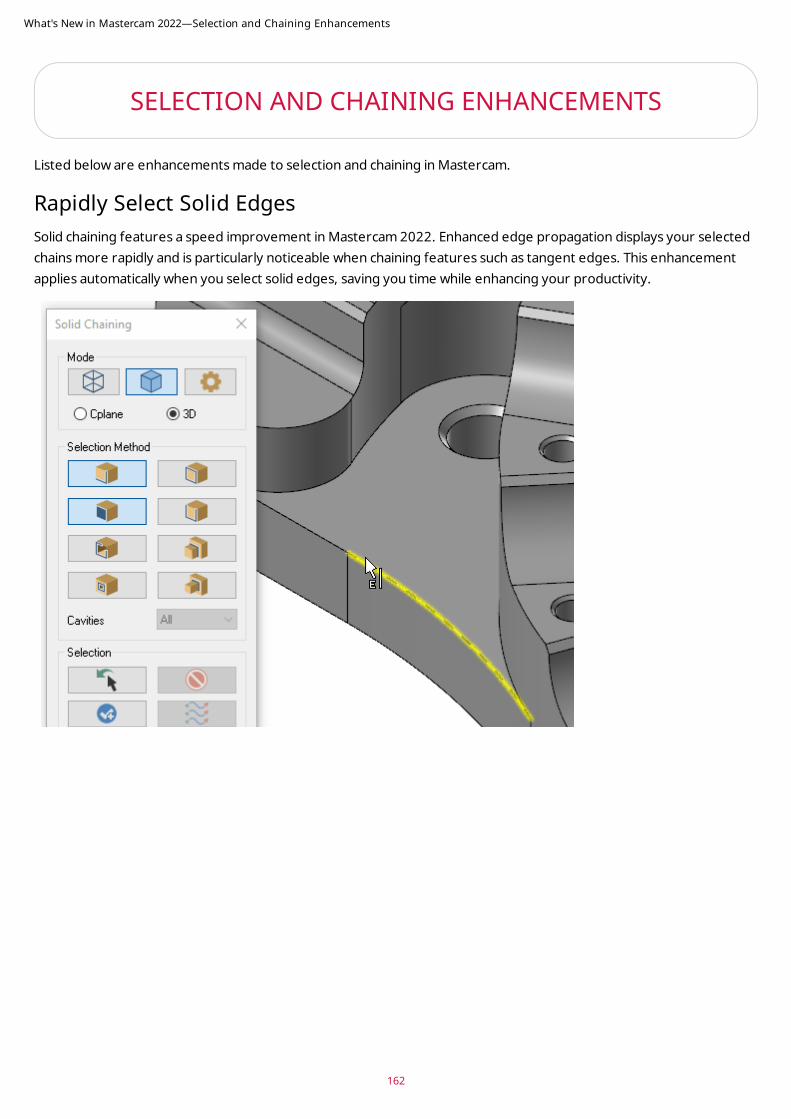
SELECTION AND CHAINING ENHANCEMENTS
Listed below are enhancements made to selection and chaining in Mastercam.
Rapidly Select Solid EdgesSolid chaining features a speed improvement in Mastercam 2022. Enhanced edge propagation displays your selected chains more rapidly and is particularly noticeable when chaining features such as tangent edges. This enhancement applies automatically when you select solid edges, saving you time while enhancing your productivity.
What's New in Mastercam 2022—Selection and Chaining Enhancements
162
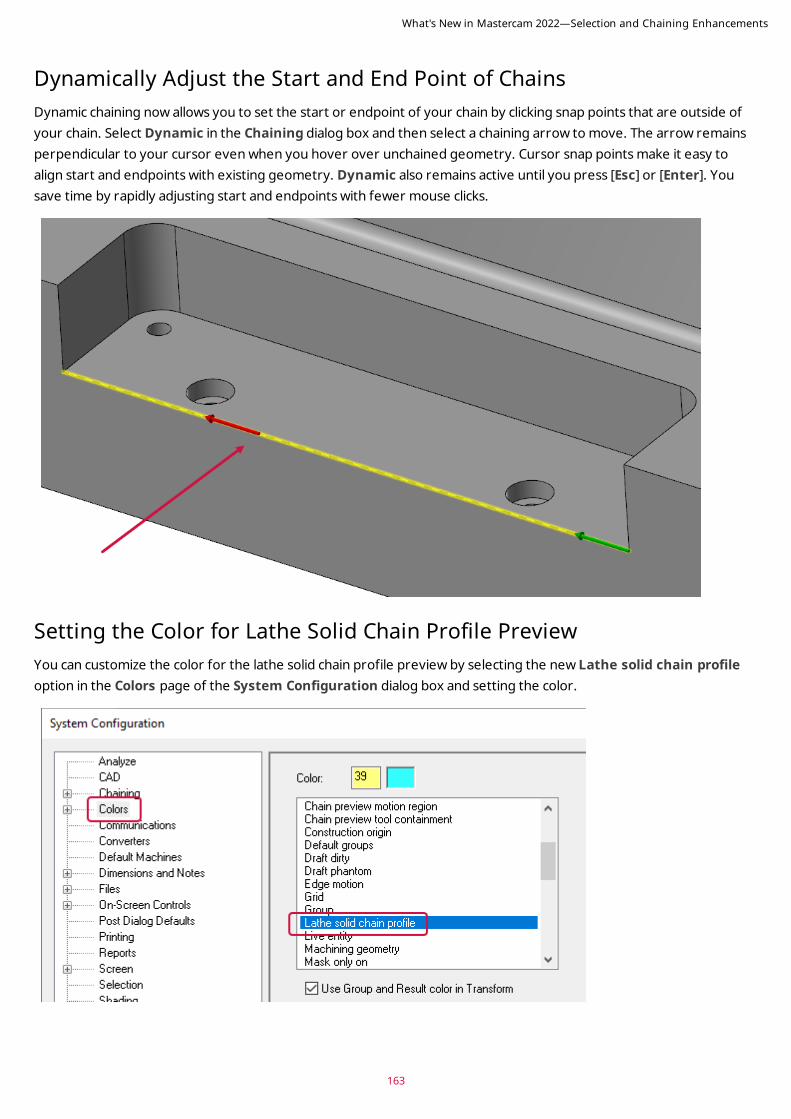
163
Dynamically Adjust the Start and End Point of ChainsDynamic chaining now allows you to set the start or endpoint of your chain by clicking snap points that are outside of your chain. Select Dynamic in the Chaining dialog box and then select a chaining arrow to move. The arrow remains perpendicular to your cursor even when you hover over unchained geometry. Cursor snap points make it easy to align start and endpoints with existing geometry. Dynamic also remains active until you press [Esc] or [Enter]. You save time by rapidly adjusting start and endpoints with fewer mouse clicks.
Setting the Color for Lathe Solid Chain Profile Preview You can customize the color for the lathe solid chain profile preview by selecting the new Lathe solid chain profile option in the Colors page of the System Configuration dialog box and setting the color.
What's New in Mastercam 2022—Selection and Chaining Enhancements
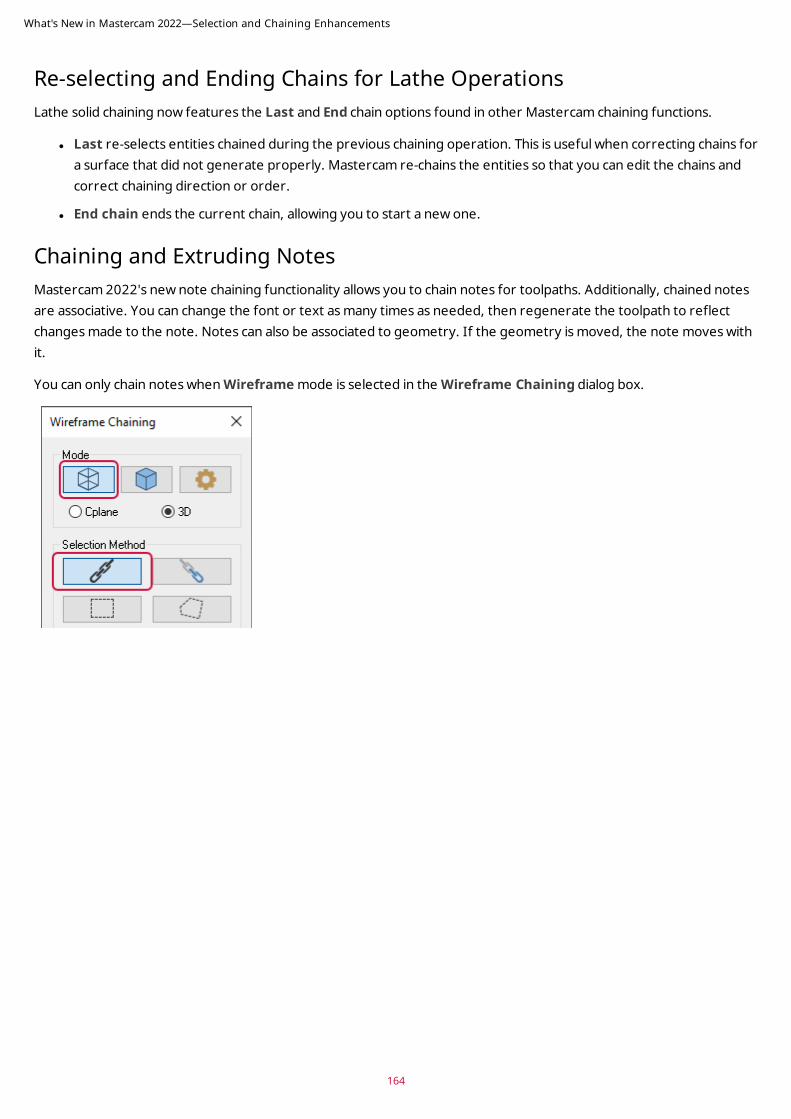
Re-selecting and Ending Chains for Lathe OperationsLathe solid chaining now features the Last and End chain options found in other Mastercam chaining functions.
l Last re-selects entities chained during the previous chaining operation. This is useful when correcting chains for a surface that did not generate properly. Mastercam re-chains the entities so that you can edit the chains and correct chaining direction or order.
l End chain ends the current chain, allowing you to start a new one.
Chaining and Extruding Notes Mastercam 2022's new note chaining functionality allows you to chain notes for toolpaths. Additionally, chained notes are associative. You can change the font or text as many times as needed, then regenerate the toolpath to reflect changes made to the note. Notes can also be associated to geometry. If the geometry is moved, the note moves with it.
You can only chain notes when Wireframe mode is selected in the Wireframe Chaining dialog box.
What's New in Mastercam 2022—Selection and Chaining Enhancements
164
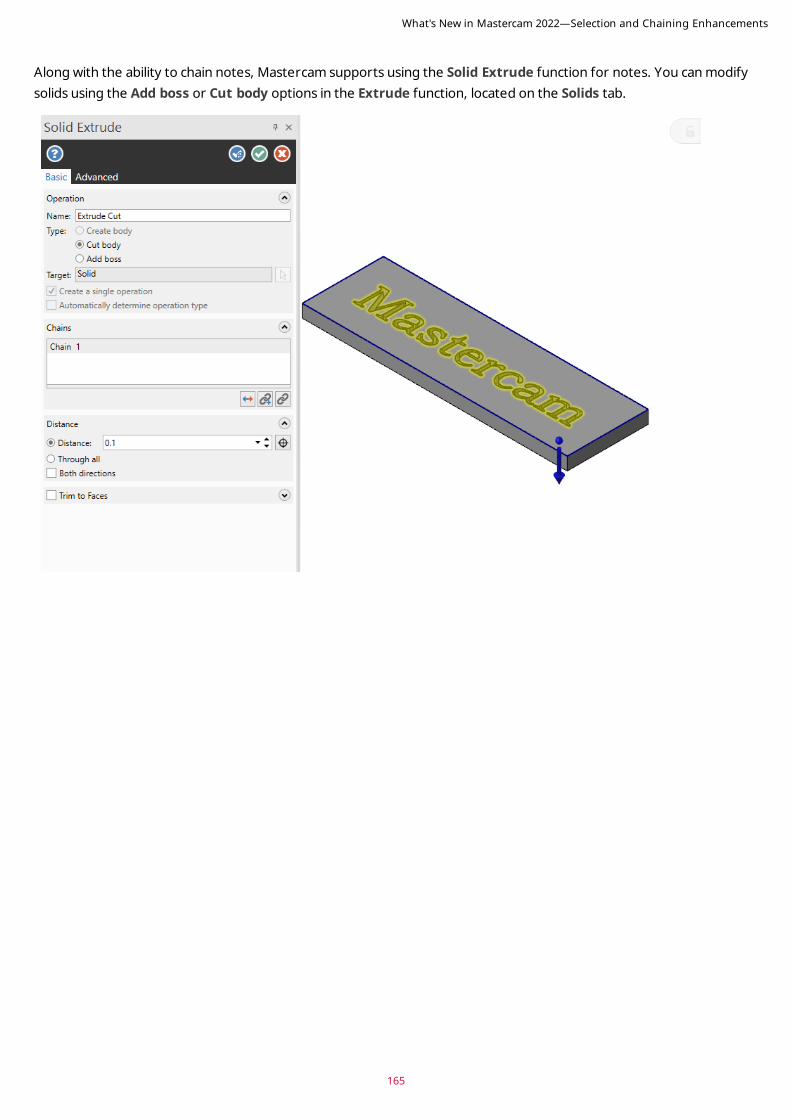
165
Along with the ability to chain notes, Mastercam supports using the Solid Extrude function for notes. You can modify solids using the Add boss or Cut body options in the Extrude function, located on the Solids tab.
What's New in Mastercam 2022—Selection and Chaining Enhancements
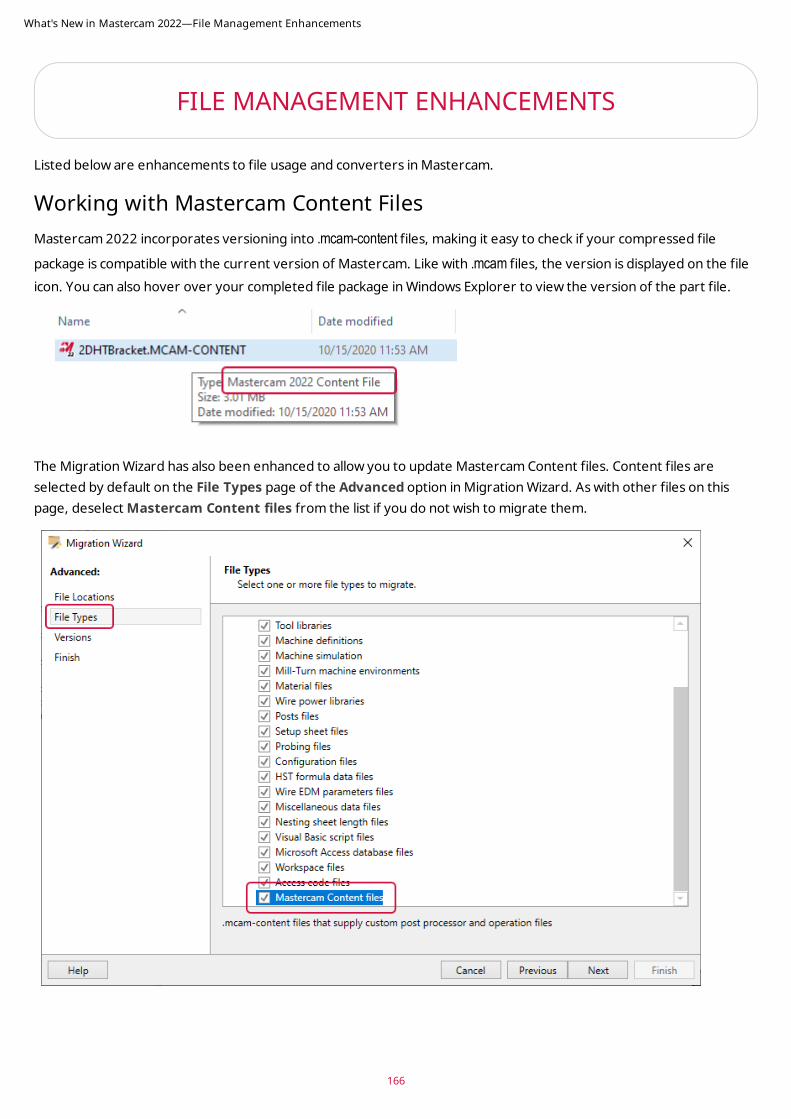
FILE MANAGEMENT ENHANCEMENTS
Listed below are enhancements to file usage and converters in Mastercam.
Working with Mastercam Content FilesMastercam 2022 incorporates versioning into .mcam-content files, making it easy to check if your compressed file
package is compatible with the current version of Mastercam. Like with .mcam files, the version is displayed on the file icon. You can also hover over your completed file package in Windows Explorer to view the version of the part file.
The Migration Wizard has also been enhanced to allow you to update Mastercam Content files. Content files are selected by default on the File Types page of the Advanced option in Migration Wizard. As with other files on this page, deselect Mastercam Content files from the list if you do not wish to migrate them.
What's New in Mastercam 2022—File Management Enhancements
166
167
File Translator EnhancementsListed below are enhancements to importing and exporting other CAD file formats.
Support for 3MF Files Mastercam now supports the import and export of 3MF files. 3D Manufacturing Format (3MF) is a file format designed specifically for additive manufacturing. It includes material, color, and other information that cannot be represented in the STL format.
Import and export 3MF files with the File, Open and Save As commands, just as you would any other Mastercam-supported CAD file.
The Converters page of the System Configuration dialog box lets you select default parameters for conversion to and from the .mcam and .3MF formats. You can also override these parameters when you convert a file to 3MF by choosing Options in the Save As dialog box.
Importing and Exporting CAD Files with New File TranslatorsMastercam 2022 includes updates to the file translators in Mastercam 2022 to support these CAD file formats:
l Parasolid v32
l ACIS 2021.1
l Rhino 7
l Spatial 2021 1.0 SDK
Mastercam also no longer supports importing or exporting CATIA V4 files.
Multiple STL Files Merged as Separate Level NamesWhen you merge multiple STL files into a single .mcam file, Mastercam places the entities from each file onto separate levels that retain the name of the STL file. This enhancement makes the organization of your part files more manageable and should be especially helpful if you import STL files to build machines.
Merge Enhancements Listed below are enhancements made to the Merge function, located on the File tab.
Merge Multiple Files in One Operation When programming your parts, you may use libraries of jigs, fixtures, and clamps that are kept in different locations. In previous Mastercam versions, you needed to create separate merge operations for each file. In Mastercam 2022, you can merge several parts from many locations using one merge operation.
Import files in either of two ways:
l Select File, Merge and choose your part files. You can also select a directory to merge all of the Mastercam files in it.
l Select the files in the Windows Explorer, and press the [Ctrl] key as you drag and drop the files onto the Mastercam graphics window.
What's New in Mastercam 2022—File Management Enhancements
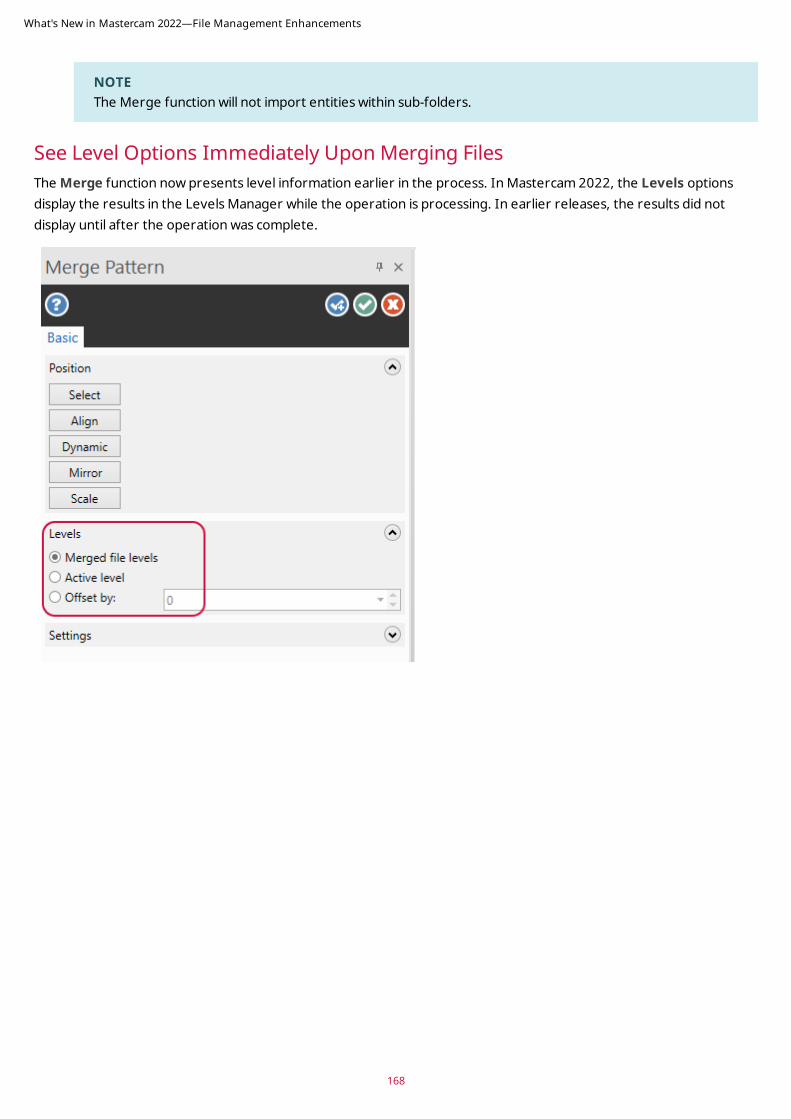
NOTEThe Merge function will not import entities within sub-folders.
See Level Options Immediately Upon Merging FilesThe Merge function now presents level information earlier in the process. In Mastercam 2022, the Levels options display the results in the Levels Manager while the operation is processing. In earlier releases, the results did not display until after the operation was complete.
What's New in Mastercam 2022—File Management Enhancements
168
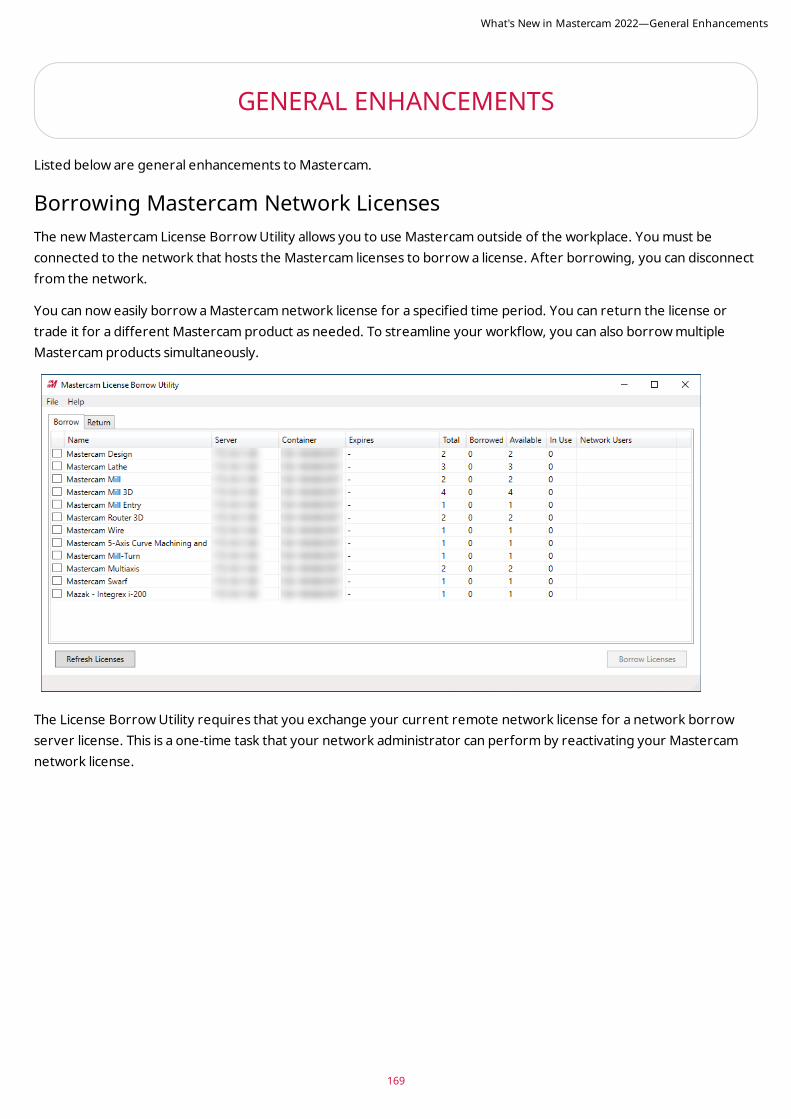
169
GENERAL ENHANCEMENTS
Listed below are general enhancements to Mastercam.
Borrowing Mastercam Network LicensesThe new Mastercam License Borrow Utility allows you to use Mastercam outside of the workplace. You must be connected to the network that hosts the Mastercam licenses to borrow a license. After borrowing, you can disconnect from the network.
You can now easily borrow a Mastercam network license for a specified time period. You can return the license or trade it for a different Mastercam product as needed. To streamline your workflow, you can also borrow multiple Mastercam products simultaneously.
The License Borrow Utility requires that you exchange your current remote network license for a network borrow server license. This is a one-time task that your network administrator can perform by reactivating your Mastercam network license.
What's New in Mastercam 2022—General Enhancements
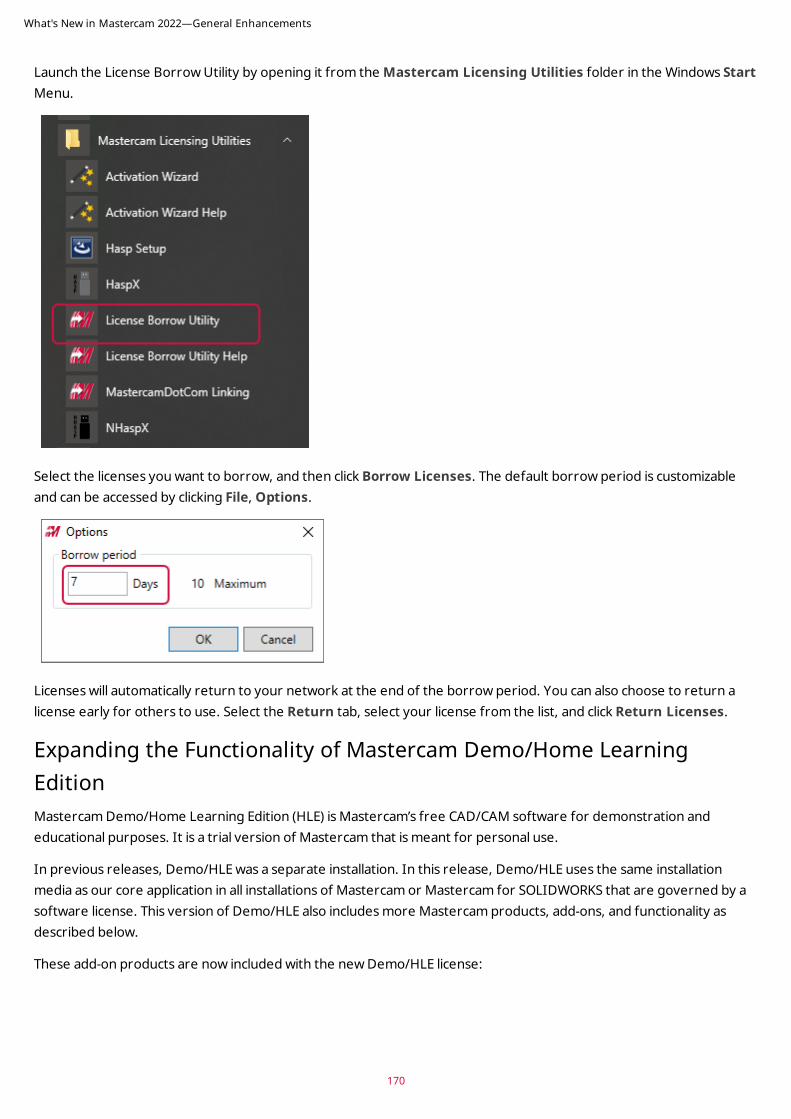
Launch the License Borrow Utility by opening it from the Mastercam Licensing Utilities folder in the Windows Start Menu.
Select the licenses you want to borrow, and then click Borrow Licenses. The default borrow period is customizable and can be accessed by clicking File, Options.
Licenses will automatically return to your network at the end of the borrow period. You can also choose to return a license early for others to use. Select the Return tab, select your license from the list, and click Return Licenses.
Expanding the Functionality of Mastercam Demo/Home Learning EditionMastercam Demo/Home Learning Edition (HLE) is Mastercam’s free CAD/CAM software for demonstration and educational purposes. It is a trial version of Mastercam that is meant for personal use.
In previous releases, Demo/HLE was a separate installation. In this release, Demo/HLE uses the same installation media as our core application in all installations of Mastercam or Mastercam for SOLIDWORKS that are governed by a software license. This version of Demo/HLE also includes more Mastercam products, add-ons, and functionality as described below.
These add-on products are now included with the new Demo/HLE license:
What's New in Mastercam 2022—General Enhancements
170
171
l Port Expert
l Blade Expert
l Productivity+™
l ProDrill (Mastercam only)
l Mill-Turn (Mastercam only)
l Includes support for all Mill-Turn machine environments
Demo/HLE users who wish to use Mill-Turn can load any of the generic Fanuc machine environments that are installed with Mastercam 2022 without an additional license. The generic Siemens .machine files can be used with Demo/HLE, but these need to be downloaded from the Tech Exchange.
Additionally, Mastercam 2022 Demo/HLE includes the following features:
l Zip2Go
l Check for Updates
l Migration Wizard
l Batch toolpath processing
l Saving control definitions
l Network licensing
The following features are only available in the Mastercam version of Demo/HLE:
l Autosave
l Command-line arguments
l Export to STL and 3MF
l Wire auxiliary registers
What's New in Mastercam 2022—General Enhancements
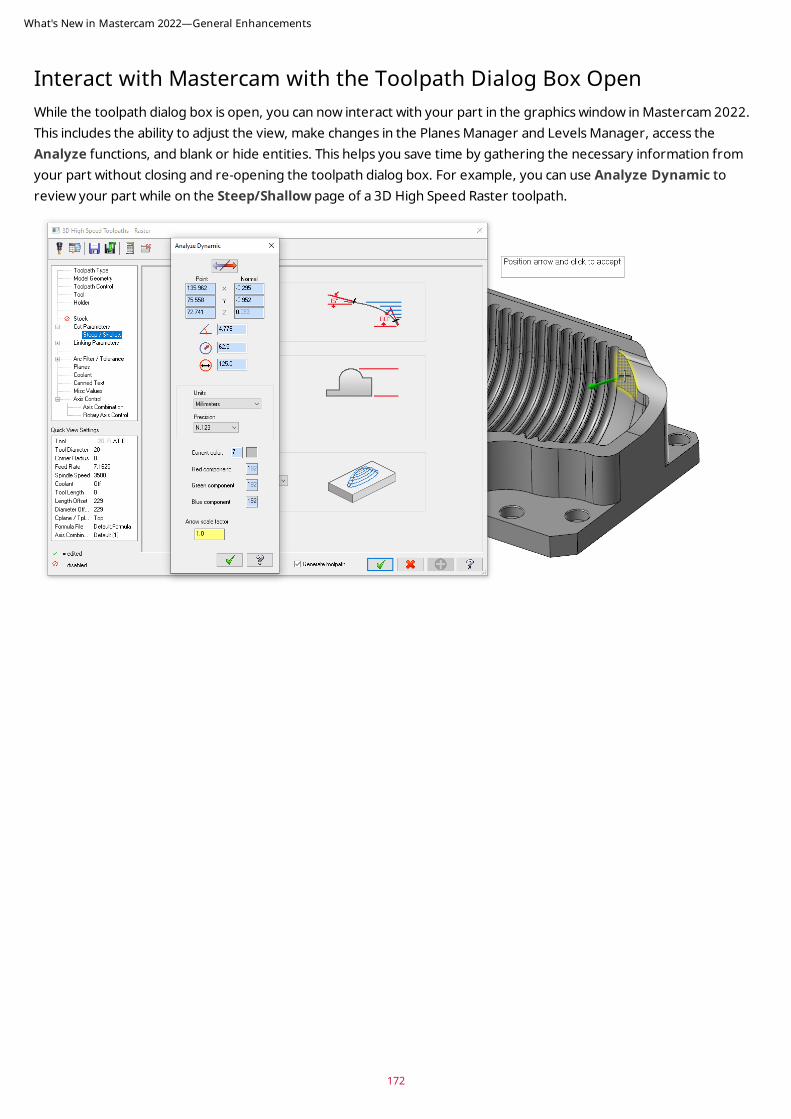
Interact with Mastercam with the Toolpath Dialog Box OpenWhile the toolpath dialog box is open, you can now interact with your part in the graphics window in Mastercam 2022. This includes the ability to adjust the view, make changes in the Planes Manager and Levels Manager, access the Analyze functions, and blank or hide entities. This helps you save time by gathering the necessary information from your part without closing and re-opening the toolpath dialog box. For example, you can use Analyze Dynamic to review your part while on the Steep/Shallow page of a 3D High Speed Raster toolpath.
What's New in Mastercam 2022—General Enhancements
172
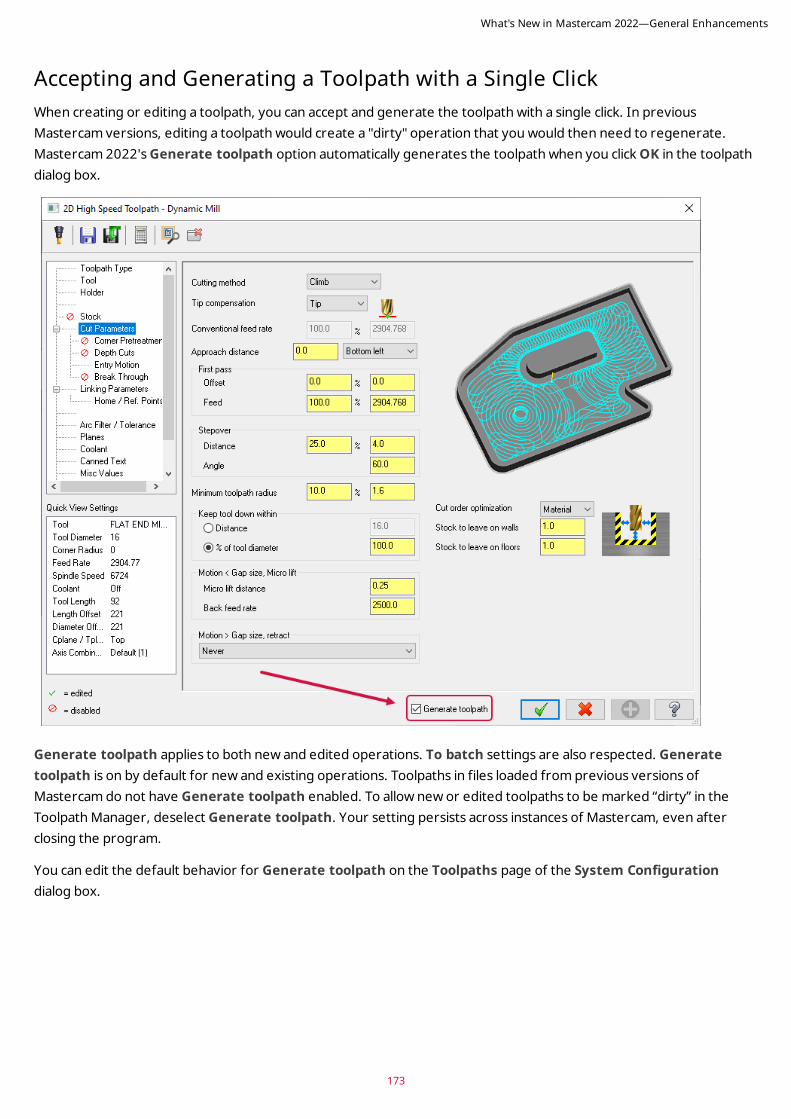
173
Accepting and Generating a Toolpath with a Single ClickWhen creating or editing a toolpath, you can accept and generate the toolpath with a single click. In previous Mastercam versions, editing a toolpath would create a "dirty" operation that you would then need to regenerate. Mastercam 2022's Generate toolpath option automatically generates the toolpath when you click OK in the toolpath dialog box.
Generate toolpath applies to both new and edited operations. To batch settings are also respected. Generate toolpath is on by default for new and existing operations. Toolpaths in files loaded from previous versions of Mastercam do not have Generate toolpath enabled. To allow new or edited toolpaths to be marked “dirty” in the Toolpath Manager, deselect Generate toolpath. Your setting persists across instances of Mastercam, even after closing the program.
You can edit the default behavior for Generate toolpath on the Toolpaths page of the System Configuration dialog box.
What's New in Mastercam 2022—General Enhancements
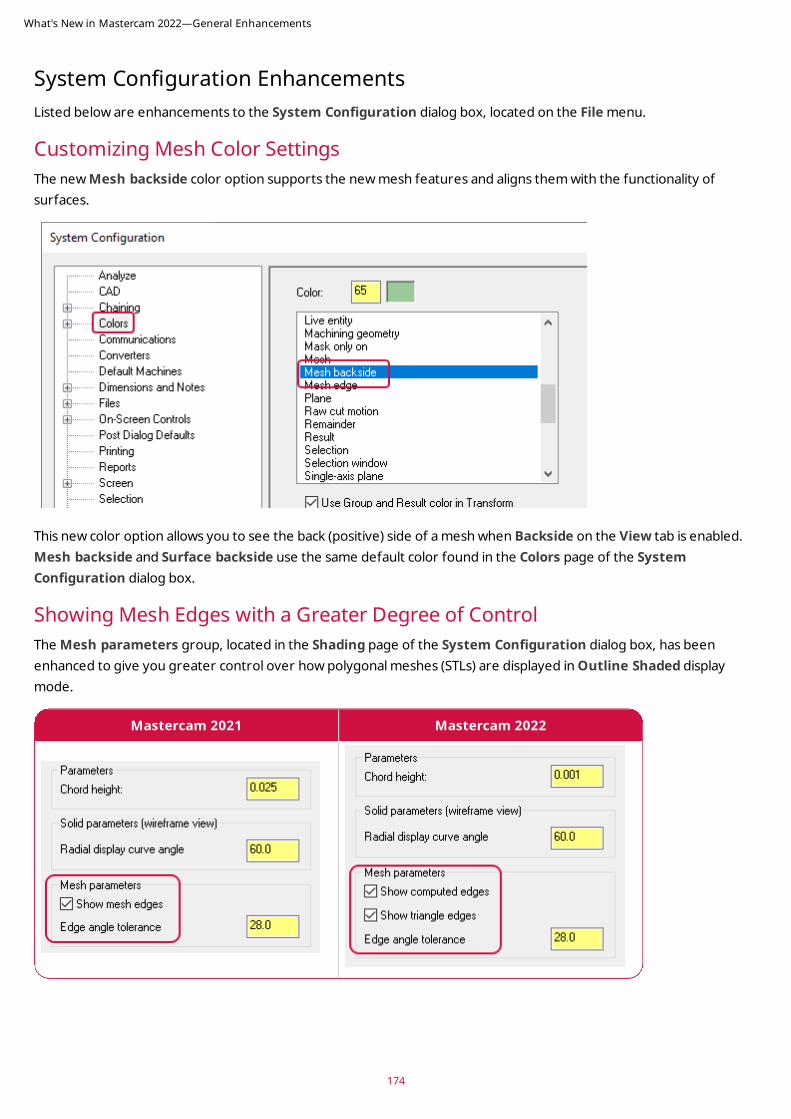
System Configuration EnhancementsListed below are enhancements to the System Configuration dialog box, located on the File menu.
Customizing Mesh Color SettingsThe new Mesh backside color option supports the new mesh features and aligns them with the functionality of surfaces.
This new color option allows you to see the back (positive) side of a mesh when Backside on the View tab is enabled. Mesh backside and Surface backside use the same default color found in the Colors page of the System Configuration dialog box.
Showing Mesh Edges with a Greater Degree of ControlThe Mesh parameters group, located in the Shading page of the System Configuration dialog box, has been enhanced to give you greater control over how polygonal meshes (STLs) are displayed in Outline Shaded display mode.
Mastercam 2021 Mastercam 2022
What's New in Mastercam 2022—General Enhancements
174

175
Previously, the Show mesh edges option created edges that were "synthetic" because they were computed by comparing the angles of adjacent polygons. The STL format does not define edges. An edge was generated if the angle was greater than the Edge angle tolerance. Individual triangle edges were shown when the setting was deselected. This enhancement allows you to see both computed edges and triangle edges at the same time, instead of one or the other.
Moving a Shared Folder Without Copying FilesFile management in Mastercam 2022 has been enhanced. Previously, when you moved a data path location, you had two options for files that had the same name in both locations: replace them or skip them from being copied.
What's New in Mastercam 2022—General Enhancements
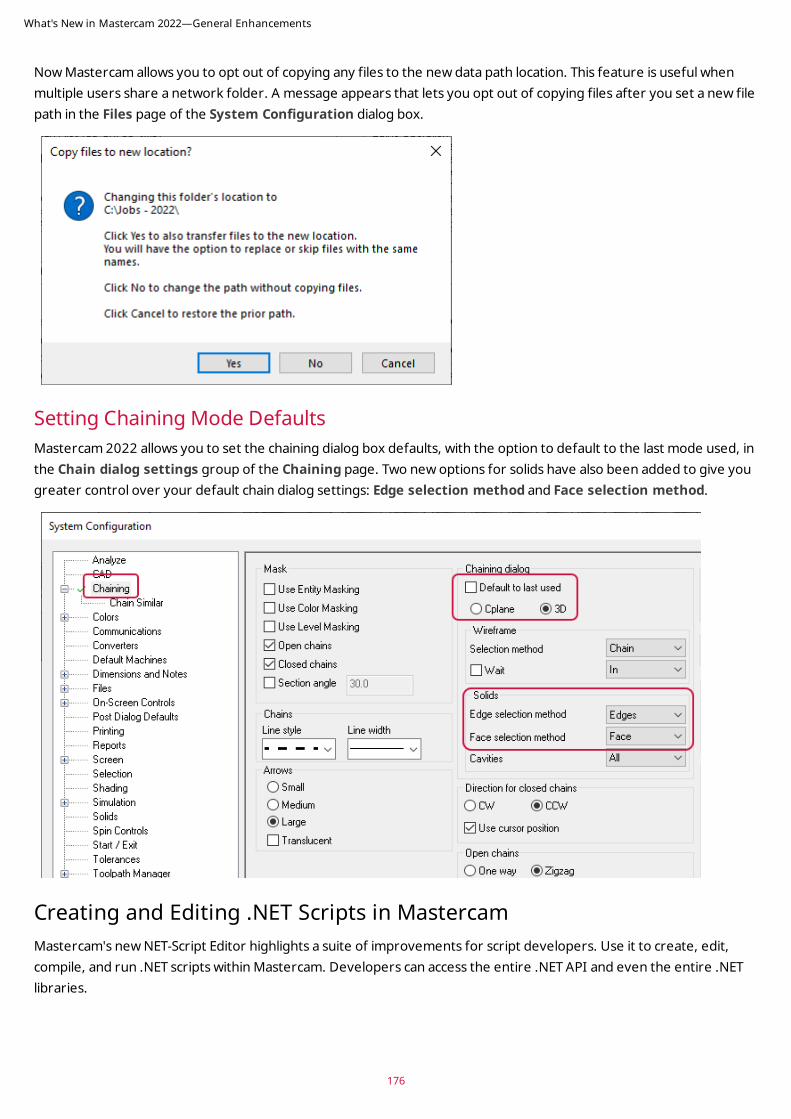
Now Mastercam allows you to opt out of copying any files to the new data path location. This feature is useful when multiple users share a network folder. A message appears that lets you opt out of copying files after you set a new file path in the Files page of the System Configuration dialog box.
Setting Chaining Mode DefaultsMastercam 2022 allows you to set the chaining dialog box defaults, with the option to default to the last mode used, in the Chain dialog settings group of the Chaining page. Two new options for solids have also been added to give you greater control over your default chain dialog settings: Edge selection method and Face selection method.
Creating and Editing .NET Scripts in MastercamMastercam's new NET-Script Editor highlights a suite of improvements for script developers. Use it to create, edit, compile, and run .NET scripts within Mastercam. Developers can access the entire .NET API and even the entire .NET libraries.
What's New in Mastercam 2022—General Enhancements
176
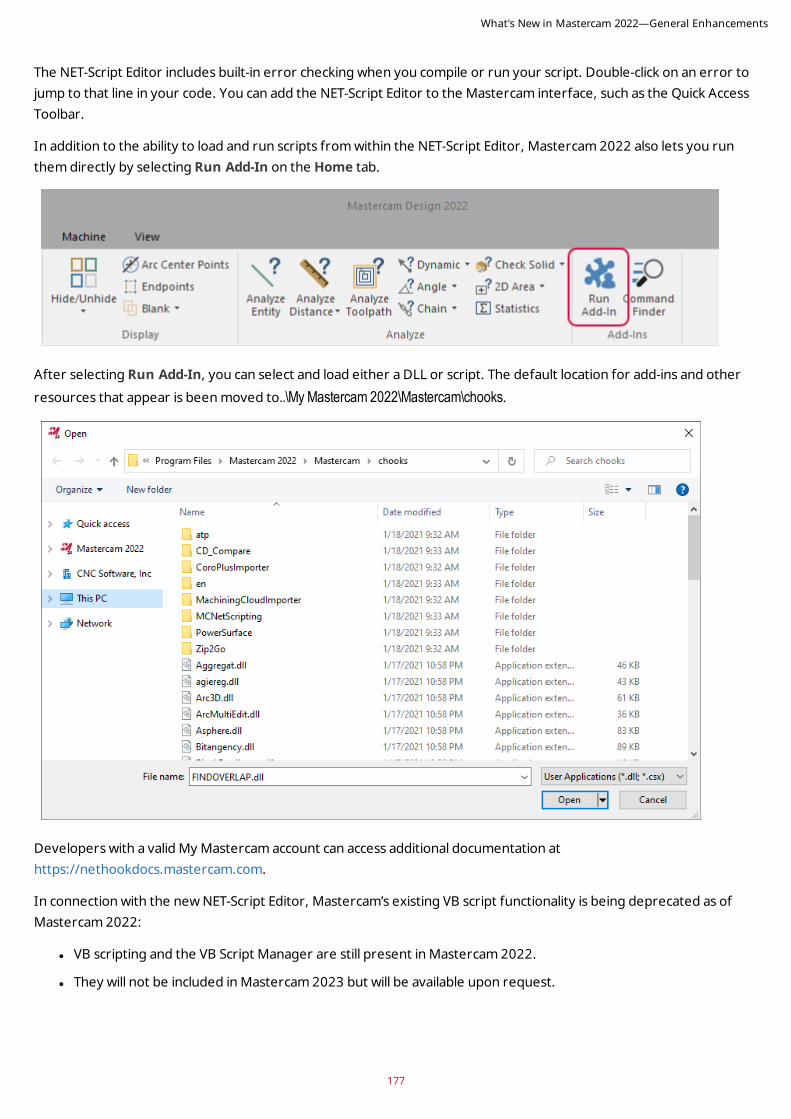
177
The NET-Script Editor includes built-in error checking when you compile or run your script. Double-click on an error to jump to that line in your code. You can add the NET-Script Editor to the Mastercam interface, such as the Quick Access Toolbar.
In addition to the ability to load and run scripts from within the NET-Script Editor, Mastercam 2022 also lets you run them directly by selecting Run Add-In on the Home tab.
After selecting Run Add-In, you can select and load either a DLL or script. The default location for add-ins and other resources that appear is been moved to..\My Mastercam 2022\Mastercam\chooks.
Developers with a valid My Mastercam account can access additional documentation at https://nethookdocs.mastercam.com.
In connection with the new NET-Script Editor, Mastercam’s existing VB script functionality is being deprecated as of Mastercam 2022:
l VB scripting and the VB Script Manager are still present in Mastercam 2022.
l They will not be included in Mastercam 2023 but will be available upon request.
What's New in Mastercam 2022—General Enhancements
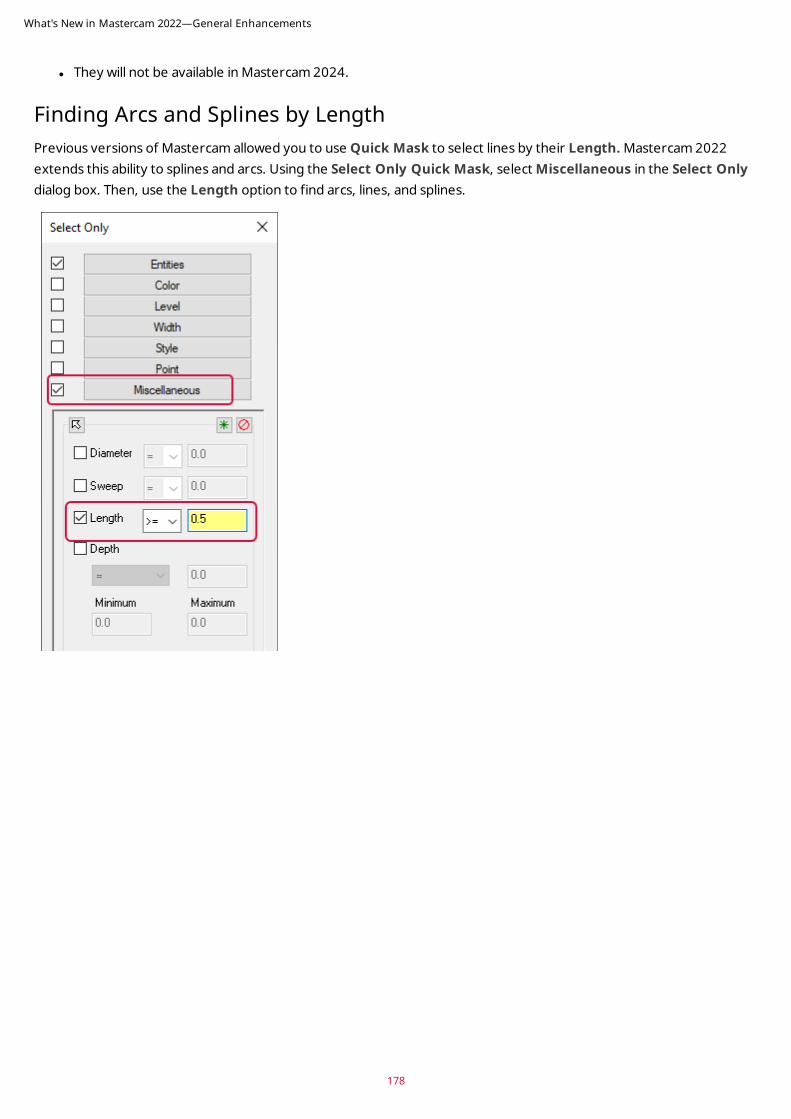
l They will not be available in Mastercam 2024.
Finding Arcs and Splines by LengthPrevious versions of Mastercam allowed you to use Quick Mask to select lines by their Length. Mastercam 2022 extends this ability to splines and arcs. Using the Select Only Quick Mask, select Miscellaneous in the Select Only dialog box. Then, use the Length option to find arcs, lines, and splines.
What's New in Mastercam 2022—General Enhancements
178
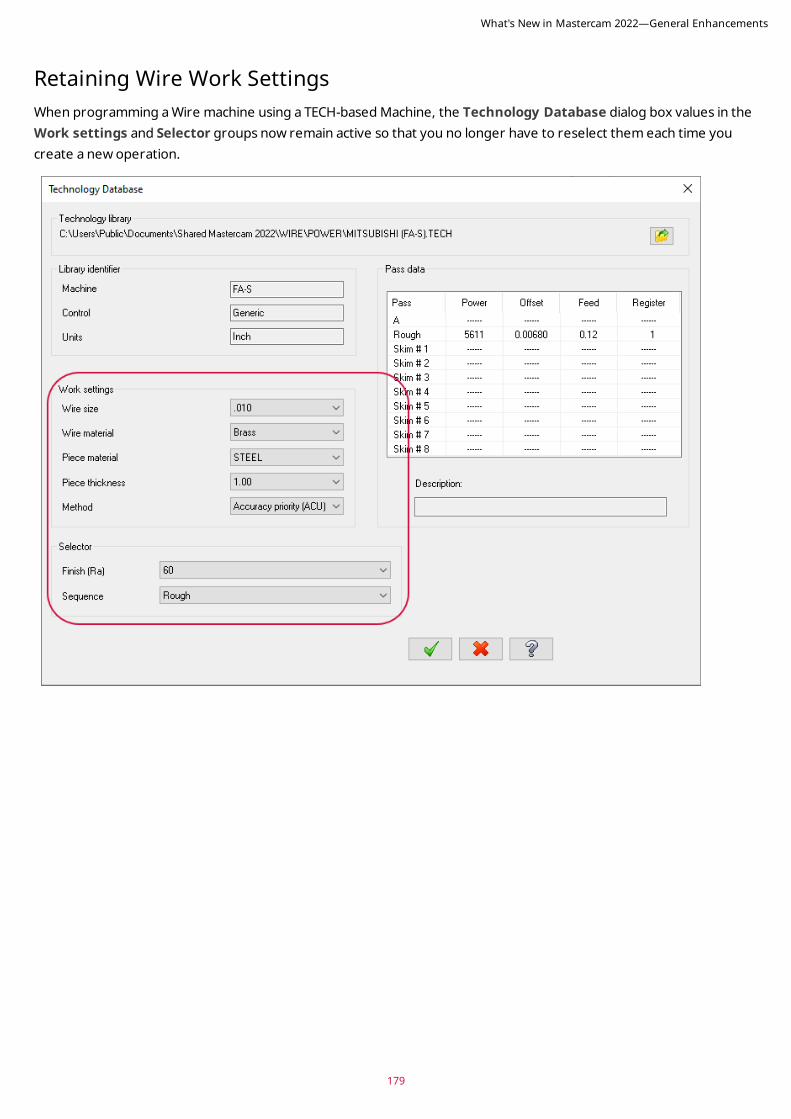
179
Retaining Wire Work SettingsWhen programming a Wire machine using a TECH-based Machine, the Technology Database dialog box values in the Work settings and Selector groups now remain active so that you no longer have to reselect them each time you create a new operation.
What's New in Mastercam 2022—General Enhancements
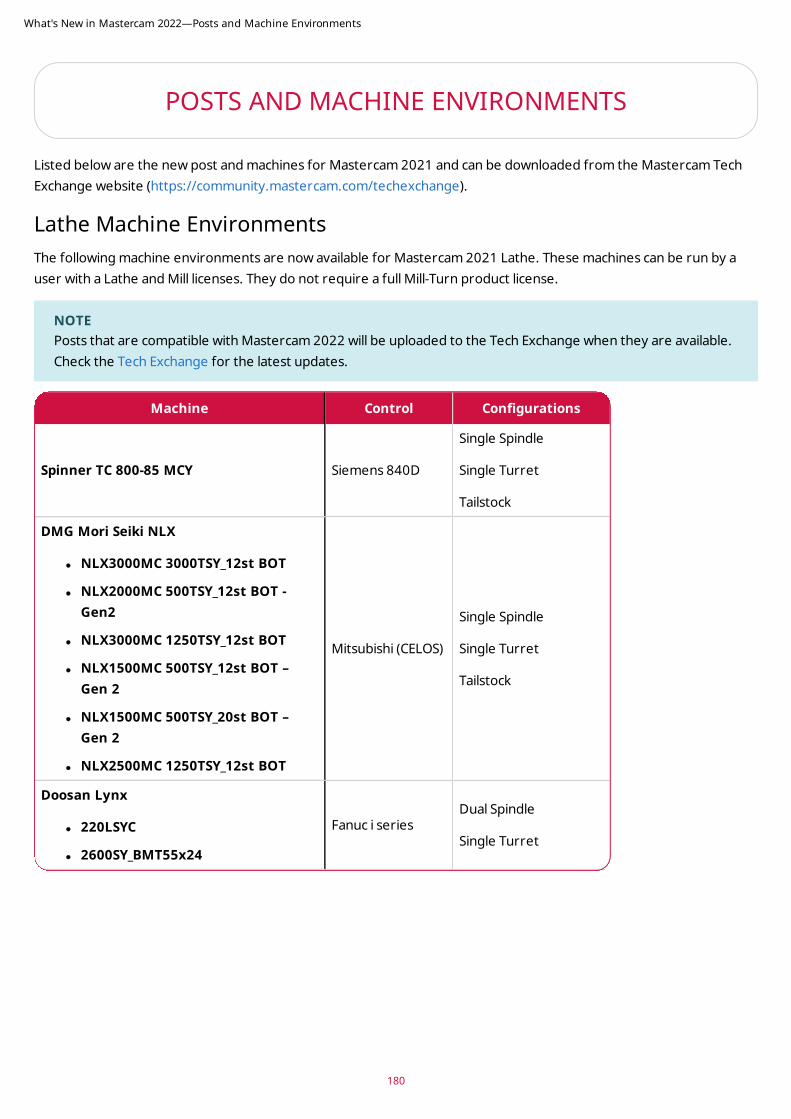
POSTS AND MACHINE ENVIRONMENTS
Listed below are the new post and machines for Mastercam 2021 and can be downloaded from the Mastercam Tech Exchange website (https://community.mastercam.com/techexchange).
Lathe Machine Environments The following machine environments are now available for Mastercam 2021 Lathe. These machines can be run by a user with a Lathe and Mill licenses. They do not require a full Mill-Turn product license.
NOTEPosts that are compatible with Mastercam 2022 will be uploaded to the Tech Exchange when they are available. Check the Tech Exchange for the latest updates.
Machine Control Configurations
Spinner TC 800-85 MCY Siemens 840D
Single Spindle
Single Turret
Tailstock
DMG Mori Seiki NLX
l NLX3000MC 3000TSY_12st BOT
l NLX2000MC 500TSY_12st BOT - Gen2
l NLX3000MC 1250TSY_12st BOT
l NLX1500MC 500TSY_12st BOT – Gen 2
l NLX1500MC 500TSY_20st BOT – Gen 2
l NLX2500MC 1250TSY_12st BOT
Mitsubishi (CELOS)
Single Spindle
Single Turret
Tailstock
Doosan Lynx
l 220LSYC
l 2600SY_BMT55x24
Fanuc i series Dual Spindle
Single Turret
What's New in Mastercam 2022—Posts and Machine Environments
180
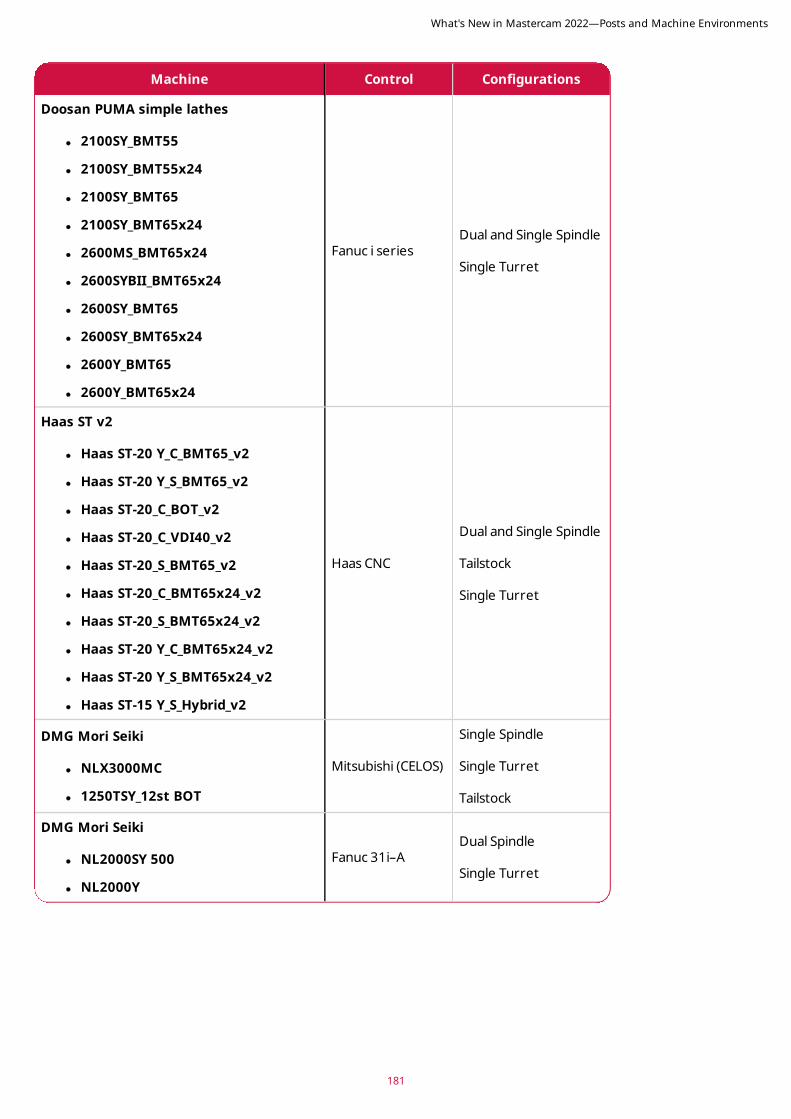
181
Machine Control Configurations
Doosan PUMA simple lathes
l 2100SY_BMT55
l 2100SY_BMT55x24
l 2100SY_BMT65
l 2100SY_BMT65x24
l 2600MS_BMT65x24
l 2600SYBII_BMT65x24
l 2600SY_BMT65
l 2600SY_BMT65x24
l 2600Y_BMT65
l 2600Y_BMT65x24
Fanuc i series Dual and Single Spindle
Single Turret
Haas ST v2
l Haas ST-20 Y_C_BMT65_v2
l Haas ST-20 Y_S_BMT65_v2
l Haas ST-20_C_BOT_v2
l Haas ST-20_C_VDI40_v2
l Haas ST-20_S_BMT65_v2
l Haas ST-20_C_BMT65x24_v2
l Haas ST-20_S_BMT65x24_v2
l Haas ST-20 Y_C_BMT65x24_v2
l Haas ST-20 Y_S_BMT65x24_v2
l Haas ST-15 Y_S_Hybrid_v2
Haas CNC
Dual and Single Spindle
Tailstock
Single Turret
DMG Mori Seiki
l NLX3000MC
l 1250TSY_12st BOT
Mitsubishi (CELOS)
Single Spindle
Single Turret
Tailstock
DMG Mori Seiki
l NL2000SY 500
l NL2000Y
Fanuc 31i–A Dual Spindle
Single Turret
What's New in Mastercam 2022—Posts and Machine Environments
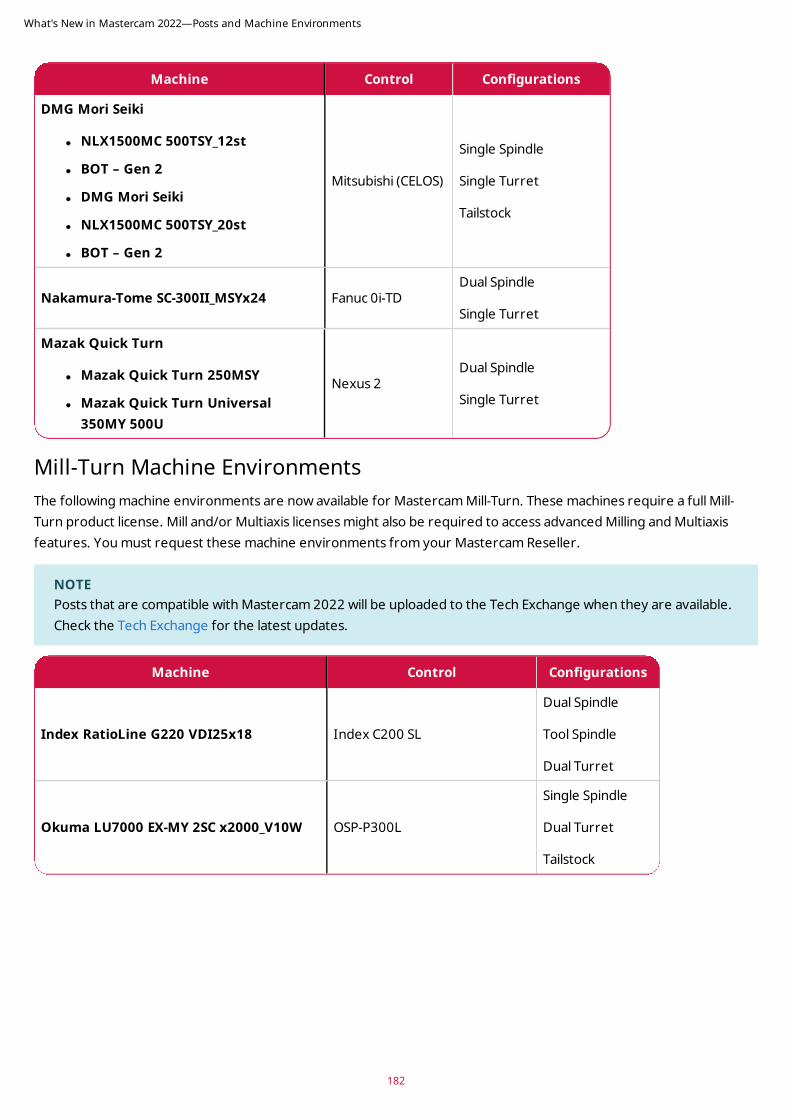
Machine Control Configurations
DMG Mori Seiki
l NLX1500MC 500TSY_12st
l BOT – Gen 2
l DMG Mori Seiki
l NLX1500MC 500TSY_20st
l BOT – Gen 2
Mitsubishi (CELOS)
Single Spindle
Single Turret
Tailstock
Nakamura-Tome SC-300II_MSYx24 Fanuc 0i-TD Dual Spindle
Single Turret
Mazak Quick Turn
l Mazak Quick Turn 250MSY
l Mazak Quick Turn Universal 350MY 500U
Nexus 2Dual Spindle
Single Turret
Mill-Turn Machine Environments The following machine environments are now available for Mastercam Mill-Turn. These machines require a full Mill-Turn product license. Mill and/or Multiaxis licenses might also be required to access advanced Milling and Multiaxis features. You must request these machine environments from your Mastercam Reseller.
NOTEPosts that are compatible with Mastercam 2022 will be uploaded to the Tech Exchange when they are available. Check the Tech Exchange for the latest updates.
Machine Control Configurations
Index RatioLine G220 VDI25x18 Index C200 SL
Dual Spindle
Tool Spindle
Dual Turret
Okuma LU7000 EX-MY 2SC x2000_V10W OSP-P300L
Single Spindle
Dual Turret
Tailstock
What's New in Mastercam 2022—Posts and Machine Environments
182
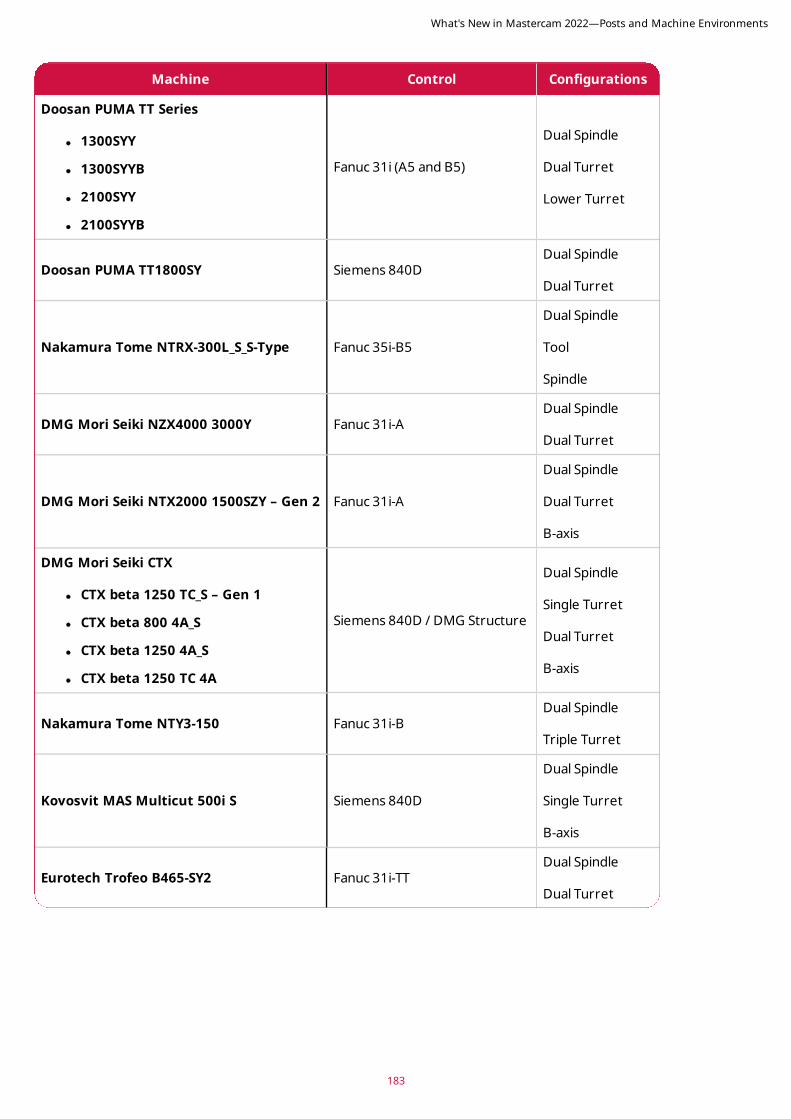
183
Machine Control Configurations
Doosan PUMA TT Series
l 1300SYY
l 1300SYYB
l 2100SYY
l 2100SYYB
Fanuc 31i (A5 and B5)
Dual Spindle
Dual Turret
Lower Turret
Doosan PUMA TT1800SY Siemens 840D Dual Spindle
Dual Turret
Nakamura Tome NTRX-300L_S_S-Type Fanuc 35i-B5
Dual Spindle
Tool
Spindle
DMG Mori Seiki NZX4000 3000Y Fanuc 31i-ADual Spindle
Dual Turret
DMG Mori Seiki NTX2000 1500SZY – Gen 2 Fanuc 31i-A
Dual Spindle
Dual Turret
B-axis
DMG Mori Seiki CTX
l CTX beta 1250 TC_S – Gen 1
l CTX beta 800 4A_S
l CTX beta 1250 4A_S
l CTX beta 1250 TC 4A
Siemens 840D / DMG Structure
Dual Spindle
Single Turret
Dual Turret
B-axis
Nakamura Tome NTY3-150 Fanuc 31i-B Dual Spindle
Triple Turret
Kovosvit MAS Multicut 500i S Siemens 840D
Dual Spindle
Single Turret
B-axis
Eurotech Trofeo B465-SY2 Fanuc 31i-TTDual Spindle
Dual Turret
What's New in Mastercam 2022—Posts and Machine Environments
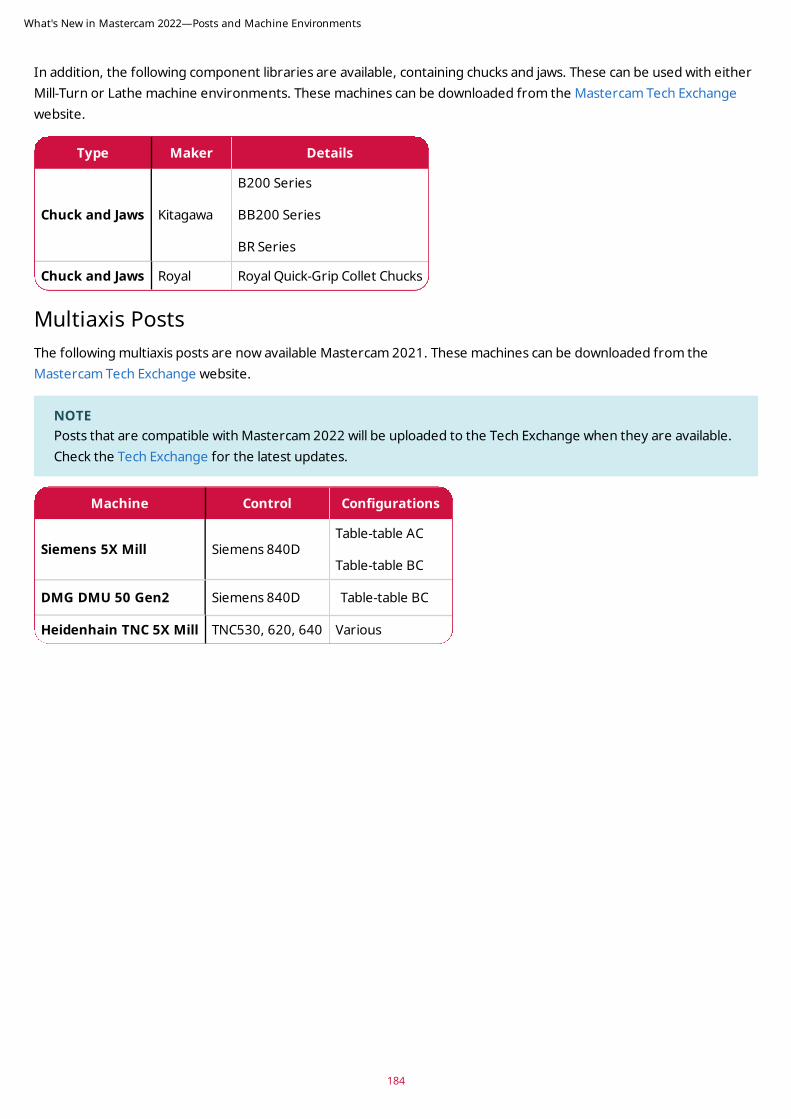
In addition, the following component libraries are available, containing chucks and jaws. These can be used with either Mill-Turn or Lathe machine environments. These machines can be downloaded from the Mastercam Tech Exchange website.
Type Maker Details
Chuck and Jaws Kitagawa
B200 Series
BB200 Series
BR Series
Chuck and Jaws Royal Royal Quick-Grip Collet Chucks
Multiaxis PostsThe following multiaxis posts are now available Mastercam 2021. These machines can be downloaded from the Mastercam Tech Exchange website.
NOTEPosts that are compatible with Mastercam 2022 will be uploaded to the Tech Exchange when they are available. Check the Tech Exchange for the latest updates.
Machine Control Configurations
Siemens 5X Mill Siemens 840DTable-table AC
Table-table BC
DMG DMU 50 Gen2 Siemens 840D Table-table BC
Heidenhain TNC 5X Mill TNC530, 620, 640 Various
What's New in Mastercam 2022—Posts and Machine Environments
184
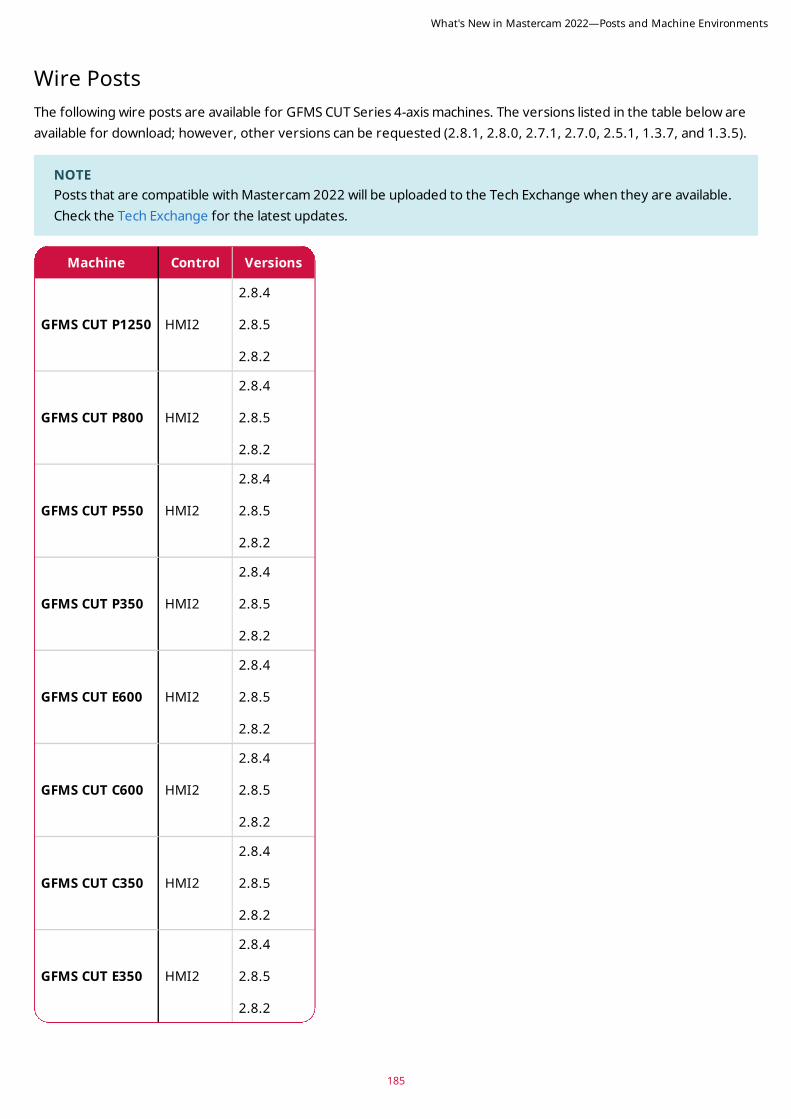
185
Wire PostsThe following wire posts are available for GFMS CUT Series 4-axis machines. The versions listed in the table below are available for download; however, other versions can be requested (2.8.1, 2.8.0, 2.7.1, 2.7.0, 2.5.1, 1.3.7, and 1.3.5).
NOTEPosts that are compatible with Mastercam 2022 will be uploaded to the Tech Exchange when they are available. Check the Tech Exchange for the latest updates.
Machine Control Versions
GFMS CUT P1250 HMI2
2.8.4
2.8.5
2.8.2
GFMS CUT P800 HMI2
2.8.4
2.8.5
2.8.2
GFMS CUT P550 HMI2
2.8.4
2.8.5
2.8.2
GFMS CUT P350 HMI2
2.8.4
2.8.5
2.8.2
GFMS CUT E600 HMI2
2.8.4
2.8.5
2.8.2
GFMS CUT C600 HMI2
2.8.4
2.8.5
2.8.2
GFMS CUT C350 HMI2
2.8.4
2.8.5
2.8.2
GFMS CUT E350 HMI2
2.8.4
2.8.5
2.8.2
What's New in Mastercam 2022—Posts and Machine Environments
ATTENTION! UPDATES MAY BE AVAILABLE. PLEASE REFER TO MASTERCAM.COM/SUPPORT
FOR THE LATEST DOWNLOADS.


![What's New in Mastercam 2018 - Zenex Computing Oyzenex.fi/tuki/files/2018/WhatsNew.pdf · Mastercam'sFiletaborbypressing[Alt+H]onyourkeyboard. l MastercamReseller—YourlocalMastercamResellercanhelpwithmostques](https://img.pdfslide.us/doc/110x75/5ad8ea557f8b9a3e578df7d9/whats-new-in-mastercam-2018-zenex-computing-sfiletaborbypressingalthonyourkeyboard.jpg)