Embed Size (px)
Citation preview
Wonderful Communication, Mobile Life.
Welcome to use HUAWEI ETS2051/2251/2551 Fixed Wireless Terminal
HUAWEI ETS2051/2251/2551 Fixed Wireless Terminal
User Manual
Copyright © 2006 Huawei Technologies Co., Ltd.
All Rights Reserved
No part of this manual may be reproduced or transmitted in any form or by any means without prior written consent of Huawei Technologies Co., Ltd.
Trademarks
and HUAWEI are trademarks of Huawei Technologies Co., Ltd. All other trademarks and trade names mentioned in this manual are the property of their respective holders.
Notice
The information in this manual is subject to change without notice. Every effort has been made in the preparation of this manual to ensure accuracy of the contents, but all statements, information, and recommendations in this manual do not constitute the warranty of any kind, expressed or implied.
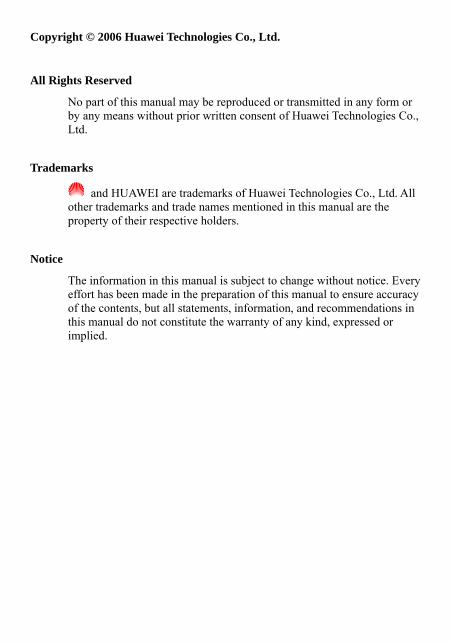
Safety Precautions
Read the safety precautions carefully to ensure the correct and safe use of your phone. For detailed information, see the section "Warnings and Precautions".
Do not switch your phone on when the use of mobile phones is prohibited or when the phone may cause interference or danger.
Do not place your phone and its accessories in containers with strong electromagnetic field.
Do not use your phone while driving.
Do not place magnetic storage media near your phone. Radiation from the phone may erase the information stored on them.
Follow any rules or regulations in hospitals and health care facilities. Switch your phone off near medical devices.
Do not put your phone in a high-temperature place or use it in a place with flammable gas such as a gas station.
Switch your phone off in aircraft. The phone may cause interference to control signals of the aircraft.
Keep your phone and its accessories away from children. Do not allow children to use your phone without guidance.
Switch your phone off near high-precision electronic devices. The phone may affect the performance of these devices.
Use approved batteries and chargers only.
Do not attempt to disassemble your phone or its accessories. Only qualified personnel may service or repair the phone.
Observe any laws or regulations on the use of mobile phones. Respect other’s privacy and legal rights when using your phone.
Contents
1 Warnings and Precautions...................................................................................1 Basic Cautions..............................................................................................1 Electronic Device .........................................................................................1 Hospital ........................................................................................................1 Traffic Safety................................................................................................2 Operating Environment ................................................................................2 Emergency Call ............................................................................................3 Battery..........................................................................................................3 Power Adapter..............................................................................................4 Using the USB Cable ...................................................................................5 Environmental Protection.............................................................................5
2 Introduction ........................................................................................................7 Packing List..................................................................................................7 Antenna and Feeder (Optional) ....................................................................7 Product Features...........................................................................................9
3 Function Description ........................................................................................13 Display and Operating Elements ................................................................13 Display Screen Description........................................................................18
4 Installation Description ....................................................................................23 External Power Adapter Installation...........................................................23 Spare Battery Detachment/Installation.......................................................23 R-UIM Card Installation (Optional)...........................................................25 Connecting the FWT to a PC .....................................................................26 Installing Antenna (Optional).....................................................................28
CCoonntteennttss
HUAWEI ii
Mounting Mode..........................................................................................34 5 Quick Start........................................................................................................37 6 Basic Operations...............................................................................................39
Preparation .................................................................................................39 Turning On.................................................................................................39 Using R-UIM Card (Optional) ...................................................................39 Making a Call.............................................................................................40 Answering a Call........................................................................................43 Hands-free Mode Switchover.....................................................................43 Supplementary Services .............................................................................44 Voice Volume Tuning .................................................................................45 Turning Off ................................................................................................46
7 Phone Book ......................................................................................................47 Entering the "Phone Book" Interface .........................................................47 Selecting Memory ......................................................................................47 Saving a Number to Phone Book ...............................................................48 Browsing Phone Book................................................................................48 Modifying Contact Entry ...........................................................................48 Deleting Contact Entry...............................................................................49 Copying Contact Entry...............................................................................49 Groups........................................................................................................50
8 Call Record.......................................................................................................53 Entering the "Records" Interface................................................................53 Received Calls............................................................................................53 Missed Calls...............................................................................................53
CCoonntteennttss
HUAWEI iii
Dialed Calls................................................................................................54 9 Message............................................................................................................55
Entering the "Messages" Interface .............................................................55 Browsing Messages....................................................................................55 Writing a Message......................................................................................56 Voice Mailbox ............................................................................................56 Outbox........................................................................................................57 Settings.......................................................................................................57
10 FWT Settings..................................................................................................59 Entering the "Settings" Interface ................................................................59 Common Setting ........................................................................................59 Personal Setting..........................................................................................62 Advanced Setting .......................................................................................64
11 Introduction to Text Entry ..............................................................................65 Text Entry Supported .................................................................................65 When to Use Text Entry .............................................................................65 How to Use Text Entry...............................................................................65 ABC (abc) Input.........................................................................................67 ENG (eng) Input.........................................................................................67 123 Input ....................................................................................................68
12 Maintenance ...................................................................................................69 13 Troubleshooting..............................................................................................71 14 Technical Specification...................................................................................73 15 Product Series.................................................................................................75 16 Abbreviation ...................................................................................................77
HUAWEI 1
1 Warnings and Precautions
To use HUAWEI ETS2051/2251/2551 Fixed Wireless Terminal (FWT) accurately, efficiently and securely, you should notice following cautions.
Basic Cautions 1 Check fittings based on the packing list to make sure they are complete and
undamaged. 2 Read this manual carefully before installing and using FWT.
Electronic Device Switch your FWT off near high-precision electronic devices. The FWT may affect the performance of these devices.
Such devices include hearing aids, pacemakers, fire alarm systems, automatic gates, and other automatic-control devices. If you are using an electronic medical device, consult the device manufacturer and confirm whether the radio wave affects the operation of this electronic device.
Hospital Pay attention to the following points in hospitals or health care facilities:
Do not take your FWT into the operating room (OR), intensive care unit (ICU), or coronary care unit (CCU).
Switch your FWT off near medial devices. Observe any instructions wherever the use of wireless device is prohibited.
11 WWaarrnniinnggss aanndd PPrreeccaauuttiioonnss
HUAWEI 2
Traffic Safety Do not use your FWT while driving. Secure the FWT on its holder. Do not
place the FWT on the seat or other places where it can get loose in a sudden stop or collision.
Observe the rules and regulations of airline companies. Switch your FWT off before boarding an aircraft.
Operating Environment Do not place magnetic storage media such as magnetic cards and floppy disks
near the FWT. Radiation from the FWT may erase the information stored on them.
Do not put your FWT, battery, or other accessories in containers with strong magnetic field, such as the induction cooker and microwave oven. Otherwise, circuit failure, fire, or explosion may result.
Do not leave your FWT, battery, or power adapter in a high-temperature place or use them in a place with flammable gas. Otherwise, malfunction of the products, fire, or explosion may result.
Because FWT needs to eliminate heat during working, put the FWT and the power supply in a ventilated and shadowy place. Never airproof the FWT or put something on it or place it near water, fire as well as inflammable and explosive materials.
Because FWT contains precision devices, you should put it in a dry place and away from moist materials.
Before cleaning FWT, please turn off the FWT, and then disconnect the power supply and take out the battery. Before moving FWT, please disconnect the external power supply.
Do not subject your FWT, battery, and power adapter to serious collision or shock. Otherwise, battery leakage, FWT malfunction, overheat, fire, or explosion may result.
Do not place sharp metal objects such as pins near the earpiece. The earpiece may attract these objects and hurt you when you are using the FWT.
Do not place the FWT in the area over the air bag or in the air bag deployment area. Otherwise, the FWT may hurt you owing to the strong force when the air bag inflates.
When lightning, if you use the power adapter, please turn off the FWT and disconnect the power adapter from external power supply. If outdoor antenna is
11 WWaarrnniinnggss aanndd PPrreeccaauuttiioonnss
HUAWEI 3
used, please turn off the FWT and do not touch the interface between FWT and antenna.
Put your FWT, battery, and power adapter in places beyond the reach of children. Do not allow children to use the FWT, battery, or power adapter without guidance.
Do not touch the antenna when a call is going on. Touching the antenna may affect call quality and cause the FWT to operate at a power level higher than needed.
The network signal condition will directly affect the quality and stability of the call. Consequently, you should place FWT in a place where it can receive network signal well. Do not put FWT in a building with an iron or metal roof. The distance between FWT and other metal materials (such as metal brackets or metal doors and windows) should be greater than 25cm and the distance between FWTs should be greater than 30cm.
Do not open the chassis in any case and the device should be maintained by a qualified maintenance department.
Without permission, you are not allowed to modify the architecture and security design of FWT. You must bear any consequence resulted from the operation without permission.
Your FWT is designed to conform to the authoritative international radio frequency (RF) specifications. Use FWT accessories approved by Huawei only.
Emergency Call You can use your FWT for emergency calls. However, connections in all conditions cannot be guaranteed. You should never rely solely on the FWT for essential communications.
Battery If the battery fluid gets into eyes, do not rub them. Wash with clean water and
seek medical assistance immediately. If the battery fluid contacts skin or cloth, wash with clean water immediately to
avoid irritation to the skin. Do not dispose of the battery in fire. Otherwise, the battery may ignite or
explode.
11 WWaarrnniinnggss aanndd PPrreeccaauuttiioonnss
HUAWEI 4
When installing the battery on your FWT, do not push the battery by force lest battery fluid leak out or the battery crack.
Do not connect two poles of the battery with metallic materials such as cables. Do not disassemble the battery or solder the battery poles. Otherwise fluid
leakage, overheat, fire, or explosion may result. If there is battery leakage, smoke, or strange smell, stop using the battery and
keep it away from open flame to avoid fire or explosion. Disconnect the power adapter and take out the spare battery when FWT is not
used for a long time. Do select its self-contained complete battery and power adapter, otherwise,
FWT may be spoiled. Dispose of used batteries according to the instructions Dispose of the battery according to local laws or regulations.
Power Adapter Use AC power as specified for the power adapter. Any violation of this rule
may result in fire or malfunction of the power adapter. Do not short-circuit the power adapter. Short-circuiting the power adapter may
cause fire or malfunction of the power adapter. Remove the dust on the power plug regularly. Do not use worn-out power cords. Otherwise, electric shock, short-circuiting of
the power adapter, or fire may result. Do not put the power adapter near the container filled with liquid such as water.
If the liquid comes into the power adapter, electrical leakage or other faults may result.
If the liquid such as water comes into the power adapter accidentally, remove the plug of the power adapter from the socket immediately.
Disconnect the power adapter from the socket before cleaning or maintaining it. Otherwise, electric shock or short-circuiting of the battery or power adapter may result.
Ensure the plug of the power adapter is properly inserted into the power socket when charging the battery. Improper insertion may result in electric shock, fire, or explosion.
Do not place any heavy object on the power cord of the power adapter. Do not damage, change, or pluck the power cord.
11 WWaarrnniinnggss aanndd PPrreeccaauuttiioonnss
HUAWEI 5
Using the USB Cable To use the USB cable, you need operate abiding strictly by the following rules. Otherwise, your FWT or PC may be damaged:
To connect your FWT and PC with the USB cable, connect to the FWT at first, and then connect to the PC;
In the process of communication between your FWT and PC, it is strictly forbidden to plug or pull out the USB cable;
To disconnect your FWT and PC from the USB cable, disconnect from the PC at first, and then disconnect from the FWT.
Environmental Protection Please abide by the local laws in proposing of the package materials of your handset, consumed batteries and used handsets, and try to recycle them.

HUAWEI 7
2 Introduction
Packing List The whole FWT fittings are listed in table below. Check the fittings packed in the box according to the table to make sure they are complete and undamaged. Otherwise, contact the local vendor immediately.
Name Quantity Unit Main unit, handset, spiral cord 1 Set
Power adapter 1 Unit
Spare battery (rechargeable) (optional) 1 Pile
User Manual 1 Volume
Tapping screw 1 Piece
Wall-mounting bracket 1 Piece
Certificate of Quality 1 Piece
Note: There are two types of FWTs. One is fixedly installed with indoor
antenna, and the other can be installed with indoor or outdoor antenna depending on the local signal strength. Please consult the local carrier;
Spare battery is optional. You can purchase an FWT with spare battery or purchase them independently.
Antenna and Feeder (Optional) If you select an FWT that can be installed with indoor or outer antenna, please read the following to learn the information about the antenna and feeder.

22 IInnttrroodduuccttiioonn
HUAWEI 8
Indoor Omni Antenna Figure 2-1 illustrates an indoor omni antenna for the FWT:
Figure 2-1 Indoor omni antenna for the FWT
Outdoor Directional Antenna Figure 2-2 illustrates an outdoor directional antenna for the FWT:
1) Fixing clip 2) Directional antenna 3) Feeder 4) Connector at the host
Figure 2-2 Outdoor directional antenna for the FWT
Outdoor Omni Antenna Figure 2-3 illustrates an outdoor omni antenna for the FWT:

22 IInnttrroodduuccttiioonn
HUAWEI 9
1) Impedance match 2) Fixing clip 3) Feeder 4) Connector at the host side
Figure 2-3 Outdoor omni antenna for the FWT
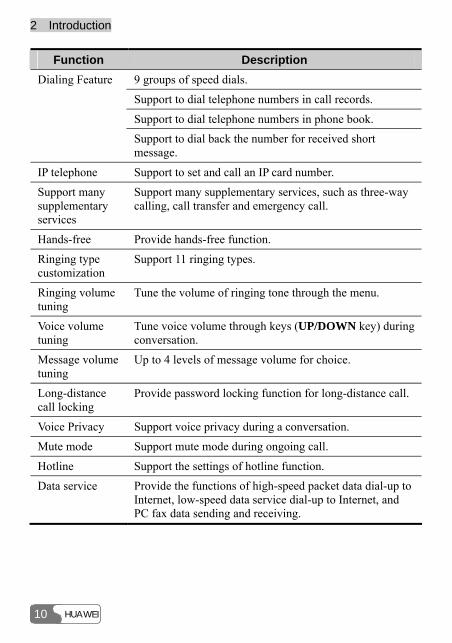
Product Features
Function Description Phone book 250 groups of contact entries (if an R-UIM card is used
for storage, the number of contact entries depends on the card).
20 groups of received (missed) telephone information query.
Call Records
100 groups of dialed telephone information query.
Message sending and receiving.
22 pieces of messages can be saved in the inbox.
40 pieces of messages can be saved in the outbox.
Message sending and receiving
Retry after message delivery failure.
22 IInnttrroodduuccttiioonn
HUAWEI 10
Function Description 9 groups of speed dials.
Support to dial telephone numbers in call records.
Support to dial telephone numbers in phone book.
Dialing Feature
Support to dial back the number for received short message.
IP telephone Support to set and call an IP card number.
Support many supplementary services
Support many supplementary services, such as three-way calling, call transfer and emergency call.
Hands-free Provide hands-free function.
Ringing type customization
Support 11 ringing types.
Ringing volume tuning
Tune the volume of ringing tone through the menu.
Voice volume tuning
Tune voice volume through keys (UP/DOWN key) during conversation.
Message volume tuning
Up to 4 levels of message volume for choice.
Long-distance call locking
Provide password locking function for long-distance call.
Voice Privacy Support voice privacy during a conversation.
Mute mode Support mute mode during ongoing call.
Hotline Support the settings of hotline function.
Data service Provide the functions of high-speed packet data dial-up to Internet, low-speed data service dial-up to Internet, and PC fax data sending and receiving.
22 IInnttrroodduuccttiioonn
HUAWEI 11
Note: For the details about supplementary services offered by the FWT,
inquire to the carrier; Charging function needs the support of the carrier's network. Please
consult the carrier; To enjoy the data service provided by the FWT, you need purchase the
data service suite, please consult the local vendor.
HUAWEI 13
3 Function Description
Display and Operating Elements
FWT Front View and Description
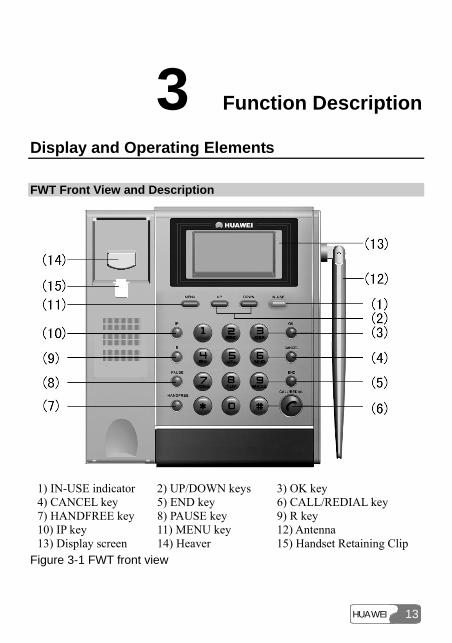
1) IN-USE indicator 2) UP/DOWN keys 3) OK key 4) CANCEL key 5) END key 6) CALL/REDIAL key 7) HANDFREE key 8) PAUSE key 9) R key 10) IP key 11) MENU key 12) Antenna 13) Display screen 14) Heaver 15) Handset Retaining Clip
Figure 3-1 FWT front view
33 FFuunnccttiioonn DDeessccrriippttiioonn
HUAWEI 14
Note: Figure 3-1 shows the type that is fixedly installed with the indoor antenna. For the other type that can be installed with indoor or outdoor antenna, the antenna as shown in Figure 3-1 will not be delivered with the FWT.
<IN-USE> indicator Red indicator means the handset of the FWT is picked up or the FWT is in hands-free state.
<MENU> key In the standby state, press this key to enter the menu options.
<UP>/<DOWN> key There are two keys <UP> and <DOWN>.
After entering the menu options, press these keys to browse the menu options; While using the text entry, press these keys to move the cursor to the left or
right, to turn page up or down. For details, refer to the “ 11 Introduction to Text Entry”;
During the conversation, press these keys to tune the volume.
<OK> key While browsing the menu options, press this key to select and enter the menu option, or save your settings.
<CANCEL> key This key is used to delete the current input.
Press this key to delete one character; Press and hold this key to delete all.
<END> key Pressing this key during the conversation, you can end a call, which is equal to the hang-up operation. In the event of receiving a call, press this key to stop the ringing and hang up the call. Moreover, it can also be used to quit from the current menu operation.
33 FFuunnccttiioonn DDeessccrriippttiioonn
HUAWEI 15
<PAUSE> key There are two functions for this key:
It is used as a sign of time interval when you set IP card number. For more information, refer to the “IP Card Calling”;
It is also used as a sign of the mute. During a conversation, press this key for a while you can see on the screen. indicates the phone is in mute mode. That is, if calling presses and holds this key for a while (then releases it), called hears nothing, but the calling can here what called say (Vice versa). When caller presses and holds this key for a while again, both parties can make conversation.
<CALL/REDIAL> key When the FWT is in standby state, if no telephone number is displayed on the screen, pressing <CALL/REDIAL>, you can view the last dialed number and the FWT will redial the number; if there is a number displayed on the screen, the FWT will call back the number after you press the key.
After a speed dialing is setting, you only need to press correspond key (from 1 to 9) and then press the <CALL/REDIAL> key, the set number is dialed.
Pressing this key, you can answer the call in hand-free mode.
<HANDFREE> key In the standby state, pressing this key, you can directly answer a call or hear the dialing tone, which means you can make a call, without picking up the handset.
<R> key This key is used in supplementary services to control the call transfer and three-way calling. Its performance is similar to pressing <CALL/REDIAL> or quickly flapping the heaver. For the details, refer to the "Supplementary Services".
<IP> key Using this key, you can dial the configured IP card number. For more information, refer to the "IP Card Calling".
Alphanumeric keys Pressing these keys, you can input the corresponding alphanumeric symbols.
33 FFuunnccttiioonn DDeessccrriippttiioonn
HUAWEI 16
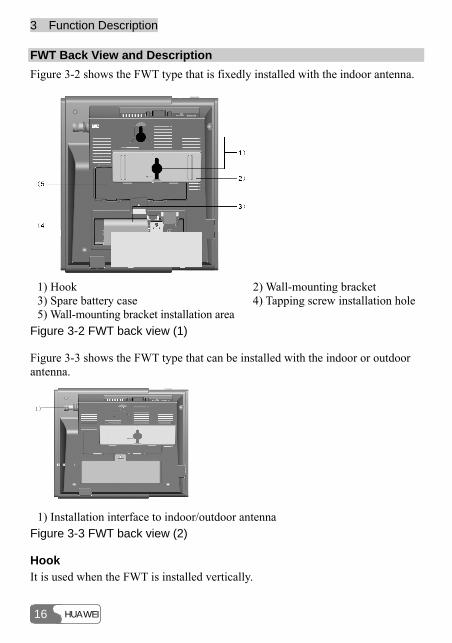
FWT Back View and Description Figure 3-2 shows the FWT type that is fixedly installed with the indoor antenna.
1) Hook 2) Wall-mounting bracket 3) Spare battery case 4) Tapping screw installation hole5) Wall-mounting bracket installation area
Figure 3-2 FWT back view (1)
Figure 3-3 shows the FWT type that can be installed with the indoor or outdoor antenna.
1 )
1) Installation interface to indoor/outdoor antenna
Figure 3-3 FWT back view (2)
Hook It is used when the FWT is installed vertically.
33 FFuunnccttiioonn DDeessccrriippttiioonn
HUAWEI 17
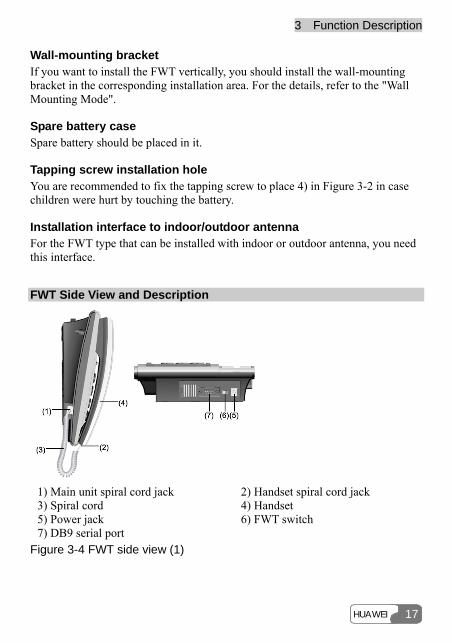
Wall-mounting bracket If you want to install the FWT vertically, you should install the wall-mounting bracket in the corresponding installation area. For the details, refer to the "Wall Mounting Mode".
Spare battery case Spare battery should be placed in it.
Tapping screw installation hole You are recommended to fix the tapping screw to place 4) in Figure 3-2 in case children were hurt by touching the battery.
Installation interface to indoor/outdoor antenna For the FWT type that can be installed with indoor or outdoor antenna, you need this interface.
FWT Side View and Description
1) Main unit spiral cord jack 2) Handset spiral cord jack 3) Spiral cord 4) Handset 5) Power jack 6) FWT switch 7) DB9 serial port
Figure 3-4 FWT side view (1)
33 FFuunnccttiioonn DDeessccrriippttiioonn
HUAWEI 18
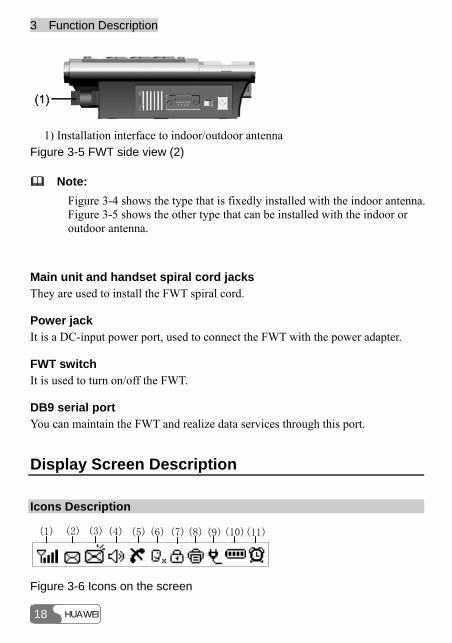
1) Installation interface to indoor/outdoor antenna
Figure 3-5 FWT side view (2)
Note: Figure 3-4 shows the type that is fixedly installed with the indoor antenna. Figure 3-5 shows the other type that can be installed with the indoor or outdoor antenna.
Main unit and handset spiral cord jacks They are used to install the FWT spiral cord.
Power jack It is a DC-input power port, used to connect the FWT with the power adapter.
FWT switch It is used to turn on/off the FWT.
DB9 serial port You can maintain the FWT and realize data services through this port.
Display Screen Description
Icons Description
(1) (2) (3) (4) (6) (8)(5) (7) (9)(10)(11)
Figure 3-6 Icons on the screen
33 FFuunnccttiioonn DDeessccrriippttiioonn
HUAWEI 19
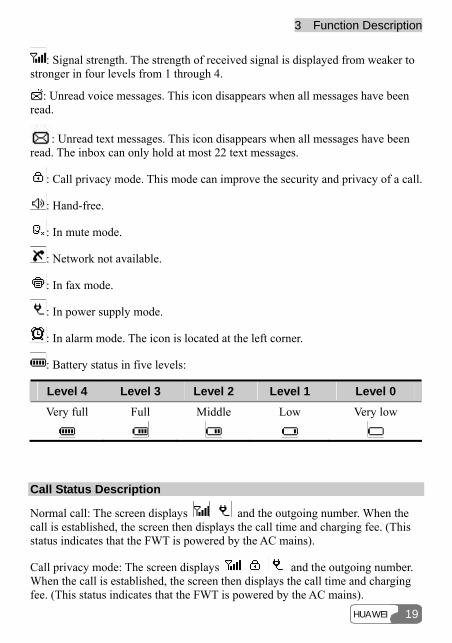
: Signal strength. The strength of received signal is displayed from weaker to stronger in four levels from 1 through 4.
: Unread voice messages. This icon disappears when all messages have been read.
: Unread text messages. This icon disappears when all messages have been read. The inbox can only hold at most 22 text messages.
: Call privacy mode. This mode can improve the security and privacy of a call.
: Hand-free.
: In mute mode.
: Network not available.
: In fax mode.
: In power supply mode.
: In alarm mode. The icon is located at the left corner.
: Battery status in five levels:
Level 4 Level 3 Level 2 Level 1 Level 0 Very full
Full
Middle
Low
Very low
Call Status Description
Normal call: The screen displays and the outgoing number. When the call is established, the screen then displays the call time and charging fee. (This status indicates that the FWT is powered by the AC mains).
Call privacy mode: The screen displays and the outgoing number. When the call is established, the screen then displays the call time and charging fee. (This status indicates that the FWT is powered by the AC mains).
33 FFuunnccttiioonn DDeessccrriippttiioonn
HUAWEI 20
Note: Charging fee cannot be displayed if this service is not enabled by your carrier. Please consult your carrier for whether it can be enabled.
Call time The current call time.
Note: The start time displayed on the display screen is likely the start time for both parties’ conversation or the time for connection setup in this call. For a specific time display, consult the carrier.
Telephone number The telephone number of the opposite end.
Name If the telephone number has been registered in the phone book, the corresponding name will be displayed. In this case, the telephone number is not displayed.
Charging information The FWT supports pulse charging, local charging, and intelligent network charging, which should be also supported by the carrier's network and carrier. For the related charging method and charging function, consult the carrier.
1 Pulse charging The pulse charging function requires the support from the carrier's network. For more details, consult the carrier.
If the pulse charging mode is preset on the FWT, during the conversation, the display screen shows the charging information “XXXX”, where “XXXX” refers to the number of pulses. During the conversation, if “XXXX” always shows “0000”, contact the carrier for details.
2 Local charging If the local charging mode is preset on the FWT, during the conversation, the display screen shows the current call fee: "XX.XX" and the current call time:
33 FFuunnccttiioonn DDeessccrriippttiioonn
HUAWEI 21
"XX-XX".
3 Intelligent Network charging This function must also be supported on the network side. For more details, consult the carrier.
If the intelligent network charging mode has been preset on the FWT, the display screen will display the current charge balance upon off-hook. You can press the <CANCEL> key to clear the information.
Voice privacy The FWT supports voice privacy function, which could enhance security and privacy of a conversation.
Missed Call State When the FWT is not in use and there is an incoming call, the display screen will show the telephone number. If there are missed calls, the display screen shows "X NEW CALLS", in which "X" indicates the number of missed calls which have not been checked with the UP/DOWN key.
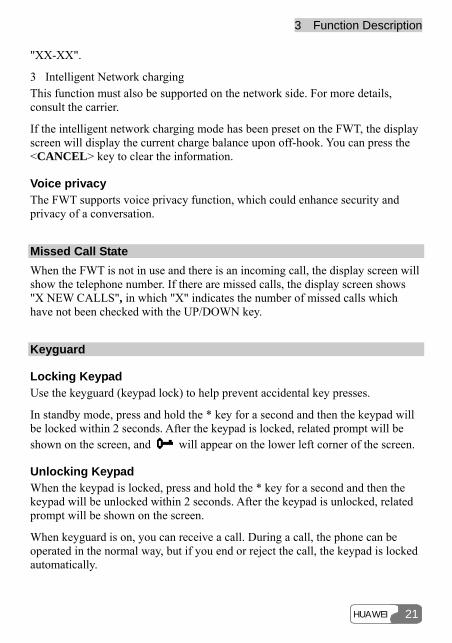
Keyguard
Locking Keypad Use the keyguard (keypad lock) to help prevent accidental key presses.
In standby mode, press and hold the * key for a second and then the keypad will be locked within 2 seconds. After the keypad is locked, related prompt will be shown on the screen, and will appear on the lower left corner of the screen.
Unlocking Keypad When the keypad is locked, press and hold the * key for a second and then the keypad will be unlocked within 2 seconds. After the keypad is unlocked, related prompt will be shown on the screen.
When keyguard is on, you can receive a call. During a call, the phone can be operated in the normal way, but if you end or reject the call, the keypad is locked automatically.
33 FFuunnccttiioonn DDeessccrriippttiioonn
HUAWEI 22
Note: When keyguard is on, you can still make emergency calls, receive messages and resent messages, but you cannot read messages. However, to read a message, you must unlock the keypad. If auto dial function is enabled, emergency numbers will be dialed out automatically. Data service and fax are available when the keypad is locked.
Menu Options
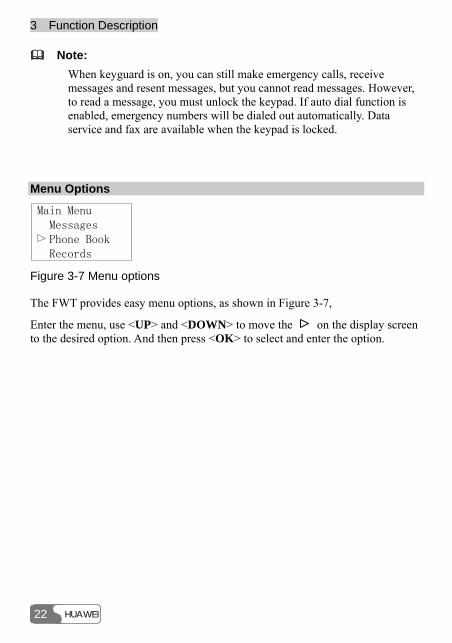
Main Menu Messages Phone Book Records
Figure 3-7 Menu options
The FWT provides easy menu options, as shown in Figure 3-7,
Enter the menu, use <UP> and <DOWN> to move the on the display screen to the desired option. And then press <OK> to select and enter the option.
HUAWEI 23
4 Installation Description
External Power Adapter Installation The FWT usually adopts the external power adapter to supply power. However, in the event of power cut or no external power adapter, it needs spare battery to supply power and you should make sure the spare battery have been charged full before using.
1 Make sure the FWT is turned off. 2 Insert one end of the power adapter connection line into the FWT power jack,
which is shown as 5) in Figure 3-4, and plug the other end into the power socket. The external power adapter installation is finished.
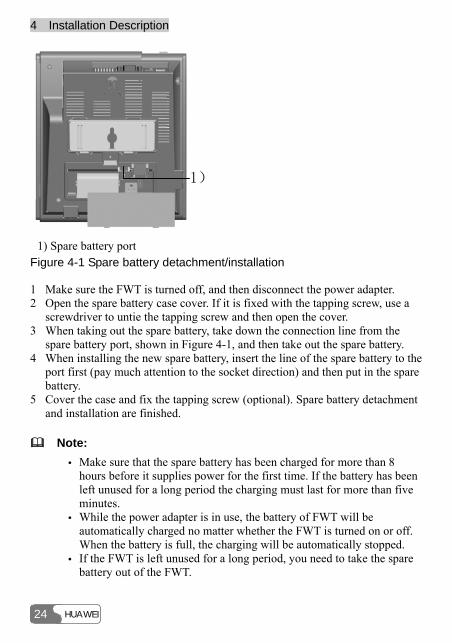
Spare Battery Detachment/Installation
Caution: Before alternating battery for the FWT, you must turn off the FWT and pull out the power adapter.
The FWT spare battery can support 5-hour conversation or stand by for 40-120 hours (reference value, the actual time is associated with the network condition) in the case of no external power supply. Take the following procedures to alternate or detach the spare battery.
44 IInnssttaallllaattiioonn DDeessccrriippttiioonn
HUAWEI 24
1)
1) Spare battery port
Figure 4-1 Spare battery detachment/installation
1 Make sure the FWT is turned off, and then disconnect the power adapter. 2 Open the spare battery case cover. If it is fixed with the tapping screw, use a
screwdriver to untie the tapping screw and then open the cover. 3 When taking out the spare battery, take down the connection line from the
spare battery port, shown in Figure 4-1, and then take out the spare battery. 4 When installing the new spare battery, insert the line of the spare battery to the
port first (pay much attention to the socket direction) and then put in the spare battery.
5 Cover the case and fix the tapping screw (optional). Spare battery detachment and installation are finished.
Note: Make sure that the spare battery has been charged for more than 8
hours before it supplies power for the first time. If the battery has been left unused for a long period the charging must last for more than five minutes.
While the power adapter is in use, the battery of FWT will be automatically charged no matter whether the FWT is turned on or off. When the battery is full, the charging will be automatically stopped.
If the FWT is left unused for a long period, you need to take the spare battery out of the FWT.
44 IInnssttaallllaattiioonn DDeessccrriippttiioonn
HUAWEI 25
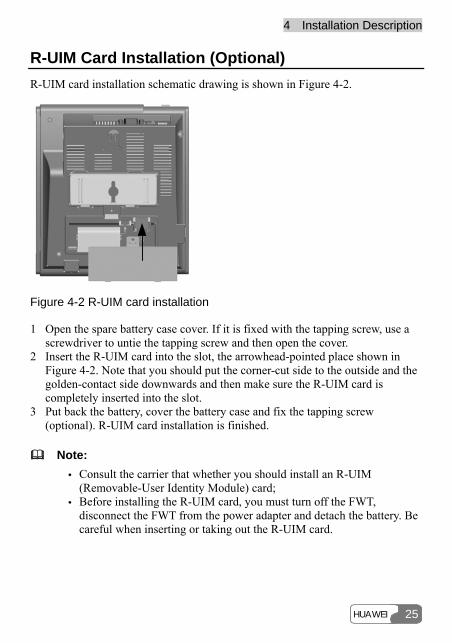
R-UIM Card Installation (Optional) R-UIM card installation schematic drawing is shown in Figure 4-2.
Figure 4-2 R-UIM card installation
1 Open the spare battery case cover. If it is fixed with the tapping screw, use a screwdriver to untie the tapping screw and then open the cover.
2 Insert the R-UIM card into the slot, the arrowhead-pointed place shown in Figure 4-2. Note that you should put the corner-cut side to the outside and the golden-contact side downwards and then make sure the R-UIM card is completely inserted into the slot.
3 Put back the battery, cover the battery case and fix the tapping screw (optional). R-UIM card installation is finished.
Note: Consult the carrier that whether you should install an R-UIM
(Removable-User Identity Module) card; Before installing the R-UIM card, you must turn off the FWT,
disconnect the FWT from the power adapter and detach the battery. Be careful when inserting or taking out the R-UIM card.

44 IInnssttaallllaattiioonn DDeessccrriippttiioonn
HUAWEI 26
Connecting the FWT to a PC The FWT can be connected to a PC to provide data services, maintenance and debugging.
To support data services, you should purchase the data service suite, in which you can get USB serial cable as shown in Figure 4-3.
1) Cable connector-D type-9 pin-male 2) Cable connector-USB-4 pin-male
Figure 4-3 USB serial cable
To maintain and debug the FWT, you should purchase serial communication cable and connect it to a PC, as shown in Figure 4-4.
1) Cable connector-D type-9 pin-male 2) Cable connector-D type-9 pin-female
Figure 4-4 Serial communication cable
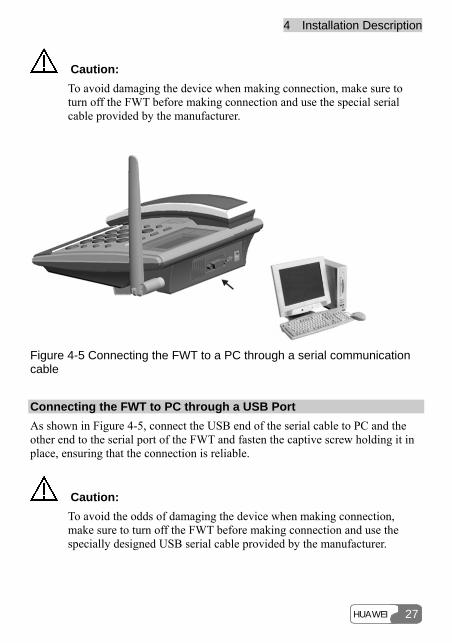
Connecting the FWT to a PC through a Serial Communication Cable As shown in Figure 4-5, connect one end of the serial communication cable to a PC, insert the other end to the serial port of the FWT, and fasten the captive screw holding it in place, ensuring that the connection is reliable.
44 IInnssttaallllaattiioonn DDeessccrriippttiioonn
HUAWEI 27
Caution: To avoid damaging the device when making connection, make sure to turn off the FWT before making connection and use the special serial cable provided by the manufacturer.
Figure 4-5 Connecting the FWT to a PC through a serial communication cable
Connecting the FWT to PC through a USB Port As shown in Figure 4-5, connect the USB end of the serial cable to PC and the other end to the serial port of the FWT and fasten the captive screw holding it in place, ensuring that the connection is reliable.
Caution: To avoid the odds of damaging the device when making connection, make sure to turn off the FWT before making connection and use the specially designed USB serial cable provided by the manufacturer.
44 IInnssttaallllaattiioonn DDeessccrriippttiioonn
HUAWEI 28
Installing Antenna (Optional) For the FWT type that can be installed with indoor or outer antenna, see the following instructions for installing the antenna.
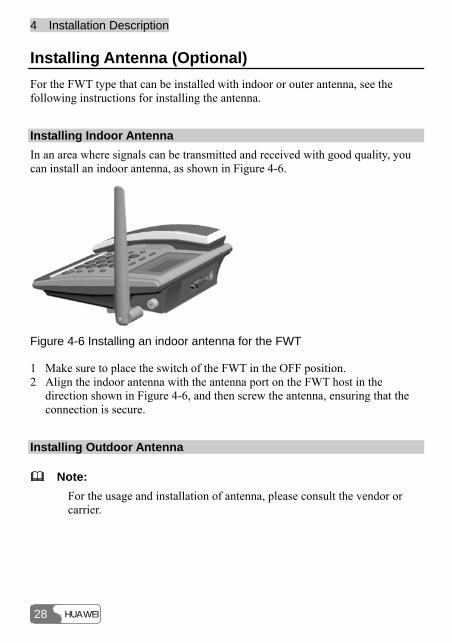
Installing Indoor Antenna In an area where signals can be transmitted and received with good quality, you can install an indoor antenna, as shown in Figure 4-6.
Figure 4-6 Installing an indoor antenna for the FWT
1 Make sure to place the switch of the FWT in the OFF position. 2 Align the indoor antenna with the antenna port on the FWT host in the
direction shown in Figure 4-6, and then screw the antenna, ensuring that the connection is secure.
Installing Outdoor Antenna
Note: For the usage and installation of antenna, please consult the vendor or carrier.
44 IInnssttaallllaattiioonn DDeessccrriippttiioonn
HUAWEI 29
Precautions 1 Normally, the outdoor antenna for the FWT is directional, but you can adopt
an omni antenna as well. A directional antenna has a higher gain than an omni antenna, but its positioning is somewhat complex. If the FWT is placed at a place faraway from the base station, it is recommended to use a directional antenna. If it is close to the base station, an omni or indoor antenna can be used.
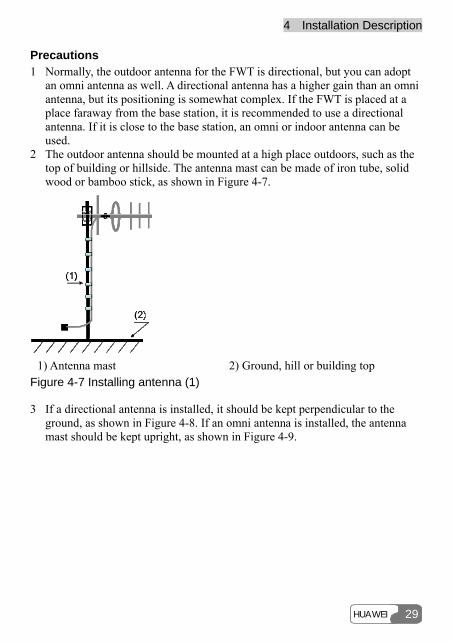
2 The outdoor antenna should be mounted at a high place outdoors, such as the top of building or hillside. The antenna mast can be made of iron tube, solid wood or bamboo stick, as shown in Figure 4-7.
1) Antenna mast 2) Ground, hill or building top
Figure 4-7 Installing antenna (1)
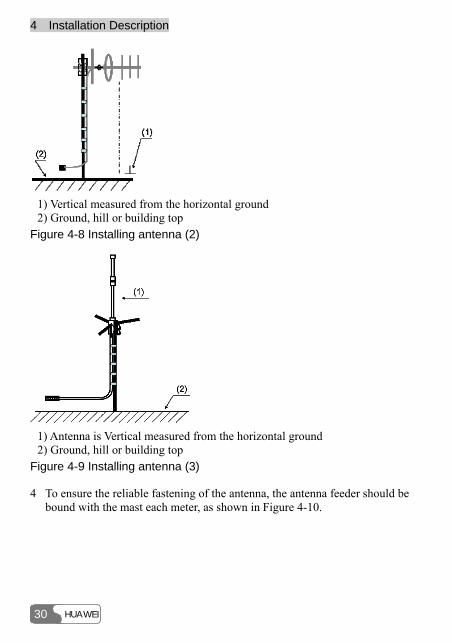
3 If a directional antenna is installed, it should be kept perpendicular to the ground, as shown in Figure 4-8. If an omni antenna is installed, the antenna mast should be kept upright, as shown in Figure 4-9.
44 IInnssttaallllaattiioonn DDeessccrriippttiioonn
HUAWEI 30
1) Vertical measured from the horizontal ground 2) Ground, hill or building top
Figure 4-8 Installing antenna (2)
1) Antenna is Vertical measured from the horizontal ground 2) Ground, hill or building top
Figure 4-9 Installing antenna (3)
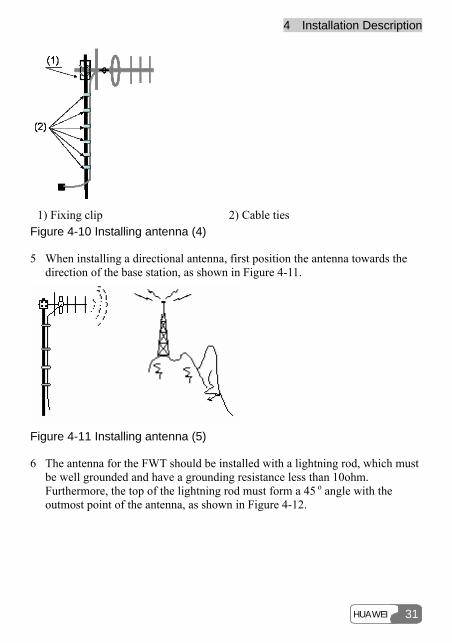
4 To ensure the reliable fastening of the antenna, the antenna feeder should be bound with the mast each meter, as shown in Figure 4-10.
44 IInnssttaallllaattiioonn DDeessccrriippttiioonn
HUAWEI 31
1) Fixing clip 2) Cable ties
Figure 4-10 Installing antenna (4)
5 When installing a directional antenna, first position the antenna towards the direction of the base station, as shown in Figure 4-11.
Figure 4-11 Installing antenna (5)
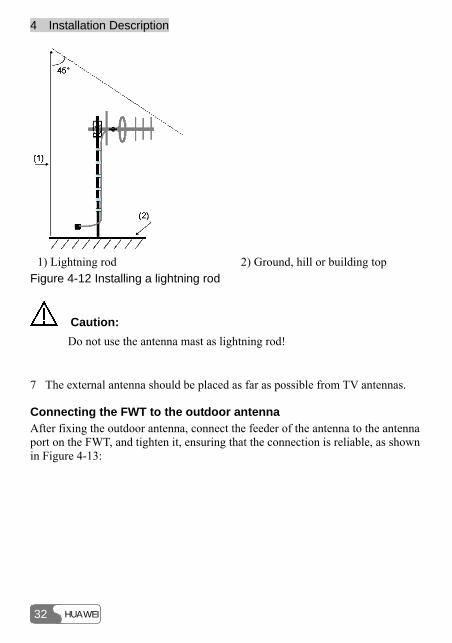
6 The antenna for the FWT should be installed with a lightning rod, which must be well grounded and have a grounding resistance less than 10ohm. Furthermore, the top of the lightning rod must form a 45 o angle with the outmost point of the antenna, as shown in Figure 4-12.
44 IInnssttaallllaattiioonn DDeessccrriippttiioonn
HUAWEI 32
1) Lightning rod 2) Ground, hill or building top
Figure 4-12 Installing a lightning rod
Caution: Do not use the antenna mast as lightning rod!
7 The external antenna should be placed as far as possible from TV antennas.
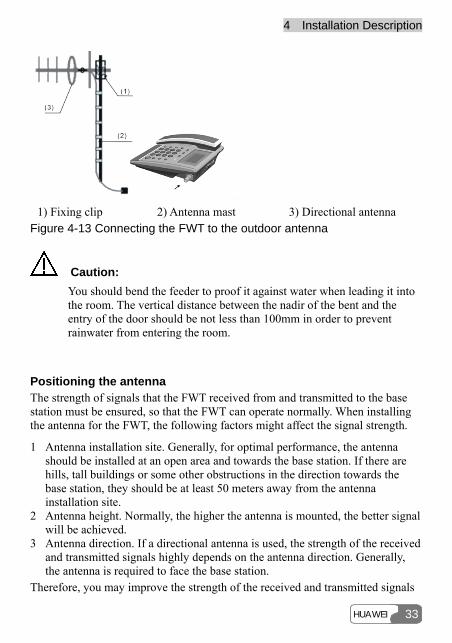
Connecting the FWT to the outdoor antenna After fixing the outdoor antenna, connect the feeder of the antenna to the antenna port on the FWT, and tighten it, ensuring that the connection is reliable, as shown in Figure 4-13:
44 IInnssttaallllaattiioonn DDeessccrriippttiioonn
HUAWEI 33
1) Fixing clip 2) Antenna mast 3) Directional antenna
Figure 4-13 Connecting the FWT to the outdoor antenna
Caution: You should bend the feeder to proof it against water when leading it into the room. The vertical distance between the nadir of the bent and the entry of the door should be not less than 100mm in order to prevent rainwater from entering the room.
Positioning the antenna The strength of signals that the FWT received from and transmitted to the base station must be ensured, so that the FWT can operate normally. When installing the antenna for the FWT, the following factors might affect the signal strength.
1 Antenna installation site. Generally, for optimal performance, the antenna should be installed at an open area and towards the base station. If there are hills, tall buildings or some other obstructions in the direction towards the base station, they should be at least 50 meters away from the antenna installation site.
2 Antenna height. Normally, the higher the antenna is mounted, the better signal will be achieved.
3 Antenna direction. If a directional antenna is used, the strength of the received and transmitted signals highly depends on the antenna direction. Generally, the antenna is required to face the base station.
Therefore, you may improve the strength of the received and transmitted signals
44 IInnssttaallllaattiioonn DDeessccrriippttiioonn
HUAWEI 34
by changing the antenna installation site, height, and direction. The antenna positioning mentioned later refers to the application combining these three methods.
Viewing the receive signal strength The FWT provides you with the function of measuring the receive signal strength, specifically as follows:
1 Searching the signal Power on the FWT. Wait for a while, until the received signal strength indicator appears or the dialing tone can be heard after you pick up the handset. Five minutes later, if there is no signal indicator or the dialing tone, please adjust the direction of the antenna. If the antenna is moved around 360o and there is still no signal indicator, it indicates that the signal condition is really bad. Move the antenna to the direction where the dialing tone can be heard after you pick up the handset.
2 Viewing the signal strength You can view the signal strength through the received signal strength indicator on the display screen of the FWT. Refer to the "Display Screen Description".
Mounting Mode
Horizontal Mode When the FWT is placed horizontally, the place should be flat, shadowy and ventilated to facilitate the FWT to eliminate heat.
Wall Mounting Mode The FWT can be placed vertically on the wall.
Installation preparation 1 Confirm the handset retaining clip state Before installation, confirm whether the handset retaining clip is as the same as shown in Figure 3-1, that is, the bulge is upwards. If it is not, pull the button, as shown in Figure 4-14, out of the slot, turn it around and then put it back so that the handset will not fall down when the FWT is placed vertically.
44 IInnssttaallllaattiioonn DDeessccrriippttiioonn
HUAWEI 35
Figure 4-14 Handset retaining clip installation
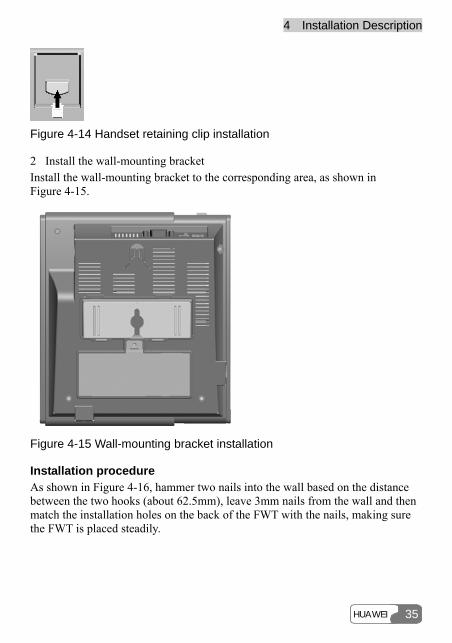
2 Install the wall-mounting bracket Install the wall-mounting bracket to the corresponding area, as shown in Figure 4-15.
Figure 4-15 Wall-mounting bracket installation
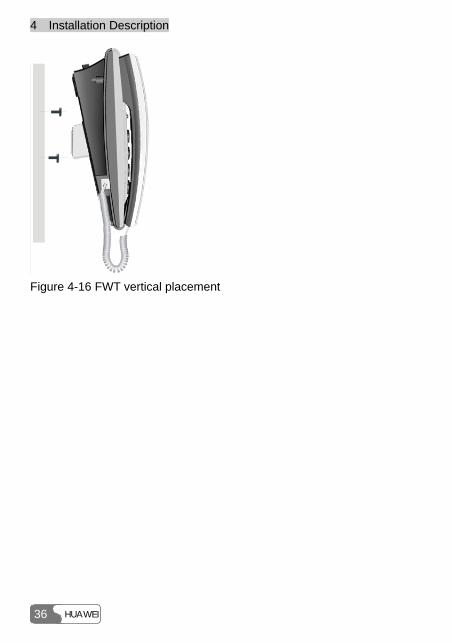
Installation procedure As shown in Figure 4-16, hammer two nails into the wall based on the distance between the two hooks (about 62.5mm), leave 3mm nails from the wall and then match the installation holes on the back of the FWT with the nails, making sure the FWT is placed steadily.
44 IInnssttaallllaattiioonn DDeessccrriippttiioonn
HUAWEI 36
Figure 4-16 FWT vertical placement
HUAWEI 37
5 Quick Start
Do as follows, you can manage how to answer and make a call through the FWT in a short time.
1 As shown in Figure 3-4, insert one end of the spiral cord into the jack at the end of the handset and the other end into the jack on the main unit.
2 Install the power adapter or the battery. For the details, refer to the “ 4 Installation Description”.
3 Turn on the FWT and wait a few seconds for the FWT searching and registering in the network until indicators such as time and signal appear. Adjust the antenna to ensure fine signal strength.
4 Pick up the handset and input a call number after hearing the dialing tone. Pressing <CALL/REDIAL>, you can dial out the number.
5 When there is a call incoming and the FWT is in standby state, you can pick up the handset or press <HANDFREE> or <CALL/REDIAL> to answer the call.
6 You can set the time for auto dialing. By default, it is seven seconds. Perform the following steps for this function:
Press <MENU> to access the function menu. Press the <UP/DOWN> scroll key to select <Settings>. Press the <UP/DOWN> scroll key to select <Personal>. Press the <UP/DOWN> scroll key to select <Auto-dial Time>.
Note: <Auto-dial Time> means that the phone number you keyed in is dialed automatically at the time you set without pressing the <CALL> key. If the time you set for auto dialing is too short, an incomplete number may be dialed before you key in the whole number.
HUAWEI 39
6 Basic Operations
Note: The standby state mentioned in this chapter indicates that the FWT is not in conversation state.
Preparation The following should be confirmed before you use the FWT.
Whether the spiral cord is correctly connected with the handset and the main unit, as shown in Figure 3-4, and whether the spiral cord is completely inserted into the port;
Whether the external power adapter is correctly connected or whether the battery is installed.
Turning On Turn on the FWT. The display screen will glitter for a few seconds. When time and signal indicators appear, picking up the handset, you can hear the dialing tone, indicating the FWT is ready for conversation operation. Before the conversation, please adjust the angle of antenna or the position of the FWT to make sure the best signal strength.
Using R-UIM Card (Optional) There are two working modes for the FWT inserted with R-UIM card, including machine-card locked mode and unlocked mode.
66 BBaassiicc OOppeerraattiioonnss
HUAWEI 40
Note: For whether your FWT needs the R-UIM card and which mode should be adopted, please consult the carrier.
Machine-Card Locked Mode For this mode, the FWT must be bound with a specified R-UIM card.
The FWT and the R-UIM card should be matched in model; otherwise, they may not work normally.
Power on the FWT:
The display screen shows "Invalid Card". It indicates that the R-UIM card does not match the FWT. Please insert a matched card. If the problem still remains, please consult the carrier.
The display screen shows "RUIM Lock Fail". It indicates that the machine-card locked mode does not function. Please consult the carrier.
Machine-Card Unlocked Mode For this mode, the FWT and the R-UIM card are not bound with each other. Any model of R-UIM cards can be cooperated with a specified FWT.
Making a Call
Note: Because of different settings from the carrier, the following cases may
occur; The number shown on the display screen is different from the number
you dial; The number you enter cannot be dialed out; For more details, consult the carrier.
66 BBaassiicc OOppeerraattiioonnss
HUAWEI 41
Making a Call Directly When dialing out, if you press "0" key for a moment, you will enter a "+", standing for "00". There are two modes to make a call.
Mode I:
Pick up the handset or press <HANDFREE>. Dial a telephone number after hearing the dialing tone. When you input the second number, you can view the prompt "<CALL> to dial" on the screen. After inputting the entire number, you need to wait for seven seconds and the FWT will automatically call the number, or press <CALL/REDIAL> to call the number immediately;
When finishing the conversation, you can replace the handset or press <HANDFREE> again to end the call.
Note: You can set the wait time for auto dial-out of the FWT through entering “##58*n#” on the keypad, where n is in the range 0 to 9. Setting n to 0 will disable the auto dial-out function of the FWT. Otherwise, the FWT will automatically dial out your desired number in n seconds. By default, n is 7 seconds.
Mode II:
Directly dial a telephone number without picking up the handset or pressing <HANDFREE>. When you input the second number, you can view the prompt "<CALL> to dial" on the screen. After inputting the entire number, press <CALL/REDIAL> and then the FWT will automatically switch to the hands-free mode and call the number immediately;
When finishing the conversation, press <HANDFREE> to end the call.
Note: The FWT can support 32 digital numbers at most; Pressing <CANCEL> once, you can delete an input number. If you
press the key for 3 seconds, you can delete the entire input numbers; Pressing <END>, you can end the current dialing operation.
66 BBaassiicc OOppeerraattiioonnss
HUAWEI 42
Making a Call from Phone Book You can find and select a telephone number from the phone book.
1 Press <MENU> to enter the "Main Menu" options; 2 Select [Phone Book], and then press <OK> to enter it; 3 Select [View], and then press <OK> to enter it; 4 Select a telephone number; 5 Press <OK> twice, and then select [Dial] in the "Options" Menu; 6 Press <OK> to dial out.
Querying and Dialing a Number from Call Records You can query any record of dialed, received and missed calls, and dial out a corresponding number.
1 Press <MENU>; 2 Find [Records], and then press <OK>; 3 Find [Dialled], [Received] or [Missed], and then press <OK>; 4 Browse the related records and select the desired one, and then press <OK>; 5 Select [Dial], and then press <OK> to dial out.
Querying and Dialing a Number from Messages You can query any message, and dial out a corresponding number.
1 Press <MENU>; 2 Find [Messages], and then press <OK>; 3 Find [Inbox], and then press <OK>; 4 Browse the messages and select the desired one, and then press <OK> to
display the message content; 5 Press <OK> to enter the "Options" menu; 6 Select [Dial], and then press <OK> to dial out.
Speed Dialing If you have set and saved a speed dialing number, you can press only one numeric key and dial out the telephone number. Refer to "Speed Dialing ".
1 Press one numeric key (1-9) according to your settings; 2 Press <CALL/REDIAL> to dial out.
66 BBaassiicc OOppeerraattiioonnss
HUAWEI 43
Redialing In the standby state, press <CALL/REDIAL> to dial out the latest number you dialed.
Answering a Call Under the FWT stand-by status, you can select to.
Pick up the handset to answer a call; Press <HANDFREE> to answer a call; Press <CALL/REDIAL> to answer a call; Press <END> to refuse a call.
Besides, you are allowed to answer any call except when the FWT is in the conversational status. When you hear a ringing of an incoming call,
If the handset is already picked up, press <HANDFREE> or <CALL/REDIAL> to answer the call;
If <HANDFREE> is already pressed down, pick up the handset or press <CALL/REDIAL> to answer the call.
Note: Pressing <END>, you can hang up the call during the conversation and
replace the handset or press <HANDFREE> again (depending on the state you answer the call) so that the FWT can return to standby state;
Call ID Display (CID) service needs special commission from telecom carriers. For more information, consult the local carrier.
Hands-free Mode Switchover If you were in handset conversation mode and wanted to switch to hands-free conversation mode, press <HANDFREE> and put back the handset after seeing
appearing. Then, you can talk in hands-free conversation mode.
You can switch to handset conversation mode from hands-free conversation mode by directly picking up the handset.
66 BBaassiicc OOppeerraattiioonnss
HUAWEI 44
Supplementary Services
Note: For the specific supplementary services of the FWT, consult the carrier. The supplementary services need special commission. This section only introduces some typical supplementary services.
Three-way Calling
Caution: Three-way calling service needs special commission from the carrier. For the details, consult the local carrier.
Following are typical operation procedures of three-way calling. For more information, consult the carrier.
1 You have been connecting with user A. 2 Press <R> or <CALL/REDIAL> or flap the heaver (you still connects with
user A and he can hear some music), and then input user B's telephone number and press <CALL/REDIAL>.
3 User B answers the call. 4 Press <R> again and then three-way calling starts. 5 If you do not enable the call transfer function, the conversation between you,
user A and B will completely end after you hang up; however, if you enable the call transfer function, user A and B can continue their conversation after you hang up.
Call Transfer
Caution: Call transfer service needs special commission from the carrier. For the details, consult the local carrier.
66 BBaassiicc OOppeerraattiioonnss
HUAWEI 45
Following are typical operation procedures of call transfer. For more information, consult the carrier.
1 You have been connecting with user A. 2 Press <R> or <CALL/REDIAL> or flap the heaver (you still connects with
user A and he can hear some music), and then input user B's telephone number and press <CALL/REDIAL>.
3 Hearing the ring-back tone, hang up the call (without need of waiting for user B answering the call). Call transfer is finished and user A and B can communicate.
Emergency Call Dialing the emergency number, you can use the emergency call service provided by the carrier. For the details, consult the carrier.
Call ID Display (CID) You can view the incoming call number when hearing the ringing tone. For the details, consult the carrier.
Voice Volume Tuning The FWT voice volume is divided into 4 levels. From the lowest to the loudest, they are level 1 to level 4. Following is the specific tuning method.
When the FWT is in conversation state, you press either the key <UP> or <DOWN>, the “VOL X (1-4)” interface appears on the display screen, showing the current volume level. You can tune the volume by pressing the key <UP> or <DOWN>. In the event that you pick up the handset, you will tune the earphone volume while in the event that you press <HANDFREE>, you will tune the hands-free volume. Press the key <UP> or <DOWN> to tune the volume. Pressing the key <DOWN>, you can turn down the volume while pressing the key <UP>, you can turn up the volume. The FWT will automatically save the volume setting.
66 BBaassiicc OOppeerraattiioonnss
HUAWEI 46
Note: The FWT will automatically save the volume setting and will keep it until you tune it next time.
Turning Off Turn the FWT switch to "OFF".
Note: You are recommended to turn off the FWT before you cut off the external power supply so that other users who call your number will hear the prompt that your FWT has been powered off.
HUAWEI 47
7 Phone Book
You can save groups of contact entries, including telephone number and related name, into the FWT or the R-UIM card.
A maximum of 250 groups of contact entries can be saved and registered in the phone book of the FWT. Each entry can include telephone number (a maximum of 32 digits) and related name (a maximum of 11 characters);
Contact entries can be saved and registered in the phone book of the R-UIM card. The capacity depends on the R-UIM card, and the maximum capacity is 250 entries.
Entering the "Phone Book" Interface 1 Press <MENU> to enter the "Main Menu" options; 2 Find [Phone Book], and then press <OK> to enter it.
Selecting Memory
Note: If your FWT is of the type that does not need R-UIM card, this menu will not appear.
You can choose to save a telephone number to the FWT or to the R-UIM card.
After you enter the "Phone Book" interface,
1 Find [Memory], and then press <OK>; 2 Select an option: [Phone]: The telephone number is saved into the FWT; [RUIM]: The telephone number is saved into the R-UIM card;
3 Press <OK>.
77 PPhhoonnee BBooookk
HUAWEI 48
Saving a Number to Phone Book After you enter the "Phone Book" interface,
1 Find [Add], and then press <OK>; 2 In the "Number" input interface, enter a telephone number, and then press
<OK>; 3 In the "Name" input interface, enter a name, and then press <OK>. If both memories are full, it will prompt not enough space.
Browsing Phone Book After you enter the "Phone Book" interface,
1 Select [View], and then press <OK>; 2 Find what you need, press <OK> to display the details. The displaying order is shown as follows when you browse the phone book:
1 Records without names. If there are many records without names, these records do not have order.
2 Space; 3 Number; 4 English characters; 5 Punctuations or other special characters (according to actual GB code of this
character); 6 Simplified Chinese characters (according to the order of Chinese Pingyin). In the "Phone Book" interface, you can instant find a phone information by inputting the first letter of a first name. The interface will not change if without the person’s information in the phone book.
For example, a1, b2 and c3 are saved personal information, in the phone book browsing interface, if you input “a”, and then the a1 information appears at the first line of the interface. If you input “b”, and then the b2 information appears at the first line of the interface.
Modifying Contact Entry After you enter the "Phone Book" interface,
1 Find [View], and then press <OK>;
77 PPhhoonnee BBooookk
HUAWEI 49
2 Find the entry to be modified, press <OK> to display the details; 3 Press <OK> to enter the "Options" menu, select <Modify>, and then press
<OK> to enter it; 4 In the "Number" input interface, modify the telephone number, and then press
<OK>; 5 In the "Name" input interface, modify the name, and then press <OK>. After adding a contact entry, you can modify it. See step 3-5.
Deleting Contact Entry
Deleting One by One After you enter the "Phone Book" interface,
1 Find [View], and then press <OK>; 2 Find the entry to be deleted, press <OK> to display the details; 3 Press <OK>, and then select [Delete]; 4 Press <OK> to confirm. After adding a contact entry, you can delete it. See step 3-4.
Deleting All After you enter the "Phone Book" interface,
1 Fine [Delete All], and press <OK>; 2 Press <OK> to confirm, or press <END> to exit.
Copying Contact Entry
Note: If your FWT is of the type that does not need R-UIM card, this menu will not appear.
After you enter the "Phone Book" interface,
1 Find [Copy], and then press <OK>; 2 Select an option:
77 PPhhoonnee BBooookk
HUAWEI 50
[Phone to RUIM]: The contact entries will be copied from the FWT to the R-UIM card;
[RUIM to Phone]: The contact entries will be copied from the R-UIM card to the FWT;
3 Press <OK>. If the memory is full, it prompts no enough space and then return to the phone book menu.
Groups The Phone book entries can be divided into as much as eight groups. A user may:
View entries in a different group; Add phone numbers to a different group; Rename a group; Delete all entries from a group.
Viewing Entries After entering the phone book menu,
1 Find the [Group] item and press <OK>; 2 Select a group and press <OK>; 3 Select [Group members] and press <OK> to enter; 4 After finding the information you need, press <OK> and the screen will
display the details of this entry.
Adding Entries After entering the phone book menu,
1 Find the [Group] item and press <OK>; 2 Select a group and press <OK>; 3 Select [Add member] and press <OK>; 4 Select entries you want to add to this groups and press <OK>.
Clearing All Entries from a Group After entering the phone book menu,
1 Find the [Group] item and press <OK>;
77 PPhhoonnee BBooookk
HUAWEI 51
2 Select a group and press <OK>; 3 Select [Clear group] and press <OK>; 4 Select “OK to clear” and press <OK> to delete all the entries from the
selected group.
Renaming a Group After entering the phone book menu,
1 Find the [Group] item and press <OK>; 2 Select a group and press <OK>; 3 Select [Rename] and press <OK>; 4 Enter a new group name and press <OK> to finish renaming the group.

HUAWEI 53
8 Call Record
The FWT can record the latest 20 pieces of answered calls and missed calls respectively, and 100 pieces of outgoing calls. The records of answered calls, missed calls and dialed calls are saved into separate memory segments. The latest record is shown on top.
Entering the "Records" Interface 1 Press <MENU>; 2 Find [Records], and then press <OK> to enter it.
Received Calls You can view the information about received calls using the “Received” function. You can dial a phone number from the records or, delete one or all records, or save them into the phone book.
After you enter the "Records" interface,
1 Find [Received], and then press <OK>; 2 Browse all the received calls, select a desired one, and then press <OK>; 3 Select an option, [Dial]: Dial out; [Delete]: Delete it; [Delete All]: Delete all records. Press <OK> to confirm, or press <END> to
abort; [Save]: Enter the corresponding name, and then press <OK> to save;
4 Press <OK>.
Missed Calls You can view the information about missed calls using the “Missed” function. You can dial a phone number from the records or, delete one or all records, or

88 CCaallll RReeccoorrdd
HUAWEI 54
save them into the phone book.
After you enter the "Records" interface,
1 Find [Missed], and then press <OK>; 2 Browse all the missed calls, select a desired one, and then press <OK>; 3 Select an option, [Dial]: Dial out; [Delete]: Delete it; [Delete All]: Delete all records. Press <OK> to confirm, or press <END> to
abort; [Save]: Enter the corresponding name, and then press <OK> to save;
4 Press <OK>.
Dialed Calls You can view the information about dialed calls using the “Dialled” function. You can dial a phone number from the records or, delete one or all records, or save them into the phone book.
After you enter the "Records" interface,
1 Find [Dialled], and then press <OK>; 2 Browse all the dialed calls, select a desired one, and then press <OK>. 3 Select an option, [Dial]: Dial out; [Delete]: Delete it. However, if the charging mode has been enabled, you will
not be able to delete the dialed phone numbers; [Delete All]: Delete all records. Press <OK> to confirm, or press <END> to
abort. However, if the charging mode has been enabled, you will not be able to delete the dialed phone numbers;
[Save]: Enter the corresponding name, and then press <OK> to save; 4 Press <OK>.
HUAWEI 55
9 Message
A maximum of 22 messages can be saved in the inbox, while a maximum of 40 messages can be saved in the outbox. Each message can support up to 160 characters.
The glittering indicator on the display screen indicates that the inbox is full and there is no space for new messages. You need to delete some messages.
When the outbox is full, the FWT will automatically delete the oldest message with a new message coming.
Entering the "Messages" Interface 1 Press <MENU>; 2 Find [Messages], and press <OK> to enter it.
Browsing Messages
When a new message is received, the display screen will show with a beep. Now you can choose from the message menu to, enter the inbox and view the messages. An unread message is marked by a "*" on its left.
After you enter the "Messages" interface,
1 Find [Inbox], and then press <OK>; 2 Browse all the messages, select the desired one, and then press <OK> to
display the details; 3 Press <OK> to enter the "Options" menu; 4 Select an option, [Reply]: After enter the message content, press <OK>, the telephone number
appears for you to confirm-Press <OK> to choose priority-Press <OK> to reply it;
99 MMeessssaaggee
HUAWEI 56
[Forward]: The display screen shows the message to be forwarded-Press <OK> and enter a telephone number (or press <MENU> to find your desired telephone number)-Press <OK> and choose priority;
[Dial]: Dial out the corresponding telephone number; [Save Number]: Enter the name, and then press <OK> to save the contact
entry to the phone book; [Delete]: Delete the message; [Delete All]: Delete all messages. Press <OK> to confirm, or press <END> to
exit; 5 Press <OK>. Or in the standby state, press <OK> to read new messages.
Writing a Message After you enter the "Messages" interface,
1 Find [New Message], and then press <OK>; 2 Enter the message content, and then press <OK>; 3 In the "Number" input interface, you can select one of the following
operations: Enter the telephone number, and then press <OK>; Press <MENU> to find your desired telephone number;
4 Press <OK>; 5 Enter the settings of delivery priority. You can select "Normal", "Urgent" or
"Emergency", and then press <OK> to send the short message.
Voice Mailbox The voice message can be received either by the ordinary message or by the voice mailbox. For the specific receiving method, consult the local carrier.
When a voice message comes, the screen will display . To receive a voice message through the voice mailbox, follow the steps below.
After you enter the "Messages" interface,
1 Find [Voice Mail], and then press <OK>; 2 If there are voice messages, the screen will display the related information
about the voice messages.
99 MMeessssaaggee
HUAWEI 57
Note: To use the voice mailbox service, you must first apply for the service from the carrier. For more details, consult the local carrier.
Outbox Whether the message is sent successfully or not, it will be saved to the outbox. If the outbox already has 40 messages, a new incoming message will be saved to the outbox and the earliest one will be removed from it.
After you enter the "Messages" interface,
1 Find [Outbox], and then press <OK> to enter it; 2 Browse all the messages, select the desired one, and then press <OK> to
display the details; 3 Press <OK> to enter the "Options" menu; 4 Select an option, [Forward]: The display screen shows the message to be forwarded. You can
modify the content and then Press <OK> and enter a telephone number (or press <MENU> to find your desired telephone number)-Press <OK> and choose priority
[Delete]: Delete the message; 5 Press <OK>.
Settings After you enter the "Messages" interface,
1 Find [Settings], and then press <OK>; 2 Select an option, [Valid Period]: Select the valid period of your message saved in the message
center. Options are 8 hours, 24 hours, 3 days, 1 week and maximum. By default, it is 8 hours. After setting, press <Ok> to save the setting;
[Notification]: Select whether to ask for notification after your outgoing message is received successfully. Options are "On" and "Off". After setting, press <Ok> to save the setting;
99 MMeessssaaggee
HUAWEI 58
[Call Back Num]: Enter a call back number, which could be different from the caller number. If set, this number will appear when the message receiver selects to reply or dial. Otherwise, the caller number will appear;
[Retransfer]: Set retransfer for the message delivery failure. There are two options shown as below: “Retry Times”: to select the retry times. Options are "1 time", "3 times", "5 times" and "Off"; “Retry Period”: to select the interval between retries. Options are "1 min", "3 min" and "5 min";
3 Press <OK>.
Note: The network conditions may be different. For the settings of valid
period, please consult the local carrier; If the message retransfer function is enabled, once a retry succeeds,
other retries will stop.
HUAWEI 59
10 FWT Settings
Entering the "Settings" Interface 1 Press <MENU>; 2 Find [Settings], and then press <OK>; 3 Select an option, [Common]: Enter the common setting menu; [Personal]: Enter the personal setting menu; [Advanced]: Enter the advanced setting menu;
4 Press <OK>.
Common Setting
Adjusting Volumes of Ringing and SMS
Ringing Volume There are 4 ringing volume levels from 1 through 4. The adjusting method is shown as follows:
After entering the common setting menu,
1 Find the [Volume Setting] and press <OK> to enter; 2 Find the [Ring Volume] and press <OK>; 3 Select a volume level and press <OK> to save it.
SMS Volume There are 4 volume levels from 1 through 4 from low to high. The adjusting method is shown as follows:
After entering the common setting menu,
1 Find the [Volume Setting] item and press <OK> to enter; 2 Find the [SMS Volume] and press <OK>; 3 Select a volume level and press <OK> to save it.
1100 FFWWTT SSeettttiinnggss
HUAWEI 60
Speed Dialing The FWT provides the speed dialing function, which is implemented by setting a speed dialing key for some telephone number.
After you enter the "Common" interface,
1 Find [Speed Dials], and then press <OK> to enter it; 2 Find the speed dial location, and press <OK> to enter the "Edit Key X"
interface; 3 Enter the telephone number; 4 Press <OK> to save the settings. For example, a telephone number "12345678" is set to a speed dialing key "5". Press <5> in the FWT standby state, and then press <CALL/REDIAL>. The FWT will switch to hands-free state and automatically dial the number "12345678".
IP Card Calling The FWT provides the IP card calling function. The relative information about the IP card is pre-configured in the FWT. After the function is enabled, press <IP> in the FWT standby state. The FWT will automatically dial out according to the IP card information.
You must press <PAUSE> to separate each part of the IP card information. Press <PAUSE> once, the display screen shows one "P".
After you enter the "Common" interface,
1 Find [IP Number], and then press <OK> to enter it; 2 Enter the IP card information, such as IP access code+P+user
account+P+password, and then press <OK> to save the settings. For example, after the above setting, press <IP> in the FWT standby state. The FWT will automatically dial the IP access code, user account, and password in turn. Key in a telephone number after the system prompt, and then wait to connect with the peer.
1100 FFWWTT SSeettttiinnggss
HUAWEI 61
Note: One pressing of <PAUSE> (P) indicates a delay for 2 seconds. You can
add one or more "P"s during the voice prompt to satisfy the time delay; Up to 32 digits can be input between or before "P"s and the maximum
length of the entire information, including "P"s, is 60 digits.
Hotline Settings The FWT supports hotline function. That is, in the standby state, the FWT can automatically dial out a hotline number if you pick up the handset or press <HANDFREE> but do not dial after a while.
After you enter the "Common" interface,
1 Find [Hotline], and then press <OK> to enter it; 2 Select an option, [Start Time]: Set the waiting time for auto-dial. Value range is 2–9 seconds; [Activation]: Select to enable or disable the function. Options are "On" and
"Off"; [Number]: Enter a hotline number;
3 Press <OK>. For example, the start time is set as 5 seconds, the hotline number is "12345678" and the activation option is "On". If you pick up the handset or press <HANDFREE> but do not dial after 5 seconds, the FWT will automatically dial out "12345678".
Long-Distance Call Locking The FWT provides the long-distance call locking function. You can set and enable the function. When somebody dials a long-distance call number, the FWT will prompt him to enter the correct password. Otherwise, the long-distance call cannot be dialed out.
After you enter the "Common" interface,
1 Find [Long Distance], and then press <OK>; 2 Enter a correct password of 4 digits. By default, it is "0000"; 3 Select whether to enable the long-distance call locking function, [On]: Enable the function;
1100 FFWWTT SSeettttiinnggss
HUAWEI 62
[Off]: Disable the function; 4 Press <OK>. If the long-distance call locking function is enabled, the FWT will prompt you to "Enter Password" when you dial a long-distance call number. After the password is entered correctly, you can make a long-distance call.
If the long-distance call locking function is enabled, the password is 1234 and the long-distance call number is 01012345678, you can follow the second method in the “Making a Call Directly”.
Do not pick up the handset nor press <HANDFREE>. Directly key in the number "01012345678", and then press <CALL/REDIAL>. The FWT will prompt you to "Enter Password". Enter the password "1234". The FWT will automatically switch to hands-free state and dial out the number.
Note: If you have set the password and enabled the long-distance call locking
function, the FWT will always ask you to input the password when you dial a long-distance call number, except when you dial the number using an IP card;
If you forget the password, please contact the carrier.
Personal Setting
Language Settings After you enter the "Personal" interface,
1 Find [Language], and then press <OK> to enter it; 2 Select an option, [ ]: The language display will switch to Chinese; [English]: The language display will switch to English;
3 Press <OK>.
Modifying Password You can modify the password of long-distance call locking.
1100 FFWWTT SSeettttiinnggss
HUAWEI 63
After you enter the "Personal" interface,
1 Find [Password], and then press <OK> to enter it; 2 Enter the old password of 4 digits. By default, it is "0000"; 3 Enter a new password of 4 digits. Enter the new password again. The FWT
will automatically save your settings and return to the "Personal" interface.
Caution: You should enter the entire new password and then confirm it after the prompt. Otherwise, the FWT will not save the new password.
Auto Hyphen Settings You can enable or disable auto hyphen function for displaying a telephone number.
After you enter the "Personal" interface,
1 Find [Auto Hyphen], and then press <OK> to enter it; 2 Select an option, [On]: Enable the function; [Off]: Disable the function;
3 Press <OK>.
Alarm Setting You can set 3 alarms at the same time.
After you enter the "Personal" interface,
1 Find [Alarm], and then press <OK> to enter it; 2 Select an option: [once]/[every day]/[Mon-Fri]/[Mon-Sat]/[off]; 3 Set “Alarm time”; 4 Press <OK>.
Setting Ringing Type After entering the personal menu, you can set the ringing type for incoming call.

1100 FFWWTT SSeettttiinnggss
HUAWEI 64
1 Find the [Ring Volume] item and press <OK> to enter; 2 Select one from the 11 ringing types and then press <OK> to save it.
Advanced Setting
DTMF Settings Dual-Tone MultiFrequency (DTMF) refers to the tone when you press a key on the FWT. The FWT supports the settings of DTMF length.
After you enter the "Advanced" interface,
1 Find [DTMF], and then press <OK> to enter it; 2 Select an option, [Normal]: Set normal DTMF length; [Long]: Set long DTMF length;
3 Press <OK>.
Voice Privacy Settings The FWT supports voice privacy function, which could enhance security and privacy of a conversation. If the voice privacy mode has been enabled, you will see on the screen, shown as below.
Call Time 00-00Pulse 0000
Please follow the following steps after you enter the "Advanced" interface,
1 Find [Voice Privacy], and then press <OK> to enter it; 2 Select an option, [Standard]: Disable the function; [Enhanced]: Enable the function;
3 Press <OK>.
HUAWEI 65
11 Introduction to Text Entry
Text Entry Supported The FWT supports the following types of text entry:
abc: to input lower case alphanumeric symbols; ABC: to input upper case alphanumeric symbols; eng: to input lower case words; ENG: to input upper case words; 123: to input numbers.
When to Use Text Entry Adding a contact entry in the phone book, including telephone number and
name; Modifying a contact entry in the phone book; Editing messages.
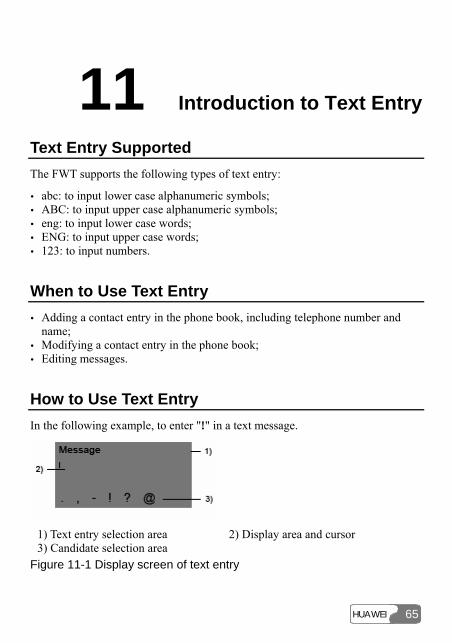
How to Use Text Entry In the following example, to enter "!" in a text message.
1) Text entry selection area 2) Display area and cursor 3) Candidate selection area
Figure 11-1 Display screen of text entry
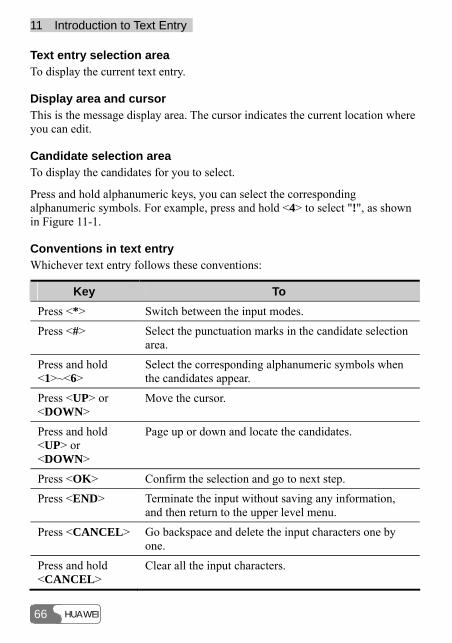
1111 IInnttrroodduuccttiioonn ttoo TTeexxtt EEnnttrryy
HUAWEI 66
Text entry selection area To display the current text entry.
Display area and cursor This is the message display area. The cursor indicates the current location where you can edit.
Candidate selection area To display the candidates for you to select.
Press and hold alphanumeric keys, you can select the corresponding alphanumeric symbols. For example, press and hold <4> to select "!", as shown in Figure 11-1.
Conventions in text entry Whichever text entry follows these conventions:
Key To Press <*> Switch between the input modes.
Press <#> Select the punctuation marks in the candidate selection area.
Press and hold <1>~<6>
Select the corresponding alphanumeric symbols when the candidates appear.
Press <UP> or <DOWN>
Move the cursor.
Press and hold <UP> or <DOWN>
Page up or down and locate the candidates.
Press <OK> Confirm the selection and go to next step.
Press <END> Terminate the input without saving any information, and then return to the upper level menu.
Press <CANCEL> Go backspace and delete the input characters one by one.
Press and hold <CANCEL>
Clear all the input characters.
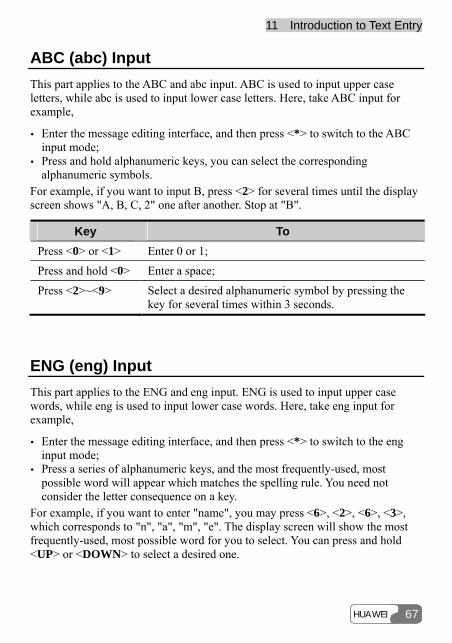
1111 IInnttrroodduuccttiioonn ttoo TTeexxtt EEnnttrryy
HUAWEI 67
ABC (abc) Input This part applies to the ABC and abc input. ABC is used to input upper case letters, while abc is used to input lower case letters. Here, take ABC input for example,
Enter the message editing interface, and then press <*> to switch to the ABC input mode;
Press and hold alphanumeric keys, you can select the corresponding alphanumeric symbols.
For example, if you want to input B, press <2> for several times until the display screen shows "A, B, C, 2" one after another. Stop at "B".
Key To Press <0> or <1> Enter 0 or 1;
Press and hold <0> Enter a space;
Press <2>~<9> Select a desired alphanumeric symbol by pressing the key for several times within 3 seconds.
ENG (eng) Input This part applies to the ENG and eng input. ENG is used to input upper case words, while eng is used to input lower case words. Here, take eng input for example,
Enter the message editing interface, and then press <*> to switch to the eng input mode;
Press a series of alphanumeric keys, and the most frequently-used, most possible word will appear which matches the spelling rule. You need not consider the letter consequence on a key.
For example, if you want to enter "name", you may press <6>, <2>, <6>, <3>, which corresponds to "n", "a", "m", "e". The display screen will show the most frequently-used, most possible word for you to select. You can press and hold <UP> or <DOWN> to select a desired one.
1111 IInnttrroodduuccttiioonn ttoo TTeexxtt EEnnttrryy
HUAWEI 68
Key To input Press <0> 0.
Press and hold <0> A space.
Press <1> Multiple characters for your choice.
Press <2>~<9> A matched English word.
123 Input If you want to input a series of numbers, you can switch to 123 input mode;
Enter the message editing interface, and then press <*> to switch to the 123 input mode.
Key To input Press and hold <0> A space.
Press <0>~<9> 0~9.

HUAWEI 69
12 Maintenance
1 Keep the FWT and its accessories away from children. 2 The FWT should be deployed in a clean and dry environment. A temperature
higher than 55°C or lower than -10°C maybe damage the FWT. If the FWT is covered with dust, please clean it with clean fine cloth. Be sure not to clean dust with cleanser or other chemical solvents.
3 Remove the battery from the FWT if you do not use the FWT for a long time. 4 If the FWT does not operate normally due to a failed battery, please replace
the battery in time or power on the FWT through a power adapter. 5 Contact the carrier in time if the FWT cannot work normally.
HUAWEI 71
13 Troubleshooting
The display screen keeps OFF after the FWT is turned on (no external power adapter is connected with the FWT). 1 Open the battery case to check whether the battery is installed. 2 If the battery has been installed, it means that the voltage of the battery
becomes weak. In this case, you need to power on the FWT with a power adapter.
The display screen keeps OFF after the FWT is turned on (an external power adapter is connected with the FWT). 1 It is likely that the voltage output by the power adapter can not meet the
requirement of the FWT. In this case, you need to check whether the AC input is normal, and whether the power adapter is the one accompanying the FWT.
2 It is also likely that the external voltage of the power adapter is lower or unstable, thus causing the case that the FWT can not operate normally. In this case, you need to check whether the external voltage of the power adapter is normal, or power on the FWT with a battery.
There is no signal indicator on the screen of the FWT. 1 Check whether the antenna has been installed properly. 2 If there is still no signal indicator, please contact the carrier to check whether
the signal covers the area of the FWT.
There is no time indicator on the screen of the FWT. 1 Check whether the antenna has been installed properly. 2 Adjust the antenna of the FWT or move the FWT to the location where the
signal can be received easily. 3 If there is still no time indicator, please contact the carrier to check whether
the signal covers the area of the FWT.
1133 TTrroouubblleesshhoooottiinngg
HUAWEI 72
Someone dials your terminal, prompt occurred like this “Sorry, the calling is out of service, please call later”, but dial a number from your terminal is normal. If the facsimile is not supported by network, this situation occurred because you selected “On” from “FAX Mode”. You need to tune off the PC facsimile function if you want to receive an incoming call normally. The operation is shown as follows:
1 Press <Menu> to enter function menu. 2 Press UP or DOWN direction key to select “Settings”. 3 Press <UP/DOWN> and select “Common”. 4 Press <UP/DOWN> and select “Data Service”. 5 Press <UP/DOWN> and select “FAX Mode” and than select “Off” to turn off
the PC facsimile function.
A caller ID is displayed on your terminal without ringing but dialing a number from your terminal is normal. It does not work even you press <CALL/REDIAL> key. If the facsimile is supported by network, this situation occurred because you selected “On” from “FAX Mode”. You need to tune off the facsimile function if you want to receive an incoming call normally. The operation is the same as the question 5 in “ 13 Troubleshooting”.
The screen sometimes displays no information and sometimes displays a power supply indicator and a glittering battery indicator after the FWT is turned off. No information on the screen is a normal status of the FWT after power-off. Displaying a power supply indicator and a glittering battery indicator indicates that the FWT is charging the battery.
Hear ring tone after hearing busy tone. Hearing ringing tone indicates that an external call is coming. If you are not in a conversation state, you can answer the call. For specific operations of answering a call, refer to the "Answering a Call".
Hear ringing tone when you are ready to dial or are dialing a number. Hearing ringing tone indicates that an external call is coming. If you are not in a conversation state, you can answer the call. For specific operations of answering a call, refer to the "Answering a Call".
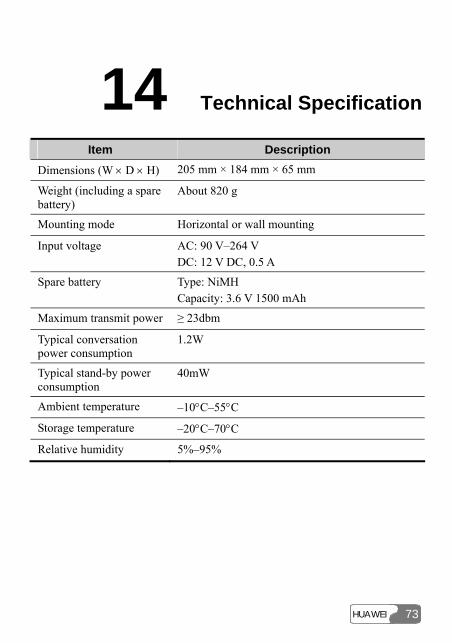
HUAWEI 73
14 Technical Specification
Item Description Dimensions (W × D × H) 205 mm × 184 mm × 65 mm
Weight (including a spare battery)
About 820 g
Mounting mode Horizontal or wall mounting
Input voltage AC: 90 V–264 V DC: 12 V DC, 0.5 A
Spare battery Type: NiMH Capacity: 3.6 V 1500 mAh
Maximum transmit power ≥ 23dbm
Typical conversation power consumption
1.2W
Typical stand-by power consumption
40mW
Ambient temperature –10°C–55°C
Storage temperature –20°C–70°C
Relative humidity 5%–95%
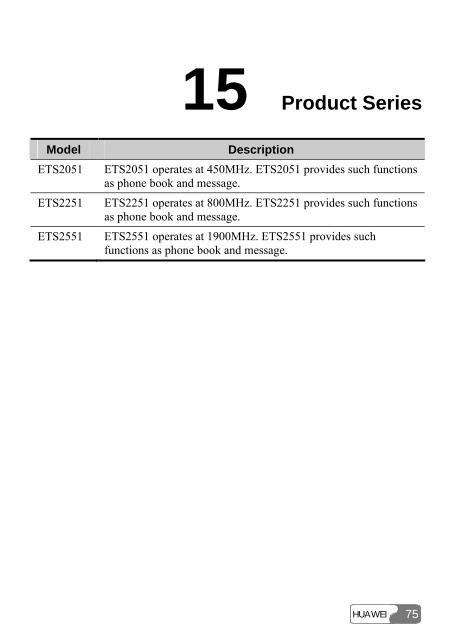
HUAWEI 75
15 Product Series
Model Description ETS2051 ETS2051 operates at 450MHz. ETS2051 provides such functions
as phone book and message.
ETS2251 ETS2251 operates at 800MHz. ETS2251 provides such functions as phone book and message.
ETS2551 ETS2551 operates at 1900MHz. ETS2551 provides such functions as phone book and message.

HUAWEI 77
16 Abbreviation
R-UIM Removable-User Identity Module
Ver: V2.22 BOM: 31015674