Embed Size (px)
Citation preview
Initial Log InGo to
www.mtdcommunity.com
1
- Enter User ID & Password you
received in the email
- Click “Log In”
2
Continued on Next Page
3
Follow the guidelines for creating a
new password3
2 2
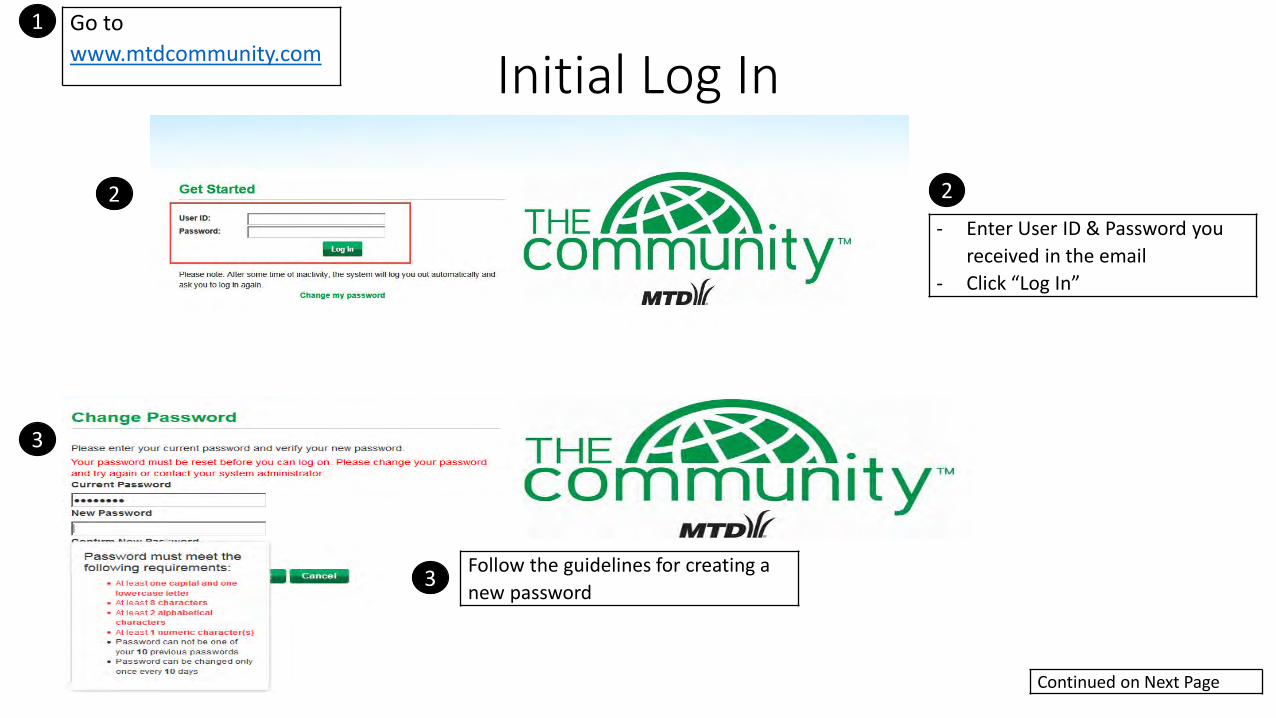
Initial Log In
2
Continued on Next Page
5
4
- Enter new password
- Re-enter new password
- Click Submit
4
Success!!! Click on “Continue”
3
5
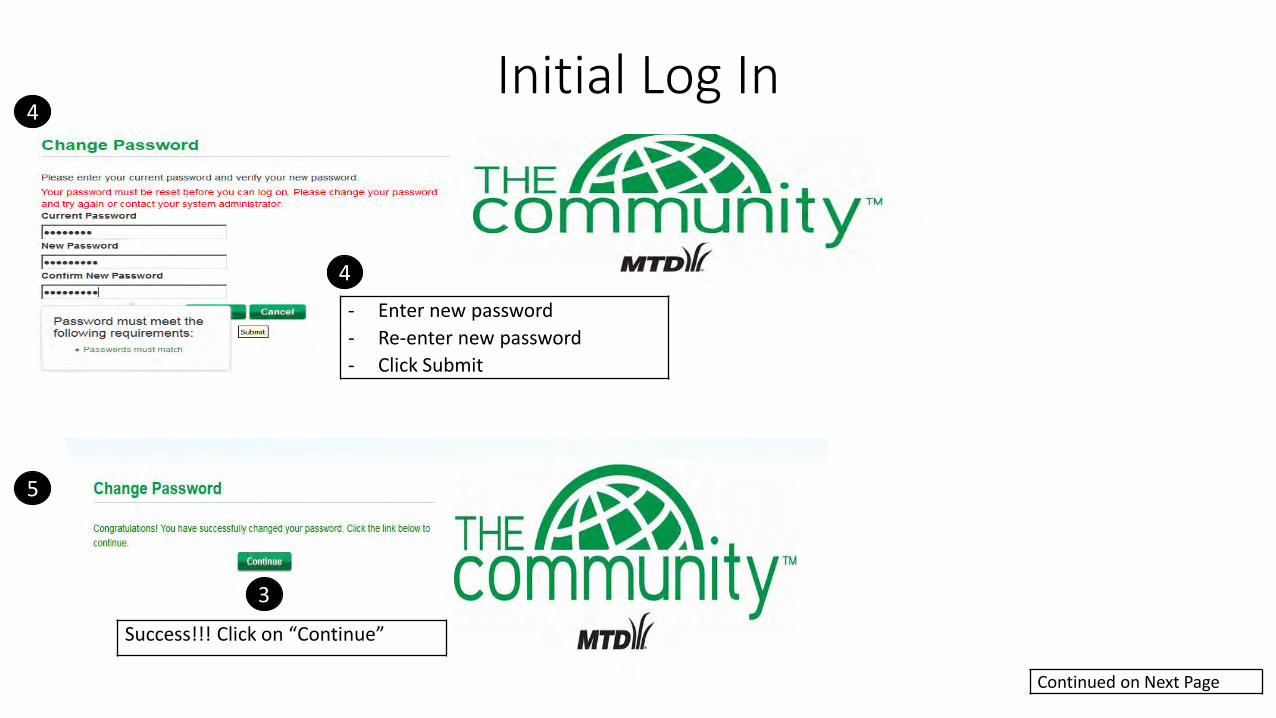
Initial Log InGet ready for the launch!

Download the Community Mobile App: iPhone Download instructions for the Cub Cadet Dealer Community App.
Click the Link in your email
for the iPhone Install. And
the App will install.
1
Find and click your settings app
on your phone. Access the
General Settings and then
Device Management. 2
You will see the MTD Products
app requesting security access.
Click on the App and Trust the
App. 3
22
2
3
3
3
1
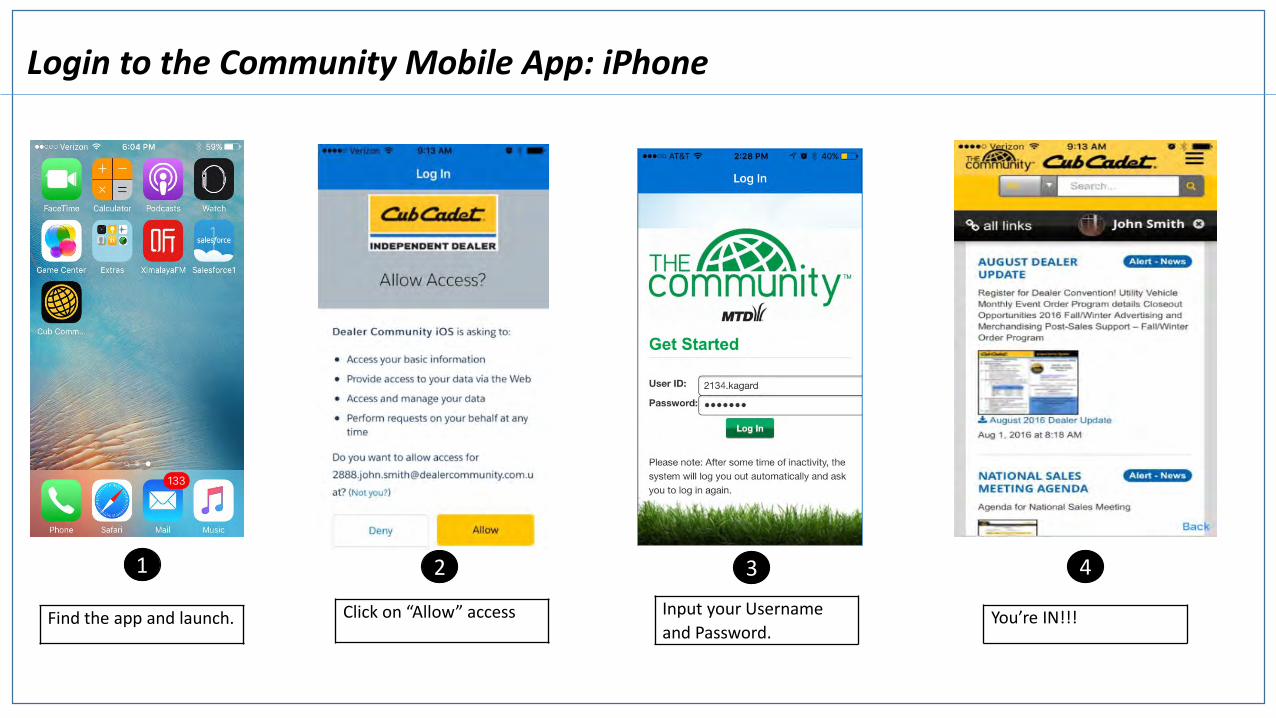
Login to the Community Mobile App: iPhone
Find the app and launch.
1
Input your Username
and Password.
2
You’re IN!!!
43
Click on “Allow” access
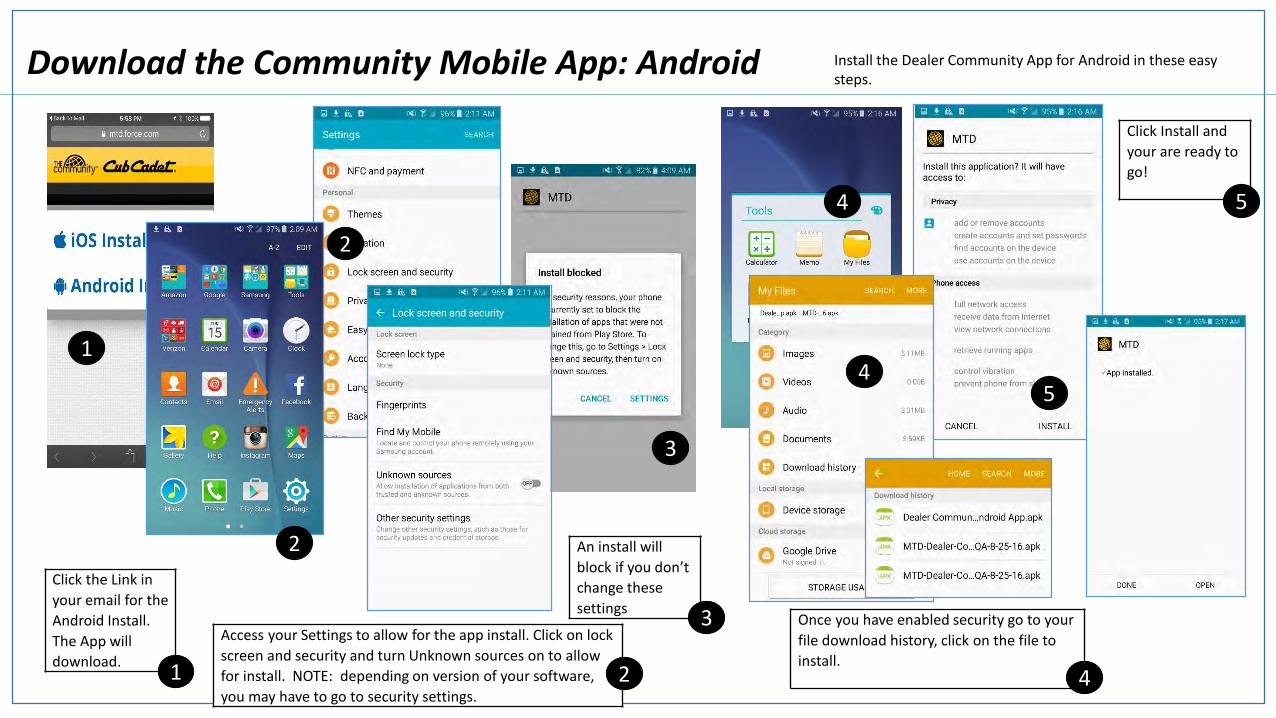
Download the Community Mobile App: Android Install the Dealer Community App for Android in these easy steps.
Click the Link in
your email for the
Android Install.
The App will
download. 1
Access your Settings to allow for the app install. Click on lock
screen and security and turn Unknown sources on to allow
for install. NOTE: depending on version of your software,
you may have to go to security settings.2
2
An install will
block if you don’t
change these
settings3
3
Once you have enabled security go to your
file download history, click on the file to
install.4
4
4
Click Install and
your are ready to
go!
5
5
1
2
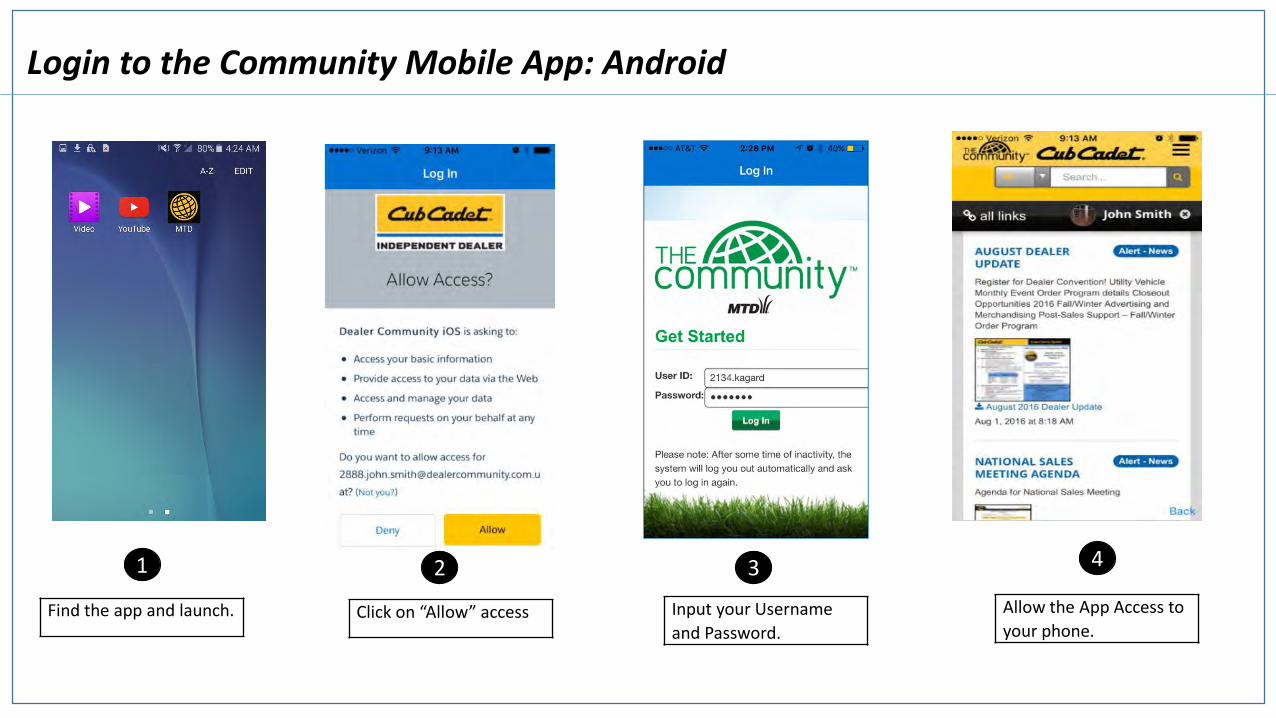
Login to the Community Mobile App: Android
Find the app and launch.
1
Input your Username
and Password.
3
Allow the App Access to
your phone.
42
Click on “Allow” access
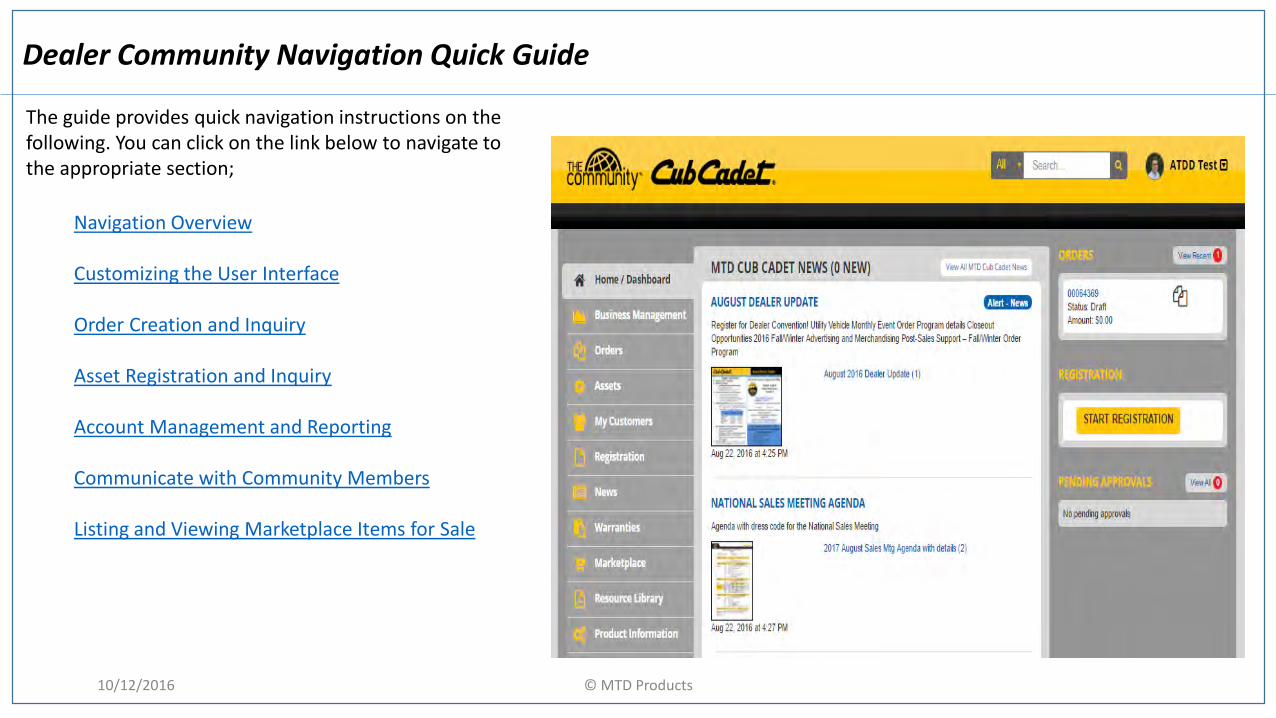
Dealer Community Navigation Quick Guide
10/12/2016
The guide provides quick navigation instructions on the following. You can click on the link below to navigate to the appropriate section;
Navigation Overview
Customizing the User Interface
Order Creation and Inquiry
Asset Registration and Inquiry
Account Management and Reporting
Communicate with Community Members
Listing and Viewing Marketplace Items for Sale
© MTD Products
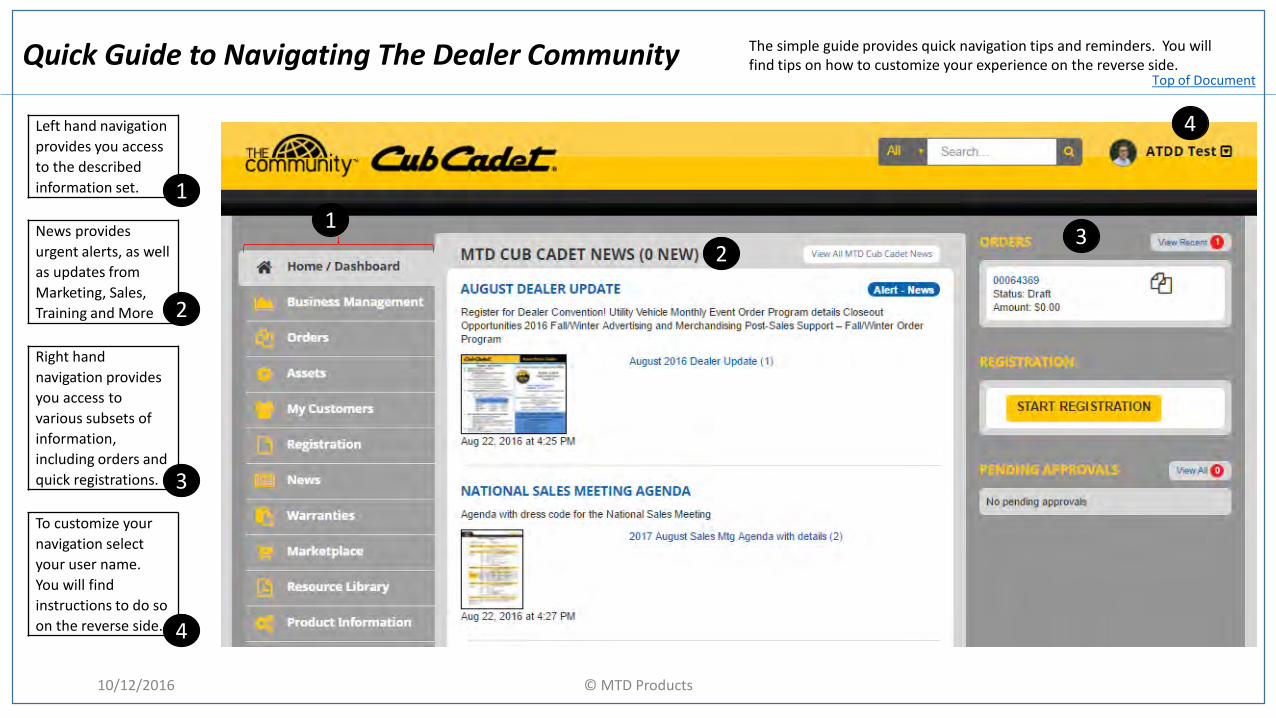
Left hand navigation
provides you access
to the described
information set.
1News provides
urgent alerts, as well
as updates from
Marketing, Sales,
Training and More
2
1
2
To customize your
navigation select
your user name.
You will find
instructions to do so
on the reverse side.
4
4
Right hand
navigation provides
you access to
various subsets of
information,
including orders and
quick registrations. 3
3
Quick Guide to Navigating The Dealer Community
10/12/2016
The simple guide provides quick navigation tips and reminders. You will find tips on how to customize your experience on the reverse side.
© MTD Products
Top of Document
Quick Guide to Navigating The Dealer Community
10/12/2016
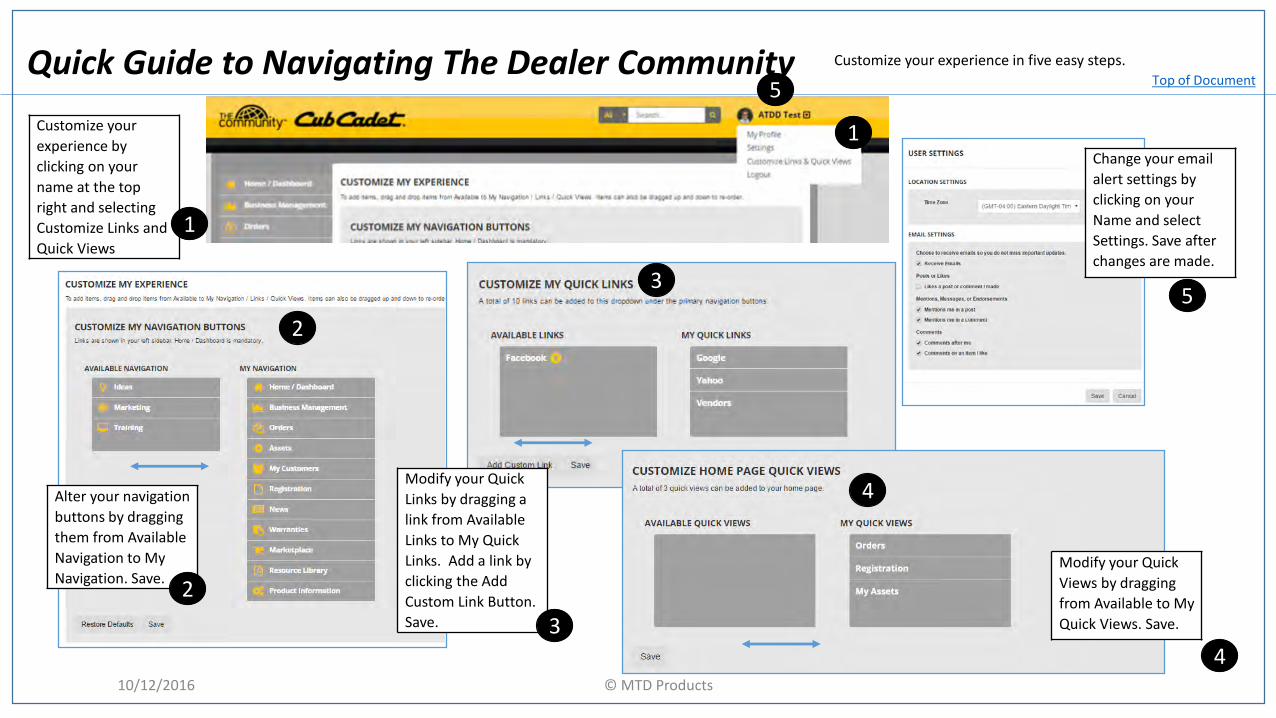
Alter your navigation
buttons by dragging
them from Available
Navigation to My
Navigation. Save.
Modify your Quick
Links by dragging a
link from Available
Links to My Quick
Links. Add a link by
clicking the Add
Custom Link Button.
Save.
Customize your experience in five easy steps.
© MTD Products
3
1
2
Customize your
experience by
clicking on your
name at the top
right and selecting
Customize Links and
Quick Views
1
2Modify your Quick
Views by dragging
from Available to My
Quick Views. Save.3
4
5
5
Change your email
alert settings by
clicking on your
Name and select
Settings. Save after
changes are made.
4
Top of Document
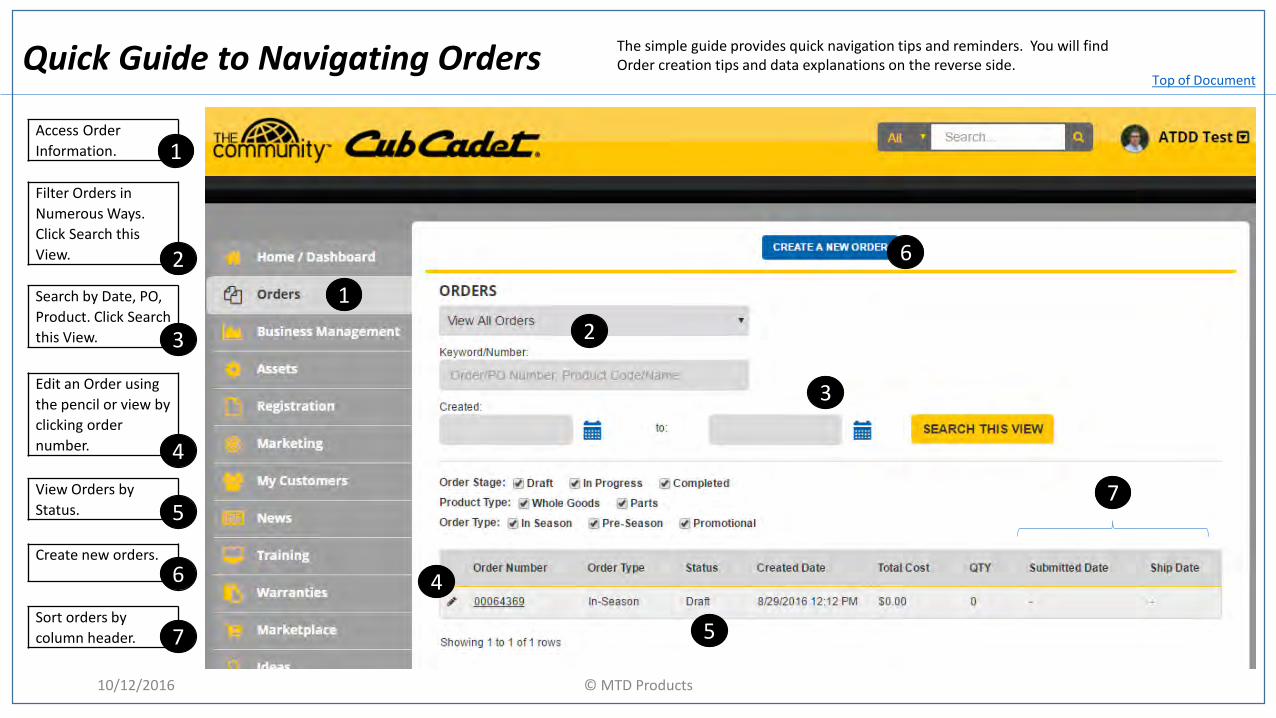
Access Order
Information.
1
Filter Orders in
Numerous Ways.
Click Search this
View.
2
1
2
Edit an Order using
the pencil or view by
clicking order
number. 4
4
View Orders by
Status. 5
5
Search by Date, PO,
Product. Click Search
this View. 3
3
Create new orders.
6
6
Quick Guide to Navigating Orders
10/12/2016
The simple guide provides quick navigation tips and reminders. You will findOrder creation tips and data explanations on the reverse side.
© MTD Products
Sort orders by
column header. 7
7
Top of Document
Quick Guide to Entering Orders
10/12/2016
1
2
3
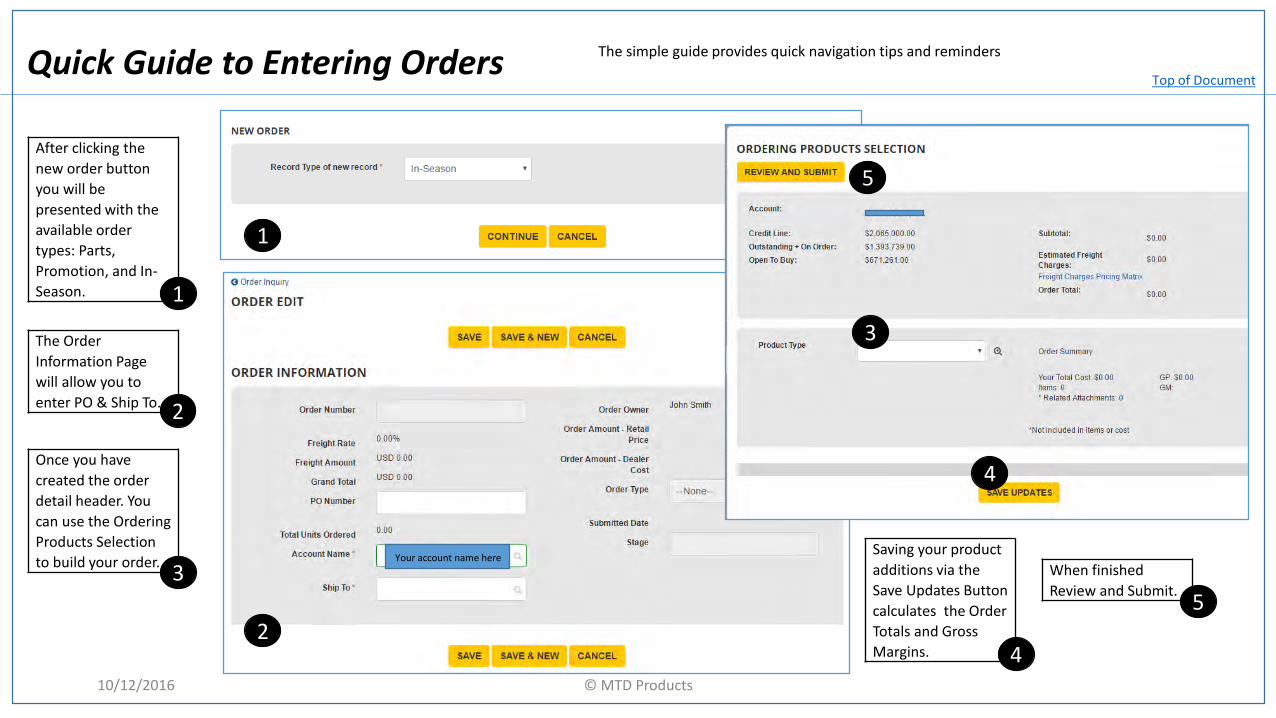
After clicking the
new order button
you will be
presented with the
available order
types: Parts,
Promotion, and In-
Season.
The Order
Information Page
will allow you to
enter PO & Ship To.
Once you have
created the order
detail header. You
can use the Ordering
Products Selection
to build your order.
1
4
2
3Saving your product
additions via the
Save Updates Button
calculates the Order
Totals and Gross
Margins. 4
When finished
Review and Submit.5
The simple guide provides quick navigation tips and reminders
© MTD Products
5
Top of Document
Your account name here
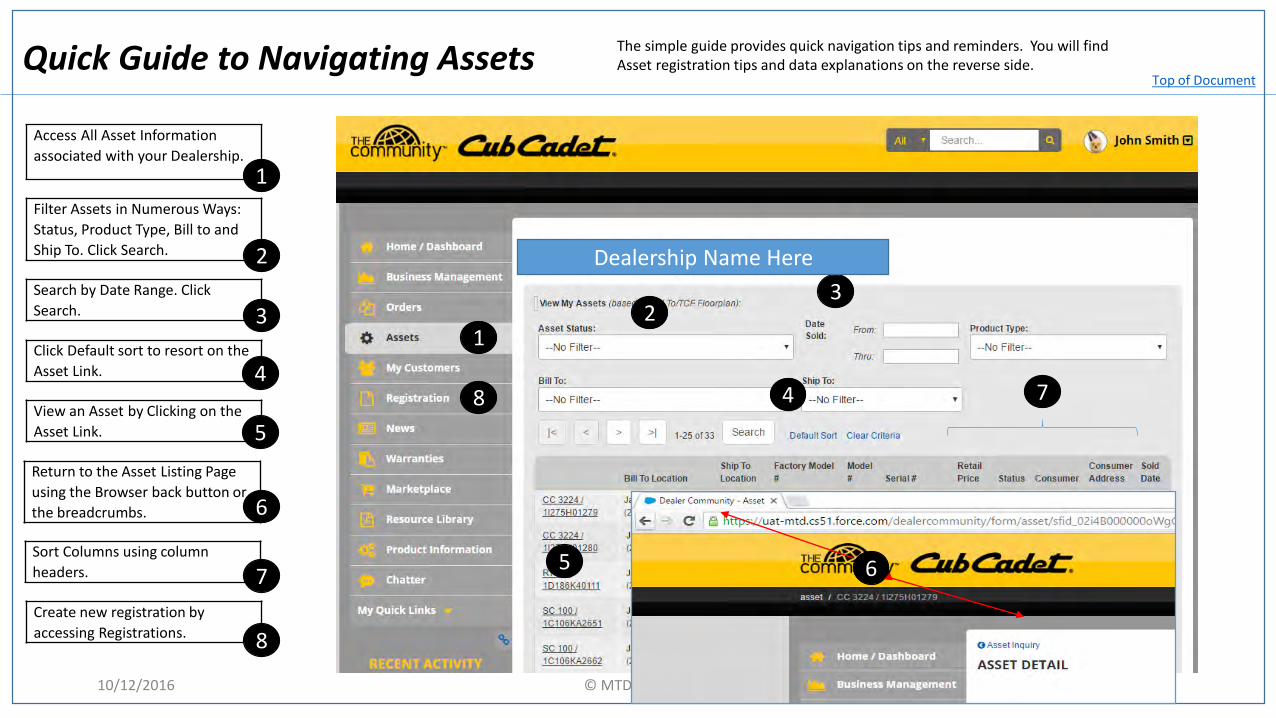
Access All Asset Information
associated with your Dealership.
1
Filter Assets in Numerous Ways:
Status, Product Type, Bill to and
Ship To. Click Search.
2
1
2
View an Asset by Clicking on the
Asset Link.
4
Sort Columns using column
headers.
8
Search by Date Range. Click
Search.
5
3
Create new registration by
accessing Registrations.
7
Quick Guide to Navigating Assets
10/12/2016
The simple guide provides quick navigation tips and reminders. You will findAsset registration tips and data explanations on the reverse side.
© MTD Products
Return to the Asset Listing Page
using the Browser back button or
the breadcrumbs.
5
Click Default sort to resort on the
Asset Link.
3
4
6
6
7
8
Top of Document
Dealership Name Here
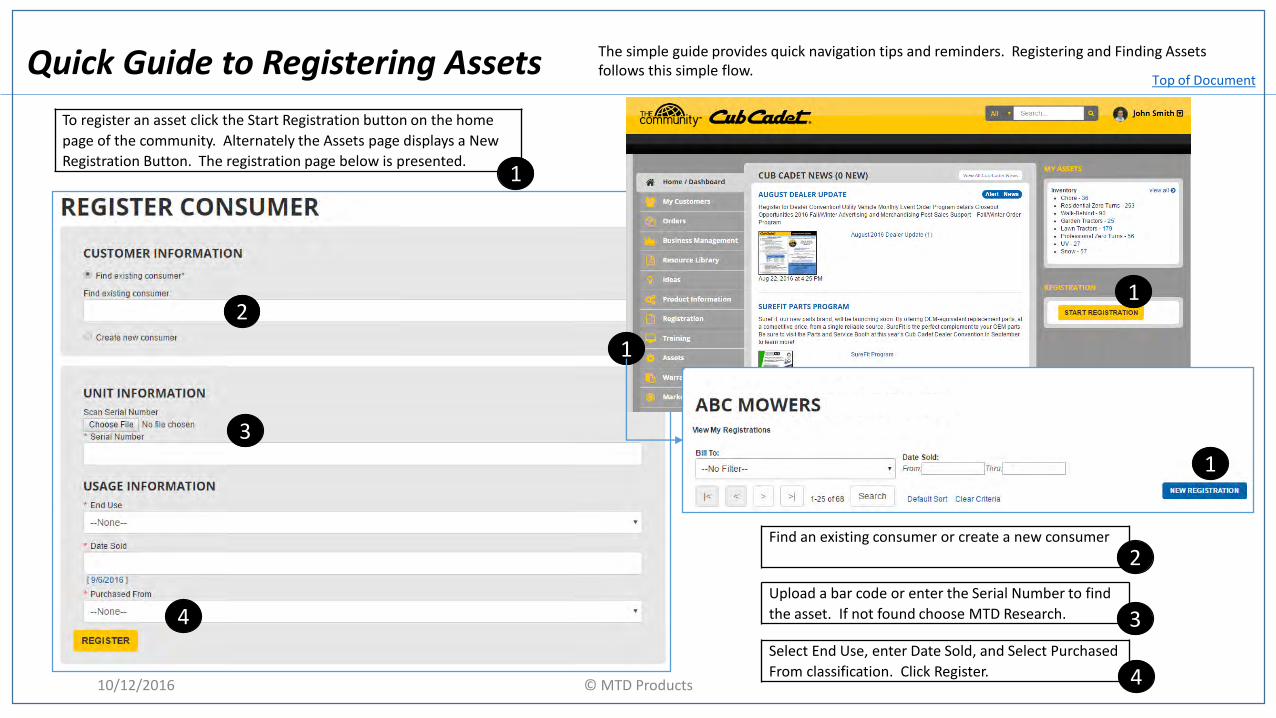
Find an existing consumer or create a new consumer
Select End Use, enter Date Sold, and Select Purchased
From classification. Click Register.
Quick Guide to Registering Assets
10/12/2016
The simple guide provides quick navigation tips and reminders. Registering and Finding Assetsfollows this simple flow.
© MTD Products
12
3
4
To register an asset click the Start Registration button on the home
page of the community. Alternately the Assets page displays a New
Registration Button. The registration page below is presented.
2
Upload a bar code or enter the Serial Number to find
the asset. If not found choose MTD Research.
4
1
1
3
1
Top of Document
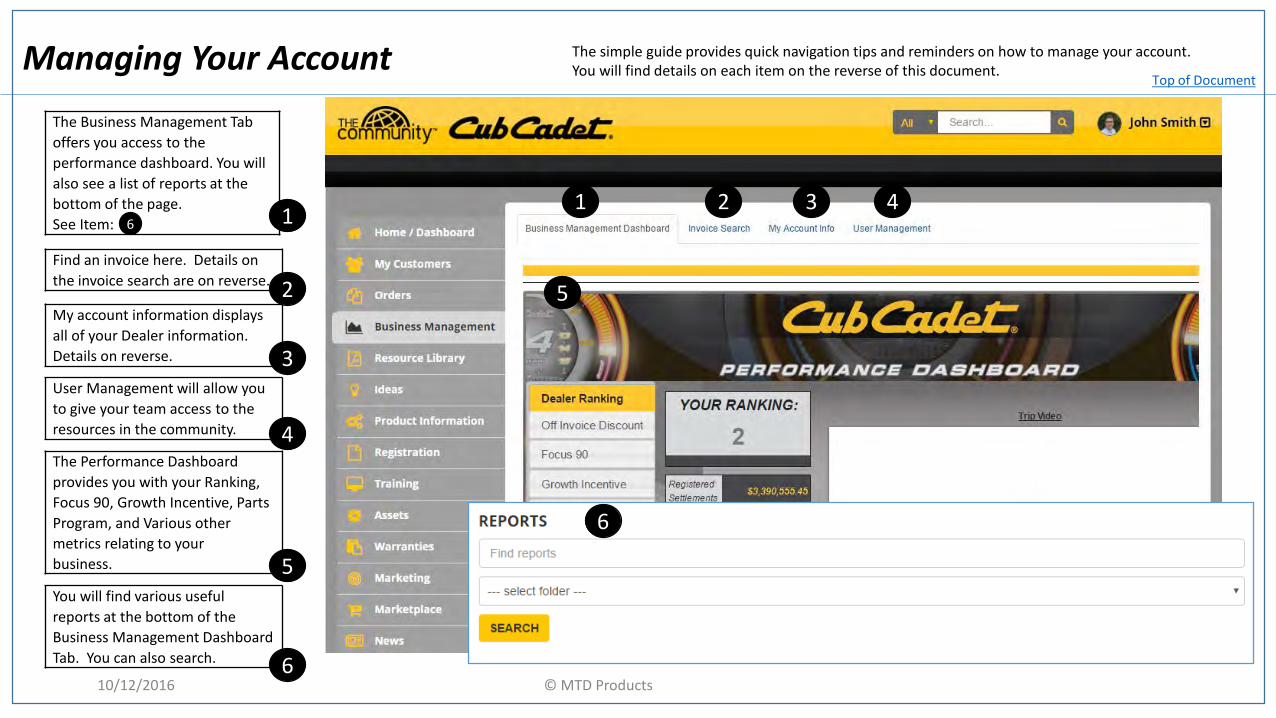
The Business Management Tab
offers you access to the
performance dashboard. You will
also see a list of reports at the
bottom of the page.
See Item:
Find an invoice here. Details on
the invoice search are on reverse.
1
User Management will allow you
to give your team access to the
resources in the community. 4The Performance Dashboard
provides you with your Ranking,
Focus 90, Growth Incentive, Parts
Program, and Various other
metrics relating to your
business. 5
My account information displays
all of your Dealer information.
Details on reverse. 3
You will find various useful
reports at the bottom of the
Business Management Dashboard
Tab. You can also search. 6
Managing Your Account
10/12/2016
The simple guide provides quick navigation tips and reminders on how to manage your account.You will find details on each item on the reverse of this document.
© MTD Products
1 2 3 4
5
6
6
2
Top of Document
Managing Your Account – the Tabs
10/12/2016
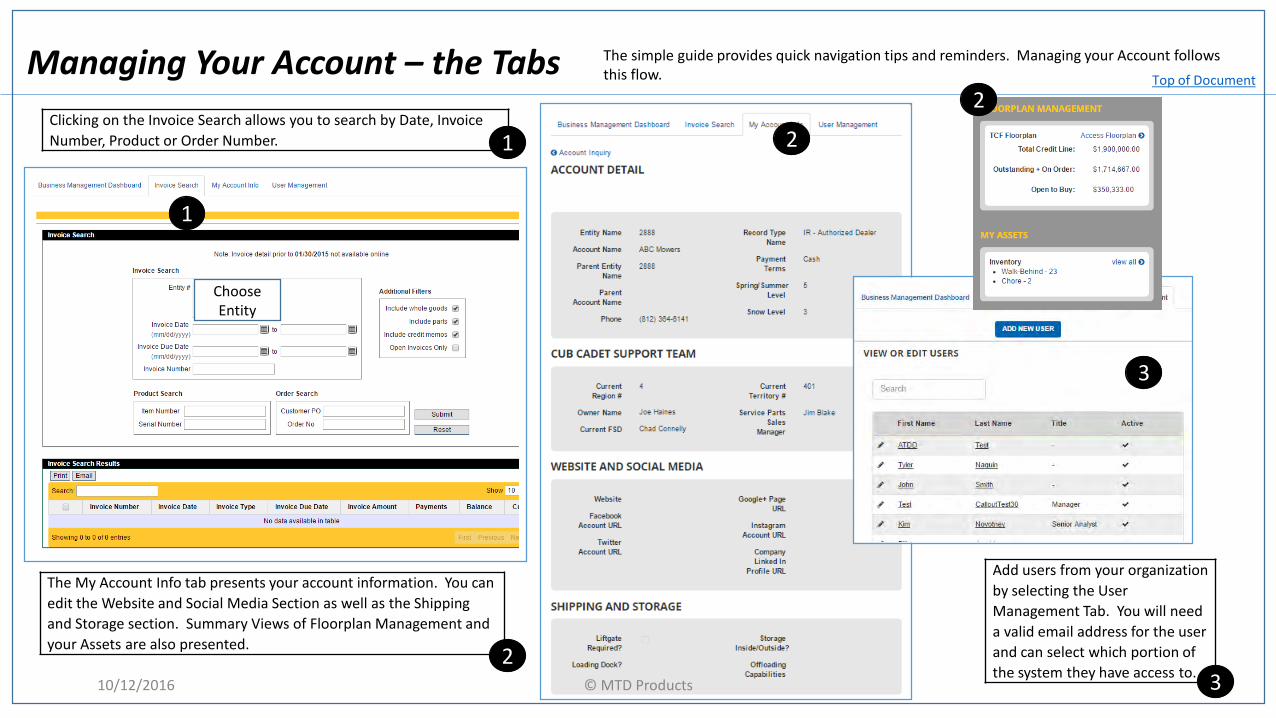
The simple guide provides quick navigation tips and reminders. Managing your Account followsthis flow.
© MTD Products
1
2Clicking on the Invoice Search allows you to search by Date, Invoice
Number, Product or Order Number.
The My Account Info tab presents your account information. You can
edit the Website and Social Media Section as well as the Shipping
and Storage section. Summary Views of Floorplan Management and
your Assets are also presented.
Add users from your organization
by selecting the User
Management Tab. You will need
a valid email address for the user
and can select which portion of
the system they have access to.
3
1
23
2Top of Document
Choose Entity
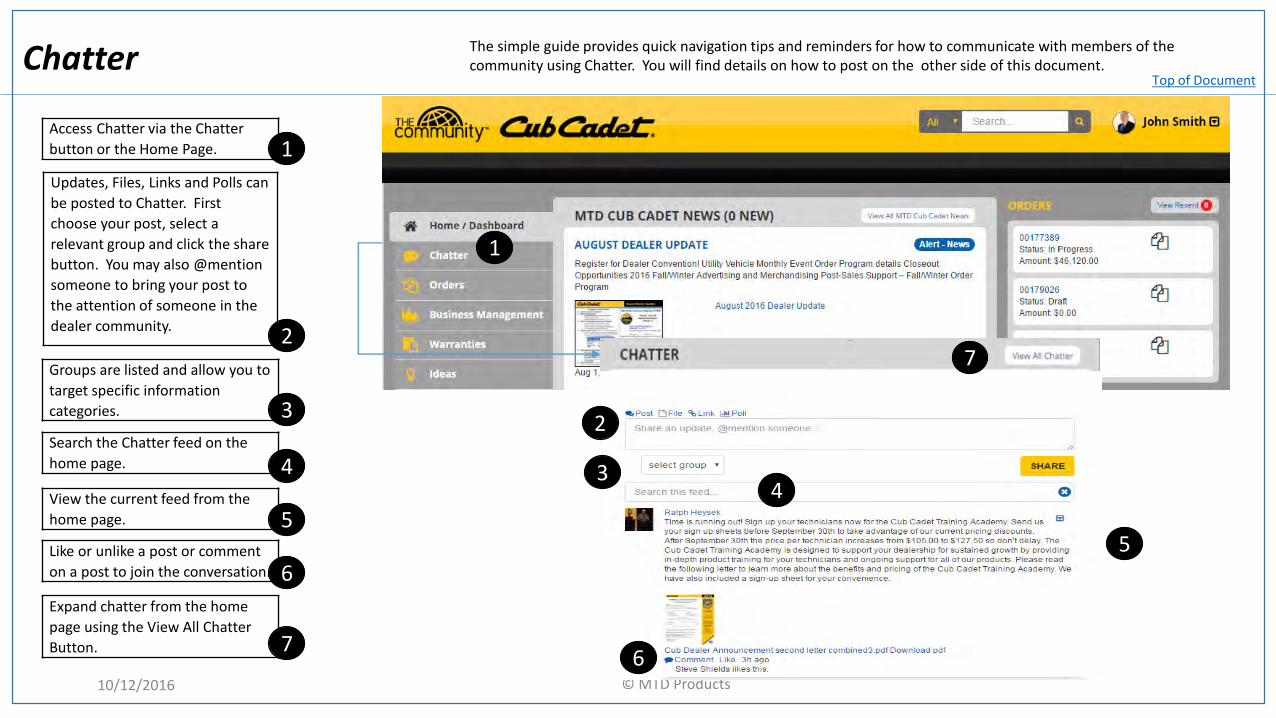
Like or unlike a post or comment
on a post to join the conversation.
Updates, Files, Links and Polls can
be posted to Chatter. First
choose your post, select a
relevant group and click the share
button. You may also @mention
someone to bring your post to
the attention of someone in the
dealer community.
Groups are listed and allow you to
target specific information
categories.
2
3
View the current feed from the
home page. 5
Search the Chatter feed on the
home page. 4
Chatter
10/12/2016
The simple guide provides quick navigation tips and reminders for how to communicate with members of the community using Chatter. You will find details on how to post on the other side of this document.
© MTD Products
1
2
Expand chatter from the home
page using the View All Chatter
Button. 7
5
Access Chatter via the Chatter
button or the Home Page. 1
7
6
Top of Document
2
6
7
34
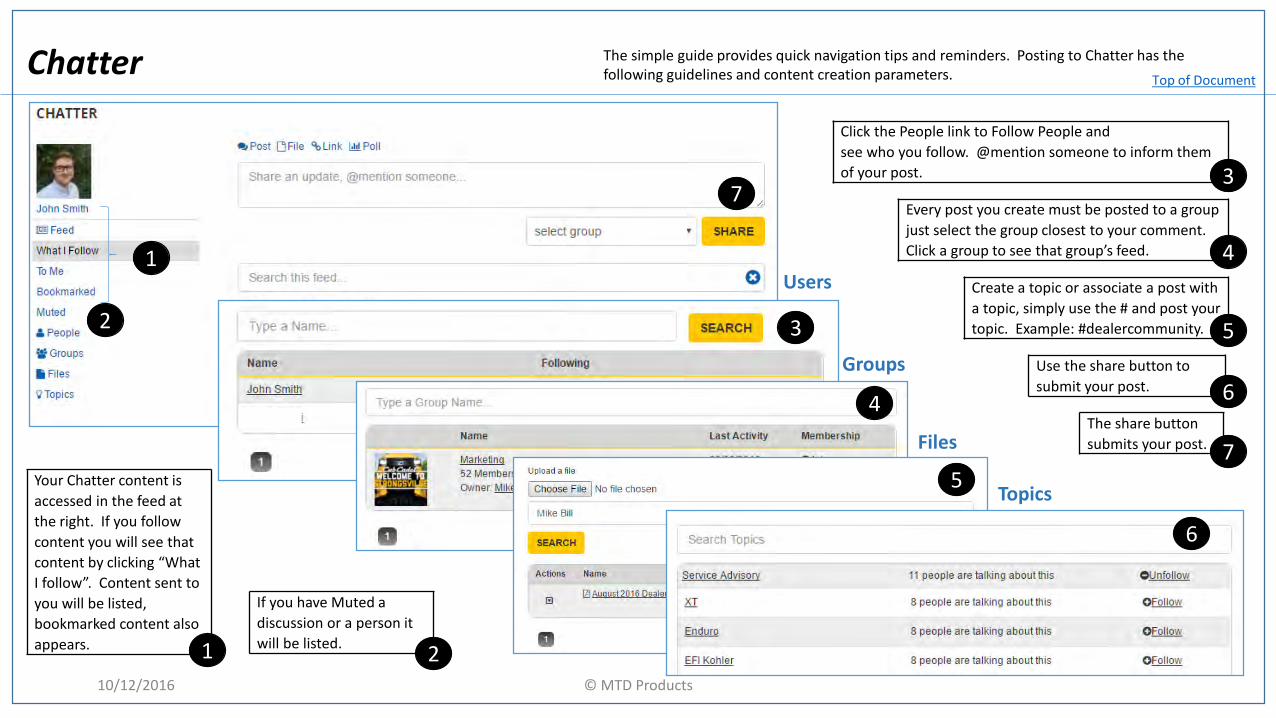
The simple guide provides quick navigation tips and reminders. Posting to Chatter has thefollowing guidelines and content creation parameters.Chatter
10/12/2016 © MTD Products
1
Your Chatter content is
accessed in the feed at
the right. If you follow
content you will see that
content by clicking “What
I follow”. Content sent to
you will be listed,
bookmarked content also
appears.
The share button
submits your post.
Every post you create must be posted to a group
just select the group closest to your comment.
Click a group to see that group’s feed.
1
If you have Muted a
discussion or a person it
will be listed.
2
2
Click the People link to Follow People and
see who you follow. @mention someone to inform them
of your post.
3
4
3
Users
Groups
Topics
Create a topic or associate a post with
a topic, simply use the # and post your
topic. Example: #dealercommunity.
4
7
7
Files
5
6
Use the share button to
submit your post.
5
6
Top of Document
Marketplace
10/12/2016© MTD Products
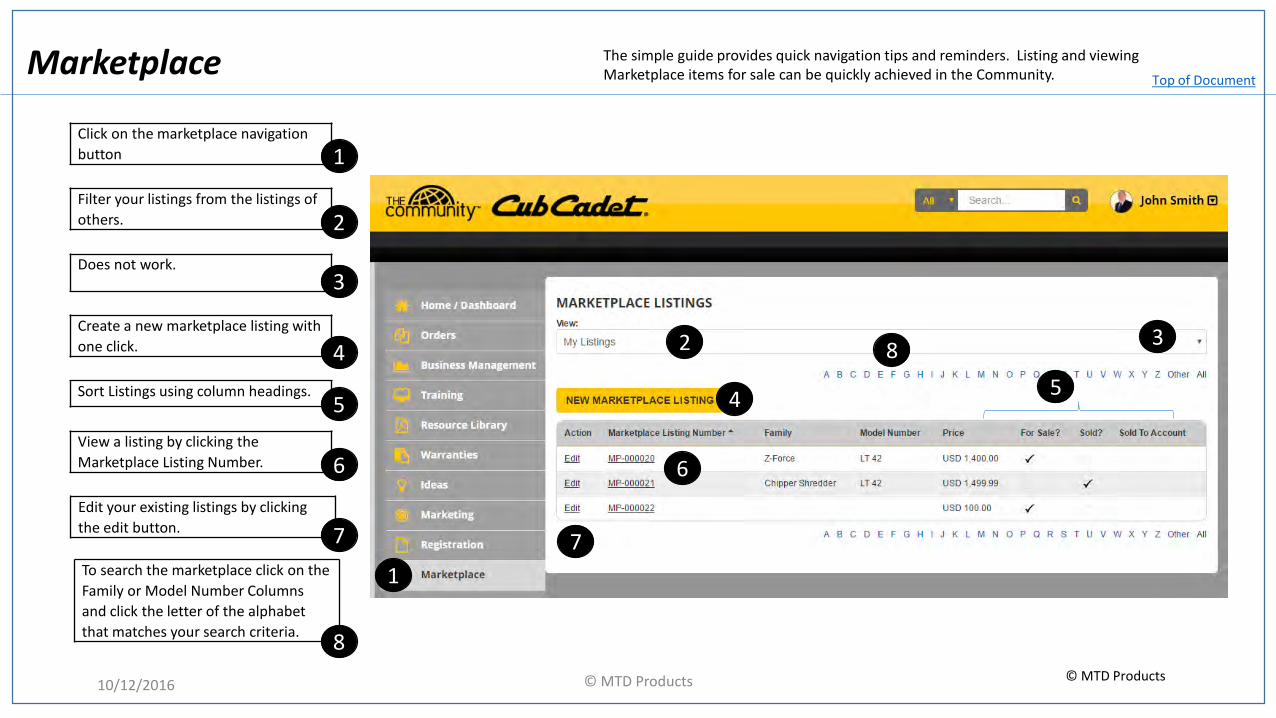
The simple guide provides quick navigation tips and reminders. Listing and viewingMarketplace items for sale can be quickly achieved in the Community.
© MTD Products
6
2
1
Click on the marketplace navigation
button
4Sort Listings using column headings. 5
Edit your existing listings by clicking
the edit button.
3
Filter your listings from the listings of
others.
Does not work.
Create a new marketplace listing with
one click.
7
1
2
3
4
5
View a listing by clicking the
Marketplace Listing Number. 6
7
To search the marketplace click on the
Family or Model Number Columns
and click the letter of the alphabet
that matches your search criteria.
8
8
Top of Document
10/12/2016 © MTD Products
Marketplace
10/12/2016
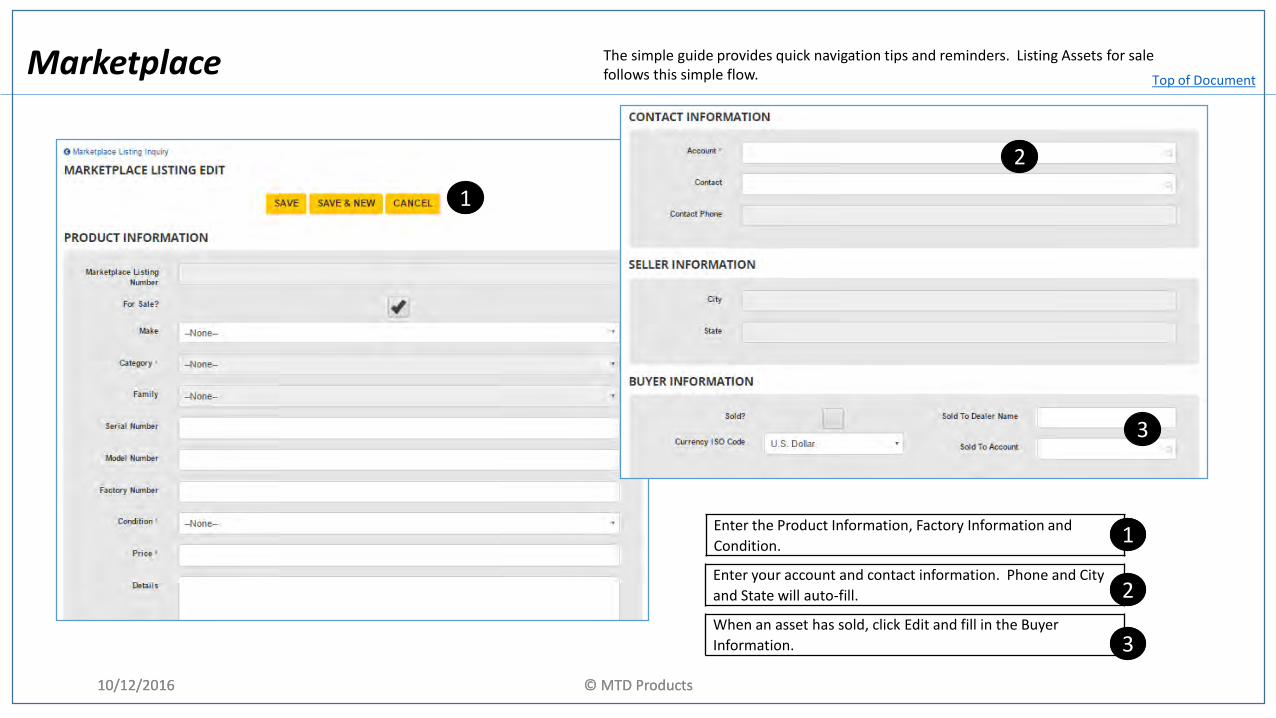
The simple guide provides quick navigation tips and reminders. Listing Assets for salefollows this simple flow.
© MTD Products
Enter the Product Information, Factory Information and
Condition.
1
Enter your account and contact information. Phone and City
and State will auto-fill.
When an asset has sold, click Edit and fill in the Buyer
Information.
1
2
3
2
3
Top of Document
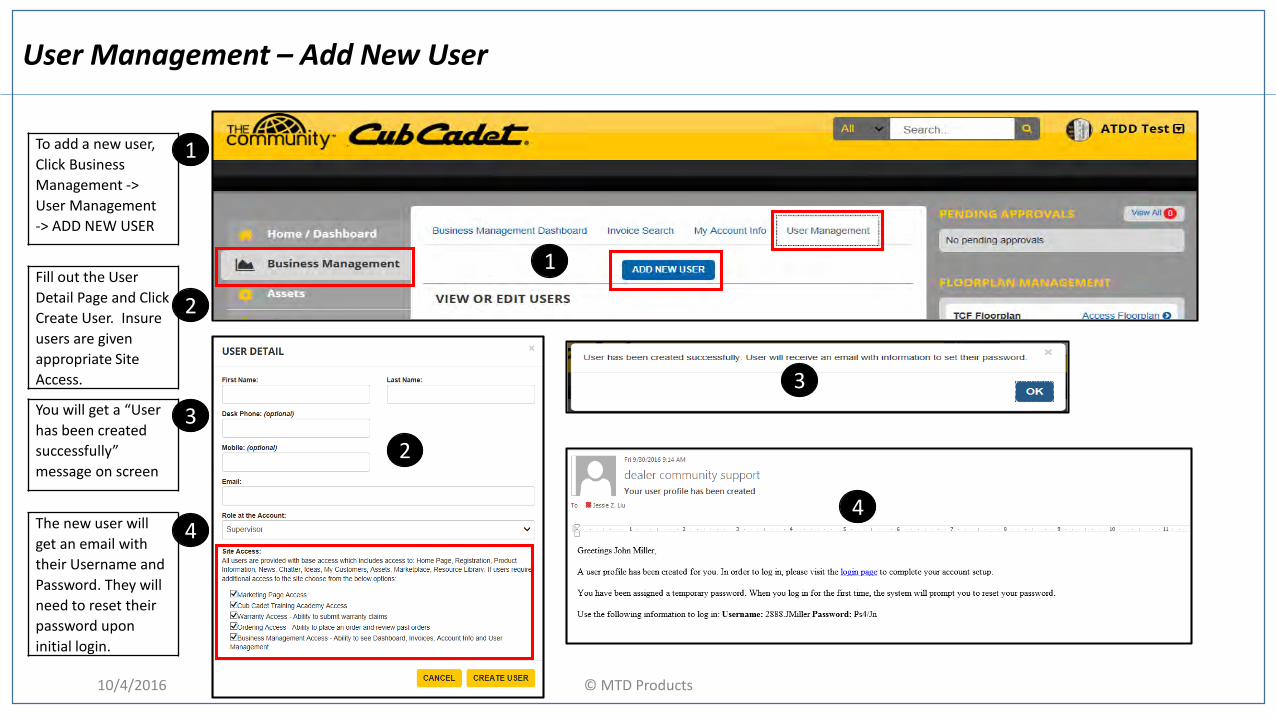
To add a new user,
Click Business
Management ->
User Management
-> ADD NEW USER
1
The new user will
get an email with
their Username and
Password. They will
need to reset their
password upon
initial login.
Fill out the User
Detail Page and Click
Create User. Insure
users are given
appropriate Site
Access.
User Management – Add New User
10/4/2016 © MTD Products
1
2
3
4
2
You will get a “User
has been created
successfully”
message on screen
3
4
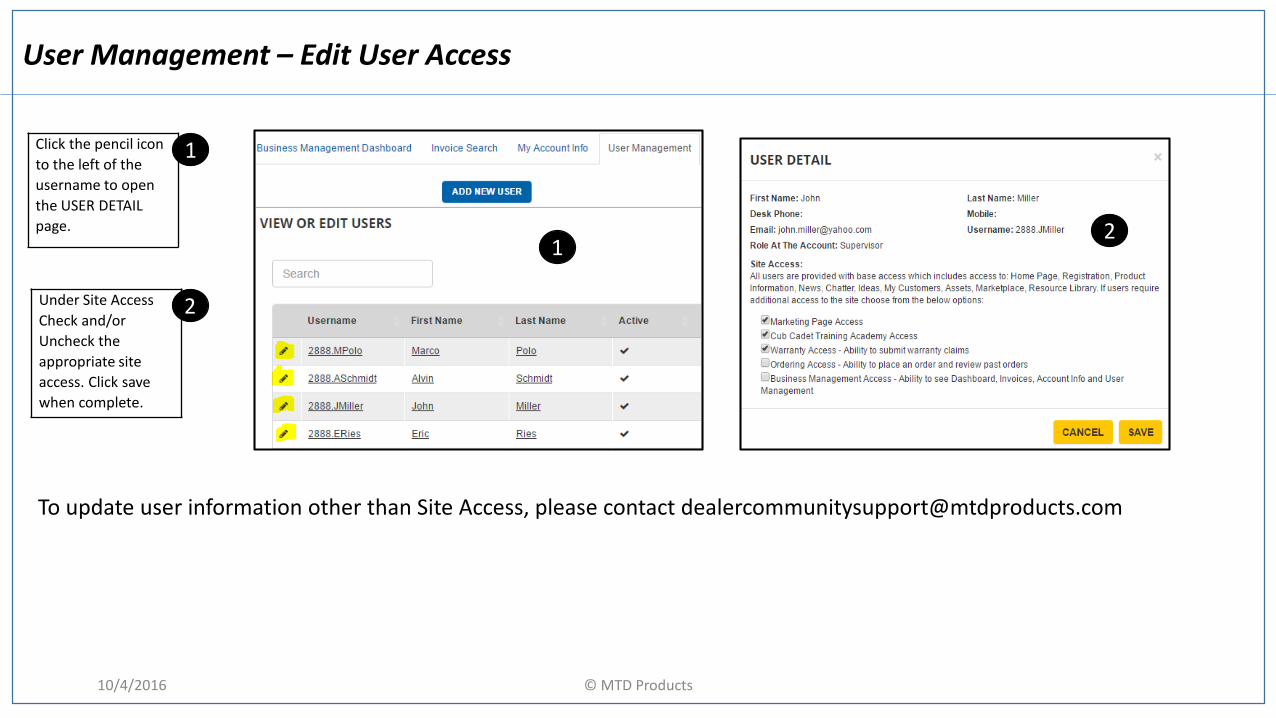
Click the pencil icon
to the left of the
username to open
the USER DETAIL
page.
1
Under Site Access
Check and/or
Uncheck the
appropriate site
access. Click save
when complete.
User Management – Edit User Access
10/4/2016 © MTD Products
2
12
To update user information other than Site Access, please contact [email protected]
DEALER COMMUNITY
RELEASE 1.1

Print Options
After completing Customer’s registration, click Printable View link
Print Registration after completion
1. Click on Registration Tab
2. Find Registration
3. Click on the Customer’s name
4. Scroll down to click on the link to the registration detail
5. Click Printable View link
Printable View links also available on Order, Asset, and Customer detail pages
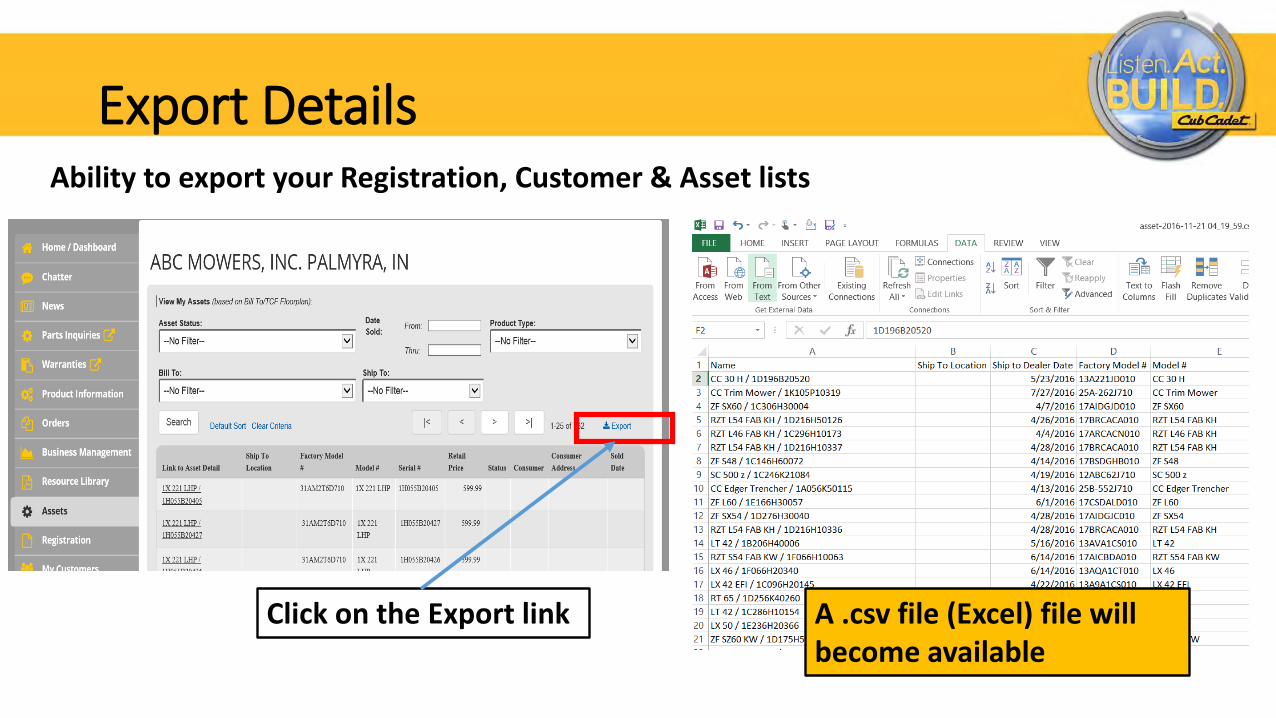
Export DetailsAbility to export your Registration, Customer & Asset lists
Click on the Export link A .csv file (Excel) file will become available
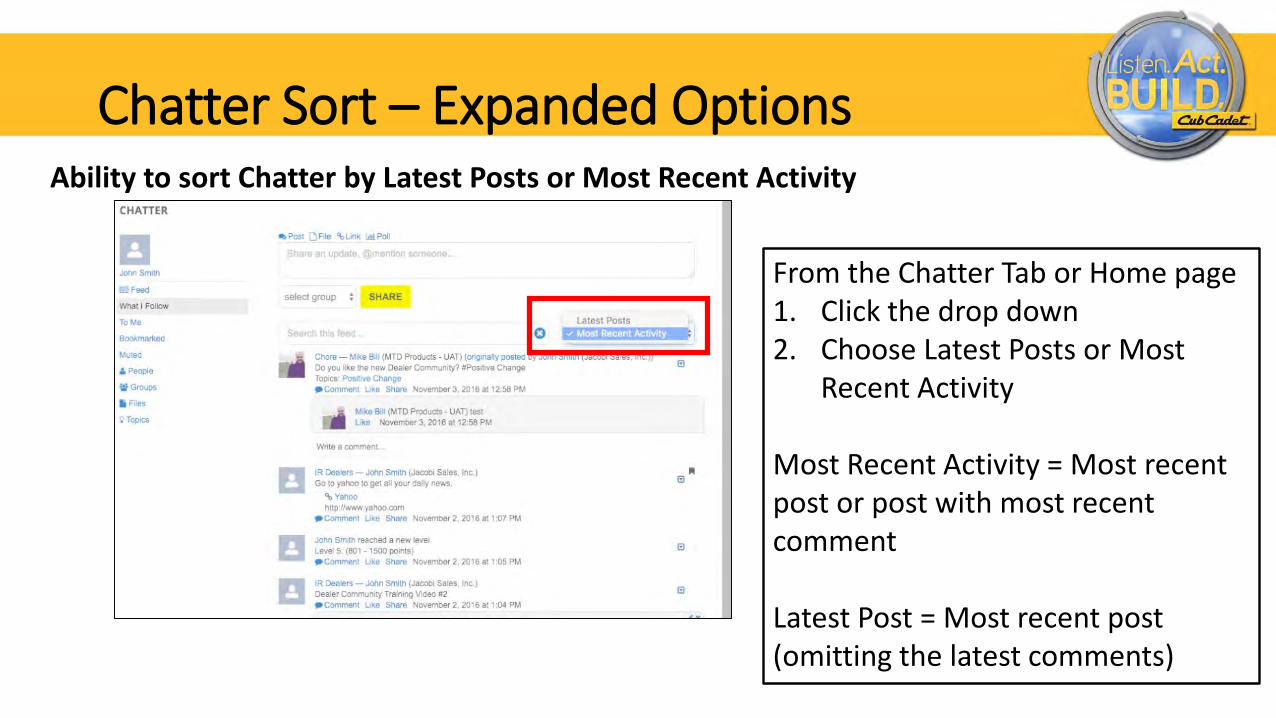
Chatter Sort – Expanded OptionsAbility to sort Chatter by Latest Posts or Most Recent Activity
From the Chatter Tab or Home page1. Click the drop down2. Choose Latest Posts or Most
Recent Activity
Most Recent Activity = Most recent post or post with most recent comment
Latest Post = Most recent post (omitting the latest comments)
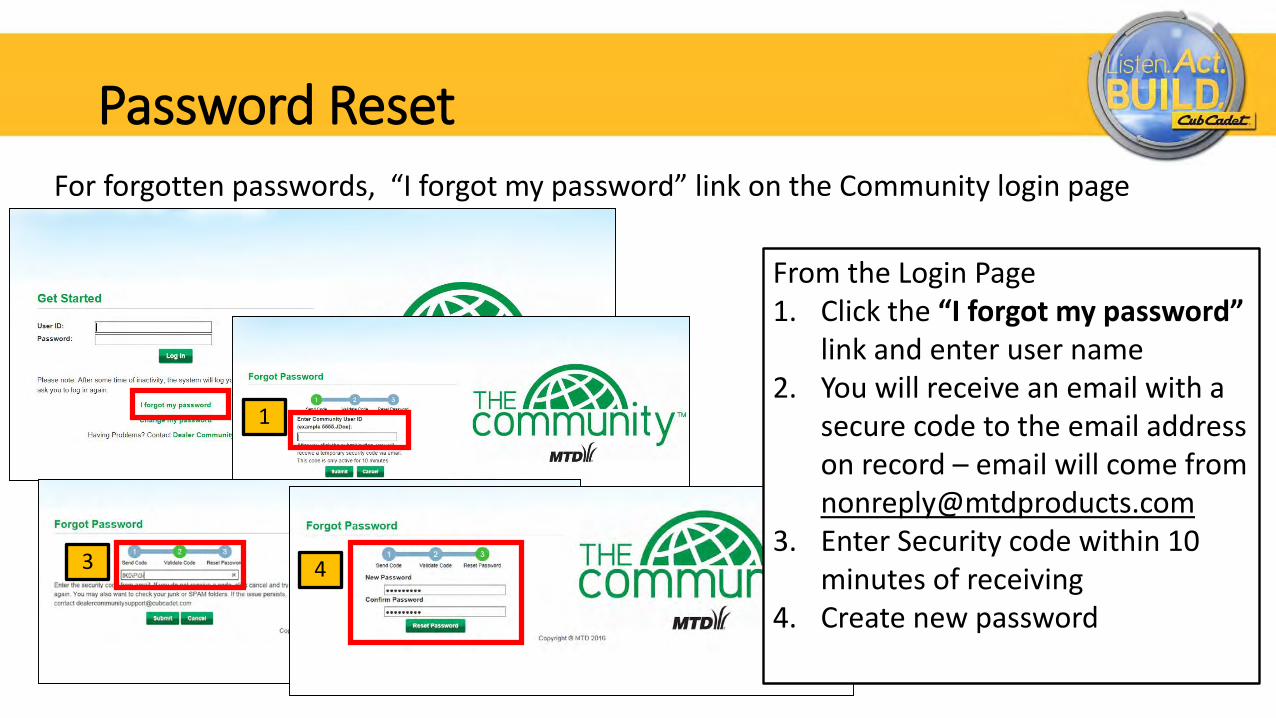
Password Reset For forgotten passwords, “I forgot my password” link on the Community login page
1
3
From the Login Page1. Click the “I forgot my password”
link and enter user name2. You will receive an email with a
secure code to the email address on record – email will come from [email protected]
3. Enter Security code within 10 minutes of receiving
4. Create new password
4
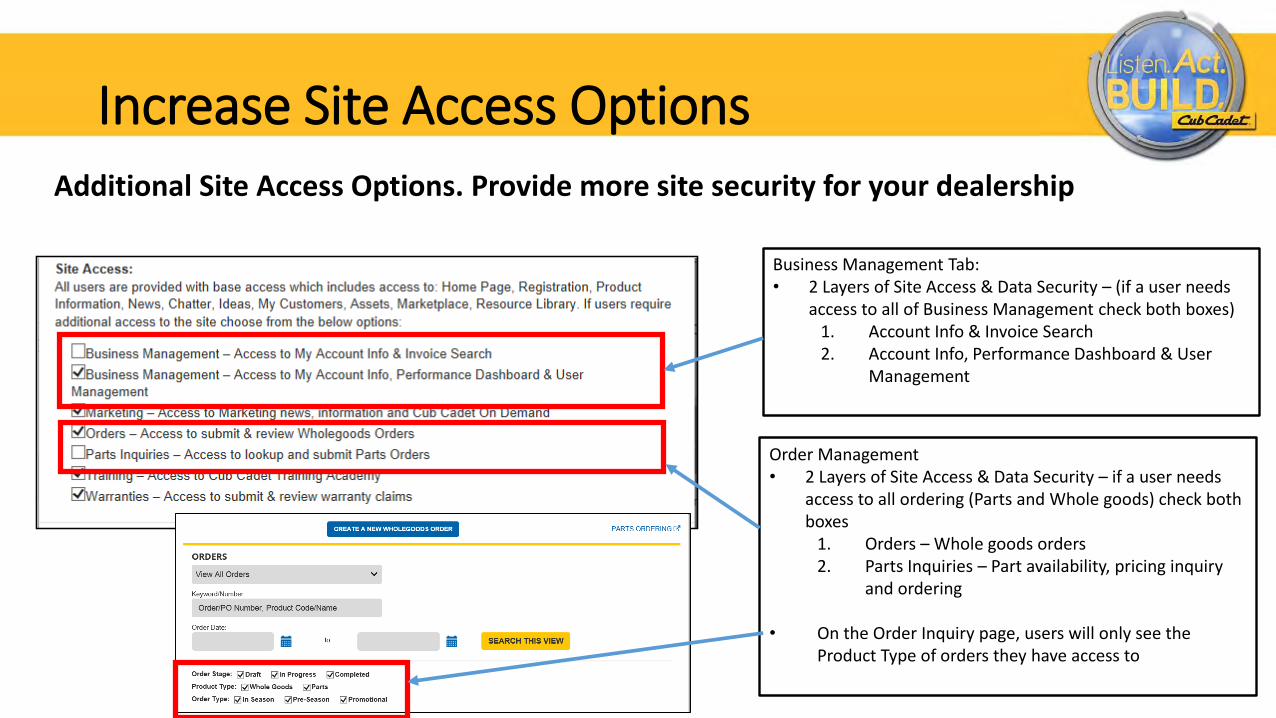
Increase Site Access OptionsAdditional Site Access Options. Provide more site security for your dealership
Business Management Tab: • 2 Layers of Site Access & Data Security – (if a user needs
access to all of Business Management check both boxes)1. Account Info & Invoice Search2. Account Info, Performance Dashboard & User
Management
Order Management• 2 Layers of Site Access & Data Security – if a user needs
access to all ordering (Parts and Whole goods) check both boxes
1. Orders – Whole goods orders2. Parts Inquiries – Part availability, pricing inquiry
and ordering
• On the Order Inquiry page, users will only see the Product Type of orders they have access to
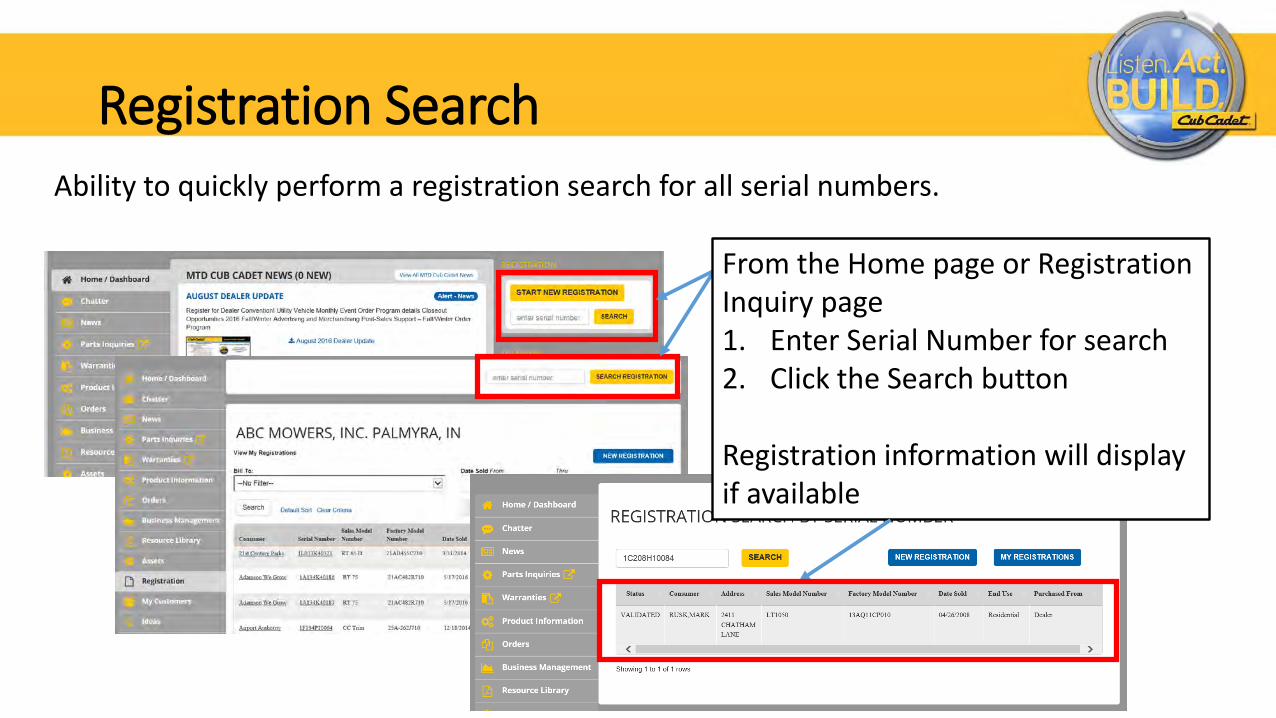
Registration SearchAbility to quickly perform a registration search for all serial numbers.
From the Home page or Registration Inquiry page1. Enter Serial Number for search2. Click the Search button
Registration information will display if available
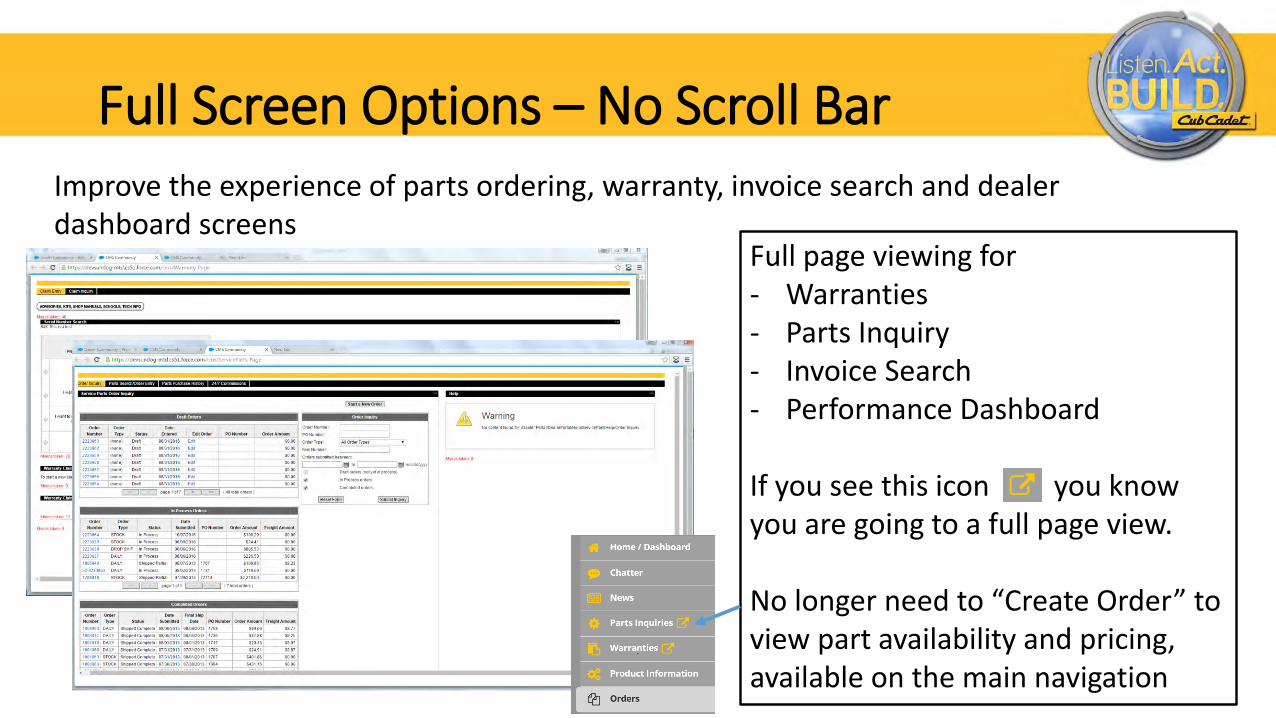
Full Screen Options – No Scroll BarImprove the experience of parts ordering, warranty, invoice search and dealer dashboard screens
Full page viewing for - Warranties- Parts Inquiry- Invoice Search- Performance Dashboard
If you see this icon you know you are going to a full page view.
No longer need to “Create Order” to view part availability and pricing, available on the main navigation