Embed Size (px)
Citation preview
Revision V1.00 Date 14.03.2013
Web Visu Tutorial
frenzel + berg electronic GmbH & Co.KG – Turmgasse 4 – 89073 Ulm - +49 (731) 97057-0 – www.frenzel-berg.de Page 1 of 5
Hipecs Web Visu
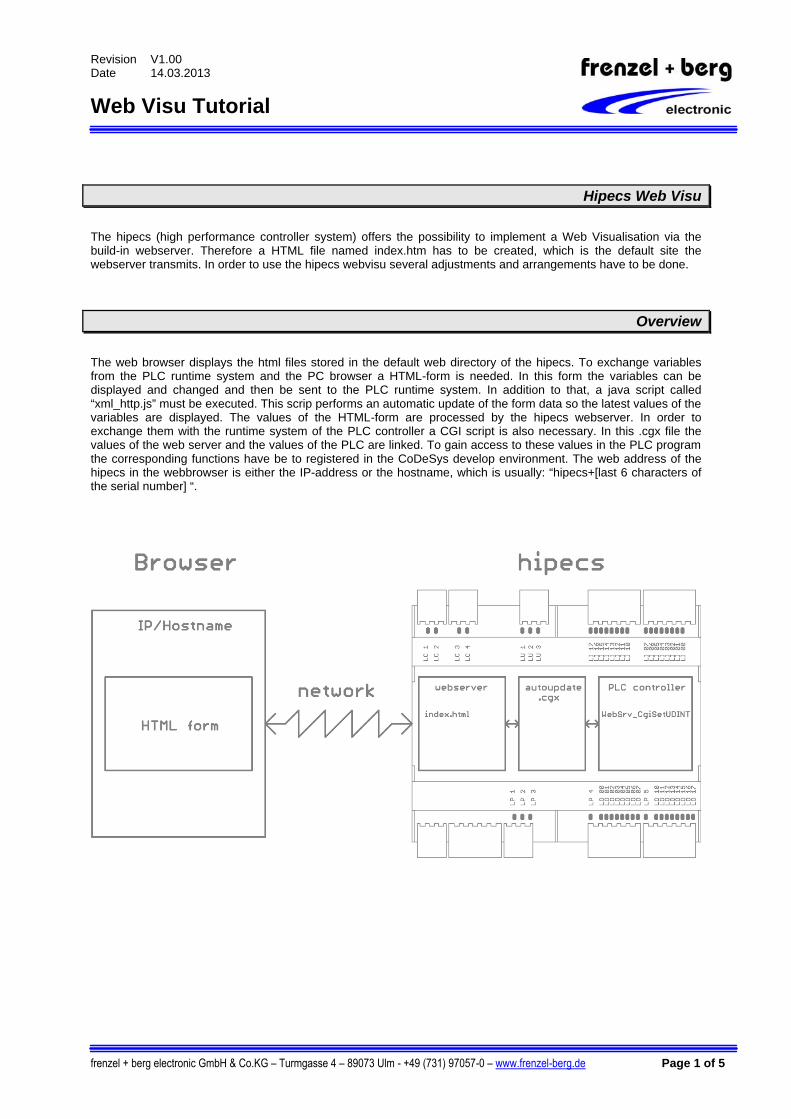
The hipecs (high performance controller system) offers the possibility to implement a Web Visualisation via the build-in webserver. Therefore a HTML file named index.htm has to be created, which is the default site the webserver transmits. In order to use the hipecs webvisu several adjustments and arrangements have to be done.
Overview
The web browser displays the html files stored in the default web directory of the hipecs. To exchange variables from the PLC runtime system and the PC browser a HTML-form is needed. In this form the variables can be displayed and changed and then be sent to the PLC runtime system. In addition to that, a java script called “xml_http.js” must be executed. This scrip performs an automatic update of the form data so the latest values of the variables are displayed. The values of the HTML-form are processed by the hipecs webserver. In order to exchange them with the runtime system of the PLC controller a CGI script is also necessary. In this .cgx file the values of the web server and the values of the PLC are linked. To gain access to these values in the PLC program the corresponding functions have be to registered in the CoDeSys develop environment. The web address of the hipecs in the webbrowser is either the IP-address or the hostname, which is usually: “hipecs+[last 6 characters of the serial number] “.

Revision V1.00 Date 14.03.2013
Web Visu Tutorial
frenzel + berg electronic GmbH & Co.KG – Turmgasse 4 – 89073 Ulm - +49 (731) 97057-0 – www.frenzel-berg.de Page 2 of 5
preparing the CoDeSys program of the hipecs PLC
At this time, the hipecs web server supports the BOOL and the UDINT data type. In order to register a function that handles the values with the web server the FBESysNet.lib library must be included in the CoDeSys program. Then the necessary functions are available.
• SysNet_HttpSetDir(‘A:web’): With this function the default directory for the web server is set. The standard HTML site, displayed by the webserver is the index.htm.
• SysNet_HttpRegCgiFunction(4, INDEXOF(WebSrv_CgiGetUDINT)): This function registers another function that sends the values to the cgi-script. (The function ‘WebSrv_CgiGetUDINT’ must then also be created in the CoDeSys Project, which is described below.) In this explicit example the name is ‘WebSrv_cgiGetUDINT’ but this name can be changed. The SysNet_HttpRegCgiFunction function returns True if the registration was successful. Registration of this function is necessary, so the runtime system can refresh the values every PLC cycle.
These functions have to be called only once in the PLC application in order to prepare the web server.
Declaring the function that handles the values of the cgi-script
As described above, functions are necessary that handle the linking between the variables in the PLC program and the web server. In this example the name of one of these function is ‘WebSrv_cgiGetUDINT’. This function sends the UDINT variables to the hipecs web server and looks as following: CASE VarIndex OF 100 : WebSrv_CgiGetUDINT:=DOUTB0;
101 : WebSrv_CgiGetUDINT:=PLC_PRG.Outbyte2; ELSE WebSrv_CgiGetUDINT:=0; END_CASE; With this CASE-Instruction the corresponding Variable Index is attached to the variable of the PLC runtime system. The variable can only be exchanged with their index number and not with their name. The number can be chosen randomly, but must not be used twice! The same is for the Boolean variables or for receiving values from the webserver. These must then be separate functions again which must be registered by the SysNet_HttpRegCgiFunction-function as described above. This means separate functions for bool and udint as send send and transmit data have to be created and registrated od their own. send Boolean varibles receive UDINT variables CASE VarIndex OF 102 : WebSrv_CgiGetBOOL:=PLC_PRG.Visible; 103 : WebSrv_CgiGetBOOL:=PLC_PRG.Outbyte2.0; ELSE WebSrv_CgiGetBOOL:=FALSE; END_CASE;
CASE VarIndex OF 200 : variable1:=Value; WebSrv_CgiSetUDINT:= TRUE; 201 : variable2:=Value; WebSrv_CgiSetUDINT:= TRUE; END_CASE
VarIndex: As described above, the variables are sent or received with an index. WebSrv_CgiGetUDINT: This is the function of the CoDeSys library that sends or receives the values to/from the webserver with the corresponding variable index. PLC_PRG.Visible: This is the name of the variable in CoDeSys.
Revision V1.00 Date 14.03.2013
Web Visu Tutorial
frenzel + berg electronic GmbH & Co.KG – Turmgasse 4 – 89073 Ulm - +49 (731) 97057-0 – www.frenzel-berg.de Page 3 of 5
preparing the default web directory of the hipecs In the default web directory some files have to be included to get the visu to work properly. These files are necessary:
• index.htm: This is the standard web site, displayed by the server by default. • xml_http.js: This is the Java-Script file used to perform an autoupdate and get the latest values from the
server. • autoupdate.cgx: In this file the variables, available in the html code, are linked with the variables used in
the PLC program. (See description below)
Preparing the other files of the web visu
preparing the autoupdate.cgx file In this file the linking between web visu and PLC is done. The values available in the html code are attached herin to the VarIndex of the CoDeSys programming tool, described above. Together with the VarIndex, the type of the variable must be declared, too. In this case this is either udint or bool Example of the syntax of an autoupdate.cgx file: t <form> r udint100 value100 r udint101 value101 r bool102 testvar1 r bool103 testvar2 r bool104 value104 r udint220 value220 r udint221 value221 r udint222 value222 t </form> . The ‘t’ / ‘r’ at the beginning of the line is mandatory. Also the <form> and </form> tags are necessary. The ‘.’ in the last line is mandatory, too.
mandatory syntax type and VarIndex in CoDeSys
name(ID) in HTML form description
r udint100 value100 The UDINT value of the variable with index 100 (in CODESYS) is attached to value100 in the HTML form
r bool102 testvar1 The BOOL value of the variable with index 102 (in CODESYS) is attached to testvar1 in the HTML form
The autoupdate.cgx must be stored in the default web directory.

Revision V1.00 Date 14.03.2013
Web Visu Tutorial
frenzel + berg electronic GmbH & Co.KG – Turmgasse 4 – 89073 Ulm - +49 (731) 97057-0 – www.frenzel-berg.de Page 4 of 5
The HTML index file
embedding the java script The HTML form is usually loaded only once when downloaded from the server, so the values displayed are not the actual values of the PLC after a few seconds. With the java script an automatic update of the HTML form is possible. The script is implemented into the header of the HTML file: <html> . . <head> <title>…….</title> . <script language=JavaScript type="text/javascript" src="xml_http.js"></script> <script language=JavaScript type="text/javascript"> var formUpdate = new periodicObj("autoupdate.cgx", 500); <!-- 500 is the refresh time in ms -- > function periodicUpdate() { updateMultiple(formUpdate); periodicFormTime = setTimeout("periodicUpdate()", formUpdate.period); } </script> . . </head>
Using the HTML form
The exchange of data between the browser and the PLC is realised with a HTML form. Display a USINT value from the PLC in the web browser: <form action="index.htm" method="post" id="indexform" name="indexform"> <input type="text" id="value100" value="?" readonly size="3" name="outbyte"> </form> action="index.htm": Name of the page to / from which the data is transmitted. method="post": The form data is directly transmitted to the page announced in action=””. id="indexform": Name of the element. name="indexform": Name of the field. type="text": Input type is text-box. id="value100": Name of the element as declared in the autoupdate.cgx-file. value="?": Default value if the variable can’t be loaded. readonly: This field can only display a value. Nothing can be entered. size=”3”: Size of the form.
Revision V1.00 Date 14.03.2013
Web Visu Tutorial
frenzel + berg electronic GmbH & Co.KG – Turmgasse 4 – 89073 Ulm - +49 (731) 97057-0 – www.frenzel-berg.de Page 5 of 5
Enter a USINT value: <form action="index.htm" method="post" id="form02" name="form02"> <input type="text" name="udint200" id="value200" size="6" value="0"> input value 1 <br> <input type="submit" name="button2" value="send to hipecs!"> </form> The “type=”submit” ” tag creates a button to submit data from the form to the webserver.