Embed Size (px)
Citation preview

Deploying System Center 2012 R2 Service ManagerMicrosoft Corporation
Published: November 1, 2013
AuthorsAnat Kerry, Bill Anderson, and John Downing
Applies ToSystem Center 2012 - Service Manager
System Center 2012 Service Pack 1 (SP1) - Service Manager
System Center 2012 R2 Service Manager
FeedbackSend suggestions and comments about this document to [email protected].

CopyrightThis document is provided "as-is". Information and views expressed in this document, including URL and other Internet website references, may change without notice.
Some examples depicted herein are provided for illustration only and are fictitious. No real association or connection is intended or should be inferred.
This document does not provide you with any legal rights to any intellectual property in any Microsoft product. You may copy and use this document for your internal, reference purposes. You may modify this document for your internal, reference purposes.
© 2013 Microsoft Corporation. All rights reserved.
Microsoft, ActiveX, Active Directory, Bing, Internet Explorer, MSDN, SharePoint, Silverlight, SQL Server, Visual Basic, Visual Studio, Windows, Windows Intune, Windows PowerShell, Windows Server, and Windows Vista are trademarks of the Microsoft group of companies. All other trademarks are property of their respective owners.
Revision History
Release Date Changes
October 17, 2013 Original release of this guide.
November 1, 2013 Minor updates to this guide.

ContentsDeploying System Center 2012 - Service Manager........................................................................5
Before You Deploy System Center 2012 - Service Manager.......................................................7How to Download and Install the Authorization Manager Hotfix...............................................8How to Install the Microsoft Report Viewer Redistributable Security Update...........................9
Turkish Language Collations.....................................................................................................10Prerequisite Checker for System Center 2012 - Service Manager............................................11Deployment Scenarios for System Center 2012 - Service Manager..........................................11
Installing Service Manager on a Single Computer (Minimum Configuration).........................13How to Install Service Manager on a Single Computer.......................................................14How to Validate the Single-Computer Installation...............................................................18
Installing Service Manager on Two Computers......................................................................19How to Install the Service Manager Management Server (Two-Computer Scenario).........20How to Install the Service Manager Data Warehouse (Two-Computer Scenario)...............22How to Validate the Two-Computer Installation...................................................................25
Installing Service Manager on Four Computers.....................................................................26How to Install the Service Manager Management Server (Four-Computer Scenario)........27How to Install the Service Manager Data Warehouse (Four-Computer Scenario)..............29How to Validate the Four-Computer Installation..................................................................32
Manual Steps to Configure the Remote SQL Server Reporting Services...............................34Manual Steps to Prepare Upgraded SQL Server...................................................................37How to Create and Deploy Server Images of Service Manager.............................................37
Guidance for Installing System Center 2012 - Service Manager on Virtual Machines...............39Configure Windows PowerShell to Run in System Center 2012 - Service Manager.................40Registering with the Service Manager Data Warehouse to Enable Reporting...........................42
How to Run the Data Warehouse Registration Wizard...........................................................42How to Determine When Data Warehouse Registration Is Complete....................................43
Deploying Additional Service Manager Management Servers...................................................44How to Install an Additional Management Server...................................................................45
Deployment Considerations with a Disjointed Namespace.......................................................47Self-Service Portal for System Center 2012 - Service Manager................................................48
Self-Service Portal Deployment Scenarios for System Center 2012 - Service Manager........48How to Install the Web Content Server...............................................................................51How to Install SharePoint Web Parts for the Self-Service Portal........................................52How to Install Both the Web Content Server and SharePoint Web Parts on One Computer
........................................................................................................................................ 54How to Grant Permissions on the SharePoint Site.............................................................56How to Configure User Authentication for the SharePoint Site...........................................56How to Verify the Installation of the Self-Service Portal......................................................57

How to Configure the Default IIS Website Port...................................................................58SSL Certificates for the Self-Service Portal............................................................................59
How to Examine Properties of a Certificate........................................................................62How to Reconfigure the Web Content Server URL.............................................................64How to Select a Certificate for Web Content Server Use....................................................66How to Connect Directly to the Web Content Server Using a Browser...............................66
Guidance for Load Balancing System Center 2012 - Service Manager.....................................68Load-Balancing Service Manager Management Servers.......................................................68Load-Balancing the Self-Service Portal..................................................................................70
How to Configure the Self-Service Portal for Web Content Server Load Balancing...........71Completing Deployment by Backing Up the Encryption Key.....................................................72Indexing Non-English Knowledge Articles.................................................................................74Troubleshooting System Center 2012 - Service Manager Deployment Issues..........................76
How to Troubleshoot a Data Warehouse Job.........................................................................77Deploying Service Manager from a Command Line..................................................................78
How to Deploy a Service Manager Management Server Using the Command Line..............81How to Deploy a Data Warehouse Management Server Using the Command Line...............81How to Deploy a Service Manager Console Using the Command Line.................................83How to Deploy the Service Manager Self-Service Portal Using the Command Line..............84
Appendix A - Command-Line Option Error Codes.....................................................................87Appendix B - Guidance for Moving the Service Manager and Data Warehouse Databases.....91
Moving the Service Manager Database.................................................................................92Moving Data Warehouse Databases......................................................................................92

Deploying System Center 2012 - Service ManagerThis guide helps you deploy System Center 2012 – Service Manager in one of several different scenarios. The scenarios range from a simple, one-computer scenario to a four-computer scenario that is designed to support production-type environments. In addition, this guide shows you how to register a Service Manager management group with the Service Manager data warehouse so that you can generate reports. You have the option of deploying the Self-Service Portal so you can provide access to Service Manager through a web browser. To improve performance and provide for redundancy, you can deploy additional secondary Service Manager management servers.
It is assumed in this guide that you are installing Service Manager on a computer where no previous version of Service Manager is installed. For information about upgrading System Center 2012 – Service Manager, see the Upgrade Guide for System Center 2012 – Service Manager.
This guide also describes how to find and read the Setup log if you encounter issues when you deploy Service Manager. And, finally, information about backing up Service Manager management server encryption keys is included. After you run Setup, the Encryption Key Backup and Restore Wizard starts automatically.
Deployment Guide Topics Before You Deploy Service Manager
Contains preliminary information you must consider before you can deploy Service Manager.
Turkish Language Collations
Describes a potential problem with the installation of a Service Manager database that is not supported on a computer running SQL Server that uses a Turkish language collation.
Prerequisite Checker for System Center 2012 - Service Manager
Describes the prerequisite checker that runs as a part of the setup procedure.
Deployment Scenarios for System Center 2012 - Service Manager
Describes how to deploy Service Manager in one-server, two-server, and four-server topologies.
Guidance for Installing System Center 2012 - Service Manager on Virtual Machines
Provides information that you have to consider when you install Service Manager in a Hyper-V virtual environment.
Registering with the Service Manager Data Warehouse to Enable Reporting
Note
5
Describes how to run the Data Warehouse Registration Wizard to register the Service Manager management group with the Service Manager data warehouse management server. Registering with the data warehouse makes it possible for you to run reports.
Deploying Additional Service Manager Management ServersDescribes how to install additional Service Manager management servers to improve performance.
Deployment Considerations with a Disjointed Namespace
Describes additional steps you must take when you deploy either an additional Service Manager management server or Self-Service Portal in an environment with a disjoint namespace.
Self-Service Portal for System Center 2012 - Service Manager
Describes how to deploy and troubleshoot the Service Manager Self-Service Portal.
Guidance for Load Balancing System Center 2012 - Service Manager
Describes how you can configure Windows Server 2008 Network Load Balancing with Service Manager.
Completing Deployment by Backing Up the Encryption Key
Describes how to use the Encryption Key Backup or Restore Wizard to back up and restore encryption keys.
Indexing Non-English Knowledge Articles
Describes how to resolve an indexing issue in SQL Server 2008 Service Pack 1 (SP1) in an environment where you create, or plan to create, knowledge articles in any language other than English.
Troubleshooting Service Manager Deployment IssuesDescribes the logs files that are created when you install Service Manager and how you can use these logs to troubleshoot deployment issues.
Deploying Service Manager from a Command LineDescribes how to deploy Service Manager using command-line parameters.
Appendix A - Command-Line Option Error Codes
Lists error codes used in command-line installation.
Appendix B - Guidance for Moving the Service Manager and Data Warehouse Databases
Provides prescriptive and how-to guidance about moving Service Manager databases.
Other Resources for This Component TechNet Library main page for System Center 2012 – Service Manager Planning Guide for System Center 2012 – Service Manager Deployment Guide for System Center 2012 – Service Manager Administrator’s Guide for System Center 2012 – Service Manager Operations Guide for System Center 2012 – Service Manager
6
Downloadable DocumentationYou can download a copy of this technical documentation from the Microsoft Download Center. Always use the TechNet library for the most up-to-date information.
Before You Deploy System Center 2012 - Service ManagerBefore you start the deployment process, prepare your environment for System Center 2012 – Service Manager, as described in the Planning Guide for Service Manager for System Center 2012. The Planning Guide contains information about the various parts of Service Manager, the hardware and software requirements, the port assignments, and the information about the accounts you must use to deploy Service Manager. The Planning Guide also contains information about the accounts that you need to create for use with Service Manager.
In addition, you have to install the Authorization Manager hotfix and the Microsoft Report Viewer Redistributable security update before you start Service Manager deployment.
Install the Authorization Manager Hotfix (KB975332)If the Service Manager management server, data warehouse management server, or the Self-Service Portal lose connection to the SQL Server databases—even briefly—the connection is not automatically re-established. The Windows team recently released a hotfix to address this issue. It is extremely import that this hotfix be installed on your computers that host a Service Manager management server, data warehouse management server, or the Self-Service Portal. For more information, see How to Download and Install the Authorization Manager Hotfix.
The Authorization Manager hotfix was included with Windows Server 2008 R2 with Service Pack 1 (SP1). If you are installing Service Manager on a computer running Windows Server 2008 R2 with SP1, you already have the Authorization Manager hotfix installed.
Install the Microsoft Report Viewer Redistributable Security Update (KB971119)During installation of a Service Manager management server or Service Manager console, the prerequisite checker checks to see whether the security update for Microsoft Report Viewer 2008 Service Pack 1 Redistributable Package has been installed. If you have not installed this security update, you will have the opportunity to do so during the installation. As an alternative, you can deploy this security hotfix before starting the installation of Service Manager. For more information, see How to Install the Microsoft Report Viewer Redistributable Security Update.
Note
7

Before you deploy topics How to Download and Install the Authorization Manager Hotfix
Describes how to download and install the Authorization Manager hotfix.
How to Install the Microsoft Report Viewer Redistributable Security Update
Describes how to install the Microsoft Report Viewer Redistributable Security Update.
How to Download and Install the Authorization Manager HotfixThe Authorization Manager hotfix is included with Windows Server 2008 R2 with Service Pack 1 (SP1). Therefore, if you are using Windows Server 2008 R2 with SP1, you can disregard this topic.
You can obtain the Authorization Manager hotfix (KB975332) by connecting to a website and requesting an email containing download instructions. This hotfix is available for both 32-bit and 64-bit operating systems and for both the Windows Server 2008 with SP1 operating system and the Windows Server 2008 R2 operating system. The type of files that you are allowed to download is determined when you connect to the website to request an email. Therefore, you should connect to the website from the computer that hosts the Service Manager parts. Use the following steps to download and install the Authorization Manager hotfix.
Install this hotfix on computers that host the following Service Manager parts:
Service Manager management server or servers Data warehouse management server Self-Service Portal
The installation of this hotfix on the Service Manager and data warehouse management servers requires a computer restart.
1. On the computer that hosts the Service Manager management server or data warehouse management server, open a browser and connect to article 975332 in the Microsoft Knowledge Base. Users and applications cannot access authorization rules that are stored in Authorization Manager.
2. On the knowledge base article page, click View and request hotfix downloads.3. Read the Agreement for Microsoft Services terms and conditions, and if applicable,
click I Accept.4. On the Hotfix Request page, select the appropriate link based on your operating system,
as shown in the following table.
Operating System Web Page Link
Windows Server 2008 with SP1 Windows Vista
Note
To download the Authorization Manager hotfix
8

Operating System Web Page Link
Windows Server 2008 R2 Windows 7/Windows Server 2008 R2
5. On the Hotfix Request page, enter your email address, type the characters in the CAPTCHA image, and then click Request hotfix.
6. In the email that you receive, you are provided with a URL. Click the URL to start the download and save the file to your computer.
1. Open Windows Explorer, locate the folder where you downloaded the hotfix, and then double-click the file to extract the hotfix files.
2. Double-click the file that you extracted.3. In the Windows Update Standalone Installer dialog box, click OK.4. On the Installation complete page, on the computers that host the Service Manager and
data warehouse management servers, click Restart Now.
1. On the Windows desktop, open the Control Panel.2. In the Control Panel window, double-click Programs and Features.3. In the Programs and Features window, in the Tasks area, click View installed updates.4. Scroll through the list and locate Microsoft Windows, and then confirm that Hotfix for
Microsoft Windows (KB975332) is listed.
How to Install the Microsoft Report Viewer Redistributable Security UpdateYou can use the following procedure to install the Microsoft Report Viewer Redistributable security update for a deployment of System Center 2012 – Service Manager.
If your system is configured to use a language other than English, you must manually install the Report Viewer Language Pack for that language. You can download the Microsoft Report Viewer Redistributable 2008 SP1 Language Pack from the Microsoft Download Center.
1. On the computer that will host a Service Manager management server, open Windows Explorer.
2. Locate the drive that contains the Service Manager installation media, and then open the Prerequisites folder
3. Double-click the ReportViewer file.
To install the Authorization Manager hotfix
To verify the installation of the Authorization Manager hotfix
Note
To install the Microsoft Report Viewer Redistributable security update
9

4. On the Welcome to Microsoft Report Viewer Redistributable 2008 (KB971119) Setup page, click Next.
5. On the License Terms page, read the Microsoft Software License Terms, and, if applicable, click I have read and accept the license terms, and then click Install.
6. On the Setup Complete page, click Finish.
Turkish Language CollationsThis topic applies only if you are considering deploying a Service Manager database or data warehouse database to a SQL Server that has been configured to use a Turkish language collation.
For this release of System Center 2012 – Service Manager, the installation of a Service Manager database is not supported on a computer running SQL Server that uses a Turkish language collation. This is true for both the Service Manager and data warehouse databases. If you specify a computer running SQL Server that contains a Turkish language collation during the deployment of a Service Manager database, the following warning message appears.
Turkish language collation warning message
If you encounter this warning message during the deployment of any of the Service Manager databases, click OK. On the Database Configuration page, in the Database server box, type the name of a computer that is hosting an installation of SQL Server that is configured with a non-Turkish collation, and then press the TAB key. When Default appears in the SQL Server instance box, click Next.For more information about the collations that are supported in System Center 2012 – Service Manager, see "Language Support for Service Manager for System Center 2012" in the Planning Guide for System Center 2012 – Service Manager.
10

Prerequisite Checker for System Center 2012 - Service ManagerDuring installation, System Center 2012 – Service Manager Setup performs prerequisite checks for software and hardware requirements and returns one of the three following states:
Success: Setup finds that all software and hardware requirements are met, and installation proceeds.
Warning: Setup finds that all software requirements are met, but the computer does not meet minimum hardware requirements. Or, the requirements for optional software are missing. Installation proceeds.
Failure: At least one software or hardware requirement is not met, and installation cannot proceed. An Installation cannot continue message appears.
On the Installation cannot continue screen, there is no option to restart the prerequisite checker. You must click Cancel to restart the installation process. Make sure that the computer meets all hardware and software requirements before you run Setup again.
Deployment Scenarios for System Center 2012 - Service ManagerSystem Center 2012 – Service Manager provides for many deployment scenarios. However, remember that you cannot deploy a Service Manager management server and a data warehouse management server on the same computer. In fact, Setup prevents you from installing both on a single server. The reason has to do with Service Manager architecture of the data warehouse, overall performance, and usage of the Operations Manager health service. The data warehouse was designed for quick data retrieval and hosting both the Service Manager management server and the data warehouse management server on a single server will negatively impact performance for both. Additionally, a single server doesn’t scale out as Service Manager usage and data storage grow.
You will also specify the server that hosts SQL Server Reporting Services (SSRS). Do not attempt to use the same SSRS instance for both Operations Manager and Service Manager.
This deployment guide describes the following three deployment scenarios: installing Service Manager on one computer, installing Service Manager on two computers, and installing Service Manager on four computers.
The collation settings for Microsoft SQL Server must be the same for the computers that host the Service Manager database, the computers that host the data warehouse databases, and the computers that host the Reporting Services database. If you intend to import data from Operations Manager, then the database collations must match between Service Manager and Operations Manager.
Note
Note
11

While we do not recommend it (for performance reasons), if you want to host the Service Manager management server and the Self-Service Portal on the same computer, you must deploy the Service Manager management server before you deploy the Self-Service Portal.
Performing an upgrade from previous versions of Service Manager to Service Manager Community Technology Preview 1 (CTP1) is not supported. Furthermore, for this release, Service Manager setup installs files in predefined folders that might already exist if you have a previous version of Service Manager installed.
The user installing Service Manager has access to the Service Connection Point (SCP) object of Service Manager in the Active Directory. This SCP stores the information about the service. Client applications, such as Service Manager, can connect to services using the SCP. For more information about service connection points, see Publishing Services in Active Directory.
Deployment Scenario Topics Installing Service Manager on a Single Computer (Minimum Configuration)
Describes how to install Service Manager on a single computer. This scenario requires you to use a virtual machine for the data warehouse management server. This scenario is useful for evaluation purposes.
Installing Service Manager on Two ComputersDescribes how to install Service Manager on two computers. This scenario is useful for testing Service Manager in a lab environment.
Installing Service Manager on Four ComputersDescribes how to install Service Manager on four computers. This scenario is useful in a production environment, and it maximizes performance and scalability.
Manual Steps to Configure the Remote SQL Server Reporting Services
Describes how to manually configure SSRS in situations where SSRS is not on the same server as the data warehouse management server.
Manual Steps to Prepare Upgraded SQL Server
Describes how to manually configure an upgraded version of SQL Server 2012 to enable SQL Server Reporting Services.
How to Create and Deploy Server Images of Service Manager
Describes how to create and deploy server images of Service Manager.
Other Resources for This Component TechNet Library main page for System Center 2012 – Service Manager Operations Guide for System Center 2012 – Service Manager Administrator's Guide for System Center 2012 – Service Manager Planning Guide for System Center 2012 – Service Manager
12
Installing Service Manager on a Single Computer (Minimum Configuration)If you want to evaluate System Center 2012 – Service Manager and you have a minimal amount of hardware available, install Service Manager on one computer. A sample single-computer configuration is shown in figure 1. This configuration will not support a production environment, and no scalability or performance estimates are provided. Because you cannot install both the Service Manager management server and the data warehouse management server on the same computer, use Hyper-V to create a virtual computer to host the data warehouse management server. For more information about the hardware requirements for Hyper-V, see Hyper-V Server 2008 R2 system requirements .
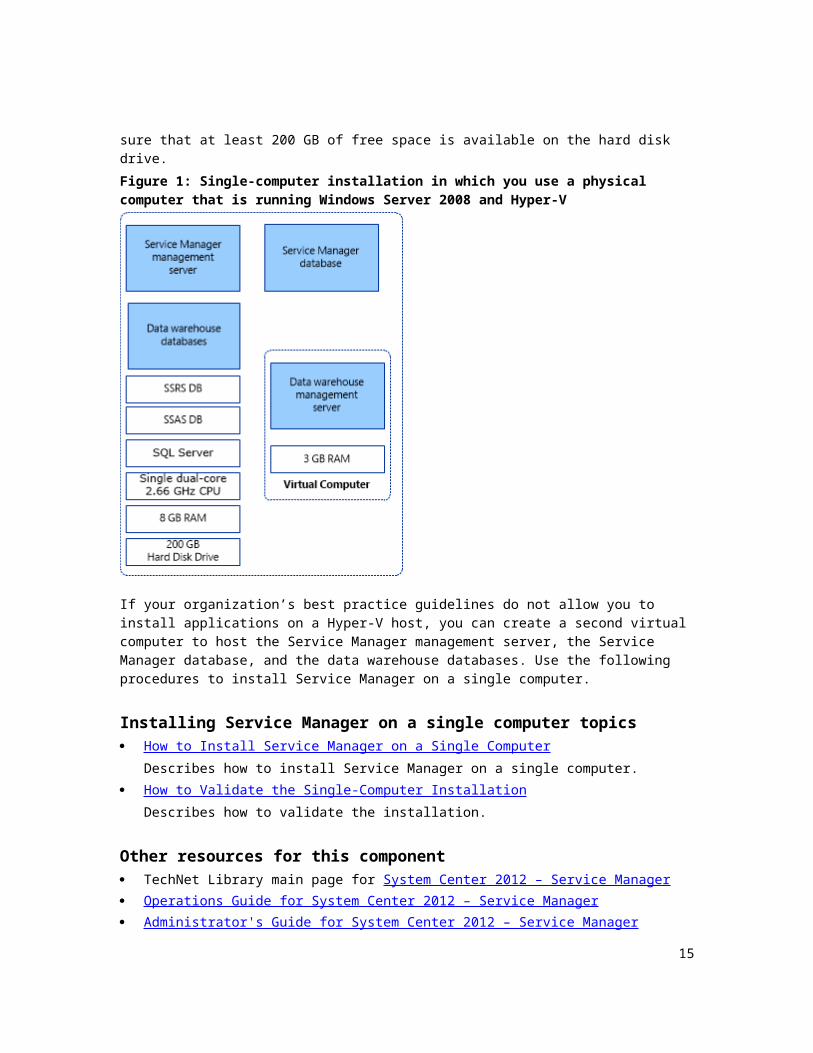
To install Service Manager on a single computer, start with a physical computer that is running Windows Server 2008 and Hyper-V, and make sure that the CPU on the physical computer is compatible with Hyper-V. Of the 8 gigabytes (GB) of RAM on the host computer, 3 GB is used for the virtual computer that hosts the data warehouse management server. Make sure that at least 200 GB of free space is available on the hard disk drive.
Figure 1: Single-computer installation in which you use a physical computer that is running Windows Server 2008 and Hyper-V
If your organization’s best practice guidelines do not allow you to install applications on a Hyper-V host, you can create a second virtual computer to host the Service Manager management server, the Service Manager database, and the data warehouse databases. Use the following procedures to install Service Manager on a single computer.
13

Installing Service Manager on a single computer topics How to Install Service Manager on a Single Computer
Describes how to install Service Manager on a single computer.
How to Validate the Single-Computer Installation
Describes how to validate the installation.
Other resources for this component TechNet Library main page for System Center 2012 – Service Manager Operations Guide for System Center 2012 – Service Manager Administrator's Guide for System Center 2012 – Service Manager Planning Guide for System Center 2012 – Service Manager
How to Install Service Manager on a Single ComputerTo install System Center 2012 – Service Manager on a single computer, you install the Service Manager management server, database, and console on the computer. Then, you install the data warehouse on a virtual machine on the same computer.
During Setup, you will be prompted to provide credentials for the following accounts:
Management group administrator Service Manager account Workflow account
For more information about the permissions that these accounts require, see "Accounts Required During Setup" in the Planning Guide for System Center 2012 – Service Manager. Before you start, make sure that Microsoft SQL Server 2008 is installed on the computer.
1. Log on to the physical computer by using an account that has administrative credentials.2. On the Service Manager installation media, double-click the Setup.exe file.3. On the Microsoft System Center 2012 page, click Service Manager management
server.4. On the Product registration page, type information in the boxes. In the Product key
boxes, type the product key that you received with Service Manager, or alternatively, select Install as an evaluation edition (180 day trial). Read the Microsoft Software License Terms, and, if applicable, click I have read, understood, and agree with the terms of the license agreement, and then click Next.
5. On the Installation location page, verify that sufficient free disk space is available, and then click Next. If necessary, click Browse to change the location in which the Service Manager management server will be installed.
6. On the System check results page, make sure that the prerequisite check passed or at least passed with warnings, and then click Next.If the prerequisite checker determines that the Microsoft Report Viewer Redistributable
To install the Service Manager management server, database, and console
14
has not been installed, click Install Microsoft Report Viewer Redistributable. After the Microsoft Report Viewer Redistributable 2008 (KB971119) Setup Wizard completes, click Check prerequisites again.
7. On the Configure the Service Manager database page, Service Manager checks the current computer to see if an instance of SQL Server exists. By default, if an instance is found, Service Manager creates a new database in the existing instance. If an instance is displayed, click Next.
ImportantA warning message appears if you are using the default collation (SQL_Latin1_General_CP1_CI_AS). Support for multiple languages in Service Manager is not possible when you are using the default collation. If later you decide to support multiple languages using a different collation, you have to reinstall SQL Server. See “Microsoft SQL Server 2008 with SP1” in the Planning Guide for System Center 2012 – Service Manager.
8. On the Configure the Service Manager management group page, complete these steps:a. In the Management group name box, type a unique name for the management
group.
ImportantManagement group names must be unique. Do not use the same management group name when you deploy a Service Manager management server and a Service Manager data warehouse management server. Furthermore, do not use the management group name that is used for Operations Manager.
b. Click Browse, enter the user account or group to which you want to give Service Manager administrative credentials, and then click Next.
9. On the Configure the account for Service Manager services page, click Domain account; specify the user name, password, and domain for the account; and then click Test Credentials. After you receive a “The credentials were accepted” message, click Next.
10. On the Configure the Service Manager workflow account page, click Domain account; specify the user name, password, and domain for the account; and then click Test Credentials. After you receive a “The credentials were accepted” message, click Next.
11. On the Help improve System Center Service Manager page, indicate your preference for participation in the Customer Experience Improvement Program. As an option, click Tell me more about the program, and then click Next.
12. On the Use Microsoft Update to help keep your computer secure and up-to-date page, indicate your preference for using Microsoft Update to check for Service Manager updates. If you want Windows Update to check for updates, select Initiate machine wide Automatic update. Click Next.
15

13. On the Installation summary page, click Install.14. On the Setup completed successfully page, we recommend that you leave Open the
Encryption Backup or Restore Wizard selected, and then click Close. For more information about backing up the encryption key, see Completing Deployment by Backing Up the Encryption Key.
1. Log on to the virtual machine by using an account that has administrative credentials.2. On the Service Manager installation media, double-click the Setup.exe file.3. On the Microsoft System Center 2012 page, click Service Manager data warehouse
management server.4. On the Product registration page, type information in the boxes. In the Product key
boxes, type the product key you received with Service Manager, or as an alternative, select Install as an evaluation edition (180 day trial. Read the Microsoft Software License Terms, and, if applicable, click I have read, understood, and agree with the terms of the license agreement, and then click Next.
5. On the Installation location page, verify that sufficient free disk space is available, and then click Next. If necessary, click Browse to change the location in which the Service Manager data warehouse management server will be installed.
6. On the System check results page, make sure that the prerequisite check passed or at least passed with warnings, and then click Next.
7. On the Configure data warehouse databases page, in the Database server box, type the computer name of the physical computer that will host the data warehouse databases, and then press the TAB key. When Default is displayed in the SQL Server instance box, click Next.
ImportantA warning message appears if you are using the default collation (SQL_Latin1_General_CP1_CI_AS). Support for multiple languages in Service Manager is not possible when you are using the default collation. If later you decide to support multiple languages using a different collation, you have to reinstall SQL Server. For more information, see “Microsoft SQL Server 2008 with SP1” in the Planning Guide for System Center 2012 – Service Manager.
8. On the Configure additional data warehouse datamarts page, Service Manager will check the current computer to see if an instance of SQL Server exists. By default, if an instance is found, Service Manager creates a new database in the existing instance. If an instance appears, click Next.
9. On the Configure the data warehouse management group page, complete these steps:a. In the Management group name box, type a unique name for the group.
ImportantManagement group names must be unique. Do not use the same
To install the data warehouse
16

management group name when you deploy a Service Manager management server and a Service Manager data warehouse management server. Furthermore, do not use the management group name that is used for Operations Manager.
b. Click Browse, enter the user account or group to which you want to give Service Manager administrative credentials, and then click Next.
10. On the Configure the reporting server for the data warehouse page, Service Manager will use the existing computer if SQL Server Reporting Services (SSRS) is present. Accept the defaults, and then click Next.
NoteThe URL that you are presented with might not be in the form of a fully qualified domain name (FQDN). If the URL as presented cannot be resolved in your environment, configure SQL Server Reporting URLs so that the FQDN is listed in the Web service URL field. For more information, see How to: Configure a URL (Reporting Services Configuration).
11. On the Configure the account for Service Manager services page, select a domain account; click Domain account; specify the user name, password, and domain for the account; and then click Test Credentials. After you receive a “The credentials were accepted” message, click Next.
12. On the Configure the reporting account page, specify the user name, password, and domain for the account, and then click Test Credentials. After you receive a “The credentials were accepted” message, click Next.
13. On the Configure Analysis Service for OLAP cubes page, click Next.14. On the Configure Analysis Services credential page, select a domain account; click
Domain account; specify the user name, password, and domain for the account; and then click Test Credentials. After you receive a “The credentials were accepted” message, click Next.
NoteThe account that you specify here must have administrator rights on the computer that hosts SSRS.
15. On the Help improve System Center Service Manager page, indicate your preference for participation in the Customer Experience Improvement Program. As an option, click Tell me more about the program, and then click Next.
16. On the Use Microsoft Update to help keep your computer secure and up-to-date page, indicate your preference for using Microsoft Update to check for Service Manager updates. Select Initiate machine wide Automatic update if you want Windows Update to check for updates. Click Next.
17. On the Installation summary page, click Install.18. On the Setup completed successfully page, we recommend that you leave Open the
Encryption Backup or Restore Wizard selected, and then click Close. For more information about backing up the encryption key, see Completing Deployment by Backing
17

Up the Encryption Key.
How to Validate the Single-Computer InstallationYou can use the following procedures to validate the single-computer installation of System Center 2012 – Service Manager.
2. Run services.msc, and then verify that the following services are installed, that they have a status of Started, and that the startup type is Automatic: System Center Data Access Service System Center Management System Center Management Configuration
1. On the physical computer, click Start, click All Programs, click Microsoft System Center, and then click Service Manager Console.
2. The first time that you run the Service Manager console, the Connect to Service Manager Server dialog box appears. In the Server name box, enter the computer name of the server that hosts the Service Manager management server.
3. The Service Manager console successfully connects to the Service Manager management server and starts.
On the virtual machine, run services.msc, and verify that the following services are installed:
System Center Data Access Service System Center Management System Center Management Configuration
To validate the Service Manager management server installation
To validate the Service Manager console installation
To validate the data warehouse management server installation
18
1. On the physical computer, click Start, click All Programs, click Microsoft SQL Server 2008, and then click SQL Server Management Studio.
2. In the Connect to Server dialog box, follow these steps:a. In the Server Type list, select Database Engine.b. In the Server Name list, select the name of the computer that hosts the Service
Manager database.c. In the Authentication list, select Windows Authentication, and then click Connect.
3. In the Object Explorer pane, expand Databases.4. Verify that the ServiceManager database is listed.5. Exit Microsoft SQL Server Management Studio.
1. On the physical computer that hosts the data warehouse databases, click Start, click All Programs, click Microsoft SQL Server 2008, and then click SQL Server Management Studio.
2. In the Connect to Server dialog box, complete these steps:a. In the Server Name list, type the computer name of the computer hosting Service
Manager data warehouse databases. For this example, type localhost.b. In the Authentication list, select Windows Authentication, and then click Connect.
3. In the Object Explorer pane, expand Databases.4. Verify that the DWDataMart, DWRepository, and DWStagingAndConfig databases are
listed.5. In the Object Explorer pane, click Connect, and then click Analysis Services.6. In the Server Name list, type the computer name for the computer hosting the Service
Manager data warehouse database. In this example, type localhost.7. In the Object Explorer pane, expand the new entry for Analysis Services, and then
expand Databases.8. Verify that the DWASDataBase database is listed.9. Exit Microsoft SQL Server Management Studio.
Installing Service Manager on Two ComputersIf you want to evaluate System Center 2012 – Service Manager and its reporting capabilities in a lab environment, we recommend that you install the Service Manager management server and data warehouse management server on two computers. The first computer hosts the Service Manager management server and the Service Manager database. The second computer hosts the data warehouse management server and the data warehouse databases. This deployment topology is shown in figure 2.
To validate the Service Manager database
To validate the data warehouse installation
19
Figure 2: An installation on two physical computers
For this release, Service Manager does not support case-sensitive instance names. Setup will display a warning if you attempt to install Service Manager on a case-sensitive instance of Microsoft SQL Server.
Installing Service Manager on two computers How to Install the Service Manager Management Server (Two-Computer Scenario)
Describes how to install the Service Manager management server, Service Manager database, and Service Manager console.
How to Install the Service Manager Data Warehouse (Two-Computer Scenario)
Describes how to install the data warehouse management server and the data warehouse database.
How to Validate the Two-Computer Installation
Describes how to validate the installation.
How to Install the Service Manager Management Server (Two-Computer Scenario)As the first step in the two-computer installation process, install the Service Manager management server, the Service Manager database, and the Service Manager console on one of the two computers.
Important
20

During setup, you will be prompted to provide credentials for the following accounts:
Management group administrator Service Manager services account Service Manager workflow account
For more information about the permissions that these accounts require, see "Accounts Required During Setup" in the Planning Guide for System Center 2012 - Service Manager.
1. Log on to the computer that will host the Service Manager management server by using an account that has administrative rights.
2. On the Service Manager installation media, double-click the Setup.exe file.3. On the Service Manager Setup Wizard page, click Service Manager management
server.4. On the Product registration page, type information in the boxes. In the Product key
boxes, type the product key that you received with Service Manager, or as an alternative, select Install as an evaluation edition (180 day trial. Read the Microsoft Software License Terms, and, if applicable, click I have read, understood, and agree with the terms of the license agreement, and then click Next.
5. On the Installation location page, verify that sufficient free disk space is available, and then click Next. If necessary, click Browse to change the location in which the Service Manager management server will be installed.
6. On the System check results page, make sure that the prerequisite check passed or at least passed with warnings, and then click Next.If the prerequisite checker determines that the Microsoft Report Viewer Redistributable has not been installed, click Install Microsoft Report Viewer Redistributable. After the Microsoft Report Viewer Redistributable 2008 (KB971119) Setup Wizard completes, click Check prerequisites again.
7. On the Configure the Service Manager database page, Service Manager will check the current computer to see if an instance of SQL Server exists. By default, if an instance is found, Service Manager creates a new database in the existing instance. If an instance appears, click Next.
ImportantA warning message appears if you are using the default collation (SQL_Latin1_General_CP1_CI_AS). Support for multiple languages in Service Manager is not possible when you are using the default collation. If later you decide to support multiple languages using a different collation, you have to reinstall SQL Server. See "Microsoft SQL Server 2008 with SP1" in the Planning Guide for System Center 2012 - Service Manager.
8. On the Configure the Service Manager management group page, complete these steps:
To install the Service Manager management server, Service Manager database, and console
21
a. In the Management group name box, type a unique name for the management group.
ImportantManagement group names must be unique. Do not use the same management group name when you deploy a Service Manager management server and a Service Manager data warehouse management server. Furthermore, do not use the management group name that is used for Operations Manager.
b. Click Browse, enter the user account or group to which you want to give Service Manager administrative rights, and then click Next.
9. On the Configure the account for Service Manager services page, click Domain account; specify the user name, password, and domain for the account; and then click Test Credentials. After you receive a “The credentials were accepted” message, click Next.
10. On the Configure the Service Manager workflow account page, click Domain account; specify the user name, password, and domain for the account; and then click Test Credentials. After you receive a “The credentials were accepted” message, click Next.
11. On the Help improve System Center Service Manager page, indicate your preference for participation in the Customer Experience Improvement Program. As an option, click Tell me more about the program, and then click Next.
12. On the Use Microsoft Update to help keep your computer secure and up-to-date page, indicate your preference for using Microsoft Update to check for Service Manager updates. If you want Windows Update to check for updates, select Initiate machine wide Automatic update. Click Next.
13. On the Installation summary page, click Install.14. On the Setup completed successfully page, we recommend that you leave Open the
Encryption Backup or Restore Wizard selected, and then click Close. For more information about backing up the encryption key, see Completing Deployment by Backing Up the Encryption Key.
How to Install the Service Manager Data Warehouse (Two-Computer Scenario)As the second step in the two-computer installation process for System Center 2012 – Service Manager, deploy the data warehouse management server and the data warehouse databases on the second computer. During Setup, you will be prompted to provide credentials for the following accounts:
Management group administrator Service Manager services account Reporting account
22

For more information about the permissions that these accounts require, see "Accounts Required During Setup" in the Planning Guide for System Center 2012 - Service Manager. Before you start, make sure that Microsoft SQL Server Reporting Services (SSRS) is installed in the default instance of Microsoft SQL Server.
Log on to the computer by using an account that has administrative rights. On the Service Manager installation media, double-click the Setup.exe file. On the Service Manager Setup Wizard page, click Service Manager data warehouse
management server. On the Product registration page, type information in the boxes. In the Product key
boxes, type the product key that you received with Service Manager, or as an alternative, select Install as an evaluation edition (180 day trial. Read the Microsoft Software License Terms, and, if applicable, click I have read, understood, and agree with the terms of the license agreement, and then click Next.
On the Installation location page, verify that sufficient free disk space is available, and then click Next. If necessary, click Browse to change the location in which the Service Manager data warehouse management server will be installed.
On the System check results page, make sure that prerequisites passed or at least passed with warnings, and then click Next.
On the Configure data warehouse databases page, Service Manager checks the computer you are using to see if it can host the data warehouse databases. For this configuration, confirm that the database server is the computer on which you are installing the data warehouse management server, and then click Next.
ImportantA warning message appears if you are using the default collation (SQL_Latin1_General_CP1_CI_AS). Support for multiple languages in Service Manager is not possible when you are using the default collation. If later you decide to support multiple languages using a different collation, you have to re-install SQL Server. See “Microsoft SQL Server 2008 with SP1” in the Planning Guide for System Center 2012 - Service Manager.
On the Configure additional data warehouse datamarts page, Service Manager checks the current computer to see if an instance of SQL Server exists. By default, if an instance is found, Service Manager creates a new database in the existing instance. If an instance appears, click Next.
On the Configure the data warehouse management group page, complete these steps:a. In the Management group name box, type a unique name for the group.
ImportantManagement group names must be unique. Do not use the same management group name when you deploy a Service Manager management
To install a data warehouse management server and data warehouse databases
23

server and a Service Manager data warehouse management server. Furthermore, do not use the management group name that is used for Operations Manager.
b. Click Browse, enter the user account or group to which you want to give Service Manager administrative rights, and then click Next.
On the Configure the reporting server for the data warehouse page, Service Manager will use the existing computer if SQL Server Reporting Services is present. Accept the defaults, and then click Next.
NoteThe URL that you are presented with might not be in the form of a fully qualified domain name (FQDN). If the URL as presented cannot be resolved in your environment, configure SQL Server Reporting URLs so that the FQDN is listed in the Web service URL field. For more information see How to: Configure a URL (Reporting Services Configuration).
On the Configure the account for Service Manager services page, click Domain account; specify the user name, password, and domain for the account; and then click Test Credentials. After you receive a “The credentials were accepted” message, click Next.
On the Configure the reporting account page, specify the user name, password, and domain for the account, and then click Test Credentials. After you receive a “The credentials were accepted” message, click Next.
On the Configure Analysis Service for OLAP cubes page, click Next. On the Configure Analysis Services credential page, select a domain account; click
Domain account specify the user name, password, and domain for the account; and then click Test Credentials. After you receive a “The credentials were accepted” message, click Next.
NoteThe account that you specify here must have administrator rights on the computer hosting SSRS.
On the Help improve System Center Service Manager page, indicate your preference for participation in the Customer Experience Improvement Program. As an option, click Tell me more about the program, and then click Next.
On the Use Microsoft Update to help keep your computer secure and up-to-date page, indicate your preference for using Microsoft Update to check for Service Manager updates. If you want Windows Update to check for updates, select Initiate machine wide Automatic update. Click Next.
On the Installation summary page, click Install. On the Setup completed successfully page, we recommend that you leave Open the
Encryption Backup or Restore Wizard selected, and then click Close. For more information about backing up the encryption key, see Completing Deployment by Backing Up the Encryption Key.
24

How to Validate the Two-Computer InstallationYou can use the following procedures to validate the two-computer installation of System Center 2012 – Service Manager. In these procedures, the first computer is the computer on which you installed the Service Manager management server, the Service Manager database, and Service Manager console. The second computer is the computer that hosts the data warehouse management server and the data warehouse databases.
On the first computer, verify that the Program Files\Microsoft System Center\Service Manager 2012 folder exists.
Run services.msc, and then verify that the following services are installed, that they have a status of Started, and that the startup type is Automatic: System Center Data Access Service System Center Management
System Center Management Configuration
1. On the first computer, click Start, click All Programs, click Microsoft System Center, and then click Service Manager Console.
2. The first time that you run the Service Manager console, the Connect to Service
Manager Server dialog box appears. In the Server name box, enter the computer name of the server that hosts the Service Manager management server.
3. The Service Manager console successfully connects to the Service Manager management server.
On the second computer, run services.msc, and verify that the following services are installed: System Center Data Access Service System Center Management System Center Management Configuration
1. On the first computer, click Start, click All Programs, click Microsoft SQL Server 2008, and then click SQL Server Management Studio.
To validate the Service Manager management server installation
To validate the Service Manager console installation
To validate the data warehouse management server installation
To validate the Service Manager database25

2. In the Connect to Server dialog box, complete these steps:a. In the Server Name list, type the computer name for the computer that hosts the
Service Manager database. In this example, type localhost.b. In the Authentication list, select Windows Authentication, and then click Connect.
3. In the Object Explorer pane, expand Databases.4. Verify that the ServiceManager database is listed.
1. On the second computer, click Start, click All Programs, click Microsoft SQL Server 2008, and then click SQL Server Management Studio.
2. In the Connect to Server dialog box, complete these steps:a. In the Server Name list, type the computer name for the computer that hosts the
Service Manager data warehouse database. In this example, type localhost.b. In the Authentication list, select Windows Authentication, and then click Connect.
3. In the Object Explorer pane, expand Databases.4. Verify that the DWDataMart, DWRepository, and DWStagingAndConfig databases are
listed.5. In the Object Explorer pane, click Connect, and then click Analysis Services.6. In the Server Name list, type the computer name for the computer hosting the Service
Manager data warehouse database. In this example, type localhost.7. In the Object Explorer pane, expand the new entry for Analysis Services, and then
expand Databases.8. Verify that the DWASDataBase database is listed.9. Exit Microsoft SQL Server Management Studio.
Installing Service Manager on Four ComputersWhen you are ready to move System Center 2012 – Service Manager into a production environment, or if you want to maximize performance and scalability, you can consider an installation topology in which each part of the Service Manager installation resides on its own computer. This topology requires the use of four computers, as shown in figure 3.
Figure 3: Four-computer topology
To validate the data warehouse installation
26

In this deployment scenario, you install Microsoft SQL Server only on the computers that hosts databases (computers 2 and 4). You install SQL Server Reporting Services (SSRS) and SQL Server Analysis Services (SSAS) on the computer that hosts the data warehouse databases (computer 4).
Installing Service Manager on four computers How to Install the Service Manager Management Server (Four-Computer Scenario)
Describes how to install the Service Manager management server and Service Manager database.
How to Install the Service Manager Data Warehouse (Four-Computer Scenario)
Describes how to install the data warehouse management server and data warehouse databases.
How to Validate the Four-Computer Installation
Describes how to validate the installation of Service Manager and the configuration of SSRS.
For this release, Service Manager does not support case-sensitive instance names. Setup will display a warning if you attempt to install Service Manager on a case-sensitive instance of Microsoft SQL Server.
How to Install the Service Manager Management Server (Four-Computer Scenario)The following procedure describes how to install the System Center 2012 – Service Manager management server, the Service Manager database, the data warehouse management server, data warehouse databases, and the Service Manager console in a four-computer topology. You start the deployment process by installing the Service Manager management server and the Service Manager console on one computer and the Service Manager database on a second computer. Before you start, make sure that Microsoft SQL Server 2008 is installed on the computer that will host the Service Manager database.
During Setup, you will be prompted to provide credentials for the following accounts:
Important
27

Management group administrator Service Manager services account Service Manager workflow account
For more information about the permissions that these accounts require, see "Accounts Required During Setup" in the Planning Guide for System Center 2012 - Service Manager.
1. Log on to the computer that will host the Service Manager management server by using an account that has administrative rights.
2. On the System Center Service Manager installation media, double-click the Setup.exe file.
3. On the Service Manager Setup Wizard page, click Service Manager management server.
4. On the Product registration page, in the Product key boxes, type the product key that you received with Service Manager, or as an alternative, select Install as an evaluation edition (180 day trial). Read the Microsoft Software License Terms, and, if applicable, click I have read, understood, and agree with the terms of the license agreement, and then click Next.
5. On the Installation location page, verify that sufficient free disk space is available. If necessary, click Browse to change the location of where the Service Manager management server will be installed. Click Next.
6. On the System check results page, make sure that the prerequisite check passed or at least passed with warnings.
If the prerequisite checker determines that the Microsoft Report Viewer Redistributable has not been installed, click Install Microsoft Report Viewer Redistributable. After the Microsoft Report Viewer Redistributable 2008 (KB971119) Setup Wizard completes, click Check prerequisites again. Click Next.
7. On the Configure the Service Manager database page, in the Database server field, type the name of the computer that will host the Service Manager database, and press the TAB key. Ensure that SQL Server instance box is set to the desired SQL Server instance and that Create a new database is selected, and then click Next. For example, type Computer 2 in the Database server box.
ImportantA warning message appears if you are using the default collation (SQL_Latin1_General_CP1_CI_AS). Support for multiple languages in Service Manager is not possible when you are using the default collation. If later you decide to support multiple languages using a different collation, you have to reinstall SQL Server. See "Microsoft SQL Server 2008 with SP1" in the Planning Guide for Service Manager for System Center 2012 .
8. On the Configure the Service Manager management group page, complete these steps:
To install the Service Manager management server, Service Manager database, and console
28

a. In the Management group name box, type a unique name for the group name.
ImportantManagement group names must be unique. Do not use the same management group name even when you are deploying a Service Manager management server and a Service Manager data warehouse management server. Furthermore, do not use the management group name that is used for Operations Manager.
b. In the Management group administrators areas, click Browse, enter the user or group that you want to be the Service Manager administrator, and then click Next. For example, select the group Woodgrove\SM_Admins.
9. On the Configure the account for Service Manager services page, click Domain account; specify the user name, password, and domain for the account; and then click Test Credentials. After you receive a “The credentials were accepted” message, click Next.
10. On the Configure the Service Manager workflow account page, click Domain account; specify the user name, password, and domain for the account; and then click Test Credentials. After you receive a “The credentials were accepted” message, click Next.
11. On the Help improve System Center Service Manager page, indicate your preference for participation in the Customer Experience Improvement Program. As an option, click Tell me more about the program, and then click Next.
12. On the Use Microsoft Update to help keep your computer secure and up-to-date page, indicate your preference for using Microsoft Update to check for Service Manager updates. If you want Windows Update to check for updates, select Initiate machine wide Automatic update. Click Next.
13. On the Installation summary page, click Install.14. On the Setup completed successfully page, we recommend that you leave Open the
Encryption Backup or Restore Wizard selected, and then click Close. For more information about backing up the encryption key, see Completing Deployment by Backing Up the Encryption Key.
How to Install the Service Manager Data Warehouse (Four-Computer Scenario)To start deployment of the System Center 2012 – Service Manager data warehouse and data warehouse databases, install the data warehouse management server on one computer (for example, computer 3), and all of the data warehouse databases on another computer (for example, computer 4).
During Setup, you will be prompted to provide credentials for the following accounts:
Management group administrator Service Manager services account
29

Reporting account Analysis Services account
For more information about the permissions that these accounts require, see "Accounts Required During Setup" in the Planning Guide for Service Manager for System Center 2012 .
The data warehouse databases include the following three databases: DWStagingAndConfig, DWRepository, and DWDataMart. The first two databases, DWStagingAndConfig and DWRepository, must reside on the same instance of Microsoft SQL Server. The DWDataMart database can reside on a separate instance of SQL Server. The optional OMDWDataMart and CMDWDataMart databases can reside together or separately on their own instances of Microsoft SQL Server.
1. Because, in this scenario, the computer that hosts SQL Server Reporting Services (SSRS) is not the same computer that hosts the data warehouse management server, you have to prepare the computer that will remotely host SSRS for Service Manager. See Manual Steps to Configure the Remote SQL Server Reporting Services before continuing with this procedure.
2. Log on to the computer that will host the data warehouse management server by using an account that has administrator rights. For example, run Setup on Computer 3.
3. On the System Center Service Manager installation media, double-click the Setup.exe file.
4. On the Service Manager Setup Wizard page, click Service Manager data warehouse management server.
5. On the Product registration page, in the Product key boxes, type the product key that you received with Service Manager, or as an alternative, select Install as an evaluation edition (180 day trial). Read the Microsoft Software License Terms, and, if applicable, click I have read, understood, and agree with the terms of the license agreement, and then click Next.
6. On the Installation location page, verify that sufficient free disk space is available, and then click Next. If necessary, click Browse to change the location where the Service Manager management server will be installed.
7. On the System check results page, verify that prerequisites passed or at least passed with warnings, and then click Next.
8. On the Configure the data warehouse databases page, click Staging and Configuration. In the Database server box, type the computer name of the computer that will host the two data warehouse databases. For example, type Computer 4, and then press the TAB key. Verify that Default appears in the SQL Server instance box.
ImportantA warning message appears if you are using the default collation (SQL_Latin1_General_CP1_CI_AS). Support for multiple languages in Service Manager is not possible when you are using the default collation. If later you decide to support multiple languages using a different collation, you have to
To install a data warehouse management server
30

reinstall SQL Server. See “Microsoft SQL Server 2008 with SP1” in the Planning Guide for System Center 2012 – Service Manager.
9. In the list of the three databases, select Data Mart. In the Database server box, type the computer name of the server that will host the Data Mart database. For example, type Computer 4, and then press the TAB key. When Default appears in the SQL Server instance box, click Next.
10. On the Configure additional data warehouse datamarts page, complete these steps:a. Click OM Data mart. In the Database server box, type the computer name of the
computer that will host the Operations Manager data mart database. For example, type Computer 4, and then press the TAB key.
b. Click CM Data mart. In the Database server box, type the computer name of the computer that will host the CM data mart database. For example, type Computer 4, and then press the TAB key.
c. Click Next.11. On the Configure the data warehouse management group page, complete these
steps:a. In the Management group name box, type a unique name for the group name.
CautionManagement group names must be unique. Do not use the same management group name even when deploying a Service Manager management server and a Service Manager data warehouse management server. Furthermore, do not use the management group name that is used for Operations Manager. All data warehouse management group names have the prefix DW_.
b. Click Browse, enter the user or group that you want to be the Service Manager administrator, and then click Next.
NoteThe group Domain\Administrators is not allowed as a management group administrator.
12. On the Configure the reporting server for the data warehouse page, follow these steps:a. In the Report server box, enter the name of the computer that will host the reporting
server. In this example, this will be the computer that hosts the data warehouse database, enter Computer 4, and then press the TAB key.
NoteThe URL that you are presented with might not be in the form of a fully qualified domain name (FQDN). If the URL as presented cannot be resolved in your environment, you will need to configure SQL Server Reporting URLs so that the FQDN is listed in the Web service URL field. For more information see the TechNet article Configure a URL
31

(http://go.microsoft.com/fwlink/p/?LinkId=230712).
b. Verify that Default is displayed in the Report server instance box.c. Because you followed the procedure “Manual Steps to Configure the Remote SQL
Server Reporting Services” in the Deployment Guide for System Center 2012 – Service Manager (http://go.microsoft.com/fwlink/p/?LinkID=209670), select the I have taken the manual steps to configure the remote SQL Server Reporting Services as described in the Service Manager Deployment Guide check box, and then click Next.
13. On the Configure the account for Service Manager services page, click Domain account, specify the user name, password, and domain for the account, and then click Test Credentials. After you receive a The credentials were accepted message, click Next.For example, enter the account information for the domain user SM_Acct.
14. On the Configure the reporting account page, specify the user name, password, and domain for the account, and then click Test Credentials. After you receive a The credentials were accepted message, click Next.
15. On the Configure Analysis Service for OLAP cubes page, in the Database server box, type the computer name of the server that will host the Analysis Services database, and then press the TAB key. When Default appears in the SQL Server instance box, click Next. For example, type Computer 4 in the Database server box.
WarningIf you are installing SQL Server Analysis Services on a computer other than the computer hosting the data warehouse management server and there is a firewall in your environment, you must make sure that the proper firewall ports are opened. For more information, see the topic Port Assignments for Service Manager 2012 in the Planning Guide for System Center 2012 – Service Manager.
16. On the Configure Analysis Services credential page, select a domain account, click Domain account, specify the user name, password, and domain for the account, and then click Test Credentials. After you receive a The credentials were accepted message, click Next.
NoteThe account you specify here must have administrator rights on the computer hosting SQL Server Analysis Services.
17. On the Help improve System Center Service Manager page, indicate your preference for participation in the Customer Experience Improvement Program. Optionally, click Tell me more about the program, and then click Next.
18. On the Use Microsoft Update to help keep your computer secure and up-to-date page, indicate your preference for using Microsoft Update to check for Service Manager updates. Select Initiate machine wide Automatic update if you want Windows Update to check for updates. Click Next.
32

19. On the Installation summary page, click Install.20. On the Setup completed successfully page, we recommend that you leave Open the
Encryption Backup or Restore Wizard selected, and then click Close. For more information about backing up the encryption key, see Completing Deployment by Backing Up the Encryption Key.
How to Validate the Four-Computer InstallationThe procedures in this topic describe how to validate the four-computer installation of System Center 2012 – Service Manager.
Step 1: Validate the Installation of the Management Server and Database
1. On the computer hosting the Service Manager management server, verify that a Program Files\Microsoft System Center 2012\Service Manager folder exists.
2. Run services.msc, and then verify that the following services are installed, that they have the status of Started, and that the startup type is Automatic: System Center Data Access Service System Center Management System Center Management Configuration
1. On the first computer, click Start, click All Programs, click Microsoft System Center, and then click Service Manager Console.
2. The first time that you run the Service Manager console, the Connect to Service Manager Server dialog box appears. In the Server name box, enter the computer name of the server that is hosting the Service Manager management server.
3. The Service Manager console successfully connects to the Service Manager management server.
1. On the computer hosting the Service Manager database, click Start, click All Programs, click Microsoft SQL Server 2008, and then click SQL Server Management Studio.
2. In the Connect to Server dialog box, select the following:a. In the Server Type list, select Database Engine.b. In the Server Name list, select the server name for your Service Manager database.
For example, select Computer 2.c. In the Authentication list, select Windows Authentication, and then click Connect.
3. In the Object Explorer pane, expand Databases.4. Verify that the ServiceManager database is listed.5. Exit Microsoft SQL Server Management Studio.
To validate a Service Manager management server installation
To validate the Service Manager console installation
To validate the Service Manager database
33

Step 2: Validate the Installation of the Data Warehouse Management Server and Database
On the computer hosting the data warehouse management server (the server you ran Setup on), run services.msc, and verify that the following services have been installed: System Center Data Access Service System Center Management System Center Management Configuration
1. On the computer hosting the data warehouse management databases, click Start, click All Programs, click Microsoft SQL Server 2008, and then click SQL Server Management Studio.
2. In the Connect to Server dialog box, select the following:a. In the Server Type list, select Database Engine.b. In the Server Name list, select the server and instance for your Service Manager
data warehouse database. For example, select Computer 4.c. In the Authentication list, select Windows Authentication, and then click Connect.
3. In the Object Explorer pane, expand Databases.4. Verify that the DWStagingAndConfig and DWRepository databases are listed.5. On the computer hosting SQL Server Reporting Services (SSRS), click Start, click All
Programs, click Microsoft SQL Server 2008, and then click SQL Server Management Studio.
6. In the Connect to Server dialog box, select the following:a. In the Server Type list, select Database Engine.b. In the Server Name list, select the server and instance for your Service Manager
data warehouse database. For example, select Computer 4.c. In the Authentication list, select Windows Authentication, and then click Connect.
7. In the Object Explorer pane, expand Databases.8. Verify that the DWDataMart database is listed.9. In the Object Explorer pane, click Connect, and then click Analysis Services.10. In the Server Name list, type the computer name for the computer hosting the Service
Manager data warehouse database. In this example, type localhost.11. In the Object Explorer pane, expand the new entry for Analysis Services, and then
expand Databases.12. Verify that the DWASDataBase database is listed.13. Exit Microsoft SQL Server Management Studio.
To validate a data warehouse management server installation
To validate data warehouse databases
34

Manual Steps to Configure the Remote SQL Server Reporting ServicesDuring deployment of the Service Manager data warehouse management server, you can specify the server to which Microsoft SQL Server Reporting Services (SSRS) will be deployed. During setup, the computer that is hosting the data warehouse management server is selected by default. If you specify a different computer to host SSRS, you are prompted to follow this procedure to prepare the server. Preparing the remote computer to host SSRS involves the following steps, which are covered in detail in this section:
Copy Microsoft.EnterpriseManagement.Reporting.Code.dll from the Service Manager installation media to the computer that is hosting SSRS.
Add a code segment to the rssrvpolicy configuration file on the computer that is hosting SSRS.
Add an Extension tag to the existing Data segment in the rsreportserver configuration file on the same computer.
If you used the default instance of SQL Server, use Windows Explorer to drag Microsoft.EnterpriseManagement.Reporting.Code.dll (which is located in the Prerequisites folder on your Service Manager installation media) to the folder \Program Files\Microsoft SQL Server\MSRS10.MSSQLSERVER\Reporting Services\ReportServer\Bin on the computer that is hosting SSRS. If you did not use the default instance of SQL Server, the path of the required folder is \Program Files\Microsoft SQL Server\MSRS10.<INSTANCE_NAME>\Reporting Services\ReportServer\Bin. In the following procedure, the default instance name is used.
1. On the computer that will host the remote SSRS, open an instance of Windows Explorer.2. Perform one of the following steps based on which version of SQL Server 2008 you are
using:a. For SQL Server 2008 Service Pack 1 (SP1), locate the folder \Program Files\
Microsoft SQL Server\MSRS10.MSSQLSERVER\Reporting Services\ReportServer\Bin.
b. For SQL Server 2008 R2, locate the folder \Program Files\Microsoft SQL Server\MSRS10_50.MSSQLSERVER\Reporting Services\ReportServer\Bin.
3. Start a second instance of Windows Explorer, locate the drive that contains the Service Manager installation media, and then open the Prerequisites folder.
4. In the Prerequisites folder, click Microsoft.EnterpriseManagement.Reporting.Code.dll, and drag it to the folder that you located in either step 2a or step 2b.
1. On the computer that will be hosting SSRS, locate the file rssrvpolicy.config in the following folder:a. For SQL Server 2008 SP1, locate \Program Files\Microsoft SQL Server\
MSRS10.MSSQLSERVER\Reporting Services\ReportServer.
To copy the Microsoft.EnterpriseManagement.Reporting.Code.dll file
To add a code segment to the rssrvpolicy.config file
35

b. For SQL Server 2008 R2, locate \Program Files\Microsoft SQL Server\MSRS10_50.MSSQLSERVER\Reporting Services\ReportServer.
2. Using an XML editor of your choice (such as Notepad), open the rssrvpolicy.config file.3. Scroll through the rssrvpolicy.config file and locate the <CodeGroup> code segments.
The following code shows an example of a <CodeGroup> segment.
<CodeGroup
class="UnionCodeGroup"
version="1"
PermissionSetName="FullTrust">
<IMembershipCondition
class="UrlMembershipCondition"
version="1"
Url="$CodeGen$/*"
/>
</CodeGroup>
4. Add the following <CodeGroup> segment in its entirety in the same section as the other <CodeGroup> segments.
<CodeGroup
class="UnionCodeGroup"
version="1"
PermissionSetName="FullTrust"
Name="Microsoft System Center Service Manager Reporting Code Assembly"
Description="Grants the SCSM Reporting Code assembly full trust permission.">
<IMembershipCondition
class="StrongNameMembershipCondition"
version="1"
PublicKeyBlob="0024000004800000940000000602000000240000525341310004000001000100B5FC90E7027F67871E773A8FDE8938C81DD402BA65B9201D60593E96C492651E889CC13F1415EBB53FAC1131AE0BD333C5EE6021672D9718EA31A8AEBD0DA0072F25D87DBA6FC90FFD598ED4DA35E44C398C454307E8E33B8426143DAEC9F596836F97C8F74750E5975C64E2189F45DEF46B2A2B1247ADC3652BF5C308055DA9"
/>
36
</CodeGroup>
5. Save the changes and close the XML editor.
1. On the computer hosting SSRS, locate the file rsreportserver.config in the following folder:a. For SQL Server 2008 SP1, locate \Program Files\Microsoft SQL Server\
MSRS10.MSSQLSERVER\Reporting Services\ReportServer.b. For SQL Server 2008 R2, locate \Program Files\Microsoft SQL Server\
MSRS10_50.MSSQLSERVER\Reporting Services\ReportServer.2. Using an XML editor of your choice (such as Notepad), open the rsreportserver.config
file.3. Scroll through the rsreportserver.config file and locate the <Data> code segment. There
is only one <Data> code segment in this file.4. Add the following Extension tag to the <Data> code segment where all the other
Extension tags are:
<Extension Name="SCDWMultiMartDataProcessor" Type="Microsoft.EnterpriseManagement.Reporting.MultiMartConnection, Microsoft.EnterpriseManagement.Reporting.Code" />
5. Save the changes and close the XML editor.
Manual Steps to Prepare Upgraded SQL ServerIf you upgrade SQL Server 2008 R2 to SQL 2012 after Service Manager SP1 installation, you must manually copy the Microsoft.EnterpriseManagement.Reporting.Code.dll file in order for SQL Server Reporting Services (SSRS) to function properly.
1. On the computer that is hosting SSRS, open an instance of Windows Explorer.2. Open <InstallationDrive>:\Program Files\Microsoft SQL Server\
MSRS11.MSSQLSERVER\Reporting Services\ReportServer\bin and copy the Microsoft.EnterpriseManagement.Reporting.Code.dll file from the Prerequisites folder on your Service Manager installation media folder.
How to Create and Deploy Server Images of Service ManagerYou can use the information in this topic to create a system image that contains Windows server, SQL Server, and Service Manager for use as a template that you can apply to new servers. Follow the basic steps below to prepare the image. You can modify them, as needed for your
To add an Extension tag to the Data segment in the rsreportserver.conf file
To copy the Microsoft.EnterpriseManagement.Reporting.Code.dll file
37
environment. For more information about the Windows System Preparation Tool, What is Sysprep?
Details about installing SQL Server using a configuration file are not covered in this topic. For more information about using a configuration file to install SQL Server, see Install SQL Server 2012 Using a Configuration File.
Afterward, modify and save the sample CMD file below to create your own customized version and then run the file.
1. Install Windows Server on the new server.2. Install SQL Server in Prepare for imaging mode. This installs the binary files, but does not
configure SQL server.
NoteSQL server is unusable at this point.
3. Copy the SQL Server installation files to a temporary location on the server. For example, c:\Runonce\ SQLFULL_ENU.
4. Copy the System Center 2012 Service Manager installation files to a temporary location on the server. For example, c:\Runonce\SCSM.
5. Save the example CMD file shown below and customize it for your environment, where necessary. This file will run SQL Server setup to complete the SQL Server installation and then run an unattended installation of Service Manager. Save this file to a temporary location such as C:\Runonce\FirstRun.cmd.
6. Run the System Preparation Tool (Sysprep) with the /generalize command to generalize the server.
7. Capture the Windows installation with ImageX, by creating a reference images with which to install servers with the same hardware configuration.
8. Create a Windows Unattend.xml file to customize Windows when the image is booted and have it run FirstRun.cmd.
Copy the following sample and modify it, as needed.
@echo off
set ServiceAccountDomain=contoso
set ServiceAccountName=Administrator
set ServiceAccountPassword=P@$$word
Note
To prepare the server for imaging
To create a CMD file that completes image installation
38

echo Finalizing SQL installation...
start /wait c:\RunOnce\SQLFULL_ENU\setup.exe /ConfigurationFile=c:\RunOnce\SQL2012Complete.ini
echo Installing additional SQL features...
start /wait c:\RunOnce\SQLFULL_ENU\setup.exe /ConfigurationFile=c:\RunOnce\SQL2012Shared.ini
echo Installing System Center Service Manager...
start /wait C:\RunOnce\SCSM\setup.exe /Install:Server /AcceptEula /RegisteredOwner:SCSM /RegisteredOrganization:Microsoft /CreateNewDatabase /SqlServerInstance:%computername% /ManagementGroupName:%computername% /AdminRoleGroup:%ServiceAccountDomain%\%ServiceAccountName% /ServiceRunUnderAccount:%ServiceAccountDomain%\%ServiceAccountName%\%ServiceAccountPassword% /WorkflowAccount:%ServiceAccountDomain%\%ServiceAccountName%\%ServiceAccountPassword% /CustomerExperienceImprovementProgram:Yes /EnableErrorReporting:Yes /silent
See AlsoDeployment Scenarios for System Center 2012 - Service Manager
Guidance for Installing System Center 2012 - Service Manager on Virtual MachinesThis topic provides guidance that you have to consider when you install System Center 2012 – Service Manager in a Hyper-V virtual environment. If you are installing Microsoft SQL Server into an environment without Hyper-V, consult your vendor’s documentation for guidance regarding the use of SQL Server.
Deploying SQL Server in a Virtual EnvironmentBefore you deploy SQL Server in a Hyper-V environment, see Running SQL Server 2008 in a Hyper-V Environment. Keep the following in mind when you prepare a virtual environment for SQL Server:
39

Using a dynamic virtual hard drive (VHD) can decrease performance. We do not recommend using a VHD.
Allocate at least two virtual CPUs for the instance of SQL Server. Do not allocate more virtual CPUs than the number of available logical CPUs. If you observe a drop in Service Manager performance in a virtual environment, check CPU
and memory utilization on the virtual machines that are hosting the instance of SQL Server and the Service Manager management server. If CPU utilization is near 100 percent, either allocate additional virtual CPUs or reduce the number of concurrent Service Manager console sessions.
MemoryThe amount of memory you have in your logical computer and the amount of memory you allocate to each virtual machine are critical. If you deploy an instance of SQL Server, Service Manager management server, and Service Manager console to the same virtual machine, the memory requirements are cumulative. You need enough memory to meet the requirements of each part of Service Manager. In this environment, 8 gigabytes (GB) of memory is the minimum recommended amount.
Deploying Service Manager Databases in a Virtual EnvironmentIn this release, if you are installing Service Manager and data warehouse databases on virtual machines, we recommend that you use one virtual machine for the Service Manager database and another virtual machine for the data warehouse databases. Furthermore, each virtual machine should be configured for two CPUs.
Configure Windows PowerShell to Run in System Center 2012 - Service ManagerBefore you can run commands in the Windows PowerShell command-line interface in System Center 2012 – Service Manager, you must set execution policy to RemoteSigned and import the data warehouse cmdlet module.
The Service Manager cmdlets are implemented in the following two modules:
System.Center.Service.Manager. This module is imported automatically every time a Service Manager Windows PowerShell session is opened.
Microsoft.EnterpriseManagement.Warehouse.Cmdlets. This module must be imported manually.
Cmdlets in Authoring Tool WorkflowsWhen you use the Service Manager SP1 version of the Authoring tool to create a workflow, then custom scripts using Windows PowerShell cmdlets called by the workflow fail. This is due to a problem in the Service Manager MonitoringHost.exe.config file.
40

To work around this problem, update the MonitoringHost.exe.config XML file using the following steps.
1. Navigate to %ProgramFiles%\Microsoft System Center 2012\Service Manager\ or the location where you installed Service Manager.
2. Edit the MonitoringHost.exe.config file and add the section in italic type from the example below in the corresponding section of your file. You must insert the section before <publisherPolicy apply="yes" />.
3. Save your changes to the file.4. Restart the System Center Management service on the Service Manager management
server.
<?xml version="1.0"?><configuration> <configSections> <section name="uri"
type="System.Configuration.UriSection, System, Version=2.0.0.0, Culture=neutral,
PublicKeyToken=b77a5c561934e089" /> </configSections> <uri> <iriParsing
enabled="true" /> </uri> <runtime> <assemblyBinding xmlns="urn:schemas-microsoft-
com:asm.v1"> <dependentAssembly> <assemblyIdentity
name="Microsoft.Mom.Modules.DataTypes" publicKeyToken="31bf3856ad364e35" />
<publisherPolicy apply="no" /> <bindingRedirect oldVersion="6.0.4900.0"
newVersion="7.0.5000.0" /> </dependentAssembly> <dependentAssembly>
<assemblyIdentity
name="Microsoft.EnterpriseManagement.HealthService.Modules.WorkflowFoundation"
publicKeyToken="31bf3856ad364e35" /> <publisherPolicy apply="no" />
<bindingRedirect oldVersion="6.0.4900.0" newVersion="7.0.5000.0" />
</dependentAssembly>
<dependentAssembly>
<assemblyIdentity name="Microsoft.EnterpriseManagement.Modules.PowerShell"
publicKeyToken="31bf3856ad364e35" />
<bindingRedirect oldVersion="6.0.4900.0" newVersion="7.0.5000.0" />
</dependentAssembly>
<publisherPolicy apply="yes" /> <probing privatePath="" />
</assemblyBinding> <gcConcurrent enabled="true" /> </runtime></configuration>
In This SectionHow to Set Execution Policy
Describes how to set execution policy to RemoteSigned.
41
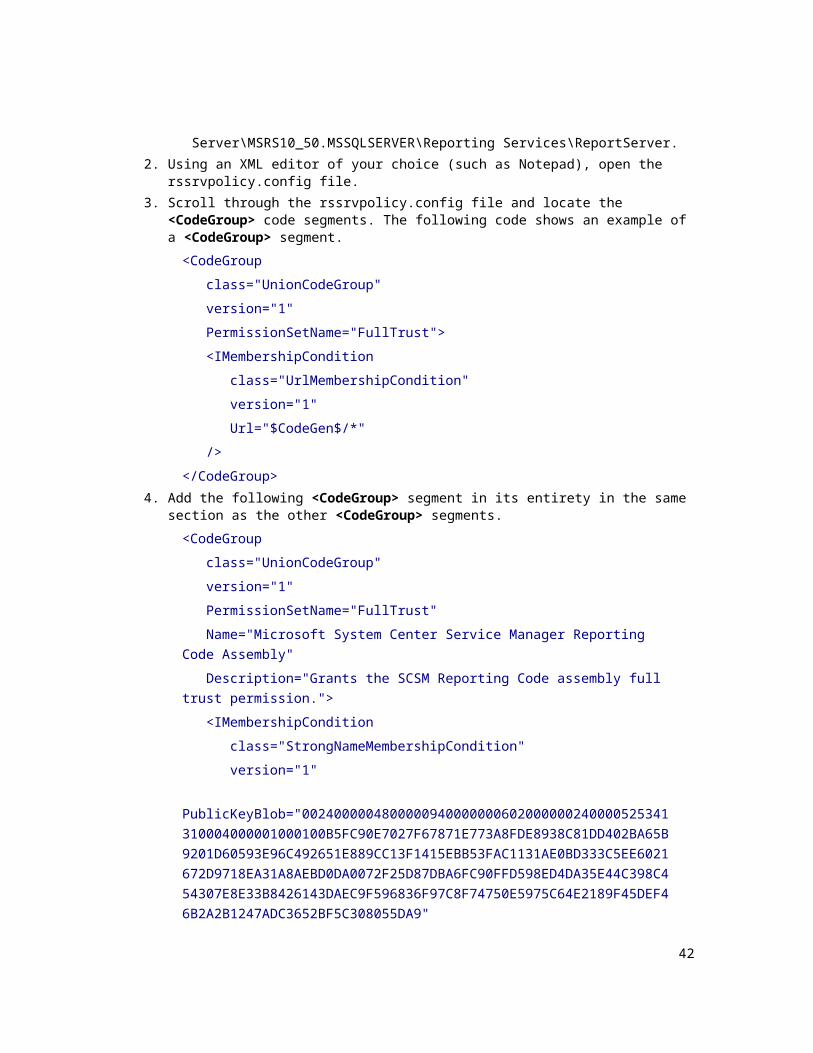
How to Import the Data Warehouse Cmdlet Module
Describes how to manually import the data warehouse Windows PowerShell cmdlets.
Registering with the Service Manager Data Warehouse to Enable ReportingAfter you have deployed the Service Manager management servers and data warehouse management servers, for reporting to function you must run the Data Warehouse Registration Wizard. This wizard registers the Service Manager management group with the data warehouse management group. It also deploys management packs from the Service Manager management server to the data warehouse management server.
The management pack deployment process can take several hours to complete. It is a best practice not to turn off any Service Manager computers or stop any Service Manager services during this time. During this registration process, you can continue to use the Service Manager console to perform any Service Manager functions that you want.
To ensure that reporting data will be available, use the procedures in the following topics to register the data warehouse and deploy the management packs.
Registering with the Service Manager Data Warehouse to Enable Reporting topics How to Run the Data Warehouse Registration Wizard
Describes how to run the data warehouse registration wizard.
How to Determine When Data Warehouse Registration Is Complete
You have to allow enough time for the management pack deployment process to complete. This topic describes how to determine when management pack deployment is complete.
How to Run the Data Warehouse Registration WizardYou can use the following steps in System Center 2012 – Service Manager to use the Data Warehouse Registration Wizard to register with the Service Manager data warehouse.
1. By using an account that is a member of the Service Manager and data warehouse management administrators group, log on to the computer that hosts the Service Manager console.
2. In the Service Manager console, select Administration.3. In the Administration pane, expand Administration.4. In the Administration view, in the Register with Service Manager’s Data Warehouse
To run the Data Warehouse Registration wizard
42

area, click Register with Service Manager Data Warehouse.5. In the Data Warehouse Registration wizard, on the Before You Begin page, click Next.6. On the Data Warehouse page, in the Server name box, type the fully qualified domain
name (FQDN) of the computer hosting the data warehouse management server, and then click Test Connection. If the test is successful, click Next.
7. On the Credentials page, you can accept the default entry in the Run as account list, and then click Next, or you can enter credentials from a user or group of your own choosing.
ImportantThe account that you specify will be assigned administrative credentials on the Service Manager management server, and it will be granted Read permission on the Service Manager database. You can specify different credentials from other Service Manager management groups when you are registering with the data warehouse.
8. On the Summary page, click Create.9. On the Completion page, when The data warehouse registration succeeded appears,
click Close.10. A dialog box states that the report deployment process is not finished. This is to be
expected. On the System Center Service Manager dialog box, click OK.11. In a few minutes, after you close the Data Warehouse Registration Wizard, the Data
Warehouse button will be added to the Service Manager console. In the Service Manager console, click the arrow at the lower right corner of the Service Manager console buttons, and then click Show More Buttons.
You can use a Windows PowerShell command to complete this task. For information about how to use Windows PowerShell to register Service Manager management groups with the data warehouse, see Add-SCDWMgmtGroup.
How to Determine When Data Warehouse Registration Is CompleteSeveral management packs are imported during the data warehouse registration process in System Center 2012 – Service Manager. Data warehouse registration is complete when all of the management packs have been imported. You will have to determine when that process is complete by using the following procedure.
1. Start the Service Manager console.2. In the Service Manager console, select Data Warehouse.3. In the Data Warehouse pane, expand Data Warehouse, and then click Data
Warehouse Jobs.
To determine when management pack deployment has completed
43

4. In the Data Warehouse Jobs pane, click MPSyncJob.5. In the MPSyncJob details pane, in the Synchronization Job Details list, scroll to the
right to view the Status column, and then click Status to alphabetically sort the status column.
6. Scroll through the Status list. The management pack deployment process is complete when the status for all of the management packs is Associated or Imported. Make sure that there is no status of either Pending Association or Failed in the status list. In the Data Warehouse Jobs pane, the status of the MPSyncJob will have changed from Running to Not Started when the registration process is complete. This deployment process can take up to two hours to complete.
7. Use the following steps to periodically refresh the Data Warehouse Job pane to monitor the progress of the registration process:a. In the Tasks pane, under Data Warehouse Jobs, click Refresh.b. In the Data Warehouse Jobs pane, click MPSyncJob.c. In the MPSyncJob details pane, in the Synchronization Job Details list, scroll to
the right to view the Status column, and then click Status to alphabetically sort the status column.
8. After the management packs have been deployed (as determined in step 6), make sure that the following five data warehouse jobs appear in the Data Warehouse Jobs pane: Extract_<Service Manager management group name> Extract_<data warehouse management group name> Load.Common Transform.Common MPSyncJob
NoteIf these five data warehouse jobs do not appear, complete the following steps:
a. In the Data Warehouse Jobs pane, click MPSyncJob.b. In the Tasks pane, under Synchronization, click Resume.c. Determine whether management pack deployment is complete by repeating steps
4through 6.
Deploying Additional Service Manager Management ServersYou can deploy additional Service Manager management servers to load-balance additional Service Manager consoles or as part of your disaster recovery strategy.
This section describes how you can install additional Service Manager management servers. The additional Service Manager management servers can improve performance in a high-use environment.
44

Management ServersYou create a management server when you click Service Manager management server in the Service Manager Setup Wizard. The initial Service Manager management server hosts data access, workflow services, and authorization services.
Initial and Additional Management ServersWhen you run Setup for the first time, you install the initial Service Manager management server and define the management group for your installation. The initial management server handles all of the workflows in your Service Manager environment. Any additional Service Manager management servers that you deploy are used to load-balance additional Service Manager console connections. With this release of Service Manager, we recommend that you deploy an additional Service Manager management server for every 40 to 50 Service Manager consoles that you intend to deploy.
To associate your additional Service Manager management servers with the initial Service Manager management server and management group, you must specify the Service Manager database that you used for your initial Service Manager management server.
Disjoint Namespace ConsiderationsIf you are installing an additional management server in an environment with a disjointed namespace, see Deployment Considerations with a Disjointed Namespace.
Installing additional management server topics How to Install an Additional Management Server
Describes how to install an additional Service Manager management server.
How to Install an Additional Management ServerThe following procedure shows how to install an additional management server in System Center 2012 – Service Manager. You must deploy the initial Service Manager management server and Service Manager database before deploying an additional management server.
You must be a member of the Service Manager Administrators user role to install an additional Service Manager management server.
1. By using an account that has administrator rights and that is also a member of the Service Manager management group administrators, log on to the computer that will host the additional Service Manager management server.
2. On the System Center 2012 – Service Manager installation media, double-click the
Note
To install an additional management server
45
Setup.exe file.3. On the Service Manager Setup Wizard page, click Service Manager management
server.4. On the Product registration page, type information in the boxes. In the Product key
boxes, type the product key you received with Service Manager, or as an alternative, select Install as an evaluation edition (180 day trial)?. Read the Microsoft Software License Terms, and, if applicable, click I have read, understood, and agree with the terms of the license agreement, and then click Next.
5. On the Installation location page, verify that sufficient free disk space is available, and then click Next. If necessary, click Browse to change the location where the additional Service Manager management server will be installed.
6. On the System check results page, make sure that the prerequisite check passed or at least passed with warnings, and then click Next.If the prerequisite checker determines that the Microsoft Report Viewer Redistributable has not been installed, click Install Microsoft Report Viewer Redistributable. After the Microsoft Report Viewer Redistributable 2008 (KB971119) Setup Wizard completes, click Check perquisites again.
7. On the Configure the Service Manager database page, in the Database server box, type the name of the computer that hosts the Service Manager database that you used for your initial Service Manager management server, and then press the TAB key. When the name of the instance appears in the SQL Server instance box, click Use an existing database. For example, type Computer 2 in the Database server box.
8. Click the Database list, select the database name for the Service Manager database (the default name is ServiceManager), and then click Next.
9. On the Configure the Service Manager management group page, verify that the management group name and management group administrators boxes have been populated. Click Next.
10. On the Configure the account for Service Manager services page, click Domain account; specify the user name, password, and domain for the account; and then click Test Credentials. After you receive a “The credentials were accepted” message, click Next. For example, enter the account information for the domain user SM_Acct, and then click Next.
11. On the Help improve System Center Service Manager page, indicate your preference for participation in the Customer Experience Improvement Program. As an option, click Tell me more about the program, and then click Next.
12. On the Use Microsoft Update to help keep your computer secure and up-to-date page, indicate your preference for using Microsoft Update to check for Service Manager updates. If you want Windows Update to check for updates, select Initiate machine wide Automatic update. Click Next.
13. On the Installation summary page, click Install.14. On the Setup completed successfully page, we recommend that you leave Open the
Encryption Backup or Restore Wizard selected, and then click Close. For more information about backing up the encryption key, see Completing Deployment by Backing
46

Up the Encryption Key.
Deployment Considerations with a Disjointed NamespaceIn System Center 2012 – Service Manager, Setup might fail when you deploy either an additional Service Manager management server or an additional Self-Service Portal in an environment where a disjoint namespace exists. This problem can occur if the Setup program is unable to resolve the principal name of the computer that is hosting the Service Manager management server. For more information, see the Microsoft TechNet article Disjoint Namespace.
We recommend that you complete the following procedures before installing either an additional Service Manager management server or an additional Self-Service Portal in an environment where a disjoint namespace exists. The first procedure shows you how to determine the principal name of your Service Manager management server. The second procedure guides you in editing the hosts file on the computer that hosts either the additional Service Manager management server or the additional Self-Service Portal.
1. Start a Service Manager console.2. In the Service Manager console, click Configuration Items.3. In the Configuration Items pane, expand Configuration Items, expand Computers,
and then click All Windows Computers.4. In the All Windows Computers pane, click the computer that hosts the Service Manager
management server.5. In the Tasks pane, under the name of the computer, click Edit.6. In the Computer - <computer name> window, observe that there is an Extensions tab
at the top of the form. The Extensions tab appears only when you view a Service Manager management server.
7. In the General tab in the form, in the Computer Identity area, the Principal name box shows the principal name that you will use in the following procedure.
8. Click Close to close the form.9. At a command prompt, ping the Service Manager management server. You must have
the IP address of the Service Manager management server for the following procedure.
1. On the computer that hosts either the additional Service Manager management server or the additional Self-Service Portal, start Windows Explorer, and then locate the %Systemroot%\System32\Drivers\Etc folder.
2. Open the hosts file with Notepad by typing notepad hosts, and then press ENTER.3. At the end of the hosts file, add an entry starting with the IP address of the Service
To determine the principal name of the Service Manager management server
To edit the hosts file
47

Manager management server followed by its principal name.4. Save and close the hosts file.5. You can now start the setup procedure for either an additional Service Manager
management server or an additional Self-Service Portal.
Self-Service Portal for System Center 2012 - Service ManagerThe Self-Service Portal provides web-based access to the features of System Center 2012 – Service Manager. This section describes how you can deploy the Self-Service Portal, and it includes information for configuring Secure Sockets Layer (SSL).
Self-Service Portal for System Center 2012 - Service Manager Topics Self-Service Portal Deployment Scenarios for System Center 2012 - Service Manager
Describes how to deploy the Self-Service Portal.
SSL Certificates for the Self-Service Portal
Describes what you need to know about using certificates with the Self-Service Portal.
Self-Service Portal Deployment Scenarios for System Center 2012 - Service ManagerThe Self-Service Portal in System Center 2012 – Service Manager is a SharePoint website that is accompanied by a set of Microsoft Silverlight applications. The Self-Service Portal consists of two elements: a SharePoint website and a web content server. The SharePoint website is accompanied by a set of applications that are built with Silverlight. The SharePoint environment provides a foundation on which the portal can be customized. It also provides a set of building blocks for extending the features that users can access through a web browser.
The web content server is a Web Application that forms the interface between the Silverlight application and the Service Manager database. The web content server provides a path for data from the Service Manager database to the Silverlight-based application that is running in the browser. A basic Self-Service Portal setup is shown in the following diagram.
48
The flow of data is as follows:
1. The client accesses the Self-Service Portal with a browser by specifying the URL for the SharePoint server.
2. The SharePoint server returns Silverlight code that creates a web page containing the basic framework of the Self-Service Portal and also the URL for the web content server computer. The URL for the web content server computer was defined when you installed the Self-Service Portal.
3. The client computer, which is now running the Silverlight code, makes a connection to the web content server computer using the URL in step 2.
4. The web content server computer reads and writes data to the Service Manager database. The computer name for the Service Manager database was defined when you installed the web content server.
5. The web content server computer returns the data that makes up the center pane on the Self-Service Portal page.
The computers that host the Self-Service Portal parts require various software components. For a complete list of requirements of Self-Service Portal parts, see Software Requirements for System Center 2012 - Service Manager.
This release of the Self-Service Portal is not compatible with—nor is upgrade possible from—the Self-Service Portal in System Center Service Manager 2010 or System Center Service Manager 2010 Service Pack 1 (SP1). You must uninstall System Center Service Manager 2010 or System Center Service Manager 2010 SP1 Self-Service Portal before you deploy the Self-Service Portal in System Center 2012 – Service Manager.
The SharePoint server hosts the web parts for the Self-Service Portal. We recommend that you use Secure Sockets Layer (SSL) for your Self-Service Portal installation. You must use the same http protocol (http or https) for both the web content server and for the SharePoint website.
During setup you select certificates based on the certificate’s Subject name. You might encounter a situation in which you have more than one certificate with the same Subject name and you might not be able to determine exactly which certificate to select. In this situation, select any valid certificate. After the Self-Service Portal is installed, you can specify the certificate by using Internet Information Services (IIS) Manager.
Important
49

You must use trusted certificates with the Self-Service Portal. Failure to use trusted certificates will result in a blank page being displayed on the Self-Service Portal.
If you want to install the SharePoint Parts on port 80, you must first move the default website in IIS to a different port—for example, port 8080—and then install the SharePoint Web Parts on port 80.
During setup of the web content server, ASP.NET might be unavailable to other websites or web applications. This issue, if it occurs, lasts only a few seconds.
The steps for installing the Self-Service Portal are outlined in the following flowchart.
Self-Service Portal Deployment topics How to Install the Web Content Server
Note
50
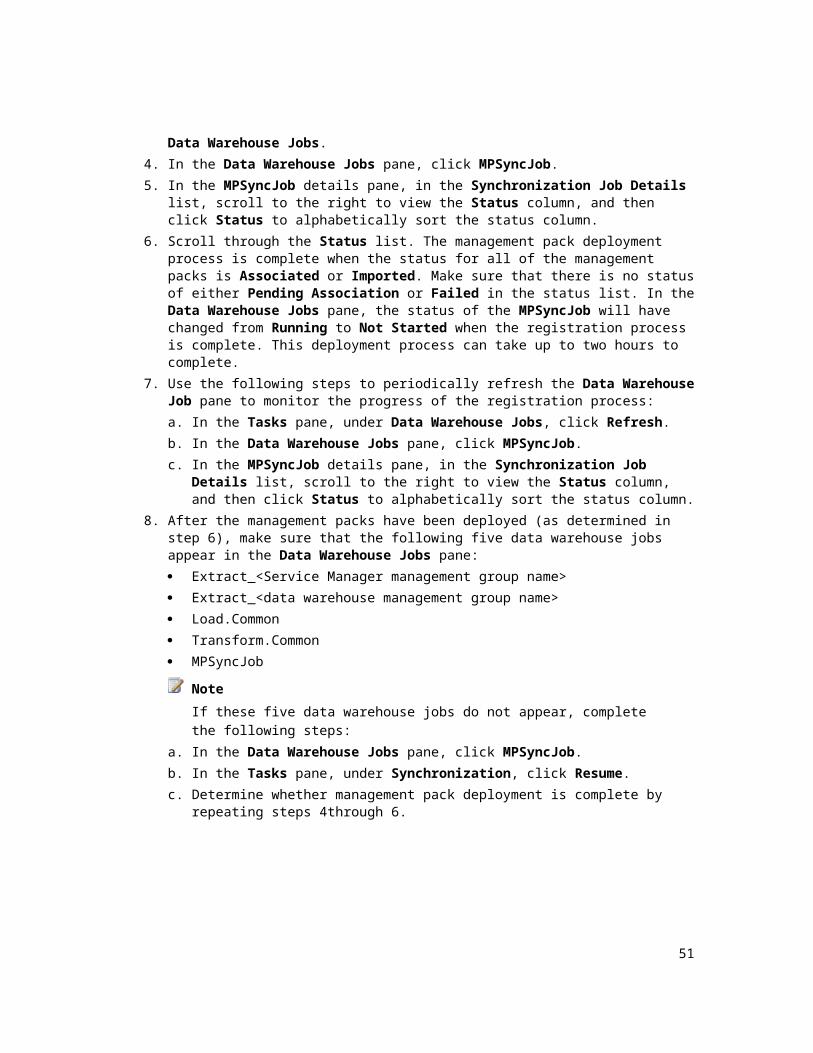
Provides step-by-step instructions for installation of the web content server.
How to Install SharePoint Web Parts for the Self-Service Portal
Provides step-by-step instructions for installation of the SharePoint Web Parts server.
How to Install Both the Web Content Server and SharePoint Web Parts on One Computer
Provides step-by-step instructions for installation of both the web content server and the SharePoint Web Parts server on one computer.
How to Grant Permissions on the SharePoint Site
Provides step-by-step instructions for granting permissions to the SharePoint Parts website.
How to Configure User Authentication for the SharePoint Site
Provides step-by-step instructions for configuring user authentication for the SharePoint site.
How to Verify the Installation of the Self-Service Portal
Provides step-by-step instructions to start a browser and verify the installation of the Self-Service Portal.
How to Configure the Default IIS Website Port
Describes how to configure the default website in IIS to a different port—for example, port 8080—so that you can install the SharePoint website on port 80.
How to Install the Web Content ServerUse the following procedure to install the Self-Service Portal web content server in System Center 2012 – Service Manager.
1. Using the Operational Database Account, log on to the computer that will host the Self-Service Portal.
2. On the System Center 2012 – Service Manager installation media, double-click the Setup.exe file.
3. On the Service Manager Setup Wizard page, click Service Manager web portal.4. On the Portal Parts page, click Web Content Server, and then click Next.5. On the Product registration page, read the Microsoft Software License Terms, and, if
applicable, click I have read, understood, and agree with the terms of the license agreement, and then click Next.
6. On the Installation location page, verify that sufficient free disk space is available, and then click Next. If necessary, click Browse to change the installation location of the web content server.
NoteWe recommend that you install the Self-Service Portal in the default location. Installing the Self-Service Portal in another location will require that you make configuration changes in Internet Information Services (IIS).
7. On the System check results page, make sure that the prerequisite check passed or at
To install the web content server
51

least passed with warnings, and then click Next.8. On the Configure the Service Manager self-service portal name and port page, do
the following:a. In the Web site name text box, accept the default name, or type a new name.b. In the Port text box, accept the default port, or type a new port.c. In the SSL certificate list, select the Secure Sockets Layer (SSL) certificate that you
want to use with the Self-Service Portal, and then click Next.
NoteWe strongly recommend the use of SSL. If you are using a self-signed certificate, make sure that the certification authority (CA) that issues the certificate has been added to the Trusted Root Certification Authorities store. You must use the same HTTP protocol (HTTP or HTTPS) with both portal parts.
9. On the Select the Service Manager database page, do the following:a. In the Database server text box, type the name of the computer that hosts the
Service Manager database, and then press TAB.b. In the SQL Server instance list, select the instance name for the Service Manager
database. (Default is the default selection.)c. In the Database list, select the database that hosts the Service Manager database.
(ServiceManager is the default database name.)d. Click Next.
10. On the Configure account for the Service Manager self-service portal page, click Domain account.
NoteMake sure that the credentials you enter here are for the sdk_users users role on the SQL Server that is hosting the Service Manager database.
11. Specify the user name, password, and domain for the Service Manager services account that you specified during installation of Service Manager. For example, enter the account information for the SM_Acct domain user.
12. Click Test Credentials. After you verify that you received a “The credentials were accepted message,” click Next.
13. On the Help improve System Center Service Manager page, indicate your preference for participation in the Customer Experience Improvement Program. As an option, click Tell me more about the program, and then click Next.
14. On the Use Microsoft Update to help keep your computer secure and up-to-date page, indicate your preference for using Microsoft Update to check for Service Manager updates. If you want Windows Update to check for updates, select Initiate machine wide Automatic update. Click Next.
15. On the Installation summary page, click Install.16. On the Setup completed successfully page, we recommend that you leave Open the
Encryption Backup or Restore Wizard selected, and then click Close. For more information about backing up the encryption key, see Completing Deployment by Backing
52
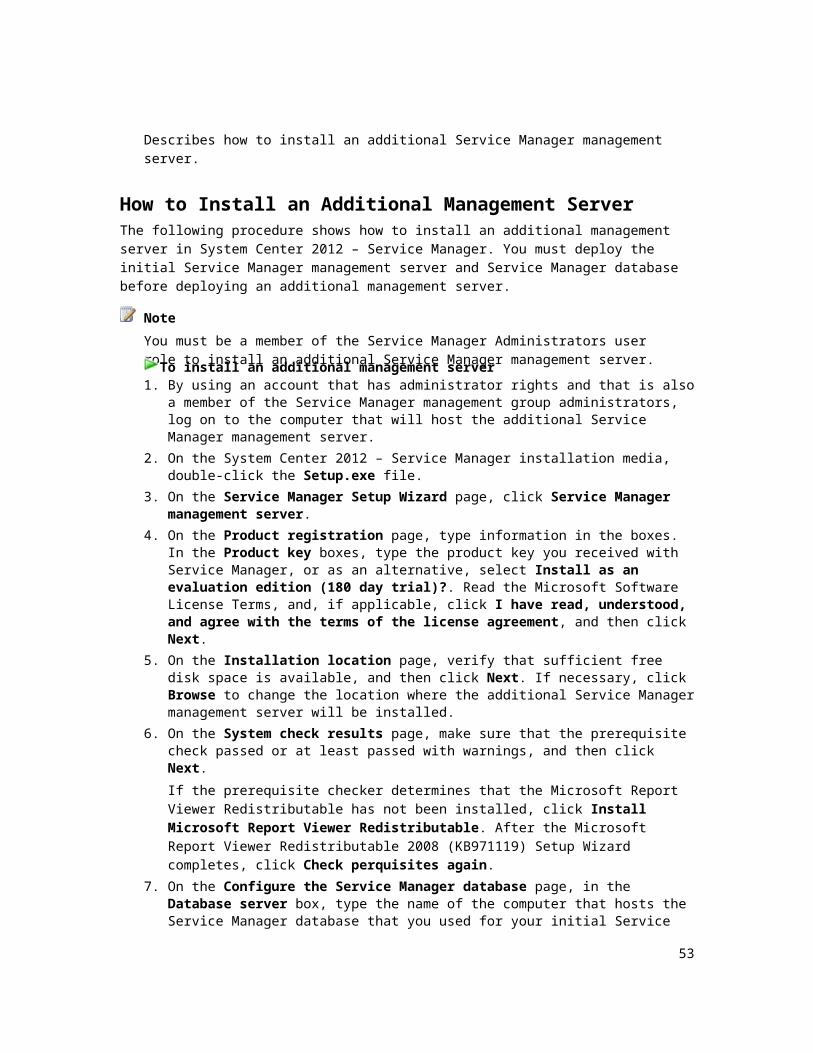
Up the Encryption Key.
See AlsoHow to Install SharePoint Web Parts for the Self-Service Portal
How to Install SharePoint Web Parts for the Self-Service PortalThe home page for the Self-Service Portal in System Center 2012 – Service Manager is on the SharePoint Web Parts server. We recommend that you use Secure Sockets Layer (SSL) and install the SharePoint Web Parts using port 443.
When you installed Internet Information Services (IIS), the default website was configured to use port 80. If you want to install the SharePoint Web Parts on port 80, you must first move the default website in IIS to a different port—for example, port 8080—and then install the SharePoint Web Parts on port 80.
You can use this information to share Excel workbooks using SharePoint. For an example, see Configure Excel Services for a BI test environment.
Use the following procedure to install the SharePoint Web Parts server.
1. Using the Operational Database Account, log on to the computer that will host the Self-Service Portal.
2. On the System Center 2012 – Service Manager installation media, double-click the Setup.exe file.
3. On the Service Manager Setup Wizard page, click Service Manager web portal.4. On the Portal Parts page, click SharePoint Web Parts.5. On the Product registration page, read the Microsoft Software License Terms, and, if
applicable, click I have read, understood, and agree with the terms of the license terms, and then click Next.
6. On the System check results page, make sure that the prerequisite check passed or at least passed with warnings, and then click Next.
7. On the Configure the Service Manager SharePoint site page, complete these steps:a. In the SSL certificate list, select the Secure Sockets Layer (SSL) certificate that you
want to use with the Self-Service Portal, and then click Next.b. In the Port text box, accept the default port, or type a new port. For example, type
443.c. In the URL text box, type the URL for the web content server in the form of
http://<computername>:<port> or https://<computername>:<port>.d. Click in any of the other text boxes, and then click Next.
NoteWe strongly recommend the use of SSL. If you are using a self-signed certificate, make sure that the certification authority (CA) that issues the certificate has been
To install the SharePoint Web Parts server
53
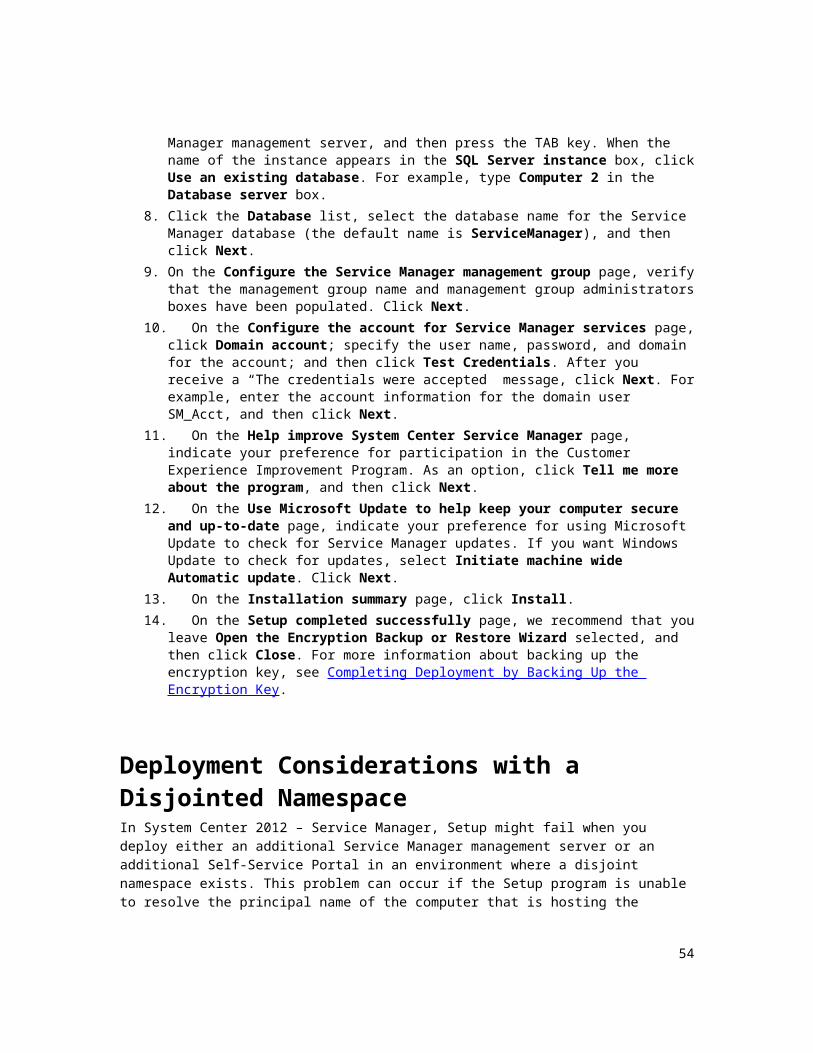
added to the Trusted Root Certification Authorities store. You must use the same HTTP protocol (HTTP or HTTPS) with both portal parts.
8. On the Configure the account for the Service Manager SharePoint app pool page, type a domain user and password, and then click Test Credentials. After you verify that you received a “The credentials were accepted” message, click Next.
9. On the Help improve System Center Service Manager page, indicate your preference for participation in the Customer Experience Improvement Program. As an option, click Tell me more about the program, and then click Next.
10. On the Use Microsoft Update to help keep your computer secure and up-to-date page, indicate your preference for using Microsoft Update to check for Service Manager updates. If you want Windows Update to check for updates, select Initiate machine wide Automatic update. Click Next.
11. On the Installation summary page, click Install.12. On the Setup completed successfully page, click Close.
See AlsoHow to Grant Permissions on the SharePoint Site
How to Install Both the Web Content Server and SharePoint Web Parts on One ComputerWhen you are installing the web content server and SharePoint Web Parts on the same computer in System Center 2012 – Service Manager, you must install both components at the same time. After one component has been installed, you will not be able to run Setup again to install the other component.
Use the following procedure to install both the web content server and SharePoint Web Parts for the Self-Service Portal on the third computer.
1. Using the Operational Database Account, log on to the computer that will host the Self-Service Portal.
2. On the System Center 2012 – Service Manager installation media, double-click the Setup.exe file.
3. On the Microsoft System Center Service Manager Setup Wizard page, click Service Manager Web portal.
4. On the Portal Parts page, click Web Content Server, click SharePoint Web Parts, and then click Next.
5. On the Product registration page, read the Microsoft Software License Terms, and, if applicable, click I have read, understood, and agree with the terms of the license terms, and then click Next.
6. On the Installation location page, verify that sufficient free disk space is available, and then click Next. If necessary, click Browse to change the installation location of the
To install the Self-Service Portal on one computer
54

Service Manager management server.
NoteWe recommend that you install the Self-Service Portal in the default location. Installing the Self-Service Portal in another location will require that you make configuration changes in Internet Information Services (IIS).
7. On the System check results page, make sure that the prerequisite check passed or at least passed with warnings, and then click Next.
8. On the Configure the Service Manager Self-Service Portal name and port page, do the following:a. In the Website name text box, accept the default name, or type a new name.b. In the Port text box, accept the default port, or type a new port.c. In the SSL certificate list, select the Secure Sockets Layer (SSL) certificate that you
want to use with the Self-Service Portal, and then click Next.
NoteWe strongly recommend the use of SSL. If you are using a self-signed certificate, make sure that the certification authority (CA) that issues the certificate has been added to the Trusted Root Certification Authorities store. You must use the same HTTP protocol (HTTP or HTTPS) with both portal parts.
9. On the Select the Service Manager database page, do the following:a. In the Database server text box, type the name of the computer that hosts the
Service Manager database, and then press TAB.b. In the SQL Server instance list, select the instance name for the Service Manager
database. (Default is the default SQL Server instance.)c. In the Database list, select the database that hosts the Service Manager database.
(ServiceManager is the default database name.)d. Click Next.
10. On the Configure the account for the Service Manager Self-Service Portal page, click Domain account.
11. Specify the user name, password, and domain for the Service Manager services account that you specified during installation of Service Manager. For example, enter the account information for the SM_Acct domain user.
12. Click Test Credentials. After you verify that you received a “The credentials were accepted” message, click Next.
13. On the Configure the Service Manager SharePoint Web site page, do the following:a. In the Web site name text box, accept the default name, or type a new name.b. In the SSL certificate list, select the SSL certificate that you want to use with the
Self-Service Portal.c. In the Port text box, accept the default port, or type a new port.
Note
55

This is the port number that will be used for accessing the Self-Service Portal.
d. In the Database server text box, type the name of the computer that hosts the SharePoint database, and then press TAB. For example, select the default entry for the computer on which you are installing the SharePoint website.
e. In the SQL Server instance list, select the instance name for the SharePoint database. (Default is the default SQL Server instance.)
f. In the Database name text box, accept the default database name, or type a new name
g. Click Next.14. On the Configure the account for Service Manager SharePoint application pool
page, type a domain user and password, and then click Test Credentials. After you verify that you received a “The credentials were accepted” message, click Next.
15. On the Help improve System Center Service Manager page, indicate your preference for participation in the Customer Experience Improvement Program. As an option, click Tell me more about the program, and then click Next.
16. On the Installation summary page, click Install.17. On the Setup completed successfully page, click the link to test the URL for the Self-
Service Portal. Make a note of this URL, and then click Close.
How to Grant Permissions on the SharePoint SiteUse the following procedure to grant permissions to the Self-Service Portal SharePoint site in System Center 2012 – Service Manager.
1. Log on to the computer that hosts the SharePoint Web site with administrative credentials.
2. Open a browser and connect to the SharePoint site at http://localhost:<port>/_layouts/settings.aspx.
3. In the upper left area of the web page, click Site Actions, and then click Site Permissions.
4. On the SharePoint ribbon, click Grant Permissions.5. In the Grant Permissions box, in the Users/Groups box, type the Active Directory name
for the users or user groups to whom you want to grant access.6. In the Grant Permissions area, click Read – Can view pages and list items and
download documents, and then click OK.7. Close the browser.
See AlsoHow to Verify the Installation of the Self-Service Portal
To grant permissions on the Self-Service Portal SharePoint site
56

How to Configure User Authentication for the SharePoint SiteThe option to Sign in as Different User has been removed from the Service Manager SharePoint site template file included in System Center 2012 – Service Manager. You should not enable this option in SharePoint site template files because using the option can result in a submitted user request having an incorrect affected user.
If you want to support multiple users on a computer, you should use the following procedure to configure user authentication in the browser that you use to connect to the Self-Service Portal SharePoint site in System Center 2012 – Service Manager. Afterward, you should notify your end-users that they should use the Sign Out option when they are done using the Self-Service Portal.
1. Log on to the computer that hosts the SharePoint Web site with the user credentials of an end-user who will submit requests by using the Self-Service Portal.
2. Open Internet Explorer and then click Tools.3. Select Internet Options and then click the Security tab.4. Click Trusted Sites and then Custom Level.5. Under User Authentication select Prompt for user name and password and then click
OK.
See AlsoSelf-Service Portal Deployment Scenarios for System Center 2012 - Service Manager
How to Verify the Installation of the Self-Service PortalThe default portal name for the Self-Service Portal in System Center 2012 – Service Manager is SMPortal. Use the following procedure to verify the installation of the Self-Service Portal.
1. On the computer hosting the SharePoint Web site, open Internet Explorer.2. In the address line, type one of the following:
a. http://localhost:<port>/SMPortal (if you are not using Secure Sockets Layer (SSL))b. https://localhost:<port>/SMPortal (if you are using SSL)
Where <port> is the port number that is defined when the SharePoint Parts server is installed.
3. The default home page for the Self-Service Portal should appear as shown in the following illustration.
To configure user authentication for the Self-Service Portal SharePoint site
To verify the installation of the Self-Service Portal
57

How to Configure the Default IIS Website PortWhen you installed Internet Information Services (IIS), the default website was configured to use port 80. The SharePoint Web Parts is the home page for the Self-Service Portal. If you want to install the SharePoint Web Parts on port 80, you must first move the default website in IIS to a different port—for example, port 8080—and then install the SharePoint Web Parts on port 80.
58

Use the following procedure to move the IIS default website to port 8080 so that you can install the SharePoint website on port 80.
1. On the Windows desktop, click Start, click Administrative Tools, and then click Internet Information Services (IIS) Manager.
2. In Internet Information Services (IIS) Manager, in the Connections pane, expand the computer name, expand Sites, and then click Default Web Site.
3. In the Actions pane, under Edit Site, click Bindings.4. In the Site Bindings dialog box, click the http entry, and then click Edit.5. In the Edit Site Binding dialog box, in Port, type 8080, and then click OK.6. In the Site Bindings dialog box, click Close.7. In the Actions pane, under Manage Web Site, click Stop, and then click Start.
SSL Certificates for the Self-Service PortalWe strongly recommend using Secure Sockets Layer (SSL) certificates with the Self-Service Portal in System Center 2012 – Service Manager. The Self-Service Portal consists of two parts, a Microsoft SharePoint website server and a web content server. When you are using SSL on the Self-Service Portal, you should use SSL certificates on both parts.
When a client connects to the Self-Service Portal, they are connecting to the SharePoint website server. The framework of the portal is delivered to the client from the SharePoint website server. The SharePoint server instructs the browser to download the Silverlight components from the web content server. The Silverlight components then contact the Windows Communication Foundation (WCF) service on the web content server. You define the URL for the web content server when you are deploying the SharePoint website server, and it is this web content server URL that is delivered to the client.
If there is a certificate-related problem when a client is establishing an SSL connection to the Self-Service Portal, a certificate warning appears. For example, if the name the client that is typed for the URL does not match the computer name on the certificate, a name mismatch warning appears. The client has the option to continue with the connection. However, if there is a certificate-related error when the client's computer attempts to download Silverlight components from the web content server, there is no opportunity to manually respond to the certificate warning. The result is that part of the Self-Service Portal web page appears blank.
Therefore, you should be aware of the following when you are working with SSL certificates:
The certificates that you use for the Self-Service Portal must be issued from a Certification Authority that is trusted by the client.
The name on the certificate for the SharePoint website server must match the URL that your users enter into the browser. For example, if the user types the URL https://portal/SMPortal, then the certificate must have been issued to portal and not, for example, portal.woodgrove.com.
To configure the default IIS website to use port 8080
59
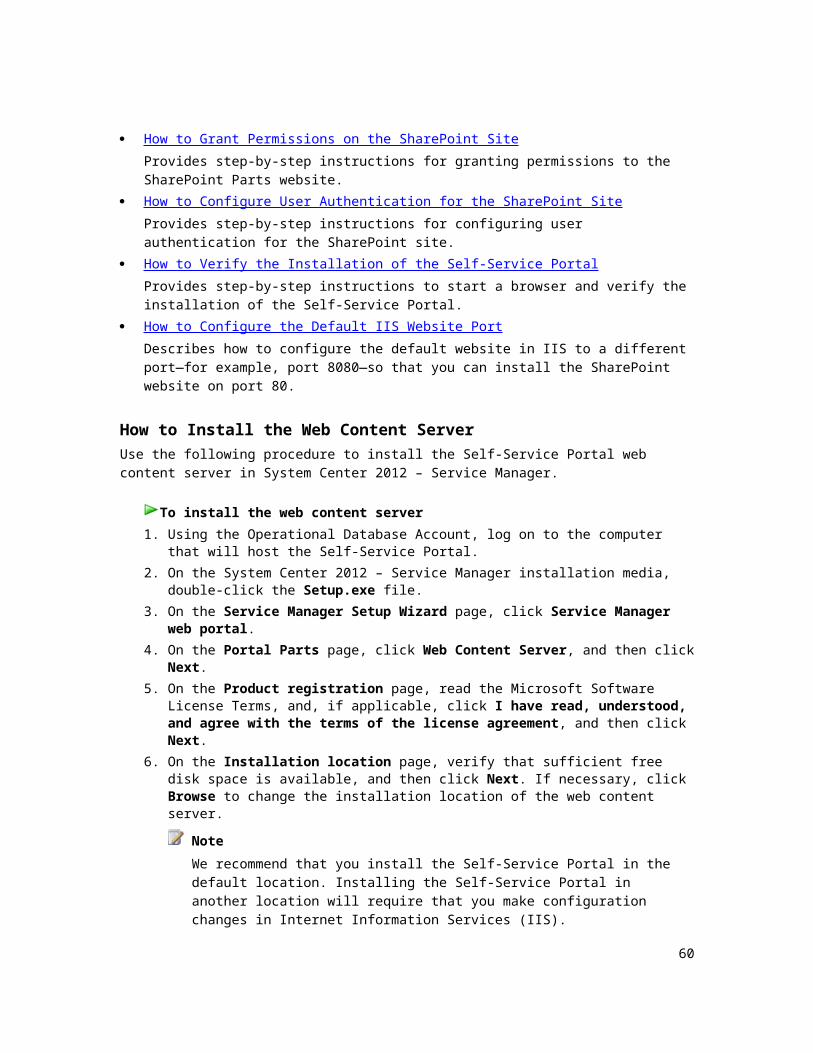
The name on the certificate for the web content server must match the name that you entered when you deployed the SharePoint website server.
The default port for SSL is 443. So that your users do not have to enter a port number in the browser when they connect to the Self-Service Portal, you should specify port 443 when you deploy the SharePoint website server. Because users never enter the URL for the web content server (remember, the web content server URL is delivered to the client when users connect to the SharePoint website server), you can use a port other than 443 (for example, port 444) for the SSL port on the web content server. If you deploy both the SharePoint website server and web content server on the same computer, you be prompted to specify the options for the web content server first; then, you install the SharePoint website server. Therefore, the first time that you are prompted to enter a port number, it will be for the web content server, and you should not use port 443 if you plan to install the SharePoint website server on the same computer. During deployment, the second port number that you are asked to provide will be for the SharePoint website server, and that is when we recommend using port 443.
If you are deploying both the SharePoint website server and web content server on the same computer, you need only one certificate. That one certificate will work for both ports. If you are deploying the SharePoint website server and web content server on different servers (which is recommended in a production environment), you will need one certificate for each computer.
Certificates are labeled by their subject name, and subject names on certificates do not have to be unique. During Service Manager setup, certificates are listed by their subject name. Therefore, during deployment of the Self-Service Portal, it is possible that you will be presented with multiple certificates with the same name. If you pick the second certificate in the list of certificates that are available to use, there is a possibility that Service Manager might use the first one in the list. This can be especially problematic when the client is attempting to connect to the web content server, because there is no opportunity for manual intervention. To resolve this issue, you can change the certificate in Internet Information Services (IIS) Manager.
The following sections expand on the steps you can take to solve SSL-related problems that you might encounter with the Self-Service Portal.
Certificate “Issued to” NameThe address that you type into the browser to connect to the SharePoint website and the address of the web content server that was defined in the SharePoint website must each match the “Issued to” name on their associated certificate or certificates. When you connect to the SharePoint website, if the address that you type in the browser does not match the “Issued to” name on the certificate, you will see a Certificate Warning and the background in the browser's address line will be red. If the web content server address that was configured in the SharePoint website does not match the “Issued to” name on the certificate, the center frame in the browser will be blank, as shown in the following illustration.
60

Name Mismatch on the SharePoint WebsiteIf the address that you type in the browser when you connect to the SharePoint website does not match the “Issued to” address in the certificate, you have the following options:
Continue past the warning and continue Change the name in the address line in the browser to match the “Issued to” name on the
certificate Obtain a new certificate where the “Issued to” name matches the address that you want to
enter in the browser
Name Mismatch for the Web Content ServerIf the address for the web content server that is configured on the SharePoint website does not match the “Issued to” address in the certificate on the web content server, the center frame in the Self-Service Portal will be blank. In this case, you have the following options:
Obtain a new certificate for the web content server that matches the URL that is configured on the SharePoint website
Configure the address for the web content server that is stored on the SharePoint website to match the “Issued to” name on the certificate that is used for the web content server
Certificate Must Be TrustedMake sure that the Certification Authority (CA) that issued your certificates is listed in the Trusted Root Certification Authority store for the clients accessing the site. For information about determining whether a certificate is trusted, see How to Examine Properties of a Certificate.
61
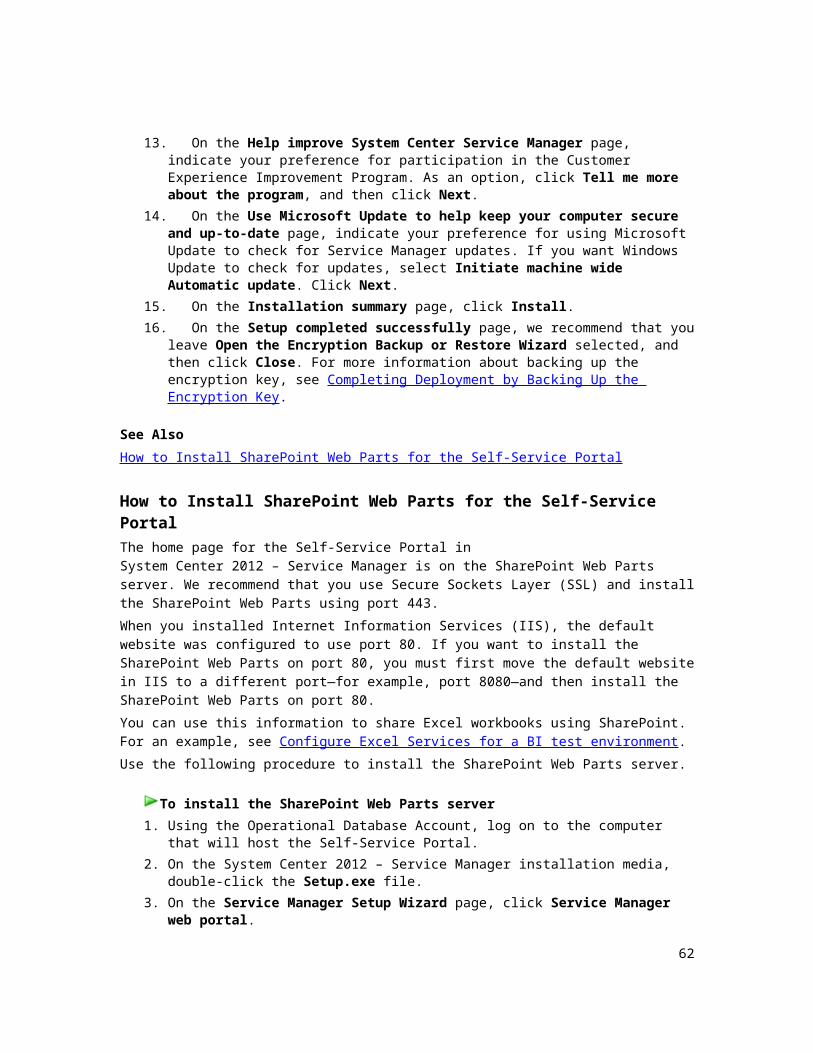
SSL Certificates for the Self-Service Portal Topics How to Examine Properties of a Certificate
Describes how to learn what the “Issue to” name is for a certificate, determine whether the certificate is trusted, and determine the certificate thumbprint.
How to Reconfigure the Web Content Server URL
Describes the procedure to use if you are using a different certificate for the web content server than the certificate that you originally selected during installation.
How to Select a Certificate for Web Content Server Use
Describes how to select the certificate that is used for the web content server.
How to Connect Directly to the Web Content Server Using a Browser
Describes how to use a browser to connect to the web content server and test a certificate.
How to Examine Properties of a CertificateUse this procedure to examine the properties of a certificate you use with the Self-Service Portal in System Center 2012 – Service Manager. Make sure that the URL you use for the Self-Service Portal matches the name on the certificate, and make sure that the certification authority (CA) that issued the certificate is a trusted CA. This gives you the opportunity to make sure that the URL you specify for the Self-Service Portal does not result in any certificate warnings or blank frames in the browser. In this example, the computer is in Woodgrove National Bank. The fully qualified domain name (FQDN) for the computer is portal.woodgrove.com. The CA that issued the certificate is woodgroveCA. Note the Issued to” and “Issued by” fields in the following illustration.
62

To view the properties of a certificate, you add the Certificates snap-in to the Microsoft Management Console (MMC). When you examine the certificate, the value in the “Issued to” field represents the URL that you must use when you are accessing the SharePoint website server, and the value in the “Issued to” field must match the URL that the your browser will use to connect to the web content server. The value in the “Issued by” field represents the CA that issued this certificate, and it must trace back to the trusted root.
You can also use this procedure to determine the thumbprint of a certificate.
1. Log on to the computer where you want to examine a certificate with administrator privileges.
2. Click Start, in Search programs and files type mmc, and then press Enter.3. In the Console1 window, click File, and then click Add/Remove Snap-in.4. In Add or Remove Snap-ins, click Certificates, and then click Add.
To examine the properties of a certificate
63

5. In the Certificates snap-in, click Computer account, and then click Next.6. In Select Computer, make sure that Local computer is selected, and then click Finish.7. In Add or Remove Snap-ins, click OK.8. In the Console1 window, expand Certificates (Local Computer), expand Personal, and
then click Certificates.9. In the Issued To pane, double-click the certificate that you want to use for the Self-
Service Portal. Examine the Issued to and Issued by fields.10. Click OK.11. In the Console1 window, expand Trusted Root Certification Authorities, and then click
Certificates.12. In the Issued To pane, make sure that the CA that issued your certificate is listed here.
1. If you have not done so already, create a certificate snap-in, as described in steps 1 through 8 in the previous procedure.
2. In the Issued To pane, double-click the certificate that you want to examine.3. In the Certificate dialog box, click Details.4. In the Show list, click Properties Only.5. Copy the thumbprint and use it to define the certificate that you want to use.6. Click OK to close the Certificate dialog box.
See AlsoSSL Certificates for the Self-Service Portal
How to Reconfigure the Web Content Server URLWhen you use certificates with the Self-Service Portal in System Center 2012 – Service Manager, you can use this procedure to change the web content server URL. For example, you may have installed the web content server only to find that the URL you used for the web content server results in a certificate warning. While resolving the certificate warning issue—for example, for a name mismatch—you may find that you are going to use a different URL to connect to the web content server. In this case, you must open a web.config file on both the SharePoint website server and web content server and update the URL.
In this example, the computer is in Woodgrove National Bank, and the fully qualified domain name (FQDN) for the computer is portal.woodgrove.com. When the web content server was installed, Secure Sockets Layer (SSL) and port 444 were used. (Port 443 was saved for the SharePoint website.) Now, the web.config file is edited using the URL https://portal.woodgrove.com:444/ContentHost/ClientBin/, as shown in the following illustration. (This image is of the web.config file on a SharePoint website server.)
To determine the thumbprint of a certificate
64

1. Log on to the computer that hosts the SharePoint website server with administrator privileges.
2. Using Windows Explorer, navigate to the folder location where you installed the SharePoint website server. The default location is <drive>:\\intetpub\wwwroot\wss\VirtualDirectories\Service Manager Portal.
3. Right-click the web.config file, and open it with the editor of your choice, for example, Notepad.
4. Scroll to the bottom of the web.config file, locate the <appSettings> area, and then locate the <add key=…> line.
5. Edit the URL in the value= section to match the new URL that you want to use for the web content server.
6. Close the editor and save your changes.
1. Log on to the computer that hosts the web content server with administrator privileges.2. Using Windows Explorer, navigate to the folder location where you installed the web
content server. The default is <drive>:\\inetpub\wwwroot\System Center Service Manager Portal\ContentHost.
3. Right-click the file web.config, and then open it with the editor of your choice, for example, Notepad.
4. Scroll to the bottom of the web.config file, locate the <appSettings> area, and then locate the <add key=…> line.
5. Edit the URL in the value= section to match the new URL that you want to use for the web content server.
6. Close the editor and save your changes.
See AlsoSSL Certificates for the Self-Service Portal
To reconfigure the web content server URL on the SharePoint website server
To reconfigure the web content server URL on the web content server
65

How to Select a Certificate for Web Content Server UseIn order for content from the web content server to display properly in the Self-Service Portal, the URL that is used to connect with the web content server must match the name on the web content server certificate. A potential solution to a certificate name mismatch problem is to change the certificate that is used by the web content server. Use the following procedure to select an alternative Secure Sockets Layer (SSL) certificate for use with the computer that is hosting the web content server.
In order to use the procedure, you must already have a certificate issued from a certification authority.
1. Log on to the computer that hosts the web content server with administrative privileges.2. Click Start, point to Administrative Tools, and then click Internet Information Services
(IIS) Manager.3. In Internet Information Services (IIS) Manager, in the Connections pane, expand the
computer name, expand Sites, and then click SCSMWebContentServer.
NoteSCSMWebContentServer is the default name used during setup of the Self-Service Portal.
4. In the Actions pane, under Edit Site, click Bindings.5. In Site Bindings, select the port that you used for the SCSMWebContentServer then
click Edit.6. In Edit Site Binding, click the SSL certificate list, and then select the new certificate that
you want to use.
See AlsoSSL Certificates for the Self-Service Portal
How to Connect Directly to the Web Content Server Using a BrowserWhen you use certificates with the Self-Service Portal in System Center 2012 – Service Manager, you can use this procedure to connect directly to the web content server using a browser. This gives you the opportunity to make sure that the URL you specify for the web content server does not result in any certificate warnings.
In this example, the computer is in Woodgrove National Bank, and the fully qualified domain name (FQDN) for the computer is portal.woodgrove.com. When the web content server was installed, Secure Sockets Layer (SSL) and port 444 were used. (Port 443 was saved for the SharePoint website.) The browser appears as shown in the following illustration.
To select a certificate for web content server use
66
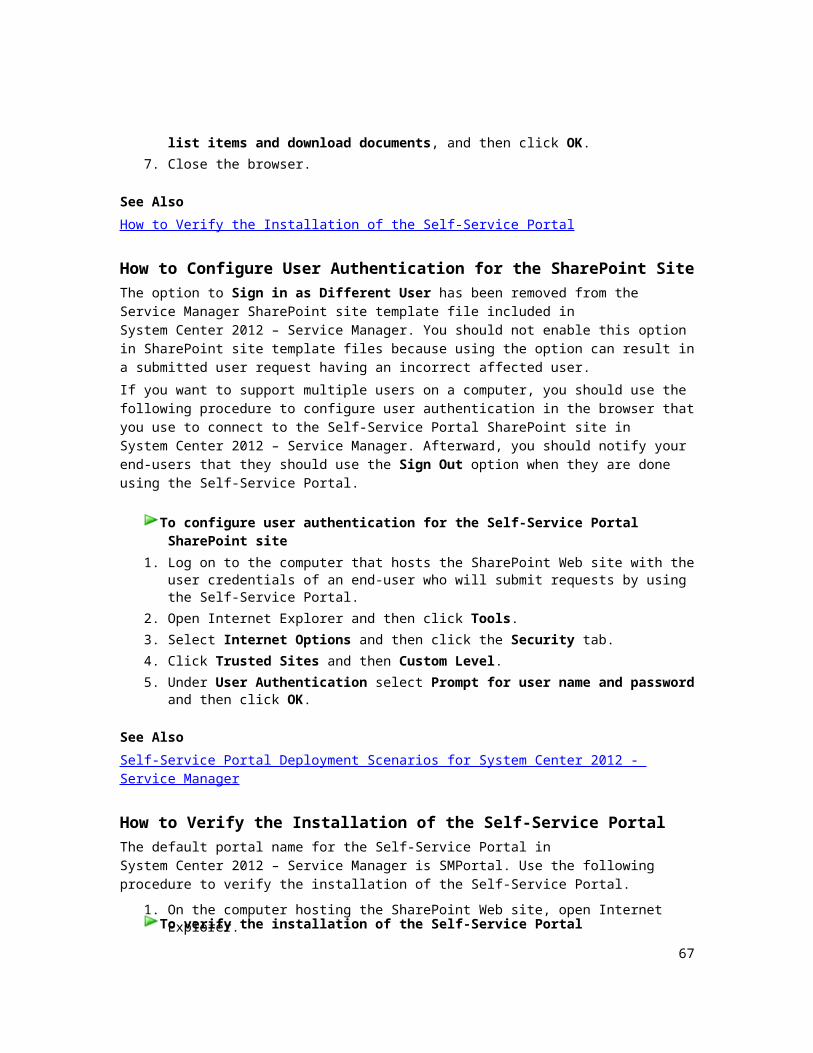
1. On any computer on the network, open Internet Explorer.2. In the address line, type the URL that you want to use for the test. For this example, type
https://portal.woodgrove.com:444/ServiceHost/Services/DataAccessService.svc.3. Examine the resulting web page for the following:
a. The web page loaded with no certificate warnings.b. The background in the address bar is white (indicating no certificate errors).c. The web page looks very similar to the previous illustration.
4. Make a note of this URL that you used successfully, and use this URL as the URL for the web content server when you deploy the SharePoint website. In this example, the URL for the web content server is https://portal.woodgrove.com:444.
See AlsoSSL Certificates for the Self-Service Portal
To connect directly to the web content server with a browser
67

Guidance for Load Balancing System Center 2012 - Service ManagerThis section describes how you can load-balance Service Manager management servers and the Self-Service Portal in System Center 2012 – Service Manager.
Load Balancing Topics Load-Balancing Service Manager Management Servers
Describes how to load-balance two or more Service Manager management servers.
Load-Balancing the Self-Service Portal
Describes how to load-balance the Self-Service Portal.
Load-Balancing Service Manager Management ServersYou can use network Load Balancing (NLB) in Windows Server 2008 to configure a pool of computers so that they take turns responding to requests. In System Center 2012 – Service Manager, the initial Service Manager management server that you deploy is the server that processes workflows. You can deploy additional management servers to provide failover for a failed initial management server and to provide load balancing for handling Service Manager console. For more information about Windows Server 2008 NLB, see the Network Load Balancing Deployment Guide. For more information about additional Service Manager management servers, see Deploying Additional Service Manager Management Servers.
As a minimum, you have to deploy an initial Service Manager management server—the management server that hosts the workflow processes—and at least one additional Service Manager management server. In an environment of this kind that consists of two Service Manager management servers, configure NLB to use both management servers, as shown in the following illustration.
68
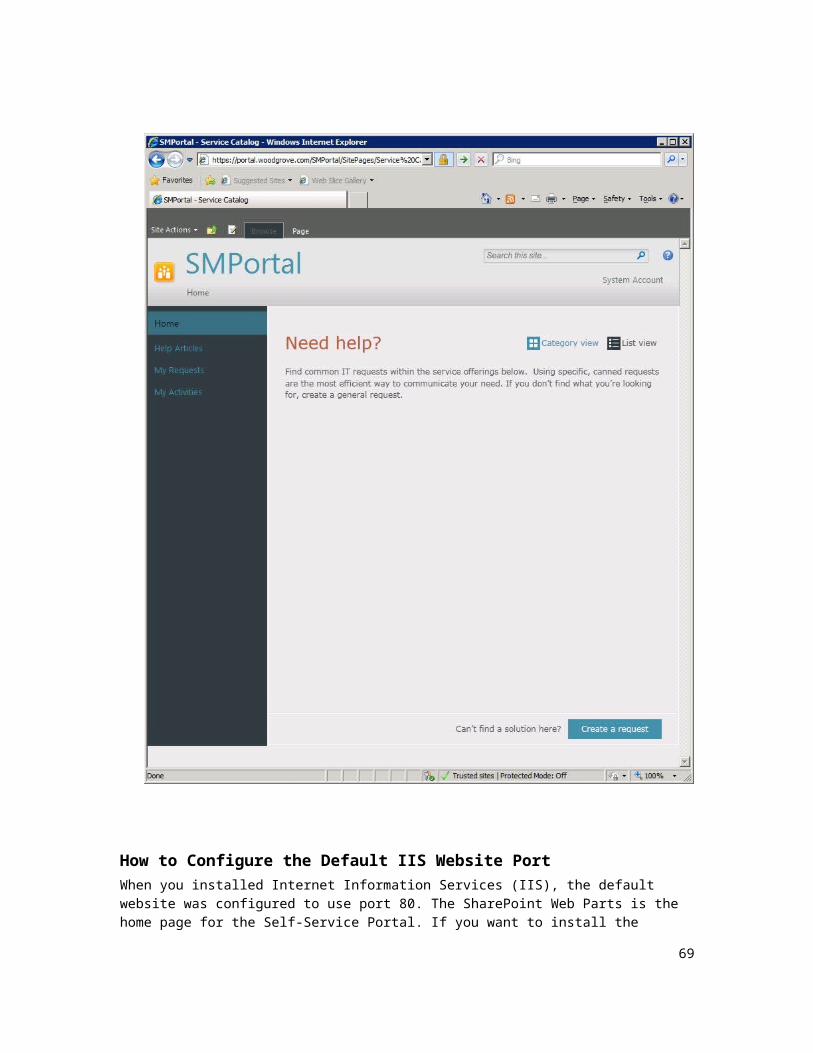
If you deploy two or more additional Service Manager management servers, you can isolate the initial Service Manager management server from the NLB pool. This reduces the workload on the initial Service Manager management server, resulting in better workflow performance. It also load-balances all of the Service Manager consoles across the remaining Service Manager management servers. This scenario is shown in the following illustration.
69

Load-Balancing the Self-Service PortalThis topic describes how to configure the Self-Service Portal in a load balancing environment. There are two computers in a Self-Service Portal deployment, the SharePoint computer and the web content server (WCS). The SharePoint computer provides two basic functions; it generates the framework of the web page you see in the Self-Service Portal and it delivers the Silverlight code required for the Self-Service Portal to function. The WCS computer reads and writes data to the Service Manager database and generates the content you see in the center pane of the Self-Service Portal.
Of the two computers in the Self-Service Portal, the WCS computer performs most of the work and we recommend that you first consider load balancing this computer.
70

Load Balancing the WCS ComputerTo create a load balancing environment for the WCS, you deploy multiple computers running Internet Information Services (IIS) and install WCS on each computer. If you are using Secure Socket Layer (SSL), which is recommended, you deploy a certificate with the same name to each computer. When you deploy the SharePoint computer, instead of specifying the URL for the WCS, you specify the URL for the node that is responsible for load balancing. If you are deploying a load balancing environment to an existing Self-Service Portal installation, you will need to edit the web.config file on the SharePoint and WCS computer and specify the URL for the load balancing node there. See the topic How to Configure the Self-Service Portal for Web Content Server Load Balancing.
Load Balancing the SharePoint ComputerInformation about how to load balance the SharePoint computers is available at Multiple servers for a three-tier farm (SharePoint Server 2010). Be sure that you edit the web.config file on the SharePoint servers to configure the URL for the either the web content server or the web content server load balancing node. See the procedure "To define the WCS load balancing URL on the SharePoint website server" in this guide.
How to Configure the Self-Service Portal for Web Content Server Load BalancingWhen a user starts a browser and connects to the Self-Service Portal in System Center 2012 – Service Manager, he or she is actually connecting to the SharePoint website server. The SharePoint website server delivers the framework for the Self-Service Portal, but it also delivers the URL for the web content server. In a web content server load-balancing environment, you want the SharePoint website server to deliver the URL for the web content server load-balancing node, not the URL for a specific web content server. If you are installing a new Self-Service Portal, you can specify the web content server load-balancing URL during setup. If you added web content server load-balancing to an existing Self-Service Portal installation, you can use the following procedure to reconfigure the URL for the web content server.
You will edit two files, one on the computer that hosts the SharePoint server and one on the computer that hosts the web content servers.
1. Log on to the computer that hosts the SharePoint website server with administrator privileges.
2. Using Windows Explorer, navigate to the folder location where you installed the SharePoint website server. The default location is <drive>:\\intetpub\wwwroot\wss\VirtualDirectories\Service Manager Portal.
3. Right-click the Web.config file, and open it with the editor of your choice, for example, Notepad.
To define the web content server load-balancing URL on the SharePoint website server
71

4. Scroll to the bottom of the Web.config file, locate the <appSettings> area, and then locate the <add key=…> line.
5. Edit the URL in the value= section to match the new URL that you want to use for the web content server load-balancing node.
6. Close the editor, and save your changes.
1. Log on to the computer that hosts each of the web content servers with administrator privileges.
2. Using Windows Explorer, navigate to the folder location where you installed the web content server. The default location is <drive>:\\inetpub\wwwroot\System Center Service Manager Portal\ContentHost.
3. Right-click the Web.config file, and then open it with the editor of your choice, for example, Notepad.
4. Scroll to the bottom of the Web.config file, locate the <appSettings> area, and then locate the <add key=…> line.
5. Edit the URL in the value= section to match the new URL that you want to use for the web.config load-balancing node.
6. Close the editor, and save your changes.
Completing Deployment by Backing Up the Encryption KeyWhen you deployed your System Center 2012 – Service Manager management server and database, an encryption key was created so that data between the Service Manager and data warehouse management servers and their associated databases could be encrypted. When you deployed the Self-Service Portal, an encryption key was created so that data between the Self-Service Portal and the Service Manager database could be encrypted.
Your disaster recovery strategy depends on you backing up the encryption keys as soon as you complete the Service Manager installation. After you back up the encryption keys and store them in a safe location, you can recover from software or hardware failures on the Service Manager management servers, data warehouse management servers, and Self-Service Portal.
Use the Encryption Key Backup or Restore Wizard and the following procedures to back up and restore encryption keys on the Service Manager management servers and Self-Service Portal. This wizard is located on the Service Manager installation media in the Tools\SecureStorageBackup folder.
1. Log on to the computer that hosts the Service Manager management server, data warehouse management server, or Self-Service Portal by using an account that is a
To reconfigure the web content server URL on the web content servers
To back up the encryption key
72
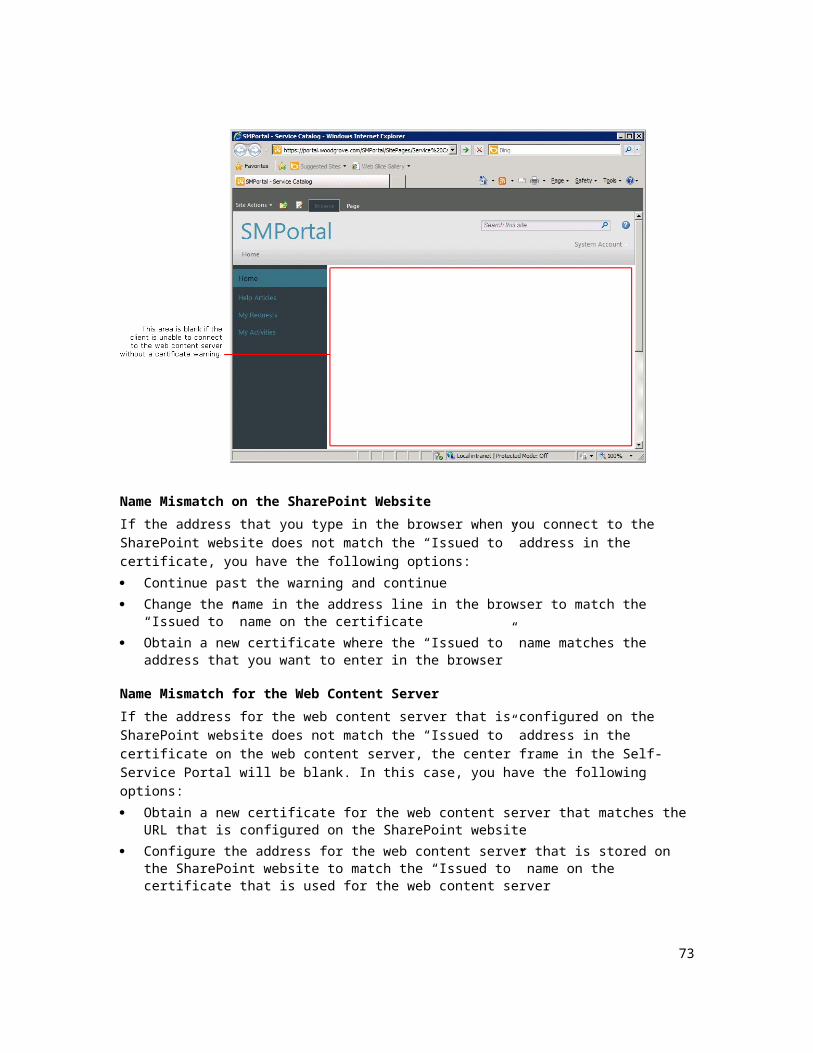
member of the Administrators group.2. In Windows Explorer, open the Tools\SecureStorageBackup folder on the installation
media.3. Right-click SecureStorageBackup.exe, and then click Run as administrator to start the
Encryption Key Backup or Restore Wizard.4. On the Introduction page, click Next.5. On the Backup or Restore? page, select Backup the Encryption Key, and then click
Next.6. On the Provide a Location page, type the path and file name for the encryption key. For
example, if you want to specify the file name SMBackupkey.bin as the encryption key and save the key on the server MyServer in the Backup folder, type \\MyServer\Backup\SMBackupkey.bin, and then click Next.
7. On the Provide a Password page, type a password that contains at least eight characters in the Password box. In the Confirm Password box, re-enter the same password, and then click Next.
NoteRecovery of the password is not possible if it is lost or forgotten.
8. After you receive the message “Secure Storage Backup Complete,” click Finish.
1. Log on to the computer that hosts the Service Manager management server, data warehouse management server, or Self-Service Portal by using an account that is a member of the Administrators group.
2. In Windows Explorer, open the Tools\SecureStorageBackup folder on the installation media.
3. Right-click SecureStorageBackup.exe, and then click Run as administrator to start the Encryption Key Backup or Restore Wizard.
4. On the Introduction page, click Next.5. On the Backup or Restore? page, select Restore the Encryption Key, and then click
Next.6. On the Provide a Location page, type the path and file name for the encryption key. For
example, if you want to specify the file name SMBackupkey.bin for the encryption key and save the key on the server MyServer in the Backup folder share, type \\MyServer\Backup\SMBackupkey.bin, and then click Next.
7. On the Provide a Password page, type the password that you used to back up the encryption key in the Password box. In the Confirm Password box, re-enter the same password, and then click Next.
8. After you receive the message, Secure Storage Key Restore Complete, click Finish.
To restore the encryption key
73
Indexing Non-English Knowledge ArticlesIf you have existing knowledge articles or are planning to create knowledge articles in any language other than English, use the following procedure to resolve an indexing issue in Microsoft SQL Server 2008 with Service Pack 1 (SP1). This issue deals with non-English characters that are used in only the Analyst Content and the Internal Content fields in a knowledge article. You must perform this procedure on the computer that hosts the System Center 2012 – Service Manager database. You have two tasks to perform. The first is to edit the registry, and the second is to run a series of SQL Server query commands on the Service Manager database.
Incorrectly editing the registry might severely damage your system; therefore, before making changes to the registry, back up any valued data on the computer.
You need three pieces of information for this procedure:
This globally unique identifier (GUID): E2403E98-663B-4DF6-B234-687789DB8560 The GUID of the .rtf file that you will discover in the following procedure The location of the file rtffil.dll, typically, C:\Windows\System32
For this procedure, it is assumed that the file rtffil.dll is located in the C:\Windows\System32 folder.
1. On the computer hosting the Service Manager database, log on to the computer as a user with administrative credentials.
2. On the Windows desktop, click Start, and then click Run.3. In the Run dialog box, in the Open box, type regedit, and then click OK.4. If the default instance was selected during etup, in the Registry Editor window, expand
HKEY_LOCAL_MACHINE\SOFTWARE\Microsoft\Microsoft SQL Server\MSSQL10.MSSQLSERVER\MSSearch\Filters\.rtf.
NoteIf the default instance was not selected during setup, the MSSQL10.MSSQLSERVER node will be different.
5. In the right pane, double-click Default.6. In the Edit String dialog box, in the Value data box, make note of the GUID that you find
here. This is the GUID of the rtf. file that you will use in step 8. Replace this value with the provided GUID, E2403E98-663B-4DF6-B234-687789DB8560. Make sure that open and close brackets surround this GUID. Click OK.
7. In the registry tree, above the Filters node that you are currently in, is the CLSID node. Expand CLSID.
8. In the left pane of the registry editor, locate the GUID that you saved from step 6. Right-click this node, and then click Rename.
Caution
To edit the registry
74

9. Rename this node by using the provided GUID, E2403E98-663B-4DF6-B234-687789DB8560. Make sure that open and close brackets surround the GUID.
10. In the right pane, double-click the Default key.11. In the Edit String dialog box, in the Value data box, type the path of the file rtffilt.dll. For
example, type c:\windows\system32\rtffilt.dll, and then click OK.12. Verify that the data entry for the ThreadingModel key is set to Both.13. Close the Registry Editor.
1. On the computer hosting the Service Manager database, on the Windows desktop, click Start, click All Programs, click Microsoft SQL Server 2008, and then click SQL Server Management Studio.
2. In the Connect to Server dialog box, perform the following:a. In the Server Type list, select Database Engine.b. In the Server Name list, select the server and instance for your Service Manager
database.c. In the Authentication list, select Windows Authentication, and then click Connect.
3. In the Object Explorer pane, expand Databases, and then click ServiceManager.4. In the toolbar, click New Query.5. In the center pane, type the following commands, and then click Execute.
exec sp_fulltext_service 'verify_signature', 0
go
exec sp_fulltext_service 'update_languages'
go
exec sp_fulltext_service 'restart_all_fdhosts'
go
6. In the Messages tab, verify that the message “Command(s) completed successfully” appears.
1. On the computer hosting the Service Manager database, on the Windows desktop, click Start, click All Programs, click Microsoft SQL Server 2008, and then click SQL Server Management Studio.
2. In the Connect to Server dialog box, perform the following:a. In the Server Type list, select Database Engine.b. In the Server Name list, select the server and instance for your Service Manager
database.c. In the Authentication list, select Windows Authentication, and then click Connect.
To run the SQL Server commands
To verify changing the .rtf filter
75
3. In the Object Explorer pane, expand Databases, and then click ServiceManager.4. In the toolbar, click New Query.5. In the center pane, type the following, and then click Execute:
select * from sys.fulltext_document_types where document_type = '.rtf'
6. The results pane shows the following results:
document_type .rtf
class_id E2403E98-663B-4DF6-B234-687789DB8560
path C:\Windows\System32\Rtffilt.dll
Troubleshooting System Center 2012 - Service Manager Deployment IssuesAn installation log file is captured during the installation of System Center 2012 – Service Manager. After Service Manager is running, various events are captured in the Windows Event Log. In addition, there are some Windows PowerShell commands that you can use to help troubleshoot data warehouse jobs. For more information, see "Troubleshoot Data Warehouse Jobs" in the Administrator's Guide for System Center 2012 – Service Manager.
Installation Log FilesA log file, SCSMInstall.log, captures the progress of the installation. You can use this log file to troubleshoot a failed installation. You can find this log file in the %temp% folder. To troubleshoot installation problems, you can open the log files and search for a line that reads Return Value 3. If you find such a line in the log file, look above this line for any indication that a particular step failed.
Event LogsService Manager event logs are located in Event Viewer, in the Application and Service Logs folder, in the Microsoft folder, and then listed as Operations Manager.
Create Database errorDuring setup, when you were configuring Service Manager or data warehouse databases, you were given the opportunity to specify how much disk space to allocate for each database. The default setting is 2,000 megabytes (MB) (2 gigabytes (GB)). In addition to the disk space that is
76
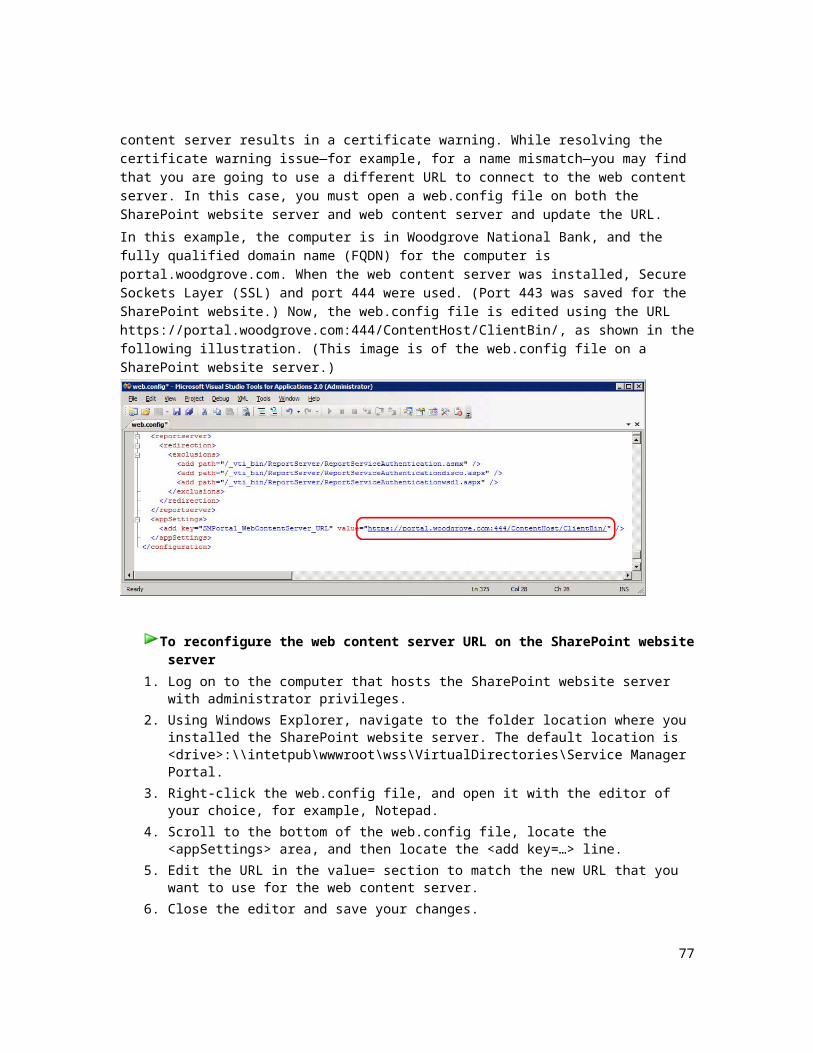
required for the database, Service Manager sets aside additional space for file groups and log files. The additional space that is required for the file groups and log files can be equal to the space that is required for the database.
If there is insufficient disk space available, a message appears, indicating that an error occurred during execution of a custom action: _CreateDatabase. The installation stops before permanent changes are made. If you examine the Service Manager setup log, you find the following string:
Additional Error Description : MODIFY FILE encountered operating system error 112(There is
not enough space on the disk.) while attempting to expand the physical file
You have to either increase the amount of free disk space that is available or reduce the amount of space that Service Manager allocates for the database, and then attempt the installation again. If you are installing Service Manager in a nonproduction environment, you can specify as little as 500 MB for the database.
Troubleshooting deployment topics How to Troubleshoot a Data Warehouse Job
Describes how to troubleshoot data warehouse jobs.
How to Troubleshoot a Data Warehouse JobIn System Center 2012 – Service Manager, after the Data Warehouse Registration Wizard is complete and after Reporting becomes available in the Service Manager console, you can start running reports. If you encounter a problem with reports (for example, the incident management report you run does not show the current data), you can use Windows PowerShell cmdlets to troubleshoot the problem. For example, you can use the following procedure to determine whether a transform job failed, and you can evaluate any error messages that the transform job created.
1. On the computer that hosts the data warehouse management server, click Start, click All Programs, click Accessories, and then click Windows PowerShell.
2. Right-click Windows PowerShell, and then click Run as administrator.3. At the Windows PowerShell command prompt, type the following command, and then
press ENTER:
Import-Module .\Microsoft.EnterpriseManagement.Warehouse.Cmdlets.psd1
4. Type the following command, and then press ENTER:
Get-SCDWJob
5. Review the output, and locate any job with a status of "Failed."6. Type the following command, and then press ENTER. In the command, specify the data
To troubleshoot data warehouse jobs by using Windows PowerShell cmdlets
77

warehouse job that failed as the value of the JobName parameter.
Get-SCDWJobModule -JobName Transform.Common
7. In the output, locate a status of "Failed," and then review the Error Message column for more information about why the data warehouse job failed.
8. When you are ready to retry the failed job, type the following command, and then press ENTER:
Resume-SCDWJob -JobName Transform.Common
Deploying Service Manager from a Command LineThis section describes how to deploy System Center 2012 – Service Manager using command-line parameters. For easier reading, the command-line examples in this guide list each command-line parameter on its own line. If you copy these examples, you must remove the carriage returns/line-feeds (CRs/LFs) from each line before you can run the commands.
The /silent parameter must be the last parameter used in a command-line install.
In this guide, the command-line arguments that you provide are delineated by brackets: []. For example, you provide the Registered Owner’s name [owners name] and Registered Organization’s name [company name] as shown in the following example:
Setup.exe
/Install:Datawarehouse
/RegisteredOwner:[owners name]
/RegisteredOrganization:[company name]
/Silent
If your command-line argument contains a space—for example, [owners name]—enclose the argument in double quotation marks. For example, if you use Garret Young as the argument for the RegisteredOwner command-line parameter, type the name as shown in the following example:
/RegisteredOwner:”Garret Young”
Some of the command-line parameters that are used for the Operations Manager and Configuration Manager data marts define Structured Query Language (SQL) path statements as command-line arguments. You must define the drive name and make sure that the path that is listed in this guide is the correct path for your version of Microsoft SQL Server. The examples in this guide are correct for SQL Server 2008, as shown in the following example:
/OMDataMartDatabaseLogFilePath:[drive name]\Program Files\Microsoft SQL Server\
MSSQL10.MSSQLSERVER\MSSQL\DATA
Note
78

The following is an example of the same command-line argument that you would use for SQL Server 2008 R2.
/OMDataMartDatabaseLogFilePath:[drive name]\Program Files\Microsoft SQL Server\
MSSQL10_50.MSSQLSERVER\MSSQL\DATA
For additional information about command-line parameters, type setup.exe /?. The parameters in the following table are optional.
/ProductKey If this parameter is omitted, Service Manager is installed as an evaluation edition with an evaluation period of 180 days.
/Installpath If this parameter is omitted, Service Manager is installed in the default folder and path:
[drive name]:\Program Files\Microsoft System Center\Service Manager 2012.
/ServiceRunUnderAccount If this parameter is omitted, the local system account is used.
/WorkflowAccount If this parameter is omitted, the local system account is used.
Before you run the command lineTo help prevent an installation failure, perform the following steps on the computer where you will be installing Service Manager:
1. Run the UI-based Setup up to the point where you run the prerequisite checker. Make sure that the prerequisite checker passes, or at least passes with a warning.
2. On the computer where you will be installing the reporting server, make sure that the SQL Server Reporting Services (SSRS) service has started.
3. If you are going to deploy the Reporting Server on a computer other than the computer hosting the data warehouse management server, make sure that you have completed the procedure in Manual Steps to Configure the Remote SQL Server Reporting Services.
Determining When Installation Is CompleteWhen installation of either the Service Manager management server or the data warehouse management server is complete, an event with Event ID 1033 is written into the Application Event log, as shown in the following illustration.
79
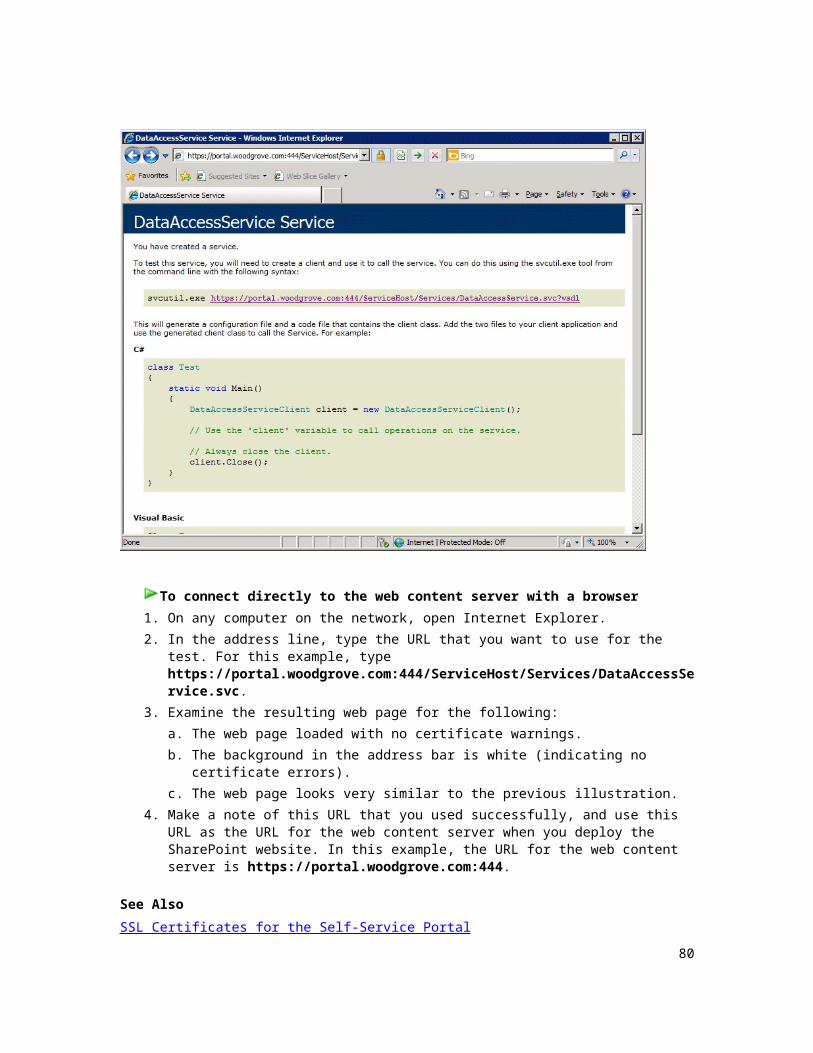
Event Viewer
If you use the start /w command when you are using setup.exe, the command window will remain open when Setup completes, giving you the opportunity to examine any return codes.
Checking Error CodesWhen the command-line Setup is complete, the command prompt appears. You can view the error code that was returned by typing echo %errorlevel%. An error code of 0 means that the installation was successful. The error codes that could be returned by the command-line installation are listed in Appendix A - Command-Line Option Error Codes in this guide.
The command-line installation will not check the database name that you supply to see if it already exists. If you supply a database name that already exists, the command-line installation will fail and a -1 will be returned as an error code.
Deploying Service Manager from a Command Line Topics How to Deploy a Service Manager Management Server Using the Command Line
Describes how to install a Service Manager management server using the command line.
How to Deploy a Data Warehouse Management Server Using the Command Line
Describes how to install a data warehouse management server using the command line.
How to Deploy a Service Manager Console Using the Command Line
Describes how to install a Service Manager console using the command line.
How to Deploy the Service Manager Self-Service Portal Using the Command Line
Describes how to install the Self-Service Portal using the command line.
80
How to Deploy a Service Manager Management Server Using the Command LineYou can use the following command-line procedures to deploy the Service Manager management server and the Service Manager database in System Center 2012 – Service Manager.
1. Log on to the computer where you want to install the Service Manager console using administrative credentials.
2. Open the command window.3. At the command prompt, change directories to the location of the Service Manager
installation media, and then type the following:
Start /Wait Setup.exe /Install:Server /AcceptEula:[YES/NO] /RegisteredOwner:[owner name] /RegisteredOrganization:[company name] /ProductKey:[25-character product key] /CreateNewDatabase /ManagementGroupName:[management group name] /AdminRoleGroup:[domain\account name] /ServiceRunUnderAccount:[domain\account name\password] /WorkflowAccount:[domain\account name\password] /CustomerExperienceImprovementProgram:[YES/NO] /EnableErrorReporting:[YES/NO]
/Silent
See AlsoDeploying Service Manager from a Command Line
How to Deploy a Data Warehouse Management Server Using the Command LineUse the following procedures to deploy a Service Manager data warehouse and databases, including the Operations Manager and Configuration Manager data mart databases, in System Center 2012 – Service Manager.
To deploy the Service Manager management server and database on one computer
81

Deploying the Data WarehouseUse the following procedures to deploy the data warehouse with the Operations Manager and Configuration Manager data mart databases. If you want to install the data warehouse management server and data warehouse databases on the same computer, use the same computer name that you are running Setup on for all instances of [computer name]. If you want to deploy the databases on a separate computer, adjust the [computer name] entries accordingly.
The /AnalysisServerDatabaseDataFilePath is optional, and if it is not used, the default path will be used.
The DWStagingAndConfig database and the DWRepository database must reside on the same instance. Make sure that you specify the same computer and instance for the /StgConfigSqlServerInstance and /RepositorySqlServerInstance command-line options.
1. Log on to the computer where you want to install the Service Manager console using administrative credentials.
2. Open a command window.
NoteYou must run the command prompt with administrative credentials.
3. At the command prompt, change directories to the location of the Service Manager installation media, and then type the following:
Start /Wait Setup.exe /Install:Datawarehouse /AcceptEula:[YES/NO] /RegisteredOwner:[owner name] /RegisteredOrganization:[company name] /ProductKey:[25-character product key] /CreateNewDatabase /AdminRoleGroup:[domain\account name] /StgConfigSqlServerInstance:[computer name] /RepositorySqlServerInstance:[computer name] /DataMartSqlServerInstance:[computer name] /ReportingServer:[computer name] /ReportingWebServiceURL:"http://[computer name]:80/ReportServer" /ServiceRunUnderAccount:[domain\account name\password] /DatasourceAccount:[domain\account name\password] /CustomerExperienceImprovementProgram:[YES/NO]
To deploy the data warehouse management server, data warehouse databases, and optional data marts
82

/EnableErrorReporting:[YES/NO] /ManagementGroupName:DW_improvement /OMDataMartSqlServerInstance:[computer name] /CMDataMartSqlServerInstance:[computer name] /AnalysisServerInstance:[computer name] /AnalysisServerDatabaseDataFilePath:[path to analysis database] /ASRunUnderAccount:[domain\account name\password] /Silent
See AlsoDeploying Service Manager from a Command Line
How to Deploy a Service Manager Console Using the Command LineUse the following command-line procedure to deploy the Service Manager console in System Center 2012 – Service Manager.
1. Log on to the computer where you want to install the Service Manager console using administrative credentials.
2. Open a command window.3. At the command prompt, change directories to the location of the Service Manager
installation media, and then type the following:
Start /Wait Setup.exe /Install:Console /AcceptEula:[YES/NO]/RegisteredOwner:[owner name] /RegisteredOrganization:[company name] /ProductKey:[25-character product key] /Installpath:[drive name]\Program Files\Microsoft System Center\Service Manager 2012 /CustomerExperienceImprovementProgram:[YES/NO] /EnableErrorReporting:[YES/NO]
/Silent
To deploy the Service Manager console
83

See AlsoDeploying Service Manager from a Command Line
How to Deploy the Service Manager Self-Service Portal Using the Command LineUse the following command-line procedures to deploy the web content server and the SharePoint website for the Service Manager Self-Service Portal in System Center 2012 – Service Manager on separate computers.
Deploying the Web Content ServerUse the following procedure to deploy the web content server on a computer.
1. Log on to the computer where you want to install the Service Manager console using administrative credentials.
2. Open the command window.3. At the command prompt, change directories to the location of the Service Manager
installation media, and then type the following:
Start /Wait Setup.exe/Install:Portal /AcceptEula:[YES/NO]/RegisteredOwner:[owner name]/RegisteredOrganization:[company name]/ProductKey:[25-character product key]/PortalWebSiteName:[Self-service portal name]/PortalWebSitePort:[Port number]/PortalWebSiteCertificate:[SSL Certificate]/PortalAccount:[domain\account name\password]/UseExistingDatabase:[ComputerName:DB Name]/CustomerExperienceImprovementProgram:[YES/NO]/EnableErrorReporting:[YES/NO] /Silent
Deploying the SharePoint WebsiteUse the following procedure to deploy the SharePoint website on another computer.
1. Log on to the computer where you want to install the Service Manager console using
To deploy the web content server
To deploy the SharePoint website
84

administrative credentials.2. Open the command window.3. At the command prompt, change directories to the location of the Service Manager
installation media, and then type the following:
Start /Wait Setup.exe
/Install:Portal /AcceptEula:[YES/NO]
/RegisteredOwner:[owner name]
/RegisteredOrganization:[company name]
/ProductKey:[25-character product key]
/SpPortalWebSiteName:[SharePoint Site Name]
/SpPortalWebSitePort:[Port number]
/SpPortalWebSiteCertificate:[SSL Certificate]
/CreateSpPortalDatabase:[YES/NO]
/SpPortalAppPoolAccount:[domain\account name\password] /CustomerExperienceImprovementProgram:[YES/NO]
/EnableErrorReporting:[YES/NO] /Silent
Deploying the Web Content Server and the SharePoint Website on the Same ComputerUse the following command-line procedure to deploy both Self-Service Portal elements—the web content server and the SharePoint website—on the same computer.
Deploy the web content server and the SharePoint website on the same computer85
1. Log on to the computer where you want to install the Service Manager console using administrative credentials.
2. Open the command window.3. At the command prompt, change directories to the location of the Service Manager
installation media, and then type the following:
Start /Wait Setup.exe
/Install:Portal /AcceptEula:[YES/NO]
/RegisteredOwner:[owner name]
/RegisteredOrganization:[company name]
/ProductKey:[25-character product key]
/PortalWebSiteName:[Self-service portal name]
/PortalWebSitePort:[Port number]
/PortalWebSiteCertificate:[SSL Certificate]
/PortalAccount:[domain\account name\password]
/UseExistingDatabase:[ComputerName:DB Name]
/SpPortalWebSiteName:[SharePoint Site Name]
/SpPortalWebSitePort:[Port number]
/SpPortalWebSiteCertificate:[SSL Certificate]
/CreateSpPortalDatabase:[YES/NO]
/SpPortalAppPoolAccount:[domain\account name\password] /CustomerExperienceImprovementProgram:[YES/NO]
86

/EnableErrorReporting:[YES/NO] /Silent
See AlsoDeploying Service Manager from a Command Line
Appendix A - Command-Line Option Error CodesThe following is a list of the error codes that are used in the command-line installation of System Center 2012 – Service Manager.
Error code Error
-16 PreUpgradeCheckFailed
-15 InvalidCommandLine
-14 FailedPrerequisiteChecks
-1 Failed
0 Successful
200 DuplicateDataLogPath
201 DuplicatedCMDB
202 EnterValidDatabaseServer
203 FailedToGetCaseSensitiveAccount
204 FailedToValidateMgmtGrp
205 FullTextSearchNotInstalled
206 InstallPathAccessDenied
207 InstallPathCreateDirectory
208 InstallPathTooLong
209 InvalidCMDB
210 InvalidDatabaseConfiguration
211 InvalidDatabaseSize
212 InvalidDataLogPath
87
Error code Error
213 InvalidDwServer
214 InvalidInstallPath
215 InvalidPrereqResultFile
216 InvalidProductKey
217 InvalidReportServerConfig
218 InvalidSCSM
219 InvalidSmAdminGroup
220 InvalidSqlInstance
221 InvalidSqlServiceState
222 InvalidToInstalleScsm
223 InvCharInMG
224 MgmtGrpRegistryExist
225 MissingSetupFiles
226 NotEnoughFreeSpace
227 NotEnoughFreeSpaceOnSqlServer
228 NotLocalAdminOnSqlServer
229 NotWin2k8x64Machine
230 NotVistaSP2OrAboveMachine
231 NullDatabaseName
232 NullMG
233 NullSMAdmin
234 OldDwDatabaseExist
235 orMessageBoxTitle
236 PrimarySdkServerEmpty
237 RequiredFreeDiskSpace
238 RequiredFreeDiskSpaceForDataFile
239 RequiredFreeDiskSpaceForLogFile
240 ScomAgentInstalled
88

Error code Error
241 ScomServerInstalled
242 ScsmComponentsInstalled
243 SelectCMDB
244 SelectSqlServerInstance
245 ServerAccessDenied
246 ServerNotFound
247 SetupAlreadyRunning
248 SetupCancelByUser
249 SetupCrashMsg
250 SetupFailedAt
251 SetupFailedWithMsior
252 SqlAccessDenied
253 SsrsInvalidWebUrl
254 SsrsNeedSecureUrl
255 SsrsNotInstalledOn
256 TestCredentialsFailed
257 TestCredentialsNotLocalAdmin
258 TooLongDatabaseName
259 TooLongMG
260 UnableToNavogateFolderOnRemoteServer
261 UncDataLogPath
262 UnsupportedSQL
263 UserNotSysAdmin
264 FaildToConnectAD
265 ScsmSameVersionInstalled
266 InvalidWebSiteName
267 InvCharInWebSiteName
268 TooLongWebSiteName
89

Error code Error
269 InvalidWebSitePort
270 WebSiteNameInUse
271 WebSitePortInUse
272 DWServerInstalled
273 SMServerInstalled
274 SMConsoleInstalled
275 SMPortalInstalled
276 IISNotConfigured
277 FailedToConnectToAD
278 SmAdminIsDomainAdministrators
279 InvalidRegisteredOwner
280 InvalidRegisteredOrganization
281 IIS7RoleNotEnable
282 Not64BitSetup
283 DatabaseSqlStoreNotFound
284 ScomUIInstalled
285 InvalidDatabaseName
286 InvalidCMDBVersion
287 UNCPathExpected
288 DataDirectoryDoesNotExist
289 AnalysisServicesNotInstalled
290 DuplicatedASDatabaseID
3010 SuccessfulNeedReboot
90

Appendix B - Guidance for Moving the Service Manager and Data Warehouse DatabasesAfter you have deployed Service Manager, you might need to move the Service Manager or data warehouse databases from one computer running Microsoft SQL Server to another for reasons such as the following:
You need to replace hardware that is experiencing issues and that is no longer considered reliable.
You need to add additional hardware to improve scalability and performance. You need to move a database and log file to a different volume because of space or
performance reasons. You need to change hardware that is leased and is due to expire soon. You need to change or upgrade hardware to comply with new hardware standards. You initially installed multiple Service Manager components on a single server, and you need
to distribute some components to other servers. You need to restore functionality in a failure scenario.
If you want the move the data warehouse database, and if you have installed Service Manager within the last 90 days, it might be easier for you to unregister the data warehouse, install a new data warehouse, and register the new database. If the data has not been groomed from the Service Manager database, there will be no data loss in the data warehouse database because it will be synchronized. By default, the grooming interval for work items is 90 days from the last time a work item was modified. Using this process is much simpler than using the following guidance, which details how to move your databases from one server to another and requires many steps.
Moving databasesFor procedures about how to move databases from one computer running SQL Server to another, see the following topics:
Moving the Service Manager Database
Describes how to move the Service Manager database from one computer running SQL Server to a new computer running SQL Server.
Moving Data Warehouse Databases
Describes how to move Service Manager data warehouse databases to new computers running SQL Server.
See also System Center 2012 – Service Manager Operations Guide for System Center 2012 – Service Manager Administrator's Guide for System Center 2012 – Service Manager Planning Guide for System Center 2012 – Service Manager
91
Moving the Service Manager DatabaseYou must use the following high-level steps to move the Service Manager database.
These steps link to content in the Service Manager Upgrade Guide.
1. Stop the System Center services on all the management servers, as described in How to Stop Service Manager Services on the Secondary Management Server.
2. Back up the Service Manager database, as described in How to Back Up the Production Service Manager Database.
3. Restore the Service Manager database on the target computer that is running Microsoft SQL Server, as described in How to Restore the Service Manager Database in the Lab Environment.
4. Configure the Service Manager database, as described in How to Prepare the Service Manager Database in the Lab Environment.
Do not perform step 17 in the procedure for configuring tables.
5. Configure the registry on all the management servers that will access the new SQL Server instance, by using the following steps:a. Open Registry Editor.b. Browse to HKEY_LOCAL_MACHINE\Software\Microsoft\System Center\2010\
Common\Database.c. Configure two keys: one for the server name (DatabaseServerName) and one for the
database name (DatabaseName). Set values to the new server name and database name, if they are different from the original values.
6. Start the System Center services on all the management servers, as described in How to Start Service Manager Services on the Secondary Management Server.
7. Install another Service Manager database that has a different name on the same computer that is running SQL Server, by installing another Service Manager management server and choosing to create a new database. This step will populate the master database with error message text so that if an error occurs in the future, the error message can describe the specific problem instead of displaying generic text. After the database is installed, you can drop it from the computer that is running SQL Server and uninstall the additional, temporary management server.
See AlsoAppendix B - Guidance for Moving the Service Manager and Data Warehouse Databases
Moving Data Warehouse DatabasesThe following high-level steps are required to move the Data Warehouse databases. Each step in this list links to an associated procedure later in this document.
Note
Important
92

1. Locate user accounts and instances of SQL Server2. Stop Service Manager services3. Back up the data warehouse databases4. Take the data warehouse databases offline5. Restore the data warehouse databases on the new computer running SQL Server6. Prepare the data warehouse databases on the new database server7. Update data warehouse management Server with the new database server name8. Update the data sources on the reporting server9. Update the data sources for the Analysis Services10. Start Service Manager Services on the data warehouse management server
After you move the DWStagingAndConfig and DWRepository databases, they have to be restored on the same instance of SQL Server. Restoring them on a separate instances of SQL Server is not supported.
The collation on the new instance of SQL Server has to match the collation of the original instances of SQL Server where the data warehouse databases were originally hosted.
Locate user accounts and instances of SQL ServerUse the following procedures to locate the user accounts and instances of SQL Server that are used by the data warehouse management server.
1. Log on to the data warehouse management server as a user with administrative credentials.
2. On the Windows desktop, click Start, and then click Run.3. In the Run dialog box, in the Open box, type regedit, and then click OK.4. In the Registry Editor window, expand HKEY_LOCAL_MACHINE\SOFTWARE\
Microsoft\System Center\2010\Common\Database, and then make note of the following registry values:
DatabaseName
DatabaseServerName
DataMartDatabaseName
DataMartSQLInstance
RepositoryDatabaseName
RepositorySQLInstance
StagingDatabaseName
StagingSQLInstance
Important
To identify the SQL Server database and instance names used by the data warehouse management server
93

OMDataMartDatabaseName
OMDataMartSQLInstance
CMDataMartDatabaseName
CMDataMartSQLInstance
1. Log on to the data warehouse management server as a user with administrative credentials.
On the Windows desktop, click Start, and then click Run.
In the Run dialog box, in the Open box, type regedit, and then click OK.
In the Registry Editor window, expand HKEY_LOCAL_MACHINE\SOFTWARE\Microsoft\System Center\2010\Common\Reporting, and then make note of the following registry values:
Server
ServerInstance
WebServiceURL
1. On the Windows desktop, click Start, and then click Run.2. In the Run dialog box, in the Open box, type services.msc, and then click OK.3. Locate the service System Center Data Access Service, and double-click it.4. In the Properties window, click the Log On tab.5. Make a note of the user account name under This account:.6. Repeat Steps 3 through 5 for the System Center Management Configuration service.
1.
NoteThe account that is configured by using the names in the following data sources in SQL Server Reporting Services is called the Reporting account.
Log on to the server with SQL Server Reporting Services that are hosting the Service Manager reports.
NoteIn this procedure, you will use values that you noted in To identify the reporting server and instance names used by data warehouse management server.
2. In SQL Server Reporting Services, click Start, click All Programs, click the program group for the version of SQL Server you are running, click Configuration Tools, and
To identify the reporting server and instance names used by data warehouse management server
To identify the service account used by the data warehouse management server
To identify the reporting account used by the data warehouse management server
94

then click Reporting Services Configuration Manager.3. In the Reporting Services Configuration Connection dialog box, connect to the SQL
Reporting instance that you noted in a previous procedure.4. In Reporting Services Configuration Manager, click Reporting Manager URL.5. On the Reporting Manager URL page, click the hyperlink that resembles
http://<Servername>:portnumber/Reports to open it in your web browser.6. Open the System Center folder and then open the Service Manager folder.7. Click the DWDataMart data source and make a note of the User name value under
Credentials stored securely in the report server.8. In your browser, click Back to return to the Service Manager folder.9. Click the DWStagingAndConfig data source and make a note of the User name value
under Credentials stored securely in the report server.10. In your browser, click Back to return to the Service Manager folder.11. Click the ConfigurationManager data source and make a note of the User name value
under Credentials stored securely in the report server.12. In your browser, click Back to return to the Service Manager folder.13. Click the MultiMartDatasource data source and make a note of the User name value
under Credentials stored securely in the report server.14. In your browser, click Back to return to the Service Manager folder.15. Click the OperationsManager data source and make a note of the User name value
under Credentials stored securely in the report server.16. Close the browser window.
1. Log on to the Service Manager server, click Start, click All Programs, click Microsoft System Center 2012, click Service Manager, and then click Service Manager Shell.
2. In the Windows PowerShell command prompt, copy the following command, and then press ENTER.
NoteReplace <DWServerName> with the name of your data warehouse management server.
$class= get-scclass –Name Microsoft.SystemCenter.ResourceAccessLayer.ASResourceStore –ComputerName <DWServerName>
$OLAPServer= get-scclassinstance –class $class –ComputerName <DWServerName>
$OLAPServer.Server
NoteThe $OLAPServer.Server cmdlet returns the name of the OLAP server that is
To identify the OLAP Account used by the data warehouse management server
95

hosting the DWASDataBase, and it contains the OLAP Account.
3. On a server where you have SQL Server Management Studio installed, do the following:a. Open SQL Server Management Studio.b. In the Connect to Server window, select Analysis Services in the Server type list.c. In the Server name list, type or select the name you noted from the output of the
$OLAPServer.Server cmdlet in previous step, and then click Connect.d. In the Object Explorer pane, expand Databases, and then expand the
DWASDataBase OLAP database.e. Expand the Data Sources folder, and then double-click CMDataMart.f. In the Data Source Properties – CMDataMart dialog box, note the value of
Connection String.g. Under Security Settings, click Impersonation Account, and then click the
properties button (…), to open the Impersonation Information dialog box.h. In the Impersonation Information dialog box, note the user name.i. Click Cancel twice to close the dialog boxes.j. Repeat the steps above to note the Connection string and the User name for the
DWDataMart and OMDataMart databases.
Stop Service Manager servicesUse the following procedure to stop the Service Manager services on the data warehouse management server.
1. In the Run dialog box, in the Open text field, type services.msc, and then click OK.2. In the Services window, in the Services (Local) pane, locate the following three
services, and for each one, click Stop:a. System Center Data Access Serviceb. System Center Managementc. System Center Management Configuration
Back up the data warehouse databasesUse the following procedure to back up the data warehouse databases on the original computer running SQL Server.
1. Log on to the original computer running SQL Server that is hosting the data warehouse databases, and open SQL Server Management Studio.
2. In the Connect to Server dialog box, follow these steps:
To stop Service Manager services on the data warehouse management server
To back up the data warehouse databases
96
a. In the Server Type list, select Database Engine.b. In the Server Name list, select the server name for your data warehouse database.c. In the Authentication list, select Windows Authentication, and then click Connect.
3. In the Object Explorer pane, expand Databases.4. Right-click the DWStagingAndConfig database, click Tasks, and then click Back Up.5. In the Back Up Database dialog box, type a path and a file name in the Destination on
disk text box, and then click OK.
ImportantThe destination location must have enough available free disk space to store the backup files.
6. Click OK in the Back Up Database dialog box to start the back up.7. Repeat these steps for the DWRepository, CMDWDataMart, OMDWDataMart, and
DWDataMart databases.
Take the data warehouse databases offlineUse the following procedure to take the data warehouse databases offline on the original computer running SQL Server.
1. Log on to the original computer running SQL Server that is hosting the data warehouse databases, and open SQL Server Management Studio.
2. In the Connect to Server dialog box, follow these steps:a. In the Server Type list, select Database Engine.b. In the Server Name list, select the server name for your data warehouse database.c. In the Authentication list, select Windows Authentication, and then click Connect.
3. In the Object Explorer pane, expand Databases.4. Right-click the DWStagingAndConfig database, click Tasks, and then click Take
Offline.5. In the Take database offline dialog box, click Close.6. Repeat the previous steps for the DWRepository, CMDWDataMart, OMDWDataMart, and
DWDataMart databases.
Restore the data warehouse databases on the new computer running SQL ServerUse the following procedure to restore the data warehouse databases on the new computer running SQL Server.
1. On the new computer running SQL Server, open SQL Server Management Studio.
To take the data warehouse databases offline
To restore the data warehouse databases
97

2. In the Connect to Server dialog box, follow these steps:a. In the Server Type list, select Database Engine.b. In the Server Name list, select the server name for your Service Manager services
database.c. In the Authentication list, select Windows Authentication, and then click Connect.
3. In the Object Explorer pane, right-click the Databases folder, and then click Restore Database.
4. In the Restore Database dialog box, under the To a point in time text box, retain the default, Mmost recent possible, or select a specific date and time by clicking the browse button to open the Point in Time Restore dialog box.
5. To specify the source and location of the backup sets to restore, click From Device.6. Click Browse to open the Specify Backup dialog box.7. In the Backup media list box, select one of the listed device types. To select more
devices for the Backup location, click Add.8. In the Select the backup sets to restore grid, select the backups to restore. (This grid
displays the backups that are available for the specified location.)9. On the General page, the name of the restoring database appears in the To database
list. Select the DWStagingAndConfig database from the list.10. In the Restore options panel, select Overwrite the existing database.11. In the Restore the database files as options panel, verify that the original database file
name and path are correct.12. For the Recovery state option, select Leave the databases ready to use by rolling
back the uncommitted transactions. Additional transaction logs cannot be restored (RESTORE WITH RECOVERY).
13. Click OK to restore the database.14. Repeat the previous steps for the DWRepository, CMDWDataMart, OMDWDataMart, and
DWDataMart databases.
Prepare the data warehouse databases on the new database serverUse the following three procedures to prepare the data warehouse databases on the new database server:
1. To configure the DWStagingAndConfig database on the new computer running SQL Server2. To configure the service account database permissions3. To configure the DWStagingAndConfig tables
1. On the new computer running SQL Server, open SQL Server Management Studio.2. In the Connect to Server dialog box, follow these steps:
a. In the Server Type list, select Database Engine.
To configure the DWStagingAndConfig database on the new computer running SQL Server
98

b. In the Server Name list, select the name of the new computer running SQL Server that hosts the DWStagingAndConfig database.
c. In the Authentication list, select Windows Authentication, and then click Connect.3. In the Object Explorer pane, expand Databases, and then click DWStagingAndConfig.4. In the toolbar, click New Query.5. In the center pane, copy the following command, and then click Execute.
sp_configure 'clr enabled', 1
go
reconfigure
go
6. In the center pane, remove the command you typed in the previous step, copy the following command, and then click Execute.
ALTER DATABASE DWStagingAndConfig SET SINGLE_USER WITH ROLLBACK IMMEDIATE
7. In the center pane, remove the command you typed in the previous step, copy the following command, and then click Execute.
ALTER DATABASE DWStagingAndConfig SET ENABLE_BROKER
8. In the center pane, remove the command you typed in the previous step, type the following command, and then click Execute.
ALTER DATABASE DWStagingAndConfig SET MULTI_USER
1. In the Object Explorer pane, expand Security, and then expand Logins. Right-click Logins, and then click New Login.
2. Click Search.3. Type the user name by using the domain\user name format for the data warehouse
service account, click Check Names, and then click OK.
NoteIf the Data Access Account is running as LocalSystem, use the format <domain\computername$> in SQL Logins, where <computername> is the name of the management server.
4. In the Select a page pane, click User Mapping.5. In the Users mapped to this login area, in the Map column, select the row that
represents the name of the DWStagingAndConfig database. DWStagingAndConfig is the default database name.
6. In the Database role membership for: DWStagingAndConfig area, ensure that the following entries are selected: configsvc_users db_accessadmin
To configure the service account database permissions
99

db_datareader db_datawriter db_ddladmin db_securityadmin dbmodule_users public sdk_users sql_dependency_subscriber db_owner
7. In the Database role membership for: DWRepository area, ensure that the following entries are selected: db_owner public
8. In the Database role membership for: DWDataMart area, ensure that the following entries are selected: db_owner public
9. Click OK.10. In the Object Explorer pane, expand Security, and then expand Logins.11. Right-click Logins, and then click New Login.12. Click Search.13. Type the user name in the domain\user name format for the reporting account, click
Check Names, and then click OK.14. In the Select a page pane, click User Mapping.15. In the Users mapped to this login area, in the Map column, select the row that
represents the name of the DWStagingAndConfig. DWStagingAndConfig is the default database name.
16. In the Database role membership for: DWStagingAndConfig area, ensure that the following entries are selected: db_datareader public
17. In the Database role membership for: DWRepository area, ensure that the following entries are selected: db_datareader public reportuser
18. In the Database role membership for: DWDataMart area, ensure that the following entries are selected: db_datareader
100
public reportuser
19. In the Database role membership for: OMDWDataMart area, ensure that the following entries are selected: db_datareader public reportuser
20. In the Database role membership for: CMDWDataMart area, ensure that the following entries are selected: db_datareader public reportuser
21. Click OK.22. In the Object Explorer pane, expand Security, and then expand Logins.23. Right-click Logins, and then click New Login.24. Click Search.25. Type the user name in the domain\user name format for the OLAP account, click Check
Names, and then click OK.26. In the Select a page pane, click User Mapping.27. In the Database role membership for: DWDataMart area, ensure that the following
entries are selected: db_datareader public reportuser
28. In the Database role membership for: OMDWDataMart area, ensure that the following entries are selected: db_datareader public reportuser
29. In the Database role membership for: CMDWDataMart area, ensure that the following entries are selected: db_datareader public reportuser
30. Click OK.
1. In the Object Explorer pane, expand Databases, expand DWStagingAndConfig, and then expand Tables.
To configure the DWStagingAndConfig tables
101

2. Right-click dbo.MT_Microsoft$SystemCenter$ManagementGroup, and then click Edit Top 200 Rows.
3. In the center pane, locate the column SQLServerName_ 43FB076F_7970_4C86_6DCA_8BD541F45E3A, and then in the first row of the column, type the name of the new computer running SQL Server that is hosting the DWStagingAndConfig database. In the case of named instances, type ComputerName\InstanceName.
4. Right-click dbo. MT_Microsoft$SystemCenter$ResourceAccessLayer$SqlResourceStore, and then click Edit Top 200 Rows.
5. Update the column Server_48B308F9_CF0E_0F74_83E1_0AEB1B58E2FA for rows representing DWStagingAndConfig, DWRepository, CMDWDataMart, OMDWDataMart, and DWDataMart by typing the name of the new computer running SQL Server that is hosting the respective databases. In the case of named instances, type ComputerName\InstanceName.
6. Right-click dbo.MT_Microsoft$SystemCenter$ResourceAccessLayer$CMDBResourceStore, and then click Edit Top 200 Rows.
7. In the center pane, locate the column Server_48B308F9_CF0E_0F74_83E1_0AEB1B58E2FA, and in the first row of the column, type the name of the new computer running SQL Server that is hosting the DWStagingAndConfig database. In the case of named instances, type ComputerName\InstanceName.
8. Right-click LFX.DataSource, and then click Edit Top 200 Rows.9. In the center pane, locate the DataSourceAddress column, and in the first row of the
column, locate the entry that starts with Data Source = <server name>; Initial Catalog = DWStagingAndConfig; Persist Security Info=False. Replace <server name> with the name of the new computer running SQL Server.
10. Ensure that the values you typed were saved by querying the tables specified in the previous steps.
11. Close Microsoft SQL Server Management Studio.
Update data warehouse management Server with the new database server nameUse the following procedure to update the data warehouse management server to use the new database server name.
1. Log on to the computer as a user with administrative credentials.2. On the Windows desktop, click Start, and then click Run.3. In the Run dialog box, in the Open box, type regedit, and then click OK.
To update the data warehouse management server to use the new database server name
102

CautionIncorrectly editing the registry might severely damage your system; therefore, before making changes to the registry, back up any valued data on the computer.
4. In the Registry Editor window, expand HKEY_LOCAL_MACHINE\SOFTWARE\Microsoft\System Center\2010\Common\Database.
5. In the right pane, double-click DatabaseServerName.6. In the Edit String box, in the Value data box, type the name of the new computer
running SQL Server that hosts the DWStagingAndConfig database. If you are using a named instance of SQL Server, use the Computer Name\Instance name format.
7. Click OK.8. Repeat the previous steps for the registry values to reflect the new name of the computer
running SQL Server for the DWDataMart, OMDWDataMart, CMDWDataMart, DWRepository, and DWStagingAndConfig databases. DataMartSQLInstance RepositorySQLInstance StagingSQLInstance OMDataMartSQLInstance CMDataMartSQLInstance
Update the data sources on the reporting serverUse the following procedure to update data sources on the reporting server to point to the new computer running SQL Server.
1. Log on to the Service Manager reporting server, and start Reporting Services Configuration Manager.
2. In the Reporting Services Configuration Connection dialog box, connect to the correct reporting server instance as noted in the section To identify the reporting server and instance name used by data warehouse management server.
3. In the Reporting Services Configuration Manager list, select Report Manager URL.4. On the Report Manager URL page, click the hyperlink that resembles
http://<Servername>:portnumber/Reports to open the Reports home page in your Internet browser.
5. On the home page, open the System Center folder, and then open the Service Manager folder.
6. Open the list of Service Manager items, and then click the DWDataMart data source.7. In the Connection string box, the string resembles data source=<server
name>;initial catalog=DWDataMart. Replace the existing name of the computer running SQL Server by typing the name of the new computer running SQL Server.
8. Go back to the previous Service Manager folder webpage, and click the
To update the data sources on the reporting server
103

DWStagingAndConfig data source.9. In the Connection string box, the string resembles data source=<server
name>;initial catalog= DWStagingAndConfig. Replace the existing name of the computer running SQL Server by typing the name of the new computer running SQL Server.
10. Go back to the previous Service Manager folder webpage and click the ConfigurationManager data source.
11. In the Connection string box, the string resembles data source=<server name>;initial catalog= CMDWDataMart. Replace the existing name of the computer running SQL Server by typing the name of the new computer running SQL Server.
12. Go back to the previous Service Manager folder webpage and click the MultiMartDatasource data source.
13. In the Connection string box, the string resembles <root><source id='DWDataMart' connectionString='Data Source=<Server name>;Initial Catalog=DWDataMart;Integrated Security=True' /><source id='OMDataMart' connectionString='Data Source=<Server name>;Initial Catalog=OMDWDataMart;Integrated Security=True' /><source id='CMDataMart' connectionString='Data Source=<Server name>;Initial Catalog=CMDWDataMart;Integrated Security=True' /></root>. Replace the existing name of the computer running SQL Server by typing the name of the new computer running SQL Server.
14. Go back to the previous Service Manager folder webpage and click the Operations Manager data source.
15. In the Connection string box, the string resembles data source=<server name>;initial catalog= OMDWDataMart. Replace the existing name of the computer running SQL Server by typing the name of the new computer running SQL Server.
16. Close your web browser.
Update the data sources for the Analysis ServicesUse the following procedure to update the connection strings for the data sources on the server that hosts the Analysis Services database.
1. Log on to the server that hosts the SQL Server Analysis Services database.2. Open SQL Server Management Studio.3. In the Connect to Server dialog box, in the Server Type list, select Analysis Services.4. In the Server name list, type the server name that you received as output from the
$OLAPServer.Server cmdlet. (You noted this information in the blah section earlier in this topic.)
5. In the Object Explorer pane, expand Databases, and then expand DWASDataBase.
To update the data sources for the Analysis services
104

6. Expand Data Sources, and then double-click CMDataMart.7. In the Data Source Properties – CMDataMart dialog box, select Connection string
Provider=SQLNCLI10.1;Data Source=<servername>;Integrated Security=SSPI;Initial Catalog=CMDWDataMart.
8. Replace <servername> with the name of the computer running SQL Server that hosts the CMDWDataMart database.
9. Click OK.10. Repeat the previous steps to update the connection strings for the DWDataMart and
OMDataMart data sources.
Start Service Manager Services on the data warehouse management serverUse the following procedure to start the Service Manager services on the data warehouse management server.
1. In the Run dialog box, in the Open text field, type services.msc, and then click OK.2. In the Services window, in the Services (Local) pane, locate the following three
services, and for each one, click Start:a. System Center Data Access Serviceb. System Center Managementc. System Center Management Configuration
See alsoAppendix B - Guidance for Moving the Service Manager and Data Warehouse Databases
To start Service Manager services on the data warehouse management server
105