Embed Size (px)
Citation preview

Stralto DMX Architecture and Setup
Overview
The architecture uses a combination of SQL Server, Azure Services and Dynamics Solution Files to create a repeatable solution for enterprise users that requires only configuration and can be setup in a matter of minutes. Fields from our solution entities used to determine the different configurations required based on the values. These values are passed to our DMX APIs hosted on Azure, that handle the server-side integration and perform the needed actions.
1. Azure Blob Storagea. Files are upload in chunksb. Once the file is committed, our tagging services goes through the files if needed and find
tags and sends them back to the client.c. The custom fields, tags and required document types or created as part of the file
upload.d. Containers are automatically created and are based on the instance name. for example.
For stralto.crm.dynamics.com the container name created would be straltocrmdynamicscom.
e. The current Microsoft naming convention is used for Lists and Foldersi. List- Entity Schema Name
ii. Folder- RecordName_RecordGUID2. SharePoint
a. Files are uploaded in chunks if over 5 MB.b. Tagging operations are performed when the last chunk is uploaded.c. When the field is created in the Field Configuration, the field is also created in the folder
on SharePointd. The current Microsoft naming convention is used for Lists and Folders.
i. List- Entity Schema Nameii. Folder- RecordName_RecordGUID
Components
1. Stralto DMX Azure SQL Server Database – Subscription, Instance name and DMX Authentication Key Information.
2. Solution includes
a. Entitiesi. DMX Configuration Entity- Used for storing all connection information for DMX
as outlined in the setup belowii. DMX Entity Config- Used for all entity specific information and has many to one
relationship with DMX Configuration. This allows us to have multiple entities/forms working with on dmx configuration e.g. One azure blob storage can have multiple folders corresponding to the multiple entities/forms. Once the entity is configured. A multiline field called stralto_documentlist is automatically created for that entity and holds JSON of all the document metadata for the record.
iii. DMX Required Documents- Used for assigning required documents for these forms. This entity has a many to one relationship with DMX Entity Config.
iv. DMX Custom Fields – Used to track metadata information about custom Fields. This entity has Many to One relationship with DMX Entity Config.
b. Web-Resources (Angular ,VueJS, Odata, CRM.SDK/Web API ) i. Stralto_dmclient.html- Main client for CRM-Forms Uses configuration
information from the above entities using CRM SDK and connects to our Azure hosted service unless using Dynamics annotations for document management
ii. Stralto_dmportal.html- Main client for Portal Entity Forms. Uses configuration information from the above entities using OData and connects to our Azure hosted service. Portal currently only works with Azure but will work with SharePoint and Dynamics Annotations in the next release.
3. Stralto DMX Azure Services (Node.js in Azure Linux VM)
a. DMX Azure Blob Services API- If Azure Blob Storage is selected in the DMX Configuration for the configured entity, the CRM Client sends all request to this API. The API handles all uploads, deletes, metadata updates, auto tagging (including cognitive services)
b. DMX SharePoint API - If SharePoint is selected in the DMX Configuration for the configured entity, the CRM Client sends all request to this API. The API handles all uploads, deletes, metadata updates, auto-tagging (including cognitive services)
c. DMX Portal Azure Blob Services API- When uploading files from the portal to Azure Blob Storage we also need to use server side integration with Dynamics to be able to update metadata and fields in Dynamics 365 and hence we use a separate API for it.
Setup
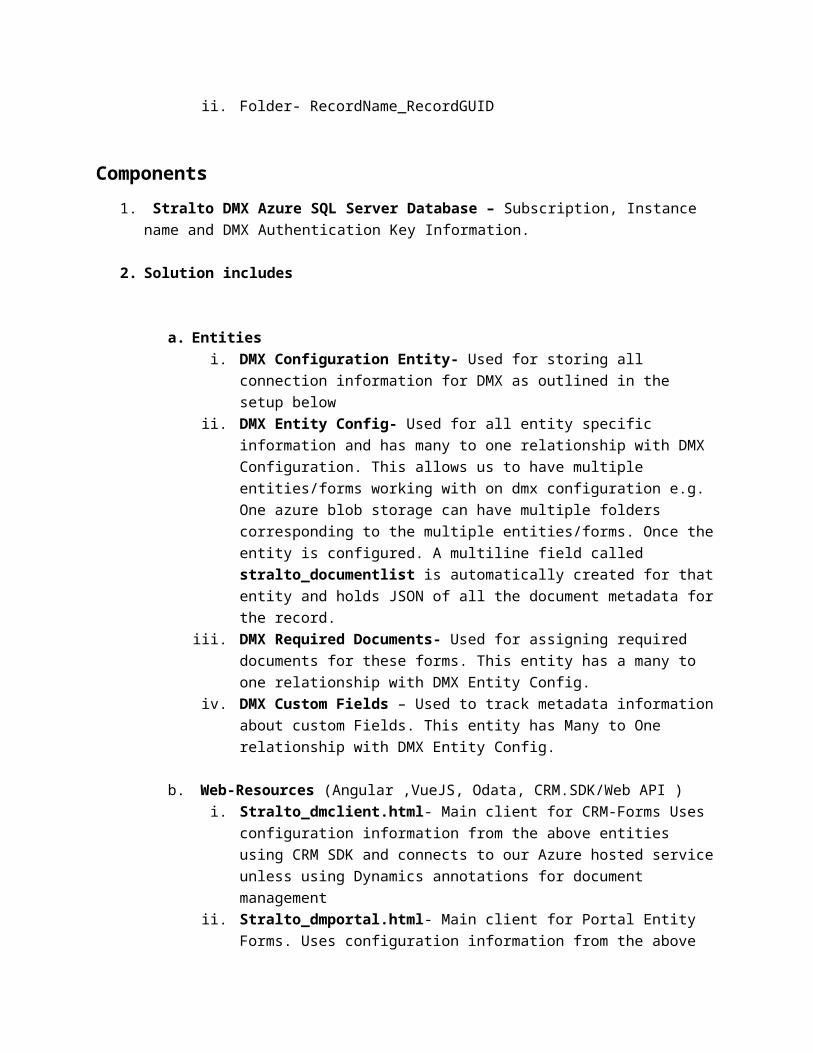
1. Import the Solution File into your Dynamics instance.2. Open the StraltoDMX solution. Click on Configuration and then “Signup for DMX”
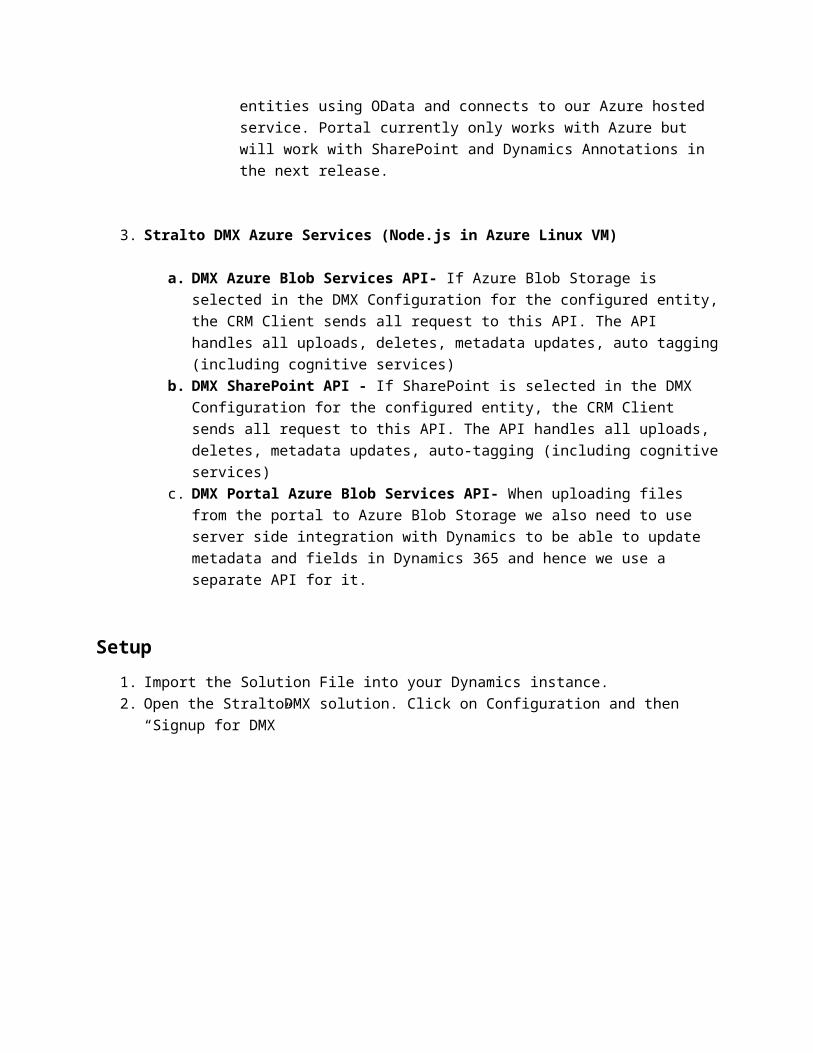
3. Select the number of users and proceed to Checkout. DMX comes with a 60 day free trial and your credit card will not be charged till the trial expires. You can easily cancel the subscription by using the manage subscription button(shown in later steps).
4. Enter the email address you want to subscribe with and click on Next.
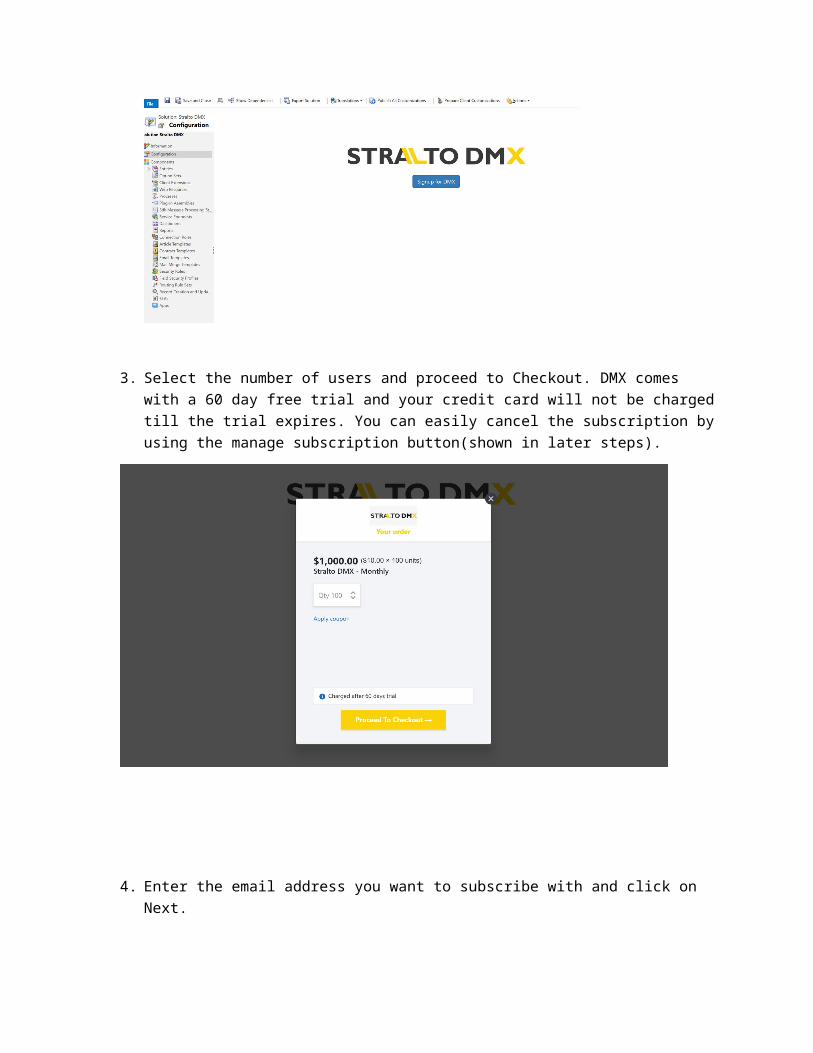
5. Enter the account details for the order and click Next.
6. Enter your billing information and click Next.
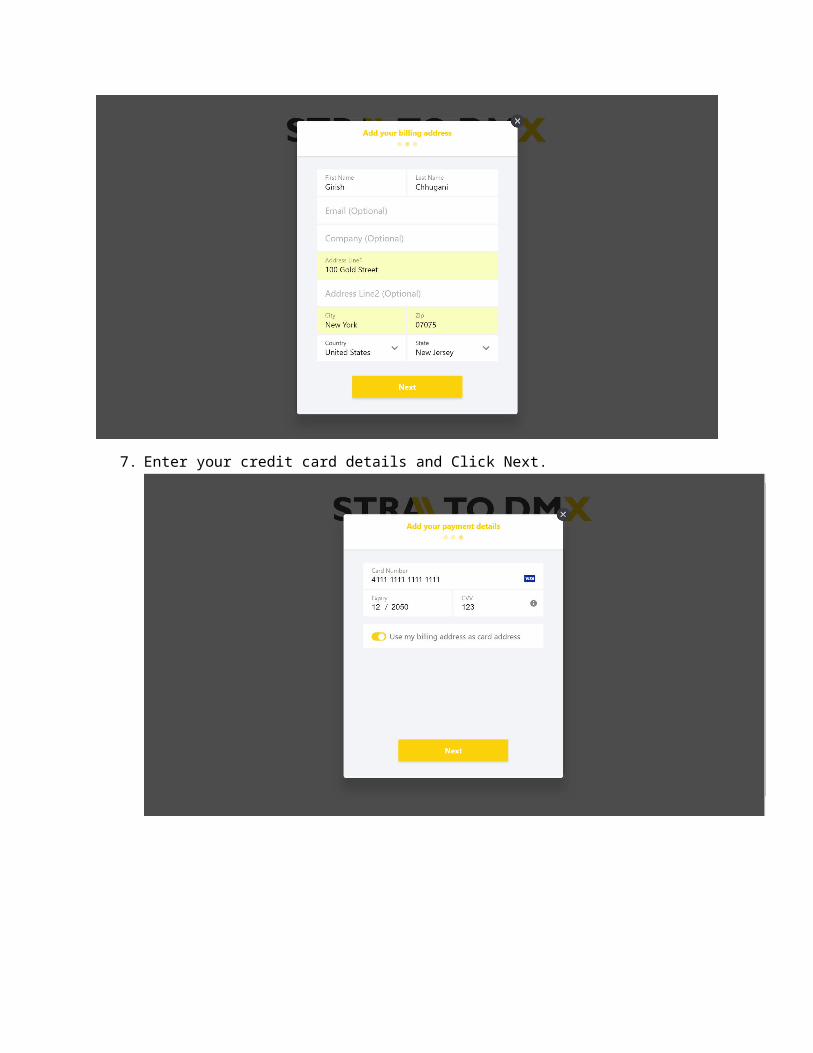
7. Enter your credit card details and Click Next.
8. Finalize your subscription and Click on Pay to Subscribe
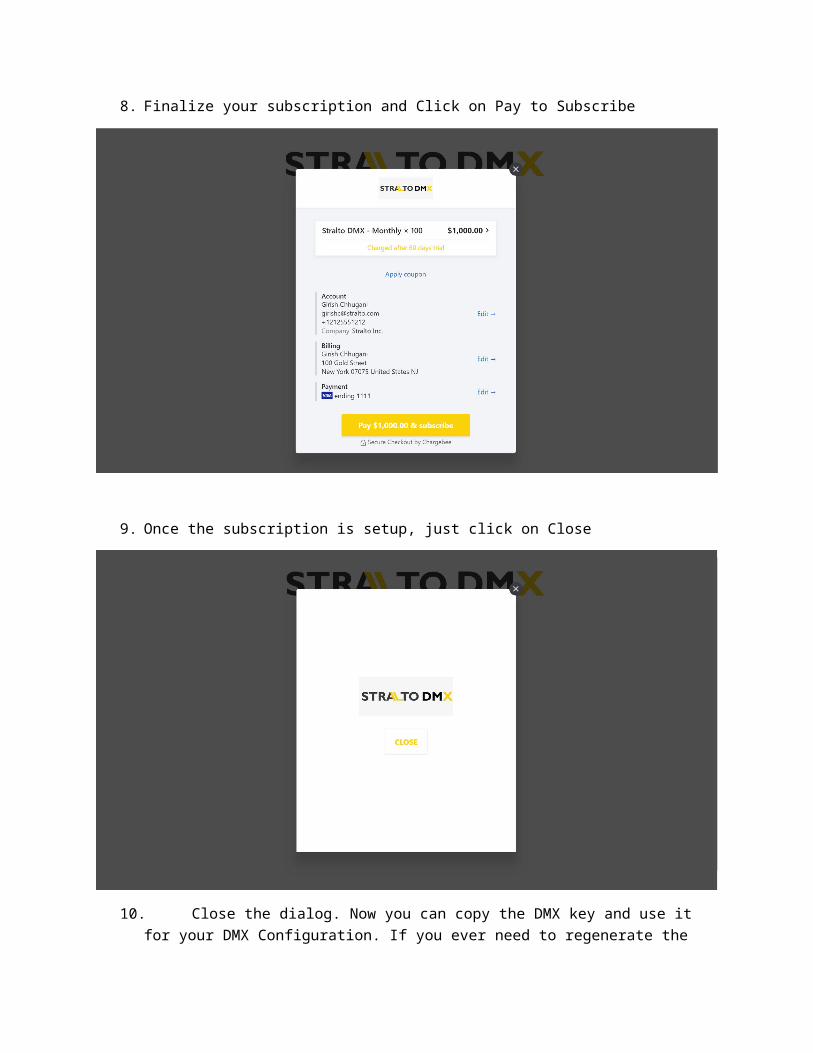
9. Once the subscription is setup, just click on Close
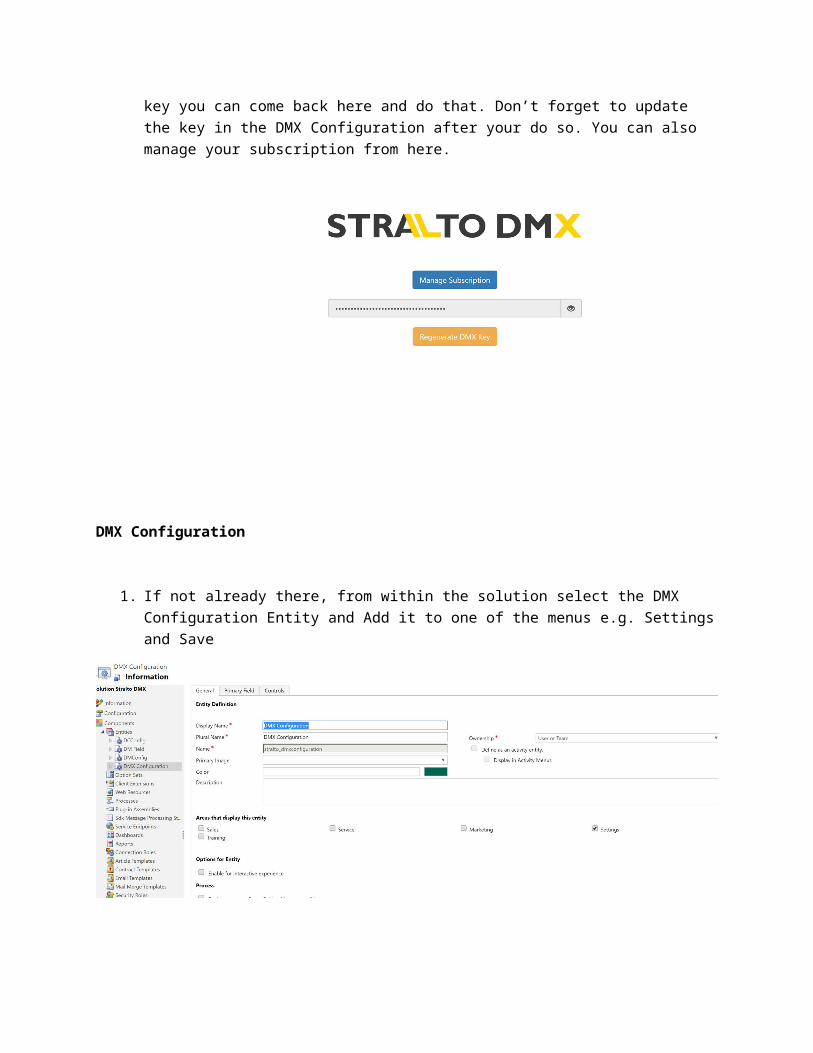
10. Close the dialog. Now you can copy the DMX key and use it for your DMX Configuration. If you ever need to regenerate the key you can come back here and do that. Don’t forget to update the key in the DMX Configuration after your do so. You can also manage your subscription from here.
DMX Configuration
1. If not already there, from within the solution select the DMX Configuration Entity and Add it to one of the menus e.g. Settings and Save
2. Go to Settings and Select “DMX Configuration” from the Menu.
3. Create a New DMX Configuration by clicking on +NEW.
4. Select DMX Type and then fill in the necessary information based on the type you select and save the record.
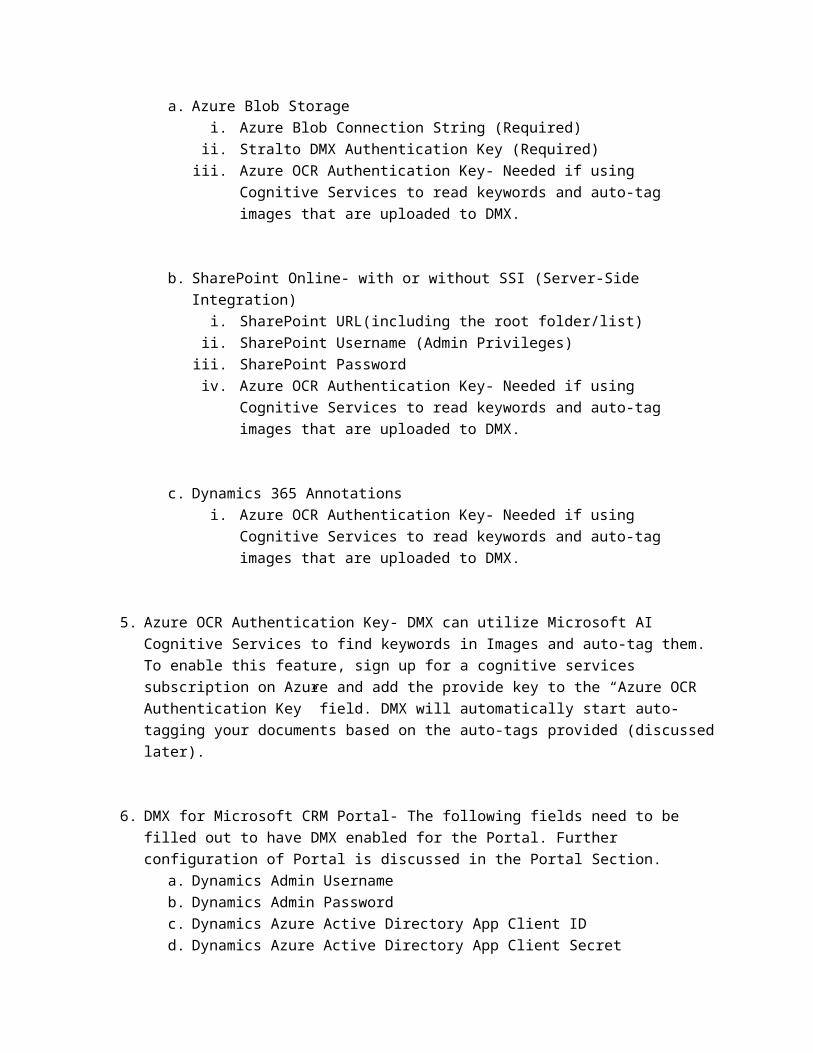
a. Azure Blob Storagei. Azure Blob Connection String (Required)
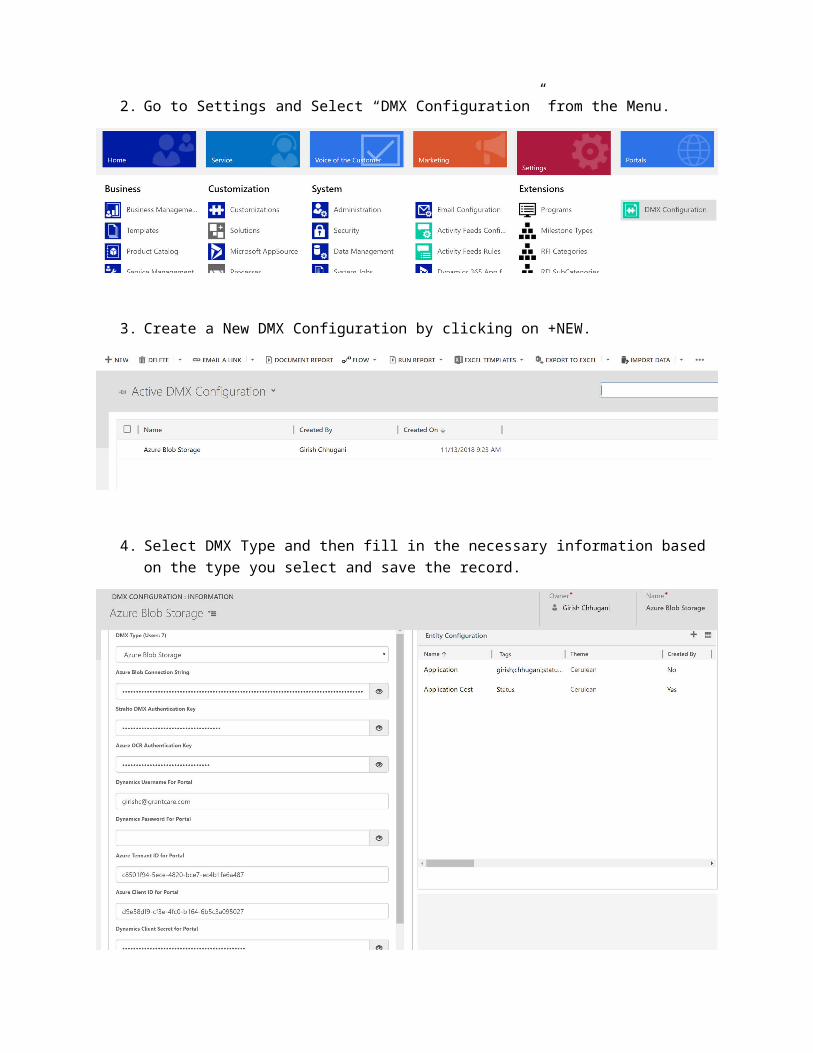
ii. Stralto DMX Authentication Key (Required)iii. Azure OCR Authentication Key- Needed if using Cognitive Services to read
keywords and auto-tag images that are uploaded to DMX.
b. SharePoint Online- with or without SSI (Server-Side Integration)i. SharePoint URL(including the root folder/list)
ii. SharePoint Username (Admin Privileges)iii. SharePoint Passwordiv. Azure OCR Authentication Key- Needed if using Cognitive Services to read
keywords and auto-tag images that are uploaded to DMX.
c. Dynamics 365 Annotationsi. Azure OCR Authentication Key- Needed if using Cognitive Services to read
keywords and auto-tag images that are uploaded to DMX.
5. Azure OCR Authentication Key- DMX can utilize Microsoft AI Cognitive Services to find keywords in Images and auto-tag them. To enable this feature, sign up for a cognitive services subscription on Azure and add the provide key to the “Azure OCR Authentication Key” field. DMX will automatically start auto-tagging your documents based on the auto-tags provided (discussed later).
6. DMX for Microsoft CRM Portal- The following fields need to be filled out to have DMX enabled for the Portal. Further configuration of Portal is discussed in the Portal Section.
a. Dynamics Admin Usernameb. Dynamics Admin Passwordc. Dynamics Azure Active Directory App Client IDd. Dynamics Azure Active Directory App Client Secrete. Dynamics Azure Activer Directory App Tennant ID.
7. Add DMX to the entity by clicking + on Entity Configuration. The entity needs to have Document Management Enabled. You can set that in Entity Settings.
8. You can also select the theme and max upload size to further customize the DMX experience for the user.
9. You can also select the fields you want to see on the DMX Client.10. Click on + to add Required Document Types.
11. You can control some important aspects of DMX from here. a. Show in Portal- Allows you to control what types of documents should be shown and be
available for upload in the portalb. Track by Stage- Allows you to filter and sort documents by what stage they are
connected to.c. Filter by Role- Allows you to filter the document type and only show it to users with a
role.
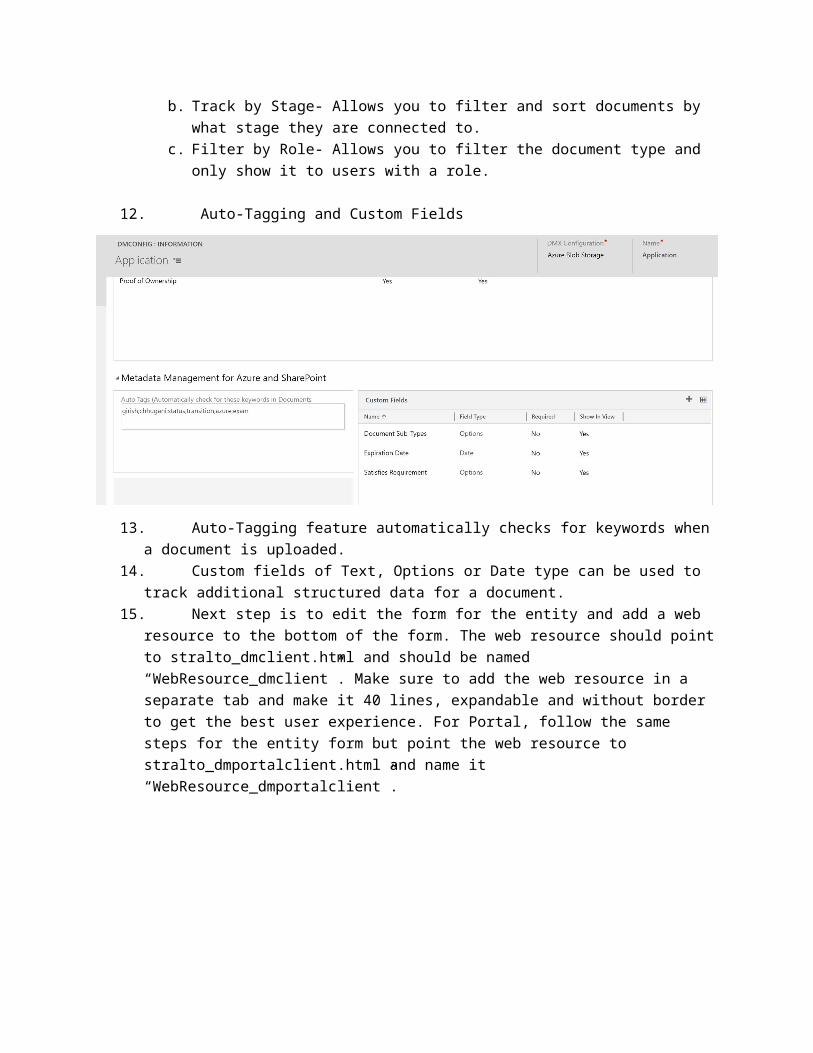
12. Auto-Tagging and Custom Fields

13. Auto-Tagging feature automatically checks for keywords when a document is uploaded.14. Custom fields of Text, Options or Date type can be used to track additional structured data for a
document.15. Next step is to edit the form for the entity and add a web resource to the bottom of the form.
The web resource should point to stralto_dmclient.html and should be named “WebResource_dmclient”. Make sure to add the web resource in a separate tab and make it 40 lines, expandable and without border to get the best user experience. For Portal, follow the same steps for the entity form but point the web resource to stralto_dmportalclient.html and name it “WebResource_dmportalclient”.
16. Once you save and publish, you can just go to the entity form and start using DMX to upload and tag files. It works in both classic and unified interface, Dynamics 365 mobile app on iOS and Android and in Microsoft CRM Portal.
In Dynamics CRM
In Microsoft CRM Portal


![DMX-Master MK II ENC DMX-Master I, DMX controller€¦ · DMX-Master I, DMX-Master MK II ENC 23. 12 [MIDI/REC] To control MIDI operations or to record programmes. 13 [AUTO/DEL] Activates](https://img.pdfslide.us/doc/110x75/6024d4b709488a62466819ea/dmx-master-mk-ii-enc-dmx-master-i-dmx-controller-dmx-master-i-dmx-master-mk-ii.jpg)