Embed Size (px)
Citation preview
Creating HPC Cloud Solutions with Windows HPC Server 2008 R2 and Windows Azure: Application Models and Data Considerations
Microsoft Corporation
Published: April 2012
AbstractWindows® HPC Server 2008 R2 SP1 and later enables administrators to increase the power of the on-premises cluster by adding computational resources in Windows Azure. With the Windows Azure “burst” scenario, various types of HPC applications can be deployed to Windows Azure nodes and run on these nodes in the same way that they run in on-premises nodes. The burst scenario also supports working solely in Windows Azure without any on-premises machines by using the Windows Azure HPC Scheduler.
This article provides a technical overview of developing HPC applications that are supported for the Windows Azure burst scenario. The article addresses the application models that are supported, and the data issues that arise when working with Windows Azure and on-premises nodes, such as the proper location for the data, the storage types in Windows Azure, various techniques to upload data to Windows Azure storage, and how to access data from the computational nodes in the cluster (on-premises and Windows Azure). Finally, this article describes how to deploy HPC applications to Windows Azure nodes and how to run these HPC applications from client applications, as well as from the Windows HPC Server 2008 R2 SP3 job submission interfaces.

Copyright Information
This document is provided "as-is." Information and views expressed in this document, including URL and other Internet Web site references, may change without notice. You bear the risk of using it.
Some examples are for illustration only and are fictitious. No real association is intended or inferred. This document does not provide you with any legal rights to any intellectual property in any Microsoft product. You may copy and use this document for your internal, reference purposes. You may modify this document for your internal, reference purposes.
© 2012 Microsoft Corporation. All rights reserved.
Microsoft, Windows, Windows Server, and Windows Azure are trademarks of the Microsoft group of companies.
All other trademarks are property of their respective owners.

CONTENTS
Introduction.................................................................................................................................................6
HPC Application Models in the Cloud..........................................................................................................8
Parametric Sweep....................................................................................................................................8
MS-MPI....................................................................................................................................................9
SOA Applications...................................................................................................................................10
Microsoft Excel Offloading.....................................................................................................................12
Development Guidance.............................................................................................................................13
Developing Parametric Sweep Applications..........................................................................................13
Migrating UNIX Applications..............................................................................................................15
Developing MPI Applications.................................................................................................................16
Developing SOA Applications.................................................................................................................18
Client Development...........................................................................................................................18
Setup and Configuration....................................................................................................................20
Developing Excel UDFs..........................................................................................................................21
Debugging HPC Applications..................................................................................................................21
Data Guidance...........................................................................................................................................23
Windows Azure Data Stores..................................................................................................................23
Windows Azure Storage....................................................................................................................23
SQL Azure..........................................................................................................................................24
Windows Azure Caching....................................................................................................................24
Content Delivery Network (CDN).......................................................................................................24
Moving Data to the Cloud......................................................................................................................24
Choosing a Storage Type...................................................................................................................25
Deciding When to Move Data............................................................................................................26
Uploading and Accessing Data...........................................................................................................30
Working with Mixed Nodes...............................................................................................................35
Using Static Data................................................................................................................................35
Outputting Results.................................................................................................................................36
Returning Results from SOA Applications..........................................................................................36
Setup and Deployment..............................................................................................................................37
Setting Up Windows Azure Nodes.........................................................................................................37
Understanding the Effects of Node Actions on Windows Azure Nodes.............................................38
Using Cloud-only Clusters with the Windows Azure HPC Scheduler..................................................40
Deploying Your Applications..................................................................................................................41
Deploying to Windows Azure Nodes.................................................................................................42
Mixed Deployment............................................................................................................................43
Windows Azure HPC Scheduler Deployment.....................................................................................43
Submitting Jobs.....................................................................................................................................44
Using HPC Cluster Manager...............................................................................................................44
Submitting Jobs from the Command Prompt....................................................................................45
Creating Jobs from Code....................................................................................................................45
Submitting Jobs with the Windows Azure HPC Scheduler.................................................................45
Conclusion.................................................................................................................................................47
Additional References...............................................................................................................................48

Introduction
High-Performance Computing (HPC) is not a new idea, but the cost and complexity of creating and maintaining HPC clusters have thus far confined HPC to the scientific and industrial communities.
Windows HPC Server 2008 R2 (the successor to Windows Compute Cluster Server 2003 and Windows HPC Server 2008) removes these limitations by providing a more extensible and manageable HPC environment. Windows HPC Server 2008 R2 simplifies the task of running computational algorithms in parallel on a cluster, and supports computations that run as executable files, Microsoft Excel user-defined functions (UDFs), or Windows Communication Foundation (WCF) services based on the service-oriented architecture (SOA) design principles.
Planning for an HPC cluster involves several decisions, including how many servers to buy to support the intended workload. Today, when businesses plan their HPC cluster, they must look at their peak scenarios. For example, a financial service company might build a cluster with several hundred servers, but while some of these servers will be used for day-to-day tasks, most will remain dormant until the time comes to prepare monthly or annual reports and computational demands reach their peak. In addition, as computational demands increase, new servers will need to be purchased and deployed. This and similar scenarios demonstrate one of the largest problems businesses face when planning and building HPC clusters: the high cost of maintaining a large number of servers that are not kept busy because they support a cyclical or irregular workload.
To address this problem, Windows HPC Server 2008 R2 supports the Windows Azure burst scenario as of Service Pack 1. Windows Azure provides on-demand access to computational resources and storage. With Windows HPC Server 2008 R2, currently at Service Pack 3, you can supplement your on-premises cluster as needed by deploying additional Windows Azure nodes. This solution allows businesses to maintain a minimal HPC cluster on-premises that is sufficient for the daily workload; during times of peak usage, administrators can temporarily provision additional computing resources in the Windows Azure cloud. The Windows Azure burst scenario offers a new approach to deploying, using, and paying for computing resources.
Combining Windows HPC Server 2008 R2 SP3 and Windows Azure provides the following benefits:
Pay-as-you-go: avoiding the up-front cost of setting up a large cluster.
Cluster elasticity: the ability to scale up and down according to the application’s needs.
If you do not require an on-premises cluster, you may rely solely on Windows Azure for your HPC cluster using the Windows Azure HPC Scheduler. The Windows Azure HPC Scheduler enables the creation of an HPC cluster entirely in Windows Azure by providing all the necessary components, such as an HPC Job Scheduler, a management web portal, and HPC management tools, thus allowing you to move your entire workload to Windows Azure, and freeing you from having to manage on-premises servers.
This document walks you through the major considerations and decisions when developing an HPC application that utilizes Windows Azure worker roles. We will discuss the types of HPC applications that

are suitable for deployment into the cloud, see how to debug HPC applications locally during development and remotely on the HPC cluster, and explain ways that are available to transfer data between the local HPC cluster and the cloud-provisioned computing nodes.
For an overview of the use of Windows HPC Server with Windows Azure, see the Windows HPC Server and Windows Azure white paper.
To gain a better understanding of how the Windows Azure platform works, see the Introduction to the Windows Azure Platform article on MSDN.

HPC Application Models in the Cloud
Windows HPC Server 2008 R2 SP3 supports several job types that can be used in Windows Azure integration scenarios. Each job type has its own set of properties, tools, and APIs that provide development and deployment models. The following application models are supported in Windows HPC Server 2008 R2 SP3 when working with Windows Azure:
Parametric sweep
MS-MPI (Microsoft Message Passing Interface)
SOA applications
Microsoft Excel offloading
Parametric Sweep
Parametric sweep provides a straightforward development path for solving delightfully parallel problems on a cluster (sometimes referred to as “embarrassingly parallel” problems, which have no data interdependencies or shared state precluding linear scaling through parallelization). For example, prime numbers calculation for a large range of numbers. Parametric sweep applications run multiple instances of the same program on different sets of input data, stored in a series of indexed storage items, such as files on disk or rows in a database table. Each instance of a parametric sweep application runs as a separate task, and many such tasks can execute concurrently, depending on the amount of available cluster resources, as shown in Figure 1. During execution, there are no interactions or dependencies between the different tasks.

Figure 1Parametric sweep application running as separate, independent tasks
When you submit a parametric sweep job to the cluster, you configure the command to run (the name of an executable file or a script file) and specify additional properties that define the input and output files, and the sweep index. Detailed information about creating a parametric sweep job can be found in the Define a Parametric Sweep Task TechNet article.
MS-MPI
Message passing interface (MPI) is a portable, platform-independent industry standard for messaging between compute nodes running intrinsically parallel applications. Intrinsically parallel applications are executables that run on multiple cores or nodes that have dependencies between them and need to communicate with each other, as shown in Figure 2. This is used, for instance, to pass intermediate results. Such applications can use MPI as a fast, powerful inter-process communication mechanism.
Figure 2Intrinsically parallel application model
The MPI specification is implemented in Windows HPC Server 2008 R2 by Microsoft’s MPI stack, also known as MS-MPI, which is based on the MPI2 standard. MS-MPI includes two parts: the APIs used in the program, and an application launcher, named mpiexec.exe, that controls the application’s execution in the cluster.
MPI applications can be written in many programming languages and on many platforms, including C/C++, Fortran 90, and Microsoft .NET (using MPI.NET). Visual Studio also supports remotely debugging MPI applications that use MS-MPI. Windows HPC Server 2008 R2 supports running both 32-bit and 64-bit MPI applications.
As shown in Figure 3, to enable fast communication between processes, MS-MPI uses shared memory for same-machine inter-process communication. For inter-process communication between machines, MS-MPI bypasses the standard Windows sockets (Winsock), by using NetworkDirect protocol, to enable Remote Direct Memory Access (RDMA). MS-MPI also supports high-bandwidth networks such as InfiniBand, and the standard Winsock protocol if NetworkDirect is not supported by the hardware.

Figure 3Network architecture for parallel programs
For detailed information on using MS-MPI in HPC clusters, refer to the paper Windows HPC Server 2008 - Using MS-MPI.
SOA Applications
Service-oriented architecture (SOA) is an architectural style designed for building distributed systems. The SOA actors are services: independent software packages that expose their functionality by receiving data (requests) and returning data (responses). SOA is designed to support the distribution of an application across computers and networks, which makes it a natural candidate for scaling on a cluster. For example, a service on the cluster can receive a string representing a sequence of DNA, and check it against the NCBI (National Center for Biotechnology Information) DNA database. Taking a large string of DNA, splitting it to smaller pieces, and sending each piece to a different service in the cluster can shorten the time it takes to search for matching DNA fragments.

The SOA support provided by Windows HPC Server 2008 R2 is based on Windows Communication Foundation (WCF), a .NET framework for building distributed applications. Windows HPC Server 2008 R2 SP3 improves SOA support by hosting WCF services inside Windows Azure nodes, in addition to on-premises nodes.
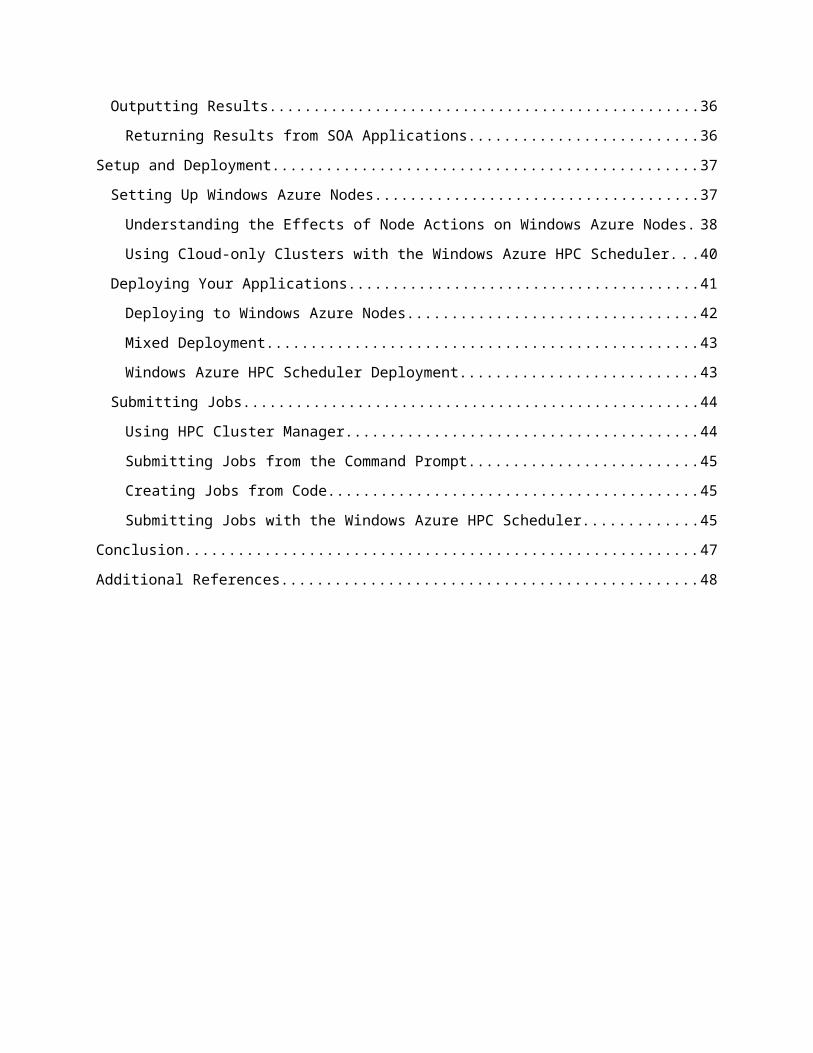
In a SOA scenario, a client application creates a session with the cluster. The client’s session is a job that the job scheduler uses to load the service into the cluster, as shown in Figure 4. When creating a session, the client specifies the head node name and the service name, and can include additional data such as the job template to be used, the priority level, and the resource requirements. The initiating job’s service task includes a command to start the service host and load the service on each of the target compute nodes. After the services have been loaded into each node, the client sends requests to them through a designated broker node which acts as a load balancer and routes the service requests according to the nodes’ availability.
Figure 4Running a SOA application
Windows HPC SOA applications can return results from compute nodes in two different ways:
Interactive. The compute node uses the WCF request-response message exchange pattern to return a result through the broker node back to the calling client when a service call completes.
Durable. The client delivers the request asynchronously through the broker node, and can then disconnect from the job and leave it running. When the service completes a call, it sends the response to the broker node which stores it in a Message Queuing (also known as MSMQ) queue. Clients can reconnect to the job and retrieve the results at any time after the work completes.

Microsoft Excel Offloading
The execution of compute-intensive Microsoft Excel workbooks with independent calculations can be sometimes scaled using a cluster. Consider for example a Microsoft Excel workbook that calculates the prices for a large number of Monte Carlo simulations for a range of stocks over a long period of time. The Windows HPC Server 2008 R2 SP3 integration with Windows Azure supports two types of Excel calculation offloading to the cluster:
User Defined Functions (UDFs) offloading. Excel workbook calculations that are based on UDFs defined in an XLL file can be installed on the cluster’s nodes (on-premises and/or Windows Azure nodes). With the XLL installed on the cluster, the user can perform the UDF calls remotely on the cluster instead of locally on the machine where the Excel workbook is open.
WCF service calls. The Excel workbook can call a WCF service in the cluster, masquerading as a standard SOA client application. You can construct this kind of Excel workbook using Visual Studio Tools for Office (VSTO), a .NET extensibility framework for Microsoft Office applications.
Development Guidance
This section covers the basics of how to develop an HPC application with Windows HPC Server 2008 R2 Service Pack 3 for a Windows Azure worker node. As discussed in the preceding section, there are several application models to choose from, a choice that affects the configuration, deployment, and execution of an application.
When designing or porting an HPC application to Windows Azure worker nodes, you need to take into consideration some restrictions which do not apply to on-premises nodes, including:
You cannot rely on continuous machine availability for the duration of the jobs’ execution. Failures and state handling should be managed accordingly.
Local storage on the machine is not durable. If a Windows Azure node is reimaged due to some problem, the local storage will be lost. Local storage can be used for volatile data, but durable data should be stored in external sources, such as Windows Azure storage or SQL Azure.
You cannot directly access Windows Azure nodes using techniques commonly available within an enterprise network cluster, such as using SMB, or send a service request directly to a WCF service running in a specific Windows Azure node.
You will choose the application model for your HPC application during its initial design phase. Depending on your choice of application model, the general development steps include the following:
Parametric sweep model. Build an executable, deploy it to the cluster, and then create a job that calls it repeatedly using an index parameter.
MPI model. Build an executable that uses MS-MPI, deploy it to the cluster, and then create a job that runs mpiexec.exe to launch and control your executable.
SOA model. Build a WCF service, deploy it to the cluster, and then build a client application that sends requests to the service and handles its responses.
Excel UDF model. Build a cluster-enabled Excel user-defined function, deploy it to the cluster, and then call it from an Excel workbook.
Developing Parametric Sweep Applications
Parametric sweep is very straightforward: compile an executable that receives an index parameter, use this parameter to access the input data, perform the actual processing, and output the result to storage that is accessible to the clients.
A parametric sweep job can be submitted by providing the executable to run, as well as the index range and step increment. The sweep index parameter is passed directly to the executable as a command-line argument.
Any programming language that can run on a worker node can be used to build this type of application. It can be a C/C++ executable, a .NET console application, or even a batch command.
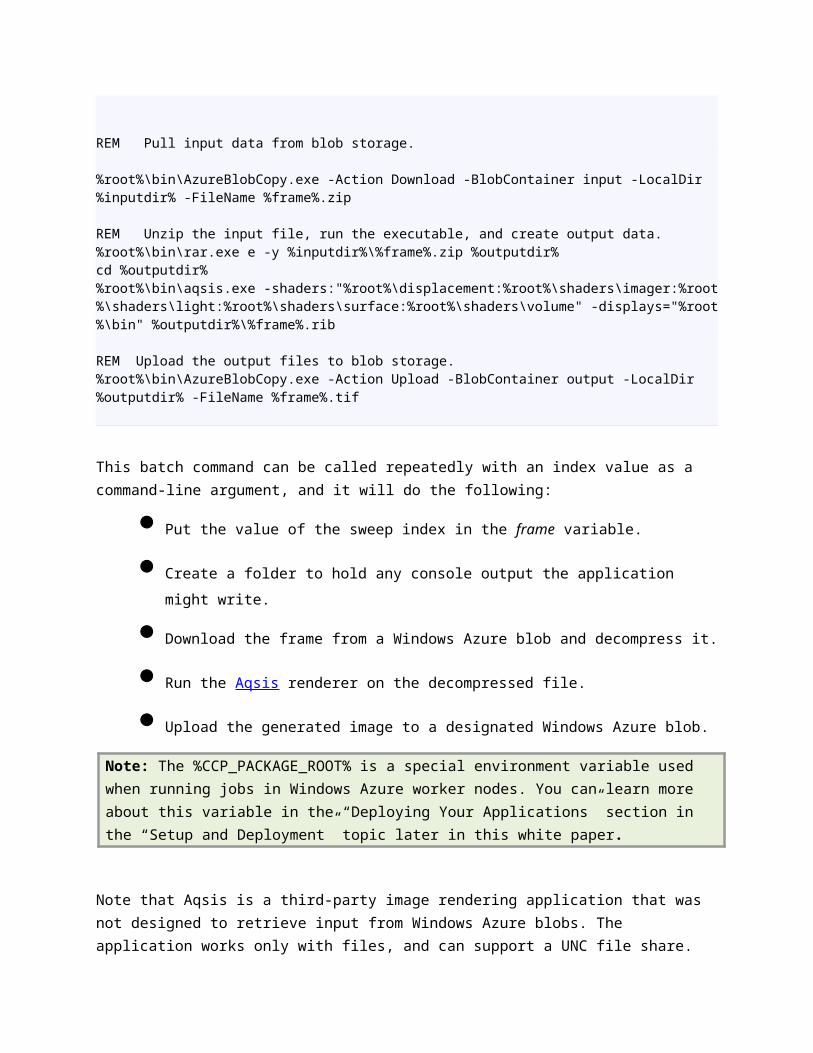
The following example illustrates a batch command that can be called for each step of the sweep. The example assumes pre-deployment of a Windows Azure service package to the Windows Azure nodes. The package includes utilities such as rar.exe to zip the files and AzureBlobCopy.exe (these utilities are not part of the Windows HPC product).
RunAqsisRenderer.cmd
REM Use the input parameter as a frame index.set frame=%1
REM Setup the executable, input, and output folders.set root=%CCP_PACKAGE_ROOT%\Aqsisset inputdir=%CCP_WORKDIR%\%CCP_JOBID%\%CCP_TASKID%\inputset outputdir=%CCP_WORKDIR%\%CCP_JOBID%\%CCP_TASKID%\outputif not exist %inputdir% mkdir %inputdir%if not exist %outputdir% mkdir %outputdir%
REM Pull input data from blob storage. %root%\bin\AzureBlobCopy.exe -Action Download -BlobContainer input -LocalDir %inputdir% -FileName %frame%.zip
REM Unzip the input file, run the executable, and create output data.%root%\bin\rar.exe e -y %inputdir%\%frame%.zip %outputdir%cd %outputdir%%root%\bin\aqsis.exe -shaders:"%root%\displacement:%root%\shaders\imager:%root%\shaders\light:%root%\shaders\surface:%root%\shaders\volume" -displays="%root%\bin" %outputdir%\%frame%.rib
REM Upload the output files to blob storage.%root%\bin\AzureBlobCopy.exe -Action Upload -BlobContainer output -LocalDir %outputdir% -FileName %frame%.tif
This batch command can be called repeatedly with an index value as a command-line argument, and it will do the following:
Put the value of the sweep index in the frame variable.
Create a folder to hold any console output the application might write.
Download the frame from a Windows Azure blob and decompress it.
Run the Aqsis renderer on the decompressed file.
Upload the generated image to a designated Windows Azure blob.
Note: The %CCP_PACKAGE_ROOT% is a special environment variable used when running jobs in Windows Azure worker nodes. You can learn more about this variable in the “Deploying Your Applications” section in the “Setup and Deployment” topic later in this white paper.
Note that Aqsis is a third-party image rendering application that was not designed to retrieve input from Windows Azure blobs. The application works only with files, and can support a UNC file share. To use it on a Windows Azure worker node, an instruction file (a .rib file) is downloaded from a Windows Azure blob container to the local storage of the node. To save storage space and download bandwidth, the instruction file is stored in the blob container in compressed form.
Note: The AzureBlobCopy C# source code can be found in the samples accompanying this paper.
After the application completes its execution, the resulting image is uploaded from the node’s local storage to another blob for further processing. For example, a client application can create a movie from the generated TIFF images.
Note: The need to download input data to the Windows Azure node, and to upload the result of the computation, must be addressed carefully when working with HPC clusters that contain on-premises nodes along Windows Azure nodes. This issue is discussed in detail in the “Data Guidance” topic below.
If your parametric sweep application requires any other resources, such as a C/C++ external DLL or a referenced .NET assembly, make sure you add it to the application’s deployment package. (For further information about creating deployment packages, see the “Deploying Your Applications” section in the “Setup and Deployment” topic later in this water paper.) To find which DLLs are required by your application, you can use tools such as Dependency Walker (in Profile mode), RedGate .NET Reflector, and the Sysinternals Process Explorer.
Migrating UNIX Applications
Some parametric sweep applications running on UNIX systems and written in C/C++ can be migrated to run under Windows HPC Server 2008 R2 and on Windows Azure.
There are several reasons to port an application from UNIX to Windows, for example, to allow the new components to be reused by other applications compiled for Windows, and to enable existing complex algorithms written for UNIX to run on Windows HPC Server clusters.
The UNIX Custom Application Migration Guide will provide you with a good understanding of what is required to port your application to Windows. You can also refer to the website UNIX to Windows Porting Dictionary for HPC. Note that the porting process will likely include a recompilation of your application. To compile the application’s source code for Windows, you can use Microsoft’s C++

compiler, Intel’s C++ compiler, or the PGI compiler. You can also use the open-source MinGW cross-compiler suite which uses GCC to compile Windows applications.
Developing MPI Applications
Intrinsically (non-embarrassingly) parallel applications that use MPI are not that easy to create. When creating such applications you need to plan how to decompose your algorithm, how to spread the data between processes, and how to gather the partial calculations.
MPI-based applications usually go through the following steps:
1. Get information about the cluster size (number of nodes), and the ID (rank) of the current node.
2. Spread (scatter) the data between the nodes.
3. Run the algorithm on the current data.
4. Gather the intermediate results into one of the nodes.
5. If required, perform steps 2-4 again.
6. Complete the algorithm using the intermediate results.
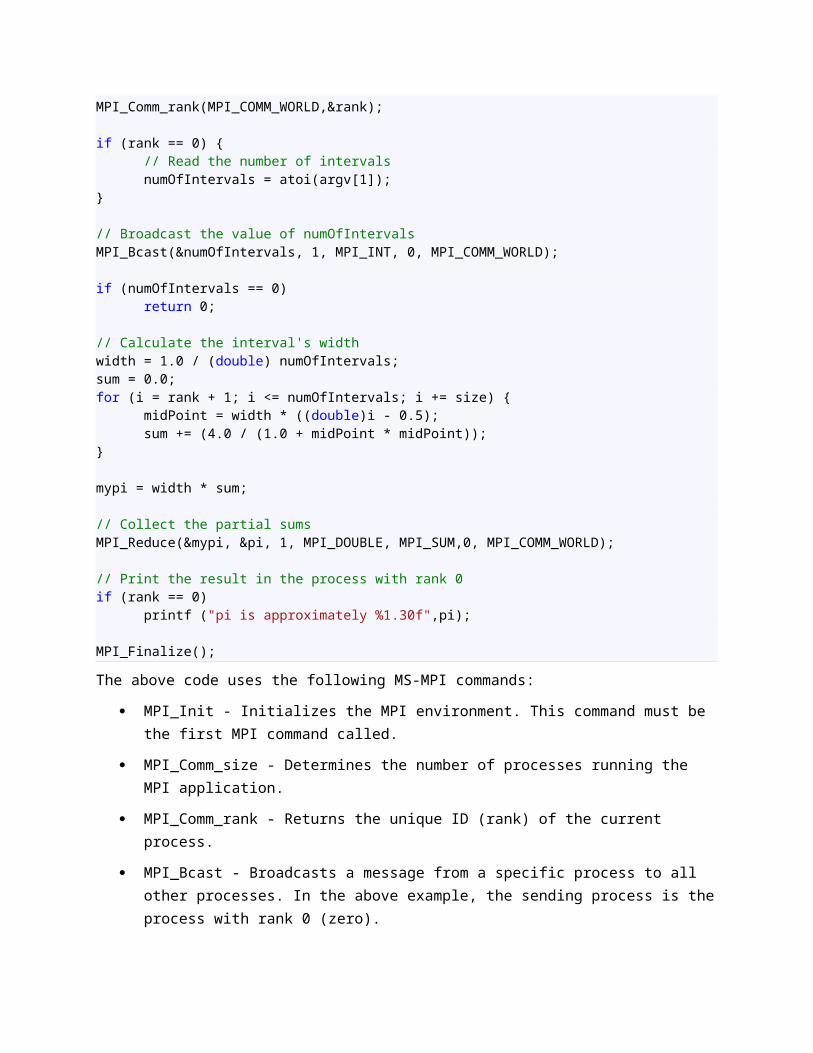
Although MS-MPI includes over 160 APIs, you will probably need to use no more than a dozen or so to write your applications. The following code demonstrates how to use MPI with C++ to calculate the value of pi (π):
C++
int numOfIntervals, rank, size, i; double mypi, pi, width, sum, midPoint;
MPI_Init(&argc, &argv); MPI_Comm_size(MPI_COMM_WORLD,&size);MPI_Comm_rank(MPI_COMM_WORLD,&rank);
if (rank == 0) {// Read the number of intervalsnumOfIntervals = atoi(argv[1]);
}
// Broadcast the value of numOfIntervalsMPI_Bcast(&numOfIntervals, 1, MPI_INT, 0, MPI_COMM_WORLD);
if (numOfIntervals == 0)return 0;
// Calculate the interval's widthwidth = 1.0 / (double) numOfIntervals; sum = 0.0;
for (i = rank + 1; i <= numOfIntervals; i += size) { midPoint = width * ((double)i - 0.5); sum += (4.0 / (1.0 + midPoint * midPoint));
}
mypi = width * sum;
// Collect the partial sumsMPI_Reduce(&mypi, &pi, 1, MPI_DOUBLE, MPI_SUM,0, MPI_COMM_WORLD);
// Print the result in the process with rank 0if (rank == 0)
printf ("pi is approximately %1.30f",pi);
MPI_Finalize();
The above code uses the following MS-MPI commands:
MPI_Init - Initializes the MPI environment. This command must be the first MPI command called.
MPI_Comm_size - Determines the number of processes running the MPI application.
MPI_Comm_rank - Returns the unique ID (rank) of the current process.
MPI_Bcast - Broadcasts a message from a specific process to all other processes. In the above example, the sending process is the process with rank 0 (zero).
MPI_Reduce - Collects data from all processes to a single process, and performs a reduction operation on the data. In the above example, all processes send their mypi variable to the process with rank 0 (zero); the data is summed and the value is placed in the pi variable.
MPI_Finalize - Terminates the MPI environment. No MPI commands can follow this command
For a more comprehensive list of MPI commands, refer to the Message Passing Interface (MPI) tutorial.
After you build your application and deploy it to the cluster, you can run it by creating a basic task in your job scheduler, which calls the mpiexec.exe command to host and control your MPI application. For example, the following command line runs the pi calculator with a million iterations on all available cores in the cluster:
CMD
mpiexec c:\app\piCalculator\piCalculator.exe 1000000
Refer to mpiexec on TechNet for more information on the command and its parameters.
Developing SOA Applications
In contrast to parametric sweep applications, where there is no interactive response mechanism to a client application, HPC can provide an execution mechanism for interactive SOA applications by harnessing WCF.

One of the benefits of running WCF services on a Windows HPC Server cluster is that in most cases, no changes need be made to the service code. However, because of the environment transition, the client and service configuration files have to be modified.
You create a SOA client that communicates with a WCF service running on an HPC cluster using the Microsoft.Hpc.Scheduler.Session namespace; some additional enumerations and types are in the Microsoft.Hpc.Scheduler.Properties namespace. Both namespaces can be found in the similarly named assemblies installed as part of the HPC Pack 2008 R2 SDK with Service Pack 3.
Client Development
Windows HPC Server 2008 R2 SP3 supports two client models:
Interactive SessionsInteractive sessions use a request-response message exchange pattern to execute service tasks on the cluster’s compute nodes. To start an interactive session, use the CreateSession static method of the Session class and create a WCF proxy using the EndpointReference property as the endpoint address. If necessary, multiple sessions can be orchestrated at one time using the WCF asynchronous invocation pattern.
C#
var info = new SessionStartInfo("HeadNodeName", "ServiceName");
// Configure session properties using the SessionStartInfo// ...
Session session = Session.CreateSession(info);
var client = new MyServiceClient(new NetTcpBinding(SecurityMode.None), session.EndpointReference);
client.BeginMyServiceOperation( (IAsyncResult ar) => { var result = client.EndMyServiceOperation(ar); // Process the computation’s result // ... });
Note: When initializing the client proxy, you must use the netTcp binding. Other bindings, such as basicHttp binding, are not supported.
Durable Sessions Durable sessions should be used for long-running tasks. A durable session ensures higher reliability and does not fail if the client disconnects from the cluster during task execution. When using durable sessions, all messages are delivered through the broker node, which persists them to an MSMQ queue. When the service task completes, the response is delivered

to the broker node and becomes available for retrieval. Thus, every durable task invocation has two parts:
◦ RequestBefore sending a request to the service, a durable session must be created using the DurableSession.CreateSession static method. To communicate with the broker node, use the BrokerClient<T> generic class, where T is the type of your service contract. The broker client uses message contracts to communicate with the broker node, so a request message class that uses the message contract attributes (i.e., the MessageContract and MessageBodyMember attributes) must be created. Requests can be delivered to the broker using the BrokerClient.SendRequest method.
C#
var info = new SessionStartInfo("HeadNodeName", "ServiceName");
// Configure session properties using the SessionStartInfo// ...
using (Session session = DurableSession.CreateSession(info)){ NetTcpBinding binding = new NetTcpBinding(SecurityMode.None); using (var client = new BrokerClient<IMyService>(session, binding)) { var request = new MyServiceRequestMessage(param1, param2); client.SendRequest<MyServiceRequestMessage>(request); }}
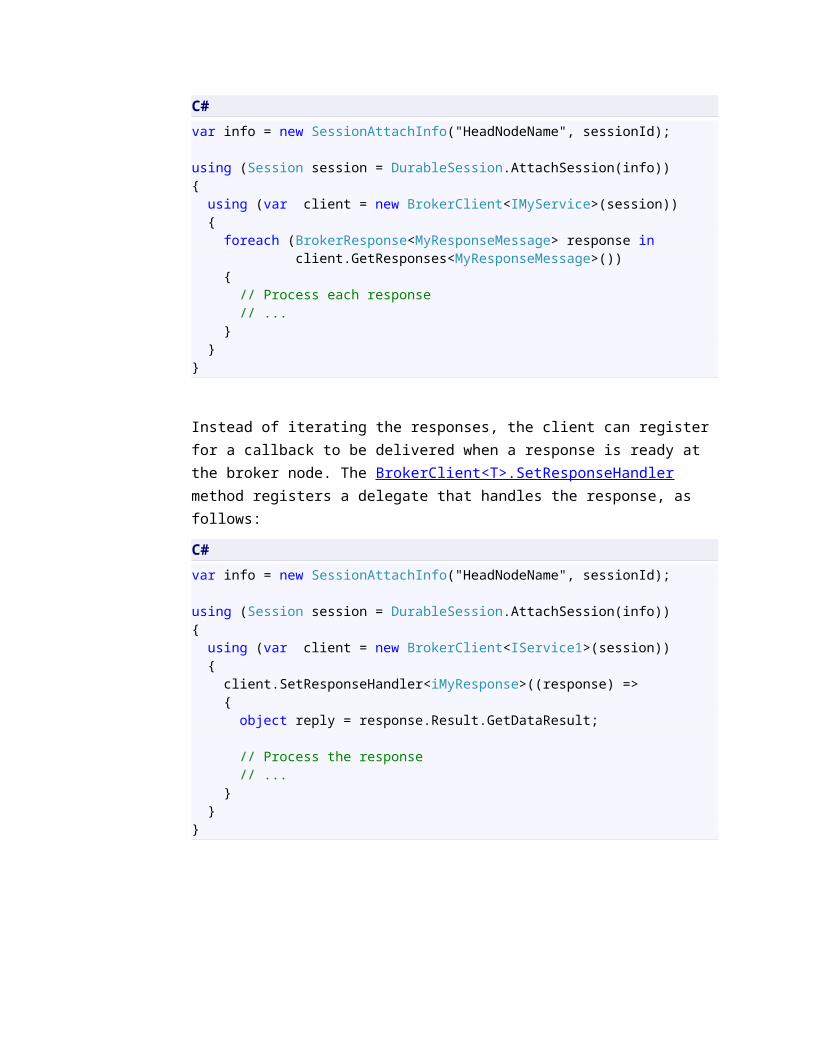
◦ ResponseTo retrieve the response, the client uses the same instance of the DurableSession class (if it is still in scope), or attaches a new durable session object it to an existing durable session using the DurableSession.AttachSession static method. Only the head node’s name and the session identifier are required to reattach the session.
C#
var info = new SessionAttachInfo("HeadNodeName", sessionId);
using (Session session = DurableSession.AttachSession(info)){ using (var client = new BrokerClient<IMyService>(session)) { foreach (BrokerResponse<MyResponseMessage> response in client.GetResponses<MyResponseMessage>()) { // Process each response
// ... } }}
Instead of iterating the responses, the client can register for a callback to be delivered when a response is ready at the broker node. The BrokerClient<T>.SetResponseHandler method registers a delegate that handles the response, as follows:
C#
var info = new SessionAttachInfo("HeadNodeName", sessionId);
using (Session session = DurableSession.AttachSession(info)){ using (var client = new BrokerClient<IService1>(session)) { client.SetResponseHandler<iMyResponse>((response) => { object reply = response.Result.GetDataResult;
// Process the response // ... } }}
Setup and Configuration
WCF services are hosted in the cluster’s compute nodes by a special service host utility named HpcServiceHost.exe, which sets the service’s endpoints automatically, so you don’t need to supply an app.config or web.config file when deploying the WCF service to the cluster’s nodes. However, since the HpcServiceHost utility needs to load your WCF service assembly, you need to create a special configuration file that specifies where to locate the service assembly and how to host the broker node. This configuration file has two special configuration sections:
microsoft.Hpc.Session.ServiceRegistration. Provides the configuration for registering the service with an HPC cluster: the assembly name and type name of the service, its contract, environment variables, and other WCF switches.
microsoft.Hpc.Broker. Configures monitoring and load balancing by the broker node.
More information about HPC WCF service configuration can be found in the TechNet article SOA Service Configuration Files in Windows HPC Server 2008 R2.
After creating the appropriate configuration, you can deploy the service to the HPC cluster. More information about service deployment can be found in the following TechNet articles: Deploy the SOA

Service DLLs to a Windows HPC 2008 R2 Cluster, and Upload a SOA service to a Windows Azure storage account.
Developing Excel UDFs
Excel UDFs are custom Excel functions stored in XLL files. XLL files, too, can be deployed to worker nodes, and then invoked from within Excel workbooks. When the UDF completes, its output is returned to the workbook for further processing. For further information and code samples on building Excel UDFs for a Windows HPC Server 2008 R2 cluster, please refer to the article Accelerating Excel® 2010 with Windows® HPC Server 2008 R2: Converting Cluster-Safe UDFs for Offloading to a Windows® HPC Cluster.
Debugging HPC Applications
Debugging parallel applications is always a challenge, and the challenge is even bigger in a complex environment like a Windows HPC Server cluster. Fortunately, Visual Studio can be used to debug HPC applications in both the local development fabric and the remote cluster environment:
Local debugging. Debugging an HPC application on the local machine is very important during the service development phase. Because it is very expensive to provide each developer with a private development cluster, a local HPC environment can be simulated.
Cluster debugging. Debugging an HPC application on the remote cluster is important in later stages of the application’s life cycle, such as integration, QA, staging, and production.
There are two add-ons for debugging HPC applications in Visual Studio:
C# Cluster-SOA DebuggerThis debugger allows both local and cluster debugging, as well as advanced features like stepping into server code from the client and simulating Windows Azure nodes locally. The SOA debugger also adds two project templates to Visual Studio to ease the development of interactive and durable session clients.More information about C# Cluster-SOA Debugger can be found in the MSDN article Debugging a Durable Session Client on a Windows HPC 2008 R2 Cluster Walkthrough.
MPI Cluster DebuggerThis debugger supports debugging MPI applications executed on the cluster (on-premises nodes only) by extending the Visual Studio Remote Debugger functionality. This debugger also includes a project template for C/C++ MPI programs.More information about the MPI Cluster Debugger can be found in the Debugging MPI Applications on an HPC Cluster article on the MSDN.

Data Guidance
The Compute, Web, and VM roles are evidence of Windows Azure’s power as a Platform as a Service (PaaS) offering. The Windows Azure Storage, Database, and Caching features make Windows Azure a complete solution. Independently from the Windows Azure roles, the storage mechanisms facilitate storing and managing data in the cloud. This data can be stored and retrieved by Windows Azure roles and non-Azure applications by using a variety of APIs, from direct URIs to .NET API calls.
A primary concern for distributed applications is the marshaling of data between services, and Windows Azure HPC applications are no different. Architects need to manage the tension between properly structuring the service and minimizing network traffic and bandwidth utilization. This concern is even more acute when dealing with complex topologies such as hybrid on-premises and Azure applications.
Windows Azure Data Stores
To understand Windows Azure data storage, we need to review the different options available for storing data in the cloud.
Windows Azure Storage
Windows Azure Storage provides several types of storage mechanisms:
Blobs
Blobs contain large binary data such as images, videos, or executable files. Blobs reside within containers that group files in a storage unit that can be scaled by Windows Azure to several servers, and serves as a security boundary.In Windows Azure there are two types of blobs:
Block blobs. Optimized for a large, streaming workload comprised of 4-megabyte blocks, identified by block IDs. Currently there is a limit of 50,000 blocks per blob, resulting in a total maximum size of 200 GB. Block blobs are suitable for uploading small-to-large objects, where updates are usually based on replacing the existing object with an updated instance of the object.
Page blobs. Divided into 512-byte pages and optimized for random read/write access. Currently there is a limit of 1 TB per page blob. Page blobs are recommended when uploading large files that can be updated in random positions (like editing a file on a local drive).
You specify which type of blob to create by calling the PutBlob operation. After creating the blob its type cannot be changed, and further updates can be performed only by the operation appropriate for that blob type—PutBlock and PutBlockList for a block blob, and PutPage for a page blob.

Tables
Windows Azure tables are a scalable and flexible mechanism for storing structured entities, such as a list of stock quotes, or a list of temperatures measured in several locations during a period of time. A table entity is identified by two properties: a “RowKey” to identify its row, and a “PartitionKey” to group related entities when Windows Azure scales the table automatically across several servers in the data center.
Queues
Queues are different from blobs and tables, and provide a persistent messaging mechanism, originally designed to allow communication between web roles and worker roles. In HPC applications, queues can be used to store sets of work waiting to be processed by the cluster’s compute nodes (on-premises and in Windows Azure).
SQL Azure
SQL Azure is the cloud-enabled version of Microsoft SQL Server. It provides the ability to store, manage, and consume complex relational data. SQL Azure has a growing list of features, including transactions, indexing, partitioning, failover, and ETL support. Unlike the on-premises version of SQL Server that has an almost infinite size support (around 500,000 terabytes), SQL Azure imposes a database size limitation determined by a database model. After choosing the database model at the time of creation, its size cannot be changed.
Windows Azure Caching
Windows Azure Caching (formerly called AppFabric Cache) is a distributed in-memory cache facility that can store commonly accessed and infrequently changed data in memory. It provides a high-performance, scalable, and safe data store for any DataContract-serializable object.
You can find more information about each storage type, its usage, and its limitations in the TechNet article Understanding Data Storage Offerings on the Windows Azure Platform.
Content Delivery Network (CDN)
Windows Azure provides a way to move data physically closer to the end user by caching files on local sites. When CDN is enabled, the first request to access a file will trigger a background copy to the closest CDN site while the file is retrieved. Subsequent accesses will contact a geographically closer server, reducing latency and overall load on the central servers. There are currently 24 physical nodes on five continents.
Moving Data to the Cloud
Of the different types of jobs that can run on an HPC cluster, a distinction can be made between jobs that require data for their operation and jobs that require minimal data or no data at all. For example, a
parametric sweep job that looks for large prime numbers needs only to send each worker node a numeric value indicating the search range (the parametric sweep index). An image-rendering job, however, would require each worker node to receive an image for processing, usually represented as a large byte array.
Note: This topic discusses the HPC application input data. For information about working with output data generated by HPC applications, please see the “Outputting Results” topic below.
When working with on-premises worker nodes that have local access to their input data, e.g., by using file servers or an RDBMS, usually passing data to the application is less of an issue because HPC cluster networks are very fast, especially when using InfiniBand technology. When Windows Azure worker nodes are added to your cluster, the location of your data becomes an issue. Accessing local storage from Windows Azure nodes might pose a problem when it comes to firewalls, bandwidth, and concurrency, particularly when scaling the nodes.
In some cases, it suffices to pass the data directly to the HPC application from the client application; for example, you can create a SOA application that receives a request object (data contract) containing all the necessary input data. Although this solution is fine for some applications, others might need a more robust solution. An image-rendering application, for instance, might use the same images in every job, changing only the type of rendering to perform. Data-centric applications might need to work with large data sets. If this kind of application is run on Windows Azure nodes, it might be advisable to migrate the data to Windows Azure storage and let the on- and off-premises nodes access it repeatedly, rather than marshal the data for every application execution.
Windows Azure storage mechanisms try to bring the data as close to the worker machines as possible by storing it in the same data center. Because communication inside the data center is much faster than an Internet connection, this significantly reduces the time spent on network transfers.
Choosing a Storage Type
When working with Windows Azure storage, you have the choice of numerous storage types: blobs, tables, queues, SQL Azure, and Windows Azure Caching. The abundance of storage types can sometimes make it difficult to determine which is most suitable for your application’s data. When looking for the appropriate storage type, the following should be taken into consideration:
The type of data. The data that needs to be handled by the HPC application can determine the type of storage to use:
◦ Structured. When handling structured data—for example, when working with an Excel worksheet in which each row is sent to a different node—you might want to store the data in structured storage in advance so you don’t have to handle serialization or encoding at runtime. Windows Azure tables can store structured data and make it easy to upload data into a table for later use.

◦ Non-structured. When using non-structured data, such as numbers or strings, you can directly send these values to the application without preliminary storage. For example, this is useful in parametric sweep jobs that search for prime numbers. However, if you need to store these values prior to running the job—e.g., if you intend to run the application several times on the same data—you can use Windows Azure tables with a table that contains a single value (a number, string, date, etc.). If the application is only run once but you want to prepare the non-structured data in advance to minimize computational latency, you might want to use queues.
◦ Binary. Binary data, especially large binary data, is more suitable for storage in blobs since tables and queues have a size limitation imposed by their design. If you have structured data with less than 64 KB of binary data, you can choose among blobs (with metadata), tables, or even queues.
◦ Entities with relations. If you have structured data that contains relations (foreign keys) required for your processing, you will need to store the data in a SQL Azure database for entity-relational navigation.
Size limitations. Each Windows Azure storage type has its limitations. For example, queues are limited to objects less than 8 KB in size, tables can contain rows with up to 255 properties, and blobs are limited according to their type (block or page).
Performance. The various storage types have different throughput performance, depending on parameters such as download vs. upload being dominant, one reader vs. multiple concurrent readers, typical transfer size, latency requirements, and so forth. After choosing a storage type, you should test it while changing various parameters to see if it operates within reasonable bounds.Azurescope benchmarks offers several test cases for various storage types, such as blobs, tables, and queues, that you can refer to when planning your throughput testing.
Pricing. The various storage types in Windows Azure have different pricing strategies. Some charge according to the size of the data you store or plan to store, while others charge according to the number of transactions you make when uploading and downloading the data. Additional pricing considerations are discussed in the following section, “Deciding When to Move Data”.
After deciding which storage type to use, you need to upload your data to that storage and then build your application to pull data from that storage. Changing your decision midway is nontrivial and should not be taken lightly.
Deciding When to Move Data
Moving your application data to Azure storage is not always the best solution, and oftentimes it might not even be possible. Issues such as pricing, sensitivity of data, and government regulations can affect the decision to upload your data. For example, Germany and the UK have regulations that prohibit the storing of financial and government information outside the boundaries of the country.

The following checklist can help you assess whether or not you should upload your data to Windows Azure, and if so, what data to upload:
Data sensitivity. Does the data need to be encrypted? Should it be accessible only with certain credentials? Does the storage type you’ve chosen support that type of authentication and security?
Regulations. Are you legally permitted to place the data in Windows Azure storage? Are there any restrictions that require you to use a specific data center or limit the volume of data that can be stored outside of the organization?
Amount of data. How much data (for example, MB, GB, TB) do you need to upload? Can the upload be done in a reasonable amount of time?
Data updates. Do you need to keep the data in Windows Azure after completing the job? Do you need to synchronize the data with a local copy?
System topology. Where are the majority of your compute nodes located—on-premises or in the cloud? If you only have a small number of nodes in the cloud, perhaps you can make do without storage by copying some of the data locally to each node before running the job.
Performance is another major issue that needs to be taken into account when deciding whether or not to move data into the cloud. If you upload your data to the cloud and store it in Windows Azure storage, your Windows Azure compute nodes will be able to reach it more easily. At the same time, however, you will adversely affect the performance of your on-premises compute nodes, which will need to get their data from the cloud instead of using local data.
For example, consider the following scenario for an image-rendering application that needs to render 400 images where each frame is defined by a 25 MB rendering instruction file. When running such an application as a parametric sweep application, each node has to retrieve the instruction file from storage. The following questions should be raised:
How many on-premises nodes and Windows Azure nodes do you have?
How will you upload the files to the storage, manually or by script?
How will you utilize your network bandwidth to upload the files quickly?
If changes occur in the files later, how will you update the storage?
To answer these questions you need to understand the factors that can affect the overall performance of your cluster when it comes to using data from the cloud:
The distribution of on-premises nodes and Windows Azure nodesIf most of your nodes are on-premises and you only have a few nodes in Windows Azure, you might not want to move the entirety of your data to Windows Azure storage, but rather only the data you need for the current calculation. If possible, the Windows Azure nodes might be allowed access to the data on your local network, instead.On the other hand, if you’ve built a new cluster that uses only Windows Azure nodes, it is logical that you upload the required data to Windows Azure storage.

The size of your on-premises nodesIf your compute nodes (on-premises and in Windows Azure) have powerful CPUs with several cores, you might be able to build an application that takes advantage of the multiple cores (for example by using the .NET Framework 4 Task Parallel Library) and downloads large sets of data instead of having several applications each downloading a small piece of data. Using one connection to download large content can sometimes be faster than using several connections to download small chunks of data, owing to connection initialization, network routing, and authentication.
The number of nodes running concurrentlyThe more nodes you have and the more parallel operations these nodes perform, the more concurrent downloads there will be from storage. If all the nodes retrieve their data from the same physical storage, such as a blob container, and each download accesses different items in the storage, you will probably see a performance hit that increases the latency of each download.However, even as download latency increases, your overall throughput (work per second) can still improve due to better utilization of network bandwidth, as seen in Figure 5.
Figure 5Throughput test for downloading files (2-9 MB) by a varying number of Windows Azure nodes
Network bandwidthIf you plan to transfer a lot of data from your local network to Windows Azure storage or from Windows Azure storage to your on-premises nodes, the overall throughput of your data access will depend on your network and Internet bandwidth and on the location of your Windows Azure data center.
The use of local storageIf you plan to use a mix of local nodes and Windows Azure nodes accessing your local storage, you should consider its ability to scale. If your local storage is a small database that

cannot support a large number of concurrent users, you will end up spending resources on improving your local storage.
How you access your dataYou usually access Windows Azure storage using a storage API (described in the next section, “Uploading and Accessing Data”). There might be circumstances in which you can’t or don’t want to use the API, for example, if you want to implement a custom validation mechanism, or upload the data so that it is split among multiple physical storage containers. In these cases you might want to create a special Windows Azure web or worker role that will receive the data and perform further processing before placing it in storage. This overhead will usually have some effect on the overall performance of your data access strategy.
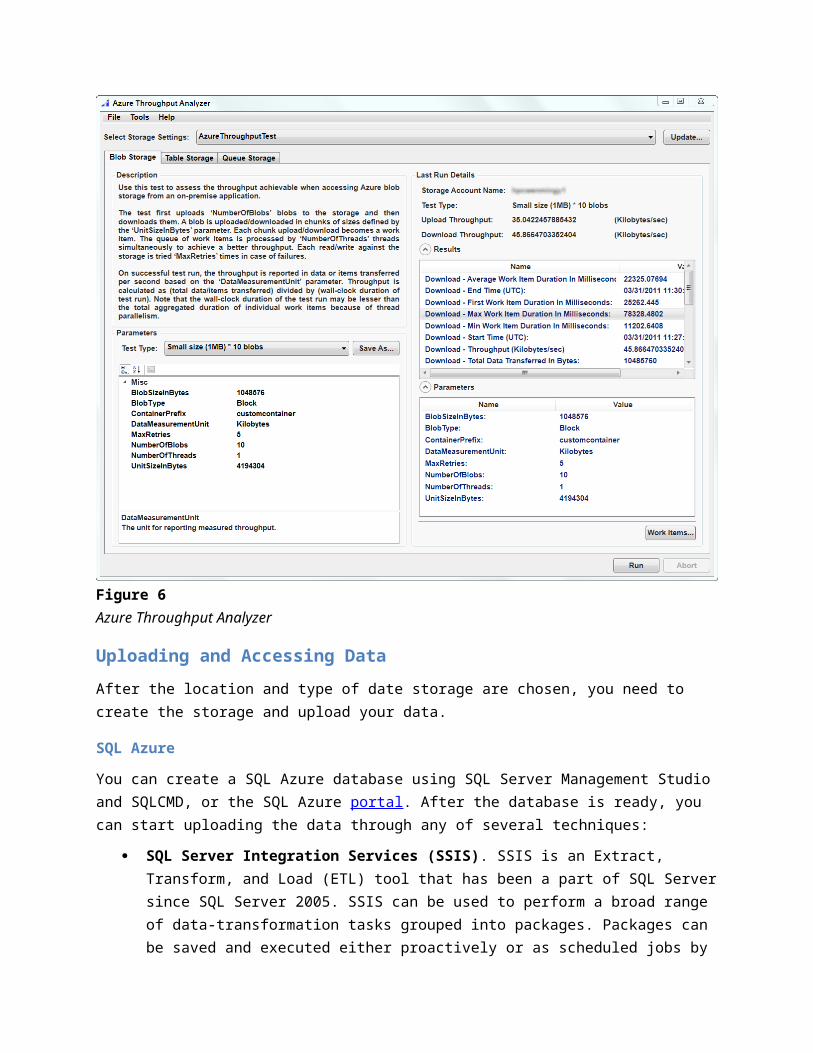
Since there are many factors that impact overall data access performance, it is recommended that you measure your upload and download throughput and latency in a variety of scenarios. These measurements will give you a better understanding of the influence of each of these factors and help you find the ideal combination for your needs. To measure the throughput of your on-premises nodes when accessing Windows Azure storage, you can use the Azure Throughput Analyzer. This tool allows you to load-test your storage (blob, table, and queue) with various data sizes and concurrency scenarios, as shown in Figure 6.

Figure 6Azure Throughput Analyzer
Uploading and Accessing Data
After the location and type of date storage are chosen, you need to create the storage and upload your data.
SQL Azure
You can create a SQL Azure database using SQL Server Management Studio and SQLCMD, or the SQL Azure portal. After the database is ready, you can start uploading the data through any of several techniques:
SQL Server Integration Services (SSIS). SSIS is an Extract, Transform, and Load (ETL) tool that has been a part of SQL Server since SQL Server 2005. SSIS can be used to perform a broad range of data-transformation tasks grouped into packages. Packages can be saved and executed either proactively or as scheduled jobs by the SQL Server agent. SSIS packages are prime candidates for uploading data to SQL Azure and supply ease of use, debugging capability, code reuse, and the ability to create a scheduled task that runs as part of the application’s life cycle. More information about using SSIS with SQL Azure can be found here.
ADO.NET applications. Connecting to SQL Azure resembles connecting to an on-premises database and can help reuse existing deployment code. Detailed instructions for connecting to an SQL Azure database can be found here.
WCF Data Services. WCF Data Services are a natural choice for cloud data access. They are built around Entity Framework. WCF Data Services provide a REST service API and a powerful querying model. Detailed instructions for using WCF Data Services with SQL Azure can be found here.
Sync Framework. SQL Azure Data Sync is a sync provider that allows automated synchronization of on-site SQL Server and SQL Azure databases. The Sync Framework Team maintains a blog that describes recent developments in SQL Azure Data Sync. They have put up recently a blog post about the latest Sync Framework Toolkit.
Windows Azure Storage
Windows Azure storage provides several tools and methods for loading and managing data. You can manage your data storage through code or by using free tools like Azure Storage Explorer, CloudBerry Explorer for Azure Blob Storage, and the https://www.myazurestorage.com website, which provides a helpful GUI for uploading and managing various Windows Azure storage types.
To upload data from code, Windows Azure provides two APIs:
A .NET API using classes in the Microsoft.WindowsAzure.StorageClient namespace. The following code creates a CloudStorageAccount object, needed to create clients for all storage types:
C#var key = new StorageCredentialsAccountAndKey( ConfigurationManager.AppSettings["StorageAccountName"], ConfigurationManager.AppSettings["StorageKey"]);
var account = new CloudStorageAccount(key, useHttps:false);
Using this account, it is possible to create storage-specific clients using extension methods defined in the CloudStorageAccountStorageClientExtensions class:
C#
// Blob clientCloudBlobClient blobClient = account.CreateCloudBlobClient(); // Table clientCloudTableClient tableClient = account.CreateCloudTableClient();
// Queue clientCloudQueueClient queueClient = account.CreateCloudQueueClient();
A REST service API that can be accessed directly or using classes from the Microsoft.WindowsAzure.StorageClient.Protocol namespace.
For example, the following request returns a list of the containers under the specified account:
Method Request URI HTTP Version
GET http://myaccount.blob.core.windows.net/?comp=list HTTP/1.1
This request can be executed using the following code:
C#
var context = new ListingContext(null,null);var request = ContainerRequest.List( new Uri(account.BlobEndpoint.AbsoluteUri), 0, context, ContainerListingDetails.None);
var response = request.GetResponse();var responseString = response.ToString();
Windows Azure Cache
Before using a Windows Azure cache, you need to create a unique name for it using the Windows Azure Platform Management Portal. To create a new cache, follow the steps in the MSDN article How to: Create a Windows Azure AppFabric Cache. After activating the cache, you can access it using the same

API used to access an on-premises Windows Server AppFabric Cache. More information about developing the Windows Azure cache client can be found in this MSDN article.
Working with Large Data and Bad Networks
When uploading a large amount of data, it is common to encounter problems with network connectivity and bandwidth. Transfers (both upload and download) can break for multiple reasons, resulting in lost data and even process failure.
Windows Azure storage has two different types of blobs: page and block. These differ in the way they store the data and manage access to it:
Block Blob. When you upload a block to Windows Azure using the PutBlock operation, it is associated with the specified block blob, but does not become part of the blob until you call the PutBlockList operation and include the ID of the block. The block remains in an uncommitted state until it is specifically committed by calling the PutBlockList method. Writing to a block blob always constitutes a two-step process.
Page Blob. Page blob operations must be done in 512-byte segments, and any writes to page blobs are immediately committed to the blob.
Speeding Up Uploads and Downloads
The block blob API supports parallel uploads of large data by splitting it into 4 MB chunks and uploading each chunk in parallel. The default number of threads used is defined by the thread pool, but you can change it by using the CloudBlobClient.ParallelOperationThreadCount property. The following example shows how to use this property to upload a large file using several threads:
C#
// Setup the connection to the Windows Azure StorageStorageCredentialsAccountAndKey key = new StorageCredentialsAccountAndKey( ConfigurationManager.AppSettings["StorageAccountName"], ConfigurationManager.AppSettings["StorageKey"]);CloudStorageAccount account = new CloudStorageAccount(key, useHttps:false); CloudBlobClient blobClient = account.CreateCloudBlobClient();blobClient.ParallelOperationThreadCount = 10; // Get/create the container, and set its permissionsCloudBlobContainer blobContainer = blobClient.GetContainerReference("myFiles");blobContainer.CreateIfNotExist();
var permissions = new BlobContainerPermissions();permissions.PublicAccess = BlobContainerPublicAccessType.Container;blobContainer.SetPermissions(permissions); FileStream fs = null;// Get a file stream
// ...
// Create the Blob and upload the filevar blob = blobContainer.GetBlobReference(targetBlobFileName);blob.UploadFromStream(fs);
Parallel downloads are not supported directly by the blob API, but there are several implementations available, such as the parallel blob upload and download sample provided by Microsoft’s eXtreme Computing Group (XCG).
Note: A race condition can develop when uploading multiple blob blocks at one time. Further information about this problem and how to work around it can be found on the Windows Azure Storage Team Blog.
In addition to parallel download and uploads, you can improve your data transfer by compressing the data when you upload it to storage, for example, by using a compression program such as WinRar and WinZip, or by using the System.IO.Compression.GZipStream class.
If you need to update the data, and you have a local copy of the previous version, you can use various diff techniques to only update what has changed, thus reducing the number of updates that need to be uploaded to storage. For example, you can store your files using page blobs that support random-access updates, which makes the update procedure easier.
Data Protection
Windows Azure provides three main types of data storage: Windows Azure storage, SQL Azure, and Windows Azure cache. Each type has its own properties and typical usage scenarios. However, all three storage types are designed to protect the data they store. This data protection is implemented in several areas:
Protection against data lossAll data in Windows Azure data stores is replicated three times across multiple physical computers in two geographically separate data centers. This provides automatic load balancing and failover.
Secure communicationSeveral default mechanisms help secure communication between Windows Azure roles and storage. When communicating sensitive information from storage to applications running on-premises, additional security measures are needed. It is possible to require SSL for all communication with all Windows Azure storage types.
Note: Any decision to require SSL-encrypted communication with storage also affects Windows Azure role access, since Windows Azure storage cannot distinguish between traffic coming from Windows Azure nodes and traffic originating from the Internet.

IsolationWindows Azure prevents interaction between data containers by creating logical and physical separation boundaries. Storage is implemented by a shared infrastructure that isolates data containers. Each of the different storage infrastructures provided by the Windows Azure platform contains a mechanism (implemented as a layer in the multi-layer architecture) responsible for isolating data containers.
Access controlAll communication with all types of storage must be authenticated and authorized. The only exception is in the use of public blobs (which are the only type that can be used with CDN).Each type of storage has its own access control functionality. Windows Azure storage and Windows Azure cache follow the same principle: the owner of the store is provided with a secret key, giving them full access to the data. This key must be protected and handled with care.SQL Azure implements the traditional SQL Server access control model, in which initial access is established using a connection string that contains a username and password. Access to each of the database objects is controlled by the login and role features.
Working with Mixed Nodes
Usually, if you already have an on-premises HPC cluster with several nodes, you want to use these nodes in conjunction with the Windows Azure nodes to run jobs. Using mixed nodes (on-premises and Windows Azure) in the same job involves either of the following two scenarios:
Using the same data storage. In this scenario, both the Windows Azure nodes and the on-premises nodes use the data that is uploaded to Windows Azure storage. This means that the application remains location-independent, but requires you to upload all of your data to Windows Azure storage. This can cause performance degradation, since your on-premises nodes will need to retrieve their data from Windows Azure storage instead of using a local database.
Using different data stores. In this scenario, each location has its own data: the on-premises nodes access data from a local database and the Azure nodes access data from Windows Azure storage. In this case you will have differently configured programs running on-premises and in Windows Azure, but the amount of data you upload to storage will be significantly reduced, improving performance, reducing costs, and reducing startup times.
Using Static Data
In many data-centric applications, data access becomes a bottleneck. Reducing round trips to storage can introduce a real performance boost.
When the underlying data is static and needs to be shared across the cluster, and the need to filter the data is limited, a distributed cache system might be appropriate. For example, consider a financial
application that needs to calculate the values of different bonds using historical interest rates. While every bond has its own distinct characteristics, such as method of calculation, duration, and amount, all of which can be passed as parameters or represented by different tasks, the historical interest rate is common to all executions.
Windows Azure Caching and Windows Server AppFabric Caching provide scalable and robust distributed cache solutions. To decide which solution (cloud or on-premises) best fits your needs, review the preceding section “Deciding When to Move Data”.
For more information about using AppFabric Caching with your on-premises nodes, see the technical paper Use AppFabric Caching for Common Data in Windows HPC Server 2008 R2.
Outputting Results
When your HPC application completes its work, it needs to store its output data for easy access by client applications.
You can use Windows Azure storage to store your output data (as well as input data)—in a table, a blob, or another storage type. After the data is stored, it can be made available to different clients that require access.
Returning Results from SOA Applications
Handling output from SOA applications is a special case. Services support the request-response message exchange pattern, so client applications can receive the response when the service call completes. If you don’t need the SOA application to save the output to storage, or if you are planning to let the client decide how to save the response, you can use one of the following patterns for handling requests and responses:
Interactive sessions. With interactive sessions, the client creates a Session object and uses it to send asynchronous requests to the service, handling the responses when they come. This pattern is useful for short operations, where the client is expected to wait until the operation completes (synchronously).
Durable sessions. To create a durable session, the client application can use the DurableSession and BrokerClient objects. A durable session is resilient to failures because the WCF broker node persists requests and responses. A client application can reattach to an existing session and retrieve the responses if the execution outlives the client.
For more information about SOA applications in HPC, see the article SOA Applications, Infrastructure and Management in Windows HPC Server 2008 R2 .
Setup and Deployment
Setting Up Windows Azure Nodes
To add a new Windows Azure node to your HPC cluster, create a new node template using the Create Node Template Wizard in the Windows HPC Server 2008 R2 Cluster Manager, as shown in Figure 7.
Figure 7Create Node Template Wizard
In the first window, select “Windows Azure worker node template” and provide the connection information required to access the Windows Azure account.
When asked to select the role of the Windows Azure nodes, you can select either the Worker role which will create an empty node installed with the basic components of the HPC Pack, or the VM role which enables you to use your own custom VHD image to create compute nodes in Windows Azure, as shown in Figure 8.
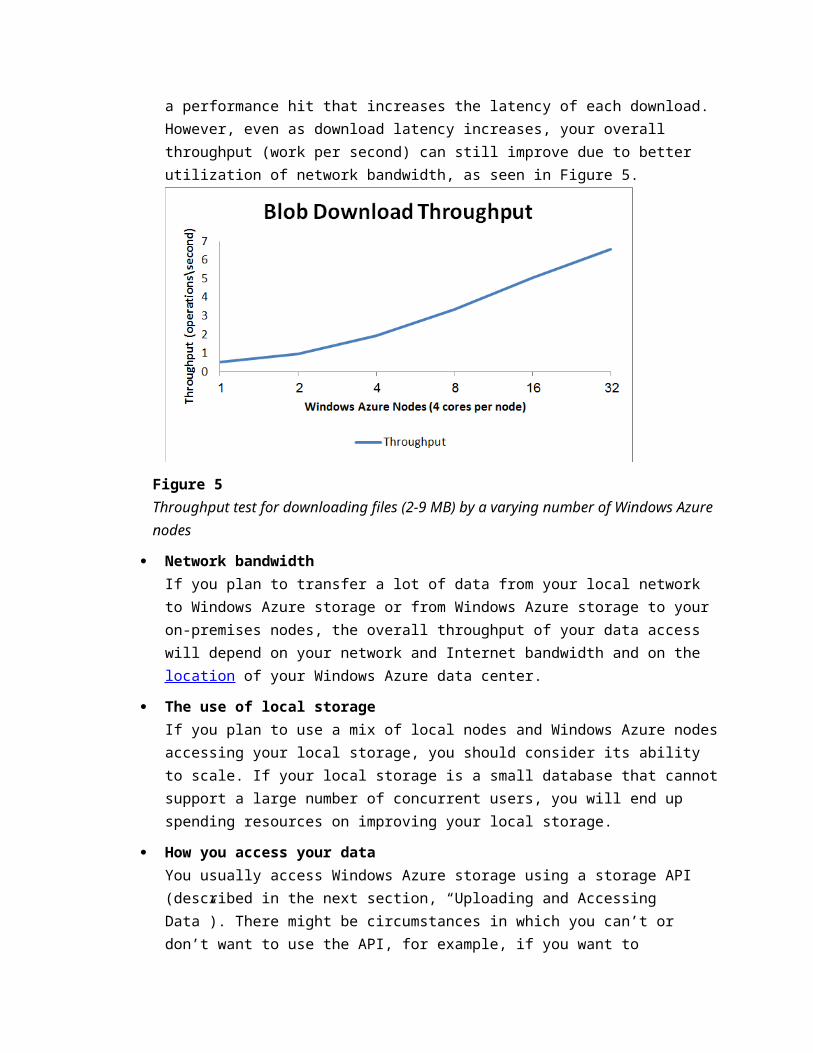
Figure 8Selecting the role of the Windows Azure nodes
Note: For more information on using VM roles with Windows Azure, refer to the Deploying Windows Azure VM Nodes in Windows HPC Server 2008 R2 Step-by-Step Guide TechNet article.
After creating the node template, you can use the new template to create new Windows Azure nodes and add them to your HPC cluster.
More information about setting up Windows Azure nodes can be found in the Deploying Windows Azure Worker Nodes in Windows HPC Server 2008 R2 Step-by-Step Guide TechNet article.
Note: Windows Azure worker nodes can be added only to Windows HPC Server 2008 R2 clusters that have been upgraded to Service Pack 1 or later.
Understanding the Effects of Node Actions on Windows Azure Nodes
Windows Azure nodes for HPC are implemented as Windows Azure worker roles whose lifecycle is managed by the Windows Azure fabric controller. A load balancer forwards incoming communication into the worker roles (see Figure 9).

Figure 9Windows Azure fabric architecture
To understand the effects of different node actions on Windows Azure nodes, it is necessary to understand some of administrative actions supported by Windows Azure roles:
Start. When a role is started, it goes through several state transitions before reaching the “Ready” state. In this state, the worker role is hosted and running, and the role is registered with the load balancer, allowing it to process incoming messages.
Stop. When a role is in the “Stopped” state, the worker role continues running (and might be still performing work), but it is not registered with the load balancer and does not process incoming messages. The account is charged for roles in this state.
Delete. Only when a role is deleted, the worker role is removed by the fabric controller, ensuring that no further work (or charges) will take place.
Some of the actions that appear in the “Node Actions” pane under “Node Management” in HPC Cluster Manager correlate with the above administrative actions. The HPC Cluster Manager actions influence Windows Azure roles in the following manner:
Start. The HPC Cluster Manager’s “Start” action is mapped to the Windows Azure “Start” action, which creates the role based on the selected worker node template. This includes deployment, loading a new VM instance to host the worker role, and starting the role instance. Processing this action might take time (approximately 7-10 minutes to start one large Windows Azure role instance). This time should be taken into consideration when planning to add new Windows
Azure nodes to an already running job (utilizing the job scheduler’s dynamic resource allocation policy which can allow running jobs to “grow” onto additional resources). Any jobs that grow onto Azure nodes must already have the necessary files deployed to the nodes. The administrator can configure resource selection properties in the job templates to ensure that only supported jobs types can burst into Azure.
Stop. The HPC Cluster Manager’s “Stop” action is mapped to the Windows Azure “Delete” action (rather than the “Stop” action). Deleting the role prevents unnecessary charges but requires that the node is restarted before it can be used again.
Take Offline and Bring Online. These two actions affect only the node’s relationship with the cluster; taking a node offline does not change the state of the worker role in Windows Azure. The role remains active, registered with the load balancer, and accessible from the outside world.
Using Cloud-only Clusters with the Windows Azure HPC Scheduler
The approach mentioned above for Windows Azure compute nodes only supports the scenario in which an on-premises head node computer controls the deployment and runtime of the Windows Azure HPC cluster. Using the Windows Azure HPC Scheduler, you can instead create HPC clusters that are hosted entirely in Windows Azure, including the head node, one or more compute nodes, and front-end web nodes for the HPC Scheduler’s Web Portal, as shown in Figure 10.
Figure 10Overview of Windows Azure HPC Scheduler deployment
The Windows Azure HPC Scheduler is constructed of the following parts:
Head node. The head node is a Windows Azure worker role that includes the essential components of the HPC Pack, including the job scheduler, node manager, resource manager, diagnostic tools, command-line tools etc. The head node can also be used as a broker node for running HPC SOA applications using WCF.
Compute node. The compute node is a Windows Azure worker role, similar to the one created when deploying Windows Azure compute nodes using the on-premises HPC Job Scheduler. The Windows Azure compute nodes support running SOA applications (WCF services), MPI applications, Excel worksheets and UDFs, and parametric sweep applications.
Front-end web node. The front-end web node is a Windows Azure web role that hosts two essential applications:
◦ The Windows Azure HPC Scheduler Web Portal. The web portal enables the submission of HPC jobs and the monitoring of running, finished, and failed jobs.
◦ HTTP Web Services. A set of REST services that enable users to submit and monitor jobs over HTTP using the REST API.
Note: For a complete list of web services and how to invoke them, refer to the HPC Web Service API Reference article on MSDN.
SQL Azure database. The Windows Azure HPC Scheduler creates a database inside a SQL Azure server to store the configuration and runtime information it requires. This is similar to the SQL Server database used by on-premises Windows HPC Server 2008 R2 head nodes.
Windows Azure storage. The Windows Azure HPC Scheduler uses Windows Azure storage to hold information about the deployed nodes and application packages that are deployed to newly created compute nodes.
Note: For more information about the supported HPC nodes and the failover support of the Windows Azure HPC Scheduler, refer to the following articles on MSDN: Things to Know About the Windows Azure HPC Scheduler and Overview of the Windows Azure HPC Scheduler.
Deploying Your Applications
After an HPC application is built, it needs to be made available to every compute node in the cluster, Windows Azure nodes included.
Instead of manually copying the application files to every node, you can use the clusrun command to copy your application to several nodes at once by specifying their names or their group name. The clusrun command allows you to perform various commands on the nodes, such as copying files to them, listing their file system content, etc. The following example shows how to copy several files from the head node to some of the on-premises compute nodes in the cluster, followed by listing the content of a certain file system folder on these nodes:
DeployMyApp.cmd
clusrun /nodegroup:ComputeNodes xcopy \\HPC-HN\Apps\MyApp\*.* E:\MyApp\*.*
clusrun /nodegroup:ComputeNodes dir E:\MyApp
Note: You must be a cluster administrator to use the clusrun command.
Deploying to Windows Azure Nodes
Using the clusrun command to copy files from an on-premises server to a Windows Azure node is possible, but currently this feature is in CTP, and is not fully supported.
Note: If you do wish to try out the virtual networking of on-premises clusters with Windows Azure compute nodes using the Windows Azure Connect CTP, refer to Appendix 1: Create a Local Endpoint Group for Windows Azure Connect.
For this scenario, Windows HPC Server 2008 R2 SP3 and the Windows Azure HPC Scheduler support another way of copying applications to Windows Azure nodes, by using the hpcpack command. With the hpcpack command you create a zip package for your application, upload it to your Azure storage account, and then deploy it to the required nodes. Whenever you start a new Windows Azure node, the installed package is automatically deployed to that node, freeing you of the need to keep your nodes in sync manually.
The following example shows how to create a new package, upload it, deploy it to your Windows Azure nodes, and then verify the deployment by listing the content of the application directory on each node:
DeployMyAppToAzure.cmd
hpcpack create MyApp.zip \\HPC-HN\Apps\MyApphpcpack upload MyApp.zip /nodetemplate:"AzureNodes Template" /relativepath:MyAppclusrun /nodegroup:AzureNodes hpcsyncclusrun /nodegroup:AzureNodes dir %CCP_PACKAGE_ROOT%\MyApp
Note: The clusrun command is called with the hpcsync parameter to sync the application packages with the Windows Azure nodes that have already been started.
For more information on packaging executable files and service assemblies, see the Integration with Windows Azure section in the New Feature Evaluation Guide for Windows HPC Server 2008 R2 SP1 TechNet article.
Note: When using the hpcpack upload command, do not use the relativepath parameter if you are packaging a service or an XLL file.

Mixed Deployment
If you want to deploy your application to both on-premises nodes and Windows Azure nodes, you can use both the clusrun command and the hpcpack command. If you want to run a batch program that calls an executable, and you want that batch program to be able to locate and run the executable file on both on-premises nodes and in Windows Azure nodes, you will need to define the %CCP_PACKAGE_ROOT% environment variable in your on-premises nodes. (By default, it is only defined in Windows Azure nodes.) You can refer to the Windows HPC Team Blog for more information.
Windows Azure HPC Scheduler Deployment
You can also deploy the entire HPC cluster – that is, the cluster’s head node, broker node, and compute nodes – to Windows Azure alone. This feature is supported by the Windows Azure HPC Scheduler. To create such a deployment you will first need to install the Windows Azure HPC Scheduler SDK and the SDK samples. Once installed, you can open the sample .NET solution provided by the SDK and run the AppConfigure .NET application, which deploys the included sample applications to Windows Azure.
Once executed, the AppConfigure application creates and deploys several Windows Azure roles: a front-end web role, a head-node worker role, and a set of compute-node worker roles. New HPC jobs can be submitted to the Windows Azure HPC Scheduler, which is installed on the head node, through either the front-end web portal/REST API, or directly against the Windows Azure HPC Scheduler using its own set of APIs and .NET classes. Once a job is submitted, the Windows Azure HPC Scheduler will utilize the Windows Azure compute nodes, execute each job on some or on all of the nodes according to the job’s settings, the preemption settings, and the grow/shrink policy of the job scheduler.
Figure 11Working with a deployment of the Windows Azure HPC Scheduler
To include your own HPC applications in the deployment and publish them to Windows Azure, follow the steps provided in the Modify the Sample Deployment article, and those provided in the Steps to Configure and Publish the Sample Applications article on MSDN.

Note: The deployment application itself does not require the prior installation of Microsoft HPC Pack 2008 R2, but if you wish to use the sample projects provided with it you need to install several additional components. Refer to the Requirements for Deploying the Sample Applications with the Windows Azure HPC Scheduler article on MSDN for a list of prerequisites to using the different sample applications provided with the SDK samples.
Cloud-Only Deployment Using Windows PowerShell
Using Visual Studio to deploy the Windows Azure HPC Scheduler and the HPC applications to Windows Azure may sometimes be inconvenient, especially when your HPC applications are not .NET-based, when the applications have already been compiled to an executable file or a .NET runtime assembly (in the case of a SOA HPC application), or when you are a system administrator who wishes to automate the deployment process. In these cases and others, there is another way to deploy the Windows Azure HPC Scheduler and your HPC applications: by using PowerShell scripts created for this complex task. By using PowerShell, you can easily deploy HPC applications to Windows Azure, execute startup tasks, and create deployment templates for later use.
To download the PowerShell scripts, and for more information on how to execute the deployment script, refer to the Deploying an HPC Cluster using just PowerShell (Part I) blog post on MSDN Blogs.
Submitting Jobs
After deploying your application to the on-premises nodes and the Windows Azure nodes, you can start submitting jobs to them. Submitting a job is indifferent to the location of the node on which it will be executed.
Each job you submit contains one or more tasks, and there are several types of tasks you can use, such as service tasks and parametric sweep tasks. For more information about how jobs and tasks work together, see Understanding Jobs and Tasks.
You can create jobs in several ways: from the HPC Job Manager console, from the command prompt or PowerShell, and from code.
If you want to learn more about jobs, how to create them, and how to use the Windows HPC Server 2008 R2 job scheduler, please refer to the Using the Job Scheduler in Windows HPC Server 2008 R2 white paper.
Using HPC Cluster Manager
The HPC Cluster Manager console allows you to create jobs either manually or through XML files that contain the job settings and list of tasks. You can even create a job manually and export it to an XML file for later use. You can see the list of steps required for creating a new job in the Create a New Job TechNet article.

Submitting Jobs from the Command Prompt
Jobs can be submitted from the command prompt with the job command, and from HPC PowerShell using the New-HpcJob cmdlet. The TechNet article Steps: Submit a Job with a Node Preparation and a Node Release Task provides a detailed example of how to submit a job using both the command line and a PowerShell snippet.
Creating Jobs from Code
If your client applications need to start a new job, you can create the job directly from code. The following example shows how to create a job and a task using the Scheduler class and the ISchedulerJob and ISchedulerTask interfaces:
C#
IScheduler scheduler = new Scheduler();scheduler.Connect("HPC-HN");ISchedulerJob job = store.CreateJob();
//Create a task to submit to the jobISchedulerTask task = job.CreateTask();task.CommandLine = "echo Hello World *";task.IsParametric = true;task.StartValue = 1;task.EndValue = 5;task.IncrementValue = 1;
//Set other job properties (cores, grow/shrink...)//...
job.AddTask(task);store.SubmitJob(job, @"domain\user", "P@ssw0rd");
If your client application needs to call a SOA application—that is, create a job with a service task—you can use the Session or DurableSession classes to automatically create the job with an attached service task. For more information about these classes and how to use them, see the previous section “Outputting Results”.
Submitting Jobs with the Windows Azure HPC Scheduler
If you choose to use a cloud-only solution with the Windows Azure HPC Scheduler, you can use any of the above techniques to submit HPC jobs, with the following restrictions:
Using the HPC Cluster Manager - When using the Windows Azure HPC Scheduler, you cannot use the HPC Cluster Manager; however, you can submit jobs through the HPC Job Manager utility.

Submitting from code - If you submit SOA jobs from code running outside of Windows Azure, you need to set the Session object to use the WebAPI transport scheme instead of the default TCP communication, as shown in the following code snippet:
C#
var info = new SessionStartInfo("HeadNodeName", "ServiceName");// Configure session properties using the SessionStartInfo// ...
// Configure the transport to work from outside Windows Azureinfo.TransportScheme = TransportScheme.WebAPI;
Session session = Session.CreateSession(info);
Note: When submitting jobs in code from within the Windows Azure cluster, you can use either the WebAPI or the default NetTCP scheme.
To use the HPC Job Manager and the Job command-line utility, you first need to connect to your Windows Azure head node through the Management Portal. Refer to the instructions specified under Step 4. Validate the Deployment in the Steps to Configure and Publish the Sample Applications article on MSDN.
In addition to the Job Manager, the command-line Job utility, and submitting jobs using code, you can use the Windows Azure HPC Scheduler Web Portal to submit jobs. For information on how to connect to the web portal and how to use it to submit and monitor jobs, refer to the “Connect to the Windows Azure HPC Scheduler Web Portal” topic in the Steps to Configure and Publish the Sample Applications article on MSDN.

Conclusion
With the integration of Windows HPC Server 2008 R2 SP3 and Windows Azure, new options are available for businesses to plan their HPC cluster and improve the ability to scale their computational needs. With Windows Azure, businesses today can choose between having large, on-premises clusters and scaling them to the cloud when necessary (also known as the Windows Azure burst scenario); having no on-premises compute nodes and placing all computational nodes in the cloud; and, with the Windows Azure HPC Scheduler, even moving the head node to Windows Azure, thus being released completely from having to manage on-premises clusters.
When it comes to developing the applications that will be deployed to the cloud, Windows HPC Server 2008 R2 SP3 and the Windows Azure HPC Scheduler offer several programming models you can choose from, such as the parametric sweep model, the MPI model, the SOA model, and the Excel UDF model. Each model has its advantages, allowing you to decide which is more suitable for your needs.
However, this new opportunity requires some work by developers and cluster administrators. Scaling application to the cloud requires preparation and a basic understanding of how the cloud works. One of the biggest decisions when moving applications from local nodes to Windows Azure nodes is where the data is stored (local vs. cloud), how it is stored (SQL Azure, blobs, etc.), and how to access it in a way that is appropriate for the bandwidth of your network.
After the application is ready, you can deploy it to the HPC cluster. With some preparation, the job submission will remain the same or require minimal modification for the end user, whether you are deploying to on-premises nodes, Windows Azure nodes, or a mixed environment of the two.
Additional References
What's New in Windows HPC Server 2008 R2 SP3
Compatibility of Windows HPC Server 2008 R2 with Previous Versions of Windows HPC Server
Release Notes for Microsoft HPC Pack 2008 R2 Service Pack 3
Technical Library for Windows HPC Server 2008 R2
White papers for Windows HPC Server 2008 R2
Using Windows HPC Server 2008 R2 Job Scheduler
Windows HPC Server 2008 R2 Resources
HPC Pack 2008 R2 MS-MPI Redistributable Package with Service Pack 3
HPC Pack 2008 R2 Client Utilities Redistributable Package with Service Pack 3
HPC Pack 2008 R2 SDK with Service Pack 3
Windows Azure HPC Scheduler SDK
Windows Azure Management Portal
Windows Azure SDK
Windows Azure Code Samples
Windows Azure Storage Code Samples
SQL Azure Data Sync
For more information about the code samples that accompany this white paper, and related Windows Azure “burst” and Windows Azure HPC Scheduler training materials, see the following references:
o Windows HPC Survival Guide blog (contains links to latest resources)
o Windows HPC with Burst to Windows Azure Training Course (contains online version of samples that can be downloaded with this paper)
o Windows Azure Training Kit (includes hands-on labs and demos of the Windows Azure HPC Scheduler)
o Windows Azure HPC Scheduler Training Course (includes hands-on labs of the Windows Azure HPC Scheduler only)