Embed Size (px)
Citation preview
Demo ScriptHello Windows AzureVersion: 2.0.0
Last updated: 5/9/2023
CONTENTS
OVERVIEW................................................................................................................................................. 3Key Messages......................................................................................................................................... 3
Key Technologies.................................................................................................................................... 3
Time Estimates........................................................................................................................................ 4
SETUP AND CONFIGURATION................................................................................................................. 4
DEMO FLOW.............................................................................................................................................. 4
OPENING STATEMENT............................................................................................................................. 5
STEP-BY-STEP WALKTHROUGH.............................................................................................................6Creating the Hello Windows Azure application........................................................................................6
Deploying the application....................................................................................................................... 12
SUMMARY................................................................................................................................................ 20
KNOWN ISSUES...................................................................................................................................... 21
Overview
This document provides setup documentation, step-by-step instructions, and a written script for showing a demo of Windows Azure. This document can also serve as a tutorial or walkthrough of the technology. In this demo you will build, debug, and deploy a simple “Hello World” ASP.NET Application using Windows Azure and have the application running on the web in less than 5 minutes. For additional demos of Windows Azure, please visit http://www.microsoft.com/windowsazure/.
Note: In order to run through this complete demo, you must have network connectivity and a Windows Azure account.
Key Messages
In this demo you will see three key things:
1. First you will see how the Windows Azure SDK and Visual Studio Tools for Windows Azure provide development tools that enable a rich and familiar development experience for cloud applications.
2. Second you will see how Windows Azure abstracts you from the underlying infrascture and uses simple models to define the roles and number of instances for your application.
3. Finally, you will see how to deploy, start, and manage a Windows Azure application through the Management portal.
Key Technologies
This demo uses the following technologies:
1. .NET Framework 4.0
2. Visual Studio 2010
3. Windows Azure SDK and Windows Azure Tools for Microsoft Visual Studio
Time Estimates
Estimated time for setting up and configuring the demo: 10 min
Estimated time to complete the demo: 5 min
Setup and Configuration
This demo does not have any advanced configuration requirements. Make sure you have checked all the dependencies for this demo and have a developer account for Windows Azure.
Demo Flow
The following diagram illustrates the high-level flow for this demo and the steps involved:
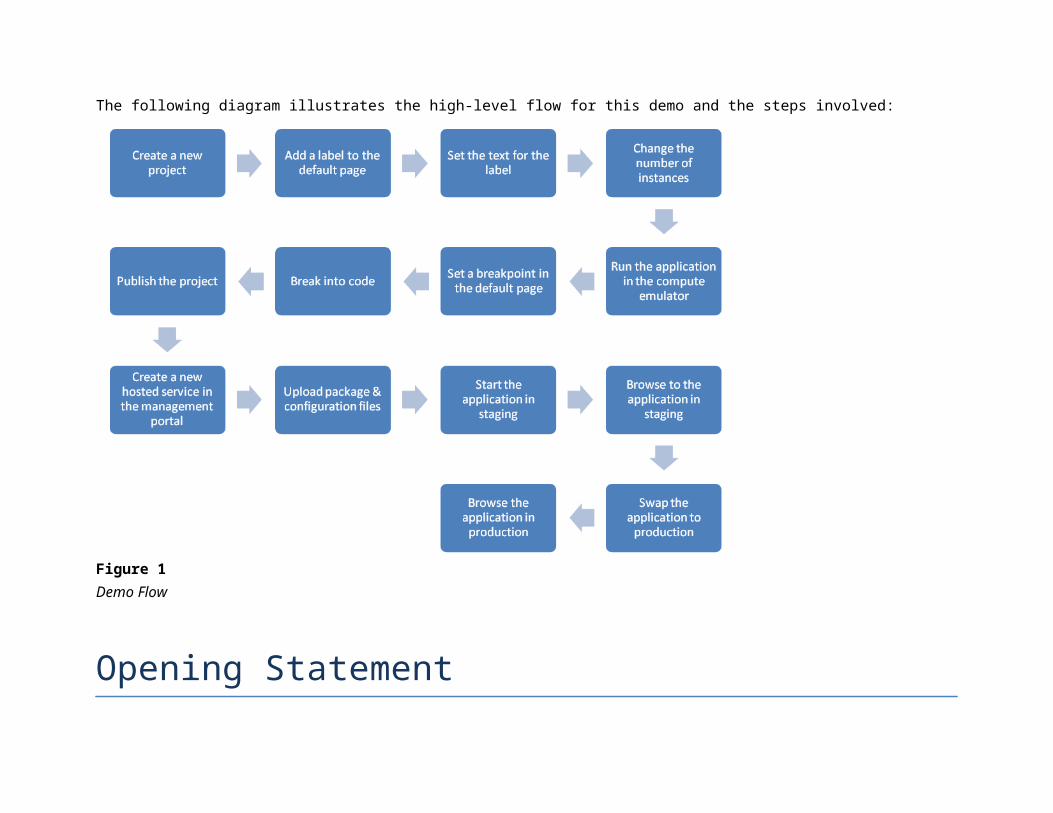
Figure 1Demo Flow
Opening Statement
In the next 5 minutes we will build, debug, and deploy a simple “Hello World” ASP.NET Application using Windows Azure. I want to show you a simple demo, so you can get a feel for the concepts and steps involved with building a Windows Azure application using the Windows Azure SDK
and Visual Studio Tools. In later demos you will see how we can build more complex applications that utilize additional roles, the Windows Azure APIs, and Windows Azure Storage services as well as additional services of Azure Services.
In this simple, Hello World demo you will specifically see three key things:
1. First you will see how the Windows Azure SDK and Visual Studio Tools for Windows Azure provide development tools that enable a rich and familiar development experience for cloud applications.
2. Second you will see how Windows Azure abstracts you from the underlying infrascture and uses simple models to define the roles and number of instances for your application.
3. Finally, you will see how to deploy, start, and manage a Windows Azure application through the Management portal.
Step-by-Step Walkthrough
This demo is composed of the following segments:
Creating the Hello Windows Azure application
Deploying the application
Creating the Hello Windows Azure application
Action Script Screenshot
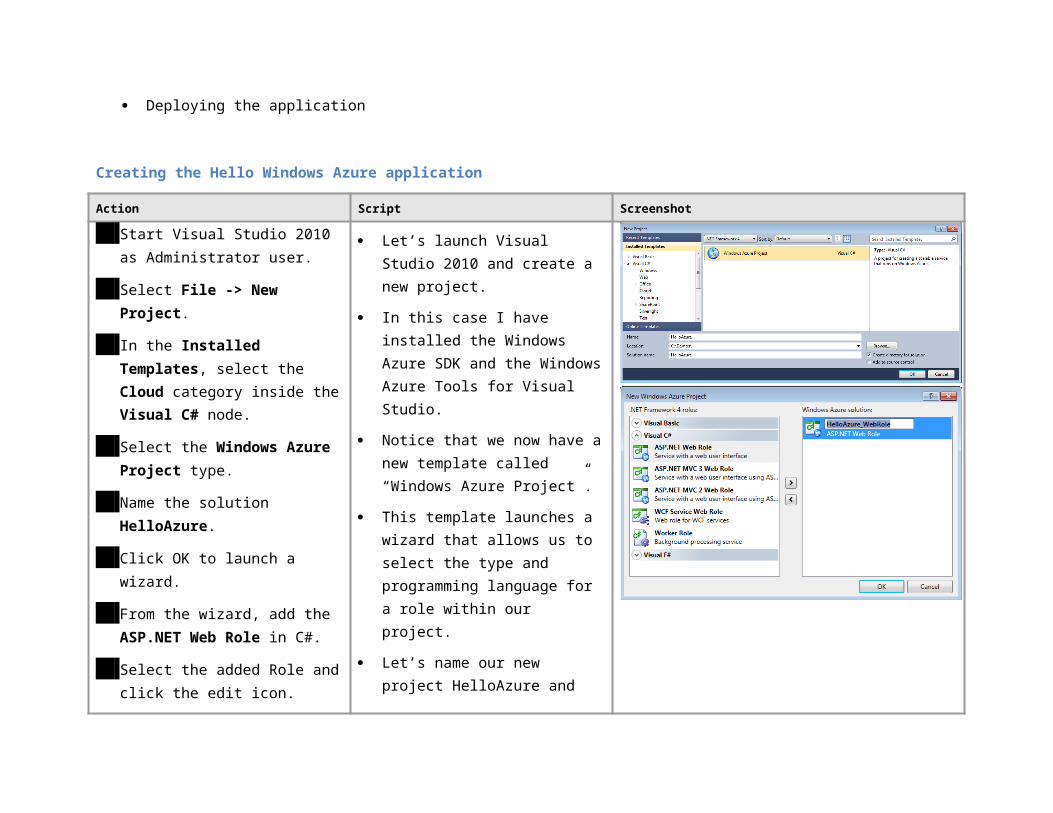
1. Start Visual Studio 2010 as Administrator user.
2. Select File -> New Project.
3. In the Installed Templates, select the Cloud category inside the Visual C# node.
4. Select the Windows Azure Project type.
5. Name the solution HelloAzure.
6. Click OK to launch a wizard.
7. From the wizard, add the ASP.NET Web Role in C#.
8. Select the added Role and click the edit icon.
9. Rename from WebRole1 to HelloAzure_WebRole.
Let’s launch Visual Studio 2010 and create a new project.
In this case I have installed the Windows Azure SDK and the Windows Azure Tools for Visual Studio.
Notice that we now have a new template called “Windows Azure Project”.
This template launches a wizard that allows us to select the type and programming language for a role within our project.
Let’s name our new project HelloAzure and rename the WebRole1 to HelloAzure_WebRole.
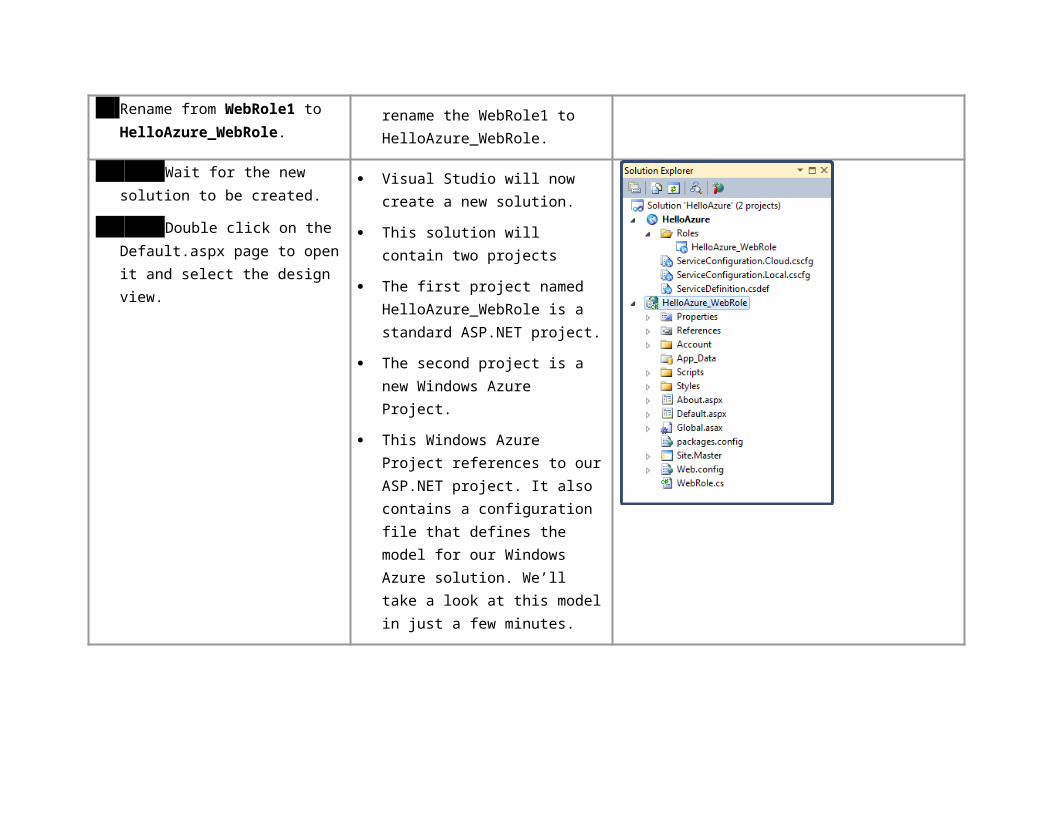
10.Wait for the new solution to be created.
11. Double click on the Default.aspx page to open it and select the design view.
Visual Studio will now create a new solution.
This solution will contain two projects
The first project named HelloAzure_WebRole is a standard ASP.NET project.
The second project is a new Windows Azure Project.
This Windows Azure Project references to our ASP.NET project. It also contains a configuration file that defines the model for our Windows Azure solution. We’ll take a look at this model in just a few minutes.
12. Expand the Toolbox.
13. Drag and drop an ASP.NET Label Control.
14. Change the Font->Size property for the new label to XX-Large
First, let’s build our HelloAzure web page.
Let’s open the default web page
Now we’ll add a standard ASP.NET label control to our default page.
Let’s go ahead and adjust the font size on the label.
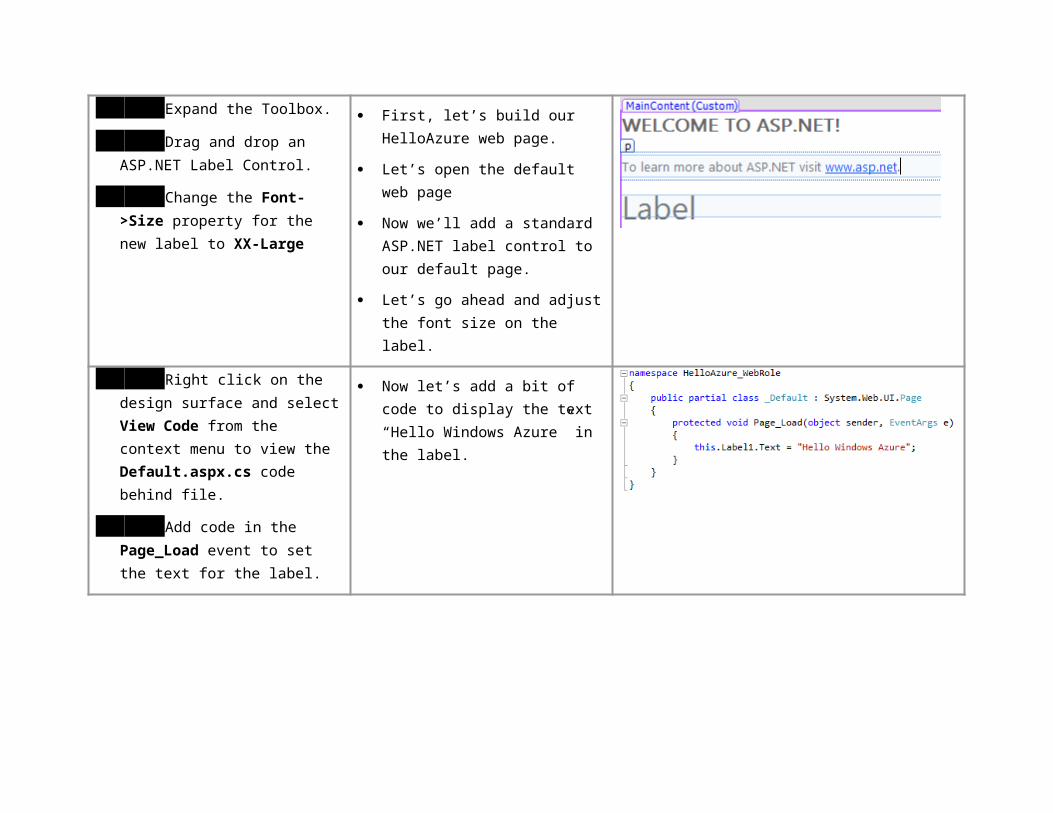
15. Right click on the design surface and select View Code from the context menu to view the Default.aspx.cs code behind file.
16. Add code in the Page_Load event to set the text for the label.
Now let’s add a bit of code to display the text “Hello Windows Azure” in the label.
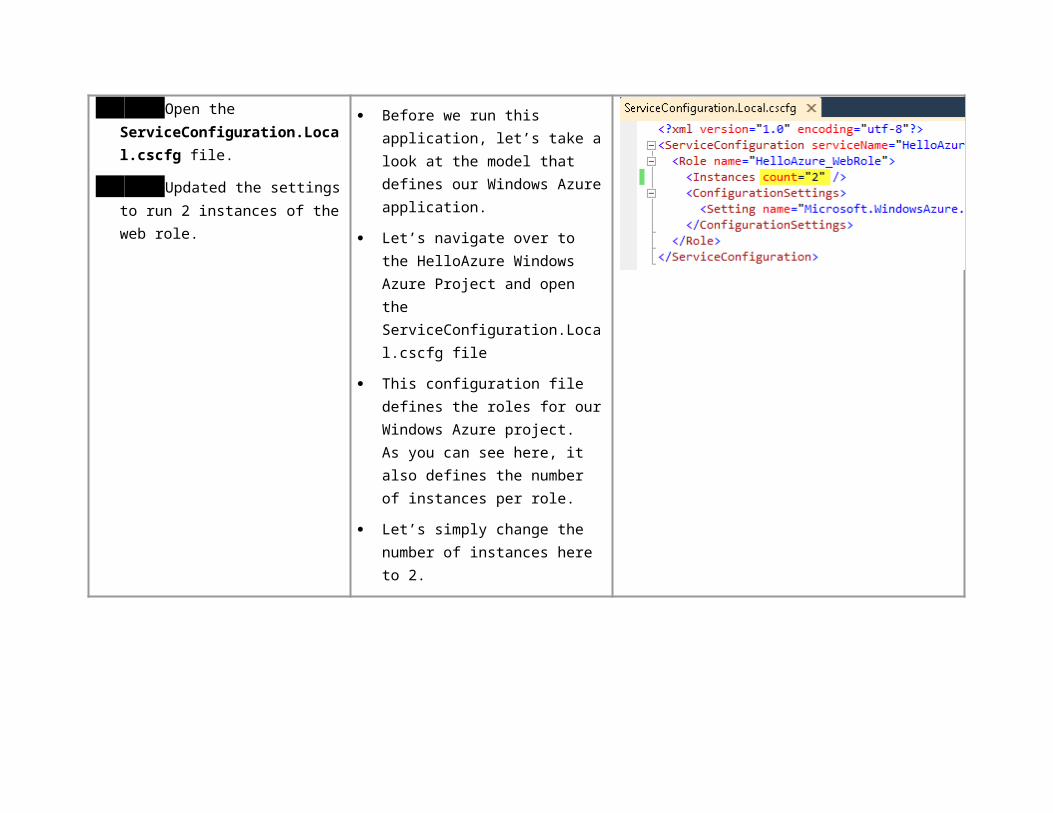
17. Open the ServiceConfiguration.Local.cscfg file.
18. Updated the settings to run 2 instances of the web role.
Before we run this application, let’s take a look at the model that defines our Windows Azure application.
Let’s navigate over to the HelloAzure Windows Azure Project and open the ServiceConfiguration.Local.cscfg file
This configuration file defines the roles for our Windows Azure project. As you can see here, it also defines the number of instances per role.
Let’s simply change the number of instances here to 2.
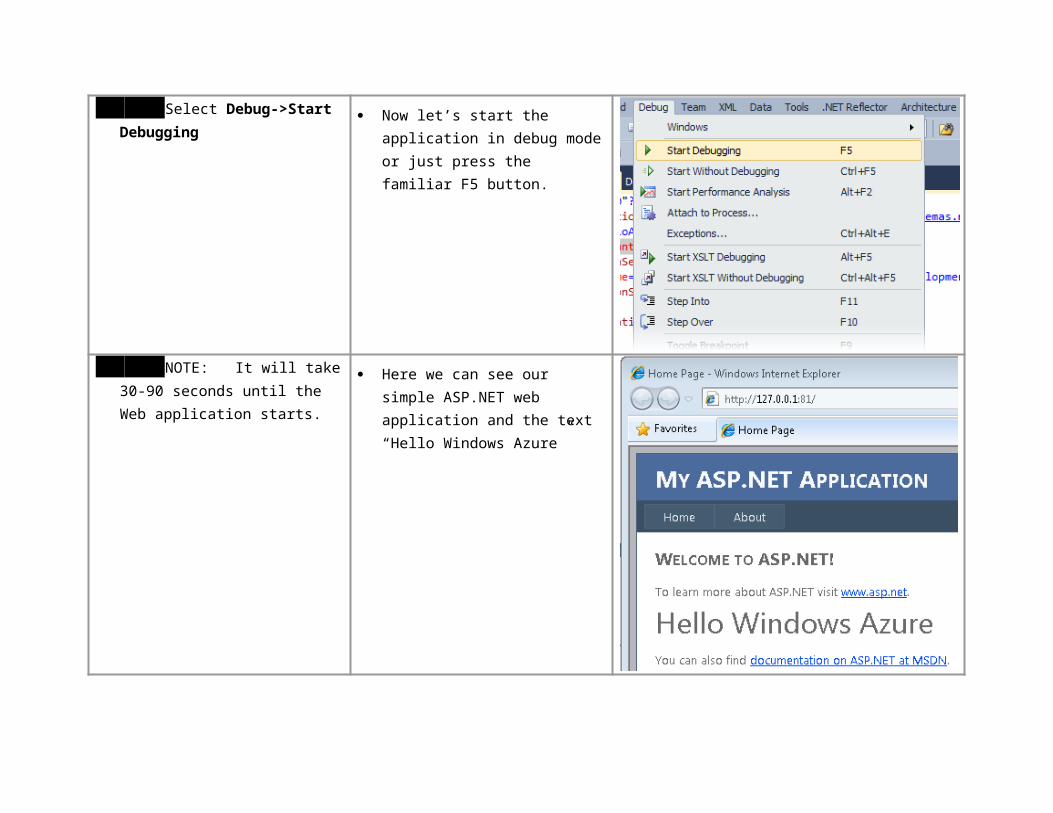
19. Select Debug->Start Debugging Now let’s start the application in debug mode or just press the familiar F5 button.
20. NOTE: It will take 30-90 seconds until the Web application starts.
Here we can see our simple ASP.NET web application and the text “Hello Windows Azure”
21. Show the compute emulator by right-clicking on the Azure icon in the task bar and select “Show Compute Emulator UI”.
22. Expand the HelloAzure application in the compute emulator and expand the HelloAzure_WebRole.
23. Select the HelloAzure_WebRole and show the two instances that are running.
This will cause the ASP.NET project to be compiled into a .NET assembly, just as normal.
However, since we have a Windows Azure Project in our solution set as the startup project, this will then start the Windows Azure compute emulator.
To see the details of the running projects we need to show the compute emulator UI.
The Windows Azure compute emulator, or simple compute emulator, is a simulated environment for developing and testing Windows Azure applications on your machine.
You can think of this as a Cassini like environment.
Here you can see the compute emulator UI.
Notice that we have a new deployment containing our HelloAzure application.
If we expand the WebRole for the HelloAzure application, we can see that there are two instances for this
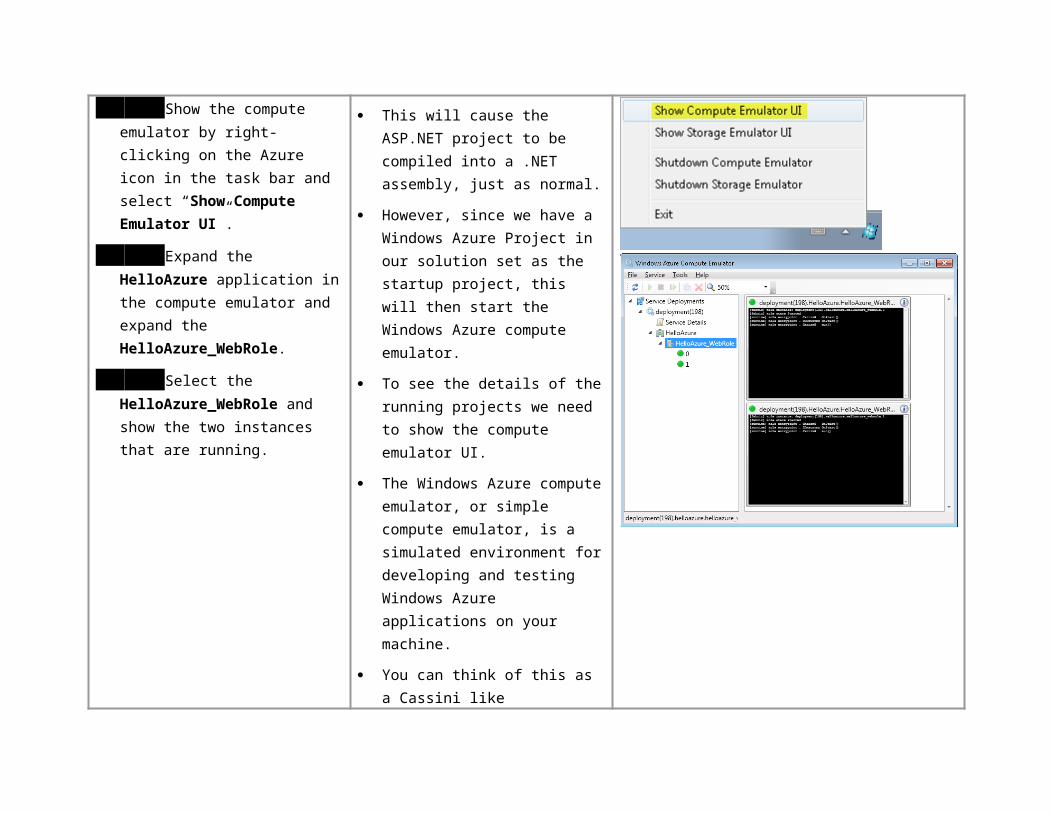
role.
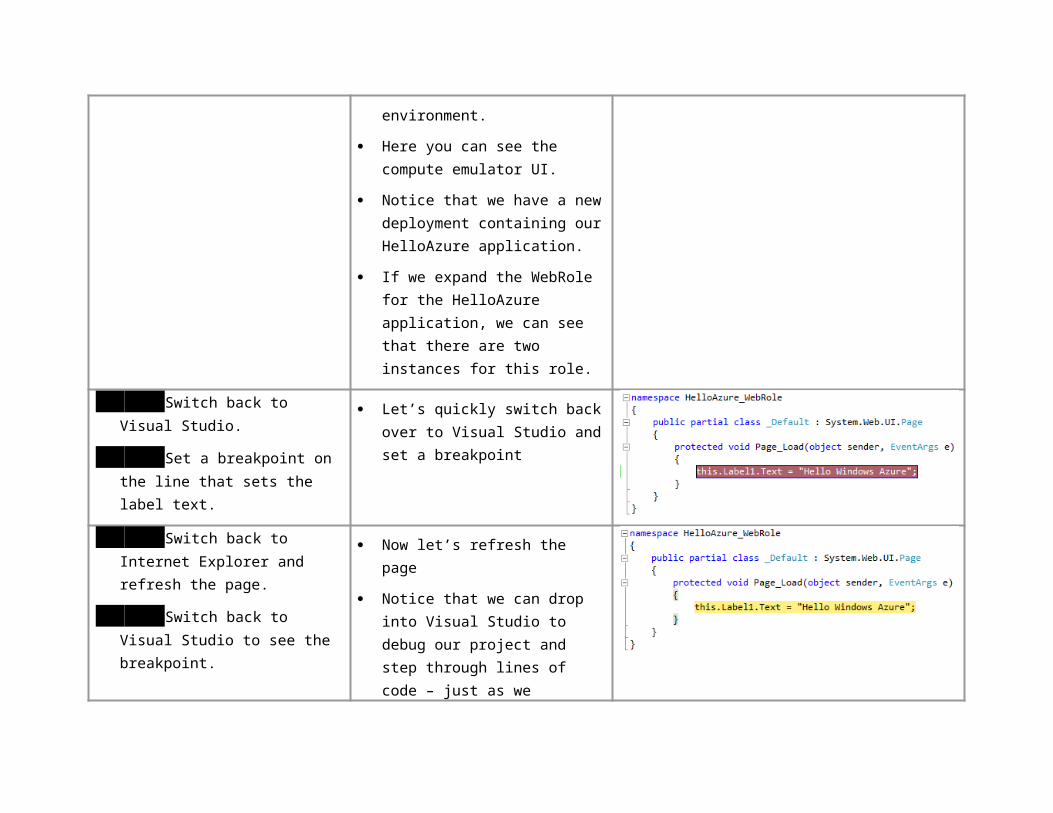
24. Switch back to Visual Studio.
25. Set a breakpoint on the line that sets the label text.
Let’s quickly switch back over to Visual Studio and set a breakpoint
26. Switch back to Internet Explorer and refresh the page.
27. Switch back to Visual Studio to see the breakpoint.
28. Press F5 to continue execution.
Now let’s refresh the page
Notice that we can drop into Visual Studio to debug our project and step through lines of code – just as we normally do.
29. Stop the application by closing Internet Explorer.
Deploying the application
Action Script Screenshot
1. Switch back to Visual Studio.
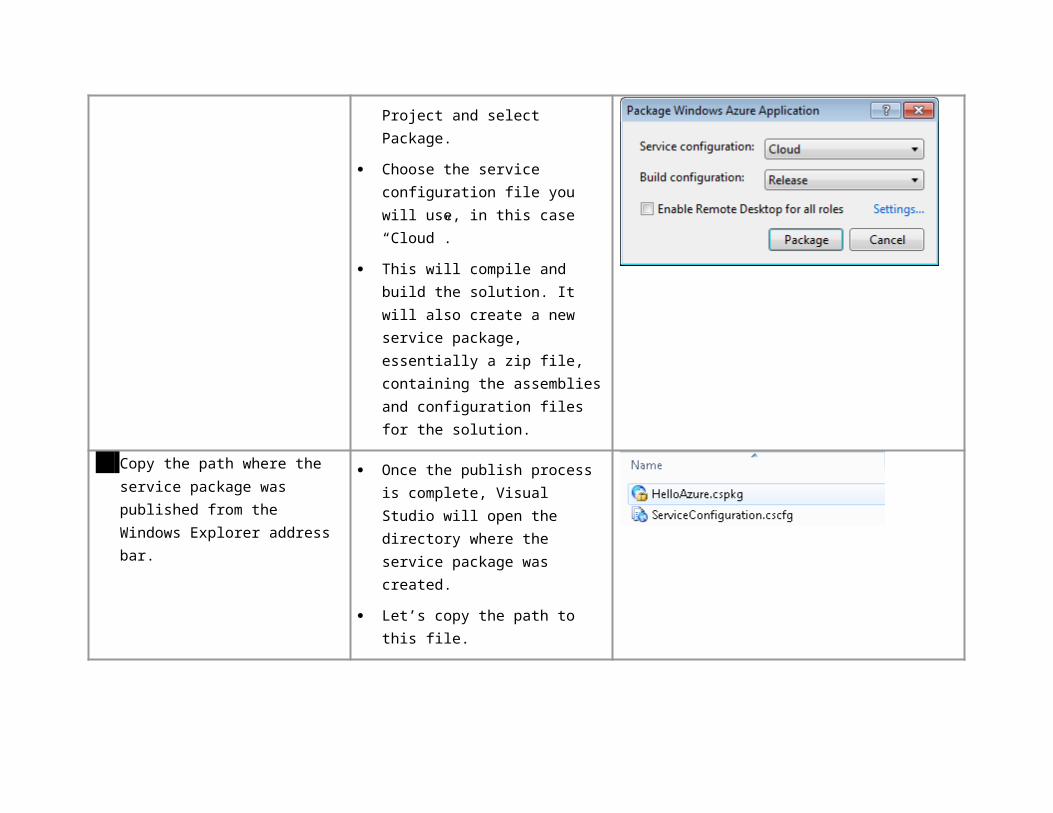
2. Right click on the HelloAzure project and select Package from the context menu.
3. On the Package Windows Azure Application dialog select the Cloud service configuration and click Package.
So you’ve seen how we can build and debug simple web applications for Windows Azure with the new Visual Studio extensions and the SDK.
Now let’s deploy our HelloAzure application to the cloud.
Let’s switch back to Visual Studio.
To deploy our app, first let’s right click on the HelloAzure Windows Azure Project and select Package.
Choose the service configuration file you will use, in this case “Cloud”.
This will compile and build the solution. It will also create a new service package, essentially a zip file, containing the assemblies and configuration files for the solution.
4. Copy the path where the service package was published from the Windows Explorer address bar.
Once the publish process is complete, Visual Studio will open the directory where the service package was created.
Let’s copy the path to this file.

5. Open a browser and navigate to the Azure Portal.
Now let’s login to the management portal using our Live ID.
Previously, I have created a subscription in the management portal.
6. Click on the New Hosted Service button from the Common Tasks ribbon.
Once in the management portal, we select the type of project we want to create in the management portal.
In this case, we want to deploy an application to run in Windows Azure, so we click on the “New Hosted Service” button from the Common Tasks ribbon.
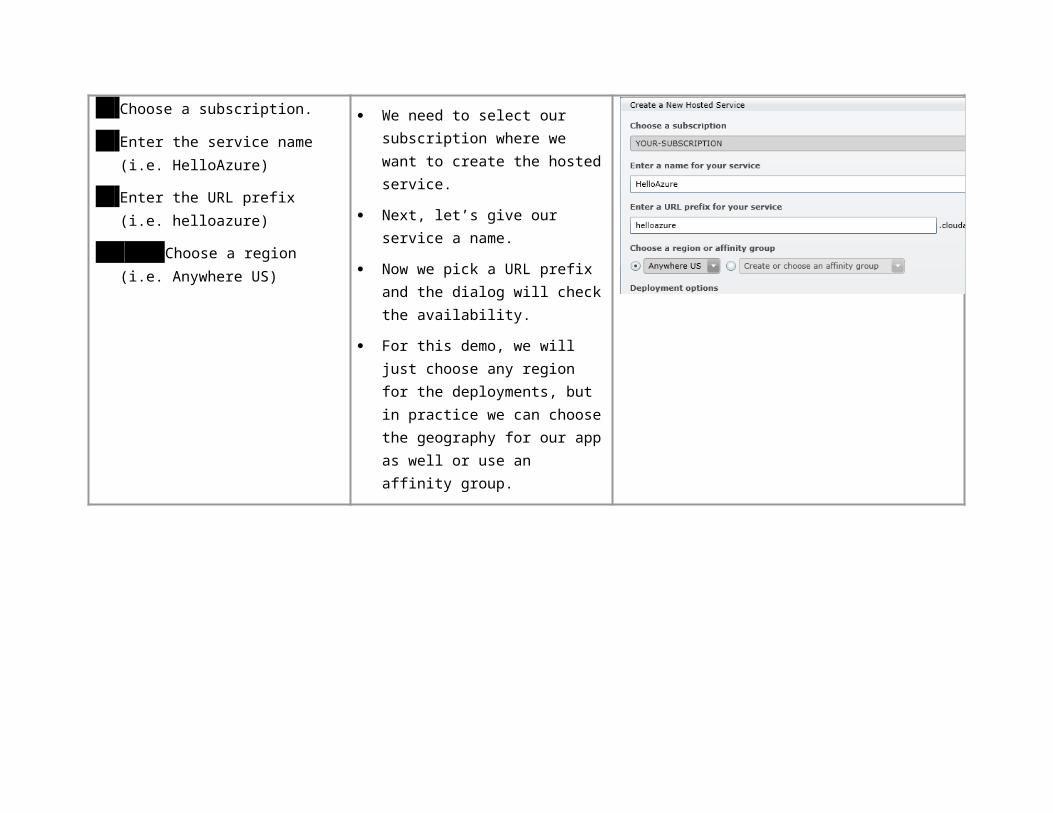
7. Choose a subscription.
8. Enter the service name (i.e. HelloAzure)
9. Enter the URL prefix (i.e. helloazure)
10. Choose a region (i.e. Anywhere US)
We need to select our subscription where we want to create the hosted service.
Next, let’s give our service a name.
Now we pick a URL prefix and the dialog will check the availability.
For this demo, we will just choose any region for the deployments, but in practice we can choose the geography for our app as well or use an affinity group.
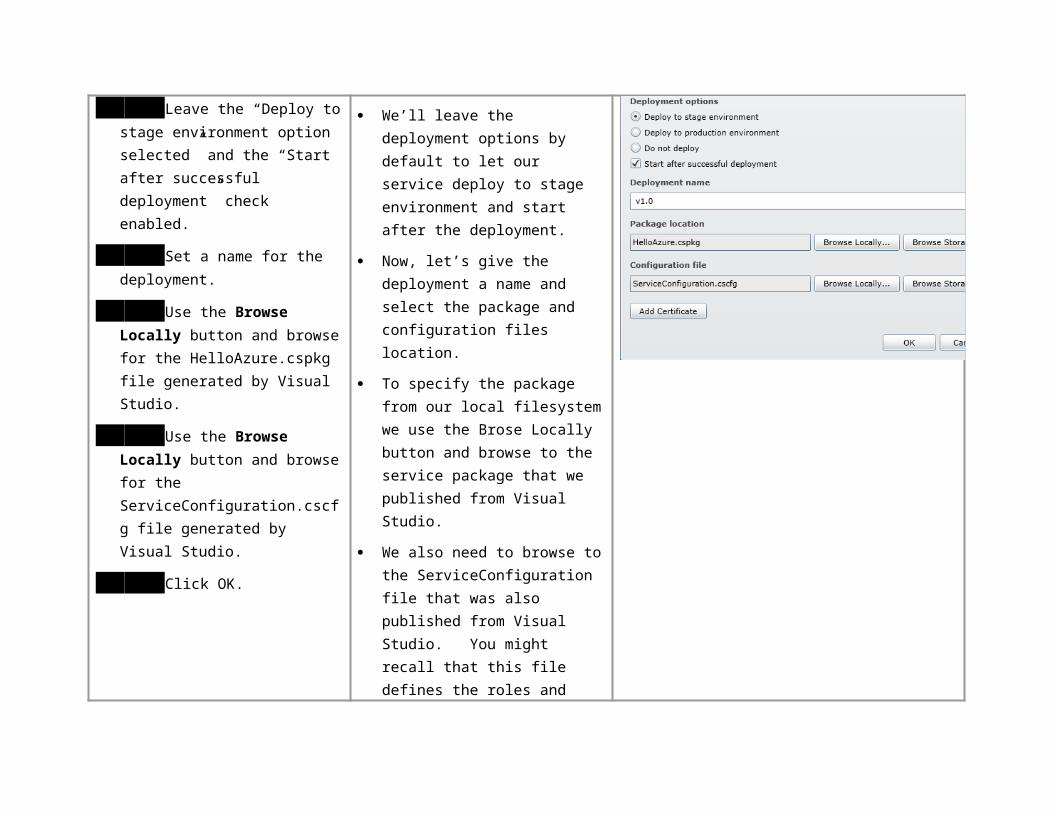
11. Leave the “Deploy to stage environment option selected” and the “Start after successful deployment” check enabled.
12. Set a name for the deployment.
13. Use the Browse Locally button and browse for the HelloAzure.cspkg file generated by Visual Studio.
14. Use the Browse Locally button and browse for the ServiceConfiguration.cscfg file generated by Visual Studio.
15. Click OK.
We’ll leave the deployment options by default to let our service deploy to stage environment and start after the deployment.
Now, let’s give the deployment a name and select the package and configuration files location.
To specify the package from our local filesystem we use the Brose Locally button and browse to the service package that we published from Visual Studio.
We also need to browse to the ServiceConfiguration file that was also published from Visual Studio.

You might recall that this file defines the roles and number of instances per role.
In this case, we don’t need to add any certificate for our service, so we click OK to start creating and deploying the hosted service.
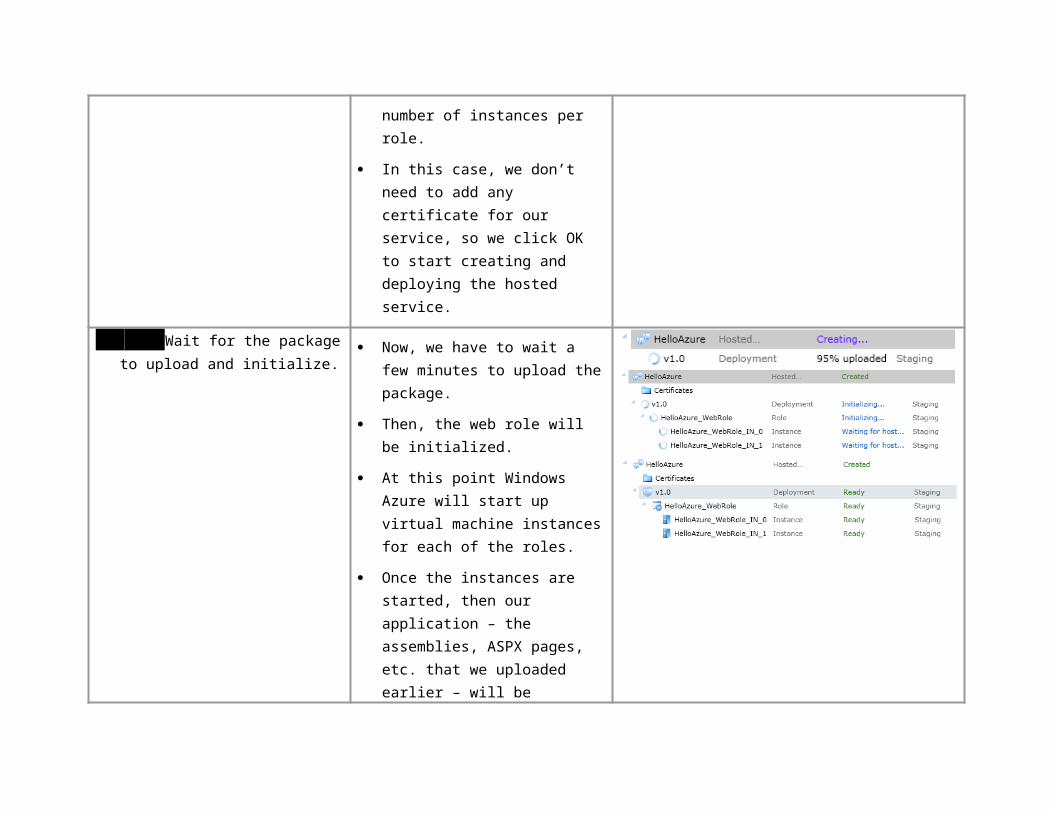
16.Wait for the package to upload and initialize.
Now, we have to wait a few minutes to upload the package.
Then, the web role will be initialized.
At this point Windows Azure will start up virtual machine instances for each of the roles.
Once the instances are started, then our application – the assemblies, ASPX pages, etc. that we uploaded earlier – will be deployed into each of the instances.
We need to wait a while until the service becomes ready.
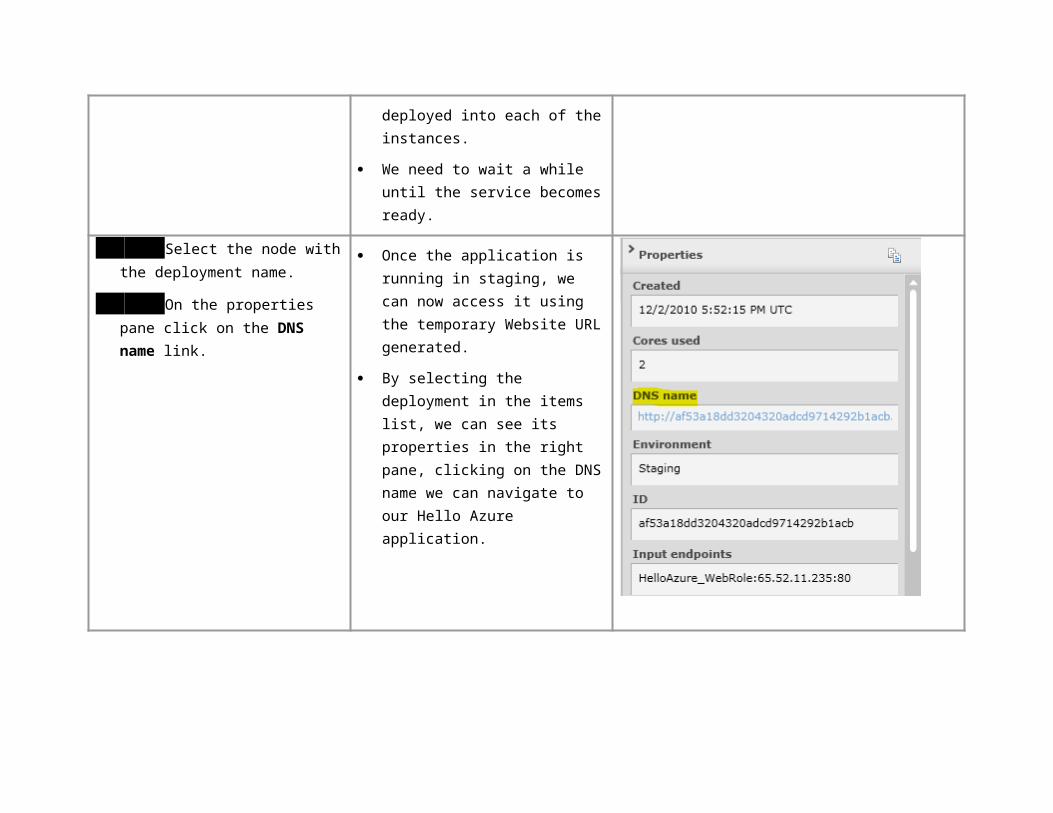
17. Select the node with the deployment name.
18. On the properties pane click on the DNS name link.
Once the application is running in staging, we can now access it using the temporary Website URL generated.
By selecting the deployment in the items list, we can see its properties in the right pane, clicking on the DNS name we can navigate to our Hello Azure application.
19. View the HelloAzure web site in the new browser window
20. Close the browser window.
Here we can see our Hello Windows Azure application running in Windows Azure – it’s publicly exposed on the web!
In fact, you could even access it now if you could enter this long, temporary web site URL.
Let’s close this window and go back to the Management portal.
21. Click on the Swap VIP button in the Deployments ribbon.
22. You will be prompted to confirm that you want to switch to the production environment. Press the OK button when prompted.
23. NOTE: This can take a few minutes to start the production environment.
Let’s see how we can move our application from staging to production.
We’ll click on the sync button and confirm that we want to move the switch the staging environment with production.
This can take a few minutes.
24. Select the node with the deployment name.
25. On the properties pane click on the DNS name link.
You can now see that the production environment is running.
Let’s now browse to our application running in production.
26. You should see the web page with the text Hello Windows Azure dialog running with the production URL.
Finally, you can see that our simple, Hello Azure application is running in the production environment.
Notice that the URL is the sub-domain on cloudapp.net that we specified when creating the project in the Management portal.
If you have internet access, you can browse to this site now.
Summary
In this demo, you saw how we could easily build and debug web applications using the familiar ASP.NET programming model and the new Windows Azure SDK and extensions to Visual Studio. You also saw how we could use the Windows Azure Management Portal to create projects, deploy applications, and manage the staging and production environments. Finally, in less than 5 minutes we created and ran a new application in the cloud.
What you did not see is the entire infrastructure Windows Azure provided. For example, we did not worry about physical machines, rack space, network switches or connectivity. We also did not have to remote into machines and physically copy files across machines. Windows Azure
abstracted us from the underlying infrastructure and provided the automated deployment, isolation, redundancy, and load balancing for our application. This was intentionally a simple demo to help you understand the concepts. In later demos, you will see how we can build more complex applications that utilize additional roles, the Windows Azure APIs, and Windows Azure Storage services.
Known Issues
Please note the following known issues with this demo:
It can sometimes take several minutes to start a Windows Azure application in the cloud. Consequently, you may want to have an example application already deployed and running in the production environment.