Embed Size (px)
Citation preview

THE UNIVERSITY OF TEXAS AT DALLAS
FY2020 Budget Planning Module Training Guide
Page | 2
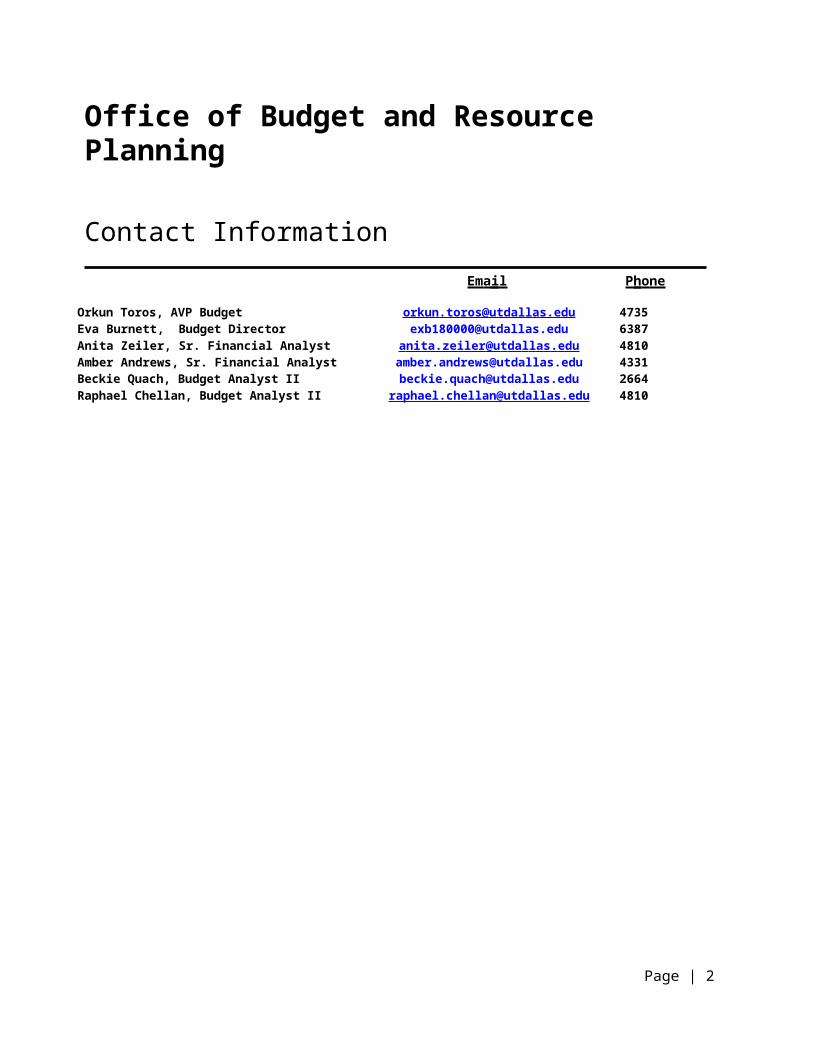
Office of Budget and Resource Planning
Contact Information
Ema il P hone
Page | 2
Orkun Toros, AVP Budget [email protected] 4735Eva Burnett, Budget Director [email protected] 6387Anita Zeiler, Sr. Financial Analyst [email protected] 4810Amber Andrews, Sr. Financial Analyst [email protected] 4331Beckie Quach, Budget Analyst II [email protected] 2664Raphael Chellan, Budget Analyst II [email protected] 4810
What is a Budget?
A budget is the financial plan for the allocation of resources during a particular period of time. Proper budget development and control provide the ability to ensure that limited financial resources are expended in an effective and efficient manner towards achieving the University’s strategic mission.
University of Texas at Dallas Budget Development ProcessSchools and divisions are responsible for updating budget information for the new fiscal year. In order to produce a balanced budget, the updated expenses must not exceed allocations, or projected revenues and carryover balances for Non-Core funds. Budget updates provided by schools and divisions include:
1. Salary information for personnel changes including pay raises, promotions, approved vacancies, title changes, funding changes and any other salary adjustments.
2. Updates of non-salary expenses for changes in account codes and distribution of funds between cost centers.
3. Development of revenue and expense projections for Non-Core cost centers.
How is this information used?Information that is submitted in the Budget Development process is used for the following:
1. As a guide for departments, designating initial spending authority and authorized positions. 2. Original budget for the upcoming budget year effective September 1– August 31.3. Operating Budget for UT System:
a. Expenditures by NACUBO function, fund group, and object of expense.b. Supplemental reports on salaries.
Page | 3
Budget Development Reminders In order for the budget development process to be successful, and to comply with all UT Dallas and UT System requirements, there are a few items to remember when completing your budget.
Two Phase ProcessBudget development at The University of Texas at Dallas is a two-phase process.
The first phase involves the review of current funding, balancing to Core allocations, and making necessary changes in revenue and expense budgeted amounts. Validation of current budgeted positions will also be completed.
During the second phase, merit allocations are awarded to eligible individuals. This phase will open to campus users after the first phase closes.
Revenue ProjectionsBudgeted revenue estimates are expected to be reasonable and realistic.
SalariesSalaries for positions which have been approved and are intended to be filled for the fiscal year being budgeted should be listed on the department’s budget submission. All vacancies and new positions must be fully funded.Salaries for all active employees must be budgeted during the budget process with the exceptions listed below:
Employees who have submitted written notification of their intent to resign prior to the start of the fiscal year being budgeted. These positions should be budgeted as vacancies or the positions inactivated if not intended to be filled.
Research assistants, teaching assistants, hourly workers, including students, and non-budgeted lecturers. These groups will be budgeted as lump sums.
Inactive and Frozen Cost CentersCost centers with a zero fund balance and zero activity projected for budget fiscal year should be inactivated or frozen. NOTE: A cost center cannot be inactivated if it has a fund balance that carries forward or if it has outstanding balance sheet or encumbrance balances.
Allowable ExpensesSee Use of Funds Matrix link for information on allowable expenses by fund code.https://www.utdallas.edu/finance/training/index.html
Current Year Information All current year information is uploaded just prior to the opening of the budget planning module.
New Departments and New Cost CentersRequests for new departments and new cost centers can be made by completing the appropriate form under Employee Self-Service/Forms in PeopleSoft.
Page | 4
User Roles In the Budget Planning Module, there are four levels of users:
Read Only AccessUsers with this group will have access to view the BPM but cannot make any changes.
Campus Group UserUsers with this role have the ability to access the campus group workbook pages and add, edit, and/or delete information. Examples: Fiscal Officer, Administrative Assistant in charge of budget entry.
Campus Group AdministratorUsers with this role have the same access to budget information as those with the Campus Group User role. However, the Campus Group Administrator will be responsible for final review of the budget in all phases, and has the authority to submit the budget to the Campus Group Executive Reviewer. The Campus Group Administrator is responsible for reviewing and approving the budget information and making the official budget submission. A Campus Group Administrator can delegate the task of submitting the workbook to another user with written authorization. For example, Deans or Directors may wish to assign the Campus Group Administrator role to their authorized designee.
Campus Group Executive ReviewerThe Executive Reviewer is the Division’s final approver for campus group budgets and will have the same access to the budget information as the Campus Groups Users and Administrators. This role has been initially assigned to members of the executive management team. An Executive Reviewer can delegate the task of submitting the workbook to another user with written authorization.
Page | 5
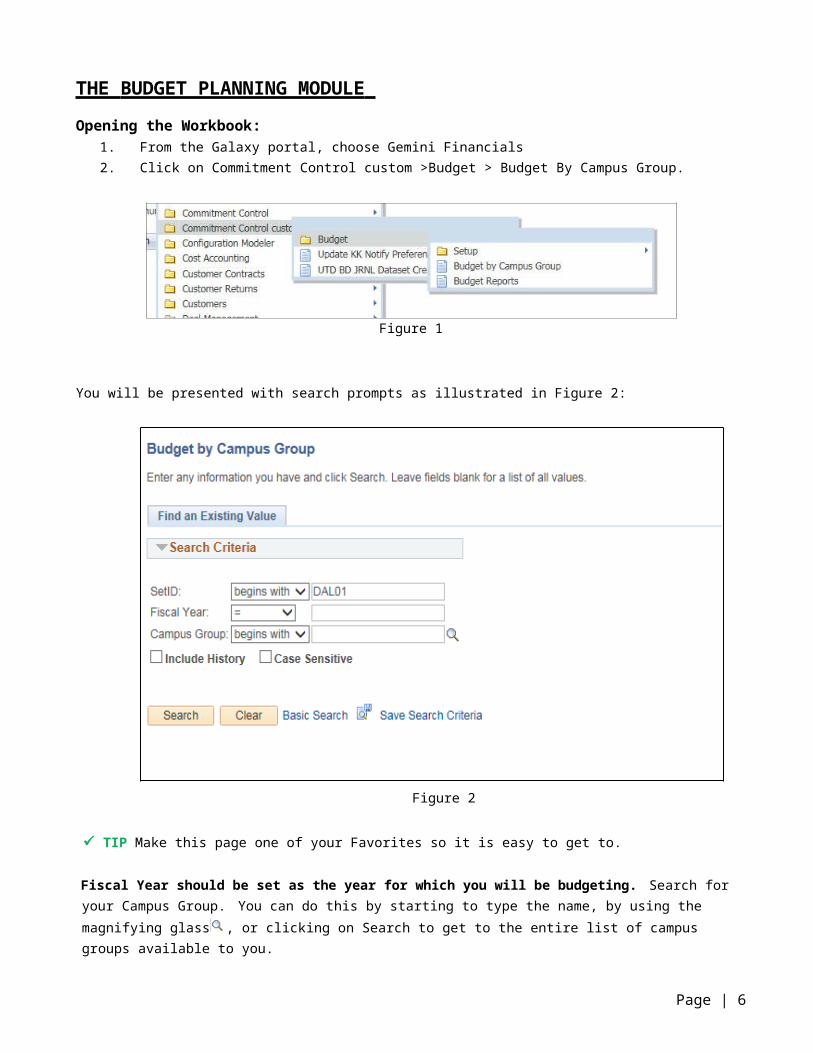
THE BUDGET PLANNING MODULE Opening the Workbook:
1. From the Galaxy portal, choose Gemini Financials2. Click on Commitment Control custom >Budget > Budget By Campus Group.
Figure 1
You will be presented with search prompts as illustrated in Figure 2:
Figure 2
TIP Make this page one of your Favorites so it is easy to get to.
Fiscal Year should be set as the year for which you will be budgeting. Search for your Campus Group. You can do this by starting to type the name, by using the magnifying glass , or clicking on Search to get to the entire list of campus groups available to you.
Page | 6

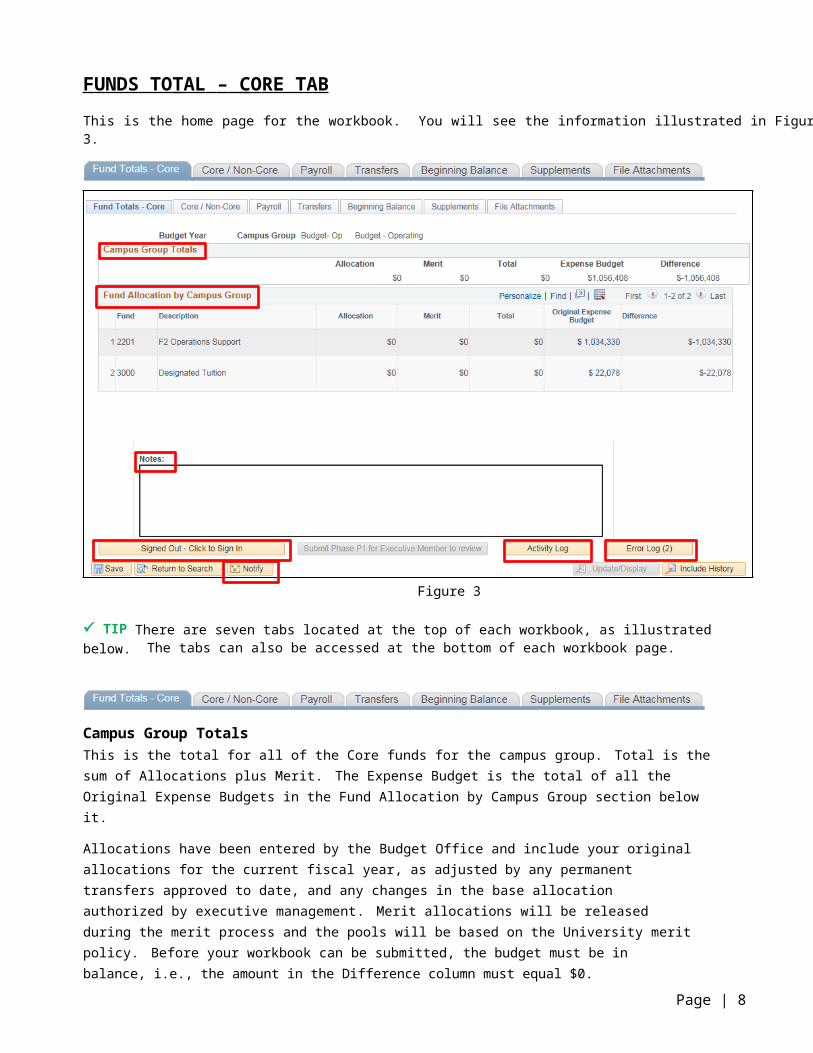
F UNDS T O T AL – C O RE TAB This is the home page for the workbook. You will see the information illustrated in Figure 3.
Figure 3
TIP There are seven tabs located at the top of each workbook, as illustrated below. The tabs can also be accessed at the bottom of each workbook page.
Campus Group TotalsThis is the total for all of the Core funds for the campus group. Total is the sum of Allocations plus Merit. The Expense Budget is the total of all the Original Expense Budgets in the Fund Allocation by Campus Group section below it. Allocations have been entered by the Budget Office and include your original allocations for the current fiscal year, as adjusted by any permanent transfers approved to date, and any changes in the base allocation authorized by executive management. Merit allocations will be released during the merit process and the pools will be based on the University merit policy. Before your workbook can be submitted, the budget must be in balance, i.e., the amount in the Difference column must equal $0.
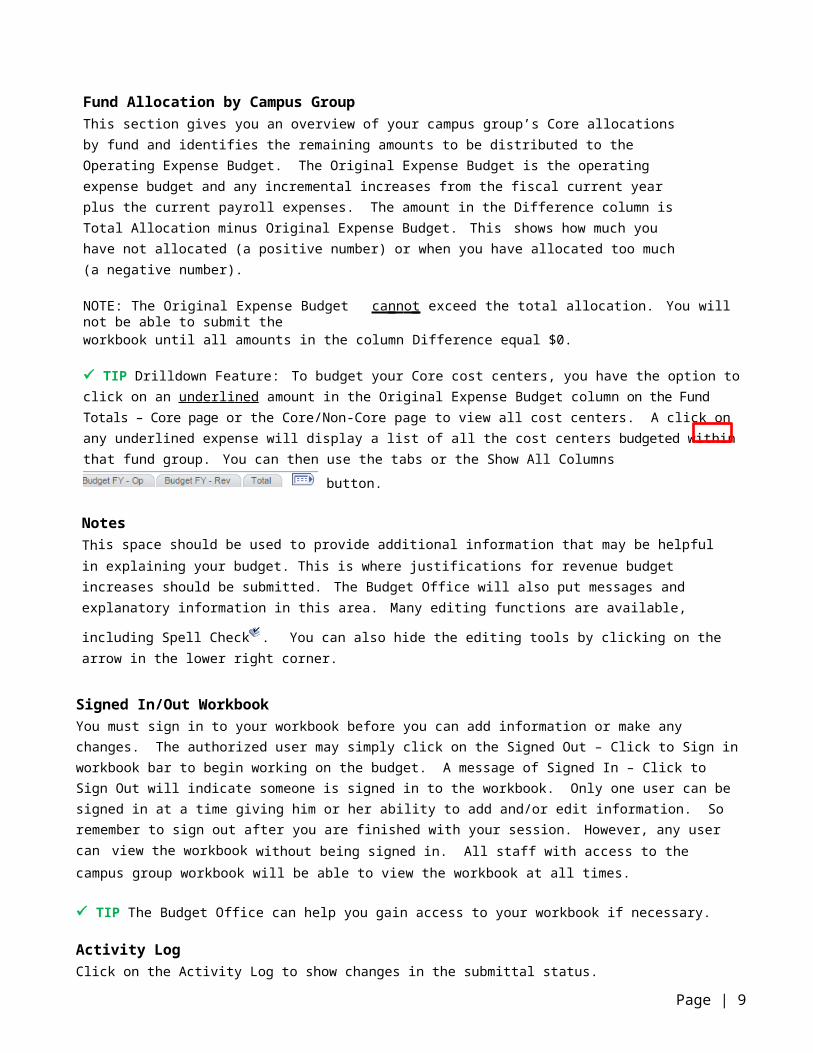
Fund Allocation by Campus GroupThis section gives you an overview of your campus group’s Core allocations by fund and identifies the remaining amounts to be distributed to the Operating Expense Budget. The Original Expense Budget is the operating expense budget and any incremental increases from the fiscal current year plus the current payroll expenses. The amount in the
Page | 7
Difference column is Total Allocation minus Original Expense Budget. This shows how much you have not allocated (a positive number) or when you have allocated too much (a negative number).
NOTE: The Original Expense Budget ca nno t exceed the total allocation. You will not be able to submit theworkbook until all amounts in the column Difference equal $0.
TIP Drilldown Feature: To budget your Core cost centers, you have the option to click on an u n d e rli n e d amount in the Original Expense Budget column on the Fund Totals – Core page or the Core/Non-Core page to view all cost centers. A click on any underlined expense will display a list of all the cost centers budgeted within that fund group. You can then use the tabs or the Show All Columns button.
NotesThis space should be used to provide additional information that may be helpful in explaining your budget. This is where justifications for revenue budget increases should be submitted. The Budget Office will also put messages and explanatory information in this area. Many editing
functions are available, including Spell Check . You can also hide the editing tools by clicking on the arrow in the lower right corner.
Signed In/Out Workbook You must sign in to your workbook before you can add information or make any changes. The authorized user may simply click on the Signed Out – Click to Sign in workbook bar to begin working on the budget. A message of Signed In – Click to Sign Out will indicate someone is signed in to the workbook. Only one user can be signed in at a time giving him or her ability to add and/or edit information. So remember to sign out after you are finished with your session. However, any user can view the workbook without being signed in. All staff with access to the campus group workbook will be able to view the workbook at all times.
TIP The Budget Office can help you gain access to your workbook if necessary.
Activity LogClick on the Activity Log to show changes in the submittal status.
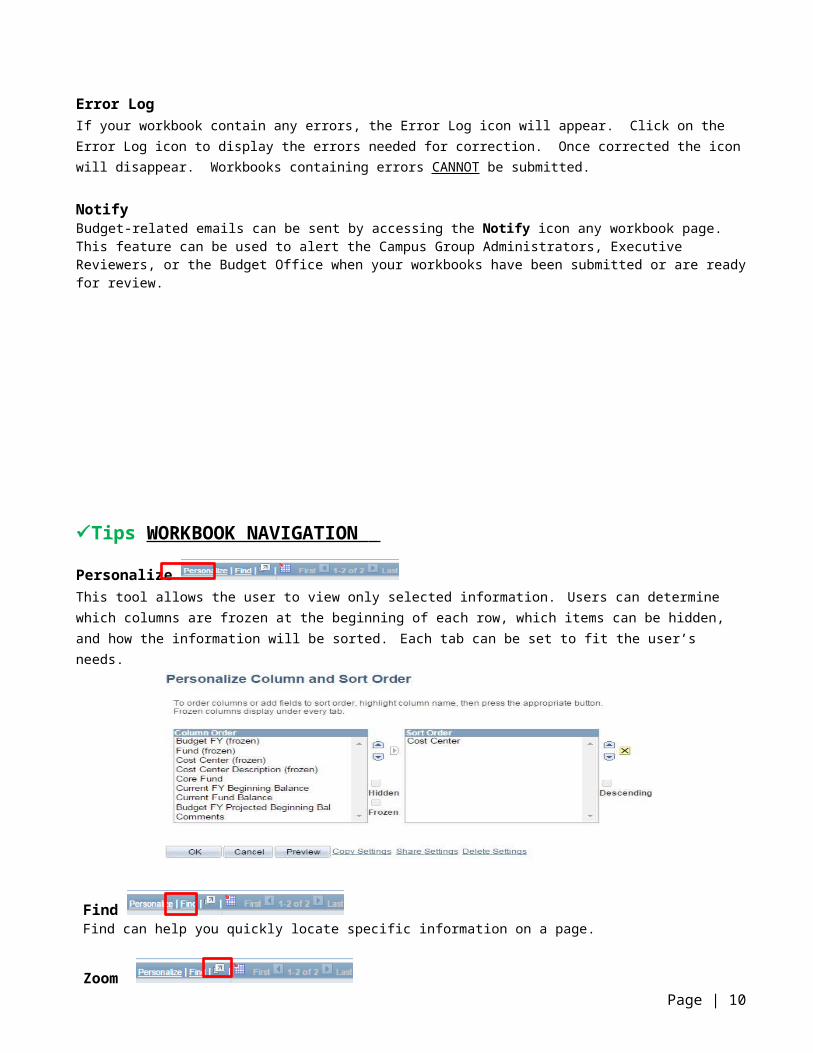
Error LogIf your workbook contain any errors, the Error Log icon will appear. Click on the Error Log icon to display the errors needed for correction. Once corrected the icon will disappear. Workbooks containing errors CANNOT be submitted.
Notify Budget-related emails can be sent by accessing the Notify icon any workbook page. This feature can be used to alert the Campus Group Administrators, Executive Reviewers, or the Budget Office when your workbooks have been submitted or are ready for review.
Page | 8
Tips WORKBOOK NAVIGATION
Personalize This tool allows the user to view only selected information. Users can determine which columns are frozen at the beginning of each row, which items can be hidden, and how the information will be sorted. Each tab can be set to fit the user’s needs.
Find Find can help you quickly locate specific information on a page.
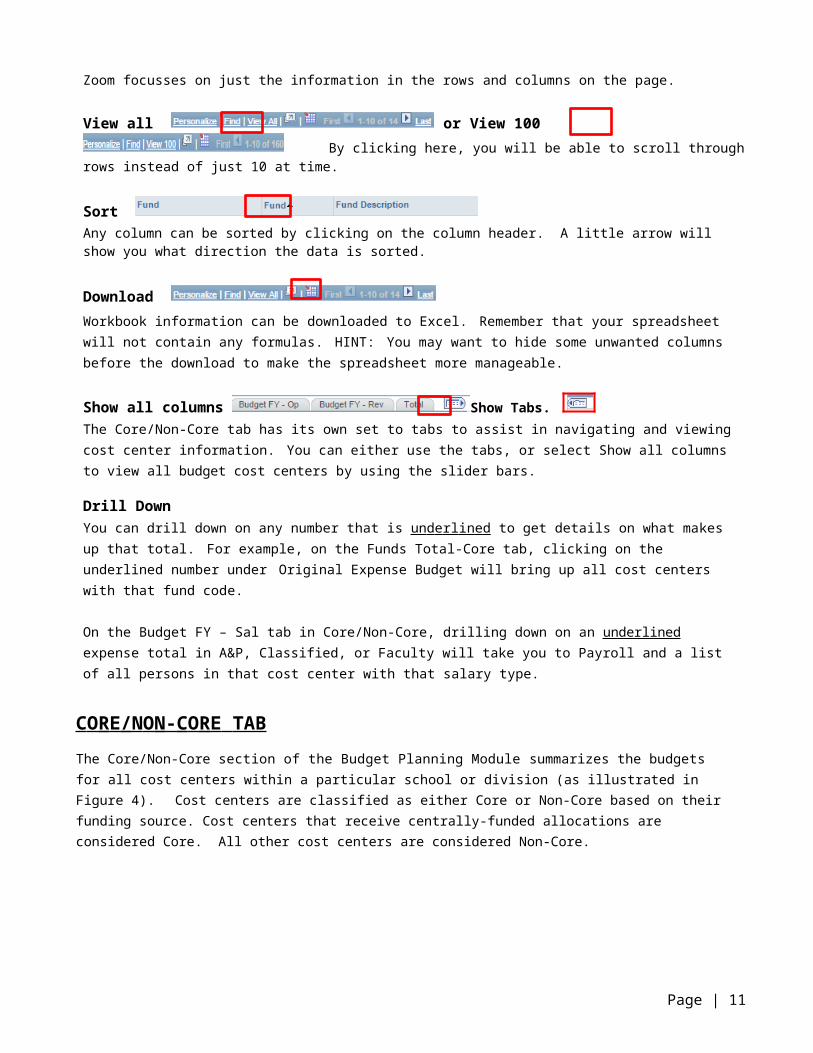
Zoom Zoom focusses on just the information in the rows and columns on the page.
View all or View 100 By clicking here, you will be able to scroll through rows instead of just 10 at time.
Sort Any column can be sorted by clicking on the column header. A little arrow will show you what direction the data is sorted.
Download Workbook information can be downloaded to Excel. Remember that your spreadsheet will not contain any formulas. HINT: You may want to hide some unwanted columns before the download to make the spreadsheet more manageable.
Show all columns Show Tabs. The Core/Non-Core tab has its own set to tabs to assist in navigating and viewing cost center information. You can either use the tabs, or select Show all columns to view all budget cost centers by using the slider bars.
Drill DownYou can drill down on any number that is un d e rl i n e d to get details on what makes up that total. For example, on the Funds Total-Core tab, clicking on the underlined number under Original
Page | 9
Expense Budget will bring up all cost centers with that fund code.
On the Budget FY – Sal tab in Core/Non-Core, drilling down on an underlined expense total in A&P, Classified, or Faculty will take you to Payroll and a list of all persons in that cost center with that salary type.
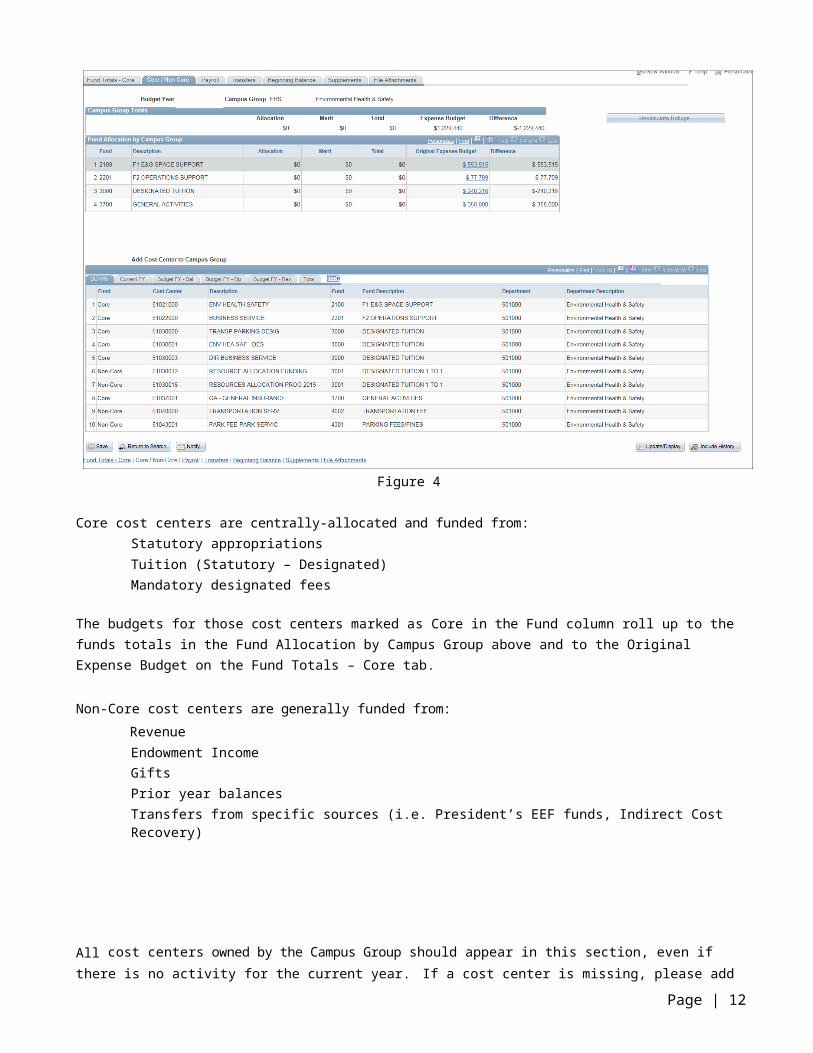
C O R E / N O N - C O R E TAB The Core/Non-Core section of the Budget Planning Module summarizes the budgets for all cost centers within a particular school or division (as illustrated in Figure 4). Cost centers are classified as either Core or Non-Core based on their funding source. Cost centers that receive centrally-funded allocations are considered Core. All other cost centers are considered Non-Core.
Figure 4
Core cost centers are centrally-allocated and funded from: Statutory appropriationsTuition (Statutory – Designated)Mandatory designated fees
The budgets for those cost centers marked as Core in the Fund column roll up to the funds totals in the Fund Allocation by Campus Group above and to the Original Expense Budget on the Fund Totals – Core tab.
Non-Core cost centers are generally funded from:RevenueEndowment IncomeGifts
Page | 10
Prior year balancesTransfers from specific sources (i.e. President’s EEF funds, Indirect Cost Recovery)
All cost centers owned by the Campus Group should appear in this section, even if there is no activity for the current year. If a cost center is missing, please add it by using the Add Cost Center to Campus Group area. You can only enter active cost centers which are a part of your campus group.
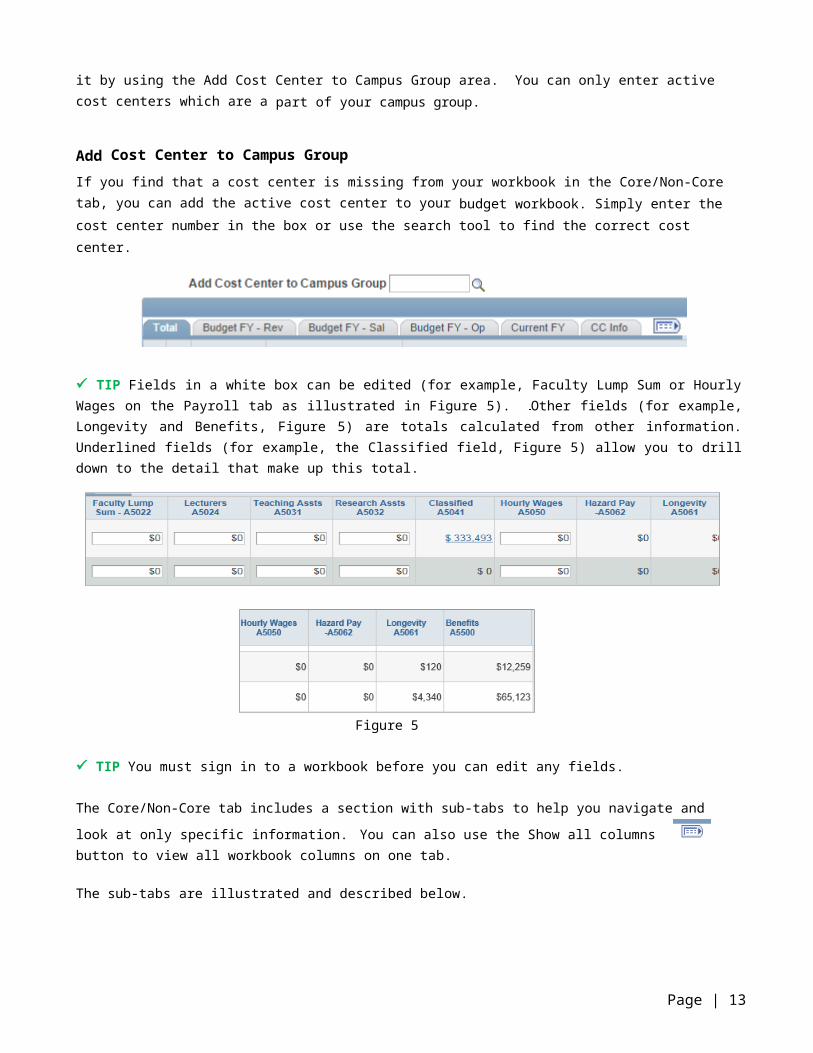
Add Cost Center to Campus GroupIf you find that a cost center is missing from your workbook in the Core/Non-Core tab, you can add the active cost center to your budget workbook. Simply enter the cost center number in the box or use the search tool to find the correct cost center.
TIP Fields in a white box can be edited (for example, Faculty Lump Sum or Hourly Wages on the Payroll tab as illustrated in Figure 5). Other fields (for example, Longevity and Benefits, Figure 5) are totals calculated from other information. Underlined fields (for example, the Classified field, Figure 5) allow you to drill down to the detail that make up this total.
Figure 5
TIP You must sign in to a workbook before you can edit any fields.
The Core/Non-Core tab includes a section with sub-tabs to help you navigate and look at only specific information. You can also use the Show all columns button to view all workbook columns on one tab.
The sub-tabs are illustrated and described below.
Page | 11
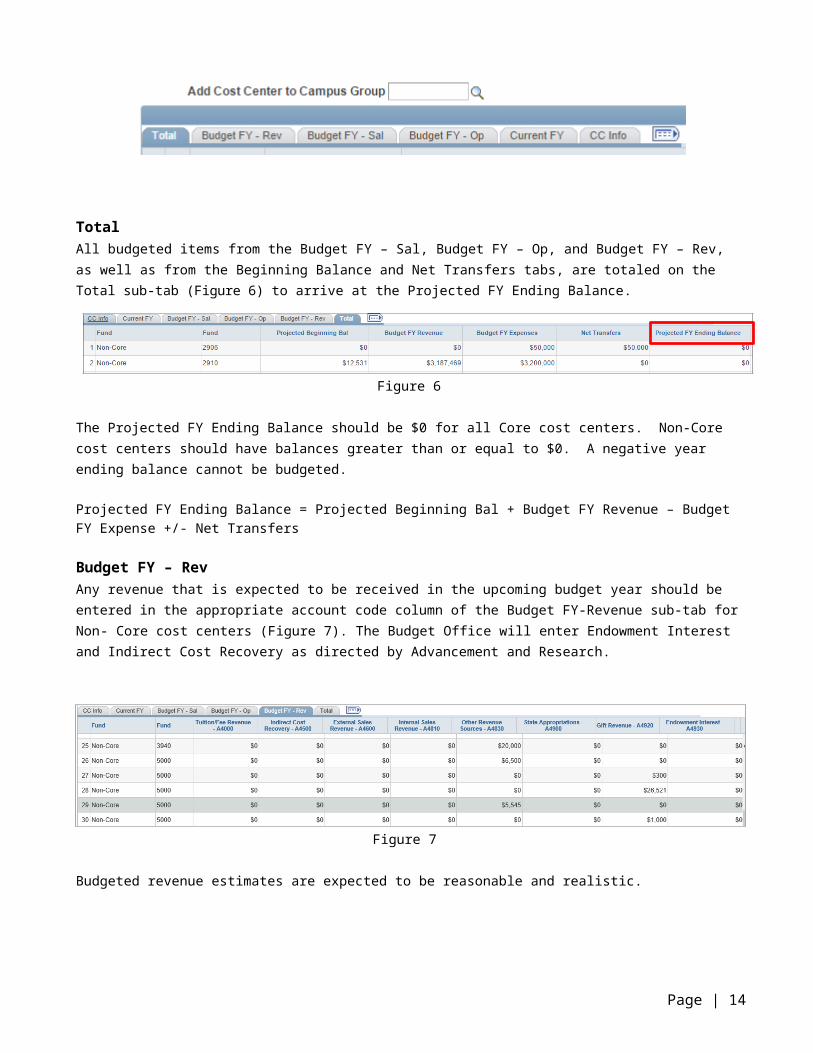
TotalAll budgeted items from the Budget FY – Sal, Budget FY – Op, and Budget FY – Rev, as well as from the Beginning Balance and Net Transfers tabs, are totaled on the Total sub-tab (Figure 6) to arrive at the Projected FY Ending Balance.
Figure 6
The Projected FY Ending Balance should be $0 for all Core cost centers. Non-Core cost centers should have balances greater than or equal to $0. A negative year ending balance cannot be budgeted.
Projected FY Ending Balance = Projected Beginning Bal + Budget FY Revenue – Budget FY Expense +/- Net Transfers
Budget FY – RevAny revenue that is expected to be received in the upcoming budget year should be entered in the appropriate account code column of the Budget FY-Revenue sub-tab for Non- Core cost centers (Figure 7). The Budget Office will enter Endowment Interest and Indirect Cost Recovery as directed by Advancement and Research.
Figure 7
Budgeted revenue estimates are expected to be reasonable and realistic.
Page | 12
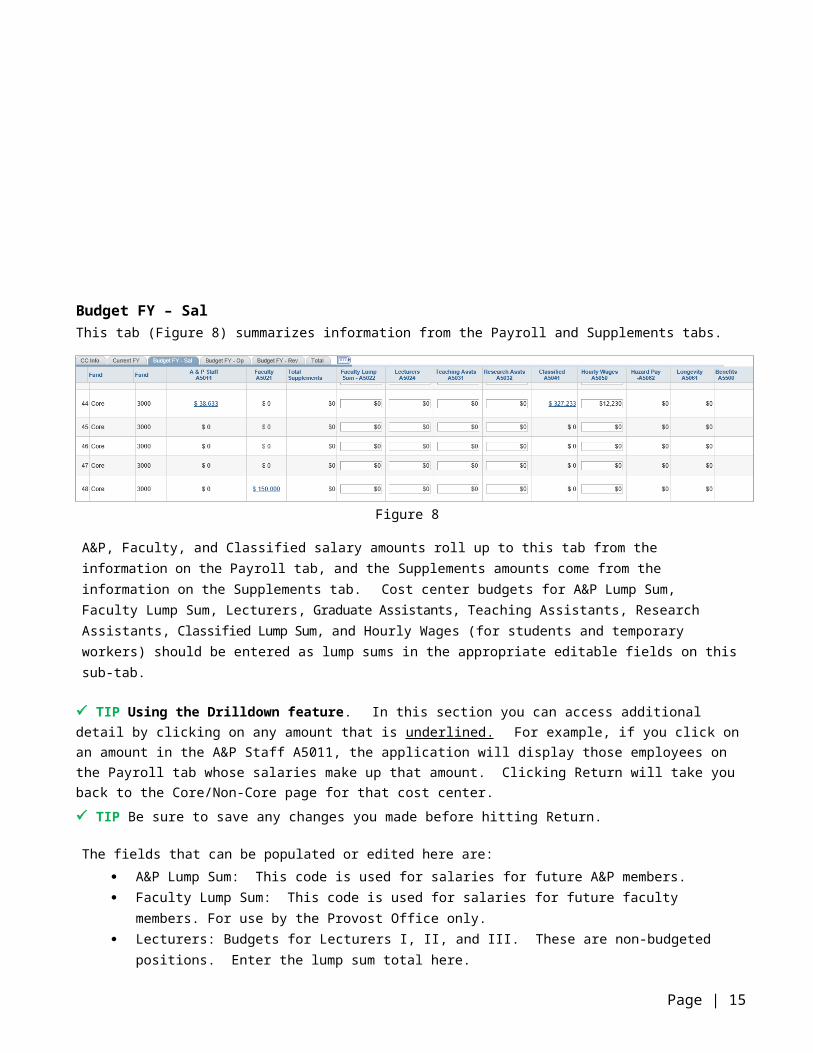
Budget FY – SalThis tab (Figure 8) summarizes information from the Payroll and Supplements tabs.
Figure 8
A&P, Faculty, and Classified salary amounts roll up to this tab from the information on the Payroll tab, and the Supplements amounts come from the information on the Supplements tab. Cost center budgets for A&P Lump Sum, Faculty Lump Sum, Lecturers, Graduate Assistants, Teaching Assistants, Research Assistants, Classified Lump Sum, and Hourly Wages (for students and temporary workers) should be entered as lump sums in the appropriate editable fields on this sub-tab.
TIP Using the Drilldown feature. In this section you can access additional detail by clicking on any amount that is underlined . For example, if you click on an amount in the A&P Staff A5011, the application will display those employees on the Payroll tab whose salaries make up that amount. Clicking Return will take you back to the Core/Non-Core page for that cost center. TIP Be sure to save any changes you made before hitting Return.
The fields that can be populated or edited here are: A&P Lump Sum: This code is used for salaries for future A&P members. Faculty Lump Sum: This code is used for salaries for future faculty members. For use by
the Provost Office only. Lecturers: Budgets for Lecturers I, II, and III. These are non-budgeted positions. Enter the
lump sum total here. Graduate Assistants: Those with Job Code S00071. Teaching Assistants: Those with Job Code S00061. Lump sum for individuals employed in
positions which require student status as a condition of employment, such as student assistants and teaching assistants.
Research Assistants: Those with Job Code S00634. Classified Lump Sum: This code is used for salaries for future Classified members. Hourly Wages: Budgeted amount to pay student employees other than TAs and RAs, and
temporary workers. Longevity, Hazard Pay, and Benefits are also summarized from the Payroll tab.
Amounts are only shown for those cost centers that must pay for these expenses.
Page | 13
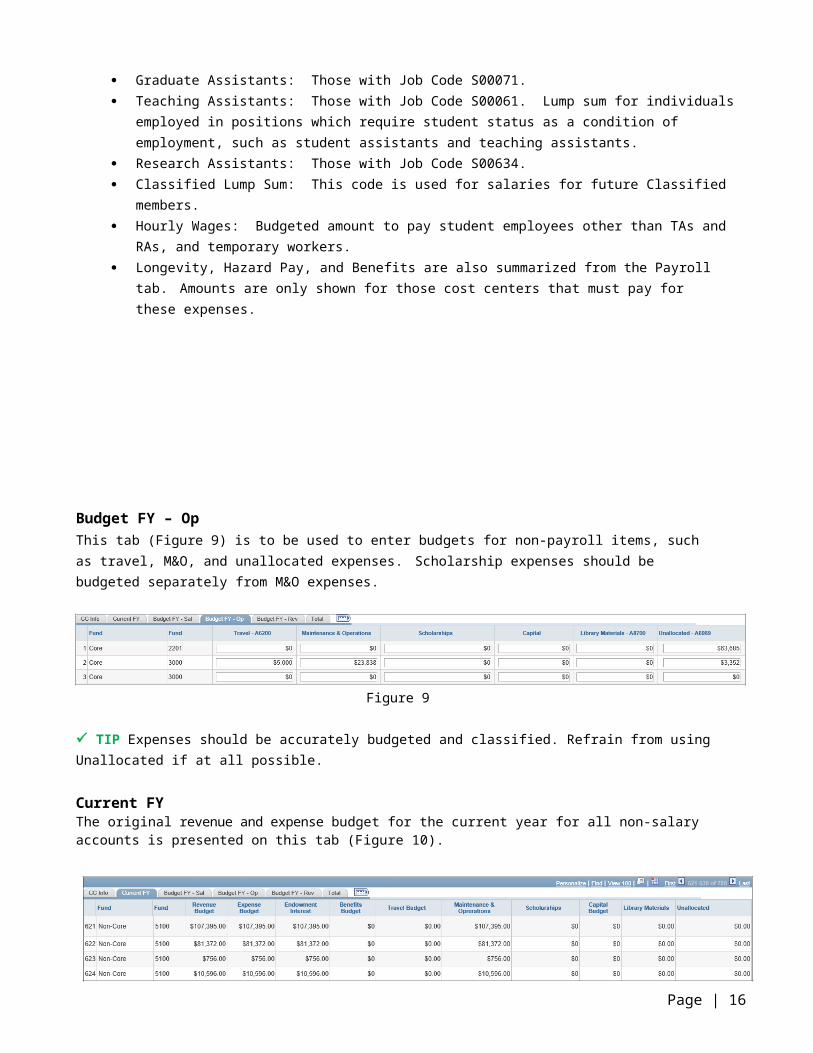
Budget FY – OpThis tab (Figure 9) is to be used to enter budgets for non-payroll items, such as travel, M&O, and unallocated expenses. Scholarship expenses should be budgeted separately from M&O expenses.
Figure 9
TIP Expenses should be accurately budgeted and classified. Refrain from using Unallocated if at all possible.
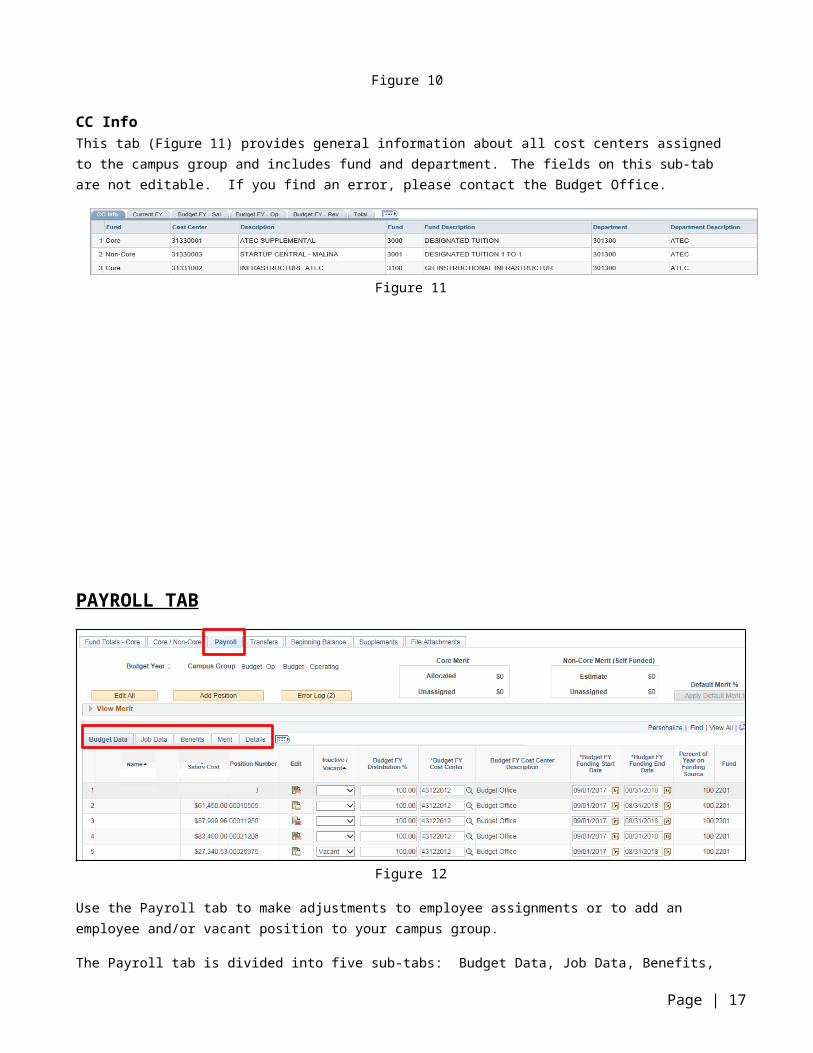
Current FY The original revenue and expense budget for the current year for all non-salary accounts is presented on this tab (Figure 10).
Figure 10
CC InfoThis tab (Figure 11) provides general information about all cost centers assigned to the campus group and includes fund and department. The fields on this sub-tab are not editable. If you find an error, please contact the Budget Office.
Figure 11
Page | 14
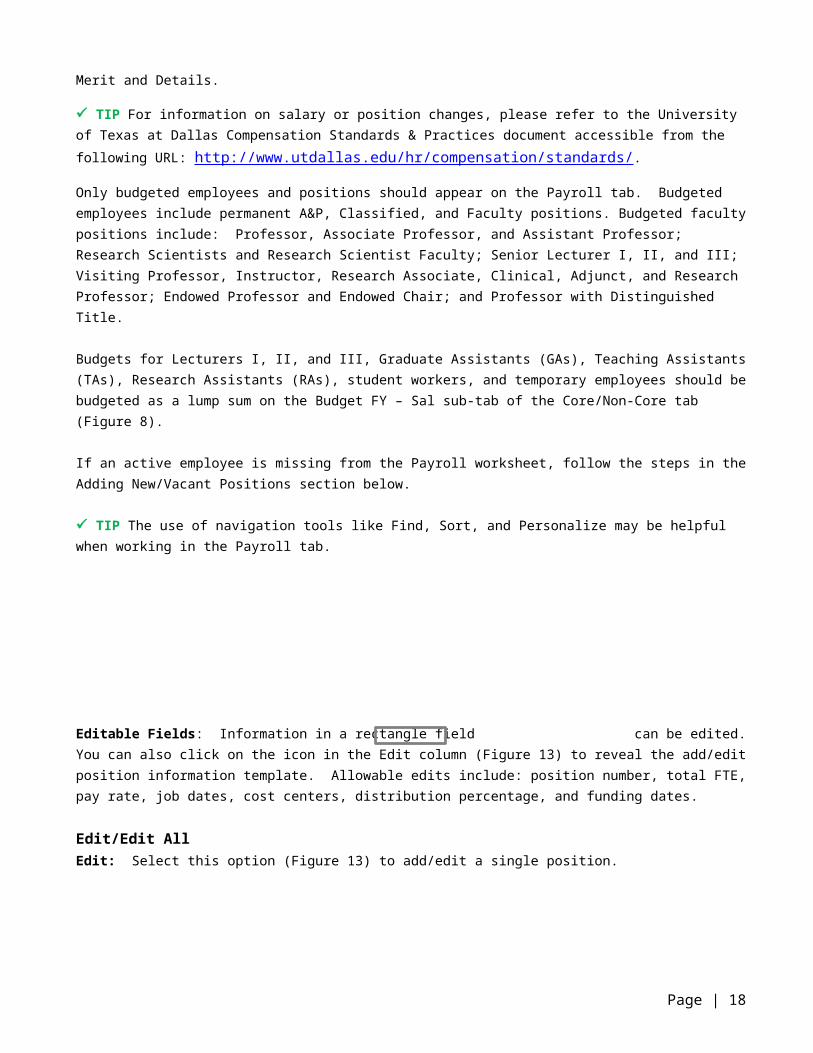
PAYROLL TAB
Figure 12
Use the Payroll tab to make adjustments to employee assignments or to add an employee and/or vacant position to your campus group.
The Payroll tab is divided into five sub-tabs: Budget Data, Job Data, Benefits, Merit and Details.
TIP For information on salary or position changes, please refer to the University of Texas at Dallas Compensation Standards & Practices document accessible from the following URL: http://www.utdallas.edu/hr/compensation/standards/.
Only budgeted employees and positions should appear on the Payroll tab. Budgeted employees include permanent A&P, Classified, and Faculty positions. Budgeted faculty positions include: Professor, Associate Professor, and Assistant Professor; Research Scientists and Research Scientist Faculty; Senior Lecturer I, II, and III; Visiting Professor, Instructor, Research Associate, Clinical, Adjunct, and Research Professor; Endowed Professor and Endowed Chair; and Professor with Distinguished Title.
Budgets for Lecturers I, II, and III, Graduate Assistants (GAs), Teaching Assistants (TAs), Research Assistants (RAs), student workers, and temporary employees should be budgeted as a lump sum on the Budget FY – Sal sub-tab of the Core/Non-Core tab (Figure 8).
If an active employee is missing from the Payroll worksheet, follow the steps in the Adding New/Vacant Positions section below.
TIP The use of navigation tools like Find, Sort, and Personalize may be helpful when working in the Payroll tab.
Page | 15
Editable Fields: Information in a rectangle field can be edited. You can also click on the icon in the Edit column (Figure 13) to reveal the add/edit position information template. Allowable edits include: position number, total FTE, pay rate, job dates, cost centers, distribution percentage, and funding dates.
Edit/Edit AllEdit: Select this option (Figure 13) to add/edit a single position.
Figure 13
After clicking Edit, the following form (Figure 14) will be displayed. You will be able to make changes in the editable fields.
Figure 14
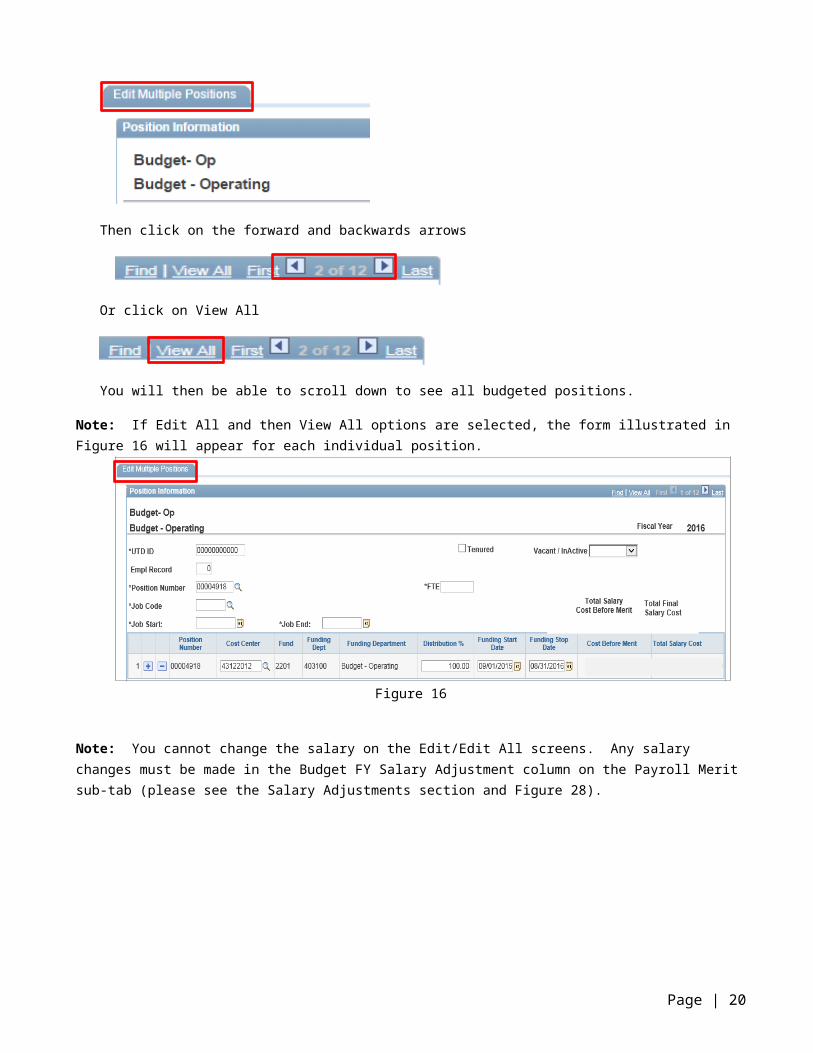
Edit All: You can edit multiple positions by accessing the Edit All button (Figure 15):
Figure 15
Page | 16
Select Edit Multiple Positions
Then click on the forward and backwards arrows
Or click on View All
You will then be able to scroll down to see all budgeted positions.
Note: If Edit All and then View All options are selected, the form illustrated in Figure 16 will appear for each individual position.
Figure 16
Note: You cannot change the salary on the Edit/Edit All screens. Any salary changes must be made in the Budget FY Salary Adjustment column on the Payroll Merit sub-tab (please see the Salary Adjustments section and Figure 28).
Page | 17
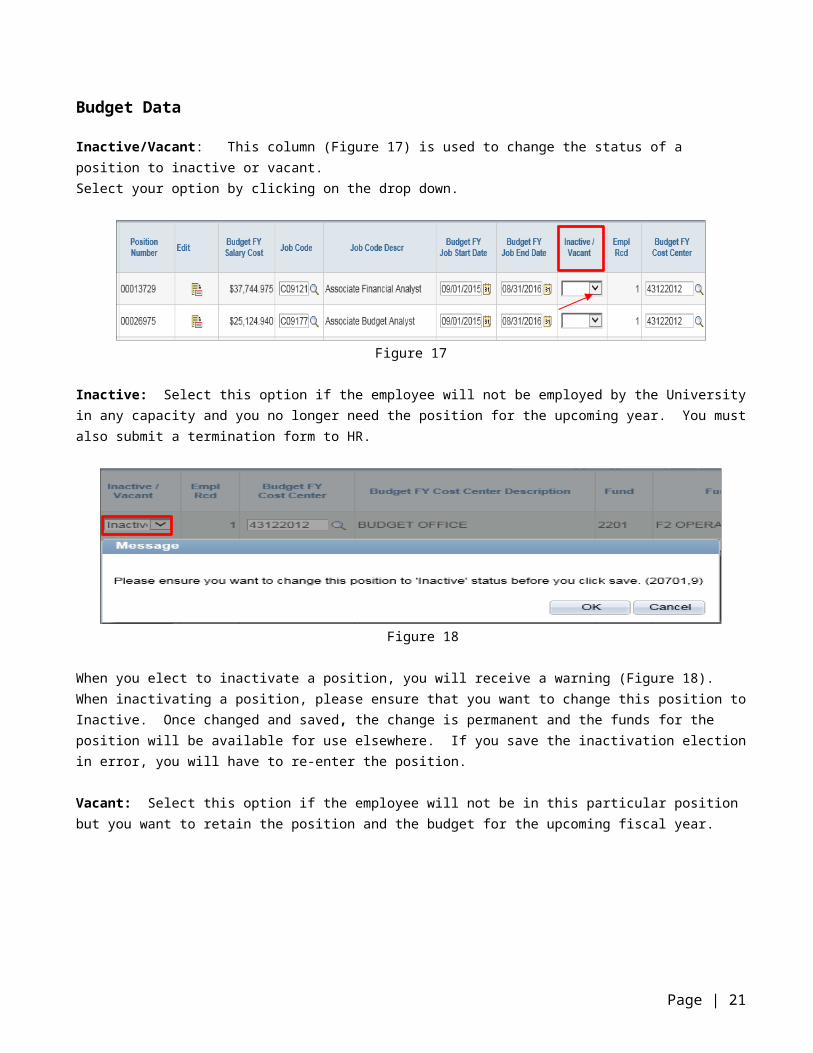
Budget Data
Inactive/Vacant: This column (Figure 17) is used to change the status of a position to inactive or vacant. Select your option by clicking on the drop down.
Figure 17
Inactive: Select this option if the employee will not be employed by the University in any capacity and you no longer need the position for the upcoming year. You must also submit a termination form to HR.
Figure 18
When you elect to inactivate a position, you will receive a warning (Figure 18). When inactivating a position, please ensure that you want to change this position to Inactive. Once changed and saved, the change is permanent and the funds for the position will be available for use elsewhere. If you save the inactivation election in error, you will have to re-enter the position.
Vacant: Select this option if the employee will not be in this particular position but you want to retain the position and the budget for the upcoming fiscal year.
Figure 19
When electing to make a position vacant, you will be prompted with a warning (Figure 19). Please Page | 18

ensure that you want to change this position to Vacant. Once changed and saved, the change is permanent and the funds are budgeted for the vacant position. If you saved the vacant election in error, you will have to re-enter the position and all related information.
Funding ChangesBudget FY Distribution %: Total distribution for a position cannot exceed 100%. If a distribution greater than 100% is entered, the error (Figure 20) will be recorded in the error log. The distribution percentage must be corrected in order to submit the budget workbook.
Please note: You cannot change the total annualized FTE. Once the Budget FY Distribution % is corrected the annualized FTE will automatically correct.
Figure 20
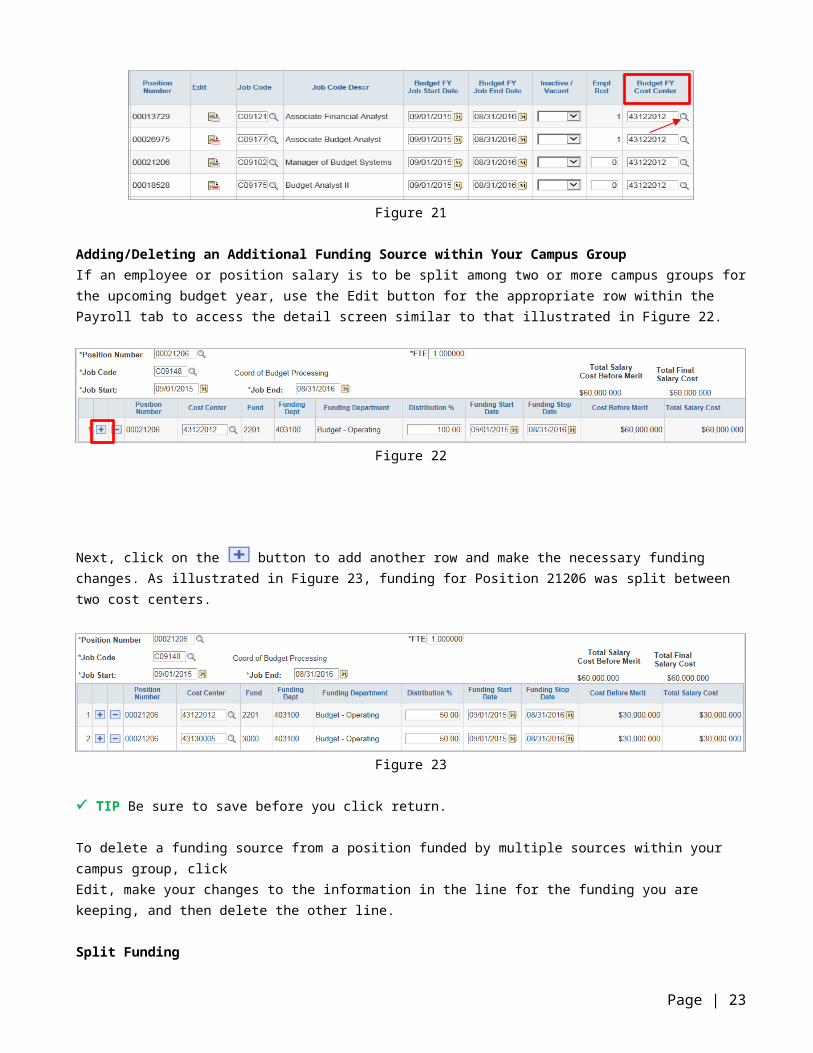
Budget FY Cost Center: Use the Budget FY Cost Center column (Figure 21) to change the cost center for an existing employee. A drop down menu is available for your use by clicking on the magnifying glass. Only those cost centers in your campus group will be available for selection.
Figure 21
Adding/Deleting an Additional Funding Source within Your Campus GroupIf an employee or position salary is to be split among two or more campus groups for the upcoming budget year, use the Edit button for the appropriate row within the Payroll tab to access the detail screen similar to that illustrated in Figure 22.
Figure 22
Page | 19
Next, click on the button to add another row and make the necessary funding changes. As illustrated in Figure 23, funding for Position 21206 was split between two cost centers.
Figure 23
TIP Be sure to save before you click return.
To delete a funding source from a position funded by multiple sources within your campus group, clickEdit, make your changes to the information in the line for the funding you are keeping, and then delete the other line.
Split FundingIf this icon appears in the Split Funding column then the funding for this position is shared between two campus groups (as illustrated in Figure 24).
Figure 24
Click on the Split Funding icon and the complete split funding information for the employee will appear (Figure 25).
Figure 25
Page | 20
Payroll-related changes for split-funded positions among multiple campus groups will require coordination among the budget preparers for all campus groups to assure that funding as well as FTE and distribution are correct for that employee. Regardless of how many campus groups support the funding for a position, the position’s FTE cannot exceed 1.00.
If this icon appears in the Split funding column then the funding for this position is shared between cost centers within the campus group (as illustrated in Figure 26).
Figure 26
Click on the Split Funding icon and the complete split funding information for the employee will appear (Figure 27).
Figure 27
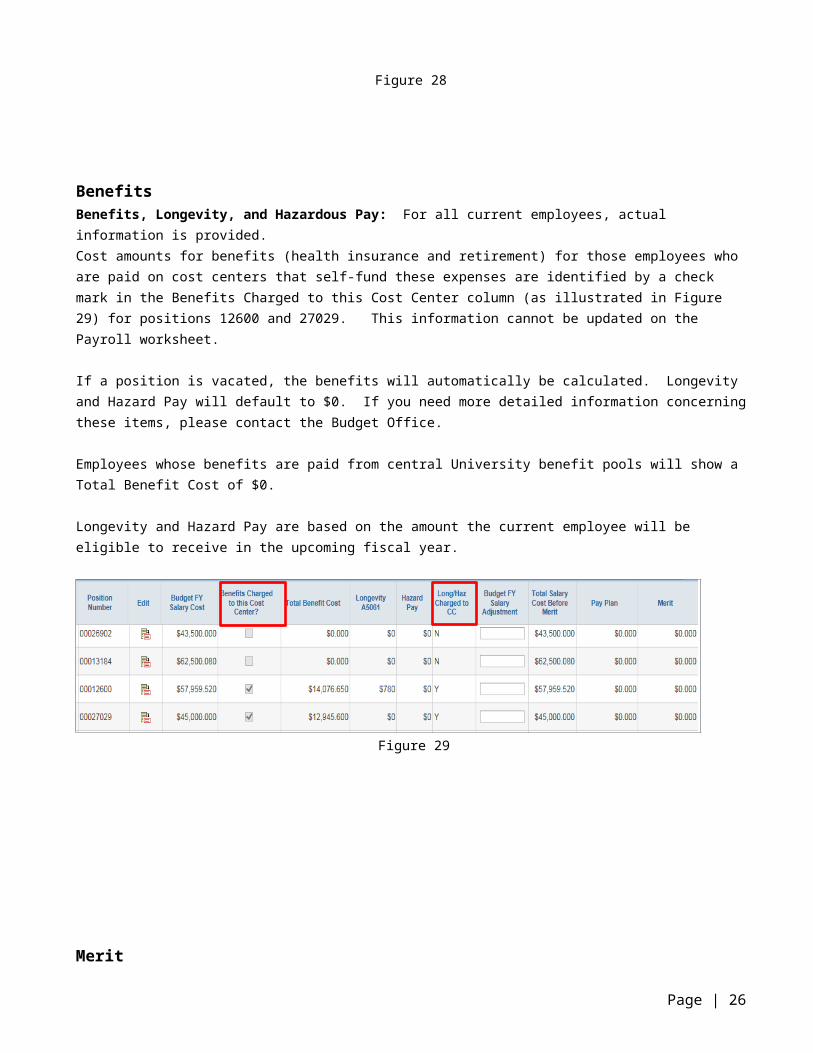
Job Data FTE: This is the percent of time worked and should equal the total FTE for this employee, including
Page | 21

all salary splits. If the calculated FTE for an employee is greater than 1.00, a warning message as illustrated in Figure 28 will be displayed. The user will need to click “OK” and correct the FTE for the employee noted. The workbook cannot be submitted until the error is corrected.
Figure 28
Benefits Benefits, Longevity, and Hazardous Pay: For all current employees, actual information is provided. Cost amounts for benefits (health insurance and retirement) for those employees who are paid on cost centers that self-fund these expenses are identified by a check mark in the Benefits Charged to this Cost Center column (as illustrated in Figure 29) for positions 12600 and 27029. This information cannot be updated on the Payroll worksheet.
If a position is vacated, the benefits will automatically be calculated. Longevity and Hazard Pay will default to $0. If you need more detailed information concerning these items, please contact the Budget Office.
Employees whose benefits are paid from central University benefit pools will show a Total Benefit Cost of $0.
Longevity and Hazard Pay are based on the amount the current employee will be eligible to receive in the upcoming fiscal year.
Figure 29
Page | 22
Merit Salary Adjustments: If you need to make an adjustment to the salary, make the change in the Budget FY Salary Adjustment column (see Figure 30). You will need to enter a positive or negative number that, when combined with the current salary, will equal the desired salary for the current budget year. This field is NOT to be used for any merit adjustments.
Figure 30
MERITThe merit portion of the workbook is located on the Payroll tab (Figure 31).
Figure 31
The merit process will take place in the second phase of budget development. A campus group’s merit pool is based on the budgeted salaries of eligible positions as balanced and submitted during the first phase. The calculated pool amount excludes vacant positions. As defined in Texas Education Code Section 51.962, an employee must have been employed by the institution for at least six consecutive months immediately preceding the effective date of the increase to be eligible for a merit increase, and at least six months must have elapsed since the employee’s last merit salary increase. For questions on merit eligibility, please refer to the University of Texas at Dallas Compensation Standards & Practices guide available at the following UR: http://www.utdallas.edu/hr/compensation/standards/.
Merit is allocated by Core and Non-Core funds. Allocations can be exceeded by using M&O or Unallocated funds, as long as the cost center and/or fund remain in balance.
Allocated Merit: This is the amount of your merit pool (Figure 31).
Unassigned Merit: This is the amount of the pool still available for distribution (Figure 31).
Merit can be added as a dollar amount (ex. $500) in the Merit column, or a specific percent increase in Merit Increase Percent column. Enter merit adjustments in either column. Vacancies are not
Page | 23

eligible for merit awards, and are automatically checked as Not Eligible for Merit. You can also mark any other positions that are not eligible for merit. Amounts can still be added for pay plan, exceptional merit, increases related to promotions, or market and equity adjustments.
If an employee’s salary is split between two or more cost centers, please ensure that the merit
percentages in each Campus Group are the same. Employees will have an icon in the Split Funding column of the Budget Data mini tab if the salary is split between cost centers within the campus group. Clicking on this will allow you to see the merit for all cost centers. Coordination between departments will be needed if an employee’s salary is split with another department.
These employees will have an icon in the Split Funding column and will show the merit awarded by each group. Total merit for that employee should equal the increase from Department A plus the increase from Department B; the total FY17 annual rate at 100% will be the same for both departments.
Other adjustments: Any budget year salary increases for market and equity adjustments, promotion, and/or exceptional merit, as well as one time merit awards, will require a written request submitted to the Provost or President. Upon authorized approval, the Budget Office will enter all approved adjustments into the workbook and make any necessary adjustments to allocations or budgets. Any necessary adjustments due to changes in the Pay Plan will be made by the Budget Office with guidance from Human Resources.
Other column: FOR BUDGET USE ONLY
Budget FY Salary Increase and Total Increase Percent: These columns are automatically updated and include adjustments from all sources.
Details Line Comments: A place for explanatory comments is available for each line of the Payroll tab
.
Home Department: Editable if the employee’s home department has changed due to a transfer, departmental reorg or split.
Adding New/Vacant Positions:Follow the steps in this section when budgeting for new positions, vacancies, or when adding additional funding lines for an existing employee.
NO positions can be added to your budget unless they have been approved and assigned a position number. Requests for new staff positions, replacements for existing positions, and reclassifications should be made through the Office of Human Resources using a Position Review and Request Form (PRR). Requests for new faculty positions are made through the Office of the Executive Vice President and Provost. You can add positions in two ways (Figure 32):
1. By clicking on the sign on the Payroll tab listing all employees, which will insert a new row. Once the row is created then enter the appropriate information.
2. Click on
Page | 24
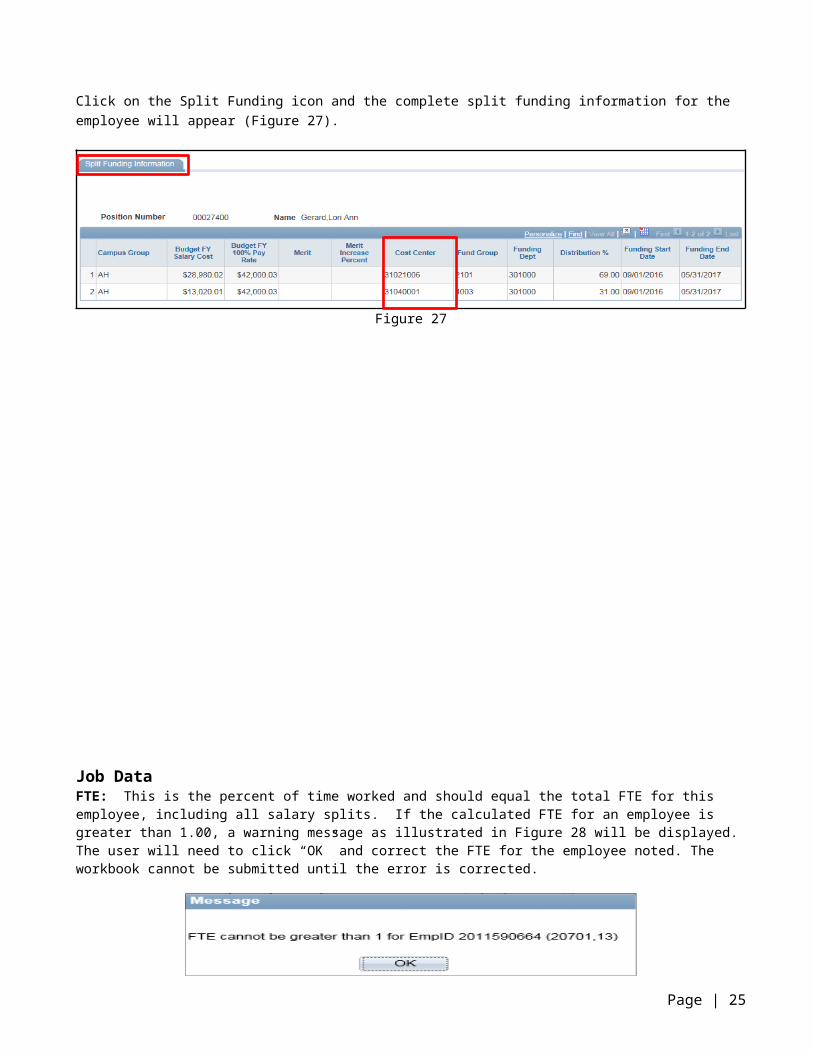
Figure 32
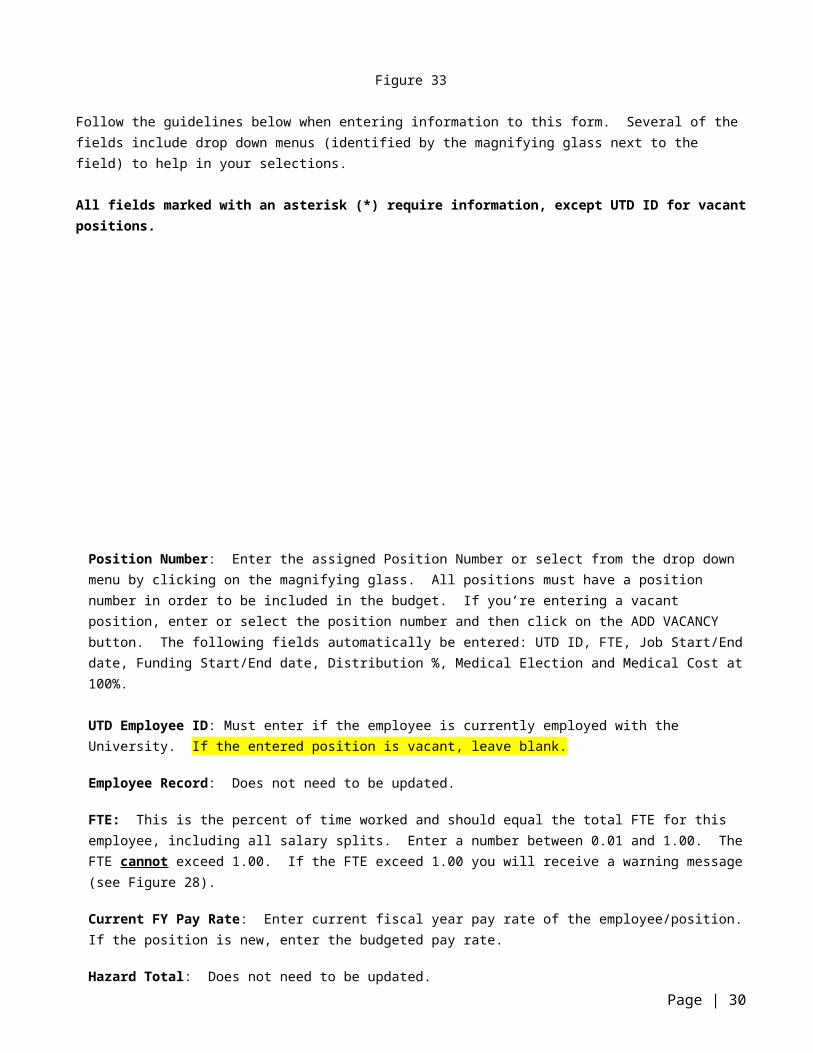
Note: If you click on the button, the form illustrated in Figure 33 will be displayed:
Figure 33
Follow the guidelines below when entering information to this form. Several of the fields include drop down menus (identified by the magnifying glass next to the field) to help in your selections.
All fields marked with an asterisk (*) require information, except UTD ID for vacant positions.
Page | 25
Position Number: Enter the assigned Position Number or select from the drop down menu by clicking on the magnifying glass. All positions must have a position number in order to be included in the budget. If you’re entering a vacant position, enter or select the position number and then click on the ADD VACANCY button. The following fields automatically be entered: UTD ID, FTE, Job Start/End date, Funding Start/End date, Distribution %, Medical Election and Medical Cost at 100%.
UTD Employee ID: Must enter if the employee is currently employed with the University. If the entered position is vacant, leave blank.
Employee Record: Does not need to be updated.
FTE: This is the percent of time worked and should equal the total FTE for this employee, including all salary splits. Enter a number between 0.01 and 1.00. The FTE cannot exceed 1.00. If the FTE exceed 1.00 you will receive a warning message (see Figure 28).
Current FY Pay Rate: Enter current fiscal year pay rate of the employee/position. If the position is new, enter the budgeted pay rate.
Hazard Total: Does not need to be updated.
Longevity Total: Does not need to be updated.
Cost Center: Enter the funding Cost Center for your campus group or select from the list of cost centers available by clicking the magnifying glass.
Fund Code: The fund code will automatically be entered based on the cost center selected.
Job Code: Enter the job code or select from the list displayed after clicking on the magnifying glass.
Job Start and End Dates: Please enter the job start and end dates. Most jobs should start September 1 of the budget year. Summer assignments begin June 1. The end date will be 05/31 for nine month employees, and 08/31 for 12 month employees.
Comp Frequency: The Comp Rate is the frequency at which the employee will be paid. Click on the magnifying glass next to this field for a list of Comp Rate codes. If you’re not sure which comp rate code to select, please leave this field blank. The most commonly used Comp Rate codes are:
Classified and A&P staff = M (paid every month for 12 months)Faculty (excludes part-time Lecturers) = M9 (paid over 9 months)
Pay group: Click on the magnifying glass next to the Pay Group field for a list of valid Pay Group codes. If you’re not sure which pay group to select, please leave this field blank. Below is a list of commonly used Pay Groups codes:
Page | 26
Pay Group
Description
MOA DAL-CONTRACT 9/12 MONTH
MOC DAL-CONTRACT 9 MONTHMOE DAL-MONTHLY EXEMPTMON DAL-MONTHLY
NONEXEMPT

Funding Start and End Dates: Enter the date that the funding for the position will begin and end in the upcoming budget year.
Distribution %: Enter a number between 0.01 and 100. This is the cost center’s allocation share for the employee. The Distribution ca nno t exceed 100%. If the Distribution exceeds 100% you will receive a message in the error log (See Figure 20).
Account Code: This will automatically populate based on the Job Code selected. 51011 Administrative and Professional Salaries 51021 Faculty Salaries51041 Classified Salaries
Retirement Code: TRS or ORP. You may leave this field blank if you are not sure of the election.
Medical Election: Elections
Description
EE Employee OnlyEE+CH Employee and ChildEE+FA Employee and FamilyEE+SP Employee and Spouse
If you do not know the correct medical election, please leave the field blank. If a position is marked as Vacant, the medical benefits will default to EE + CH.
Medical Cost at 100%: This will automatically populate based on the Medical Election selected.
Once all of the payroll information is entered, click on the Save button. After saving the information, click on the Return button, go to the Core/Non-Core tab, and click on the Recalculate Rollups (Figure 34).
Figure 34
Page | 27
SALARY ROSTER The Salary Roster is a report that generates the total salary by employee within your campus group. Even if the employee is split funded it will be included in the total salary.
Click on Commitment Control custom >Budget > Budget Reports
Figure 35
You will be presented with the following prompt when you click search. Select bud_ as Illustrated in Figure 36:
Figure 36
You will be presented with the following prompt. Click Run as Illustrated in Figure 37:
Page | 28
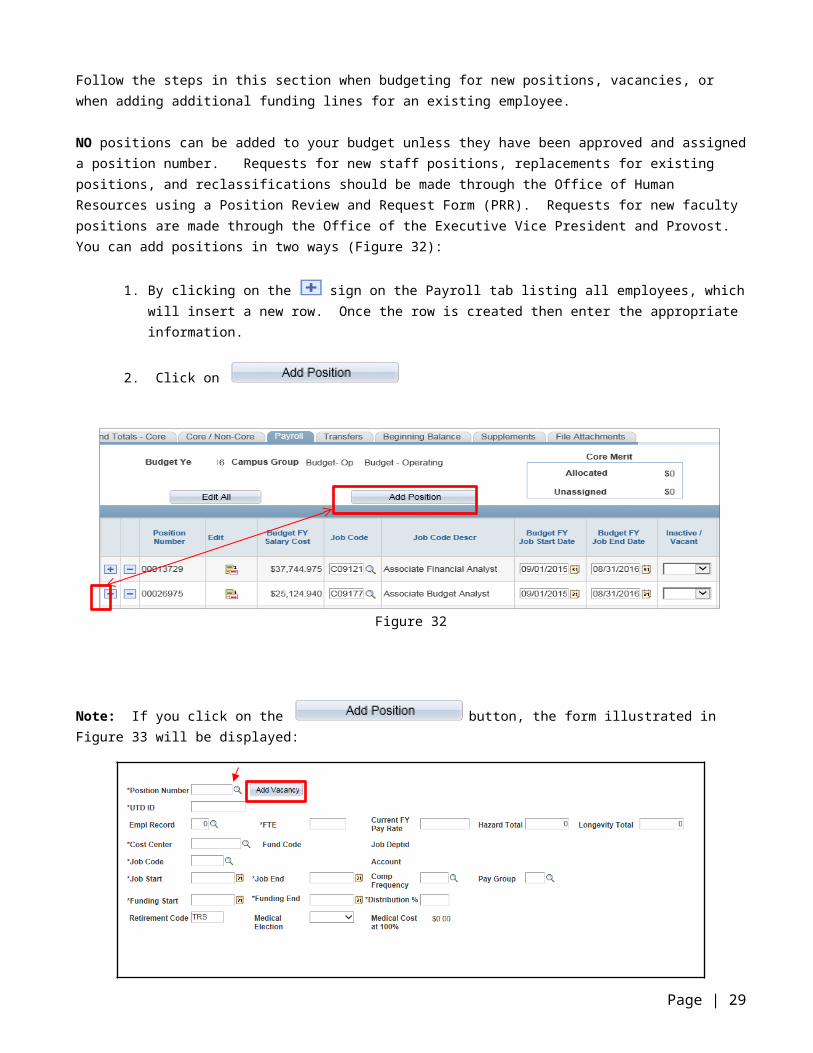
Figure 37
Then select Salary Roster Report and click OK (Figure 38). Figure 37 will appear again and then you’ll need to click on Process Monitor. After clicking on Process Monitor and it will take you to Figure 39.
Figure 38
Once the process Run Status says Success and the Distribution Status says Posted click on Page | 29
Details
Figure 39
Click on View Log/Trace (Figure 40).
Figure 40Click on UTDBP035.xls (Figure 41).
Figure 41
T RANSFERS TAB Page | 30
Figure 42
The Transfers tab (as illustrated in Figure 42) lists all funds transferred both to and from the campus group cost centers. Campus groups can enter transfers to and from cost centers within their departments. All other transfers will be loaded by the Budget Office.
All amounts in the From Amount must be entered as a negative number. Amounts for the Target Cost Center will automatically populate once the Transfer From amount is entered. These amounts are then populated in the Total sub-tab in the Core/Non-Core tab.
Only cost centers which belong to the campus group may be used. The cost center may be selected from the drop down list or may be entered manually.
When a fund transfer is needed to or from a cost center outside of your campus group, please contact the Budget Office for assistance.
B E GI N NI NG BAL A N C E TAB
Figure 43
The Beginning Balance Worksheet (as illustrated in Figure 43) is provided to budget large uses of prior year balances. These should be limited to critical items, unique opportunities, or projects funded from prior year income committed for that purpose. Generally, balance usage should be reserved for nonrecurring activities. Budget Office approval is required for budgeted fund balances. Justification details should be added to the comments section.
SUPPLEMENTS TAB This section is for Salary Supplements only. The Supplements tab (illustrated in Figure 44) contains information for any supplemental payroll items for employees in your campus group, and
Page | 31

reflects current year expenses. Please verify this data and make any necessary changes. The distribution for any supplements that are split between cost centers must equal 100%. If you need to add a salary supplement, click on the sign to add a line, and provide the appropriate information. If an employee is no longer receiving a supplement amount, change the amount to zero. Do not delete the row. The totals for this tab roll up to Budget FY – Sal sub-tab on the Core/Non-Core tab.
Figure 44
FILE ATTACHMENTS TAB
Figure 45
The File Attachments Tab (Figure 45) can be used to include supporting documents for the campus group budget. Explanatory emails, documents, etc. which will confirm or clarify budget information can be uploaded here. Reference to any attachments can be put on the Notes section of Fund Totals - Core or in any of the Comments sections of the tabs.
Some examples of attachments the Budget Office will add: IDC List for any campus groups that receive indirect cost funds. This information is
provided by the Office of Research and is estimated of money that will be available for these Non-Core cost centers.
Endowment Report: This report contains preliminary estimates of long-term funds accessible in the budget year. The Office of Development and Alumni Relations is the source for this report. Only those departments with Endowment income will have this attachment and revenue as part of their campus group workbook.
S UB M I TT I NG T H E W O R K BO O K Once all of the work on the budget is complete, including merit, the balancing of the Core
Page | 32

allocations and the clearing of all errors on the Error Log, it must be reviewed by the Campus Group Administrator (the appropriate dean, director, or vice president). If the administrator has designated another staff as an administrator to submit the workbook on their behalf, an email needs to be sent to the Budget Office, attesting that the administrator has reviewed the budget information and approves it.
Figure 46
To submit a workbook, The Campus Group Administrator (or designee) should click the area “Submit Phase P1 for Executive Member to review” on the Funds Total – Core page (see Figure 46). The workbook will then be locked for editing by the campus group users until the merit phase opens.
If the Core funds are not in balance, you will get an error message indicating which fund(s) exceed the allocations (illustrated in Figure 47).
Figure 47
Click Ok, and fix the allocation for the fund(s) noted. Once corrected, you may submit the workbook.
Page | 33


![[chapter title] - Department of Treasury and Finance · Web viewA $59.5 million Budget investment will deliver a new rehab centre at Bendigo Hospital, bringing together vital services](https://img.pdfslide.us/doc/110x75/5f2e15df99db5258ab2357ce/chapter-title-department-of-treasury-and-finance-web-view-a-595-million-budget.jpg)