Embed Size (px)
Citation preview

Web
Pu
blish
ing
Win
zard
Web
Pu
blish
ing
Win
zard
Fir
st
inF
ield
bu
sF
irs
tin
Fie
ldb
us
sm
ar
FOUNDATION
TM
USER’S MANUAL
Web PublishingWizard
MAY / 06
VERSION 8
-
Web Publishing Wizard
P V I E W W P W M E

web: www.smar.com/contactus.asp
www.smar.com
Specifications and information are subject to change without notice.
Up-to-date address information is available on our website.
Table of Contents
III
TABLE OF CONTENTS
WEB PUBLISHING WIZARD ...........................................................................................................5 INTRODUCTION TO HTML PUBLISHING.....................................................................................................................5
BASIC STEPS IN PUBLISHING GRAPHWORX DISPLAYS........................................................................................................ 5 DELIVERING THE NECESSARY WEB COMPONENTS TO THE CLIENT ................................................................................. 6 MULTIPLE DISPLAY SUPPORT.................................................................................................................................................. 6 EMBEDDED ACTIVEX CONTROL SUPPORT ............................................................................................................................ 7
USING THE WEB PUBLISHING WIZARD .....................................................................................................................7 STARTING THE WEB PUBLISHING WIZARD............................................................................................................................. 7 EXPORTING A DISPLAY FILE LOCALLY.................................................................................................................................... 9 PUBLISHING A DISPLAY FILE TO A WEB SERVER................................................................................................................ 11 PUBLISHING CUSTOMIZATION OPTIONS .............................................................................................................................. 13 VIEWING LOCALLY EXPORTED HTML FILES......................................................................................................................... 17 VIEWING PUBLISHED HTML FILES ......................................................................................................................................... 17
WEB PUBLISHING IN PROJECTWORX .....................................................................................................................18 WEB PUBLISHING FROM ALARM AND TREND VIEWER FILES ............................................................................................ 20 GRAPHWORX-BASED HTML.................................................................................................................................................... 20 ALARMWORX-BASED HTML .................................................................................................................................................... 20 TRENDWORX-BASED HTML .................................................................................................................................................... 21 LOCAL HTML FILES .................................................................................................................................................................. 21 PUBLISHED DOCUMENTS ....................................................................................................................................................... 22 LAUNCHING THE WEB PUBLISHING WIZARD IN PROJECTWORX ...................................................................................... 22
EXPORT AND PUBLISH OPTIONS IN PROJECTWORX ...........................................................................................25 EXPORTING AND PUBLISHING MULTIPLE DISPLAY FILES IN PROJECTWORX................................................................. 26 EXPORTING AND PUBLISHING INDIVIDUAL DISPLAY FILES IN PROJECTWORX .............................................................. 27 EXPORTING A DISPLAY FILE LOCALLY IN PROJECTWORX ................................................................................................ 29 PUBLISHING A DISPLAY FILE TO A WEB SERVER IN PROJECTWORX............................................................................... 30 PUBLISHING CUSTOMIZATION OPTIONS .............................................................................................................................. 31 PUBLISHING FILES AT A LATER TIME .................................................................................................................................... 35
WEB PUBLISHING LOG...............................................................................................................................................36

Web Publishing Winzard
IV

Web Publishing Winzard
5
WEB PUBLISHING WIZARD
Introduction to HTML Publishing The ProcessView Web Publishing Wizard enables you to "export" your GraphWorX (.gdf), TrendWorX (.t32), and AlarmWorX (.a32) displays to HTML files and/or publish the HTML files to a Web server (LAN or Internet). In publishing displays to a Web server, WebHMI uses HTML to reference the files in an Internet-enabled format. Once a display is "exported" to an HTML file and then published to a Web server, client machines can browse it through an Internet browser, such as Microsoft Internet Explorer. Each display can be viewed as a Web page. Basic Steps in Publishing GraphWorX Displays Publishing a GraphWorX display to HTML involves the following basic steps:
1. Create a GraphWorX display (.gdf) file on a developer workstation with GraphWorX installed.
2. Use the Web Publishing Wizard to generate an HTML file and publish the file to a Web server (URL) address.
3. On the Web server PC (with ProcessView installed), start GenBroker Server from ProcessView Tray.
4. On a client PC, open a Web browser, such as Microsoft Internet Explorer, and browse to the URL address of the HTML file. The client PC downloads the HTML file from the Web server. The Web server delivers all the necessary components (e.g. ActiveX controls) to the client PC's Web browser, which then runs the GraphWorX display directly within the browser. This way you can view the GraphWorX display in real time as a Web page.
The source code of the published HTML file contains references to the required “plug-ins” that are needed to deliver the GraphWorX Viewer ActiveX control to the client. The GraphWorX Viewer ActiveX is needed to run the .gdf file over the network. The GraphWorX display itself is not really “converted” into HTML. Instead the display (.gdf) file is referenced in the HTML code by the ActiveX plug-in. To expand on step 2 above, the following Microsoft Internet Explorer example shows the portion of the generated HTML source code that references the .gdf file. The GWXview32.cab file is referenced in the codeBase field to deliver the “plug-in” for the GraphWorX Viewer ActiveX. This in turn opens up the .gdf display. In the example below, the .gdf display file is called Building1.gdf, as shown below in the DisplayName parameter field. <OBJECT classid=clsid:98A5DDE3-563B-11CF-A343-487C03C10000 codeBase="http://www.myserver.com/webhmi/cabs/GWXview32.cab" id=GWXview321 style="HEIGHT: 420px; WIDTH: 620px" height=420 width=620> <param name="_Version" value="65537"> <param name="_ExtentX" value="16404"> <param name="_ExtentY" value="11113"> <param name="_StockProps" value="160"> <param name="BorderStyle" value="1"> <param name="Appearance" value="1"> <param name="DisplayName" value="http://www.myserver.com/webhmi/Building1.gdf"> <param name="UseAmbientBackColor" value="0"> <param name="AutoStartRuntime" value="-1"> <param name="OverrideScrollbarSettings" value="1"> <param name="VerticalScrollbar" value="0"> <param name="HorizontalScrollbar" value="0"> </OBJECT> Exporting a .gdf file to an HTML file not only references the GWXview32.cab file, as shown in the example above, but also references any other "plug-in" .cab files required for other ActiveX components that may be embedded within the .gdf file (e.g., TrendWorX or AlarmWorX Viewer ActiveX controls). However, before a .gdf file can communicate with live OPC data, the IcoSetServer.cab file “plug-in,” which is necessary for security and licensing, as well as a GenBroker configuration (.gbx) file,
Web Publishing Winzard
6
which contains network configuration settings for OPC communications, must also be delivered to the client PC. The IcoSetServer.cab file and the .gbx file are referenced in the HTML source code. This way the security and licensing information are available whenever a component (such as an Alarm Viewer ActiveX) is downloaded. The sample HTML source code below shows how these files are referenced in the code. <object id="SetServer" classid="clsid:57802C16-9A15-11D4-B2A8-0090272E599B" codeBase=http://www.myserver.com/WebHMI/cabs/IcoSetServer.cab height=28 width=17> <PARAM NAME="CfgName" VALUE="http://www.myserver.com/WebHMI/Samples/Default.gbx"> </object> The ProcessView Web Publishing Wizard in GraphWorX takes care of all the necessary HTML code references automatically. Microsoft Internet Explorer uses .cab files. Note: If you are using multiple frames for your WebHMI pages (e.g. a main "navigation" frame for browsing between pages, and a "content" frame that contains the body of the pages), make sure that the IcoSetServer.cab file and the .gbx file are properly referenced in the HTML source code for the main frame. This way the security and licensing information are available whenever a component is downloaded. Delivering the Necessary Web Components to the Client WebHMI is designed to operate with Zero Install and Thin Client philosophy. This means the client PC has nothing but Windows and Internet Explorer loaded. Thus, all necessary Web components must be remotely delivered and seamlessly installed. The type and number of components required for delivery on the client PC are determined by the content of the GraphWorX displays. For instance, a display with an embedded Trend Viewer requires delivery of the corresponding TrendWorX Viewer ActiveX Web component, but not the AlarmWorX Viewer ActiveX. On the other hand, a display with an embedded Alarm Viewer requires the corresponding AlarmWorX Viewer ActiveX but not the TrendWorX Viewer ActiveX. The delivery process can be very slow in terms of network speed. To avoid wasting time, the first requirement is to deliver only the required component. The delivery process is strictly connected to the HTML code. Inside the HTML code, there are references to .cab files, the basic ways to deliver components. As a result, the building of the HTML page is a critical step. The Web Publishing Wizard looks inside the display to understand what components are needed on the client side and then builds the corresponding HTML code. Client Station Requirement In order to view a published GraphWorX display, a client PC must have Microsoft Internet Explorer installed. Developer Station Requirement The developer station requires GraphWorX. Web Server Station Requirement The Web server PC must have the following installed:
• WebHMI
• ProcessView (with GenBroker)
• For Windows NT, Internet Information Server (IIS) or a Personal Web Server
• For Windows 2000, Windows XP and Windows Server 2003, Internet Information Server (IIS)
NOTE Because publishing via Microsoft Posting Acceptor is no longer supported on Windows Server 2003, we were forced to find another way of transporting published files from a ProcessView development machine to a WebHMI server. It appeared that FTP would be the best choice. For more information, please see the "Publishing Channel" section below.
Multiple Display Support Suppose that you have a main GraphWorX display (.gdf) file that is linked to other display files (e.g. each display contains pick actions, such as Load Display or Pop-up Window, that point to the other

Introduction to HTML Publishing
7
display files). When you publish the main display to an HTML file, you want all the links and references to the other dependent display files to be functional when the HTML file is downloaded to a client Web browser. The Web Publishing Wizard makes this possible by detecting all mutually linked display files, looping through all dynamic actions, and checking for pick actions in which a file name is specified as one of its parameters. The following pick actions are supported for multiple GraphWorX display Web publishing support: • Load Display • Embedded Window • Popup Window • Drag/Drop Load • Set Aliases • Alias Dialog (alias files specified through the Set Aliases dialog box in GraphWorX). The LoadTabs display property is also supported for publishing multiple GraphWorX displays. Embedded ActiveX Control Support In dealing with a main GraphWorX display (.gdf) file that is linked to other display files (as described in the "Multiple Display Support" section above), suppose you included an ActiveX Control (e.g. Alarm Viewer ActiveX or Trend Viewer ActiveX) into each of the dependent display files. Also suppose that you generated and published an HTML file only from the main display, but you want this single HTML file to trigger the simultaneous download and installation of all ActiveX Controls embedded within all interlinked GraphWorX display files. The Web Publishing Wizard's embedded ActiveX Control support makes this possible, allowing you to view the ActiveX Controls in all displays from a single client Web browser.
Using the Web Publishing Wizard The Web Publishing Wizard performs two basic operations:
1. The Wizard creates an HTML file based on a user-specified GraphWorX display (.gdf) file, TrendWorX display (.t32) file, or AlarmWorX display (.a32 file).
2. The Wizard then either "exports" (saves) the HTML file to a user-specified directory on the local drive and/or "publishes" (uploads) the HTML file to a user-specified Web server URL address (i.e. over the Internet or an intranet).
Starting the Web Publishing Wizard To launch the Web Publishing Wizard in GraphWorX:
1. Load or create a GraphWorX display (.gdf) file.
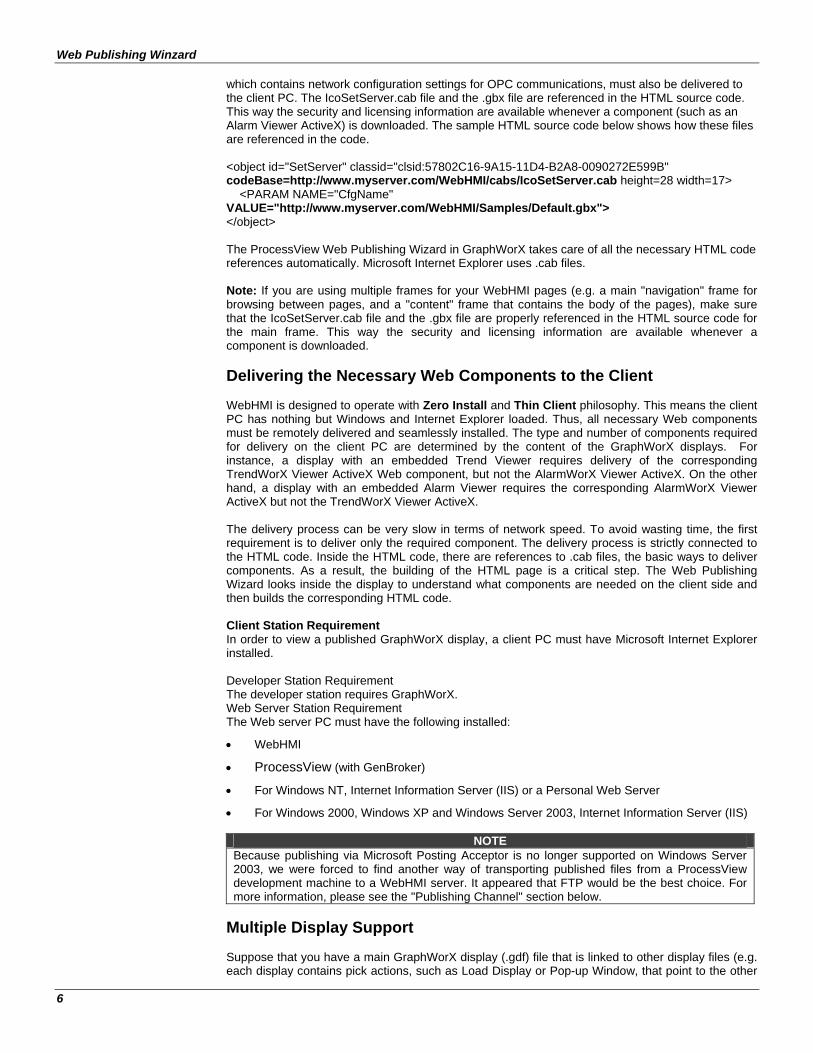
2. After you have either created a new display file or opened an existing file, select Save As from the File menu. The Save As dialog box opens, allowing you to specify the name and location of the file you are about to save. Type a name for the new file in the File Name field. It is important that, when saving your file, you select "GraphWorX Displays without VBA (*.gdf)" in the Save as Type field, as shown in the figure below, because the Web Publishing Wizard does not support Microsoft Visual Basic for Applications (VBA). Click the Save button to save the current file.
Web Publishing Winzard
8
Saving the Display As a Non-VBA File
3. Select Publish to HTML from the Tools menu, as shown in the figure below.
Starting the Web Publishing Wizard in GraphWorX
NOTE If you try to run the Web Publishing Wizard with a GraphWorX display with VBA, you will get a warning message as shown in the figure below. If you click Yes, the Web Publishing Wizard automatically saves the display as a non-VBA file. If you click No, the publishing operation is cancelled.
Warning Message About Displays With VBA
4. This launches the Web Publishing Wizard configuration dialog box, as shown in the figure below. This dialog box serves as the interface through which you export/publish GraphWorX display files to the Web.

Introduction to HTML Publishing
9
NOTE
Both the Publish to Web Server and Export Local Copy actions can be performed at the same time.
Web Publishing Wizard Dialog Box
Exporting a Display File Locally To export a GraphWorX display to a directory on the local drive:
1. In the Based on Source File field of the Web Publishing Wizard, you must specify the name of the GraphWorX display (.gdf) file to be exported, as shown in the figure below. To choose a different display, click the … button to the right to browse for a file. Select a file and then click Open. The directory path and the file name are shown in the text field.

Web Publishing Winzard
10
Specifying a GraphWorX Display File
2. In the Publish Web Page field of the Web Publishing Wizard, specify the name of the HTML file that will be created. The .gdf file name is filled in by default, but you can give the HTML file a different name.
3. In the Publishing Options field, check the Export Local Copy check box and specify the local directory path name to which you want to export the HTML file. You can select a recently used path from the drop-down list, or click the … button to browse for a destination directory, as shown in the figure below. Select the directory and click OK.
Setting the Local Directory

Introduction to HTML Publishing
11
4. The local directory pathway you selected appears in the Export Local Copy field of the Web Publishing Wizard, as shown in the figure below.
Export Local Copy Pathway Shown in the Wizard
5. Click the OK button to generate the HTML file. The new HTML file is saved to the local directory pathway specified in the Export Local Copy field.
NOTE
Both the Publish to Web Server and Export Local Copy actions can be performed at the same time.
Publishing a Display File to a Web Server To publish the HTML file to a directory on a Web server (i.e. over the Internet or an intranet):
1. In the Based on Source File field of the Web Publishing Wizard, you must specify the name of the GraphWorX display (.gdf) file to be published, as shown in the figure below. To choose a different display, click the … button to the right to browse for a file. Select a file and then click Open. The directory path and the file name are shown in the text field.

Web Publishing Winzard
12
Specifying a GraphWorX Display File
2. In the Publish Web Page field of the Web Publishing Wizard, specify the name of the HTML file that will be created. The .gdf file name is filled in by default, but you can give the HTML file a different name.
3. In the Publishing Options field, check the Publish to Web Server check box and type in the URL address of your Web server with the complete directory indicating where you want to publish the HTML file, as shown in the figure below. In the sample Web server URL address shown below ("http://www.myserver.com/WebHMI/Samples"), the various components are:
• http://www.myserver.com: IP address (server name) of the WebHMI Server
• WebHMI: Name of the WebHMI server root directory
• Samples: Name of the directory on the server to which the HTML file will be saved
4. The Web server URL address now appears in the Web Publishing Wizard dialog box in the Publish to Web Server field of the Web Publishing Wizard, as shown in the figure below.

Introduction to HTML Publishing
13
Publish to Web Server Location Specified in Web Publishing Wizard
5. Click the OK button to generate the HTML file. The new HTML file is uploaded to the Web server and then saved to the URL address path specified in the Publish to Web Server field.
Note: Both the Publish to Web Server and Export Local Copy actions can be performed at the same time. Publishing Customization Options The Web Publishing Wizard contains some customization options for exporting/publishing HTML files. Clicking the Advanced button on the Web Publishing Wizard dialog opens the Web Publishing Properties dialog box, as shown in the figure below, which contains the following tabs:
• Server Switching Support
• Screen Resolution Settings
• Publishing Options
• Publishing Channel Server Switching Support The Server Switching Support tab of the Web Publishing Properties dialog box, shown in the figure below, allows you to enable or disable GenBroker support for the exported/published HTML file. Here you can specify which GenBroker configuration file (.gbx) will be activated. The GenBroker configuration file establishes the settings for OPC data communications between the clients and the Web server.

Web Publishing Winzard
14
Server Switching Support Settings
There are three available options for GenBroker support:
• None: GenBroker support is disabled. If this option is selected, all the communication will default to the local node. This option should be checked when the Web pages are meant to be used only from the local node. If this option is checked, Web pages may not work on a remote node, unless the remote node has ProcessView installed and GenBroker is properly configured to communicate with the WebHMI server.
• As Configured in WebHMI Settings: This setting uses the default URL address of the GenBroker configuration (.gbx) file as specified in the WebHMI installation. This is the recommended option for non-expert users.
• User Defined: When this option is selected, the GenBroker Configuration File URL field becomes available, allowing you to specify the URL address of the GenBroker configuration (.gbx) file. This option gives the maximum flexibility and should be used by expert users only.
NOTE
For information about configuring GenBroker settings, please see the GenBroker Configurator Help documentation.
Screen Resolution Settings The Screen Resolution tab of the Web Publishing Properties dialog box, shown in the figure below, determines the screen resolution and size of the GraphWorX Viewer ActiveX control, which is referenced in the generated HTML file and then downloaded to a client PC when the HTML file is viewed in the client's Web browser. You can specify the screen size in the Width and Height fields in terms of pixels (px) or percentage (%). Click the Resolutions button to select from a pop-up menu of standard screen resolutions, as shown in the figure below.

Introduction to HTML Publishing
15
Screen Resolution Settings
Publishing Options The Publishing Options tab of the Web Publishing Properties dialog box, shown in the figure below, enhances the publishing process. By default, the Web Publishing Wizard provides support for related files detection (for more details, see the Multiple Display Support section). The multiple display detection could be a rather lengthy process. You can speed up the process by disabling the Enable Multiple Display Support option. This is especially useful, if you have already published your project files to the Web server, and now you want to update display you have changed. The multiple display detection mechanism ensures that the Web page will be published properly for the source file. Disabling the Multiple Display Support may cause publishing of an incomplete web page, which may result in unexpected behavior. Therefore, it is suggested to disallow publishing of the Web page. You can do so by enabling the Publish Display File Only option.
Publishing Options

Web Publishing Winzard
16
Publishing Channel Because publishing via Microsoft Posting Acceptor is no longer supported on Windows Server 2003, we were forced to find another way of transporting published files from a ProcessView development machine to a WebHMI server. It appeared that FTP would be the best choice. Changing the Communication Channel By default, the method that uses Posting Acceptor services is used for publishing files to a Web server. The Publishing Channel tab of the Web Publishing Properties dialog box, shown in the figure below, enables you to change the way that files are uploaded to the Web server by selecting FTP Channel. This tells the Web Publishing Wizard to use FTP communications for uploading files instead of Posting Acceptor.
NOTE Selecting FTP Channel does not affect the configuration of the main Web Publishing Wizard dialog; the settings are the same if you were publishing files using the default method (i.e. Posting Acceptor).
Publishing Channel
Configuring FTP Access Just before uploading files to the Web server, you will be prompted to specify the FTP connection settings, as shown in the figure below. Enter the correct FTP path, user name and password.
NOTE For information about FTP site configuration, please see the application note called “Publishing to Windows 2003 Server,” which is located on the ProcessView CD.

Introduction to HTML Publishing
17
Uploading Files Via FTP
Viewing Locally Exported HTML Files To view an HTML file that was exported to a local directory, simply browse to the local directory pathway and click on the file to open it in your Web browser. You can also open your Web browser and copy the directory pathway of the file into the Address field of the Web browser, as shown in the figure below. A complete directory path is, for example, "C:\Documents and Settings\Administrator\My Documents\Web Publishing Example\ChemFood_BeanRoaster.htm." Be sure to include the name of the HTML file that you have exported and the file extension "htm."
Viewing the Exported HTML File in a Web Browser
Viewing Published HTML Files Before connecting a client machine to a WebHMI Server, you must start the GenBroker Server on the WebHMI Server using ProcessView Tray. If the GenBroker Server is not started, then the client will not get proper licensing and security information. To start the GenBroker Server on the WebHMI Server:
1. Launch ProccessView Tray from the Windows Start menu by selecting Programs > Smar ProcessView > Tools > ProcessView Tray.
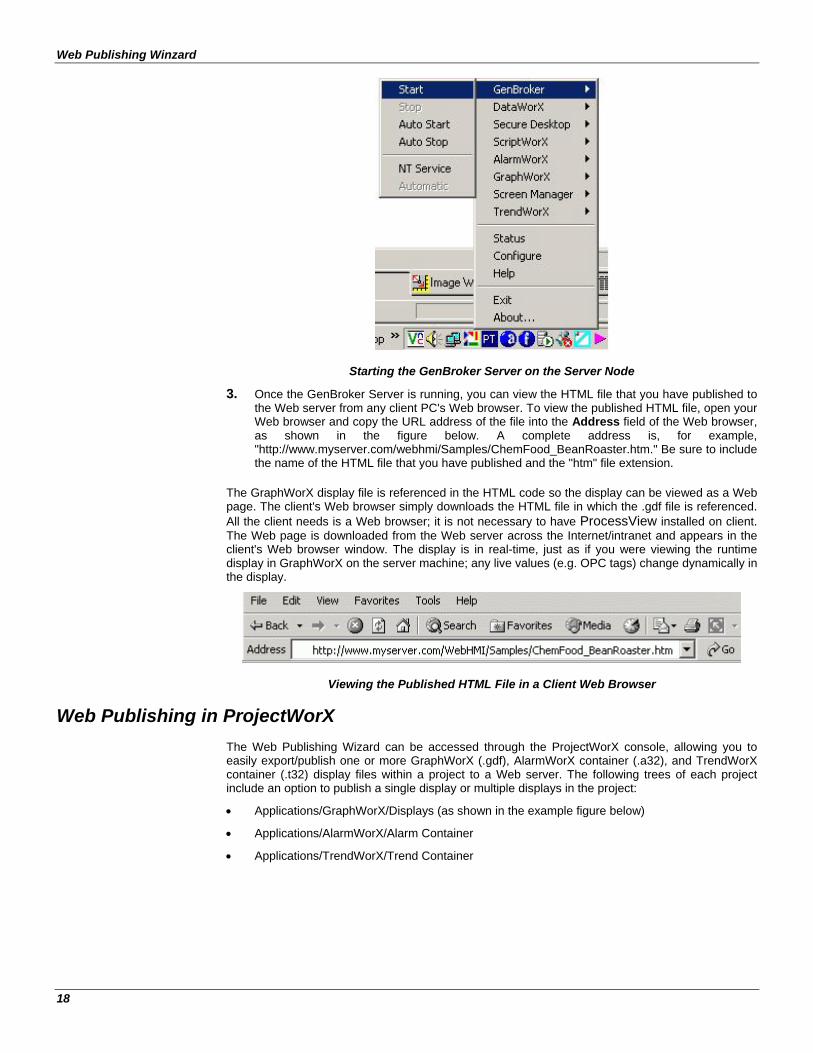
2. When ProcessView Tray opens, the triangle icon will appear in the Windows tool tray. Click on the triangle and select GenBroker > Start from the pop-up menu, as shown in the figure below. This activates the GenBroker Server.
Web Publishing Winzard
18
Starting the GenBroker Server on the Server Node
3. Once the GenBroker Server is running, you can view the HTML file that you have published to the Web server from any client PC's Web browser. To view the published HTML file, open your Web browser and copy the URL address of the file into the Address field of the Web browser, as shown in the figure below. A complete address is, for example, "http://www.myserver.com/webhmi/Samples/ChemFood_BeanRoaster.htm." Be sure to include the name of the HTML file that you have published and the "htm" file extension.
The GraphWorX display file is referenced in the HTML code so the display can be viewed as a Web page. The client's Web browser simply downloads the HTML file in which the .gdf file is referenced. All the client needs is a Web browser; it is not necessary to have ProcessView installed on client. The Web page is downloaded from the Web server across the Internet/intranet and appears in the client's Web browser window. The display is in real-time, just as if you were viewing the runtime display in GraphWorX on the server machine; any live values (e.g. OPC tags) change dynamically in the display.
Viewing the Published HTML File in a Client Web Browser
Web Publishing in ProjectWorX The Web Publishing Wizard can be accessed through the ProjectWorX console, allowing you to easily export/publish one or more GraphWorX (.gdf), AlarmWorX container (.a32), and TrendWorX container (.t32) display files within a project to a Web server. The following trees of each project include an option to publish a single display or multiple displays in the project:
• Applications/GraphWorX/Displays (as shown in the example figure below)
• Applications/AlarmWorX/Alarm Container
• Applications/TrendWorX/Trend Container

Introduction to HTML Publishing
19
Publishing Displays From the ProjectWorX Console
The WebHMI tree under the Applications tree for each project in the ProjectWorX console, shown in the figure below, manages Web publishing for the entire project. From here you can right-click and publish HTML files to a Web server. The WebHMI tree includes the following categories:
• GraphWorX-Based HTML
• AlarmWorX-Based HTML
• TrendWorX-Based HTML
• Local HTML Files
• Published Documents
WebHMI Tree in ProjectWorX Console
Web Publishing Winzard
20
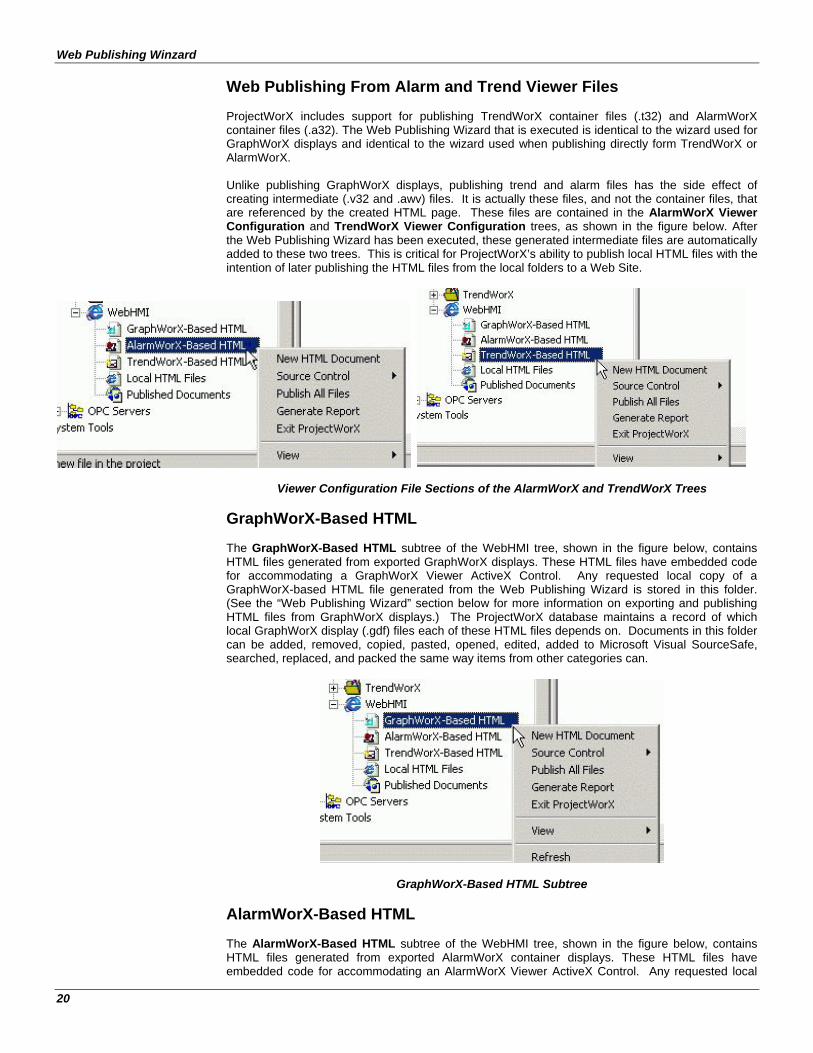
Web Publishing From Alarm and Trend Viewer Files ProjectWorX includes support for publishing TrendWorX container files (.t32) and AlarmWorX container files (.a32). The Web Publishing Wizard that is executed is identical to the wizard used for GraphWorX displays and identical to the wizard used when publishing directly form TrendWorX or AlarmWorX. Unlike publishing GraphWorX displays, publishing trend and alarm files has the side effect of creating intermediate (.v32 and .awv) files. It is actually these files, and not the container files, that are referenced by the created HTML page. These files are contained in the AlarmWorX Viewer Configuration and TrendWorX Viewer Configuration trees, as shown in the figure below. After the Web Publishing Wizard has been executed, these generated intermediate files are automatically added to these two trees. This is critical for ProjectWorX’s ability to publish local HTML files with the intention of later publishing the HTML files from the local folders to a Web Site.
Viewer Configuration File Sections of the AlarmWorX and TrendWorX Trees
GraphWorX-Based HTML The GraphWorX-Based HTML subtree of the WebHMI tree, shown in the figure below, contains HTML files generated from exported GraphWorX displays. These HTML files have embedded code for accommodating a GraphWorX Viewer ActiveX Control. Any requested local copy of a GraphWorX-based HTML file generated from the Web Publishing Wizard is stored in this folder. (See the “Web Publishing Wizard” section below for more information on exporting and publishing HTML files from GraphWorX displays.) The ProjectWorX database maintains a record of which local GraphWorX display (.gdf) files each of these HTML files depends on. Documents in this folder can be added, removed, copied, pasted, opened, edited, added to Microsoft Visual SourceSafe, searched, replaced, and packed the same way items from other categories can.
GraphWorX-Based HTML Subtree
AlarmWorX-Based HTML The AlarmWorX-Based HTML subtree of the WebHMI tree, shown in the figure below, contains HTML files generated from exported AlarmWorX container displays. These HTML files have embedded code for accommodating an AlarmWorX Viewer ActiveX Control. Any requested local
Introduction to HTML Publishing
21
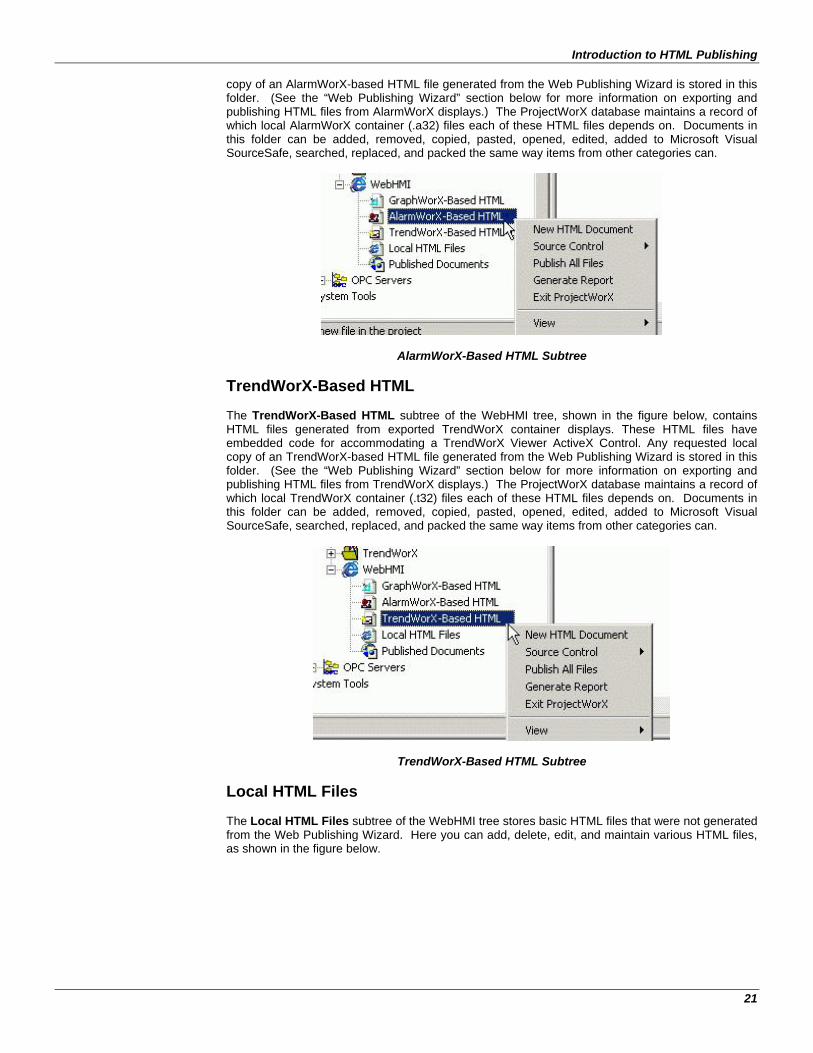
copy of an AlarmWorX-based HTML file generated from the Web Publishing Wizard is stored in this folder. (See the “Web Publishing Wizard” section below for more information on exporting and publishing HTML files from AlarmWorX displays.) The ProjectWorX database maintains a record of which local AlarmWorX container (.a32) files each of these HTML files depends on. Documents in this folder can be added, removed, copied, pasted, opened, edited, added to Microsoft Visual SourceSafe, searched, replaced, and packed the same way items from other categories can.
AlarmWorX-Based HTML Subtree
TrendWorX-Based HTML The TrendWorX-Based HTML subtree of the WebHMI tree, shown in the figure below, contains HTML files generated from exported TrendWorX container displays. These HTML files have embedded code for accommodating a TrendWorX Viewer ActiveX Control. Any requested local copy of an TrendWorX-based HTML file generated from the Web Publishing Wizard is stored in this folder. (See the “Web Publishing Wizard” section below for more information on exporting and publishing HTML files from TrendWorX displays.) The ProjectWorX database maintains a record of which local TrendWorX container (.t32) files each of these HTML files depends on. Documents in this folder can be added, removed, copied, pasted, opened, edited, added to Microsoft Visual SourceSafe, searched, replaced, and packed the same way items from other categories can.
TrendWorX-Based HTML Subtree
Local HTML Files The Local HTML Files subtree of the WebHMI tree stores basic HTML files that were not generated from the Web Publishing Wizard. Here you can add, delete, edit, and maintain various HTML files, as shown in the figure below.

Web Publishing Winzard
22
Local HTML Files Subtree
Published Documents The Published Documents subtree of the WebHMI tree, shown in the figure below, maintains a list of all HTML files that have been exported/published from ProjectWorX.
Published Documents Subtree
In the right-hand pane of the ProjectWorX Console, each item is listed as a URL with the date it was published, as shown in the figure below. For information about publishing files from ProjectWorX, please see "Using the Web Publishing Wizard."
List of All Documents Published From ProjectWorX
Launching the Web Publishing Wizard in ProjectWorX The Web Publishing Wizard in ProjectWorX, shown in the figure below, performs two basic operations:
1. The Wizard creates HTML files based on user-specified GraphWorX display (.gdf) files, AlarmWorX container (.a32) files, and TrendWorX container (.t32) files.
2. The Wizard then either "exports" (saves) the HTML files to a user-specified directory on the local drive and/ or "publishes" (uploads) the HTML file to a user-specified Web server URL address (i.e. over the Internet or an intranet).

Introduction to HTML Publishing
23
Web Publishing Wizard in ProjectWorX Console
You can open the Web Publishing Wizard dialog from the ProjectWorX console in the following ways:
• Select the project root and then choose Publish Wizard from the Tools menu, as shown in the figure below.
Opening the Publishing Wizard From the Tools Menu
Choose the type of file to publish, as shown in the figure below. In this case, both the Publish Web Page field and the Based on Source File field in the Web Publishing Wizard dialog are read-only and contain the text “(Display Name).htm” and “(All [GraphWorX, AlarmWorX, or TrendWorX] Displays in Project),” respectively. The browse (…) button is also disabled.

Web Publishing Winzard
24
Choosing a File Type to Publish
• Right-click on the GraphWorX/Displays (or the AlarmWorX/Alarm Container tree or the TrendWorX/Trend Container) tree and select Publish All Displays, as shown in the figure below. In this case, both the Publish Web Page field and the Based on Source File field in the Web Publishing Wizard dialog are read-only and contain the text “(Display Name).htm” and “(All [GraphWorX, AlarmWorX, or TrendWorX] Displays in Project),” respectively. The browse (…) button is also disabled.
Publishing All Displays in a Project
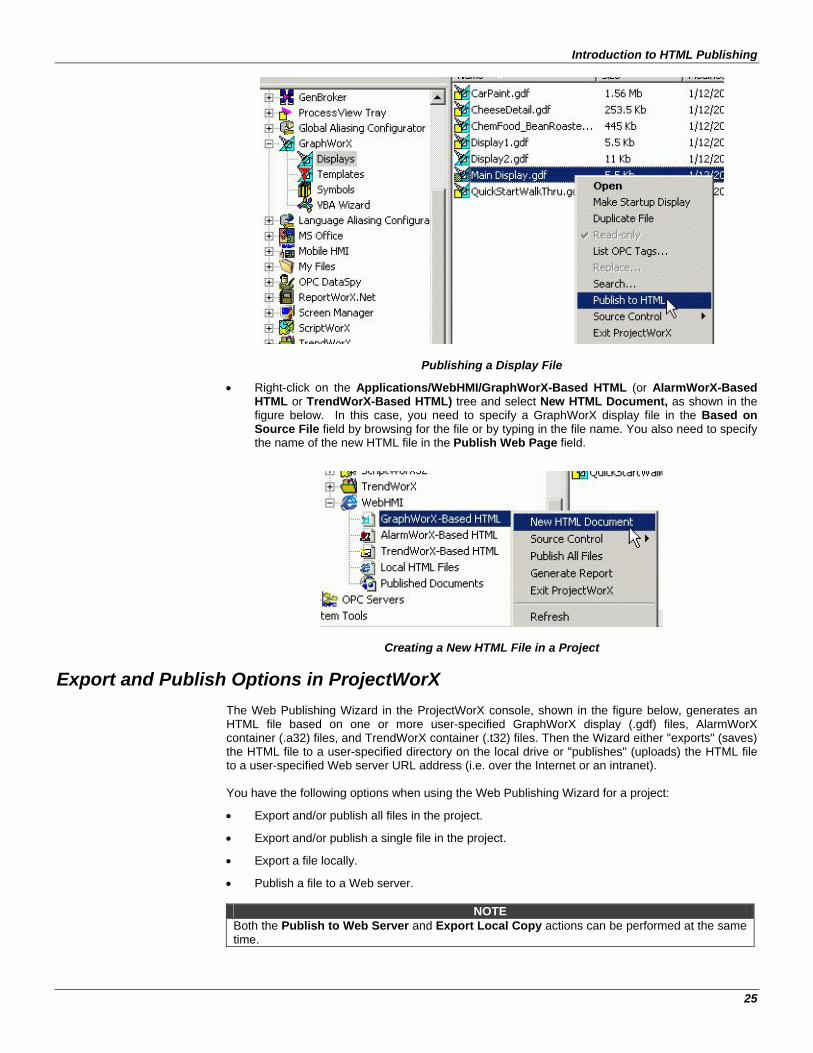
• Right-click on a GraphWorX (.gdf), AlarmWorX (.a32), or TrendWorX (.t32) file and select Publish to HTML, as shown in the figure below. In this case, the Based on Source File field in the Web Publishing Wizard dialog is read-only and contains the name of the selected display file. The browse (…) button is also disabled.
Introduction to HTML Publishing
25
Publishing a Display File
• Right-click on the Applications/WebHMI/GraphWorX-Based HTML (or AlarmWorX-Based HTML or TrendWorX-Based HTML) tree and select New HTML Document, as shown in the figure below. In this case, you need to specify a GraphWorX display file in the Based on Source File field by browsing for the file or by typing in the file name. You also need to specify the name of the new HTML file in the Publish Web Page field.
Creating a New HTML File in a Project
Export and Publish Options in ProjectWorX The Web Publishing Wizard in the ProjectWorX console, shown in the figure below, generates an HTML file based on one or more user-specified GraphWorX display (.gdf) files, AlarmWorX container (.a32) files, and TrendWorX container (.t32) files. Then the Wizard either "exports" (saves) the HTML file to a user-specified directory on the local drive or "publishes" (uploads) the HTML file to a user-specified Web server URL address (i.e. over the Internet or an intranet). You have the following options when using the Web Publishing Wizard for a project:
• Export and/or publish all files in the project.
• Export and/or publish a single file in the project.
• Export a file locally.
• Publish a file to a Web server.
NOTE Both the Publish to Web Server and Export Local Copy actions can be performed at the same time.

Web Publishing Winzard
26
Web Publishing Wizard in ProjectWorX Console
Exporting and Publishing Multiple Display Files in ProjectWorX In ProjectWorX, you can export and/or publish multiple display files using the Web Publishing Wizard. To export/publish all displays in a project:
1. Select the project root and then choose Publish Wizard from the Tools menu, or right-click on the Applications/GraphWorX/Displays tree (or the AlarmWorX/Alarm Container tree or the TrendWorX/Trend Container) and select Publish All Displays, as shown in the figure below.
Launching the Web Publishing Wizard

Introduction to HTML Publishing
27
2. This launches the Web Publishing Wizard, as shown in the figure below. In this case, both the Publish Web Page field and the Based on Source File field in the Web Publishing Wizard dialog are read-only and contain the text “(Display Name).htm” and “(All [GraphWorX, AlarmWorX, or TrendWorX] Displays in Project),” respectively. The browse (…) button is also disabled.
Publishing All Displays in a Project
Exporting and Publishing Individual Display Files in ProjectWorX In ProjectWorX, you can export and/or publish individual files using the Web Publishing Wizard. To export/publish a single display in a project:
1. Right-click on a GraphWorX (.gdf) file, an AlarmWorX container (.a32) file, or a TrendWorX container (.t32) file and select Publish to HTML, as shown in the figure below.
Launching the Web Publishing Wizard

Web Publishing Winzard
28
2. This launches the Web Publishing Wizard, as shown in the figure below. In this case, the Based on Source File field in the Web Publishing Wizard dialog is read-only and contains the name of the selected display file. The browse (…) button is also disabled.
3. In the Publish Web Page field of the Web Publishing Wizard, specify the name of the HTML file that will be created. The file name is filled in by default, but you can give the HTML file a different name.
Publishing a Display in a Project
NOTE You can also right-click on the Applications/WebHMI/GraphWorX-Based HTML tree (or the AlarmWorX-Based HTML tree or the TrendWorX-Based HTML tree) and select New HTML Document, as shown in the figure below, to export/publish a display. This launches the Web Publishing Wizard. In this case, you need to specify a display file in the Based on Source File field by browsing for the file or by typing in the file name. You also need to specify the name of the new HTML file in the Publish Web Page field.
Creating a New HTML File in a Project

Introduction to HTML Publishing
29
Exporting a Display File Locally in ProjectWorX To export a display file to a directory on the local drive:
1. Right-click on the Applications/WebHMI/GraphWorX-Based HTML tree (or the AlarmWorX-Based HTML tree or the TrendWorX-Based HTML tree) and select New HTML Document, as shown in the figure below.
Launching the Web Publishing Wizard
2. This launches the Web Publishing Wizard, as shown in the figure below. In the Based on Source File field of the Web Publishing Wizard, you must specify the name of the display file to be exported, as shown in the figure below. To choose a display, click the … button to the right to browse for a file. Select a file and then click Open. The directory path and the file name are shown in the text field.
Exporting a Display File Locally in ProjectWorX
3. In the Publish Web Page field of the Web Publishing Wizard, specify the name of the HTML file that will be created.
In the Publishing Options field, the Export Local Copy check box is checked by default. Specify the local directory path name to which you want to export the HTML file. You can select a recently used path from the drop-down list, or click the … button to browse for a destination directory. Select the directory and click OK. The local directory pathway you selected appears in the Export Local Copy field of the Web Publishing Wizard.
Web Publishing Winzard
30
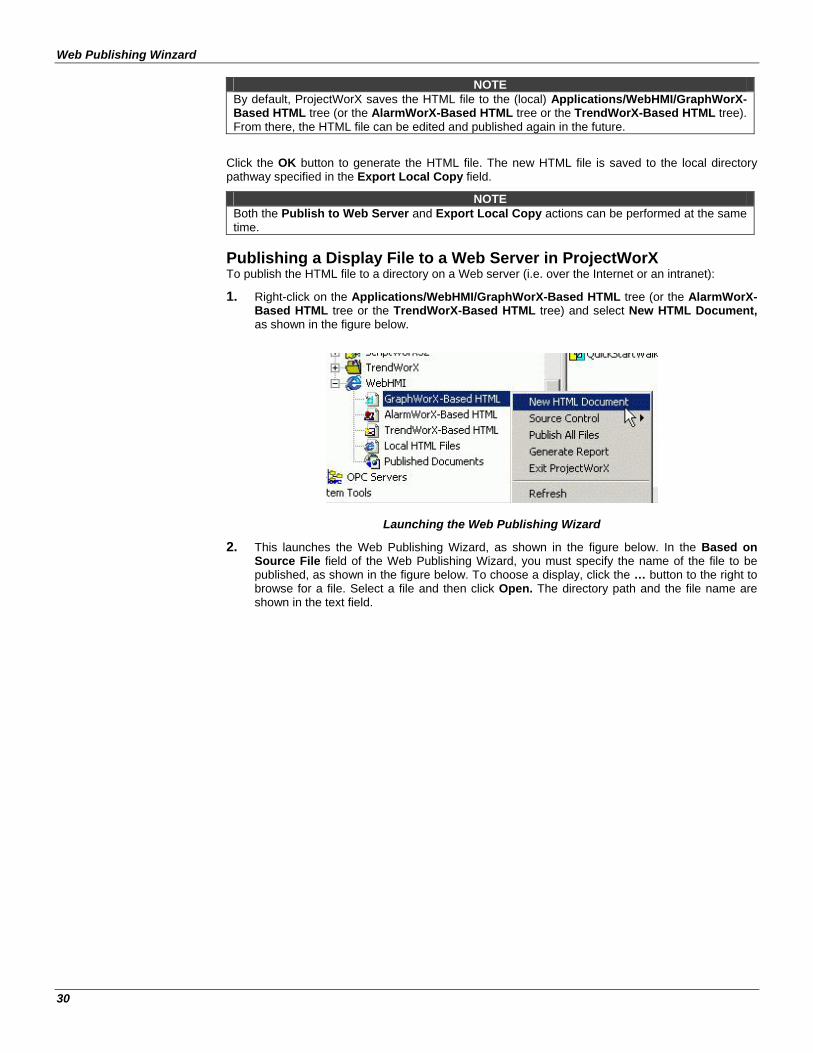
NOTE By default, ProjectWorX saves the HTML file to the (local) Applications/WebHMI/GraphWorX-Based HTML tree (or the AlarmWorX-Based HTML tree or the TrendWorX-Based HTML tree). From there, the HTML file can be edited and published again in the future.
Click the OK button to generate the HTML file. The new HTML file is saved to the local directory pathway specified in the Export Local Copy field.
NOTE Both the Publish to Web Server and Export Local Copy actions can be performed at the same time.
Publishing a Display File to a Web Server in ProjectWorX To publish the HTML file to a directory on a Web server (i.e. over the Internet or an intranet):
1. Right-click on the Applications/WebHMI/GraphWorX-Based HTML tree (or the AlarmWorX-Based HTML tree or the TrendWorX-Based HTML tree) and select New HTML Document, as shown in the figure below.
Launching the Web Publishing Wizard
2. This launches the Web Publishing Wizard, as shown in the figure below. In the Based on Source File field of the Web Publishing Wizard, you must specify the name of the file to be published, as shown in the figure below. To choose a display, click the … button to the right to browse for a file. Select a file and then click Open. The directory path and the file name are shown in the text field.

Introduction to HTML Publishing
31
Publishing a Display File to a Web Server
3. In the Publish Web Page field of the Web Publishing Wizard, specify the name of the HTML file that will be created.
4. In the Publishing Options field, check the Publish to Web Server check box and type in the URL address of your Web server with the complete directory indicating where you want to publish the HTML file, as shown in the figure above. In the sample Web server URL address shown above ("http://www.myserver.com/WebHMI/Samples"), the various components are:
• http://www.myserver.com: IP address (server name) of the WebHMI Server
• WebHMI: Name of the WebHMI server root directory
• Samples: Name of the directory on the server to which the HTML file will be saved
5. Click the OK button to generate the HTML file. The new HTML file is uploaded to the Web server and then saved to the URL address path specified in the Publish to Web Server field.
NOTES
By default, ProjectWorX also saves the HTML file to the (local) Applications/WebHMI/GraphWorX-Based HTML tree (or the AlarmWorX-Based HTML tree or the TrendWorX-Based HTML tree). From there, the HTML file can be edited and published again in the future. Both the Publish to Web Server and Export Local Copy actions can be performed at the same time.
Publishing Customization Options The Web Publishing Wizard contains some customization options for exporting/publishing HTML files. Clicking the Advanced button on the Web Publishing Wizard dialog opens the Web Publishing Properties dialog box, which contains the following tabs:
• Server Switching Support
• Screen Resolution Settings
• Publishing Options

Web Publishing Winzard
32
• Publishing Channel Server Switching Support The Server Switching Support tab of the Web Publishing Properties dialog box, shown in the figure below, allows you to enable or disable GenBroker support for the exported/published HTML file. Here you can specify which GenBroker configuration file (.gbx) will be activated. The GenBroker configuration file establishes the settings for OPC data communications between the clients and the Web server.
Server Switching Support Settings
There are three available options for GenBroker support:
• None: GenBroker support is disabled. If this option is selected, all the communication will default to the local node. This option should be checked when the Web pages are meant to be used only from the local node. If this option is checked, Web pages may not work on a remote node, unless the remote node has ProcessView installed and GenBroker is properly configured to communicate with the WebHMI server.
• As Configured in WebHMI Settings: This setting uses the default URL address of the GenBroker configuration (.gbx) file as specified in the WebHMI installation. This is the recommended option for non-expert users.
• User Defined: When this option is selected, the GenBroker Configuration File URL field becomes available, allowing you to specify the URL address of the GenBroker configuration (.gbx) file. This option gives the maximum flexibility and should be used by expert users only.
NOTE
For information about configuring GenBroker settings, please see the GenBroker Configurator Help documentation.
Screen Resolution Settings The Screen Resolution tab of the Web Publishing Properties dialog box, shown in the figure below, determines the screen resolution and size of the GraphWorX Viewer ActiveX control, which is referenced in the generated HTML file and then downloaded to a client PC when the HTML file is viewed in the client's Web browser. You can specify the screen size in the Width and Height fields in terms of pixels (px) or percentage (%). Click the Resolutions button to select from a list of standard screen resolutions, as shown in the figure below.

Introduction to HTML Publishing
33
Screen Resolution Settings
Publishing Options The Publishing Options tab of the Web Publishing Properties dialog box, shown in the figure below, enhances the publishing process. By default, the Web Publishing Wizard provides support for related files detection (for more details, see the Multiple Display Support section). The multiple display detection could be a rather lengthy process. You can speed up the process by disabling the Enable Multiple Display Support option. This is especially useful, if you have already published your project files to the Web server, and now you want to update display you have changed. The multiple display detection mechanism ensures that the Web page will be published properly for the source file. Disabling the Multiple Display Support may cause publishing of an incomplete web page, which may result in unexpected behavior. Therefore, it is suggested to disallow publishing of the Web page. You can do so by enabling the Publish Display File Only option.
Publishing Options
Web Publishing Winzard
34
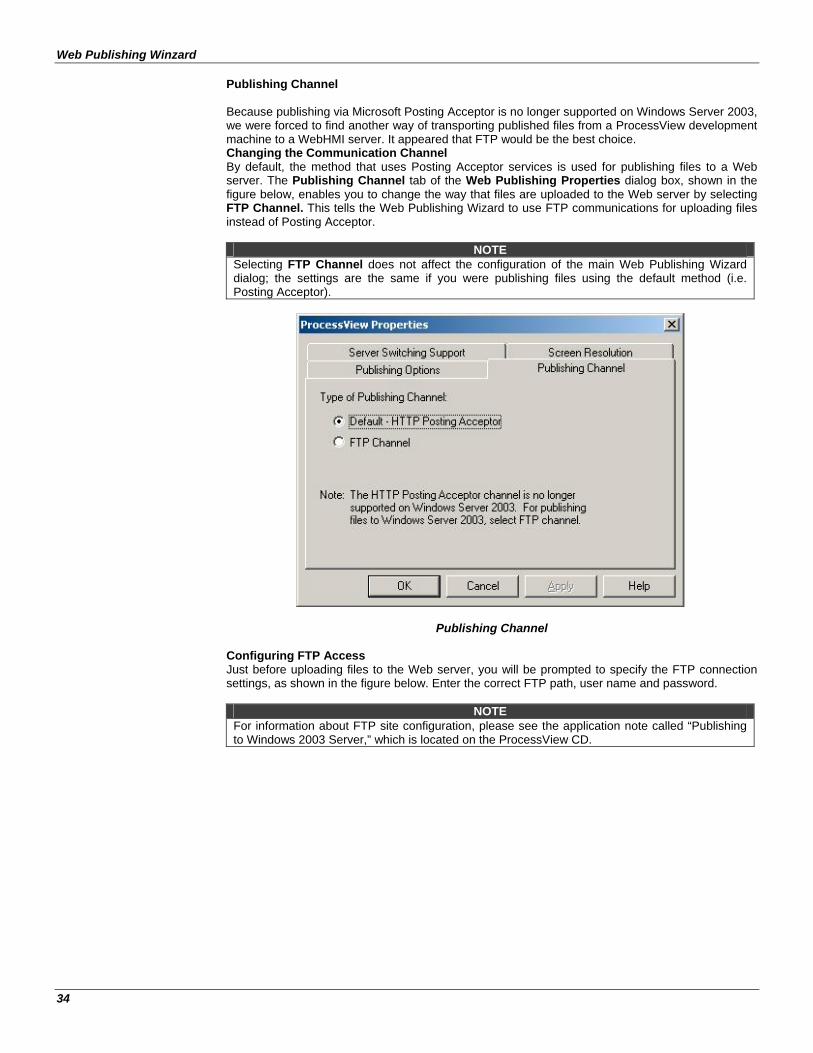
Publishing Channel Because publishing via Microsoft Posting Acceptor is no longer supported on Windows Server 2003, we were forced to find another way of transporting published files from a ProcessView development machine to a WebHMI server. It appeared that FTP would be the best choice. Changing the Communication Channel By default, the method that uses Posting Acceptor services is used for publishing files to a Web server. The Publishing Channel tab of the Web Publishing Properties dialog box, shown in the figure below, enables you to change the way that files are uploaded to the Web server by selecting FTP Channel. This tells the Web Publishing Wizard to use FTP communications for uploading files instead of Posting Acceptor.
NOTE Selecting FTP Channel does not affect the configuration of the main Web Publishing Wizard dialog; the settings are the same if you were publishing files using the default method (i.e. Posting Acceptor).
Publishing Channel Configuring FTP Access Just before uploading files to the Web server, you will be prompted to specify the FTP connection settings, as shown in the figure below. Enter the correct FTP path, user name and password.
NOTE For information about FTP site configuration, please see the application note called “Publishing to Windows 2003 Server,” which is located on the ProcessView CD.

Introduction to HTML Publishing
35
Uploading Files Via FTP
Publishing Files at a Later Time The Web Publishing Wizard, ProjectWorX saves the generated HTML file to the (local) Applications/WebHMI/GraphWorX-Based HTML tree (or the AlarmWorX-Based HTML tree or the TrendWorX-Based HTML tree). The advantage of storing a local copy of an exported HTML file is that it can be edited, packed, moved, unpacked, and then published again at any time. This saves you the burden of having to re-export the same file to a new HTML file. You can use this option in any of the following ways:
• Right-click on any HTML file in the Applications/WebHMI/GraphWorX-Based HTML tree (or the AlarmWorX-Based HTML tree or the TrendWorX-Based HTML tree) and select Publish to Web Server from the pop-up menu, as shown in the figure below.
• Right-click on any HTML file in the Applications/WebHMI/Local HTML Files tree and select Publish to Web Server from the pop-up menu.
NOTE
Selecting Edit HTML from the pop-up menu opens the HTML file in the default HTML editor.
Publishing a Locally Stored HTML File
• Right-click on the GraphWorX-Based HTML Files tree (or the AlarmWorX-Based HTML tree or the TrendWorX-Based HTML tree) and select Publish All Files from the pop-up menu, as shown in the figure below.

Web Publishing Winzard
36
• Right-click on the Local HTML Files tree and select Publish All Files from the pop-up menu.
• Right-click on the WebHMI tree and select Publish All Files from the pop-up menu. This publishes all HTML files in the WebHMI tree.
Publishing All Locally Stored HTML Files
All of these actions open the Publish HTML File to Web Site dialog box, as shown in the figure below. The Qualified WWW Folder field in this dialog is identical to the Publish to Web Server field in the Web Publishing Wizard dialog and is stored in the same place in the registry if the action is successful. This specifies the location of the Web server to which the HTML file will be published. If the export/publish action is successful, a "publish” action on an HTML file in the Local HTML Files tree simply uploads the HTML file to the Web server. A “publish” action on an HTML file in the GraphWorX-Based HTML Files tree (or the AlarmWorX-Based HTML tree or the TrendWorX-Based HTML tree) uploads both the HTML file and its attached display file to the Web server.
Specifying a Web Server Location for HTML Publishing
Web Publishing Log When exporting/publishing only one file from a display to HTML, you are alerted if anything goes wrong in the process. If, however, multiple files are being exported/published simultaneously, a log is generated so the operation will not be halted with each file that cannot be exported/published. After a batch publishing operation from the GraphWorX-Based HTML Files tree (or the AlarmWorX-Based HTML tree or the TrendWorX-Based HTML tree), a log file appears showing the success or failure of each attempt to publish the files. If this log file is needed at a later time, it can be found in the project root, as shown in the figure below.
Location of Web Publishing Log File


![[MS-SSDPWP]: Database Publishing Wizard Protocol](https://img.pdfslide.us/doc/110x75/616c2340fb4ff101684552a1/ms-ssdpwp-database-publishing-wizard-protocol.jpg)


![[MS-SSDPWP]: Database Publishing Wizard Protocol Specification](https://img.pdfslide.us/doc/110x75/61f7ce38dd685701e46ad88a/ms-ssdpwp-database-publishing-wizard-protocol-specification.jpg)