Embed Size (px)
Citation preview
~ 1 ~
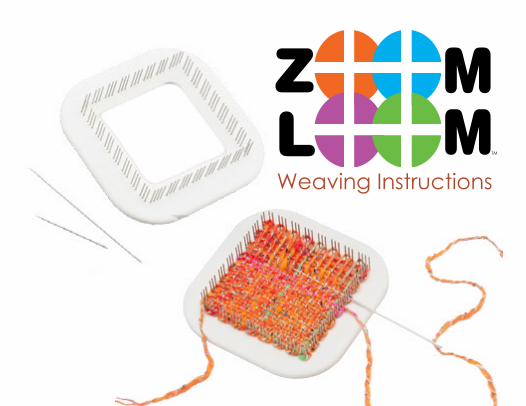
Weaving Instructions
~ 2 ~
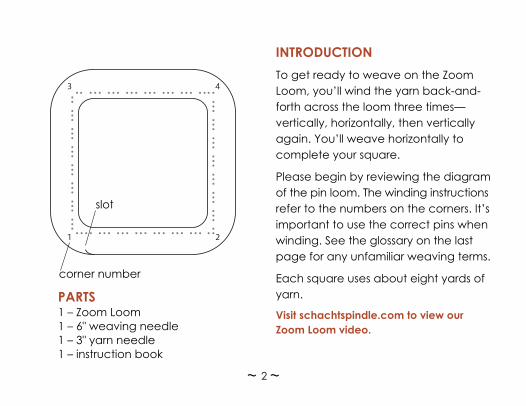
PARTS1 – Zoom Loom1 – 6" weaving needle1 – 3" yarn needle1 – instruction book
INTRODUCTIONTo get ready to weave on the Zoom Loom, you’ll wind the yarn back-and-forth across the loom three times—vertically, horizontally, then vertically again. You’ll weave horizontally to complete your square.
Please begin by reviewing the diagram of the pin loom. The winding instructions refer to the numbers on the corners. It’s important to use the correct pins when winding. See the glossary on the last page for any unfamiliar weaving terms.
Each square uses about eight yards of yarn.
Visit schachtspindle.com to view our Zoom Loom video.
3 4
1 2
slot
corner number
~ 3 ~
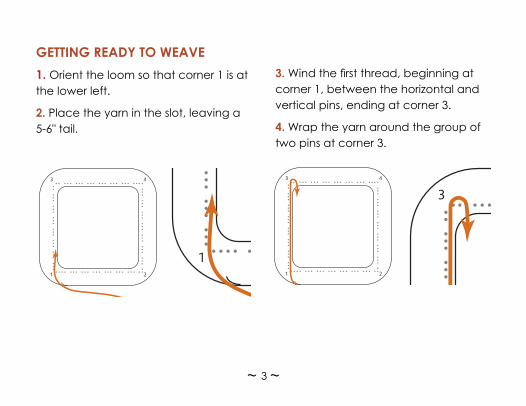
GETTING READY TO WEAVE1. Orient the loom so that corner 1 is at the lower left.
2. Place the yarn in the slot, leaving a 5-6" tail.
3 4
1 2
3 4
1 2
3 4
1 2
3 4
1 2
3. Wind the first thread, beginning at corner 1, between the horizontal and vertical pins, ending at corner 3.
4. Wrap the yarn around the group of two pins at corner 3.
~ 4 ~
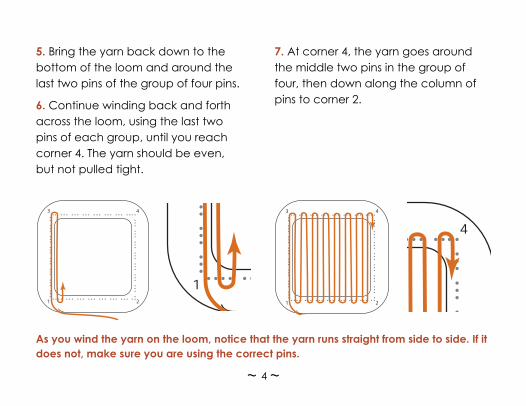
7. At corner 4, the yarn goes around the middle two pins in the group of four, then down along the column of pins to corner 2.
5. Bring the yarn back down to the bottom of the loom and around the last two pins of the group of four pins.
6. Continue winding back and forth across the loom, using the last two pins of each group, until you reach corner 4. The yarn should be even, but not pulled tight.
3 4
1 2
3 4
1 2
3 4
1 2
3 4
1 2
As you wind the yarn on the loom, notice that the yarn runs straight from side to side. If it does not, make sure you are using the correct pins.
~ 5 ~
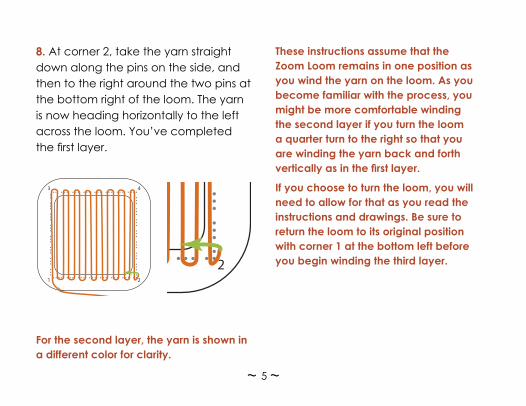
8. At corner 2, take the yarn straight down along the pins on the side, and then to the right around the two pins at the bottom right of the loom. The yarn is now heading horizontally to the left across the loom. You’ve completed the first layer.
3 4
1 2
For the second layer, the yarn is shown in a different color for clarity.
These instructions assume that the Zoom Loom remains in one position as you wind the yarn on the loom. As you become familiar with the process, you might be more comfortable winding the second layer if you turn the loom a quarter turn to the right so that you are winding the yarn back and forth vertically as in the first layer.
If you choose to turn the loom, you will need to allow for that as you read the instructions and drawings. Be sure to return the loom to its original position with corner 1 at the bottom left before you begin winding the third layer.
3 4
1 2
~ 6 ~
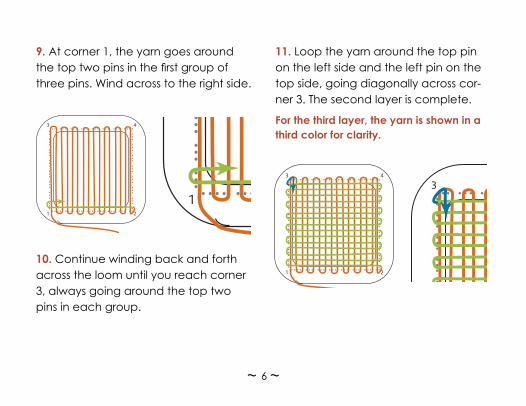
9. At corner 1, the yarn goes around the top two pins in the first group of three pins. Wind across to the right side.
10. Continue winding back and forth across the loom until you reach corner 3, always going around the top two pins in each group.
11. Loop the yarn around the top pin on the left side and the left pin on the top side, going diagonally across cor-ner 3. The second layer is complete.
For the third layer, the yarn is shown in a third color for clarity.
3 4
1 2
3 4
1 2
3 4
1 2
3 4
1 2
~ 7 ~
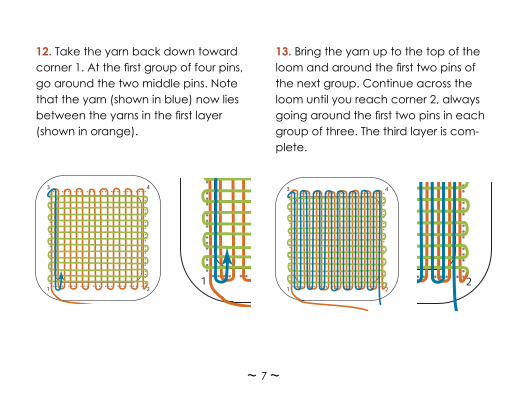
12. Take the yarn back down toward corner 1. At the first group of four pins, go around the two middle pins. Note that the yarn (shown in blue) now lies between the yarns in the first layer (shown in orange).
3 4
1 2
13. Bring the yarn up to the top of the loom and around the first two pins of the next group. Continue across the loom until you reach corner 2, always going around the first two pins in each group of three. The third layer is com-plete.
3 4
1 2
3 4
1 2
3 4
1 2
~ 8 ~
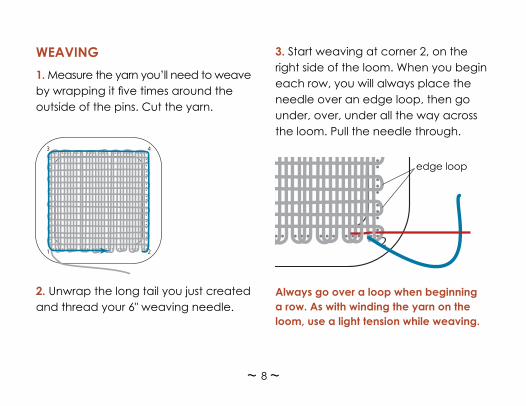
WEAVING1. Measure the yarn you’ll need to weave by wrapping it five times around the outside of the pins. Cut the yarn.
2. Unwrap the long tail you just created and thread your 6" weaving needle.
3. Start weaving at corner 2, on the right side of the loom. When you begin each row, you will always place the needle over an edge loop, then go under, over, under all the way across the loom. Pull the needle through.
Always go over a loop when beginning a row. As with winding the yarn on the loom, use a light tension while weaving.
3 4
1 2
3 4
1 2
edge loop
~ 9 ~
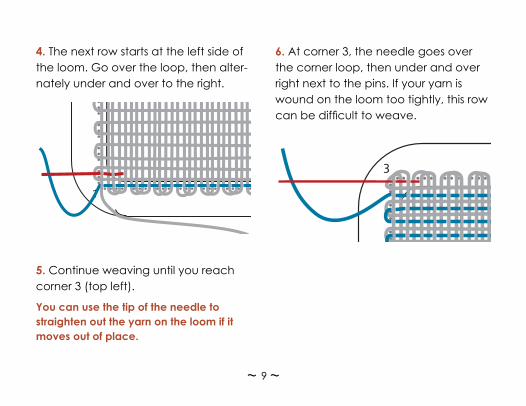
4. The next row starts at the left side of the loom. Go over the loop, then alter-nately under and over to the right.
5. Continue weaving until you reach corner 3 (top left).
You can use the tip of the needle to straighten out the yarn on the loom if it moves out of place.
6. At corner 3, the needle goes over the corner loop, then under and over right next to the pins. If your yarn is wound on the loom too tightly, this row can be difficult to weave.
3 4
1 2
3 4
1 2
~ 10 ~
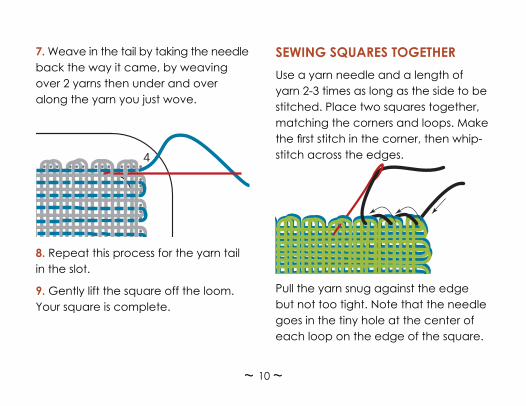
7. Weave in the tail by taking the needle back the way it came, by weaving over 2 yarns then under and over along the yarn you just wove.
8. Repeat this process for the yarn tail in the slot.
9. Gently lift the square off the loom. Your square is complete.
SEWING SQUARES TOGETHER Use a yarn needle and a length of yarn 2-3 times as long as the side to be stitched. Place two squares together, matching the corners and loops. Make the first stitch in the corner, then whip-stitch across the edges.
Pull the yarn snug against the edge but not too tight. Note that the needle goes in the tiny hole at the center of each loop on the edge of the square.
3 4
1 2
~ 11 ~
When you’ve sewn all along the edge, knot the end of the yarn and work the tail back along your stitching to hide the end. Finish the yarn tail at the start of your stitching in the same way.
It is usually easier to stitch the squares together before wet finishing.
FINISHINGThe process of wet finishing your project will fluff up the yarn and shrink it a bit, making a thicker fabric. This process is called “fulling.”
Hand wash your square or project in warm water with a bit of soap. Gently agitate to fluff the fibers, then rinse. If you wash in warm water and rinse in cold water, your project will shrink more
quickly. The more you wash and rinse, the more your project will shrink. If your project is not fulled to your satisfaction, just wash it again. Some yarns will shrink more than others, depending on the fi-ber content. Some yarns (for example, acrylic) will not shrink at all. The best way to know how a yarn will behave is to make a sample square and finish it as you intend to finish the project.
Yarn WeightsIn the project directions that follow, yarn weight is given in wraps per inch (w.p.i.) to make it easier to compare yarns.
To determine w.p.i., wrap the yarn around a ruler for one inch using moder-ate tension. The wraps should touch but not overlap. Count the wraps.
~ 12 ~
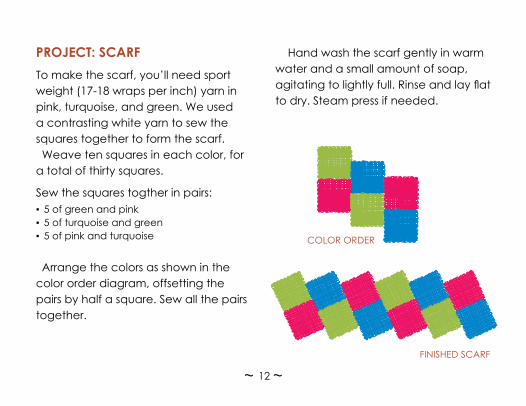
PROjECT: SCARFTo make the scarf, you’ll need sport weight (17-18 wraps per inch) yarn in pink, turquoise, and green. We used a contrasting white yarn to sew the squares together to form the scarf. Weave ten squares in each color, for
a total of thirty squares.
Sew the squares togther in pairs: ▪ 5 of green and pink ▪ 5 of turquoise and green ▪ 5 of pink and turquoise
Arrange the colors as shown in the color order diagram, offsetting the pairs by half a square. Sew all the pairs together.
Hand wash the scarf gently in warm water and a small amount of soap, agitating to lightly full. Rinse and lay flat to dry. Steam press if needed.
COLOR ORdER
FINISHEd SCARF
~ 13 ~
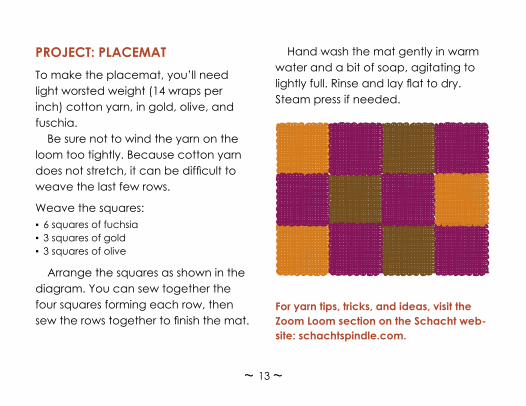
PROjECT: PLACEmATTo make the placemat, you’ll need light worsted weight (14 wraps per inch) cotton yarn, in gold, olive, and fuschia.
Be sure not to wind the yarn on the loom too tightly. Because cotton yarn does not stretch, it can be difficult to weave the last few rows.
Weave the squares: ▪ 6 squares of fuchsia ▪ 3 squares of gold ▪ 3 squares of olive
Arrange the squares as shown in the diagram. You can sew together the four squares forming each row, then sew the rows together to finish the mat.
Hand wash the mat gently in warm water and a bit of soap, agitating to lightly full. Rinse and lay flat to dry. Steam press if needed.
For yarn tips, tricks, and ideas, visit the Zoom Loom section on the Schacht web-site: schachtspindle.com.
~ 14 ~
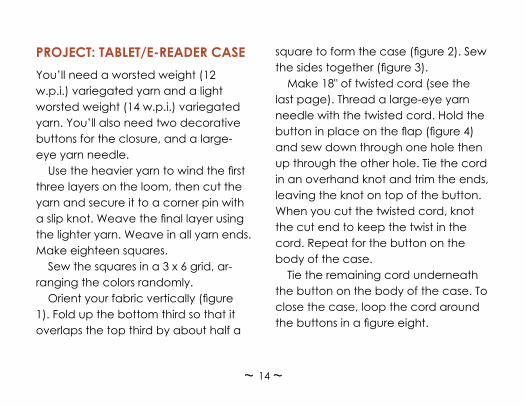
PROjECT: TABLET/E-READER CASEYou’ll need a worsted weight (12 w.p.i.) variegated yarn and a light worsted weight (14 w.p.i.) variegated yarn. You’ll also need two decorative buttons for the closure, and a large-eye yarn needle.
Use the heavier yarn to wind the first three layers on the loom, then cut the yarn and secure it to a corner pin with a slip knot. Weave the final layer using the lighter yarn. Weave in all yarn ends. Make eighteen squares.
Sew the squares in a 3 x 6 grid, ar-ranging the colors randomly.
Orient your fabric vertically (figure 1). Fold up the bottom third so that it overlaps the top third by about half a
square to form the case (figure 2). Sew the sides together (figure 3).
Make 18" of twisted cord (see the last page). Thread a large-eye yarn needle with the twisted cord. Hold the button in place on the flap (figure 4) and sew down through one hole then up through the other hole. Tie the cord in an overhand knot and trim the ends, leaving the knot on top of the button. When you cut the twisted cord, knot the cut end to keep the twist in the cord. Repeat for the button on the body of the case.
Tie the remaining cord underneath the button on the body of the case. To close the case, loop the cord around the buttons in a figure eight.
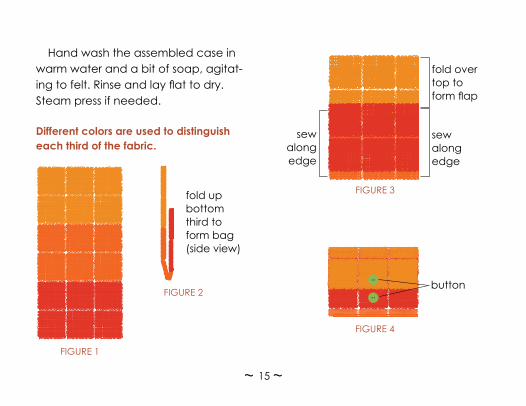
~ 15 ~FIGURE 1
Different colors are used to distinguish each third of the fabric.
FIGURE 3
sew along edge
fold over top to form flap
FIGURE 4
button
Hand wash the assembled case in warm water and a bit of soap, agitat-ing to felt. Rinse and lay flat to dry. Steam press if needed.
fold up bottom third to form bag (side view)
FIGURE 2
sew along edge
~ 16 ~
15 100 100 10 67 49 36 0 42 5 92 4
38 37 94 24 0 76 81 31 90 7 0 36
3 66 100 9 49 24 0 70 0 42 59 49Find out more at schachtspindle.comSchacht Spindle Company 6101 Ben Place Boulder, CO 80301p. 303.442.3212 f. 303.447.9273
© 2013 Schacht Spindle Company, Inc.
Glossary Felting: Washing fabric so that it shrinks, blend-ing warp and weft threads together, creating a dense fabric.Fulling: Washing a fabric so that it shrinks, usu-ally much less than in felting, and the yarns puff up. The individual yarns are still visible in the fabric.Warp: Noun: the set of threads held taut by the loom. Verb: the process of threading the warp onto the loom. Weaving: Interlacing one set of threads with another.Weft: The threads or yarn that interlaces with the warp threads.
ResourcesSearching for “pin loom” on the web yields many sites. You might find these helpful: ▪ schachtspindle.com ▪ eloomanation.com ▪ malarkycrafts.com
making Twisted CordCut two 54" pieces of one of the yarns. Tie each end to a pencil, then weight one pencil or have someone hold it.
Holding the yarn under tension, turn the other pencil until the yarn twists back on itself when tension is released.
Fold the twisted yarn in half, letting it twist together. Smooth out the twist if needed.
Remove the yarn from the pencils and tie the free ends in an overhand knot.
made in the U.S.A.