Embed Size (px)
Citation preview


Warnings ……………………………………………………………………… 3-5
Parts List ……………………………………………………………………… 6-9
Tools Required ..................................…………………………………………… 9
Hardware ……………………………………………………………………… 10-12
Product Diagram ……………………………………………………………… 13
Assembly Instructions ……………………………………………………….. 14-24
Installation Instructions ……………………………………………………… 25-26
Care and Maintenance ………………………………………………………. 27
Warranty Information ………………………………………………………… 28
Table of Contents Page
2
Note: Before beginning assembly of product, make sure all parts are present. Compare parts with package content list and hardware contents. If any part is missing or damaged do not attempt to assemble the unit. Contact customer service for replacement parts.

Warnings
3
ATTENTION!WHEN YOU SEE A SYMBOL OR THE WORD “WARNING!” BE SURE TO READ THE MESSAGE! THE INFORMATION CONTAINED IN THESE MESSAGES CAN SAVE YOUR LIFE OR PREVENT SERIOUS INJURY!! BE SAFE! FOLLOW ALL WARNINGS!!
WARNING! THIS PRODUCT CARRIES A STRICT WEIGHT LIMITATION. DO NOT USE THIS PRODUCT IF YOU EXCEED THIS TOTAL WEIGHT LIMIT. PLEASE NOTE THIS WEIGHT LIMIT INCLUDES THE USER AND EQUIPMENT. FAILURE TO FOLLOW THESE INSTRUCTIONS MAY RESULT IN SERIOUS INJURY OR DEATH!WARNING! Prior to each hunt, make certain you have a signaling device (e.g., mobile phone, cell phone, radio, whistle, signal flare, Personal Locator Device [PLD], etc.) in your possession and on your person in an operable condition. This device must be within easy access should you experience the need to contact emergency assistance. Failure to follow this instruction may result in serious injury or death!
WARNING! Thoroughly inspect this or any other Game Winner product(s) prior to use for signs of wear, rot, corrosion, cracks, fraying, deterioration and/or any other type of damage. DO NOT use this or any other Game Winner product(s) if they show evidence of wear, rot, corrosion, cracks, fraying, deterioration and/or any other type of damage. Failure to follow these instructions may result serious injury or death!
WARNING! Do not remove, modify any portion or otherwise mechanically modify this product or its assemblies in any manner. Make certain that all parts are used in the assembly of this product. Parts are designed and tested to work together. Modification, additions, misuse, part omission or substitution shall immediately void your factory warranty and may result in serious injury or death! If you suspect a part(s) is missing and/or damaged, immediately contact Innopower Inc. at (949) 262-3416 for replacement of missing or detective parts. Never modify your stand in any way by making repairs, altering, omitting, adding or attaching anything to it. ALWAYS USE GENUINE FACTORY AUTHORIZED INNOPOWER INC. REPLACEMENT PARTS. USE OF ANY REPLACEMENT PARTS OTHER THAN GENUINE INNOPOWER INC. PARTS VOIDS YOUR WARRANTY AND RELIEVES INNOPOWER INC. OF ANY RESULTANT LIABILITIES AND MAY RESULT IN SERIOUS INJURY OR DEATH!
WARNING! FALLS FROM A POD STAND CAN OCCUR ANYTIME AFTER LEAVING THE GROUND.THESE FALLS RESULT IN EITHER SERIOUS INJURY OR DEATH! FOR YOUR PERSONAL SAFETY, PLEASE TAKE A MOMENT TO CAREFULLY READ THIS PRODUCT INSTRUCTION MANUAL IN ITS ENTIRETY BEFORE ATTEMPTING TO ASSEMBLE, SET-UP, INSTALL AND/OR OTHERWISE USE THIS GAME WINNER PRODUCT. ANNUALLY REVIEW THE CONTENTS OF THIS INSTRUCTION MANUAL. ADDITIONALLY, KEEP THESE INSTRUCTIONS FOR THE ENTIRE DURATION YOU OWN THIS PRODUCT(S). FAILURE TO FOLLOW THESE INSTRUCTIONS MAY RESULT IN SERIOUS INJURY OR DEATH! WARNING! THE SAFE USE AND OPERATION OF THIS PRODUCT(S) IS THE SOLE RESPONSIBILITY OF THE USER. IT IS THE SOLE RESPONSIBILITY OF THE OWNER TO PROVIDE ANY PERSON(S) WHO BORROW OR PURCHASE THIS PRODUCT WITH ALL WRITTEN AND SAFETY VIDEO INSTRUCTIONS AND WARNINGS PRIOR TO USE. DO NOT ALLOW A PERSON TO USE THE PRODUCT THAT HAS NOT REVIEWED ALL WRITTEN AND SAFETY VIDEO INSTRUCTIONS AND WARNINGS PRIOR TO USE. FAILURE TO FOLLOW THESE INSTRUCTIONS MAY RESULT IN SERIOUS INJURY OR DEATH! STORE ALL WRITTEN AND SAFETY VIDEO INSTRUCTIONS AND WARNINGS IN A SAFE LOCATION WHERE THEY CAN BE SHARED WITH POTENTIAL USERS. IF ANY INSTRUCTIONS OR WARNINGS ARE LOST OR DISCARDED, DO NOT USE THE PRODUCT AND DO NOT ALLOW ANY OTHER PERSON TO USE THE PRODUCT.
WARNING! Prior to attempting to use this or any Game Winner product(s), you must take a moment and become familiar with its assembly, setup, installation and removal. You must practice setting-up using and removing the product(s) at ground level prior to attempting to use it at heights above ground-level. Once you have become thoroughly knowledgeable and comfortable with this product set-up, use and removal at ground-level, you are now ready to use it at heights above ground-level. Failure to follow these instructions may result in serious injury or death!
WARNING! This product is designed for adult use only. No one under the age of 18 should attempt to use this or any other Game Winner product(s) without direct adult supervision.

Warnings
4
WARNING! ALWAYS inspect ALL of the seat and all straps prior to each use. Replace the seat and/or any straps if inspection reveals any damage, including but not limited to wear, rot, fraying, deterioration and/or any other type before each use. You must replace ALL straps (i.e., ratchet, cinch, button, stabilizing straps/ropes, etc) and suspension seats EVERY two years. Inspect all tags and/or labels for dates prior to each use. If any tag or label is missing, damaged or unreadable, replace and do not use the strap. Use only Game Winner replacement straps. Use of any other straps, which are not genuine Game Winner straps constitutes a modification to the product and could result in serious injury or death. Any modification will void the warranties and relieve Game Winner Inc. from all liabilities. Failure to follow these instructions may result in serious injury or death! WARNING! You must always inform someone of your hunting location, where the pod stand will be located and the expected duration of the hunt. Failure to follow these instructions may result in serious injury or death!WARNING! Inspect all safety devices each time before each use. DO NOT use these devices if they show signs of wear, damage, deterioration, vandalism, fraying or other damage. Factors such as vandals, weather and animals may affect the performance of an unattended pod stand or safety device. Do not store these devices outdoors when not in use. Failure to follow these instructions may result in serious injury or death! WARNING! If you have a limiting physical and/or health condition, DO NOT hunt from heights above ground level. Hunt from the ground when self-recovery/escape ability is absent. Failure to follow these instructions may result in serious injury or death!
WARNING! Never attempt to climb up or climb down with a weapon and/or gear period. ALWAYS unload your weapon and pull it up to hunting height using pull up rope. ALWAYS lower your unloaded weapon down to the ground prior (when raising or lowering firearms, the chamber must be open and the barrel pointing toward the ground) to attempting to climb down. Use this same method when raising or lowering all other gear. Failure to follow these instructions may result in serious injury or death!
WARNING! DO NOT attempt to use this and/or any other Game Winner product(s) when ice, snow and/or freezing rain has deposited or formed on any portion of the product you intend to climb. Failure to follow these instructions may result in serious injury or death!
WARNING! ALWAYS maintain three (3) point contact when climbing up/down when using this product. Proper three (3) point contact means having either two (2) feet with one (1) hand on step or one (1) foot with two (2) hands on the step portion of the climbing aids at all time when climbing up or down. Failure to follow these instructions may result in serious injury or death!
WARNING! NEVER adjust ANY straps, cables, and/or adjustable support bars while standing on or leaning against any treestand. DO NOT use any treestand if there is wear, rot, corrosion, cracks, fraying, deterioration and/or any other type of damage on any part of the pod stand. Failure to follow these instructions may result in serious injury or death!
WARNING! Replace all hardware/cables/nuts/bolts/clips on your pod stand if inspection reveals any damage, including but not limited to wear, rot, corrosion, cracks, fraying, deterioration and/or any other type of damage. Use only Game Winner replacement parts. The product is tested to be used only with genuine Game Winner parts. Use of any other parts, which are not genuine Game Winner parts, constitutes a modification to the product and could result in serious injury or death. Any modification will void the warranties and relieve Game Winner Inc. from all liabilities. Failure to follow these instructions may result in serious injury or death!
WARNING! Never rely on a tree branch for support while climbing. Failure to follow these instructions may result in serious injury or death!
WARNING! Never leave a treestand in a tree for more than two (2) weeks (14 days). Weather, elements, animals, vandalism, and/or other mechanisms could damage the treestand. Failure to follow these instructions may result in serious injury or death!

Warnings
5
WARNING! DO NOT use this or any other Game Winner product(s) if you have a history of heart problems, back problems, impaired vision, joints that lock-up, spinal fusions, equilibrium problems, high blood pressure, are not well-rested and/or any other physical impairment that may limit your ability to use and/or operate this product(s) in the safe manner outlined in this instruction manual. Additionally, do not use this or any other Game Winner product(s) if you are currently taking any medication (including prescription or over-the-counter [OTC]) and/or using and/or consuming any substance, or consumed any substance, including alcohol, that may limit your ability to use this product as outlined and described in this instruction manual. Never use a pod stand when feeling ill, nauseous or dizzy. Do not use any Game Winner product(s) without consent from your medical doctor. Failure to follow these instructions may result in serious injury or death!
WARNING! DO NOT attempt to use this or any other Game Winner product(s) when lighting or thunderstorms are threatening and/or present within five (5) miles. Do not attempt to use this or any other Game Winner product(s) during or under threat of any adverse weather condition. This includes weather conditions which have the potential for producing winds, lighting, rain, snow, sleet and/or any other atmospheric condition which may limit the user’s ability to operate this product in a safe manner as described in this instruction manual. Should inclement weather conditions arise during your use of this product, return to the ground immediately. Failure to follow these instructions may result in serious injury or death!
SPECIAL CONSIDERATIONS FOR TRIPOD TREESTAND USAGE
WARNING! DO NOT modify, fix/repair, alter, bend, cut, weld, or heat this product in any way. Failure to follow these instructions may result in serious injury or death!
WARNING! DO NOT lean out from a pod stand for any reason. Failure to follow these instructions may result in serious injury or death!
WARNING! Never jump from or bounce on a pod stand for any reason. Failure to follow these instructions may result in serious injury or death!
WARNING! You must use at least four (4) adults to install and/or take down this tripod treestand. Failure to follow these instructions may result in serious injury or death!
WARNING! You must check every ladder sections connection every time you use the stand before you leave the ground. If you find that the ladder section are separating, DO NOT USE the pod stand. Failure to follow these instructions may result in serious injury or death!
WARNING! You must check the ground under the tripod to make sure it is firm and level. Sloping ground or uneven surfaces (e.g., one foot on a rock) can cause your tripod ladder to tilt or shift as you climb. Failure to follow these instructions may result in serious injury or death!
WARNING! You must maintain three(3) points-of-contact when climbing the ladder and onto the tripod (i.e., two feet-one hand, two hands-one foot). Failure to follow these instructions may result in serious injury or death!
WARNING! Always have a second adult present or at least accessible by cell phone or other means when using this product. The ability to get help quickly may save your life in the event of a fall. A good non-slip safety boot is important for your safety. Be especially careful that bootlaces do not get hooked on the pod stand (tuck shoelaces into boot before climbing). Failure to follow these instructions may result in serious injury or death!
WARNING! In addition to level ground, you MUST ensure that your Game Winner tripod stand is erected so that the platform is level. Any installation other than level, will result in a dangerous condition for the user. If you find your pod stand canted, un-level or in any condition other than level, you must remove it and review the installation step by step to insure that you have properly assembled the stand. If the cantor is the result of a sloping ground, do not hunt from that location. Find an alternative installation site that affords level installation. Failure to follow these instructions may result in serious injury or death!
Parts List
1 Front Platform (with 2 tabs)
Qty
1
2 Back Platform (with 3 tabs)
Qty
1
3 Lower Seat Post
Qty
1
4 Ladder Supports
Qty
2
5 Leg SupportsQty
2
6 Back Rail Uprights
Qty 3
7 Front Rail Uprights
Qty 2
6
Parts List
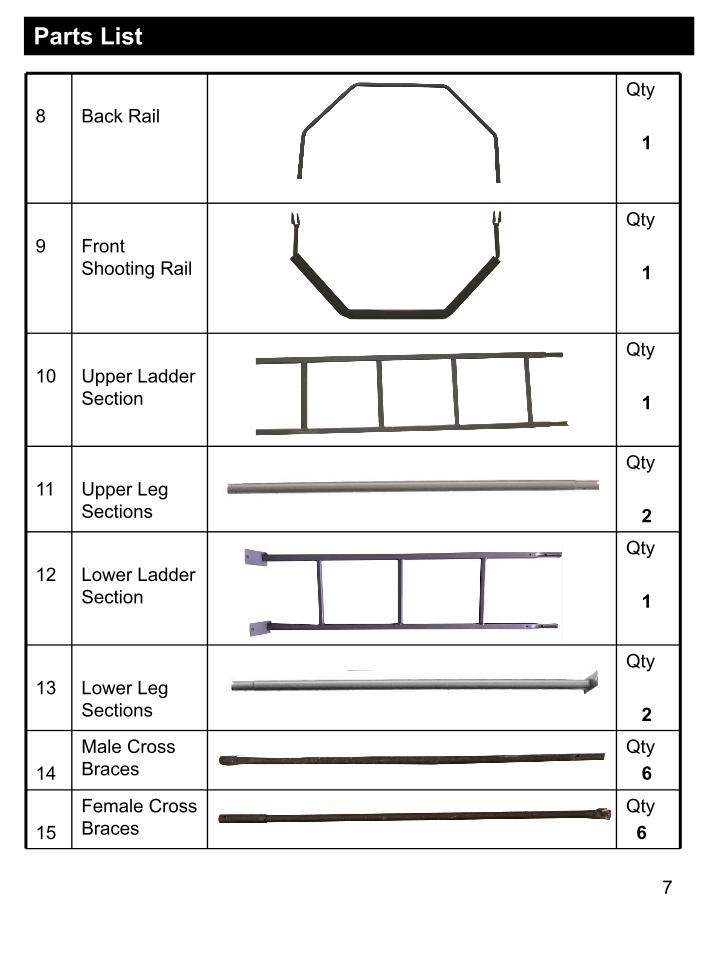
8 Back Rail
Qty
1
9 Front Shooting Rail
Qty
1
10 Upper Ladder Section
Qty
1
11 Upper Leg Sections
Qty
2
12 Lower Ladder Section
Qty
1
13 Lower Leg Sections
Qty
2
14Male Cross Braces
Qty 6
15Female Cross Braces
Qty 6
7
Parts List
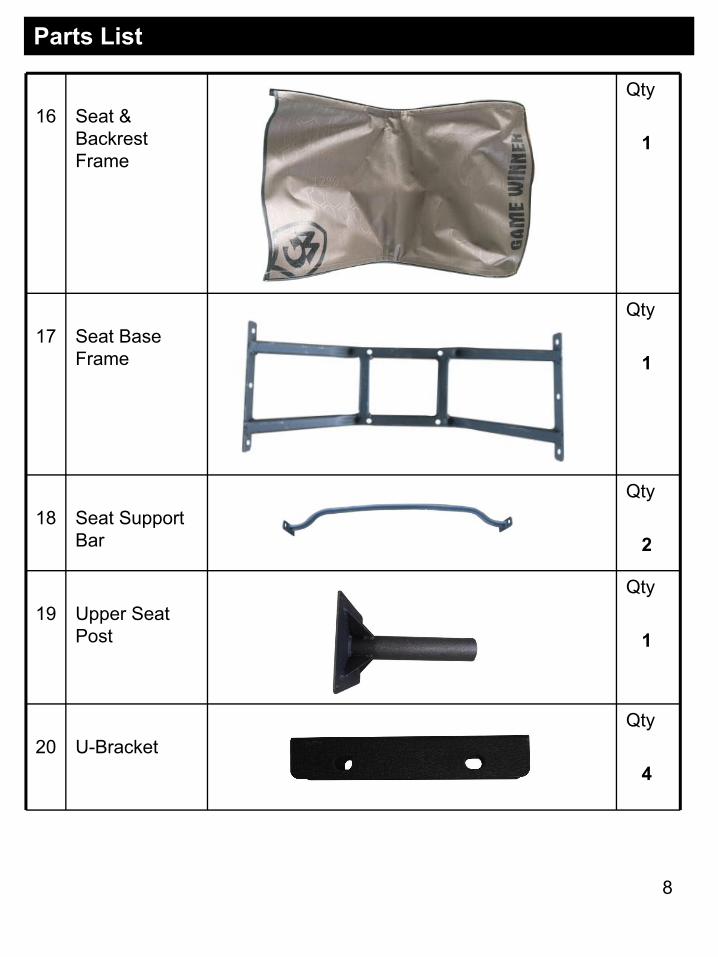
16 Seat & Backrest Frame
Qty
1
17 Seat Base Frame
Qty
1
18 Seat Support Bar
Qty
2
19 Upper Seat Post
Qty
1
20 U-BracketQty
4
8
Parts List
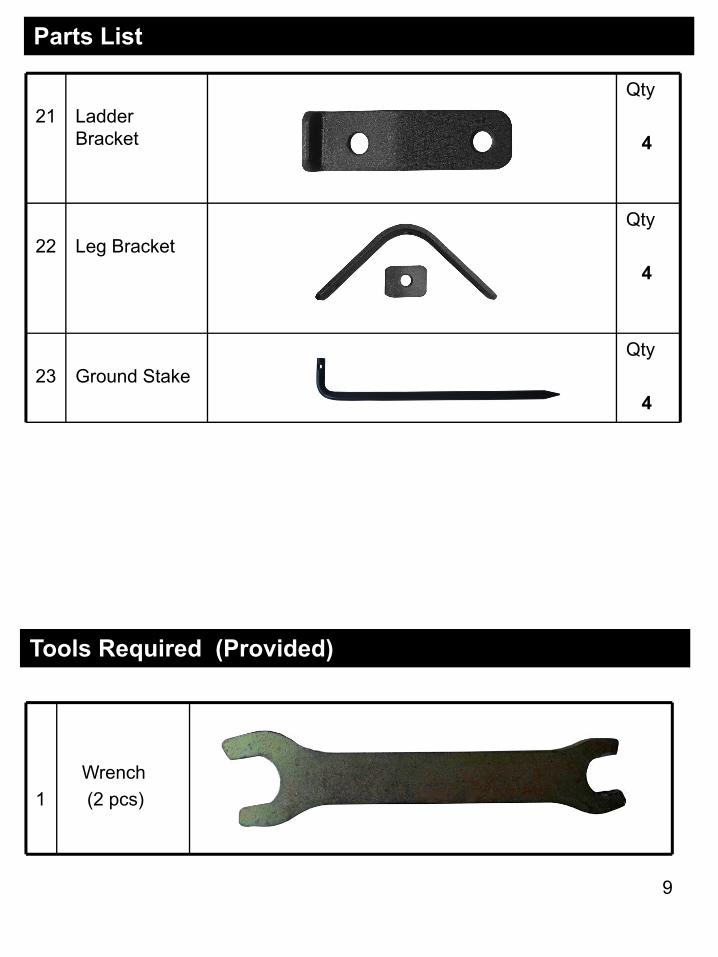
21 Ladder Bracket
Qty
4
22 Leg BracketQty
4
23 Ground StakeQty
4
9
1
Wrench (2 pcs)
Tools Required (Provided)
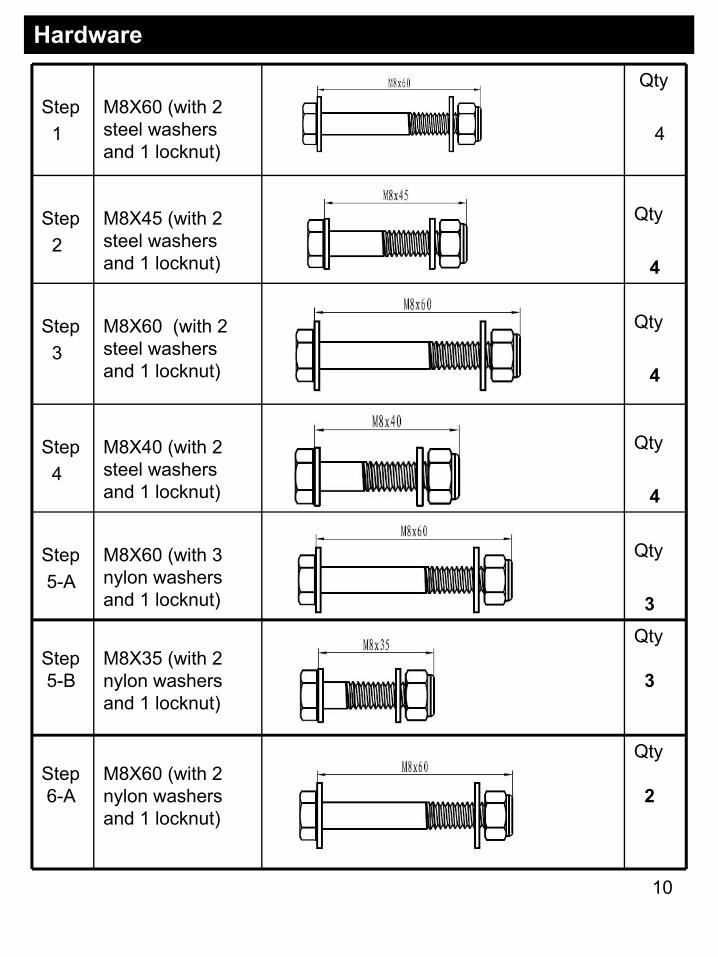
Hardware
Step 1
M8X60 (with 2 steel washers and 1 locknut)
Qty
4
Step 2
M8X45 (with 2 steel washers and 1 locknut)
Qty
4
Step 3
M8X60 (with 2 steel washers and 1 locknut)
Qty
4
Step 4
M8X40 (with 2 steel washers and 1 locknut)
Qty
4
Step 5-A
M8X60 (with 3 nylon washers and 1 locknut)
Qty
3
Step 5-B
M8X35 (with 2 nylon washers and 1 locknut)
Qty
3
Step 6-A
M8X60 (with 2 nylon washers and 1 locknut)
Qty
2
10
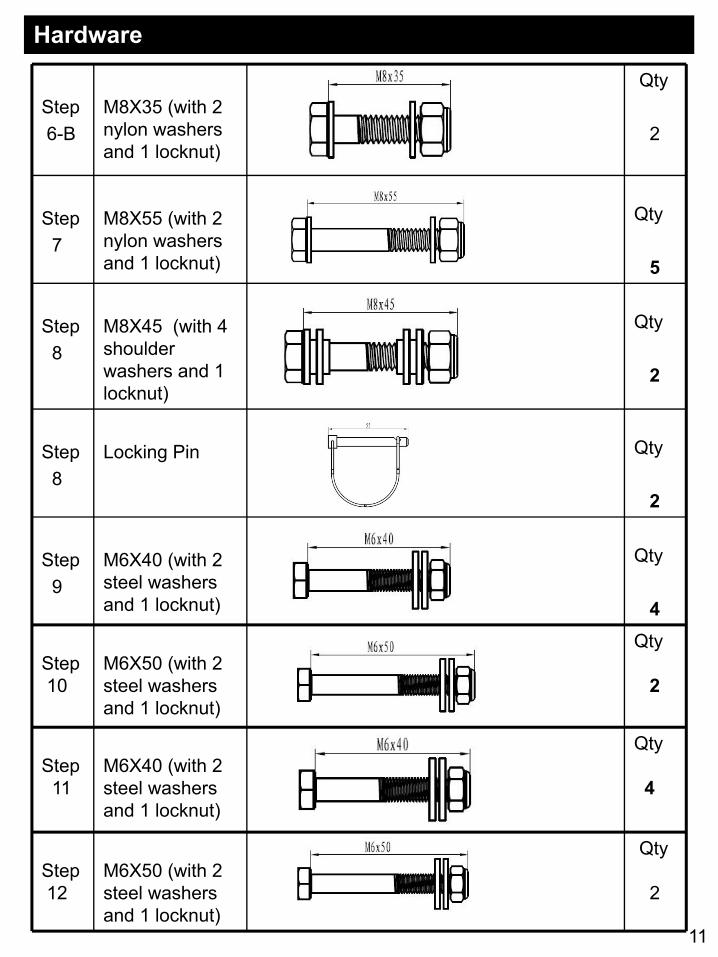
Hardware
Step 6-B
M8X35 (with 2 nylon washers and 1 locknut)
Qty
2
Step 7
M8X55 (with 2 nylon washers and 1 locknut)
Qty
5
Step 8
M8X45 (with 4 shoulder washers and 1 locknut)
Qty
2
Step 8
Locking Pin Qty
2
Step 9
M6X40 (with 2 steel washers and 1 locknut)
Qty
4
Step 10
M6X50 (with 2 steel washers and 1 locknut)
Qty
2
Step 11
M6X40 (with 2 steel washers and 1 locknut)
Qty
4
Step 12
M6X50 (with 2 steel washers and 1 locknut)
Qty
2
11
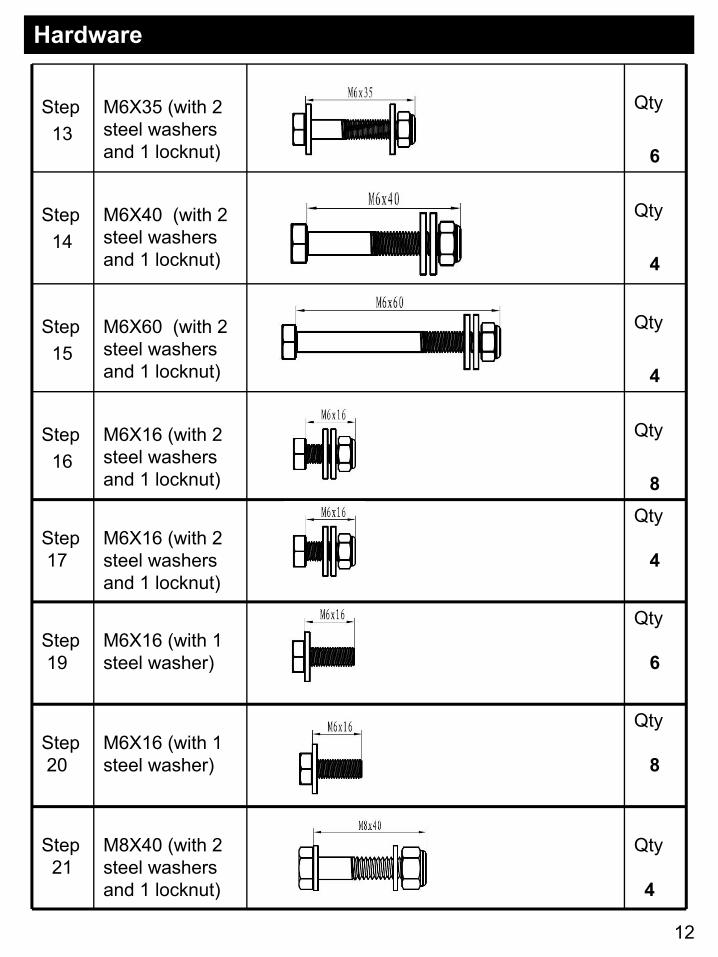
Hardware
Step 13
M6X35 (with 2 steel washers and 1 locknut)
Qty
6
Step 14
M6X40 (with 2 steel washers and 1 locknut)
Qty
4
Step 15
M6X60 (with 2 steel washers and 1 locknut)
Qty
4
Step 16
M6X16 (with 2 steel washers and 1 locknut)
Qty
8
Step 17
M6X16 (with 2 steel washers and 1 locknut)
Qty
4
Step 19
M6X16 (with 1 steel washer)
Qty
6
Step 20
M6X16 (with 1 steel washer)
Qty
8
Step 21
M8X40 (with 2 steel washers and 1 locknut)
Qty
4
12
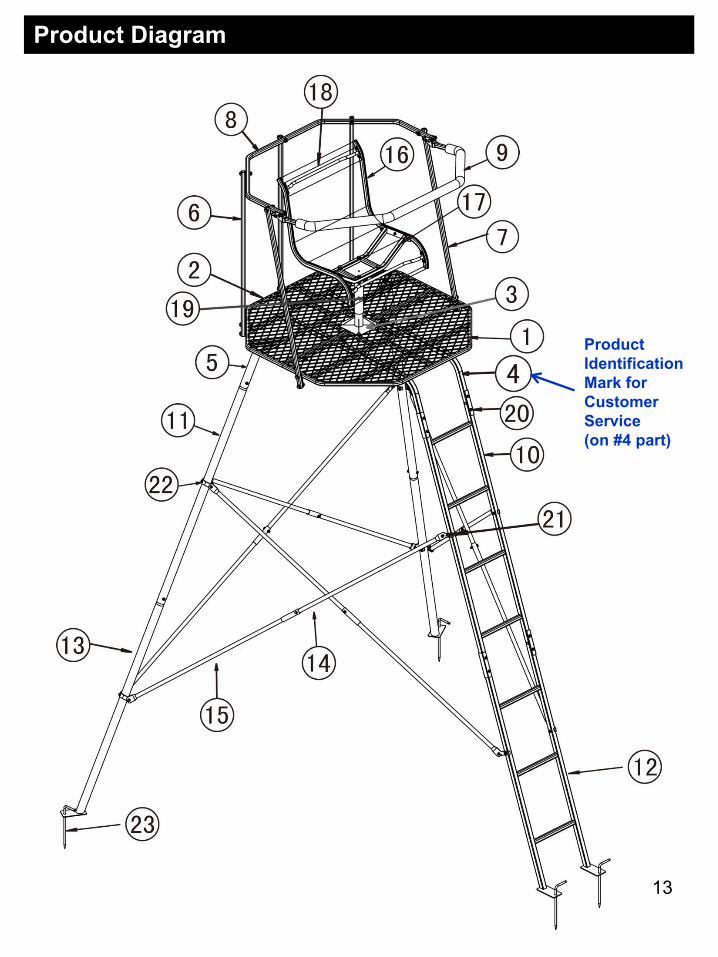
Product Diagram
13
Product Identification Mark for Customer Service (on #4 part)
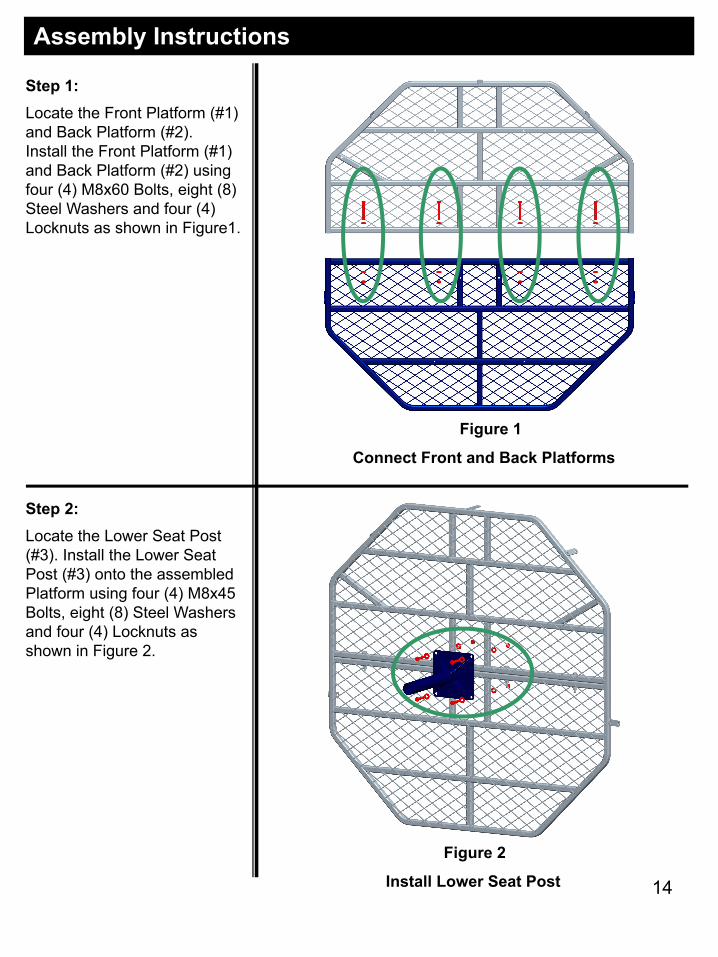
Assembly Instructions
Step 1:Locate the Front Platform (#1) and Back Platform (#2). Install the Front Platform (#1) and Back Platform (#2) using four (4) M8x60 Bolts, eight (8) Steel Washers and four (4) Locknuts as shown in Figure1.
Step 2:Locate the Lower Seat Post (#3). Install the Lower Seat Post (#3) onto the assembled Platform using four (4) M8x45 Bolts, eight (8) Steel Washers and four (4) Locknuts as shown in Figure 2.
14
Figure 1
Connect Front and Back Platforms
Figure 2
Install Lower Seat Post
Assembly Instructions
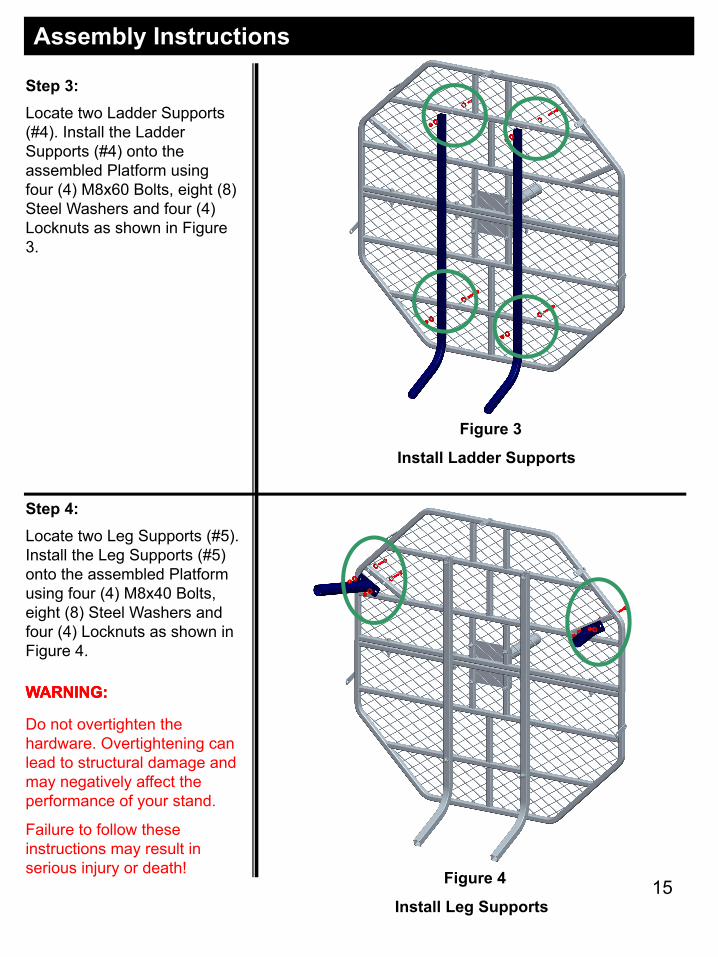
Step 3:Locate two Ladder Supports (#4). Install the Ladder Supports (#4) onto the assembled Platform using four (4) M8x60 Bolts, eight (8) Steel Washers and four (4) Locknuts as shown in Figure 3.
Step 4:Locate two Leg Supports (#5). Install the Leg Supports (#5) onto the assembled Platform using four (4) M8x40 Bolts, eight (8) Steel Washers and four (4) Locknuts as shown in Figure 4.
15
Figure 3
Install Ladder Supports
Figure 4
Install Leg Supports
WARNING:WARNING:WARNING:
Do not overtighten the hardware. Overtightening can lead to structural damage and may negatively affect the performance of your stand.
Failure to follow these instructions may result in serious injury or death!
Assembly Instructions
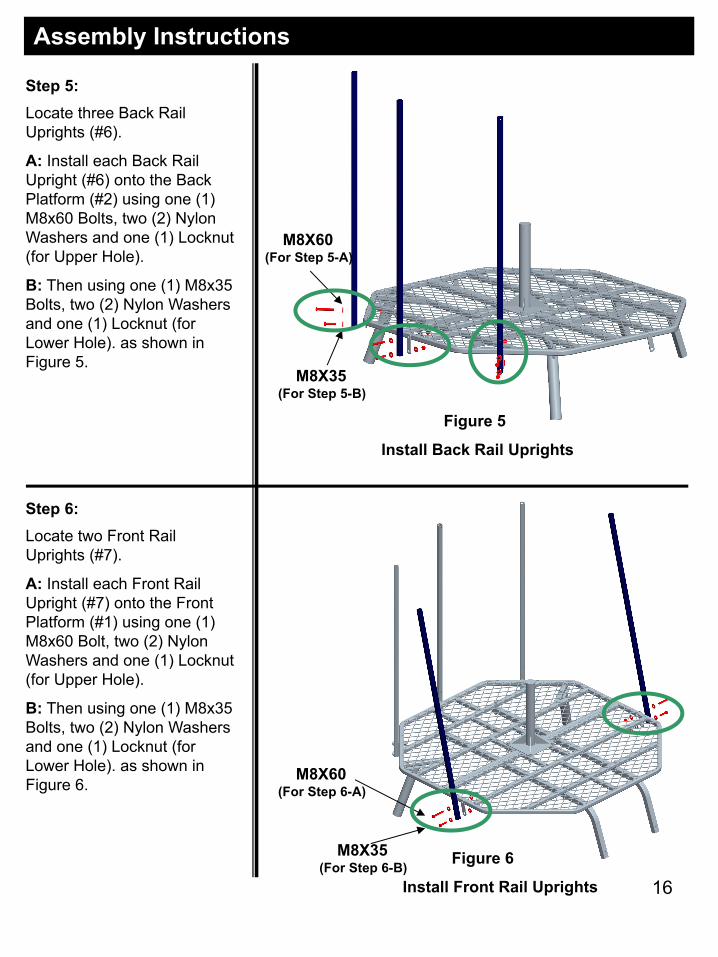
Step 5:Locate three Back Rail Uprights (#6).
A: Install each Back Rail Upright (#6) onto the Back Platform (#2) using one (1) M8x60 Bolts, two (2) Nylon Washers and one (1) Locknut (for Upper Hole).
B: Then using one (1) M8x35 Bolts, two (2) Nylon Washers and one (1) Locknut (for Lower Hole). as shown in Figure 5.
Step 6:Locate two Front Rail Uprights (#7).
A: Install each Front Rail Upright (#7) onto the Front Platform (#1) using one (1) M8x60 Bolt, two (2) Nylon Washers and one (1) Locknut (for Upper Hole).
B: Then using one (1) M8x35 Bolts, two (2) Nylon Washers and one (1) Locknut (for Lower Hole). as shown in Figure 6.
16
Figure 5
Install Back Rail Uprights
Figure 6
Install Front Rail Uprights
M8X60 (For Step 5-A)
M8X35 (For Step 5-B)
M8X60 (For Step 6-A)
M8X35 (For Step 6-B)
Assembly Instructions
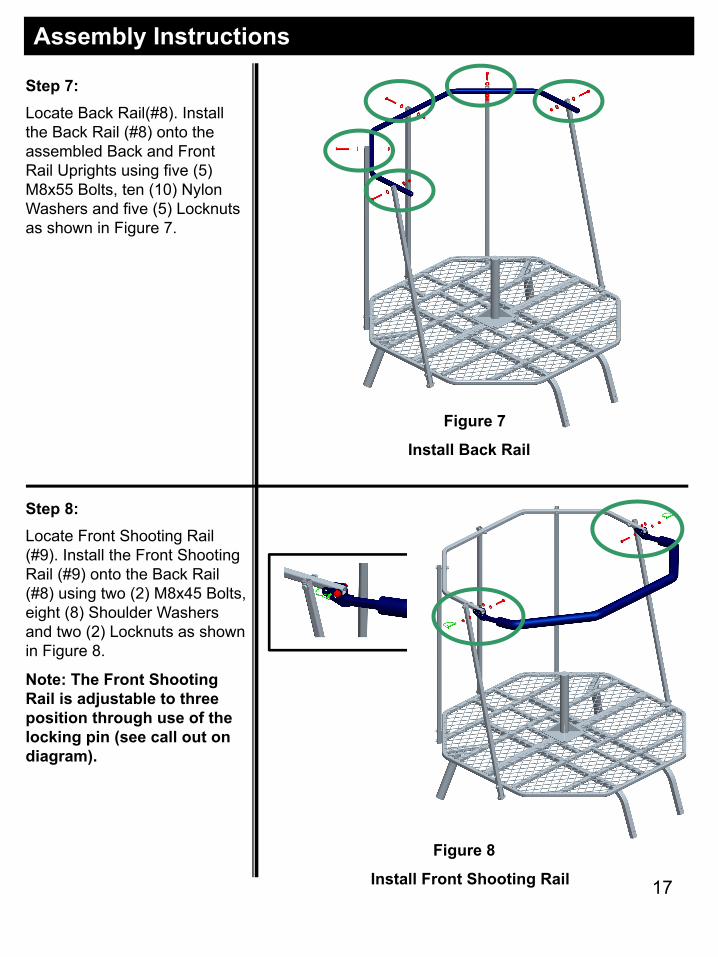
Step 7:Locate Back Rail(#8). Install the Back Rail (#8) onto the assembled Back and Front Rail Uprights using five (5) M8x55 Bolts, ten (10) Nylon Washers and five (5) Locknuts as shown in Figure 7.
Step 8:Locate Front Shooting Rail (#9). Install the Front Shooting Rail (#9) onto the Back Rail (#8) using two (2) M8x45 Bolts, eight (8) Shoulder Washers and two (2) Locknuts as shown in Figure 8.
Note: The Front Shooting Rail is adjustable to three position through use of the locking pin (see call out on diagram).
17
Figure 7
Install Back Rail
Figure 8
Install Front Shooting Rail
Assembly Instructions
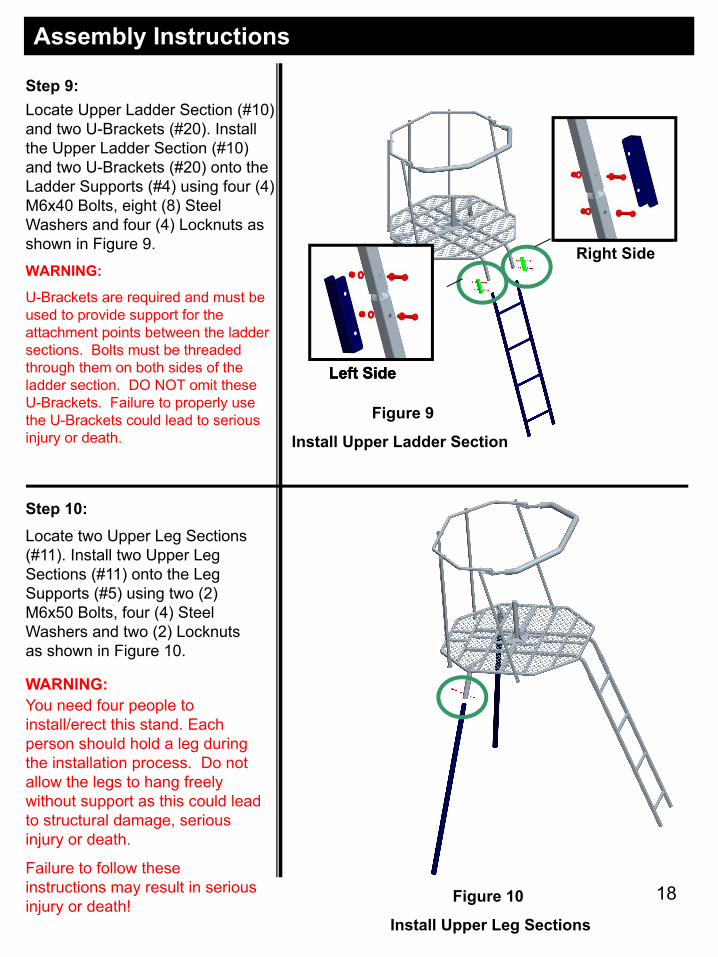
Step 9:Locate Upper Ladder Section (#10) and two U-Brackets (#20). Install the Upper Ladder Section (#10) and two U-Brackets (#20) onto the Ladder Supports (#4) using four (4) M6x40 Bolts, eight (8) Steel Washers and four (4) Locknuts as shown in Figure 9.
WARNING:
U-Brackets are required and must be used to provide support for the attachment points between the ladder sections. Bolts must be threaded through them on both sides of the ladder section. DO NOT omit these U-Brackets. Failure to properly use the U-Brackets could lead to serious injury or death.
Step 10:Locate two Upper Leg Sections (#11). Install two Upper Leg Sections (#11) onto the Leg Supports (#5) using two (2) M6x50 Bolts, four (4) Steel Washers and two (2) Locknuts as shown in Figure 10.
18
Figure 9
Install Upper Ladder Section
Figure 10
Install Upper Leg Sections
WARNING:You need four people to install/erect this stand. Each person should hold a leg during the installation process. Do not allow the legs to hang freely without support as this could lead to structural damage, serious injury or death.
Failure to follow these instructions may result in serious injury or death!
Left Side
Right Side
Left SideLeft Side
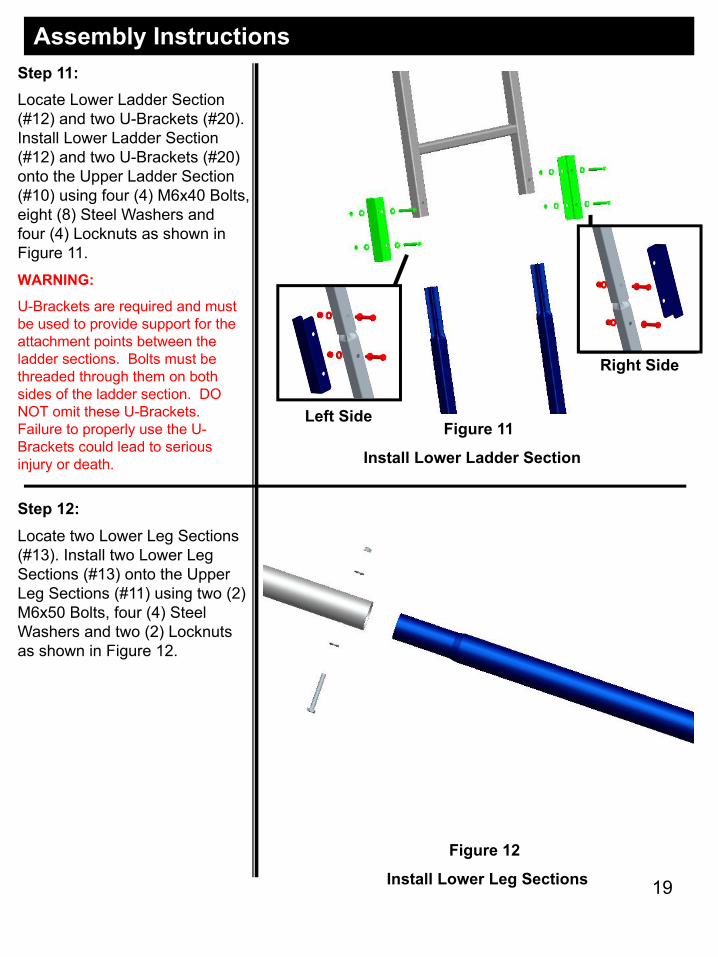
Assembly InstructionsStep 11:Locate Lower Ladder Section (#12) and two U-Brackets (#20). Install Lower Ladder Section (#12) and two U-Brackets (#20) onto the Upper Ladder Section (#10) using four (4) M6x40 Bolts, eight (8) Steel Washers and four (4) Locknuts as shown in Figure 11.
WARNING:
U-Brackets are required and must be used to provide support for the attachment points between the ladder sections. Bolts must be threaded through them on both sides of the ladder section. DO NOT omit these U-Brackets. Failure to properly use the U-Brackets could lead to serious injury or death.
Step 12:Locate two Lower Leg Sections (#13). Install two Lower Leg Sections (#13) onto the Upper Leg Sections (#11) using two (2) M6x50 Bolts, four (4) Steel Washers and two (2) Locknuts as shown in Figure 12.
19
Figure 11
Install Lower Ladder Section
Figure 12
Install Lower Leg Sections
Left Side
Right Side
Assembly Instructions
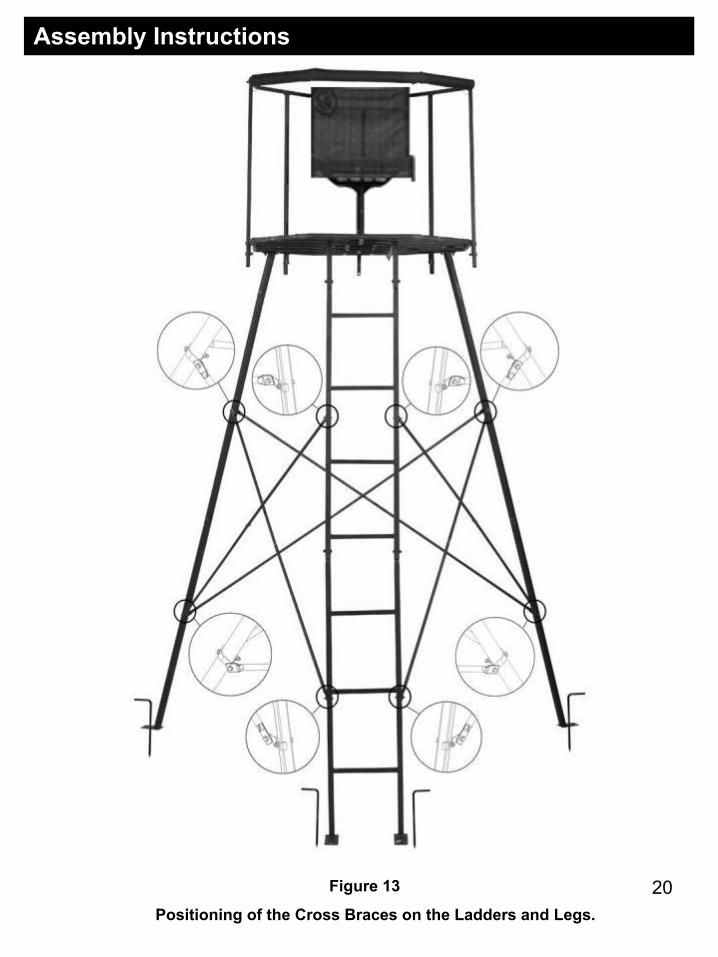
20 Figure 13
Positioning of the Cross Braces on the Ladders and Legs.

Assembly Instructions
Step 13:
Locate six Male Cross Braces (#14) and six Female Cross Braces (#15). Bolt a single Male Section (#14) to a single Female Section (#15) using one (1) M6x35 Bolts, two (2) Steel Washers and one (1) Locknuts as shown in Figure 14.
Step 15:
Locate four Leg Brackets (#22). Install each Leg Bracket (#22) onto the Leg Sections using one (1) M6x60 Bolts, two (2) Steel Washers and one (1) Locknuts as shown in Figure 13&16.
21
Figure 14
Assemble Cross Braces
Figure 15
Install Ladder Brackets
Step 14:
Locate four Ladder Brackets (#21). Install each Ladder Bracket (#21) onto the Ladder Sections using one (1) M6x40 Bolts, two (2) Steel Washers and one (1) Locknuts as shown in Figure 13&15.
Figure 16
Install Leg Brackets

Assembly Instructions
Step 16:Locate assembled six Cross Braces. Locate Cross Brace holes to Leg Brackets holes using eight (8) M6x16 Bolts, sixteen (16) Steel Washers and eight (8) Locknuts as shown in Figure 13&17.
Step 17:Install remaining end Cross Brace holes to Ladder Brackets holes using four (4) M6x16 Bolts, eight (8) Steel Washers and four (4) Locknuts as shown in Figure 13&18.
22
Figure 17
Cross Braces Bolted Onto Legs
Figure 18
Cross Braces Bolted Onto Ladder
Step 18:Locate four Ground Stake (#23). Secure the Ladder and Legs using this four Ground Stakes (#23) as shown in Figure 13.
WARNING:Do not overtighten the hard wares. Overtightening can lead to structural damage and may negatively affect the performance of your stand.
Failure to follow these instructions may result in serious injury or death!
Assembly Instructions
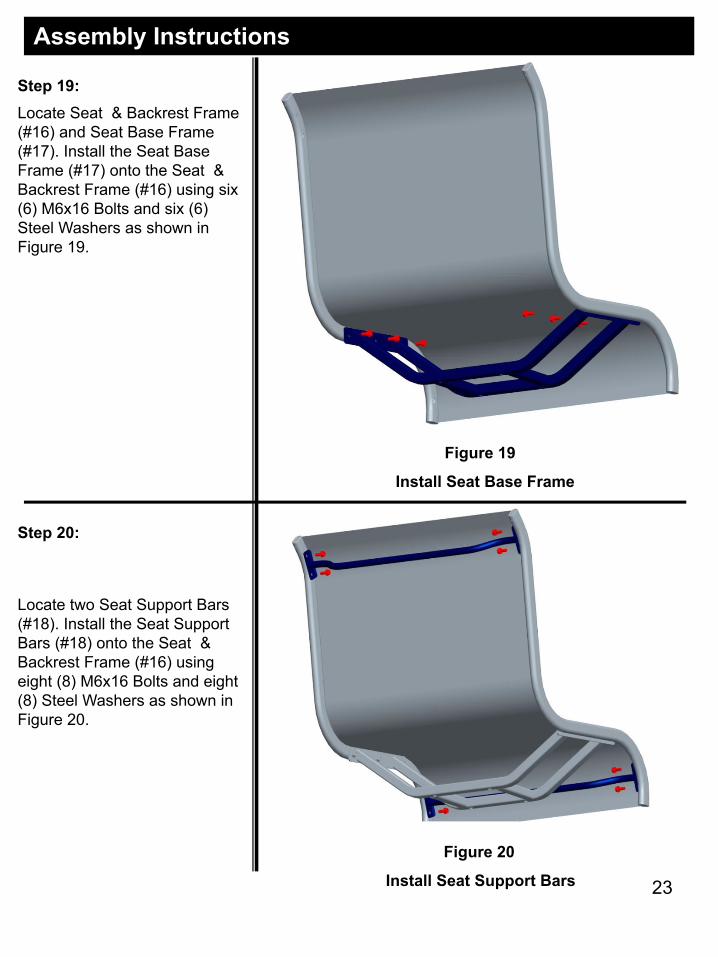
Step 19:Locate Seat & Backrest Frame (#16) and Seat Base Frame (#17). Install the Seat Base Frame (#17) onto the Seat & Backrest Frame (#16) using six (6) M6x16 Bolts and six (6) Steel Washers as shown in Figure 19.
Step 20:
Locate two Seat Support Bars (#18). Install the Seat Support Bars (#18) onto the Seat & Backrest Frame (#16) using eight (8) M6x16 Bolts and eight (8) Steel Washers as shown in Figure 20.
23
Figure 19
Install Seat Base Frame
Figure 20
Install Seat Support Bars
Installation Instructions
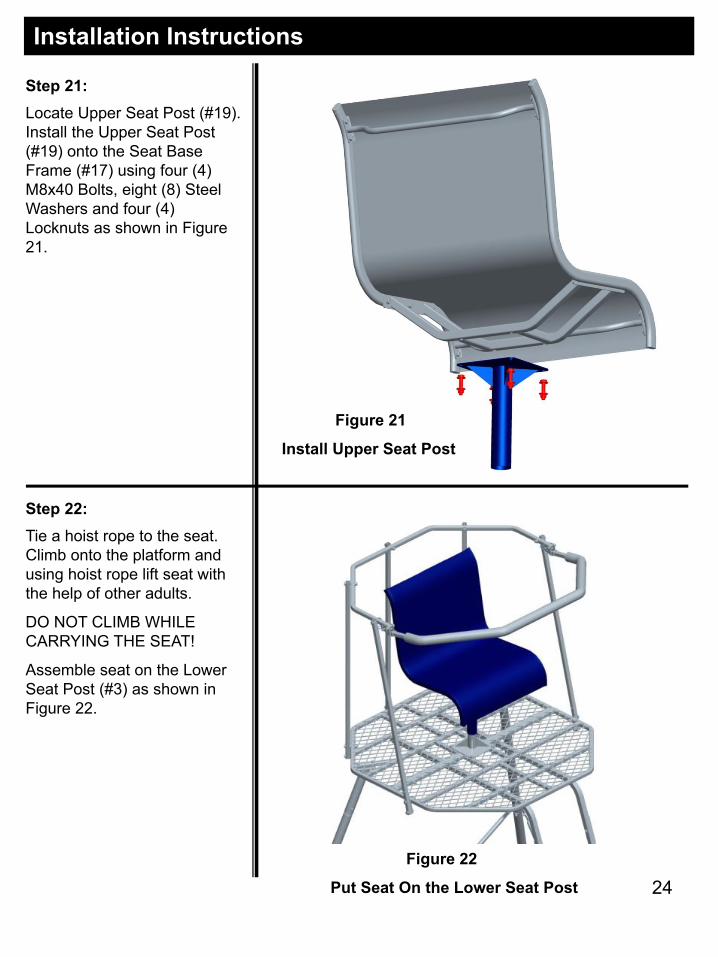
Step 21:Locate Upper Seat Post (#19). Install the Upper Seat Post (#19) onto the Seat Base Frame (#17) using four (4) M8x40 Bolts, eight (8) Steel Washers and four (4) Locknuts as shown in Figure 21.
Step 22:Tie a hoist rope to the seat. Climb onto the platform and using hoist rope lift seat with the help of other adults.
DO NOT CLIMB WHILE CARRYING THE SEAT!
Assemble seat on the Lower Seat Post (#3) as shown in Figure 22.
24 Figure 22
Put Seat On the Lower Seat Post
Figure 21
Install Upper Seat Post
Installation Instructions
25
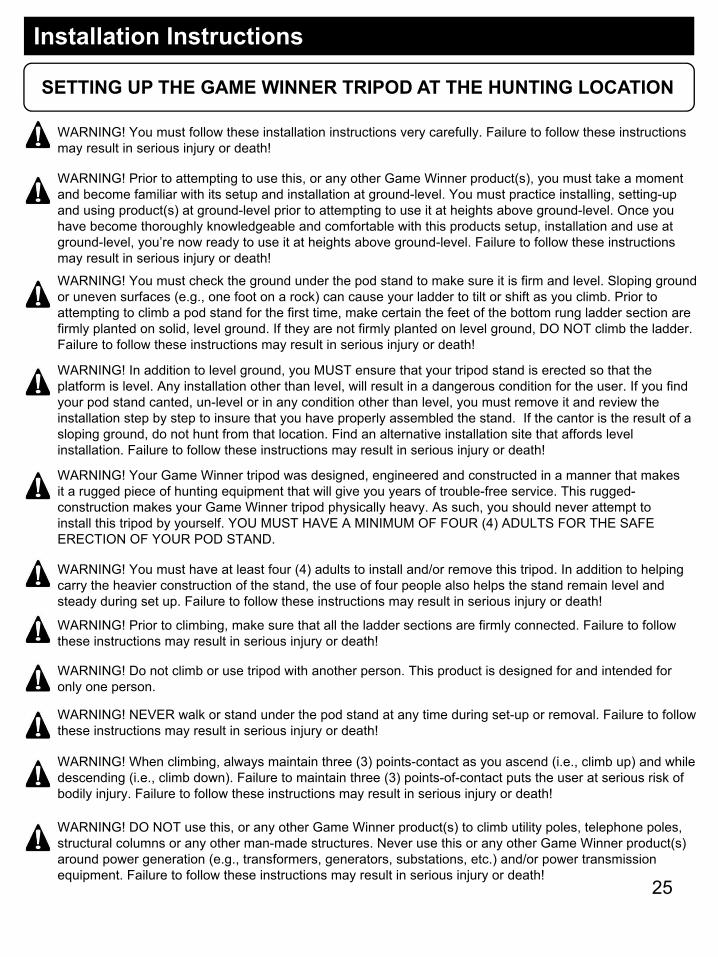
SETTING UP THE GAME WINNER TRIPOD AT THE HUNTING LOCATION
WARNING! You must follow these installation instructions very carefully. Failure to follow these instructions may result in serious injury or death!
WARNING! Prior to attempting to use this, or any other Game Winner product(s), you must take a moment and become familiar with its setup and installation at ground-level. You must practice installing, setting-up and using product(s) at ground-level prior to attempting to use it at heights above ground-level. Once you have become thoroughly knowledgeable and comfortable with this products setup, installation and use at ground-level, you’re now ready to use it at heights above ground-level. Failure to follow these instructions may result in serious injury or death!
WARNING! You must check the ground under the pod stand to make sure it is firm and level. Sloping ground or uneven surfaces (e.g., one foot on a rock) can cause your ladder to tilt or shift as you climb. Prior to attempting to climb a pod stand for the first time, make certain the feet of the bottom rung ladder section are firmly planted on solid, level ground. If they are not firmly planted on level ground, DO NOT climb the ladder. Failure to follow these instructions may result in serious injury or death!
WARNING! Your Game Winner tripod was designed, engineered and constructed in a manner that makes it a rugged piece of hunting equipment that will give you years of trouble-free service. This rugged-construction makes your Game Winner tripod physically heavy. As such, you should never attempt to install this tripod by yourself. YOU MUST HAVE A MINIMUM OF FOUR (4) ADULTS FOR THE SAFE ERECTION OF YOUR POD STAND.
WARNING! You must have at least four (4) adults to install and/or remove this tripod. In addition to helping carry the heavier construction of the stand, the use of four people also helps the stand remain level and steady during set up. Failure to follow these instructions may result in serious injury or death!
WARNING! Prior to climbing, make sure that all the ladder sections are firmly connected. Failure to follow these instructions may result in serious injury or death!
WARNING! NEVER walk or stand under the pod stand at any time during set-up or removal. Failure to follow these instructions may result in serious injury or death!
WARNING! When climbing, always maintain three (3) points-contact as you ascend (i.e., climb up) and while descending (i.e., climb down). Failure to maintain three (3) points-of-contact puts the user at serious risk of bodily injury. Failure to follow these instructions may result in serious injury or death!
WARNING! DO NOT use this, or any other Game Winner product(s) to climb utility poles, telephone poles, structural columns or any other man-made structures. Never use this or any other Game Winner product(s) around power generation (e.g., transformers, generators, substations, etc.) and/or power transmission equipment. Failure to follow these instructions may result in serious injury or death!
WARNING! In addition to level ground, you MUST ensure that your tripod stand is erected so that the platform is level. Any installation other than level, will result in a dangerous condition for the user. If you find your pod stand canted, un-level or in any condition other than level, you must remove it and review the installation step by step to insure that you have properly assembled the stand. If the cantor is the result of a sloping ground, do not hunt from that location. Find an alternative installation site that affords level installation. Failure to follow these instructions may result in serious injury or death!
WARNING! Do not climb or use tripod with another person. This product is designed for and intended for only one person.
Installation Instructions
26
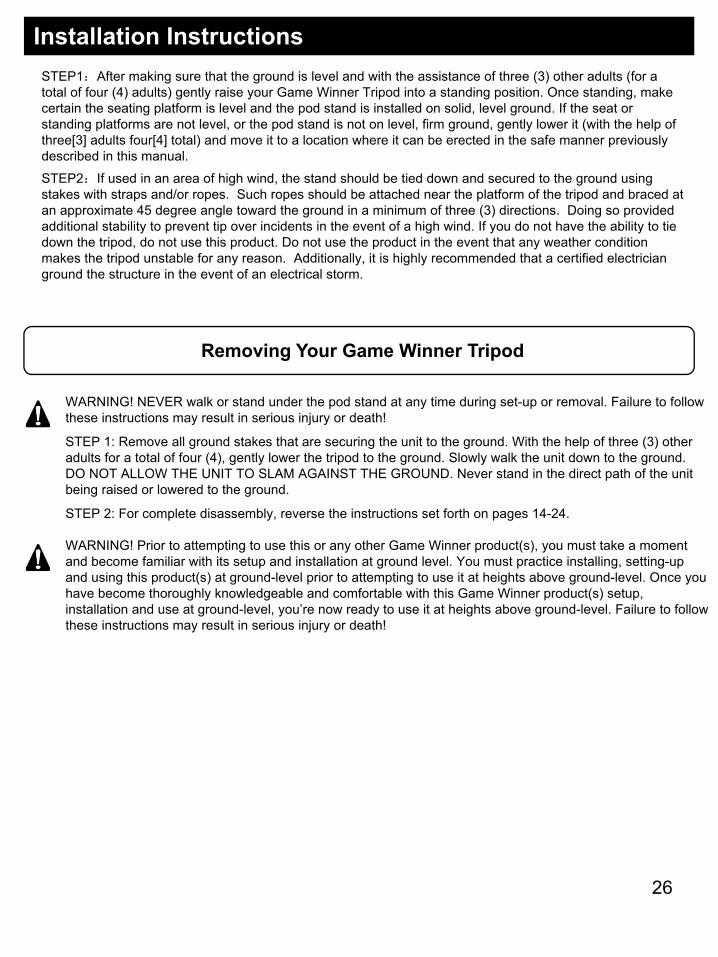
Removing Your Game Winner Tripod
WARNING! NEVER walk or stand under the pod stand at any time during set-up or removal. Failure to follow these instructions may result in serious injury or death!
STEP 1: Remove all ground stakes that are securing the unit to the ground. With the help of three (3) other adults for a total of four (4), gently lower the tripod to the ground. Slowly walk the unit down to the ground. DO NOT ALLOW THE UNIT TO SLAM AGAINST THE GROUND. Never stand in the direct path of the unit being raised or lowered to the ground.
WARNING! Prior to attempting to use this or any other Game Winner product(s), you must take a moment and become familiar with its setup and installation at ground level. You must practice installing, setting-up and using this product(s) at ground-level prior to attempting to use it at heights above ground-level. Once you have become thoroughly knowledgeable and comfortable with this Game Winner product(s) setup, installation and use at ground-level, you’re now ready to use it at heights above ground-level. Failure to follow these instructions may result in serious injury or death!
STEP 2: For complete disassembly, reverse the instructions set forth on pages 14-24.
STEP1:After making sure that the ground is level and with the assistance of three (3) other adults (for a total of four (4) adults) gently raise your Game Winner Tripod into a standing position. Once standing, make certain the seating platform is level and the pod stand is installed on solid, level ground. If the seat or standing platforms are not level, or the pod stand is not on level, firm ground, gently lower it (with the help of three[3] adults four[4] total) and move it to a location where it can be erected in the safe manner previously described in this manual.
STEP2:If used in an area of high wind, the stand should be tied down and secured to the ground using stakes with straps and/or ropes. Such ropes should be attached near the platform of the tripod and braced at an approximate 45 degree angle toward the ground in a minimum of three (3) directions. Doing so provided additional stability to prevent tip over incidents in the event of a high wind. If you do not have the ability to tie down the tripod, do not use this product. Do not use the product in the event that any weather condition makes the tripod unstable for any reason. Additionally, it is highly recommended that a certified electrician ground the structure in the event of an electrical storm.

Care and Maintenance
27
WARNING! Proper maintenance and inspection is required for this product. Thoroughly inspect this or any other Game Winner product(s) prior to use for signs of wear, rot, corrosion, cracks, fraying, deterioration and/or any other type of damage. DO NOT use this or any other Game Winner product(s) if they show evidence of wear, rot, corrosion, cracks, fraying, deterioration and/or any other type of damage. Failure to follow these instructions may result serious injury or death!
WARNING! DO NOT allow this product to be kept outdoors for more than two weeks. DO NOT expose this product for extended periods to direct sunlight, high wind, bad weather conditions, excessive heat or freezing temperatures. Exposure to such weather conditions can be unpredictable and can lead to damage of the product. Allowing a product to remain unattended may also result in damage to the product that could be caused by a variety of sources, including but not limited to vandals, animals or other sources. Inspect the product upon removal and prior to every installation and use.
WARNING! Do not remove, modify any portion or otherwise mechanically modify this product or its assemblies in any manner. Make certain that all parts are used in the assembly of this product. Parts are designed and tested to work together. Modification, additions, misuse, part omission or substitution shall immediately void your factory warranty and may result in serious injury or death! If you suspect a part(s) is missing and/or damaged, immediately contact Innopower Inc. at (949) 262-3416 for replacement of missing or detective parts. Never modify your stand in any way by making repairs, altering, omitting, adding or attaching anything to it. ALWAYS USE GENUINE FACTORY AUTHORIZED INNOPOWER INC. REPLACEMENT PARTS. USE OF ANY REPLACEMENT PARTS OTHER THAN GENUINE INNOPOWER INC. PARTS VOIDS YOUR WARRANTY AND RELIEVES INNOPOWER INC. OF ANY RESULTANT LIABILITIES AND MAY RESULT IN SERIOUS INJURY OR DEATH!
WARNING! Replace all hardware/cables/nuts/bolts/clips on your treestand if inspection reveals any damage, including but not limited to wear, rot, corrosion, cracks, fraying, deterioration and/or any other type of damage. Use only Game Winner replacement parts. The product is tested to be used only with genuine Game Winner parts. Use of any other parts, which are not genuine Game Winner parts, constitutes a modification to the product and could result in serious injury or death. Any modification will void the warranties and relieve Innopower Inc. from all liabilities. Failure to follow these instructions may result in serious injury or death! WARNING! ALWAYS inspect the seat and all straps prior to each use. Replace the seat and/or any straps if inspection reveals any damage, including but not limited to wear, rot, fraying, deterioration and/or any other type of before each use. You must replace ALL straps (i.e., ratchet, cinch, button, stabilizing straps/ropes, etc) and suspension seats EVERY two years. Inspect all tags and/or labels for dates prior to each use. If any tag or label is missing, damaged or unreadable, replace and do not use the strap. Use only Game Winner replacement straps. Use of any other straps, which are not genuine Game Winner straps constitutes a modification to the product and could result in serious injury or death. Any modification will void the warranties and relieve Game Winner from all liabilities. Failure to follow these instructions may result in serious injury or death!
WARNING! Inspect all safety devices each time before each use. DO NOT use these devices if they show signs of wear, damage, deterioration, vandalism, fraying or other damage. Factors such as tree growth, vandals, weather and animals may affect the performance of an unattended treestand or safety device. Do not store these devices outdoors when not in use. Failure to follow these instructions may result in serious injury or death!
WARNING! NEVER adjust ANY straps, cables, and/or adjustable support bars while standing on tripod stand. Make all adjustments at ground level. DO NOT use any pod stand if there is wear, rot, corrosion, cracks, fraying, deterioration and/or any other type of damage on any part of the pod stand. Failure to follow these instructions may result in serious injury or death!
Store treestand and full body safety harnesses indoors in a clean, dry environment free from direct sunlight, harmful chemicals, excessive heat and dust. Exposure to sunlight, excessive heat and the elements can weaken tree strap or affect its performance.

Warranty Information
28
Important Warranty InformationImportant Warranty Information
Innopower Inc. warrants this Game Winner product against defect(s) in material and workmanship, under proper use and storage, for the period of one (1) year from the date of purchase. Proof of purchase, plus, the return of your warranty application card to our home office, is required for any warranty claim. In the events this product is found to be defective within the warranty period, Innopower Inc.’s only obligation and your exclusive remedy shall be replacement or repair of any defective parts at our discretion. To obtain warranty service, please contact Innopower Customer Service at (949) 262-3416. Exclusions to this warranty include seat, paint, plastics, webbing and/or defects caused by operator misuse and/or abuse. Limitation to liability include the forgoing warranty is made in lieu of all other warranties, express or implied and Innopower Inc. disclaims any implied warranty of merchantability and fitness. Innopower Inc. shall not be liable for any damages direct, consequential or incidental arising out of the use or inability of this product.
Warranty Application Card
I have read and understand the safety, assembly and operating instructions provided with my Game Winner product. I have read the warranty information and know that I can call Innopower Inc. at (949) 262-3416 with any questions or concerns that I may have about this or any other Game Winner product. Mail to: INNOPOWER INC.
PO Box 265, E. Irvine, CA 92650. Email: [email protected]
Name____________________ Purchase Location__________________________________
Address___________________________________________________________________
City/State/Zip______________________________________________________________
Purchase Date______________________________________________________________
Product____________________________________________________________________
Manufactured by Innopower Inc., PO Box 265, E. Irvine, CA 92650


![INDEX [] file2 INDEX 1. Symbols and warnings Page 3 2. General information Page 4 3. Warnings Page 5 4. Technical characteristics Page 6 5. Installation Page 6 6](https://img.pdfslide.us/doc/110x75/5c77721409d3f21d538be227/index-index-1-symbols-and-warnings-page-3-2-general-information-page-4-3.jpg)