Embed Size (px)
Citation preview
WaMS Provider User Guide
Waiver Management System (WAMS) Provider User Guide
June 2018
Version 2.0
Virginia Department of Behavioral Health & Developmental Services (DBHDS)

WaMS Provider User Guide
Copyright 2018 by Virginia Department of Behavioral Health & Developmental Services (DBHDS). All rights reserved. No part of this User’s Guide may be reproduced or transmitted in any form or by any means, electronic or mechanical, including photocopying, recording, storage in an information retrieval system, or otherwise, without express written permission from DBHDS, 1220 Bank Street, Richmond, VA, 23219. Created and customized for you by Dee Dee Thomas, WaMS Training Services on June 22, 2018.
For Authorized Use Only – Do Not Distribute i
Table of Contents
1 Navigating the WaMS Environment ......................................................................................................... 1
1.1 About WaMS ........................................................................................................................................................ 1
1.2 Become familiar with the WaMS environment..................................................................................... 1
1.3 Log In to WaMS .................................................................................................................................................. 1
1.4 Navigating WaMS .............................................................................................................................................. 2
1.4.1 Home Tab .............................................................................................................................................................................. 2
1.4.2 Dashboard Tab .................................................................................................................................................................... 2
1.4.3 My Lists Tab .......................................................................................................................................................................... 2
1.4.4 Alerts Tab .............................................................................................................................................................................. 2
1.4.5 Reports Tab ........................................................................................................................................................................... 2
1.4.6 Service Authorizations Tab ............................................................................................................................................ 3
1.4.7 Person’s Details Tab .......................................................................................................................................................... 3
2 Roles and Permissions ................................................................................................................................. 4
3 Locating and Working with Individual’s Record................................................................................. 6
3.1 Alerts Tab ............................................................................................................................................................. 6
3.1.1 View Alerts ............................................................................................................................................................................ 6
3.1.2 Grouping Alerts ................................................................................................................................................................... 7
3.1.3 Go to Individual’s Record ................................................................................................................................................. 9
3.2 My Lists Tab ........................................................................................................................................................ 9
3.2.1 Individual Support Plan ................................................................................................................................................... 9
3.2.2 Recertification (ISP) ....................................................................................................................................................... 10
3.2.3 Service Authorizations .................................................................................................................................................. 11
3.3 Search Filter ..................................................................................................................................................... 12

For Authorized Use Only – Do Not Distribute ii
4 Individual Support Plan ............................................................................................................................. 13
4.1 ISP Symbols in WaMS ................................................................................................................................... 14
4.2 Part IV. Agreements ...................................................................................................................................... 14
4.3 Part V. Plan for Supports – Complete Use ............................................................................................ 18
4.3.1 Add Part V to ISP ............................................................................................................................................................. 18
4.3.2 General Schedule of Supports ..................................................................................................................................... 23
4.3.3 Signatures .......................................................................................................................................................................... 25
4.3.4 Safety Restrictions ........................................................................................................................................................... 28
4.3.5 Complete Part V ............................................................................................................................................................... 29
4.3.6 Revise Part V...................................................................................................................................................................... 30
4.3.7 Status Line for Part V - Plan of Supports .............................................................................................................. 33
4.4 Part V. Plan for Supports – Modified Use ............................................................................................. 33
4.4.1 Add Part V to ISP ............................................................................................................................................................. 34
4.4.2 General Schedule of Supports ..................................................................................................................................... 38
4.4.3 Signatures .......................................................................................................................................................................... 39
4.5 Complete Part V – Modified Use .............................................................................................................. 42
4.6 Upload Attachments to ISP ........................................................................................................................ 42
4.7 Add Form Note to ISP ................................................................................................................................... 44
4.8 Complete ISP .................................................................................................................................................... 44
4.9 Print ISP ............................................................................................................................................................. 46
4.9.1 Print Entire ISP................................................................................................................................................................. 46
4.9.2 Print Part V – Plan for Supports ................................................................................................................................ 46
5 Service Authorizations ............................................................................................................................... 47
5.1 Add Service Lines ........................................................................................................................................... 48
5.2 SA Notes ............................................................................................................................................................. 50
5.2.1 View and Add Notes to SA ............................................................................................................................................ 50
5.3 Submit SA to Support Coordinator ......................................................................................................... 52
5.4 Edit SA ................................................................................................................................................................ 53
5.5 Revise SA ........................................................................................................................................................... 54
5.5.1 Locate the SA to be Revised ......................................................................................................................................... 55
5.5.2 Revise the SA ...................................................................................................................................................................... 56
5.6 End Service Line ............................................................................................................................................. 58
For Authorized Use Only – Do Not Distribute iii
6 WaMS Menu Options ................................................................................................................................... 59
6.1 Main ..................................................................................................................................................................... 59
6.2 Administration / User Directory ............................................................................................................. 59
6.3 My Information ............................................................................................................................................... 59
6.3.1 My Profile, Overview ....................................................................................................................................................... 59
6.3.2 My Profile, My Delegations .......................................................................................................................................... 60
6.3.3 My Organization Unit .................................................................................................................................................... 62
6.3.4 My Staff ................................................................................................................................................................................ 62
6.4 Tools .................................................................................................................................................................... 62
6.4.1 Service Definitions ........................................................................................................................................................... 62
6.5 Feedback ............................................................................................................................................................ 64
6.5.1 Submit Feedback to WaMS Helpdesk ...................................................................................................................... 64
6.5.2 View List of Previously Submitted Feedback ........................................................................................................ 65
6.6 Print (Print the Screen) ............................................................................................................................... 66
7 Add New Staff Members ............................................................................................................................. 67
7.1 Complete Staff Profile – General Information .................................................................................... 67
7.1.1 Add User Information .................................................................................................................................................... 68
7.2 Add Role for New Staff Member .............................................................................................................. 69
8 Miscellaneous ................................................................................................................................................ 71
8.1 Set Email Notification for Alerts .............................................................................................................. 71
8.2 Dashboard ......................................................................................................................................................... 72
8.2.1 Dashboard Calendar ...................................................................................................................................................... 72
8.2.2 Dashboard Alerts ............................................................................................................................................................. 74
8.2.3 Dashboard To Do List .................................................................................................................................................... 75
8.3 Forgot User Name or Password ............................................................................................................... 77
8.3.1 Receive Forgotten User Name .................................................................................................................................... 77
8.3.2 Reset Password ................................................................................................................................................................. 78
9 Index ................................................................................................................................................................. 80
Navigating the WaMS Environment
For Authorized Use Only – Do Not Distribute 1
1 Navigating the WaMS Environment
1.1 About WaMS
The Waiver Management System (WaMS) is a web hosted data management system used to manage waivers. WaMS interfaces with the Virginia Medicaid Management Information System (VAMMIS), and establishes the assessment levels (of care) based on an individual’s needs and automates the authorization process. Additionally, WaMS interfaces with various Electronic Health Record (EHR) systems to transfer data into WaMS.
WaMS is customized to allow a single process for service authorizations for all three waivers (Community Living, Family and Individual Supports, and Building Independence) supporting individuals with intellectual or developmental disabilities (ID/DD).
1.2 Become familiar with the WaMS environment
The options and view that is available in WaMS is based on the assigned role. Take time to use the various tabs and tools in WaMS to determine how to best support your workstyle by using the Dashboard, Alerts, My Lists and Service Authorization tabs. See more information on using these tabs below.
1.3 Log In to WaMS
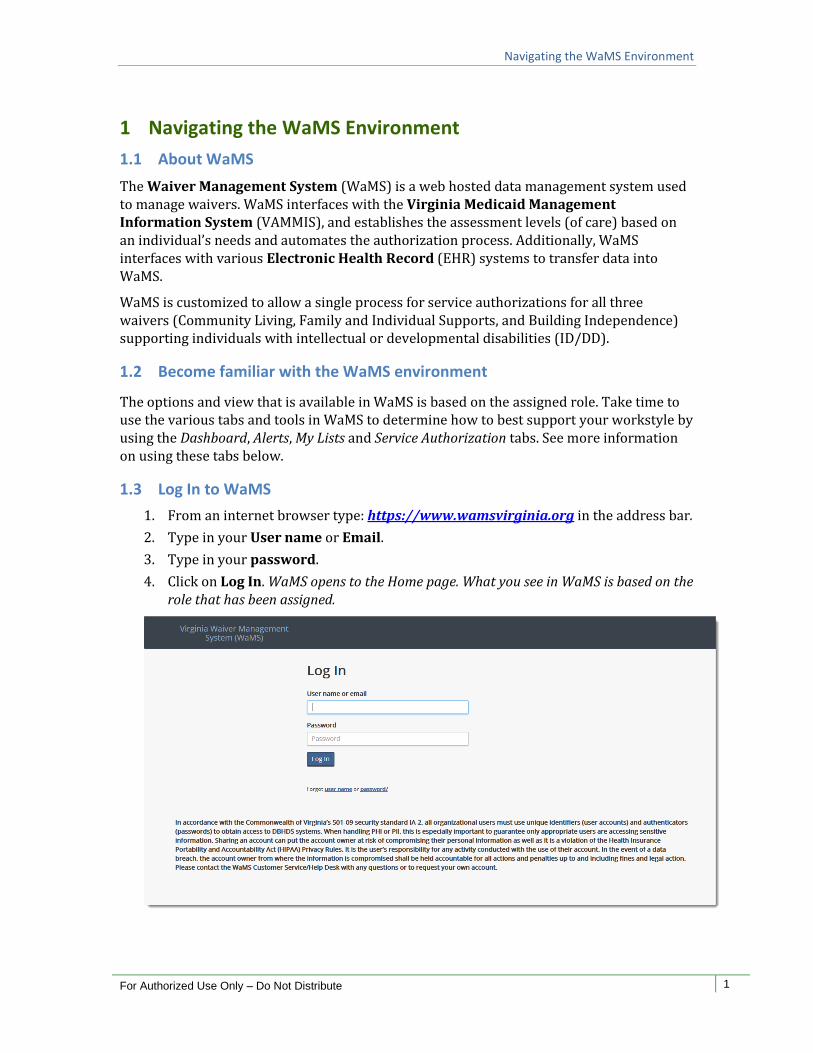
1. From an internet browser type: https://www.wamsvirginia.org in the address bar.
2. Type in your User name or Email.
3. Type in your password.
4. Click on Log In. WaMS opens to the Home page. What you see in WaMS is based on the role that has been assigned.
Navigating the WaMS Environment
For Authorized Use Only – Do Not Distribute 2
Note: The ISP Approver role does not have access
to the Reports information.
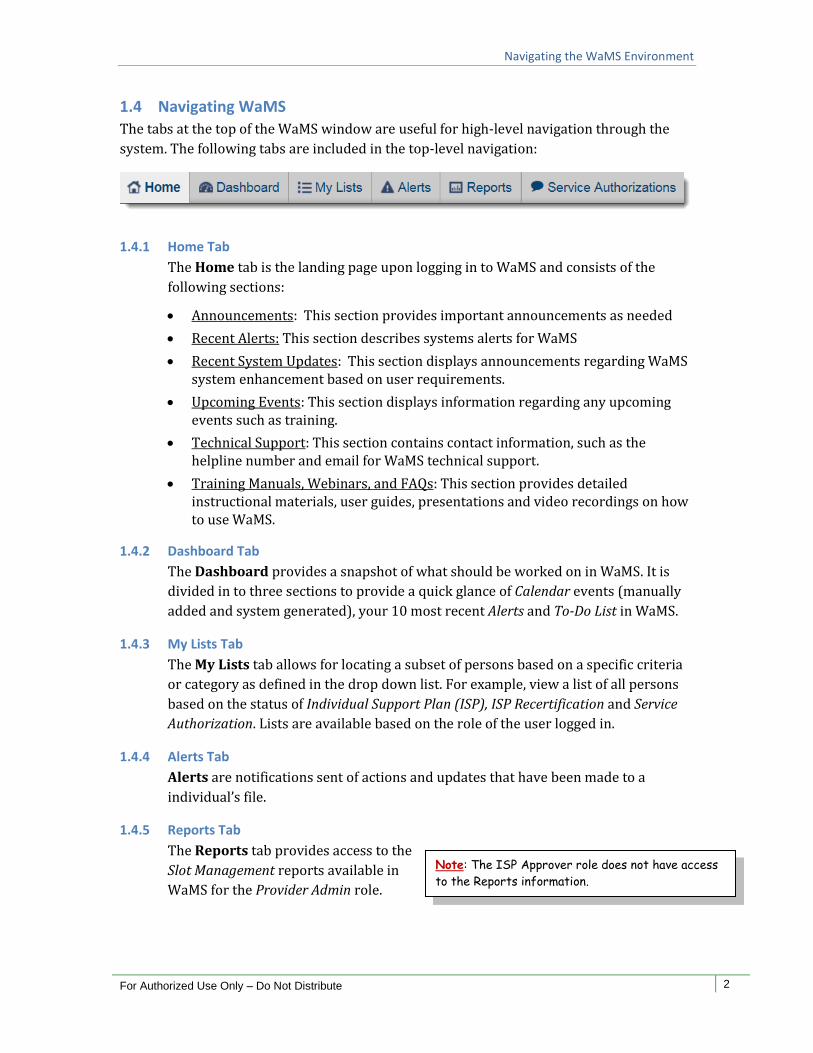
1.4 Navigating WaMS
The tabs at the top of the WaMS window are useful for high-level navigation through the
system. The following tabs are included in the top-level navigation:
1.4.1 Home Tab
The Home tab is the landing page upon logging in to WaMS and consists of the
following sections:
Announcements: This section provides important announcements as needed
Recent Alerts: This section describes systems alerts for WaMS
Recent System Updates: This section displays announcements regarding WaMS system enhancement based on user requirements.
Upcoming Events: This section displays information regarding any upcoming events such as training.
Technical Support: This section contains contact information, such as the helpline number and email for WaMS technical support.
Training Manuals, Webinars, and FAQs: This section provides detailed instructional materials, user guides, presentations and video recordings on how to use WaMS.
1.4.2 Dashboard Tab
The Dashboard provides a snapshot of what should be worked on in WaMS. It is
divided in to three sections to provide a quick glance of Calendar events (manually
added and system generated), your 10 most recent Alerts and To-Do List in WaMS.
1.4.3 My Lists Tab
The My Lists tab allows for locating a subset of persons based on a specific criteria
or category as defined in the drop down list. For example, view a list of all persons
based on the status of Individual Support Plan (ISP), ISP Recertification and Service
Authorization. Lists are available based on the role of the user logged in.
1.4.4 Alerts Tab
Alerts are notifications sent of actions and updates that have been made to a
individual’s file.
1.4.5 Reports Tab
The Reports tab provides access to the
Slot Management reports available in
WaMS for the Provider Admin role.
Navigating the WaMS Environment
For Authorized Use Only – Do Not Distribute 3
1.4.6 Service Authorizations Tab
The Service Authorizations tab provides a more direct access to Service
Authorizations. Search by the individual’s name, assigned CSB, status, type of service
or by any other available options.
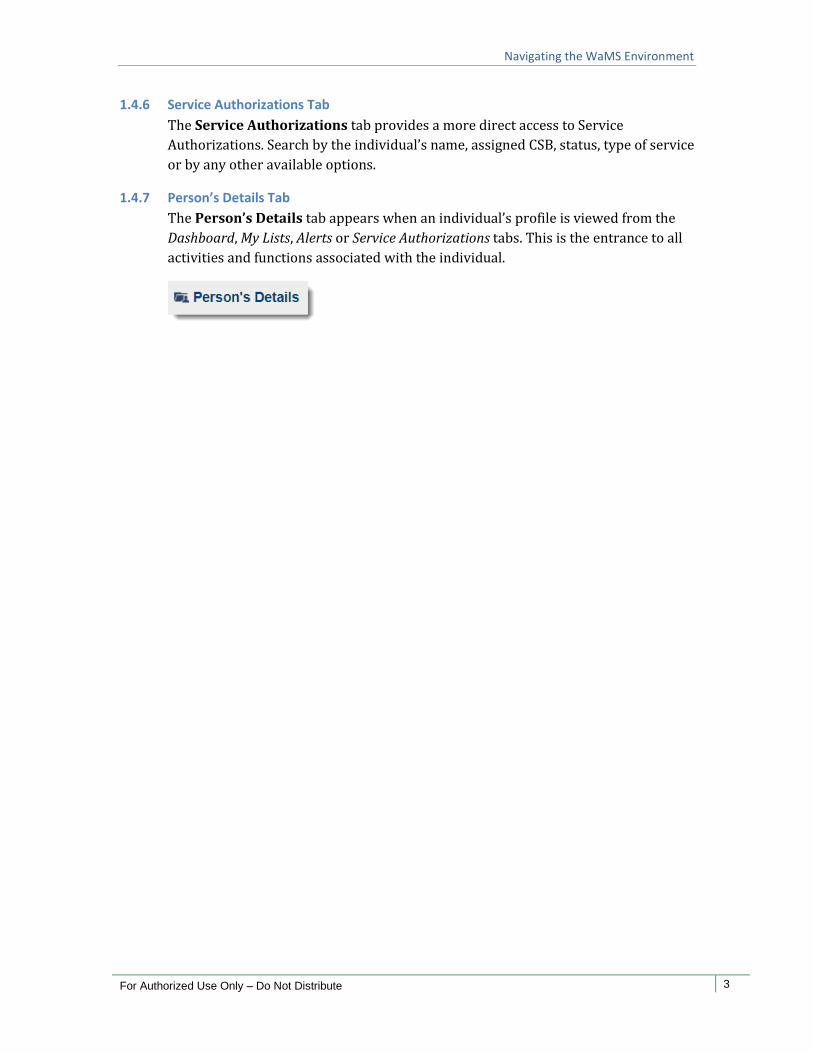
1.4.7 Person’s Details Tab
The Person’s Details tab appears when an individual’s profile is viewed from the
Dashboard, My Lists, Alerts or Service Authorizations tabs. This is the entrance to all
activities and functions associated with the individual.
Roles and Permissions
For Authorized Use Only – Do Not Distribute 4
2 Roles and Permissions WaMs functionality is based on Roles and Permissions. What you see in WaMS is based on
how you are logged in. There are four types of Provider Roles in WaMS:
Provider Admin
o Add Service Lines to the Service Authorization
Provider ISP Approver
o Uploads attachments to ISP such as Part V – Plan for Supports, Activity Schedules, Nurse Plans, etc.
CM Provider
o Providers that have both provider and case manager responsibilities (i.e., has create/edit rights to Individual Support Plans and Service Authorizations)
Provider Billing
o Mostly read-only access to WaMS
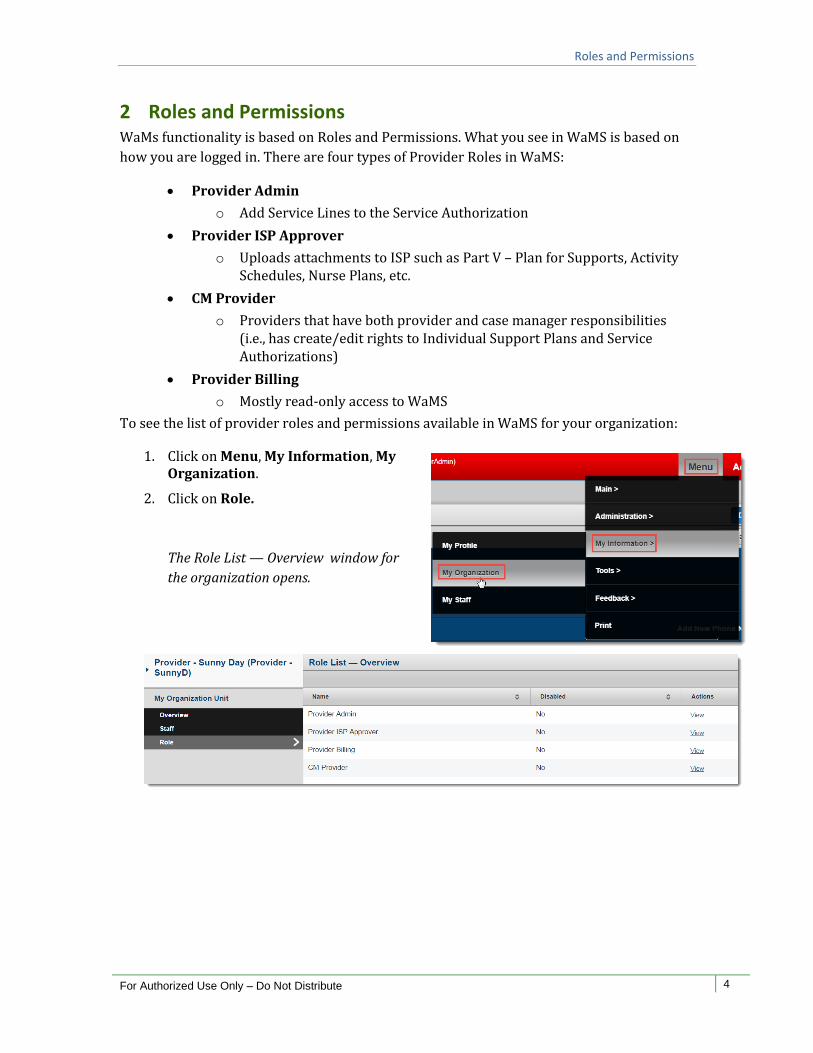
To see the list of provider roles and permissions available in WaMS for your organization:
1. Click on Menu, My Information, My Organization.
2. Click on Role.
The Role List — Overview window for
the organization opens.
Roles and Permissions
For Authorized Use Only – Do Not Distribute 5
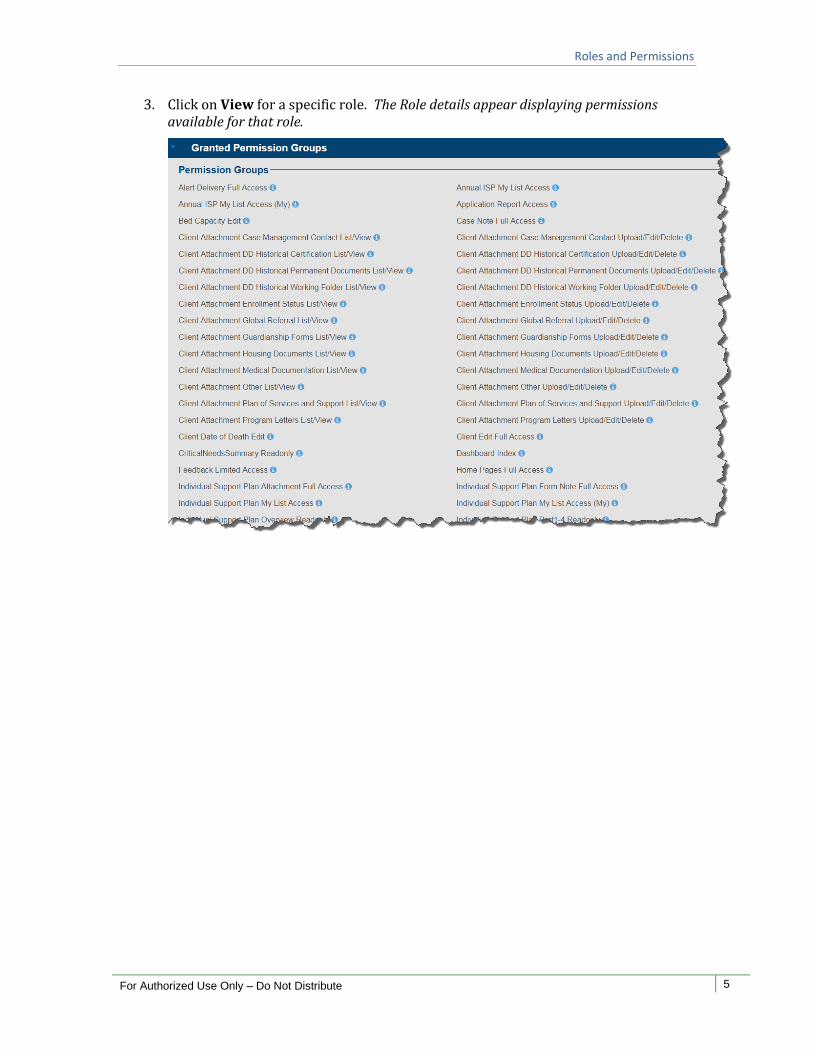
3. Click on View for a specific role. The Role details appear displaying permissions available for that role.
Locating and Working with Individual’s Record
For Authorized Use Only – Do Not Distribute 6
3 Locating and Working with Individual’s Record There are several ways to find an individual to work with in WaMS.
Make use of the tabs and other tools to determine how to best support your personal
workstyle. As an example, many access the Alerts tab at the beginning of the day. Alerts give
insight to recent actions and updates that have been made to an individual’s record. While
others prefer to start with the My Lists tab, focusing on the Individual Support Plans (ISPs)
and Service Authorizations information and needed actions.
For CSBs who utilize EHRs for their centralized records, the data for Parts I, II, III and IV of
the ISP will be transferred from the EHR into WaMS, thereby eliminating the need for
double entry.
3.1 Alerts Tab
Alerts inform the recipient that some type of action is required or has been completed.
Alerts are specific to the user’s role and assignments to specific tasks. Use Alerts to view and
accept notifications from others. The list displays at most 500 records.
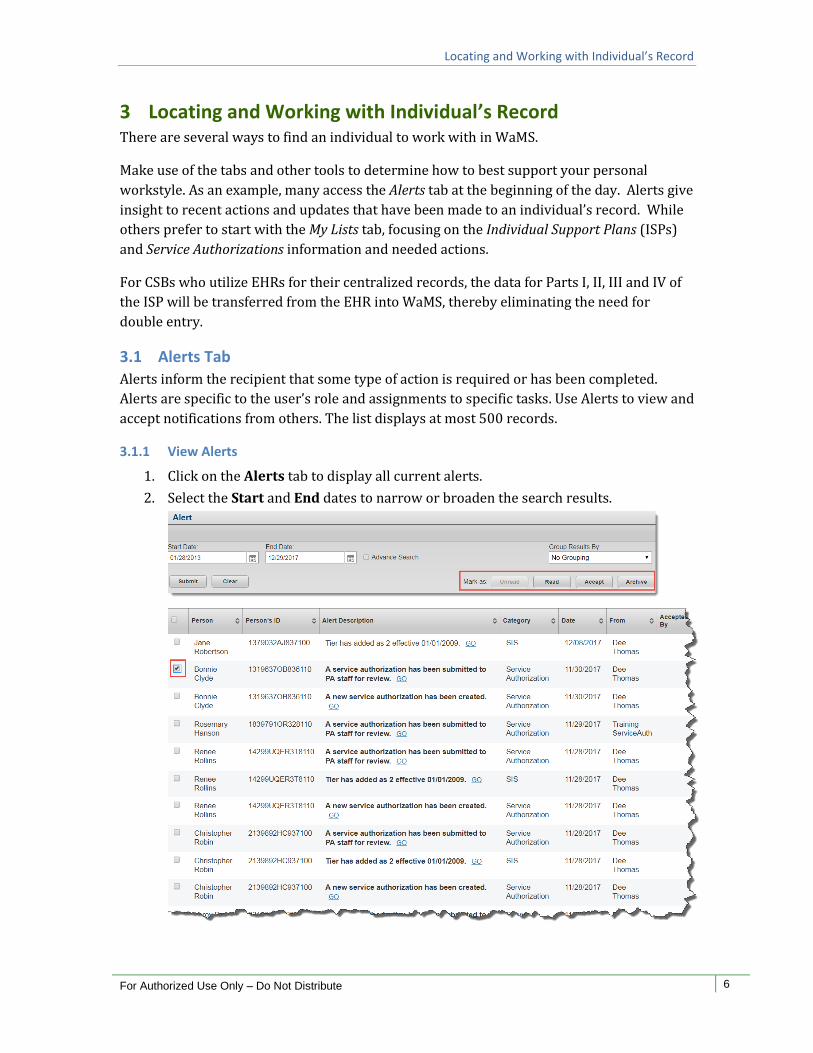
3.1.1 View Alerts
1. Click on the Alerts tab to display all current alerts.
2. Select the Start and End dates to narrow or broaden the search results.
Locating and Working with Individual’s Record
For Authorized Use Only – Do Not Distribute 7
Note: It is a good idea to use the
Archive option to move alerts that
have been completed to the Archived
section. You can always locate it there
to view if necessary.
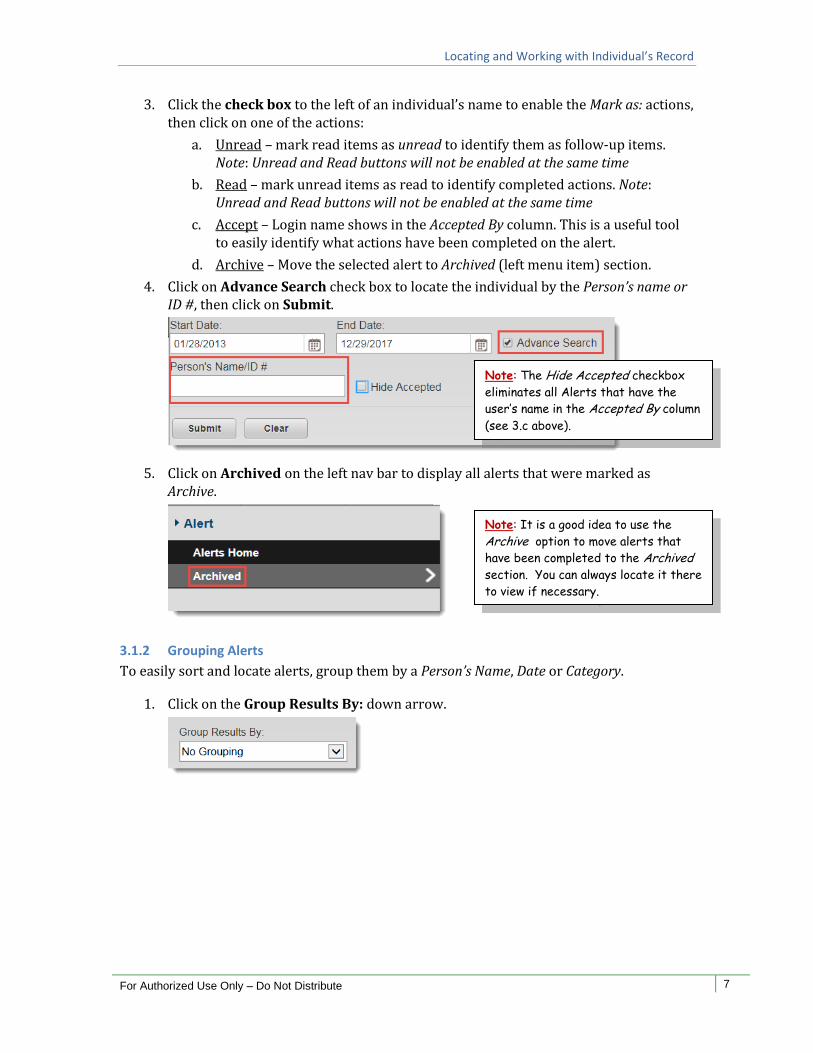
3. Click the check box to the left of an individual’s name to enable the Mark as: actions, then click on one of the actions:
a. Unread – mark read items as unread to identify them as follow-up items. Note: Unread and Read buttons will not be enabled at the same time
b. Read – mark unread items as read to identify completed actions. Note: Unread and Read buttons will not be enabled at the same time
c. Accept – Login name shows in the Accepted By column. This is a useful tool to easily identify what actions have been completed on the alert.
d. Archive – Move the selected alert to Archived (left menu item) section.
4. Click on Advance Search check box to locate the individual by the Person’s name or ID #, then click on Submit.
5. Click on Archived on the left nav bar to display all alerts that were marked as Archive.
3.1.2 Grouping Alerts
To easily sort and locate alerts, group them by a Person’s Name, Date or Category.
1. Click on the Group Results By: down arrow.
Note: The Hide Accepted checkbox
eliminates all Alerts that have the
user’s name in the Accepted By column
(see 3.c above).
Locating and Working with Individual’s Record
For Authorized Use Only – Do Not Distribute 8
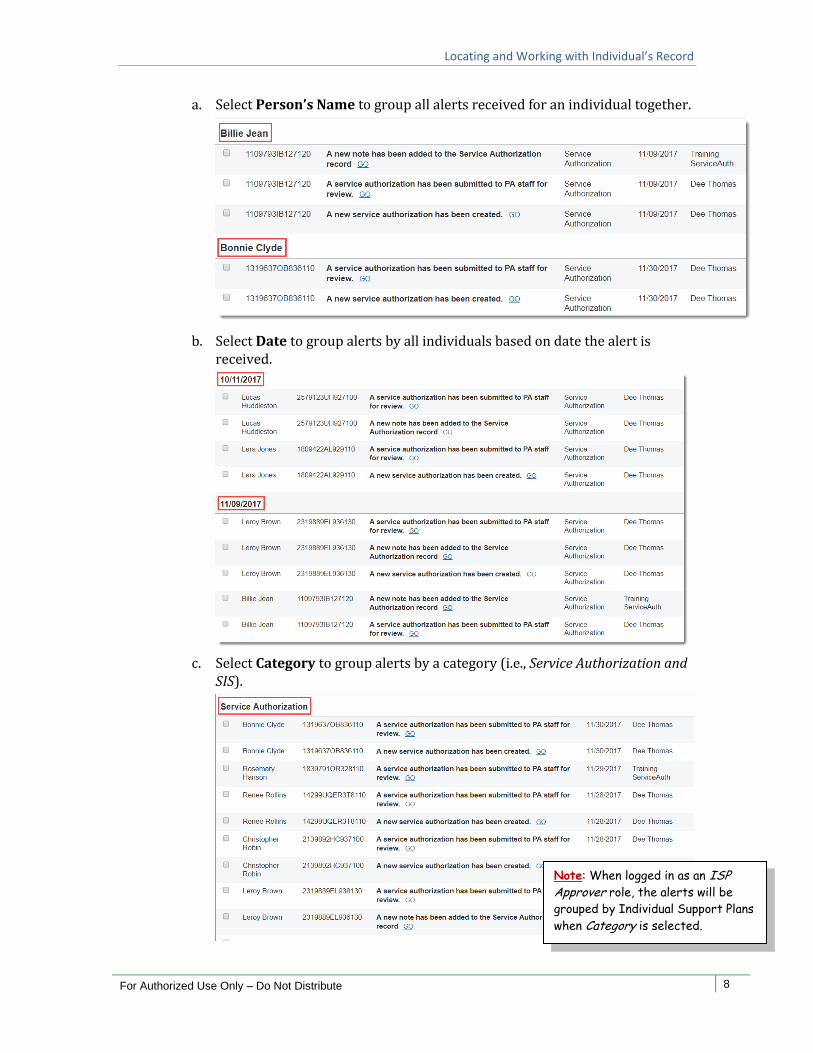
a. Select Person’s Name to group all alerts received for an individual together.
b. Select Date to group alerts by all individuals based on date the alert is received.
c. Select Category to group alerts by a category (i.e., Service Authorization and SIS).
Note: When logged in as an ISP Approver role, the alerts will be
grouped by Individual Support Plans
when Category is selected.
Locating and Working with Individual’s Record
For Authorized Use Only – Do Not Distribute 9
Note: Providers are only able to view
records for those individuals where
the CSB has added them as a Provider.
Note: To narrow the search for the
ISP, you can also select the Waiver
type, Effective Date and/or End Date
before clicking on filter.
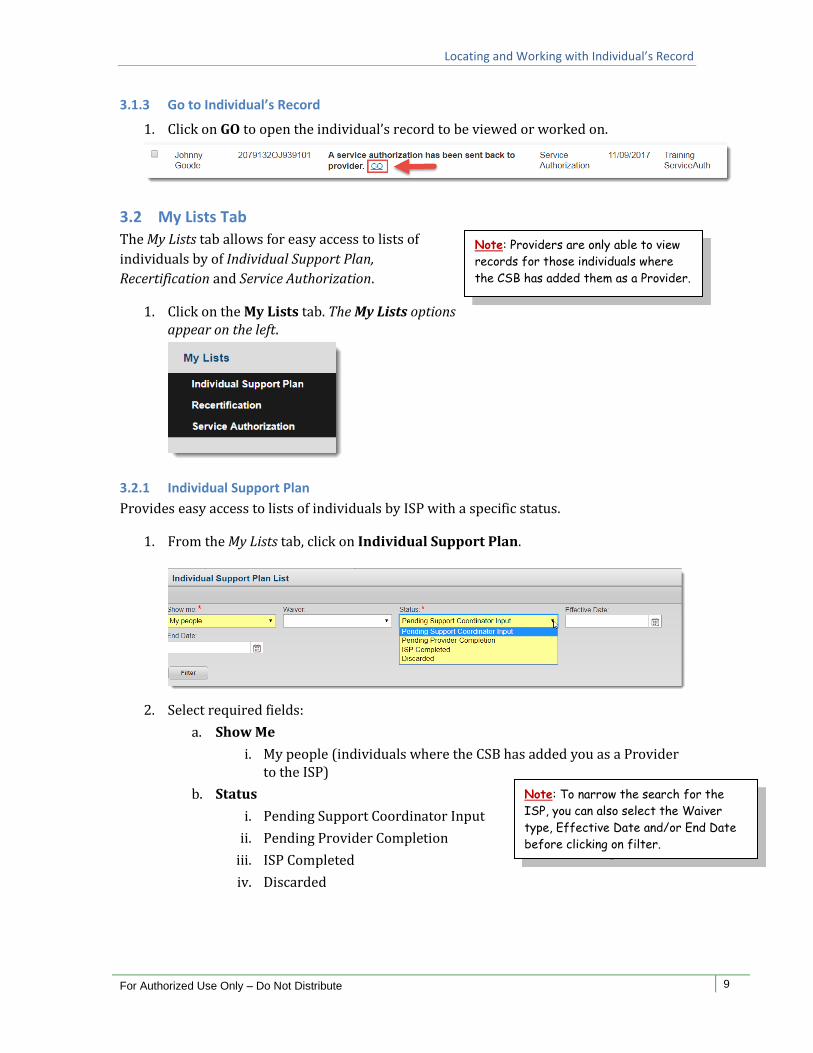
3.1.3 Go to Individual’s Record
1. Click on GO to open the individual’s record to be viewed or worked on.
3.2 My Lists Tab
The My Lists tab allows for easy access to lists of
individuals by of Individual Support Plan,
Recertification and Service Authorization.
1. Click on the My Lists tab. The My Lists options appear on the left.
3.2.1 Individual Support Plan
Provides easy access to lists of individuals by ISP with a specific status.
1. From the My Lists tab, click on Individual Support Plan.
2. Select required fields:
a. Show Me
i. My people (individuals where the CSB has added you as a Provider to the ISP)
b. Status
i. Pending Support Coordinator Input
ii. Pending Provider Completion
iii. ISP Completed
iv. Discarded
Locating and Working with Individual’s Record
For Authorized Use Only – Do Not Distribute 10
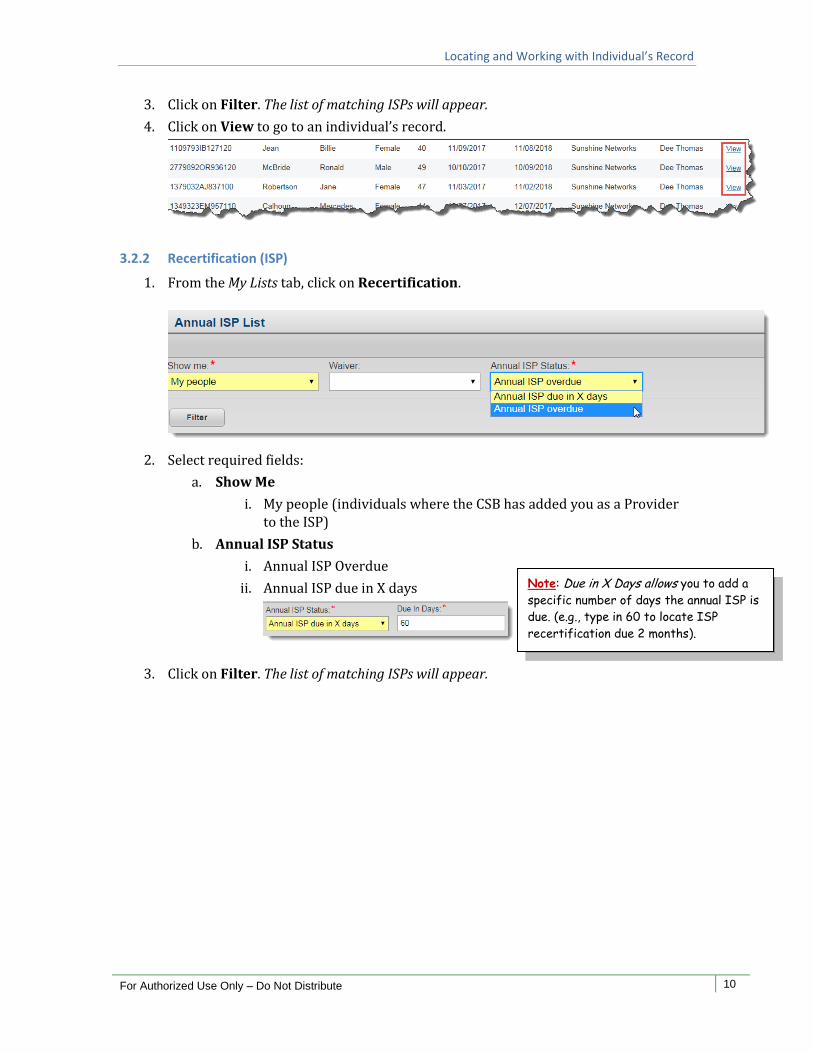
3. Click on Filter. The list of matching ISPs will appear.
4. Click on View to go to an individual’s record.
3.2.2 Recertification (ISP)
1. From the My Lists tab, click on Recertification.
2. Select required fields:
a. Show Me
i. My people (individuals where the CSB has added you as a Provider to the ISP)
b. Annual ISP Status
i. Annual ISP Overdue
ii. Annual ISP due in X days
3. Click on Filter. The list of matching ISPs will appear.
Note: Due in X Days allows you to add a
specific number of days the annual ISP is
due. (e.g., type in 60 to locate ISP
recertification due 2 months).
Locating and Working with Individual’s Record
For Authorized Use Only – Do Not Distribute 11
Note: Providers are only able to view
records for those individuals where
the CSB has added them as a Provider.
Note: To narrow the search for the ISP, you
can also select the Waiver type, Effective
Date and/or End Date before clicking on
filter.
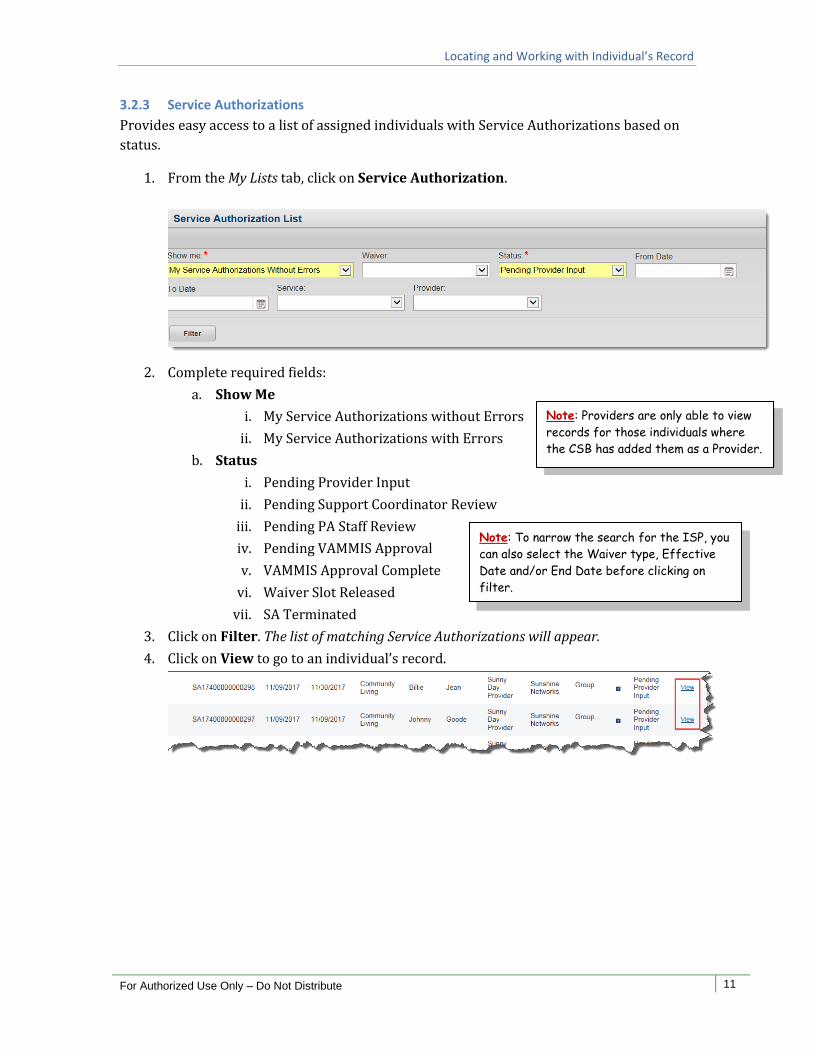
3.2.3 Service Authorizations
Provides easy access to a list of assigned individuals with Service Authorizations based on
status.
1. From the My Lists tab, click on Service Authorization.
2. Complete required fields:
a. Show Me
i. My Service Authorizations without Errors
ii. My Service Authorizations with Errors
b. Status
i. Pending Provider Input
ii. Pending Support Coordinator Review
iii. Pending PA Staff Review
iv. Pending VAMMIS Approval
v. VAMMIS Approval Complete
vi. Waiver Slot Released
vii. SA Terminated
3. Click on Filter. The list of matching Service Authorizations will appear.
4. Click on View to go to an individual’s record.
Locating and Working with Individual’s Record
For Authorized Use Only – Do Not Distribute 12
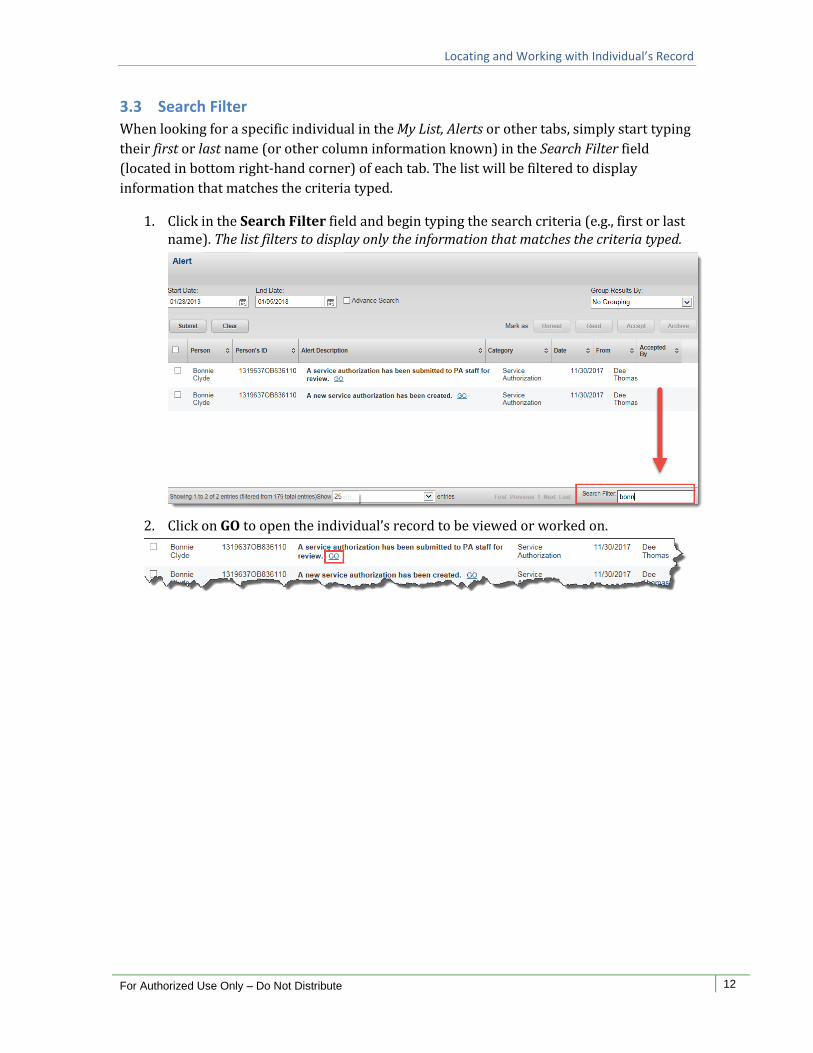
3.3 Search Filter
When looking for a specific individual in the My List, Alerts or other tabs, simply start typing
their first or last name (or other column information known) in the Search Filter field
(located in bottom right-hand corner) of each tab. The list will be filtered to display
information that matches the criteria typed.
1. Click in the Search Filter field and begin typing the search criteria (e.g., first or last name). The list filters to display only the information that matches the criteria typed.
2. Click on GO to open the individual’s record to be viewed or worked on.
Individual Support Plan
For Authorized Use Only – Do Not Distribute 13
4 Individual Support Plan
The Individual Support Plan (ISP) section in WaMS is used to enter information and attach documents necessary to determine services needed for an individual as well as the providers involved in providing services to the individual.
The Support Coordinator is responsible for Parts I through IV of the ISP in WaMS.
The Provider is responsible for adding signatures to the Agreements section in Part IV, and adding Part V – Plan for Supports in WaMS. The provider must have the ISP Approver role assigned in WaMS to perform these actions.
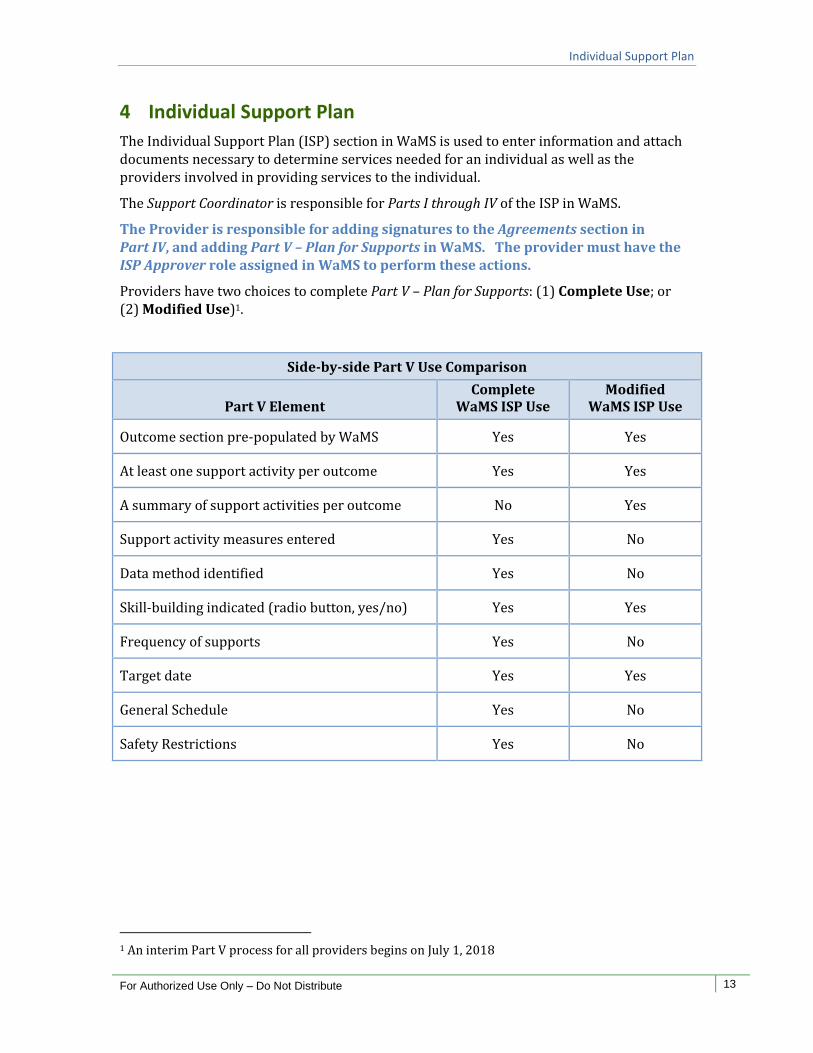
Providers have two choices to complete Part V – Plan for Supports: (1) Complete Use; or (2) Modified Use)1.
Side-by-side Part V Use Comparison
Part V Element Complete
WaMS ISP Use Modified
WaMS ISP Use
Outcome section pre-populated by WaMS Yes Yes
At least one support activity per outcome Yes Yes
A summary of support activities per outcome No Yes
Support activity measures entered Yes No
Data method identified Yes No
Skill-building indicated (radio button, yes/no) Yes Yes
Frequency of supports Yes No
Target date Yes Yes
General Schedule Yes No
Safety Restrictions Yes No
1 An interim Part V process for all providers begins on July 1, 2018
Individual Support Plan
For Authorized Use Only – Do Not Distribute 14
Note: All Providers must log in to WaMS and
sign their respective ISP Part IV before the
Part IV can be completed by the Support
Coordinator.
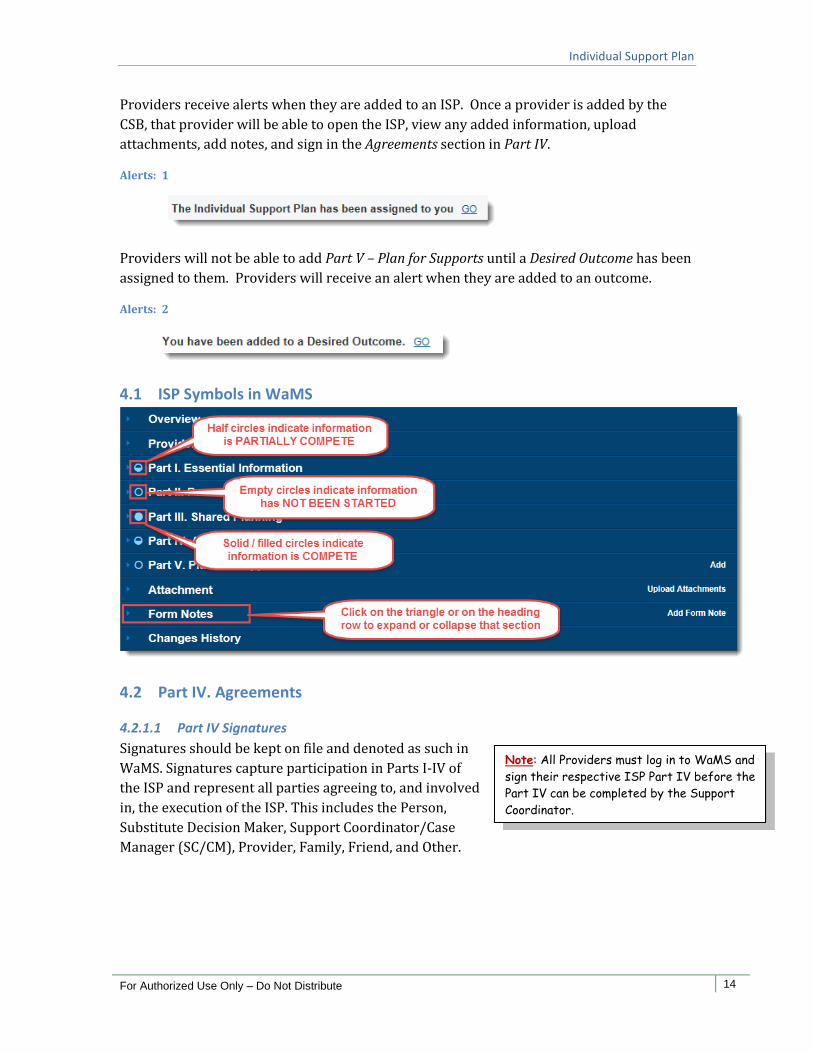
Providers receive alerts when they are added to an ISP. Once a provider is added by the
CSB, that provider will be able to open the ISP, view any added information, upload
attachments, add notes, and sign in the Agreements section in Part IV.
Alerts: 1
Providers will not be able to add Part V – Plan for Supports until a Desired Outcome has been
assigned to them. Providers will receive an alert when they are added to an outcome.
Alerts: 2
4.1 ISP Symbols in WaMS
4.2 Part IV. Agreements
4.2.1.1 Part IV Signatures
Signatures should be kept on file and denoted as such in
WaMS. Signatures capture participation in Parts I-IV of
the ISP and represent all parties agreeing to, and involved
in, the execution of the ISP. This includes the Person,
Substitute Decision Maker, Support Coordinator/Case
Manager (SC/CM), Provider, Family, Friend, and Other.
Individual Support Plan
For Authorized Use Only – Do Not Distribute 15
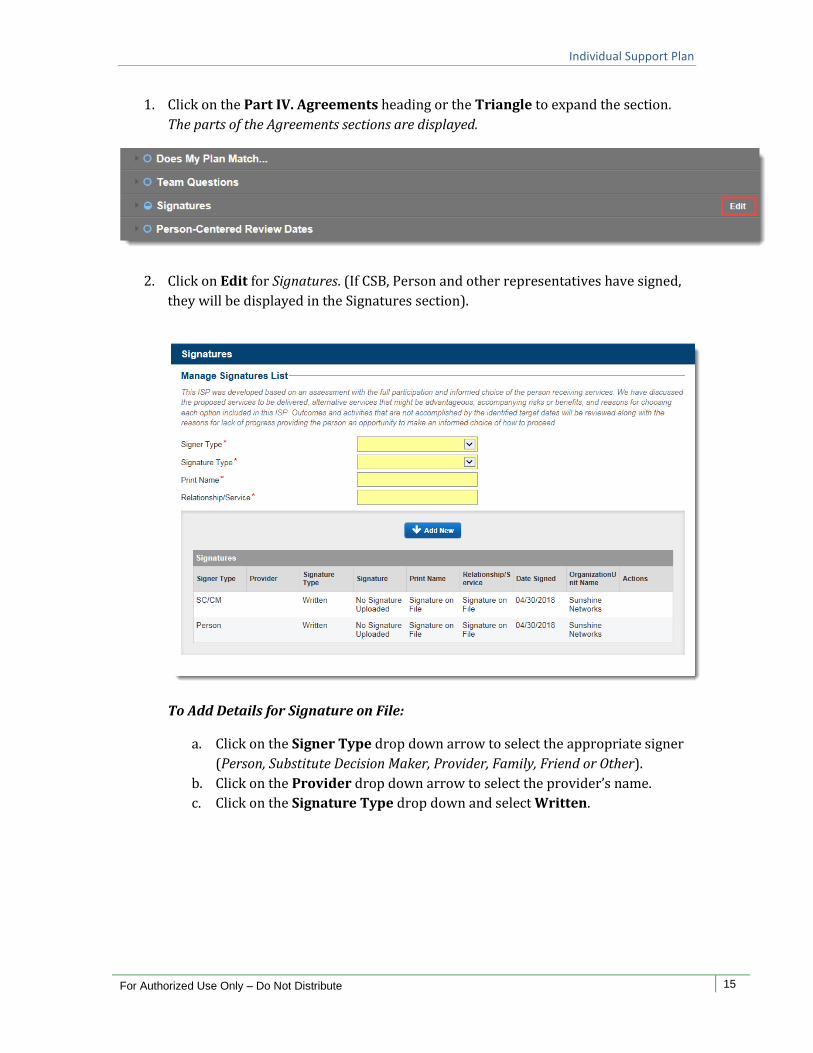
1. Click on the Part IV. Agreements heading or the Triangle to expand the section.
The parts of the Agreements sections are displayed.
2. Click on Edit for Signatures. (If CSB, Person and other representatives have signed,
they will be displayed in the Signatures section).
To Add Details for Signature on File:
a. Click on the Signer Type drop down arrow to select the appropriate signer
(Person, Substitute Decision Maker, Provider, Family, Friend or Other).
b. Click on the Provider drop down arrow to select the provider’s name.
c. Click on the Signature Type drop down and select Written.
Individual Support Plan
For Authorized Use Only – Do Not Distribute 16
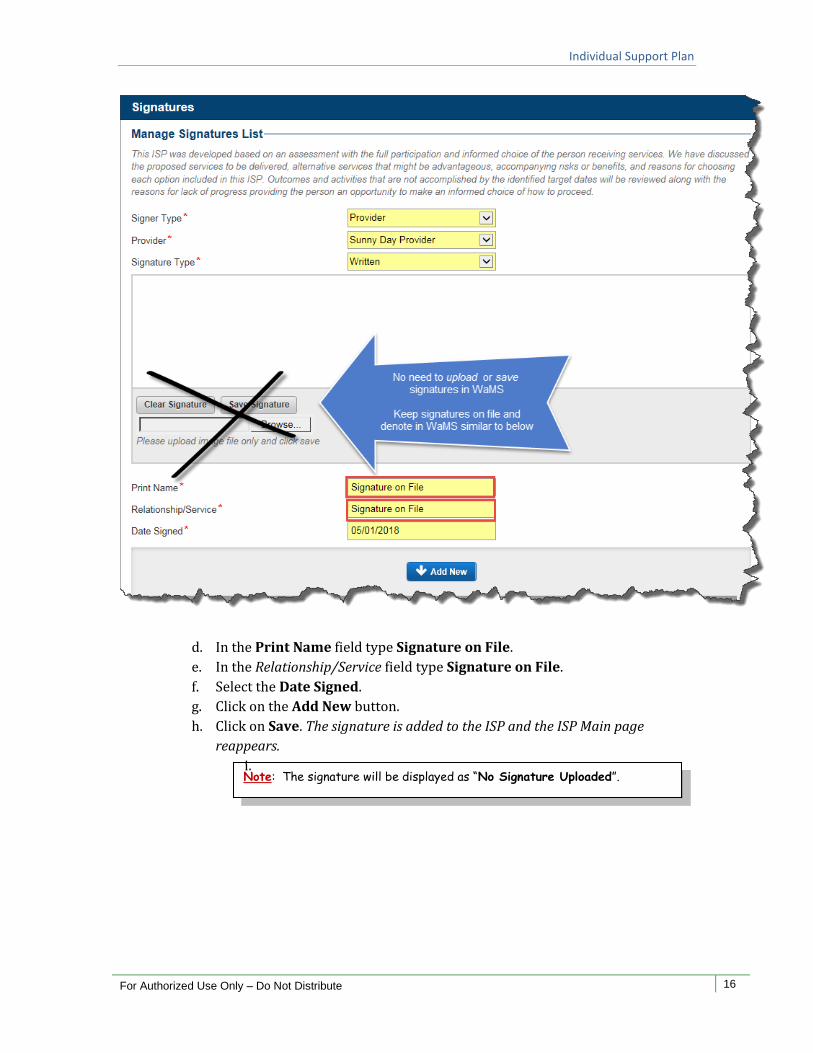
Note: The signature will be displayed as “No Signature Uploaded”.
d. In the Print Name field type Signature on File.
e. In the Relationship/Service field type Signature on File.
f. Select the Date Signed.
g. Click on the Add New button.
h. Click on Save. The signature is added to the ISP and the ISP Main page
reappears.
i.
Individual Support Plan
For Authorized Use Only – Do Not Distribute 17
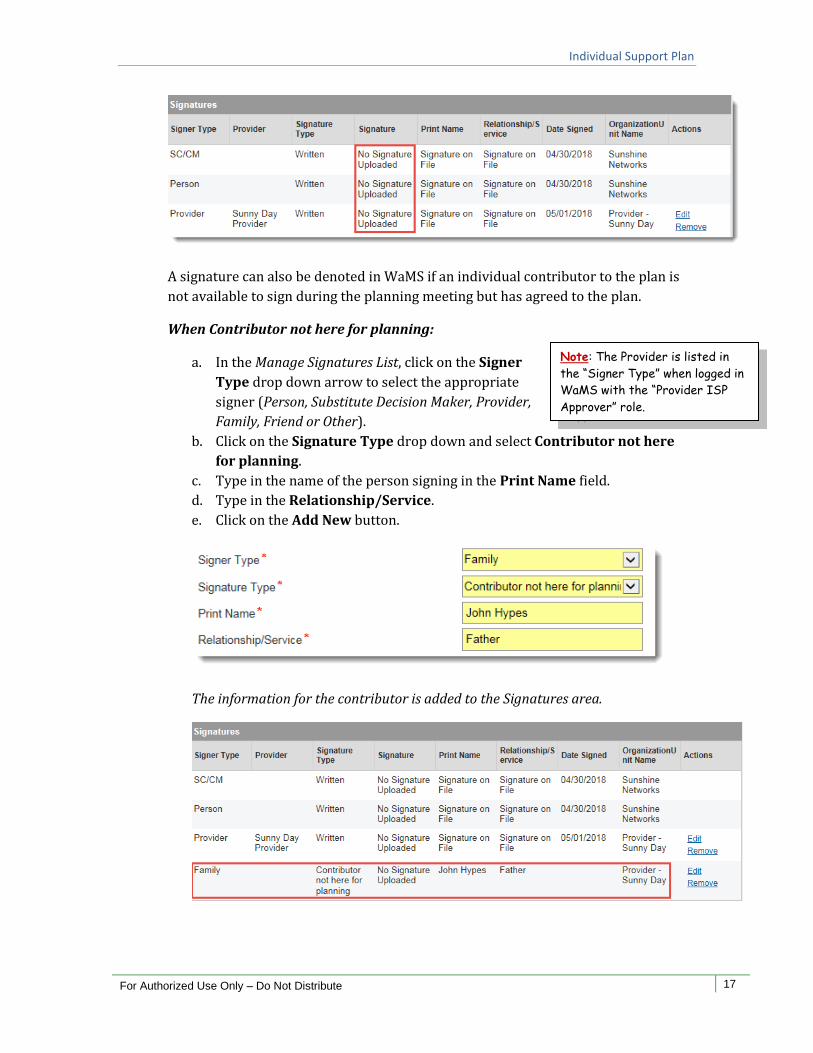
Note: The Provider is listed in
the “Signer Type” when logged in
WaMS with the “Provider ISP
Approver” role.
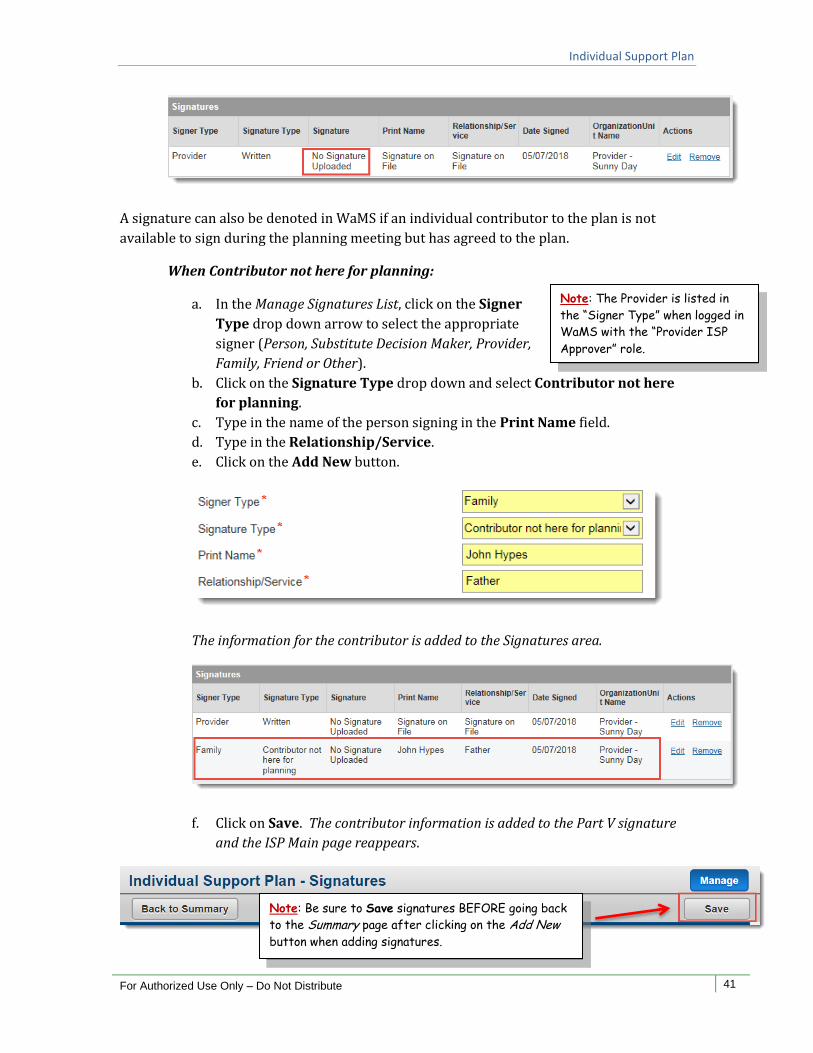
A signature can also be denoted in WaMS if an individual contributor to the plan is
not available to sign during the planning meeting but has agreed to the plan.
When Contributor not here for planning:
a. In the Manage Signatures List, click on the Signer
Type drop down arrow to select the appropriate
signer (Person, Substitute Decision Maker, Provider,
Family, Friend or Other).
b. Click on the Signature Type drop down and select Contributor not here
for planning.
c. Type in the name of the person signing in the Print Name field.
d. Type in the Relationship/Service.
e. Click on the Add New button.
The information for the contributor is added to the Signatures area.
Individual Support Plan
For Authorized Use Only – Do Not Distribute 18
Note: The Provider signature is required before the Support
Coordinator can Complete the Signatures section in Part IV.
Note: It is a good idea to view Part III – Shared Planning to see the desired outcome(s)
that have been assigned by the Support
Coordinator.
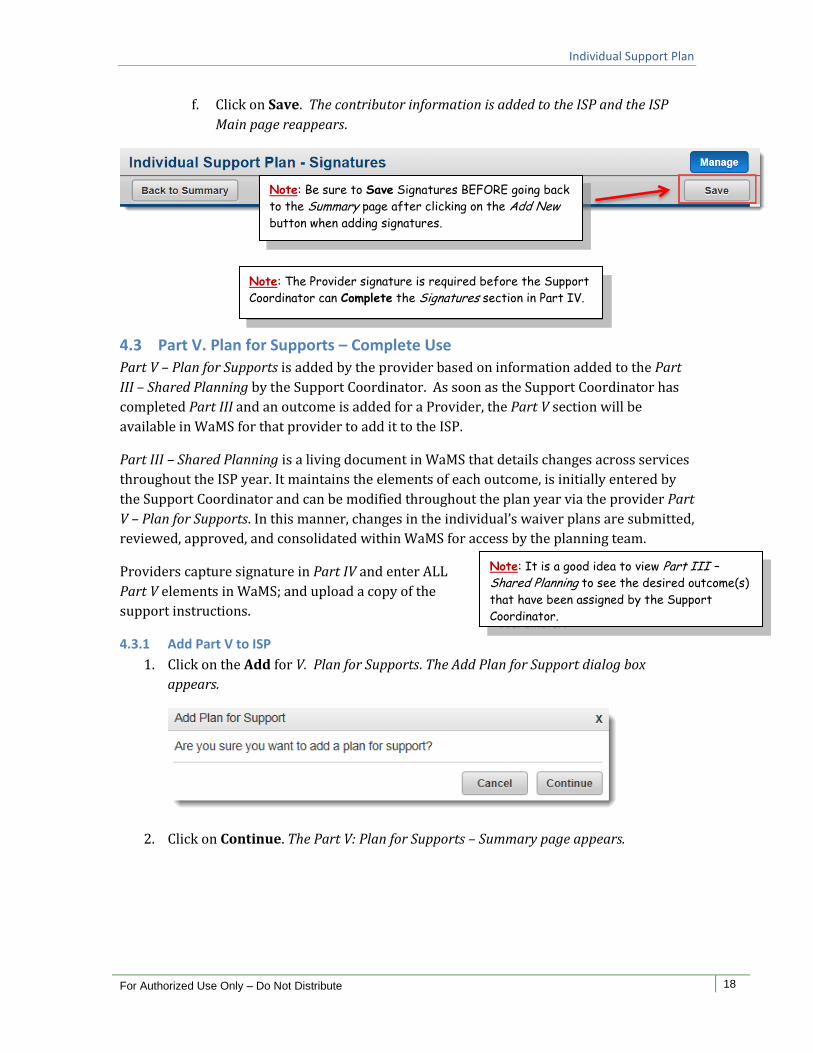
f. Click on Save. The contributor information is added to the ISP and the ISP
Main page reappears.
4.3 Part V. Plan for Supports – Complete Use
Part V – Plan for Supports is added by the provider based on information added to the Part
III – Shared Planning by the Support Coordinator. As soon as the Support Coordinator has
completed Part III and an outcome is added for a Provider, the Part V section will be
available in WaMS for that provider to add it to the ISP.
Part III – Shared Planning is a living document in WaMS that details changes across services
throughout the ISP year. It maintains the elements of each outcome, is initially entered by
the Support Coordinator and can be modified throughout the plan year via the provider Part
V – Plan for Supports. In this manner, changes in the individual’s waiver plans are submitted,
reviewed, approved, and consolidated within WaMS for access by the planning team.
Providers capture signature in Part IV and enter ALL
Part V elements in WaMS; and upload a copy of the
support instructions.
4.3.1 Add Part V to ISP
1. Click on the Add for V. Plan for Supports. The Add Plan for Support dialog box
appears.
2. Click on Continue. The Part V: Plan for Supports – Summary page appears.
Note: Be sure to Save Signatures BEFORE going back
to the Summary page after clicking on the Add New
button when adding signatures.
Individual Support Plan
For Authorized Use Only – Do Not Distribute 19
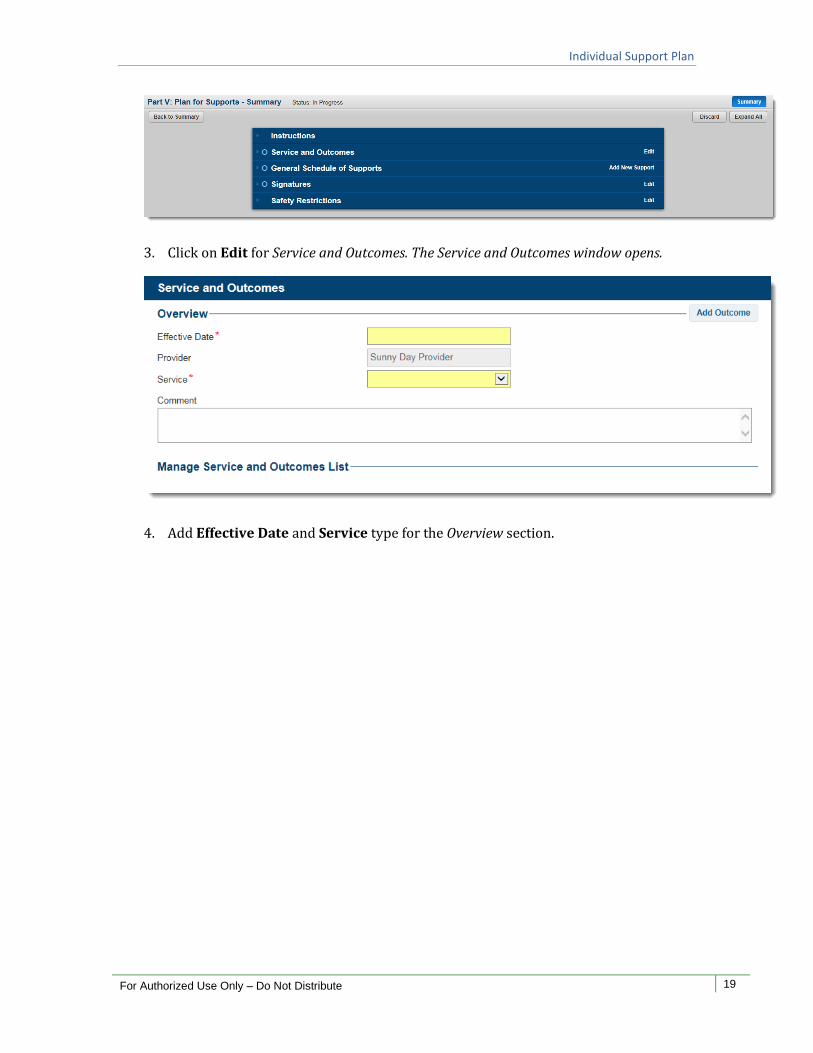
3. Click on Edit for Service and Outcomes. The Service and Outcomes window opens.
4. Add Effective Date and Service type for the Overview section.
Individual Support Plan
For Authorized Use Only – Do Not Distribute 20
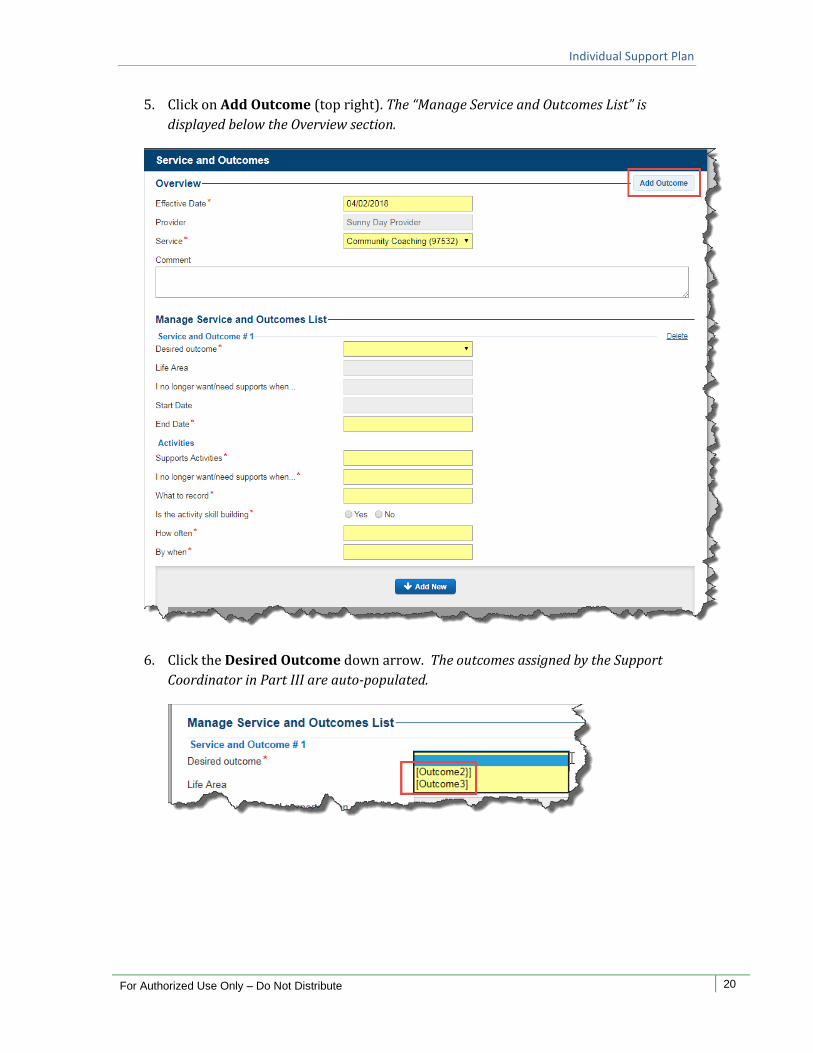
5. Click on Add Outcome (top right). The “Manage Service and Outcomes List” is
displayed below the Overview section.
6. Click the Desired Outcome down arrow. The outcomes assigned by the Support
Coordinator in Part III are auto-populated.
Individual Support Plan
For Authorized Use Only – Do Not Distribute 21
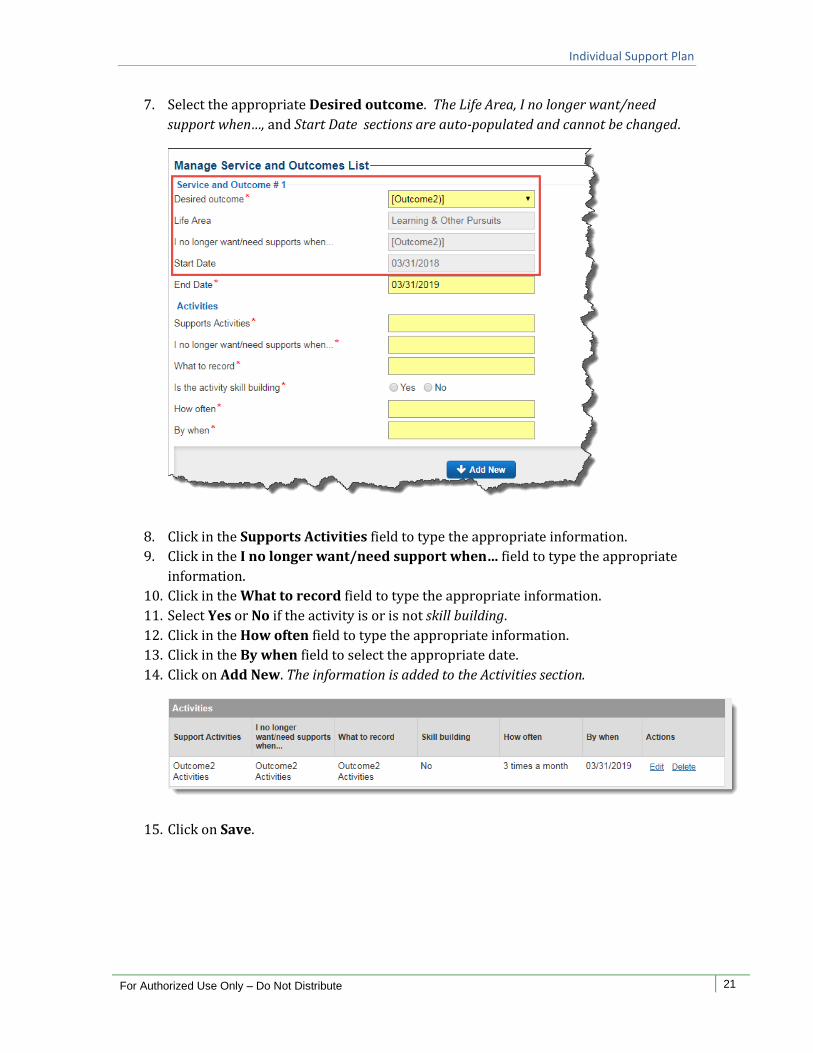
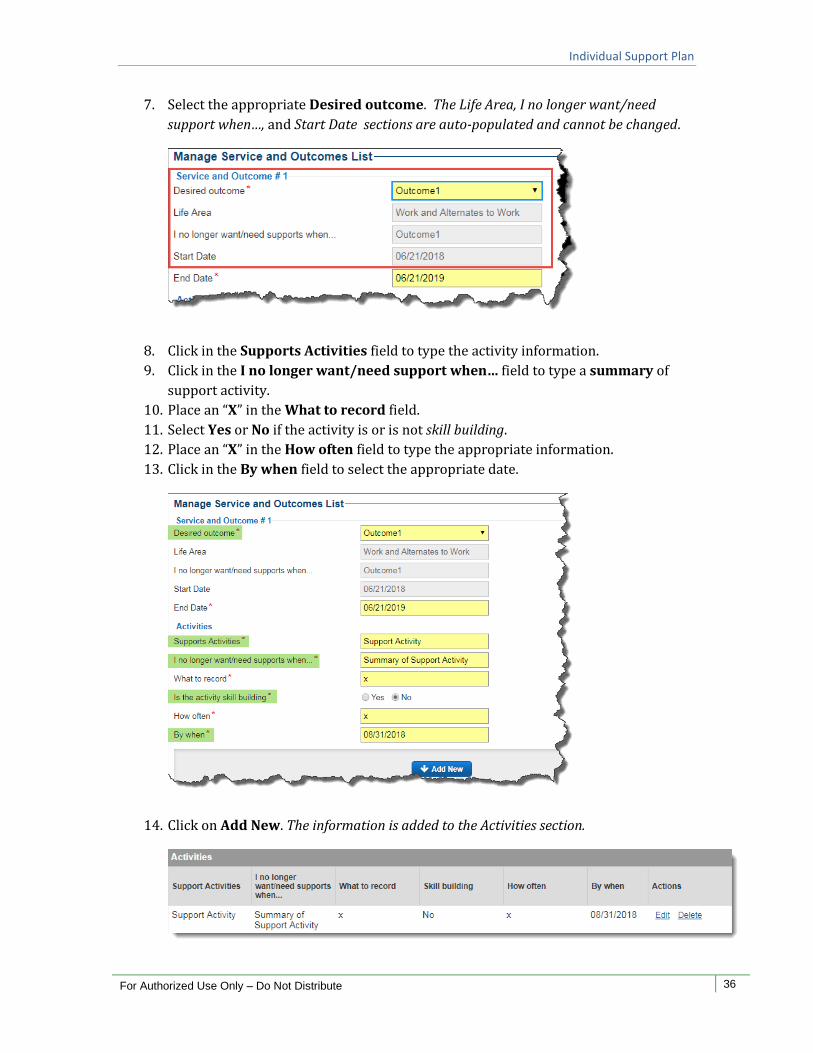
7. Select the appropriate Desired outcome. The Life Area, I no longer want/need
support when…, and Start Date sections are auto-populated and cannot be changed.
8. Click in the Supports Activities field to type the appropriate information.
9. Click in the I no longer want/need support when… field to type the appropriate
information.
10. Click in the What to record field to type the appropriate information.
11. Select Yes or No if the activity is or is not skill building.
12. Click in the How often field to type the appropriate information.
13. Click in the By when field to select the appropriate date.
14. Click on Add New. The information is added to the Activities section.
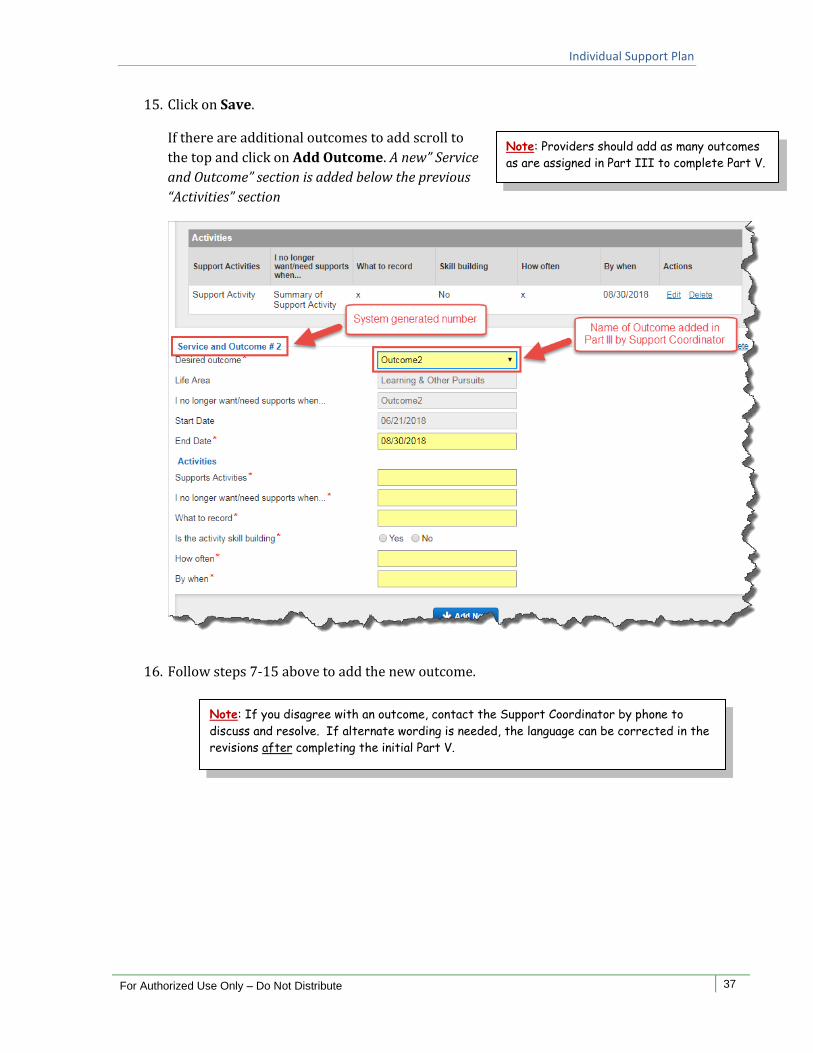
15. Click on Save.
Individual Support Plan
For Authorized Use Only – Do Not Distribute 22
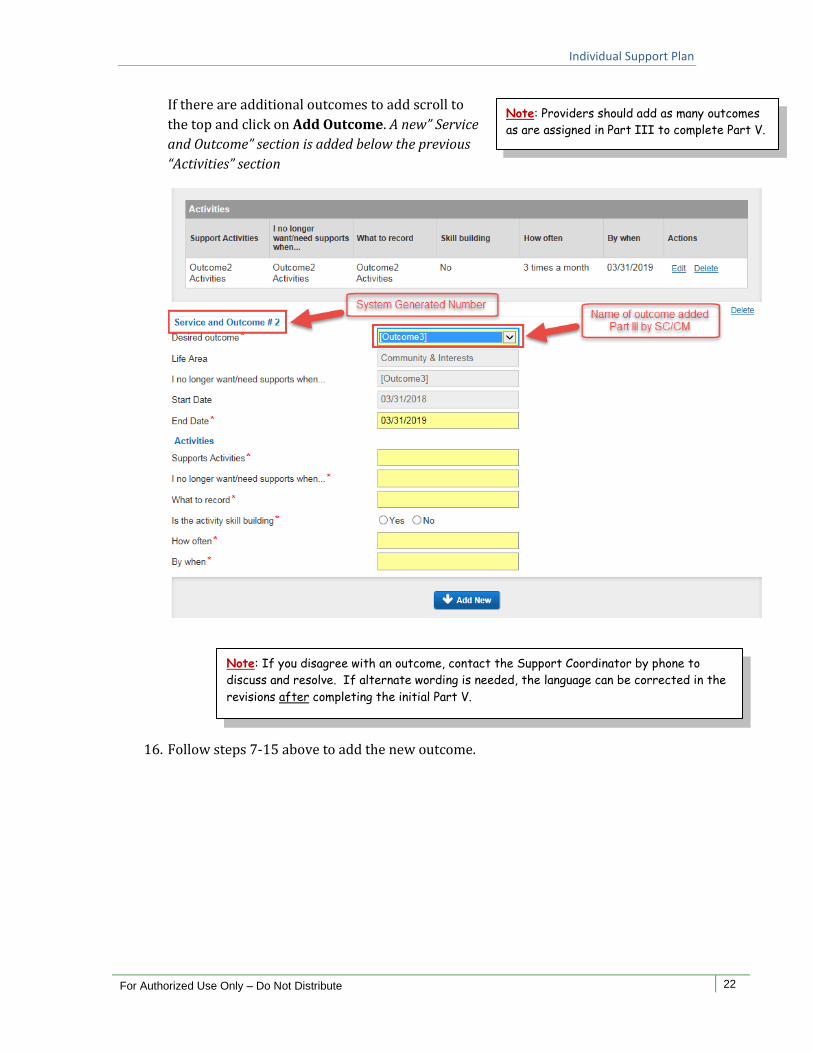
Note: Providers should add as many outcomes
as are assigned in Part III to complete Part V.
Note: If you disagree with an outcome, contact the Support Coordinator by phone to
discuss and resolve. If alternate wording is needed, the language can be corrected in the
revisions after completing the initial Part V.
If there are additional outcomes to add scroll to
the top and click on Add Outcome. A new” Service
and Outcome” section is added below the previous
“Activities” section
16. Follow steps 7-15 above to add the new outcome.
Individual Support Plan
For Authorized Use Only – Do Not Distribute 23
Note: The days of the week can be selected
individually.
If “Daily Support” is selected, you will not be
able to select a start and end time for the
support and it will not be calculated in the
“Total Authorized Hours.”
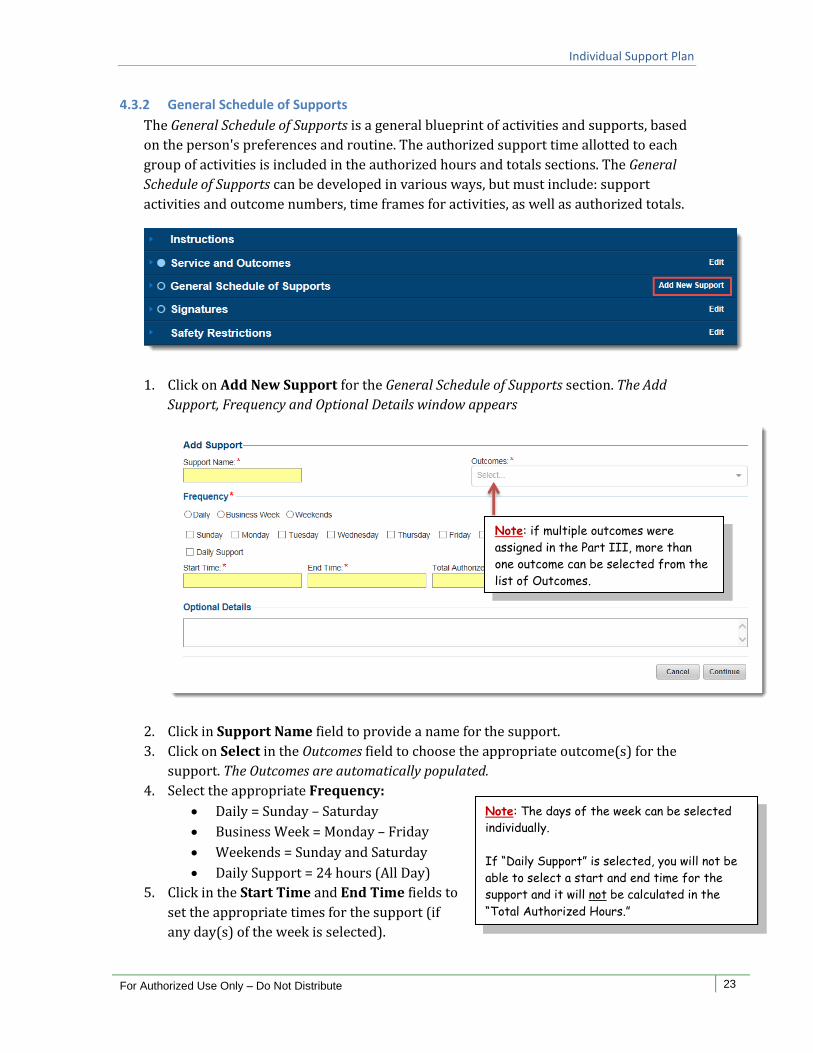
4.3.2 General Schedule of Supports
The General Schedule of Supports is a general blueprint of activities and supports, based
on the person's preferences and routine. The authorized support time allotted to each
group of activities is included in the authorized hours and totals sections. The General
Schedule of Supports can be developed in various ways, but must include: support
activities and outcome numbers, time frames for activities, as well as authorized totals.
1. Click on Add New Support for the General Schedule of Supports section. The Add
Support, Frequency and Optional Details window appears
2. Click in Support Name field to provide a name for the support.
3. Click on Select in the Outcomes field to choose the appropriate outcome(s) for the
support. The Outcomes are automatically populated.
4. Select the appropriate Frequency:
Daily = Sunday – Saturday
Business Week = Monday – Friday
Weekends = Sunday and Saturday
Daily Support = 24 hours (All Day)
5. Click in the Start Time and End Time fields to
set the appropriate times for the support (if
any day(s) of the week is selected).
Note: if multiple outcomes were
assigned in the Part III, more than
one outcome can be selected from the
list of Outcomes.
Individual Support Plan
For Authorized Use Only – Do Not Distribute 24
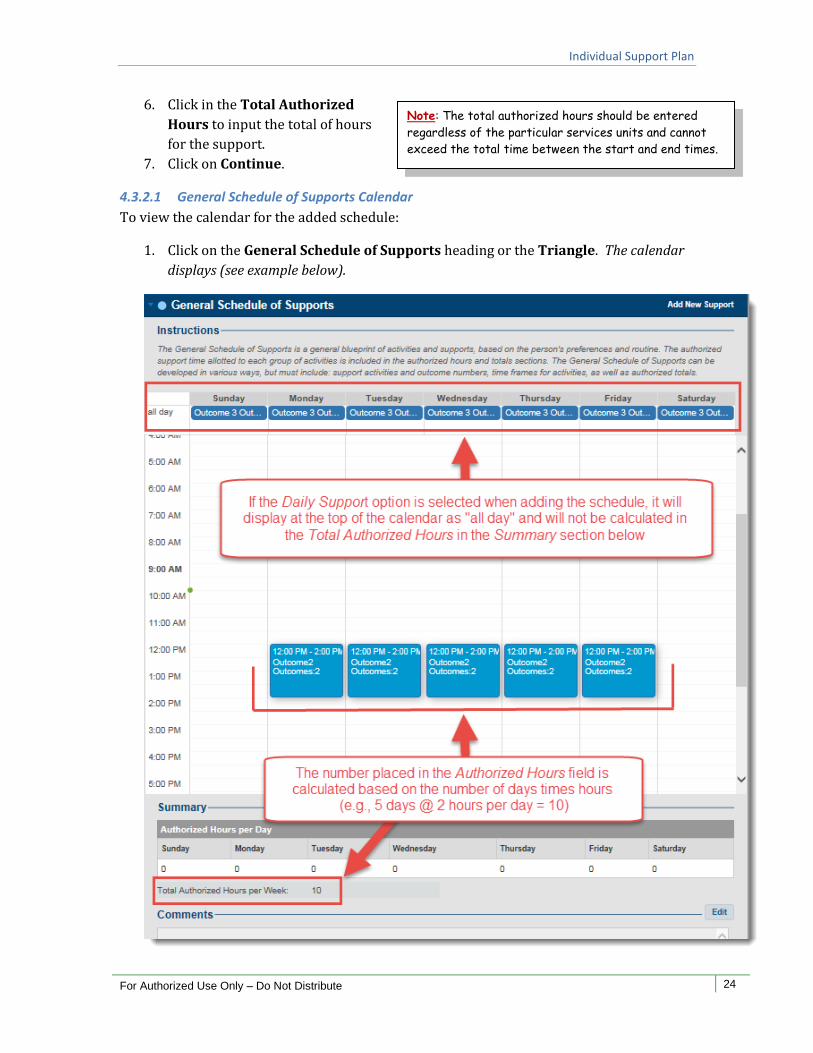
Note: The total authorized hours should be entered
regardless of the particular services units and cannot
exceed the total time between the start and end times.
6. Click in the Total Authorized
Hours to input the total of hours
for the support.
7. Click on Continue.
4.3.2.1 General Schedule of Supports Calendar
To view the calendar for the added schedule:
1. Click on the General Schedule of Supports heading or the Triangle. The calendar
displays (see example below).
Individual Support Plan
For Authorized Use Only – Do Not Distribute 25
4.3.2.2 Print Schedule of Supports
See section 4.9.2 (Print Part V) for printing the calendar for the General Schedule of
Supports.
4.3.2.3 Edit Schedule of Supports
1. From the calendar view, click on the outcome to be edited. The Edit Support window
appears.
2. Make appropriate changes.
3. Click on Continue. Changes are saved.
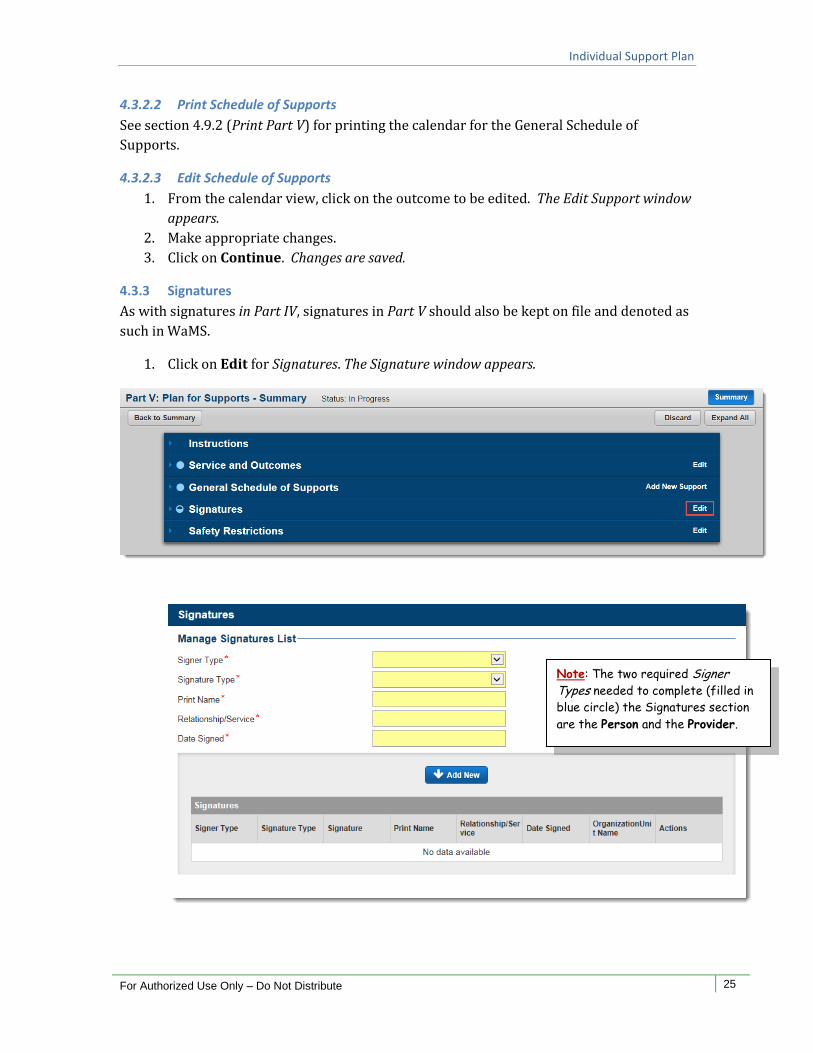
4.3.3 Signatures
As with signatures in Part IV, signatures in Part V should also be kept on file and denoted as
such in WaMS.
1. Click on Edit for Signatures. The Signature window appears.
Note: The two required Signer Types needed to complete (filled in
blue circle) the Signatures section
are the Person and the Provider.
Individual Support Plan
For Authorized Use Only – Do Not Distribute 26
Note: The signature will be displayed as “No Signature Uploaded”.
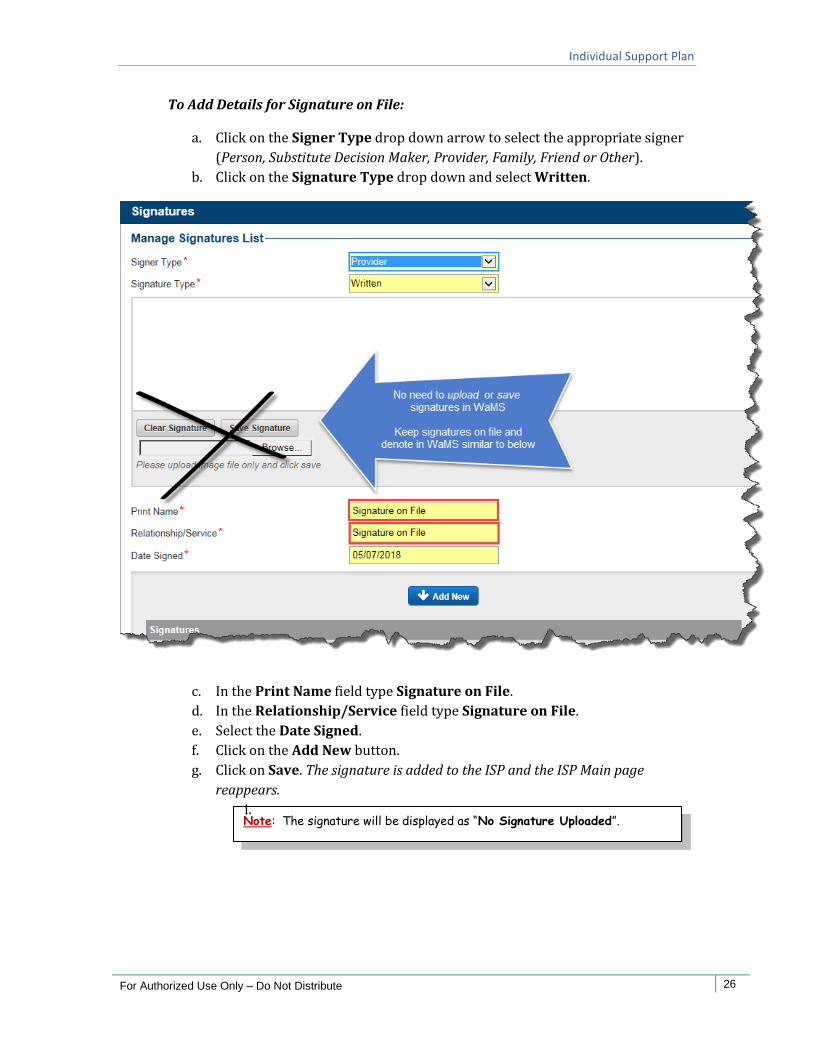
To Add Details for Signature on File:
a. Click on the Signer Type drop down arrow to select the appropriate signer
(Person, Substitute Decision Maker, Provider, Family, Friend or Other).
b. Click on the Signature Type drop down and select Written.
c. In the Print Name field type Signature on File.
d. In the Relationship/Service field type Signature on File.
e. Select the Date Signed.
f. Click on the Add New button.
g. Click on Save. The signature is added to the ISP and the ISP Main page
reappears.
i.

Individual Support Plan
For Authorized Use Only – Do Not Distribute 27
Note: The Provider is listed in
the “Signer Type” when logged in
WaMS with the “Provider ISP
Approver” role.
A signature can also be denoted in WaMS if an individual contributor to the plan is not
available to sign during the planning meeting but has agreed to the plan.
When Contributor not here for planning:
a. In the Manage Signatures List, click on the Signer
Type drop down arrow to select the appropriate
signer (Person, Substitute Decision Maker, Provider,
Family, Friend or Other).
b. Click on the Signature Type drop down and select Contributor not here
for planning.
c. Type in the name of the person signing in the Print Name field.
d. Type in the Relationship/Service.
e. Click on the Add New button.
The information for the contributor is added to the Signatures area.
f. Click on Save. The contributor information is added to the Part V signature
and the ISP Main page reappears.
Note: Be sure to Save signatures BEFORE going back
to the Summary page after clicking on the Add New
button when adding signatures.
Individual Support Plan
For Authorized Use Only – Do Not Distribute 28
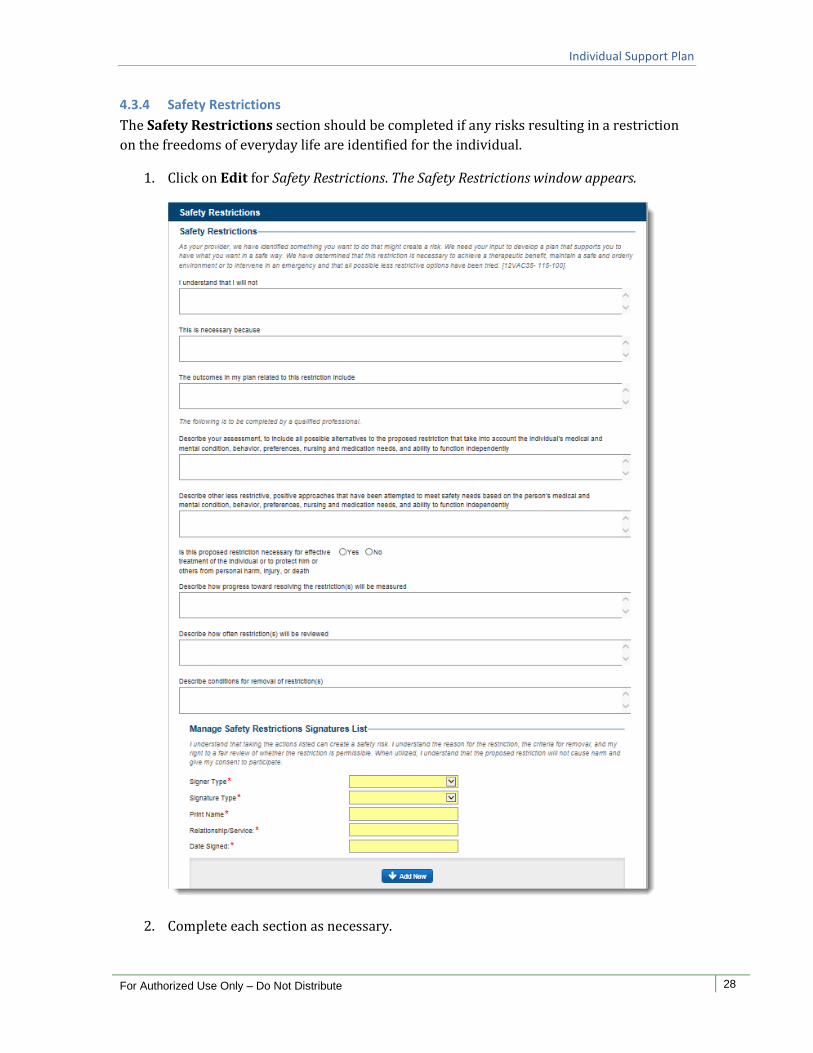
4.3.4 Safety Restrictions
The Safety Restrictions section should be completed if any risks resulting in a restriction
on the freedoms of everyday life are identified for the individual.
1. Click on Edit for Safety Restrictions. The Safety Restrictions window appears.
2. Complete each section as necessary.
Individual Support Plan
For Authorized Use Only – Do Not Distribute 29
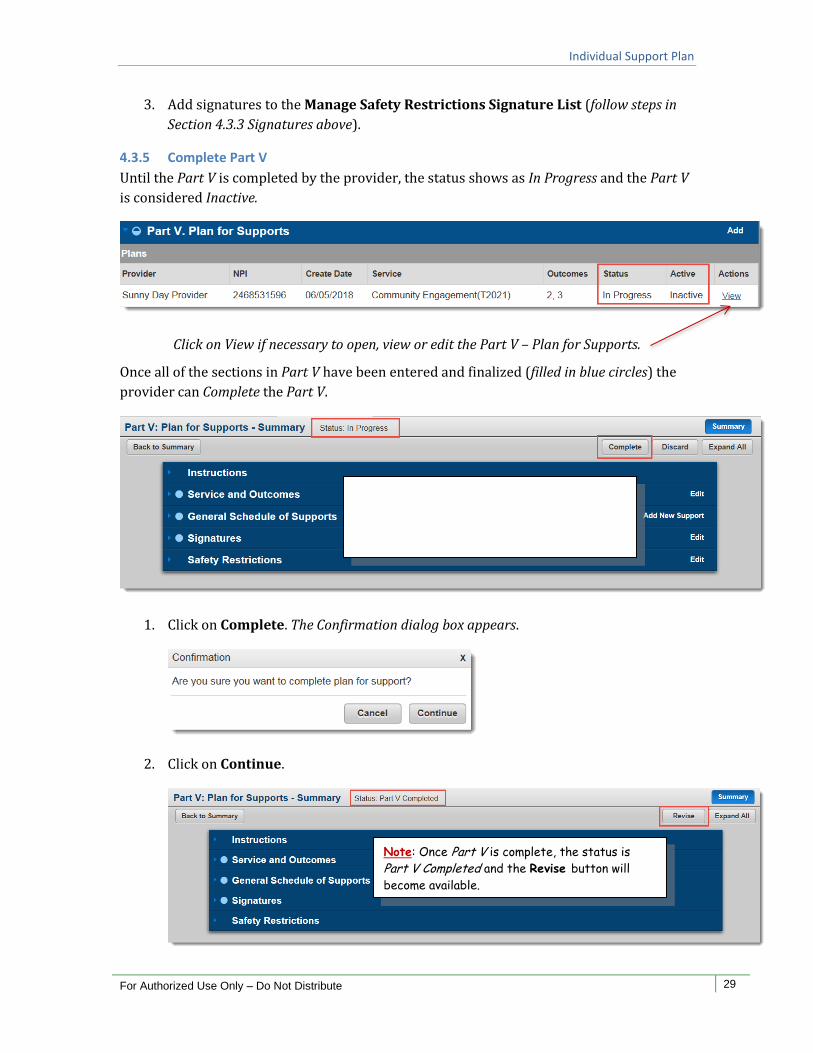
3. Add signatures to the Manage Safety Restrictions Signature List (follow steps in
Section 4.3.3 Signatures above).
4.3.5 Complete Part V
Until the Part V is completed by the provider, the status shows as In Progress and the Part V
is considered Inactive.
Click on View if necessary to open, view or edit the Part V – Plan for Supports.
Once all of the sections in Part V have been entered and finalized (filled in blue circles) the
provider can Complete the Part V.
1. Click on Complete. The Confirmation dialog box appears.
2. Click on Continue.
Note: Once Part V is complete, the status is
Part V Completed and the Revise button will
become available.
Individual Support Plan
For Authorized Use Only – Do Not Distribute 30
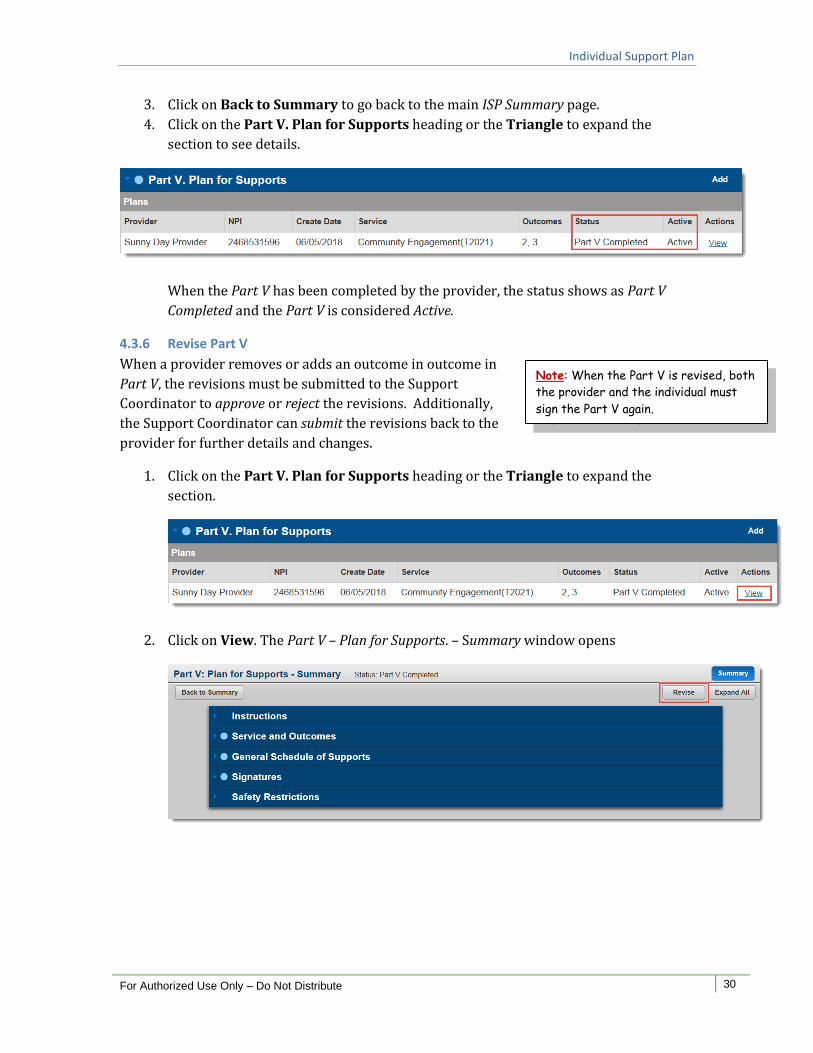
Note: When the Part V is revised, both
the provider and the individual must
sign the Part V again.
3. Click on Back to Summary to go back to the main ISP Summary page.
4. Click on the Part V. Plan for Supports heading or the Triangle to expand the
section to see details.
When the Part V has been completed by the provider, the status shows as Part V
Completed and the Part V is considered Active.
4.3.6 Revise Part V
When a provider removes or adds an outcome in outcome in
Part V, the revisions must be submitted to the Support
Coordinator to approve or reject the revisions. Additionally,
the Support Coordinator can submit the revisions back to the
provider for further details and changes.
1. Click on the Part V. Plan for Supports heading or the Triangle to expand the
section.
2. Click on View. The Part V – Plan for Supports. – Summary window opens
Individual Support Plan
For Authorized Use Only – Do Not Distribute 31
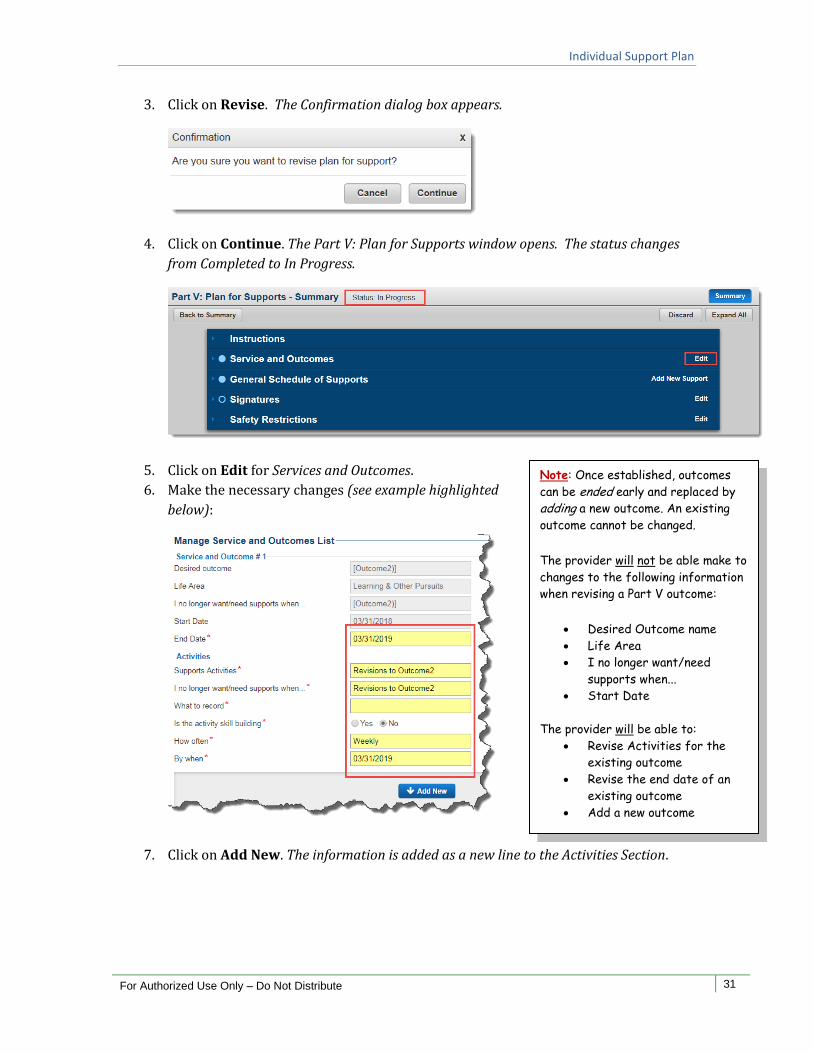
Note: Once established, outcomes
can be ended early and replaced by
adding a new outcome. An existing
outcome cannot be changed.
The provider will not be able make to
changes to the following information
when revising a Part V outcome:
Desired Outcome name
Life Area
I no longer want/need
supports when...
Start Date
The provider will be able to:
Revise Activities for the
existing outcome
Revise the end date of an
existing outcome
Add a new outcome
3. Click on Revise. The Confirmation dialog box appears.
4. Click on Continue. The Part V: Plan for Supports window opens. The status changes
from Completed to In Progress.
5. Click on Edit for Services and Outcomes.
6. Make the necessary changes (see example highlighted
below):
7. Click on Add New. The information is added as a new line to the Activities Section.

Individual Support Plan
For Authorized Use Only – Do Not Distribute 32
Note: An Alert will be sent to the Support
Coordinator stating the provider has submitted a
plan for support (to approve, reject or submit
back to provider).
8. Click on Save (top right). The Confirmation dialog box appears.
9. Click on OK. The Part V: Plan for Supports – Summary window appears. The status for
the Part V is “In Progress”.
10. Click on Edit for the Signatures section to add required signatures to Part V (follow
steps in Section 4.3.3 Signatures above).
11. Click on Back to Summary to return to the main Part V: Plan for Supports –
Summary window.
12. Click on Submit. The Confirmation dialog box appears.
13. Click on Continue. The revised outcome is
listed as a new line and the status changes to
Pending SC Review for the Part V and is
Inactive.
Individual Support Plan
For Authorized Use Only – Do Not Distribute 33
When the Support Coordinator reviews and submits (i.e., does not approve or reject the
revisions) back to the provider for further details and changes, the Provider receives an
Alert stating “the SC/CSB has reviewed plan for support” and Status is Pending Provider
Review.
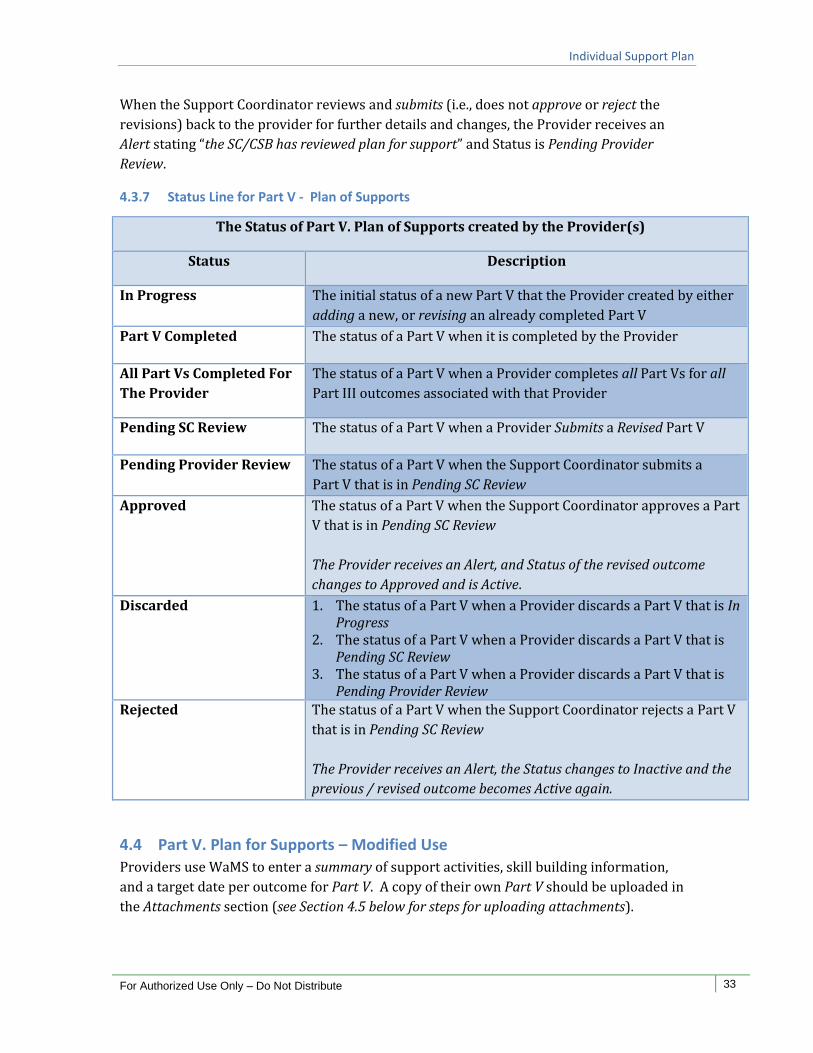
4.3.7 Status Line for Part V - Plan of Supports
The Status of Part V. Plan of Supports created by the Provider(s)
Status Description
In Progress The initial status of a new Part V that the Provider created by either
adding a new, or revising an already completed Part V
Part V Completed The status of a Part V when it is completed by the Provider
All Part Vs Completed For
The Provider
The status of a Part V when a Provider completes all Part Vs for all
Part III outcomes associated with that Provider
Pending SC Review The status of a Part V when a Provider Submits a Revised Part V
Pending Provider Review The status of a Part V when the Support Coordinator submits a
Part V that is in Pending SC Review
Approved The status of a Part V when the Support Coordinator approves a Part
V that is in Pending SC Review
The Provider receives an Alert, and Status of the revised outcome
changes to Approved and is Active.
Discarded 1. The status of a Part V when a Provider discards a Part V that is In Progress
2. The status of a Part V when a Provider discards a Part V that is Pending SC Review
3. The status of a Part V when a Provider discards a Part V that is Pending Provider Review
Rejected The status of a Part V when the Support Coordinator rejects a Part V
that is in Pending SC Review
The Provider receives an Alert, the Status changes to Inactive and the
previous / revised outcome becomes Active again.
4.4 Part V. Plan for Supports – Modified Use
Providers use WaMS to enter a summary of support activities, skill building information,
and a target date per outcome for Part V. A copy of their own Part V should be uploaded in
the Attachments section (see Section 4.5 below for steps for uploading attachments).
Individual Support Plan
For Authorized Use Only – Do Not Distribute 34
Note: It is a good idea to view Part III – Shared Planning to see the desired outcome(s)
that have been assigned by the Support
Coordinator.
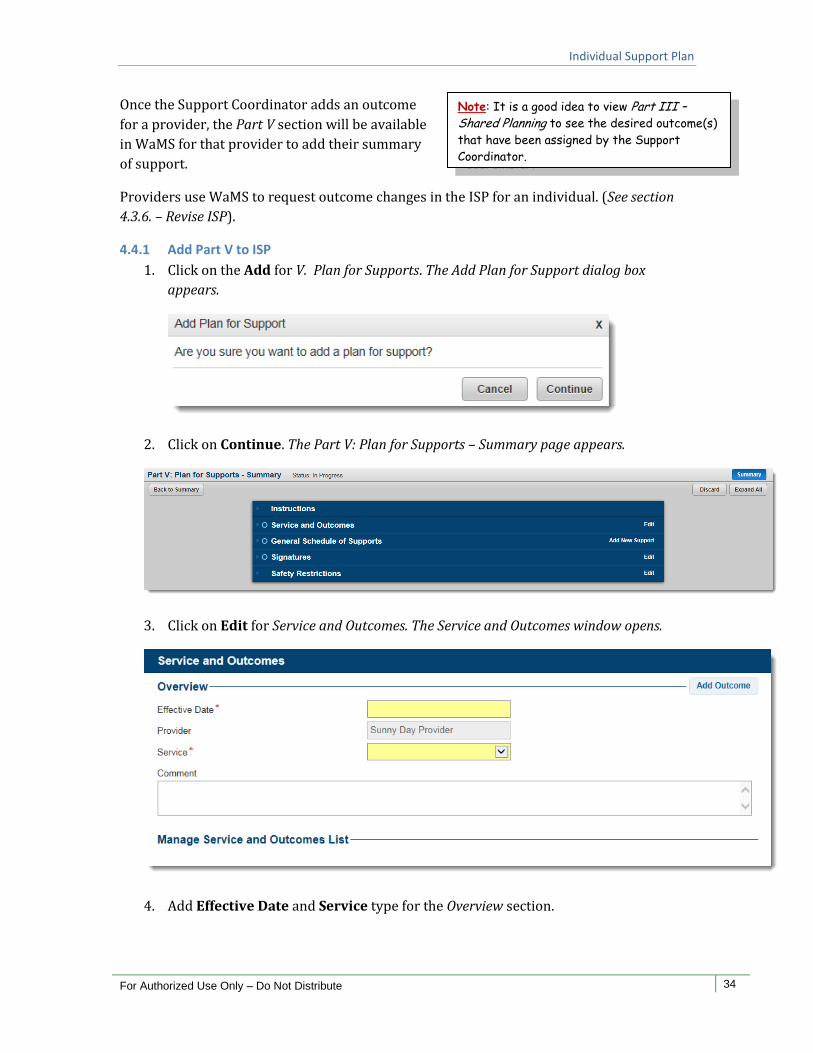
Once the Support Coordinator adds an outcome
for a provider, the Part V section will be available
in WaMS for that provider to add their summary
of support.
Providers use WaMS to request outcome changes in the ISP for an individual. (See section
4.3.6. – Revise ISP).
4.4.1 Add Part V to ISP
1. Click on the Add for V. Plan for Supports. The Add Plan for Support dialog box
appears.
2. Click on Continue. The Part V: Plan for Supports – Summary page appears.
3. Click on Edit for Service and Outcomes. The Service and Outcomes window opens.
4. Add Effective Date and Service type for the Overview section.
Individual Support Plan
For Authorized Use Only – Do Not Distribute 35
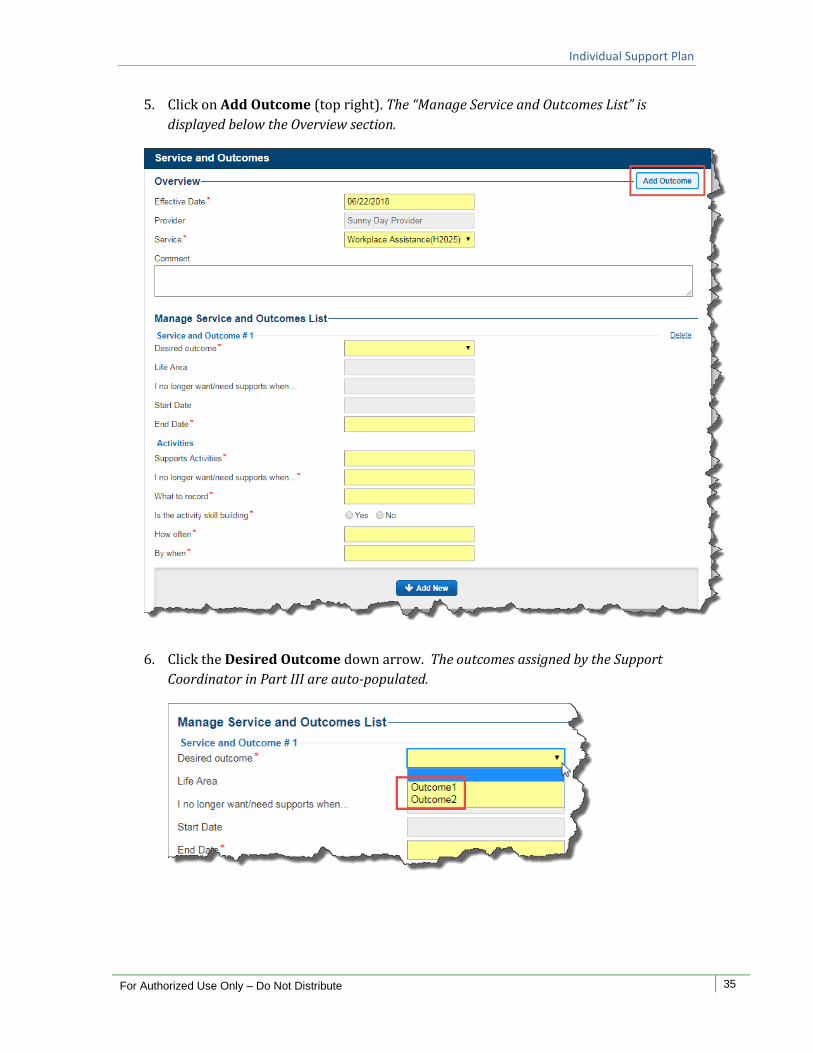
5. Click on Add Outcome (top right). The “Manage Service and Outcomes List” is
displayed below the Overview section.
6. Click the Desired Outcome down arrow. The outcomes assigned by the Support
Coordinator in Part III are auto-populated.
Individual Support Plan
For Authorized Use Only – Do Not Distribute 36
7. Select the appropriate Desired outcome. The Life Area, I no longer want/need
support when…, and Start Date sections are auto-populated and cannot be changed.
8. Click in the Supports Activities field to type the activity information.
9. Click in the I no longer want/need support when… field to type a summary of
support activity.
10. Place an “X” in the What to record field.
11. Select Yes or No if the activity is or is not skill building.
12. Place an “X” in the How often field to type the appropriate information.
13. Click in the By when field to select the appropriate date.
14. Click on Add New. The information is added to the Activities section.
Individual Support Plan
For Authorized Use Only – Do Not Distribute 37
Note: Providers should add as many outcomes
as are assigned in Part III to complete Part V.
Note: If you disagree with an outcome, contact the Support Coordinator by phone to
discuss and resolve. If alternate wording is needed, the language can be corrected in the
revisions after completing the initial Part V.
15. Click on Save.
If there are additional outcomes to add scroll to
the top and click on Add Outcome. A new” Service
and Outcome” section is added below the previous
“Activities” section
16. Follow steps 7-15 above to add the new outcome.
Individual Support Plan
For Authorized Use Only – Do Not Distribute 38
4.4.2 General Schedule of Supports
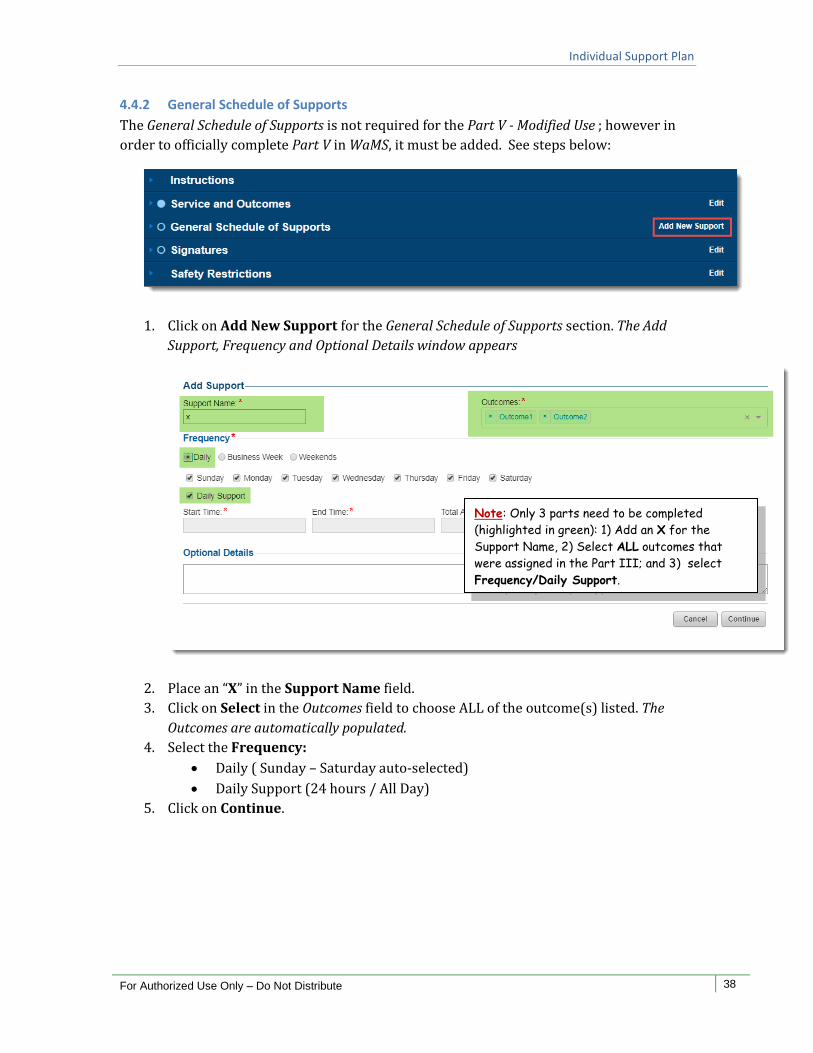
The General Schedule of Supports is not required for the Part V - Modified Use ; however in
order to officially complete Part V in WaMS, it must be added. See steps below:
1. Click on Add New Support for the General Schedule of Supports section. The Add
Support, Frequency and Optional Details window appears
2. Place an “X” in the Support Name field.
3. Click on Select in the Outcomes field to choose ALL of the outcome(s) listed. The
Outcomes are automatically populated.
4. Select the Frequency:
Daily ( Sunday – Saturday auto-selected)
Daily Support (24 hours / All Day)
5. Click on Continue.
Note: Only 3 parts need to be completed
(highlighted in green): 1) Add an X for the
Support Name, 2) Select ALL outcomes that
were assigned in the Part III; and 3) select
Frequency/Daily Support.
Individual Support Plan
For Authorized Use Only – Do Not Distribute 39
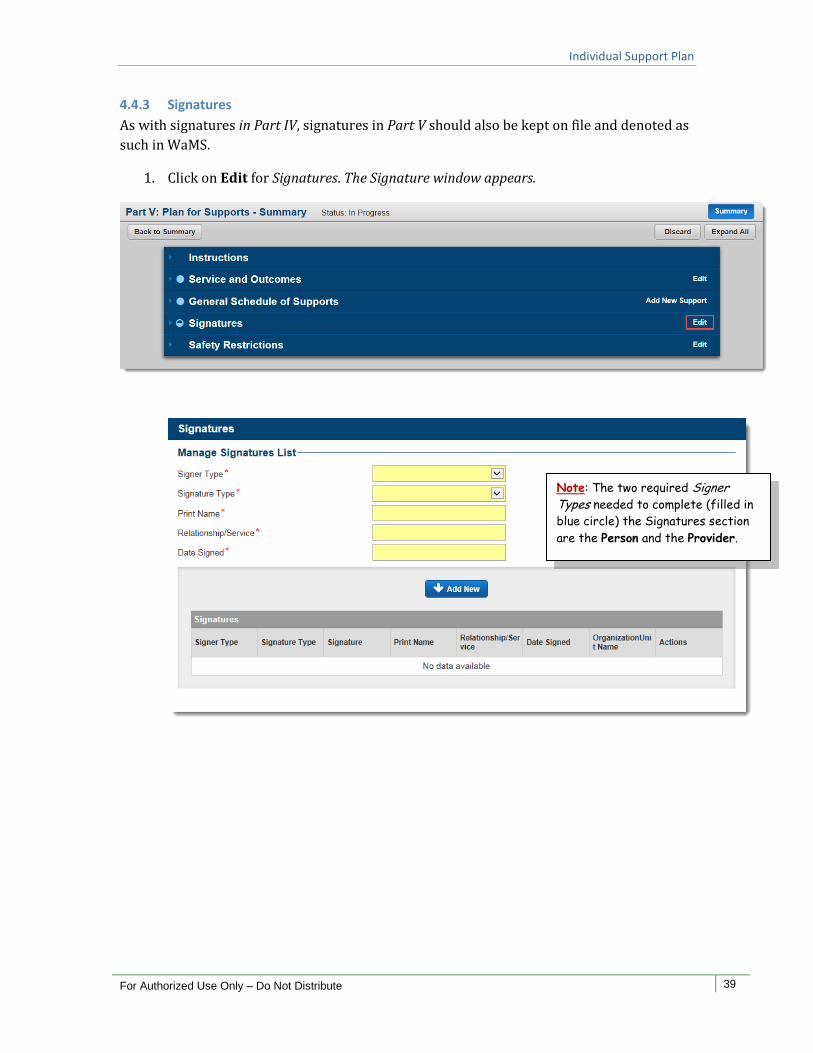
4.4.3 Signatures
As with signatures in Part IV, signatures in Part V should also be kept on file and denoted as
such in WaMS.
1. Click on Edit for Signatures. The Signature window appears.
Note: The two required Signer Types needed to complete (filled in
blue circle) the Signatures section
are the Person and the Provider.

Individual Support Plan
For Authorized Use Only – Do Not Distribute 40
Note: The signature will be displayed as “No Signature Uploaded”.
To Add Details for Signature on File:
a. Click on the Signer Type drop down arrow to select the appropriate signer
(Person, Substitute Decision Maker, Provider, Family, Friend or Other).
b. Click on the Signature Type drop down and select Written.
c. In the Print Name field type Signature on File.
d. In the Relationship/Service field type Signature on File.
e. Select the Date Signed.
f. Click on the Add New button.
g. Click on Save. The signature is added to the ISP and the ISP Main page
reappears.
i.
Individual Support Plan
For Authorized Use Only – Do Not Distribute 41
Note: The Provider is listed in
the “Signer Type” when logged in
WaMS with the “Provider ISP
Approver” role.
A signature can also be denoted in WaMS if an individual contributor to the plan is not
available to sign during the planning meeting but has agreed to the plan.
When Contributor not here for planning:
a. In the Manage Signatures List, click on the Signer
Type drop down arrow to select the appropriate
signer (Person, Substitute Decision Maker, Provider,
Family, Friend or Other).
b. Click on the Signature Type drop down and select Contributor not here
for planning.
c. Type in the name of the person signing in the Print Name field.
d. Type in the Relationship/Service.
e. Click on the Add New button.
The information for the contributor is added to the Signatures area.
f. Click on Save. The contributor information is added to the Part V signature
and the ISP Main page reappears.
Note: Be sure to Save signatures BEFORE going back
to the Summary page after clicking on the Add New
button when adding signatures.
Individual Support Plan
For Authorized Use Only – Do Not Distribute 42
Note: A provider will be able to upload an attachment to
the ISP area when: 1) an ISP has been created; and 2)
the provider has been added to the ISP. Avoid, when
possible, adding any ISP attachments to the”Person’s
Information” section.
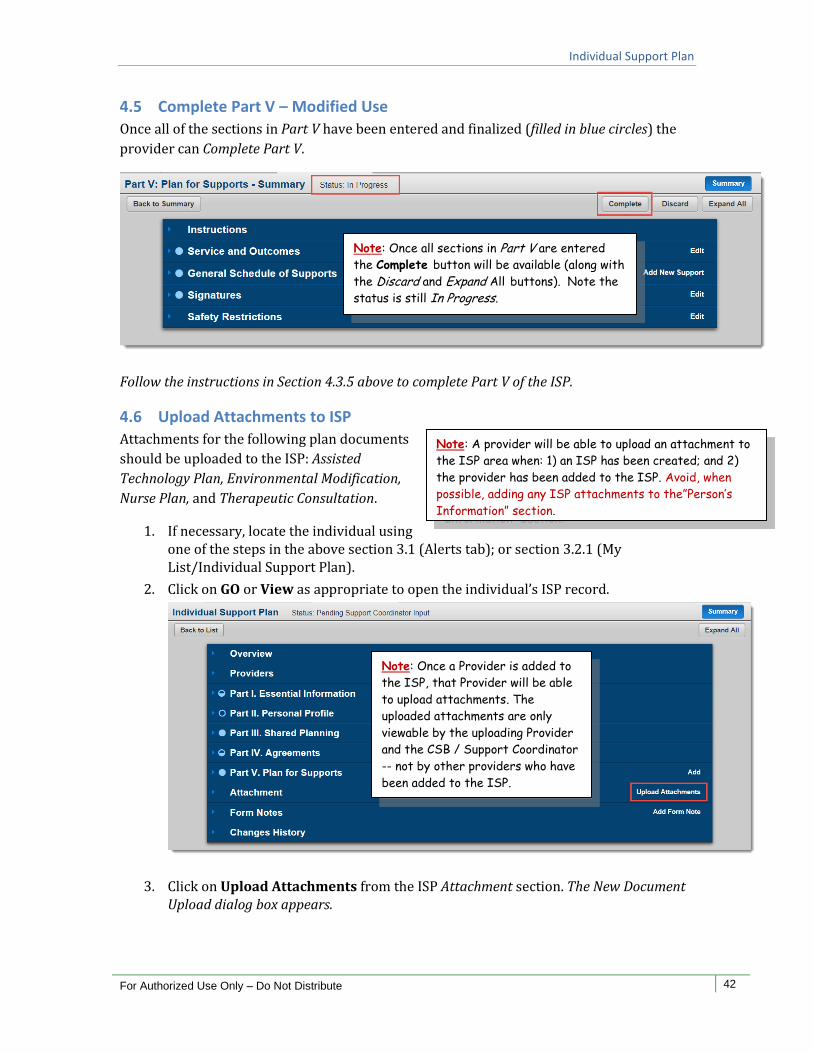
4.5 Complete Part V – Modified Use
Once all of the sections in Part V have been entered and finalized (filled in blue circles) the
provider can Complete Part V.
Follow the instructions in Section 4.3.5 above to complete Part V of the ISP.
4.6 Upload Attachments to ISP
Attachments for the following plan documents
should be uploaded to the ISP: Assisted
Technology Plan, Environmental Modification,
Nurse Plan, and Therapeutic Consultation.
1. If necessary, locate the individual using one of the steps in the above section 3.1 (Alerts tab); or section 3.2.1 (My List/Individual Support Plan).
2. Click on GO or View as appropriate to open the individual’s ISP record.
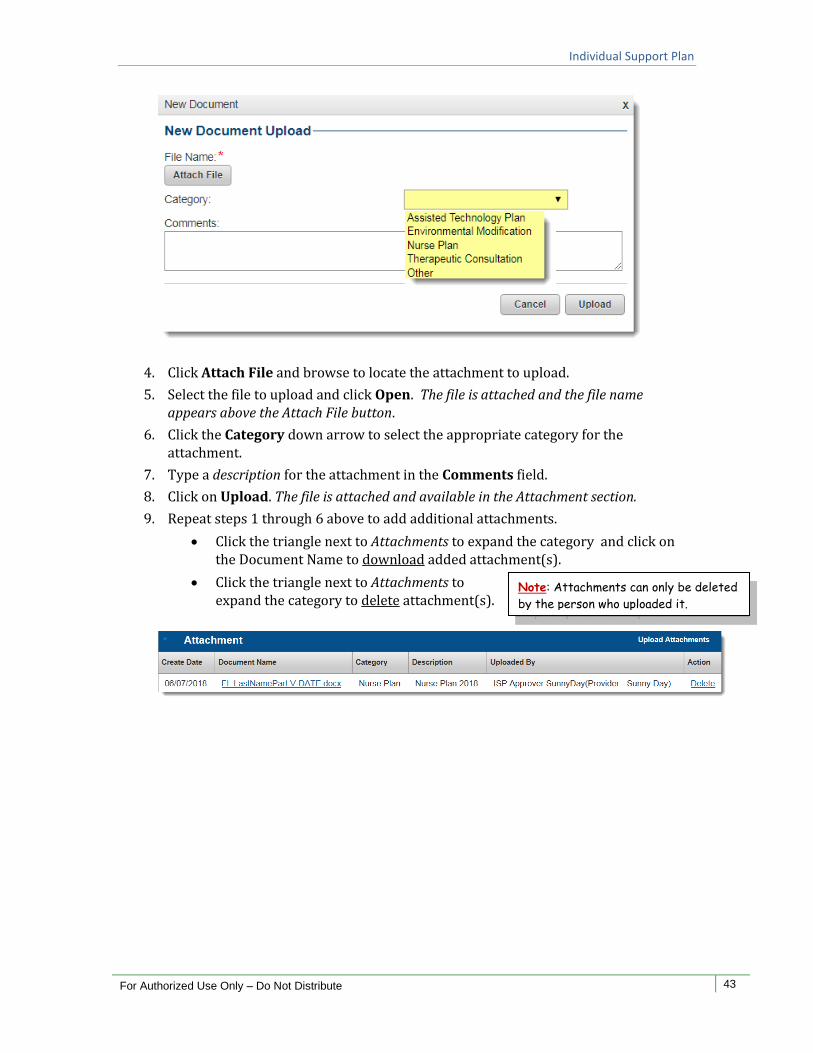
3. Click on Upload Attachments from the ISP Attachment section. The New Document Upload dialog box appears.
Note: Once all sections in Part V are entered
the Complete button will be available (along with
the Discard and Expand All buttons). Note the
status is still In Progress.
Note: Once a Provider is added to
the ISP, that Provider will be able
to upload attachments. The
uploaded attachments are only
viewable by the uploading Provider
and the CSB / Support Coordinator
-- not by other providers who have
been added to the ISP.
Individual Support Plan
For Authorized Use Only – Do Not Distribute 43
Note: Attachments can only be deleted
by the person who uploaded it.
4. Click Attach File and browse to locate the attachment to upload.
5. Select the file to upload and click Open. The file is attached and the file name appears above the Attach File button.
6. Click the Category down arrow to select the appropriate category for the attachment.
7. Type a description for the attachment in the Comments field.
8. Click on Upload. The file is attached and available in the Attachment section.
9. Repeat steps 1 through 6 above to add additional attachments.
Click the triangle next to Attachments to expand the category and click on the Document Name to download added attachment(s).
Click the triangle next to Attachments to expand the category to delete attachment(s).
Individual Support Plan
For Authorized Use Only – Do Not Distribute 44
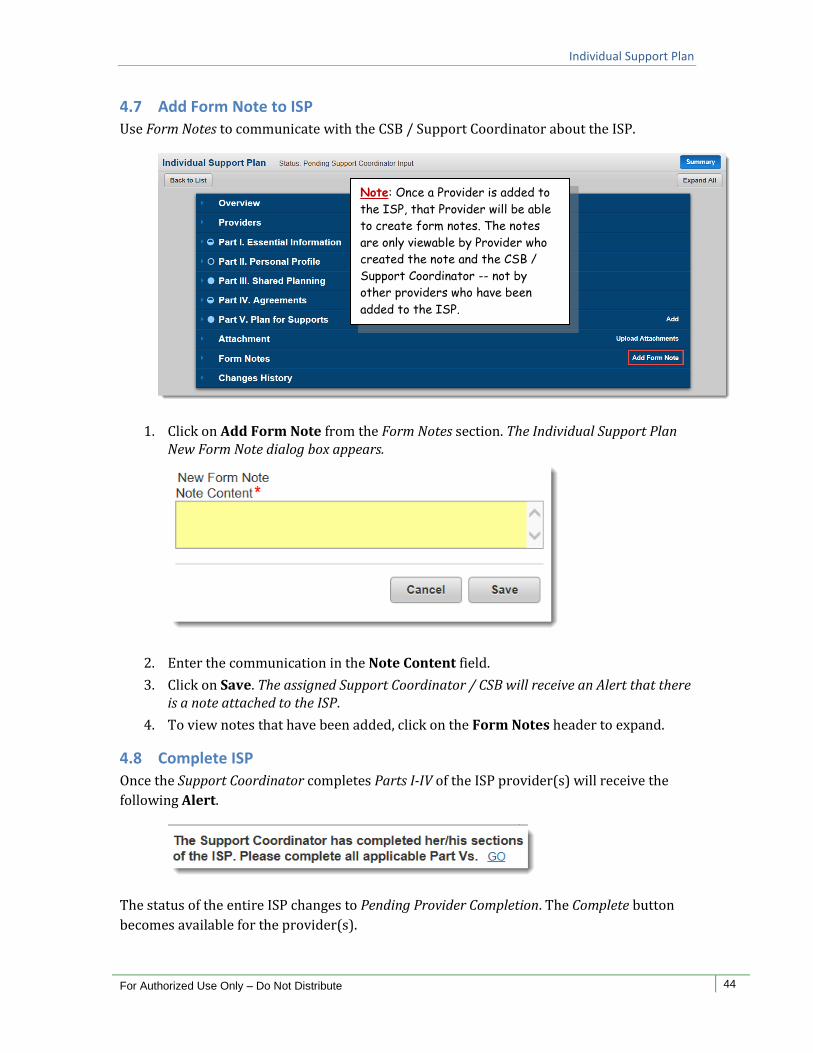
4.7 Add Form Note to ISP
Use Form Notes to communicate with the CSB / Support Coordinator about the ISP.
1. Click on Add Form Note from the Form Notes section. The Individual Support Plan New Form Note dialog box appears.
2. Enter the communication in the Note Content field.
3. Click on Save. The assigned Support Coordinator / CSB will receive an Alert that there is a note attached to the ISP.
4. To view notes that have been added, click on the Form Notes header to expand.
4.8 Complete ISP
Once the Support Coordinator completes Parts I-IV of the ISP provider(s) will receive the
following Alert.
The status of the entire ISP changes to Pending Provider Completion. The Complete button
becomes available for the provider(s).
Note: Once a Provider is added to
the ISP, that Provider will be able
to create form notes. The notes
are only viewable by Provider who
created the note and the CSB /
Support Coordinator -- not by
other providers who have been
added to the ISP.
Individual Support Plan
For Authorized Use Only – Do Not Distribute 45
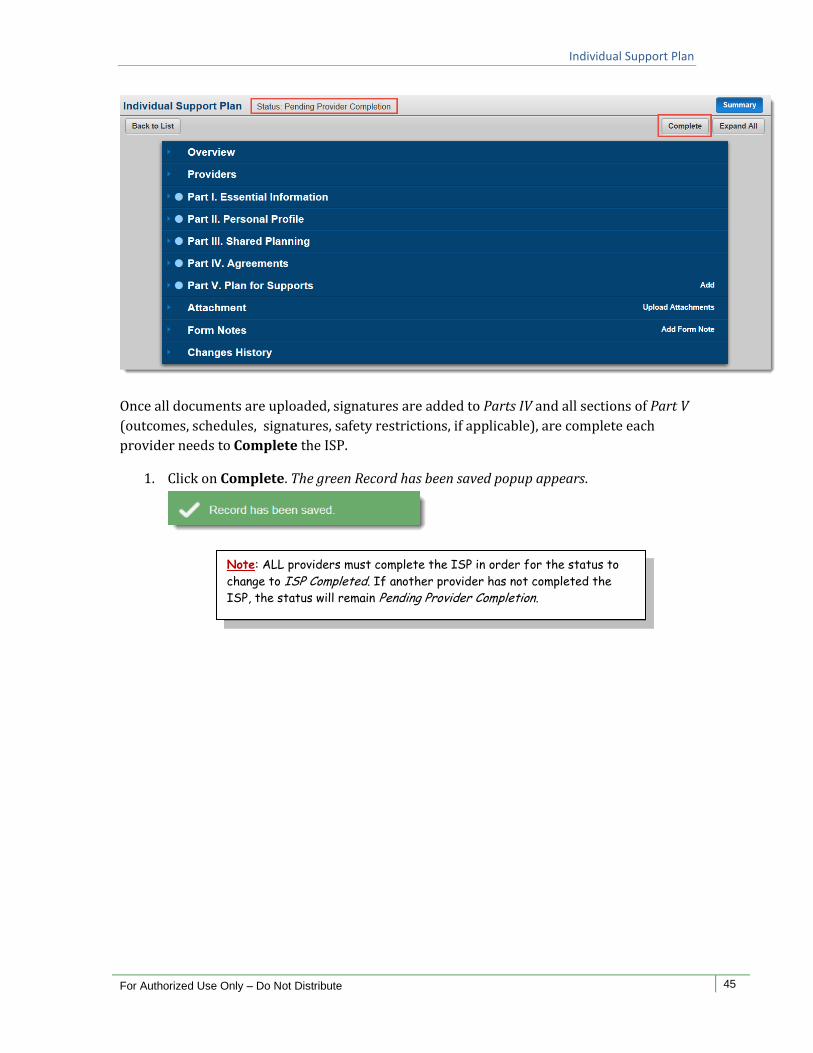
Note: ALL providers must complete the ISP in order for the status to
change to ISP Completed. If another provider has not completed the
ISP, the status will remain Pending Provider Completion.
Once all documents are uploaded, signatures are added to Parts IV and all sections of Part V
(outcomes, schedules, signatures, safety restrictions, if applicable), are complete each
provider needs to Complete the ISP.
1. Click on Complete. The green Record has been saved popup appears.
Individual Support Plan
For Authorized Use Only – Do Not Distribute 46
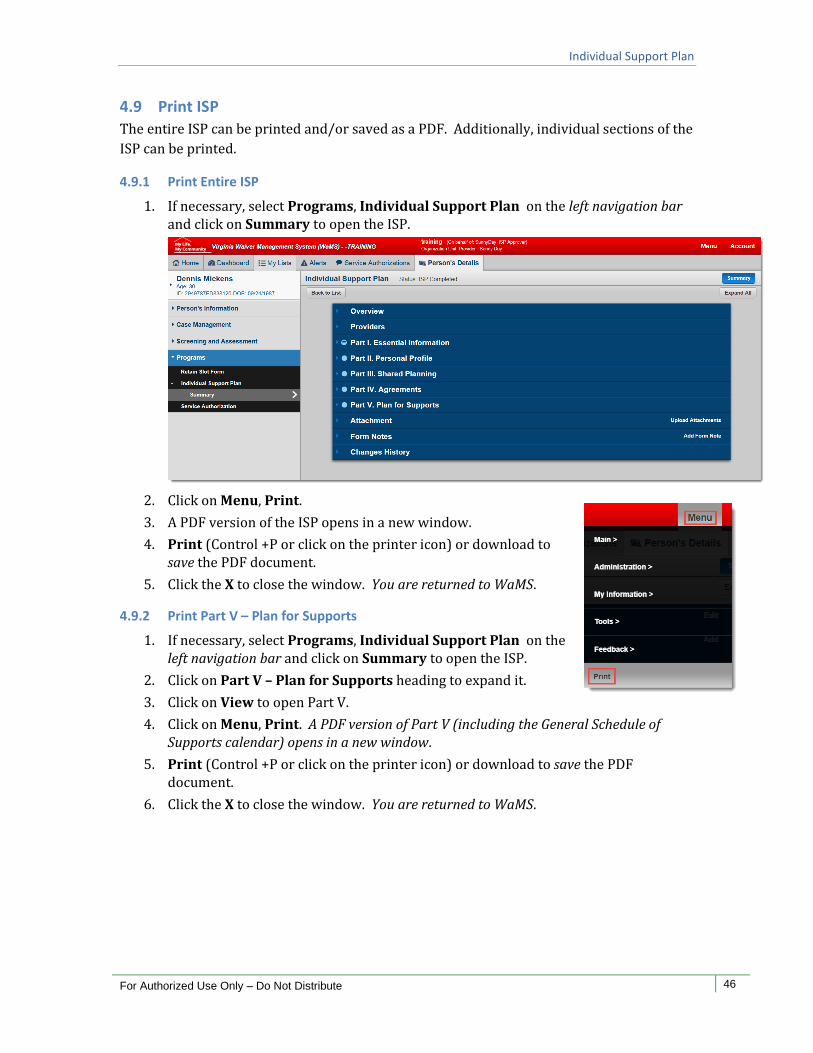
4.9 Print ISP
The entire ISP can be printed and/or saved as a PDF. Additionally, individual sections of the
ISP can be printed.
4.9.1 Print Entire ISP
1. If necessary, select Programs, Individual Support Plan on the left navigation bar and click on Summary to open the ISP.
2. Click on Menu, Print.
3. A PDF version of the ISP opens in a new window.
4. Print (Control +P or click on the printer icon) or download to save the PDF document.
5. Click the X to close the window. You are returned to WaMS.
4.9.2 Print Part V – Plan for Supports
1. If necessary, select Programs, Individual Support Plan on the left navigation bar and click on Summary to open the ISP.
2. Click on Part V – Plan for Supports heading to expand it.
3. Click on View to open Part V.
4. Click on Menu, Print. A PDF version of Part V (including the General Schedule of Supports calendar) opens in a new window.
5. Print (Control +P or click on the printer icon) or download to save the PDF document.
6. Click the X to close the window. You are returned to WaMS.
Service Authorizations
For Authorized Use Only – Do Not Distribute 47
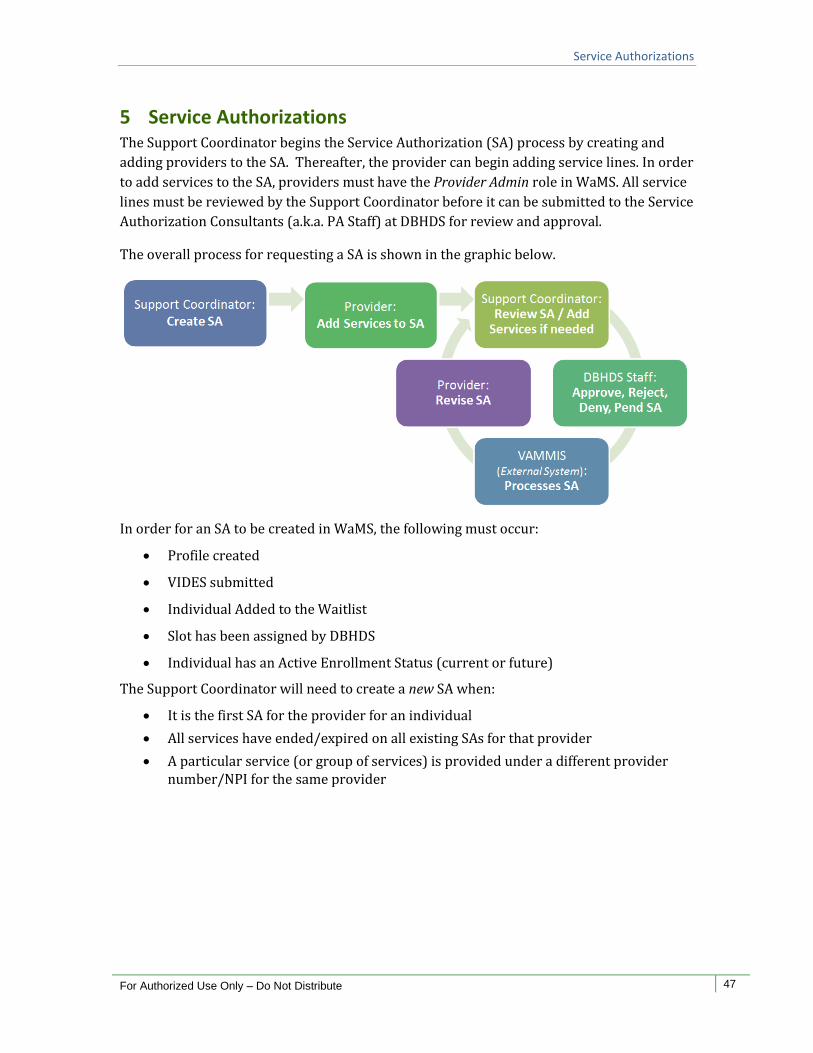
5 Service Authorizations The Support Coordinator begins the Service Authorization (SA) process by creating and
adding providers to the SA. Thereafter, the provider can begin adding service lines. In order
to add services to the SA, providers must have the Provider Admin role in WaMS. All service
lines must be reviewed by the Support Coordinator before it can be submitted to the Service
Authorization Consultants (a.k.a. PA Staff) at DBHDS for review and approval.
The overall process for requesting a SA is shown in the graphic below.
In order for an SA to be created in WaMS, the following must occur:
Profile created
VIDES submitted
Individual Added to the Waitlist
Slot has been assigned by DBHDS
Individual has an Active Enrollment Status (current or future)
The Support Coordinator will need to create a new SA when:
It is the first SA for the provider for an individual
All services have ended/expired on all existing SAs for that provider
A particular service (or group of services) is provided under a different provider number/NPI for the same provider
Service Authorizations
For Authorized Use Only – Do Not Distribute 48
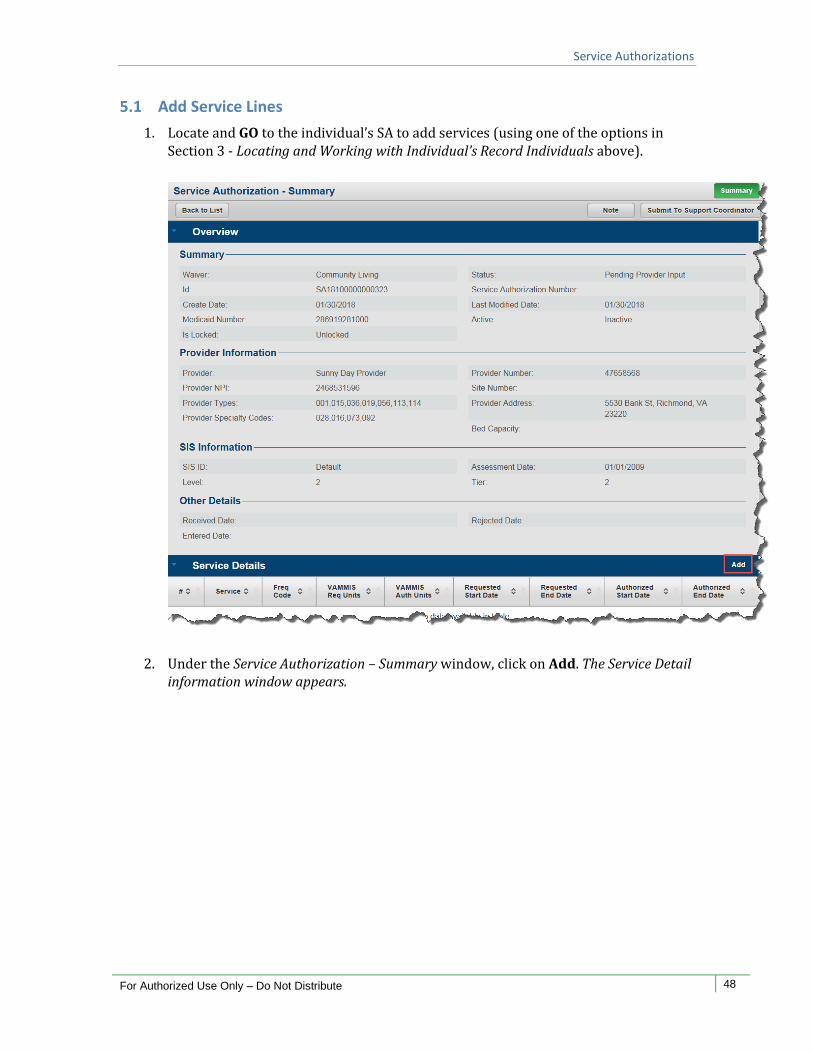
5.1 Add Service Lines
1. Locate and GO to the individual’s SA to add services (using one of the options in Section 3 - Locating and Working with Individual’s Record Individuals above).
2. Under the Service Authorization – Summary window, click on Add. The Service Detail information window appears.
Service Authorizations
For Authorized Use Only – Do Not Distribute 49
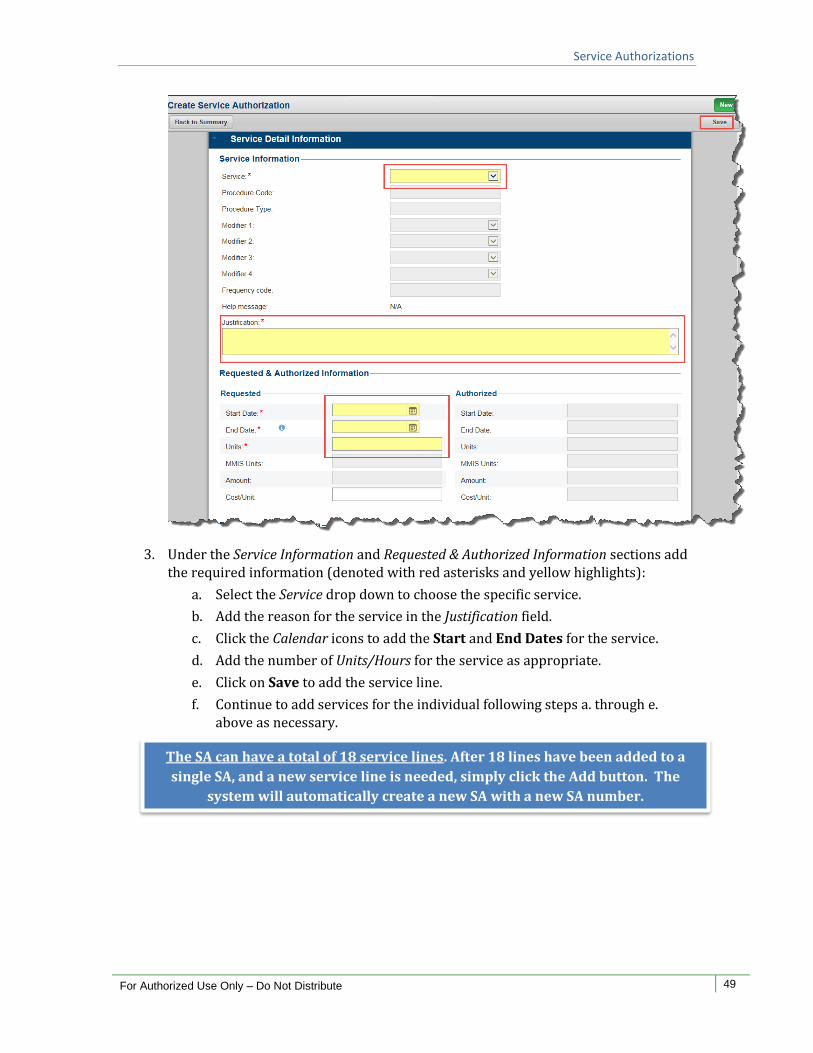
3. Under the Service Information and Requested & Authorized Information sections add the required information (denoted with red asterisks and yellow highlights):
a. Select the Service drop down to choose the specific service.
b. Add the reason for the service in the Justification field.
c. Click the Calendar icons to add the Start and End Dates for the service.
d. Add the number of Units/Hours for the service as appropriate.
e. Click on Save to add the service line.
f. Continue to add services for the individual following steps a. through e. above as necessary.
The SA can have a total of 18 service lines. After 18 lines have been added to a
single SA, and a new service line is needed, simply click the Add button. The
system will automatically create a new SA with a new SA number.
Service Authorizations
For Authorized Use Only – Do Not Distribute 50
5.2 SA Notes
Notes are used to communicate information regarding the SA. For instance, if an SA is
“pended”, the Service Authorization Consultants will add the reason for the pend in the SA
notes area. Providers should add Notes to communicate information regarding the SA to the
Support Coordinator and DBHDS staff. The notes can be entered or viewed at any time. An
alert will be sent to the assigned Support Coordinator that a note has been added to the SA.
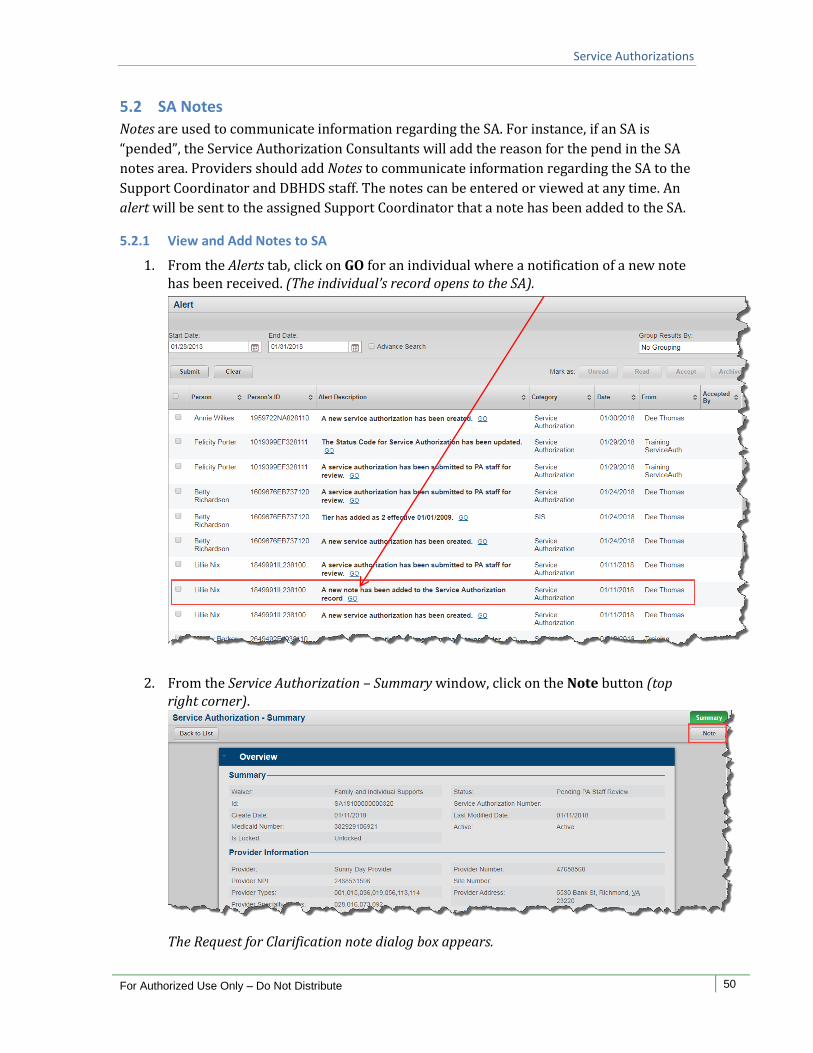
5.2.1 View and Add Notes to SA
1. From the Alerts tab, click on GO for an individual where a notification of a new note has been received. (The individual’s record opens to the SA).
2. From the Service Authorization – Summary window, click on the Note button (top right corner).
The Request for Clarification note dialog box appears.
Service Authorizations
For Authorized Use Only – Do Not Distribute 51
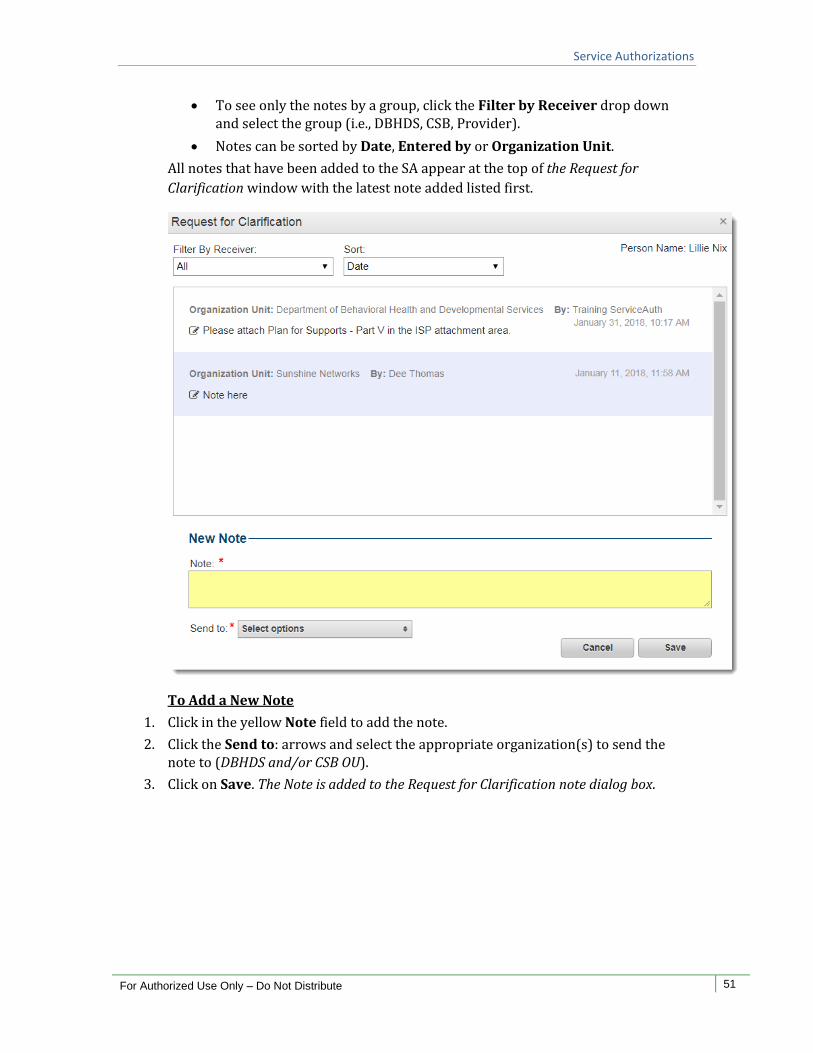
To see only the notes by a group, click the Filter by Receiver drop down and select the group (i.e., DBHDS, CSB, Provider).
Notes can be sorted by Date, Entered by or Organization Unit.
All notes that have been added to the SA appear at the top of the Request for
Clarification window with the latest note added listed first.
To Add a New Note
1. Click in the yellow Note field to add the note.
2. Click the Send to: arrows and select the appropriate organization(s) to send the note to (DBHDS and/or CSB OU).
3. Click on Save. The Note is added to the Request for Clarification note dialog box.
Service Authorizations
For Authorized Use Only – Do Not Distribute 52
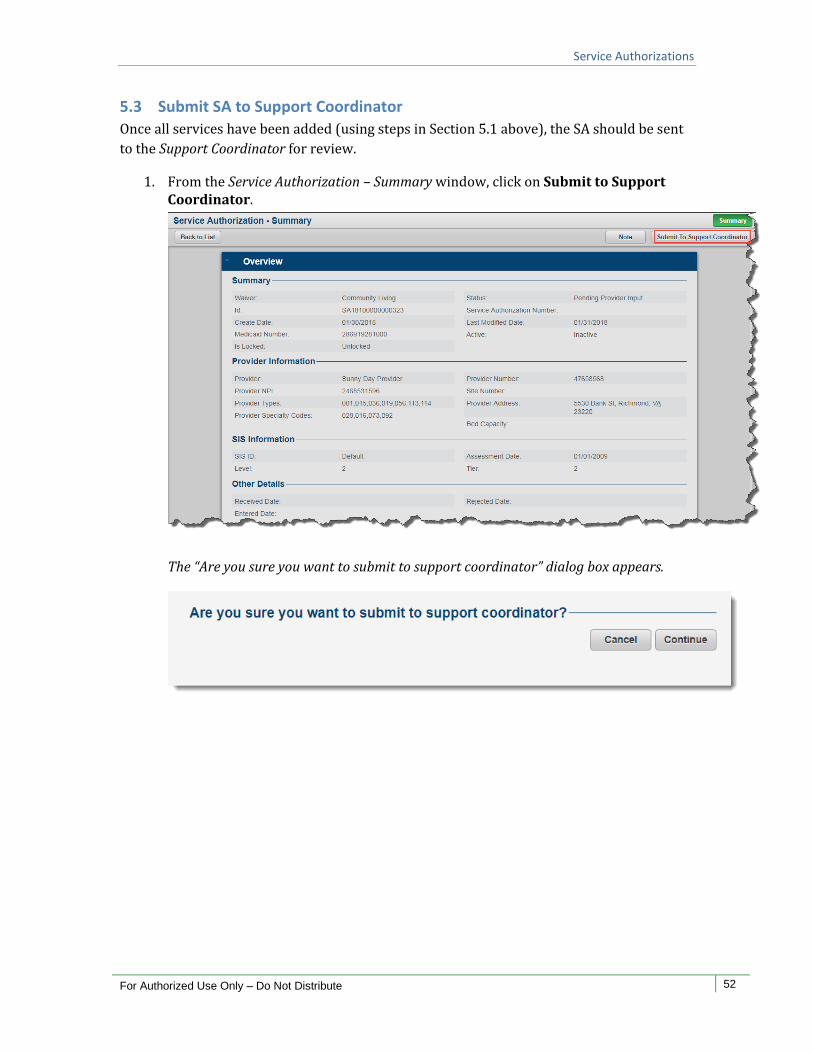
5.3 Submit SA to Support Coordinator
Once all services have been added (using steps in Section 5.1 above), the SA should be sent
to the Support Coordinator for review.
1. From the Service Authorization – Summary window, click on Submit to Support Coordinator.
The “Are you sure you want to submit to support coordinator” dialog box appears.
Service Authorizations
For Authorized Use Only – Do Not Distribute 53
Note: The status of the SA returns
to “Pending Provider Input” and can
now be edited or deleted.
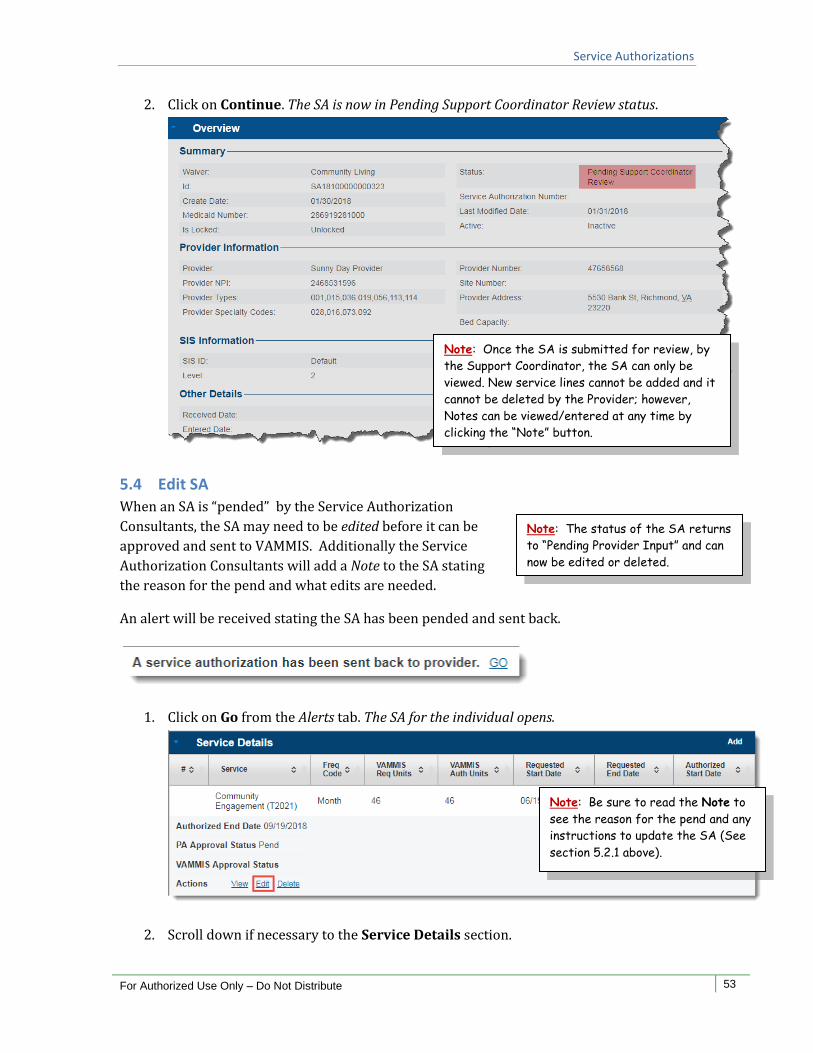
2. Click on Continue. The SA is now in Pending Support Coordinator Review status.
5.4 Edit SA
When an SA is “pended” by the Service Authorization
Consultants, the SA may need to be edited before it can be
approved and sent to VAMMIS. Additionally the Service
Authorization Consultants will add a Note to the SA stating
the reason for the pend and what edits are needed.
An alert will be received stating the SA has been pended and sent back.
1. Click on Go from the Alerts tab. The SA for the individual opens.
2. Scroll down if necessary to the Service Details section.
Note: Be sure to read the Note to
see the reason for the pend and any
instructions to update the SA (See
section 5.2.1 above).
Note: Once the SA is submitted for review, by
the Support Coordinator, the SA can only be
viewed. New service lines cannot be added and it
cannot be deleted by the Provider; however,
Notes can be viewed/entered at any time by
clicking the “Note” button.
Service Authorizations
For Authorized Use Only – Do Not Distribute 54
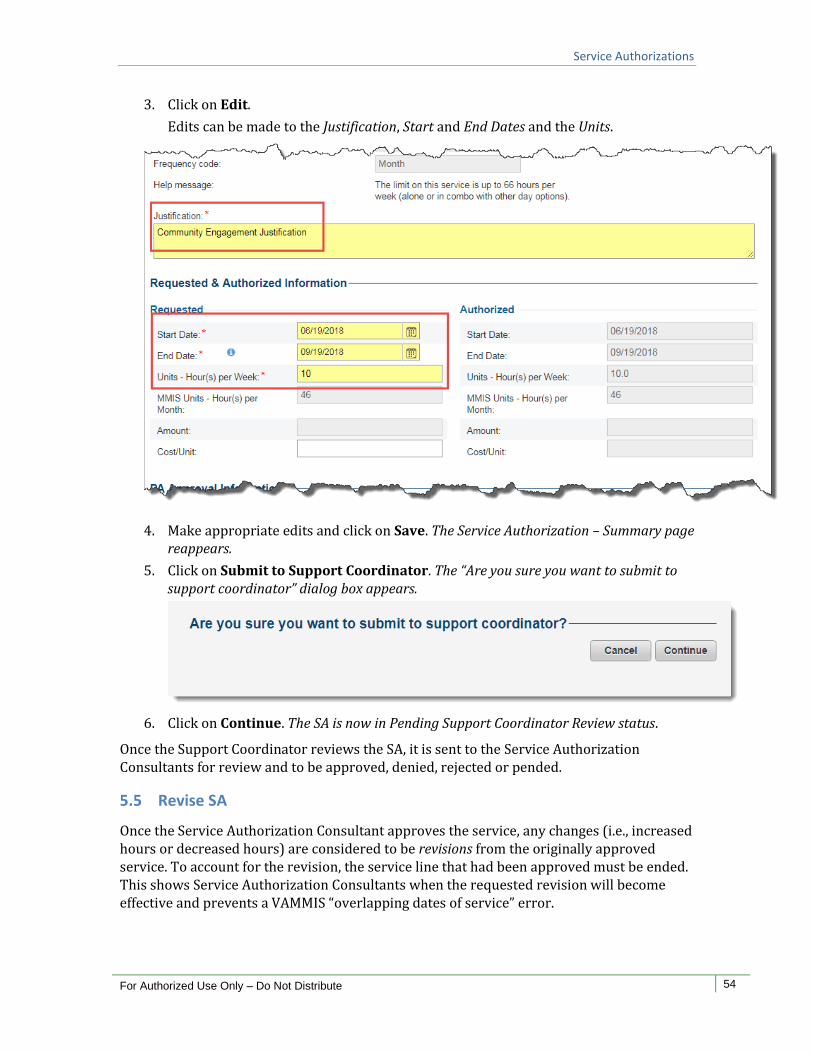
3. Click on Edit.
Edits can be made to the Justification, Start and End Dates and the Units.
4. Make appropriate edits and click on Save. The Service Authorization – Summary page reappears.
5. Click on Submit to Support Coordinator. The “Are you sure you want to submit to support coordinator” dialog box appears.
6. Click on Continue. The SA is now in Pending Support Coordinator Review status.
Once the Support Coordinator reviews the SA, it is sent to the Service Authorization Consultants for review and to be approved, denied, rejected or pended.
5.5 Revise SA
Once the Service Authorization Consultant approves the service, any changes (i.e., increased hours or decreased hours) are considered to be revisions from the originally approved service. To account for the revision, the service line that had been approved must be ended. This shows Service Authorization Consultants when the requested revision will become effective and prevents a VAMMIS “overlapping dates of service” error.
Service Authorizations
For Authorized Use Only – Do Not Distribute 55
Note: You may need to scroll to find
the appropriate SA.
Note: Use the SA tab to locate the SA by searching
by an individual’s first and/or last name without
needing to know the status of the SA.
The SA can be revised by the Provider or the Support Coordinator when the following conditions have been met:
SA has the status of VAMMIS Approval Complete
SA has at least one active service
User has the Provider Admin user role
5.5.1 Locate the SA to be Revised
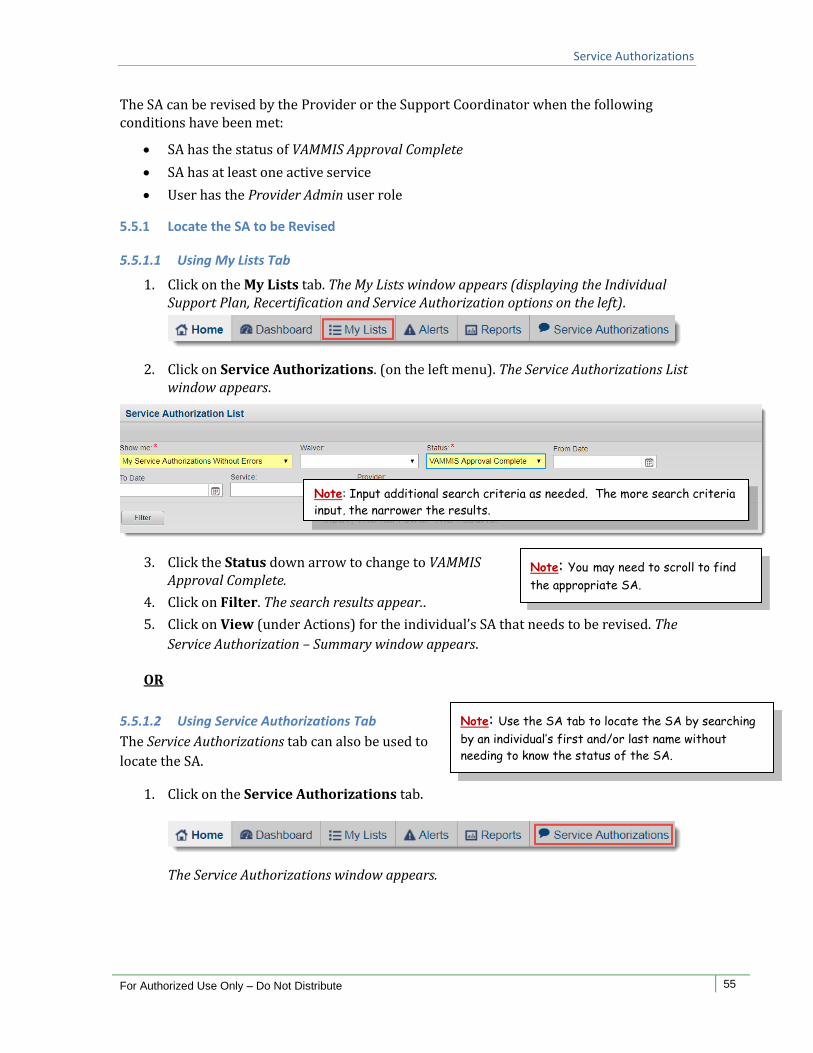
5.5.1.1 Using My Lists Tab
1. Click on the My Lists tab. The My Lists window appears (displaying the Individual Support Plan, Recertification and Service Authorization options on the left).
2. Click on Service Authorizations. (on the left menu). The Service Authorizations List window appears.
3. Click the Status down arrow to change to VAMMIS Approval Complete.
4. Click on Filter. The search results appear..
5. Click on View (under Actions) for the individual’s SA that needs to be revised. The
Service Authorization – Summary window appears.
OR
5.5.1.2 Using Service Authorizations Tab
The Service Authorizations tab can also be used to
locate the SA.
1. Click on the Service Authorizations tab.
The Service Authorizations window appears.
Note: Input additional search criteria as needed. The more search criteria
input, the narrower the results.
Service Authorizations
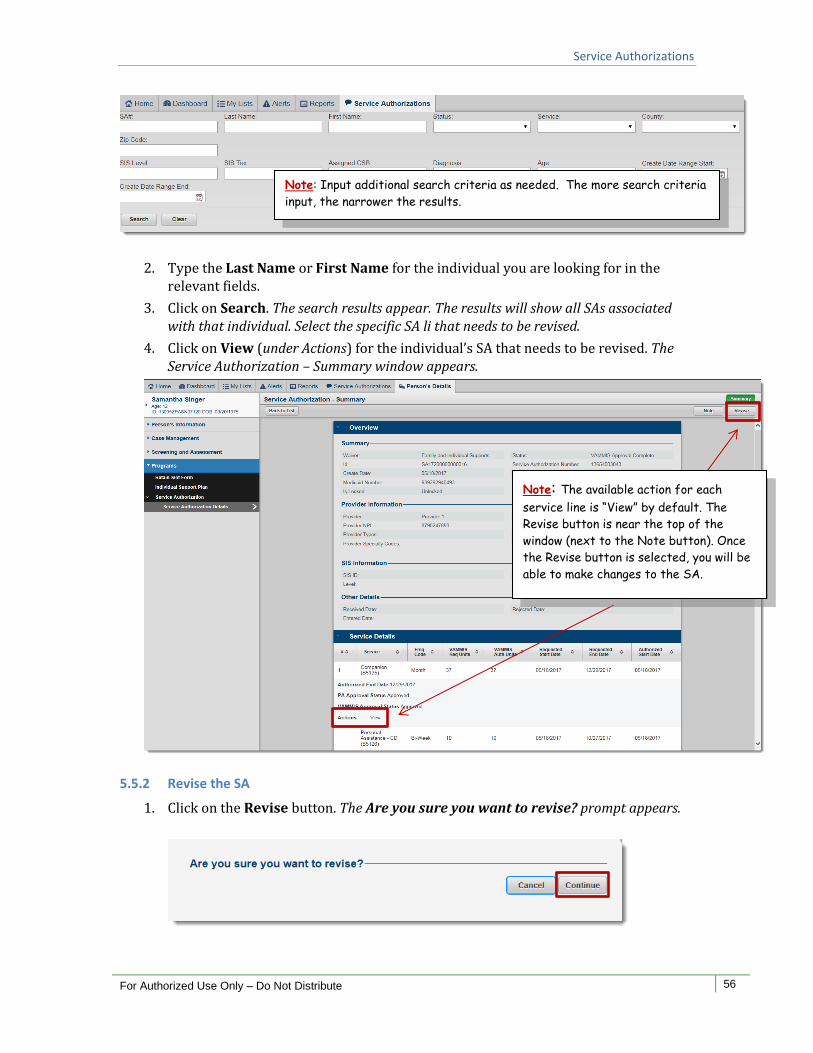
For Authorized Use Only – Do Not Distribute 56
2. Type the Last Name or First Name for the individual you are looking for in the relevant fields.
3. Click on Search. The search results appear. The results will show all SAs associated with that individual. Select the specific SA li that needs to be revised.
4. Click on View (under Actions) for the individual’s SA that needs to be revised. The Service Authorization – Summary window appears.
5.5.2 Revise the SA
1. Click on the Revise button. The Are you sure you want to revise? prompt appears.
Note: Input additional search criteria as needed. The more search criteria
input, the narrower the results.
Note: The available action for each
service line is “View” by default. The
Revise button is near the top of the
window (next to the Note button). Once
the Revise button is selected, you will be
able to make changes to the SA.
Service Authorizations
For Authorized Use Only – Do Not Distribute 57
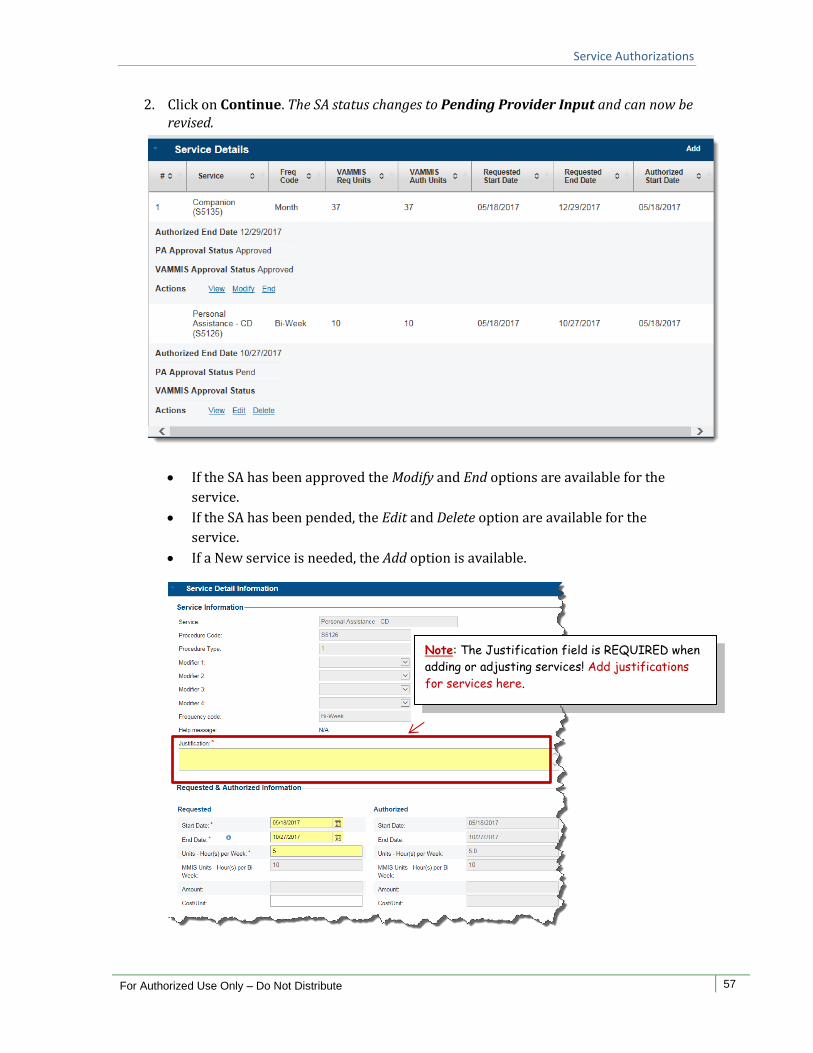
2. Click on Continue. The SA status changes to Pending Provider Input and can now be revised.
If the SA has been approved the Modify and End options are available for the
service.
If the SA has been pended, the Edit and Delete option are available for the
service.
If a New service is needed, the Add option is available.
Note: The Justification field is REQUIRED when
adding or adjusting services! Add justifications
for services here.

Service Authorizations
For Authorized Use Only – Do Not Distribute 58
Note: Ending the historical service lines is the
responsibility of the previous provider!
Failing to end lines can result in a delayed service
delivery to an individual.
The revised SA should be re-submitted to the Support Coordinator for review and then to
the PA Staff for approval.
5.6 End Service Line
If an individual wishes to add a new service or
change the service provider mid-plan year, the
“already approved” service lines will need to be
ended. For example: If an individual receiving CD
personal assistance services moves into a group
home, the previous CD services will need to be
terminated by the historical service facilitator
PRIOR to SA being approved for the group home services.
Likewise, if an individual switches providers for the same service, the historical provider
will need to end their services before a new provider can receive approval.
See section 5.5.2 for steps to end a service line.
Menu Options
For Authorized Use Only – Do Not Distribute 59
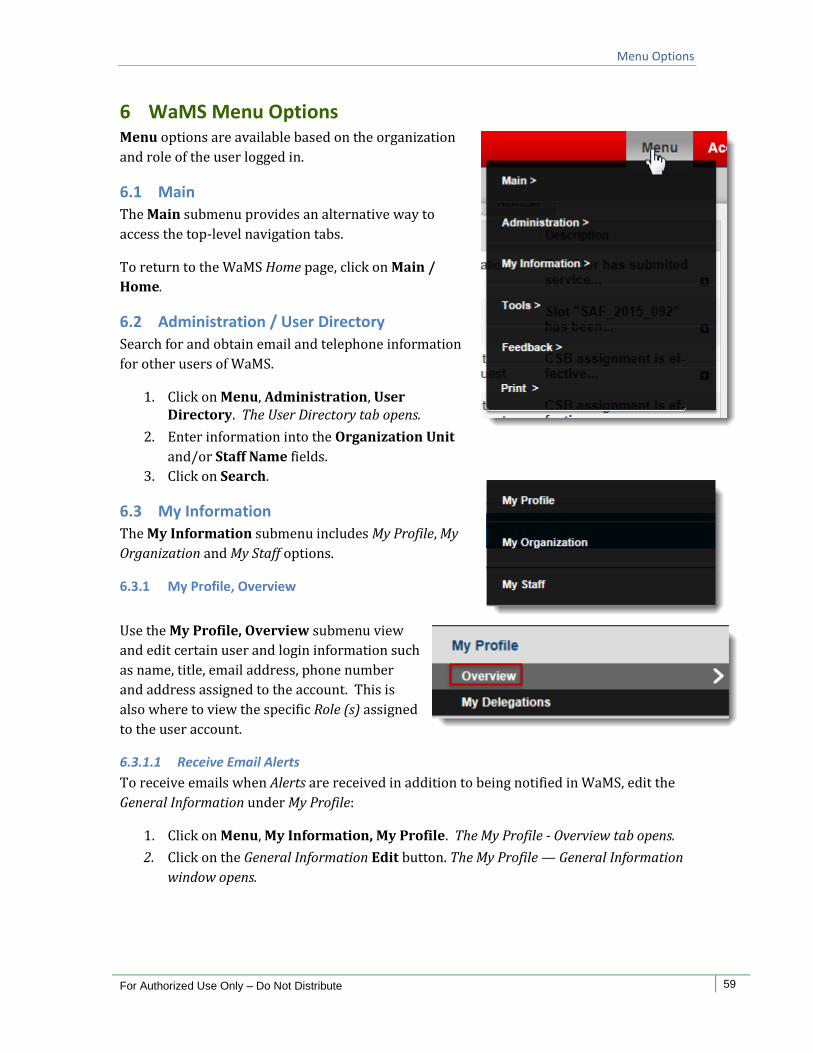
6 WaMS Menu Options Menu options are available based on the organization
and role of the user logged in.
6.1 Main
The Main submenu provides an alternative way to
access the top-level navigation tabs.
To return to the WaMS Home page, click on Main /
Home.
6.2 Administration / User Directory
Search for and obtain email and telephone information
for other users of WaMS.
1. Click on Menu, Administration, User Directory. The User Directory tab opens.
2. Enter information into the Organization Unit
and/or Staff Name fields.
3. Click on Search.
6.3 My Information
The My Information submenu includes My Profile, My
Organization and My Staff options.
6.3.1 My Profile, Overview
Use the My Profile, Overview submenu view
and edit certain user and login information such
as name, title, email address, phone number
and address assigned to the account. This is
also where to view the specific Role (s) assigned
to the user account.
6.3.1.1 Receive Email Alerts
To receive emails when Alerts are received in addition to being notified in WaMS, edit the
General Information under My Profile:
1. Click on Menu, My Information, My Profile. The My Profile - Overview tab opens.
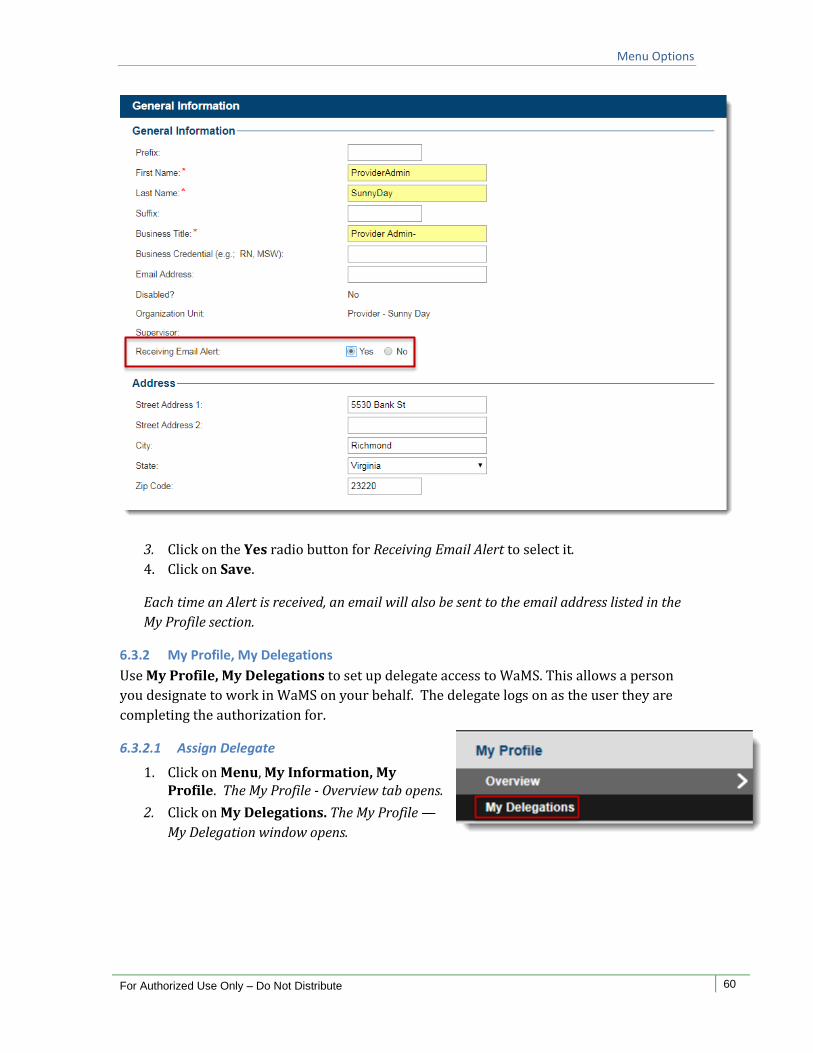
2. Click on the General Information Edit button. The My Profile — General Information
window opens.
Menu Options
For Authorized Use Only – Do Not Distribute 60
3. Click on the Yes radio button for Receiving Email Alert to select it.
4. Click on Save.
Each time an Alert is received, an email will also be sent to the email address listed in the
My Profile section.
6.3.2 My Profile, My Delegations
Use My Profile, My Delegations to set up delegate access to WaMS. This allows a person
you designate to work in WaMS on your behalf. The delegate logs on as the user they are
completing the authorization for.
6.3.2.1 Assign Delegate
1. Click on Menu, My Information, My Profile. The My Profile - Overview tab opens.
2. Click on My Delegations. The My Profile —
My Delegation window opens.
Menu Options
For Authorized Use Only – Do Not Distribute 61
Note: The delegate will no longer be able
to login as that user after the end date.
The End Date should be the day after the
last day permission is needed.
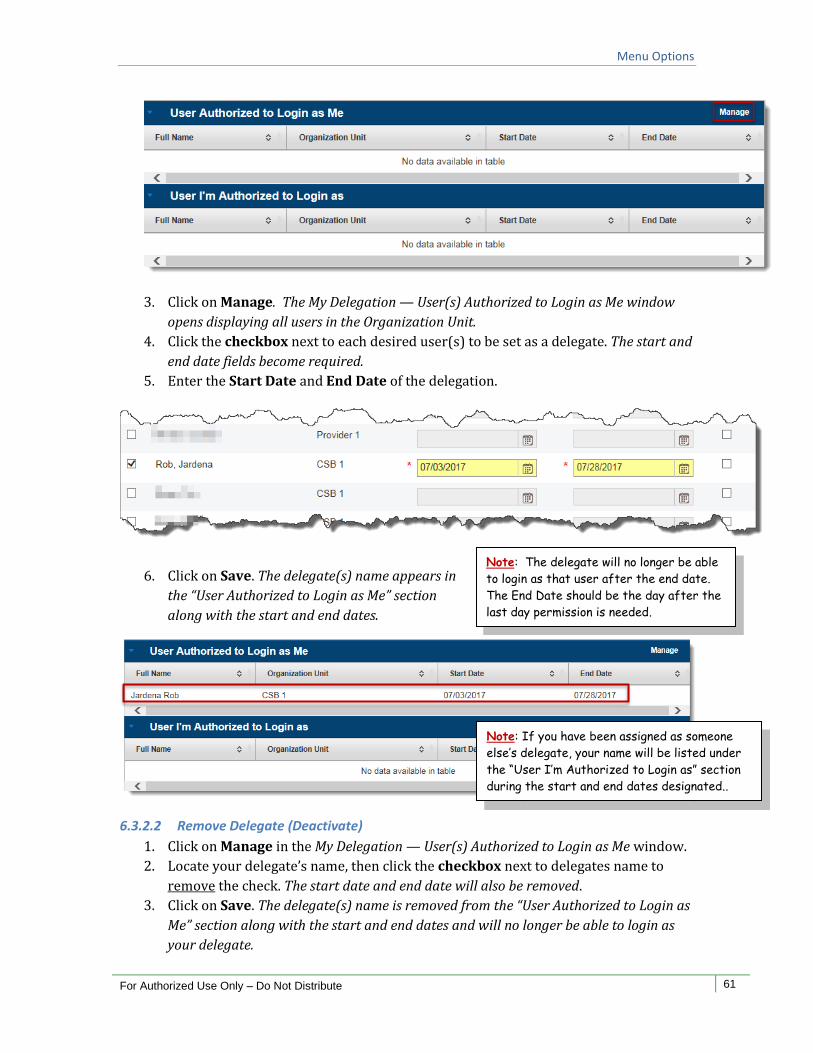
3. Click on Manage. The My Delegation — User(s) Authorized to Login as Me window
opens displaying all users in the Organization Unit.
4. Click the checkbox next to each desired user(s) to be set as a delegate. The start and
end date fields become required.
5. Enter the Start Date and End Date of the delegation.
6. Click on Save. The delegate(s) name appears in
the “User Authorized to Login as Me” section
along with the start and end dates.
6.3.2.2 Remove Delegate (Deactivate)
1. Click on Manage in the My Delegation — User(s) Authorized to Login as Me window.
2. Locate your delegate’s name, then click the checkbox next to delegates name to
remove the check. The start date and end date will also be removed.
3. Click on Save. The delegate(s) name is removed from the “User Authorized to Login as
Me” section along with the start and end dates and will no longer be able to login as
your delegate.
Note: If you have been assigned as someone
else’s delegate, your name will be listed under
the “User I’m Authorized to Login as” section
during the start and end dates designated..
Menu Options
For Authorized Use Only – Do Not Distribute 62
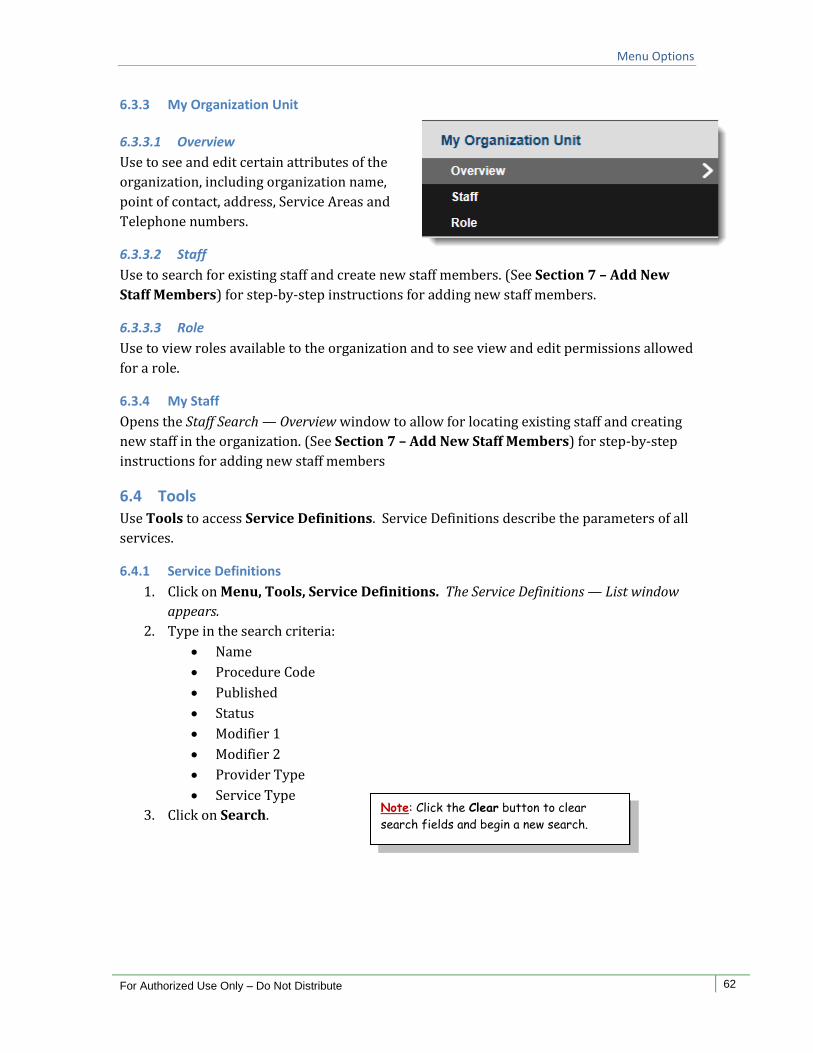
6.3.3 My Organization Unit
6.3.3.1 Overview
Use to see and edit certain attributes of the
organization, including organization name,
point of contact, address, Service Areas and
Telephone numbers.
6.3.3.2 Staff
Use to search for existing staff and create new staff members. (See Section 7 – Add New
Staff Members) for step-by-step instructions for adding new staff members.
6.3.3.3 Role
Use to view roles available to the organization and to see view and edit permissions allowed
for a role.
6.3.4 My Staff
Opens the Staff Search — Overview window to allow for locating existing staff and creating
new staff in the organization. (See Section 7 – Add New Staff Members) for step-by-step
instructions for adding new staff members
6.4 Tools
Use Tools to access Service Definitions. Service Definitions describe the parameters of all
services.
6.4.1 Service Definitions
1. Click on Menu, Tools, Service Definitions. The Service Definitions — List window
appears.
2. Type in the search criteria:
Name
Procedure Code
Published
Status
Modifier 1
Modifier 2
Provider Type
Service Type
3. Click on Search.
Note: Click the Clear button to clear
search fields and begin a new search.

Menu Options
For Authorized Use Only – Do Not Distribute 63
Note: The Next button is not active. The
following message is received when the Next
button is clicked: “Error: Access denied.
Reason: No permission. You’re not authorized
to access.”
6.4.1.1 View Service Definition Details
1. Click Details under the Actions column. The Service Definition – View window opens.
2. Click Manage for the category name to view additional details.
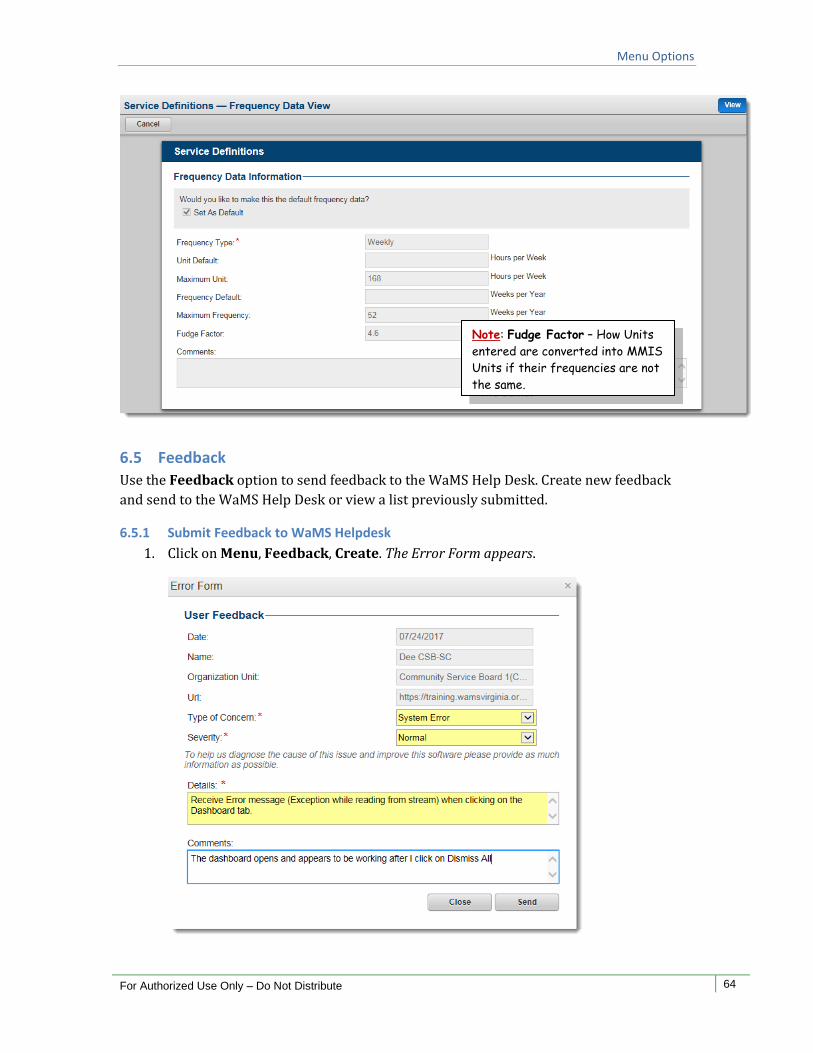
3. Click Details under the Actions. The Service
Definitions — Frequency Data View window
opens with additional information.
Menu Options
For Authorized Use Only – Do Not Distribute 64
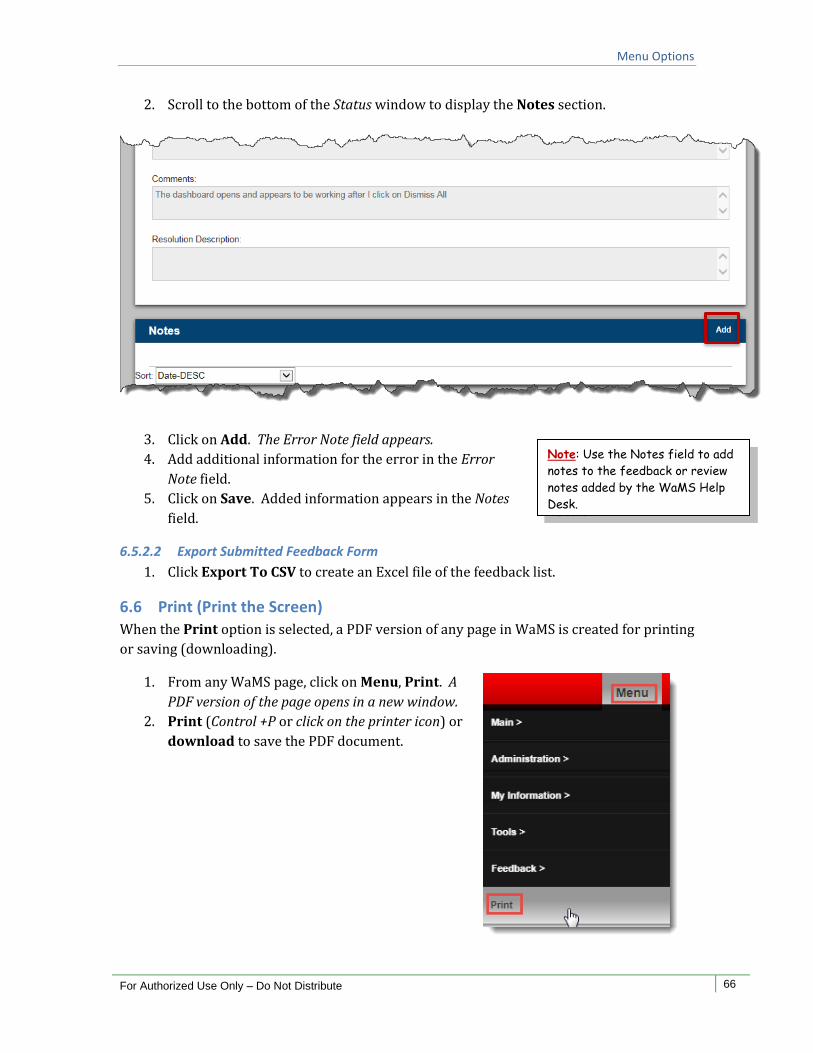
6.5 Feedback
Use the Feedback option to send feedback to the WaMS Help Desk. Create new feedback
and send to the WaMS Help Desk or view a list previously submitted.
6.5.1 Submit Feedback to WaMS Helpdesk
1. Click on Menu, Feedback, Create. The Error Form appears.
Note: Fudge Factor – How Units
entered are converted into MMIS
Units if their frequencies are not
the same.

Menu Options
For Authorized Use Only – Do Not Distribute 65
2. Complete the required fields:
Type of Concern: System Error, Question/Comment, Unknown
Severity: Normal, Urgent
Details: Free form comments field to address the concern
3. Add additional comments if necessary in the Comments field.
4. Click on Send.
6.5.2 View List of Previously Submitted Feedback
1. Click on Menu, Feedback, List.
2. Click the Status drop down arrow to select submissions that are Pending, In
Progress or Resolved.
3. If necessary, select the Severity (Normal or Urgent) and/or Waiver Type
(Community Living, Family and Individual Supports or Building Independence) to
narrow the search.
4. Click on Search. The submitted List appears.
To perform another search, click on Clear to remove the search results and repeat
steps 2 – 4 above.
6.5.2.1 Add a Note to the Submitted Feedback Form
1. From the List search results (by performing Steps 1-4 in Section 6.5.2 above), click
on View under Actions. The Status window opens.
Menu Options
For Authorized Use Only – Do Not Distribute 66
Note: Use the Notes field to add
notes to the feedback or review
notes added by the WaMS Help
Desk.
2. Scroll to the bottom of the Status window to display the Notes section.
3. Click on Add. The Error Note field appears.
4. Add additional information for the error in the Error
Note field.
5. Click on Save. Added information appears in the Notes
field.
6.5.2.2 Export Submitted Feedback Form
1. Click Export To CSV to create an Excel file of the feedback list.
6.6 Print (Print the Screen)
When the Print option is selected, a PDF version of any page in WaMS is created for printing
or saving (downloading).
1. From any WaMS page, click on Menu, Print. A
PDF version of the page opens in a new window.
2. Print (Control +P or click on the printer icon) or
download to save the PDF document.
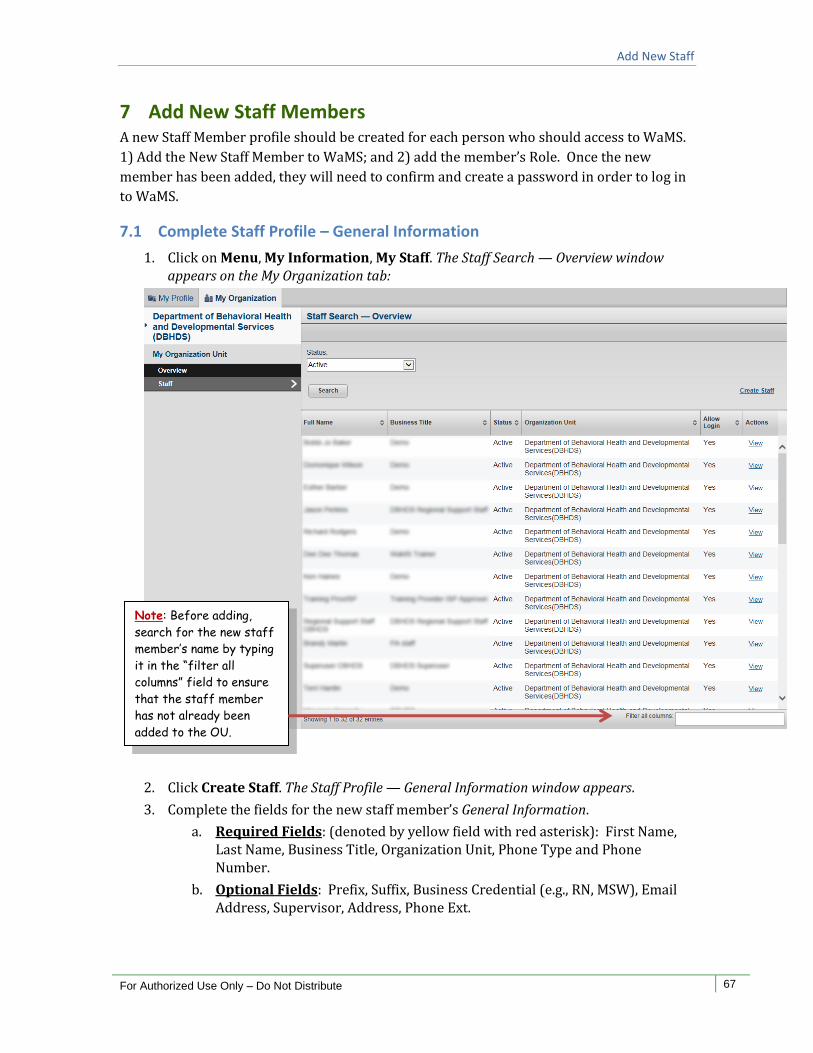
Add New Staff
For Authorized Use Only – Do Not Distribute 67
7 Add New Staff Members A new Staff Member profile should be created for each person who should access to WaMS.
1) Add the New Staff Member to WaMS; and 2) add the member’s Role. Once the new
member has been added, they will need to confirm and create a password in order to log in
to WaMS.
7.1 Complete Staff Profile – General Information
1. Click on Menu, My Information, My Staff. The Staff Search — Overview window appears on the My Organization tab:
2. Click Create Staff. The Staff Profile — General Information window appears.
3. Complete the fields for the new staff member’s General Information.
a. Required Fields: (denoted by yellow field with red asterisk): First Name, Last Name, Business Title, Organization Unit, Phone Type and Phone Number.
b. Optional Fields: Prefix, Suffix, Business Credential (e.g., RN, MSW), Email Address, Supervisor, Address, Phone Ext.
Note: Before adding,
search for the new staff
member’s name by typing
it in the “filter all
columns” field to ensure
that the staff member
has not already been
added to the OU.
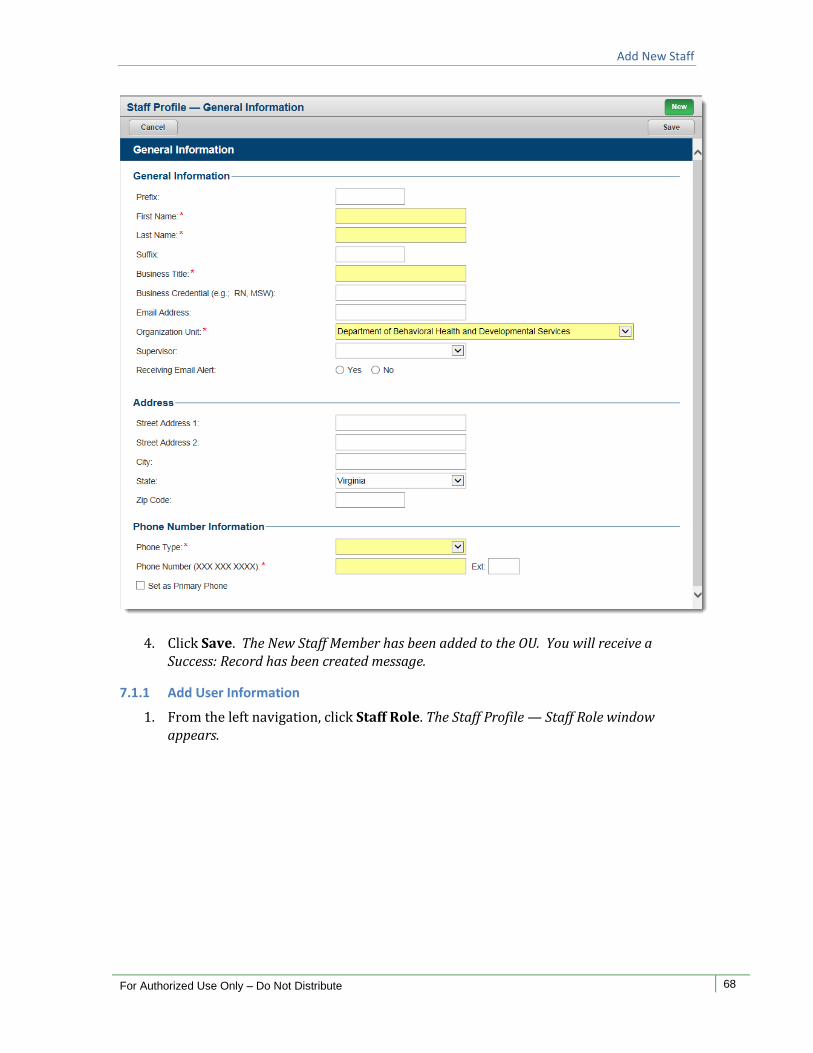
Add New Staff
For Authorized Use Only – Do Not Distribute 68
4. Click Save. The New Staff Member has been added to the OU. You will receive a Success: Record has been created message.
7.1.1 Add User Information
1. From the left navigation, click Staff Role. The Staff Profile — Staff Role window appears.
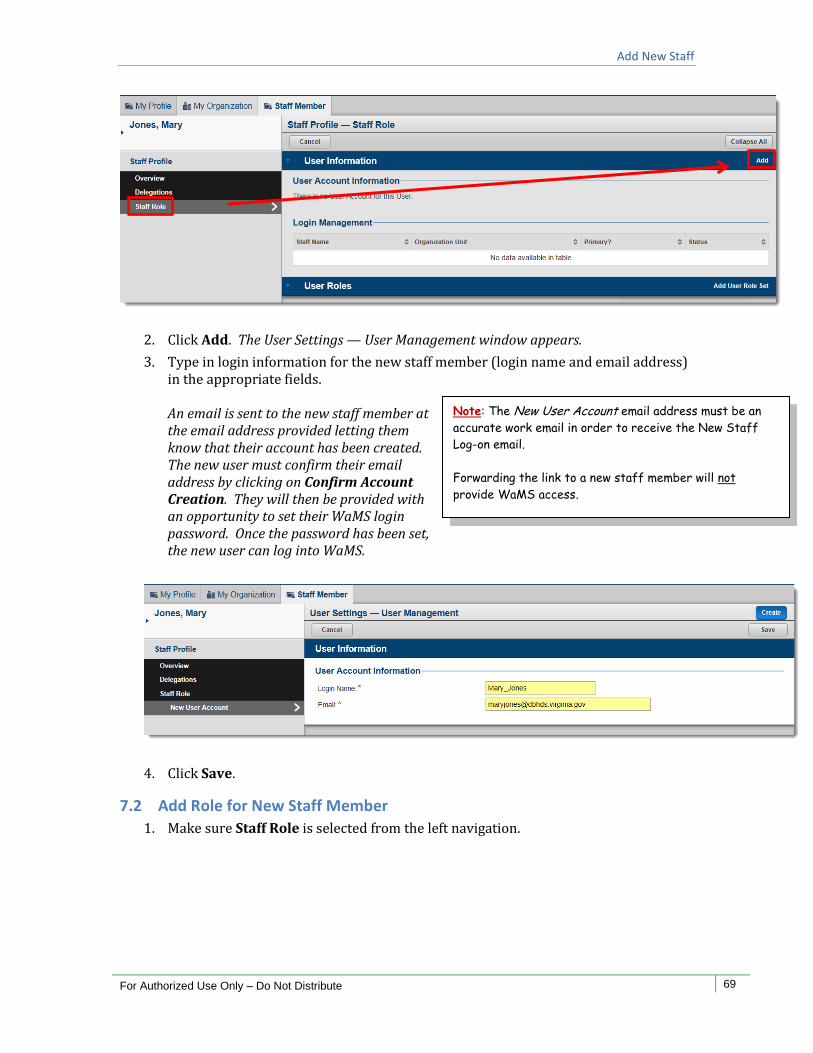
Add New Staff
For Authorized Use Only – Do Not Distribute 69
2. Click Add. The User Settings — User Management window appears.
3. Type in login information for the new staff member (login name and email address) in the appropriate fields. An email is sent to the new staff member at the email address provided letting them know that their account has been created. The new user must confirm their email address by clicking on Confirm Account Creation. They will then be provided with an opportunity to set their WaMS login password. Once the password has been set, the new user can log into WaMS.
4. Click Save.
7.2 Add Role for New Staff Member
1. Make sure Staff Role is selected from the left navigation.
Note: The New User Account email address must be an
accurate work email in order to receive the New Staff
Log-on email.
Forwarding the link to a new staff member will not
provide WaMS access.
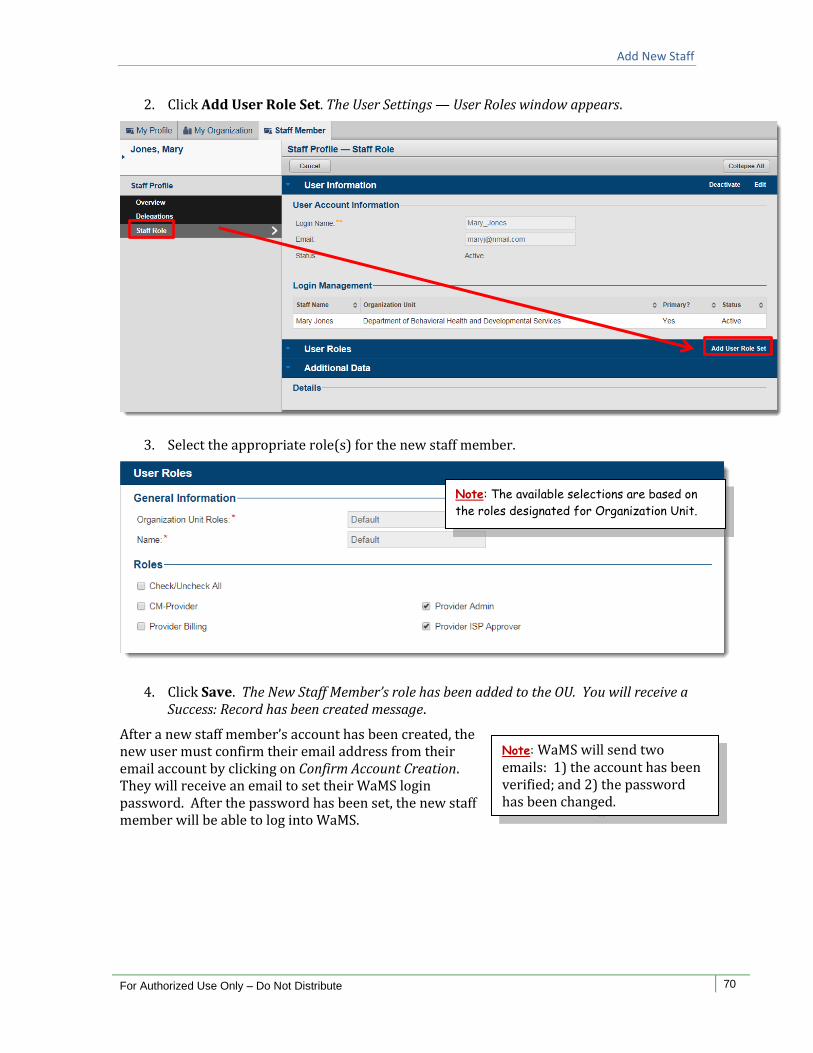
Add New Staff
For Authorized Use Only – Do Not Distribute 70
Note: WaMS will send two emails: 1) the account has been verified; and 2) the password has been changed.
2. Click Add User Role Set. The User Settings — User Roles window appears.
3. Select the appropriate role(s) for the new staff member.
4. Click Save. The New Staff Member’s role has been added to the OU. You will receive a Success: Record has been created message.
After a new staff member’s account has been created, the new user must confirm their email address from their email account by clicking on Confirm Account Creation. They will receive an email to set their WaMS login password. After the password has been set, the new staff member will be able to log into WaMS.
Note: The available selections are based on
the roles designated for Organization Unit.
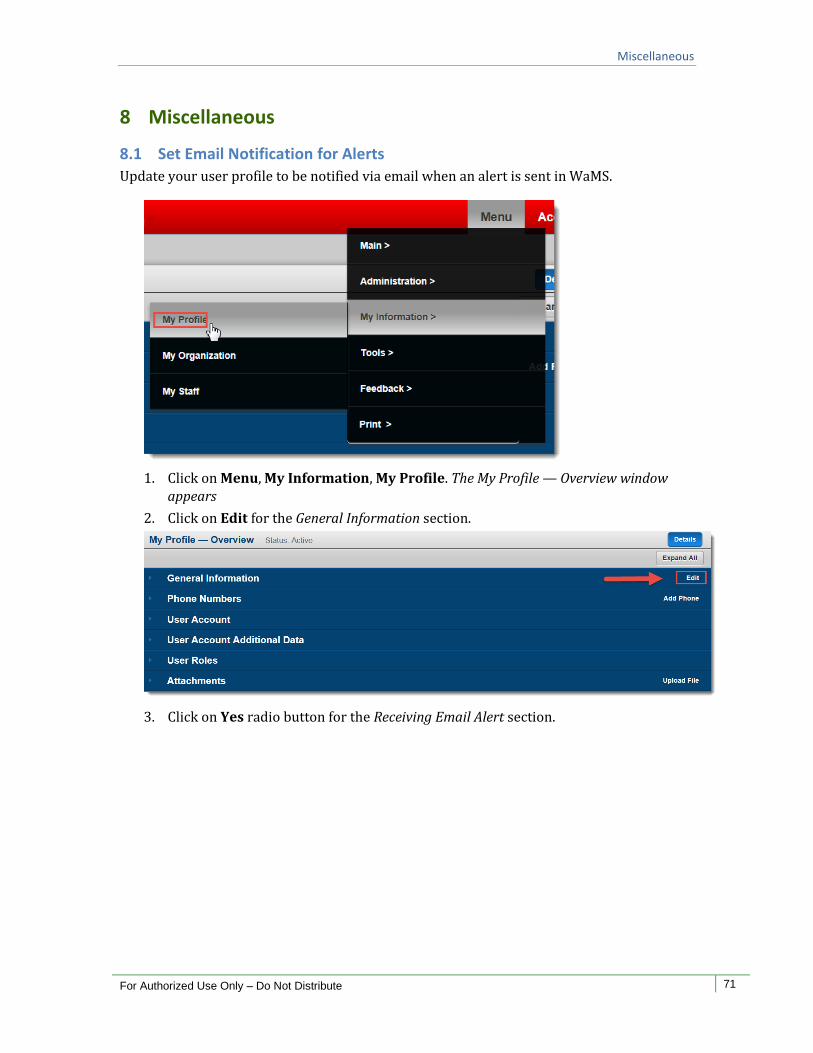
Miscellaneous
For Authorized Use Only – Do Not Distribute 71
8 Miscellaneous
8.1 Set Email Notification for Alerts
Update your user profile to be notified via email when an alert is sent in WaMS.
1. Click on Menu, My Information, My Profile. The My Profile — Overview window appears
2. Click on Edit for the General Information section.
3. Click on Yes radio button for the Receiving Email Alert section.
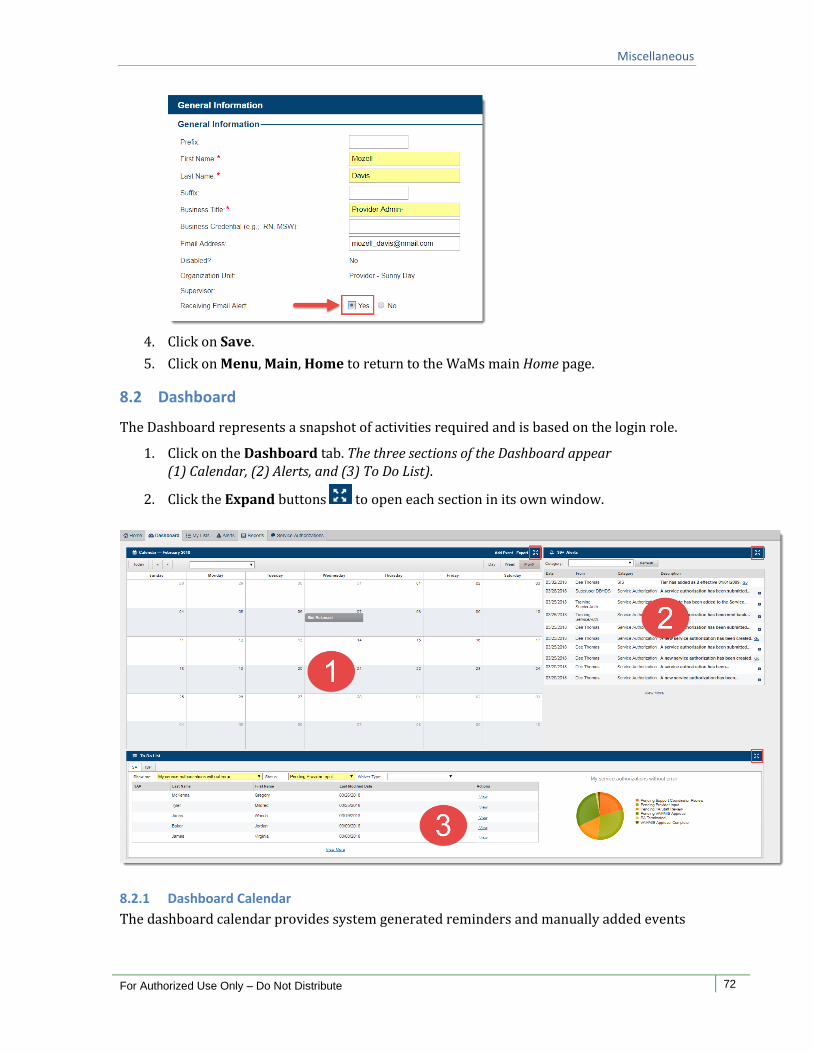
Miscellaneous
For Authorized Use Only – Do Not Distribute 72
4. Click on Save.
5. Click on Menu, Main, Home to return to the WaMs main Home page.
8.2 Dashboard
The Dashboard represents a snapshot of activities required and is based on the login role.
1. Click on the Dashboard tab. The three sections of the Dashboard appear (1) Calendar, (2) Alerts, and (3) To Do List).
2. Click the Expand buttons to open each section in its own window.
8.2.1 Dashboard Calendar
The dashboard calendar provides system generated reminders and manually added events
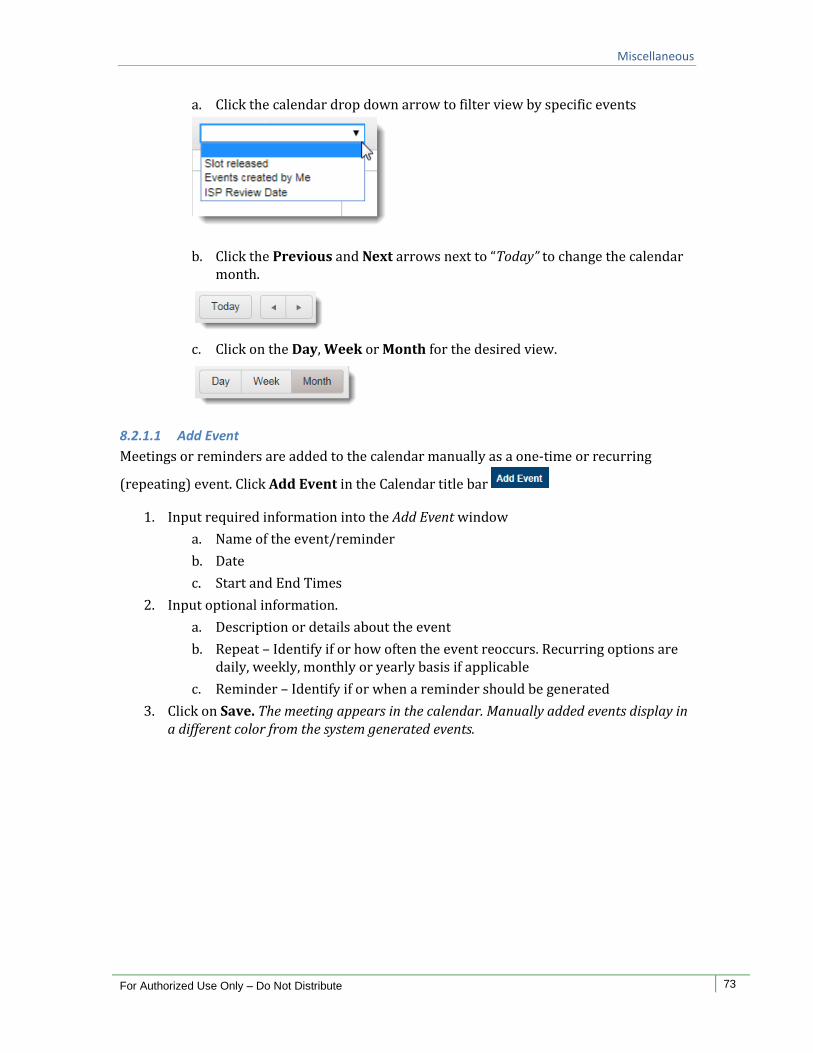
Miscellaneous
For Authorized Use Only – Do Not Distribute 73
a. Click the calendar drop down arrow to filter view by specific events
b. Click the Previous and Next arrows next to “Today” to change the calendar month.
c. Click on the Day, Week or Month for the desired view.
8.2.1.1 Add Event
Meetings or reminders are added to the calendar manually as a one-time or recurring
(repeating) event. Click Add Event in the Calendar title bar
1. Input required information into the Add Event window
a. Name of the event/reminder
b. Date
c. Start and End Times
2. Input optional information.
a. Description or details about the event
b. Repeat – Identify if or how often the event reoccurs. Recurring options are daily, weekly, monthly or yearly basis if applicable
c. Reminder – Identify if or when a reminder should be generated
3. Click on Save. The meeting appears in the calendar. Manually added events display in a different color from the system generated events.
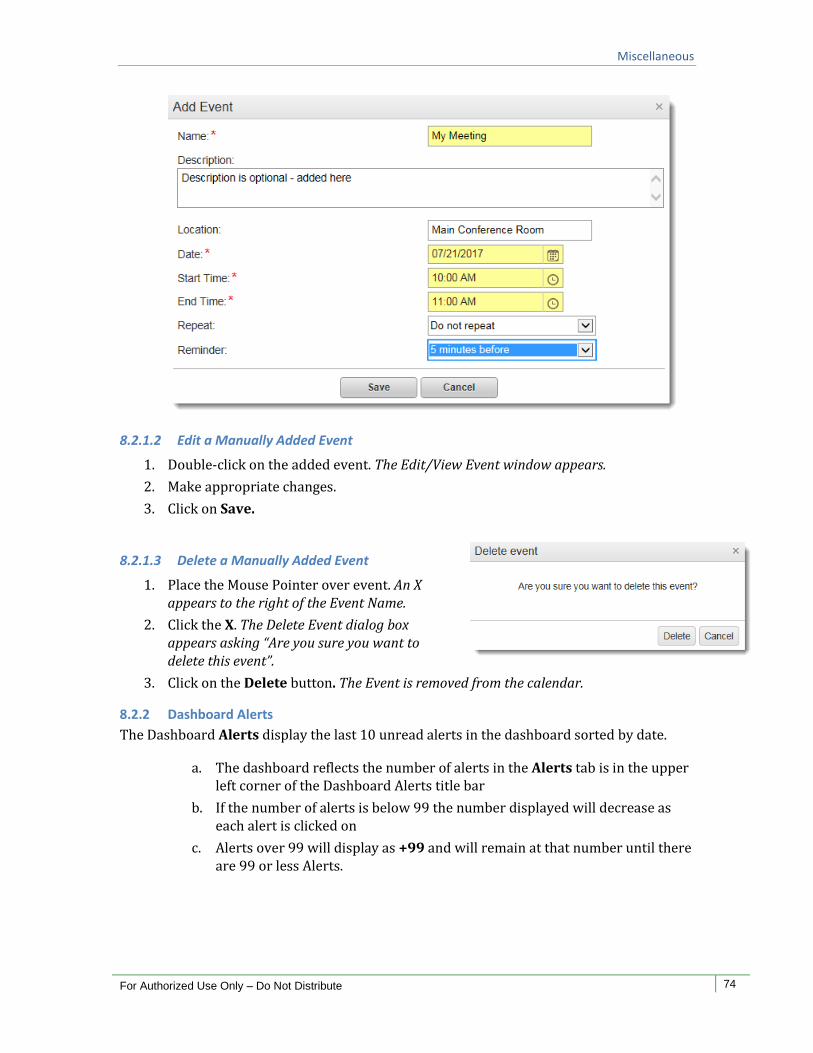
Miscellaneous
For Authorized Use Only – Do Not Distribute 74
8.2.1.2 Edit a Manually Added Event
1. Double-click on the added event. The Edit/View Event window appears.
2. Make appropriate changes.
3. Click on Save.
8.2.1.3 Delete a Manually Added Event
1. Place the Mouse Pointer over event. An X appears to the right of the Event Name.
2. Click the X. The Delete Event dialog box appears asking “Are you sure you want to delete this event”.
3. Click on the Delete button. The Event is removed from the calendar.
8.2.2 Dashboard Alerts
The Dashboard Alerts display the last 10 unread alerts in the dashboard sorted by date.
a. The dashboard reflects the number of alerts in the Alerts tab is in the upper left corner of the Dashboard Alerts title bar
b. If the number of alerts is below 99 the number displayed will decrease as each alert is clicked on
c. Alerts over 99 will display as +99 and will remain at that number until there are 99 or less Alerts.

Miscellaneous
For Authorized Use Only – Do Not Distribute 75
1. Click on the Category drop-down arrow to display a specific category (i.e., alerts related only to the Service Authorization)
2. Click on the category to be viewed.
3. Click the + in the description column to expand the alert and display the Go link.
4. Click on Go to go directly to the Individual’s record. The record will be opened in a new browser window.
8.2.2.1 Refresh Alerts
Easily remove viewed and acted upon Alerts from the Dashboard and see newly added Alerts
1. Click on the Refresh button. Acted on and viewed alerts will be removed from the list. Any new alerts will be added.
8.2.3 Dashboard To Do List
The To Do List provides a snapshot of the SA (Service Authorization) and ISP (Individual Support Plan). Each has a graphic that provides a visual of pending and completed actions.
8.2.3.1 SA (Service Authorization)
View the most recent Service Authorizations by status.
1. Click on the SA tab so it is the active tab (displays in white).
2. Click the Show Me down arrow to select
a. My Service Authorizations with error
b. My Service Authorizations without error
3. Click the Status down arrow to select the appropriate status to display:
a. Pending Provider input
b. Pending Support Coordinator review
c. Pending PA staff review
d. Pending VAMMIS approval
e. VAMMIS approval complete
f. Waiver Slot released
g. SA terminated
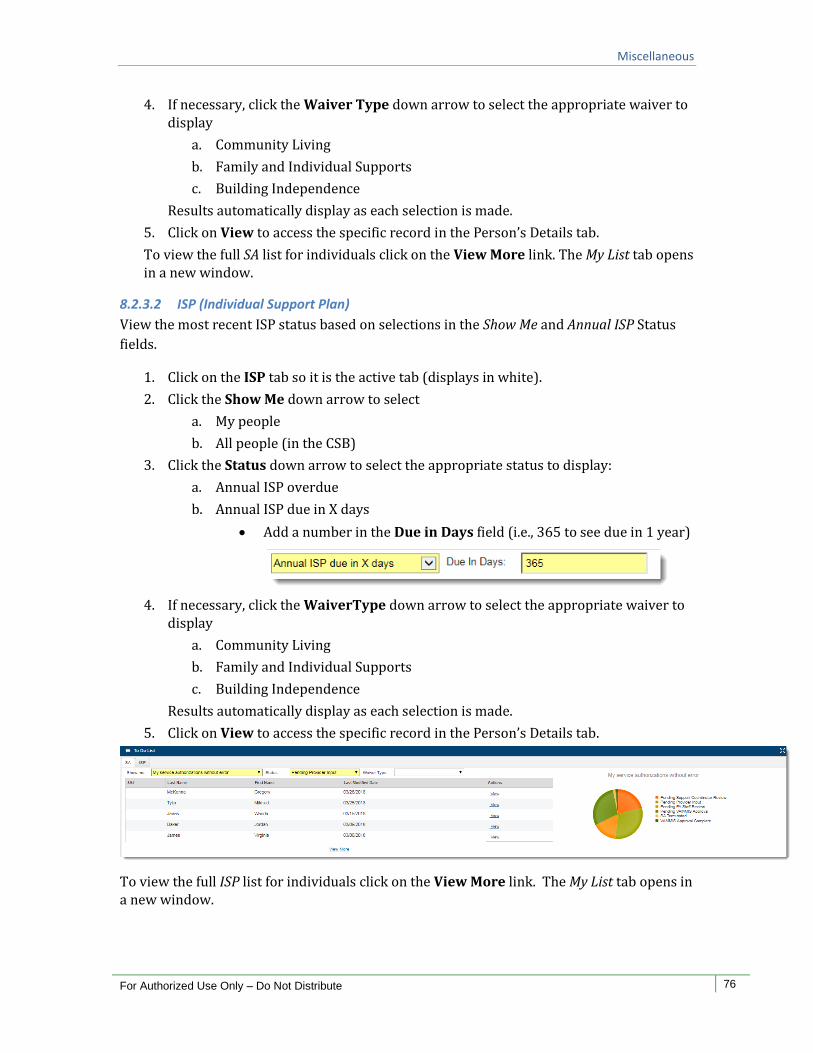
Miscellaneous
For Authorized Use Only – Do Not Distribute 76
4. If necessary, click the Waiver Type down arrow to select the appropriate waiver to display
a. Community Living
b. Family and Individual Supports
c. Building Independence
Results automatically display as each selection is made.
5. Click on View to access the specific record in the Person’s Details tab.
To view the full SA list for individuals click on the View More link. The My List tab opens in a new window.
8.2.3.2 ISP (Individual Support Plan)
View the most recent ISP status based on selections in the Show Me and Annual ISP Status
fields.
1. Click on the ISP tab so it is the active tab (displays in white).
2. Click the Show Me down arrow to select
a. My people
b. All people (in the CSB)
3. Click the Status down arrow to select the appropriate status to display:
a. Annual ISP overdue
b. Annual ISP due in X days
Add a number in the Due in Days field (i.e., 365 to see due in 1 year)
4. If necessary, click the WaiverType down arrow to select the appropriate waiver to display
a. Community Living
b. Family and Individual Supports
c. Building Independence
Results automatically display as each selection is made.
5. Click on View to access the specific record in the Person’s Details tab.
To view the full ISP list for individuals click on the View More link. The My List tab opens in a new window.
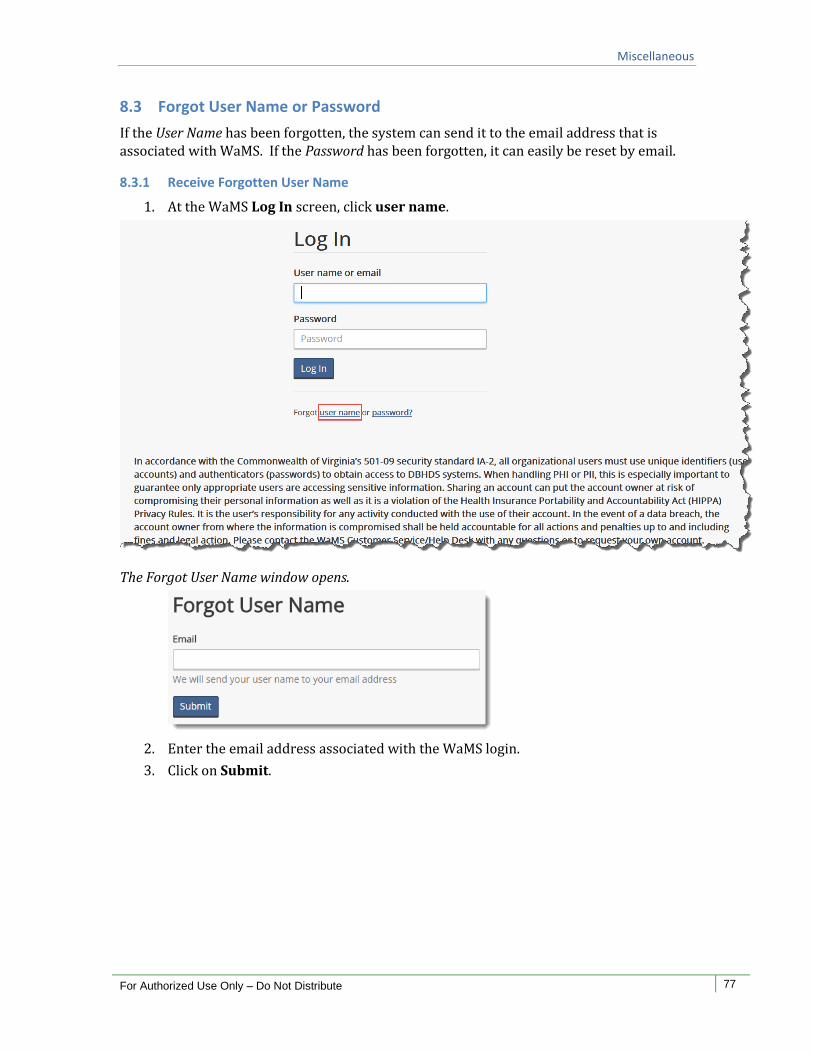
Miscellaneous
For Authorized Use Only – Do Not Distribute 77
8.3 Forgot User Name or Password
If the User Name has been forgotten, the system can send it to the email address that is associated with WaMS. If the Password has been forgotten, it can easily be reset by email.
8.3.1 Receive Forgotten User Name
1. At the WaMS Log In screen, click user name.
The Forgot User Name window opens.
2. Enter the email address associated with the WaMS login.
3. Click on Submit.
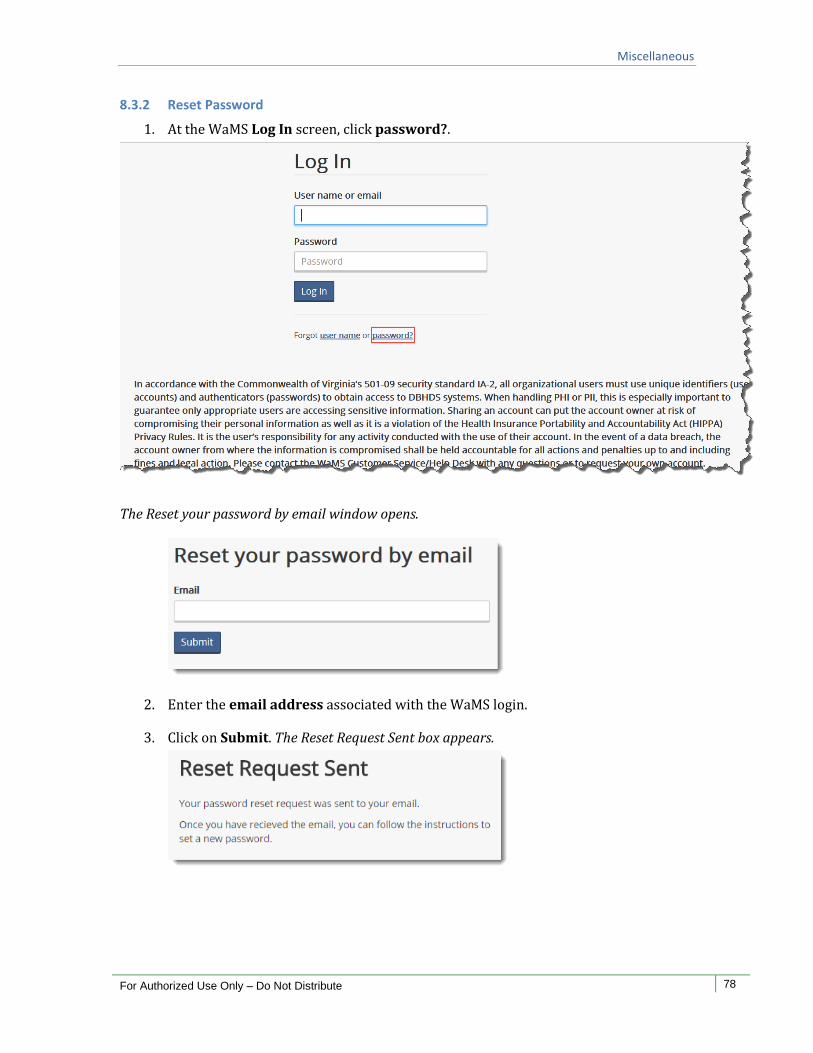
Miscellaneous
For Authorized Use Only – Do Not Distribute 78
8.3.2 Reset Password
1. At the WaMS Log In screen, click password?.
The Reset your password by email window opens.
2. Enter the email address associated with the WaMS login.
3. Click on Submit. The Reset Request Sent box appears.
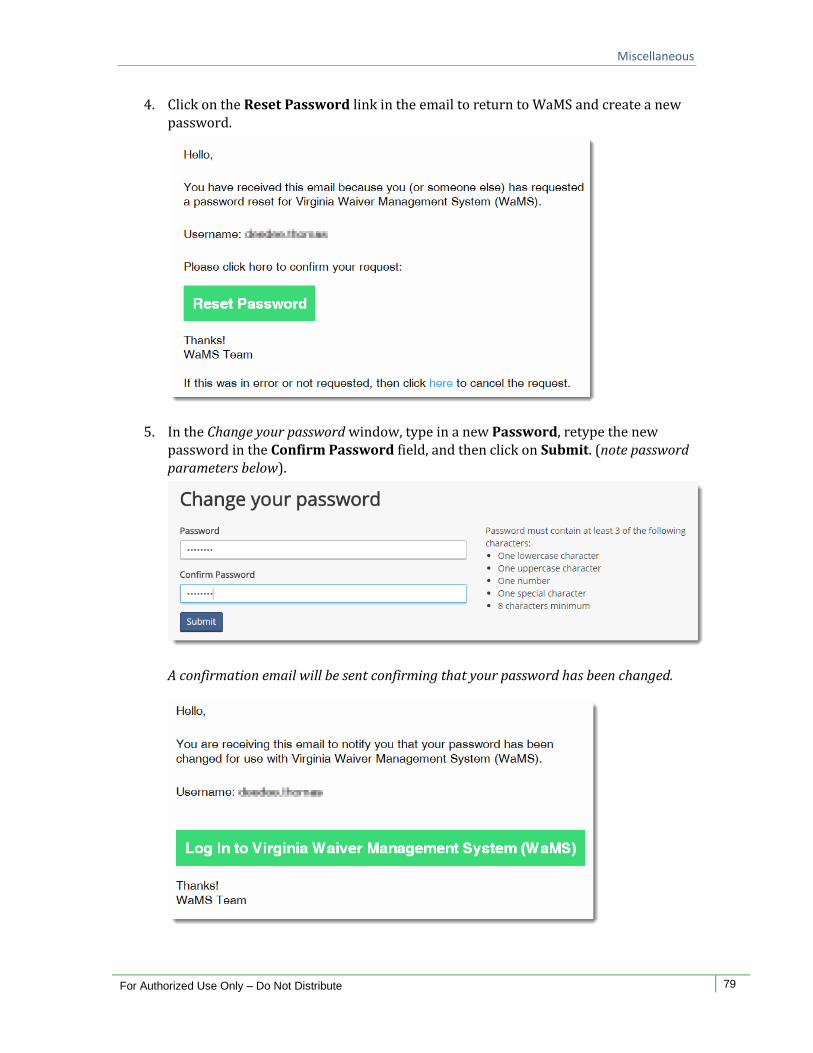
Miscellaneous
For Authorized Use Only – Do Not Distribute 79
4. Click on the Reset Password link in the email to return to WaMS and create a new password.
5. In the Change your password window, type in a new Password, retype the new password in the Confirm Password field, and then click on Submit. (note password parameters below).
A confirmation email will be sent confirming that your password has been changed.
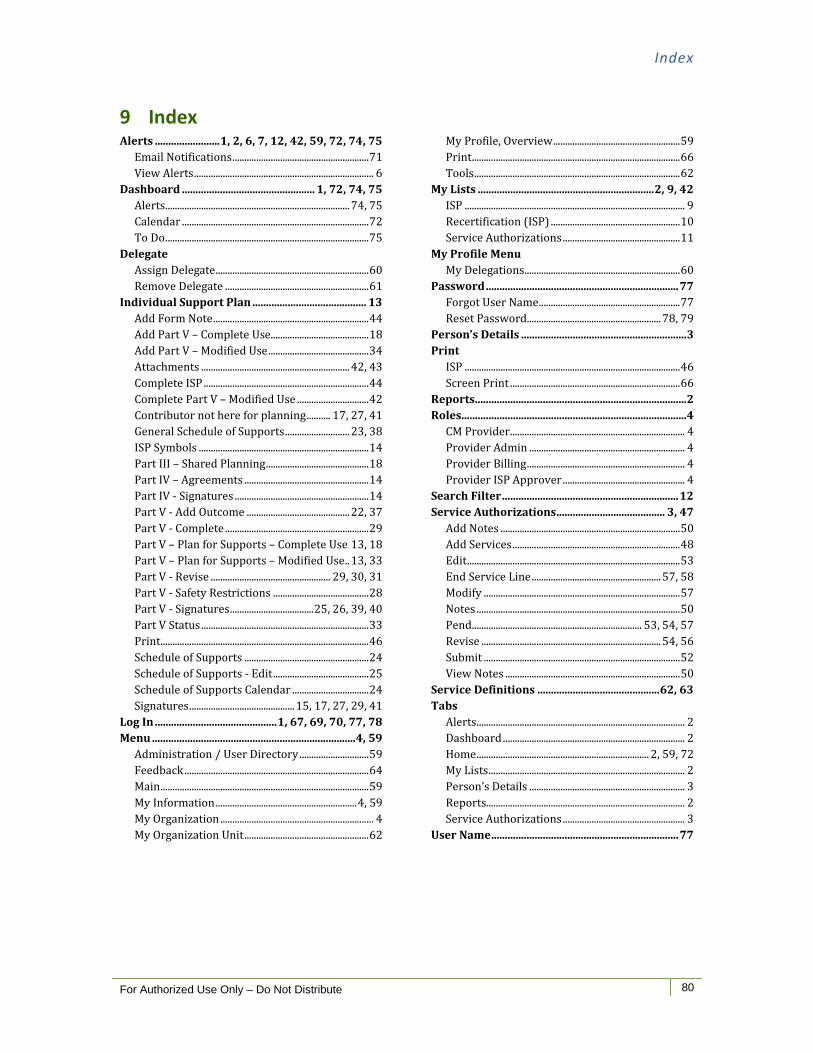
Index
For Authorized Use Only – Do Not Distribute 80
9 Index Alerts ........................ 1, 2, 6, 7, 12, 42, 59, 72, 74, 75
Email Notifications ......................................................... 71
View Alerts ........................................................................... 6
Dashboard ................................................. 1, 72, 74, 75
Alerts ............................................................................. 74, 75
Calendar .............................................................................. 72
To Do ..................................................................................... 75
Delegate
Assign Delegate ................................................................ 60
Remove Delegate ............................................................ 61
Individual Support Plan .......................................... 13
Add Form Note ................................................................. 44
Add Part V – Complete Use......................................... 18
Add Part V – Modified Use .......................................... 34
Attachments .............................................................. 42, 43
Complete ISP ..................................................................... 44
Complete Part V – Modified Use .............................. 42
Contributor not here for planning .......... 17, 27, 41
General Schedule of Supports ........................... 23, 38
ISP Symbols ....................................................................... 14
Part III – Shared Planning ........................................... 18
Part IV – Agreements .................................................... 14
Part IV - Signatures ........................................................ 14
Part V - Add Outcome ........................................... 22, 37
Part V - Complete ............................................................ 29
Part V – Plan for Supports – Complete Use 13, 18
Part V – Plan for Supports – Modified Use .. 13, 33
Part V - Revise .................................................. 29, 30, 31
Part V - Safety Restrictions ........................................ 28
Part V - Signatures ................................... 25, 26, 39, 40
Part V Status ...................................................................... 33
Print ....................................................................................... 46
Schedule of Supports .................................................... 24
Schedule of Supports - Edit ........................................ 25
Schedule of Supports Calendar ................................ 24
Signatures ............................................ 15, 17, 27, 29, 41
Log In ............................................. 1, 67, 69, 70, 77, 78
Menu ........................................................................... 4, 59
Administration / User Directory ............................. 59
Feedback ............................................................................. 64
Main ....................................................................................... 59
My Information ........................................................... 4, 59
My Organization ................................................................ 4
My Organization Unit .................................................... 62
My Profile, Overview ..................................................... 59
Print ....................................................................................... 66
Tools ...................................................................................... 62
My Lists ................................................................. 2, 9, 42
ISP ............................................................................................ 9
Recertification (ISP) ...................................................... 10
Service Authorizations ................................................. 11
My Profile Menu
My Delegations ................................................................. 60
Password ....................................................................... 77
Forgot User Name ........................................................... 77
Reset Password........................................................ 78, 79
Person’s Details ............................................................. 3
ISP .......................................................................................... 46
Screen Print ....................................................................... 66
Reports .............................................................................. 2
Roles................................................................................... 4
CM Provider ......................................................................... 4
Provider Admin ................................................................. 4
Provider Billing .................................................................. 4
Provider ISP Approver ................................................... 4
Search Filter ................................................................. 12
Service Authorizations ........................................ 3, 47
Add Notes ........................................................................... 50
Add Services ...................................................................... 48
Edit ......................................................................................... 53
End Service Line ...................................................... 57, 58
Modify .................................................................................. 57
Notes ..................................................................................... 50
Pend....................................................................... 53, 54, 57
Revise ........................................................................... 54, 56
Submit .................................................................................. 52
View Notes ......................................................................... 50
Service Definitions ............................................. 62, 63
Tabs
Alerts ....................................................................................... 2
Dashboard ............................................................................ 2
Home ........................................................................ 2, 59, 72
My Lists .................................................................................. 2
Person’s Details ................................................................. 3
Reports................................................................................... 2
Service Authorizations ................................................... 3
User Name ..................................................................... 77