1
Installation Instructions 1. Review your local building codes to ensure compliance. 2. Contact Diggers Hotline to mark buried objects before excavating begins. 3. Ensure all faucets, hoses, sprinklers, and downspouts are at least 10 feet from the well and are aimed away from the well at all times. 4. Excavate a hole that is at least 12” wider than the well in all directions. The hole should be at least 12” below the bottom edge of your window to allow for stone in the base of the well. Pack the base so the well is sitting on firm ground. Add more dirt as needed to ensure the proper overall well height. Preparations 5205 Freitag Drive, Menomonie, WI 54751 | Phone: 715-232-0495 Fax: 715-232-0580 3 Year Limited Warranty on Manufacturer’s Defects Only Shape Products, LLC warrants its White Well window well for a period of three (3) years from the original date of purchase. This warranty extends to the original purchaser. This warranty does not apply to damage from accident, misuse, normal wear, alteration, improper installation, improper maintenance, or abuse. At no time will Shape Products be responsible for any damage to property due to improper installation of this product. ANY IMPLIED WARRANTIES WHICH THE PURCHASER MAY HAVE ARE LIMITED IN DURATION TO THREE (3) YEARS FROM THE DATE OF PURCHASE. Some states do not allow limitations on how long an implied warranty lasts, so the above limitation may not imply to you. Shape Products, LLC will replace a defective window well free of charge (except for dealer labor and shipping costs). Contact Shape Products, LLC at the address listed below (or see your Shape Products dealer) to obtain service under this warranty. Proof of purchase is required and replacement is the sole remedy of the purchaser under this warranty, and in no event shall Shape Products, LLC be liable for any incidental or consequential damages, losses, or expenses. Some states do not allow the exclusion of incidental or consequential damage, so the above limitation or exclusion may not apply. This warranty gives specific legal rights and you may also have other rights which vary from state to state. You will mark the location of your first two mounting points. The top two points are approximately 52” to the center of each hole and 2 ½” below the top edge of the well. Using your window as a center point, measure and mark the top two mounting points. It is important to mount the well using the recommended dimensions to prevent adding stress to the well. This will also ensure a better fit for the cover. Using the correct anchors for your foundation type, such as a sleeve or wedge anchors, mount your well to the foundation at the two points you just marked. Be sure the entire flange of your well is tight to the foundation before you begin mounting, and during the mounting process. It is recommended that you use a 1” diameter washer between your foundation anchor and the flange of the well. Using hand tools only, backfill around your well in 6-8” layers. Pack each layer using non-mechanical means. Be sure any soil is free of frozen clods, organic matter, rocks, and other debris. To help facilitate drainage, it is suggested you backfill with a compactable fill sand. The area around the well should be backfilled approximately 3” below the upper rim of the well. It is important to ensure that the finished grade slopes away from the well in all directions. *NOTE: Heavy machinery must stay at LEAST 10 feet from the well installation site at all times. The mounting flange should extend beyond your window by a minimum of 3 inches on each side. The well should extend above the top of your window by at least 2 inches to allow for unrestricted use of your egress window. If your window frame protrudes out from the home, it is suggested you install the well above the frame to allow for a window well cover to be installed flush with the home. Installation WINDOWTop of area well should extend 3” above the grade line sloping away from the well Window at least 2 inches below top rim of well. 2” 12” Base of well should extend 12” below the window sill. 3” Gravel Base www.ShapeProducts.com Products White Well 3” 3” Area well should extend 3” beyond the window rough opening to mount to the foundation. 12” Base of well should extend 12” below the window sill. Products WHITE WLL**NOTE: Egress ladders are required for finished window well heights greater than 44”. Ladder rungs must be at least 12” wide with a 3” projection from the wall not to exceed 6“ from back wall, distance between rungs can not exceed 18”.

W White Well

  • Upload
    others

  • View
    1

  • Download
    0

Embed Size (px)

Citation preview

Installation Instructions

1. Review your local building codes to ensure compliance.2. Contact Diggers Hotline to mark buried objects before excavating begins.3. Ensure all faucets, hoses, sprinklers, and downspouts are at least 10 feet from the well and are aimed away from the well at all times. 4. Excavate a hole that is at least 12” wider than the well in all directions. The hole should be at least 12” below the bottom edge of your window to allow for stone in the base of the well. Pack the base so the well is sitting on �rm ground. Add more dirt as needed to ensure the proper overall well height.

Preparations

5205 Freitag Drive, Menomonie, WI 54751 | Phone: 715-232-0495 Fax: 715-232-0580

3 Year Limited Warranty on Manufacturer’s Defects OnlyShape Products, LLC warrants its White Well window well for a period of three (3) years from the original date of purchase. This warranty extends to the original purchaser. This warranty does not apply to damage from accident, misuse, normal wear, alteration, improper installation, improper maintenance, or abuse. At no time will Shape Products be responsible for any damage to property due to improper installation of this product. ANY IMPLIED WARRANTIES WHICH THE PURCHASER MAY HAVE ARE LIMITED IN DURATION TO THREE (3) YEARS FROM THE DATE OF PURCHASE. Some states do not allow limitations on how long an implied warranty lasts, so the above limitation may not imply to you. Shape Products, LLC will replace a defective window well free of charge (except for dealer labor and shipping costs). Contact Shape Products, LLC at the address listed below (or see your Shape Products dealer) to obtain service under this warranty. Proof of purchase is required and replacement is the sole remedy of the purchaser under this warranty, and in no event shall Shape Products, LLC be liable for any incidental or consequential damages, losses, or expenses. Some states do not allow the exclusion of incidental or consequential damage, so the above limitation or exclusion may not apply. This warranty gives speci�c legal rights and you may also have other rights which vary from state to state.

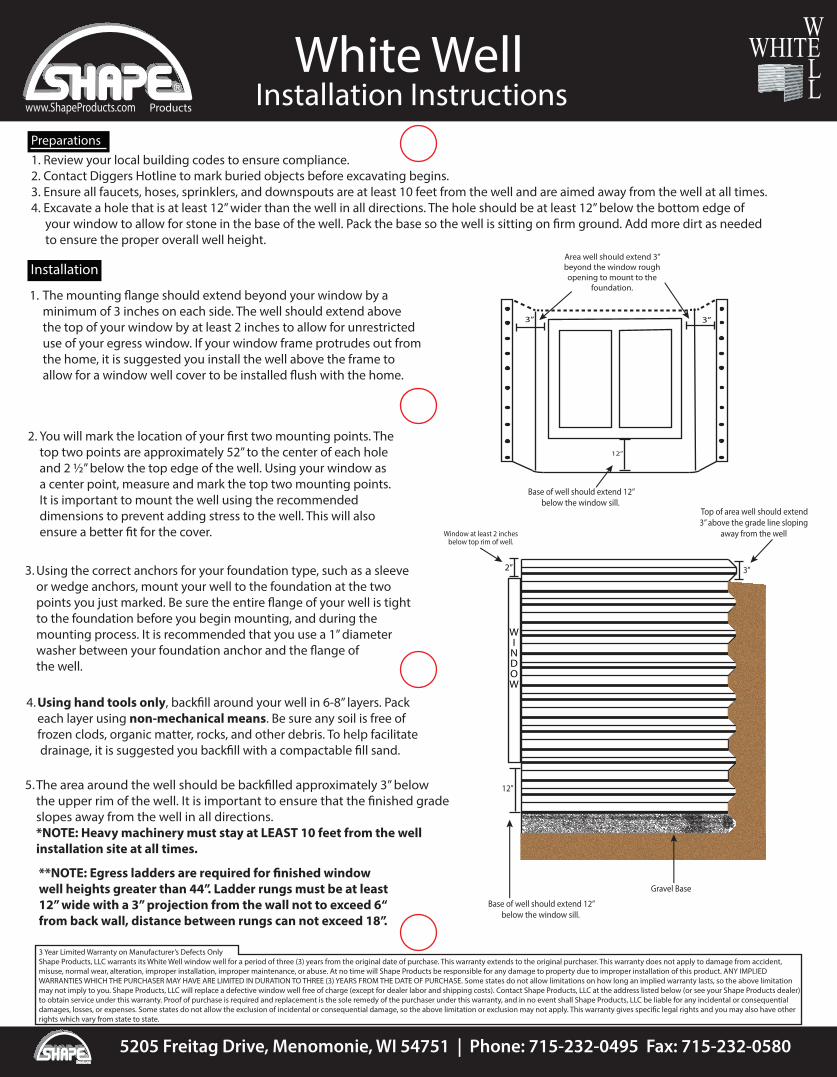
You will mark the location of your �rst two mounting points. The top two points are approximately 52” to the center of each hole and 2 ½” below the top edge of the well. Using your window as a center point, measure and mark the top two mounting points. It is important to mount the well using the recommended dimensions to prevent adding stress to the well. This will alsoensure a better �t for the cover.

Using the correct anchors for your foundation type, such as a sleeve or wedge anchors, mount your well to the foundation at the two points you just marked. Be sure the entire �ange of your well is tightto the foundation before you begin mounting, and during the mounting process. It is recommended that you use a 1” diameter washer between your foundation anchor and the �ange ofthe well.

Using hand tools only, back�ll around your well in 6-8” layers. Packeach layer using non-mechanical means. Be sure any soil is free of frozen clods, organic matter, rocks, and other debris. To help facilitate drainage, it is suggested you back�ll with a compactable �ll sand.

The area around the well should be back�lled approximately 3” below the upper rim of the well. It is important to ensure that the �nished grade slopes away from the well in all directions.*NOTE: Heavy machinery must stay at LEAST 10 feet from the well installation site at all times.

The mounting �ange should extend beyond your window by a minimum of 3 inches on each side. The well should extend above the top of your window by at least 2 inches to allow for unrestricted use of your egress window. If your window frame protrudes out fromthe home, it is suggested you install the well above the frame to allow for a window well cover to be installed �ush with the home.

Installation

WINDOW

Top of area well should extend 3” above the grade line sloping

away from the wellWindow at least 2 inches below top rim of well.

2”

12”

Base of well should extend 12” below the window sill.

3”

Gravel Base

www.ShapeProducts.com Products

White Well

3” 3”

Area well should extend 3” beyond the window rough opening to mount to the

foundation.

12”

Base of well should extend 12” below the window sill.

Products

WHITEW

LL

**NOTE: Egress ladders are required for �nished window well heights greater than 44”. Ladder rungs must be at least 12” wide with a 3” projection from the wall not to exceed 6“ from back wall, distance between rungs can not exceed 18”.