Embed Size (px)
Citation preview
Visual Art – 7th grade Southeast Middle School – Ms. Catherine Beltran
REVIEW: Islamic Art History Day 11
ASSIGNMENT: SPEND THIS DAY REVIEWING THE ARTICLE AND COMPLETING THE WORK ASSIGNED ON DAY 1 (SEE BELOW). PLEASE DRAW IN THE MICROSOFT PHOTO EDITOR (READ MORE IN LESSON PLAN BELOW) OR DRAW ON PAPER (TAKE A PHOTO) AND EMAIL ME YOUR WORK: [email protected] Note – there is a tutorial at the end of this document showing how to draw on the computer!
Standards
VA.C IM.6.1 I can examine characteristic s among artistic styles, periods or cultures and describe how cultures influence each other.
Learning Targets
I can identify characteristics that distinguish Early Islamic art.
I can use a grid system to recreate a line drawing.
Essential Question(s)
1. What defines Early Islamic art?
Resources Handouts – 2 pages for Early Islamic art: first page includes article and questions, second page includes grid drawing
Learning Activities or Experiences
1. Read the brief article about Early Islamic art. 2. Answer the question at the bottom of page 1. 3. On page 2, recreate the line drawing of the Islamic tile designs using the grid drawing system we learned about earlier
in the year.
NOTE: Students completing the work using a computer should type the answers into a Word document labeled “7th Day 1 – YOUR NAME” (please don’t type the words “your name” – you need to insert your first and last name into the title of the document). For the drawing, you may either complete it on notebook/copy paper to turn in when you return, OR you may use the file named “Grid Page.” Open the image and add your drawing right over top using the “Draw” tools under the “Edit & Create” tab. Save the drawing under the same name as your Word document (Create your drawing, then hit the small disk icon to save a copy. Once it saves, hit the . . . icon on the top right and click “Save As” to save the file under the name “7th Day 1 – YOUR NAME”).

EARLY ISLAMIC ART HISTORY Name____________________________________ Period_____
Directions: You will be taking a trip through Early Islamic Art. You will need to read the description
and answer the questions. After, there will be an art assignment where you will need to copy the
image onto the grid into the correct box locations.
Early Islamic Art
The religion of Islam was established in Medina (Saudia Arabia) by the prophet Muhammad in 622CE.
Through the seventh century, the faith spread to Asia, Africa, and Europe. Various artistic influences,
from early Persian to Christian art, merged to create a distinct Islamic artistic style.
Beautiful Patterns
Magaficent mosaics were created to decorate mosques and other religious buildings. Islamic art is
different from most Western and Asian art, as it rarely shows people or other living creatures.
Instead, it often features calligraphy and geometric or floral patterns.
Major Development
Great advances in art, architectures, science, medicine, mathematics, and astronomy were made in
the area where the Islamic faith was first practice, from North America in the west to the Persian Gulf
in the east. Art was often religious, but non-religious art, such as enameled glass and patterned
carpets, was also highly valued in Islamic socities.
Early Mosque
The Dome of the rock is a mosque on Temple Mount in Jeruselum. It was complete in 691CE. Ornate
and glittering, it is embellished with brightly colored mosiac tiles in intricate repeating patterns.
Mosques such as this were decorated to encourage worshippers to think about life and the greatness
of creation.
Write Down 5 facts you learned from Early Islamic Art (Please use complete sentences):
1._______________________________________________________________________________
2._______________________________________________________________________________
3._______________________________________________________________________________
4._______________________________________________________________________________
5._______________________________________________________________________________

Early Islamic Tile Designs-Copy the pattern onto the grid

Visual Art – 7th grade Southeast Middle School – Ms. Catherine Beltran
REVIEW: Pre-Columbian Art History Day 12
ASSIGNMENT: SPEND THIS DAY REVIEWING THE ARTICLE AND COMPLETING THE WORK ASSIGNED ON DAY 2 (SEE BELOW). PLEASE DRAW IN THE MICROSOFT PHOTO EDITOR (READ MORE IN LESSON PLAN BELOW) OR DRAW ON PAPER (TAKE A PHOTO) AND EMAIL ME YOUR WORK: [email protected] Note – there is a tutorial at the end of this document showing how to draw on the computer!
Standards
VA.C IM.6.1 I can examine characteristic s among artistic styles, periods or cultures and describe how cultures influence each other.
Learning Targets
I can identify characteristics that distinguish Pre-Columbian art.
I can design a work of art in the style of Aztec Sun Medallions.
Essential Question(s)
1. What defines Pre-Columbian art?
Resources Handouts – 2 pages for Pre-Columbian art: first page includes article and questions, second page includes grid drawing
Learning Activities or Experiences
1. Read the brief article about Pre-Columbian art. 2. Answer the question at the bottom of page 1. 3. On page 2, design an Aztec Sun God Medallion with a face in the central circle and patterns in the circle layers
NOTE: Students completing the work using a computer should type the answers into a Word document labeled “7th Day 2 – YOUR NAME” (please don’t type the words “your name” – you need to insert your first and last name into the title of the document). For the drawing, you may either complete it on notebook/copy paper to turn in when you return, OR you may use the file named “7th grade Day 2 Medallion.” Open the image and add your drawing right over top using the “Draw” tools under the “Edit & Create” tab. Save the drawing under the same name as your Word document (Create your drawing, then hit the small disk icon to save a copy. Once it saves, hit the . . . icon on the top right and click “Save As” to save the file under the name “7th Day 2 – YOUR NAME”).
ANCIENT PRE-COLUMBIAN ART HISTORY Name_____________________________ Period_____
Directions: You will be taking a trip through Ancient Pre-Columbian Art. You will need to read the
description and answer the questions. After, there will be an art assignment where you will need to
create your own Aztec Sun God Medallion.
Ancient Pre-Columbian Art
The art, architecture, and crafts made by the native people of North, Central, South America, and the
Caribbean island during 13,000BCE-1500CE is called Pre-Columbian Art. This is before Christopher
Columbus sailed to the Americas. Mesoamerica (Central America) is where the Mayan, Aztec, Incan,
Toltec, and Olmecs lived.
Pre-classic
This era was dominated by the Olmec civilization, which flourished about 1200-400 BCE. The Olmecs
created jade figurines, and carved colossal heads up to 8 feet high. The Central American tradition of
constructing huge ceremonial complexes began with the Olmecs.
Classic
This period was dominated by the Mayan in 200-900CE. Mayans lived in large, agricultural
settlements, practicing their own type of hieroglyphic writing as well as advanced astronomy. Mayan
art is mainly characterized by petroglyphs, a variety of rock art, some stone sculpture and wood-
carving, as well as mural paintings.
Post-classic
This period was between 900-1300CE It was dominated first by the Toltec civilization from the
western region who carved massive, block-like sculptures like those used as free-standing columns at
Tula, Mexico. The Aztec culture of central and southern Mexico produced a variety of visual art,
including: brightly colored fresco painting, masks, ceremonial costumes, bracelets and necklaces, as
well as a range of clay, stone and wood sculpture. Aztec mosaic art was frequently used to decorate
masks as well as architecture.
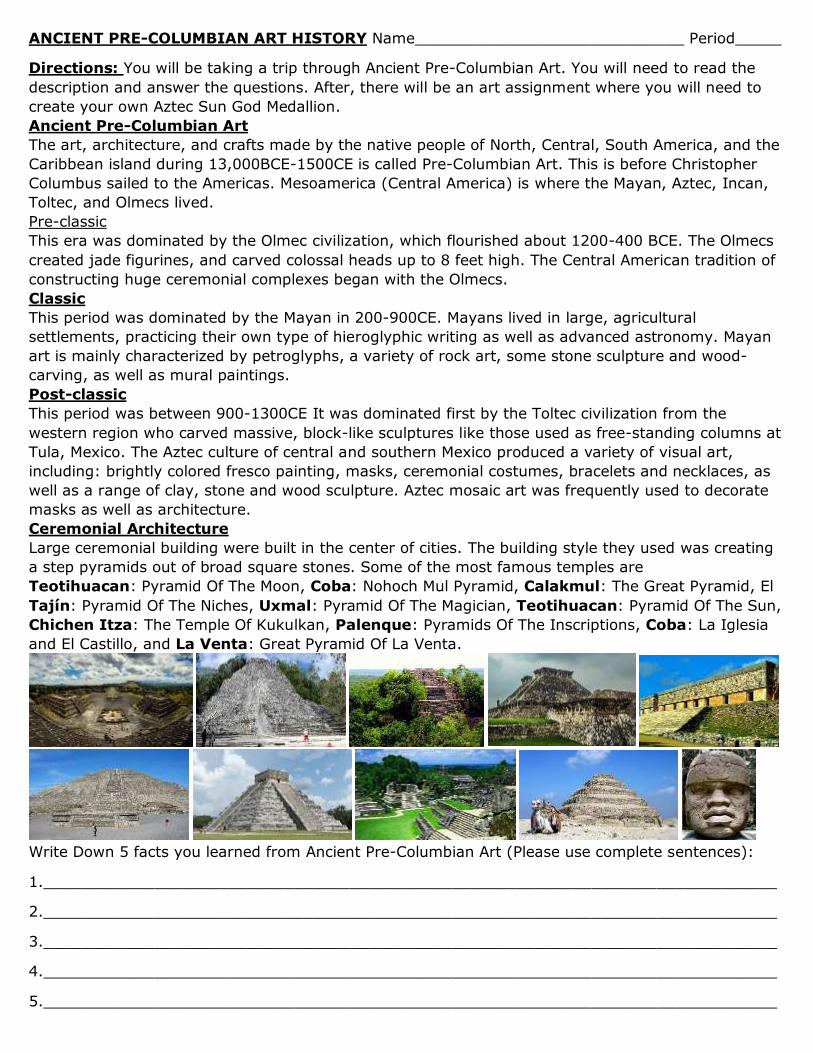
Ceremonial Architecture
Large ceremonial building were built in the center of cities. The building style they used was creating
a step pyramids out of broad square stones. Some of the most famous temples are
Teotihuacan: Pyramid Of The Moon, Coba: Nohoch Mul Pyramid, Calakmul: The Great Pyramid, El
Tajín: Pyramid Of The Niches, Uxmal: Pyramid Of The Magician, Teotihuacan: Pyramid Of The Sun,
Chichen Itza: The Temple Of Kukulkan, Palenque: Pyramids Of The Inscriptions, Coba: La Iglesia
and El Castillo, and La Venta: Great Pyramid Of La Venta.
Write Down 5 facts you learned from Ancient Pre-Columbian Art (Please use complete sentences):
1._______________________________________________________________________________
2._______________________________________________________________________________
3._______________________________________________________________________________
4._______________________________________________________________________________
5._______________________________________________________________________________
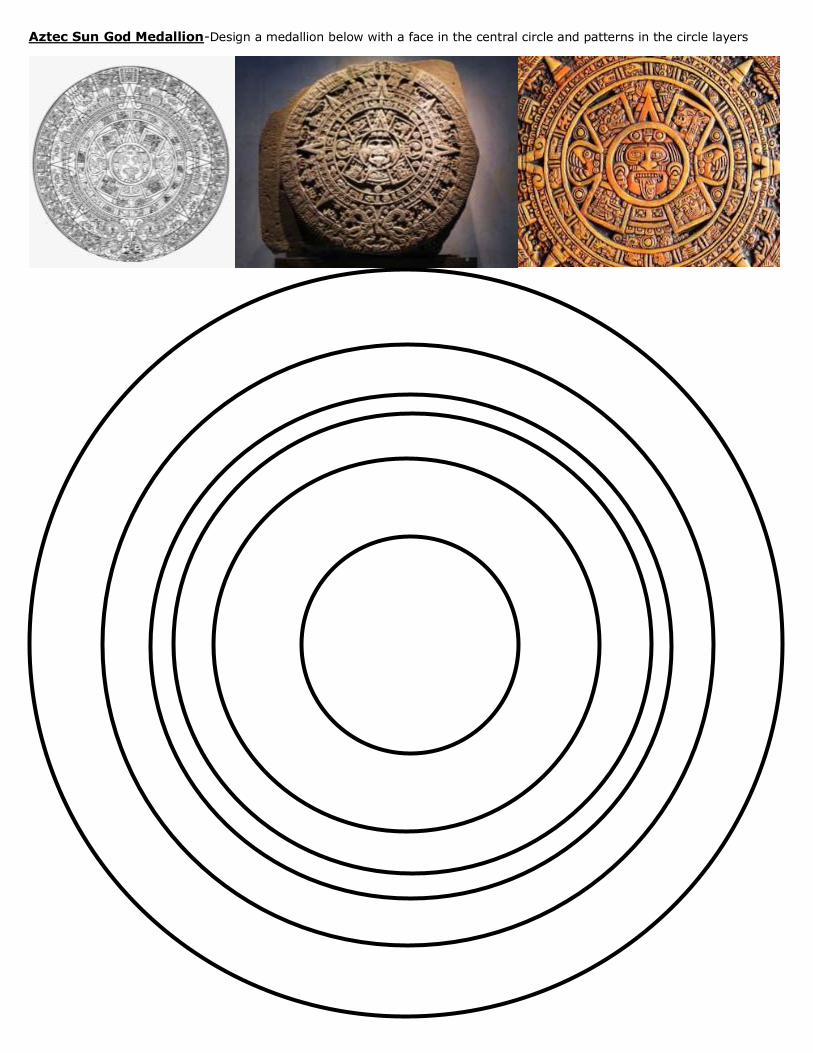
Aztec Sun God Medallion-Design a medallion below with a face in the central circle and patterns in the circle layers

Visual Art – 7th grade Southeast Middle School – Ms. Catherine Beltran
REVIEW: Medieval Art History Day 13
ASSIGNMENT: SPEND THIS DAY REVIEWING THE ARTICLE AND COMPLETING THE WORK ASSIGNED ON DAY 3 (SEE BELOW). PLEASE DRAW IN THE MICROSOFT PHOTO EDITOR (READ MORE IN LESSON PLAN BELOW) OR DRAW ON PAPER (TAKE A PHOTO) AND EMAIL ME YOUR WORK: [email protected] Note – there is a tutorial at the end of this document showing how to draw on the computer!
Standards
VA.C IM.6.1 I can examine characteristic s among artistic styles, periods or cultures and describe how cultures influence each other.
Learning Targets
I can identify characteristics that distinguish Medieval art.
I can recreate a design without tracing.
Essential Question(s)
1. What defines Medieval art?
Resources Handouts – 2 pages for Medieval art: first page includes article and questions, second page includes 3 knot examples and space to recreate the knot designs.
Learning Activities or Experiences
1. Read the brief article about Medieval art. 2. Answer the question at the bottom of page 1. 3. On page 2, recreate all of the Viking Celtic knot designs in the rectangles below each design (3 designs).
NOTE: Students completing the work using a computer should type the answers into a Word document labeled “7th Day 3 – YOUR NAME” (please don’t type the words “your name” – you need to insert your first and last name into the title of the document). For the drawing, you may either complete it on notebook/copy paper to turn in when you return, OR use Paint on your computer to create the designs and submit electronically (name the Paint file the same as your Word file).
MEDIEVAL ART ERA HISTORY Name_______________________________________ Period_____
Directions: You will be taking a trip through Medieval Art. You will need to read the description and
answer the questions. After, there will be an art assignment where you will need to copy the Celtic
knot into the box into and create your own gothic window design.
Medieval Art Era
The medieval period of art history spans from the fall of the Roman Empire in 300 CE to the beginning
of the Renaissance in 1400 CE. This era has many artistic styles. These include Christian, Byzantine,
Viking, Gothic, and many more. Early medieval art shared some specific characteristic. These art
piece included iconography, Christian subject matter, elaborate patterns and decoration, bright colors,
the use of precious metals, gems, and other luxurious materials, stylized figures, and social status.
Christian
Christianity grew from a small sect into a popular religion during the three centuries after the death of
Jesus. At first, the Romans banned the religion, so Christians met secretly in tunnels and tombs below
ground, known as the catacombs. On the tomb walls, they painted scenes from the bible. Later, it
became the official religion of the Roman Empire, and Christian Art flourished in the open.
Byzantine
Byzantine artistic styles spread across Europe, from Spain in the west to Russia in the east.
Illuminated manuscripts of holy texts were made, but most churchgoers were illiterate, so large
frescoes and mosaics were created for the new churches to inform people about the bible through art.
Viking
Viking Age almost exclusively made applied art in 790 CE-1100 CE. These are everyday objects that
were jazzed up to make them more pleasing to look at. The painted art would often be made to
depict Norse (Viking) mythology. Vikings loved elaborate decorations and they decorated many of the
things they used: weapons, jewelry, ruin stones, ship woodwork and even their common, everyday
items.
Gothic
From the 12th century, great churches and cathedrals were built across Europe. Artists decorated then
with brightly colored paintings, often featuring slightly elongated, elegant figures and intricate details.
Lavish illustrations for illuminated manuscripts were also made.
Write Down 5 facts you learned from Medevial Art (Please use complete sentences):
1._______________________________________________________________________________
2._______________________________________________________________________________
3._______________________________________________________________________________
4._______________________________________________________________________________
5._______________________________________________________________________________

Viking Celtic Knot Design-Try coping the pattern in the box below

Visual Art – 7th grade Southeast Middle School – Ms. Catherine Beltran
REVIEW: African Art History Day 14
ASSIGNMENT: SPEND THIS DAY REVIEWING THE ARTICLE AND COMPLETING THE WORK ASSIGNED ON DAY 4 (SEE BELOW). PLEASE DRAW IN THE MICROSOFT PHOTO EDITOR (READ MORE IN LESSON PLAN BELOW) OR DRAW ON PAPER (TAKE A PHOTO) AND EMAIL ME YOUR WORK: [email protected] Note – there is a tutorial at the end of this document showing how to draw on the computer!
Standards
VA.C IM.6.1 I can examine characteristic s among artistic styles, periods or cultures and describe how cultures influence each other.
Learning Targets
I can identify characteristics that distinguish African art.
I can design a work of art in the style of traditional African masks.
Essential Question(s)
1. What defines African art?
Resources Handouts – 3 pages for African art: first page includes article and questions, second page includes grid drawing
Learning Activities or Experiences
1. Read the brief article about African art. 2. Answer the question at the bottom of page 1. 3. Using the images of masks on page 2 as inspiration, use page 3 to draw an African mask that utilizes a line of
symmetry, meaning the left side and the right side look the same.
NOTE: Students completing the work using a computer should type the answers into a Word document labeled “7th Day 4 – YOUR NAME” (please don’t type the words “your name” – you need to insert your first and last name into the title of the document). For the drawing, you may either complete it on notebook/copy paper to turn in when you return, OR you may use the file named “7th grade Day 4 Mask.” Open the image and add your drawing right over top using the “Draw” tools under the “Edit & Create” tab. Save the drawing under the same name as your Word document (Create your drawing, then hit the small disk icon to save a copy. Once it saves, hit the . . . icon on the top right and click “Save As” to save the file under the name “7th Day 4 – YOUR NAME”).

AFRICAN ART HISTORY Name_____________________________________________ Period_____
Directions: You will be taking a trip through African Art. You will need to read the description and
answer the questions. After, there will be an art assignment where you will need to draw your own
African mask using the reference images provided.
African Art Africa is a large and diverse continent. Its history is filled with the rise and fall of numerous civilizations and empires. As a result, the art of Ancient Africa is varied and diverse. However, there are some common themes throughout much of African art that we will discuss on this page. Regions Ancient African art can be somewhat divided into regions. The art of northern Africa was heavily influenced by the Arabs after the Islam conquest. Similarly, the art of Ethiopia and the Horn of Africa was influenced by Europe and Christianity. There is also the well preserved art of Ancient Egypt found in temples and burial chambers. However, what most people think of today as African art is the art produced by the peoples living south of the Sahara Desert. Materials The art of Ancient Africa was produced using a wide variety of materials. Unfortunately, a lot of African art was produced using wood, which has since been destroyed by time and the elements. Other materials, such as metals (like bronze and iron), ceramics, and ivory have survived. Three Dimensions One of the main elements of African art is that it is often created in three-dimensions rather than two-dimensions. For example, they used sculpture more often than flat paintings. Here are some of the primary types of art used in Ancient Africa. Sculpture - Sculpture was one of the most important types of art in Ancient Africa. Sculptures were mostly made of people and sometimes animals. African artists often used wood for their sculpture, but they also used bronze, terracotta, and ivory. Masks - Masks were an important part of art. They were often used together with dance to create a type of
performance art. Masks were generally made of wood, but were often decorated with ivory, gems, paint, and animal fur. Jewelry- Many Ancient African civilizations created jewelry from gold, gems, shells, and other materials. Jewelry was an important part of showing one's status and wealth. Pottery - Ceramics were used for everyday items like bowls and cooking pots. However, some ceramics were works of art that were shaped and painted with fine details. Human Form One of the main themes in the art of Ancient Africa is the human form. The primary subject in the majority of the art is people. Sometimes people were shown with animals or as part animal, part person. Many times the representation of people wasn't natural, but was more abstract with certain features exaggerated while others were entirely left out.
Write Down 5 facts you learned from African Art (Please use complete sentences):
1._______________________________________________________________________________
2._______________________________________________________________________________
3._______________________________________________________________________________
4._______________________________________________________________________________
5._______________________________________________________________________________

African Mask-Create your own African masks using the examples below. You will need to
draw it to fill up the box to receive complete credit. Remember that masks have
symmetrical balance so you will need to try to have the left look the right.
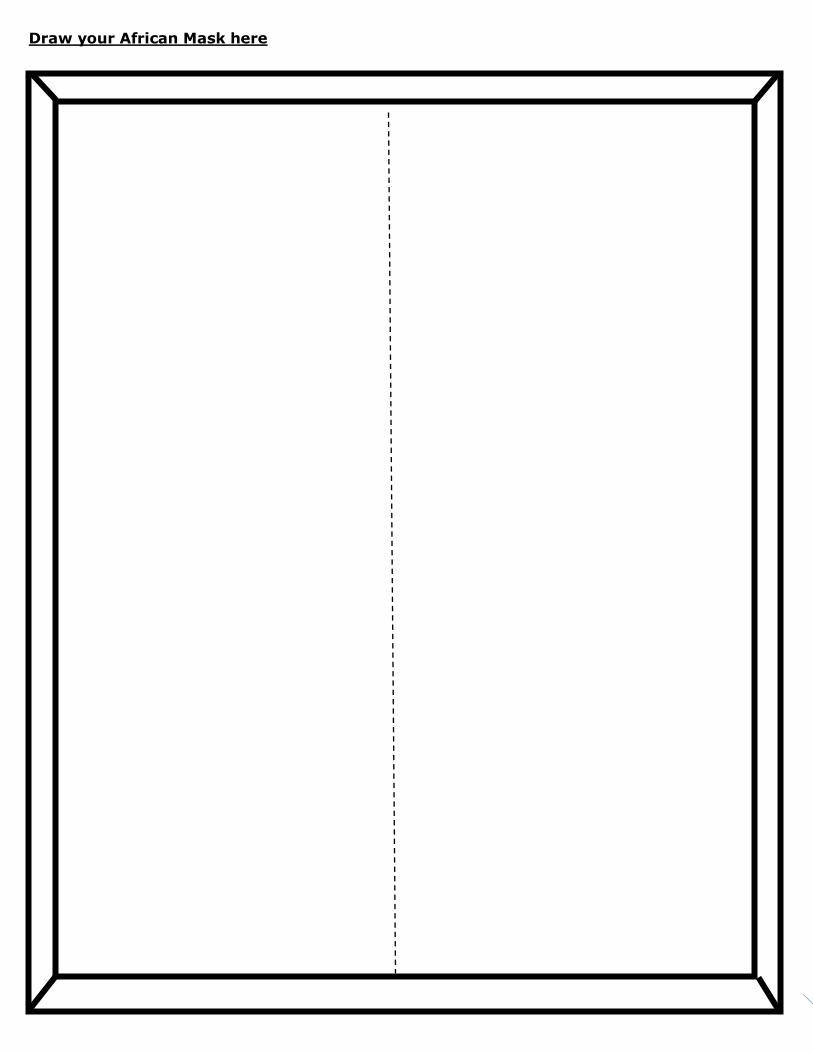
Draw your African Mask here

Visual Art – 7th grade Southeast Middle School – Ms. Catherine Beltran
REVIEW: Polynesian/Oceanic Art History Day 15
ASSIGNMENT: SPEND THIS DAY REVIEWING THE ARTICLE AND COMPLETING THE WORK ASSIGNED ON DAY 10 (SEE BELOW). PLEASE DRAW IN THE MICROSOFT PHOTO EDITOR (READ MORE IN LESSON PLAN BELOW) OR DRAW ON PAPER (TAKE A PHOTO) AND EMAIL ME YOUR WORK: [email protected] Note – there is a tutorial at the end of this document showing how to draw on the computer!
Standards
VA.C IM.6.1 I can examine characteristic s among artistic styles, periods or cultures and describe how cultures influence each other.
Learning Targets
I can identify characteristics that distinguish Polynesian/Oceanic art.
I can use a grid system to recreate a line drawing.
Essential Question(s)
1. What defines Polynesian/Oceanic art?
Resources Handouts – 2 pages for Polynesian/Oceanic art: first page includes article and questions, second page includes grid drawing
Learning Activities or Experiences
1. Read the brief article about Polynesian/Oceanic art. 2. Answer the question at the bottom of page 1. 3. On page 2, redraw the patterns seen in the left column in the spaces to the right. There are 12 patterns – you must
redraw 10 of the 12 patterns for full credit.
NOTE: Students completing the work using a computer should type the answers into a Word document labeled “7th Day 5 – YOUR NAME” (please don’t type the words “your name” – you need to insert your first and last name into the title of the document). For the drawing, you may either complete it on notebook/copy paper to turn in when you return, OR use Paint on your computer to create the designs and submit electronically (name the Paint file the same as your Word file).

POLYNESIAN/OCEANIC ART HISTORY Name_______________________________ Period_____
Directions: You will be taking a trip through Polynesian/Oceanic Art. You will need to read the
description and answer the questions. After, there will be an art assignment where you will need to
draw your own African mask using the reference images provided.
Polynesian/Oceanic Culture
Polynesia is a group of islands located within the Polynesian Triangle, on the continent of Oceania.
Polynesia is one among three major cultural areas in the Pacific Ocean, aside from Micronesia and
Melanesia. Polynesian/Oceanic Art
The most famous Polynesian art forms are the Moai (statues) of Rapa Nui/Easter Island. Polynesian
art is characteristically ornate, and often meant to contain supernatural power or mana. Polynesian works of art were thought to contain spiritual power and could affect change in the
world.
Easter Island
The Moai are monolithic statues, their minimalist style related to forms found throughout Polynesia. Moai are carved in relatively flat planes, the faces bearing proud but enigmatic
expressions. The human figures would be outlined in the rock wall first, then chipped away until only
the image was left. Wood Carving
Polynesian Carving often represented gods, deities or an ancestral hero. They were sometimes made
free standing but are also often found as part of an object like the top of a fly whisk. Polynesian Carving also includes bowls weapons and Jewelry by they are covered in other articles.
Write Down 5 facts you learned from Polynesian/Oceanic Art (Please use complete sentences):
1._______________________________________________________________________________
2._______________________________________________________________________________
3._______________________________________________________________________________
4._______________________________________________________________________________
5._______________________________________________________________________________

Polynesian/Oceanic Patterns-redraw the patterns in the box provided

TO MAKE A DRAWING ON YOUR COMPUTER:
1. Download the grid page on Microsoft Teams by clicking in the circle to the left and
then hitting Download. The file should show up at the bottom of the screen.
2. Click on the file and it should pop up in a new screen. Hit the Edit button as shown
and then click Draw.

3. You can then select the Ballpoint Pen (left option). Make the pen size as small as
possible and black.
4. Arrange your screen so that you can see both the image on the PDF and your grid
photo. Draw using your finger.
5. Don’t forget to save your work appropriately and email it to Ms. Beltran!
I hope this helps! You can always email or chat with me in Microsoft Teams if you still have
questions!