Embed Size (px)
Citation preview

rating manualEN)operating manual
VisioNize®
Software operating manual
2.2

Copyright© 2020 Eppendorf AG, Germany. All rights reserved, including graphics and images. No part of this publication may be reproduced without the prior permission of the copyright owner.
Eppendorf® and the Eppendorf Brand Design are registered trademarks of Eppendorf AG, Germany.
VisioNize®, CryoCube®, Eppendorf Research ®, and Mastercycler ® are registered trademarks of Eppendorf AG, Germany.
Apple®, macOS®, and Safari® are registered trademarks of Apple Inc. in the U.S. and other countries.
Azure®, Internet Explorer®, Microsoft®, Microsoft Edge®, and Windows® are registered trademarks of Microsoft Corporation in the United States and other countries.
Firefox® is a trademark of the Mozilla Foundation in the U.S. and other countries.
Google Chrome™ browser and Android™ are protected trademarks of Google Inc., United States.
IOS is a trademark or registered trademark of Cisco in the U.S. and other countries.
Registered trademarks and protected trademarks are not marked in all cases with ® or ™ in this manual.
Notice
The software of the VisioNize contains open source software. License information is available in the settings of the VisioNize software under Terms and Conditions.
1112000240-2/202002

Table of contentsVisioNize®
English (EN)3
Table of contents
1 Operating instructions . . . . . . . . . . . . . . . . . . . . . . . . . . . . . . . . . . . . . . . . . . . . . . . . . . . . . . . . . . . . . . 51.1 Using this manual . . . . . . . . . . . . . . . . . . . . . . . . . . . . . . . . . . . . . . . . . . . . . . . . . . . . . . . . . . . . . 51.2 Danger symbols and danger levels . . . . . . . . . . . . . . . . . . . . . . . . . . . . . . . . . . . . . . . . . . . . . . . . 5
1.2.1 Danger symbols . . . . . . . . . . . . . . . . . . . . . . . . . . . . . . . . . . . . . . . . . . . . . . . . . . . . . . . 51.2.2 Danger levels. . . . . . . . . . . . . . . . . . . . . . . . . . . . . . . . . . . . . . . . . . . . . . . . . . . . . . . . . . 5
1.3 Symbols used . . . . . . . . . . . . . . . . . . . . . . . . . . . . . . . . . . . . . . . . . . . . . . . . . . . . . . . . . . . . . . . . 51.4 Abbreviations used . . . . . . . . . . . . . . . . . . . . . . . . . . . . . . . . . . . . . . . . . . . . . . . . . . . . . . . . . . . . 61.5 Glossary. . . . . . . . . . . . . . . . . . . . . . . . . . . . . . . . . . . . . . . . . . . . . . . . . . . . . . . . . . . . . . . . . . . . . 6
2 Safety. . . . . . . . . . . . . . . . . . . . . . . . . . . . . . . . . . . . . . . . . . . . . . . . . . . . . . . . . . . . . . . . . . . . . . . . . . . . 92.1 Intended use . . . . . . . . . . . . . . . . . . . . . . . . . . . . . . . . . . . . . . . . . . . . . . . . . . . . . . . . . . . . . . . . . 92.2 Warnings for intended use . . . . . . . . . . . . . . . . . . . . . . . . . . . . . . . . . . . . . . . . . . . . . . . . . . . . . . 92.3 Data security . . . . . . . . . . . . . . . . . . . . . . . . . . . . . . . . . . . . . . . . . . . . . . . . . . . . . . . . . . . . . . . . . 9
3 Product description . . . . . . . . . . . . . . . . . . . . . . . . . . . . . . . . . . . . . . . . . . . . . . . . . . . . . . . . . . . . . . . 113.1 Software description . . . . . . . . . . . . . . . . . . . . . . . . . . . . . . . . . . . . . . . . . . . . . . . . . . . . . . . . . . 113.2 Product overview . . . . . . . . . . . . . . . . . . . . . . . . . . . . . . . . . . . . . . . . . . . . . . . . . . . . . . . . . . . . 11
4 Requirements on site . . . . . . . . . . . . . . . . . . . . . . . . . . . . . . . . . . . . . . . . . . . . . . . . . . . . . . . . . . . . . . 134.1 Requirements . . . . . . . . . . . . . . . . . . . . . . . . . . . . . . . . . . . . . . . . . . . . . . . . . . . . . . . . . . . . . . . 13
4.1.1 Supported browser . . . . . . . . . . . . . . . . . . . . . . . . . . . . . . . . . . . . . . . . . . . . . . . . . . . . 134.1.2 Network components . . . . . . . . . . . . . . . . . . . . . . . . . . . . . . . . . . . . . . . . . . . . . . . . . . 134.1.3 Firewall . . . . . . . . . . . . . . . . . . . . . . . . . . . . . . . . . . . . . . . . . . . . . . . . . . . . . . . . . . . . . 13
4.2 VisioNize account . . . . . . . . . . . . . . . . . . . . . . . . . . . . . . . . . . . . . . . . . . . . . . . . . . . . . . . . . . . . 134.3 Devices . . . . . . . . . . . . . . . . . . . . . . . . . . . . . . . . . . . . . . . . . . . . . . . . . . . . . . . . . . . . . . . . . . . . 134.4 VisioNize-onboard device . . . . . . . . . . . . . . . . . . . . . . . . . . . . . . . . . . . . . . . . . . . . . . . . . . . . . . 14
4.4.1 Registration . . . . . . . . . . . . . . . . . . . . . . . . . . . . . . . . . . . . . . . . . . . . . . . . . . . . . . . . . . 164.4.2 Connecting later . . . . . . . . . . . . . . . . . . . . . . . . . . . . . . . . . . . . . . . . . . . . . . . . . . . . . . 17
4.5 VisioNize-qualified devices . . . . . . . . . . . . . . . . . . . . . . . . . . . . . . . . . . . . . . . . . . . . . . . . . . . . . 17
5 Before starting . . . . . . . . . . . . . . . . . . . . . . . . . . . . . . . . . . . . . . . . . . . . . . . . . . . . . . . . . . . . . . . . . . . 195.1 Accounts . . . . . . . . . . . . . . . . . . . . . . . . . . . . . . . . . . . . . . . . . . . . . . . . . . . . . . . . . . . . . . . . . . . 19
5.1.1 Get an administrator account . . . . . . . . . . . . . . . . . . . . . . . . . . . . . . . . . . . . . . . . . . . . 195.1.2 Get a user account . . . . . . . . . . . . . . . . . . . . . . . . . . . . . . . . . . . . . . . . . . . . . . . . . . . . 19
5.2 Login . . . . . . . . . . . . . . . . . . . . . . . . . . . . . . . . . . . . . . . . . . . . . . . . . . . . . . . . . . . . . . . . . . . . . . 195.2.1 Initial login . . . . . . . . . . . . . . . . . . . . . . . . . . . . . . . . . . . . . . . . . . . . . . . . . . . . . . . . . . 195.2.2 Log in . . . . . . . . . . . . . . . . . . . . . . . . . . . . . . . . . . . . . . . . . . . . . . . . . . . . . . . . . . . . . . 205.2.3 Log out . . . . . . . . . . . . . . . . . . . . . . . . . . . . . . . . . . . . . . . . . . . . . . . . . . . . . . . . . . . . . 20
6 Operation . . . . . . . . . . . . . . . . . . . . . . . . . . . . . . . . . . . . . . . . . . . . . . . . . . . . . . . . . . . . . . . . . . . . . . . 216.1 Operating controls . . . . . . . . . . . . . . . . . . . . . . . . . . . . . . . . . . . . . . . . . . . . . . . . . . . . . . . . . . . 21
6.1.1 Digital lab space . . . . . . . . . . . . . . . . . . . . . . . . . . . . . . . . . . . . . . . . . . . . . . . . . . . . . . 216.1.2 Device symbols . . . . . . . . . . . . . . . . . . . . . . . . . . . . . . . . . . . . . . . . . . . . . . . . . . . . . . . 22
7 Applications . . . . . . . . . . . . . . . . . . . . . . . . . . . . . . . . . . . . . . . . . . . . . . . . . . . . . . . . . . . . . . . . . . . . . 237.1 Monitoring . . . . . . . . . . . . . . . . . . . . . . . . . . . . . . . . . . . . . . . . . . . . . . . . . . . . . . . . . . . . . . . . . 23
7.1.1 Color code . . . . . . . . . . . . . . . . . . . . . . . . . . . . . . . . . . . . . . . . . . . . . . . . . . . . . . . . . . . 237.1.2 Filter . . . . . . . . . . . . . . . . . . . . . . . . . . . . . . . . . . . . . . . . . . . . . . . . . . . . . . . . . . . . . . . 24

Table of contentsVisioNize®
English (EN)4
7.1.3 History Chart . . . . . . . . . . . . . . . . . . . . . . . . . . . . . . . . . . . . . . . . . . . . . . . . . . . . . . . . . 247.2 Notifications . . . . . . . . . . . . . . . . . . . . . . . . . . . . . . . . . . . . . . . . . . . . . . . . . . . . . . . . . . . . . . . . 26
7.2.1 Subscriptions. . . . . . . . . . . . . . . . . . . . . . . . . . . . . . . . . . . . . . . . . . . . . . . . . . . . . . . . . 277.2.2 Deactivate . . . . . . . . . . . . . . . . . . . . . . . . . . . . . . . . . . . . . . . . . . . . . . . . . . . . . . . . . . . 28
7.3 Device Management . . . . . . . . . . . . . . . . . . . . . . . . . . . . . . . . . . . . . . . . . . . . . . . . . . . . . . . . . . 297.3.1 Create token . . . . . . . . . . . . . . . . . . . . . . . . . . . . . . . . . . . . . . . . . . . . . . . . . . . . . . . . . 307.3.2 Transfer token . . . . . . . . . . . . . . . . . . . . . . . . . . . . . . . . . . . . . . . . . . . . . . . . . . . . . . . . 317.3.3 Deregister device . . . . . . . . . . . . . . . . . . . . . . . . . . . . . . . . . . . . . . . . . . . . . . . . . . . . . 31
7.4 User Management. . . . . . . . . . . . . . . . . . . . . . . . . . . . . . . . . . . . . . . . . . . . . . . . . . . . . . . . . . . . 327.4.1 Users . . . . . . . . . . . . . . . . . . . . . . . . . . . . . . . . . . . . . . . . . . . . . . . . . . . . . . . . . . . . . . . 33
8 Contact information . . . . . . . . . . . . . . . . . . . . . . . . . . . . . . . . . . . . . . . . . . . . . . . . . . . . . . . . . . . . . . . 35
9 Troubleshooting . . . . . . . . . . . . . . . . . . . . . . . . . . . . . . . . . . . . . . . . . . . . . . . . . . . . . . . . . . . . . . . . . . 379.1 VisioNize . . . . . . . . . . . . . . . . . . . . . . . . . . . . . . . . . . . . . . . . . . . . . . . . . . . . . . . . . . . . . . . . . . . 37
Index . . . . . . . . . . . . . . . . . . . . . . . . . . . . . . . . . . . . . . . . . . . . . . . . . . . . . . . . . . . . . . . . . . . . . . . . . . . 39

Operating instructionsVisioNize®
English (EN)5
1 Operating instructions1.1 Using this manual
Your VisioNize software manual consists of software instructions. Separate instructions exists for some optional software and hardware modules.
The software manual is part of the product and can be called via the footer entry in VisioNize portal.
The current version of the software manual can be found on our website: www.eppendorf.com.
Read the complete software manual before using the software.
Open the software manual via the footer entry in VisioNize portal.
Store the software manual at an easily accessible location.
The software may only be transferred with the software manual.
1.2 Danger symbols and danger levels1.2.1 Danger symbols
The safety instructions in this manual have the following danger symbols and danger levels:
1.2.2 Danger levels
1.3 Symbols used
Hazard point Material damage
DANGER Will lead to severe injuries or death.
WARNING May lead to severe injuries or death.
CAUTION May lead to light to moderate injuries.
NOTICE May lead to material damage.
Depiction Meaning
1.2.
Actions in the specified order
Actions without a specified order
• List
Direction of movement
Text Display or software texts
Additional information

Operating instructionsVisioNize®
English (EN)6
1.4 Abbreviations used
DHCPDynamic Host Configuration Protocol (network)
DNSDomain Name System (network)
HTTPSHyperText Transfer Protocol Secure
IPInternet Protocol (network)
MQTTMessage Queuing Telemetry Transport
PDFPortable Document Format
URLUniform Resource Locator
USBUniversal Serial Bus
1.5 Glossary
D
Data servicesA service provider that enables data access on demand to users regardless of their geographic location.
DeviceAn object, machine, or piece of equipment that has been made for a particular purpose.
DHCPA standardized network protocol used on Internet Protocol (IP) networks. This protocol is controlled by a DHCP server that dynamically distributes network configuration parameters, such as IP addresses, for interfaces, and services.
DNS serverDNS is the Domain Name System. This network system is used to translate names into IP addresses. The DNS name server stores the records for VisioNize and answers to queries against the database.

Operating instructionsVisioNize®
English (EN)7
H
HTTPSA protocol for secure communication over a computer network. The communication over HTTPS is encrypted by Transport Layer Security, or its predecessor, Secure Socket Layer.
M
MQTTFor communication between device and cloud.
N
NTP sersverThe Network Time Protocol is used to synchronize the clock to computer systems.
U
URLUniform Resource Locator is a specific character string that constitutes a reference to a resource e.g. for a website.

Operating instructionsVisioNize®
English (EN)8

SafetyVisioNize®
English (EN)9
2 Safety2.1 Intended use
VisioNize is a cloud-based IoT platform intended to be used for connecting laboratory devices for data management, notification services by e-mail/SMS, and remote monitoring of the connected devices.
VisioNize is intended for research use only.
2.2 Warnings for intended use
Using VisioNize is easy and safe. To avoid data loss, read the following notices.
2.3 Data security
VisioNize is based on the Azure cloud infrastructure from Microsoft taking advantage of its wide array of security tools and capabilities. All servers running VisioNize are located in the EU and all data is stored on servers in the EU as well.
Data loss and malfunction due to malicious softwareMalicious software (like a computer virus) is designed to cause harm to computer and user.
Check storage media with updated antivirus software. Do not download software from uncertain source. Do not open e-mail attachments of uncertain origin.
To avoid unauthorized access, data loss, sample loss, and data abuse, protect your VisioNize-onboard devices against unauthorized access from Internet.
Ask your local IT administration for advice.
In addition to the warnings and notes of this manual, safety notes and other notes mentioned in the operation manuals of connected devices are valid.
Read the operating manuals of connected devices and VisioNize box, before you start using VisioNize.
CAUTION! Poor safety due to incorrect accessories and spare parts.The use of accessories and spare parts other than those recommended by Eppendorf may impair the safety, functioning and precision of the device. Eppendorf cannot be held liable or accept any liability for damage resulting from the use of accessories and spare parts other than those recommended, or from the improper use of such equipment.
Only use accessories and original spare parts recommended by Eppendorf.

SafetyVisioNize®
English (EN)10
Built-in firewalls control the access to network resources of VisioNize to protect against unauthorized access.
Security updates to VisioNize are provided regularly and independent from the release cycle of new software versions.
Encryption of all data within VisioNize is handled with the utmost care to prevent any unauthorized access. This handling includes a state-of-the-art approach to encrypt data at rest and in transit.
To give you full control over all your personal data in VisioNize, all acquisition, processing, and storage of personal data is fully compliant to the General Data Protection Regulation (EU) 2016/679 (GDPR).
For detailed information, refer to the Whitepaper of VisioNize.

Product descriptionVisioNize®
English (EN)11
3 Product description3.1 Software description
VisioNize is the digital platform of Eppendorf, delivering value adding services in and around your Eppendorf devices. This platform is built up for a varying and increasing number of applications. VisioNize safely stores data and makes this data accessible through the Internet. All you need is a computer or a mobile device with Internet access, a web browser, and an account for VisioNize.
3.2 Product overview
1 VisioNize services
2 Mobile devices
3 VisioNize client
4 Home network / IT department
5 VisioNize box
6 VisioNize-onboard device
7a VisioNize-qualified device (USB)
7b VisioNize-qualified device (serial)
7c VisioNize-qualified device (USB to Ethernet adapter)
7d VisioNize-qualified device (Ethernet)
autovent
Centrifuge 5920 R
nexusMastercyclerNew Brunswick S41i
1
4
5
6 7a 7b 7c 7d
3
2
2

Product descriptionVisioNize®
English (EN)12

Requirements on siteVisioNize®
English (EN)13
4 Requirements on site4.1 Requirements
Meet the following requirements so that you can integrate an Eppendorf device to VisioNize and access the data via a web browser.
4.1.1 Supported browser
• Google Chrome; versions 75.x (64-Bit) or later• Mozilla Firefox (Quantum); versions 68.x (32-Bit) or later• Safari (iOS); versions 12.3.1 or later• Microsoft Edge; versions 42.x or later
4.1.2 Network components
• DNS server• NTP server
4.1.3 Firewall
Define the following exceptions for outgoing connections for your firewall.
• port 443 for HTTPS • port 8883 for MQTT
4.2 VisioNize account
Your laboratory, institute, or company needs one user account with administration rights for VisioNize.
To get an VisioNize administrator account, visit the Eppendorf eShop www.eppendorf.com/visionize-subscription (see Accounts on p. 19).
The VisioNize administrator manages all other users (see User Management on p. 32).
The administrator and each created user gets an e-mail including a link to VisioNize.
4.3 Devices
At the moment, VisioNize displays data of two families of devices.
The devices with the following software versions are ready to connect to VisioNize Digital Lab Space:
Firewall settings
Ask your IT system administration for advice.

Requirements on siteVisioNize®
English (EN)14
Tab. 4-1: Software requirements for devices
* Currently, VisioNize connectivity is not available for these devices.
4.4 VisioNize-onboard device
The following steps describe how to connect a VisioNize-onboard device to your network.
Requirements:• Network socket of the local network near the device• Standard Ethernet cable• Internet access
Device family Device Software version
VisioNize-onboard (see VisioNize-onboard device on p. 14)
CellXpert C170i 2.0.9 or higher
CryoCube F740i 2.1.5.202 or higher
Shaker Innova S44i* 2.1.5.200 or higher
VisioNize-qualified via VisioNize box (see Device Management on p. 29)
VisioNize box* 1.8 or higher
Connecting devices with lower software versions to the VisioNize Digital Lab Space may require assistance from Eppendorf service.
To get more information about the connectivity of a device, contact your Eppendorf service representative.
To avoid unauthorized access, data loss, sample loss and data abuse, protect your VisioNize-onboard devices against unauthorized access from the Internet.
Ask your IT system administrator for advice.
Security risk
Enable OPC/REST only on demand, as any communication protocol exposed to the Internet is a potential security risk.
This option in not required to integrate a device into the digital lab space of VisioNize.

Requirements on siteVisioNize®
English (EN)15
Connect to the network
DHCP
1. Connect the ethernet socket at the rear site of the device to an unlocked socket of the network with a standard ethernet cable.
2. To check the network connection, open the settings on the touch screen of the device.
3. Tap Menu > Settings> System Settings > Network.
4. Switch on DHCP as network protocol.
5. If you do not use DHCP, switch off Enable DHCP and tap Manual Setup.
6. Enter the device settings.
7. To check the entries, tap Back.When the device is successfully connected, the IP address is displayed next to IP Addresses.If the IP address is not displayed, note the MAC address and contact your local IT administrator.

Requirements on siteVisioNize®
English (EN)16
4.4.1 Registration
VisioNize-onboard devices already have the certificate to connect to VisioNize. After you have put the device into operation and connected the device to the network, the following dialogs guide you through the registration.
1. To configure your device, follow the instructions.
2. To identify your device in the network, enter a nickname.
3. Select the time zone of the device and tap Continue >.
4. To connect to VisioNize directly, select Connect.To connect later, select Connect Later and follow the instructions.

Requirements on siteVisioNize®
English (EN)17
4.4.2 Connecting later
4.5 VisioNize-qualified devices
VisioNize-qualified devices that are connected to your network using the VisioNize box can be integrated in the Digital Lab Space of VisioNize. Find the information how to integrate a device into your network in the VisioNize box manual. Apply for a VisioNize account (see VisioNize account on p. 13) and register the VisioNize box in Device Management (see Create token on p. 30).
5. Enter the Administrator Credentials of the VisioNize account and select Confirm.Your device is successfully connected to VisioNize.A cloud in the status bar indicates the cloud connection and the grayed out menu item VisioNize Setup (connected) in the System Settings.
1. To start the registration of your VisioNize-onboard device for VisioNize, tap Settings > System Settings > VisioNize Setup.
2. Follow the instructions.

Requirements on siteVisioNize®
English (EN)18

Before startingVisioNize®
English (EN)19
5 Before starting5.1 Accounts5.1.1 Get an administrator account
Visit the Eppendorf eShop www.eppendorf.com/visionize-subscription and request an administrator account (tenant) for your company or institute. You get one administrator account for one organizational unit, through which all other users and additional administrator accounts can be activated.
5.1.2 Get a user account
The administrator has to add a user account to VisioNize in the User Management (see User Management on p. 32).
To get an account, contact your VisioNize administrator.
5.2 Login5.2.1 Initial login
The administrator and each user created, receive an e-mail including a link to VisioNize.
Do not wait longer than 5 days after receiving the e-mail with the initial login. Find more details in chapter troubleshooting (see VisioNize on p. 37).

Before startingVisioNize®
English (EN)20
Password
5.2.2 Log in
5.2.3 Log out
To open your web browser, click the link Set Password in the e-mail from VisioNize.A Set password dialog opens.
Enter and confirm your self-chosen password. The password must contain at least:
• eight characters• one upper case • one lower case• one number• one special character
Click Set password.
Enter the URL of VisioNize https://visionize.eppendorf.com in your web browser.
To log in, enter your e-mail address and password.
Click Enter.
Click your user name in the upper right corner.The log out button is displayed.
To log out, click the button.

OperationVisioNize®
English (EN)21
6 Operation6.1 Operating controls
The following describes the main operating controls of VisioNize.
6.1.1 Digital lab space
After logging in, the digital lab space of VisioNize is displayed. This space is the home screen and gives an overview of all applications.
Abb. 6-1: VisioNize digital lab space
Fig. 6-1: VisioNize digital lab space
1 VisioNize iconFunctions as home button to get back to VisioNize digital lab space.
2 Application indicatorThe name next to the vertical line shows the name of the application used.
3 Buttons for applicationsThe number of buttons displayed depends on whether a user or the administrator is logged in.
4 User Name Functions as button for logout.
5 InformationTerms and Conditions, Privacy Policy, Imprint, and Manual
User Name
1 3 2 4
5

OperationVisioNize®
English (EN)22
6.1.2 Device symbols
The following table shows the commonly used symbols for devices.
Tab. 6-1: Symbol of devices
To open an application, click the corresponding button.
To get back to digital lab space, click the VisioNize symbol in the upper left corner.
To open the PDF of the VisioNize manual, or the Term and Conditions, click the corresponding link in the lower right corner of the home screen.
Symbol Device
Bioreactor
Centrifuge
Cycler
Freezer
VisioNize box
Incubator
Shaker

ApplicationsVisioNize®
English (EN)23
7 Applications7.1 Monitoring
The Monitoring application displays device-specific parameters, such as history chart, a status overview and an Event List.
Abb. 7-1: Charts
Fig. 7-1: Charts
7.1.1 Color code
The color of the devices in the list show the status of the devices at a glance.
1 Deviceslist of devices
2 Status Overviewstatus of the selected device
3 History Chartdevice data up to 6 month in the past; not available for every device
4 Event Listlist of events with filter and search
5 Parameterskey parameters of the selected device
running
finished
1 3 2
5 4

ApplicationsVisioNize®
English (EN)24
7.1.2 Filter
7.1.3 History Chart
Time span selection
idle
paused or hold
preparing or updating
not connected
error
To filter the list of devices e.g. by location, open the drop-down list and select an option.
To display the history data from 1 hour to up to 6 month in the past, select a time span tab. Gaps in a curve indicate that a device was offline or switched off.

ApplicationsVisioNize®
English (EN)25
Select charts
Display values
Time navigation bar
To display more than one chart, click the drop down menu of Select charts to display and select the offered charts.
To display set point value and the actual value, move the mouse pointer over the chart area.
To display a time span of historical data, click and drag the blue area on the time navigation bar.
To scroll back to the latest data, click Auto Scroll.

ApplicationsVisioNize®
English (EN)26
7.2 Notifications
VisioNize provides the option to send notifications as e-mail and text. These notifications are connected to the events of devices and can be adjusted to your needs. Decide which devices should trigger which channel of notification.
Abb. 7-2: Notifications
Fig. 7-2: Notifications
E-mail and text dataE-mail notifications are sent to the e-mail address used for the VisioNize enrollment.Text notifications are sent to the mobile phone number stored in the User Management.
To enter your mobile phone number, contact your VisioNize administrator.
1 My Subscriptionslist of subscriptions
2 Title boxtitle of a subscription
3 Eventslist of categories
4 Deviceslist of connected devices
5 Channelse-mail or text notification channels
6 Button barbuttons to edit, add, delete, or save notifications
1 3 2 4
6
5
ApplicationsVisioNize®
English (EN)27
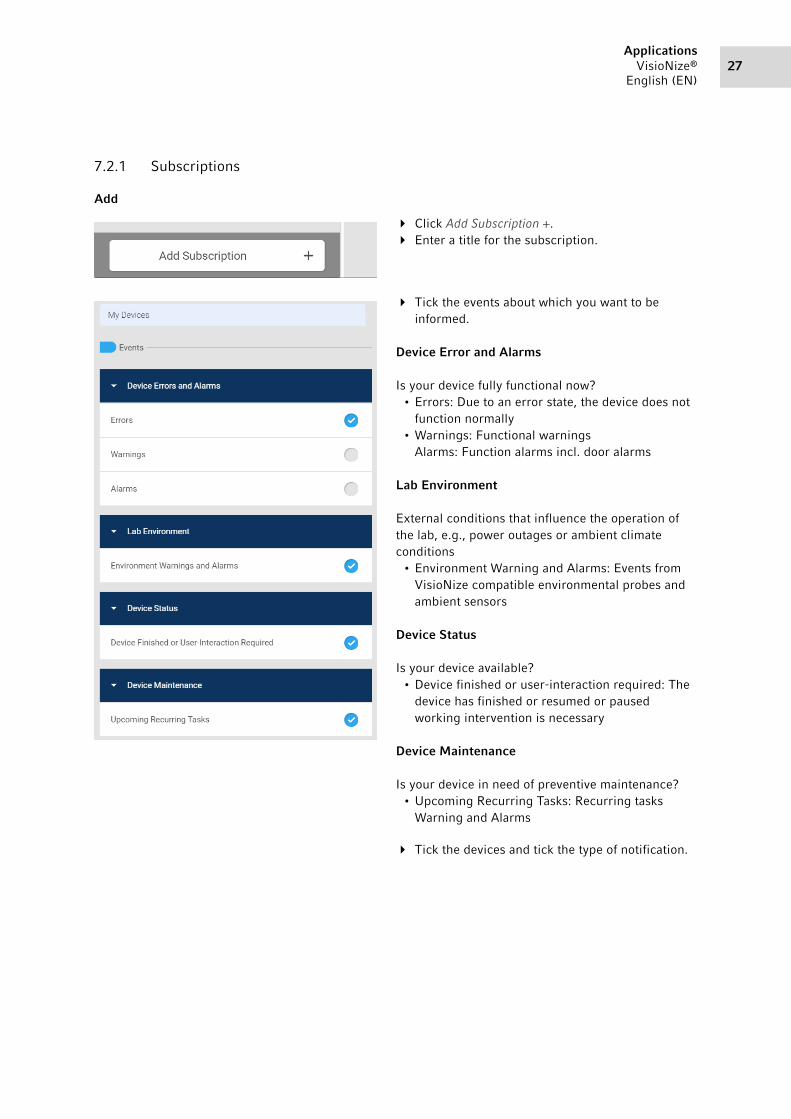
7.2.1 Subscriptions
Add
Click Add Subscription +. Enter a title for the subscription.
Tick the events about which you want to be informed.
Device Error and Alarms
Is your device fully functional now?• Errors: Due to an error state, the device does not
function normally• Warnings: Functional warnings
Alarms: Function alarms incl. door alarms
Lab Environment
External conditions that influence the operation of the lab, e.g., power outages or ambient climate conditions
• Environment Warning and Alarms: Events from VisioNize compatible environmental probes and ambient sensors
Device Status
Is your device available?• Device finished or user-interaction required: The
device has finished or resumed or paused working intervention is necessary
Device Maintenance
Is your device in need of preventive maintenance?• Upcoming Recurring Tasks: Recurring tasks
Warning and Alarms
Tick the devices and tick the type of notification.

ApplicationsVisioNize®
English (EN)28
Edit
7.2.2 Deactivate
Disable
Select the name of the subscription in the list and click Disable.
Disabled subscriptions are displayed in gray in the list of subscriptions. These subscriptions can be reactivated.
Delete
Select the name of the subscription in the list and click Delete.
Deleted subscriptions can no longer be reactivated.
Restriction on text messages by blacklisting of mobile phone numbers• If more than 20 text messages are sent to one mobile phone number within an hour.• If more than six text messages with equal content are sent to one mobile phone number
within an hour.
Blacklisting of mobile phone numbers lasts an hour.To be on the safe side, all notifications that cannot be delivered to a blacklisted mobile phone number are sent by e-mail.
To confirm, click Save.
To edit a subscription, select the name in the list of subscriptions.
Select or deselect events, devices, or channels to your needs.
To confirm the changes, click Save Changes.

ApplicationsVisioNize®
English (EN)29
7.3 Device Management
Device Management displays information about all registered devices for each user.
Abb. 7-3: Device Management
Fig. 7-3: Device Management
Within this application, administrators are able to add VisioNize-qualified devices and to deregister connected devices separately. The application helps to define the network settings for VisioNize-qualified devices that are connected through a VisioNize box.
1 List of devices
2 Information about the device
3 Button to add a device
4 Button to deregister a device
1 2
3 4

ApplicationsVisioNize®
English (EN)30
7.3.1 Create token
A VisioNize-qualified device that is integrated into your network using the VisioNize box can be registered in the Digital Lab Space of VisioNize. Authenticate the box once with a security token. To create the token, fill out the following form. To save the token, keep a USB storage medium ready.
Configuration without DHCP
To obtain the network settings for your VisioNize box, contact your IT system administration.
Click Add Device + . Enter the nickname of the VisioNize box and the
serial number.Find the serial number on the name plate at the rear site of the VisioNize box.
To automatically retrieve the DNS information for the VisioNize box through a DHCP server in your network, select DHCP from the drop-down list next to Mode.
To manually set the network information for the VisioNize box, select Manually from the drop-down list next to Mode.
Enter the IP Address, the Subnet Mask, and the Gateway information.
To automatically retrieve the network information for the VisioNize box through a DHCP server in your network, select DHCP from the drop-down list next to Mode.
To manually set the DNS information for the VisioNize box, select Manually from the drop-down list next to Mode.
Enter Primary and Secondary DNS information.
Missing DNS serverKeep in mind, that you cannot connect to VisioNize without a working DNS server.
To automatically retrieve the NTP time server information for the VisioNize box through a DHCP server in your network, select DHCP from the drop-down list next to Mode.
To manually set the NTP Time Server information for the VisioNize box, select Manually from the drop-down list next to Mode.
Enter the NTP Time Server information.

ApplicationsVisioNize®
English (EN)31
7.3.2 Transfer token
1. To configure the VisioNize box, connect the USB storage medium to the box.
2. Restart the box and wait a few minutes.
7.3.3 Deregister device
To get correct time stamps for all events, we recommend using an NTP Time Server.
Connect a USB storage medium to the computer. Click Download Token.
The file is stored in the download folder on your computer.
Transfer the file of the token to the uppermost level on your medium.
LED of the VisioNize box• Lights blue: VisioNize License is transferred to the device and the connection to
VisioNize is active.• Flashes blue: VisioNize License is transferred to the device and the connection to
VisioNize is missing.
Check that the VisioNize box is integrated into the network and can access the Internet. Check the connection of the device to the VisioNize box.For more details on network access and connecting the device to the VisioNize box, refer to the operating manual of the VisioNize box.
Select a device from the list.
Click Deregister Decice. To derigister the device from VisioNize, confirm
the following dialog.

ApplicationsVisioNize®
English (EN)32
7.4 User Management
The application User Management is only available for the administrator.
At the left, a list of users is displayed.
Abb. 7-4: User Management
Fig. 7-4: User Management
1 List of Users
2 User details
3 Button bar
User Name
1. User
2. User
Deactivated User
John Administrator
John
Administrator
3
1 2

ApplicationsVisioNize®
English (EN)33
7.4.1 Users
Add
Deactivate / Delete
Click Add User. Enter the first and last name in the edit boxes. Entering an e-mail address is mandatory. To assign the administrator privilege, tick the
corresponding checkbox.
Mobile phone number
To receive text notifications, enter a mobile phone number. Enter the mobile phone number without spaces in the following format:+4912312345678
To deactivate a user, select the user in the list and click Deactivate User.Deactivated users are displayed in gray in the list of users. They can be reactivated or deleted.
To delete a user, select the user in the list, click Delete User and confirm the next dialog.Deleted users are no longer displayed and cannot be reactivated.

ApplicationsVisioNize®
English (EN)34

Contact informationVisioNize®
English (EN)35
8 Contact information
If you need support for VisioNize contact: https://www.eppendorf.com/service-support/

Contact informationVisioNize®
English (EN)36
37Troubleshooting
VisioNize®
English (EN)
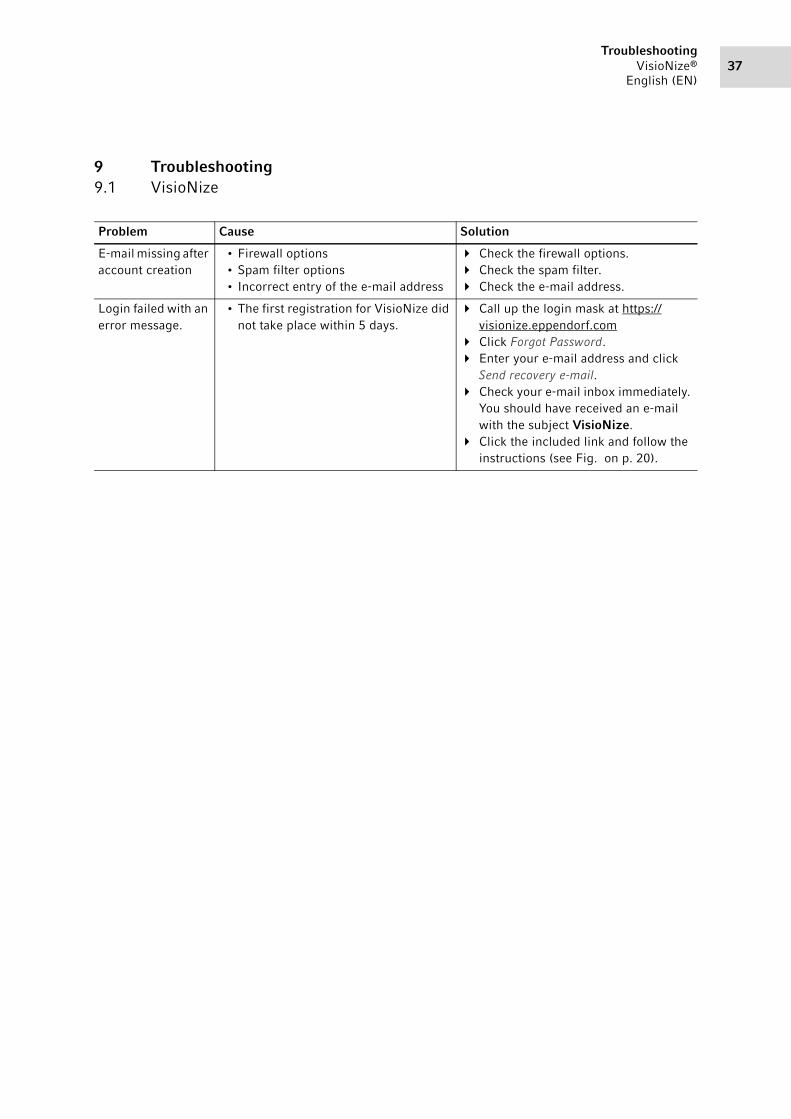
9 Troubleshooting9.1 VisioNize
Problem Cause Solution
E-mail missing after account creation
• Firewall options• Spam filter options• Incorrect entry of the e-mail address
Check the firewall options. Check the spam filter. Check the e-mail address.
Login failed with an error message.
• The first registration for VisioNize did not take place within 5 days.
Call up the login mask at https://visionize.eppendorf.com
Click Forgot Password. Enter your e-mail address and click
Send recovery e-mail. Check your e-mail inbox immediately.
You should have received an e-mail with the subject VisioNize.
Click the included link and follow the instructions (see Fig. on p. 20).

TroubleshootingVisioNize®
English (EN)38

IndexVisioNize®
English (EN)39
Index
A
AccountAdministrator ...................................................13
AddDevices.............................................................30Subscription.....................................................27User..................................................................33
Alarms ...................................................................27
AmbientConditions ........................................................27
Auto scroll .............................................................25
B
BrowserSupported ........................................................13
C
ChartsSelect charts.....................................................25
Color codeSymbols............................................................23
Connecting later ....................................................17
Credentials ............................................................17
D
DeactivateUser..................................................................33
DeleteSubscription.....................................................28User..................................................................32
DeviceAvailable...........................................................27Family...............................................................14Maintenance ....................................................27Management ....................................................29Manual Setup ...................................................15Register............................................................14Status ...............................................................27Symbols............................................................22
DHCP ...................................................................... 6Enable.............................................................. 15Settings............................................................ 15
Digital lab space ................................................... 21
DisableSubscription .................................................... 28
DNS......................................................................... 6
DNS serverDefinition........................................................... 6
E
E-mail.................................................................... 19Incorrect .......................................................... 37
EnableDHCP............................................................... 15
Environment ......................................................... 27
Errors .................................................................... 27
F
FilterMonitoring....................................................... 24
FirewallOptions ............................................................ 37Ports ................................................................ 13
Forgot Password ................................................... 37
H
HistoryChart................................................................ 23
HTTPS..................................................................... 6
I
InitialE-mail .............................................................. 19Login ............................................................... 19
IP............................................................................. 6
IP Address............................................................. 15

IndexVisioNize®
English (EN)40
L
ListDevices.............................................................29User..................................................................32
Log out ..................................................................20
Login .....................................................................20E-mail address .................................................20Failed................................................................37Initial ................................................................19
M
Monitoring.............................................................23Color code........................................................23Display values ..................................................25Filter.................................................................24Select charts.....................................................25Time span.........................................................24
MQTT.......................................................................6
N
NetworkSettings ............................................................15VisioNize-onboard device ................................14
Notifications ..........................................................26
NTP serverDefinition ...........................................................7
O
OPC/REST..............................................................14
Operating controls.................................................21
P
PasswordPolicy................................................................20Set ....................................................................20
PDF..........................................................................6
R
Recurring task .......................................................27
Register .................................................................14
Registration .......................................................... 16
S
Save Changes........................................................ 28
SelectCharts .............................................................. 25
SetPassword ......................................................... 20
SettingsDHCP............................................................... 15VisioNize-onboard device ............................... 15
SoftwareVersions........................................................... 14
Spam filterOptions ............................................................ 37
SubscriptionDelete .............................................................. 28Disable............................................................. 28
SymbolsDevice.............................................................. 22
T
Time navigation bar.............................................. 25
U
URL......................................................................... 6Definition........................................................... 7VisioNize ......................................................... 20
USB......................................................................... 6
UserAdd .................................................................. 33Deactivate........................................................ 33Delete .............................................................. 32List................................................................... 32Management ................................................... 32
V
VersionSoftware .......................................................... 14
VisioNize digital lab space.................................... 21

IndexVisioNize®
English (EN)41
VisioNize-onboard deviceIP Address........................................................15Settings ............................................................15
W
Warnings ...............................................................27

IndexVisioNize®
English (EN)44


Evaluate your manual
Give us your feedback.www.eppendorf.com/manualfeedback
Your local distributor: www.eppendorf.com/contactEppendorf AG · 22331 Hamburg · [email protected] · www.eppendorf.com