Embed Size (px)
Citation preview

Introduction
Introduction
Visionary Scan combines a rich set of quality control and productivity features with a simple interface designed specifically for scanning and coding deposition exhib-
its. It is intended to provide court reporting firms, videographers, and litigation support professionals with a production-level scanning tool that facilitates good doc-
ument production methods.
Visionary Scan creates document and image load files compatible with all major litigation support and trial presentation packages. It can also create Visionary
Image Group (.vig) files for use with the Visionary Auto-Syncer, which can package exhibits, video and the associated transcript for review in the Visionary Viewer
product.
System Requirement
Minimum System Requirements
The specifications listed below are the minimum required specifications for general use of the software.
System Specifications
Hardware 1 GHz Processor
256 MB RAM
4 MB video RAM; 1024 X 768 resolution
20 MB of free disk space
Scanner (with installed TWAIN drivers)
Software Windows 2000, Windows XP
Internet Explorer 6.0
Contacting Visionary Legal Technologies
Visionary Legal Technologies provides support for Visionary Scan via email at [email protected] and our Online Support Request Form.
Contacting Visionary:
Corporate Office:
12000 Ford Road, Suite 150
Dallas, TX 75234
Tel: (214) 370-4359
Fax: (214) 370-0033
E-Mail: [email protected]
Home Page: http://www.VisionaryLegalTechnologies.com

Product Overview
Screen Overview
Main Window Deposition Toolbar Folder Toolbar File Toolbar Image Toolbar
Main Window
Deposition Toolbar
Refresh deposition project list
Display deposition project properties
Create new deposition project
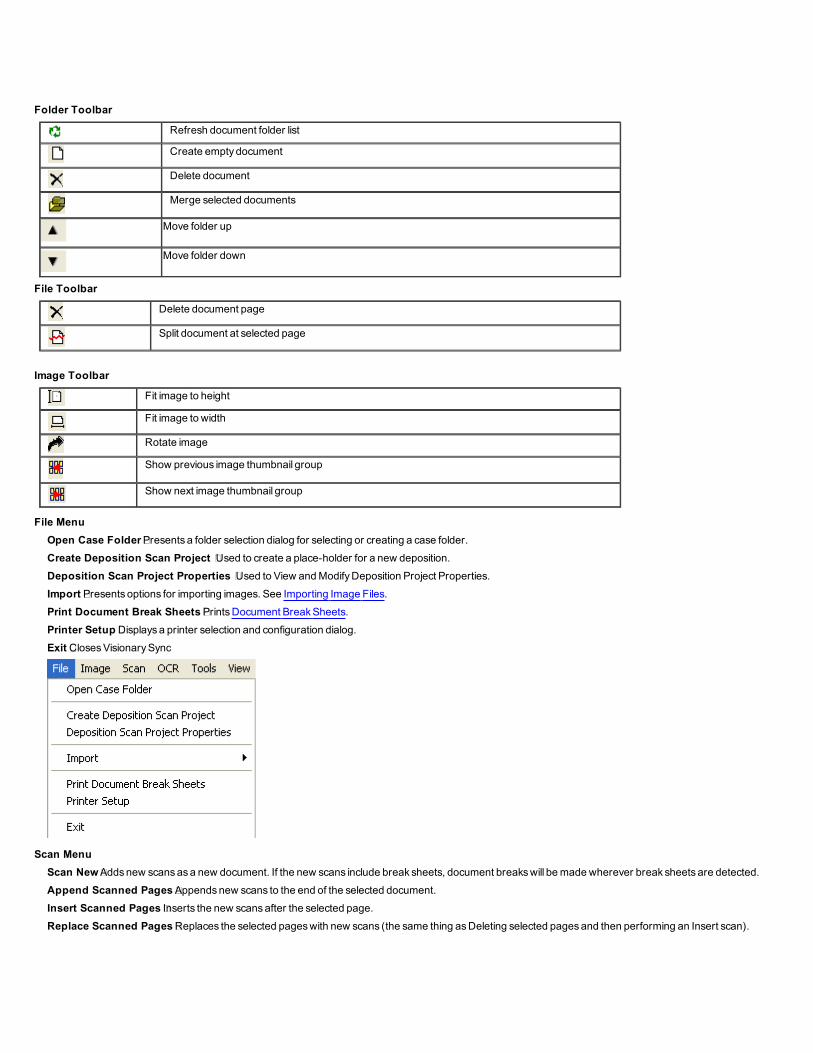
Folder Toolbar
Refresh document folder list
Create empty document
Delete document
Merge selected documents
Move folder up
Move folder down
File Toolbar
Delete document page
Split document at selected page
Image Toolbar
Fit image to height
Fit image to width
Rotate image
Show previous image thumbnail group
Show next image thumbnail group
File Menu
Open Case Folder � Presents a folder selection dialog for selecting or creating a case folder.
Create Deposition Scan Project �Used to create a place-holder for a new deposition.
Deposition Scan Project Properties �Used to View and Modify Deposition Project Properties.
Import � Presents options for importing images. See Importing Image Files.
Print Document Break Sheets � Prints Document Break Sheets.
Printer Setup � Displays a printer selection and configuration dialog.
Exit � Closes Visionary Sync
Scan Menu
Scan New � Adds new scans as a new document. If the new scans include break sheets, document breaks will be made wherever break sheets are detected.
Append Scanned Pages � Appends new scans to the end of the selected document.
Insert Scanned Pages � Inserts the new scans after the selected page.
Replace Scanned Pages � Replaces the selected pages with new scans (the same thing as Deleting selected pages and then performing an Insert scan).
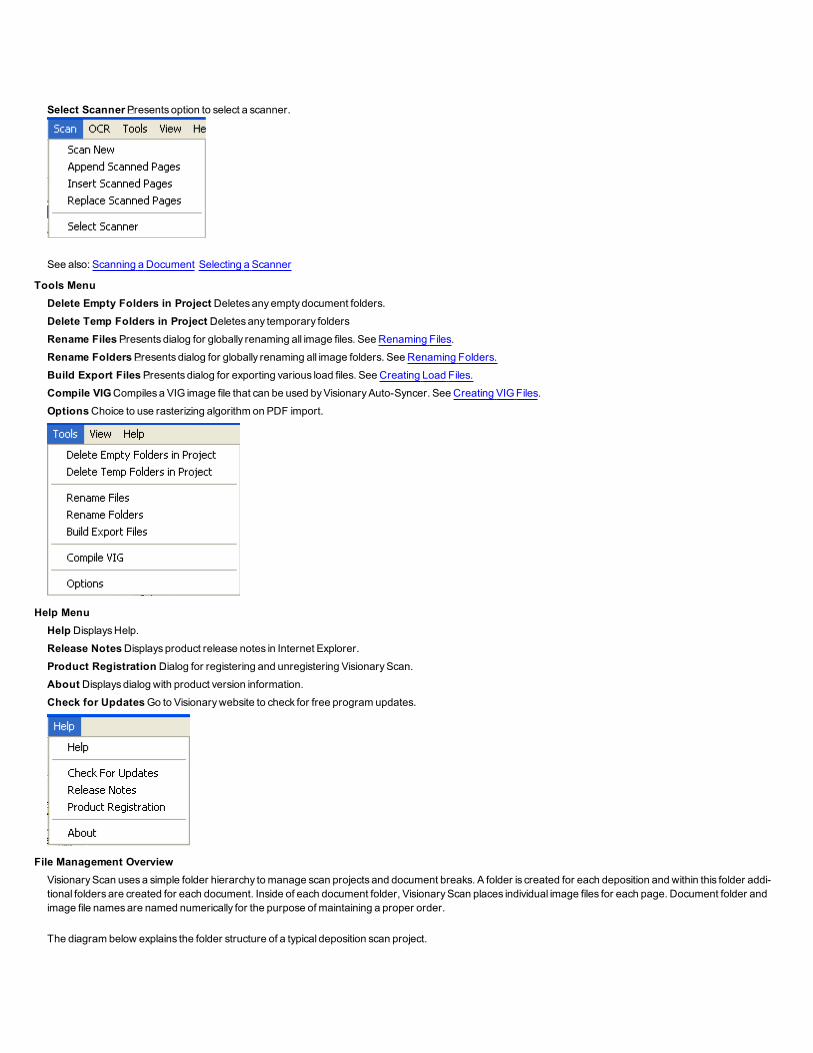
Select Scanner � Presents option to select a scanner.
See also: Scanning a Document Selecting a Scanner
Tools Menu
Delete Empty Folders in Project � Deletes any empty document folders.
Delete Temp Folders in Project � Deletes any temporary folders
Rename Files � Presents dialog for globally renaming all image files. See Renaming Files.
Rename Folders � Presents dialog for globally renaming all image folders. See Renaming Folders.
Build Export Files � Presents dialog for exporting various load files. See Creating Load Files.
Compile VIG � Compiles a VIG image file that can be used by Visionary Auto-Syncer. See Creating VIG Files.
Options Choice to use rasterizing algorithm on PDF import.
Help Menu
Help � Displays Help.
Release Notes � Displays product release notes in Internet Explorer.
Product Registration � Dialog for registering and unregistering Visionary Scan.
About � Displays dialog with product version information.
Check for Updates Go to Visionary website to check for free program updates.
File Management Overview
Visionary Scan uses a simple folder hierarchy to manage scan projects and document breaks. A folder is created for each deposition and within this folder addi-
tional folders are created for each document. Inside of each document folder, Visionary Scan places individual image files for each page. Document folder and
image file names are named numerically for the purpose of maintaining a proper order.
The diagram below explains the folder structure of a typical deposition scan project.
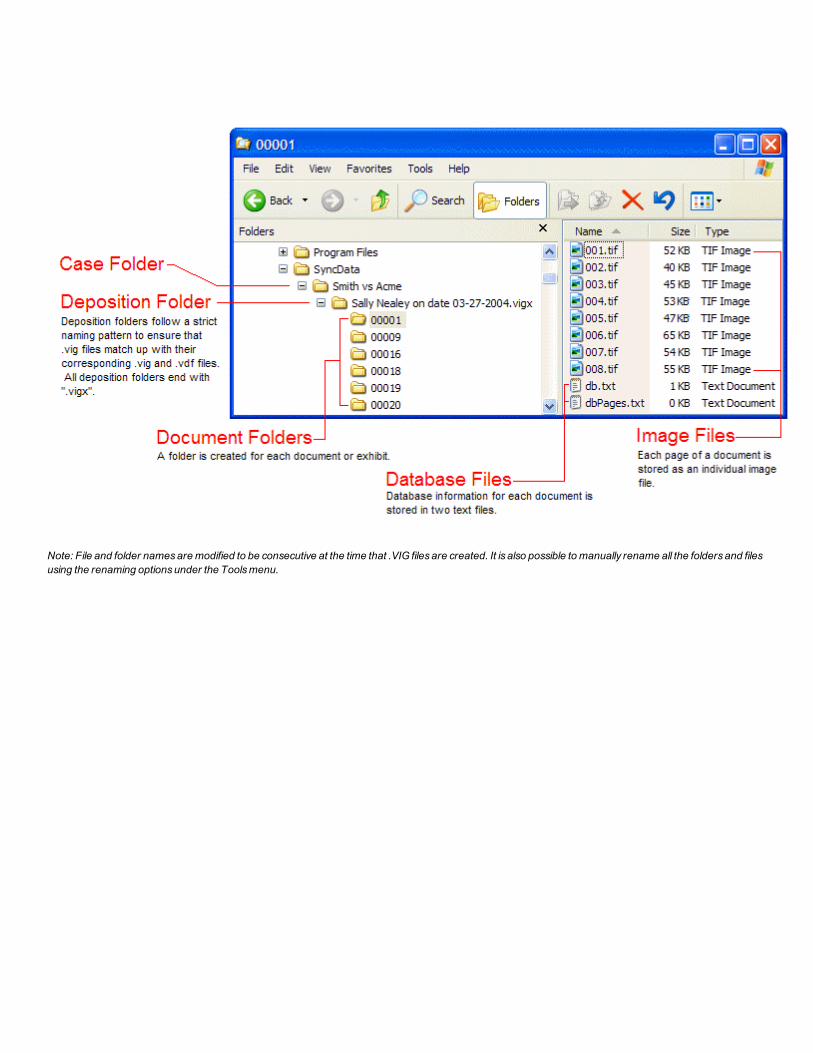
Note: File and folder namesaremodified to be consecutive at the time that .VIG files are created. It is also possible to manually rename all the folders and files
using the renaming optionsunder the Toolsmenu.

Scanning
Selecting a Case Folder
When Visionary Scan starts it either opens to the last case folder or prompts you to select one. Visionary Scan case folders can be the same case folders that are
used by Visionary Auto-Syncer.
To select a case folder:
1. Select the File Open Case Folder menu item
or
Press the �Case Folder item on the top toolbar.
2. Select the desired case folder from the folder selection dialog.
Once a case folder is selected, Visionary Scan will list all the deposition scan projects in the case folder. Scan projects are identified by folder names that have a
first name, last name, date information followed by a ".VIGX" extension.
See also: Selecting a Deposition Scan Project File Management Overview
Creating a Deposition Scan Project
To create a deposition scan project:
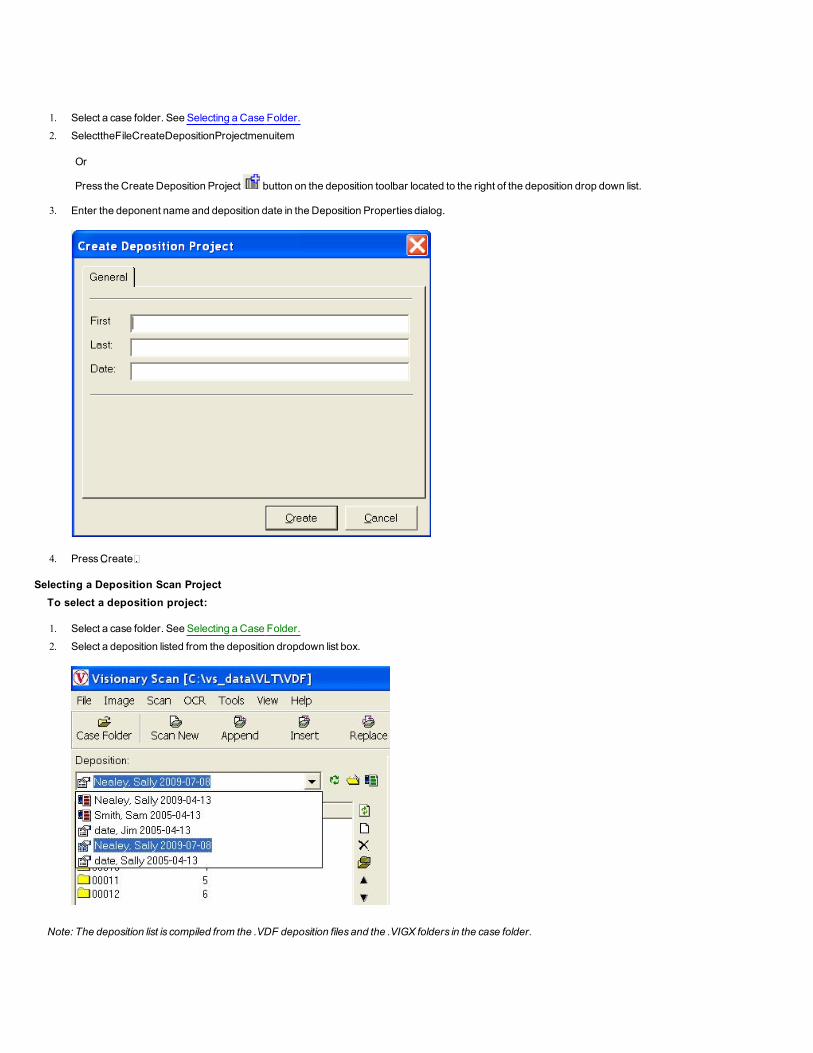
1. Select a case folder. See Selecting a Case Folder.
2. SelecttheFileCreateDepositionProjectmenuitem
Or
Press the Create Deposition Project button on the deposition toolbar located to the right of the deposition drop down list.
3. Enter the deponent name and deposition date in the Deposition Properties dialog.
4. Press �Create�.
Selecting a Deposition Scan Project
To select a deposition project:
1. Select a case folder. See Selecting a Case Folder.
2. Select a deposition listed from the deposition dropdown list box.
Note: The deposition list is compiled from the .VDF deposition files and the .VIGX folders in the case folder.
.
See also: Creating a Deposition Scan Project
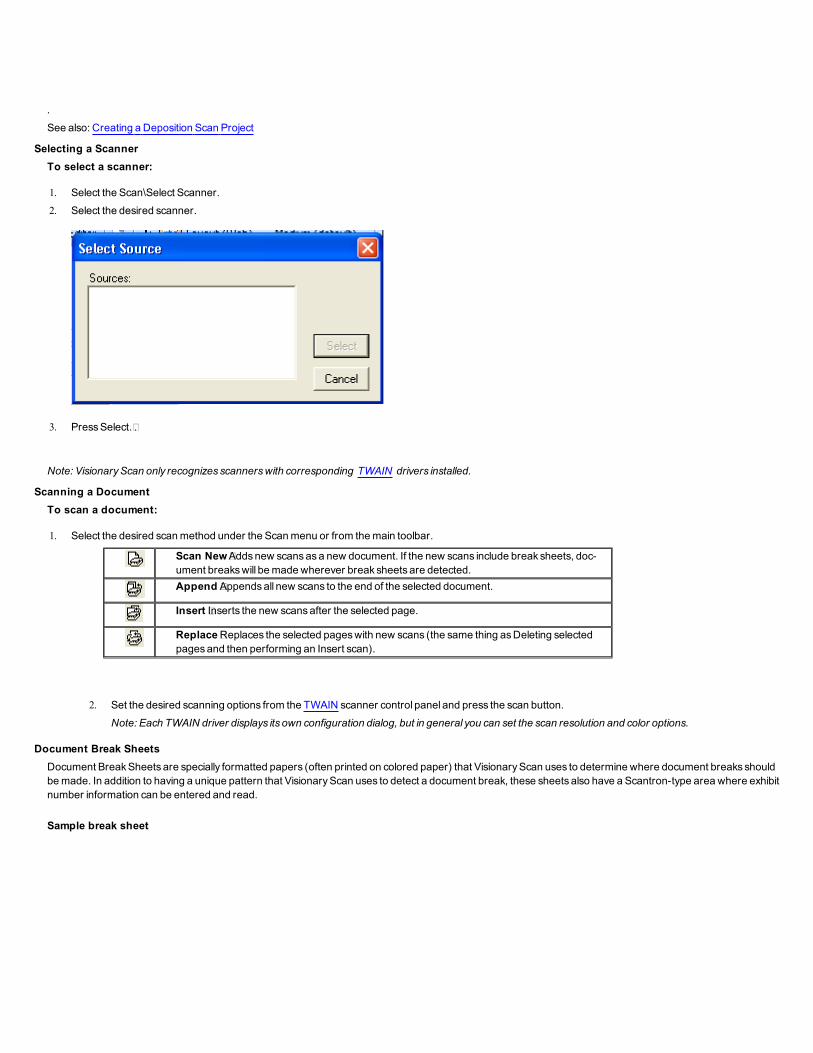
Selecting a Scanner
To select a scanner:
1. Select the Scan\Select Scanner.
2. Select the desired scanner.
3. Press Select.�.
Note: VisionaryScan only recognizes scannerswith corresponding TWAIN drivers installed.
Scanning a Document
To scan a document:
1. Select the desired scan method under the Scan menu or from the main toolbar.
Scan New � Adds new scans as a new document. If the new scans include break sheets, doc-
ument breaks will be made wherever break sheets are detected.
Append � Appends all new scans to the end of the selected document.
Insert � Inserts the new scans after the selected page.
Replace � Replaces the selected pages with new scans (the same thing as Deleting selected
pages and then performing an Insert scan).
2. Set the desired scanning options from the TWAIN scanner control panel and press the scan button.
Note: Each TWAIN driver displays its own configuration dialog, but in general you can set the scan resolution and color options.
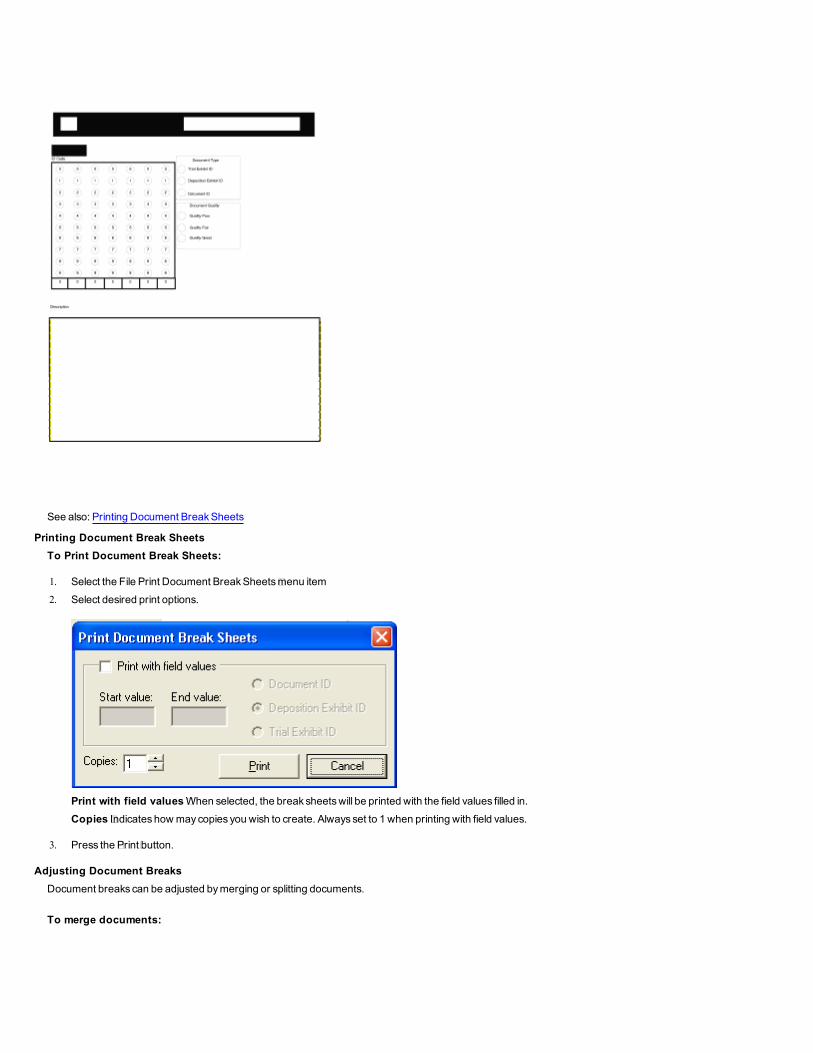
Document Break Sheets
Document Break Sheets are specially formatted papers (often printed on colored paper) that Visionary Scan uses to determine where document breaks should
be made. In addition to having a unique pattern that Visionary Scan uses to detect a document break, these sheets also have a Scantron-type area where exhibit
number information can be entered and read.
Sample break sheet
See also: Printing Document Break Sheets
Printing Document Break Sheets
To Print Document Break Sheets:
1. Select the File Print Document Break Sheets �menu item
2. Select desired print options.
Print with field values � When selected, the break sheets will be printed with the field values filled in.
Copies � Indicates how may copies you wish to create. Always set to 1 when printing with field values.
3. Press the �Print� button.
Adjusting Document Breaks
Document breaks can be adjusted by merging or splitting documents.
To merge documents:
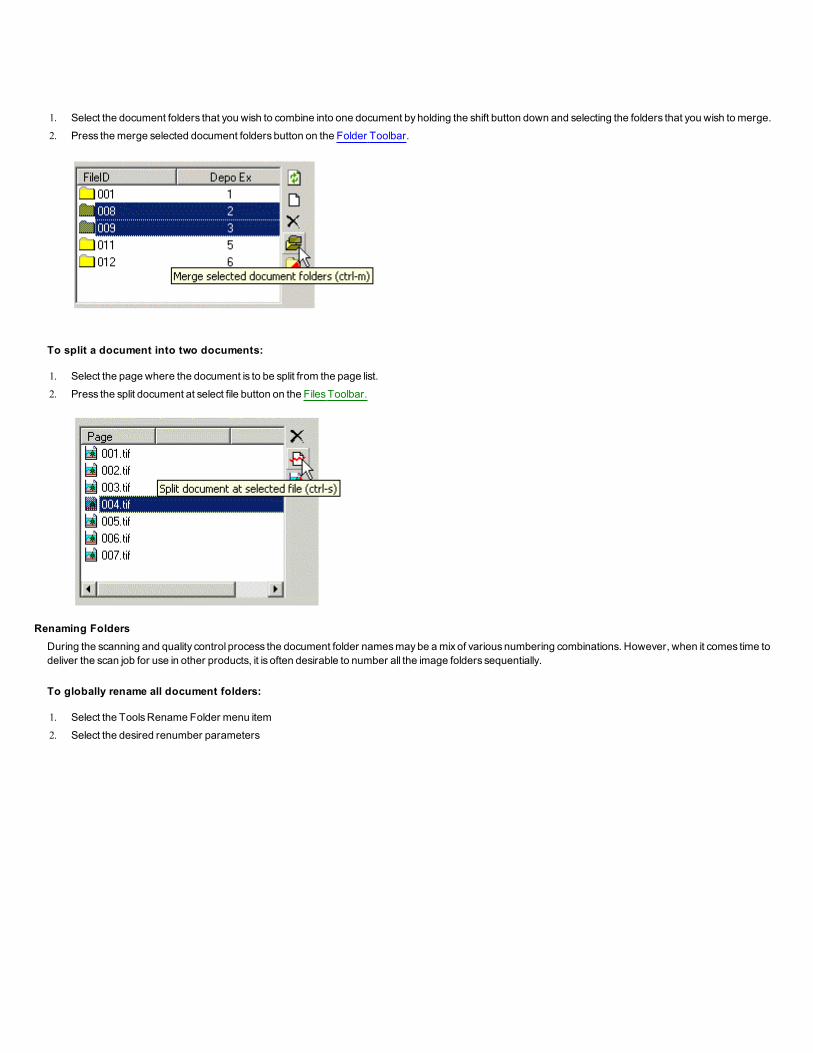
1. Select the document folders that you wish to combine into one document by holding the shift button down and selecting the folders that you wish to merge.
2. Press the merge selected document folders button on the Folder Toolbar.
To split a document into two documents:
1. Select the page where the document is to be split from the page list.
2. Press the split document at select file button on the Files Toolbar.
Renaming Folders
During the scanning and quality control process the document folder names may be a mix of various numbering combinations. However, when it comes time to
deliver the scan job for use in other products, it is often desirable to number all the image folders sequentially.
To globally rename all document folders:
1. Select the Tools Rename Folder menu item
2. Select the desired renumber parameters
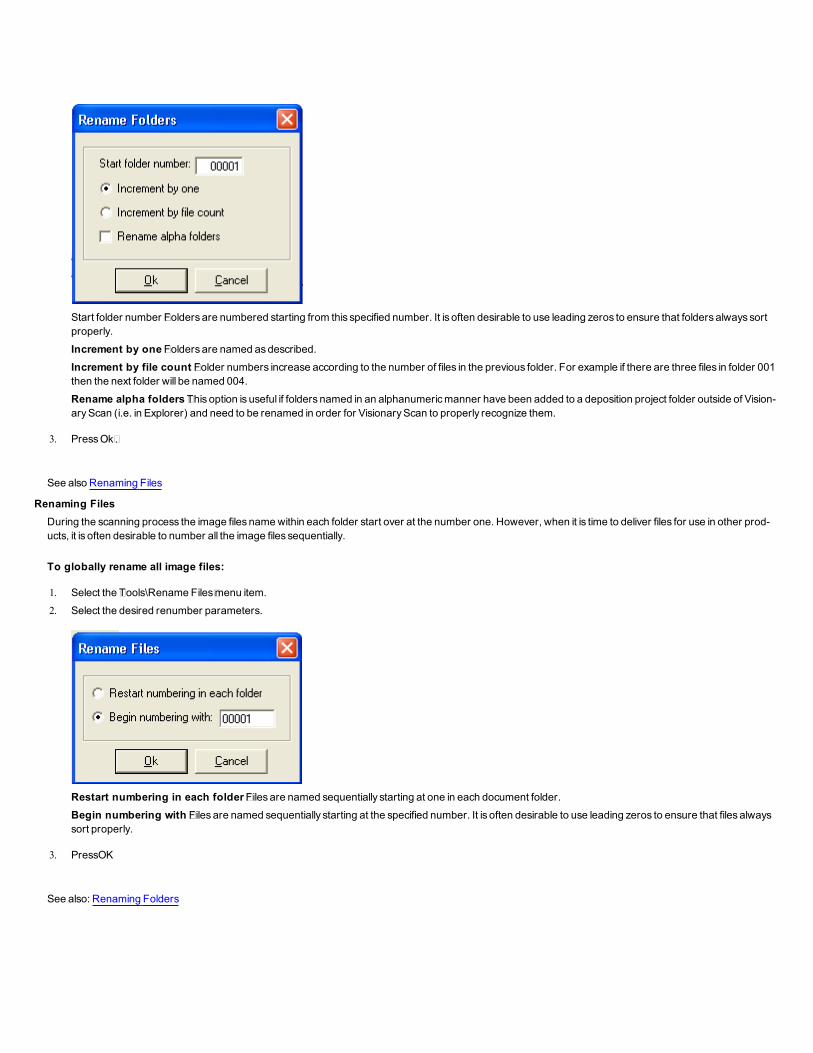
Start folder number � Folders are numbered starting from this specified number. It is often desirable to use leading zeros to ensure that folders always sort
properly.
Increment by one � Folders are named as described.
Increment by file count � Folder numbers increase according to the number of files in the previous folder. For example if there are three files in folder 001
then the next folder will be named 004.
Rename alpha folders � This option is useful if folders named in an alphanumeric manner have been added to a deposition project folder outside of Vision-
ary Scan (i.e. in Explorer) and need to be renamed in order for Visionary Scan to properly recognize them.
3. Press �Ok�.
See also Renaming Files
Renaming Files
During the scanning process the image files name within each folder start over at the number one. However, when it is time to deliver files for use in other prod-
ucts, it is often desirable to number all the image files sequentially.
To globally rename all image files:
1. Select the �Tools\Rename Files� menu item.
2. Select the desired renumber parameters.
Restart numbering in each folder � Files are named sequentially starting at one in each document folder.
Begin numbering with � Files are named sequentially starting at the specified number. It is often desirable to use leading zeros to ensure that files always
sort properly.
3. PressOK
See also: Renaming Folders
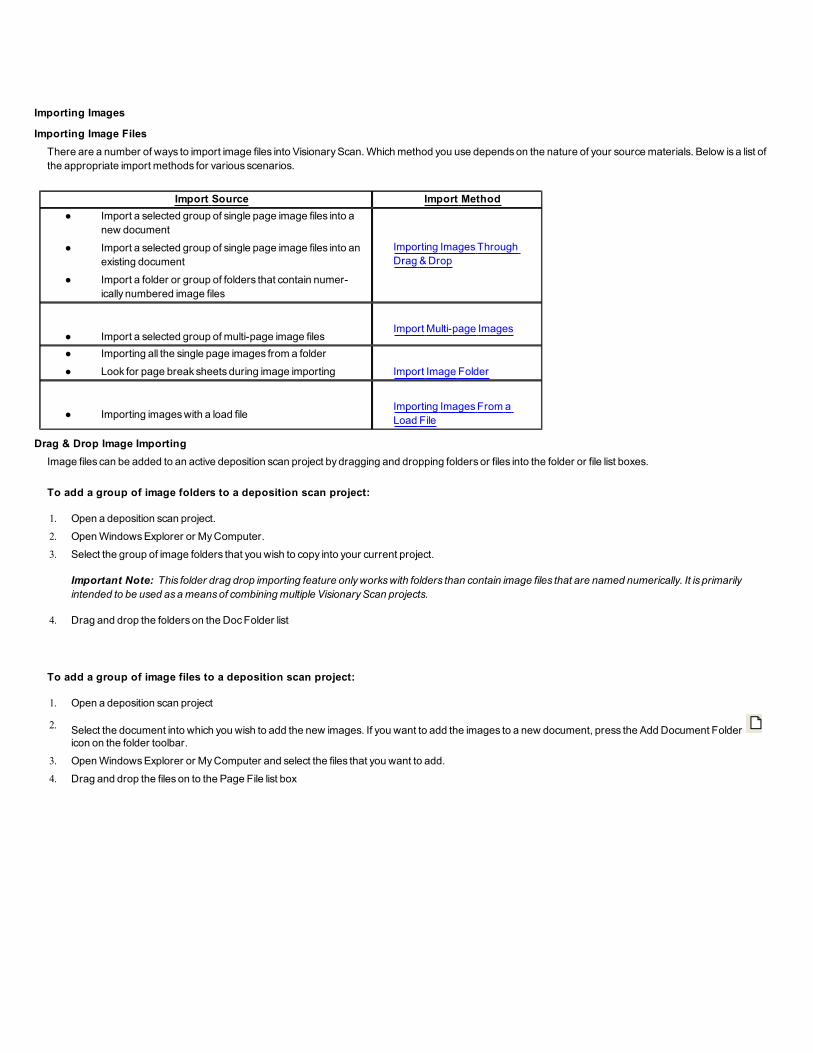
Importing Images
Importing Image Files
There are a number of ways to import image files into Visionary Scan. Which method you use depends on the nature of your source materials. Below is a list of
the appropriate import methods for various scenarios.
Import Source Import Method
l Import a selected group of single page image files into a
new document
l Import a selected group of single page image files into an
existing document
l Import a folder or group of folders that contain numer-
ically numbered image files
Importing Images Through
Drag & Drop
l Import a selected group of multi-page image filesImport Multi-page Images
l Importing all the single page images from a folder
l Look for page break sheets during image importing Import Image Folder
l Importing images with a load fileImporting Images From a
Load File
Drag & Drop Image Importing
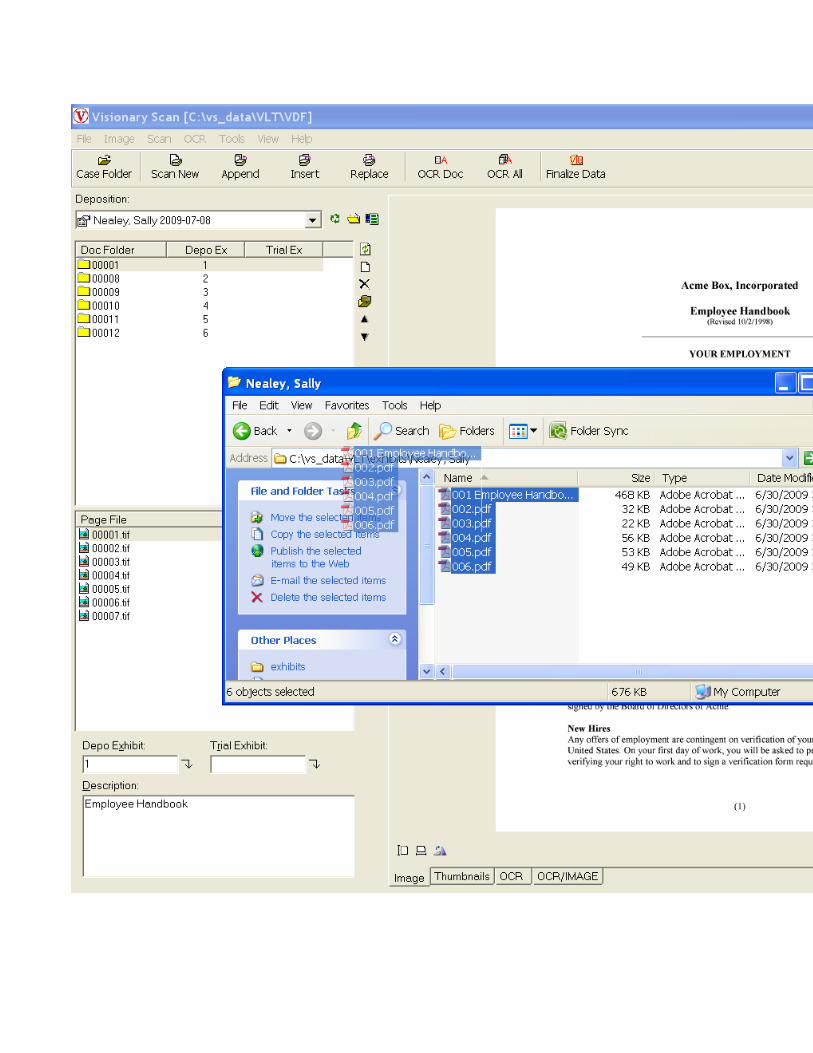
Image files can be added to an active deposition scan project by dragging and dropping folders or files into the folder or file list boxes.
To add a group of image folders to a deposition scan project:
1. Open a deposition scan project.
2. Open Windows Explorer or My Computer.
3. Select the group of image folders that you wish to copy into your current project.
Important Note: This folder drag drop importing feature onlyworkswith folders than contain image files that are named numerically. It is primarily
intended to be used asameansof combiningmultiple VisionaryScan projects.
4. Drag and drop the folders on the Doc Folder list
To add a group of image files to a deposition scan project:
1. Open a deposition scan project
2.Select the document into which you wish to add the new images. If you want to add the images to a new document, press the Add Document Foldericon on the folder toolbar.
3. Open Windows Explorer or My Computer and select the files that you want to add.
4. Drag and drop the files on to the Page File list box
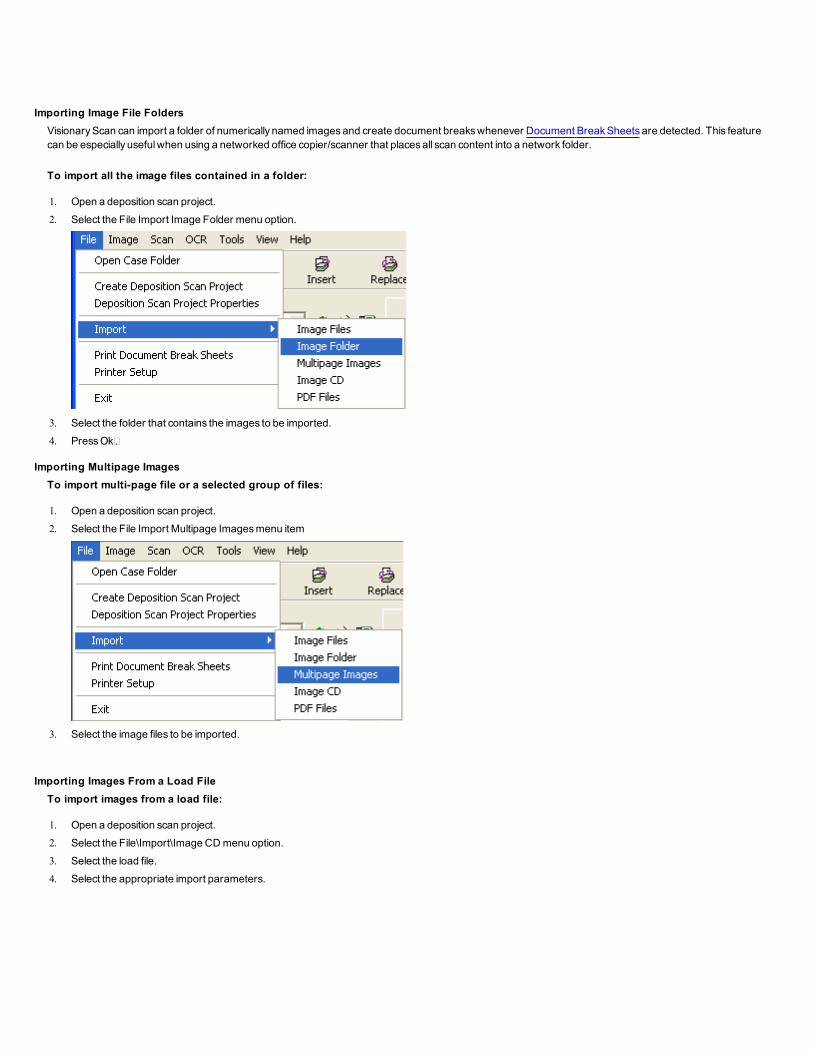
Importing Image File Folders
Visionary Scan can import a folder of numerically named images and create document breaks whenever Document Break Sheets are detected. This feature
can be especially useful when using a networked office copier/scanner that places all scan content into a network folder.
To import all the image files contained in a folder:
1. Open a deposition scan project.
2. Select the File Import Image Folder menu option.
3. Select the folder that contains the images to be imported.
4. Press �Ok�.
Importing Multipage Images
To import multi-page file or a selected group of files:
1. Open a deposition scan project.
2. Select the File Import Multipage Images menu item
3. Select the image files to be imported.
Importing Images From a Load File
To import images from a load file:
1. Open a deposition scan project.
2. Select the File\Import\Image CD menu option.
3. Select the load file.
4. Select the appropriate import parameters.

CD Load File � Source load file
Root Image Folder � Identifies the root folder to the image paths identified in the CD load file.
Load File Type � The type of image load file.
Volume Label � Indicates the volume label in the load file.
5. Press the OK button.
Note: VisionaryScan uses the Root Image Folder parameter along with the load file information to determine the path to the image files, which are then copied
into the deposition scan project.
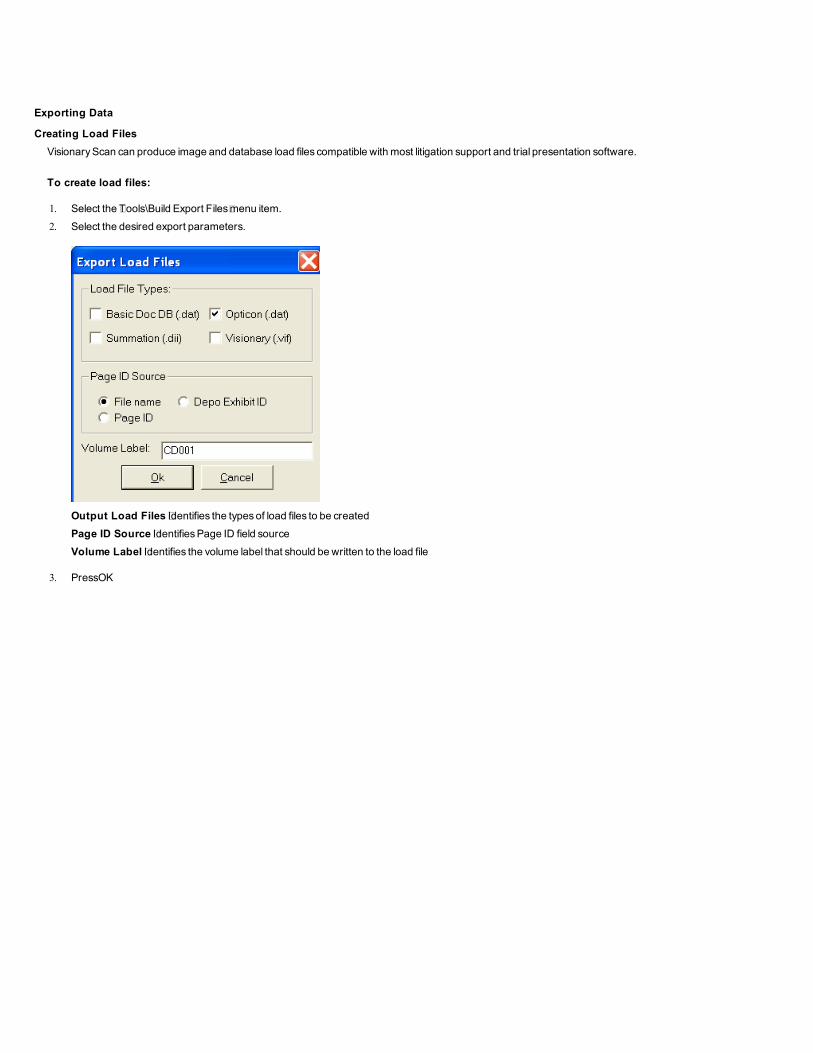
Exporting Data
Creating Load Files
Visionary Scan can produce image and database load files compatible with most litigation support and trial presentation software.
To create load files:
1. Select the �Tools\Build Export Files� menu item.
2. Select the desired export parameters.
Output Load Files � Identifies the types of load files to be created
Page ID Source � Identifies Page ID field source
Volume Label � Identifies the volume label that should be written to the load file
3. PressOK

Finalizing Data
Creating VIG Files
To create a VIG file:
1. Scan documents.
2. Complete Coding of the documents.
3. Select the �Tools\Compile VIG� menu option.
or
Press the �Compile VIG� button on the top toolbar.
4. Select the Page ID output options
Standard ID Format � (recommended) creates an ID based on the deponent�s name, deposition date and a counter
Custom ID Format � Creates an ID based on user preference. If desired, an alpha prefix can be used. For example, if "DEX0100" is entered the first page
will have the ID "DEX0100", followed by "DEX0101", "DEX0102", etc.
Note: The Page ID providesan identifier for each page of each document. Most litigation support and trial presentation software require that this ID be
unique for all pagesof all documents for the entire case. Thus, if you restart the Page ID value for each deposition within the same case, a conflict will arise
when the image files from all the depositionsaremerged together into a common database.
5. PresstheOKbutton
See also: Visionary Image Group
Using VIG Files in Visionary Viewer
Visionary Viewer has the ability to display the images scanned and coded in Visionary Scan along with synchronized video created by Visionary Auto-Syncer.
The process of delivering the scanned images in the .VIG format and transcripts in the .VDF format to Visionary Viewer, are outlined in the diagram below.

See also: Using with Visionary Auto-Syncer
Using VIG Files with Visionary
Visionary can import .VIG files created in Visionary Scan without the need to associate the .VIG with any .VDF file or the use of the Visionary Auto-Syncer. VIG
files are probably the easiest way for end users to import new image sets into a case because there is no need to manually copy images from a CD or zip file, nor
is there a need to import load files. Users simply select the VIG file and everything else is done automatically.
Unlike Visionary Viewer, Visionary does not require VIG files to be published. Accordingly, you can distribute .VIG files for Visionary at no cost and without the
need to use the Visionary Auto-Syncer.
Appendix
Shortcut Keys
Scanning
F2 Scan new document
F3 Scan and append to selected document
F4 Scan and insert in selected document at selected page
F5 Scan and replace selected page(s)
Image Viewing
CTRL-T Thumbnail view
CTRL-H Fit to height
CTRL-W Fit to width
CTRL- Left arrow Rotate clockwise
CTRL - Right Arrow Rotate counter clockwise
Database
CTRL-R Rename selected document folder or file
CTRL-F Flag selected document folder or file
PAGE UP Show previous document
PAGE DOWN Show next document
TWAIN
TWAIN is an image capture standard that is used as an interface between image processing software and a scanner or digital camera. TWAIN drivers are typ-
ically supplied by scanner manufacturers and must be installed before Visionary Scan can recognize them as input sources.
Visionary Viewer
Visionary Viewer is a deposition review tool that allows users to view deposition videos and exhibits. It also provides basic printing, data export and clip functions.
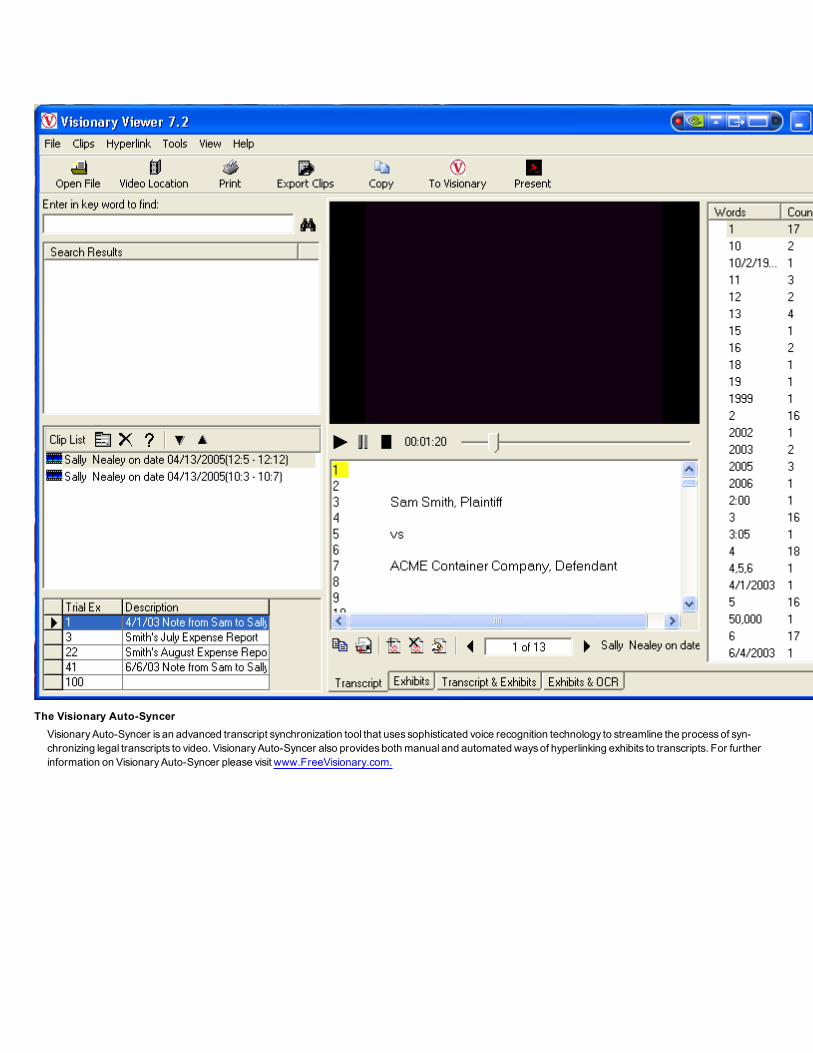
The Visionary Auto-Syncer
Visionary Auto-Syncer is an advanced transcript synchronization tool that uses sophisticated voice recognition technology to streamline the process of syn-
chronizing legal transcripts to video. Visionary Auto-Syncer also provides both manual and automated ways of hyperlinking exhibits to transcripts. For further
information on Visionary Auto-Syncer please visit www.FreeVisionary.com.

Visionary Deposition Format (.VDF)
.VDF files are created by the Visionary Auto-Syncer and contain transcript, hyperlink, video file reference, and sync information. .VDF files can be viewed in
Visionary Viewer and imported into Visionary.
Visionary Image Group (.VIG)
Visionary Image Group (.VIG) files are used for packaging a group of images into a single easy-to-distribute file. VIG files published by Visionary Auto-Syncer can
be viewed in Visionary Viewer. Both unpublished and published .VIG files can be imported into Visionary .
Visionary Scan
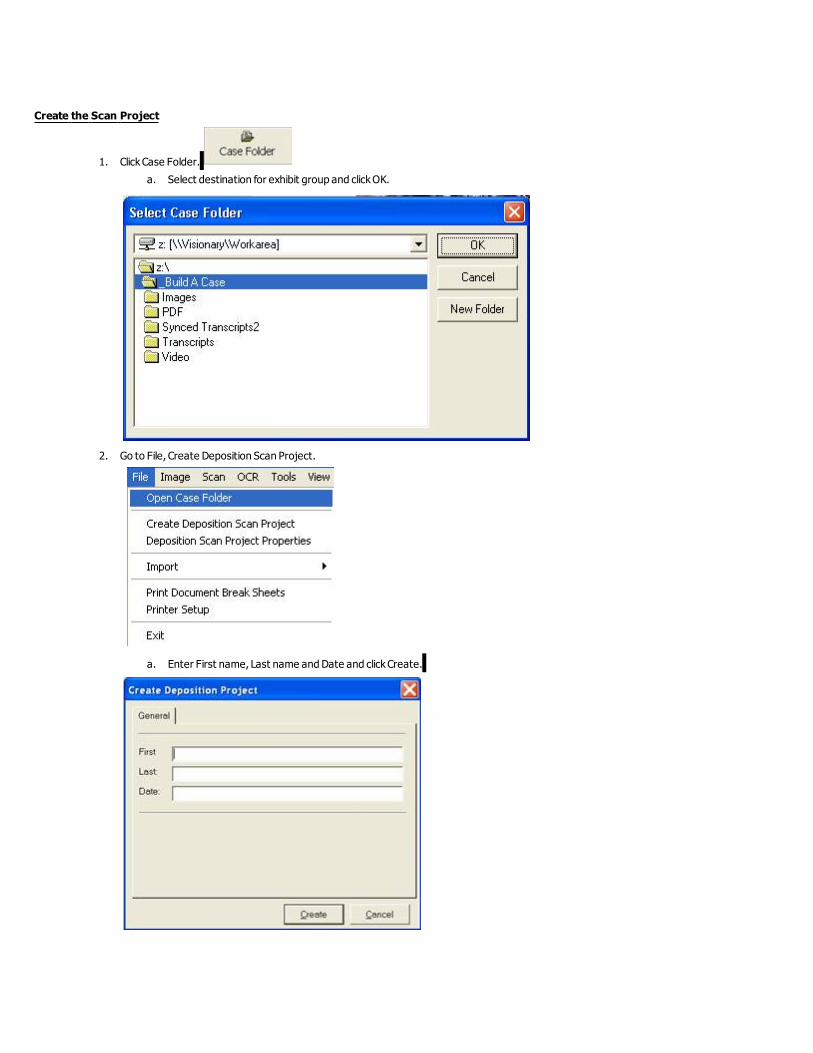
Create the Scan Project
1. Click Case Folder.
a. Select destination for exhibit group and click OK.
2. Go to File, Create Deposition Scan Project.
a. Enter First name, Last name and Date and click Create.
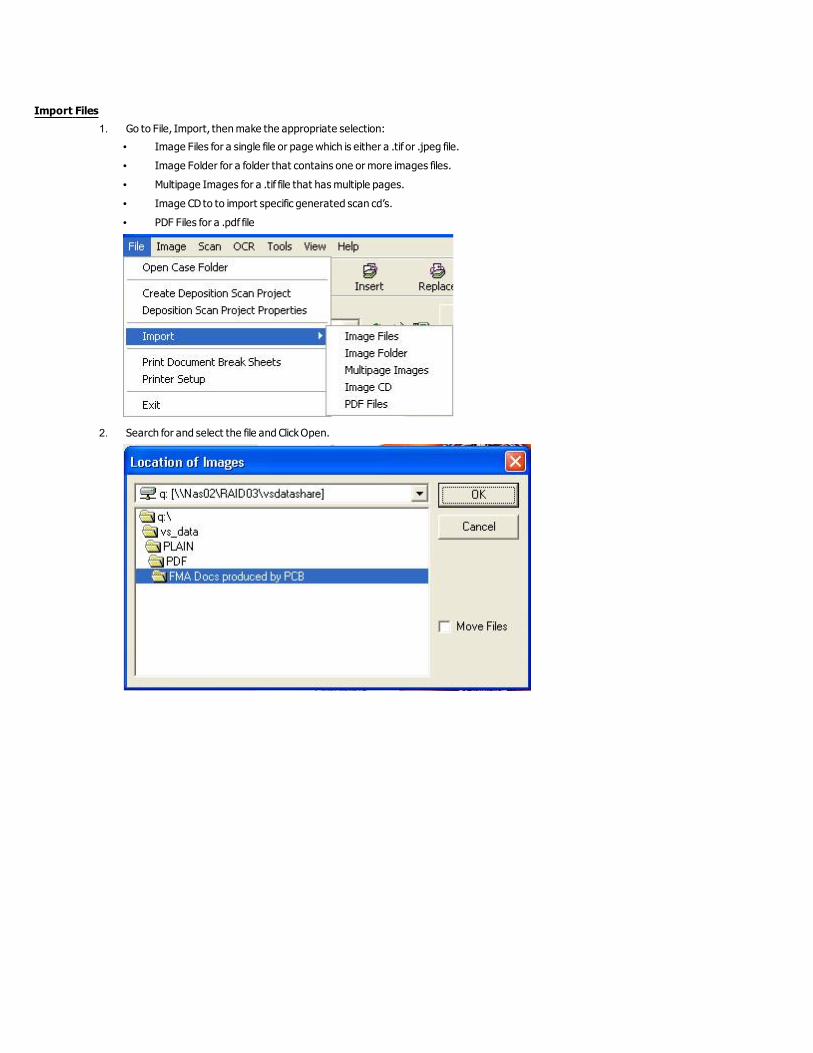
Import Files
1. Go to File, Import, then make the appropriate selection:
• Image Files for a single file or page which is either a .tif or .jpeg file.
• Image Folder for a folder that contains one or more images files.
• Multipage Images for a .tif file that has multiple pages.
• Image CD to to import specific generated scan cd’s.
• PDF Files for a .pdf file
2. Search for and select the file and Click Open.

Viewing Exhibits
1. Select the Thumbnails tab at the bottom of the screen to see thumbnails of the images.
2. Click Image, View Thumb Count to change the number of thumbnails you view per screen, this can be set to as low as two or as much as twelve
images at once.
Splitting Exhibits
1. If a single exhibit needs to be separated into two separate exhibits, pull up the exhibit.
2. Select the page that should be the first page of the next exhibit
a. Right-click and select split document.
Orb. click the split document button.
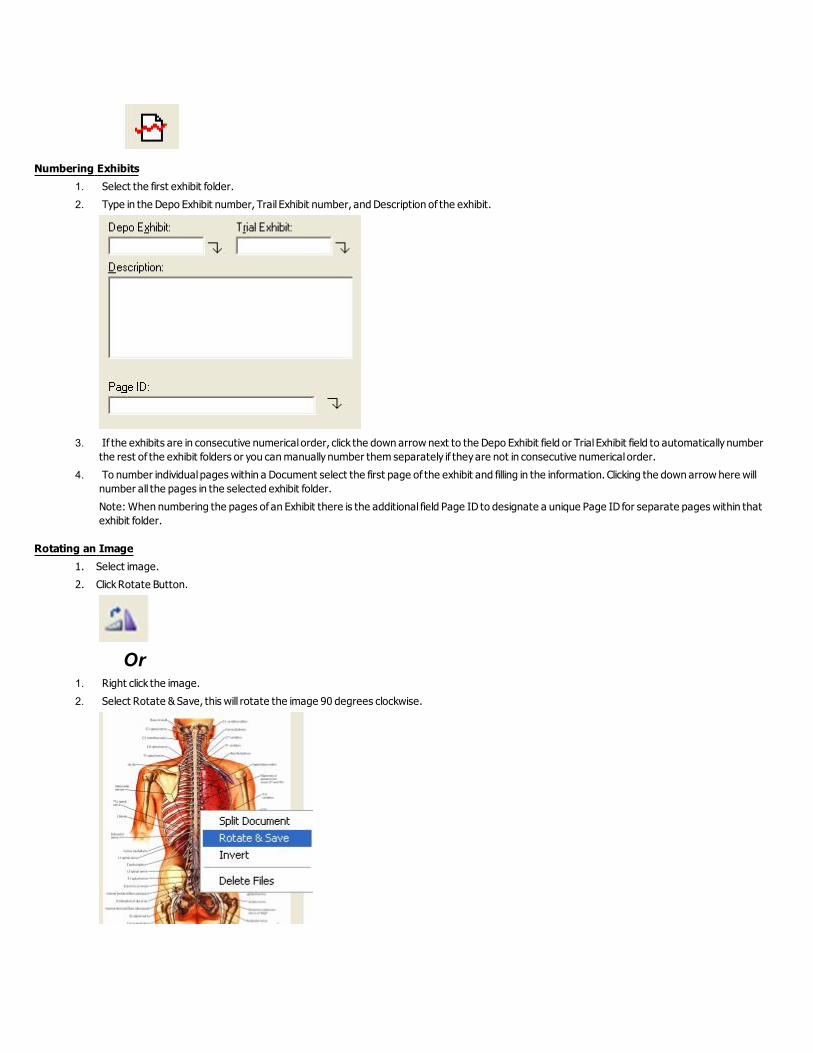
Numbering Exhibits
1. Select the first exhibit folder.
2. Type in the Depo Exhibit number, Trail Exhibit number, and Description of the exhibit.
3. If the exhibits are in consecutive numerical order, click the down arrow next to the Depo Exhibit field or Trial Exhibit field to automatically number
the rest of the exhibit folders or you can manually number them separately if they are not in consecutive numerical order.
4. To number individual pages within a Document select the first page of the exhibit and filling in the information. Clicking the down arrow here will
number all the pages in the selected exhibit folder.
Note: When numbering the pages of an Exhibit there is the additional field Page ID to designate a unique Page ID for separate pages within that
exhibit folder.
Rotating an Image
1. Select image.
2. Click Rotate Button.
Or1. Right click the image.
2. Select Rotate & Save, this will rotate the image 90 degrees clockwise.
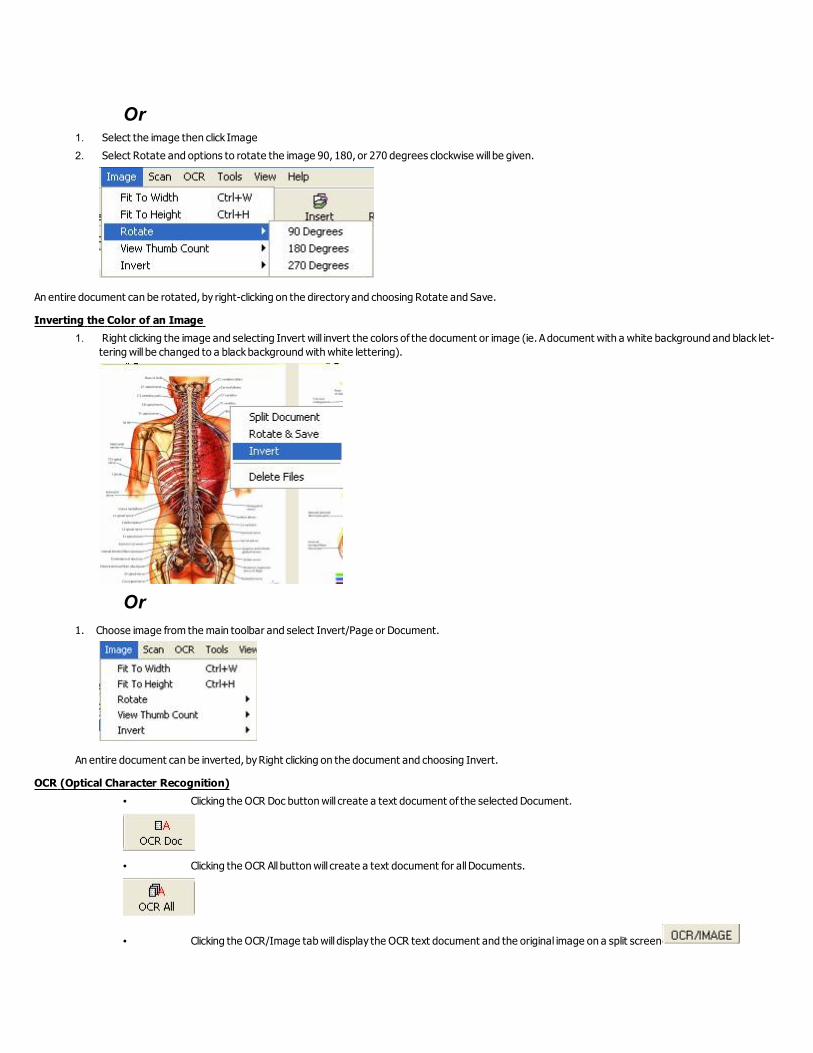
Or1. Select the image then click Image
2. Select Rotate and options to rotate the image 90, 180, or 270 degrees clockwise will be given.
An entire document can be rotated, by right-clicking on the directory and choosing Rotate and Save.
Inverting the Color of an Image
1. Right clicking the image and selecting Invert will invert the colors of the document or image (ie. Adocument with a white background and black let-
tering will be changed to a black background with white lettering).
Or
1. Choose image from the main toolbar and select Invert/Page or Document.
An entire document can be inverted, by Right clicking on the document and choosing Invert.
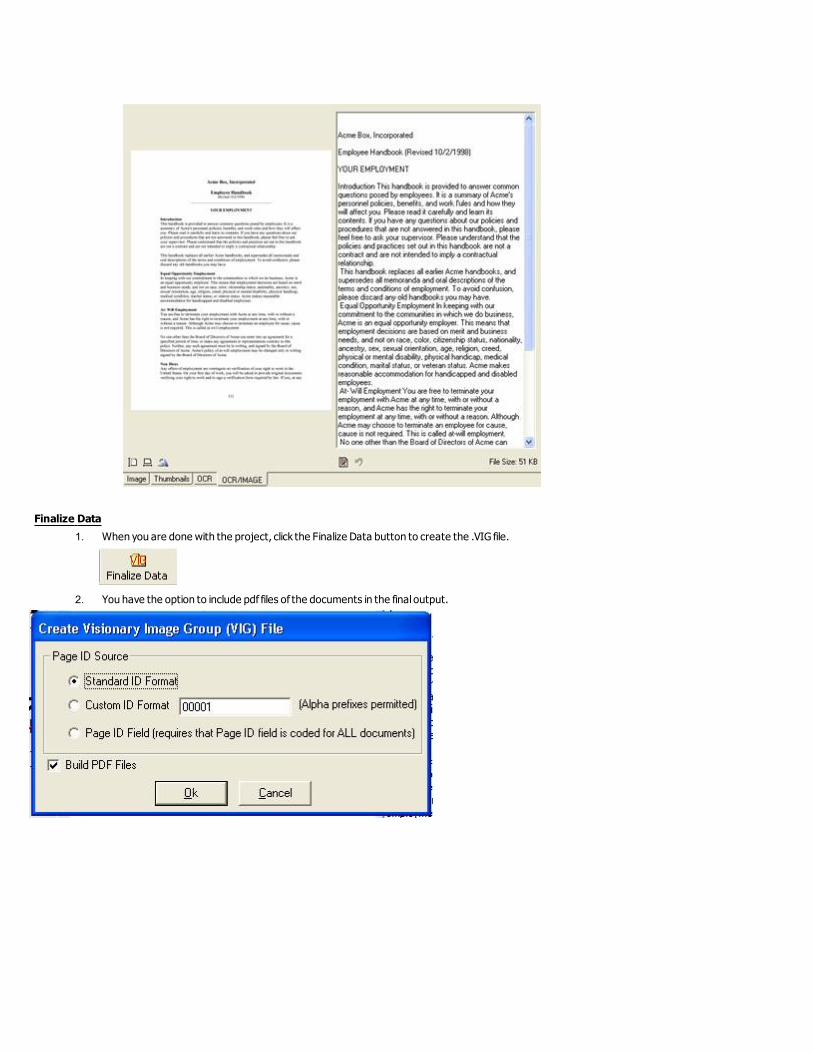
OCR (Optical Character Recognition)
• Clicking the OCR Doc button will create a text document of the selected Document.
• Clicking the OCR All button will create a text document for all Documents.
• Clicking the OCR/Image tab will display the OCR text document and the original image on a split screen
Finalize Data
1. When you are done with the project, click the Finalize Data button to create the .VIG file.
2. You have the option to include pdf files of the documents in the final output.