Embed Size (px)
Citation preview
APR IL/ MAY 2006 - VOL . 2 NO. 2
www.VirtualInstrumentsMag.com
USA $4.95CANADA $6.50
THE WORLD OF SOFTSYNTHS AND SAMPLERS
WIN a Universal Audio UAD-1 Ultra PAK in our Mungo Giveaway!
V E RY D E E P C L I N I C :
Cubase
SX3Most excellent tips forthe famous sequencer
Build the revolutionarymulti-machine rig – it’s easy.
REVIEWED:East West/Quantum Leap Symphonic OrchestraProfessional Expansion • Cakewalk Dimension Pro •Mick Fleetwood: Total Drumming • Loopmasters OriginSeries: Percussionism, Raw Power, Hip Hop Progressions,and Polyester Loops • Line 6 Variac Workbench
Is Scarbee Imperial Drums XL the most advanced drum library ever?
WIN a Universal Audio UAD-1 Ultra PAK in our Mungo Giveaway!

2 V I R T U A L I N S T R U M E N T S
From the
Virtual Instruments is published bi-monthlyfor $12.95/year, $20/two years (with occa-
sional add-on one-year promotions for$9.95) by Virtual Instruments, Inc., 3849
Ventura Canyon, Sherman Oaks, CA91423-4710. 818/905-5434, 1-877/ViMagzn.
[email protected] to Mail at Periodicals PostageRates is Pending at Van Nuys, CA, and atadditional mailing offices. POSTMASTER:please send address changes to VIRTUAL
INSTRUMENTS, 3849 VENTURACANYON, SHERMAN OAKS, CA 91423-
4710.
Editor
Editor/publisher: Nick Batzdorf
Art director: Lachlan Westfall/Quiet Earth Design
Ad/marketing manager: Carl Marinoff
Web designer: Denise Young/DMY Studios
Contributors: Jim Aikin, Peter Buick, David Das, Doyle Donehoo, Jerry
Gerber, David Govett, Ashif “King Idiot” Hakik, Monte McGuire, Orren
Merton, Chris Meyer, Dave Moulton, Zack Price, Frederick Russ, Bruce
Richardson, Craig Sharmat, Lee Sherman, Dietz Tinhof, Jesse White.
Advertising contact: Carl Marinoff 818/590-0018.
Subscriptions/Address changes: 818/905-5434, 1-877/ViMagzn,
[email protected]. The best method is to subscribe
via our website: www.VirtualInstrumentsMag.com.
Letters to the editor: [email protected]
Writing for Virtual Instruments Magazine: query
[email protected] or call 818/905-9101
Welcome to the fifth issue of VI.One of the hot topics for V.I. users these days is net-
working. And before going any farther, I want to empha-size you should absolutely not get scared if you aren’t net-working multiple computers in your rig. You can get a lotof music out of a single machine, and there’s plenty ofgreat material for you in this issue.
However, the large, streaming sample libraries we have today—such as Scarbee Imperial Drums XL and theEWQLSO XP orchestra reviewed in this issue—can devour asignificant part (SID XL) or all (EWQLSO XP) of a singlemachine for breakfast. And they’re putting the machines togood use, they’re not being wasteful.
So until the elusive single machine that can do all thedancing becomes available, it makes sense in a moredeluxe rig to throw multiple computers at the job. Andnow that computers have reached the point where the lastgeneration is still capable of running some V.l.s, that’s allthe more practical; you can throw your “old” machines atthe job instead of sticking them in the garage.
Jesse White, consulting tech to some of the busiest com-posers in Los Angeles, has contributed an article explainingone really elegant way to set up a completely integrated
multi-machine rig. It’s very clever. The entire thing canstream into your main DAW, connected by just a singleCAT5e ethernet cable. That single cable carries multiplechannels of audio, MIDI, and the keyboard/video/mouse.Jesse has actually done this in busy, high-pressure workingsituations—it’s not just theoretical.
Now, many of you aren’t likely to use four or moremachines. The article is still well worth reading, becauseyou don’t have go all the way with this kind of rig. There’sa good chance you can incorporate some of its ideas intoyour set-up.
For example, did you know there’s a cross-platform fea-ture built into Windows XP Pro (Remote Access) that letsyou share a keyboard, monitor, and mouse over ethernet?Especially over gigabit ethernet, remote Access is snappyenough to be perfectly usable. (The Mac client is availablefor free download at www.Mactopia.com.)
Or maybe your laptop sits unused in its case whenyou’re not out sipping cappuccino. Why not just plug inan ethernet cable, have it come up in a window in yourmain DAW, and put it to work in your studio? For example.
Enjoy the issue.
Distributor: Rider Circulation Services, 3700Eagle Rock Blvd., Los Angeles, CA 90065.
323/344-1200. Bipad: 05792, UPC: 0 744 7005792 5 05
Standard disclaimer: Virtual InstrumentsMagazine and its staff can’t be held legallyresponsible for the magazine’s contents or
guarantee the return of articles and graphicssubmitted. Reasonable care is taken to ensure
accuracy. All trademarks belong to their owners.Everything in here is subject to international
copyright protection, and you may not copy orimitate anything without permission.
© 2006 Virtual Instruments, Inc.

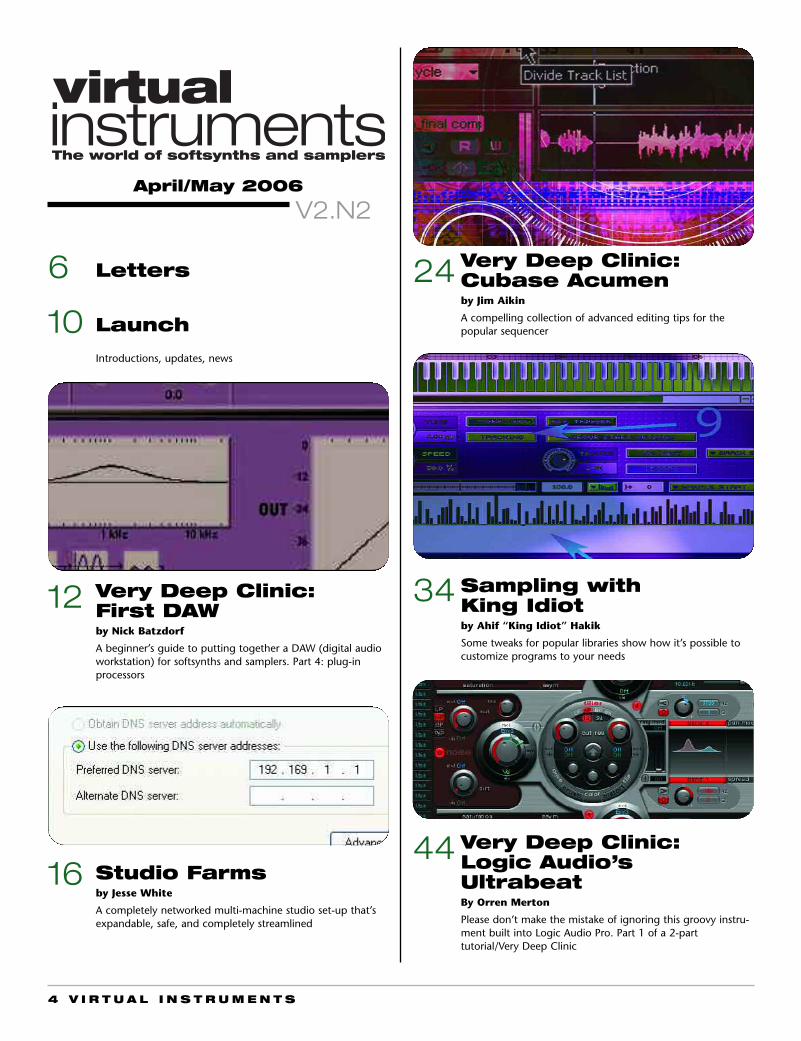
Studio Farms by Jesse White
A completely networked multi-machine studio set-up that’sexpandable, safe, and completely streamlined
4 V I R T U A L I N S T R U M E N T S
Letters
Launch
Introductions, updates, news
6
16
10
April/May 2006
V2.N2
Very Deep Clinic:Logic Audio’sUltrabeat By Orren Merton
Please don’t make the mistake of ignoring this groovy instru-ment built into Logic Audio Pro. Part 1 of a 2-parttutorial/Very Deep Clinic
44
Very Deep Clinic: First DAW by Nick Batzdorf
A beginner’s guide to putting together a DAW (digital audioworkstation) for softsynths and samplers. Part 4: plug-inprocessors
34
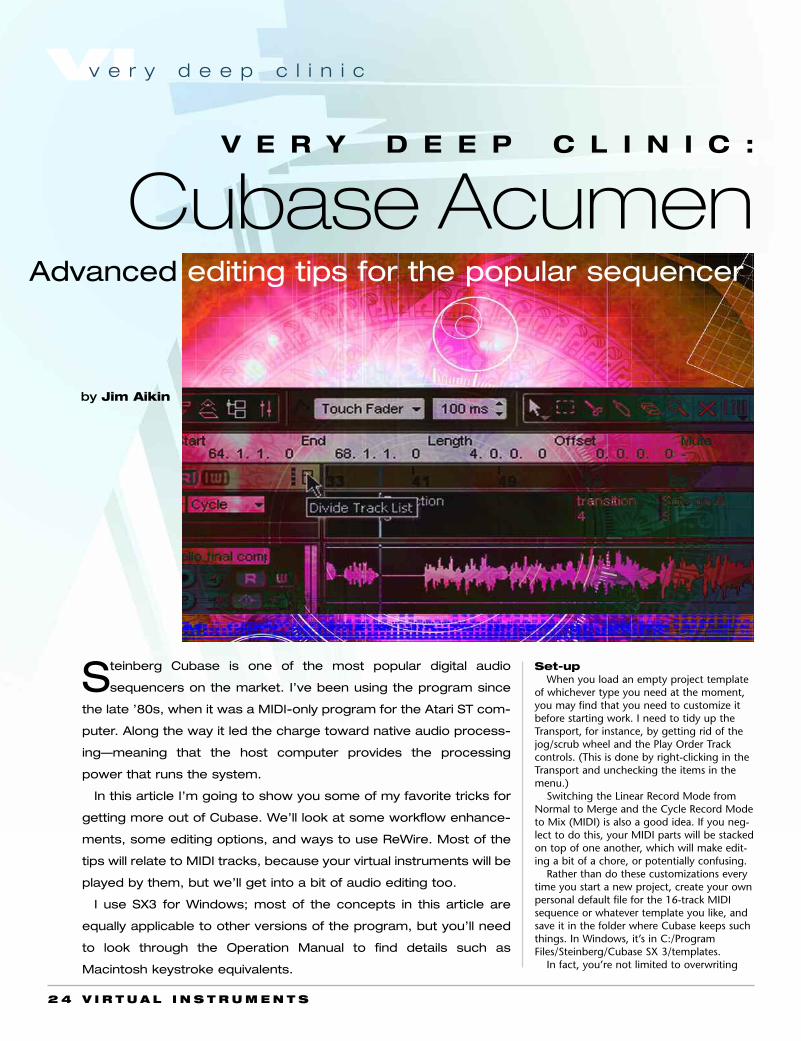
Very Deep Clinic:Cubase Acumen by Jim Aikin
A compelling collection of advanced editing tips for the popular sequencer
Sampling with King Idiot by Ahif “King Idiot” Hakik
Some tweaks for popular libraries show how it’s possible tocustomize programs to your needs
12
24
VIV I R T U A L I N S T R U M E N T S 5
VI
VI
contents
reviews
30, 42
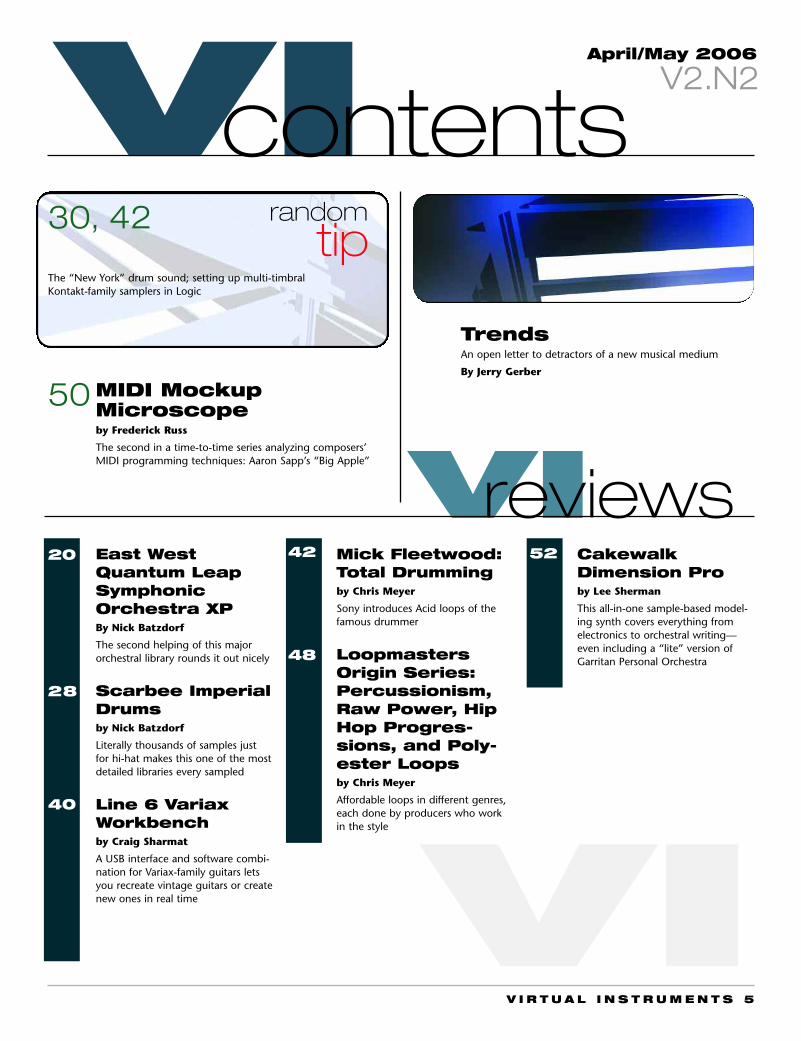
East WestQuantum LeapSymphonicOrchestra XP By Nick Batzdorf
The second helping of this majororchestral library rounds it out nicely
Scarbee ImperialDrums by Nick Batzdorf
Literally thousands of samples justfor hi-hat makes this one of the mostdetailed libraries every sampled
Line 6 VariaxWorkbench by Craig Sharmat
A USB interface and software combi-nation for Variax-family guitars letsyou recreate vintage guitars or createnew ones in real time
Mick Fleetwood:Total Drumming by Chris Meyer
Sony introduces Acid loops of thefamous drummer
LoopmastersOrigin Series:Percussionism,Raw Power, HipHop Progres-sions, and Poly-ester Loops by Chris Meyer
Affordable loops in different genres,each done by producers who workin the style
CakewalkDimension Pro by Lee Sherman
This all-in-one sample-based model-ing synth covers everything fromelectronics to orchestral writing—even including a “lite” version ofGarritan Personal Orchestra
April/May 2006
V2.N2
5064
20
28
40
42
48
52
randomtip
MIDI MockupMicroscope by Frederick Russ
The second in a time-to-time series analyzing composers’MIDI programming techniques: Aaron Sapp’s “Big Apple”
TrendsAn open letter to detractors of a new musical medium
By Jerry Gerber
The “New York” drum sound; setting up multi-timbral Kontakt-family samplers in Logic
6 V I R T U A L I N S T R U M E N T S
Y VIThere are two reasons I subscribed to your
magazine.1. You stuck up for beginners, for whom
I’m just one of many, in your response to theletter on “Networks, notation and no copying(2-3/06).” We beginners need all the basicswe can get. Copying all the Help Chapters inan application or program isn’t going tomake you a geek when the instructions areconfusing or just plain wrong! Books becomeobsolete too soon. Tech Support has its prob-lems. Hence, a magazine, and its articles, isgreat for everybody, if everybody is consid-ered.
2. Jim Aikin. I believe he is one of the best,if not the best. His honesty in his reviews, andhis ability to write and explain what he’s talk-ing about is the best, in my book. For exam-ple: if he uses an acronym, he’ll go the extramile and write out what it stands for.
I appreciate that.Robert Andersonvia email
Well, we generally try to do just a little morein our Very Deep Clinics than copying helpchapters out of the manual, Robert! But while ahefty percentage of our subscribers are profes-sional musicians, of course we don’t want toleave beginners behind. Thanks.
And I have to agree with you 100% aboutJim. Having worked with a lot of writers over theyears, I can tell you there’s only a short handfulof them at his level. (No dis to our other won-derful writers, of course!)
License pleaseFirst, when I buy a VST instrument or use a
free one is it legal to use those sounds andpresets in a song commercially? Can I just usea preset as is, put it on a MIDI track for a bassline, or just press a key and hold it down, sayfor a pad, without tweaking it?
What about these software emulations ofhardware synths—can I use these use thesewithout any legal troubles? What are theirsounds based on—are they taking from hard-ware or is it a new engine?
Or drum machines—can I make patternsusing a drumkit and modify the kit with otherroyalty-free one-shot samples? Do one-shotsneed to be copyrighted?
Last, can I use effects processors and theirpresets to modify the sounds, or an audio edi-tor?
I just want to be safe. Thank you, I appreci-ate it.
AltwistedNew York, NY
VIl e t t e r s
Letterswrite to:[email protected]
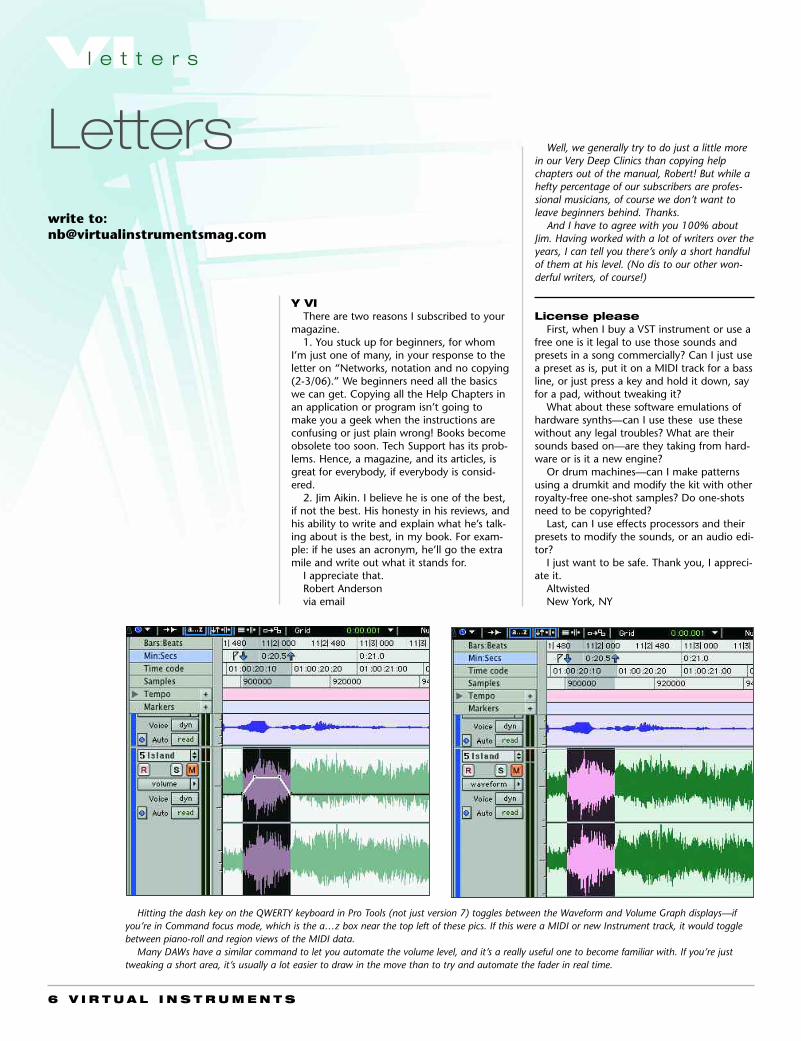
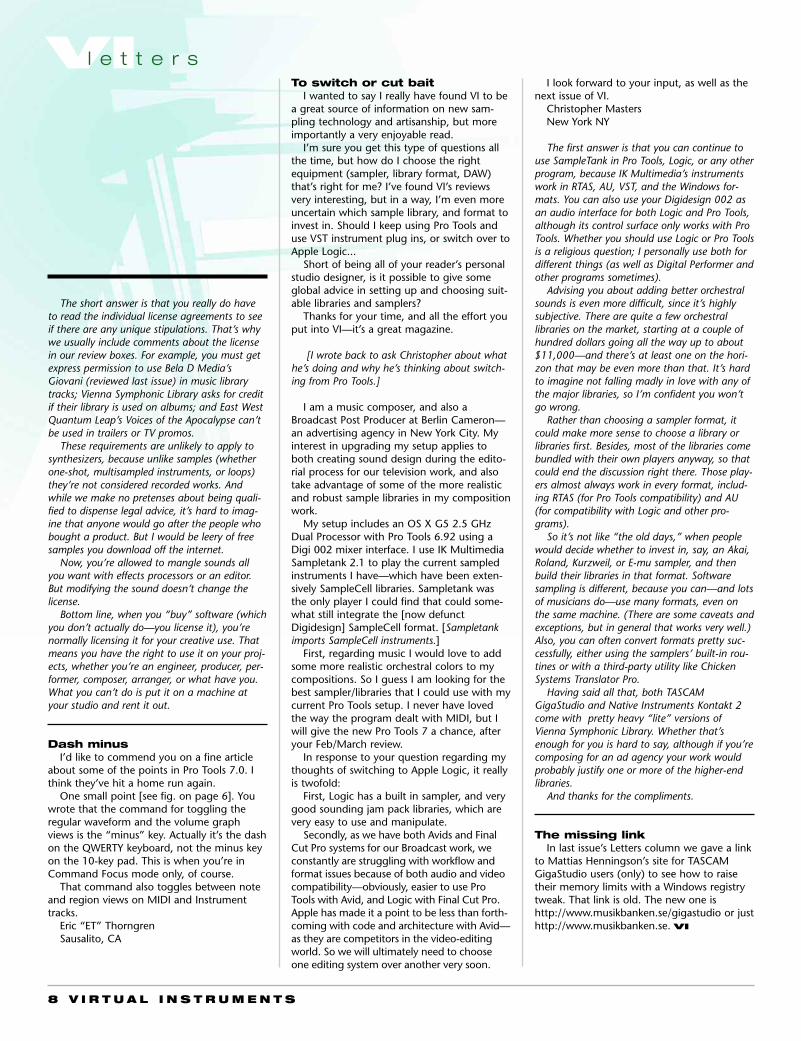
Hitting the dash key on the QWERTY keyboard in Pro Tools (not just version 7) toggles between the Waveform and Volume Graph displays—ifyou’re in Command focus mode, which is the a…z box near the top left of these pics. If this were a MIDI or new Instrument track, it would togglebetween piano-roll and region views of the MIDI data.
Many DAWs have a similar command to let you automate the volume level, and it’s a really useful one to become familiar with. If you’re justtweaking a short area, it’s usually a lot easier to draw in the move than to try and automate the fader in real time.
8 V I R T U A L I N S T R U M E N T S
To switch or cut baitI wanted to say I really have found VI to be
a great source of information on new sam-pling technology and artisanship, but moreimportantly a very enjoyable read.
I’m sure you get this type of questions allthe time, but how do I choose the rightequipment (sampler, library format, DAW)that’s right for me? I’ve found VI’s reviewsvery interesting, but in a way, I’m even moreuncertain which sample library, and format toinvest in. Should I keep using Pro Tools anduse VST instrument plug ins, or switch over toApple Logic...
Short of being all of your reader’s personalstudio designer, is it possible to give someglobal advice in setting up and choosing suit-able libraries and samplers?
Thanks for your time, and all the effort youput into VI—it’s a great magazine.
[I wrote back to ask Christopher about whathe’s doing and why he’s thinking about switch-ing from Pro Tools.]
I am a music composer, and also aBroadcast Post Producer at Berlin Cameron—an advertising agency in New York City. Myinterest in upgrading my setup applies toboth creating sound design during the edito-rial process for our television work, and alsotake advantage of some of the more realisticand robust sample libraries in my compositionwork.
My setup includes an OS X G5 2.5 GHzDual Processor with Pro Tools 6.92 using aDigi 002 mixer interface. I use IK MultimediaSampletank 2.1 to play the current sampledinstruments I have—which have been exten-sively SampleCell libraries. Sampletank wasthe only player I could find that could some-what still integrate the [now defunctDigidesign] SampleCell format. [Sampletankimports SampleCell instruments.]
First, regarding music I would love to addsome more realistic orchestral colors to mycompositions. So I guess I am looking for thebest sampler/libraries that I could use with mycurrent Pro Tools setup. I never have lovedthe way the program dealt with MIDI, but Iwill give the new Pro Tools 7 a chance, afteryour Feb/March review.
In response to your question regarding mythoughts of switching to Apple Logic, it reallyis twofold:
First, Logic has a built in sampler, and verygood sounding jam pack libraries, which arevery easy to use and manipulate.
Secondly, as we have both Avids and FinalCut Pro systems for our Broadcast work, weconstantly are struggling with workflow andformat issues because of both audio and videocompatibility—obviously, easier to use ProTools with Avid, and Logic with Final Cut Pro.Apple has made it a point to be less than forth-coming with code and architecture with Avid—as they are competitors in the video-editingworld. So we will ultimately need to chooseone editing system over another very soon.
I look forward to your input, as well as thenext issue of VI.
Christopher MastersNew York NY
The first answer is that you can continue touse SampleTank in Pro Tools, Logic, or any otherprogram, because IK Multimedia’s instrumentswork in RTAS, AU, VST, and the Windows for-mats. You can also use your Digidesign 002 asan audio interface for both Logic and Pro Tools,although its control surface only works with ProTools. Whether you should use Logic or Pro Toolsis a religious question; I personally use both fordifferent things (as well as Digital Performer andother programs sometimes).
Advising you about adding better orchestralsounds is even more difficult, since it’s highlysubjective. There are quite a few orchestrallibraries on the market, starting at a couple ofhundred dollars going all the way up to about$11,000—and there’s at least one on the hori-zon that may be even more than that. It’s hardto imagine not falling madly in love with any ofthe major libraries, so I’m confident you won’tgo wrong.
Rather than choosing a sampler format, itcould make more sense to choose a library orlibraries first. Besides, most of the libraries comebundled with their own players anyway, so thatcould end the discussion right there. Those play-ers almost always work in every format, includ-ing RTAS (for Pro Tools compatibility) and AU(for compatibility with Logic and other pro-grams).
So it’s not like “the old days,” when peoplewould decide whether to invest in, say, an Akai,Roland, Kurzweil, or E-mu sampler, and thenbuild their libraries in that format. Softwaresampling is different, because you can—and lotsof musicians do—use many formats, even onthe same machine. (There are some caveats andexceptions, but in general that works very well.)Also, you can often convert formats pretty suc-cessfully, either using the samplers’ built-in rou-tines or with a third-party utility like ChickenSystems Translator Pro.
Having said all that, both TASCAMGigaStudio and Native Instruments Kontakt 2come with pretty heavy “lite” versions ofVienna Symphonic Library. Whether that’senough for you is hard to say, although if you’recomposing for an ad agency your work wouldprobably justify one or more of the higher-endlibraries.
And thanks for the compliments.
The missing linkIn last issue’s Letters column we gave a link
to Mattias Henningson’s site for TASCAMGigaStudio users (only) to see how to raisetheir memory limits with a Windows registrytweak. That link is old. The new one ishttp://www.musikbanken.se/gigastudio or justhttp://www.musikbanken.se. VI
VIl e t t e r s
The short answer is that you really do haveto read the individual license agreements to seeif there are any unique stipulations. That’s whywe usually include comments about the licensein our review boxes. For example, you must getexpress permission to use Bela D Media’sGiovani (reviewed last issue) in music librarytracks; Vienna Symphonic Library asks for creditif their library is used on albums; and East WestQuantum Leap’s Voices of the Apocalypse can’tbe used in trailers or TV promos.
These requirements are unlikely to apply tosynthesizers, because unlike samples (whetherone-shot, multisampled instruments, or loops)they’re not considered recorded works. Andwhile we make no pretenses about being quali-fied to dispense legal advice, it’s hard to imag-ine that anyone would go after the people whobought a product. But I would be leery of freesamples you download off the internet.
Now, you’re allowed to mangle sounds allyou want with effects processors or an editor.But modifying the sound doesn’t change thelicense.
Bottom line, when you “buy” software (whichyou don’t actually do—you license it), you’renormally licensing it for your creative use. Thatmeans you have the right to use it on your proj-ects, whether you’re an engineer, producer, per-former, composer, arranger, or what have you.What you can’t do is put it on a machine atyour studio and rent it out.
Dash minusI’d like to commend you on a fine article
about some of the points in Pro Tools 7.0. Ithink they’ve hit a home run again.
One small point [see fig. on page 6]. Youwrote that the command for toggling theregular waveform and the volume graphviews is the “minus” key. Actually it’s the dashon the QWERTY keyboard, not the minus keyon the 10-key pad. This is when you’re inCommand Focus mode only, of course.
That command also toggles between noteand region views on MIDI and Instrumenttracks.
Eric “ET” ThorngrenSausalito, CA
1 0 V I R T U A L I N S T R U M E N T S
LaunchIntroductions, updates, news
VIl a u n c h
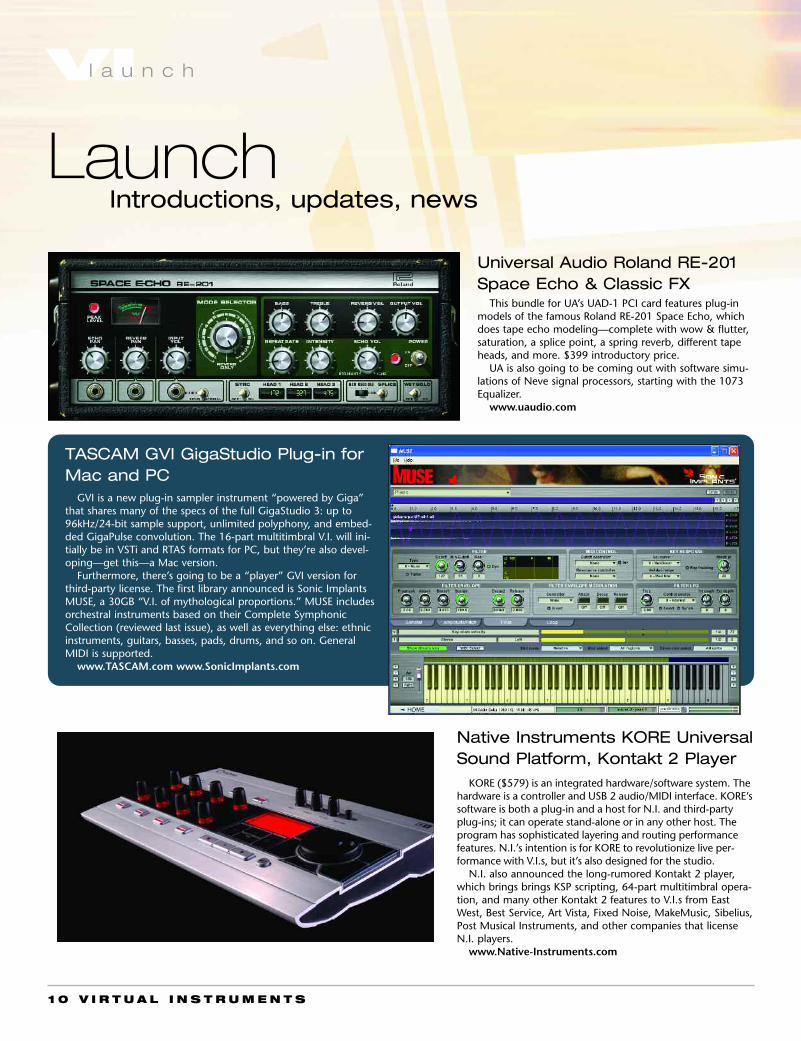
Native Instruments KORE UniversalSound Platform, Kontakt 2 Player
KORE ($579) is an integrated hardware/software system. Thehardware is a controller and USB 2 audio/MIDI interface. KORE’ssoftware is both a plug-in and a host for N.I. and third-partyplug-ins; it can operate stand-alone or in any other host. Theprogram has sophisticated layering and routing performancefeatures. N.I.’s intention is for KORE to revolutionize live per-formance with V.I.s, but it’s also designed for the studio.
N.I. also announced the long-rumored Kontakt 2 player,which brings brings KSP scripting, 64-part multitimbral opera-tion, and many other Kontakt 2 features to V.I.s from EastWest, Best Service, Art Vista, Fixed Noise, MakeMusic, Sibelius,Post Musical Instruments, and other companies that licenseN.I. players.
www.Native-Instruments.com
Universal Audio Roland RE-201Space Echo & Classic FX
This bundle for UA’s UAD-1 PCI card features plug-inmodels of the famous Roland RE-201 Space Echo, whichdoes tape echo modeling—complete with wow & flutter,saturation, a splice point, a spring reverb, different tapeheads, and more. $399 introductory price.
UA is also going to be coming out with software simu-lations of Neve signal processors, starting with the 1073Equalizer.
www.uaudio.com
TASCAM GVI GigaStudio Plug-in forMac and PC
GVI is a new plug-in sampler instrument “powered by Giga”that shares many of the specs of the full GigaStudio 3: up to96kHz/24-bit sample support, unlimited polyphony, and embed-ded GigaPulse convolution. The 16-part multitimbral V.I. will ini-tially be in VSTi and RTAS formats for PC, but they’re also devel-oping—get this—a Mac version.
Furthermore, there’s going to be a “player” GVI version forthird-party license. The first library announced is Sonic ImplantsMUSE, a 30GB “V.I. of mythological proportions.” MUSE includesorchestral instruments based on their Complete SymphonicCollection (reviewed last issue), as well as everything else: ethnicinstruments, guitars, basses, pads, drums, and so on. GeneralMIDI is supported.
www.TASCAM.com www.SonicImplants.com
V I R T U A L I N S T R U M E N T S 1 1
VIl a u n c h
Berklee College of MusicIn addition to being a world-famous college (your editor
happens to be an alumnus), Berklee offers online courses in V.I.-related topics. These include (some titles abbreviated)Producing Music with Propellerhead Reason, MOTU DigitalPerformer, Desktop Music Production for PC/Mac, SoundDesign, MIDI Sequencing, Hip-Hop Writing and Production,and Remixing.
Also, Electronica artist Richard Devine, who has remixed forAphex Twin and done sound design for Nine Inch Nails andalso for V.I. developer Native Instruments, will be guest-teachingat the college from April 10 – 14.
Finally, all incoming freshmen will receive free SubmersibleMusic DrumCore software as part of their bundle.
www.Berklee.edu 617/747-2247
Digidesign Music Production Toolkit and DV Toolkit 2
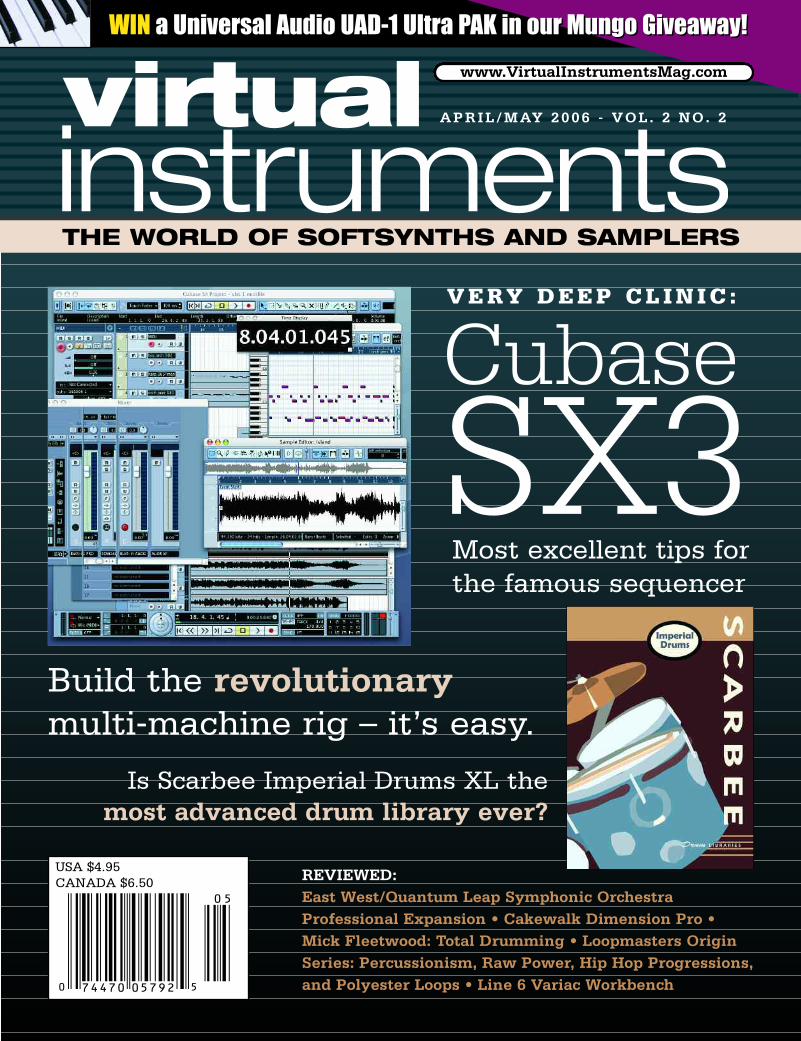
Pro Tools LE or M-Powered 7.1 can now run 48 mono orstereo tracks at up to 96kHz (up from 16 stereo or 32 mono)with this bundle, which includes the new Hybrid synthesizer,TL Space™ Native Edition convolution reverb, Smack!™ LEcompressor, DINR™ LE noise reduction; and theSoundReplacer™ drum replacement tool and Beat Detective™tool (the latter two formerly only in the top-line TDM sys-tems).
The DV Toolkit 2 option for Pro Tools LE also raises the trackcount and includes the DigiBase™ Pro file management tool,TS Space Native Edition, an option for exporting MP3s, andeverything in the original DV Toolkit: timecode andfeet/frames displays with timecode and video rate pull-up/-down, DigiTranslator for OMS and AF import/export; DINR LE;and Synchro Arts VocAlign Project for automated dialogreplacement.
Digidesign also announced the formation of AIR: theAdvanced Instrument Research Group. These people (whoused to be Wizoo, which Digidesign acquired) will be designing V.I.s.
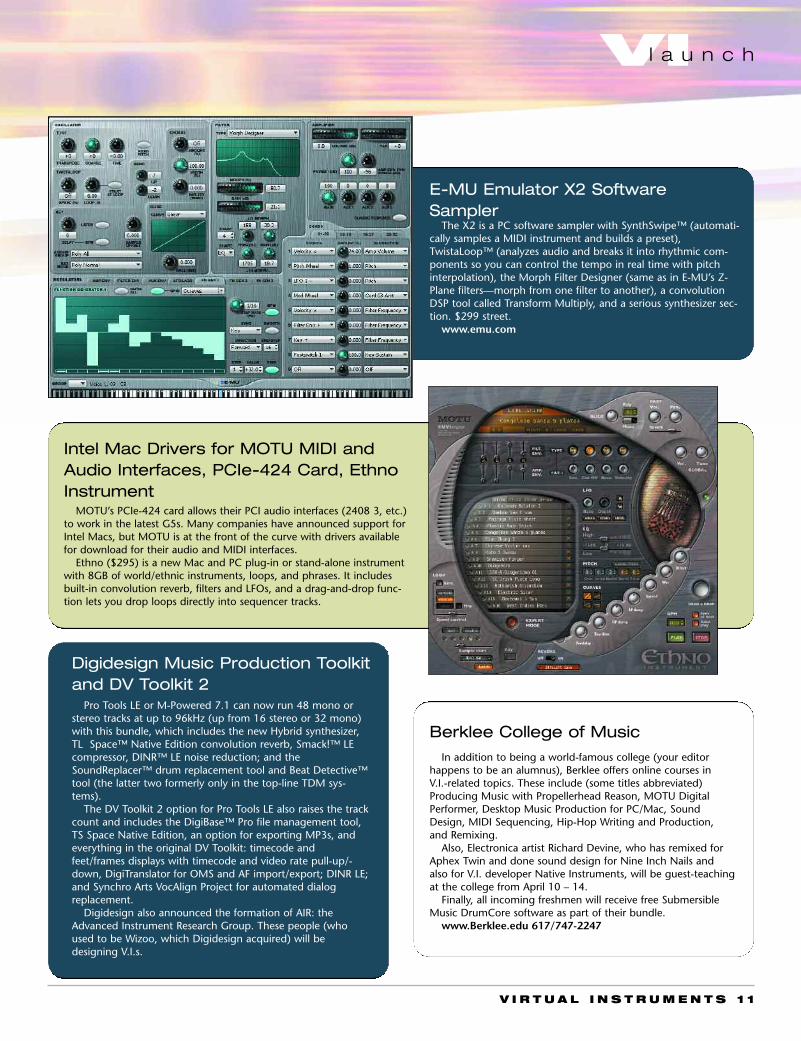
E-MU Emulator X2 SoftwareSampler
The X2 is a PC software sampler with SynthSwipe™ (automati-cally samples a MIDI instrument and builds a preset),TwistaLoop™ (analyzes audio and breaks it into rhythmic com-ponents so you can control the tempo in real time with pitchinterpolation), the Morph Filter Designer (same as in E-MU’s Z-Plane filters—morph from one filter to another), a convolutionDSP tool called Transform Multiply, and a serious synthesizer sec-tion. $299 street.
www.emu.com
Intel Mac Drivers for MOTU MIDI andAudio Interfaces, PCIe-424 Card, EthnoInstrument
MOTU’s PCIe-424 card allows their PCI audio interfaces (2408 3, etc.)to work in the latest G5s. Many companies have announced support forIntel Macs, but MOTU is at the front of the curve with drivers availablefor download for their audio and MIDI interfaces.
Ethno ($295) is a new Mac and PC plug-in or stand-alone instrumentwith 8GB of world/ethnic instruments, loops, and phrases. It includesbuilt-in convolution reverb, filters and LFOs, and a drag-and-drop func-tion lets you drop loops directly into sequencer tracks.
VIf e a t u r e
1 2 V I R T U A L I N S T R U M E N T S
All aboutTechnically, a “plug-in” is a little program
that plugs into a big one, in our case a virtualprocessor that goes in a DAW (or other hostprogram, such as Ableton Live or Sony ACID).People tend to extend that definition toinclude anything that gets inserted into aDAW’s channel strip, whether it comes withthe DAW or from a third-party developer.
For example, the thing you insert in orderto stream a program running outside yourDAW, such as Propellerhead Reason using theReWire protocol, is referred to as a plug-in—the ReWire plug-in. Apple Logic Audio evenhas an I/O plug-in, which is simply asend/return to external hardware attached toyour audio interface. V.I.s are plug-ins too,but they’re instrument plug-ins rather thanprocessing plug-ins.
Plug-ins work mostly in real time, but theycan also be file-based. Examples of file-basedprocessors are Sound Toys Speed and SerratoPitch’nTime, which do a pretty astoundingjob of pitch-shifting or time-stretching/com-pressing full mixes.
Sometimes it’s convenient for spot fixes justto write the processing directly to the file,rather than automating a real-time processorin and out of the signal path. Maybe you’reEQ-ing out a short noise in a track (yes, somecommercial sample libraries do have them) orgetting rid of a vocal pop. For that reason,some DAWs come with both file-based andreal-time versions of the same plug-ins.Digidesign Pro Tools includes both AudioSuite
FIRST DAWpart 4: processing plug-ins
A beginner’s guide to putting together a DAW (digital audio workstation) for softsynths and samplers
by Nick Batzdorf
Processing plug-ins—software EQs, compressors, reverbs, and
so on—are an essential part of V.I. production. For that matter
they’re an essential part of all audio production, and the earliest
ones started appearing shortly after the first DAWs did, launching
a whole cottage industry.
But V.I. production has some unique requirements that don’t
necessarily apply, say, if you’re recording your band in a garage.
The band members are hopefully listening and responding to one
another, and when you record them you hear everything in con-
text. So for example you can ask the sax player to step back six
inches from the mic.
Not so with sample libraries, which weren’t necessarily record-
ed with the specific musical context in which you’re using them in
mind. And softsynths (except for the sample-based ones) aren’t
even using recordings as the basis for their sounds.
So it’s up to us to manipulate the sounds in our songs and
compositions to seem as if they are listening to each other.
Primarily, that means putting the sounds in the right space to
create the illusion, but there’s more to it than that.
V I R T U A L I N S T R U M E N T S 1 3
(file-based) and RTAS—Real TimeAudioSuite—versions of most of its stockplug-ins, for example.
Plug-ins can use the host computer’s pro-cessing, or they can use add-on DSP (digitalsignal processing) cards for their horsepower.The three examples of the latter areDigidesign Pro Tools TDM, TC ElectronicPowerCore, and Universal Audio UAD-1.
Plug-ins can also run on external hardware.There’s a FireWire version of the TCPowerCore, which lives in a rack unit. TheIsraeli company Waves, probably the foremostplug-in developer, offers two hardware boxesthat run their plug ins: the APA32 and APA44-M (although they always release their proces-sors in every format known to man).
You can also run plug-ins in Mackie andYamaha digital mixers, Metric Halo’s FireWireaudio interfaces can run plug-insonboard…and then there’s the MuseResearch Receptor, which is a dedicated com-puter that hosts V.I.s and plug-ins. It hassome very slick software that makes it con-nect to a standard computer over ethernetseamlessly, and it streams into your DAW byway of its own plug-in.
In all cases the plug-in appears to be run-ning on your host computer inside your DAW.The only difference is that the user interface isa “remote control” for a program that lives inan external box or a PCI card inside yourcomputer. Well, another difference is that insome cases the host program needs to com-pensate for a little more processing delaythrough add-on or external hardware.
We’ve almost certainly left out somedevices that run plug-ins—our apologies—butwe don’t want to get too far astray from thetopic at hand, which is the essential plug-insyou should be looking at for V.I. productionand why. That requires a little backgroundinto how they’re used.
Taking stockYou can either run an entire signal through
a plug-in or you can address it with a send,which is a split off the main signal path (usu-ally with a volume control in front of it).
Examples of plug-ins that in their traditionalrole are used in-line include equalizers, com-pressors, and gates; these are sometimescalled signal processors. (We’re not going tobother describing what every plug-in does,since that information is readily available inyour DAW or other host’s manual.)
By contrast, choruses and reverbs areexamples that would normally be placed on asend, and they’re called effects. You set themup this way because they’re combined withthe direct signal and the send’s level controlmakes the relative amount of the effect easyto adjust, and also because the same effect is
often shared by several tracks (e.g. reverb—several instruments are placed in the samespace).
But given that production is an art ratherthan a rigid science, the distinction betweensignal processors and effects doesn’t alwayshold. The Random Tip on the New York drumsound, page 30, which uses a compressor ona send, is an example.
The next important issue is whether aprocessor is normally intended to be used onindividual channels or as a mastering tool,meaning on the entire mix. A processor witha lot of color might be wonderful on an indi-vidual channel but way over the top oneverything; likewise, a mastering plug-inmight be too pristine to add the characteryou’re looking for to an individual track.
For example, you can use a peak limiter ondrums to good effect, but its normal applica-tion is in mastering to allow you to raise theoverall level without having to worry about theodd stray peak causing horrible distortion. Buthere again, since the only rule is that ultimatelythere are no rules, the distinction betweenmastering and channel plug-ins is fluid.
Just be aware that there are masteringplug-ins that introduce a larger delay and useup too much horsepower to be used simulta-neously on lots of channels. The main reasonfor this is that good mastering processors aredesigned to a very high level, since you’rerunning the whole mix through them anddon’t want them to ruin the sound quality.
VIf e a t u r e
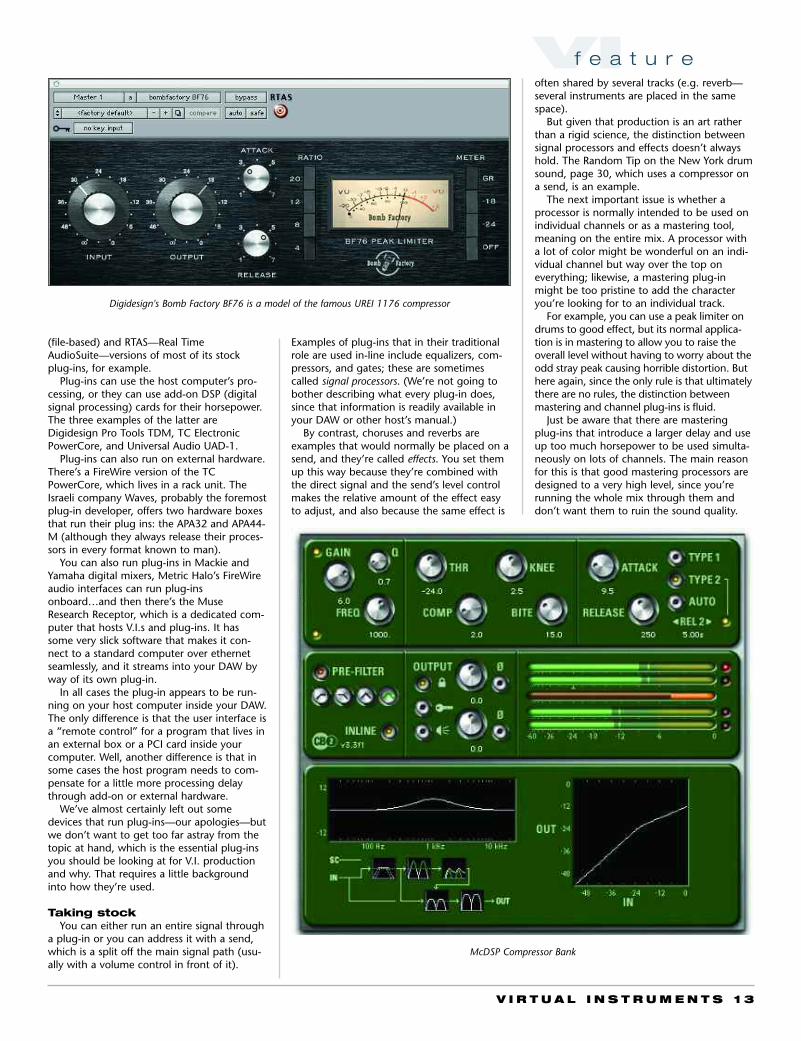
Digidesign's Bomb Factory BF76 is a model of the famous UREI 1176 compressor
McDSP Compressor Bank
1 4 V I R T U A L I N S T R U M E N T S
EQIt’s normal to EQ sounds to make various
frequency bands fit in a mix, whether you’reworking with live instruments or V.I.s. But weroutinely work with sample libraries that wererecorded at opposite ends of the earth, andEQ is the premier tool for integrating them.
In addition to the garden-variety digital EQplug-ins that come with most DAWs, differentones can sound subtly different (especiallywhen you use them to boost rather than tocut). Some of them attempt to model thethicker sound of a good analog equalizer,such as the Pultec EQ in the Universal AudioUAD-1 (the Cambridge EQ in the UAD-1 isalso very good). Others are more surgical,offering lots of incredibly narrow bands withradical amounts of boost or cut.
Still others, typically designed for masteringapplications, are designed not to have anyphase shift—the opposite of the “character”EQs. This kind of processor is very usefulwhen you’re playing with the high end onsampled instruments that are notoriouslyunforgiving of EQ, such as piano and espe-cially sampled string sections. (They typicallysound very synthy with just a small amount ofboost.)
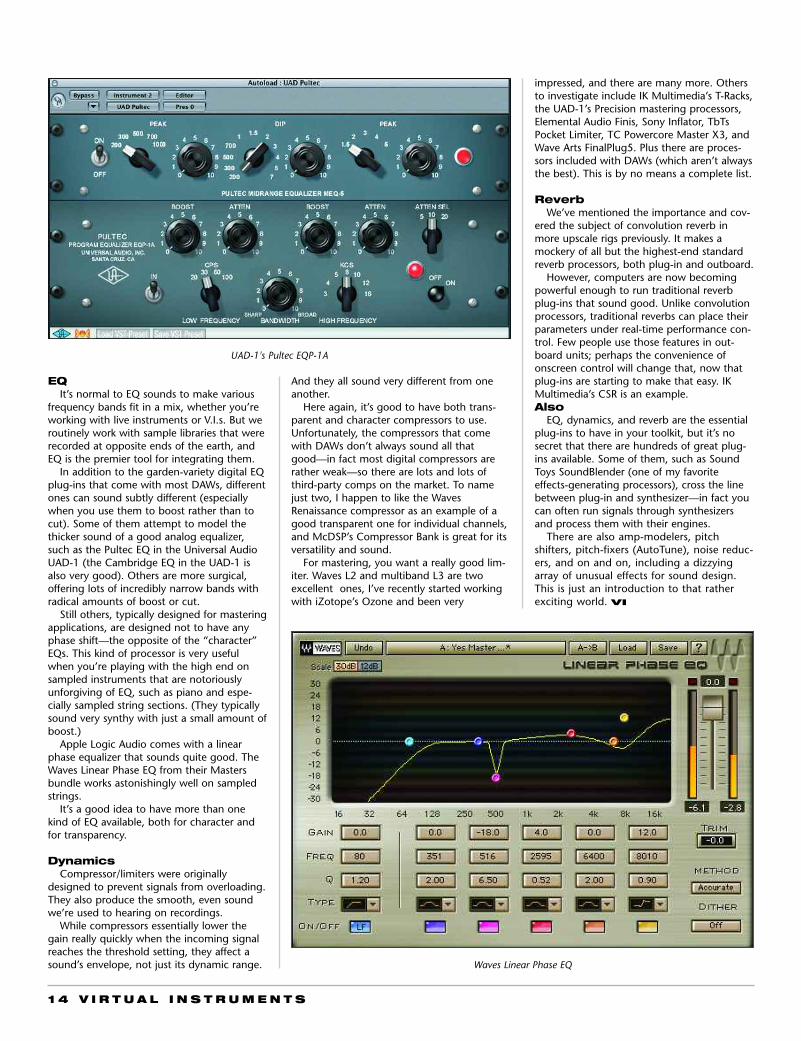
Apple Logic Audio comes with a linearphase equalizer that sounds quite good. TheWaves Linear Phase EQ from their Mastersbundle works astonishingly well on sampledstrings.
It’s a good idea to have more than onekind of EQ available, both for character andfor transparency.
DynamicsCompressor/limiters were originally
designed to prevent signals from overloading.They also produce the smooth, even soundwe’re used to hearing on recordings.
While compressors essentially lower thegain really quickly when the incoming signalreaches the threshold setting, they affect asound’s envelope, not just its dynamic range.
And they all sound very different from oneanother.
Here again, it’s good to have both trans-parent and character compressors to use.Unfortunately, the compressors that comewith DAWs don’t always sound all thatgood—in fact most digital compressors arerather weak—so there are lots and lots ofthird-party comps on the market. To namejust two, I happen to like the WavesRenaissance compressor as an example of agood transparent one for individual channels,and McDSP’s Compressor Bank is great for itsversatility and sound.
For mastering, you want a really good lim-iter. Waves L2 and multiband L3 are twoexcellent ones, I’ve recently started workingwith iZotope’s Ozone and been very
impressed, and there are many more. Othersto investigate include IK Multimedia’s T-Racks,the UAD-1’s Precision mastering processors,Elemental Audio Finis, Sony Inflator, TbTsPocket Limiter, TC Powercore Master X3, andWave Arts FinalPlug5. Plus there are proces-sors included with DAWs (which aren’t alwaysthe best). This is by no means a complete list.
ReverbWe’ve mentioned the importance and cov-
ered the subject of convolution reverb inmore upscale rigs previously. It makes amockery of all but the highest-end standardreverb processors, both plug-in and outboard.
However, computers are now becomingpowerful enough to run traditional reverbplug-ins that sound good. Unlike convolutionprocessors, traditional reverbs can place theirparameters under real-time performance con-trol. Few people use those features in out-board units; perhaps the convenience ofonscreen control will change that, now thatplug-ins are starting to make that easy. IKMultimedia’s CSR is an example.Also
EQ, dynamics, and reverb are the essentialplug-ins to have in your toolkit, but it’s nosecret that there are hundreds of great plug-ins available. Some of them, such as SoundToys SoundBlender (one of my favoriteeffects-generating processors), cross the linebetween plug-in and synthesizer—in fact youcan often run signals through synthesizersand process them with their engines.
There are also amp-modelers, pitchshifters, pitch-fixers (AutoTune), noise reduc-ers, and on and on, including a dizzyingarray of unusual effects for sound design.This is just an introduction to that ratherexciting world. VI
UAD-1's Pultec EQP-1A
Waves Linear Phase EQ

1 6 V I R T U A L I N S T R U M E N T S
VIf e a t u r e
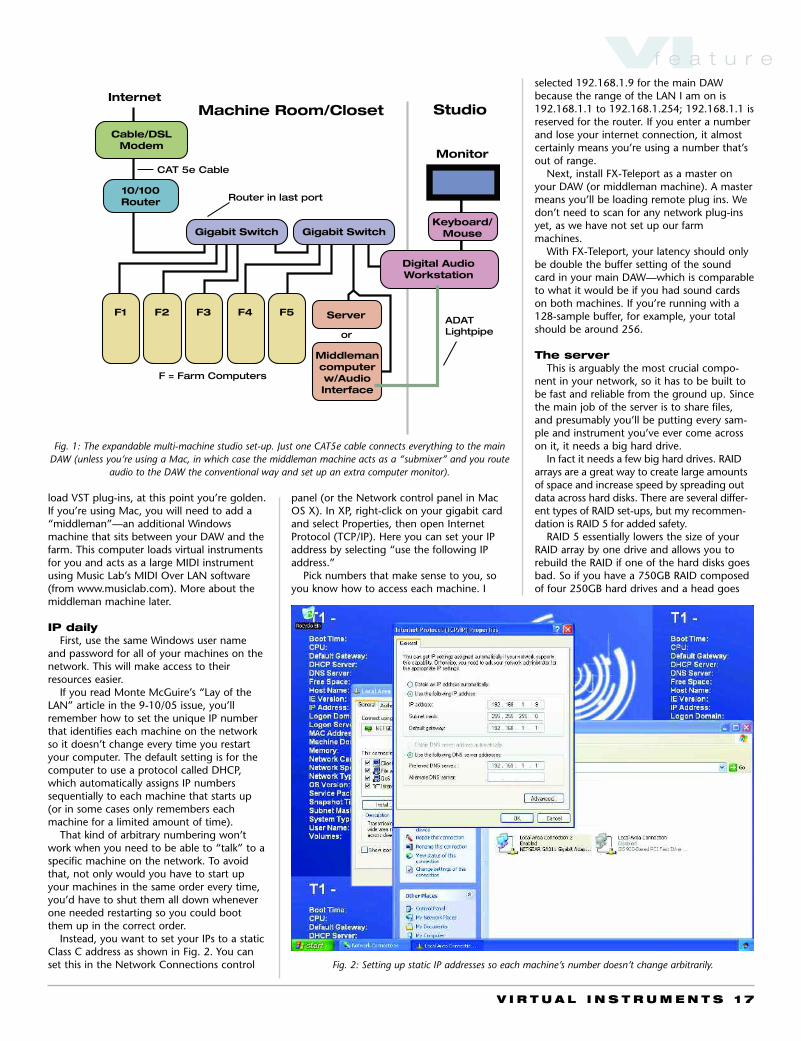
Braving the elementsTo start, let’s break our network down into
four elements, as shown in Fig. 11. This is going to be a high-bandwidth sit-
uation for your LAN (local area network), sousing gigabit ethernet is a necessity at almostevery layer. That means putting gigabit cardsin every computer involved, a gigabit switchor switches, and I recommend using CAT5efor cabling.
You’ll also want a router if you have aninternet connection. The router acts as a fire-wall between your cable or DSL modem andyour network. It goes in the last port of yourgigabit ethernet switcher.
2. DAW: the main host machine that you’regoing to use for writing and mixing, which iswhere you interface to the network. This canbe a PC or Mac.
3. Server: a central node for all the filesthat will be referenced over the LAN. Thiscould be a Mac, but in the set-up here it’s aWindows machine.
4. Farm machines: a collection of comput-ers that are essentially the same and are usedto run plug-ins to decrease CPU and memoryload on the host DAW. These are Windowsmachines in the set-up we’re describing, foronly one reason: so far there isn’t a solid andtotally usable software program for Mac thatsends audio over ethernet (taking the place ofaudio interfaces on the sending and receivingmachines).
On the PC there is: FX-Teleport, a programthat can load plug-ins over a network reliablyand efficiently. You can get it fromhttp://www.fx-max.com for prices rangingfrom $99 for two machines to $236 for four(with additional machines $59 each). They’vereportedly been working on a Mac version aswell.
If you’re already running your main DAWon Windows and your software allows you to
The ultimate scalable V.I. rig uses multiple computers, all withaccess to the same plug-ins and sample libraries on a
server. It’s surprisingly easy to set up, and only a single gigabit ethernet cable connects everything: audio,
MIDI, video, the keyboard, and mouse…
Studio Farms
by Jesse White
One day a single computer may have the resources
to run as many softsynths, sample libraries, and
processing plug-ins as we need. Until then, a network of
two and probably more machines is an essential compo-
nent of any serious V.I. studio.
But the reliability and ease of basing an entire studio
set-up around computers—and more importantly on net-
works—is easy to overlook when you’re designing it. You
have to think of it logically: how can I have quick access
to everything I need at my fingertips without having to
worry about systems crashing or overtaxing my main
computer?
The answer is simple. Distribute your virtual instruments
and effects across a network to decrease load, and cen-
tralize your network around a server so all your machines
can conform to the same data.
If this is done right, you end up with each computer on
your network, or each “farm,” having the ability to run any
instrument or processing plug-in you have and access
any sample you need. Not only is this convenient, it also
offers some insurance. If one of the farm machines goes
down in the middle of a project, you can simply reassign
the plug-ins to a different one instead of spending pre-
cious time repairing it right away.
V I R T U A L I N S T R U M E N T S 1 7
load VST plug-ins, at this point you’re golden.If you’re using Mac, you will need to add a“middleman”—an additional Windowsmachine that sits between your DAW and thefarm. This computer loads virtual instrumentsfor you and acts as a large MIDI instrumentusing Music Lab’s MIDI Over LAN software(from www.musiclab.com). More about themiddleman machine later.
IP dailyFirst, use the same Windows user name
and password for all of your machines on thenetwork. This will make access to theirresources easier.
If you read Monte McGuire’s “Lay of theLAN” article in the 9-10/05 issue, you’llremember how to set the unique IP numberthat identifies each machine on the networkso it doesn’t change every time you restartyour computer. The default setting is for thecomputer to use a protocol called DHCP,which automatically assigns IP numberssequentially to each machine that starts up(or in some cases only remembers eachmachine for a limited amount of time).
That kind of arbitrary numbering won’twork when you need to be able to “talk” to aspecific machine on the network. To avoidthat, not only would you have to start upyour machines in the same order every time,you’d have to shut them all down wheneverone needed restarting so you could bootthem up in the correct order.
Instead, you want to set your IPs to a staticClass C address as shown in Fig. 2. You canset this in the Network Connections control
panel (or the Network control panel in MacOS X). In XP, right-click on your gigabit cardand select Properties, then open InternetProtocol (TCP/IP). Here you can set your IPaddress by selecting “use the following IPaddress.”
Pick numbers that make sense to you, soyou know how to access each machine. I
selected 192.168.1.9 for the main DAWbecause the range of the LAN I am on is192.168.1.1 to 192.168.1.254; 192.168.1.1 isreserved for the router. If you enter a numberand lose your internet connection, it almostcertainly means you’re using a number that’sout of range.
Next, install FX-Teleport as a master onyour DAW (or middleman machine). A mastermeans you’ll be loading remote plug ins. Wedon’t need to scan for any network plug-insyet, as we have not set up our farmmachines.
With FX-Teleport, your latency should onlybe double the buffer setting of the soundcard in your main DAW—which is comparableto what it would be if you had sound cardson both machines. If you’re running with a128-sample buffer, for example, your totalshould be around 256.
The serverThis is arguably the most crucial compo-
nent in your network, so it has to be built tobe fast and reliable from the ground up. Sincethe main job of the server is to share files,and presumably you’ll be putting every sam-ple and instrument you’ve ever come acrosson it, it needs a big hard drive.
In fact it needs a few big hard drives. RAIDarrays are a great way to create large amountsof space and increase speed by spreading outdata across hard disks. There are several differ-ent types of RAID set-ups, but my recommen-dation is RAID 5 for added safety.
RAID 5 essentially lowers the size of yourRAID array by one drive and allows you torebuild the RAID if one of the hard disks goesbad. So if you have a 750GB RAID composedof four 250GB hard drives and a head goes
VIf e a t u r e
Cable/DSLModem
10/100Router
Gigabit Switch
F1 Server
Digital AudioWorkstation
Machine Room/Closet StudioInternet
Gigabit Switch
CAT 5e Cable
Router in last port
F2 F3 F4 F5
F = Farm Computers
Middlemancomputerw/AudioInterface
or
Monitor
Keyboard/Mouse
ADATLightpipe
Fig. 1: The expandable multi-machine studio set-up. Just one CAT5e cable connects everything to the mainDAW (unless you’re using a Mac, in which case the middleman machine acts as a “submixer” and you route
audio to the DAW the conventional way and set up an extra computer monitor).
Fig. 2: Setting up static IP addresses so each machine’s number doesn’t change arbitrarily.
1 8 V I R T U A L I N S T R U M E N T S
bad on one drive, you simply replace the baddrive and rebuild the RAID (which can takesome time).
Unless the motherboard you use supports alarge enough RAID for what you need, youwill probably need a RAID card. These areusually PCI cards that go in a slot in yourserver’s motherboard, and they’re used toconnect all the hard drives. I use the HightechRocketRaid 1810A to connect the SATA harddrives on my server.
Your server is going to need to do someheavy-duty file sharing, so it going to need anOS that is specifically designed for that kindof stress. Windows Server 2003 is an excellentchoice; it’s very easy to set up, and will allowmany computers to access your RAID effi-ciently.
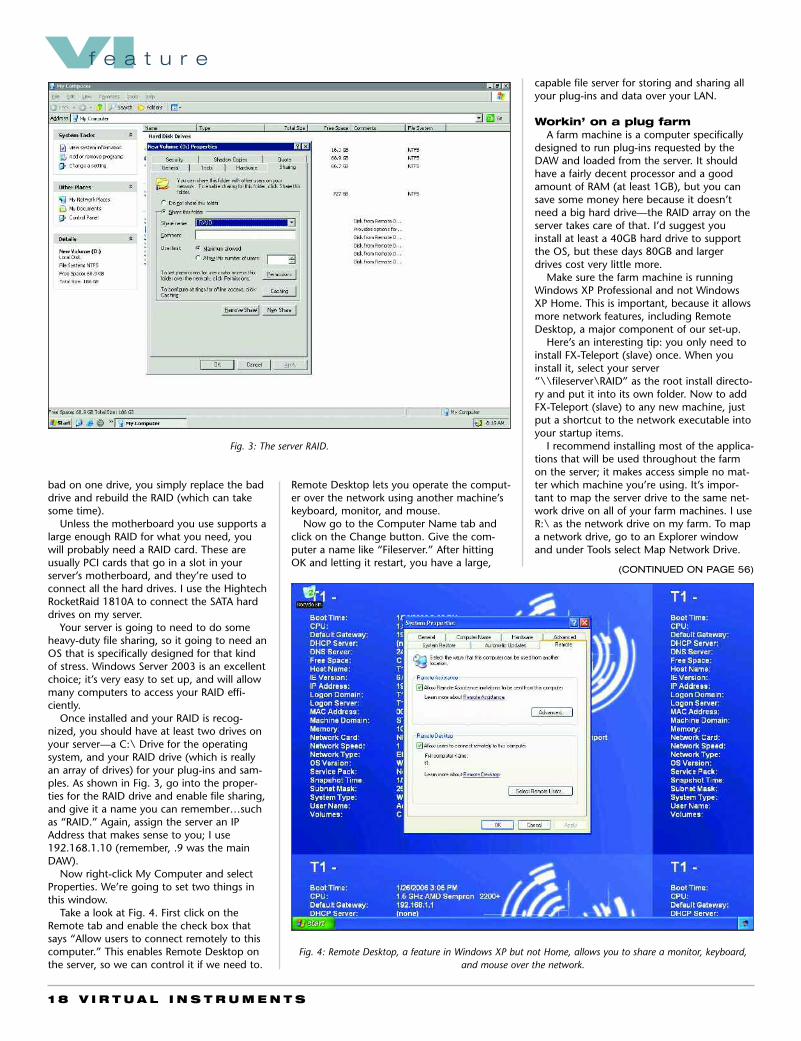
Once installed and your RAID is recog-nized, you should have at least two drives onyour server—a C:\ Drive for the operatingsystem, and your RAID drive (which is reallyan array of drives) for your plug-ins and sam-ples. As shown in Fig. 3, go into the proper-ties for the RAID drive and enable file sharing,and give it a name you can remember…suchas “RAID.” Again, assign the server an IPAddress that makes sense to you; I use192.168.1.10 (remember, .9 was the mainDAW).
Now right-click My Computer and selectProperties. We’re going to set two things inthis window.
Take a look at Fig. 4. First click on theRemote tab and enable the check box thatsays “Allow users to connect remotely to thiscomputer.” This enables Remote Desktop onthe server, so we can control it if we need to.
capable file server for storing and sharing allyour plug-ins and data over your LAN.
Workin’ on a plug farmA farm machine is a computer specifically
designed to run plug-ins requested by theDAW and loaded from the server. It shouldhave a fairly decent processor and a goodamount of RAM (at least 1GB), but you cansave some money here because it doesn’tneed a big hard drive—the RAID array on theserver takes care of that. I’d suggest youinstall at least a 40GB hard drive to supportthe OS, but these days 80GB and largerdrives cost very little more.
Make sure the farm machine is runningWindows XP Professional and not WindowsXP Home. This is important, because it allowsmore network features, including RemoteDesktop, a major component of our set-up.
Here’s an interesting tip: you only need toinstall FX-Teleport (slave) once. When youinstall it, select your server“\\fileserver\RAID” as the root install directo-ry and put it into its own folder. Now to addFX-Teleport (slave) to any new machine, justput a shortcut to the network executable intoyour startup items.
I recommend installing most of the applica-tions that will be used throughout the farmon the server; it makes access simple no mat-ter which machine you’re using. It’s impor-tant to map the server drive to the same net-work drive on all of your farm machines. I useR:\ as the network drive on my farm. To mapa network drive, go to an Explorer windowand under Tools select Map Network Drive.
Remote Desktop lets you operate the comput-er over the network using another machine’skeyboard, monitor, and mouse.
Now go to the Computer Name tab andclick on the Change button. Give the com-puter a name like “Fileserver.” After hittingOK and letting it restart, you have a large,
VIf e a t u r e
Fig. 3: The server RAID.
Fig. 4: Remote Desktop, a feature in Windows XP but not Home, allows you to share a monitor, keyboard,and mouse over the network.
(CONTINUED ON PAGE 56)
2 0 V I R T U A L I N S T R U M E N T S
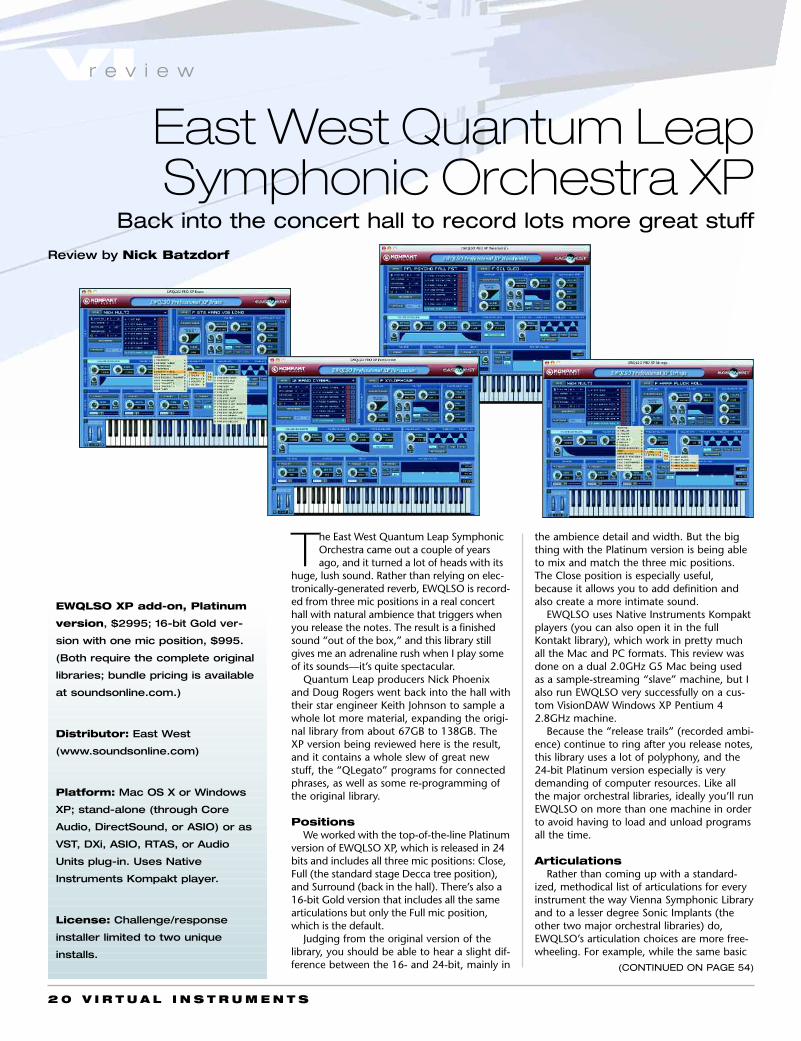
the ambience detail and width. But the bigthing with the Platinum version is being ableto mix and match the three mic positions.The Close position is especially useful,because it allows you to add definition andalso create a more intimate sound.
EWQLSO uses Native Instruments Kompaktplayers (you can also open it in the fullKontakt library), which work in pretty muchall the Mac and PC formats. This review wasdone on a dual 2.0GHz G5 Mac being usedas a sample-streaming “slave” machine, but Ialso run EWQLSO very successfully on a cus-tom VisionDAW Windows XP Pentium 42.8GHz machine.
Because the “release trails” (recorded ambi-ence) continue to ring after you release notes,this library uses a lot of polyphony, and the24-bit Platinum version especially is verydemanding of computer resources. Like allthe major orchestral libraries, ideally you’ll runEWQLSO on more than one machine in orderto avoid having to load and unload programsall the time.
ArticulationsRather than coming up with a standard-
ized, methodical list of articulations for everyinstrument the way Vienna Symphonic Libraryand to a lesser degree Sonic Implants (theother two major orchestral libraries) do,EWQLSO’s articulation choices are more free-wheeling. For example, while the same basic
VIr e v i e w
The East West Quantum Leap SymphonicOrchestra came out a couple of yearsago, and it turned a lot of heads with its
huge, lush sound. Rather than relying on elec-tronically-generated reverb, EWQLSO is record-ed from three mic positions in a real concerthall with natural ambience that triggers whenyou release the notes. The result is a finishedsound “out of the box,” and this library stillgives me an adrenaline rush when I play someof its sounds—it’s quite spectacular.
Quantum Leap producers Nick Phoenixand Doug Rogers went back into the hall withtheir star engineer Keith Johnson to sample awhole lot more material, expanding the origi-nal library from about 67GB to 138GB. TheXP version being reviewed here is the result,and it contains a whole slew of great newstuff, the “QLegato” programs for connectedphrases, as well as some re-programming ofthe original library.
PositionsWe worked with the top-of-the-line Platinum
version of EWQLSO XP, which is released in 24bits and includes all three mic positions: Close,Full (the standard stage Decca tree position),and Surround (back in the hall). There’s also a16-bit Gold version that includes all the samearticulations but only the Full mic position,which is the default.
Judging from the original version of thelibrary, you should be able to hear a slight dif-ference between the 16- and 24-bit, mainly in
East West Quantum LeapSymphonic Orchestra XP
Back into the concert hall to record lots more great stuff
EWQLSO XP add-on, Platinum
version, $2995; 16-bit Gold ver-
sion with one mic position, $995.
(Both require the complete original
libraries; bundle pricing is available
at soundsonline.com.)
Distributor: East West
(www.soundsonline.com)
Platform: Mac OS X or Windows
XP; stand-alone (through Core
Audio, DirectSound, or ASIO) or as
VST, DXi, ASIO, RTAS, or Audio
Units plug-in. Uses Native
Instruments Kompakt player.
License: Challenge/response
installer limited to two unique
installs.
Review by Nick Batzdorf
(CONTINUED ON PAGE 54)

Giveaway in
Just go to www.VirtualInstrumentsMag.com/giveawayto enter for a Very Good Chance to win.
The
MungoVI history.
most
Enter to win a top-of-the-line $1495 UAD-1 Ultra PAK fromUniversal Audio.The UAD-1 Ultra PAK is designed for the most demanding DAW profes-sional who needs premium sonic quality for mixing and mastering appli-cations and wants the largest and best-value UA plug collection in oneconvenient bundle. The Ultra PAK includes the award-winning UAD-1DSP card plus a complete suite of 24 powered plug-ins including all theclassic UA vintage emulations. UA uses unique proprietary circuit mod-eling techniques to capture every subtle nuance of analog studio main-stays such as the 1176LN, LA-2A, Pultec EQP-1A, and Fairchild 670. TheUAD-1 also offers innovative “UA Original” plug-ins to enhance yourproductions including the Cambridge EQ, Nigel Guitar Processor,Channel Strip, RealVerb, DreamVerb and the highly prized Plate 140.Ultra PAK also delivers the Precision Limiter and Precision Equalizerfrom the Precision Mastering Series which have been rigorously engi-neered and studio-tested to reach a sonic class only shared with thevery best analog and digital hardware units.
And while you’re there, we invite you to take a few momentsout of your schedule and subscribe to our favorite magazine.
Why would anybody want to miss the best writers in the industry, helping you get the absolute most out ofyour softsynths and samplers? You’ll pay only $12.95 a year (newsstand price: $59.40) or $20 for two years.You’ll be helping us print more issues and more pages, which will only benefit you (and us). Most importantly,you’ll congratulate yourself for having been so intelligent every time Virtual Instruments Magazine showsup in your mailbox.

2 4 V I R T U A L I N S T R U M E N T S
by Jim Aikin
VIv e r y d e e p c l i n i c
Set-upWhen you load an empty project template
of whichever type you need at the moment,you may find that you need to customize itbefore starting work. I need to tidy up theTransport, for instance, by getting rid of thejog/scrub wheel and the Play Order Trackcontrols. (This is done by right-clicking in theTransport and unchecking the items in themenu.)
Switching the Linear Record Mode fromNormal to Merge and the Cycle Record Modeto Mix (MIDI) is also a good idea. If you neg-lect to do this, your MIDI parts will be stackedon top of one another, which will make edit-ing a bit of a chore, or potentially confusing.
Rather than do these customizations everytime you start a new project, create your ownpersonal default file for the 16-track MIDIsequence or whatever template you like, andsave it in the folder where Cubase keeps suchthings. In Windows, it’s in C:/ProgramFiles/Steinberg/Cubase SX 3/templates.
In fact, you’re not limited to overwriting
V E R Y D E E P C L I N I C :
Cubase Acumen
Steinberg Cubase is one of the most popular digital audio
sequencers on the market. I’ve been using the program since
the late ’80s, when it was a MIDI-only program for the Atari ST com-
puter. Along the way it led the charge toward native audio process-
ing—meaning that the host computer provides the processing
power that runs the system.
In this article I’m going to show you some of my favorite tricks for
getting more out of Cubase. We’ll look at some workflow enhance-
ments, some editing options, and ways to use ReWire. Most of the
tips will relate to MIDI tracks, because your virtual instruments will be
played by them, but we’ll get into a bit of audio editing too.
I use SX3 for Windows; most of the concepts in this article are
equally applicable to other versions of the program, but you’ll need
to look through the Operation Manual to find details such as
Macintosh keystroke equivalents.
Advanced editing tips for the popular sequencer
V I R T U A L I N S T R U M E N T S 2 5
the factory templates. You can create yourown (see Figure 1), complete with pre-loadedsoftsynths, effects, and so on. It will be listedin the box whenever you create a new proj-ect.
Making arrangementsCubase displays tracks in the Project win-
dow (which I seem to recall used to be calledthe Arrange window). You’ll be spending a lotof time staring at it. Most sequencers havesimilar displays, all of them packed with fea-tures, but Cubase has a few distinctive tools.
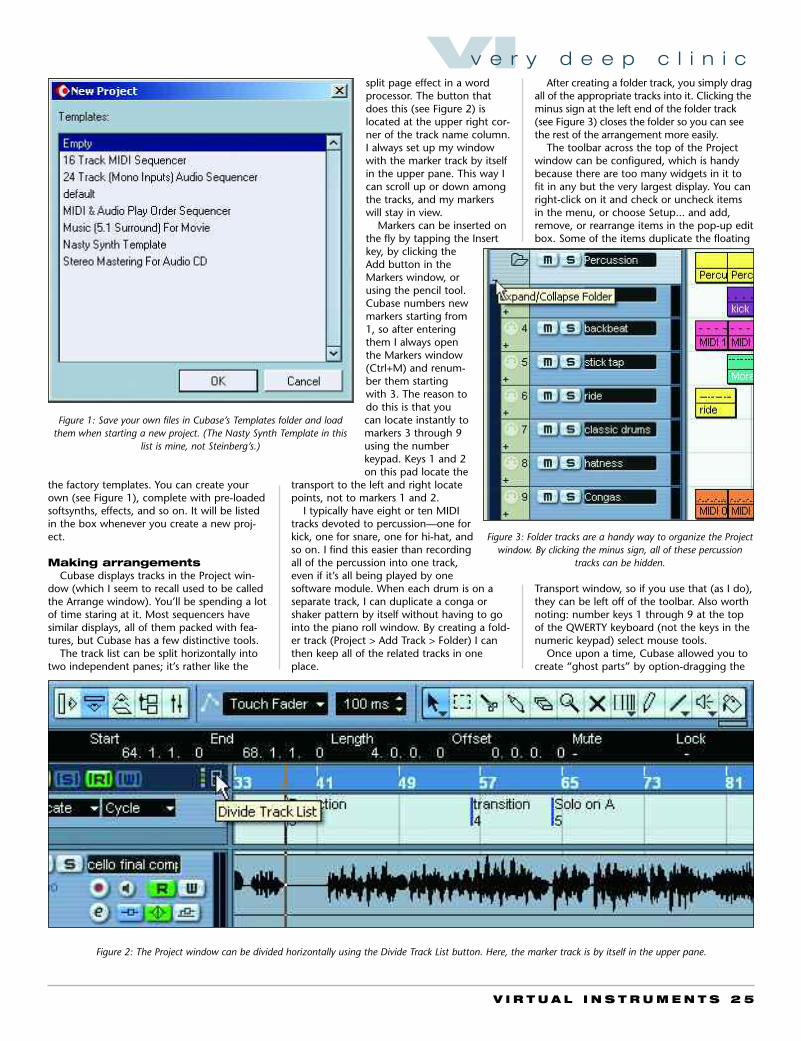
The track list can be split horizontally intotwo independent panes; it’s rather like the
split page effect in a wordprocessor. The button thatdoes this (see Figure 2) islocated at the upper right cor-ner of the track name column.I always set up my windowwith the marker track by itselfin the upper pane. This way Ican scroll up or down amongthe tracks, and my markerswill stay in view.
Markers can be inserted onthe fly by tapping the Insertkey, by clicking theAdd button in theMarkers window, orusing the pencil tool.Cubase numbers newmarkers starting from1, so after enteringthem I always openthe Markers window(Ctrl+M) and renum-ber them startingwith 3. The reason todo this is that youcan locate instantly tomarkers 3 through 9using the numberkeypad. Keys 1 and 2on this pad locate the
transport to the left and right locatepoints, not to markers 1 and 2.
I typically have eight or ten MIDItracks devoted to percussion—one forkick, one for snare, one for hi-hat, andso on. I find this easier than recordingall of the percussion into one track,even if it’s all being played by onesoftware module. When each drum is on aseparate track, I can duplicate a conga orshaker pattern by itself without having to gointo the piano roll window. By creating a fold-er track (Project > Add Track > Folder) I canthen keep all of the related tracks in oneplace.
After creating a folder track, you simply dragall of the appropriate tracks into it. Clicking theminus sign at the left end of the folder track(see Figure 3) closes the folder so you can seethe rest of the arrangement more easily.
The toolbar across the top of the Projectwindow can be configured, which is handybecause there are too many widgets in it tofit in any but the very largest display. You canright-click on it and check or uncheck itemsin the menu, or choose Setup... and add,remove, or rearrange items in the pop-up editbox. Some of the items duplicate the floating
Transport window, so if you use that (as I do),they can be left off of the toolbar. Also worthnoting: number keys 1 through 9 at the topof the QWERTY keyboard (not the keys in thenumeric keypad) select mouse tools.
Once upon a time, Cubase allowed you tocreate “ghost parts” by option-dragging the
VIv e r y d e e p c l i n i c
Figure 1: Save your own files in Cubase’s Templates folder and loadthem when starting a new project. (The Nasty Synth Template in this
list is mine, not Steinberg’s.)
Figure 3: Folder tracks are a handy way to organize the Projectwindow. By clicking the minus sign, all of these percussion
tracks can be hidden.
Figure 2: The Project window can be divided horizontally using the Divide Track List button. Here, the marker track is by itself in the upper pane.
2 6 V I R T U A L I N S T R U M E N T S
right end of a part in the Project window. Innewer versions, that operation creates realcopies—but the old “ghost part” function isstill available. Select a part, use Ctrl+K (for“clone,” I suppose), and check the SharedCopies checkbox.
Now all of the repeated parts will be clonesof one another. The advantage to doing thisis that when you editMIDI events in one of theclones, all of the otherswill change to reflect theedits. This is especiallyuseful with drum parts,because they tend to berepetitive.
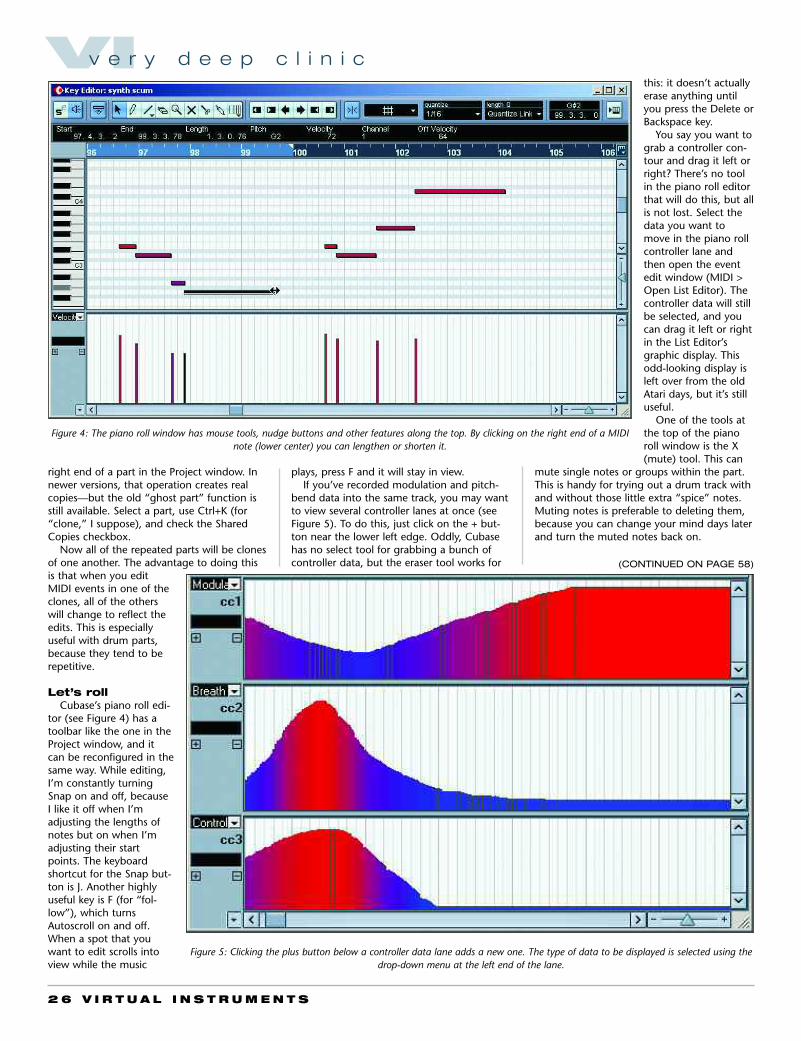
Let’s rollCubase’s piano roll edi-
tor (see Figure 4) has atoolbar like the one in theProject window, and itcan be reconfigured in thesame way. While editing,I’m constantly turningSnap on and off, becauseI like it off when I’madjusting the lengths ofnotes but on when I’madjusting their startpoints. The keyboardshortcut for the Snap but-ton is J. Another highlyuseful key is F (for “fol-low”), which turnsAutoscroll on and off.When a spot that youwant to edit scrolls intoview while the music
plays, press F and it will stay in view.If you’ve recorded modulation and pitch-
bend data into the same track, you may wantto view several controller lanes at once (seeFigure 5). To do this, just click on the + but-ton near the lower left edge. Oddly, Cubasehas no select tool for grabbing a bunch ofcontroller data, but the eraser tool works for
this: it doesn’t actuallyerase anything untilyou press the Delete orBackspace key.
You say you want tograb a controller con-tour and drag it left orright? There’s no toolin the piano roll editorthat will do this, but allis not lost. Select thedata you want tomove in the piano rollcontroller lane andthen open the eventedit window (MIDI >Open List Editor). Thecontroller data will stillbe selected, and youcan drag it left or rightin the List Editor’sgraphic display. Thisodd-looking display isleft over from the oldAtari days, but it’s stilluseful.
One of the tools atthe top of the pianoroll window is the X(mute) tool. This can
mute single notes or groups within the part.This is handy for trying out a drum track withand without those little extra “spice” notes.Muting notes is preferable to deleting them,because you can change your mind days laterand turn the muted notes back on.
(CONTINUED ON PAGE 58)
Figure 4: The piano roll window has mouse tools, nudge buttons and other features along the top. By clicking on the right end of a MIDInote (lower center) you can lengthen or shorten it.
Figure 5: Clicking the plus button below a controller data lane adds a new one. The type of data to be displayed is selected using thedrop-down menu at the left end of the lane.
VIv e r y d e e p c l i n i c
2 8 V I R T U A L I N S T R U M E N T S
Review by Nick Batzdorf
VIr e v i e w
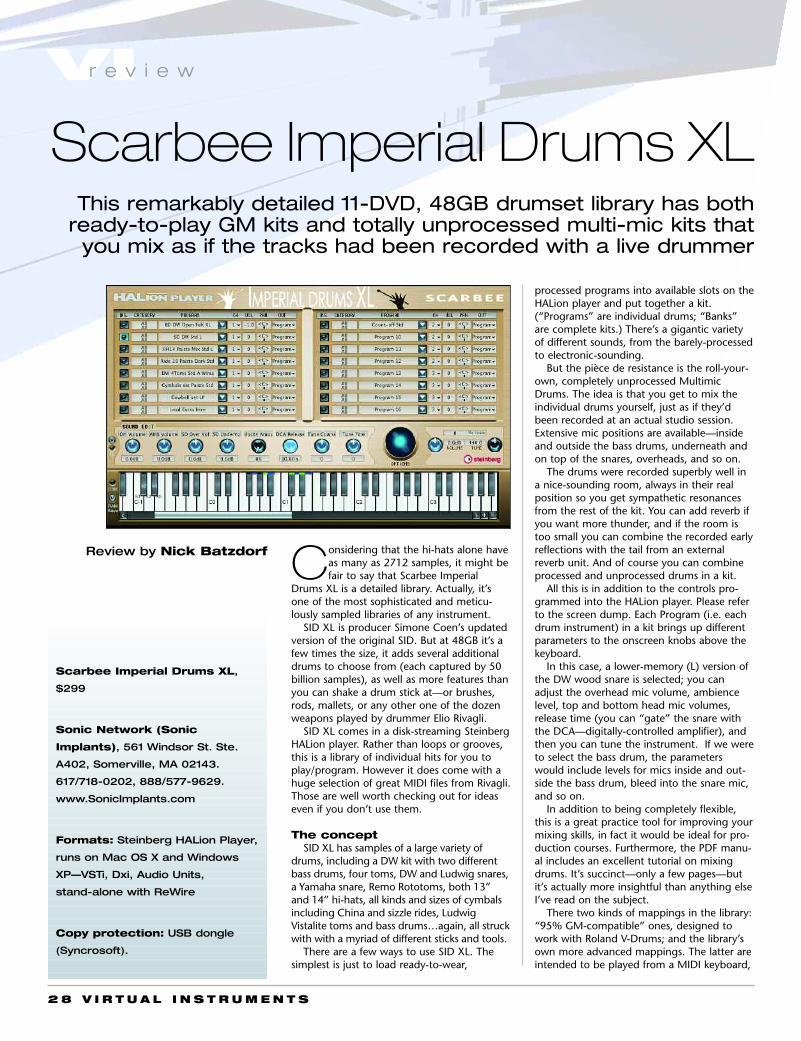
Considering that the hi-hats alone haveas many as 2712 samples, it might befair to say that Scarbee Imperial
Drums XL is a detailed library. Actually, it’sone of the most sophisticated and meticu-lously sampled libraries of any instrument.
SID XL is producer Simone Coen’s updatedversion of the original SID. But at 48GB it’s afew times the size, it adds several additionaldrums to choose from (each captured by 50billion samples), as well as more features thanyou can shake a drum stick at—or brushes,rods, mallets, or any other one of the dozenweapons played by drummer Elio Rivagli.
SID XL comes in a disk-streaming SteinbergHALion player. Rather than loops or grooves,this is a library of individual hits for you toplay/program. However it does come with ahuge selection of great MIDI files from Rivagli.Those are well worth checking out for ideaseven if you don’t use them.
The conceptSID XL has samples of a large variety of
drums, including a DW kit with two differentbass drums, four toms, DW and Ludwig snares,a Yamaha snare, Remo Rototoms, both 13”and 14” hi-hats, all kinds and sizes of cymbalsincluding China and sizzle rides, LudwigVistalite toms and bass drums…again, all struckwith with a myriad of different sticks and tools.
There are a few ways to use SID XL. Thesimplest is just to load ready-to-wear,
processed programs into available slots on theHALion player and put together a kit.(“Programs” are individual drums; “Banks”are complete kits.) There’s a gigantic varietyof different sounds, from the barely-processedto electronic-sounding.
But the pièce de resistance is the roll-your-own, completely unprocessed MultimicDrums. The idea is that you get to mix theindividual drums yourself, just as if they’dbeen recorded at an actual studio session.Extensive mic positions are available—insideand outside the bass drums, underneath andon top of the snares, overheads, and so on.
The drums were recorded superbly well ina nice-sounding room, always in their realposition so you get sympathetic resonancesfrom the rest of the kit. You can add reverb ifyou want more thunder, and if the room istoo small you can combine the recorded earlyreflections with the tail from an externalreverb unit. And of course you can combineprocessed and unprocessed drums in a kit.
All this is in addition to the controls pro-grammed into the HALion player. Please referto the screen dump. Each Program (i.e. eachdrum instrument) in a kit brings up differentparameters to the onscreen knobs above thekeyboard.
In this case, a lower-memory (L) version ofthe DW wood snare is selected; you canadjust the overhead mic volume, ambiencelevel, top and bottom head mic volumes,release time (you can “gate” the snare withthe DCA—digitally-controlled amplifier), andthen you can tune the instrument. If we wereto select the bass drum, the parameterswould include levels for mics inside and out-side the bass drum, bleed into the snare mic,and so on.
In addition to being completely flexible,this is a great practice tool for improving yourmixing skills, in fact it would be ideal for pro-duction courses. Furthermore, the PDF manu-al includes an excellent tutorial on mixingdrums. It’s succinct—only a few pages—butit’s actually more insightful than anything elseI’ve read on the subject.
There two kinds of mappings in the library:“95% GM-compatible” ones, designed towork with Roland V-Drums; and the library’sown more advanced mappings. The latter areintended to be played from a MIDI keyboard,
Scarbee Imperial Drums XLThis remarkably detailed 11-DVD, 48GB drumset library has both
ready-to-play GM kits and totally unprocessed multi-mic kits thatyou mix as if the tracks had been recorded with a live drummer
Scarbee Imperial Drums XL,
$299
Sonic Network (Sonic
Implants), 561 Windsor St. Ste.
A402, Somerville, MA 02143.
617/718-0202, 888/577-9629.
www.SonicImplants.com
Formats: Steinberg HALion Player,
runs on Mac OS X and Windows
XP—VSTi, Dxi, Audio Units,
stand-alone with ReWire
Copy protection: USB dongle
(Syncrosoft).

3 0 V I R T U A L I N S T R U M E N T S
VIr e v i e wwhich of course has dozens of keys ratherthan just a few pads.
SID XL’s own mapping takes advantage ofkeyswitches, MIDI controllers, sustain pedaland mod wheel cymbal-choking, and spread-out instruments that couldn’t fit into the GMstandard. For example, snare ghost notes areon their own keys. Also, the mod wheel isused to move the stick closer to the center ofvarious cymbals and hi-hats; different wheelpositions have their own complete set ofvelocity layers at different cymbal locations.(That’s how Coen was able to get the report-ed 2712 hi-hat samples on just two keys; Ipromise I didn’t count them.)
The GM mappings use sample alternationto avoid repeating the same samples, whilethe standard mappings have so many samplesthat this is unnecessary—you won’t hit thesame one twice.
The player #1As we discuss the features of this library, it’s
important to mention the most importantone: Elio Rivagli’s control and ability to playsuch a huge number of different velocities oneach drum. That—one assumes along with hiscreative input into what to record with whatweapons—is what makes SID XL capable ofso much subtlety.
Even though MIDI has 128 discrete velocityvalues in its spec, this aspect of the library isactually ahead of most if not all MIDI con-
trollers’ ability to take advantage of it. For thisreview I used a weighted Kurzweil K2500 key-board and an Alesis Photon X25 unweightedkeyboard, but unfortunately not Roland V-Drums, which one would expect to fare con-siderably better. Still, it’s good the library hasthe overhead to capture the most responseyour controller has to offer.
The huge number of velocities in SID XLalso allows you to get a lot of different soundsout of the drum instruments, which makesthem fit different contexts. One of the firstsurprises for me was that the most powerful,resonant sound you can get out of a bassdrum is several notches below the maximumvelocity.
The player #2Once installed, the HALion player has been
solid. Its streaming performance is fine, and ithas some nice features. One of these featuresis RAM Save, which listens to your sequenceddrum part and unloads all the samples thatweren’t triggered to save memory. Given thatthe full-memory kits can easily take up250MB, that’s very useful.
But alack, the praise comes with a caveat.Now, I’ve installed other HALion players
and Syncrosoft dongle-protected software onWindows XP machines with absolutely noproblem.
However, installing this one on the Mac G5used for this review was not smooth sailing.
Whether that was entirely due to bugs in theSyncrosoft system or to the player itself ishard to say, but I’d actually thrown in thetowel and reviewed the library in the full ver-sion of HALion (which did install properly, tocompound all the mystery); it was only a fewdays before we went to press that I was ableto get the player to work without simplycrashing on launch. Hopefully that coincidedwith the latest version of the Syncrosoftand/or the HALion player software, but I can’treally explain why it decided to work all of asudden.
It’s a testament to how great this library isthat I’d still recommend it to G5 users in spiteof that.
Unbeatable drumsAfter playing SID XL for just a few minutes,
some excellent drum libraries pale by com-parison. Subjectively, the biggest differencewith SID XL is the cymbals, which are usuallythe instrument that gives it all away. But youjust play these cymbals while moving themod wheel to vary the stick position, andthey sound amazingly realistic.
The last Scarbee library we reviewed washis Vintage Keys Gold bundle (9-10/05),about which I commented that this is whatsampling technology is all about. ScarbeeImperial Drums XL is in the same league. At$300 it’s a no-brainer. VI
Nobody knows why it’s called the New York drum sound, but there’s an old engineering trick that will make drums ofall kind (drum kits, taikos, congas…anything) sound like they’re being slammed by a huge gorilla as hard as he can.You can use it to get the pounding movie trailer percussion sound, or just to punch up percussive sounds in general.
Now, compressors are signal processors rather than effects, meaning that it’s nor-mal to route the entire signal through them rather than using them on a send-returnpath; they’re intended to shape and control the dynamics of a signal (after all, they’reessentially super-fast volume reducers). But you don’t have to use them that way—youcan combine a drastically compressed version of the original back in with itself. Thesource track retains its dynamics, while the compressed track adds slam.
There are no painting-by-the-numbers compression settings for this or any othertrick. But in broad strokes, you probably want the compressor to have a moderateattack time (maybe 100 milliseconds as a starting point) so the transient gets through.
The release time depends on the drum and what you’re trying to achieve. A rela-tively fast release time will give you a “pssht” sustained sound, for example, but youreally have to play around with the settings.
If your compressor has hard and soft knee settings, pick the former. Soft kneemeans the gain reduction ramps up gradually as the signal approaches the threshold,but you want it to clamp down right away. Finally, the ratio should most likely be 4:1or greater, meaning every 4dB over the threshold setting in results in 1dB out.
It’s important that your DAW have delay compensation so that the compressed sig-nal is in perfect sync with the source track. Most do, but if you don’t have automaticdelay compensation you’ll have to bounce the tracks to disk and line them up manu-ally…which is unfortunate, because you can’t really hear the effect properly before-hand.
Taking the trick farther, you can set up multiple compression busses, each going toa separate track with an EQ in front of the compressor’s sidechain input. Each track can then be tuned for a different frequency range andeffect. The sidechain is an input that only goes to the compressor’s detection “circuit”; the filtered signal is only being used to trigger thecompression being applied to the regular drum signal. Because they’re not all at the same level, different frequencies cause the compressor toreact differently. It takes experimentation.
Just don’t be shy—this is not intended to be a subtle trick.
The Slamming “New York Drum Sound” randomtip
VIf e a t u r e
3 4 V I R T U A L I N S T R U M E N T S
If you don’t have those libraries, don’tfret—most of this isn’t so specific that youcan’t apply the same general ideas to otherlibraries.
In the past I’ve tried to keep things as gen-eral as possible, but this time I’ll be using spe-cific terms found in the owner’s manual of thesoftware being used. If you still get a little lostin the text and terms, just look at the picturesto get your bearings.
String me upThe first sample library we’re going to have
fun operating on is Sonic Implants SymphonicString Collection (SISC). If you read thereview in the previous issue you’ll know thatthis library is great out of the box, but hereare some ideas to extend its capabilities.
I should mention that I’m using theGigaSampler 2.5 version of SISC. The libraryis available for Kontakt, but these tutorials willbe performed on a version converted viaKontakt 1 (Chicken Systems Translator will doa nice job of conversion as well).
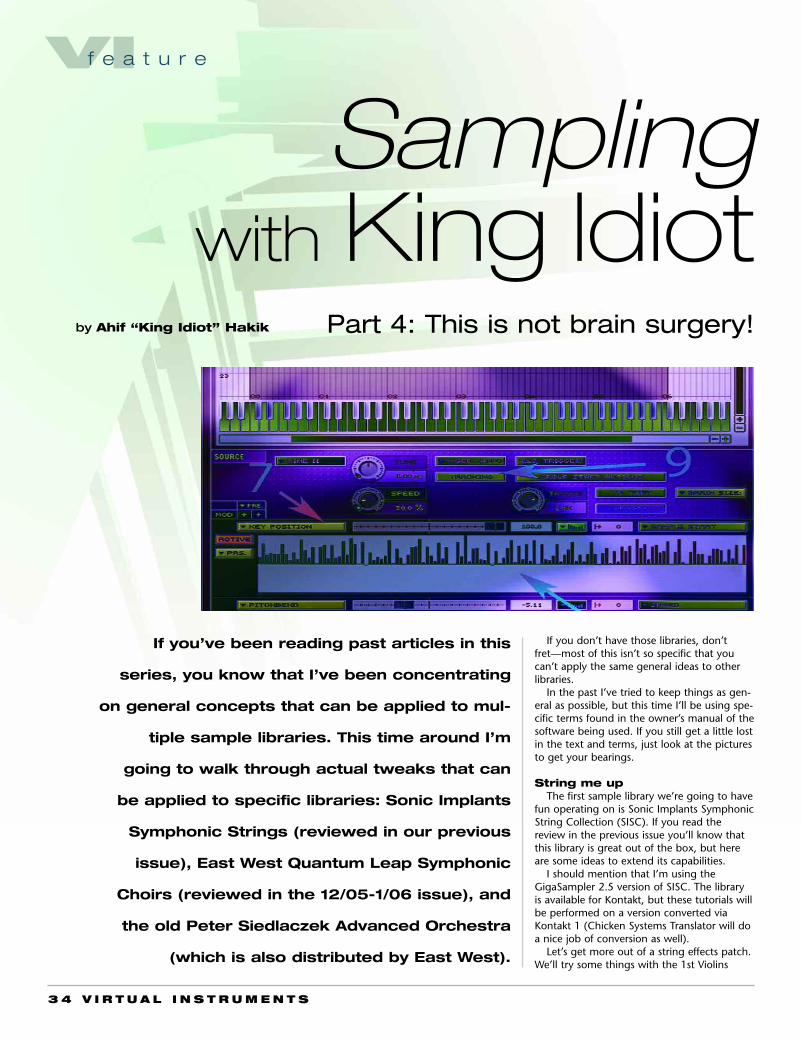
Let’s get more out of a string effects patch.We’ll try some things with the 1st Violins
Part 4: This is not brain surgery!by Ahif “King Idiot” Hakik
Sampling with King Idiot
If you’ve been reading past articles in this
series, you know that I’ve been concentrating
on general concepts that can be applied to mul-
tiple sample libraries. This time around I’m
going to walk through actual tweaks that can
be applied to specific libraries: Sonic Implants
Symphonic Strings (reviewed in our previous
issue), East West Quantum Leap Symphonic
Choirs (reviewed in the 12/05-1/06 issue), and
the old Peter Siedlaczek Advanced Orchestra
(which is also distributed by East West).
V I R T U A L I N S T R U M E N T S 3 5
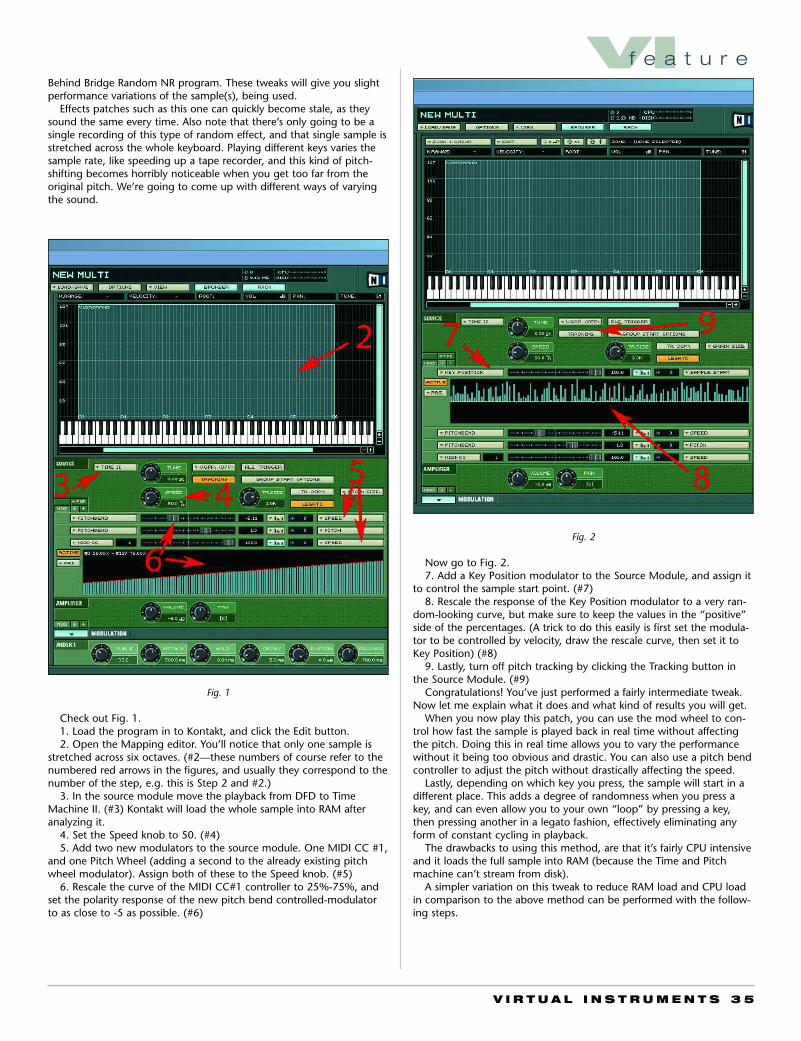
Behind Bridge Random NR program. These tweaks will give you slightperformance variations of the sample(s), being used.
Effects patches such as this one can quickly become stale, as theysound the same every time. Also note that there’s only going to be asingle recording of this type of random effect, and that single sample isstretched across the whole keyboard. Playing different keys varies thesample rate, like speeding up a tape recorder, and this kind of pitch-shifting becomes horribly noticeable when you get too far from theoriginal pitch. We’re going to come up with different ways of varyingthe sound.
Check out Fig. 1.1. Load the program in to Kontakt, and click the Edit button.2. Open the Mapping editor. You’ll notice that only one sample is
stretched across six octaves. (#2—these numbers of course refer to thenumbered red arrows in the figures, and usually they correspond to thenumber of the step, e.g. this is Step 2 and #2.)
3. In the source module move the playback from DFD to TimeMachine II. (#3) Kontakt will load the whole sample into RAM afteranalyzing it.
4. Set the Speed knob to 50. (#4)5. Add two new modulators to the source module. One MIDI CC #1,
and one Pitch Wheel (adding a second to the already existing pitchwheel modulator). Assign both of these to the Speed knob. (#5)
6. Rescale the curve of the MIDI CC#1 controller to 25%-75%, andset the polarity response of the new pitch bend controlled-modulatorto as close to -5 as possible. (#6)
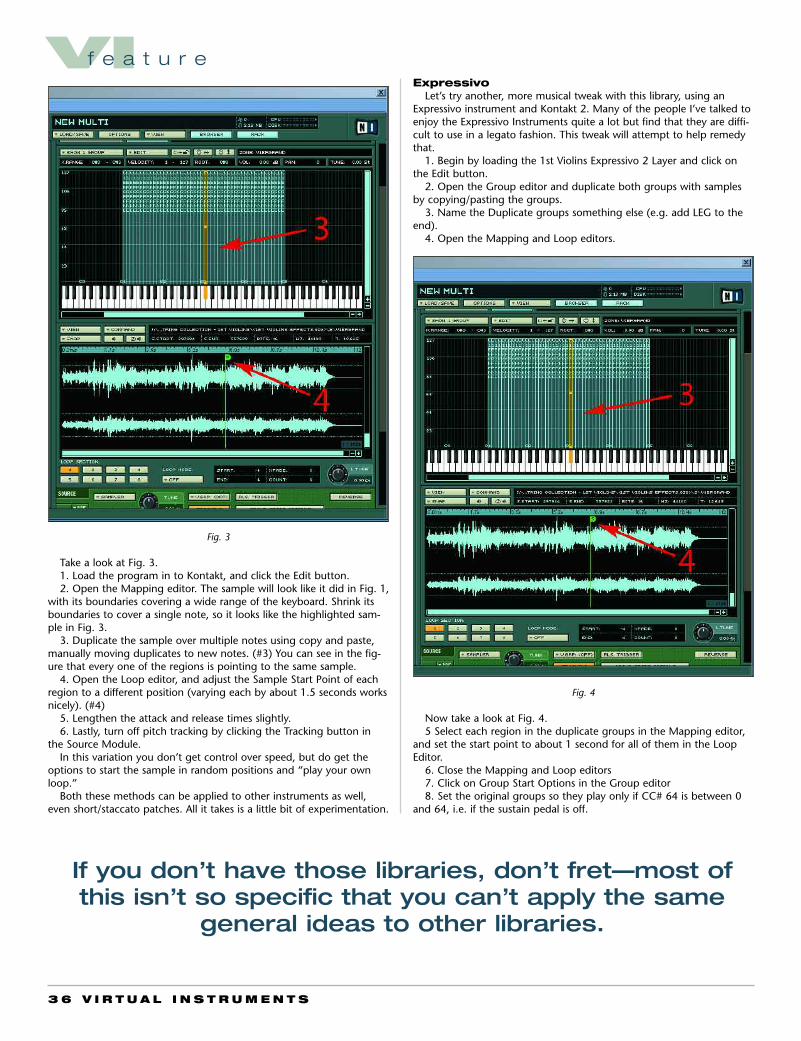
Now go to Fig. 2.7. Add a Key Position modulator to the Source Module, and assign it
to control the sample start point. (#7)8. Rescale the response of the Key Position modulator to a very ran-
dom-looking curve, but make sure to keep the values in the “positive”side of the percentages. (A trick to do this easily is first set the modula-tor to be controlled by velocity, draw the rescale curve, then set it toKey Position) (#8)
9. Lastly, turn off pitch tracking by clicking the Tracking button inthe Source Module. (#9)
Congratulations! You’ve just performed a fairly intermediate tweak.Now let me explain what it does and what kind of results you will get.
When you now play this patch, you can use the mod wheel to con-trol how fast the sample is played back in real time without affectingthe pitch. Doing this in real time allows you to vary the performancewithout it being too obvious and drastic. You can also use a pitch bendcontroller to adjust the pitch without drastically affecting the speed.
Lastly, depending on which key you press, the sample will start in adifferent place. This adds a degree of randomness when you press akey, and can even allow you to your own “loop” by pressing a key,then pressing another in a legato fashion, effectively eliminating anyform of constant cycling in playback.
The drawbacks to using this method, are that it’s fairly CPU intensiveand it loads the full sample into RAM (because the Time and Pitchmachine can’t stream from disk).
A simpler variation on this tweak to reduce RAM load and CPU loadin comparison to the above method can be performed with the follow-ing steps.
VIf e a t u r e
Fig. 1
Fig. 2
ExpressivoLet’s try another, more musical tweak with this library, using an
Expressivo instrument and Kontakt 2. Many of the people I’ve talked toenjoy the Expressivo Instruments quite a lot but find that they are diffi-cult to use in a legato fashion. This tweak will attempt to help remedythat.
1. Begin by loading the 1st Violins Expressivo 2 Layer and click onthe Edit button.
2. Open the Group editor and duplicate both groups with samplesby copying/pasting the groups.
3. Name the Duplicate groups something else (e.g. add LEG to theend).
4. Open the Mapping and Loop editors.
Now take a look at Fig. 4.5 Select each region in the duplicate groups in the Mapping editor,
and set the start point to about 1 second for all of them in the LoopEditor.
6. Close the Mapping and Loop editors7. Click on Group Start Options in the Group editor8. Set the original groups so they play only if CC# 64 is between 0
and 64, i.e. if the sustain pedal is off.
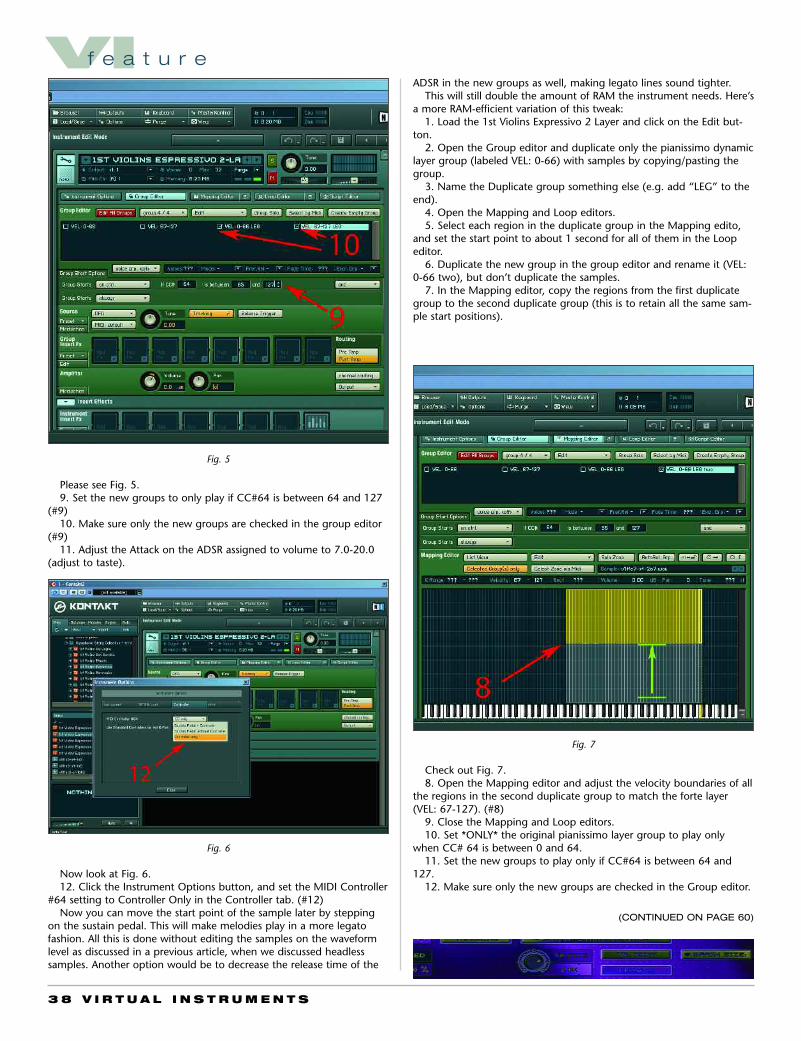
Take a look at Fig. 3.1. Load the program in to Kontakt, and click the Edit button.2. Open the Mapping editor. The sample will look like it did in Fig. 1,
with its boundaries covering a wide range of the keyboard. Shrink itsboundaries to cover a single note, so it looks like the highlighted sam-ple in Fig. 3.
3. Duplicate the sample over multiple notes using copy and paste,manually moving duplicates to new notes. (#3) You can see in the fig-ure that every one of the regions is pointing to the same sample.
4. Open the Loop editor, and adjust the Sample Start Point of eachregion to a different position (varying each by about 1.5 seconds worksnicely). (#4)
5. Lengthen the attack and release times slightly.6. Lastly, turn off pitch tracking by clicking the Tracking button in
the Source Module.In this variation you don’t get control over speed, but do get the
options to start the sample in random positions and “play your ownloop.”
Both these methods can be applied to other instruments as well,even short/staccato patches. All it takes is a little bit of experimentation.
3 6 V I R T U A L I N S T R U M E N T S
VIf e a t u r e
Fig. 3
Fig. 4
If you don’t have those libraries, don’t fret—most ofthis isn’t so specific that you can’t apply the same
general ideas to other libraries.
ADSR in the new groups as well, making legato lines sound tighter.This will still double the amount of RAM the instrument needs. Here’s
a more RAM-efficient variation of this tweak:1. Load the 1st Violins Expressivo 2 Layer and click on the Edit but-
ton.2. Open the Group editor and duplicate only the pianissimo dynamic
layer group (labeled VEL: 0-66) with samples by copying/pasting thegroup.
3. Name the Duplicate group something else (e.g. add “LEG” to theend).
4. Open the Mapping and Loop editors.5. Select each region in the duplicate group in the Mapping edito,
and set the start point to about 1 second for all of them in the Loopeditor.
6. Duplicate the new group in the group editor and rename it (VEL:0-66 two), but don’t duplicate the samples.
7. In the Mapping editor, copy the regions from the first duplicategroup to the second duplicate group (this is to retain all the same sam-ple start positions).
Please see Fig. 5.9. Set the new groups to only play if CC#64 is between 64 and 127
(#9)10. Make sure only the new groups are checked in the group editor
(#9)11. Adjust the Attack on the ADSR assigned to volume to 7.0-20.0
(adjust to taste).
3 8 V I R T U A L I N S T R U M E N T S
VIf e a t u r e
Now look at Fig. 6.12. Click the Instrument Options button, and set the MIDI Controller
#64 setting to Controller Only in the Controller tab. (#12)Now you can move the start point of the sample later by stepping
on the sustain pedal. This will make melodies play in a more legatofashion. All this is done without editing the samples on the waveformlevel as discussed in a previous article, when we discussed headlesssamples. Another option would be to decrease the release time of the
Fig. 5
Fig. 6
Fig. 7
Check out Fig. 7.8. Open the Mapping editor and adjust the velocity boundaries of all
the regions in the second duplicate group to match the forte layer(VEL: 67-127). (#8)
9. Close the Mapping and Loop editors.10. Set *ONLY* the original pianissimo layer group to play only
when CC# 64 is between 0 and 64.11. Set the new groups to play only if CC#64 is between 64 and
127.12. Make sure only the new groups are checked in the Group editor.
(CONTINUED ON PAGE 60)
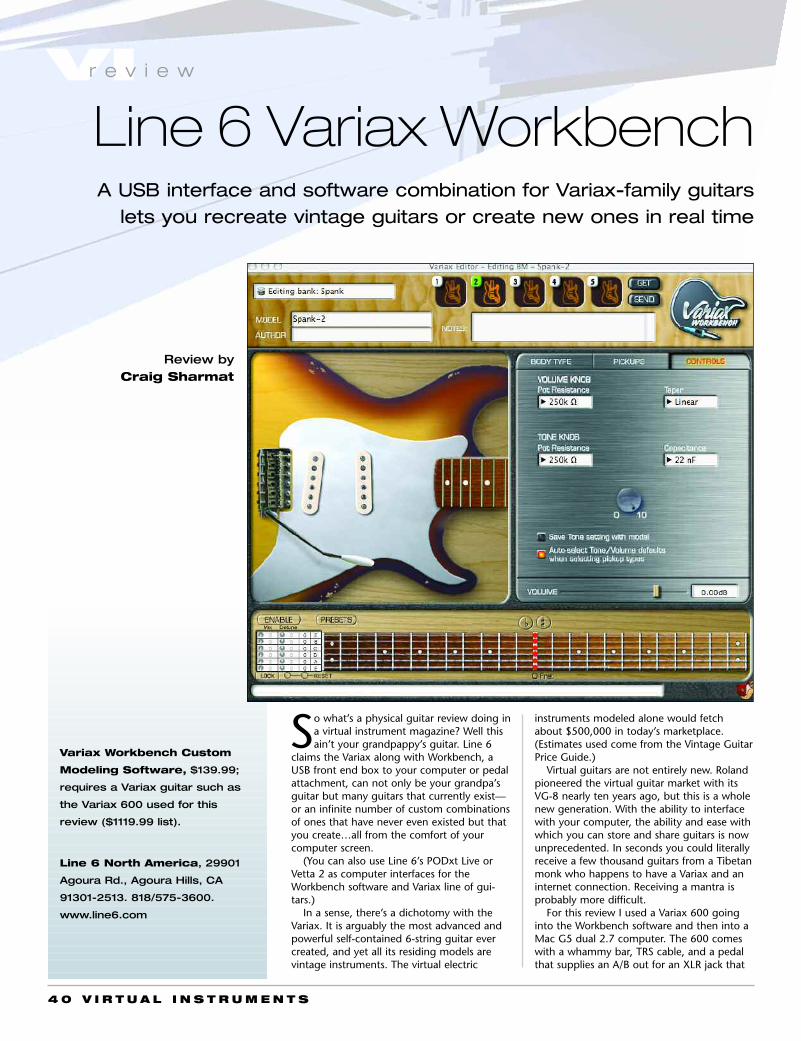
VIr e v i e w
4 0 V I R T U A L I N S T R U M E N T S
instruments modeled alone would fetchabout $500,000 in today’s marketplace.(Estimates used come from the Vintage GuitarPrice Guide.)
Virtual guitars are not entirely new. Rolandpioneered the virtual guitar market with itsVG-8 nearly ten years ago, but this is a wholenew generation. With the ability to interfacewith your computer, the ability and ease withwhich you can store and share guitars is nowunprecedented. In seconds you could literallyreceive a few thousand guitars from a Tibetanmonk who happens to have a Variax and aninternet connection. Receiving a mantra isprobably more difficult.
For this review I used a Variax 600 goinginto the Workbench software and then into aMac G5 dual 2.7 computer. The 600 comeswith a whammy bar, TRS cable, and a pedalthat supplies an A/B out for an XLR jack that
So what’s a physical guitar review doing ina virtual instrument magazine? Well thisain’t your grandpappy’s guitar. Line 6
claims the Variax along with Workbench, aUSB front end box to your computer or pedalattachment, can not only be your grandpa’sguitar but many guitars that currently exist—or an infinite number of custom combinationsof ones that have never even existed but thatyou create…all from the comfort of yourcomputer screen.
(You can also use Line 6’s PODxt Live orVetta 2 as computer interfaces for theWorkbench software and Variax line of gui-tars.)
In a sense, there’s a dichotomy with theVariax. It is arguably the most advanced andpowerful self-contained 6-string guitar evercreated, and yet all its residing models arevintage instruments. The virtual electric
Variax Workbench Custom
Modeling Software, $139.99;
requires a Variax guitar such as
the Variax 600 used for this
review ($1119.99 list).
Line 6 North America, 29901
Agoura Rd., Agoura Hills, CA
91301-2513. 818/575-3600.
www.line6.com
Line 6 Variax WorkbenchA USB interface and software combination for Variax-family guitars
lets you recreate vintage guitars or create new ones in real time
Review by Craig Sharmat
V I R T U A L I N S T R U M E N T S 4 1
services the acoustic guitar models and astandard ?” jack for using the electric models.Both jacks can be used for all models, but thiswould be a typical set-up.
The pedal also houses the power to the gui-tar in place of using batteries. There is a lessexpensive 300 version that is a hardtail (nowhammy) and has a rosewood finger board.And Variax Workbench 1.5 will be compatiblewith the Variax Acoustic 700 model.
Sound and feelIn principle all this is great, but one is left
asking, “How does it sound, and how doesthe guitar feel?” The earliest versions of theVariax guitar were impressive, but to mostplayers the feel of the instrument left some-thing to be desired. Line 6 paid attention andcreated a new line of better instruments.
The guitar I used had a maple fingerboardand felt like a good Fender, a real improve-ment over earlier Variax models. I was happywith the feel of the instrument.
Soundwise, Line 6 decided not to laychance to your local Mexican Strat, as men-tioned earlier. In their search for some of thebest and most accurate guitar tones, theyincorporated Albert Molinaro, one of theworld’s foremost authorities and collectors ofvintage guitars, to rent and advise whatinstruments to model.
The Telecaster and Strats sound like Telesand Strats. There are Les Pauls, an ES 175,Gibson Super 400…among other Gibsonhighlights that are reproduced faithfully. Alsoincluded are some Rickenbacker and Gretschguitars.
It would be good to have more moderninstruments, however. Heavy rock guitars withdropped tunings are absent. This can beaddressed with Variax’s convient tuning fea-tures (more later), but the depth of heavystrings on, say, a metal baritone guitar are notaccounted for, and the different scaling ofsome of the more modern guitars makes thistransition technically difficult.
Dropping your own tuning on the Variaxdoes offer a good metal chord tone, and theabsence of hum from pickups is a greatadded bonus. There is also a wide range ofacoustics, from resonators to three sizes ofstandard acoustic guitars, a banjo, electricsitar, two 12-string models, and others.
Playing an acoustic model on an electricguitar is a little strange feel-wise. My sensewas that these models sounded like aplugged-in version like you’d get directlyfrom an acoustic guitar pickup, as opposed tothe feeling of air one gets from miking one. Icould see using these acoustics for much pro-fessional work, but for tracks under scrutiny areal acoustic will give better results. That said,I would have no trouble using most of theVariax electrics the appropriate situation.
To the benchThis is where it gets interesting. With Line
6’s Workbench software you can literally cre-ate an infinite amount of custom guitars, or
retune the guitars that already exist, or both.This software is elegant and fun, with greatvisuals to guide you as you create your per-sonal guitars.
The recreation process allows you to swapbody shapes, change and move pickups fordifferent tonalities, alter tone and volumecontrols, and alter how the knobs actuallywork on the guitar. You can create hybrid gui-tars, which might be a combination of a LesPaul body and single-coil Fender-style pickup,for example.
Then you can detune your guitar to anytuning and save it so it’s ready any time youwant. This is also a convenient way to createheavy metal dropped tuning guitars, forexample. Using a Line 6 Pod XT amp/cabinet-modeling unit and some dropped tunings,the Variax slams.
Environmentally friendlyWell not exactly, but having one axe might
preclude you from chopping down moretrees when considering your next guitar pur-chase. The Variax could be your first and orlast guitar, depending on your needs.
Many VI musicians are not primarily gui-tarists, but can play enough to lay downsome tracks. Most are frustrated that theydon’t have an arsenal of guitars for the varietyof sounds available. The Variax is literally aone-stop solution.
When creating, it’s often a hassle to pick upa guitar, find out it’s the wrong one for thesong, and try another. With the Variax youhave a plethora of options. You can go from aStrat to a Hollow body in a second and notlose your creative juices picking up guitars.You could even use it as an auditioningprocess for the guitars you already own. Evenif you only play guitar occasionally on yourtracks, the Variax can add that needed guitartouch for almost any guitar application.
In conclusion, the Variax along withWorkbench is a toolshed of some of the finestguitars ever made—and ones that don’t yetexist. The unprecedented flexibility, greattone, and good feel makes this a guitar play-ers’ dream at a bargain price. Highly recom-mended! VI
As a guitarist, Craig Sharmat’s (www.score-dog.tv) credits include Ronnie Laws (for whomhe served as musical director), the PointerSisters, and Randy Crawford. His list of scoringcredits spans dozens of live action and animatedTV shows, films, trailers, commercials, and mostrecently several Playstation games. Craig alsoarranged and programmed on Rick Braun’s lat-est album ‘Yours Truly.’
VIr e v i e w
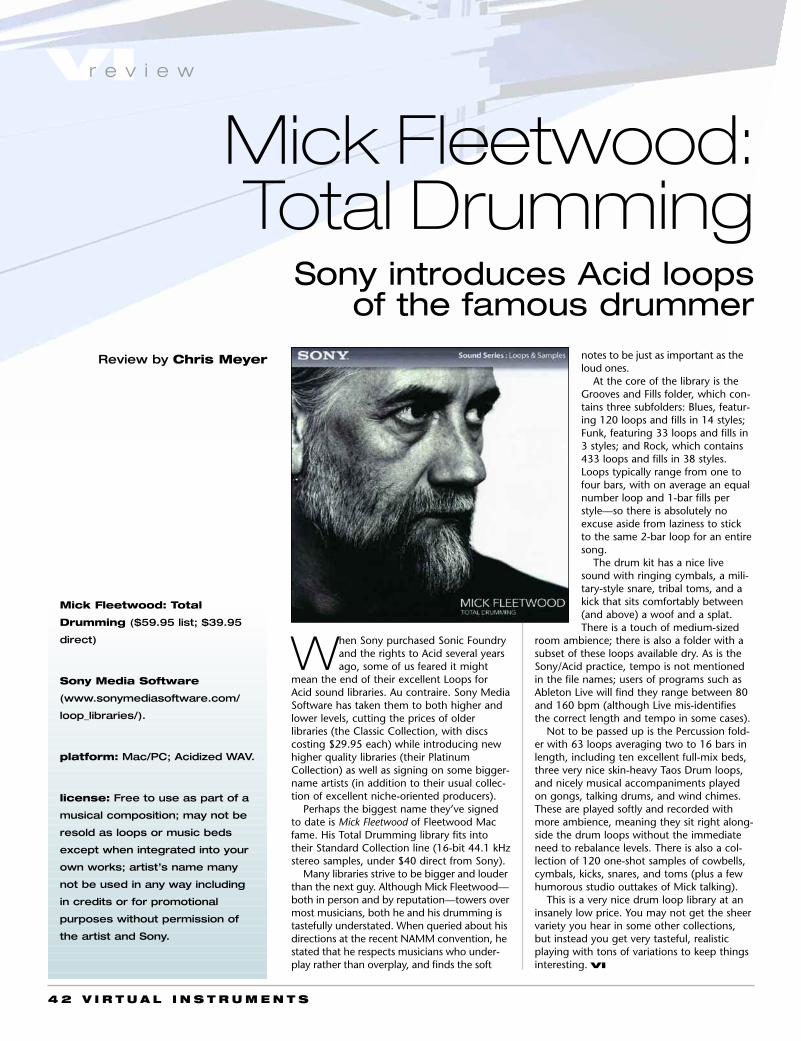
VIr e v i e w
Mick Fleetwood: Total
Drumming ($59.95 list; $39.95
direct)
Sony Media Software
(www.sonymediasoftware.com/
loop_libraries/).
platform: Mac/PC; Acidized WAV.
license: Free to use as part of a
musical composition; may not be
resold as loops or music beds
except when integrated into your
own works; artist’s name many
not be used in any way including
in credits or for promotional
purposes without permission of
the artist and Sony.
Review by Chris Meyer
4 2 V I R T U A L I N S T R U M E N T S
notes to be just as important as theloud ones.
At the core of the library is theGrooves and Fills folder, which con-tains three subfolders: Blues, featur-ing 120 loops and fills in 14 styles;Funk, featuring 33 loops and fills in3 styles; and Rock, which contains433 loops and fills in 38 styles.Loops typically range from one tofour bars, with on average an equalnumber loop and 1-bar fills perstyle—so there is absolutely noexcuse aside from laziness to stickto the same 2-bar loop for an entiresong.
The drum kit has a nice livesound with ringing cymbals, a mili-tary-style snare, tribal toms, and akick that sits comfortably between(and above) a woof and a splat.There is a touch of medium-sized
room ambience; there is also a folder with asubset of these loops available dry. As is theSony/Acid practice, tempo is not mentionedin the file names; users of programs such asAbleton Live will find they range between 80and 160 bpm (although Live mis-identifiesthe correct length and tempo in some cases).
Not to be passed up is the Percussion fold-er with 63 loops averaging two to 16 bars inlength, including ten excellent full-mix beds,three very nice skin-heavy Taos Drum loops,and nicely musical accompaniments playedon gongs, talking drums, and wind chimes.These are played softly and recorded withmore ambience, meaning they sit right along-side the drum loops without the immediateneed to rebalance levels. There is also a col-lection of 120 one-shot samples of cowbells,cymbals, kicks, snares, and toms (plus a fewhumorous studio outtakes of Mick talking).
This is a very nice drum loop library at aninsanely low price. You may not get the sheervariety you hear in some other collections,but instead you get very tasteful, realisticplaying with tons of variations to keep thingsinteresting. VI
When Sony purchased Sonic Foundryand the rights to Acid several yearsago, some of us feared it might
mean the end of their excellent Loops forAcid sound libraries. Au contraire. Sony MediaSoftware has taken them to both higher andlower levels, cutting the prices of olderlibraries (the Classic Collection, with discscosting $29.95 each) while introducing newhigher quality libraries (their PlatinumCollection) as well as signing on some bigger-name artists (in addition to their usual collec-tion of excellent niche-oriented producers).
Perhaps the biggest name they’ve signedto date is Mick Fleetwood of Fleetwood Macfame. His Total Drumming library fits intotheir Standard Collection line (16-bit 44.1 kHzstereo samples, under $40 direct from Sony).
Many libraries strive to be bigger and louderthan the next guy. Although Mick Fleetwood—both in person and by reputation—towers overmost musicians, both he and his drumming istastefully understated. When queried about hisdirections at the recent NAMM convention, hestated that he respects musicians who under-play rather than overplay, and finds the soft
Sony introduces Acid loops of the famous drummer
Mick Fleetwood:Total Drumming

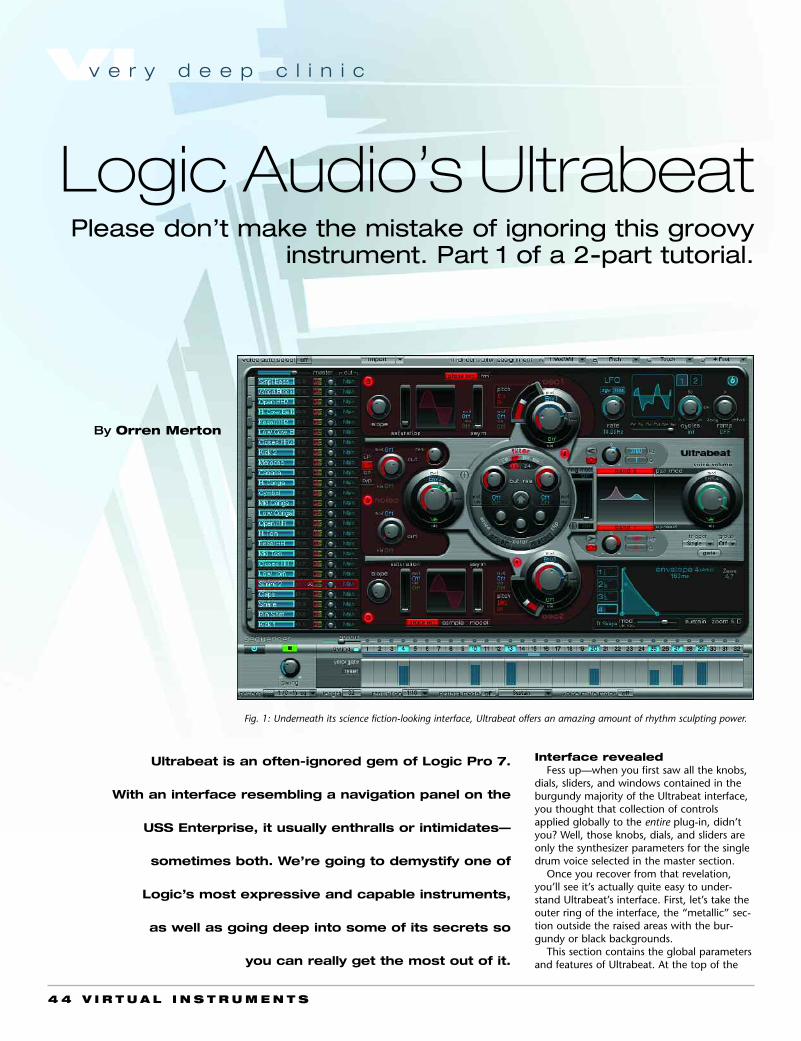
VIv e r y d e e p c l i n i c
4 4 V I R T U A L I N S T R U M E N T S
Interface revealedFess up—when you first saw all the knobs,
dials, sliders, and windows contained in theburgundy majority of the Ultrabeat interface,you thought that collection of controlsapplied globally to the entire plug-in, didn’tyou? Well, those knobs, dials, and sliders areonly the synthesizer parameters for the singledrum voice selected in the master section.
Once you recover from that revelation,you’ll see it’s actually quite easy to under-stand Ultrabeat’s interface. First, let’s take theouter ring of the interface, the “metallic” sec-tion outside the raised areas with the bur-gundy or black backgrounds.
This section contains the global parametersand features of Ultrabeat. At the top of the
Please don’t make the mistake of ignoring this groovyinstrument. Part 1 of a 2-part tutorial.
Fig. 1: Underneath its science fiction-looking interface, Ultrabeat offers an amazing amount of rhythm sculpting power.
Ultrabeat is an often-ignored gem of Logic Pro 7.
With an interface resembling a navigation panel on the
USS Enterprise, it usually enthralls or intimidates—
sometimes both. We’re going to demystify one of
Logic’s most expressive and capable instruments,
as well as going deep into some of its secrets so
you can really get the most out of it.
Logic Audio’s Ultrabeat
By Orren Merton
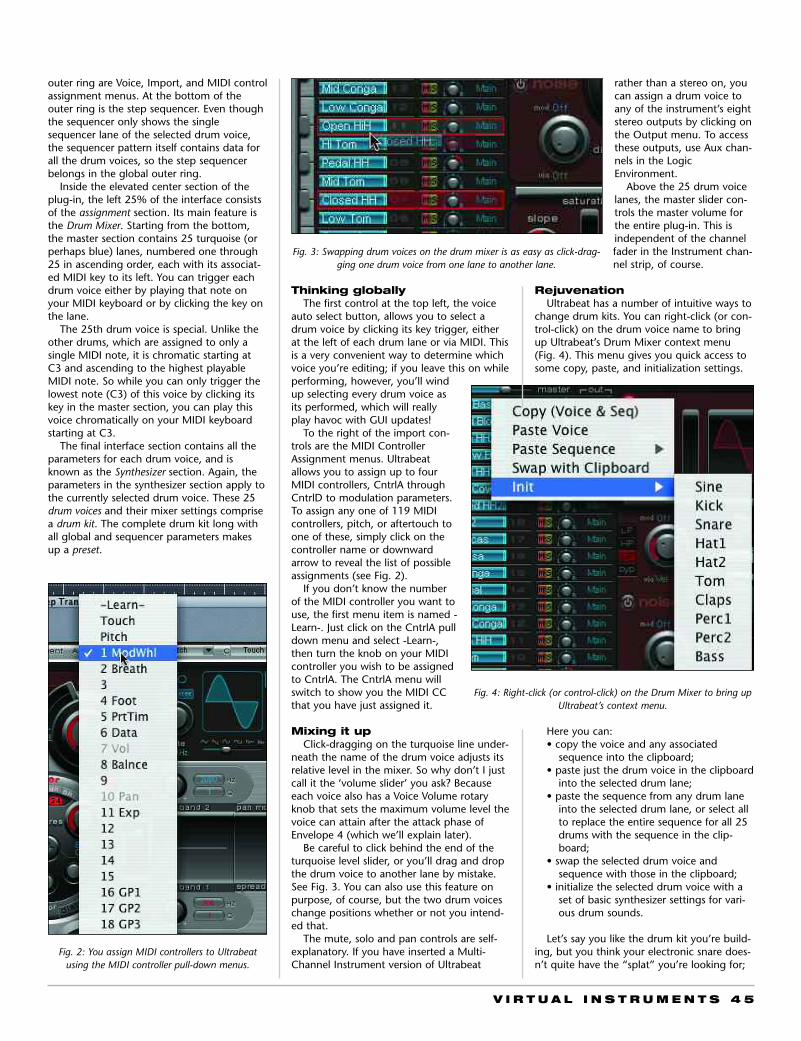
V I R T U A L I N S T R U M E N T S 4 5
outer ring are Voice, Import, and MIDI controlassignment menus. At the bottom of theouter ring is the step sequencer. Even thoughthe sequencer only shows the singlesequencer lane of the selected drum voice,the sequencer pattern itself contains data forall the drum voices, so the step sequencerbelongs in the global outer ring.
Inside the elevated center section of theplug-in, the left 25% of the interface consistsof the assignment section. Its main feature isthe Drum Mixer. Starting from the bottom,the master section contains 25 turquoise (orperhaps blue) lanes, numbered one through25 in ascending order, each with its associat-ed MIDI key to its left. You can trigger eachdrum voice either by playing that note onyour MIDI keyboard or by clicking the key onthe lane.
The 25th drum voice is special. Unlike theother drums, which are assigned to only asingle MIDI note, it is chromatic starting atC3 and ascending to the highest playableMIDI note. So while you can only trigger thelowest note (C3) of this voice by clicking itskey in the master section, you can play thisvoice chromatically on your MIDI keyboardstarting at C3.
The final interface section contains all theparameters for each drum voice, and isknown as the Synthesizer section. Again, theparameters in the synthesizer section apply tothe currently selected drum voice. These 25drum voices and their mixer settings comprisea drum kit. The complete drum kit long withall global and sequencer parameters makesup a preset.
Thinking globallyThe first control at the top left, the voice
auto select button, allows you to select adrum voice by clicking its key trigger, eitherat the left of each drum lane or via MIDI. Thisis a very convenient way to determine whichvoice you’re editing; if you leave this on whileperforming, however, you’ll windup selecting every drum voice asits performed, which will reallyplay havoc with GUI updates!
To the right of the import con-trols are the MIDI ControllerAssignment menus. Ultrabeatallows you to assign up to fourMIDI controllers, CntrlA throughCntrlD to modulation parameters.To assign any one of 119 MIDIcontrollers, pitch, or aftertouch toone of these, simply click on thecontroller name or downwardarrow to reveal the list of possibleassignments (see Fig. 2).
If you don’t know the numberof the MIDI controller you want touse, the first menu item is named -Learn-. Just click on the CntrlA pulldown menu and select -Learn-,then turn the knob on your MIDIcontroller you wish to be assignedto CntrlA. The CntrlA menu willswitch to show you the MIDI CCthat you have just assigned it.
Mixing it upClick-dragging on the turquoise line under-
neath the name of the drum voice adjusts itsrelative level in the mixer. So why don’t I justcall it the ‘volume slider’ you ask? Becauseeach voice also has a Voice Volume rotaryknob that sets the maximum volume level thevoice can attain after the attack phase ofEnvelope 4 (which we’ll explain later).
Be careful to click behind the end of theturquoise level slider, or you’ll drag and dropthe drum voice to another lane by mistake.See Fig. 3. You can also use this feature onpurpose, of course, but the two drum voiceschange positions whether or not you intend-ed that.
The mute, solo and pan controls are self-explanatory. If you have inserted a Multi-Channel Instrument version of Ultrabeat
rather than a stereo on, youcan assign a drum voice toany of the instrument’s eightstereo outputs by clicking onthe Output menu. To accessthese outputs, use Aux chan-nels in the LogicEnvironment.
Above the 25 drum voicelanes, the master slider con-trols the master volume forthe entire plug-in. This isindependent of the channelfader in the Instrument chan-nel strip, of course.
RejuvenationUltrabeat has a number of intuitive ways to
change drum kits. You can right-click (or con-trol-click) on the drum voice name to bringup Ultrabeat’s Drum Mixer context menu(Fig. 4). This menu gives you quick access tosome copy, paste, and initialization settings.
Here you can:• copy the voice and any associated
sequence into the clipboard; • paste just the drum voice in the clipboard
into the selected drum lane;• paste the sequence from any drum lane
into the selected drum lane, or select allto replace the entire sequence for all 25drums with the sequence in the clip-board;
• swap the selected drum voice andsequence with those in the clipboard;
• initialize the selected drum voice with aset of basic synthesizer settings for vari-ous drum sounds.
Let’s say you like the drum kit you’re build-ing, but you think your electronic snare does-n’t quite have the “splat” you’re looking for;
Fig. 2: You assign MIDI controllers to Ultrabeatusing the MIDI controller pull-down menus.
Fig. 3: Swapping drum voices on the drum mixer is as easy as click-drag-ging one drum voice from one lane to another lane.
Fig. 4: Right-click (or control-click) on the Drum Mixer to bring upUltrabeat’s context menu.
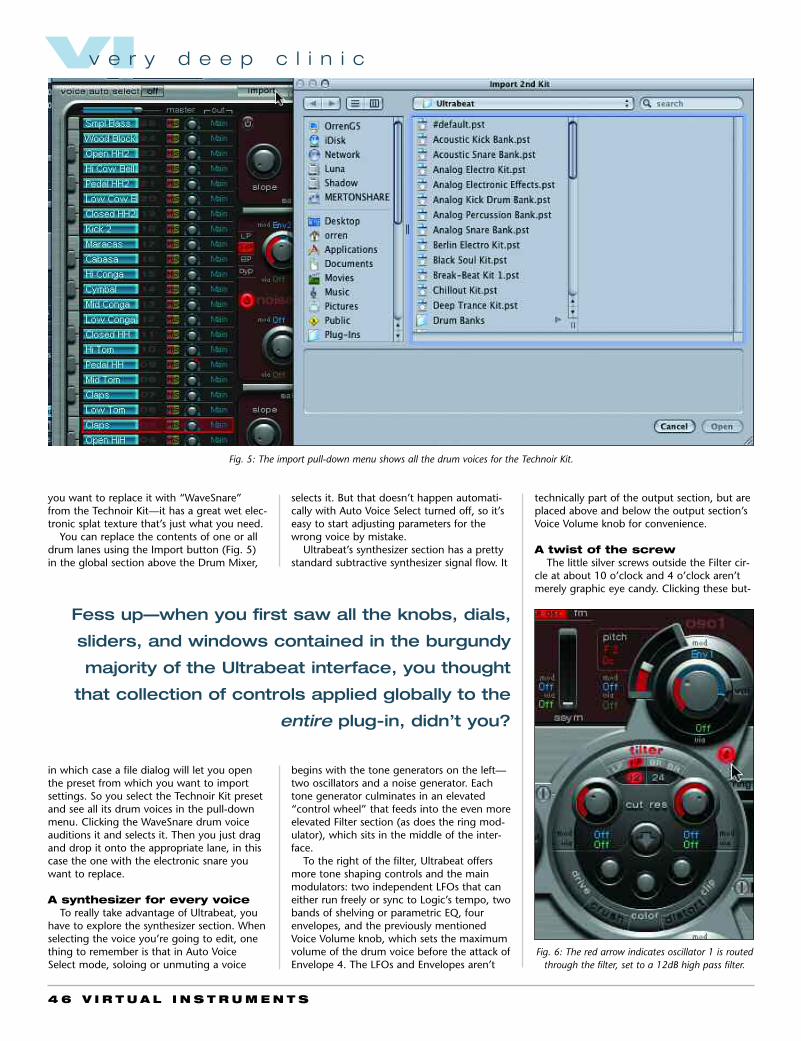
4 6 V I R T U A L I N S T R U M E N T S
selects it. But that doesn’t happen automati-cally with Auto Voice Select turned off, so it’seasy to start adjusting parameters for thewrong voice by mistake.
Ultrabeat’s synthesizer section has a prettystandard subtractive synthesizer signal flow. It
begins with the tone generators on the left—two oscillators and a noise generator. Eachtone generator culminates in an elevated“control wheel” that feeds into the even moreelevated Filter section (as does the ring mod-ulator), which sits in the middle of the inter-face.
To the right of the filter, Ultrabeat offersmore tone shaping controls and the mainmodulators: two independent LFOs that caneither run freely or sync to Logic’s tempo, twobands of shelving or parametric EQ, fourenvelopes, and the previously mentionedVoice Volume knob, which sets the maximumvolume of the drum voice before the attack ofEnvelope 4. The LFOs and Envelopes aren’t
technically part of the output section, but areplaced above and below the output section’sVoice Volume knob for convenience.
A twist of the screwThe little silver screws outside the Filter cir-
cle at about 10 o’clock and 4 o’clock aren’tmerely graphic eye candy. Clicking these but-
you want to replace it with “WaveSnare”from the Technoir Kit—it has a great wet elec-tronic splat texture that’s just what you need.
You can replace the contents of one or alldrum lanes using the Import button (Fig. 5)in the global section above the Drum Mixer,
in which case a file dialog will let you openthe preset from which you want to importsettings. So you select the Technoir Kit presetand see all its drum voices in the pull-downmenu. Clicking the WaveSnare drum voiceauditions it and selects it. Then you just dragand drop it onto the appropriate lane, in thiscase the one with the electronic snare youwant to replace.
A synthesizer for every voiceTo really take advantage of Ultrabeat, you
have to explore the synthesizer section. Whenselecting the voice you’re going to edit, onething to remember is that in Auto VoiceSelect mode, soloing or unmuting a voice
Fig. 5: The import pull-down menu shows all the drum voices for the Technoir Kit.
Fig. 6: The red arrow indicates oscillator 1 is routedthrough the filter, set to a 12dB high pass filter.
Fess up—when you first saw all the knobs, dials,
sliders, and windows contained in the burgundy
majority of the Ultrabeat interface, you thought
that collection of controls applied globally to the
entire plug-in, didn’t you?
VIv e r y d e e p c l i n i c
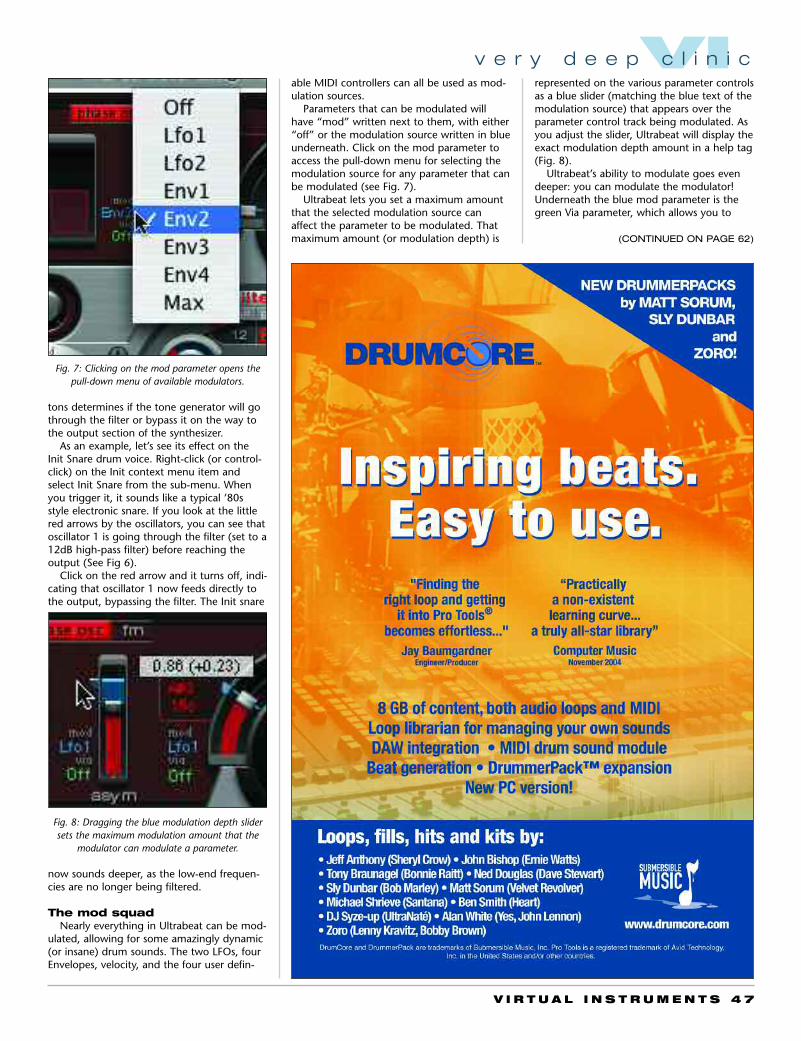
V I R T U A L I N S T R U M E N T S 4 7
tons determines if the tone generator will gothrough the filter or bypass it on the way tothe output section of the synthesizer.
As an example, let’s see its effect on theInit Snare drum voice. Right-click (or control-click) on the Init context menu item andselect Init Snare from the sub-menu. Whenyou trigger it, it sounds like a typical ’80sstyle electronic snare. If you look at the littlered arrows by the oscillators, you can see thatoscillator 1 is going through the filter (set to a12dB high-pass filter) before reaching theoutput (See Fig 6).
Click on the red arrow and it turns off, indi-cating that oscillator 1 now feeds directly tothe output, bypassing the filter. The Init snare
now sounds deeper, as the low-end frequen-cies are no longer being filtered.
The mod squadNearly everything in Ultrabeat can be mod-
ulated, allowing for some amazingly dynamic(or insane) drum sounds. The two LFOs, fourEnvelopes, velocity, and the four user defin-
able MIDI controllers can all be used as mod-ulation sources.
Parameters that can be modulated willhave “mod” written next to them, with either“off” or the modulation source written in blueunderneath. Click on the mod parameter toaccess the pull-down menu for selecting themodulation source for any parameter that canbe modulated (see Fig. 7).
Ultrabeat lets you set a maximum amountthat the selected modulation source canaffect the parameter to be modulated. Thatmaximum amount (or modulation depth) is
represented on the various parameter controlsas a blue slider (matching the blue text of themodulation source) that appears over theparameter control track being modulated. Asyou adjust the slider, Ultrabeat will display theexact modulation depth amount in a help tag(Fig. 8).
Ultrabeat’s ability to modulate goes evendeeper: you can modulate the modulator!Underneath the blue mod parameter is thegreen Via parameter, which allows you to
(CONTINUED ON PAGE 62)
Fig. 7: Clicking on the mod parameter opens thepull-down menu of available modulators.
Fig. 8: Dragging the blue modulation depth slidersets the maximum modulation amount that the
modulator can modulate a parameter.
VIv e r y d e e p c l i n i c
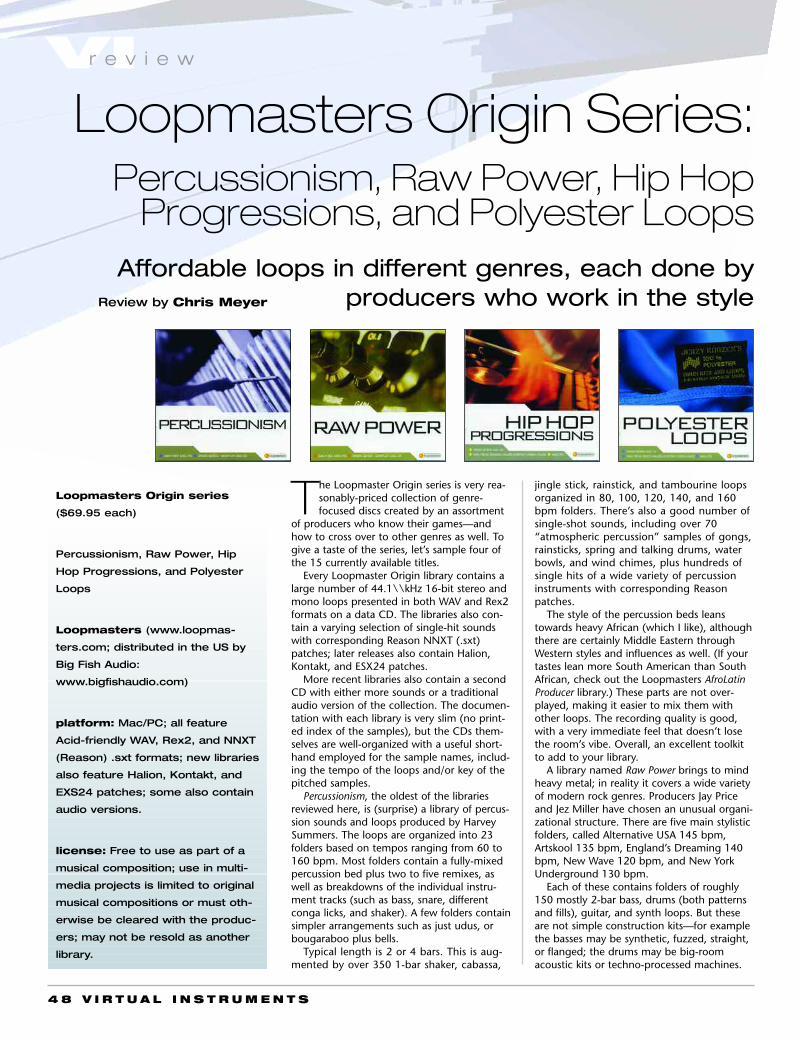
4 8 V I R T U A L I N S T R U M E N T S
Review by Chris Meyer
Loopmasters Origin series
($69.95 each)
Percussionism, Raw Power, Hip
Hop Progressions, and Polyester
Loops
Loopmasters (www.loopmas-
ters.com; distributed in the US by
Big Fish Audio:
www.bigfishaudio.com)
platform: Mac/PC; all feature
Acid-friendly WAV, Rex2, and NNXT
(Reason) .sxt formats; new libraries
also feature Halion, Kontakt, and
EXS24 patches; some also contain
audio versions.
license: Free to use as part of a
musical composition; use in multi-
media projects is limited to original
musical compositions or must oth-
erwise be cleared with the produc-
ers; may not be resold as another
library.
The Loopmaster Origin series is very rea-sonably-priced collection of genre-focused discs created by an assortment
of producers who know their games—andhow to cross over to other genres as well. Togive a taste of the series, let’s sample four ofthe 15 currently available titles.
Every Loopmaster Origin library contains alarge number of 44.1\\kHz 16-bit stereo andmono loops presented in both WAV and Rex2formats on a data CD. The libraries also con-tain a varying selection of single-hit soundswith corresponding Reason NNXT (.sxt)patches; later releases also contain Halion,Kontakt, and ESX24 patches.
More recent libraries also contain a secondCD with either more sounds or a traditionalaudio version of the collection. The documen-tation with each library is very slim (no print-ed index of the samples), but the CDs them-selves are well-organized with a useful short-hand employed for the sample names, includ-ing the tempo of the loops and/or key of thepitched samples.
Percussionism, the oldest of the librariesreviewed here, is (surprise) a library of percus-sion sounds and loops produced by HarveySummers. The loops are organized into 23folders based on tempos ranging from 60 to160 bpm. Most folders contain a fully-mixedpercussion bed plus two to five remixes, aswell as breakdowns of the individual instru-ment tracks (such as bass, snare, differentconga licks, and shaker). A few folders containsimpler arrangements such as just udus, orbougaraboo plus bells.
Typical length is 2 or 4 bars. This is aug-mented by over 350 1-bar shaker, cabassa,
VIr e v i e w
Affordable loops in different genres, each done by producers who work in the style
jingle stick, rainstick, and tambourine loopsorganized in 80, 100, 120, 140, and 160bpm folders. There’s also a good number ofsingle-shot sounds, including over 70“atmospheric percussion” samples of gongs,rainsticks, spring and talking drums, waterbowls, and wind chimes, plus hundreds ofsingle hits of a wide variety of percussioninstruments with corresponding Reasonpatches.
The style of the percussion beds leanstowards heavy African (which I like), althoughthere are certainly Middle Eastern throughWestern styles and influences as well. (If yourtastes lean more South American than SouthAfrican, check out the Loopmasters AfroLatinProducer library.) These parts are not over-played, making it easier to mix them withother loops. The recording quality is good,with a very immediate feel that doesn’t losethe room’s vibe. Overall, an excellent toolkitto add to your library.
A library named Raw Power brings to mindheavy metal; in reality it covers a wide varietyof modern rock genres. Producers Jay Priceand Jez Miller have chosen an unusual organi-zational structure. There are five main stylisticfolders, called Alternative USA 145 bpm,Artskool 135 bpm, England’s Dreaming 140bpm, New Wave 120 bpm, and New YorkUnderground 130 bpm.
Each of these contains folders of roughly150 mostly 2-bar bass, drums (both patternsand fills), guitar, and synth loops. But theseare not simple construction kits—for examplethe basses may be synthetic, fuzzed, straight,or flanged; the drums may be big-roomacoustic kits or techno-processed machines.
Loopmasters Origin Series:Percussionism, Raw Power, Hip Hop
Progressions, and Polyester Loops
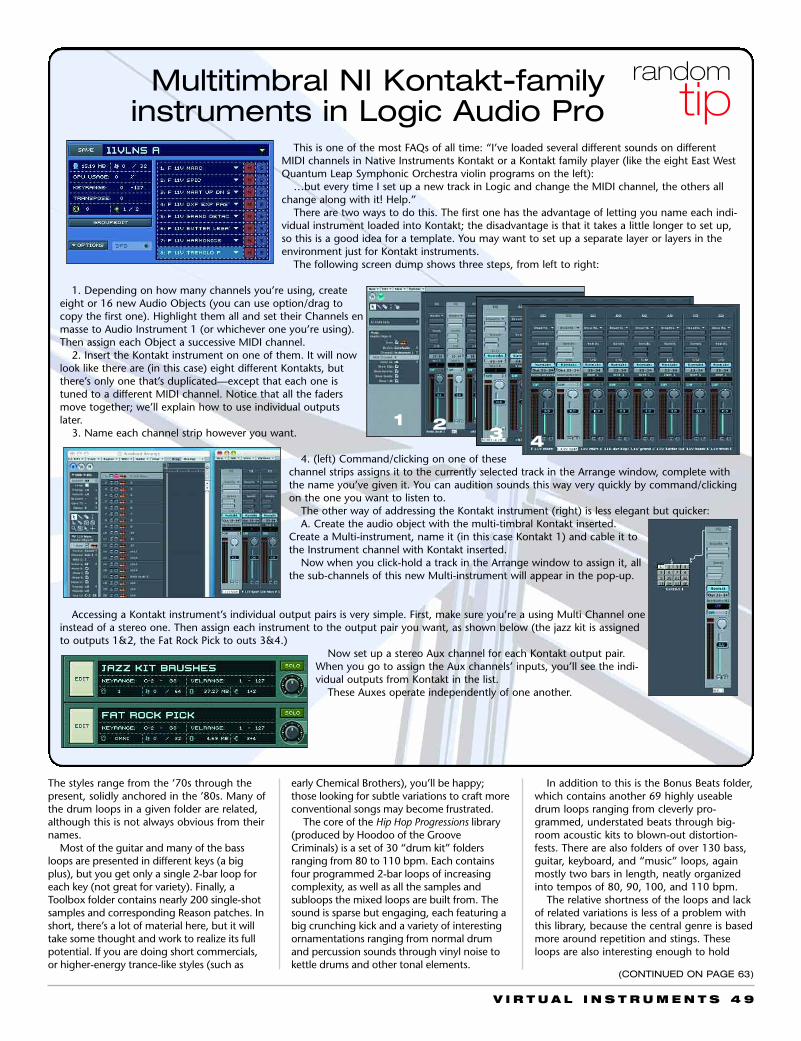
V I R T U A L I N S T R U M E N T S 4 9
The styles range from the ’70s through thepresent, solidly anchored in the ’80s. Many ofthe drum loops in a given folder are related,although this is not always obvious from theirnames.
Most of the guitar and many of the bassloops are presented in different keys (a bigplus), but you get only a single 2-bar loop foreach key (not great for variety). Finally, aToolbox folder contains nearly 200 single-shotsamples and corresponding Reason patches. Inshort, there’s a lot of material here, but it willtake some thought and work to realize its fullpotential. If you are doing short commercials,or higher-energy trance-like styles (such as
early Chemical Brothers), you’ll be happy;those looking for subtle variations to craft moreconventional songs may become frustrated.
The core of the Hip Hop Progressions library(produced by Hoodoo of the GrooveCriminals) is a set of 30 “drum kit” foldersranging from 80 to 110 bpm. Each containsfour programmed 2-bar loops of increasingcomplexity, as well as all the samples andsubloops the mixed loops are built from. Thesound is sparse but engaging, each featuring abig crunching kick and a variety of interestingornamentations ranging from normal drumand percussion sounds through vinyl noise tokettle drums and other tonal elements.
In addition to this is the Bonus Beats folder,which contains another 69 highly useabledrum loops ranging from cleverly pro-grammed, understated beats through big-room acoustic kits to blown-out distortion-fests. There are also folders of over 130 bass,guitar, keyboard, and “music” loops, againmostly two bars in length, neatly organizedinto tempos of 80, 90, 100, and 110 bpm.
The relative shortness of the loops and lackof related variations is less of a problem withthis library, because the central genre is basedmore around repetition and stings. Theseloops are also interesting enough to hold
(CONTINUED ON PAGE 63)
Multitimbral NI Kontakt-familyinstruments in Logic Audio Pro
randomtip
This is one of the most FAQs of all time: “I’ve loaded several different sounds on differentMIDI channels in Native Instruments Kontakt or a Kontakt family player (like the eight East WestQuantum Leap Symphonic Orchestra violin programs on the left):
…but every time I set up a new track in Logic and change the MIDI channel, the others allchange along with it! Help.”
There are two ways to do this. The first one has the advantage of letting you name each indi-vidual instrument loaded into Kontakt; the disadvantage is that it takes a little longer to set up,so this is a good idea for a template. You may want to set up a separate layer or layers in theenvironment just for Kontakt instruments.
The following screen dump shows three steps, from left to right:
1. Depending on how many channels you’re using, createeight or 16 new Audio Objects (you can use option/drag tocopy the first one). Highlight them all and set their Channels enmasse to Audio Instrument 1 (or whichever one you’re using).Then assign each Object a successive MIDI channel.
2. Insert the Kontakt instrument on one of them. It will nowlook like there are (in this case) eight different Kontakts, butthere’s only one that’s duplicated—except that each one istuned to a different MIDI channel. Notice that all the fadersmove together; we’ll explain how to use individual outputslater.
3. Name each channel strip however you want.
4. (left) Command/clicking on one of thesechannel strips assigns it to the currently selected track in the Arrange window, complete withthe name you’ve given it. You can audition sounds this way very quickly by command/clickingon the one you want to listen to.
The other way of addressing the Kontakt instrument (right) is less elegant but quicker:A. Create the audio object with the multi-timbral Kontakt inserted.
Create a Multi-instrument, name it (in this case Kontakt 1) and cable it tothe Instrument channel with Kontakt inserted.
Now when you click-hold a track in the Arrange window to assign it, allthe sub-channels of this new Multi-instrument will appear in the pop-up.
Accessing a Kontakt instrument’s individual output pairs is very simple. First, make sure you’re a using Multi Channel oneinstead of a stereo one. Then assign each instrument to the output pair you want, as shown below (the jazz kit is assignedto outputs 1&2, the Fat Rock Pick to outs 3&4.)
Now set up a stereo Aux channel for each Kontakt output pair.When you go to assign the Aux channels’ inputs, you’ll see the indi-vidual outputs from Kontakt in the list.
These Auxes operate independently of one another.
1 2 3 4
VIf e a t u r e
5 0 V I R T U A L I N S T R U M E N T S
How do you approach the overallsequence?
There are four important things to focus onin an orchestral sequence.
1. Attacks and releases: if a piece is soft andcalls for a delicate entrance with strings, fadeinto the note to simulate a softer attack.Before you release a note at the end of aphrase, fade out slightly to simulate the easein bow pressure. The same goes for wood-winds and brass.
2. Volume/velocity relationships: mostdevelopers tend to normalize all the samplesin their libraries, so typical crossfade programsstay the same volume while only the tonechanges. Unless you reprogram the patch sothat the volume matches the given velocity,you have to ride the cc7/cc11 controller tomaintain that relationship.
(cc means MIDI Continuous Controller, andhere we’re talking about two sliders—although you could use pedals or anythingelse. #7 is Volume, which is usually used toset an overall level, and #11 is Expression,which is usually used to “ride” the level upand down while you play. Sometimes cc11 isalso set to control brightness.)
3. Transitions: in a legato passage, listen forany abrupt changes in volume from note tonote. A dead giveaway that a piece is usingsamples is when there are inconsistencies likethat.
4. Orchestration and balance: a flutist willnever overpower a trombone section playingtriple forte. Apply that understanding to therest of the orchestra and the music will bal-ance itself.
Do you prefer one particular samplerformat over another?
I have a sequencer PC and two dedicatedGiga machines. I’ve yet to come across a sam-pler format as reliable as GigaStudio. Onceyou get it up and running, the performance isrock solid.
Please tell me about the brass you’re
MIDI Mockup Microscope
moreonline
www.virtualinstrumentsmag.com
by Frederick Russ
The second in a time-to-time series analyzingcomposers’ MIDI programming techniques
Along with software synths, modern sample libraries
created the new musical medium this magazine is all
about. And as with anything else, making these libraries
sound their best is a real skill.
In this series we take a look at different pieces of
music by people who have that skill and find out what
they did. You’ll find the compositions we’re analyzing
on the VI website so you can download them and hear
what’s going on.
Please feel free to email us with any additional ques-
tions you may have. We’ll pass them on to the com-
posers and print all suitable answers.
Aaron Sapp is a very young and very talented orchestral
composer/sound designer from Florida. He has done extensive beta test-
ing and official demos for several of the major orchestral sample libraries,
including Sonic Implants, East West Symphonic Orchestra, Project SAM,
Kirk Hunter, Dan Dean, Garritan Orchestral Strings, and also Kurzweil.
Aaron has composed music for PSP Game Audio, spent time as an
orchestrator/copyist, and written music for the Videohelper music library.
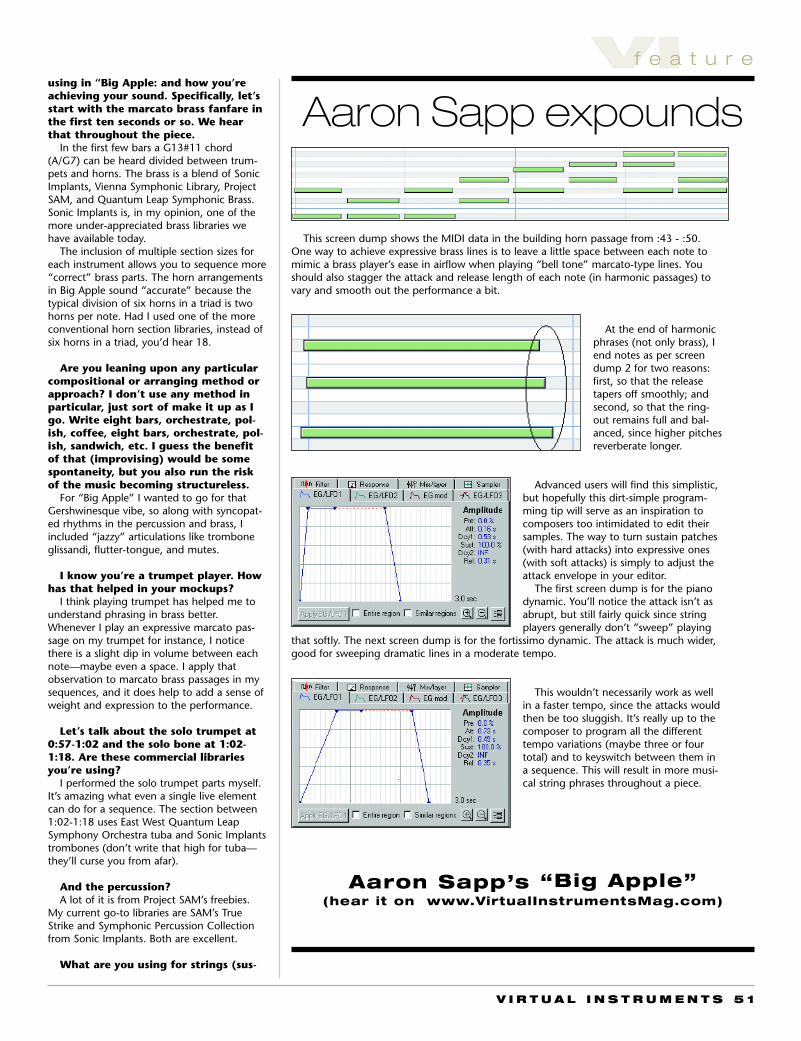
V I R T U A L I N S T R U M E N T S 5 1
using in “Big Apple: and how you’reachieving your sound. Specifically, let’sstart with the marcato brass fanfare inthe first ten seconds or so. We hearthat throughout the piece.
In the first few bars a G13#11 chord(A/G7) can be heard divided between trum-pets and horns. The brass is a blend of SonicImplants, Vienna Symphonic Library, ProjectSAM, and Quantum Leap Symphonic Brass.Sonic Implants is, in my opinion, one of themore under-appreciated brass libraries wehave available today.
The inclusion of multiple section sizes foreach instrument allows you to sequence more“correct” brass parts. The horn arrangementsin Big Apple sound “accurate” because thetypical division of six horns in a triad is twohorns per note. Had I used one of the moreconventional horn section libraries, instead ofsix horns in a triad, you’d hear 18.
Are you leaning upon any particularcompositional or arranging method orapproach? I don’t use any method inparticular, just sort of make it up as Igo. Write eight bars, orchestrate, pol-ish, coffee, eight bars, orchestrate, pol-ish, sandwich, etc. I guess the benefitof that (improvising) would be somespontaneity, but you also run the riskof the music becoming structureless.
For “Big Apple” I wanted to go for thatGershwinesque vibe, so along with syncopat-ed rhythms in the percussion and brass, Iincluded “jazzy” articulations like tromboneglissandi, flutter-tongue, and mutes.
I know you’re a trumpet player. Howhas that helped in your mockups?
I think playing trumpet has helped me tounderstand phrasing in brass better.Whenever I play an expressive marcato pas-sage on my trumpet for instance, I noticethere is a slight dip in volume between eachnote—maybe even a space. I apply thatobservation to marcato brass passages in mysequences, and it does help to add a sense ofweight and expression to the performance.
Let’s talk about the solo trumpet at0:57-1:02 and the solo bone at 1:02-1:18. Are these commercial librariesyou’re using?
I performed the solo trumpet parts myself.It’s amazing what even a single live elementcan do for a sequence. The section between1:02-1:18 uses East West Quantum LeapSymphony Orchestra tuba and Sonic Implantstrombones (don’t write that high for tuba—they’ll curse you from afar).
And the percussion?A lot of it is from Project SAM’s freebies.
My current go-to libraries are SAM’s TrueStrike and Symphonic Percussion Collectionfrom Sonic Implants. Both are excellent.
What are you using for strings (sus-
Aaron Sapp’s “Big Apple”(hear it on www.VirtualInstrumentsMag.com)
This screen dump shows the MIDI data in the building horn passage from :43 - :50.One way to achieve expressive brass lines is to leave a little space between each note tomimic a brass player’s ease in airflow when playing “bell tone” marcato-type lines. Youshould also stagger the attack and release length of each note (in harmonic passages) tovary and smooth out the performance a bit.
At the end of harmonicphrases (not only brass), Iend notes as per screendump 2 for two reasons:first, so that the releasetapers off smoothly; andsecond, so that the ring-out remains full and bal-anced, since higher pitchesreverberate longer.
Advanced users will find this simplistic,but hopefully this dirt-simple program-ming tip will serve as an inspiration tocomposers too intimidated to edit theirsamples. The way to turn sustain patches(with hard attacks) into expressive ones(with soft attacks) is simply to adjust theattack envelope in your editor.
The first screen dump is for the pianodynamic. You’ll notice the attack isn’t asabrupt, but still fairly quick since stringplayers generally don’t “sweep” playing
that softly. The next screen dump is for the fortissimo dynamic. The attack is much wider,good for sweeping dramatic lines in a moderate tempo.
This wouldn’t necessarily work as wellin a faster tempo, since the attacks wouldthen be too sluggish. It’s really up to thecomposer to program all the differenttempo variations (maybe three or fourtotal) and to keyswitch between them ina sequence. This will result in more musi-cal string phrases throughout a piece.
Aaron Sapp expoundsVIf e a t u r e

Dimension Pro is destined to please twodistinctly different kinds of musicians.Its vast sound library will have obvious
appeal to preset addicts, while its manysound-shaping tools are a godsend for thosewhose first inclination when they get a newsynth is to erase all the presets—i.e. sounddesigners. So how well does it succeed atstraddling this fence?
Although it provides a variety of sound-shaping tools, there are so many sounds onoffer here that most musicians might neverbe tempted to create their own. Among thetwo DVDs’ worth of sounds (a staggering1500 presets) are both realistic and synthbasses, grand and electric pianos, electric gui-tar, drum kits, a full orchestral suite includingstrings, brass, woodwinds, and percussion(drawn from Garritan Personal Orchestra), asmattering of world instruments, and soundsand effects suitable for electronica, techno,and trance.
Of note are the “Dimensions,” which arecomplex layered sounds that really show offthe software’s sound-generating engine. Ifyou’re looking for a replacement for your
aging Trinity workstation, you’ve come to theright place. But a number of additions to thebasic sampler paradigm mean this ain’t yourdaddy’s ROMpler.
Sticking with the built-in sound palettewould be a big mistake. There’s far moresound-generating power here than in theaverage sampler. That power comes largely inthe form of a wavetable synthesis engine,extensive envelope-shaping capabilities, andLFOs that sync to tempo.
The software isn’t really new; Dimensionhas been shipping with Cakewalk Project 5since Version 2. What makes this a Pro versionis the extended sound library and the factthat it now runs on the Mac.
Architecturally speakingDimension is unique in its use of the open-
standard, text-based sfz format for its sam-ples. The Sfz format (which supports uncom-pressed and compressed samples up to 32-bits in either mono or stereo at any samplerate) goes beyond traditional sample-map-ping parameters such as standard keyboardand velocity splits, allowing for multiple lay-
5 2 V I R T U A L I N S T R U M E N T S
VIr e v i e w
This all-in-one sample-based modeling synth covers everythingfrom electronics to orchestral writing (it even includes a “lite”
version of Garritan Personal Orchestra)
Review ByLee Sherman
Dimension Pro, $359
Cakewalk, 268 Summer St.,
Boston, MA 02210. 888/225-3925,
617/423-9004.
License: challenge/response
system for a single machine.
CakwalkDimension Pro
V I R T U A L I N S T R U M E N T S 5 3
ers, release triggers, cross-fades, legato play-back, random and alternate samples, andsamples triggered by MIDI controllers.
This flexible sample format providesDimension with a powerful jumping off pointfor its powerful sound generation architec-ture. At the core of Dimension’s sound gener-ation prowess is what Cakewalk calls thePlayer. The Player can produce new soundsusing one of three methods: sample playback,oscillator/wavetable synthesis, or waveguidesynthesis.
Dimension breaks sound generation intofour components, which it calls Elements, thatwhen combined produce some extremelycomplex sounds. Each element has its ownplayer, filter, lo-fi and drive sections, threeEQs, effects, LFO and modulators (pitch, cut-off, resonance, pan, and amplitude) and eachelement can be assigned to a single multi-sample. Then each element can also beassigned a separate MIDI channel for multi-timbral sounds.
The sound from the four elements is mixedand routed to a stereo output. In addition,each element processes two stereo effect busmixes, which are routed to the two GlobalEffects. The output of the two Global Effects isthen added to the main output.
A rather extensive effects section includesdelays, chorus, phaser, detuner, multiple filtertypes (lowpass, highpass, bandpass), andpanning. Insert and send effects include bitreducer/ decimator, 16 filter types, five drivemodes, three stackable parametric EQs, sixdelay types, three chorus types, LFO filters,autopan, room simulation, and modulation.Effects can be set for each element, andthere’s also a master effects section that canapply reverb, chorus, phasing, or symphonicresonance to the entire sound.
The Vector Mixer is an extra gain stagelocated after the Mix section in the signalchain. Vector Mixing, first seen in the ProphetVS and the Korg Wavestation, allows onesound to be morphed into another in realtime, either by moving the mouse or byassigning a MIDI continuous controller to ahardware controller such as a joystick.
Dimension is a sample-based synth with anumber of unique tricks up its sleeve. Besidesbeing able to play back multisamples basedon standard PCM wave files, Dimension Prosupports wavetable synthesis and a form ofphysical modeling called waveguide synthesis.
According to the Center for ComputerResearch in Music and Acoustics (CCRMA) atStanford University, digital waveguide synthe-sis models are computational physical modelsfor certain classes of musical instruments(string, winds, brasses, etc.), which are madeup of delay lines, digital filters, and often non-linear elements designed to follow the geom-etry and reproduce physical properties of adesired acoustic system.
It is important to note that this differssomewhat from the approach to physicalmodeling used by Logic’s Sculpture synth orAAS String Studio, where oscillator, filter, andenvelope parameters are replaced by a math-ematical model of these components. Instead,
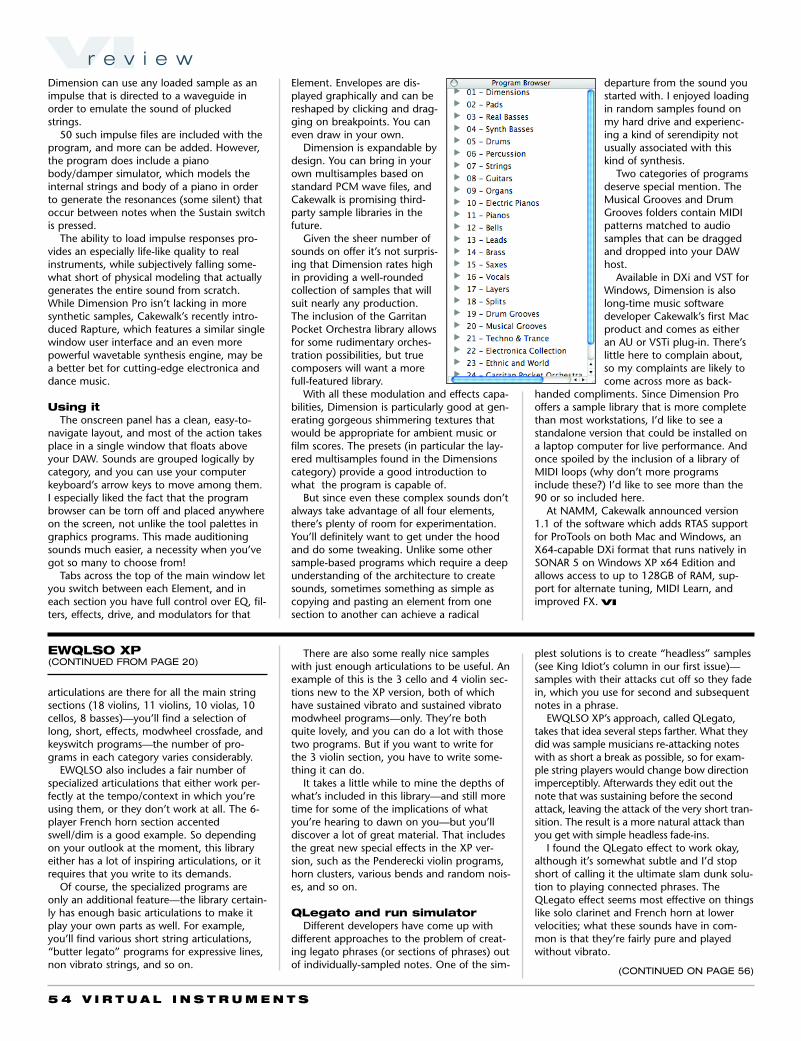
5 4 V I R T U A L I N S T R U M E N T S
Dimension can use any loaded sample as animpulse that is directed to a waveguide inorder to emulate the sound of pluckedstrings.
50 such impulse files are included with theprogram, and more can be added. However,the program does include a pianobody/damper simulator, which models theinternal strings and body of a piano in orderto generate the resonances (some silent) thatoccur between notes when the Sustain switchis pressed.
The ability to load impulse responses pro-vides an especially life-like quality to realinstruments, while subjectively falling some-what short of physical modeling that actuallygenerates the entire sound from scratch.While Dimension Pro isn’t lacking in moresynthetic samples, Cakewalk’s recently intro-duced Rapture, which features a similar singlewindow user interface and an even morepowerful wavetable synthesis engine, may bea better bet for cutting-edge electronica anddance music.
Using itThe onscreen panel has a clean, easy-to-
navigate layout, and most of the action takesplace in a single window that floats aboveyour DAW. Sounds are grouped logically bycategory, and you can use your computerkeyboard’s arrow keys to move among them.I especially liked the fact that the programbrowser can be torn off and placed anywhereon the screen, not unlike the tool palettes ingraphics programs. This made auditioningsounds much easier, a necessity when you’vegot so many to choose from!
Tabs across the top of the main window letyou switch between each Element, and ineach section you have full control over EQ, fil-ters, effects, drive, and modulators for that
Element. Envelopes are dis-played graphically and can bereshaped by clicking and drag-ging on breakpoints. You caneven draw in your own.
Dimension is expandable bydesign. You can bring in yourown multisamples based onstandard PCM wave files, andCakewalk is promising third-party sample libraries in thefuture.
Given the sheer number ofsounds on offer it’s not surpris-ing that Dimension rates highin providing a well-roundedcollection of samples that willsuit nearly any production.The inclusion of the GarritanPocket Orchestra library allowsfor some rudimentary orches-tration possibilities, but truecomposers will want a morefull-featured library.
With all these modulation and effects capa-bilities, Dimension is particularly good at gen-erating gorgeous shimmering textures thatwould be appropriate for ambient music orfilm scores. The presets (in particular the lay-ered multisamples found in the Dimensionscategory) provide a good introduction towhat the program is capable of.
But since even these complex sounds don’talways take advantage of all four elements,there’s plenty of room for experimentation.You’ll definitely want to get under the hoodand do some tweaking. Unlike some othersample-based programs which require a deepunderstanding of the architecture to createsounds, sometimes something as simple ascopying and pasting an element from onesection to another can achieve a radical
departure from the sound youstarted with. I enjoyed loadingin random samples found onmy hard drive and experienc-ing a kind of serendipity notusually associated with thiskind of synthesis.
Two categories of programsdeserve special mention. TheMusical Grooves and DrumGrooves folders contain MIDIpatterns matched to audiosamples that can be draggedand dropped into your DAWhost.
Available in DXi and VST forWindows, Dimension is alsolong-time music softwaredeveloper Cakewalk’s first Macproduct and comes as eitheran AU or VSTi plug-in. There’slittle here to complain about,so my complaints are likely tocome across more as back-
handed compliments. Since Dimension Prooffers a sample library that is more completethan most workstations, I’d like to see astandalone version that could be installed ona laptop computer for live performance. Andonce spoiled by the inclusion of a library ofMIDI loops (why don’t more programsinclude these?) I’d like to see more than the90 or so included here.
At NAMM, Cakewalk announced version1.1 of the software which adds RTAS supportfor ProTools on both Mac and Windows, anX64-capable DXi format that runs natively inSONAR 5 on Windows XP x64 Edition andallows access to up to 128GB of RAM, sup-port for alternate tuning, MIDI Learn, andimproved FX. VI
VIr e v i e w
EWQLSO XP(CONTINUED FROM PAGE 20)
articulations are there for all the main stringsections (18 violins, 11 violins, 10 violas, 10cellos, 8 basses)—you’ll find a selection oflong, short, effects, modwheel crossfade, andkeyswitch programs—the number of pro-grams in each category varies considerably.
EWQLSO also includes a fair number ofspecialized articulations that either work per-fectly at the tempo/context in which you’reusing them, or they don’t work at all. The 6-player French horn section accentedswell/dim is a good example. So dependingon your outlook at the moment, this libraryeither has a lot of inspiring articulations, or itrequires that you write to its demands.
Of course, the specialized programs areonly an additional feature—the library certain-ly has enough basic articulations to make itplay your own parts as well. For example,you’ll find various short string articulations,“butter legato” programs for expressive lines,non vibrato strings, and so on.
There are also some really nice sampleswith just enough articulations to be useful. Anexample of this is the 3 cello and 4 violin sec-tions new to the XP version, both of whichhave sustained vibrato and sustained vibratomodwheel programs—only. They’re bothquite lovely, and you can do a lot with thosetwo programs. But if you want to write forthe 3 violin section, you have to write some-thing it can do.
It takes a little while to mine the depths ofwhat’s included in this library—and still moretime for some of the implications of whatyou’re hearing to dawn on you—but you’lldiscover a lot of great material. That includesthe great new special effects in the XP ver-sion, such as the Penderecki violin programs,horn clusters, various bends and random nois-es, and so on.
QLegato and run simulatorDifferent developers have come up with
different approaches to the problem of creat-ing legato phrases (or sections of phrases) outof individually-sampled notes. One of the sim-
plest solutions is to create “headless” samples(see King Idiot’s column in our first issue)—samples with their attacks cut off so they fadein, which you use for second and subsequentnotes in a phrase.
EWQLSO XP’s approach, called QLegato,takes that idea several steps farther. What theydid was sample musicians re-attacking noteswith as short a break as possible, so for exam-ple string players would change bow directionimperceptibly. Afterwards they edit out thenote that was sustaining before the secondattack, leaving the attack of the very short tran-sition. The result is a more natural attack thanyou get with simple headless fade-ins.
I found the QLegato effect to work okay,although it’s somewhat subtle and I’d stopshort of calling it the ultimate slam dunk solu-tion to playing connected phrases. TheQLegato effect seems most effective on thingslike solo clarinet and French horn at lowervelocities; what these sounds have in com-mon is that they’re fairly pure and playedwithout vibrato.
(CONTINUED ON PAGE 56)

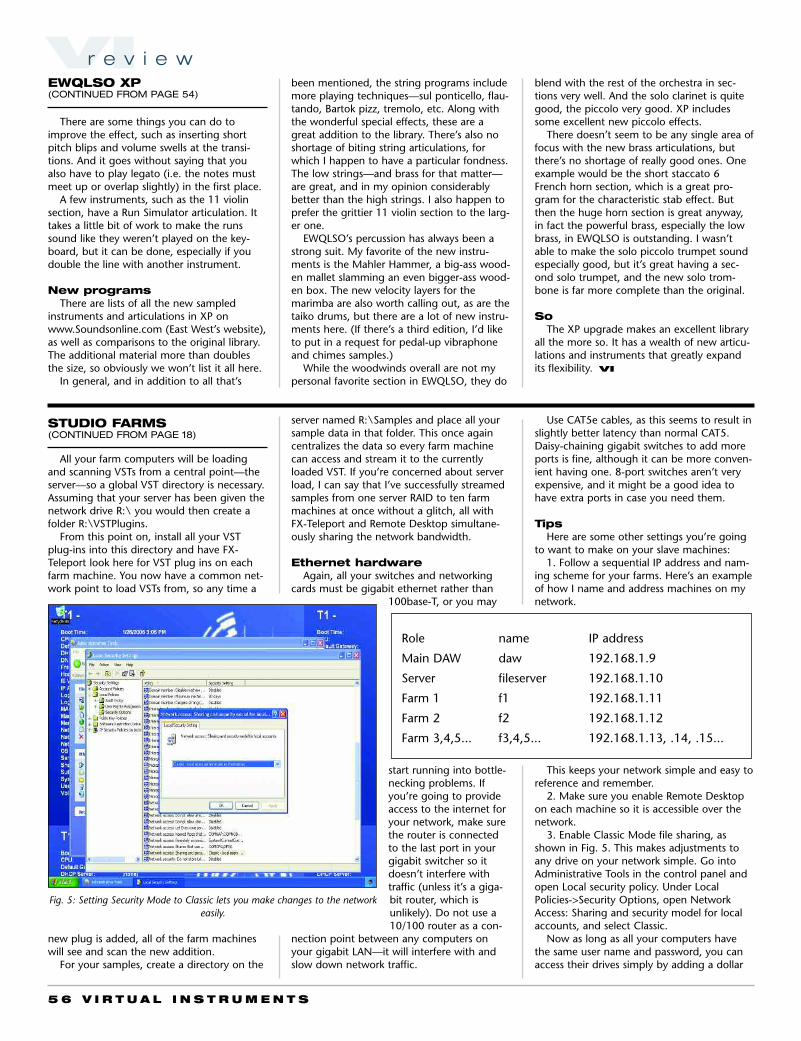
All your farm computers will be loadingand scanning VSTs from a central point—theserver—so a global VST directory is necessary.Assuming that your server has been given thenetwork drive R:\ you would then create afolder R:\VSTPlugins.
From this point on, install all your VSTplug-ins into this directory and have FX-Teleport look here for VST plug ins on eachfarm machine. You now have a common net-work point to load VSTs from, so any time a
new plug is added, all of the farm machineswill see and scan the new addition.
For your samples, create a directory on the
server named R:\Samples and place all yoursample data in that folder. This once againcentralizes the data so every farm machinecan access and stream it to the currentlyloaded VST. If you’re concerned about serverload, I can say that I’ve successfully streamedsamples from one server RAID to ten farmmachines at once without a glitch, all withFX-Teleport and Remote Desktop simultane-ously sharing the network bandwidth.
Ethernet hardwareAgain, all your switches and networking
cards must be gigabit ethernet rather than100base-T, or you may
start running into bottle-necking problems. Ifyou’re going to provideaccess to the internet foryour network, make surethe router is connectedto the last port in yourgigabit switcher so itdoesn’t interfere withtraffic (unless it’s a giga-bit router, which isunlikely). Do not use a10/100 router as a con-
nection point between any computers onyour gigabit LAN—it will interfere with andslow down network traffic.
Use CAT5e cables, as this seems to result inslightly better latency than normal CAT5.Daisy-chaining gigabit switches to add moreports is fine, although it can be more conven-ient having one. 8-port switches aren’t veryexpensive, and it might be a good idea tohave extra ports in case you need them.
TipsHere are some other settings you’re going
to want to make on your slave machines: 1. Follow a sequential IP address and nam-
ing scheme for your farms. Here’s an exampleof how I name and address machines on mynetwork.
This keeps your network simple and easy toreference and remember.
2. Make sure you enable Remote Desktopon each machine so it is accessible over thenetwork.
3. Enable Classic Mode file sharing, asshown in Fig. 5. This makes adjustments toany drive on your network simple. Go intoAdministrative Tools in the control panel andopen Local security policy. Under LocalPolicies->Security Options, open NetworkAccess: Sharing and security model for localaccounts, and select Classic.
Now as long as all your computers havethe same user name and password, you canaccess their drives simply by adding a dollar
STUDIO FARMS(CONTINUED FROM PAGE 18)
VIr e v i e w
Fig. 5: Setting Security Mode to Classic lets you make changes to the networkeasily.
5 6 V I R T U A L I N S T R U M E N T S
Role name IP address
Main DAW daw 192.168.1.9
Server fileserver 192.168.1.10
Farm 1 f1 192.168.1.11
Farm 2 f2 192.168.1.12
Farm 3,4,5... f3,4,5... 192.168.1.13, .14, .15...
There are some things you can do toimprove the effect, such as inserting shortpitch blips and volume swells at the transi-tions. And it goes without saying that youalso have to play legato (i.e. the notes mustmeet up or overlap slightly) in the first place.
A few instruments, such as the 11 violinsection, have a Run Simulator articulation. Ittakes a little bit of work to make the runssound like they weren’t played on the key-board, but it can be done, especially if youdouble the line with another instrument.
New programsThere are lists of all the new sampled
instruments and articulations in XP onwww.Soundsonline.com (East West’s website),as well as comparisons to the original library.The additional material more than doublesthe size, so obviously we won’t list it all here.
In general, and in addition to all that’s
been mentioned, the string programs includemore playing techniques—sul ponticello, flau-tando, Bartok pizz, tremolo, etc. Along withthe wonderful special effects, these are agreat addition to the library. There’s also noshortage of biting string articulations, forwhich I happen to have a particular fondness.The low strings—and brass for that matter—are great, and in my opinion considerablybetter than the high strings. I also happen toprefer the grittier 11 violin section to the larg-er one.
EWQLSO’s percussion has always been astrong suit. My favorite of the new instru-ments is the Mahler Hammer, a big-ass wood-en mallet slamming an even bigger-ass wood-en box. The new velocity layers for themarimba are also worth calling out, as are thetaiko drums, but there are a lot of new instru-ments here. (If there’s a third edition, I’d liketo put in a request for pedal-up vibraphoneand chimes samples.)
While the woodwinds overall are not mypersonal favorite section in EWQLSO, they do
blend with the rest of the orchestra in sec-tions very well. And the solo clarinet is quitegood, the piccolo very good. XP includessome excellent new piccolo effects.
There doesn’t seem to be any single area offocus with the new brass articulations, butthere’s no shortage of really good ones. Oneexample would be the short staccato 6French horn section, which is a great pro-gram for the characteristic stab effect. Butthen the huge horn section is great anyway,in fact the powerful brass, especially the lowbrass, in EWQLSO is outstanding. I wasn’table to make the solo piccolo trumpet soundespecially good, but it’s great having a sec-ond solo trumpet, and the new solo trom-bone is far more complete than the original.
SoThe XP upgrade makes an excellent library
all the more so. It has a wealth of new articu-lations and instruments that greatly expandits flexibility. VI
EWQLSO XP(CONTINUED FROM PAGE 54)
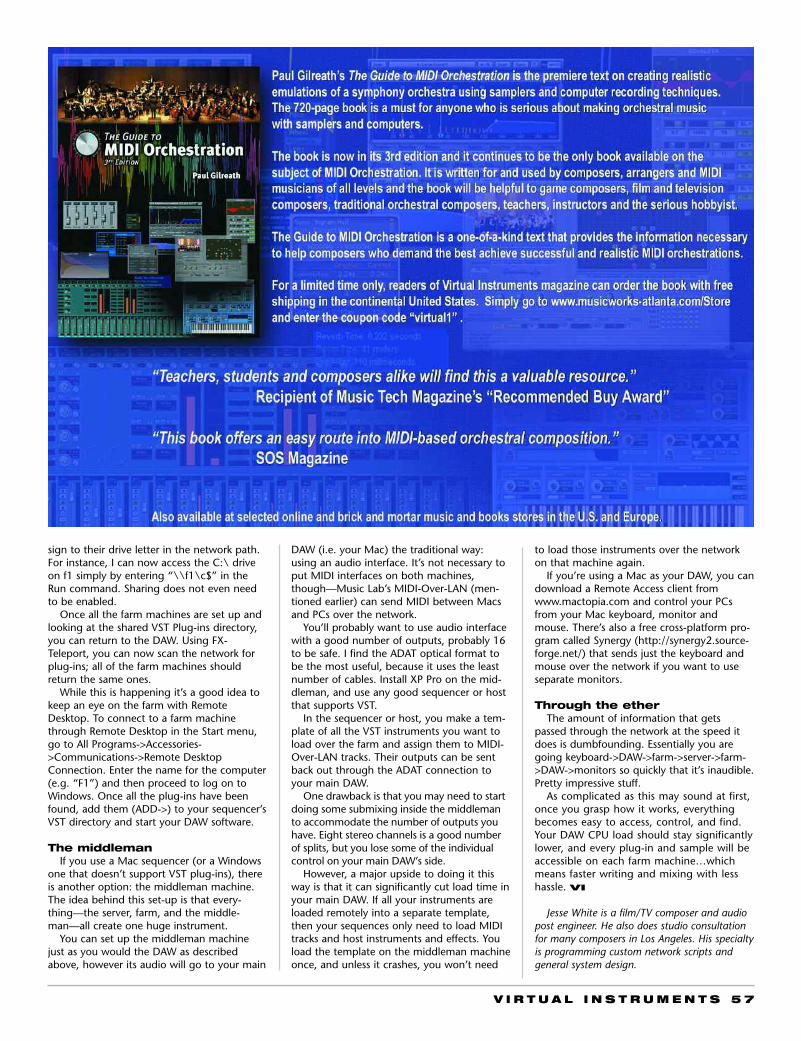
V I R T U A L I N S T R U M E N T S 5 7
sign to their drive letter in the network path.For instance, I can now access the C:\ driveon f1 simply by entering “\\f1\c$” in theRun command. Sharing does not even needto be enabled.
Once all the farm machines are set up andlooking at the shared VST Plug-ins directory,you can return to the DAW. Using FX-Teleport, you can now scan the network forplug-ins; all of the farm machines shouldreturn the same ones.
While this is happening it’s a good idea tokeep an eye on the farm with RemoteDesktop. To connect to a farm machinethrough Remote Desktop in the Start menu,go to All Programs->Accessories->Communications->Remote DesktopConnection. Enter the name for the computer(e.g. “F1”) and then proceed to log on toWindows. Once all the plug-ins have beenfound, add them (ADD->) to your sequencer’sVST directory and start your DAW software.
The middlemanIf you use a Mac sequencer (or a Windows
one that doesn’t support VST plug-ins), thereis another option: the middleman machine.The idea behind this set-up is that every-thing—the server, farm, and the middle-man—all create one huge instrument.
You can set up the middleman machinejust as you would the DAW as describedabove, however its audio will go to your main
DAW (i.e. your Mac) the traditional way:using an audio interface. It’s not necessary toput MIDI interfaces on both machines,though—Music Lab’s MIDI-Over-LAN (men-tioned earlier) can send MIDI between Macsand PCs over the network.
You’ll probably want to use audio interfacewith a good number of outputs, probably 16to be safe. I find the ADAT optical format tobe the most useful, because it uses the leastnumber of cables. Install XP Pro on the mid-dleman, and use any good sequencer or hostthat supports VST.
In the sequencer or host, you make a tem-plate of all the VST instruments you want toload over the farm and assign them to MIDI-Over-LAN tracks. Their outputs can be sentback out through the ADAT connection toyour main DAW.
One drawback is that you may need to startdoing some submixing inside the middlemanto accommodate the number of outputs youhave. Eight stereo channels is a good numberof splits, but you lose some of the individualcontrol on your main DAW’s side.
However, a major upside to doing it thisway is that it can significantly cut load time inyour main DAW. If all your instruments areloaded remotely into a separate template,then your sequences only need to load MIDItracks and host instruments and effects. Youload the template on the middleman machineonce, and unless it crashes, you won’t need
to load those instruments over the networkon that machine again.
If you’re using a Mac as your DAW, you candownload a Remote Access client fromwww.mactopia.com and control your PCsfrom your Mac keyboard, monitor andmouse. There’s also a free cross-platform pro-gram called Synergy (http://synergy2.source-forge.net/) that sends just the keyboard andmouse over the network if you want to useseparate monitors.
Through the etherThe amount of information that gets
passed through the network at the speed itdoes is dumbfounding. Essentially you aregoing keyboard->DAW->farm->server->farm->DAW->monitors so quickly that it’s inaudible.Pretty impressive stuff.
As complicated as this may sound at first,once you grasp how it works, everythingbecomes easy to access, control, and find.Your DAW CPU load should stay significantlylower, and every plug-in and sample will beaccessible on each farm machine…whichmeans faster writing and mixing with lesshassle. VI
Jesse White is a film/TV composer and audiopost engineer. He also does studio consultationfor many composers in Los Angeles. His specialtyis programming custom network scripts andgeneral system design.
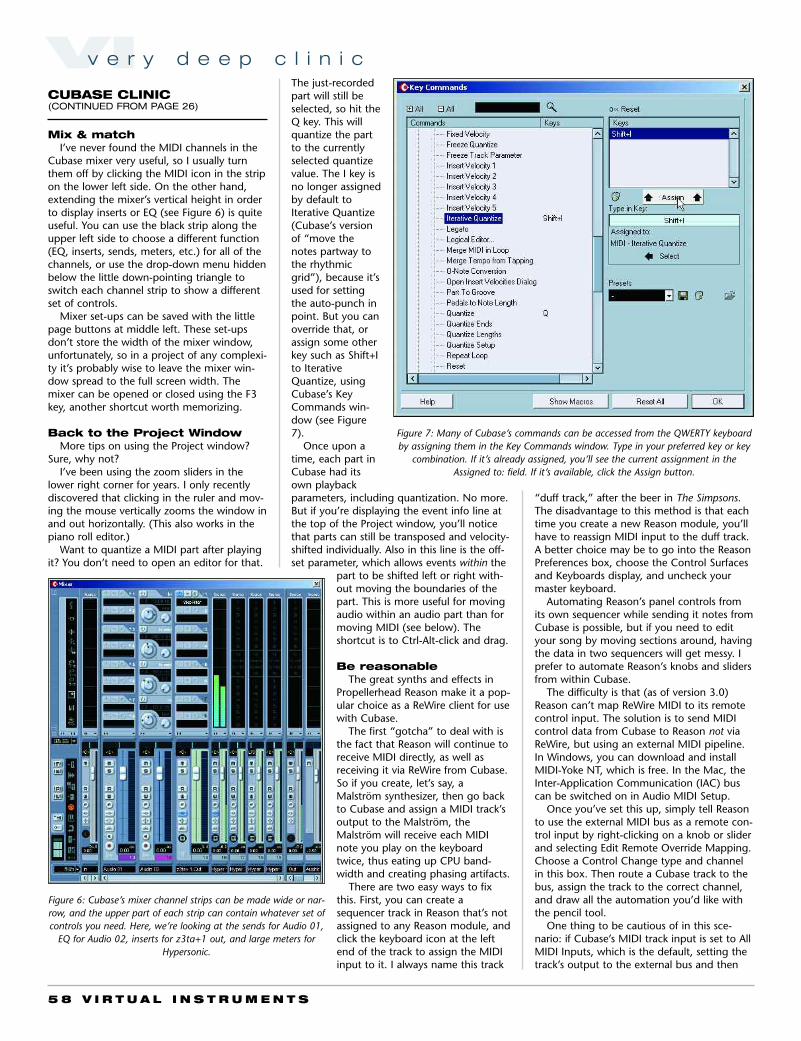
5 8 V I R T U A L I N S T R U M E N T S
VIv e r y d e e p c l i n i c
CUBASE CLINIC(CONTINUED FROM PAGE 26)
Mix & matchI’ve never found the MIDI channels in the
Cubase mixer very useful, so I usually turnthem off by clicking the MIDI icon in the stripon the lower left side. On the other hand,extending the mixer’s vertical height in orderto display inserts or EQ (see Figure 6) is quiteuseful. You can use the black strip along theupper left side to choose a different function(EQ, inserts, sends, meters, etc.) for all of thechannels, or use the drop-down menu hiddenbelow the little down-pointing triangle toswitch each channel strip to show a differentset of controls.
Mixer set-ups can be saved with the littlepage buttons at middle left. These set-upsdon’t store the width of the mixer window,unfortunately, so in a project of any complexi-ty it’s probably wise to leave the mixer win-dow spread to the full screen width. Themixer can be opened or closed using the F3key, another shortcut worth memorizing.
Back to the Project WindowMore tips on using the Project window?
Sure, why not?I’ve been using the zoom sliders in the
lower right corner for years. I only recentlydiscovered that clicking in the ruler and mov-ing the mouse vertically zooms the window inand out horizontally. (This also works in thepiano roll editor.)
Want to quantize a MIDI part after playingit? You don’t need to open an editor for that.
The just-recordedpart will still beselected, so hit theQ key. This willquantize the partto the currentlyselected quantizevalue. The I key isno longer assignedby default toIterative Quantize(Cubase’s versionof “move thenotes partway tothe rhythmicgrid”), because it’sused for settingthe auto-punch inpoint. But you canoverride that, orassign some otherkey such as Shift+Ito IterativeQuantize, usingCubase’s KeyCommands win-dow (see Figure7).
Once upon atime, each part inCubase had itsown playbackparameters, including quantization. No more.But if you’re displaying the event info line atthe top of the Project window, you’ll noticethat parts can still be transposed and velocity-shifted individually. Also in this line is the off-set parameter, which allows events within the
part to be shifted left or right with-out moving the boundaries of thepart. This is more useful for movingaudio within an audio part than formoving MIDI (see below). Theshortcut is to Ctrl-Alt-click and drag.
Be reasonableThe great synths and effects in
Propellerhead Reason make it a pop-ular choice as a ReWire client for usewith Cubase.
The first “gotcha” to deal with isthe fact that Reason will continue toreceive MIDI directly, as well asreceiving it via ReWire from Cubase.So if you create, let’s say, aMalström synthesizer, then go backto Cubase and assign a MIDI track’soutput to the Malström, theMalström will receive each MIDInote you play on the keyboardtwice, thus eating up CPU band-width and creating phasing artifacts.
There are two easy ways to fixthis. First, you can create asequencer track in Reason that’s notassigned to any Reason module, andclick the keyboard icon at the leftend of the track to assign the MIDIinput to it. I always name this track
“duff track,” after the beer in The Simpsons.The disadvantage to this method is that eachtime you create a new Reason module, you’llhave to reassign MIDI input to the duff track.A better choice may be to go into the ReasonPreferences box, choose the Control Surfacesand Keyboards display, and uncheck yourmaster keyboard.
Automating Reason’s panel controls fromits own sequencer while sending it notes fromCubase is possible, but if you need to edityour song by moving sections around, havingthe data in two sequencers will get messy. Iprefer to automate Reason’s knobs and slidersfrom within Cubase.
The difficulty is that (as of version 3.0)Reason can’t map ReWire MIDI to its remotecontrol input. The solution is to send MIDIcontrol data from Cubase to Reason not viaReWire, but using an external MIDI pipeline.In Windows, you can download and installMIDI-Yoke NT, which is free. In the Mac, theInter-Application Communication (IAC) buscan be switched on in Audio MIDI Setup.
Once you’ve set this up, simply tell Reasonto use the external MIDI bus as a remote con-trol input by right-clicking on a knob or sliderand selecting Edit Remote Override Mapping.Choose a Control Change type and channelin this box. Then route a Cubase track to thebus, assign the track to the correct channel,and draw all the automation you’d like withthe pencil tool.
One thing to be cautious of in this sce-nario: if Cubase’s MIDI track input is set to AllMIDI Inputs, which is the default, setting thetrack’s output to the external bus and then
Figure 6: Cubase’s mixer channel strips can be made wide or nar-row, and the upper part of each strip can contain whatever set ofcontrols you need. Here, we’re looking at the sends for Audio 01,
EQ for Audio 02, inserts for z3ta+1 out, and large meters forHypersonic.
Figure 7: Many of Cubase’s commands can be accessed from the QWERTY keyboardby assigning them in the Key Commands window. Type in your preferred key or key
combination. If it’s already assigned, you’ll see the current assignment in theAssigned to: field. If it’s available, click the Assign button.
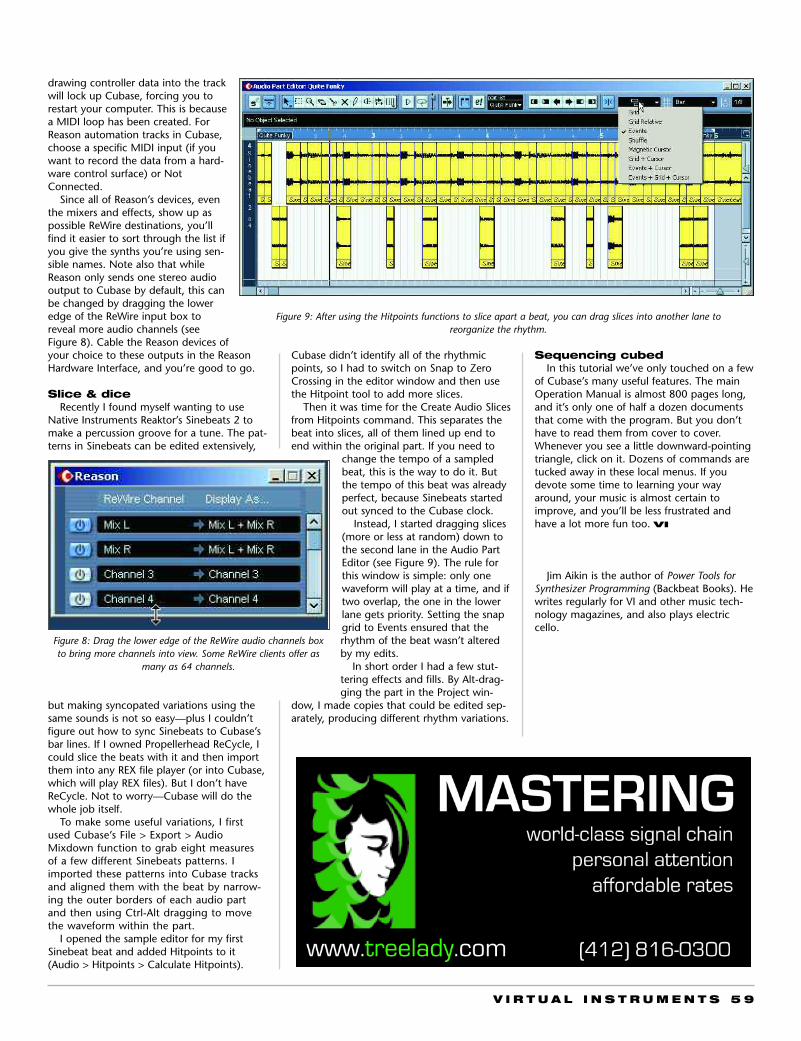
V I R T U A L I N S T R U M E N T S 5 9
drawing controller data into the trackwill lock up Cubase, forcing you torestart your computer. This is becausea MIDI loop has been created. ForReason automation tracks in Cubase,choose a specific MIDI input (if youwant to record the data from a hard-ware control surface) or NotConnected.
Since all of Reason’s devices, eventhe mixers and effects, show up aspossible ReWire destinations, you’llfind it easier to sort through the list ifyou give the synths you’re using sen-sible names. Note also that whileReason only sends one stereo audiooutput to Cubase by default, this canbe changed by dragging the loweredge of the ReWire input box toreveal more audio channels (seeFigure 8). Cable the Reason devices ofyour choice to these outputs in the ReasonHardware Interface, and you’re good to go.
Slice & diceRecently I found myself wanting to use
Native Instruments Reaktor’s Sinebeats 2 tomake a percussion groove for a tune. The pat-terns in Sinebeats can be edited extensively,
but making syncopated variations using thesame sounds is not so easy—plus I couldn’tfigure out how to sync Sinebeats to Cubase’sbar lines. If I owned Propellerhead ReCycle, Icould slice the beats with it and then importthem into any REX file player (or into Cubase,which will play REX files). But I don’t haveReCycle. Not to worry—Cubase will do thewhole job itself.
To make some useful variations, I firstused Cubase’s File > Export > AudioMixdown function to grab eight measuresof a few different Sinebeats patterns. Iimported these patterns into Cubase tracksand aligned them with the beat by narrow-ing the outer borders of each audio partand then using Ctrl-Alt dragging to movethe waveform within the part.
I opened the sample editor for my firstSinebeat beat and added Hitpoints to it(Audio > Hitpoints > Calculate Hitpoints).
Cubase didn’t identify all of the rhythmicpoints, so I had to switch on Snap to ZeroCrossing in the editor window and then usethe Hitpoint tool to add more slices.
Then it was time for the Create Audio Slicesfrom Hitpoints command. This separates thebeat into slices, all of them lined up end toend within the original part. If you need to
change the tempo of a sampledbeat, this is the way to do it. Butthe tempo of this beat was alreadyperfect, because Sinebeats startedout synced to the Cubase clock.
Instead, I started dragging slices(more or less at random) down tothe second lane in the Audio PartEditor (see Figure 9). The rule forthis window is simple: only onewaveform will play at a time, and iftwo overlap, the one in the lowerlane gets priority. Setting the snapgrid to Events ensured that therhythm of the beat wasn’t alteredby my edits.
In short order I had a few stut-tering effects and fills. By Alt-drag-ging the part in the Project win-
dow, I made copies that could be edited sep-arately, producing different rhythm variations.
Sequencing cubedIn this tutorial we’ve only touched on a few
of Cubase’s many useful features. The mainOperation Manual is almost 800 pages long,and it’s only one of half a dozen documentsthat come with the program. But you don’thave to read them from cover to cover.Whenever you see a little downward-pointingtriangle, click on it. Dozens of commands aretucked away in these local menus. If youdevote some time to learning your wayaround, your music is almost certain toimprove, and you’ll be less frustrated andhave a lot more fun too. VI
Jim Aikin is the author of Power Tools forSynthesizer Programming (Backbeat Books). Hewrites regularly for VI and other music tech-nology magazines, and also plays electriccello.
Figure 8: Drag the lower edge of the ReWire audio channels boxto bring more channels into view. Some ReWire clients offer as
many as 64 channels.
Figure 9: After using the Hitpoints functions to slice apart a beat, you can drag slices into another lane to reorganize the rhythm.
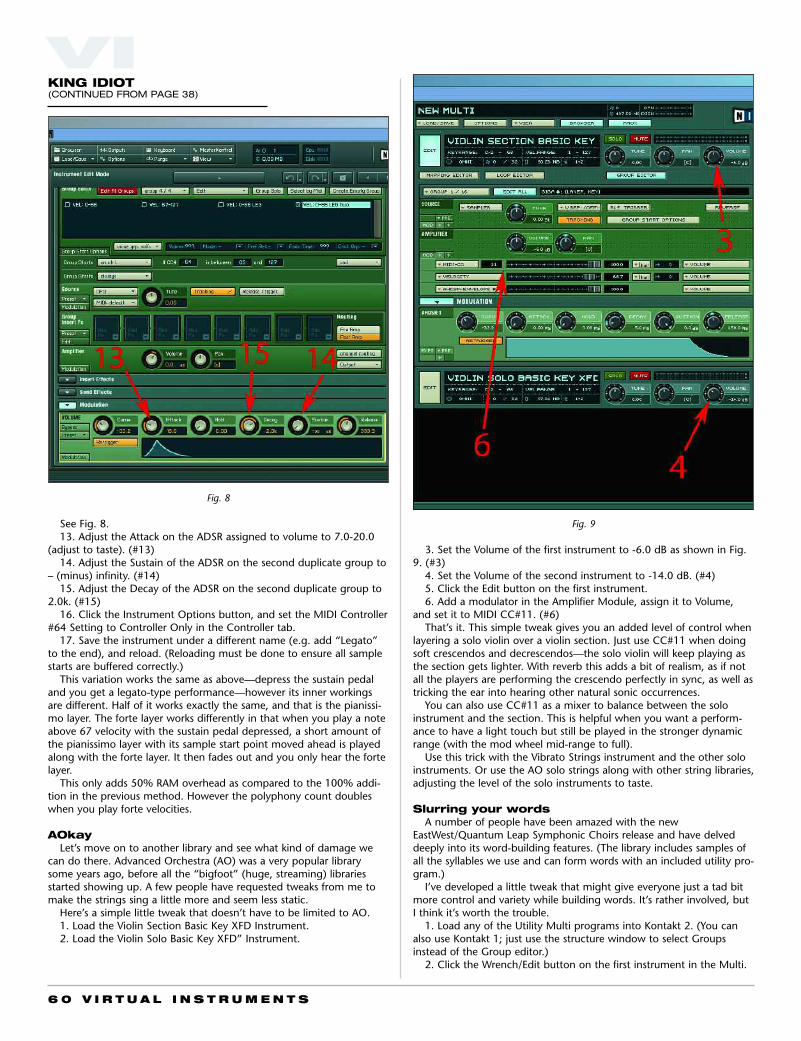
6 0 V I R T U A L I N S T R U M E N T S
KING IDIOT(CONTINUED FROM PAGE 38)
VI
3. Set the Volume of the first instrument to -6.0 dB as shown in Fig.9. (#3)
4. Set the Volume of the second instrument to -14.0 dB. (#4)5. Click the Edit button on the first instrument.6. Add a modulator in the Amplifier Module, assign it to Volume,
and set it to MIDI CC#11. (#6)That’s it. This simple tweak gives you an added level of control when
layering a solo violin over a violin section. Just use CC#11 when doingsoft crescendos and decrescendos—the solo violin will keep playing asthe section gets lighter. With reverb this adds a bit of realism, as if notall the players are performing the crescendo perfectly in sync, as well astricking the ear into hearing other natural sonic occurrences.
You can also use CC#11 as a mixer to balance between the soloinstrument and the section. This is helpful when you want a perform-ance to have a light touch but still be played in the stronger dynamicrange (with the mod wheel mid-range to full).
Use this trick with the Vibrato Strings instrument and the other soloinstruments. Or use the AO solo strings along with other string libraries,adjusting the level of the solo instruments to taste.
Slurring your wordsA number of people have been amazed with the new
EastWest/Quantum Leap Symphonic Choirs release and have delveddeeply into its word-building features. (The library includes samples ofall the syllables we use and can form words with an included utility pro-gram.)
I’ve developed a little tweak that might give everyone just a tad bitmore control and variety while building words. It’s rather involved, butI think it’s worth the trouble.
1. Load any of the Utility Multi programs into Kontakt 2. (You canalso use Kontakt 1; just use the structure window to select Groupsinstead of the Group editor.)
2. Click the Wrench/Edit button on the first instrument in the Multi.
See Fig. 8.13. Adjust the Attack on the ADSR assigned to volume to 7.0-20.0
(adjust to taste). (#13)14. Adjust the Sustain of the ADSR on the second duplicate group to
– (minus) infinity. (#14)15. Adjust the Decay of the ADSR on the second duplicate group to
2.0k. (#15)16. Click the Instrument Options button, and set the MIDI Controller
#64 Setting to Controller Only in the Controller tab.17. Save the instrument under a different name (e.g. add “Legato”
to the end), and reload. (Reloading must be done to ensure all samplestarts are buffered correctly.)
This variation works the same as above—depress the sustain pedaland you get a legato-type performance—however its inner workingsare different. Half of it works exactly the same, and that is the pianissi-mo layer. The forte layer works differently in that when you play a noteabove 67 velocity with the sustain pedal depressed, a short amount ofthe pianissimo layer with its sample start point moved ahead is playedalong with the forte layer. It then fades out and you only hear the fortelayer.
This only adds 50% RAM overhead as compared to the 100% addi-tion in the previous method. However the polyphony count doubleswhen you play forte velocities.
AOkayLet’s move on to another library and see what kind of damage we
can do there. Advanced Orchestra (AO) was a very popular librarysome years ago, before all the “bigfoot” (huge, streaming) librariesstarted showing up. A few people have requested tweaks from me tomake the strings sing a little more and seem less static.
Here’s a simple little tweak that doesn’t have to be limited to AO.1. Load the Violin Section Basic Key XFD Instrument.2. Load the Violin Solo Basic Key XFD” Instrument.
Fig. 8
Fig. 9
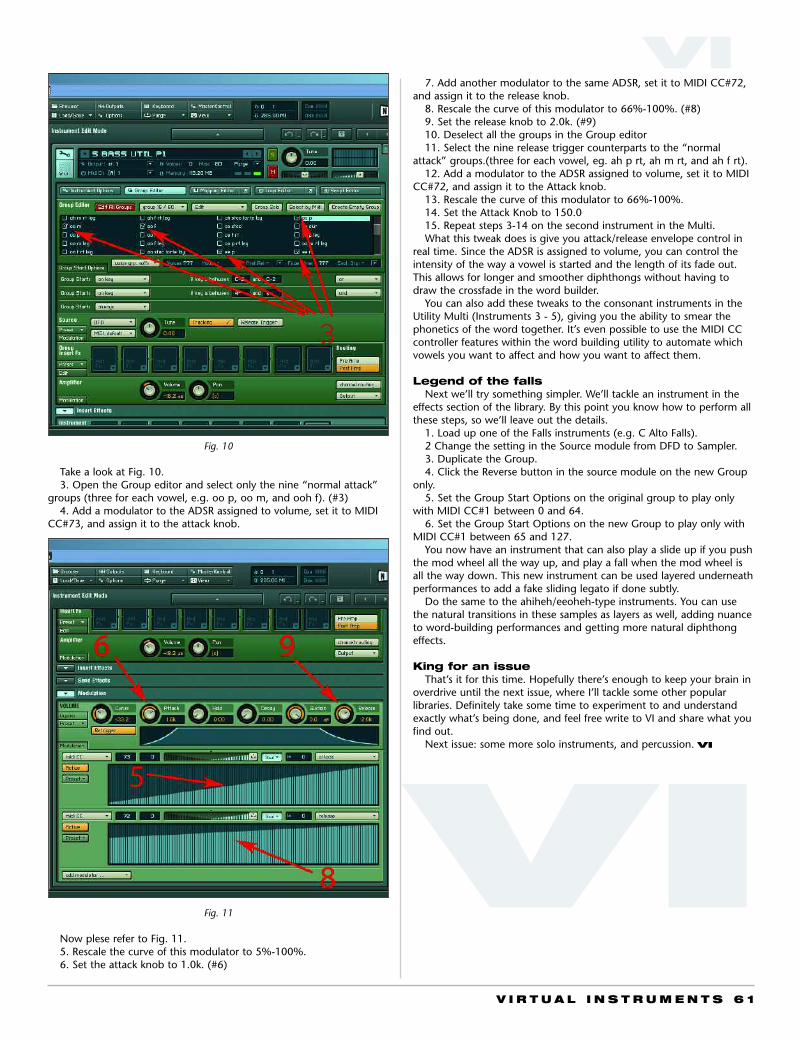
V I R T U A L I N S T R U M E N T S 6 1
Take a look at Fig. 10.3. Open the Group editor and select only the nine “normal attack”
groups (three for each vowel, e.g. oo p, oo m, and ooh f). (#3)4. Add a modulator to the ADSR assigned to volume, set it to MIDI
CC#73, and assign it to the attack knob.
7. Add another modulator to the same ADSR, set it to MIDI CC#72,and assign it to the release knob.
8. Rescale the curve of this modulator to 66%-100%. (#8)9. Set the release knob to 2.0k. (#9)10. Deselect all the groups in the Group editor11. Select the nine release trigger counterparts to the “normal
attack” groups.(three for each vowel, eg. ah p rt, ah m rt, and ah f rt).12. Add a modulator to the ADSR assigned to volume, set it to MIDI
CC#72, and assign it to the Attack knob.13. Rescale the curve of this modulator to 66%-100%.14. Set the Attack Knob to 150.015. Repeat steps 3-14 on the second instrument in the Multi.What this tweak does is give you attack/release envelope control in
real time. Since the ADSR is assigned to volume, you can control theintensity of the way a vowel is started and the length of its fade out.This allows for longer and smoother diphthongs without having todraw the crossfade in the word builder.
You can also add these tweaks to the consonant instruments in theUtility Multi (Instruments 3 - 5), giving you the ability to smear thephonetics of the word together. It’s even possible to use the MIDI CCcontroller features within the word building utility to automate whichvowels you want to affect and how you want to affect them.
Legend of the fallsNext we’ll try something simpler. We’ll tackle an instrument in the
effects section of the library. By this point you know how to perform allthese steps, so we’ll leave out the details.
1. Load up one of the Falls instruments (e.g. C Alto Falls).2 Change the setting in the Source module from DFD to Sampler. 3. Duplicate the Group.4. Click the Reverse button in the source module on the new Group
only.5. Set the Group Start Options on the original group to play only
with MIDI CC#1 between 0 and 64.6. Set the Group Start Options on the new Group to play only with
MIDI CC#1 between 65 and 127.You now have an instrument that can also play a slide up if you push
the mod wheel all the way up, and play a fall when the mod wheel isall the way down. This new instrument can be used layered underneathperformances to add a fake sliding legato if done subtly.
Do the same to the ahiheh/eeoheh-type instruments. You can usethe natural transitions in these samples as layers as well, adding nuanceto word-building performances and getting more natural diphthongeffects.
King for an issueThat’s it for this time. Hopefully there’s enough to keep your brain in
overdrive until the next issue, where I’ll tackle some other popularlibraries. Definitely take some time to experiment to and understandexactly what’s being done, and feel free write to VI and share what youfind out.
Next issue: some more solo instruments, and percussion. VI
VI
Now plese refer to Fig. 11.5. Rescale the curve of this modulator to 5%-100%.6. Set the attack knob to 1.0k. (#6)
Fig. 10
Fig. 11VI
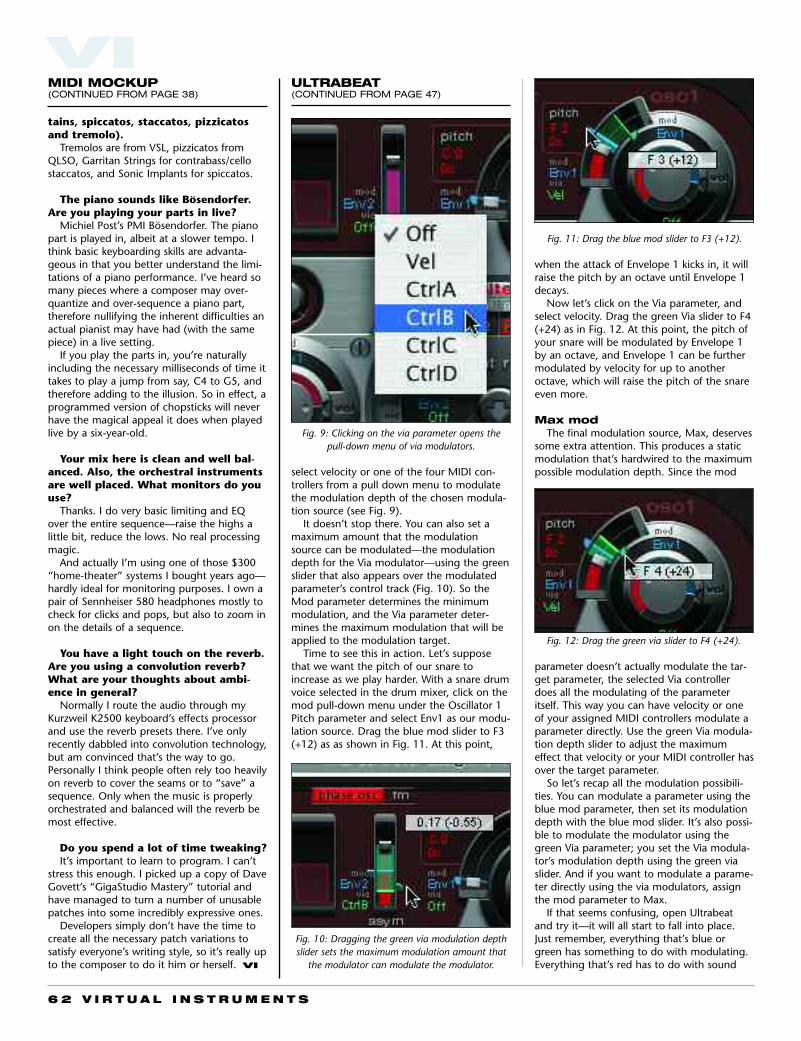
6 2 V I R T U A L I N S T R U M E N T S
MIDI MOCKUP (CONTINUED FROM PAGE 38)
VIULTRABEAT(CONTINUED FROM PAGE 47)
select velocity or one of the four MIDI con-trollers from a pull down menu to modulatethe modulation depth of the chosen modula-tion source (see Fig. 9).
It doesn’t stop there. You can also set amaximum amount that the modulationsource can be modulated—the modulationdepth for the Via modulator—using the greenslider that also appears over the modulatedparameter’s control track (Fig. 10). So theMod parameter determines the minimummodulation, and the Via parameter deter-mines the maximum modulation that will beapplied to the modulation target.
Time to see this in action. Let’s supposethat we want the pitch of our snare toincrease as we play harder. With a snare drumvoice selected in the drum mixer, click on themod pull-down menu under the Oscillator 1Pitch parameter and select Env1 as our modu-lation source. Drag the blue mod slider to F3(+12) as as shown in Fig. 11. At this point,
tains, spiccatos, staccatos, pizzicatosand tremolo).
Tremolos are from VSL, pizzicatos fromQLSO, Garritan Strings for contrabass/cellostaccatos, and Sonic Implants for spiccatos.
The piano sounds like Bösendorfer.Are you playing your parts in live?
Michiel Post’s PMI Bösendorfer. The pianopart is played in, albeit at a slower tempo. Ithink basic keyboarding skills are advanta-geous in that you better understand the limi-tations of a piano performance. I’ve heard somany pieces where a composer may over-quantize and over-sequence a piano part,therefore nullifying the inherent difficulties anactual pianist may have had (with the samepiece) in a live setting.
If you play the parts in, you’re naturallyincluding the necessary milliseconds of time ittakes to play a jump from say, C4 to G5, andtherefore adding to the illusion. So in effect, aprogrammed version of chopsticks will neverhave the magical appeal it does when playedlive by a six-year-old.
Your mix here is clean and well bal-anced. Also, the orchestral instrumentsare well placed. What monitors do youuse?
Thanks. I do very basic limiting and EQover the entire sequence—raise the highs alittle bit, reduce the lows. No real processingmagic.
And actually I’m using one of those $300“home-theater” systems I bought years ago—hardly ideal for monitoring purposes. I own apair of Sennheiser 580 headphones mostly tocheck for clicks and pops, but also to zoom inon the details of a sequence.
You have a light touch on the reverb.Are you using a convolution reverb?What are your thoughts about ambi-ence in general?
Normally I route the audio through myKurzweil K2500 keyboard’s effects processorand use the reverb presets there. I’ve onlyrecently dabbled into convolution technology,but am convinced that’s the way to go.Personally I think people often rely too heavilyon reverb to cover the seams or to “save” asequence. Only when the music is properlyorchestrated and balanced will the reverb bemost effective.
Do you spend a lot of time tweaking?It’s important to learn to program. I can’t
stress this enough. I picked up a copy of DaveGovett’s “GigaStudio Mastery” tutorial andhave managed to turn a number of unusablepatches into some incredibly expressive ones.
Developers simply don’t have the time tocreate all the necessary patch variations tosatisfy everyone’s writing style, so it’s really upto the composer to do it him or herself. VI
when the attack of Envelope 1 kicks in, it willraise the pitch by an octave until Envelope 1decays.
Now let’s click on the Via parameter, andselect velocity. Drag the green Via slider to F4(+24) as in Fig. 12. At this point, the pitch ofyour snare will be modulated by Envelope 1by an octave, and Envelope 1 can be furthermodulated by velocity for up to anotheroctave, which will raise the pitch of the snareeven more.
Max modThe final modulation source, Max, deserves
some extra attention. This produces a staticmodulation that’s hardwired to the maximumpossible modulation depth. Since the mod
parameter doesn’t actually modulate the tar-get parameter, the selected Via controllerdoes all the modulating of the parameteritself. This way you can have velocity or oneof your assigned MIDI controllers modulate aparameter directly. Use the green Via modula-tion depth slider to adjust the maximumeffect that velocity or your MIDI controller hasover the target parameter.
So let’s recap all the modulation possibili-ties. You can modulate a parameter using theblue mod parameter, then set its modulationdepth with the blue mod slider. It’s also possi-ble to modulate the modulator using thegreen Via parameter; you set the Via modula-tor’s modulation depth using the green viaslider. And if you want to modulate a parame-ter directly using the via modulators, assignthe mod parameter to Max.
If that seems confusing, open Ultrabeatand try it—it will all start to fall into place.Just remember, everything that’s blue orgreen has something to do with modulating.Everything that’s red has to do with sound
Fig. 9: Clicking on the via parameter opens thepull-down menu of via modulators.
Fig. 10: Dragging the green via modulation depthslider sets the maximum modulation amount that
the modulator can modulate the modulator.
Fig. 11: Drag the blue mod slider to F3 (+12).
Fig. 12: Drag the green via slider to F4 (+24).
attention while being sparse enough to layereasily. Beyond the drum loops, there is a widevariety of single hit effects, record scratches(most done to tempo—nice touch), humanbeatbox loops, and vinyl crackle beds. A sec-ond CD contains the samples as audio.
The vibe is immediate and street-wise,while managing to fold in a wide range ofgenres. For example, the instrumental loopscontain acoustic strumming and orchestralstrings as well as psychedelic licks and sci-fisynth warbles. The result is a lot of materialuseful for anything from progressive hip-hop
through downtempo cool lounge to nu metaland industrial electronica. It is rare that I’veheard a single library that inspires so manydifferent compositional ideas.
The newest of the libraries discussed here isthe 2-CD Polyester Loops, crafted by compos-er, producer, and remixer Jerzy Korzen. Unlikethe other libraries discussed, which are prima-rily acoustic-sourced, this library was createdalmost entirely with soft synths and effects.The results are considerably more twistedthan your standard techno libraries.
There are two main folders of loops:Handwashed and Machinewashed.Handwashed contains 36 bassline, 40 music,and over 180 drum loops ranging from oneto four bars in length and 80 to 180 bpm intempo. The styles range from technotribal togeeky hip-hop to clockwork industrial toexperimental electronica. They tend towardthe minimal, with many of the drum loopshaving strongly pitched elements while the“music” loops sounds more like radio wavesfrom Saturn.
Machinewashed contains 57 music andnearly 170 drum loops ranging from 70 to170 bpm, again typically one to four bars
creation. Pretty simple, eh?Part 2 in the next issue will feature our in-
depth exploration of the synthesizer and stepsequencer. VI
Orren Merton is a pro audio writer whose lat-est book is “Guitar Rig 2 Power,” CourseTechnologies 2006. He has also written bookson Logic and Garageband.
LOOPMASTERS(CONTINUED FROM PAGE 49)
long. They are slightly heavier and earthier intone, bringing to mind experiments such as amind meld between hip-hop and electronicaproducers, drum ‘n’ bass through an acid jazzfilter, and industrial experimentations mutedthrough a veil of anti-depressants. Very few ofthe loops are related to each other, so youwill either need to focus on repetitive tranceforms or layer other loops to add variety.
The loops are augmented by 20 “drumkits,” which are folders of anywhere from acouple dozen to nearly 100 related single-shot sounds, with corresponding ReasonNNXT, EXS24, Halion, and Kontakt patches. Ifnothing else this library will serve as inspira-tion for budding softsynth programmers.
Although they all come under theLoopmasters Origin banner and use similarformatting and naming conventions, eachlibrary strongly reflects the sensibilities of itsindividual producers. All I’ve heard are worththeir money; some of them—such asPercussionism and Hip Hop Progressions—aretruly inspirational in how many useable ideasand layers they pack onto a single CD. VI
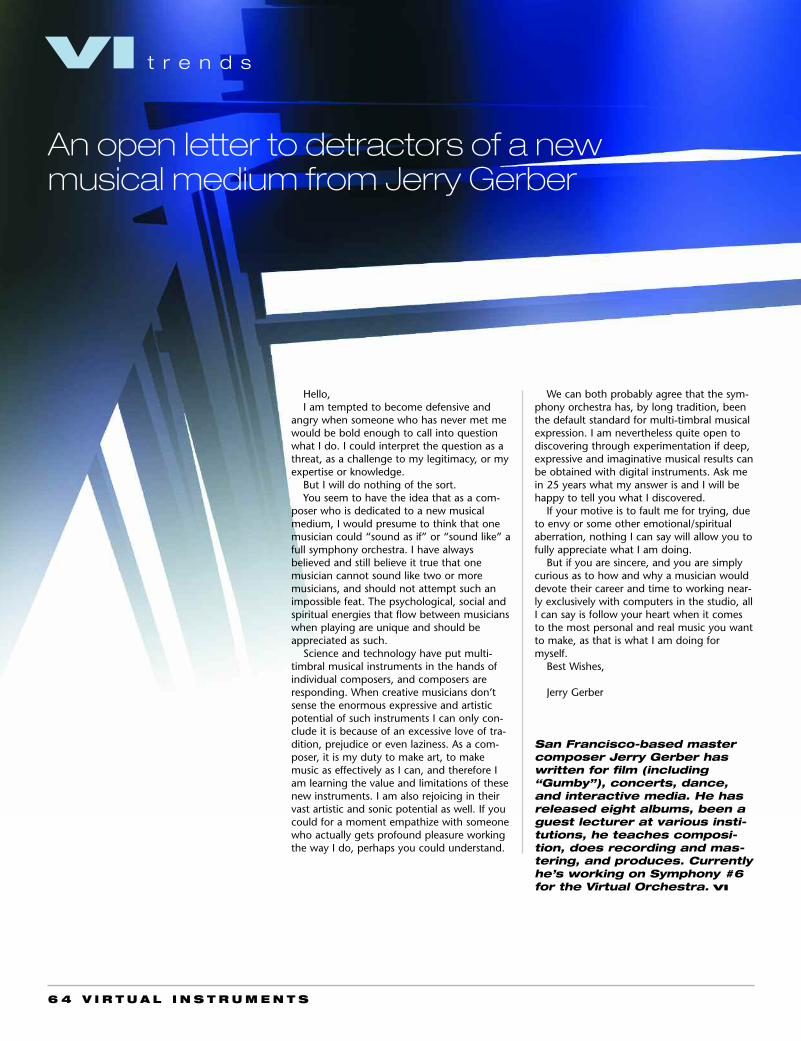
6 4 V I R T U A L I N S T R U M E N T S
Hello,I am tempted to become defensive and
angry when someone who has never met mewould be bold enough to call into questionwhat I do. I could interpret the question as athreat, as a challenge to my legitimacy, or myexpertise or knowledge.
But I will do nothing of the sort.You seem to have the idea that as a com-
poser who is dedicated to a new musicalmedium, I would presume to think that onemusician could “sound as if” or “sound like” afull symphony orchestra. I have alwaysbelieved and still believe it true that onemusician cannot sound like two or moremusicians, and should not attempt such animpossible feat. The psychological, social andspiritual energies that flow between musicianswhen playing are unique and should beappreciated as such.
Science and technology have put multi-timbral musical instruments in the hands ofindividual composers, and composers areresponding. When creative musicians don’tsense the enormous expressive and artisticpotential of such instruments I can only con-clude it is because of an excessive love of tra-dition, prejudice or even laziness. As a com-poser, it is my duty to make art, to makemusic as effectively as I can, and therefore Iam learning the value and limitations of thesenew instruments. I am also rejoicing in theirvast artistic and sonic potential as well. If youcould for a moment empathize with someonewho actually gets profound pleasure workingthe way I do, perhaps you could understand.
We can both probably agree that the sym-phony orchestra has, by long tradition, beenthe default standard for multi-timbral musicalexpression. I am nevertheless quite open todiscovering through experimentation if deep,expressive and imaginative musical results canbe obtained with digital instruments. Ask mein 25 years what my answer is and I will behappy to tell you what I discovered.
If your motive is to fault me for trying, dueto envy or some other emotional/spiritualaberration, nothing I can say will allow you tofully appreciate what I am doing.
But if you are sincere, and you are simplycurious as to how and why a musician woulddevote their career and time to working near-ly exclusively with computers in the studio, allI can say is follow your heart when it comesto the most personal and real music you wantto make, as that is what I am doing formyself.
Best Wishes,
Jerry Gerber
San Francisco-based mastercomposer Jerry Gerber haswritten for film (including“Gumby”), concerts, dance,and interactive media. He hasreleased eight albums, been aguest lecturer at various insti-tutions, he teaches composi-tion, does recording and mas-tering, and produces. Currentlyhe’s working on Symphony #6for the Virtual Orchestra. VI
VI t r e n d s
An open letter to detractors of a new musical medium from Jerry Gerber