Embed Size (px)
Citation preview
CREATING MAIL MERGE DOCUMENTS
Creating Merge DocumentsThe PROSECUTORbyKARPEL program utilizes the Microsoft Word mail merge functions to easily create merge templates. Specific Data source files, named below, will be attached to your templates allowing you to insert merge field codes specific to the template you are creating.
Data SourcesThe data sources reside in the PBK /Template folder. The BCCheck.doc, TXCheck.doc and the RestCheck.doc located in the Templates folder are mail merge documents currently formatted for a single check, two stub check stock. These templates can be modified to your specific check stock layout.
DataSourceForCaseInfoTemplates.txt contains merge fields from different tables such as case and referral information. These tables include defendant, offense, charges, victim, witness, attorney, court, and co-defendant information.
DataSourceForBadCheckTemplates.txt contains merge fields for Bad Check documents and is only used for documents generated in the PROSECUTORbyKARPEL Bad Check module.
DataSourceForBadCheckDisbursement.txt contains merge fields specifically for a Check template used to disburse checks generated by PROSECUTORbyKARPEL Bad Check module.
DataSourecforBCVictimletterTemplates.txt contains merge fields specifically for a Check template used to create a victim letter for check disbursements dispersed by the PROSECUTORbyKARPEL Bad Check module.
DataSourceForDelinquentTaxTemplates.txt contains merge fields for Delinquent Tax documents and is only used for documents generated in the PROSECUTORbyKARPEL Delinquent Tax module.
DataSourceForDelTaxDisbursement.txt contains merge fields specifically for a Check template used to disburse checks generated by the PROSECUTORbyKARPEL Delinquent Tax module.
DataSourceForDelTaxReceipt.txt contains merge fields specifically for a custom Delinquent Tax Receipt. DataSourceForRestitutionReceipt.txt contains merge fields specifically for a custom Restitution Receipt. DataSourceForBadCheckReceipt.txt contains merge fields specifically for the creation of a custom Bad
Check Receipt. DataSourceForRestVictimLetterTemplates.txt contains merge fields specifically designed for the creation
of victim letters with the payment of restitution. DataSourceForProgramReceipt.txt contains merge fields specifically designed for the creation of a
custom Program Receipt for diversion programs. DataSourceForRestChecksDisbursement.txt contains merge fields specifically for the Check template
used to disburse checks generated in the PROSECUTORbyKARPEL Restitution collection. DataSourceforDocketLabels.txt contains merge fields for docket labels from Setting Control. DataSourceForCaseAndReferralLables.txt contains merge fields to create referral and case file labels. DataSourceForChargeLanguageInfoTemplate.txt contains merge fields and prompts specifically created
for charge language document creation. DataSourceForCustomDocketTemplates.txt contains merge fields specifically for the creation of custom
dockets. DataSourceForDiscoveryInvoice.txt contains merge fields specifically to create your own discovery
invoice. DataSourceForSeizureReport.txt contains merge fields specifically to create asset seizure/forfeiture
reports. DataSourceForPersonTemplates.txt contains merge fields at the person level instead of case level.
Creating a new templateYou can copy and paste from an existing document or you can start from the beginning. You will place merge fields inside the document where you want merged information to go that is populated from PROSECUTORbyKARPEL.
Before starting, it’s recommended that you add the mail merge toolbar to your standard Word 2003 window by selecting View/Toolbars, and selecting Mail Merge. Another tool that is helpful is having the “View Field Codes” button in your standard Word toolbar.
Mail Merge Toolbar
To add additional commands to your standard toolbar, right click a blank space in the main toolbar. Select Customize. Choose the Commands tab. Select “View” under categories. Scroll for the “View Field Codes command.” Double Click the command to add it to your toolbar.
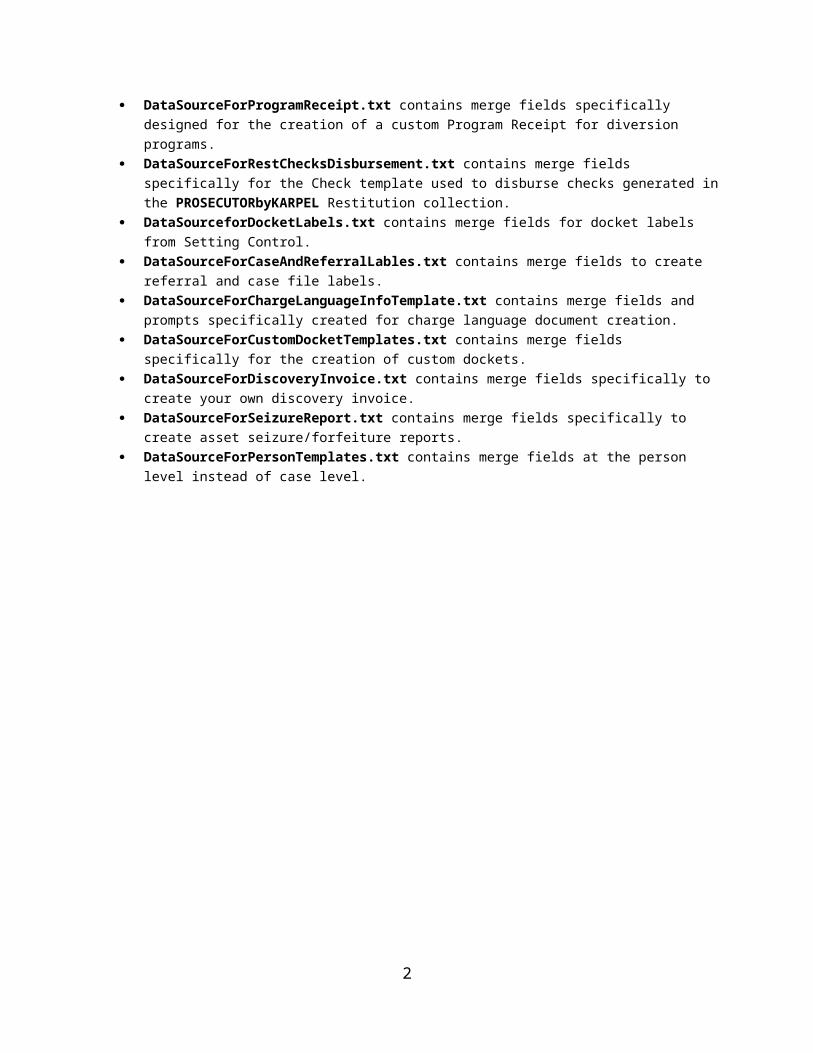
If you are using Word 2007, 2010, or 2013, the Mail Merge ribbon is already enabled by default and can be found by selecting Mailings
2
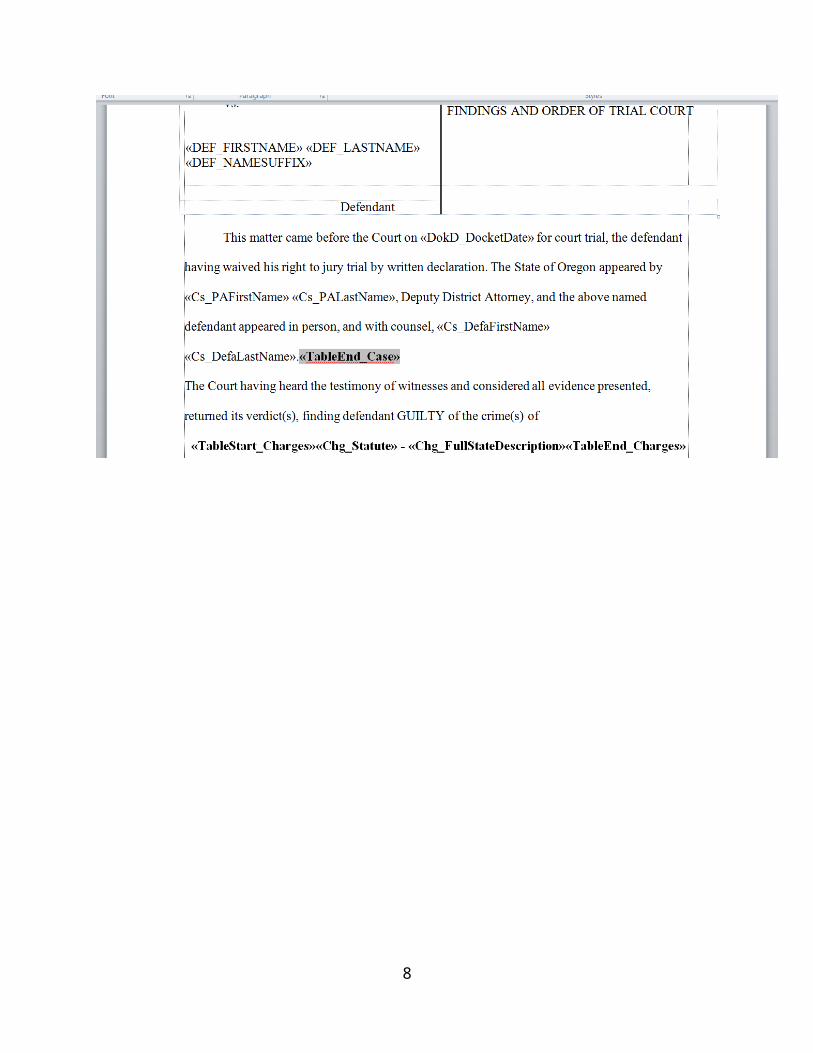
Things to know before creating a templateAll templates must contain the “Start field” and “End Field” from the table you are using to insert your merge fields. For example, you will insert the «TableStart_Case» field first before selecting any fields from the case table. You will insert the «TableEnd_Case» field at the end of the template where you will no longer be using merge fields from the Case. Inserting Charge information into a document requires the «TableStart_Charges» field where you want to begin adding merge fields from the Charges table. You will add the «TableEnd_Charges» field where you want the charge information to end. The fields you insert between the Start and End fields for Charges, Witnesses and Victims will merge all the charges, witnesses or victims in the Case. The example below of a partial charging document shows how the Start Fields and End Fields are used.
COUNT «Chg_CountNumberRoman»: «Chg_ChargeDescription» «Chg_ChargeCode»«Chg_ChargeNcic»«Chg_ChargeModifier»)«TableEnd_Charges»
There are rules regarding the use of the Start and End fields. Each Start field must have its respective End field. You can nest tables, meaning you can insert a Start and End field from another table inside the TableStart_Case field and End field. As shown above, the TableStart_Case field is outside the table and the TableEnd_Case field is at the bottom. When working with Word tables, Start and End fields must be placed at the beginning and ending of each row or table cell.
A Start or End field cannot be on the same line as a section break and the Start and End fields from two separate tables cannot be on the same line.
3

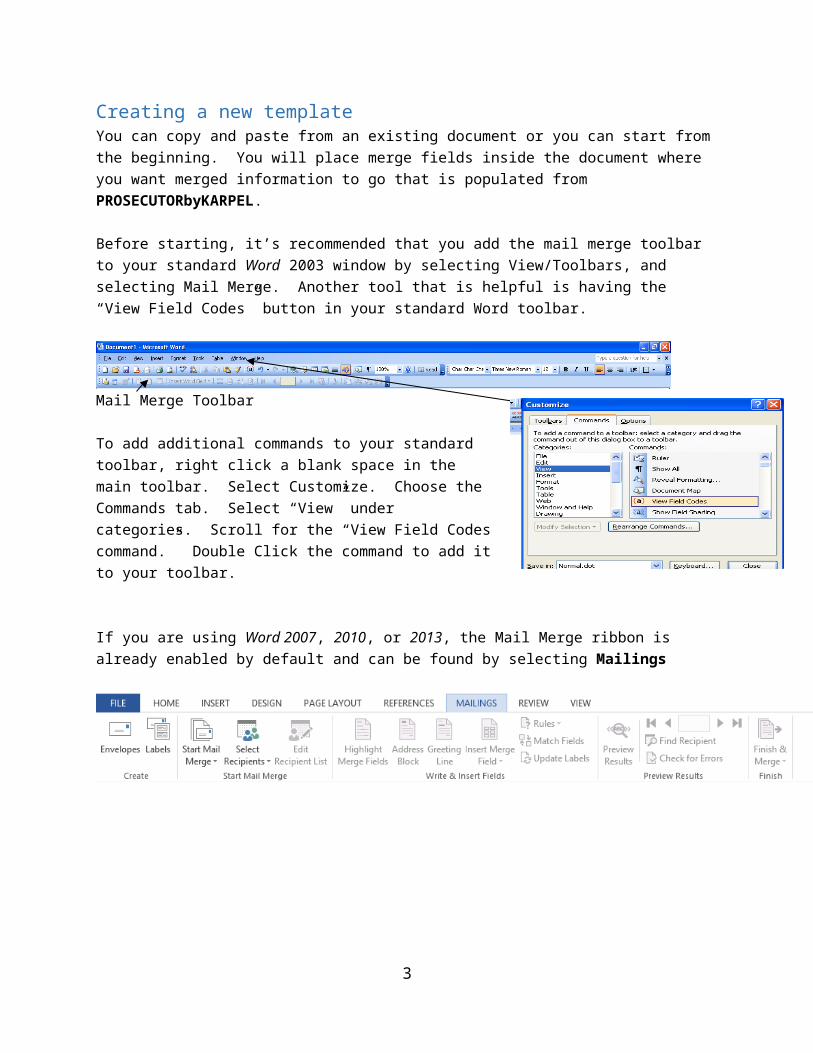
Create Your TemplateTo begin, open a blank document in Word. (The following is using Word 2013)Select the Mailing tab and choose the Select Recipients Button icon.
You will next need to select a data source from the Template folder inside PBK. Click Use Existing List from the Select Recipients list and navigate to the folder and select the appropriate data source.
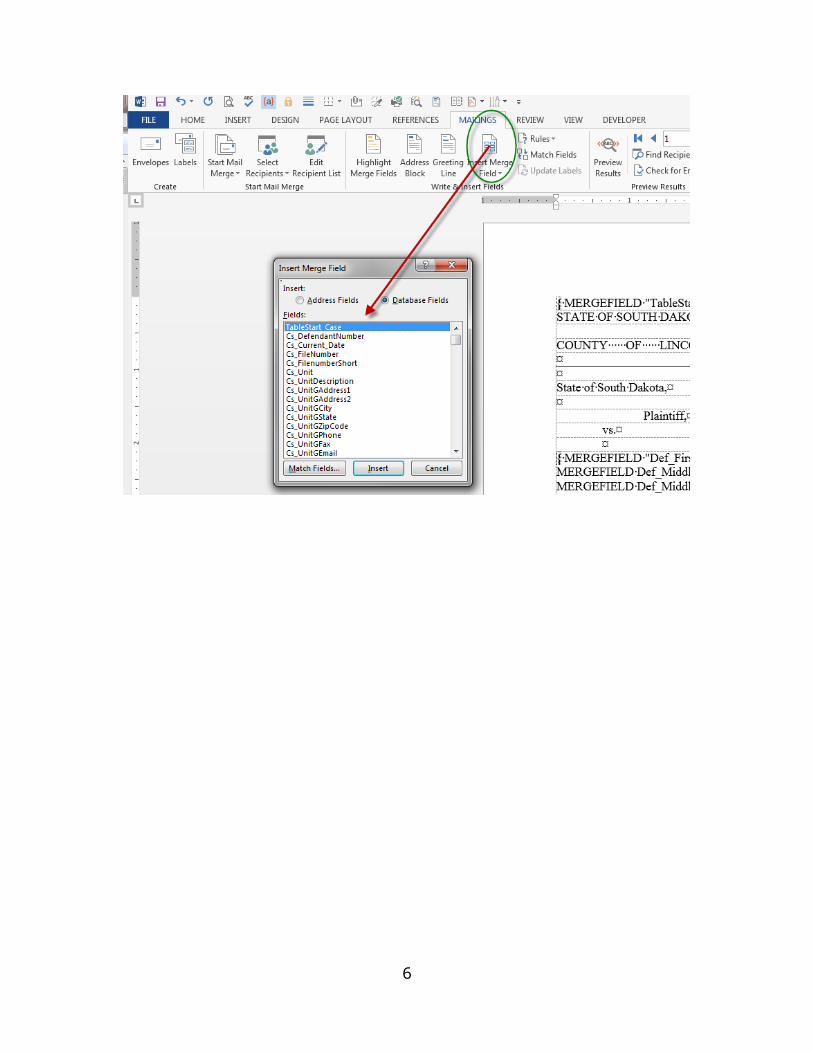
Once your data source is loaded you will use the Insert Merge Field icon to select your appropriate merge field.
4
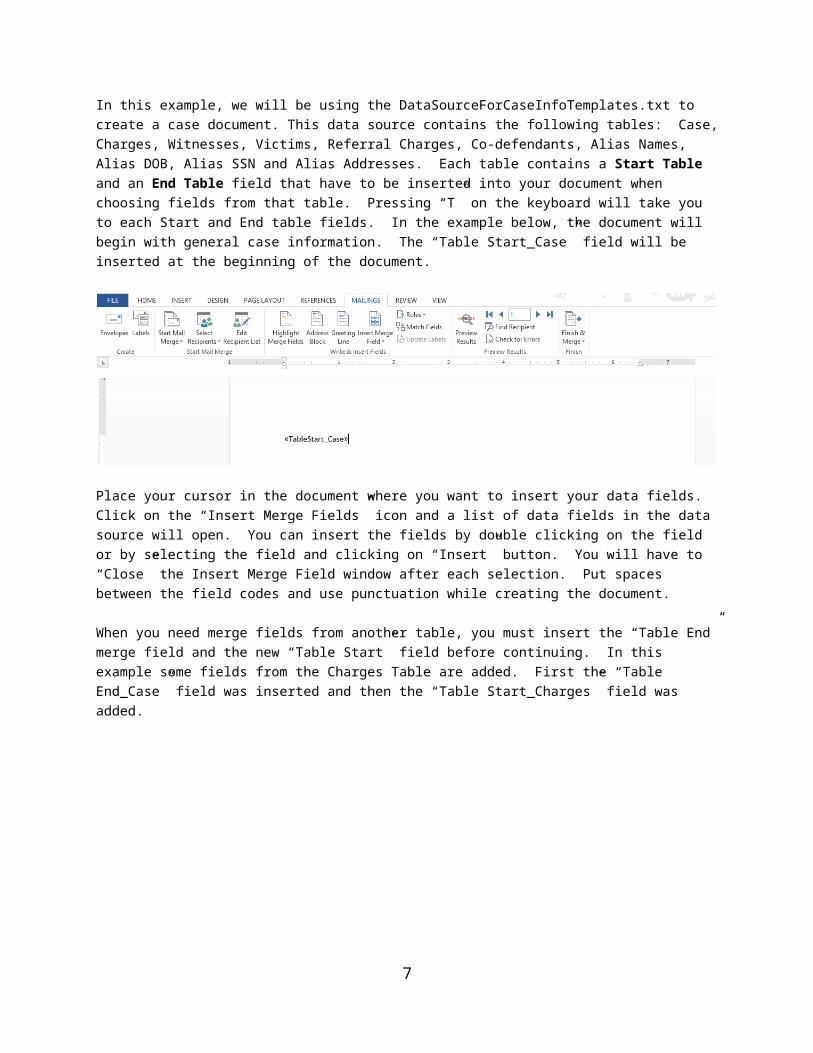
In this example, we will be using the DataSourceForCaseInfoTemplates.txt to create a case document. This data source contains the following tables: Case, Charges, Witnesses, Victims, Referral Charges, Co-defendants, Alias Names, Alias DOB, Alias SSN and Alias Addresses. Each table contains a Start Table and an End Table field that have to be inserted into your document when choosing fields from that table. Pressing “T” on the keyboard will take you to each Start and End table fields. In the example below, the document will begin with general case information. The “Table Start_Case” field will be inserted at the beginning of the document.
Place your cursor in the document where you want to insert your data fields. Click on the “Insert Merge Fields” icon and a list of data fields in the data source will open. You can insert the fields by double clicking on the field or by selecting the field and clicking on “Insert” button. You will have to “Close” the Insert Merge Field window after each selection. Put spaces between the field codes and use punctuation while creating the document.
When you need merge fields from another table, you must insert the “Table End” merge field and the new “Table Start” field before continuing. In this example some fields from the Charges Table are added. First the “Table End_Case” field was inserted and then the “Table Start_Charges” field was added.
5
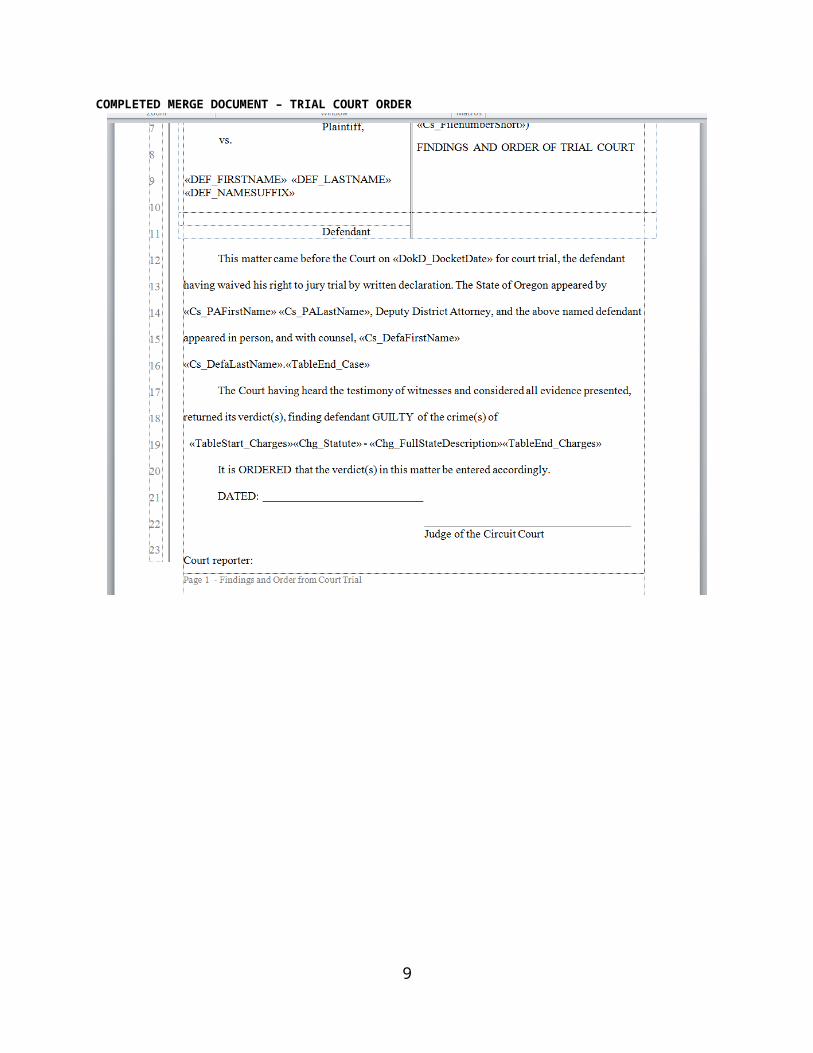
COMPLETED MERGE DOCUMENT – TRIAL COURT ORDER
6
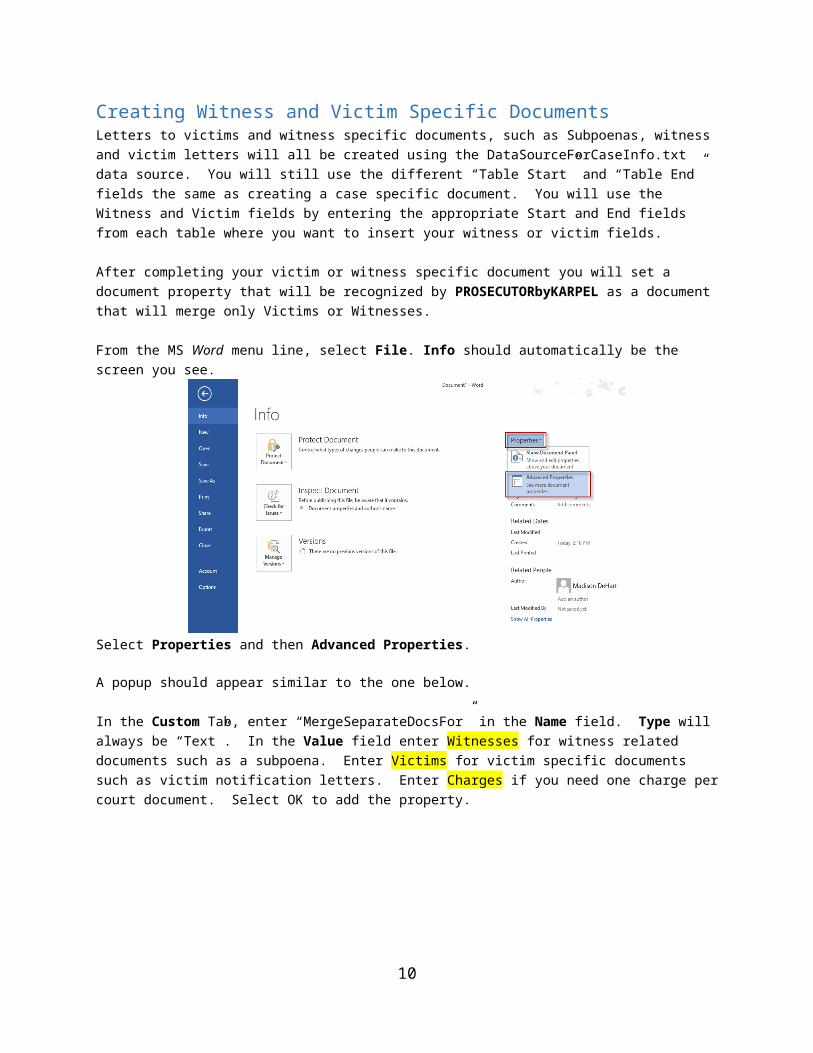
Creating Witness and Victim Specific DocumentsLetters to victims and witness specific documents, such as Subpoenas, witness and victim letters will all be created using the DataSourceForCaseInfo.txt data source. You will still use the different “Table Start” and “Table End” fields the same as creating a case specific document. You will use the Witness and Victim fields by entering the appropriate Start and End fields from each table where you want to insert your witness or victim fields.
After completing your victim or witness specific document you will set a document property that will be recognized by PROSECUTORbyKARPEL as a document that will merge only Victims or Witnesses.
From the MS Word menu line, select File. Info should automatically be the screen you see.
Select Properties and then Advanced Properties.
A popup should appear similar to the one below.
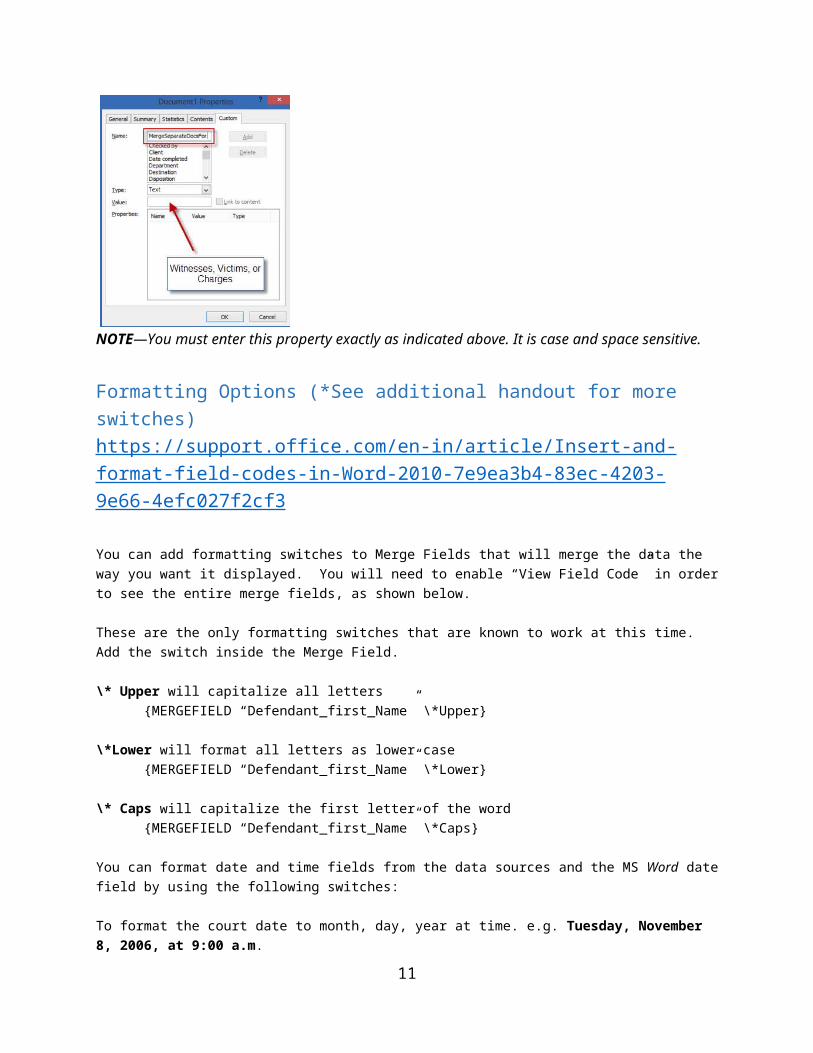
In the Custom Tab, enter “MergeSeparateDocsFor” in the Name field. Type will always be “Text”. In the Value field enter Witnesses for witness related documents such as a subpoena. Enter Victims for victim specific documents such as victim notification letters. Enter Charges if you need one charge per court document. Select OK to add the property.
NOTE—You must enter this property exactly as indicated above. It is case and space sensitive.
7
Formatting Options (*See additional handout for more switches) https://support.office.com/en-in/article/Insert-and-format-field-codes-in-Word-2010-7e9ea3b4-83ec-4203-9e66-4efc027f2cf3
You can add formatting switches to Merge Fields that will merge the data the way you want it displayed. You will need to enable “View Field Code” in order to see the entire merge fields, as shown below.
These are the only formatting switches that are known to work at this time. Add the switch inside the Merge Field.
\* Upper will capitalize all letters{MERGEFIELD “Defendant_first_Name” \*Upper}
\*Lower will format all letters as lower case{MERGEFIELD “Defendant_first_Name” \*Lower}
\* Caps will capitalize the first letter of the word{MERGEFIELD “Defendant_first_Name” \*Caps}
You can format date and time fields from the data sources and the MS Word date field by using the following switches:
To format the court date to month, day, year at time. e.g. Tuesday, November 8, 2006, at 9:00 a.m.
{MERGEFIELD “Next_Court_Date” \@ “dddd, MMMM d, yyyy’, at’ h:mm am/pm”}
To format a date as Month, day and year, e.g. December 1, 2006
{MERGEFIELD “Case_Date” \@ “MMMM d, yyyy” }
8
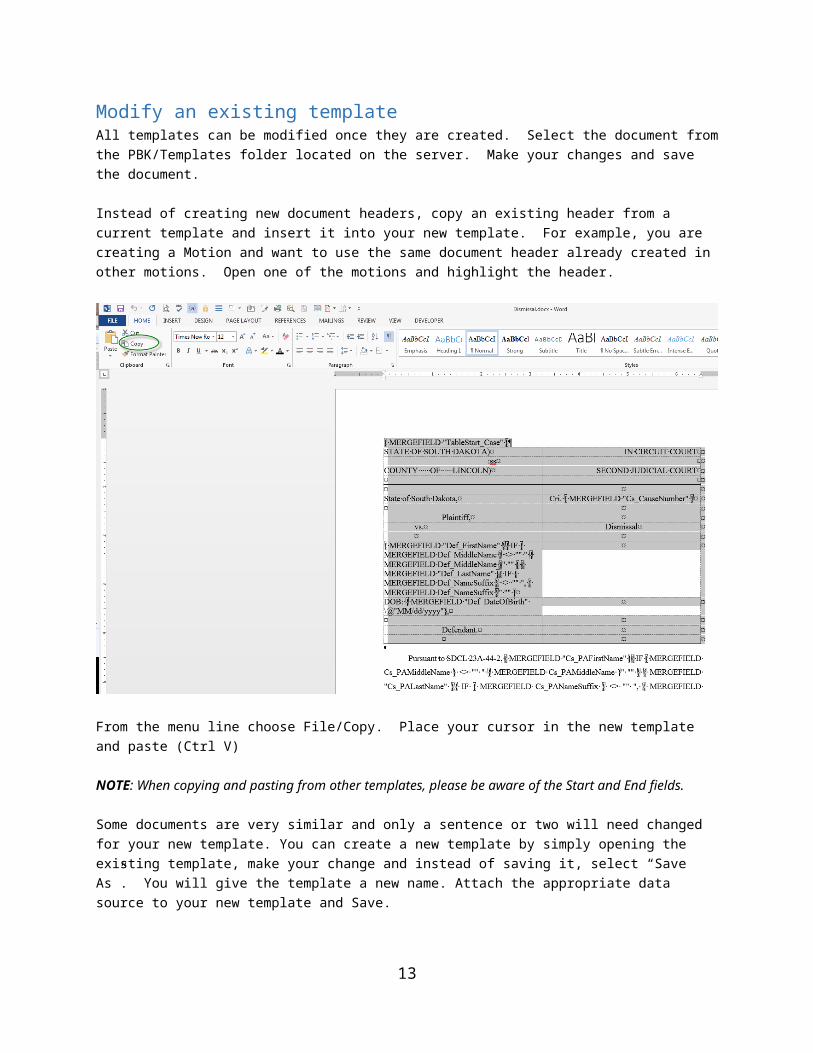
Modify an existing templateAll templates can be modified once they are created. Select the document from the PBK/Templates folder located on the server. Make your changes and save the document.
Instead of creating new document headers, copy an existing header from a current template and insert it into your new template. For example, you are creating a Motion and want to use the same document header already created in other motions. Open one of the motions and highlight the header.
From the menu line choose File/Copy. Place your cursor in the new template and paste (Ctrl V)
NOTE: When copying and pasting from other templates, please be aware of the Start and End fields.
Some documents are very similar and only a sentence or two will need changed for your new template. You can create a new template by simply opening the existing template, make your change and instead of saving it, select “Save As”. You will give the template a new name. Attach the appropriate data source to your new template and Save.
9
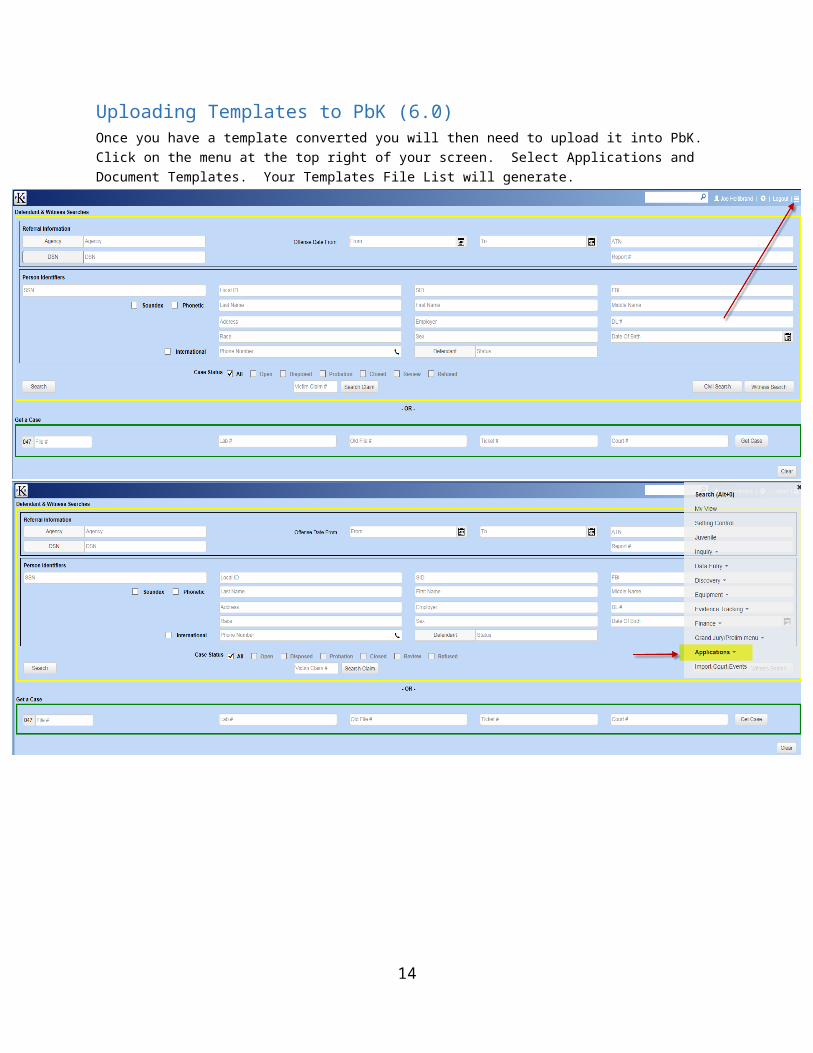
Uploading Templates to PbK (6.0)Once you have a template converted you will then need to upload it into PbK. Click on the menu at the top right of your screen. Select Applications and Document Templates. Your Templates File List will generate.
10
Click on Upload to add your template. Browse out to your template location and click Upload. Your template is now ready for use.
11

Attaching a template to an Event CodeFor the template to generate through Event Entry, it first has to be attached to an Event Code. In this example we will use a Subpoena. From the program left navigation bar select Maintenance Menu. From the Maintenance Menu select Event Codes.
In the Event Codes window, select the Event Code that will generate the document. If the event code does not exist, you will have to add a new code. In that instance you will select the Add button.
12
Check the Generate Document option and click the Documents button to add your document.
In the Document for Event Code screen, click on the Add button.
13
Select Existing Documents button. Browse for the document in Template folder and select the document you created. The Print Sequence field allows for more than one document to be attached to an Event Code. You can specify which document will be printed first. Check the Include Codefendant box if co-defendants should be included in the document. NOTE: specific instructions for codefendant documents are included on the next page. Checking the Include in Court Transfer option will include your document in electronic court transfer if setup for your jurisdiction. Checking the Include Nolled Charges will include the nolled charges on the document. Checking the Keep witness level individual documents will create separate documents for each witness, along with a master document. You can check the Email documents using Outlook option if your office uses Outlook and would like to send the documents generated. You can also specify a Document Category if you want the document to have a category listed in the Documents Tab, Case Information Screen.
After selecting the document and entering the print sequence, click the Add button. You will be taken back to the Documents for Action Code screen. If you were to add another document to this Event code, you would select Add again to attach another document. When finished adding documents, select the “Exit” button.
14


![Malware-Techniken und Malware-Analyse [MM-108] · Header Entpacker-Stub Header Entpacker-Stub Entpacker-Stub UPX0 UPX1 .rsrc UPX0 UPX1 .rsrc Header .text .data .rsrc Zertifikatsprogramm](https://img.pdfslide.us/doc/110x75/5bdd6f6a09d3f2f6568cd013/malware-techniken-und-malware-analyse-mm-108-header-entpacker-stub-header.jpg)


![2012 PBK/Gallup Poll Full Report[1]](https://img.pdfslide.us/doc/110x75/577ce6611a28abf10392b44a/2012-pbkgallup-poll-full-report1.jpg)