Embed Size (px)
Citation preview

Aatrix 1095-C Preparation Guide for Payroll Users Without HR
YOU MUST BE ON VERSION 18.1
YOU DO NOT NEED TO OWN HR TO PROCESS 1095-C FROM MIP THROUGH AATRIX.
This guide is gives instructions for the preparation of the Federal 1095-C for users that do not own or have not used the HR module for processing 1095-C information. If you
own HR much of the information can be entered in a more efficient process through HR. See the User Guide for producing 1095-C with HR.
This guide also covers the basic concepts for the 1095-B.
1
2016 Form 1095 User Guide Version 1.0

ContentsContents............................................................................................................................1
Overview........................................................................................................................4
ALE Reporting............................................................................................................5
Step 2 – Launch Aatrix...................................................................................................7
Step 3 – Use Aatrix to Record Employer Information..................................................11
1 – Verify Employee information..............................................................................14
Deleting Records......................................................................................................14
Adding Records........................................................................................................15
Step 5 Add Employee Covered Individuals/Dependents............................................19
Step 6 Electronic Delivery Preferences......................................................................20
Step 7 – Final Checking...............................................................................................20
Step 8 Printing and Filing...........................................................................................21
Other Options...........................................................................................................22
The Form Viewer.........................................................................................................23
The 1094-C..................................................................................................................25
Federal 1095-C............................................................................................................26
Instructions for Recipient.............................................................................................27
Employer 1095-C.........................................................................................................27
Employee 1095-C........................................................................................................28
E-filing –.......................................................................................................................29
Appendix A: Required Forms.......................................................................................30
Appendix B: Importing 1095 Information Into Aatrix.....................................................30
Appendix C: Copying and Pasting Information into the Aatrix Grid..............................32
Appendix E: 1095-B.....................................................................................................34
2
2016 Form 1095 User Guide Version 1.0

Overview Starting with Tax year 2015 Employers with 50 or more Full Time Equivalent (FTE) employees issue all Full Time Employees a 1095-C. In addition they must submit a 1094-C Transmittal Form to the IRS.
Overview of Producing the 1095-C/1094-C without HR. Form 1095-B has a similar process, except that it applies to Employers who are self-insured regardless of size. For details see Appendix E: 1095-B.
Step 1 – Determine if the organization is an Applicable Large Employer (ALE). This means you have 50 or more FTE employees.
- The criteria for determining if you are a ALE depends on the number of people that you had working for you during the measurement and stability periods and how many hours they worked. There is a report under Reports>Payroll>History>Earnings>Summary FTE by Employee. This report will give you information based on the hours recorded through the year. You should consult with a qualified tax advisor to determine if you are required to file.
Step 2 – After you have determined that your organization needs to file 1095-C/1094-C you will need to use Aatrix to record detailed information for the forms.
- MIP will pull limited information for ALL employees into the Aatrix grid. Then you will need to decide which employees will receive a 1095-C and enter the detailed information
Step 3 – Use Aatrix to Record Employer Information
- The Aatrix 1095 Wizard will ask you for employer information related to the 1095-C. Questions like if you have self-insured coverage, certifications of eligibility and number of forms. Abila Customer support cannot advise you on the answers to the questions, you should contact a qualified tax advisor
Step 4- Verify Employees and Employee Data and Fill in Part II of the form 1095-C for each employee.
- ALL employees in the payroll system will pull into a grid. Go through and verify that the necessary employees are present and remove any employees who should not receive a form. Verify the employee information such as name and address etc. and fill in their box selections.
Step 5 – Add Employee Covered Individuals
- If any employees are in an Employer Sponsored Self Insured plan and have covered dependents they need to be added.
Step 6 – If any Employee wants Electronic Delivery of their 1095-C you can enter and verify their email address. NOTE: You must select the complete filing option for electronic delivery.
Step 7 – Verify Employee Coverage
This step is essentially a repeat of Step 4 with error checking to make sure all required fields are filled out.
Step 8 – Print and File
- Choose your printing and filing options.
3
2016 Form 1095 User Guide Version 1.0

Step 1 – Determine if the organization is an Applicable Large Employer (ALE). This means you have 50 or more FTE employees.
One of the provisions of the ACA is that employers who have 50+ Full Time Equivalent (FTE) are considered to be Applicable Large Employers (ALE) and must offer all full time employees (30+ hours a week or 130 hours a month) health coverage and report that offer of that coverage on a 1095-C.
If the employer is self-insured with less than 50 FTE they must give out a form 1095-B.
If an employer is self-insured or not self-insured with more than 50 FTE they must give out a form 1095-C.
This leads to two reporting questions.
ALE Reporting
To be considered an ALE you must have an average of 50+ FTE in your measurement period. The purpose of this period is to calculate if you have 50+ FTE.
The measurement period and stability period is a period between 3-12 months that is selected by the employer. It is supposed to be reasonable and consistent. For more details about what measurement and stability period works best for your organization you should contact your tax advisor. Abila Customer Support cannot advise you on what period of time to use for the measurement period.
If you think that you’re on the border of 50+ FTE your best bet for that determination is to look at your time keeping records. Throughout the year some mechanism outside of MIP was used to record hours worked, then some of that data may have been put into MIP. It may be better to look at the raw data rather than the subset that was keyed into MIP.
If you wish to use MIP to determine how many FTE’s you had there is a report that you can use. Go to Reports>Payroll>History>Earnings History Report. There is a default <Summary FTE by Employee>. You would want to change the dates to your Measurement period. The report will show FTE’s by month for employees that had hours recorded on their timesheet. Salaried employees who didn’t have hours recorded on the timesheet will need to be manually added into the count.
Who gets a 1095-C?
4
2016 Form 1095 User Guide Version 1.0

Once you have determined that you are an ALE, then you have to offer coverage and give a 1095-C to all Full Time Employees. This means anyone who worked more than 130 hours in any month of the year. Selecting employees who get a 1095-C should not be confused with your FTE count or measurement period to determine if you are an ALE. Once you are determined to be an ALE, all employees with 130 hours or more in a month get a 1095-C. This is true even if they only worked for one month and left the company or were hired in on the last month. For months that the employee did not work or was not full time you will still need to fill in the appropriate code on the form.
In addition if you provide insurance to a Part Time Employee they get a 1095-C.
Like determining if the company was an ALE employer the best way to determine if an employee was full time in a month is to go back and look at the primary records (time punches, spreadsheets etc.) on a month by month basis.
5
2016 Form 1095 User Guide Version 1.0

Step 2 – Launch Aatrix Go to Activities>Payroll>Tax Forms and E-filing by Aatrix.
NOTE: You must be in 18.1 or later to accomplish this. Only this version or later has the necessary programing to fully support the 1095’s. Once on the screen there are several selections.
1 – Update your forms
When you start out you will not see the 1095’s available. First update your forms by choosing the form updates button. You should choose the automatic update. After applying the update you should get out and get back in to see the forms. If you cannot do the form updates or if you have issues with the form updates see KB 8751 – Troubleshooting Aatrix Updates .
If you get out and get back in at a later time and see the form update button is still available you should go ahead and update your forms. Aatrix frequently updates forms several times a week during peak tax times.
2 – Select your Form. You should choose Federal and Form 2015 2095/1094-C. If you do not see it then you need to update your forms.
3 – Full Time Employees. This selection does not really contribute to the 1095 Process and should be left at default.
6
2016 Form 1095 User Guide Version 1.0

NOTE: This tag is a best guess with information provided. If hours were not included with earning codes during the year this may be incorrect.
4 – Select the date range of the forms.
5 – Filters. In most cases filters SHOULD NOT be used. The only time that filters should be used is if you are doing multiple filings for DIFFERENT Tax ID numbers from the same database. If that is not the scenario then do not use filters. If you use filters to break up your filing into different groups for the same Tax ID number it will result in incomplete filings and duplicate work. DO NOT DO IT!
After you have selected your options click OK and proceed through the Aatrix wizard.
The first time through you may wish to test drive the process without saving any data. Anything entered into the test drive will not be saved or filed.
Verify your Tax ID number.
7
2016 Form 1095 User Guide Version 1.0

You may need to verify or complete your company information
Designated Government Entity.
In most cases you should choose that you are filing for your company unless you are a consultant filing for someone else.
8
2016 Form 1095 User Guide Version 1.0

Single vs Multiple Data files.
This selection applies if you are filing for the same EIN from MULTIPLE databases. For example if you have multiple offices each of which records their payroll in a separate database but ALL share the SAME EIN number. For more information on this scenario see KB 8061. This KB discusses multiple filing option in the context of 1099/W2 but the mechanism is the same.
9
2016 Form 1095 User Guide Version 1.0

This does not apply when you are filing for multiple EIN’s from the SAME database. For more instruction on that scenario see KB 12791. This KB discusses multiple filing option in the context of 1099/W2 but the mechanism is the same.
In most cases you should choose NO.
Step 3 – Use Aatrix to Record Employer Information The first step in filing the 1095 is to record information about your employer filing options.
Overview
1 – ALE member information.
Choose which items apply to your filing situation. Selections on this screen will affect which other sections are available
A) Selecting self-insured coverage if your organization is self-insured. You should consult with your tax advisor or plan administrator on how to answer this question.
B) Selecting foreign addresses will change the error checking to allow for non-US address codes.
10
2016 Form 1095 User Guide Version 1.0

C) Enter total number of 1095-C forms. This will automatically populate but if you are going to be adding removing forms you will need to adjust this number.
D) Is this the Authoritative Transmittal for this ALE Member – An organization might have multiple sites or locations or departments, each of which produces their own payroll. But all of them need to be rolled up into one submission. This is a flag that tells the system if this is the combined submission for the entire organization or just a partial submission. Unless you are planning on combing more records into a filing this should be checked.
E) If the Authoritative Transmittal is checked then this option will be available. In most cases you would say yes. Exceptions would be if you were filing for some employees in a different/multiple filing scenario.
F) If you checked yes for the above option this will populate automatically. If the answer above was no then you will need to put in the number of employees
G) Enter the total number of forms filed for ALL ALE members. This is the count of the number of 1095-C you will be filing. If you have said YES on question C this field must have a number. If you are unsure of the number you can change it later in the review process.
H) Is this employer a member of an Aggregated ALE Group. Related to question C. If you are the only entity filing for this tax ID number then you should say no. If you are part of a larger organizational filing you should say yes.
2 – Certifications of Eligibility
Choose which el methods apply to your filing situation. The text is hyperlinked to the tax code on the IRS website. MIP Support cannot advise you which options to check (more than one may apply). You should consult with your tax advisor about this selection.
3- ALE information monthly
This is a month by month summary of the employee count, coverage and relief selections. The employee count will pull in based on the selection method in Step 2.
Understand that this is a best guess based on the hours available in payroll. If employees were paid without recording hours it may not be correct. You can change this value by typing in the correct information.
4 – Errors
11
2016 Form 1095 User Guide Version 1.0

When going through the Aatrix wizard the system will do error checking on your entry to make sure all required information is selected (not that the information is correct). If there is a problem you will see an error message here along with what is required to correct it.
5 – Tips for completing this section.
6 – Section navigator
When you are done with a section go here to move to the next option as well as view your progress through the wizard. Click Next Step to move to the next section.
12
2016 Form 1095 User Guide Version 1.0

Step 4- Verify Employees and Employee Data.
1 – Verify Employee information
This grid will show ALL employees pulled in from payroll. It will pull in all employees regardless if they are full time or part time or if they have information from HR or not. The reason for this is to accommodate all possible use case scenarios. Some employers may not have properly entered hours into MIP throughout the year for the system to make an accurate determination if they are full time or part time. Therefore the system pulls all employees into the grid so the user has a final chance to make that determination. Employees who are not required may be removed.
Deleting Records
To remove a record right click on the row and choose Remove.
If you need to remove multiple records right click and choose Remove Multiple.
13
2016 Form 1095 User Guide Version 1.0

This will let you select and Delete Multiple Records.
Adding Records
If you removed someone by mistake it may be best to get out of Aatrix and then get back in without saving any changes. This will pull the information in from the beginning.
If that is not feasible or if the record was not pulled into the grid in the first place it is possible to add additional records. You would Right Click and choose Add. This will add a new row in the grid at the bottom. You will need to fill out all the fields manually.
2 – Plan Selection information
This section allows you enter information about the coverage values you are selecting for the employee. There is an option to make a selection for the entire year or month by month depending on which columns you select.
14
2016 Form 1095 User Guide Version 1.0

If you choose a value in the “All Year” columns then you will not have to make an selection each month.
A- The coverage offer is chosen from the dropdown list form the valid list of options. MIP Support cannot explain what the options are or which option you should select. For assistance with this you should contact your tax advisor.
B- Employee Share – This will be required if the coverage offer is 1B, 1C, 1D, 1E, 1J, 1K. It is not required for 1A, 1F, 1G, 1H, 1I. This amount is what the employee would pay for their portion of the lowest cost monthly premium for self only coverage that meets the minimum standards. This is not necessarily what the employee is paying as they might have dependents or selected a better plan. This information WILL NOT automatically pull from any field in MIP or HR. You will have to determine this value and enter it.
C- Safe Harbor Code – If the Employer provides self-insurance coverage to that employee Safe Harbor Codes may be used. If the employer does not provide self-insured coverage these are not required. Employees may be checked as covered by Employer Sponsored Self Insurance in a column in the employee information (Section 1).
15
2016 Form 1095 User Guide Version 1.0

Any information entered in these sections will show up below in the detail section. For
an IRS definition of the different Coverage offer and Safe Harbor Codes see this link.
https://www.irs.gov/instructions/i109495c/ar01.html#d0e1062
Question: If I have a lot of information is it possible for me to import this information into Aatrix?
Answer: Yes, if you have information in a CSV file it may be possible to import it. See Appendix B: Importing 1095.
Question: If I have a lot of information is it possible for me to Copy/Paste this information in?
Answer: Yes, it is possible to copy and paste with some limitations. See Appendix C: Copy/Paste Information into the Grid.
3 – Add/Remove Employees
You can use this feature to Add or Remove employees from the grid.
To remove an employee, select the employee and click Remove Employee.
Add Employee will create a new line on the grid. Employee information can be entered into the grid or in the detail window down at the bottom.
16
2016 Form 1095 User Guide Version 1.0

4 – Detail Employee Information
5- Detail Information. This is the same information as what is in Section 2 of the grid but in a detailed format for easier reading. . Information can be changed or updated here. Any changes you make will flow back up to the grid and any changes in the grid will flow down to this form. Users may find it easier to enter information in the detail form.
6 – Covered Dependents – This is best addressed in the next step.
17
2016 Form 1095 User Guide Version 1.0

– Step 5 Add Employee Covered Individuals/Dependents If any employees are selected for Employer-Sponsored Self Insurance it is possible that they may need to recorded any dependents that are covered. For this option to be used you must have selected YES for the “does this employer provide self-insurance coverage”.
In addition you have to choose the Employer-Sponsored Self Insured Coverage checked on the employee record.
If HR was used and properly configured this information would pull in. If not they will need to be individually entered. Click on the Add Covered Individual to add them as a sub record of the employee.
Fill in their information and any coverage elections.
This process can also be initiated via the Sidebar buttons.
You will not be able to proceed if there are any errors that need to be fixed. Look in the error box on the right sidebar. Any errors will reference specific employee SSN’s.
18
2016 Form 1095 User Guide Version 1.0

– Step 6 Electronic Delivery Preferences It is possible that employees can receive their 1095-C only via email. This requires that you use the complete filing option (detailed later) and that the Electronic Only box is checked. Employers are also supposed to get written consent to do electronic only distribution. The consent form can be found in Aatrix Forms dropdown box where you selected the 1095.
If electronic only is checked and the email address will need to be provided.
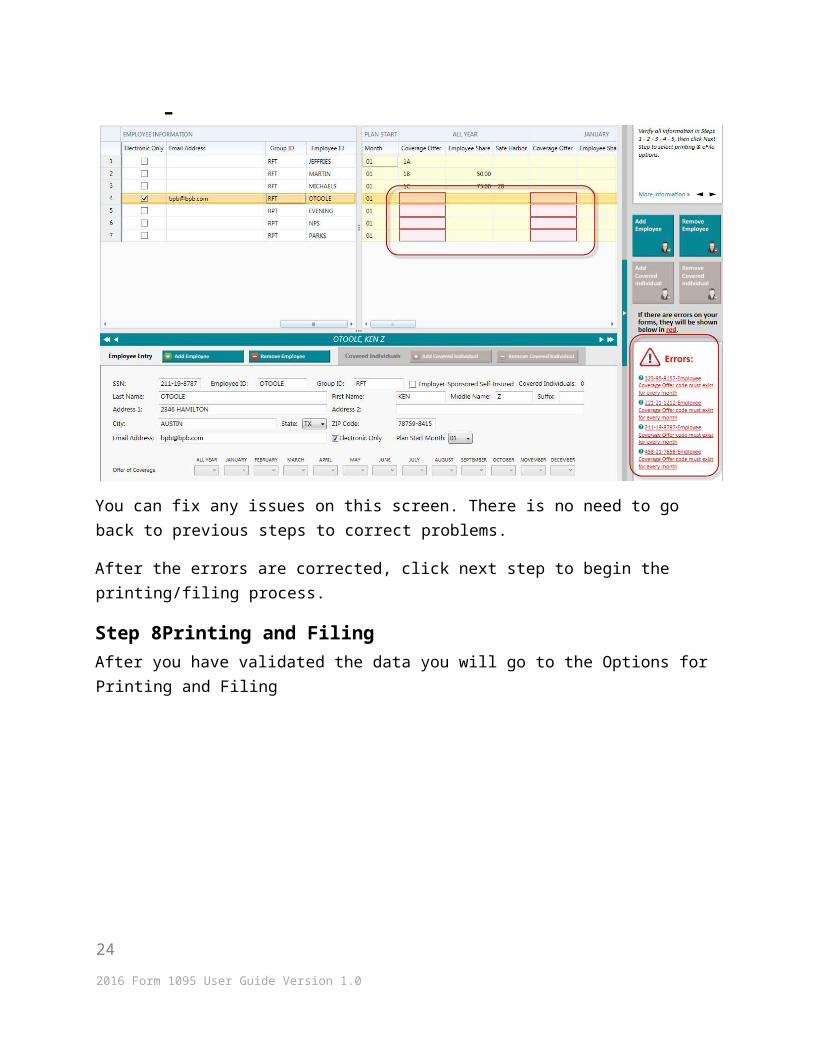
Step 7 – Final Checking This step validates all the information and ensures that nothing is missing. It validates completeness but not the accuracy of the data.
If you have any errors they will be highlighted on the grid and listed in the error box on the right hand side.
You can fix any issues on this screen. There is no need to go back to previous steps to correct problems.
19
2016 Form 1095 User Guide Version 1.0

– After the errors are corrected, click next step to begin the printing/filing process.
Step 8 Printing and Filing After you have validated the data you will go to the Options for Printing and Filing
20
2016 Form 1095 User Guide Version 1.0

Complete E-file Service.
The complete E-file service is $1.99/employee with a $24.95 minimum.
This service will: - Print and Mail any Employee Copies - E-file the 1095-C and 1094 to the IRS - Email 1095-C to employees who elected email only. - Make e-mailed 1095-C availible
for all employees.
If you chose the Complete Filing option for the W2s there is a discount on this service
which leads to a combined price of $2.99/employee. To take advantage of this you must
A) Complete and Submit your W2s with the Complete Filing Option.
B) Choose a filing date on your W2s that gives you enough time to complete and submit your 1095.
C) Use the Complete Filing option for 1095.
If this is done Aatrix will combine your W2 and 1095 into a single filing. The employee will be mailed one package with both W2 and 1095 information in it.
When processing the 1095 filing if you have a submitted W2 Complete Filing Option it will be detected and you will be given the chance to combine the filings and receive the discount.
If the W2 filing has already been processed you will not be eligible for this discount.
Other Options
Print My Employee 1095-C
This will print out employee 1095-C for all employees.
Forms for this can be found at Abila Checks and Forms. The part number is L1095CBLK . These forms are perforated to fit into the same envelopes as the W2s.
IRS specifications say that you have to provide the employee the form and the instructions. If you do not want to order the form, you can print the form on plain paper and print the instructions. If you have chosen to print Employee Copies the instructions for recipient will be in the list of forms that you can print.
21
2016 Form 1095 User Guide Version 1.0

E-file Federal 1095/10940C
If you choose to print your employee 1095-C you can still e-file the government copy. The price is $.49/record with a $24.95 minimum. You will need your Aatrix user name and password to do this or set up an account if you have not used Aatrix before.
Print Federal Copy 1095/1094-C
This allows you to print and mail your Federal copies of the 1095/1094-C. This is printed on plain paper. No special forms are required.
Print Employer Copy of 1095/1094-C
This prints a record copy of the forms on plain paper. No special forms are required.
The Form Viewer If you have chosen to print forms you will continue through the wizard. The print button on the Review Data Screen WILL NOT print your forms, only a list of what is to be printed. You should click NEXT on that screen.
This will launch another screen and bring up the form viewer where you will have the option to review the forms before they are printed. If the system seems to go away at this point check behind other windows or applications.
After it comes up you will see a navigation bar up at the top. The
Navigation Bar
22
2016 Form 1095 User Guide Version 1.0

1) This tells you which particular form you are looking at. Pay attention to this to determine if you are printing the employee, employer, or record copies of forms.
2) Page Numbers - Many forms have multiple pages. Use this to navigate to different pages.
3) Print Final vs Print Draft- Depending on your selections and the type of form, you may only have one option or another. If you print final, it records the form as having been printed. If you choose print draft, it does not.
4) Step Navigator- Use this to move forward in the process. If this looks good you should choose the “Print Final” when you are ready to print or click Next if you are just checking the forms. If in the process you discover an error, exit the form viewer to go back and correct the problem.
23
2016 Form 1095 User Guide Version 1.0
The 1094-C The 1094-C is part of the Federal Filing. The 1094-C contains transmittal information for the organization and should match what was selected in the opening of the 1095-C process.
24
2016 Form 1095 User Guide Version 1.0

Federal 1095-C The Federal 1095-C is the sent to the Government if you are paper filing. If you are e-filing, this form does not need to be printed. You may wish to print a copy for your records. There will be one form for each Employee.
This should not be confused with the Employee 1095-C which may be available later on. Check the form in the navigator bar to be sure what you are printing.
This form should be printed on plain paper, not peforated paper. No special pre-printed forms are needed.
25
2016 Form 1095 User Guide Version 1.0

Instructions for Recipient If you are using plain paper instead of the complete filing option or purchased forms you will need to provide the employee with instructions. You should load plain paper (not perforated forms). Click print and choose the number of copies you want to print (one for each employee).
Employer 1095-C This is the employer copy of the 1095-C. The information is similar to the employee copy but in a different non-filing format. It will be watermarked. It should be printed on plain paper and not a printed form.
26
2016 Form 1095 User Guide Version 1.0

Employee 1095-C This is the form that you will print and distribute to your employees. You should check the form up in the navigator bar to make sure you are printing the correct form.
These are designed to be printed on pre-printed perforated forms. Printed forms are available from Abila Checks and Forms. The part number is L1095CBLK. If you do not have them you can print on plain paper as long as you provide the employees with instructions (see above).
27
2016 Form 1095 User Guide Version 1.0

E-filing –
If you have chosen some type of e-filing option, things will work a little different. You will still go through the form viewer process to review your filings, but for the forms that will be e-filed, you will not have the print final option, only print draft. This will cause the printouts to be watermarked not to file. This is done to prevent accidental duplicate filings.
At the end of the process you will be prompted to log into the Aatrix e-file center to complete your filing.
If you don’t already have an Aatrix account, you will see the option to create one.
If you have any questions about your Aatrix E-filing, if you have an account, what your password was or related topics you can contact Aatrix directly at 1-701-746-6814 or [email protected].
28
2016 Form 1095 User Guide Version 1.0

MIP Support cannot assist you with e-filing issues as they are outside of the MIP product.
The Aatrix knowledgebase has answers to common questions.
https://www.aatrix.com/support/knowledgebase/windows
The most common problems with E-filing relate to internet connection issues and
security restrictions. For more information on this see the Aatrix knowledgebase.
https://www.aatrix.com/support/knowledgebase/windows/troubleshoot/connection MIP
Support cannot troubleshoot connectivity issues.
Appendix A: Required Forms Form and envelopes are available from Abila Checks and Forms. Or
Call 1-844-857-2898
The Part Number for the 1095C is L1095CBLK.
It is a blank sheet on the front with a perforation to make it easy to fold. The filing instructions are printed on the back. The form should be folded and mailed, not detached.
They are available with or without the recommended envelopes.
These forms use the same envelopes as the W2/1099s.
Question: If I am not able to get the forms, what options do I have?
Answer: If you are unable to obtain the forms, there are two options:
1) Use the complete filing option. Aatrix will print and mail the employee their 1095C.
2) Print the form on plain paper. Click Next Step to load the instructions. Print the instructions and give both to the employee. When Aatrix prints the form it includes all the grid lines an information, so it can be printed on blank paper. There are no regulations that state it has to be a pre-printed form or on red ink. If you choose to print employee copies, the Instructions for Recipient will be in the list of forms you can print.
29
2016 Form 1095 User Guide Version 1.0

Appendix B: Importing 1095 Information into Aatrix It is possible to import information into Aatrix. This import is limited to importing one column at a time. If you wished to fill in multiple columns it will require multiple files and multiple imports. One file and import for each column. You do the import by right clicking on the column you wish to import and then selected the file.
Organizing the data to import is done by putting it into a Comma Separated Variable (CSV) file with two columns. The first column would be the Social Security number (with Dashes). Then you would have a comma followed by the value you wish to import into the column.
Example: If you were importing the value “1A” for three employees in the All Year Coverage offer the data file would look like this:
325-95-8157,1A 454-99-8765,1A 222-52-6464,1A
In the Aatrix grid you would right click on Coverage Offer and choose Import CSV File.
Then browse to the location of the csv file and select it.
30
2016 Form 1095 User Guide Version 1.0

The system will then import the values associated with the social security numbers.
The advantage of import is that the data in your CSV file does not have to be in the same order as the data in the Aatrix grid. Information will be matched up by SSN.
Question: What happens if there is data in my CSV file that doesn’t have a corresponding recording in the Aatrix grid?
Answer: It gets ignored.
Appendix C: Copying and Pasting Information into the Aatrix Grid If you use a spreadsheet to prepare your information prior to putting it into the Aatrix grid, it is possible to paste that information into the system. Copying and Pasting into Aatrix is limited to one column at a time. Therefore you would have to Copy/Paste Multiple times, one for each column.
31
2016 Form 1095 User Guide Version 1.0

First make sure that the Employee Information is sorted in the same fashion as your spreadsheet. You can re-sort your spreadsheet or you can resort your information in Aatrix. To do this, right click on the column you wish to sort and choose Sort Rows.
After the information is sorted the same in both Aatrix and the spreadsheet, copy the column or range of cells in a column.
Right Click on the Column Header you wish to paste into and choose Paste.
This will paste the results into the column.
32
2016 Form 1095 User Guide Version 1.0

You can repeat this process with additional columns.
If you wish to Copy information FROM Aatrix you can right click on one column at a time and choose COPY. Then paste it elsewhere.
Appendix E: 1095-B
Form 1095-B is required for Employers who are self-insured regardless of size. The printing and entry of 1095-B information is very similar to that of the 1095-C.
To access the 1095-B forms you would choose the 1095/1094-B option in Aatrix.
33
2016 Form 1095 User Guide Version 1.0

This will take you into the wizard. The steps going through the wizard are the same as the 1095-C. The data information screen will look a bit different.
Some of the significant differences are that it tells you up top you are on the 1095-B form. The Information grid only has one section, not two. There are only 4 steps up top instead of 5.
As you go through the wizard you will have to enter different information and there are different validations. The actual printing and filing is identical.
34
2016 Form 1095 User Guide Version 1.0


![[Type the document title] - Universiti Malaysia Pahangumpir.ump.edu.my/15741/7/Proceeding iCECInno 20161 … · · 2017-01-11Patient based on Geo-Location Identification .....21](https://img.pdfslide.us/doc/110x75/5aa954147f8b9a72188cbc81/type-the-document-title-universiti-malaysia-icecinno-20161-2017-01-11patient.jpg)