Embed Size (px)
Citation preview
~ Mufflers, Converters, Systems and Tips
INSTALLATION INSTRUCTIONS
FOR 15741 2002 MINI COOPER - 1-4 l .6L N.A.
TUNNEL BRACE (TO BE RE-USED)
• e
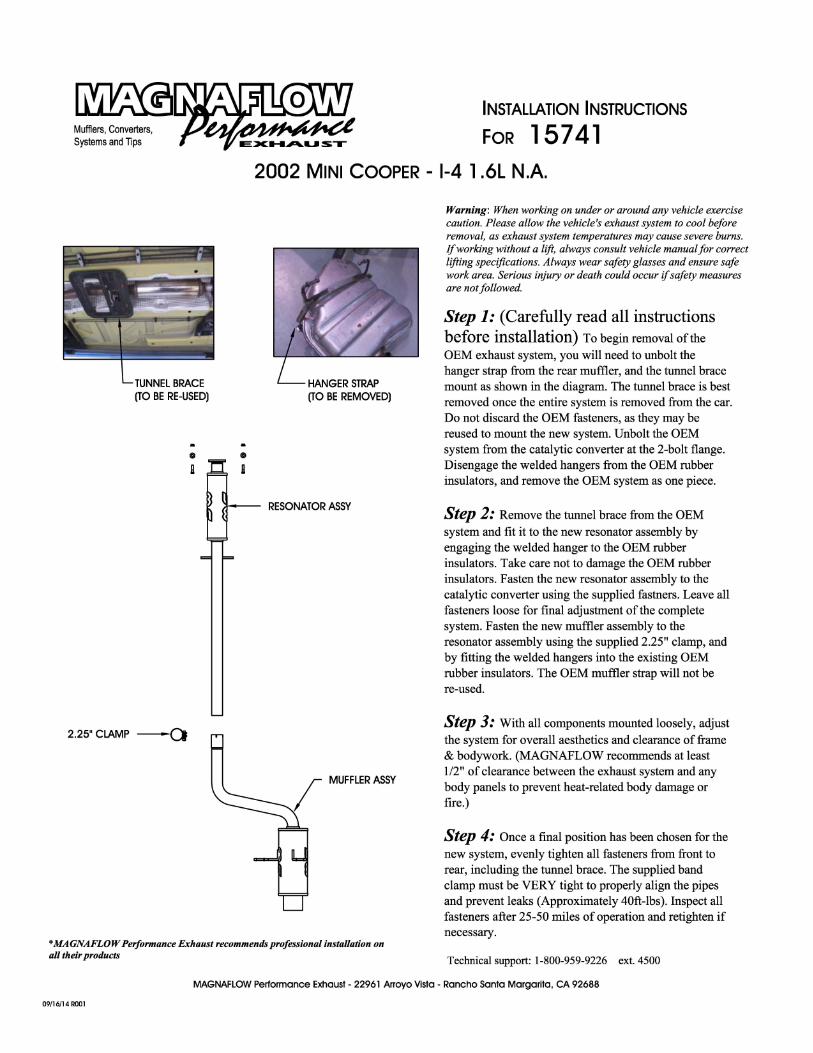
2.25" CLAMP -Q
• e
HANGER STRAP (TO BE REMOVED)
RESONATOR ASSY
MUFFLER ASSY
*MAGNAFLOW Performance Exhaust recommends professional installation on all their products
Warning : When working on under or around any vehicle exercise caution. Please allow the vehicle's exhaust system to cool before removal, as exhaust system temperatures may cause severe burns. If working without a lift, always consult vehicle manual for correct lifting specifications. Always wear safety glasses and ensure safe work area. Serious injury or death could occur if safety measures are not followed.
Step 1: (Carefully read all instructions before installation) To begin removal of the OEM exhaust system, you will need to unbolt the hanger strap from the rear muffler, and the tunnel brace mount as shown in the diagram. The tunnel brace is best removed once the entire system is removed from the car. Do not discard the OEM fasteners, as they may be reused to mount the new system. Unbolt the OEM system from the catalytic converter at the 2-bolt flange . Disengage the welded hangers from the OEM rubber insulators, and remove the OEM system as one piece.
Step 2: Remove the tunnel brace from the OEM system and fit it to the new resonator assembly by engaging the welded hanger to the OEM rubber insulators. Take care not to damage the OEM rubber insulators. Fasten the new resonator assembly to the catalytic converter using the supplied fastners. Leave all fasteners loose for final adjustment of the complete system. Fasten the new muffler assembly to the resonator assembly using the supplied 2.25" clamp, and by fitting the welded hangers into the existing OEM rubber insulators. The OEM muffler strap will not be re-used.
Step 3: With all components mounted loosely, adjust the system for overall aesthetics and clearance of frame & bodywork. (MAGNAFLOW recommends at least 1/2" of clearance between the exhaust system and any body panels to prevent heat-related body damage or fire.)
Step 4: Once a final position has been chosen for the new system, evenly tighten all fasteners from front to rear, including the tunnel brace. The supplied band clamp must be VERY tight to properly align the pipes and prevent leaks (Approximately 40ft-lbs). Inspect all fasteners after 25-50 miles of operation and retighten if necessary.
Technical support: 1-800-959-9226 ext. 4500
MAGNAFLOW Performance Exhaust - 22961 Arroyo Vista - Rancho Santo Margarito, CA 92688
09/16/14 ROOl