Embed Size (px)
Citation preview

™
READ ALL INSTRUCTIONS BEFORE USING
Installation Instructions and Use & Care Guide
VESTA™DWV322CBAutomatic Compact Dishwasher
Unit Parts Identification 1Important Safety Instructions 2-3
Installation InstructionsInstallation Requirements 4Countertop Installation 5Disconnecting Your Dishwasher 6
Use and Care GuideLoading the Dishwasher 7Using a Detergent 8Using a Rinse Agent 9Selecting a Cycle 10Additional Features 11About the Controls 12Quick Operation Instructions 13Cleaning the Filter 14Caring for the Dishwasher 15-16Winterization 16
TroubleshootingCommon Problems/Solutions Chart 17-18Error Code Chart 19If You Need Service 19


1
UNIT PARTS IDENTIFICATION
Not Shown: Quick Connect Faucet Adapter, Detergent Measuring Spoon and Rinse Agent Measuring Container
NOTE: The manufacturer, following a policy of continual product improvement, may make modifications without giving prior notice
A LED DISPLAY
B 3 IN 1 Button
C DELAY START Button
D START/RESET Button
E Program Dial
F ON/OFF Button
G Child Lock Function
H Power Light
1 Detergent Dispenser
2 Cutlery Basket
3 Filter Assembly
4 Rinse Aid Dispenser
5 Spray Arm
6 Dish Rack with Cup Shelf
7 Drain Pipe Connector
8 Inlet Pipe Connector
Front View Rear View
Control Panel
Dishwasher Features
4
5
62
1
3
A
B C D
G
E
F
H
7 8

2
IMPORTANT SAFETY INSTRUCTIONS
• Locate sharp items so that they are not likely to damage the door seal. Load sharp knives with the handles up to reduce the risk of cut-type injuries.
• Do not load plastic items unless they are marked “Dishwasher Safe” or the equivalent. For plastic items not marked as such, check the manufacturers recommendations.
• Do not load glasses over the dish rack pins. Glasses loaded over dish rack pins are not properly supported and are likely to get damaged. Items with wooden or bone handles, or items joined together with glue are unsuitable as they cannot resist hot water.
• Open the door very carefully if the dishwasher is operating, there is a risk of water squirting out.
• Check that the detergent receptacle is empty after the completion of the wash cycle.
• Do not operate your dishwasher unless all enclosure panels are properly in place.
• Do not tamper with controls.
• Do not abuse, sit on, or stand on the open door or dish-rack of the dishwasher. The machine may topple over.
• Protect cables and hoses from high temperatures.
• To reduce the risk of injury, do not allow children to operate or play on the dishwasher.
• When removing an old dishwasher for service or discarding it, remove the door to the washing compartment.
• Under certain conditions, hydrogen gas may be produced in a hot-water system that has not been used for two weeks or more. HYDROGEN GAS IS EXPLOSIVE. If the hot-water system has not been used for such a period, before using the dishwasher, turn on all hot-water faucets and let the water flow from each for several minutes. This will release any accumulated hydrogen gas. As hydrogen gas is flammable, do not smoke or use an open flame during this time.
IMPORTANT SAFETY INSTRUCTIONS
SAVE THESE INSTRUCTIONS
WHEN LOADING ITEMS TO BE WASHED
WARNING When using your dishwasher, follow basic safety precautions:
• Read all instructions before using the dishwasher.
• Use the dishwasher only for it’s intended use.
• Use only detergents or wetting agents recommended for use in a dishwasher and keep them out of reach of children.

3
IMPORTANT SAFETY INSTRUCTIONS
ELECTRICAL INSTRUCTIONS
Refer to the rating label to connect the dishwasher to the appropriate power supply. Use the required 15 amp fuse, time delay fuse or circuit breaker and make sure that a suitable electrical supply socket is located close to where the dishwasher is to be placed.
GROUNDING INSTRUCTIONS
This appliance must be grounded. In the event of malfunction, or breakdown, grounding will reduce the risk of electric shock by providing the path of least resistance for electric current. This appliance is equipped with a cord having an equipment grounding conductor and grounding plug. The plug must be plugged into an appropriate outlet that is properly installed and grounded in accordance with all local codes and ordinances.
WARNING • Do not use an extension cord or adapter
plug with this appliance. WARNING • Improper connection of the grounding
conductor can result in the risk of an electric shock. Ensure proper ground exists before use.
• Check with a qualified electrician or service representative if you are in doubt whether the appliance is properly grounded.
• Do not modify the plug provided with the appliance. If the plug does not fit prop-erly to the outlet, please have a qualified electrician to install a proper outlet.

4
INSTALLATION INSTRUCTIONS
All Installations• Remove all packing materials carefully.
• Make sure the electrical power supply is within easy reach of the machine and the power cord is not excessivelyordangerouslybentorflattened.
• Supply shut-off valves should be easily accessible.
• If the water pipes you will be connecting to are new or unused, run the water until clear to remove any debris that could clog the water valves before connecting the machine. The appliance should be connected to the water mains using only new hose sets. Old hose-sets should not be reused.
• The dishwasher must be installed on a ‘solid’ level surface.
Electrical• Machine Voltage/Amperage: 120V, 60 Hz, 5.72 Total
Amps
• Connection: 3-prong plug with cord provided
• Circuit/Protector: 3-wire single phase, 120V, 60Hz, AC, on a separate 15 Amp circuit.
WaterFor best operating results, incoming water pressure should be between 10 and 145 psi (.7 and 10 bar). Incoming water supply for the dishwasher is controlled by a ‘pressure switch’ application, so if available water pressure is low, dishwasher fill time will be longer. The dishwasher isequipped with water supply and drain hoses that can be positioned to the right or the left to facilitate proper installation.
For Best ResultsYour dishwasher cleans by spraying a mixture of hot clean water and detergent (under pressure) against the soiled surface of dishes. The water is pumped through arotatingsprayarm,drainedthroughafilter(toremovefood and soiled particles) and pumped back through the spray arm.
Soiled water is pumped out and replaced with clean water at the end of each cycle (the number of times depends on the cycle being used). For best cleaning results, the water temperature must be at least 130°F (55°C). To prevent dishwasher damage, the temperature of the incoming water supply should not exceed 160°F (71°C).
Note: Hard Water conditions will adversely affect washability performance of your dishwasher. Hard water conditions will also contribute to “Lime” (white film substance) deposits and/or “Scaling” on the stainless steel surface of the dishwasher tub and “Heater Element” located in the sump underneath the removable filter screen. To assist in minimizing these conditions, it is recommended to periodically operate/rinse the inside of the dishwasher (empty) using 1 cup of white vinegar (at least once a week).
INSTALLATION REQUIREMENTS
WARNING ELECTRICAL SHOCK HAZARD
Disconnect electrical power before installing dishwasher. Failure to do so can result in
death or electrical shock
IMPORTANT The installation of the pipes and electrical equipment should be done by professionals.

5
Bleeder Button
Use with inside threaded faucet only
Push collar down and slip faucet adapter onto faucet
About the Faucet AdapterYour dishwasher came with a Quick-Connect Faucet AdapterKitthatincludesafillanddrainhoseassemblythatis compatible with both male (exterior) and female (interior) threaded faucet connections. If your existing faucet adapter is not compatible with the Quick-Connect hose assembly supplied, use the adapter supplied with the Quick Connect Faucet Adapter Kit:
• If your faucet has a “male” type thread connection, remove the second rubber washer and use only the standard washer supplied inside the tap adapter (both 5mm thick).
• If your faucet has a “female” type thread connection, keep the two rubber washers (both 5 mm) installed inside the tap adapter.
Installation LocationThe minimum height clearance required to install your dishwasher on a countertop surface with overhead cupboards is 18” (45.7 cm).
Follow These Steps1. Screw the faucet adapter onto the faucet, then check
for leaks. (Use plumbing tape to eliminate leaks if necessary.)
2. Connect the open end of the drain hose to the Drain Hose Connection at the rear of the dishwasher.
3. Connect the water inlet hose to the Water Inlet Connection at the rear of the dishwasher.
4. Attach the Quick-Connect Faucet Adapter by pulling down on the outer collar while pushing upwards on the faucet adapter. When the Quick Connect snaps onto the adapter, release the outer collar and it will lock into place.Checkforacorrectfit.
5. Slowly turn the faucet on. Examine all hose connections for water leaks. Immediately close the water supply and repair the hose connections if leaks are found.
6. If you are unable to successfully complete the countertop installation yourself, please call our Service Headquarters toll-free: 1-800-356-0766.
INSTALLATION INSTRUCTIONS
COUNTERTOP INSTALLATION
WARNING Always turn off the faucet after using to prevent water from sitting in the inlet hose.
WARNING Once you open a supply line, (even if it’s closed immediately thereafter) the water inlet
hose will be pressurized.

6
Disconnect the Faucet Adapter
When the cycle is complete, always relieve water pressure from the inlet hose:
• Close the HOT water supply at the faucet.• Disconnect the Power Supply Cord.
Releasewaterpressurefrominsidethefillhosebypressingthe “red” Bleeder Button on the Quick Connect Assembly until thewater flowstops.Then,disconnect theQuickConnectHose Assembly from the faucet by pulling down on the outer collar.
When the dishwasher is not in use, place/store the hose on a hanger hose bracket or similar hanging device.
Appliances that are to be discarded must be made unusable. Before discarding, remove the door to the washing compartment.
INSTALLATION INSTRUCTIONS
DISCONNECTING YOUR DISHWASHER
CAUTION DO NOT LET CHILDREN DISCONNECT THE
DISHWASHER QUICK-CONNECT HOSE ASSEMBLY. Close supervision of children is
always important around appliances.
WARNING To relieve water pressure that’s inside the water inlet hose, first close the water line (faucet). Then press the Bleeder Button on the Quick Connect Assembly until the flow of
water stops.
WARNING BEFORE DISCONNECTING THE QUICK-
CONNECT ASSEMBLY FROM THE FAUCET, ALWAYS RELIEVE WATER PRESSURE.
Failure to do so will result in back-pressure overspray. Back-pressure overspray could cause severe burns and/or scalding as the
temperature of incoming water could be VERY HOT.

7
Wash Up to Six Place Settings
The dishwasher is designed to receive a standard “6 piece” plate setting consisting of the following:
• 6 Dinner Plates• 6 Bread & Butter Plates• 6 Fruit Bowls• 6 Cups and Saucers• 1 Serving Bowl• 1 Oval Platter• 6 Short Glasses• 6 Dinner Forks• 6 Dinner Knives• 6 Salad Forks• 6 Teaspoons• 2 Serving Spoons• 1 Serving Fork
NOTE: For ease of loading/unloading large size dinner plates from the dish rack it may be necessary to temporarily remove the cutlery basket. For best results, do not over load your dishwasher.
Preparing Your Items For Washing
• Load only items that are considered ‘Dishwasher Safe’ (Do not load wooden, pewter, crystal, steel, glued or bondeditems,oritemsmadewithsyntheticfibers)
• Scrape off all solid food particles from the dishes.• Remove excessive quantities of oil or grease.• Empty any liquids from glasses and cups.• All dishes should be thoroughly rinsed before being
placed inside the dishwasher. • Arrange all items with recessed or curved sections on a
slant to drain water away.• Cups, pots, glasses etc. should be placed upside down.• When loading the cutlery basket, sharp items should be
loaded handle-up, all other items should be loaded han-dle-down.
• To avoid damage to glasses, they should not be allowed to touch
NOTE: Dishes with dried-on foods are more difficult to wash and may not come clean in a normal wash cycle.
USE AND CARE
LOADING THE DISHWASHER
IMPORTANT When loading the cutlery basket, load sharp utensils handle up, but do not let any sharp item extend through the bottom of the basket. Especially long items should be placed in the horizontal position at the front of the upper basket.

8
Using the Right Detergent
Use only a mild detergent specifically made for use indishwashers, as other types will cause oversudsing. If your detergent is old and/or lumpy, throw it away. Old detergent loses it’s washing power. Lumpy detergent won’t dissolve. The amount of detergent you use depends if your water is “hard” or “soft”.
NOTE: Hard water requires more detergent to get dishes clean. Soft water requires less detergent to get dishes clean.
Concentrated Powder
Unlike conventional detergents, concentrated detergents use natural enzymes instead of caustic components. Using a concentrated detergent in conjunction with the ‘Normal’ allows you to achieve the same results as you would if you were using the ‘Heavy’ cycle with a conventional detergent. This is better for your dishes and the environment.
Detergent Tablets
Detergent tablets take longer to dissolve and therefore require the use of longer wash programs to achieve their full cleaning power and to completely remove all detergent residue. When using detergent tablets, press the ‘3-in-1’ button and only select cycles where ‘3-in-1’ is available.
Loading the Detergent Dispenser
To load the detergent dispenser:1. Press the release button to open the dispenser lid.
2. Fill the dispenser compartment(s) to the desired dosage level and close the door. Generally, only 1 Tablespoon of powder is needed for a ‘Normal’ wash load.
3. Press the dispenser lid closed until it clicks shut.
Pre-Wash Option: If dishes are heavily soiled, place an additional detergent dose in the Pre-Wash detergent cham-ber (the recessed area located on the top of the detergent dispenser lid).
NOTE: Always add detergent just before starting the wash cycle, otherwise it may get damp and not dissolve properly.
USE AND CARE
A 1 TBSP (15g)Powder Detergent
B 1.5 TBSP (25g)Powder Detergent (or Detergent Tablet)
A B
USING DETERGENT
CAUTION Dishwashing detergent is corrosive. Keep all
detergent out of reach of children.
9
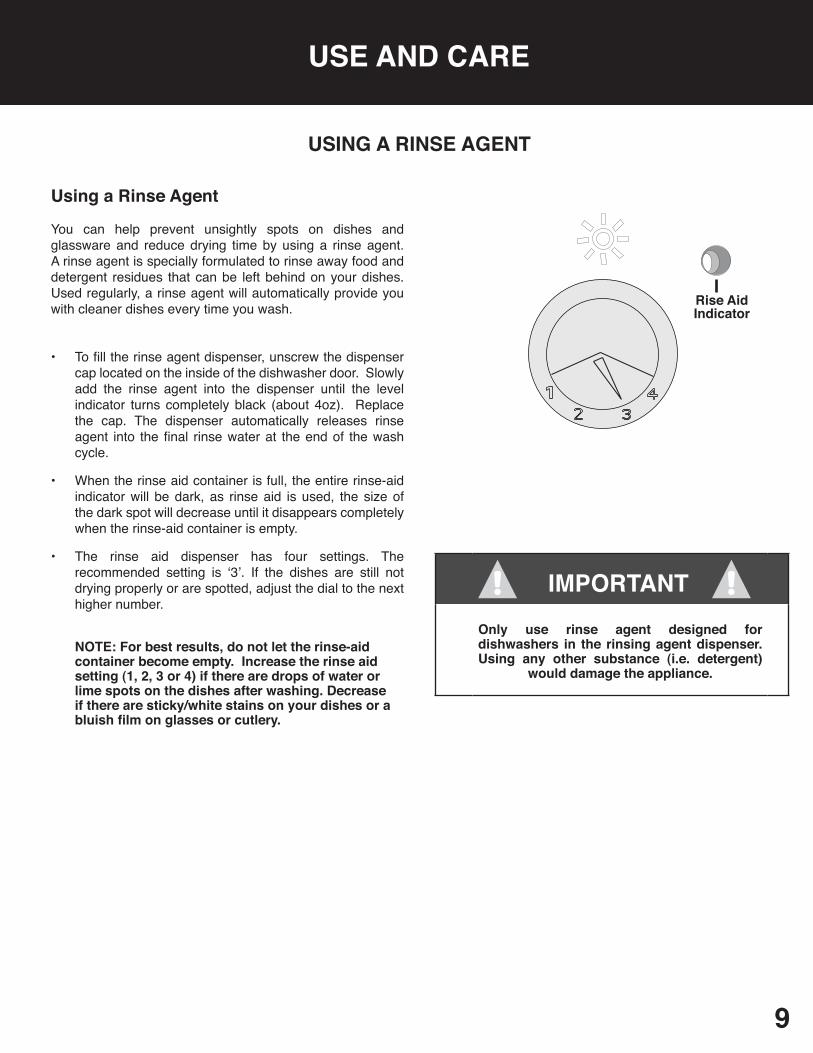
Using a Rinse Agent
You can help prevent unsightly spots on dishes and glassware and reduce drying time by using a rinse agent. A rinse agent is specially formulated to rinse away food and detergent residues that can be left behind on your dishes. Used regularly, a rinse agent will automatically provide you with cleaner dishes every time you wash.
• Tofilltherinseagentdispenser,unscrewthedispensercap located on the inside of the dishwasher door. Slowly add the rinse agent into the dispenser until the level indicator turns completely black (about 4oz). Replace the cap. The dispenser automatically releases rinse agent into thefinal rinsewaterat theendof thewashcycle.
• When the rinse aid container is full, the entire rinse-aid indicator will be dark, as rinse aid is used, the size of the dark spot will decrease until it disappears completely when the rinse-aid container is empty.
• The rinse aid dispenser has four settings. The recommended setting is ‘3’. If the dishes are still not drying properly or are spotted, adjust the dial to the next higher number.
NOTE: For best results, do not let the rinse-aid container become empty. Increase the rinse aid setting (1, 2, 3 or 4) if there are drops of water or lime spots on the dishes after washing. Decrease if there are sticky/white stains on your dishes or a bluish film on glasses or cutlery.
USE AND CARE
Rise Aid Indicator
IMPORTANT Only use rinse agent designed for dishwashers in the rinsing agent dispenser. Using any other substance (i.e. detergent)
would damage the appliance.
USING A RINSE AGENT

10
Refer to the chart below to select the correct wash cycle for your dishes based on the type of items you’re washing and their degree of soil.
Program Cycle Selection InformationDescription of
CycleDetergent
CompartmentRunning
Time*Energy
UseWater Use
Rinse Aid Dispensed
Heavy
For the heaviest soiled loads (i.e. pots, pans, casserole dishes and dishes that have been sitting with dried food on them for awhile)
Pre-WashPre-Wash(122˚F)Pre-Wash(122˚F)Wash(140˚F)Wash(122˚F)RinseRinse(149˚F)
Pre WashMain
110 min.
0.499 Kwh
4.2 gallons Yes
Normal
For normally soiled loads (i.e. pots, plates, glasses and lightly soiled pans)
Pre-WashPre-WashPre-Wash Wash(131˚F)Wash(122˚F)RinseRinse(149˚F)
Pre WashMain
85 min.
0.344 Kwh
3.6 gallons Yes
Light
For lightly soiled loads (i.e. plates, glasses, bowls and lightly soiled pans)
Pre-WashPre-Wash(122˚F)Wash(122˚F)RinseRinse(140˚F)
Pre Wash Main
75 min.
0.317 Kwh
3.1 gallons Yes
Glass
For lightly soiled loads (i.e. glasses,crystalandfinechina)
Pre-WashWash(122˚F)RinseRinse(140˚F)
Main 70 min.
0.281 Kwh
2.5 gallons Yes
Speed
A shorter wash for lightly soiled loads
Pre-WashPre-Wash(122˚F)Wash(122˚F)RinseRinse(131˚F)
Main 45 min.
0.236 Kwh
3.1 gallons No
SoakTo rinse dishes that you plan to wash later that day Pre-Wash - 10
min.0.01 Kwh
0.7 gallons No
*NOTE: Wash times may vary according to the incoming water temperature and the environmental temperature.
USE AND CARE
SELECTING A CYCLE

11
3-IN-1
Detergent tablets often take longer to dissolve and reach their full washing potential. Therefore, to select an appropri-ate cycle when using a detergent tablet, simply press the 3-IN-1 button and refer to the LED display as you turn the PROGRAM DIAL.
Delay Start
DELAY START allows you to delay the start of any cycle by 1 to 24 hours. To activate this feature, press the DELAY START button and refer to the LED DISPLAY. Each press of the button corresponds to one hour. Once you’ve reached the desired hour(s), use the PROGRAM dial to select a wash cycle, then press START/RESET.
Child Lock Feature
Pressing the 3-IN-1 button and the DELAY START button at the same time will lock the controls. Pressing the two buttons again, will unlock the controls.
Start/Reset/Pause
The START/RESET button will start the selected program, or let you reset or pause a cycle that’s already in progress.
ResetTo change a cycle that’s already started, press and hold the START/RESET button for 3 seconds, then select a different program. Depending on how long the previous cycle has run, thedetergentdispensermayneedtoberefilled.
PauseA forgotten dish can be added any time before the detergent dispenser lid opens:
1. Press the START/RESET button once to pause the cycle.
2. Open the door a little to stop the washing. After the spray arm stops turning, open the door completely.
3. Add the forgotten dishes
4. Close the door.
5. Press the START/RESET button. The dishwasher will re-sume the cycle after 10 seconds.
NOTE: You can also pause a cycle by opening the door. Once the door is closed, the cycle will resume after 10 seconds.
USE AND CARE
ADDITIONAL FEATURES
CAUTION Water may be HOT! Always use caution when
opening the door during a wash cycle.

12
NOTE: At the beginning of each cycle, the dishwasher always starts in the “drain” mode. This is because the drain pump always retains a small amount of water (in the sump) from the previous (last) cycle. This is necessary to keep the pump primed. Therefore, don’t be alarmed if a small amount of water being pumped out from the drain hose prior to the start of the regular wash cycle. THIS IS NORMAL.
USE AND CARE GUIDE
ABOUT THE CONTROLS
ALED DISPLAY: Shows the symbol of the program or option(s) selected as well as the cycle time remaining.
B3-IN-1: When using a detergent tablet instead of detergent powder, press this button and refer to the LED DISPLAY to select the correct cycle.
CDELAY: Press this button and refer to the LED DISPLAY to delay the start of the cycle by 1 to 24 hours.
DSTART/RESET: This button can be used to start, reset (press and hold for 3 seconds), or pause (press once) a program already in progress.
E PROGRAM SELECTOR: Turn this dial and refer to the LED DISPLAY to select a program.
F ON/OFF: Use this button to turn power to the dishwasher ON/OFF.
G Child Lock Function: Press the 3-IN-1 and the DELAY button at the same time to lock the controls.
H Power Light
A
B C D
G
E
F
H

13
To Operate Your Dishwasher1. Make sure the water inlet and drain hoses are correctly
and securely connected and the water supply is turned on to full pressure.
2. Open the dishwasher door.
3. Place the dishes on the Dish Rack and the cutlery inside the Silverware Basket.
4. Check to make sure that the rotating spray arm can turn freely all the way around. If necessary, remove any obstacles.
5. Fill the dispenser compartment(s) with the desired dosage (Generally only 1 TBSP of powder loaded into the left compartment is needed for a ‘Normal’ wash load). Press the Dispenser lid closed until it clicks shut.
6. Firmly close the dishwasher door. Open the water supply.
7. Press the ON/OFF Button. The Power Light will illuminate, indicating the machine is receiving power.
8. Press the 3-IN-1 button if you are using a detergent tablet.
9. If desired, press DELAY START to delay the start of the program by 1 to 24 hours.
10. Rotate the PROGRAM SELECTOR to select a cycle. The LED DISPLAY window will show the symbol of the wash program you selected.
11. Press the START/RESET button. The LED DISPLAY will show the duration of the selected cycle and the cycle will begin. The time remaining in the cycle will continue to count down for the duration of the cycle.
12. To pause a program that has already started, press the START/RESET button. NOTE: The dishwasher is designed to pause if the door is opened accidentally during operation. The cycle will resume 10 seconds after the door is closed.
QUICK OPERATION GUIDE
USE AND CARE GUIDE
13. At the end of the cycle, the dishwasher will beep for 8 seconds.
14. When the cycle is complete, always switch off the dishwasher by pressing the ON/OFF button and relieve pressure on the inlet hose by closing the water supply.
15. After washing, dishes should be allowed to cool down for approx. 15 minutes so they are not too hot to handle. Dishes will cool quicker if door is slightly open. It is normal for the dishwasher to still be wet inside.
16. Afterunloadingthedishwasher, inspectthefilter(s)andclean off any remaining food.
IMPORTANT IMPORTANT NOTE ABOUT DRYING
The dishes dry by a “convection” method only. To speed-up the drying time, it is sug-gested to leave the dishwasher door partially open after the program is complete. This will
allow humidity from within to escape.

14
USE AND CARE
About the Filter AssemblyThe dishwasher’s filtering system prevents objects fromblocking the pump and removes food particles from the wash water, allowing it to be recirculated. The FILTER ASSEMBLY consistsofthreefilters:
A. Coarse FilterLarger items that could block the drain are trapped in the coarsefilter.
B. Fine FilterThisfiltertrapsfoodresidueinthesumpareaandpreventsitfrom being redeposited on the dishes during the wash cycle.
C. Main FilterFood particles trapped by this filter are pulverized by aspecial jet in the spray arm and washed down the drain.
Cleaning the FiltersForbestperformanceandcleaning results, theentirefilterassembly must be clean and free of large food particles. Aftereachuse,inspectthefiltersforanyblockages.Tocleanthem,removethefiltersinthefollowingorderandrinsethemunder running water:
1. Remove the FINE FILTER by rotating it counter-clockwise 2. Remove the MAIN FILTER by squeezing the tabs located
onthetopofthisfilterandliftingitoutoftheFINEFILTER3. Oncetheotherfiltersareremoved,theCOARSEFILTER
can be taken out by lifting it straight up. 4. Reverse these steps to reinstall the FILTER ASSEMBLY.
NOTE: Clean the entire filter assembly once per week. If needed, use a brush to clean the COARSE and FINE Filters.
A
B
C
IMPORTANT • When cleaning the filters, never strike
them against another surface. This could cause them to become deformed and fail to work properly
• Never run the dishwasher without the filters in place
• Improper replacement of the filters may reduce dishwashing performance and damage dishes and utensils

15
USE AND CARE
Caring for Your DishwasherAfter Every WashTurn the water supply to the dishwasher OFF. Leave the door slightly open so moisture and odors are not trapped inside
Unplug the DishwasherBefore cleaning or performing any maintenance, always unplug the dishwasher from the electrical socket.
No Solvents or Abrasive CleanersNever use sharp objects, scouring pads or harsh cleaners on any part of the dishwasher. To clean the exterior and rubber parts of the dishwasher, do not use solvents or abrasive cleaning products. Use only a cloth dampened with warm, soapy water.
When the Dishwasher is Not Used for AwhileRun a wash cycle with the dishwasher empty and then unplug the dishwasher from the electrical socket. Turn off the water supply and leave the door to the appliance slightly open.
Moving the ApplianceWhenever moving the appliance to a different installation location, try to keep it in a vertical position. If necessary, it can be transported on it’s back. Verify door is closed.
IMPORTANT • Never use a spray cleaner to clean the
door panel as it could damage the door lock and electrical components
• Abrasive agents or certain paper towels should not be used to clean the exterior of the dishwasher as they may scratch or leave spots on the exterior surfaces.

16
Winterizing Your DishwasherFor dishwashers installed in RV’s, boats, or wherever it will be exposed to freezing temperatures, take these steps to protect it from freezing.
1. Cut off electrical power to the dishwasher
2. Turn off the water supply and disconnect the dishwasher
3. Drain the water from the inlet pipe and water valve (Use a pan to catch the water)
4. Reconnect the water inlet pipe to the water valve.
5. Remove the filter at the bottom of the tub and use asponge to soak up any water left in the sump area
NOTE: If your dishwasher cannot work because it has become frozen, please contact a service professional.
Cleaning InstructionsThe Control PanelThe control panel can be cleaned using a damp cloth and then dried thoroughly.
The Metal CaseIf needed, a gentle appliance wax can be used to polish the metal case.
Rubber SealsOne reason odors form in dishwashers is when food remains trapped inside the seals. Periodic cleaning with a damp cloth will prevent this from occurring.
The TubShould spots or stains form on the stainless steel tub, clean the interior using a cloth dampened with a weak mixture of waterandvinegaroracleaningproductmadespecificallyfordishwashers.
The DoorThe edge around the inside of the dishwasher door can be cleaned using a damp cloth. Avoid dripping water into the door lock and electrical components, DO NOT use a spray cleaner of any kind.
The Spray ArmTo prevent the spray arm jets from clogging, the spray arm should be cleaned periodically. For easy cleaning, the entire spray arm can be removed by grasping it at the middle and pulling upwards. Once removed, rinse the spray arm under running water to clean the jets. After cleaning, make sure the spray arm is reinstalled correctly and can turn freely.
USE AND CARE

17
TROUBLESHOOTINGCOMMON PROBLEMS & SOLUTIONS
PROBLEM POSSIBLE CAUSE SOLUTIONDishwasher will not start • Dishwasher not receiving
electrical power• Check electrical connection fuse/circuit breaker
• Power supply not turned on • Make sure the dishwasher is turned on and the power cord is properly plugged into the wall socket
• Door is unlatched • Make sure the door is closed securely• Dishwasher not level • Make sure dishwasher is installed on a ‘solid’ level
surface
Water remains in the bottom of the tub
• A small amount of water is normal
• This is necessary to keep the pump primed and is drained automatically at the beginning of each cycle
• Excessive amount of water; Cycle is not completed
• Allow the dishwasher to complete full cycle
• Drain hose kinked • Check drain hose• Filter clogged • Cleanthefilter• Kitchen sink clogged • Check that sink is draining properly
The dishes are not clean • Improper loading • Arrange dishes so spray arm can rotate freely and spray action reaches all surfaces.
• Do not overload dishwasher• Spray arm not rotating freely • Make sure nothing (i.e. cutlery) is obstructing spray
armrotation.Makesurefilterscreenhasnotbecomedislodged and is not obstructing spray arm rotation.
• Not enough detergent and/or improper detergent being used
• Use more dish washing detergent. Do not use detergent that is hard or caked. Use only a recommended dishwashing detergent.
• Improperly prepared dishes • Excess food soil and liquids should be removed from dishes before loading
• Incorrect program • Select a longer wash cycle• Too little detergent • Use more/change your detergent• Water inlet hose kinked/bent
due to improper installation• Eliminate kink/bend from inlet hose
• Filter needs to be cleaned • Cleanthefilterandsprayarmjets
The dishes are not drying
• Improper loading • Load the dishes according to suggested guidelines
• Too little rinse-aid • Increasetheamountofrinse-aid/Refilltherinse-aiddispenser
• Dishes are removed too soon • Do not empty your dishwasher immediately after washing. Open the door slightly so that the steam can escape and until dishes are barely warm to the touch. Emptythelowerbasketfirsttopreventwaterfromdripping off of dishes from the upper basket.
• Wrong program selection • Select a longer program with a warmer wash temperature.

18
TROUBLESHOOTINGCOMMON PROBLEMS & SOLUTIONS
PROBLEM POSSIBLE CAUSE SOLUTIONThe dishes are not
drying (cont’d)• Dishes are not dishwasher
safe • Only wash and dry items that are dishwasher safe
Cloudiness on glassware
• Soft water and too much detergent
• Use less detergent and select a shorter wash cycle
Black/Gray marks on dishes
• Aluminum utensils have rubbed against dishes
• Use a mild abrasive cleaner to eliminate the marks
Detergent remains in the dispenser
• Improper loading • Load the dishwasher so dishes do not block detergent cups
Suds in the tub • Improper detergent • Use only recommended dish washing detergent. Open door and let suds evaporate. Add 1 gallon of cold water to the tub. Close the dishwasher then run the Soak cycle to drain out water. Repeat if necessary.
• Spilled rise-aid • Always wipe up rinse aid spills immediatelyStained tub interior • Detergent with colorant was
used• Make sure the detergent is one without colorant
White film on inside surface
• Hard water minerals • To clean the interior, use a damp sponge with dishwashing detergent and wear rubber gloves. Never use any other cleaner than dishwashing detergent .
Rust stains on cutlery • The affected items are not corrosion resistant
• Only wash dishwasher safe cutlery in the dishwasher
Knocking/Rattling noise in wash cabinet
• Spray arm not rotating freely or improper loading of dishes
• Arrange dishes so spray arm can rotate freely and they are secure in the rack
Knocking noise in water pipes
• This may be caused by on-site piping
• Thishasnoinfluenceondishwasheroperation

19
TROUBLESHOOTINGCOMMON PROBLEMS & SOLUTIONS
ERROR CODE MEANS POSSIBLE PROBLEME1 • LONG WATER FILL TIME • Faucet is not openE4 • ABNORMAL WATER LEVEL • Too much inlet water. Leak
ERROR CODE CHART
This Vesta™ appliance comes with a Limited Warranty (please read the Limited Warranty Statement that came withyourdishwasherforcompletedetails.)You’llfindmanyanswers to common problems in the Troubleshooting sec-tionofthismanual. Ifyoureadthissectionfirst,youmaynot need to call for service at all. If you do need service, you can relax knowing that help is only a phone call away.
Call our Technical Service and Assistance Department toll-free at
1-800-356-0766 Monday-Friday,7:00AM-4:30PM(PacificTime)
IF YOU NEED SERVICE
WARNING If overflow occurs, turn off the main water supply before calling for service. If there is water in the base pan because of a leak or overflow, the water should be removed before
restarting the dishwasher.

™Vesta DWV322CB
Automatic Compact Dishwasher
Westland Sales Corporate Headquarters : Clackamas, ORWestland Sales Elkhart Operations: Elkhart, INPhone: 503-655-2563 Toll-Free: 800-356-0766
www.westlandsales.com
© 2011 Westland Sales