Embed Size (px)
Citation preview
ANY ATHLETE, ANY SPORT, VERTIMAX WILL TAKE YOU TO THE NEXT LEVEL
Advanced Off Platform
Speed Training
Simultaneous leg
& arm loading for
maximum vertical
gains!
VertiMax V8 Vertical Jump
&
Speed Training Program
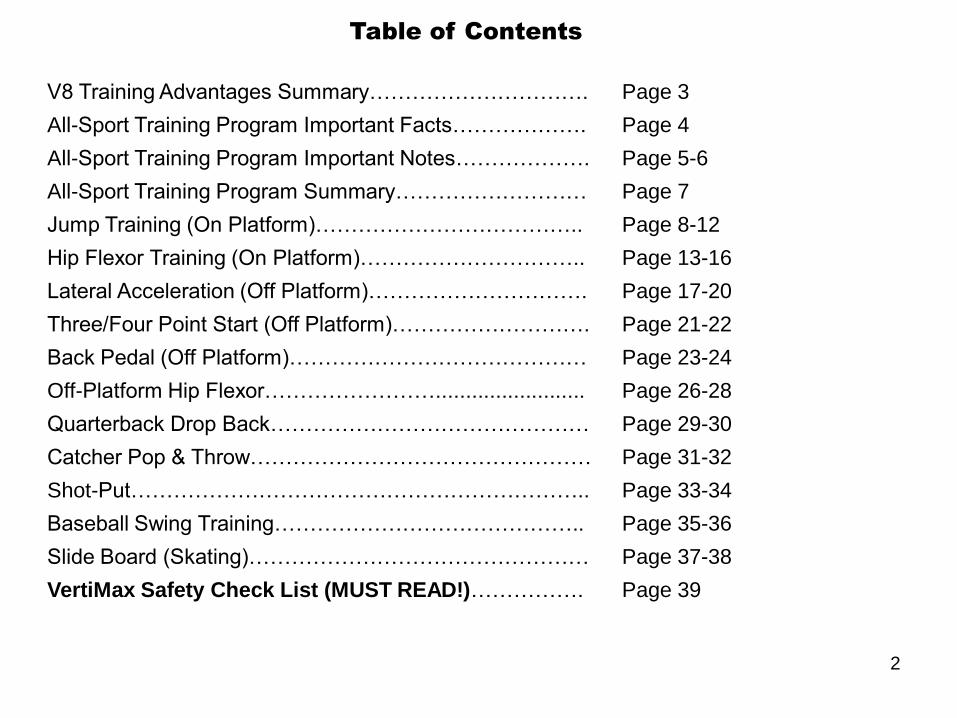
Table of Contents
2
V8 Training Advantages Summary…………………………. Page 3
All-Sport Training Program Important Facts………………. Page 4
All-Sport Training Program Important Notes………………. Page 5-6
All-Sport Training Program Summary……………………… Page 7
Jump Training (On Platform)……………………………….. Page 8-12
Hip Flexor Training (On Platform)………………………….. Page 13-16
Lateral Acceleration (Off Platform)…………………………. Page 17-20
Three/Four Point Start (Off Platform)………………………. Page 21-22
Back Pedal (Off Platform)…………………………………… Page 23-24
Off-Platform Hip Flexor……………………......................... Page 26-28
Quarterback Drop Back……………………………………… Page 29-30
Catcher Pop & Throw………………………………………… Page 31-32
Shot-Put……………………………………………………….. Page 33-34
Baseball Swing Training…………………………………….. Page 35-36
Slide Board (Skating)………………………………………… Page 37-38
VertiMax Safety Check List (MUST READ!)……………. Page 39
VertiMax V8 Training Advantages
Represents a training breakthrough that elevates explosive power development
to new levels which are highly relevant to improving competitive performance.
How does the V8 accomplish this?
• Allows explosive training under load with 100% effort utilizing sports
specific motions on three axis. This type of training will place the highest
demand for synchronized motor unit recruitment and firing and the human
body will adapt to more efficiently satisfy the training demands.
Provides improved training response that is more applicable to competition
• Addresses “Loading Neglect” by simultaneous loading of drive & swing
phase during acceleration, arm & leg while jumping and adductor /
abductor during lateral movement. Avoids unbalanced loading!
To view the “Why VertiMax” video which is the most important video to view to
understand the function and advantages of the Vertimax system please visit:
www.vertimax.com and click on the “Why VertiMax” link next to the “Home” link
3
All Sport Training Program Important Facts
Designed to maximize explosive power focusing on improving:
• The vertical jump
• First step quickness and
• Overall athleticism
Program involves a combination on-platform and off-platform training comprising the most
fundamental athletic movements required in most all sports.
Recommended frequency 2-3 times/week off season, 1-2 times/week in season (8 to 9 year olds
once/week on average)
This program is for advanced athletes typically 14 years of age or older but can be used by
younger athletes IF fewer resistance bands are utilized in the multi-band configurations and arm
loading and foot loading exercises are eliminated.
If any athlete appears to struggle to maintain form or natural movement mechanics during these
drills, there is either too much resistance applied or the athlete is simply not developed enough
relative to core and functional strength to properly & safely perform the exercise. Goal is to perform
exercises at high speed against load moving as naturally as possible!
4
All-Sport Training Program Important Notes
1. For this training program resistance levels are set at minimum levels and as the athlete
progresses through the program, resistance is increased by adding additional bands as
opposed to making small incremental adjustments by extracting the bands through the
resistance cam cleats. This allows the athlete to quickly progress through each exercise without
having to change resistance by extracting the bands out of the platform through the cam cleats.
It is therefore important to remember that if you are working with a younger athlete, you do not
have to add additional bands as the configurations show through the workout progression. You
can simply make a small incremental adjustment by extracting the bands through the cam cleats
and only connecting two bands to the athlete. For instance, a younger athlete (typically 12
years old or younger) performing jump training would only perform multiple sets using
Configuration 1(on Page 8). They would not progress to Configurations 2, 3 and 4 on pages 9,
10 and 11 respectively which show more bands being added to the athlete. While using
Configuration 1 on Page 8, if a younger athlete wanted to increase resistance they would just
extract the cords from the VertiMax through the resistance adjustment cam cleat to make small
incremental resistance adjustments.
2. Arm loading while jump training should only be performed by strong jumpers (13+ years) using
only the ¼ inch diameter bands set at minimum resistance connected to the hands. No matter
what age the athlete is, if they look destabilized and their jumping form is significantly disrupted
they should not try to jump with resistance bands connected to the hands. One option for this
case is to allow the athlete to train arm swing using the jumping movement but do not allow
them to become airborne – stay grounded! This allows younger athletes to safely without having
them leave the platform.
3. When performing off-platform training a minimum of one resistance band must always be
attached to the waist to maintain stability. NEVER CONDUCT OFF PLATFORM TRAINING
WITH BANDS CONNECTED TO THE FEET ONLY!!!!!
5
All-Sport Training Program Important Notes (Continued)
4) Athletes under the age of 13 should not perform any explosive (high speed) multi-step off
platform exercises with resistance bands attached to both feet. Single step movements with ¼
inch diameter bands connected to the feet may be attempted if the athlete can perform the
movement without significantly disrupting their natural mechanics.
5) Jump training configurations shown on pages 9, 10 and 11 are for advanced athletes. Most
athletes under the age of 13 should NOT jump train with arm loading or hip flexor training
configurations shown on pages 14 and 15 which are for advanced athletes. Athletes under the
age of 14 should limit their hip flexor training Exercise 2 – Configuration 1 on page 13.
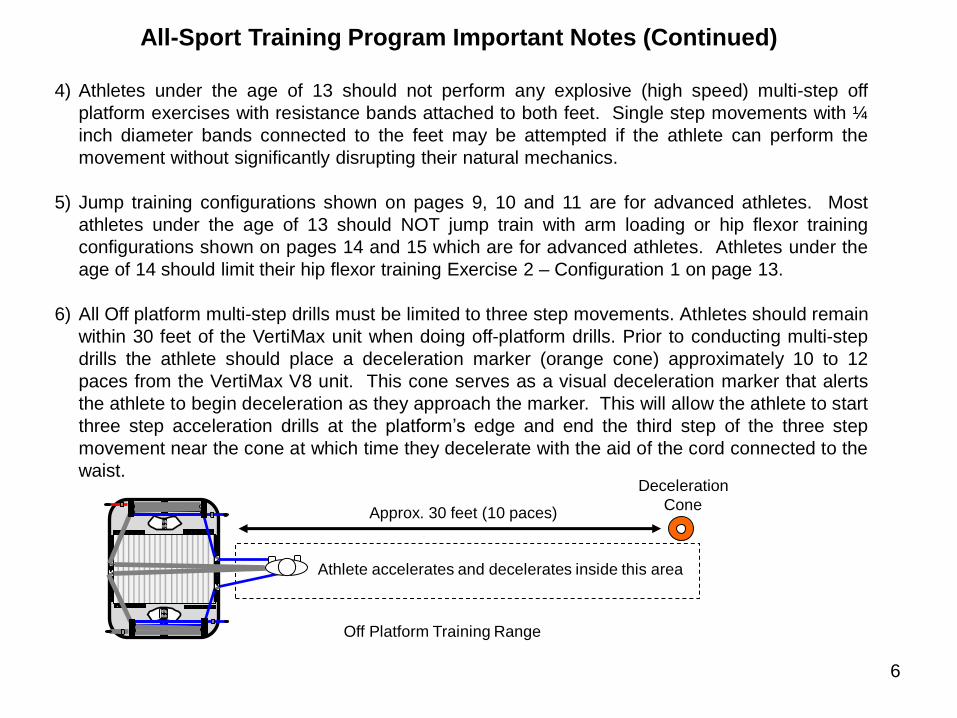
6) All Off platform multi-step drills must be limited to three step movements. Athletes should remain
within 30 feet of the VertiMax unit when doing off-platform drills. Prior to conducting multi-step
drills the athlete should place a deceleration marker (orange cone) approximately 10 to 12
paces from the VertiMax V8 unit. This cone serves as a visual deceleration marker that alerts
the athlete to begin deceleration as they approach the marker. This will allow the athlete to start
three step acceleration drills at the platform’s edge and end the third step of the three step
movement near the cone at which time they decelerate with the aid of the cord connected to the
waist.
6
Approx. 30 feet (10 paces)
Deceleration
Cone
Athlete accelerates and decelerates inside this area
Off Platform Training Range
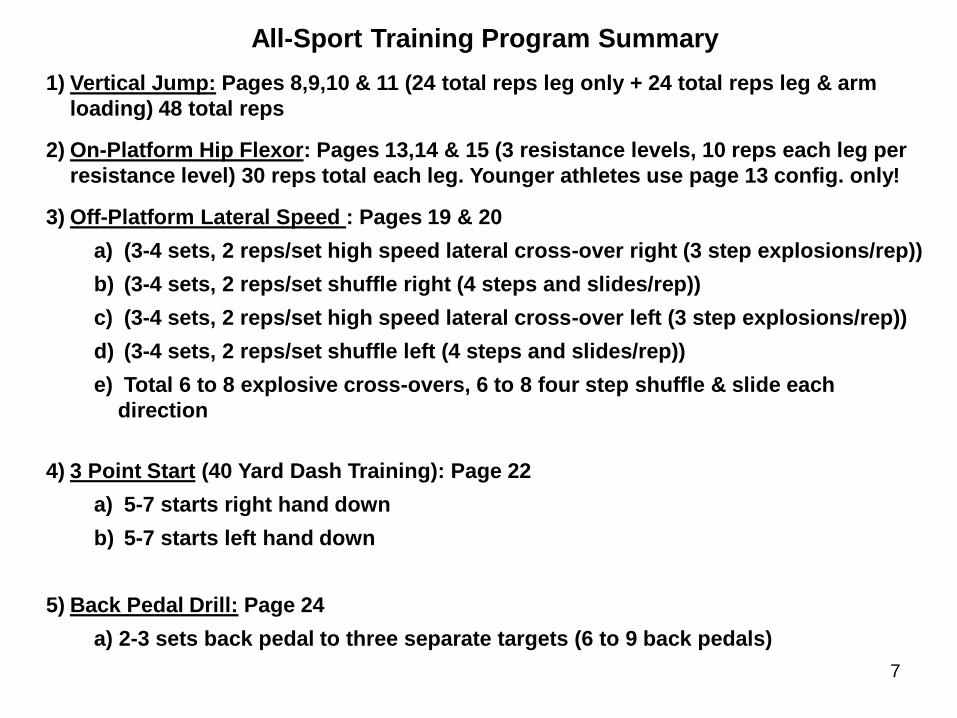
All-Sport Training Program Summary
1) Vertical Jump: Pages 8,9,10 & 11 (24 total reps leg only + 24 total reps leg & arm
loading) 48 total reps
2) On-Platform Hip Flexor: Pages 13,14 & 15 (3 resistance levels, 10 reps each leg per
resistance level) 30 reps total each leg. Younger athletes use page 13 config. only!
3) Off-Platform Lateral Speed : Pages 19 & 20
a) (3-4 sets, 2 reps/set high speed lateral cross-over right (3 step explosions/rep))
b) (3-4 sets, 2 reps/set shuffle right (4 steps and slides/rep))
c) (3-4 sets, 2 reps/set high speed lateral cross-over left (3 step explosions/rep))
d) (3-4 sets, 2 reps/set shuffle left (4 steps and slides/rep))
e) Total 6 to 8 explosive cross-overs, 6 to 8 four step shuffle & slide each
direction
4) 3 Point Start (40 Yard Dash Training): Page 22
a) 5-7 starts right hand down
b) 5-7 starts left hand down
5) Back Pedal Drill: Page 24
a) 2-3 sets back pedal to three separate targets (6 to 9 back pedals)
7
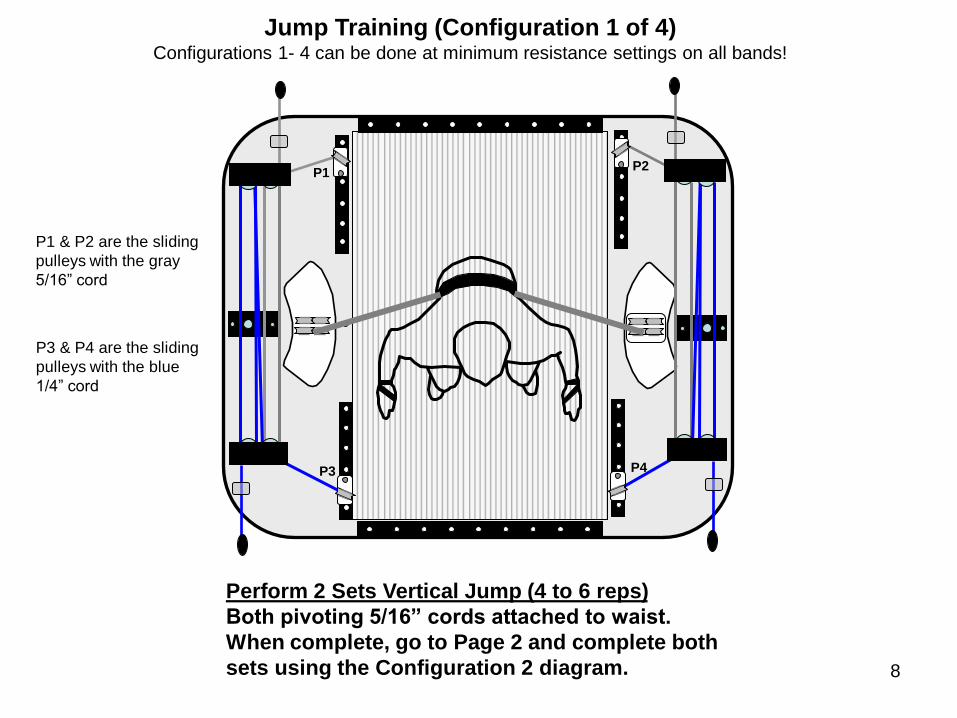
Perform 2 Sets Vertical Jump (4 to 6 reps)
Both pivoting 5/16” cords attached to waist.
When complete, go to Page 2 and complete both
sets using the Configuration 2 diagram.
P1 P2
P3 P4
P1 & P2 are the sliding
pulleys with the gray
5/16” cord
P3 & P4 are the sliding
pulleys with the blue
1/4” cord
Jump Training (Configuration 1 of 4) Configurations 1- 4 can be done at minimum resistance settings on all bands!
8
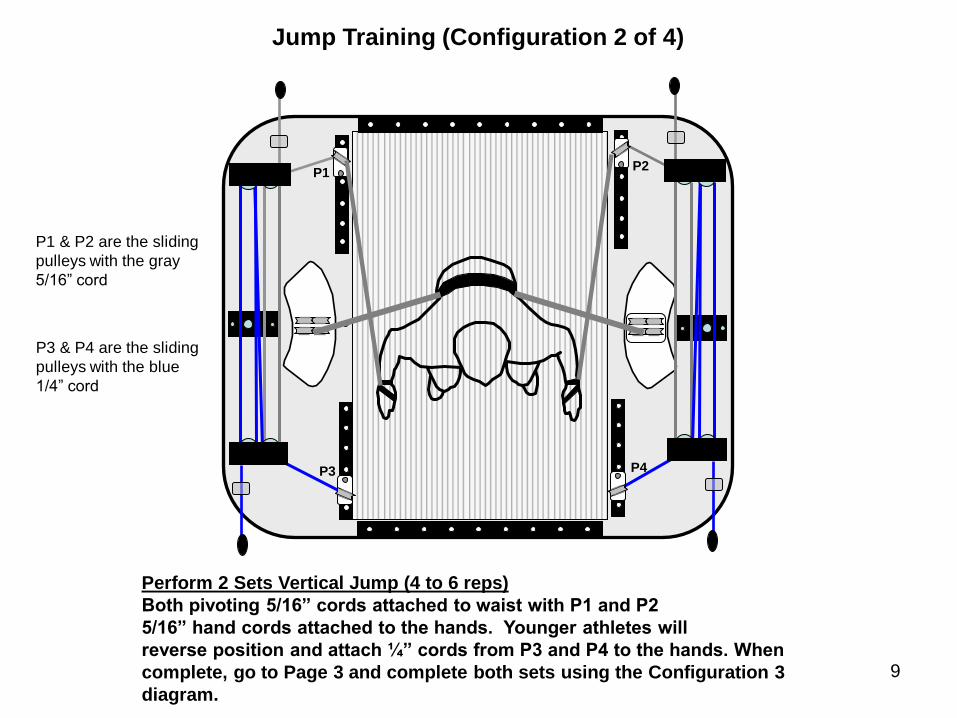
Perform 2 Sets Vertical Jump (4 to 6 reps)
Both pivoting 5/16” cords attached to waist with P1 and P2
5/16” hand cords attached to the hands. Younger athletes will
reverse position and attach ¼” cords from P3 and P4 to the hands. When
complete, go to Page 3 and complete both sets using the Configuration 3
diagram.
P1 P2
P3 P4
P1 & P2 are the sliding
pulleys with the gray
5/16” cord
P3 & P4 are the sliding
pulleys with the blue
1/4” cord
Jump Training (Configuration 2 of 4)
9
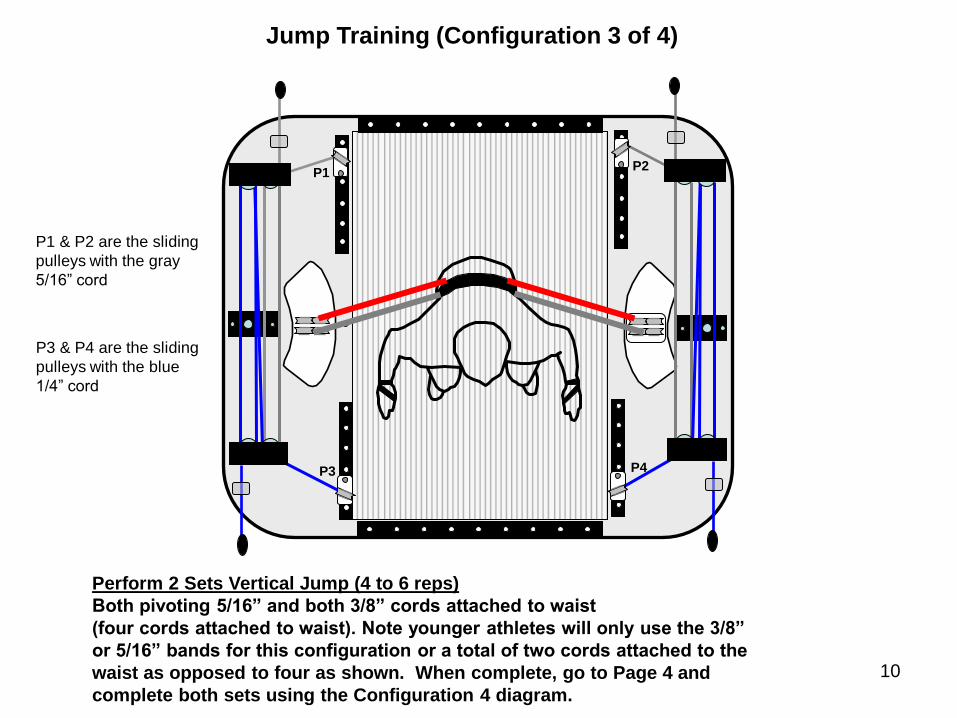
Perform 2 Sets Vertical Jump (4 to 6 reps)
Both pivoting 5/16” and both 3/8” cords attached to waist
(four cords attached to waist). Note younger athletes will only use the 3/8”
or 5/16” bands for this configuration or a total of two cords attached to the
waist as opposed to four as shown. When complete, go to Page 4 and
complete both sets using the Configuration 4 diagram.
P1 P2
P3 P4
P1 & P2 are the sliding
pulleys with the gray
5/16” cord
P3 & P4 are the sliding
pulleys with the blue
1/4” cord
Jump Training (Configuration 3 of 4)
10
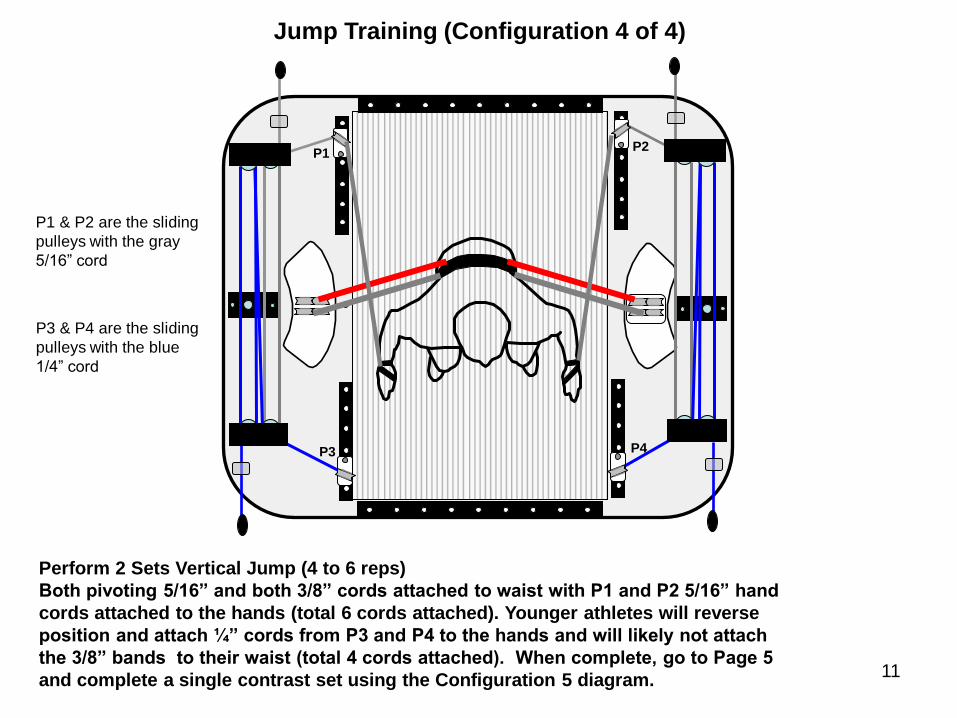
Perform 2 Sets Vertical Jump (4 to 6 reps)
Both pivoting 5/16” and both 3/8” cords attached to waist with P1 and P2 5/16” hand
cords attached to the hands (total 6 cords attached). Younger athletes will reverse
position and attach ¼” cords from P3 and P4 to the hands and will likely not attach
the 3/8” bands to their waist (total 4 cords attached). When complete, go to Page 5
and complete a single contrast set using the Configuration 5 diagram.
P1 P2
P3 P4
P1 & P2 are the sliding
pulleys with the gray
5/16” cord
P3 & P4 are the sliding
pulleys with the blue
1/4” cord
Jump Training (Configuration 4 of 4)
11

Vertical Jump Contrast Set, 1 Set (2 to 4 reps) JUMP WITH NO RESISTANCE BANDS ATTACHED TO BODY!!!!!!
P1 & P2 are the sliding
pulleys with the gray
¼” cord
P3 & P4 are the sliding
pulleys with the red
5/16” cord
P1 P2
P3 P4
Jump Training (Final Contrast Set) Last Set! Contrast Jumps with no resistance!
12
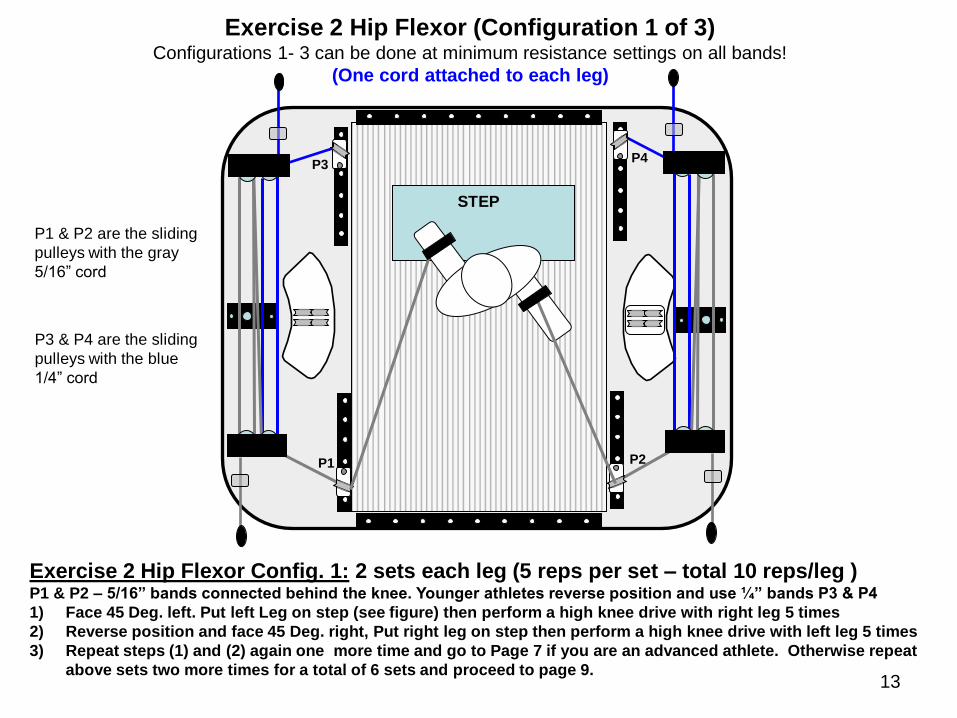
Exercise 2 Hip Flexor Config. 1: 2 sets each leg (5 reps per set – total 10 reps/leg ) P1 & P2 – 5/16” bands connected behind the knee. Younger athletes reverse position and use ¼” bands P3 & P4
1) Face 45 Deg. left. Put left Leg on step (see figure) then perform a high knee drive with right leg 5 times
2) Reverse position and face 45 Deg. right, Put right leg on step then perform a high knee drive with left leg 5 times
3) Repeat steps (1) and (2) again one more time and go to Page 7 if you are an advanced athlete. Otherwise repeat
above sets two more times for a total of 6 sets and proceed to page 9.
P3 P4
P1 P2
P1 & P2 are the sliding
pulleys with the gray
5/16” cord
P3 & P4 are the sliding
pulleys with the blue
1/4” cord
STEP
Exercise 2 Hip Flexor (Configuration 1 of 3) Configurations 1- 3 can be done at minimum resistance settings on all bands!
(One cord attached to each leg)
13
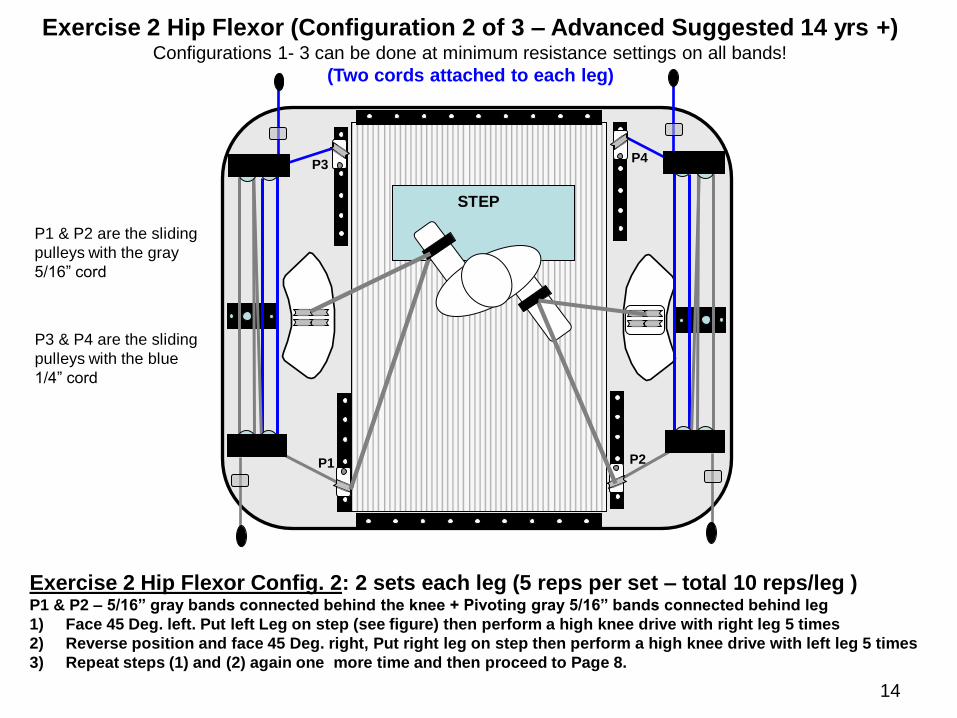
Exercise 2 Hip Flexor Config. 2: 2 sets each leg (5 reps per set – total 10 reps/leg ) P1 & P2 – 5/16” gray bands connected behind the knee + Pivoting gray 5/16” bands connected behind leg
1) Face 45 Deg. left. Put left Leg on step (see figure) then perform a high knee drive with right leg 5 times
2) Reverse position and face 45 Deg. right, Put right leg on step then perform a high knee drive with left leg 5 times
3) Repeat steps (1) and (2) again one more time and then proceed to Page 8.
P3 P4
P1 P2
P1 & P2 are the sliding
pulleys with the gray
5/16” cord
P3 & P4 are the sliding
pulleys with the blue
1/4” cord
STEP
Exercise 2 Hip Flexor (Configuration 2 of 3 – Advanced Suggested 14 yrs +) Configurations 1- 3 can be done at minimum resistance settings on all bands!
(Two cords attached to each leg)
14
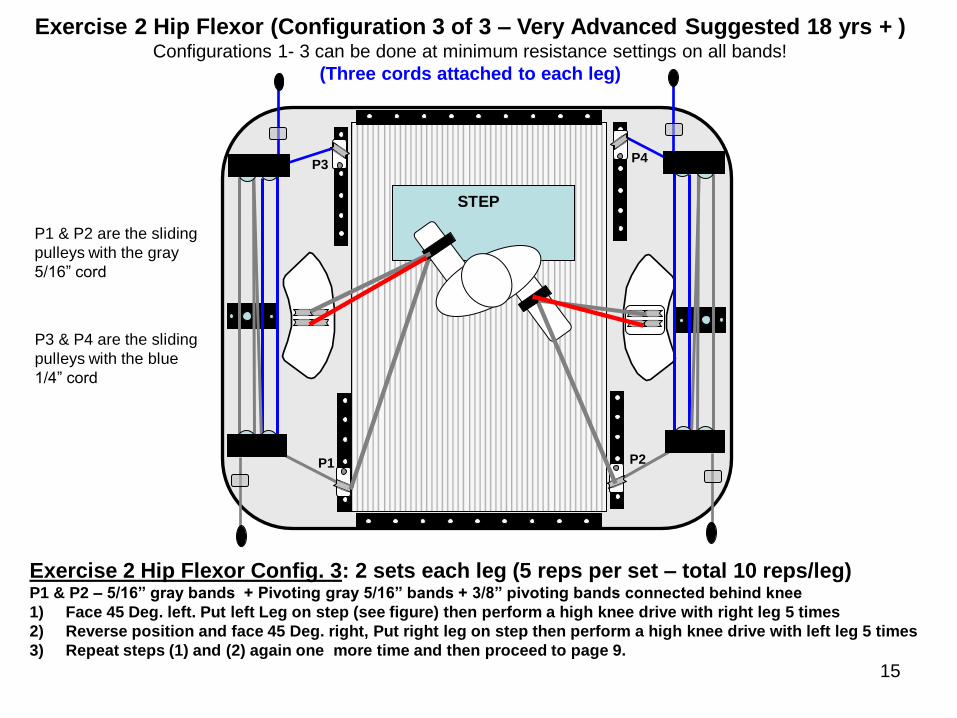
Exercise 2 Hip Flexor Config. 3: 2 sets each leg (5 reps per set – total 10 reps/leg) P1 & P2 – 5/16” gray bands + Pivoting gray 5/16” bands + 3/8” pivoting bands connected behind knee
1) Face 45 Deg. left. Put left Leg on step (see figure) then perform a high knee drive with right leg 5 times
2) Reverse position and face 45 Deg. right, Put right leg on step then perform a high knee drive with left leg 5 times
3) Repeat steps (1) and (2) again one more time and then proceed to page 9.
P3 P4
P1 P2
P1 & P2 are the sliding
pulleys with the gray
5/16” cord
P3 & P4 are the sliding
pulleys with the blue
1/4” cord
STEP
Exercise 2 Hip Flexor (Configuration 3 of 3 – Very Advanced Suggested 18 yrs + ) Configurations 1- 3 can be done at minimum resistance settings on all bands!
(Three cords attached to each leg)
15
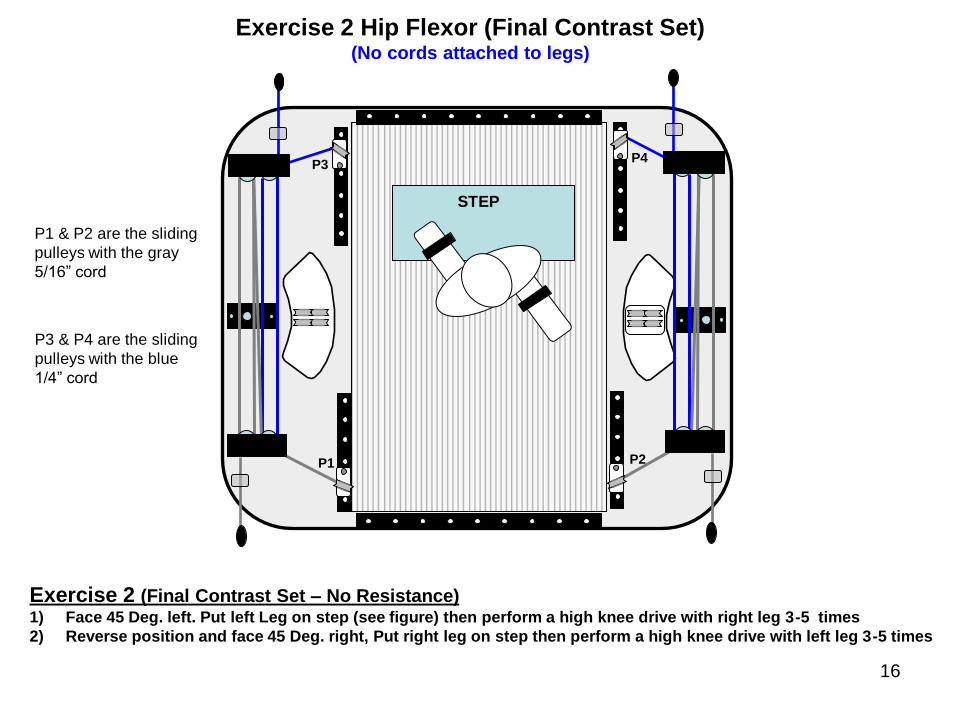
Exercise 2 (Final Contrast Set – No Resistance) 1) Face 45 Deg. left. Put left Leg on step (see figure) then perform a high knee drive with right leg 3-5 times
2) Reverse position and face 45 Deg. right, Put right leg on step then perform a high knee drive with left leg 3-5 times
P3 P4
P1 P2
P1 & P2 are the sliding
pulleys with the gray
5/16” cord
P3 & P4 are the sliding
pulleys with the blue
1/4” cord
STEP
Exercise 2 Hip Flexor (Final Contrast Set) (No cords attached to legs)
16
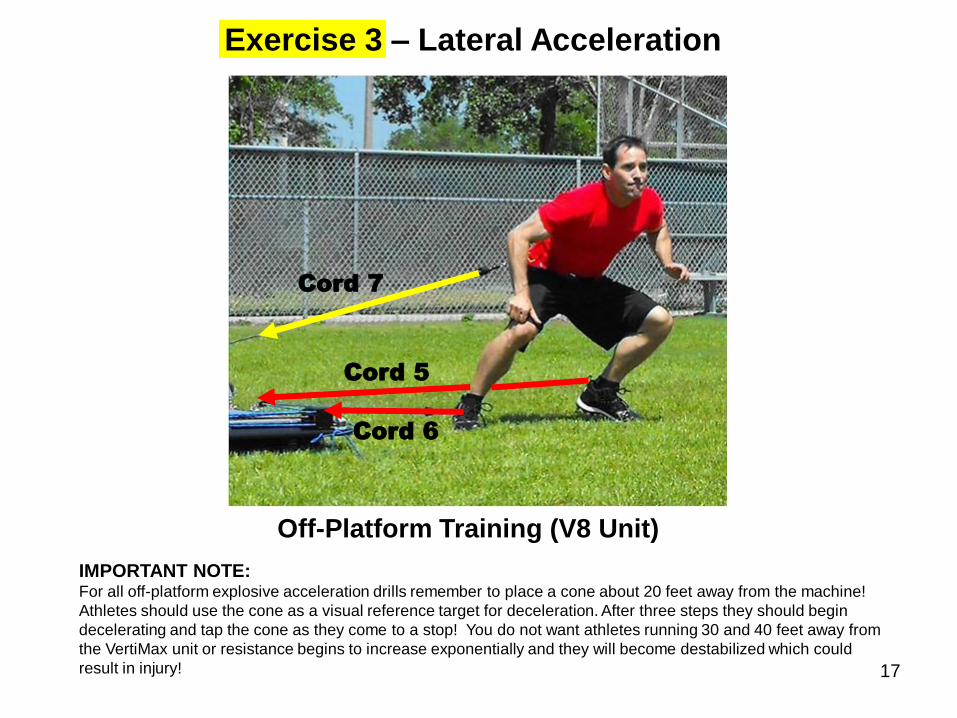
Cord 5
Cord 6
Off-Platform Training (V8 Unit)
Exercise 3 – Lateral Acceleration
IMPORTANT NOTE: For all off-platform explosive acceleration drills remember to place a cone about 20 feet away from the machine!
Athletes should use the cone as a visual reference target for deceleration. After three steps they should begin
decelerating and tap the cone as they come to a stop! You do not want athletes running 30 and 40 feet away from
the VertiMax unit or resistance begins to increase exponentially and they will become destabilized which could
result in injury!
Cord 7
17
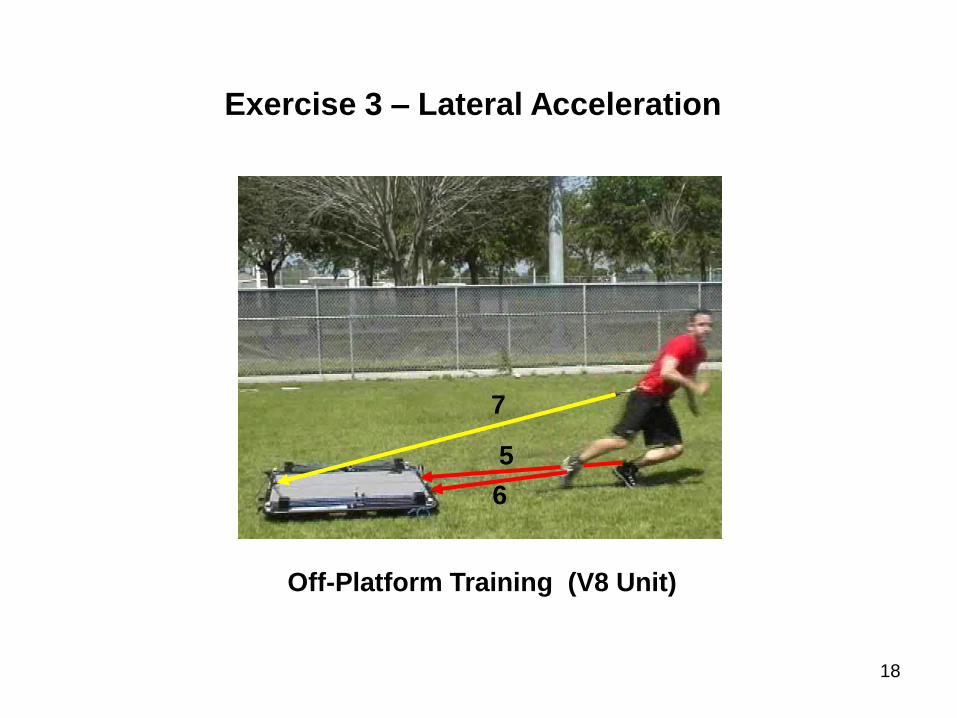
6
7
Exercise 3 – Lateral Acceleration
Off-Platform Training (V8 Unit)
5
18
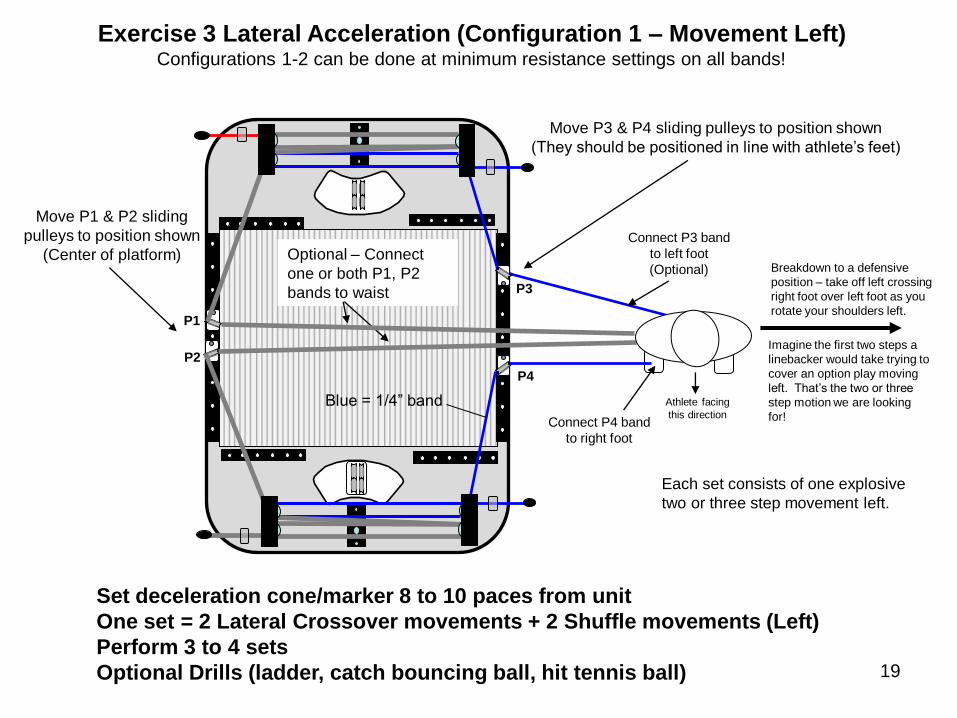
Set deceleration cone/marker 8 to 10 paces from unit
One set = 2 Lateral Crossover movements + 2 Shuffle movements (Left)
Perform 3 to 4 sets
Optional Drills (ladder, catch bouncing ball, hit tennis ball)
P3
P4
P1
P2
Move P3 & P4 sliding pulleys to position shown
(They should be positioned in line with athlete’s feet)
Move P1 & P2 sliding
pulleys to position shown
(Center of platform)
Connect P4 band
to right foot
Breakdown to a defensive
position – take off left crossing
right foot over left foot as you
rotate your shoulders left.
Imagine the first two steps a
linebacker would take trying to
cover an option play moving
left. That’s the two or three
step motion we are looking
for!
Each set consists of one explosive
two or three step movement left.
Optional – Connect
one or both P1, P2
bands to waist
Athlete facing
this direction
Exercise 3 Lateral Acceleration (Configuration 1 – Movement Left) Configurations 1-2 can be done at minimum resistance settings on all bands!
Blue = 1/4” band
Connect P3 band
to left foot
(Optional)
19
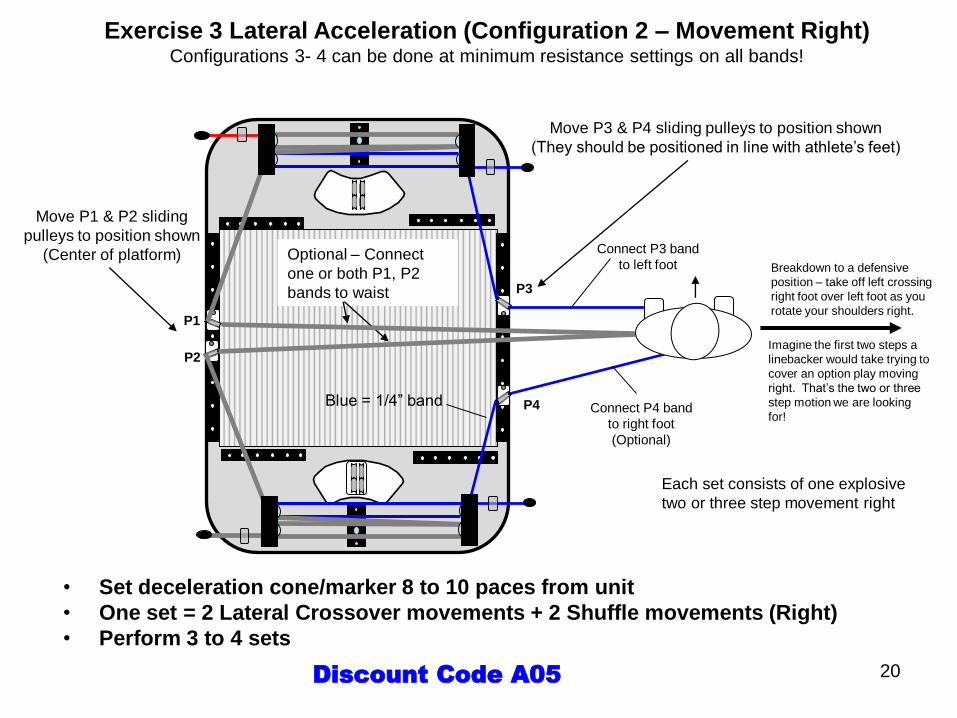
P3
P4
P1
P2
Move P3 & P4 sliding pulleys to position shown
(They should be positioned in line with athlete’s feet)
Move P1 & P2 sliding
pulleys to position shown
(Center of platform) Connect P3 band
to left foot Breakdown to a defensive
position – take off left crossing
right foot over left foot as you
rotate your shoulders right.
Imagine the first two steps a
linebacker would take trying to
cover an option play moving
right. That’s the two or three
step motion we are looking
for!
Each set consists of one explosive
two or three step movement right
Optional – Connect
one or both P1, P2
bands to waist
Exercise 3 Lateral Acceleration (Configuration 2 – Movement Right) Configurations 3- 4 can be done at minimum resistance settings on all bands!
Blue = 1/4” band Connect P4 band
to right foot
(Optional)
• Set deceleration cone/marker 8 to 10 paces from unit
• One set = 2 Lateral Crossover movements + 2 Shuffle movements (Right)
• Perform 3 to 4 sets
20 Discount Code A05
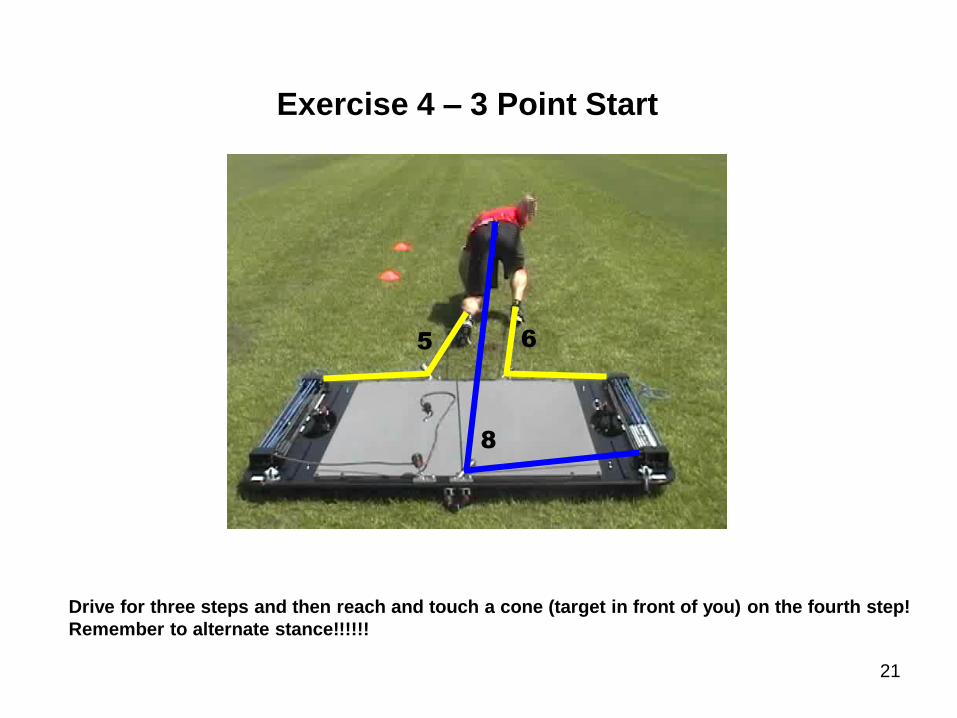
5 6
8
Exercise 4 – 3 Point Start
Drive for three steps and then reach and touch a cone (target in front of you) on the fourth step!
Remember to alternate stance!!!!!!
21
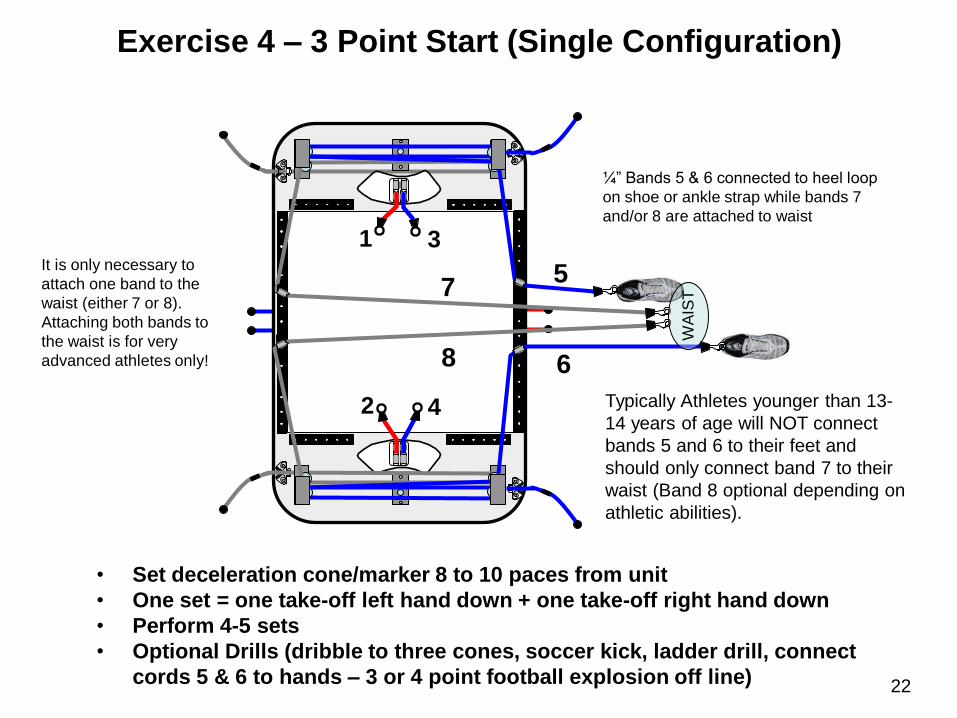
8
1 3
2 4
WA
IST
Exercise 4 – 3 Point Start (Single Configuration)
7 5
6
¼” Bands 5 & 6 connected to heel loop
on shoe or ankle strap while bands 7
and/or 8 are attached to waist
Typically Athletes younger than 13-
14 years of age will NOT connect
bands 5 and 6 to their feet and
should only connect band 7 to their
waist (Band 8 optional depending on
athletic abilities).
It is only necessary to
attach one band to the
waist (either 7 or 8).
Attaching both bands to
the waist is for very
advanced athletes only!
• Set deceleration cone/marker 8 to 10 paces from unit
• One set = one take-off left hand down + one take-off right hand down
• Perform 4-5 sets
• Optional Drills (dribble to three cones, soccer kick, ladder drill, connect
cords 5 & 6 to hands – 3 or 4 point football explosion off line) 22
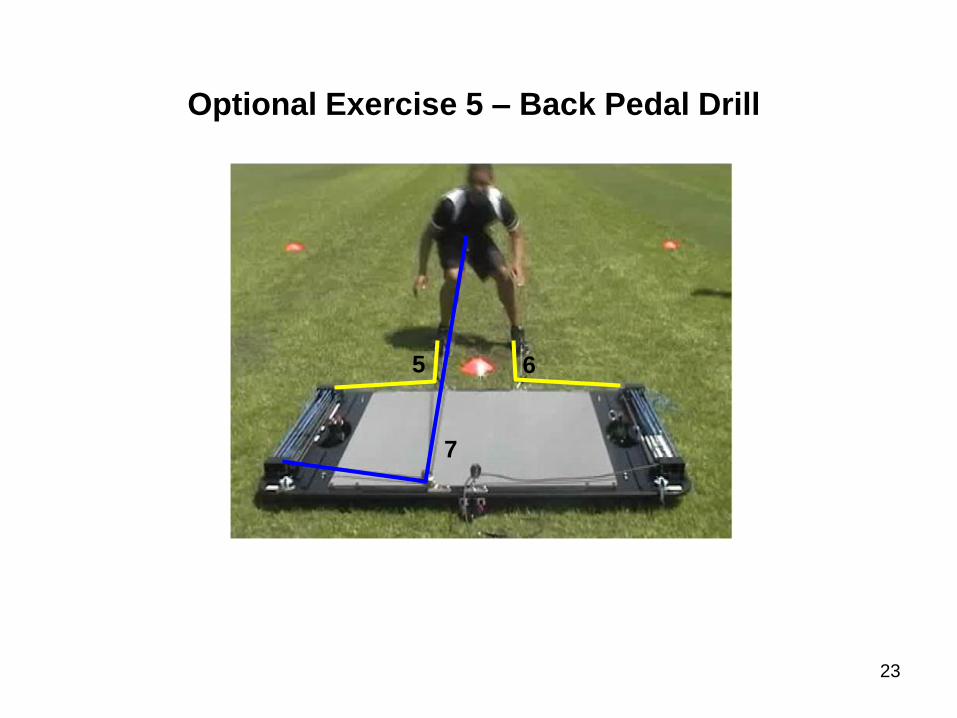
5 6
7
Optional Exercise 5 – Back Pedal Drill
23
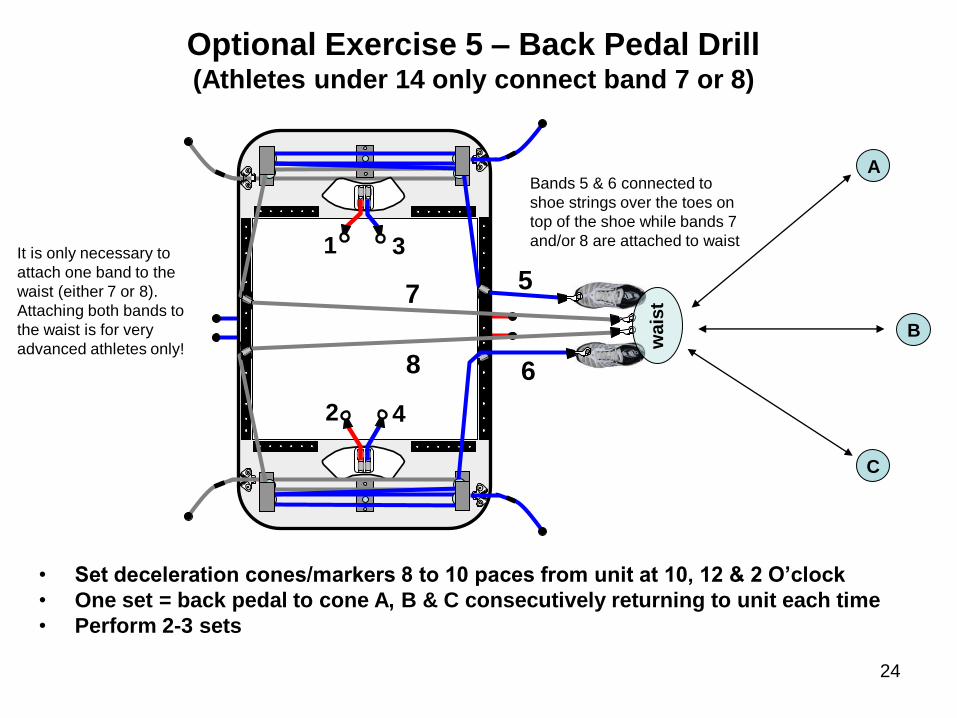
Optional Exercise 5 – Back Pedal Drill (Athletes under 14 only connect band 7 or 8)
8
1 3
2 4
7 5
6
Bands 5 & 6 connected to
shoe strings over the toes on
top of the shoe while bands 7
and/or 8 are attached to waist
wais
t
A
B
C
It is only necessary to
attach one band to the
waist (either 7 or 8).
Attaching both bands to
the waist is for very
advanced athletes only!
• Set deceleration cones/markers 8 to 10 paces from unit at 10, 12 & 2 O’clock
• One set = back pedal to cone A, B & C consecutively returning to unit each time
• Perform 2-3 sets
24
Additional Sport Specific Drills & Safety Check List
• Off-Platform Hip Flexor: Page 26-28
• Quarterback Drop Back: Page 29-30
• Catcher Pop & Throw: Page 31-32
• Shot-Put: Page 33-34
• Baseball Swing Training: Page 35-36
• Slide Board (Skating): Page 37-38
• Pre-Workout Safety Check List 39-41
25
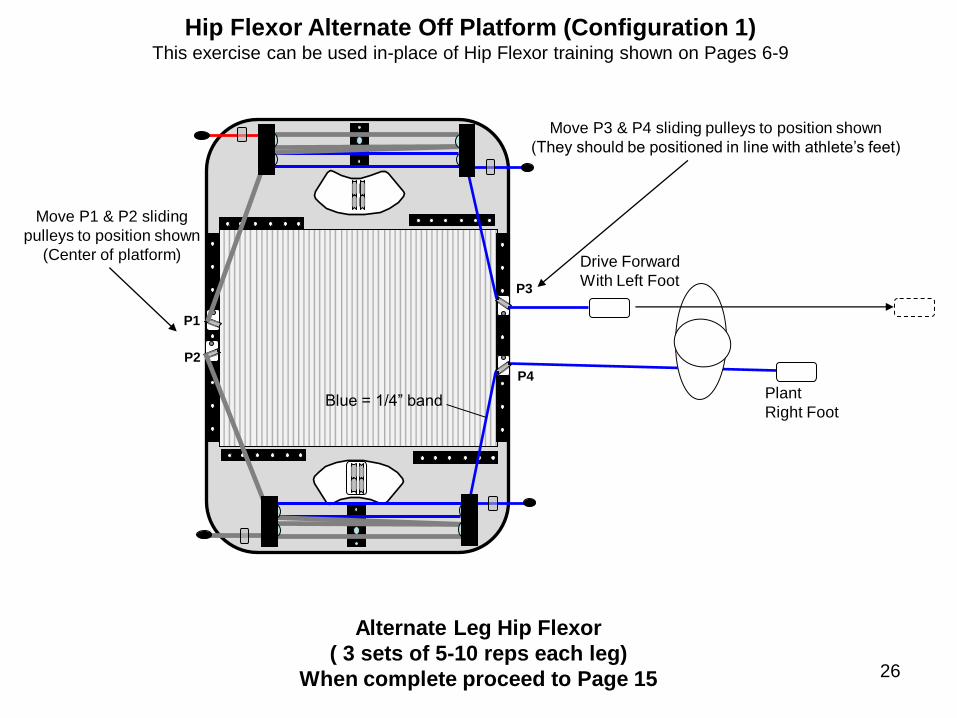
Alternate Leg Hip Flexor
( 3 sets of 5-10 reps each leg)
When complete proceed to Page 15
P3
P4
P1
P2
Move P3 & P4 sliding pulleys to position shown
(They should be positioned in line with athlete’s feet)
Move P1 & P2 sliding
pulleys to position shown
(Center of platform)
Hip Flexor Alternate Off Platform (Configuration 1) This exercise can be used in-place of Hip Flexor training shown on Pages 6-9
Blue = 1/4” band Plant
Right Foot
Drive Forward
With Left Foot
26
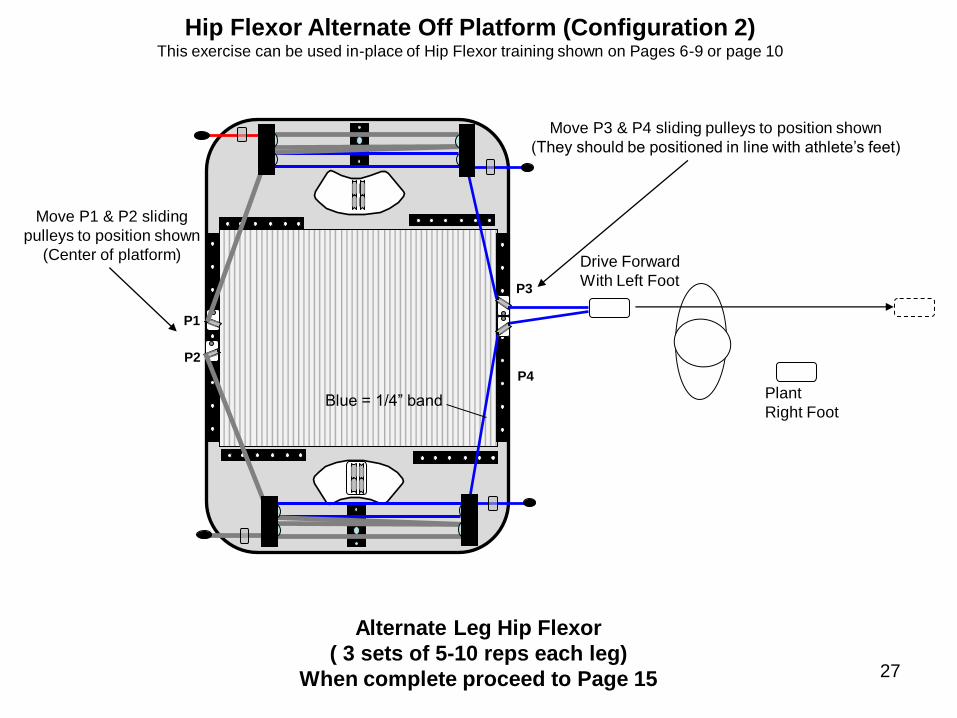
Alternate Leg Hip Flexor
( 3 sets of 5-10 reps each leg)
When complete proceed to Page 15
P3
P4
P1
P2
Move P3 & P4 sliding pulleys to position shown
(They should be positioned in line with athlete’s feet)
Move P1 & P2 sliding
pulleys to position shown
(Center of platform)
Hip Flexor Alternate Off Platform (Configuration 2) This exercise can be used in-place of Hip Flexor training shown on Pages 6-9 or page 10
Blue = 1/4” band Plant
Right Foot
Drive Forward
With Left Foot
27
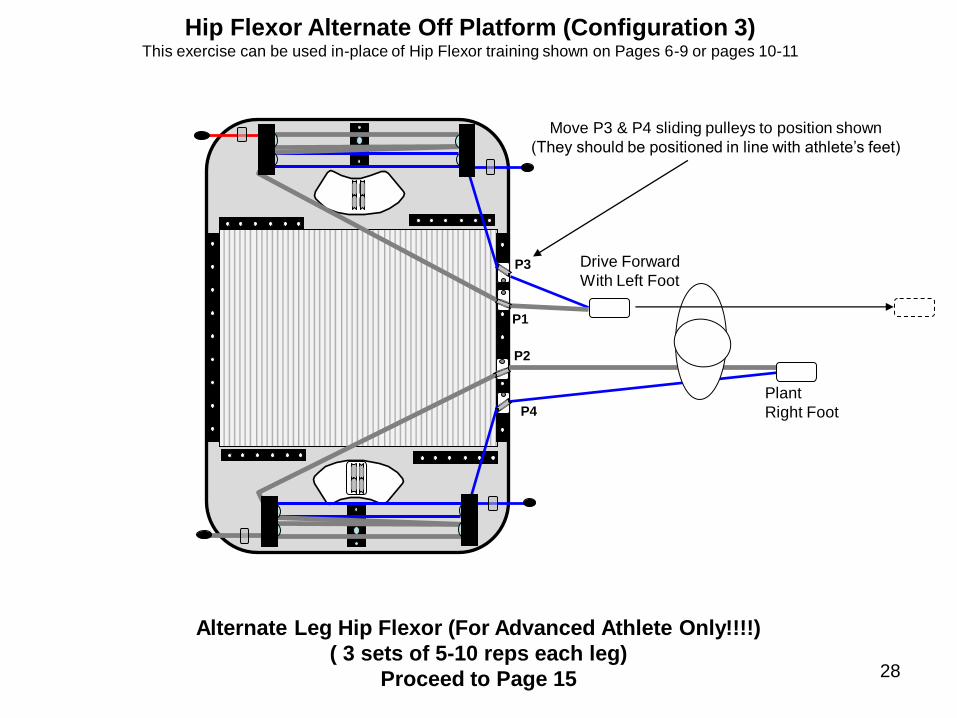
Alternate Leg Hip Flexor (For Advanced Athlete Only!!!!)
( 3 sets of 5-10 reps each leg)
Proceed to Page 15
P3
P4
P1
P2
Move P3 & P4 sliding pulleys to position shown
(They should be positioned in line with athlete’s feet)
Hip Flexor Alternate Off Platform (Configuration 3) This exercise can be used in-place of Hip Flexor training shown on Pages 6-9 or pages 10-11
Plant
Right Foot
Drive Forward
With Left Foot
28
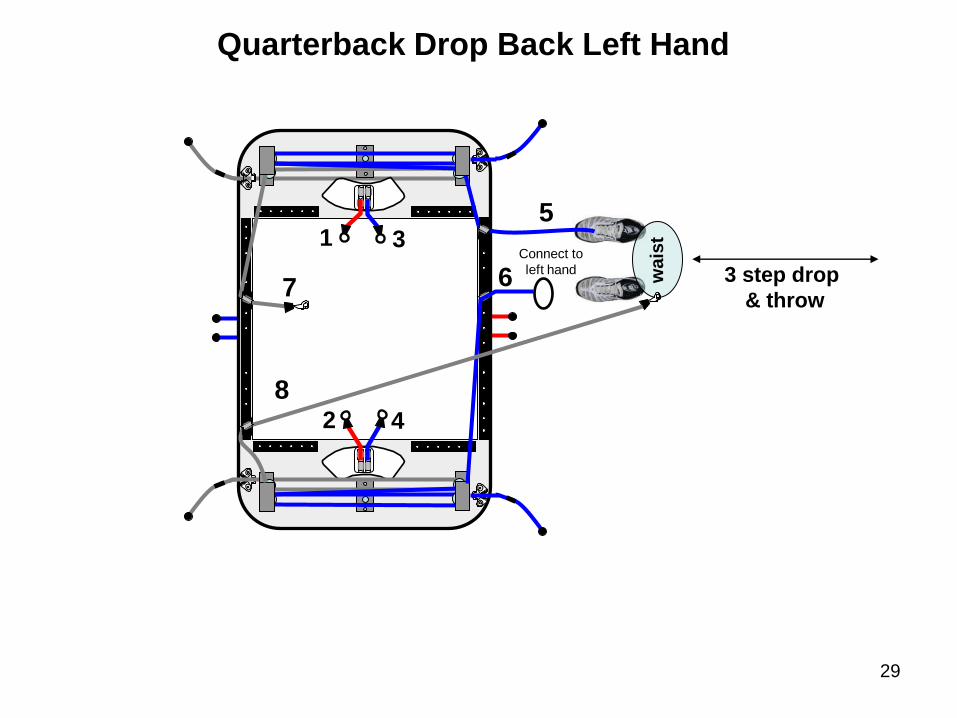
Quarterback Drop Back Left Hand
7
2 4
1 3
8
5
6 wais
t
Connect to
left hand 3 step drop
& throw
29
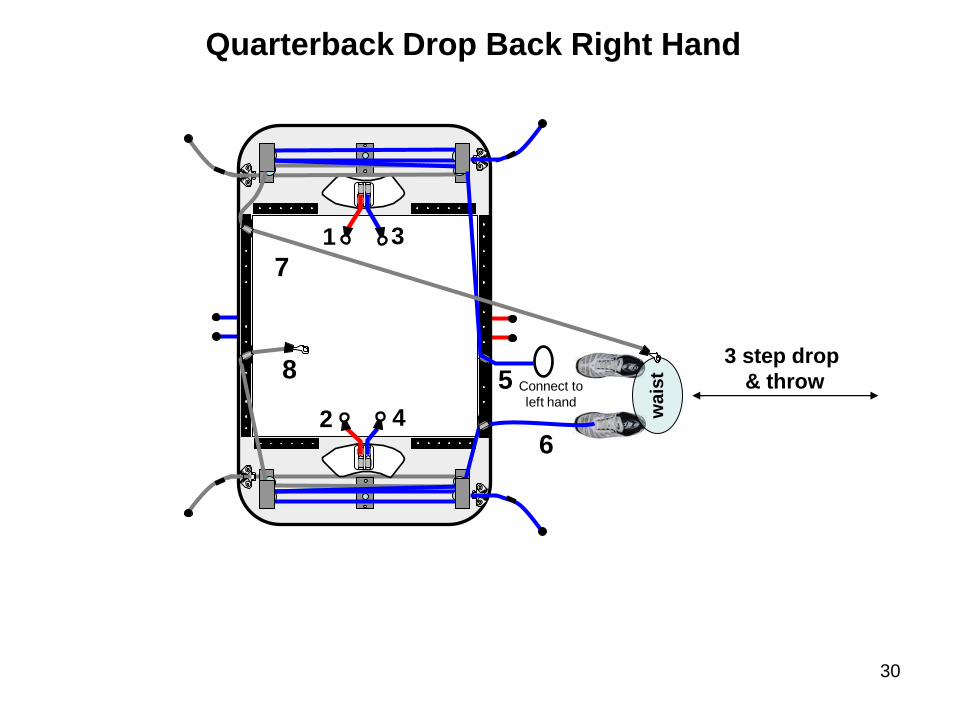
Quarterback Drop Back Right Hand
8
1 3
2 4
7
6
5
wais
t
Connect to
left hand
3 step drop
& throw
30
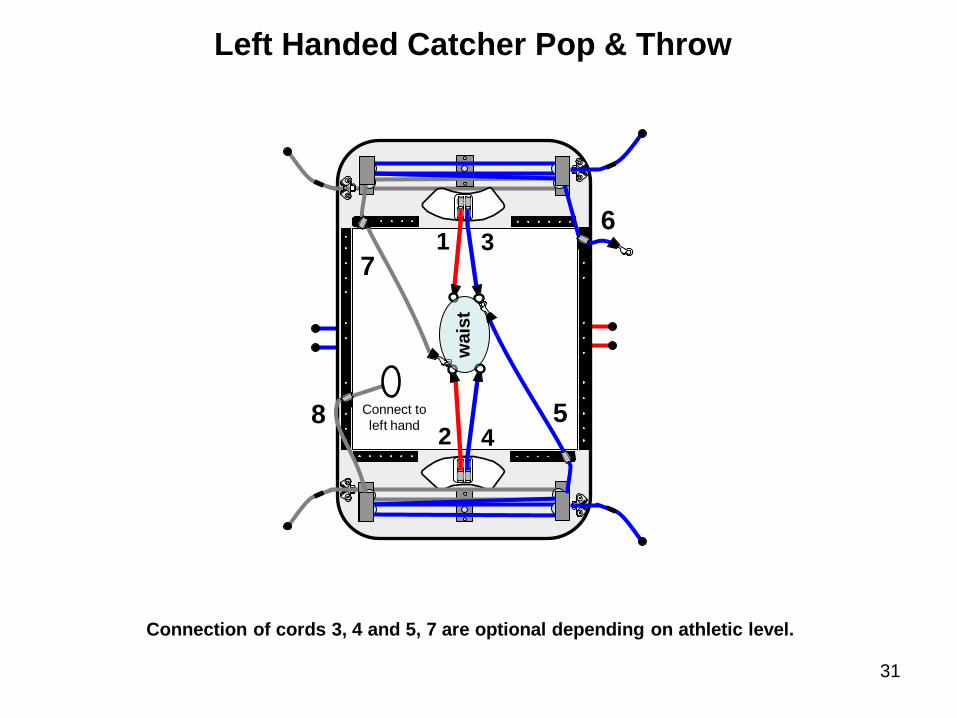
Left Handed Catcher Pop & Throw
8
1 3
2 4
7
5
6
wais
t
Connect to
left hand
Connection of cords 3, 4 and 5, 7 are optional depending on athletic level.
31
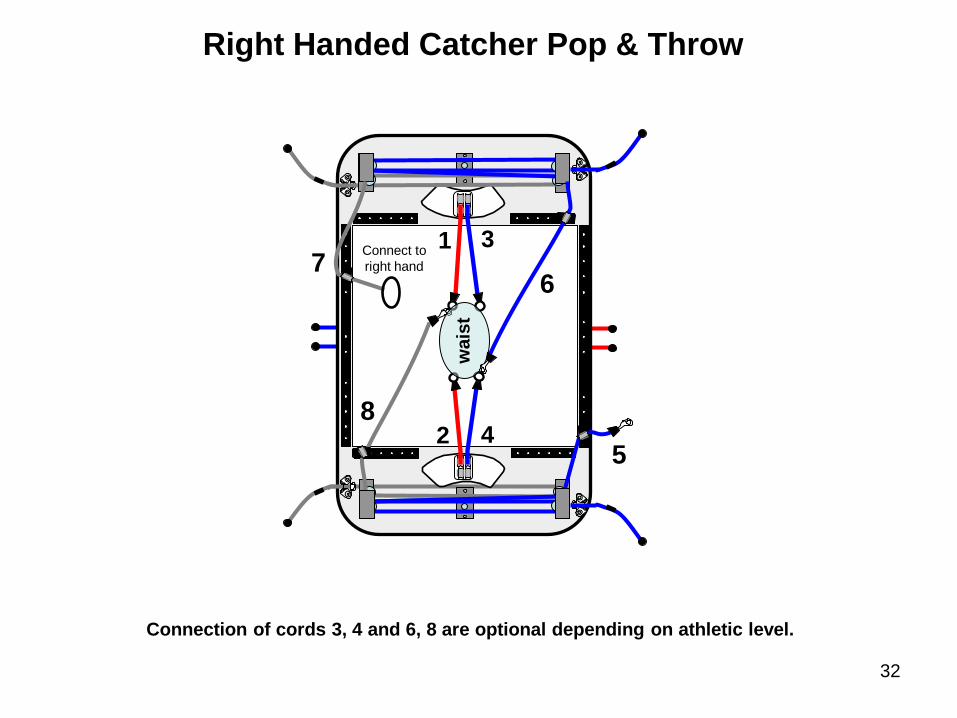
Right Handed Catcher Pop & Throw
7
2 4
1 3
8
6
5 w
ais
t
Connect to
right hand
Connection of cords 3, 4 and 6, 8 are optional depending on athletic level.
32
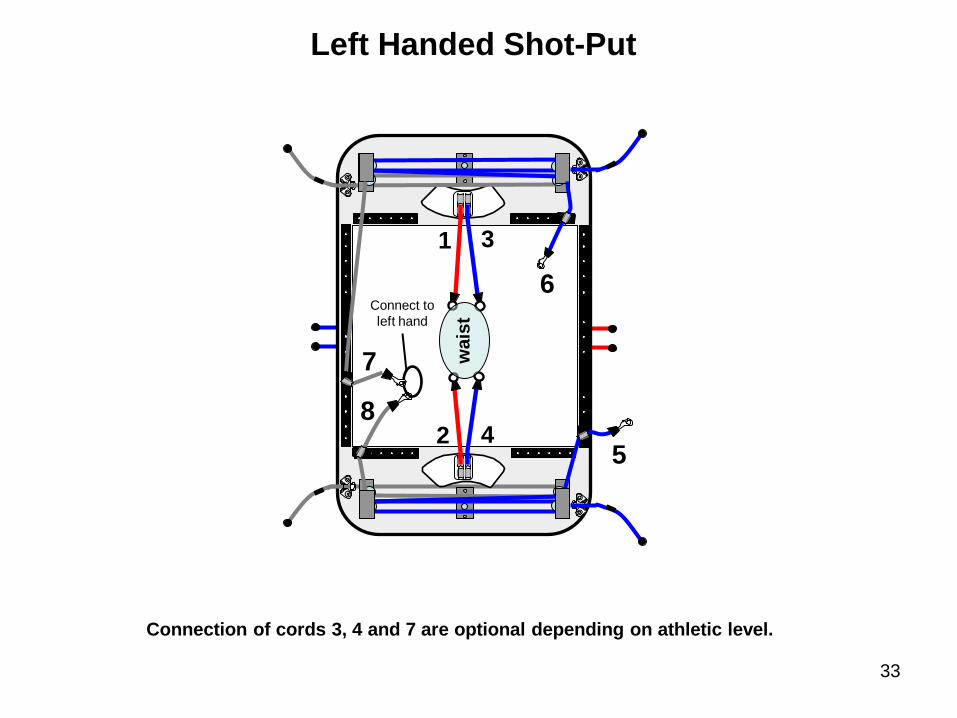
Left Handed Shot-Put
7
2 4
1 3
8
6
5 w
ais
t
Connect to
left hand
Connection of cords 3, 4 and 7 are optional depending on athletic level.
33
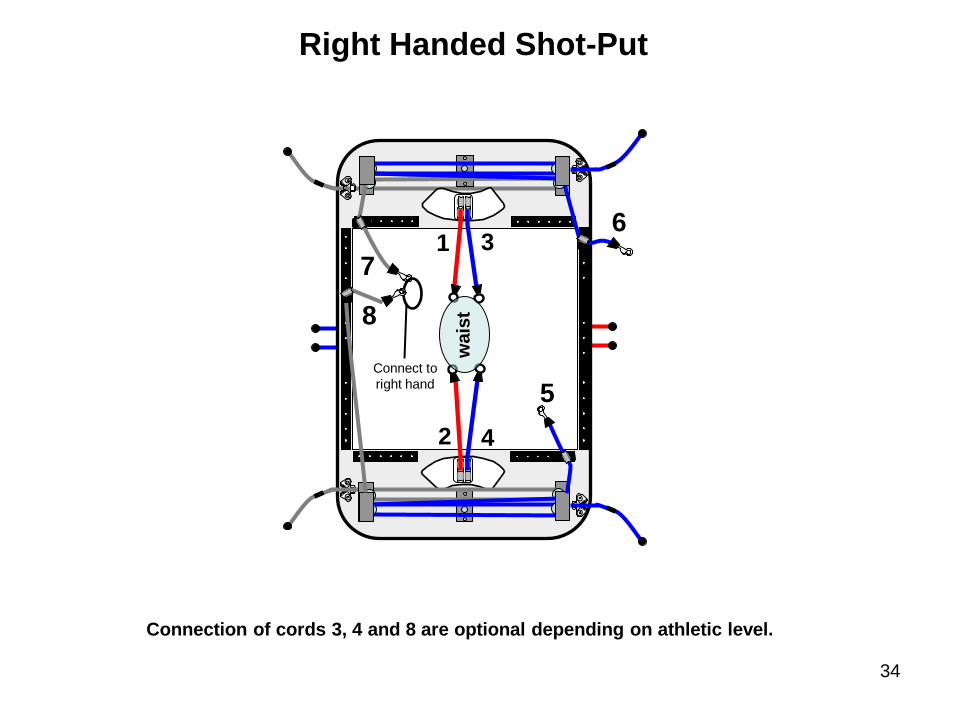
Right Handed Shot-Put
Connection of cords 3, 4 and 8 are optional depending on athletic level.
8
1 3
2 4
7
5
6
wais
t
Connect to
right hand
34
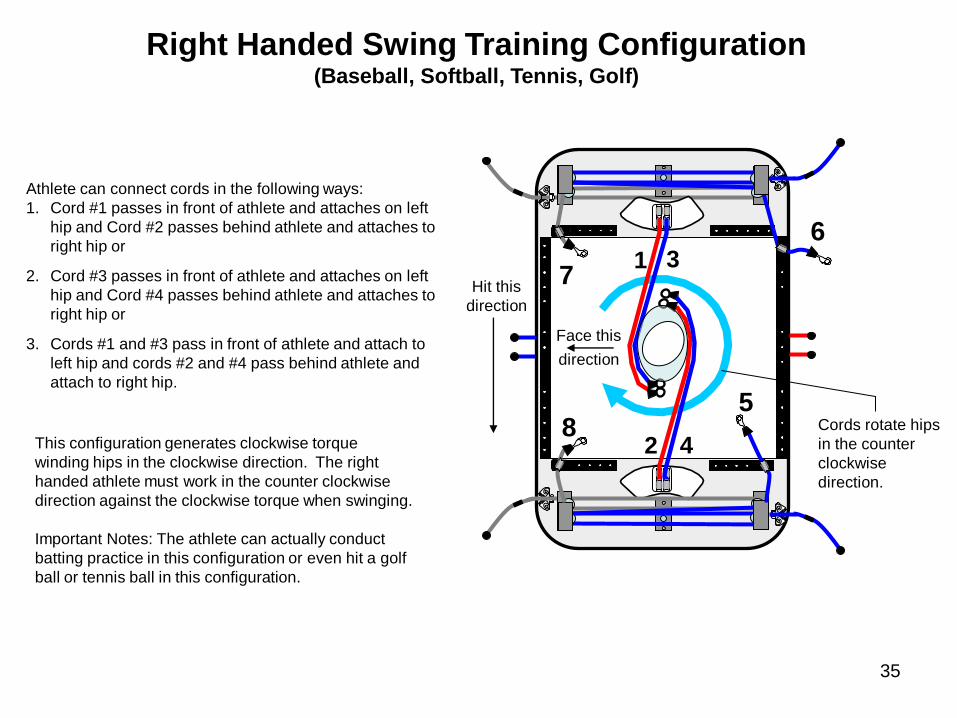
Right Handed Swing Training Configuration (Baseball, Softball, Tennis, Golf)
8
1 3
2 4
7
5
6
35
Athlete can connect cords in the following ways:
1. Cord #1 passes in front of athlete and attaches on left
hip and Cord #2 passes behind athlete and attaches to
right hip or
2. Cord #3 passes in front of athlete and attaches on left
hip and Cord #4 passes behind athlete and attaches to
right hip or
3. Cords #1 and #3 pass in front of athlete and attach to
left hip and cords #2 and #4 pass behind athlete and
attach to right hip.
Cords rotate hips
in the counter
clockwise
direction.
Face this
direction
This configuration generates clockwise torque
winding hips in the clockwise direction. The right
handed athlete must work in the counter clockwise
direction against the clockwise torque when swinging.
Important Notes: The athlete can actually conduct
batting practice in this configuration or even hit a golf
ball or tennis ball in this configuration.
Hit this
direction
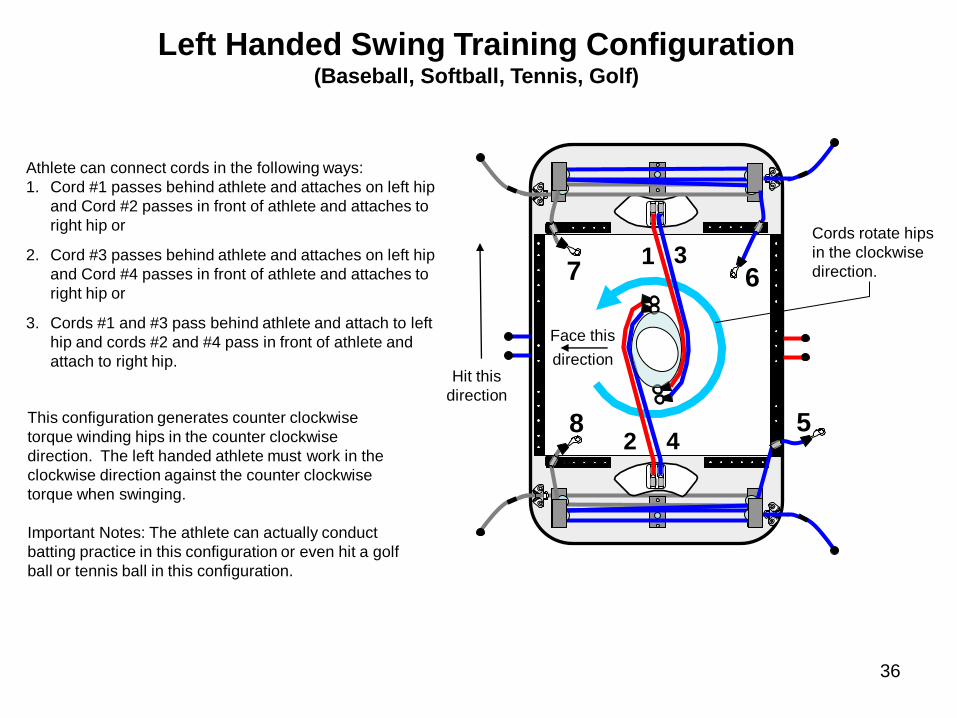
Left Handed Swing Training Configuration (Baseball, Softball, Tennis, Golf)
36
8
1 3
2 4
7
5
6
Cords rotate hips
in the clockwise
direction.
Athlete can connect cords in the following ways:
1. Cord #1 passes behind athlete and attaches on left hip
and Cord #2 passes in front of athlete and attaches to
right hip or
2. Cord #3 passes behind athlete and attaches on left hip
and Cord #4 passes in front of athlete and attaches to
right hip or
3. Cords #1 and #3 pass behind athlete and attach to left
hip and cords #2 and #4 pass in front of athlete and
attach to right hip.
This configuration generates counter clockwise
torque winding hips in the counter clockwise
direction. The left handed athlete must work in the
clockwise direction against the counter clockwise
torque when swinging.
Important Notes: The athlete can actually conduct
batting practice in this configuration or even hit a golf
ball or tennis ball in this configuration.
Face this
direction Hit this
direction
P3
P4
P1
P2
Move P1 & P2 sliding
pulleys to position shown
(Center of platform)
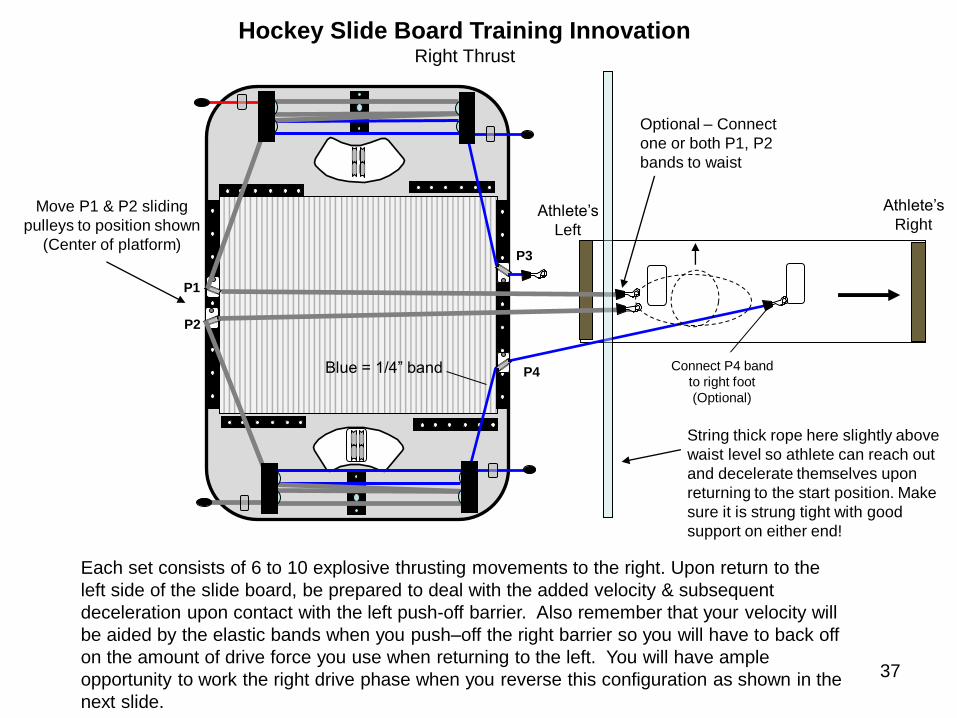
Each set consists of 6 to 10 explosive thrusting movements to the right. Upon return to the
left side of the slide board, be prepared to deal with the added velocity & subsequent
deceleration upon contact with the left push-off barrier. Also remember that your velocity will
be aided by the elastic bands when you push–off the right barrier so you will have to back off
on the amount of drive force you use when returning to the left. You will have ample
opportunity to work the right drive phase when you reverse this configuration as shown in the
next slide.
Hockey Slide Board Training Innovation Right Thrust
Blue = 1/4” band
37
Athlete’s
Right
Optional – Connect
one or both P1, P2
bands to waist
Connect P4 band
to right foot
(Optional)
Athlete’s
Left
String thick rope here slightly above
waist level so athlete can reach out
and decelerate themselves upon
returning to the start position. Make
sure it is strung tight with good
support on either end!
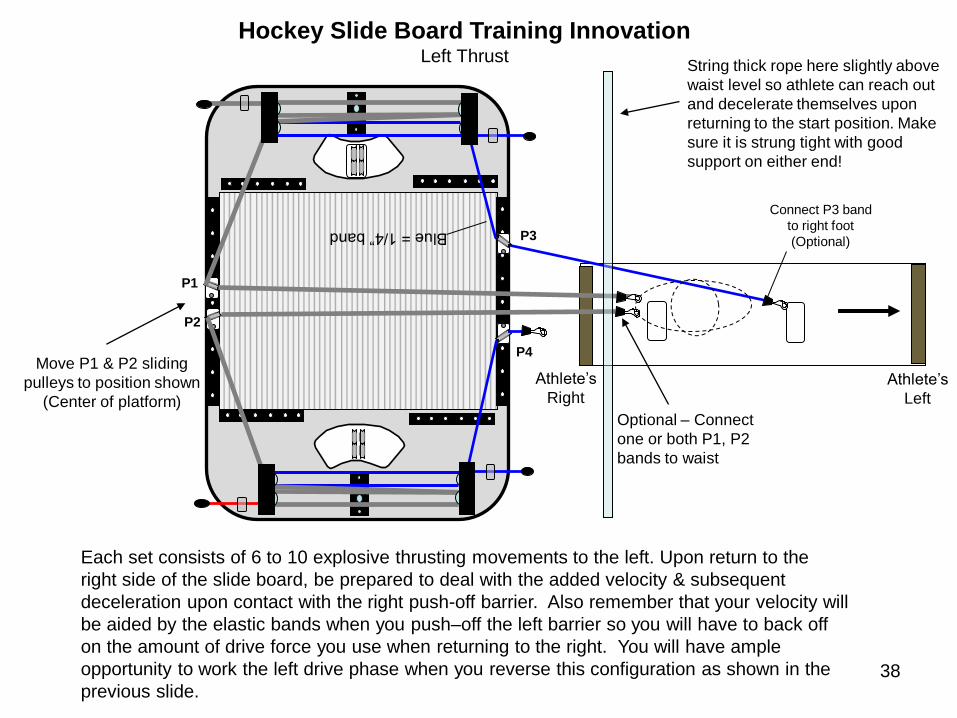
Each set consists of 6 to 10 explosive thrusting movements to the left. Upon return to the
right side of the slide board, be prepared to deal with the added velocity & subsequent
deceleration upon contact with the right push-off barrier. Also remember that your velocity will
be aided by the elastic bands when you push–off the left barrier so you will have to back off
on the amount of drive force you use when returning to the right. You will have ample
opportunity to work the left drive phase when you reverse this configuration as shown in the
previous slide.
Hockey Slide Board Training Innovation Left Thrust
38
P4
P3
P1
P2
Move P1 & P2 sliding
pulleys to position shown
(Center of platform) Optional – Connect
one or both P1, P2
bands to waist
Blue = 1/4” band
Connect P3 band
to right foot
(Optional)
Athlete’s
Left
Athlete’s
Right
String thick rope here slightly above
waist level so athlete can reach out
and decelerate themselves upon
returning to the start position. Make
sure it is strung tight with good
support on either end!
39
Pre-Workout Safety Check List For The VertiMax Training System Please perform visual VertiMax Safety Inspection steps 1-5 prior to utilizing VertiMax each training
session. If any of the inspection steps fail the pass criteria indicated for each step, discontinue use of
the VertiMax system and call 800-699-5867 for diagnosis and repair instructions.
Cord Inspection: Prior to using VertiMax each time, the integrity of each individual band on the
VertiMax system should be verified. Starting from the end of the band that attaches to the user, the
metal attachment mechanisms and nylon braided cords should examined for any damage beyond
normal wear and tear that could impact safety.
1)
Chrome Plated Ringlets on Bands 1-4 should not be cracked or have any sharp edges or be
deformed from their circular shape.
Chrome Plated Spring Loaded Snap Hooks on the ends of Bands 5 & 6 (V6 & V6 Pro
models) or Bands 5 thru 8 (V8 models) should checked to verify the spring snaps are retracting
and closing completely upon release of the spring pin. If the clasp’s spring pin does not
automatically close completely upon retracting and releasing the pin the clasp is damaged and
the complete cord with non-functional clasp must be replaced before the system can be used.
Cord Integrity: Before each use, all nylon braided elastic cords should be checked from end to
end for damage. The nylon braiding will sometimes become fuzzy in areas around the pulleys
with normal wear and the fuzzy appearance will not impact the performance or safety of the
system. If any nylon braiding is broken or cut to the extent that any white rubber strands are
visible beneath the nylon braining, the cord safety has been compromised and the unit cannot
be used until the damaged cord or cords have been replaced.
a)
b)
c)
Sliding Pulley Inspection: There are two Sliding Pulley assemblies on V6Pro units and four
Sliding Pulley assemblies on V8 units that travel on black T-Rails around the perimeter of the mat.
All Sliding Pulley assemblies have spring loaded locking pins that lock the sliding assembly in
place after the user repositions the sliding assemblies on the T-Rails. The locking pins can be
retracted via push button on the sliding assembly or by pulling a plunger pin on VertiMax sliding
assemblies for units purchased before 2010. When the button or plunger pin is released make
sure the spring mechanism on each sliding assembly is working properly and that the spring
inside the sliding assembly forces the protracting locking pin into the receptor holes in the T-Rails
so the assemblies lock into place. If the user releases the push button or plunger pin (on pre 2010
models) on any Sliding Pulley assembly and the locking pin is not driven into the receptor holes
by the spring mechanism, then the Sliding Pulley assembly is damaged or inoperable and it must
be replaced and pass this inspection before the Vertimax unit can be used again.
40
2)
Cam Cleat Inspection: All resistance bands on VertiMax units exit the system through spring
loaded Cam Cleats that automatically grab the elastic cords and holds them in place once
inserted between the two spring loaded cleats and released. Before each use, the proper
function of each Cam Cleat underneath and on top of the system should be verified. Wedge
each cord firmly between the two cams on each cleat and pull each cord on the back side of the
cleat (side opposite from which the cord exits the cleat and leaves the platform) firmly to verify the
two cams pinch the cord and hold it in place without slippage. If the user can pull cordage through
any Cam Cleat (cord pulls and slides between locking cams) then the Cam Cleat is damaged or
dis-functional and the unit should not be used until the damaged Cam Cleat or cord is replaced.
3)
Pre-Workout Safety Check List For The VertiMax Training System
Platform Inspection: Prior to each use the user or trainer should examine the platform structure
to make sure there are no structural flaws (cracks in the platform) or parts that are obviously
damaged. If any structural cracks are found in the platform or if the platform bends or flexes
when the user steps on the training surface, do not use the system until Genetic Potential
Customer Service is contacted and consulted with about the issue.
General Inspection: When in use in public or private facilities the owners of the VertiMax unit
should conduct periodic weekly inspections of all parts on the VertiMax system to make sure
parts are functional and there are no obvious components that are broken. If any parts appear to
have changed in shape or form or become dysfunctional, please call Genetic Potential Customer
Service for diagnosis of any potential problem with the system.
41
4)
Pre-Workout Safety Check List For The VertiMax Training System
5)