Embed Size (px)
Citation preview
Version 6.11
Analytics and Rules Guide
May 2013
Disclaimers and Legal Information
Copyright © 2013 Aimetis Inc. All rights reserved.
This guide is for informational purposes only. AIMETIS MAKES NO WARRANTIES, EXPRESS, IMPLIED OR STATUTORY, AS TO THE INFORMATION IN THIS DOCUMENT.
Complying with all applicable copyright laws is the responsibility of the user. Without limiting the rights under copyright, no part of this document may be reproduced, stored in or introduced into a retrieval system, or transmitted in any form or by any means (electronic, mechanical, photocopying, recording, or otherwise), or for any purpose, without the express written permission of Aimetis Corp.
Aimetis may have patents, patent applications, trademarks, copyrights, or other intellectual property rights covering subject matter in this document. Except as expressly provided in any written license agreement from Aimetis, the furnishing of this document does not give you any license to these patents, trademarks, copyrights, or other intellectual property.
Aimetis and Aimetis Symphony are either registered trademarks or trademarks of Aimetis Corp. in the United States and/or other countries.
Portions Copyright © 1993-2013 ARH Inc.
Portions of this software are based in part on the work of the Independent JPEG Group.
Conventions Preface
Preface
Conventions
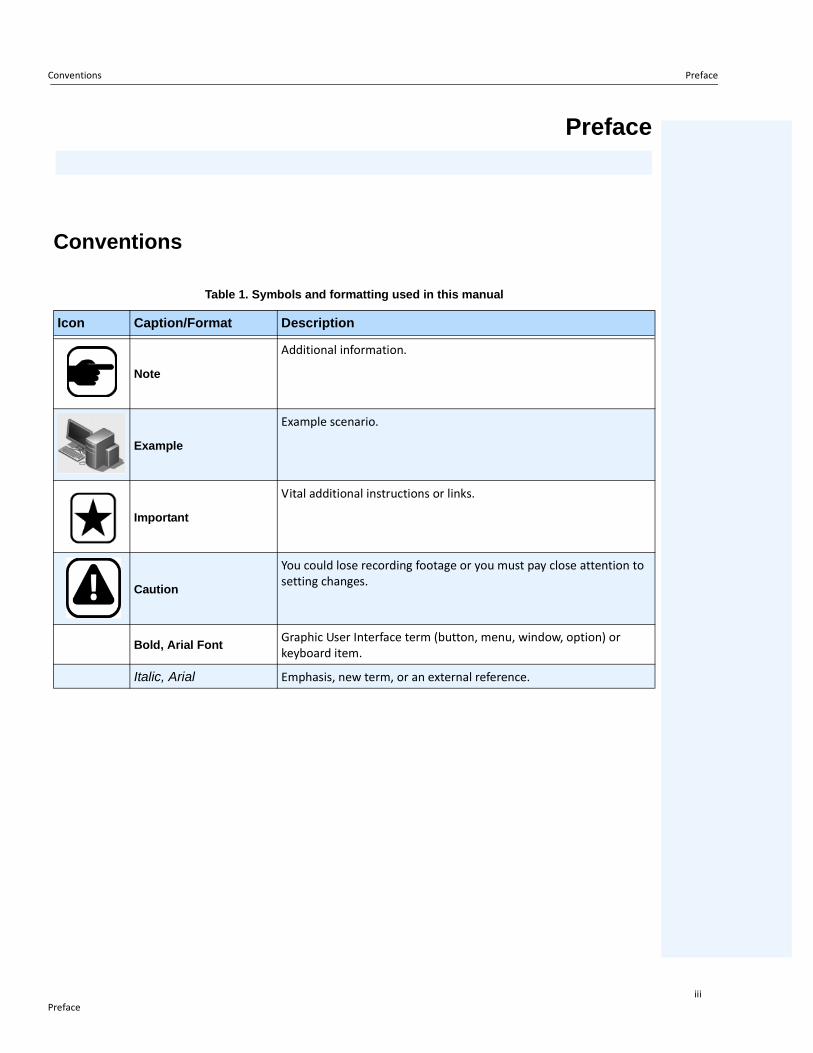
Table 1. Symbols and formatting used in this manual
Icon Caption/Format Description
Note
Additional information.
Example
Example scenario.
Important
Vital additional instructions or links.
Caution
You could lose recording footage or you must pay close attention to setting changes.
Bold, Arial FontGraphic User Interface term (button, menu, window, option) or keyboard item.
Italic, Arial Emphasis, new term, or an external reference.
Prefaceiii
Document Suite Preface
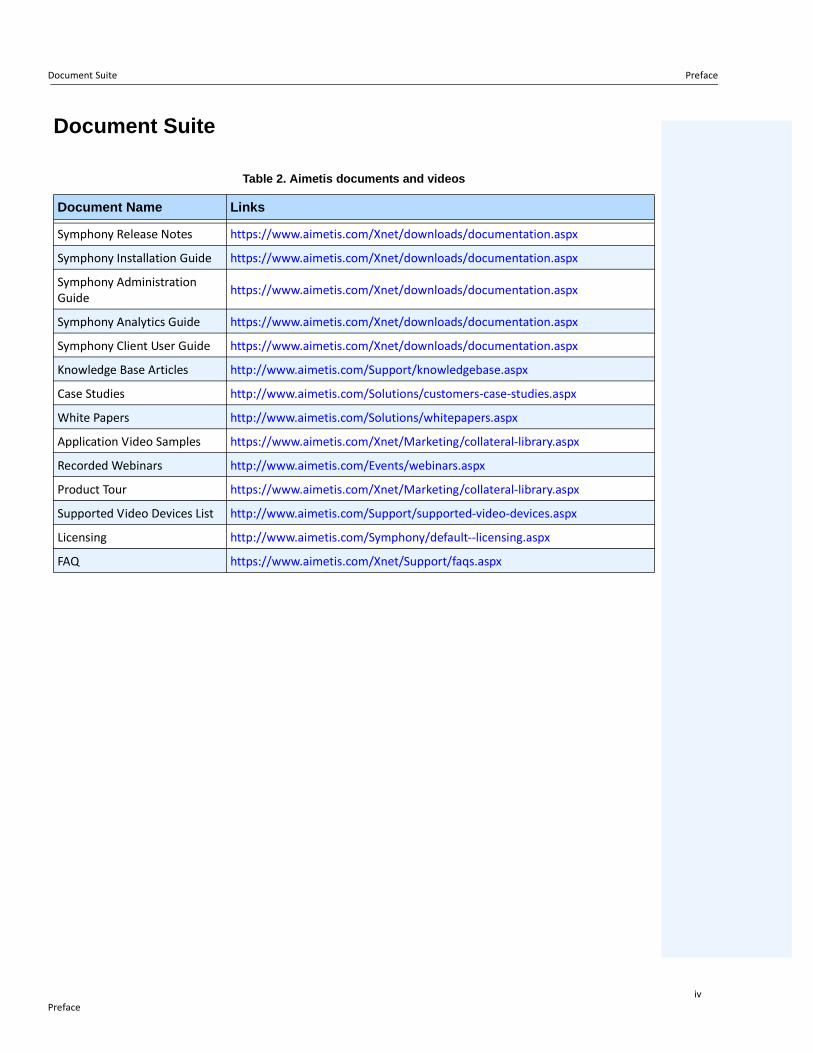
Document Suite
Table 2. Aimetis documents and videos
Document Name Links
Symphony Release Notes https://www.aimetis.com/Xnet/downloads/documentation.aspx
Symphony Installation Guide https://www.aimetis.com/Xnet/downloads/documentation.aspx
Symphony Administration Guide https://www.aimetis.com/Xnet/downloads/documentation.aspx
Symphony Analytics Guide https://www.aimetis.com/Xnet/downloads/documentation.aspx
Symphony Client User Guide https://www.aimetis.com/Xnet/downloads/documentation.aspx
Knowledge Base Articles http://www.aimetis.com/Support/knowledgebase.aspx
Case Studies http://www.aimetis.com/Solutions/customers-case-studies.aspx
White Papers http://www.aimetis.com/Solutions/whitepapers.aspx
Application Video Samples https://www.aimetis.com/Xnet/Marketing/collateral-library.aspx
Recorded Webinars http://www.aimetis.com/Events/webinars.aspx
Product Tour https://www.aimetis.com/Xnet/Marketing/collateral-library.aspx
Supported Video Devices List http://www.aimetis.com/Support/supported-video-devices.aspx
Licensing http://www.aimetis.com/Symphony/default--licensing.aspx
FAQ https://www.aimetis.com/Xnet/Support/faqs.aspx
Prefaceiv
Aimetis Xnet Portal Preface
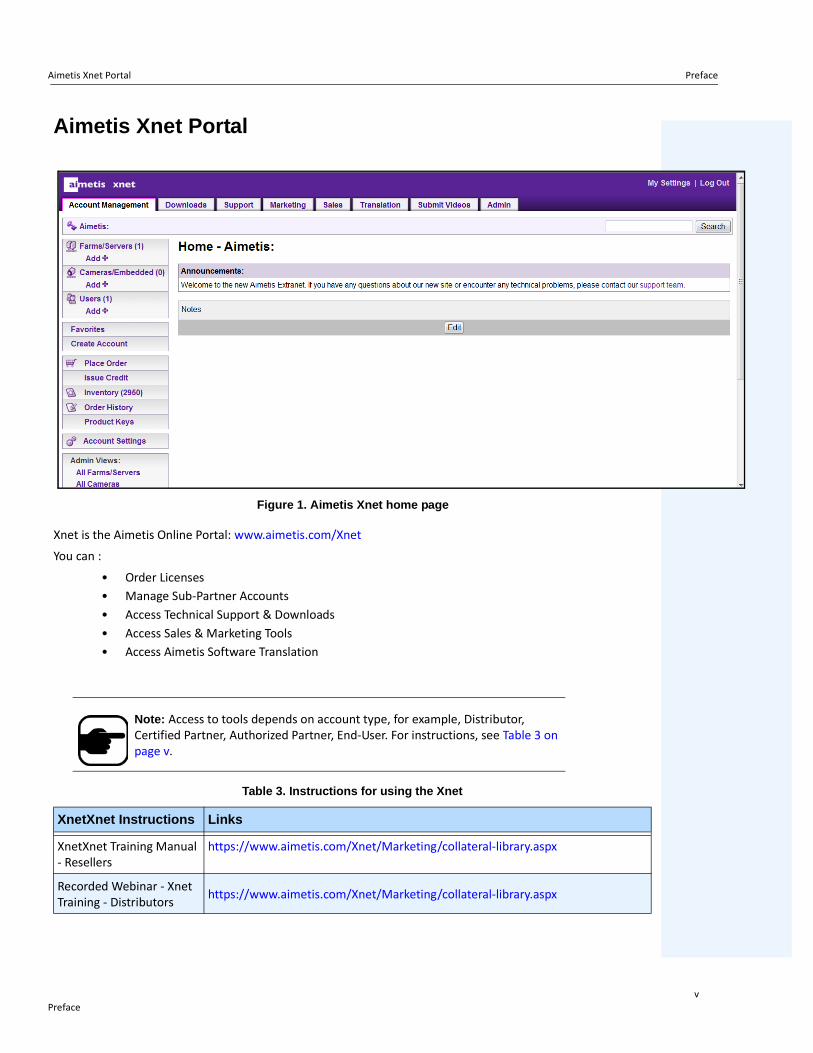
Aimetis Xnet Portal
Figure 1. Aimetis Xnet home page
Xnet is the Aimetis Online Portal: www.aimetis.com/Xnet
You can :
• Order Licenses• Manage Sub-Partner Accounts• Access Technical Support & Downloads• Access Sales & Marketing Tools• Access Aimetis Software Translation
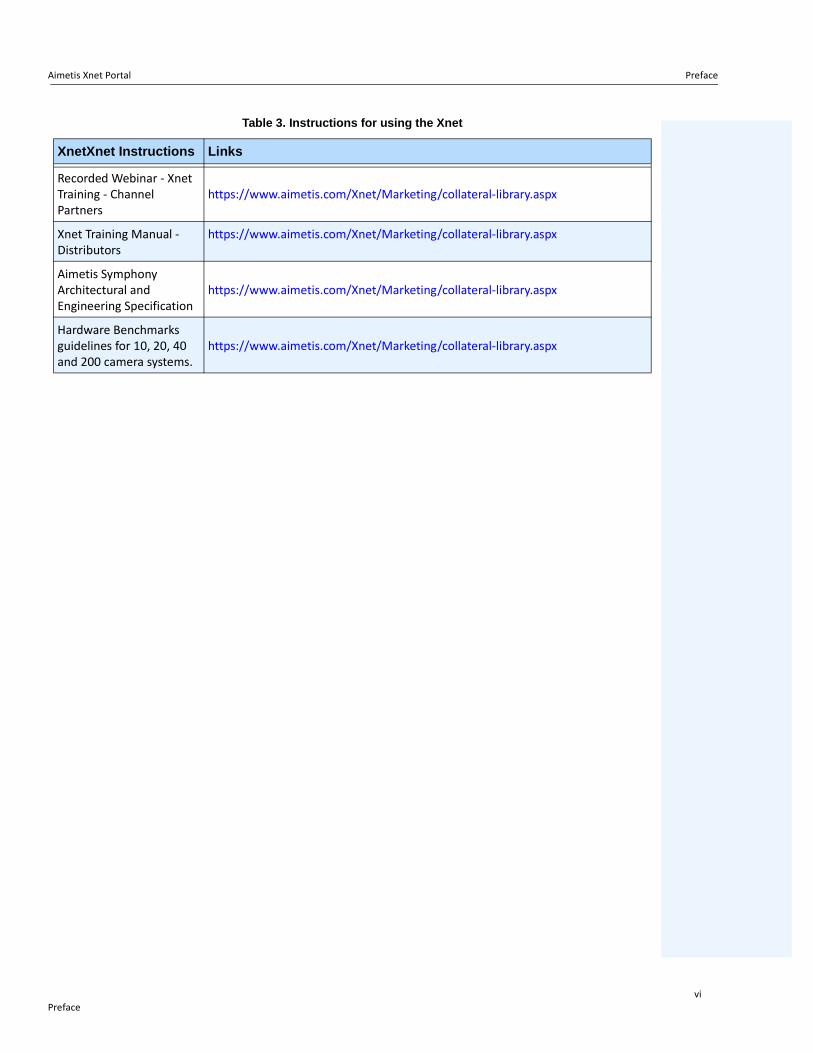
Note: Access to tools depends on account type, for example, Distributor, Certified Partner, Authorized Partner, End-User. For instructions, see Table 3 on page v.
Table 3. Instructions for using the Xnet
XnetXnet Instructions Links
XnetXnet Training Manual - Resellers
https://www.aimetis.com/Xnet/Marketing/collateral-library.aspx
Recorded Webinar - Xnet Training - Distributors https://www.aimetis.com/Xnet/Marketing/collateral-library.aspx
Prefacev
Aimetis Xnet Portal Preface
Recorded Webinar - Xnet Training - Channel Partners
https://www.aimetis.com/Xnet/Marketing/collateral-library.aspx
Xnet Training Manual - Distributors
https://www.aimetis.com/Xnet/Marketing/collateral-library.aspx
Aimetis Symphony Architectural and Engineering Specification
https://www.aimetis.com/Xnet/Marketing/collateral-library.aspx
Hardware Benchmarks guidelines for 10, 20, 40 and 200 camera systems.
https://www.aimetis.com/Xnet/Marketing/collateral-library.aspx
Table 3. Instructions for using the Xnet
XnetXnet Instructions Links
Prefacevi
Contact Us Preface
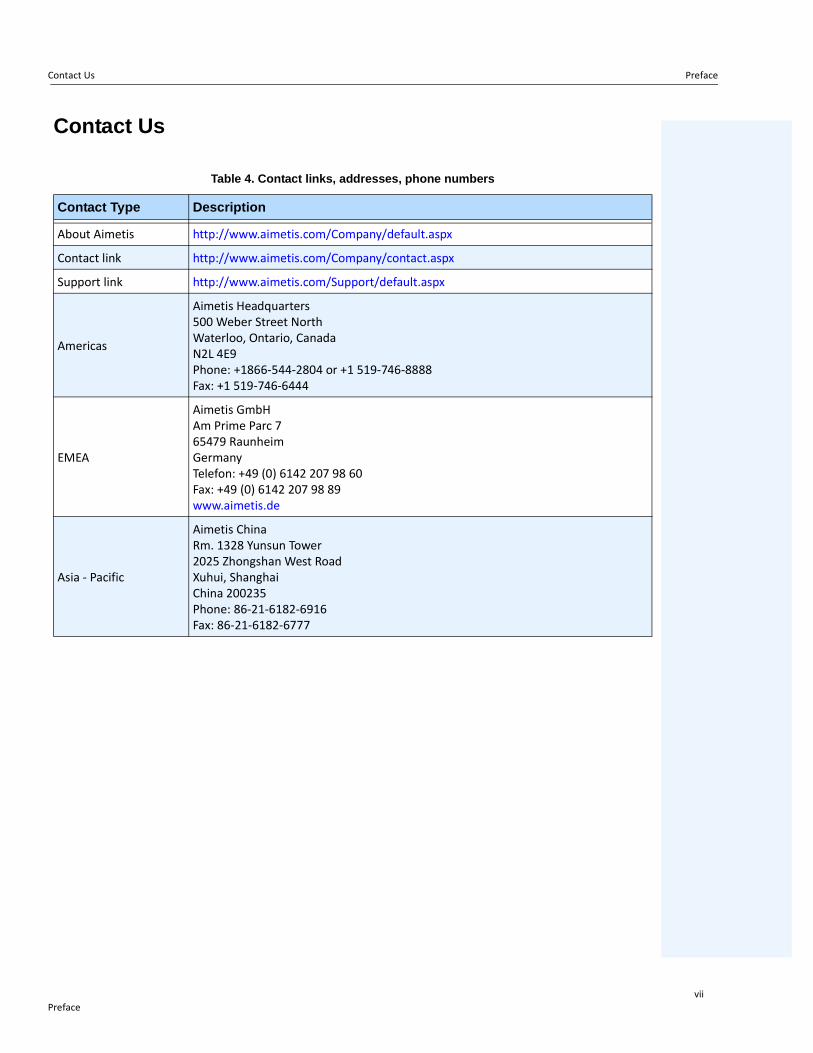
Contact Us
Table 4. Contact links, addresses, phone numbers
Contact Type Description
About Aimetis http://www.aimetis.com/Company/default.aspx
Contact link http://www.aimetis.com/Company/contact.aspx
Support link http://www.aimetis.com/Support/default.aspx
Americas
Aimetis Headquarters500 Weber Street NorthWaterloo, Ontario, CanadaN2L 4E9Phone: +1866-544-2804 or +1 519-746-8888 Fax: +1 519-746-6444
EMEA
Aimetis GmbHAm Prime Parc 765479 RaunheimGermanyTelefon: +49 (0) 6142 207 98 60Fax: +49 (0) 6142 207 98 89www.aimetis.de
Asia - Pacific
Aimetis ChinaRm. 1328 Yunsun Tower2025 Zhongshan West RoadXuhui, ShanghaiChina 200235Phone: 86-21-6182-6916Fax: 86-21-6182-6777
Prefacevii
Document History
Document History
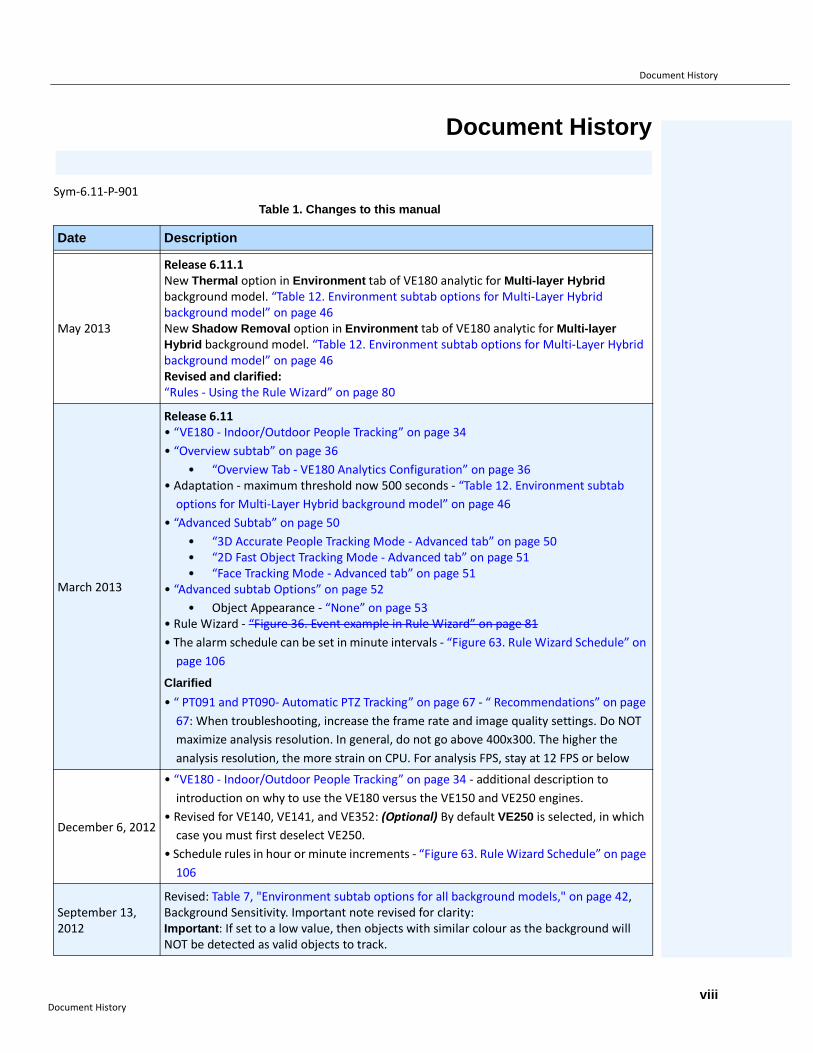
Sym-6.11-P-901Table 1. Changes to this manual
Date Description
May 2013
Release 6.11.1New Thermal option in Environment tab of VE180 analytic for Multi-layer Hybrid background model. “Table 12. Environment subtab options for Multi-Layer Hybrid background model” on page 46New Shadow Removal option in Environment tab of VE180 analytic for Multi-layer Hybrid background model. “Table 12. Environment subtab options for Multi-Layer Hybrid background model” on page 46Revised and clarified:“Rules - Using the Rule Wizard” on page 80
March 2013
Release 6.11 • “VE180 - Indoor/Outdoor People Tracking” on page 34• “Overview subtab” on page 36
• “Overview Tab - VE180 Analytics Configuration” on page 36• Adaptation - maximum threshold now 500 seconds - “Table 12. Environment subtab
options for Multi-Layer Hybrid background model” on page 46• “Advanced Subtab” on page 50
• “3D Accurate People Tracking Mode - Advanced tab” on page 50• “2D Fast Object Tracking Mode - Advanced tab” on page 51• “Face Tracking Mode - Advanced tab” on page 51
• “Advanced subtab Options” on page 52• Object Appearance - “None” on page 53
• Rule Wizard - “Figure 36. Event example in Rule Wizard” on page 81• The alarm schedule can be set in minute intervals - “Figure 63. Rule Wizard Schedule” on
page 106
Clarified
• “ PT091 and PT090- Automatic PTZ Tracking” on page 67 - “ Recommendations” on page 67: When troubleshooting, increase the frame rate and image quality settings. Do NOT maximize analysis resolution. In general, do not go above 400x300. The higher the analysis resolution, the more strain on CPU. For analysis FPS, stay at 12 FPS or below
December 6, 2012
• “VE180 - Indoor/Outdoor People Tracking” on page 34 - additional description to introduction on why to use the VE180 versus the VE150 and VE250 engines.
• Revised for VE140, VE141, and VE352: (Optional) By default VE250 is selected, in which case you must first deselect VE250.
• Schedule rules in hour or minute increments - “Figure 63. Rule Wizard Schedule” on page 106
September 13, 2012
Revised: Table 7, "Environment subtab options for all background models," on page 42, Background Sensitivity. Important note revised for clarity: Important: If set to a low value, then objects with similar colour as the background will NOT be detected as valid objects to track.
Document Historyviii
Document History
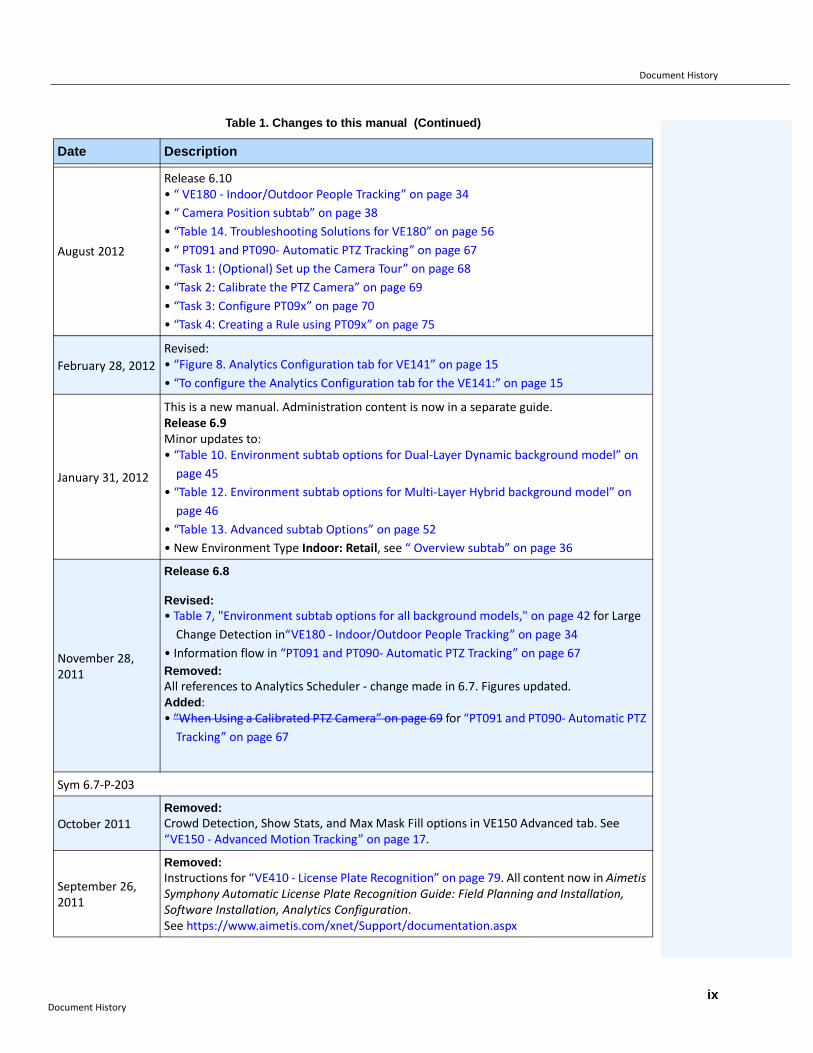
August 2012
Release 6.10• “ VE180 - Indoor/Outdoor People Tracking” on page 34• “ Camera Position subtab” on page 38• “Table 14. Troubleshooting Solutions for VE180” on page 56• “ PT091 and PT090- Automatic PTZ Tracking” on page 67• “Task 1: (Optional) Set up the Camera Tour” on page 68• “Task 2: Calibrate the PTZ Camera” on page 69• “Task 3: Configure PT09x” on page 70• “Task 4: Creating a Rule using PT09x” on page 75
February 28, 2012Revised:• “Figure 8. Analytics Configuration tab for VE141” on page 15 • “To configure the Analytics Configuration tab for the VE141:” on page 15
January 31, 2012
This is a new manual. Administration content is now in a separate guide. Release 6.9Minor updates to:• “Table 10. Environment subtab options for Dual-Layer Dynamic background model” on
page 45• “Table 12. Environment subtab options for Multi-Layer Hybrid background model” on
page 46• “Table 13. Advanced subtab Options” on page 52• New Environment Type Indoor: Retail, see “ Overview subtab” on page 36
November 28, 2011
Release 6.8
Revised:• Table 7, "Environment subtab options for all background models," on page 42 for Large
Change Detection in“VE180 - Indoor/Outdoor People Tracking” on page 34 • Information flow in “PT091 and PT090- Automatic PTZ Tracking” on page 67Removed:All references to Analytics Scheduler - change made in 6.7. Figures updated.Added:• “When Using a Calibrated PTZ Camera” on page 69 for “PT091 and PT090- Automatic PTZ
Tracking” on page 67
Sym 6.7-P-203
October 2011Removed:Crowd Detection, Show Stats, and Max Mask Fill options in VE150 Advanced tab. See “VE150 - Advanced Motion Tracking” on page 17.
September 26, 2011
Removed:Instructions for “VE410 - License Plate Recognition” on page 79. All content now in Aimetis Symphony Automatic License Plate Recognition Guide: Field Planning and Installation, Software Installation, Analytics Configuration. See https://www.aimetis.com/xnet/Support/documentation.aspx
Table 1. Changes to this manual (Continued)
Date Description
Document Historyix
Document History
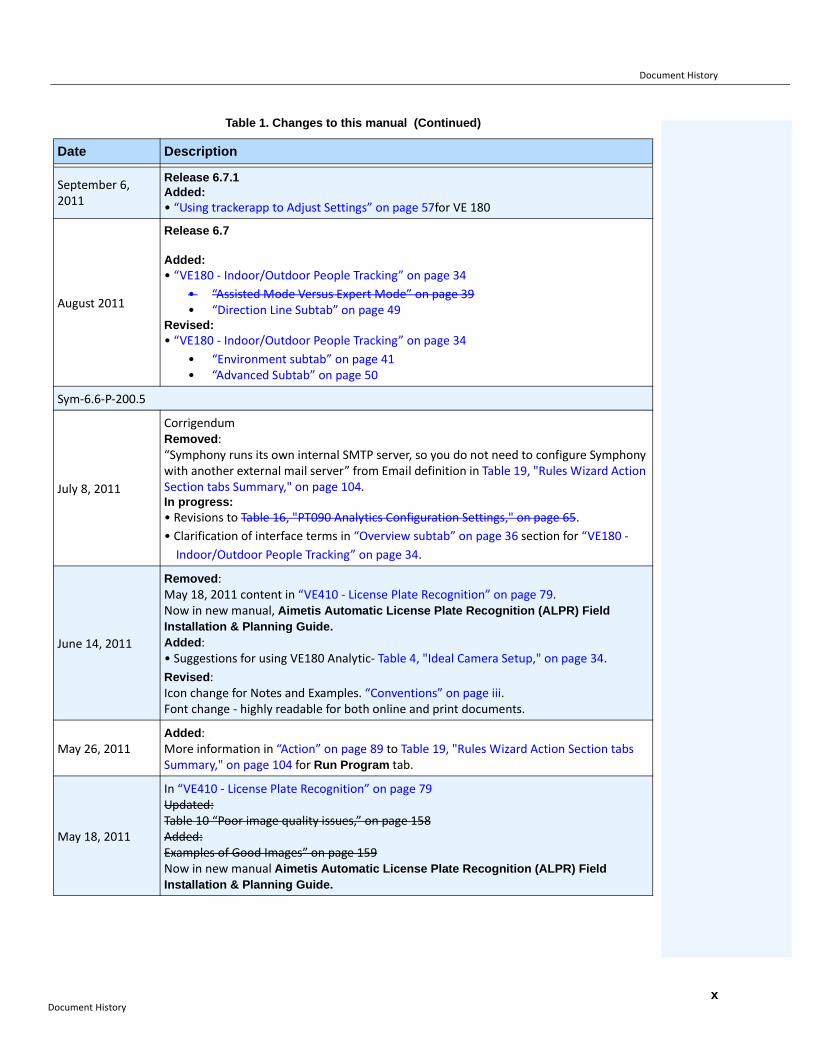
September 6, 2011
Release 6.7.1Added:• “Using trackerapp to Adjust Settings” on page 57for VE 180
August 2011
Release 6.7
Added:• “VE180 - Indoor/Outdoor People Tracking” on page 34
• “Assisted Mode Versus Expert Mode” on page 39• “Direction Line Subtab” on page 49
Revised:• “VE180 - Indoor/Outdoor People Tracking” on page 34
• “Environment subtab” on page 41• “Advanced Subtab” on page 50
Sym-6.6-P-200.5
July 8, 2011
CorrigendumRemoved:“Symphony runs its own internal SMTP server, so you do not need to configure Symphony with another external mail server” from Email definition in Table 19, "Rules Wizard Action Section tabs Summary," on page 104.In progress:• Revisions to Table 16, "PT090 Analytics Configuration Settings," on page 65.• Clarification of interface terms in “Overview subtab” on page 36 section for “VE180 -
Indoor/Outdoor People Tracking” on page 34.
June 14, 2011
Removed:May 18, 2011 content in “VE410 - License Plate Recognition” on page 79. Now in new manual, Aimetis Automatic License Plate Recognition (ALPR) Field Installation & Planning Guide.Added:• Suggestions for using VE180 Analytic- Table 4, "Ideal Camera Setup," on page 34.Revised:Icon change for Notes and Examples. “Conventions” on page iii.Font change - highly readable for both online and print documents.
May 26, 2011Added:More information in “Action” on page 89 to Table 19, "Rules Wizard Action Section tabs Summary," on page 104 for Run Program tab.
May 18, 2011
In “VE410 - License Plate Recognition” on page 79Updated:Table 10 “Poor image quality issues,” on page 158Added:Examples of Good Images” on page 159Now in new manual Aimetis Automatic License Plate Recognition (ALPR) Field Installation & Planning Guide.
Table 1. Changes to this manual (Continued)
Date Description
Document Historyx
Document History
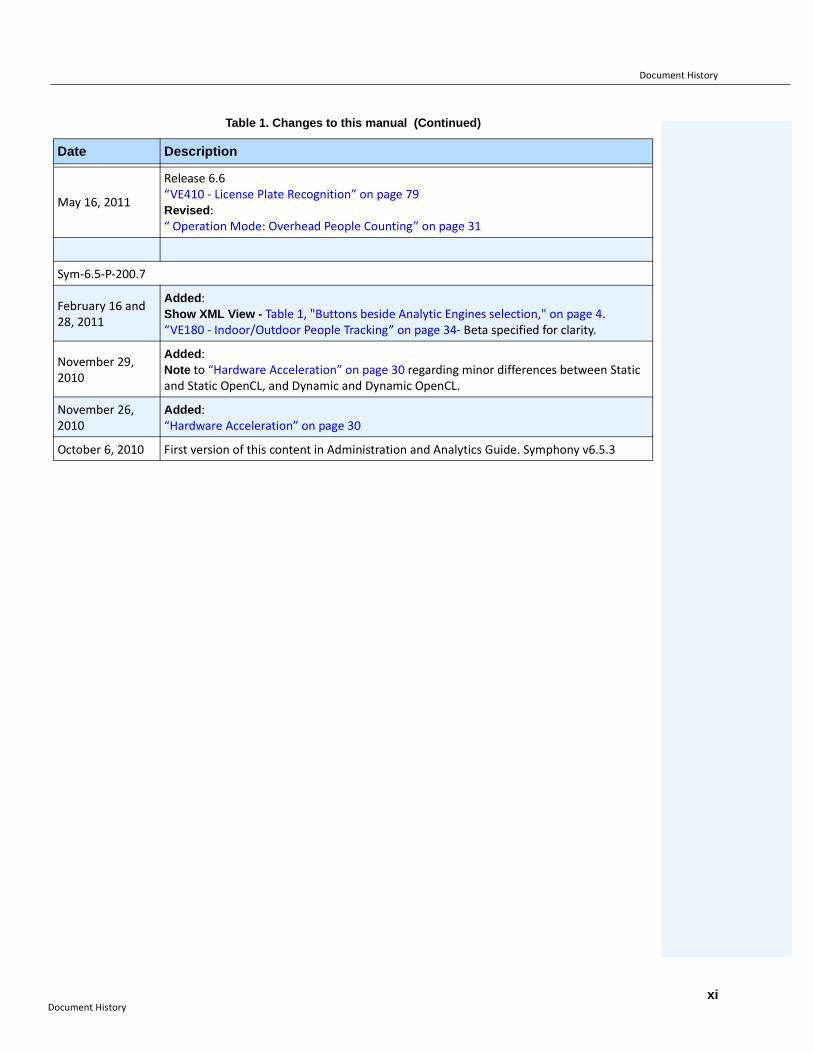
May 16, 2011
Release 6.6“VE410 - License Plate Recognition” on page 79Revised:“ Operation Mode: Overhead People Counting” on page 31
Sym-6.5-P-200.7
February 16 and 28, 2011
Added:Show XML View - Table 1, "Buttons beside Analytic Engines selection," on page 4.“VE180 - Indoor/Outdoor People Tracking” on page 34- Beta specified for clarity.
November 29, 2010
Added: Note to “Hardware Acceleration” on page 30 regarding minor differences between Static and Static OpenCL, and Dynamic and Dynamic OpenCL.
November 26, 2010
Added:“Hardware Acceleration” on page 30
October 6, 2010 First version of this content in Administration and Analytics Guide. Symphony v6.5.3
Table 1. Changes to this manual (Continued)
Date Description
Document Historyxi
xii
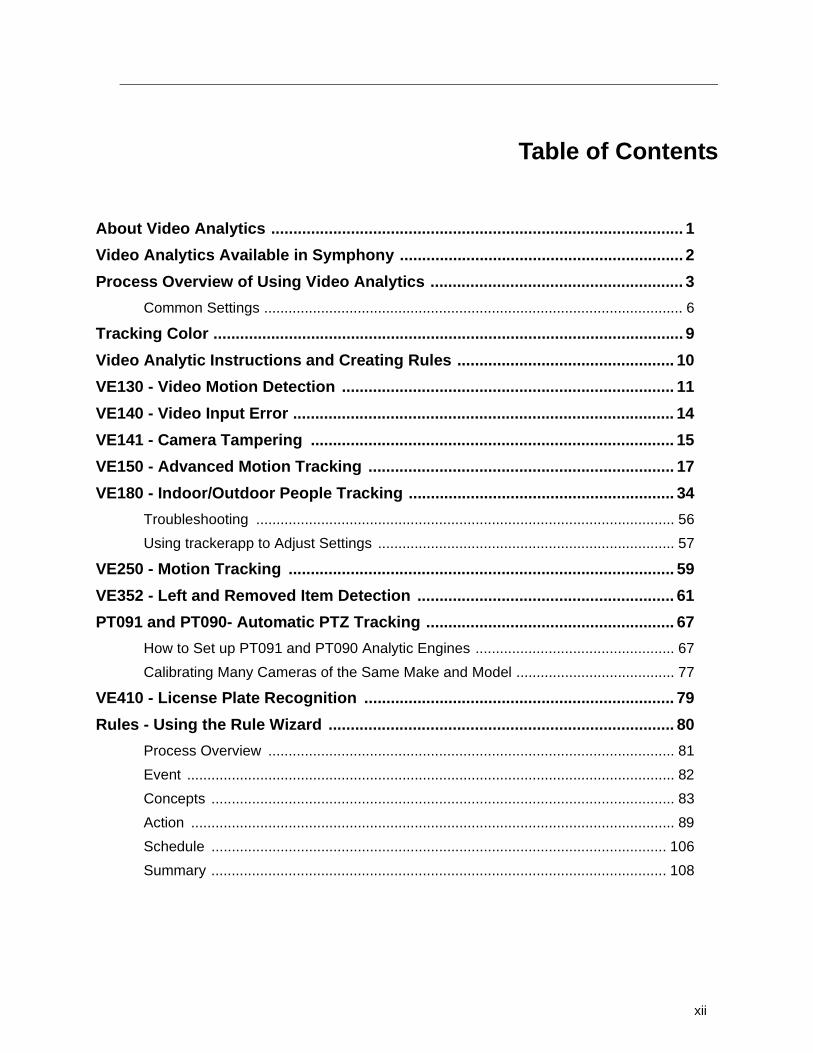
Table of Contents
About Video Analytics ............................................................................................. 1
Video Analytics Available in Symphony ................................................................ 2
Process Overview of Using Video Analytics ......................................................... 3
Common Settings ....................................................................................................... 6
Tracking Color .......................................................................................................... 9
Video Analytic Instructions and Creating Rules ................................................. 10
VE130 - Video Motion Detection ........................................................................... 11
VE140 - Video Input Error ...................................................................................... 14
VE141 - Camera Tampering .................................................................................. 15
VE150 - Advanced Motion Tracking ..................................................................... 17
VE180 - Indoor/Outdoor People Tracking ............................................................ 34
Troubleshooting ....................................................................................................... 56
Using trackerapp to Adjust Settings ......................................................................... 57
VE250 - Motion Tracking ....................................................................................... 59
VE352 - Left and Removed Item Detection .......................................................... 61
PT091 and PT090- Automatic PTZ Tracking ........................................................ 67
How to Set up PT091 and PT090 Analytic Engines ................................................. 67
Calibrating Many Cameras of the Same Make and Model ....................................... 77
VE410 - License Plate Recognition ...................................................................... 79
Rules - Using the Rule Wizard .............................................................................. 80
Process Overview .................................................................................................... 81
Event ........................................................................................................................ 82
Concepts .................................................................................................................. 83
Action ....................................................................................................................... 89
Schedule ................................................................................................................ 106
Summary ................................................................................................................ 108
About Video Analytics Video Analytics and Rules
Video Analytics and Rules
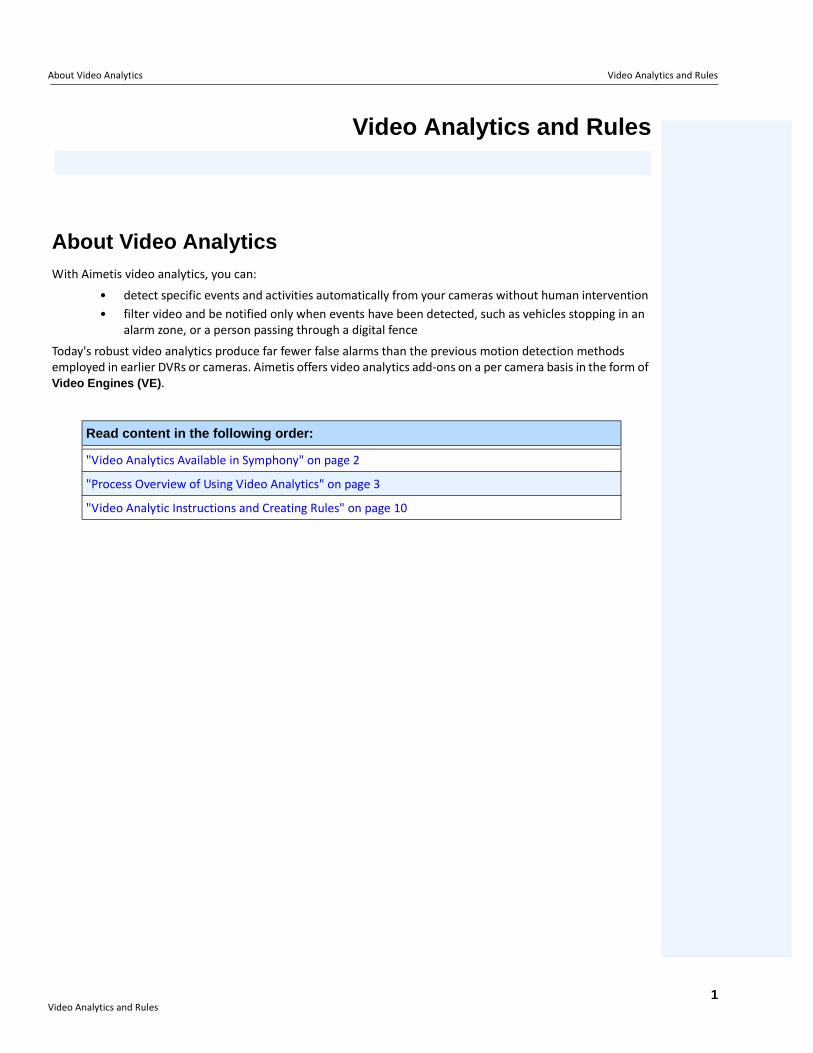
About Video AnalyticsWith Aimetis video analytics, you can:
• detect specific events and activities automatically from your cameras without human intervention • filter video and be notified only when events have been detected, such as vehicles stopping in an
alarm zone, or a person passing through a digital fence
Today's robust video analytics produce far fewer false alarms than the previous motion detection methods employed in earlier DVRs or cameras. Aimetis offers video analytics add-ons on a per camera basis in the form of Video Engines (VE).
Read content in the following order:
"Video Analytics Available in Symphony" on page 2
"Process Overview of Using Video Analytics" on page 3
"Video Analytic Instructions and Creating Rules" on page 10
Video Analytics and Rules1
Video Analytics Available in Symphony Video Analytics and Rules
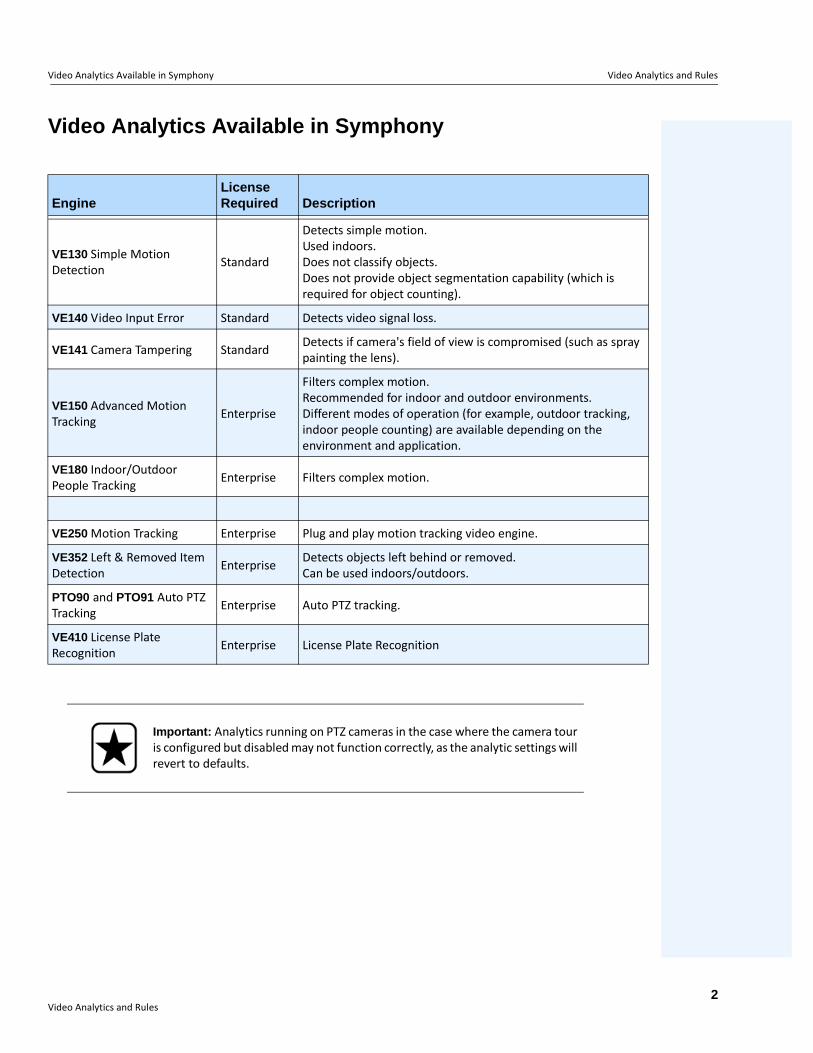
Video Analytics Available in Symphony
EngineLicense Required Description
VE130 Simple Motion Detection Standard
Detects simple motion.Used indoors.Does not classify objects.Does not provide object segmentation capability (which is required for object counting).
VE140 Video Input Error Standard Detects video signal loss.
VE141 Camera Tampering Standard Detects if camera's field of view is compromised (such as spray painting the lens).
VE150 Advanced Motion Tracking Enterprise
Filters complex motion.Recommended for indoor and outdoor environments. Different modes of operation (for example, outdoor tracking, indoor people counting) are available depending on the environment and application.
VE180 Indoor/Outdoor People Tracking Enterprise Filters complex motion.
VE250 Motion Tracking Enterprise Plug and play motion tracking video engine.
VE352 Left & Removed Item Detection Enterprise Detects objects left behind or removed.
Can be used indoors/outdoors.
PTO90 and PTO91 Auto PTZ Tracking Enterprise Auto PTZ tracking.
VE410 License Plate Recognition Enterprise License Plate Recognition
Important: Analytics running on PTZ cameras in the case where the camera tour is configured but disabled may not function correctly, as the analytic settings will revert to defaults.
Video Analytics and Rules2
Process Overview of Using Video Analytics Video Analytics and Rules
Process Overview of Using Video AnalyticsTo detect special events and activities automatically, you must:
1. "Assign analytic(s) to the camera"
2. "Configure the analytics" on page 4
3. "Create a Rule and configure the video engine detection capabilities" on page 8
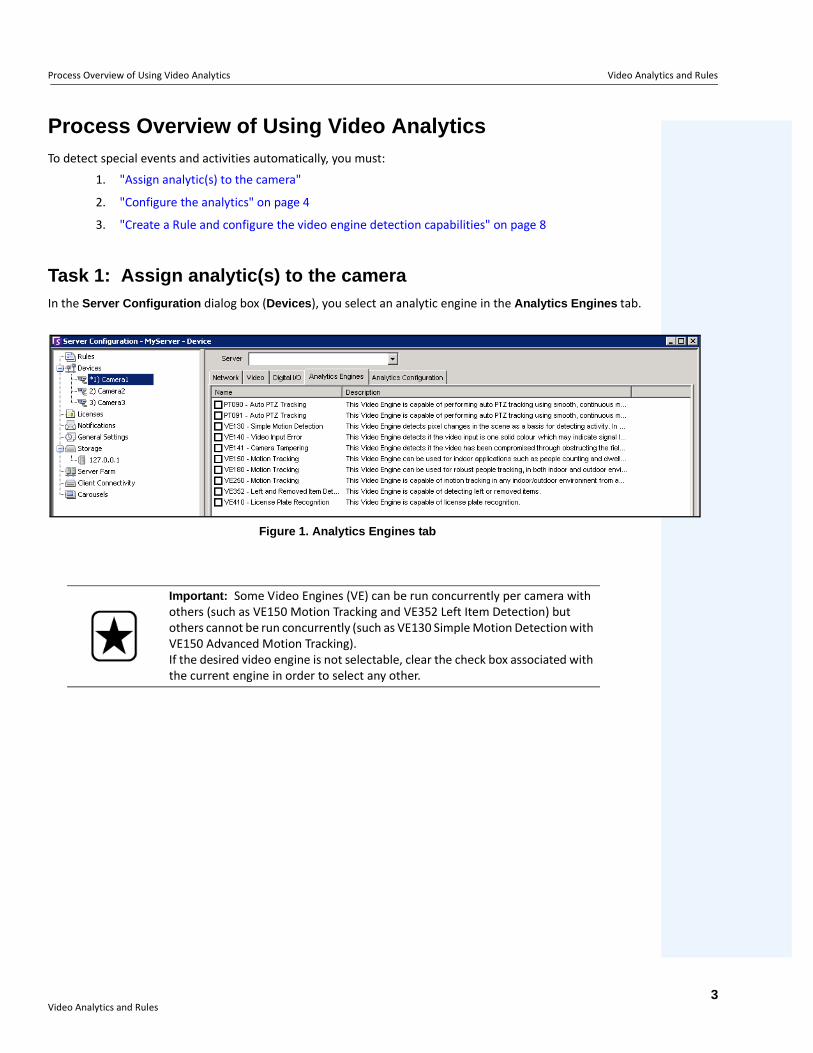
Task 1: Assign analytic(s) to the cameraIn the Server Configuration dialog box (Devices), you select an analytic engine in the Analytics Engines tab.
Figure 1. Analytics Engines tab
Important: Some Video Engines (VE) can be run concurrently per camera with others (such as VE150 Motion Tracking and VE352 Left Item Detection) but others cannot be run concurrently (such as VE130 Simple Motion Detection with VE150 Advanced Motion Tracking). If the desired video engine is not selectable, clear the check box associated with the current engine in order to select any other.
Video Analytics and Rules3
Process Overview of Using Video Analytics Video Analytics and Rules
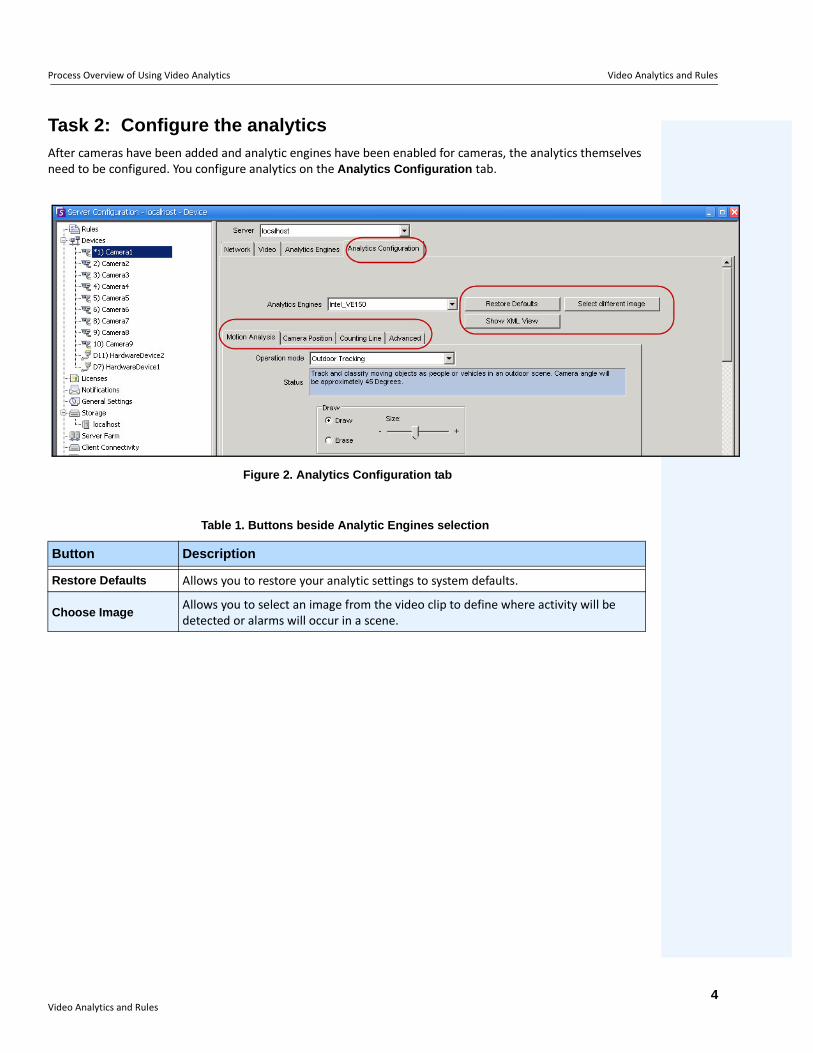
Task 2: Configure the analyticsAfter cameras have been added and analytic engines have been enabled for cameras, the analytics themselves need to be configured. You configure analytics on the Analytics Configuration tab.
Figure 2. Analytics Configuration tab
Table 1. Buttons beside Analytic Engines selection
Button Description
Restore Defaults Allows you to restore your analytic settings to system defaults.
Choose ImageAllows you to select an image from the video clip to define where activity will be detected or alarms will occur in a scene.
Video Analytics and Rules4
Process Overview of Using Video Analytics Video Analytics and Rules
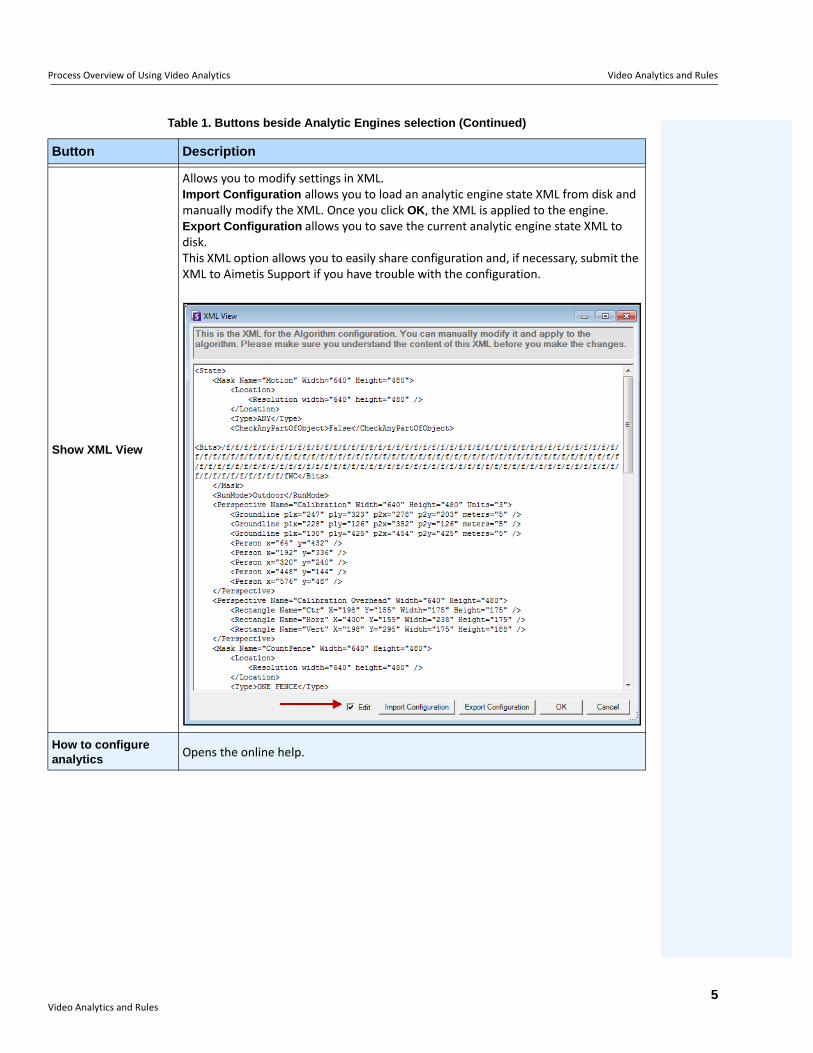
Show XML View
Allows you to modify settings in XML.Import Configuration allows you to load an analytic engine state XML from disk and manually modify the XML. Once you click OK, the XML is applied to the engine. Export Configuration allows you to save the current analytic engine state XML to disk. This XML option allows you to easily share configuration and, if necessary, submit the XML to Aimetis Support if you have trouble with the configuration.
How to configure analytics
Opens the online help.
Table 1. Buttons beside Analytic Engines selection (Continued)
Button Description
Video Analytics and Rules5
Common Settings Video Analytics and Rules
Common Settings
Each video analytic may have slightly different configuration options; however; there are many commonalities:
• " Masks: The Areas Where Symphony Tracks Objects"
• "Analysis FPS"• "Perspective" on page 7
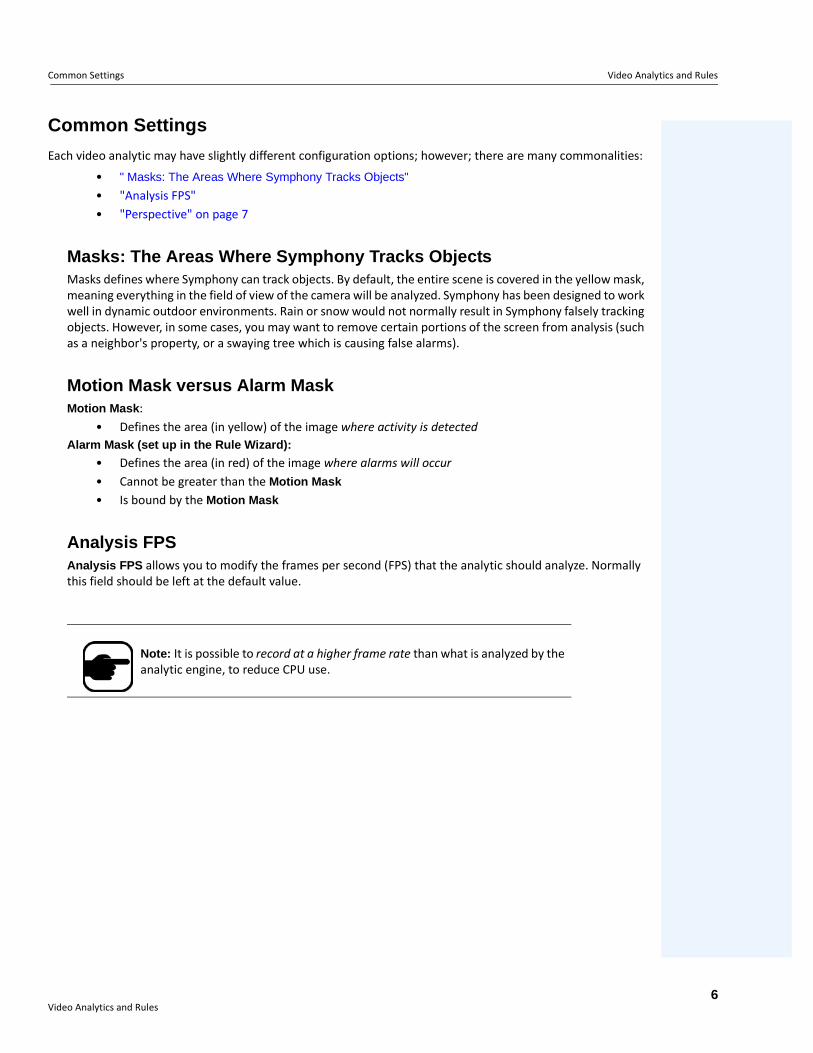
Masks: The Areas Where Symphony Tracks ObjectsMasks defines where Symphony can track objects. By default, the entire scene is covered in the yellow mask, meaning everything in the field of view of the camera will be analyzed. Symphony has been designed to work well in dynamic outdoor environments. Rain or snow would not normally result in Symphony falsely tracking objects. However, in some cases, you may want to remove certain portions of the screen from analysis (such as a neighbor's property, or a swaying tree which is causing false alarms).
Motion Mask versus Alarm MaskMotion Mask:
• Defines the area (in yellow) of the image where activity is detectedAlarm Mask (set up in the Rule Wizard):
• Defines the area (in red) of the image where alarms will occur• Cannot be greater than the Motion Mask
• Is bound by the Motion Mask
Analysis FPSAnalysis FPS allows you to modify the frames per second (FPS) that the analytic should analyze. Normally this field should be left at the default value.
Note: It is possible to record at a higher frame rate than what is analyzed by the analytic engine, to reduce CPU use.
Video Analytics and Rules6
Common Settings Video Analytics and Rules
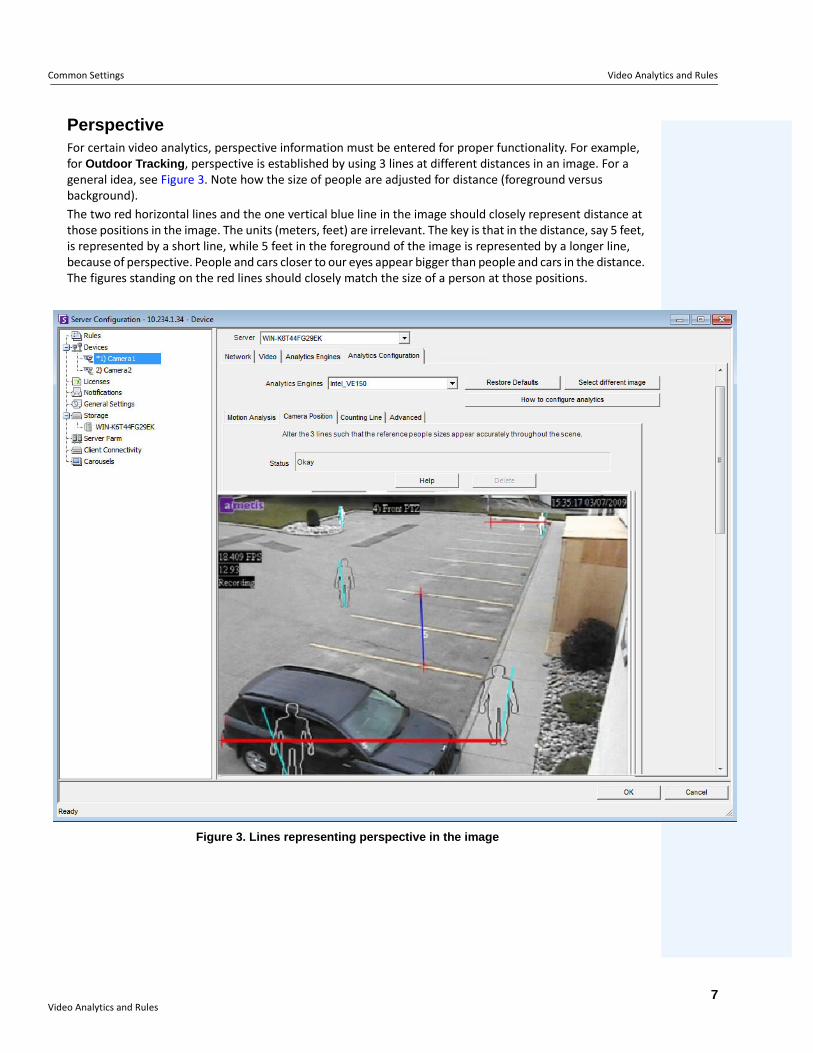
PerspectiveFor certain video analytics, perspective information must be entered for proper functionality. For example, for Outdoor Tracking, perspective is established by using 3 lines at different distances in an image. For a general idea, see Figure 3. Note how the size of people are adjusted for distance (foreground versus background).The two red horizontal lines and the one vertical blue line in the image should closely represent distance at those positions in the image. The units (meters, feet) are irrelevant. The key is that in the distance, say 5 feet, is represented by a short line, while 5 feet in the foreground of the image is represented by a longer line, because of perspective. People and cars closer to our eyes appear bigger than people and cars in the distance. The figures standing on the red lines should closely match the size of a person at those positions.
Figure 3. Lines representing perspective in the image
Video Analytics and Rules7
Common Settings Video Analytics and Rules
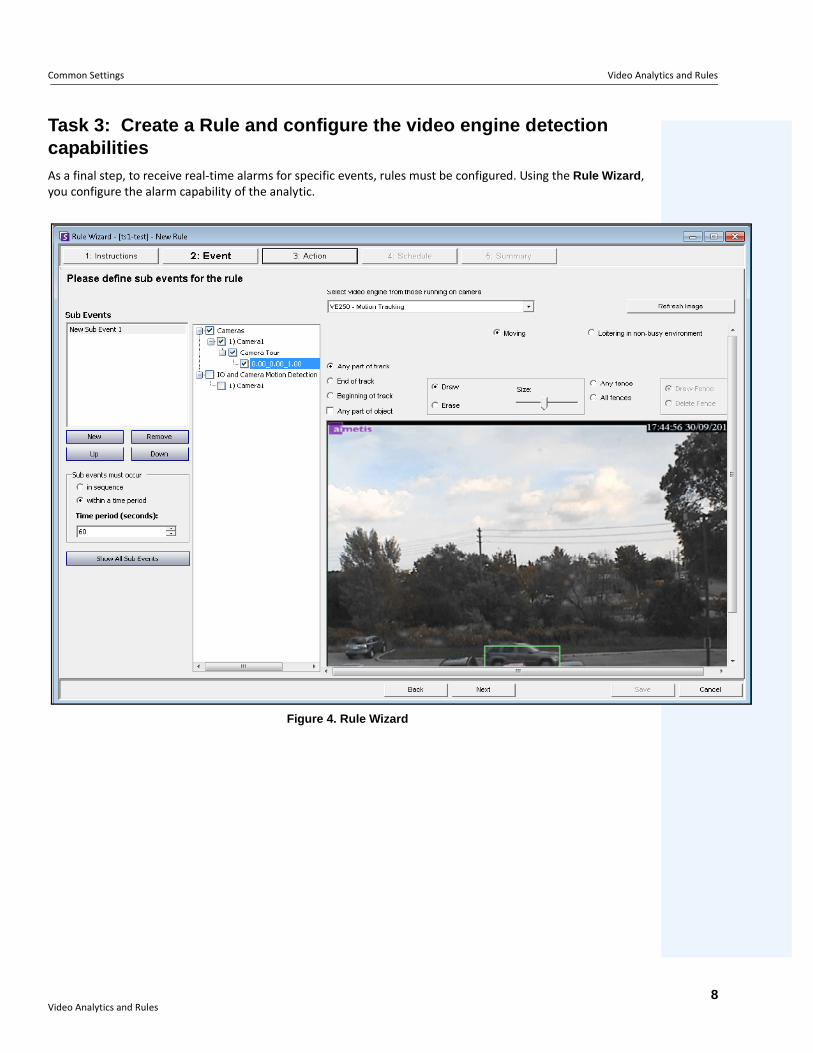
Task 3: Create a Rule and configure the video engine detection capabilitiesAs a final step, to receive real-time alarms for specific events, rules must be configured. Using the Rule Wizard, you configure the alarm capability of the analytic.
Figure 4. Rule Wizard
Video Analytics and Rules8
Tracking Color Video Analytics and Rules
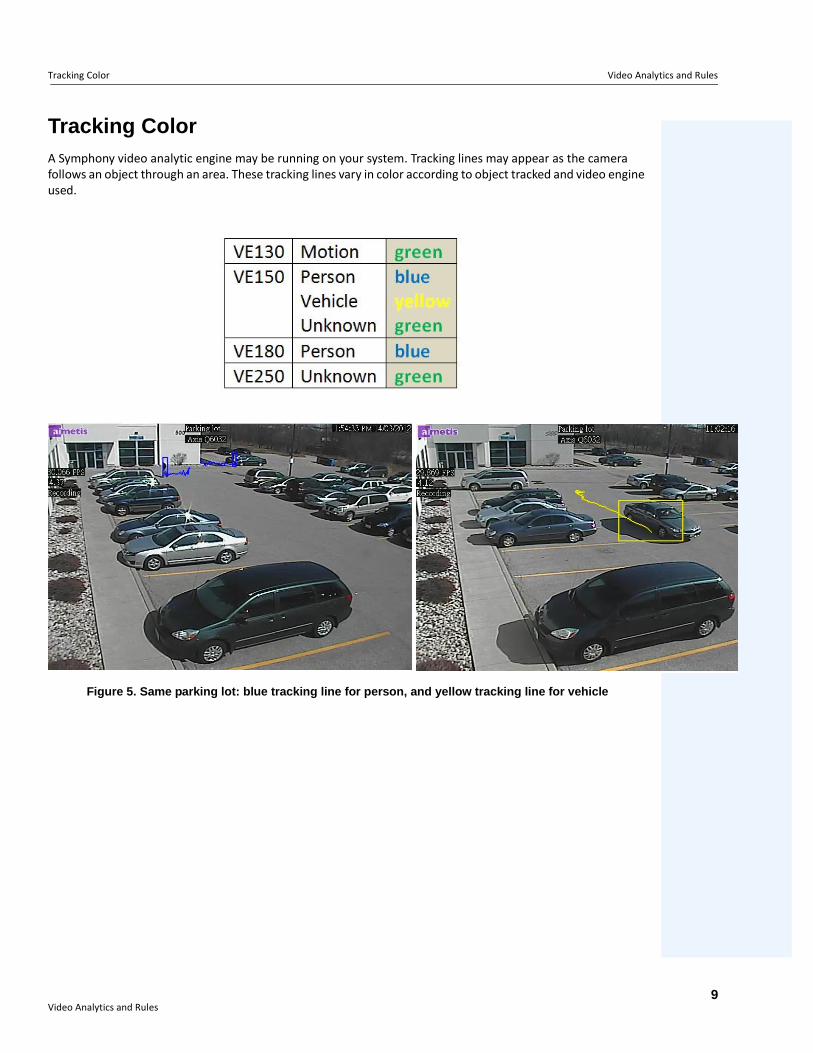
Tracking ColorA Symphony video analytic engine may be running on your system. Tracking lines may appear as the camera follows an object through an area. These tracking lines vary in color according to object tracked and video engine used.
Figure 5. Same parking lot: blue tracking line for person, and yellow tracking line for vehicle
Video Analytics and Rules9
Video Analytic Instructions and Creating Rules Video Analytics and Rules
Video Analytic Instructions and Creating Rules
Links to Instructions
"VE130 - Video Motion Detection" on page 11
"VE140 - Video Input Error" on page 14
"VE141 - Camera Tampering" on page 15
"VE150 - Advanced Motion Tracking" on page 17
"VE180 - Indoor/Outdoor People Tracking" on page 34
"VE250 - Motion Tracking" on page 59
"VE352 - Left and Removed Item Detection" on page 61
"PT091 and PT090- Automatic PTZ Tracking" on page 67
"VE410 - License Plate Recognition" on page 79
"Rules - Using the Rule Wizard" on page 80
Video Analytics and Rules10
VE130 - Video Motion Detection Video Analytics and Rules
VE130 - Video Motion DetectionThe VE130 is a good choice in indoor environments where only motion is to be detected and the type of object or object count is not required. The VE130 is a good alternative over camera based motion detection due to its simplified configuration and higher accuracy. Camera position is not heavily constrained, making VE130 a good general purpose video engine in many applications. If you require object counting or dwell time, use the VE150. For outdoor environments, also use VE150 as shadows or lighting changes will cause VE130 to function inaccurately.
Task 1: Configure VE130
Procedure
To configure the VE130:
1. In Symphony Client, from the Server menu, select Configuration. The Configuration dialog box opens. This allows you to configure devices for the currently selected server.
2. In the left pane, click Devices. The Devices dialog box opens.
3. Click the camera you want to configure for use with video analytics and click Edit.
4. Click the Analytics Engines tab and select VE130. By default VE250 is selected, in which case you must first deselect VE250.
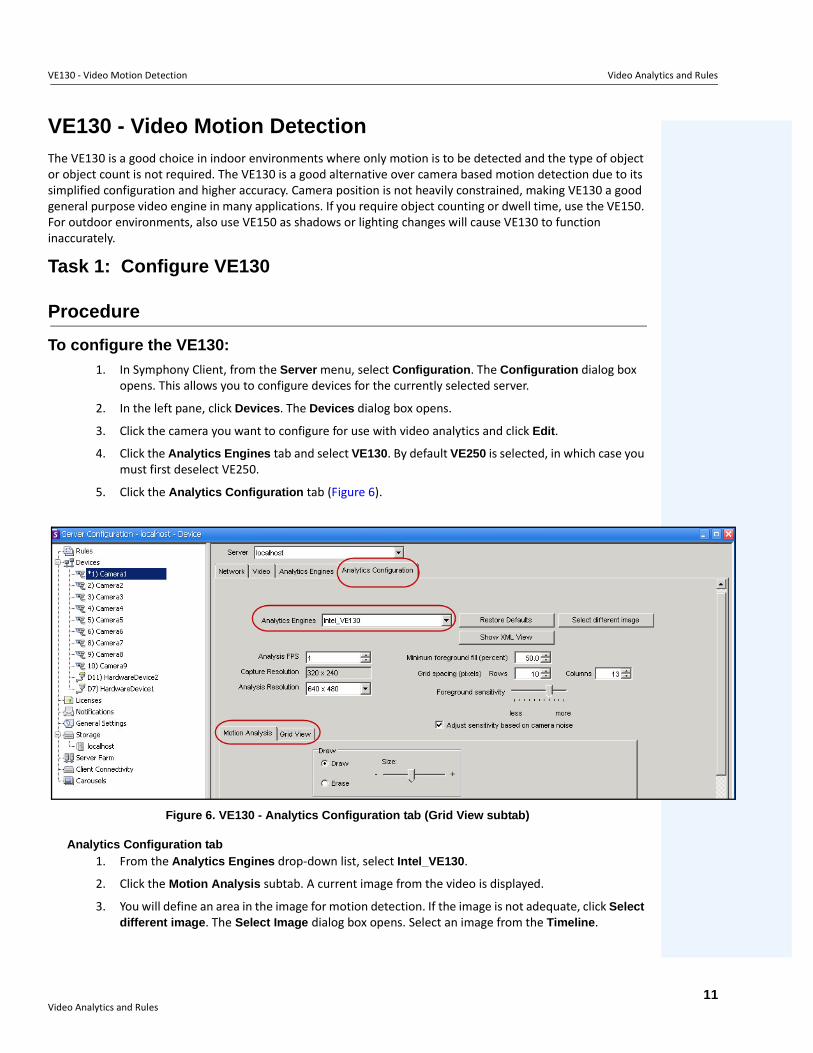
5. Click the Analytics Configuration tab (Figure 6).
Figure 6. VE130 - Analytics Configuration tab (Grid View subtab)
Analytics Configuration tab
1. From the Analytics Engines drop-down list, select Intel_VE130.
2. Click the Motion Analysis subtab. A current image from the video is displayed.
3. You will define an area in the image for motion detection. If the image is not adequate, click Select different image. The Select Image dialog box opens. Select an image from the Timeline.
Video Analytics and Rules11
VE130 - Video Motion Detection Video Analytics and Rules
4. Using the displayed image from the video, define the area in yellow (a mask) where objects in motion should be detected. (Not sure of the concept? See "Masks: The Areas Where Symphony Tracks Objects" on page 6.)
• Select the Erase option to erase the yellow mask.• Select the Draw option to draw the yellow mask. • The Size slider adjusts the pen thickness.
5. (Optional) You can adjust the following specifications:
6. Click the Grid View tab and adjust the following specifications as necessary.
7. Click OK to save settings.
Analysis FPSFrame rate at which the video engine analyzes frames. Can be set lower than the record frame rate.
Capture Resolution
Displays the resolution at which the video is being recorded. This can be changed in the Device setup.
Analysis Resolution
Resolution which is used to analyze frames. Normally this is lower than Capture Resolution to conserve CPU.
Minimum foreground fill (percent)The scene is divided into a grid. This value specifies how much each grid square must change (in %) before activity is detected in this square.
Grid spacing (pixels) Defines grid spacing as Rows and Columns.
Foreground sensitivityDefines how sensitive the video engine should be to scene change. The more sensitive it is to change, the more likely the minimum foreground fill will detect activity in the grid space.
Adjust sensitivity based on camera noise
Video Analytics and Rules12
VE130 - Video Motion Detection Video Analytics and Rules
Task 2: Create a Rule using VE130
Procedure
To configure a Rule using the VE130:
1. From the Server menu, select Configuration and then Rules.
2. Click New. The Rule Wizard opens. Read the overview and click Next.
3. Select the check box next to the camera name. If it is a PTZ camera, select the camera tour position check box.
4. From the Select video engine for those running on camera drop-down list, select VE130 - Simple Motion Detection.
5. Using the displayed image from the video, define the area in red (a mask) where alarms should be set. (Not sure of the concept? See "Motion Mask versus Alarm Mask" on page 6.)
• Select the Erase option to erase the red mask.• Select the Draw option to draw the red mask. • The Size slider adjusts the pen thickness.
6. (Optional) Sub Events - see Rules content
7. Click Next to continue in the Rule Wizard. Set up the rules as per concepts and instructions in "Rules - Using the Rule Wizard" on page 80.
TroubleshootingIf too many false alarms are caused by shadows, rain, or other environmental conditions, use the VE150.
Important: Although the VE130 engine requires less CPU than other video engines, the video still needs to be decompressed in the server for analysis. As a result, the CPU savings are limited.
Video Analytics and Rules13
VE140 - Video Input Error Video Analytics and Rules
VE140 - Video Input ErrorThe VE140 analytic is designed to detect video signal loss. It is a good idea to run the VE140 on all cameras. This analytic is environment independent. The VE140 requires minimal CPU.
Task 1: Configure VE140
Procedure
To configure the VE140:
1. In Symphony Client, from the Server menu, select Configuration. The Configuration dialog box opens. This allows you to configure devices for the currently selected server.
2. In the left pane, click Devices. The Devices dialog box opens.
3. Click the camera you want to configure for use with video analytics and click Edit.
4. Click the Analytics Engines tab and select VE140. (Optional) By default VE250 is selected, in which case you must first deselect VE250.
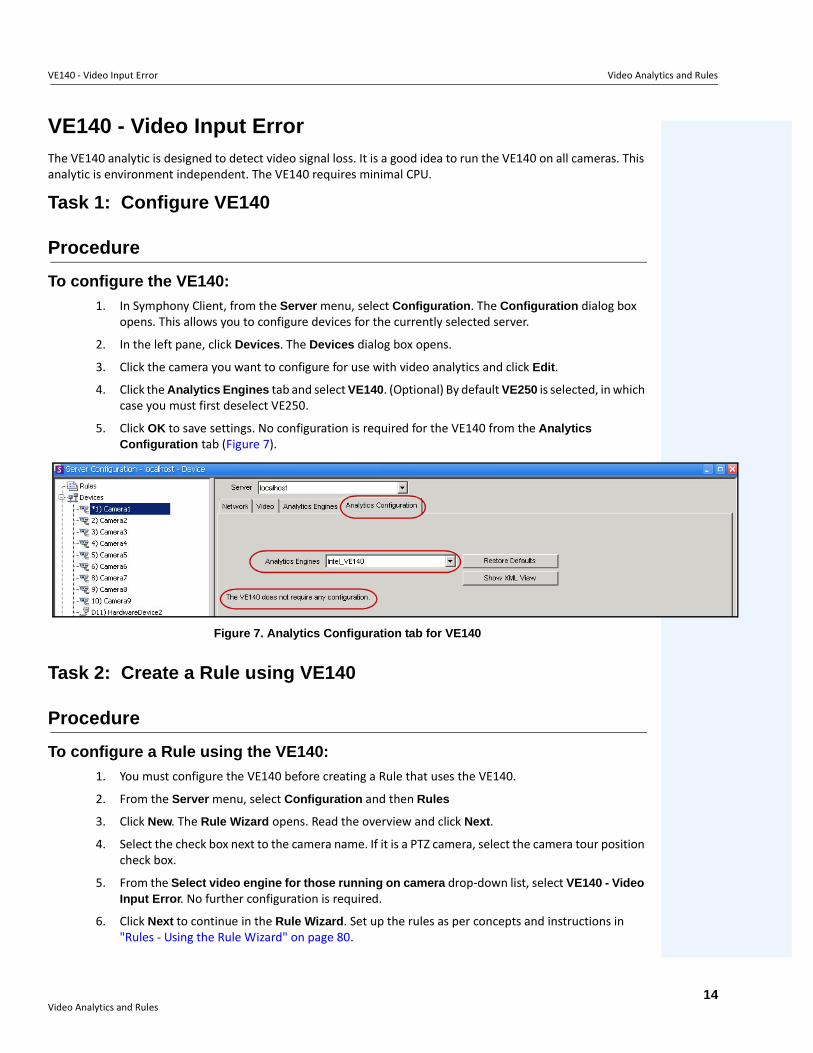
5. Click OK to save settings. No configuration is required for the VE140 from the Analytics Configuration tab (Figure 7).
Figure 7. Analytics Configuration tab for VE140
Task 2: Create a Rule using VE140
Procedure
To configure a Rule using the VE140:
1. You must configure the VE140 before creating a Rule that uses the VE140.
2. From the Server menu, select Configuration and then Rules
3. Click New. The Rule Wizard opens. Read the overview and click Next.
4. Select the check box next to the camera name. If it is a PTZ camera, select the camera tour position check box.
5. From the Select video engine for those running on camera drop-down list, select VE140 - Video Input Error. No further configuration is required.
6. Click Next to continue in the Rule Wizard. Set up the rules as per concepts and instructions in "Rules - Using the Rule Wizard" on page 80.
Video Analytics and Rules14
VE141 - Camera Tampering Video Analytics and Rules
VE141 - Camera TamperingThe VE141 Camera Tampering Engine is designed to detect when the field of view is obstructed. This can occur if the camera has been moved, if the lens is spray painted, or if a large object is placed in front of the camera. This is a general purpose analytic and should normally run on each camera.
Task 1: Configure VE141
Procedure
To configure the VE141:
1. In Symphony Client, from the Server menu, select Configuration. The Configuration dialog box opens. This allows you to configure devices for the currently selected server.
2. In the left pane, click Devices. The Devices dialog box opens.
3. Click the camera you want to configure for use with video analytics and click Edit.
4. Click the Analytics Engines tab and select VE141. (Optional) By default VE250 is selected, in which case you must first deselect VE250.
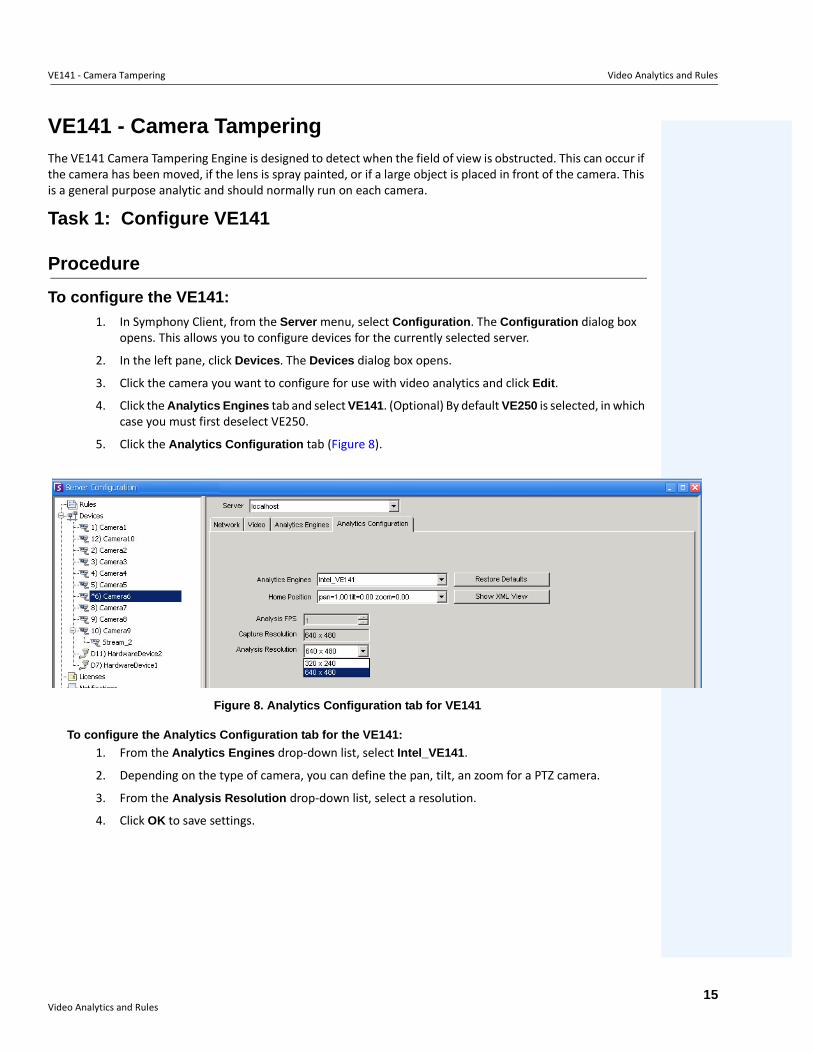
5. Click the Analytics Configuration tab (Figure 8).
Figure 8. Analytics Configuration tab for VE141
To configure the Analytics Configuration tab for the VE141:
1. From the Analytics Engines drop-down list, select Intel_VE141.
2. Depending on the type of camera, you can define the pan, tilt, an zoom for a PTZ camera.
3. From the Analysis Resolution drop-down list, select a resolution.
4. Click OK to save settings.
Video Analytics and Rules15
VE141 - Camera Tampering Video Analytics and Rules
Task 2: Create a Rule using VE141
Procedure
To configure a Rule using the VE141:
1. You must configure the VE141 before creating a Rule that uses the VE141.
2. From the Server menu, select Configuration and then Rules
3. Click New. The Rule Wizard opens. Read the overview and click Next.
4. Select the check box next to the camera name. If it is a PTZ camera, select the camera tour position check box.
5. From the Select video engine for those running on camera drop-down list, select VE141 - Camera Tampering. No further configuration is required.
6. Click Next to continue in the Rule Wizard. Set up the rules as per concepts and instructions in "Rules - Using the Rule Wizard" on page 80.
Video Analytics and Rules16
VE150 - Advanced Motion Tracking Video Analytics and Rules
VE150 - Advanced Motion TrackingThe VE150 is a good choice for indoor and outdoor motion tracking applications. The engine can classify the difference between people and vehicles, and can detect if the object is stopping, starting, or simply moving through the scene. Alarm rules can therefore be designed around these features.
Typical deployments include:
• commercial buildings, where people or vehicles are to be detected, • military bases, where objects entering an alarm zone or crossing a pre-defined perimeter should
be detected, or• for car dealers and construction sites, where full time security guards are not a cost effective
approach to detecting people or vehicles after hours.
The VE150 will produce far fewer false alarms caused by a changing outdoor environment as compared to normal motion detection algorithms. Different VE150 modes of operation are available, which can be used for indoor people counting and dwell time applications.
Task 1: Configure VE150
Procedure
To configure the VE150:
1. In Symphony Client, from the Server menu, select Configuration. The Configuration dialog box opens. This allows you to configure devices for the currently selected server.
2. In the left pane, click Devices. The Devices dialog box opens.
3. Click the camera you want to configure for use with video analytics and click Edit.
4. Click the Analytics Engines tab and select VE150. By default VE250 is selected, in which case you must first deselect VE250.
5. Click the Analytics Configuration tab (Figure on page 18).
Video Analytics and Rules17
VE150 - Advanced Motion Tracking Video Analytics and Rules
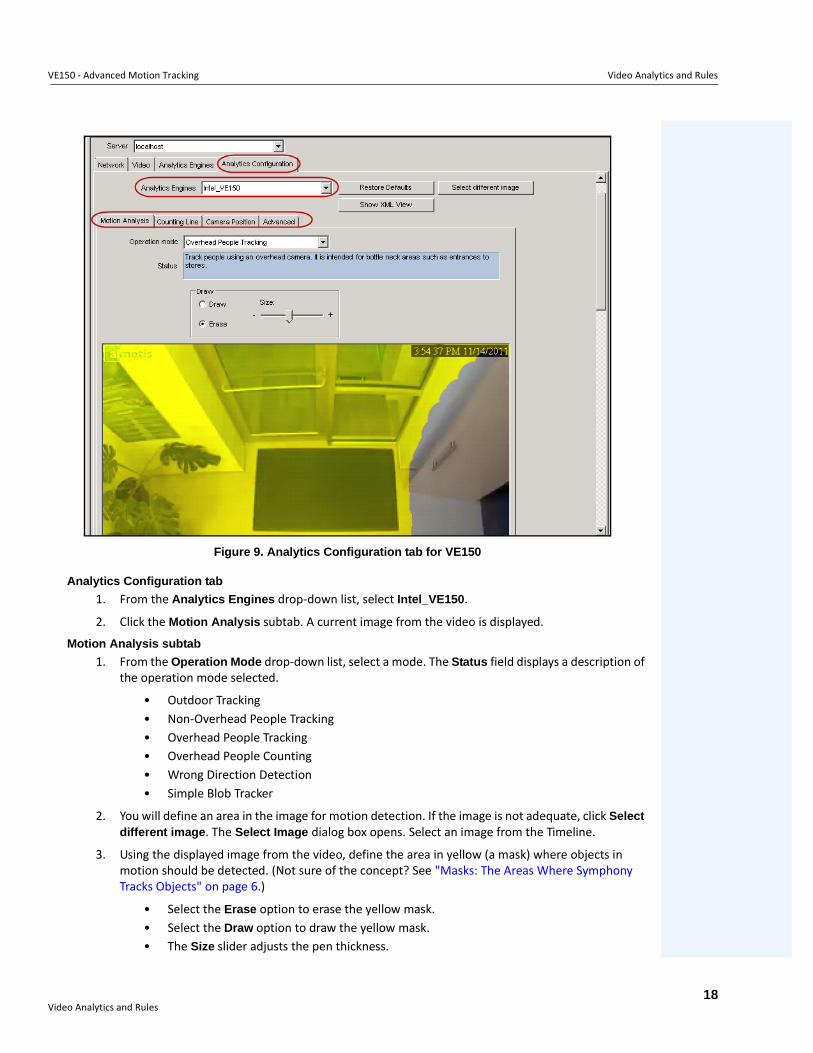
Figure 9. Analytics Configuration tab for VE150
Analytics Configuration tab
1. From the Analytics Engines drop-down list, select Intel_VE150.
2. Click the Motion Analysis subtab. A current image from the video is displayed.
Motion Analysis subtab
1. From the Operation Mode drop-down list, select a mode. The Status field displays a description of the operation mode selected.
• Outdoor Tracking• Non-Overhead People Tracking• Overhead People Tracking• Overhead People Counting• Wrong Direction Detection• Simple Blob Tracker
2. You will define an area in the image for motion detection. If the image is not adequate, click Select different image. The Select Image dialog box opens. Select an image from the Timeline.
3. Using the displayed image from the video, define the area in yellow (a mask) where objects in motion should be detected. (Not sure of the concept? See "Masks: The Areas Where Symphony Tracks Objects" on page 6.)
• Select the Erase option to erase the yellow mask.• Select the Draw option to draw the yellow mask. • The Size slider adjusts the pen thickness.
Video Analytics and Rules18
VE150 - Advanced Motion Tracking Video Analytics and Rules
Camera Position subtab
1. Click the Camera Position subtab. Depending on which Operating Mode you selected in the Motion Analysis subtab, the Camera Position options will vary.
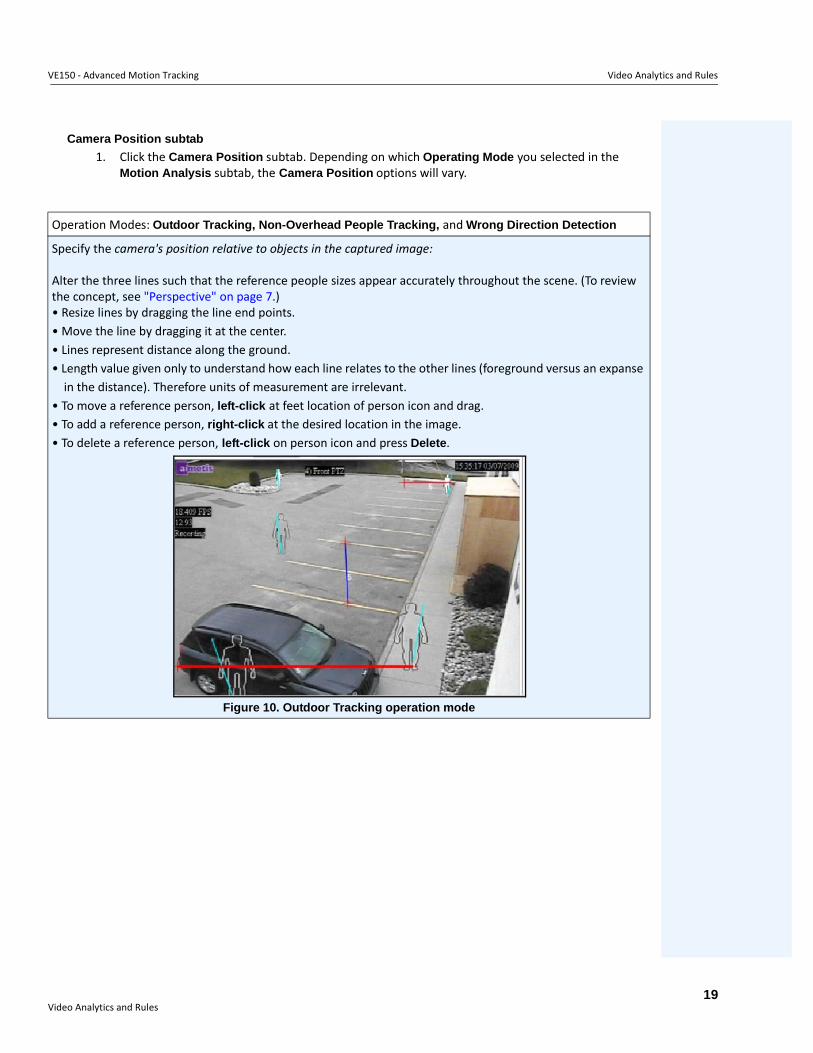
Operation Modes: Outdoor Tracking, Non-Overhead People Tracking, and Wrong Direction Detection
Specify the camera's position relative to objects in the captured image:
Alter the three lines such that the reference people sizes appear accurately throughout the scene. (To review the concept, see "Perspective" on page 7.)• Resize lines by dragging the line end points.• Move the line by dragging it at the center.• Lines represent distance along the ground.• Length value given only to understand how each line relates to the other lines (foreground versus an expanse
in the distance). Therefore units of measurement are irrelevant.• To move a reference person, left-click at feet location of person icon and drag.• To add a reference person, right-click at the desired location in the image.• To delete a reference person, left-click on person icon and press Delete.
Figure 10. Outdoor Tracking operation mode
Video Analytics and Rules19
VE150 - Advanced Motion Tracking Video Analytics and Rules
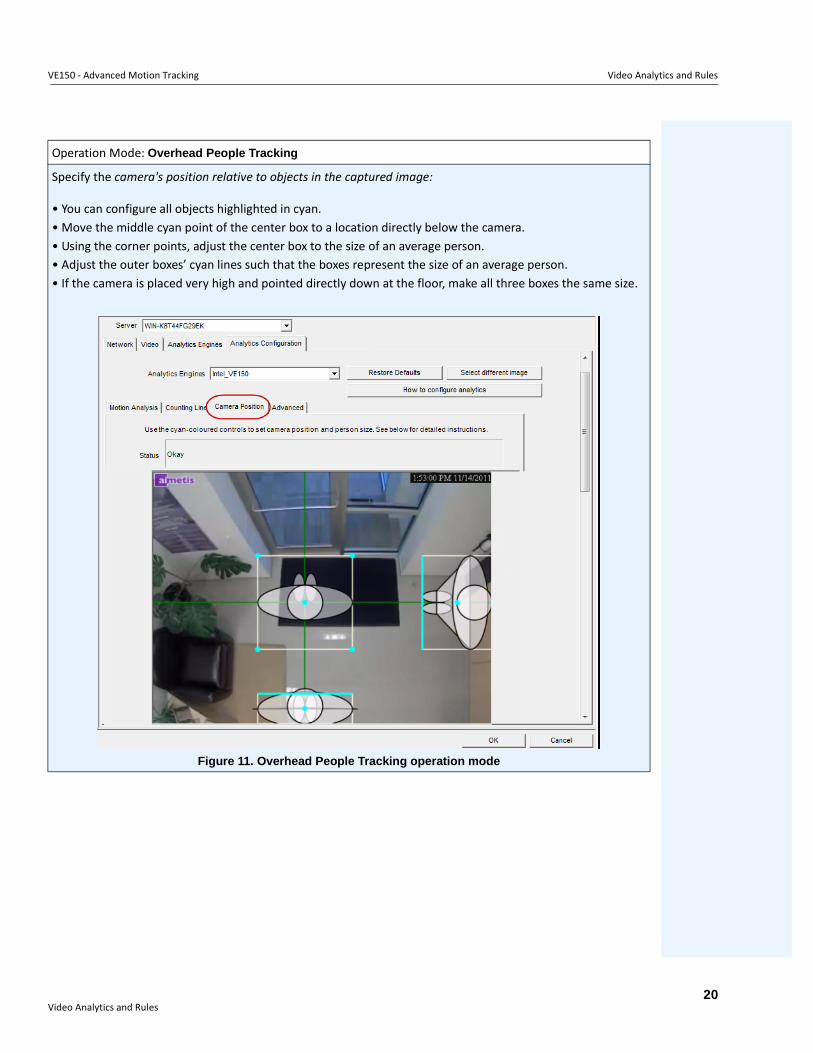
Operation Mode: Overhead People Tracking
Specify the camera's position relative to objects in the captured image:
• You can configure all objects highlighted in cyan.• Move the middle cyan point of the center box to a location directly below the camera.• Using the corner points, adjust the center box to the size of an average person.• Adjust the outer boxes’ cyan lines such that the boxes represent the size of an average person.• If the camera is placed very high and pointed directly down at the floor, make all three boxes the same size.
Figure 11. Overhead People Tracking operation mode
Video Analytics and Rules20
VE150 - Advanced Motion Tracking Video Analytics and Rules
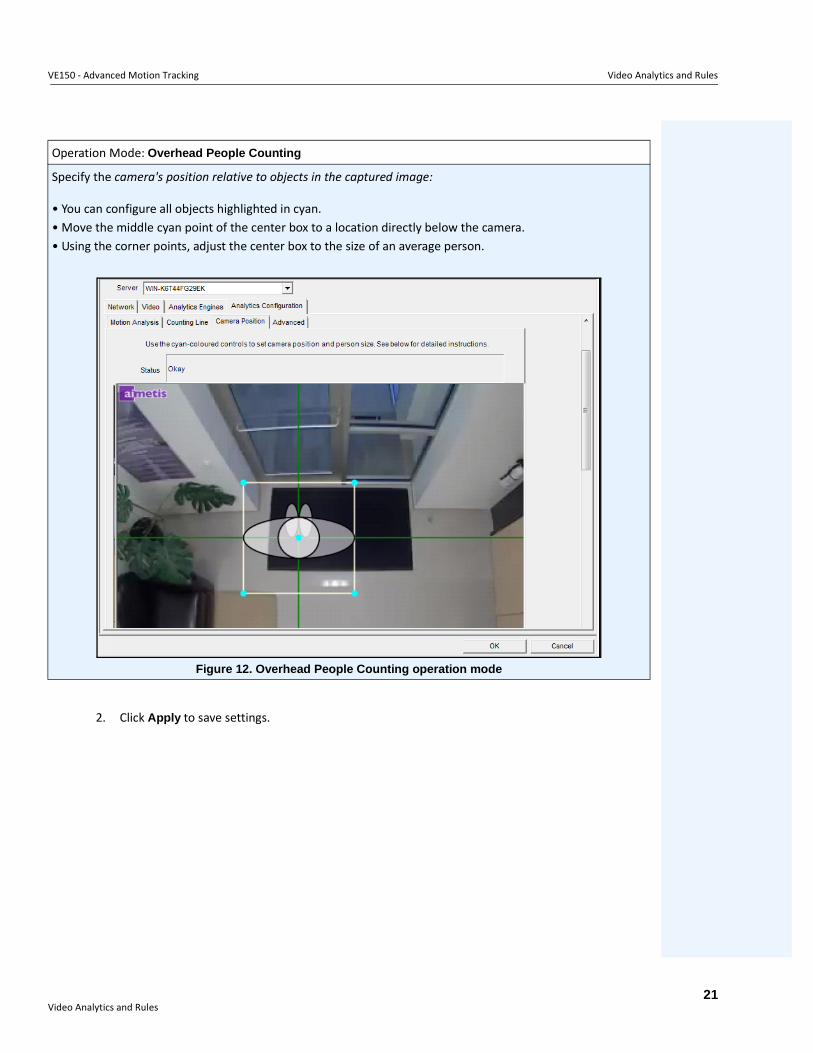
2. Click Apply to save settings.
Operation Mode: Overhead People Counting
Specify the camera's position relative to objects in the captured image:
• You can configure all objects highlighted in cyan.• Move the middle cyan point of the center box to a location directly below the camera.• Using the corner points, adjust the center box to the size of an average person.
Figure 12. Overhead People Counting operation mode
Video Analytics and Rules21
VE150 - Advanced Motion Tracking Video Analytics and Rules
Counting Line subtab (display based on Operation Mode)
1. Ensure the Camera Position and Motion Analysis mask is set properly and then click the Counting Line subtab.
2. By default, the Draw Counting Line option is selected.
3. Left-click on the image and draw a line that will cause items (people or cars) to be counted as they pass the delineated area.
• The line appears with arrows indicating when movement is detected as In to a delineated area and Out of the delineated area.
4. Click OK to save settings or click the Advanced subtab for further settings.
Advanced subtab
1. Enter a frame per second value in the Analysis FPS field.
• This value indicates how many frames will be analyzed by the system. Typically the default value should not be altered. However, there may be cases where the analysis frame rate can be reduced to conserve CPU. Doing this may negatively alter the algorithms performance.
• Like the Analysis Resolution, the Analysis FPS can be set to a different value than the Record FPS.
2. Set the Analysis Resolution as required.
• Setting the Analysis Resolution the same as the Capture Resolution ensures that objects will be detected as far away as possible. However, in order to conserve CPU resources it is possible to down sample the video sent for analysis. Downsampling will reduce CPU requirements but may also reduce the detection range of the video analytic.
3. From the Background Model drop-down list, select the model that best represents the environment the camera is recording (for example, a high movement area). For a complete description of usage, see Table 2 on page 23.
Important: The Advanced subtab settings are for experts only. Values should be changed only in cases where the analytic engine is not functioning as expected.
Important: Adjusting the Background Model is usually the best way to reduce false alarms. (It requires more CPU.)
Video Analytics and Rules22
VE150 - Advanced Motion Tracking Video Analytics and Rules
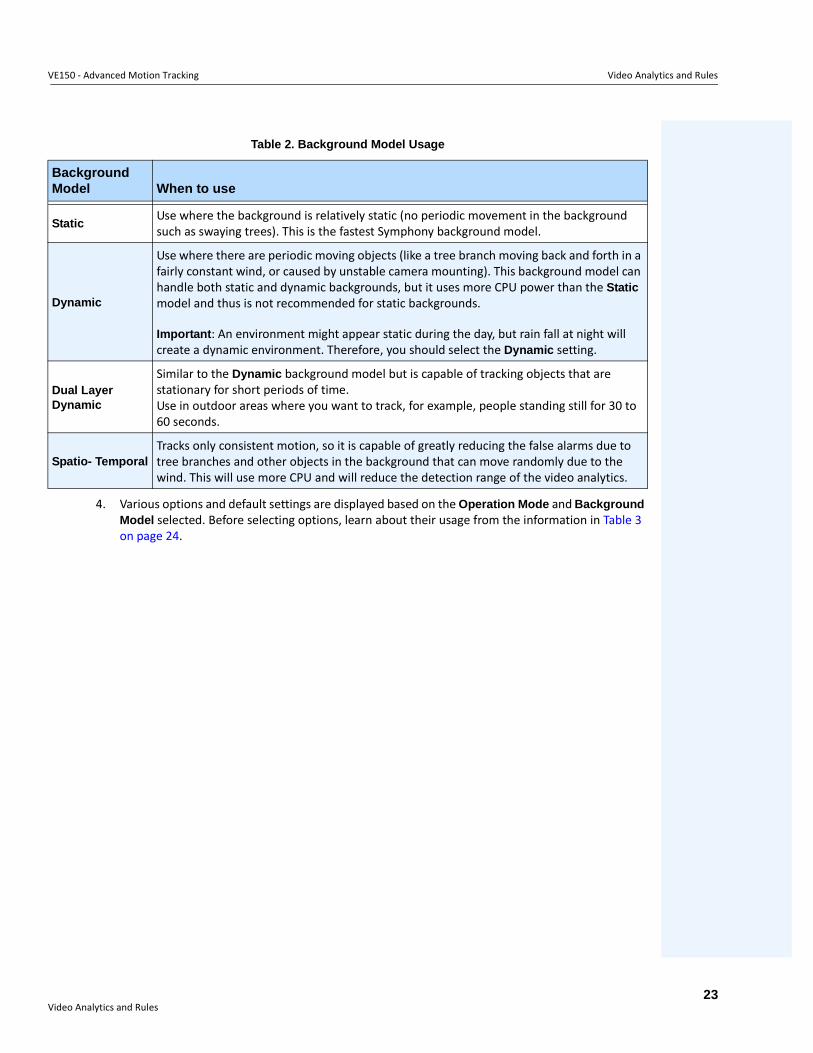
4. Various options and default settings are displayed based on the Operation Mode and Background Model selected. Before selecting options, learn about their usage from the information in Table 3 on page 24.
Table 2. Background Model Usage
Background Model When to use
StaticUse where the background is relatively static (no periodic movement in the background such as swaying trees). This is the fastest Symphony background model.
Dynamic
Use where there are periodic moving objects (like a tree branch moving back and forth in a fairly constant wind, or caused by unstable camera mounting). This background model can handle both static and dynamic backgrounds, but it uses more CPU power than the Static model and thus is not recommended for static backgrounds.
Important: An environment might appear static during the day, but rain fall at night will create a dynamic environment. Therefore, you should select the Dynamic setting.
Dual Layer Dynamic
Similar to the Dynamic background model but is capable of tracking objects that are stationary for short periods of time. Use in outdoor areas where you want to track, for example, people standing still for 30 to 60 seconds.
Spatio- TemporalTracks only consistent motion, so it is capable of greatly reducing the false alarms due to tree branches and other objects in the background that can move randomly due to the wind. This will use more CPU and will reduce the detection range of the video analytics.
Video Analytics and Rules23
VE150 - Advanced Motion Tracking Video Analytics and Rules
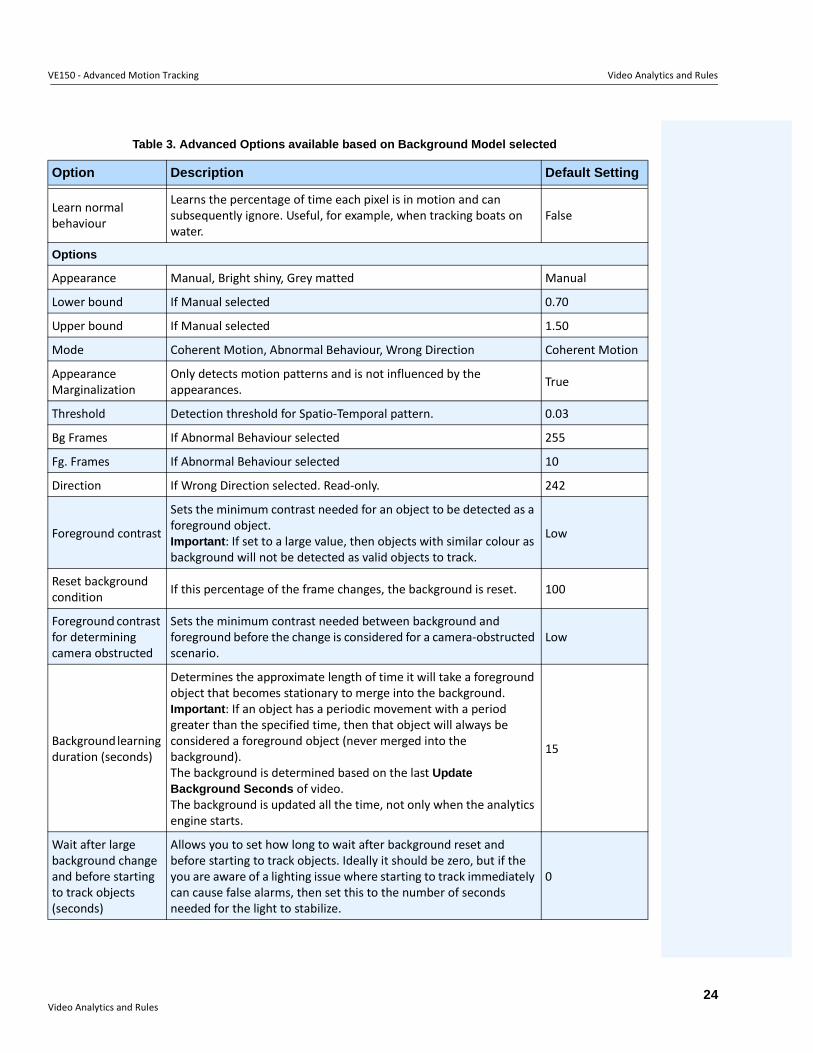
Table 3. Advanced Options available based on Background Model selected
Option Description Default Setting
Learn normal behaviour
Learns the percentage of time each pixel is in motion and can subsequently ignore. Useful, for example, when tracking boats on water.
False
Options
Appearance Manual, Bright shiny, Grey matted Manual
Lower bound If Manual selected 0.70
Upper bound If Manual selected 1.50
Mode Coherent Motion, Abnormal Behaviour, Wrong Direction Coherent Motion
Appearance Marginalization
Only detects motion patterns and is not influenced by the appearances. True
Threshold Detection threshold for Spatio-Temporal pattern. 0.03
Bg Frames If Abnormal Behaviour selected 255
Fg. Frames If Abnormal Behaviour selected 10
Direction If Wrong Direction selected. Read-only. 242
Foreground contrast
Sets the minimum contrast needed for an object to be detected as a foreground object. Important: If set to a large value, then objects with similar colour as background will not be detected as valid objects to track.
Low
Reset background condition If this percentage of the frame changes, the background is reset. 100
Foreground contrast for determining camera obstructed
Sets the minimum contrast needed between background and foreground before the change is considered for a camera-obstructed scenario.
Low
Background learning duration (seconds)
Determines the approximate length of time it will take a foreground object that becomes stationary to merge into the background. Important: If an object has a periodic movement with a period greater than the specified time, then that object will always be considered a foreground object (never merged into the background). The background is determined based on the last Update Background Seconds of video. The background is updated all the time, not only when the analytics engine starts.
15
Wait after large background change and before starting to track objects (seconds)
Allows you to set how long to wait after background reset and before starting to track objects. Ideally it should be zero, but if the you are aware of a lighting issue where starting to track immediately can cause false alarms, then set this to the number of seconds needed for the light to stabilize.
0
Video Analytics and Rules24
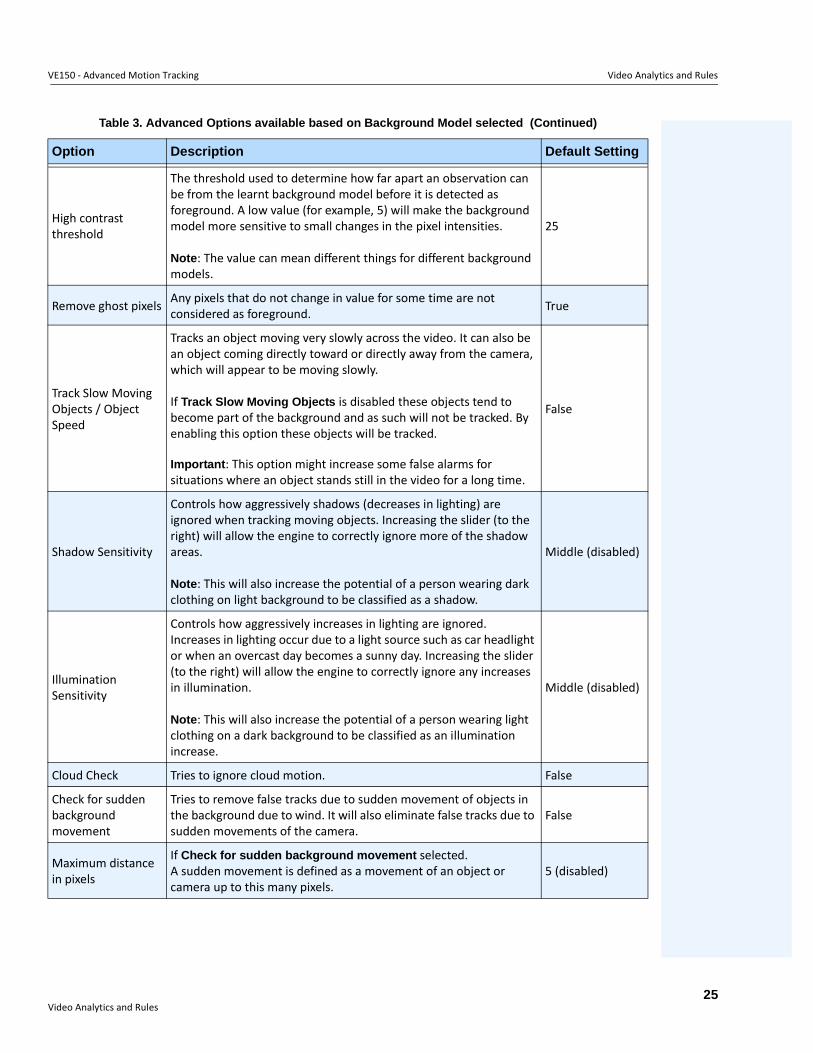
VE150 - Advanced Motion Tracking Video Analytics and Rules
High contrast threshold
The threshold used to determine how far apart an observation can be from the learnt background model before it is detected as foreground. A low value (for example, 5) will make the background model more sensitive to small changes in the pixel intensities.
Note: The value can mean different things for different background models.
25
Remove ghost pixels Any pixels that do not change in value for some time are not considered as foreground. True
Track Slow Moving Objects / Object Speed
Tracks an object moving very slowly across the video. It can also be an object coming directly toward or directly away from the camera, which will appear to be moving slowly.
If Track Slow Moving Objects is disabled these objects tend to become part of the background and as such will not be tracked. By enabling this option these objects will be tracked.
Important: This option might increase some false alarms for situations where an object stands still in the video for a long time.
False
Shadow Sensitivity
Controls how aggressively shadows (decreases in lighting) are ignored when tracking moving objects. Increasing the slider (to the right) will allow the engine to correctly ignore more of the shadow areas.
Note: This will also increase the potential of a person wearing dark clothing on light background to be classified as a shadow.
Middle (disabled)
Illumination Sensitivity
Controls how aggressively increases in lighting are ignored. Increases in lighting occur due to a light source such as car headlight or when an overcast day becomes a sunny day. Increasing the slider (to the right) will allow the engine to correctly ignore any increases in illumination.
Note: This will also increase the potential of a person wearing light clothing on a dark background to be classified as an illumination increase.
Middle (disabled)
Cloud Check Tries to ignore cloud motion. False
Check for sudden background movement
Tries to remove false tracks due to sudden movement of objects in the background due to wind. It will also eliminate false tracks due to sudden movements of the camera.
False
Maximum distance in pixels
If Check for sudden background movement selected.A sudden movement is defined as a movement of an object or camera up to this many pixels.
5 (disabled)
Table 3. Advanced Options available based on Background Model selected (Continued)
Option Description Default Setting
Video Analytics and Rules25
VE150 - Advanced Motion Tracking Video Analytics and Rules
Time to clear long-term background (seconds)
Only available for Codebook (Dual-Dynamic) background model. False (disabled)
Time to clear short-term background (seconds)
Only available for Codebook (Dual-Dynamic) background model. False (disabled)
Time to move short-term background to long-term (seconds)
Only available for Codebook (Dual-Dynamic) background model. False (disabled)
Initial background model learn time (seconds)
Only available for Codebook (Dual-Dynamic) background model. False (disabled)
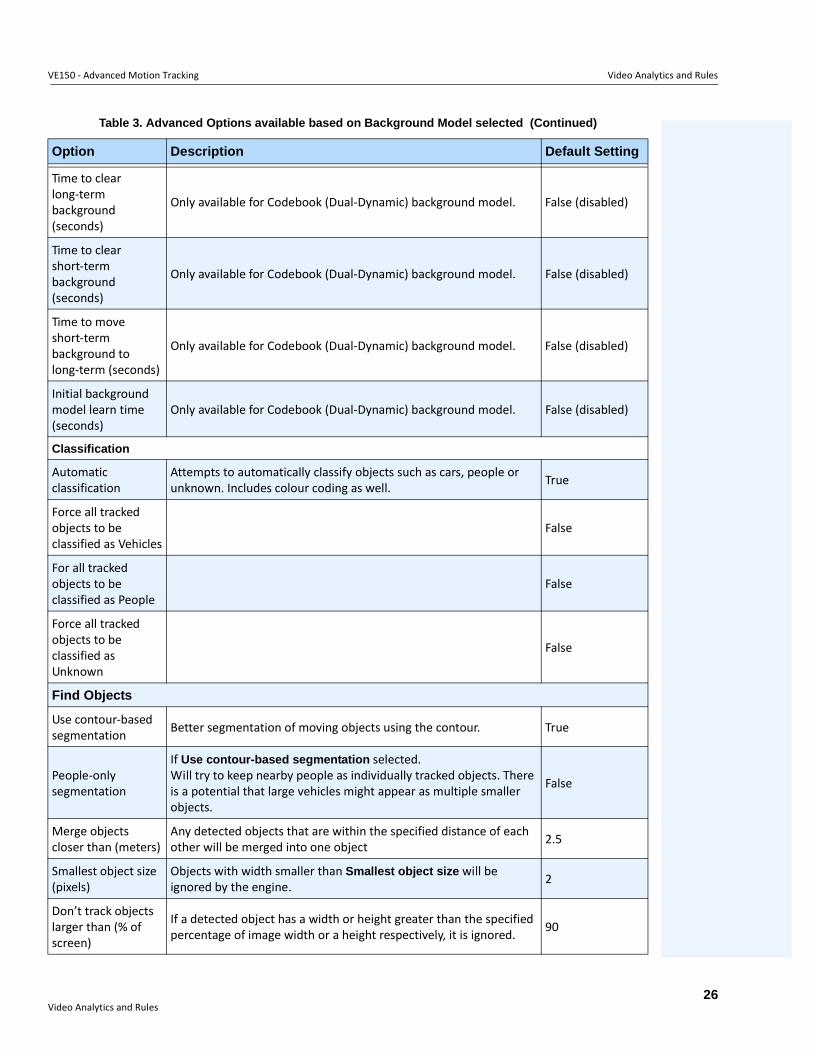
Classification
Automatic classification
Attempts to automatically classify objects such as cars, people or unknown. Includes colour coding as well. True
Force all tracked objects to be classified as Vehicles
False
For all tracked objects to be classified as People
False
Force all tracked objects to be classified as Unknown
False
Find Objects
Use contour-based segmentation Better segmentation of moving objects using the contour. True
People-only segmentation
If Use contour-based segmentation selected.Will try to keep nearby people as individually tracked objects. There is a potential that large vehicles might appear as multiple smaller objects.
False
Merge objects closer than (meters)
Any detected objects that are within the specified distance of each other will be merged into one object 2.5
Smallest object size (pixels)
Objects with width smaller than Smallest object size will be ignored by the engine. 2
Don’t track objects larger than (% of screen)
If a detected object has a width or height greater than the specified percentage of image width or a height respectively, it is ignored. 90
Table 3. Advanced Options available based on Background Model selected (Continued)
Option Description Default Setting
Video Analytics and Rules26
VE150 - Advanced Motion Tracking Video Analytics and Rules
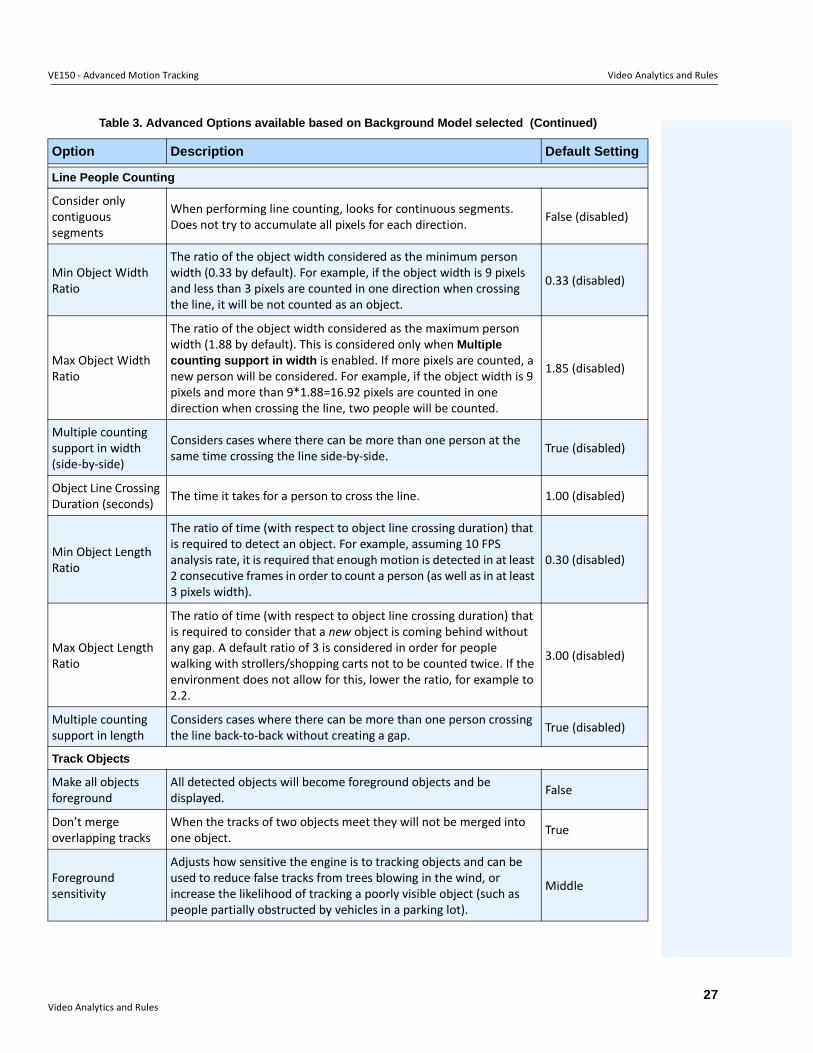
Line People Counting
Consider only contiguous segments
When performing line counting, looks for continuous segments. Does not try to accumulate all pixels for each direction. False (disabled)
Min Object Width Ratio
The ratio of the object width considered as the minimum person width (0.33 by default). For example, if the object width is 9 pixels and less than 3 pixels are counted in one direction when crossing the line, it will be not counted as an object.
0.33 (disabled)
Max Object Width Ratio
The ratio of the object width considered as the maximum person width (1.88 by default). This is considered only when Multiple counting support in width is enabled. If more pixels are counted, a new person will be considered. For example, if the object width is 9 pixels and more than 9*1.88=16.92 pixels are counted in one direction when crossing the line, two people will be counted.
1.85 (disabled)
Multiple counting support in width (side-by-side)
Considers cases where there can be more than one person at the same time crossing the line side-by-side. True (disabled)
Object Line Crossing Duration (seconds) The time it takes for a person to cross the line. 1.00 (disabled)
Min Object Length Ratio
The ratio of time (with respect to object line crossing duration) that is required to detect an object. For example, assuming 10 FPS analysis rate, it is required that enough motion is detected in at least 2 consecutive frames in order to count a person (as well as in at least 3 pixels width).
0.30 (disabled)
Max Object Length Ratio
The ratio of time (with respect to object line crossing duration) that is required to consider that a new object is coming behind without any gap. A default ratio of 3 is considered in order for people walking with strollers/shopping carts not to be counted twice. If the environment does not allow for this, lower the ratio, for example to 2.2.
3.00 (disabled)
Multiple counting support in length
Considers cases where there can be more than one person crossing the line back-to-back without creating a gap. True (disabled)
Track Objects
Make all objects foreground
All detected objects will become foreground objects and be displayed. False
Don’t merge overlapping tracks
When the tracks of two objects meet they will not be merged into one object. True
Foreground sensitivity
Adjusts how sensitive the engine is to tracking objects and can be used to reduce false tracks from trees blowing in the wind, or increase the likelihood of tracking a poorly visible object (such as people partially obstructed by vehicles in a parking lot).
Middle
Table 3. Advanced Options available based on Background Model selected (Continued)
Option Description Default Setting
Video Analytics and Rules27
VE150 - Advanced Motion Tracking Video Analytics and Rules
Task 2: Create a Rule using VE150
Procedure
To configure a Rule using the VE150:
1. You must configure the VE150 before creating a Rule that uses the VE150.
2. From the Server menu, select Configuration and then Rules
3. Click New. The Rule Wizard opens. Read the overview and click Next.
4. Select the check box next to the camera name. If it is a PTZ camera, select the camera tour position check box.
5. From the Select video engine for those running on camera drop-down list, select VE150.
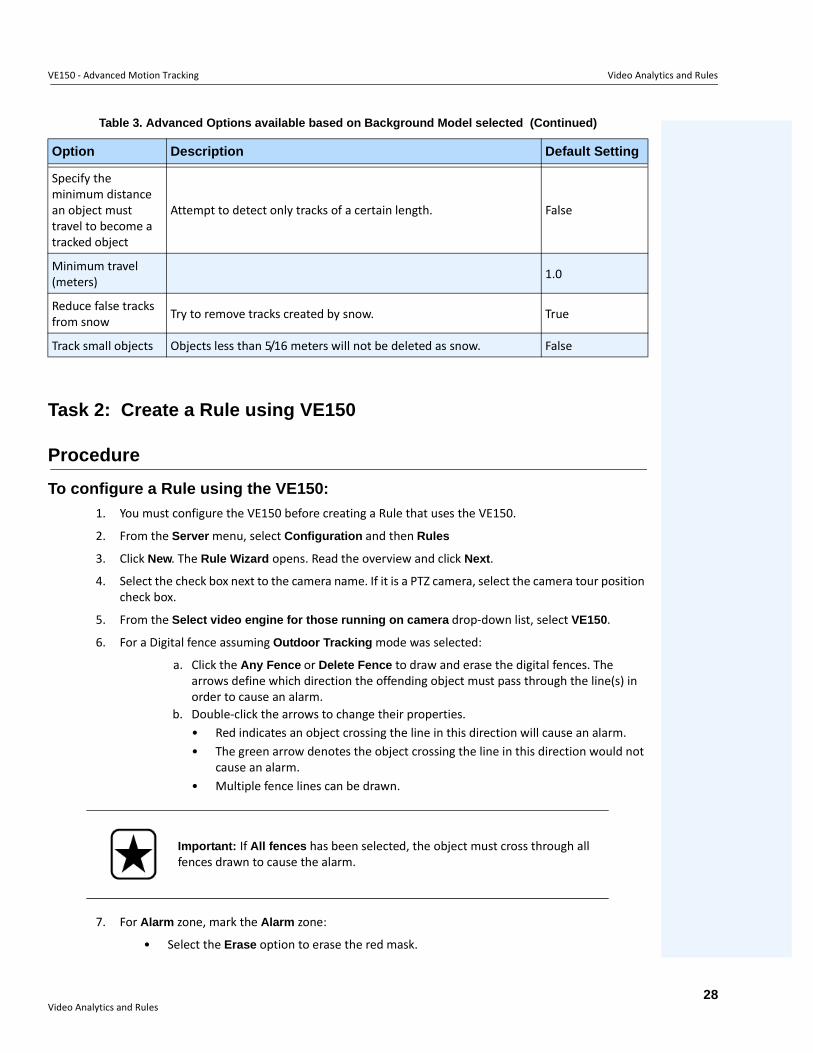
6. For a Digital fence assuming Outdoor Tracking mode was selected:
a. Click the Any Fence or Delete Fence to draw and erase the digital fences. The arrows define which direction the offending object must pass through the line(s) in order to cause an alarm.
b. Double-click the arrows to change their properties. • Red indicates an object crossing the line in this direction will cause an alarm.• The green arrow denotes the object crossing the line in this direction would not
cause an alarm. • Multiple fence lines can be drawn.
7. For Alarm zone, mark the Alarm zone:
• Select the Erase option to erase the red mask.
Specify the minimum distance an object must travel to become a tracked object
Attempt to detect only tracks of a certain length. False
Minimum travel (meters) 1.0
Reduce false tracks from snow Try to remove tracks created by snow. True
Track small objects Objects less than 5/16 meters will not be deleted as snow. False
Important: If All fences has been selected, the object must cross through all fences drawn to cause the alarm.
Table 3. Advanced Options available based on Background Model selected (Continued)
Option Description Default Setting
Video Analytics and Rules28
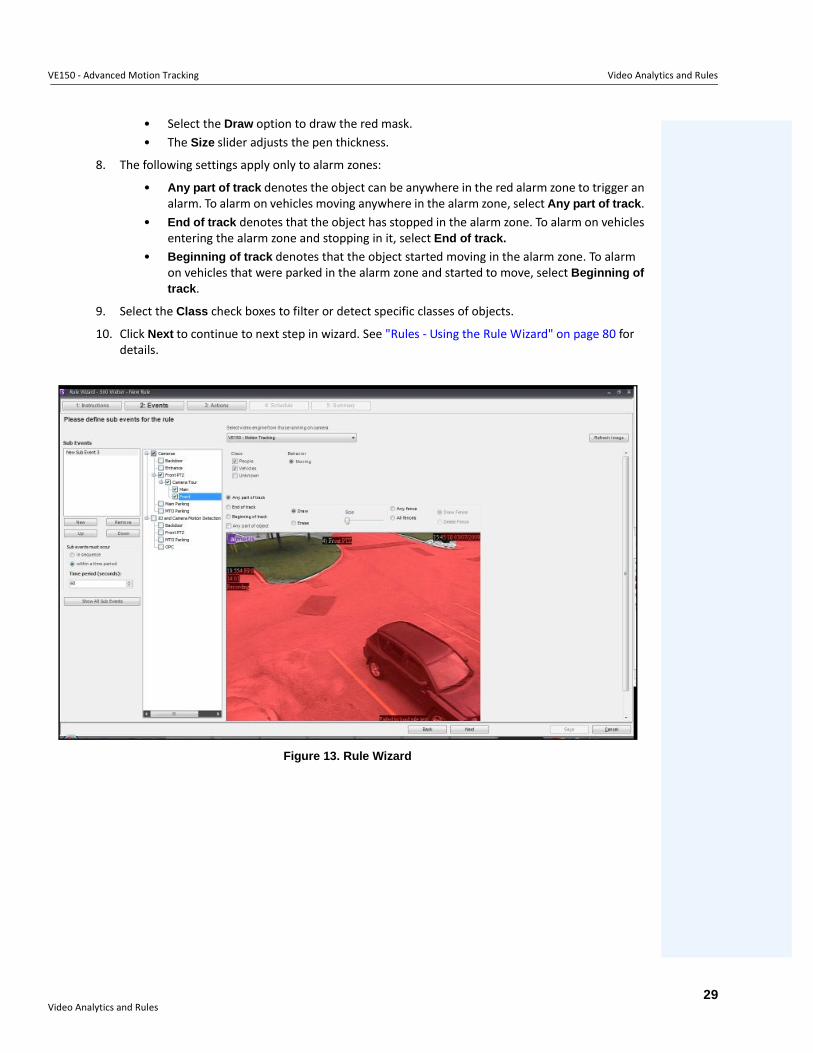
VE150 - Advanced Motion Tracking Video Analytics and Rules
• Select the Draw option to draw the red mask. • The Size slider adjusts the pen thickness.
8. The following settings apply only to alarm zones:
• Any part of track denotes the object can be anywhere in the red alarm zone to trigger an alarm. To alarm on vehicles moving anywhere in the alarm zone, select Any part of track.
• End of track denotes that the object has stopped in the alarm zone. To alarm on vehicles entering the alarm zone and stopping in it, select End of track.
• Beginning of track denotes that the object started moving in the alarm zone. To alarm on vehicles that were parked in the alarm zone and started to move, select Beginning of track.
9. Select the Class check boxes to filter or detect specific classes of objects.
10. Click Next to continue to next step in wizard. See "Rules - Using the Rule Wizard" on page 80 for details.
Figure 13. Rule Wizard
Video Analytics and Rules29
VE150 - Advanced Motion Tracking Video Analytics and Rules
Troubleshooting• Ensure the correct frame rate is being used, and that enough CPU is available on the system to
perform proper analysis.• Verify that perspective has been properly set by adjusting the Camera Position tab.• If nuisance false alarms occur by trees or reflections, try the Dynamic background model
(Environment tab). If problems still persist, contact Aimetis for support.
Hardware AccelerationGraphics cards contain processing power which can be used by Symphony. This is called “hardware acceleration” and is currently available with the VE150.When GPU (hardware acceleration) is used, the CPU is not used by VE150, which increases the scalability of Symphony.Symphony GPU acceleration is achieved using OpenCL, which must be installed properly:
• NVIDIA comes with the latest drivers: http://www.nvidia.com/Download/index.aspx?lang=en-us • ATI/AMD via ATI Stream v.2.0 with OpenCL 1.0 support:
http://developer.amd.com/gpu/atistreamsdk/pages/default.aspx If OpenCL is detected, new background models will appear in VE150 automatically (Static OpenCL, Dynamic OpenCL, Spatio-temporal OpenCL).
Note: In typical situations, the VE150 can detect a person 100 feet from the camera, a vehicle 150 feet from camera (assuming 4CIF or 640x480 and adequate lighting conditions). These distances depend on the lens and zoom used.Keep the camera lens clean from rain droplets or bugs. Rain droplets hitting the camera lens directly will cause false alarms. Bugs will do the same. If a spot light is installed too close to camera, it will attract bugs.The camera must be stable, if wind or vibrations causes the camera to move, false alarms will occur
The Static OpenCL and Dynamic OpenCL models do not provide model specific options such as Track Slow Moving Objects, Shadow/Illumination Removal, and Remove Ghost Pixels.
Video Analytics and Rules30
VE150 - Advanced Motion Tracking Video Analytics and Rules
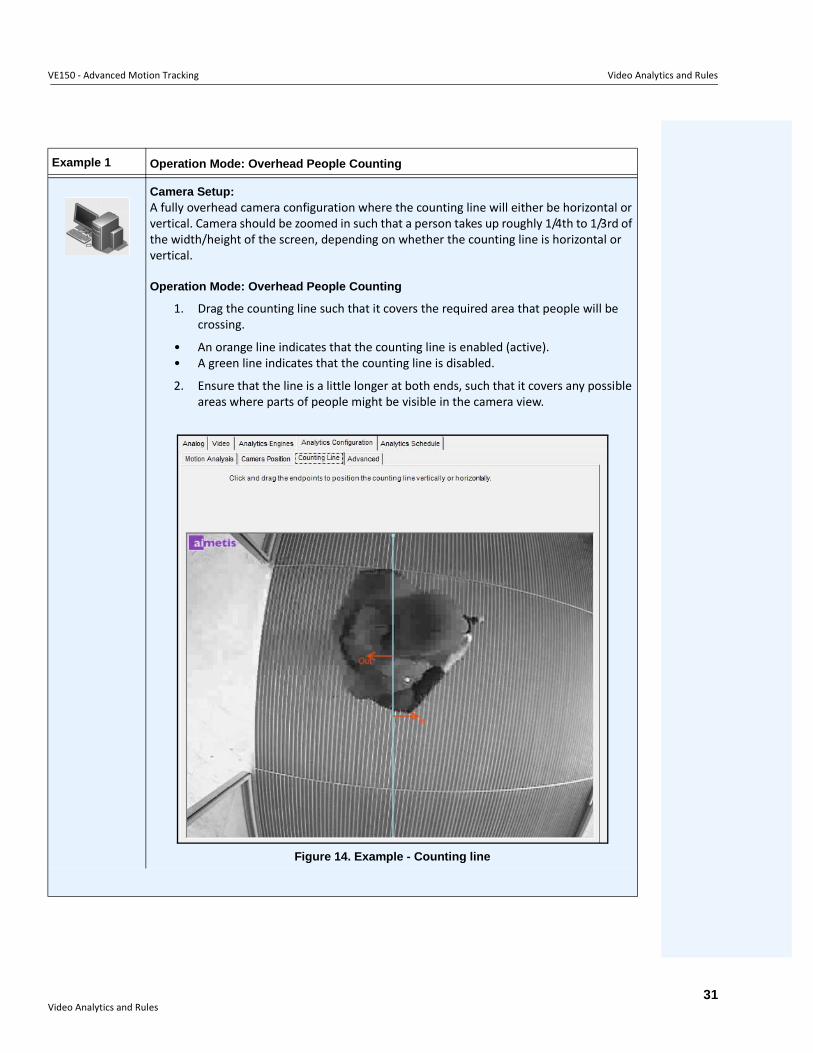
Example 1 Operation Mode: Overhead People Counting
Camera Setup: A fully overhead camera configuration where the counting line will either be horizontal or vertical. Camera should be zoomed in such that a person takes up roughly 1/4th to 1/3rd of the width/height of the screen, depending on whether the counting line is horizontal or vertical.
Operation Mode: Overhead People Counting
1. Drag the counting line such that it covers the required area that people will be crossing.
• An orange line indicates that the counting line is enabled (active).• A green line indicates that the counting line is disabled.
2. Ensure that the line is a little longer at both ends, such that it covers any possible areas where parts of people might be visible in the camera view.
Figure 14. Example - Counting line
Video Analytics and Rules31
VE150 - Advanced Motion Tracking Video Analytics and Rules
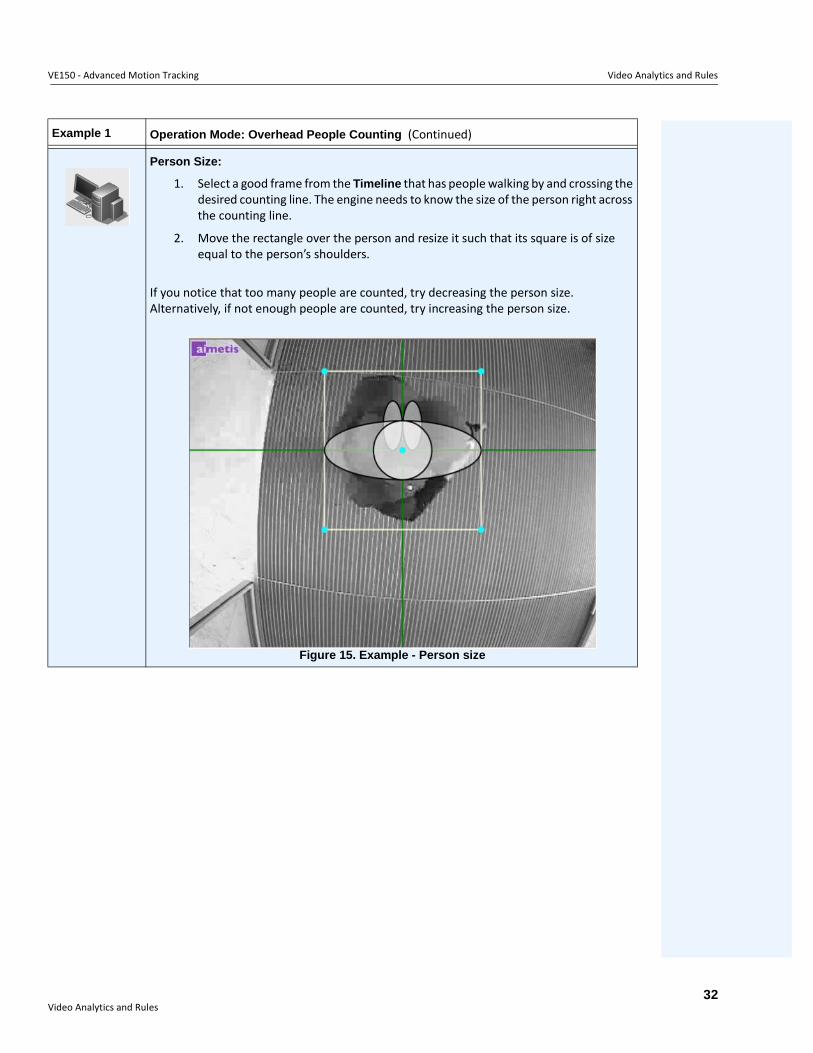
Person Size:
1. Select a good frame from the Timeline that has people walking by and crossing the desired counting line. The engine needs to know the size of the person right across the counting line.
2. Move the rectangle over the person and resize it such that its square is of size equal to the person’s shoulders.
If you notice that too many people are counted, try decreasing the person size. Alternatively, if not enough people are counted, try increasing the person size.
Figure 15. Example - Person size
Example 1 Operation Mode: Overhead People Counting (Continued)
Video Analytics and Rules32
VE150 - Advanced Motion Tracking Video Analytics and Rules
Advanced Options
Analysis FPS: Should be at least 8 FPS, but higher FPS is recommended (10). The bigger a person is with respect to the total image size, the higher is the required FPS.
Analysis FPS: By default, it should be 40x30 for regular size people (1/4th of the image or higher); however, for really small people, this should be increased to 80x60, because when down-sampled at that resolution, the person will become 1-2 pixels, which is not enough for processing. This will take more processing, so it is recommended that the image is zoomed in more.
Background Model: Only the spatio-temporal background model has support for motion estimation. Do not change this option.
Threshold: The default 0.03 should be used. If you notice that you get counts even when there are no people crossing, try increasing this value.
Appearance Marginalization: Should be turned on by default. You can experiment turning it off in environments with more shadows (and adjust the threshold as well, such as increasing it to 0.1).
CountingThe following parameters influence the counting across the line. These parameters are typically good at the default setting and they usually do not require manual intervention.
• Consider only contiguous segments• Multiple counting support in width• Min Object Width Ratio• Max Object Width Ratio • Object Line crossing duration • Multiple counting support in length • Min Object Length Ratio • Max Object Length Ratio
Example 1 Operation Mode: Overhead People Counting (Continued)
Video Analytics and Rules33

VE180 - Indoor/Outdoor People Tracking Video Analytics and Rules
VE180 - Indoor/Outdoor People TrackingThe VE180 is a good choice for indoor/outdoor people tracking applications. Typical deployments include commercial buildings. This video engine can be used for applications such as people counting and dwell time. Table 4 provides ideal settings only. They are not mandatory. The VE180 is a robust analytic.
Use the VE180 engine (over the VE150 or VE250) in situations where people are crossing paths, or walking together, for instance, and you want to track them as individual objects. Note that the VE180 typically requires more CPU than the VE150 and the VE250 engines.
Table 4. Ideal Camera Setup
Setup Ideal Conditions
Environment
• Away from moving objects such as elevator doors, or moved objects such as carts, carriages and large luggage.
• Avoid camera placement near escalators or stairs. Ensure that people are tracked on flat and level surfaces for accurate detection.
• Ensure that people are fully visible to the camera and not partially hidden by shelves or low walls.
Lighting
• At least 75 LUX or better.• Ensure there is consistent light throughout the space and throughout the
period of time that people are tracked.• Ensure that there are no shiny objects, like a shiny floor in the area people are
tracked. A shiny floor may reflect light/shadows from surrounding area and generate false counts.
• In the indoor tracking area, if possible, avoid sunlight from outside. Sunlight occasionally obscured by moving clouds will cast shadows that cross a counting line.
• Depending on the angle of an indoor light, the shadows of people walking by (but not through) a counting line can trigger false counts.
Counting Lines
• An overhead view is usually more accurate for counting people across a line, but it covers less ground than a 45-degree view if the ceiling is low.
• Try to have at least 1 meter of floor space on either side of the counting line.• In angled views, try to have at least 2 meters of space on either side of the
counting line.• Setting person size: A person crossing the line should not take up more than
about 1/3 of the view in width and no more than 1/2 of the view in height.
Camera Placement
• Note that accuracy decreases for nearly horizontal views (for example, less than 20 degrees declination).
• If the camera is placed such that people appear smaller than 20 pixels on the screen, counting accuracy will decrease and you will need to use advanced option settings.
Video Analytics and Rules34
VE180 - Indoor/Outdoor People Tracking Video Analytics and Rules
Task 1: Configure VE180
Procedure
To configure the VE180:
1. In Symphony Client, from the Server menu, select Configuration. The Configuration dialog box opens. This allows you to configure devices for the currently selected server.
2. In the left pane, click Devices. The Devices dialog box opens.
3. Click the camera you want to configure for use with video analytics and click Edit.
4. Click the Analytics Engines tab and select VE180. By default VE250 is selected, in which case you must first deselect VE250.
5. Click the Analytics Configuration tab (Figure 16 on page 36). From the Analytics Engines drop-down list, select Intel_VE180.
6. Click the Choose Image button to select an image from your camera on which to base your analytic configuration.
7. Click all the subtabs necessary to configure your analytic:
• "Overview subtab" on page 36• "Processing Mask subtab" on page 37• "Camera Position subtab" on page 38• "Environment subtab" on page 41• "Counting Line subtab" on page 48• "Direction Line Subtab" on page 49• "Advanced Subtab" on page 50
Video Analytics and Rules35
VE180 - Indoor/Outdoor People Tracking Video Analytics and Rules
Overview subtab
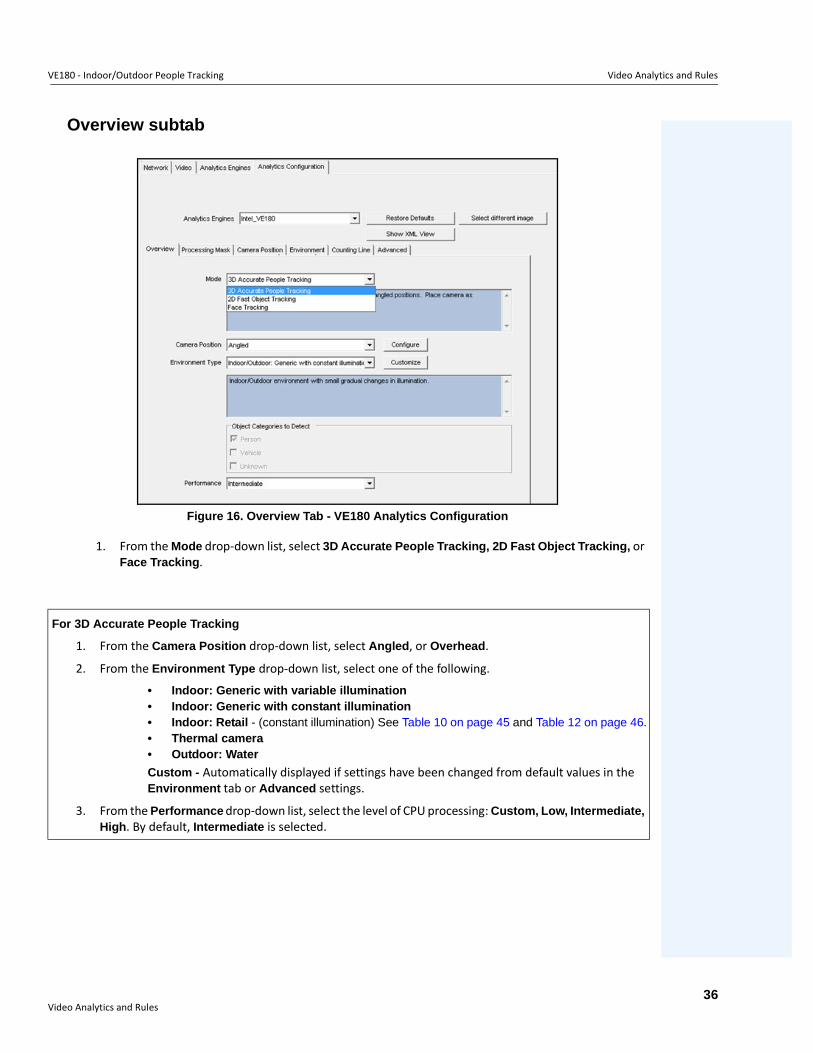
Figure 16. Overview Tab - VE180 Analytics Configuration
1. From the Mode drop-down list, select 3D Accurate People Tracking, 2D Fast Object Tracking, or Face Tracking.
For 3D Accurate People Tracking
1. From the Camera Position drop-down list, select Angled, or Overhead.
2. From the Environment Type drop-down list, select one of the following.
• Indoor: Generic with variable illumination• Indoor: Generic with constant illumination• Indoor: Retail - (constant illumination) See Table 10 on page 45 and Table 12 on page 46.• Thermal camera• Outdoor: Water
Custom - Automatically displayed if settings have been changed from default values in the Environment tab or Advanced settings.
3. From the Performance drop-down list, select the level of CPU processing: Custom, Low, Intermediate, High. By default, Intermediate is selected.
Video Analytics and Rules36
VE180 - Indoor/Outdoor People Tracking Video Analytics and Rules
Processing Mask subtab
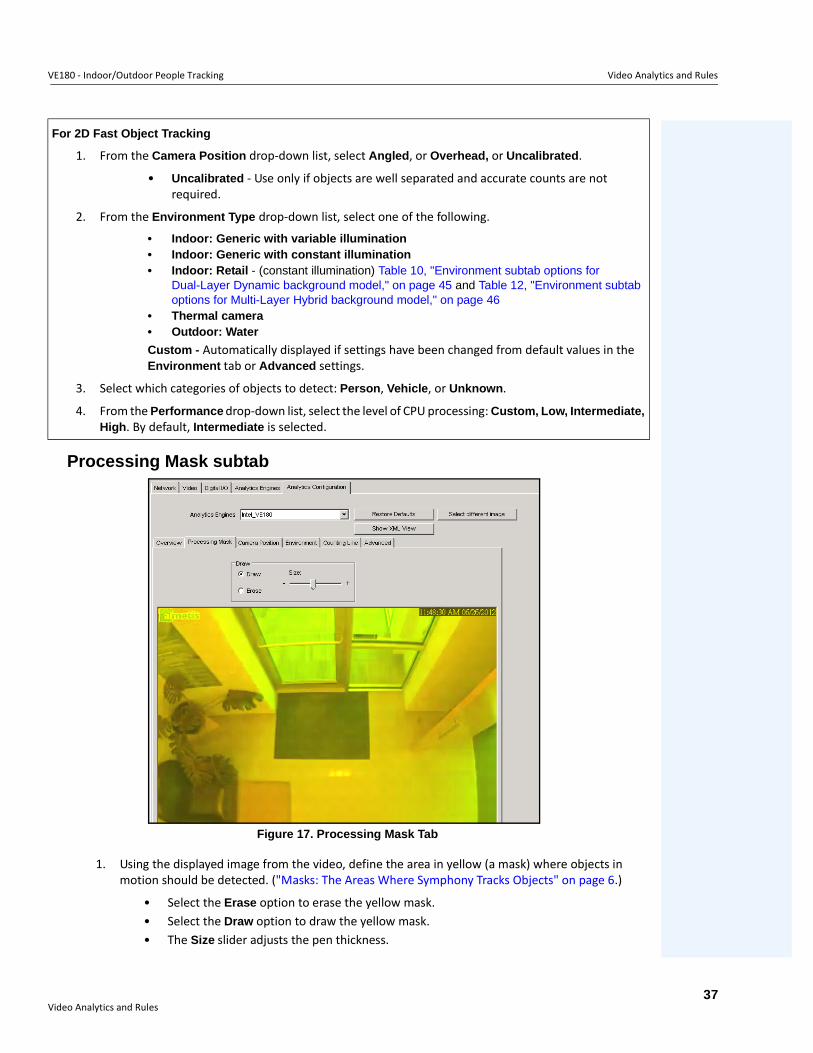
Figure 17. Processing Mask Tab
1. Using the displayed image from the video, define the area in yellow (a mask) where objects in motion should be detected. ("Masks: The Areas Where Symphony Tracks Objects" on page 6.)
• Select the Erase option to erase the yellow mask.• Select the Draw option to draw the yellow mask. • The Size slider adjusts the pen thickness.
For 2D Fast Object Tracking
1. From the Camera Position drop-down list, select Angled, or Overhead, or Uncalibrated.
• Uncalibrated - Use only if objects are well separated and accurate counts are not required.
2. From the Environment Type drop-down list, select one of the following.
• Indoor: Generic with variable illumination• Indoor: Generic with constant illumination• Indoor: Retail - (constant illumination) Table 10, "Environment subtab options for
Dual-Layer Dynamic background model," on page 45 and Table 12, "Environment subtab options for Multi-Layer Hybrid background model," on page 46
• Thermal camera• Outdoor: Water
Custom - Automatically displayed if settings have been changed from default values in the Environment tab or Advanced settings.
3. Select which categories of objects to detect: Person, Vehicle, or Unknown.
4. From the Performance drop-down list, select the level of CPU processing: Custom, Low, Intermediate, High. By default, Intermediate is selected.
Video Analytics and Rules37
VE180 - Indoor/Outdoor People Tracking Video Analytics and Rules
Camera Position subtab
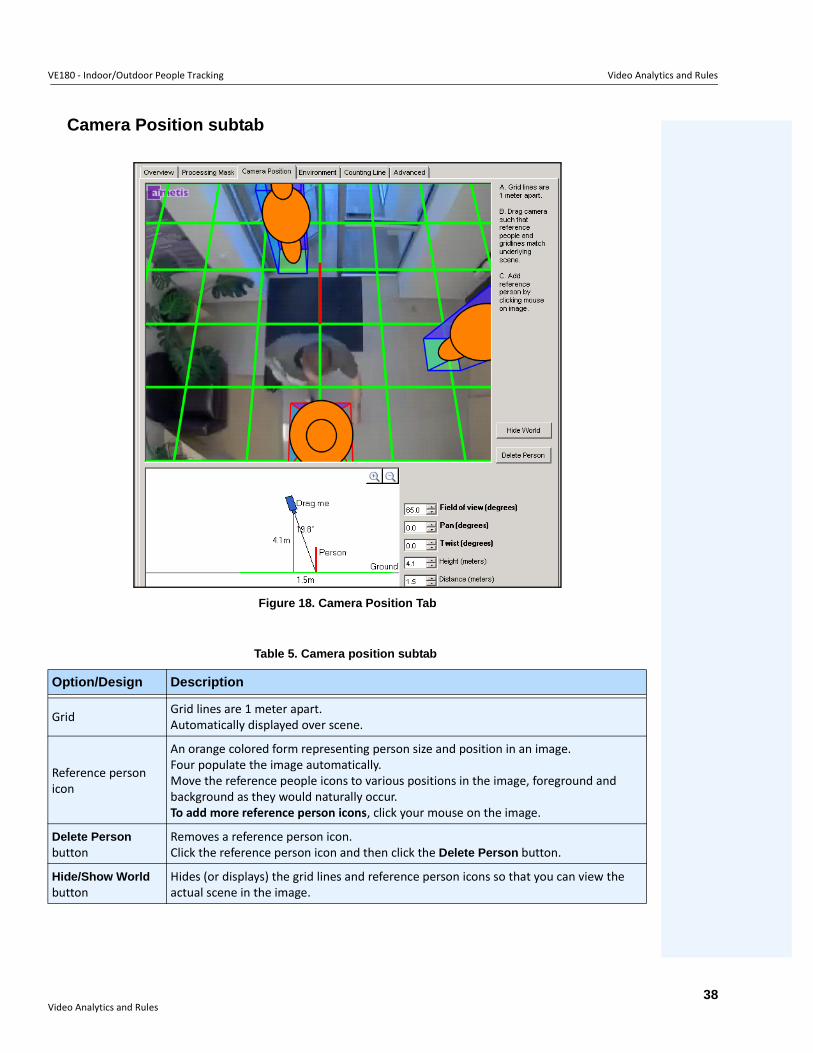
Figure 18. Camera Position Tab
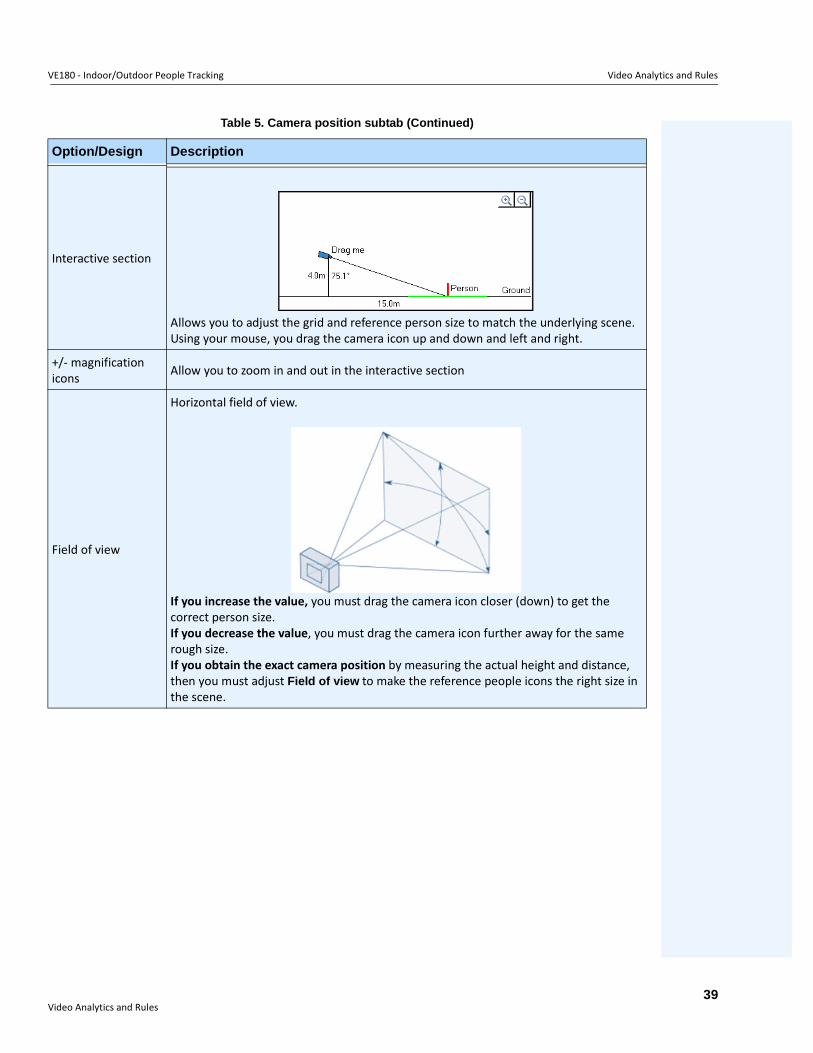
Table 5. Camera position subtab
Option/Design Description
Grid Grid lines are 1 meter apart.Automatically displayed over scene.
Reference person icon
An orange colored form representing person size and position in an image.Four populate the image automatically. Move the reference people icons to various positions in the image, foreground and background as they would naturally occur.To add more reference person icons, click your mouse on the image.
Delete Person button
Removes a reference person icon. Click the reference person icon and then click the Delete Person button.
Hide/Show World button
Hides (or displays) the grid lines and reference person icons so that you can view the actual scene in the image.
Video Analytics and Rules38
VE180 - Indoor/Outdoor People Tracking Video Analytics and Rules
Interactive section
Allows you to adjust the grid and reference person size to match the underlying scene. Using your mouse, you drag the camera icon up and down and left and right.
+/- magnification icons Allow you to zoom in and out in the interactive section
Field of view
Horizontal field of view.
If you increase the value, you must drag the camera icon closer (down) to get the correct person size. If you decrease the value, you must drag the camera icon further away for the same rough size. If you obtain the exact camera position by measuring the actual height and distance, then you must adjust Field of view to make the reference people icons the right size in the scene.
Table 5. Camera position subtab (Continued)
Option/Design Description
Video Analytics and Rules39

VE180 - Indoor/Outdoor People Tracking Video Analytics and Rules
Pan
Movement of the camera from left to right or right to left around the imaginary vertical axis that runs through the camera.
When the camera is pointed at the ground, it basically tilts the ground plane. When the camera is closer to horizontal, it looks more like a rotation of the ground plane.
Here Pan tilts the grid against the ground plane, which is incorrect based on the actual scene.
Most useful in an near-overhead view when the camera is pointing off to the side (that is, the deflection from vertical is not completely on the camera view’s up-down axis)
Twist
Rotation of the camera around the axis that extends directly out of the camera through the center of the view.
Useful in an angled view when the camera is twisted a bit so that a vertical line in the world does not correspond to up-down in the image. Also useful if the ground in the image appears to tilt a bit from left to right
Table 5. Camera position subtab (Continued)
Option/Design Description
Video Analytics and Rules40
VE180 - Indoor/Outdoor People Tracking Video Analytics and Rules
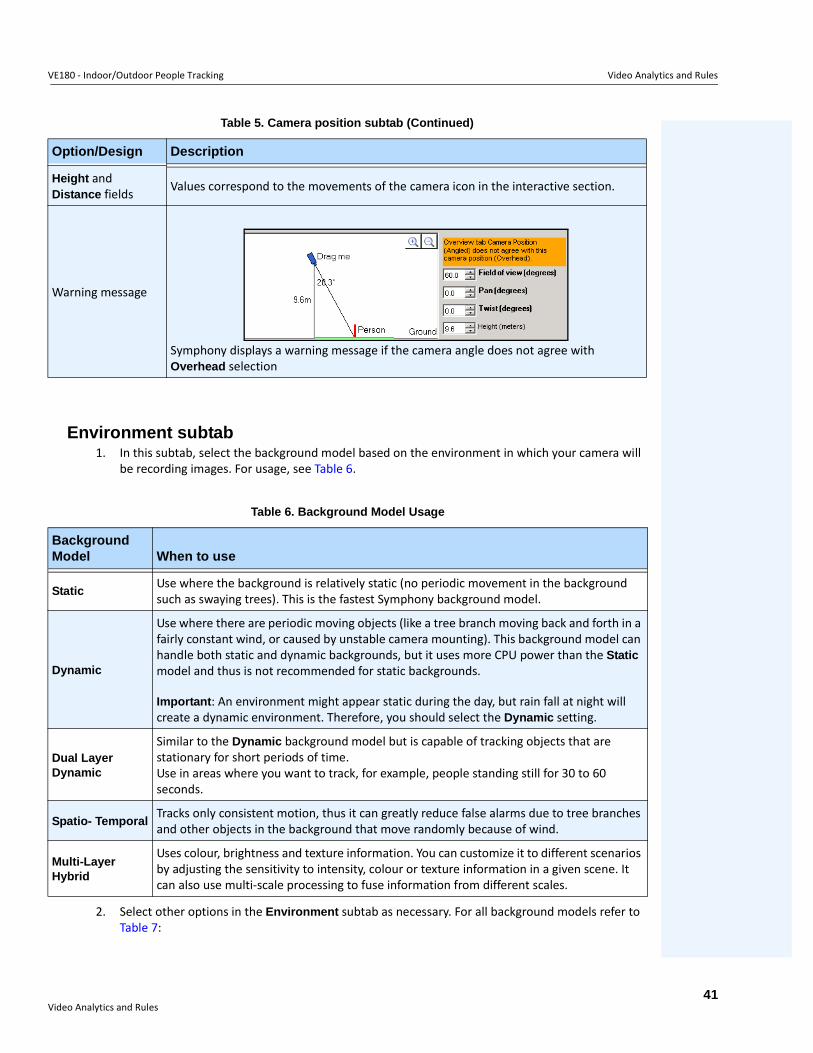
Environment subtab1. In this subtab, select the background model based on the environment in which your camera will
be recording images. For usage, see Table 6.
2. Select other options in the Environment subtab as necessary. For all background models refer to Table 7:
Height and Distance fields Values correspond to the movements of the camera icon in the interactive section.
Warning message
Symphony displays a warning message if the camera angle does not agree with Overhead selection
Table 6. Background Model Usage
Background Model When to use
StaticUse where the background is relatively static (no periodic movement in the background such as swaying trees). This is the fastest Symphony background model.
Dynamic
Use where there are periodic moving objects (like a tree branch moving back and forth in a fairly constant wind, or caused by unstable camera mounting). This background model can handle both static and dynamic backgrounds, but it uses more CPU power than the Static model and thus is not recommended for static backgrounds.
Important: An environment might appear static during the day, but rain fall at night will create a dynamic environment. Therefore, you should select the Dynamic setting.
Dual Layer Dynamic
Similar to the Dynamic background model but is capable of tracking objects that are stationary for short periods of time. Use in areas where you want to track, for example, people standing still for 30 to 60 seconds.
Spatio- TemporalTracks only consistent motion, thus it can greatly reduce false alarms due to tree branches and other objects in the background that move randomly because of wind.
Multi-Layer Hybrid
Uses colour, brightness and texture information. You can customize it to different scenarios by adjusting the sensitivity to intensity, colour or texture information in a given scene. It can also use multi-scale processing to fuse information from different scales.
Table 5. Camera position subtab (Continued)
Option/Design Description
Video Analytics and Rules41
VE180 - Indoor/Outdoor People Tracking Video Analytics and Rules
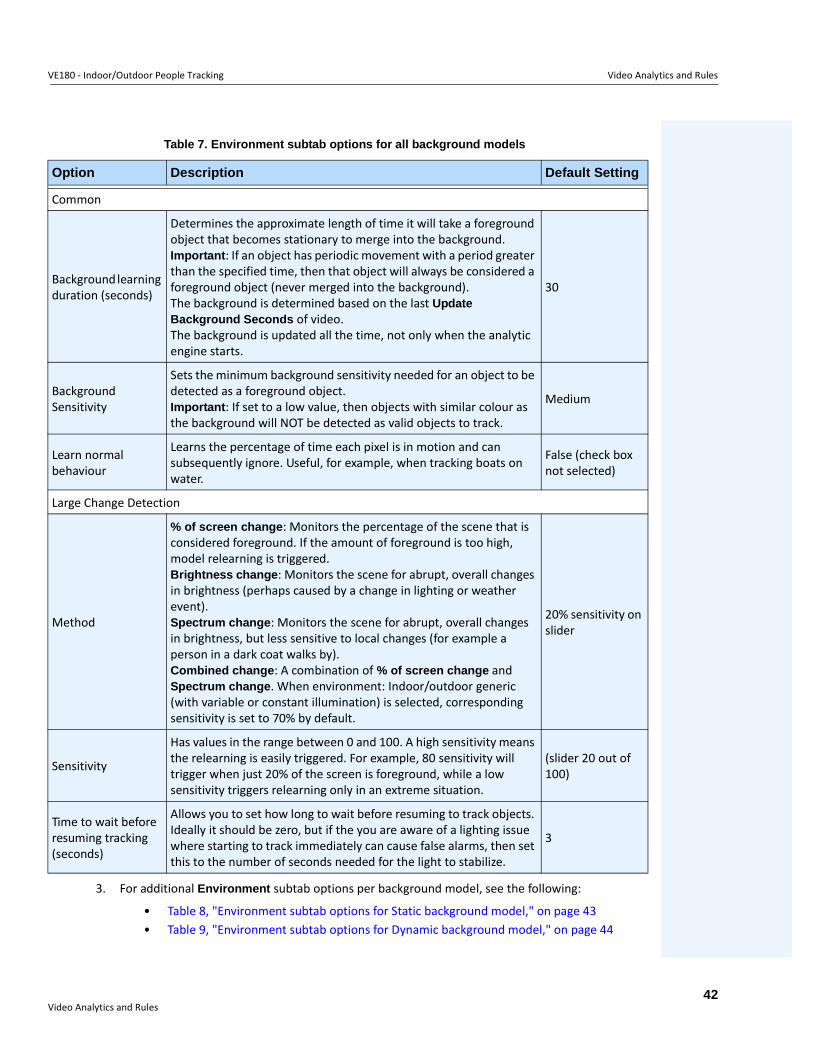
3. For additional Environment subtab options per background model, see the following:
• Table 8, "Environment subtab options for Static background model," on page 43• Table 9, "Environment subtab options for Dynamic background model," on page 44
Table 7. Environment subtab options for all background models
Option Description Default Setting
Common
Background learning duration (seconds)
Determines the approximate length of time it will take a foreground object that becomes stationary to merge into the background. Important: If an object has periodic movement with a period greater than the specified time, then that object will always be considered a foreground object (never merged into the background). The background is determined based on the last Update Background Seconds of video. The background is updated all the time, not only when the analytic engine starts.
30
Background Sensitivity
Sets the minimum background sensitivity needed for an object to be detected as a foreground object. Important: If set to a low value, then objects with similar colour as the background will NOT be detected as valid objects to track.
Medium
Learn normal behaviour
Learns the percentage of time each pixel is in motion and can subsequently ignore. Useful, for example, when tracking boats on water.
False (check box not selected)
Large Change Detection
Method
% of screen change: Monitors the percentage of the scene that is considered foreground. If the amount of foreground is too high, model relearning is triggered.Brightness change: Monitors the scene for abrupt, overall changes in brightness (perhaps caused by a change in lighting or weather event).Spectrum change: Monitors the scene for abrupt, overall changes in brightness, but less sensitive to local changes (for example a person in a dark coat walks by).Combined change: A combination of % of screen change and Spectrum change. When environment: Indoor/outdoor generic (with variable or constant illumination) is selected, corresponding sensitivity is set to 70% by default.
20% sensitivity on slider
Sensitivity
Has values in the range between 0 and 100. A high sensitivity means the relearning is easily triggered. For example, 80 sensitivity will trigger when just 20% of the screen is foreground, while a low sensitivity triggers relearning only in an extreme situation.
(slider 20 out of 100)
Time to wait before resuming tracking (seconds)
Allows you to set how long to wait before resuming to track objects. Ideally it should be zero, but if the you are aware of a lighting issue where starting to track immediately can cause false alarms, then set this to the number of seconds needed for the light to stabilize.
3
Video Analytics and Rules42
VE180 - Indoor/Outdoor People Tracking Video Analytics and Rules
• Table 10, "Environment subtab options for Dual-Layer Dynamic background model," on page 45
• Table 11, "Environment subtab options for Spatio-Temporal background model," on page 45
• Table 12, "Environment subtab options for Multi-Layer Hybrid background model," on page 46
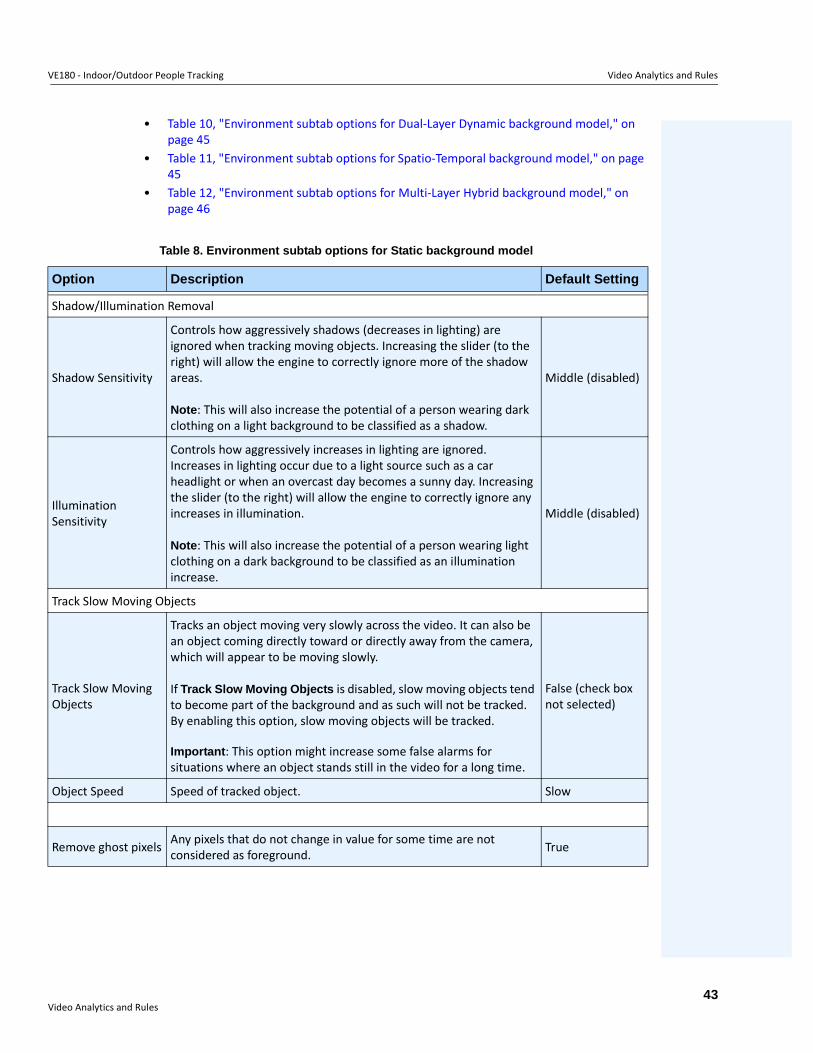
Table 8. Environment subtab options for Static background model
Option Description Default Setting
Shadow/Illumination Removal
Shadow Sensitivity
Controls how aggressively shadows (decreases in lighting) are ignored when tracking moving objects. Increasing the slider (to the right) will allow the engine to correctly ignore more of the shadow areas.
Note: This will also increase the potential of a person wearing dark clothing on a light background to be classified as a shadow.
Middle (disabled)
Illumination Sensitivity
Controls how aggressively increases in lighting are ignored. Increases in lighting occur due to a light source such as a car headlight or when an overcast day becomes a sunny day. Increasing the slider (to the right) will allow the engine to correctly ignore any increases in illumination.
Note: This will also increase the potential of a person wearing light clothing on a dark background to be classified as an illumination increase.
Middle (disabled)
Track Slow Moving Objects
Track Slow Moving Objects
Tracks an object moving very slowly across the video. It can also be an object coming directly toward or directly away from the camera, which will appear to be moving slowly.
If Track Slow Moving Objects is disabled, slow moving objects tend to become part of the background and as such will not be tracked. By enabling this option, slow moving objects will be tracked.
Important: This option might increase some false alarms for situations where an object stands still in the video for a long time.
False (check box not selected)
Object Speed Speed of tracked object. Slow
Remove ghost pixels Any pixels that do not change in value for some time are not considered as foreground. True
Video Analytics and Rules43
VE180 - Indoor/Outdoor People Tracking Video Analytics and Rules
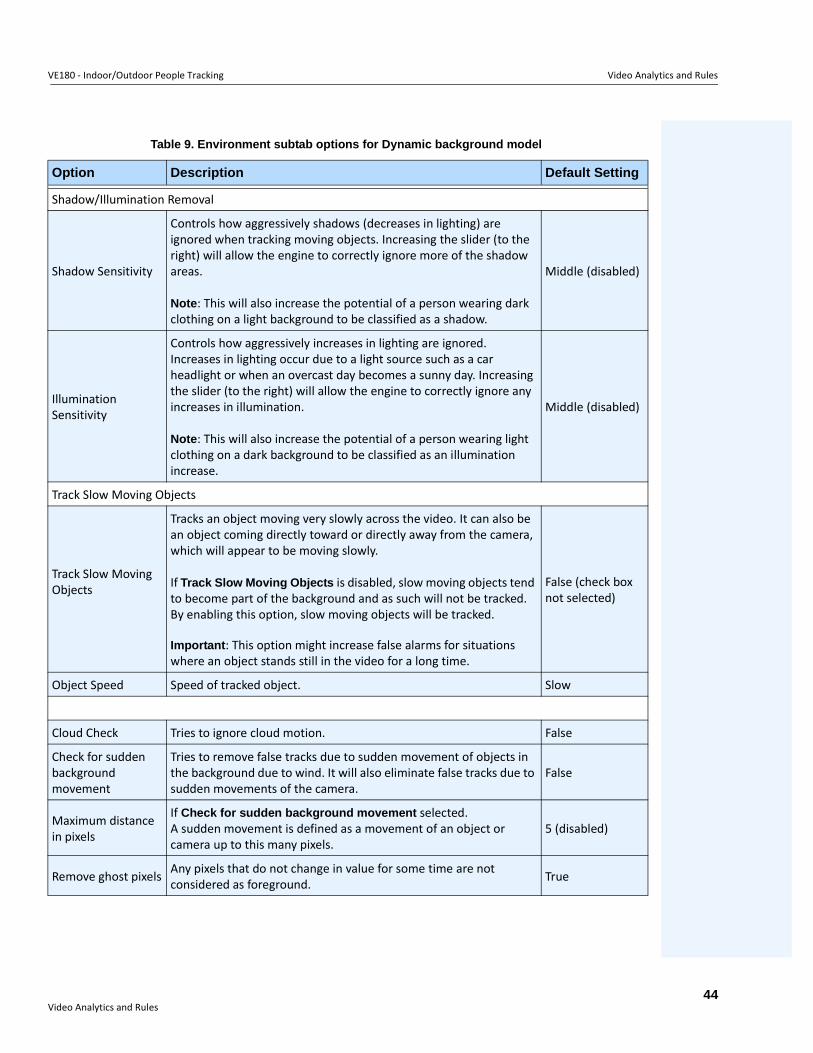
Table 9. Environment subtab options for Dynamic background model
Option Description Default Setting
Shadow/Illumination Removal
Shadow Sensitivity
Controls how aggressively shadows (decreases in lighting) are ignored when tracking moving objects. Increasing the slider (to the right) will allow the engine to correctly ignore more of the shadow areas.
Note: This will also increase the potential of a person wearing dark clothing on a light background to be classified as a shadow.
Middle (disabled)
Illumination Sensitivity
Controls how aggressively increases in lighting are ignored. Increases in lighting occur due to a light source such as a car headlight or when an overcast day becomes a sunny day. Increasing the slider (to the right) will allow the engine to correctly ignore any increases in illumination.
Note: This will also increase the potential of a person wearing light clothing on a dark background to be classified as an illumination increase.
Middle (disabled)
Track Slow Moving Objects
Track Slow Moving Objects
Tracks an object moving very slowly across the video. It can also be an object coming directly toward or directly away from the camera, which will appear to be moving slowly.
If Track Slow Moving Objects is disabled, slow moving objects tend to become part of the background and as such will not be tracked. By enabling this option, slow moving objects will be tracked.
Important: This option might increase false alarms for situations where an object stands still in the video for a long time.
False (check box not selected)
Object Speed Speed of tracked object. Slow
Cloud Check Tries to ignore cloud motion. False
Check for sudden background movement
Tries to remove false tracks due to sudden movement of objects in the background due to wind. It will also eliminate false tracks due to sudden movements of the camera.
False
Maximum distance in pixels
If Check for sudden background movement selected.A sudden movement is defined as a movement of an object or camera up to this many pixels.
5 (disabled)
Remove ghost pixels Any pixels that do not change in value for some time are not considered as foreground. True
Video Analytics and Rules44
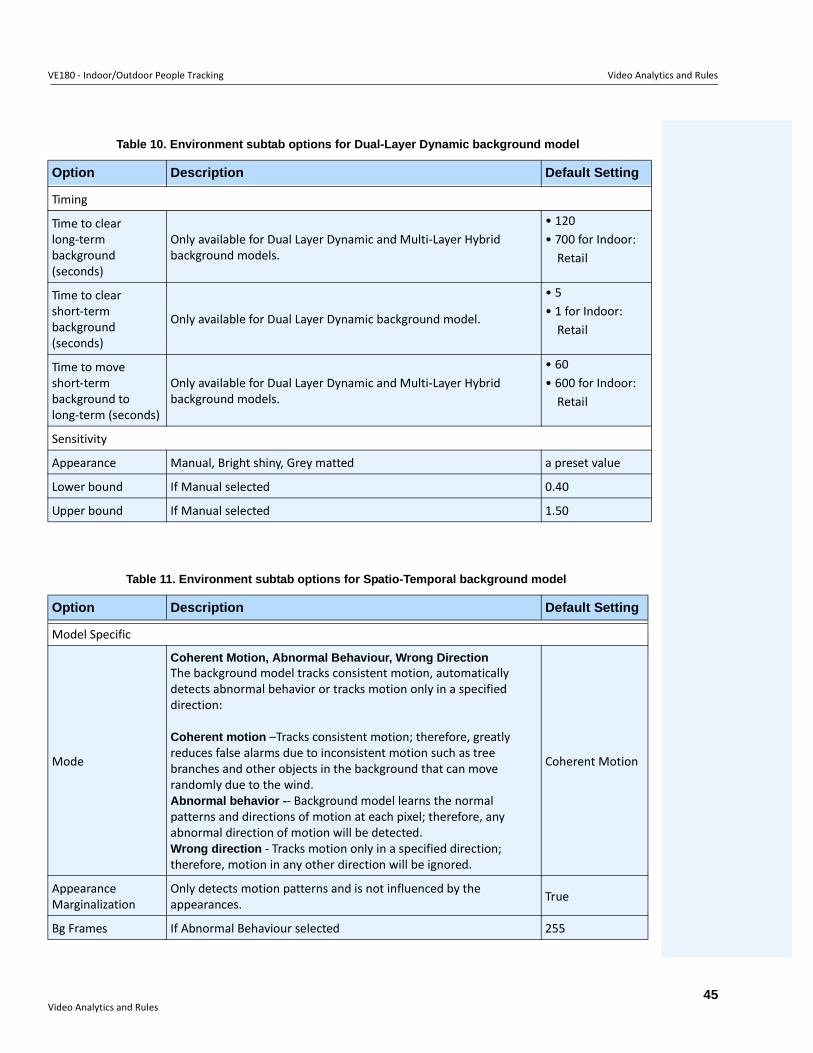
VE180 - Indoor/Outdoor People Tracking Video Analytics and Rules
Table 10. Environment subtab options for Dual-Layer Dynamic background model
Option Description Default Setting
Timing
Time to clear long-term background (seconds)
Only available for Dual Layer Dynamic and Multi-Layer Hybrid background models.
• 120• 700 for Indoor:
Retail
Time to clear short-term background (seconds)
Only available for Dual Layer Dynamic background model.
• 5• 1 for Indoor:
Retail
Time to move short-term background to long-term (seconds)
Only available for Dual Layer Dynamic and Multi-Layer Hybrid background models.
• 60• 600 for Indoor:
Retail
Sensitivity
Appearance Manual, Bright shiny, Grey matted a preset value
Lower bound If Manual selected 0.40
Upper bound If Manual selected 1.50
Table 11. Environment subtab options for Spatio-Temporal background model
Option Description Default Setting
Model Specific
Mode
Coherent Motion, Abnormal Behaviour, Wrong DirectionThe background model tracks consistent motion, automatically detects abnormal behavior or tracks motion only in a specified direction:
Coherent motion –Tracks consistent motion; therefore, greatly reduces false alarms due to inconsistent motion such as tree branches and other objects in the background that can move randomly due to the wind. Abnormal behavior -- Background model learns the normal patterns and directions of motion at each pixel; therefore, any abnormal direction of motion will be detected.Wrong direction - Tracks motion only in a specified direction; therefore, motion in any other direction will be ignored.
Coherent Motion
Appearance Marginalization
Only detects motion patterns and is not influenced by the appearances. True
Bg Frames If Abnormal Behaviour selected 255
Video Analytics and Rules45
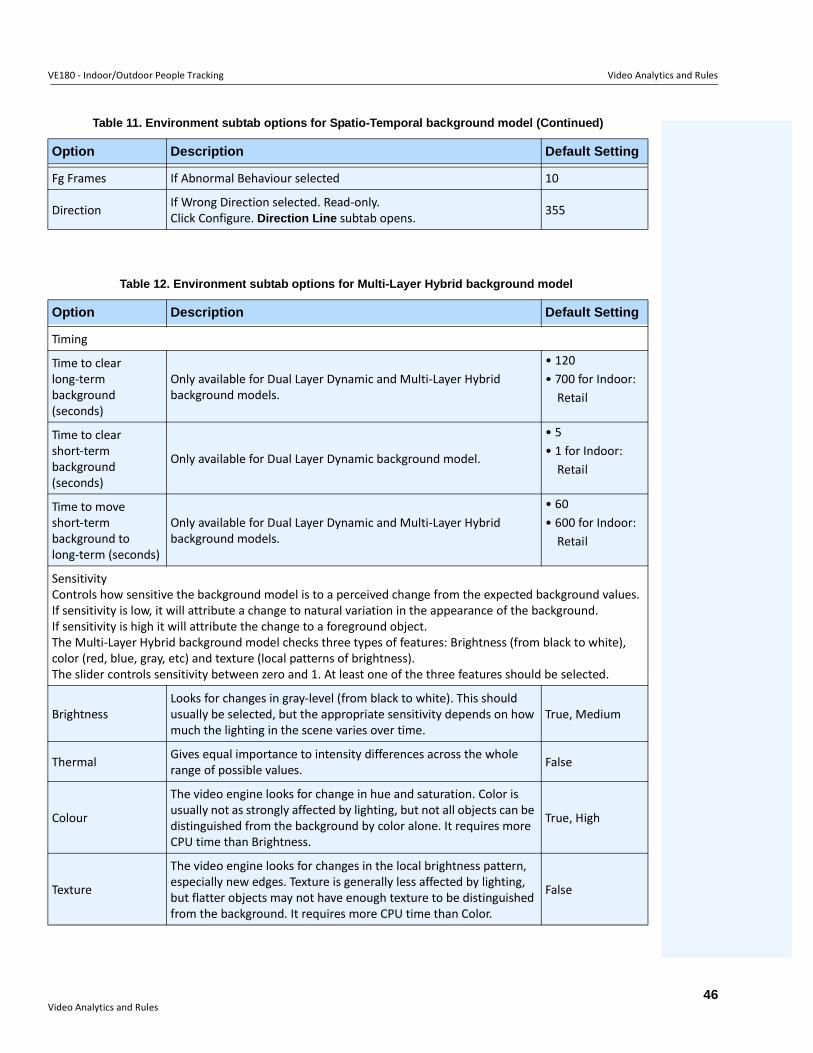
VE180 - Indoor/Outdoor People Tracking Video Analytics and Rules
Fg Frames If Abnormal Behaviour selected 10
Direction If Wrong Direction selected. Read-only. Click Configure. Direction Line subtab opens. 355
Table 12. Environment subtab options for Multi-Layer Hybrid background model
Option Description Default Setting
Timing
Time to clear long-term background (seconds)
Only available for Dual Layer Dynamic and Multi-Layer Hybrid background models.
• 120• 700 for Indoor:
Retail
Time to clear short-term background (seconds)
Only available for Dual Layer Dynamic background model.
• 5• 1 for Indoor:
Retail
Time to move short-term background to long-term (seconds)
Only available for Dual Layer Dynamic and Multi-Layer Hybrid background models.
• 60• 600 for Indoor:
Retail
SensitivityControls how sensitive the background model is to a perceived change from the expected background values. If sensitivity is low, it will attribute a change to natural variation in the appearance of the background. If sensitivity is high it will attribute the change to a foreground object. The Multi-Layer Hybrid background model checks three types of features: Brightness (from black to white), color (red, blue, gray, etc) and texture (local patterns of brightness). The slider controls sensitivity between zero and 1. At least one of the three features should be selected.
BrightnessLooks for changes in gray-level (from black to white). This should usually be selected, but the appropriate sensitivity depends on how much the lighting in the scene varies over time.
True, Medium
Thermal Gives equal importance to intensity differences across the whole range of possible values. False
Colour
The video engine looks for change in hue and saturation. Color is usually not as strongly affected by lighting, but not all objects can be distinguished from the background by color alone. It requires more CPU time than Brightness.
True, High
Texture
The video engine looks for changes in the local brightness pattern, especially new edges. Texture is generally less affected by lighting, but flatter objects may not have enough texture to be distinguished from the background. It requires more CPU time than Color.
False
Table 11. Environment subtab options for Spatio-Temporal background model (Continued)
Option Description Default Setting
Video Analytics and Rules46
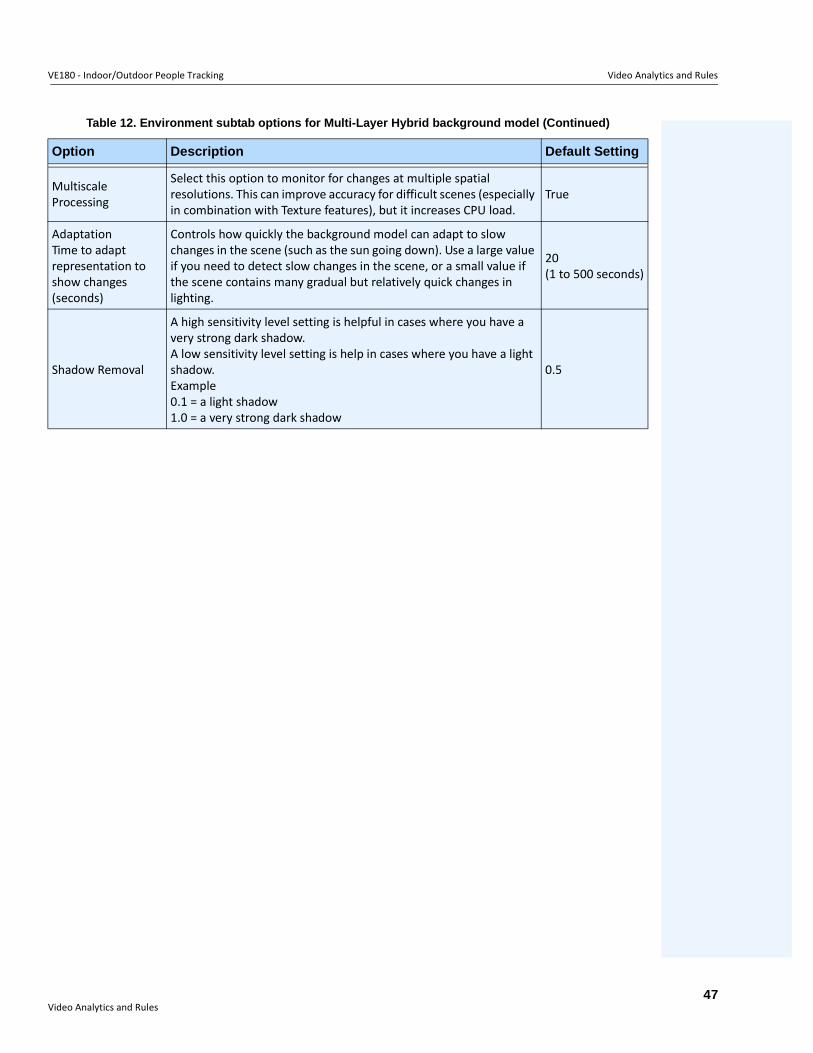
VE180 - Indoor/Outdoor People Tracking Video Analytics and Rules
Multiscale Processing
Select this option to monitor for changes at multiple spatial resolutions. This can improve accuracy for difficult scenes (especially in combination with Texture features), but it increases CPU load.
True
AdaptationTime to adapt representation to show changes (seconds)
Controls how quickly the background model can adapt to slow changes in the scene (such as the sun going down). Use a large value if you need to detect slow changes in the scene, or a small value if the scene contains many gradual but relatively quick changes in lighting.
20(1 to 500 seconds)
Shadow Removal
A high sensitivity level setting is helpful in cases where you have a very strong dark shadow.A low sensitivity level setting is help in cases where you have a light shadow.Example0.1 = a light shadow1.0 = a very strong dark shadow
0.5
Table 12. Environment subtab options for Multi-Layer Hybrid background model (Continued)
Option Description Default Setting
Video Analytics and Rules47
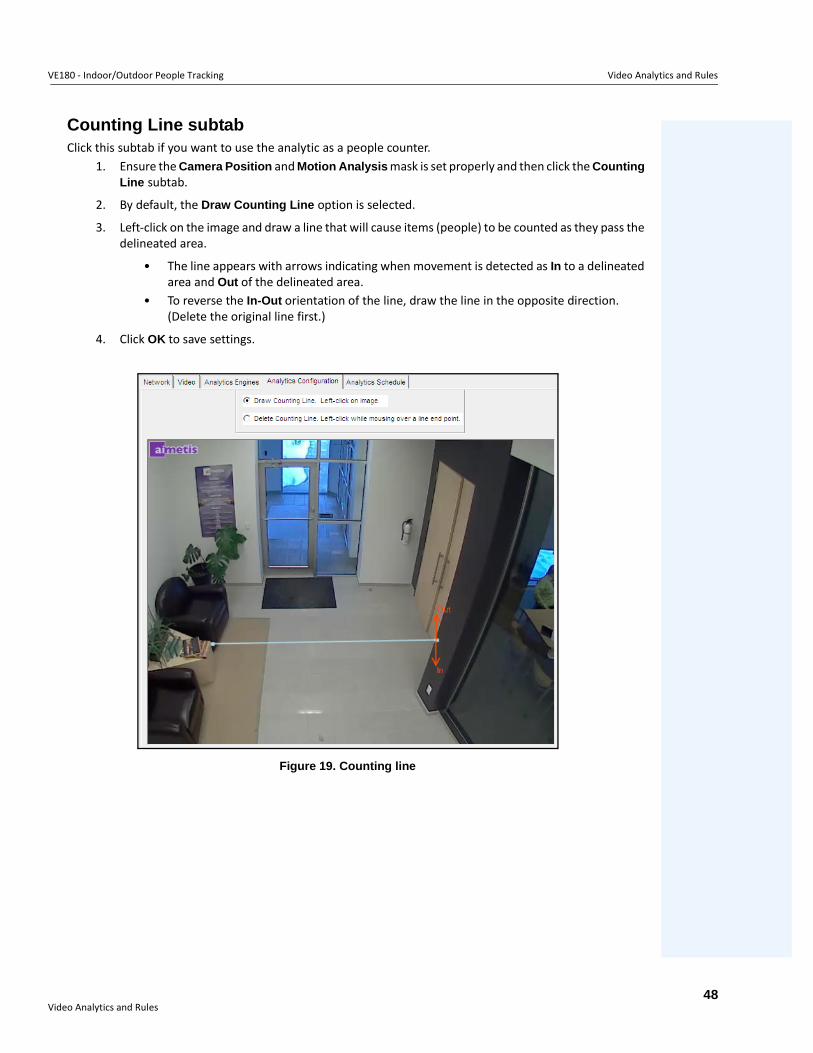
VE180 - Indoor/Outdoor People Tracking Video Analytics and Rules
Counting Line subtabClick this subtab if you want to use the analytic as a people counter.
1. Ensure the Camera Position and Motion Analysis mask is set properly and then click the Counting Line subtab.
2. By default, the Draw Counting Line option is selected.
3. Left-click on the image and draw a line that will cause items (people) to be counted as they pass the delineated area.
• The line appears with arrows indicating when movement is detected as In to a delineated area and Out of the delineated area.
• To reverse the In-Out orientation of the line, draw the line in the opposite direction. (Delete the original line first.)
4. Click OK to save settings.
Figure 19. Counting line
Video Analytics and Rules48
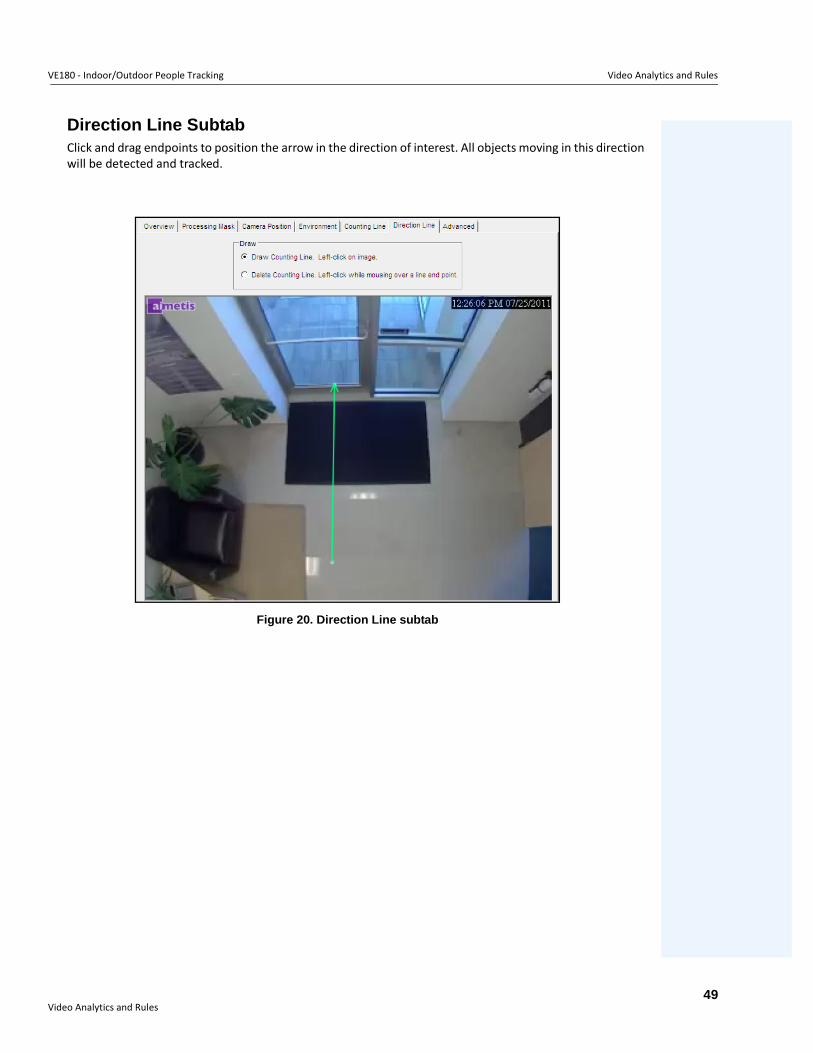
VE180 - Indoor/Outdoor People Tracking Video Analytics and Rules
Direction Line SubtabClick and drag endpoints to position the arrow in the direction of interest. All objects moving in this direction will be detected and tracked.
Figure 20. Direction Line subtab
Video Analytics and Rules49
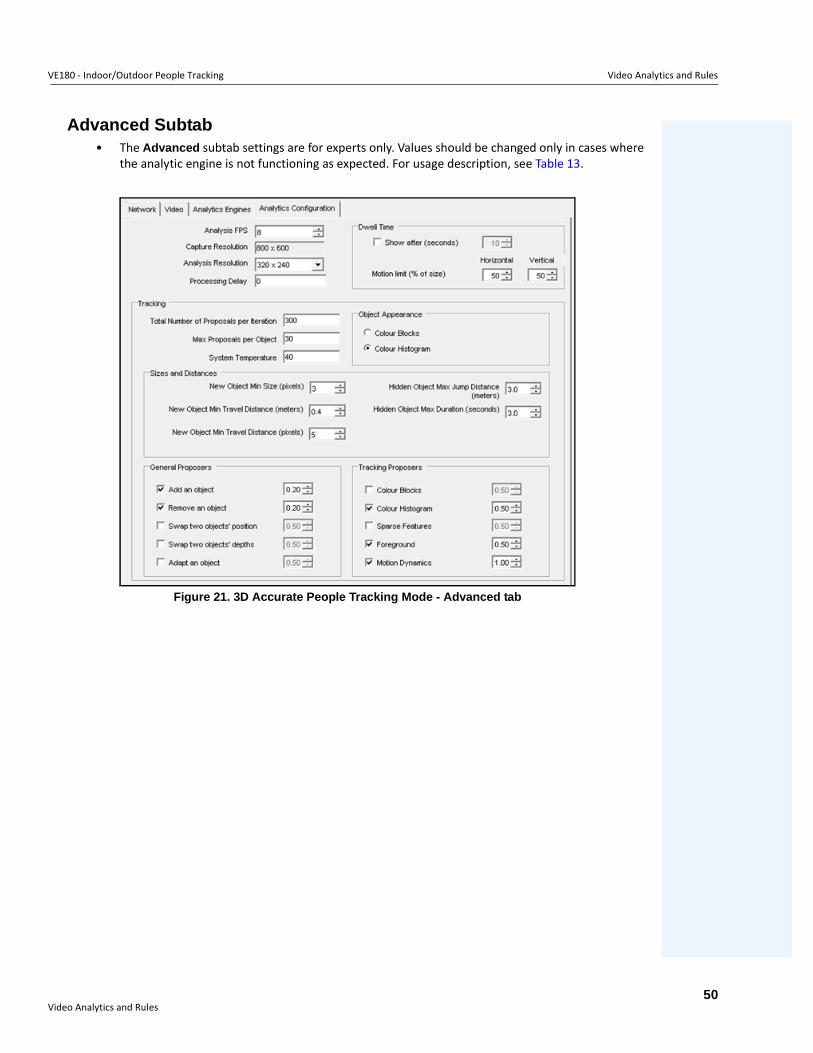
VE180 - Indoor/Outdoor People Tracking Video Analytics and Rules
Advanced Subtab • The Advanced subtab settings are for experts only. Values should be changed only in cases where
the analytic engine is not functioning as expected. For usage description, see Table 13.
Figure 21. 3D Accurate People Tracking Mode - Advanced tab
Video Analytics and Rules50
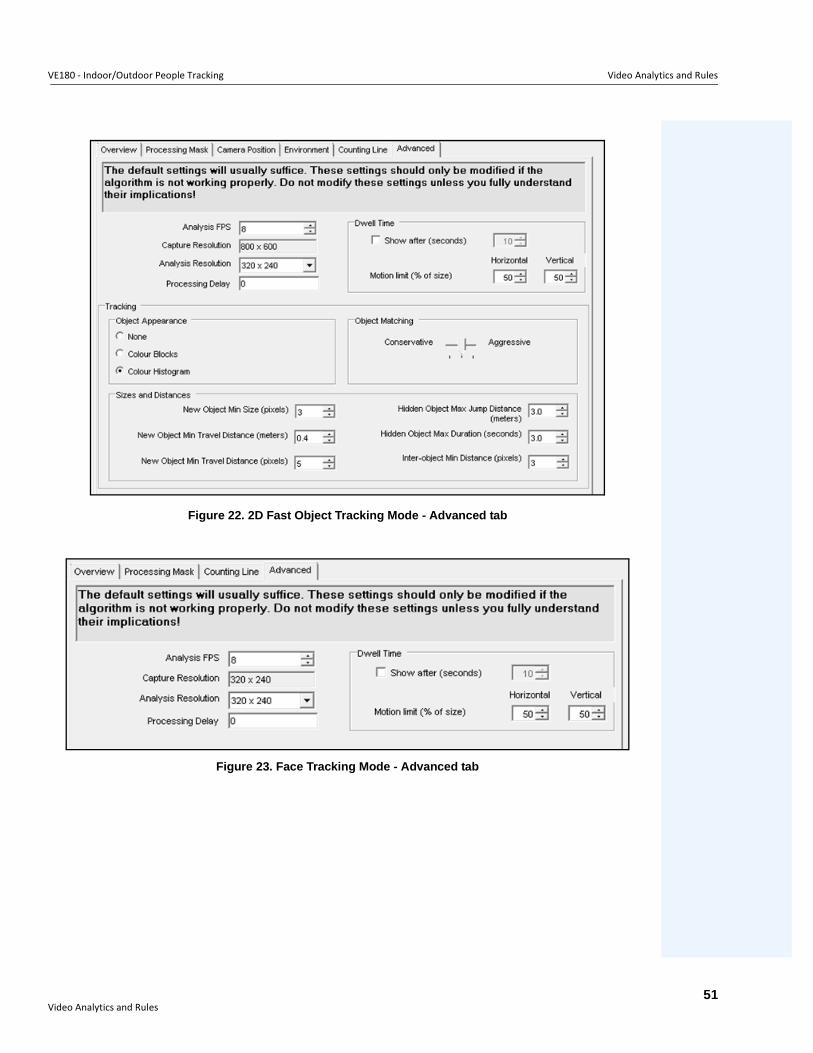
VE180 - Indoor/Outdoor People Tracking Video Analytics and Rules
Figure 22. 2D Fast Object Tracking Mode - Advanced tab
Figure 23. Face Tracking Mode - Advanced tab
Video Analytics and Rules51
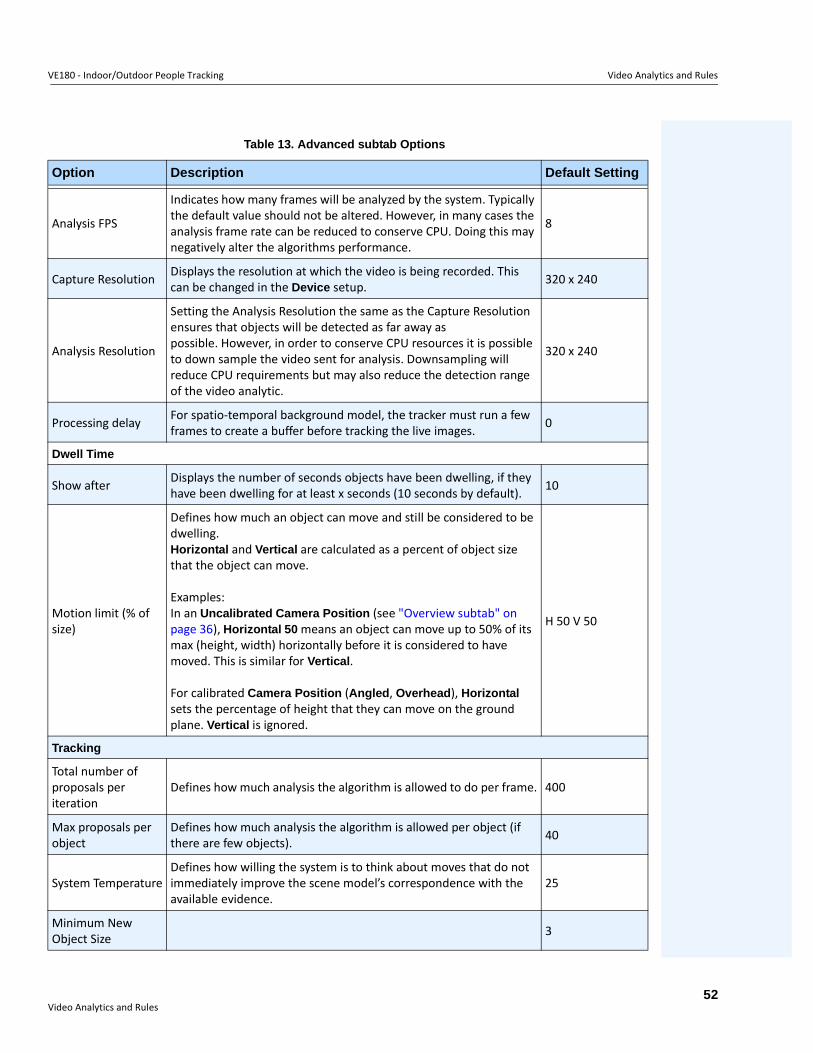
VE180 - Indoor/Outdoor People Tracking Video Analytics and Rules
Table 13. Advanced subtab Options
Option Description Default Setting
Analysis FPS
Indicates how many frames will be analyzed by the system. Typically the default value should not be altered. However, in many cases the analysis frame rate can be reduced to conserve CPU. Doing this may negatively alter the algorithms performance.
8
Capture Resolution Displays the resolution at which the video is being recorded. This can be changed in the Device setup. 320 x 240
Analysis Resolution
Setting the Analysis Resolution the same as the Capture Resolution ensures that objects will be detected as far away as possible. However, in order to conserve CPU resources it is possible to down sample the video sent for analysis. Downsampling will reduce CPU requirements but may also reduce the detection range of the video analytic.
320 x 240
Processing delay For spatio-temporal background model, the tracker must run a few frames to create a buffer before tracking the live images. 0
Dwell Time
Show after Displays the number of seconds objects have been dwelling, if they have been dwelling for at least x seconds (10 seconds by default). 10
Motion limit (% of size)
Defines how much an object can move and still be considered to be dwelling. Horizontal and Vertical are calculated as a percent of object size that the object can move.
Examples:In an Uncalibrated Camera Position (see "Overview subtab" on page 36), Horizontal 50 means an object can move up to 50% of its max (height, width) horizontally before it is considered to have moved. This is similar for Vertical.
For calibrated Camera Position (Angled, Overhead), Horizontal sets the percentage of height that they can move on the ground plane. Vertical is ignored.
H 50 V 50
Tracking
Total number of proposals per iteration
Defines how much analysis the algorithm is allowed to do per frame. 400
Max proposals per object
Defines how much analysis the algorithm is allowed per object (if there are few objects). 40
System TemperatureDefines how willing the system is to think about moves that do not immediately improve the scene model’s correspondence with the available evidence.
25
Minimum New Object Size 3
Video Analytics and Rules52
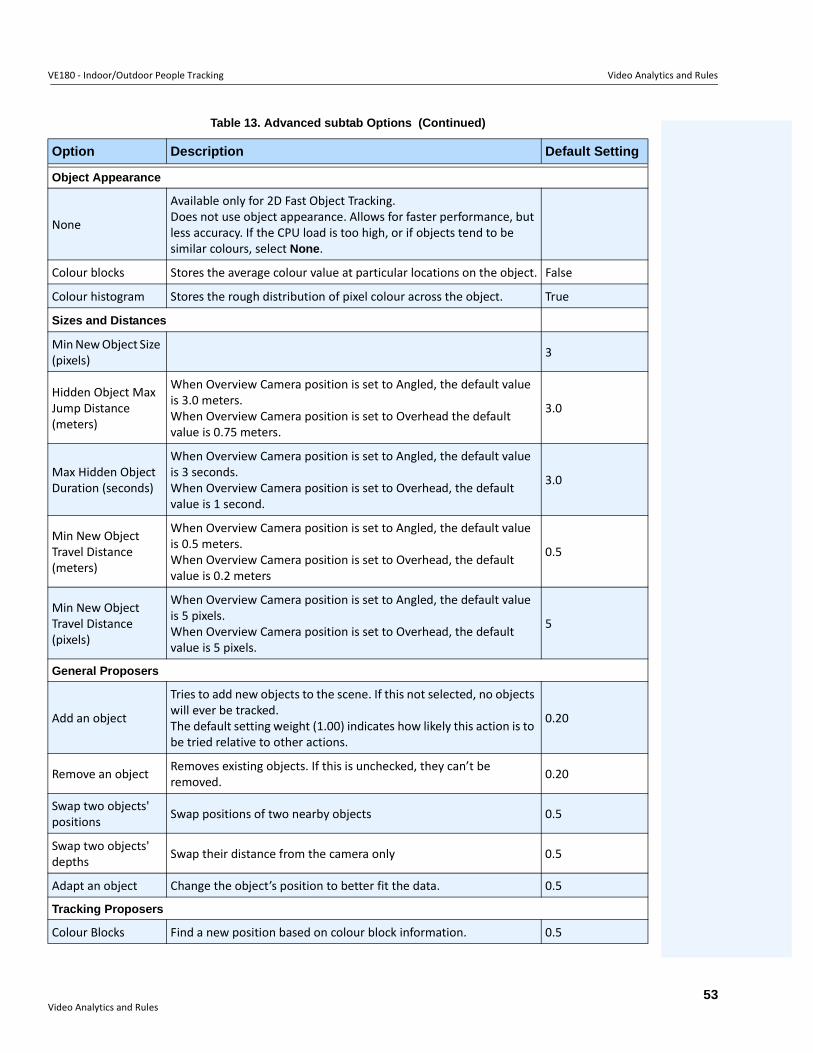
VE180 - Indoor/Outdoor People Tracking Video Analytics and Rules
Object Appearance
None
Available only for 2D Fast Object Tracking.Does not use object appearance. Allows for faster performance, but less accuracy. If the CPU load is too high, or if objects tend to be similar colours, select None.
Colour blocks Stores the average colour value at particular locations on the object. False
Colour histogram Stores the rough distribution of pixel colour across the object. True
Sizes and Distances
Min New Object Size (pixels) 3
Hidden Object Max Jump Distance (meters)
When Overview Camera position is set to Angled, the default value is 3.0 meters.When Overview Camera position is set to Overhead the default value is 0.75 meters.
3.0
Max Hidden Object Duration (seconds)
When Overview Camera position is set to Angled, the default value is 3 seconds.When Overview Camera position is set to Overhead, the default value is 1 second.
3.0
Min New Object Travel Distance (meters)
When Overview Camera position is set to Angled, the default value is 0.5 meters.When Overview Camera position is set to Overhead, the default value is 0.2 meters
0.5
Min New Object Travel Distance (pixels)
When Overview Camera position is set to Angled, the default value is 5 pixels.When Overview Camera position is set to Overhead, the default value is 5 pixels.
5
General Proposers
Add an object
Tries to add new objects to the scene. If this not selected, no objects will ever be tracked.The default setting weight (1.00) indicates how likely this action is to be tried relative to other actions.
0.20
Remove an object Removes existing objects. If this is unchecked, they can’t be removed. 0.20
Swap two objects' positions Swap positions of two nearby objects 0.5
Swap two objects' depths Swap their distance from the camera only 0.5
Adapt an object Change the object’s position to better fit the data. 0.5
Tracking Proposers
Colour Blocks Find a new position based on colour block information. 0.5
Table 13. Advanced subtab Options (Continued)
Option Description Default Setting
Video Analytics and Rules53

VE180 - Indoor/Outdoor People Tracking Video Analytics and Rules
Colour Histogram Find a new position based on colour histogram information. 0.5
Contours Find a new position based on the object’s outline. 0.5
Sparse Features Find a new position based on local texture points. 0.5
Foreground Find a new position that aligns the object with detected foreground. 0.5
Motion Dynamics Find a new position, randomly, based on how it moved in previous frames. 1.0
Table 13. Advanced subtab Options (Continued)
Option Description Default Setting
Video Analytics and Rules54
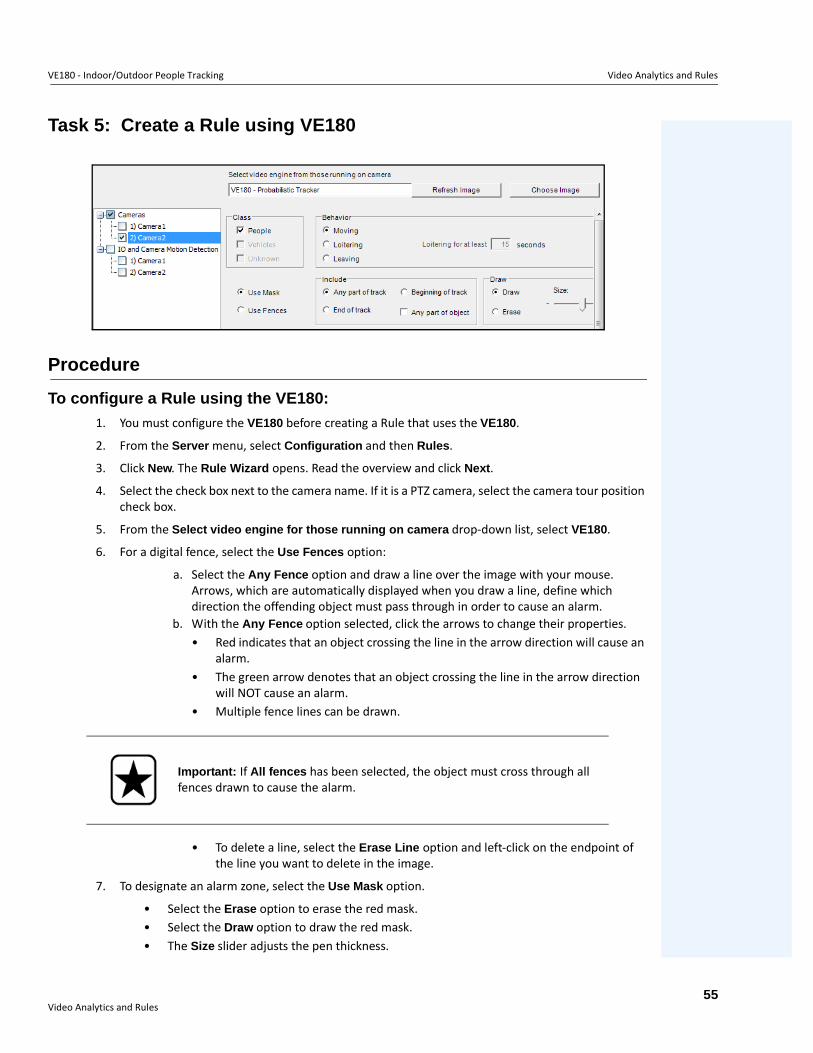
VE180 - Indoor/Outdoor People Tracking Video Analytics and Rules
Task 5: Create a Rule using VE180
Procedure
To configure a Rule using the VE180:
1. You must configure the VE180 before creating a Rule that uses the VE180.
2. From the Server menu, select Configuration and then Rules.
3. Click New. The Rule Wizard opens. Read the overview and click Next.
4. Select the check box next to the camera name. If it is a PTZ camera, select the camera tour position check box.
5. From the Select video engine for those running on camera drop-down list, select VE180.
6. For a digital fence, select the Use Fences option:
a. Select the Any Fence option and draw a line over the image with your mouse. Arrows, which are automatically displayed when you draw a line, define which direction the offending object must pass through in order to cause an alarm.
b. With the Any Fence option selected, click the arrows to change their properties. • Red indicates that an object crossing the line in the arrow direction will cause an
alarm.• The green arrow denotes that an object crossing the line in the arrow direction
will NOT cause an alarm. • Multiple fence lines can be drawn.
• To delete a line, select the Erase Line option and left-click on the endpoint of the line you want to delete in the image.
7. To designate an alarm zone, select the Use Mask option.
• Select the Erase option to erase the red mask.• Select the Draw option to draw the red mask. • The Size slider adjusts the pen thickness.
Important: If All fences has been selected, the object must cross through all fences drawn to cause the alarm.
Video Analytics and Rules55

Troubleshooting Video Analytics and Rules
ity in nd ).
.
The following settings apply only to alarm zones:• Any part of track denotes the object can be anywhere in the red alarm zone to trigger an
alarm. To alarm on objects moving anywhere in the alarm zone, select Any part of track. • End of track denotes that the object has stopped in the alarm zone. To alarm on objects
entering the alarm zone and stopping in it, select End of track. • Beginning of track denotes that the object started moving in the alarm zone. To alarm
on objects that were in the alarm zone and started to move, select Beginning of track.• Any part of object denotes that any part of the object can be anywhere in the red alarm
zone to trigger an alarm.
8. Click Next to continue to next step in wizard. See "Rules - Using the Rule Wizard" on page 80 for details.
Troubleshooting
Table 14. Troubleshooting Solutions for VE180
Problem Reasons Solutions
False counts. Not enough objects tracked
Calibration. Person size too big. Adjust person size.
Background model. Sensitivity too low. Increase sensitivity of the background model.
Trouble detecting people with dark clothing against a dark background (or light clothing against a light background).
Increase the brightness sensitivthe Multilayer Hybrid Backgroumodel (on the Environment taborSwitch to the hybrid model andincrease brightness sensitivity.
False counts. Too many objects tracked.
Real person tracked as two or more people.Calibration. Person size too small. Adjust person size.
Many objects throughout the scene.Background model. Sensitivity too high.
Decrease the sensitivity of the background model.
Shadows or lighting changes. Decrease brightness sensitivity
Video Analytics and Rules56
Using trackerapp to Adjust Settings Video Analytics and Rules
Using trackerapp to Adjust Settings
The trackerapp utility allows you to run and adjust a video analytic on a live view/recorded video and see exactly which part of an object (for example, a person) is in the foreground.
Procedure
To use trackerapp:
1. In Symphony Client, stop the camera:
a. In the Camera Tree, right-click on the camera.b. From the context menu, select Stop Camera.
2. In the command line, change your directory to C:\Program Files\Aimetis\Symphony\_bin. If you are running on a 64 bit machine, use Program Files(x86) in the path instead.
3. Enter trackerapp x where x is the ID of the camera you are using. (The tracker number always precedes the camera name in the Camera Tree.)
4. The Aimetis Demo (Motion Tracking) dialog box opens (Figure 24 on page 58). A live video is displayed in the window.
• If you want to run a recorded video instead:a. Click the Disk icon. The Open dialog box appears. b. Select the video you want to run back through Symphony (MPEG or AIRA) and click
Open. c. The Select Movie dialog box appears. Select the method/speed to run the video
back through and click OK. Slow (real-time) is recommended. Symphony will now run the video back through tracker on the camera with the video engine and configuration you selected.
Video Analytics and Rules57
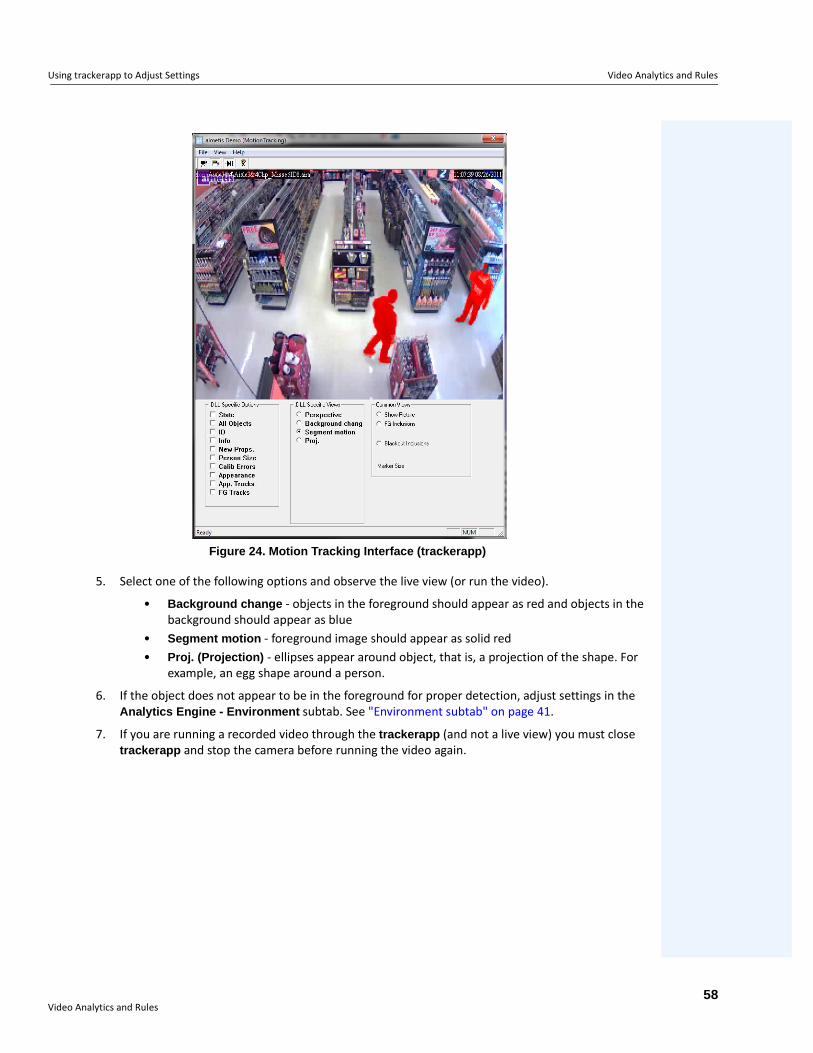
Using trackerapp to Adjust Settings Video Analytics and Rules
Figure 24. Motion Tracking Interface (trackerapp)
5. Select one of the following options and observe the live view (or run the video).
• Background change - objects in the foreground should appear as red and objects in the background should appear as blue
• Segment motion - foreground image should appear as solid red• Proj. (Projection) - ellipses appear around object, that is, a projection of the shape. For
example, an egg shape around a person.
6. If the object does not appear to be in the foreground for proper detection, adjust settings in the Analytics Engine - Environment subtab. See "Environment subtab" on page 41.
7. If you are running a recorded video through the trackerapp (and not a live view) you must close trackerapp and stop the camera before running the video again.
Video Analytics and Rules58
VE250 - Motion Tracking Video Analytics and Rules
VE250 - Motion TrackingThe VE250 is a good choice for indoor or outdoor motion tracking applications. The advantage the VE250 has over the VE150, is that no Perspective information is required. It is considered a plug and play video engine. It will work at virtually any camera angle. The VE250 also works better in busier environments since it has better object segmentation capabilities as compared with the VE130. However, the VE250 does not have any object classification capability, and will use more CPU.
Typical deployments include commercial buildings, where objects are to be detected, military basis, where objects entering an alarm zone or crossing a pre-defined line are to be detected, regardless of class of object (people or vehicles). The VE250 is essentially a big improvement over the motion detection technology previously on the market (which would generate numerous false alarms caused by lighting changes or environment changes). The VE250 can be used in moderately busy, indoor or outdoor environments, at virtually any camera angle. For best performance, the camera must be mounted far enough away from the objects that 8 frames will contain the moving object as it passes by the camera.
Task 1: Configure VE250
Procedure
To configure the VE250:
1. In Symphony Client, from the Server menu, select Configuration. The Configuration dialog box opens. This allows you to configure devices for the currently selected server.
2. In the left pane, click Devices. The Devices dialog box opens.
3. Click the camera you want to configure for use with video analytics and click Edit.
4. Click the Analytics Engines tab and select VE250. By default VE250 is selected. If the check box for VE250 is not selected, you must clear other check boxes (algorithms) that conflict with VE250.
5. Click the Analytics Configuration tab.
6. From the Analytics Engines drop-down list, select Intel_VE250.
7. The Analysis FPS box configures how many frames will be analyzed by the system. Typically the default value should not be altered. However, there may be cases where the analysis frame rate can be reduced to conserve CPU. Doing this may negatively alter the algorithms performance. Like the Analysis Resolution, the Analysis FPS can be set differently than the record FPS.
8. Adjust the Analysis Resolution as required.
• Setting the Analysis Resolution the same as the Capture Resolution ensures that objects will be detected as far away as possible. However, in order to conserve CPU resources it is possible to downsample the video sent for analysis. Downsampling will reduce CPU requirements but may also reduce the detection range of the video analytic.
9. Modify the motion mask by adjusting the yellow mask as required (see how to configure analytics for more help). Select the Erase radio to erase the yellow mask, and select Draw to draw the mask. The Size slider adjusts the pen thickness.
10. Click Apply to save settings.
Video Analytics and Rules59
VE250 - Motion Tracking Video Analytics and Rules
Task 2: Create a Rule using VE250
Procedure
To configure a Rule using the VE250:
1. You must configure the VE250 before creating a Rule that uses the VE250.
2. From the Server menu, select Configuration and then Rules
3. Click New. The Rule Wizard opens. Read the overview and click Next.
4. Select the check box next to the camera name. If it is a PTZ camera, select the camera tour position check box.
5. From the Select video engine for those running on camera drop-down list, select VE250.
6. Click Next to continue in the Rule Wizard. Set up the rules as per concepts and instructions in "Rules - Using the Rule Wizard" on page 80.
Video Analytics and Rules60
VE352 - Left and Removed Item Detection Video Analytics and Rules
VE352 - Left and Removed Item DetectionThe VE352 video engine detects left or removed items in moderately to less busy indoor environments. Typical deployments include retail facilities where detecting removal of merchandise is desired. Camera position should be at least 15 feet above the ground, and the camera angle can be flexible, depending on the field of view you wish to capture.
Task 1: Configure VE352
Procedure
To configure the VE352:
1. In Symphony Client, from the Server menu, select Configuration. The Configuration dialog box opens. This allows you to configure devices for the currently selected server.
2. In the left pane, click Devices. The Devices dialog box opens.
3. Click the camera you want to configure for use with video analytics and click Edit.
4. Click the Analytics Engines tab and select VE352. (Optional) By default VE250 is selected, in which case you must first deselect VE250.
5. Click the Analytics Configuration tab. From the Analytic Engines drop-down box, select VE352.
6. By default, the Masks tab is shown. Leave the default settings for the Analysis FPS and Analysis Resolution.
7. Click the Persistence Mask subtab and adjust the yellow mask as required.
• Select the Erase option to erase the yellow mask.• Select the Draw option to draw the yellow mask. • The Size slider adjusts the pen thickness.
8. Click the Perspective subtab and set the perspective for the scene: The red lines must be drawn such that they represent a length of 5m at their location in the scene. The Person icon will be sized automatically.
9. Click the Basic tab to configure additional settings. See Table 15 on page 62.
Video Analytics and Rules61
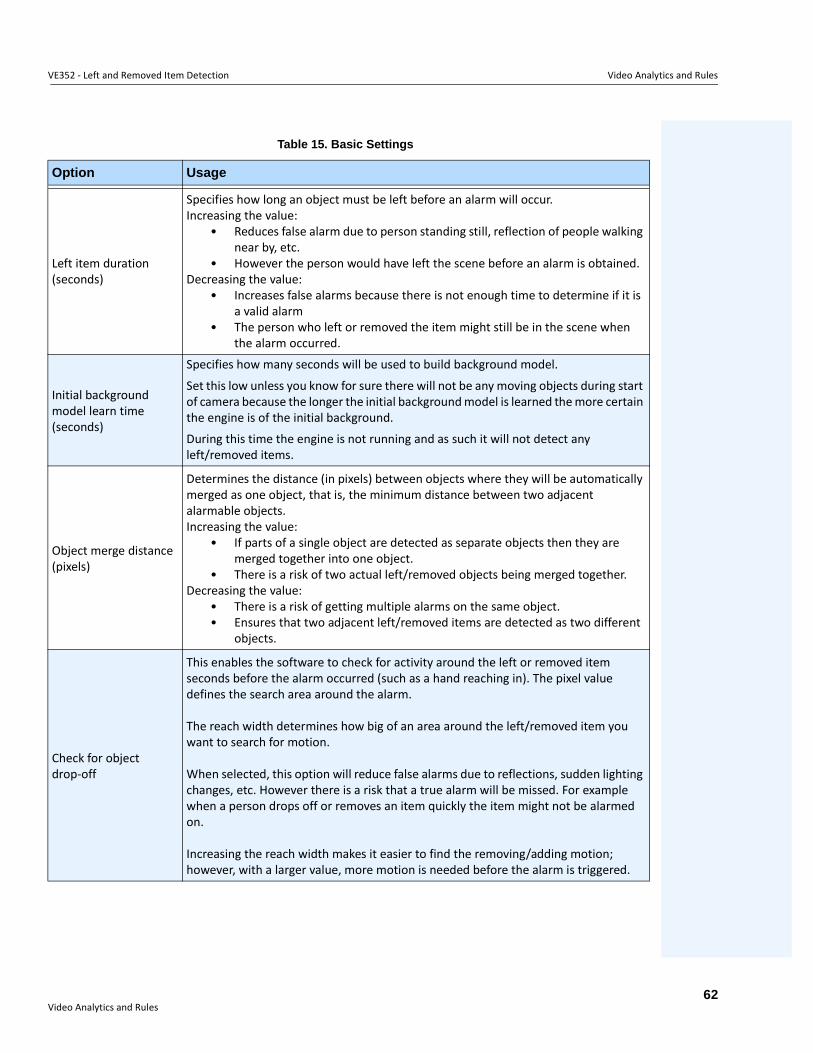
VE352 - Left and Removed Item Detection Video Analytics and Rules
Table 15. Basic Settings
Option Usage
Left item duration (seconds)
Specifies how long an object must be left before an alarm will occur.Increasing the value:
• Reduces false alarm due to person standing still, reflection of people walking near by, etc.
• However the person would have left the scene before an alarm is obtained.Decreasing the value:
• Increases false alarms because there is not enough time to determine if it is a valid alarm
• The person who left or removed the item might still be in the scene when the alarm occurred.
Initial background model learn time (seconds)
Specifies how many seconds will be used to build background model.
Set this low unless you know for sure there will not be any moving objects during start of camera because the longer the initial background model is learned the more certain the engine is of the initial background.
During this time the engine is not running and as such it will not detect any left/removed items.
Object merge distance (pixels)
Determines the distance (in pixels) between objects where they will be automatically merged as one object, that is, the minimum distance between two adjacent alarmable objects.Increasing the value:
• If parts of a single object are detected as separate objects then they are merged together into one object.
• There is a risk of two actual left/removed objects being merged together.Decreasing the value:
• There is a risk of getting multiple alarms on the same object.• Ensures that two adjacent left/removed items are detected as two different
objects.
Check for object drop-off
This enables the software to check for activity around the left or removed item seconds before the alarm occurred (such as a hand reaching in). The pixel value defines the search area around the alarm.
The reach width determines how big of an area around the left/removed item you want to search for motion.
When selected, this option will reduce false alarms due to reflections, sudden lighting changes, etc. However there is a risk that a true alarm will be missed. For example when a person drops off or removes an item quickly the item might not be alarmed on.
Increasing the reach width makes it easier to find the removing/adding motion; however, with a larger value, more motion is needed before the alarm is triggered.
Video Analytics and Rules62
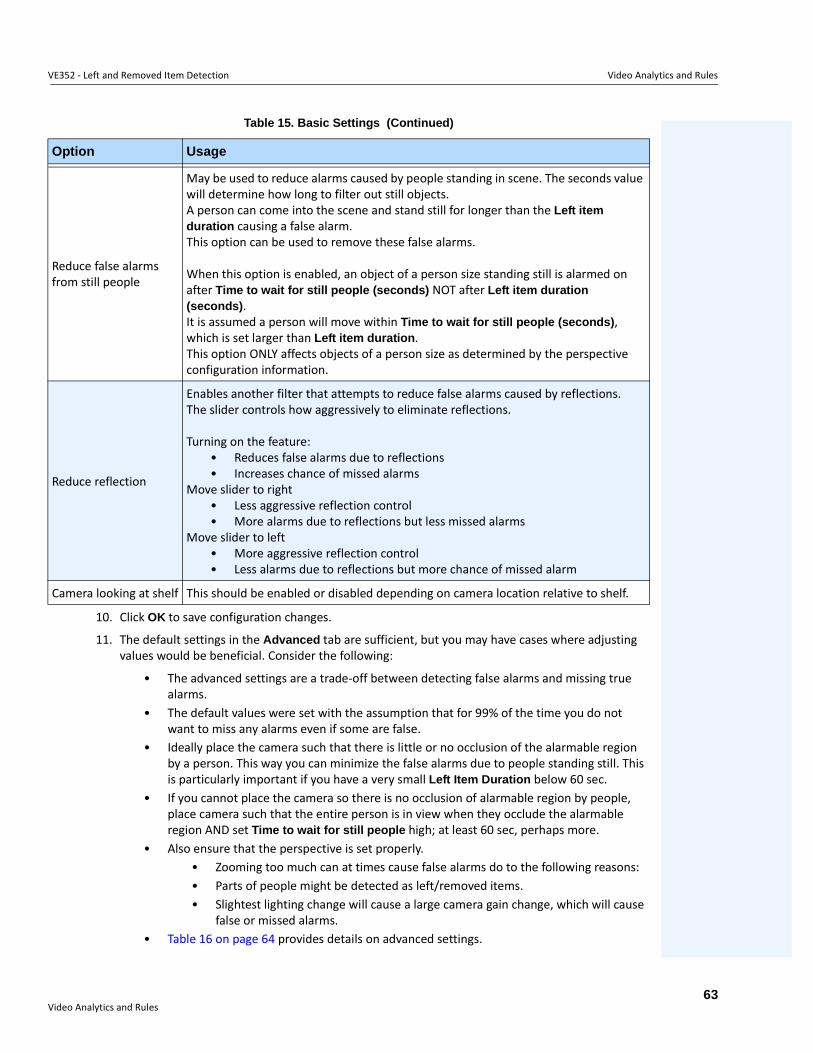
VE352 - Left and Removed Item Detection Video Analytics and Rules
10. Click OK to save configuration changes.
11. The default settings in the Advanced tab are sufficient, but you may have cases where adjusting values would be beneficial. Consider the following:
• The advanced settings are a trade-off between detecting false alarms and missing true alarms.
• The default values were set with the assumption that for 99% of the time you do not want to miss any alarms even if some are false.
• Ideally place the camera such that there is little or no occlusion of the alarmable region by a person. This way you can minimize the false alarms due to people standing still. This is particularly important if you have a very small Left Item Duration below 60 sec.
• If you cannot place the camera so there is no occlusion of alarmable region by people, place camera such that the entire person is in view when they occlude the alarmable region AND set Time to wait for still people high; at least 60 sec, perhaps more.
• Also ensure that the perspective is set properly.• Zooming too much can at times cause false alarms do to the following reasons:• Parts of people might be detected as left/removed items.• Slightest lighting change will cause a large camera gain change, which will cause
false or missed alarms.• Table 16 on page 64 provides details on advanced settings.
Reduce false alarms from still people
May be used to reduce alarms caused by people standing in scene. The seconds value will determine how long to filter out still objects.A person can come into the scene and stand still for longer than the Left item duration causing a false alarm.This option can be used to remove these false alarms.
When this option is enabled, an object of a person size standing still is alarmed on after Time to wait for still people (seconds) NOT after Left item duration (seconds).It is assumed a person will move within Time to wait for still people (seconds), which is set larger than Left item duration.This option ONLY affects objects of a person size as determined by the perspective configuration information.
Reduce reflection
Enables another filter that attempts to reduce false alarms caused by reflections.The slider controls how aggressively to eliminate reflections.
Turning on the feature:• Reduces false alarms due to reflections• Increases chance of missed alarms
Move slider to right• Less aggressive reflection control• More alarms due to reflections but less missed alarms
Move slider to left• More aggressive reflection control• Less alarms due to reflections but more chance of missed alarm
Camera looking at shelf This should be enabled or disabled depending on camera location relative to shelf.
Table 15. Basic Settings (Continued)
Option Usage
Video Analytics and Rules63
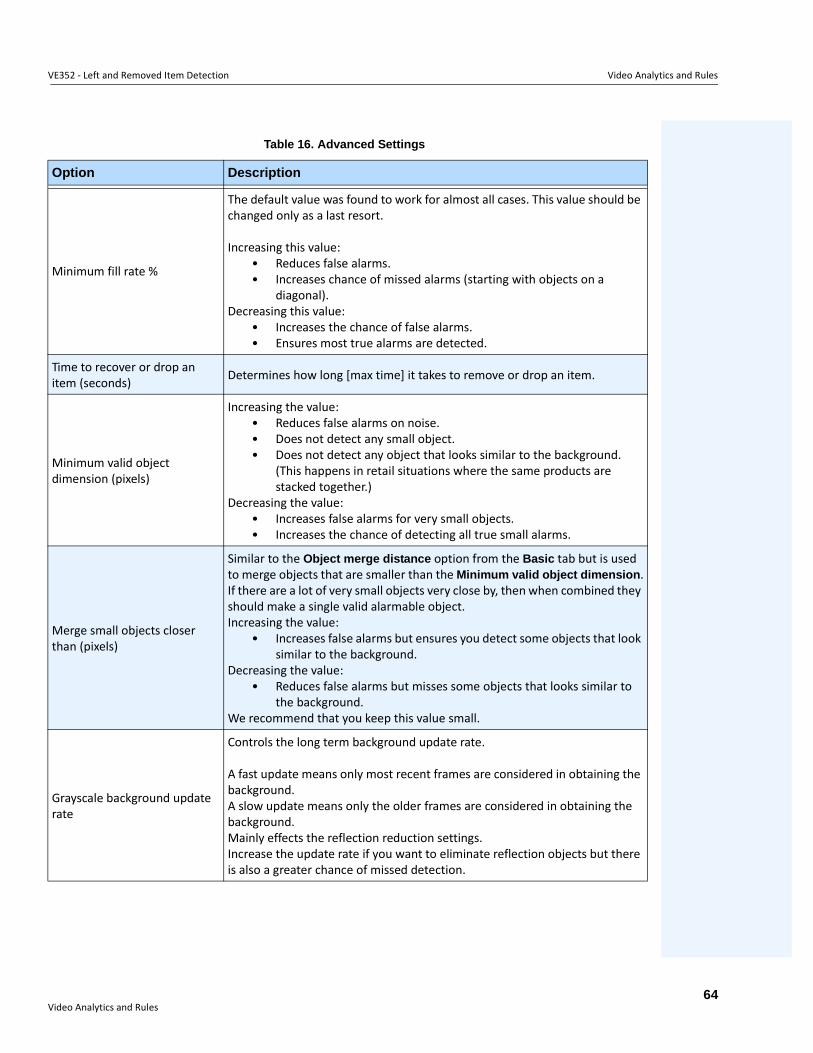
VE352 - Left and Removed Item Detection Video Analytics and Rules
Table 16. Advanced Settings
Option Description
Minimum fill rate %
The default value was found to work for almost all cases. This value should be changed only as a last resort.
Increasing this value:• Reduces false alarms.• Increases chance of missed alarms (starting with objects on a
diagonal).Decreasing this value:
• Increases the chance of false alarms.• Ensures most true alarms are detected.
Time to recover or drop an item (seconds) Determines how long [max time] it takes to remove or drop an item.
Minimum valid object dimension (pixels)
Increasing the value:• Reduces false alarms on noise.• Does not detect any small object. • Does not detect any object that looks similar to the background.
(This happens in retail situations where the same products are stacked together.)
Decreasing the value:• Increases false alarms for very small objects.• Increases the chance of detecting all true small alarms.
Merge small objects closer than (pixels)
Similar to the Object merge distance option from the Basic tab but is used to merge objects that are smaller than the Minimum valid object dimension.If there are a lot of very small objects very close by, then when combined they should make a single valid alarmable object.Increasing the value:
• Increases false alarms but ensures you detect some objects that look similar to the background.
Decreasing the value:• Reduces false alarms but misses some objects that looks similar to
the background.We recommend that you keep this value small.
Grayscale background update rate
Controls the long term background update rate.
A fast update means only most recent frames are considered in obtaining the background.A slow update means only the older frames are considered in obtaining the background.Mainly effects the reflection reduction settings.Increase the update rate if you want to eliminate reflection objects but there is also a greater chance of missed detection.
Video Analytics and Rules64
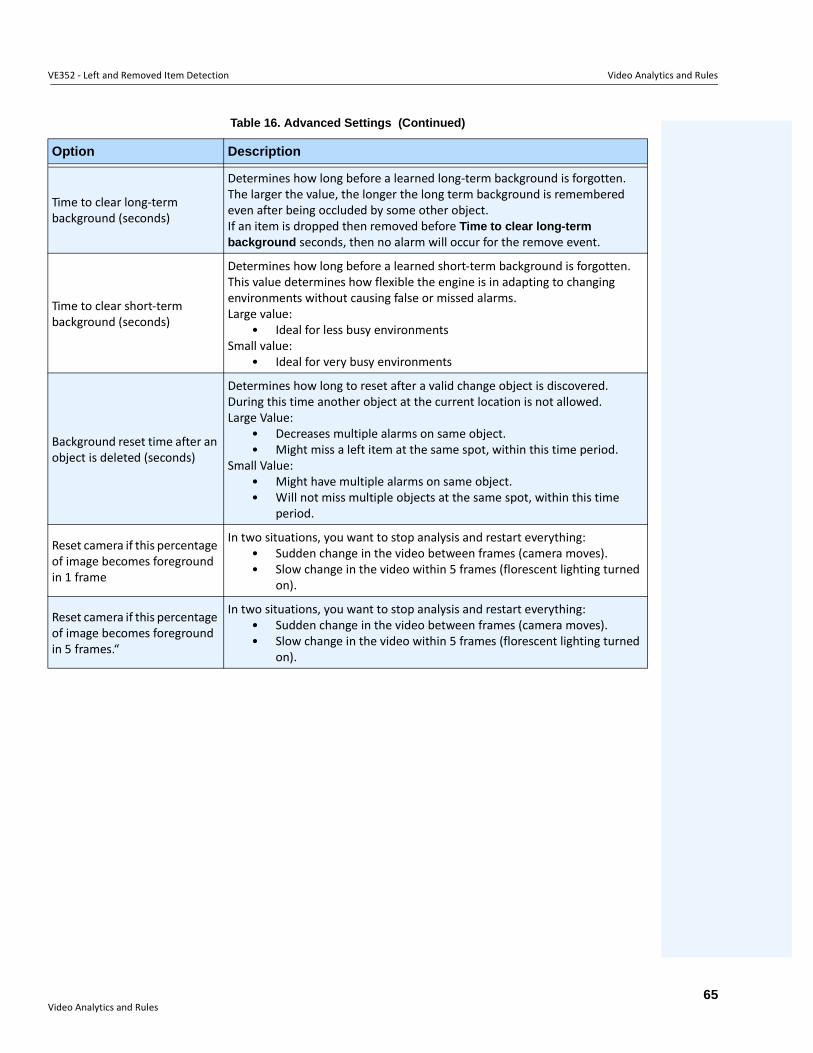
VE352 - Left and Removed Item Detection Video Analytics and Rules
Time to clear long-term background (seconds)
Determines how long before a learned long-term background is forgotten.The larger the value, the longer the long term background is remembered even after being occluded by some other object.If an item is dropped then removed before Time to clear long-term background seconds, then no alarm will occur for the remove event.
Time to clear short-term background (seconds)
Determines how long before a learned short-term background is forgotten.This value determines how flexible the engine is in adapting to changing environments without causing false or missed alarms.Large value:
• Ideal for less busy environmentsSmall value:
• Ideal for very busy environments
Background reset time after an object is deleted (seconds)
Determines how long to reset after a valid change object is discovered.During this time another object at the current location is not allowed.Large Value:
• Decreases multiple alarms on same object.• Might miss a left item at the same spot, within this time period.
Small Value:• Might have multiple alarms on same object.• Will not miss multiple objects at the same spot, within this time
period.
Reset camera if this percentage of image becomes foreground in 1 frame
In two situations, you want to stop analysis and restart everything:• Sudden change in the video between frames (camera moves).• Slow change in the video within 5 frames (florescent lighting turned
on).
Reset camera if this percentage of image becomes foreground in 5 frames.“
In two situations, you want to stop analysis and restart everything:• Sudden change in the video between frames (camera moves).• Slow change in the video within 5 frames (florescent lighting turned
on).
Table 16. Advanced Settings (Continued)
Option Description
Video Analytics and Rules65
VE352 - Left and Removed Item Detection Video Analytics and Rules
Task 2: Creating a Rule using VE352
Procedure
To configure a Rule using the VE352:
1. You must configure the VE352 before creating a Rule that uses the VE352.
2. From the Server menu, select Configuration and then Rules
3. Click New. The Rule Wizard opens. Read the overview and click Next.
4. Select the check box next to the camera name. If it is a PTZ camera, select the camera tour position check box.
5. From the Select video engine for those running on camera drop-down list, select VE352.
6. Using the displayed image from the video, define the area in red (a mask) where alarms should be set. (Not sure of the concept? See "Motion Mask versus Alarm Mask" on page 6.)
• Select the Erase option to erase the red mask.• Select the Draw option to draw the red mask. • The Size slider adjusts the pen thickness.• The VE352 does not distinguish between a left or removed item.• Objects that are left or removed outside the red alarm zone will not cause alarms.
7. Specify what percentage threshold for an object, which is not fully inside an alarm zone, by adjusting the Alarm based on percentage of object inside alarm mask option.
8. (Optional) Alarm conditions may be filtered by enabling the Alarm only if, or OR, at least options. Both conditions can be enabled together or separately.
• The Alarm only if filter is designed for retailers who want to alarm only if a certain number of items are removed from a shelf in a pre-determined time. For example, 2 LCD monitors must be removed before the event is triggered.
• The OR, at least option is a work-around if multiple objects are removed but they are so close together it creates one bounding box (and therefore one alarm).
• Therefore by combining both filters, many small background changes or one large background change (caused by a removed item) can trigger the event.
• Alarm only, if: Defines how many alarms must occur in predetermined time• OR, at least: Defines the size of alarm before• Alarms Occur: Based on alarms detected• Pixels Change: Based on pixels changed
9. Click Next to continue in the Rule Wizard. Set up the rules as per concepts and instructions in "Rules - Using the Rule Wizard" on page 80.
Further NotesCurrently, there is no distinction between left and removed items.
TroubleshootingIf objects are too small, detection is difficult. Move camera closer to objects that are to be detected.
Video Analytics and Rules66
PT091 and PT090- Automatic PTZ Tracking Video Analytics and Rules
PT091 and PT090- Automatic PTZ TrackingWe recommend that you try the PT091 Video Engine before trying PT090.
PT091 and PT090 Video Engines are used to automatically control PTZ cameras when activity is detected. After the PT091 or PT090 is enabled for a PTZ camera, a Rule can be configured where the PTZ camera can be automatically controlled by Symphony to zoom and follow objects that have broken the Rule (such as entered into the alarm zone or crossed a tripwire).
Recommendations• Minimize the number of moving objects in the camera’s field of view that you do not want to
track, for example, trees.• Eliminate On Screen Display (OSD) of PTZ movements. Some cameras display information on the
screen when panning/tilting/zooming. For example, “Zooming 5x” may appear in large letters at bottom of screen. The Symphony video engines may erroneously try to track this text instead of the objects of interest. Camera manufacturers typically provide a way to turn off this text. For example:
• In a Bosch camera, you might select the Camera OSD off option in one of the Settings Groups of the camera Web page interface.
• In a Pelco camera, you might have to click the OSD button, then select Display Setup and turn OFF various labels in the camera Web page interface.
• The camera must be stable, if wind or vibrations causes the camera to move, false alarms will occur.
• This engine does not perform well indoors, or where the objects are very close to the camera, or if the environment is very busy.
• Absolute positioning cameras are preferred over relative positioning cameras.• MJPEG mode, or running MPEG-4 at higher frame rates increases performance.• Ensure that enough available CPU is present to perform proper analysis.• When troubleshooting, increase the frame rate and image quality settings. Do NOT maximize
analysis resolution. In general, do not go above 400 x 300. The higher the analysis resolution, the more strain on CPU. For analysis FPS, stay at 12 FPS or below.
How to Set up PT091 and PT090 Analytic Engines
Instructions apply to both PT091 and PT090 video analytic engines, henceforth referred to as PT09x.
• “Task 1: (Optional) Set up the Camera Tour” on page 68• “Task 2: Calibrate the PTZ Camera” on page 69• “Task 3: Configure PT09x” on page 70• “Task 4: Creating a Rule using PT09x” on page 75
Additional Information• “ Calibrating Many Cameras of the Same Make and Model” on page 77
Video Analytics and Rules67
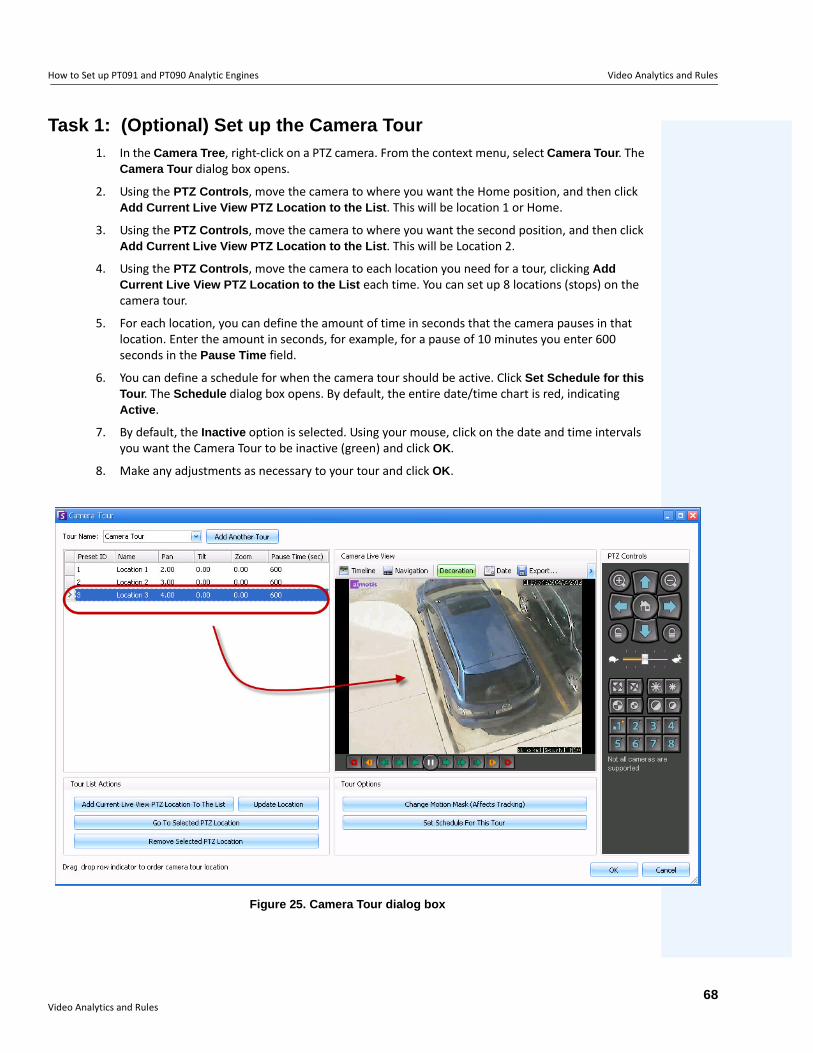
How to Set up PT091 and PT090 Analytic Engines Video Analytics and Rules
Task 1: (Optional) Set up the Camera Tour1. In the Camera Tree, right-click on a PTZ camera. From the context menu, select Camera Tour. The
Camera Tour dialog box opens.
2. Using the PTZ Controls, move the camera to where you want the Home position, and then click Add Current Live View PTZ Location to the List. This will be location 1 or Home.
3. Using the PTZ Controls, move the camera to where you want the second position, and then click Add Current Live View PTZ Location to the List. This will be Location 2.
4. Using the PTZ Controls, move the camera to each location you need for a tour, clicking Add Current Live View PTZ Location to the List each time. You can set up 8 locations (stops) on the camera tour.
5. For each location, you can define the amount of time in seconds that the camera pauses in that location. Enter the amount in seconds, for example, for a pause of 10 minutes you enter 600 seconds in the Pause Time field.
6. You can define a schedule for when the camera tour should be active. Click Set Schedule for this Tour. The Schedule dialog box opens. By default, the entire date/time chart is red, indicating Active.
7. By default, the Inactive option is selected. Using your mouse, click on the date and time intervals you want the Camera Tour to be inactive (green) and click OK.
8. Make any adjustments as necessary to your tour and click OK.
Figure 25. Camera Tour dialog box
Video Analytics and Rules68
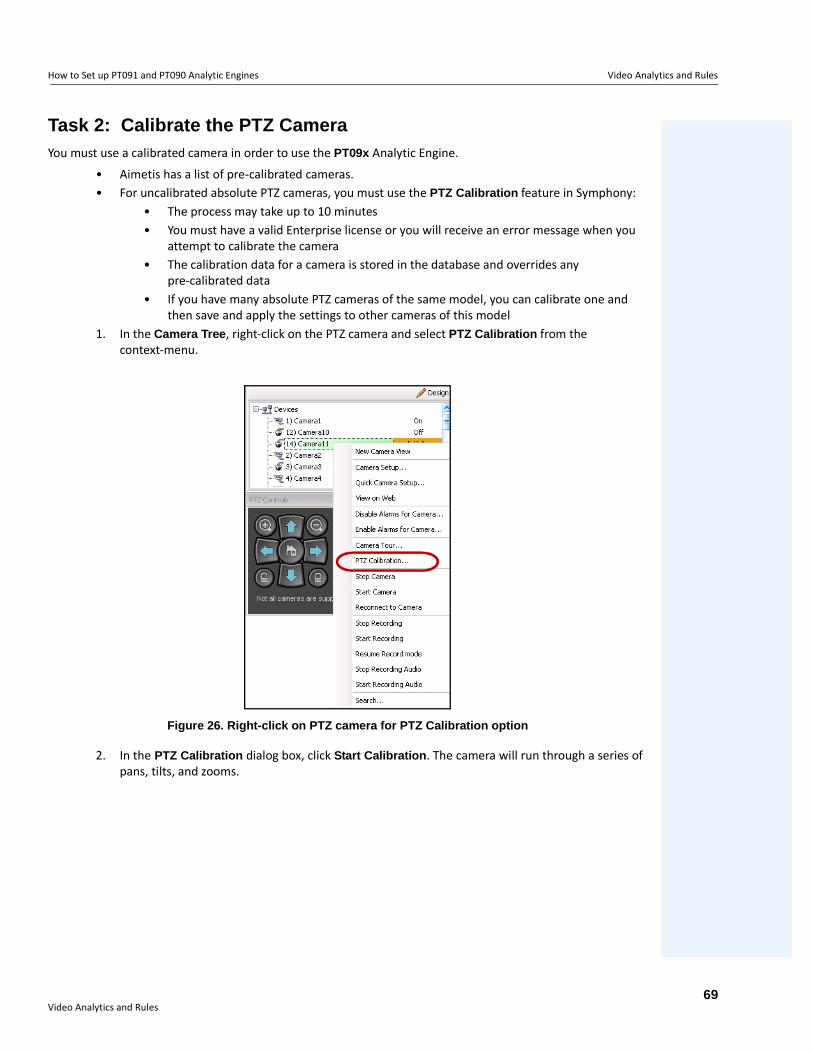
How to Set up PT091 and PT090 Analytic Engines Video Analytics and Rules
Task 2: Calibrate the PTZ CameraYou must use a calibrated camera in order to use the PT09x Analytic Engine.
• Aimetis has a list of pre-calibrated cameras. • For uncalibrated absolute PTZ cameras, you must use the PTZ Calibration feature in Symphony:
• The process may take up to 10 minutes• You must have a valid Enterprise license or you will receive an error message when you
attempt to calibrate the camera• The calibration data for a camera is stored in the database and overrides any
pre-calibrated data• If you have many absolute PTZ cameras of the same model, you can calibrate one and
then save and apply the settings to other cameras of this model 1. In the Camera Tree, right-click on the PTZ camera and select PTZ Calibration from the
context-menu.
Figure 26. Right-click on PTZ camera for PTZ Calibration option
2. In the PTZ Calibration dialog box, click Start Calibration. The camera will run through a series of pans, tilts, and zooms.
Video Analytics and Rules69
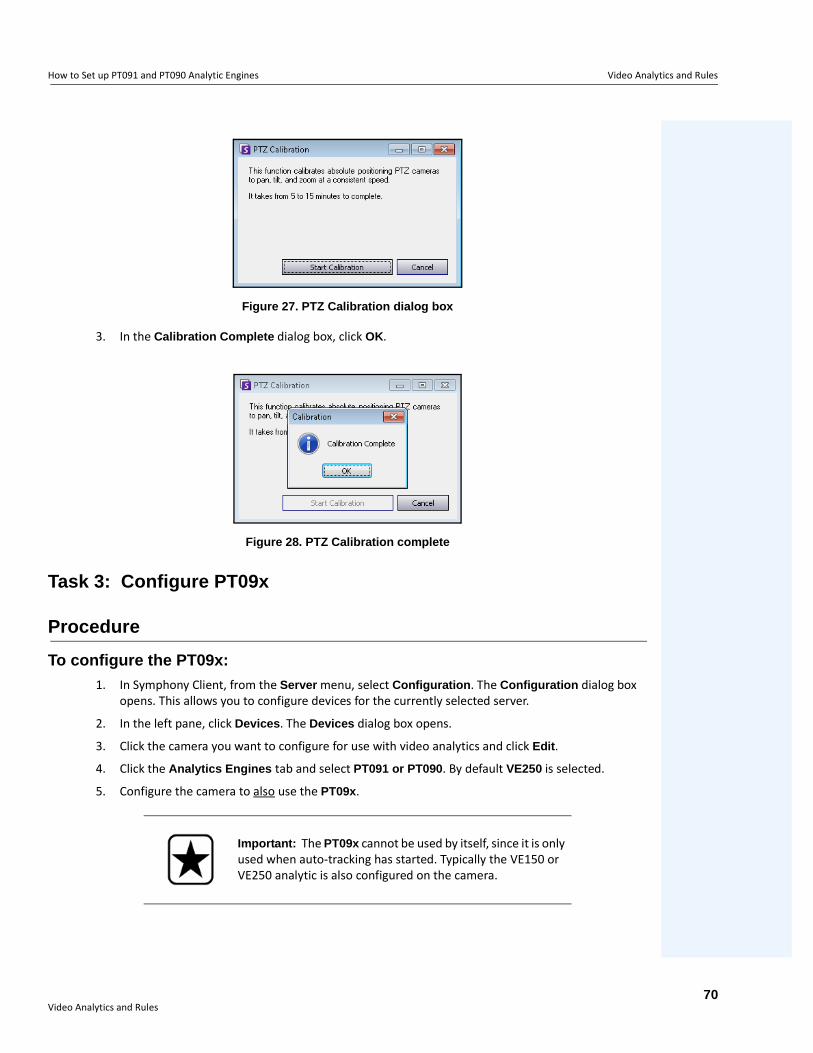
How to Set up PT091 and PT090 Analytic Engines Video Analytics and Rules
Figure 27. PTZ Calibration dialog box
3. In the Calibration Complete dialog box, click OK.
Figure 28. PTZ Calibration complete
Task 3: Configure PT09x
Procedure
To configure the PT09x:
1. In Symphony Client, from the Server menu, select Configuration. The Configuration dialog box opens. This allows you to configure devices for the currently selected server.
2. In the left pane, click Devices. The Devices dialog box opens.
3. Click the camera you want to configure for use with video analytics and click Edit.
4. Click the Analytics Engines tab and select PT091 or PT090. By default VE250 is selected.
5. Configure the camera to also use the PT09x.
Important: The PT09x cannot be used by itself, since it is only used when auto-tracking has started. Typically the VE150 or VE250 analytic is also configured on the camera.
Video Analytics and Rules70
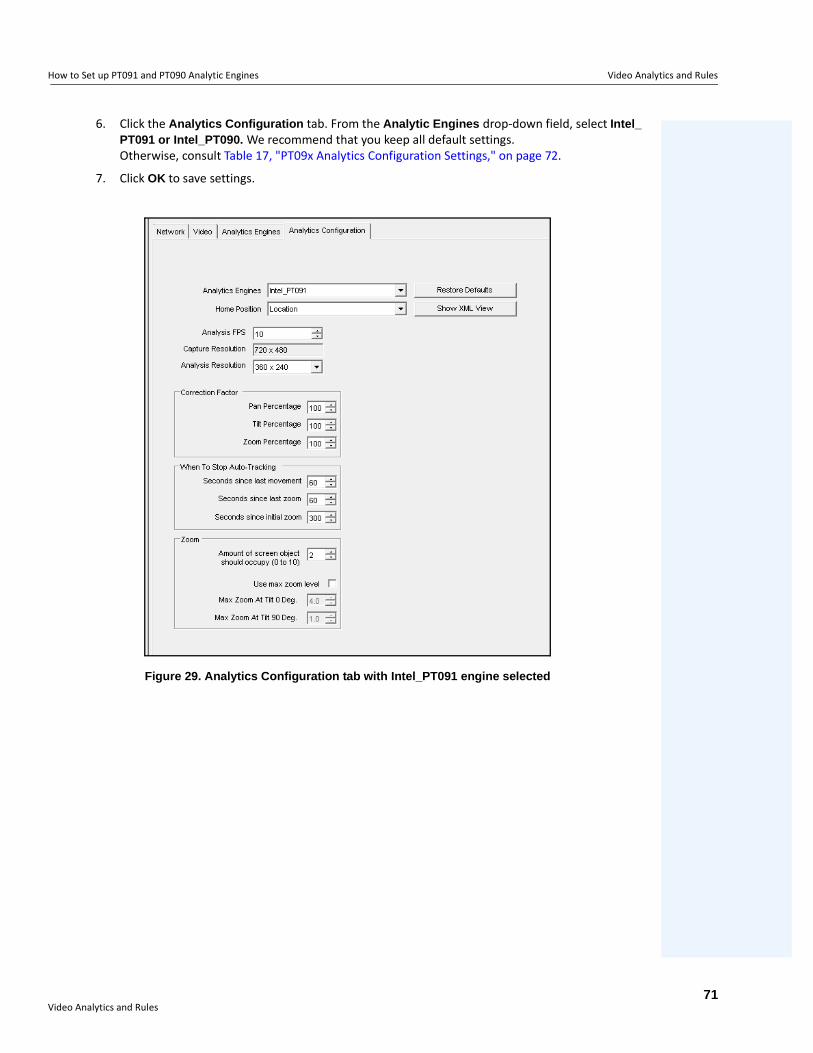
How to Set up PT091 and PT090 Analytic Engines Video Analytics and Rules
6. Click the Analytics Configuration tab. From the Analytic Engines drop-down field, select Intel_ PT091 or Intel_PT090. We recommend that you keep all default settings. Otherwise, consult Table 17, "PT09x Analytics Configuration Settings," on page 72.
7. Click OK to save settings.
Figure 29. Analytics Configuration tab with Intel_PT091 engine selected
Video Analytics and Rules71
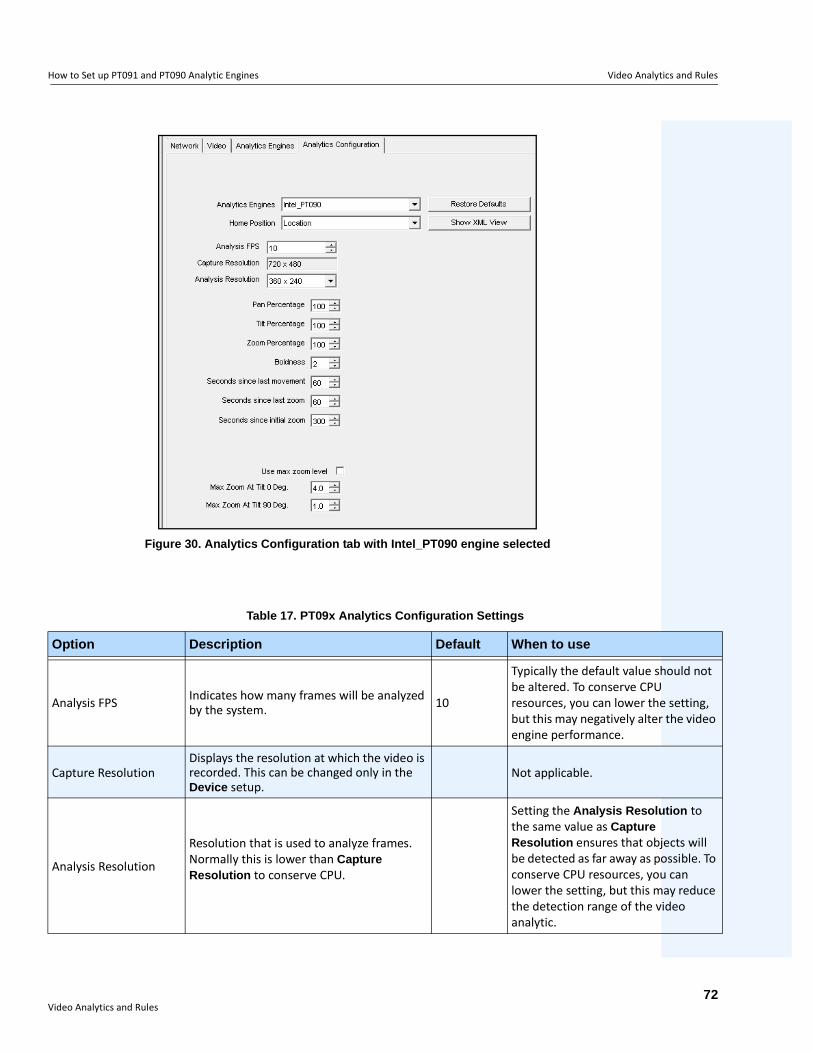
How to Set up PT091 and PT090 Analytic Engines Video Analytics and Rules
ould not setting,
the video
tion to
jects will ossible. To
can ay reduce ideo
Figure 30. Analytics Configuration tab with Intel_PT090 engine selected
Table 17. PT09x Analytics Configuration Settings
Option Description Default When to use
Analysis FPS Indicates how many frames will be analyzed by the system. 10
Typically the default value shbe altered. To conserve CPUresources, you can lower thebut this may negatively alterengine performance.
Capture ResolutionDisplays the resolution at which the video is recorded. This can be changed only in the Device setup.
Not applicable.
Analysis Resolution
Resolution that is used to analyze frames. Normally this is lower than Capture Resolution to conserve CPU.
Setting the Analysis Resoluthe same value as Capture Resolution ensures that obbe detected as far away as pconserve CPU resources, youlower the setting, but this mthe detection range of the vanalytic.
Video Analytics and Rules72

How to Set up PT091 and PT090 Analytic Engines Video Analytics and Rules
appears to the stable ntage if it
appears to the stable ntage if it
appears to the stable ntage if it
ning or thing rn back ult).
ng but not on some t.
this many ees. For g cars on
to the ant to he object. to zoom he object, k of losing
a is cking imit the zoom can
Pan Percentage Enhances or dampens the control of the video engine. 100
If the camera overshoots or be jumping a scene, reduce percentage to ensure more tracking. Increase the perceis too slow.
Tilt Percentage Enhances or dampens the control of the video engine. 100
If the camera overshoots or be jumping a scene, reduce percentage to ensure more tracking. Increase the perceis too slow.
Zoom Percentage Enhances or dampens the control of the video engine. 100
If the camera overshoots or be jumping a scene, reduce percentage to ensure more tracking. Increase the perceis too slow.
Seconds since last movement
Returns to the camera to home positionafter indicated seconds. 15
When the camera is not pantilting, and does not see anymoving anymore, it will retuhome after 15 seconds (defa
Seconds since last zoom Returns to the camera to home positionafter indicated seconds. 60
If the camera has been movizooming, that is, it is caughtsmall background movemen
Seconds since initial zoom
Returns to the camera to home positionafter indicated seconds. 150
The camera will return afterseconds, no matter what it sexample, it has been trackinthe road.
Amount of screen object should occupy (0-10)
• The video engine is trying to maintain the target as a certain fraction of the screen in width and height.
• 0 corresponds to 25% of the screen. • 5 corresponds to 35% of the screen. • 10 corresponds to 45% of the screen.
Use a low value if you want maintain more of a sense ofobject’s surroundings and wminimize chances of losing tUse a high value if you wantin close to better recognize tthough this increases the ristrack.
Use Max Zoom Level
This sets the maximum zoom level possible for a given tilt angle.
Note: This does not mean you will reach this zoom level during tracking; it just guarantees you will never exceed this zoom level.
Disabled because the max zoom level depends on where the camera is placed.
If you notice that the camerzooming too much when traobjects, use this feature to lmax zoom. Limiting the maximprove tracking at time.
Table 17. PT09x Analytics Configuration Settings
Option Description Default When to use
Video Analytics and Rules73
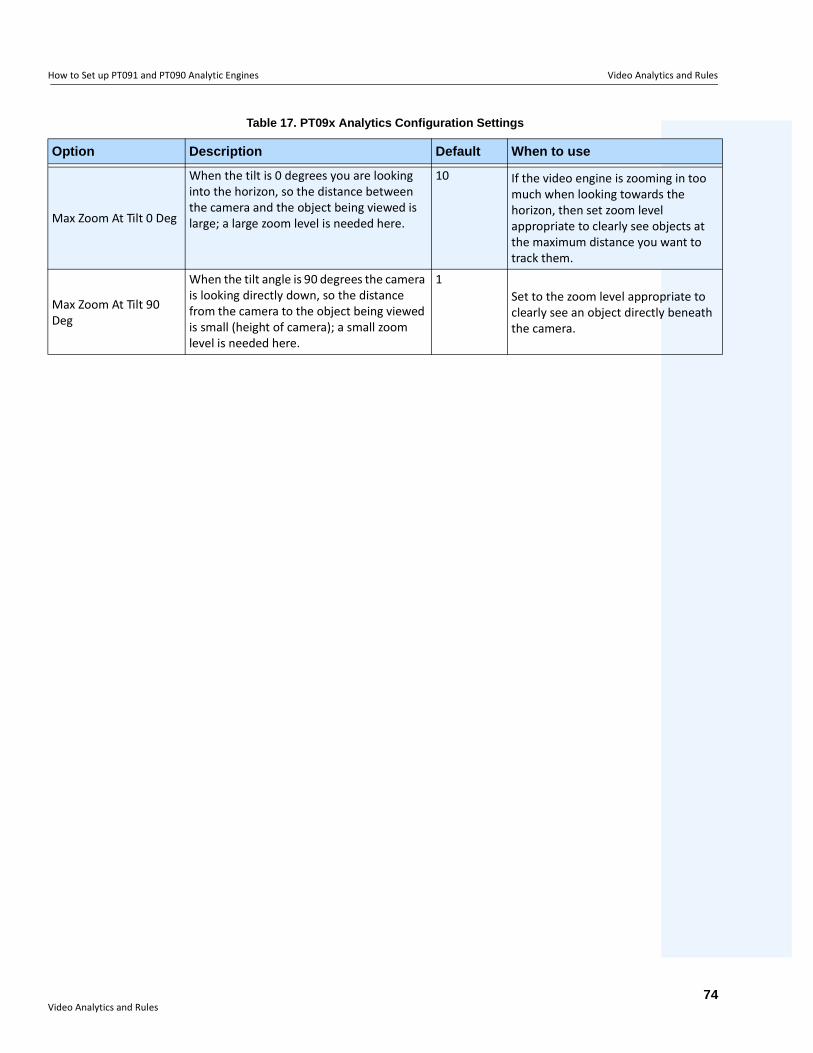
How to Set up PT091 and PT090 Analytic Engines Video Analytics and Rules
g in too the
l jects at
want to
riate to beneath
Max Zoom At Tilt 0 Deg
When the tilt is 0 degrees you are looking into the horizon, so the distance between the camera and the object being viewed is large; a large zoom level is needed here.
10 If the video engine is zoominmuch when looking towardshorizon, then set zoom leveappropriate to clearly see obthe maximum distance you track them.
Max Zoom At Tilt 90 Deg
When the tilt angle is 90 degrees the camera is looking directly down, so the distance from the camera to the object being viewed is small (height of camera); a small zoom level is needed here.
1Set to the zoom level appropclearly see an object directlythe camera.
Table 17. PT09x Analytics Configuration Settings
Option Description Default When to use
Video Analytics and Rules74
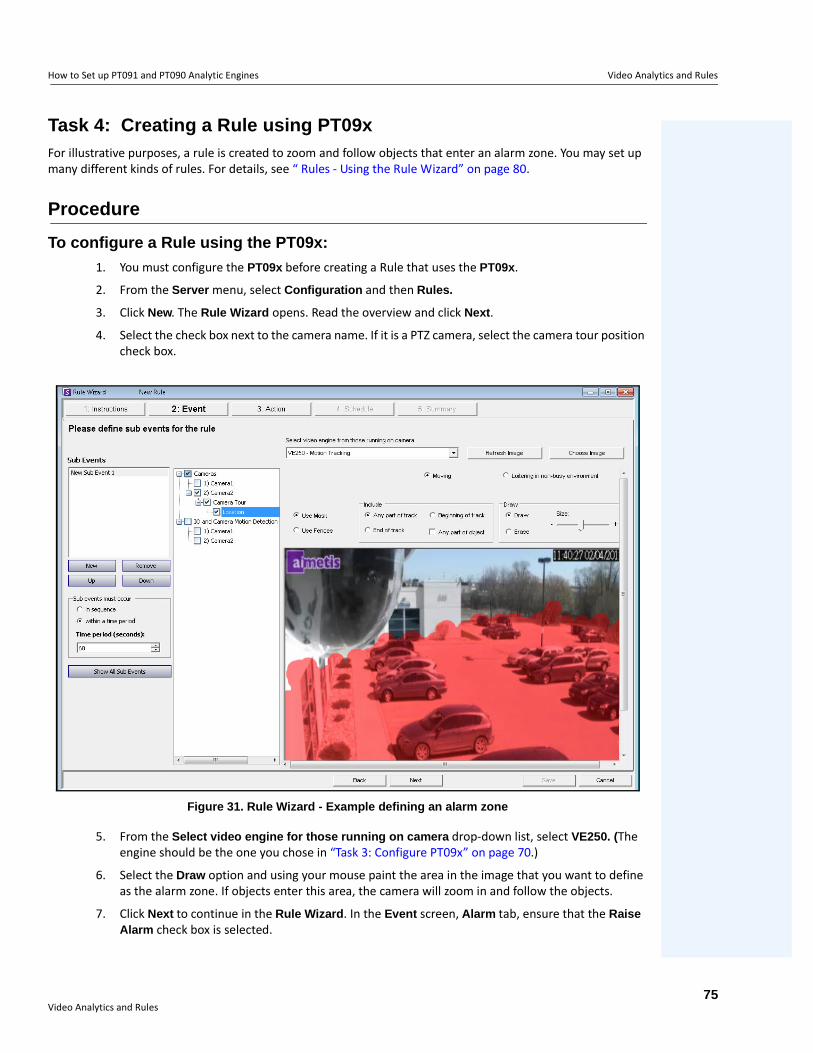
How to Set up PT091 and PT090 Analytic Engines Video Analytics and Rules
Task 4: Creating a Rule using PT09xFor illustrative purposes, a rule is created to zoom and follow objects that enter an alarm zone. You may set up many different kinds of rules. For details, see “ Rules - Using the Rule Wizard” on page 80.
Procedure
To configure a Rule using the PT09x:
1. You must configure the PT09x before creating a Rule that uses the PT09x.
2. From the Server menu, select Configuration and then Rules.
3. Click New. The Rule Wizard opens. Read the overview and click Next.
4. Select the check box next to the camera name. If it is a PTZ camera, select the camera tour position check box.
Figure 31. Rule Wizard - Example defining an alarm zone
5. From the Select video engine for those running on camera drop-down list, select VE250. (The engine should be the one you chose in “Task 3: Configure PT09x” on page 70.)
6. Select the Draw option and using your mouse paint the area in the image that you want to define as the alarm zone. If objects enter this area, the camera will zoom in and follow the objects.
7. Click Next to continue in the Rule Wizard. In the Event screen, Alarm tab, ensure that the Raise Alarm check box is selected.
Video Analytics and Rules75
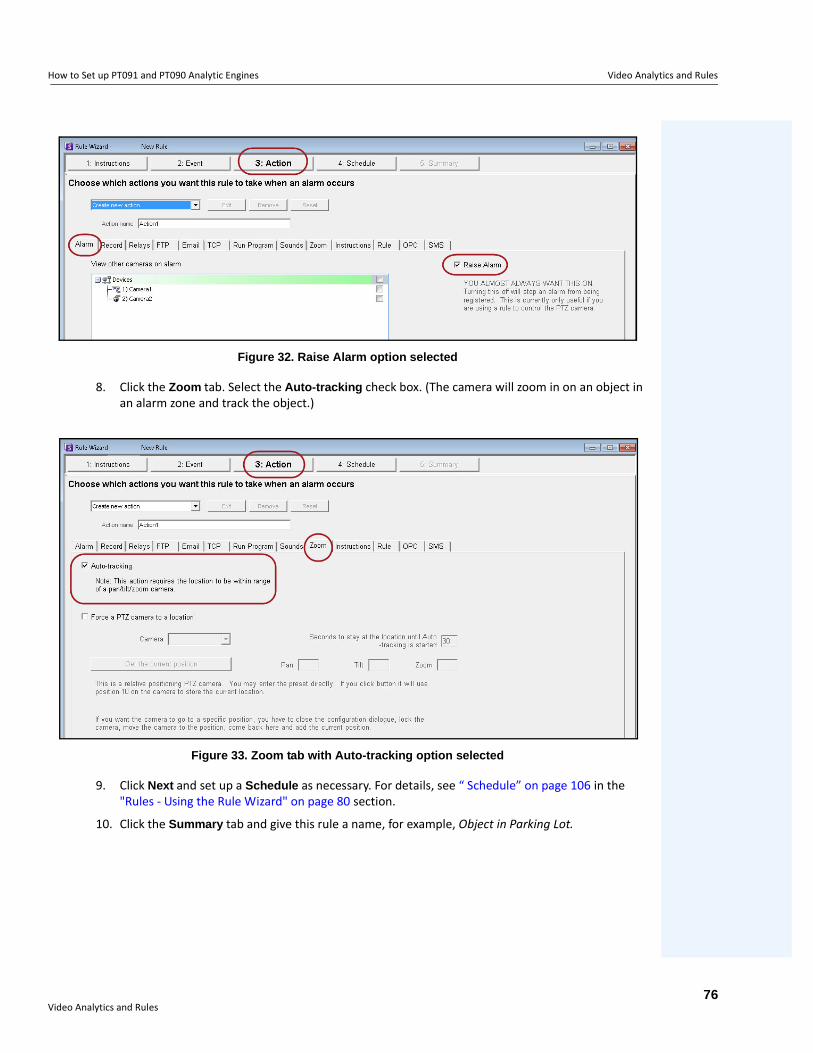
How to Set up PT091 and PT090 Analytic Engines Video Analytics and Rules
Figure 32. Raise Alarm option selected
8. Click the Zoom tab. Select the Auto-tracking check box. (The camera will zoom in on an object in an alarm zone and track the object.)
Figure 33. Zoom tab with Auto-tracking option selected
9. Click Next and set up a Schedule as necessary. For details, see “ Schedule” on page 106 in the "Rules - Using the Rule Wizard" on page 80 section.
10. Click the Summary tab and give this rule a name, for example, Object in Parking Lot.
Video Analytics and Rules76

Calibrating Many Cameras of the Same Make and Model Video Analytics and Rules
Calibrating Many Cameras of the Same Make and Model
Task 1: Obtain the Camera Model String
Figure 34. Obtain camera model string
1. From the Server menu, select Manual Configuration Editor.
2. Expand Type: Camera
3. Find the ID of your camera and expand it.
4. Find the row where Section= Client and Key= DetectionXML.
5. In the Value column, click the + sign to expand the field. Copy the manufacturer and model name. For example: <Manufacturer name='Axis'><Model name='AXIS Q6035-E' type='PTZ Camera'>
Important: Ensure that you have calibrated the camera first. See “Task 2: Calibrate the PTZ Camera” on page 69.
Video Analytics and Rules77
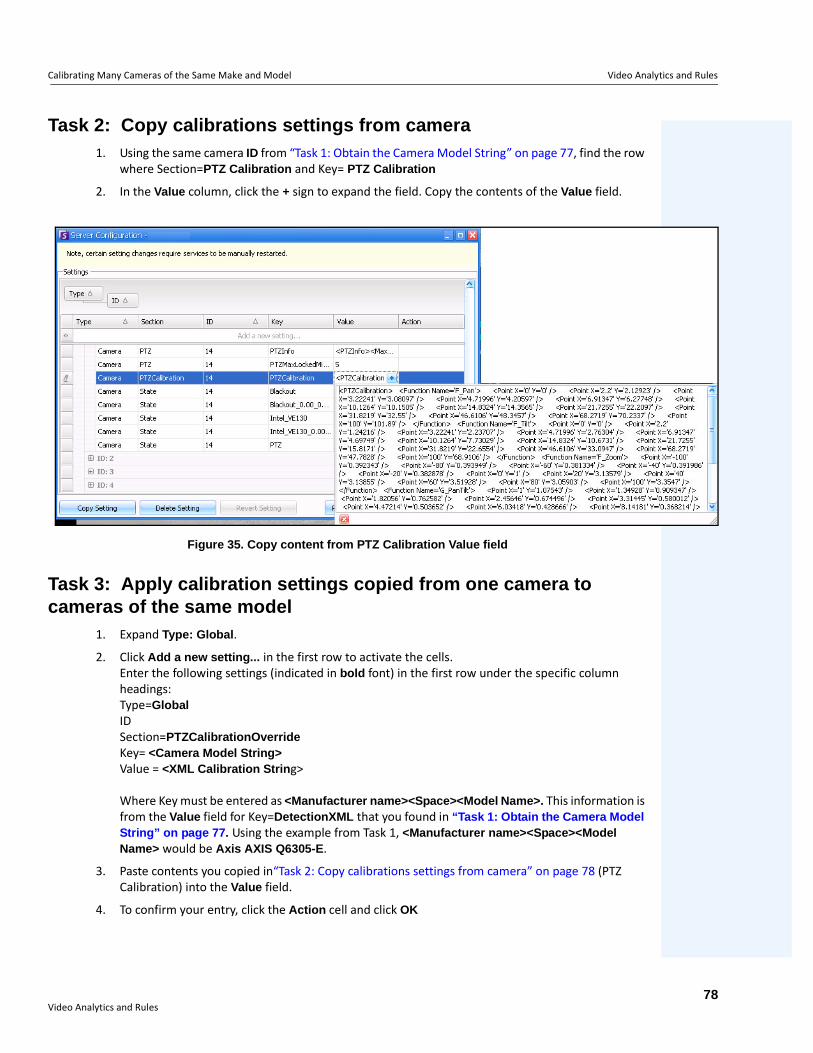
Calibrating Many Cameras of the Same Make and Model Video Analytics and Rules
Task 2: Copy calibrations settings from camera1. Using the same camera ID from “Task 1: Obtain the Camera Model String” on page 77, find the row
where Section=PTZ Calibration and Key= PTZ Calibration
2. In the Value column, click the + sign to expand the field. Copy the contents of the Value field.
Figure 35. Copy content from PTZ Calibration Value field
Task 3: Apply calibration settings copied from one camera to cameras of the same model
1. Expand Type: Global.
2. Click Add a new setting... in the first row to activate the cells.Enter the following settings (indicated in bold font) in the first row under the specific column headings:Type=GlobalIDSection=PTZCalibrationOverrideKey= <Camera Model String>Value = <XML Calibration String>
Where Key must be entered as <Manufacturer name><Space><Model Name>. This information is from the Value field for Key=DetectionXML that you found in “Task 1: Obtain the Camera Model String” on page 77. Using the example from Task 1, <Manufacturer name><Space><Model Name> would be Axis AXIS Q6305-E.
3. Paste contents you copied in“Task 2: Copy calibrations settings from camera” on page 78 (PTZ Calibration) into the Value field.
4. To confirm your entry, click the Action cell and click OK
Video Analytics and Rules78
VE410 - License Plate Recognition Video Analytics and Rules
VE410 - License Plate RecognitionAutomatic License Plate Recognition is available as a video engine inside Aimetis Symphony. The VE410 allows you to detect and index license plates. It is designed for vehicle access control applications as well as traffic control and enforcement applications.
• For complete instructions on field installation and planning, software installation, and analytics configuration, see the Aimetis Automatic License Plate Recognition (ALPR) Guide. https://www.aimetis.com/xnet/Support/documentation.aspx
Video Analytics and Rules79

Rules - Using the Rule Wizard Video Analytics and Rules
Rules - Using the Rule WizardA rule generates alarms in Symphony. Alarms can occur as a result of an event (such as motion detected) or a signal from another device (such as a door access device).
You must configure the Event, Action, and Schedule for each rule.
• Event - Define what causes an Alarm, such as motion detected, people loitering, door access, etc.• Action - Define what actions Symphony should take after the alarm is detected.• Schedule - Define which times the Alarm Rule is active.
Procedure
To access the Rules Summary dialog box:
1. From the Server menu, select Configuration. The Server Configuration dialog box opens.
2. In the left pane, click Rules. The Rules Summary opens in the right pane.The Rules Summary dialog box lists all the current Rules and allows you.
• New - Create a new rule.• Edit - Modify an existing rule. Select the rule on the list and click Edit.• Delete - Delete an existing Rule. Select the rule on the list and click Delete.• Disable - Temporarily disable a rule instead of deleting it entirely. Select the rule on the list and
click Disable.• Enable - Enable a rule that has been disabled. Select the rule on the list and click Enable.
Note: Rule elements can be reused. For example, if you change the "24/7" Schedule, it will affect all Rules that use this Rule Element.
Important: The Disable Alarms for Server dialog box allows you to disable all the alarms for the currently selected server. This is useful in cases where all alarms should be disabled for a period of time on the server. This is faster than manually disabling individual Rules. To quickly enable or disable all Rules:
1. From the Server menu, select Disable Alarms for Server.
2. Specify the amount of time to disable the alarms for the current server and click OK.
Video Analytics and Rules80
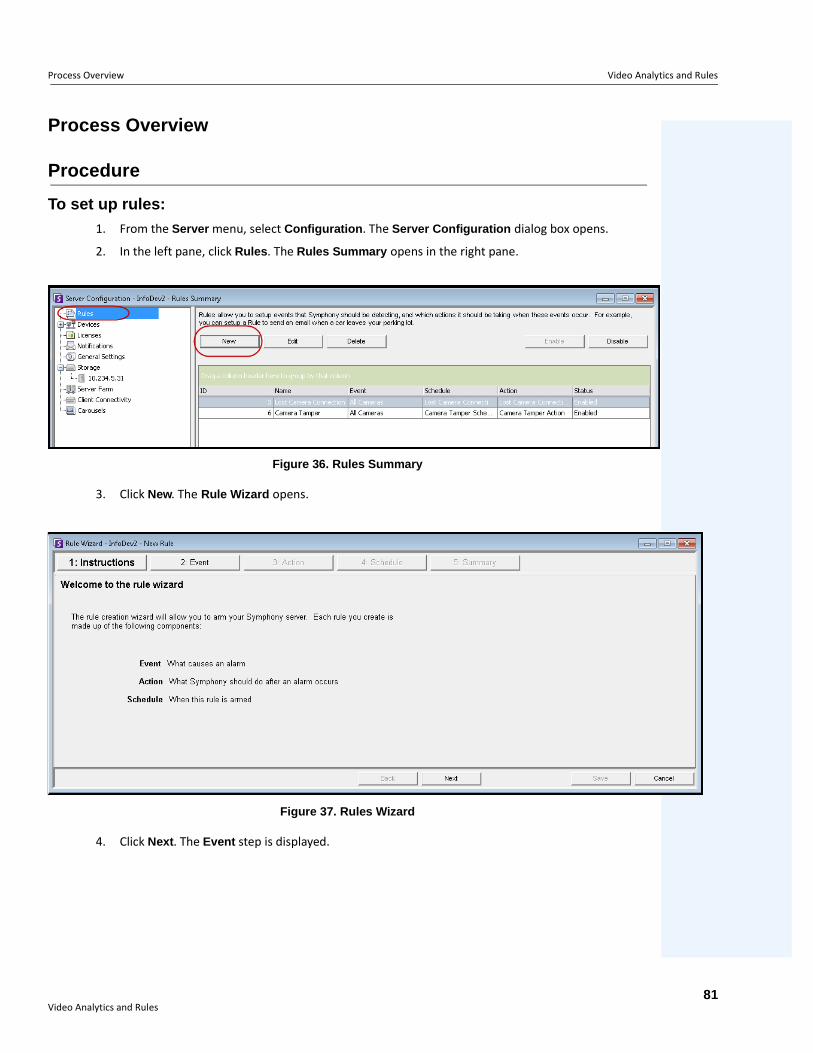
Process Overview Video Analytics and Rules
Process Overview
Procedure
To set up rules:
1. From the Server menu, select Configuration. The Server Configuration dialog box opens.
2. In the left pane, click Rules. The Rules Summary opens in the right pane.
Figure 36. Rules Summary
3. Click New. The Rule Wizard opens.
Figure 37. Rules Wizard
4. Click Next. The Event step is displayed.
Video Analytics and Rules81
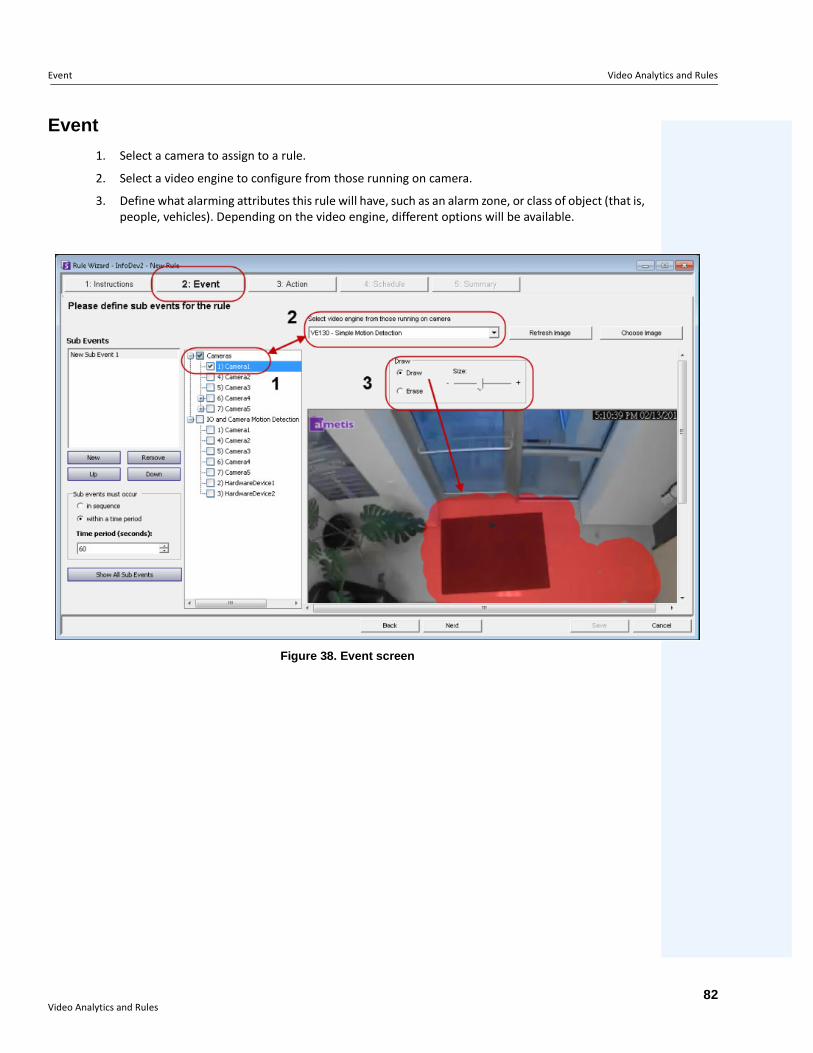
Event Video Analytics and Rules
Event
1. Select a camera to assign to a rule.
2. Select a video engine to configure from those running on camera.
3. Define what alarming attributes this rule will have, such as an alarm zone, or class of object (that is, people, vehicles). Depending on the video engine, different options will be available.
Figure 38. Event screen
Video Analytics and Rules82
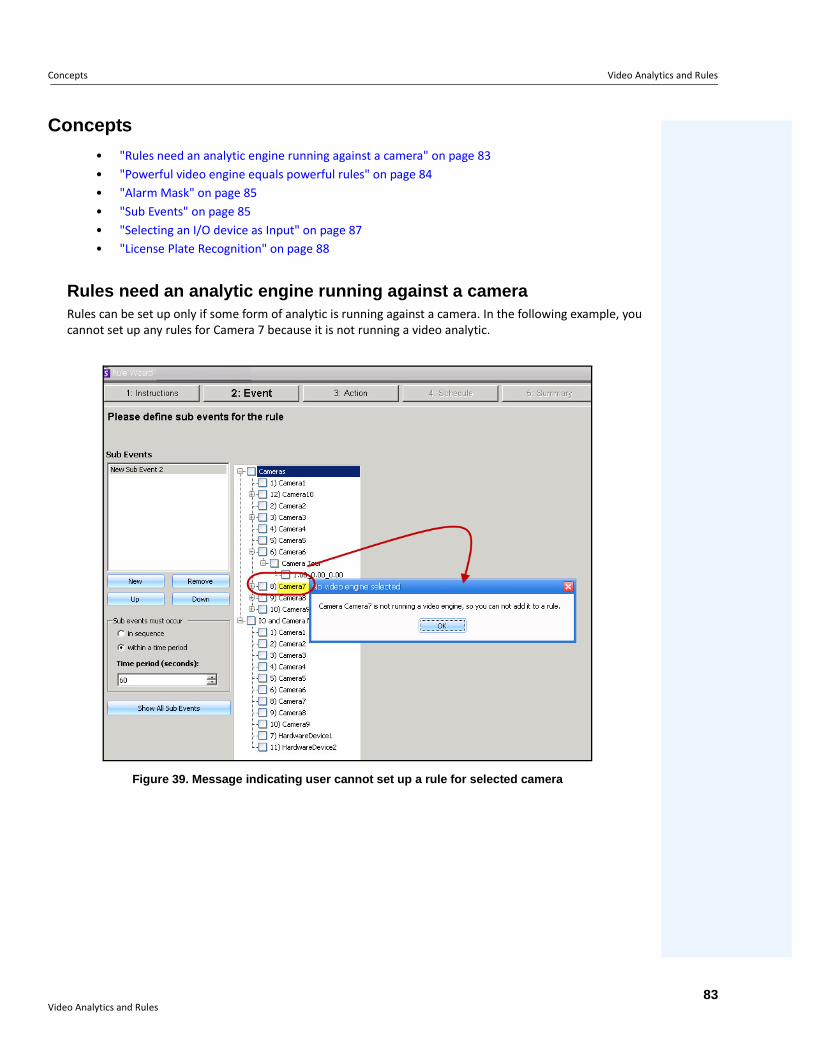
Concepts Video Analytics and Rules
Concepts
• "Rules need an analytic engine running against a camera" on page 83• "Powerful video engine equals powerful rules" on page 84• "Alarm Mask" on page 85• "Sub Events" on page 85• "Selecting an I/O device as Input" on page 87• "License Plate Recognition" on page 88
Rules need an analytic engine running against a cameraRules can be set up only if some form of analytic is running against a camera. In the following example, you cannot set up any rules for Camera 7 because it is not running a video analytic.
Figure 39. Message indicating user cannot set up a rule for selected camera
Video Analytics and Rules83
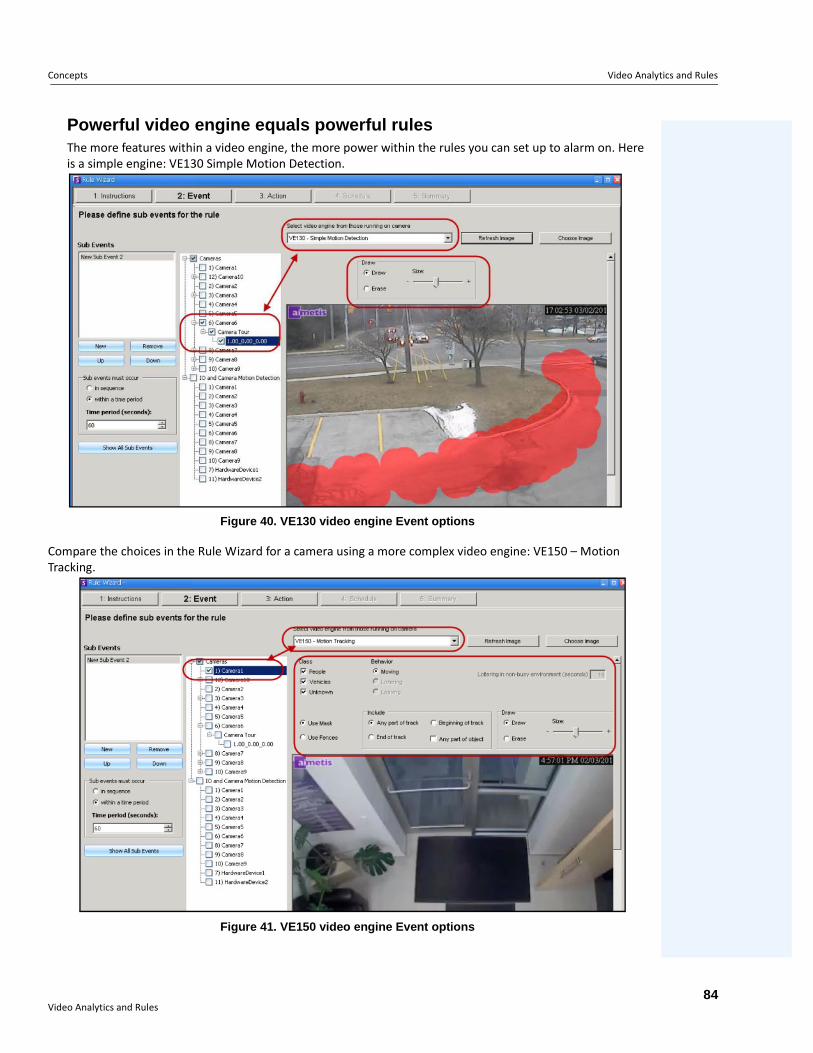
Concepts Video Analytics and Rules
Powerful video engine equals powerful rulesThe more features within a video engine, the more power within the rules you can set up to alarm on. Here is a simple engine: VE130 Simple Motion Detection.
Figure 40. VE130 video engine Event options
Compare the choices in the Rule Wizard for a camera using a more complex video engine: VE150 – Motion Tracking.
Figure 41. VE150 video engine Event options
Video Analytics and Rules84
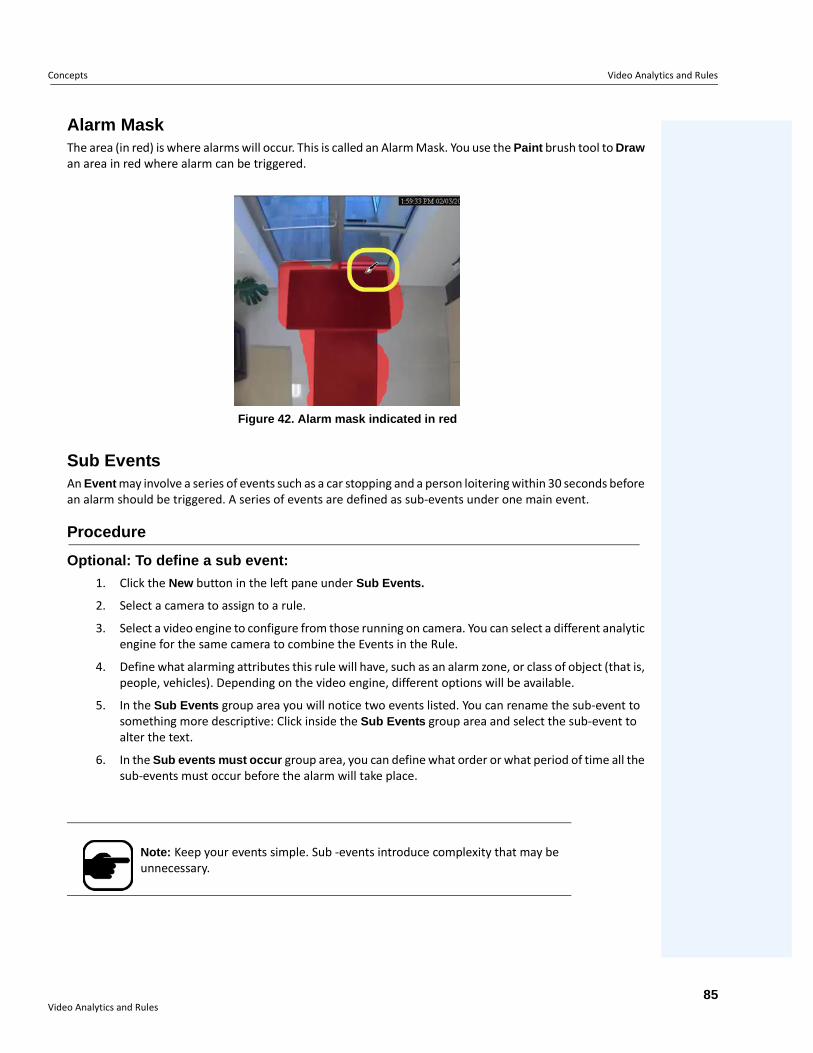
Concepts Video Analytics and Rules
Alarm MaskThe area (in red) is where alarms will occur. This is called an Alarm Mask. You use the Paint brush tool to Draw an area in red where alarm can be triggered.
Figure 42. Alarm mask indicated in red
Sub EventsAn Event may involve a series of events such as a car stopping and a person loitering within 30 seconds before an alarm should be triggered. A series of events are defined as sub-events under one main event.
Procedure
Optional: To define a sub event:
1. Click the New button in the left pane under Sub Events.
2. Select a camera to assign to a rule.
3. Select a video engine to configure from those running on camera. You can select a different analytic engine for the same camera to combine the Events in the Rule.
4. Define what alarming attributes this rule will have, such as an alarm zone, or class of object (that is, people, vehicles). Depending on the video engine, different options will be available.
5. In the Sub Events group area you will notice two events listed. You can rename the sub-event to something more descriptive: Click inside the Sub Events group area and select the sub-event to alter the text.
6. In the Sub events must occur group area, you can define what order or what period of time all the sub-events must occur before the alarm will take place.
Note: Keep your events simple. Sub -events introduce complexity that may be unnecessary.
Video Analytics and Rules85
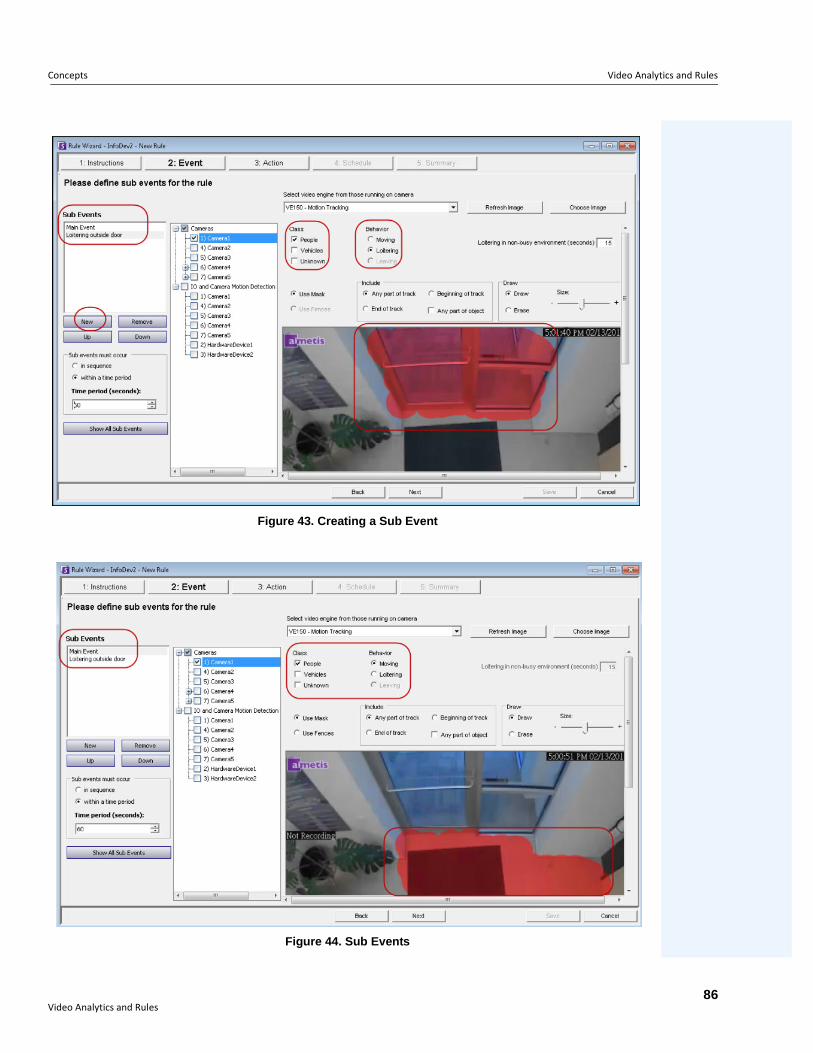
Concepts Video Analytics and Rules
Figure 43. Creating a Sub Event
Figure 44. Sub Events
Video Analytics and Rules86
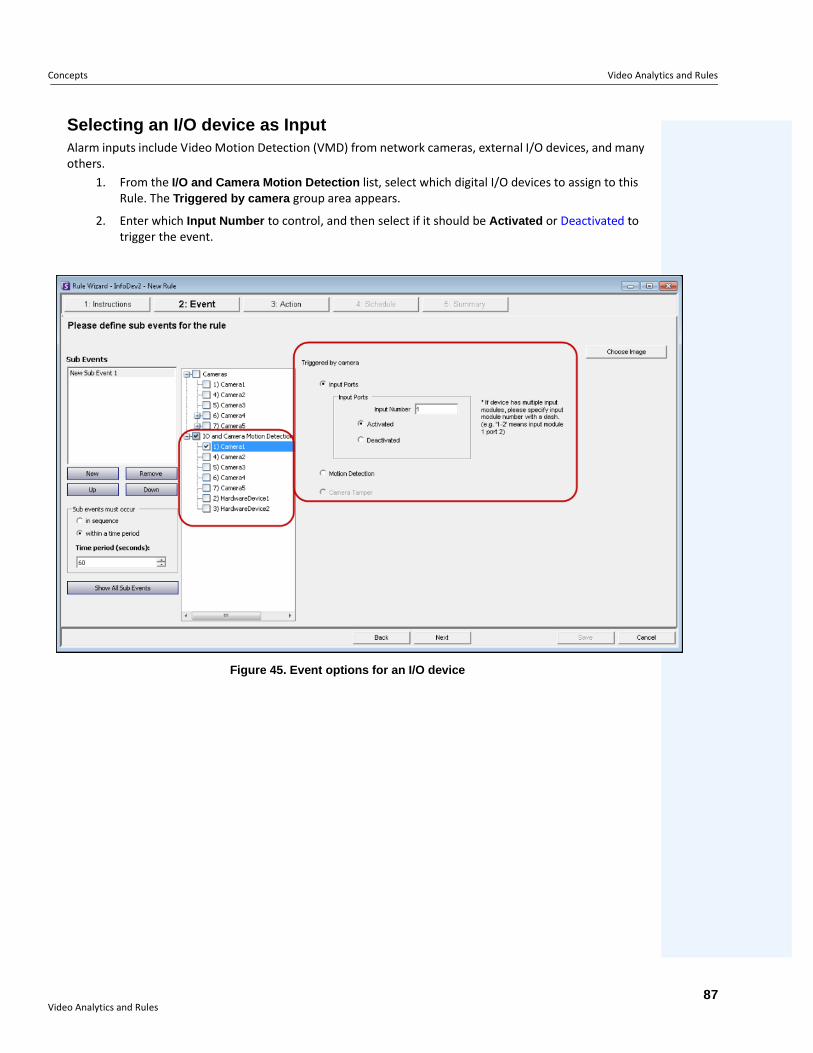
Concepts Video Analytics and Rules
Selecting an I/O device as InputAlarm inputs include Video Motion Detection (VMD) from network cameras, external I/O devices, and many others.
1. From the I/O and Camera Motion Detection list, select which digital I/O devices to assign to this Rule. The Triggered by camera group area appears.
2. Enter which Input Number to control, and then select if it should be Activated or Deactivated to trigger the event.
Figure 45. Event options for an I/O device
Video Analytics and Rules87
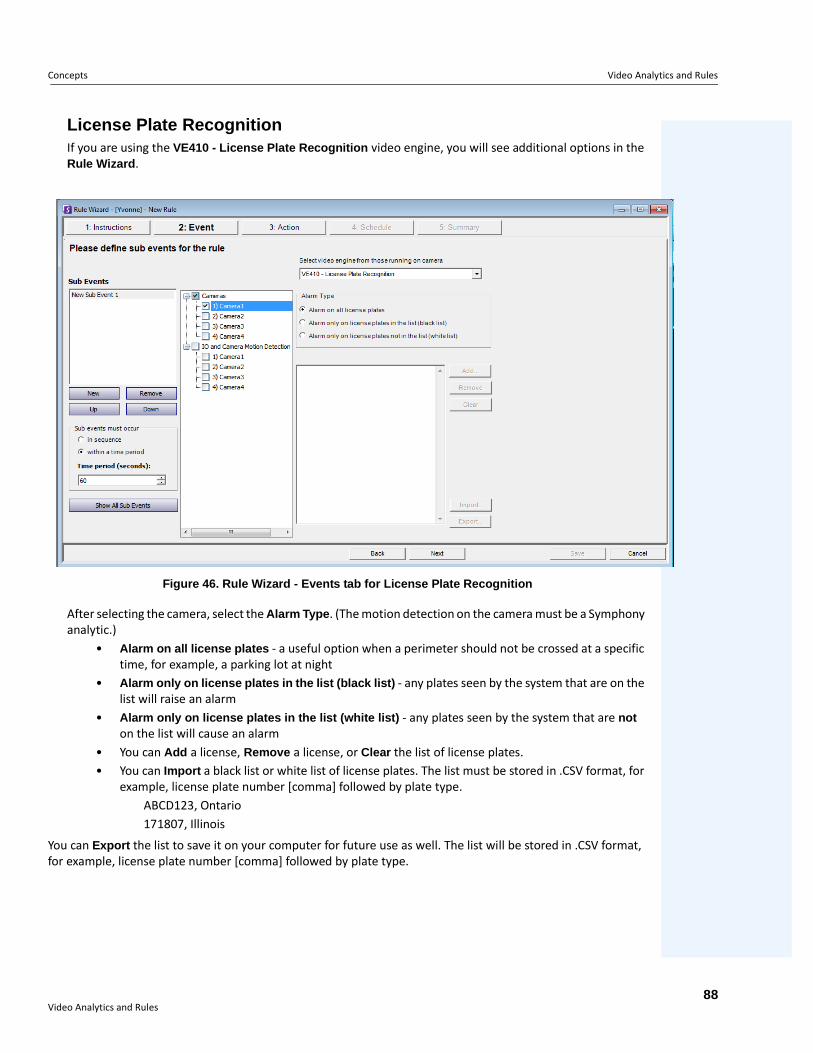
Concepts Video Analytics and Rules
License Plate RecognitionIf you are using the VE410 - License Plate Recognition video engine, you will see additional options in the Rule Wizard.
Figure 46. Rule Wizard - Events tab for License Plate Recognition
After selecting the camera, select the Alarm Type. (The motion detection on the camera must be a Symphony analytic.)
• Alarm on all license plates - a useful option when a perimeter should not be crossed at a specific time, for example, a parking lot at night
• Alarm only on license plates in the list (black list) - any plates seen by the system that are on the list will raise an alarm
• Alarm only on license plates in the list (white list) - any plates seen by the system that are not on the list will cause an alarm
• You can Add a license, Remove a license, or Clear the list of license plates.• You can Import a black list or white list of license plates. The list must be stored in .CSV format, for
example, license plate number [comma] followed by plate type.ABCD123, Ontario171807, Illinois
You can Export the list to save it on your computer for future use as well. The list will be stored in .CSV format, for example, license plate number [comma] followed by plate type.
Video Analytics and Rules88
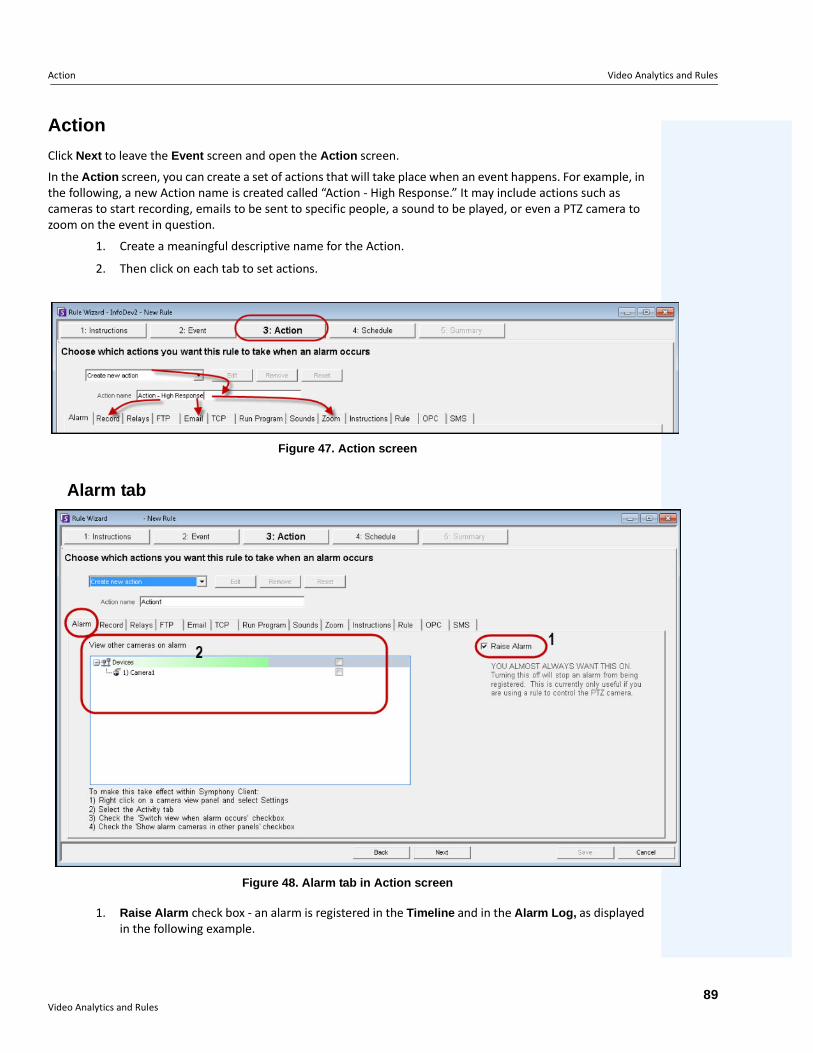
Action Video Analytics and Rules
Action
Click Next to leave the Event screen and open the Action screen.
In the Action screen, you can create a set of actions that will take place when an event happens. For example, in the following, a new Action name is created called “Action - High Response.” It may include actions such as cameras to start recording, emails to be sent to specific people, a sound to be played, or even a PTZ camera to zoom on the event in question.
1. Create a meaningful descriptive name for the Action.
2. Then click on each tab to set actions.
Figure 47. Action screen
Alarm tab
Figure 48. Alarm tab in Action screen
1. Raise Alarm check box - an alarm is registered in the Timeline and in the Alarm Log, as displayed in the following example.
Video Analytics and Rules89
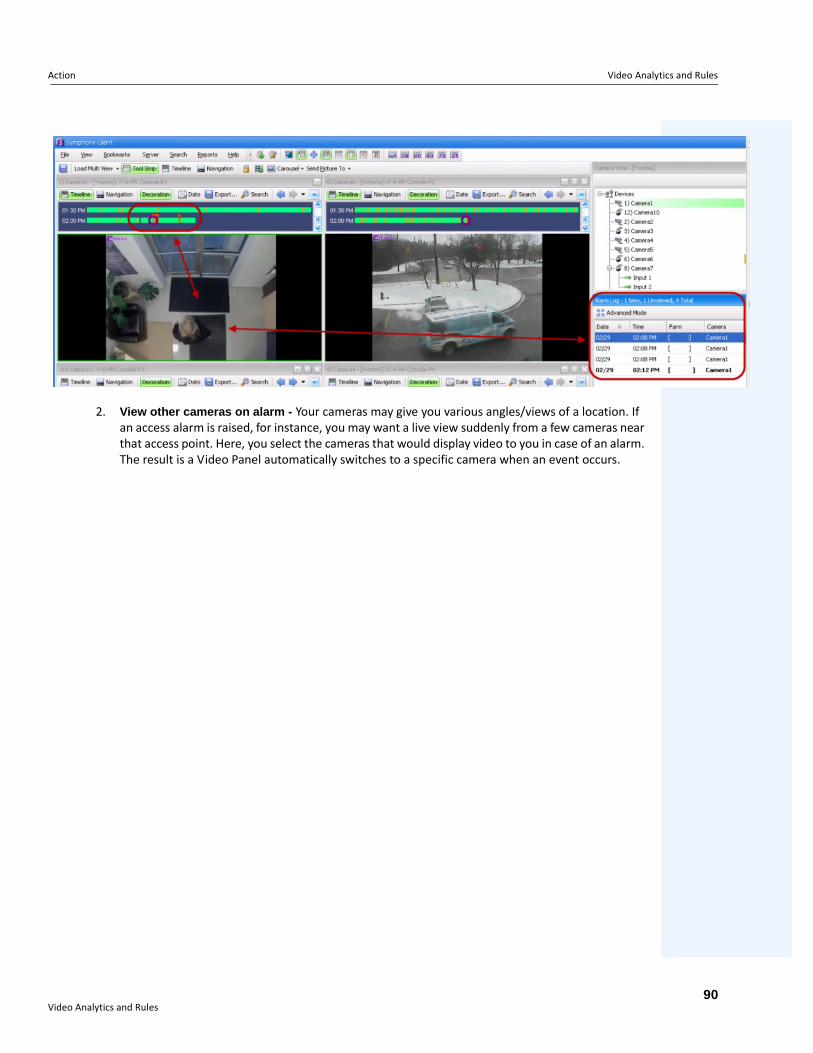
Action Video Analytics and Rules
2. View other cameras on alarm - Your cameras may give you various angles/views of a location. If an access alarm is raised, for instance, you may want a live view suddenly from a few cameras near that access point. Here, you select the cameras that would display video to you in case of an alarm. The result is a Video Panel automatically switches to a specific camera when an event occurs.
Video Analytics and Rules90
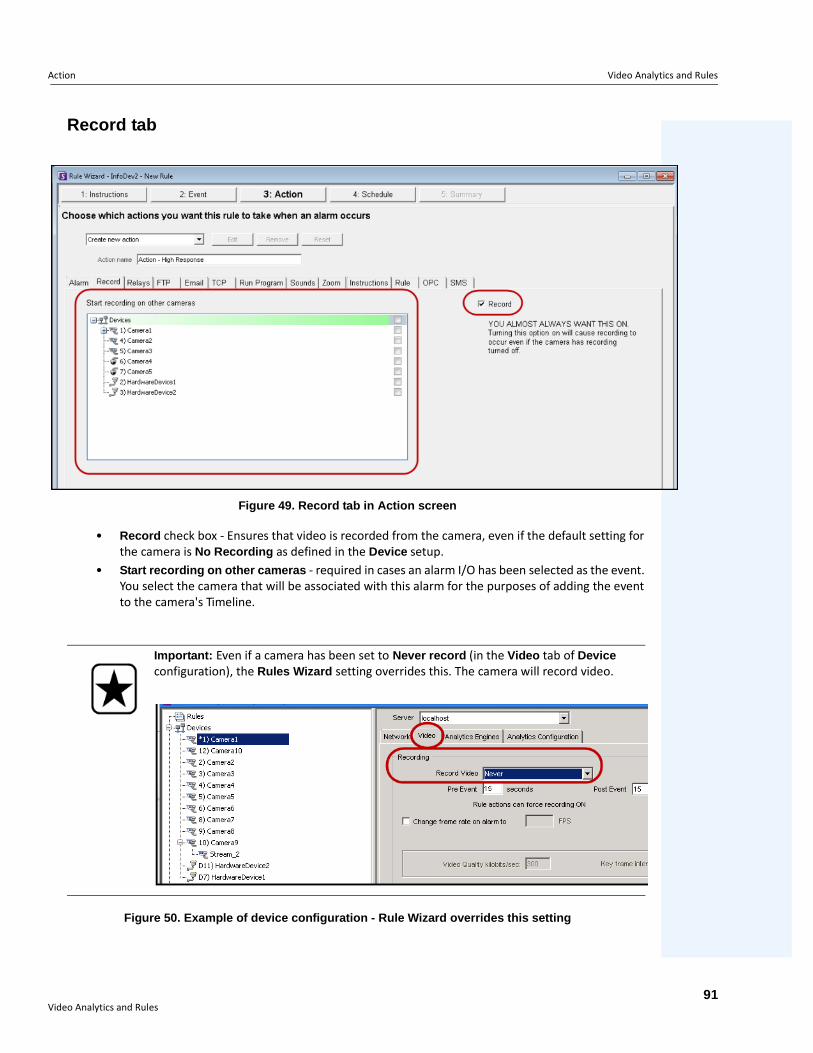
Action Video Analytics and Rules
Record tab
Figure 49. Record tab in Action screen
• Record check box - Ensures that video is recorded from the camera, even if the default setting for the camera is No Recording as defined in the Device setup.
• Start recording on other cameras - required in cases an alarm I/O has been selected as the event. You select the camera that will be associated with this alarm for the purposes of adding the event to the camera's Timeline.
Figure 50. Example of device configuration - Rule Wizard overrides this setting
Important: Even if a camera has been set to Never record (in the Video tab of Device configuration), the Rules Wizard setting overrides this. The camera will record video.
Video Analytics and Rules91
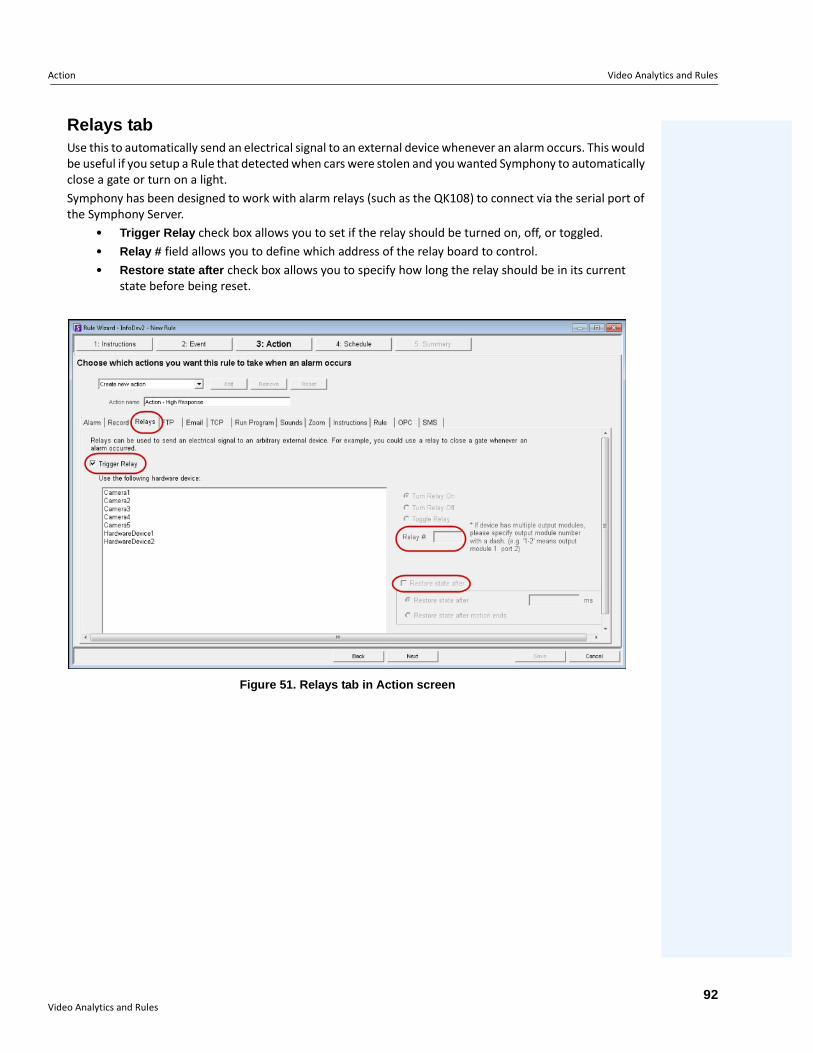
Action Video Analytics and Rules
Relays tabUse this to automatically send an electrical signal to an external device whenever an alarm occurs. This would be useful if you setup a Rule that detected when cars were stolen and you wanted Symphony to automatically close a gate or turn on a light. Symphony has been designed to work with alarm relays (such as the QK108) to connect via the serial port of the Symphony Server.
• Trigger Relay check box allows you to set if the relay should be turned on, off, or toggled.• Relay # field allows you to define which address of the relay board to control.• Restore state after check box allows you to specify how long the relay should be in its current
state before being reset.
Figure 51. Relays tab in Action screen
Video Analytics and Rules92
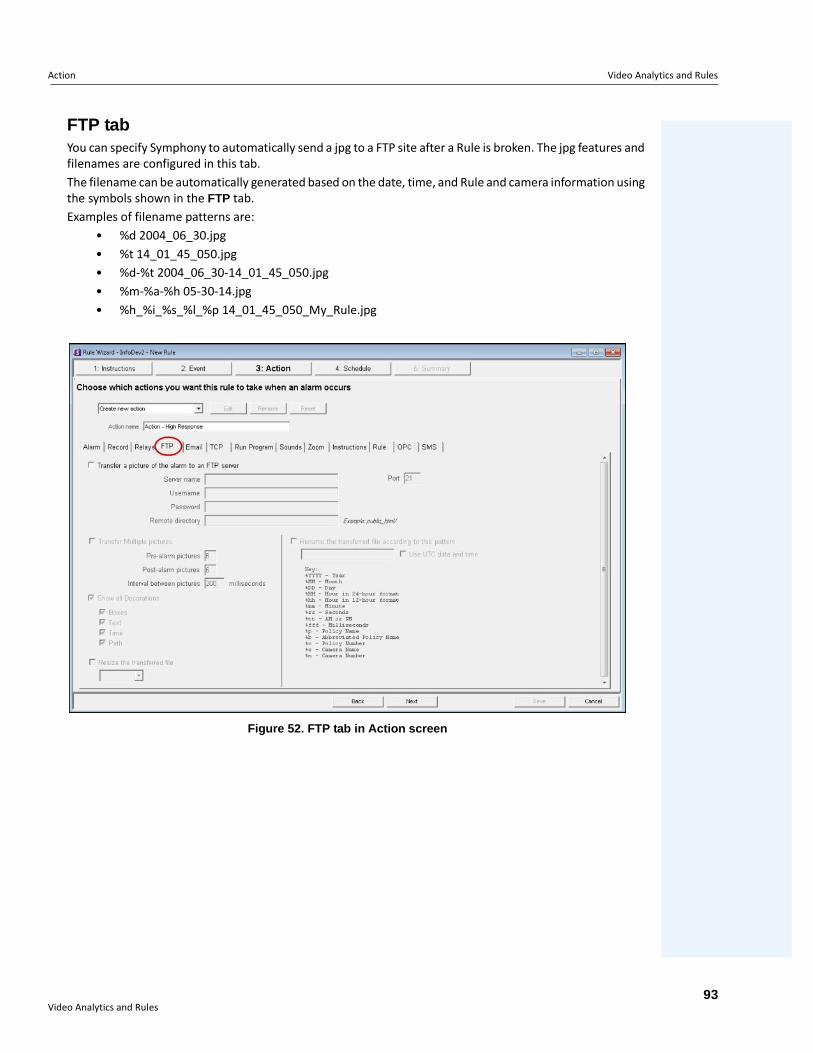
Action Video Analytics and Rules
FTP tabYou can specify Symphony to automatically send a jpg to a FTP site after a Rule is broken. The jpg features and filenames are configured in this tab.The filename can be automatically generated based on the date, time, and Rule and camera information using the symbols shown in the FTP tab.Examples of filename patterns are:
• %d 2004_06_30.jpg• %t 14_01_45_050.jpg• %d-%t 2004_06_30-14_01_45_050.jpg• %m-%a-%h 05-30-14.jpg• %h_%i_%s_%l_%p 14_01_45_050_My_Rule.jpg
Figure 52. FTP tab in Action screen
Video Analytics and Rules93
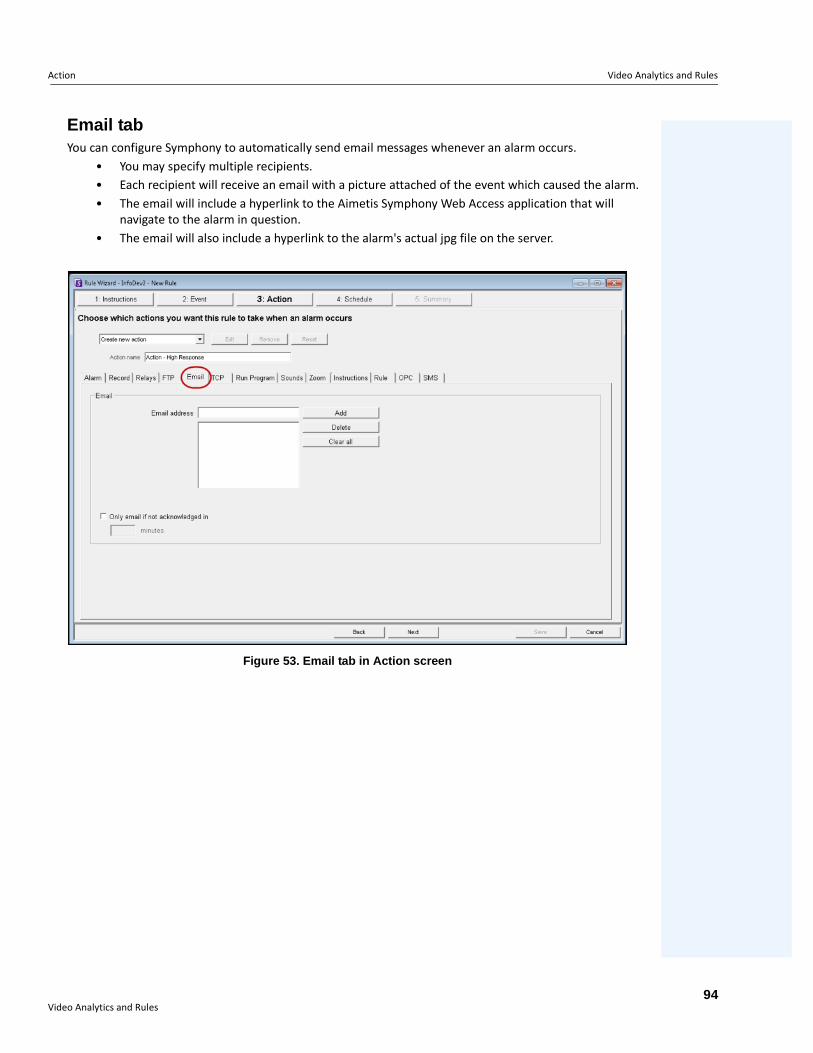
Action Video Analytics and Rules
Email tabYou can configure Symphony to automatically send email messages whenever an alarm occurs.
• You may specify multiple recipients. • Each recipient will receive an email with a picture attached of the event which caused the alarm. • The email will include a hyperlink to the Aimetis Symphony Web Access application that will
navigate to the alarm in question.• The email will also include a hyperlink to the alarm's actual jpg file on the server.
Figure 53. Email tab in Action screen
Video Analytics and Rules94
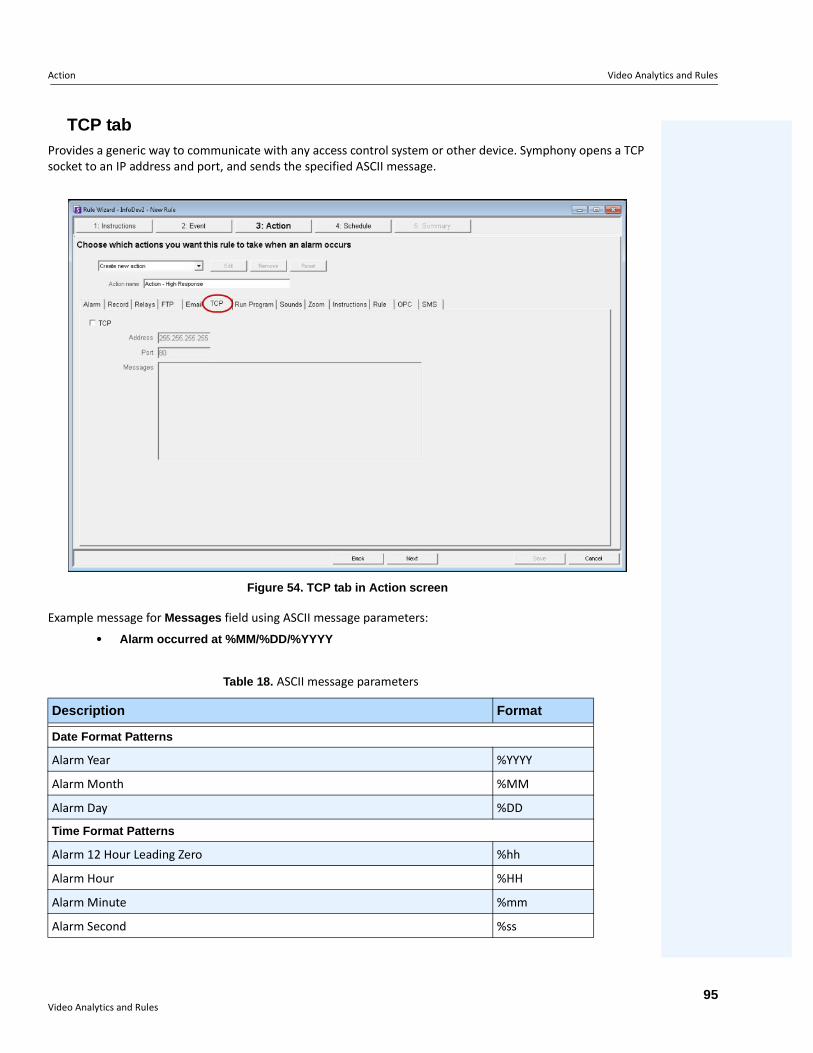
Action Video Analytics and Rules
TCP tabProvides a generic way to communicate with any access control system or other device. Symphony opens a TCP socket to an IP address and port, and sends the specified ASCII message.
Figure 54. TCP tab in Action screen
Example message for Messages field using ASCII message parameters:
• Alarm occurred at %MM/%DD/%YYYY
Table 18. ASCII message parameters
Description Format
Date Format Patterns
Alarm Year %YYYY
Alarm Month %MM
Alarm Day %DD
Time Format Patterns
Alarm 12 Hour Leading Zero %hh
Alarm Hour %HH
Alarm Minute %mm
Alarm Second %ss
Video Analytics and Rules95
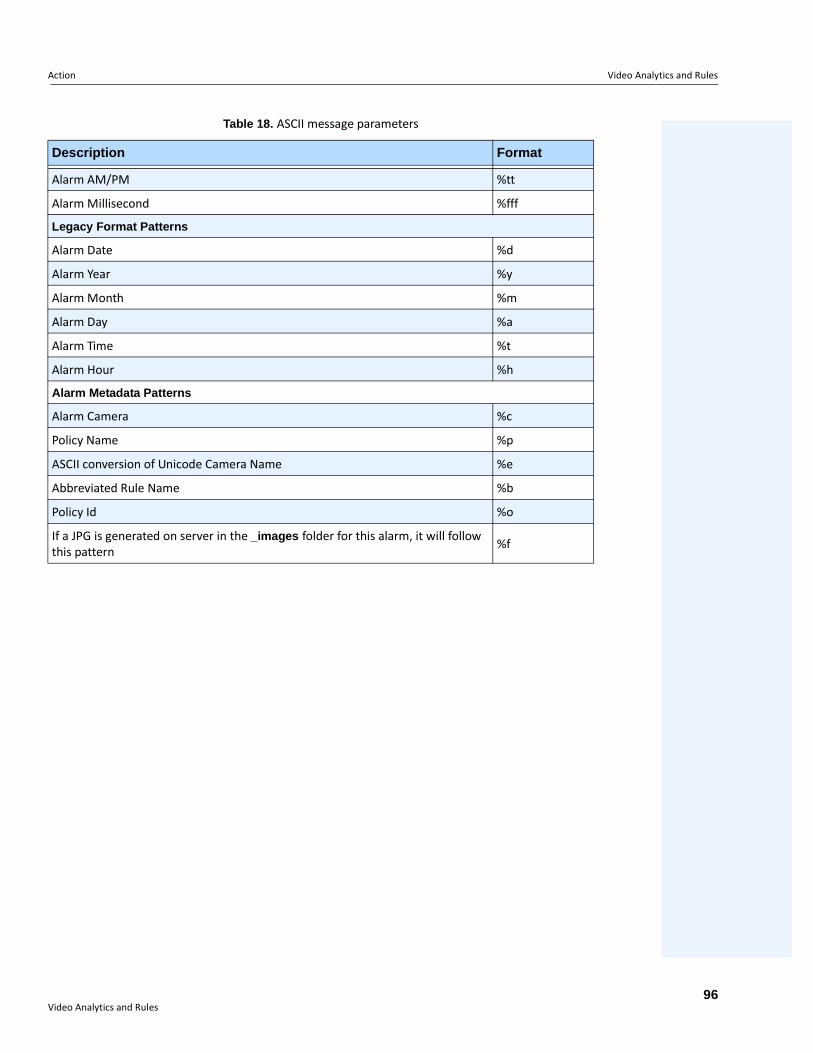
Action Video Analytics and Rules
Alarm AM/PM %tt
Alarm Millisecond %fff
Legacy Format Patterns
Alarm Date %d
Alarm Year %y
Alarm Month %m
Alarm Day %a
Alarm Time %t
Alarm Hour %h
Alarm Metadata Patterns
Alarm Camera %c
Policy Name %p
ASCII conversion of Unicode Camera Name %e
Abbreviated Rule Name %b
Policy Id %o
If a JPG is generated on server in the _images folder for this alarm, it will follow this pattern %f
Table 18. ASCII message parameters
Description Format
Video Analytics and Rules96
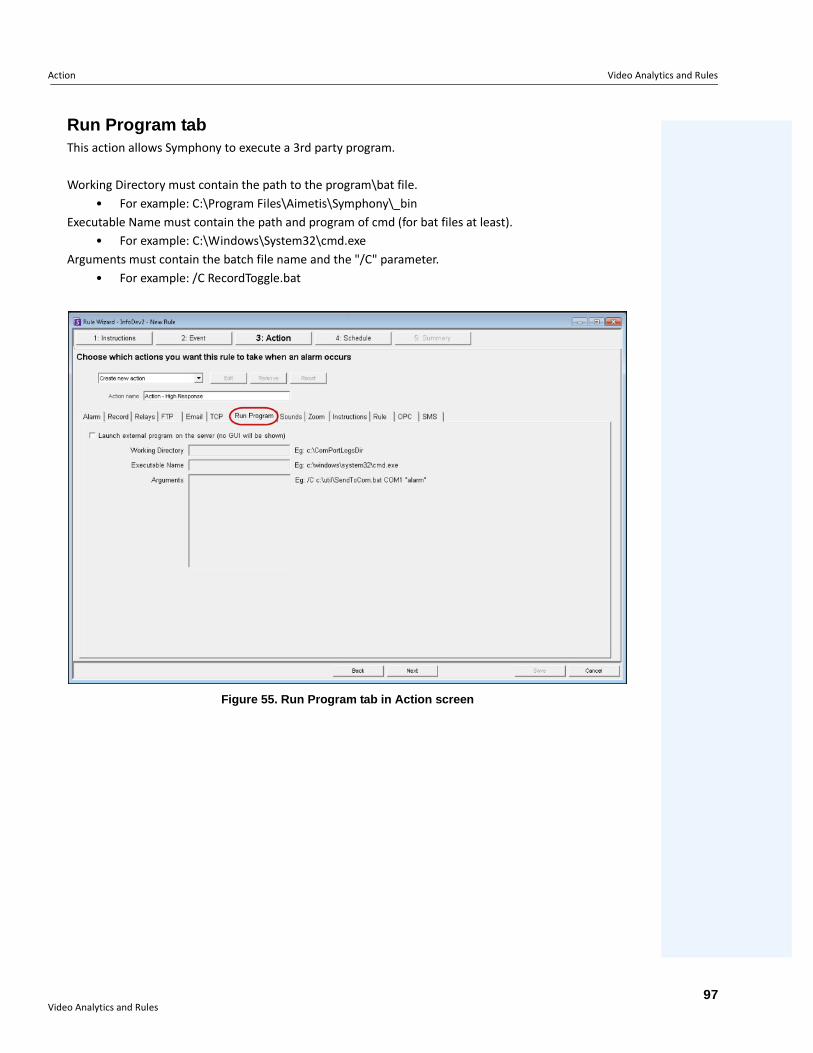
Action Video Analytics and Rules
Run Program tabThis action allows Symphony to execute a 3rd party program.
Working Directory must contain the path to the program\bat file.• For example: C:\Program Files\Aimetis\Symphony\_bin
Executable Name must contain the path and program of cmd (for bat files at least).• For example: C:\Windows\System32\cmd.exe
Arguments must contain the batch file name and the "/C" parameter.• For example: /C RecordToggle.bat
Figure 55. Run Program tab in Action screen
Video Analytics and Rules97
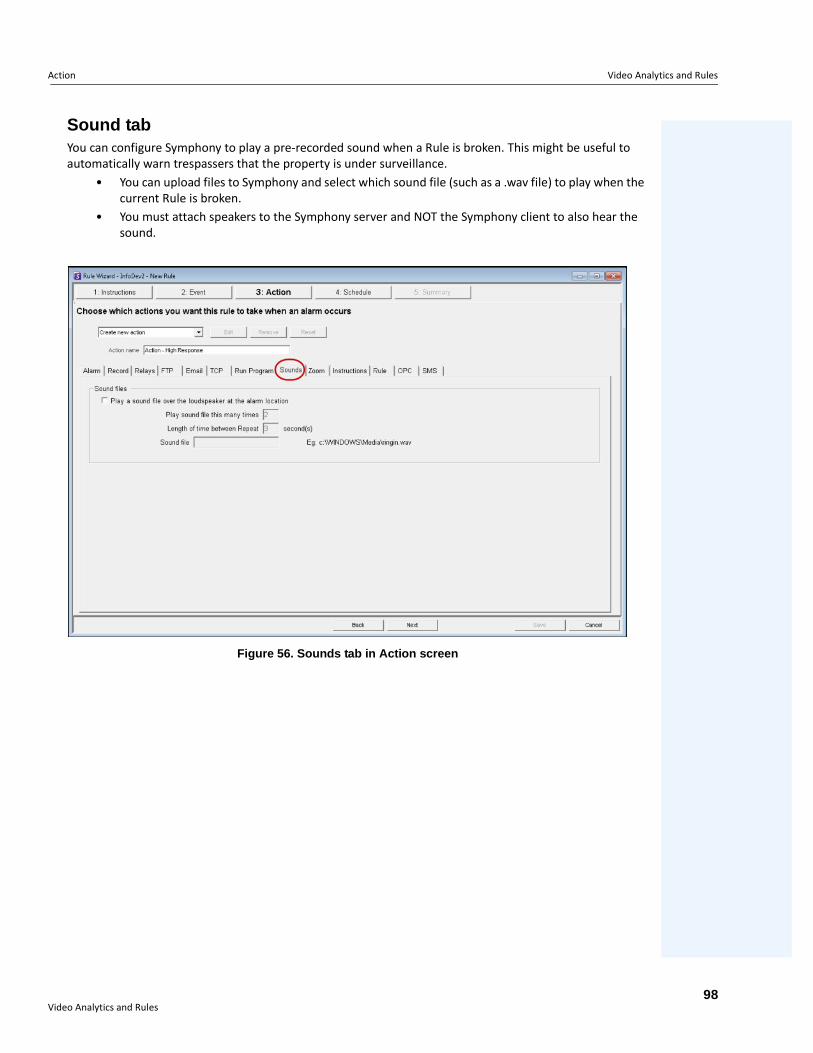
Action Video Analytics and Rules
Sound tabYou can configure Symphony to play a pre-recorded sound when a Rule is broken. This might be useful to automatically warn trespassers that the property is under surveillance.
• You can upload files to Symphony and select which sound file (such as a .wav file) to play when the current Rule is broken.
• You must attach speakers to the Symphony server and NOT the Symphony client to also hear the sound.
Figure 56. Sounds tab in Action screen
Video Analytics and Rules98
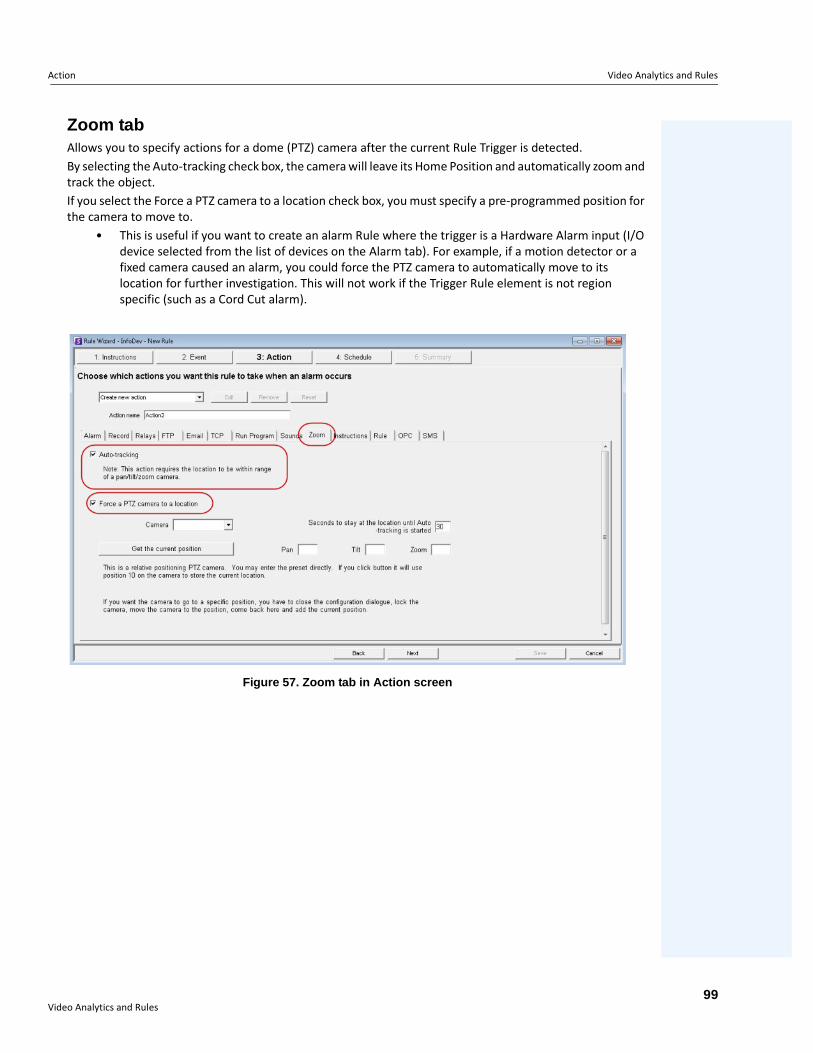
Action Video Analytics and Rules
Zoom tabAllows you to specify actions for a dome (PTZ) camera after the current Rule Trigger is detected.By selecting the Auto-tracking check box, the camera will leave its Home Position and automatically zoom and track the object.If you select the Force a PTZ camera to a location check box, you must specify a pre-programmed position for the camera to move to.
• This is useful if you want to create an alarm Rule where the trigger is a Hardware Alarm input (I/O device selected from the list of devices on the Alarm tab). For example, if a motion detector or a fixed camera caused an alarm, you could force the PTZ camera to automatically move to its location for further investigation. This will not work if the Trigger Rule element is not region specific (such as a Cord Cut alarm).
Figure 57. Zoom tab in Action screen
Video Analytics and Rules99
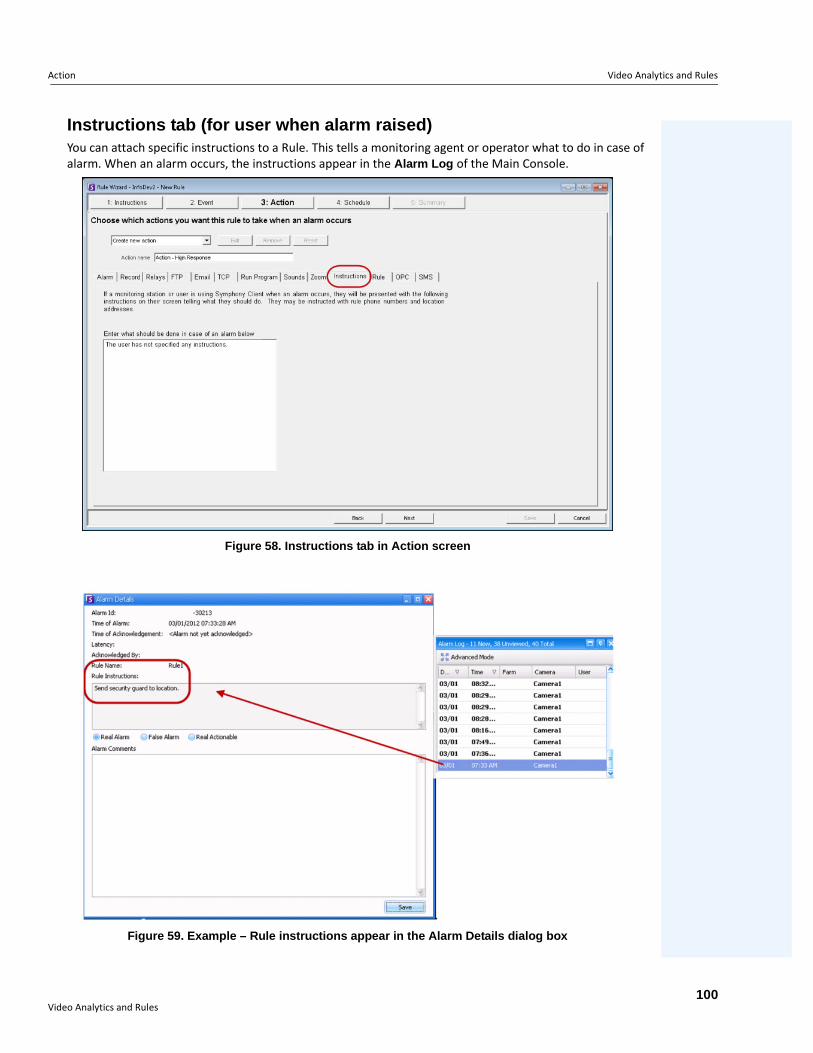
Action Video Analytics and Rules
Instructions tab (for user when alarm raised)You can attach specific instructions to a Rule. This tells a monitoring agent or operator what to do in case of alarm. When an alarm occurs, the instructions appear in the Alarm Log of the Main Console.
Figure 58. Instructions tab in Action screen
Figure 59. Example – Rule instructions appear in the Alarm Details dialog box
Video Analytics and Rules100
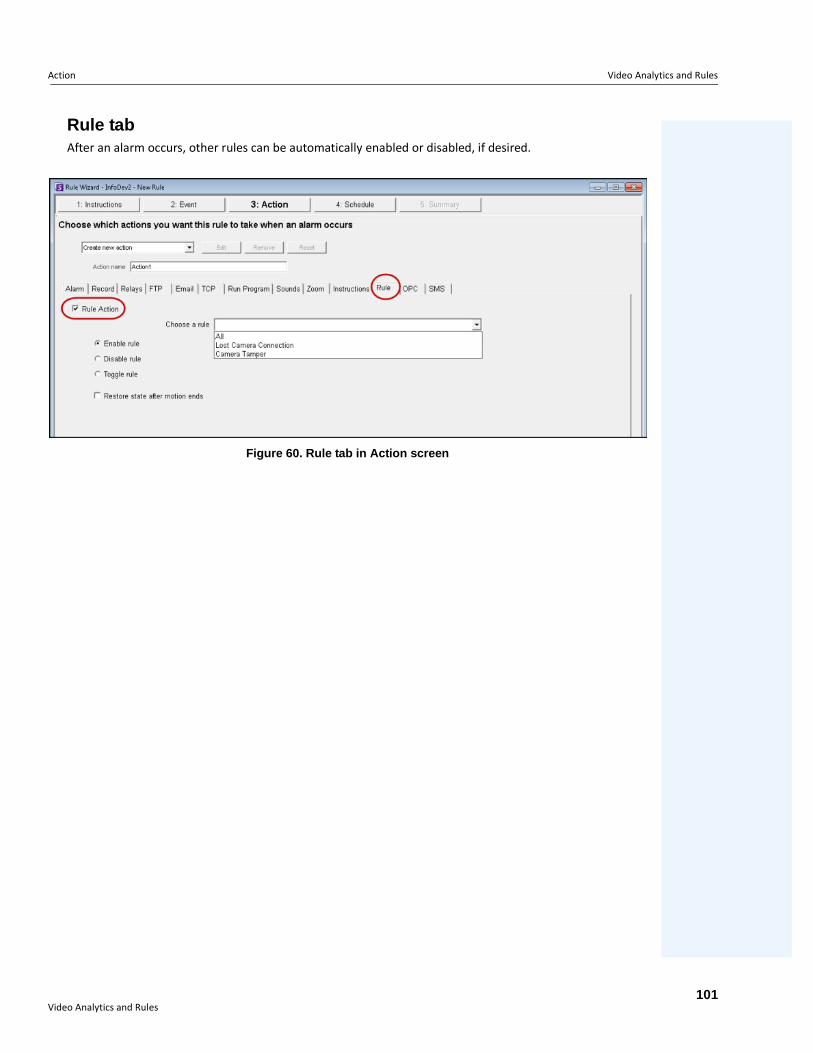
Action Video Analytics and Rules
Rule tabAfter an alarm occurs, other rules can be automatically enabled or disabled, if desired.
Figure 60. Rule tab in Action screen
Video Analytics and Rules101
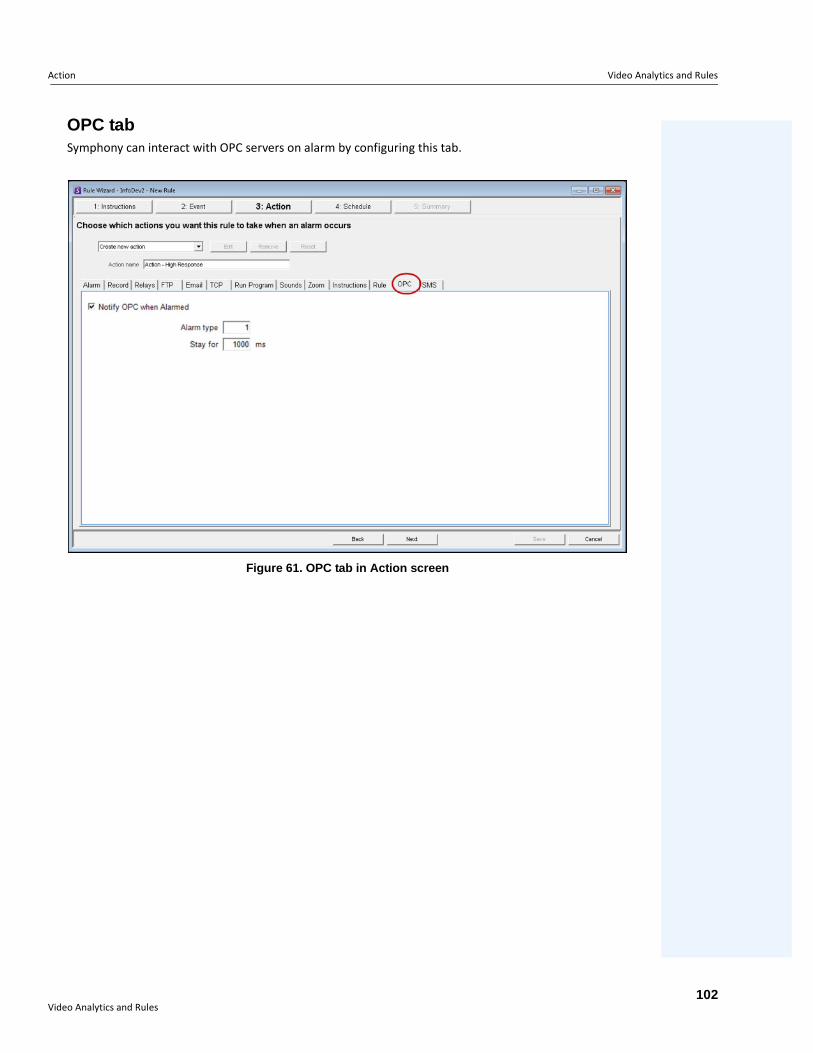
Action Video Analytics and Rules
OPC tabSymphony can interact with OPC servers on alarm by configuring this tab.
Figure 61. OPC tab in Action screen
Video Analytics and Rules102
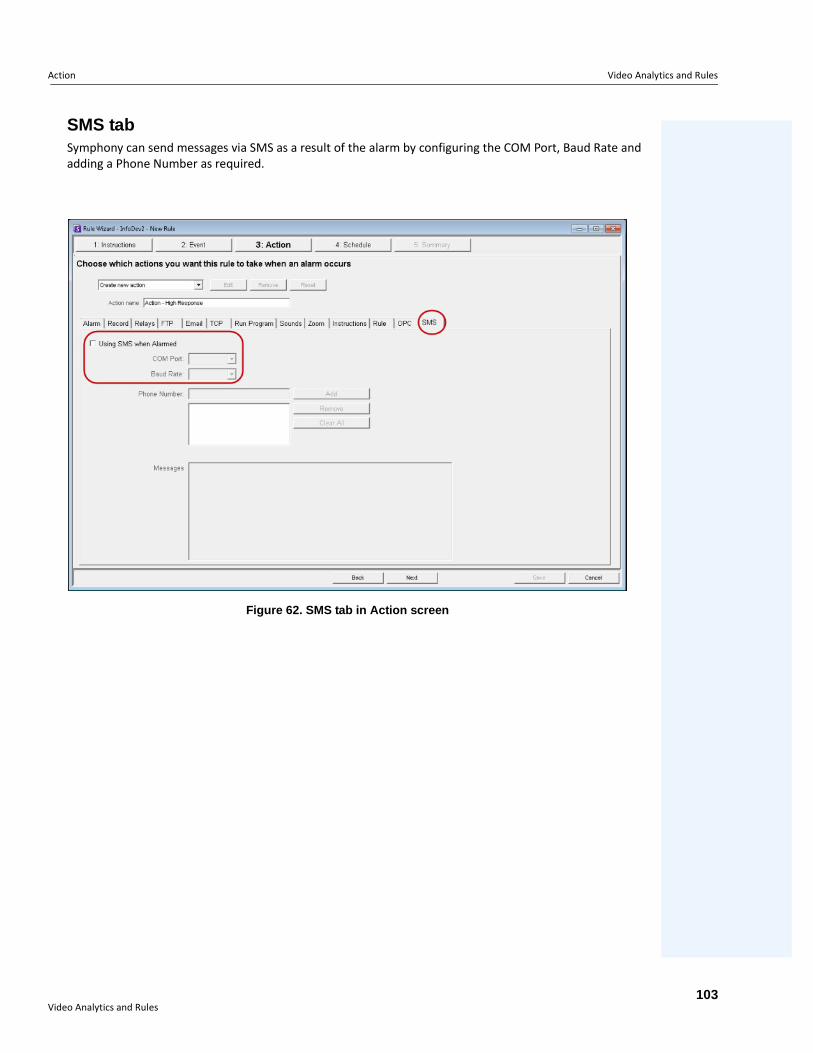
Action Video Analytics and Rules
SMS tabSymphony can send messages via SMS as a result of the alarm by configuring the COM Port, Baud Rate and adding a Phone Number as required.
Figure 62. SMS tab in Action screen
Video Analytics and Rules103
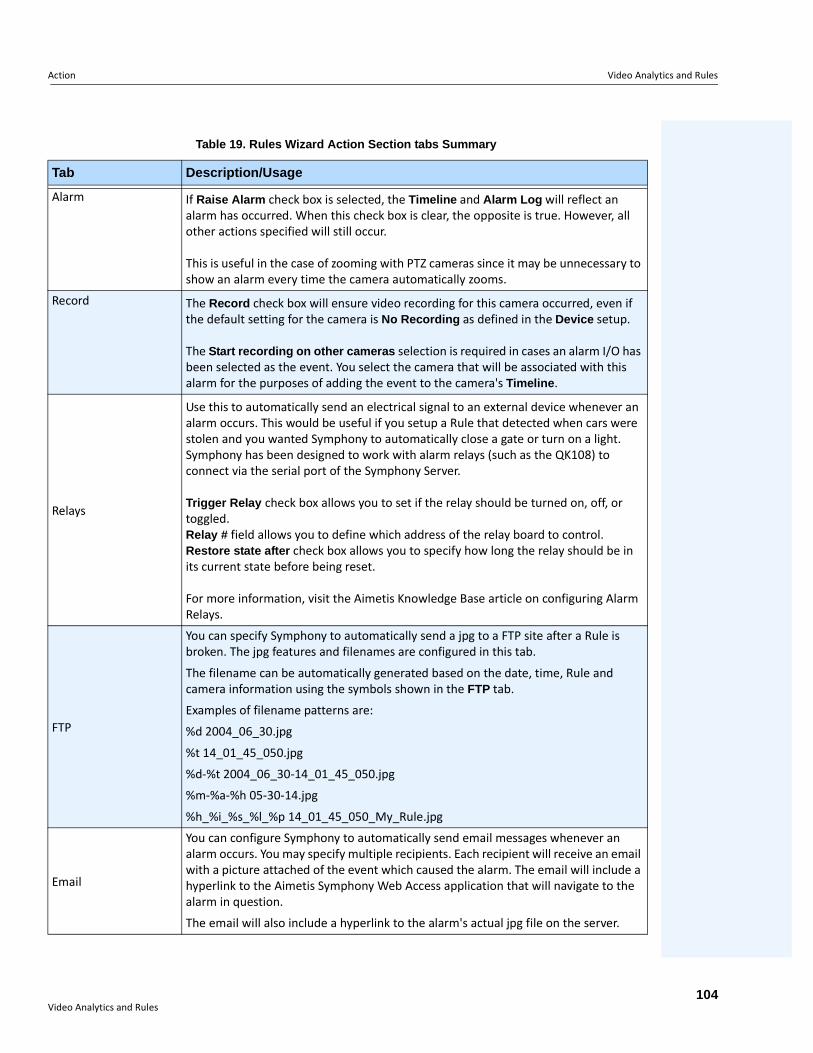
Action Video Analytics and Rules
Table 19. Rules Wizard Action Section tabs Summary
Tab Description/Usage
Alarm If Raise Alarm check box is selected, the Timeline and Alarm Log will reflect an alarm has occurred. When this check box is clear, the opposite is true. However, all other actions specified will still occur.
This is useful in the case of zooming with PTZ cameras since it may be unnecessary to show an alarm every time the camera automatically zooms.
Record The Record check box will ensure video recording for this camera occurred, even if the default setting for the camera is No Recording as defined in the Device setup.
The Start recording on other cameras selection is required in cases an alarm I/O has been selected as the event. You select the camera that will be associated with this alarm for the purposes of adding the event to the camera's Timeline.
Relays
Use this to automatically send an electrical signal to an external device whenever an alarm occurs. This would be useful if you setup a Rule that detected when cars were stolen and you wanted Symphony to automatically close a gate or turn on a light. Symphony has been designed to work with alarm relays (such as the QK108) to connect via the serial port of the Symphony Server.
Trigger Relay check box allows you to set if the relay should be turned on, off, or toggled.Relay # field allows you to define which address of the relay board to control. Restore state after check box allows you to specify how long the relay should be in its current state before being reset.
For more information, visit the Aimetis Knowledge Base article on configuring Alarm Relays.
FTP
You can specify Symphony to automatically send a jpg to a FTP site after a Rule is broken. The jpg features and filenames are configured in this tab.
The filename can be automatically generated based on the date, time, Rule and camera information using the symbols shown in the FTP tab.
Examples of filename patterns are:
%d 2004_06_30.jpg
%t 14_01_45_050.jpg
%d-%t 2004_06_30-14_01_45_050.jpg
%m-%a-%h 05-30-14.jpg
%h_%i_%s_%l_%p 14_01_45_050_My_Rule.jpg
You can configure Symphony to automatically send email messages whenever an alarm occurs. You may specify multiple recipients. Each recipient will receive an email with a picture attached of the event which caused the alarm. The email will include a hyperlink to the Aimetis Symphony Web Access application that will navigate to the alarm in question.
The email will also include a hyperlink to the alarm's actual jpg file on the server.
Video Analytics and Rules104
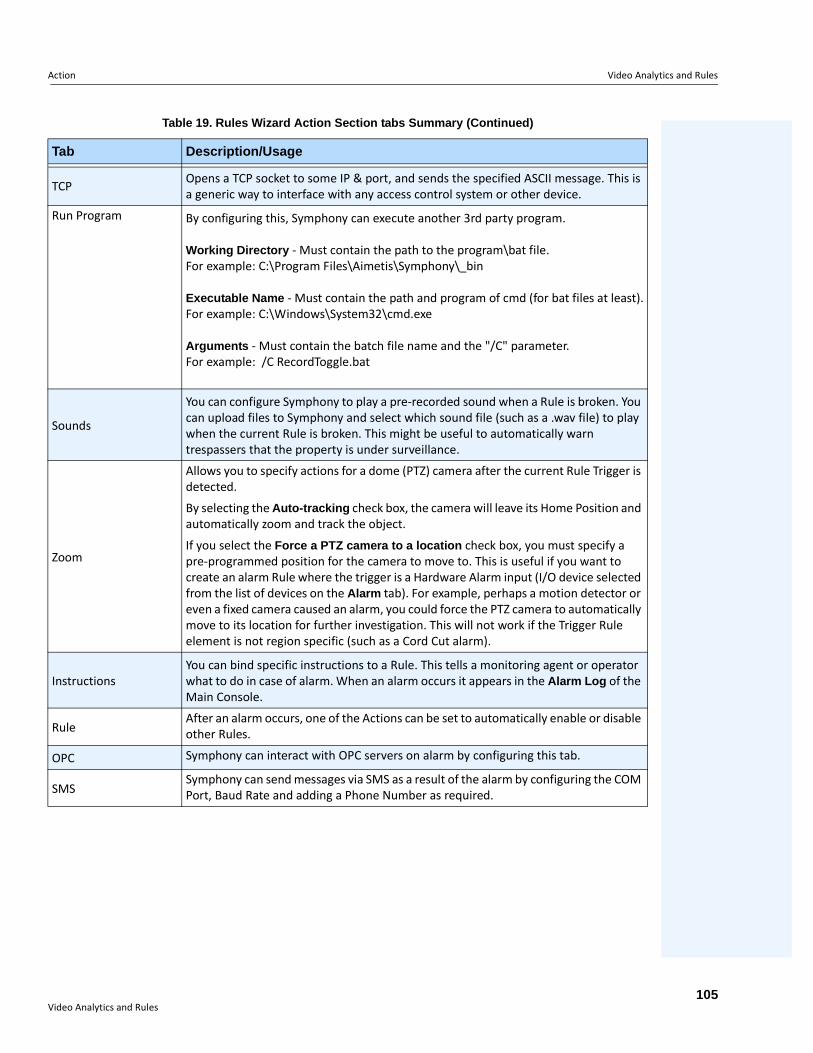
Action Video Analytics and Rules
TCP Opens a TCP socket to some IP & port, and sends the specified ASCII message. This is a generic way to interface with any access control system or other device.
Run Program By configuring this, Symphony can execute another 3rd party program.
Working Directory - Must contain the path to the program\bat file.For example: C:\Program Files\Aimetis\Symphony\_bin
Executable Name - Must contain the path and program of cmd (for bat files at least).For example: C:\Windows\System32\cmd.exe
Arguments - Must contain the batch file name and the "/C" parameter.For example: /C RecordToggle.bat
Sounds
You can configure Symphony to play a pre-recorded sound when a Rule is broken. You can upload files to Symphony and select which sound file (such as a .wav file) to play when the current Rule is broken. This might be useful to automatically warn trespassers that the property is under surveillance.
Zoom
Allows you to specify actions for a dome (PTZ) camera after the current Rule Trigger is detected.
By selecting the Auto-tracking check box, the camera will leave its Home Position and automatically zoom and track the object.
If you select the Force a PTZ camera to a location check box, you must specify a pre-programmed position for the camera to move to. This is useful if you want to create an alarm Rule where the trigger is a Hardware Alarm input (I/O device selected from the list of devices on the Alarm tab). For example, perhaps a motion detector or even a fixed camera caused an alarm, you could force the PTZ camera to automatically move to its location for further investigation. This will not work if the Trigger Rule element is not region specific (such as a Cord Cut alarm).
InstructionsYou can bind specific instructions to a Rule. This tells a monitoring agent or operator what to do in case of alarm. When an alarm occurs it appears in the Alarm Log of the Main Console.
RuleAfter an alarm occurs, one of the Actions can be set to automatically enable or disable other Rules.
OPC Symphony can interact with OPC servers on alarm by configuring this tab.
SMSSymphony can send messages via SMS as a result of the alarm by configuring the COM Port, Baud Rate and adding a Phone Number as required.
Table 19. Rules Wizard Action Section tabs Summary (Continued)
Tab Description/Usage
Video Analytics and Rules105
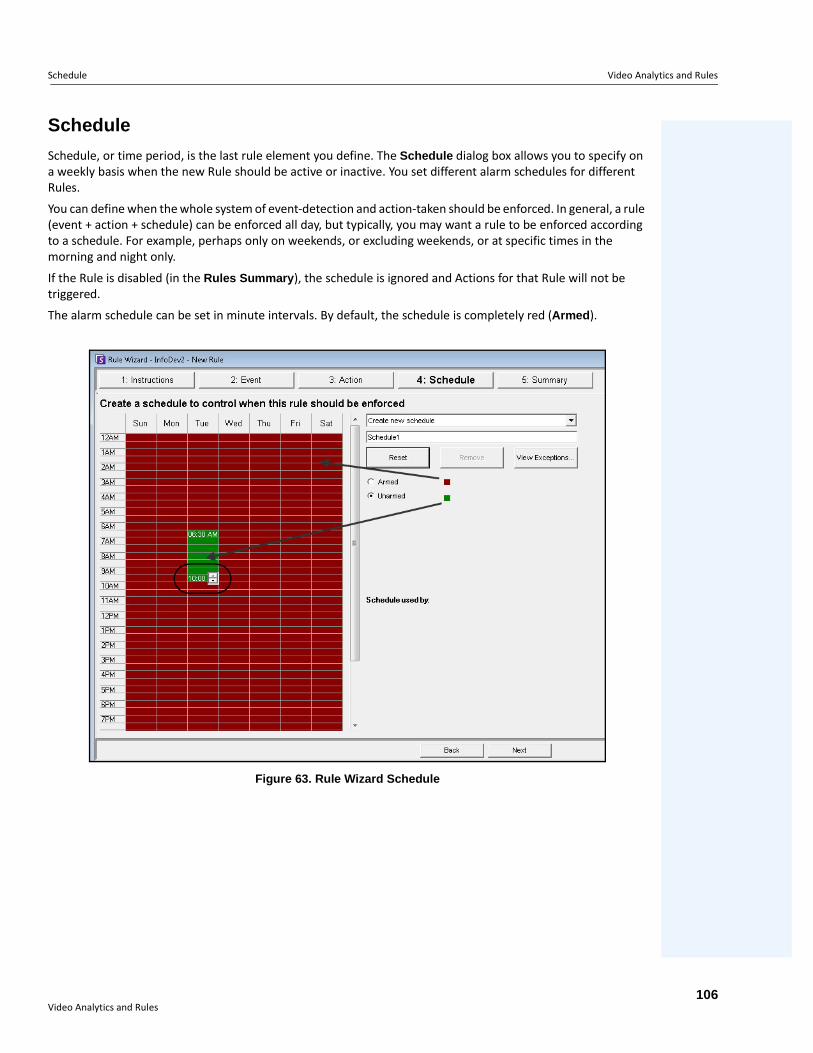
Schedule Video Analytics and Rules
Schedule
Schedule, or time period, is the last rule element you define. The Schedule dialog box allows you to specify on a weekly basis when the new Rule should be active or inactive. You set different alarm schedules for different Rules.
You can define when the whole system of event-detection and action-taken should be enforced. In general, a rule (event + action + schedule) can be enforced all day, but typically, you may want a rule to be enforced according to a schedule. For example, perhaps only on weekends, or excluding weekends, or at specific times in the morning and night only.
If the Rule is disabled (in the Rules Summary), the schedule is ignored and Actions for that Rule will not be triggered.
The alarm schedule can be set in minute intervals. By default, the schedule is completely red (Armed).
Figure 63. Rule Wizard Schedule
Video Analytics and Rules106
Schedule Video Analytics and Rules
Procedure
To modify the alarm schedule:
1. Give the new Schedule a descriptive name in the Name field, or reuse an existing Schedule by selecting it from the Create new schedule drop-down field.
2. If a new schedule is being created, select the Armed or Unarmed option. Using your mouse, click on the date and time interval squares.
• You can set per minute ranges. Click on at least two squares in one column. Hover your mouse over the first square or the last square in the column (earliest or latest hour interval). Arrow range buttons appear. Click the arrows to change times to per minute ranges.
3. Click View Exceptions to set an exception to this weekly schedule. An example might be holidays.
a. To set exceptions, mark each half hour increment in red or green. Red means it is armed, green means it is disarmed.
b. If a day already has exceptions it will be displayed in bold in the calendar. The current day is highlighted in blue.
4. Click OK to save your changes, or the X at the top of the form to close it without saving changes to the current day.
5. Click Next to move to the next dialog in the Rule Wizard. The Summary displays the essential elements of the rule you created.
Note: You can re-use Rule elements between rules. For example, if you have two rules, both may use the same Schedule or Action. Do not, for instance, create two schedules that are both 24/7.You can use 2 rules on the same video analytic if the rules are enforced at different times of the day.
Video Analytics and Rules107
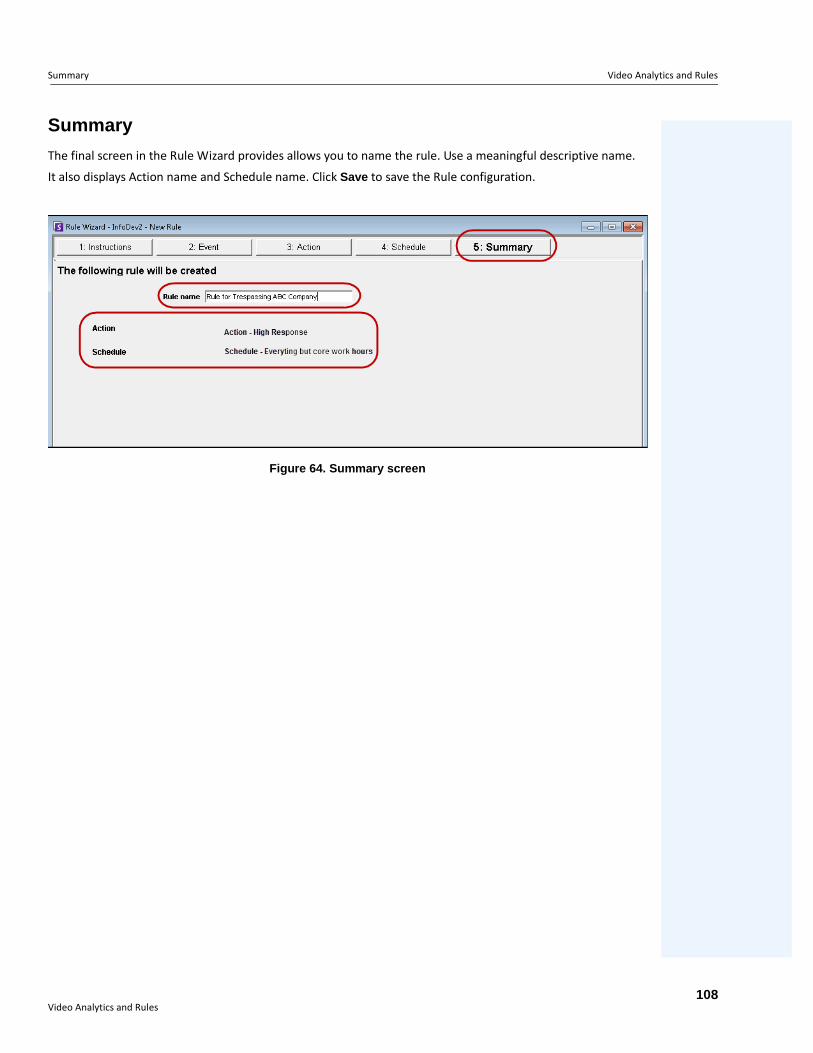
Summary Video Analytics and Rules
Summary
The final screen in the Rule Wizard provides allows you to name the rule. Use a meaningful descriptive name.
It also displays Action name and Schedule name. Click Save to save the Rule configuration.
Figure 64. Summary screen
Video Analytics and Rules108
109
Copyright © 2013 Aimetis Inc. All rights reserved.This guide is for informational purposes only. AIMETIS MAKES NO WARRANTIES, EXPRESS, IMPLIED OR STATUTORY, AS TO THE INFORMATION IN THIS DOCUMENT.Complying with all applicable copyright laws is the responsibility of the user. Without limiting the rights under copyright, no part of this document may be reproduced, stored in or introduced into a retrieval system, or transmitted in any form or by any means (electronic, mechanical, photocopying, recording, or otherwise), or for any purpose, without the express written permission of Aimetis Corp. Aimetis may have patents, patent applications, trademarks, copyrights, or other intellectual property rights covering subject matter in this document. Except as expressly provided in any written license agreement from Aimetis, the furnishing of this document does not give you any license to these patents, trademarks, copyrights, or other intellectual property.Aimetis and Aimetis Symphony are either registered trademarks or trademarks of Aimetis Corp. in the United States and/or other countries.Portions Copyright © 1993-2012 ARH Inc.Portions of this software are based in part on the work of the Independent JPEG Group.