Embed Size (px)
Citation preview
IBMTivoli®
Version 3.1.0
Using OMEGAVIEW and OMEGAVIEW II for the Enterprise
SC32-9427-00
OMEGAVIEW and OMEGAVIEW II for the Enterprise

12
1
2
IBMTivoli®
Version 3.1.0
OMEGAVIEW and OMEGAVIEW II for the Enterprise
Using OMEGAVIEW and OMEGAVIEW II for the Enterprise
SC32-9427-00
12
1
Fourth Edition (November 2005)
This edition applies to version 3, release 1, modification 0 of OMEGAVIEW (product number 5608-A1200) and OMEGAVIEW II for the Enterprise (product number 5608-A4200), and to all subsequent releases and modifications until otherwise indicated in new editions.
This edition replaces GC32-9336-00.
© Copyright International Business Machines Corporation 1996, 2005. All rights reserved.
Note to U.S. Government Users Restricted Rights -- Use, duplication or disclosure restricted by GSA ADP Schedule Contract with IBM Corp.
2
Before using this information and the product it supports, read the information in “Notices” on page 211.
Note
Contents 5
Preface . . . . . . . . . . . . . . . . . . . . . . . . . . . . . . . . . . . . . . . . . . . . . . . . . . . . . . . . . . . . . . 9About This Book . . . . . . . . . . . . . . . . . . . . . . . . . . . . . . . . . . . . . . . . . . . . . . . . . . . . . .10Documentation Conventions. . . . . . . . . . . . . . . . . . . . . . . . . . . . . . . . . . . . . . . . . . . . .12
Section 1. Using the OMEGAVIEW Software
Chapter 1. OMEGAVIEW User Interface . . . . . . . . . . . . . . . . . . . . . . . . . . . . . . . . . . . . . . 17Panels . . . . . . . . . . . . . . . . . . . . . . . . . . . . . . . . . . . . . . . . . . . . . . . . . . . . . . . . . . . . . .18Selectable Panel Items . . . . . . . . . . . . . . . . . . . . . . . . . . . . . . . . . . . . . . . . . . . . . . . . . .21Pull-down Menus . . . . . . . . . . . . . . . . . . . . . . . . . . . . . . . . . . . . . . . . . . . . . . . . . . . . .22Pop-up Windows. . . . . . . . . . . . . . . . . . . . . . . . . . . . . . . . . . . . . . . . . . . . . . . . . . . . . .23Quick Navigation in OMEGAVIEW . . . . . . . . . . . . . . . . . . . . . . . . . . . . . . . . . . . . . . . .25Obtaining Online Help . . . . . . . . . . . . . . . . . . . . . . . . . . . . . . . . . . . . . . . . . . . . . . . . .28Switch to Session Menu. . . . . . . . . . . . . . . . . . . . . . . . . . . . . . . . . . . . . . . . . . . . . . . . .32Tools Menu . . . . . . . . . . . . . . . . . . . . . . . . . . . . . . . . . . . . . . . . . . . . . . . . . . . . . . . . . .33Samples Menu . . . . . . . . . . . . . . . . . . . . . . . . . . . . . . . . . . . . . . . . . . . . . . . . . . . . . . .35Options Menu . . . . . . . . . . . . . . . . . . . . . . . . . . . . . . . . . . . . . . . . . . . . . . . . . . . . . . . .36
Chapter 2. Creating OMEGAVIEW Panels . . . . . . . . . . . . . . . . . . . . . . . . . . . . . . . . . . . . . 39Overview. . . . . . . . . . . . . . . . . . . . . . . . . . . . . . . . . . . . . . . . . . . . . . . . . . . . . . . . . . . .40Creating a Systems Panel . . . . . . . . . . . . . . . . . . . . . . . . . . . . . . . . . . . . . . . . . . . . . . .41Creating a Storage Panel . . . . . . . . . . . . . . . . . . . . . . . . . . . . . . . . . . . . . . . . . . . . . . . .54Creating a Network Panel . . . . . . . . . . . . . . . . . . . . . . . . . . . . . . . . . . . . . . . . . . . . . . .56Creating an Onlines Panel . . . . . . . . . . . . . . . . . . . . . . . . . . . . . . . . . . . . . . . . . . . . . . .58Creating an Overview Panel . . . . . . . . . . . . . . . . . . . . . . . . . . . . . . . . . . . . . . . . . . . . .60Creating a Software Panel . . . . . . . . . . . . . . . . . . . . . . . . . . . . . . . . . . . . . . . . . . . . . . .62Creating a Connectivity Panel . . . . . . . . . . . . . . . . . . . . . . . . . . . . . . . . . . . . . . . . . . . .63Creating an Index Panel . . . . . . . . . . . . . . . . . . . . . . . . . . . . . . . . . . . . . . . . . . . . . . . .65Copying and Editing Existing Panels . . . . . . . . . . . . . . . . . . . . . . . . . . . . . . . . . . . . . . .67Linking and Cross-Referencing Status Items . . . . . . . . . . . . . . . . . . . . . . . . . . . . . . . . .69
Chapter 3. Creating and Using Templates. . . . . . . . . . . . . . . . . . . . . . . . . . . . . . . . . . . . . . 71Overview. . . . . . . . . . . . . . . . . . . . . . . . . . . . . . . . . . . . . . . . . . . . . . . . . . . . . . . . . . . .72Accessing the Template Editor . . . . . . . . . . . . . . . . . . . . . . . . . . . . . . . . . . . . . . . . . . . .73Creating a New Template . . . . . . . . . . . . . . . . . . . . . . . . . . . . . . . . . . . . . . . . . . . . . . .74Saving a Template. . . . . . . . . . . . . . . . . . . . . . . . . . . . . . . . . . . . . . . . . . . . . . . . . . . . .77Exiting the Template Editor . . . . . . . . . . . . . . . . . . . . . . . . . . . . . . . . . . . . . . . . . . . . . .79Positioning a Template on a New Panel . . . . . . . . . . . . . . . . . . . . . . . . . . . . . . . . . . . . .80
Contents
6 Using OMEGAVIEW and OMEGAVIEW II for the Enterprise, V3.1.0
Chapter 4. The Panel Editor . . . . . . . . . . . . . . . . . . . . . . . . . . . . . . . . . . . . . . . . . . . . . . . . 83Overview. . . . . . . . . . . . . . . . . . . . . . . . . . . . . . . . . . . . . . . . . . . . . . . . . . . . . . . . . . . .84Using Line and Box Drawings . . . . . . . . . . . . . . . . . . . . . . . . . . . . . . . . . . . . . . . . . . . .86Using Longterm History Status Bars . . . . . . . . . . . . . . . . . . . . . . . . . . . . . . . . . . . . . . .88Adding Session Names . . . . . . . . . . . . . . . . . . . . . . . . . . . . . . . . . . . . . . . . . . . . . . . . .89Adding Action Text . . . . . . . . . . . . . . . . . . . . . . . . . . . . . . . . . . . . . . . . . . . . . . . . . . . .90Adding an Instruction Line . . . . . . . . . . . . . . . . . . . . . . . . . . . . . . . . . . . . . . . . . . . . . .91Adding Status and Transient Text Objects . . . . . . . . . . . . . . . . . . . . . . . . . . . . . . . . . . .92
Chapter 5. Setting OMEGAVIEW Options . . . . . . . . . . . . . . . . . . . . . . . . . . . . . . . . . . . . . 97Setting Preferences . . . . . . . . . . . . . . . . . . . . . . . . . . . . . . . . . . . . . . . . . . . . . . . . . . . .98Setting Status Display Options. . . . . . . . . . . . . . . . . . . . . . . . . . . . . . . . . . . . . . . . . . .102Setting Panel Editor keys . . . . . . . . . . . . . . . . . . . . . . . . . . . . . . . . . . . . . . . . . . . . . . .104Setting Switch/Zoom Options . . . . . . . . . . . . . . . . . . . . . . . . . . . . . . . . . . . . . . . . . . .106Session Logon Data . . . . . . . . . . . . . . . . . . . . . . . . . . . . . . . . . . . . . . . . . . . . . . . . . .109
Chapter 6. Defining and Maintaining Status Items . . . . . . . . . . . . . . . . . . . . . . . . . . . . . . 111Overview. . . . . . . . . . . . . . . . . . . . . . . . . . . . . . . . . . . . . . . . . . . . . . . . . . . . . . . . . . .112Adding a Status Item or Rollup . . . . . . . . . . . . . . . . . . . . . . . . . . . . . . . . . . . . . . . . . .113Changing a Status Item . . . . . . . . . . . . . . . . . . . . . . . . . . . . . . . . . . . . . . . . . . . . . . . .117Deleting a Status Item . . . . . . . . . . . . . . . . . . . . . . . . . . . . . . . . . . . . . . . . . . . . . . . . .118Linking Status Items . . . . . . . . . . . . . . . . . . . . . . . . . . . . . . . . . . . . . . . . . . . . . . . . . .119Using the Cross-Reference Option . . . . . . . . . . . . . . . . . . . . . . . . . . . . . . . . . . . . . . . .121
Chapter 7. Providing Logon Information for Zooming and Switching . . . . . . . . . . . . . . . . 123Using the Maintain Session Logon Data Option . . . . . . . . . . . . . . . . . . . . . . . . . . . . .124Starting or Stopping Prompting for User ID . . . . . . . . . . . . . . . . . . . . . . . . . . . . . . . . .132
Chapter 8. Controlling Profile Synchronization. . . . . . . . . . . . . . . . . . . . . . . . . . . . . . . . .135Overview. . . . . . . . . . . . . . . . . . . . . . . . . . . . . . . . . . . . . . . . . . . . . . . . . . . . . . . . . . .136Overriding the Profile Synchronization Default . . . . . . . . . . . . . . . . . . . . . . . . . . . . . .137
Chapter 9. Switching Sessions . . . . . . . . . . . . . . . . . . . . . . . . . . . . . . . . . . . . . . . . . . . . .139Switching among OMEGAMON Sessions . . . . . . . . . . . . . . . . . . . . . . . . . . . . . . . . . .140Navigating to OMEGACENTER Status Manager . . . . . . . . . . . . . . . . . . . . . . . . . . . . .141
Chapter 10. Using the Zoom Feature . . . . . . . . . . . . . . . . . . . . . . . . . . . . . . . . . . . . . . . . . 143Using the Zoom-to-Session Confirmation Option . . . . . . . . . . . . . . . . . . . . . . . . . . . .144Zooming to the Default Destination . . . . . . . . . . . . . . . . . . . . . . . . . . . . . . . . . . . . . . .146Zooming to an Alternative Destination . . . . . . . . . . . . . . . . . . . . . . . . . . . . . . . . . . . .147Valid Zoom Destinations for OMEGAMON Products . . . . . . . . . . . . . . . . . . . . . . . . . .149
Chapter 11. Problem Management . . . . . . . . . . . . . . . . . . . . . . . . . . . . . . . . . . . . . . . . . . 161Overview. . . . . . . . . . . . . . . . . . . . . . . . . . . . . . . . . . . . . . . . . . . . . . . . . . . . . . . . . . .162Finding Underlying Status Information and Triggering Alerts . . . . . . . . . . . . . . . . . . . .163Viewing a Problem Management Record . . . . . . . . . . . . . . . . . . . . . . . . . . . . . . . . . . .165
Contents 7
Adding a Problem Management Record . . . . . . . . . . . . . . . . . . . . . . . . . . . . . . . . . . .166Changing a Problem Management Record . . . . . . . . . . . . . . . . . . . . . . . . . . . . . . . . .168Deleting a Problem Management Record . . . . . . . . . . . . . . . . . . . . . . . . . . . . . . . . . .169
Section 2. Using OMEGAVIEW II for the Enterprise
Chapter 12. Introducing OMEGAVIEW II for the Enterprise . . . . . . . . . . . . . . . . . . . . . . . . 173OMEGAVIEW II for the Enterprise. . . . . . . . . . . . . . . . . . . . . . . . . . . . . . . . . . . . . . . .174Tivoli OMEGAMON XE, Tivoli OMEGAMON DE, and OMEGAMON Platform . . . . .175Key Features . . . . . . . . . . . . . . . . . . . . . . . . . . . . . . . . . . . . . . . . . . . . . . . . . . . . . . . .178
Chapter 13. OMEGAVIEW II for the Enterprise Workspaces and Situations . . . . . . . . . . . . 179Workspaces . . . . . . . . . . . . . . . . . . . . . . . . . . . . . . . . . . . . . . . . . . . . . . . . . . . . . . . . .180Situations . . . . . . . . . . . . . . . . . . . . . . . . . . . . . . . . . . . . . . . . . . . . . . . . . . . . . . . . . .181Attributes. . . . . . . . . . . . . . . . . . . . . . . . . . . . . . . . . . . . . . . . . . . . . . . . . . . . . . . . . . .184
Section 3. Appendixes
Appendix A. Status Item Qualifiers . . . . . . . . . . . . . . . . . . . . . . . . . . . . . . . . . . . . . . . . . . . 187Status Item Qualifiers for OMEGAMON II for CICS . . . . . . . . . . . . . . . . . . . . . . . . . .188Status Item Qualifiers for OMEGAMON II for DB2 . . . . . . . . . . . . . . . . . . . . . . . . . . .190Status Item Qualifiers for OMEGAMON II for IMS . . . . . . . . . . . . . . . . . . . . . . . . . . . .191Status Item Qualifiers for OMEGAMON II for MVS . . . . . . . . . . . . . . . . . . . . . . . . . . .192Status Item Qualifiers for OMEGAMON II for SMS . . . . . . . . . . . . . . . . . . . . . . . . . . .194Status Item Qualifiers for OMEGAMON II for VTAM or OMEGAMON II for Mainframe Networks . . . . . . . . . . . . . . . . . . . . . . . . . . . . . . . . . .195
Appendix B. Enhanced Logging Facility . . . . . . . . . . . . . . . . . . . . . . . . . . . . . . . . . . . . . . .197
Appendix C. Enhanced Action Code Navigation . . . . . . . . . . . . . . . . . . . . . . . . . . . . . . . . .201
Appendix D. Support Information . . . . . . . . . . . . . . . . . . . . . . . . . . . . . . . . . . . . . . . . . . . .205
Appendix E. Notices . . . . . . . . . . . . . . . . . . . . . . . . . . . . . . . . . . . . . . . . . . . . . . . . . . . . . . 211
Index . . . . . . . . . . . . . . . . . . . . . . . . . . . . . . . . . . . . . . . . . . . . . . . . . . . . . . . . . . . . 215

8 Using OMEGAVIEW and OMEGAVIEW II for the Enterprise, V3.1.0
Preface 9
Preface
OMEGAVIEW® and OMEGAVIEW II® for the Enterprise are components of IBM® Tivoli® OMEGAMON® DE on z/OS®. They provide an integrated view of your mainframe enterprise and the power to take corrective action when problems threaten system and application availability.
OMEGAVIEW aggregates, into a single Common User Access (CUA) view, the status information from the OMEGAMON II® components of these IBM Tivoli OMEGAMON XE products:
! Tivoli OMEGAMON XE for CICS® on z/OS
! Tivoli OMEGAMON XE for DB2® on z/OS
! Tivoli OMEGAMON XE for IMSTM on z/OS
! Tivoli OMEGAMON XE for Mainframe Networks
! Tivoli OMEGAMON XE for Storage on z/OS
! Tivoli OMEGAMON XE on z/OS
You can use the OMEGAVIEW status information to monitor and manage your mainframe computing enterprise.
OMEGAVIEW II for the Enterprise integrates status information into the Tivoli OMEGAMON XE architecture, allowing situations and policies to be created against a number of managed systems. The status information can come from any of these sources:
! OMEGAMON sessions
! user-defined IBM Tivoli AF/OPERATOR® automation scripts
! user-defined IBM Tivoli OMEGACENTER® Gateway probes
! status items defined in the OMEGAVIEW Status Item Manager
This book explains how to use OMEGAVIEW and OMEGAVIEW II for the Enterprise to monitor your computing enterprise. For more information about the Tivoli OMEGAMON XE products, Tivoli OMEGAMON DE features, and OMEGAMON and OMEGAMON II components, see �Introducing OMEGAVIEW II for the Enterprise� on page 173.
Note: Before you can follow any of the instructions in this book, you must install and configure Tivoli OMEGAMON DE on z/OS. For instructions, see the Program Directory and the installation and configuration books on the publications CDs that accompanied this product.
P
About This Book
10 Using OMEGAVIEW and OMEGAVIEW II for the Enterprise, V3.1.0
About This Book
Who should read this bookThis book is intended for IT operations staff and administrators, system programmers, and network administrators.
Related publicationsThis section lists other useful publications in the Tivoli OMEGAMON DE on z/OS library and in the OMEGAMON Platform library.
Other books in the Tivoli OMEGAMON DE on z/OS library! Configuring OMEGAVIEW and OMEGAVIEW II for the Enterprise, SC32-9426,
explains how to configure OMEGAVIEW and OMEGAVIEW II for the Enterprise, and how to administer the OMEGAVIEW software.
! OMEGAVIEW and OMEGAVIEW II for the Enterprise Release Notes, GI11-4085-00, contains information about changes to OMEGAVIEW and OMEGAVIEW II for the Enterprise since the last release, as well as late-breaking information about these products.
! IBM Tivoli Candle® Products Messages, 5 vols. SC32-9416�SC32-9420, lists messages issued by OMEGAVIEW and OMEGAVIEW II for the Enterprise, by the Tivoli OMEGAMON XE products, and by the OMEGAMON Platform components.
OMEGAMON Platform library
These books explain how to install and configure the OMEGAMON Platform components:
! Installing and Setting up OMEGAMON Platform and CandleNet Portal® on Windows and UNIX, SC32-1768.
! Configuring IBM Tivoli Candle Management Server® on z/OS, GC32-9414.
These books also provide useful information about the OMEGAMON Platform and the CandleNet Portal interface:
! Administering OMEGAMON Products: CandleNet Portal, GC32-9180, describes the support tasks and functions required for the OMEGAMON Platform, including CandleNet Portal user administration.
! Using OMEGAMON Products: CandleNet Portal, GC32-9182, describes the features of CandleNet Portal and how to use them with your Tivoli OMEGAMON XE products.
! Historical Data Collection Guide for IBM Tivoli OMEGAMON XE Products, GC32-9429, describes the process of collecting historical data and either warehousing it or converting it to delimited flat files for reporting purposes.
The online glossary for the CandleNet Portal includes definitions for many of the technical terms related to Tivoli OMEGAMON XE software.
Preface 11
About This Book
Accessing publications online
The documentation CD contains the publications that are in the product library. The format of the publications is PDF. Refer to the readme file on the CD for instructions on how to access the documentation.
IBM posts publications for this and all other Tivoli products, as they become available and whenever they are updated, to the Tivoli software information center Web site. Access the Tivoli software information center by first going to the Tivoli software library at the following Web address:
http://publib.boulder.ibm.com/tividd/td/tdprodlist.html
In the Tivoli Technical Product Documents Alphabetical Listing window, click the IBM Tivoli OMEGAMON DE on z/OS link to access the product library at the Tivoli software information center.
If you print PDF documents on other than letter-sized paper, set the option in the File > Print window that allows Adobe Reader to print letter-sized pages on your local paper.
Downloading and ordering publications
You can download many Tivoli publications online from the following Web site:
http://www.elink.ibmlink.ibm.com/public/applications/publications/cgibin/pbi.cgi
You can also order publications by telephone by calling one of these numbers:
! In the United States: 800-879-2755
! In Canada: 800-426-4968
In other countries, contact your software account representative to order Tivoli publications by telephone.
Tivoli technical trainingFor Tivoli technical training information, see the IBM Tivoli Education Web site:
http://www.ibm.com/software/tivoli/education
Support informationIf you have a problem with your IBM software, you want to resolve it quickly. IBM provides the following ways for you to obtain the support you need:
! Searching knowledge bases: You can search across a large collection of known problems and workarounds, Technotes, and other information.
! Obtaining fixes: You can locate the latest fixes that are already available for your product.
! Contacting IBM Software Support: If you still cannot solve your problem, and you need to work with someone from IBM, you can use a variety of ways to contact IBM Software Support.
For more information about these three ways of resolving problems, see �Support Information� on page 205.
Documentation Conventions
12 Using OMEGAVIEW and OMEGAVIEW II for the Enterprise, V3.1.0
Documentation Conventions
OverviewThis guide uses several conventions for special terms and actions, and operating system-dependent commands and paths.
Panels and figuresThe panels and figures in this document are representations. Actual product panels may differ.
Required blanksThe slashed-b (!) character in examples represents a required blank. The following example illustrates the location of two required blanks.
!!!!eBA*ServiceMonitor!!!!0990221161551000
Revision barsRevision bars (|) may appear in the left margin to identify new or updated material.
Variables and literalsIn examples of z/OS® command syntax, uppercase letters are actual values (literals) that the user should type; lowercase letters are used for variables that represent data supplied by the user. Default values are underscored.
LOGON APPLID (cccccccc)
In the above example, you type LOGON APPLID followed by an application identifier (represented by cccccccc) within parentheses.
SymbolsThe following symbols may appear in command syntax:
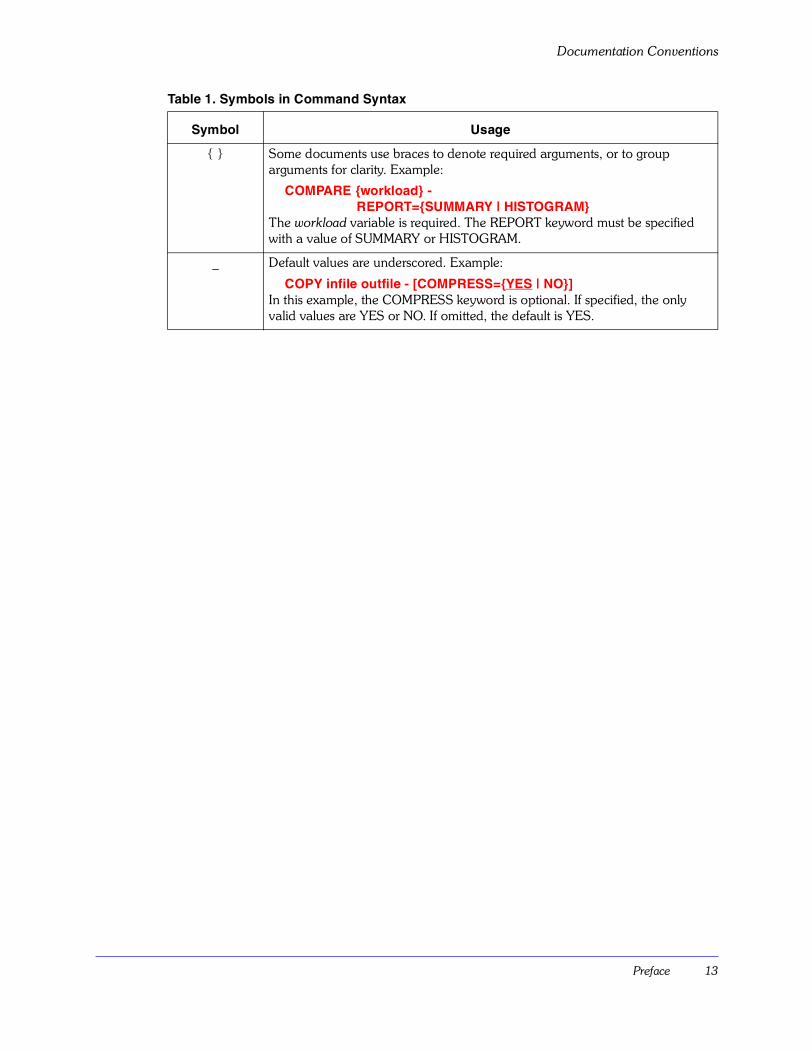
Table 1. Symbols in Command Syntax
Symbol Usage
| The �or� symbol is used to denote a choice. Either the argument on the left or the argument on the right may be used. Example:
YES | NOIn this example, YES or NO may be specified.
[ ] Denotes optional arguments. Those arguments not enclosed in square brackets are required. Example:
APPLDEST DEST [ALTDEST]In this example, DEST is a required argument and ALTDEST is optional.
Preface 13
Documentation Conventions
{ } Some documents use braces to denote required arguments, or to group arguments for clarity. Example:
COMPARE {workload} -REPORT={SUMMARY | HISTOGRAM}
The workload variable is required. The REPORT keyword must be specified with a value of SUMMARY or HISTOGRAM.
_ Default values are underscored. Example:
COPY infile outfile - [COMPRESS={YES | NO}]In this example, the COMPRESS keyword is optional. If specified, the only valid values are YES or NO. If omitted, the default is YES.
Table 1. Symbols in Command Syntax
Symbol Usage
Documentation Conventions
14 Using OMEGAVIEW and OMEGAVIEW II for the Enterprise, V3.1.0

Section 1. Using the OMEGAVIEW Software 15
Section 1. Using the OMEGAVIEW Software
This section gives instructions for using the OMEGAVIEW software and its CUA interface to manage your mainframe computing enterprise.
These are the chapters in this section.
OMEGAVIEW User Interface . . . . . . . . . . . . . . . . . . . . . . . . . . . . . . . . . . . . . . . . . . . 17Creating OMEGAVIEW Panels . . . . . . . . . . . . . . . . . . . . . . . . . . . . . . . . . . . . . . . . . . 39Creating and Using Templates . . . . . . . . . . . . . . . . . . . . . . . . . . . . . . . . . . . . . . . . . . 71The Panel Editor. . . . . . . . . . . . . . . . . . . . . . . . . . . . . . . . . . . . . . . . . . . . . . . . . . . . . 83Setting OMEGAVIEW Options . . . . . . . . . . . . . . . . . . . . . . . . . . . . . . . . . . . . . . . . . . 97Defining and Maintaining Status Items . . . . . . . . . . . . . . . . . . . . . . . . . . . . . . . . . . . 111Providing Logon Information for Zooming and Switching. . . . . . . . . . . . . . . . . . . . . 123Controlling Profile Synchronization. . . . . . . . . . . . . . . . . . . . . . . . . . . . . . . . . . . . . . 135Switching Sessions . . . . . . . . . . . . . . . . . . . . . . . . . . . . . . . . . . . . . . . . . . . . . . . . . . 139Using the Zoom Feature . . . . . . . . . . . . . . . . . . . . . . . . . . . . . . . . . . . . . . . . . . . . . . 143Problem Management . . . . . . . . . . . . . . . . . . . . . . . . . . . . . . . . . . . . . . . . . . . . . . . 161

16 Using OMEGAVIEW and OMEGAVIEW II for the Enterprise, V3.1.0
OMEGAVIEW User Interface 17
OMEGAVIEW User Interface
IntroductionOMEGAVIEW uses a common set of features throughout its panels. These features, based on CUA standards, are designed to facilitate ease of learning and use. After you become familiar with the basics of an OMEGAVIEW panel, you can use OMEGAVIEW to monitor the health of your enterprise.
Chapter ContentsPanels. . . . . . . . . . . . . . . . . . . . . . . . . . . . . . . . . . . . . . . . . . . . . . . . . . . . . . . . . . . . . . . . . . . . .18Selectable Panel Items . . . . . . . . . . . . . . . . . . . . . . . . . . . . . . . . . . . . . . . . . . . . . . . . . . . . . . . .21Pull-down Menus . . . . . . . . . . . . . . . . . . . . . . . . . . . . . . . . . . . . . . . . . . . . . . . . . . . . . . . . . . . .22Pop-up Windows . . . . . . . . . . . . . . . . . . . . . . . . . . . . . . . . . . . . . . . . . . . . . . . . . . . . . . . . . . . .23Quick Navigation in OMEGAVIEW. . . . . . . . . . . . . . . . . . . . . . . . . . . . . . . . . . . . . . . . . . . . . . .25Obtaining Online Help . . . . . . . . . . . . . . . . . . . . . . . . . . . . . . . . . . . . . . . . . . . . . . . . . . . . . . . .28Switch to Session Menu . . . . . . . . . . . . . . . . . . . . . . . . . . . . . . . . . . . . . . . . . . . . . . . . . . . . . . .32Tools Menu. . . . . . . . . . . . . . . . . . . . . . . . . . . . . . . . . . . . . . . . . . . . . . . . . . . . . . . . . . . . . . . . .33Samples Menu . . . . . . . . . . . . . . . . . . . . . . . . . . . . . . . . . . . . . . . . . . . . . . . . . . . . . . . . . . . . . .35Options Menu . . . . . . . . . . . . . . . . . . . . . . . . . . . . . . . . . . . . . . . . . . . . . . . . . . . . . . . . . . . . . .36
1
Panels
18 Using OMEGAVIEW and OMEGAVIEW II for the Enterprise, V3.1.0
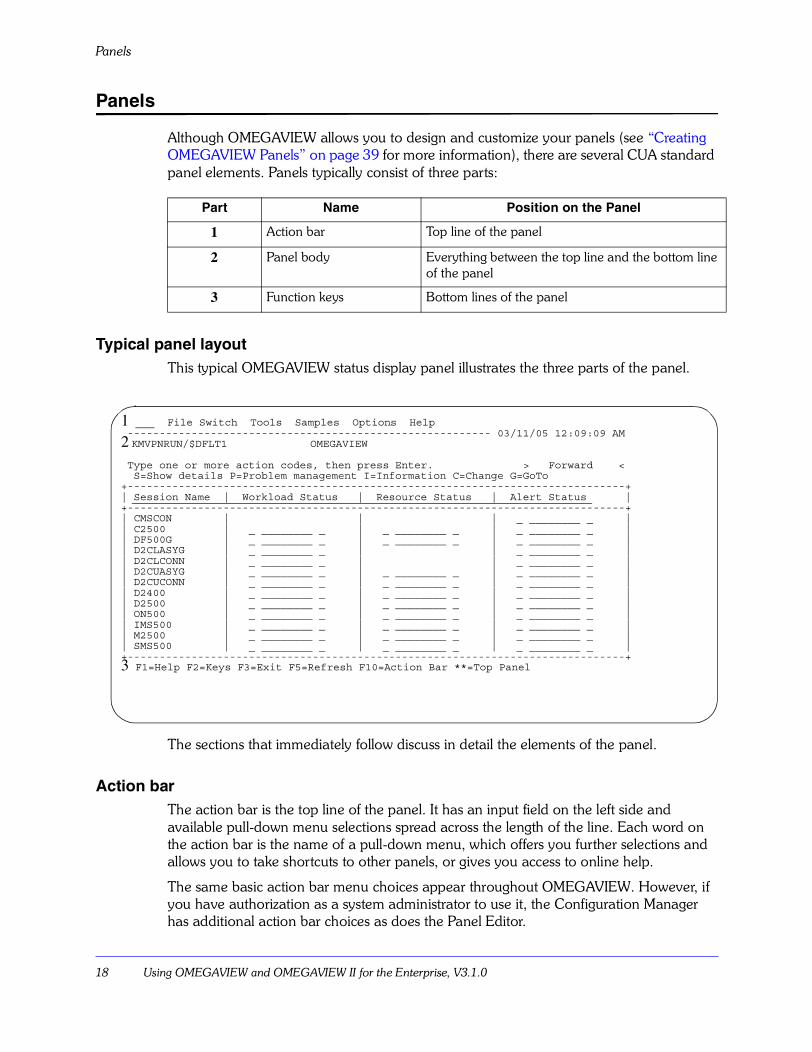
Panels
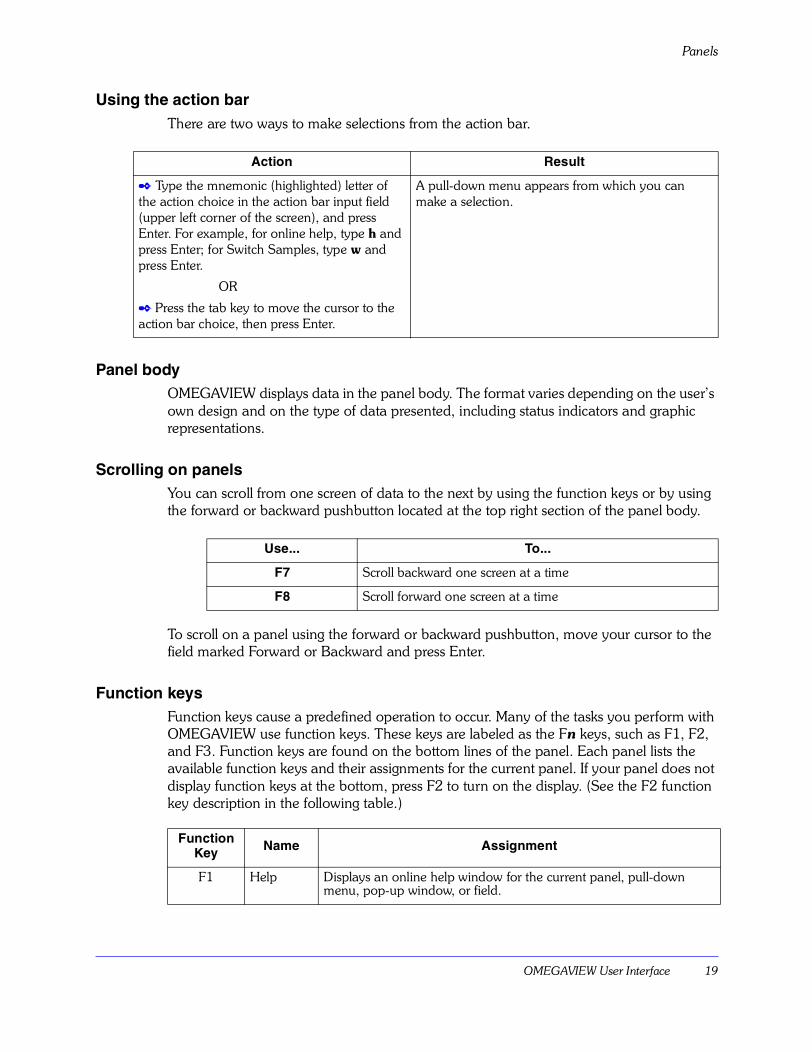
Although OMEGAVIEW allows you to design and customize your panels (see �Creating OMEGAVIEW Panels� on page 39 for more information), there are several CUA standard panel elements. Panels typically consist of three parts:
Typical panel layoutThis typical OMEGAVIEW status display panel illustrates the three parts of the panel.
The sections that immediately follow discuss in detail the elements of the panel.
Action barThe action bar is the top line of the panel. It has an input field on the left side and available pull-down menu selections spread across the length of the line. Each word on the action bar is the name of a pull-down menu, which offers you further selections and allows you to take shortcuts to other panels, or gives you access to online help.
The same basic action bar menu choices appear throughout OMEGAVIEW. However, if you have authorization as a system administrator to use it, the Configuration Manager has additional action bar choices as does the Panel Editor.
Part Name Position on the Panel
1 Action bar Top line of the panel
2 Panel body Everything between the top line and the bottom line of the panel
3 Function keys Bottom lines of the panel
1 ___ File Switch Tools Samples Options Help --------------------------------------------------------- 03/11/05 12:09:09 AM2 KMVPNRUN/$DFLT1 OMEGAVIEW Type one or more action codes, then press Enter. > Forward < S=Show details P=Problem management I=Information C=Change G=GoTo+------------------------------------------------------------------------------+| Session Name | Workload Status | Resource Status | Alert Status |+------------------------------------------------------------------------------+| CMSCON | | | _ ________ _ || C2500 | _ ________ _ | _ ________ _ | _ ________ _ || DF500G | _ ________ _ | _ ________ _ | _ ________ _ || D2CLASYG | _ ________ _ | | _ ________ _ || D2CLCONN | _ ________ _ | | _ ________ _ || D2CUASYG | _ ________ _ | _ ________ _ | _ ________ _ || D2CUCONN | _ ________ _ | _ ________ _ | _ ________ _ || D2400 | _ ________ _ | _ ________ _ | _ ________ _ || D2500 | _ ________ _ | _ ________ _ | _ ________ _ || ON500 | _ ________ _ | _ ________ _ | _ ________ _ || IMS500 | _ ________ _ | _ ________ _ | _ ________ _ || M2500 | _ ________ _ | _ ________ _ | _ ________ _ || SMS500 | _ ________ _ | _ ________ _ | _ ________ _ |+------------------------------------------------------------------------------+3 F1=Help F2=Keys F3=Exit F5=Refresh F10=Action Bar **=Top Panel
OMEGAVIEW User Interface 19
Panels
Using the action barThere are two ways to make selections from the action bar.
Panel bodyOMEGAVIEW displays data in the panel body. The format varies depending on the user�s own design and on the type of data presented, including status indicators and graphic representations.
Scrolling on panelsYou can scroll from one screen of data to the next by using the function keys or by using the forward or backward pushbutton located at the top right section of the panel body.
To scroll on a panel using the forward or backward pushbutton, move your cursor to the field marked Forward or Backward and press Enter.
Function keysFunction keys cause a predefined operation to occur. Many of the tasks you perform with OMEGAVIEW use function keys. These keys are labeled as the Fn keys, such as F1, F2, and F3. Function keys are found on the bottom lines of the panel. Each panel lists the available function keys and their assignments for the current panel. If your panel does not display function keys at the bottom, press F2 to turn on the display. (See the F2 function key description in the following table.)
Action Result
✒ Type the mnemonic (highlighted) letter of the action choice in the action bar input field (upper left corner of the screen), and press Enter. For example, for online help, type h and press Enter; for Switch Samples, type w and press Enter.
OR
✒ Press the tab key to move the cursor to the action bar choice, then press Enter.
A pull-down menu appears from which you can make a selection.
Use... To...
F7 Scroll backward one screen at a time
F8 Scroll forward one screen at a time
Function Key Name Assignment
F1 Help Displays an online help window for the current panel, pull-down menu, pop-up window, or field.
Panels
20 Using OMEGAVIEW and OMEGAVIEW II for the Enterprise, V3.1.0
F2 Keys Turns on (or off) the display of the function key area at the bottom of the panel.
F3 Exit Exits the current panel, saving all changes and additions made in any of the fields. From the OMEGAVIEW default panel, you can exit the product or return to the previous panel. From most other panels, you are returned to a previous panel.
F4 Prompt Displays a list of valid selections for an input field. Selections denoted with a plus sign (+) can be prompted. If there are only two valid selections, such as on or off, F4 switches between the two.
F5 RefreshFilter
In a panel display, F5 clears and updates the panel.In Status Item Manager, F5 shows and/or changes the selection filter.
F6 DeleteDerivation Rule
In Problem Management, F6 deletes the current record.In Status Information, F6 shows the derivation rule.
F7 Backward Scrolls backward if there is more information than can fit on the current screen. If you cannot scroll backward, two asterisks display instead of the function key.
F8 Forward Scrolls forward if there is more information than can be displayed on the current screen. If you cannot scroll forward, two asterisks display instead of the function key.
F9 Function keys help
Displays online help describing the assignments for each function key.
F10 Action bar Moves the cursor back and forth between the action bar at the top of the panel and the panel body.
F12 Cancel Cancels the current panel, and erases all changes and additions made in any of the fields since you last pressed Enter. Lets you back up one panel at a time.
F15 Top panel Returns to the top level in the panel hierarchy
PA1 Switch Session
Issues a pop-up menu of OMEGAMON sessions. From any OMEGAMON session you can zoom to another OMEGAMON session by selecting it from this pop-up.
PA2 Zoom Return
Returns to the OMEGAVIEW interface from an OMEGAMON monitoring session.
Function Key Name Assignment
OMEGAVIEW User Interface 21
Selectable Panel Items
Selectable Panel Items
OMEGAVIEW uses colors, highlighting, underlining, and other characters to indicate items that are available for you to select.
Color terminalsOn color terminals, items available for selection appear in white; items not available for selection appear in blue. Fields that accept input are underlined and green. Emphasized fields appear in yellow.
The mnemonic letter, a one letter abbreviation for a selectable menu item, is highlighted. For example, for Configuration Manager, the C is highlighted and underlined.
Non-color and other terminal typesOn non-color terminals, fields that accept input are underlined. On some terminal types (such as 3290s), emphasized fields appear in reverse video.
ConsiderationIf you are using 3270 emulation hardware and software on a PC, various screen attributes, such as color, highlight, underline, reverse video, shape of lines and corners, may appear significantly different from the way they would appear on a native 3279 display. You may have to change definitions in your 3270 emulator to achieve the desired results. Refer to the appropriate manuals or consult your system administrator.
Pull-down Menus
22 Using OMEGAVIEW and OMEGAVIEW II for the Enterprise, V3.1.0
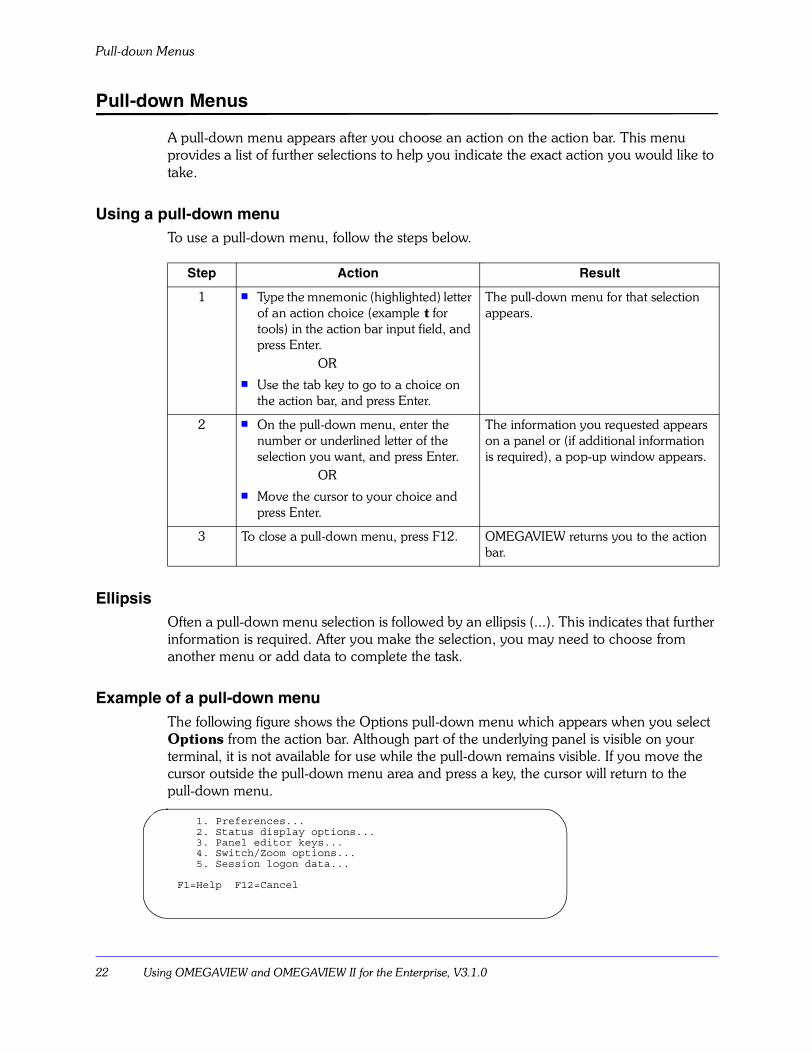
Pull-down Menus
A pull-down menu appears after you choose an action on the action bar. This menu provides a list of further selections to help you indicate the exact action you would like to take.
Using a pull-down menuTo use a pull-down menu, follow the steps below.
EllipsisOften a pull-down menu selection is followed by an ellipsis (...). This indicates that further information is required. After you make the selection, you may need to choose from another menu or add data to complete the task.
Example of a pull-down menuThe following figure shows the Options pull-down menu which appears when you select Options from the action bar. Although part of the underlying panel is visible on your terminal, it is not available for use while the pull-down remains visible. If you move the cursor outside the pull-down menu area and press a key, the cursor will return to the pull-down menu.
Step Action Result
1 ! Type the mnemonic (highlighted) letter of an action choice (example t for tools) in the action bar input field, and press Enter.
OR! Use the tab key to go to a choice on
the action bar, and press Enter.
The pull-down menu for that selection appears.
2 ! On the pull-down menu, enter the number or underlined letter of the selection you want, and press Enter.
OR! Move the cursor to your choice and
press Enter.
The information you requested appears on a panel or (if additional information is required), a pop-up window appears.
3 To close a pull-down menu, press F12. OMEGAVIEW returns you to the action bar.
1. Preferences... 2. Status display options... 3. Panel editor keys... 4. Switch/Zoom options... 5. Session logon data... F1=Help F12=Cancel
OMEGAVIEW User Interface 23
Pop-up Windows
Pop-up Windows
Pop-up windows appear superimposed over the body of the panel in response to selections a user makes on a menu or on the panel body. OMEGAVIEW may display a pop-up window when you:
! make a selection from a pull-down menu
! press a function key
! type an action code (such as S for Show details)
In general, pop-up windows:
! present further selections
! provide alerts for possible error conditions
! display help
! solicit input
! display security information
Function keysAvailable function keys for a pop-up are displayed at the bottom of its window.
ConsiderationsThe pop-up window appears to lie on top of the current panel or menu. However, you cannot use the options of the underlying panel while the pop-up window is displayed.
More than one pop-up window may be visible at the same time, and the windows can overlap. However, only the last pop-up displayed will accept data.
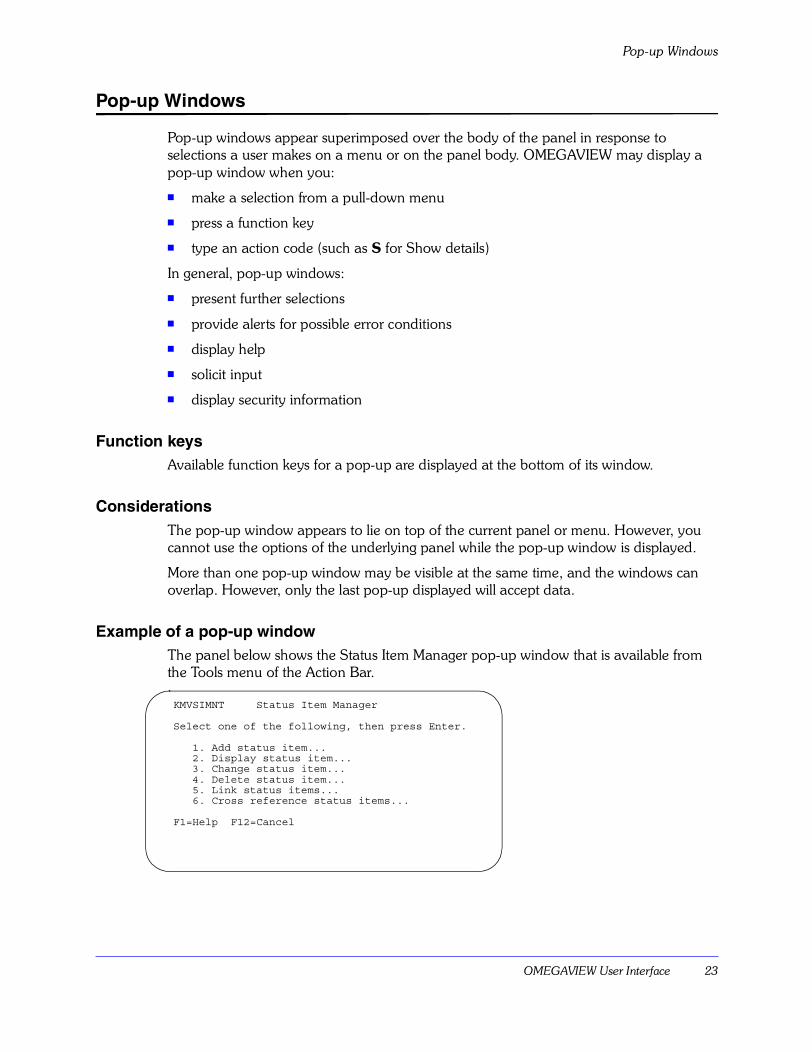
Example of a pop-up windowThe panel below shows the Status Item Manager pop-up window that is available from the Tools menu of the Action Bar.
KMVSIMNT Status Item Manager Select one of the following, then press Enter. 1. Add status item... 2. Display status item... 3. Change status item... 4. Delete status item... 5. Link status items... 6. Cross reference status items... F1=Help F12=Cancel
Pop-up Windows
24 Using OMEGAVIEW and OMEGAVIEW II for the Enterprise, V3.1.0
Promotable fieldsCertain fields have a plus sign (+) after them. The plus sign indicates that there are more choices available for this field. In some cases, there are two choices for each field. To toggle between the two choices:
✒ Move your cursor to the field and press F4.
Result: The field choice changes.
Note: If there are more than two choices for a field, pressing F4 will present you with a list of possible choices.
OMEGAVIEW User Interface 25
Quick Navigation in OMEGAVIEW
Quick Navigation in OMEGAVIEW
Using the object/action technique and conventional keys to navigate, you can easily move anywhere in OMEGAVIEW. However, as you become more comfortable with the product, you may want to use these powerful navigation tools.
! mnemonics
! action codes
! fast paths
! pushbuttons
MnemonicsCertain letters are designated as mnemonics (one-letter abbreviations) for selections you make. Mnemonics are identified with highlighting, underlining, or parentheses. After you learn the mnemonics, you can use them to make selections quickly. You will see later how several mnemonics strung together can create an even quicker way of navigating, called fast paths.
Examples of mnemonics
The following table lists several mnemonics from a variety of panels.
Using a mnemonic
To use a mnemonic, type the mnemonic in the input field and press Enter.
Action CodesAction codes are mnemonics with special characteristics. Unlike other mnemonics, action codes have the same meanings across panels, and they are operable on most (although not all) panels.
Commonly used action codes
The following action codes are shown on the OMEGAVIEW default panel.
Action Mnemonic Description
Edit panel E Allows user to edit the current panel
Preferences P Brings up a pop-up window for setting user preferences
Switch w Brings up a pop-up that lets you choose another session from a selection list
Exit x Exits the product
Action Mnemonic Description
Show details s Displays a detailed breakdown of the status bar which represents either basic or rollup status items.
Quick Navigation in OMEGAVIEW
26 Using OMEGAVIEW and OMEGAVIEW II for the Enterprise, V3.1.0
Using an action code
To use an action code, type the action code in the input field and press Enter.
Fast PathsWhen you are familiar with the product, you may want to take advantage of the time saving feature known as fast paths. A fast path can let you skip intervening panels to reach the desired level quickly by stringing mnemonics together.
Using a fast path
In the input field of the action bar you can enter a string of up to 3 mnemonics, taking you down as many as 3 levels. Mnemonics are identified on menus by highlighting, underlining, or parentheses.
Examples of common fast paths
The following fast paths are frequently used and may prove helpful to you.
Enabling fast path mnemonics
If you do not see an input field to the left of File on the action bar, you will be unable to use fast paths. To display the action bar input field that accepts mnemonics, perform the following steps.
1. Select Options from the action bar.
2. Enter 1 to select Preferences and display the Preferences pop-up window.
3. Type On in the Mnemonics field and press Enter.
Problem management
p Allows you to notify other viewers that a problem is being worked on.
Information i Displays more information about a status bar�s underlying status item.
Change c Used for making changes to user-defined status items.
GoTo g Lets you navigate to a destination panel associated with a particular status bar.
Mnemonics Action Result
fe File, Edit panel Allows you to edit the current panel
tt Tools, Template editor Allows you to create a new template
os Options, Session Logon Data
Displays the Session Logon Data panel
tsa Tools, Status Item Manager, Add Status Item
Displays the Add Status Item pop-up window where you can add and supply values for a new status item.
Action Mnemonic Description
OMEGAVIEW User Interface 27
Quick Navigation in OMEGAVIEW
The OMEGAVIEW default panel appears, with an action bar input field in the upper left corner of your display screen.
PushbuttonsPushbuttons allow you to link panels together with a word or words displayed in reverse video between angle brackets. For example,
>Forward...<
Pushbuttons offer you a way to navigate to panels that are closely related in subject and level of detail to the current panel. Linked panels are grouped in a way that offers suggestions regarding where to find information related to the current panel.
For information on how to create pushbuttons for use on your panels, see �Pushbuttons� on page 27.
Using a pushbutton
To use a pushbutton, place your cursor on the phrase or word in brackets > < , and press Enter.
Note: If there is a pushbutton for the current panel, it will appear in parentheses and will not be selectable.
Obtaining Online Help
28 Using OMEGAVIEW and OMEGAVIEW II for the Enterprise, V3.1.0
Obtaining Online Help
OMEGAVIEW provides context-sensitive help through a complete online help system. You can easily access the help system from any input field or any panel, as well as from the Help pull-down menu.
Kinds of online helpThe following table contains a description of the available kinds of online help.
Field-level helpField-level help is available from any input field.
If you are on a OMEGAVIEW panel and you want to know what a status bar indicates, move your cursor to the status bar�s input field and press F1.
OMEGAVIEW displays a pop-up window like the one shown here.
Extended HelpExtended help (panel help) is available from many field-level help pop-up windows, as well as from the help pull-down menu.
Kind of online help What to expect
Field-level help A short description of the selected field and guidelines for what to enter in the field.
Extended help A description of an entire panel, how to use the panel, and how you may proceed.
Glossary A definition of a technical term.
Status Bar - Help More: + A status bar shows the health of your computing enterprise with a traffic signal-like display. For further information on status bars or destination panels, type the following action codes in the status bar input area: Action Code Description ------ ----------------------------------------------- S Show a detailed breakdown of this status bar . This action also occurs if you press Enter (if the implied action On is specified) on this status bar without typing an action code. F1=Help F3=Exit F5=Glossary **=Bkwd F8=Fwd F9=Keys F11=Index F12=Cancel
OMEGAVIEW User Interface 29
Obtaining Online Help
Using extended help
Follow these steps to get extended help.
1. Choose Options from the OMEGAVIEW display panel action bar and press Enter.
2. Select Preferences from the menu and press Enter.
3. Move your cursor to any input field (such as the mnemonics field) and press F1.
The help panel for the mnemonics input field appears.
4. For extended help press F2 (or F1 if your cursor is not on an input field).
An extended help panel provides general information about the feature or panel you are using.
5. When you have finished viewing the item, press F12 to go back to the previous panel.
6. When you have finished viewing the item, press F12.
More help
In the upper right-hand corner of a Help pop-up window, you may see the word More+, More-, or More-+. They indicate that you can scroll to more Help windows on this topic.
! More+ indicates that scrolling forward with F8 will produce another Help window.
! More- indicates that scrolling backward with F7 will produce a previous Help window.
! More-+ indicates that you may scroll forward or backward in the Help window.
Looking up a technical term in the glossaryThe glossary, which contains definitions of technical terms found in OMEGAVIEW, is available from any Help pop-up window, as well as any panel (using the Help pull-down menu).
There are three ways to look up a technical term.
Accessing the glossary
To access the glossary, follow these steps.
1. Select Options from the action bar and press Enter.
2. Select Preferences from the menu and press Enter.
3. Move your cursor to the mnemonics input field and press F1 for online help.
If you are... Then...
on the action bar of any panel enter fast path hg to bypass the Help pull-down menu and go straight to the glossary.
in a Help window press F5.
in a Help pop-up window containing a highlighted phrase,
tab to the phrase and press Enter for a definition of that phrase
Obtaining Online Help
30 Using OMEGAVIEW and OMEGAVIEW II for the Enterprise, V3.1.0
4. Press F5 to access the glossary.
5. Press F6 to start your search.
6. On the Search Glossary pop-up window, type the term you want to look up, and press Enter.
7. To see the definition, select the term from the pop-up window that appears.
Other online help informationYou can obtain other helpful information using the Help function keys and the Help pull-down menu.
Help function keys
The following table describes the Help-specific function keys and their assignments.
Help pull-down menu
The following is an example of the Help pull-down menu, showing all the kinds of help available. You can access the Help pull-down menu by entering h in the action bar input field.
Function key Name Assignment
F1 Help for Help Displays information about the help system.
F2 Extended help Provides general information about the contents of the panel from which help was requested.
F3 Exit Exits the help system.
F5 Glossary Displays an alphabetic list of glossary terms.
F6 Search Searches the help index or glossary for specific topics or terms.
F11 Index Displays an alphabetical list of help topics.
1. Help for help... 2. Extended help... 3. Keys help... 4. Help index... 5. Glossary... 6. About... 7. User Information... 8. New Features... F1=Help F12=Cancel
OMEGAVIEW User Interface 31
Obtaining Online Help
Other help features
The Help pull-down menu has other features: Keys help, About, User Information, and New Features.
Feature Description
Keys help Describes the function keys used with OMEGAVIEW, as well as any other special purpose keys.
About Shows logo, copyright, and product version information.
User Information Shows information about your current session such as user ID, terminal ID, system ID, VTAM logmode name, and current ACB name.
New Features Lists and describes new features in the current release of the product.
Switch to Session Menu
32 Using OMEGAVIEW and OMEGAVIEW II for the Enterprise, V3.1.0
Switch to Session Menu
Selecting Switch from the action bar brings up the Switch to Session pull-down. It allows you to:
! zoom to an OMEGAMON session without navigating through a status light
! switch among OMEGAMON zoom sessions without returning to the OMEGAVIEW interface
For more information on session switching, see �Switching among OMEGAMON Sessions� on page 140.
Sample Switch to Session menuThe following figure shows an example of the Switch to Session pull-down menu.
KMVSEDIS Switch to Session Move cursor next to session, then press Enter. More: + Session Type Description ---------- ----------- ------------------------------------- _ C2500 OM/II-CICS C2 V500 _ D2SLCONN OM-DB2 D2 V400 bt CCONN _ D2CUCONN O2/II D2 CUA V400 CCONN _ D2400 O2/II DB2 V400 _ D2500 O2/II DB2 V500
F1=Help **=Bkwd F8=Fwd F12=Cancel F14=Find
OMEGAVIEW User Interface 33
Tools Menu
Tools Menu
The following features are available on the Tools pull-down menu, from the Main Status panel or the Configuration Manager panel:
! Template Editor
! Status Item Manager
! Configuration Manager (if authorized)
! Default Status Panel Builder
! Alerts Manager
In addition, the Tools pull-down from the Configuration Manager includes:
! Export objects (see Configuring OMEGAVIEW and OMEGAVIEW II for the Enterprise).
! Import objects (see Configuring OMEGAVIEW and OMEGAVIEW II for the Enterprise).
! Technical support (use under the guidance of IBM Software Support).
! OMEGAVIEW users (displays current users).
Template EditorThe Template Editor allows you to create background drawings for customizing panels. For a more detailed description of how to use this feature, see �Creating and Using Templates� on page 71.
Status Item ManagerThe Status Item Manager allows you to add, display, change, or delete status items for your user-defined status items that are represented by OMEGAVIEW status bars. For a more detailed description of these functions see �Defining and Maintaining Status Items� on page 111.
Configuration ManagerThe Configuration Manager allows a system administrator to define the sessions that OMEGAVIEW monitors and displays. How to use the Configuration Manager is described in detail in Configuring OMEGAVIEW and OMEGAVIEW II for the Enterprise.
Note: If this option does not appear on your menu, it is because the item�s availability is restricted to the system administrator.
Default Status Panel BuilderAfter you add or delete monitoring sessions in the Configuration Manager, you can use the Default Status Panel Builder to rebuild the default panels that represent the status of all defined sessions. For more information, see Configuring OMEGAVIEW and OMEGAVIEW II for the Enterprise.
Tools Menu
34 Using OMEGAVIEW and OMEGAVIEW II for the Enterprise, V3.1.0
Note: If this option does not appear on your menu, it is because its availability is restricted to the system administrator.
Alerts ManagerUse this option to control the generation of NetView® and Tivoli AF/OPERATOR alerts. Help is available to explain in detail the selections on the Alerts Manager pull-down. To access help from that panel, press F1 with the cursor placed in any area of the panel that is not an input field.
OMEGAVIEW User Interface 35
Samples Menu
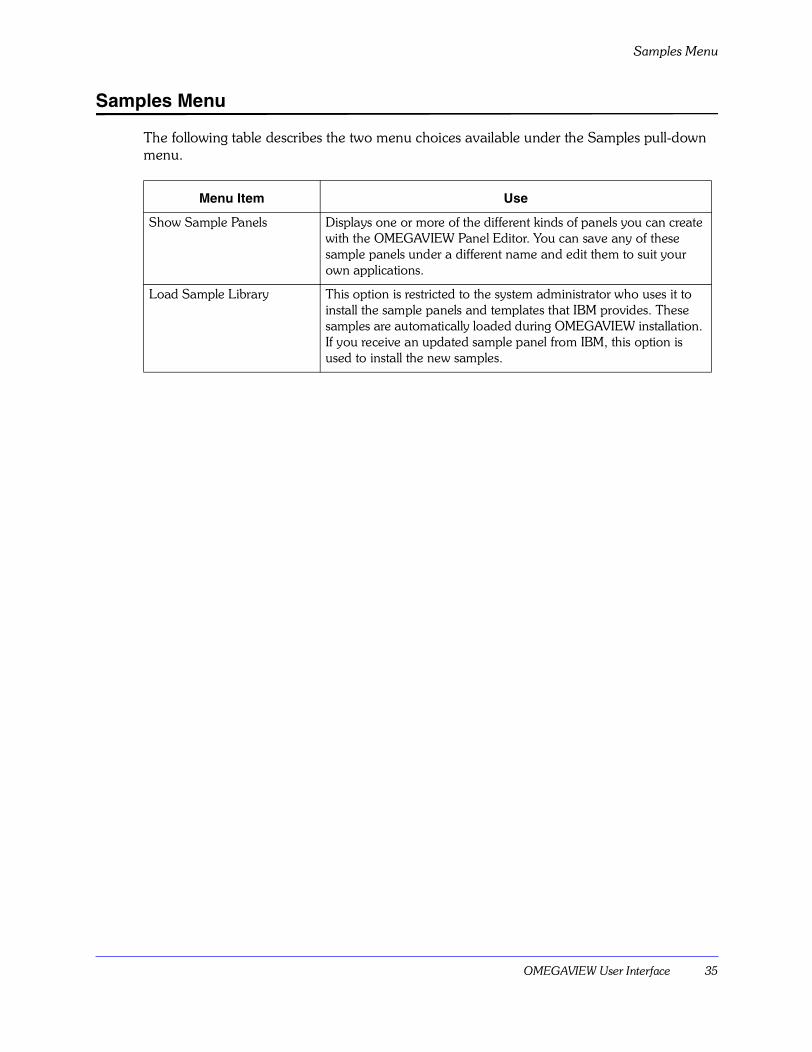
Samples Menu
The following table describes the two menu choices available under the Samples pull-down menu.
Menu Item Use
Show Sample Panels Displays one or more of the different kinds of panels you can create with the OMEGAVIEW Panel Editor. You can save any of these sample panels under a different name and edit them to suit your own applications.
Load Sample Library This option is restricted to the system administrator who uses it to install the sample panels and templates that IBM provides. These samples are automatically loaded during OMEGAVIEW installation. If you receive an updated sample panel from IBM, this option is used to install the new samples.
Options Menu
36 Using OMEGAVIEW and OMEGAVIEW II for the Enterprise, V3.1.0
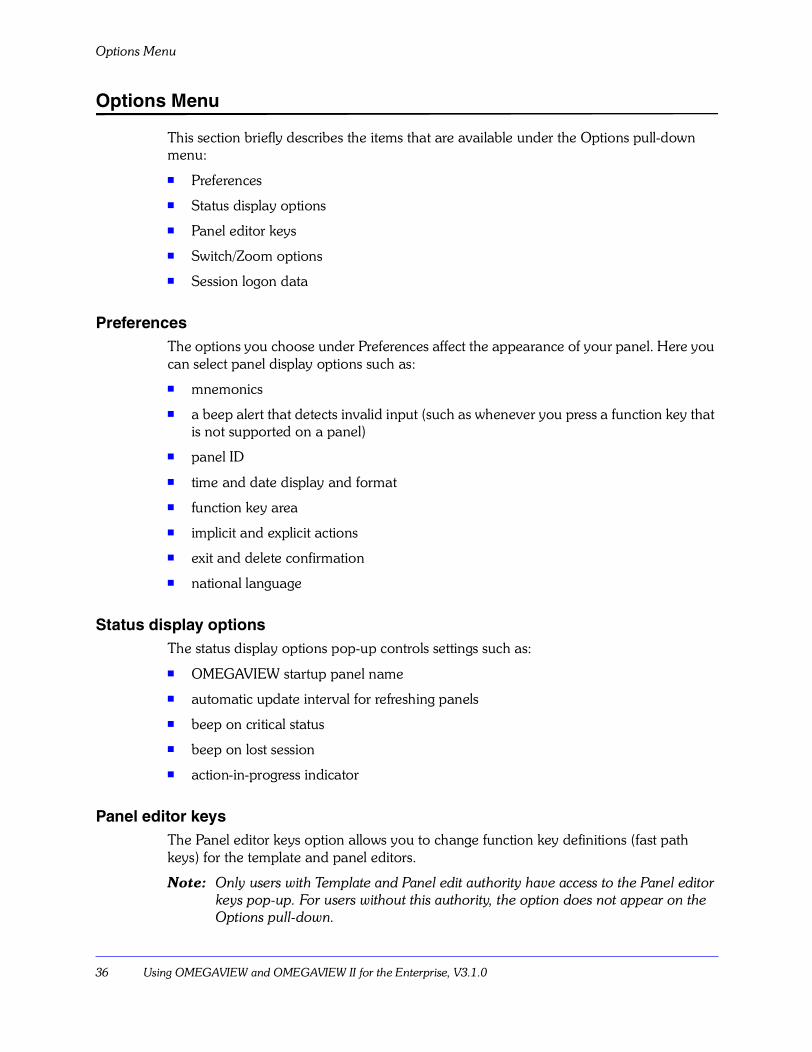
Options Menu
This section briefly describes the items that are available under the Options pull-down menu:
! Preferences
! Status display options
! Panel editor keys
! Switch/Zoom options
! Session logon data
PreferencesThe options you choose under Preferences affect the appearance of your panel. Here you can select panel display options such as:
! mnemonics
! a beep alert that detects invalid input (such as whenever you press a function key that is not supported on a panel)
! panel ID
! time and date display and format
! function key area
! implicit and explicit actions
! exit and delete confirmation
! national language
Status display optionsThe status display options pop-up controls settings such as:
! OMEGAVIEW startup panel name
! automatic update interval for refreshing panels
! beep on critical status
! beep on lost session
! action-in-progress indicator
Panel editor keysThe Panel editor keys option allows you to change function key definitions (fast path keys) for the template and panel editors.
Note: Only users with Template and Panel edit authority have access to the Panel editor keys pop-up. For users without this authority, the option does not appear on the Options pull-down.
OMEGAVIEW User Interface 37
Options Menu
Switch and Zoom optionsOn this pop-up you can set the Switch and Zoom session return keys. You can also set the Zoomed session timeout interval. This interval determines the amount of time (in minutes) before an OMEGAMON session that you have zoomed or switched into is terminated from lack of use, and you are returned to OMEGAVIEW.
The setting Start or Stop Prompting for User ID allows you to determine whether the system starts or stops prompting for logon information during zoom-to-session operations.
The Zoom to Session Confirmation feature lets you choose whether or not OMEGAVIEW automatically displays the Confirm Zoom to Session pop-up whenever you attempt to zoom from a basic status item. With this feature on the Switch and Zoom options pop-up, you can override the default zoom destination.
Note: Only users with zoom authority can access the Switch and Zoom Options pop-up.
Session logon dataThis panel allows you to define logon information to be used to establish a session with a monitor product when you switch or zoom.

Options Menu
38 Using OMEGAVIEW and OMEGAVIEW II for the Enterprise, V3.1.0
Creating OMEGAVIEW Panels 39
Creating OMEGAVIEW Panels
IntroductionThis chapter explains how to create OMEGAVIEW panels customized to your monitoring needs.
Chapter ContentsOverview . . . . . . . . . . . . . . . . . . . . . . . . . . . . . . . . . . . . . . . . . . . . . . . . . . . . . . . . . . . . . . . . . .40Creating a Systems Panel . . . . . . . . . . . . . . . . . . . . . . . . . . . . . . . . . . . . . . . . . . . . . . . . . . . . . .41Creating a Storage Panel . . . . . . . . . . . . . . . . . . . . . . . . . . . . . . . . . . . . . . . . . . . . . . . . . . . . . .54Creating a Network Panel . . . . . . . . . . . . . . . . . . . . . . . . . . . . . . . . . . . . . . . . . . . . . . . . . . . . . .56Creating an Onlines Panel . . . . . . . . . . . . . . . . . . . . . . . . . . . . . . . . . . . . . . . . . . . . . . . . . . . . .58Creating an Overview Panel . . . . . . . . . . . . . . . . . . . . . . . . . . . . . . . . . . . . . . . . . . . . . . . . . . . .60Creating a Software Panel . . . . . . . . . . . . . . . . . . . . . . . . . . . . . . . . . . . . . . . . . . . . . . . . . . . . .62Creating a Connectivity Panel. . . . . . . . . . . . . . . . . . . . . . . . . . . . . . . . . . . . . . . . . . . . . . . . . . .63Creating an Index Panel . . . . . . . . . . . . . . . . . . . . . . . . . . . . . . . . . . . . . . . . . . . . . . . . . . . . . . .65Copying and Editing Existing Panels. . . . . . . . . . . . . . . . . . . . . . . . . . . . . . . . . . . . . . . . . . . . . .67Linking and Cross-Referencing Status Items . . . . . . . . . . . . . . . . . . . . . . . . . . . . . . . . . . . . . . . .69
2
Overview
40 Using OMEGAVIEW and OMEGAVIEW II for the Enterprise, V3.1.0
Overview
OMEGAVIEW status panels provide information about the health of your enterprise at a glance. Through its color and text attributes, OMEGAVIEW gives both high-level and supporting status information.
When you first log onto OMEGAVIEW, you�ll see the OMEGAVIEW default panel. The sessions displayed on this panel are the sessions that have already been defined by your system administrator. You may use this panel as is, or you may copy it under a different name and edit it. A third option is to use the Panel and Template Editors with their graphic objects and other data display features to create new panels.
This chapter has been designed to familiarize you with the process of creating panels. Here you will learn how to build several related panels that combine templates, text, text fields, status bars, pushbuttons, and other panel options. These allow you to design custom panels that are useful in monitoring the systems of your particular enterprise.
The panels in this section are based on actual panels that were built for IBM customers. These panels (for a fictitious company named ACME) are easily constructed and provide details that allow you to see 4 hours of trending and historical status information.
Note: To use panel and template options, you must have Panel and Template Editor authority assigned to you by your system administrator. To make panel-linking easier, build the panels in the order in which they appear in the tutorial.
Creating OMEGAVIEW Panels 41
Creating a Systems Panel
Creating a Systems Panel
IntroductionThis section shows you how to build a panel that gives you one screen of status information with four 1-hour histories for multiple OMEGAMON products. Note that the status items we chose for ACME (our fictitious site) are those status items that ACME personnel deemed important to the effective monitoring of their systems.
Note: Be sure to build the panel on a display monitor that is compatible with most of the monitors used at your site. For example, if your terminal is set up to display 24 lines (rows), and you design a panel that requires 35 lines, the last 11 lines of the panel will not be displayed on your screen.
ACME systems panelHere is an example of ACME Corporation�s Systems panel. The callouts mark different areas of the panel that you will build.
1 Panel label: See �Creating a panel label� on page 43..
2 Panel heading: See �Creating a panel heading� on page 44..
OMEGAVIEW1 SYSTEMS 2 ACME Corporation 3 MVS PRA1 MVS PRB1 MVS PRC1 MVS TRZ1 _ Enqueue. Normal _ Normal_ Normal_ Normal_ _ GRS..... Normal4_ Normal_ Normal_ Normal_ _ GTF..... Warning_ Normal_ Normal_ Warning_ _ HSM..... Normal_ Normal_ Normal_ Normal_ _ WTO Buff Normal_ Normal_ Normal_ Normal_ _ Channel. Normal_ Normal_ Normal_ Normal_ _ CPU..... Critical_ Normal_ Warning_ Normal_ _ CSA..... Warning_ Normal_ Warning_ Normal_ _ DASD.... Normal_ Normal_ Normal_ Normal_ _ Paging.. Normal_ Normal_ Normal_ Normal_ _ Storage. Normal_ Normal_ Normal_ Normal_ _ Tape.... Normal_ Normal_ Normal_ Normal_ _ All perf Critical_ Normal_ Normal_ Normal_ _ Batch... Normal_ Normal_ Warning_ Warning_ _ TSO Host Normal_ Normal_ Normal_ Normal_ _ TSO ETE. Normal_ Normal_ Normal_ Normal_
+--------------+ +-------------+ +---------------+ +---------------+ | > OVERVIEW < | | > ONLINES < | | > STORAGE < | | > NETWORK < | +--------------+ +-------------+ +---------------+ +---------------+ +------------------+ +--------------+ 5 | > CONNECTIVITY < | | > SOFTWARE < | +------------------+ +--------------+ +-----------+ | > INDEX < | +-----------+
Creating a Systems Panel
42 Using OMEGAVIEW and OMEGAVIEW II for the Enterprise, V3.1.0
Procedure prerequisiteWhen building a panel, make sure it conforms to the height and width specifications of your user terminals. If you design a 32-line panel and any user at your site is set up with a 24-line terminal, the information will be truncated. To ensure that your panel has the appropriate number of lines in relation to your user terminals, choose a logmode from the following table:
Open a new edit panelFollow this procedure to open a new edit panel that you can use to create a Systems panel.
New edit panelHere is an example of a new edit panel:
3 Column label: See �Labeling a column of status items� on page 50..
4 Short history status bar: See �Short History status bar� on page 45..
5 Pushbuttons: See �Creating pushbuttons� on page 52..
3270 Device Type Lines Columns VTAM Logmode
Model 2 24 x 80 SNX32702
Model 3 32 x 80 SNX32703
Model 4 43 x 80 SNX32704
Model 5 27 x 132 SNX32705
Step Action Result
1 Select File from the main action bar and press Enter.
OMEGAVIEW displays the File pull-down menu.
2 Select New from the File menu and press Enter.
A new untitled edit panel appears.
File Edit Tools Options Help------------------------------------------------------------ 07/15/04 Edit Panel - {Untitled}
Creating OMEGAVIEW Panels 43
Creating a Systems Panel
Creating a panel labelCreate a panel label for easy panel identification.
Step Action Result
1 Place your cursor in the upper left-hand corner of the panel; then press the F15 key. (If PANELID is ON, place the cursor on the third line.)
The Object Class Selection window appears
2 On the Object Class Selection menu, choose Text string and press Enter.
The Literal Text Definition pop-up appears.
3 On the Literal Text Definition window:! Type the panel label,
SYSTEMS, on the empty text field.
! Change the color of the label to white. (To see the other color choices press F4.)
! Change the label�s highlighting to Reverse for reverse video. (To see the other highlighting choices press F4.)
! Press Enter when you�ve made your selections.
The new panel label appears in the upper left-hand corner of your panel.
Note: If at any time you need to change a text object that you�ve already created and placed on your panel, simply press F14, the Change key, to bring up that object�s corresponding pop-up window on which you can enter any modifications.
Creating a Systems Panel
44 Using OMEGAVIEW and OMEGAVIEW II for the Enterprise, V3.1.0
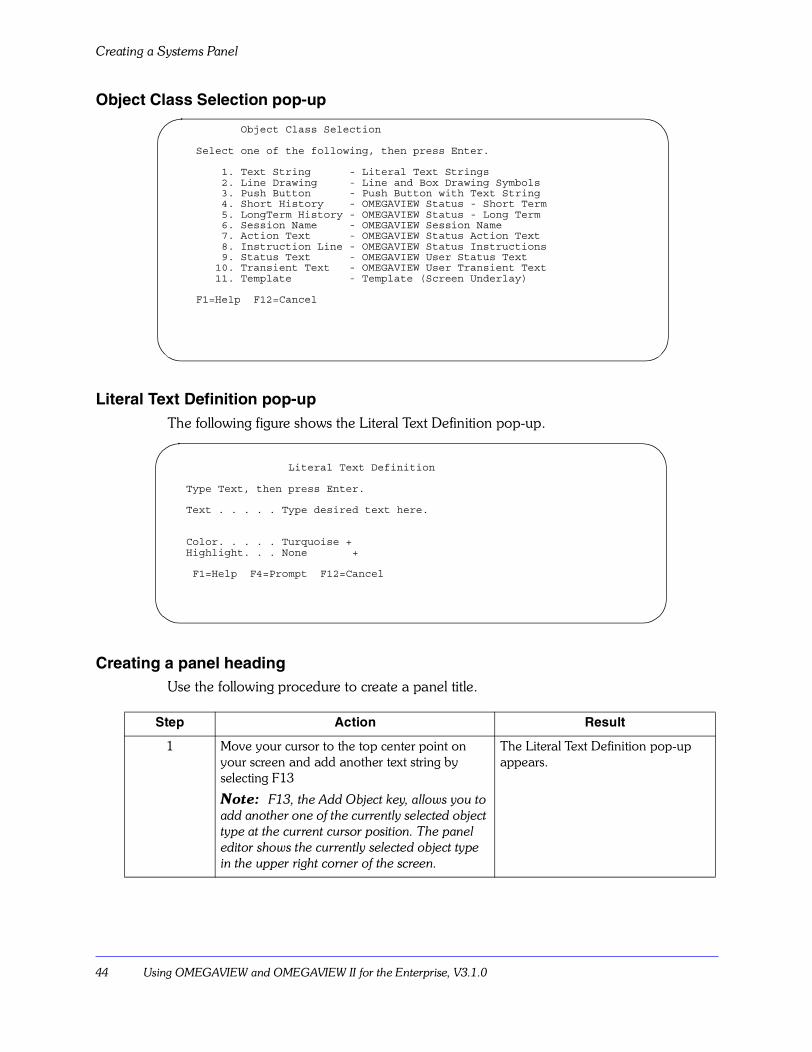
Object Class Selection pop-up
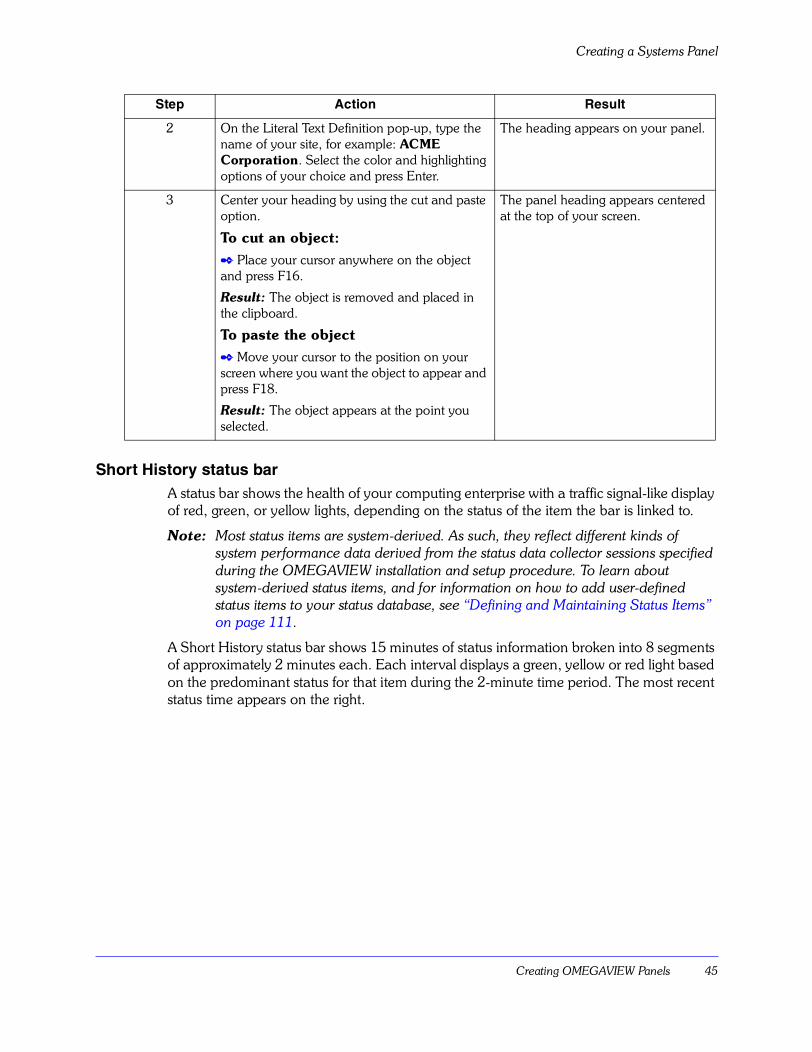
Literal Text Definition pop-upThe following figure shows the Literal Text Definition pop-up.
Creating a panel headingUse the following procedure to create a panel title.
Step Action Result
1 Move your cursor to the top center point on your screen and add another text string by selecting F13
Note: F13, the Add Object key, allows you to add another one of the currently selected object type at the current cursor position. The panel editor shows the currently selected object type in the upper right corner of the screen.
The Literal Text Definition pop-up appears.
Object Class Selection Select one of the following, then press Enter. 1. Text String - Literal Text Strings 2. Line Drawing - Line and Box Drawing Symbols 3. Push Button - Push Button with Text String 4. Short History - OMEGAVIEW Status - Short Term 5. LongTerm History - OMEGAVIEW Status - Long Term 6. Session Name - OMEGAVIEW Session Name 7. Action Text - OMEGAVIEW Status Action Text 8. Instruction Line - OMEGAVIEW Status Instructions 9. Status Text - OMEGAVIEW User Status Text 10. Transient Text - OMEGAVIEW User Transient Text 11. Template - Template (Screen Underlay) F1=Help F12=Cancel
Literal Text Definition Type Text, then press Enter. Text . . . . . Type desired text here. Color. . . . . Turquoise + Highlight. . . None + F1=Help F4=Prompt F12=Cancel
Creating OMEGAVIEW Panels 45
Creating a Systems Panel
Short History status barA status bar shows the health of your computing enterprise with a traffic signal-like display of red, green, or yellow lights, depending on the status of the item the bar is linked to.
Note: Most status items are system-derived. As such, they reflect different kinds of system performance data derived from the status data collector sessions specified during the OMEGAVIEW installation and setup procedure. To learn about system-derived status items, and for information on how to add user-defined status items to your status database, see �Defining and Maintaining Status Items� on page 111.
A Short History status bar shows 15 minutes of status information broken into 8 segments of approximately 2 minutes each. Each interval displays a green, yellow or red light based on the predominant status for that item during the 2-minute time period. The most recent status time appears on the right.
2 On the Literal Text Definition pop-up, type the name of your site, for example: ACME Corporation. Select the color and highlighting options of your choice and press Enter.
The heading appears on your panel.
3 Center your heading by using the cut and paste option.
To cut an object:✒ Place your cursor anywhere on the object and press F16.
Result: The object is removed and placed in the clipboard.
To paste the object✒ Move your cursor to the position on your screen where you want the object to appear and press F18.
Result: The object appears at the point you selected.
The panel heading appears centered at the top of your screen.
Step Action Result
Creating a Systems Panel
46 Using OMEGAVIEW and OMEGAVIEW II for the Enterprise, V3.1.0
Creating a Short History status barUse the following procedure to create a Short History status bar.
Step Action Result
1 Move your cursor to the spot where you want your short history status light to appear and press F15.
Note: Refer to the ACME systems panel illustration earlier in this section to see where we�ve placed the first column of short history bars and the first row, labeled Enqueue.
The Object Class Selection menu appears.
2 Select Short History from the object list and press Enter.
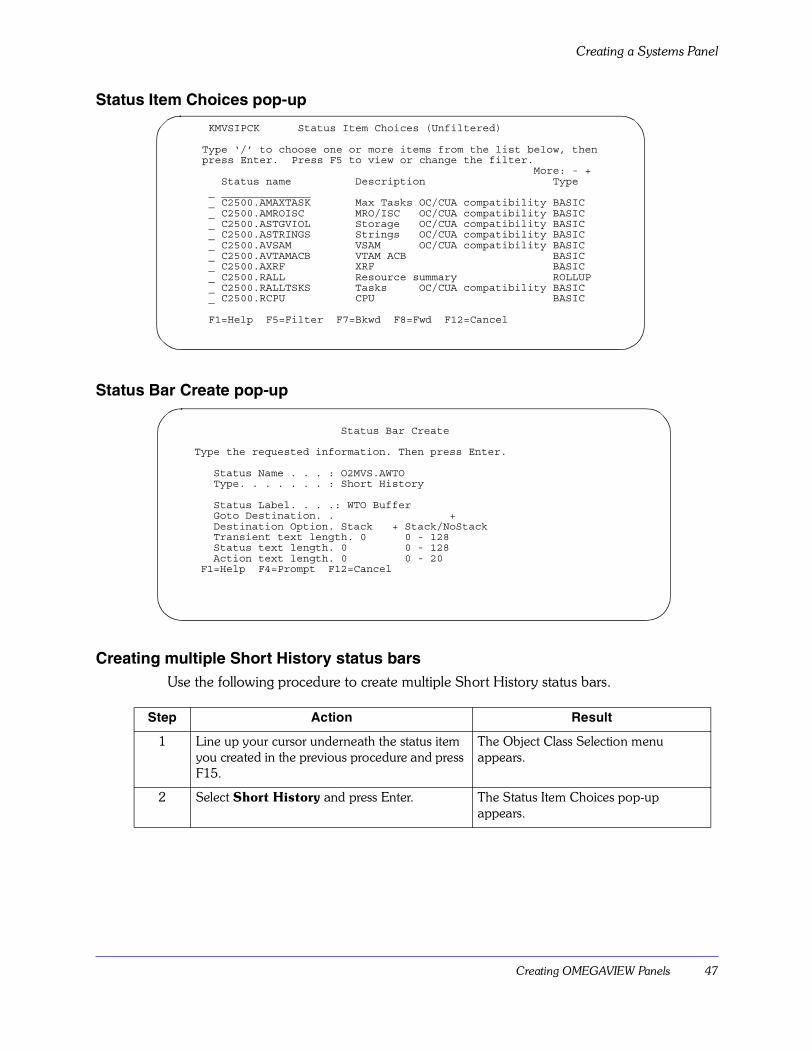
The Status Item Choices pop-up appears. (See �Status Item Choices pop-up� on page 47 for an example.)
3 Type �/� next to the status item you want to add to your panel, and press Enter.
The Status Bar Create pop-up appears. (See �Status Bar Create pop-up� on page 47 for an example.)
4 On the Status Bar Create pop-up, type your status bar label in the field provided and press Enter.
Note: Be sure to give each status item label the same number of characters so that all the labels on your panel will line up evenly. Eight-character labels are used in the ACME panels.
A labeled Short History status bar appears.
Creating OMEGAVIEW Panels 47
Creating a Systems Panel
Status Item Choices pop-up
Status Bar Create pop-up
Creating multiple Short History status barsUse the following procedure to create multiple Short History status bars.
Step Action Result
1 Line up your cursor underneath the status item you created in the previous procedure and press F15.
The Object Class Selection menu appears.
2 Select Short History and press Enter. The Status Item Choices pop-up appears.
KMVSIPCK Status Item Choices (Unfiltered) Type ‘/’ to choose one or more items from the list below, then press Enter. Press F5 to view or change the filter. More: - + Status name Description Type _ ______________ _ C2500.AMAXTASK Max Tasks OC/CUA compatibility BASIC _ C2500.AMROISC MRO/ISC OC/CUA compatibility BASIC _ C2500.ASTGVIOL Storage OC/CUA compatibility BASIC _ C2500.ASTRINGS Strings OC/CUA compatibility BASIC _ C2500.AVSAM VSAM OC/CUA compatibility BASIC _ C2500.AVTAMACB VTAM ACB BASIC _ C2500.AXRF XRF BASIC _ C2500.RALL Resource summary ROLLUP _ C2500.RALLTSKS Tasks OC/CUA compatibility BASIC _ C2500.RCPU CPU BASIC
F1=Help F5=Filter F7=Bkwd F8=Fwd F12=Cancel
Status Bar Create Type the requested information. Then press Enter. Status Name . . . : O2MVS.AWTO Type. . . . . . . : Short History Status Label. . . .: WTO Buffer Goto Destination. . + Destination Option. Stack + Stack/NoStack Transient text length. 0 0 - 128 Status text length. 0 0 - 128 Action text length. 0 0 - 20 F1=Help F4=Prompt F12=Cancel
Creating a Systems Panel
48 Using OMEGAVIEW and OMEGAVIEW II for the Enterprise, V3.1.0
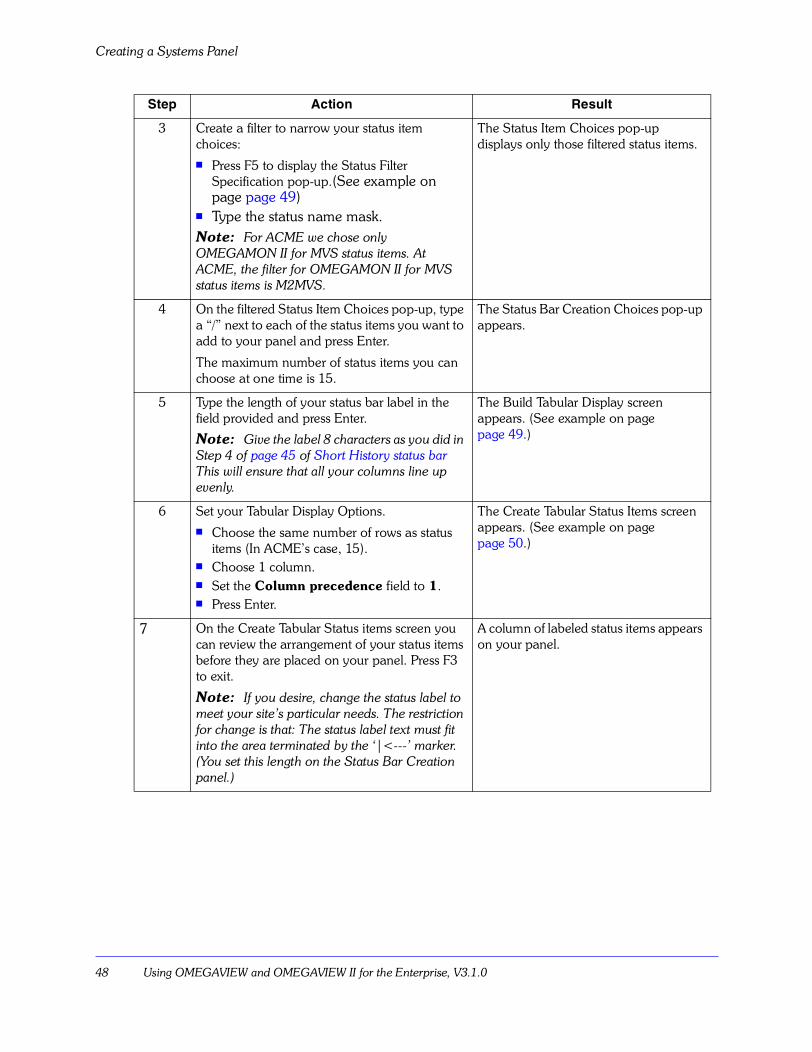
3 Create a filter to narrow your status item choices:! Press F5 to display the Status Filter
Specification pop-up.(See example on page page 49)
! Type the status name mask.Note: For ACME we chose only OMEGAMON II for MVS status items. At ACME, the filter for OMEGAMON II for MVS status items is M2MVS.
The Status Item Choices pop-up displays only those filtered status items.
4 On the filtered Status Item Choices pop-up, type a �/� next to each of the status items you want to add to your panel and press Enter.
The maximum number of status items you can choose at one time is 15.
The Status Bar Creation Choices pop-up appears.
5 Type the length of your status bar label in the field provided and press Enter.
Note: Give the label 8 characters as you did in Step 4 of page 45 of Short History status bar This will ensure that all your columns line up evenly.
The Build Tabular Display screen appears. (See example on page page 49.)
6 Set your Tabular Display Options.! Choose the same number of rows as status
items (In ACME�s case, 15).! Choose 1 column.! Set the Column precedence field to 1.! Press Enter.
The Create Tabular Status Items screen appears. (See example on page page 50.)
7 On the Create Tabular Status items screen you can review the arrangement of your status items before they are placed on your panel. Press F3 to exit.
Note: If you desire, change the status label to meet your site�s particular needs. The restriction for change is that: The status label text must fit into the area terminated by the �|<---� marker. (You set this length on the Status Bar Creation panel.)
A column of labeled status items appears on your panel.
Step Action Result
Creating OMEGAVIEW Panels 49
Creating a Systems Panel
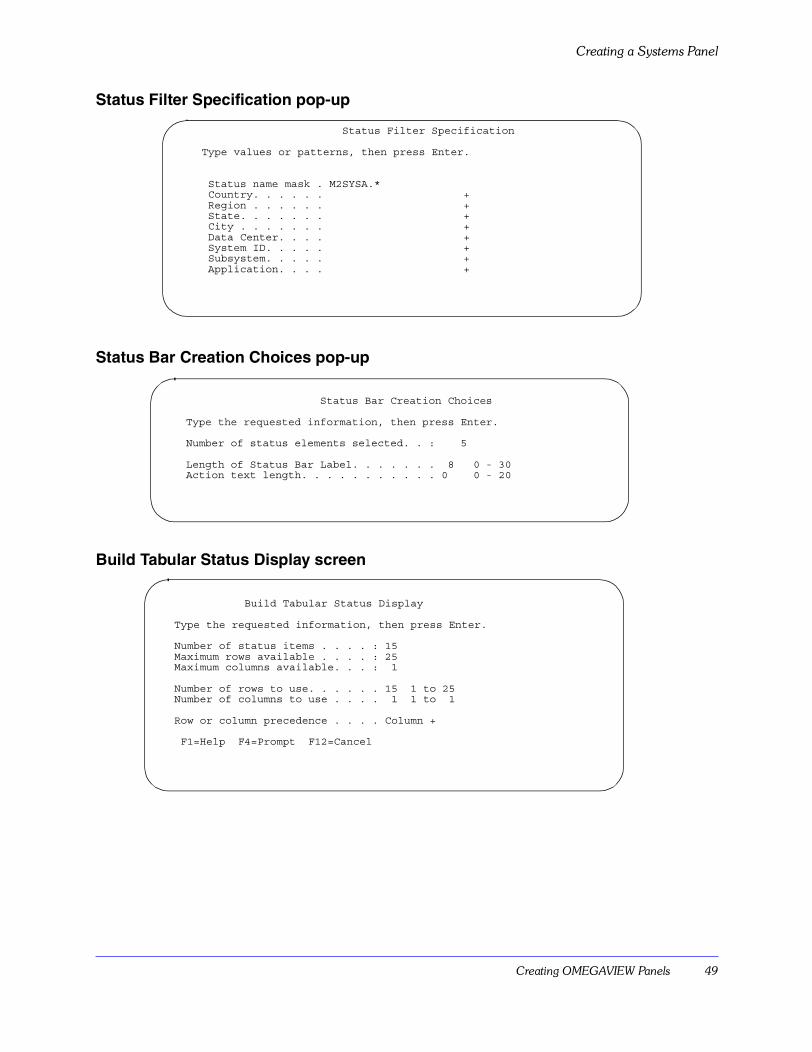
Status Filter Specification pop-up
Status Bar Creation Choices pop-up
Build Tabular Status Display screen
Status Filter Specification Type values or patterns, then press Enter. Status name mask . M2SYSA.* Country. . . . . . + Region . . . . . . + State. . . . . . . + City . . . . . . . + Data Center. . . . + System ID. . . . . + Subsystem. . . . . + Application. . . . +
Status Bar Creation Choices
Type the requested information, then press Enter. Number of status elements selected. . : 5 Length of Status Bar Label. . . . . . . 8 0 - 30 Action text length. . . . . . . . . . . 0 0 - 20
Build Tabular Status Display Type the requested information, then press Enter. Number of status items . . . . : 15 Maximum rows available . . . . : 25 Maximum columns available. . . : 1 Number of rows to use. . . . . . 15 1 to 25 Number of columns to use . . . . 1 1 to 1 Row or column precedence . . . . Column + F1=Help F4=Prompt F12=Cancel
Creating a Systems Panel
50 Using OMEGAVIEW and OMEGAVIEW II for the Enterprise, V3.1.0
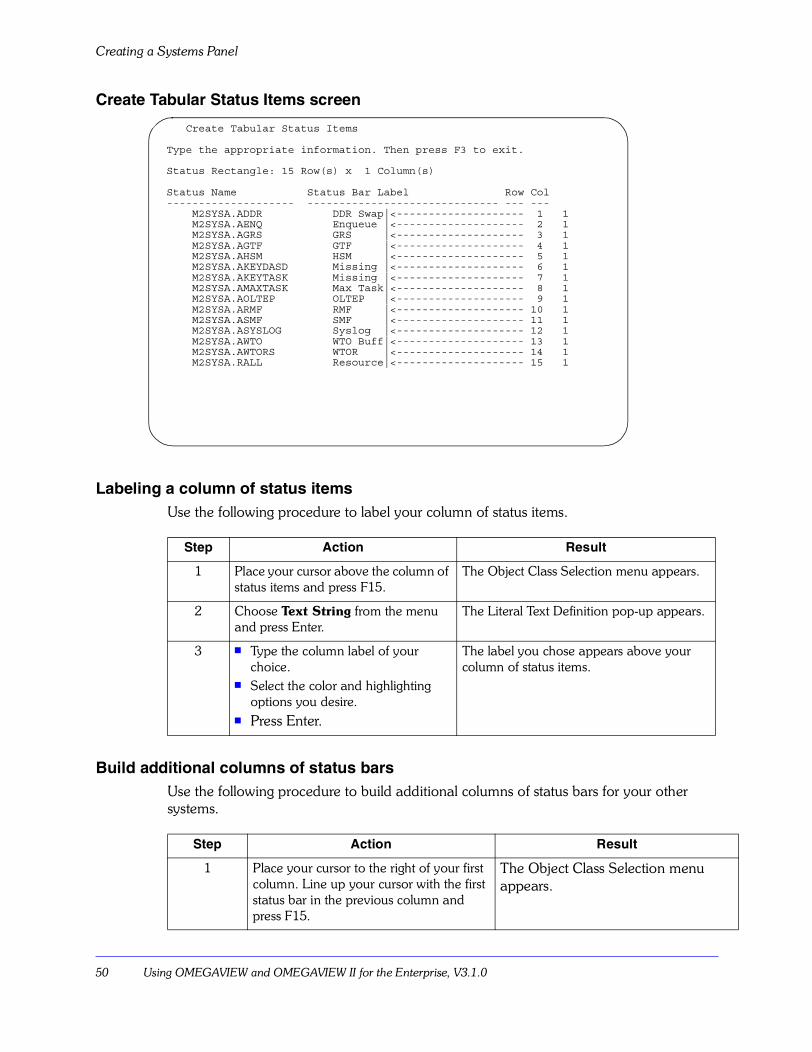
Create Tabular Status Items screen
Labeling a column of status itemsUse the following procedure to label your column of status items.
Build additional columns of status barsUse the following procedure to build additional columns of status bars for your other systems.
Step Action Result
1 Place your cursor above the column of status items and press F15.
The Object Class Selection menu appears.
2 Choose Text String from the menu and press Enter.
The Literal Text Definition pop-up appears.
3 ! Type the column label of your choice.
! Select the color and highlighting options you desire.
! Press Enter.
The label you chose appears above your column of status items.
Step Action Result
1 Place your cursor to the right of your first column. Line up your cursor with the first status bar in the previous column and press F15.
The Object Class Selection menu appears.
Create Tabular Status Items Type the appropriate information. Then press F3 to exit. Status Rectangle: 15 Row(s) x 1 Column(s) Status Name Status Bar Label Row Col-------------------- ------------------------------ --- --- M2SYSA.ADDR DDR Swap|<-------------------- 1 1 M2SYSA.AENQ Enqueue |<-------------------- 2 1 M2SYSA.AGRS GRS |<-------------------- 3 1 M2SYSA.AGTF GTF |<-------------------- 4 1 M2SYSA.AHSM HSM |<-------------------- 5 1 M2SYSA.AKEYDASD Missing |<-------------------- 6 1 M2SYSA.AKEYTASK Missing |<-------------------- 7 1 M2SYSA.AMAXTASK Max Task|<-------------------- 8 1 M2SYSA.AOLTEP OLTEP |<-------------------- 9 1 M2SYSA.ARMF RMF |<-------------------- 10 1 M2SYSA.ASMF SMF |<-------------------- 11 1 M2SYSA.ASYSLOG Syslog |<-------------------- 12 1 M2SYSA.AWTO WTO Buff|<-------------------- 13 1 M2SYSA.AWTORS WTOR |<-------------------- 14 1 M2SYSA.RALL Resource|<-------------------- 15 1
Creating OMEGAVIEW Panels 51
Creating a Systems Panel
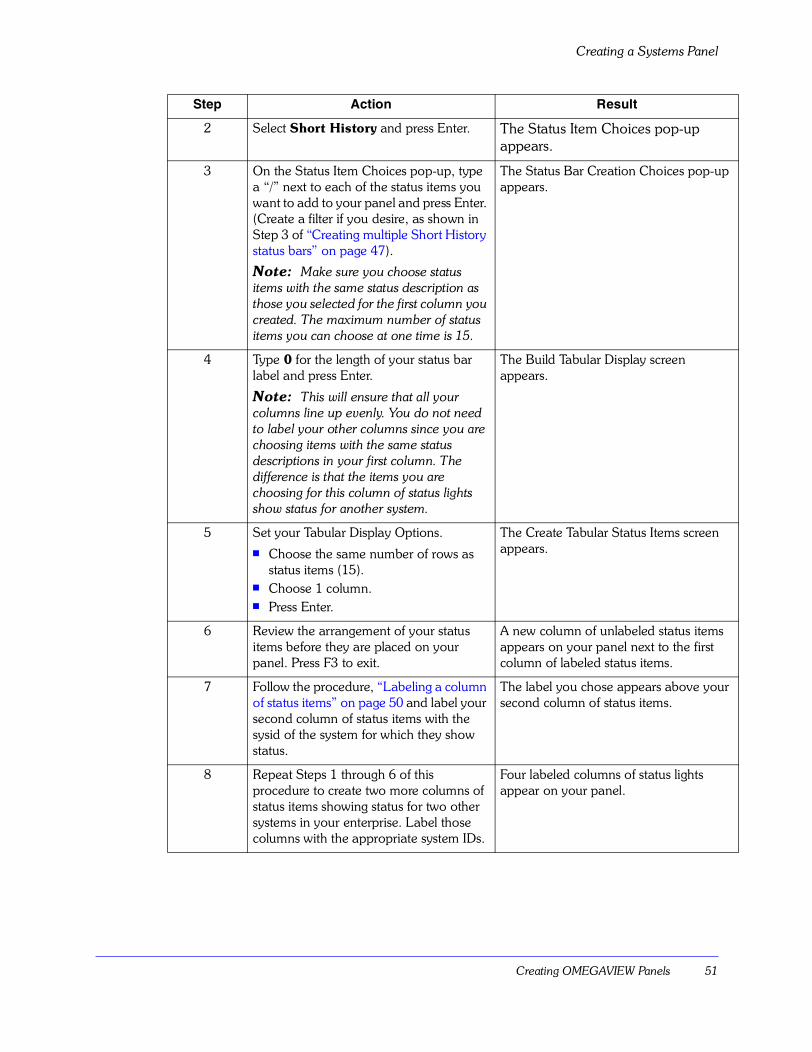
2 Select Short History and press Enter. The Status Item Choices pop-up appears.
3 On the Status Item Choices pop-up, type a �/� next to each of the status items you want to add to your panel and press Enter. (Create a filter if you desire, as shown in Step 3 of �Creating multiple Short History status bars� on page 47).
Note: Make sure you choose status items with the same status description as those you selected for the first column you created. The maximum number of status items you can choose at one time is 15.
The Status Bar Creation Choices pop-up appears.
4 Type 0 for the length of your status bar label and press Enter.
Note: This will ensure that all your columns line up evenly. You do not need to label your other columns since you are choosing items with the same status descriptions in your first column. The difference is that the items you are choosing for this column of status lights show status for another system.
The Build Tabular Display screen appears.
5 Set your Tabular Display Options.! Choose the same number of rows as
status items (15).! Choose 1 column.! Press Enter.
The Create Tabular Status Items screen appears.
6 Review the arrangement of your status items before they are placed on your panel. Press F3 to exit.
A new column of unlabeled status items appears on your panel next to the first column of labeled status items.
7 Follow the procedure, �Labeling a column of status items� on page 50 and label your second column of status items with the sysid of the system for which they show status.
The label you chose appears above your second column of status items.
8 Repeat Steps 1 through 6 of this procedure to create two more columns of status items showing status for two other systems in your enterprise. Label those columns with the appropriate system IDs.
Four labeled columns of status lights appear on your panel.
Step Action Result
Creating a Systems Panel
52 Using OMEGAVIEW and OMEGAVIEW II for the Enterprise, V3.1.0
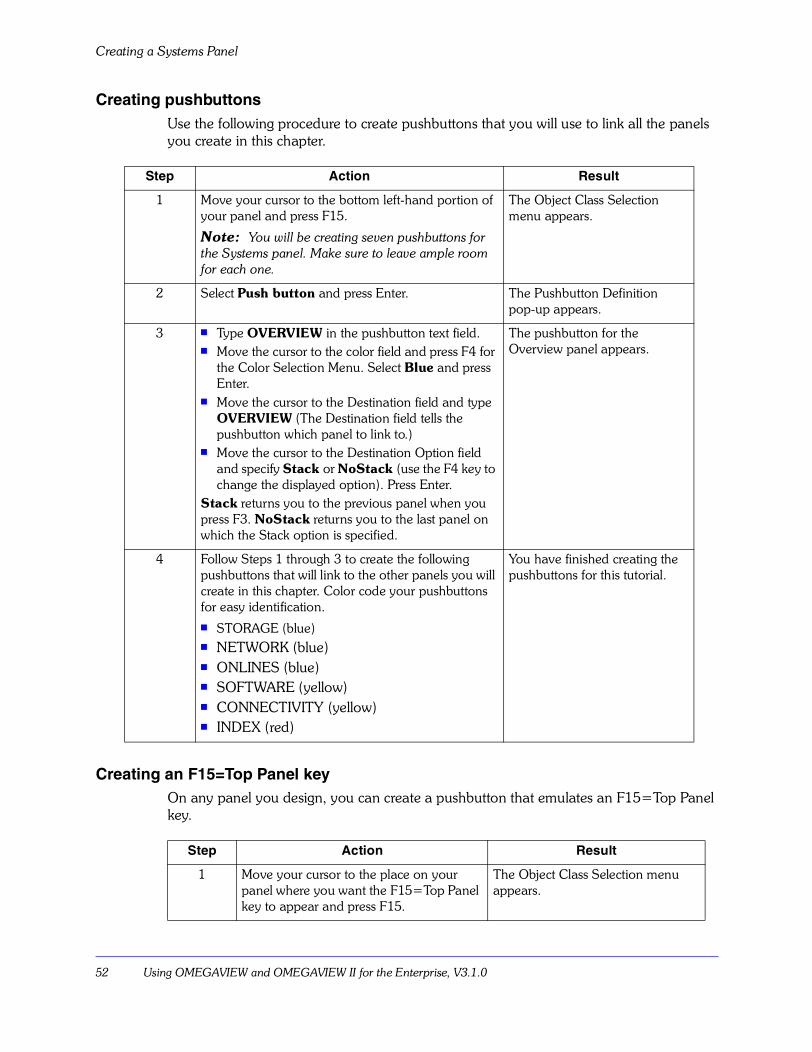
Creating pushbuttonsUse the following procedure to create pushbuttons that you will use to link all the panels you create in this chapter.
Creating an F15=Top Panel keyOn any panel you design, you can create a pushbutton that emulates an F15=Top Panel key.
Step Action Result
1 Move your cursor to the bottom left-hand portion of your panel and press F15.
Note: You will be creating seven pushbuttons for the Systems panel. Make sure to leave ample room for each one.
The Object Class Selection menu appears.
2 Select Push button and press Enter. The Pushbutton Definition pop-up appears.
3 ! Type OVERVIEW in the pushbutton text field.! Move the cursor to the color field and press F4 for
the Color Selection Menu. Select Blue and press Enter.
! Move the cursor to the Destination field and type OVERVIEW (The Destination field tells the pushbutton which panel to link to.)
! Move the cursor to the Destination Option field and specify Stack or NoStack (use the F4 key to change the displayed option). Press Enter.
Stack returns you to the previous panel when you press F3. NoStack returns you to the last panel on which the Stack option is specified.
The pushbutton for the Overview panel appears.
4 Follow Steps 1 through 3 to create the following pushbuttons that will link to the other panels you will create in this chapter. Color code your pushbuttons for easy identification.! STORAGE (blue)! NETWORK (blue)! ONLINES (blue)! SOFTWARE (yellow)! CONNECTIVITY (yellow)! INDEX (red)
You have finished creating the pushbuttons for this tutorial.
Step Action Result
1 Move your cursor to the place on your panel where you want the F15=Top Panel key to appear and press F15.
The Object Class Selection menu appears.
Creating OMEGAVIEW Panels 53
Creating a Systems Panel
Saving the panelUse the following procedure to save the new panel you have created.
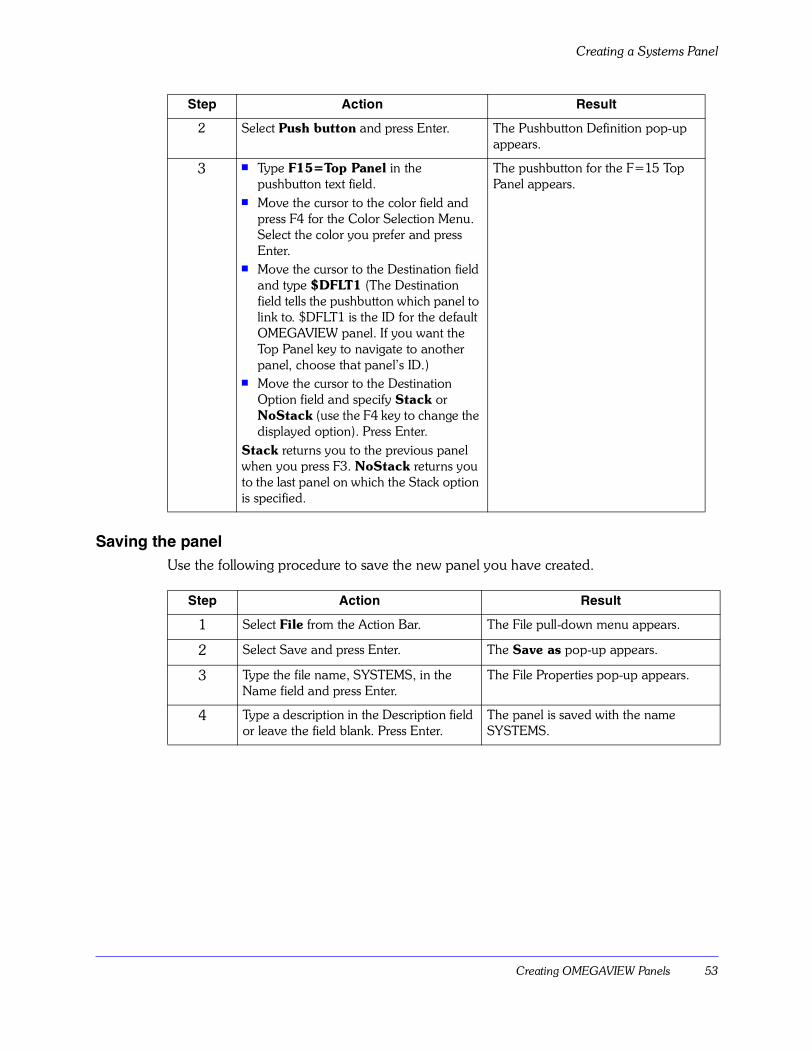
2 Select Push button and press Enter. The Pushbutton Definition pop-up appears.
3 ! Type F15=Top Panel in the pushbutton text field.
! Move the cursor to the color field and press F4 for the Color Selection Menu. Select the color you prefer and press Enter.
! Move the cursor to the Destination field and type $DFLT1 (The Destination field tells the pushbutton which panel to link to. $DFLT1 is the ID for the default OMEGAVIEW panel. If you want the Top Panel key to navigate to another panel, choose that panel�s ID.)
! Move the cursor to the Destination Option field and specify Stack or NoStack (use the F4 key to change the displayed option). Press Enter.
Stack returns you to the previous panel when you press F3. NoStack returns you to the last panel on which the Stack option is specified.
The pushbutton for the F=15 Top Panel appears.
Step Action Result
1 Select File from the Action Bar. The File pull-down menu appears.
2 Select Save and press Enter. The Save as pop-up appears.
3 Type the file name, SYSTEMS, in the Name field and press Enter.
The File Properties pop-up appears.
4 Type a description in the Description field or leave the field blank. Press Enter.
The panel is saved with the name SYSTEMS.
Step Action Result
Creating a Storage Panel
54 Using OMEGAVIEW and OMEGAVIEW II for the Enterprise, V3.1.0
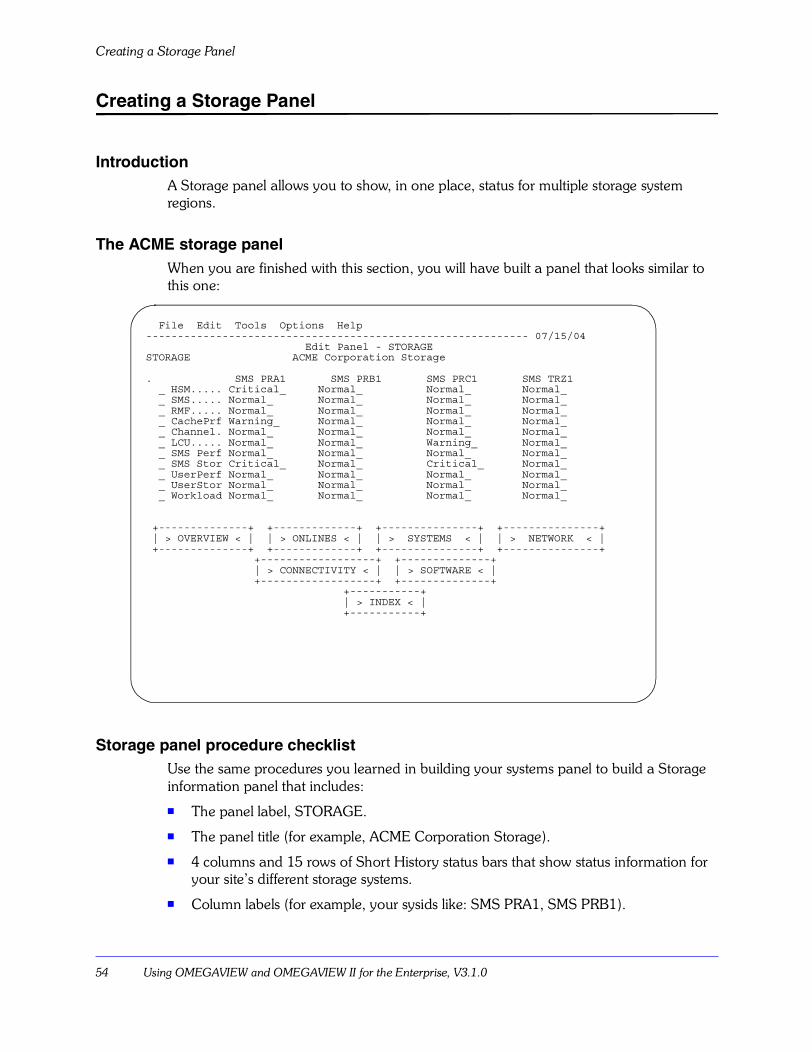
Creating a Storage Panel
IntroductionA Storage panel allows you to show, in one place, status for multiple storage system regions.
The ACME storage panelWhen you are finished with this section, you will have built a panel that looks similar to this one:
Storage panel procedure checklistUse the same procedures you learned in building your systems panel to build a Storage information panel that includes:
! The panel label, STORAGE.
! The panel title (for example, ACME Corporation Storage).
! 4 columns and 15 rows of Short History status bars that show status information for your site�s different storage systems.
! Column labels (for example, your sysids like: SMS PRA1, SMS PRB1).
File Edit Tools Options Help------------------------------------------------------------ 07/15/04 Edit Panel - STORAGESTORAGE ACME Corporation Storage . SMS PRA1 SMS PRB1 SMS PRC1 SMS TRZ1 _ HSM..... Critical_ Normal_ Normal_ Normal_ _ SMS..... Normal_ Normal_ Normal_ Normal_ _ RMF..... Normal_ Normal_ Normal_ Normal_ _ CachePrf Warning_ Normal_ Normal_ Normal_ _ Channel. Normal_ Normal_ Normal_ Normal_ _ LCU..... Normal_ Normal_ Warning_ Normal_ _ SMS Perf Normal_ Normal_ Normal_ Normal_ _ SMS Stor Critical_ Normal_ Critical_ Normal_ _ UserPerf Normal_ Normal_ Normal_ Normal_ _ UserStor Normal_ Normal_ Normal_ Normal_ _ Workload Normal_ Normal_ Normal_ Normal_ +--------------+ +-------------+ +---------------+ +---------------+ | > OVERVIEW < | | > ONLINES < | | > SYSTEMS < | | > NETWORK < | +--------------+ +-------------+ +---------------+ +---------------+ +------------------+ +--------------+ | > CONNECTIVITY < | | > SOFTWARE < | +------------------+ +--------------+ +-----------+ | > INDEX < | +-----------+
Creating OMEGAVIEW Panels 55
Creating a Storage Panel
! The following pushbuttons, color-coded for easy identification:
� OVERVIEW (blue)
� SYSTEMS (blue)
� NETWORK (blue)
� ONLINES (blue)
� SOFTWARE (yellow)
� CONNECTIVITY (yellow)
� INDEX (red)
! When you have completed the panel, save the file under the name STORAGE.
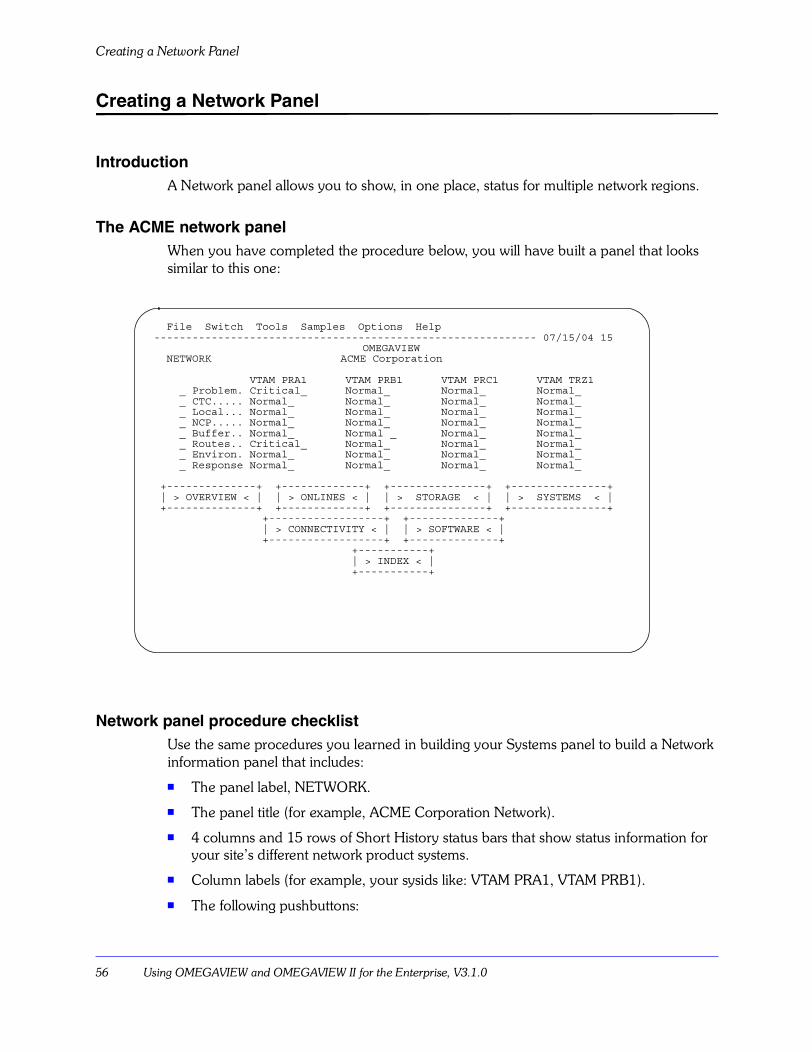
Creating a Network Panel
56 Using OMEGAVIEW and OMEGAVIEW II for the Enterprise, V3.1.0
Creating a Network Panel
IntroductionA Network panel allows you to show, in one place, status for multiple network regions.
The ACME network panelWhen you have completed the procedure below, you will have built a panel that looks similar to this one:
Network panel procedure checklistUse the same procedures you learned in building your Systems panel to build a Network information panel that includes:
! The panel label, NETWORK.
! The panel title (for example, ACME Corporation Network).
! 4 columns and 15 rows of Short History status bars that show status information for your site�s different network product systems.
! Column labels (for example, your sysids like: VTAM PRA1, VTAM PRB1).
! The following pushbuttons:
File Switch Tools Samples Options Help------------------------------------------------------------ 07/15/04 15
OMEGAVIEW NETWORK ACME Corporation VTAM PRA1 VTAM PRB1 VTAM PRC1 VTAM TRZ1 _ Problem. Critical_ Normal_ Normal_ Normal_ _ CTC..... Normal_ Normal_ Normal_ Normal_ _ Local... Normal_ Normal_ Normal_ Normal_ _ NCP..... Normal_ Normal_ Normal_ Normal_ _ Buffer.. Normal_ Normal _ Normal_ Normal_ _ Routes.. Critical_ Normal_ Normal_ Normal_ _ Environ. Normal_ Normal_ Normal_ Normal_ _ Response Normal_ Normal_ Normal_ Normal_ +--------------+ +-------------+ +---------------+ +---------------+ | > OVERVIEW < | | > ONLINES < | | > STORAGE < | | > SYSTEMS < | +--------------+ +-------------+ +---------------+ +---------------+ +------------------+ +--------------+ | > CONNECTIVITY < | | > SOFTWARE < | +------------------+ +--------------+ +-----------+ | > INDEX < | +-----------+
Creating OMEGAVIEW Panels 57
Creating a Network Panel
� OVERVIEW (blue)
� SYSTEMS (blue)
� STORAGE (blue)
� ONLINES (blue)
� SOFTWARE (yellow)
� CONNECTIVITY (yellow)
� INDEX (red)
! When you have completed the panel, save the file under the name NETWORK.
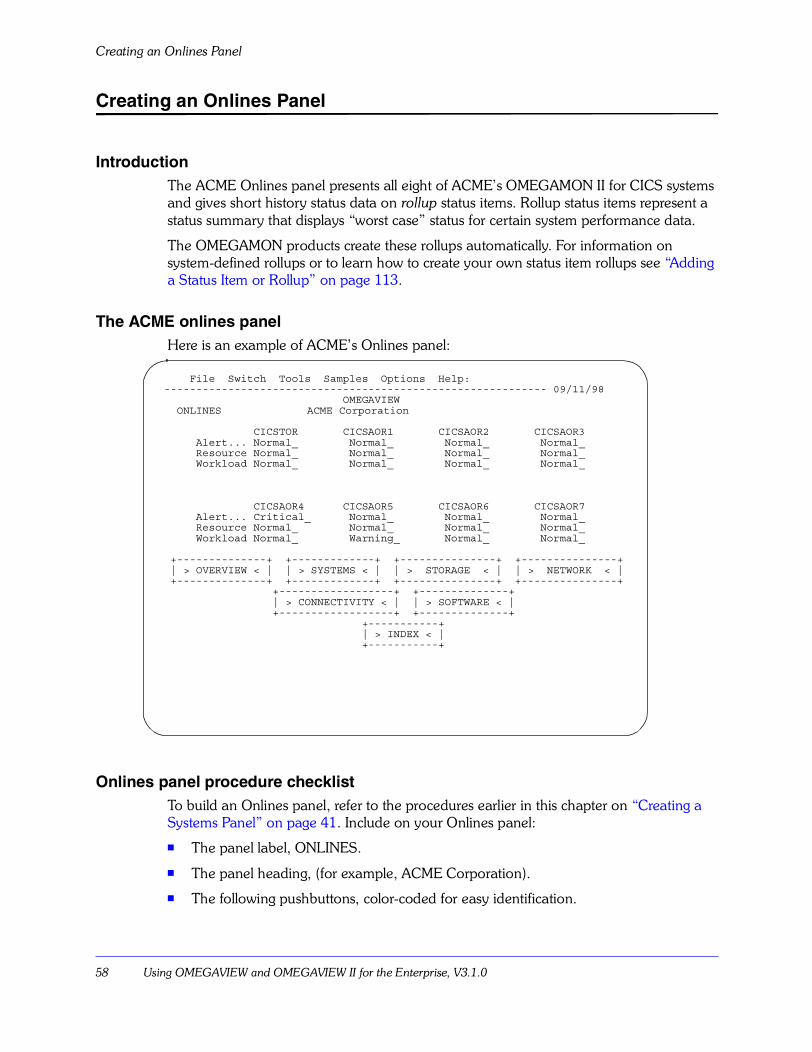
Creating an Onlines Panel
58 Using OMEGAVIEW and OMEGAVIEW II for the Enterprise, V3.1.0
Creating an Onlines Panel
IntroductionThe ACME Onlines panel presents all eight of ACME�s OMEGAMON II for CICS systems and gives short history status data on rollup status items. Rollup status items represent a status summary that displays �worst case� status for certain system performance data.
The OMEGAMON products create these rollups automatically. For information on system-defined rollups or to learn how to create your own status item rollups see �Adding a Status Item or Rollup� on page 113.
The ACME onlines panelHere is an example of ACME�s Onlines panel:
Onlines panel procedure checklistTo build an Onlines panel, refer to the procedures earlier in this chapter on �Creating a Systems Panel� on page 41. Include on your Onlines panel:
! The panel label, ONLINES.
! The panel heading, (for example, ACME Corporation).
! The following pushbuttons, color-coded for easy identification.
File Switch Tools Samples Options Help:------------------------------------------------------------ 09/11/98 OMEGAVIEW ONLINES ACME Corporation CICSTOR CICSAOR1 CICSAOR2 CICSAOR3 Alert... Normal_ Normal_ Normal_ Normal_ Resource Normal_ Normal_ Normal_ Normal_ Workload Normal_ Normal_ Normal_ Normal_ CICSAOR4 CICSAOR5 CICSAOR6 CICSAOR7 Alert... Critical_ Normal_ Normal_ Normal_ Resource Normal_ Normal_ Normal_ Normal_ Workload Normal_ Warning_ Normal_ Normal_ +--------------+ +-------------+ +---------------+ +---------------+ | > OVERVIEW < | | > SYSTEMS < | | > STORAGE < | | > NETWORK < | +--------------+ +-------------+ +---------------+ +---------------+ +------------------+ +--------------+ | > CONNECTIVITY < | | > SOFTWARE < | +------------------+ +--------------+ +-----------+ | > INDEX < | +-----------+
Creating OMEGAVIEW Panels 59
Creating an Onlines Panel
� OVERVIEW (blue)
� SYSTEMS (blue)
� STORAGE (blue)
� NETWORK (blue)
� CONNECTIVITY (yellow)
� SOFTWARE (yellow)
� INDEX (red)
! Several Short History status bar rollups representing alert status, resource status and workload status for multiple system regions. Refer to the following checklist for information on Creating your rollup status bars:
! Create your Short History status bars as you did in �Creating multiple Short History status bars� on page 47.
! Choose rollup status items (instead of basic status items) from the Status Item Choices menu.
! Decide which system regions you want to show status for. (ACME chose to show status information for all 8 of their OMEGAMON II for CICS regions.)
! For each of the system regions you want to show status for, build multiple status item columns using three status categories:
� Alert
� Resource
� Workload
! Refer to the figure The ACME onlines panel, on page page 58 to see how ACME designed the layout of 8 multiple status item columns.
! When you have completed the panel, save the file under the name ONLINES.
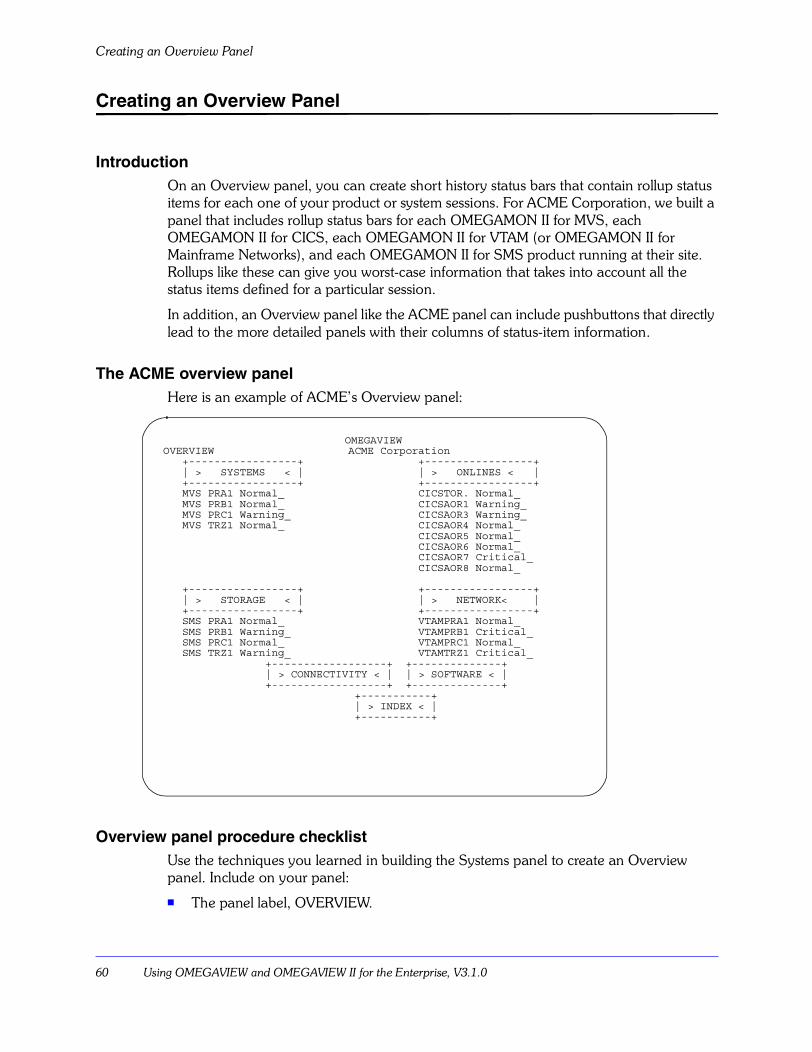
Creating an Overview Panel
60 Using OMEGAVIEW and OMEGAVIEW II for the Enterprise, V3.1.0
Creating an Overview Panel
IntroductionOn an Overview panel, you can create short history status bars that contain rollup status items for each one of your product or system sessions. For ACME Corporation, we built a panel that includes rollup status bars for each OMEGAMON II for MVS, each OMEGAMON II for CICS, each OMEGAMON II for VTAM (or OMEGAMON II for Mainframe Networks), and each OMEGAMON II for SMS product running at their site. Rollups like these can give you worst-case information that takes into account all the status items defined for a particular session.
In addition, an Overview panel like the ACME panel can include pushbuttons that directly lead to the more detailed panels with their columns of status-item information.
The ACME overview panelHere is an example of ACME�s Overview panel:
Overview panel procedure checklistUse the techniques you learned in building the Systems panel to create an Overview panel. Include on your panel:
! The panel label, OVERVIEW.
OMEGAVIEW OVERVIEW ACME Corporation +-----------------+ +-----------------+ | > SYSTEMS < | | > ONLINES < | +-----------------+ +-----------------+ MVS PRA1 Normal_ CICSTOR. Normal_ MVS PRB1 Normal_ CICSAOR1 Warning_ MVS PRC1 Warning_ CICSAOR3 Warning_ MVS TRZ1 Normal_ CICSAOR4 Normal_ CICSAOR5 Normal_ CICSAOR6 Normal_ CICSAOR7 Critical_ CICSAOR8 Normal_ +-----------------+ +-----------------+ | > STORAGE < | | > NETWORK< | +-----------------+ +-----------------+ SMS PRA1 Normal_ VTAMPRA1 Normal_ SMS PRB1 Warning_ VTAMPRB1 Critical_ SMS PRC1 Normal_ VTAMPRC1 Normal_ SMS TRZ1 Warning_ VTAMTRZ1 Critical_ +------------------+ +--------------+ | > CONNECTIVITY < | | > SOFTWARE < | +------------------+ +--------------+ +-----------+ | > INDEX < | +-----------+
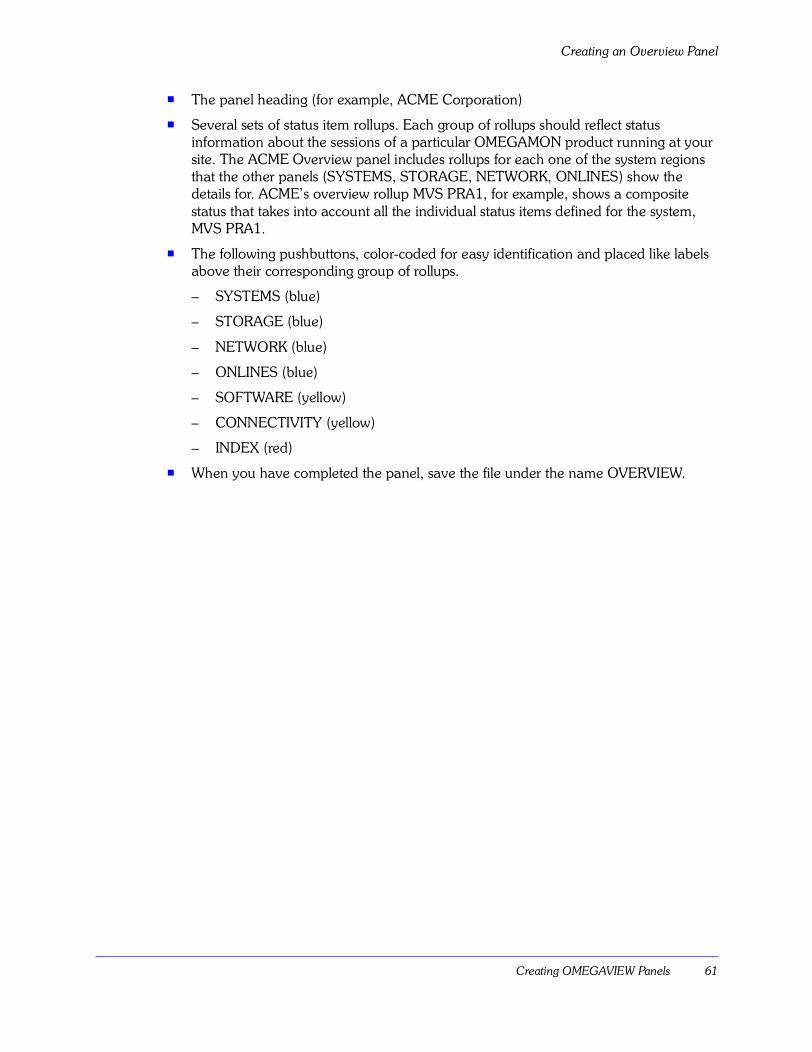
Creating OMEGAVIEW Panels 61
Creating an Overview Panel
! The panel heading (for example, ACME Corporation)
! Several sets of status item rollups. Each group of rollups should reflect status information about the sessions of a particular OMEGAMON product running at your site. The ACME Overview panel includes rollups for each one of the system regions that the other panels (SYSTEMS, STORAGE, NETWORK, ONLINES) show the details for. ACME�s overview rollup MVS PRA1, for example, shows a composite status that takes into account all the individual status items defined for the system, MVS PRA1.
! The following pushbuttons, color-coded for easy identification and placed like labels above their corresponding group of rollups.
� SYSTEMS (blue)
� STORAGE (blue)
� NETWORK (blue)
� ONLINES (blue)
� SOFTWARE (yellow)
� CONNECTIVITY (yellow)
� INDEX (red)
! When you have completed the panel, save the file under the name OVERVIEW.
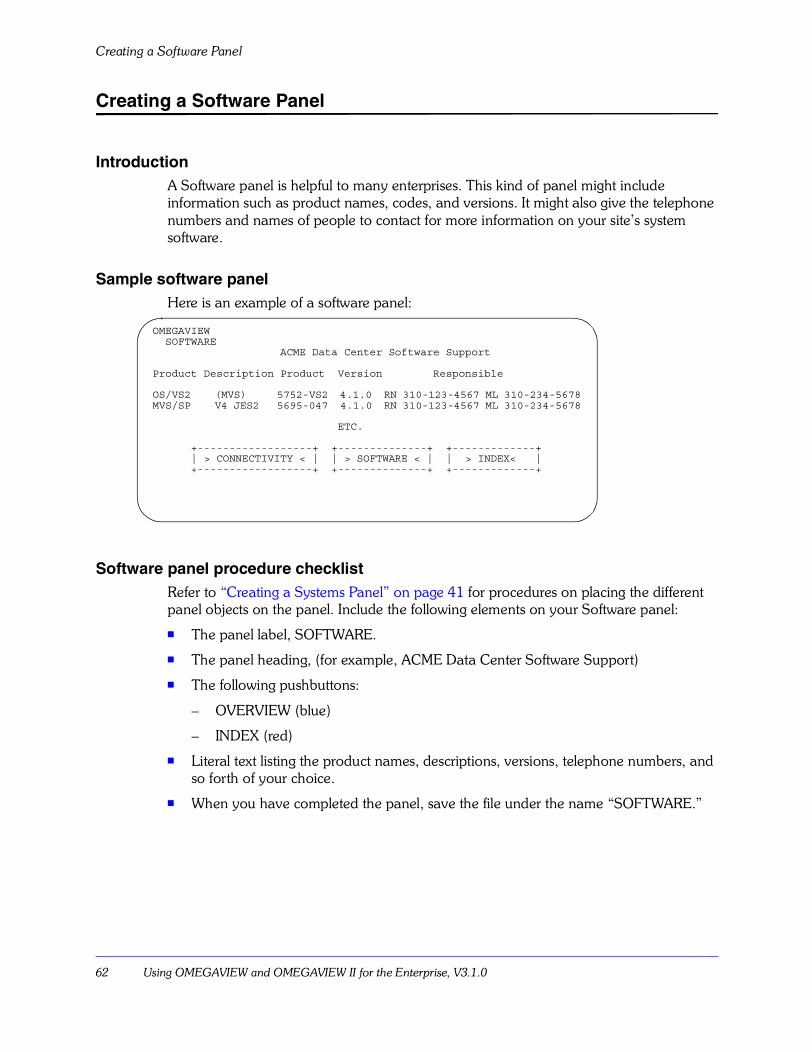
Creating a Software Panel
62 Using OMEGAVIEW and OMEGAVIEW II for the Enterprise, V3.1.0
Creating a Software Panel
IntroductionA Software panel is helpful to many enterprises. This kind of panel might include information such as product names, codes, and versions. It might also give the telephone numbers and names of people to contact for more information on your site�s system software.
Sample software panelHere is an example of a software panel:
Software panel procedure checklistRefer to �Creating a Systems Panel� on page 41 for procedures on placing the different panel objects on the panel. Include the following elements on your Software panel:
! The panel label, SOFTWARE.
! The panel heading, (for example, ACME Data Center Software Support)
! The following pushbuttons:
� OVERVIEW (blue)
� INDEX (red)
! Literal text listing the product names, descriptions, versions, telephone numbers, and so forth of your choice.
! When you have completed the panel, save the file under the name �SOFTWARE.�
OMEGAVIEW SOFTWARE ACME Data Center Software Support Product Description Product Version Responsible OS/VS2 (MVS) 5752-VS2 4.1.0 RN 310-123-4567 ML 310-234-5678MVS/SP V4 JES2 5695-047 4.1.0 RN 310-123-4567 ML 310-234-5678 ETC. +------------------+ +--------------+ +-------------+ | > CONNECTIVITY < | | > SOFTWARE < | | > INDEX< | +------------------+ +--------------+ +-------------+
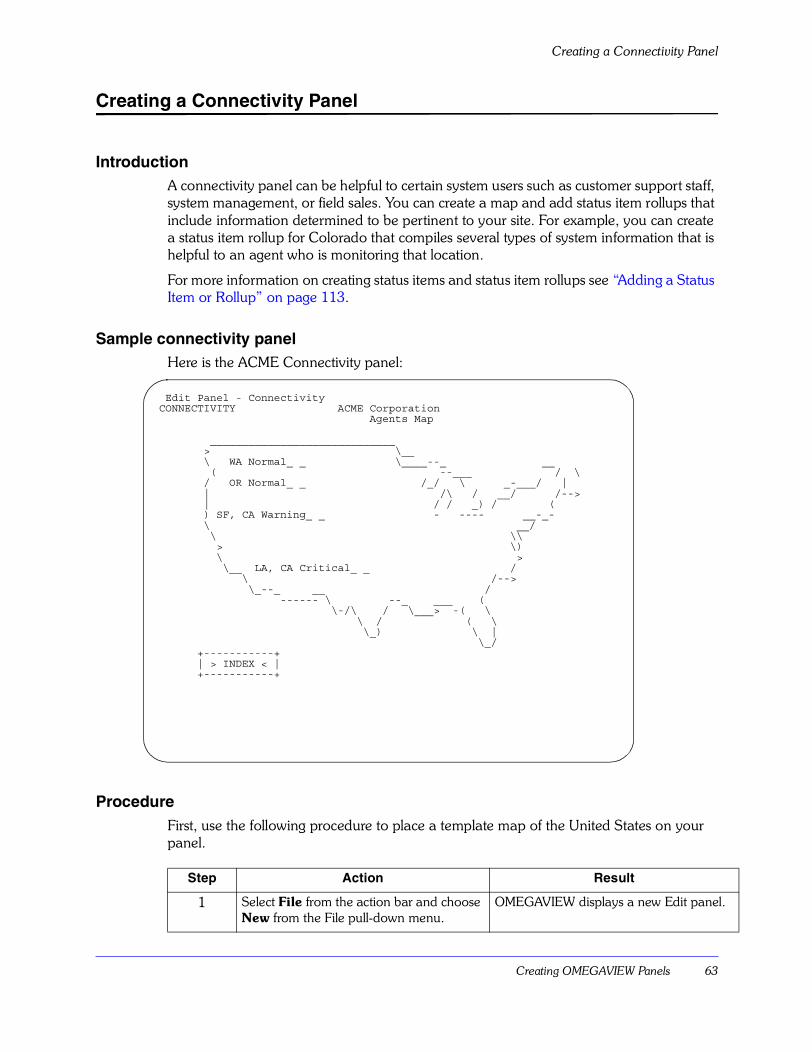
Creating OMEGAVIEW Panels 63
Creating a Connectivity Panel
Creating a Connectivity Panel
IntroductionA connectivity panel can be helpful to certain system users such as customer support staff, system management, or field sales. You can create a map and add status item rollups that include information determined to be pertinent to your site. For example, you can create a status item rollup for Colorado that compiles several types of system information that is helpful to an agent who is monitoring that location.
For more information on creating status items and status item rollups see �Adding a Status Item or Rollup� on page 113.
Sample connectivity panelHere is the ACME Connectivity panel:
ProcedureFirst, use the following procedure to place a template map of the United States on your panel.
Step Action Result
1 Select File from the action bar and choose New from the File pull-down menu.
OMEGAVIEW displays a new Edit panel.
Edit Panel - ConnectivityCONNECTIVITY ACME Corporation Agents Map _____________________________ > \__ \ WA Normal_ _ \____--_ __ ( --___ / \ / OR Normal_ _ /_/ \ _-___/ | | /\ / __/ /--> | / / _) / ( ) SF, CA Warning_ _ - ---- __-_- \ __/ \ \\ > \) \ > \__ LA, CA Critical_ _ / \ /--> \_--_ __ / ------ \ --_ ___ ( \-/\ / \___> -( \ \ / ( \ \_) \ | \_/ +-----------+ | > INDEX < | +-----------+

Creating a Connectivity Panel
64 Using OMEGAVIEW and OMEGAVIEW II for the Enterprise, V3.1.0
Next follow the procedure �Short History status bar� on page 45 to add basic or rollup status items to your panel. ACME chose to create status bar rollups with status information that ACME field agents deemed relevant to particular geographic areas of the United States.
2 Move your cursor to the place on your screen where you want the Connectivity map to appear and press F15.
The Object Class Selection menu appears.
3 Choose Template from the object list. The Template Name pop-up window appears.
4 Press F4 on the Template Name input field. OMEGAVIEW displays a list of available templates
5 Select the template labeled ZZ_TMUSA OMEGAVIEW displays an outline map of the USA on your Edit Template panel in the spot you indicated with your cursor position.
6 Use F16 (cut key) and F18 (paste key) to reposition the template if you should need to.
The map appears on the panel in the place you specified.
Step Action Result
Creating OMEGAVIEW Panels 65
Creating an Index Panel
Creating an Index Panel
IntroductionOn an index panel, you create numerous pushbuttons that allow you to quickly navigate to any of the panels in your OMEGAVIEW system.
Sample index panelHere is the ACME Corporation Index panel:
Note: In our example there are very few screens available. However, most sites have many panels and so find the index to be an extremely helpful navigation tool.
Index panel procedure checklistInclude the following panel elements on your index panel.
! The panel label, INDEX.
! The panel heading (for example, ACME Panel Index).
! The following pushbuttons, color-coded for easy identification.
� OVERVIEW (blue)
� SYSTEMS (blue)
� STORAGE (blue)
� NETWORK (blue)
� ONLINES (blue)
OMEGAVIEW ACME Panel Index System Services: Other: +--------------+ +---------------+ | > OVERVIEW < | | > SOFTWARE < | +--------------+ +---------------+ +--------------+ +------------------+ | > SYSTEMS < | | > CONNECTIVITY < | +--------------+ +------------------+ +--------------+ | > STORAGE < | +--------------+ +--------------+ | > NETWORK < | +--------------+ +--------------+ | > ONLINES < | +--------------+
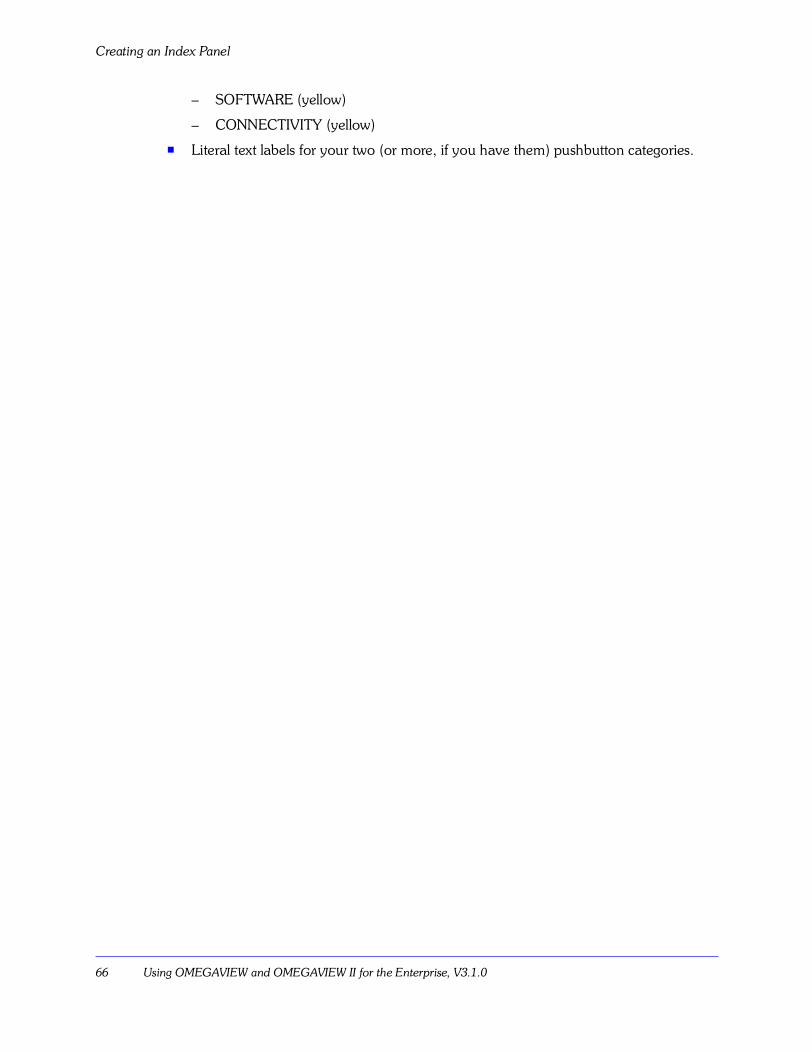
Creating an Index Panel
66 Using OMEGAVIEW and OMEGAVIEW II for the Enterprise, V3.1.0
� SOFTWARE (yellow)
� CONNECTIVITY (yellow)
! Literal text labels for your two (or more, if you have them) pushbutton categories.
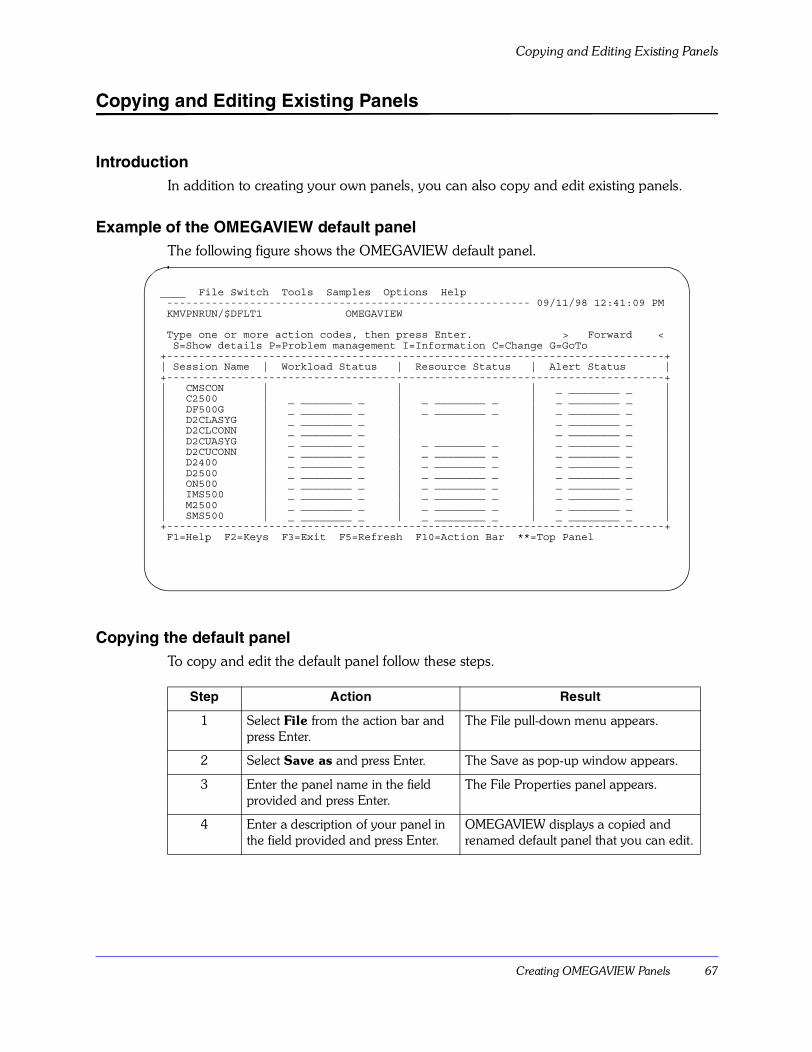
Creating OMEGAVIEW Panels 67
Copying and Editing Existing Panels
Copying and Editing Existing Panels
IntroductionIn addition to creating your own panels, you can also copy and edit existing panels.
Example of the OMEGAVIEW default panelThe following figure shows the OMEGAVIEW default panel.
Copying the default panelTo copy and edit the default panel follow these steps.
Step Action Result
1 Select File from the action bar and press Enter.
The File pull-down menu appears.
2 Select Save as and press Enter. The Save as pop-up window appears.
3 Enter the panel name in the field provided and press Enter.
The File Properties panel appears.
4 Enter a description of your panel in the field provided and press Enter.
OMEGAVIEW displays a copied and renamed default panel that you can edit.
____ File Switch Tools Samples Options Help --------------------------------------------------------- 09/11/98 12:41:09 PM KMVPNRUN/$DFLT1 OMEGAVIEW Type one or more action codes, then press Enter. > Forward < S=Show details P=Problem management I=Information C=Change G=GoTo+------------------------------------------------------------------------------+| Session Name | Workload Status | Resource Status | Alert Status |+------------------------------------------------------------------------------+| CMSCON | | | _ ________ _ || C2500 | _ ________ _ | _ ________ _ | _ ________ _ || DF500G | _ ________ _ | _ ________ _ | _ ________ _ || D2CLASYG | _ ________ _ | | _ ________ _ || D2CLCONN | _ ________ _ | | _ ________ _ || D2CUASYG | _ ________ _ | _ ________ _ | _ ________ _ || D2CUCONN | _ ________ _ | _ ________ _ | _ ________ _ || D2400 | _ ________ _ | _ ________ _ | _ ________ _ || D2500 | _ ________ _ | _ ________ _ | _ ________ _ || ON500 | _ ________ _ | _ ________ _ | _ ________ _ || IMS500 | _ ________ _ | _ ________ _ | _ ________ _ || M2500 | _ ________ _ | _ ________ _ | _ ________ _ || SMS500 | _ ________ _ | _ ________ _ | _ ________ _ |+------------------------------------------------------------------------------+ F1=Help F2=Keys F3=Exit F5=Refresh F10=Action Bar **=Top Panel
Copying and Editing Existing Panels
68 Using OMEGAVIEW and OMEGAVIEW II for the Enterprise, V3.1.0
Copying sample panelsThere are several sample panels under the Samples pull-down menu of the action bar. You can copy any one of these panels and edit it for your own use. To copy a sample panel refer to the following procedure.
Step Action Result
1 Select Samples from the action bar and press Enter.
The Samples pull-down menu appears.
2 Type S, Show samples, and press Enter. OMEGAVIEW displays the Welcome to Sample Panels screen.
3 To view sample panels, press Enter while the cursor is on the �Continue� pushbutton.
An overview screen with a list of sample panels appears.
4 Choose one of the sample panels by pressing Enter while the cursor is on one of the pushbuttons.
OMEGAVIEW displays the sample panel you�ve chosen.
5 To copy this panel:! Choose File from the action bar and
press Enter.! Select Save as from the File menu,
rename the panel you�ve chosen on the Save as pop-up window, and press Enter.
! On the File Properties pop-up window type the panel description and press Enter.
OMEGAVIEW displays a copied and renamed version of your chosen sample panel that you can edit.
Creating OMEGAVIEW Panels 69
Linking and Cross-Referencing Status Items
Linking and Cross-Referencing Status Items
IntroductionWhen you have created your panels, you can:
! Use the Cross-Referencing option to specify a cross reference list of status items and panels.
! Use the Linking Status Item option to link one or more panels that you have created to a specific OMEGAMON session
For more information! See �Using the Cross-Reference Option� on page 121.
! See �Linking Status Items� on page 119.

Linking and Cross-Referencing Status Items
70 Using OMEGAVIEW and OMEGAVIEW II for the Enterprise, V3.1.0

Creating and Using Templates 71
Creating and Using Templates
IntroductionThis chapter explains how to use templates to create visual elements of your panels.
Chapter ContentsOverview . . . . . . . . . . . . . . . . . . . . . . . . . . . . . . . . . . . . . . . . . . . . . . . . . . . . . . . . . . . . . . . . . .72Accessing the Template Editor . . . . . . . . . . . . . . . . . . . . . . . . . . . . . . . . . . . . . . . . . . . . . . . . . .73Creating a New Template . . . . . . . . . . . . . . . . . . . . . . . . . . . . . . . . . . . . . . . . . . . . . . . . . . . . . .74Saving a Template . . . . . . . . . . . . . . . . . . . . . . . . . . . . . . . . . . . . . . . . . . . . . . . . . . . . . . . . . . .77Exiting the Template Editor . . . . . . . . . . . . . . . . . . . . . . . . . . . . . . . . . . . . . . . . . . . . . . . . . . . .79Positioning a Template on a New Panel . . . . . . . . . . . . . . . . . . . . . . . . . . . . . . . . . . . . . . . . . . .80
3
Overview
72 Using OMEGAVIEW and OMEGAVIEW II for the Enterprise, V3.1.0
Overview
Templates are drawings that lie beneath objects you draw on a panel. Templates allow you to enhance the visual impact of your panel. A template can be a map, an outline of your data center, or anything you consider visually pleasing, like a blue background. After you create a template, you can save it and use it on multiple panels without having to recreate it each time.
Note: Refer to the panels in Samples for ideas on how to use templates. An excellent example is the map of the world.
User authorityIn order to access and use the Template Editor, you must have Template Editor authority assigned to you by your system administrator.
PrerequisiteBefore you can add or place a template on a panel, you must first create it using the Template Editor. If you plan to use a template, place the finished template on the work area using the Panel Editor before you add any other objects to the work area. Templates always appear behind Panel Editor objects; that is, if you try to place a template on top of an existing panel, that panel�s existing objects may hide portions of your template.
Note: The Panel Editor cannot be used to make changes to a template. Templates may only be modified in the Template Editor.
Template editor keysThere are two function keys that are specific to the Template Editor.
! The Line/Box Draw key (F9) allows you to initiate the line and box drawing operation in the Template Editor.
! The Delete Box key (F19) functions in exactly the same way as the standard delete function key by removing a selected object from your panel.
Note: There is no option that allows you to change template editor�s line/box draw key (F9). However, you can change the Delete Box key (F19) by changing the Delete Object key on the Panel Editor keys pop-up under the main Options pull-down menu. For more information on setting the Panel Editor function keys see �Setting Panel Editor keys� on page 104.
Creating and Using Templates 73
Accessing the Template Editor
Accessing the Template Editor
ProcedureRefer to the following procedure to access the template editor.
When you are in the template editor you can either access an existing template or create a new one. To access an existing template:
Step Action Result
1 Select Tools from the action bar and press Enter.
The Tools pull-down menu appears.
2 Select Template editor from the Tools menu and press Enter.
OMEGAVIEW displays a blank panel entitled Edit Template - {Untitled}
Step Action Result
1 Select File from the Template Editor action bar.
The File pull-down menu appears.
2 Select Open from the File menu. The Open pop-up window appears.
3 Type the existing template�s name and press Enter, or press F4 for a list of templates and press Enter next to the template you want.
You have accessed an existing template.
Creating a New Template
74 Using OMEGAVIEW and OMEGAVIEW II for the Enterprise, V3.1.0
Creating a New Template
IntroductionThere are three basic methods you can use to create templates.
! line drawing
! box drawing
! freehand drawing
Drawing linesThe Line/Box Draw option allows you to draw vertical and horizontal lines that, when placed on a panel, become background objects on that panel. Follow these instructions to draw horizontal or vertical lines:
Step Action Results
1 Select Tools from the action bar and press Enter.
The Tools pull-down panel appears.
2 Select Template editor from the Tools pull-down and press Enter.
An untitled template editor panel appears.
3 Position your cursor at the point on your panel where you want your line to start and press F9.
A plus sign (+) appears in the location you�ve chosen.
4 Move your cursor to the point on the panel where you want your line to end and press Enter.
OMEGAVIEW displays the Line/Box Attributes window on which you can specify color and highlight information.
Creating and Using Templates 75
Creating a New Template
Drawing boxesThe Line/Box Draw function also allows you to draw boxes. Use the following procedure to draw boxes that you can later place on your panels as background objects.
5 To change the color of a line, type the new color in the Line/Box Color field. For a list of available colors press F4.
Note: If your 327x terminal has a character select keyboard, you can build your template with the various color and highlight capabilities of that terminal. You can tell whether your terminal supports this option by the appearance of a> O> in the operator information area at the bottom of your display.
To change the highlighting attributes of a line, move your cursor to the Line/Box Highlight field and type the new highlight attribute. For a list of available highlights press F4.
After you have chosen both color and highlighting attributes for your box, press Enter.
OMEGAVIEW draws the line between the two cursor positions you specified with color and highlighting attributes you chose.
Step Action Result
1 Position your cursor at the point on the panel where you want your box to begin and press F9, Line/Box Draw
A plus sign (+) appears at the location you�ve chosen.
2 Move your cursor to the opposite (diagonal) corner from the plus sign on the panel and press Enter.
OMEGAVIEW displays the Line/Box Attributes window from which you can select color and highlight attributes.
Step Action Results
Creating a New Template
76 Using OMEGAVIEW and OMEGAVIEW II for the Enterprise, V3.1.0
Freehand drawingYou can also create a template by typing characters by hand on the work area. With this method you can create pictures, maps, or any other drawing you desire. You are limited only by the type of characters on your keyboard and by your drawing skills.
The outline map of the United States that appears under the Samples action bar item was created using freehand drawing.
The only restriction for creating a template in freehand style applies to deleting characters. To delete a character, use the space bar to blank out the character. Or simply type over the character with another character. Do not use the delete key or the Erase EOF key to make corrections. These keys will clear your screen only temporarily and won�t actually delete any of the characters of your template.
3 To change the color of your box, type the new color in the Line/Box Color field. Press F4 for a list of available colors.
To change the highlighting attributes of your box, move your cursor to the Line/Box Highlight field and type the new highlight attribute. Press F4 for a list of available highlights.
Note: If your 327x terminal has a character select keyboard, you can build your template with the various color and highlight capabilities of that terminal. You can tell if your terminal supports this option by the appearance of �a> O>� in the operator information area at the bottom of your display.
After you have chosen both color and highlighting attributes for your box, press Enter.
OMEGAVIEW draws the box between the two cursor positions you chose with the color and highlight attributes you specified.
Step Action Result
Creating and Using Templates 77
Saving a Template
Saving a Template
ProcedureAfter drawing your template using freehand drawings, lines, and boxes, follow these steps to save the template.
Step Action Result
1 Select File from the Action bar. The File pull-down menu appears.
2 Select Save or Save as from the File pull-down menu and press Enter.
OMEGAVIEW displays the Save as panel.
3 Type the name of your template and press Enter.
OMEGAVIEW displays the Save As panel, which prompts you to assign a template name.
4 Type the template name and press Enter.
OMEGAVIEW displays the Template Properties panel.
5 Type the template description and press Enter.
Note: The date, time, and your user ID have been already been entered under the Template Created section on this panel. If you modify this particular template, OMEGAVIEW will automatically record the new information under the Template Created section.
OMEGAVIEW displays a message telling you that your template has been saved and then returns you to your newly titled template in edit mode.
Saving a Template
78 Using OMEGAVIEW and OMEGAVIEW II for the Enterprise, V3.1.0
Figure–Template Properties panelThe following figure shows the Template Properties panel.
Template Properties Change description . Then press Enter. Template . . . . : World View Version. . . . . : 1 Description. . . . Template Created Date . . . . : 07/26/04 Time . . . . : 11:18:33 User ID. . . : TDTD89 Template Last Modified Date . . . . : Time . . . . : User ID. . . : F1=Help F12=Cancel
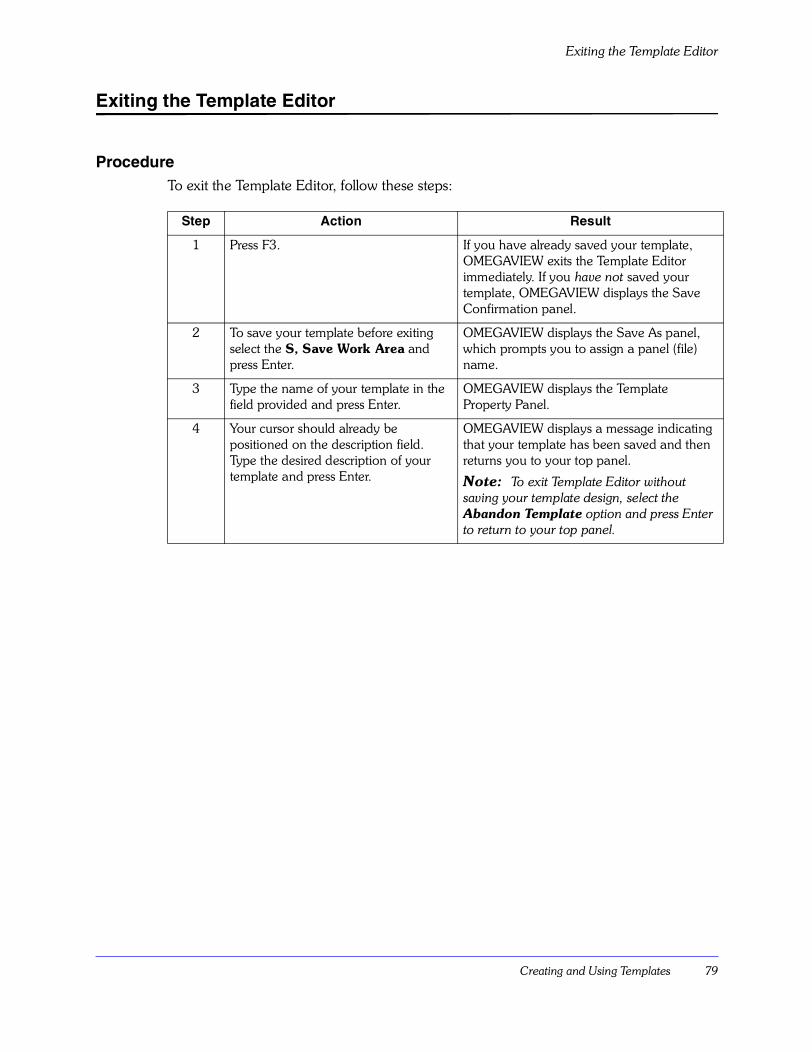
Creating and Using Templates 79
Exiting the Template Editor
Exiting the Template Editor
ProcedureTo exit the Template Editor, follow these steps:
Step Action Result
1 Press F3. If you have already saved your template, OMEGAVIEW exits the Template Editor immediately. If you have not saved your template, OMEGAVIEW displays the Save Confirmation panel.
2 To save your template before exiting select the S, Save Work Area and press Enter.
OMEGAVIEW displays the Save As panel, which prompts you to assign a panel (file) name.
3 Type the name of your template in the field provided and press Enter.
OMEGAVIEW displays the Template Property Panel.
4 Your cursor should already be positioned on the description field. Type the desired description of your template and press Enter.
OMEGAVIEW displays a message indicating that your template has been saved and then returns you to your top panel.
Note: To exit Template Editor without saving your template design, select the Abandon Template option and press Enter to return to your top panel.
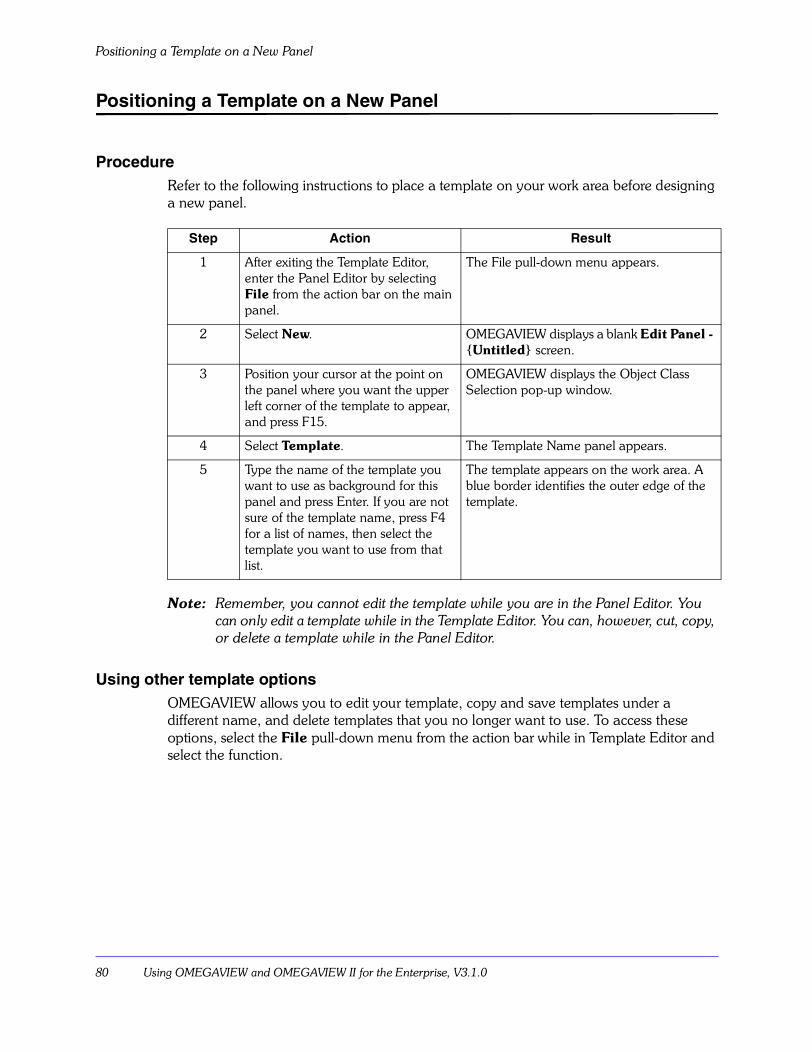
Positioning a Template on a New Panel
80 Using OMEGAVIEW and OMEGAVIEW II for the Enterprise, V3.1.0
Positioning a Template on a New Panel
ProcedureRefer to the following instructions to place a template on your work area before designing a new panel.
Note: Remember, you cannot edit the template while you are in the Panel Editor. You can only edit a template while in the Template Editor. You can, however, cut, copy, or delete a template while in the Panel Editor.
Using other template optionsOMEGAVIEW allows you to edit your template, copy and save templates under a different name, and delete templates that you no longer want to use. To access these options, select the File pull-down menu from the action bar while in Template Editor and select the function.
Step Action Result
1 After exiting the Template Editor, enter the Panel Editor by selecting File from the action bar on the main panel.
The File pull-down menu appears.
2 Select New. OMEGAVIEW displays a blank Edit Panel - {Untitled} screen.
3 Position your cursor at the point on the panel where you want the upper left corner of the template to appear, and press F15.
OMEGAVIEW displays the Object Class Selection pop-up window.
4 Select Template. The Template Name panel appears.
5 Type the name of the template you want to use as background for this panel and press Enter. If you are not sure of the template name, press F4 for a list of names, then select the template you want to use from that list.
The template appears on the work area. A blue border identifies the outer edge of the template.
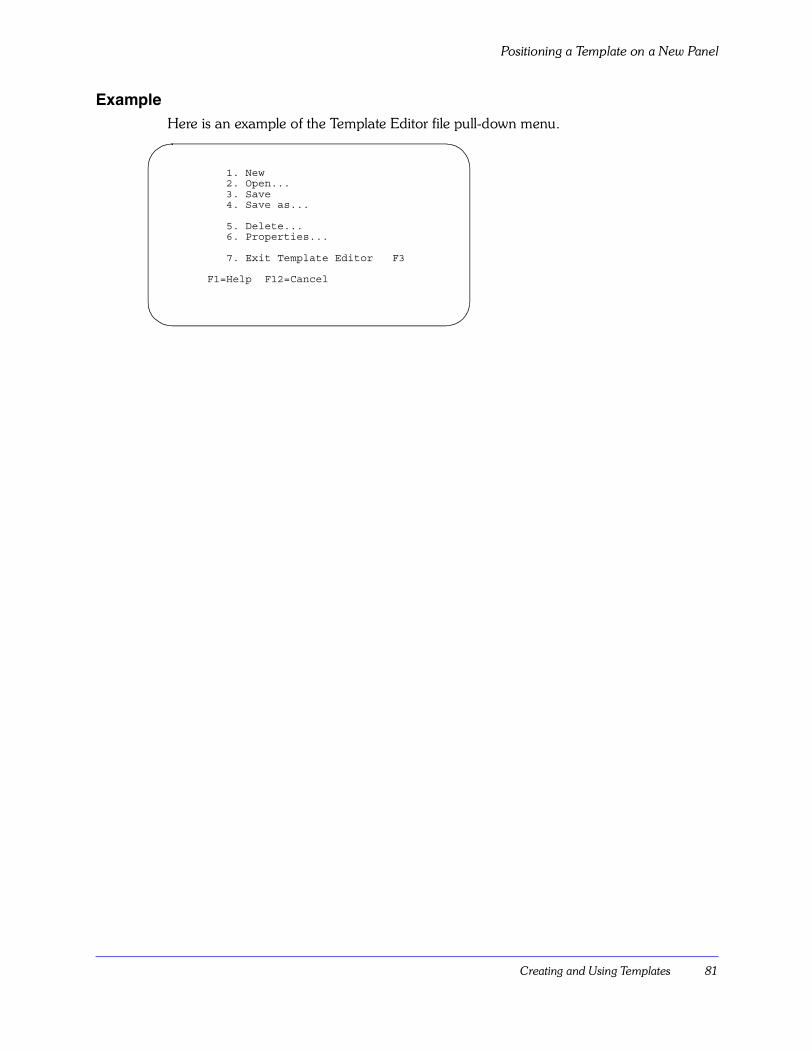
Creating and Using Templates 81
Positioning a Template on a New Panel
ExampleHere is an example of the Template Editor file pull-down menu.
1. New 2. Open... 3. Save 4. Save as... 5. Delete... 6. Properties... 7. Exit Template Editor F3 F1=Help F12=Cancel

Positioning a Template on a New Panel
82 Using OMEGAVIEW and OMEGAVIEW II for the Enterprise, V3.1.0

The Panel Editor 83
The Panel Editor
IntroductionThis chapter explains how to use the objects and features in the Panel Editor.
Chapter ContentsOverview . . . . . . . . . . . . . . . . . . . . . . . . . . . . . . . . . . . . . . . . . . . . . . . . . . . . . . . . . . . . . . . . . .84Using Line and Box Drawings . . . . . . . . . . . . . . . . . . . . . . . . . . . . . . . . . . . . . . . . . . . . . . . . . .86Using Longterm History Status Bars . . . . . . . . . . . . . . . . . . . . . . . . . . . . . . . . . . . . . . . . . . . . . .88Adding Session Names . . . . . . . . . . . . . . . . . . . . . . . . . . . . . . . . . . . . . . . . . . . . . . . . . . . . . . . .89Adding Action Text . . . . . . . . . . . . . . . . . . . . . . . . . . . . . . . . . . . . . . . . . . . . . . . . . . . . . . . . . . .90Adding an Instruction Line . . . . . . . . . . . . . . . . . . . . . . . . . . . . . . . . . . . . . . . . . . . . . . . . . . . . .91Adding Status and Transient Text Objects . . . . . . . . . . . . . . . . . . . . . . . . . . . . . . . . . . . . . . . . . .92
4
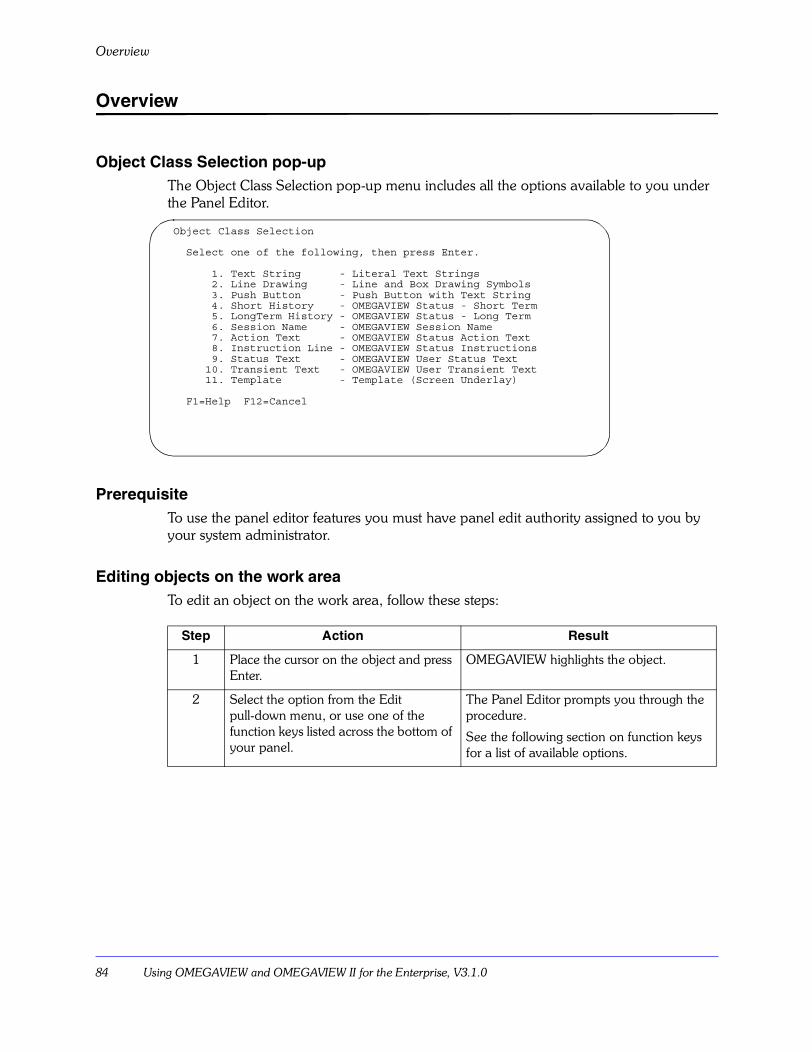
Overview
84 Using OMEGAVIEW and OMEGAVIEW II for the Enterprise, V3.1.0
Overview
Object Class Selection pop-upThe Object Class Selection pop-up menu includes all the options available to you under the Panel Editor.
PrerequisiteTo use the panel editor features you must have panel edit authority assigned to you by your system administrator.
Editing objects on the work areaTo edit an object on the work area, follow these steps:
Step Action Result
1 Place the cursor on the object and press Enter.
OMEGAVIEW highlights the object.
2 Select the option from the Edit pull-down menu, or use one of the function keys listed across the bottom of your panel.
The Panel Editor prompts you through the procedure.
See the following section on function keys for a list of available options.
Object Class Selection Select one of the following, then press Enter. 1. Text String - Literal Text Strings 2. Line Drawing - Line and Box Drawing Symbols 3. Push Button - Push Button with Text String 4. Short History - OMEGAVIEW Status - Short Term 5. LongTerm History - OMEGAVIEW Status - Long Term 6. Session Name - OMEGAVIEW Session Name 7. Action Text - OMEGAVIEW Status Action Text 8. Instruction Line - OMEGAVIEW Status Instructions 9. Status Text - OMEGAVIEW User Status Text 10. Transient Text - OMEGAVIEW User Transient Text 11. Template - Template (Screen Underlay) F1=Help F12=Cancel
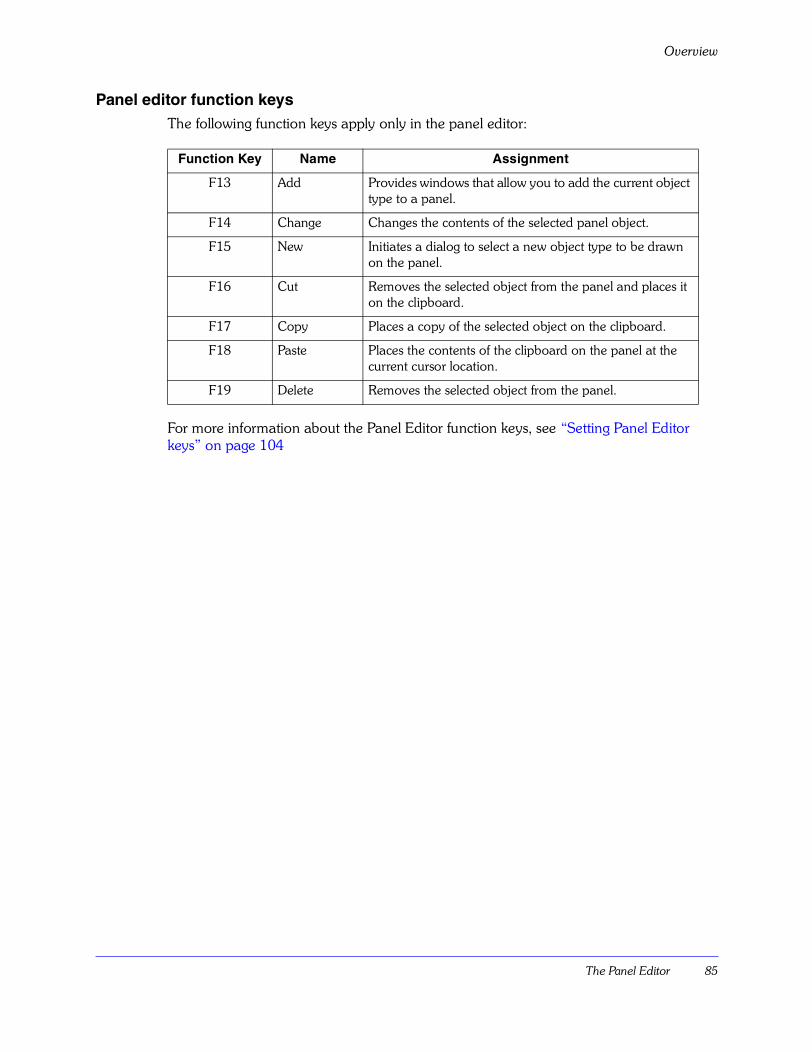
The Panel Editor 85
Overview
Panel editor function keysThe following function keys apply only in the panel editor:
For more information about the Panel Editor function keys, see �Setting Panel Editor keys� on page 104
Function Key Name Assignment
F13 Add Provides windows that allow you to add the current object type to a panel.
F14 Change Changes the contents of the selected panel object.
F15 New Initiates a dialog to select a new object type to be drawn on the panel.
F16 Cut Removes the selected object from the panel and places it on the clipboard.
F17 Copy Places a copy of the selected object on the clipboard.
F18 Paste Places the contents of the clipboard on the panel at the current cursor location.
F19 Delete Removes the selected object from the panel.
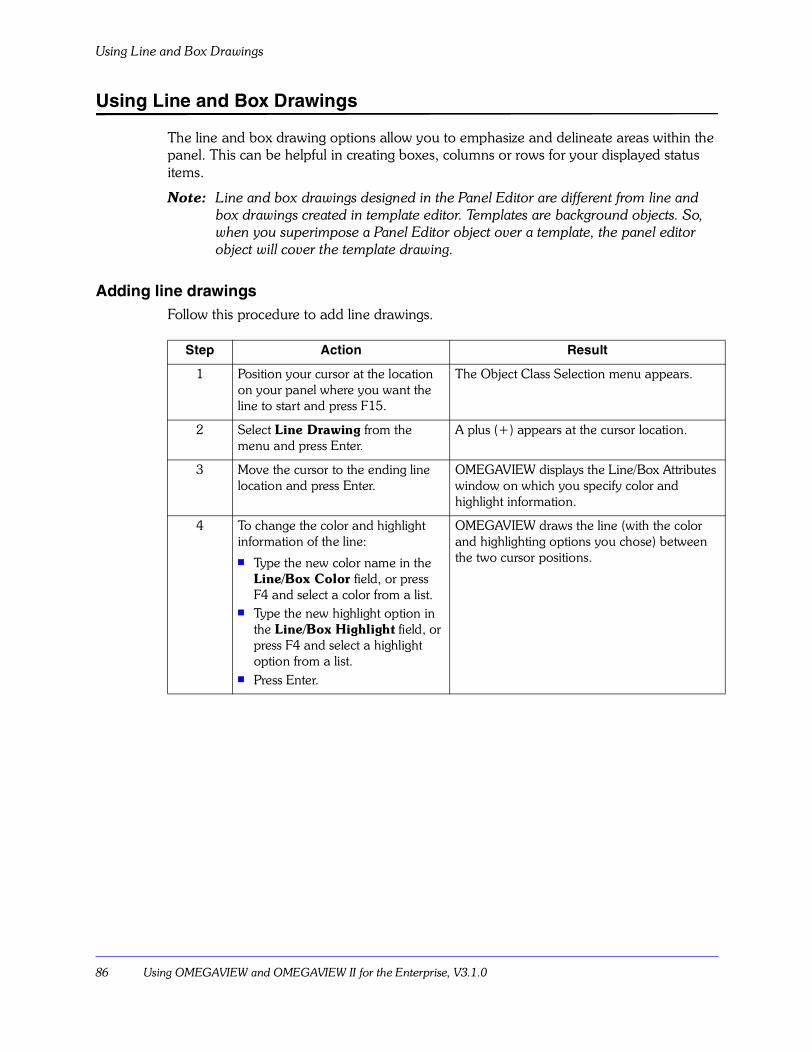
Using Line and Box Drawings
86 Using OMEGAVIEW and OMEGAVIEW II for the Enterprise, V3.1.0
Using Line and Box Drawings
The line and box drawing options allow you to emphasize and delineate areas within the panel. This can be helpful in creating boxes, columns or rows for your displayed status items.
Note: Line and box drawings designed in the Panel Editor are different from line and box drawings created in template editor. Templates are background objects. So, when you superimpose a Panel Editor object over a template, the panel editor object will cover the template drawing.
Adding line drawingsFollow this procedure to add line drawings.
Step Action Result
1 Position your cursor at the location on your panel where you want the line to start and press F15.
The Object Class Selection menu appears.
2 Select Line Drawing from the menu and press Enter.
A plus (+) appears at the cursor location.
3 Move the cursor to the ending line location and press Enter.
OMEGAVIEW displays the Line/Box Attributes window on which you specify color and highlight information.
4 To change the color and highlight information of the line:! Type the new color name in the
Line/Box Color field, or press F4 and select a color from a list.
! Type the new highlight option in the Line/Box Highlight field, or press F4 and select a highlight option from a list.
! Press Enter.
OMEGAVIEW draws the line (with the color and highlighting options you chose) between the two cursor positions.
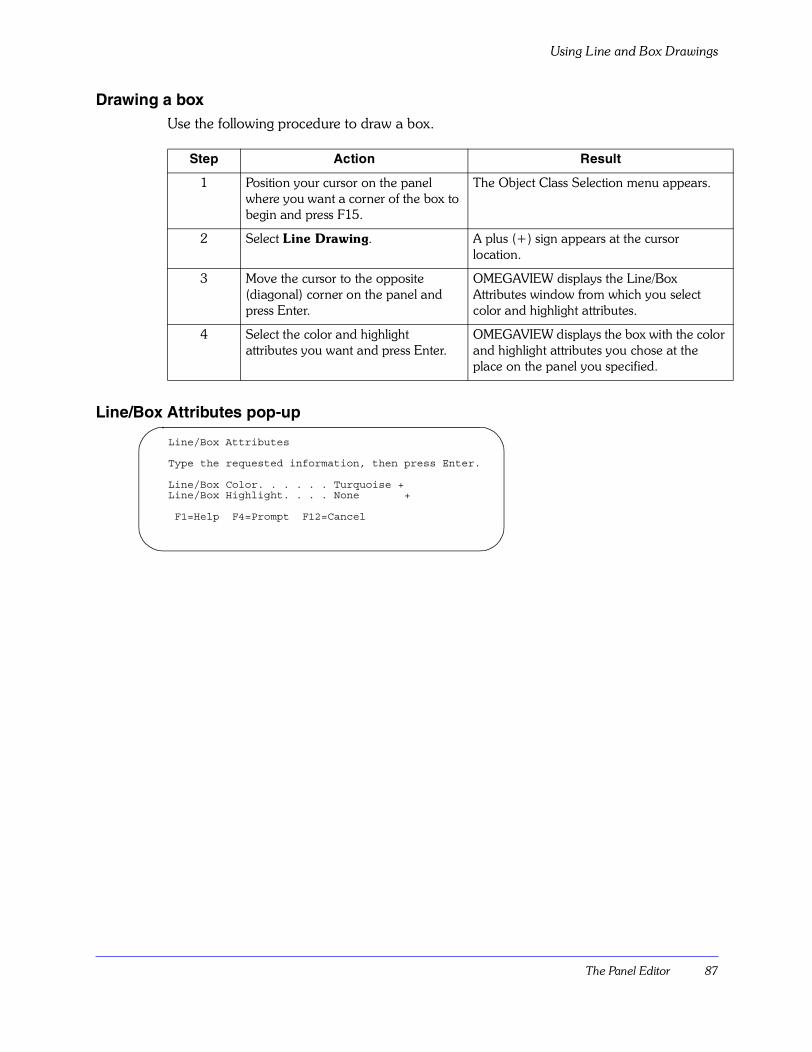
The Panel Editor 87
Using Line and Box Drawings
Drawing a boxUse the following procedure to draw a box.
Line/Box Attributes pop-up
Step Action Result
1 Position your cursor on the panel where you want a corner of the box to begin and press F15.
The Object Class Selection menu appears.
2 Select Line Drawing. A plus (+) sign appears at the cursor location.
3 Move the cursor to the opposite (diagonal) corner on the panel and press Enter.
OMEGAVIEW displays the Line/Box Attributes window from which you select color and highlight attributes.
4 Select the color and highlight attributes you want and press Enter.
OMEGAVIEW displays the box with the color and highlight attributes you chose at the place on the panel you specified.
Line/Box Attributes Type the requested information, then press Enter. Line/Box Color. . . . . . Turquoise + Line/Box Highlight. . . . None + F1=Help F4=Prompt F12=Cancel
Using Longterm History Status Bars
88 Using OMEGAVIEW and OMEGAVIEW II for the Enterprise, V3.1.0
Using Longterm History Status Bars
IntroductionA status bar shows the health of your computing enterprise with a traffic signal-like display of red, green, or yellow lights, depending on the status of the item the bar is linked to.
Most status items are system-derived. As such, they reflect different kinds of system performance data derived from the status data collector sessions specified during the OMEGAVIEW installation and setup procedure. To learn about system-derived status items, and for information on how to add user-defined status items to your status database, see �Defining and Maintaining Status Items� on page 111
A Longterm History bar shows four hours of status information. The bar is broken into four status bars each representing one hour of status. The four bars are further divided into 15 minute segments. Each of these segments displays a green, yellow, or red light based on the worst case status for the item during that 15 minutes. The most recent time appears on the right.
Adding Longterm History statusTo add a Longterm History status bar to a panel, follow the procedure for adding Short History status bars on page 59, but select Longterm History from the Object Class Selection list instead.
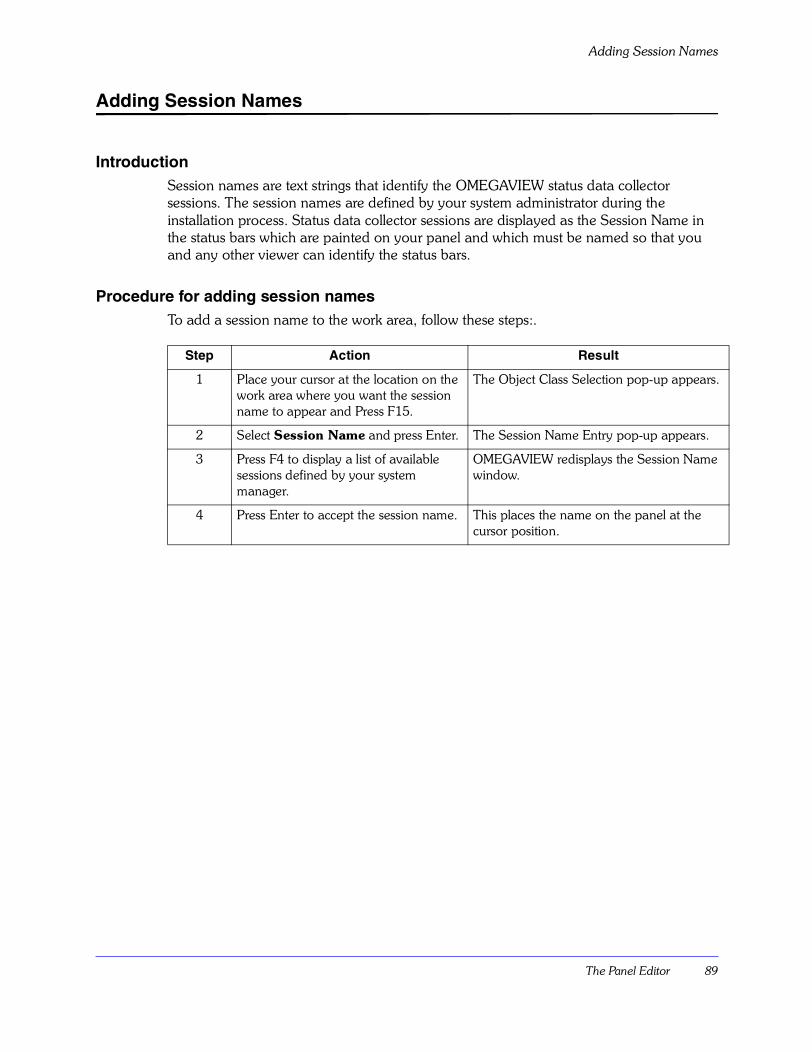
The Panel Editor 89
Adding Session Names
Adding Session Names
IntroductionSession names are text strings that identify the OMEGAVIEW status data collector sessions. The session names are defined by your system administrator during the installation process. Status data collector sessions are displayed as the Session Name in the status bars which are painted on your panel and which must be named so that you and any other viewer can identify the status bars.
Procedure for adding session namesTo add a session name to the work area, follow these steps:.
Step Action Result
1 Place your cursor at the location on the work area where you want the session name to appear and Press F15.
The Object Class Selection pop-up appears.
2 Select Session Name and press Enter. The Session Name Entry pop-up appears.
3 Press F4 to display a list of available sessions defined by your system manager.
OMEGAVIEW redisplays the Session Name window.
4 Press Enter to accept the session name. This places the name on the panel at the cursor position.
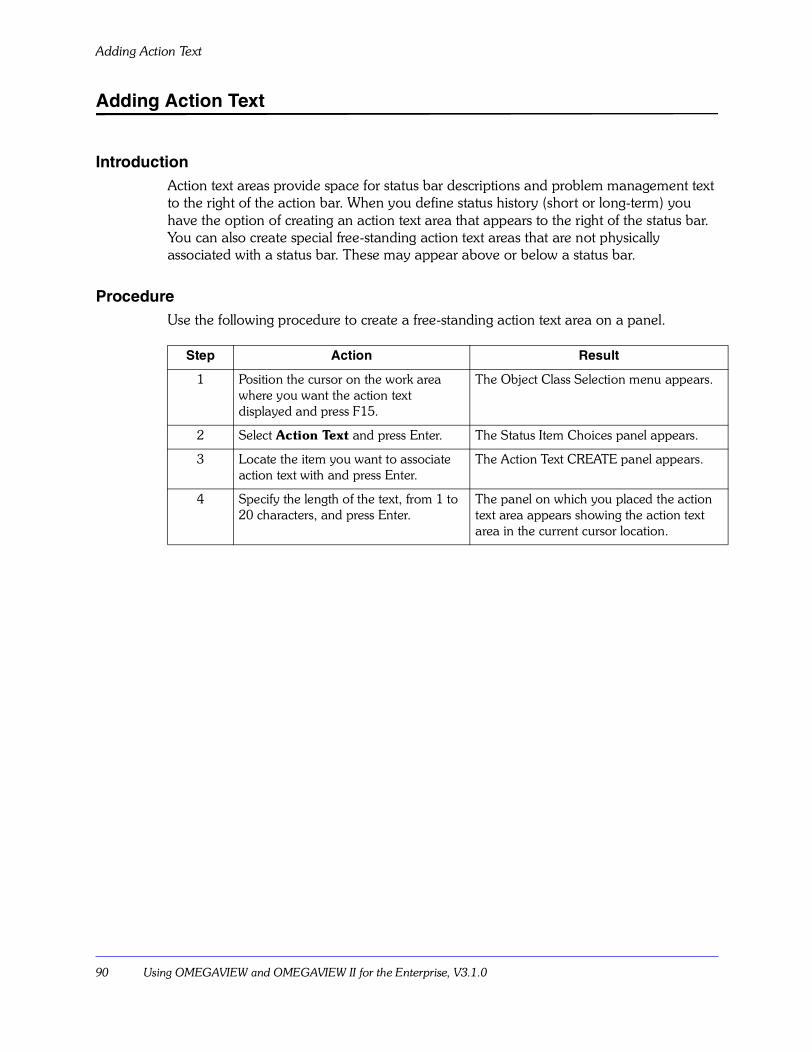
Adding Action Text
90 Using OMEGAVIEW and OMEGAVIEW II for the Enterprise, V3.1.0
Adding Action Text
IntroductionAction text areas provide space for status bar descriptions and problem management text to the right of the action bar. When you define status history (short or long-term) you have the option of creating an action text area that appears to the right of the status bar. You can also create special free-standing action text areas that are not physically associated with a status bar. These may appear above or below a status bar.
ProcedureUse the following procedure to create a free-standing action text area on a panel.
Step Action Result
1 Position the cursor on the work area where you want the action text displayed and press F15.
The Object Class Selection menu appears.
2 Select Action Text and press Enter. The Status Item Choices panel appears.
3 Locate the item you want to associate action text with and press Enter.
The Action Text CREATE panel appears.
4 Specify the length of the text, from 1 to 20 characters, and press Enter.
The panel on which you placed the action text area appears showing the action text area in the current cursor location.
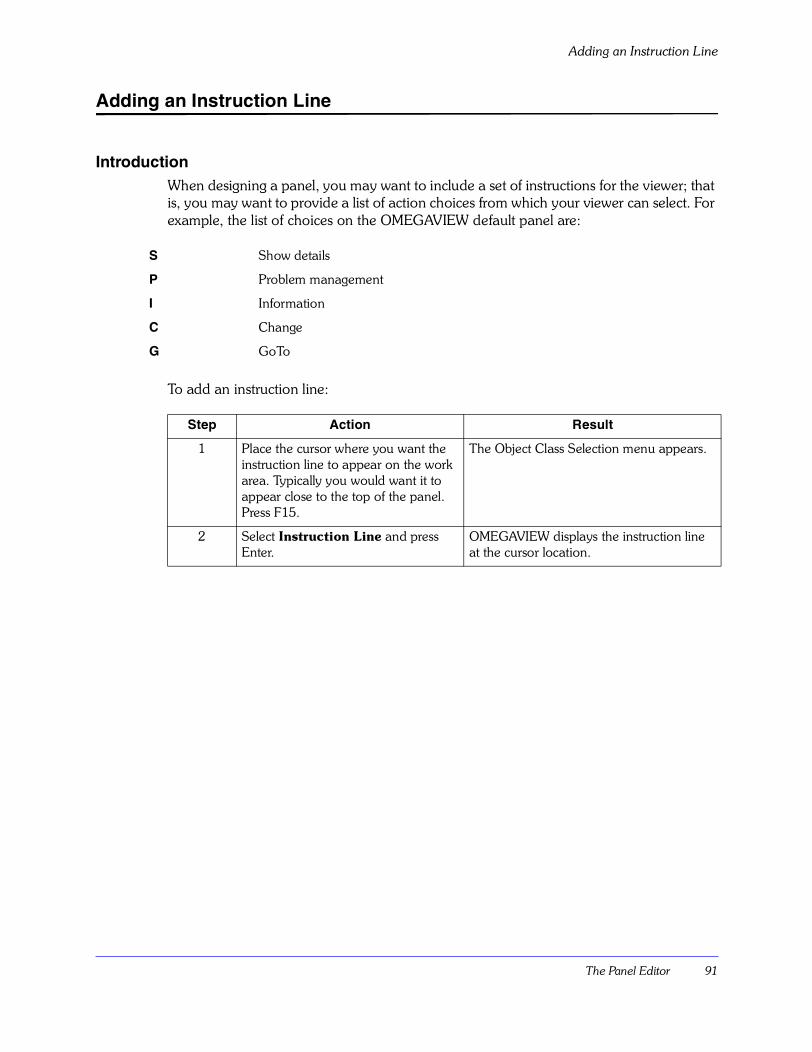
The Panel Editor 91
Adding an Instruction Line
Adding an Instruction Line
IntroductionWhen designing a panel, you may want to include a set of instructions for the viewer; that is, you may want to provide a list of action choices from which your viewer can select. For example, the list of choices on the OMEGAVIEW default panel are:
To add an instruction line:
S Show details
P Problem management
I Information
C Change
G GoTo
Step Action Result
1 Place the cursor where you want the instruction line to appear on the work area. Typically you would want it to appear close to the top of the panel. Press F15.
The Object Class Selection menu appears.
2 Select Instruction Line and press Enter.
OMEGAVIEW displays the instruction line at the cursor location.
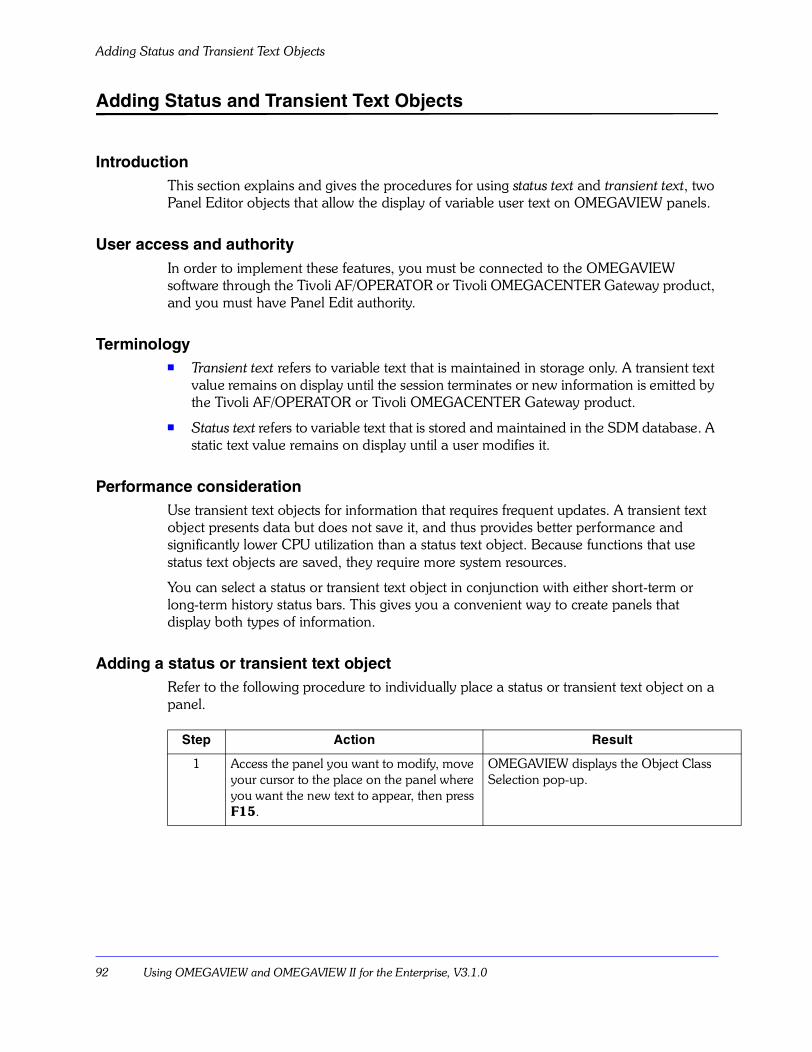
Adding Status and Transient Text Objects
92 Using OMEGAVIEW and OMEGAVIEW II for the Enterprise, V3.1.0
Adding Status and Transient Text Objects
IntroductionThis section explains and gives the procedures for using status text and transient text, two Panel Editor objects that allow the display of variable user text on OMEGAVIEW panels.
User access and authorityIn order to implement these features, you must be connected to the OMEGAVIEW software through the Tivoli AF/OPERATOR or Tivoli OMEGACENTER Gateway product, and you must have Panel Edit authority.
Terminology! Transient text refers to variable text that is maintained in storage only. A transient text
value remains on display until the session terminates or new information is emitted by the Tivoli AF/OPERATOR or Tivoli OMEGACENTER Gateway product.
! Status text refers to variable text that is stored and maintained in the SDM database. A static text value remains on display until a user modifies it.
Performance considerationUse transient text objects for information that requires frequent updates. A transient text object presents data but does not save it, and thus provides better performance and significantly lower CPU utilization than a status text object. Because functions that use status text objects are saved, they require more system resources.
You can select a status or transient text object in conjunction with either short-term or long-term history status bars. This gives you a convenient way to create panels that display both types of information.
Adding a status or transient text objectRefer to the following procedure to individually place a status or transient text object on a panel.
Step Action Result
1 Access the panel you want to modify, move your cursor to the place on the panel where you want the new text to appear, then press F15.
OMEGAVIEW displays the Object Class Selection pop-up.
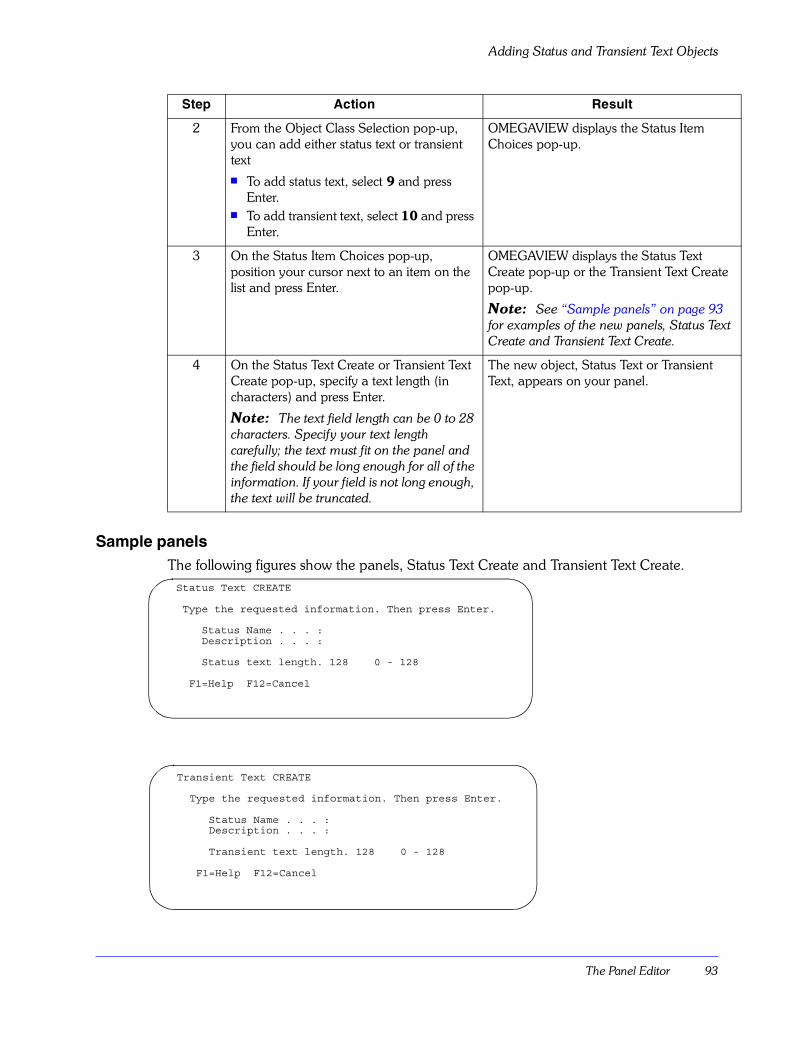
The Panel Editor 93
Adding Status and Transient Text Objects
Sample panelsThe following figures show the panels, Status Text Create and Transient Text Create.
2 From the Object Class Selection pop-up, you can add either status text or transient text! To add status text, select 9 and press
Enter.! To add transient text, select 10 and press
Enter.
OMEGAVIEW displays the Status Item Choices pop-up.
3 On the Status Item Choices pop-up, position your cursor next to an item on the list and press Enter.
OMEGAVIEW displays the Status Text Create pop-up or the Transient Text Create pop-up.
Note: See �Sample panels� on page 93 for examples of the new panels, Status Text Create and Transient Text Create.
4 On the Status Text Create or Transient Text Create pop-up, specify a text length (in characters) and press Enter.
Note: The text field length can be 0 to 28 characters. Specify your text length carefully; the text must fit on the panel and the field should be long enough for all of the information. If your field is not long enough, the text will be truncated.
The new object, Status Text or Transient Text, appears on your panel.
Step Action Result
Status Text CREATE Type the requested information. Then press Enter. Status Name . . . : Description . . . : Status text length. 128 0 - 128 F1=Help F12=Cancel
Transient Text CREATE Type the requested information. Then press Enter. Status Name . . . : Description . . . : Transient text length. 128 0 - 128 F1=Help F12=Cancel
Adding Status and Transient Text Objects
94 Using OMEGAVIEW and OMEGAVIEW II for the Enterprise, V3.1.0
Annotating a history bar with status or transient textUse the following procedure to add status text or transient text to an existing panel in conjunction with either the short-term or long-term status history bar.
Step Action Result
1 Access the panel you want to modify, move your cursor to the place on the panel where you want the new text to appear, then press F15.
OMEGAVIEW displays the Object Class Selection pop-up.
2 From the Object Class Selection pop-up you can choose either Short History or LongTerm History.! To add a Short History status bar, select 4
and press Enter.! To add LongTerm History status bar,
select 5 and press Enter.
OMEGAVIEW displays the Status Item Choices pop-up.
3 On the Status Item Choices pop-up, position your cursor next to an item on the list, type a slash (/), and press Enter.
OMEGAVIEW displays the Status Bar Create pop-up
Note: See �Sample panels� on page 95 for examples of the modified panels, Status Bar Create and Status Bar Change.
4 On the Status Bar Create pop-up you can specify both status text and/or transient text! To add a status text field, specify text
length (in characters) next to the status text length option and press Enter.
! To add a transient text field, specify text length (in characters) next to the transient text length option and press Enter.
Note: The text field length can be 0 to 128 characters. Specify your text length carefully; the text must fit on the panel and the field should be long enough for all of the information. If your field is not long enough, the text will be truncated.
A short or long-term history status bar appears with a status and/or transient text field beside it.
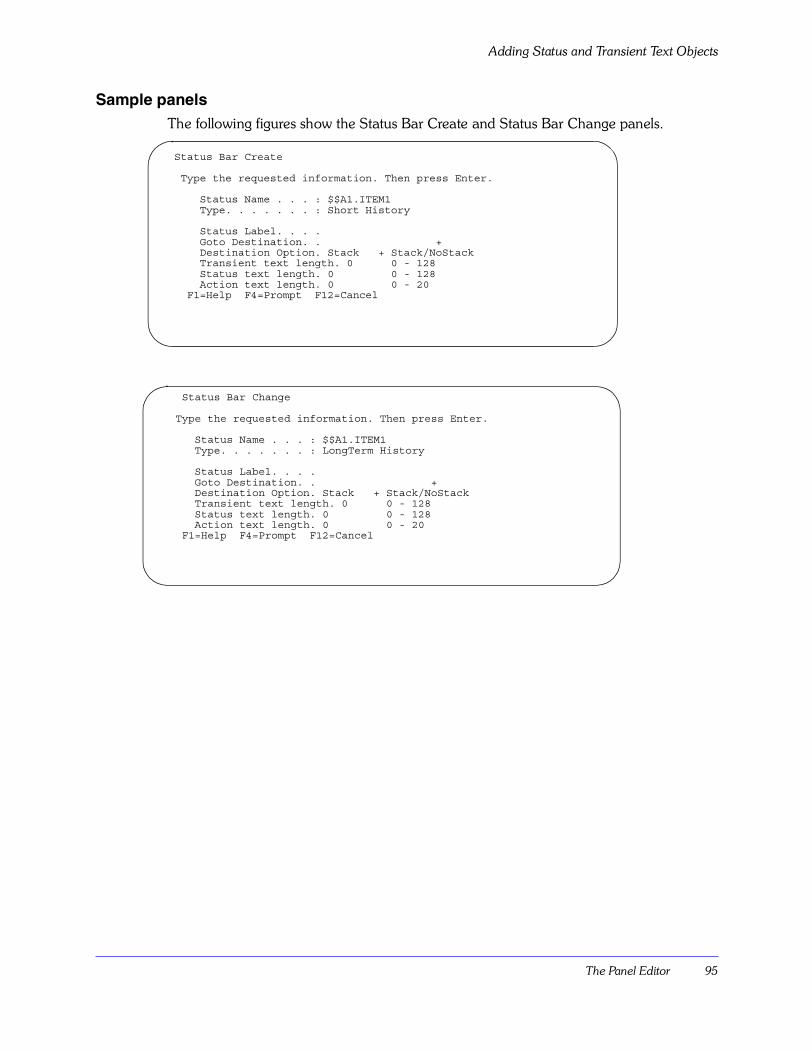
The Panel Editor 95
Adding Status and Transient Text Objects
Sample panelsThe following figures show the Status Bar Create and Status Bar Change panels.
Status Bar Create Type the requested information. Then press Enter. Status Name . . . : $$A1.ITEM1 Type. . . . . . . : Short History Status Label. . . . Goto Destination. . + Destination Option. Stack + Stack/NoStack Transient text length. 0 0 - 128 Status text length. 0 0 - 128 Action text length. 0 0 - 20 F1=Help F4=Prompt F12=Cancel
Status Bar Change Type the requested information. Then press Enter. Status Name . . . : $$A1.ITEM1 Type. . . . . . . : LongTerm History Status Label. . . . Goto Destination. . + Destination Option. Stack + Stack/NoStack Transient text length. 0 0 - 128 Status text length. 0 0 - 128 Action text length. 0 0 - 20 F1=Help F4=Prompt F12=Cancel
Adding Status and Transient Text Objects
96 Using OMEGAVIEW and OMEGAVIEW II for the Enterprise, V3.1.0
Setting OMEGAVIEW Options 97
Setting OMEGAVIEW Options
IntroductionThis chapter explains the options available to you for customizing OMEGAVIEW.
Chapter ContentsSetting Preferences . . . . . . . . . . . . . . . . . . . . . . . . . . . . . . . . . . . . . . . . . . . . . . . . . . . . . . . . . . .98Setting Status Display Options . . . . . . . . . . . . . . . . . . . . . . . . . . . . . . . . . . . . . . . . . . . . . . . . .102Setting Panel Editor keys . . . . . . . . . . . . . . . . . . . . . . . . . . . . . . . . . . . . . . . . . . . . . . . . . . . . .104Setting Switch/Zoom Options . . . . . . . . . . . . . . . . . . . . . . . . . . . . . . . . . . . . . . . . . . . . . . . . . .106Session Logon Data . . . . . . . . . . . . . . . . . . . . . . . . . . . . . . . . . . . . . . . . . . . . . . . . . . . . . . . . .109
5
Setting Preferences
98 Using OMEGAVIEW and OMEGAVIEW II for the Enterprise, V3.1.0
Setting Preferences
IntroductionOne of the ways to customize your system is by setting preferences. The preference options affect the appearance of your OMEGAVIEW panels and determine things like where the function keys appear or the format of the date/time information. The settings you choose are saved in a permanent profile and retrieved each time you log onto the application. There are 14 different preference options that you can change. To learn how to choose between the different preference settings, refer to the table that follows. The sections that follow the table describe each feature in detail.
ProcedureTo set your preferences, refer to the following procedure.
Step Action Result
1 Select Options from the action bar and press Enter.
The Options pull-down menu appears.
2 Select Preferences from the menu and press Enter.
The Preferences panel appears.
3 Place your cursor on the field of the option you want to change and press F4.
OMEGAVIEW toggles between the two available choices, or displays a list of valid options.
4 Type any desired changes and then press Enter to save the new values.
OMEGAVIEW saves your settings in a permanent profile.
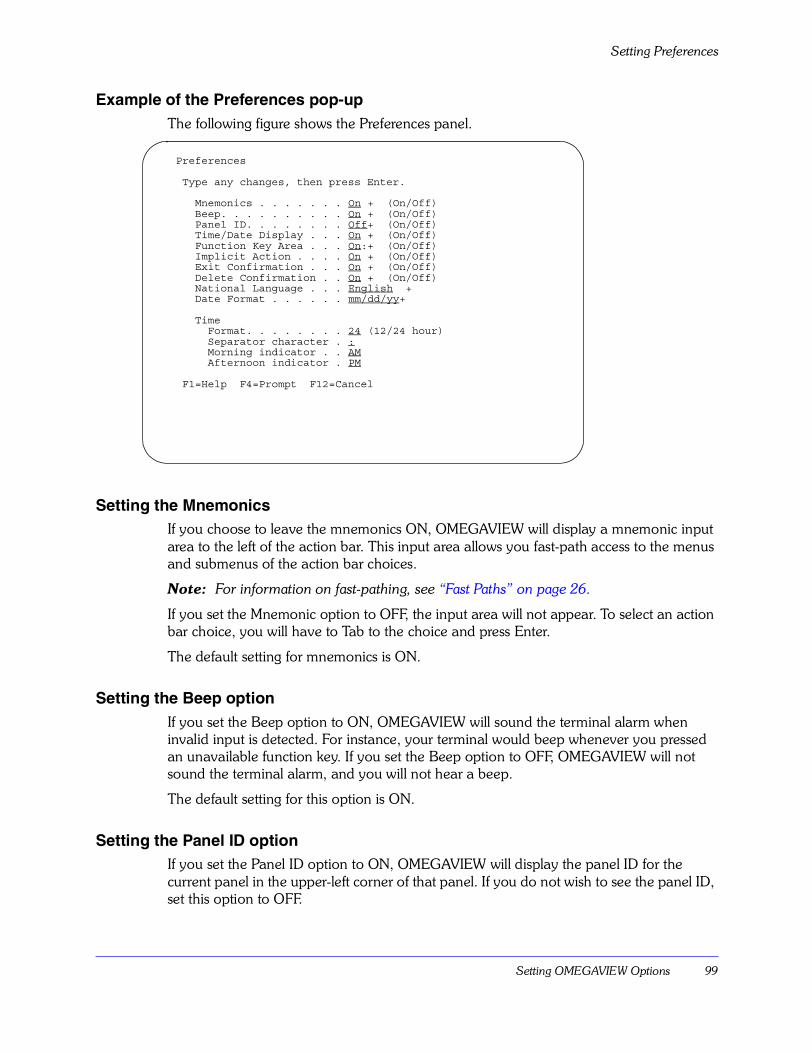
Setting OMEGAVIEW Options 99
Setting Preferences
Example of the Preferences pop-upThe following figure shows the Preferences panel.
Setting the MnemonicsIf you choose to leave the mnemonics ON, OMEGAVIEW will display a mnemonic input area to the left of the action bar. This input area allows you fast-path access to the menus and submenus of the action bar choices.
Note: For information on fast-pathing, see �Fast Paths� on page 26.
If you set the Mnemonic option to OFF, the input area will not appear. To select an action bar choice, you will have to Tab to the choice and press Enter.
The default setting for mnemonics is ON.
Setting the Beep optionIf you set the Beep option to ON, OMEGAVIEW will sound the terminal alarm when invalid input is detected. For instance, your terminal would beep whenever you pressed an unavailable function key. If you set the Beep option to OFF, OMEGAVIEW will not sound the terminal alarm, and you will not hear a beep.
The default setting for this option is ON.
Setting the Panel ID optionIf you set the Panel ID option to ON, OMEGAVIEW will display the panel ID for the current panel in the upper-left corner of that panel. If you do not wish to see the panel ID, set this option to OFF.
Preferences Type any changes, then press Enter. Mnemonics . . . . . . . On + (On/Off) Beep. . . . . . . . . . On + (On/Off) Panel ID. . . . . . . . Off+ (On/Off) Time/Date Display . . . On + (On/Off) Function Key Area . . . On:+ (On/Off) Implicit Action . . . . On + (On/Off) Exit Confirmation . . . On + (On/Off) Delete Confirmation . . On + (On/Off) National Language . . . English + Date Format . . . . . . mm/dd/yy+ Time Format. . . . . . . . 24 (12/24 hour) Separator character . : Morning indicator . . AM Afternoon indicator . PM F1=Help F4=Prompt F12=Cancel
Setting Preferences
100 Using OMEGAVIEW and OMEGAVIEW II for the Enterprise, V3.1.0
Note: You might need to provide the panel ID if you contact IBM Software Support to report any problems with a panel.
The default setting for this option is OFF.
Setting the Time/Date DisplayIf you set the Time/Date Display option to ON, OMEGAVIEW displays the current time and date on the right side of the action bar separator line. Set the option to OFF if you do not want the current time and date to appear.
The default setting is ON.
Setting the Function Key AreaTo display the currently available function keys on the bottom one or two lines of the display panel, set the Function Key Area option to ON. If you turn the option OFF, OMEGAVIEW does not display the function key area. In some cases, you may want to set the option to OFF to allow for the display of different information.
The default setting for this option is ON.
Setting Implicit ActionIf you set the Implicit Action option to ON, OMEGAVIEW allows implicit action for selectable items on a display panel. This means that when you press Enter with the cursor on an entry field, a predefined action occurs.
If you turn this option OFF, you will be required to type an action code into the entry field on a display panel item in order for an action to occur.
The default setting for this feature is ON.
Setting Exit ConfirmationSet the Exit Confirmation option to ON and OMEGAVIEW provides a prompt to confirm an exit from the current application.
The default setting for this feature is ON.
Setting Delete ConfirmationIf you set the Delete Confirmation option to ON, OMEGAVIEW provides a prompt to confirm any delete action that you select.
The default setting for this feature is ON.
Choosing the Date FormatTo select the date format, type the format you wish to use for your session in the field provided. Or, you may press F4 (Prompt) for a list of the valid formats and then select one from that display.
Setting OMEGAVIEW Options 101
Setting Preferences
Choosing the Time FormatSpecify either the 12-hour or 24-hour time format by selecting 12 or 24 for this option. You can press F4 (Prompt) to toggle to your choice.
The default setting is 24.
Choosing the Time Separator characterThis option allows you to specify a character that will be inserted between the hours, minutes, and seconds portion of the time stamp. The default value is a colon (:), which will display as hh:mm:ss. However, any character is valid.
Specifying the Time Morning indicatorThis option allows you to specify two characters that OMEGAVIEW will display during the morning hours when the 12-hour Time Format is selected. The default value is AM. However, any two characters are valid.
Specifying the Time Afternoon indicatorThis option lets you specify two characters that OMEGAVIEW will display during afternoon hours when the 12-hour Time Format is selected.
The default value is PM. However, any two characters are valid.
Setting Status Display Options
102 Using OMEGAVIEW and OMEGAVIEW II for the Enterprise, V3.1.0
Setting Status Display Options
IntroductionThe status display options window, under the main Options pull-down menu, allows you to customize these OMEGAVIEW terminal display options:
! Startup panel name
! Panel automatic update interval
! Beep on critical status
! Beep on lost session
! Change default show details to GoTo
! Action-in-progress indicator
Example of Status Display Options windowThe following figure shows the Status Display Options pop-up window.
The sections that follow describe each of these application options in detail.
Choosing the startup panel nameOMEGAVIEW provides a default system status panel, named $DFLT1. By default, when users log onto OMEGAVIEW, they see this default system status panel. The startup panel name field allows you to specify the name of the panel you want displayed when you log onto OMEGAVIEW. For example, you can choose to display a panel that has been custom designed for your site. Simply specify the desired name in the entry field. If you choose not to specify a startup panel name, OMEGAVIEW, displays the default panel for your installation.
To see a list of all the panels that are available in your installation, press the F4 (Prompt) key.
Status Display Options Type the requested information, then press Enter. Startup panel name . . . . . . . . . . _$DFLT1_________+ Panel automatic update interval . . . . 60 0, 15-999 sec. Beep on critical status . . . . . . . . No + Yes/No Beep on lost session . . . . . . . . . No + Yes/No Change default Show details to GoTo . . No + Yes/No Action-in-progress indicator . . . . . ! F1=Help F4=Prompt F12=Cancel

Setting OMEGAVIEW Options 103
Setting Status Display Options
Setting the Panel Automatic Update IntervalWhile you are viewing any OMEGAVIEW panel, the panel is in automatic update mode. This means that the information shown is updated periodically without any action on your part.
The Panel Automatic Update Interval on the Status Display Options pop-up allows you to specify the automatic update interval for your terminal. To set the value, specify any number between 15 and 999. This value determines the number of seconds between automatic panel refreshes. To turn off the automatic update, specify 0.
The default value for this field is 60 seconds.
Setting Beep on Critical StatusThis field lets you choose whether or not you want to hear a beep when there are any critical status indicators on the current panel. This is a Yes/No option. Specify Yes if you want to hear a beep. The default value is Yes.
Setting Beep on Lost SessionSpecify Yes if you want a beep tone to sound when any of the status indicators on your current panel are based on a status data collection session that is no longer responding to requests for data.
The default setting for this field is Yes.
Changing the default action codeThis option allows you to change the default action code from S=Show Details to G=GoTo on your startup panel. This is a Yes/No option.
The default setting for this field is No.
Setting the Action-in-progress IndicatorThis option allows you to specify the character that will appear inside a status bar to indicate that corrective action is being taken.
The default setting for this field is the exclamation point (!). However, any character is valid.
Setting Panel Editor keys
104 Using OMEGAVIEW and OMEGAVIEW II for the Enterprise, V3.1.0
Setting Panel Editor keys
IntroductionThe Panel Editor Keys window (option K, Panel editor keys) under the Options action bar pull-down menu lets you change the settings for the panel editor fast-path keys.
Note: For more information on the Panel Editor see �Creating OMEGAVIEW Panels� on page 39 and �The Panel Editor� on page 83.
User authority requiredOnly users with Panel/Template edit authority can view and access the Panel Editor Key pop-up shown in this section
Example of Panel Editor Keys pop-up
ProcedureTo change the name of an existing key:
! Type the name change over the existing key; then press Enter.
Add object keyThis Panel Editor key lets you create another of the currently selected object type. The Panel Editor adds this object to the work area at the cursor location when you press the Add key.
The default setting for this key is F13.
Change object keyThis Panel Editor key allows you to change the information that was used when an object was created and placed on the work area.
The default setting for this key is F14.
Panel Editor Keys Type the requested information, then press Enter. Add object key . . . . . . . F13 F13-F24 Change object key . . . . . F14 “ New object key . . . . . . . F15 “ Cut object key . . . . . . . F16 “ Copy object key . . . . . . F17 “ Paste object key . . . . . . F18 “ Delete object key . . . . . F19 “ F1=Help F12=Cancel
Setting OMEGAVIEW Options 105
Setting Panel Editor keys
New object keyThis Panel Editor key allows you to specify the type of object that you wish to draw on the work area. The Panel Editor presents you with a list of valid object types. After you have selected an object type, the Panel Editor draws that object on the work area at the current cursor position.
The default setting for this key is F15.
Cut object keyThis Panel Editor key allows you to cut (remove from the work area) any object under the cursor. The Panel Editor places the cut object in the clipboard.
The default setting for this key is F16.
Copy object keyThis Panel Editor key lets you place a copy of the object under the cursor on the clipboard.
The default setting for this key is F17.
Paste object keyThis Panel Editor key lets you place a copy of the clipboard object onto the work area at the current cursor position.
The default setting for this key is F18.
Delete object keyThis Panel Editor key lets you delete the object at the current cursor position. The Panel Editor does not place a copy of this object on the clipboard.
The default setting for this key is F19.
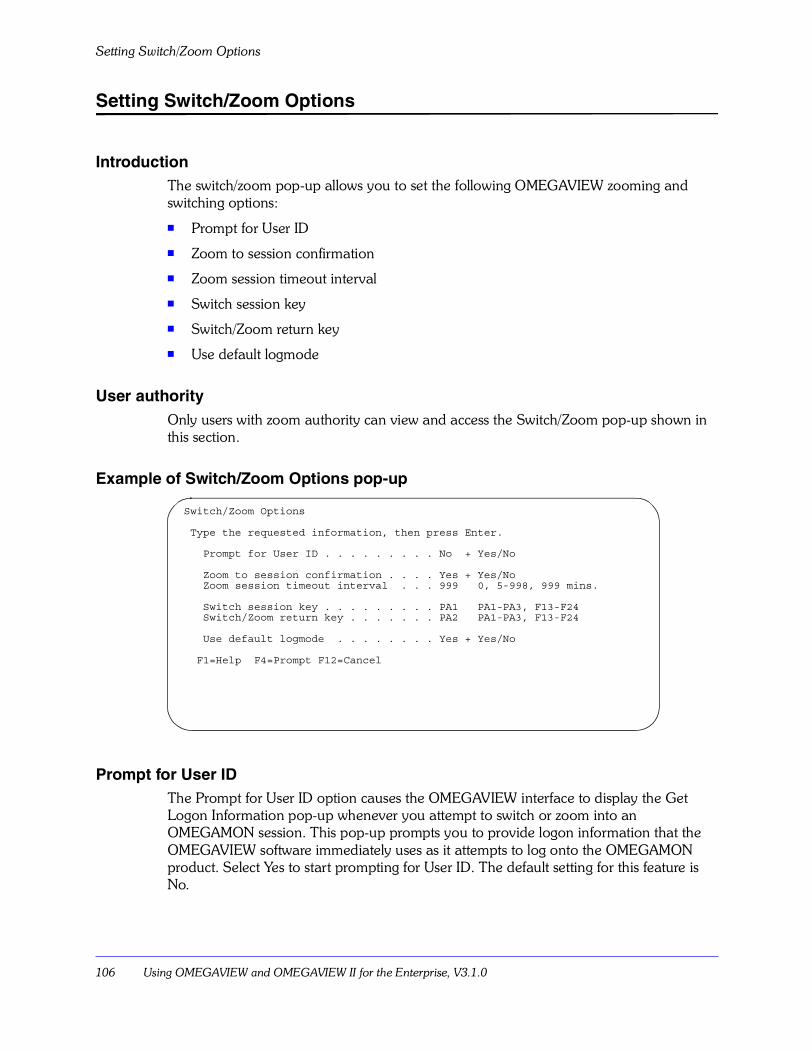
Setting Switch/Zoom Options
106 Using OMEGAVIEW and OMEGAVIEW II for the Enterprise, V3.1.0
Setting Switch/Zoom Options
IntroductionThe switch/zoom pop-up allows you to set the following OMEGAVIEW zooming and switching options:
! Prompt for User ID
! Zoom to session confirmation
! Zoom session timeout interval
! Switch session key
! Switch/Zoom return key
! Use default logmode
User authorityOnly users with zoom authority can view and access the Switch/Zoom pop-up shown in this section.
Example of Switch/Zoom Options pop-up
Prompt for User IDThe Prompt for User ID option causes the OMEGAVIEW interface to display the Get Logon Information pop-up whenever you attempt to switch or zoom into an OMEGAMON session. This pop-up prompts you to provide logon information that the OMEGAVIEW software immediately uses as it attempts to log onto the OMEGAMON product. Select Yes to start prompting for User ID. The default setting for this feature is No.
Switch/Zoom Options Type the requested information, then press Enter. Prompt for User ID . . . . . . . . . No + Yes/No Zoom to session confirmation . . . . Yes + Yes/No Zoom session timeout interval . . . 999 0, 5-998, 999 mins. Switch session key . . . . . . . . . PA1 PA1-PA3, F13-F24 Switch/Zoom return key . . . . . . . PA2 PA1-PA3, F13-F24 Use default logmode . . . . . . . . Yes + Yes/No F1=Help F4=Prompt F12=Cancel
Setting OMEGAVIEW Options 107
Setting Switch/Zoom Options
For more information about this feature see �Starting or Stopping Prompting for User ID� on page 132.
Zoom to session confirmationThis field lets you choose whether or not you want to see a prompt before OMEGAVIEW zooms you to the session that controls the status bar you are analyzing. The prompt is the �Zoom to Session� pop-up that provides a keyboard input area where you can override the default zoom destination from a list of supported destinations.
This is a Yes/No option. Specify Yes if you want to be prompted. The default value is No.
For more information on zoomed sessions, see �Using the Zoom Feature� on page 143. For specific information on the zoom to session confirmation feature, see �Using the Zoom-to-Session Confirmation Option� on page 144.
Setting the Zoom Session Timeout IntervalThis field allows you to specify the maximum amount of time (in minutes) after which the sessions that you have zoomed into are logged off.
To set the timeout interval for logging off unused zoom sessions, specify any value from 5 to 998 minutes.
If you do not wish your sessions to timeout, choose the default value for this field, which is 999. Or, if you wish to terminate the zoomed session as soon as you return to OMEGAVIEW (using the PA2 key), specify 0.
Note: You may not have the authority to change the default value for this timeout interval. Your system administrator sets the default. Contact your system administrator if the default does not meet your requirements and you do not have the authority to change the default values.
Switch session keyThis key issues a pop-up menu of sessions currently defined in the Configuration Manager. You can switch to any session on this menu without having to first return to OMEGAVIEW. The Switch Session Key functions from any OMEGAMON panel, and from the OMEGAVIEW System Status panel.
The default setting for this key is PA1.
Switch/Zoom Return keyThis key lets you return to the OMEGAVIEW interface after you have switched or zoomed into an OMEGAMON session. Apart from ending your OMEGAMON session, it is the only way you can return to the OMEGAVIEW interface after switching or zooming to an OMEGAMON session.
The default setting for this key is PA2.
Setting Switch/Zoom Options
108 Using OMEGAVIEW and OMEGAVIEW II for the Enterprise, V3.1.0
Use default logmodeWhen zooming or switching, the OMEGAVIEW software establishes a VTAM LU-2 session with the OMEGAMON product you select. During that switch or zoom process, the OMEGAVIEW software provides a logon mode table name (logmode) that matches the physical characteristics of your terminal (for example, number of display lines) to the OMEGAMON application you are switching or zooming to. The OMEGAMON products can then create and send display panels that match the particular terminal device type you are using.
This feature is a Yes/No option. Specify Yes to use the default logmode table entry name (for example, SNX32702) for your device type. Specify No to use the logmode table entry name defined for your terminal by your data center (for example, D4A32782).
Note: If you specify a VTAM logmode when you log onto the OMEGAVIEW interface, that specified logmode is used regardless of whether the use default logmode option is set to Yes or No.
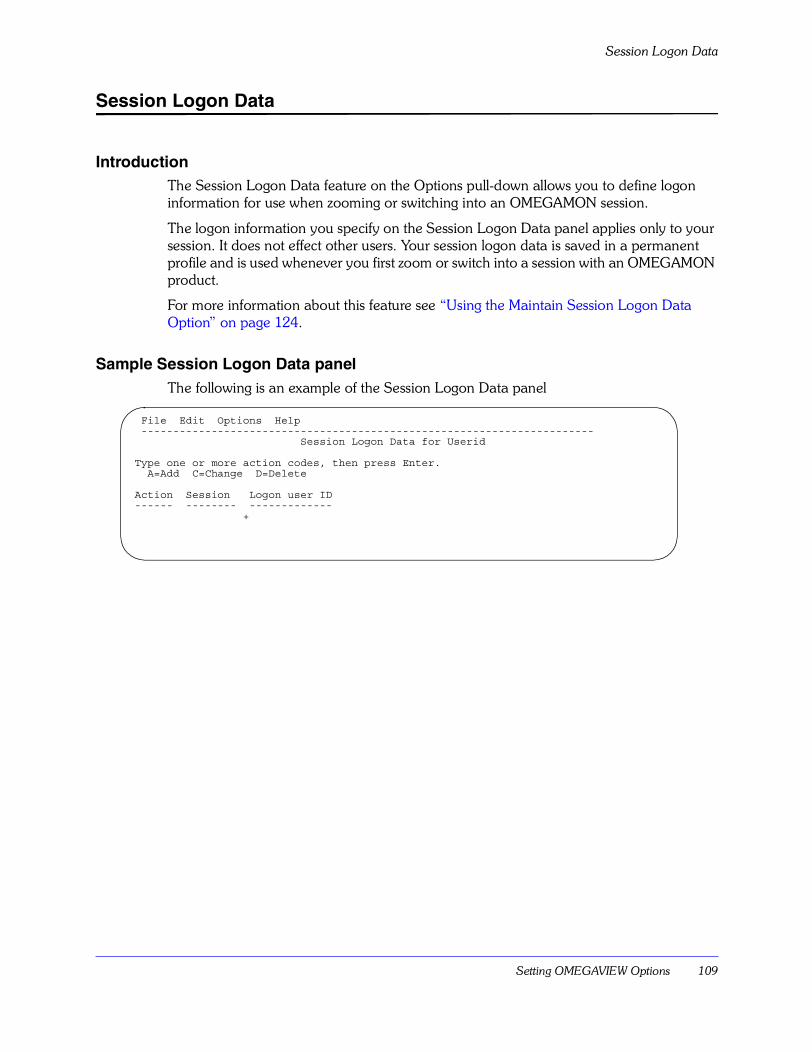
Setting OMEGAVIEW Options 109
Session Logon Data
Session Logon Data
IntroductionThe Session Logon Data feature on the Options pull-down allows you to define logon information for use when zooming or switching into an OMEGAMON session.
The logon information you specify on the Session Logon Data panel applies only to your session. It does not effect other users. Your session logon data is saved in a permanent profile and is used whenever you first zoom or switch into a session with an OMEGAMON product.
For more information about this feature see �Using the Maintain Session Logon Data Option� on page 124.
Sample Session Logon Data panelThe following is an example of the Session Logon Data panel
File Edit Options Help ----------------------------------------------------------------------- Session Logon Data for Userid Type one or more action codes, then press Enter. A=Add C=Change D=Delete Action Session Logon user ID------ -------- ------------- +
Session Logon Data
110 Using OMEGAVIEW and OMEGAVIEW II for the Enterprise, V3.1.0
Defining and Maintaining Status Items 111
Defining and Maintaining Status Items
IntroductionThis chapter explains how to use status items and rollups to show system and application status.
Chapter ContentsOverview . . . . . . . . . . . . . . . . . . . . . . . . . . . . . . . . . . . . . . . . . . . . . . . . . . . . . . . . . . . . . . . . .112Adding a Status Item or Rollup . . . . . . . . . . . . . . . . . . . . . . . . . . . . . . . . . . . . . . . . . . . . . . . . .113Changing a Status Item . . . . . . . . . . . . . . . . . . . . . . . . . . . . . . . . . . . . . . . . . . . . . . . . . . . . . .117Deleting a Status Item. . . . . . . . . . . . . . . . . . . . . . . . . . . . . . . . . . . . . . . . . . . . . . . . . . . . . . . .118Linking Status Items . . . . . . . . . . . . . . . . . . . . . . . . . . . . . . . . . . . . . . . . . . . . . . . . . . . . . . . . .119Using the Cross-Reference Option . . . . . . . . . . . . . . . . . . . . . . . . . . . . . . . . . . . . . . . . . . . . . .121
6
Overview
112 Using OMEGAVIEW and OMEGAVIEW II for the Enterprise, V3.1.0
Overview
Most entries in the status database are system-derived. That is, different status items reflect different kinds of system performance data derived from the status data collector sessions specified during the installation and setup procedure. These items, converted to status values, are displayed as status bars on panels. The status bars are assigned colors based on threshold values set by your system administrator. As these values change, so can the color of the status bar.
You can define a status item as either a basic (single) or a rollup. A rollup contains more than one status item, either basic or other rollups, or both. A rollup shows the worst case status of its combined basic and rollup status item components. If even one of its components shows a red or yellow status light, break down the rollup to determine the severity of the status item condition.
Status item typesThere are two types of status items: system-derived and user-defined. There is an important difference between system-derived status items and user-defined basic status items: system-derived status items are created and updated automatically by the system. The status information is accumulated by the status data collector and is reflected in the status bars displayed on panels. User-defined status items, however, represent some entity or unit that you may want to display on a panel as a status bar.
Status item usage scenarioYou might want to display a panel of numbered status bars that represents an operations bulletin board. Each status bar (status item) can have an action text area to the right of the bar into which the operator types information. Next to one status bar, the operator types printer down - 1 hr. and next to another status bar, the message Main. at 22:00. These items, unlike sessions, are not sampled by a status data collector. Since these user-defined status items are not sampled, the status bar color does not change automatically. There is no system-derived data corresponding to a severity level.
For each user-defined status bar, you manually assign a color that corresponds to a severity level. When its status changes, you must manually change the severity level in order to change the color of the status bar. Using the example of the operations bulletin board, you might assign a critical severity level to the printer status bar during the time the printer is out of service, changing it to OK when it becomes available and at the same time, changing the message. Until maintenance begins on the system, you can assign a warning severity level to the associated status item, manually changing the severity level and the status item message minutes before maintenance occurs. When you place these status items on the panel, they will be displayed in the color for that severity level. The severity levels change only when you manually change them using the Change function on the default startup panel�s instruction line.
Defining and Maintaining Status Items 113
Adding a Status Item or Rollup
Adding a Status Item or Rollup
IntroductionYour system administrator defined sessions during OMEGAVIEW�s installation and setup procedure. When you sign onto OMEGAVIEW, these sessions display on your top panel.
The sessions selected for monitoring are associated with IBM-supplied status items on which performance data is reported. These predefined status items may not necessarily be those on which you want information, or they may not include items you want to monitor. You can define individual (basic) status items to the status database, or you can add rollups, status items that are comprised of several other status items.
Status item naming conventionsUser-defined status items can be assigned any name as long as it does not exceed the 20-character Status Name field.
Each system-derived status item name must consist of a high-level qualifier and a low-level qualifier, separated by a period. The name can be up to 20 characters long.
High-level qualifier descriptionThe high-level qualifier, assigned by your system administrator, is the session name established by the status data collectors for all system-derived statuses. The high-level qualifier for user-defined status items can be any name you assign, such as the name of the application, region, or data center. The high-level qualifier is optional, but the name you use must not contain blanks.
The high-level, user-defined qualifier should be determined by configuration type and should not contain variable information, such as system ID or subsystem type. For mainframes, a name composed of region, data center, and application is appropriate. For example:
WEBUNDPAYRL
For networked minicomputers, the VTAM node ID or a geographic address is more suitable:
V1234567 VTAM node ID
or
WELA1999
WE (WEst) is the region
BUND (BUNDy) is the data center
PAYRL is the application
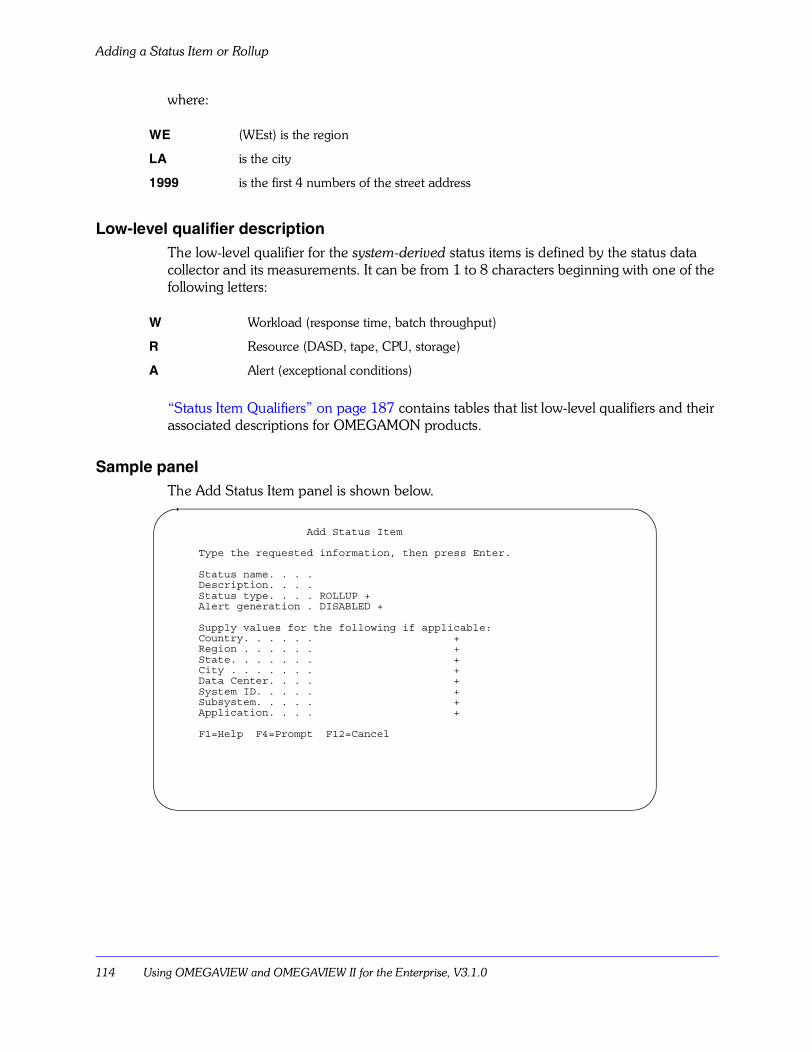
Adding a Status Item or Rollup
114 Using OMEGAVIEW and OMEGAVIEW II for the Enterprise, V3.1.0
where:
Low-level qualifier descriptionThe low-level qualifier for the system-derived status items is defined by the status data collector and its measurements. It can be from 1 to 8 characters beginning with one of the following letters:
�Status Item Qualifiers� on page 187 contains tables that list low-level qualifiers and their associated descriptions for OMEGAMON products.
Sample panelThe Add Status Item panel is shown below.
WE (WEst) is the region
LA is the city
1999 is the first 4 numbers of the street address
W Workload (response time, batch throughput)
R Resource (DASD, tape, CPU, storage)
A Alert (exceptional conditions)
Add Status Item Type the requested information, then press Enter. Status name. . . . Description. . . . Status type. . . . ROLLUP + Alert generation . DISABLED + Supply values for the following if applicable: Country. . . . . . + Region . . . . . . + State. . . . . . . + City . . . . . . . + Data Center. . . . + System ID. . . . . + Subsystem. . . . . + Application. . . . + F1=Help F4=Prompt F12=Cancel

Defining and Maintaining Status Items 115
Adding a Status Item or Rollup
Field descriptionsThe table below describes the available fields on the Add Status Item panel.
For information on the remaining optional fields, press F1.
ProcedureTo add a status item to OMEGAVIEW, follow these steps:
Status Item Field Description
Status name A 1 to 20 character name for the status item. You can use the status item naming conventions or you can use any name you choose. The name appears in the list when you Display Status Items. This is a required entry. The name also appears in the list of rollup status items that you break down when you use Show details.
Note: It is possible to use characters A-Z, numbers 0-9, and special characters #, _, @, and $ when adding status names, session names, or when specifying filters.
Description A 1-30 character description for the status item. This description can appear when the status item is drawn on a panel.
Status type OMEGAVIEW automatically displays ROLLUP in this field. Press F4 if you want BASIC to appear.
Alerts If you have Administrator authority, you can generate NetView and Tivoli OMEGACENTER Gateway alerts. Any user can display the alert generation status on the status information panel.
Note: The Alerts field on the Add or Change Status Items panels is unprotected for users with Administrator authority. If the field is unprotected, you can toggle between the two available settings: ENABLED or DISABLED.
For more information on NetView or Tivoli OMEGACENTER Gateway alerts, see Configuring OMEGAVIEW and OMEGAVIEW II for the Enterprise.
Step Action Result
1 Select Tools from the Action Bar. Then select the Status Item Manager option and press Enter.
OMEGAVIEW displays the Status Item Manager.
2 From the Status Item Manager, select Add status item and press Enter.
Note: You can fastpath through the first 2 steps by typing TSA on the Action Bar input field, and pressing Enter.
OMEGAVIEW displays the Add Status Item panel.
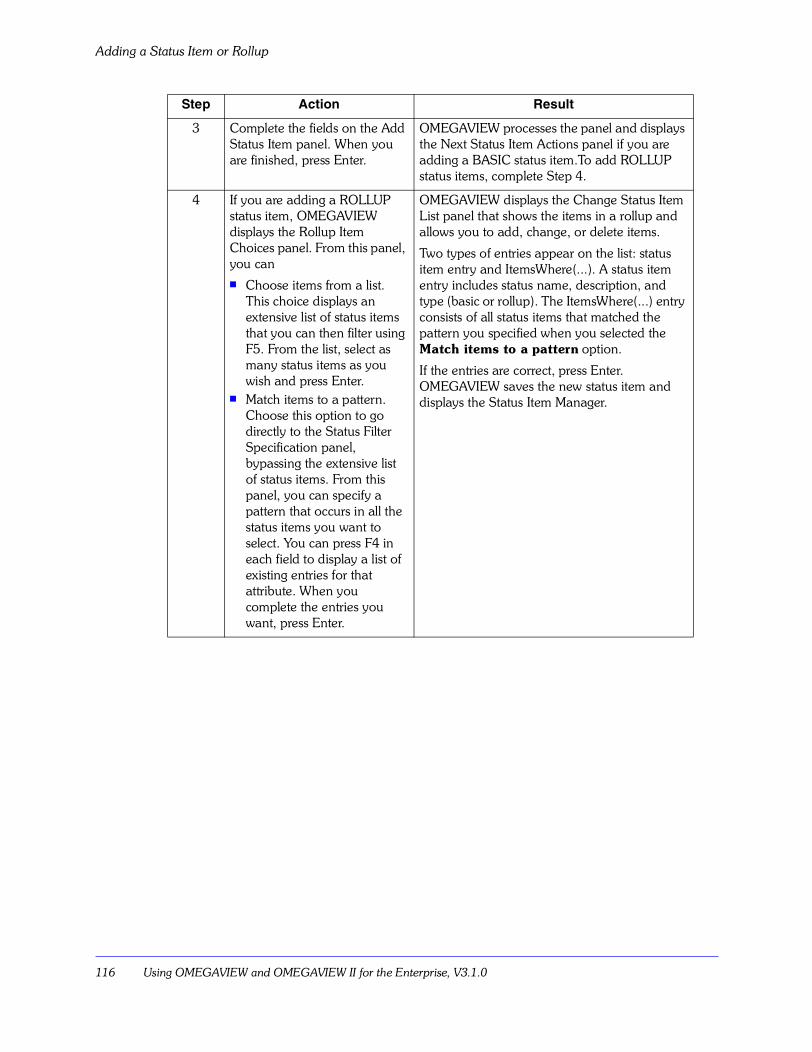
Adding a Status Item or Rollup
116 Using OMEGAVIEW and OMEGAVIEW II for the Enterprise, V3.1.0
3 Complete the fields on the Add Status Item panel. When you are finished, press Enter.
OMEGAVIEW processes the panel and displays the Next Status Item Actions panel if you are adding a BASIC status item.To add ROLLUP status items, complete Step 4.
4 If you are adding a ROLLUP status item, OMEGAVIEW displays the Rollup Item Choices panel. From this panel, you can ! Choose items from a list.
This choice displays an extensive list of status items that you can then filter using F5. From the list, select as many status items as you wish and press Enter.
! Match items to a pattern. Choose this option to go directly to the Status Filter Specification panel, bypassing the extensive list of status items. From this panel, you can specify a pattern that occurs in all the status items you want to select. You can press F4 in each field to display a list of existing entries for that attribute. When you complete the entries you want, press Enter.
OMEGAVIEW displays the Change Status Item List panel that shows the items in a rollup and allows you to add, change, or delete items.
Two types of entries appear on the list: status item entry and ItemsWhere(...). A status item entry includes status name, description, and type (basic or rollup). The ItemsWhere(...) entry consists of all status items that matched the pattern you specified when you selected the Match items to a pattern option.
If the entries are correct, press Enter. OMEGAVIEW saves the new status item and displays the Status Item Manager.
Step Action Result
Defining and Maintaining Status Items 117
Changing a Status Item
Changing a Status Item
IntroductionYou can change a user-defined status item. You cannot change system-derived status items.
ProcedureTo change an existing status item, follow these steps:
Step Action Result
1 Select Tools from the Action Bar. Then select the Status Item Manager option and press Enter.
OMEGAVIEW displays the Status Item Manager.
2 Select Change status item and press Enter.
Note: You can fastpath through the first 2 steps by typing TSC on the Action Bar input field, and pressing Enter.
OMEGAVIEW displays the list of status item choices.
3 Select the status item you wish to change and press Enter.
OMEGAVIEW displays the Change Status Item panel.
4 Make any changes by typing over the existing entries. When you are finished, press Enter.
OMEGAVIEW processes the panel and returns to the Status Item Manager panel.
Deleting a Status Item
118 Using OMEGAVIEW and OMEGAVIEW II for the Enterprise, V3.1.0
Deleting a Status Item
IntroductionYou can delete a user-defined status item. You cannot delete system-derived status items.
ProcedureTo delete an existing status item, follow these steps:
Step Action Result
1 Select Tools from the Action Bar. Then select the Status Item Manager option and press Enter.
OMEGAVIEW displays the Status Item Manager.
2 Select Delete status item and press Enter.
Note: You can fastpath through the first 2 steps by typing TSD on the Action Bar input field, and pressing Enter.
OMEGAVIEW displays the list of status item choices.
3 Select the status item you wish to delete and press Enter.
To delete multiple status items, select all the items before pressing Enter. If the Delete Confirmation option is set to on, OMEGAVIEW allows you to verify the name of the status item you want to delete before displaying the Maintain Status Items panel. If the Delete Confirmation option is set to off, OMEGAVIEW deletes the items and displays the Status Item Manager panel.
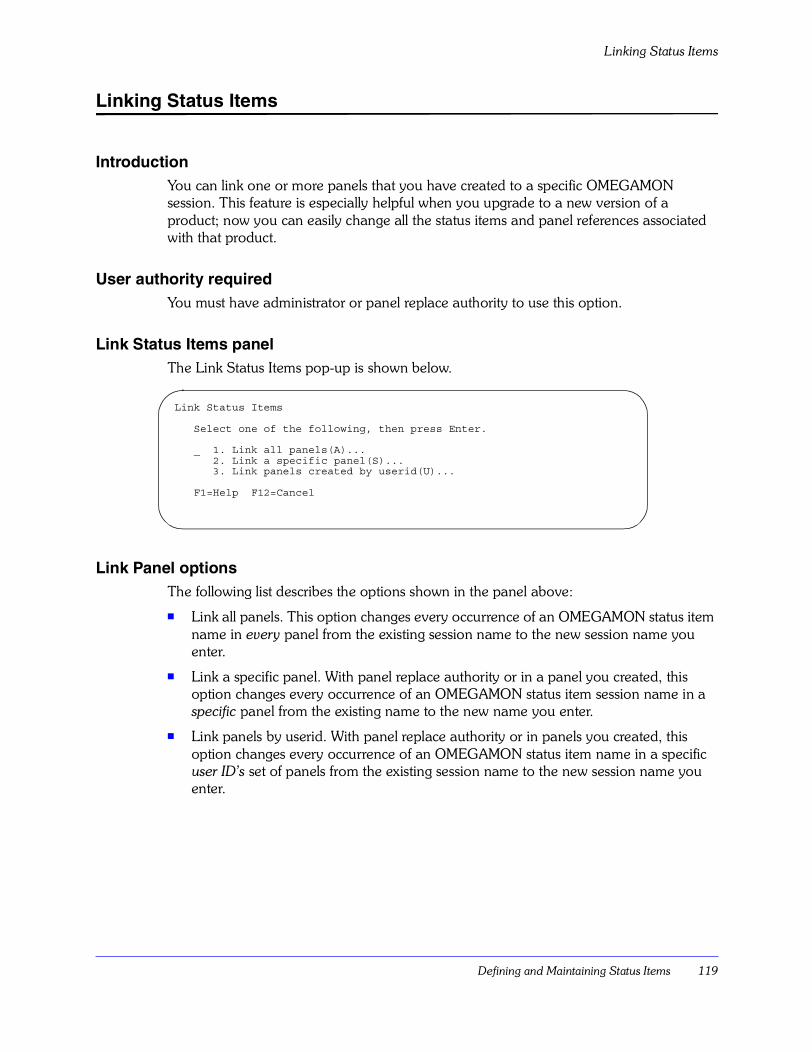
Defining and Maintaining Status Items 119
Linking Status Items
Linking Status Items
IntroductionYou can link one or more panels that you have created to a specific OMEGAMON session. This feature is especially helpful when you upgrade to a new version of a product; now you can easily change all the status items and panel references associated with that product.
User authority requiredYou must have administrator or panel replace authority to use this option.
Link Status Items panelThe Link Status Items pop-up is shown below.
Link Panel optionsThe following list describes the options shown in the panel above:
! Link all panels. This option changes every occurrence of an OMEGAMON status item name in every panel from the existing session name to the new session name you enter.
! Link a specific panel. With panel replace authority or in a panel you created, this option changes every occurrence of an OMEGAMON status item session name in a specific panel from the existing name to the new name you enter.
! Link panels by userid. With panel replace authority or in panels you created, this option changes every occurrence of an OMEGAMON status item name in a specific user ID�s set of panels from the existing session name to the new session name you enter.
Link Status Items Select one of the following, then press Enter. _ 1. Link all panels(A)... 2. Link a specific panel(S)... 3. Link panels created by userid(U)... F1=Help F12=Cancel
Linking Status Items
120 Using OMEGAVIEW and OMEGAVIEW II for the Enterprise, V3.1.0
ProcedureTo link status items, follow these steps:
Step Action Result
1 From the Configuration Manager, Select Tools and press Enter. Then select Status Item Manager and press Enter.
OMEGAVIEW displays the Status Item Manager.
2 From the Status Item Manager, select Link status items and press Enter.
OMEGAVIEW displays the Link Status Items pop-up.
3 From the Link Status Items pop-up, you can choose one of the following:! To choose to link all panels, select
Link all panels and press Enter. Complete the fields as indicated and press Enter.
! To choose to link a specific panel, select Link specific panel and press Enter. Complete the fields as indicated and press Enter.
! To choose to link panels by userid, select Link panels by userid and press Enter. Complete the fields as indicated and press Enter.
OMEGAVIEW scans all the requested panels and updates every status item. When the scanning process is complete, OMEGAVIEW displays a message showing how many panels were examined, how many panels were updated, and the number of panel objects linked to the new sessions.
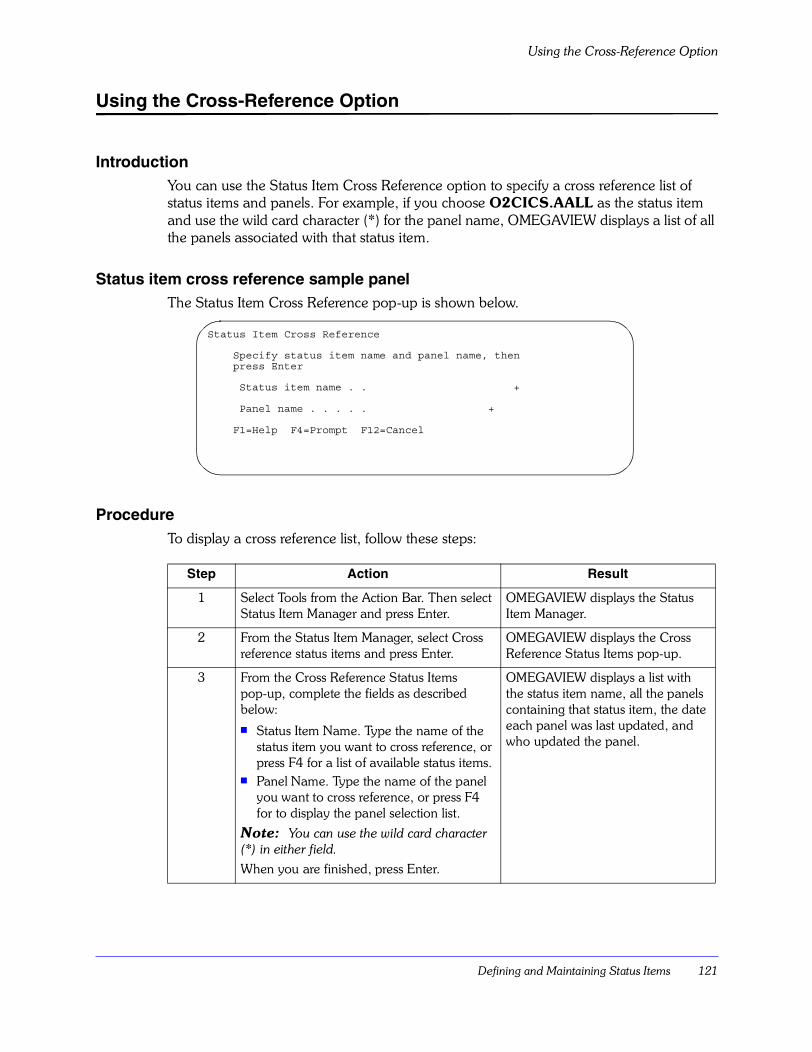
Defining and Maintaining Status Items 121
Using the Cross-Reference Option
Using the Cross-Reference Option
IntroductionYou can use the Status Item Cross Reference option to specify a cross reference list of status items and panels. For example, if you choose O2CICS.AALL as the status item and use the wild card character (*) for the panel name, OMEGAVIEW displays a list of all the panels associated with that status item.
Status item cross reference sample panelThe Status Item Cross Reference pop-up is shown below.
ProcedureTo display a cross reference list, follow these steps:
Step Action Result
1 Select Tools from the Action Bar. Then select Status Item Manager and press Enter.
OMEGAVIEW displays the Status Item Manager.
2 From the Status Item Manager, select Cross reference status items and press Enter.
OMEGAVIEW displays the Cross Reference Status Items pop-up.
3 From the Cross Reference Status Items pop-up, complete the fields as described below:! Status Item Name. Type the name of the
status item you want to cross reference, or press F4 for a list of available status items.
! Panel Name. Type the name of the panel you want to cross reference, or press F4 for to display the panel selection list.
Note: You can use the wild card character (*) in either field.
When you are finished, press Enter.
OMEGAVIEW displays a list with the status item name, all the panels containing that status item, the date each panel was last updated, and who updated the panel.
Status Item Cross Reference Specify status item name and panel name, then press Enter Status item name . . + Panel name . . . . . + F1=Help F4=Prompt F12=Cancel
Using the Cross-Reference Option
122 Using OMEGAVIEW and OMEGAVIEW II for the Enterprise, V3.1.0
Providing Logon Information for Zooming and Switching 123
Providing Logon Information forZooming and Switching
IntroductionThis chapter describes two optional OMEGAVIEW features that improve the process of zooming and switching sessions to the underlying products. These features are Maintain Session Logon Data and Start or Stop Prompting for User ID. You may find these features helpful if your site requires different user IDs and passwords for different sessions.
Chapter ContentsUsing the Maintain Session Logon Data Option . . . . . . . . . . . . . . . . . . . . . . . . . . . . . . . . . . . .124Starting or Stopping Prompting for User ID . . . . . . . . . . . . . . . . . . . . . . . . . . . . . . . . . . . . . . .132
7
Using the Maintain Session Logon Data Option
124 Using OMEGAVIEW and OMEGAVIEW II for the Enterprise, V3.1.0
Using the Maintain Session Logon Data Option
IntroductionThe Maintain dSession Logon Data option lets you define the user IDs and passwords you want OMEGAVIEW to use when switching to an underlying product session. It is best to use this feature only if IDs and passwords for different sessions are not synchronized.
Security considerationsThe Maintain Session Logon Data feature prompts for and retains user IDs and passwords. Passwords are encrypted in memory and are never displayed.
Every session logon data profile is owned by a user who must be defined to the security system that controls OMEGAVIEW access. If your system administrator permits it, you may share session logon data profiles with other users, if you know the user IDs and passwords associated with the shared profiles.
Here are some things to consider when sharing profiles:
! Profiles contain valuable information: the user IDs that OMEGAVIEW uses to switch to underlying products and the access privileges defined for that user ID within an underlying product. Do not permit a low-authority user access to the profile of a high-authority user.
! When you first try to read or write a session logon data profile associated with another user ID, you must supply the current password belonging to that user ID. OMEGAVIEW will validate this user ID-password combination before allowing you to access the profile.
! The password you supply during the process of reading or writing another session logon data profile is never saved, neither in memory nor on disk. If you access the profile successfully, its associated user ID is saved and used internally to reopen the profile on your behalf. Do not permit a low-authority user to take the place of a high-authority user during the same OMEGAVIEW session. The high-authority user must log off OMEGAVIEW.
! Any changes you make to another profile while it is open are permanent. Try to avoid changing profiles associated with other user IDs.
Providing Logon Information for Zooming and Switching 125
Using the Maintain Session Logon Data Option
Add or change field descriptionsThe following is a description of the fields you will use when adding or changing information in your session logon data profile.
Displaying your Session Logon Data profileThis procedure describes how to access and display your session logon data profile. After you display your profile, you can add, change, or delete the information in it as described in the following procedures.
Field Name Description
Session Name Configuration Manager name for the session to which this logon data applies. For example, M2VTAMA.
Description Configuration Manager description for the session. For example, OMEGAMON II for MVS.
User ID User ID for the session. Make sure the user ID you specify is defined to the security system that controls access to the session.
Password Password associated with the user ID. Make sure the password you specify is defined to the security system that controls access to the session.
OMEGAMON password Value for the OMEGAMON PSWD= operand. Not required unless your site has defined a value for it.
Group Optional group identifier to pass to the security system.
Account Optional account information to pass to the security system.
Logon user data Additional optional parameters passed to OMEGAMON products as logon user data in addition to existing parameters specified in the Configuration Manager.
Step Action Result
1 From the Status Display panel, select Options and press Enter.
OMEGAVIEW displays the Options pull-down menu.
2 From the Options pull-down menu, select Session Logon Data and press Enter.
OMEGAVIEW displays the Session Logon Data panel.
This panel shows a list of session names and their associated user IDs, if any have been created. You can add new entries to the list on this panel, as well as change or delete existing entries.
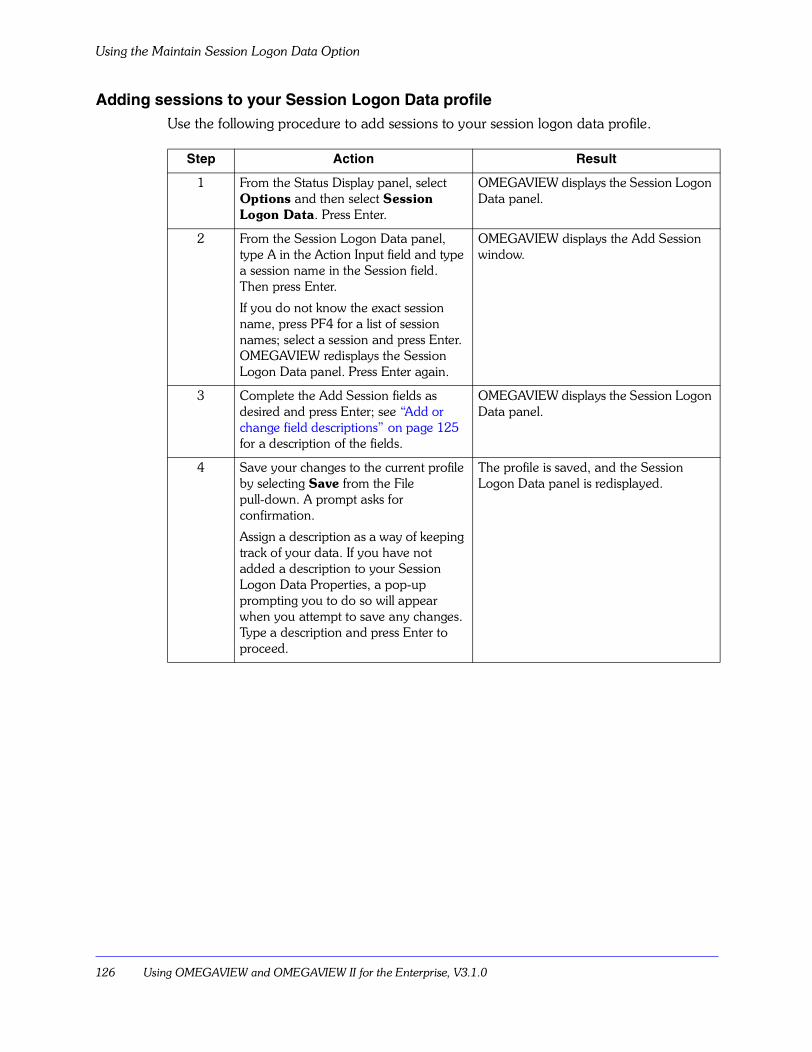
Using the Maintain Session Logon Data Option
126 Using OMEGAVIEW and OMEGAVIEW II for the Enterprise, V3.1.0
Adding sessions to your Session Logon Data profileUse the following procedure to add sessions to your session logon data profile.
Step Action Result
1 From the Status Display panel, select Options and then select Session Logon Data. Press Enter.
OMEGAVIEW displays the Session Logon Data panel.
2 From the Session Logon Data panel, type A in the Action Input field and type a session name in the Session field. Then press Enter.
If you do not know the exact session name, press PF4 for a list of session names; select a session and press Enter. OMEGAVIEW redisplays the Session Logon Data panel. Press Enter again.
OMEGAVIEW displays the Add Session window.
3 Complete the Add Session fields as desired and press Enter; see �Add or change field descriptions� on page 125 for a description of the fields.
OMEGAVIEW displays the Session Logon Data panel.
4 Save your changes to the current profile by selecting Save from the File pull-down. A prompt asks for confirmation.
Assign a description as a way of keeping track of your data. If you have not added a description to your Session Logon Data Properties, a pop-up prompting you to do so will appear when you attempt to save any changes. Type a description and press Enter to proceed.
The profile is saved, and the Session Logon Data panel is redisplayed.
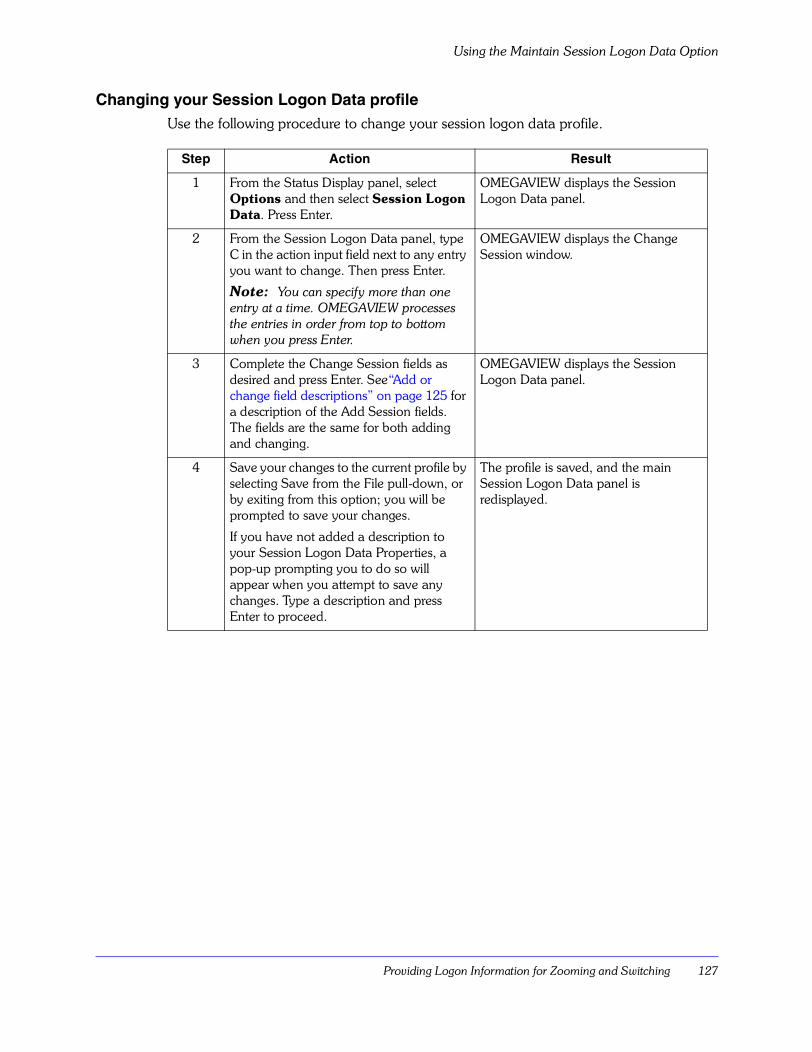
Providing Logon Information for Zooming and Switching 127
Using the Maintain Session Logon Data Option
Changing your Session Logon Data profileUse the following procedure to change your session logon data profile.
Step Action Result
1 From the Status Display panel, select Options and then select Session Logon Data. Press Enter.
OMEGAVIEW displays the Session Logon Data panel.
2 From the Session Logon Data panel, type C in the action input field next to any entry you want to change. Then press Enter.
Note: You can specify more than one entry at a time. OMEGAVIEW processes the entries in order from top to bottom when you press Enter.
OMEGAVIEW displays the Change Session window.
3 Complete the Change Session fields as desired and press Enter. See�Add or change field descriptions� on page 125 for a description of the Add Session fields. The fields are the same for both adding and changing.
OMEGAVIEW displays the Session Logon Data panel.
4 Save your changes to the current profile by selecting Save from the File pull-down, or by exiting from this option; you will be prompted to save your changes.
If you have not added a description to your Session Logon Data Properties, a pop-up prompting you to do so will appear when you attempt to save any changes. Type a description and press Enter to proceed.
The profile is saved, and the main Session Logon Data panel is redisplayed.
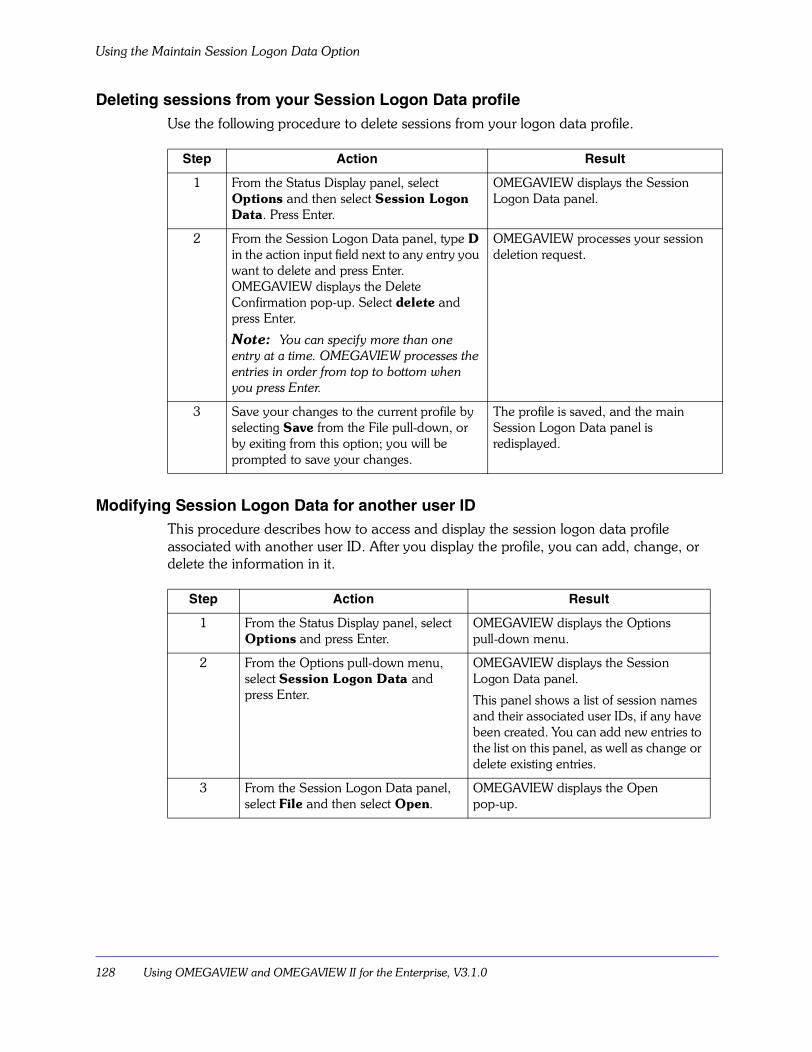
Using the Maintain Session Logon Data Option
128 Using OMEGAVIEW and OMEGAVIEW II for the Enterprise, V3.1.0
Deleting sessions from your Session Logon Data profileUse the following procedure to delete sessions from your logon data profile.
Modifying Session Logon Data for another user IDThis procedure describes how to access and display the session logon data profile associated with another user ID. After you display the profile, you can add, change, or delete the information in it.
Step Action Result
1 From the Status Display panel, select Options and then select Session Logon Data. Press Enter.
OMEGAVIEW displays the Session Logon Data panel.
2 From the Session Logon Data panel, type D in the action input field next to any entry you want to delete and press Enter. OMEGAVIEW displays the Delete Confirmation pop-up. Select delete and press Enter.
Note: You can specify more than one entry at a time. OMEGAVIEW processes the entries in order from top to bottom when you press Enter.
OMEGAVIEW processes your session deletion request.
3 Save your changes to the current profile by selecting Save from the File pull-down, or by exiting from this option; you will be prompted to save your changes.
The profile is saved, and the main Session Logon Data panel is redisplayed.
Step Action Result
1 From the Status Display panel, select Options and press Enter.
OMEGAVIEW displays the Options pull-down menu.
2 From the Options pull-down menu, select Session Logon Data and press Enter.
OMEGAVIEW displays the Session Logon Data panel.
This panel shows a list of session names and their associated user IDs, if any have been created. You can add new entries to the list on this panel, as well as change or delete existing entries.
3 From the Session Logon Data panel, select File and then select Open.
OMEGAVIEW displays the Open pop-up.
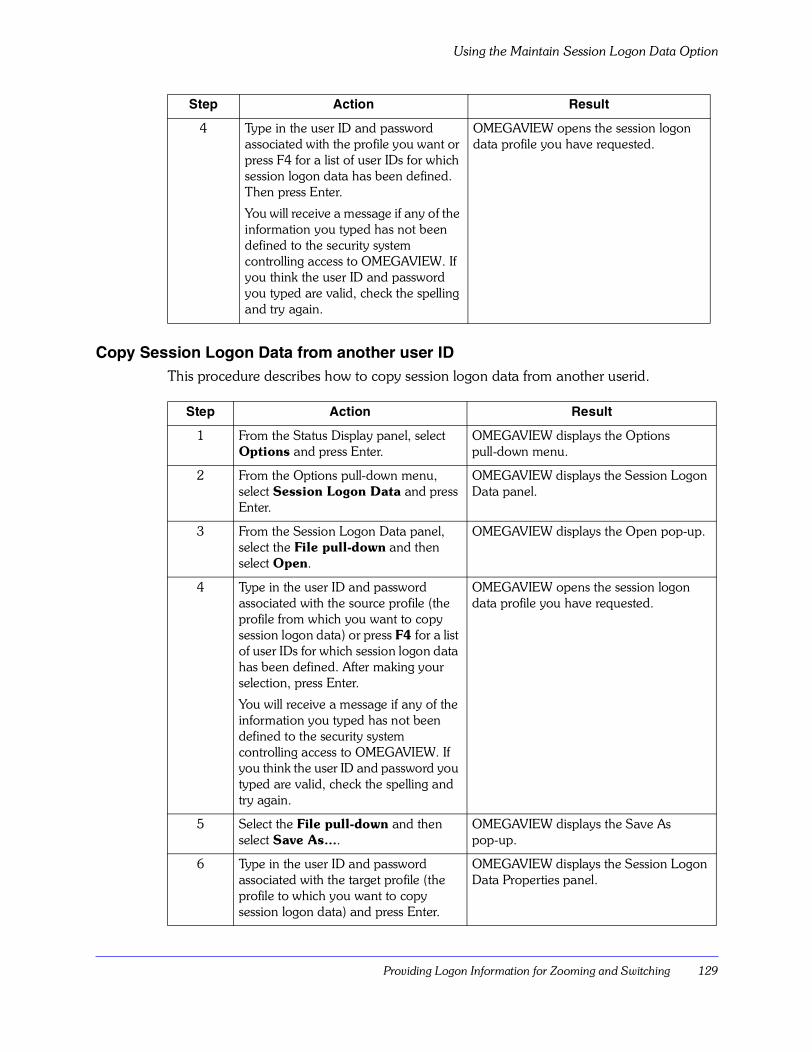
Providing Logon Information for Zooming and Switching 129
Using the Maintain Session Logon Data Option
Copy Session Logon Data from another user IDThis procedure describes how to copy session logon data from another userid.
4 Type in the user ID and password associated with the profile you want or press F4 for a list of user IDs for which session logon data has been defined. Then press Enter.
You will receive a message if any of the information you typed has not been defined to the security system controlling access to OMEGAVIEW. If you think the user ID and password you typed are valid, check the spelling and try again.
OMEGAVIEW opens the session logon data profile you have requested.
Step Action Result
1 From the Status Display panel, select Options and press Enter.
OMEGAVIEW displays the Options pull-down menu.
2 From the Options pull-down menu, select Session Logon Data and press Enter.
OMEGAVIEW displays the Session Logon Data panel.
3 From the Session Logon Data panel, select the File pull-down and then select Open.
OMEGAVIEW displays the Open pop-up.
4 Type in the user ID and password associated with the source profile (the profile from which you want to copy session logon data) or press F4 for a list of user IDs for which session logon data has been defined. After making your selection, press Enter.
You will receive a message if any of the information you typed has not been defined to the security system controlling access to OMEGAVIEW. If you think the user ID and password you typed are valid, check the spelling and try again.
OMEGAVIEW opens the session logon data profile you have requested.
5 Select the File pull-down and then select Save As....
OMEGAVIEW displays the Save As pop-up.
6 Type in the user ID and password associated with the target profile (the profile to which you want to copy session logon data) and press Enter.
OMEGAVIEW displays the Session Logon Data Properties panel.
Step Action Result
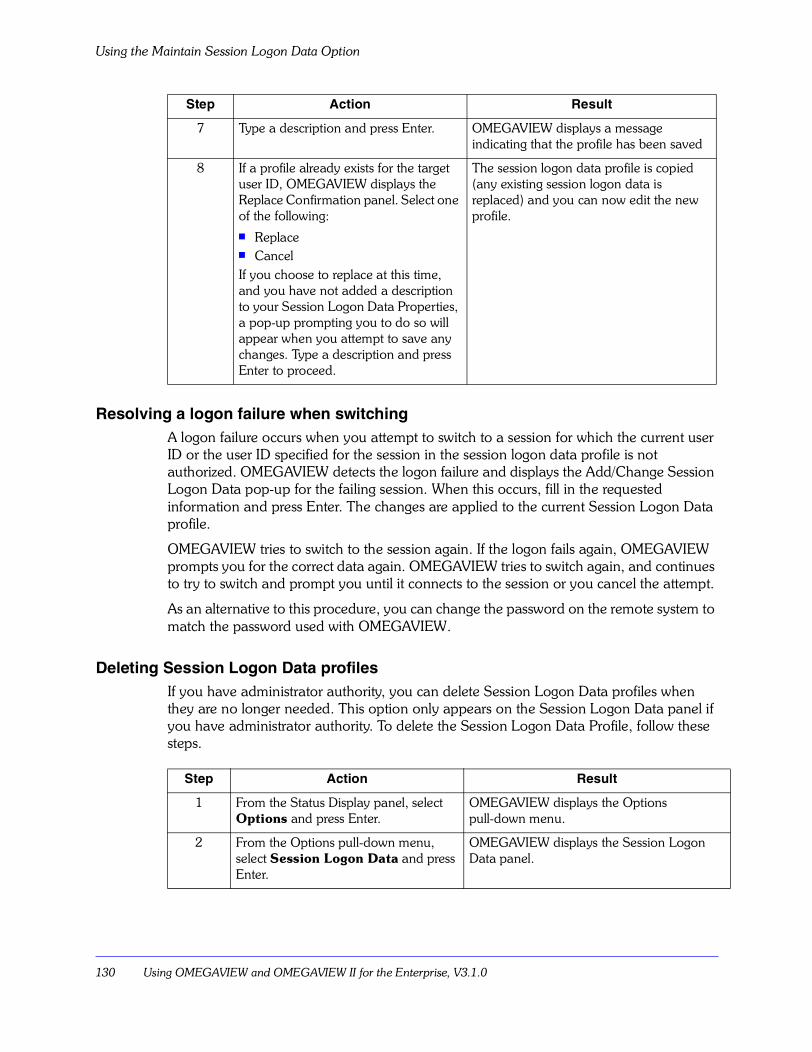
Using the Maintain Session Logon Data Option
130 Using OMEGAVIEW and OMEGAVIEW II for the Enterprise, V3.1.0
Resolving a logon failure when switchingA logon failure occurs when you attempt to switch to a session for which the current user ID or the user ID specified for the session in the session logon data profile is not authorized. OMEGAVIEW detects the logon failure and displays the Add/Change Session Logon Data pop-up for the failing session. When this occurs, fill in the requested information and press Enter. The changes are applied to the current Session Logon Data profile.
OMEGAVIEW tries to switch to the session again. If the logon fails again, OMEGAVIEW prompts you for the correct data again. OMEGAVIEW tries to switch again, and continues to try to switch and prompt you until it connects to the session or you cancel the attempt.
As an alternative to this procedure, you can change the password on the remote system to match the password used with OMEGAVIEW.
Deleting Session Logon Data profilesIf you have administrator authority, you can delete Session Logon Data profiles when they are no longer needed. This option only appears on the Session Logon Data panel if you have administrator authority. To delete the Session Logon Data Profile, follow these steps.
7 Type a description and press Enter. OMEGAVIEW displays a message indicating that the profile has been saved
8 If a profile already exists for the target user ID, OMEGAVIEW displays the Replace Confirmation panel. Select one of the following:! Replace! CancelIf you choose to replace at this time, and you have not added a description to your Session Logon Data Properties, a pop-up prompting you to do so will appear when you attempt to save any changes. Type a description and press Enter to proceed.
The session logon data profile is copied (any existing session logon data is replaced) and you can now edit the new profile.
Step Action Result
1 From the Status Display panel, select Options and press Enter.
OMEGAVIEW displays the Options pull-down menu.
2 From the Options pull-down menu, select Session Logon Data and press Enter.
OMEGAVIEW displays the Session Logon Data panel.
Step Action Result
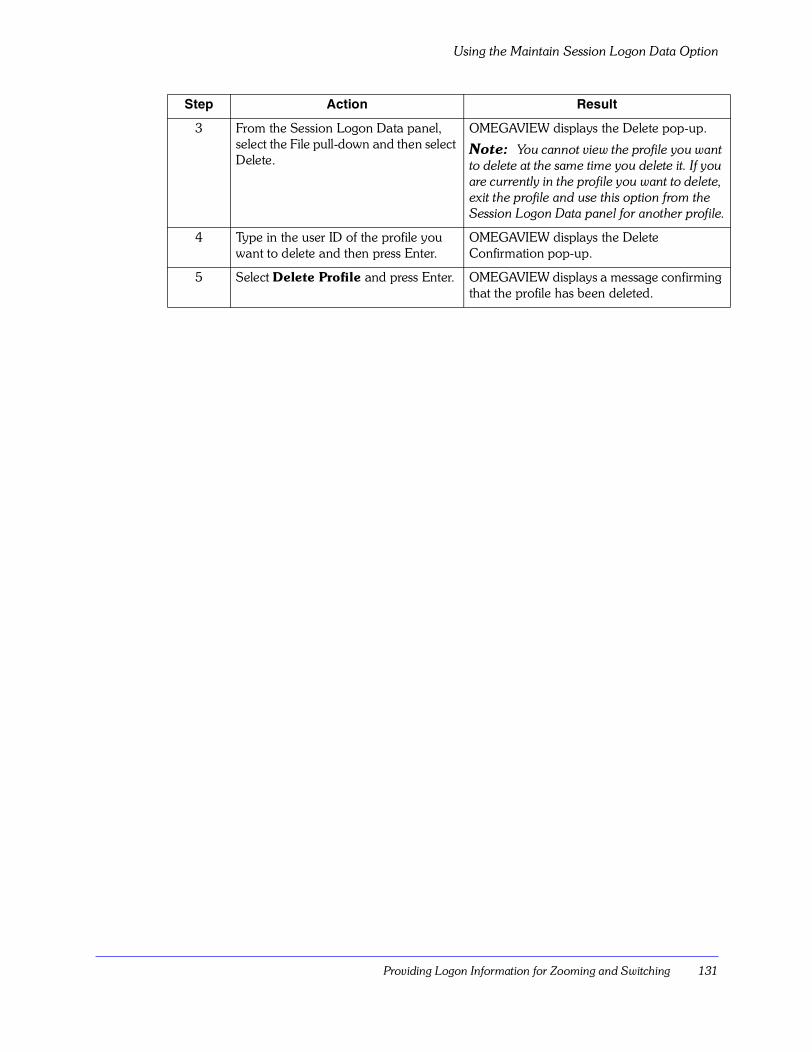
Providing Logon Information for Zooming and Switching 131
Using the Maintain Session Logon Data Option
3 From the Session Logon Data panel, select the File pull-down and then select Delete.
OMEGAVIEW displays the Delete pop-up.
Note: You cannot view the profile you want to delete at the same time you delete it. If you are currently in the profile you want to delete, exit the profile and use this option from the Session Logon Data panel for another profile.
4 Type in the user ID of the profile you want to delete and then press Enter.
OMEGAVIEW displays the Delete Confirmation pop-up.
5 Select Delete Profile and press Enter. OMEGAVIEW displays a message confirming that the profile has been deleted.
Step Action Result
Starting or Stopping Prompting for User ID
132 Using OMEGAVIEW and OMEGAVIEW II for the Enterprise, V3.1.0
Starting or Stopping Prompting for User ID
IntroductionThe Start or Stop Prompting for User ID option lets you determine whether you want OMEGAVIEW to prompt for a user ID and password on the first attempt to switch or zoom to an OMEGAMON product.
During the process of switching or zooming into an OMEGAMON session, OMEGAVIEW first establishes an LU-2 session, logs onto the product, and then transfers terminal control to the requested OMEGAMON product. During product logon, OMEGAVIEW must provide a User ID and Password and possibly other entry validation data such as Account, Group, User Data, etc.
The Start Prompting for User ID option causes OMEGAVIEW to display the Get Logon Information pop-up whenever you attempt to switch or zoom into an OMEGAMON session. This pop-up prompts you to provide logon information that OMEGAVIEW immediately uses as it attempts to logon to the OMEGAMON product.
The Stop Prompting for User ID option stops OMEGAVIEW from displaying the Get Logon Information pop-up whenever you attempt to switch or zoom from OMEGAVIEW to an OMEGAMON session. Instead, OMEGAVIEW logs onto the OMEGAMON product using your current Session Logon data. If you have not defined Session Logon Data for the OMEGAMON session, OMEGAVIEW uses the User ID and password you specified when you logged onto OMEGAVIEW to log onto the OMEGAMON product.
Security considerationsThis feature changes the security environment of a OMEGAVIEW session by temporarily transferring ownership of one or more of its switched-to sessions to a new user. The transfer is not permitted unless the new user supplies a valid userid and password at the time of the transfer. Since the primary reason for changing userids is to change the level of access permitted within the underlying sessions, active sessions are terminated before switching to the new user or disabling prompting for user ID. Terminating the underlying sessions ensures that one user is not inadvertently granted access to a monitor product with another user�s access privileges.
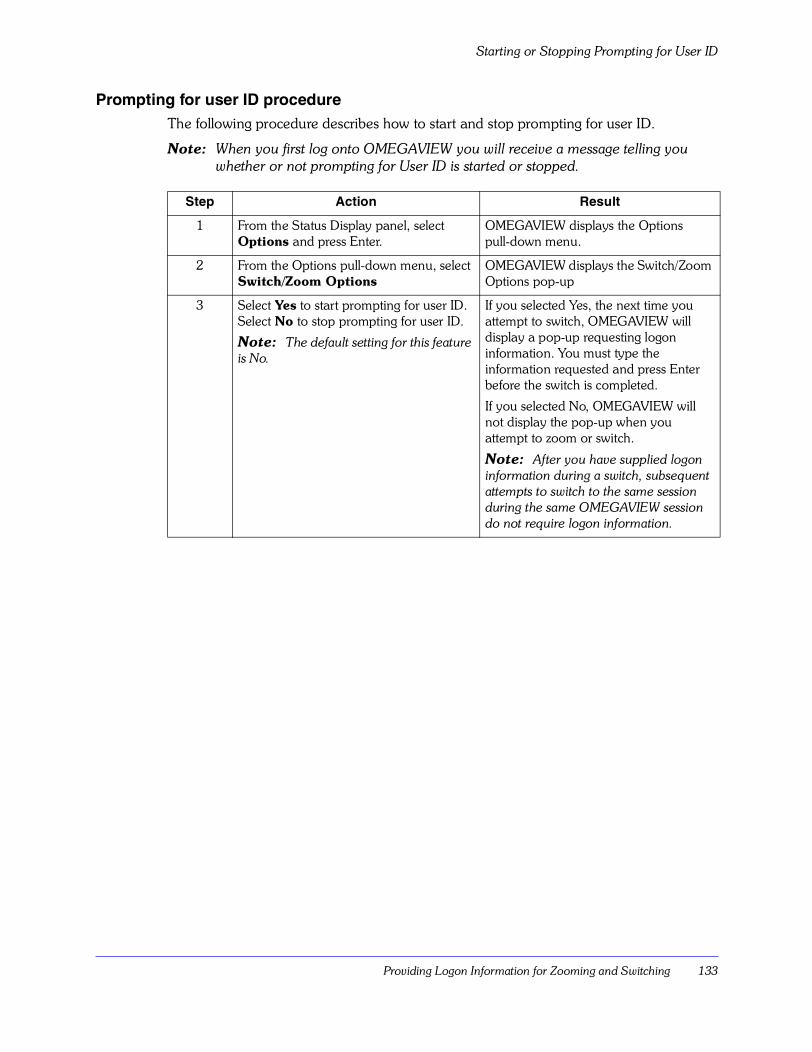
Providing Logon Information for Zooming and Switching 133
Starting or Stopping Prompting for User ID
Prompting for user ID procedureThe following procedure describes how to start and stop prompting for user ID.
Note: When you first log onto OMEGAVIEW you will receive a message telling you whether or not prompting for User ID is started or stopped.
Step Action Result
1 From the Status Display panel, select Options and press Enter.
OMEGAVIEW displays the Options pull-down menu.
2 From the Options pull-down menu, select Switch/Zoom Options
OMEGAVIEW displays the Switch/Zoom Options pop-up
3 Select Yes to start prompting for user ID. Select No to stop prompting for user ID.
Note: The default setting for this feature is No.
If you selected Yes, the next time you attempt to switch, OMEGAVIEW will display a pop-up requesting logon information. You must type the information requested and press Enter before the switch is completed.
If you selected No, OMEGAVIEW will not display the pop-up when you attempt to zoom or switch.
Note: After you have supplied logon information during a switch, subsequent attempts to switch to the same session during the same OMEGAVIEW session do not require logon information.
Starting or Stopping Prompting for User ID
134 Using OMEGAVIEW and OMEGAVIEW II for the Enterprise, V3.1.0
Controlling Profile Synchronization 135
Controlling Profile Synchronization
IntroductionThis chapter provides instructions for overriding the profile synchronization default.
Chapter ContentsOverview . . . . . . . . . . . . . . . . . . . . . . . . . . . . . . . . . . . . . . . . . . . . . . . . . . . . . . . . . . . . . . . . .136Overriding the Profile Synchronization Default . . . . . . . . . . . . . . . . . . . . . . . . . . . . . . . . . . . . .137
8
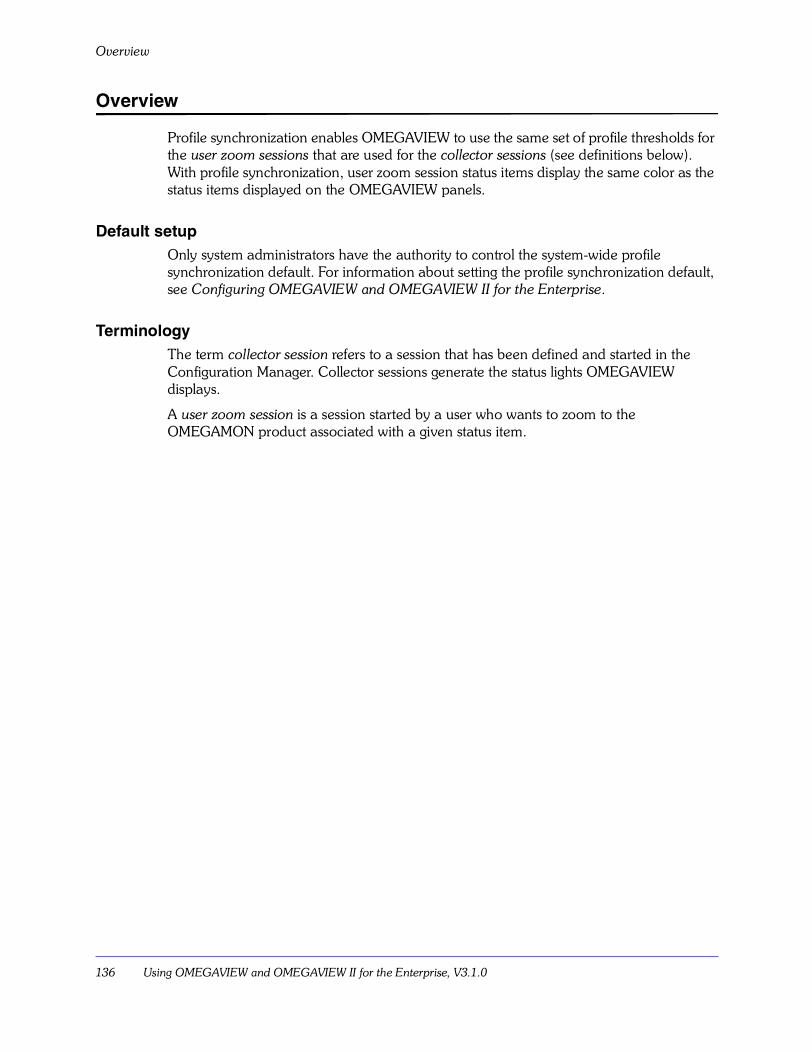
Overview
136 Using OMEGAVIEW and OMEGAVIEW II for the Enterprise, V3.1.0
Overview
Profile synchronization enables OMEGAVIEW to use the same set of profile thresholds for the user zoom sessions that are used for the collector sessions (see definitions below). With profile synchronization, user zoom session status items display the same color as the status items displayed on the OMEGAVIEW panels.
Default setupOnly system administrators have the authority to control the system-wide profile synchronization default. For information about setting the profile synchronization default, see Configuring OMEGAVIEW and OMEGAVIEW II for the Enterprise.
TerminologyThe term collector session refers to a session that has been defined and started in the Configuration Manager. Collector sessions generate the status lights OMEGAVIEW displays.
A user zoom session is a session started by a user who wants to zoom to the OMEGAMON product associated with a given status item.
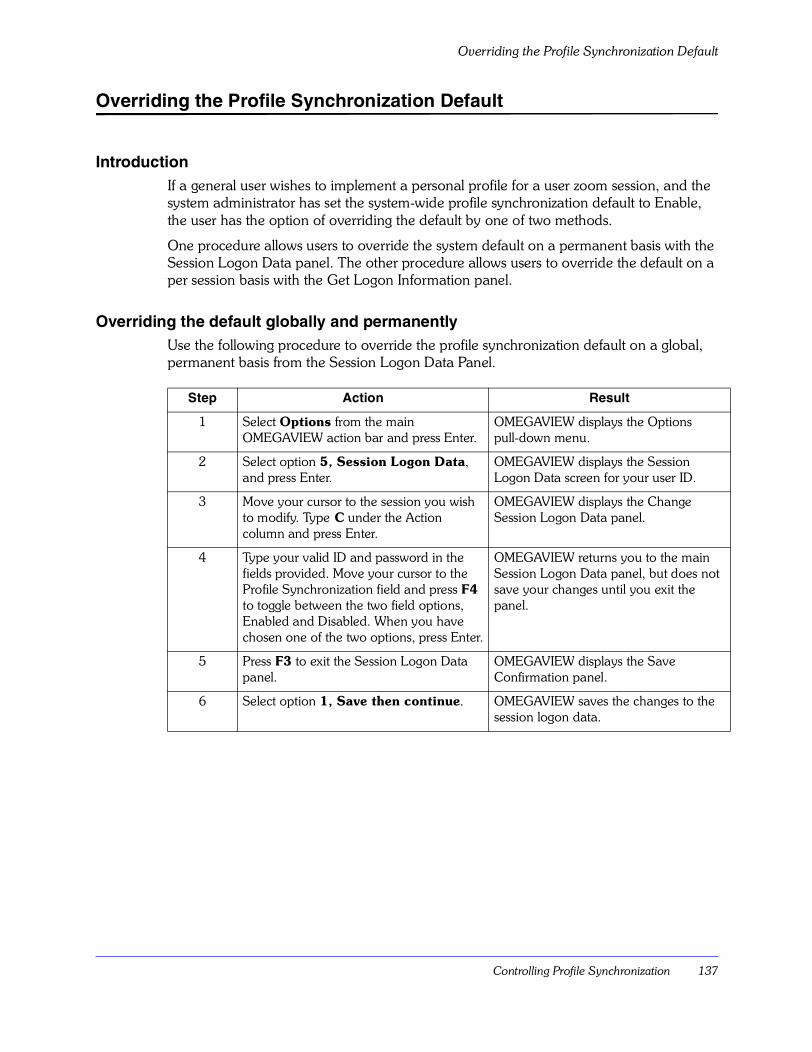
Controlling Profile Synchronization 137
Overriding the Profile Synchronization Default
Overriding the Profile Synchronization Default
IntroductionIf a general user wishes to implement a personal profile for a user zoom session, and the system administrator has set the system-wide profile synchronization default to Enable, the user has the option of overriding the default by one of two methods.
One procedure allows users to override the system default on a permanent basis with the Session Logon Data panel. The other procedure allows users to override the default on a per session basis with the Get Logon Information panel.
Overriding the default globally and permanentlyUse the following procedure to override the profile synchronization default on a global, permanent basis from the Session Logon Data Panel.
Step Action Result
1 Select Options from the main OMEGAVIEW action bar and press Enter.
OMEGAVIEW displays the Options pull-down menu.
2 Select option 5, Session Logon Data, and press Enter.
OMEGAVIEW displays the Session Logon Data screen for your user ID.
3 Move your cursor to the session you wish to modify. Type C under the Action column and press Enter.
OMEGAVIEW displays the Change Session Logon Data panel.
4 Type your valid ID and password in the fields provided. Move your cursor to the Profile Synchronization field and press F4 to toggle between the two field options, Enabled and Disabled. When you have chosen one of the two options, press Enter.
OMEGAVIEW returns you to the main Session Logon Data panel, but does not save your changes until you exit the panel.
5 Press F3 to exit the Session Logon Data panel.
OMEGAVIEW displays the Save Confirmation panel.
6 Select option 1, Save then continue. OMEGAVIEW saves the changes to the session logon data.
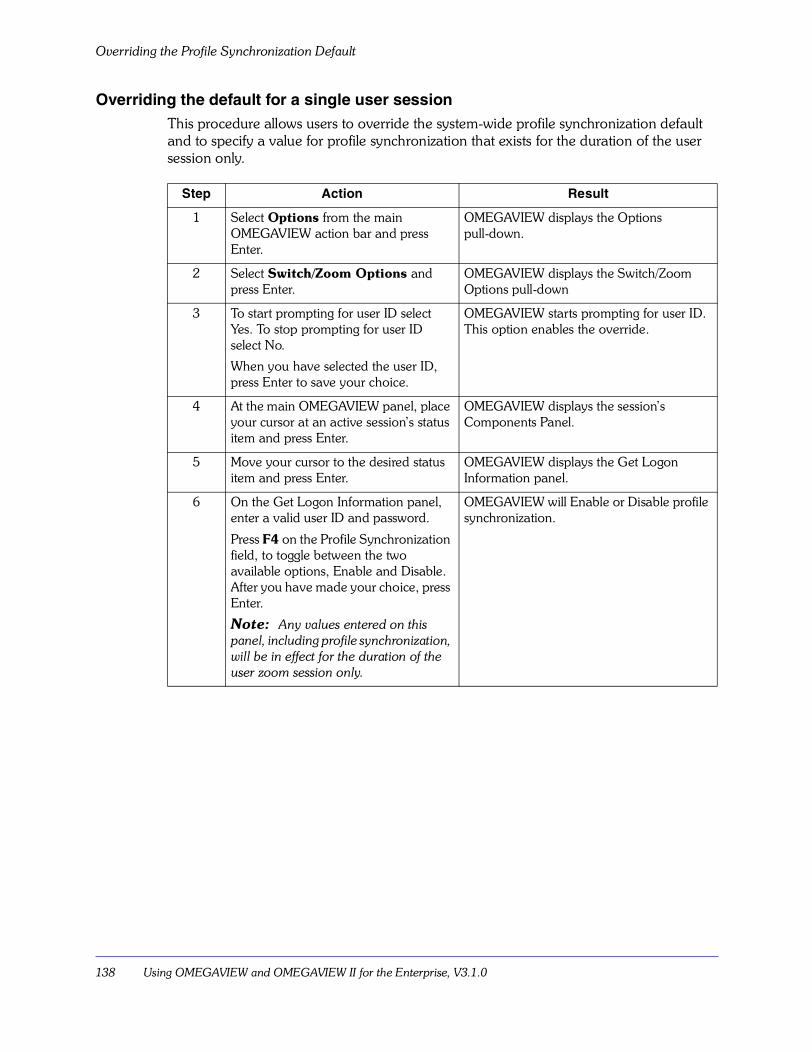
Overriding the Profile Synchronization Default
138 Using OMEGAVIEW and OMEGAVIEW II for the Enterprise, V3.1.0
Overriding the default for a single user sessionThis procedure allows users to override the system-wide profile synchronization default and to specify a value for profile synchronization that exists for the duration of the user session only.
Step Action Result
1 Select Options from the main OMEGAVIEW action bar and press Enter.
OMEGAVIEW displays the Options pull-down.
2 Select Switch/Zoom Options and press Enter.
OMEGAVIEW displays the Switch/Zoom Options pull-down
3 To start prompting for user ID select Yes. To stop prompting for user ID select No.
When you have selected the user ID, press Enter to save your choice.
OMEGAVIEW starts prompting for user ID. This option enables the override.
4 At the main OMEGAVIEW panel, place your cursor at an active session�s status item and press Enter.
OMEGAVIEW displays the session�s Components Panel.
5 Move your cursor to the desired status item and press Enter.
OMEGAVIEW displays the Get Logon Information panel.
6 On the Get Logon Information panel, enter a valid user ID and password.
Press F4 on the Profile Synchronization field, to toggle between the two available options, Enable and Disable. After you have made your choice, press Enter.
Note: Any values entered on this panel, including profile synchronization, will be in effect for the duration of the user zoom session only.
OMEGAVIEW will Enable or Disable profile synchronization.

Switching Sessions 139
Switching Sessions
IntroductionThis chapter includes instructions for session-switching (navigating directly among OMEGAMON sessions without returning to OMEGAVIEW) and for navigating to Tivoli OMEGACENTER Gateway.
Chapter contentsSwitching among OMEGAMON Sessions . . . . . . . . . . . . . . . . . . . . . . . . . . . . . . . . . . . . . . . . .140Navigating to OMEGACENTER Status Manager . . . . . . . . . . . . . . . . . . . . . . . . . . . . . . . . . . .141
9
Switching among OMEGAMON Sessions
140 Using OMEGAVIEW and OMEGAVIEW II for the Enterprise, V3.1.0
Switching among OMEGAMON Sessions
IntroductionYou can switch directly among OMEGAMON sessions defined to OMEGAVIEW without having to return to OMEGAVIEW.
User authority requiredTo access the OMEGAVIEW Switch feature, you must have Switch and Zoom authority set by your system administrator.
Session-switching procedureUse the following procedure to switch sessions.
Step Action
1 You can switch sessions in two ways:! To switch sessions from any OMEGAMON panel or from the
OMEGAVIEW main panel, press PA1. (PA1 is the default key. You can change the default key by selecting Options from the OMEGAVIEW action bar, and then selecting Switch/Zoom options.)
! To switch sessions from a OMEGAVIEW status display panel action bar, select Switch and press Enter.
OMEGAVIEW displays the Switch to Session pop-up menu.
2 From the Switch to Session pop-up menu do one of the following:! Type the name of the session you want in the input field at the top of
the session list and press Enter.! Move the cursor next to the session you want and press Enter.! Use the PF Find key (PF14) when you do not know the exact name
of the session. For example, if you know your session begins with ABC, press PF14 to get the Find Session pop-up. From the Find Session pop-up, type ABC in the Session Name input field and press Enter. OMEGAVIEW returns you to the Switch to Session pop-up menu. The session list will now begin with the session that precedes all of the ABC sessions. Select a session with the cursor and press Enter.
OMEGAVIEW switches to the session you have chosen.
Switching Sessions 141
Navigating to OMEGACENTER Status Manager
Navigating to OMEGACENTER Status Manager
If you use OMEGAVIEW and OMEGACENTER Status Manager for MVS� to manage the availability of your systems, this feature provides quick, direct navigation between these products.
Follow these steps.
Step Action
1 Choose Switch from the main OMEGAVIEW status display panel action bar and press Enter.
The Switch to Session panel appears.
2 Position the cursor next to the OMEGACENTER Status Manager (OSM/MVS) session and press Enter.
Note: If no OMEGACENTER Status Manager session appears on the menu, it is because your system administrator has not enabled OSM/MVS navigation. For information on enabling OSM/MVS navigation, see Configuring OMEGAVIEW and OMEGAVIEW II for the Enterprise.
Result: A TSO user ID and password must be supplied for OSM/MVS navigation. This user ID must display the TSO READY prompt to make navigation successful. When you select the OSM/MVS session, OMEGAVIEW will do one of 3 things:! If the OMEGAVIEW Prompt for User ID feature is set to Yes, OMEGAVIEW
will display the Get Logon Information panel, which allows you to specify a user ID and password. For more information about the Get Logon Information panel see �Starting or Stopping Prompting for User ID� on page 132.
! If Prompt for User ID is set to No, OMEGAVIEW will check your session logon information and use the user ID and password defined there. For more information about session logon data see �Using the Maintain Session Logon Data Option� on page 124.
! If Prompt for User ID is set to No and there is no session logon data available, OMEGAVIEW will use the userid and password you supplied when logging onto OMEGAVIEW.
End Result: OMEGAVIEW automatically navigates to OSM/MVS.
Navigating to OMEGACENTER Status Manager
142 Using OMEGAVIEW and OMEGAVIEW II for the Enterprise, V3.1.0
Using the Zoom Feature 143
Using the Zoom Feature
IntroductionThe zoom feature provides you with direct access from the OMEGAVIEW software to a specific area of an OMEGAMON product, enabling you to obtain more detailed information about the cause of a status light. You can zoom to a panel, screen space, or menu specific to the selected status item.
This chapter explains how to zoom directly to the default destination and how to zoom to an alternative destination after you enable the zoom confirmation option.
Note: To access the OMEGAVIEW zoom feature, your OMEGAVIEW administrator must give you Zoom authority.
Chapter ContentsUsing the Zoom-to-Session Confirmation Option . . . . . . . . . . . . . . . . . . . . . . . . . . . . . . . . . . .144Zooming to the Default Destination . . . . . . . . . . . . . . . . . . . . . . . . . . . . . . . . . . . . . . . . . . . . .146Zooming to an Alternative Destination . . . . . . . . . . . . . . . . . . . . . . . . . . . . . . . . . . . . . . . . . . .147Valid Zoom Destinations for OMEGAMON Products . . . . . . . . . . . . . . . . . . . . . . . . . . . . . . . .149
10
Using the Zoom-to-Session Confirmation Option
144 Using OMEGAVIEW and OMEGAVIEW II for the Enterprise, V3.1.0
Using the Zoom-to-Session Confirmation Option
IntroductionWhen the Zoom to Session Confirmation feature is set to Yes, you can use the Confirm Zoom to Session pop-up window to select a zoom destination other than the default.
However, you must enable the pop-up window before you can access it. After you select an alternative destination, you can disable the pop-up window so that it will not appear in subsequent zooms. The pop-up window still retains your chosen destination until you change it.
One of two different pop-up windows appears when you want to confirm zooming to a session. One appears when you are zooming from a classic OMEGAMON status item. The list of zoom destinations on this pop-up consists of OMEGAMON screen space names. The other pop-up appears when you zoom from an OMEGAMON II status item. The list of zoom destinations on this pop-up are the predefined default zoom destinations.
Enabling and disabling the zoom confirmation optionUsers with zoom authority can enable or disable the Confirm Zoom to Session pop-up window at any time from the Options pull-down menu. See �Using the Zoom-to-Session Confirmation Option� on page 144 for details.
Sample Confirm Zoom to Session pop-up for classic OMEGAMON productsThe Confirm Zoom to Session pop-up shown below displays a list of possible zoom destination choices that appears when you zoom from a classic OMEGAMON status item.
The screen space names and descriptions on the list are provided by the OMEGAVIEW system administrator. Users can choose a name from the list or can enter their own screen space name in the input field provided, as long as the name already exists in the OMEGAMON product.
Confirm Zoom to (OMDB2) Type a selection number, then press Enter. If you want to zoom to a different OMEGAMON screen space other than those listed in the menu below,press the tab key and then enter the desired OMEGAMON screen space name. 0. ______________________________________________ 1. ZXGRPTI - THREAD EXCEPTIONS 2. ZMENUI - MAIN MENU F1=Help F12=Cancel
Using the Zoom Feature 145
Using the Zoom-to-Session Confirmation Option
Sample Confirm Zoom to Session pop-up for OMEGAMON II productsThe Confirm Zoom to Session pop-up shown below displays a list of possible zoom destination choices that appears when you zoom from an OMEGAMON II product status item.
The zoom destination names and descriptions on the list are provided by the system administrator. A user must select one of the choices that appear on this list.
Confirm Zoom to (OMIIMVS) Type a selection number, then press Enter. 1. ANALYZE PROBLEMS 1. ENQUEUE AND RESERVE CONFLICTS 2. SYSTEM STATUS F1=Help F12=Cancel
Zooming to the Default Destination
146 Using OMEGAVIEW and OMEGAVIEW II for the Enterprise, V3.1.0
Zooming to the Default Destination
You can zoom directly from a status light to more information about the cause of that light. For a list of default destinations, see �Valid Zoom Destinations for OMEGAMON Products� on page 149.
To zoom to a destination, type s in the field next to the status item and press Enter.
! If you selected a basic status item, OMEGAVIEW automatically zooms to a default destination and displays the destination screen.
! If you selected a rollup status item, OMEGAVIEW displays the Components list. If you choose another rollup item, OMEGAVIEW displays another Components list. Continue to choose status items until you can choose a basic item.
To return to OMEGAVIEW, press the Return-from-Zoom key (the default is PA2).
Note: Use of action codes is available on Workload, Resource, and Alert Status Components rollup panels. See �Enhanced Action Code Navigation� on page 201 for more information.
Using the Zoom Feature 147
Zooming to an Alternative Destination
Zooming to an Alternative Destination
IntroductionYou can use the Confirm Zoom to Session pop-up to view the default zoom destination or to override the default. For a list of default and alternative zoom destinations, see �Valid Zoom Destinations for OMEGAMON Products� on page 149.
ConsiderationTo change or view the default destination, the Zoom to Session Confirmation field on the Switch/Zoom options panel under the Options pull-down menu must be set to Yes. For instructions on changing this field, see �Using the Zoom-to-Session Confirmation Option� on page 144.
If you change the default zoom destination, the change remains active until you change it again.
ProcedureUse the following procedure to change the default destination.
Step Action
1 Type s next to a status item and press Enter.
Note: The Zoom to Session Confirmation field on the Switch/Zoom Options pop-up (under the Options pull-down) must be set to Yes.
There are two possible results:! If you select a rollup status item, OMEGAVIEW displays the Components list.
Go to Step 2.! OMEGAVIEW displays the Confirm Zoom to Session pop-up. Go to Step 3.
2 From the Components list, choose a status item. There are two possible results:! OMEGAVIEW displays the Confirm Zoom to Session pop-up. Go to Step 3.! OMEGAVIEW displays the Components list if you chose another rollup status
item. Continue to choose status items until you can choose a basic item. When OMEGAVIEW displays the Confirm Zoom to Session pop-up, go to Step 3.
3 From the Confirm Zoom to Session pop-up, you can! View or change the default destination. Go to Step 4.! Return to the previous display. Press F12.
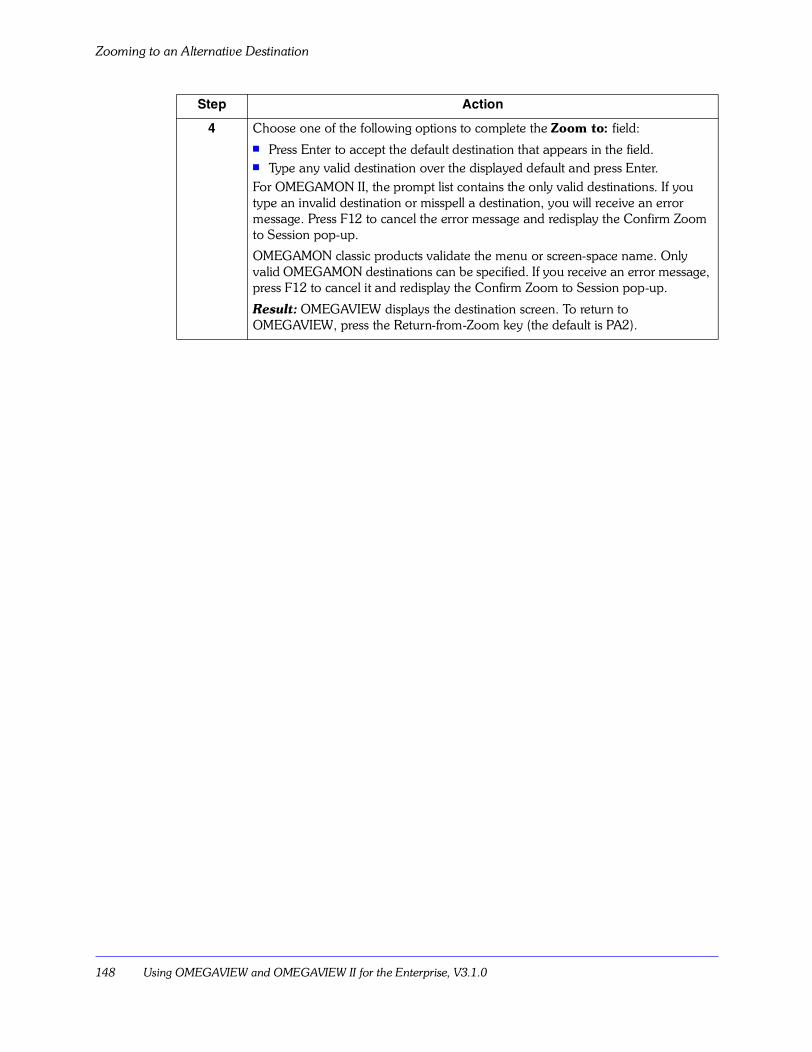
Zooming to an Alternative Destination
148 Using OMEGAVIEW and OMEGAVIEW II for the Enterprise, V3.1.0
4 Choose one of the following options to complete the Zoom to: field:! Press Enter to accept the default destination that appears in the field.! Type any valid destination over the displayed default and press Enter.For OMEGAMON II, the prompt list contains the only valid destinations. If you type an invalid destination or misspell a destination, you will receive an error message. Press F12 to cancel the error message and redisplay the Confirm Zoom to Session pop-up.
OMEGAMON classic products validate the menu or screen-space name. Only valid OMEGAMON destinations can be specified. If you receive an error message, press F12 to cancel it and redisplay the Confirm Zoom to Session pop-up.
Result: OMEGAVIEW displays the destination screen. To return to OMEGAVIEW, press the Return-from-Zoom key (the default is PA2).
Step Action
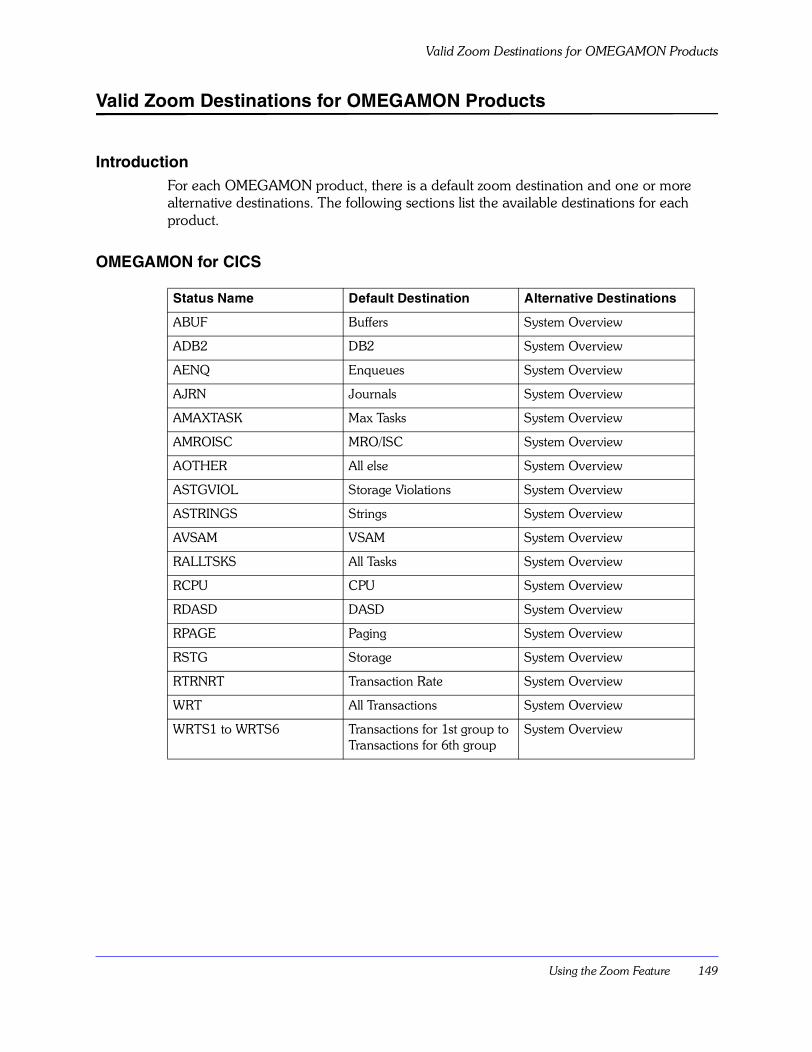
Using the Zoom Feature 149
Valid Zoom Destinations for OMEGAMON Products
Valid Zoom Destinations for OMEGAMON Products
IntroductionFor each OMEGAMON product, there is a default zoom destination and one or more alternative destinations. The following sections list the available destinations for each product.
OMEGAMON for CICS
Status Name Default Destination Alternative Destinations
ABUF Buffers System Overview
ADB2 DB2 System Overview
AENQ Enqueues System Overview
AJRN Journals System Overview
AMAXTASK Max Tasks System Overview
AMROISC MRO/ISC System Overview
AOTHER All else System Overview
ASTGVIOL Storage Violations System Overview
ASTRINGS Strings System Overview
AVSAM VSAM System Overview
RALLTSKS All Tasks System Overview
RCPU CPU System Overview
RDASD DASD System Overview
RPAGE Paging System Overview
RSTG Storage System Overview
RTRNRT Transaction Rate System Overview
WRT All Transactions System Overview
WRTS1 to WRTS6 Transactions for 1st group to Transactions for 6th group
System Overview
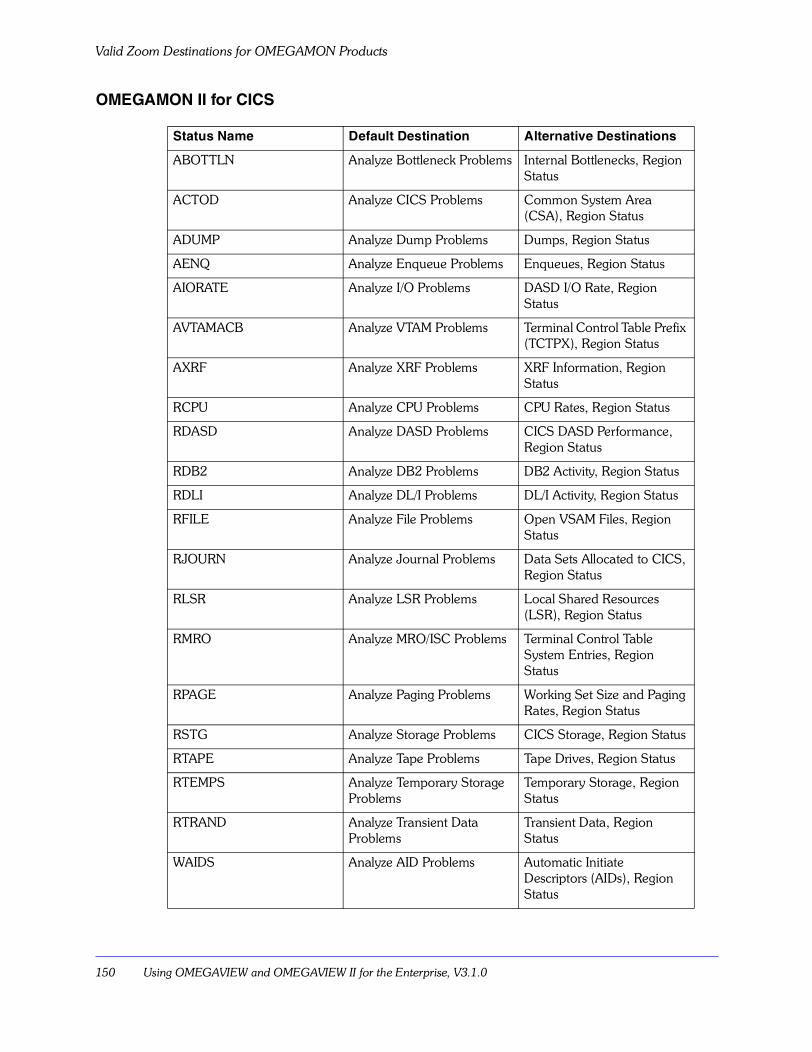
Valid Zoom Destinations for OMEGAMON Products
150 Using OMEGAVIEW and OMEGAVIEW II for the Enterprise, V3.1.0
OMEGAMON II for CICS
Status Name Default Destination Alternative Destinations
ABOTTLN Analyze Bottleneck Problems Internal Bottlenecks, Region Status
ACTOD Analyze CICS Problems Common System Area (CSA), Region Status
ADUMP Analyze Dump Problems Dumps, Region Status
AENQ Analyze Enqueue Problems Enqueues, Region Status
AIORATE Analyze I/O Problems DASD I/O Rate, Region Status
AVTAMACB Analyze VTAM Problems Terminal Control Table Prefix (TCTPX), Region Status
AXRF Analyze XRF Problems XRF Information, Region Status
RCPU Analyze CPU Problems CPU Rates, Region Status
RDASD Analyze DASD Problems CICS DASD Performance, Region Status
RDB2 Analyze DB2 Problems DB2 Activity, Region Status
RDLI Analyze DL/I Problems DL/I Activity, Region Status
RFILE Analyze File Problems Open VSAM Files, Region Status
RJOURN Analyze Journal Problems Data Sets Allocated to CICS, Region Status
RLSR Analyze LSR Problems Local Shared Resources (LSR), Region Status
RMRO Analyze MRO/ISC Problems Terminal Control Table System Entries, Region Status
RPAGE Analyze Paging Problems Working Set Size and Paging Rates, Region Status
RSTG Analyze Storage Problems CICS Storage, Region Status
RTAPE Analyze Tape Problems Tape Drives, Region Status
RTEMPS Analyze Temporary Storage Problems
Temporary Storage, Region Status
RTRAND Analyze Transient Data Problems
Transient Data, Region Status
WAIDS Analyze AID Problems Automatic Initiate Descriptors (AIDs), Region Status
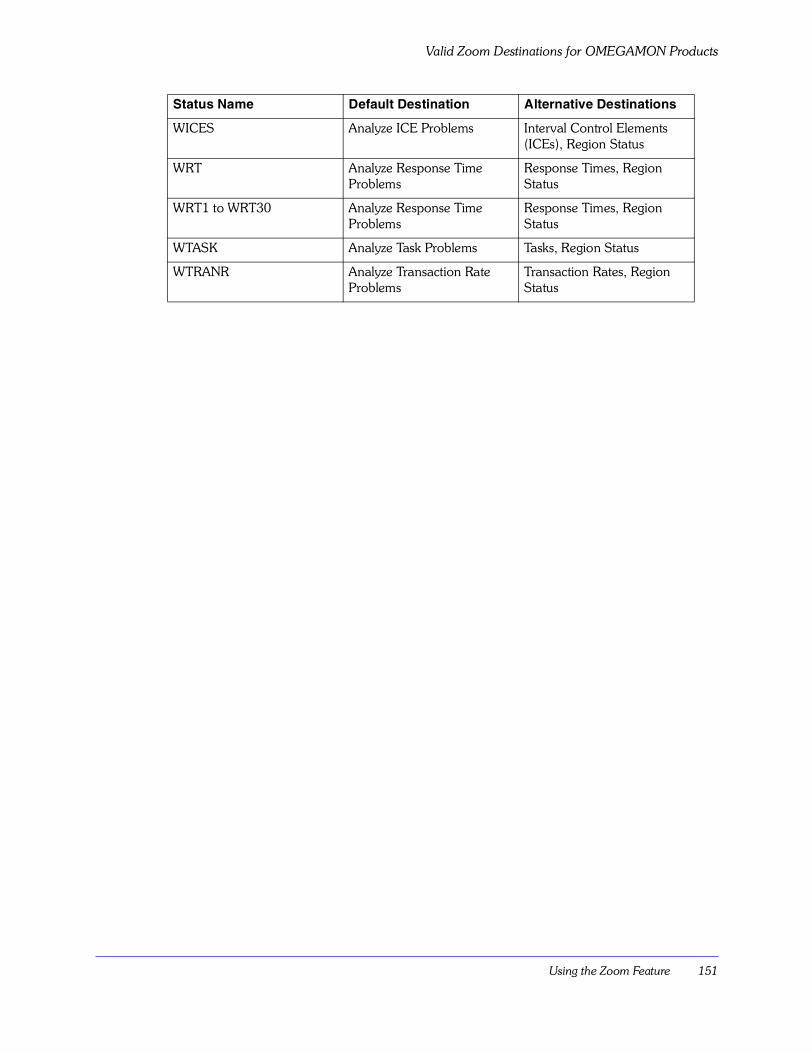
Using the Zoom Feature 151
Valid Zoom Destinations for OMEGAMON Products
WICES Analyze ICE Problems Interval Control Elements (ICEs), Region Status
WRT Analyze Response Time Problems
Response Times, Region Status
WRT1 to WRT30 Analyze Response Time Problems
Response Times, Region Status
WTASK Analyze Task Problems Tasks, Region Status
WTRANR Analyze Transaction Rate Problems
Transaction Rates, Region Status
Status Name Default Destination Alternative Destinations
Valid Zoom Destinations for OMEGAMON Products
152 Using OMEGAVIEW and OMEGAVIEW II for the Enterprise, V3.1.0
OMEGAMON for DB2
Status Name Default Destination Alternative Destinations
A* ZMENUI (Main Menu) None
ACI ZXGRPCI (CICS Exceptions) ZMENUI (Main Menu)
AIM ZXGRPIMI (IMS Exceptions) ZMENUI
ASY ZXGRPSI (System Exceptions)
ZMENUI
ATH ZXGRPTI (Thread Exceptions)
ZMENUI
WRT ZSUMMI (Summary of DB2 Activity)
ZMENUI
WRTBATCH ZSUMMI ZMENUI
WRTCICS ZSUMMI ZMENUI
WRTDDB ZSUMMI ZMENUI
WRTIMS ZSUMMI ZMENUI
WRTTSO ZSUMMI ZMENUI
Using the Zoom Feature 153
Valid Zoom Destinations for OMEGAMON Products
OMEGAMON II for DB2
Status Name Default Destination Alternative Destinations
AACT Analyze Traces Active DB2 Traces, System Status
ADB2 Analyze System Activity DB2 System Activity, System Status
AINTH Analyze Inactive Threads Inactive Threads, System Status
ALOCK Analyze Locks Locking Conflicts, System Status
ATHRA Analyze Thread Activity All DB2 Threads, System Status
AVOL Analyze Volume Activity Volume Activity Summary, System Status
RBUFF Analyze Buffer Pools Buffer Manager Information, System Status
RDDF Analyze DDF Distributed Data Facility, System Status
REDM Analyze EDM Pool EDM Pool Information, System Status
RLOG Analyze DB2 Log Log Manager Information, System Status
WBACK Analyze Background Background Thread Summary, System Status
WCICS Analyze CICS CICS Thread Summary, System Status
WDIS Analyze Distributed Threads Distributed Thread Summary, System Status
WIMS Analyze IMS IMS Thread Summary, System Status
WTSO Analyze TSO TSO Thread Summary, System Status
WUTIL Analyze Utilities Utilities Summary, System Status
Valid Zoom Destinations for OMEGAMON Products
154 Using OMEGAVIEW and OMEGAVIEW II for the Enterprise, V3.1.0
OMEGAMON II for IMS
Status Name Default Destination Alternative Destinations
ACANPROB System Overview None
ACONF Database Conflicts System Overview
ADBASE Databases Alerts System Overview
AFPATH Fast Path Status System Overview
ALOG Logging Environment System Overview
AMSGQ Message Queue Buffers System Overview
APOOLS Storage Pools System Overview
AREGNS IMS Regions Alerts System Overview
ATERM Signed-On Terminals System Overview
ATRACE Traces System Overview
RBUFFRP OSAM Buffer Pools VSAM Buffer Pools, System Overview
RCPU CPU Status System Overview
RDB2 DB2 Status System Overview
RIMSSTAT IMS Status System Overview
RIO I/O Status System Overview
RVSTG Virtual Storage System Overview
RXRF XRF Status System Overview
WRT RTA� for All Groups System Overview
WTRNQL Transactions Workload System Overview
WRTOTH RTA for Other Groups System Overview
WRT1 to WRT30 RTA for Group 01 to RTA for Group 30
System Overview
Using the Zoom Feature 155
Valid Zoom Destinations for OMEGAMON Products
OMEGAMON for MVS
Status Name Default Destination Alternative Destinations
A* ZMENUI (Main Menu) None
AAS ZALLI (Systemwide Exceptions)
ZMENUI (Main Menu)
AHD ZALLI ZMENUI
ARS ZALLI ZMENUI
AOP ZALLI ZMENUI
ASR ZALLI ZMENUI
RDASDBSY ZPATHI (Long Device Response Times)
ZMENUI
RDASDSVC ZPATHI ZMENUI
WALL ZRESPI (TSO Average Response Time)
ZMENUI
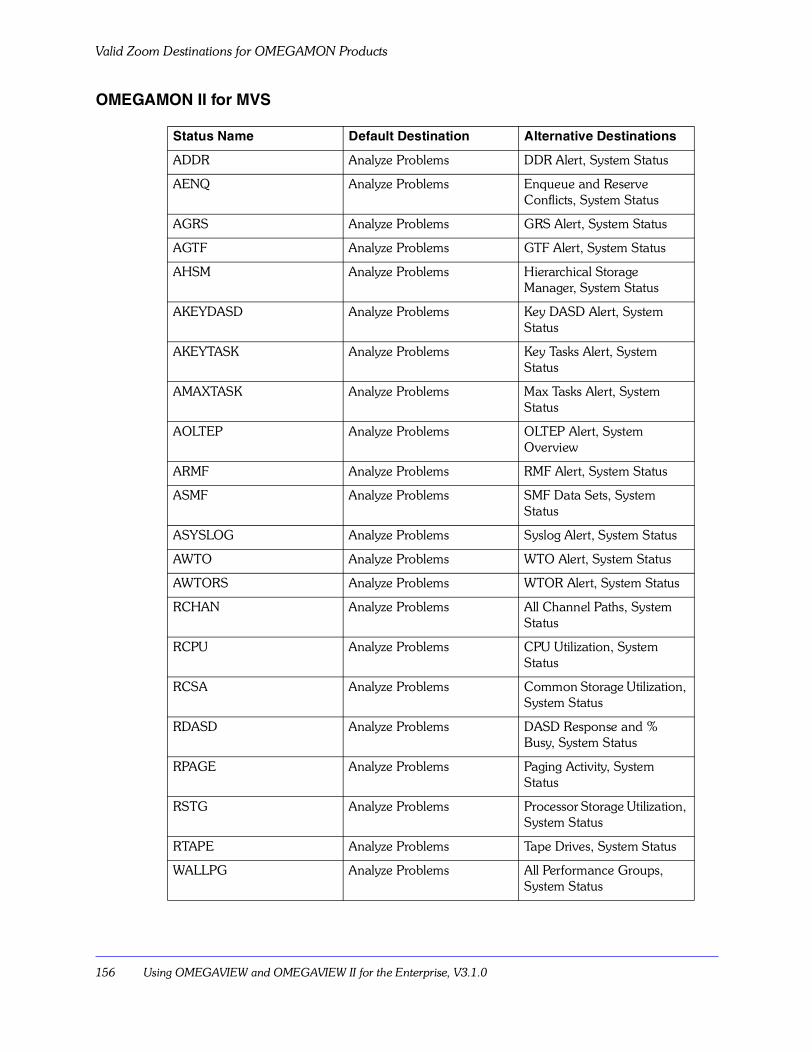
Valid Zoom Destinations for OMEGAMON Products
156 Using OMEGAVIEW and OMEGAVIEW II for the Enterprise, V3.1.0
OMEGAMON II for MVS
Status Name Default Destination Alternative Destinations
ADDR Analyze Problems DDR Alert, System Status
AENQ Analyze Problems Enqueue and Reserve Conflicts, System Status
AGRS Analyze Problems GRS Alert, System Status
AGTF Analyze Problems GTF Alert, System Status
AHSM Analyze Problems Hierarchical Storage Manager, System Status
AKEYDASD Analyze Problems Key DASD Alert, System Status
AKEYTASK Analyze Problems Key Tasks Alert, System Status
AMAXTASK Analyze Problems Max Tasks Alert, System Status
AOLTEP Analyze Problems OLTEP Alert, System Overview
ARMF Analyze Problems RMF Alert, System Status
ASMF Analyze Problems SMF Data Sets, System Status
ASYSLOG Analyze Problems Syslog Alert, System Status
AWTO Analyze Problems WTO Alert, System Status
AWTORS Analyze Problems WTOR Alert, System Status
RCHAN Analyze Problems All Channel Paths, System Status
RCPU Analyze Problems CPU Utilization, System Status
RCSA Analyze Problems Common Storage Utilization, System Status
RDASD Analyze Problems DASD Response and % Busy, System Status
RPAGE Analyze Problems Paging Activity, System Status
RSTG Analyze Problems Processor Storage Utilization, System Status
RTAPE Analyze Problems Tape Drives, System Status
WALLPG Analyze Problems All Performance Groups, System Status
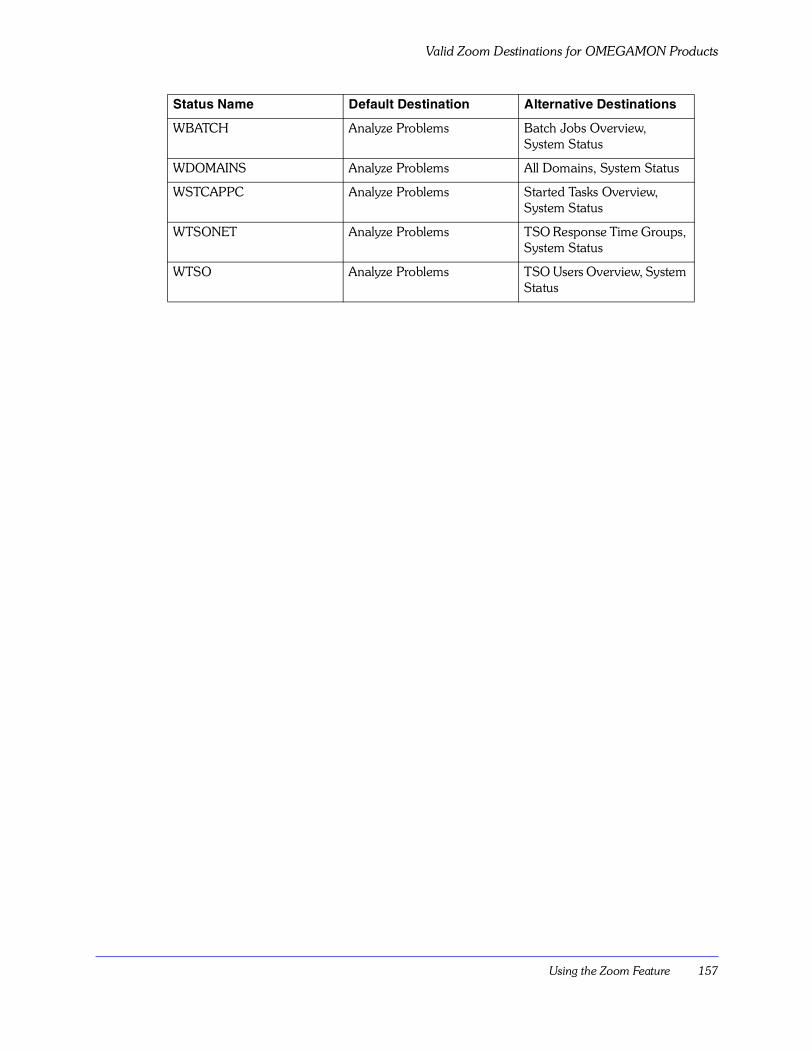
Using the Zoom Feature 157
Valid Zoom Destinations for OMEGAMON Products
WBATCH Analyze Problems Batch Jobs Overview, System Status
WDOMAINS Analyze Problems All Domains, System Status
WSTCAPPC Analyze Problems Started Tasks Overview, System Status
WTSONET Analyze Problems TSO Response Time Groups, System Status
WTSO Analyze Problems TSO Users Overview, System Status
Status Name Default Destination Alternative Destinations
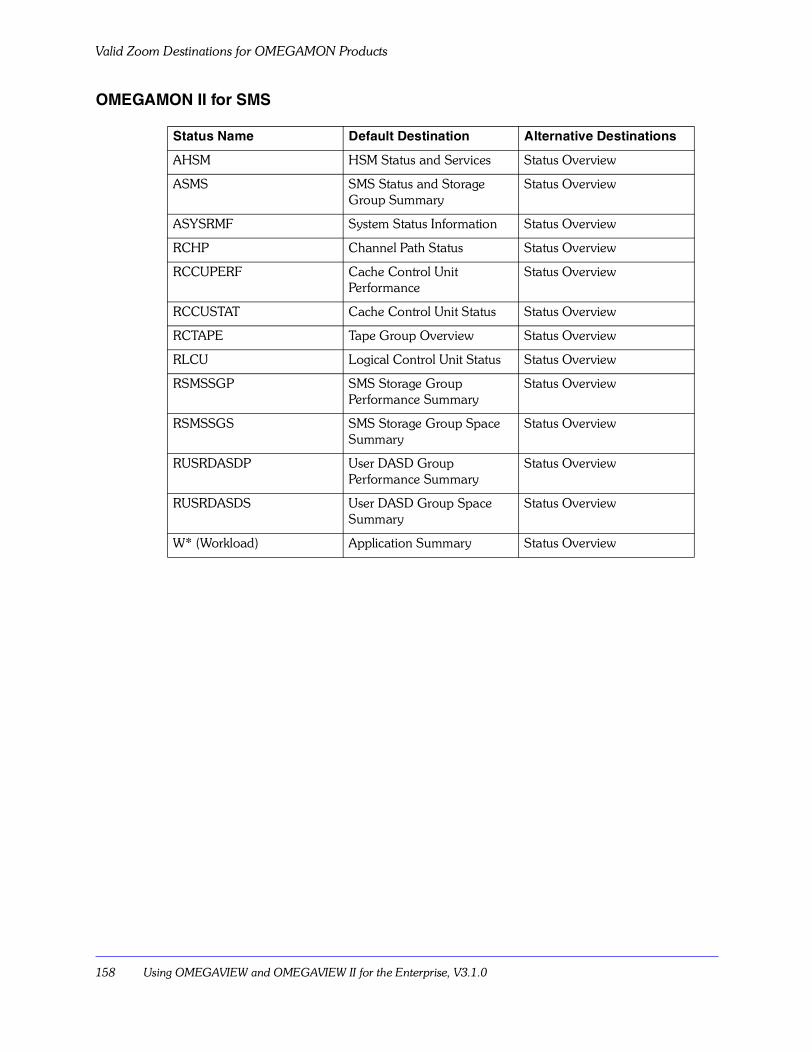
Valid Zoom Destinations for OMEGAMON Products
158 Using OMEGAVIEW and OMEGAVIEW II for the Enterprise, V3.1.0
OMEGAMON II for SMS
Status Name Default Destination Alternative Destinations
AHSM HSM Status and Services Status Overview
ASMS SMS Status and Storage Group Summary
Status Overview
ASYSRMF System Status Information Status Overview
RCHP Channel Path Status Status Overview
RCCUPERF Cache Control Unit Performance
Status Overview
RCCUSTAT Cache Control Unit Status Status Overview
RCTAPE Tape Group Overview Status Overview
RLCU Logical Control Unit Status Status Overview
RSMSSGP SMS Storage Group Performance Summary
Status Overview
RSMSSGS SMS Storage Group Space Summary
Status Overview
RUSRDASDP User DASD Group Performance Summary
Status Overview
RUSRDASDS User DASD Group Space Summary
Status Overview
W* (Workload) Application Summary Status Overview
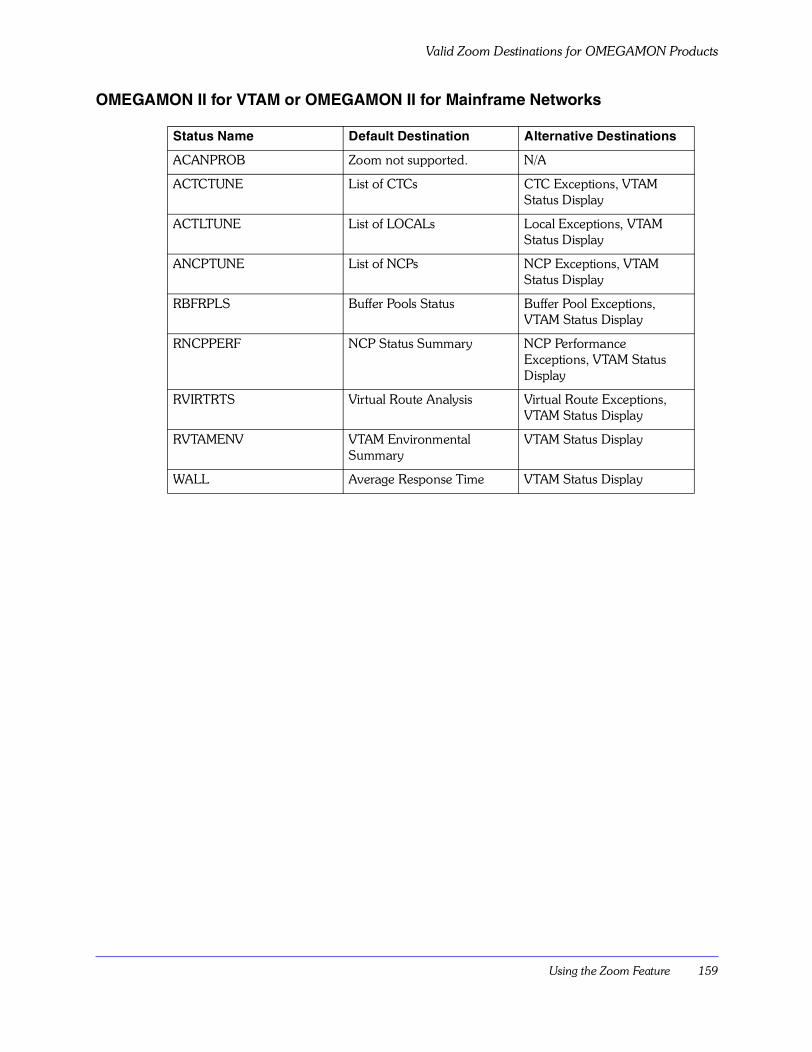
Using the Zoom Feature 159
Valid Zoom Destinations for OMEGAMON Products
OMEGAMON II for VTAM or OMEGAMON II for Mainframe Networks
Status Name Default Destination Alternative Destinations
ACANPROB Zoom not supported. N/A
ACTCTUNE List of CTCs CTC Exceptions, VTAM Status Display
ACTLTUNE List of LOCALs Local Exceptions, VTAM Status Display
ANCPTUNE List of NCPs NCP Exceptions, VTAM Status Display
RBFRPLS Buffer Pools Status Buffer Pool Exceptions, VTAM Status Display
RNCPPERF NCP Status Summary NCP Performance Exceptions, VTAM Status Display
RVIRTRTS Virtual Route Analysis Virtual Route Exceptions, VTAM Status Display
RVTAMENV VTAM Environmental Summary
VTAM Status Display
WALL Average Response Time VTAM Status Display
Valid Zoom Destinations for OMEGAMON Products
160 Using OMEGAVIEW and OMEGAVIEW II for the Enterprise, V3.1.0
Problem Management 161
Problem Management
IntroductionThis chapter explains how to use OMEGAVIEW problem management functions to record problems and track the resolution process.
Chapter ContentsOverview . . . . . . . . . . . . . . . . . . . . . . . . . . . . . . . . . . . . . . . . . . . . . . . . . . . . . . . . . . . . . . . . .162Finding Underlying Status Information and Triggering Alerts . . . . . . . . . . . . . . . . . . . . . . . . . .163Viewing a Problem Management Record . . . . . . . . . . . . . . . . . . . . . . . . . . . . . . . . . . . . . . . . .165Adding a Problem Management Record . . . . . . . . . . . . . . . . . . . . . . . . . . . . . . . . . . . . . . . . . .166Changing a Problem Management Record . . . . . . . . . . . . . . . . . . . . . . . . . . . . . . . . . . . . . . . .168Deleting a Problem Management Record . . . . . . . . . . . . . . . . . . . . . . . . . . . . . . . . . . . . . . . . .169
11
Overview
162 Using OMEGAVIEW and OMEGAVIEW II for the Enterprise, V3.1.0
Overview
When a problem occurs in a large data processing organization, it can be difficult to determine how the problem is being investigated and who is working towards a solution. With OMEGAVIEW problem management functions, authorized users can record problems and track the resolution process. Problem records identify who is taking action against a problem, what the problem might be, how long it will take to resolve the problem, and any comments regarding the situation.
OMEGAVIEW indicates session problems by displaying different colors on the status bar. Critical conditions are shown in red (by default) and potential problems are shown in yellow (by default).
When a critical condition is indicated, you can add a problem management record. You can also view, change, or delete an existing record.
To help you perform problem management functions, you can find information about the underlying status item causing a critical status. Use the Show Details command to find this information.
User authority requiredYou must be authorized by the system administrator to use problem management functions. Authorized users can add, create, change, or delete problem management records. If you are not an authorized user, you may still view problem management records to obtain information and keep track of the resolution process.
Problem Management 163
Finding Underlying Status Information and Triggering Alerts
Finding Underlying Status Information and Triggering Alerts
Using the Show Details commandTo find underlying status information, type S (Show details) in the input field to the left of the critical status bar and press Enter. If the status bar represents a single status item, you will navigate directly to the underlying OMEGAMON product.
If the status bar represents a rollup of single status items, the OMEGAVIEW interface shows the component status items and their associated severity levels. One or more of these status items might show a critical severity level. If you press Enter with the cursor next to the item with the critical severity level, the OMEGAVIEW interface either shows the next level of component status items (if the selected item is another rollup) or zooms into the OMEGAMON session.
Use of action codes is available on Workload, Resource, and Alert Status Components rollup panels. See �Enhanced Action Code Navigation� on page 201 for more information.
Triggering AlertsWhenever problem management data changes, an alert can be transmitted from OMEGAVIEW. Using REXX execs, Tivoli AF/OPERATOR or Tivoli OMEGACENTER Gateway can trap the alert and capture the data. To enable alerts, use the Alerts Manager.
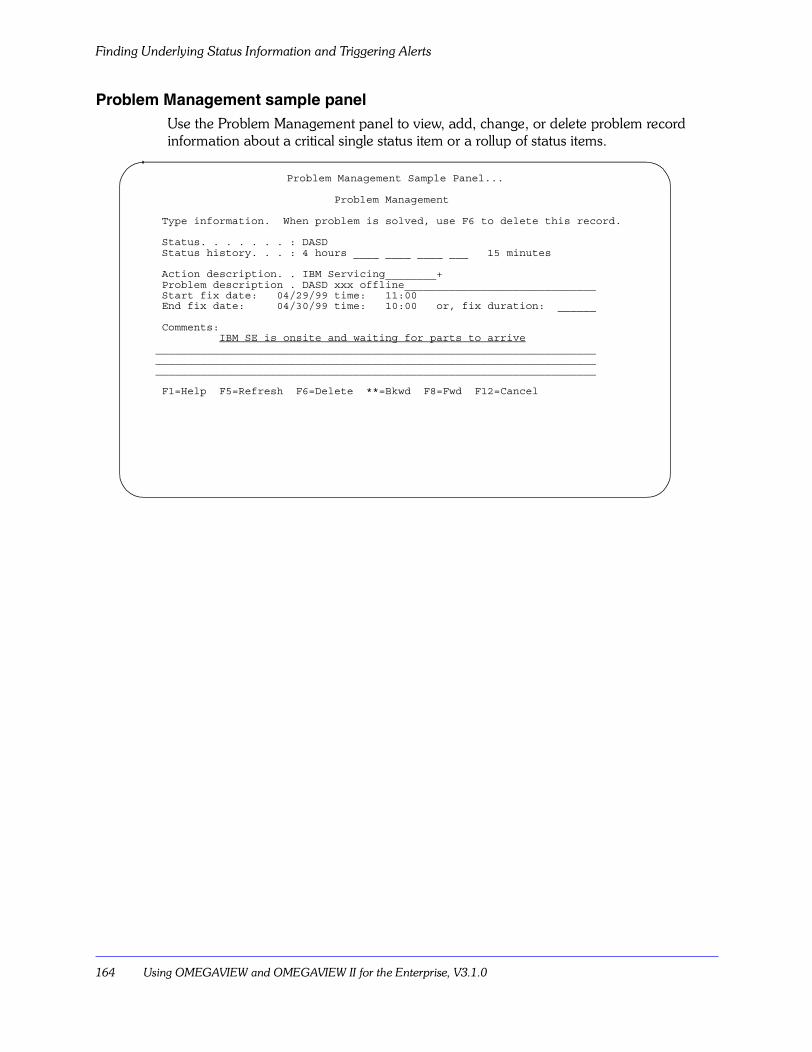
Finding Underlying Status Information and Triggering Alerts
164 Using OMEGAVIEW and OMEGAVIEW II for the Enterprise, V3.1.0
Problem Management sample panelUse the Problem Management panel to view, add, change, or delete problem record information about a critical single status item or a rollup of status items.
Problem Management Sample Panel...
Problem Management Type information. When problem is solved, use F6 to delete this record. Status. . . . . . . : DASD Status history. . . : 4 hours ____ ____ ____ ___ 15 minutes Action description. . IBM Servicing________+ Problem description . DASD xxx offline______________________________ Start fix date: 04/29/99 time: 11:00 End fix date: 04/30/99 time: 10:00 or, fix duration: ______ Comments: IBM SE is onsite and waiting for parts to arrive_______________________________________________________________________________________________________________________________________________________________________________________________________________ F1=Help F5=Refresh F6=Delete **=Bkwd F8=Fwd F12=Cancel

Problem Management 165
Viewing a Problem Management Record
Viewing a Problem Management Record
User authority requiredNone. All users can view open records.
ProcedureUse the following procedure to view a problem management record.
Step Action Result
1 Type P (Problem Management) in the input field to the left of the critical status bar and press Enter.! If you are working with a single
status item, skip to step 3.! If you are working with a rollup of
status items, continue to step 2.
If the status bar represents a single status item, OMEGAVIEW displays the Problem Management panel.
If the status bar represents a rollup of single status items, OMEGAVIEW displays the Rollup Problem Management Choices pop-up.
2 From the Rollup Problem Management Choices pop-up, you can:! Display a list of existing records for
this rollup. Select Find component items with action indicators and press Enter. If there are no existing records for this rollup, OMEGAVIEW displays the message: There are no available components.
! Go directly to the Problem Management panel to view a record. Select View/change problem data for this item and press Enter.
OMEGAVIEW displays the Problem Management panel.
Adding a Problem Management Record
166 Using OMEGAVIEW and OMEGAVIEW II for the Enterprise, V3.1.0
Adding a Problem Management Record
User authority requiredYou must have authority to add a record. If you do not, see your system administrator.
ProcedureUse the following procedure to add a problem management record.
Step Action Result
1 Type P (Problem Management) in the input field to the left of the critical status bar and press Enter.! If you are working with a single
status item, skip to step 3.! If you are working with a rollup of
status items, continue to step 2.
If the status bar represents a single status item, OMEGAVIEW displays the Problem Management panel.
If the status bar represents a rollup of single status items, OMEGAVIEW displays the Rollup Problem Management Choices pop-up.
2 From the Rollup Problem Management Choices pop-up, you can:! Display a list of existing records for
this rollup. Select Find component items with action indicators and press Enter. If there are no existing records for this rollup, OMEGAVIEW displays the message: There are no available components.
! Go directly to the Problem Management panel to view a record. Select View/change problem data for this item and press Enter.
OMEGAVIEW displays the Problem Management panel.
Problem Management 167
Adding a Problem Management Record
Field DescriptionsThe following table describes the fields on the Problem Management panel that you complete to add or change a problem management record.
3 Complete the information fields in the Problem Management entry panel and press Enter. Refer to the Field Descriptions table following this procedure.
If you custom-designed a status display panel with status bars that have action text areas to the right of the status bar, you may type your name or initials and the brief problem message in that space instead of typing it in the problem management record. This short description appears on the panel next to the status bar, informing the viewer of the problem.
OMEGAVIEW processes the information and redisplays the critical bar. The status bar now displays an exclamation point (!) in the rightmost segment of the status bar. This is an action indicator used to notify viewers that someone is taking action. (The exclamation point is the default; it can be changed through OMEGAVIEW Status Defaults on the Options pull-down menu). Until the problem is solved and the problem management record is deleted, the problem indicator is extended, from left to right, across the status bar.
Panel Field Description
Action Description You can enter your name or initials (or those of the person assigned to the problem) and a brief description of the action being taken. For example, you could enter DP Mgr - trans pblm to alert all viewers that the Data Processing manager suspects that the critical or warning condition may be due to a transmission problem.
Instead of entering freeform text, you can use F4 (Prompt) to display a prompt list from which you can select predefined values, such as ACKNOWLEDGE or RESET.
Problem Description Type from 1 to 50 characters to describe the problem, then press Tab.
Action start date Enter the date on which problem resolution action began. Use the same format specified for date in Preferences under the Options pull-down menu.
Action start time Enter the time of day when problem resolution began in the format HH:MM.
Action end date Enter the date on which you except the problem to be resolved. Use the same format specified for date in Preferences under the Options pull-down menu.
Action end time Enter the time of day when you expect the problem to be resolved in the format HH:MM.
Duration Instead of entering an end time, you can enter how long you expect problem resolution to take in the format HHH:MM. The end time is computed for you.
Comments Type up to 4 lines of additional information in this area to clarify the problem and its resolution. If you need more than 4 lines, press F8 to scroll the comment area. Continue typing comments. There is no limit to the number of comment lines. When complete, press Enter to return to the OMEGAVIEW panel you were viewing.
Step Action Result
Changing a Problem Management Record
168 Using OMEGAVIEW and OMEGAVIEW II for the Enterprise, V3.1.0
Changing a Problem Management Record
User authority requiredYou must have authority to change a record. If you do not, see your system administrator.
ProcedureUse the following procedure to change a record.
Step Action Result
1 Type P (Problem Management) in the input field to the left of the critical status bar and press Enter.! If you are working with a single
status item, skip to step 3.! If you are working with a rollup
of status items, continue to step 2.
If the status bar represents a single status item, OMEGAVIEW displays the Problem Management panel.
If the status bar represents a rollup of single status items, OMEGAVIEW displays the Rollup Problem Management Choices pop-up.
2 From the Rollup Problem Management Choices pop-up, you can:! Display a list of existing records
for this rollup. Select Find component items with action indicators and press Enter. If there are no existing records for this rollup, OMEGAVIEW displays the message: There are no available components.
! Go directly to the Problem Management panel to view a record. Select View/change problem data for this item and press Enter.
OMEGAVIEW displays the Problem Management panel.
3 Type over the existing field information (refer to �Field Descriptions� on page 167) or press F8 to scroll to another panel on which you can type additional comment lines. When all entries are complete, press Enter.
OMEGAVIEW processes your changes.
Problem Management 169
Deleting a Problem Management Record
Deleting a Problem Management Record
User authority requiredYou must have authority to delete a record. If you do not, see your system administrator.
ProcedureUse the following procedure to delete a record.
Step Action Result
1 Type P (Problem Management) in the input field to the left of the critical status bar and press Enter.! If you are working with a single status
item, skip to step 3.! If you are working with a rollup of status
items, continue to step 2.
If the status bar represents a single status item, OMEGAVIEW displays the Problem Management panel.
If the status bar represents a rollup of single status items, OMEGAVIEW displays the Rollup Problem Management Choices pop-up.
2 From the Rollup Problem Management Choices pop-up, you can:! Display a list of existing records for this
rollup. Select Find component items with action indicators and press Enter. If there are no existing records for this rollup, OMEGAVIEW displays the message: There are no available components.
! Go directly to the Problem Management panel to view a record. Select View/change problem data for this item and press Enter.
OMEGAVIEW displays the Problem Management panel.
3 When OMEGAVIEW displays the problem record, verify that this is the record you want deleted, then press F6.
If the Confirm Deletes option is set to ON, OMEGAVIEW displays the Confirm Problem Data Deletion pop-up.
4 If you are certain that you want this problem management record deleted, select Delete problem data and press Enter.
OMEGAVIEW deletes the record and returns you to the status bar which no longer shows a critical condition.
Note: Action indicators are no longer added to the status bar, eventually disappearing from the bar when the history cycle ends.
Deleting a Problem Management Record
170 Using OMEGAVIEW and OMEGAVIEW II for the Enterprise, V3.1.0

Section 2. Using OMEGAVIEW II for the Enterprise 171
Section 2. Using OMEGAVIEW II for the Enterprise
This section gives information about using OMEGAVIEW II for the Enterprise. This component of Tivoli OMEGAMON DE on z/OS integrates status information into the Tivoli OMEGAMON XE architecture, allowing situations and policies to be created against a number of managed systems.
These are the chapters in this section.
Introducing OMEGAVIEW II for the Enterprise . . . . . . . . . . . . . . . . . . . . . . . . . . . . . 173OMEGAVIEW II for the Enterprise Workspaces and Situations . . . . . . . . . . . . . . . . . 179

172 Using OMEGAVIEW and OMEGAVIEW II for the Enterprise, V3.1.0

Introducing OMEGAVIEW II for the Enterprise 173
IntroducingOMEGAVIEW II for the Enterprise
IntroductionThis chapter provides an introduction to OMEGAVIEW II for the Enterprise. It explains what OMEGAVIEW II for the Enterprise is and how it can help you monitor the health of your mainframe enterprise.
The chapter also describes the Tivoli OMEGAMON XE and Tivoli OMEGAMON DE architecture.
Chapter contentsOMEGAVIEW II for the Enterprise . . . . . . . . . . . . . . . . . . . . . . . . . . . . . . . . . . . . . . . . . . . . . .174Tivoli OMEGAMON XE, Tivoli OMEGAMON DE, and OMEGAMON Platform . . . . . . . . . . . .175Key Features. . . . . . . . . . . . . . . . . . . . . . . . . . . . . . . . . . . . . . . . . . . . . . . . . . . . . . . . . . . . . . .178
12
OMEGAVIEW II for the Enterprise
174 Using OMEGAVIEW and OMEGAVIEW II for the Enterprise, V3.1.0
OMEGAVIEW II for the Enterprise
OMEGAVIEW II for the Enterprise is a component of Tivoli OMEGAMON DE on z/OS. The components of Tivoli OMEGAMON DE on z/OS provide an integrated view of your mainframe enterprise and the power to take corrective action when problems threaten system and application availability.
What OMEGAVIEW II for the Enterprise doesOMEGAVIEW II for the Enterprise provides status information you can use to create situations and policies for enterprise-wide monitoring. The status information can come from:
! OMEGAMON sessions
! user-defined automation scripts of Tivoli AF/OPERATOR
! user-defined probes of Tivoli OMEGACENTER Gateway
! status items defined in the OMEGAVIEW Status Item Manager
You can use status item attributes to monitor any of the following systems, subsystems, and applications:
! CICS
! DB2
! IMS
! Mainframe Networks
! Storage
! z/OS
! user-defined applications or subsystems monitored by Tivoli AF/OPERATOR on z/OS or Tivoli OMEGACENTER Gateway on z/OS
OMEGAVIEW II for the Enterprise can support more than one managed system at a time, so you can create situations using status information from a number of sources. The information is passed from all sessions defined during product configuration.
For more information, see Configuring OMEGAVIEW and OMEGAVIEW II for the Enterprise.
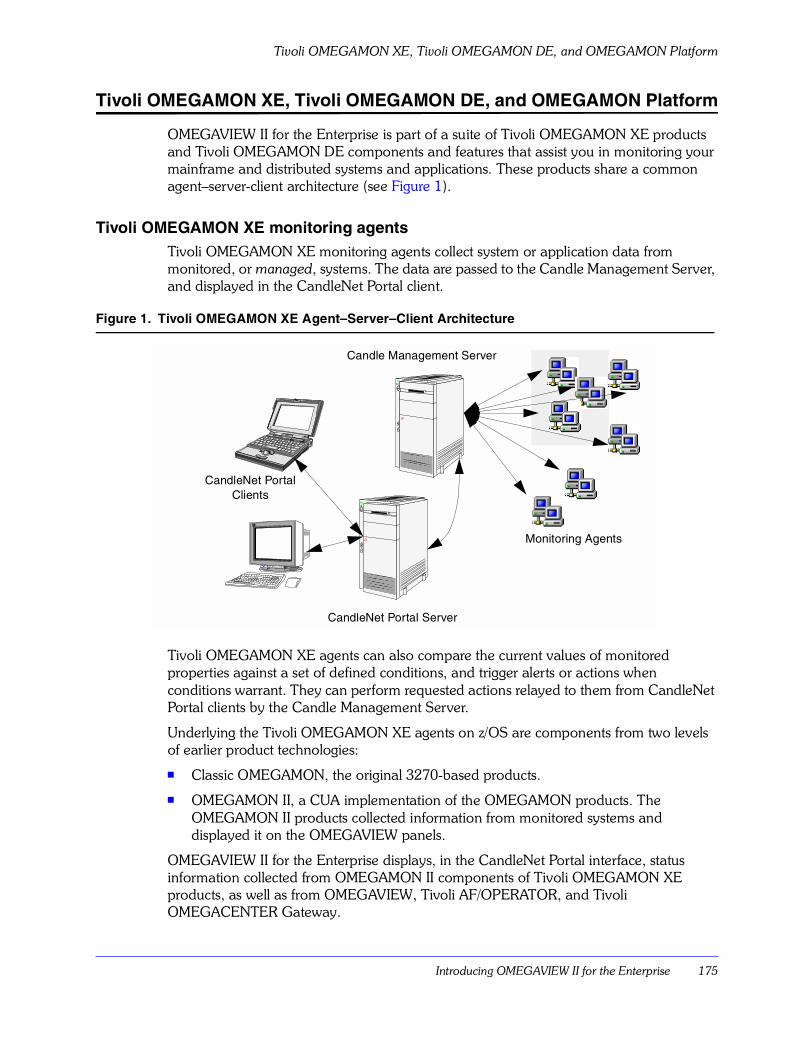
Introducing OMEGAVIEW II for the Enterprise 175
Tivoli OMEGAMON XE, Tivoli OMEGAMON DE, and OMEGAMON Platform
Tivoli OMEGAMON XE, Tivoli OMEGAMON DE, and OMEGAMON Platform
OMEGAVIEW II for the Enterprise is part of a suite of Tivoli OMEGAMON XE products and Tivoli OMEGAMON DE components and features that assist you in monitoring your mainframe and distributed systems and applications. These products share a common agent�server-client architecture (see Figure 1).
Tivoli OMEGAMON XE monitoring agentsTivoli OMEGAMON XE monitoring agents collect system or application data from monitored, or managed, systems. The data are passed to the Candle Management Server, and displayed in the CandleNet Portal client.
Figure 1. Tivoli OMEGAMON XE Agent–Server–Client Architecture
Tivoli OMEGAMON XE agents can also compare the current values of monitored properties against a set of defined conditions, and trigger alerts or actions when conditions warrant. They can perform requested actions relayed to them from CandleNet Portal clients by the Candle Management Server.
Underlying the Tivoli OMEGAMON XE agents on z/OS are components from two levels of earlier product technologies:
! Classic OMEGAMON, the original 3270-based products.
! OMEGAMON II, a CUA implementation of the OMEGAMON products. The OMEGAMON II products collected information from monitored systems and displayed it on the OMEGAVIEW panels.
OMEGAVIEW II for the Enterprise displays, in the CandleNet Portal interface, status information collected from OMEGAMON II components of Tivoli OMEGAMON XE products, as well as from OMEGAVIEW, Tivoli AF/OPERATOR, and Tivoli OMEGACENTER Gateway.
Monitoring Agents
CandleNet Portal Server
CandleNet Portal Clients
Candle Management Server
Tivoli OMEGAMON XE, Tivoli OMEGAMON DE, and OMEGAMON Platform
176 Using OMEGAVIEW and OMEGAVIEW II for the Enterprise, V3.1.0
Candle Management ServerThe Candle Management Server gathers data from the Tivoli OMEGAMON XE agents and acts as a collection and control point for alerts received from the agents. The Candle Management Server sends the data it receives from the agents to CandleNet Portal clients, where it is displayed in tabular or graphic views in a set of predefined or customized workspaces. The Candle Management Server also accepts requests for information or action from CandleNet Portal clients and distributes them to the agents for execution.
CandleNet Portal clientsCandleNet Portal is the JavaTM-based interface to the data monitoring and management resources of OMEGAMON Platform. Depending on how it is installed, CandleNet Portal can be used as either a desktop or browser-based client.
CandleNet Portal has its own server, the CandleNet Portal Server. The CandleNet Portal Server performs common CandleNet Portal functions and lightens the client.
Tivoli OMEGAMON DE on z/OSTivoli OMEGAMON DE is a CandleNet Portal feature that gives you a process-driven view of your enterprise. It enables you to pull together information from disparate sources, including a range of operating systems, servers, databases, mainframes, and network and Web components, in a single workspace; and provides a single point of control from which you can manage all the resources in your enterprise.
Tivoli OMEGAMON DE on z/OS extends the capabilities of Tivoli OMEGAMON XE to include:
! Enterprise-specific Navigator views
The Navigator physical view shows the hierarchy of managed resources by operating system and type of Tivoli OMEGAMON XE agent. The Navigator business view offered by Tivoli OMEGAMON DE shows the hierarchy of any managed objects. You can define Navigator views for any logical grouping, such as a business process or a departmental hierarchy.
! Views of data from different types of monitoring agents in one workspace
In a single workspace, you can build a table or chart with data from one type of monitoring agent, and another table or chart with data from a different agent. Within that workspace, you can show views from as many different agent types as are included on that branch of the Navigator.
! Linking application workspaces
You can define a link from a workspace associated with one type of monitoring agent to a workspace associated with another type of agent.
! Automation policies
The Workflow editor enables you to design sets of automated system processes, called policies, to resolve system problems. A policy performs actions, schedules work to be performed by users, or automates manual tasks.
Introducing OMEGAVIEW II for the Enterprise 177
Tivoli OMEGAMON XE, Tivoli OMEGAMON DE, and OMEGAMON Platform
! OMEGAVIEW and OMEGAVIEW II for the Enterprise
These components aggregate and display status information from a variety of sources.
Where to find more informationFor more information about OMEGAMON Platform, see the CandleNet Portal online help and the books on the OMEGAMON Platform publications CD.
Key Features
178 Using OMEGAVIEW and OMEGAVIEW II for the Enterprise, V3.1.0
Key Features
Predefined workspacesOMEGAVIEW II for the Enterprise includes a set of predefined workspaces, which display status information for all sessions configured for monitoring by the product. You can customize the predefined workspaces or create your own.
Predefined monitoring situationsSituations are descriptions of conditions to which you want to be alerted. When situations are distributed to monitored systems they can, for example, alert you to a critical resource or workload problem. Situations can also be used to automate responses to problems.
OMEGAVIEW II for the Enterprise provides a set of predefined situations designed to enable you to monitor critical activity and to serve as templates for creating customized situations of your own. The predefined situations start automatically when the agent is started.
AttributesAttributes are characteristics or properties of monitored objects. Attributes are used in defining the queries used to collect the information presented in workspaces and to specify the conditions, or situations, that trigger alerts and automated actions.
OMEGAVIEW II for the Enterprise provides one group of status attributes. You can use these attributes to customize the predefined views or to create your own views and workspaces. You can use them to define situations that target specific thresholds, events, or performance problems you want to monitor.
Where to find more informationFor more information about the workspaces and situations provided by OMEGAVIEW II for the Enterprise, see the next chapter.
For detailed information about the product�s attributes, see the OMEGAVIEW II for the Enterprise online help.
For general instructions on using and customizing the CandleNet Portal interface, see the CandleNet Portal online help.

OMEGAVIEW II for the Enterprise Workspaces and Situations 179
OMEGAVIEW II for the EnterpriseWorkspaces and Situations
IntroductionThis chapter describes the workspaces and situations provided by OMEGAVIEW II for the Enterprise.
Chapter contentsWorkspaces . . . . . . . . . . . . . . . . . . . . . . . . . . . . . . . . . . . . . . . . . . . . . . . . . . . . . . . . . . . . . . .180Situations . . . . . . . . . . . . . . . . . . . . . . . . . . . . . . . . . . . . . . . . . . . . . . . . . . . . . . . . . . . . . . . . .181Attributes . . . . . . . . . . . . . . . . . . . . . . . . . . . . . . . . . . . . . . . . . . . . . . . . . . . . . . . . . . . . . . . . .184
13
Workspaces
180 Using OMEGAVIEW and OMEGAVIEW II for the Enterprise, V3.1.0
Workspaces
Predefined workspacesOMEGAVIEW II for the Enterprise provides these workspaces, which you can use to view the status of your mainframe enterprise:
! Critical and Warning Basic Status Items for All OMEGAVIEWs
! Critical and Warning Status Items
! All Status Items
Critical and Warning Status Items for All OMEGAVIEWs workspaceThis workspace displays when you select OMEGACENTER Bridge in the Navigator Physical view. It summarizes, for all the OMEGAVIEW products running in your enterprise, the basic status items that are in a Critical or Warning state. This is the highest level of the Navigator tree at which you can see an OMEGAVIEW II for the Enterprise workspace.
Critical and Warning Basic Status Items workspaceThis workspace displays when you select an instance of the OMEGAVIEW product in the Navigator Physical view. It shows the status items, for the selected OMEGAVIEW instance, that are in a Critical or Warning state. This workspace excludes rollup status items (summaries of worst-case status).
All Status Items workspaceThis workspace appears at the lowest level of the Navigator Physical view under the OMEGACENTER Bridge, when you select an OMEGAMON II product in the Navigator. It shows all status items (including rollup and data types) for the selected product.
Creating your own workspacesFor instructions on creating your own workspaces, see the CandleNet Portal online help.
OMEGAVIEW II for the Enterprise Workspaces and Situations 181
Situations
Situations
Predefined situationsOMEGAVIEW II for the Enterprise provides predefined situations that enable you to begin monitoring systems immediately. You can also base your own situations on the predefined situations.
Note: Rather than editing a predefined situation, copy it with Create Another and then edit the copy. This practice prevents your edited situations from being overwritten during installation and configuration of future versions of the product. For instructions, see Administering OMEGAMON Products: CandleNet Portal.
The predefined situations use status information from a number of sources:
! OMEGAMON or OMEGAMON II components of these Tivoli OMEGAMON XE products:
� Tivoli OMEGAMON XE for CICS on z/OS
� Tivoli OMEGAMON XE for DB2 on z/OS
� Tivoli OMEGAMON XE for IMS on z/OS
� Tivoli OMEGAMON XE for Mainframe Networks
� Tivoli OMEGAMON XE for Storage on z/OS
� Tivoli OMEGAMON XE on z/OS
! user-defined automation scripts of Tivoli AF/OPERATOR on z/OS
! user-defined probes of Tivoli OMEGACENTER Gateway on z/OS
! status items defined in the OMEGAVIEW Status Item Manager
The status information is passed from as many sessions as are configured for OMEGAVIEW II for the Enterprise. The OMEGAVIEW II for the Enterprise situations monitor for status changes to Warning or Critical, not for data values. All OMEGAVIEW II for the Enterprise predefined situations are started automatically whenever the agent or the Candle Management Server is restarted.
Alert-detecting situationsSituation OMEGAMON_ALERT_CRITICAL detects critical alerts from a monitored system (red status light). The formula is:
Status_Item.Current_State EQ CRITICAL AND
Status_Item.Type NE ROLLUP AND
Status_Item.Status_Name EQ A*
Situations
182 Using OMEGAVIEW and OMEGAVIEW II for the Enterprise, V3.1.0
Situation OMEGAMON_ALERT_WARNING detects warning alerts from a monitored system (yellow status light). The formula is:
Status_Item.Current_State EQ WARNING AND
Status_Item.Type NE ROLLUP AND
Status_Item.Status_Name EQ A*
Resource-related situationsSituation OMEGAMON_RESOURCE_CRITICAL detects critical resources from a monitored system (red status light). The formula is:
Status_Item.Current_State EQ CRITICAL AND
Status_Item.Type NE ROLLUP AND
Status_Item.Status_Name EQ R*
Situation OMEGAMON_RESOURCE_WARNING detects warning resources from a monitored system (yellow status light). The formula is:
Status_Item.Current_State EQ WARNING AND
Status_Item.Type NE ROLLUP AND
Status_Item.Status_Name EQ R*
Workload-related situationsSituation OMEGAMON_WORKLOAD_CRITICAL detects critical workloads from a monitored system (red status light). The formula is:
Status_Item.Current_State EQ CRITICAL AND
Status_Item.Type NE ROLLUP AND
Status_Item.Status_Name EQ W*
Situation OMEGAMON_WORKLOAD_WARNING detects warning workloads from a monitored system (yellow status light). The formula is:
Status_Item.Current_State EQ WARNING AND
Status_Item.Type NE ROLLUP AND
Status_Item.Status_Name EQ W*
OMEGAVIEW II for the Enterprise Workspaces and Situations 183
Situations
Creating, editing, and distributing situationsFor information on creating, editing, and distributing situations, see the CandleNet Portal online help.
Note: OMEGAVIEW status items can be modified from the CandleNet Portal. Tivoli AF/OPERATOR status items cannot be modified from the CandleNet Portal.
Attributes
184 Using OMEGAVIEW and OMEGAVIEW II for the Enterprise, V3.1.0
Attributes
You can use attributes to create situations based on status information passed to OMEGAVIEW II for the Enterprise. The status information can originate from many sources (listed in Situations). When a situation is evaluated as True, an event is reported in the CandleNet Portal interface, and you can examine the values the attributes had at the time of the event.
The attributes provided by OMEGAVIEW II for the Enterprise are in a single attribute group: Status_Item. For detailed information about the attributes in the Status_Item group, see the OMEGAVIEW II for the Enterprise online help.

Section 3. Appendixes 185
Section 3. Appendixes
Status Item Qualifiers . . . . . . . . . . . . . . . . . . . . . . . . . . . . . . . . . . . . . . . . . . . . . . . . 187Enhanced Logging Facility . . . . . . . . . . . . . . . . . . . . . . . . . . . . . . . . . . . . . . . . . . . . 197Enhanced Action Code Navigation. . . . . . . . . . . . . . . . . . . . . . . . . . . . . . . . . . . . . . 201Support Information . . . . . . . . . . . . . . . . . . . . . . . . . . . . . . . . . . . . . . . . . . . . . . . . . 205Notices . . . . . . . . . . . . . . . . . . . . . . . . . . . . . . . . . . . . . . . . . . . . . . . . . . . . . . . . . . . 211

186 Using OMEGAVIEW and OMEGAVIEW II for the Enterprise, V3.1.0
Status Item Qualifiers 187
Status Item Qualifiers
This appendix contains tables that list the low-level qualifiers used when assigning names to user-defined status items. Session qualifiers are for:
! OMEGAMON II for CICS
! OMEGAMON II for DB2
! OMEGAMON II for IMS
! OMEGAMON II for MVS
! OMEGAMON II for SMS
! OMEGAMON II for VTAM (or OMEGAMON II for Mainframe Networks)
A
Status Item Qualifiers for OMEGAMON II for CICS
188 Using OMEGAVIEW and OMEGAVIEW II for the Enterprise, V3.1.0
Status Item Qualifiers for OMEGAMON II for CICS
Table 2. Alert Status Items
Status Item Qualifier Description
AALL Alert summary Roll-up Status Item
ABOTTLN Bottlenecks
ABUF Buffers
ACTOD CICS TOD
ADB2 DB2
ADUMP Dumps
AENQ Enqueues
AIORATE I/O Rate
AJRN Journals
AMAXTASK Max tasks
AMROISC MRO/ISC
AOTHER All else
ASTGVIOL Storage violations
ASTRING Strings
AVSAM VSAM
AVTAMACB VTAM ACB
AXRF XRF
Status Item Qualifiers 189
Status Item Qualifiers for OMEGAMON II for CICS
Table 3. Resource Status Items
Status Item Qualifiers Description
RALL Resource Summery Roll-up Status Item
RALLTSKS All Tasks
RCPU CPU
RDASD DASD
RDB2 DB2
RDLI DL/I
RFILE Files
RJOURN Journals
RLSR LSR
RMRO MRO/ISC
RPAGE Paging
RSTG Storage
RTAPE Tapes
RTEMPS Temporary Storage
RTRAND Transient Data
RTRNRT Transaction Rate
TTDOCS22 Transplex Navigation
Table 4. Workload Status Items
Status Item Qualifiers Description
WALL Workload Summary Roll-up Status Item
WAIDS AIDs
WICES ICEs
WRT Response
WRTcc Transaction group cc response time
WTASK Tasks
WTRANR Transaction Rates
WUOWS Units of Work (UOWs)
Status Item Qualifiers for OMEGAMON II for DB2
190 Using OMEGAVIEW and OMEGAVIEW II for the Enterprise, V3.1.0
Status Item Qualifiers for OMEGAMON II for DB2
Table 5. Alert Status Items
Status Item Qualifier Description
AALL Alert summary Roll-up Status Item
AACT Active traces
ADB2 DB2 Activity
AINTH Inactive Threads
ALOCK Locks
ATHRA Thread Activity
AVOL Volume Activity
Table 6. Resource Status Items
Status Item Qualifier Description
RALL Resource performance summary Roll-up Status Item
RBUFF Buffer Pool
RDDF DDF Statistics
REDM EDM Pool
RLOCK Lock Statistics
RLOG Log Manager
Table 7. Workload Status Items (RTA)
Status Item Qualifier Description
WALL Response Time Analysis summary Roll-up Status Item
WBACK Background
WCICS Buffer Pool
WDIS Distributed
WIMS EDM Pool
WTSO TSO
WUTIL Utility
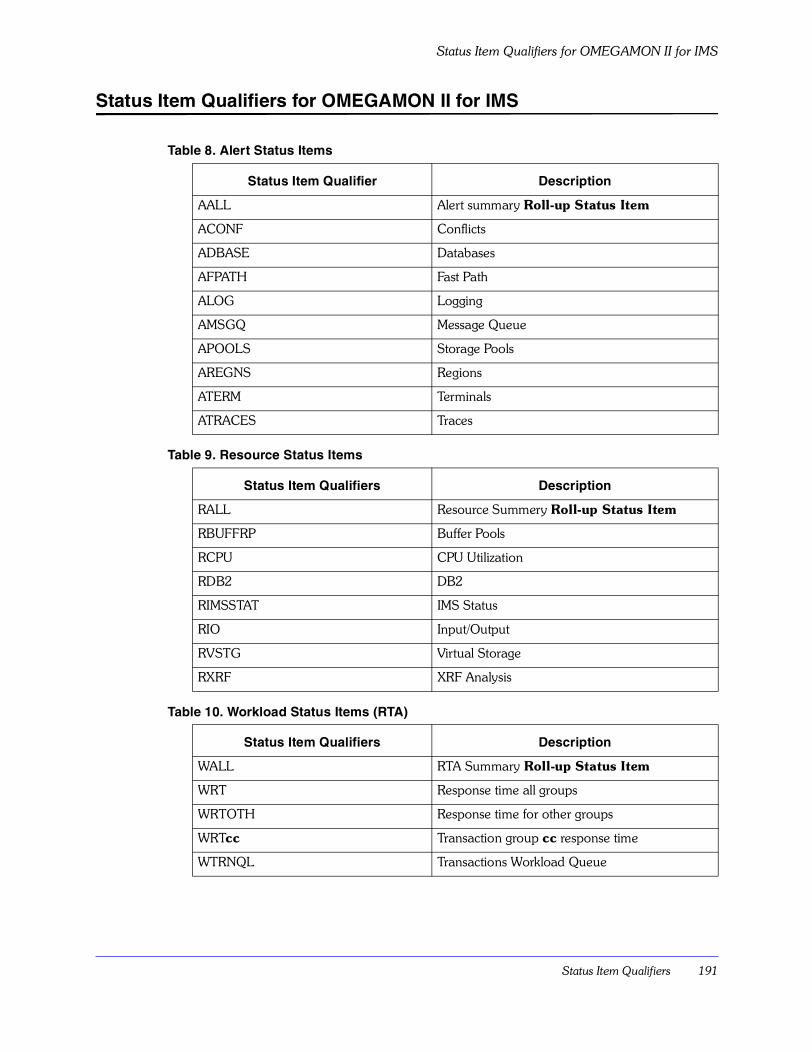
Status Item Qualifiers 191
Status Item Qualifiers for OMEGAMON II for IMS
Status Item Qualifiers for OMEGAMON II for IMS
Table 8. Alert Status Items
Status Item Qualifier Description
AALL Alert summary Roll-up Status Item
ACONF Conflicts
ADBASE Databases
AFPATH Fast Path
ALOG Logging
AMSGQ Message Queue
APOOLS Storage Pools
AREGNS Regions
ATERM Terminals
ATRACES Traces
Table 9. Resource Status Items
Status Item Qualifiers Description
RALL Resource Summery Roll-up Status Item
RBUFFRP Buffer Pools
RCPU CPU Utilization
RDB2 DB2
RIMSSTAT IMS Status
RIO Input/Output
RVSTG Virtual Storage
RXRF XRF Analysis
Table 10. Workload Status Items (RTA)
Status Item Qualifiers Description
WALL RTA Summary Roll-up Status Item
WRT Response time all groups
WRTOTH Response time for other groups
WRTcc Transaction group cc response time
WTRNQL Transactions Workload Queue
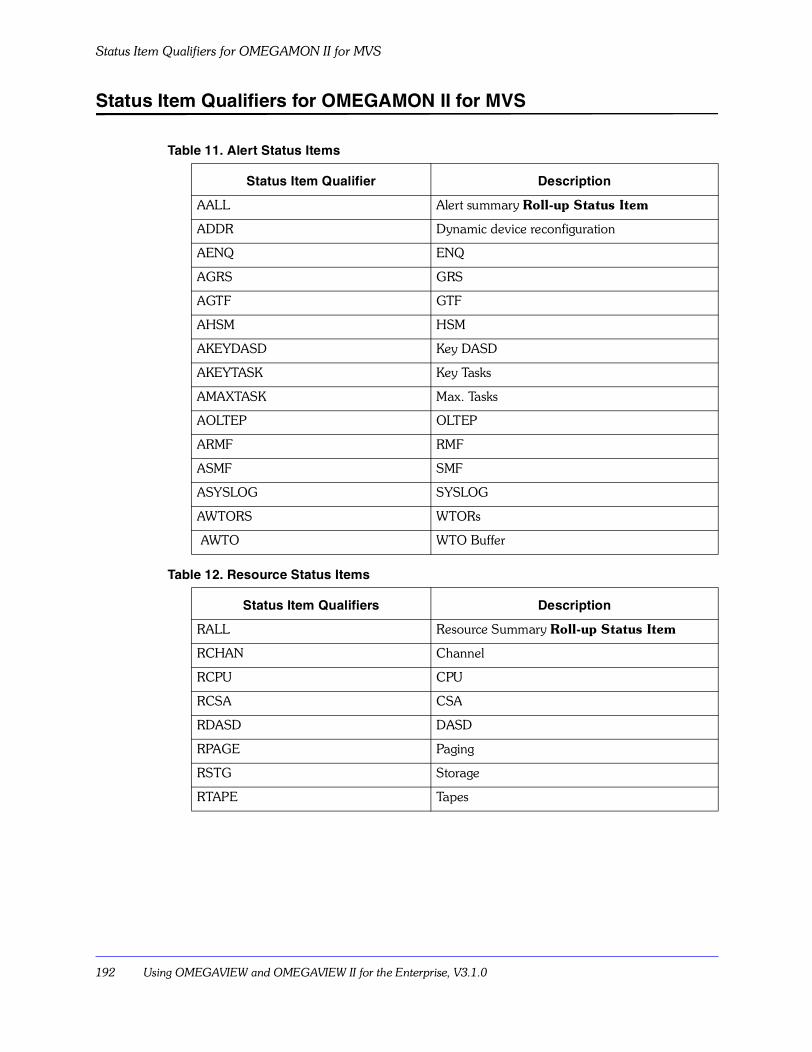
Status Item Qualifiers for OMEGAMON II for MVS
192 Using OMEGAVIEW and OMEGAVIEW II for the Enterprise, V3.1.0
Status Item Qualifiers for OMEGAMON II for MVS
Table 11. Alert Status Items
Status Item Qualifier Description
AALL Alert summary Roll-up Status Item
ADDR Dynamic device reconfiguration
AENQ ENQ
AGRS GRS
AGTF GTF
AHSM HSM
AKEYDASD Key DASD
AKEYTASK Key Tasks
AMAXTASK Max. Tasks
AOLTEP OLTEP
ARMF RMF
ASMF SMF
ASYSLOG SYSLOG
AWTORS WTORs
AWTO WTO Buffer
Table 12. Resource Status Items
Status Item Qualifiers Description
RALL Resource Summary Roll-up Status Item
RCHAN Channel
RCPU CPU
RCSA CSA
RDASD DASD
RPAGE Paging
RSTG Storage
RTAPE Tapes
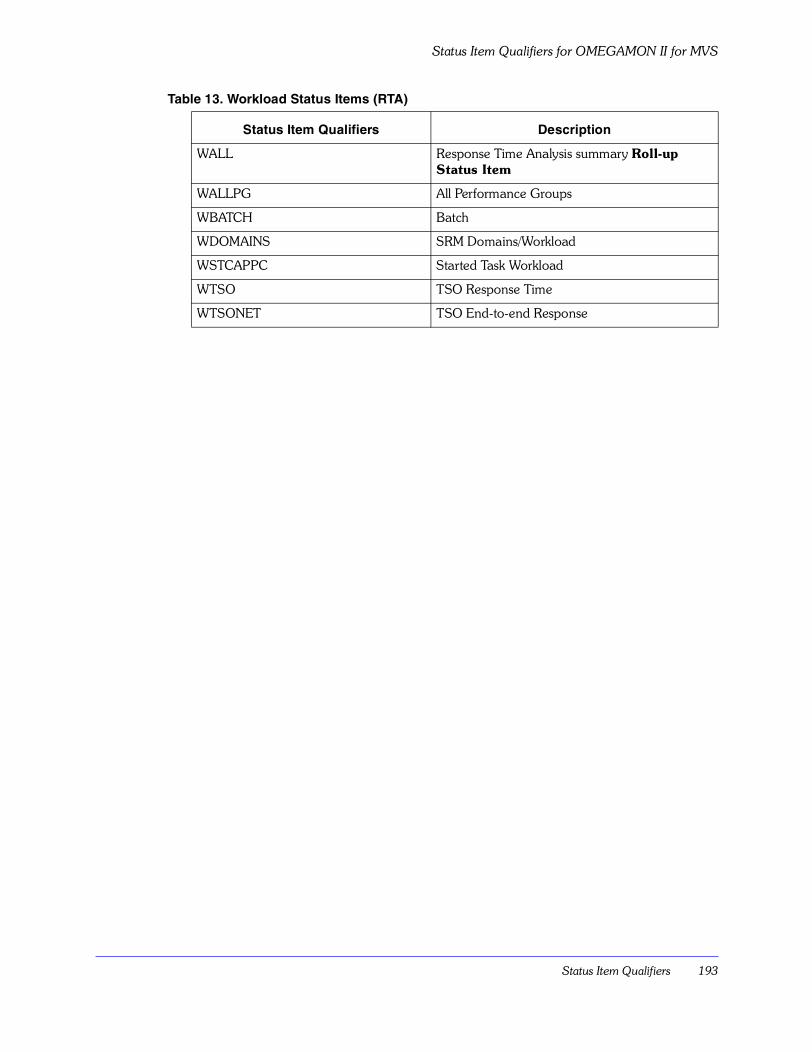
Status Item Qualifiers 193
Status Item Qualifiers for OMEGAMON II for MVS
Table 13. Workload Status Items (RTA)
Status Item Qualifiers Description
WALL Response Time Analysis summary Roll-up Status Item
WALLPG All Performance Groups
WBATCH Batch
WDOMAINS SRM Domains/Workload
WSTCAPPC Started Task Workload
WTSO TSO Response Time
WTSONET TSO End-to-end Response
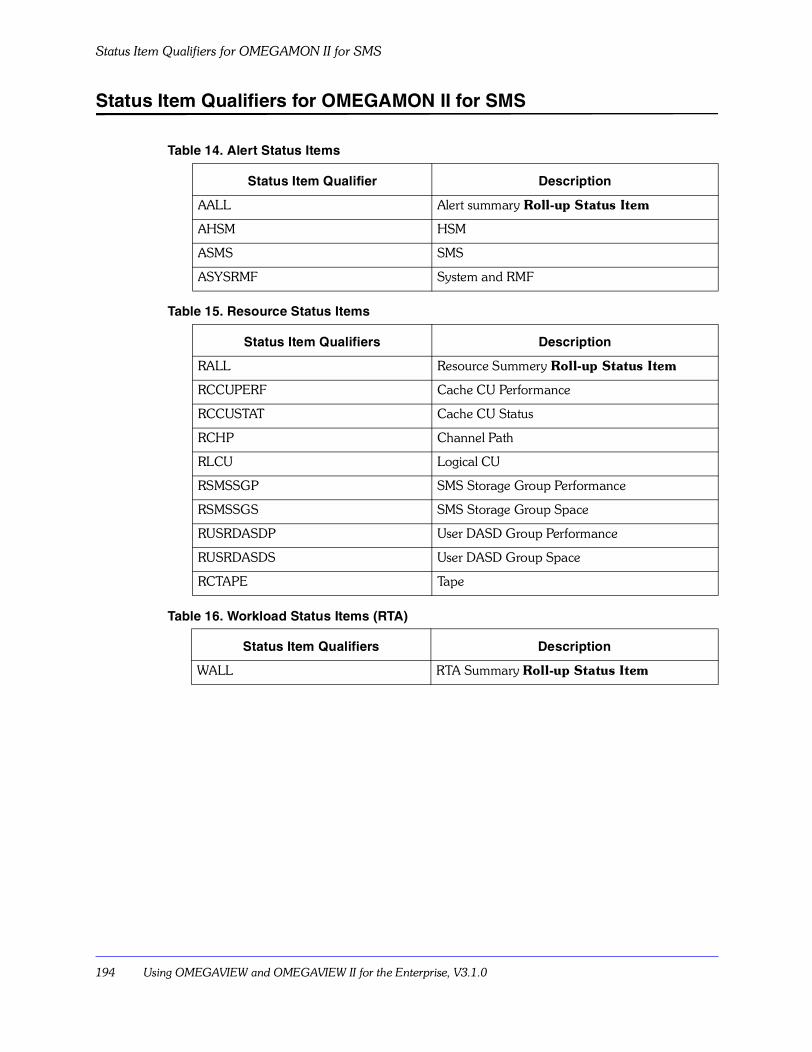
Status Item Qualifiers for OMEGAMON II for SMS
194 Using OMEGAVIEW and OMEGAVIEW II for the Enterprise, V3.1.0
Status Item Qualifiers for OMEGAMON II for SMS
Table 14. Alert Status Items
Status Item Qualifier Description
AALL Alert summary Roll-up Status Item
AHSM HSM
ASMS SMS
ASYSRMF System and RMF
Table 15. Resource Status Items
Status Item Qualifiers Description
RALL Resource Summery Roll-up Status Item
RCCUPERF Cache CU Performance
RCCUSTAT Cache CU Status
RCHP Channel Path
RLCU Logical CU
RSMSSGP SMS Storage Group Performance
RSMSSGS SMS Storage Group Space
RUSRDASDP User DASD Group Performance
RUSRDASDS User DASD Group Space
RCTAPE Tape
Table 16. Workload Status Items (RTA)
Status Item Qualifiers Description
WALL RTA Summary Roll-up Status Item
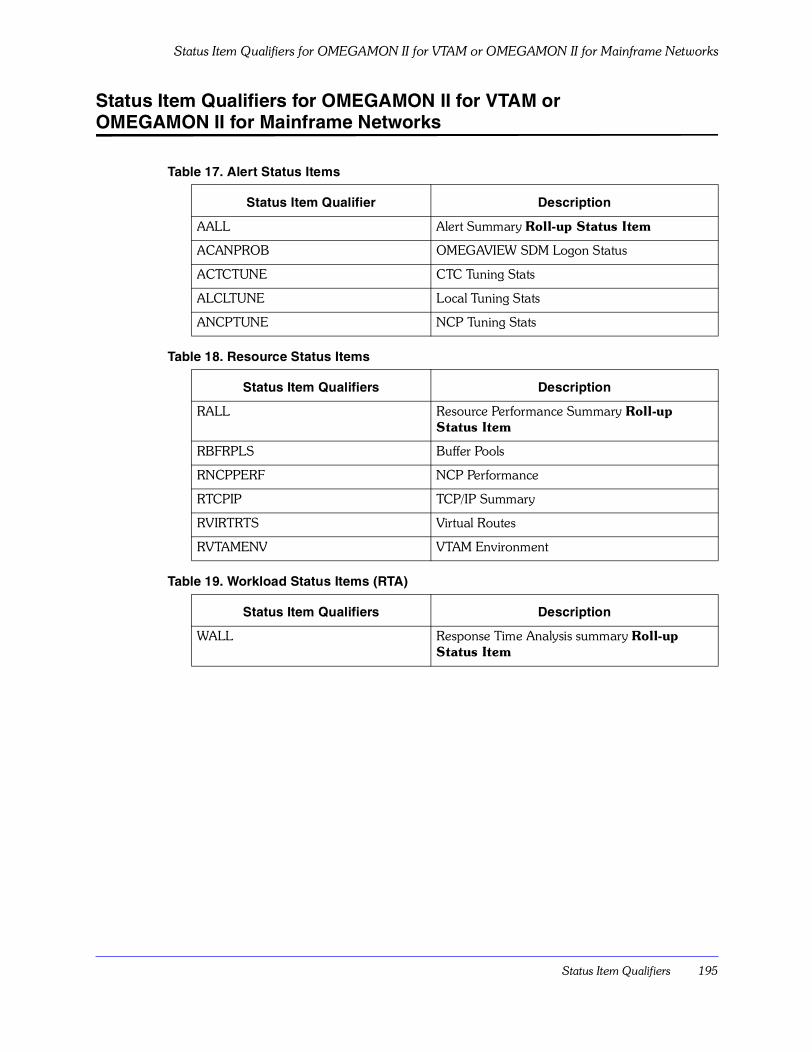
Status Item Qualifiers 195
Status Item Qualifiers for OMEGAMON II for VTAM or OMEGAMON II for Mainframe Networks
Status Item Qualifiers for OMEGAMON II for VTAM or OMEGAMON II for Mainframe Networks
Table 17. Alert Status Items
Status Item Qualifier Description
AALL Alert Summary Roll-up Status Item
ACANPROB OMEGAVIEW SDM Logon Status
ACTCTUNE CTC Tuning Stats
ALCLTUNE Local Tuning Stats
ANCPTUNE NCP Tuning Stats
Table 18. Resource Status Items
Status Item Qualifiers Description
RALL Resource Performance Summary Roll-up Status Item
RBFRPLS Buffer Pools
RNCPPERF NCP Performance
RTCPIP TCP/IP Summary
RVIRTRTS Virtual Routes
RVTAMENV VTAM Environment
Table 19. Workload Status Items (RTA)
Status Item Qualifiers Description
WALL Response Time Analysis summary Roll-up Status Item
Status Item Qualifiers for OMEGAMON II for VTAM or OMEGAMON II for Mainframe Networks
196 Using OMEGAVIEW and OMEGAVIEW II for the Enterprise, V3.1.0
Enhanced Logging Facility 197
Enhanced Logging Facility
This appendix contains the procedure for using the Enhanced Logging Facility of OMEGAVIEW.
IntroductionThe OMEGAVIEW Enhanced Logging Facility is a diagnostic tool that runs one or both of the following two types of functional area traces:
The State and Data tracing levels may be selected separately or in combination. If you choose both levels, all RKLVLOG messages are generated for each tracing level.
Activating the Enhanced Logging FacilityTo navigate to the Enhanced Logging Facility selection panel, follow this procedure:
1. In the OMEGAVIEW Configuration Manager, select Tools on the action bar.Result: The Tools pull-down menu appears.
2. From the Tools pull-down menu, select Technical support.Result: The Technical Support pull-down menu appears.
3. From the Technical support pull-down menu, select Enhanced Logging Facility.Result: The Enhanced Logging Facility pop-up panel appears, listing the following seven functional areas:
! Session Manager
! Configuration Manager
State For the selected functional areas, writes messages to the OMEGAVIEW RKLVLOG that track! the starting and stopping of key processes.! the values of pertinent status variables for each significant dialog in
the execution sequence.
Data For the selected functional areas, writes messages to the OMEGAVIEW RKLVLOG that display! parameter values being passed between dialogs! request/response data being passed between IPC (interprocess
communication) queues.
B
198 Using OMEGAVIEW and OMEGAVIEW II for the Enterprise, V3.1.0
! Status Item Manager
! Import/Export
! Problem Management
! Automated Session Control
! Alerts Manager
4. On the Enhanced Logging Facility pop-up panel, activate the Enhanced Logging Facility by typing a slash (/) in the STATE and/or DATA columns, and pressing ENTER.
Result: The Enhanced Logging Facility is activated. You can now proceed to the desired functional areas and take the appropriate actions.
Deactivating the Enhanced Logging FacilityTo deactivate the Enhanced Logging Facility, return to the Enhanced Logging Facility pop-up panel and remove the slash (/) from the appropriate STATE or DATA selection columns.
Enhanced Logging Facility outputBoth the State and Data logging options cause messages to be written to the OMEGAVIEW RKLVLOG. Typical examples of these messages follow.
For STATE:
KMVSMSRV SM@@ CICS300 START requested by KMVCSSZ
For DATA:
KMVPBSTR SM@@ Logon Data for CICSCUA data<LROWS=255,AUP=NO,CICS=CIX4DEM>
REXX extraction utilityOMEGAVIEW provides a REXX utility to extract Enhanced Logging Facility output from the OMEGAVIEW RKLVLOG and then write it to a sequential data set. The REXX utility is located in &rhilev.RKANSAM(KMVELFEX).
Preparing to use the REXX extraction utilityTo prepare to run the REXX utility, follow these steps:
Step Action
1 In SDSF, select the OMEGAVIEW started task to obtain a listing of the RKLVLOG.
2 On the SDSF command line, type
F cansmv,FLUSHwhere cansmv is your OMEGAVIEW started task procedure name.
Enhanced Logging Facility 199
Running the REXX extraction utilityAfter you have completed preparation, run the REXX utility by executing the following steps:
3 (Optional) If you want to limit the size of your output data set, find the line in the RKLVLOG where you want to begin message capture.
If you do not want to limit output size, continue to step 4.
4 On the SDSF command line, type
PRINT ODSN ‘your.dataset.name’ * SHRwhere your.dataset.name is the name of a preallocated data set with an LRECL of 133.
5 On the SDSF command line, type one of the following commands:! If you positioned the RKLVLOG at a specific line, type
PRINT * nnnn
where nnnn is the number of lines you would like to capture.
! If you did not position the RKLVLOG at a specific line, typePRINT
6 On the SDSF command line, type
PRINT CLOSE
Step Action
1 Modify member KMVELFEX according to the instructions in the comments section.
2 Using ISPF option 6 (TSO Command Facility), run the REXX utility by typing the following command:
EX ‘&rhilev.RKANSAM(KMVELFEX)
where &rhilev. RKANSAM is the name of your OMEGAVIEW runtime sample data set.
Step Action

200 Using OMEGAVIEW and OMEGAVIEW II for the Enterprise, V3.1.0
Enhanced Action Code Navigation 201
Enhanced Action Code Navigation
This appendix provides you with the information needed to use action codes from the Workload/Resource/Alert Status Components rollup panel (KMVSIEXP).
These action codes allow you to
! show a detailed breakdown of a status bar
! enter the problem management system
! display information on a selected status
! change the status for user-created basic status items
Action codes availableThe following action codes are available for use on the Workload, Resource, and Alert Status Components rollup panels:
User authorityAdditional administrative authority may be required for you to invoke some of the action codes.
S Show Details
P Problem Management
I Information
C Change
C
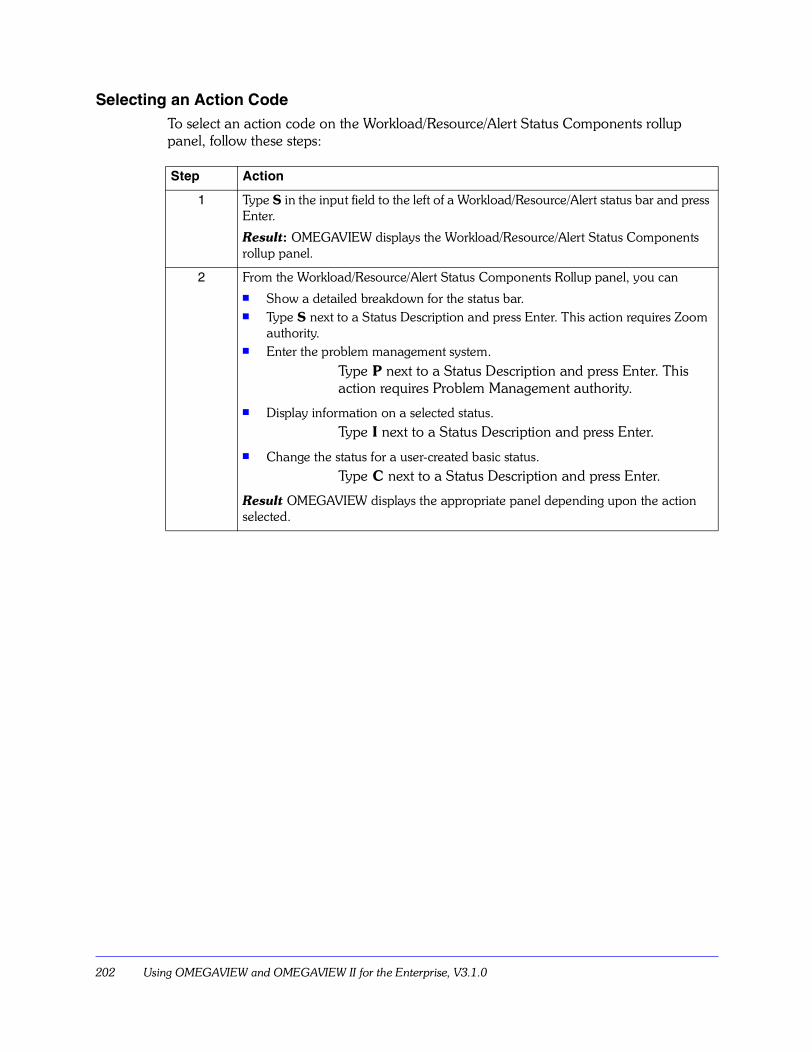
202 Using OMEGAVIEW and OMEGAVIEW II for the Enterprise, V3.1.0
Selecting an Action CodeTo select an action code on the Workload/Resource/Alert Status Components rollup panel, follow these steps:
Step Action
1 Type S in the input field to the left of a Workload/Resource/Alert status bar and press Enter.
Result: OMEGAVIEW displays the Workload/Resource/Alert Status Components rollup panel.
2 From the Workload/Resource/Alert Status Components Rollup panel, you can! Show a detailed breakdown for the status bar.! Type S next to a Status Description and press Enter. This action requires Zoom
authority.! Enter the problem management system.
Type P next to a Status Description and press Enter. This action requires Problem Management authority.
! Display information on a selected status.Type I next to a Status Description and press Enter.
! Change the status for a user-created basic status.Type C next to a Status Description and press Enter.
Result OMEGAVIEW displays the appropriate panel depending upon the action selected.
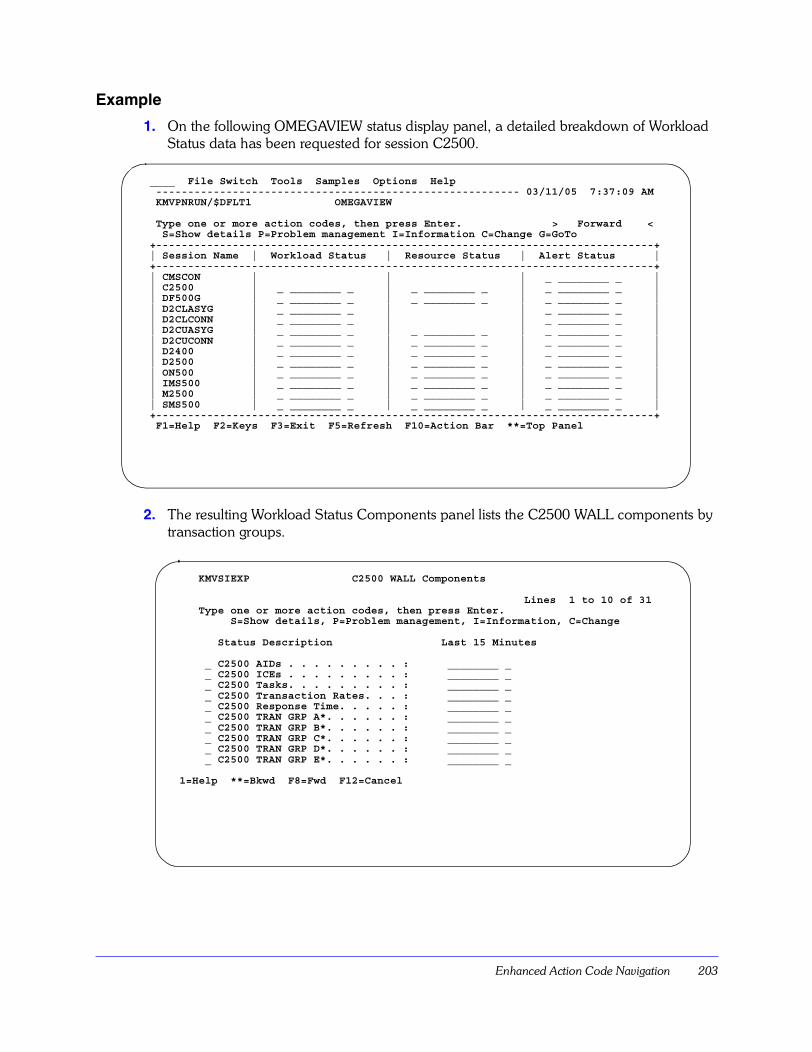
Enhanced Action Code Navigation 203
Example
1. On the following OMEGAVIEW status display panel, a detailed breakdown of Workload Status data has been requested for session C2500.
2. The resulting Workload Status Components panel lists the C2500 WALL components by transaction groups.
____ File Switch Tools Samples Options Help --------------------------------------------------------- 03/11/05 7:37:09 AM KMVPNRUN/$DFLT1 OMEGAVIEW Type one or more action codes, then press Enter. > Forward < S=Show details P=Problem management I=Information C=Change G=GoTo+------------------------------------------------------------------------------+| Session Name | Workload Status | Resource Status | Alert Status |+------------------------------------------------------------------------------+| CMSCON | | | _ ________ _ || C2500 | _ ________ _ | _ ________ _ | _ ________ _ || DF500G | _ ________ _ | _ ________ _ | _ ________ _ || D2CLASYG | _ ________ _ | | _ ________ _ || D2CLCONN | _ ________ _ | | _ ________ _ || D2CUASYG | _ ________ _ | _ ________ _ | _ ________ _ || D2CUCONN | _ ________ _ | _ ________ _ | _ ________ _ || D2400 | _ ________ _ | _ ________ _ | _ ________ _ || D2500 | _ ________ _ | _ ________ _ | _ ________ _ || ON500 | _ ________ _ | _ ________ _ | _ ________ _ || IMS500 | _ ________ _ | _ ________ _ | _ ________ _ || M2500 | _ ________ _ | _ ________ _ | _ ________ _ || SMS500 | _ ________ _ | _ ________ _ | _ ________ _ |+------------------------------------------------------------------------------+ F1=Help F2=Keys F3=Exit F5=Refresh F10=Action Bar **=Top Panel
KMVSIEXP C2500 WALL Components Lines 1 to 10 of 31 Type one or more action codes, then press Enter. S=Show details, P=Problem management, I=Information, C=Change Status Description Last 15 Minutes _ C2500 AIDs . . . . . . . . . : ________ _ _ C2500 ICEs . . . . . . . . . : ________ _ _ C2500 Tasks. . . . . . . . . : ________ _ _ C2500 Transaction Rates. . . : ________ _ _ C2500 Response Time. . . . . : ________ _ _ C2500 TRAN GRP A*. . . . . . : ________ _ _ C2500 TRAN GRP B*. . . . . . : ________ _ _ C2500 TRAN GRP C*. . . . . . : ________ _ _ C2500 TRAN GRP D*. . . . . . : ________ _ _ C2500 TRAN GRP E*. . . . . . : ________ _ 1=Help **=Bkwd F8=Fwd F12=Cancel

204 Using OMEGAVIEW and OMEGAVIEW II for the Enterprise, V3.1.0
3. At this point, you can enter any of the action codes next to one of the listed components to get more detailed information. For example, if you type I in the input field to the left of TRAN GRP E*, an Information panel appears similar to the following panel:
KMVSINFO TRAN GRP E* Information Status name . . . . . . : C2500.WRT5 Description . . . . . . : TRAN GRP E* Status type . . . . . . : BASIC Alert generation . . . : DISABLED Last 4 hours Last 15 minutes ____ ____ ____ ____ ________ _ Application. . . : Country. . . . . : Region . . . . . : State. . . . . . : City . . . . . . : Data Center. . . : System ID. . . . : Subsystem. . . . : F1=Help F6=Derivation rule F9=Cross reference F12=Cancel
Support Information 205
Support Information
If you have a problem with your IBM software, you want to resolve it quickly. This section describes the following options for obtaining support for IBM software products:
! �Searching knowledge bases� on page 205
! �Obtaining fixes� on page 206
! �Receiving weekly support updates� on page 206
! �Contacting IBM Software Support� on page 207
Searching knowledge basesYou can search the available knowledge bases to determine whether your problem was already encountered and is already documented.
Searching the information center
IBM provides extensive documentation that can be installed on your local computer or on an intranet server. You can use the search function of this information center to query conceptual information, instructions for completing tasks, and reference information.
Searching the Internet
If you cannot find an answer to your question in the information center, search the Internet for the latest, most complete information that might help you resolve your problem.
To search multiple Internet resources for your product, use the Web search topic in your information center. In the navigation frame, click Troubleshooting and support > Searching knowledge bases and select Web search. From this topic, you can search a variety of resources, including the following:
! IBM technotes
! IBM downloads
! IBM Redbooks®
! IBM developerWorks®
! Forums and newsgroups
D
206 Using OMEGAVIEW and OMEGAVIEW II for the Enterprise, V3.1.0
Obtaining fixesA product fix might be available to resolve your problem. To determine what fixes are available for your IBM software product, follow these steps:
1. Go to the IBM Software Support Web site at (http://www.ibm.com/software/support).
2. Click Downloads and drivers in the Support topics section.
3. Select the Software category.
4. Select a product in the Sub-category list.
5. In the Find downloads and drivers by product section, select one software category from the Category list.
6. Select one product from the Sub-category list.
7. Type more search terms in the Search within results if you want to refine your search.
8. Click Search.
9. From the list of downloads returned by your search, click the name of a fix to read the description of the fix and to optionally download the fix.For more information about the types of fixes that are available, IBM Software Support Handbook at http://techsupport.services.ibm.com/guides/handbook.html.
Receiving weekly support updatesTo receive weekly e-mail notifications about fixes and other software support news, follow these steps:
1. Go to the IBM Software Support Web site at http:/www.ibm.com/software/support.
2. Click My Support in the upper right corner of the page.
3. If you have already registered for My Support, sign in and skip to the next step. If you have not registered, click register now. Complete the registration form using your e-mail address as your IBM ID and click Submit.
4. Click Edit Profile.
5. In the Products list, select Software. A second list is displayed.
6. In the second list, select a product segment, for example, Application servers. A third list is displayed.
7. In the third list, select a product sub-segment, for example, Distributed Application & Web Servers. A list of applicable products is displayed.
8. Select the products for which you want to receive updates, for example, IBM HTTP Server and WebSphere Application Server.
9. Click Add products.
10. After selecting all products that are of interest to you, click Subscribe to email on the Edit profile tab.
11. Select Please send these documents by weekly email.
Support Information 207
12. Update your e-mail address as needed.
13. In the Documents list, select Software.
14. Select the types of documents that you want to receive information about.
15. Click Update. If you experience problems with the My support feature, you can obtain help in one of the following ways:
Online: Send an e-mail message to [email protected], describing your problem.
By phone: Call 1-800-IBM-4You (1-800-426-4968).
Contacting IBM Software SupportIBM Software Support provides assistance with product defects.
Before contacting IBM Software Support, your company must have an active IBM software maintenance contract, and you must be authorized to submit problems to IBM. The type of software maintenance contract that you need depends on the type of product you have:
! For IBM distributed software products (including, but not limited to, Tivoli, Lotus®, and Rational® products, as well as DB2® and WebSphere® products that run on Windows or UNIX operating systems), enroll in Passport Advantage® in one of the following ways:
� Online: Go to the Passport Advantage Web page (http://www.lotus.com/services/passport.nsf/WebDocs/ Passport_Advantage_Home) and click How to Enroll
� By phone: For the phone number to call in your country, go to the IBM Software Support Web site at http://techsupport.services.ibm.com/guides/contacts.html and click the name of your geographic region.
! For customers with Subscription and Support (S & S) contracts, go to the Software Service Request Web site at https://techsupport.services.ibm.com/ssr/login.
! For customers with IBMLink�, CATIA, Linux�, S/390®, iSeries�, pSeries®, zSeries®, and other support agreements, go to the Support Line Web site at http://www.ibm.com/services/us/index.wss/so/its/a1000030/dt006.
! For IBM eServer� software products (including, but not limited to, DB2 and WebSphere products that run in zSeries, pSeries, and iSeries environments), you can purchase a software maintenance agreement by working directly with an IBM sales representative or an IBM Business Partner. For more information about support for eServer software products, go to the IBM Technical Support Advantage Web site at http://www.ibm.com/servers/eserver/techsupport.html.
If you are not sure what type of software maintenance contract you need, call 1-800-IBMSERV (1-800-426-7378) in the United States. From other countries, go to the contacts page of the IBM Software Support Handbook on the Web at
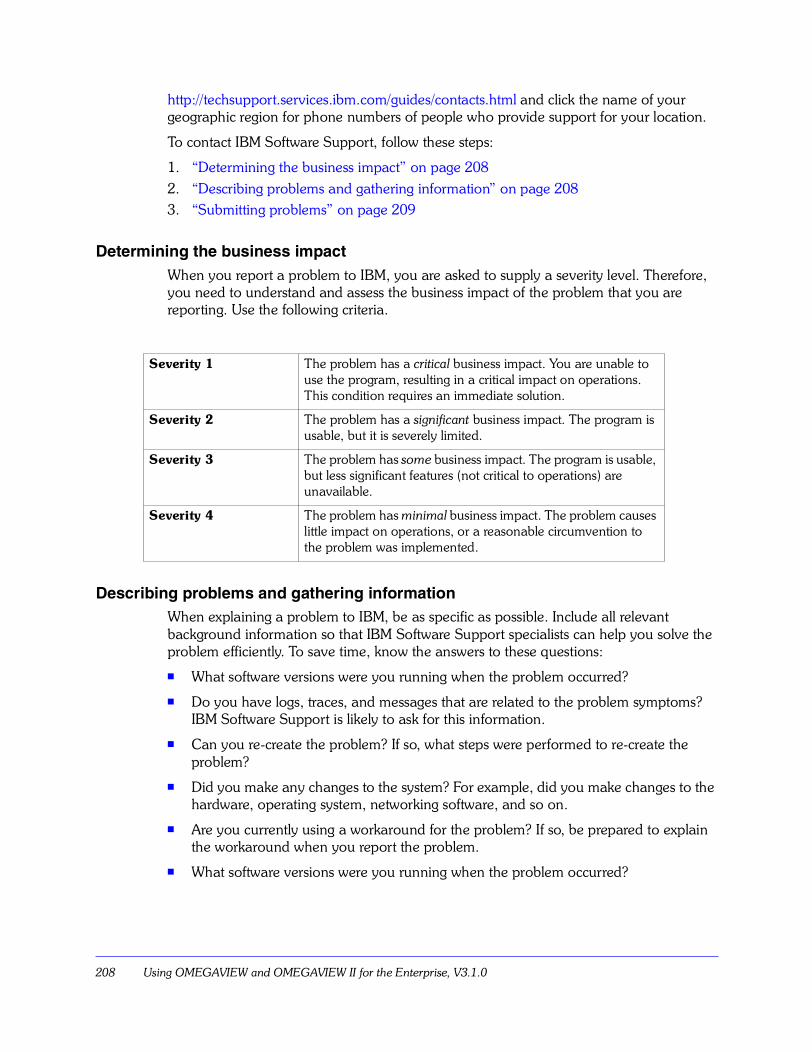
208 Using OMEGAVIEW and OMEGAVIEW II for the Enterprise, V3.1.0
http://techsupport.services.ibm.com/guides/contacts.html and click the name of your geographic region for phone numbers of people who provide support for your location.
To contact IBM Software Support, follow these steps:
1. �Determining the business impact� on page 2082. �Describing problems and gathering information� on page 2083. �Submitting problems� on page 209
Determining the business impactWhen you report a problem to IBM, you are asked to supply a severity level. Therefore, you need to understand and assess the business impact of the problem that you are reporting. Use the following criteria.
Describing problems and gathering informationWhen explaining a problem to IBM, be as specific as possible. Include all relevant background information so that IBM Software Support specialists can help you solve the problem efficiently. To save time, know the answers to these questions:
! What software versions were you running when the problem occurred?
! Do you have logs, traces, and messages that are related to the problem symptoms? IBM Software Support is likely to ask for this information.
! Can you re-create the problem? If so, what steps were performed to re-create the problem?
! Did you make any changes to the system? For example, did you make changes to the hardware, operating system, networking software, and so on.
! Are you currently using a workaround for the problem? If so, be prepared to explain the workaround when you report the problem.
! What software versions were you running when the problem occurred?
Severity 1 The problem has a critical business impact. You are unable to use the program, resulting in a critical impact on operations. This condition requires an immediate solution.
Severity 2 The problem has a significant business impact. The program is usable, but it is severely limited.
Severity 3 The problem has some business impact. The program is usable, but less significant features (not critical to operations) are unavailable.
Severity 4 The problem has minimal business impact. The problem causes little impact on operations, or a reasonable circumvention to the problem was implemented.
Support Information 209
Submitting problemsYou can submit your problem to IBM Software Support in one of two ways:
! Online: Click Submit and track problems on the IBM Software Support site at http://www.ibm.com/software/support/probsub.html. Type your information into the appropriate problem submission form.
! By phone: For the phone number to call in your country, go to the contacts page of the IBM Software Support Handbook (http://techsupport.services.ibm.com/guides/contacts.html) and click the name of your geographic region.
If the problem you submit is for a software defect or for missing or inaccurate documentation, IBM Software Support creates an Authorized Program Analysis Report (APAR). The APAR describes the problem in detail. Whenever possible, IBM Software Support provides a workaround that you can implement until the APAR is resolved and a fix is delivered. IBM publishes resolved APARs on the Software Support Web site daily, so that other users who experience the same problem can benefit from the same resolution.

210 Using OMEGAVIEW and OMEGAVIEW II for the Enterprise, V3.1.0
Notices 211
Notices
OverviewThis information was developed for products and services offered in the U.S.A. IBM may not offer the products, services, or features discussed in this document in other countries. Consult your local IBM representative for information on the products and services currently available in your area. Any reference to an IBM product, program, or service is not intended to state or imply that only that IBM product, program, or service may be used. Any functionally equivalent product, program, or service that does not infringe any IBM intellectual property right may be used instead. However, it is the user's responsibility to evaluate and verify the operation of any non-IBM product, program, or service.
IBM may have patents or pending patent applications covering subject matter described in this document. The furnishing of this document does not give you any license to these patents. You can send license inquiries, in writing, to:
IBM Director of LicensingIBM CorporationNorth Castle DriveArmonk, NY 10504-1785 U.S.A.
For license inquiries regarding double-byte (DBCS) information, contact the IBM Intellectual Property Department in your country or send inquiries, in writing, to:
IBM World Trade Asia CorporationLicensing2-31 Roppongi 3-chome, Minato-kuTokyo 106, Japan
The following paragraph does not apply to the United Kingdom or any other country where such provisions are inconsistent with local law:
INTERNATIONAL BUSINESS MACHINES CORPORATION PROVIDES THIS PUBLICATION "AS IS" WITHOUT WARRANTY OF ANY KIND, EITHER EXPRESS OR IMPLIED, INCLUDING, BUT NOT LIMITED TO, THE IMPLIED WARRANTIES OF NON-INFRINGEMENT, MERCHANTABILITY OR FITNESS FOR A PARTICULAR PURPOSE.
Some states do not allow disclaimer of express or implied warranties in certain transactions, therefore, this statement might not apply to you.
This information could include technical inaccuracies or typographical errors. Changes are periodically made to the information herein; these changes will be incorporated in
E
212 Using OMEGAVIEW and OMEGAVIEW II for the Enterprise, V3.1.0
new editions of the publication. IBM may make improvements and/or changes in the product(s) and/or the program(s) described in this publication at any time without notice.
Any references in this information to non-IBM Web sites are provided for convenience only and do not in any manner serve as an endorsement of those Web sites. The materials at those Web sites are not part of the materials for this IBM product and use of those Web sites is at your own risk.
IBM may use or distribute any of the information you supply in any way it believes appropriate without incurring any obligation to you.
Licensees of this program who wish to have information about it for the purpose of enabling: (i) the exchange of information between independently created programs and other programs (including this one) and (ii) the mutual use of the information which has been exchanged, should contact:
IBM Corporation2Z4A/10111400 Burnet RoadAustin, TX 78758 U.S.A.
Such information may be available, subject to appropriate terms and conditions, including in some cases payment of a fee.
The licensed program described in this document and all licensed material available for it are provided by IBM under terms of the IBM Customer Agreement, IBM International Program License Agreement or any equivalent agreement between us.
Any performance data contained herein was determined in a controlled environment. Therefore, the results obtained in other operating environments may vary significantly. Some measurements may have been made on development-level systems and there is no guarantee that these measurements will be the same on generally available systems. Furthermore, some measurement may have been estimated through extrapolation. Actual results may vary. Users of this document should verify the applicable data for their specific environment.
Information concerning non-IBM products was obtained from the suppliers of those products, their published announcements or other publicly available sources. IBM has not tested those products and cannot confirm the accuracy of performance, compatibility or any other claims related to non-IBM products. Questions on the capabilities of non-IBM products should be addressed to the suppliers of those products.
All statements regarding IBM's future direction or intent are subject to change or withdrawal without notice, and represent goals and objectives only.
All IBM prices shown are IBM's suggested retail prices, are current and are subject to change without notice. Dealer prices may vary.
This information is for planning purposes only. The information herein is subject to change before the products described become available.
This information contains examples of data and reports used in daily business operations. To illustrate them as completely as possible, the examples include the names of individuals, companies, brands, and products. All of these names are fictitious and any
Notices 213
similarity to the names and addresses used by an actual business enterprise is entirely coincidental.
COPYRIGHT LICENSE:
This information contains sample application programs in source language, which illustrate programming techniques on various operating platforms. You may copy, modify, and distribute these sample programs in any form without payment to IBM, for the purposes of developing, using, marketing or distributing application programs conforming to the application programming interface for the operating platform for which the sample programs are written. These examples have not been thoroughly tested under all conditions. IBM, therefore, cannot guarantee or imply reliability, serviceability, or function of these programs. You may copy, modify, and distribute these sample programs in any form without payment to IBM for the purposes of developing, using, marketing, or distributing application programs conforming to IBM�s application programming interfaces.
Each copy or any portion of these sample programs or any derivative work, must include a copyright notice as follows:
© (your company name) (year). Portions of this code are derived from IBM Corp. Sample Programs. © Copyright IBM Corp. _enter the year or years_. All rights reserved.
If you are viewing this information in softcopy form, the photographs and color illustrations might not display.
TrademarksIBM, the IBM logo, AF/OPERATOR, AIX, Candle, Candle Command Center, Candle Management Server, Candle Management Workstation, CandleNet Portal, CICS, DB2, developerWorks, eServer, IBMLink, IMS, Informix, iSeries, Lotus, MVS, OMEGACENTER, OMEGAMON, OMEGAMON II, OMEGAVIEW, OMEGAVIEW II, OS/2, OS/400, NetView, Passport Advantage, pSeries, RACF, Rational, Redbooks, S/390, Tivoli, the Tivoli logo, Tivoli Enterprise Console, TME, WebSphere, z/OS, and zSeries are trademarks or registered trademarks of International Business Machines Corporation in the United States, other countries, or both.
Intel, Intel Inside (logos), MMX, Celeron, Intel Centrino, Intel Xeon, Itanium, Pentium and Pentium III Xeon are trademarks or registered trademarks of Intel Corporation or its subsidiaries in the United States, other countries, or both.
Linux is a trademark of Linus Torvalds in the United States, other countries, or both.
Microsoft, Windows, Windows NT, and the Windows logo are trademarks of Microsoft Corporation in the United States, other countries, or both.
Java and all Java-based trademarks and logos are trademarks or registered trademarks of Sun Microsystems, Inc. in the United States, other countries, or both.
214 Using OMEGAVIEW and OMEGAVIEW II for the Enterprise, V3.1.0
SET and the SET Logo are trademarks owned by SET Secure Electronic Transaction LLC.
UNIX is a registered trademark of The Open Group in the United States and other countries.
Other company, product, and service names may be trademarks or service marks of others.
Index 215
Numerics3270 emulation hardware and software 21
Aaction bar 18, 19action codes
change 25goto 25information 25problem management 25rollup 201show details 25using 25
action text, adding 90alerts manager 34alerts, problem management 163attributes 178automation 176
Bbackward key 19beep option, setting 99, 103books
see publications 11boxes, drawing 75
Ccancel key 19Candle Management Server 176CandleNet Portal 176CandleNet Portal Server 176change object key 104change, action code 25collector session 136color terminals 21configuration manager 33connectivity panel 63controls 102Create Tabular Status Items 48, 50cross-reference option 121customer support
see Software Support 207cut object key 105
Ddate format 100default
action code, changing 103logmode 108panel, copying and editing 67startup panel 102status panel builder 33
default startup panel 102delete
confirmation 100key 19object key 105status items 118
derivation rule key 19destinations, zoom 149diagnostic logging facility 197documentation conventions 12drawing, freehand for templates 76
Eedit panel, opening a new 42ellipsis 22enhanced logging facility 197
activating 197deactivating 198outout 198preparing 198REXX extraction facility 198, 199running 199
exit confirmation, setting 100exit key 19extended help 28
FF7, scrolling with 19F8, scrolling with 19field-level help 28fields, promptable 24filter key 19forward key 19function key area, setting 100function keys 19, 104
Index
216 Using OMEGAVIEW and OMEGAVIEW II for the Enterprise, V3.1.0
Gglossary 28goto action code 25
Hhelp
extended 28field level 28function keys 30glossary 28key 19pull-down menu 30
high-level qualifier 113
Iimplicit action, setting 100index panel 65information action code 25information centers 205instruction line, adding 91Items Where entry 116
Kkeys 19knowledge bases 205
Lline and box draw key (F9) 72lines, drawing 74linking status items
options 119overview 119procedure 120sample panel 119
literal text definition 44logmode, default 108logon data
field descriptions 125overview 123security considerations 124
longterm history status bars, using 88low-level qualifier 113
alert 114resource 114workload 114
Mmanaged systems, defined 175manuals
see publications 11mnemonics 99more-+ 29
Nnaming conventions for status items 113navigation
action codes 201in OMEGAVIEW 25
network panel 56new object key, using 105non-color and other terminal types 21
OOMEGAMON Platform 175online publications 11onlines panel 58options pull-down menu 36ordering publications 11OSM/MVS, navigating to 141Overview 112overview panel 60
Ppanels
connectivity 63editor keys 36headings, creating 44ID options, setting 99index 65introduction 18labels, creating 43network 56OMEGAVIEW default 67onlines 58overview 60saving 53software 62storage 54systems 41
paste object key, using 105plus sign (+) 24pop-up windows 23preferences, setting 98
Index 217
problem management 161action code 25adding a record 166alerts 163changing a record 168deleting a record 169field descriptions 167overview 161show details command, using with 163viewing a record 165
profilesaccessing 125adding sessions 126modifying 125synchronization 135synchronization, overriding default 137
prompt key 19promptable fields 24publications
accessing online 11ordering 11related 10
pull-down menusexample 22overview 22
pushbuttons 52
Qqualifiers
high-level 113low-level 113
Rrefresh key 19rollups
adding to database 113defined 112status items 58
Ssamples pull-down menu 35scrolling 19session logon data
changing session profiles 127copy from another user ID 129field descriptions 125logon failure when switching, resolve 130maintain 124modify for another user ID 128
overview 123panel 37security considerations 124
sessionslogon data 109, 124names, adding 89qualifiers 187switching 123, 140
short history status bar 45show details action code 25, 163situations 178, 181software panel 62Software Support 207startup panel 102status bar
creating 47creation choices 49help 28short history 45
status display panel 18status item choices 47status item manager 33
adding rollups 113adding status items 113changing status items 117deleting status items 118displaying 115
status itemsadding 113basic 111linking 119naming conventions 113qualifiers 187rollups 58, 111system-derived 111types 112user-defined 111using the cross-reference option 121
status specification 49status text objects
adding 92defined 92performance consideration 92
storage panel 54switch menu 32switch/zoom options, setting 106switching sessions 19, 37, 140synchronization, profile 135systems panel 41
218 Using OMEGAVIEW and OMEGAVIEW II for the Enterprise, V3.1.0
Ttabular display 48, 49templates
creating 74deleting box (F19) 72drawing lines, boxes, freehand artwork 74editor 33, 73exiting the template editor 79line and box draw key (F9) 72positioning on a new panel 80savings 77
terminalscolor 21non-color and other terminal types 21
timeafternoon indicator, setting 101format, setting 101morning indicator, setting 101separator character, setting 101
time/date display option, setting 100Tivoli software information center 11tools menu 33top panel key 19transient text objects
adding 92defined 92
triggering alerts 163
Uuser ID
start prompting 132stop prompting 132
user zoom session 136
WWorkflow editor 176workspaces 178, 180
Zzoom
confirmation option, setting 107confirmation option, using 144defined 143invalid destinations 149overview 143return key 19, 37session logon data, maintain 123session timeout interval, setting 107using 143


IBM@
Part Number: SC32-9427-00
Printed in USA
SC32-9427-00
SC32-9427-00