Embed Size (px)
Citation preview

Version: 1.0.0
Revision 1 (October 2021)

CONTENTS 1 Introduction .......................................................................................................................... 3
1.1 Medit Temporaries Overview .................................................................................................. 3
1.2 System Requirements ............................................................................................................. 3
1.3 Installation Guide .................................................................................................................... 4
2 Data Management................................................................................................................. 7
2.1 Acquiring Data ......................................................................................................................... 7
2.2 Running Medit Temporaries from Medit Link ......................................................................... 9
2.3 3D Data Contol ...................................................................................................................... 11
3 User Interface ..................................................................................................................... 12
3.1 Title Bar ................................................................................................................................. 13
3.2 Tree View .................................................................................. Error! Bookmark not defined.
3.3 Toolbox .................................................................................................................................. 15
3.4 Viewing Tools ........................................................................................................................ 15
3.5 Undo/Redo ............................................................................................................................ 16
3.6 Previous/Next........................................................................................................................ 16
4 Major Functionality ............................................................................................................. 17
4.1 Modules in Medit Temporaries ............................................................................................. 17
4.2 Modes in Medit Temporaries ................................................................................................ 19
4.3 Data Sculpting ....................................................................................................................... 20
5 How to Design Eggshell Crowns (Pre-Op Data) ...................................................................... 25
5.1 How to Design Eggshell Crowns in Quick Mode ................................................................... 25
5.2 How to Design Eggshell Crowns in Design Mode .................................................................. 31
5.2.1 Designing the Outer Surface ......................................................................................... 31
5.2.2 Designing the Inner Surface .......................................................................................... 34
5.3 How to Utilize Settings in Eggshell Module........................................................................... 39
6 How to Design Temporary Crowns (Pre-Op Data + Preparation Data) .................................... 41
6.1 How to Design Temporary Crowns in Quick Mode ............................................................... 41
6.1.1 Utilize the Margin Line Imported from Medit Scan for Clinics ...................................... 43
6.1.2 Create Margin Line in Medit Temporaries .................................................................... 45
6.2 How to Design Temporary Crowns in Design Mode .............................................................. 49
6.2.1 Designing the Outer Surface ......................................................................................... 49
6.2.2 Designing the Inner Surface .......................................................................................... 55
6.3 How to Utilize Settings in Temporary Module ...................................................................... 57

1 Introduction
1.1 Medit Temporaries Overview
With Medit Temporaries, create temporary crowns in less than a minute using pre-op scan data or
both pre-op and preparation data.
Design crowns in just a few clicks with the program's user-friendly interface. Use various tools to
adjust the inner and outer surface of the restorations. Incorporate Medit Temporaries seamlessly
into your everyday workflow even without any prior CAD experience.
Crowns designed via Medit Temporaries can be optimized for both 3D printing and milling.
You can run Medit Temporaries from both clinic and lab accounts in Medit Link.
1.2 System Requirements
Laptop Desktop
CPU Intel Core i5 2.6 GHz or higher
RAM 16 GB or higher
Graphics NVIDIA GeForce GT 760 2 GB (or equivalent AMD video card) or higher
OS Windows 8 64-bit or higher (Unavailable in 32-bit)
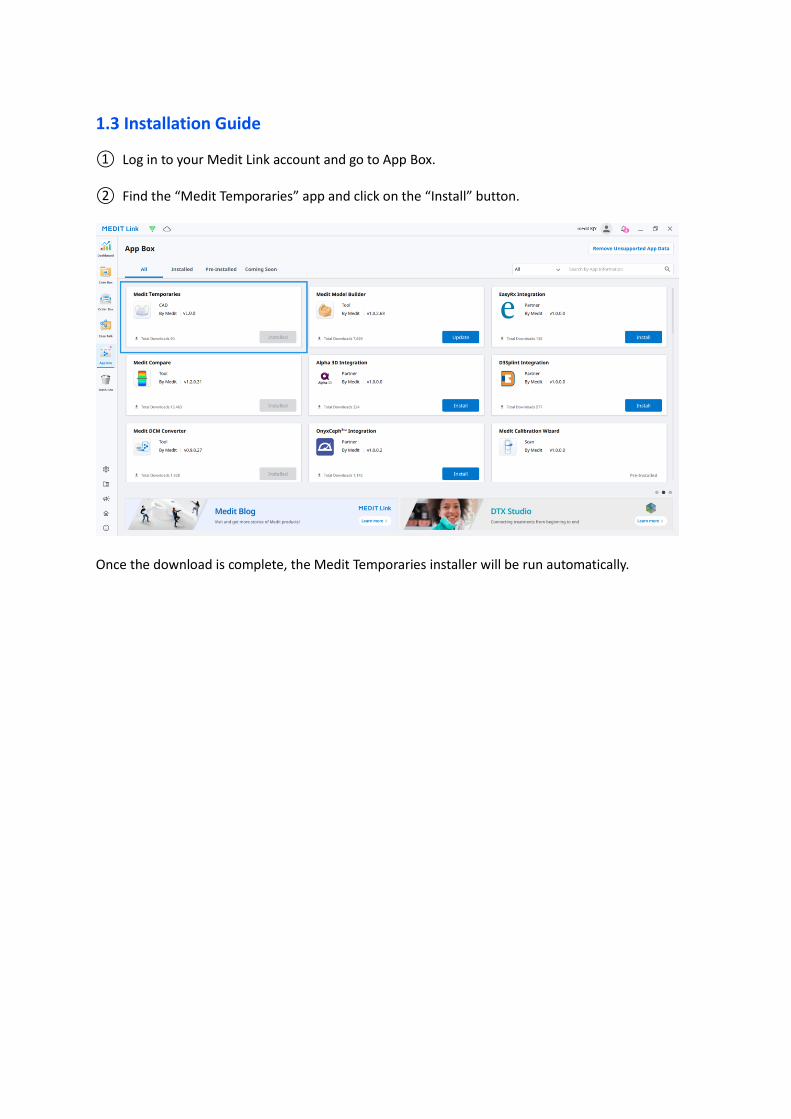
1.3 Installation Guide
① Log in to your Medit Link account and go to App Box.
② Find the “Medit Temporaries” app and click on the “Install” button.
Once the download is complete, the Medit Temporaries installer will be run automatically.

③ Read and agree to the License Terms and Conditions.
④ It may take several minutes to finish the installation process. Please do not turn off the PC until
the installation is complete.
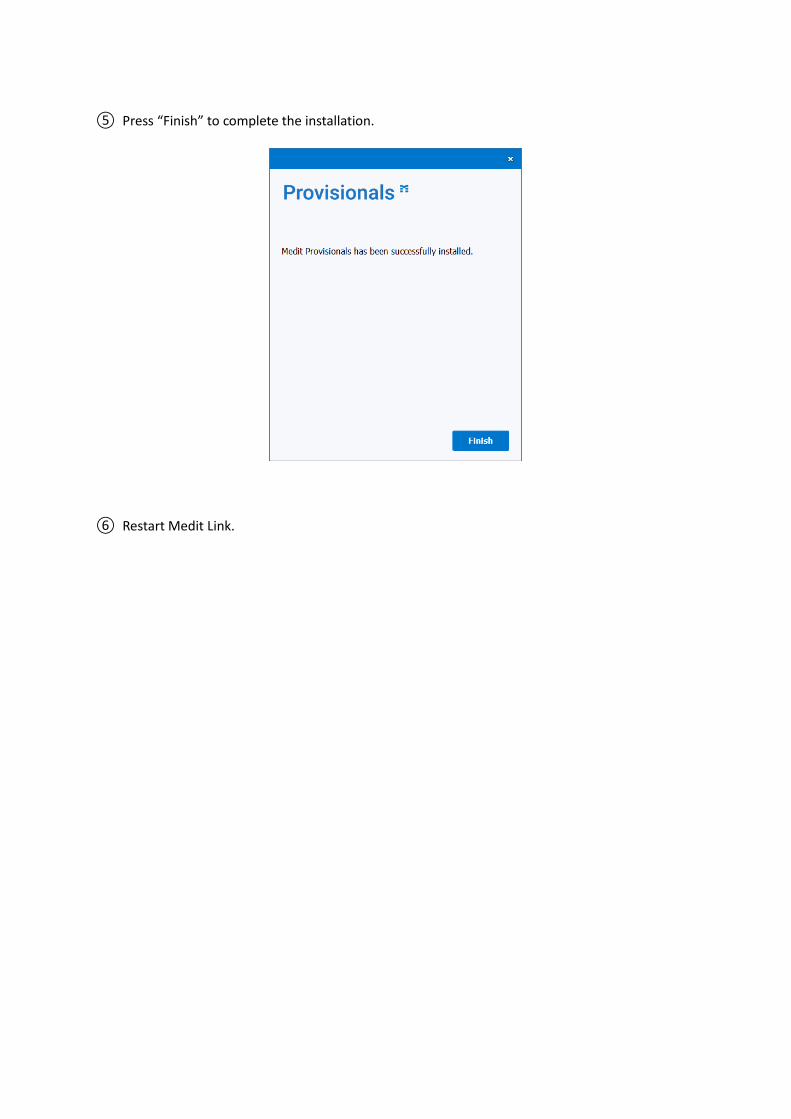
⑤ Press “Finish” to complete the installation.
⑥ Restart Medit Link.

2 Data Management
2.1 Acquiring Data
Medit Temporaries uses 3D scanned data to create temporary restorations.
Utilize data scanned in Medit Scan for Clinics, Medit Scan for Labs, or data attached to the Medit Link
case.
Use the “Solid” option when scanning data using Medit Scan for Labs.
Make sure that the data of the tooth you are making a crown for (both pre-operation and
prepared data) has no major holes. When feasible, use the “Fill Hole” function when finishing scanning.

The program consists of two modules that differ based on the data you have acquired in the
Medit Scan applications. However, both modules require pre-operation data.
To acquire pre-operation data, as well as prepared data, make sure to turn on the "Pre-Op for Maxilla"
or "Pre-Op for Mandible" option in your Medit Link case before scanning in both lab and clinic accounts.
< Clinic Account >
After turning this option on, you will see that the pre-operation stages appear in the scanning program.
< Medit Scan for Clinics >

2.2 Running Medit Temporaries from Medit Link
① Go to the Case Box (clinic account) or Work Box (lab account) and choose the case you would
like to work on.
The case must have 3D data scanned or attached to it.
The case form must have a “Crown” type product selected in the form.
Medit Temporaries v1.0 only supports working on a single crown at a time; therefore, only one
crown can be registered in the form.
If necessary, clone the case (data only) and create a new form to run the app.
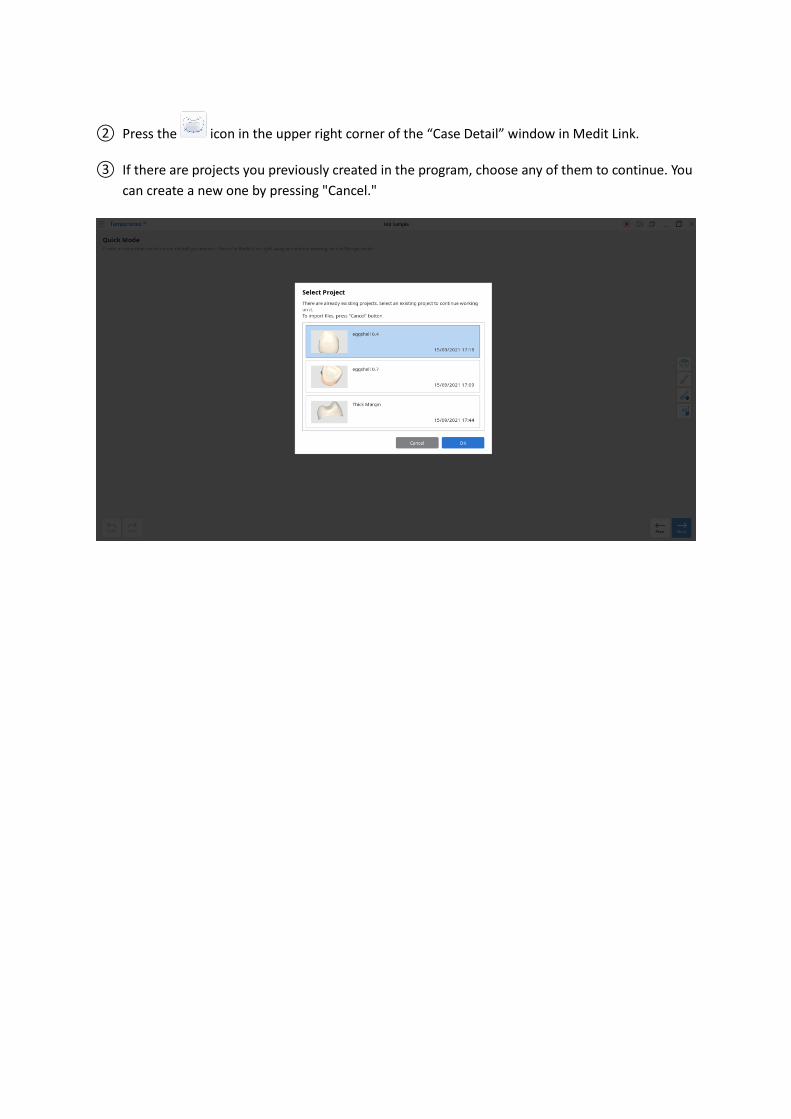
② Press the icon in the upper right corner of the “Case Detail” window in Medit Link.
③ If there are projects you previously created in the program, choose any of them to continue. You
can create a new one by pressing "Cancel."

2.3 3D Data Control
3D data control using mouse:
Button Action Use Image
Wheel
Drag Moves the data in view screen.
Scroll Zooms in/out the data in view screen.
Right Drag Rotates data in view screen.
3D data control using mouse and keyboard buttons:
Button Action Use Image
Shift
Left Click and Drag
Zoom in/out
Up and Down Keys
Alt
Left Click and Drag
Rotate
Up, Down, Left and Right Keys
Ctrl
Left Click and Drag
Move
Up, Down, Left and Right Keys
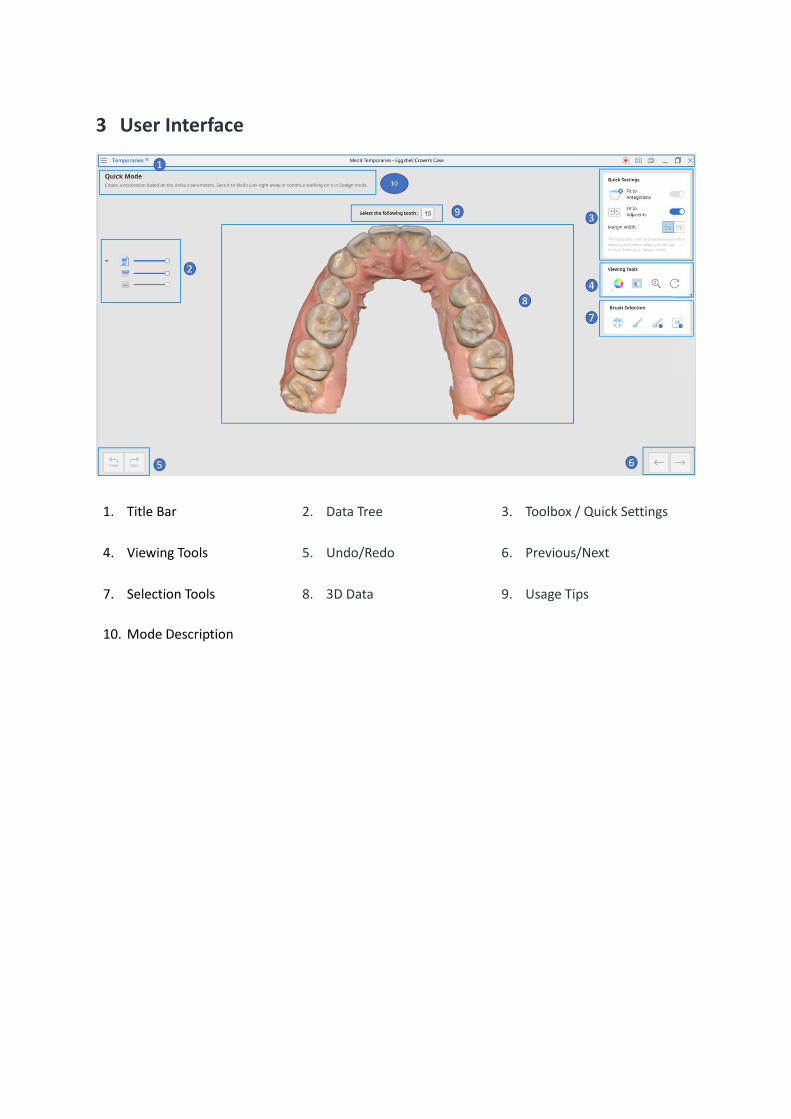
3 User Interface
1. Title Bar 2. Data Tree 3. Toolbox / Quick Settings
4. Viewing Tools 5. Undo/Redo 6. Previous/Next
7. Selection Tools 8. 3D Data 9. Usage Tips
10. Mode Description

3.1 Title Bar
The Title Bar consists of the following options:
Menu Open menu. It includes tools to manage the program and shows the details of application.
Help Center Open Help Center page. It contains various information about using Medit Temporaries.
Start Video Recording Start video capture.
Screenshot Capture the screen.
Screen Capture Image Manager Manage the captured screen images
Minimize Minimize the application.
Maximize or Restore Maximize or restore the application.
Exit Terminate the application.

3.2 Data Tree
The Data Tree is located on the left side of the screen.
Temporary
Module
Scan Data
⚫ Maxilla/mandible (the data of the
arch you are currently working on)
⚫ Pre-operation data for maxilla
and/or mandible
Reference Data
⚫ Margin line
Restoration
⚫ Outer surface
⚫ Inner surface
Eggshell Module
Scan Data
⚫ Maxilla
⚫ Mandible
Reference Data
⚫ Margin line
Restoration
⚫ Outer surface
⚫ Inner surface
You can easily control data viewing options by hiding, showing, or changing the transparency one
by one or as a group.

3.3 Toolbox
Toolboxes contain all major tools and exist to assist the design process.
3.4 Viewing Tools
Viewing Tools contains useful tools to view and analyze data.
Data Display
Change Data Display Mode
Change the data display mode.
Grid Settings (mm) Show or hide the grid, and control its position in relation to the model (overlay on/off).
Touch Screen Options
Zoom In/Out Zoom model in/out.
Rotate Rotate model.
Data Analysis
Show/Hide Contact Areas with Antagonists
When on, this function shows overlapping areas of the restoration and the antagonists. Turn on when sculpting the outer surface of the restoration to check the occlusion.
Show/Hide Contact Areas with Adjacents
Turn on to show overlapping areas between restoration and adjacents. Use while sculpting the outer surface of the restoration to add or remove material to ensure optimal fitting. *Only available in Temporary Module.
Show/Hide Minimum Thickness
Turn on to see the thin areas on the restoration. Use while sculpting to make sure that the restoration is not too thin to print/mill.

3.5 Undo/Redo
The undo/redo buttons are located at the bottom left corner of the screen.
Undo Undo the previous action.
Redo Redo the previous action.
3.6 Previous/Next
The previous/next buttons are located at the bottom right corner of the screen.
Previous Go back to the previous step.
Next Apply the changes and move to the next step.
4 Major Functionality
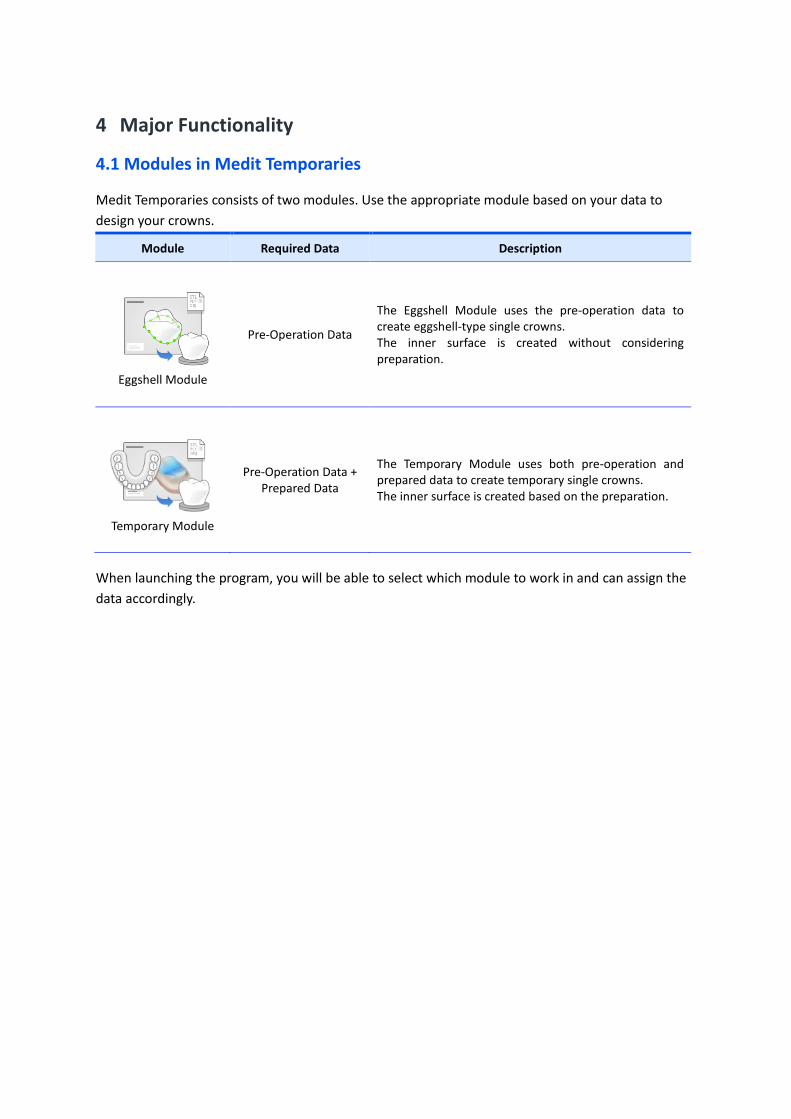
4.1 Modules in Medit Temporaries
Medit Temporaries consists of two modules. Use the appropriate module based on your data to
design your crowns.
Module Required Data Description
Eggshell Module
Pre-Operation Data
The Eggshell Module uses the pre-operation data to create eggshell-type single crowns. The inner surface is created without considering preparation.
Temporary Module
Pre-Operation Data + Prepared Data
The Temporary Module uses both pre-operation and prepared data to create temporary single crowns. The inner surface is created based on the preparation.
When launching the program, you will be able to select which module to work in and can assign the
data accordingly.

⚫ For the Eggshell Module, assign data as maxilla or mandible.
⚫ For the Temporary Module, assign and categorize data into pre-operation, prepared, and
antagonist.

4.2 Modes in Medit Temporaries
Medit Temporaries consists of two modes: Quick Mode and Design Mode.
Quick Mode
Quick Mode offers a basic workflow to design a restoration. Select corresponding tooth area, create margin line, and examine the crown before saving it. If the crown created in the Design Mode does not require additional alterations, you can save it to Medit Link right away. Working in Design Mode is optional.
Design Mode Design Mode offers a variety of tools for editing the outer surface (adaptation or sculpting) and adjusting the parameters of the inner surface.
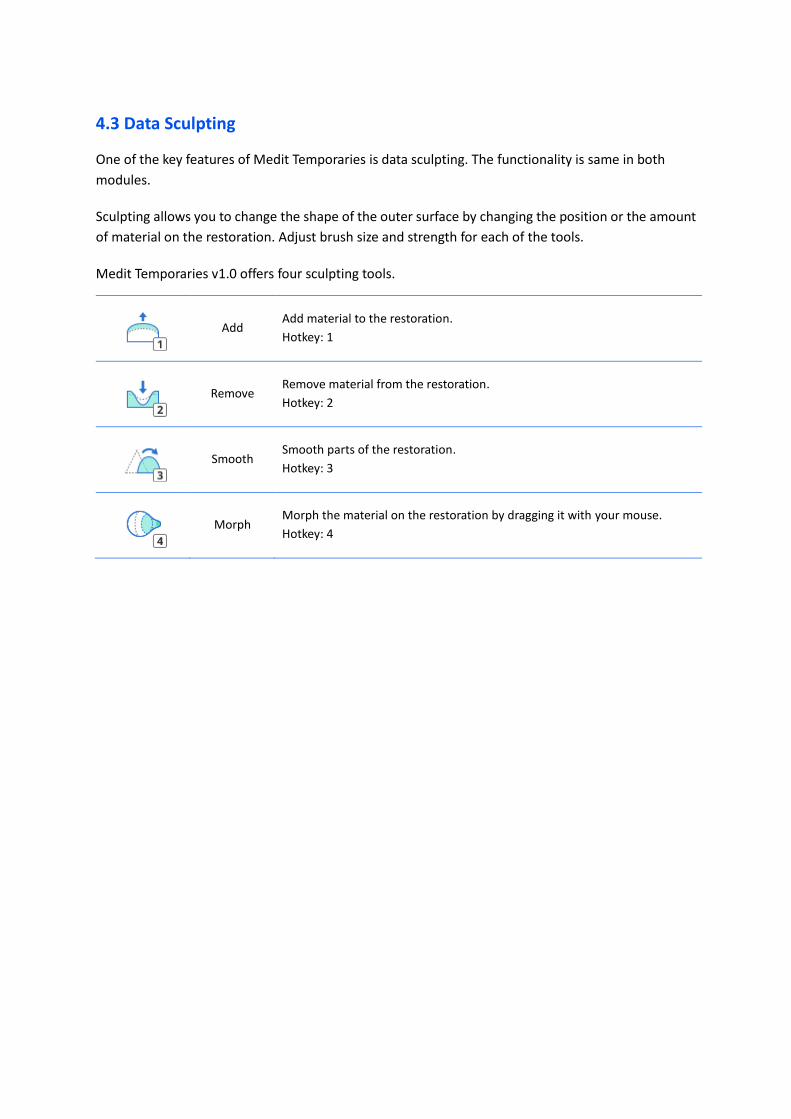
4.3 Data Sculpting
One of the key features of Medit Temporaries is data sculpting. The functionality is same in both
modules.
Sculpting allows you to change the shape of the outer surface by changing the position or the amount
of material on the restoration. Adjust brush size and strength for each of the tools.
Medit Temporaries v1.0 offers four sculpting tools.
Add Add material to the restoration.
Hotkey: 1
Remove Remove material from the restoration.
Hotkey: 2
Smooth Smooth parts of the restoration.
Hotkey: 3
Morph Morph the material on the restoration by dragging it with your mouse.
Hotkey: 4
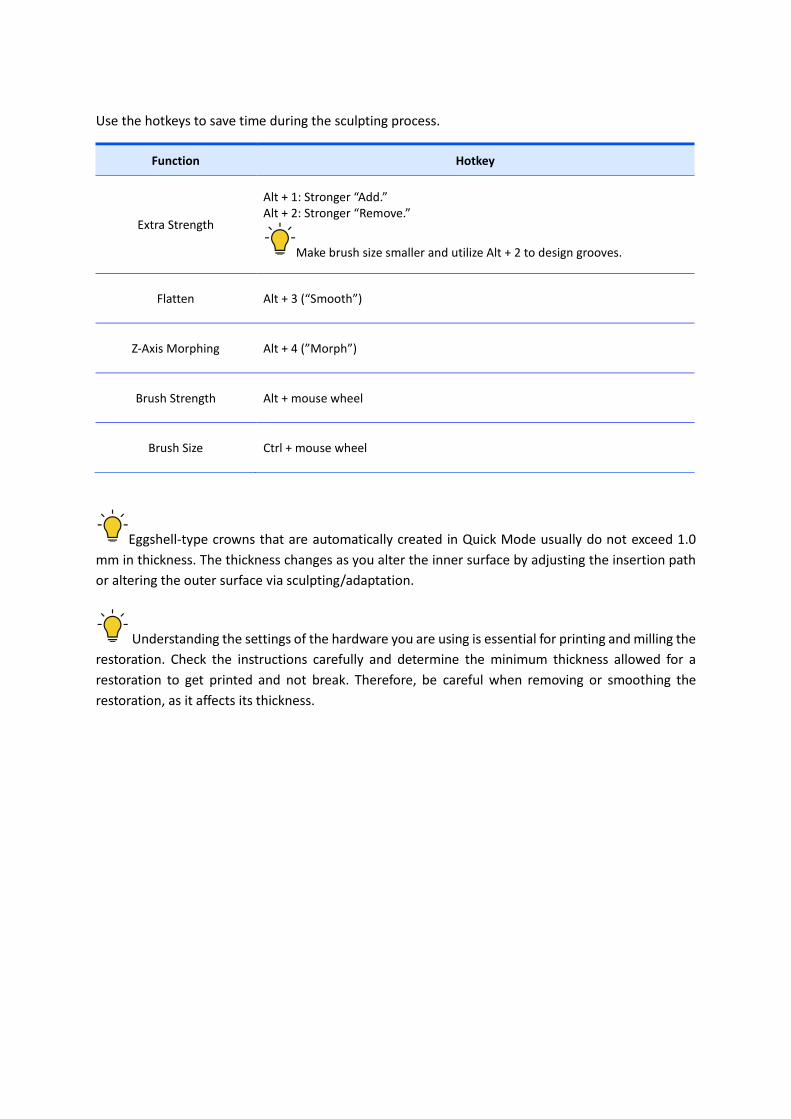
Use the hotkeys to save time during the sculpting process.
Function Hotkey
Extra Strength
Alt + 1: Stronger “Add.” Alt + 2: Stronger “Remove.”
Make brush size smaller and utilize Alt + 2 to design grooves.
Flatten Alt + 3 (“Smooth”)
Z-Axis Morphing Alt + 4 (”Morph”)
Brush Strength Alt + mouse wheel
Brush Size Ctrl + mouse wheel
Eggshell-type crowns that are automatically created in Quick Mode usually do not exceed 1.0
mm in thickness. The thickness changes as you alter the inner surface by adjusting the insertion path
or altering the outer surface via sculpting/adaptation.
Understanding the settings of the hardware you are using is essential for printing and milling the
restoration. Check the instructions carefully and determine the minimum thickness allowed for a
restoration to get printed and not break. Therefore, be careful when removing or smoothing the
restoration, as it affects its thickness.

When to Use Sculpting Tools
Sculpting tools help change the shape of the restoration and help make the restoration fit comfortably
between the adjacent teeth.
⚫ Make the arch scan data visible in the Data Tree on the left side of the screen to reference
the scan data. You can adjust its visibility to view how the restoration will fit.
⚫ Use “Add” or “Remove” when adjusting the contact points of the restoration.
Turning on “Show/Hide Contact Areas with Adjacents” (only available in Temporary Module)
in the Viewing Tools might be necessary to see alterations.
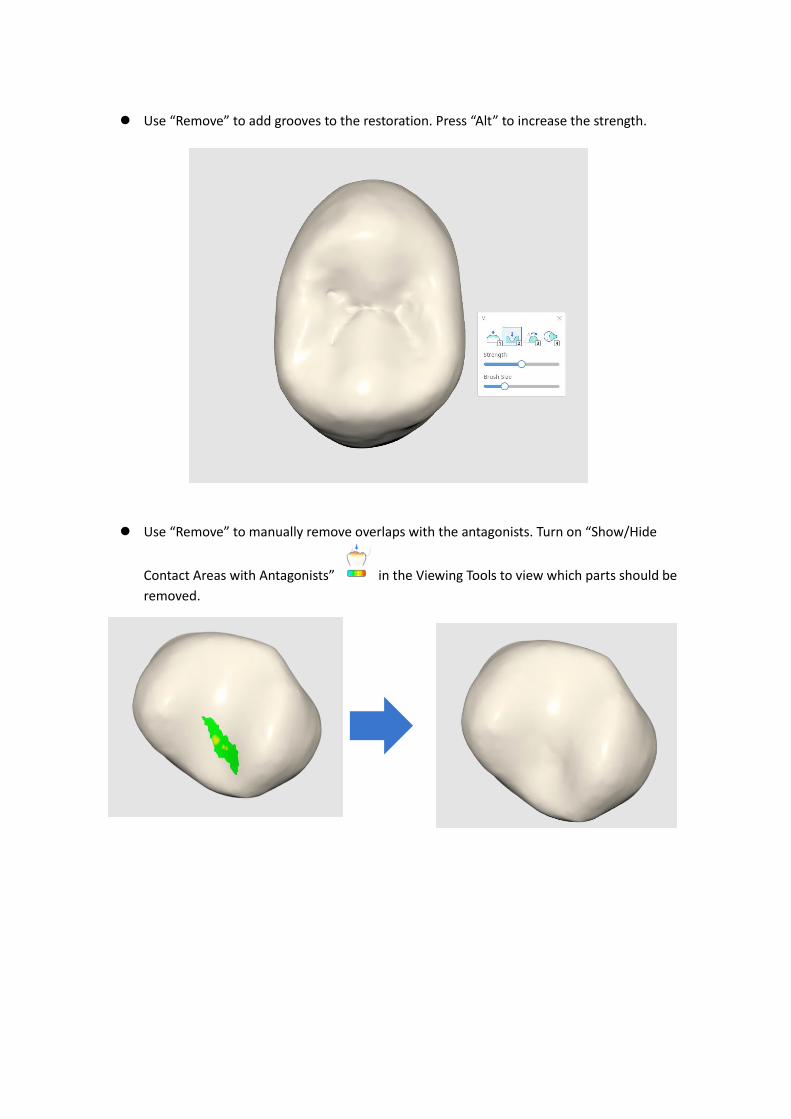
⚫ Use “Remove” to add grooves to the restoration. Press “Alt” to increase the strength.
⚫ Use “Remove” to manually remove overlaps with the antagonists. Turn on “Show/Hide
Contact Areas with Antagonists” in the Viewing Tools to view which parts should be
removed.

⚫ Use “Smooth” to smooth over rough parts where removals are not necessary or to
add finishing touches at the end of the design process.
⚫ Use “Morph” to move larger parts of the anatomy.

5 How to Design Eggshell Crowns (Pre-Op Data)
5.1 How to Design Eggshell Crowns in Quick Mode
Only pre-operation data is required to design an eggshell-type crown.
① Confirm that the form in Medit Link is filled in correctly.
② Choose “Eggshell-type Crown” in the Assign Data dialogue window.
③ Assign data and press “Confirm.”
④ The scan data will be displayed on the screen.
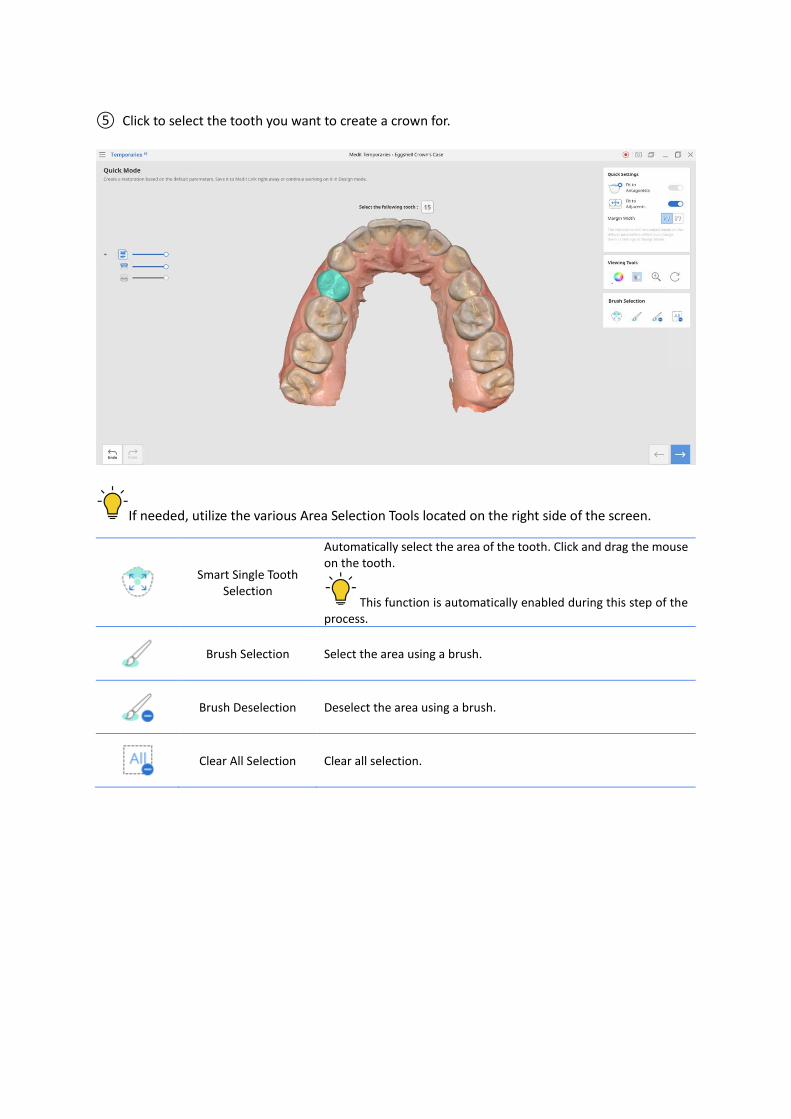
⑤ Click to select the tooth you want to create a crown for.
If needed, utilize the various Area Selection Tools located on the right side of the screen.
Smart Single Tooth Selection
Automatically select the area of the tooth. Click and drag the mouse on the tooth.
This function is automatically enabled during this step of the process.
Brush Selection Select the area using a brush.
Brush Deselection Deselect the area using a brush.
Clear All Selection Clear all selection.

⑥ The Quick Settings are located at the top right corner of the screen. Using Quick Settings helps
decrease the time spent on manual editing of the restoration.
Fit to Antagonists
Use this option to cut all intersections of the restoration with its antagonist (0.2 mm). You can perform more precise adjustments in Design Mode by entering a specific value.
Fit to Adjacents Use this option to fit the outer surface to the adjacents. This is a useful tool that expands the restoration, so that the space between the crown and adjacents is minimized.
Margin Width
Thin Margin: Choose this option to create a restoration with a thin margin line (0.2 mm). Go to Design Mode to access more inner surface parameters. Thick Margin: Choose this option to create a restoration with a thick margin line (0.5 mm). Go to Design Mode to access more inner surface parameters.
The restoration will be created based on the default parameters unless you change them in Settings
or Design Mode.
Observe the difference between thin and thick margin lines below.
Thin Margin Thick Margin
⑦ Press “Next” to continue.
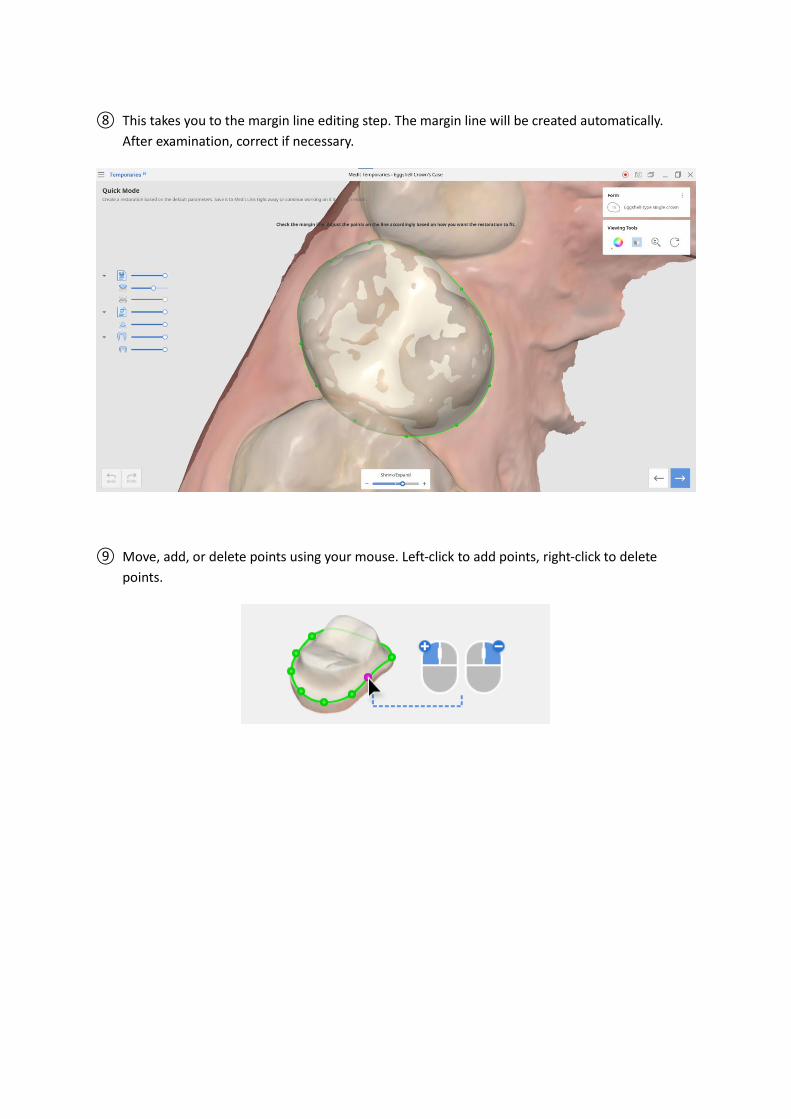
⑧ This takes you to the margin line editing step. The margin line will be created automatically.
After examination, correct if necessary.
⑨ Move, add, or delete points using your mouse. Left-click to add points, right-click to delete
points.

⑩ At the bottom of the screen, you will see “Shrink/Expand” slider. Use “+” and “-” buttons to
adjust the size of the margin line. By default, the program will create a slightly bigger margin
line.
⑪ Click “Next” to see the restoration ready.

⑫ Either save it to the Medit Link case or continue working on it in Design Mode. The following
buttons are located at the bottom right corner of the screen.
Design Mode Utilize various tools to design the outer and inner surfaces of the restoration before saving it to Medit Link.
Complete Complete the design process and save the restoration to Medit Link.
⑬ Click “Complete” to save the restoration and project file to Medit Link.
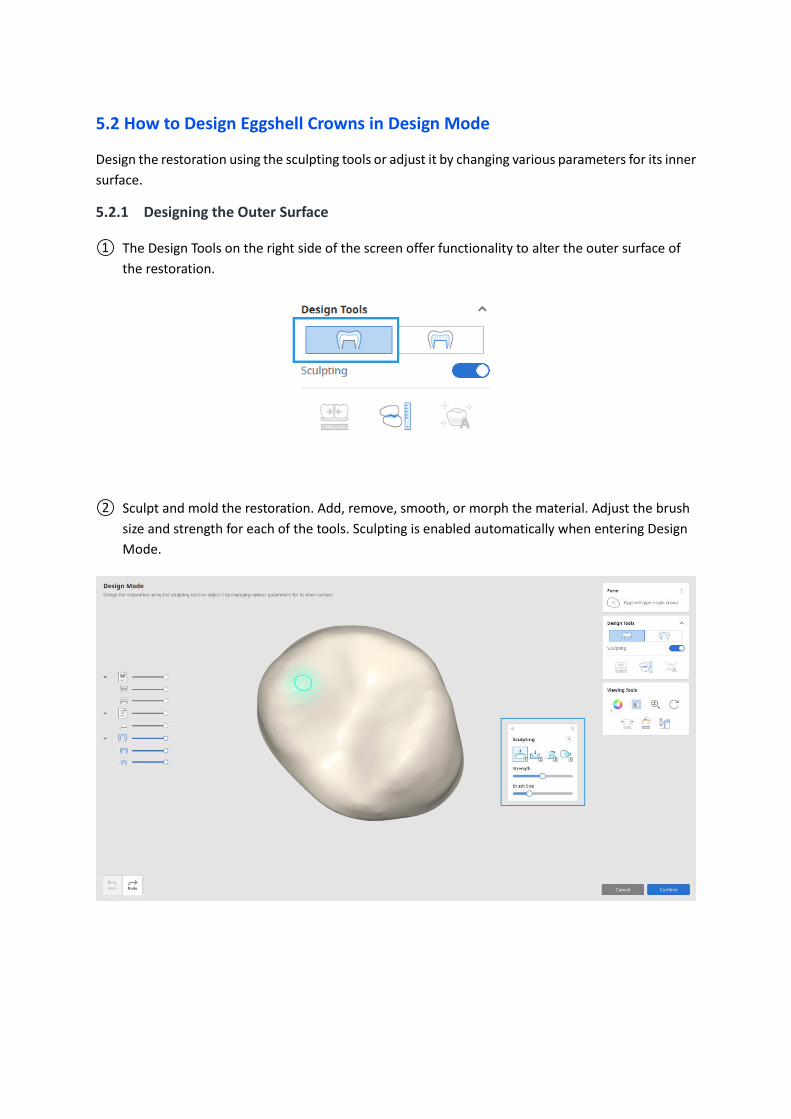
5.2 How to Design Eggshell Crowns in Design Mode
Design the restoration using the sculpting tools or adjust it by changing various parameters for its inner
surface.
5.2.1 Designing the Outer Surface
① The Design Tools on the right side of the screen offer functionality to alter the outer surface of
the restoration.
② Sculpt and mold the restoration. Add, remove, smooth, or morph the material. Adjust the brush
size and strength for each of the tools. Sculpting is enabled automatically when entering Design
Mode.

③ Using Quick Settings in Quick Mode is enough for most cases. If both “Fit to Adjacent” and “Fit
to Antagonists” toggles are on, the contact points are matched, and the occlusion is low. If you
did not use these options or want to do more editing manually, Design Mode offers tools for
additional design.
④ Click “Adapt to Antagonists” to modify the restoration to fit the antagonists by removing
overlapping parts.
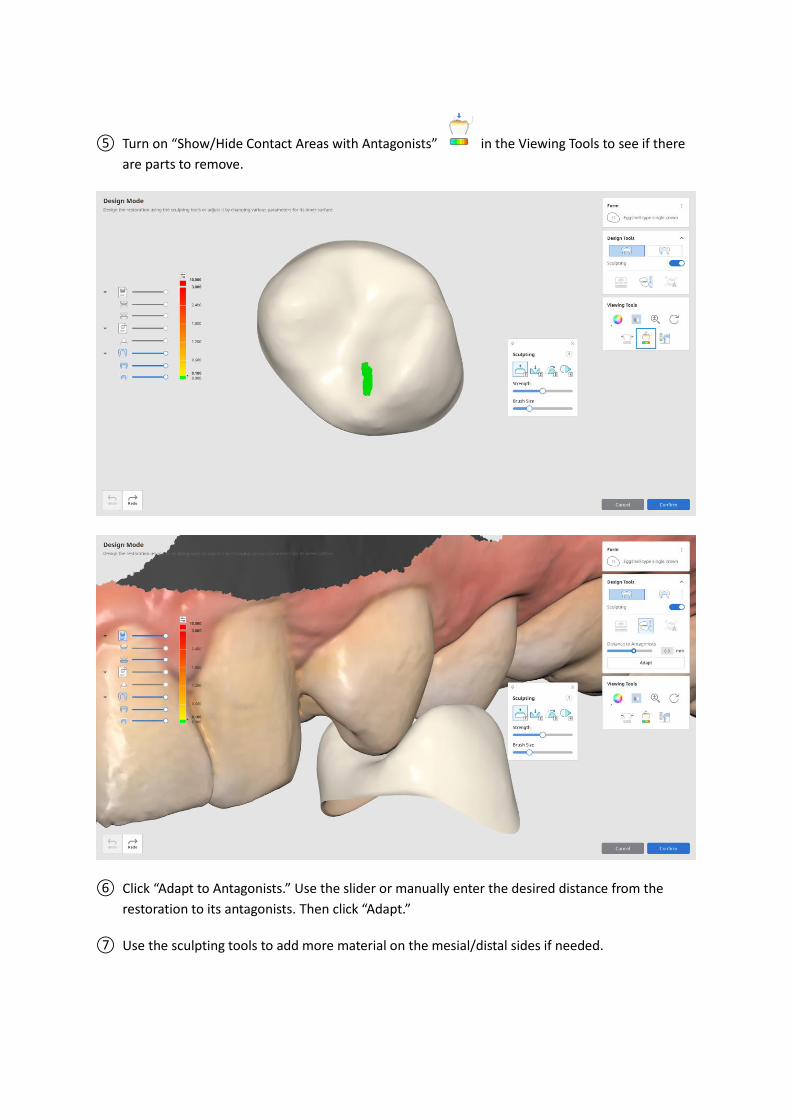
⑤ Turn on “Show/Hide Contact Areas with Antagonists” in the Viewing Tools to see if there
are parts to remove.
⑥ Click “Adapt to Antagonists.” Use the slider or manually enter the desired distance from the
restoration to its antagonists. Then click “Adapt.”
⑦ Use the sculpting tools to add more material on the mesial/distal sides if needed.

5.2.2 Designing the Inner Surface
Eggshell-type crowns are designed before the preparation process. Still, it is important to create the
inner surface that will fit the prepared tooth properly. The Design Tools located on the right side of
the screen contain functions that adjust the inner surface of the restoration.

In the Eggshell Module you can adjust the following parameters:
1 Restoration Thickness The thickness of the final restoration that best reflects your 3D printer/milling machine settings.
2 Insertion Path
The angle from which you insert the restoration. The insertion path is shown by default. Turn the toggle off in the Toolbox to turn off.
3 Preparation Angle The angle from which the preparation takes place.
4 Margin Width The width of the restoration's margin line.
5 Shoulder Slope The angle of the preparation shoulder.

If needed, adjust the insertion path by dragging the arrow in your desired direction. The program’s
automatically calculated insertion path will remain blue (1), while the insertion path you manually
adjusted will be displayed in gold (2).

Note that in some cases, changing the insertion path will also change the thickness of the
restoration. Using “Grid Settings” or “Show/Hide Minimum Thickness” will show you how
the changes you made affect the thickness of the restoration. Minimum Thickness can be customized
in the Settings. Make sure there are no areas in deep blue color – those areas might be prone to
breaking during 3D printing or milling.
Minimum thickness, set as the standard, can be customized in the Settings.
① Click “Apply” in the Toolbox to apply the changes.
② Click “Reset” to reset the values.
③ You can switch back and forth between the inner and outer surface settings.
④ Once you are done, click “Confirm” to exit Design Mode.
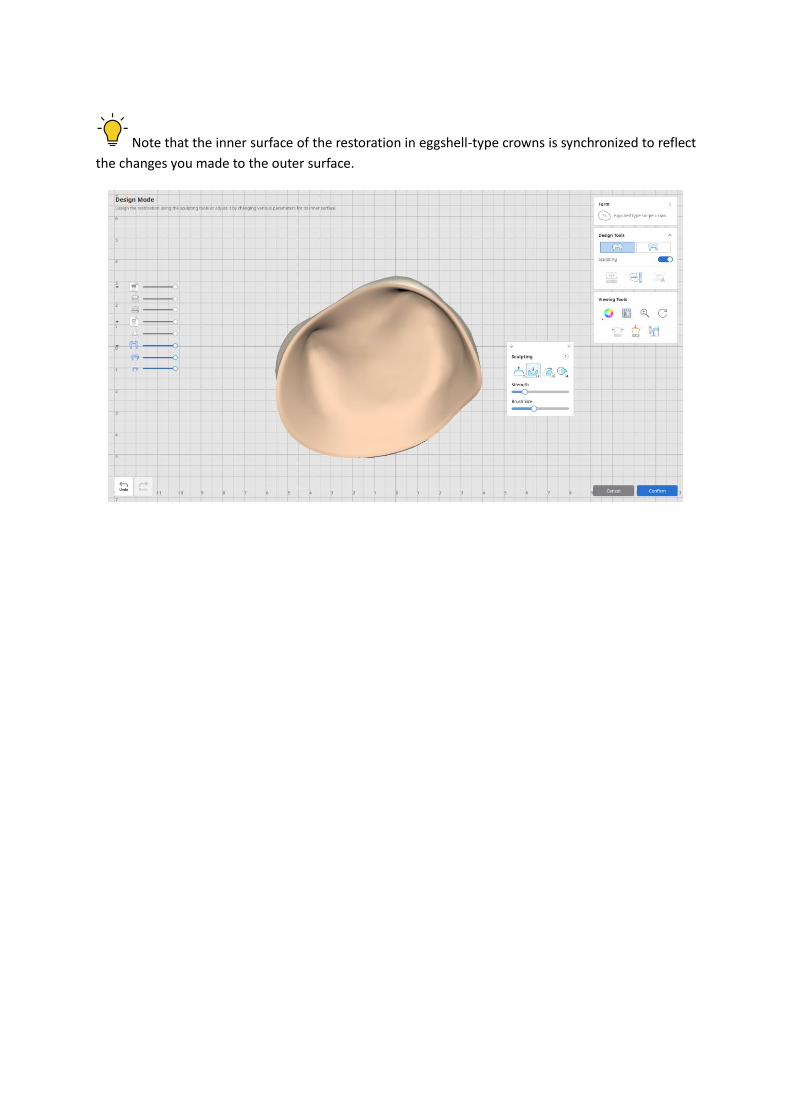
Note that the inner surface of the restoration in eggshell-type crowns is synchronized to reflect
the changes you made to the outer surface.
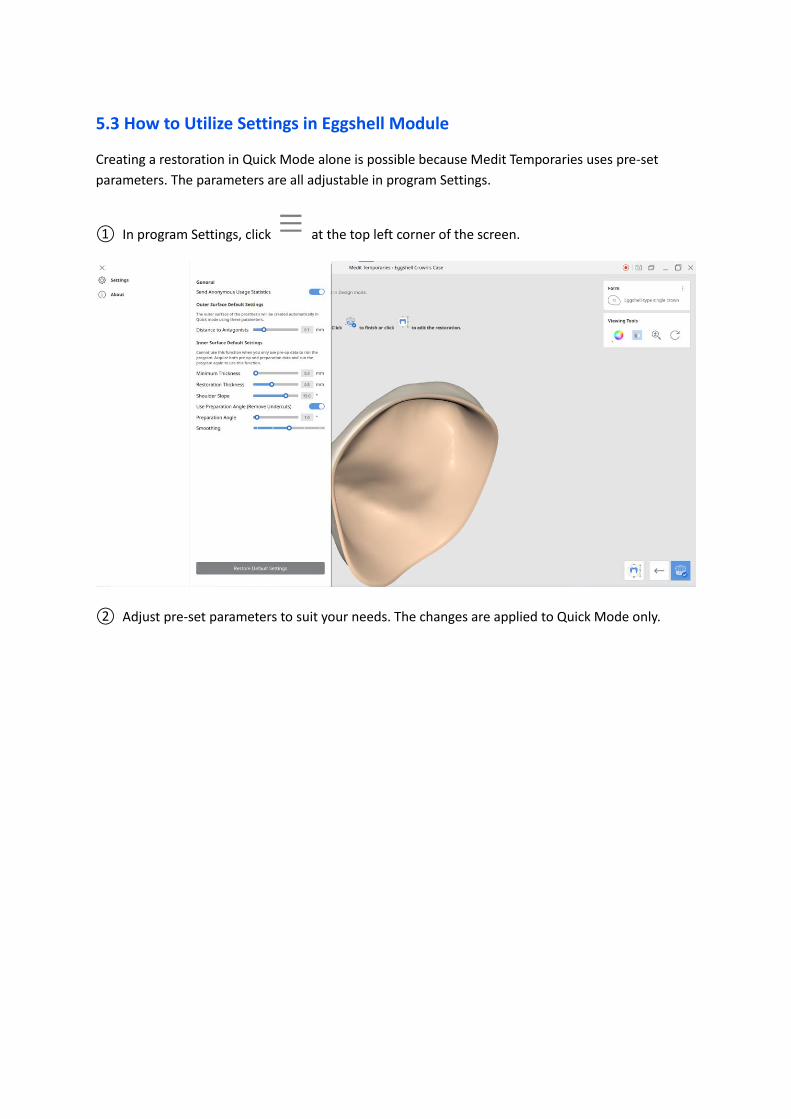
5.3 How to Utilize Settings in Eggshell Module
Creating a restoration in Quick Mode alone is possible because Medit Temporaries uses pre-set
parameters. The parameters are all adjustable in program Settings.
① In program Settings, click at the top left corner of the screen.
② Adjust pre-set parameters to suit your needs. The changes are applied to Quick Mode only.
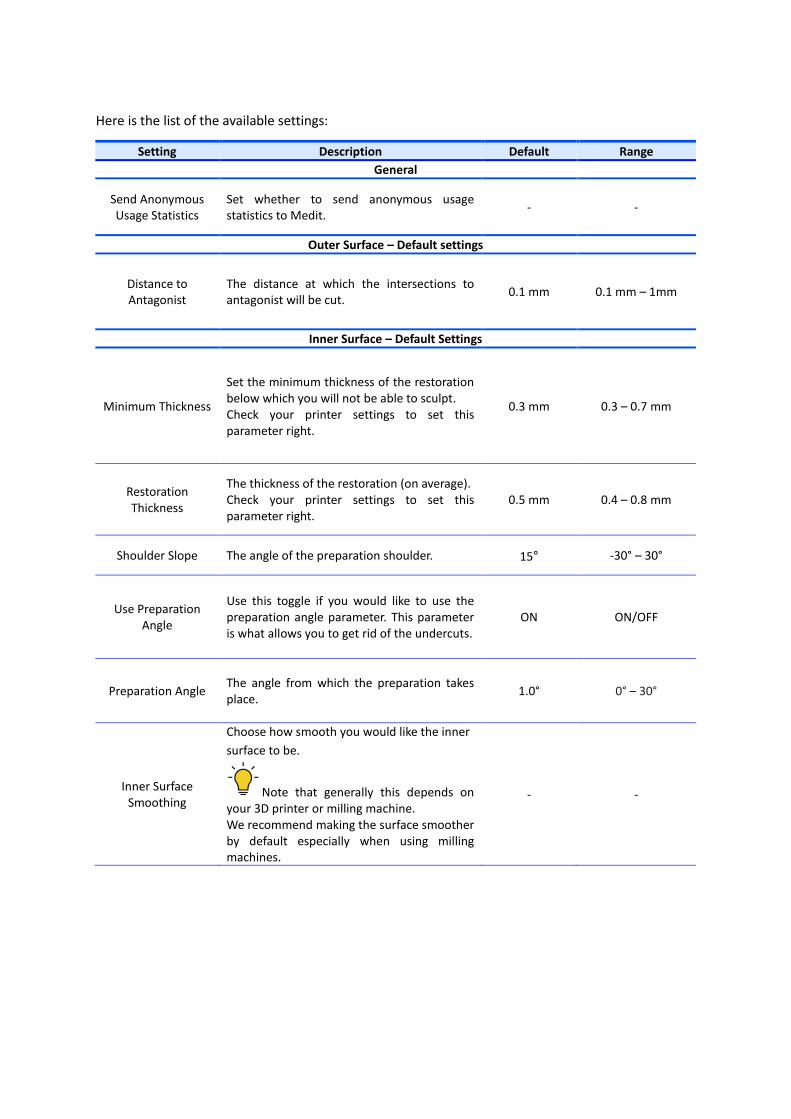
Here is the list of the available settings:
Setting Description Default Range
General
Send Anonymous Usage Statistics
Set whether to send anonymous usage statistics to Medit.
- -
Outer Surface – Default settings
Distance to Antagonist
The distance at which the intersections to antagonist will be cut.
0.1 mm 0.1 mm – 1mm
Inner Surface – Default Settings
Minimum Thickness
Set the minimum thickness of the restoration below which you will not be able to sculpt. Check your printer settings to set this parameter right.
0.3 mm 0.3 – 0.7 mm
Restoration Thickness
The thickness of the restoration (on average). Check your printer settings to set this parameter right.
0.5 mm 0.4 – 0.8 mm
Shoulder Slope The angle of the preparation shoulder. 15° -30° – 30°
Use Preparation Angle
Use this toggle if you would like to use the preparation angle parameter. This parameter is what allows you to get rid of the undercuts.
ON ON/OFF
Preparation Angle The angle from which the preparation takes place.
1.0° 0° – 30°
Inner Surface Smoothing
Choose how smooth you would like the inner
surface to be.
Note that generally this depends on your 3D printer or milling machine. We recommend making the surface smoother by default especially when using milling machines.
- -

6 How to Design Temporary Crowns (Pre-Op Data + Preparation
Data)
6.1 How to Design Temporary Crowns in Quick Mode
Design a temporary crown that fits the prepared surface of the tooth using pre-operation data and
prepared data.
① Choose “Temporary Crown” in the Assign Data dialogue window.
② Assign data and click “Confirm.”

③ Check Quick Settings located at the top right corner of the screen. Using Quick Settings helps
decrease the time spent on manual editing of the restoration.
Fit to Antagonists
Use this option to remove all overlapping restoration and antagonist areas (0.2 mm). You can perform more precise adjustments in Design Mode by entering a specific value.
Fit to Adjacents
Use this option to fit the outer surface to the adjacents: If pre-operation data has overlapping areas, they will be cut; if pre-operation data lacked contact points with adjacents, they will be automatically added. Make more precise adjustments in Design Mode by entering a specific value.
The restoration will be created based on default parameters unless you change them in Settings or
Design Mode.

6.1.1 Utilize the Margin Line Imported from Medit Scan for Clinics
① On application launch, the prepared scan data will be displayed. If you already created a margin
line for the prepared tooth in Medit Scan for Clinics, it will be displayed on the scan data right
away.
To see pre-operation data together with prepared data, change the settings in Data Tree.

② Examine the margin line.
③ Add or delete points using your mouse. Left-click to add points, right-click to delete points.
④ Click “Next” to see the completed restoration when everything is completed.

6.1.2 Create Margin Line in Medit Temporaries
① If you have not yet created a margin line for the prepared tooth in Medit Scan for Clinics, you
can draw it in Medit Temporaries.
② Upon launch of the program, you will be asked to choose the tooth you are creating a crown for.
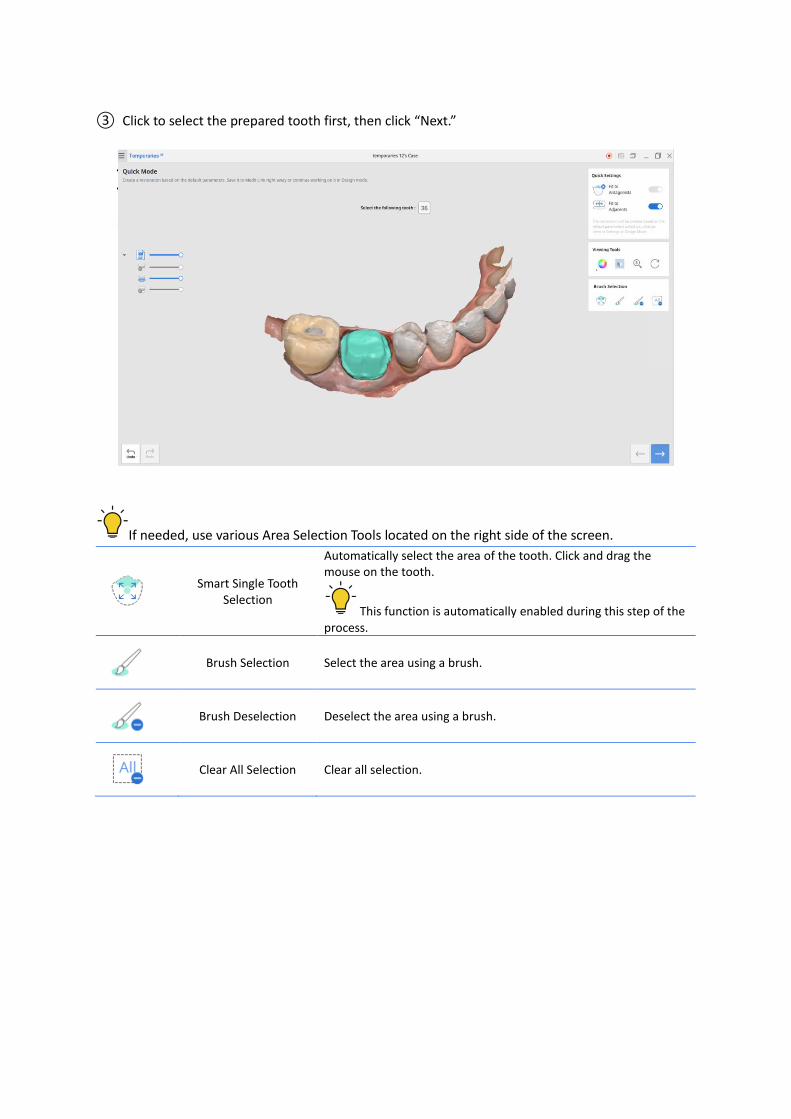
③ Click to select the prepared tooth first, then click “Next.”
If needed, use various Area Selection Tools located on the right side of the screen.
Smart Single Tooth Selection
Automatically select the area of the tooth. Click and drag the mouse on the tooth.
This function is automatically enabled during this step of the process.
Brush Selection Select the area using a brush.
Brush Deselection Deselect the area using a brush.
Clear All Selection Clear all selection.

④ A margin line will be created.
⑤ Add or delete points by using your mouse. Left-click to add points, right-click to delete points.
⑥ When editing is completed, click “Next” to see the completed restoration.

⑦ Save it to your Medit Link case or continue working on it in Design Mode. The following buttons
are located at the bottom right corner of the screen.
Design Mode Utilize various tools to design the outer and inner surfaces of the restoration before saving it to Medit Link.
Complete Complete the design process and save the restoration to Medit Link.
⑧ Click “Complete” to save the restoration and project file to Medit Link.

6.2 How to Design Temporary Crowns in Design Mode
Use the sculpting tools to design the restoration. Adjust various parameters for its inner surface.
6.2.1 Designing the Outer Surface
① The Design Tools on the right side of the screen offer features to alter the outer surface of the
restoration.
② Sculpt and mold the restoration. Add, remove, smooth, or morph the material. Adjust brush size
and strength for each of the tools. When entering Design Mode, sculpting is enabled
automatically.
While designing, make pre-operation data visible in the Data Tree to refer to the original shape
of the tooth.

③ Using Quick Settings in Quick Mode is enough for the majority of cases: if both “Fit to Adjacent”
and “Fit to Antagonists” toggles are on, the contact points are matched. If you did not use these
options or want to do more editing manually, Design Mode offers tools for additional design.
④ You can change the shape of the restoration by removing the overlapping areas with antagonists
and/or adjacents, and by expanding the restoration to make sure there are no spaces between
the teeth. To do so, use adaptation tools such as adjacent adaptation (1), occlusal adaptation (2),
or both simultaneously (the “Smart Adaptation” function (3)). Enter the desired distance of the
restoration to the adjacents/antagonists and click “Adapt.”
⚫ Turn on “Show/Hide Contact Areas with Antagonists” and “Show/Hide Contact Areas
with Adjacents” in the Viewing Tools to examine which parts should be removed.

⚫ Click on “Adapt to Adjacents.” Use the slider or enter the distance from the restoration to the
adjacents manually. If you choose a negative value, the restoration will expand. If you choose
a positive value, the overlapping areas of restoration and adjacent will be removed.
< Before performing adjacent adaptation >
< After performing adjacent adaptation >

⚫ Click on “Adapt to Antagonists.” Use the slider or enter the distance from the restoration to
its antagonists to remove all overlapping areas.
< Before performing antagonist adaptation >
< After performing antagonist adaptation >
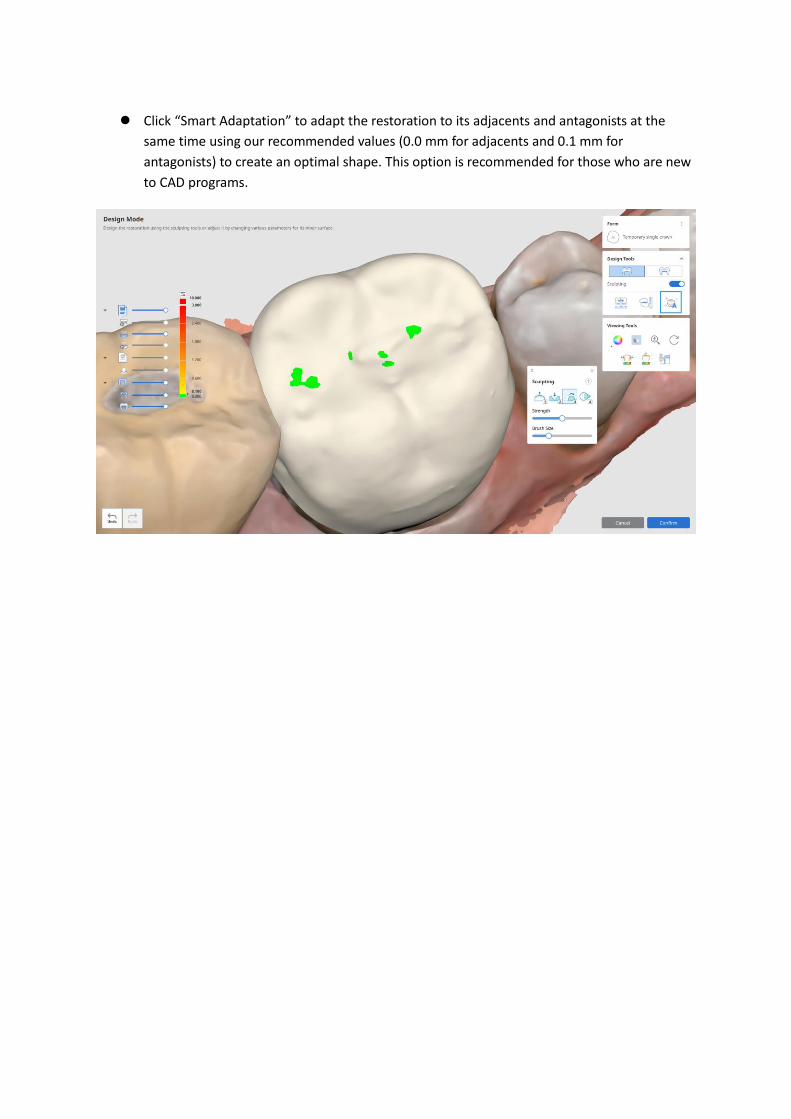
⚫ Click “Smart Adaptation” to adapt the restoration to its adjacents and antagonists at the
same time using our recommended values (0.0 mm for adjacents and 0.1 mm for
antagonists) to create an optimal shape. This option is recommended for those who are new
to CAD programs.
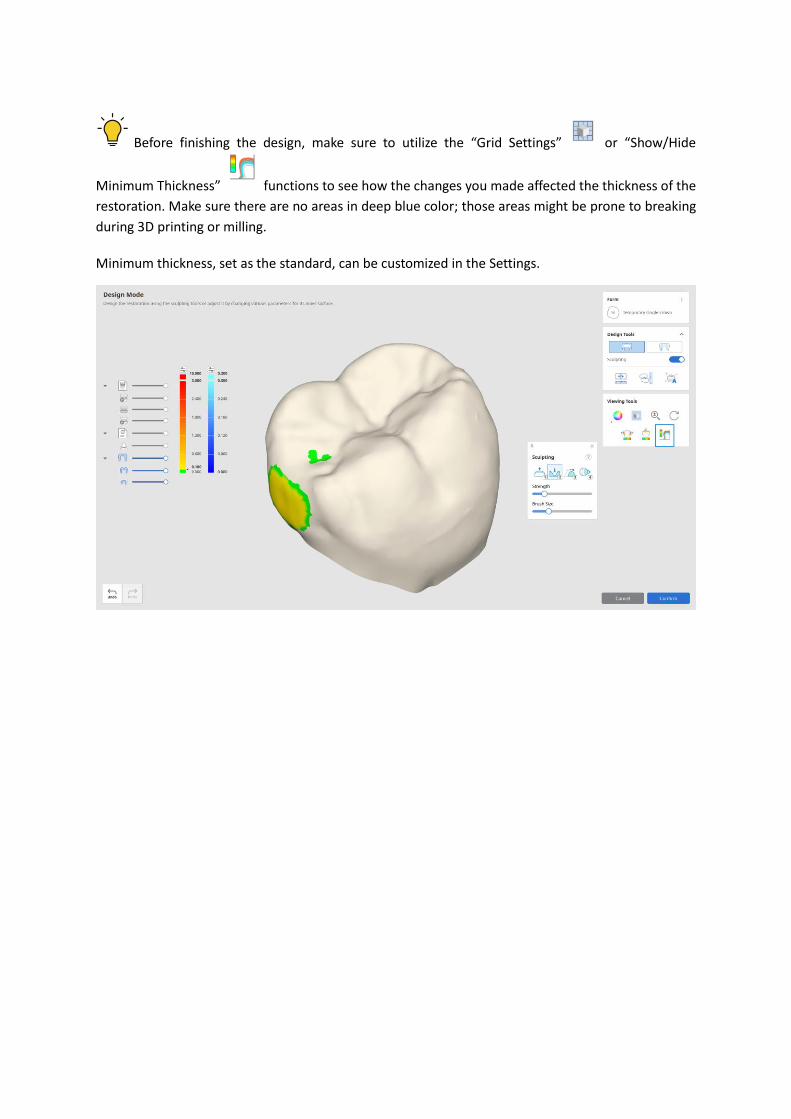
Before finishing the design, make sure to utilize the “Grid Settings” or “Show/Hide
Minimum Thickness” functions to see how the changes you made affected the thickness of the
restoration. Make sure there are no areas in deep blue color; those areas might be prone to breaking
during 3D printing or milling.
Minimum thickness, set as the standard, can be customized in the Settings.
6.2.2 Designing the Inner Surface
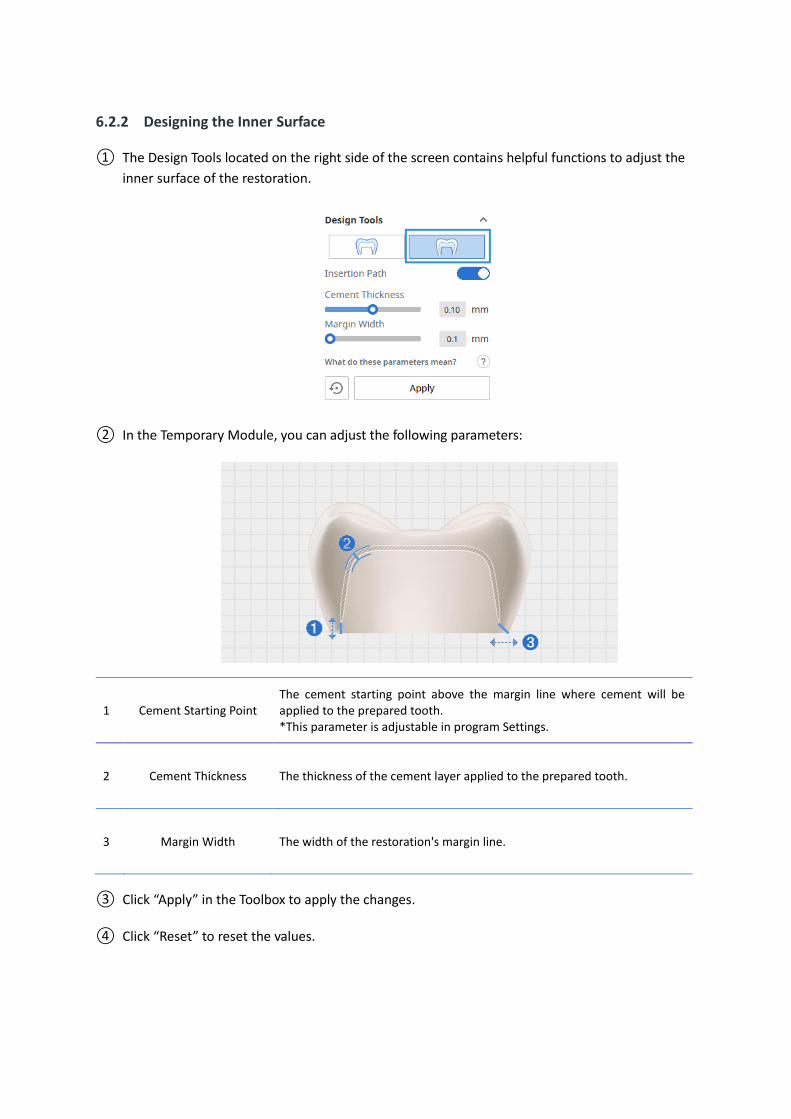
① The Design Tools located on the right side of the screen contains helpful functions to adjust the
inner surface of the restoration.
② In the Temporary Module, you can adjust the following parameters:
1 Cement Starting Point The cement starting point above the margin line where cement will be applied to the prepared tooth. *This parameter is adjustable in program Settings.
2 Cement Thickness The thickness of the cement layer applied to the prepared tooth.
3 Margin Width The width of the restoration's margin line.
③ Click “Apply” in the Toolbox to apply the changes.
④ Click “Reset” to reset the values.

⑤ You can switch back and forth between the inner and outer surface settings.
⑥ Once you are done, click “Confirm” to exit Design Mode.

6.3 How to Utilize Settings in Temporary Module
The reason finishing full design in Quick Mode alone is possible is since Medit Temporaries uses
several pre-set parameters. All of them are adjustable in program Settings.
① Go to program Settings. Press button at the top left corner of the screen.
② Adjust all the pre-set parameters. The changes will be applied straight away. The changes are
applied to Quick Mode only.
Here is the list of the available settings:
Setting Description Default Range
General
Send Anonymous
Usage Statistics
Set whether to send anonymous usage
statistics to Medit. - -
Outer Surface – Default settings
Distance to
Antagonists
The distance from the restoration to its
antagonists. All overlapping areas will be
removed.
0.1 mm 0.1 mm – 1 mm
Distance to Adjacents
The distance from the restoration to its
adjacents.
Negative value: Overlapping areas will be
created.
Positive value: All overlapping areas will be
removed.
-0.02 mm -0.1 mm – +1 mm
Inner Surface – Default Settings
Minimum Thickness
Set the minimum thickness of the restoration below which you will not be able to sculpt. Check your printer settings to set this
parameter right.
0.3 mm 0.3 – 0.7 mm
Cement Thickness The thickness of the cement layer over the
prepared tooth. 0.1 0 mm – 0.2 mm
Cement Starting Point
The point, counted from the margin line,
from which cement will be applied to the
prepared tooth.
- -
Inner Surface
Smoothing
Choose how smooth you would like the
inner surface to be.
Note that generally this depends on your 3D printer or milling machine. We recommend making the surface
smoother by default especially when using
milling machines.
- -