Embed Size (px)
Citation preview

VERIZON VOICE MAIL USER GUIDEDC/DE/MD/NJ/PA/VA REGION — BUSINESS

1
ABOUT YOUR VERIZON BUSINESS VOICE MAIL SERVICEBusiness Voice Mail service can be a benefit to your business and to callers who need to leave you messages.
The voice prompts guide you through the different processes. They move quickly from one step to another in order to make the use of the service fast and convenient.
Before dialing into your mailbox, please take a few minutes to review this guide and familiarize yourself with the set-up, operation and the many features of your new service.
2
TABLE OF CONTENTS
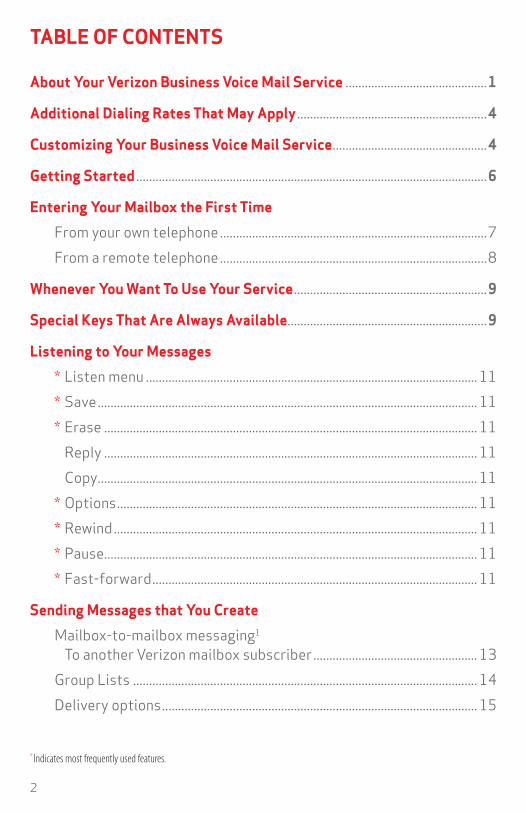
About Your Verizon Business Voice Mail Service ............................................1
Additional Dialing Rates That May Apply ...........................................................4
Customizing Your Business Voice Mail Service ................................................4
Getting Started .............................................................................................................6
Entering Your Mailbox the First Time
From your own telephone ...................................................................................7 From a remote telephone ...................................................................................8
Whenever You Want To Use Your Service ............................................................9
Special Keys That Are Always Available ..............................................................9
Listening to Your Messages
* Listen menu ....................................................................................................... 11 * Save ...................................................................................................................... 11 * Erase .................................................................................................................... 11 Reply .................................................................................................................... 11 Copy ...................................................................................................................... 11 * Options ................................................................................................................ 11 * Rewind ................................................................................................................. 11 * Pause.................................................................................................................... 11 * Fast-forward ..................................................................................................... 11
Sending Messages that You Create
Mailbox-to-mailbox messaging1 To another Verizon mailbox subscriber ................................................... 13 Group Lists ........................................................................................................... 14 Delivery options .................................................................................................. 15
* Indicates most frequently used features.
3
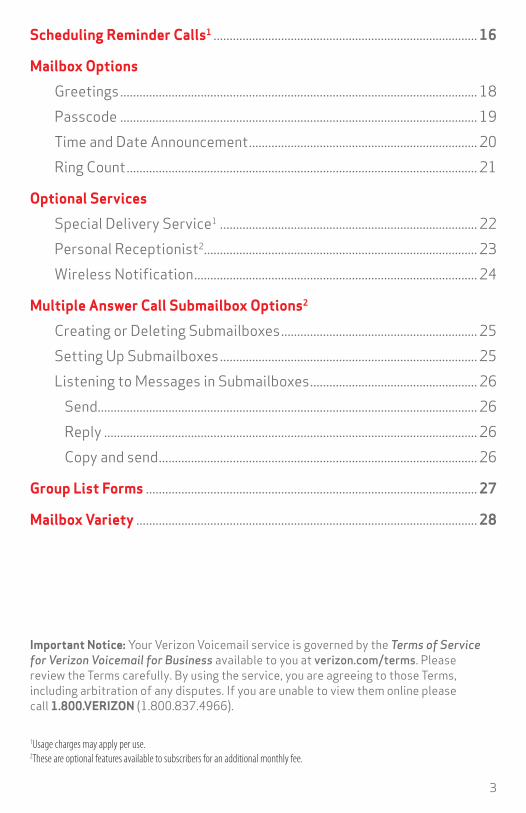
Scheduling Reminder Calls1 .................................................................................. 16
Mailbox Options
Greetings ............................................................................................................... 18 Passcode ............................................................................................................... 19 Time and Date Announcement ....................................................................... 20 Ring Count ............................................................................................................. 21
Optional Services
Special Delivery Service1 ................................................................................ 22 Personal Receptionist2 ..................................................................................... 23 Wireless Notification ........................................................................................ 24
Multiple Answer Call Submailbox Options2
Creating or Deleting Submailboxes ............................................................. 25 Setting Up Submailboxes ................................................................................ 25 Listening to Messages in Submailboxes .................................................... 26 Send...................................................................................................................... 26 Reply .................................................................................................................... 26 Copy and send ................................................................................................... 26
Group List Forms ....................................................................................................... 27
Mailbox Variety .......................................................................................................... 28
1Usage charges may apply per use.2These are optional features available to subscribers for an additional monthly fee.
Important Notice: Your Verizon Voicemail service is governed by the Terms of Service for Verizon Voicemail for Business available to you at verizon.com/terms. Please review the Terms carefully. By using the service, you are agreeing to those Terms, including arbitration of any disputes. If you are unable to view them online please call 1.800.VERIZON (1.800.837.4966).
4
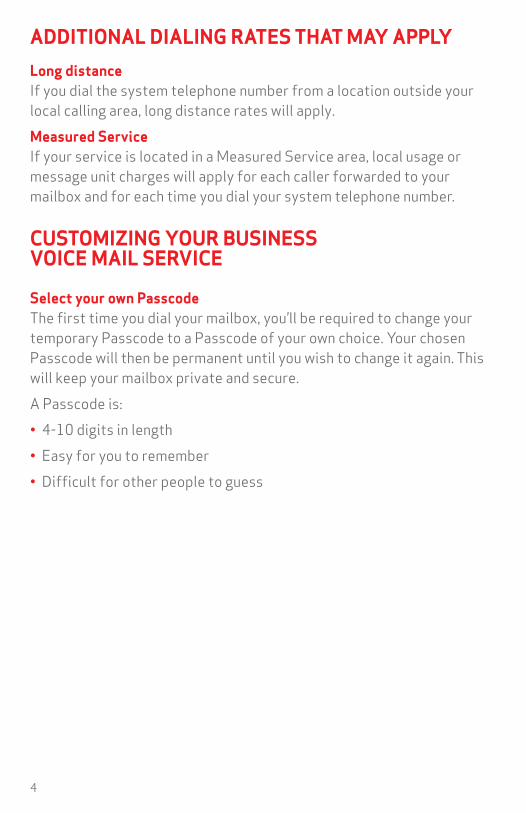
ADDITIONAL DIALING RATES THAT MAY APPLYLong distance If you dial the system telephone number from a location outside your local calling area, long distance rates will apply.Measured Service If your service is located in a Measured Service area, local usage or message unit charges will apply for each caller forwarded to your mailbox and for each time you dial your system telephone number.
CUSTOMIZING YOUR BUSINESS VOICE MAIL SERVICE
Select your own Passcode The first time you dial your mailbox, you’ll be required to change your temporary Passcode to a Passcode of your own choice. Your chosen Passcode will then be permanent until you wish to change it again. This will keep your mailbox private and secure.A Passcode is:• 4-10 digits in length• Easy for you to remember• Difficult for other people to guess
5
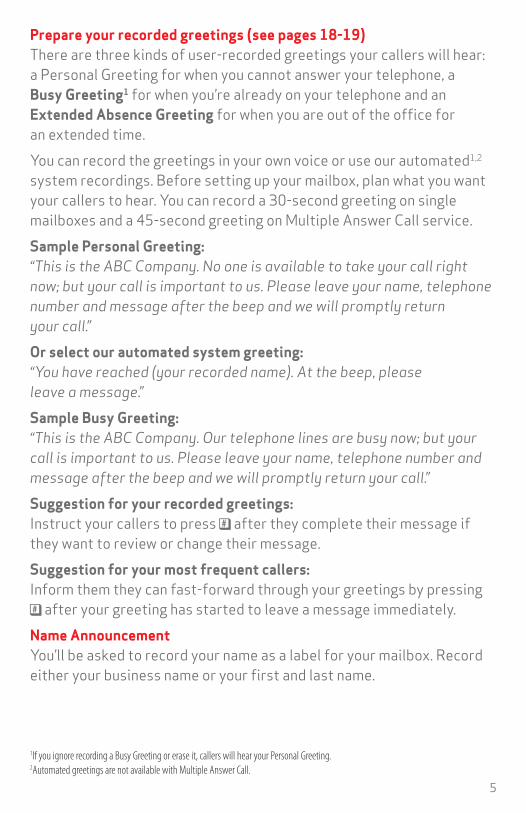
Prepare your recorded greetings (see pages 18-19) There are three kinds of user-recorded greetings your callers will hear: a Personal Greeting for when you cannot answer your telephone, a Busy Greeting1 for when you’re already on your telephone and an Extended Absence Greeting for when you are out of the office for an extended time.You can record the greetings in your own voice or use our automated1,2 system recordings. Before setting up your mailbox, plan what you want your callers to hear. You can record a 30-second greeting on single mailboxes and a 45-second greeting on Multiple Answer Call service. Sample Personal Greeting: “This is the ABC Company. No one is available to take your call right now; but your call is important to us. Please leave your name, telephone number and message after the beep and we will promptly return your call.”Or select our automated system greeting: “You have reached (your recorded name). At the beep, please leave a message.”Sample Busy Greeting: “This is the ABC Company. Our telephone lines are busy now; but your call is important to us. Please leave your name, telephone number and message after the beep and we will promptly return your call.”Suggestion for your recorded greetings: Instruct your callers to press after they complete their message if they want to review or change their message.Suggestion for your most frequent callers: Inform them they can fast-forward through your greetings by pressing
after your greeting has started to leave a message immediately.Name Announcement You’ll be asked to record your name as a label for your mailbox. Record either your business name or your first and last name.
1If you ignore recording a Busy Greeting or erase it, callers will hear your Personal Greeting.2Automated greetings are not available with Multiple Answer Call.
6
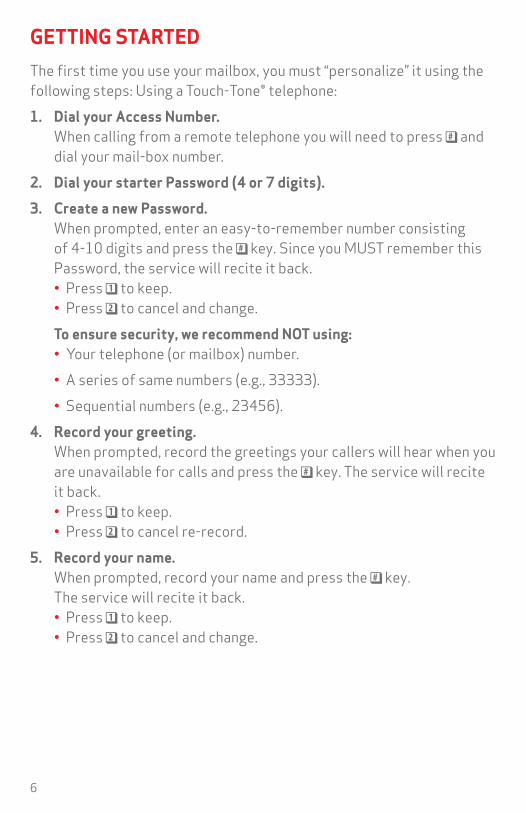
GETTING STARTEDThe first time you use your mailbox, you must “personalize” it using the following steps: Using a Touch-Tone® telephone:1. Dial your Access Number.
When calling from a remote telephone you will need to press and dial your mail-box number.
2. Dial your starter Password (4 or 7 digits).
3. Create a new Password. When prompted, enter an easy-to-remember number consisting of 4-10 digits and press the key. Since you MUST remember this Password, the service will recite it back. • Press to keep. • Press to cancel and change.
To ensure security, we recommend NOT using: • Your telephone (or mailbox) number. • A series of same numbers (e.g., 33333). • Sequential numbers (e.g., 23456).4. Record your greeting.
When prompted, record the greetings your callers will hear when you are unavailable for calls and press the key. The service will recite it back. • Press to keep. • Press to cancel re-record.
5. Record your name. When prompted, record your name and press the key. The service will recite it back. • Press to keep. • Press to cancel and change.
7
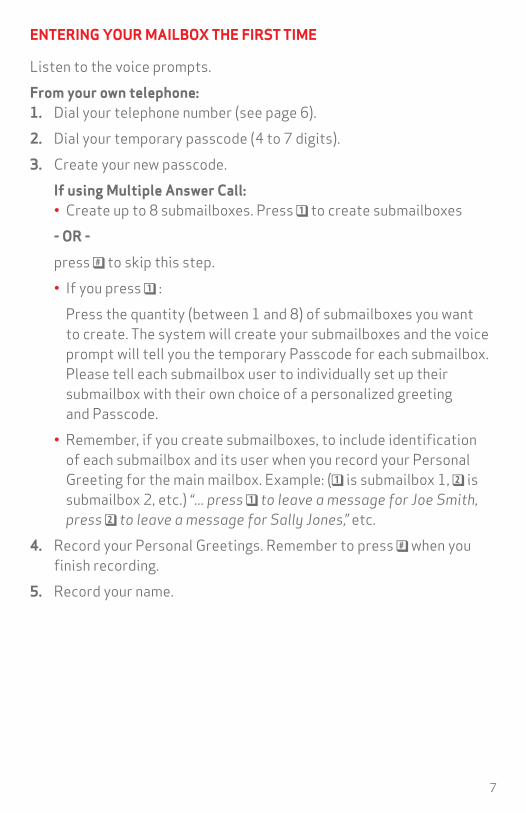
ENTERING YOUR MAILBOX THE FIRST TIME
Listen to the voice prompts.From your own telephone: 1. Dial your telephone number (see page 6).2. Dial your temporary passcode (4 to 7 digits).3. Create your new passcode. If using Multiple Answer Call:
• Create up to 8 submailboxes. Press to create submailboxes - OR -
press to skip this step. • If you press : Press the quantity (between 1 and 8) of submailboxes you want
to create. The system will create your submailboxes and the voice prompt will tell you the temporary Passcode for each submailbox. Please tell each submailbox user to individually set up their submailbox with their own choice of a personalized greeting and Passcode.
• Remember, if you create submailboxes, to include identification of each submailbox and its user when you record your Personal Greeting for the main mailbox. Example: ( is submailbox 1, is submailbox 2, etc.) “... press to leave a message for Joe Smith, press to leave a message for Sally Jones,” etc.
4. Record your Personal Greetings. Remember to press when you finish recording.
5. Record your name.
8
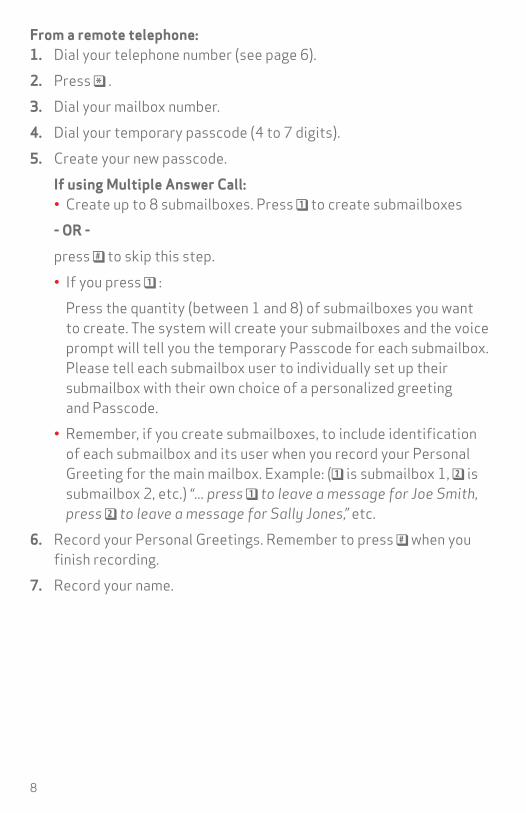
From a remote telephone: 1. Dial your telephone number (see page 6).2. Press .3. Dial your mailbox number.4. Dial your temporary passcode (4 to 7 digits).5. Create your new passcode. If using Multiple Answer Call:
• Create up to 8 submailboxes. Press to create submailboxes - OR -
press to skip this step. • If you press : Press the quantity (between 1 and 8) of submailboxes you want
to create. The system will create your submailboxes and the voice prompt will tell you the temporary Passcode for each submailbox. Please tell each submailbox user to individually set up their submailbox with their own choice of a personalized greeting and Passcode.
• Remember, if you create submailboxes, to include identification of each submailbox and its user when you record your Personal Greeting for the main mailbox. Example: ( is submailbox 1, is submailbox 2, etc.) “... press to leave a message for Joe Smith, press to leave a message for Sally Jones,” etc.
6. Record your Personal Greetings. Remember to press when you finish recording.
7. Record your name.
9
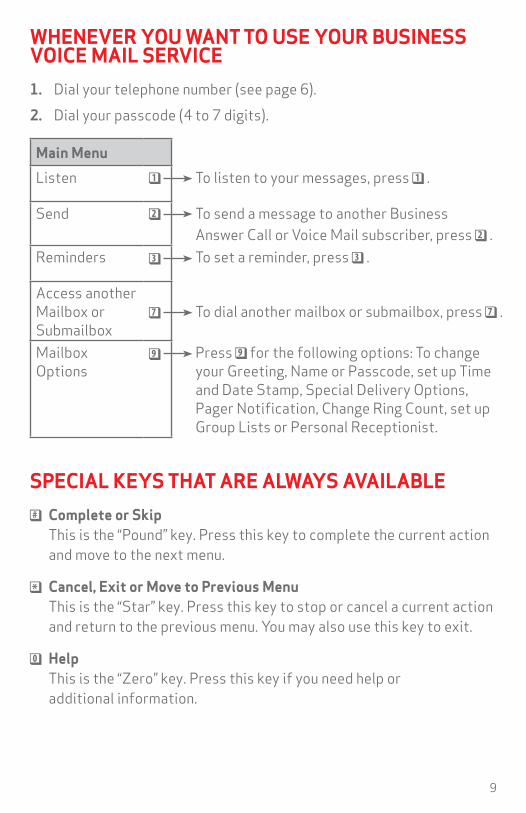
WHENEVER YOU WANT TO USE YOUR BUSINESS VOICE MAIL SERVICE1. Dial your telephone number (see page 6).2. Dial your passcode (4 to 7 digits).
Main Menu
Listen To listen to your messages, press .
Send To send a message to another Business Answer Call or Voice Mail subscriber, press .
Reminders To set a reminder, press .
Access another Mailbox or Submailbox
To dial another mailbox or submailbox, press .
MailboxOptions
Press for the following options: To change your Greeting, Name or Passcode, set up Time and Date Stamp, Special Delivery Options, Pager Notification, Change Ring Count, set up Group Lists or Personal Receptionist.
SPECIAL KEYS THAT ARE ALWAYS AVAILABLE Complete or Skip
This is the “Pound” key. Press this key to complete the current action and move to the next menu.
Cancel, Exit or Move to Previous Menu This is the “Star” key. Press this key to stop or cancel a current action and return to the previous menu. You may also use this key to exit.
Help This is the “Zero” key. Press this key if you need help or additional information.
10
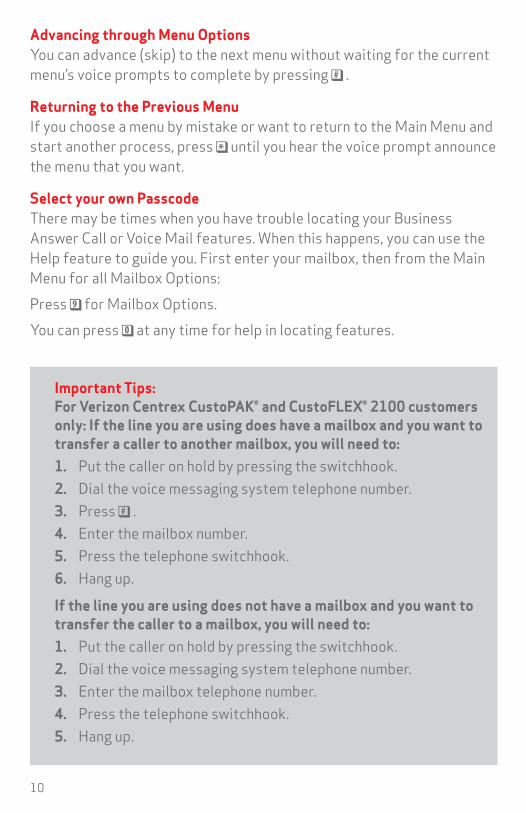
Advancing through Menu Options You can advance (skip) to the next menu without waiting for the current menu’s voice prompts to complete by pressing .
Returning to the Previous Menu If you choose a menu by mistake or want to return to the Main Menu and start another process, press until you hear the voice prompt announce the menu that you want.
Select your own Passcode There may be times when you have trouble locating your Business Answer Call or Voice Mail features. When this happens, you can use the Help feature to guide you. First enter your mailbox, then from the Main Menu for all Mailbox Options:Press for Mailbox Options.You can press at any time for help in locating features.
Important Tips: For Verizon Centrex CustoPAK® and CustoFLEX® 2100 customers only: If the line you are using does have a mailbox and you want to transfer a caller to another mailbox, you will need to:1. Put the caller on hold by pressing the switchhook.2. Dial the voice messaging system telephone number.3. Press .4. Enter the mailbox number.5. Press the telephone switchhook.6. Hang up.
If the line you are using does not have a mailbox and you want to transfer the caller to a mailbox, you will need to:1. Put the caller on hold by pressing the switchhook.2. Dial the voice messaging system telephone number.3. Enter the mailbox telephone number.4. Press the telephone switchhook.5. Hang up.
11
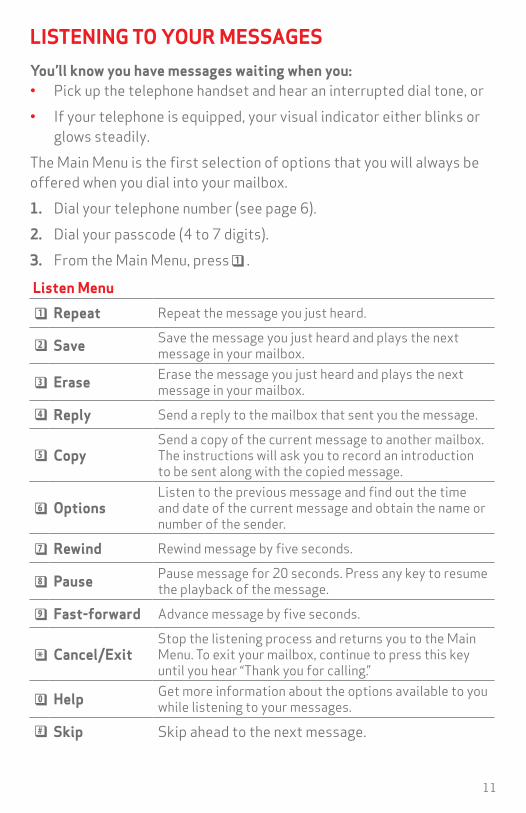
LISTENING TO YOUR MESSAGESYou’ll know you have messages waiting when you: • Pick up the telephone handset and hear an interrupted dial tone, or• If your telephone is equipped, your visual indicator either blinks or
glows steadily.The Main Menu is the first selection of options that you will always be offered when you dial into your mailbox.1. Dial your telephone number (see page 6).2. Dial your passcode (4 to 7 digits).3. From the Main Menu, press .
Listen Menu
Repeat Repeat the message you just heard.
Save Save the message you just heard and plays the next message in your mailbox.
Erase Erase the message you just heard and plays the next message in your mailbox.
Reply Send a reply to the mailbox that sent you the message.
CopySend a copy of the current message to another mailbox. The instructions will ask you to record an introduction to be sent along with the copied message.
OptionsListen to the previous message and find out the time and date of the current message and obtain the name or number of the sender.
Rewind Rewind message by five seconds.
Pause Pause message for 20 seconds. Press any key to resume the playback of the message.
Fast-forward Advance message by five seconds.
Cancel/ExitStop the listening process and returns you to the Main Menu. To exit your mailbox, continue to press this key until you hear “Thank you for calling.”
Help Get more information about the options available to you while listening to your messages.
Skip Skip ahead to the next message.
12
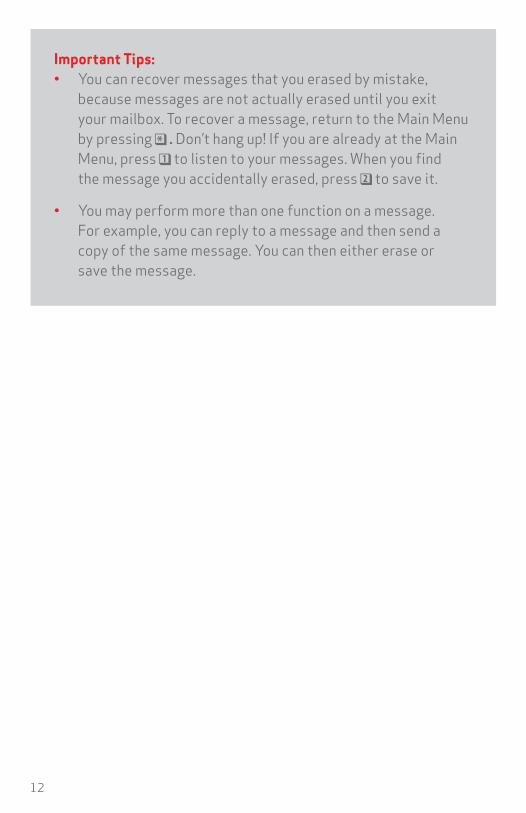
Important Tips: • You can recover messages that you erased by mistake,
because messages are not actually erased until you exit your mailbox. To recover a message, return to the Main Menu by pressing . Don’t hang up! If you are already at the Main Menu, press to listen to your messages. When you find the message you accidentally erased, press to save it.
• You may perform more than one function on a message. For example, you can reply to a message and then send a copy of the same message. You can then either erase or save the message.
13
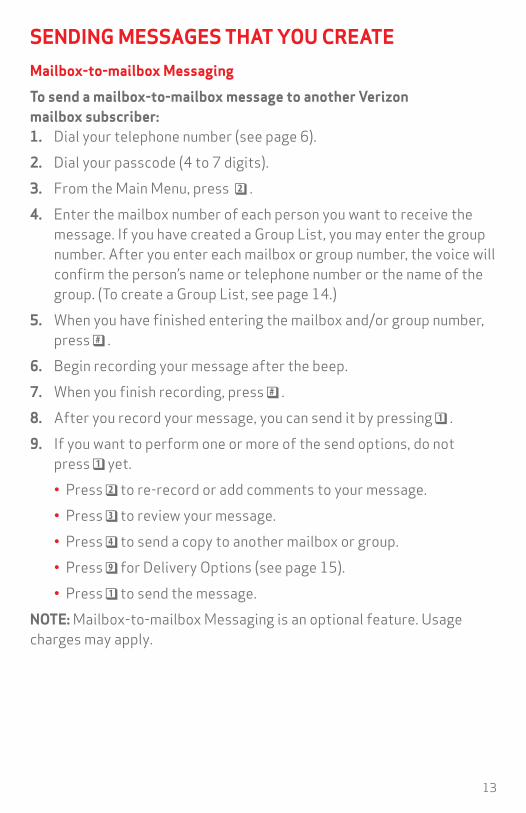
SENDING MESSAGES THAT YOU CREATEMailbox-to-mailbox Messaging
To send a mailbox-to-mailbox message to another Verizon mailbox subscriber: 1. Dial your telephone number (see page 6).2. Dial your passcode (4 to 7 digits).3. From the Main Menu, press .4. Enter the mailbox number of each person you want to receive the
message. If you have created a Group List, you may enter the group number. After you enter each mailbox or group number, the voice will confirm the person’s name or telephone number or the name of the group. (To create a Group List, see page 14.)
5. When you have finished entering the mailbox and/or group number, press .
6. Begin recording your message after the beep.7. When you finish recording, press .8. After you record your message, you can send it by pressing .9. If you want to perform one or more of the send options, do not
press yet. • Press to re-record or add comments to your message. • Press to review your message. • Press to send a copy to another mailbox or group. • Press for Delivery Options (see page 15). • Press to send the message.NOTE: Mailbox-to-mailbox Messaging is an optional feature. Usage charges may apply.
14
Important Tips: • If you do not know the group number, press . You will hear
information on the Group Lists you have created. Use your touch-tone keypad to select the group number you want.
• Pressing cancels the message and returns you to the Main Menu. You can also press to undo an action. For example, press to remove a mailbox or group destination that you entered by mistake. You can also press to cancel a recording.
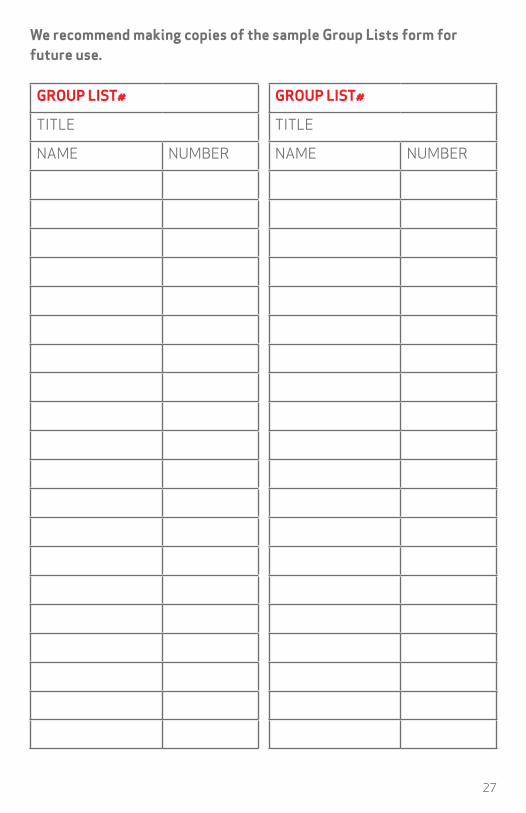
• For your convenience in creating your group distribution lists, Verizon has provided you with Group List forms (see pages 27). We recommend making copies of the sample Group List form for future use.
GROUP LISTSYou can create group distribution lists which allow you to simultaneously send a message to several mailbox subscribers.Using this feature keeps you from having to re-enter the telephone numbers to which you frequently send messages.The mailbox numbers for your Group Lists must be within your Regional Calling Area, which can be found in the white pages of your telephone directory.1. Dial your telephone number (see page 6).2. Dial your passcode (4 to 7 digits).3. From the Main Menu, press for Mailbox Options.4. Press for Group Lists and follow the voice prompts to set up,
review or delete a group list. You will be instructed to enter a group number to record a name
for the group. Then, enter the mailbox number of each person to be included in the group. If you accidentally enter the wrong mailbox number, you can cancel this action by pressing .

15
DELIVERY OPTIONSWhen you send a message to another Verizon mailbox subscriber using T-Mail, you can send your message using one or more of the four Delivery Options available to you: Urgent, Private, Return Receipt and Future Delivery.
1. Dial your telephone number (see page 6).2. Dial your passcode (4 to 7 digits).3. From the Main Menu, press for Send Options.4. Dial the mailbox number(s) or Group List(s) and press
when finished.5. Record your message and press when you finish speaking
your message.6. Press if you want Delivery Options. You will hear the following
four options: • Press to mark a message Urgent. Urgent messages
automatically go to the front of the recipient’s mailbox and are heard before non urgent messages.
• Press to mark a message Private. Private messages cannot be copied to other mailboxes.
• Press to activate Return Receipt. When you activate this feature, you will be notified when the message you are sending has been heard by the recipient. When the recipient listens to your message, the system will automatically send you a message that includes the name of the recipient, the time and date the recipient heard the message, and a copy of the message itself. You can then review it, erase it, copy it to another user, reply to it or save it.
• Press to mark the message for Future Delivery. Your message will be delivered at whatever time period you specify, up to one year in the future. You will be instructed to enter the time and date for message delivery.
If you want more than one delivery option on the same message, you must press again after selecting the first delivery option and go back into “Delivery Options” to select another option.
7. Press to send the message after you have selected your delivery option(s).

16
SCHEDULING REMINDER CALLSUse Reminder service to help you remember appointments or other important events. Simply choose a future delivery date and time for the reminder message to call you.When delivered, Reminder service will ring your telephone and play the reminder message at the date and time you have set. If you do not answer the telephone, the reminder message will be left as a message in your mailbox.After hearing the reminder message, you can choose to have the same reminder message delivered to you again in the future.To create a Reminder: 1. Dial your telephone number (see page 6).2. Dial your passcode (4 to 7 digits).3. From the Main Menu, press for Reminder.4. Press to create a Reminder. • Press to schedule a Daily Reminder. • Press to schedule a One-Time-Only Reminder.5. Follow the voice instructions to create your Reminder. Remember,
you will have to enter the time you want the Reminder service to call you by using the keys on your telephone.
You can record the Reminder message, review or cancel it at any time. You can have up to three daily and three one-time-only Reminders at any time. Once a one-time Reminder has played, it will be erased. Daily Reminders will continue to play until you erase the schedule.NOTE: Provided at no charge for Organizational Mailboxes. All other mailbox subscribers incur a usage charge when the service is used.
Important Tips: If your number is busy or does not answer, Reminder service will ring your telephone 15 minutes later to deliver the Reminder to you. After four unsuccessful attempts to reach you, the Reminder will be put into your mailbox.
17
MAILBOX OPTIONSDefinitions
Greetings What your callers hear when they reach your mailbox, when you are currently on the line, or when you are on an extended absence.Passcode A 4- to 10-digit number you choose to keep your mailbox private and secure.Time and Date Announcement Automatically hear the time and date each message was sent, before the message is played.Ring Count Program how many rings callers hear before they are transferred to your mailbox.Special Delivery® For an additional fee, you can be called anywhere in your Regional Calling Area when new messages arrive in your mailbox.Personal Receptionist For an additional fee, you can provide a “live” receptionist to callers who reach your mailbox.Multiple Answer Call A mailbox where you can add up to eight personal submailboxes on a single telephone line.Language Options1 Choose whether you wish to hear (and have your callers hear) the system prompts in English or Spanish.AutoPlay1 Listen to all of your New and Saved messages sequentially without any input after each message has played.
1This feature may not be available in your area—please call for availability.
18
GREETINGSPersonal Greeting There may be times when you need to change your Personal Greeting to inform callers of new information, for example, a change in the office hours, or where you can be reached if the call is urgent. For this reason, you may change your Personal Greeting at any time from virtually any location.To change your Personal Greeting: 1. Dial your telephone number (see page 6).2. Dial your passcode (4 to 7 digits).3. From the Main Menu, press for Mailbox Options.4. Press to change your Greeting, Name Announcement or Passcode.5. Press for Greetings.6. Press for Personal Greeting.7. Press to review you current Greeting. • Press to keep the current Greeting. • Press to record your Greeting. • Press to use the Automated Greeting/Name Announcement.Busy Greeting Use your Busy Greeting to inform callers that you are in the office, but you are currently on the phone, and if they leave their name, telephone number and a message you will get back to them promptly.To change your Busy Greeting: 1. Dial your telephone number (see page 6).2. Dial your passcode (4 to 7 digits).3. From the Main Menu, press for Mailbox Options.4. Press to change your Greeting, Name Announcement or Passcode.5. Press for Greetings.6. Press for Busy Greeting. • Press to review or change your Busy Greeting. • Press for a sample Busy Greeting. • Press to delete your Busy Greeting.
19
Extended Absence Greeting There may be instances when you are away from the office for an extended period, for example a vacation or an out-of-town conference. Use your Extended Absence Greeting to let callers know the dates you will be gone and the date you will return, or to give them an alternate number to use if their call is urgent. This helps you avoid giving callers the impression that their messages are not important by letting them know when you expect to be back in the office to return their call.To change your Extended Absence Greeting: 1. Dial your telephone number (see page 6).2. Dial your passcode (4 to 7 digits).3. From the Main Menu, press for Mailbox Options.4. Press to change your Greeting, Name Announcement or Passcode.5. Press for Greetings.6. Press for Extended Absence Greeting. • Press to turn your Extended Absence Greeting on or off. • Press to review or change your Extended Absence Greeting. • Press to delete your Extended Absence Greeting.Passcode For security purposes, you may wish to change your Passcode from time to time. Your Passcode must be a 4-to 10-digit number that should be easy for you to remember, but hard for others to guess. You may change your Passcode at any time and as often as you wish.To change your Passcode: 1. Dial your telephone number (see page 6).2. Dial your passcode (4 to 7 digits).3. From the Main Menu, press for Mailbox Options.4. Press to change your Greeting, Name Announcement or Passcode.5. Press for Greetings.6. Dial your new passcode.7. Listen to your new passcode for accuracy. • Press to keep the new passcode. • Press to change the new passcode.
20
Time and Date Announcement1 The Time and Date Announcement can be turned on or off. It allows you to automatically hear the time and date your message was sent before it is played. By activating this feature, you will automatically hear the time and date before each message. If you do not wish to have this feature activated for all messages, you may press , then during any individual message to hear the time and date that message was sent.To hear Time and Date Announcement before each message: 1. Dial your telephone number (see page 6).2. Dial your passcode (4 to 7 digits).3. From the Main Menu, press for Mailbox Options.4. Press for Other Mailbox Settings.5. Press for Time and Date Announcement. • Press to turn this feature on or off. • Press to leave this feature on.AutoPlay1 The AutoPlay feature can be turned on or off. It allows you to listen to all of your New or Saved messages sequentially without any input after each message has played. Messages are strung together with a brief 1to 2 second pause between messages.Language Options1 Language Options allow you to choose whether to hear (and have your callers hear) the system prompts in English or Spanish. The default language is English. You may change it to Spanish by pressing , then
, then , then . You can change the Language option at any time and as often as you like.
1This feature may not be available in your area—please call for availability.

21
Ring Count (Business Answer Call only) If you have Call Forwarding/Don’t Answer, you may set and change at any time the number of rings you would like your callers to hear before their call is forwarded to your mailbox. You can set it for as little as two rings, or as many as eight. This feature is not available with Centrex CustoPAK® or CustoFLEX® 2100 services.Your callers may hear 1-2 rings more than you have set.To set Ring Count: 1. Dial your telephone number (see page 6).2. Dial your passcode (4 to 7 digits).3. From the Main Menu, press for Mailbox Options.4. Press for Other Mailbox Settings.5. Press to set Ring Count. • Press to set number of ring cycles your telephone rings before
going to your mailbox.NOTE: Ring Count Change may not be compatible with some hunting arrangements. If you need assistance in hunting situations, please call 1.800.VERIZON (1.800.837.4966). The Ring Count Change option is currently not available for Voice Mail subscribers. Multiple Answer Call subscribers can only change the Ring Count from the Main Mailbox.
22
OPTIONAL SERVICESYour Verizon® Business Answer Call or Voice Mail service is compatible with other Verizon services that can increase your availability to callers, improve your customer service and ensure you get important messages in a timely manner, no matter where you are in your Regional Calling Area.These features are available from Verizon for an additional per-use or monthly fee. Please call your local Verizon Business Office for availability, as some features may not be available in some areas.
Special Delivery® Service This feature is available to subscribers for an additional per-usage fee. When you are away from the office, Special Delivery service will call you anywhere in your Regional Calling Area1 and let you know when new messages (or only urgent messages) are in your mailbox.To set up Special Delivery: 1. Dial your telephone number (see page 6).2. Dial your passcode (4 to 7 digits).3. From the Main Menu, press for Mailbox Options.4. Press for Message Notification.5. Press for Special Delivery.6. Press to set/change Number.7. Press for Restrictions. • Press and dial the telephone number you want to be notified of
new, urgent messages. • Press and dial the telephone number you want to be notified of
all new messages.When a new message is left in your mailbox, the system calls the number you have pre-designated and instructs you to enter your Passcode and listen to your message. If the call is unanswered, the system will make three additional attempts every 15 minutes.When you are back at your office and no longer need to use this feature,NOTE: You will be charged for each new message that Special Delivery attempts to deliver to you.
1A map of your regional calling area is shown in the front of your local Verizon white pages directory.
23
Personal Receptionist1 Personal Receptionist service is an optional feature available to subscribers for an additional monthly fee. You must add this feature to your mailbox prior to setting up the Personal Receptionist service. Personal Receptionist lets you provide a live receptionist for callers who reach your mailbox by instructing the caller to press before or after they leave a message for you. If different people are available to take calls at different times of day, you can set up the system to automatically allow a different person to answer the phone.In order to make callers aware of this option, you must first change your Personal Greeting.See page 18 for instructions on changing your Personal Greeting.Callers can transfer to a receptionist either before or after leaving a message.To set up Personal Receptionist: 1. Dial your telephone number (see page 6).2. Dial your passcode (4 to 7 digits).3. From the Main Menu, press for Mailbox Options.4. Press for Other Mailbox Settings.5. Press for Personal Receptionist. • Press to set up a Single Personal Receptionist. • Press to set up Multiple Personal Receptionists.Personal Receptionist Sample Greetings: To encourage callers to transfer before leaving a message:
“Hello, I’m sorry I’m not available at the moment. Please leave a message after the beep. If this is urgent, press zero now for a receptionist.”To encourage callers to transfer after leaving a message: “Hello, I’m not available at the moment. Please leave a message after the beep. If this is urgent and you need to speak with someone live and also want to leave a message, please record your message, then press the ‘pound’ key, and then ‘zero’.”The system does not automatically inform callers of the ability to access a Personal Receptionist by pressing . You must notify callers of this option in your greeting.
1This feature may not be available in your area—please call for availability.
24
Call Forwarding Variable If you have Personal Receptionist service and use Call Forwarding Variable to turn this feature on and off, please use the following special system telephone number to program your Call Forwarding Variable from your line so that your customers will reach Personal Receptionist service:To activate Call Forwarding Variable, press and enter the special system telephone number.To deactivate this feature, press .NOTE: Continue to use your normal system telephone number (found on page 8) to listen to your messages or make changes to your mailbox options.
Wireless Notification1 You can be notified on your Verizon Wireless digital cell phone when you receive a message in your mailbox. You will receive a text message, “Your have a voice mail message at xxx-xxx-xxxx (your mailbox access number). You will not be charged for this feature or the text message; however, it does require activation. To order, please call your local business office.
1 Only available with Verizon Wireless phones. Not available in all areas. No charge for the feature but it requires activation. Contact your local business office.

25
MULTIPLE ANSWER CALL SUBMAILBOX OPTIONSMultiple Answer Call gives you a mailbox where you can add as many as eight personal submailboxes on a single telephone line. These eight submailboxes are in addition to the Main Mailbox. The Main Mailbox holder can delete or add submailboxes at any time.Creating or Deleting Submailboxes 1. Dial your telephone number (see page 6).2. Dial your passcode (4 to 7 digits).3. From the Main Menu, press for Mailbox Options.4. Press for Other Mailbox Settings.5. Press to create or delete submailboxes. • Press to create a submailbox. • Press to delete a submailbox.6. Follow the voice prompts.7. Press when finished creating the number of submailboxes
you want.After you have finished creating submailboxes, the Main Mailbox user must record a Personal Greeting (optional and a Busy Greeting) that announces the submailboxes to callers. (See “Personal Greeting” on page 18.)NOTE: Each submailbox holder now needs to follow the steps in “Setting Up Submailboxes” below.
Setting up Submailboxes 1. Dial your telephone number (see page 6).2. Press .3. Dial the Main Mailbox telephone number.4. Dial the Main Mailbox passcode (4 to 7 digits).5. Press . • Press to create a submailbox. • Press to delete a submailbox.6. Dial your temporary Passcode for the submailbox.7. Follow voice prompts to set up your submailbox.
26
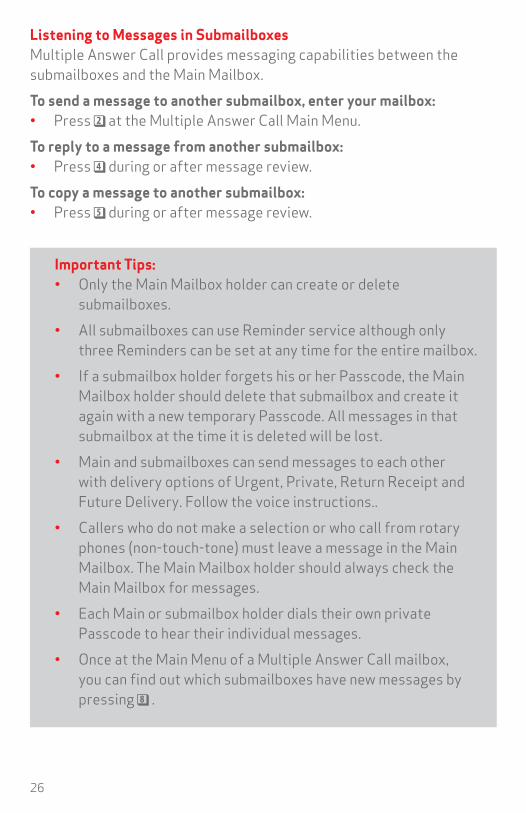
Listening to Messages in Submailboxes Multiple Answer Call provides messaging capabilities between the submailboxes and the Main Mailbox.To send a message to another submailbox, enter your mailbox: • Press at the Multiple Answer Call Main Menu.To reply to a message from another submailbox: • Press during or after message review.To copy a message to another submailbox: • Press during or after message review.
Important Tips: • Only the Main Mailbox holder can create or delete
submailboxes.• All submailboxes can use Reminder service although only
three Reminders can be set at any time for the entire mailbox.• If a submailbox holder forgets his or her Passcode, the Main
Mailbox holder should delete that submailbox and create it again with a new temporary Passcode. All messages in that submailbox at the time it is deleted will be lost.
• Main and submailboxes can send messages to each other with delivery options of Urgent, Private, Return Receipt and Future Delivery. Follow the voice instructions..
• Callers who do not make a selection or who call from rotary phones (non-touch-tone) must leave a message in the Main Mailbox. The Main Mailbox holder should always check the Main Mailbox for messages.
• Each Main or submailbox holder dials their own private Passcode to hear their individual messages.
• Once at the Main Menu of a Multiple Answer Call mailbox, you can find out which submailboxes have new messages by pressing .
27
We recommend making copies of the sample Group Lists form for future use.
GROUP LIST# GROUP LIST#
TITLE TITLE
NAME NUMBER NAME NUMBER
28
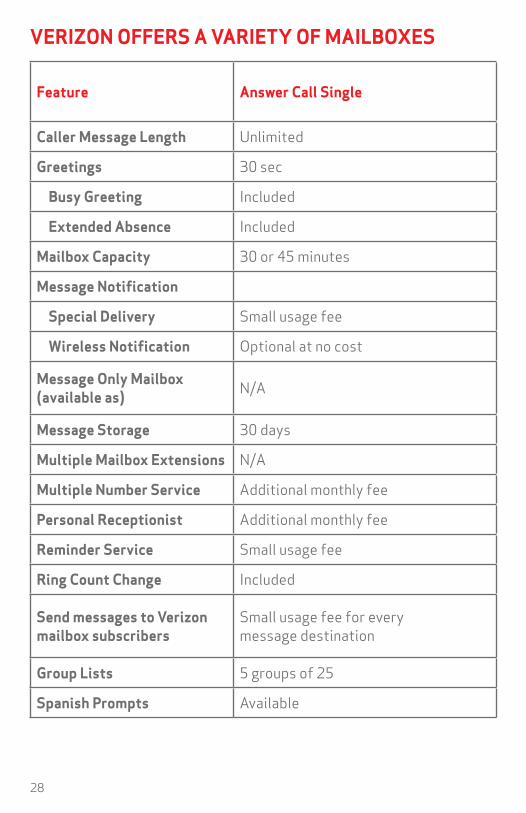
VERIZON OFFERS A VARIETY OF MAILBOXES
Feature Answer Call Single
Caller Message Length Unlimited
Greetings 30 sec
Busy Greeting Included
Extended Absence Included
Mailbox Capacity 30 or 45 minutes
Message Notification
Special Delivery Small usage fee
Wireless Notification Optional at no cost
Message Only Mailbox (available as) N/A
Message Storage 30 days
Multiple Mailbox Extensions N/A
Multiple Number Service Additional monthly fee
Personal Receptionist Additional monthly fee
Reminder Service Small usage fee
Ring Count Change Included
Send messages to Verizon mailbox subscribers
Small usage fee for every message destination
Group Lists 5 groups of 25
Spanish Prompts Available
29
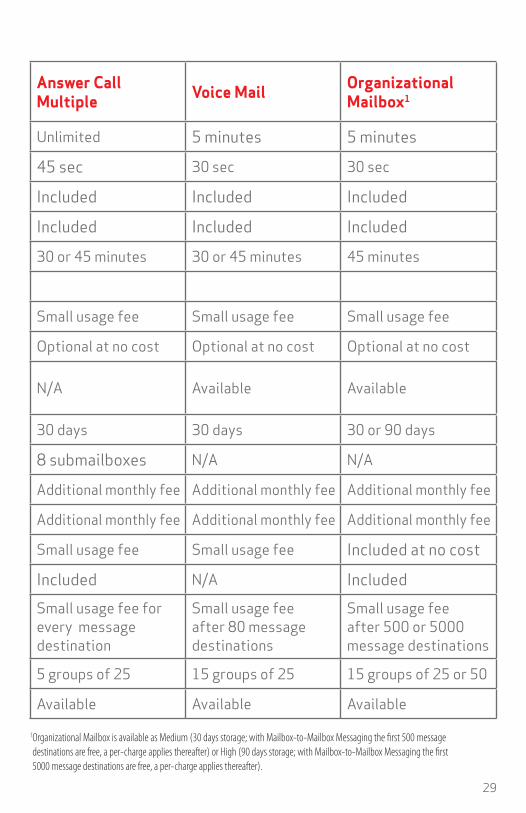
Answer Call Multiple Voice Mail Organizational
Mailbox1
Unlimited 5 minutes 5 minutes
45 sec 30 sec 30 sec
Included Included Included
Included Included Included
30 or 45 minutes 30 or 45 minutes 45 minutes
Small usage fee Small usage fee Small usage fee
Optional at no cost Optional at no cost Optional at no cost
N/A Available Available
30 days 30 days 30 or 90 days
8 submailboxes N/A N/A
Additional monthly fee Additional monthly fee Additional monthly fee
Additional monthly fee Additional monthly fee Additional monthly fee
Small usage fee Small usage fee Included at no cost
Included N/A IncludedSmall usage fee for every message destination
Small usage fee after 80 message destinations
Small usage fee after 500 or 5000 message destinations
5 groups of 25 15 groups of 25 15 groups of 25 or 50
Available Available Available
1 Organizational Mailbox is available as Medium (30 days storage; with Mailbox-to-Mailbox Messaging the first 500 message destinations are free, a per-charge applies thereafter) or High (90 days storage; with Mailbox-to-Mailbox Messaging the first 5000 message destinations are free, a per-charge applies thereafter).

SMBCTXVMUGMAA1114©2015 Verizon. All Rights Reserved.
If you need help using Verizon Voice Mail or have questions about the service, please call
1.800.VERIZON (1.800.837.4966).